TOWABLE EXCAVATOR - Princess Auto · The Towable Excavator can be used in various tasks including...
15
TOWABLE EXCAVATOR USER MANUAL Please read and understand all instructions before use. Retain this manual for future reference. 10005833-10 REV2
Transcript of TOWABLE EXCAVATOR - Princess Auto · The Towable Excavator can be used in various tasks including...
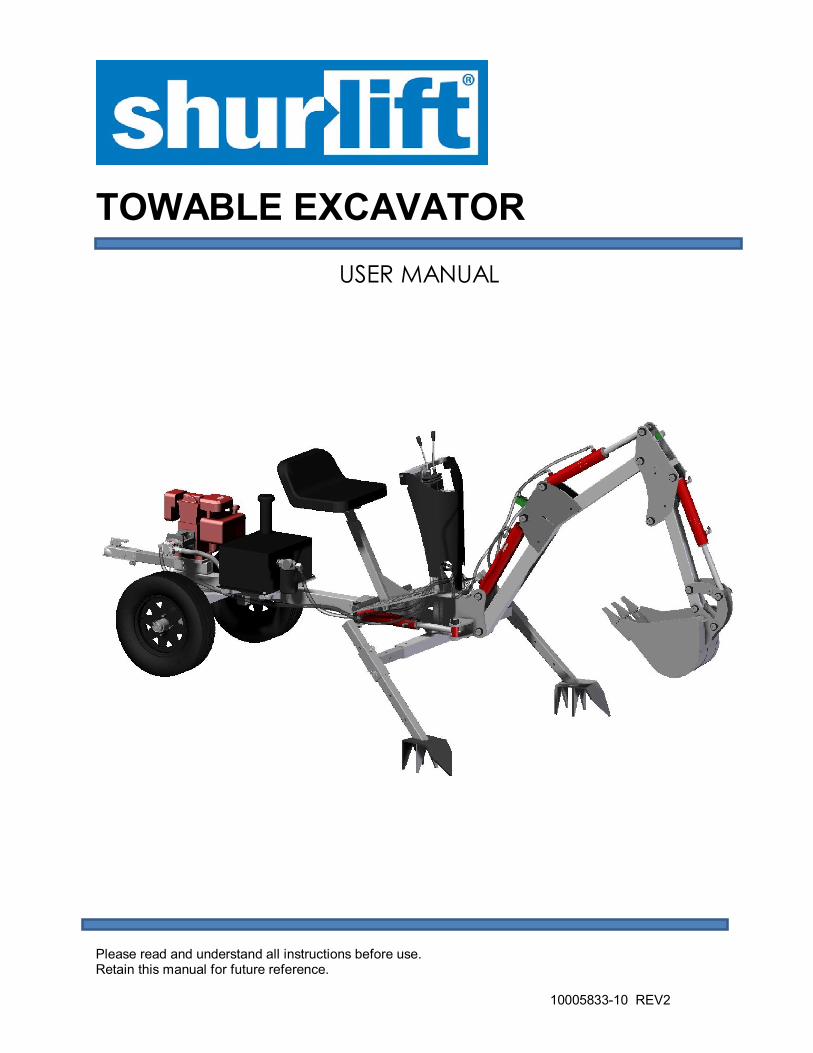
TOWABLE EXCAVATOR
USER MANUAL
Please read and understand all instructions before use. Retain this manual for future reference.
10005833-10 REV2

8318578
2
This Towable Excavator is designed to be towed by a motorized vehicle. This machine employs a Subaru SP 170 engine coupled with a hydraulic pump as a power pack that makes this a stand-alone unit without a need for a tractor or a loader. Two adjustable outriggers are used to maintain stability during operation. The 5 Gallon Hydraulic Reservoir with a temperature and fluid level gauge improves maintenance. Built-in Hydraulic oil filtration to prevent contaminants from entering the system. Adjustable seat for multi-user configurations. Four of our very own Shur-lift brand cylinders are used in this unit to tackle any big or small project. Due to its compact size and towable capability, this unit can go where the full-size backhoes can’t go. It can be easily transported from one job site to another.
The Towable Excavator can be used in various tasks including (but not limited to) landscaping, excavating, trenching, small demolitions, etc. It is commonly used in projects like moving boulders or rocks, uprooting small trees and digging earth. This machine is designed to carry out a light to medium duty task.
Introduction 2
Functions 2
Specifications 3
Important Safety Precaution 4
Assembly Instructions 5
Initial Operation 8
Excavator Configurations 8
Maintenance 10
Grease fitting Locations 11
Parts List 12
Trouble Shooting 14
Replacement parts 14
TABLE OF CONTENTS
INTRODUCTION
FUNCTIONS

8318578
3
7'-4'' 8'-1''
8'-11''
4'-9''
6'-1''
Max. Digging Depth 7 feet
Bucket Width 11 in.
Boom Swing Angle 120 degrees
Digging Strength 2,100 lbs.
Engine Type Subaru SP 170 5.7 HP
Trailer Coupler 1-7/8 in.
Tire Size 5.30 x 12 in.
Hydraulic Reservoir 5 Gal
SPECIFICATIONS

8318578
4
WARNING! Read and understand all instructions before using this tool. The operator must follow basic precautions and safe work practices to reduce the risk of personal injury and/or damage to the equipment. Keep this manual for the safety warnings, precautions and operating, inspection and maintenance instructions.
WORK AREA 1. Operate in a safe work environment. Keep your work area clean, well lit
and free of distractions. 2. Keep anyone not wearing appropriate safety equipment away from the
work area. 3. Store tools properly in a safe and dry location. Keep tools out of the reach of
children.
PERSONAL SAFETY CAUTION! Wear protective equipment approved by the Canadian Standards Association (CSA) or American National Standards Institute (ANSI). PERSONAL PROTECTIVE EQUIPMENT
1. Always wear impact safety goggles that provide front and side protection for the eyes. Wear gloves that provide protection based on the work materials or to reduce the effects of tool vibration.
2. Non-skid footwear is recommended to maintain footing and balance in the work environment.
3. Wear protective clothing designed for the work environment. 4. Wear hearing protection gear with an appropriate Noise Reduction Rating.
PERSONAL PRECAUTIONS Control the tool, personal movement and the work environment to avoid personal injury or damage to tool.
1. Do not operate any tool when tired or under the influence of drugs, alcohol or medications.
2. Avoid wearing clothes or jewelry that can become entangled with the moving parts of a tool. Keep long hair covered or bound.
3. Do not overreach when operating a tool. Proper footing and balance enables better control in unexpected situations.
IMPORTANT SAFETY PRECAUTION

8318578
5
SPECIFIC SAFETY PRECAUTIONS
1. Always call your local utility before digging to ensure that there are no buried gas lines, water line, electrical lines or cables.
2. Do not allow anyone to operate the backhoe who has not read the Operator’s Manual or who has not been instructed on the safe operation of the backhoe.
3. If a helper is assisting in excavating, ensure that they are clear of the working area when actuating the controls.
4. Never allow a second person to ride your excavator during operation. 5. Never allow anyone to ride the excavator while towing. 6. Always use your hands to operate the control levers. Never use another body part,
rope or any extension devices to operate the control levers. 7. Keep the outriggers away from any holes that can cause the Excavator to lose
balance or fall in. 8. Do not place your hands between the moving components. 9. Do not touch engine as it may be hot after use. 10. Do not modify this tool or use for a purpose for which it was not designed for.
This product comes partially assembled and minimal assembly is required to be able to operate the Towable Excavator. Please follow the assembly guidelines carefully.
UNPACKING 1. Unpack the Towable Excavator on a level surface in a clear area.
2. Remove the plastic wrapping off the entire unit.
3. Cut the straps that secure the unit to the pallet using sheet metal snips. Stay clear while cutting as the straps are under tension and might snap back which may lead to serious injury or damage to property.
4. Stay clear around the excavator and do not place yourself in a position where you can be pinned in the case that the excavator shifts or tips over.
5. It is important not to lean on or rock the excavator while on the pallet. It is recommended that the unit is supported (e.g. hoist) during assembly.
6. Inspect the entire unit for any damage during the shipping and handling. Do not operate the unit until damaged components are replaced.
ASSEMBLY INSTRUCTIONS

8318578
6
ASSEMBLY The following assembly instructions are applicable with the use of a lifting device such as forklifts or overhead cranes.
1. Lift the entire unit off the ground with just enough clearance so that the Outriggers
can be installed. 2. Remove the pallet along with the other components out of the way. 3. Install the Outriggers, Wheel assembly and the Hitch assembly. Secure them with
the pins provided. 4. Slowly lower the unit to the ground.

8318578
7
The following instructions must be performed before engaging your Towable Backhoe to any task. Follow these steps carefully to ensure maximum performance of the unit.
1. Grease all the grease fittings. See “Grease Fitting Locations” section (pg.10). 2. Ensure correct air pressure on the tires. 3. Fill the engine with recommended oil and gas. See the engine manual. 4. Fill the hydraulic reservoir with hydraulic oil approximately 80% full. 5. Ensure all pins are fastened with its respective nuts and bolts. 6. Inspect all hoses and fittings for damage. 7. Start the engine and let it warm up for a few minutes. 8. Remove the safety lock (red) that prevents the boom from moving when not in use
or during transport. 9. Familiarize yourself with the controls, see the decal on the valve bank.
INITIAL OPERATION

8318578
8
10. Slowly cycle all the cylinders to remove all the air pockets inside. Fully extend and retract all the cylinder one at a time.
11. Check hydraulic oil level, refill to 80% if necessary. 12. Aquaint yourself with the controls by practicing in an open area.
TOWING CONFIGURATION This configuration is used when towing the Excavator. Do not use this configuration while working as it may cause the Excavator to roll and may lead to injury or damage to the machine. Ensure that the boom safety lock is in place before towing.
WORKING CONFIGURATION This configuration is used when working with the Excavator. Do not tow the Excavator at this position as it may cause accidents that may lead to injury or damage to the machine.
EXCAVATOR CONFIGURATIONS
SAFETY LOCK ENGAGED

8318578
9
EXCHANGING TIRES AND OUTRIGGERS When switching from “Towing configuration” to “Working configuration” or vice-versa, park the Excavator on a hard level ground.
1. Carefully lift Excavator on its side by aiming the boom at an angle and push the ground using the bucket.
2. Remove the hitch pins from the outriggers and the wheels. 3. Switch the wheel and the outrigger and secure them with the pins. Replace one side
at a time as shown in the picture.
MAINTENANCE

8318578
10
BEFORE EACH USE
1. Inspect the Excavator for loose, worn or damaged components. Replace if necessary.
2. Inspect for oil leakage. If oil leaks, locate the source and replace the component. 3. Inspect tires before towing. 4. Check the engine’s gas and oil levels. 5. Check the reservoir’s oil level and refill to approximately 80% full if necessary. 6. Inspect all the nuts and bolts on the pins and tighten if necessary. 7. Grease all the grease fittings. (See Grease fittings Locations)
AFTER EVERY 4 HOURS OF USE
1. Inspect all bolts and nuts on the pins. 2. Visually inspect hydraulic system for leaks. 3. Lubricate all the greasing points. 4. Check the filter gauge. Replace filter when filter enters bypass mode. Bypass mode
is indicated when filter gauge points to red (25 PSI+). 5. Check engine oil level. Refill if necessary.
AFTER 50 HOURS OF USE
1. Clean engine air filter. 2. Change engine oil.
ANNUALLY OR AFTER EVERY 250 HOURS OF USE
1. Replace hydraulic oil. 2. Lubricate the axle bearings. 3. Replace engine air filter. 4. Replace engine spark plug.
AFTER EACH USE
1. Clean the Excavator, use a pressure washer if necessary. 2. Grease all the grease fittings. 3. Grease the exposed areas of the cylinder shafts.
STORAGE
1. Thoroughly clean the whole unit with soap and water. Use a pressure washer if necessary.
2. Thoroughly wipe dry the entire unit. 3. Apply thin coat of lubricant on the metal parts to prevent rusting. 4. Apply grease on all the grease fittings. 5. Apply grease on the exposed areas of the cylinder shafts. 6. Install the safety lock on the boom. 7. Cover the unit to protect from sun, rain, snow or other elements.

8318578
11
Lubrication is essential on maintaining your Excavator. Below is an illustration of all the locations of the grease fittings. Pins with built in grease fittings are provided for ease of grease application. Proper greasing practice will prolong the life of the Excavator and continued success in operation. Here is the recommended schedule for greasing the unit.
Before each use. After 4 hours of use. After each use. Before storage.
Do not operate the Excavator with components that are damaged, rusted or worn as it may lead to injury or damage to property. Replace damaged or worn parts before operating your Excavator.
G
G
G
G
G
G
G
G
G
G
G
G
G
G
GREASE FITTING LOCATIONS

8318578
12
Normal wear and tear will occur when putting the Towable Excavator to work. Refer to the illustration to find the appropriate part number when replacing worn or damaged parts of your excavator.
COMMON PROBLEMS
POSSIBLE CAUSE SOLUTION
ENGINE DOES NOT START OR HAVE
POOR PERFORMANCE
Low or no fuel in the gas tank. Fill with recommended gas. Spark plug might be fouled. Clean or replace spark plug. Air filter might be clogged. Clean or replace filter. Gas tank might contain stale gas.
Drain and replace gas.
Carburetor might be clogged. Clean the carburetor.
BOOM AND BUCKET MOVING SLOW
Engine throttle set on low. Open throttle. Low hydraulic oil level. Add more hydraulic oil. Loosing pressure due to leak. Replace leaking component/s. Damaged or worn pump. Replace hydraulic pump.
JERKING ACTION ON CYLINDERS
Low hydraulic oil level. Add more hydraulic oil. Air pockets inside the cylinder. Purge air by fully extending
and retracting each cylinder. Air is entering the system. Inspect for leaking fittings or
hoses.
BOOM CANNOT
HOLD UP A LOAD
Cylinder seal is leaking. Replace cylinder seals. Oil is leaking through broken hose or fitting.
Locate then replace broken hose or fitting.
TROUBLESHOOTING
REPLACEMENT PARTS

8318578
13
12
3
44
5
7
4
8
6
9
10
11
12
13
14
15
16
17
18
19
21
22
2324
25
26
27
27
2829
30
31
31
31
31
33
34
35
36
36
36
36
36
20
32
PARTS LIST

8318578
14
NO. ITEM NO. DESCRIPTION QTY
1 10007938 SUBARU SP 170 5.7 HP ENGINE 1
2 10005527 RESERVOIR 1
3 1200132 CYL UTILITY THD 2510 1
4 1200131 CYL UTILITY THD 2010 3
5 10005727 BUCKET WELDMENT LARGE 1
6 10005692 BUCKET TOOTH ASM 3
7 10005490 MAIN WELDMENT 1
8 10005556 SWING ASSEMBLY 1
9 10005550 BOOM ASSY 1
10 10005554 BOOM EXTENSION ASSY 1
11 10005584 LINK PLATE WELDMENT 1
12 10005585 LINK PLATE ASSY 1
13 8241218 HYD FILTER SYNTEQ 10 MICRON 1
14 2060366 ECONOMY TRACTOR SEAT 1
15 10006115 SEAT BRACKET ASM 1
16 10007791 SEAT UPPER TUBE ASSY 1
17 10005633 VALVE PEDESTAL ASM 1
18 10005738 SHIELD 1
19 10005960 VALVE FOUR SPOOL BM20/4 FU 1
20 10007620 DECAL SHURLIFT 1
21 10005776 INNER SHIELD 1
22 100005726 SAFETY BAR 1
23 10005562 WHEEL/HUB WELDMENT 1
24 2026771 TRAILER TIRE 5.30 X 12 2
25 10005574 RETAINER WELDMENT R/H 1
26 10005630 RETAINER WELDMENT L/H 1
27 10005569 OUTRIGGER WELDMENT 2
28 4200045 TRAILER COUPLER 1.875 DIA/CLASS I 2000 1
29 10005660 HITCH WELDMENT 1
30 8002889 SAFETY CHAIN .25 x 48 WITH SAFETY CATCHES 1
31 10007840 PIN .500 X 3.00 LG W/ HANDLE & LINCH PIN 7
32 8155376 PUMP GEAR HYD .12CU IN AA-2BLT 1
33 10007841 LINCH PIN .250 OD X 1.25 LG 2
34 10005525-2 CLEVIS PIN 1.25 DIA X 4.25 LG 1
35 10006190-2 CLEVIS PIN 1.00C DIA X 10.00 LG 1
36 10006190-4 CLEVIS PIN 1.00 DIA X 5.25 LG 13

8318578
15