TouchChat · 10083 Version 2.6 / Versión 2.6 . TouchChat ® English/Spanish User ’s Guide ....
100
10083 Version 2.6 / Versión 2.6 TouchChat ® English/Spanish User’s Guide Guía del usuario Inglés / Español touchchatapp.com
Transcript of TouchChat · 10083 Version 2.6 / Versión 2.6 . TouchChat ® English/Spanish User ’s Guide ....

10083 Version 2.6 / Versión 2.6
TouchChat® English/Spanish User’s Guide
Guía del usuario Inglés / Español
touchchatapp.com


TouchChat User’s Guide 2
Copyright/Trademark Information © 2013-2018 Saltillo Corporation. All rights reserved. TouchChat and ChatWrap are trademarks of Saltillo Corporation. Apple and iTunes are registered trademarks of Apple Inc. YouTube is a trademark of Google Inc. Microsoft and Windows are registered trademarks of Microsoft Corporation in the United States and/or other countries. The Bluetooth® word mark and logos are registered trademarks owned by the Bluetooth SIG, Inc. and any use of such marks by Saltillo Corporation is under license. Acapela is a trademark of Acapela Group. The Picture Communication Symbols ©1981–2017 by Tobii Dynavox. All Rights Reserved Worldwide. Used with permission. Boardmaker® is a trademark of Tobii Dynavox. SymbolStix®, Copyright 2017, SymbolStix, LLC. All rights reserved. Used with permission. 10083en Version 2.6 ∙ 02/14/2018

TouchChat User’s Guide 3
Table of Contents
Welcome to TouchChat.......................................................................................................................................... 5 Finding the TouchChat Version .............................................................................................................................. 5 Working with TouchChat Menus ............................................................................................................................ 5 Working with Vocabulary Files .............................................................................................................................. 6
English Vocabulary Files ............................................................................................................................................ 6 Spanish Vocabulary Files ........................................................................................................................................... 7 Loading a Vocabulary File .......................................................................................................................................... 8 Copying a Vocabulary File ......................................................................................................................................... 8 Creating a New Blank Vocabulary File ....................................................................................................................... 8 Deleting a Customized Vocabulary File ..................................................................................................................... 9 Backing up a Customized Vocabulary File using iTunes ............................................................................................ 9
Activating Edit Mode ........................................................................................................................................... 10 Using Chat Editor with TouchChat ....................................................................................................................... 10
Downloading and Installing Chat Editor .................................................................................................................. 10 Configuring Chat Editor ........................................................................................................................................... 10 Enabling Speech in Chat Editor................................................................................................................................ 11 Opening Chat Editor ................................................................................................................................................ 11 Using Chat Editor to Create Instructional Materials ............................................................................................... 11
Working with Buttons .......................................................................................................................................... 12 Editing a Button ....................................................................................................................................................... 12 Adding or Changing a Button Action ....................................................................................................................... 12 Removing or Changing the Order of an Action ....................................................................................................... 13 Modifying Text ........................................................................................................................................................ 13 Inserting Special Characters .................................................................................................................................... 13 Adding a Symbol from the SymbolStix Library ........................................................................................................ 14 Adding a Picture from the Image Library ................................................................................................................ 14 Using the Camera to Take a Picture for Your Button .............................................................................................. 14 Creating a Camera Button ....................................................................................................................................... 15 Resizing a Button ..................................................................................................................................................... 15 Changing a Button Style .......................................................................................................................................... 16 Creating a Button to Link to a Page ......................................................................................................................... 16 Storing Text on a Button ......................................................................................................................................... 17 Creating a Volume Control Button .......................................................................................................................... 17 Creating a Battery Status Button ............................................................................................................................. 17 Copying and Pasting a Button ................................................................................................................................. 18 Copying and Pasting the Same Button .................................................................................................................... 19 Copying and Pasting a Button Style ......................................................................................................................... 19 Moving a Button ...................................................................................................................................................... 20 Hiding a Button ........................................................................................................................................................ 20 Hiding or Showing Multiple Buttons at Once .......................................................................................................... 21 Changing Button Timing .......................................................................................................................................... 21 Hiding and Showing Button Navigation Arrows ...................................................................................................... 22
Working with Pages ............................................................................................................................................. 22 Renaming a Page ..................................................................................................................................................... 22 Duplicating a Page ................................................................................................................................................... 22 Loading Another Page ............................................................................................................................................. 23

TouchChat User’s Guide 4
Creating a New Page ............................................................................................................................................... 23 Creating a New Page from a Navigate Action ......................................................................................................... 24 Choosing a New Keyboard....................................................................................................................................... 24 Copying a Page from a Different Vocabulary File .................................................................................................... 24 Adding a Gesture to a Page ..................................................................................................................................... 25 Creating a Template Page ....................................................................................................................................... 26 Using a Template to Create a Page ......................................................................................................................... 26
Editing an Abbreviation Expansion ...................................................................................................................... 26 Editing Pronunciations ......................................................................................................................................... 27 Adding Acapela Vocal Smileys ............................................................................................................................. 27
Adding a Sound ....................................................................................................................................................... 27 Adding an Exclamation ............................................................................................................................................ 27 Finding a Vocal Smiley ............................................................................................................................................. 27 Example: Add a Smiley Face and Laugh Sound to a Button .................................................................................... 28
Setting up Your VocaliD™ Voice ........................................................................................................................... 29 Creating a Visual Scene ........................................................................................................................................ 30
Selecting a Background Image ................................................................................................................................ 30 Adding Buttons ........................................................................................................................................................ 31
Enlarging Text in the Speech Display Bar ............................................................................................................. 31 Changing Text Size or Number of Lines in the SDB ................................................................................................. 31 Expanding the Display by Changing Screen Orientation ......................................................................................... 32 Creating a Tap Action .............................................................................................................................................. 32
Making an In-App Purchase ................................................................................................................................. 32 Set up a Button to Play a YouTube™ Video .......................................................................................................... 33 Blocking and Restoring Access to the Editing Menus ........................................................................................... 34 Working with Profiles .......................................................................................................................................... 35 Changing TouchChat Settings ............................................................................................................................... 37 Updating the TouchChat Application Software .................................................................................................... 40 Analyzing Language Development ....................................................................................................................... 41
Using the Realize Language Website ....................................................................................................................... 41 Turning on Data Logging from Your Device ............................................................................................................. 42 Creating a Privacy Password.................................................................................................................................... 42 Manually Uploading Data for Analysis .................................................................................................................... 43 Clearing Usage Data ................................................................................................................................................ 43 Changing or Removing Your Privacy Password ....................................................................................................... 44
Transferring a Vocabulary File from Chat Editor to the Device using iTunes ........................................................ 45 Copying a Vocabulary File from the Device to Chat Editor using iTunes ............................................................... 45 Changing Screen Orientation ............................................................................................................................... 46 Locking Screen Orientation .................................................................................................................................. 47 Backing up Your Device ........................................................................................................................................ 47 Restoring Your Device .......................................................................................................................................... 47 Appendix A: Advanced Grammar Features .......................................................................................................... 48
Creating a Grammar Button .................................................................................................................................... 48 Identifying Parts of Speech ...................................................................................................................................... 48 Creating a Grammar Rule Button ............................................................................................................................ 49 Using Your Grammar Rule Button ........................................................................................................................... 50 Clearing a Grammar Rule ........................................................................................................................................ 50

TouchChat User’s Guide 5
Welcome to TouchChat TouchChat® is intended for individuals who have difficulty using their natural voice. TouchChat is designed for individuals with Autism, Down Syndrome, ALS, apraxia, stroke, or other conditions that affect a person's ability to use natural speech. This user’s guide offers step-by-step instructions for using TouchChat.
Finding the TouchChat Version 1. Tap Vocab. 2. Tap Choose New Vocab. 3. In portrait mode, the software version will be displayed at the bottom of the screen.
Working with TouchChat Menus To access the TouchChat menus, tap Menu. Menu options depend on where you are in the application and whether Edit Mode is turned on. For example:
Menu options with Edit Mode turned off (gold menu bar)
Menu options with Edit Mode turned on (red menu bar)
Menu options after choosing Vocab > Choose New Vocab >
Menu (gold menu bar)

TouchChat User’s Guide 6
Working with Vocabulary Files TouchChat provides a variety of pages that have different button layouts. Each set of pages, or vocabulary set, is called a vocabulary file. TouchChat-provided vocabulary files have locks in front of them indicating they cannot be deleted. Vocabulary files are provided in English and Spanish.
English Vocabulary Files Note: If your system language is English, the English vocabulary files will be listed individually when you tap Choose New Vocab and the Spanish vocabulary files will be located in a folder labeled “Spanish”. If your system language is Spanish, the Spanish vocabulary files will be listed individually when you tap Choose New Vocab and the English files will be located in a folder labeled “Inglés”.
4-Basic 4-Basic offers just that, a basic vocabulary option with 4 buttons per page.
Communication Journey: Aphasia “Communication Journey: Aphasia” is a vocabulary file containing features and vocabulary designed to support people with aphasia. It was developed by Lois Turner (SLP), Anne MacCallum (SLP) and Sarah Gauthier (SLP Assistant) in consultation with a group of speech-language pathologists who work exclusively with people with aphasia and brain injuries. All the participants work at CAYA (Communication Assistance for Youth and Adults) and the GF Strong Rehabilitation Centre in Vancouver, BC, Canada. The framework of the file was derived from the Life Participation Approach to Aphasia from the Aphasia Institute in Toronto, Canada. The pages were created to facilitate participation in daily activities and to promote social links.
Aphasia, a disorder caused by damage to the parts of the brain where language is stored, may affect the ability to comprehend language, to express oneself, to read, or to spell and write. “Communication Journey: Aphasia” can easily be adapted for use by people with different types of aphasia and a range of cognitive levels and degrees of severity.
Symbols, photographs, visual scenes, videos, or words can be used on the message, topic, and script pages. Included are pages that facilitate supported communication techniques, self-advocacy, directing care, and repair of communication breakdowns. Types of information typically included in communication books—such as pain and emotion scales, maps, and templates for personal information and life stories—are also incorporated into the vocabulary file. Specialized features include variable “rate of speech” and “pause between words”. Grid size and vocabulary are easily customized to reflect and support the life experiences of the person with aphasia.
Although this vocabulary file contains starting-point vocabulary commonly required by adults with aphasia, it must be customized. Each person has a unique history, and the file must reflect that person’s life, experiences, and abilities.
MultiChat 15 MultiChat 15 is now offered in a Student, Adolescent and Adult version and was created for individuals with emerging language skills. There are multiple forms of communication available in this program: sentences, phrases, individual words, recordings for story-telling and visual scenes. Also included are interactive play and reading pages, and social pages. There are symbols on every button with the exception of several core words.
myCore myCore is a combination of core and phrase-based vocabulary geared toward individuals who have literacy skills.

TouchChat User’s Guide 7
myQuickChat myQuickChat is an introductory communication system geared toward child and adult AAC users with complex communication needs. myQuickChat is available for both kids and adults in 4, 8, and 12 locations, each with an identical 16-location Support Master Home Page. myQuickChat was created to offer a high frequency, phrase-based communication system in an easy to use yet very engaging format. The progressive system offers a variety of topics for everyday needs and conversation and provides AAC users immediate and more successful communication exchanges within a variety of settings.
Spelling Spelling is a QWERTY keyboard page set with four word prediction buttons and a few pre-stored phrases.
VocabPC VocabPC was designed by Gail Van Tatenhove, PA, MS, CCC-SLP, for adults and adolescents with developmental disabilities. Vocabulary in VocabPC is arranged as carrier phrases, interactive sentences, activity vocabulary and naming words. VocabPC uses a 12-location page layout. Both portrait and landscape versions of VocabPC are included.
Spanish Vocabulary Files Note: If your system language is Spanish, the Spanish vocabulary files will be listed individually when you tap Choose New Vocab and the English vocabulary files will be located in a folder labeled “English”. If your system language is English, the English vocabulary files will be listed individually when you tap Choose New Vocab and the Spanish vocabulary files will be located in a folder named “español”.
MultiChat 15 Spanish MultiChat 15 Spanish is the student version developed for devices running TouchChat. This Spanish version is very similar to the English MultiChat 15 Student file. However, due to the differences in the two languages, some changes have been made to accurately represent each language.
MultiChat 15 Spanish Bilingual This vocabulary file is exactly the same as the MultiChat 15 Spanish file except that the labels on the buttons show both English and Spanish words or phrases. Please note that when the device speaks the words or phrases, they are only spoken in Spanish.
Sin sintaxis 4 x 4 English and Spanish Sin sintaxis 4 x 4 English and Spanish consists of categories of words with a symbol on each button. This file is intended for children who do not have the ability to construct sentences yet.
Sintaxis 4 x 5 English and Spanish Sintaxis 4 x 5 English and Spanish is intended for children who are beginning to create simple sentences. Each page contains 20 buttons, and each button contains a word or phrase with a picture. Words are organized into categories with some core words for creating beginning sentences.
Teclado Teclado is a Spanish keyboard.
VocabPC Spanish VocabPC Spanish is a direct translation of the English version. VocabPC was designed by Gail Van Tatenhove, PA, MS, CCC-SLP, for adults and adolescents with developmental disabilities. Vocabulary in VocabPC is arranged as carrier phrases, interactive sentences, activity vocabulary, and naming words.
TouchChat User’s Guide 8
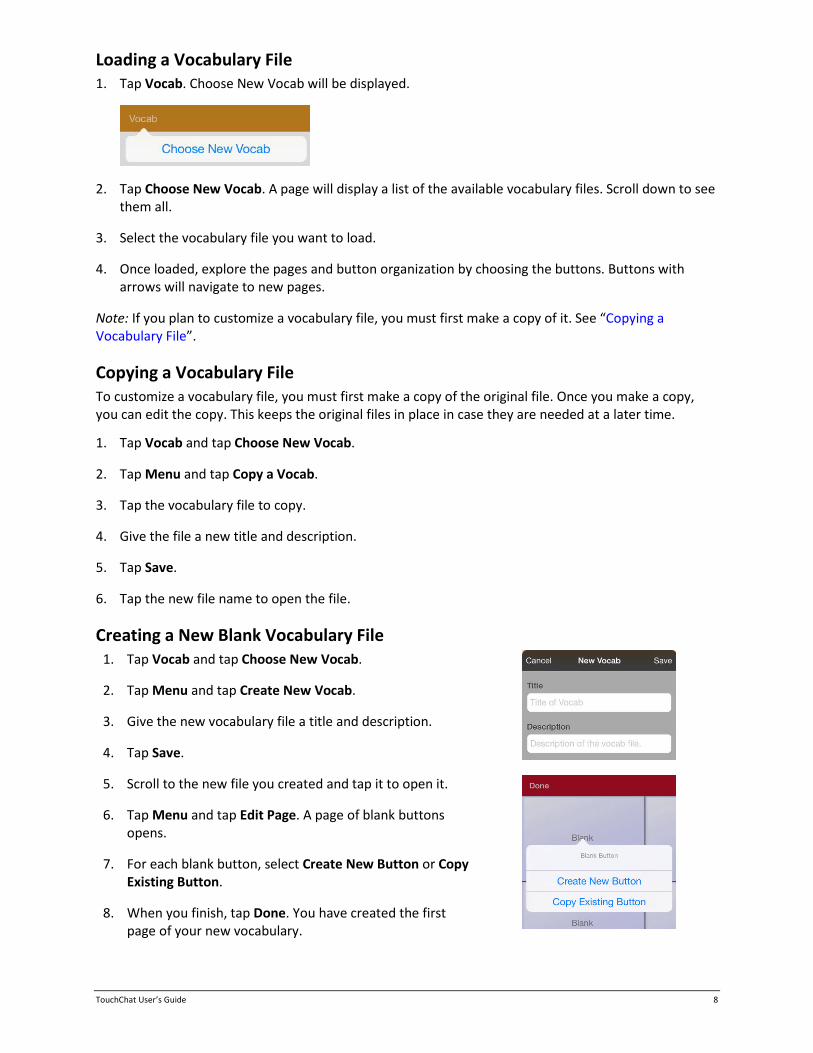
Loading a Vocabulary File 1. Tap Vocab. Choose New Vocab will be displayed.
2. Tap Choose New Vocab. A page will display a list of the available vocabulary files. Scroll down to see them all.
3. Select the vocabulary file you want to load.
4. Once loaded, explore the pages and button organization by choosing the buttons. Buttons with arrows will navigate to new pages.
Note: If you plan to customize a vocabulary file, you must first make a copy of it. See “Copying a Vocabulary File”.
Copying a Vocabulary File To customize a vocabulary file, you must first make a copy of the original file. Once you make a copy, you can edit the copy. This keeps the original files in place in case they are needed at a later time.
1. Tap Vocab and tap Choose New Vocab.
2. Tap Menu and tap Copy a Vocab.
3. Tap the vocabulary file to copy.
4. Give the file a new title and description.
5. Tap Save.
6. Tap the new file name to open the file.
Creating a New Blank Vocabulary File 1. Tap Vocab and tap Choose New Vocab.
2. Tap Menu and tap Create New Vocab.
3. Give the new vocabulary file a title and description.
4. Tap Save.
5. Scroll to the new file you created and tap it to open it.
6. Tap Menu and tap Edit Page. A page of blank buttons opens.
7. For each blank button, select Create New Button or Copy Existing Button.
8. When you finish, tap Done. You have created the first page of your new vocabulary.

TouchChat User’s Guide 9
Deleting a Customized Vocabulary File 1. From the home page of the vocabulary file, tap Vocab.
2. Tap Choose New Vocab.
3. Tap Edit.
4. The delete icon will appear to the left of each padlock image. You will only be able to delete custom vocabulary files. The original vocab files are displayed with a locked padlock and cannot be deleted.
5. When you tap the delete icon , “Rename” and “Delete” buttons will appear.
6. Tap Delete and the vocabulary file will be deleted from TouchChat. Tap Done.
Backing up a Customized Vocabulary File using iTunes It is always a good idea to keep a copy of all custom files on a second computer for safekeeping. We suggest always using a wired connection to a PC to copy files consistently.
1. Connect the device to the computer.
2. Open iTunes on the computer.
3. On the device, tap Vocab and tap Choose New Vocab. Then tap Menu.
4. Tap Import/Export.
5. Tap Export to iTunes.
6. Choose the vocabulary file you want to back up.
7. Name the file and tap Save.
8. In iTunes on the computer, tap on the device and go to the Apps section.
9. Scroll down until you see TouchChat in the File Sharing area.
10. Highlight the vocabulary file that you are backing up.
11. Click Save To on the bottom right.
12. A Windows save box will appear. Select the folder in which you want to save the file.

TouchChat User’s Guide 10
Activating Edit Mode You can only edit a copy of a vocabulary file, not the original. To make a copy, see “Copying a Vocabulary File” on page 8.
1. Go to the page you want to edit.
2. Tap Menu.
3. Tap Edit Page. The page is now in Edit Mode.
Using Chat Editor with TouchChat Chat Editor is a supplemental program that runs on a Microsoft® Windows® desktop or laptop computer. It allows you to customize vocabulary files. Although customizing is also possible on the device itself, the Editor allows the family and/or professionals to customize the vocabulary when the device is not present.
Note: Having the custom vocabulary on a computer is always recommended as a backup to the device. See “Copying a Vocabulary File from the Device to Chat Editor using iTunes” on page 45.
Downloading and Installing Chat Editor Important! With software release 2.0, we replaced Touch Chat Windows Editor with Chat Editor. If you have used Touch Chat Windows Editor in the past, it will no longer work with 2.0 files or newer.
The installation process installs Chat Editor on your computer and creates desktop shortcuts to the “Chat Editor” application and the “Chat Editor Import” folder.
Hint: To see a video that explains how to download and install Chat Editor, go to http://touchchatapp.com/support/videos/touchchat-chat-editor-installation
To download and install Chat Editor: 1. Go to http://touchchatapp.com/support/software-updates
2. Under “Chat Editor for Windows”, select the Download version link.
3. Save the downloaded Chat Editor_x.x.x_Setup.exe file to your desktop.
4. Double-click the Chat Editor_x.x.x_Setup.exe file to start the installation process.
5. Select the language you want to use for the installation and click OK.
6. Click Next, accept the license agreement, and click Next.
7. Click Install. When the installation process is complete, click Finish. You should see desktop shortcuts to the “Chat Editor” application and the “Chat Editor Import” folder.
Configuring Chat Editor 1. Double-click the “Chat Editor” desktop shortcut to open Chat Editor.
2. Select Touch Chat from the Choose Product window and click OK.
3. Select your language from the Choose Language window and click OK.
4. Select one or more symbol sets from the Choose Symbol Sets window.
Important! This symbol set must match what is on the device you are supporting.

TouchChat User’s Guide 11
5. Click OK.
6. Type a descriptive name for the configuration in the Enter Name window and click OK.
7. Chat Editor will open.
Note: You may need to set up multiple configurations if you support more than one client. For example: Tommy with only SymbolStix® images and Sarah with both SymbolStix and PCS™ symbols.
Enabling Speech in Chat Editor Note: When you install Chat Editor on a computer that had Chat Editor installed previously, speech will be enabled.
When you install Chat Editor on a computer that did not have Chat Editor installed previously, the following message will be displayed: Speech is currently disabled. Please connect a TouchChat device to this computer to enable speech.
Choose OK to close the message. To enable speech in Chat Editor, simply connect a USB cable between your computer and your device. Test the Editor to verify that speech is now working and then disconnect the cable. Speech will now be enabled whenever you use the Editor; you will not need to re-connect the cable.
Opening Chat Editor To open the Editor for normal use after you have set up a configuration, choose the Chat Editor shortcut from your computer’s desktop. The Editor will open on your computer.
Using Chat Editor to Create Instructional Materials Capture sequences of buttons from screens in Chat Editor to paste into instructional materials you create such as Word documents, PowerPoint presentations, flash cards, etc.
1. In Chat Editor, choose Capture in the top section of the Editor window. The Button Capture window will open.
2. With Capture Selections selected, start selecting the buttons you want to appear in your document. Each button you select will be captured in the Button Capture window.

TouchChat User’s Guide 12
3. When you finish capturing a sequence of buttons, choose Copy to Clipboard. The sequence will be cleared from the Button Capture window.
4. In your document, insert the cursor and select Paste. The sequence will be pasted into the document.
5. Capture the next sequence.
6. When you finish capturing sequences, select Exit to close the Button Capture window.
Notes on Capturing Button Sequences If you need to try several sequences to find the one you want, turn off Capture Selections. Once you decide what you want to capture, turn Capture Selections back on.
If you make a mistake, select Clear and start capturing the sequence again. Keep in mind that Clear removes all captured content from the Button Capture window.
Working with Buttons What a button speaks, how it appears, what icon is shown, what action the button performs, and the location of a button can be modified. All button modifications are performed in Edit Mode.
Editing a Button 1. Go to the page you want to edit and tap Menu.
2. Tap Edit Page. The page is now in Edit Mode.
3. Either tap or touch and hold the button you want to modify.
Note: If you touch and hold the button, keep your finger steady. If you move your finger, the button will start to move. See “Moving a Button“ on page 20.
4. The Edit Button menu opens.
5. Tap Edit This Button. A window opens that will allow you to modify the button.
6. Tap the menu option you want to use.
Adding or Changing a Button Action To add a button action:
1. Tap Menu, tap Edit Page, tap the button you want to modify, and tap Edit This Button.
2. Scroll down to the Button Actions section.
3. Tap Add.
4. Scroll through the list of actions and tap the action you want. It will be added below the existing action for the button.
5. Tap Save and Done.

TouchChat User’s Guide 13
To change a button action:
1. Tap Menu, tap Edit Page, tap the button you want to modify, and tap Edit This Button.
2. Scroll down to the Button Actions section.
3. Tap the existing action. The list of available actions will be displayed, with the existing action selected.
4. Tap the new action you want. The new action will replace the old action under Button Actions.
5. Tap Save and Done.
Removing or Changing the Order of an Action 1. While in the Button Actions area, tap Edit. The delete icon will appear in front of each action
linked to the button.
2. To remove an action, tap the delete icon and then tap Delete. To rearrange the order of the actions, touch and hold the gray bars to the right of an action and drag the action into the correct position.
3. Tap Done.
4. Tap Save and Done.
Modifying Text Within the Edit window:
1. Tap in the Button Label area to change the label that will be displayed on the button.
2. Tap in the Button Message area to change the message that will be spoken.
Inserting Special Characters Sometimes you may need to insert a special character in a word that you type, such as a letter with an accent; for example, ó.
On the keyboard, press and hold the applicable character key. A small menu of special characters available for that character will open above the key. Select the special character you want.
For example, to insert the special character ó, you would hold down the “o” key on the keyboard and select ó from the small menu.
TouchChat User’s Guide 14
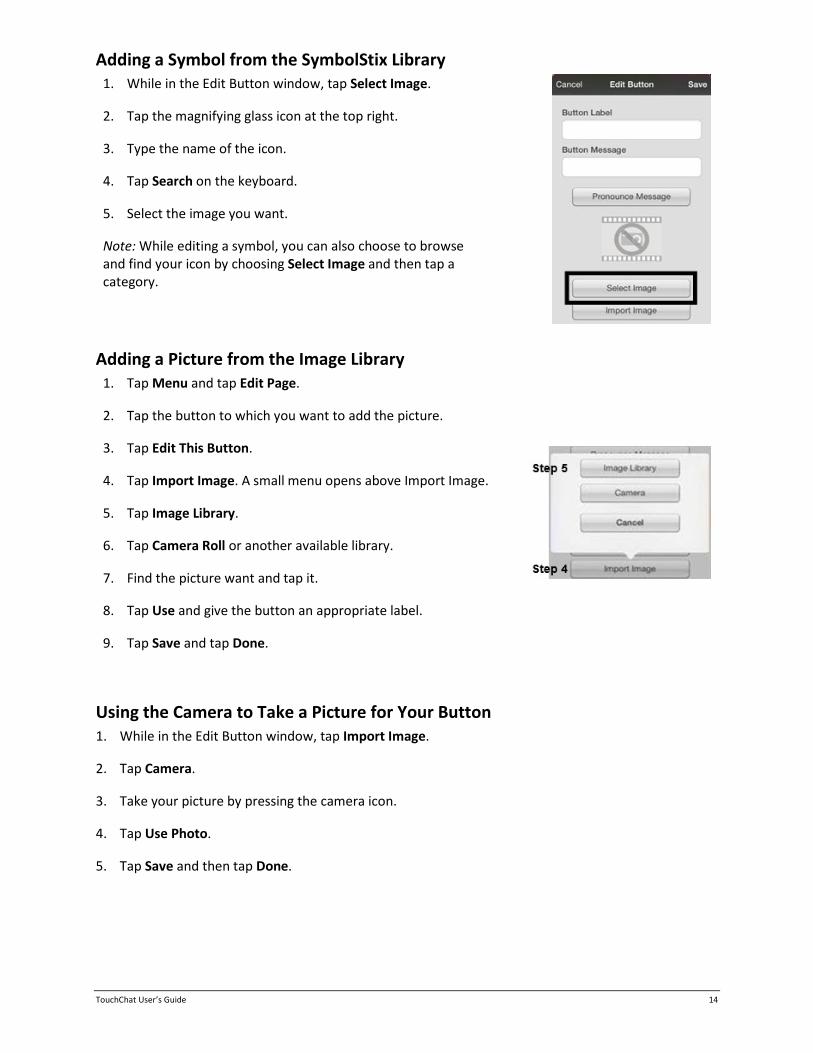
Adding a Symbol from the SymbolStix Library 1. While in the Edit Button window, tap Select Image.
2. Tap the magnifying glass icon at the top right.
3. Type the name of the icon.
4. Tap Search on the keyboard.
5. Select the image you want.
Note: While editing a symbol, you can also choose to browse and find your icon by choosing Select Image and then tap a category.
Adding a Picture from the Image Library 1. Tap Menu and tap Edit Page.
2. Tap the button to which you want to add the picture.
3. Tap Edit This Button.
4. Tap Import Image. A small menu opens above Import Image.
5. Tap Image Library.
6. Tap Camera Roll or another available library.
7. Find the picture want and tap it.
8. Tap Use and give the button an appropriate label.
9. Tap Save and tap Done.
Using the Camera to Take a Picture for Your Button 1. While in the Edit Button window, tap Import Image.
2. Tap Camera.
3. Take your picture by pressing the camera icon.
4. Tap Use Photo.
5. Tap Save and then tap Done.

TouchChat User’s Guide 15
Creating a Camera Button You can create a button that allows you to take a picture that will be imported to the button automatically every time you tap the button. The picture will also be added to your library of imported images. Each time you press the button, a new image from the camera will replace the existing image on the button. If the old image on the button was imported and not used elsewhere, it will be deleted. An image will appear on the button until you press the button again.
To set up the button action: 1. Go to the page with the button location you want.
2. Tap Menu > Edit Page.
3. Press and hold the button you want to use.
4. Tap Edit This Button.
5. Add a label and message.
6. Scroll down to “Button Actions” and tap Add to open the list of actions.
7. Scroll down the list and tap Take a Photo.
8. The Take a Photo action will be added to the button’s actions.
9. Tap Save and then tap Done.
To take a photo for your button: 1. Tap the new button to activate the camera.
2. Take a picture of the object or person.
3. Tap Use Photo.
4. The photo will appear as the image on the button.
To delete photos: To delete photos, you must connect your device to your computer and remove the photos using Explorer from the computer.
Resizing a Button 1. Tap Menu and tap Edit Page.
2. Tap the button you want to resize.
3. Tap Change Button Size.
4. Select the number of rows and columns you want.
5. Tap Save.

TouchChat User’s Guide 16
Changing a Button Style 1. While still in the Edit Button window, scroll down to the area you want to edit.
2. Choose to edit the font, size, color, and border and make those changes.
3. Tap Save.
Creating a Button to Link to a Page When a button action is set to Navigate or Visit you can determine what page that button will take you to. Navigate will take you to a New Page and leave you there requiring an additional button to be hit to return to your previous page or to the home page. Visit will take you there for one selection and immediately return to the previous page. The following linking button actions are available.
Action Description
Navigate Links to a new page and requires another button press to move away from this page
Visit Links to a page for a single hit and then automatically goes back to the previous page
Navigate Back Returns to the previous page
Navigate to Home Links to the Home page of the vocabulary file
To create a linking button:
1. Turn Edit Mode on.
2. Tap the button to be linked to the next page.
3. Tap Edit This Button.
4. Enter the label and message. (Entering a symbol is optional.)
5. Under the Button Actions, tap Add.
6. Select a navigation action for the button from the drop-down list (Navigate, Visit, Navigate Back, Navigate to Home). Navigate and Visit offer a listing of pages to link to. If you choose Navigate Back or Navigate to Home, skip to step 8.
7. Choose the page to navigate to or visit from the listing. If the page doesn’t already exist, choose + and create a new page to link the button to.
8. Tap an animation (how the page will appear as it navigates), or tap No Animation.
9. Tap Save.
Note: There may have been a previous action on this button. To remove that action, tap Edit, tap the delete icon , tap Delete, and tap Done.

TouchChat User’s Guide 17
Storing Text on a Button 1. Go to the page that includes the button on which you want
to store text.
2. Tap Menu and then tap Edit Page.
3. Tap the button on which you want to store text.
4. Tap Edit This Button.
5. Name the button, and optionally create a message and modify the style.
6. Scroll down to the Button Actions section and tap Add.
7. Scroll down and tap Store Text to Button. The action will be displayed in the Button Actions section.
8. Tap Save and then tap Done.
Note: Once a sentence or phrase has been constructed, it can now be saved on a button by navigating to the location of the Store Text button that you created. Tap the button, tap Continue, tap the button in which you want to store the text, and then tap Okay. The text will appear in the button you selected, and each time you tap that button it will speak that saved text.
Creating a Volume Control Button
Excessive volume or sound pressure level when using earphones or headphones can cause hearing loss over extended periods of time.
You can add volume controls to buttons within vocabulary pages.
1. In TouchChat, tap Menu > Edit Page.
2. Go to the page on which you want to create the button.
3. Press and hold on the button you want to use. A list of button options appears.
4. Choose Edit This Button.
5. Add a button label and icon.
6. Under Button Actions, choose Add. A list of actions appears.
7. Choose either Volume Up or Volume Down.
8. Choose Save.
Creating a Battery Status Button You can create a button that displays the battery status of both the device and the amplifier in the Speech Display Bar (SDB).
1. In TouchChat, tap Menu > Edit Page.
2. Go to the page on which you want to create the button.
3. Press and hold on the button you want to use. A list of button options appears.

TouchChat User’s Guide 18
4. Choose Edit This Button.
5. Add a button label and icon.
6. Under Button Actions, choose Add. A list of actions appears.
7. Choose Battery Status.
8. Choose Save.
Copying and Pasting a Button Buttons can be copied and pasted to new locations. If you modify a copy of a button, you will edit only the copy.
1. Tap Menu and tap Edit Page.
2. Tap the button you would like to copy. The Edit Button menu opens.
3. Tap Copy Button.
4. Tap Done.
5. Go to the page where you want to add the copied button.
6. Tap Menu and tap Edit Page.
7. Tap the location you wish to copy the button to. The Edit Button menu opens with additional options.
8. Tap Paste Button. The button you copied will appear in that location.
9. Tap Done.

TouchChat User’s Guide 19
Copying and Pasting the Same Button If you modify a button that is used in multiple locations, the button will also be modified automatically everywhere else it appears. You may want to use this technique on buttons that contain tools used on each page.
1. Tap Menu and tap Edit Page.
2. Tap the button you would like to copy. The Edit Button menu opens.
3. Tap Copy Button.
4. Tap Done.
5. Go to the page where you want to add the copied button.
6. Tap Menu and tap Edit Page.
7. Tap the location you wish to copy the button to. The Edit Button menu opens with additional options.
8. Tap Use Same Button. The button you copied will appear in that location.
9. Tap Done.
Copying and Pasting a Button Style “Button Style” refers to the background color and the font size and options that are associated with a button. There are times when it might be faster to copy and paste a button’s style from an existing button rather than editing each of these items on a new button.
1. Tap Menu and tap Edit Page.
2. Tap the button whose style you want to copy. The Edit Button menu opens.
3. Tap Copy Button.
4. Tap the location you want to copy the button to. The Edit Button menu opens with additional options.
5. Tap Paste Button Style. The button will display the pasted style.
6. Tap Done.

TouchChat User’s Guide 20
Moving a Button 1. Tap Menu and tap Edit Page.
2. Touch the button you want to move and drag it to another location.
Note: When you start to drag the button, the original location will be outlined in red. As you move into the new location, the red outline will move to that location.
3. Upon release, the button will move to the new location. If there is already a button in the new location, it will move to the old location. The buttons will exchange locations.
Hiding a Button There are times that presenting all buttons at once might be intimidating, or in order to complete a task a button might need to be hidden.
1. Tap Menu and tap Edit Page.
2. Tap the button you want to hide and tap Edit This Button.
3. Turn Visible off.
4. Tap Save and Done.

TouchChat User’s Guide 21
Hiding or Showing Multiple Buttons at Once 1. Tap Menu and tap Edit Page.
2. Tap Menu and tap Hide Mode.
3. Tap the buttons you want to hide or show.
4. Tap Menu and tap Normal Mode.
Changing Button Timing Tap Menu and tap Settings. Scroll down to the “Buttons” section.
Activate on Release This option offers to have buttons activated when released rather than upon touch. This allows the device user to slide his or her finger across the screen before finally releasing on the button that he or she wants to select. Turn the toggle switch to the On position.
Dwell Time The dwell time setting controls the delay before a button press is recognized. When the user touches a button, a slight dimming and a white square box identifies the chosen button. As long as the user continues to keep his or her finger inside the button area the dwell timer counts down. Once the time is reached, the button press is accepted. To set a dwell time, tap Dwell Time and select a value from 0.1 Seconds to 5.0 Seconds.
Release Time
Release time is intended to help prevent accidental double button activations. When the time is set, all buttons are disabled for the specified period of time after each button press event. To set a release time, tap Release Time and select a value from 0.1 Seconds to 5.0 Seconds.

TouchChat User’s Guide 22
Hiding and Showing Button Navigation Arrows
Buttons that navigate to new pages display a small arrow in the top right corner.
To hide or show all navigation arrows:
1. Choose Menu > Settings.
2. Under Navigation, tap Button Navigation Icons.
Working with Pages TouchChat allows you to rename, duplicate, load, and create pages, choose a different keyboard, copy a page from a different vocabulary, and add gestures to pages.
Renaming a Page 1. Tap Menu and tap Edit Page.
2. Tap Menu and tap Edit Page Layout.
3. In the area under Page Name, tap, then backspace to erase the name, and then type the new name.
4. Tap Save.
Duplicating a Page 1. Tap Menu and tap Edit Page.
2. Tap Menu and tap Import/Copy Pages.
3. Tap Duplicate This Page. A duplicate of the page, followed by “(Copy)”, will appear in the list of pages in this vocabulary.
4. Tap Done.

TouchChat User’s Guide 23
Loading Another Page 1. Tap Menu and tap Edit Page.
2. Tap Menu and tap Load Another Page.
3. Scroll up to find the page you want to load.
4. Tap Done.
Note: This page is now available to copy buttons or make additions or changes to your vocabulary.
Creating a New Page 1. Tap Menu and tap Edit Page.
2. Tap Menu and tap Add New Page.
3. Give the page a name.
4. Select how many rows and columns you would like.
5. If you want this new page to be the Home page, tap Make Home Page to turn the option on.
6. Choose a background color.
7. Select an image (optional).
8. Tap Save. A new page will appear with blank buttons.
9. Start creating buttons on this page.
10. Tap Done when you are finished.

TouchChat User’s Guide 24
Creating a New Page from a Navigate Action 1. Display the page from which you want to navigate.
2. Tap Menu and tap Edit Page.
3. Tap the location for a button that will navigate to the page you want to create.
4. Tap Edit This Button. The Edit Button dialog opens.
5. Enter a button label and select or import an image.
6. Scroll down to the Button Actions section and tap the existing action to open the list of available actions.
7. Select the Navigate action to open the list of existing pages.
8. Tap the + in the upper right corner to create the new page.
9. Enter a page name and adjust the number of rows and columns.
10. Tap Save, select No Animation, and tap Save again.
11. To verify that the button navigates to your new page, tap Done to exit Edit Mode and then tap the button to navigate to the new page.
12. Tap Menu, tap Edit Page, and add buttons to the page.
Choosing a New Keyboard 1. Tap Menu and tap Edit Page.
2. Tap Menu and tap Import/Copy Pages.
3. Tap Import Another Page.
4. Tap the vocabulary file that contains the keyboard you want and tap the appropriate page to import.
5. Tap Import.
6. Edit the original keyboard button and have it navigate to the new keyboard page.
7. Edit the linking button to navigate to the new page.
Copying a Page from a Different Vocabulary File There are times that borrowing previously created pages could be a time saver. TouchChat allows you to import multiple pages at one time.
1. Have your vocabulary file open.
2. Tap Menu and tap Edit Page.
3. Tap Menu and tap Import/Copy Pages.
4. Tap Import Another Page.

TouchChat User’s Guide 25
5. Tap the vocabulary file that contains the page you want and tap the appropriate pages to import. A checkmark will appear following each page you tap.
6. Tap Import and tap Done.
7. While still in Edit Mode, tap the button that you want to navigate to the imported pages.
8. Tap Edit This Button.
9. Give the button a label and, if needed, an icon and make any style changes you want.
10. Scroll down to the Button Actions section, tap Add, and then tap Navigate.
11. Tap the page you imported.
12. Tap an animation or No Animation.
13. Tap Save and tap Done.
Adding a Gesture to a Page 1. Tap Menu and tap Edit Page.
2. Tap Menu and tap Edit Gestures.
3. Tap +.
4. Add a label and message.
5. Tap the gesture type to tap the type you want. An arrow will appear following the type you selected
6. Tap a gesture action or tap Add to add an action.
7. To add gestures to an entire vocabulary file at one time, tap Apply to All Pages.
Note: To delete a gesture action, tap Edit and tap the action you want to delete. The delete icon will be displayed in front of the action. Tap the delete icon to delete the action.
8. Tap Save and tap Done.

TouchChat User’s Guide 26
Creating a Template Page You can create a template page in Chat Editor. This feature is handy when building vocabulary files with the same configurations of buttons to be displayed on each page. Create a page with the buttons that will be consistent on each page. Set this page as a template to be used when creating new pages.
1. Turn Edit Mode on.
2. Create a page to use as the template.
3. Click Pages.
4. Choose the page you would like to duplicate.
5. Choose Save as Template.
Using a Template to Create a Page You can create a page from a template in Chat Editor.
1. Turn Edit Mode on.
2. Select Pages > Templates > New Page from Template.
3. Select a template category.
4. Select a specific template. When you select the template, a preview will be displayed.
5. Select Choose and type a descriptive name for the new page.
6. Select Save.
Editing an Abbreviation Expansion 1. Tap Menu and tap Edit Abbreviations.
2. Tap +.
3. In the space under Abbreviation, type the abbreviated form.
4. In the space under Expands to, type the full word, phrase, or sentence that it will expand to.
5. Tap Save and tap Done.
Note: When typing the abbreviation, type a period after the abbreviation to activate the action.

TouchChat User’s Guide 27
Editing Pronunciations 1. Tap Menu and tap Edit Pronunciations.
2. Tap +.
3. In the space under Word, type the correct spelling.
4. In the space under Pronounce As, type word phonetically or the way it should be pronounced. Tap Pronounce Word to see if it is pronounced correctly. If not, change the spelling until it sounds correctly.
5. Tap Save and tap Done.
Note: If the word already exists in the Pronunciation list, scroll up to find the word and then tap the word to edit to the correct pronunciation.
Adding Acapela Vocal Smileys Acapela-Group has created the capability of using Voice Sounds and Exclamations.
Adding a Sound Sounds are produced by the speaker’s voice for laughing, breathing, sneezing, coughing, or whatever sounds our voices can produce to mimic sounds we make in our daily lives. Sounds are always between two pound signs; for example: #LAUGH02# in capital letters and sometimes followed by numbers if there are more than one of the same kind. The children’s voices have more sounds than adult voices.
Adding an Exclamation Exclamations include a variety of letters and symbols. Type exactly what you see.
Finding a Vocal Smiley To find the list of Acapela Vocal Smiley commands:
1. Go to http://www.acapela-group.com/doc/Vocal%20smileys/excla.html
2. Click the link to the appropriate language. Important! The language you select must match the language of the voice you are using.
3. Select the specific Vocal Smiley you want.

TouchChat User’s Guide 28
Example: Add a Smiley Face and Laugh Sound to a Button A button can be set up with the command in the message. However, if you use the “speech message” action, the command appears in the Speech Display Bar (SDB), which isn't ideal. A better way may be to set up a button with an emoticon symbol in the message.
For example, you could use a smiley face symbol. Note that you may need to go to Settings > General > Keyboards and add the Emoji keyboard so that you can type emoticon symbols. Once the button is set up with the emoticon and speech message, go to Pronunciations and add a pronunciation for the smiley face emoticon. Enter a command such as #LAUGH02# for the pronunciation.
The Pronunciation Editor can be found in Menu > Edit Pronunciations > +. Add the same Emoticon used on the button to the Word box and add the command—for example, #LAUGH02#—to the Pronounce As box.
Now when you touch the button, the emoticon will appear in the SDB and the laugh sound will be heard.

TouchChat User’s Guide 29
Setting up Your VocaliD™ Voice 1. Enable a Wi-Fi connection.
2. Choose Menu > Settings.
3. Scroll to the Speech section and tap Install VocaliD Voice. A VocaliD login screen is displayed.
4. Enter your VocaliD email address and VocaliD password.
5. Tap Sign In in the upper right corner to display a Download Voice prompt.
6. Tap Download Voice. “Downloading Voice” will be displayed.
7. When the download is complete, “New Voice Installed” will be displayed.
8. Tap Okay.
9. Tap Done. The downloaded VocaliD voice is now your primary voice.
10. Try out the voice. You can change the voice rate and pitch in Settings.
To change the rate: Move the slide bar.
To change the pitch: Tap Voice Pitch to open a list of pitch levels. Select the pitch you want: Lowest, Lower, Low, Normal, High, Higher, or Highest.
11. Test the voice again and adjust the rate and pitch as needed.

TouchChat User’s Guide 30
To switch to a different voice: Any time you want to switch to a different voice, do the following:
1. Choose Menu > Settings.
2. Scroll to the Speech section. The Voice setting shows VocaliD Voice.
3. Tap Voice to open a list of available voices.
4. Tap or download the voice you want and tap Done.
Creating a Visual Scene To create a visual scene, select a background image, set up the page, and add buttons.
Selecting a Background Image Start by having the picture you want to use for the background image on the device. You can take a picture using your device if it has a built-in camera. Otherwise, transfer the picture to the device from a computer.
1. Tap Menu and tap Edit Page.
2. Tap the location to add a linking button (the button you wish to link to your visual scene) and tap Edit This Button.
3. Add a label, scroll down to the Button Actions section, and replace the existing action with Navigate.
4. Tap the + in the upper right corner to create your new visual scene page.
5. Enter a page name.
6. Adjust the number of rows and columns on the page. Choosing as many rows and columns as possible will make it easier to create buttons that fit with the images on the page.
7. Scroll down to Import Image.
8. Tap Import Image and take a picture or find the image you want. A thumbnail view of the image will appear above Import Image.
9. Tap Save, select No Animation, and tap Save again.
10. To verify that the button navigates to your new page, tap Done to exit Edit Mode.
11. Tap the button to navigate to the new page.
12. Tap Menu and tap Edit Page, and proceed to the next topic, “Adding Buttons”.

TouchChat User’s Guide 31
Adding Buttons Now with the background picture in place, using the blank buttons, buttons can be created that speak or move to other pages. In our example, let’s create a button that speaks “Horse” whenever tapping on the horse in the picture (assuming we used a picture with a horse in it).
1. Tap the upper most left corner location that covers the ear.
2. Tap Create New Button.
3. Type Horse into the button message box.
4. Set the Transparent option to the On position. That way the scene behind it comes through.
5. Tap Save.
6. Tap the newly created button and choose Change Button Size. From here, you can adjust the button height and width so that it fits the entire image.
7. Tap Save.
8. Create the remaining buttons and re-size them to go along with the scene. All the buttons can have their own size and shape.
9. When you finish, tap Done.
Enlarging Text in the Speech Display Bar There are a number of ways to enlarge text in the Speech Display Bar (SDB).
Changing Text Size or Number of Lines in the SDB 1. Tap Menu and tap Settings.
2. Scroll to the Speech Display Bar section.
3. Under Font Size, choose a larger font. Or, under Number of Lines, select the number of lines of text you want to appear in the Speech Display Bar.

TouchChat User’s Guide 32
Expanding the Display by Changing Screen Orientation You can set TouchChat to expand the Speech Display Bar (SDB) when the device is rotated between portrait and landscape.
Expand and Speak: When you rotate the device, text in the Speech Display Bar (SDB) will expand to fill the screen and the device will speak it.
Expand Only: When you rotate the device, text in the Speech Display Bar (SDB) will expand to fill the screen, but the device will not speak it.
1. Tap Menu and tap Settings.
2. Scroll down to the Tilt section.
3. Tap Tilt Action and tap either Expand and Speak or Expand Only.
4. Tap Done.
Creating a Tap Action Create a tap action to enlarge the text in the SDB.
1. Tap Menu and tap Settings.
2. Scroll down to the Speech Display Bar section.
3. Under Tap Action, tap Speak and Enlarge Text.
Making an In-App Purchase Saltillo provides additional voices, other language packages, unique vocabulary files, support packages, and curriculum support in the Upgrade Store. Apple provides an option for these materials to be purchased from within the TouchChat application.
To explore the Upgrade Store: 1. Enable a wireless connection.
2. Tap Vocab and tap Choose New Vocab.
3. Tap Menu and tap Upgrade Store.
To make a purchase: In the Upgrade Store, make a selection and enter your iTunes purchase information.
NCMEC First Responder Event This free in-app download consists of TouchChat pages to support the project by The National Center for Missing and Exploited Children, entitled “How to Host a Sensory Friendly First Responder Event for Children with Autism”. None of the activities has a link to a Home page, so the Back button in TouchChat must be used to move from one activity to another. The idea is that the facilitator will set the page for a specific activity, and then the child will stay on that page. The facilitator will use the Back button to navigate back to the Home page. By design, some of the pages don’t speak. They are intended to allow the child to show, rather than tell, the facilitator how he or she is feeling.

TouchChat User’s Guide 33
Set up a Button to Play a YouTube™ Video Note: You must have an active Wi-Fi connection.
1. On your device, select the YouTube video you want.
2. Tap the Share icon and then tap the Copy Link icon. A “Copied” message should appear.
3. In TouchChat, display the page that has the button you want to use to play the YouTube video.
4. Choose Menu > Edit Page.
5. Tap the button you want to use to use and choose Edit This Button.
6. Give the button a label and scroll down to the Button Actions section.
7. Select the existing action to open the Select Actions list.
8. Select the action Play Video. The Video Type window will display two options.
9. Select YouTube Video. The YouTube window will display a Video Link field.
10. Press and hold on the Video Link field. A small Paste prompt will appear.
11. Tap the Paste prompt. The link you copied in step 2 will be pasted into the field.
12. Select Done. Play Video will be displayed under Button Actions.
13. Select Save. The label you entered will be displayed on the button.
14. Select Done. When you tap the button, the YouTube video should play.
Note: If you do not have a Wi-Fi connection when you attempt to play the YouTube video, the display area will be black and the following message will appear:
No Connection to YouTube An internet connection is required to play a YouTube video.
If there is an internet connection but YouTube cannot be reached, the following message will appear:
No Connection to YouTube YouTube appears to be blocked by your internet service provider. Please contact your network administrator.

TouchChat User’s Guide 34
Blocking and Restoring Access to the Editing Menus There may be times when you need to block access to the Editing menus. To do this, the Use Menu Passcode setting can be turned on or off. When this setting is turned on, the Menu and Vocab items can only be accessed by entering a password.
To password-protect the Editing menus: 1. In TouchChat, tap Menu and tap Settings. The Settings menu will open.
2. Under “Editing”, turn Use Menu Passcode on.
3. Tap in the Passcode field to open a keyboard.
4. Enter your password and tap Done on the keyboard.
5. Tap Done on the Settings menu.
Now when the user taps either Menu or Vocab, a password prompt will be displayed.
To reset your password: If you forget your password, enter the numeric sequence 72584556 to overwrite the existing password. Then you can create a new password.
To remove password protection from the Editing menus: 1. In TouchChat, tap Menu or Vocab. The Password prompt will be displayed.
2. Enter your password. The Settings menu will open.
3. Turn Use Menu Passcode off.
4. To remove the password, tap in the Passcode field to open the keyboard. Use the Keyboard backspace key to remove the password.
5. Tap Done on the keyboard.
6. Tap Done on the Settings menu.

TouchChat User’s Guide 35
Working with Profiles Profiles provide a snapshot of the current settings of the system to be saved for easy access at a later time. You can save multiple profiles to be used when needed. Creating multiple profiles allows you to switch between groups of settings.
Create and Save a Profile 1. Configure the settings you want associated with the profile. This includes the vocabulary file,
settings, etc.
2. Go to Menu > Settings > Save Profile. The Profile Name window will open.
3. Tap in the Profile Name field to open a keyboard.
4. Enter a name for the profile (for example, “Mary’s Profile”).
5. Choose Save. A profile will be created for Mary with all the current settings.
Note: To create a second profile (for example, “John’s Profile”), repeat these steps, making new settings changes to associate with this profile.
Load a Profile To load a profile that you previously created:
1. Go to Menu > Settings > Load Profile. Profiles that you have created will be listed.
2. Tap the profile name you want. The associated settings will be loaded.
Rename or Delete a Profile 1. Go to Menu > Settings > Load Profile. Profiles that you have created will be listed.
2. Choose Edit. The delete icon will appear to the left of each profile name.

TouchChat User’s Guide 36
3. Tap the delete icon for the profile you want to rename. Rename and Delete buttons will appear.
4. Rename or delete the profile.
To rename the profile: Choose Rename, enter the new name in the Profile Name field, and choose Save.
To delete the profile: Choose Delete. The profile will be deleted immediately.
Modify a Profile 1. Make the changes you want associated with the profile.
2. Go to Menu > Settings > Save Profile. The Profile Name window will open.
3. Tap in the Profile Name field to open a keyboard.
4. Enter the profile’s original name and choose Save. A message will inform you that the file name already exists.
5. Choose Yes. The changes will be saved.

TouchChat User’s Guide 37
Changing TouchChat Settings TouchChat settings are located by going—within the TouchChat app—to Menu > Settings. From the TouchChat Settings screen, scroll to see all available settings.
Profiles
Setting Description
Save Profile Allows you to save the current settings as a profile.
Load Profile Allows you to load, rename, or delete a profile.
Navigation
Setting Description
Page Animation When turned on, this setting allows you to navigate a page by scrolling up, down, right, or left.
Allow Gestures When turned on, this setting allows you to add a gesture to a page such as swiping left or right to engage an action.
Gesture Pop Sound When turned on, this setting provides audible feedback when a gesture is performed.
Button Click Sound When turned on, this setting provides audible feedback when a button is selected.
Button Navigation Icons When turned on, this setting displays the small navigation arrows in the top right corner of all buttons. When the setting is turned off, the arrows are hidden.
Page Size
Setting Description
Status Bar When turned on, this setting displays the device status bar above the Speech Display Bar.
Keyguard Inset When turned on, this setting adjusts the display for a keyguard.
Editing
Setting Description
Menu Passcode When applicable, enter the password you want to use in this field.
Use Menu Passcode When turned on, this setting requires a password to access the Editing menus.

TouchChat User’s Guide 38
Speech
Setting Description
Voice Since there are many voice options, voices are downloadable. This will save a lot of space on the app by only downloading the voices needed. To download a voice, tap the green down arrow and select Yes. Note: Some voices are only available at a cost. These voices must be purchased from the Upgrade Store before they are available in the Voice listing.
Rate Use the slide bar to modify the rate of speech.
Voice Pitch You can make a voice sound different by modifying the pitch. Select the pitch you want: Lowest, Lower, Low, Normal, High, Higher, or Highest.
Pause Between Words You can add a speech delay between individual words. Note: This option is not available for a VocaliD voice.
Install VocaliD Voice Install and set up a VocaliD voice.
Speech Display Bar
Setting Description
Hide Speech Display When turned on, this setting hides the entire SDB.
Allow Copy/Paste When turned on, this setting gives the user the option to copy/paste from the SDB.
Auto Capitalization When turned on, this setting capitalizes the first word of a sentence automatically.
Show Icons Choose this setting if you want to display icons with text in the SDB.
Hide Delete Button When turned on, this setting hides the SDB’s Delete button.
Font Select one of the 7 available fonts for use for text in the SDB.
Font Size Determines the size of the font that appears in the SDB.
Font Color Choose one of the 12 available font colors to apply to text in the SDB.
Background Color Choose one of the 12 available background colors to apply to the SDB.
Number of Lines Choose how many lines of text you want to appear in the SDB.
Single Line Cursor Choose this setting if you want a cursor to appear in the SDB.
Tap Action Choose Speak, Speak and Enlarge Text, or No Action when the SDB is tapped.
Expanded Speech Area
Setting Description
Font Select one of the 7 available fonts for use for text in the expanded speech area.
Font Size Determines the size of the font that appears in the expanded speech area.
Font Color Choose one of the 12 available font colors to apply to text in the expanded speech area.
Background Color Choose one of the 12 available background colors to apply to the expanded speech area.

TouchChat User’s Guide 39
Speak
Setting Description
Speak Characters When this setting is turned on, each character will be spoken as entered.
Speak Words When this setting is turned on, each word will be spoken as entered.
Speak Sentences When this setting is turned on, each sentence will be spoken as entered.
Auto Clear When this setting is turned on, the SDB clears automatically after speaking.
Prevent Interruption When turned on, this setting will prevent interruptions of speaking a sentence if you accidentally hit another button while it is speaking.
Tilt
Setting Description
Preferred Orientation Select either Portrait or Landscape.
Tilt Action Select an option to expand text in the Speech Display Bar and speak it, expand the text only, reorient the screen, or allow no action.
Data Logging
Setting Description
Enable Logging Turn on data logging, allowing your device to collect language usage data which you can upload to the Realize Language website for web-based analysis or save to a file to analyze manually.
Privacy Password Set or change your data logging privacy password.
Clear Log Clear usage data for the current person.
Realize Language Setup Upload data collected for a person to the Realize Language website for analysis.

TouchChat User’s Guide 40
Buttons
Setting Description
Activate on Release When this setting is turned on, a button will not activate until released, rather than on touch.
Dwell Time Controls the delay before a button press is recognized in case a user needs to slide across multiple buttons before pressing the intended button.
Release Time All buttons are disabled for specified period after each button press event to prevent accidental double button presses.
Force Font Size When this setting is turned off, the button label font size is automatically reduced as needed to allow the entire label to fit into the button area.
Highlight Touch When this setting is turned on, the button that is touched is highlighted briefly—the button turns red for a moment when activated.
Hide All Icons When turned on, this setting will hide all of the icons from the buttons and only the text will appear. Note that hiding the button icons will also force the SDB setting “Show Icons” off.
Show Hidden Buttons When turned on, buttons that have been hidden will be displayed.
Dynamic Grammar Labels When turned on, Dynamic Grammar Labels displays on button labels the changes that will be made to words when grammar rules are applied. See Appendix A: Advanced Grammar Features.
Social Networking
Setting Description
Allow Social Networking When turned on, this setting allows you to share text from the SDB to social networks.
Amp Connect
Setting Description
Select Amp Select your amplifier name to make a Bluetooth connection to the TouchChat software for getting proper battery status readings.
Set up Amp Set left and right speaker volume, bass, and treble.
Updating the TouchChat Application Software 1. Connect the device to the computer.
2. Launch iTunes on the computer.
3. Go to the Apps section of iTunes.
4. Scroll to the Updates section and locate the option “Check for Updates” in the bottom right corner of the screen.
Note: The location of the Updates option depends on the version of iTunes you are using.
5. Enter the Apple ID that you used to purchase TouchChat previously.
6. The update will start downloading.

TouchChat User’s Guide 41
Analyzing Language Development You can use the data logging capabilities of your device to collect information on a person’s language development. Then you can upload that information to the Realize Language™ website.
Collect data on your device
Upload the data to the Realize Language website
Create easy-to-understand reports
This process allows you to monitor, measure and maximize the person's use of the device.
Using the Realize Language Website Realize Language is a subscription-based online service that organizes and analyzes information and presents the results in easy-to-understand graphic formats that provides valuable insights into each person's language development. Using this service from your computer, you can
• Track the person’s progress and communication development over time • Compare different aspects of communication automatically • Create a detailed summary of performance • Share information with others • Quickly create reports that anyone can understand
To learn more, go to the Realize Language website: https://realizelanguage.com/info/
To view or download the Realize Language Starter’s Guide, go to https://realizelanguage.com/info/support
For Customer Support: If you have a problem with the Realize Language website, email [email protected]
If you have a problem with your device, call Saltillo technical support at 1-800-382-8622 or email [email protected].

TouchChat User’s Guide 42
Turning on Data Logging from Your Device When data logging is turned on, your device collects language usage data which you can upload to the Realize Language website for web-based analysis or save to a file to analyze manually.
1. In TouchChat tap Menu and tap Settings. The TouchChat Settings screen will be displayed.
2. Under Data Logging, turn on Enable Logging.
When data logging is turned on, the data logging icon appears in the Speech Display Bar.
Important! If you plan to use the Realize Language website to analyze data, set up a person before you start collecting data.
Creating a Privacy Password Data logging provides the option to create a privacy password to protect the data you collect against unauthorized access.
1. Under Data Logging, tap the password box located to the right of Privacy Password. A cursor will appear in the password box and keyboard will be displayed.
2. Type the privacy password you want to use and tap Done. The Confirm New Privacy Password prompt will be displayed.
3. Type your password again and tap Enter. “New Password Set” will be displayed.
4. Tap OK to close the message.

TouchChat User’s Guide 43
Manually Uploading Data for Analysis Upload data collected for a person to the Realize Language website for analysis.
1. Connect the device to your computer.
2. Open iTunes on the computer.
3. In iTunes on the computer, tap on the device and go to the Apps section.
4. Scroll down until you see TouchChat in the File Sharing area.
5. Highlight the logFile.txt file that you are uploading.
6. Click Save To on the bottom right. A Windows save box will open. Select the folder in which you want the file saved.
7. Log onto the Realize Language website.
8. Select Upload Data File and then Select a File to Upload.
9. Select the file and click Upload.
Clearing Usage Data To clear usage data for the current person:
1. Under Data Logging, tap the Clear button.
2. The Privacy Password prompt and keyboard will be displayed. Type your privacy password and tap Enter.
3. “Do you really want to Clear Log?” will be displayed. Choose Yes to clear the data log.
4. “Clear Log Completed” will be displayed. Tap Okay to close the message.

TouchChat User’s Guide 44
Changing or Removing Your Privacy Password By default, each time you save data to a file, you enter a password. Entering a password helps ensure privacy—only you will be able to view the data. You can change this privacy password as often as you want, or you can eliminate the need for a privacy password.
To change your privacy password: 1. Under Data Logging, tap the password box located to the right of Privacy Password. A Privacy
Password prompt and keyboard will be displayed.
2. Type your old privacy password and tap Enter. A cursor will appear in the password box.
3. Use the backspace key to clear the Privacy Password field.
4. Type your new password and tap Done.
5. The Confirm New Privacy Password prompt will be displayed. Type your new password again and tap Enter.
6. “New Password Set” will be displayed. Tap OK to close the message.
To remove your privacy password: If you prefer not to enter a password each time you save data to a file, use this procedure. Keep in mind, however, that you will also lose the privacy protection a password provides.
1. Under Data Logging, tap the password box located to the right of Privacy Password. A Privacy Password prompt and keyboard will be displayed.
2. Type your old privacy password and tap Enter. A cursor will appear in the password box.
3. Use the backspace key to clear the Privacy Password field and tap Done.
4. “Privacy Password Cleared” will be displayed. Tap OK to close the message.

TouchChat User’s Guide 45
Transferring a Vocabulary File from Chat Editor to the Device using iTunes 1. Open Chat Editor on your computer.
2. Choose Library > Transfer > Vocabs to File. The Transfer box will appear.
3. Highlight the file you want to transfer and click Transfer in the top left.
4. Save your vocabulary file to your computer (remember where you save it).
5. Open iTunes on the computer.
6. Attach the device to the computer.
7. Tap on the device (left column) and go to the Apps section.
8. Scroll down until you see TouchChat in the File Sharing area.
9. Tap TouchChat. “Add File” should appear in the lower right-hand section.
10. Tap Add File. A Windows Save screen will appear.
11. Locate the file you want to add to your device and tap Open.
12. The file should appear in the TouchChat Documents section.
13. On the device, choose Vocab > Choose New Vocab.
14. Choose Menu > Import/Export Vocab.
15. Choose Import from iTunes.
16. Select the file you want to import, then tap Save in the top right portion of the screen. Your imported file should appear in the list of vocabularies.
17. Select the file.
Copying a Vocabulary File from the Device to Chat Editor using iTunes 1. Connect the device to the computer.
2. Open iTunes on the computer.
3. On the device, choose Vocab > Choose New Vocab.
4. Tap Import/Export Vocab.
5. Tap Export to iTunes.
6. Choose the vocabulary file you want to export.
7. Name the file that you are exporting and tap Save.
8. In iTunes on the computer, tap on the device and go to the Apps section.
9. Scroll down until you see TouchChat in the File Sharing area.
10. Highlight the vocabulary file that you are exporting.
11. Click Save To on the bottom right.
12. A Windows save box will appear. Select the folder in which you want the file saved.

TouchChat User’s Guide 46
To place the file into Chat Editor, use the Chat Editor Import folder located on your computer’s desktop. The folder was placed there when Chat Editor was installed. If the folder is not there, you can locate the import folder depending on the version of Windows you are using at:
Windows Version Path to Import Folder
Windows XP My computer > C drive (local drive) > Documents and Settings > Users (*log in ID*) > Application Data > Chat Editor > Import
Windows Vista or Windows 7, 8, or 10
C: Drive > Users > *User ID* > AppData > Roaming > Chat Editor > Import
Note: The Application Data folder (for Windows XP) or the App Data Folder (for Windows Vista/7) might be hidden. To make these folders visible, go to Control Panel and choose Folder Options. Then choose the View tab, and under Advanced Settings > Hidden Files and Folders, select Show Hidden Files and Folders. Then click OK. The folders should now be visible. The vocabulary file should start importing automatically after a few minutes.
Changing Screen Orientation 1. Tap Menu and tap Settings.
2. Scroll to the Tilt section and tap Tilt Action.
3. Tap one of the options:
Option Description
Expand and Speak When you rotate the device, text in the Speech Display Bar (SDB) will expand to fill the screen and the device will speak it.
Expand Only When you rotate the device, text in the Speech Display Bar (SDB) will expand to fill the screen, but the device will not speak it.
Reorient Display When you rotate the device, the screen orientation will switch between portrait and landscape.
No Action When you rotate the device, the screen orientation will not change. Screen orientation will be locked.
4. Tap Done.
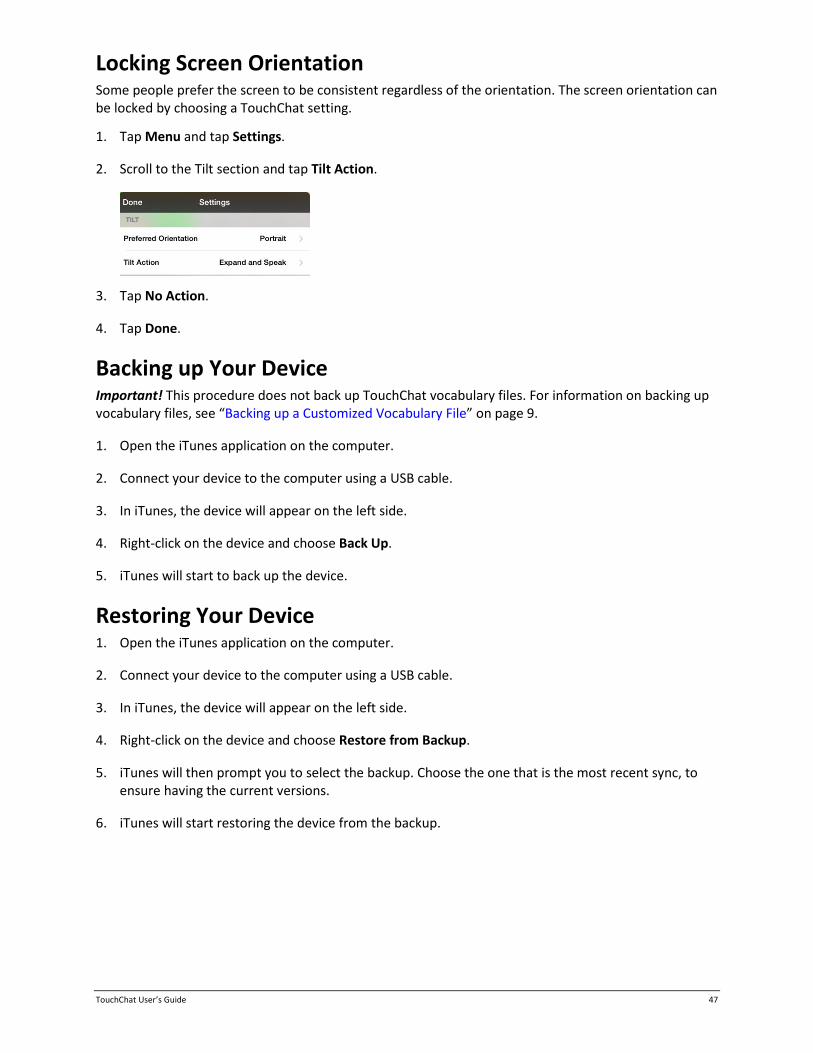
TouchChat User’s Guide 47
Locking Screen Orientation Some people prefer the screen to be consistent regardless of the orientation. The screen orientation can be locked by choosing a TouchChat setting.
1. Tap Menu and tap Settings.
2. Scroll to the Tilt section and tap Tilt Action.
3. Tap No Action.
4. Tap Done.
Backing up Your Device Important! This procedure does not back up TouchChat vocabulary files. For information on backing up vocabulary files, see “Backing up a Customized Vocabulary File” on page 9.
1. Open the iTunes application on the computer.
2. Connect your device to the computer using a USB cable.
3. In iTunes, the device will appear on the left side.
4. Right-click on the device and choose Back Up.
5. iTunes will start to back up the device.
Restoring Your Device 1. Open the iTunes application on the computer.
2. Connect your device to the computer using a USB cable.
3. In iTunes, the device will appear on the left side.
4. Right-click on the device and choose Restore from Backup.
5. iTunes will then prompt you to select the backup. Choose the one that is the most recent sync, to ensure having the current versions.
6. iTunes will start restoring the device from the backup.

TouchChat User’s Guide 48
Appendix A: Advanced Grammar Features The features explained in this appendix are intended for persons with extensive knowledge of grammar. Please note that this is an alternative way to set up grammar within a vocabulary file. Some vocabulary files already have a grammar in place.
Creating a Grammar Button To create a button that changes a word to a different grammatical form:
1. Go to the page with the button location you want.
2. Tap Menu > Edit Page.
3. Press and hold the button you want to use.
4. Tap Edit This Button.
5. Add a label. For example, enter -s.
6. Scroll down to the Button Actions section.
7. Tap Add.
8. Tap Grammar Action. The Grammar actions will be displayed.
9. Tap the action you want. For example, tap add -s. The action will be listed in the Button Actions section.
10. Tap Save. In this example, a button labeled “-s” will be available to pluralize all nouns.
Identifying Parts of Speech To apply a part of speech to a button:
1. Navigate to a page of “things” (nouns).
2. Choose Menu > Edit Page.
3. Press and hold a “thing” button (for example, car), choose Edit This Button, and scroll down to the Actions section.
4. Choose Add to open the list of actions.
5. Select Apply Grammar Property. The Part of Speech menu will list adjective, noun, and verb options.
6. Select the applicable part of speech (for example, noun).

TouchChat User’s Guide 49
7. Choose Save. In this example Apply Grammar Property (noun), will appear at the bottom of the list of actions defined for the button.
Important! The grammar property must appear first in the list of actions. You’ll need to move it to the top of the list.
8. Tap Edit. A delete icon will appear in front of each action and gray bars will appear to the right. Touch and hold the gray bars to the right of the Apply Grammar Property (noun) action and drag it to the top of the list of actions.
9. Choose Save.
10. Repeat steps 3 through 10 for the remaining “thing” buttons on the page.
Creating a Grammar Rule Button 1. Press and hold the button you want to set up as a pluralize button, choose Edit This Button, enter a
label for the button (for example “-s”), and choose the Actions tab.
2. Choose Add to open the list of actions.
3. Select Apply Grammar State. The Grammar menu will display a list of options.
These options perform as follows:
Option Application
add -ed verb simple past tense
add -en verb past perfect participle
add -er adjective comparative
add -est adjective superlative
add -ing verb present participle/gerund
Add -ly adverb
add -s noun plural 4. Select the applicable option (for example, add -s).
5. Choose Save. In this example, Apply Grammar State (add -s) will appear in the list of actions defined for the button.
6. Remove any other actions that were already on the list.
7. Choose Save. In this example, a button labeled “-s” is now available to pluralize all words identified as nouns.

TouchChat User’s Guide 50
Using Your Grammar Rule Button Place the grammar rule button on a page of applicable items. For example, place a pluralize button on a page of things (nouns). If you tap your pluralize button and then choose a thing, you will need to tap the pluralize button again before pluralizing another thing.
1. In the Speech Display Bar (SDB), enter the words you want to speak up to the thing you want to pluralize. For example, enter “I want more”.
2. Tap the “-s” button you created in the previous section, Creating a Grammar Rule Button.
3. Choose the thing button you want (for example, car). The SDB will display “I want more cars”.
Clearing a Grammar Rule You may find it useful to create a Clear Grammar State button.
If you tap the pluralize button and decide you don’t want to pluralize a word on the current page, you can move to another page of things, select a noun from that page, and that noun will be pluralized.
If, however, you tap the pluralize button and decide you don’t want to pluralize any word, the software will pluralize the next noun you select unless you clear the pluralize state. In this case, after you tapped the pluralize button and then changed your mind, you would navigate to your Clear Grammar State button and tap it. From that point forward, nouns won’t be pluralized until you tap your pluralize button.
To create a button for clearing the current grammar state: 1. Go to the button you want to use and choose Menu > Edit Page > Edit This Button.
2. Give the button a label, scroll down to the Actions section, select Add, and select the action Clear Grammar State,
3. Remove any other actions that were already on the list.
4. Choose Save. This button will now clear any grammar state that has been activated.

TouchChat ∙ Guía del usuario: Español 2
Derechos de autor (copyright) y marcas registradas © 2013-2018 Saltillo Corporation. Todos los derechos reservados. TouchChat y ChatWrap son marcas registradas de Saltillo Corporation. Apple y iTunes son marcas registradas de Apple Inc. Microsoft y Windows son marcas registradas de Microsoft Corporation en los Estados Unidos y/u otros países. La marca y el símbolo de Bluetooth son marcas registradas de Bluetooth SIG, Inc. y cualquier uso que haga Saltillo Corporation de estas marcas es bajo licencia. Acapela es una marca registrada del grupo Acapela. Picture Communication Symbols ©1981–2017 es de Tobii Dynavox. Todos los derechos reservados globalmente. Usado con permiso. Boardmaker® es una marca registrada de Tobii Dynavox. SymbolStix®, Copyright 2017, SymbolStix, LLC. Todos los derechos reservados. Usado con permiso. 10083es Versión 2.6 ∙ 02/14/2018

TouchChat ∙ Guía del usuario: Español 3
Tabla de contenidos
Introducción .......................................................................................................................................................... 5 Buscando la versión de TouchChat......................................................................................................................... 5 Usando los menús de TouchChat ........................................................................................................................... 5 Usando archivos de vocabulario ............................................................................................................................ 6
Archivos de vocabulario en español .......................................................................................................................... 6 Archivos de vocabulario en inglés ............................................................................................................................. 6 Descargando un archivo de vocabulario ................................................................................................................... 8 Copiando un archivo de vocabulario ......................................................................................................................... 8 Creando un archivo de vocabulario nuevo en blanco ............................................................................................... 8 Borrando un archivo de vocabulario ......................................................................................................................... 9 Haciendo una copia de seguridad de un archivo de vocabulario .............................................................................. 9
Activando el Modo de edición ............................................................................................................................... 9 Usando el Chat Editor con TouchChat .................................................................................................................. 10
Descargando e instalando el Chat Editor ................................................................................................................ 10 Configurando el Chat Editor .................................................................................................................................... 10 Activando la función de habla en el Chat Editor ..................................................................................................... 11 Abriendo el Chat Editor ........................................................................................................................................... 11 Usando el Chat Editor para crear material educativo ............................................................................................. 11
Trabajando con botones ...................................................................................................................................... 12 Editando un botón ................................................................................................................................................... 12 Añadiendo o cambiando la función de un botón .................................................................................................... 12 Modificando texto ................................................................................................................................................... 13 Usando caracteres especiales ................................................................................................................................. 13 Añadiendo un símbolo de la biblioteca a un botón ................................................................................................ 13 Añadiendo una foto de la biblioteca de imágenes a un botón ............................................................................... 13 Usando la cámara para añadir una foto a un botón ............................................................................................... 14 Creando un botón de cámara .................................................................................................................................. 14 Cambiando el tamaño de un botón......................................................................................................................... 15 Cambiando el estilo de un botón ............................................................................................................................ 15 Cambiando la función de un botón ......................................................................................................................... 15 Quitando o cambiando el orden de una función .................................................................................................... 15 Creando un botón que enlace a una página ........................................................................................................... 15 Almacenando texto en un botón............................................................................................................................. 16 Cambiando el orden de botones usando la función de arrastrar y soltar ............................................................... 16 Creando un botón para controlar el volumen ......................................................................................................... 17 Creando un botón con el estado de la batería ........................................................................................................ 17 Copiando y pegando un botón ................................................................................................................................ 17 Copiando y pegando el mismo botón ..................................................................................................................... 18 Copiando y pegando el estilo de un botón .............................................................................................................. 19 Moviendo un botón ................................................................................................................................................. 19 Escondiendo un botón ............................................................................................................................................ 20 Escondiendo o mostrando varios botones a la vez ................................................................................................. 20 Cambiando los ajustes de tiempo del botón ........................................................................................................... 21 Escondiendo y enseñando las flechas de navegación en los botones ..................................................................... 21

TouchChat ∙ Guía del usuario: Español 4
Trabajando con páginas ....................................................................................................................................... 22 Renombrando una página ....................................................................................................................................... 22 Duplicando una página ............................................................................................................................................ 22 Cargando otra página .............................................................................................................................................. 22 Creando una página nueva ...................................................................................................................................... 23 Creando una página nueva partiendo de una función de Navegar ......................................................................... 23 Escogiendo un teclado nuevo.................................................................................................................................. 24 Copiando una página desde otro archivo de vocabulario ....................................................................................... 24 Añadiendo un gesto a una página ........................................................................................................................... 25 Creando una plantilla .............................................................................................................................................. 25 Usando una plantilla para crear una página ............................................................................................................ 26
Editando una expansión de una abreviación ........................................................................................................ 26 Editando pronunciaciones ................................................................................................................................... 26 Emoticonos vocales de Acapela ........................................................................................................................... 27
Añadiendo un sonido .............................................................................................................................................. 27 Añadiendo una exclamación ................................................................................................................................... 27 Encontrando un emoticono vocal ........................................................................................................................... 27 Ejemplo: Añadiendo una sonrisa y sonido de risa a un botón ................................................................................ 27 Configurando la voz VocaliD™ ................................................................................................................................. 28
Creando una escena visual ................................................................................................................................... 29 Seleccionando una imagen de trasfondo ................................................................................................................ 29 Añadiendo botones ................................................................................................................................................. 30
Agrandando el texto de la Barra de visualización del habla ................................................................................. 30 Cambiando el tamaño del texto o la cantidad de líneas del BVH ............................................................................ 30 Cambiando la orientación de la pantalla para expandir la BVH .............................................................................. 30 Creando una función de toque ................................................................................................................................ 31
Configurando un botón para reproducir un vídeo de YouTube™ ............................................................................ 31 Bloqueando y restableciendo acceso a los menús de edición .............................................................................. 33 Trabajando con perfiles ....................................................................................................................................... 34 Cambiando las preferencias del TouchChat ......................................................................................................... 36 Actualizando el programa TouchChat .................................................................................................................. 39 Analizando el desarrollo lingüístico ..................................................................................................................... 40
Usando la página de Realize Language .................................................................................................................... 40 Activando el Registro de data en su equipo ............................................................................................................ 41 Creando una contraseña de privacidad ................................................................................................................... 41 Carga manual de datos para el análisis ................................................................................................................... 42 Despejando los datos de uso ................................................................................................................................... 42 Cambiando o quitando su contraseña .................................................................................................................... 42
Transfiriendo un archivo de vocabulario desde el Chat Editor al equipo usando iTunes ...................................... 43 Copiando un archivo de vocabulario del equipo al Chat Editor usando iTunes ..................................................... 43 Bloqueando la orientación de la pantalla............................................................................................................. 44 Haciendo una copia de seguridad del equipo ....................................................................................................... 44 Restaurando el equipo ......................................................................................................................................... 44 Apéndice A: Funciones avanzadas de gramática .................................................................................................. 45
Creando un botón de gramática ............................................................................................................................. 45 Identificando las partes de las oraciones ................................................................................................................ 45 Creando un botón para una regla gramatical ......................................................................................................... 46 Usando su botón de regla gramatical...................................................................................................................... 46 Despejando una regla gramatical ............................................................................................................................ 46

TouchChat ∙ Guía del usuario: Español 5
Introducción TouchChat® es una aplicación de comunicación para personas que tienen dificultad usando su voz natural. Está diseñado para individuos con autismo, síndrome de Down, esclerosis lateral amiotrófica, apraxia, derrame cerebral, u otra condición que pueda afectar sus capacidades comunicativas.
Buscando la versión de TouchChat 1. Toque Vocabulario. 2. Toque Escoger un vocabulario nuevo. 3. En modo horizontal, aparecerá la versión de software en la parte inferior de la pantalla.
Usando los menús de TouchChat Para acceder a los menús del TouchChat, toque Menú. Las opciones de éste varían dependiendo de la parte del programa que está usando y si el Modo de edición está activado. Por ejemplo:
Opciones de menú con el Modo de edición apagado
(menú dorado)
Opciones de menú con el Modo de edición activado (menú rojo)
Opciones de menú luego de tocar Vocabulario > Escoger
un vocabulario nuevo > Menú (menú dorado)

TouchChat ∙ Guía del usuario: Español 6
Usando archivos de vocabulario TouchChat ofrece una variedad de página con distintas distribuciones de botones. Cada grupo de páginas, o grupo de vocabularios, se llama un archivo de vocabulario. Aquellos archivos de vocabulario de TouchChat con un candado indican que no pueden ser borrados. TouchChat ofrece los siguientes archivos de vocabulario.
Archivos de vocabulario en español Nota: Si su idioma del sistema está en español, los archivos de vocabulario en español aparecerán individualmente en una lista cuando toque “Escoger un vocabulario nuevo”, y los archivos en inglés estarán en la carpeta “English”. Si su idioma del sistema está en inglés, los archivos de vocabulario aparecerán individualmente en una lista cuando toque “Choose New Vocab”, y los archivos de vocabulario aparecerán en la carpeta “español”.
MultiChat 15 Spanish MultiChat 15 Spanish es la versión en español desarrollada para equipos que usen el TouchChat. La versión en español es muy similar a la versión estudiantil en inglés. Sin embargo, dadas las diferencias entre ambos idiomas, se hicieron algunos cambios para reflejar cada idioma apropiadamente.
MultiChat 15 Spanish Bilingual Este archivo de vocabulario es exactamente igual al archivo MultiChat 15 en español, excepto que las etiquetas muestran las etiquetas en los botones tanto en español como en inglés. Tenga en cuenta que el equipo habla únicamente en español.
Sin sintaxis 4 x 4 English & Spanish Sin sintaxis 4 x 4 English & Spanish consiste de categorías de palabras con un símbolo en cada botón. Este archivo está diseñado para niños que aún no tengan la capacidad de formar oraciones.
Sintaxis 4 x 5 English & Spanish Sintaxis 4 x 5 English & Spanish está diseñado para niños que comienzan a desarrollar oraciones sencillas. Cada página tiene 20 botones, y cada botón tiene una palabra o frase con una imagen. Las palabras están organizadas en categorías, con algunas palabras claves para crear oraciones básicas.
Teclado Teclado es, precisamente, un teclado en español.
VocabPC Spanish VocabPC Spanish es una traducción directa de su contraparte en inglés. VocabPC fue diseñado por Gail Van Tatenhove, PA, MS, CCC-SLP, para adultos y adolescentes con discapacidades del desarrollo. El vocabulario en el VocabPC consiste de frases de transición, oraciones interactivas, vocabulario de actividad y palabras para nombrar objetos.
Archivos de vocabulario en inglés Nota: Si su idioma del sistema está en inglés, los archivos de vocabulario aparecerán individualmente en una lista cuando toque “Choose New Vocab”, y los archivos de vocabulario aparecerán en la carpeta “español”. Si su idioma del sistema está en español, los archivos de vocabulario en español aparecerán individualmente en una lista cuando toque “Escoger un vocabulario nuevo”, y los archivos en inglés estarán en la carpeta “Inglés”.

TouchChat ∙ Guía del usuario: Español 7
4-Basic 4-Basic es una opción de vocabulario básico con 4 botones por página.
Communication Journey: Aphasia “Communication Journey: Aphasia” es un archivo de vocabulario con funciones y vocabulario diseñado específicamente para personas con afasia. Lo desarrolló Lois Turner (PHL), Anne MacCallum (PHL) y Sarah Gauthier (asistente a PHL) en colaboración con un grupo de patólogos del habla y lenguaje que trabajan exclusivamente con personas que tienen afasia y lesiones cerebrales. Todos los participantes trabajan en el Centro de asistencia comunicativa para jóvenes y adultos (CAYA, “Communication Assistance for Youth and Adults”) y el Centro de rehabilitación GF Strong (“GF Strong Rehabilitation Centre”) de Vancouver, BC, Canadá. El marco de este archivo se deriva del “Life Participation Approach to Aphasia” del Instituto de afasia en Toronto, Canadá. Las páginas se diseñaron para facilitar la participación en actividades cotidianas y promover vínculos sociales.
La afasia, un desorden causado por daño a partes del cerebro asociadas al lenguaje, puede afectar la capacidad de comprensión o expresión del lenguaje, de escritura, deletreo o lectura. El archivo “Communication Journey: Aphasia” se puede adaptar fácilmente para individuos con distintos tipos de afasia, diferentes grados de daño cerebral y niveles cognitivos.
Podrá usar símbolos, fotos, escenas visuales, vídeos o palabras en el mensaje, título o en las páginas como tal. Se incluyen páginas que facilitan ciertas técnicas comunicativas, fomentan la capacidad de defensa propia, el cuidado dirigido y la reparación de fallas comunicativas. También se incorpora al archivo de vocabulario el tipo de información que usualmente se incluye en libros de comunicación, como escalas emocionales o de dolor, mapas y plantillas para información personal e historias de vida. Algunas funciones especializadas son la capacidad de personalizar el ritmo de habla y pausar entre palabras. Podrá personalizar el tamaño de las páginas y el vocabulario según sea necesario para apoyar las experiencias de vida y cumplir con las necesidades de la persona con afasia.
Aunque este archivo de vocabulario incluye vocabulario básico que usualmente necesitan adultos con afasia, tendrá que personalizarlo. Cada persona tiene una historia única y el archivo deberá reflejar su vida, sus experiencias y sus capacidades.
MultiChat 15 MultiChat 15 es un archivo diseñado con 15 botones y disponible en tres versiones: una para individuos de edad escolar con capacidades lingüísticas emergentes, una para adolescentes y otra para adultos. Hay varias formas de comunicación disponibles con este vocabulario: oraciones, frases, palabras individuales, grabaciones para contar cuentos, y escenas visuales. Además, hay páginas para leer y jugar interactivamente, páginas sociales y una página News-2-You que ofrece el periódico semanal. Verá símbolos en cada botón, con la excepción de algunas palabras básicas.
myCore myCore es una combinación de archivos de vocabulario basados en palabras claves y frases de transición, y diseñado para usuarios con destrezas de alfabetización.
myQuickChat myQuickChat es un sistema de comunicación introductorio diseñado para niños y adultos usuarios de comunicación aumentativa y alternativa (CAA), con necesidades comunicativas más complejas. Está disponible en formatos de 4, 8 y 12 ubicaciones, cada uno con una página principal idéntica de 16 ubicaciones. Se creó para ofrecer un vocabulario con palabras comunes en un sistema de comunicación basado en frases que sea fácil de usar pero también atractivo. El sistema progresivo ofrece una variedad de temas para cubrir necesidades y conversaciones cotidianas, y les ofrece a usuarios de CAA la posibilidad de comunicarse en distintos ambientes.

TouchChat ∙ Guía del usuario: Español 8
Spelling Este archivo consiste de páginas de teclados con cuatro botones de predicción de palabras y algunas frases almacenadas.
VocabPC VocabPC fue diseñado por Gail Van Tatenhove, PA, MS, CCC-SLP, para adultos y adolescentes con discapacidades del desarrollo. El vocabulario en el VocabPC consiste de frases de transición, oraciones interactivas, vocabulario de actividad y palabras para nombrar objetos. La página del VocabPC tiene un diseño de 12 ubicaciones.
Descargando un archivo de vocabulario 1. Toque Vocabulario. Verá la opción para escoger un archivo de vocabulario nuevo.
2. Toque la opción de Escoger un vocabulario nuevo. Aparecerá una página con los archivos de
vocabulario disponibles. Deslícese hacia abajo para verlos todos.
3. Seleccione el archivo de vocabulario que desea cargar.
4. Una vez haya descargado un archivo de vocabulario, explore las páginas y los botones. Aquellos botones con flechas redirigen a otras páginas.
Nota: Si va a personalizar un archivo de vocabulario, tendrá primero que hacer una copia del archivo. Vea el tema siguiente, “Copiando un archivo de vocabulario”.
Copiando un archivo de vocabulario Para personalizar un archivo de vocabulario, tendrá primero que hacer una copia del archivo original. Luego de hacer una copia, podrá editarla. Esto mantendrá los archivos originales en su lugar por si luego son necesarios. 1. Toque Vocabulario > Escoger un vocabulario nuevo. 2. Toque Menú > Copiar un archivo de vocabulario.
3. Escoja el archivo que desea copiar. 4. Ingrese un nombre y una descripción para el archivo nuevo. 5. Toque Guardar. 6. Toque el archivo nuevo para abrirlo.
Creando un archivo de vocabulario nuevo en blanco 1. Toque Vocabulario > Escoger un vocabulario nuevo. 2. Toque Menú > Crear archivo de vocabulario nuevo. 3. Ingrese un nombre y descripción para el archivo nuevo. 4. Toque Guardar. 5. Deslícese al archivo creado y tóquelo para abrirlo.
6. Toque Menú y luego Editar página. Aparecerá una página con botones vacíos. 7. Para cada botón en blanco, seleccione Crear botón nuevo o Copiar botón existente. 8. Al terminar, toque OK. Ya creó la primera página de su archivo nuevo.

TouchChat ∙ Guía del usuario: Español 9
Borrando un archivo de vocabulario 1. Desde la página principal del archivo de vocabulario, toque Vocabulario.
2. Escoja Escoger un vocabulario nuevo. 3. Toque Editar. 4. Aparecerá el símbolo de borrar a la izquierda de los candados. Únicamente podrá borrar los
archivos de vocabulario personalizados. Los archivos de vocabulario originales tienen un candado cerrado indicando que no podrá borrarlos.
5. Toque el símbolo de borrar . Verá un botón de “Eliminar”.
6. Toque Eliminar para eliminar el archivo de vocabulario del TouchChat. Luego, toque OK.
Haciendo una copia de seguridad de un archivo de vocabulario Siempre es una buena idea retener una copia de todos los archivos personalizados en otra computadora. Sugerimos usar una conexión alámbrica a la computadora con tal de copiar los archivos de manera consistente.
1. Conecte el equipo a la computadora. 2. Abra iTunes en su computadora. 3. Toque Vocabulario > Escoger un vocabulario nuevo. Toque Menú. 4. Toque Importar/Exportar. 5. Toque Exportar a iTunes . 6. Escoja el archivo de vocabulario a exportar. 7. Ingrese un nombre para el archivo que está exportando y toque Guardar. 8. En iTunes en la computadora, toque el equipo y vaya a la sección de aplicaciones. 9. Deslícese hacia abajo hasta ver TouchChat en el área de Compartir archivos (“File Sharing”). 10. Toque el archivo de vocabulario que está exportando. 11. Toque Grabar a (“Save To”) en la parte inferior derecha. 12. Aparecerá un recuadro para grabar el archivo. Seleccione la carpeta donde desea grabar el archivo.
Activando el Modo de edición Solo podrá editar las copias de los archivos de vocabulario, no las versiones originales. Para hacer una copia, vea la sección de Copiando un archivo de vocabulario en la página 8.
1. Vaya a la página que desea editar.
2. Toque Menú.
3. Toque Editar página. La página está en Modo de edición.

TouchChat ∙ Guía del usuario: Español 10
Usando el Chat Editor con TouchChat El Chat Editor es un programa suplementario para una computadora de escritorio o laptop Microsoft® Windows®. Le permite personalizar los archivos de vocabulario. Puede personalizar los archivos en el equipo como tal, pero el Editor permite a familiares y/o a profesionales personalizar el archivo de vocabulario si el equipo no está físicamente presente.
Nota: Recomendamos que siempre tenga una copia del archivo de vocabulario personalizado en la computadora. Vea “Copiando un archivo de vocabulario del equipo al Chat Editor usando iTunes” en la página 43.
Descargando e instalando el Chat Editor ¡Importante! Luego del software 2.0, sustituimos el Editor Windows de TouchChat con el Chat Editor. Si previamente ha usado el Editor Windows TouchChat, no funcionará con archivos creados con la versión 2.0 o versiones posteriores.
El proceso de instalación instalará Chat Editor en su computadora, y crea atajos a la aplicación del “ChatEditor”, así como una carpeta llamada “Chat Editor Import”.
Consejo: Puede acceder a un vídeo que explica cómo descargar e instalar el Chat Editor a través de http://touchchatapp.com/support/videos/touchchat-chat-editor-installation.
Para descargar e instalar el Chat Editor 1. Vaya a http://touchchatapp.com/support/software-updates.
2. Bajo la opción de “Chat Editor for Windows”, seleccione el enlace de Download version.
3. Grabe el archivo Chat Editor_x.x.x_Setup.exe en la página principal de su computadora.
4. Haga un doble clic en Chat Editor_x.x.x_Setup.exe para comenzar el proceso de instalación.
5. Seleccione el idioma que desea usar para la instalación y toque OK.
6. Toque Continuar (“Next”), acepte el acuerdo de licencia, y toque Continuar (“Next”).
7. Toque Instalar (“Install”). Una vez haya comenzado el proceso de instalación, toque Terminar (“Finish”). Debe ver atajos en la página principal a la aplicación “Chat Editor” y la carpeta “Chat Editor Import”.
Configurando el Chat Editor 1. Haga un doble clic en el atajo de “Chat Editor” desde la pantalla principal para abrir el programa.
2. Seleccione TouchChat de la pantalla emergente para seleccionar el producto y toque OK.
3. Seleccione el idioma de la pantalla emergente y toque OK.
4. En la pantalla para escoger los grupos de símbolos (“Symbol Sets”), escoja la opción deseada.
¡Importante! Este grupo de símbolos tiene que ser el mismo que está en el equipo que está usando.
5. Toque OK.
6. Ingrese un nombre para la configuración en la ventana correspondiente y toque OK.
7. Abrirá Chat Editor.
Nota: Tal vez necesite hacer varias configuraciones si más de un cliente usará el TouchChat. Por ejemplo, digamos que Tommy solo usa las imágenes SymbolStix® y Sarah usa SymbolStix y PCS™ symbols.

TouchChat ∙ Guía del usuario: Español 11
Activando la función de habla en el Chat Editor Nota: Cuando instale el Chat Editor en una computadora que ya tenía el Chat Editor instalado, la función de habla ya estará activada.
Cuando instale el Chat Editor en una computadora que no tenga el Chat Editor ya instalado, aparecerá este mensaje: La función de habla está desactivada en estos momentos. Favor conectar un equipo TouchChat a esta computadora para activar el habla.
Toque OK para cerrar el mensaje. Para activar la función de habla en el Chat Editor, sencillamente conecte un cable USB a su computadora y al equipo. Pruebe el Editor para verificar que esté funcionando adecuadamente y desconecte el cable. Ahora la función de habla estará disponible siempre que use el Editor, y no necesitará conectar el cable nuevamente.
Abriendo el Chat Editor Para abrir y usar el Editor luego de hacer una configuración, toque el atajo para el Chat Editor desde la pantalla principal de su computadora. El Editor abrirá en su computadora.
Usando el Chat Editor para crear material educativo Puede capturar secuencias de botones en el Chat Editor para pegarlas a material educativo que cree en programas como Word, Power Point, etcétera.
1. En el Chat Editor, escoja Capturar en la sección superior de la ventana del Editor. Abrirá la venta de captura del botón.
2. Con la opción de Capturar selecciones activada, comience a seleccionar los botones que desee aparezcan en su documento. Cada botón seleccionado aparecerá en la ventana de Captura de botón.
3. Cuando termine de capturar la secuencia de botones deseada, escoja Copiar a portapapeles. Se despejará la selección de la ventana de Captura de botón.
4. En su documento, inserte el cursor y seleccione Paste. Se copiará la secuencia a su documento.
5. Capture la próxima secuencia.
6. Cuando termine de capturar secuencias, seleccione Salir para cerrar la ventana.

TouchChat ∙ Guía del usuario: Español 12
Notas sobre capturar secuencias de botones Si necesita intentar varias secuencias para encontrar la que busca, desmarque la opción de Capturar selecciones. Una vez decida lo que quiere capturar, vuelva a marcar esta opción.
Si comete un error, seleccione Despejar y vuelva a capturar la secuencia. No olvide que esta opción quita todo el contenido capturado de la ventana de Captura de botón.
Trabajando con botones Puede modificar lo que un botón dice, cómo aparece, su símbolo, función y ubicación. Toda modificación se lleva a cabo en Modo de edición.
Editando un botón 1. Toque Menú y Editar página. La página estará en Modo de edición.
2. Toque brevemente o sostenga el botón que desea modificar.
Nota: Si toca y sostiene el botón, asegúrese de mantener el dedo quieto. Si mueve el dedo, el botón también se moverá. Vea la sección de Moviendo un botón en la página 19.
3. Aparecerá el menú de Editar botón.
4. Toque Editar este botón. Abrirá una ventana que le permitirá modificar el botón.
5. Toque la opción de menú deseada.
Añadiendo o cambiando la función de un botón Para añadir una función de un botón:
1. Toque Menú, Editar página, toque el botón que desea modificar y luego Editar este botón.
2. Toque Añadir.
3. Busque la función deseada entre la lista de funciones. Se añadirá bajo la función existente para el botón.
4. Toque Guardar y OK.
Para cambiar la función de un botón:
1. Toque Menú, Editar página, seleccione el botón que desea modificar y luego Editar este botón.
2. Baje a la sección de Funciones del botón.
3. Toque la función actual. Aparecerá la lista de funciones disponibles.
4. Ingrese la función deseada. Esta función sustituirá la que está bajo Funciones del botón.
5. Toque Guardar y OK.

TouchChat ∙ Guía del usuario: Español 13
Modificando texto En la ventana de editar:
1. Toque el área de etiqueta del botón para cambiar la etiqueta que aparecerá en el botón.
2. Toque el área de mensaje del botón para cambiar el mensaje que el equipo dirá.
Usando caracteres especiales A veces necesitará usar un carácter especial en alguna palabra, como una letra con acento (por ejemplo, “ó”).
En el teclado, toque y sostenga el carácter deseado. Aparecerá un pequeño menú sobre el carácter encima de la tecla. Seleccione el carácter especial deseado.
Por ejemplo, para insertar el carácter especial “ó”, toque y sostenga la tecla “o” en el teclado y seleccione ó del menú emergente.
Añadiendo un símbolo de la biblioteca a un botón 1. Toque Menú y Editar página.
2. Toque el botón que desee editar.
3. Toque Editar este botón.
4. En la ventana para Editar botón, toque Seleccionar imagen.
5. Seleccione una biblioteca y la categoría.
6. Seleccione la imagen deseada.
7. Toque Guardar y OK.
Añadiendo una foto de la biblioteca de imágenes a un botón 1. Toque Menú y Editar página.
2. Toque el botón al cual desea añadir la foto.
3. Toque Editar este botón.
4. Seleccione Importar imagen. Abrirá un pequeño menú.
5. Toque Biblioteca de imágenes.
6. Escoja la biblioteca deseada.
7. Toque la foto deseada.
8. Toque Usar e ingrese una etiqueta para el botón.
9. Toque Guardar y OK.

TouchChat ∙ Guía del usuario: Español 14
Usando la cámara para añadir una foto a un botón 1. Desde la ventana para editar el botón, toque Importar imagen.
2. Toque Cámara.
3. Toque el símbolo de cámara para tomar la foto.
4. Toque Usar.
5. Toque Guardar y OK.
Creando un botón de cámara Puede crear un botón que le permitirá tomar una foto a importarse automáticamente al botón cada vez que lo toque. También se añadirá la imagen a su biblioteca de fotos importadas. Cada vez que toque el botón, una nueva imagen de la cámara sustituirá la foto que esté en el botón. Si importó la imagen que estaba previamente en el botón y no la usó en ningún otro lugar, ésta se borrará. Aparecerá la última imagen tomada en el botón hasta que lo toque nuevamente.
Para configurar la función del botón: 1. Vaya a la página en donde añadirá el botón.
2. Toque Menú > Editar página.
3. Toque y sostenga el botón que desea usar.
4. Toque Editar este botón.
5. Añada una etiqueta y un mensaje.
6. En la sección de Funciones, toque Añadir para abrir una lista de las funciones disponibles.
7. Busque en la lista la opción de “Tomar foto”.
8. Aparecerá Tomar foto entre las funciones del botón.
9. Toque Grabar y OK.
Para tomar una foto para el botón: 1. Toque el botón nuevo para activar la cámara del equipo.
2. Tome una foto del objeto o la persona.
3. Toque Usar foto.
4. Aparecerá la foto como la imagen del botón.
Para eliminar fotos: Para eliminar fotos, debe conectar su equipo al su computadora y eliminar las fotos usando el Explorador desde el computadora.

TouchChat ∙ Guía del usuario: Español 15
Cambiando el tamaño de un botón 1. Toque Menú y Editar página. 2. Toque el botón que desea editar y toque Cambiar tamaño del botón. 3. Seleccione la cantidad de filas y columnas para cubrir el área del mensaje que quiera. 4. Toque Guardar.
Cambiando el estilo de un botón 1. Toque Menú y Editar página. 2. Toque el botón que desea editar. 3. Toque Editar este botón. 4. En la ventana para editar el botón, deslícese al área que quiere editar. 5. Edite la fuente, su tamaño, color o el margen según desee. 6. Toque Guardar.
Cambiando la función de un botón 1. Toque Menú y Editar página. 2. Toque el botón que desea editar. 3. Toque Editar este botón.
4. En la ventana para editar el botón, deslícese a la sección de funciones del botón. 5. Realice uno de los siguientes:
• Toque una función y cambiarla a una función distinta. • Toque Añadir, seleccione la función deseada y eliminar la función anterior.
Quitando o cambiando el orden de una función 1. En el área de funciones del botón, toque Editar. Verá el símbolo de borrar al lado de cada función. 2. Para quitar una función, toque el símbolo de borrar y luego Borrar. Para cambiar el orden de
funciones, toque y sostenga las barras grises que verá a la derecha de cada función y arrástrela a la posición deseada.
3. Toque OK. 4. Toque Guardar y OK.
Creando un botón que enlace a una página Cuando la función de un botón es Navegar o Visitar, puede determinar a qué página el botón redirige. Navegar lo llevará a otra página y lo dejará ahí, y necesitará darle a otro botón para regresar a la página previa o ir a la página principal. La función de Visitar lo llevará a otra página para que seleccione un botón, e inmediatamente después lo devolverá a la página original. Las siguientes funciones de enlace están disponibles:
Función Descripción
Navegar Lo lleva a una página nueva, y necesitará tocar otro botón para ir a otra página.
Visitar Lo llevará a una página para una sola selección, y luego lo devolverá inmediatamente a la página previa.
Regresar Regresa a la página previa.
Navegar a página principal
Lo llevará a la página principal del archivo de vocabulario.

TouchChat ∙ Guía del usuario: Español 16
Para crear un botón de enlace:
1. Toque Menú y Editar página.
2. Toque el botón que enlazará a la próxima página.
3. Toque Editar este botón.
4. Ingrese una etiqueta y mensaje. Puede añadir un símbolo si desea.
5. Bajo las funciones del botón, toque Añadir.
6. Seleccione una función de navegación de la lista desplegable (Navegar, Visitar, Regresar o Navegar a página principal). Si selecciona la función de Navegar o Visitar, verá una lista de páginas a las cuales puede enlazar el botón. Si selecciona Regresar o Navegar a página principal, salte al paso 8.
7. Seleccione la página a la cual navegará. Si la página aún no existe, toque + para crear una página nueva a la cual enlazar el botón.
8. Toque una animación (cómo aparecerá la página al navegar), o toque Ninguna animación.
9. Toque Guardar.
Nota: Si ya había una función en este botón, la puede quitar tocando Editar, seleccionando el símbolo de borrar , tocando Borrar, y luego OK.
Almacenando texto en un botón 1. Vaya a la página donde esté el botón en el cual desea almacenar
texto.
2. Toque Menú y Editar página.
3. Toque el botón donde desea almacenar texto.
4. Toque Editar este botón.
5. Ingrese un nombre para el botón y, si desea, cree un mensaje y modifique el estilo.
6. Deslícese hacia abajo a la sección de Funciones del botón y toque Añadir.
7. Busque en la lista Almacenar texto en botón. La función aparecerá en la sección de funciones del botón.
8. Toque Guardar y luego OK.
Nota: Luego de hacer una oración o frase, la podrá grabar en un botón yendo al botón de Almacenar texto que creó. Toque el botón, luego toque Continuar, seleccione el botón en donde almacenará el texto, y toque OK. Aparecerá el texto en el botón seleccionado, y cada vez que toque el botón, el equipo dirá el texto grabado.
Cambiando el orden de botones usando la función de arrastrar y soltar 1. Mientras esté editando una página, toque el botón y arrástrelo a otra ubicación…
2. Al soltarlo, el botón se moverá a la ubicación nueva. Si ya hay un botón en la ubicación seleccionada, éste irá a la posición previa del botón que seleccionó.

TouchChat ∙ Guía del usuario: Español 17
Creando un botón para controlar el volumen
Volumen excesivo o demasiada presión del sonido al usar audífonos puede tener como consecuencia pérdida de audición a largo plazo.
Puede añadir botones para controlar el volumen en las páginas de vocabulario:
1. Toque Menú > Editar página.
2. Vaya a la página donde desea crear el botón.
3. Toque y sostenga el botón que desee usar. Aparecerá una lista de opciones.
4. Toque Editar este botón.
5. Añada una etiqueta y un símbolo.
6. Bajo Funciones del botón, toque Añadir. Aparecerá una lista de funciones.
7. Toque Subir volumen o Bajar volumen.
8. Toque Guardar.
Creando un botón con el estado de la batería Puede crear un botón que muestre el estado de la batería del equipo y del amplificador en la Barra de visualización del habla (BVH).
1. Toque Menú > Editar página.
2. Vaya a la página donde desea crear el botón.
3. Toque y sostenga el botón que desee usar. Aparecerá una lista de opciones.
4. Toque Editar este botón.
5. Añada una etiqueta y, si desea, un símbolo.
6. Bajo Funciones del botón, toque Añadir. Aparecerá una lista de funciones.
7. Toque Estado de la batería.
8. Toque Guardar.
Copiando y pegando un botón Puede copiar botones y pegarlos a ubicaciones nuevas. Si modifica una copia de un botón, solamente editará esa copia.
1. Toque Menú y Editar página.
2. Toque el botón que desea copiar. Abrirá el menú de Editar botón.
3. Toque Copiar botón.

TouchChat ∙ Guía del usuario: Español 18
4. Toque OK.
5. Vaya a la página donde desea añadir el botón copiado.
6. Toque Menú y Editar página.
7. Seleccione la ubicación donde desea copiar el botón. Abrirá el menú de Editar botón con opciones adicionales.
8. Toque Pegar botón. El botón copiado aparecerá en esa ubicación.
9. Toque OK.
Copiando y pegando el mismo botón Si modifica un botón que usa en varios lugares, se modificará el botón automáticamente en todos los sitios que aparezca. Esta técnica es útil para botones con herramientas que se usan en todas las páginas.
1. Toque Menú y Editar página.
2. Toque el botón que desea copiar. Abrirá el menú de Editar botón.
3. Toque Copiar botón.
4. Toque OK.
5. Vaya a la página donde desea añadir el botón copiado.
6. Toque Menú y Editar página.
7. Seleccione la ubicación donde desea copiar el botón. Abrirá el menú de Editar botón con opciones adicionales.
8. Toque Usar mismo botón. El botón copiado aparecerá en esa ubicación.
9. Toque OK.

TouchChat ∙ Guía del usuario: Español 19
Copiando y pegando el estilo de un botón El estilo del botón se refiere al color de trasfondo y los tamaños y opciones de la fuente asociada al botón. A veces, es más rápido copiar y pegar el estilo de un botón existente en lugar de editar cada aspecto de un botón nuevo.
1. Toque Menú y luego Editar página.
2. Toque el botón cuyo estilo desea copiar. Aparecerá el menú de Editar botón.
3. Toque Copiar botón.
4. Toque el botón donde desea pegar el estilo. El menú de Editar botón aparecerá con opciones adicionales.
5. Toque Pegar estilo solamente. El botón mostrará el estilo pegado.
6. Toque OK.
Moviendo un botón 1. Toque Menú y Editar página.
2. Toque el botón que desea mover y arrástrelo a otro lugar.
Nota: Cuando comience a arrastrar el botón, se indicará la ubicación original con un marco rojo. Según se mueve a la nueva ubicación, el marco rojo también se moverá.
3. Al soltar el botón, éste se moverá a esa nueva ubicación. Si ya hay un botón en la nueva ubicación, éste se moverá a la ubicación vieja. Los botones intercambiarán ubicaciones.

TouchChat ∙ Guía del usuario: Español 20
Escondiendo un botón En ocasiones, presentar todos los botones a la vez puede ser abrumador, o puede ser que sea conveniente esconderlos para llevar a cabo alguna tarea específica:
1. Toque Menú y Editar página.
2. Seleccione el botón a esconder y toque Editar este botón.
3. Desactive la opción de Visible.
4. Toque Guardar y OK.
Escondiendo o mostrando varios botones a la vez 1. Toque Menú y Editar página.
2. Toque Menú y Modo de esconder.
3. Seleccione los botones que desea esconder o mostrar.
4. Toque Menú y luego Modo normal.

TouchChat ∙ Guía del usuario: Español 21
Cambiando los ajustes de tiempo del botón Toque Menú y luego Preferencias. Deslícese hacia abajo a la sección de “Botones”.
Activar al soltar Esta opción permite activar los botones al soltarlos en lugar de al tocarlos. Esto le permite al usuario deslizar su dedo por la pantalla y soltarlo en el botón que desea seleccionar. Mueva el pequeño botón a la derecha para activarlo.
Tiempo de activación Esta opción le permite controlar el tiempo que tiene que pasar para que el equipo registre que seleccionó un botón. Cuando el usuario toque un botón, el botón se oscurecerá un poco y lo rodeará un cuadro blanco. Mientras el usuario mantenga su dedo en el área del botón, el tiempo de activación estará corriendo. Una vez se haya expirado el tiempo de activación, el equipo registrará la selección del botón. Para usar un tiempo de activación, seleccione Tiempo de activación y seleccione un valor entre 0.1 segundo y 5.0 segundos.
Tiempo de espera
El tiempo de espera tiene la función de prevenir tocar el mismo botón dos veces sin querer. Al usar esta opción, todo botón estará desactivado por período de tiempo específico luego de tocarlo. Para especificar un tiempo de activación, toque Tiempo de espera y seleccione un valor entre 0.1 segundo y 5.0 segundos.
Escondiendo y enseñando las flechas de navegación en los botones Los botones que navegan a otras páginas tienen una pequeña flecha en la esquina superior derecha.
Para esconder o mostrar todas las flechas de navegación:
1. Vaya a Menú > Preferencias.
2. Bajo Navegación, toque la opción de Símbolos de navegación del botón.

TouchChat ∙ Guía del usuario: Español 22
Trabajando con páginas TouchChat le permite renombrar, duplicar, cargar y crear páginas, cambiar el teclado, copiar una página de un archivo de vocabulario distinto, y añadir gestos a las páginas.
Renombrando una página 1. Toque Menú y Editar página.
2. Toque Menú y Editar el diseño de la página.
3. En el área bajo “nombre de página”, seleccione y borre el nombre existente e ingrese el nombre deseado.
4. Toque Guardar.
Duplicando una página 1. Toque Menú y Editar página.
2. Toque Menú y Importar/Copiar páginas.
3. Toque Duplicar esta página. Aparecerá un duplicado de la página entre la lista de páginas dentro del vocabulario.
4. Toque OK.
Cargando otra página 1. Toque Menú y Editar página.
2. Toque Menú y Cargar otra página.
3. Deslícese hacia arriba para buscar la página que desea cargar.
4. Toque OK.
Nota: Ahora podrá copiar, cambiar o añadir botones en esta página para el grupo de vocabulario.

TouchChat ∙ Guía del usuario: Español 23
Creando una página nueva 1. Toque Menú y Editar página.
2. Toque Menú y Añadir página nueva.
3. Ingrese un nombre para la página.
4. Seleccione la cantidad de filas y columnas.
5. Si desea que esta página nueva sea la página principal, toque Hacer página principal para activar la opción.
6. Escoja un color para el trasfondo.
7. Seleccione una imagen si desea.
8. Toque Guardar. Aparecerá una página nueva con botones en blanco.
9. Comience a crear los botones deseados en esta página.
10. Toque OK cuando haya terminado.
Creando una página nueva partiendo de una función de Navegar 1. Abra la página desde la cual desea navegar.
2. Toque Menú y Editar Página.
3. Seleccione el lugar donde desea colocar el botón que navegará a la página.
4. Toque Editar este botón o Crear botón nuevo. Abrirá el menú para Editar botón.
5. Ingrese una etiqueta para el botón y seleccione o importe una imagen.
6. Baje a la sección de Funciones del botón y toque la función actual para abrir la lista de funciones disponibles.
7. Seleccione la función de Navegar para abrir la lista de páginas existentes.
8. Toque + en la equina superior derecha para crear la página nueva.

TouchChat ∙ Guía del usuario: Español 24
9. Ingrese la página nueva y ajuste la cantidad de filas y columnas.
10. Toque Guardar, seleccione Ninguna animación y luego Guardar de nuevo.
11. Para verificar que el botón navegue a su página nueva, toque OK para salir del Modo de edición y luego toque el botón para navegar a la página nueva.
12. Toque Menú, toque Editar página y añada botones nuevos a la página.
Escogiendo un teclado nuevo 1. Toque Menú y Editar página.
2. Toque Menú y Importar/Copiar páginas.
3. Toque Importar otra página.
4. Toque el archivo de vocabulario que tiene el teclado deseado y seleccione la página que desea importar.
5. Toque Importar.
6. Edite el botón original del teclado, y configúrelo para que navegue a la nueva página de teclado.
7. Edite el botón de enlace para que navegue a la página nueva.
Copiando una página desde otro archivo de vocabulario En ocasiones, se puede ahorrar tiempo importando páginas ya creadas en lugar de crear una en blanco. TouchChat le permite importar varias páginas a la vez.
1. Abra su archivo de vocabulario.
2. Toque Menú y Editar página.
3. Toque Menú y Importar/Copiar páginas.
4. Toque Importar otra página.
5. Seleccione el archivo de vocabulario que tenga la página deseada, y seleccione las páginas a importar. Aparecerá una marca de cotejo al lado de cada página que seleccione.
6. Toque Importar y OK.
7. Mientras continúe en Modo de edición, toque el botón que desea que navegue a las páginas importadas.
8. Toque Editar este botón.

TouchChat ∙ Guía del usuario: Español 25
9. Ingrese una etiqueta para el botón y, de ser necesario, añada un símbolo y haga cualquier cambio deseado en el estilo.
10. Deslícese hacia abajo a la sección de funciones del botón, toque Añadir y luego Navegar.
11. Seleccione la página importada.
12. Toque una animación o seleccione Ninguna animación.
13. Toque Guardar y luego OK.
Añadiendo un gesto a una página 1. Toque Menú y Editar página.
2. Toque Menú y Editar gestos.
3. Toque el símbolo de suma +.
4. Añada una etiqueta y un mensaje.
5. Toque el tipo de gesto y seleccione el tipo de gesto deseado. Aparecerá una marca junto al gesto seleccionado.
6. Toque una función para al gesto, o toque Añadir para añadir una función.
7. Para añadir gestos a todo el archivo de vocabulario simultáneamente, seleccione la opción de Aplicar a todas las páginas.
Nota: Para borrar la función de un gesto, toque Editar y seleccione la función que desea borrar. Verá el símbolo de borrar frente a la función. Toque este símbolo para eliminar la función.
8. Toque Guardar y luego OK.
Creando una plantilla Puede crear una página en Chat Editor que sirva como plantilla. Esto es útil si hará archivos de vocabulario con las mismas configuraciones de botones en cada página. Cree una página con la distribución y configuración de botones que será consistente en las demás páginas. Luego, úsela como plantilla al momento de crear páginas nuevas:
1. Toque Menú y Editar página.
2. Cree una página que servirá como plantilla.
3. Toque Páginas.
4. Seleccione la página que desea duplicar.
5. Toque la opción de Guardar como plantilla.

TouchChat ∙ Guía del usuario: Español 26
Usando una plantilla para crear una página En Chat Editor, puede crear una página partiendo de una plantilla.
1. Toque Menú y Editar página.
2. Seleccione Páginas > Plantillas > Página nueva partiendo de plantilla.
3. Seleccione una categoría de plantillas.
4. Escoja una plantilla particular. Al seleccionar la plantilla, aparecerá un cuadro con una vista preliminar.
5. Seleccione Escoger e ingrese un nombre para la página nueva.
6. Toque Guardar.
Editando una expansión de una abreviación 1. Toque Menú y luego Editar abreviaciones.
2. Toque el símbolo de suma +.
3. En el espacio bajo el cuadro de “abreviación”, ingrese la forma abreviada.
4. En el espacio de “expandir a”, escriba la palabra, frase u oración a la cual la abreviación se expandirá.
5. Toque Guardar y luego OK.
Nota: Cuando desee escribir una abreviación, escriba un punto después de la abreviación para activar la palabra, frase u oración completa.
Editando pronunciaciones 1. Toque Menú y luego Editar pronunciaciones.
2. Toque el símbolo de suma +.
3. En el espacio bajo “Palabra”, ingrese la palabra según se deletrea.
4. En el espacio bajo “pronunciar como”, escribe la pronunciación fonética de la palabra. Puede probar si la pronunciación está correcta tocando el botón de Pronunciar. Si no está correcta, cambie la palabra en el cuadro de “pronunciar como” e intente nuevamente hasta obtener la pronunciación correcta.
5. Toque Guardar y luego OK.
Nota: Si ya la palabra está en la lista de pronunciaciones, deslícese para encontrar la palabra y selecciónela para corregir la pronunciación.

TouchChat ∙ Guía del usuario: Español 27
Emoticonos vocales de Acapela Acapela-Group añadió la función de sonidos y exclamaciones.
Añadiendo un sonido Puede usar esta función para imitar sonidos de la vida cotidiana como el sonido de una risa, respiración o tos. Los sonidos se identifican entre dos signos de número, en letras mayúsculas y a veces seguidos de un número si hay más de un tipo del mismo sonido; por ejemplo, #LAUGH02#. Las voces de niños tienen más sonidos que las voces de adultos.
Añadiendo una exclamación Una exclamación incluye una variedad de letras y símbolos. Escriba exactamente lo que ve.
Encontrando un emoticono vocal Para una lista de los comandos Acapela para emoticonos vocales: 1. Acceda a http://www.acapela-group.com/doc/Vocal%20smileys/excla.html
2. Seleccione el enlace correspondiente a su idioma. ¡Importante! El idioma seleccionado tiene que ser el mismo de la voz que esté usando.
3. Seleccione el emoticono vocal deseado.
Ejemplo: Añadiendo una sonrisa y sonido de risa a un botón Puede configurar un botón que tenga el comando deseado en el mensaje. Sin embargo, si usa una función de habla, el comando aparecerá en la Barra de visualización del habla (BVH), lo cual no es ideal. Una mejor forma de configurar un botón con un emoticono es añadiéndolo al mensaje.
Por ejemplo, puede usar un emoticono sonriente. Tal vez tenga que ir a Preferencias > General > Teclados y añadir el teclado “Emoji” para poder usar emoticonos. Una vez haya configurado el botón con su emoticono y mensaje a hablar, vaya a las Pronunciaciones e ingrese una pronunciación para la cara sonriente. Ingrese un comando como #LAUGH02# en el cuadro de pronunciación.
Podrá encontrar el editor de pronunciaciones a través de Menú > Editar pronunciaciones > +. Ingrese el mismo emoticono del botón al cuadro de “Palabra” y escriba el comando – por ejemplo, #LAUGH02# – en el cuadro de “Pronunciar como”.
Ahora, al tocar el botón, verá el emoticono en la BVH y escuchará el sonido de una risa.

TouchChat ∙ Guía del usuario: Español 28
Configurando la voz VocaliD™ 1. Active una conexión inalámbrica.
2. Toque Menú y Preferencias.
3. Deslícese a la sección de Habla y toque la opción de Instalar VocaliD (Install VocaliD Voice). Aparecerá la pantalla para ingresar a VocaliD.
4. Ingrese su correo electrónico y contraseña de VocaliD.
5. Toque Ingresar en la esquina superior derecha para mostrar un aviso para descargar la voz.
6. Toque Descargar voz. Aparecerá “Descargar voz” (“Downloading Voice”) en la pantalla.
7. Al terminar de descargar, aparecerá “Nueva voz instalada” (“New Voice Installed”) en la pantalla.
8. Toque OK.
9. Toque OK. Aparecerá la voz de VocaliD como la voz principal.
10. Prueba la voz. Puede cambiar la velocidad y el tono de la voz en las Preferencias.
Para cambiar la velocidad: Deslice la barra.
Para cambiar el tono: Toque Tono de voz para abrir una lista de tonos. Seleccione el tono deseado: Sumamente bajo, Más bajo, Bajo, Normal, Más alto o Sumamente alto.
11. Prueba la voz nuevamente y ajuste la velocidad y el ritmo según sea necesario.

TouchChat ∙ Guía del usuario: Español 29
Para cambiar a otra voz: Cuando quiera cambiar a otra voz, haga lo siguiente:
1. Toque Menú y Preferencias.
2. Deslícese a la sección de Habla. La preferencia de Voz mostrará Voz VocaliD.
3. Toque Voz para abrir una lista de voces disponibles.
4. Toque o descargue la voz deseada y toque OK.
Creando una escena visual Para crear una escena visual, seleccione una imagen de trasfondo, configure la página y añada botones.
Seleccionando una imagen de trasfondo Comience buscando la foto que desea usar como imagen de trasfondo en su equipo. Puede tomar la foto con su equipo si éste tiene una cámara integrada. De lo contrario, transfiera la imagen a su equipo desde una computadora.
1. Toque Menú y Editar página.
2. Seleccione dónde desea añadir un botón de enlace (el que lo llevará a su escena visual) y seleccione Editar este botón.
3. Añada una etiqueta (y, si desea, un símbolo), deslícese hacia abajo a la sección de Funciones del botón, y sustituya la función existente con la función de Navegar.
4. Toque el botón de + en la esquina superior derecha para crear su página nueva con la escena visual.
5. Ingrese un nombre para la página.
6. Ajuste las filas y columnas en la página. Mientras más filas y columnas seleccione, más fácil será crear botones que coincidan con las partes de las imágenes en la página.
7. Deslícese hacia abajo a Importar imagen.
8. Toque Importar imagen para tomar una foto o buscar la foto deseada. Aparecerá una pequeña muestra de la imagen sobre “importar imagen”.
9. Toque Guardar.
10. Toque OK.
11. Toque el botón que navegará a la página nueva.
12. Toque Menú y luego Editar página.

TouchChat ∙ Guía del usuario: Español 30
Añadiendo botones Una vez coloque la imagen de trasfondo, puede editar botones en blanco para que digan algún mensaje o redirijan a otras páginas. En el siguiente ejemplo, puede crear un botón que diga “caballo” cada vez que seleccione el caballo en la foto (suponiendo que usamos una foto con un caballo).
1. Toque la esquina superior izquierda del caballo que cubre su oreja.
2. Seleccione Crear botón nuevo.
3. Escriba “Caballo” en el cuadro de mensaje.
4. Active la opción de “transparente” para que pueda ver la escena subyacente.
5. Toque Guardar.
6. Seleccione el nuevo botón y la opción de Cambiar el tamaño del botón. Aquí, podrá ajustar la altura y anchura del botón para que coincida con la imagen completa del caballo.
7. Toque Guardar.
8. Continúe creando botones y cambiándoles el tamaño para que coincidan con la escena. Cada botón puede tener su propio tamaño y forma.
9. Cuando termine, toque OK.
Agrandando el texto de la Barra de visualización del habla Hay varias formas de agrandar el texto que aparece en la Barra de visualización del habla (BVH)
Cambiando el tamaño del texto o la cantidad de líneas del BVH 1. Toque Menú y Preferencias.
2. Deslícese a la sección de “Barra de visualización del habla”.
3. Puede agrandar la fuente bajo “Tamaño de la fuente”. Bajo “Cantidad de líneas”, puede escoger la cantidad de líneas que aparecerán en la BVH.
Cambiando la orientación de la pantalla para expandir la BVH Puede configurar el TouchChat para que la Barra de visualización del habla (BVH) se expanda al rotar su equipo en orientación horizontal o vertical.
Expandir y hablar: Al rotar el equipo, el texto de la BVH se expandirá para rellenar la pantalla completa, y el equipo pronunciará el texto.
Expandir solamente: Al rotar el equipo, el texto de la BVH se expandirá para rellenar la pantalla completa, pero el equipo no pronunciará el texto.
1. Toque Menú y Preferencias. 2. Deslícese hacia abajo a la sección de “inclinación”. 3. Toque Función de inclinación y seleccione Expandir y hablar o
Expandir solamente. 4. Toque OK.

TouchChat ∙ Guía del usuario: Español 31
Creando una función de toque Cree una función de toque para agrandar el texto en la BVH.
1. En el TouchChat, toque Menú y Preferencias.
2. Deslícese hacia abajo a la sección de “Barra de visualización del habla”.
3. Bajo “Función de toque”, seleccione Hablar y agrandar texto.
Configurando un botón para reproducir un vídeo de YouTube™ Nota: Necesita una conexión Wi-Fi activa.
1. En su equipo, seleccione el vídeo de YouTube deseado.
2. Toque el símbolo de Compartir (Share) y luego Copiar enlace (Copy Link). Verá un mensaje indicando que se copió el enlace.
Nota: Si tiene una versión más vieja de iOS, tal vez tenga que tocar “Share” y luego “Copy”.
3. En el TouchChat, abra la página con el botón que desea usar para reproducir el vídeo de YouTube.
4. Toque Menú y luego Editar página.
5. Toque el botón que desea usar y luego Editar este botón.
6. Ingrese una etiqueta para el botón y vaya a la sección de Funciones del botón.
7. Seleccione la función existente para abrir la lista de Seleccionar función.
8. Seleccione Reproducir vídeo (“Play Video”). Aparecerá una ventana para escoger el tipo de vídeo.
9. Seleccione Vídeo de YouTube (“YouTube Video”). Aparecerá la ventana de YouTube con un campo para ingresar el enlace del vídeo.
10. Toque y sostenga el campo del enlace de vídeo. Aparecerá un mensaje para Pegar (“Paste”).
11. Toque el mensaje de Paste (“Pegar”). Se copiará a este campo el enlace que copió en el paso 2.
12. Seleccione OK (“Done”). Verá la función de Reproducir vídeo entre las funciones del botón.
13. Seleccione OK (“Done”). Al tocar el botón, el vídeo de YouTube debe comenzar.

TouchChat ∙ Guía del usuario: Español 32
Nota: Si no tiene una conexión Wi-Fi al intentar ver el vídeo de YouTube, la pantalla aparecerá negra y verá el siguiente mensaje:
No hay conexión a YouTube (No Connection to YouTube) Necesita una conexión a Internet para ver vídeos de YouTube (An internet connection is required to play a YouTube video.)
Si hay una conexión a Internet, pero YouTube no funciona, aparecerá el siguiente mensaje:
No hay conexión a YouTube (No Connection to YouTube) YouTube parece estar bloqueado por su proveedor de Internet. Favor contactar a su administrador de Internet. (YouTube appears to be blocked by your internet service provider. Please contact your network administrator.)

TouchChat ∙ Guía del usuario: Español 33
Bloqueando y restableciendo acceso a los menús de edición En ocasiones, puede querer bloquear acceso a los menús de edición. Para hacer esto, puede activar y desactivar la opción de Usar código de acceso para el menú. Al activar esta opción, únicamente podrá acceder a las opciones de menú y el archivo de vocabulario al ingresar una contraseña.
Para bloquear los menús de edición con una contraseña: 1. En el TouchChat, toque Menú y Preferencias. Aparecerá el menú
de preferencias.
2. Bajo “Edición”, active la opción de Usar código de acceso para el menú.
3. Toque el campo de Código de acceso para abrir un teclado.
4. Ingrese una contraseña y toque OK.
5. Toque OK en el menú de preferencias. Ahora, al usuario tocar Menú o Vocabulario, aparecerá un cuadro para ingresar el código.
Para borrar y cambiar la contraseña: Si se le olvida la contraseña, ingrese la secuencia numérica 72584556 para borrar la contraseña. Luego podrá escribir una contraseña nueva.
Para quitar el código de los menús de edición: 1. En el TouchChat, toque Menú o Vocabulario. Aparecerá un cuadro para ingresar el código.
2. Ingrese su contraseña. Abrirá el menú de preferencias.
3. Desactive la opción de Usar código de acceso para el menú.
4. Para quitar el código, toque el campo de Código de acceso para abrir el teclado. Use la tecla de borrar para quitar la contraseña.
5. Toque OK en el teclado.
6. Toque OK en el menú de preferencias.

TouchChat ∙ Guía del usuario: Español 34
Trabajando con perfiles Los perfiles graban las preferencias del sistema para que luego las pueda acceder fácilmente. Puede grabar varios perfiles para usarlos cuando los necesite. Crear varios perfiles le permitirá cambiar entre distintos conjuntos de preferencias.
Creando y grabando un perfil 1. Configure las preferencias que desea asociar con el perfil. Esto incluye el archivo de vocabulario, las
configuraciones, etcétera.
2. Vaya a Menú > Preferencias > Grabar perfil. Aparecerá la ventana para ingresar el nombre del perfil.
3. Toque el campo del nombre del perfil para abrir un teclado.
4. Ingrese un nombre para el perfil (por ejemplo, “Perfil de María”).
5. Toque Guardar. Se creará un perfil para María con todas las configuraciones actuales del sistema.
Nota: Para crear un segundo perfil (por ejemplo, “Perfil de Juan”), siga estos mismos pasos, primero cambiando las configuraciones para el perfil deseado.
Cargando un perfil Para cargar un perfil previamente creado:
1. Vaya a Menú > Preferencias > Cargar perfil. Aparecerán los perfiles creados.
2. Escoja el nombre del perfil deseado. Aparecerán las configuraciones correspondientes.

TouchChat ∙ Guía del usuario: Español 35
Cambiando el nombre o borrando un perfil 1. Vaya a Menú > Preferencias > Cargar perfil. Aparecerán los perfiles creados.
2. Toque Editar. El símbolo de borrar aparecerá a la izquierda de cada perfil.
3. Toque el símbolo de borrar para el perfil cuyo nombre quiere cambiar. Aparecerá un botón para cambiar el nombre y otro para borrar el perfil.
4. Cambie el nombre o borre el perfil.
Para cambiar el nombre del perfil: Toque Cambiar nombre, ingrese el nuevo nombre en el campo correspondiente y toque OK.
Para borrar el perfil: Toque Borrar. Se borrará el perfil inmediatamente.
Modificando un perfil 1. Haga los cambios que desea asociar con el perfil.
2. Vaya a Menú > Preferencias > Grabar perfil. Aparecerá la ventana del nombre del perfil
3. Toque el cuadro del nombre del perfil para abrir un teclado.
4. Ingrese el nombre original del perfil y toque Guardar. Aparecerá un mensaje informando que ya existe el nombre del archivo.
5. Toque Sí. Se grabarán los cambios.

TouchChat ∙ Guía del usuario: Español 36
Cambiando las preferencias del TouchChat Puede encontrar las preferencias del TouchChat en Menú > Preferencias. Desde esta pantalla, deslícese para ver los distintos tipos de ajustes disponibles.
Perfiles
Preferencia Descripción
Grabar perfil Le permite guardar las configuraciones actuales como un perfil.
Cargar perfil Le permite cargar, cambiar el nombre o borrar un perfil.
Navegación
Preferencia Descripción
Animación de la página Con esta opción activada, podrá navegar a una página deslizándose hacia arriba, abajo, derecha o izquierda.
Permitir gestos Con esta opción activada, podrá añadir un gesto a una página como deslizar hacia la izquierda o derecha para llevar a cabo alguna función particular.
Sonido de pop del gesto Con esta opción activada, el equipo provee retroalimentación auditiva al llevar a cabo un gesto.
Sonido de clic del botón Con esta opción activada, el equipo provee retroalimentación auditiva al seleccionar un botón.
Símbolos de navegación del botón
Cuando esté encendido, esta preferencia hará que aparezcan pequeñas flechas de navegación en la esquina superior derecha de todos los botones. Cuando esté apagado, se esconderán las flechas.
Tamaño de la página
Preferencia Descripción
Barra de estado (Status Bar)
Al prenderla, esta función mostrará la barra de estado sobre la barra de visualización del habla
Bloqueo de teclados Al prenderla, esta función ajusta la pantalla para un bloqueo de teclados.
Edición
Preferencia Descripción
Usar código de acceso para el menú
Con esta opción activada, únicamente podrá acceder a las opciones de menú y el archivo de vocabulario al ingresar una contraseña.
Código de acceso Ingrese una contraseña.

TouchChat ∙ Guía del usuario: Español 37
Habla
Preferencia Descripción
Voz Dada la diversidad de sintetizadores, las voces están disponibles para descargarlas. Esto tiene el fin de ahorrar espacio en la aplicación descargando sólo aquellas voces que sean necesarias.
Para descargar una voz, toque la flecha verde y seleccione Sí.
Nota: Algunas voces sólo están disponibles para la venta. Tendrá que comprar estas voces en la tienda de actualización para tenerlas entre la lista de voces disponibles.
Velocidad Utilice la barra deslizable para cambiar la velocidad de habla.
Tono de voz Puede modificar el tono de la voz para que suene distinto. Seleccione el tono deseado: Sumamente bajo, Más bajo, Bajo, Normal, Más alto o Sumamente alto.
Pausar entre palabras Puede añadir una pausa entre palabras individuales. Nota: Esta opción no está disponible para una voz VocaliD.
Instalar voz de VocaliD Instala y configura una voz de VocaliD.
Barra de visualización del habla
Preferencia Descripción
Esconder Barra de Visualización
Con esta opción activada se esconderá la BVH completa.
Permitir función de copiar y pegar
Con esta opción activada, el usuario podrá copiar y pegar texto en el BVH.
Capitalización automática
Con esta opción activada, el equipo automáticamente hará que la primera letra de cada oración sea mayúscula.
Mostrar símbolos Escoja esta opción si desea mostrar los símbolos correspondientes al texto en los botones en la BVH.
Esconder botón para borrar
Con esta opción activada, se esconderá el botón de borrar de la BVH.
Fuente Seleccione entre 7 fuentes disponibles para el texto de la BVH
Tamaño de la fuente Determina el tamaño de la fuente para el texto de la BVH.
Color de la fuente Seleccione entre 12 fuentes disponibles para el texto de la BVH.
Color de trasfondo Seleccione entre 12 colores disponibles para el trasfondo de la BVH.
Cantidad de líneas Seleccione la cantidad de líneas que desea para la BVH.
Cursor de una línea Escoja esta opción si desea añadir un cursor a la BVH.
Función de toque Escoja entre las funciones de Hablar, Hablar y agrandar texto o Ninguna función al tocar la BVH.

TouchChat ∙ Guía del usuario: Español 38
Área de habla expandida
Preferencia Descripción
Fuente Seleccione entre 7 fuentes disponibles para el texto del área expandida de habla.
Tamaño de la fuente Determina el tamaño de la fuente que aparece en el área expandida de habla.
Color de la fuente Seleccione entre 12 colores disponibles para la fuente del texto del área expandida de habla.
Color de trasfondo Seleccione entre 12 colores disponibles para el trasfondo del área expandida de habla.
Hablar
Preferencia Descripción
Hablar caracteres Con esta opción activada, el equipo pronunciará individualmente cada carácter que ingrese.
Hablar palabras Con esta opción activada, el equipo pronunciará cada palabra que ingrese.
Hablar oraciones Con esta opción activada, el equipo pronunciará cada oración que ingrese.
Borrar automáticamente
Con esta opción activada, el equipo despejará la BVH automáticamente luego de decir el mensaje.
Impedir interrupción Con esta opción activada, no se interrumpirá la pronunciación de una oración si sin querer toca otro botón mientras el equipo habla.
Inclinación
Preferencia Descripción
Orientación preferida Seleccione entre una orientación horizontal o vertical.
Función Seleccione entre las opciones de Expandir y hablar, Expandir texto solamente, Cambiar orientación de la pantalla, o Ninguna función.
Monitor de actividad de idioma
Preferencia Descripción
Activar registro Esta opción le permite al equipo recolectar información asociada al uso de idioma que puede subir a la página de Realize Language para un análisis en línea, o que puede grabar a un archivo para analizar manualmente.
Contraseña de privacidad
Ingrese o cambie su contraseña para el Registro de data.
Despejar registro Despeja el registro de uso para el usuario actual.
Configuración de Realize Language
Sube la información recolectada del usuario a la página Realize Language para análisis.
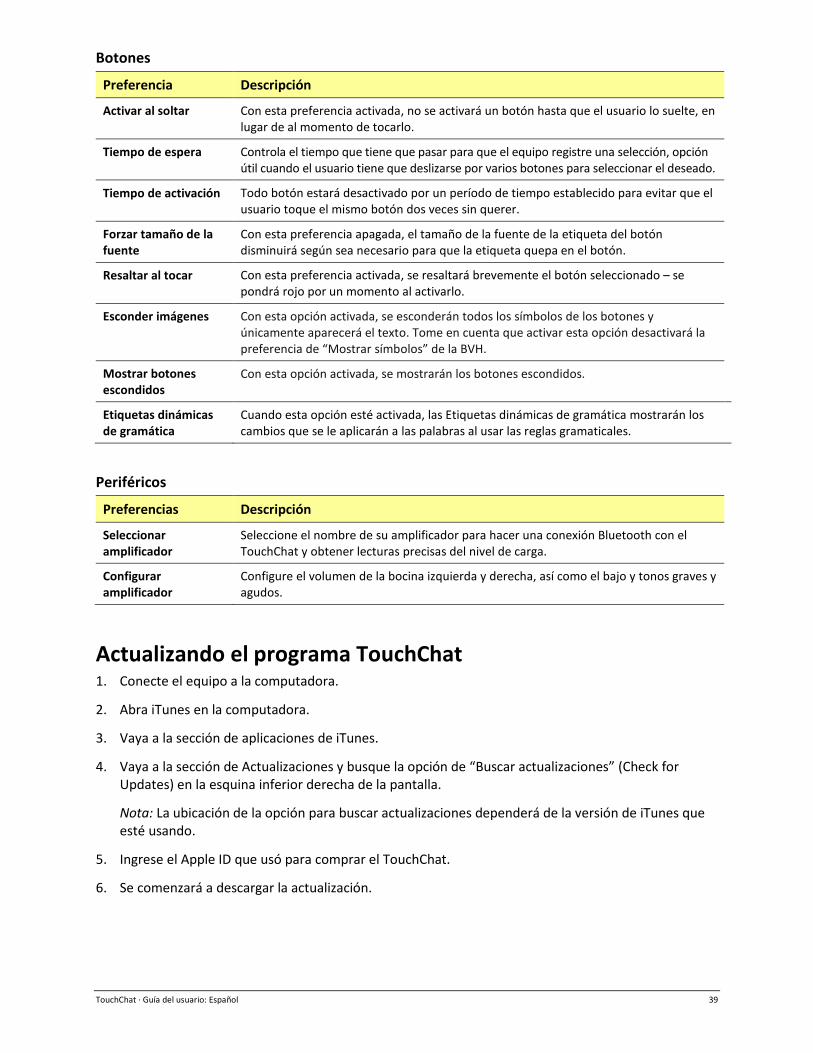
TouchChat ∙ Guía del usuario: Español 39
Botones
Preferencia Descripción
Activar al soltar Con esta preferencia activada, no se activará un botón hasta que el usuario lo suelte, en lugar de al momento de tocarlo.
Tiempo de espera Controla el tiempo que tiene que pasar para que el equipo registre una selección, opción útil cuando el usuario tiene que deslizarse por varios botones para seleccionar el deseado.
Tiempo de activación Todo botón estará desactivado por un período de tiempo establecido para evitar que el usuario toque el mismo botón dos veces sin querer.
Forzar tamaño de la fuente
Con esta preferencia apagada, el tamaño de la fuente de la etiqueta del botón disminuirá según sea necesario para que la etiqueta quepa en el botón.
Resaltar al tocar Con esta preferencia activada, se resaltará brevemente el botón seleccionado – se pondrá rojo por un momento al activarlo.
Esconder imágenes Con esta opción activada, se esconderán todos los símbolos de los botones y únicamente aparecerá el texto. Tome en cuenta que activar esta opción desactivará la preferencia de “Mostrar símbolos” de la BVH.
Mostrar botones escondidos
Con esta opción activada, se mostrarán los botones escondidos.
Etiquetas dinámicas de gramática
Cuando esta opción esté activada, las Etiquetas dinámicas de gramática mostrarán los cambios que se le aplicarán a las palabras al usar las reglas gramaticales.
Periféricos
Preferencias Descripción
Seleccionar amplificador
Seleccione el nombre de su amplificador para hacer una conexión Bluetooth con el TouchChat y obtener lecturas precisas del nivel de carga.
Configurar amplificador
Configure el volumen de la bocina izquierda y derecha, así como el bajo y tonos graves y agudos.
Actualizando el programa TouchChat 1. Conecte el equipo a la computadora.
2. Abra iTunes en la computadora.
3. Vaya a la sección de aplicaciones de iTunes.
4. Vaya a la sección de Actualizaciones y busque la opción de “Buscar actualizaciones” (Check for Updates) en la esquina inferior derecha de la pantalla.
Nota: La ubicación de la opción para buscar actualizaciones dependerá de la versión de iTunes que esté usando.
5. Ingrese el Apple ID que usó para comprar el TouchChat.
6. Se comenzará a descargar la actualización.

TouchChat ∙ Guía del usuario: Español 40
Analizando el desarrollo lingüístico Puede usar las capacidades de registro de data de su equipo para recolectar información sobre el desarrollo lingüístico de una persona. Luego, puede subir esa información a la página de Realize Language™.
Este proceso le permite monitorear, medir y maximizar el potencial de uso del equipo de una persona.
Usando la página de Realize Language Realize Language es un servicio electrónico basado en suscripciones que organiza y analiza información, presentando los resultados en formatos gráficos fáciles de entender que proveen información valiosa en torno al desarrollo lingüístico de cada usuario. El uso de este servicio desde su computadora te permite…
• Rastrear el progreso y desarrollo en la comunicación de una persona a través del tiempo. • Comparar automáticamente distintos aspectos de la comunicación. • Crear un resumen detallado de la ejecución. • Compartir información con otros. • Rápidamente crear reportes fáciles de entender.
Para aprender más, vaya a la página de Internet de Realize Language: https://realizelanguage.com/info/
Para ver o descargar la guía de usuario de Realize Language (actualmente solo disponible en inglés), vaya a https://realizelanguage.com/info/support.
Para apoyo al cliente: De tener algún problema con la página de internet de Realize Language, puede enviar un correo electrónico a [email protected].
De tener algún problema con el equipo, puede contactar la unidad de apoyo técnico de Saltillo al 1-800-382-8622, o a través de correo electrónico a [email protected].

TouchChat ∙ Guía del usuario: Español 41
Activando el Registro de data en su equipo Con la opción de Registro de data activada, su equipo recolectará información asociada al uso de lenguaje del usuario, que podrá subir a la página de Realize Language para un análisis en línea, o grabar a un archivo para analizar manualmente.
1. En TouchChat, vaya a Menú y Preferencias. Aparecerá la pantalla de preferencias del TouchChat.
2. Bajo “Registro de data”, active la opción de Activar registro.
Con esta opción activada, verá el símbolo de Registro de data en la Barra de visualización del habla.
¡Importante! Si usará la página de Realize Language para analizar los datos, debe configurar un perfil antes de comenzar a recolectar información.
Creando una contraseña de privacidad Puede crear una contraseña para proteger la información recolectada a través del Registro de data, con el fin de prevenir acceso no autorizado.
1. Bajo el área de “Registro de data”, ingrese una contraseña en el cuadro a la derecha de Contraseña de privacidad. Aparecerá un cursor en el cuadro de contraseña y un teclado.
2. Ingrese la contraseña que desea usar y toque OK. Aparecerá una ventana para confirmar la contraseña.
3. Ingrese la contraseña nuevamente y toque OK. Verá un mensaje confirmando que se registró la contraseña nueva.
4. Toque OK para cerrar el mensaje.

TouchChat ∙ Guía del usuario: Español 42
Carga manual de datos para el análisis Sube los datos recogidos por una persona a la página Realize Language para el análisis.
1. Conecte el equipo a la computadora.
2. Abra iTunes en la computadora.
3. En iTunes en la computadora, pulse sobre el equipo y vaya a la sección de Aplicaciones (“Apps”).
4. Deslícese hacia abajo hasta que encuentre el TouchChat en el área de Compartir archivos (“File Sharing”).
5. Resalte el archivo logfile.txt que está cargando.
6. Seleccione Guardar a (“Save To”) en la esquina inferior derecha. Aparecerá un cuadro de Windows para grabar. Seleccione la carpeta donde desea grabar el archivo.
7. Acceder a la página Realize Language.
8. Seleccione la opción Upload Data File (Carga de archivos de datos) y luego seleccione la opción Select a File to Upload (Seleccionar un archivo para subir).
9. Seleccione el archivo y haga clic en Upload (Cargar).
Despejando los datos de uso Para despejar la información de uso para el usuario actual:
1. Bajo el área de “Registro de data”, toque Despejar.
2. Aparecerá una ventana y un teclado para ingresar la contraseña. Ingrese su contraseña y toque OK.
3. Confirme que desea despejar el registro tocando Sí.
4. Aparecerá un mensaje confirmando que los datos se despejaron. Toque OK para cerrarlo.
Cambiando o quitando su contraseña El equipo está configurado para que tenga que ingresar una contraseña cada vez que graba datos a un archivo. Esto ayuda a proteger su privacidad para que solo usted pueda ver la información. Puede cambiar su contraseña cuando desee o cambiar la configuración para que no necesite ingresar una contraseña.
Para cambiar su contraseña: 1. Bajo “Registro de data”, toque el cuadro de contraseña que verá a la derecha de Contraseña de
privacidad. Aparecerá una ventana y un teclado para ingresar su contraseña.
2. Ingrese su contraseña actual y toque OK. Verá un cursor en el cuadro de contraseña.
3. Use la tecla de borrar para despejar el campo de contraseña.
4. Ingrese su contraseña nueva y toque OK.
5. Aparecerá un cuadro para confirmar la contraseña. Ingrese su contraseña nuevamente y toque OK.
6. Aparecerá un mensaje confirmando que se registró la contraseña nueva. Toque OK para cerrarlo.
TouchChat ∙ Guía del usuario: Español 43
Para quitar su contraseña: Si prefiere no usar una contraseña cada vez que grabe datos en un archivo, siga este procedimiento. Sin embargo, tenga en cuenta que perderá la protección que provee una contraseña:
1. Bajo “Registro de data”, toque el cuadro de contraseña que verá a la derecha de “Contraseña de privacidad”. Aparecerá una ventana y un teclado para ingresar su contraseña
2. Ingrese su contraseña actual y toque OK. Verá un cursor en el cuadro de contraseña.
3. Use la tecla de borrar para despejar el campo de contraseña y toque OK.
4. Verá un mensaje confirmando que se borró su contraseña. Toque OK para cerrarlo.
Transfiriendo un archivo de vocabulario desde el Chat Editor al equipo usando iTunes 1. Abra el Chat Editor en su computadora. 2. Toque Biblioteca > Transferir > Vocabularios al archivo. Aparecerá el cuadro de transferencias. 3. Resalte el archivo que desea transferir y seleccione Transferir en la esquina superior izquierda. 4. Grabe el archivo de vocabulario a su computadora (acuérdese de dónde graba el archivo). 5. Abra iTunes en la computadora. 6. Conecte el equipo a la computadora. 7. Seleccione el equipo en la columna izquierda, y vaya a la sección de Aplicaciones (“Apps”). 8. Deslícese hacia abajo hasta que encuentre el TouchChat en el área de Compartir archivos (“File Sharing”). 9. Seleccione TouchChat. Debe aparecer la opción de Añadir archivo (“Add File”) en la sección inferior
derecha. 10. Toque Añadir archivo. Aparecerá una pantalla de Windows para grabar. 11. Busque el archivo que desea añadir a su equipo y toque Abrir (“Open”). 12. El archivo debe aparecer en la sección de documentos del TouchChat. 13. Vaya al equipo y busque la sección de Archivos de vocabulario. 14. Toque Menú en la esquina superior derecha y luego seleccione Importar/Exportar vocabulario. 15. Toque Importar desde iTunes. 16. Seleccione el archivo a importar, y luego toque Guardar en la porción superior derecha de la
pantalla. Debe aparecer el archivo importado en la lista de archivos de vocabulario. 17. Seleccione el archivo deseado.
Copiando un archivo de vocabulario del equipo al Chat Editor usando iTunes 1. Conecte el equipo a la computadora.
2. Abra iTunes en la computadora.
3. En el equipo, vaya a la sección de Archivos de vocabulario y toque Menú en la sección superior derecha de la pantalla.
4. Toque Importar/Exportar vocabulario.
5. Toque Exportar al iTunes.
6. Seleccione el archivo de vocabulario a exportar.
7. Ingrese un nombre para el archivo que está exportando y toque Guardar.
8. Desde la computadora, seleccione el equipo en iTunes y vaya a la sección de Aplicaciones (“Apps”).

TouchChat ∙ Guía del usuario: Español 44
9. Deslícese hacia abajo hasta ver TouchChat en el área de compartir archivos.
10. Resalte el archivo de vocabulario que está exportando.
11. Seleccione Guardar a (“Save To”) en la esquina inferior derecha.
12. Aparecerá un cuadro de Windows para grabar. Seleccione la carpeta donde desea grabar el archivo.
Para colocar la carpeta en el Chat Editor, utilice la carpeta de “Chat Editor Import” en la página principal de su computadora. Esta carpeta se instaló con el Chat Editor. Si la ve ahí, la puede encontrar mediante los siguientes pasos, dependiendo de la versión de Windows que esté usando:
Versión de Windows Cómo llegar a la carpeta de “Import”
Windows XP Este equipo (¨My computer¨) > C (disco local) > ¨Documents and Settings¨ > Usuarios (*su nombre de usuario*) > Application Data > Chat Editor > Import
Windows Vista o Windows 7, 8, o 10
C: Drive > Usuarios (¨Users¨) > *Su nombre de usuario* > AppData > Roaming > Chat Editor > Import
Nota: La carpeta de “Application Data” (para Windows XP) o “App Data” (para Windows Vista/7/10) puede estar escondida. Para verla, vaya a Panel de control (¨Control Panel¨) y toque Opciones del explorador de archivos (¨Folder Options¨). Luego, toque la ventana de Ver (¨View¨), y bajo Configuración avanzada (¨Advanced Settings¨) > Archivos y carpetas ocultos (¨Hidden Files and Folders¨), seleccione Mostrar archivos, carpetas y unidades ocultos (¨Show Hidden Files and Folders ¨). Luego toque Aceptar (OK). La importación del equipo debe comenzar automáticamente en unos cuantos minutos.
Bloqueando la orientación de la pantalla 1. Toque Menú y Preferencias.
2. Deslícese a la sección de Inclinación y toque Función.
3. Toque Ninguna función.
4. Toque OK.
Haciendo una copia de seguridad del equipo 1. Abra la aplicación de iTunes en la computadora.
2. Conecte el equipo iOS a la computadora mediante un cable USB.
3. En iTunes, aparecerá el equipo a mano izquierda.
4. Haga un clic derecho en el equipo y toque la opción de Realizar copia ahora (“Back up”).
5. iTunes comenzará a hacer una copia de seguridad del equipo.
Restaurando el equipo 1. Abra la aplicación de iTunes en la computadora.
2. Conecte el equipo iOS a la computadora mediante un cable USB.
3. En iTunes, aparecerá el equipo a mano izquierda.
4. Haga un clic derecho en el equipo y toque la opción de Restaurar copia (“Restore from Backup”).
5. Escoja la copia de seguridad más reciente para asegurarse de sincronizar la versión actualizada.
6. iTunes comenzará el proceso de restaurar la copia de seguridad en el equipo.

TouchChat ∙ Guía del usuario: Español 45
Apéndice A: Funciones avanzadas de gramática Las funciones en este apéndice están dirigidas a personas con un amplio conocimiento de gramática. Considere que son métodos alternos de configurar la gramática dentro de un archivo de vocabulario. Algunos archivos de vocabulario ya tienen su función de gramática.
Creando un botón de gramática Para crear un botón que cambie la forma gramática de una palabra: 1. Vaya a la página que contenga el botón deseado.
2. Toque Menú y Editar página. 3. Toque y sostenga el botón deseado. 4. Toque Editar este botón. 5. Ingrese una etiqueta, por ejemplo, Add -s.
6. Baje a la sección de Funciones del botón. 7. Toque Añadir. 8. Toque Función de gramática. Verá las funciones de gramática disponibles.
Add -es: forma plural de sustantivo
Add -s: forma plural de sustantivo
9. Toque la función deseada. Por ejemplo, Add -s para añadir una “s”. Verá la función entre la lista de Funciones del botón.
10. Toque Guardar. En este ejemplo, verá un botón con la etiqueta “-s” para pluralizar los sustantivos.
Identificando las partes de las oraciones Para aplicar una parte de una oración a un botón: 1. Vaya a la página de “cosas” (sustantivos).
2. Toque Menú y Editar página.
3. Toque y sostenga un botón de una “cosa” (por ejemplo, carro), seleccione Editar este botón y baje a la sección de Funciones del botón.
4. Toque Añadir para abrir la lista de funciones.
5. Seleccione la opción de Aplicar propiedad gramática. En el menú de Parte de la oración verá las opciones de adjetivo, sustantivos y verbos.
6. Seleccione la parte de oración deseada (por ejemplo, sustantivo).
7. Toque Guardar. En este ejemplo, Aplicar propiedad gramática aparecerá en la parte inferior de la lista de funciones del botón.
¡Importante! La propiedad gramatical tiene que ser la primera función en la lista. Muévala al primer lugar.
8. Toque Editar. Aparecerá un símbolo de borrar frente a cada función y verá barras grises a la derecha. Toque y sostenga las barras grises a la derecha de la función de Aplicar propiedad gramática (sustantivo) y arrástrela a la parte superior de la lista de funciones.
9. Toque Guardar.
10. Repita los pasos 3 a 10 para los botones restantes de “cosas”.

TouchChat ∙ Guía del usuario: Español 46
Creando un botón para una regla gramatical 1. Toque y sostenga el botón que servirá para pluralizar las palabras, toque Editar este botón, ingrese
una etiqueta para el botón (por ejemplo, “-s”) y vaya a la ventanilla de Funciones.
2. Toque Añadir para abrir la lista de funciones.
3. Seleccione Aplicar estado gramático. Aparecerán las funciones gramaticales disponibles.
Add -es: forma plural de sustantivo
Add -s: forma plural de sustantivo
4. Seleccione la opción que corresponda (por ejemplo, Add -s).
5. Toque Guardar. En este ejemplo, aparecerá Aplicar estado gramático (Add -s) entre la lista de funciones para el botón.
6. Quite cualesquiera otras funciones que ya estaban en la lista.
7. Toque Guardar. En este ejemplo, verá el botón con la etiqueta “-s” que le permitirá pluralizar cualquier palabra identificada como sustantivo.
Usando su botón de regla gramatical Coloque el botón de regla gramatical en la página correspondiente. Por ejemplo, puede colocar un botón para pluralizar las cosas (sustantivos). Si toca el botón de pluralizar y luego escoge una cosa, tendrá que tocar el botón de pluralizar nuevamente antes de pluralizar otra cosa.
1. En la Barra de visualización de habla (BVH), ingrese las palabras deseadas hasta antes de la cosa que quiera pluralizar. Por ejemplo, puede ingresar “quiero más”.
2. Toque el botón de “-s” que creó en la sección anterior, Creando un botón para una regla gramatical.
3. Escoja el botón que desee pluralizar (por ejemplo, carro). En la BVH, verá “quiero más carros”.
Despejando una regla gramatical Puede ser útil crear un botón para despejar el estado gramático.
Si toca el botón de pluralizar y luego decide que no quiere pluralizar una palabra en la página actual, puede moverse a otra página de cosas y seleccionar un sustantivo de esa página para pluralizarlo.
Sin embargo, si toca el botón para pluralizar y luego decide que no quiere pluralizar ninguna palabra, el programa pluralizará el próximo sustantivo que escoja a menos que despeje la función. Es decir, si toca el botón para pluralizar y luego cambia de opinión, tendría que navegar y tocar el botón para Despejar estado gramático. Luego, no se pluralizará ningún sustantivo hasta que toque el botón de pluralizar nuevamente.
Para crear un botón que despeje el estado gramatical actual 1. Vaya al botón que desea usar y toque Menú > Editar página > Editar este botón.
2. Ingrese una etiqueta para el botón, vaya a la sección de Funciones, seleccione Añadir y luego la función Despejar estado gramático.
3. Quite cualquier otra función que ya esté en la lista.
4. Toque Guardar. Ahora este botón despejará cualquier estado gramatical activado.


Saltillo Corporation 2143 Township Road 112 Millersburg, OH 44654
www.saltillo.com