Torsion Bars to Coilovers Background Info and...
26
1 Torsion Bars to Coilovers Background Info and Installation Guide for 1999-2007 GMT800 2WD/4WD Trucks and SUVs V2.0 Chevy/GMC Silverado/Sierra/Tahoe/Suburban/Yukon 1500 4WD/2WD vehicles with factory torsion bars using the factory lower and upper control arms. *will not fit 2500 or 3500 series vehicles These are to remove the torsion bar setup on 99-07 GM Fullsize Trucks and SUVs and install coilovers as the front suspension. This swap is useful for ~7” of drop to ~4” of lift with no other mods compared to a stock height truck. The newest style of the upper brackets will accommodate lifted trucks up to ~9" of lift. Please contact me at [email protected] or see my website at www.atomicfabandperformance.com if you have any questions! I take no responsibility for any harm or damage as a result of your decision to do this modification. If you aren’t comfortable doing this swap, don’t do it!
Transcript of Torsion Bars to Coilovers Background Info and...

1
Torsion Bars to Coilovers Background Info and Installation Guide for 1999-2007 GMT800
2WD/4WD Trucks and SUVs
V2.0
Chevy/GMC Silverado/Sierra/Tahoe/Suburban/Yukon 1500 4WD/2WD vehicles with factory torsion bars using the factory lower and upper control arms.
*will not fit 2500 or 3500 series vehicles
These are to remove the torsion bar setup on 99-07 GM Fullsize Trucks and SUVs and install coilovers as the front suspension. This swap is useful for ~7” of drop to ~4” of lift with no other mods compared to a stock height truck. The newest style of the upper brackets will accommodate lifted trucks up to ~9" of lift. Please contact me at [email protected] or see my website at www.atomicfabandperformance.com if you have any questions!
I take no responsibility for any harm or damage as a result of your decision to do this modification. If you aren’t comfortable doing this swap, don’t do it!

2
Table of Contents Why Do I Want Coilovers? ............................................................................................................................ 3 Driving Impressions ...................................................................................................................................... 4 Testimonials .................................................................................................................................................. 5 Setup Overview ............................................................................................................................................. 6 Lower Mount Bracket ................................................................................................................................... 9 Upper Reinforcement Bracket ...................................................................................................................... 9 Adapting the Top of the Shock .................................................................................................................... 10 Frame Modifications ................................................................................................................................... 11 Bearings, Bushings, and Bumpstops ............................................................................................................ 12 Limiting Straps ............................................................................................................................................. 12 What These Brackets Will Not Work On ..................................................................................................... 12 Selecting Springs and Shocks ...................................................................................................................... 13 Purchasing Information ............................................................................................................................... 15 Parts List ...................................................................................................................................................... 15 Final Word ................................................................................................................................................... 16
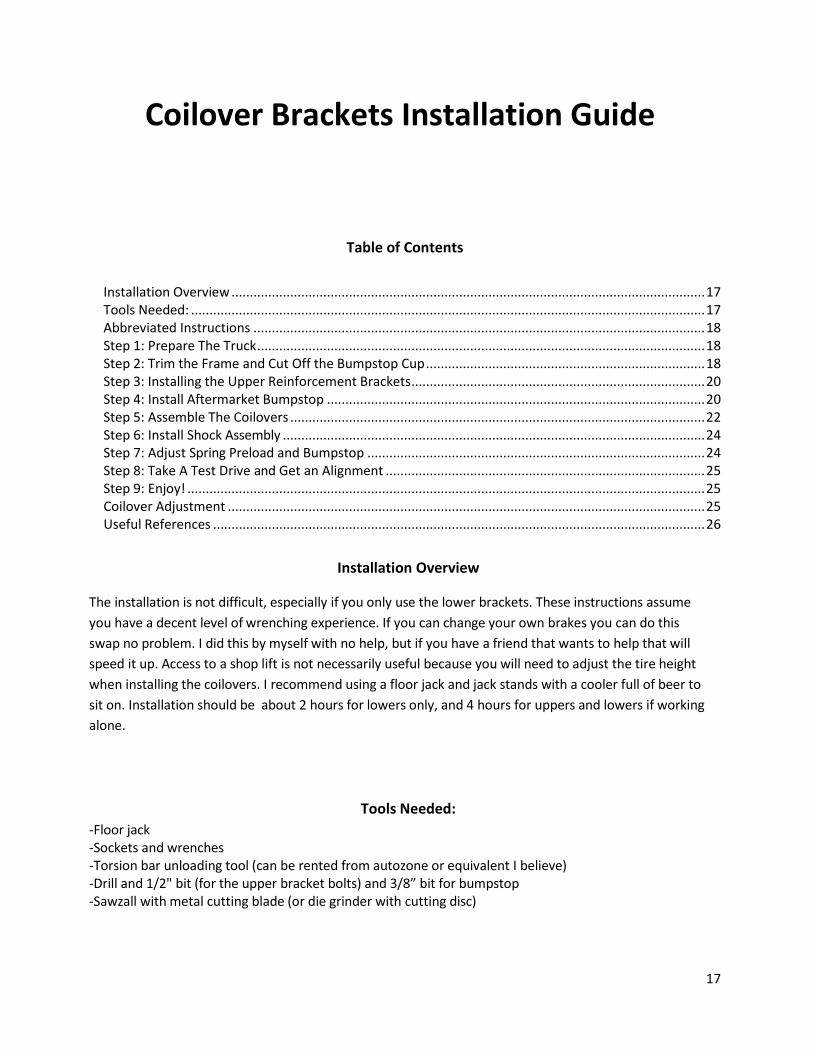
Coilover Brackets Installation Guide ..................................................................................................... 17
Installation Overview .................................................................................................................................. 17 Tools Needed: ............................................................................................................................................. 17 Abbreviated Instructions ............................................................................................................................ 18 Step 1: Prepare The Truck ........................................................................................................................... 18 Step 2: Trim the Frame and Cut Off the Bumpstop Cup ............................................................................. 18 Step 3: Installing the Upper Reinforcement Brackets ................................................................................. 20 Step 4: Install Aftermarket Bumpstop ........................................................................................................ 20 Step 5: Assemble The Coilovers .................................................................................................................. 22 Step 6: Install Shock Assembly .................................................................................................................... 24 Step 7: Adjust Spring Preload and Bumpstop ............................................................................................. 24 Step 8: Take A Test Drive and Get an Alignment ........................................................................................ 25 Step 9: Enjoy! .............................................................................................................................................. 25 Coilover Adjustment ................................................................................................................................... 25 Useful References ....................................................................................................................................... 26

3
Why Do I Want Coilovers? There are several advantages to coilovers from torsion bars. The biggest one is coilovers ride much, much better, and depending on what shocks and springs you use, can have many different ride settings for many different conditions. Torsion bars, on the other hand, leave you pretty much stuck and only able to adjust shock dampening rates (through aftermarket shocks) and not the spring rate itself. Many 4wd guys crank or decrank the bars to adjust ride height (yes this applies both to lifted and lowered guys), and this changes the ride drastically. With coilovers you can choose spring rates specific to your application; higher spring rates for more aggressive driving, and softer for more daily driver type duty. The torsion bar setups are basically meant to ride on the bump stops or slightly above them. On lifted setups when you crank the bars the ride is usually the biggest complaint since the bump stop is so far away its not used. On lowered setups it’s basically the same just the opposite direction and you are constantly riding on the bump stops even after trimming them. In both cases the suspension is operating out of its intended range, and so the ride quality suffers. The spring force of the torsion bar changes proportional to the amount of preload put on it by the index key. Second advantage is going to be the huge selection of shocks and springs available in the aftermarket for coilovers. I use QA1 shocks and hyperco springs, however, King, Fox, Viking, QA1, and whoever else makes coilovers can be used. Spring wise, hyperco seems to offer the biggest range in lengths and spring rates that I could find, and they are well priced. Eibach and PAC also have a wide variety of spring sizes and stiffnesses. I used 1300lb springs with qa1 ds301 shocks. I discuss how to select springs and shocks for your particular application further down. Third advantage is weight. All of the stock torsion bar stuff including keys, crossmember, bars, shocks, and bolts weighs 71lbs. My shocks with my brackets (upper and lowers), and 7" 2.5" springs and limiting straps weigh 15lbs each. So total weight savings is only 41lbs, but it IS weight savings with a much better riding and handling front end. Taking out the crossmember also makes it a lot easier to drop the transfer case. The only real disadvantage I can think of is it costs money and you might have to modify your frame (drilling). Both of which are par for the course in this hobby.

4
Driving Impressions I have some decent road time with these now, and I must say I really like the ride. I currently have over 5000 miles on them. I have the shocks set to 10/18 and am using a 1300lb spring with about an inch of preload to put the front end exactly level (CVs are perfectly flat). A shock setting of 10 may be a little stiff for daily driving, but 6 is too soft, so I may try an 8 or 9. For the track I might try a 12-13 or so. Your particular settings will vary depending on how you like it and the weight of your vehicle. The truck is very precise with this conversion. The steering feels very planted and in control without being harsh. Obviously you can fine tune your ride however you want it with spring and shock combinations, but I like it slightly firm. I am very happy with this conversion and feel like it handles a ton better. I use the truck for drag racing and keep going faster and faster now that the front end is under control. I have been 1.3x 60ft with these on radials and slicks at 5000lb. The truck makes approximately 1100rwhp.

5
Testimonials A more complete (but not exhaustive) list of guys who have done this swap is near the end of this document. The following is from “Tahoewhat” on tahoeyukonforum, one of the first guys to do this swap on his tahoe. See his full thread here: http://www.tahoeyukonforum.com/forum/showthread.php?t=59830
Starting off on the test drive around to settle the suspension I noticed a difference immediately, a much softer ride in front. The big difference came on the ride back home; about 50 miles on back roads and freeway traveling. First let me say, I forgot I had the front shocks on setting 5 and the rear on 10. Adjusting the knob only 1 click will make a difference. But on the way home not even 10mins into the drive I could not believe the vast amount of difference I was feeling. This, coming from a jar bouncing ride w/ about 1 to 2” of shock travel on the previously installed shocks to having the correct shocks installed w/ the t –bar setup gone. I felt no bumps at all, no jarring bounce, no squeaks, no rattles, nothing but pure bliss. Some of the roads were twisty, (I did not go crazy as I just did the install and still had that, how is my 5” shock holding this beast up mentality) but took the turns w/ even more ease than before. No more side to side movement, it felt as though I had much more control of the front wheels or front as a whole. It is hard to explain. The best explanation I can say is it’s like driving a car w/ a good suspension setup and knowing that you have control of it at most times. You point left it goes left, no movement. Not sure if that really makes sense. The other road or time I noticed an improvement is the entrance to my neighborhood is terrible, like going over 50 million little speed bumps and now it is bearable. I do not get bounced up and down the whole way through the entrance. It cushions the bumps and the only way I can think of, is it feels like driving a car, not a slammed Tahoe. I need more time to actually respond on the feeling of the ride. At the time of writing this I have only put around 50 miles on it and in just that little time has me honestly blown away on the improvement. Just feels more planted & more in control. To copy Atomics words “It’s kind of hard to verbalize just the truck feels more confident and secure, makes it a lot more fun than it should be.”
And his cliff notes version: “WOW, the feeling of driving is fun again in a slammed Tahoe and rides 100x better than with the t-bars. I find myself making up places to go to keep driving it. Well worth the investment and time. You will not be disappointed. If for some reason you are, i would love to know why!”

6
Setup Overview
There are 4 basic pieces to the kit: 1. Lower brackets. These are needed regardless of what you do with the top. See Figures 1 and 2. 2. Normal Upper brackets. I call these normal because they are the original design that uses the
procomp shock adapter, but can also be used with the stud bushing. See Figures 1 and 2. 3. Lifted Upper brackets. These are for guys with lift kits that drop the LCA and/or use a lift spindle.
They can be used in non-lifted applications however they are more difficult to install than the normal upper brackets. See Figures 3 and 4.
4. Stud Bushings. I make these washers and bushings so the stud top for QA1 shocks can be used. This decreases the amount of room the mounting hardware takes up which allows for a longer shock to be used or for more drop in very low applications. See Figure 5.
There are several different combinations of stuff that will work depending on what you want to do. The bare minimum to do this swap only requires the lower brackets. The most popular combination is the lower brackets and the normal upper brackets (this constitutes a Full Normal kit). The lifted uppers are required for lift-kit applications (along with the lowers). The Stud Bushings can be used with or without the normal upper brackets. Figure 1 below is the complete assembly with the normal style upper mount, lower mount, and the procomp shock adapter. Figure 2 is what the Full Normal kit looks like fully installed. This is on my truck.
Figure 1: Full Normal Coilover Assembly
Figure 2: Full Normal Kit Installed (Passenger Side)

7
The lifted upper style has an integrated mount (instead of using the procomp shock adapter) to mount the shock. The purpose of this is to create clearance with the factory Upper Control Arm (UCA) which is the point of least clearance when doing this swap on a lift-kit setup by moving the mount forward away from the arm. On the brackets below, the bottom left is the passenger side and the bottom right is the driver side. These can be used on non-lifted setups, but I recommend using the normal style as the lifted style is more difficult to install. The installed picture is from a customer that was kind enough to take pictures for me on what looks to be a 6-7” lift. The cognito UCA is not required, but does look cool.
Figure 3: Lifted Brackets (Passenger side bracket on left,
Driver side bracket on right)
Figure 4: Lifted Brackets Installed (Driver side)

8
QA1 makes a stud top conversion for the shocks to replace the more traditional loop style (not sure what the exact name is). This part allows the shock to be mounted without using the procomp shock adapter, however the trouble has been the included bushings with the QA1 part are not very strong. They are a soft rubber so I am making some custom washers and poly bushings (see figure below) that can withstand the load without being destroyed. The advantage to using the stud top is it takes much less room to mount the shock so a longer shock can be used that has more travel, or your truck can be dropped about 1.5” lower compared to using the procomp mount on the same shock. The upper bracket is not required to use the stud top but is highly recommended. I originally recommended against the stud top, but that was before I found a suitable way to make a bushing to handle the load the coilover will see. Now depending on what your specific needs are using the stud top may be the best solution. Pictured below is the QA1 stud on the driver side normal upper bracket and the bushing kit I make which includes the wasters and a poly piece.
Figure 5: Stud Bushing on the Driver Side Bracket

9
Lower Mount Bracket I drew these up in AutoCAD and had them laser cut from 3/8" steel and powdercoated them a flat black. They are doweled by design and have been MIG welded. It is the male end of the dowel into the sides supporting the weight, not the weld, so there is no need for a lot of welding. In addition, the bolts holding these to the frame (the lower shock bolt hole) and new coilover bolt hold them together. These are not going anywhere. The need for these is because the lower mount on the 1500 4wd LCA is a male- style mount. All aftermarket coilovers that I have found also have a male style mount, so the issue is trying to hook up two male style mounts together. These brackets sit on top of the shock mount and prevent the coilover lower mount from rotating on the LCA. The included hardware is all grade 8 stuff. Either bolt makes a good mounting location for limiting straps if you plan on going that route. There is plenty of clearance for the CV shaft and everything else. This is literally a slide-over and bolts in place of the shock deal. Installation takes 30 seconds. The inside width is roughly 1 3/8". My QA1 shocks have a lower mount thickness with the bearing of approximately 1". To prevent it from sliding around I used a pair of spacers. I was not sure if different coilovers have different mounting widths, but these should be wide enough to accommodate anything. These spacers are not included with my kit.
Upper Reinforcement Bracket Similar to the lower mounts, these are laser cut 3/8" steel that have been MIG welded and powdercoated. These are optional for the coilover swap and do require some drilling or welding. I say they are optional because guys have not reinforced the top mount and been fine. However, many feel this is not safe because the shock hoop was not designed with carrying the full weight of the vehicle in mind, especially over harsh terrain if that's your thing. These are side dependent and work by sitting up inside the factory upper shock mount and use two 1/2" grade 8 bolts through the frame to secure it. I call this a reinforcement mount because it is reinforcing the mount that is there, not just carrying the full weight by itself. When you drill the holes for these, I recommend bolting them through the top to ensure they fit tight to the frame before you start drilling. Remember when drilling, use lots of oil and go slow with moderate pressure. Cobalt drill bits are great for drilling steel. The passenger side is relatively easy to get to, but because of the differences in the frame, the driver side is harder and needs to be reached by using a wrench under the truck. This is kind of a pain...ok it's a pain in the ass since there is not a lot of room, but can be done without removing the axle. I used the trick of using a piece of tape to hold the nut and washer to the wrench as I put it up there. The upper mount works well as an anchoring point for limiting straps, although this is more difficult on the driver side because of where the holes are in relation to the spring. This may not be an issue on other setups but it was on mine. The other option than drilling through the frame is to simply weld them in place and not use the bolts. The coating will need to be stripped on both the mounts and the frame to make sure you get a good weld. I bolted mine on, but if you have a good welder or know a guy, go for it. A note on bolting them in, do not overtighten these. The frame bends rather easily, you just want to take up the slack in the bolt. You can easily overtighten and bend the frame, so be mindful.

10
If you ever decide to convert back to torsion bars (don’t know why you would), you can leave the top normal mount in place, and the factory shock will still fit fine. So if you want to weld to the frame, this is not something that is completely irreversible. The lifted style upper mounts mount the exact same way as the normal style but the bolt holes are located in different positions on the brace. This is not an issue with installation, but it is not recommended to switch from the normal upper mount to the lifted styles because of all of the holes that would need to be drilled.
Adapting the Top of the Shock Most coilovers have an eyelet upper mount and this must be adapted to do this swap without changing the shock upper mount unless you want to use the stud top with the bushing kit. I used a procomp shock adapter for this purpose. The inner width of the upper bracket is roughly 1.5" and similar to the bottoms, the mount on my QA1s is 1" wide, so I used 1/2" spacers to take up the slack. The lifted style upper mount does not require the procomp adapter since the coilover shock is bolted directly to the bracket. The width on the upper mount is 1 3/8" and my QA1 shocks are 1" so spacers will be needed to take up the slack to make sure the shock doesnt move around. QA1 offers a conversion kit to convert the bearing style upper mount to a stud style. They negate the need for the shock adapter and should allow the use of a longer shock or to go lower with the same size shock than the procomp adapters. This is a viable option with the use of the bushing kit I make (see figure 5).
My kit does not include the procomp bracket, only the upper mounts with bolts to bolt to the frame and the bushing kit if ordered. The lifted style upper includes the bolt needed to secure the shock to the mount.

11
Frame Modifications The only modification that may need to be done is trimming the corner of the bump stop mount. This is most easily done with a sawzall and this is simply to create clearance for the spring. Mine fit without trimming but I wanted to trim anyway to make sure there would be enough room at full extension when the spring is drawn inward slightly. The bump stop upper cup should also be cut off and an aftermarket bumpstop installed. This is where the frame will need be trimmed:
Figure 6: Frame Trimming Required (Driver Side)
Two ½” holes will need to be drilled in the frame for the upper reinforcement bracket, and a single 3/8” hole will need to be drilled in the LCA bumpstop area for the aftermarket bumpstop.

12
Bearings, Bushings, and Bumpstops I initially used the included QA1 nylon bearings that come with the DS301, 303, etc., but they were destroyed in very short order. After talking to the QA1 tech he said they were only designed for around a 600lb spring, and since I’m running twice that he wasn’t surprised that they failed. The good news is there is a drop in steel replacement bearing, the part number for QA1 is COM8T and are rated for a 30,000lb static load. These are roughly $8 each (you need 4 if you do the shock adapter upper mount, or 2 if you do the stud upper mount) and can be found on summit, jegs, amazon, ebay, etc. under the QA1 COM8T part number. There is a kit (COM8T-102PK), but it’s more expensive for some reason and only comes with extra snap rings, which are the same snap rings used with the included nylon bearing. These bearings are the only mandatory thing that needs to change out of the box for the shocks. They are easily installed by hand. If you do the top stud mount you will need the bushing kit I make, but will only need 2 upgraded bearings for the bottom of the shocks. The tech also highly recommended bumpstops to prevent bottoming out so I got some generic energy suspension bump stops ($8 for a pair) and mounted them to the LCA by drilling a hole in the factory bump stop location and mounted them upside down. You can see this in Figure 2 above.
Limiting Straps Limiting straps are used to prevent the shocks from topping out and damaging them. They are mainly used for offroad situations, but I and several others have used them in the past to control front end lift when launching in 4wd. I don’t feel they are needed with the adjustability of coilovers, but they are easily added to my kit. Usually they use a clevis bolt for adjustability, but I mounted mine between some of the bolts. I would completely install your coilovers first, and then measure from whatever mounting points you choose with the truck jacked up and hanging in the air. Now subtract 1" from this and you want that size strap. The reason for subtracting an inch is you never really want the shock to top out, but you want to use the full travel. I do not currently use straps because I did not need them and they are a bit cumbersome to install on stock or lowered setups. My front end lift is very well controlled with just the shock alone and I do not recommend straps in addition to coilovers on anything but lifted setups and even then, only setups that actually offroad.
What These Brackets Will Not Work On
The lower brackets will not work on 2WD or Chevy/ CMC 2500 trucks. The frame on the 2500s goes inward (toward the engine) a few inches down whereas on the 1500s it’s a straight section. However, if you want to weld these to the frame, they should work fine, just bolting them on will not work as intended. If any 2500 guys want to try these I will give you a discounted set without the hardware. The bottom brackets are not needed on the 2500 to do the coilover swap because of the way the shock mounts on the 2500. This swap is much easier on 2500s, although I recommend possibly reinforcing that lower mount if you do a lot of towing or competitive driving. This will also not work on lifted trucks that moved the UCA out of the factory position. This is mainly on bigger lifts (9"+). This swap requires the factor LCA on 1500 trucks.

13
Selecting Springs and Shocks To find out what shocks and springs you need you will need to measure the “ride height” of the shock. In terms of the shock, this is the distance from the lower mount to the upper mount. This is the most important measurement of this swap. The easiest way to measure this is with the factory shock removed and a floor jack handy, although it can be done without much difficulty just by turning the wheels one way or the other to make some room. You need to measure from the lower shock bolt on the LCA to the top of the shock hoop in a straight line. If you want to gain lift from this swap, use the jack to raise the front end to the height you want then measure between the same points. I have posted a spreadsheet on every forum I have posted this swap that will aid in the selection of springs and shocks. You just need the main measurement illustrated below and to know the sprung corner weight (corner weight minus the weight of the wheel, tire, spindle, brakes, etc.) of your truck. Smaller trucks are about 1450, with larger trucks and SUVs being closer to 1550 in my experience.
Figure 7: Ride Height Measurement
The height of my bottom bracket is 1.75". The height of the procomp mount is 1.5”. The height of the upper reinforcement bracket is roughly 0.5” since it doesn’t sit exactly flush on the frame hoop. When using the lifted upper mount instead of 1.5" for the procomp adapter it will be 0.75". The stud mount is also 0.75”.

14
So as an example, if you measured 18" between the LCA shock bolt hole and the frame hoop and you use the upper brackets and procomp adapters instead of the stud conversion, your ride height will be 18"-1.75"-1.5"-0.5"=14.25". Now you want to find a shock that has this as its ride height, or median measurement between fully collapsed and fully extended. Most shock makers post this sort of thing in a table, along with a recommended spring length. If a shock says fully extended= 16” and fully collapsed=12” then it will probably work perfectly. You generally want 60% of the travel to be for compression and 40% for uptravel, but no more out of range than this. So if the shock has 2” of travel, you want 1.2” from the fully collapsed and 0.8” from fully open so it has more room to compress. Shock manufacturers generally list a ride height range with their shocks. You want to be in this range. Dividing the travel by 2 would leave 50% for downtravel and 50% for uptravel.
Once you found your shock you need to pick your spring. These need to be 2.5" ID springs to clear the UCA. 1500 trucks have roughly 1450lb of sprung weight per corner. Do not be scared by seemingly small shock travels. Travel at the wheel is roughly twice what travel at the shock is, so if a shock has 3” of travel that is roughly 6” at the wheel, which is very significant on IFS. My shocks only have 2.5” of travel and my truck rides great. The shock you select will also tell you the spring length you need.
Now you need to compress the spring to half of the travel to be at the center of shock travel. If your shock has 3.25” of travel (fully extended – fully collapsed) and we use 1350lb as the corner weight, you will need a spring that will support that weight with half the amount of travel you have. That is accounting for the static load of the vehicle. 3.25”/2 = 1.625” of travel on either side 1450lb/1.625” = 892lb/in spring If you want it to be at 60% compression and 40% uptravel, you need 3.25"*(1-.6)=1.3” of movement from just supporting the weight, and 1450/1.3=1115lb/in spring. So I like to say you need a spring between 900lb and 1150lb depending on how smooth or stiff you want the ride. The stiffer (more precise) the ride you desire, the stiffer spring you need. You may also be limited by what spring rates are actually produced in the length you need. I prefer to go more on the stiffer side. The spring rate will also affect the amount of preload you need on the spring when you install it. The risk with too soft of a spring is with bottoming out the shock, and you really want to avoid this as it could damage the shock. So as you can see choosing a shock/spring combination needs to be done after you decide on your ride height. To further tweak things, you can use the stud top, or space the procomp bracket some, or not run the upper reinforcement if you are feeling lucky. Please use the spreadsheet I made that will be close to this file on any forum as it will greatly help in selecting hardware and I have included part numbers for all springs of the relevant size made by Hyperco, Eibach, and PAC in the spreadsheet as well as a full parts list. Also feel free to email or message me if you need further help or want verification.

15
Purchasing Information See here for latest pricing and contact info: www.atomicfabandperformance.com
Or email me at [email protected] with any questions or comments.
Parts List
(2) coilover shocks.
(2) 2.5" coilover springs.
3/8" spacers for the lower mount, 1 spacer per side, ALL18571 o If using the lifted uppers, you need 2 spacers per side
1/2" spacers for the upper mount if you use the procomp bracket, 1 per side, ALL18572 o If using the lifted uppers, you do not need any of these
Pair of aftermarket bumpstops if your truck is lower than stock height, ENS-9-9101G
Upgraded bearings for the lower mount, 1 per side for stud top, 2 per side for procomp mount. Part number for QA1 shocks is COM8T-102PK. I used 4 since I used the procomp mount.
Procomp shock adapter OR stud top adapter (Stud Top is QA1 SS110SDM), Procomp mount is 690001 This is not needed if you use the lifted style uppers
QA1 spanner wrench and thrust bearing, makes preloading the spring and subsequent preload adjustment much easier, HAL-7888-110
o Viking also sells a spanner and thrust bearing kit with their shocks, highly recommended
Upgraded bushing kit that I sell if using the stud mount
I have approximately $525 invested for the above parts bought mainly from summit. This is not an expensive mod considering what you get for it. Summit/jegs/amazon/ebay/ wherever you favorite shop is will most likely have the other parts like shocks and springs. Vikings are often straight from the manufacturer. This is the second tab in the spreadsheet I made that lists the parts required depending how you do it.
Figure 8: Parts List

16
Final Word I feel it is important to say that if you are not comfortable modifying your truck’s suspension please do not attempt this modification. I am not a big shop or company with hundreds of hours in R&D. I am a guy in my garage with a skill set that allowed me to design these parts to my work on my particular application. I have a full time job otherwise, and do not carry inventory of anything but the brackets, and usually just in small quantities. I made these brackets for the sole purpose of making it easy on guys that want to do this mod but don’t have the tools/knowledge/skills/time to make the brackets themselves. This swap, even with it being a bolt-on mod, will still require refinement and tweaking on your part. This comes with the territory any time you modify a vehicle and is really the spirit of hot-rodding. I can lend my advice and experience, but due diligence must be paid before hand by reading this and doing the proper research and proper measuring to make sure of the correct parts for your particular application.
17
Coilover Brackets Installation Guide
Table of Contents
Installation Overview ................................................................................................................................. 17 Tools Needed: ............................................................................................................................................ 17 Abbreviated Instructions ........................................................................................................................... 18 Step 1: Prepare The Truck .......................................................................................................................... 18 Step 2: Trim the Frame and Cut Off the Bumpstop Cup ............................................................................ 18 Step 3: Installing the Upper Reinforcement Brackets ................................................................................ 20 Step 4: Install Aftermarket Bumpstop ....................................................................................................... 20 Step 5: Assemble The Coilovers ................................................................................................................. 22 Step 6: Install Shock Assembly ................................................................................................................... 24 Step 7: Adjust Spring Preload and Bumpstop ............................................................................................ 24 Step 8: Take A Test Drive and Get an Alignment ....................................................................................... 25 Step 9: Enjoy! ............................................................................................................................................. 25 Coilover Adjustment .................................................................................................................................. 25 Useful References ...................................................................................................................................... 26
Installation Overview The installation is not difficult, especially if you only use the lower brackets. These instructions assume
you have a decent level of wrenching experience. If you can change your own brakes you can do this
swap no problem. I did this by myself with no help, but if you have a friend that wants to help that will
speed it up. Access to a shop lift is not necessarily useful because you will need to adjust the tire height
when installing the coilovers. I recommend using a floor jack and jack stands with a cooler full of beer to
sit on. Installation should be about 2 hours for lowers only, and 4 hours for uppers and lowers if working
alone.
Tools Needed:
-Floor jack -Sockets and wrenches -Torsion bar unloading tool (can be rented from autozone or equivalent I believe) -Drill and 1/2" bit (for the upper bracket bolts) and 3/8” bit for bumpstop -Sawzall with metal cutting blade (or die grinder with cutting disc)

18
Abbreviated Instructions
This is the short version of the installation for those that don’t want to read the whole thing.
1. Jack the front end up in the air, take off the front tires for more room, and remove all the torsion bar stuff including shocks.
2. Trim the corner of the frame above the bumpstop (see picture) and on lowered vehicles cut off the bumpstop as well.
3. Install the upper reinforcement brackets (if applicable, otherwise skip this step). 4. Install the new bumpstop or confirm the factory one is acceptable. 5. Assemble the shocks and springs with thrust washer kit and bearings (if needed) on the bench. 6. Install the shock assembly into the truck and connect to both upper and lower brackets. 7. Adjust the spring preload so the shock sits at half travel and trim bumpstop if needed. 8. Take a test drive and get an alignment if your ride height changed. 9. Enjoy!
Step 1: Prepare The Truck
Jack the front end off the ground so the suspension is fully extended and the tires are roughly 3-4" off
the ground. Support the frame with jack stands and sit the truck down on them. Take off the front
wheels to gain access to where we will be working. Take off the factory shocks.
I recommend using the official GM torsion bar unloading tool when dealing with the torsion keys. I have
used a 2 jaw puller before and trust me when I say it was sketchy as hell, the real tool is much easier and
far safer. With that said you can go ahead and unload the torsion bars and remove the bars, keys, and
crossmember and throw it next to the factory shocks you just took off.
Step 2: Trim the Frame and Cut Off the Bumpstop Cup It is easier to remove the bumpstop first. Use your cutting instrument of choice (I used a sawzall) and cut
off the bumpstop cup as evenly with the frame as you can. Lifted trucks may not need to do this
depending how much clearance you currently have and what shock you go with. The idea is to make sure
the bumpstop prevents the shock from bottoming out and damaging it. Next use your cutting instrument
of choice and cut off the corner of the frame that was closets to the shock from about middle of the
bumpstop cup pointing to the front axle. The corner above that section may need trimming as well. See
the Figure 2 below. This cut will not affect the truck integrity in any way. You will be installing an
aftermarket bumpstop to replace the factory one, except it will be pointed up, which is why you want the
area where you cut off the factory cup to be smooth, however, you can leave it if you center the new
bumpstop. I recommend just removing the old one though to make it easy.
If you have the lifted style brackets, you may need to trim the edge of the shock pocket to ease
installation of the bolt that holds the shock. Do not cut excessively here. A 1 inch section cut out is plenty.

19
Figure 9: Frame Trimming
Repeat this cut for both sides. This is the only cutting that will be needed during this installation.

20
Step 3: Installing the Upper Reinforcement Brackets Skip this step if you are not using the upper brackets. This is the hardest part of the installation because space is limited, especially on the driver side. Do the
passenger side first because it is easier. You want to put the bracket up against the vertical frame and
top of the shock hoop as tight as you can. The top bolt hole is slightly oversize and should line up fairly
well, but it doesn’t need to be exact because the hole is much larger than the procomp (or stud top)
shaft. You want it to be flat against the frame and touching the shock hoop, basically as snuggly in the
corner as possible. I recommend using a bolt (or the procomp adapter itself) to hold it tight to the frame
while you drill. Tighten the top bolt and nut so it does not move and make sure it's as tight as you can
get it and touching the top of the shock hoop before you drill your 1/2" holes.
The installation of the lifted style upper is similar, except you will not use the procomp bracket and
should instead use some other bolt through the top. It doesn’t have to be a large bolt, you just need
enough force to make the bracket stay and not shift during the drilling process.
When you drill go straight into the frame and take your time while using plenty of lubricant. Use the
bracket as a guide to where the holes should be drilled. Cobalt drill bits are very good for this purpose.
Use a slow speed with lots of pressure. Overheating will destroy drill bits quickly. Once you are through
both sides of the frame, insert the included bolt and tighten just enough to take up the slack. The frame
will crush rather easily if you overtighten, so be gentle. Make sure both bolts are tight before calling it
done. The bolt should have at least 1-2 threads showing past the nut. The nuts are locking nuts and
should not need to retightened or back out.
The procedure is nearly identical with the driver side in terms of securing the bracket to the frame and
hoop before you drill. You will notice they are more on top of each other and access to the top one is
difficult. I found it easiest to put the nut on a box wrench and secure with a piece of masking top on the
outside to hold it in there while turning the bolt when with a socket wrench. The front axle is right in the
way, but I managed to do it with it installed. Install the lower bolt after the top one. Keep in mind again
not to overtighten these because the frame can be crushed. Make sure both are tight before moving on.
Once you finish this step the hard part is done and the rest goes much faster!
Step 4: Install Aftermarket Bumpstop The aftermarket bumpstop I used was a generic one with a 3/8" stud and nut on the bottom side. I
drilled a 3/8" hole in the round flat spot of the LCA where the factory bumpstop contacted. I installed
the new one so it faces up (upside down of the factory one). I positioned it so it fully contacted the
frame above it and fully sat on the LCA. I used a standard drill and 3/8" bit. The LCA drills surprisingly
easily. See Figure 2 below for bumpstop location.

21
Figure 10: Complete Passenger Side
Repeat this for both sides. The bumpstop can/will be trimmed when we have the coilover established in the truck. We want the
bumpstop to engage just before the shock bottoms out preventing damage to the shock while still using
all of the shocks available travel. This is easiest at this point before the spring is installed. Take the shock
and loosely mount it in the lower bracket and attach the it to the procomp bracket and install in the
upper mount. You may need to use a floor jack under the LCA to raise it up so you can tighten the top nut
holding either the stud on or the procomp adapter.
What we are doing is finding how much we need to trim the bumpstop so it engages before the shock
bottoms out. The bumpstops are to protect the shock from bottoming out should you hit a really large
bump in the road or something.
You want the bumpstop to engage slightly before the shock bottoms out. With the truck sitting at ride
height, measure from the top of the bump stop to the spot on the frame where it would contact should
the suspension cycle all the way down. You want this distance to be slightly less than your available
downtravel. So if your shock has 4" of travel, then the shock should be sitting at roughly 2” (middle of

22
travel). You want to use most of the shock travel before the bumpstop engages. I use the rule that you
want the bumpstop to engage with 20% travel downtravel left to give the bumpstop time and distance to
absorb the load, so 2”*(100%-20%)=1.6". That is the amount you want the bumpstop to be away from the
frame with the truck sitting at ride height. This will give 2”-1.6”= 0.4” for the stop to do its job. If yours is
closer than that you can cut the bumpstop with a knife or saw. If it is farther away, you may need to shim
your bumpstop or buy a longer one. I had to cut the first land off my bumpstops to get the right distance.
Slowly raise the lca using the floor jack so the bumptop is almost engaging the frame above it. It should
contact before the shock bottoms out otherwise you will need a longer bumpstop (they come in many
different sizes and are very cheap). Trim the bumpstop using a sawzall or other cutting tool to the height
at which this happens.
Once the bumpstop height is set lower the LCA and remove the shock for assembly.
Step 5: Assemble The Coilovers
This installation will go a lot easier if you set out all the stuff and make sure everything is present before
you start turning wrenches. Hopefully you followed my instructions on how to select the proper springs
and shocks so this should be fairly painless.
If you bought QA1 shocks, you will want to replace the nylon bearings first. The metal ones you bought
(right? COM8t-102PK) are easily inserted where the nylon ones are currently. You should not need any
tools to press them in, but may need pliers to remove the snap ring holding them in. The upgraded
bearings are not optional, they are mandatory! Viking shocks already come with upgraded bearings.
Now is good time to make a mark on the shaft at exactly half travel. Measure from the shock from eye
to eye fully extended and fully collapsed. Now subtract these two numbers and divide by 2. Now add
this number to the collapsed measurement and extend the shock to this measurement. Make a mark
right at the bottom of the shaft near the body with a felt tip sharpie marker. This is where you want the
shock to be sitting when you install it in the truck and it has the full weight on it. You will use this mark
to adjust the preload of the spring. This is important to do!
For example, if your shock is 16" extended and 12" collapsed, that is (16”-12”)/2=2".
2”+12”=14" so you want to extend the shock so it measures 14" eye to eye and make your mark on the
shaft near the body. Do this for both shocks.
If you also bought the thrust bearing kit go ahead and put on the lower jam nut all the way to the
bottom, then the adjustment nut, then the washer, then the bearing, then the top washer. Make sure to
put adequate anti-seize or heavy grease on the bearing before installation, it will make adjustment much
easier when the spring is under load. I found I had to take the top off the shock to be able to put the top
puck in. This is easy when the spring is off. You may just have to loosen it and not take it all the way off,
or you may be able to install the top puck without loosening it at all. I believe it’s a 23mm wrench for the

23
nut, but a smaller crescent wrench will work in a bind.
Put the spring over the shock and insert the top puck. If you had to loosen or remove it to install the
spring tighten it back now. It is tricky with the spring in the way, but I managed to do it with a 23mm (I
think) wrench and a crescent wrench. Go ahead and turn the spring adjustment nut on the shock as far
as you can hand tight, then get the adjustment spanner wrench and turn it about half an inch up on the
shock. This is just an initial preload guess and we will fine adjust it once we get it installed.
Once you finish this part the shock should have the spring installed and slightly preloaded, and the metal
bearings installed. I recommend going ahead and setting the shocks to a 9/18 setting so you can avoid it
being too soft to start with. This is a good daily driver setting in my opinion anyway. Once you have done
this set the shocks aside for the moment. It should look like this (minus the procomp adapter),
Figure 11: Assembled Shock

24
Step 6: Install Shock Assembly You may find it easier to go ahead and install the procomp adapter and lower bracket on the shock
before putting it in the truck (see Figure 1 on page 6). Use the 1/2" spacer to move the shock towards
the truck (see Figure 10) when installing the procomp adapter. You also want it to be rotated nearly
perpendicular to the frame (see Figure 10 again). The corners of the bracket will fit between the gussets
of the upper reinforcement bracket. Go ahead and snug up the bolt. It does not need to be super tight,
just snug, perhaps 25ftlb. Now you are ready to put it in the truck. The following process is the same for
both sides.
I found it easiest to come up under the UCA and insert the stud of the procomp adapter into the shock
hoop then slide the bottom bracket over the LCA. If you can't get it in there push the spindle down which
should be easy since the torsion bars are out. You need to use the 3/8" spacer on the lower bolt on the
backside, so it should push the shock towards the front of the truck. The bolt direction shouldn’t matter,
but I put it facing the back giving the CV shaft more clearance. Same torque spec for the top bolt,
probably 25ftlb or so. Go ahead and snug up the lower bolt that goes through the LCA as well.
Now you may need the floor jack to lift the spindle so you can get the nut on top of the procomp
adapter installed (unless you are a beast and pick up the brake/hub/spindle with one hand and guide the
shock with the other hand), this is where a second set of hands comes in handy. Simply put the jack
under the lower ball joint and jack it up so the stud goes through the hole in the hock hoop. You want to
slide it away from the UCA as far as possible. Mine has roughly 1" clearance between the OD of the
spring and the UCA. Clearance will change as the suspension cycles, this is normal. Make sure to install
the large washer under the nut on top of the procomp bracket.
Once this is done make sure nothing is contacting the shock or spring and tighten all bolts and reinstall the wheels. The stud top installation is nearly identical to the procomp adapter. You can use washers/spacers with either one to gain additional height without adjusting spring preload. The lifted style upper is very similar, but you may find it easier to install it on the lower mount first while off the truck then move the entire assembly into position at once. Install the top bolt through the bracket to hold it (don’t forget the spacer), and then lift the LCA so you can install the bottom bolt.
Step 7: Adjust Spring Preload and Bumpstop You will want to pay attention to that mark you made on the shock shaft when you first started. You
want the truck to sit right at that level with the full weight on the coilovers. Remove the jackstands and
slowly lower the truck down on to the wheels. The following process will probably take several iterations
to get the right preload on the spring.
Use the spanner wrench to turn up the adjustment nut until the truck sits at the mark you made. See
25
Figure 10 for about how much it took mine to sit where I made the mark on the shaft. You will want to
raise the truck back up while adjusting to make turning the wrench easier. Once the shock sits where
you made the mark on the shaft you are almost done! Once you have the main nut set, tighten the jam
nut to make sure it doesn’t move.
Overextension is generally not a problem unless you frequently pull the front wheels off the ground (hill
jumping perhaps) in which case you will want to install limiting straps to prevent overextension.
Step 8: Take A Test Drive and Get an Alignment On the first test drive go very slow making sure there are no abnormal sounds or feels. Clanking or
banging is bad, and if it's over a bump probably indicates the shock is bottoming out in which case you
need to adjust your bumpstop, use a higher spring rate, increase shock dampening, or a combination of
all of these.
Because you changed the front end height (most likely), you will need to get a front end alignment. You
will probably get some funny looks from the tech but the camber adjustment range should still be in
check unless you are super low. I had to install the belltech offset UCA bushings in mine because it is
rather low, but others have not needed to. The alignment adjusters operate the same as factory.
Step 9: Enjoy! I am very happy with this mod and think it is a great upgrade for these trucks. Please let me know if you
have any questions or comments in one of the forums mentioned in the beginning. I am mainly on PT,
but check in on the others often. I go by the screen name “Atomic” on all internet forums. Also feel free
to visit my facebook page and/or website.
If you need further detail, the link from “Tahoewhat” on tahoeyukonforum.com in the Useful References section above is very helpful and he documents his installation quite well.
Coilover Adjustment
The shock settings can be adjusted to your personal taste. I generally prefer it very stiff for track duty (13-15) and somewhat soft for common driving (9-10). The knobs make it very easy to adjust the shock dampening. Ride height can be adjusted in the same fashion that we used to initially set the preload. The springs may need readjustment after the first week or so. I have not touched mine since I first installed them. Whenever ride height changes it is recommend to have your front end aligned. Do not move the shocks far out of their mid range of travel. If you find yourself having to adjust them so there is almost no uptravel or downtravel then the solution is to get a new shock that is longer or shorter, or to adjust your ride height some other way. The stud top with my bushing kit can easily be raised by using some shims up to about 0.5”, and the procomp adapter can be done the same way.

26
Useful References These are forum threads that I made before typing this document, and/or threads made by other forum
goers who have used my parts for their own swap. There words are there's alone.
My Website My website is www.atomicfabandperformance.com and my facebook page is https://www.facebook.com/atomicFandP/
performancetrucks.net
My build first coilover thread: http://www.performancetrucks.net/forums/gm-drivetrain-suspension-
22/99-07-4wd-front-coilover-conversion-518118/
My purchase thread: http://www.performancetrucks.net/forums/member-made-tools-parts-classifieds-
197/99-07-4wd-front-coilover-conversion-brackets-524354/#post5168393
Iregret build thread: http://www.performancetrucks.net/forums/projects-gallery-189/2000-chevy-
silverado-project-charlie-murphy-489579/page11/#post5156548
Thread that gave me the idea and good for 2500 guys: http://www.performancetrucks.net/forums/gm-
drivetrain-suspension-22/ditched-torsion-bars-coilovers-hd-504605/
tahoeyukonforum.com
My initial thread seeking interest: http://www.tahoeyukonforum.com/forum/showthread.php?t=57560 Tahoewhat review and user guide **very detailed**:
http://www.tahoeyukonforum.com/forum/showthread.php?t=59830
04blackout review and build thread:
http://www.tahoeyukonforum.com/forum/showthread.php?t=60498
gmfullsize.com
Initial thread: http://www.gmfullsize.com/forum/showthread.php?t=274179 00silvyON (lifted guy): http://www.gmfullsize.com/forum/showthread.php?t=291434&page=8 My initial thread on each forum contains an older version of my summary document, but the conversations take different turns based on the personality of the forum. For instance, PT is mainly performance based, the tahoe guys want to go really low, and GMFS is mainly cranked/lifed setups.