Tools for Reconciling Financial Statements
43
Financial Statements Tools for Reconciling
Transcript of Tools for Reconciling Financial Statements

Financial Statements Tools for Reconciling


Financial Statements – Tools for Reconciling
Page iii
Table of Contents View Source Documents ........................................................................................................ 1
Journals (General Ledger) ................................................................................................... 1
Expense Reports ................................................................................................................ 2
ProCard Statement ............................................................................................................. 2
Budget Transfers ................................................................................................................ 2
Budget Journals ................................................................................................................. 3
Reconciling ProCard Charges .................................................................................................. 4
Generate ProCard Transaction Register .............................................................................. 4
Download ProCard Payment Voucher to Excel .................................................................. 10
Reconciling Payroll Transactions .......................................................................................... 13
Generate Payroll Analysys Report .................................................................................... 13
Commitment Accounting Salary by Cost Center Report ........................................................ 18
Salary by Cost Center ....................................................................................................... 18
Salary by Project ID Report ............................................................................................... 23
View Commitment Control Activity Log ............................................................................... 28
Budget Details .................................................................................................................. 28
Budget Overview ............................................................................................................. 33
Shared Information Services Monthly Reconciliation Report ................................................ 35
Financial Statements – Tools for Reconciling
Last Revision 02/06/2020
1
View Source Documents The source document is the original form used to generate a transaction line. The source document can be accessed from the Budget Details or the Budget Overview page, but it requires several layers of drilling. Since you have the reference number from the Financial Statement, it is suggested to navigate directly to the page used to generate the transaction by using the appropriate search page. Listed below are the navigation paths for the different types of documents found on the Financial Statement:
Journals (General Ledger) 1. Navigate to the Navigator > Financials > General
Ledger – Journals > Journal Entry > Create/Update Journal Entries.
2. The Create/Update Journal Entries page is displayed. If necessary, click the Find an Existing Value tab.
3. Click the Clear button to remove the default values. 4. Enter the Business Unit (example: UTARL). 5. Enter the 10-digit reference number in the Journal
ID field. 6. Click Search. The Journal page is displayed.
Vouchers
1. Navigate to the Navigator > Financials > Accounts Payable – Vouchers > Add/Update > Regular Entry.
2. The Voucher page is displayed. If necessary, click the Find an Existing Value tab.
3. Enter the 8-digit reference number in the Voucher ID field.
4. Click Search. The Voucher page is displayed.

Financial Statements – Tools for Reconciling
Last Revision 02/06/2020
2
Expense Reports 1. Navigate to the Navigator > Financials > Travel
and Expense > Travel and Expense Center. 2. Click Expense Report. 3. Click View. 4. Enter the 10-digit reference number in the Report
ID. 5. Click Search. The Expense Report Detail page is
displayed.
ProCard Statement The ProCard Transaction Reconciliation statement provides detailed ProCard information to help aid in the reconciliation of the monthly Financial Statement.
1. Navigate to the Navigator > Financials > Purchasing > Procurement Cards > Reconcile > Reconcile Statement.
2. Enter or lookup the cardholder by Name or Empl ID.
3. Click the Statement Status drop-down menu and select Closed.
4. Click the Search button. 5. The Procurement Card Transaction page is
displayed. The charges will have a status of Closed. This status is assigned automatically by the system after the ProCard processing deadline date occurs.
Budget Transfers The Budget Transfer page is used to view transfers between and within Cost Centers.
1. Navigate to the Navigator > Financials > Commitment Control > Budget Journals > Enter Budget Transfers.
2. The Search page is displayed. Make sure the Business Unit field is defaulting to UTARL.
3. Enter the 10-digit Journal ID number. 4. If necessary, remove the defaulting Empl ID from the
User ID field. 5. Click Search. The Journal page is displayed.

Financial Statements – Tools for Reconciling
Last Revision 02/06/2020
3
Budget Journals The Budget Journal page is used to view budget adjustment and other journals processed by the Budgets & Financial Planning office.
1. Navigate to the Navigator > Financials > Commitment Control > Budget Journals > Enter Budget Journals.
2. The search page is displayed. Make sure the Business Unit field is defaulting to UTARL.
3. Enter the 10-digit Journal ID number. 4. If necessary, remove the defaulting Empl ID from the
User ID field. 5. Click Search. The Journal page is displayed.

Financial Statements – Tools for Reconciling
Last Revision 02/06/2020
4
Reconciling ProCard Charges
Generate ProCard Transaction Register The ProCard Transaction Register provides detailed ProCard information to help aid in the reconciliation of the monthly Financial Statement. The ProCard Transaction Register can be generated by department or for a single cardholder. If generated by department, the report displays each cardholder with ProCard charges for a specific Cost Center or Project. Each Cost Center/Project is displayed in a different sheet of the workbook (Sheet 1, Sheet 2, etc.).
This report contains information such as: • Transaction Description • General Ledger Account (e.g. 63003 – Office Supplies) • ChartField string associated with the expense line • ProCard payment voucher reference number and the payment voucher status • Merchant information • Relevant Dates (e.g. Transaction Date, Merchant Post Date, etc.)
The ProCard Transaction Register provides detailed ProCard information to help aid in the reconciliation of the monthly Financial Statement. The ProCard Transaction Register can be generated by department or for a single cardholder. If generated by department, the report displays each cardholder with ProCard charges for a specific Cost Center or Project. Each Cost Center/Project is displayed in a different sheet of the workbook (Sheet 1, Sheet 2, etc.).
This report contains information such as:
• Transaction Description • General Ledger Account (e.g. 63003 – Office Supplies) • ChartField string associated with the expense line • ProCard payment voucher reference number and the payment voucher status • Merchant information • Relevant Dates (e.g. Transaction Date, Merchant Post Date, etc.)
1. Navigating to the: Navigator > Financials > Reporting Tools > BI Publisher > Query Report Scheduler Note: To generate this report, you must have one of the following UT Share security roles:
• Level III-Reconciler • Level V-Reconciler
The Query Report Scheduler page is used to run the ProCard Transaction Register and to preserve the criteria used to generate the report in a run control record.
2. The Query Report Scheduler page is displayed: • First Time Users: The fields on the page are blank. You will be required to provide the conditions
for your report. Proceed to step 3. • Returning Users: The fields on the page defaults with the settings that were last saved. You must
verify the Data Source Type and Report Name. If correct, proceed to step 9.
Financial Statements – Tools for Reconciling
Last Revision 02/06/2020
5
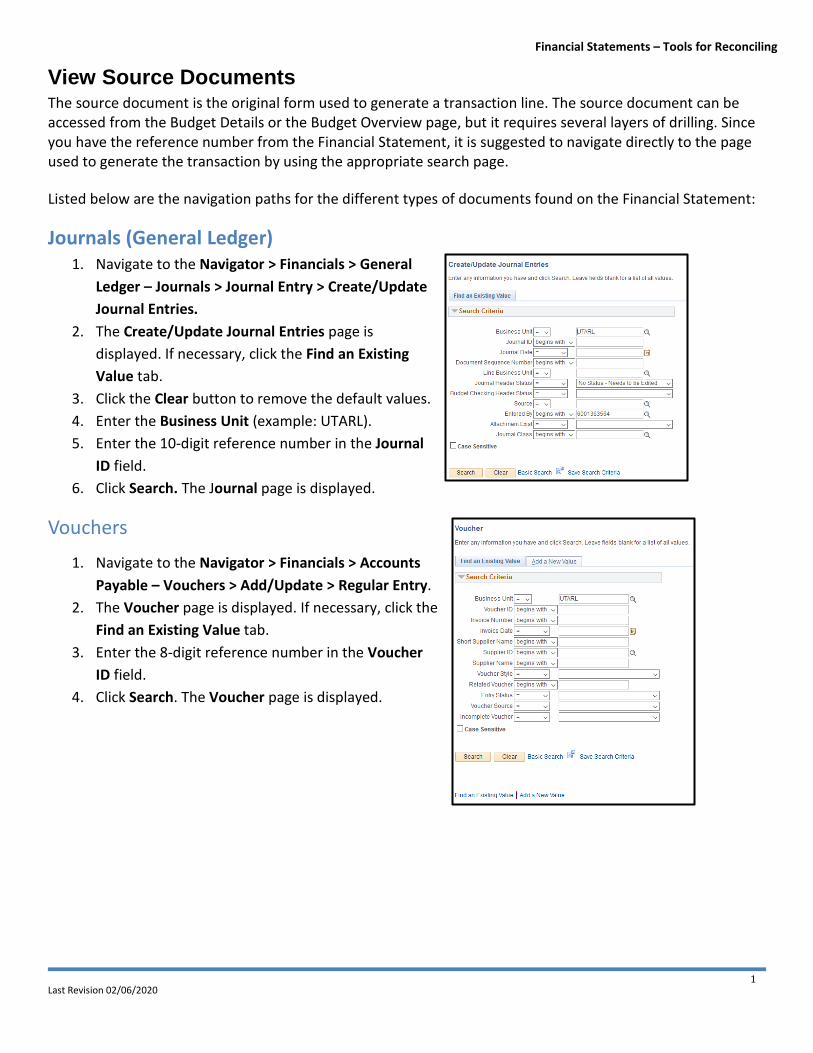
Optional: You may leave the Search By field blank and click the Search button. If you have created only one Run Control, the Query Report Scheduler page displays. If you have multiple Run Controls, a Search Results table will display; where you must select the appropriate ID.
3. Select “Connected Query” from the Data Source Type drop-down menu.
4. From the Report Name field: Enter or lookup the Report Name: UTAPPROCREG (UTA ProCard Transaction Register).
5. Press Save.
6. Enter the Query Parameters in the first pop-up:
a. Enter Set ID “UTARL”. Enter or lookup 6-digit Dept number.
b. Click OK.
7. Enter the Query Parameters in the second pop-up:
a. Enter Employee ID or leave this field blank for ALL ProCard cardholders.
b. Enter the desired Bill Date From and Bill Date To fields.
c. Click OK. Proceed to step 10.
Note: The billing cycle for ProCard charges is the 4th through the 3rd (e.g. Feb 4th – Mar 3rd). If you want to generate a report for a specific billing cycle, you must enter the date after the billing cycle ends in the Bill Date From and the Bill Date To field.
8. Click the Update Parameters link to change the parameters of the report. Proceed to step 6 and step 7 above.
9. Click the Save button to save the conditions of your report.
10. To generate the report, click the Run button.

Financial Statements – Tools for Reconciling
Last Revision 02/06/2020
6
The Process Scheduler Request page is displayed.
11. Select the Type from the drop down list. • Email will send the report directly to your email when it has processed. • Web will make the report available through the Report Manager.
12. The Format field defaults to “XLS”. This indicates the output file is an excel file. PDF or XLS are recommended.
Note: To send the report to additional recipients, click the Distribution link and complete the appropriate fields.
13. Click the OK button to return to the Query Report Scheduler page.
A Process Instance number is now assigned. This number is used to track your report from the Process Monitor page.
14. Click the Process Monitor link.

Financial Statements – Tools for Reconciling
Last Revision 02/06/2020
7
9. The Process Monitor page is used to view the status of the report. Initially, the Run Status may be “Queued” and the Distribution Status is “N/A”.
It may be necessary for you to click the Refresh button multiple times (every 20 seconds) to refresh the page, until the Run Status is “Success” and the Distribution Status is “Posted”.
11. Once the statuses have changed to “Success” and “Posted”, Click the Go Back to Query Report Scheduler link.
rom the Query Report Scheduler page.
12. Click the Report Manager link to view the ProCard Transaction Register.
Financial Statements – Tools for Reconciling
Last Revision 02/06/2020
8
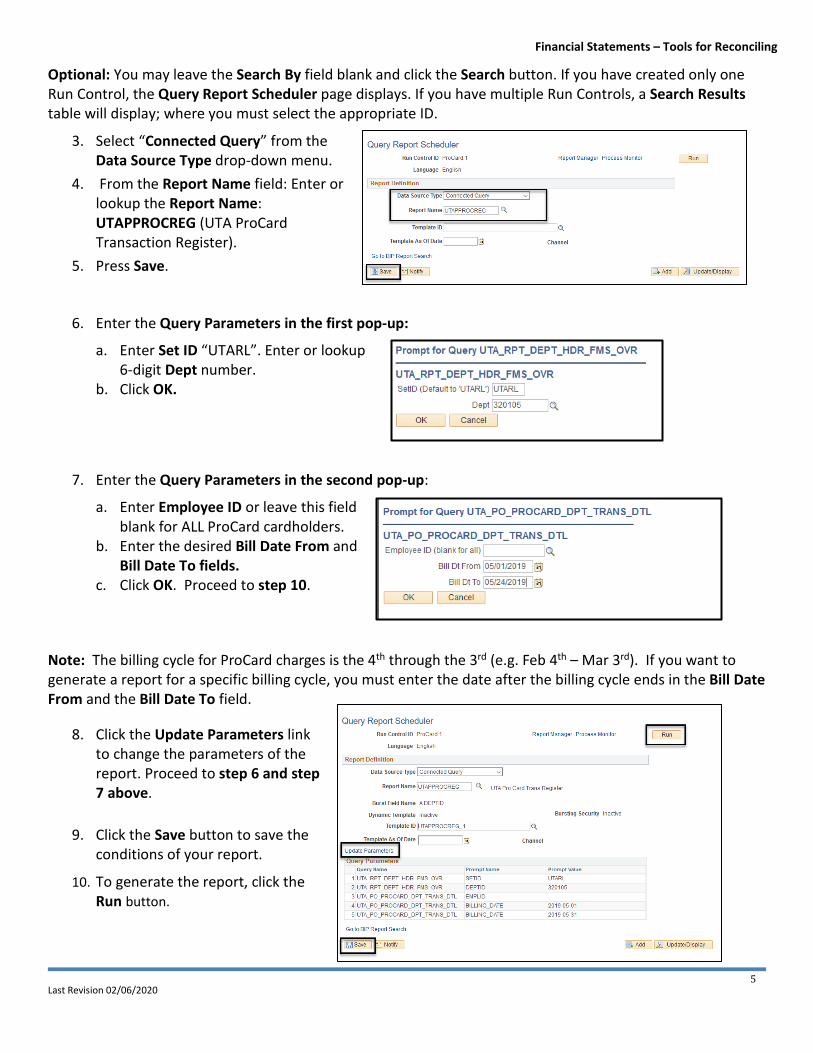
The Report Manager page will display. The report may be found under one or more of the tabs; List, Explorer or Administration. The example below displays the report under the Administration tab.
13. Select the ProCard report file name located under the Report column.
The File List grid may display under a new Report Index Tab depending on which Report Manager tab you find the report.
14. Click the ProCard report file name (UTAPPROCREG.xlsx) to open the report. Note: If you run the report from the home page pagelet this will display as well.
10. You may be presented with a dialog to Save or Open the report, select the appropriate option.
Financial Statements – Tools for Reconciling
Last Revision 02/06/2020
9
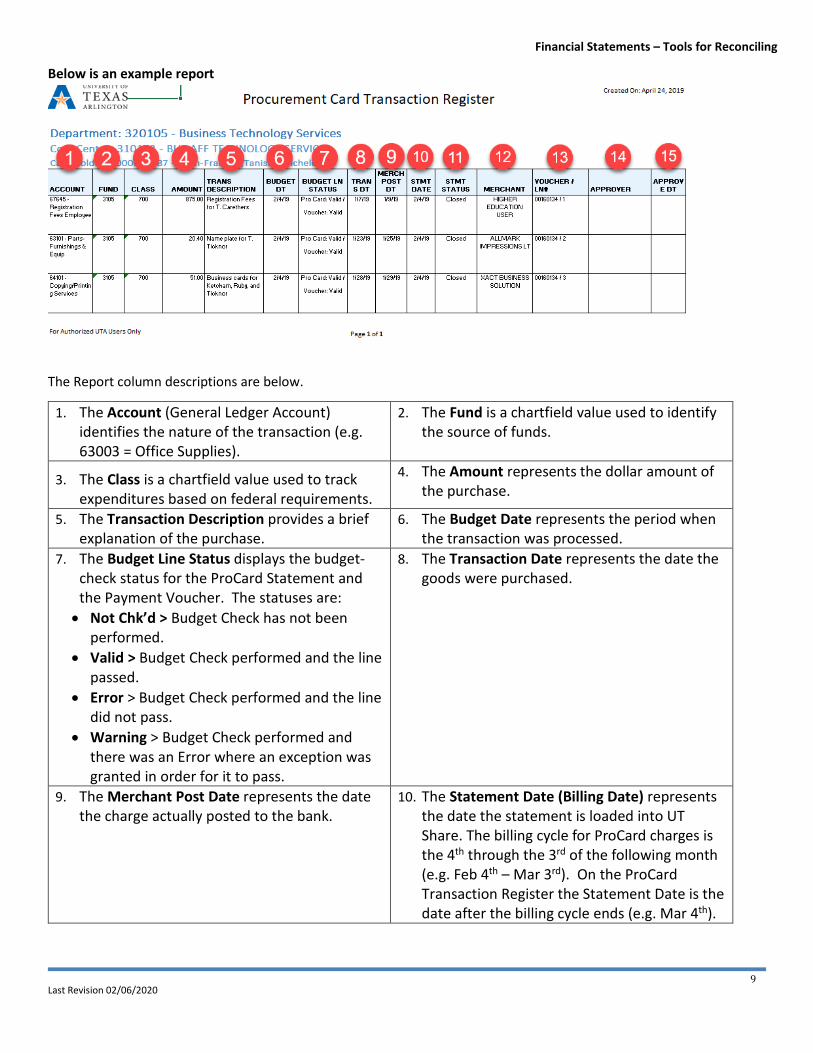
Below is an example report
The Report column descriptions are below.
1. The Account (General Ledger Account) identifies the nature of the transaction (e.g. 63003 = Office Supplies).
2. The Fund is a chartfield value used to identify the source of funds.
3. The Class is a chartfield value used to track expenditures based on federal requirements.
4. The Amount represents the dollar amount of the purchase.
5. The Transaction Description provides a brief explanation of the purchase.
6. The Budget Date represents the period when the transaction was processed.
7. The Budget Line Status displays the budget-check status for the ProCard Statement and the Payment Voucher. The statuses are: • Not Chk’d > Budget Check has not been
performed. • Valid > Budget Check performed and the line
passed. • Error > Budget Check performed and the line
did not pass. • Warning > Budget Check performed and
there was an Error where an exception was granted in order for it to pass.
8. The Transaction Date represents the date the goods were purchased.
9. The Merchant Post Date represents the date the charge actually posted to the bank.
10. The Statement Date (Billing Date) represents the date the statement is loaded into UT Share. The billing cycle for ProCard charges is the 4th through the 3rd of the following month (e.g. Feb 4th – Mar 3rd). On the ProCard Transaction Register the Statement Date is the date after the billing cycle ends (e.g. Mar 4th).

Financial Statements – Tools for Reconciling
Last Revision 02/06/2020
10
11. The Statement Status column displays the status of the ProCard Statement. The purpose of this information is to help you identify those transactions requiring reconciliation and/or approval. The statuses are: • Staged > Statement has not been
reconciled. • Verified > Statement reconciled but waiting
approval. • Approved > Statement reconciled and
approved. • Closed > Statement is no longer available to
departments. Transactions have been pulled into a voucher to pay the vendor (e.g. Citibank).
12. The Merchant column provides the name of the vendor where the purchase was made.
13. The Voucher/Line column provides the reference number for payment voucher and the transaction line number.
14. The Approver column displays the name of the individual that approved the ProCard Statement.
15. The Approver Date represents the date the approving official approved the ProCard Statement.
Download ProCard Payment Voucher to Excel The ProCard charges on the ProCard Payment Voucher are sub-totaled (dollar amounts are added together) for transactions using the same General Ledger Account (e.g. 67106 – Official Occasion) and the payee for the ProCard payment is listed as “Citibank”. This can make it difficult to reconcile the entries on the voucher to your ProCard Transaction Log or to the monthly Financial Statement.
To reconcile the amounts that were sub-totaled on the voucher, you can download the ProCard Payment Voucher to Excel, sort/filter the information by department or GL Account and add a formula to match the totals. The steps below explain how to download the ProCard Payment Voucher to Excel:
1. Begin by navigating to the Navigator > Financials >Accounts Payable > Review Accounts Payable > Vouchers > Accounting Entries
2. Enter the ProCard Voucher reference number in the Voucher ID field and click Search.

Financial Statements – Tools for Reconciling
Last Revision 02/06/2020
11
3. Click the “Show All Columns” icon to display all columns in the table.
4. Scroll to the right-side of the page and click the download icon located in the blue title bar.
5. Depending on your browser, a
new window will appear. If necessary, select “Open with Microsoft Excel” and click OK.
Note: If the new window does not appear, it may be necessary for you to disable pop-up blockers.
6. When the Excel Window opens, you may be presented with the following message “The file you are trying to open, ‘ps-2.xls’, is in a different format than specified by the file extension. Verify that the file is not corrupted and is from a trusted source before opening the file. Do you want to open the file

Financial Statements – Tools for Reconciling
Last Revision 02/06/2020
12
now?” select “Yes”.
7. The charges from the ProCard voucher are now displayed in Excel. 8. Click the Enable Editing button on the yellow bar that displays above the open spreadsheet.
9. It is recommended that you Sort or Filter the table accordingly to match the information with your
Financial Statement. To Filter the table: a. Click the Sort & Filter icon . b. Select Filter from the menu.
c. After selecting Filter from the menu. A drop-down triangle will be added to Row 1 for each column in the table. Select the down-triangle for the column that you want to filter.
d. Once you have added the appropriate filters, the table will display only the selected
information. If necessary, you can sort the Account column (General Ledger Account) and/or add a formula to calculate the Monetary Amount column to reconcile the information against your Financial Statement.
Example of Results: Financial Statement

Financial Statements – Tools for Reconciling
Last Revision 02/06/2020
13
Reconciling Payroll Transactions Generate Payroll Analysis Report
1. Navigate to the Payroll Analysis Report: Navigator > Financials >FMS Reporting Tools > BI Publisher > Query Report Scheduler.
Note: First Time Users need to create a Run Control ID, see below:
a) Click the Add a New Value tab. b) Provide a meaningful name like “payroll.analysis.report”, (up
to 30 characters, no spaces, case sensitive). c) Click the Add button. d) Select the Connected Query from the Data Source Type drop
down list. e) Enter UTAPYANALDPT in the Report Name field, or lookup
the report. f) Press Save. Proceed to Step 6.
To find an existing RunControl:
2. Click the Find an Existing Value Tab. 3. Click Search. A list of Run Control IDs will be listed if there are multiple, otherwise the existing Run
Control ID report will display. 4. Click on the payroll analysis Run Control ID that displays in the list.

Financial Statements – Tools for Reconciling
Last Revision 02/06/2020
14
5. Click on the blue Update Parameters link. You will be prompted to enter the query parameters.
Financial Statements – Tools for Reconciling
Last Revision 02/06/2020
15
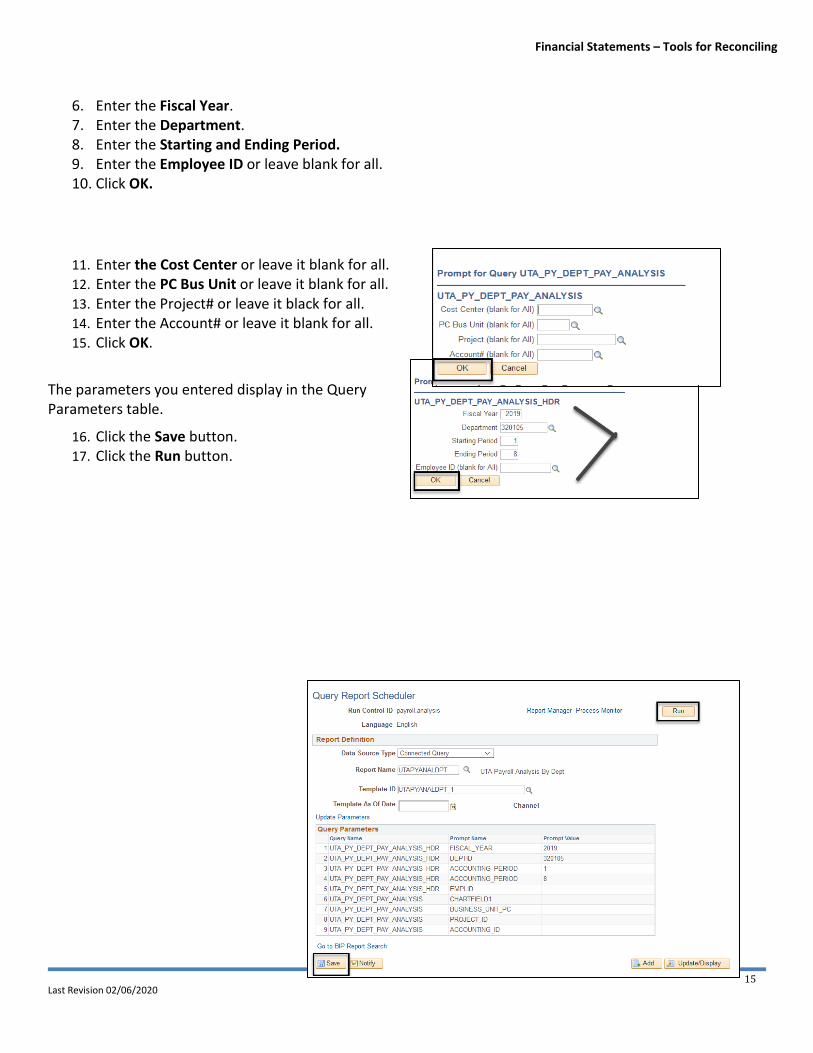
6. Enter the Fiscal Year. 7. Enter the Department. 8. Enter the Starting and Ending Period. 9. Enter the Employee ID or leave blank for all. 10. Click OK.
11. Enter the Cost Center or leave it blank for all. 12. Enter the PC Bus Unit or leave it blank for all. 13. Enter the Project# or leave it black for all. 14. Enter the Account# or leave it blank for all. 15. Click OK.
The parameters you entered display in the Query Parameters table.
16. Click the Save button. 17. Click the Run button.

Financial Statements – Tools for Reconciling
Last Revision 02/06/2020
16
The Process Scheduler Request page is displayed. 18. If necessary, change the Format
field to the appropriate output option: “PDF” (Portable Document Format) or “XLS” (Excel).
19. If necessary change the Type of report field to Email which will send the report to the user email. The default is Web which will enable the report to be viewed in Report Manager.(Web defaults).
20. Click OK.
21. Click the blue Process Monitor link to monitor the progress of the report. The Process Instance number is also displayed.
The report is complete and ready to view when the Run Status shows “Success” and the Distribution Status shows “Posted”. Note: If multiple reports are listed, verify using the process instance number.
22. Click the blue Go back to Query Report Schedule link.

Financial Statements – Tools for Reconciling
Last Revision 02/06/2020
17
23. Click the blue Report Manager link.
The Report Manager page is displayed. The report will display under one or more of the tabs, usually the Administration tab.
15. Click the TABs to find the report listing.
17. Click the file name located under the Description column.
Here is an example of the report as an Excel file.

Financial Statements – Tools for Reconciling
Last Revision 02/06/2020
18
Commitment Accounting Salary by Cost Center Report Salary by Cost Center The Salary by Cost Center report is used to view salary information for all employees associated with a specific Cost Center.
Note: The Salary by Cost Center Report can be generated by end users with the following UT Share security roles: Level III, Level III-Reconciler, Level V, or Level V-Reconciler.
1. Begin by navigating to the: Navigator > Financials >UTZ Customization > Commitment Accounting > Reports > Salary by Cost Center
2. The Salary by Cost Center search page is displayed.
• First Time User – Create a Run Control ID:
a) Click the Add a New Value tab. b) Provide a meaningful name for your Run
Control ID (up to 30 characters, no spaces, case-sensitive). Run Control ID Example: salary-by-cost-center
c) Click the Add button and proceed to step 3. • Returning Users > Use an Existing Run Control ID
a) From the Find Existing Value page, enter the Run Control ID in the Search by field.
b) Click Search and proceed to step 3.
Optional: You may leave the Search By field blank and click the Search button. If you have created only one Run Control, the Salary by Cost Center page displays. If you have multiple Run Controls, a Search Results table will display; where you must select the appropriate Run Control ID.
The Salary by Cost Center page is displayed. Note: If you are a returning user, the Salary by Cost Center page defaults with the values last saved or used. Depending on the information that you want to view, you should update the parameters accordingly (e.g. Accounting Period, Cost Center, etc.).
a) Enter Set ID “UTARL”.Enter Fiscal Year (e.g. 2019).
b) Enter Accounting Period (e.g. 1 = Sept, 2 = Oct, etc.).
c) nter Cost Center or leave the field blank for all Cost Centers.
d) Enter Empl ID or leave the field blank for all employees.
3. Click the Save button to save the conditions of your report. 4. To generate the report, click the Run button.

Financial Statements – Tools for Reconciling
Last Revision 02/06/2020
19

Financial Statements – Tools for Reconciling
Last Revision 02/06/2020
20
5. The Process Scheduler Request page is displayed. If necessary, select “XLS” (Excel File) from the Format field.
6. Change the Type to Email to have the report output emailed to you directly, otherwise choose WEB. Note: To send the report to additional recipients, click the Distribution link and complete the appropriate fields.
7. Click the OK button to return to the Salary by Cost Center page.
8. A Process Instance number is generated. This number is used to track your report from the Process
Monitor page. 9. Click the Process Monitor link.
10. The Process Monitor page is used to view the status of the report. Initially, the Run Status may be “Queued” and the Distribution Status is “N/A”.
It may be necessary for you to click the Refresh button multiple times (every 20 seconds) to refresh the page, until the Run Status is “Success” and the Distribution Status is “Posted”.
11. Once the statuses have changed to “Success” and “Posted”, click the blue Go Back to Salary by Cost Center ink.

Financial Statements – Tools for Reconciling
Last Revision 02/06/2020
21
From the Salary by Cost Center page,
12. click the Report Manager link to view the report.
The Report Manager page is displayed. The report will generate two output files. 13. Click the Administration TAB 14. Select the report with the Excel file extension (e.g. UTZ_HC509.xlsx) located under the Description
column.

Financial Statements – Tools for Reconciling
Last Revision 02/06/2020
22
15. A dialog window may prompt you to Open or Save the file, select the appropriate option.
16. Click OK.
17. The report will display.

Financial Statements – Tools for Reconciling
Last Revision 02/06/2020
23
Salary by Project ID Report The Salary by Project ID report is used to view salary information for all employees associated with a specific Project ID.
Note: The Salary by Project ID report can be generated by end users with the following UT Share security roles: Level III, Level III-Reconciler, Level V, or Level V-Reconciler.
1. Begin by navigating to the: Navigator > Financials >UTZ Customization > Commitment Accounting > Reports > Salary by Project ID
2. The Salary by Project ID search page is displayed. • First Time User – Create a Run Control ID:
d) Click the Add a New Value tab. e) Provide a meaningful name for your Run
Control ID (up to 30 characters, no spaces, case-sensitive). Run Control ID Example: salary-by-cost-center
f) Click the Add button and proceed to step 3. • Returning Users > Use an Existing Run Control ID
c) From the Find Existing Value page, enter the Run Control ID in the Search by field.
d) Click Search and proceed to step 3.
Optional: You may leave the Search By field blank and click the Search button. If you have created only one Run Control, the Salary by Cost Center page displays. If you have multiple Run Controls, a Search Results table will display; where you must select the appropriate Run Control ID.
The Salary by Cost Center page is displayed. Note: If you are a returning user, the Salary by Cost Center page defaults with the values last saved or used. Depending on the information that you want to view, you should update the parameters accordingly (e.g. Accounting Period, Cost Center, etc.).
3. Enter Project Costing Business Unit “UTASP”. 4. Enter Project Costing Project ID or
leave the field blank for all PC Project IDs.
5. Enter Fiscal Year (e.g. 2019) and then the Accounting Period (e.g. 1 = Sept, 2 = Oct, etc.).
6. Enter Empl ID or leave the field blank for all employees.
7. Click the Save button. 8. To generate the report, click the Run button.

Financial Statements – Tools for Reconciling
Last Revision 02/06/2020
24
9. Change the Type to Email to have the report output emailed to you directly, otherwise choose WEB.
10. The Process Scheduler Request page is displayed. If necessary, select “XLS” (Excel File) from the Format field.
Note: To send the report to additional recipients, click the Distribution link and complete the appropriate fields.
11. Click the OK button to return to the Salary by Project ID page.
12. A Process Instance number is now assigned. This number is used to track your report from the Process Monitor page.
13. Click the Process Monitor link.
14. The Process Monitor page is used to view the status of the report. Initially, the Run Status may be “Queued” or “Processing” and the Distribution Status is “N/A”.
It may be necessary for you to click the Refresh button multiple times (every 20 seconds) to refresh the page, until the Run Status is “Success” and the Distribution Status is “Posted”.
15. Once the statuses have changed to “Success” and “Posted”, click the Go Back to Salary by Project ID link.

Financial Statements – Tools for Reconciling
Last Revision 02/06/2020
25
16. From the Salary by Project ID page, click the Report Manager link to view the report.
The Report Manager page is displayed. The report will generate two output files.
17. Click on the Administration TAB. 18. Select the report with the Excel file extension (e.g. UTZ_HC502.xlsx) located under the Report column.

Financial Statements – Tools for Reconciling
Last Revision 02/06/2020
26
A dialog window will prompt you to Open or Save the file, select the appropriate option.
19. Click OK.

Financial Statements – Tools for Reconciling
Last Revision 02/06/2020
27
20. The Report will display: See the example Report:

Financial Statements – Tools for Reconciling
Last Revision 02/06/2020
28
View Commitment Control Activity Log The Commitment Control Activity Log is used to view all the General Ledger (GL) and the Budget Accounts associated with a transaction line. The GL Account is used to categorize the transaction for reporting purposes (e.g. 63003 > Office Supplies). The Budget Account is used to identify the purpose of the funds (e.g. A4000 > Operating Expense, G4110 > Domestic Travel, etc.).
Scenario: You need to research an Expense Report. You want to view all the Cost Centers and/or Projects, as well as, the GL Accounts used on the reimbursement document. If you use the Expense Report page, it will be necessary for you to click the arrow beside each line to open the line details, then the arrow by Accounting Details by each line to view the budget information; whereas, the Commitment Control Activity Log displays everything on one page.
Expense Report Commitment Control Activity Log
Review the Commitment Control Activity Log The Commitment Control Activity Log may be viewed from the Budget Details or the Budget Overview page. Listed below are the instructions for viewing the Commitment Control Activity Log.
Budget Details Budget Details > View Transaction Activity & Source Document
1. Begin by navigating to the Budget Details page: Navigator > Financials >Commitment Control > Review Budget Activities > Budget Details
From the Budget Details search page: 2. Verify the Business Unit is defaulting with “UTARL”. 3. Enter or lookup a Ledger Group:
a. Select “OPE” or “OPR”to view budget activity for a Cost Center.
b. Select “DETAIL” to view budget activity for a specific GL Account.
c. Select “GRT_PARENT” to view the overall balance for a Sponsored Project.
d. Select “PLANT_PRNT” to view the overall

Financial Statements – Tools for Reconciling
Last Revision 02/06/2020
29
balance for a Capital Project. e. Select “GRT_CHILD1” to view budget activity for a single budget account for a Sponsored Project. f. Select “PLANT” to view budget activity for a single budget account for a Capital Project.
4. Click Search.
The Budget Detail Overview Screen Displays:
5. Enter the Account (Budget or General Ledger) that you want to view. 6. Enter the Cost Center or Project number that you want to view. 7. Enter the Budget Period. 8. Click Search.
Note: The Budget Period field is not used when viewing budget activity for a Sponsored Project (Grant) or Capital Project (Plant Fund).
9. Click the blue View Details link beside the Account you want to view.
The Commitment Control Budget Details page provides a summary of budget information for a specific Cost Center or Project.
10. To view transaction activity, click the Drill to Activity Log icon (gold book).

Financial Statements – Tools for Reconciling
Last Revision 02/06/2020
30
The transaction Activity Log page is displayed. When transactions are budget-checked, the system creates activity lines and stores them in the Activity Log.
The Activity Log contains the following information: Document Label: Indicates the type of form used to generate the transaction line. The document types include:
• Report ID = Travel or Non-Travel Expense Report • Voucher ID = Purchase Order or Non-PO Voucher • Employee ID = ProCard Transactions
Tran Line: (Journal ID) = Corrections, Inter-Departmental Transfers, Payroll transactions or Budget Transfers will have an ID number. Document ID: The reference number for the transaction. Account: Used to identify the purpose of the funds like A4000 – Operation Expenses. Fund, PC Bus Unit, Project and Activity: Represent the chartfield values used for the transaction line. Budget Period represents the period where the funds were taken.
Use the magnifying glass or the footprint icon to drill into the details. See below:
11. Click the Line Drill Down icon (magnifying glass ) to get transaction details for a particular line like the chartfield values associated with the transaction line.

Financial Statements – Tools for Reconciling
Last Revision 02/06/2020
31
12. Click the View Related Links icon to drill down and view the source document used to create the transaction line like a Voucher, or Expense Report, used to generate the transaction line.

Financial Statements – Tools for Reconciling
Last Revision 02/06/2020
32
The source document will open immediately in a new window or you may be presented with a dialog box where you must select "Go to Source Entry" to display the information. Note: To view the page where the source document was created, you must have the appropriate level of security.
13. Back on the Activity Log screen, Click the footprint icon .
The Commitment Control Activity Log page displays. 14. Clicking the magnifying glass takes you back to the Budget Journal Line Drill Down as shown above in
step 11.
15. Click the open page icon to return to the Commitment Control Budget Details page as shown in step 10.

Financial Statements – Tools for Reconciling
Last Revision 02/06/2020
33
Budget Overview Budget Overview > View Transaction Activity & Source Document
1. Begin by navigating to the Budget Overview page: Navigator > Financials >Commitment Control > Review Budget Activities > Budget Overview.
Note: First time users must create a Budget Overview Inquiry to use the Budget Overview page. The steps below assume that you have already created an Inquiry.
From the Budget Overview search page: 2. Enter the Inquiry Name and click Search. OR
Leave the Inquiry Name field blank and click the Search button. The Budget Overview page will display or If you have multiple inquiries, a Search Results table will display where you select the appropriate inquiry.
The Budget Overview page is displayed with the values identified in the creation of the inquiry or that was last used.
3. Update the fields listed below to change the results information. 4. Verify the appropriate Ledger Group/Set OR Ledger Inquiry Set is selected:
• For Cost Centers use Ledger Group: OPE, OPR; OR Ledger Inquiry Set: OPE_OPR • For Sponsored Projects (Grants) use Ledger Group: GRT_CHILD1 • For Capital Projects (Plant Funds) use Ledger Group: PLANT • To view general ledger account information for a Cost Center, Sponsored Project, or a Capital Project use
Ledger Group: DETAIL.

Financial Statements – Tools for Reconciling
Last Revision 02/06/2020
34
5. Select the Calendar Type. The recommended options are “Detail Accounting Period" (specific month
or range) or "Detail Budget Period" (fiscal year-to-date). 6. If applicable, enter the Budget Period and/or the Accounting Period that you want to view.
Note: When viewing information for a Project (Sponsored or Capital) with Calendar Type "Detail Budget Period", leave the Budget Period "From" and "To" field blank. If you want to view budget information by Budget Period, select calendar type “Detail Accounting Period”.
7. From the ChartField Criteria section, enter the Cost Center or Project that you want to view. 8. Click the Search button to view the results of your inquiry
Note: You may get this pop-up message: just click the OK button.
9. The Inquiry Results page is displayed. To view details for a specific line item, click either the Budget
Details icon to go to the Budget Details page, or the Budget Transaction types icon to go to the Budget Transactions. See Budget Details page 18 for more information.

Financial Statements – Tools for Reconciling
Last Revision 02/06/2020
35
Note: For more information about how to use the Budget Details or the Budget Overview page, refer to the following web page: https://www.uta.edu/business-affairs/training/training-page-UTShare-Financial.php
Shared Information Services Monthly Reconciliation Report The SIS Monthly Reconciliation Report provides financial activity for Cost Centers and Projects for a specific time period.
Note: This report should only be used as supplementary material. The Monthly Financial Statement is the official report for reconciling financial/budget activity.
1. Begin by navigating to the: Navigator > Financials >UTZ Customizations > General Ledger > Reports > Reconciliation Report
2. The Financial Reconciliation Report search page is displayed.

Financial Statements – Tools for Reconciling
Last Revision 02/06/2020
36
• First Time User > Create a Run Control ID: a) Click the Add a New Value tab. b) Provide a meaningful name for the Run Control
ID (up to 30 characters, no spaces, example: recon_report).
c) Click the Add button. Proceed to step 3.
• Returning Users > Use an Existing Run Control ID a) From the Find Existing Value page, enter the
Run Control ID in the Search by field. b) Click Search. Proceed to step 3.
Optional: You may leave the Search By field blank and click the Search button. If you have created only one Run Control, the SIS Monthly Reconciliation Report page displays. If you have multiple Run Controls, a Search Results table will display; where you must select the appropriate ID.
3. The SIS Monthly Reconciliation Report page is displayed: • First Time Users: The Business Unit field defaults with “UTARL”. Proceed to step 4. • Returning Users: The fields on the page will default with the settings that were last saved.
Proceed to step 4. 4. Complete or update the remaining report parameters:
a. Enter the From and To Fiscal Year fields (e.g. 2019)
b. Enter the From and To Accounting Period (e.g. 1 = Sept, 2 = Oct, 3 = Nov, etc.)
c. Select the Report Format. The recommended format is “XLS” (Excel).
You have the option of generating a report by department number or for a single Project ID or Cost Center.
5. Enter one of the following parameters: Department, Project ID, Cost Center. 6. Click the Save button to save the conditions of your report. 7. Click Run to generate the report.

Financial Statements – Tools for Reconciling
Last Revision 02/06/2020
37
The Process Scheduler Request page is displayed. If necessary, select the report Format. The recommended Format is “XLS” (Excel).
Optional: To send the reports to additional recipients, click the Distribution link and enter the recipient’s information (e.g. Empl ID).
8. Click the OK button to return to the SIS Monthly Reconciliation Report page.
A Process Instance number is now assigned. This number is used to track your report from the Process Monitor page.
9. Click the blue Process Monitor link.
The Process Monitor page is used to view the status of the report. Initially, the Run Status may display “Queued” and the Distribution Status “N/A”. It may be necessary for you to click the Refresh button multiple times (every 20 seconds), until the Run Status has changed to “Success” and the Distribution Status column is displaying “Posted”.
Once the status’s have changed to the appropriate values (Success and Posted),
10. click the Go back to Monthly Reconciliation Report link.

Financial Statements – Tools for Reconciling
Last Revision 02/06/2020
38

Financial Statements – Tools for Reconciling
Last Revision 02/06/2020
39
11. Click the Report Manager link to view the reports.
11. Click the Administration tab
12. The SIS Monthly Reconciliation Report will generate three files:
• Detail Financial Report
• Summary Financial Report
• Trace /Standard Output file labeled “Monthly Recon Rpt” (this file is not used).
13. To view the desired report, click the file name located under the Description column.

Financial Statements – Tools for Reconciling
Last Revision 02/06/2020
40
14. The Report Detail page is displayed. From the File List section, click the file name to open the report.
Depending on your browser and/or the file type (e.g. XLS or PDF), you may be presented with a dialog box prompting you to Save or Open the report; or the report may open immediately in a new window.
A Report example is below: