Expand you Car Wash Business with Pearl Waterless Car Wash Products
Upload
truongnguyetCategory
view
218download
1
Spot Free
Reverse Osmosis
Rinse System
©2016 TOMMY CAR WASH SYSTEMS
CONTENTS

1
General Instructions ............................................................................................................................................................ 2
Overview of RO System .................................................................................................................................................... 2
Key Reverse Osmosis System Terms................................................................................................................................ 5
Requirements ....................................................................................................................................................................... 8
Feed Water Pre-treatment Requirements ..................................................................................................................... 8
Pre-Treatment Solutions ..................................................................................................................................................... 8
RO Unit Installation ............................................................................................................................................................. 9
Water Supply ..................................................................................................................................................................... 9
Electric power requirements .......................................................................................................................................... 10
Carbon Media Filter (Clack Valve) .............................................................................................................................. 10
Floor Drain (Ditch) ............................................................................................................................................................ 10
Compressed Air Supply .................................................................................................................................................. 11
Carbon Filter Installation (Chlorine Removal) ............................................................................................................ 11
Reverse Osmosis Unit Installation .................................................................................................................................. 12
Sediment Filter ................................................................................................................................................................. 12
RO Membrane Installation ............................................................................................................................................. 13
Electrical Installation ........................................................................................................................................................ 14
RO Tank Level Sensor Installation ................................................................................................................................ 14
RO System Controller...................................................................................................................................................... 15
Human Machine Interface (HMI) ................................................................................................................................... 16
TDS Transmitter ................................................................................................................................................................ 16
Operating Instructions ..................................................................................................................................................... 16
Human Machine Interface (HMI Screen) Operating Modes .................................................................................... 16
System Start-Up Instructions .......................................................................................................................................... 30
Maintenance ..................................................................................................................................................................... 31
Appendix 1 – RO System Packaging .......................................................................................................................... 33
Appendix 2 – Electrical Schematics ............................................................................................................................. 36
Appendix 3 – RO System Data Log ............................................................................................................................ 40

2
GENERAL INSTRUCTIONS
It is unsafe to operate or service this device without first reading and understanding the entire
Operator's Manual. Keep this manual and other associated documentation for future reference.
Eye protection should be worn at all times when operating the RO system as unit has high pressure
water lines and membrane housings which may leak if fittings loosen over time..
Unit installation must adhere to local codes for electrical and plumbing,
All maintenance and repair actions are to be performed by maintenance personnel who have
been trained to support this equipment.
To avoid electrical shock hazard, do not operate this device when covers or controller enclosure is
opened.
Electrical power must be turned off and a lock out procedure utilized to ensure all electrical power
is completely turned off prior to performing maintenance to any portion of the system.
Plumbing connections and drains must adhere to local standards and any facility codes.
Do not remove any Caution, Warning or any other descriptive labels from the RO system.
Do not operate this device in an explosive environment or in the presence of flammable materials.
Movement or vibrations during shipment may cause connections to loosen. Check all connections
prior to turning the unit on.
Do not operate this unit in an environment where temperatures may be below 40 F or above 90 F.
Improper water flow, water pre-treatment, misuse or improper operation of this device will void
manufacturer’s warranty.
CAUTION: FAILURE TO FOLLOW THE INSTALLATION AND OPERATING INSTRUCTIONS MAY RESULT
IN DAMAGE TO EQUIPMENT OR PERSONAL INJURY.
OVERVIEW OF RO SYSTEM
Tommy Car Wash Systems has developed a proprietary reverse osmosis (RO) system to provide spot free
rinse for car wash applications.
This RO system has been engineered to allow years of trouble-free operation and low life cycle cost for
the operator. The system utilizes commercial low temperature (high efficiency) RO membranes which
operate at low pressure. In addition, all the components (chlorine filter, sediment filter, pumps, etc.) have
been selected to improve the system reliability, minimize energy use and reduce required maintenance.
It is important to completely review the entire operating manual prior to the installation and start-up of the
RO system. The manual includes installation guidelines, start-up procedures and operating instructions.
The RO System schematic shows a typical installation which uses an RO product tank and RO reject tank to
capture and re-use the RO reject water.
System Schematic - Figure 1 (below) shows a simplified schematic for the RO system. The system takes
pre-treated water (treatment varies based on water sample) through a sediment filter to the RO Pump.
This pump generates flow and pressure needed to produce RO water. The four air operated solenoid

3
valves combined with a programmable logic controller (PLC) provide control of the electrical pumps to
perform the following functions: Start-up, Auto Generate / RO Flush Cycle, RO Re-pressurization to Tunnel
and RO System Bypass.
Figure 1 - Simplified Schematic of the RO System
Each of these functions is designed to ensure a reliable and consistent supply of RO water for the spot free
rinse portion of the wash.
Off Mode – The unit will always start-up in the OFF mode. In this mode, power is supplied to the PLC and
the 24 Volt signals are energized; however, the pumps and solenoid valves are commanded off. The HMI
will show a red dot in the mode button on the main screen.
Purge Mode – The Purge mode is designed to allow operation with municipal water pressure only to allow
purging of air from the system during start-up or after maintenance is performed (filter replacement,
membrane replacement, etc). It is critical to start-up the system in this mode for several minutes to purge
any air trapped in the system and avoid potential damage to the membranes or plumbing.
Auto Mode – Will produce RO based on the RO tank level turn-on level until the RO tank is full (Full Tank
Signal) and immediately will then perform an RO Flush cycle which pumps RO water into the membrane
feed path and allows a RO water flush to protect the membrane and extend their life. This flush consists of
a 2 minute operation of the RO re-pressurization pump with Solenoid B open to flow water to the main RO
feed hose. The RO water will remain in the membrane housing until the RO tank level sensor signals a
demand (RO Pump Turn-on level) for additional RO water production.

4
RO Two Minute Test Mode – The two minute mode is used to allow check-out of system when RO tank
sensor is signaling that RO tank is full. This will allow the unit to turn on the RO pump and produce RO
water for a limited time to allow recording of data or verification of solenoid operation, check pressure
gauges, etc and not have to drain water down in the RO tank to the RO turn-on level.
RO System By-pass – This mode by-passes the RO system (pump, membranes, etc.) and is specifically
designed to allow the wash to continue running in the event that a failure occurs in the RO production
system. In by-pass mode, the unit command from the tunnel will operate solenoid D and feed municipal
water to the tunnel. The mode operates automatically in the event of a fault detected by the PLC (low
feed pressure, solenoid failure, etc). Because the by-pass mode impacts the quality of the wash,t and is
intended to be utilized only until the RO unit is serviced and returned to operation. In the event of a loss of
controller power, you can direct water to the tunnel by moving the air feed for Solenoid D from the NC
port to the NO port on the air solenoid bank (located on right side of controller enclosure).
Tunnel Signal Command for RO Water deliver to tunnel– This signal is controlled directly by the Tommy
System Controller using an 110V AC relay signal to the RO System Controller. This signal is converted to a
24 V signal and used to open Solenoid C and turn-on the Re-pressurization Pump. This signal turns on and
off for each car in the tunnel based on the belt speed. The re-pressurization pump is limited to 180 cycles
per hour (maximum cycle rate) and if the belt speed exceeds the 180 per hour rate, the operator should
utilize the look ahead feature on the system controller (which will leave re-pressurization pump on) to
avoid exceeding cycle rating of the pump manufacturer and potential for thermal overload of motor or
motor contactors. Warning: The 110V AC signal may be present in system controller even with the
controller power has been shut off. Therefore, you must turn off the 110 V electrical signal (RO Request)
from the Tommy System controller prior to performing maintenance or repair to the system controller.
Failure to de-energize this circuit could lead to personal injury or death.
RO System Performance
RO systems are designed to provide spot free rinse to the car wash tunnel and are rated by volume of RO
water produced per day. This system has been optimize to support the Tommy Car Wash System which
requires a maximum of 10 GPM RO Production rate. This level of RO production reflects a conservative
design approach which creates a system that allows this production rate of 10 GPM from 50F to 80F feed
water temperature. The unit will operate on feed water down to 40F; however, the RO output will be
reduced by 20% to approximately 8 GPM at this condition. Although the membranes are rated and
capable of higher flow rates (25,300 GPD), the system (carbon filter sizing, recovery rate, pump sizing,
etc) have all been designed to provide a consistent RO flow across a wide range of temperatures.
The membranes performance (flux rating) varies as the feed water temperature changes. In general, for a
fixed pressure across the membrane, the flow will reduce 2% for every 1 degree F reduction in feed
water temperature from the 77F rating temperature. To compensate for this characteristic of the
membranes requires increasing the feed pressure as the water temperature decreases. The feed pressure
is varied by use of the manually operated Recirculation globe valve. This valve allows recirculation of a
portion of the RO concentrate (water exiting the membranes) to the suction side of the RO Production Pump.
The reject control valve allows operator to control the reject flow rate. This approach allows operator to
control both pressure (which controls RO Flow) and reject flow rate over a wide range of pressure. The
system uses the re-circulation loop to allow 35-50 GPM of RO Membrane Feed Flow while controlling the
municipal water feed to a total flow of approximately 20 GPM. Proper use of the re-circulation and RO
Reject valves is critical to optimize the performance of the system.

5
The RO Production centrifugal pump flow rate reduces as the feed pressure is increased so it is critical to
stay within the guidelines in the following table. The general guideline is to always keep RO Reject Flow
equal to or greater than the RO Product Flow and to keep combined flow (RO Reject + RO Flow) at 18-
22 GPM. Caution: Maintaining feed flow of <22 GPM is important to maximize life and performance of
the carbon filter.
Feed Water
Temperature
Municipal
Feed Flow
GPM
Reject Flow
GPM
RO Flow
Nominal
GPM
Re-circulation
Flow GPM
Maximum
Feed Pressure
PSI
40 F 18-20 10-12 8 ~10 160
50 F 20-22 10-12 10 ~10 160
60 F 20-22 10-12 10 ~15 135
70 F 20-22 10-12 10 ~20 110
80 F 20-22 10-12 10 ~30 95
Note: Numbers in this table represent the published flow rates based on the DOW membrane specification
and over time the flow and pressures may vary. Lower flow rates would indicate potential scaling or
fouling of the membranes and high flows would flows (and increasing RO TDS readings) may indicate
membrane damage (caused by chlorine damage) or a membrane adapter seal leak.
KEY REVERSE OSMOSIS SYSTEM TERMS
Reverse osmosis (RO) is a water purification technology that uses a semipermeable membrane to remove
dissolved substances from the water. In reverse osmosis, an applied pressure is used to overcome osmotic
pressure, which allows the water molecules to pass through the membrane while all dissolved solids remain
in the feed water side of the membrane.
CAUTION: RESTRICTION OF THE REJECT FLOW (CLOSING GLOBE VALVE ON RO REJECT
LINE) BELOW THE MINIMUM REJECT OR OPERATING BEYOND MAXIMUM RO FLOWS AS
SHOWN IN THE TABLE ABOVE MAY RESULT IN PRE-MATURE DAMAGE TO THE RO
MEMBRANE RESULTING IN REDUCED MEMBRANE LIFE AND/OR MEMBRANE FAILURE.

6
Thin Film Composite Membrane (TFC)
Thin Film Composite membranes are a special type of RO membrane which offers high efficiency, long life
and resistance to most adverse water conditions. The membrane material is very sensitive to free
chlorine and if the feed water is chlorinated a chlorine pre-filter must be used to protect the
membrane. Free chlorine must be controlled to lower than 0.1 PPM. The DOW membranes have
a 1000 hour life at 0.1 PPM free chlorine level in the feed water and damage accumulates
proportional to the free chlorine level (for example, membrane life is reduced to 200 hours at 0.5
PPM of free chlorine) so a failure in the carbon filter will quickly lead to a membrane failure.
Feed Water
The water supply which feeds water into the membrane for processing. This water must be pre-conditioned
to meet the membrane manufacturer’s water requirements to prevent damage to the membrane. Pre-
treatments may include softening, chlorine removal, sediment filters and chemical anti-scaleants based on
the water analysis of the site.
Product Water (RO Product)
The pure water that has been separated from the feed water stream by the reverse osmosis membranes.
Recovery
The amount of RO Product water produced as a percent of the total amount of feed water. As an example,
if the system feed flow is 20 GPM and the RO Product is 10 GPM than the recovery would be 50%. This
system has been designed for a maximum recovery of 50% recovery.
Reject Water (RO Reject or Concentrate)
That portion of the feed water that does not pass through the RO membrane. This water has a higher level
of impurities than the feed water and is captured in storage tank for other uses in the wash system.
Percent Rejection
The percentage of TDS removed from the feed water. Membranes typically reject greater than 95% of
the dissolved solids in the feed water.
Chlorine Removal - GAC Filter
Granular Activated Carbon filter is used to remove chlorine from the water for protection of special thin
film composite (TFC) reverse osmosis membranes. The carbon filter supplied with the Tommy RO unit is a
10 cubic foot unit which is sized to remove 1.0 PPM of chlorine from the feed water for approximately 10
million gallons of feed water. The life of the filter is dependent on the level of free chlorine in the feed
water so it is important to understand your local water supplier and the level of chlorine used to sanitize
lines. In addition, it is critical that the water supply can provide at least 30 GPM of water flow at 40-60

7
psi to ensure that proper back wash (turning or fluffing carbon) occurs on a nightly schedule. The back
wash cycle must be operated when there is no demand for RO production (wash tunnel is closed).
Additional information is included in the system set-up and operation section of manual.
Dissolved Solids (TDS)
Generally, the total amount of mineral salts which are dissolved in water. TDS is measured in parts per
million (PPM). The system is designed to operate with feed water TDS up to 1000 PPM.
Low RO Pump Pressure Switch
A pressure switch located on the suction side of the RO pump will signal low feed pressure (less than 5 psi)
indicating a problem with the water supply, pre-treatment filter, or sediment filter. When pressure falls
below 5 psi for 3 seconds the RO Pump will shut down. This switch is adjustable between 3 -7 psi by
removal of the connector and adjusting the screw located in the center of the connector surface with a
3/32 Allen wrench. Turning the wrench clockwise (viewed from top of switch) will raise the pressure while
counter-clockwise adjustment will lower the set pressure.
Re-pressurization Pump Pressure Switch (Flow to Tunnel)
A pressure switch (set at 10 psi) is located in the line which feeds water to the tunnel. In normal operation
this switch would confirm that the water is flowing to the tunnel (as requested by system controller) from
Solenoid C. In By-pass mode, this switch signals water flow to the tunnel from Municipal Water. If the
pressure does not close, would indicate the pump or solenoid is not operating, broken hose or low pump
flow. If there is a demand for water and the switch does not close then the controller will turn off the RO
Re-pressurization Pump to protect the pump from running in a dead-headed condition. This switch closes
at 10 psi and provides an input to the system controller to provide a fault diagnostic. This switch is
adjustable between 5-30 psi by removal of the connector and adjusting the screw located in the center of
the connector surface with a 3/32 Allen wrench. Turning the wrench clockwise (viewed from top of switch)
will raise the pressure while counter-clockwise adjustment will lower the set pressure.
Parts Per Million (PPM)
The standard measure of total dissolved solids where 1 PPM is equivalent to 1ml / Liter.

8
REQUIREMENTS
FEED WATER PRE-TREATMENT REQUIREMENTS
Listed below are all the critical water specification limits and the required pre-treatment
Note: Failure to properly pre-treat the water may result in reduced membrane life and premature
membrane failure and is not covered under the limited warranty.
Feed Water Limits and Recommended Pre-treatment Approach
Specification Limit Recommended Pre-treatment
Water Hardness < 1 grain Ion- exchange Water Softener
Iron (Fe) < 0.1mg/L Iron Filter
Free Chlorine (Cl2) < 0.1 mg/l 0.1 PPM Activated Carbon
Turbidity (dirt) SDI < 5 5 Micron Sediment Filter
Manganese (Mn) < 0.05 mg/l Ion-exchange Water Softener
Hydrogen Sulfide (H2S) > 0.0 mg/l Oxidation, Aeration
Organics > 0.0 mg/l Activated Carbon
Total Dissolved Solids 2,000 mg/l (maximum) Feed water must be below 1000 mg/l
* The RO Unit may work with water hardness over 1 grain but water analysis needs to be reviewed with
the membrane supplier to avoid premature membrane failure from scaling. Tommy Car Wash Systems
recommends use of a water softener to treat the water; however, if requested, Tommy Car Wash Systems
will run the DOW RO membrane software to determine membrane performance and evaluate the impact
of higher hardness on the membrane life and expected performance.
PRE-TREATMENT SOLUTIONS
Water Softener
For best performance and life of the RO membrane, it is recommended that the RO unit should use soft
water (less than 1 grain hardness). The capacity of the softener needs to be sized to provide continuous
soft water during the RO system operation. There are options to achieve the necessary soft water with
ability to regenerate during RO operation (multiple tanks with coordinated regeneration controller) or
scheduling regen to occur after the wash is closed and the RO tank has completed the cycle to re-fill the
storage tank.
Carbon Filter for Chlorine Removal
Most municipal water supplies treat the water with either chlorine or chloramine. Some water suppliers will
use a combination of chlorine and chloramine or change the treatment from season to season so you must
contact your municipal water supplier and determine if the water treatment will result in free chlorine in the
feed water. The DOW RO (TFC type) membranes are not tolerant to free chlorine and as such require a
chlorine filter system to remove free chlorine from the feed water.

9
Properly sized activated carbon filters provide the ability to remove the free chlorine from the feed water.
A weekly check needs to be performed to ensure the carbon filter system is functioning properly and the
level of free chlorine is less than 0.1 PPM at all times. Important Note: Operating the system with a
depleted or non-functioning chlorine filter will immediately start to damage the membranes and void any
warranty from the membrane manufacturer. Chlorine damage to the membranes occurs quickly (less than
200 hours when exposed to a 0.5 PPM level of free chlorine) and will lead to failure of the membranes so
it is imperative to verify that the carbon removal system be inspected (check chlorine removal performance,
verify clock and back wash settings of filter, and verify lift of media during back wash cycle) once per
week. Bed expansion during back wash should be 30-40%. Water temperature impacts water density
(colder water has higher density) and the expansion rate needs to be inspected monthly to avoid under or
over expansion of the media bed. Colder water will increase the expansion of the media while warmer
water reduces the lift of the carbon. Expansion of less than 30% reduces the carbon reclassification
(fluffing or turning) and results in poor chlorine removal. Over expansion of bed may lead to loss of
carbon media during back wash cycle by flushing the carbon to the drain. Bed expansion should be
checked by marking tank before and during back flush and calculating expansion rate. The level can be
seen by using a bright light on the back side of the tank to illuminate the carbon and see the lifting
between normal and back wash operations.
Additional Feed Water Pre-treatment
A water analysis should be performed at each new site to ensure that the water and pre-treatment
solutions are compatible with the RO membranes. Tommy Car Wash Systems can evaluate the water
analysis and make recommendations for additional pre-treatment needed to ensure proper operation of
the RO unit.
INSTALLATION
Important: The RO system installation must conform to local plumbing, electrical, and sanitation codes.
It is the customer’s responsibility to obtain all permits and install equipment to conform to all state
and local codes.
WATER SUPPLY
The water supply must be able to supply a minimum of 30 GPM at 40-60 psi to the RO unit. The flow lines
need to be sized to minimize pressure drops per accepted plumbing design guidelines. Normal operating
feed flow will vary between 20-22 GPM depending on water temperature. At this condition, the feed
water pressure should not exceed 60 psi. If water pressure is above 60 psi (at municipal feed line to RO
system) than a pressure reducing valve should be installed and adjusted to 40-50 psi. This allows proper
operation of the recirculation loop.

10
ELECTRIC POWER REQUIREMENTS
The electrical service (consult local electrical codes) should be provided in the vicinity of the Reverse
Osmosis system with the following service:
The unit has been designed to utilize 480 VAC 3 Phase power with ground from the facility. Review the
electrical schematic (Appendix 2) for required current ratings and integration of the system controller.
The primary RO pump is 5 HP and the re-pressurization pump is a 1.5 HP pump.
RO Power requirement is 15A, 3 Phase 480VAC fed by a trip class 10 or higher. Wiring and conduits as
permitted by local code. Solenoid D is operated by the Tommy System Controller and uses a 110 VAC
signal to the RO System Controller. This signal is converted to a 24 Volt signal to be used in the controller.
WARNING: THE 110 V SIGNAL FROM THE SYSTEM CONTROLLER CAN ONLY BE TURNED ON
OR OFF AT THE TOMMY SYSTEM CONTROLLER. THE 110 VOLT SIGNAL POWER MUST BE
TURNED OFF AT THE SYSTEM CONTROLLER RELAY BEFORE OPENING THE RO SYSTEM
CONTROLLER FOR MAINTENANCE.
CARBON MEDIA FILTER (CLACK VALVE)
The Clack Valves located on the chlorine filter require a 115 VAC, 1 Amp, waterproof grounded
receptacle to support the Clack low voltage power supply.
FLOOR DRAIN (DITCH)
All water drains and overflow lines must drain to the floor drain (ditch) that runs along the length of the
wash tunnel. The plumbing should be constructed to allow a visual indication of water flowing to drain to
help diagnose proper system operation. NOTE: THE RO REJECT TANK OVERFLOW LINE MUST BE
SIZED TO GRAVITY FLOW 25 GPM DURING THE INITIAL START-UP AND CHECK-OUT OF THE
SYSTEM.
The water lines from the RO System to the RO Product and RO Reject Tanks should be sized to minimize
pressure drops. Lines should be sized for a maximum of 2 psi drop at the following flow rates to ensure
proper function of the unit.
Feed Water Flow – 30 GPM (this is the flow rate required for back wash of the carbon filter.
Municipal Feed during operation in By-pass Mode – 12 GPM at 40 psi minimum

11
COMPRESSED AIR SUPPLY
The pilot operated solenoid valves require a supply of compressed air to operate. Install a compressed
air supply line on the back wall of the equipment room in the vicinity of the RO unit. Add a ball valve and
fitting to allow running an air-line to the pressure regulator / water separator located on the RO frame
directly below the controller. This air supply is required to operate the ASCO 8290 air operated solenoid
valves. The 24 Volt pilot valves are located on the right side of the RO system controller housing and are
controller by the RO controller. The supply pressure must be between 80-150 psi. A small regulator and
water separator is mounted on the RO frame directly under the right corner of the RO controller. This
regular should be adjusted to provide 80 psi to the pilot solenoid valves. The water separator should be
CARBON FILTER INSTALLATION (CHLORINE REMOVAL)
Assembly of Carbon Filter
1. Install ball valve on municipal feed line (1.25 or 1.5 inch)
2. Install a 110 Volt 60 HZ AC Outlet (for Clack transformers)
3. Install feed line to the Clack valve with 1.25 inch lines
4. Build Carbon filter system
a. Use 1-24 inch diameter by 65 inches tall tank
b. Verify proper installation of hub and lateral in tank (verify height of standpipe is
compatible with Clack head).
c. Add 50 pounds of stone media to bottom of tank (cover hub and lateral)
d. Add 10 cubic foot of Granular Activated Carbon (GAC)
e. Add small chamfer on standpipe to prevent cutting O-ring seal (internal port on
bottom of Clack valve assembly).
f. Install seal using small amount of silicone grease.
g. Install Clack Head and program for 10 minute Backflush and 10 minute rapid rinse
cycle on each tank during a non-operational period. Important note: 24 inch tank
requires a 30 GPM back flush rate so a 30 GPM flow restrictor should be installed in
the flush line to drain.
5. For initial install only or when new media has been replaced it is critical to wet the carbon by
slowly filling tank in back flush mode (set head to flush and unplug to allow as much time as
needed to “burb tank” and wet carbon media). Then slowly crack open ball valve which
feeds tank and slowly fill the tank. This process may tank several minutes and should not be
rushed to avoid flushing carbon media into drain. Once this step is completed plug Clack
head back in and set to normal operating mode.
6. With RO system feed line disconnected, open feed line and flow service flow for 20 minutes
followed by another 10 minute backflush and 10 minute rapid rinse cycle to remove any
powder or loose fines from the media before hooking to the RO system. Repeat this step to
allow remaining fines to purge from system and flow to drain. Note: Failure to properly flush
the tanks prior to connecting to the RO system will significantly shorten life of the sediment
filter.
7. Add a sample port between the GAC filter and the RO unit to allow water sampling to ensure
free chlorine level is below 0.1 PPM level required for the FilmTech membranes.
8. Complete installation by programming Clack head for a 10 minute back flush followed by an
8 minute rapid rinse cycle to drain. Make sure unit is flowing 30 GPM during the back flush
cycle and the carbon media is expanding between 30-40 %. Caution: Mark the 30-40%

12
expansion height on the tank and verify that during back flush the media is achieving this level
of expansion. The back flush should be programmed to occur every day when the RO unit is
not running. IMPORTANT NOTE: THE BACK FLUSH CYCLE AT HIGH FLOW IS A
CRITICAL MAINTENANCE STEP TO ALLOW THE MEDIA TO “RE-ORIENT” IN TANK
AND PREVENT THE MEDIA FROM CLUMPING. BACK FLUSHING WILL MAXIMIZE
THE LIFE AND PERFORMANCE OF THE CHLORINE FILTER. IF POWER IS LOST FOR
ANY REASON FOR OVER 8 HOURS OR THE BATTERY FAILS IN THE CLACK HEAD,
THE TIME MUST BE RESET. SPECIFICS FOR MAINTENANCE OF THE CLACK HEAD
ARE INCLUDED IN THE CLACK MANUAL.
REVERSE OSMOSIS UNIT INSTALLATION
Unit should be located 4-6 inches from the back wall and 36 inches from the left side wall (based on
Tommy Equipment Room design). Unit should sit on ½ inch rubber pads (4 pads supplied with RO unit) to
reduce vibration and any movement on the floor. There are a total of six water lines that must be
attached to the unit (refer to RO unit pictures in Appendix 1).
1. Municipal Water In (from Chlorine Filter Tanks) – 1.25 inch Hose
2. RO Product to RO Tank – 1.0 inch Hose
3. RO Reject to RO Reject Tank – 1.0 inch Hose
4. RO Tank Feed to Re-pressurization Pump – 1.25 inch Hose
5. RO (from Re-pressurization Pump to Tunnel – 1.0 inch Hose
6. Municipal water for RO By-Pass mode – 1.0 inch Hose
Use 200 psi hose (Eaton BOSFLEX or equivalent) and use heavy duty stainless steel hose clamps on every
connection to ensure reliable operation. Lines should be positioned to minimize bends and lines from tanks
should hang in a manner to minimize loading on the PVC connections. If needed, install additional wall
clamps or hose supports to RO frame to reduce hose weight on PVC fittings.
SEDIMENT FILTER
The sediment filter is integrated into the RO unit skid and uses a 5 micron filter. It has been selected to
provide low pressure drop and long service life. Filter replacement should be performed based on
pressure drop across the filter. Filter should be replaced when the pressure drop across the filter reaches
15 psi or the inlet pressure to the RO Pump falls below 20 psi (at the RO pump suction pressure gauge
when RO Pump is operating). The filter should last for 6-12 months based on water usage and water
quality; however, it is important to check pressure drop once a month while unit is producing RO to verify
condition of the filter. CAUTION: THE FILTER IS DESIGNED FOR A MAXIMUM DESIGN PRESSURE
DROP OF 30 PSI PRIOR TO COLLAPSE OF THE ELEMENT SO REMOVE AND REPLACE AT A
MAXIMUM OF 15 PSI DIFFERENTIAL PRESSURE. COLLAPSE OF THE FILTER ELEMENT WOULD
ALLOW DEBRIS TO CONTAMINATE ENTIRE SYSTEM (PUMPS, MEMBRANES, VALVES, ETC.)
AND WOULD REQUIRE EXTENSIVE DIS-ASSEMBLY AND CLEANING OF ALL COMPONENTS.
When the sediment filter needs removal / replacement, follow these instructions,
1. Maintenance should be performed when the car wash is closed and no cars are in the tunnel.

13
2. Turn RO External Switch to OFF position, and then switch RO power OFF in the Tommy
Electrical Panel. In addition, turn off the 110V signal coming from the Tommy System
Controller.
3. Close ball valve from municipal line to the carbon filter
4. Verify that RO pump feed pressure is 0 psi (gauge reading).
5. Open vent in cap of the sediment filter to verify 0 psi pressure in filter housing
6. Loosen pipe clamp (Stauff) and 1.5 inch union on Municipal Feed line to allow draining the
filter of contamination and ensure filter housing does not have pressure. WARNING: DO
NOT ATTEMPT TO REMOVE THE FILTER COVER IF THE PRESSURE IN THE
HOUSING IS NOT ZERO. IF THE CAP IS REMOVED WHILE THE UNIT IS
PRESSURIZED, THE CAP COULD CAUSE SERIOUS INJURY OR DEATH.
7. Carefully remove snap-ring from cover of filter housing.
8. Remove filter element using tabs at top of filter.
9. Replace with new element.
10. Re-install snap-ring, be sure snap-ring is fully seated.
11. Re-attach union and pipe clamp to the PVC feed line
12. Switch power on from the Tommy Electrical panel and then switch on Master RO switch. Turn on the 110V signal (on-off) from the tunnel request for RO water.
13. Bleed air out of the filter housing by holding vent open (push red cap downward) while turning RO system to Start-up mode (this will open Solenoid A but not turn on the RO Pump)
14. Once all air is purged from system, return unit to Auto mode, go to maintenance screen and hit re-set for the sediment filter history file. The unit will track hours of use for the filter and maintain a maintenance history for the unit.
RO MEMBRANE INSTALLATION
Installation of the RO membranes require removal of the membrane housings to access the membranes.
The membranes utilize an integrated locking jumper tube (DOW i-LEC) system which should allow removal
and replacement without removal of the membrane housing, hoses or bottom caps. Note: In case the
ceiling height does not permit the membrane to be remove while the housing is on the RO unit, the IPS split
clamps will need to be removed to remove the feed hoses and remove the membrane housings. Codeline
and DOW have excellent on-line videos which show proper way to remove and replace membranes.
1. Turn off power on controller and verify the feed pressure is 0 psi
2. Remove plumbing from the top of the membrane caps to allow removal of the caps.
3. Remove the split clamps from the side ports of the membrane housings.
4. Remove the band that holds the membrane on the stand.
5. Remove membrane housings and lay on cardboard or soft material to avoid damage to the
housings.
6. Remove top and bottom caps, look over to ensure they are not cracked or damaged. Replace
if cap assembly if damage is seen.
7. Install new o-ring seals on cap (large diameter ring) and smaller o-rings on membrane
adapters. Apply a thin coat of silicone grease to the rubber seals, the brine seal (on
membrane) and membrane housing chamfers / seal bore to avoid rolling or cutting during
installation.

14
8. Insert membrane (re-use i-LEC adapters on new membranes) into housing from top opening
(feed side). Note: feed water flow is from top to bottom of membrane housings. The
membrane brine seal (black seal at one end of the membrane) must be located at the feed
port end (top port) to ensure proper flow of feed water through the membrane.
9. Carefully install bottom caps and top caps (engage the adapter seal by hand and once
aligned tap the cap on using a rubber mallet). Note: remove the 1 inch PVC from the top cap
or use a spare PVC 80 1 inch union to create a surface to allow tapping with the rubber
mallet.
10. Re-install spiral snap-ring. CAUTION: BE SURE THAT SNAP-RING EXPANDS INTO
GROOVE AND IS FULLY SEATED. FAILURE TO PROPERLY SEAT THE SNAP-RING
COULD ALLOW THE CAP TO DIS-CONNECT WHEN PRESSURE INCREASES IN
HOUSING AND MAY CAUSE EQUIPMENT DAMAGE OR PERSONAL INJURY.
11. Re-connect unions, split clamps and membrane bands to complete installation.
12. New membranes are installed dry and will take a few hours of operation for the
manufacturing chemicals to flush off the surfaces of the membranes. During start-up or after
replacement of membranes it is suggested that the RO line be disconnected from the RO tank
and the initial RO production be dumped to drain until the TDS level comes down to normal
operating levels (20 TDS or lower).
ELECTRICAL INSTALLATION
The electrical schematics and connection points in the controller are designated in Appendix 2.
IMPORTANT: FOLLOW ALL LOCAL CODES.
Main Control Fuse Block (FB1) – Bussmann LP-CC-15 fuses are used for the 480 VAC primary
MOTOR Protection Circuit Breaker (M1, M2) – Individually sized for each motor. These provide short
circuit protection to the motor as well as thermal overload protection.
DC Power Supply (PS1) – Converts 480 VAC to 24 VDC for control circuit components.
PLC (PLC) – Programmable Logic Controller – Executes a programs that controls the sequence and times of
the operation through I/O (inputs and outputs).
HMI (HMI) – Human Machine Interface – Executes a graphical interface program that communicates with
the PLC to let the operator know the state of the equipment.
Black terminals (L1, L2, L3) – Electrical connection point for the 480 VAC 3 phase main power.
Control Relay (CR1) – Land the 120 VAC request for RO water signal from the tunnel to this component.
RO TANK LEVEL SENSOR INSTALLATION
The AST LP-440 pressure transducer should be installed into the RO tank using a ½ NPTF bulkhead fitting.
It should be located slightly above the bulkhead fitting for the re-pressurization pump feed line.

15
The transducer generates a 1-6 volt based on the static water pressure head (from 0-69 inches of water
above the centerline of sensor). The signal provides the input to the PLC to set the “Tank Full”, “RO Pump
Turn-On”, and “Tank Empty” levels in the tank. This sensor was selected to support the standard 400
gallon Tommy Car Wash tank solution and is limited to a 69 inch tank full to tank empty height. Contact
Tommy if your application uses a tank that is over the 69 inch height limit of the sensor for a
recommendation of an alternative sensor.
The Tank Full signal will turn the RO pump off and initiate a RO Flush of the membranes.
The RO Pump Turn-On signal initiates the RO Production cycle which opens Solenoid A and turns on the RO
Pump.
The Tank Empty level establishes the level which indicates the tank is empty. In normal operation, the unit is
sized to keep up with demand from the tunnel; however, if the demand exceeds the supply (damaged
membranes) and the tank empties while in the Auto mode, it will cause the RO system to switch to By-pass
mode (using municipal water) to protect the re-pressurization pump from running without water. The RO
pump will continue to generate RO water to re-fill the tank. Once the tank level returns above the empty
level, unit will go back to the Auto mode and supply RO water to the tunnel.
If the unit consistently goes to by-pass mode indicates a need to review RO production rate vs usage rate
and may require changes to the delivery system in the tunnel to match flow to available RO. In addition,
the turn-on set point can be set higher in the tank to ensure additional “reserve” in the tank. Normal setting
should be in the 10-30% range but this value can be adjusted higher to add additional reserve to system.
Going above the 50% level will increase the RO production cycles but generates additional pump cycles.
Electrical Wiring of the RO Level transducer.
The switches utilize a 24 V signal from the controller and attach to the terminals shown in the wiring
schematic (located in Appendix 2). The sensor has been selected for long life and high reliability for the
life of the system.
RO SYSTEM CONTROL
The brain of the RO unit is the system controller. This controller uses a number of inputs (switches, sensors,
signals, etc.) to run the RO system and feed RO water to the car wash tunnel as commanded by the car
wash controller. This unit has been designed to utilize highly reliable Allen Bradley (A-B) Programmable
Logic Controller. In addition, the electrical switch gear (relays, motor starter, transformers and circuit
breakers) are all commercial equipment manufactured by A-B. This system is designed to provide many
years of service life. In addition, the A-B hardware and software systems will be supported for many
years in the future to avoid equipment obsolescence.
The unit includes maintenance screens and setting screen which are accessible from the “touch screen”
located on the cover of the system controller. The controller system is UL-508A approved and each unit is
manufactured and tested to conform to the UL standard. The PLC program (software) can be updated in
the field (if needed) by installation of a new “memory module” that can be shipped to customer. Loading
the new program is accomplished by turning power off on external switch, installing the memory module
and turning power back on. Verify that download occurred by checking the Version level on the HMI
screen.

16
HUMAN MACHINE INTERFACE (HMI)
The HMI screen provides a “touch screen” input from the operator to select the operating mode, visually
watch the system operate and keep tracks of important maintenance and operation data. In addition,
digital flow sensors provide feedback to help operator properly set the recirculation and RO reject
manual valves. Motor protection is provided by pressure switches which will signal a fault if the switch
shows a lower than expected pressure. Maintenance screens show cycle counts for solenoids and hour
meters on all the critical components (pumps, sediment filter, membranes, etc).
It connects to the PLC using a serial port which simplifies the wiring and permits the ability to update the
system with addition features needed to support the car wash operating and maintenance requirements.
If the HMI fails, the unit can be ran without the HMI working by using a jumper to select either the auto
mode or bypass mode. The auto mode jumper connects 108 to 101 as shown on the electrical schematic in
Appendix 2. The bypass mode jumper connects 109 to 101 as shown on the electrical schematic in
Appendix 2. Only one mode can be selected at a time. CAUTION: THE ELECTRICAL POWER MUST
BE DISCONNECTED BEFORE OPENING THE RO ELECTRICAL ENCLOSURE TO PERFORM
MAINTENANCE OR CONNECT THE JUMPER TO SELECT AUTO OR BYPASS MODE. THE
ENCLOSURE HAS BOTH 480V AND 110V POWER WHICH MUST BE TURNED OFF AT THE
TOMMY ELECTRICAL BOX TO AVOID ELECTRICAL SHOCK OR POTENTIAL ARC FLASH
INJURY.
TDS TRANSMITTER
Designed as a stand-alone instrument, the transmitter is designed to be extremely stable over a wide
temperature and TDS range for greater accuracy. It has two probes which are located in 1) feed water
port and 2) the RO product port. The battery operated device is turned by pressing the on/off switch at
the top level of the transmitter and then pressing the in or out button to select the water source which will
be analyzed.
In normal operation, the system should be operated for at least 2 minutes before a reading is taken to
allow the membranes to stabilize flow rates. The TDS reading from the RO TDS product should read
between 0-20 for normal operation. TDS levels above 20 are abnormal and if the TDS is above 40 it
indicates either damaged membranes or seals. The membrane seals (brine seal at top and O-rings on the
adapters) may be damaged and need replacement. If seals are replaced and the TDS remains higher
than 20, the membranes will need to be replaced or as a minimum packaged wet (per DOW Chemical
storage guidelines in sealed bag) and sent to a membrane cleaning service who can determine if the
membranes can be serviced. Note: DOW membranes are very robust and in large commercial
applications can withstand multiple cleaning cycles (up to 12 cleaning cycles) so cleaning membranes may
be a viable approach to avoid costly membrane replacement. Cleaning will not reverse damage done
from free chlorine in the feed water so proper operation of the carbon filter is a critical step to protect the
membranes.
OPERATING INSTRUCTIONS
HUMAN MACHINE INTERFACE (HMI SCREEN) OPE RATING MODES

17
Off Mode
When power is turned on (external power switch in ON position) a flashing red dot will appear in the Mode Button of the HMI touch screen. The HMI will show the main screen and the unit will start in the OFF mode.
In this mode, the PLC is ON but it does not turn on any other devices (Solenoids or Pumps).
The screen shot below shows the system with external power ON and the PLC in the OFF Mode. Multiple electrical voltages (480, 110 & 24) are energized in this mode.
Off Mode Screen – Mode Button Flashes Red
CAUTION: WHEN THE EXTERNAL POWER SWITCH IS IN THE ON POSITION, 480 V THREE PHASE POWER FROM THE FACILITY WILL STILL BE ENERGIZED IN THE CONTROL BOX ALONG WITH THE 24 V POWER TRANSFORMER AND 110 V RO COMMAND SIGNAL FROM THE TOMMY CONTROLLER. AT NO TIME SHOULD THE CONTROLLER HOUSING BE OPENED WITH THE EXTERNAL POWER SWITCH IS IN THE ON POSITION.
IF MAINTENANCE IS REQUIRED, LOCK OUT / TAG OUT PROCEDURES MUST BE USED IF MAINTENANCE TO ANY COMPONENT OF THE CONTROLLER OR WIRING IS TO BE PERFORMED. FAILURE TO UTILIZE SAFE MAINTENANCE PROCEDURES COULD LEAD TO INJURY OR DEATH FROM ELECTRICAL SHOCK OR POTENTIAL ARC FLASH BY WORKING ON AN ENERGIZED CONTROLLER.

18
Mode Screen as selected from the main screen
PURGE Mode
This PURGE mode is used for initial start-up and any time air is introduced into the system (membrane replacement, sediment filter replacement, etc). In the mode, Valve A opens but the RO pump does not turn on. This allows feed water to flow through system to purge air from lines and housings. The unit should be left in this mode until all air bubbles are purged from the system (look at flow meter sight gages to determine if there is air in the RO reject or RO circuits. The flow in this condition will be 15-20 GPM (total flow of RO Reject and RO) with RO Reject Valve open. It make take a few minutes for the air to purge from the RO membranes and allow air in the system to purge.
AUTO Mode
When AUTO is selected, the system PLC will follow this logic sequence. 1. Monitor Level Sensor – If level is at Full RO Tank level than nothing happens. 2. When sensor level drops to a % of tank capacity (selected by operator) the PLC will command
“RO Production sequence” 3. RO production sequence opens Solenoid A for 15 seconds to allow feed water pressure and flow
to reach the RO membranes. 4. The controller looks for a signal that the 5 psi pressure switch (on RO Pump Suction side) has closed.
The unit will not operate if the pressure switch does not close and a PRS A fault will flash on the Main Screen. This insures a proper amount of flow is being delivered to the RO pump from the main water supply / pre-treatment / sediment filter.
5. If 5 psi switch is closed, RO Pump turns on to generate RO 6. RO Pump remains on until High Float Switch opens (signaling RO Tank Full) or the 5 psi Low
pressure switch opens for 3 seconds or more. This signal protects the pump from running with insufficient water flow from the municipal feed. The low pressure could be caused by a number of issues:
a. Municipal water ball valve being turned off or restricted flow b. High flow restriction in the carbon filter c. Failure of Solenoid A to open when commanded (valve failure, pilot valve failure, low air
pressure or leak in the air feed line to the solenoid).

19
d. Dirty sediment filter which is restricting flow. The restriction will be highest at high flow rates so a test is to run system at 22 GPM total flow (RO flow plus RO Reject) by opening the Recirculation valve completely and then adjusting the RO Reject valve to get a combined flow of 22 GPM. Look at the inlet pressure on the suction side of the RO Pump to verify it is above 20 psi when the RO pump is running.
e. Collapsed hose or restricted hose on system.
CAUTION: RO PUMP DAMAGE MAY OCCUR IF THE PUMP IS OPERATED WITH A RESTRICTED INLET FLOW TO THE PUMP. PRESSURE SWITCH 1 (PRS1) IS DESIGNED TO PROTECT THE PUMP FOR THIS CONDITION. IF PRESSURE SWITCH DOES NOT CLOSE THE RO PUMP WILL NOT TURN ON AND THE SWITCH WILL FLASH RED ON THE HMI SCREEN.
7. During normal operation, once RO Tank is Full, RO Pump is turned off, 3 seconds later Solenoid A
is closed, Solenoid B is opened and Re-pressurization Pump is turned on for two minutes (this value is adjustable from the setting screen) before turning Re-pressurization Pump Off and Closing Solenoid Valve B. This sequence provides an RO Flush cycle to pump RO water into the feed line of the membrane housings to extend the life of the membranes and reduce scaling. Unit should be set to a 120 second flush cycle as a starting point. Once set for the system, this value should not be changed. There is a ¾ inch ball valve in this line that must be adjusted to restrict flush flow to 5-6 GPM during the flush cycle. This can be done by watching the system and once the RO flush cycle is initiated (without request from tunnel) to close the ball valve slowly until the pressure gage reads 70-90 PSI. The need to adjust the ball valve is based on the need to split flow to ensure flow to tunnel if demand is requested during flush cycle. The split flow should send about 75% of the flow to the tunnel while still providing an “RO flush” of the membrane. Once this valve is set, the handle should be removed and stored to avoid mis-adjustment.
RO production mode
Two Minute RO Test Mode
The Two Minute Test Mode is designed to allow the operator to command the RO system to produce water when the high float has indicated the Tank is Full. This feature is intended to only be used when the operator wants to record performance data on the system and the RO tank is already full. This prevents the operator from having to drain tank to allow the RO pump to run. Selecting this mode will, open solenoid A for 15 seconds and then turn of the RO Pump for 1 minute and 45 seconds. Let the system stabilize for the at least the first minute before taking data as the membranes take time to stabilize

20
pressures and flows. If the tunnel is full of cars and the unit is in the AUTO mode, just wait until the RO Pump is on and then record data.
CAUTION: THE 2 MINUTE TEST DOES NOT AUTOMATICALLY PERFORM THE RO FLUSH AFTER IT COMPLETES THE TWO MINUTE TEST.
By-Pass Mode 1. When By-pass mode is selected, the system will open Solenoid D (fed from Municipal water) by
providing air supply to valve (valve is normally closed) and wait for a command from the Tommy System Controller allowing flow to the tunnel. This function can be selected by the operator or will occur automatically during the following conditions:
a. In AUTO Mode if the RO Tank Low Level Float opens indicating that no RO water is available for the Spot Free Rinse
b. Or if the RO Re-pressurization Low Pump Pressure Switch opens (indicating less than 25 psi pressure when pump is operating).
c. Or if the RO Re-pressurization Pump has recorded a fault that has not been cleared.
By-Pass Mode
Additional information collected by the system controller
When power is on, the PLC will start in the “Home Screen” mode, but other modes are operator selectable to support additional information. The system has the Home Screen, a Mode Selection Screen, a Setting Screen and a Maintenance Screen. The maintenance screen allows collecting information on the RO system to support maintenance activities. Timers are in place to capture hours of operation on the major elements of the system (Sediment Filter, RO Pump, Re-pressurization Pump and the RO Membranes). In addition, a counter has been added to document valve actuation cycles for each solenoid. Each of these files can be re-set by the operator when maintenance actions are taken or components are replaced. This data provides information that is important to better understand the performance of the equipment in an individual wash application. The HMI has the ability to log faults, clear faults and maintain a history file on the unit by use of a plug-in USB memory stick. The memory stick will maintain the unit history and can be removed and down-loaded to support preventive maintenance activities or provide full history of the unit.

21
Diagnostics
The PLC is programmed to support trouble shooting the RO system through the use of the low pressure switches, flow sensors, motor fault detection and use of the RO tank level sensor. If a fault occurs, the main screen will flash the location of the fault until the fault is cleared. In addition, a log is keep of all faults and stored to a memory stick which can be download to understand the type of faults and a date stamp to show how often and how long the fault occurred.
In addition to the intelligence of the controller, pressure gauges and flow meters have been incorporated to allow manual monitoring and recording of operation to spot potential issues early on and prevent damage to the major components. Data should be recorded daily to ensure proper operation for the first few weeks. This daily log is a critical step in maximizing the performance and life of the system and is valuable information to help trouble-shoot any issues with the equipment. In addition, it helps to train the operator of the various features of the unit and will help sort out any issues quickly and protect the equipment from damage.
The following screen shots are used to describe various faults and how to use the various screens to operate and maintain the unit.
The screen below (main screen) is showing in the AUTO Mode generating RO (Solenoid A Open, Low Pressure Switch Closed, RO Pump Operating, Tank Filling)
In this mode if Pressure switch A signals LOW Pressure then the switch will flash red and shut down the RO Pump as shown below.

22
Touch the maintenance screen to pull up the fault log as shown below. New faults will show in red until the fault is cleared. Then the fault turns grey and is reset.

23
The next shot shows the fault cleared although it remains captured in the log.

24
A similar screen shows the RO Production Motor (M1) with a fault. This fault could be a motor contactor or a thermal overload of the motor. In either case the unit will log a fault that must be cleared prior to operation.
From the Main Screen, go to the maintenance log (Hour Meters) as shown below.
The Hour Meter Screen (above) captures hours of operation on the major components and also logs the number of cycles for each of the solenoids. This log is important to keep track of the major component operating hours / cycles and may be used to schedule preventive maintenance prior to an operating failure.

25
Another screen is used to adjust settings needed to accommodate flow variations or instability in the water supply. The “PRS A On Delay” is the delay prior to signaling the PRS A has closed. In addition, there is an Off delay which is adjustable to avoid cycling of the pump as the pressure drops in the line until flow stabilizes.
At the end of each RO production cycle, the RO pump shuts off and a flush cycle initiates. This cycle uses Re-pressurization Pump to send RO water to the membrane feed path and completely fills the membranes with RO water to reduce membrane scaling and extend membrane life.
Setting Screen allows varying delays and RO Flush Cycle Time
The RO Flush cycle time is selectable to ensure adequate RO water flows during flush to completely fill the membrane housings. This delays can be changed by touching the box and then selecting a new time value. These settings should only be adjusted if the pump is having cycling issues or the RO Reject water flowing from the membranes still has a high TDS > 20 level. The RO flush is designed to flow RO water on the Feed side (outside) of the membranes until the RO Reject water TDS reduces to near RO levels (< 20 TDS). Water should be checked by catching water coming into the RO Reject tank with a cup and using a hand held TDS meter to verify that the flush has purged the high TDS municipal water from the membrane housings. The quantity of flush to fill the membrane housings is approximately 10 gallons so if the flush is set to 5 GPM flow rate (by the ball valve in the line from Solenoid B) then the flush cycle timer should be set to 120 seconds.
The screen shot below shows the operator selectable delays and cycle times that are available to adjust for pump cycling or instability in the water supply as other systems turn on or off in the wash.

26
The tank mode is used to set the high ltank evel, turn on level and empty tank levels. The sensor produces a 1-6 volt signal which corresponds to 0-69 inches of water level (from the sensor level as installed in the tank). The tank sensor screen is shown below and allows both default settings and operator selections.
Tank Level Settings can be set by hitting “set low” and “set high” or clicking on the actual numbers and entering a new number. The “level sensor raw value” is a number that will range from around 100 (empty) to a value of over 1000 (at 69 inches of water above the sensor level). The turn-on level is set by entering a percentage (between 10% and 90%). The PLC will then set the turn-on point based on the tank low and full settings. This level should normally be set to 10-30% to allow low RO production cycles and reduce the number of pump cycles per day. If the system cannot keep up with peak demand, then the turn-on value can be adjusted up to 50% or higher to allow a greater buffer before the tank hits the empty level.

27
A flow screen uses the digital flow meters to allow operating unit in the optimal “target zone” of 10 GPM of RO Flow and 10 GPM of RO Reject Flow. The red, yellow and green zones help operator to avoid operating the unit in an area which could damage the membranes.
In addition, the flow meters are also used to calculate total gallons of RO and RO Reject used. This number allows understanding total water usage and can be used to develop a history on membrane life and water usage.
This screen below shows the unit operating in the BY-PASS mode. This mode can be selected by the operator from the mode screen or will occur in the AUTO mode if the RO Low Float indicates the RO tank is empty or a fault occurs with the re-pressurization pump. In this mode, solenoid D opens to supply municipal water to the tunnel as Solenoid C is controlled by the Tunnel Request Signal for RO water.
In this case, because there are no faults indicated, the unit has been commanded to the BY-PASS mode. If the mode was in AUTO mode, the RO Pump would be pumping to generate RO and fill the tank. The unit

28
can go to By-pass mode from AUTO mode if the demand from the tunnel exceeds the RO generation for an extended period and empties the RO tank.
IMPORTANT NOTE: IT IS IMPORTANT TO TRAIN OPERATORS AND MAINTENANCE
PERSONNEL ON THE VARIOUS MODES OF THE SYSTEM AND EXPLAIN THE IMPORTANCE OF
OPERATING THE SYSTEM WITHIN OPERATING LIMITS OF PRESSURE AND FLOWS. FAILURE
TO ADJUST THE TWO MANUAL VALVES (BASED ON FEED WATER TEMPERATURE) CAN
STRESS THE MEMBRANES AND CAUSE PRE-MATURE FAILURE.
The system has been designed to operate up to 160 psi from the RO production pump. Caution:
Operating system at higher pressures (greater than 160 psi) will reduce the RO Production Pump flow and
may result in reduced membrane life.
OPERATION WITH FAILURE OF THE HMI SCREEN
The PLC schematic has been designed to allow operation if the HMI module has failed. This is
accomplished through the use of by-pass (or jumpers) wiring to command the Auto Mode or By-pass Mode
based on how the operator wants the unit to perfrom.
This capability is shown on the wiring diagram as shown below.
In the auto mode, the unit will perform completely but the operator will need to use the pressure gages
and analog sight flow meters to adjust system.
The picture below shows the jumper location to place the unit in the AUTO mode. Warning: Power to the
unit should be turned off before installing jumper for either mode.

29
This picture shows jumper wire installed for AUTO MODE in the event of an HMI failure.
The picture below shows the unit with jumper installed in the by-pass condition. Once again, power should
be turned off prior to opening the control enclosure.
Picture above shows jumper in the By-Pass mode to allow operation in the event of an HMI failure.

30
SYSTEM START-UP INSTRUCTIONS
SYSTEM START-UP 1. Open ball valve to allow municipal water to operate carbon filter system and flush per instructions
(page 9) 2. Check water sample for Chlorine level using test kit. Free chlorine level must be 0.0 PPM to avoid
damage to the membranes. 3. Set Recirculation and RO Reject valves to wide open (full counter-clockwise position) 4. Make sure air supply is turned on and the regulator is set to 80 psi. 5. Turn External Power Switch to ON, Touch screen should show a flashing red circle in the Mode
button indicating unit is off. 6. On initial start-up of new system, air must be purged from system by using the start-up mode. The
PURGE mode turns on Solenoid A and allows municipal water to flow through the system to purge air from the sediment filter, pumps, membranes and plumbing prior to turning on the RO production pump. While operating in this mode:
a. Open the vent on the sediment filter by pushing the red valve on the top cover downward. Air will escape and will all air is gone water will stream from top of cover. Release valve when water is streaming from red valve.
B. Watch flow meters to ensure all air is removed from system before selecting the AUTO mode. CAUTION: GOING TO AUTO MODE (WHICH STARTS THE RO PUMP) PRIOR TO PURGING THE AIR FROM THE MEMBRANE HOUSINGS AND PVC PLUMBING CAN RESULT IN COMPRESSED AIR CAUSING DAMAGE TO THE MEMBRANES, MEMBRANE HOUSINGS AND PVC PLUMBING.
c. This process may require loosening the plumbing unions in the top of the membrane housings to allow air to escape from the center of the membranes (RO water side).
d. This process may take 10-15 minutes or more, but is a critical step to protect the system during initial start-up or after any maintenance which would allow air to enter the system.
7. Verify that the Grundfos pump motors are rotating correctly. This needs to be done by the electrician prior to completing the electrical installation. The motors should be “bump started” to verify direction of rotation (pumps should rotate counter-clockwise when viewed from the top). Follow the Grundfos installation manual instructions for start-up directions.
8. Allow the system to run for a few minutes in the PURGE Mode before starting to close (turn clockwise from front of unit) RO Reject Valve to reduce flow to 10 GPM on the RO Reject Flow meter. During this time, the RO membranes should start to flow at a low level of flow.
9. Check system for leaks and repair any leaks before continuing operation. If system requires draining sections of plumbing or membrane housings the unit should be re-started as described in Step 6 above to remove any trapped air from the system.
10. Once all leaks have been addressed, verify hose clamps are tight and go back to Step 8 11. Start unit in AUTO mode and set re-circulation valve based on water temperature to correct RO
flow rate. Verify adequate RO Reject flow by referring to table on Page 5. It may take a few minutes for the RO flow to stabilize so stay with unit until flows become stable. The RO pump is pumping between 35 and 50 GPM of flow when it is operating. The recirculation valve allows the majority of this water to recirculate back to the inlet side of the RO pump. The recirculation valve should be used to establish the feed pressure level and the RO Reject Valve should always be used to trim the Reject Flow. IMPORTANT NOTE: THE PROPER WAY TO SET THE MANUAL VALVES IS TO ALWAYS START WITH BOTH VALVES WIDE OPEN AND THEN CLOSING RO REJECT VALVE TO ACHIEVE 10 GPM FLOW (TO AVOID HIGHER LEVELS OF MUNICIPAL FLOW), THEN USE THE RECIRCULATION VALVE TO INCREASE PRESSURE (BY SLOWLY CLOSING RECIRCULATION VALVE- CLOCKWISE) WHICH WILL INCREASE RO FLOW RATE TO DESIRED LEVEL (8-10 GPM) BY INCREASING THE RO PUMP PRESSURE, THEN SETTING (TRIMMING) THE RO REJECT FLOW BY SLOWLY CLOSING THE RO REJECT VALVE UNTIL THE REJECT FLOW IS REDUCED TO 10 GPM. CLOSING REJECT VALVE MAY CAUSE THE RO FLOW TO GO SLIGHTLY HIGHER THAN 10 GPM SO THE RECIRCULATION VALVE CAN BE OPENED SLIGHTLY TO ACHIEVE DESIRED FLOW. NOTE:

31
IT IS RECOMMENDED THAT THE INITIAL RO PRODUCT BE DUMPED TO DRAIN UNTIL THE TDS OF THE RO WATER STABILIZES. THE INITIAL TDS FROM THE UNIT WILL BE HIGH (50-150) BECAUSE OF MANUFACTURING CHEMICALS RINSING FROM THE DRY MEMBRANE. THE TDS WILL SLOWLY GO DOWN AS THE UNIT OPERATES AND SHOULD STABILIZE IN THE 3-20 RANGE BASED ON THE TDS OF THE FEED WATER WITHIN FIRST FEW HOURS OF OPERATION.
12. Once the TDS stabilizes, allow the RO flow to fill tank, verify the RO Pump shuts down once RO tank is FULL. If RO Pump does not shut off after tank is FULL, need to verify proper setting of the FULL level and wiring of the level sensor. Note: unit will not operate if the level sensor is reading a voltage outside of the operating limits.
13. Seconds after the RO tank is full, the RO membrane flush cycle should begin (Solenoid B opens and Re-pressurization pump turns on). There is an ¾ inchball valve which needs to be set to flow approximately 5-6 GPM during the flush cycle (70-90 psi). The RO flush helps to reduce membrane scaling by flowing RO water into the membrane feed port to flush the municipal water out of the feed side of the membrane. This feature provides an RO flush after each RO production cycle and ensures that the membranes have low TDS water whenever the unit is not operating (overnight, etc). This flush will automatically occur each time the RO tank reaches the full level. The duration of the flush should be set for 2 minutes for normal operation but the length of the cycle is selectable on the settings screen. The ball valve acts to restrict re-pressurization flow and balance flow between the flush cycle and the tunnel (when RO water is requested from the tunnel). Verify the flow rate by looking at the RO Reject flow meter and adjust flow when there is not a demand from the tunnel flow.
MAINTENANCE
The RO has been designed to provide long life and require minimum maintenance. The best method to
maintain this system is to take a few minutes daily to review and record the operational data from the
system and examine the unit for leaks or any indication of a mechanical or electrical fault. If a change is
performance or operation is observed it is important to take corrective action quickly to minimize the
potential damage to the membranes or other parts of the system.
There are elements of the system which will require replacement during normal maintenance actions. These
items include:
Carbon Filter – This filter should have a long life (> 2 years) and requires minimal maintenance. The key
maintenance activity is to check the free chlorine level of the water coming from the carbon filter to verify
it is at a 0.00 PPM level of free chlorine present in the feed water to the RO system. This should be done
on a weekly basis and the carbon media must be replaced if the unit is not removing the chlorine from the
municipal water. Failure to check and maintain the carbon filter will lead to failure of the RO membranes.
The 10 cubic foot carbon filter should be able to remove 1.0 PPM of chlorine from approximately 10
million gallons of the feed water prior to replacement of the carbon. Some municipalities increase chlorine
levels for a few months each year to sanitize the distribution system so checking to verify complete chlorine
removal is critical to proper operation of the system.
Sediment Filter – Replace filter when pressure drop across the filter exceeds 15 psi at combined RO and
RO Reject flow (equals feed flow). With normal municipal water, the filter should last between 3-12
months based on the turbidity and the total water flow through the system.
RO Membrane System (Membranes and O-ring seals in housing) – Clean or replace when the TDS levels
exceed 40 or the RO generation flow rate reduces by 40% of design flow rate shown in Table on page 6.

32
The rest of the major components of the system have been selected for long life and reliability. Every
effort has been made to utilize the best equipment available to ensure long life and low maintenance costs.
Because car wash system accumulate thousands of cycles per day, the operator can use cycle life as a
method to predict when equipment will need to be repaired or replaced. The incorporation of hour meters
and cycle counters in the system controller allow the operator to monitor the system and learn how the
hardware responds in his application. By keeping good maintenance logs, the operator can learn how the
equipment performs and use that knowledge to help plan a maintenance strategy.
The following information has been pulled from the manufacturer’s data sheets and should provide help in
understanding design life of the major components. These design life values are based on lab testing and
may not reflect actual life in the difficult environment of a car wash equipment room; however, it does
allow the operator to understand more about the expected life of various components.
Pressure Switches – The Dietz pressure switches have a design life of over 1 million cycles. A plan to
replacement the pressure switches when the Solenoid Valve A for Switch A reach a million cycles (on
maintenance counter) would be a recommended maintenance strategy to avoid unplanned downtime on
the equipment.
ASCO 8290 Solenoid Valves – These valves are designed for multi-million cycle design life which should
provide 5-10 year life in most car wash systems. Solenoid C (RO to tunnel) sees 50 times the number of
cycles of the other three valves so you should plan on having a spare for Solenoid C. Solenoid Band D are
exactly the same valve so if needed solenoid D could be removed and used to allow operation until
replacement valve arrives.
Air Pilot Solenoid Valves – These valves typically have a 1 million cycle life so consideration should be
made to replace these valves prior to failure. As a minimum, the operator should keep a couple of the
pilot solenoids on the shelf as spares in the event of a failure.
Pumps – The Grundfos pumps are designed for a 20,000 hour life and should provide a long service life
in the RO application. Pump seals are typically the part that will fail first and having a seal kit available
for each pump is recommended.
Electrical / Controller Hardware – The motor contactors for the re-pressurization pump experience high
cycles in the car wash application and a spares contactor is recommended spare. The PLC controller and
associated equipment should be very reliable unless the ambient temperature of the controller exceeds the
maximum temperature ratings.
Carbon Filter – A two year replacement schedule for the carbon filter media should provide a reliable
chlorine removal system. Although the carbon filter theoretically has a much longer life, the damage
created by a failed carbon filter is not worth trying to stretch the life of the carbon. Carbon replacement
can be a messy process, so a viable option is to re-use the head but replace both the tank and the carbon
media.
Sediment Filter- The filter element should be replaced when the pressure drop across the filter reaches 15
psi. Experience in the field indicates that the filter should be good for six months (on most municipal water
quality) minimum. It is recommended that a replacement filter is always available as the pressure drop
will increase quickly once the drop reaches the 15 psi level.
33
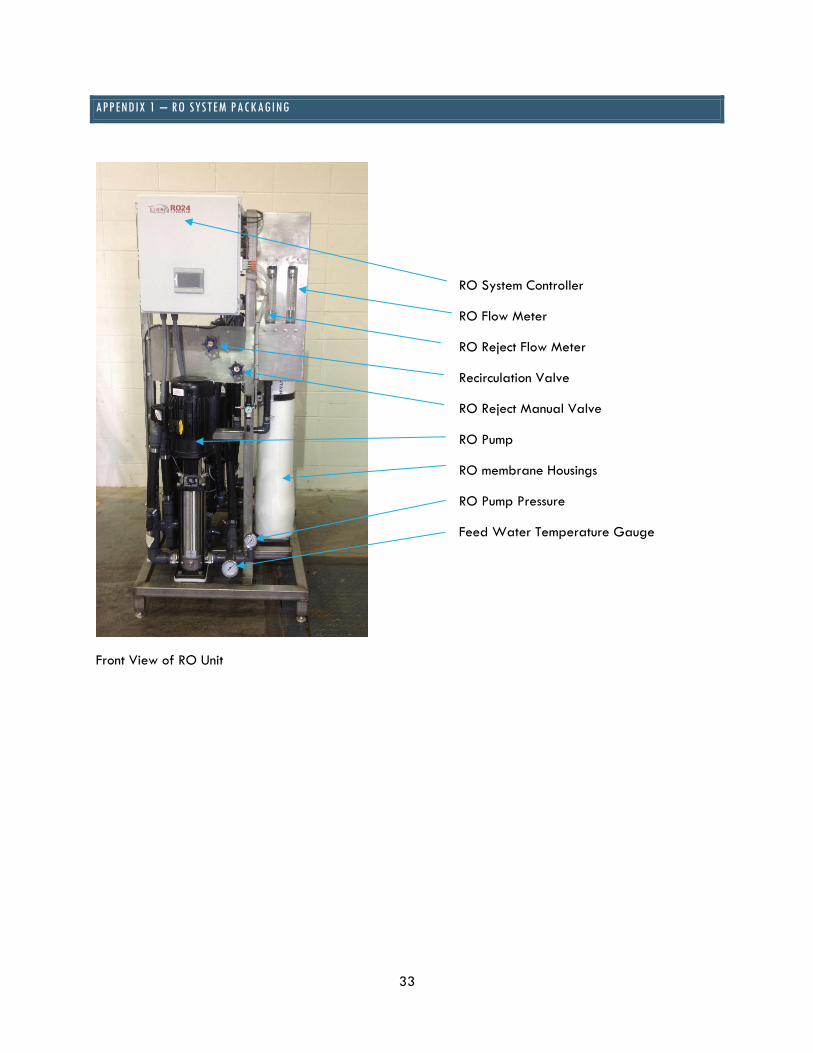
APPENDIX 1 – RO SYSTEM PACKAGING
Front View of RO Unit
RO System Controller
RO Flow Meter
RO Reject Flow Meter
Recirculation Valve
RO Reject Manual Valve
RO Pump
RO membrane Housings
RO Pump Pressure
Feed Water Temperature Gauge

34
Left Side View of the RO Unit
Rear View of RO System
Municipal Water to By-Pass (1.0 hose)
RO Water from RO Tank to Re-pressurization Pump
(1.0 pump fitting on pump) Use 1.25 inch hose
Pre-treated Municipal Water (1.25 inch hose)
RO Flow Sensor
RO Reject Flow Sensor
Master Power Switch
TDS Meter
Re-pressurization Pump (M2)
Solenoid B
5 Micron Sediment Filter
Re-pressurization Pump Pressure
Solenoid A
Pre-Filter Pressure
After Filter Pressure

35
Left rear corner of RO Unit showing Solenoid B and RO Flush Ball Valve (set ball valve to 5-6 GPM during
FLUSH cycle)
Ball Valve to Set RO Flush Flow
at 5-6 GPM
Solenoid B

36
APPENDIX 2 – ELECTRICAL SCHEMATICS

37

38

39

40
APPENDIX 3 – RO SYSTEM DATA LOG
DATE WATER
TEMP -F
CHLORINE
LEVEL- PPM
RO PUMP INLET
PRESSURE - PSI
RO FLOW -
GPM
RO REJECT -
GPM
RO PUMP FEED
PRESSURE - PSI
TDS IN / TDS
OUT