To the happy family of satisfied CASIO electronic musical ...
33
CTK-650 ELECTRONIC MUSICAL INSTRUMENT INSTRUMENTO MUSICAL ELECTRONICO OPERATION MANUAL MANUAL DE OPERACION CASIO. ye ae Welcome... To the happy family ofsatisfied CASIO electronic musical instrument owners! To get the most out of the many features and functions of the CTK-630, be sure to carefully read this manual and keep iton hand for future reference. important! When using batteries, besure to replace them or shift to one ofthe alternate power sources whenever you notice any ofthe following symptoms. « Dim power supply indicator Abnormally low speaker/headphone volume Distortion ofsound output A totally different tone may sound Abnormal rhythm pattern and demo tune play ; Continued sound output even after you release a button Occasional interruption ofsound when playing at highvolumes Sudden power failure when playing at highvolumes oo ee eo ow [ GUIDELINES LAID DOWN BY FCC RULES FOR USE OF THE UNIT IN a THE U.S.A (not applicable to other areas). NOTICE This equipment has been tested and found to comply with the limits for a Class B digital device, pursuant to Part 15 of the FCC Rules. These limits are designed to provide reasonable protection against harmful interference in a residential installation. This equipment gen- erates, uses and can radiate radio frequency energy and, if not installed and used in accordance with the instructions, may cause harmful interference to radio communications. However, there is no guarantee that interference will not occur ina particular installation. If this equipment does cause harmful interference to radio or television reception, which can be determined byturning the equipment off and on, the user isencouraged to tryto correct the interference by one or more ofthe following measures: * Reorient or relocate the receiving antenna. * Increase the separation between the equipment and receiver. * Connect the equipment into an outlet on a circuit different from that towhich the receiver isconnected. * Consult the dealer or an experienced radio/TV technician for help. FCC WARNING Changes or modifications not expressly approved by the party re- sponsible forcompliance could void the user's authority to operate the j eaurement,
Transcript of To the happy family of satisfied CASIO electronic musical ...

CTK-650 ELECTRONIC MUSICAL INSTRUMENT
INSTRUMENTO MUSICAL ELECTRONICO
OPERATION MANUAL
MANUAL DE OPERACION
CASIO.
ye ae
Welcome...
To the happy family of satisfied CASIO electronic musical instrument owners! To get the most out of the many features and functions of the CTK-630, be sure to carefully read this manual and keep it on hand for future reference.
important! When using batteries, be sure to replace them or shift to one of the alternate power sources whenever you notice any of the following symptoms.
« Dim power supply indicator Abnormally low speaker/headphone volume Distortion of sound output A totally different tone may sound Abnormal rhythm pattern and demo tune play ; Continued sound output even after you release a button Occasional interruption of sound when playing at high volumes Sudden power failure when playing at high volumes oo ee eo ow
[ GUIDELINES LAID DOWN BY FCC RULES FOR USE OF THE UNIT IN a THE U.S.A (not applicable to other areas).
NOTICE This equipment has been tested and found to comply with the limits for a Class B digital device, pursuant to Part 15 of the FCC Rules. These limits are designed to provide reasonable protection against harmful interference in a residential installation. This equipment gen- erates, uses and can radiate radio frequency energy and, if not installed and used in accordance with the instructions, may cause harmful interference to radio communications. However, there is no guarantee that interference will not occur in a particular installation. If this equipment does cause harmful interference to radio or television reception, which can be determined by turning the equipment off and on, the user is encouraged to try to correct the interference by one or more of the following measures:
* Reorient or relocate the receiving antenna. * Increase the separation between the equipment and receiver. * Connect the equipment into an outlet on a circuit different from
that to which the receiver is connected. * Consult the dealer or an experienced radio/TV technician for
help.
FCC WARNING Changes or modifications not expressly approved by the party re- sponsible for compliance could void the user's authority to operate the
j eaurement,

a a Control Locations
BE vvicacién de los controles
@ 128 RHYTHMS list @ NORMAL/FILL-IN button @ 32 PAD VARIATIONS list @ VARiation/FILL-IN button @ START/STOP button @ SYNCHRO/ENDING button @® TEMPO indicator @ SONG MEMORY button
@® TEMPO buttons @ ACCOMP VOLUME button © TRANSPOSE/TUNING button @ 10-key/+/~ pads @ MIDI button @ REGISTRATION button. i @® MULTI FUNCTION DISPLAY @ DIGITAL EFFECT button i @® RHYTHM button @ DEMO button ® TONE button @ TOUCH RESPONCE button ‘ @ MAGICAL PRESET button — @ + MIDI terminals : ® SPLIT button For connection of other MIDI instru- {
LAYER butto ments and devices. 1 {: utton i ® NS @ ASSIGNABLE jack i @ 128 TONES list For connection of an optional sustain @ 128 MAGICAL PRESETS list pedal (SP-2/SP-10).
@® 10 DIGITAL EFFECTS list & PHONES/OUTPUT jack [ rare For connection of commercially
© POWER indicator available headphones. Output from | @ POWER button the speakers is automatically cut | @ MODE button when headphones are connected.
| ® VOLUME slider @ DC9V jack ; i
‘ For connection of an optional AC @ SOUND/CONTROL PAD adaptor AD-5 i
@ INTRO button

Main Features
2) 128 amazingly realistic tones
J Layer and Split Keyboard capabilities for play of fwo tones at
the same time
° Layer Function
two tones at the same time.
Split Function Split the keyboard between two different tones.
2 Magical Preset for a new dimension in keyboard play
Perform such “magical” functions as changir key, play of a different chord each time you pr percussion sounds, and more!
*
Q Sound/Control pads Pan TT?) * Choose from amot
Set up to pl
Set up for subtl
t set-ups e
1 over tones ed on the keyboard
(1 Enhanced auto-accompaniment function for greater versatility
* 128 built in auto-ac
different
nge Chords allow both board range.
it patterns.
5 to create your own patterns
rd and melody W y across the entire key-
2 Song Memory
* A collection of favorites t
practice.
ay t yment or use tor
1 Touch Response
¢ Automatic adjustment of output to match keybos
Q Transpose Function
¢ An easy operation instantly changes the key of the keyboard.
Q 10 versatile digital effects
¢ Choose from various rev
} MIDI compatible
* Hook up to other MIDI devices and expand your creative potential.
rb effects or even an rotating speaker effect.
2) Registration Memory
* Store up to four set-ups for instant recall when you need them

Sound control pads:
Digital Effects:
Auto-play tunes:
Other Functions:
Speakers:
VQ Terminals:
Power Supply:
Auto power off:
Power consumption:
Dimensions:
Weight:
Accessory:
CASIO CHORD, FINGERED, FULL RANGE CHORD), effects, layer on/off, split on/off, pad
function set, assignable jack, MIDI sent channel on/ off; GM on/off; local control on/off; bend range,
auto-accompaniment on/off, rhythm settings for the
INTRO, NORMAL/FILL-IN, VAR/FILL-IN, and SYNCHRO/ENDING buttons
Phrases 10
Drums : * 10
” SE/PERCUSSION 10 Controller 2
REVERB 1, REVERB 2, REVERB 3, CHORUS, TREMOLO, PHASE SHIFTER, ORGAN SP, ENHANCER, FLANGER, EQ LOUNDNESS
3 tunes , aa
Transpose (G~C~F*:half-note) Tuning Adjustable Ad = 440Hz 100cents increments
Volume control (Main/ Accompaniment)
12cm diameter x 2 (Output: 2W+2W)
9V DC jack Stereo mini jack
Power Supply Headphones loutput impedance: 100 ©, output voltage: 4.5V
(RMS) MAX], Assignable jack Standard jack MIDI - IN, OUT
3-way AC/DC power sources; Batteries Six D-size Battery life approximately 5 hours
on R20P (SUM-1)
manganese batteries
AC : Required optional AD-5
, AC adaptor Required optional CA-5 car adaptor
Car battery
Approximately 6 minutes after the last operation #
77W
942 x 367 x 135 mm (31 7/16" x 14 1/2" x 43/8")
5.2 kg (11.7 Ibs) excluding batteries
Score stand’
* Designs and specifications are subject to change without notice. FLBD
Bienvenido... . Re ee ~~ HA dog NaS OAS MPT Ber ee SS MS ay tf
iA la familia feliz de propietarios satisfechos de los instrumentos musicales olectré- nicos CASIO! Para obtener lo maximo de todas éstas y muchas otras caracterfsticas y funciones del CTK-650, lea detalladamente este manual v téngalo a mano para referencias futuras. :
iimportante! ; ‘ : Ms : Cuando energize mediante las pilas, asegtirese de reemplazarlas 6 cambiar a —_ alimentacién alternativa siempre que observe cualquiera d
indicador de alimentacion débil. Volumen de altavoz/auricular anormalmente bajo. Salida de sonido distorsionada. El sonido producido es diferente al sonido seleccionado. : Ejecucién anormal de melodia de demostracién y patrén de ritmo. La salida de sonido contintia aun después de soltar un Botén'! oe Interrupcidn ocasional de sonido cuando se ejecuta en voltimenes altos. ,..:,.11 Falla de alimentacién repentina cuando se ejecuta en voltimenes altos.
e los sintomas siguientes,
oo e © wo wow ©
ey

Control Locations
Quick Reference
Contents
To switch power on and Off. eee.
To change tones . , eo taba Lelavachind Re Radar na dee uecoene tee?
To switch Touch Response on ‘and off. a deas are sdgthyuaniete Ath veouianenbupsnpideadve te renesEED.
To play the demo tunes ....c . HOG Bava weiaat en
Using effects. To select an effect ; rep Gine WF % To switch effects on and off ate = 6, Gen Bae we EY
To select and play a rhythm . E-7
Using auto-accompaniment . E-8 To play a CASIO CHORD auto- accomponim E-
To play a FINGERED auto- prepatotaiarisy <8 E-8 To start an accompaniment with synchro start . cee wn EB
Adjusting the accompaniment volume .E-9 To adjust the accompaniment volume ..., .E-9
Using the sound/control pads E-9 To Ploy A Pad wen E-9
To change the pad functions £9
Using the Song Memory susj bus bunaeateqaerneeanansdt E-9 To feCOrd 10 SONG MOMOTY «css seeesecseesesseeseentenee E-9 To play back a song frorn Seng Memory .E-9
To tune the keyBodtd veces ois evestay ct Ki vetiameven uaa is 10
To transpose the keyboard . ..E-10
To set the touch sensitivity ... E10
Part 1 Before using the Keyboard «0.0... cece eceeeereeteeereeseneeneeeereeaes E-11
About the power supply... E-7] installing the bafferies EV Using AC power en E-12 Using a car's cigarette lighter ... E-12 Auto Power Off Function i kets E-12 To cancel the Auto Power Of function... Seles Soren E13 About settings and memory contents . E13
General overview of CTK-650 operation Res E-14 How the dispiay shows data... Susan acr eas dos 14 About CTK-650 modes «0. £14
Part 2 Basic Operations 00... cece eneeseseneerereerterersere ssucpuatstvonnsnegreganes E-16
To switch power on and off o..c...
To change tones Digital Sampling Polyphony
Touch Response .. : re To switch Touch Response: on nana off.
Playing the demo tunes _. SUG Uso
B.4
Part 3 Advanced Operations .
To start demo tune play ........ onc E18 To stop demo tune play ou. Sree sal tt
Using effects. E-18 Types of effects we EG To select an effect . E19 To switch effects on and off on B20
PIGHYIIG ATI EAIIS 35 c5 224; sassy ocauvegeess ask cassnivert scutes Chusuarlvarelelok ghana E20 To select and play a rhythm | E-20
improvising with the preset patterns . 2) To play intro and ending patterns... 22
Using auto-accompaniment oo... About the accompaniment keyboard
Using the CASIO CHORD system
To play a CASIO CHORD auto-accompani Using standard fingerings . fas is To play a FINGERED auto- accomponiment iS Va ransasiietaieress E-25 To start an accompaniment with synchro start
improvising with the preset accompaniment patterns
Using FUull-Range CHOrds oo. cccccscceecsecseecesceseeseesenseree To play a FULL-RANGE CHORD auto-accompaniment Example - To play the chord C major...
Adjusting the accompaniment volume... To adjust the accompaniment volume
Using the Split function .. To split the KEYDOOIC oo. iecteeeccesteseenees
To change the tocation of the split point ..
To unsplit the keyboard 4
Using the Layer function To layer tones
To untayer the keyboord
Using Split and Layer together... To split and layer the keyboard ....
Using the sound/control pads Types of operations available for the pa
To change the pad functions
Assigning rhythms to the Intro, Variation, and Ending Buttons To change the Intro. Fill-in. and Ending button rhythm assignments
Using Magical Presets shri etcg BOBO To change the Magical Preset To switch Magical Presel off .
About Magical Presets wo... To start a Free Session progression
Using tone buttons with ets Presets ... To change fhe tone ou. pig nsictahes
Using the Registration function . To store a sef-up ..
To recall a setup
To switch the Registration f
Assignable jack .. To change the assi gnable jack function

Using the Song Memory... Sneutenattatves Basic Song Memory operations eetenaish ees
To record to Song Memory ©... 4 To play back a song from Song Memery . About data recorded in the Song Mernory vaste How Touch Response is handied by Song Memory .....
Part 4 MIDI
What is MIDI? oo sdetesnege ebuieloa alent
What the MIDI Mode allows y you to GO sicccedeitess Eyre hevetiere . fe
Send oy ‘ . hase ae . : oS
RECEIVE os : sunk ¥ 3 oa
About the MIDI terminals. apts LANG sees ae eeestaves Funan naeaverds oe
MIDUIN Usactandncwia baer Suxd Saidts : ; é ae
MIDI OUT .. 2
What is a MIDI channel? jpaperetabagestatens €-47
To set the basic channel .. otbict oabawPeseosbecetet hres RRR ak MIQi Send Channel Allocation ...... Z Volume balance between channels ......... : Modulation volume, stereo position (pan), effect volum
Song Memory and demo tune@s once ; : on -
GONeral MIDI hein savestesiteess et sgurieieanineeaspeeess : ci Beare E-
e (effect send)
To switch General MIDI on and off igi
Local control settings ........-. : ; Poe a acess: . ote
To switch Local Contral on and ‘off. : os
Bend range settings 0... ces ‘ latina a
To set the bend range .... : sus : :
Accompaniment data ..c : ‘ vegeta =
To switch accompaniment data output on hand of aren hi =
Assignable jack data niece re dheradeais Suneraie a
Specifying a tone for each receive ‘channel : . “a Pe
To specify a tone for a receive channel ates 2 -
MIDI Receive Channel Allocation safeties . E
Part 5 Other SONGS ccs cceeneseseenescenereneensersaresseenenessennaaneetaeeetenenens
To tune the keyboard .......
To transpose the keyboard .
To set the touch sensitivity... ee
Part 6 Technical Reference
Troubleshooting 0.05.
Precautions .
Specifications 0...
Part 7 Appendix/Apéndice ..
Fingered Chord Charts .
Melodycomp Chord Charts. nee oe
Free Session Chord Progression Che srs: Key of C ay
NGtE Table i..cpe Shdea bettas Gostesaant Se
rf
| | Quick Reference
This part of the manual provides a brief overview of keyboard operation. This is meant for experienced users, so be sure to read the rest of the manual for details before trying to actually use the keyboard.
i To switch power on and off (page &-16) eet Press the POWER button to switch power on and off. Sa
@ To change tones (rage E-18)
‘\ 1. Press the TONE button.
2. Use the 10-key pad to input the 3-digit num ber that identifies the tone you want to select
2
@ To switch Touch Response on and off (page £-17) suas" Press the TOUCH RESPONSE button to switch Touch Resprnse on and off.
@ To play the demo tunes (Page E-18) CJ Press the DEMO button to start and stop demo tune play.
@ Using effects (rage E-18)
To select an effect ° s 1. Press the DIGITAL EFFECT button to switch digital effects on
2. Use the 10-key pad to input the number for the effect you want to use.
To switch effects on and off ommaewecr Press the DIGITAL EFFECT button to switch the currently selected effect on and
off.
@ To select and play a rhythm (rage E-20) MODE | 1. Use the MODE button to enter the NORMAL mode (all MODE indicators udlit).
2. Press the RHYTHM button.

3. Use the 10-key pad to input the 3-digit rhythm number for the rhythm you want
to use. o os
cy 4, Press the START/STOP button to start play of the rhythm. ty
5. To stop rhythm play, press the START/STOP button again.
@ Using auto-accompaniment (page E-22)
To play a CASIO CHORD auto-accompaniment
on ~ 1. Use the MODE button to select CASIO CHORD.
2. Select an auto-rhythm
3. Start play of the rhythm.
4, Press either one or up to four keys on the accompaniment keyboard (page E- 23), and the corresponding accompaniment starts to play automatically
5. Continue pressing different keys on the accompaniment keyboard.
we". To stop auto-accompaniment play, press START/STOP again
To play a FINGERED auto-accompaniment
"CO 1. Use the MODE button to select FINGERED.
2. Select an auto-rhythm
3. Start play of the rhythm.
4. Play a chord on the accompaniment keyboard (lower 1.5 octaves} to start play
of the auto-accompaniment.
5. Continue pressing keys on the accompaniment keyboard
sranngtoe 6. To stop auto-accompaniment play, press START/STOP again
To start an accompaniment with synchro start
25 4. Use the MODE button to select either CASIO CHORD or FINGERED
=| 2. Select a rhythm
3. Press the SYNCHRO/ENDING button. At this time, the indicator above the
button lights.
ee
4. Play a chord on the accompaniment keyboard. #.. _.- an <6 F
5. To stop the accompaniment pattern, press START/STOP again. °
& Adjusting the accompaniment volume ace £27) Use the following procedure to set the volume that the accompaniment is played. You can set the volume to any value in the range of 000 to 127, 6. o>
To adjust the accompaniment volume 1. Press the ACCOMP VOLUME button.
2. Use the 10-key pad to input a 3-digit number and specify the accompaniment volume level.
@ Using the sound/control pads (page &-32) To play a pad . Simply press one of the four pads to play the sound assigned to it.
To change the pad functions 1. Press any one of the four pads and the number that identifies the set
of functions currently assigned to the pads appears on the display. Pod 2. While the function set number is on the display, use the 10-key pad to input the number of the set of functions you want to change to. i
@ Using the Song Memory (page &-43) To record to Song Memory
1. Set up the keyboard to play the tune you want to play
sors MEMORY @ 2: Press the SONG MEMORY button until the message [r Fc]
appears on the display. PEt 3. Play the song that you want to perform.
wanll 4. After the song is finished, press the START/STOP button to stop the recording operation.
To play back a song from Song Memory G MEMORY
if t# TPT!
“AES” @ 1. Press the SONG MEMORY button until the message Poy [Pp 1 i appears on the display. i L y [Sgro atc | srastsroe
‘ai 2. Press the START/STOP button to start playback.

To tune the keyboard (rage £-57)
1. Press the TRANSPOSE/TUNE button until the message [Fifa] appears on the
display.
TRANSPOSE TUNE
2. Use the 10-key pad’s [+] and [-] buttons to tune the keyboard.
B To transpose the keyboard (rage E-58)
sevsrose 1 Brags the TRANSPOSE/TUNE button until the message fy” appears on the display.
2. Use the 10-key paa’s [+] and [-] buttons to select a key
@ To set the touch sensitivity (Page E-59)
Touuuntsronse Preags the TOUCH RESPONSE button
2. Use the 10-key pad to input the number that identifies the touch sensitivity you
want to use.
Before usingthe keyboard si, a at Ahn Be sure to read the contents of this part of the manual before using the keyboard for the first time.
& About the power supply You can power your keyboard with 6 D batteries, standard AC power (with an optional AC adaptor) or by plugging in to the cigarette lighter of a car (with an optional car adaptor). :
Installing the batteries
This keyboard can be powered by 6 D size (SUM-1/R20P) manganese dry cell batteries. Make sure that the unit is turned off when installing batteries.
1. Open the battery compartment cover on the bottom of the unit. 2. Load new batteries as illustrared, taking care that the plus (+) and minus (-) poles are
facing in the correct directions. 3. Replace the battery compariment cover.
* Standard battery life is approximately 5 hours (SUM-1).
Important! Any of the following conditions indicates that battery power is low and that you should replace batteries or shift to one of alternate power sources as soon as possible. . -
* Dim power supply indicator * Abnormally low speaker/headphone volume * Distortion of sound output * A totally different tone may sound * Abnormal rhythm pattern and demo tune play * Continued sound output even after you release a button : * Occasional interruption of sound when playing at high volume’ * Sudden power failure when playing at high volumes
| Precautions | :
Incorrectly using batteries can cause them to leak or burst, and may damage your unit. Note the following precautions:
* Be sure that the plus (+) and minus (-) poles are facing in the correct directions. * Do not mix battery types. : i * Do not mix new batteries with old ones. * Never leave dead batteries in the battery compartment * Remove batteries when not using the unit for extended periods. * Never try to recharge the batteries that are specified for the power supply of this
unit. : : * Do not expose batteries to direct heat, let them become shorted or try to take
them apart. . (fa battery leaks, clean out the battery compartment of the unit i vediately, taking care to avoid letting the battery fluid come into direct contact with your chin} Aa scree:
srt
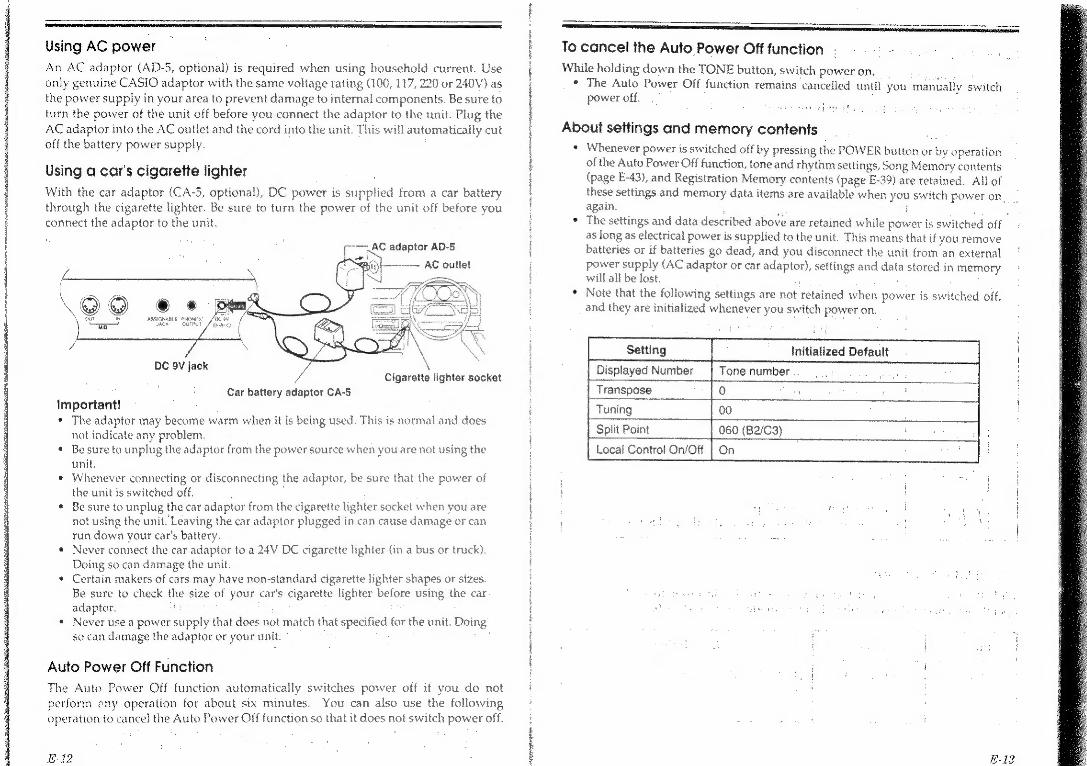
Using AC power
An AC adaptor (AD-5, optional) is required when using household current. Use
only genuine CASIO adaptor with the same voltage rating (100, 117, 220 or 240V) as
the power supply in your area to prevent damage to internal components. Be sure to
turn the power of the unit off before you connect the adaptor to the unit. Plug the
AC adaptor into the AC outlet and the cord into the unit. This will automatically cut
off the battery power supply.
Using a car's cigarette lighter
With the car adaptor (CA-5, optional), DC power is sipplied from a car battery through the cigarette lighter. Be sure to turn the power of the unit off before you
connect the adaptor to the unit.
p77 AC adaptor AD-5
DC 9V Jack / Cigarette lighter socket
Car battery adaptor CA-5
Important! * The adaptor may become warm when it is being used. This is normal and does
not indicate any problem. « Be sure to unplug the adaptor from the power source when you are not using the
unit. * Whenever connecting or disconnecting the adaptor, be sure that the power of
the unit is switched off. * Be sure to unplug the car adaptor from the cigarette lighter socket when you are
not using the unit. Leaving the car adaptor plugged in can cause damage or can run down your car's battery.
* Never connect the car adaptor to a 24V DC cigarette lighter (in a bus or truck). Doing so can damage the unit.
* Certain makers of cars may have non-standard cigarette lighter shapes or sizes. Be sure to check the size of your car's cigarette lighter before using the car adaptor. ; :
* Never use a power supply that does not match that specified for the unit. Doing so can damage the adaptor or your unit.
Auto Power Off Function
The Auto Power Off function automatically switches power off if you do not perform ony operation for about six minutes. You can also use the following operation to cancel the Auto Power Off function so that it does not switch power off.
E-12
came met mesic petnte Oe HREM AE
seagrass
Bente Bem,
To cancel the Auto Power Off function While holding down the TONE button, switch power on.
* The Auto Power Off function remains cancelled until you manually switch power off. -
About settings and memory contents * Whenever power is switched off by pressing the POWER button or by operation
of the Auto Power Off function, tone and rhythm settings, Song Memory contents (page E-43), and Registration Memory contents (page E-39) are retained. All of these settings and memory data items are available when you switch power on. again
. .
* The settings and data described above are retained while power is switched off as long as electrical power is supplied to the unit. This means that i f you remove batteries or if batteries go dead, and you disconnect the unit from an external power supply (AC adaptor or car adaptor), settings and data stored in memory will all be lost
* Note that the following settings are not retained when power is switched off, and they are initialized whenever you switch power on.
Setting Initialized Default.
Displayed Number Tone number
_Transpose 0 :
Tuning 00
Split Point 060 (B2/C3)
Local Control On/Off
mss
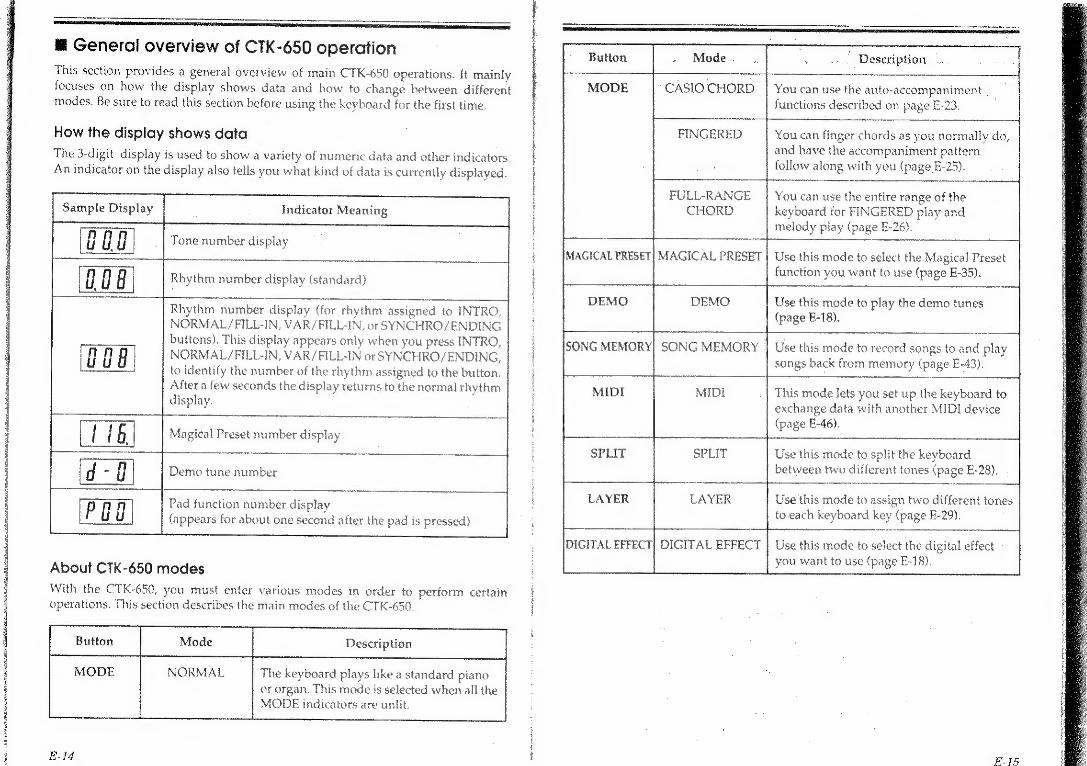
& General overview of CTK-650 operation This section provides a general overview of main CTK-650 operations. It mainly focuses on how the display shows data and how to change between different modes. Be sure to read this section before using the keyboard for the first time.
How the display shows data
The 3-digit display is used to show a variety of numeric data and other indicators. An indicator on the display also tells you what kind of data is currently displayed.
7 Rhythm number display (for rhythm assigned to INTRO, NORMAL/FILL-IN, VAR/FILL-IN, or SYNCHRO/ENDING buttons). This display appears only when you press INTRO, NORMAL/FILL-IN, VAR/FILL-IN or SYNCHRO/ENDING,
—J to identify the number of the rhythm assigned to the button. After a few seconds the display returns to the normal rhythm display.
Sample Display Indicator Meaning ———
{ ' nn Tone number display LU UU |
a add beeen letennet ed
Rhythm number display (standard)
Magical Preset number display Seca aoe a ane 2. sas 7 ch 4 rT Mm d - Hi Demo tune number
I p nn Pad function number display (Fe uu (appears for about one second after the pad is pressed)
l i
About CTK-650 modes
With the CTK-650, you must enter various modes in order to perform certain operations. This section describes the main modes of the CTK-650
Button Mode Description
MODE NORMAL The keyboard plays like a standard piano or organ. This mode is selected when all the MODE indicators are unlit.
seemeremayie pleat RN
maiceaeaieans,
cman |
Button Mode | .. Description
MODE CASIO CHORD | You can use the auto-accompaniment
functions described on page E-23.
FINGERED You can finger chords as you normally do,
and have the accompaniment pattern
follow along with you (page E-25).
FULL-RANGE You can use the entire range of the
CHORD keyboard for FINGERED play and melody play (page E-26).
I
MAGICAL PRESET] MAGICAL PRESET | Use this mode to select the Magical Preset function you want to use (page E-35).
DEMO DEMO Use this mode to play the demo tunes
(page E-18),
SONG MEMORY] SONG MEMORY J Use this mode to record songs to and play songs back from memory (page E-43).
MIDI MIDI This mode Jets you set up the keyboard to exchange data with another MIDI device
| (page E-46).
SPLIT SPLIT Use this mode to split the keyboard between two different tones (page E-28),
LAYER LAYER Use this mode to assign two different tones to each keyboard key (page E-29).
DIGITAL EFFECT) DIGITAL EFFECT | Use this mode to select the digital effect
you want to use (page E-18).

nee Basic operations _
This part of the manual provides you with the basic information you need to use your keyboard.
To switch power on and off
1. Press the POWER button to switch power on. The indicator above the button is it while
power is on. ya
solen
2. Adjust the volume, you
Y * Be sure to adjust the volume to a relatively low setting before playing the keyboard.
3. Press the keyboard keys.
* Adjust the volume to the level you want while playing the keyboard * Whenever you switch power on, the tone that was selected when you last
switched power off is still selected
4. To switch power off, press the POWER button again peowent .
Milochange tones’ ” 1. Look at the tone list printed on the keyboard's console and find the one you want
* A total of 128 tones are available.
2. Press the TONE button. . tone * The number for the fone that is currently selected is shown on the L\ display.
3, Use the 10-key pad to Input the 3-digit number that identifies the tone you want to select.
+, ®* Use the numeric buttons to input a 3-digit number. adinaraliarsd * You can also use the [+] and [-] buttons. Pressing [+] increases the
OOOO displayed tone number by 1, while [-] decreases it. Oo Oo ; () * Be sure to always specify a 3-digit number.
* If you specify a number greater than 127, tone number 127 is selected automatically.
* If you discover a mistake before you input the third digit, press the LX TONE button to return to the previously set tone number.
® With tone number 031 (GT HARMONICS), the high octave from C'S to C6 is identical to the high ectave from C*4 to C5.
Ten
E-16
sic sc mein oo aa renin rie ieschagigy ier es aN
1 manent te
a
Digital Sampling
Number of the tones that are available with this keyboard have been recorded and processed using a technique called digital sampling. To ensure a high level of tonal quality, samples are taken in the low, mid, and high ranges and then combined to provide you with sounds that are amazingly close to the originals. You may notice very slight differences in volume or sound quality for some tones when you play them at different positions on the keyboard. This is an unavoidable result of multi- ple sampling, and it is not a sign of malfunction.
Polyphony
The term polyphony refers to the maximum number of notes you can play at the same time. The CTK-650 has 32-note polyphony, which includes the notes you play as well as the rhythms and auto-accompaniment patterns that are played by the keyboard. This means that when a rhythm or auto-accompaniment pattern is being played by the keyboard, the number of notes (polyphony) available for keyboard play is reduced. Also note that some of the tones offer only 16-note polyphony.
Touch Response
Touch Response makes it possible for the keyboard to match the power of the note produced with the amount of pressure you use to press the keyboard keys. Note that beginners or those with insufficient strength in their fingers can use the proce- dure to switch Touch Response off.
To switch Touch Response on and off
Press the TOUCH RESPONSE button to switch Touch Response on and off. * When Touch Response is switched off, the notes produced by the
of keyboard are not affected by the keyboard pressure. 7 Touch Response is on when the TOUCH RESPONSE indicator is lit.
* Note that when you switch power on, the Touch Response on/off setting is the one that was selected when you last switched power off.
* Touch Response is not applied to the accompaniment keyboard when you are using auto-accompaniment (page E-22). It is, however, ap- plied to the melody keyboard." nous : The TOUCH RESPONSE button is automatically deactivated when- ever a demonstration tune is playing. If Touch Response is switched on when you start play of the demo tune, it remains on and cannot be
switched off during demo tune play. If it is switched off when you start play of the demo tune, is remains off. ‘ -
* You can also adjust the Touch Response sensitivity using the proce- dures described on page E-59.
°
*
EL?

B Playing the demo tunes
This keyboard comes with the following three pre-recorded demo tunes that vou can use for practice or simply for your listening enjoyment.
Tune Number Name i Composer Play Time
0 | Cosmopolitan X+ Cursion| (CASIO original) | 2:04
1 ° | Lightin’ Up | Edward Alstrom 2:43
: 2 ir Connect The Dots idward Alstrari | 2:32 —
* Note that you cannot start playback of a demo tune while you are recording to Song Memory (page E-43).
To start demo tune play
1. Switch power on and adjust the volume level.
2, Press the DEMO button. ak, « Demo tune play continues in a sequential endless loop until you
switch it off. * The number of the demo tune currently playing is shown on the
display.
* You can play along on the keyboard while a demo tune is playing back.
3. You can change the demo tune being played by pressing [+] (to advance) or
back) in the 10-key pad. f] (to move
4
v
To slop deme tune play
Press the DEMO button again to stop Demo tune play. DEMO,
@ Using effects
A total of 10 digital effects can applied to the keyboard’s tone to create exactly the mood that you want for your music. Note that only one effect can be selected at a
time.
E-18
ane arn mem meneame cme hneartmentretre nip srenheeettisttrrettt GAC HORN
sniper entenitetiinteeAncb amy omc
a ac
Types of effects
Effect [Effect Number| Description fo een Ta ipa ee | REVERBI | £-8 _ | Deep reverb
REVERB 2 E- 1 | Medium reverb
REVERB 3 | E-2 | Shallow reverb
CHORUS | | Adds depth and breadth to sound, i Recommended for electric piano.
TREMOLO B-4¥ | Causes pulsating sound. Recommended for i electric piano or vibraphone.
PHASE SHIFTER | £-§ | Rotating effect a :
ORGAN SP Pah | Like a rotating speaker on an electronic organ. : Recommended for organ tones. iy
ENHANCER E-% © | Strong attack effect | sin | ais FLANGER E-@ Adds depth and sharpness. Recommended for
bass sounds. — EQ LOUDNESS beg Enhances low range.
* Digital effects are applied to notes played on the keyboard, pad sounds, rhythins, and auto-accom paniments
* Effects £ - J through £ - 8 are quite strong, and may cause problems for the tone you are trying to play. When this happens, try changing to effects E> 0 t through E-2
* Depending on the tone and rhythm you are using, the EQ LOUDNESS effect, may cause distortion at high volume settings. When this happens, try lowering the volume. ;
To select an effect 1. Press the DIGITAL EFFECT button to switch digita! effects on,
¢ When you do, the DIGITAL EFFECT indicator lights. * The number that appears on the display indicates
the currently selected rhytlin.
oGrai ferect
ef
2. Use the 10-key pad to input the 1-digit number for the effect you want to use. To select HEVERE 1, for example, input 0.
a 7 * You canalso use the [+] and [-] buttens. -QPF-4 8 Es = Pressing [+] increases the displayed oe
effect number by 1, while [-] decreases ahF # &-g-* . E. ", oO OOo it
E19

* Preset effects are automatically selected whenever you play a demo tune. These presets cannot be changed or switched off during demo tune play.
« Ifyou change the effect while a note is still sounding, the keyboard may make an irregular sound when the effect change is made.
To switch effects on and off
A“ Press the DIGITAL EFFECT button to switch the cur- f f
cs eae rently selected effect on and off. o
@ Playing rhythms
This keyboard features a collection of 128 exciting built-in rhythm patterns. Each pattern provides percussion back up for all your performances.
To select and play a rhythm
1. Make sure that power is switched on and that volume is adjusted to a comfortabie level.
2. Use t! e MODE button to enter the NORMAL mode (all MODE indicators unlit)
MODE * Each time you press the MODE but- il co
j ton, the status of the indicators changes All of I zt
so as illustrated here. as
3. Look at the rhythm list printed on the keyboard's console and find the one you want.
4. Press the RHYTHM button
owen * When you do, the RHYTHM indicator lights LN * The mimber that appears on the display indicates UL uu
the currently selected rhythm
5. Use the 10-key pad to input the 3-digit rhythm number for the rhythm you want fo use. To
- select "012 8 BEAT 2”, for example, input 0, 1, 2.
2 1, 2, * You can also use the [+} and [-] buttons. Pressing | fJ} ¢ chy OoOod Oj [+] inereases the displayed rhythm number by | | Lf ff
OO O O while [-| decreases it.
oog [] Be sure to always specify a 3-digit number
-20
nda OAC nt eset er pay te aca Mt
! } i i
¢ If you specify a number greater than 127, thyihm number 127 is selected automatically.
* If you discover a mistake before you input the third digit, press the RHYTHM button to return to the previously set rhythm number.
6. Press the START/STOP button to start play of the rhythm. | * When you do, the selected rhythm starts to sound, with the indicator
next to the START/STOP button flashes with each beat.
7. Use the TEMPO buttons to adjust the tempo of the rhythm. : __TeMPo + When you press one of the TEMPO buttons, the tempo setting appears
} on the display. The value indicates the number of beats per minute. The display returns to normal shortly after you release the TEMPO button.
* Each time you press one of the TEMPO buttons + while the tempo value is displayed, the tempo set- | { ting changes one step, within the range of 40 to 255.
* Holding down either of the TEMPO buttons changes the tempo setting at high speed.
ooo * To reset the tempo to the standard value of each oooo rhythm, press both TEMPO buttons or the 10-key
: Sear pad's [+] and [-] buttons at the same time. C1 + You can also use the [+] and [-] buttons. Pressing [+] increases the
displayed rhythm number by 1, while [~] decreases it. Be sure to always specify a 3-digit number.
8. To stop oe play, press the START/STOP button again.
0 ie
& Improvising with the preset patterns Pressing the START/STOP button to start rhythm play causes the normal version of the pattern to be played. You can also play a variation of the rhy thm using the operation described below.
0D Important! * In addition to the variations described below, you can also a
rhythm types to each of INTRO, NORMAL/FILL-IN, VAR/I SYNCHRO/ENDING buttons. See page E-34 for details.
specific LL-IN, and
* Press this button while the normal rhythm pattern is playing in | et order to switch to the variation pattern. man
* If vou press this button while the variation pattern is playing, a one- measure fill-in pattern is played and then play of variation pattern i
continues.
E-2]

* Press this button while the variation rhythm pattern is playing in | order to switch to the normal pattern.
| ¢ Ifyou press this button while the normal pattern is playing, a one-
| measure fill-in pattern is played and then play of normal pattern | | continues. “
eee |
* Note that fill-in patterns can logically be inserted at specific locations inside a chord progression. Because of this, the fill-in pattern may not sound immedi- ately when you press a fill-in button. Instead, it will sound at the next location that a fill-in pattern is possible.
* The fill-in patterns for rhythms 017 and 047 are two measures long. All others are one measure long.
To play intro and ending patterns
i * When no aig thm is playing, press the INTRO button instead of the |
| START/STOP button. When you do, an intro pattern is played to | start the normal version of the selected rhythm pattern. | * To start play of the variation pattern, press INTRO and then VAR/ | FILL-IN, | | ¢ While a rhythm is playing, pressing SYNCHRO/ENDING instead
of START/STOP plays an ending pattern, after which play of the | pattern stops.
ByNGHaree ENON
mM Using auto-accompaniment
This keyboard features 128 accompaniment patterns that Jet you add full accompa- niments to your performances automatically. With auto-accompaniment, part of the
keyboard is reserved as an accompaniment keyboard. As you play your chords on the accompaniment keyboard, the accompaniment patterns adjusts automatically to follow the progression you play. You get a choice between two different methods for chord play. FINGERED lets you play chords as you normally do, while CASIO CHORD makes it possible to play fully formed ¢ hords with one finger. Note that this keyboard also features a FULL
RANGE CHORD system (page E-26) that lets you use the entire keyboard for chord and melody play.
About the accompaniment keyboard
The lower (left) 1.5 octaves are reserved for use as an accompaniment keyboard whenever you select CASIO CHORD or FINGERED with the MODE button. The panel above the accompaniment keyboard keys is marked with the names of the notes they play. The remainder of the keyboard (the part that is not included in the accompaniment keyboard) is called the melady keyboard. Please be sure to remem- ber these terms, because they will be used throughout the rest of this manual.
E22
rhc rir ree opin behest eng vention ite
compar
TUTTI: UL L as i
ee Oe 7 < Acsomneaniniaht —>, Pee anesats Melody keyboard Se keyboard
( When all the MODE button indicators are unlit, the entire keyboard becomes a melody keyboard. )
Using the CASIO CHORD system The CASIO CHORD system lets you easil y play the four main type: s of chords. Play of chords is simplified as shown in the chart below.
ao T Keys | Chord Type Example
Pressing one | Major chord iC We gne ee accompaniment} | | (C Major Chord) keys | |
| = 6 Snpce {
z Pressing two | Minor chord 'Cm el accompaniment! (C Minor Chord) a | keys | ready y | | ee THIET Pressing three | Seventh chord 27 a CDEFG ABCD ‘ae 7 accompaniment | (CSeventh Chord) I] {ll | | | keys | | |
| aete ON Pressing four | Minor seventh = | Cm7 COEFGAB CODE F accompaniment} chord | (C Minor Seventh {| Ih Ht keys | |
‘eh 7 tt
Note , e The bottom (leftmost) 1 note that you play determines the name of the chord, if
the bottom note is a C for example, the keyboard produces a C chord.

To play a CASIO CHORD auto-accompaniment
2) Use the MODE button to select CASIO CHORD.
2. Select mn auto-rhythm as described under “To select and play a rhythm” on page E-20.
3. Start play of the rhythm,
* If you want start play of the normal rhythm pattern, press START /
STOP. ae ;
are * To start play of the variation rhythm pattern, press VAR/FILL-IN
r * You can also use synchro start (page E-26) to start rhythm play.
STAND STOP
4, Press either one or up to four keys on the accompaniment keyboard, and the correspond-
ing accompaniment starts to play automatically
5. Continue pressing different keys on the accompaniment keyboard to play your chord
progression.
6. To stop aulo-accompaniment play, press START/STOP again STANTSTOR
Using standard fingerings
The FINGERED mode lets you play a wider variety of chords. In this mode, you can
start play of an accompaniment pattern by pressing three or four of the accompani-
ment keyboard keys. : 7
This keyboard is capable of recognizing 14 different chords. The SUeM De One
the fingerings of these chords with a root of C, Note that you can omit the fifth notes
(which are shown inside parentheses in the illustrations below) to produce 7, m7,
ow add9 and mM? chords.
c m Cm7 Caddy
TU TAN TE TM A cd leh WW all | ol telson a) Jeb) eee deh
Crmaj7 Cm7* Cdim : Caug, s ccc
it WE a iii HW mi | t Tj : Hl l,l |
vl leideb de LETT is Teh ol th ET biel Csus4 C72 joes ear
; I
Pi in tl} ii iy | ol | il
se Ra Cael Laks buat
ae s used as the root.
iy identi fies the root you want to use. *T With this chords, : lee est note
Make sure that your fingering cor:
RO inicio
nn nearer
| Important! ‘ i © Ifyou play one or two notes onl y in the left hand, or three notes that do not make | up a recognizable chord formation (for example, C-D-D"), no sound will be : produced. FINGERED MODE requires a conventional three or four-note chord |
|
formation to produce an auto-accompaniment. Also, note that auto-chords only work in conjunction with rhythm patterns, and not inc lependenitly of them.
Notes « The above oe show only one of the possible fingerings for “each chord.
Note that you can play the notes that form a chord in any combination. Each of the following fingerings for example, produces the same C chord.
HANA, WM, UA le TELL AScaiRnanaaRl SegBead) keyboard
* See the “List of fingered chords” on page A-1 for information on the fingerings of chords for all roots.
To play a FINGERED auto-accompaniment singe 1, Use the MODE button to select FINGERED. ¢ : bree toay
FAL AME ee
rovocren @ cas OC} S38 O
yoee
2. Select an auto-rhythm as described under "To select and play a rhythm” on page E-20.
w Start play of the rhythm.
ue * If you want start play of the normal rhythm pene: press START/ STOP.
wn, * To start play of the variation rhythm pattern, press VAR/FILL-IN. () * You can ‘also use synchro start (page £-26} to start rhythm play.
4. Play a chord on the accompaniment keyboard to start play of the auto-accompaniment.
5. Continue pressing keys on the accompaniment keyboard to play your chord progression,
6. To stop auto-accompaniment play, press START/STOP again.
eae ee.

To start an accompaniment with synchro start
1. Use the MODE button to select either CASIO CHORD or FINGERED. a
z 2. Select a rhythm using the procedure described under “To select and play a rhythm” on
page E-20
Mi
3. Press the SYNCHRO/ENDING button. At this time the indicator above the button lights.
«Tf you want to start out with the variation pattern of the selected
rhythm, press VAR/FILL-IN here.
4. Play a chord on the accompaniment keyboard and the accompaniment pattern starts to
play.
5. To stop the accompaniment pattern, press START/STOP again
Improvising with the preset accompaniment patterns
You can use intro, fill-in, variation, and ending operations (see “Improvising with
the preset patterns” on page E-21) with auto-accompaniment. Note the following when using intro and ending patterns.
« When an intro pattern is playing, the final measure of the pattern is indicated by the tempo indicator speed slowing down. This signals you to get ready to start playing. ; ee
* Intro patterns are available in major chord and minor chord versions. The i } priate versic rR accor 2 with the keyboard automatically selects the appropriate version in accordance with the
chord you play to start the accompaniment pattern - ¢ Ending patterns are also available in major chord and minor chord versions. The
i 2 fot i ce Wi 5 tae keyboard automatically selects the correct version in accordance with the last
chord you play at the end of the accompaniment.
Using Full-Range Chords
This function lets you use the entire range of the keyboard for play of accompani- ment and melody. Unlike the FINGERED mode, the melody can be played in the
accompaniment keyboard range, and chords can be played in the range of the
melody keyboard,
To play a FULL-RANGE CHORD auto-accompaniment
1. Use the MODE button to select FULL-RANGE CHORD.
2. Select an auto-rhythm as described under “To select and play a rhythm” on page E-20.
oR AeA er eemeaapen let
Sanna 3. Start play of the rhythm.
sare ¢ If you want start play of the normal rhythm pattern, press START/ (}3% stor. we -* To start play of the variation rhythm pattern, press VAR/FILL-IN. a * You can also use synchro start (page E-26) to start rhythm play.
4. Play the song on the keyboard. * Anythit.g you play using one or two keys al the same time is considered to be
part of the melody, and so the corresponding notes sound as you play them. * Anything you play using three or more keys at the same time is considered to be
part of the accompaniment, and so the matching chord (using the same fingerings as FINGERED) is played.
Example - To play the chord C major Any of the fingerings shown in the illustration below will produce C major.
i * It makes no difference how far apart the keys you play are. * Aswith the Fingered Mode (page E-24), you can play the notes that form a chord in any combination.
It makes no difference if your fingering includes two or more of the same note.
# Adjusting the accompaniment volume Use the following procedure to set the volume that the accompaniment is played You can set the volume to any value in the range of 000 to 127.
To adjust the accompaniment volume 1. Press the ACCOMP VOLUME button.
2. Use the 10-key pad to input a 3-digit number and specify the accompaniment volume level, * Youcan also use the [+] and [-] buttons. Pressing |+] increases the volume by 1, while [-] decreases it. * Holding down either of the key transpose buttons changes the displayed value at high speed. * Be sure to specify a 3-digit number. * Ifyou specify a number greater than 127, an accompaniment volume of 127 is set automatically. * Remember that you have about five seconds after pressing the ACCOMP VOL- UME button to input the first digit. Otherwise, the accom paniment number will
disappear from the display, and you will have to press the ACCOMP VOLUME button again to get it back. Pressing the [+] and [-] buttons at the same time automatically sets an accompa- niment volume of 100.
| | :
| |
| | i | i
{ | 4
|
This part of the manual describes the more advanced features and functions of the
CTK-650. Using these features effectively helps to add something extra to your
performances.
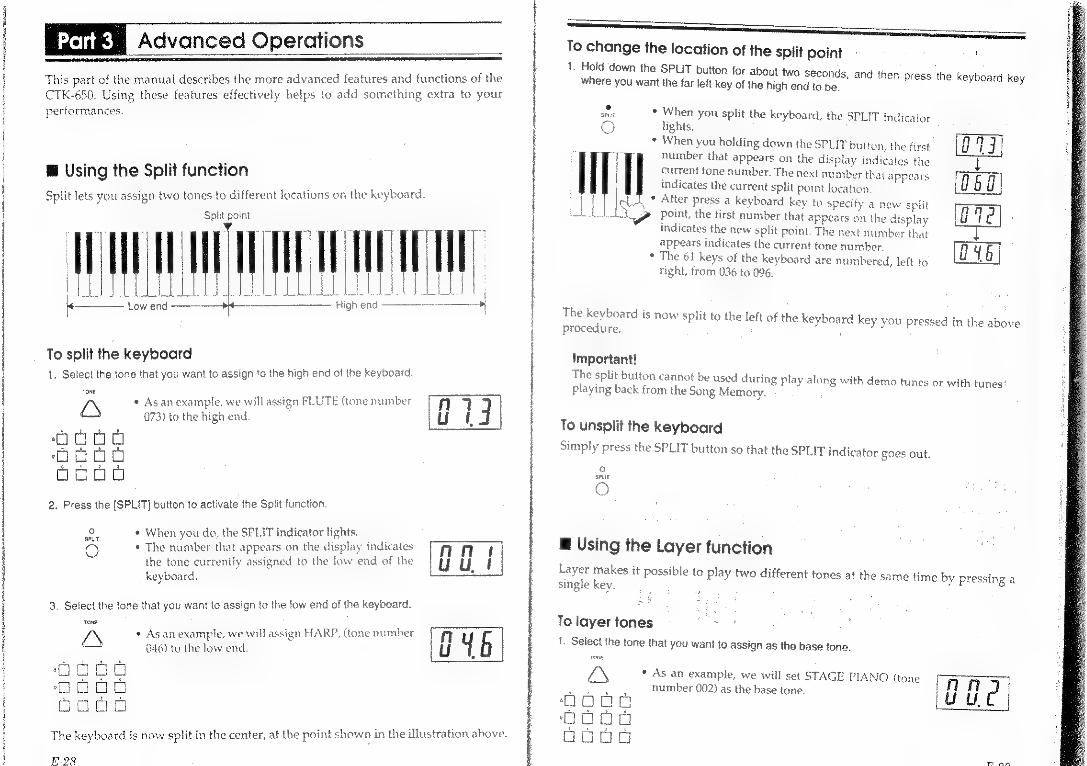
@ Using the Split function
i S i 2 ions on the keyboard. Split lets you assign two tones to different locations on the key i
ll a
Split point
WV UE | |
{ i | |
mB I Ll | LJ
° i = Ow — ~ High end
To split the keyboard
1. Select the tone that you want to assign to the high end of the keyboard
in * Asan example, we will assign FLUTE (tone number
& 073) to the high end.
Lc
OO
2. Press the [SPLIT] button to activate the Split function.
o * When you do, the SPLIT indicator lights e Pee es eens al bss ae eaeras
O * The number that appears on the display indicates | nine
the tone currently ass keyboard.
ned to the low end of the U ul {
i t board. 3. Select the tone that you want to assign to the low end of the keyboa'
TONE.
“\ * Asanexample, we will assign HARP, (tone number | n Y h
= 046) to the low end. | u i
ood aia OOOO
aood
iti e point shawn in the illustration above. The keyboard is now split in the center, at the point shaw nin thei a
F.28
_—————————— To change the location of the split point ; 1. Hold down the SPLIT button for about two seconds, and then press the keyboard key where you want the far left key of the high end to be.
sat * When you split the keyboard, the SPLIT indicator oO lights,
fe) fa! faa * When you holding down the SPLIT button, the first number that appears on the display indicates the current tone number. The next r number that appears indicates the current split point location.
i ¢ After press a keyboard | key to specify a new Se it point, the first number that appears on the display indicates the new split point. The next number that appears indicates the current tone number
* The 61 keys of the keyboard are numbered, left to right, from 036 to 096.
ze T
c2 ona om
The keyboard is now split to the left of the seyhourg key you pressed in the above procedure, :
Important! The split button cannot be used during play along with demo tunes or with tunes! playing back from the Song Memory.
To unsplit the keyboard Simply press the SPLIT button so that the SPLIT indicator goes out.
° spurt
O
@ Using the Layer function Layer makes it possible to play two different tones at the s. ame time by pressing a single key.
To layer tones oe 2 1. Select the tone that you want to assign as the base tone.
roe
/\ * As an example, we will set STAGE PIANO (tone AAT) a ' number 002) as the base tone. Pa | i cog Bue cgo00
ita
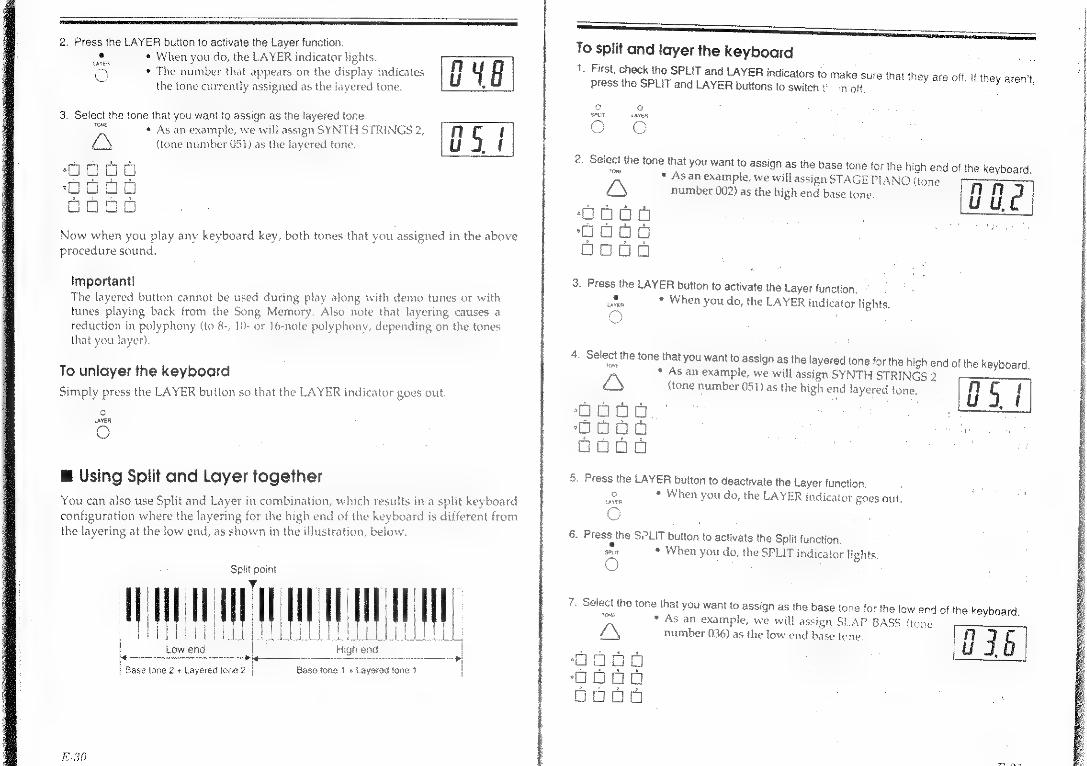
2. Press the LAYER button to activate the Layer function.
® * When you do, the LAYER indicater lights. LAYER, ¢ The number that appears on the display indicates
the tone currently assigned as the layered tone.
3. Select the tone thal you want to assign as the layered tone
oe * Asan example, we will assign SYNTH STRINGS 2 » TA { £y (tone number 051) as the layered tone. ulgd
coood oooo oooo
Now when you play any keyboard key, both tones that you assigned in the above procedure sound,
Important! The layered button cannot be used during play along with demo tunes or with tunes playing back from the Song Memory. Also note that layering causes a reduction in polyphony (to 8-, 10- or 16-note polyphony, depending on the tones that you layer).
To unlayer the keyboard
Simply press the LAYER button so that the LAYER indicator goes out
lo] LAYER,
O
@ Using Split and Layer together
You can also use Split and Layer in combination, which results in a split keyboard configuration where the layering for the high end of the keyboard is dif ferent from the layering at the low end, as shown in the illustration, below.
HU
4
Split peint
WU HN abt i PPE RL Eads {|
Low end '
: } Base tone 2 + Layered jone 2 | Base tone 1 + Layerad tone 1 |
E30
To split and layer the keyboard 1. First, check the SPLIT and LAYER indicators to make su re thal they are off. If th E Press the SPLIT and LAYER buttons to switch § om off. J oar
2. Select the tone that you want to assign as the base tone for the high end of the keyboard. : * Asan example, we will assign STAGE PIAN (fone SRS LN number 002) as the high end base tone. | Hi p} Pa
oooea ; oOoog oes ooo
3. Press the LAYER button to activate the Layer function. e ¢ When you do, the LAYER indicator lights. tArER
4. Select the tone that you want to assign as the layered tone for the high end of the keyboard, Be * As an example, we will assign SYNTH STRINGS 2 r aN (tone number 051) as the high end layered tone.
C noo : ‘ : CL og tie
[ og j ;
5. Press the LAYER button to deactivate the Layer function. * When you do, the LAYER indicator goes out.
cy
6. Press the SPLIT baie to activate the Split function. fi * When you do, the SPLIT indicator lights fe
O
7. Select the tone that you want to assign as the base tone for the low end of the keyboard. bs * As an example, we will assign SLAP BASS (tone és number 036) as the low end base tene. i} J b
| : z = +
La awe OOO0
ooo boon

( function. . Press the LAYER button to activate the Layer n / ;
: e * When you do, the LAYER indicator lights. LAYER i.
fo’,
for the low end of the keyboard. 9. Select the tone that you want to assign as the layered ton:
a ¢ As an example, we will assign GUNSHOT (tone 1
LN number 127) as the low end layered tone. {
ooga ooog aooo eal .
The keyboard is now split and layered in the configuration illustrated below.
: Split point
Pit) THT TTT CHAT TET TERE TT | Prd dd] hd
iI PEO LEEPER | Low end a High end .
STUDIO PIANO + SYNTH STRINGS 2 i acer SLAP BASS 1 + GUNSHOT
@ Using the sound/control pads
The sound/control pads put a variety of useful sound effects and eee
fingertips You get a choice of 32 sets of sound effects and controls ae gia : a
‘full list ; as to the pads. Once you set the pads 34 for a full list) that you can assign ener el ed
fancaans that you want, they are always on hand whenever you need them
Types of operations available for the pads
T f | | i Function | Description | | Function | Numbers | ‘
| . ——— ; Gi
| Short musical phrases. 00 is the default setting | Phrases | 00 to 09 | for the pads. 7 |
a a ——— | t ; | _ |
Percussion / 10to029 | Percussion and sound effects | | Sound Effects | | . a i L { aot
3 Controller 30 to 31 | Controls for pitch, vibrato, etc. i
| A. ! * \ es
To change the pad functions .
1. Look at the pad function fist printed on the keyboard's console and fit
assign to the pads. : fa ao
© Here we will assign set 05, which is PHRASE 6
nd the one you want to
2: Press any one of the four pads and the number that ide assigned to the pads appears on the display. —mmowrnecrao- ¢ The number remains on the displ
es the set of functions currently
ay for about two I gc0 | sso -seconds.
P i ff
2
3. While the function set number is on the display, i use the 10-key pad to input the number of the set of functions you want to change to.
Oo C1 Cy * Remember that you have two seconds after press- ~ oogeaa the pad to input the first digit. Otherwise, the p Hi 5 rs g 5 : pad function number will disappear from the dis- play, and you will have to Press a pad again to get it back. , The following lists show each of the sounds pads. Note that assignment is made in se individually, ‘
and controls that can be assigned to the ts of 4. You cannot assign to each pad
Phrases (00 to 09) The numbers in parentheses are the tone numbers used for each pad.
00 A TIMPANY (047)
B HARP (046)
C BRASS (061)
D COUNTRY FARM (094)
05 A FIFTHLEAD (086) C CELESTA (008) B STRINGS 1 (M8) DD HONKY-TONK(003)
[Ol A ATMOSPHERE (099) C COSMIC SOUND (103) | 06 A GUNSHOT (127) © DRUM i B BRIGHTNESS (100) D PEARL DROP (096) | |
B SYNTH-LEADIO80) -D METAL LEAD (084) | 1. {02 A PIANO (oO) C STRINGS (048) 07 A PIANO (000) | B_ PIANO (000) D TRUMPET (056) | B PIAN
|
{ 03 A FLUTE (073) C ORCHESTRA HIT 55) | og A DRUM C DRUM i B PICCOLO (072) D CHOIR (952) B DRUM D DRUM L | Ob A H HORN (069) C STEEL DRUM (114) loo A DRUM C DRUM H adoptees
| 3 i B SITAR (104) D WOOD Bass (032) | B DRUM D DRUM A
Percussion/Sound Effects (10 to 29)
i iQ A KICK1
B SNARET
C HIHAT-CLOSE | H C HIHAT-CLOSE D HIHAT-OPEN | DO MHAT-OPEN
A KICK1
t
| | yu Cc TOMLOW i. B SNARE I on
D TOM-HIGH
A RICK 4
B SNARES
¢ TOM-Low
D TOM-HIGH
Paes

A KICKS C HIHAT-CLOSE in A CABASA
B SNARE2 D HIHAT-OPEN
| C WOODBLOCK-HIGH j
B MARACAS 3B Wena ace tow
A KICK3 C TOM-LOW
B SNARE2 0 TOM-HIGH B CUICA-OPEN —-D- TAMBOURINE
A KICK € HIHAT-CLOSE
j = 3 A CUICA-MUTE — C VIBRASLAP
|
p24 A WHISTLE-SHORT C GUIRO-SHORT
B SNARE D HIHAT-OPE |B WHISTLE-LONG D GUIRO-LONG : +
A KICK © TOM-LOW 125A TRIANGLE-MUTE C COWBELL B SNARE D TOM-HIGH |B TRIANGLE.OPE :
=< 2:
A RIDE © SPLASH 126 © SCRATCH2 -_ : i D SCRATCH 3 |B CLASH D CHINA | = -
cme oe 5 IM-HIGH C TATKO-HIGH 19 A KICK1 © SIDE-STICK RUM-HIGH C
j DRUM-LOW D TAIKO-LOW B SNARE I D HAND-CLAP -DRUM.LOW D v
A TIMPANLLOW 2 TIMPANLMID
B ORCHIT-LOW D ORCHIT-MID
200 A BONG-HIGH
B BONG-LOW 1D CONG-LOW
129 A APPLAUSE ¢ GUNSHOT
B HELICOPTER D TELEPHOD
21 A TIMBALE-HIGH =C AGOGO-HIGH
B TIMBALE-LOW DD AGOGO-LOW
Controller (30 to 31) ; eos
A BEND UP (F/ © MODUL f
B BEND DOWN (FAST) D> MODULATION
{31 A BENDUP
B BEND DOW
DUP AND DOWN,
D BEND TREMOLQ
ee i 1 t
race ne that is uced by * Bend Up/Bend Down produces an effect like the one that is Laas by bending the strings of a guitar. The range is two semitones up and down from the original note, ; PR ongEc ;
* The cond ‘spnBe for Bend Up/Bend Down is adjustable to either two semitones or three semitones (“To set the bend range” on page E-53).
' 5 the itude of vibrato. * Modulation changes the amplitude 9 ; ; *: on * In 28 and 29 the tones will be different from the tone shown above when
ansposed, sen iat . Use the ACCOMP VOLUME slider to control the volume for pads 08 and 09.
@ Assigning rhythms fo the Intro, Variation, and Ending Buttons
rma @ ress an Intr ar ¥ r Ending button, a corresponding Normally when you press a ntro, Variation, o g Dutton, , id
attern is played n xy the main rhythm that re Currenty using. Using the yt at you are cu t U u atte s played to match th 2 y &
Bi ocedure described below, however, you can assign any of the 128 r hythms fo each
E-34
of the Intro, Fill-In, and Endin 8 buttons. When you do preset rhythm sounds when yi a pattern that matches the ou press the button,
To change the Intro, Fill-In, and Ending button rhythm assignments 1. Press the Intro, Fill-In, or Endi ng button whose rhythm you want to change and the number that identifies the rhythm currently assigned to the button appears on the display. xe FEY AT ES O J O * The number remains on the display for about two | (7 FTA seconds.
| UU 2. While the rhythm number is on
the number of the the display, use the 10-key pad to input rhythm you want to change to.
goon * Remember that you have two seconds after press- Au ‘ing the button to input the first digit. Otherwise, the — | fect 4
= OOOO rhythm number will disappear from the display, } ff OOO and you will have to press the button again to getit back.
* Whenever you change to a different main rhythm, all of above buttons auto- matically change to the new thythm. . You can also change the rhythm assigned to the NORMAL/FILL+IN button. When you do, however, the display for the main rhythm continues to show the main rhythm setting, even though the rhythm you assigned to the NORMAL/ FILL-IN button is the one that sounds. Example: When 000 is set as the mai
NORMAL/FILL-IN button. In this case, Pressing the NORMAL/FILL-IN button causes rl 111 to sound, but the rhythm d isplay shows 000.
n rhythms and you assign 111 to the
syihm
@ Using Magical Presets Magical Presets let you configure the effects, such as playing key, change tones eact total of 128 Magical P;
keyboard to perform a variety of a short accompaniment phrase when you h time you press a keyboard key, and muct resets in memory for instant recall when y
special press a keyboard
n more. There are a ou need them.
To change the Magical Preset 1. Look af the magical preset list printed on the keyboard's consol € and find the one you want. * Here we will assign Magical Preset 016, whic his Melodycomp 1.
2. Press the MAGICAL PRESET button, and the number that ident Preset appears on the display. ifies the current Magical
i U. | eect Ie
sce ~ * Note that the “*” indicator on the display mov Ann
the far right to indicate the Magical Preset dis

3. Use the 10-key pad to input the number Magical Preset you want to change to.
C] a im go * You can also use the [+] and [-] buttons. Pressing
© a Oo Q [+] increases the displayed Magical Preset number
ah ok JeRe Cee by 1, while [-] decreases it. DOOO .», * Be sure to always specify a 3-digit number.
« If you specify a number greater than 127, Magical fl ¢ 5
A Preset number 127 is selected automatically ued
The keyboard is now assigned the Magical Preset that you specified in the above
procedure. Following are detailed explanations of each type of Magical Preset.
To switch Magical Preset off
Press the MAGICAL PRESET button to switch the function off.
¢ Note that the “#” indicator on the display moves to the left to indicate that Magical Preset is switched
off.
a
@ About Magical Presets
Following are detailed explanations of each type of Magical Preset
Break Beat (000 to 015) With Break Beat, pressing any of the keys in the range shown below, causes the
selected Break Beat phrase to sound. Each phrase is four measures long, and it
continues to sound as long as you keep the key depressed. The phrase is played in
the key that corresponds to the keyboard key that you press (pressing C plays the
phrase in C). Note that you can also control the tempo of the phrase using the
TEMPO buttons.
Cp Rag cle CDEEGABRC DER
Melodycomp (016 to 023) Melodycomp automatically plays chord-like tones, changing to the next chord as
Jong as you press the keyboard key. Chord progressions are four or eight chords
long, depending on the Melodycomp progression you select. Note that in some
cases, a very slow or fast tempo may make it difficult for you to time chord changes
correctly. In this case, it is best to have the tempo ata middle setting.
Shadow Drum (024 to 027) With Shadow Drum, pressing a keyboard key plays the percussion sound. As shown in the score below, if you play notes at fixed intervals, it creates the effect of playing along with a drummer.
Free Session (028 to 059) Free Session gives you a selection of preset chord progressions (see page A-4 fora full list) that you can play along with. Free Session chord changes play automatically, independent of what you play on the keyboard. Use the following procedure to start a Free Session progression. :
To start a Free Session progression 1. After selecting the Free Session progression you want to use (see “To change the Magical
Preset” on page E-35), press a key on the Free Session ac i ; $s s companiment ki define the key of the progression i ae Macca CORSET .
CE Rap Ce Ope FGA BCD EF
+ Pressing one of the keys in the above illustration starts auto-accompaniment play in the key that matches the key you press. You can then use any of the keyboard's keys to play Free Session chords. To select the key of C for example, press the C key. ; ‘
. You can also change the rhythm being used with a Free Session i “Usi is r i Se progression (see “Usin: tone buttons with Magical Presets” on page E-38) :
. To stop play of the Free Session progression, press the START/STOP button. Siametee * Note that you can use ending patterns (see “Improvi
Preset patterns” on page E-21) with Free Session progressions. ° Whenever you play a fill-in pattern during a performance using Free Session, play returns to the first chord of the selected chord progres- sion.
with the

Tone Stack (060 to 099) Pte
T Stack brings you additional tones that are separate from the :
ROG Sn Raine to rhythms with Tone Stack tones, but you cannot : t you can play auto rhythms h Tone Stack tones, ¥ tones. Note, that you can p : ;
use aulo-accompa niment.
ndard preset +}
Key Split (100 to 11) ; Key Split splits the keyboard between a umber of different tones and sounds.
Sound Effe esse
Percussion (no sound produces on the 9 far r
Bass + Keyboard tones 108 to 111
a cannot use atito- it tones, bu ¢ You can play auto rhythms with Key
Wie dey of “To sy ve keyboard” on f the keyboard is transposed (see “To transy * If the key of the keyboard is tra inapinse ie Seee ee
8) while you are using Key Split, one ot the keys of the keyboard may
Geinenen other he keyboard. Which key plays a oard is transposed
page Ee! :
es sounds that are from another section of tt
different sound depends upon how much the keyb
Hyperactive (112 to 127)
fa key chang the stereo position Each press of a key changes j ;
Presine a single key plays an arpeggio pattern based on re
note played. You can use the TEMPO buttons to change the
tempo used for the arpeggio Each press of a key changes the tone
Pressing a single key automatically adds harmony
112to 115 116 to 119
120 to 123 124 to 127
set to match the Hyperactive effect that is selected. ject another tone while usi peractive. button to select another tone whi if 4 so
@ The tone is automaticall
* You can use the TO When you do, the initial note is plas
arpeggio pattern ate Pl
matically selected by the Hypera ; pene ae
pl r 5 with Hyperactive, but you cannot use * You can play a ythms with Hype
paniment,
in accordance are played using the initial tones auto-
@ Using tone buttons with Magical Presets
iffon to change tones whic you are u You can use the TON
To change the tone
ss lhe MAGICAL PRESET buiton. re
-key pad to select the Magicat Preset you want to use.
3. Press the TONE button. sone
LN
4. Use the 10-key pad to input a tone number.
nge to another Magical Preset, press the MAGICAL PRESET button. To the Magical Preset that you were us igain, press the MAGICAL PRESET button and then select that Magical Preset number again ° When you press the TONE button, either the currently selected tone nunrber, the currently selected Magical Preset number, or a number used by the keyboard for internal processing appears on the display. The type of number depends on the type of Magical Preset that you are using. “1 When you are using Magical Preset 065, for example, pressing the TONE button displays 047 : *2 When you are using Magical Preset 104, for example, pressing the TONE button displays 128. * Selecting one of the 128 preset tones while using Tone Stack (060 to 099 the selected preset tone and the Tone Stack tone to sound together. ® Selecting one of the 128 preset tones while using Key Split (108 to 111) causes the selected preset tone to sound when you play on the high end of the keyboard. * If you press the LAYER or SPLIT button while a Magical Preset number is shown on the display, the Magical Preset number is cleared and the display changes to show data for the button you pressed,
) causes
@ Using the Registration function With the Registration function, you can save setups su selections, tempo settings, and effect select four set-ups (0 to 3) i
Las tene and rhythm 1 You can store up to S$ for ins
ay registra tion me
To store a set-up L#
of all, make the following settings and selections: * Tone er * Rhythm number * Tempo * Chord type (NORMAL, CASIO CHORD, FINGERED, FULL RANGE
iment volume HORD)
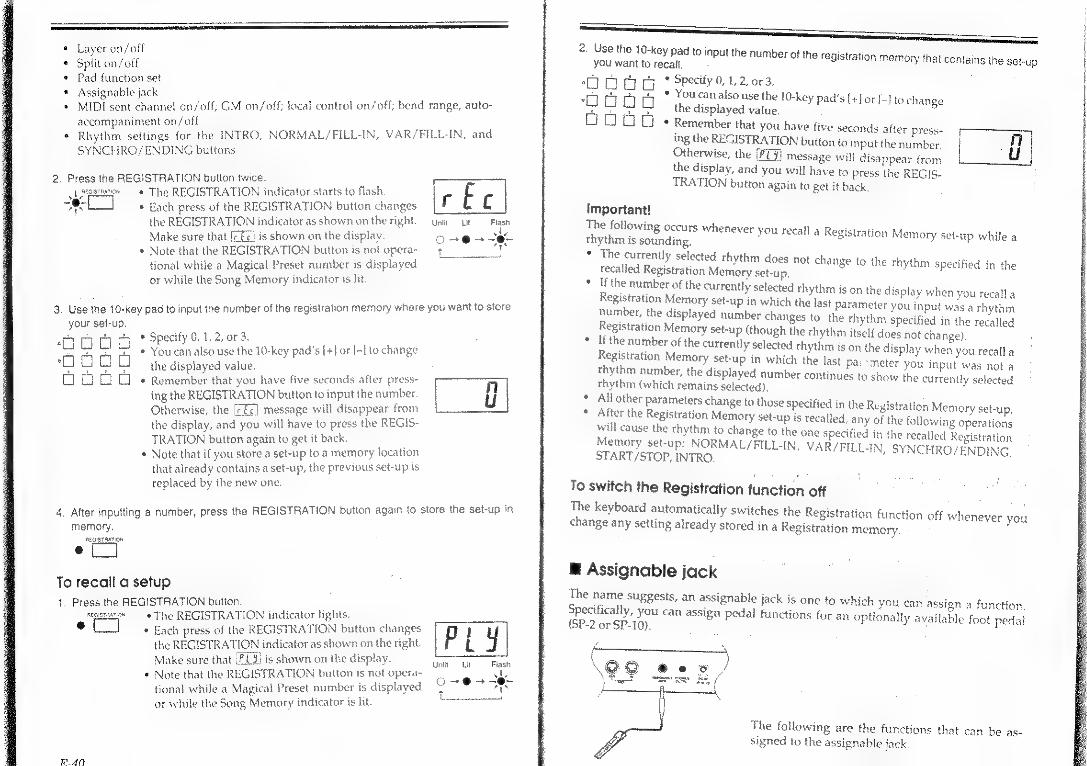
* Layer on/off
© Split on/off ¢ Pad function set
ssignable jack ral :
; ore annel on/off; GM on/off; lacal control on/off; bend range, auto MIDI s ha 7 accompaniment on/off = a ne oe
. Rhythm settings for the INTRO, NORMAL/FILL-IN, VAR/FILL-IN, and
SYNCHRO/ENDING buttons
re N button twice.
a a eee indicator starts to flash ;
® ¢ Each press of the REGISTRATION button changes
' the REGISTRATION indicator as shown on the right. unit uit Fin
Make sure that [¢ fc! is shown on the display. Oo-e- -e-
* Note that the REGISTRATION button is not Operas" p32
tional while a Magical Preset number is displayed or while the Song Memory indicator is lit.
Ir Ec
3. Use the 10-key pad to input the number of the registration memory where you want fo store
your set-up. sda aatk
4 yt * Specify 0, 1, 2, or 3. OOO 6 f epecly% oh ¢ You canalso use the 10-key pad’s [+] or [-] to change
0 0 O the displayed value. “] £1 C1 C1 + Remember that you have five seconds after press-
ing the REGISTRATION button to input the number.
Otherwise, the [e£c} message will disappear from
the display, and you will have to press the REGIS-
TRATION button again to get it back. ;
¢ Note that if you store a set-up to a memory location
that already contains a set-up, the previous set-up is replaced by the new one.
tt
tt int t-up in 4. Alter inputting a number, press the REGISTRATION button again to store the set-up
memory. PEGISTRATION
To recall a sefup
utton.
7 Pe eeemie The REGISTRATION indicator lights.
. * Each press of the REGISTRATION button changes
the REGISTRATION indicator as shown on the right.
Make sure that PL shown on the display.
* Note that the REGISTRATION button is not opera-
tional while a Magical Preset numb ri displayed
or while the Song Memory indicator is lit
RL Unit Ut Flash
vie
OOo 2es
ELAN
2. Use the 10-key Pad to input the number of the re. gistration memory that contains the set-up you want to recall. Ao ‘Se Specify 0, 1, 2, or 3. > = 3 & * Youcanalsouse the 10-key pads [+] or [-] to change “SH UU ithe displayed value. J C1 (1 + Remember that you have five seconds after Press= pr ing the REGISTRATION button to input the number. | i} | Otherwise, the (PTY) message will disappear from LM the display, and you will have to press the REGIS-
TRATION button again to get it back,
Important! The following occurs whenever you recall a Re rhythm is sounding. * The currently selected rhythm does not change
recalled Registration Memory set-up. If the number of the currently selected rhythm is on the dis Registration Memory set-up in which the last parameter you input was a rhythm number, the displayed number changes to. the rhythm specified in the recalled Registration Memory set-up (though the rhythm itself does not change). if the number of the currently selected rhythm is on the display when you recall a Registration Memory set-up in which the last pa: -meter you input was not a thythm number, the displayed number continues to show the currently selected rhythm (which remains selected). All other parameters change to those specified in the Registration Memor After the Registration Memory set-up is recalled, any of the following operations will cause the rhythm to change to the one specified in the recalled Regis Memory set-up: NORMAL/FILL-IN, VAR/FILL-IN, SYNCHRO/E START/STOP, INTRO.
gistration Memory set-up while a
fo the rhythm specified in the
. play when you recall a
y set-up,
ration
DING,
To switch the Registration function off The keyboard automatically switches the Registration function off whenever you change any setting already stored ina Registration memory.
& Assignable jack
The name suggests, an assignable jack is one to which you can assign a function. Specifically, you can assign pedal functions for an optionally avail able foot pedal (SP-2 or SP-10).
The following are the functions that can be as- signed to the as: nable jack.
| ' :

eee 1
* Remember that you have five seconds after displaying the Wc] mes: ! Functi | Display i Description sage fo input the number. Otherwise, the dic) message will disap- i UNCON: | Indicator | = | ear from the display, and you will have to ress the MIDI button
| ae | 2 Seale = : P Pa) ¥' PR i be ee | | again to get it back. | | | « With piano and other attenuating tones, the | \ pedal works like a piano’s damper pedal to
i | cause notes to linger. & Using the Song Memo | Sustain | 5 U | @ With organ and other sustaining tones, g g vy i i { pressing the pedal causes the played note to | The Song Memory lets you record up to approximately 1,300 notes in memory. You | j } ld
can then play it back and even play along with yourself on the keyboard.
{ | | be held. y y y ) | oe peel em - - oe ~ ~ “a : , | ij | ® This function works similarly to Sustain, but \ Basic Song Memory Operations i | | the timing of the effect is different from that | The status of the Song Memory changes each time you press the Song Memory , Sostenuto | 5 oO 5 i used for Sustain. If the pedal is pressed after button.
| i | LJ | a note is played (and the keyboard key is 1. Normal 2. Playback sae Rietaine song Meany wien
| { : | | still depressed), only that note is sustained. Seesdch ‘whi
; en AN Batra i ; i ae | G20] PLy Soft 5 f t | * Softens notes played on the keyboard | Dispel bebe the bution ; y | oe | - ; t q : . oo
| 3. Record Vo fs |
Rhythm | ® This function assigns the function of the | ee start/Stop cr H y | START/STOP button to the pedal.
J i | i
To change the assignable jack function
1. Press the MIDI button until the message (/f:| appears on the display.
its * Each press of the MIDI button changes the displayed { p |
a message in the following sequence. u Cc
cH Gan Lon bad Ach 5 i Ml 3. Locai contro! BeND sange © ACcomParment «{iCHannet_ Wp 2 Gomera MIDE gp. 3) Local control mp ited Important!
1. Normal
2. Playback
3. Record
Operation
Return here when you are finished using the Song Memory. Playing back from Song Memory.
Recording to Song Memory.
Be sure to return to 1, Normal whenever you are not usin, Some keyboard operations (such a Magical Presets cannot be used while the Song Memory is set to 2. PI. Any time you store something into Song Memory,
8 the Song Memory and Registration Memory) ayback or 3. Record.
wo Oi
anything that was previously ; there is automatically deleted and replaced with the new recording. 2, Use the 10-key pad’s [+] and [-] buttons to change the displayed assignable jack function Song Memory contents are retained in memory as long as power is supplied to the one you want to use. Deas CHS] 05 | from batteries or and AC outlet. If power is cut off (by dead batteries and * Each press of [+] and [-] changes the assignable ane aw unplugging from an AC outlet), everything stored in Song Memory will be oC] jack function in the following sequence. deleted. es
* If the POWER indicator gees out whil “Ll corded up to that point is deleted. € recording is in progress, anything re-

To record to Song Memory
i ti vant to play First, set up the keyboard to play the tune you wan arene es . 1. : Noe rhe you will not be able to record to Song memory while a aot a sae
number (page E-35) is displayed. If Magical Preset number is displayed, press
MAGICAL PRESET to switch the Magical Preset function off,
NG MEMORY buiton twice.
= aa ay as * The SONG MEMORY indicator starts to flash | f
Se Bach press of the SONG MEMORY button changes iF C
the SON EMORY indicator as shown on the San ik Pas
right. ; a a
Make sure that [ shown on the display. F
* After about five seconds, the [-Fc) message clears
from the display, but the SONG MEMORY indicator
continues to flash, indicating that the keyboard is
still standing by to record.
ding. ; he START/STOP button to start recor ; ae
vee « If you want to record something without using a rhythm pattern, skip
i continue from step 4. — this step and continue from step enn
"6 The ate pattern starts to play after a 4-beat count. Each beat of the
count is indicated by the START/STOP indicator. : wih
* Anything you play on the melody keyboard while the 4-beat count is
ing is ecorde Song Memory sounding is also recorded in MOTO oc :
* To use ache start, press the SYNCHRO/ENDING putlon bes
of the START/STOP button. Recording and rhythm play wi c
automatically when you play something on the accompaniment key~ i ¥ - oi
board. —_ sees ° To start with an intro pattern, press the SYNCI IRO/ Seri
and then the INTRO button in place of the START/S abies i
Recording and the intro pattern play will start ia y when
: thi e accompaniment keyboard. you play something on the accompa : jac ORT
* To start rhythm play part way through a 1 aay) oon Button YNCHRO/ENDING button in place of the START/S . u wes
Recording will start automatically when you play somet a on :
melody keyboard, and the rhythm will start automatically when you
play something on the accompaniment keyboard
sragtisror
the song that you want to perform. ; Se otis Hie
: SNe eke Song Memory has Jess than 100 notes of aes ee ee « Wheneve ¢ . y
’ 3 , indica starts to flash quickly. rec e Song Memory indicator starts : you are recording, the Song Y Stal ards
retary becomes full, the indicator stops flashing. — iW you are using @
‘ } et pe f accompaniment, it also stops when memory becomes full.
t n fo stop the recording operation. is finished, press the START/STOP button to st pt ng ope :
Pe ° To end ih an ending pattern, press the SYNCI TRO/ENDING but
ie if and then be recorded and the stantaror
i) Phe enc ern will p i ton. The ending patter :
Lye rhythm pattern will stop automatically.
To play back a song from Song Memory 1. Press the SONG MEMORY button once. p } Soun scchien * The SONG MEMORY indicator lights, t @ * Each press of the SONG MEMORY button changes the SONG MEMORY indicator as shown on the "tlt kit right. : 2 Bm Make sure that [PI9] is shown on the display. a * After about five seconds, the (PLY) message clears from the display,
ating that the key- but the SONG MEMORY indicator Stays lit, indic board is still standing by to play back.
2. Press the START/STOP button to start playback. STARTSTOR * Each beat of the thythm count is indicated by the START/STOP oO indicator.
* You can change the volume and rhythm settings while playback is in progress. If the Song Memory tune was recorded along with changes in these settings, the recorded settings will take place where they are ae regardless of the manual changes you make during play- ack, * You can use the entire keyboard for play along with playback from the Song Memory, * Playback stops automatically (and the START/STODP indicator stops flashing) when the end of the Song Bank piece is reached. * You can manually stop playback from the Song Memory at any point by pressing the START/STOP button, Sots :
About data recorded in the Song Memory In addition to the notes you play on the keyboard, the following data is also stored in Song Memory. These operations are also performed whenever you play back from Song Memory.
* Tone numbers * Rhythm numbers * Intros . .
* Pedal operations .
¢ Endings
Se ° ry .
Split on/off Layer on/off Pad operations Effect types Assignable jack sett Rhythm numbers assigned to the four auto-accompaniment buttons (INTRO, NORMAL/FILL-IN, VARIATION/ ge the split on/off or Layer on/
~ord play method during that reco
How Touch Response is handled by Song Memory Asong recorded into Song Memory includes Touch Response data. Note, however, that the Touch Response applied for playback is in accordance with the Touch Response sensitivity settings (see “To set the touch sensitivity” on page B-59) in effect on the keyboard.
* Whenever you change Touch Response sensitivity (page E-59) while playing back from the Song Memory, that setting is not immediately applied to t the song that is playing. It will be applied starting from pla k of the next song. You should note, however, that the new Touch Response sensitivity setting is immediately applied to keyboard play, even during playback of the current song.
Accompaniment patterns (NORMAL and VARIATION) Fill-ins (NORMAL and VARIATION)
* Chord progressions * Chord play method")
°
CASIO Chord, Fu.gered, Full Range Chord. If you ch during a recording, you will not be able to change the ch off setting rding
he playback of

MIDI @ What is MIDI?
“MIDI” stands for Musical Instrument Digital Interface, which is a worldwide
standard for the exchange of digital signals produced by electronic musical instru-
ments and devices. MIDI lets you easily exchange data with other MIDI devi
less of maker or model Lega
@ What the MIDI Mode allows you. to do
The MIDI mode of this keyboard makes it pe
variety of digital data.
to send and receive a
Send
* You can connect to a MEDI device to sound the notes
‘This provides you with the means of playing two instruments at once, for ric her
sound and expanded versatility.
* You can connect lo a sound modie*! to provide you with a wider superscript
selection, of tones. * You can connect to a commercially availat
keyboard play * Each part af this keyboard
output over separate channels.
pu play en the keyboard,
MIDI sequencer™ to record your
rhythm and auto-accompaniment patterns can be
Receive
* You can connect toa MIDI device and sound notes played on the device using
the keyboard's tones. * You can connect to a commercia
ir key board, With this configur
parts*’ as they are received
lly available MIDI sequencer™ to play back on
hon, you S multiple simultaneously p
“1 A sound source that can be controlled by an external M
*2 An external module that performs recording ca
can store data on disks or cards provides you with virtually
: juencer tha unlimited storage
for your recording
*3 For the send and re
e Channels | to 9, 16: Tones (see page E-28 and E eive operation, channels are allocated as follows.
29 for information on Split
and Layer). « Channels 10 to [4: Auto-accompanim
15: Pad data
® About the MIDI terminals
MIDI terminals ate equipped to provide a place te connect carry digital signals b petween MIDI devices. The CTK MIDI Ou T terminals.
S$ that pecial MIL
d Vand features M
MIDI IN
* This is an input terminal that connects to the MIDI OUT terminal of another ee | device, Data passes from the MIDI OUT ; rl WHEAT i
tminal of the sending unit to the MIDI H i iL] IN terminal of the receiving unit. ee
MIDI OUT
* This is an output terminal that connects
to the MIDI IN terminal of another de- vice. Data passes from the MIDI OUT terminal of the sending unit to the MIDI IN terminal of the receiving unit.
@ What is a MIDI channel?
MIDI channels range from 1 through 16, and you can think of them as being similar to the channels on your television. Just as your TV has to be tuned into channel 3 to receive broadcasts on that channel, a receiving MIDI device cannot receive MIDI channel 3 data unless it is set properly to channel 3
Channel 3 broadcast
MIDI data sent on Channel 3
MIDI data can be
Receivable on Channel 3 received on Channel 3
EA?
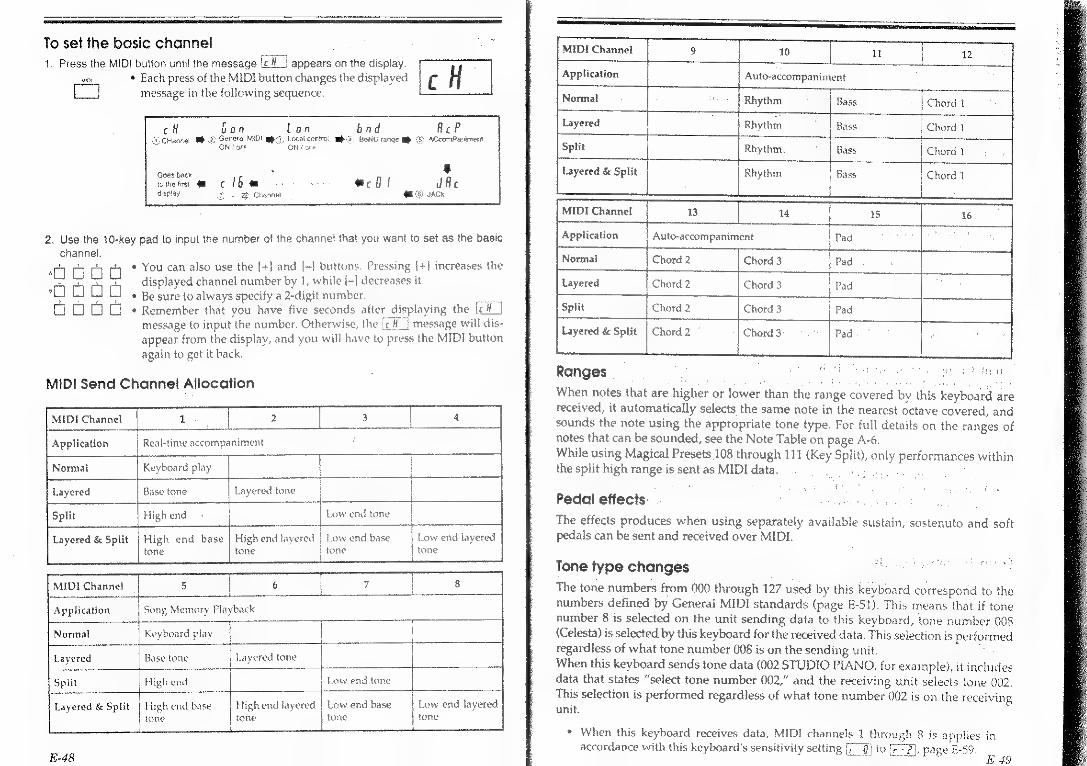
To set the basic channel 1. Press the MIDI button until the message .¢._| appears on the display.
891 ¢ Each press of the MIDI button changes the displayed C H
message in the following sequence.
cH boa Lon ind cP :CHannel Sp 2) General MIDI gape3) Local contro! mip: BeND range mp <) ACcomPaniment a ON /orF ON fo
Sa Ufc
JACK
Goes back rote frst @ oc 1G display ~ B Channel
2. Use the 10-key pad to input the number of the channei that you want to set as the basic
channel. /
roa ra rh *® You can also use the [+] and [~| buttons. Pressing [+] increases the
OG displayed channel number by 1, while {-] decreases it
he!» Be sure to always specify a 2-digit number Paar
(1 ¢ Remember that you have five seconds after displaying the icH | message to input the number. Otherwise, the (¢H_| message will dis- appear from the display, and you will have to press the MIDI button again to get it back,
MIDI Send Channel Allocation
MIDI Channel |
Application | Real-time accompaniment 7 - =
Normal | Keyboard play i | ko
Layered | Base tone | Layered tone |
Split | High end | ee | Low end tone
Layered & Split | age end base | righ end layered oe end base | i end layered
aa MIDI Channel
Application
Normal
Layered |
Split
+ il
t
eee oe eee eee
|
; | Ss yer 7 High end base High end layered | Low end base Low end layered tone | tone | tone | tone
i +
Layered & Split
E-48
MIDI Channel g 16 W T 12
Application | | Auto-accompaniment
Normal [ | Rhythm | Bass © Chord 1 i t : - a
Layered | | Rhythm Bass 4 Chord 1 T 7
Split i Rhythm. | Bass Chord 1 Tz t nia Layered & Split Rhythm | Bass | Chord 1 } i |
ibaa bo aaa ™ MIDI Channel| 13 | 4 15 16
Application | Auto-accompaniment Pad ‘ : +
Normal 1 Chord 2 | Chord 3 Pad 5 | | + . a Foes ae pect
Layered | Chord 2 | Chord 3 | Pad i i S _ Split | Chord 2 Chord 3 Pad
Layered & Split | Chord 2 | Chord 3 - | Pad
Ranges : HOME OPM ole Ade cah geblay
When notes that are higher or lower than the range covered by this keyboard are received, it automatically selects the same note in the nearest octave covered, and sounds the note using the appropriate tone type. For full details on the ranges of notes that can be sounded, see the Note Table on page A-6. While using Magical Presets 108 through 111 (Key Split), only performances within the split high range is sent as MIDI data. Mi .
Pedal effects:
The effects produces when using separately available sustain, sostenuto and soft pedals can be sent and received over MIDI.
Tone type changes BB aah PE isi
The tone numbers from 000 through 127 used by this keyboard correspond to the numbers defined by General MIDI standards (page E-51). This means that if tone number 8 is selected on the unit sending data to this keyboard, tone number 008 (Celesta) is selected by this keyboard for the received data. This selection is performed regardless of what tone number 008 is on the sending unit. When this keyboard sends tone data (002 STUDIO PIANO, for example), it includes data that states “select tone number 002,” and the receiving unit selects tone 002. This selection is performed regardless of what tone number 002 is on the receiving unit.
* When this keyboard receives data, MIDI channels 1 through 8 is applies in accordance with this keyboard's sensitivity setting 7-9) t 2), page E-59,
E49

See se erred
Touch Response :
¢ Even when Touch Response is switched off, this unit sends data that indicates the
pressure used to operate the keyboard keys. * When this unit receives data, it applies Touch Response data in accordance with whether or not its own Touch Response function is switched on or off.
Volume balance between channels
Channels 1 through 9, 15 and 16 You cannot make changes in volumes using this keyboard. Changes are made only if they are received from a connected MIDI device.
Channels 10 through 14 You can change the volume settings of these channels using this keyboard's Accom- paniment Volume setting. Changes are also made when they are received from a connected MIDI device".
* Control change 7 |
Modulation volume, stereo position (pan), effect volume (effect send)
* You cannot set modulation volume, stereo position, and effect volume using this unit. Changes are made only if they are received from a connected MIDI device.
¢ Ifa program change is received from a connected device, this keyboard returns to its initial settings.
* See the MIDI Implementation chart at the back of this manual for details.
Notes * With effect number 03 (CHORUS), the stereo position is always located in the
center, and any external changes in this setting are ignored. « With effect number 07 (ENHANCER) and effect number 09 (LOUDNESS), the
effect volume is fixed at maximum, and any external changes in this setting are ignored.
¢ MIDI Channel 10 cannot receive an effect send command.
Sound/Control pads
The sound and sound number is sent when a pad is pressed, except for pad
functions 30 and 31 (Bend Up, Bend Down). When receiving data, you can use the
pads 30 and 31 to apply their effects to the sounds being received.
@ Song Memory and demo tunes
You cannot send Song Memory and demo tune playback as MIDI data. Also, you
cannot save MIDI data in this keyboard's Song Memory.
The Ger
=
eee he coe Level 1 (popularly known as General MIDD w mn€ a certain class of MIDI synthesizer modules that are more ou numbers of the tones of this keyboard Tee é S, but in other aspects it does ‘01
: : : i 'S rot confi this keyboard you may experience some compatibility problems when ae : ned oard to a General MIDI device. : Soe se the followi i fitch eee A to switch the General MIDI capabilities of this key- : en this keyboard receives data with General MIDI on epee ‘ones* of the ke board are ra € octave, in accorda nce wi eneral }
t yboard are raised on ; ITA, with General MI II * Tone number 32~39, 43, 67, 70.
as pub-
To switch General MIDI on and off . Press the MIDI b utton until the messa e iho eneral MIDI on) appears on the displa
lessage ibaa! (G if Pp 4 1 MIDI on
apace : has ) in the display. é i isplayec
cH ban L ne ; on bad DCHannet MZ General MIO" mp 3) Pea AcP ON/orr & onrean hE BOND range mM) %) ACcomPaniment
Goes back tomme frst mo 15 am eee #0 display Ay - soy D ~ ® Channet
g JAc
8) JACK
2. Use the 10-key pad’s [+] and [- ~] buttons to switch General MIDI on and off . Press i i : erik bat switches General MIDI on, while [-] switches it off - Kemem 2 that you have five seconds after displaying the [heal / Con) ¥ l ess ect vi D
J sage to make your selection, Otherwise, the r age will disappear from the display, and you will have button again to get it back ,f0 press the MIDI

@ Local control seftings *
You can use local control to specify whether keyboard, _ ce aes .
e ti hould be output through MIDI OUT only, OF w het ss "
padrars fe local sound source (the instrument you are playing).
MIDI
Sound source ae Sound o
ofr LOCAL CONTROL
d it is always switched on automatically } i ally switched on, and it is always swi cal cai trol is normally switched on, Ea
ae ere switch the power of the keyboard on or whe werent! ret ne aan local control is switched off, playing ie ss sina es Hae
sede does not affect the keyboard itself, but only affects the cont pede y
To switch Local Control on and off oak
Press the MIDI button until the message LLo.2) (Local Control on) appears 1. Pres: * Each press of the MIDI button changes the displayed ]
a message in the following sequence. L fa] n
Lon bad AcP ;
BeNO 5 Parument cH a Goraea AAID' wep 3) Local control gp @ BeNO range mp <5) ACcomPanim Dehaine me ON fore ON fof
8 Goes back f ; ell Ue tothe tt ec EG wet display 4. @® Channet
2. Use the 10- d "7 ' : ey pad's and buttons to switch Local Control on and of}
J “
: " - have five seconds after displaying the Le emember that you pay. Re ieee
O ; at ] message to make your selection. Otherwise, pavagrnc eis
appear fe igple you will have to press b disappear from the display, and you will have to p
TL button again to get it back.
R59
m Bend range settings This setting defines the amount that tones are changed by the pitch bend controller, You can select between two different settings. Note that the pitch bend controller for this keyboard is controlled by pad function settings 30 and 31 (see “Controller (30 to 31)” on page E-34). The setting you make here determines the pitch bend amount applied when you press a pad set with these functions.
To set the bend range 1. Press the MIDI button until the message bad) appears on the display. wi * Each press of the MIDI button changes the displayed Cc] message in the following sequence. b nN d
cH Gon lon bad DCHannet_ Mp 2) General MIO! m3) Local contol wpe Bone (Ange Bi} ON fore ON fore ?
AcP ACcomPaniment
8 Goes back toretirst Mm oC Th mw... mcd UJRc display @® ~ ® Channet
EE JACK
* After a short while, the current bend range setting (2 or 3) appears on the display.
2. Use the 10-key pad to input 2 (two semitones) or 3 (three semitones) to specify the bend range. ; * You can also use the [+] and {-] buttons. Pressing [+] increases the displayed number, while {-] decreases it. esas, * Remember that you have five seconds after displaying the bad! UOOOD message to make your selection. Otherwise, the message will disap-
Spy ty ky 8 y F Wooo pear from the display, and you will have to press the MIDI button O o Oo oO again to get it back,
Auto-accompaniment patterns such as rhythm number 110 (ENKA) that include pitch bend Operations were programmed using a bend range of 2. If you play these rhythms using a bend range of 3, the resulting rhythm will sound strange. .
@ Accompaniment data With this setting, you can specify whether or not the rhythm, bass, and chord data for the auto-accompaniment played on the keyboard should be output through the MIDI OUT terminal.
To swi.ch accompaniment data output on and off 1. Press the MIDI button until the message Ac?) appears on the display. wot ae * Each press of the MIDI button changes the displayed | A p message in the following sequence. i C

cH ban Lan bod acP 4 CMannel WH) General MIC! gpd: Local contro! BBE) BeND range WH |) ACcomPaniment % ON for “ON oFF
Goes back s
ometst oC EB ee DY _ dfe display ® ~ B Channet WS sack
(send) /[aF Fi (do not send) set- * After a short while, the curren
ting appears on the display.
2. Use the 10-key pad’s [+] and [~-] buttons to switch accompaniment data output on and off.
* Remember that you have five seconds after displaying the inc P)
a o o oO message to make your setting, Otherwise, the message will disappear
ie] a Og {] from i oeplay: and you will have to press the MIDI button again to
ok uae oo pet it back. a
’
Accompaniment data is sent using the following MIDI OUT channels.
Channel 10 wd i | 13 | 14
= Bass | Chord 1
|
a
Part | Rhythm | Chord2 | Chord 3
i(percussion)* | i | i
* Percussion instrument types and MIDI note numbers conform with General
MIDI specifications. The following shows the relationship between percussion
numbers and names.
General MIDI Percussion Map (Channel 10) :
MIDI Key] Drum Sound (MIDI Key | Drum Sound MIDI Key| Drum Sound i "
35 | Acoustic Bass Drum| 4] | Low Floor Tom | Low-Mid Tom
42 |Closed Hi Hat | 4g. | Hi Mid Tom
i]
‘
I
47
36 | Bass Drum 1
i
|
| t |
| i
37 | Side Stick | 43 “High Floor Tom 49 | Crash Cymbal 1
i | 38 Acoustic Snare | 44 [Pedal Hi-Hat 50 High Tom
39 51 | Ride Cymbal 1 [Hand Clap” | 45 Low Tom
46 |Open Hi-Hat 52__| Chinese Cymbal 40 | Electric Snare
BL
i . : MIDI Key Drum Sound [MIDI Key; Drum Sound {MIDI Key) Drum Sound
53 ” | Ride Bell i
ae 63 [Open Hi Conga 73 Shot Guiro 54‘. | Tambourine | | ns i 64 | Low Conga | 74 | Long Guiro of plash Cymbal 65 jHighTimbale =| 75 | Claves
Cowbe .
: [Cowbell | 66 | Low Timbale | 76 | Hi Wood Block 5 Crash Cymbai i | 7 - Cymbai 2 | 67 High Agogo 77 Low Wood Block 5 Vibraslap 68 eed Agogo | 78 | Mute Cuica 59 | Ride Cymbal 2 69 Cabasa | 79 | Open Cuica 60 | Hi Bongo | 70 [Maracas ‘ | “80 Mute Triangle 61 | Low Bongo | 71 Short Whistle, | 81 | Open Triangle | i | E 62 Mute Hi Conga 72 | Long Whistle
@ Assignable jack data Though this setting is made usin, itis act
t g the MIDI key, it is actually not part For details on making this setting, see “Assignable jack” a page Pal : poet
& Specifying a tone for each receive chanel oe ee oo for each of the 16 channels when receiving data a evice. This means that you can connect ala rcially available MIDI multi-track s i ee ae.
equencer, and play up to 16 tones si 7 neer, J nes simultaneously, Remember, however, that the maximum polyphony for this keyboard is 32 notes.
To specify a tone fora receive channel : 1. Press the MIDI button until the message id) appears on the display. Paws i] su * Each press of the MIDI button changes t
following sequence, he displayed message in the
lon bad AcP cH * Gon CHanne! 2 General Midi * ' q Ps
Nore ee ae RO BEND range wp GS ACcomPancment
Goes back g : ~
Se eee. cee #0! UR y GT) ~ B Channes 8% IAG c

* Here, we selected channel 1 | but you could als nt
select any of the 16 channels ic | through [¢ 76 Cc uel
e After a short while, the number of the tone cur-
renily assigned to the channel you selected appears o
on the display. nn Py
UU
2, Use the 10-key pad to input the 3-digit number that identifies the tone you want to select.
.. © Use the numeric buttons to input a 3-digit number. ani anti ontt ant
oe ts g Ll « You can also use the [+] and [-] buttons. Pressing [+] increases the
am Ud - O - displayed tone number by 1, while [-] decreases it.
7 0 « Besure to always specify a 3-digit namber.
If you specify a number greater than 127, tone number 127 is selected
automatically.
* If you discover a mistake before you input the third digit, press the
MIDI button to return to the previously set tone number
Channel 10, which is reserved for percussion instruments u nder Gen-
eral MIDI standards, has eight presets, from 0 to 7. This keyboard also
reserves channel 10 for percussion instruments, but you can select
only one of the eight presets.
This keyboard cannot shut off receive channels. }f you do not want to
receive a channel, switch that channel off on the sending unit.
Magical Preset uses MIDI channels 1 through 4. If you are using Tone
Stack, for example, these tones are combined by up to four different
tone and assigned to MIDI channels I through 4
°
MIDI Receive Channel Allocation
MIDI Channel
Application | | |
i ] |
Normal | | |
ees Boe | = :
Layered Base tone jb yered tone | |
4 ft
Split High end | {tone t
= | 2s . ; 2
Layered & Split | High end base | High end layered | Low end base i Lew end layered
tone j tone | tone | tone ui ae eee ae Se =a
ie | Sea a Se Fa | Sete epics 84
MIpiChannel [5/6 | 7/8) 9 | wo ) ul wa |
~ est Application | \ t] | Auto-accompaniment \
tT i T ] i wae T
Normal | i | | | Rhythm | Bass | Chord t | Chord 2 | Chord 3 i
‘ee sade | we H i ee it a
i t | | = zy lives ss 1
Layered ho Fo | Rhythe | Bass Chord 1 | Chord 2 ) Chord 3 | r
tt pt Ss mt ie 4 4 - na ~
Pop | | : | | H
Split PTT Tenythm | Bass | Chord t | Chord 2 | Chord || P i ' i : [Ee i H H j i H
x a | Isr i sath | |
Layered & Split ho bf) | Rhythm | Bass | Chord t | Chord 2 | Chord3 | | ee aioe a Ce ‘ ! ! i i
roe
| Part 5 | Other Settings ; . %
This part of the manual details other general se 3
ttings,
To tune the keyboard LP seclih TRANSPOSE/TUNE button until the message [fF
ner * Each press of the TRANSPOSE /TUNE changes the display contents i pe pag he display contents in the following se- | t i n
Erin mp iE in | t = display
Display before pressir
, Appears on the display.
2. Use thi - x @ 10-key pad's [+] and {-] buttons to tune the keyboard. sarah & ° Each press of 0 O c] fm eo Pre es I+] and [~] buttons changes the ooog.* ae e following sequence. a Ju lolding down either button changes the tuning {7 (1 __ high speed. 7 bea 7 pan that you have five seconds Bh ie after displaying the [EUa} display to 7 a * tune the keyboard, Ollieiwne the 30; uos 5g Message will disappear from the dis- ep ce will have to press the RANSPOSE/TUNE button again’ sat it back. ufton again to.
Pressing the [+] and (-] buttons at the same time automatically sets atically sets the tun- ing to 00. on.
o
: Each time you prass +
oa : Each time you press —
Notes * You can tune the keyboard within the
equivalent to one semitone. Switching powel ’ ron or playing a de: 3 She Ok playing a demo tune
You can change the tuning of the keybo: from the Song Memory. Note I : in Song Memory.
range of £50 cents (101 levels). 100 cents is Sis
automatically sets the keyboard
ard when recording to or playin ne ng bac! however, that keyboard tuni he. ng data is not stored
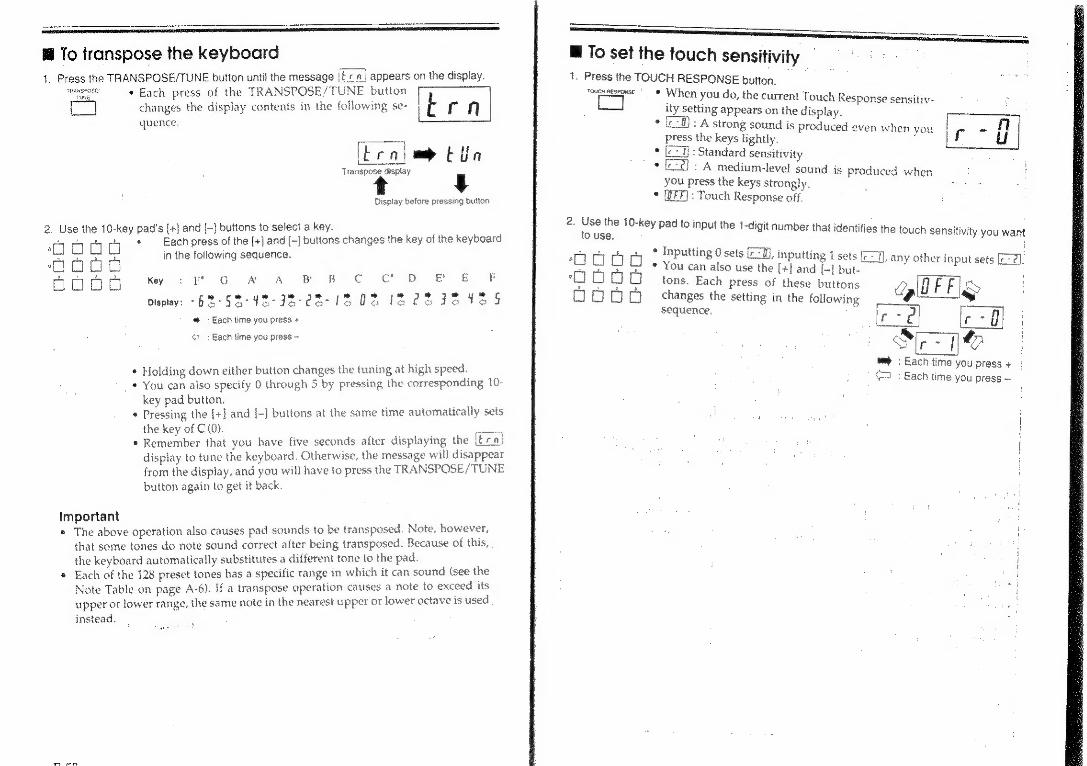
@ To transpose the keyboard
1. Press the TRANSPOSE/TUNE buiton until the message (Era)
« Each press of the TRANSPOSE/TUNE button fe |
changes the display contents in the following se- t rn
quence,
appears on the display.
“oo iErn) mp bin
Transpose display u
Display before pressing button
2, Use the 10-key pad’s [+] and (-] buttons to select a key.
gp . Each press of the [+] and [-] buttons changes the key of the keyboard ‘: ry Ol oO Lviiten in the following sequence, Oooo nooo Ky : FY G A A B B C Cc’ D EB EB F
Display: -hS-S2-4%-F92-2e8- 13 a? {3 23 5 Be 4% §
™® > Each time you press +
& > Bach lime you press ~
* Holding down either button changes the tuning at high speed
_* You can also specify 0 through 5 by pressing the corresponding 10-
key pad button. * Pressing the [+] and {-] buttons at the same time automatically sets
the key of C(O). zoe
* Remember that you have five seconds after displaying the (Ere
display to tune the keyboard. Otherwise, the message will disappe:
from the display, and you will have to press the TRANSPOSE/TUNE
button again to get it back.
Important © The above operation also causes pad sounds to be transposed. Note, however,
that some tones do note sound correct after being transposed. Because of this,
the keyboard automatically substitutes a different tone to the pad.
* Each of the 128 preset tones has a specific range in which it can sound (see the
Note Table on page A-6). If a transpose operation causes a note to exceed its
upper or lower range, the same note in the nearest upper or lower octave is used
instead.
SS oss
@ To set the touch sensitivity Po CAS 1. Press the TOUCH RESPONSE button.
Tovexntsrewse ~— ¢ When you do, the current Touch Response sensitiv- ity setting appears on the display. —m wcBcA strong sound is produced even when vou - n pres: the keys lightly. ,
. lee |: Standard sensitivity [=]: A medium-level sound is produced when you press the keys strongly.
* (FF) : Touch Response off,
2. Use th | @ 10-key pad to input the 1-digit number that identifies the touch sensitivity you want to use. +, 4, * Inputting 0 sets £"T, inputting ; s , inputting | sets [7-7]. any other inp
’ 7] = * You can also use the [+] and [-] but. ey oe ie seca: Le} tons. f 3 | coe G ° Each press of these buttons Y, if FF RS oO [] changes the setting in the following “@ : os
sequence.
mm: Each time you press +: : Each time you press — ¢

nee Technical Reference _
B Troubleshooting Be sure to check the following table whenever you experience problems with keyboard operation.
[ Problem Possible Causes | Action
| ht. Power supply problem 13. Connect AC adaptor correctly and make sure that batteries are loaded with the positive (+) and negative (-) poles facing
| correctly 2. VOLUME setting is too low |2. Move the VOLUME slider
| more towards the maxim ny setting.
Unplug the headphones.
No sound when playing the keyboard,
nN
in 3. Headphones are plugged [3
{ : |
- You are attempting to play |4 4 Enter the NORMAL mode normally on the (all mode indicators unlit) accompaniment keyboard
, . while CASIO CHORD or ‘ FINGERED is selected |
Magical Presets 104 through | 5. With these Magical Presets, 107 are selected. ; the far right nine keys
} Bormally do not sound MIDI Local Control is off. |6. Switch MIDI Local control
; oon 7. Command from external | 7. Use the external MIDI
MIDI device has set the} — device to adjust the volume
| | |
| | |
wn
EN
| | volume of channel 1 tozero.|— of channel 1 | ee i a | H n oO 7
Rhythm and j Accompaniment vohime is set i the ACCOMP VOLUME auto-accompaniment do not] to 000. | button to raise the volume of play. | the accompaniment | ine — cet —
Following symptoms occur| Low battery power. ! Replace the batteries with new
when using batteries. | 8.
* Dim power supply indicator | «Abnormally low speaker/; headphone volume |
¢ Distortion of sound output i *A totally different tone may| sound |
¢ Abnormal rhythm pattern and i demo tune play
* Continued sound output even | after you release a button
*Occasional interruption of sound when playing at high volumes |
¢Sudden power failure when playing at high volumes
bee ee
Ret ey
Care of your keyboard » Avoid heat, humidity or direct sunlight. Do not overexpose the unit to direct sunlight, or place near an air conditioner, or in any extremely hot place... an, facden
Take care not to drop the unit and avoid strong impact. Strong impact may cause malfunctions. When carrying or transporting the unit, protect the keyboard and switches with soft cloth or other material. Keep the unit free of liquids, dust, etc. Do not allow foreign matter to get between the keys, especially metallic objects such as hairpins, sewing needies or coins. Also, do not let the unit get wet. Never attempt to modify any parts of the unit. Fi The unit is a precision instrument, made of electronic parts. Any modification of, or tampering with inner parts May cause malfunction.
Do not use lacquer, thinner or similar chemicals for cleaning. Clean the keyboard with a soft cloth dampened in a weak solution of water and a neutral detergent. (Soak the cloth in the solution and squeeze until itis almost dry.) lin
& Specifications
Model: CTK-650
Keyboard: 61 standard-size keys; 5 octaves; Touch Response (can be switched on and off, sensitivity; 3 sets)
Tones: 128 presets
Polyphony: 32 - note (max.)
Magical preset: BREAK BEAT 16 MELODYCOMP © 8 SHADOW DRUM 4 FREESESSION — 32 TONE STACK 40 KEY SPLIT 12 HYPERACTIVE 16
Auto-accompaniment: Rhythm patterns 128presets Tempo Adjustable (40 ~ 255) Chords Three systems: CASIO CHORD,
FINGERED, FULL-RANGE CHORD Other Variation pattern, fill-in pattern, intro/
ending pattern for each rhythm Song memory:
song: : one System: Real-time recording Memory capacity: Up to 1.300 notes
Registration memory: 4 setups
Contents: Tone number, rhythm number, tempo, accompaniment volume, chord type (NORMAL,