To install LSGAM for your GEM2000 or GEM5000 instrument ...
16
If you recently had a java update and are now unable to launch LSGAM click here To install LSGAM for your GEM2000 or GEM5000 instrument, you will need to do the following: Install the USB Drivers Install the Java Platform Launch LSGAM to cache it on your computer STEP1—Install the USB Drivers_ To install the LANDTEC GEM USB cable Drivers, first unplug your USB cable from the computer. Then click on http://www.landtecna.com/lsgam/files/usb.exe and run the file. During the installation you should see a black “Dos” like screen will appear for a brief moment. This will detect your operating system environment and install the appropriate driver for the GEM-2000 series of instruments. Next you will see an installer appear for the GEM5000 series of instruments
Transcript of To install LSGAM for your GEM2000 or GEM5000 instrument ...

If you recently had a java update and are now unable to launch LSGAM click here
To install LSGAM for your GEM2000 or GEM5000 instrument, you will
need to do the following: Install the USB Drivers
Install the Java Platform
Launch LSGAM to cache it on your computer
STEP1—Install the USB Drivers_
To install the LANDTEC GEM USB cable Drivers, first unplug your USB cable from the computer.
Then click on http://www.landtecna.com/lsgam/files/usb.exe and run the file. During the
installation you should see a black “Dos” like screen will appear for a brief moment. This will
detect your operating system environment and install the appropriate driver for the GEM-2000
series of instruments.
Next you will see an installer appear for the GEM5000 series of instruments

Note: you may see a box appear indicating that the drivers are “unsigned”. Please answer the box to
continue anyways.
After the installation plug in your USB cable. The computer should detect the cable and
will complete the installation for the cable drivers once the cable is plugged in.
STEP 2—Install Java Runtime Environment
Install Java Runtime engine from http://www.java.com/en. Click on the button.
STEP 2b—Manually copy the java serial driver to your computer
Download the RXTXserial.dll for Java from
http://www.landtecna.com/wp-content/rxtx/32bit/rxtxserial.dll to your computer. Once on your
computer, copy it to either the
c:\program files (x86)\java\jre7\bin
folder or to the
c:\program files\java\jre7\bin
folder depending upon your version of windows.
STEP 3—Launch LSGAM to cache it on your PC
Run the LSGAM from http://www.landtecna.com/lsgam/lsgam60.jnlp
You should see
or or
followed by LSGAM starting.
traceythompson174
Typewritten Text
traceythompson174
Typewritten Text
traceythompson174
Typewritten Text
traceythompson174
Typewritten Text
traceythompson174
Typewritten Text

STEP 3—Launch LSGAM to cache it on your PC
Verify your LSGAM will run and connect to your instrument(s) while OFF-LINE from the internet. First,
unplug any network cables and disconnect any wireless connections you may have to the internet. Now
start LSGAM and ensure you are able to communicate with the instrument.
Step 4—Download your instrument manual
A copy of the GEM-instrument manual can be found at http://www.landtecna.com
Troubleshooting If you are having trouble with your instrument please refer to one of the following sections specific to
your instrument:
GEM5000 Series of Instruments
GEM2xxx Series of Instruments (Includes GEM-2000, GEM-2000 Plus, GEM2Nav, GEM2Nav Plus)
Problems common to both the GEM5000 and GEM2xxx series of instruments
GEM5000series troubleshooting
Symptom: LSGAM Starts but does not connect
The USB cable may not be plugged in to either the computer or to the instrument.
The USB Cable driver may not be installed.
a. Cable Verification (open device manager… StartRunDEVMGMT.MSC)
b. Expand the Ports Com & LPT section
i. Plug in or remove the USB cable from either the instrument or the computer.
You should see a port named “LANDTEC USB Serial Port (COMxx)” appear and
disappear as the cable is plugged in and then removed. “xx” represents the
actual COM port number assigned to your instrument. Note: Each 5000
instrument will have a different port number for a given computer.
ii. If the port does NOT appear then ensure the instrument is in “LEGACY” mode by
pressing the Menu Key on the instrument, then pressing device options. Within
device options choose information. On the information scree press the
Left-Softkey to toggle the communications mode between ‘GA5K’ and
‘LEGACY’ until it shows ‘LEGACY’.
iii. If the USB Cable driver has been installed AND you do not have any data in the
instrument you can attempt a “hard power off” of the instrument by pressing
and holding the power key for approximately 25 seconds until the RED led
illuminates above the power button. After restarting the instrument, you will
be prompted to enter the date and time. The instrument will be in GA5K mode
and will not communicate. It must be reset through the “device settings” menu
Device Information Screen and set to “LEGACY” mode.
c. On the instrument
i. Try switching between GM5K & Legacy mode. Then close and re-open LSGAM
Now ensure the instrument is in the main reading screen. Restart LSGAM and attempt a connection to
the instrument.
As an alternative to using the USB cable, a Bluetooth connection can be made to the instrument. Please
refer to the Instrument Manual for more specifics on using Bluetooth.
GEM2xxx series troubleshooting
Symptom: LSGAM Starts but does not connect
The USB Cable driver may not be installed or the cable is not connected to the instrument.
d. Cable Verification (open device manager… StartRunDEVMGMT.MSC)
e. Expand the Ports Com & LPT section
i. Plug in or remove the USB cable. You should see a USB Serial port (COMx)
appear and disappear as the cable is plugged in and then removed.
ii. If not, Please see Step 1 above
If the USB Cable driver has been installed AND you do not have any data in the instrument you can
attempt a cold start of the instrument.
Warning: A cold start of the instrument will do the following to your instrument:
Erase ALL ID’s from the instrument
Erase All Readings from the instrument
Erase All comments from the instrument
Erase All Field Calibration information from the instrument
Reset the instrument clock to a default time
To perform the cold start of the instrument. Turn on the instrument, press and hold the number 1
screen after you see the logo appear. Wait about 1 second, release the number 1 key. The instrument
will prompt you for a passcode. Enter in 12345 followed by the enter key. Once complete, you will have
an option 1 for Cold Start. Press 1 and then enter to confirm the cold start of the instrument.
Now ensure the instrument is in the main reading screen. Restart LSGAM and attempt a connection to
the instrument.
Problems common to both the GEM5000 and GEM2xxx series of
instruments
Symptom: LSGAM does not retain saved information. If you create or edit an ID, project, route, or comment and save the project, LSGAM will indicate that the
information is saved. You then close LSGAM and open LSGAM and discover that the newly created
information or edit does not show or shows the old information prior to being edited.
This behavior is caused due to security settings on the data files used by LSGAM. Network
administrators, Local administrators, and the original person who installed LSGAM will not encounter
this behavior but other users of the computer will encounter the behavior because they only have
“read” and “execute” permission rather than “change” permission to the folders holding the data.
Solution: Login to the computer as a user with Administrative Permissions. Reset permissions on the
LSGAM data folders to allow all users of the computer the ability to have “full control” permission on the
directory containing LSGAM data.
For Windows XP, the data is stored in the directory c:\documents and settings\all users\application
data\LANDTEC
For Windows 7 & 8 the data is stored in the directory c:\programdata\LANDTEC
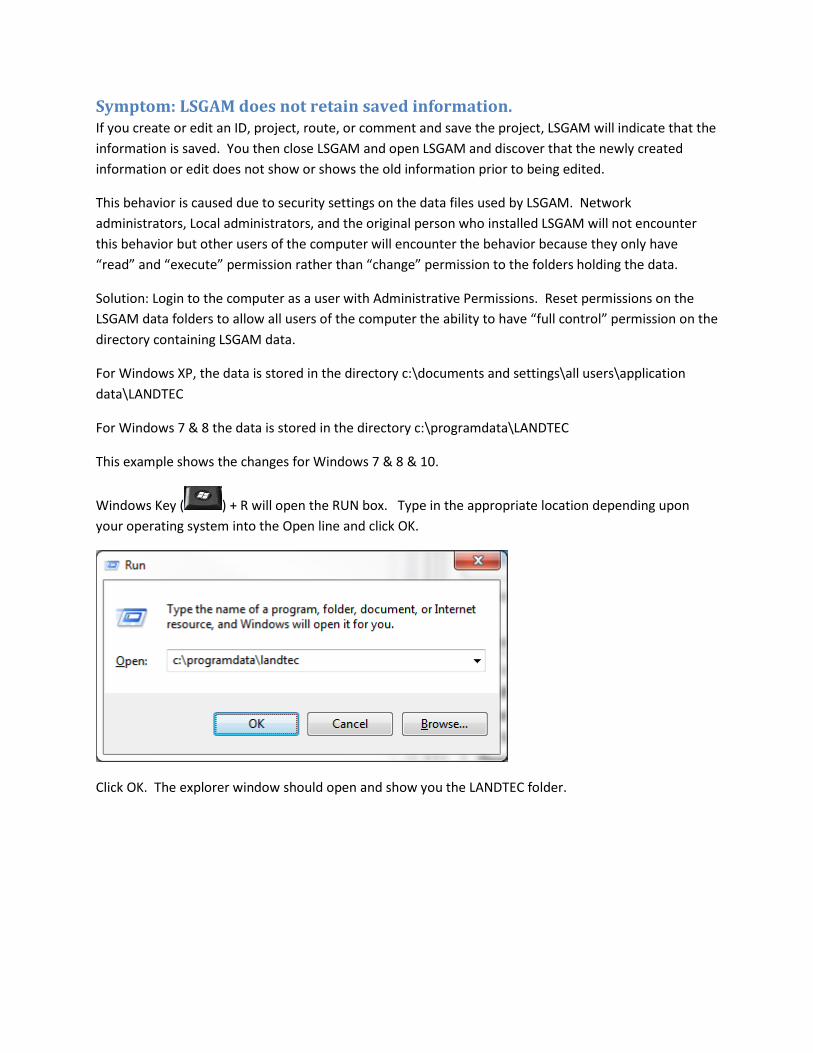
This example shows the changes for Windows 7 & 8 & 10.
Windows Key ( ) + R will open the RUN box. Type in the appropriate location depending upon
your operating system into the Open line and click OK.
Click OK. The explorer window should open and show you the LANDTEC folder.

Right click on the LANDTEC folder and choose Properties. On the Properties window, select the Security
tab and then highlight Users. Now look to see if the Users have a check mark beneath the Allow column
for the permissions of “Full control” or “Modify”. If there is NO check mark for Allow click the Edit
button.
Figure 1—Permissions
Figure 2—Edit Permissions Window
Now highlight Users in the “Edit Permissions Window”. Click on the two check boxes under the allow
column

Figure 3—Permissions
Figure 4—Properties after resetting Permissions
Then click the Apply followed by the OK button. The LANDTEC Properties window will then refresh
showing dark check marks for “Full Control”, “Modify”, and “Write” permissions. Click OK to complete
resetting the permissions.
Restart LSGAM and test that changes are now being saved.
Symptom: LSGAM is connects to instrument in the office but not in the field. The serial communications driver used by Java is probably missing from the Java installation. This often
occurs if installing Java directly from the java website. A copy of the driver is automatically used from
LANDTEC’s website when you are connected to the internet so the problem is masked when an internet
connection is present. Refer to step 2b above for obtaining the driver and copying it to your computer.
Symptom: LSGAM Starts but an unknown error has occurred. Most likely the temporary internet files which Java uses for the program are corrupted on your
computer. Clear the files using the steps below and then use the link from Step 3 above.
Clear Java cache by going to control panelJavaGeneral (tab) Temporary Internet files

Note: from control panel you may need to switch your view to “Detail View” or “Small Icons” view to see
the actual icon for Java.
Click on settings button

Click on Delete Files Button
Click OK
Click OK again
Click OK again to close the Java windows. Now return to step 3 above.
Symptom: Java update gives Unable to Launch Application. http://www.landtecna.com/lsgam/lsgam60.jnlp

Click details

This is because Java security principals beginning with Version 7 Update 51 require permissions to be
different.
A work around to this is as follows:
Open control panel
Open Java

Click on the security Tab
Click on the Edit Site List

Click on the Add button
Click on Continue
The list of locations will reappear
Click OK. You’ll be returned to the Java Control Panel Security Tab.

Verify that you see http://www.landtecna.com in the Exception Site List. If you do click OK
Relaunch LSGAM by going to
http://www.landtecna.com/lsgam/lsgam60.jnlp
the application should start without throwing an exception as it previously did