TME 10 Module For Oracle** - User Management User’s...
166
TME 10 Module For Oracle** - User Management User’s Guide Version 1.0
Transcript of TME 10 Module For Oracle** - User Management User’s...

TME 10 Module For Oracle** - UserManagementUser’s Guide
Version 1.0


TME 10 Module For Oracle - User Management User’s Guide(November 1997)Copyright NoticeCopyright © 1997 by Tivoli Systems, an IBM Company, including this documentation and all software.All rights reserved. May only be used pursuant to a Tivoli Systems Software License Agreement orAddendum for Tivoli Products to IBM Customer or License Agreement. No part of this publication maybe reproduced, transmitted, transcribed, stored in a retrieval system, or translated into any computerlanguage, in any form or by any means, electronic, mechanical, magnetic, optical, chemical, manual, orotherwise, without prior written permission of Tivoli Systems. The document is not intended forproduction and is furnished “as is” without warranty of any kind.All warranties on this document arehereby disclaimed including the warranties of merchantability and fitness for a particular purpose.
Note to U.S. Government Users—Documentation related to restricted rights—Use, duplication ordisclosure is subject to restrictions set forth in GSA ADP Schedule Contract with IBM Corporation.
TrademarksThe following product names are trademarks of Tivoli Systems or IBM Corporation: AIX, IBM, OS/2,RISC System/6000, Tivoli Management Environment, and TME 10.
Microsoft, Windows, and the Windows 95 logo are trademarks or registered trademarks of MicrosoftCorporation.
UNIX is a registered trademark in the United States and other countries licensed exclusively throughX/Open Company Limited.
Oracle is a registered trademark of Oracle Corporation.
Other company, product, and service names mentioned in this document may be trademarks orservicemarks of others.
NoticeReferences in this publication to Tivoli Systems or IBM products, programs, or services do not imply thatthey will be available in all countries in which Tivoli Systems or IBM operates. Any reference to theseproducts, programs, or services is not intended to imply that only Tivoli Systems or IBM products,programs, or services can be used. Subject to Tivoli Systems’ or IBM’s valid intellectual property or otherlegally protectable right, any functionally equivalent product, program, or service can be used instead ofthe referenced product, program, or service. The evaluation and verification of operation in conjunctionwith other products, except those expressly designated by Tivoli Systems or IBM, are the responsibilityof the user.
Tivoli Systems or IBM may have patents or pending patent applications covering subject matter in thisdocument. The furnishing of this document does not give you any license to these patents. You can sendlicense inquiries, in writing, to the IBM Director of Licensing, IBM Corporation, 500 Columbus Avenue,Thornwood, New York 10594.


TME 10 Module For Oracle - User Management User’s Guide i
TME 10 Module For Oracle - User ManagementUser’s Guide
Preface.................................................................................................................... v
Chapter 1—InstallationSoftware Requirements.......................................................................................1-1
Hardware Requirements......................................................................................1-1
Installation...........................................................................................................1-2
Command Line...........................................................................................1-8
Chapter 2—Understanding TME 10 Oracle UserManagementManagement Policy ............................................................................................2-2
Management-by-Subscription.............................................................................2-2
Secure Delegation ...............................................................................................2-2
Profile Capabilities..............................................................................................2-3
Management of Database Configuration Information ........................................2-3
Setting Default and Validation Policy ................................................................2-4
Chapter 3—Setting up Oracle User Management ProfilesSetting Managed Resources................................................................................3-1
Desktop.......................................................................................................3-2
Command Line...........................................................................................3-4
Creating a Profile Manager .................................................................................3-4
Desktop.......................................................................................................3-4
Command Line...........................................................................................3-6
Creating an Oracle User Profile ..........................................................................3-6
Desktop.......................................................................................................3-7
Command Line.........................................................................................3-11
Adding Subscribers...........................................................................................3-11

ii Version 1.0
Desktop, Drag and Drop .......................................................................... 3-11
Desktop, Profile Manager ........................................................................ 3-12
Command Line......................................................................................... 3-15
Removing Subscribers ...................................................................................... 3-16
Desktop, Edit Menu ................................................................................. 3-16
Command Line......................................................................................... 3-20
Chapter 4—Profile PolicySetting and Editing Default Policy ..................................................................... 4-1
Desktop ...................................................................................................... 4-2
Command Line........................................................................................... 4-7
Setting and Editing Validation Policy ................................................................ 4-7
Desktop ...................................................................................................... 4-7
Command Line......................................................................................... 4-12
Using String Constants in User and Role Profiles............................................ 4-13
Using String Constants in Resource Profiles.................................................... 4-15
Chapter 5—Using Oracle User Management ProfilesPopulating an Oracle User Profile from a Database........................................... 5-1
Copying Profile Records..................................................................................... 5-6
Moving Profile Records...................................................................................... 5-9
Locking/Unlocking Records............................................................................. 5-11
Listing User Information .................................................................................. 5-11
Distributing Profiles.......................................................................................... 5-11
Deleting a Profile .............................................................................................. 5-18
Chapter 6—Managing Oracle Database UsersAdding a User Record......................................................................................... 6-1
Editing a User Record....................................................................................... 6-10
Editing Multiple Users Records........................................................................ 6-13
Managing Object Privileges.............................................................................. 6-19
Deleting a User Record..................................................................................... 6-25

TME 10 Module For Oracle - User Management User’s Guide iii
Viewing Granted Object Privileges ..................................................................6-27
Setting the Tablespace List ...............................................................................6-29
Chapter 7—Managing Oracle Database RolesUnderstanding TME 10 Oracle Role Profiles .....................................................7-1
Adding a Role Record.........................................................................................7-1
Editing a Role Record.........................................................................................7-8
Editing Multiple Role Records .........................................................................7-10
Deleting a Role Record.....................................................................................7-13
Chapter 8—Managing Oracle Database Resource ProfilesUnderstanding TME 10 Oracle Resource Profiles..............................................8-1
Adding a Resource Record .................................................................................8-2
Desktop.......................................................................................................8-2
Command Line...........................................................................................8-7
Editing a Resource Record..................................................................................8-7
Editing Multiple Resource Records ....................................................................8-9
Desktop.......................................................................................................8-9
Command Line.........................................................................................8-12
Deleting a Resource Record..............................................................................8-12
Desktop.....................................................................................................8-13
Command Line.........................................................................................8-14
Appendix A—ExamplesProfile Validation Policy.................................................................................... A-1
Locking ............................................................................................................ A-15

iv Version 1.0

Preface
TME 10 Module For Oracle - User Management User’s Guide v
PrefaceTheTME 10 Module For Oracle - User Management User’s Guidedescribes how to install and use the TME 10 Module For Oracle - UserManagement. You can install it from the Tivoli ManagementEnvironment 10(TME 10) desktop or from the command line. WithTME 10 Module For Oracle - User Management, you can manageOracle users, roles, and resource profiles for any number of Oracledatabases.
Who Should Read This GuideThis guide explains the concepts you should know to use TME 10Module For Oracle - User Management. Readers of this guide shouldhave a knowledge of the UNIX or Windows NT operating system,TME 10, and Oracle database administration.
Prerequisite and Related DocumentsTheTME 10 Framework User’s Guide contains more detailedinformation about profiles and profile management.
The TME 10 Module For Oracle - Framework User’s Guidecontainsinformation about database and instance management using TME 10Module For Oracle - Framework, and how it is integrated into TME 10.
For general information about the Oracle server and how it works, seethe relevant version of the Server Concepts Manual.
For information about administering the Oracle Server, see therelevent version of the Server Administrator’s Guide.
What This Guide ContainsTheTME 10 Module For Oracle - User Management User’s Guidecontains the following sections:
■ Chapter 1 ‘Installation’
Contains information about software and hardware requirements,and describes how to the installation the product.
■ Chapter 2 ‘Understanding TME 10 Oracle User Management’

Preface
vi Version 1.0
Describes Tivoli concepts relevant to the TME 10 Module ForOracle - User Management, including policy,management-by-subscription and profiles.
■ Chapter 3 ‘Setting up Oracle User Management Profiles’
Describes how to create profile managers, profiles andsubscribers.
■ Chapter 4 ‘Profile Policy’
Describes how to set up default and validation policy in a profile.
■ Chapter 5 ‘Using Oracle User Management Profiles’
Describes how to populate, distribute and delete profiles, andcopy, move, and lock profile records.
■ Chapter 6 ‘Managing Oracle Database Users’
Describes how to add, edit and drop users in a profile.
■ Chapter7 ‘Managing Oracle Database Roles’
Describes how to add, edit and drop roles in a profile.
■ Chapter 8 ‘Managing Oracle Database Resource Profiles’
Describes how to add, edit and drop resource profiles in a profile.
■ Appendix A ‘Examples’
Contains examples demonstrating how validation policy andlocking can be applied to the management of Oracle users.
Typeface ConventionsThe guide uses several typeface conventions for special terms andactions. These conventions have the following meaning:
Bold Commands, keywords, file names, or otherinformation that you must use literally appear inbold.Names of windows, dialogs, and other controls alsoappear inbold.
Italics Variables and values that you must provide appear initalics.

Preface
TME 10 Module For Oracle - User Management User’s Guide vii
Bold Italics New terms appear in bold italics the first time they areused.
Monospace Code examples appear in amonospace font.
Platform-Specific InformationThe following markers are used to identify platform-specificinformation or procedures.
Oracle Software RequirementsTME 10 Module For Oracle - User Management can manage Oracleversion 7.1 or higher.
Contacting Customer SupportWe are very interested in hearing from you about your experience withthe products in the Tivoli Management Environment 10. We welcomeyour suggestions for improvements.
If you encounter difficulties with any TME 10 product, please contactyour customer support representative. To assist you, the TME 10Framework includes thewsupport command. This command promptsyou for problem information, which can be E-mailed to your supportprovider or saved to a text file. You can then print the saved file, andfax the resulting TME 10 Problem Report form to your supportprovider. See theTME 10 Framework Reference Manual for additionalinformation about thewsupport command.
Platform Supported Configuration
IBM RS/6000 series running AIX 3.2.5
IBM RS/6000 series running AIX 4.1
HP9000/700 and 800 series running HP/UX 9.x
HP9000/700 and 800 series running HP/UX 10.0
Sun SPARC series running SunOS 4.1.2 or higher
Sun SPARC series running Solaris 2.3 or higher
AIX 3.2.5
AIX 4.1
HP 9.x
HP 10.0
SunOS
Solaris

Preface
viii Version 1.0
If you have comments or suggestions about the TME 10documentation, please send E-mail to [email protected].

TME 10 Module For Oracle - User Management User’s Guide 1–1
Installation
1Installation
TME 10 Module For Oracle - User Management software enables youto use TME 10 to add Oracle database management capabilities to yourTME 10 platform. This chapter provides the information you need toinstall this application in your TME 10. This chapter covers thefollowing topics:
■ Software requirements
■ Hardware requirements
■ Installation
Before installing TME 10 Module For Oracle - User Management,please review the release notes for the specific release.
Software RequirementsThis product is dependent on the following software:
■ TME 10 Framework, Version 3.1.
■ TME 10 Module For Oracle - Framework, Version 1.0
Hardware RequirementsThe following table provides the estimated disk space requirements forthe TME 10 Module For Oracle - User Management software. Thespace requirements listed below are for the Tivoli Management Region(TMR) server and clients. This space is in addition to the spacerequirements for the management platform and other products. Please
1

Installation
1–2 Version 1.0
refer to theTME 10 Framework Planning and Installation Guide forTMR server and client hardware requirements.
InstallationYou can install the TME 10 Module For Oracle - User Managementapplication from either theTME 10 desktop or command line.
DesktopUse the following steps to install the application from the TME 10desktop. You must have the TME 10senior authorization role to installthis application.
Platform Server Client
6.69MB 6.35 MB
5.85MB 5.45MB
4.49MB 4.15MB
18.45MB 18.11MB
3.43MB 3.1MB
8.96MB 8.62MB
17 Mb 16.5 Mb
AIX3
AIX4
HP-UX9
HP-UX10
Solaris
SunOS
NT

Installation
TME 10 Module For Oracle - User Management User’s Guide 1–3
Installation
1. Select theInstall -> Install Product... option from theDesktopmenu.

Installation
1–4 Version 1.0
TME 10 displays theInstall Product dialog.
If the Select Product to Install:scrolling list is empty, proceedto step 2. If there are products listed in the scrolling list, movedirectly to step 3.
2. Press theSelect Media... button.

Installation
TME 10 Module For Oracle - User Management User’s Guide 1–5
Installation
TME 10 displays theFile Browser dialog.
TheFile Browser dialog enables you to identify or specify thepath to the installation media.
If you already know the path to the installation media:
a. Enter the full path in thePath Name: field.
b. Press theSet Path button to change to the specified directory.
c. Press theSet Media & Close button to save the new mediapath and return to theInstall Product dialog. The dialog nowcontains a list of products that are available for installation.
If you do not know the exact path to the installation media:
a. From theHosts: scrolling list, choose the host on which theinstall media is mounted.
b. Choose a directory from theDirectories: scrolling list.
c. Press theSet Media & Close button to save the new mediapath and return to theInstall Product dialog. The dialog nowcontains a list of products that are available for installation.

Installation
1–6 Version 1.0
3. SelectTME 10 Module For Oracle - User Management,Version 1.0from theSelect Product to Install: scrolling list.
4. Use the arrow buttons to move the clients from one choice list toanother. The application will be installed on the clients in theClients to Install On: list.
You must install the software on the TMR server and on anyclient where you want to manage Oracle users, roles, andresource profiles. TME 10 Module For Oracle - Framework mustalready be installed on these machines.
5. Press theInstall & Close button to install the product and closethe Install Product dialog.
—OR—
Press theInstall button to install the product and keep theInstallProduct dialog open. You can then install the same product onanother set of clients or you can install another product.

Installation
TME 10 Module For Oracle - User Management User’s Guide 1–7
Installation
The installation process prompts you with aProduct Installdialog similar to the following.
This dialog provides the list of operations that will take placewhen installing the software. This dialog also warns you of anyproblems that you may want to correct before you install theapplication.
6. Press theContinue Install button to start the installation.

Installation
1–8 Version 1.0
When the installation is complete, theProduct Install dialog willreturn a completion message similar to the one below.
7. Press theClosebutton to close the dialog.
Command LineYou can use thewinstall command to install TME 10 Module ForOracle - User Management from the command line
winstall [-c cdrom-dir ] [-s server ] [-i product ][-ny] [ install-variable... ] [ managed_node... ]
where:
-c cdrom-dir Specifies the complete path to the images.

Installation
TME 10 Module For Oracle - User Management User’s Guide 1–9
Installation
-s server Specifies the managed node in the TME 10 region touse as the product’s installation server.
-i product Specifies the product installation index file to install.A product installation index file ends with the fileextension.IND . For example, the fileOUSER.IND isthe installation index file for TME 10 Module ForOracle - User Management.
-n Installs the product on all managed nodes that do notcurrently have the product installed. This argument isignored ifmanaged_node is specified.
-y Specifies that the installation should proceed withoutconfirmation.
install-variable=value
Several of the install variables specify the directorieswhere the TME 10 product will be installed. If adirectory already contains files from a previousinstallation,winstall will not re-copy the files. Youcan force any of these directories to be re-installed byentering a ‘!’ character after the specified directory.The following are the install variables related to theinstallation directories. Your settings will override thecurrent default installation directories.
BIN=binaries_directory
Overrides the default installation path for theproduct’s binaries.
LIB =libraries_directory
Overrides the default installation path for theproduct’s libraries.
MAN =man_page_directory
Overrides the default installation path for theproduct’s man pages.

Installation
1–10 Version 1.0
CAT=message_catalog_directory
Overrides the default installation path for theproduct’s message catalogs.
DB=database_directory
Overrides the default installation path for theproduct’s database.
managed_nodeSpecifies the managed node on which a TME 10product will be installed. Multiple managed nodes canbe specified. If no managed nodes are specified, theproduct will be installed on all managed nodes in theTivoli Management Region (TMR). In most cases, thisargument will not be specified.
ExamplesThe following example installs TME 10 Module For Oracle - UserManagement on managed nodedonald. The installation will proceedwithout prompting for confirmation. The install image is taken fromdirectory/Test/Oracle1.0 on solaris25. The product installation indexfile is OUSER.IND. The installation directory locations aredetermined by the current settings.
winstall -y -c /Test/Oracle1.0 -s solaris25\-i OUSER.IND donald

TME 10 Module For Oracle - User Management User’s Guide 2–1
Understanding T
ME
10O
racle User M
anagement
2Understanding TME 10 OracleUser Management
TME 10 Module For Oracle - User Management allows you to add,alter, and drop Oracle users, roles, and resource profiles for anynumber of Oracle databases in a distributed, heterogeneousenvironment.
TME 10 introduces the powerful concepts ofpolicy regions,management policy, management-by-subscription, and securedelegation. For details of registering and managing Oracle databases,see theTME 10 Module For Oracle - Framework User’s Guide.
This chapter describes these and other concepts that form the basis ofTME 10 Module For Oracle - User Management. They are thefollowing:
■ Management policy
■ Management-by-subscription
■ Secure delegation
■ Profile capabilities
■ Management of database configuration information
■ Setting default and validation policy
2

Management Policy
2–2 Version 1.0
Management PolicyTME 10 allows you to group Oracle database resources into entitiescalled policy regions. Hierarchically structured, policy regions reflectgroupings that make sense to your organization, such as department,job function, or geographic region. Once policy regions have beencreated, you establish policy guidelines for managed resources withineach policy region. These guidelines are the rules by which youmaintain control over Oracle installations on the network. TME 10incorporates bothdefault policy andvalidation policy to ensure thatchanges made to any Oracle users, roles, and resources conform toyour current policy constraints. TME 10 Module For Oracle - UserManagement ships with built-in “Best Practices” policy for eachmanaged resource.
Management-by-SubscriptionTME 10 incorporates a powerful concept calledmanagement-by-subscription, which allows you to capture, define,and distribute Oracle configuration information in a series of logicallyorganized profiles.Profiles enable you to define Oracle informationand policies centrally and apply that information across the enterprise.You manage Oracle users, roles, and resources in profiles, for example,you define all of your Oracle users in the Sales department in an OracleUser profile. Oracle databases act asendpoints that subscribe todistributions of profile information.Profile managers manage therelationship between profiles and subscribers and provide scalability.You can easily update your enterprise-wide environment by editing aprofile and then distributing the changes to all subscribing Oracledatabases.
Secure DelegationThe advanced security mechanisms built into TME 10 enable you todelegate securely and confidently routine Oracle administrative tasksto less experienced database administrators (DBAs). You can specifywhich Oracle managed resources can be controlled within each policyregion. You can also control the access and authority TME 10administrators have within policy regions. In addition, TME 10 uses

Profile Capabilities
TME 10 Module For Oracle - User Management User’s Guide 2–3
Understanding T
ME
10O
racle User M
anagement
access control lists to limit authority on a resource-by-resource basis.This means that TME 10 administrators can perform privilegedoperations without privileged password access (SYS or SYSTEM).Theevent notification group for TME 10 Module For Oracle - UserManagement provides a detailed audit trail of all TME 10administrators’ activity.
For example, a corporate DBA creates a policy region for thedatabases in the Boston office. Within this policy region, he creates aprofile manager to manage Oracle users for these databases. The DBAat the Boston office is relatively inexperienced, so the corporate DBAsets up default and validation policy to restrict what the DBA at Bostoncan do. A common mistake when adding a new user to an Oracledatabase is to set the temporary tablespace to SYSTEM. The corporateDBA sets a policy on the temporary tablespace attribute of the userprofile that prevents the creation of a new Oracle user with thetemporary tablespace set to SYSTEM.
Profile CapabilitiesAll profile-based managed resources share common functionality andGUI behavior, increasing ease of use for administrators. You caninitially populate a profile from an existing Oracle database,extracting the information from the data dictionary, thus eliminatingtranscription errors.
In the event that user changes are made out of TME 10’s control, youcan use thesynchronizationfacility to determine the differencesbetween the profile configuration and the actual Oracle database. TME10 gives you the ability to resolve the differences.
Note: Changes are applied to each endpoint separately, and eachdistribution will succeed or fail without reference to otherendpoints in the distribution.
Management of Database ConfigurationInformation
It is important to distinguish between the records in a TME 10 ModuleFor Oracle - User Management profile and the records in an Oracle

Setting Default and Validation Policy
2–4 Version 1.0
database. You can initially populate from an Oracle database, but anendpoint database is not updated until the profile is distributed to theendpoint. Changes are made to the profile independently of anendpoint database. When you add, edit, or delete a record in a profile,you tell TME 10 how you want a user, role, or resource to look on thedatabase. For example, adding records to a profile is not alwayssynonymous with a CREATE statement in SQL. At the databaseendpoint, TME 10 determines the syntax of the SQL statementrequired to make the database match the specification in the profile.
Setting Default and Validation PolicyFor each profile you can set default and validation policies. Defaultpolicy allows you to set initial values for each attribute in a profile andapplies to creating new records in a profile. For example, creating anew user with an initial value for the user’s temporary tablespace.Validation policy runs when you populate a profile, add a new profilerecord, or explicitly request validation. TME 10 uses validation policyto verify that a profile record complies with set policy and preventsrecords with invalid values being created. You can enable or disablevalidation policy within a profile.
The policy for any attribute can be set to eitherScript or Constant. Ifthe policy is set toScript, the user creates a shell script (called thescript body). If the policy is set toConstant, the allowable valuesdepend on the attribute, and are set as string representations of IDLstructures.

TME 10 Module For Oracle - User Management User’s Guide 3–1
Setting up O
racle User
Managem
ent Profiles
3Setting up Oracle UserManagement Profiles
This chapter explains how to set up Oracle User profiles and managesubscribers in a profile manager. The same concepts apply equally toOracle Role and Oracle Resource profiles. This chapter describes thefollowing tasks:
■ Setting managed resources
■ Creating a profile manager
■ Creating a TME 10 Oracle User Profile
■ Adding subscribers
■ Removing subscribers
Setting Managed ResourcesEachpolicy region maintains a list ofmanaged resource types that arevalid or defined for that specific policy region. TME 10 provides thefollowing three managed resource types for Oracle User Management:
■ OracleUserProfile
■ OracleRoleProfile
■ OracleResourceProfile
You can add or remove managed resource types at any time. To createand manage each type of Oracle User Management profile within a
3

Setting Managed Resources
3–2 Version 1.0
policy region, you must set the relevant managed resource type as acurrent resource in the region. TME 10 managed resource types areindependent of each other. They can exist together or in separate policyregions.
When you add a managed resource type to a policy region, TME 10assigns the managed resource type the policy region's basic defaultpolicy. TME 10 also enables you to create new instances of themanaged resource in the policy region.
The following table provides the context and authorization rolerequired for the following task:
You can perform this task from either the TME 10 desktop or thecommand line.
DesktopUse the following steps to add or remove Oracle User Managementmanaged resources.
1. In the policy region, select theManaged Resources... optionfrom theProperties menu.
Activity Context Required Role
Add or remove a managedresource type for a policyregion
Policy region senior

Setting Managed Resources
TME 10 Module For Oracle - User Management User’s Guide 3–3
Setting up O
racle User
Managem
ent Profiles
TME 10 displays theSet Managed Resources dialog.
TheCurrent Resources: scrolling list displays the policyregion’s current managed resource types. TheAvailableResources: scrolling list displays the managed resource typesthat you can add to the policy region.
2. Highlight theOracleResourceProfile, OracleRoleProfile andOracleUserProfile managed resource types from theAvailableResources: scrolling list and press the Left Arrow button.
TME 10 moves the chosen managed resource types to theCurrent Resources: scrolling list. You can achieve the sameresult by double-clicking on an entry.

Creating a Profile Manager
3–4 Version 1.0
To remove a managed resource type from the policy region,choose one or more managed resource types in theCurrentResources: scrolling list. Use the Right Arrow button to movethe managed resource types into theAvailable Resources:scrolling list.
3. PressSet & Close button to save the changes and return to thepolicy region.
Command LineFor more information about using the command line to examine andchange the managed resource types of a policy region, see the manualpage for thewgetpr and wsetpr commands.
Creating a Profile ManagerA profile manager manages the relationship between a profile and thesubscribers who receive the profile’s information. You create a profilein a profile manager.
The following table provides the context and authorization rolerequired for this task.
You can perform this task from either the TME 10 desktop or thecommand line.
DesktopUse the following steps to create a profile manager.
Activity Context Required Role
Create a profilemanager
Policy region senior

Creating a Profile Manager
TME 10 Module For Oracle - User Management User’s Guide 3–5
Setting up O
racle User
Managem
ent Profiles
1. From a policy region, select theProfile Manager... option fromtheCreate menu to display theCreate Profile Manager dialog.
2. Enter the name of the profile manager in theName/Icon Labeltext field.
The name of a TME 10 resource such as a profile manager caninclude any alphanumeric character, an underscore (_), a dash (-),a period (.), or a space. We advise against using a space, whichcan make CLI operations awkward.

Creating an Oracle User Profile
3–6 Version 1.0
3. PressCreate & Close to create the profile manager and return tothe policy region window.
TME 10 displays the profile manager in the policy regionwindow.
Command LineFor more information about using the command line to create a profilemanager, see the manual page for thewcrtprfmgr command.
Creating an Oracle User ProfileThe following table provides the context and authorization rolerequired for this task.
You can perform this task from either the TME 10 desktop or thecommand line.
Activity Context Required Role
Create an Oracle Userprofile
Profile manager senior

Creating an Oracle User Profile
TME 10 Module For Oracle - User Management User’s Guide 3–7
Setting up O
racle User
Managem
ent Profiles
DesktopUse the following steps to create an Oracle User profile. You musthave previously created the policy region and profile manger in whichthe Oracle User profile will reside.
1. To display theProfile Manager window, double-click on aprofile manager icon.
--OR--
Select theOpen... option from the profile manager icon's pop-upmenu.

Creating an Oracle User Profile
3–8 Version 1.0
2. Select theProfile... option from theCreate menu of theProfileManager window to display theCreate Profiledialog.
3. Select the appropriate profile type from theType: scrolling list.

Creating an Oracle User Profile
TME 10 Module For Oracle - User Management User’s Guide 3–9
Setting up O
racle User
Managem
ent Profiles
The managed resources available in the policy region determinethe types of profiles available in theType: scrolling list.
4. Enter a name for the profile in theName/Icon Label: field.Within a profile manager, each Oracle User profile must have aunique name.
5. PressCreate to create the profile and keep theCreate Profiledialog open. Repeat steps 3 and 4 to create more profiles.
--OR--
Press theCreate & Close button to create the profile and returnto theProfile Manager window.

Creating an Oracle User Profile
3–10 Version 1.0
The icon for the Oracle User profile appears in theProfiles areaof the Profile Manager window.

Adding Subscribers
TME 10 Module For Oracle - User Management User’s Guide 3–11
Setting up O
racle User
Managem
ent Profiles
The following illustration shows the icons for an OracleResource, Oracle Role and Oracle User profile.
Command LineFor more information about using the command line to create profilesin a profile manager, see the manual page for thewcrtprf command.
Adding SubscribersSubscription takes place at the profile manager level. Therefore, to adda subscriber to an Oracle User profile, the subscriber must be added tothe profile manager.
You can subscribe a managed Oracle database to profiles, in the sameway as any other managed resource. You can subscribe an Oracledatabase to a profile manager in one of the following ways:
■ By The drag and drop method
■ Through theSubscribers dialog
■ From the command line
Desktop, Drag and DropTo subscribe an endpoint to a profile manager, drag and drop theendpoint icon onto the profile manager. Valid endpoints for a profilemanager include other profile managers and Oracle databases.

Adding Subscribers
3–12 Version 1.0
The following table provides the context and authorization rolerequired for this task.
Desktop, Profile ManagerUse the following steps to add one or more subscribers to a profilemanager.
1. To display theSubscribers dialog, select theSubscribers...option from the profile manager icon’s pop-up menu.
--OR--
Activity Context Required Role
Add one or moresubscribers
Profile manager’spolicy region
admin
Activity Context Required Role
Add or remove one ormore subscribers
TMR admin

Adding Subscribers
TME 10 Module For Oracle - User Management User’s Guide 3–13
Setting up O
racle User
Managem
ent Profiles
Select theSubscribers... option from theProfile Managermenu.

Adding Subscribers
3–14 Version 1.0
2. Select one or more subscribers from theAvailable to becomeSubscribers: list.
This dialog contains a list of all profile managers and endpointsthat can subscribe to the current profile manager. Only profilemanagers and Oracle databases are valid subscribers for TME 10Module For Oracle - User Management profiles.
3. Press the left arrow button to move your selections from theavailable list to theCurrent Subscribers: list.

Adding Subscribers
TME 10 Module For Oracle - User Management User’s Guide 3–15
Setting up O
racle User
Managem
ent Profiles
4. Press theSet Subscriptions & Close button to add thesubscribers to the profile manager and dismiss theSubscribersdialog. The subscribers now appear in the profile manager.
You update the subscribing Oracle database’s system catalogsonly when you distribute a profile to the endpoint subscribers.
Command LineFor more information about using the command line to subscribe aprofile manager or profile endpoint to a profile manager, see themanual page for thewsub command.

Removing Subscribers
3–16 Version 1.0
Removing SubscribersSubscription takes place at the profile manager level. Therefore, toremove a subscriber from an Oracle User profile, you must remove itfrom the profile manager.
You can unsubscribe a managed Oracle database to profiles, in thesame way as any other managed resource. You can unsubscribe anOracle database to a profile manager in one of the following ways:
■ Through Subscribers-->Unsubscribe option on theEdit menu
■ Through theSubscribers dialog
■ From the command line
The following table provides the context and authorization rolerequired for this task.
Desktop, Edit MenuUse the following steps to remove one or more subscribers from aprofile manager.
Activity Context Required Role
Remove one or moresubscribers
Profile manager’spolicy region
admin

Removing Subscribers
TME 10 Module For Oracle - User Management User’s Guide 3–17
Setting up O
racle User
Managem
ent Profiles
1. From theProfile Manager window, select the subscriber’s icon.Press the <Ctrl> key and click on additional icons to selectmultiple icons.

Removing Subscribers
3–18 Version 1.0
2. Select theSubscribers-->Unsubscribe... option from theEditmenu.

Removing Subscribers
TME 10 Module For Oracle - User Management User’s Guide 3–19
Setting up O
racle User
Managem
ent Profiles
TME 10 displays theUnsubscribe Subscribers dialog.
3. Press theDelete all profile copies button to remove all localcopies of any profile received by the subscriber in this profilemanager and by its subscribers below in the subscriptionhierarchy.
--OR--
Press theKeep all profile copies button if you do not want todelete the local copies of each profile received by a subscriber.Each local copy will become an original.

Removing Subscribers
3–20 Version 1.0
TME 10 returns you to the profile manager. The unsubscribedsubscribers have been removed from the profile manager.
Command LineFor information about using the command line to remove asubscription to a profile manager, see the manual page for thewunsubcommand.

TME 10 Module For Oracle - User Management User’s Guide 4–1
Profile P
olicy
4Profile Policy
This chapter explains how to set up profile policy in Oracle Userprofiles. The same concepts apply equally to Oracle Role and OracleResource profiles. This chapter describes the following tasks:
■ Setting and editing default policy
■ Setting and editing validation policy
■ Using string constants in User and Role profiles
■ Using string constants in Resource profiles
Setting and Editing Default PolicyWhen you create a new entry in an TME 10 Oracle User Managementprofile, default policy can provide initial values for one or moreattributes. You can lock each default attribute against change bysubscribers in their local copies of the distributed profiles.
The following table provides the context and authorization rolerequired for this task.
You can perform this task from either the TME 10 desktop or thecommand line.
4
Activity Context Required Role
Set or edit defaultpolicy
Oracle User profile senior

Setting and Editing Default Policy
4–2 Version 1.0
DesktopUse the following steps to set or edit default policy in an Oracle Userprofile.
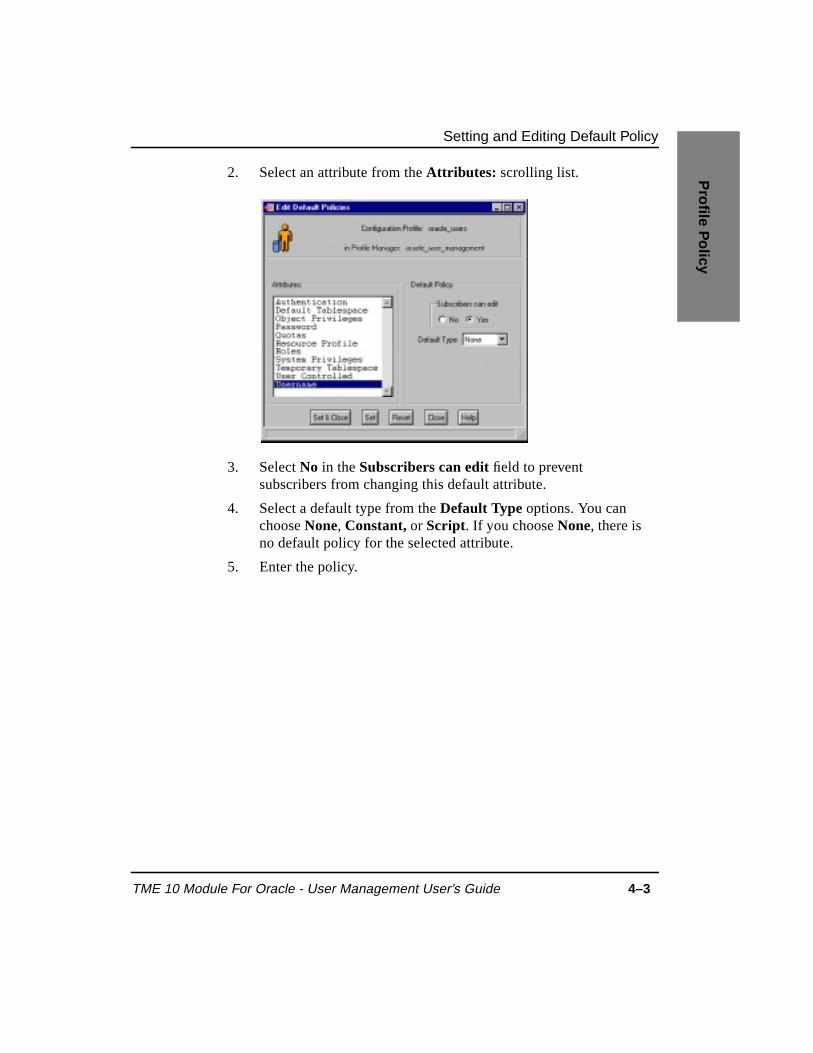
1. Select theDefault Policies...option from theEdit menu in theDatabase User Profile window to display theEdit DefaultPolicies dialog.
Setting and Editing Default Policy
TME 10 Module For Oracle - User Management User’s Guide 4–3
Profile P
olicy
2. Select an attribute from theAttributes: scrolling list.
3. SelectNo in theSubscribers can editfield to preventsubscribers from changing this default attribute.
4. Select a default type from theDefault Type options. You canchooseNone, Constant, or Script. If you chooseNone, there isno default policy for the selected attribute.
5. Enter the policy.

Setting and Editing Default Policy
4–4 Version 1.0
Entering a Constant Value
a. If you chooseConstant, enter a constant for the attribute intheValue field. See “Using String Constants in User andRole Profiles” on page 4-13 and “Using String Constants inResource Profiles” on page 4-15 for the allowable stringformats.
Press theSet button to save the changes and edit anotherdefault policy attribute.
--OR--
Press theSet & Close button to apply your changes anddismiss the dialog.

Setting and Editing Default Policy
TME 10 Module For Oracle - User Management User’s Guide 4–5
Profile P
olicy
Entering a Script
b. If you chooseScript, TME 10 updates the dialog to includetheEdit Script Arguments... andEdit Script Body... fields.
Press theEdit Script Arguments... button to display thePolicy Script Arguments dialog.
Select one or more attributes and press the right arrow buttonto add them to the valid defaultScript Arguments: scrollinglist.

Setting and Editing Default Policy
4–6 Version 1.0
Press theSet & Close button to apply your changes anddismiss the dialog.
--OR--
Press theSet button to apply your changes and continueediting in this dialog.
Press theEdit Script Body... button in theEdit DefaultPolicies dialog to display theEdit Policy Script dialog.
In the text window, enter (or edit) the policy script for theselected attribute.
Press theSave & Close button to apply your changes anddismiss the dialog.
At theEdit Default Policies dialog, press theSet button tosave the changes and edit another default policy attribute.
--OR--
Press theSet & Close button to save the changes and returnto theDatabase User Profiledialog.
You must distribute the profile to update existing subscribers’ copiesof the profile. Default policy only affects the profile records; it doesnot affect the Oracle database’s system catalogs.
Setting and Editing Validation Policy
TME 10 Module For Oracle - User Management User’s Guide 4–7
Profile P
olicy
Command LineFor more information about using the command line to examine andset default policy, see the manual page for thewlspolm, wgetpolm,and wputpolm commands.
Setting and Editing Validation PolicyIf validation policy is enabled, it operates when you populate a profile,add a new entry, or explicitly request validation. TME 10 usesvalidation to verify that a profile entry complies with set policy andprevents you from creating an entry that does not meet validationpolicy. You can enable or disable validation policy within a profile.You can also lock an attribute’s validation policy against change bysubscribers at a lower level.
See “Profile Validation Policy” on A-1, for an example of setting upand using validation policy.
The following table provides the context and authorization rolerequired for this task.
You can perform this task from either the TME 10 desktop or thecommand line.
DesktopUse the following steps to set or edit validation policy in an OracleUser profile.
Activity Context Required Role
Set or edit validationpolicy
Oracle User profile senior

Setting and Editing Validation Policy
4–8 Version 1.0
1. Select theValidation Policies...option from theEdit menu in theDatabase User Profile window to display theEdit ValidationPolicies dialog.
2. Select theValidation Policy Disabled radio button if you wantto turn off validation in this profile.

Setting and Editing Validation Policy
TME 10 Module For Oracle - User Management User’s Guide 4–9
Profile P
olicy
3. Select an attribute from theAttributes: scroll list.
4. PressYes in theSubscribers can edit policy field to allowsubscribers to change this policy; otherwise pressNo.
5. Select a default type from theDefault Type options. You canchooseNone, Constant, Script or Regular Expression. If youchooseNone, there is no validation policy for the selectedattribute.
6. Enter the policy.
Entering a Constant Value
a. If you chooseConstant, enter a constant for the attribute intheValue field. See “Using String Constants in User andRole Profiles” on page 4-13 and “Using String Constants inResource Profiles” on page 4-15 for the allowable stringformats.
Press theSet & Close button to apply your changes anddismiss the dialog.
--OR--

Setting and Editing Validation Policy
4–10 Version 1.0
Press theSet button to apply your changes and continueediting in this dialog.
Entering a Script
b. If you chooseScript, the dialog is updated to include theEdit Script Arguments... andEdit Script Body... fields.
Press theEdit Script Arguments... button to display thePolicy Script Arguments dialog.

Setting and Editing Validation Policy
TME 10 Module For Oracle - User Management User’s Guide 4–11
Profile P
olicy
Select one or more attributes and press the right arrow buttonto add them to the list of validationScript Arguments:scrolling list.
Press theSet & Close button to apply your changes anddismiss the dialog.
--OR--
Press theSet button to apply your changes and continueediting in this dialog.
In theEdit Validation Policy dialog, press theEdit ScriptBody...button to display theEdit Policy Script dialog.
In the text window, enter (or edit) the policy script for theselected attribute.
Press theSave & Close button to apply your changes anddismiss the dialog.

Setting and Editing Validation Policy
4–12 Version 1.0
Entering a Regular Expression
c. If you selectRegular Expressions,the dialog prompts youto enter a regular expression in theValue field.
Press theSet button to save the changes and edit anothervalidation policy attribute.
--OR--
Press theSet & Close button to save the changes and returnto theDatabase User Profile dialog.
You must distribute the profile to update existing subscribers’ copiesof the profile. Validation policy only affects the profile records; it doesnot affect the Oracle database’s system catalogs.
Command LineFor more information about using the command line to examine andset validation policy, see the manual page for thewlspolm, wgetpolm,and wputpolm commands.

Using String Constants in User and Role Profiles
TME 10 Module For Oracle - User Management User’s Guide 4–13
Profile P
olicy
Using String Constants in User and Role ProfilesThis section describes the syntax used when defining profile policy forOracle User and Oracle Role profiles. See “Setting and Editing DefaultPolicy” on page 4-1 and “Setting and Editing Validation Policy” onpage 4-7 for the procedures for setting policy.
Profile Oracle User Profile
Attribute Default Tablespace
Synopsis Tablespace Name
Example USERS
Enter the name of the tablespace in theValue field.
Profile Oracle User Profile
Attribute Temporary Tablespace
Synopsis Tablespace Name
Example TEMP
Enter the name of the tablespace in theValue field.
Profile Oracle User Profile
Attribute Resource Profile
Synopsis Name
Example LIMITCPU
Enter the name of the resource profile in theValuefield. This value must relate to a record in an OracleResource profile within the same profile manager.
Profile Oracle User Profile or Oracle Role Profile
Attribute Roles
Synopsis { Count_of [ {privilege_name is_grantableis_default_role } ] ...}

Using String Constants in User and Role Profiles
4–14 Version 1.0
Example { 2 { "CONNECT" FALSE TRUE } {"RESOURCE" FALSE TRUE } }
The number of roles defined is 2. The first role,CONNECT, is not grantable but is a default role. Thesecond role, RESOURCE, is not grantable but is adefault role. Note that the role names are enclosed indouble quotes, but the keywords TRUE and FALSEare not in quotes.
Profile Oracle User Profile or Oracle Role Profile
Attribute System Privileges
Synopsis { Count_of [{ privilege_name is_grantable } ] ...}
Example { 2 { "SELECT ANY TABLE" TRUE }
{ "CREATE TABLE" FALSE } }
The number of privileges is 2. The first privilege,SELECT ANY TABLE, is grantable. The secondprivilege, CREATE TABLE, is not grantable.
Profile Oracle User Profile
Attribute Object Privileges
Synopsis { Count_of [ { grantee privilege_name {column_count [ column ] ... } schema_name objectis_grantable } ] ... }
Example { 1 { "ACCOUNTS" "UPDATE" { 2 "SAL""COMM" } "SCOTT" "EMP" FALSE } }
Only 1 user, ACCOUNTS, is granted an objectprivilege. The privilege UPDATE is granted on asequence of 2 columns, SAL and COMM columns.The object is SCOTT.EMP, and the grantee is notallowed to grant the privileges to other users or roles.
Profile Oracle User Profile
Attribute Quotas

Using String Constants in Resource Profiles
TME 10 Module For Oracle - User Management User’s Guide 4–15
Profile P
olicy
Synopsis { Count_of [ { tablespace_name is_limitedlimit_value } ] ... }
Example { 2 { "USERS" TRUE 512000 } { "TEMP" FALSE0 } }
The user is given a quota of 512K bytes on theUSERS tablespace, and UNLIMITED quota on theTEMP tablespace. Limit_value is the numericalvalue of the limit in bytes.
Using String Constants in Resource ProfilesThis section describes the syntax used when defining profile policy forOracle Resource profiles. See “Setting and Editing Default Policy” onpage 4-1 and “Setting and Editing Validation Policy” on page 4-7 forthe procedures for setting policy.
Attribute Name
Synopsis Resource profile name
Examples LIMIT_CPU
Enter the name of the resource profile.
Attribute CompositeLimitSessionsPerUserCPUPerCallLogicalReadsPerCallIdleTimeCPUPerSessionLogicalReadsPerSessionConnectTimePrivateSGA
Synopsis { limit_type limit_value }
Examples { LIMITED 3000 }
If this value is entered for the attributeCPU_PER_CALL, the profile will limit a user to 30CPU seconds per call.
Using String Constants in Resource Profiles
4–16 Version 1.0
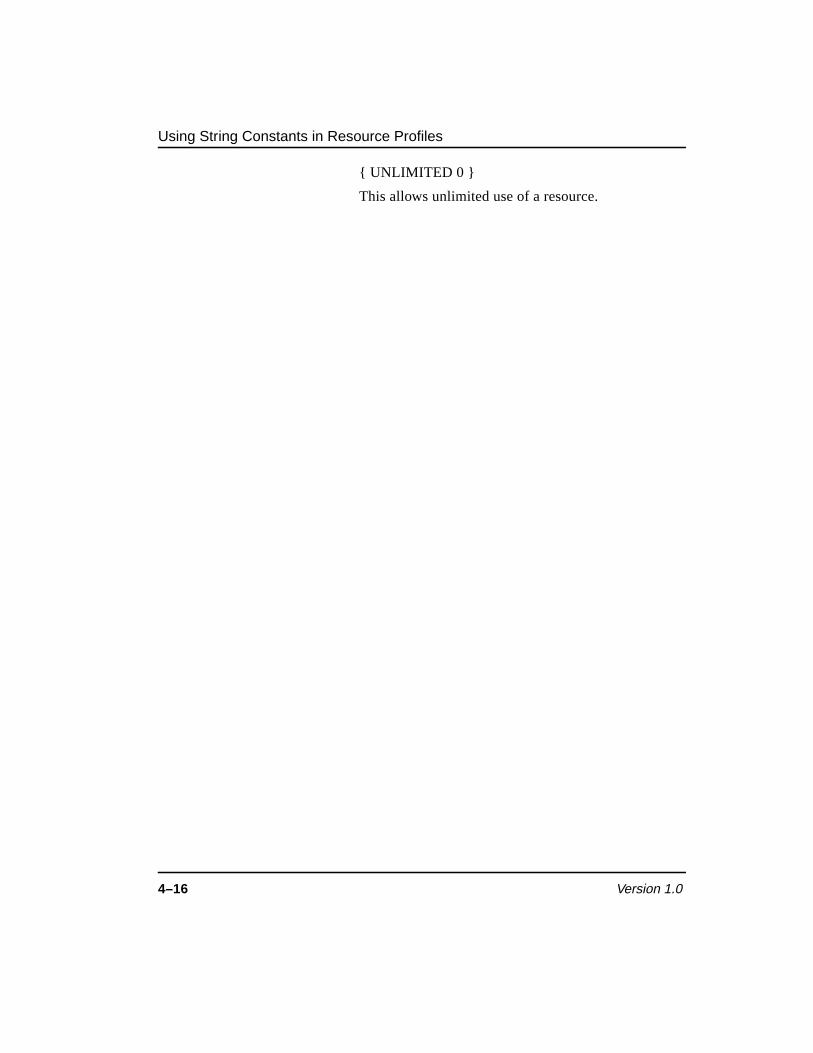
{ UNLIMITED 0 }
This allows unlimited use of a resource.

TME 10 Module For Oracle - User Management User’s Guide 5–1
Using O
racle User
Managem
ent Profiles
5Using Oracle User ManagementProfiles
This chapter explains how to use Oracle User profiles. The sameconcepts apply equally to Oracle Role and Oracle Resource profiles.This chapter describes the following tasks:
■ Populating an Oracle User profile from a database
■ Copying profile records
■ Moving profile records
■ Locking/unlocking records
■ Listing user information
■ Distributing profiles
■ Deleting a profile
Populating an Oracle User Profile from a DatabaseThepopulate operation reads information from the specified databaseand copies it into an Oracle User profile. TME 10 provides basicvalidation policy, which prevents the pre-defined usernames SYS andSYSTEM from being read into a profile. These user accounts shouldnot be modified. TME 10 provides basic validation policy in OracleRole profiles to protect the following pre-defined roles:
■ CONNECT
5

Populating an Oracle User Profile from a Database
5–2 Version 1.0
■ DBA
■ EXP_FULL_DATABASE
■ IMP_FULL_DATABASE
■ RESOURCE
TME 10 provides basic validation policy in Oracle Resource profilesto protect the pre-defined profile DEFAULT.
The following table provides the context and authorization rolerequired for this task.
You can perform this task from either the TME 10 desktop or thecommand line.
DesktopUse the following steps to populate an Oracle User profile with theentries from an Oracle database.
1. To display theDatabase User Profile window, double-click onan Oracle User profile icon.
--OR--
Activity Context Required Role
Populate an OracleUser profile
Oracle User profile oracle_dba

Populating an Oracle User Profile from a Database
TME 10 Module For Oracle - User Management User’s Guide 5–3
Using O
racle User
Managem
ent Profiles
Select theEdit Properties... option from the Oracle Userprofile's pop-up menu.

Populating an Oracle User Profile from a Database
5–4 Version 1.0
2. Select thePopulate... option from theProfile menu of theDatabase User Profile window to display thePopulate OracleProfile dialog.
3. Select the databases from which to populate the profile from thescrolling list.

Populating an Oracle User Profile from a Database
TME 10 Module For Oracle - User Management User’s Guide 5–5
Using O
racle User
Managem
ent Profiles
If more than one record exists with the same information on thedatabases from which you are populating, only the first instanceof that record is added to the profile records.
4. Press the left arrow to move the databases into theGet recordsfrom these databases: scrolling list.
5. Press one of the following radio buttons:
• Append to existing record listAdds the new records to the existing records in the profile.Use this option when populating a profile that containsrecords you want to keep.
• Overwrite existing record listReplaces the user records in the profile with the new records.Use this option with caution. Existing records in this profilewill be lost.
6. PressPopulate to add the new records to the profile.
--OR--
PressPopulate & Close to add the records to the profile andclose the dialog.
If validation policy is enabled, TME 10 displays anErrormessage dialog. This message confirms that the pre-definedusernames of SYS and SYSTEM were not read into the profile.TME 10 validates each record from each Oracle database youchoose to get records from.
7. Press theDismiss button.

Copying Profile Records
5–6 Version 1.0
TME 10 displays theDatabase User Profile window with theuser records.
Command LineFor information about using the command line to populate userprofiles, see the manual page for theopopusers command.
Copying Profile RecordsYou can copy profile records from one Oracle User profile to another.The source and target profiles must be in different profile managers.
The following table provides the context and authorization rolerequired for this task.
You can perform this task from either the TME 10 desktop or thecommand line.
Activity Context Required Role
Copy a profile record Oracle User profile admin

Copying Profile Records
TME 10 Module For Oracle - User Management User’s Guide 5–7
Using O
racle User
Managem
ent Profiles
DesktopUse the following steps to copy a profile record from one Oracle Userprofile to another.
1. Select the record you want to copy in theDatabase User Profilewindow.

Copying Profile Records
5–8 Version 1.0
2. Select theCopy... option from theEdit menu to display theCopyProfile Records dialog.
3. Select the profile manager that contains the target profile fromtheAvailable Profile Managers: scrolling list.
4. Select a target profile from theAvailable Profiles: scrolling listand press the arrow button to move the selection to theTargetProfiles: scrolling list.
5. Press theCopy & Close button.

Moving Profile Records
TME 10 Module For Oracle - User Management User’s Guide 5–9
Using O
racle User
Managem
ent Profiles
Command LineFor information about using the command line to copy user recordsbetween profiles, see the manual page for theocpuser command.
Moving Profile RecordsYou can move records from one Oracle User profile to another.
The following table provides the context and authorization rolerequired for this task.
DesktopUse the following steps to move a profile record from one Oracle Userprofile to another.
1. Select the record you want to move from theDatabase UserProfile window.
Activity Context Required Role
Move a profile record Oracle User profile admin

Moving Profile Records
5–10 Version 1.0
2. Select theMove... option from theEdit menu to display theMove Records dialog.
3. Select the profile manager that contains the target profile fromtheAvailable Profile Managers:scrolling list. The profiles thatare in the selected profile manager appear in theAvailableProfiles scrolling list.
4. Select the target profile from theAvailable Profiles: scrollinglist.
5. Press theMove & Close button.

Locking/Unlocking Records
TME 10 Module For Oracle - User Management User’s Guide 5–11
Using O
racle User
Managem
ent Profiles
Command LineFor information about using the command line to move user recordsfrom one profile to another, see the manual page for theomvusercommand.
Locking/Unlocking RecordsYou can lock individual records in an Oracle User profile. Lockedrecords are read-only when distributed to lower levels in the hierarchy.See “Locking” on page A-15, for an example of how to set up locking,and what happens when a locked record is distributed to a subscriber.
Listing User InformationYou can list all the users in an Oracle User profile, or list specificinformation for an individual user in a profile.
Command LineFor information about using the command line to list the users in anOracle User profile, see the manual page for theolsusers command.
For information about using the command line to list specificinformation about a user in an Oracle User profile, see the manual pagefor theogetuser command.
Distributing Profiles
Levels of Distribution
You can distribute a profile from a profile manager or from a databaseendpoint. When you distribute from a profile manager you can choosethe level of distribution: to the next level of subscribers or to allsubscribers. When you distribute to the next level you never updateOracle database system catalogs. Distribution from a profile managerto all subscribers and distribution from a database endpoint areeffectively the same because you update the Oracle database systemcatalogs.
Distributing Profiles
5–12 Version 1.0
Distribution Methods
You can distribute a profile using the following methods:
■ From the Distribute Profile dialog, which is available from theprofile window
■ from theDistribute Profiles dialog, which is available from theProfile Manager menu
■ By the drag and drop method
■ From the command line
The following table provides the context and authorization rolerequired for this task.
Desktop, Profile WindowUse the following steps to distribute an Oracle User profile from anOracle User profile window.
Activity Context Required Role
Distribute a profile Profile’s policy region admin
Update Oracledatabase systemcatalogs
Oracle Databaseendpoint’s policyregion
oracle_dba

Distributing Profiles
TME 10 Module For Oracle - User Management User’s Guide 5–13
Using O
racle User
Managem
ent Profiles
1. Select theDistribute... option from theProfile menu in theDatabase User Profilewindow to display theDistribute Profiledialog.
2. PressNext level of subscribersin theDistribute To field to senda copy of the profile to only the next level of subscribers. Use thisoption when you want to change only the profile copies at thenext level of subscribers in the subscription hierarchy.
--OR--

Distributing Profiles
5–14 Version 1.0
PressAll levels of subscribers to send a copy of the profile to thenext level of subscribers and all of their subscribers. Use thisoption when you want to change all of the lower level subscribersin the subscription hierarchy and update the system catalogs ofthe database endpoints.
3. PressPreserve modifications in subscribers’ copies of theprofile to keep any changes TME 10 Administrators have madeto profiles whose profile managers subscribe to the current one.Use this option when you have profiles in subscribers whosedifferences you want to keep.
--OR--
PressMake each subscriber's profile an EXACT COPY ofthis profile to overwrite any changes TME 10 Administratorshave made to their profiles with the values defined in this profile.Use this option when you do not want to keep the differences insubscriber's profiles.
4. Select the subscribers you do not want to distribute to in theDistribute to These Subscribers:scrolling list and press theright arrow button to move them to theDo Not Distribute toThese Subscribers: scrolling list.

Distributing Profiles
TME 10 Module For Oracle - User Management User’s Guide 5–15
Using O
racle User
Managem
ent Profiles
5. Press theDistribute & Close button to distribute the profile anddismiss the dialog
--OR--
Press theSchedule... button to display theAdd Scheduled Jobdialog. This dialog allows you to schedule the distribution ofprofiles at a later time.
Desktop, Profile Manager IconUse the following steps to distribute all profiles in the profile manager,to all subscribers in the profile manager. This method uses thedistribution defaults for the profile.
1. From a policy region, select theDistribute... option from aprofile manager icon's pop-up menu to display theDistributeProfiles dialog.
2. Press theDistribute Now button to distribute all profiles in theprofile manager.
--OR--

Distributing Profiles
5–16 Version 1.0
Press theSchedule... button to display theAdd Scheduled Jobsdialog.
This dialog allows you to schedule the distribution of profiles fora later time.
Desktop, Profile Manager MenuUse the following steps to distribute one or more profiles to one ormore subscribers in the profile manager. This method uses thedistribution defaults for the profile. Alternatively, you can drag anddrop profiles onto subscribers.

Distributing Profiles
TME 10 Module For Oracle - User Management User’s Guide 5–17
Using O
racle User
Managem
ent Profiles
1. Select the profile icons and the subscriber icons in the profilemenu and selectDistribute... from theProfile Manager menu todisplay theDistribute Profiles dialog.
2. Press theDistribute Now button to distribute all profiles in theprofile manager.
--OR--

Deleting a Profile
5–18 Version 1.0
Press theSchedule... button to display theAdd Scheduled Jobsdialog.
This dialog allows you to schedule the distribution of profiles fora later time.
Command LineFor information about using the command line to distribute profilesfrom a profile manager, see the manual page for thewdistribcommand.
Deleting a ProfileWhen you delete an Oracle User profile, you remove the profile and allits records from the profile manager. You can only delete an original(top level) copy of a profile. This action also deletes each subscriber'scopy of the profile. Deleting a profile does not remove objects from theOracle database system catalogs.
The following table provides the context and authorization rolerequired for this task.
You can perform this task from either the TME 10 desktop or thecommand line.
DesktopUse the following steps to delete an Oracle User profile.
Activity Context Required Role
Delete an OracleUser profile
Profile manager senior

Deleting a Profile
TME 10 Module For Oracle - User Management User’s Guide 5–19
Using O
racle User
Managem
ent Profiles
1. Select the icons of the Oracle User profiles you want to delete andchoose theProfiles --> Delete... option from theEdit menu oftheProfile Manager window to display theDelete Profilesdialog.

Deleting a Profile
5–20 Version 1.0
2. Press theDelete button to delete the profile and remove the iconfrom theProfile Manager window.
Command LineFor information about using the command line to delete profiles froma profile manager, see the manual page for thewdel command.

TME 10 Module For Oracle - User Management User’s Guide 6–1
Managing O
racleD
atabase Users
6Managing Oracle Database Users
This chapter explains how to use an Oracle User profile to manageOracle database users. This chapter describes the following tasks:
■ Adding a user record
■ Editing a user record
■ Editing multiple user records
■ Managing object privileges
■ Deleting a user record
■ Viewing granted object privileges
■ Editing the tablespace list
Adding a User RecordThere are two ways to create records in an Oracle User profile: bypopulating the profile with existing users or by adding new users. Thepopulate operation is described in Chapter 5. This section describeshow to add new users to a profile.
The following table provides the context and authorization rolerequired for this task.
6
Activity Context Required Role
Add an Oracle user Oracle User profile admin

Adding a User Record
6–2 Version 1.0
You can perform this task from either the TME 10 desktop or thecommand line.
DesktopUse the following steps to add a user to an Oracle User profile.
1. To display theProfile Manager window, double-click on aprofile manager icon from the policy region.
--OR--
Select theOpen... option from the profile manager icon’s pop-upmenu.

Adding a User Record
TME 10 Module For Oracle - User Management User’s Guide 6–3
Managing O
racleD
atabase Users
2. To display theDatabase User Profile window, double-click onan Oracle User profile icon in theProfile Manager window.
--OR--
Select theEdit Properties... option from the Oracle Userprofile's pop-up menu.

Adding a User Record
6–4 Version 1.0
3. To display theAdd Database User dialog, press theAdd...button in theDatabase User Profilewindow.
--OR--
Select theAdd... option from theEdit menu.

Adding a User Record
TME 10 Module For Oracle - User Management User’s Guide 6–5
Managing O
racleD
atabase Users
The values defined by the default policies determine how TME10 displays theAdd Database User dialog. In the followingexample theQuotas area is collapsed, but on your desktop allareas may be expanded. Use theExpand andCollapse buttons tochange the view of the dialog box to suit your needs.
4. Type the name of the new user into theName field.
5. If a field is “grayed out,” default policy has been set for that field.Press the Set Defaults button to add any default values to the
Collapse
Button
Expand
Button

Adding a User Record
6–6 Version 1.0
dialog. Once the default values are added to the dialog, TME 10activates those fields with default policy.
--OR--
Use theClear Defaultsbutton to clear any default values andenable new values to be entered.
6. Enter the database password for the user in thePassword field(this will not be echoed on the screen), or press theOSAuthentication button to allow Oracle to verify access throughthe operating system. This will create an 'OPS$' account (theactual prefix depends on the value of the INIT.ORA parameterOS_AUTHENT_PREFIX).
7. Check the boxUser Controls Passwordif you want the user tohave the ability to set his or her own password. TME 10 will notoverwrite the password. If this box is not checked, TME 10 canreset the password for the user. Leave the box unchecked toensure consistency between the password in the profile and thepassword on the database.
TME 10 needs to know and use a user’s password. TME 10connects as the owner of an object when granting objectprivileges. See “Managing Object Privileges” on page 6-19.
8. Select a tablespace from theDefault Tablespace option list.Oracle recommend that you do not use the SYSTEM tablespacefor user objects. If the tablespace is not in the option list, you willhave to exit this dialog and use theSet Tablespaces dialog to addthe tablespace to the option list. TheSet Tablespaces dialog isdescribed later in this chapter.
9. Select a tablespace from theTemporary Tablespace option list.Oracle recommend that you do not use the SYSTEM tablespace.Consider creating a separate tablespace for temporary segments.If the tablespace is not in the option list, you will have to exit thisdialog and use theSet Tablespaces dialog to add the tablespaceto the option list. TheSet Tablespaces dialog is described laterin this chapter.

Adding a User Record
TME 10 Module For Oracle - User Management User’s Guide 6–7
Managing O
racleD
atabase Users
10. If you want to grant roles to the user, press theAdd Role...button. TME 10 displays theAdd Role dialog.
Note: To revoke or change a role, highlight the role and presstheRemove Privilege button.
a. Select the role to be granted from theDatabase Rolesscrolling list. This list contains the standard, pre-definedOracle roles, plus any roles defined in Oracle Role profiles inthe current profile manager.
b. Check the boxGrant Role to Others: if you want to allowthe user to grant the role to other users.
c. Uncheck the boxDefault Role if you do not want theselected role to be a default role.
d. PressAdd to grant the role.
--OR--
PressAdd & Close to grant the role and close the dialog.
--OR--
PressCancel to close the dialog. This option does not affectyour previous selections.

Adding a User Record
6–8 Version 1.0
11. If you want to grant system privileges to the user, press theAddPrivilege...button. TME 10 displays theAdd System Privilegedialog.
Note: To revoke or change a system privilege, highlight theprivilege and press theRemove Privilege button.
a. Select the system privilege to be granted from theSystemPrivileges scrolling list.
b. Check the boxGrant Privilege To Others if you want toallow the user to grant the system privilege to other users.
c. PressAdd to grant the privilege.
--OR--
PressAdd & Close to grant the privilege and close thedialog.
--OR--
PressCancel to close the dialog. This option does not affectyour previous selections.

Adding a User Record
TME 10 Module For Oracle - User Management User’s Guide 6–9
Managing O
racleD
atabase Users
12. If you wish to add tablespace quotas for the user, press theAddQuota... button. TME 10 displays theAdd Tablespace Quotadialog.
Note: To revoke or change a tablespace quota, highlight thequota and press theRemove Quota button.
a. Select the tablespace from theTablespace: scrolling list.
b. Check the boxLimit Tablesize to set a quota for atablespace. TME 10 activates theSize andBytes boxes. Ifyou do not click on this box, a quota will not be allocated, andthe user will not be restricted on the amount of allocatedspace.
c. Enter the quota value in theSize field. Use the option list tospecify the quota units (Bytes, Kb , Mb or Gb).
d. PressAdd to add the quota for the tablespace.
--OR--
PressAdd & Close to add the quota for the tablespace andclose theAdd Tablespace Quota dialog.
13. Press theObject Privileges button to grant object privileges toothers. See “Managing Object Privileges” on page 6-19 fordetails of this operation.

Editing a User Record
6–10 Version 1.0
14. Press Add & Close to add the new user to the profile and closetheAdd Database Userdialog.
--OR--
Press theAdd button to save the new user and keep the dialogopen to add additional users.
--OR--
Press theReset button to cancel any unsaved changes in thedialog.
--OR--
Press theClose button to cancel any unsaved changes and closethe dialog.
Note: Changes made in the profile are independent of thedatabase. To update the database with the changes, youmust distribute the profile to the database endpoint.
Command LineFor information about using the command line to add Oracle users toa profile, see the manual page for theocrtuser command.
Editing a User RecordYou can edit one or multiple user records in a profile. This sectiondescribes editing a single user in a profile.
The following table provides the context and authorization rolerequired for this task.
You can perform this task from either the TME 10 desktop or thecommand line.
DesktopUse the following steps to edit a user in an Oracle User profile.
Activity Context Required Role
Edit an Oracle user Oracle User profile admin

Editing a User Record
TME 10 Module For Oracle - User Management User’s Guide 6–11
Managing O
racleD
atabase Users
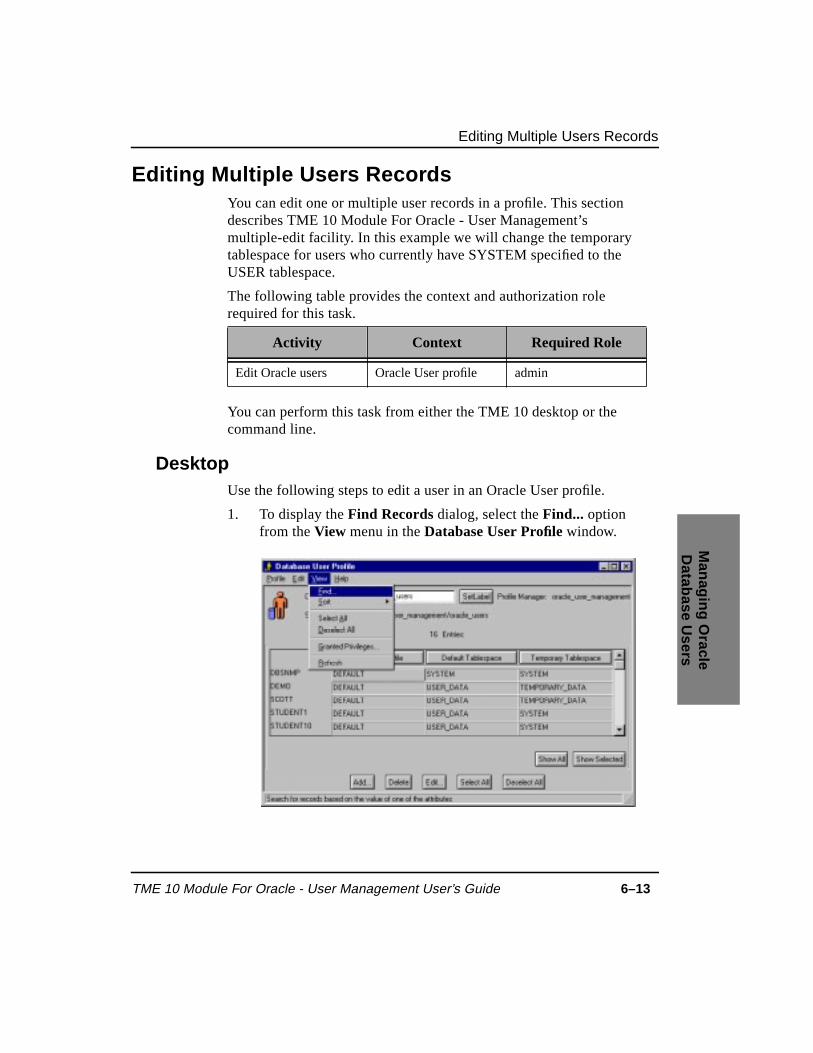
1. To display theEdit Database User dialog, select the user in theDatabase User Profilewindow to edit and press theEdit button.
--OR--
Select theEdit... option from theEdit menu.

Editing a User Record
6–12 Version 1.0
In this example all areas are collapsed, but on your desktop allareas may be expanded. Use theExpand andCollapsebuttons tochange the view of the dialog box to suit your needs.
2. If you want to change any of the parameters for the user, enter thenew value in the appropriate field(s). See “Adding a UserRecord” on page 6-1 for details on the various fields on thisscreen.
3. PressChange & Closeto save the parameters for the user andclose theEdit Database User dialog.
Note: Changes made in the profile are independent of the database.To update the database with the changes, you must distributethe profile to the database endpoint.
Command LineFor information about using the command line to edit a user record ina profile, see the manual page for theosetuser command.
Expand
Button
Editing Multiple Users Records
TME 10 Module For Oracle - User Management User’s Guide 6–13
Managing O
racleD
atabase Users
Editing Multiple Users RecordsYou can edit one or multiple user records in a profile. This sectiondescribes TME 10 Module For Oracle - User Management’smultiple-edit facility. In this example we will change the temporarytablespace for users who currently have SYSTEM specified to theUSER tablespace.
The following table provides the context and authorization rolerequired for this task.
You can perform this task from either the TME 10 desktop or thecommand line.
DesktopUse the following steps to edit a user in an Oracle User profile.
1. To display theFind Records dialog, select theFind... optionfrom theView menu in theDatabase User Profile window.
Activity Context Required Role
Edit Oracle users Oracle User profile admin

Editing Multiple Users Records
6–14 Version 1.0
2. Select the attribute to search on from theAttributes: scrollinglist.
3. Select the comparison operator and enter the search criteria.
4. Press theFind All button and press theClose button.

Editing Multiple Users Records
TME 10 Module For Oracle - User Management User’s Guide 6–15
Managing O
racleD
atabase Users
5. To display only the records matching the search criteria in theDatabase User Profile window, press theShow Selected button.
6. Press theSelect All button in the Database User Profile window,to select the records chosen in the previous step.
7. To edit several attributes at once, press theEdit... button in theDatabase User Profile window.

Editing Multiple Users Records
6–16 Version 1.0
--OR--
To edit a single attribute press the attribute button. In thisexample, press theTemporary Tablespacebutton in theDatabase User Profile window.

Editing Multiple Users Records
TME 10 Module For Oracle - User Management User’s Guide 6–17
Managing O
racleD
atabase Users
TME 10 displays theEdit Multiple Database Users dialog. Theonly attribute that is active is theTemporary Tablespaceoptionmenu.

Editing Multiple Users Records
6–18 Version 1.0
8. Select TEMP from theTemporary Tablespace option menu.
9. Press Change & Closeto save the changes to the profile andclose theEdit Multiple Database Userdialog.
--OR--
Press theCancel button to cancel any unsaved changes and closethe dialog.

Managing Object Privileges
TME 10 Module For Oracle - User Management User’s Guide 6–19
Managing O
racleD
atabase Users
TME 10 displays the changes in theDatabase User Profilewindow.
Note: Changes made in the profile are independent of thedatabase. To update the database with the changes, youmust distribute the profile to the database endpoint.
Command LineFor information about using the command line to edit multiple userrecords in a profile, see the manual page for theosetusers command.
Managing Object PrivilegesTo grant object privileges, the user must own the object or have objectprivileges with the GRANT OPTION on the object. Use theObjectPrivileges dialog from within the grantor’s user profile record to grantor revoke object privileges. To change a grantee’s privileges on anobject, you must revoke the existing grant and create a new one.
TME 10 must be able to connect as the grantor to issue the GRANTcommand. Therefore, the grantor’s password must be eitherOSAuthentication or Password with the check boxUser ControlsPassword unchecked. See “Adding a User Record” on page 6-1.

Managing Object Privileges
6–20 Version 1.0
The following table provides the context and authorization rolerequired for this task.
You can perform this task from either the TME 10 desktop or thecommand line.
DesktopUse the following steps to grant object privileges in an Oracle Userprofile.
1. Select the user who is granting the object privileges in theDatabase User Profile dialog, and press theEdit button.
--OR--
Select the user who is granting the object privileges and select theEdit... option from theEdit menu.
Activity Context Required Role
Grant or revokeobject privileges
Oracle User profile admin

Managing Object Privileges
TME 10 Module For Oracle - User Management User’s Guide 6–21
Managing O
racleD
atabase Users
2. In theEdit Database User dialog, press theObject Privileges...button.
3. In theObject Privilegesdialog, press theAdd Privilege...button.
To revoke a privilege, highlight the existing privilege and presstheRemove Privilege button.

Managing Object Privileges
6–22 Version 1.0
4. In theAdd Object Privilege dialog, enter the name of the user tobe granted the privilege in theGrantee: field.
5. Select the object privilege to be granted from theObjectPrivileges option menu.
6. Uncheck the boxPrivilege Grantable: if you do not want theuser to be able to grant the privilege to other users.
7. Enter the schema name for the object in the Schema Name:box.
8. Enter the name of the object in theObject Name: box.
9. If the object privilege chosen allows the privilege to be grantedon columns, theColumns: scrolling list,Column Name: field,andRemove Column button will be highlighted.
a. Enter the name of a column in theColumn Name: box andpress<Return>. Each column will be added to theColumns: scrolling list.
Note: If no columns are selected, the privilege will begranted on all columns.
b. If you decide not to grant the privilege on a particularcolumn, highlight the column in theColumns: scrolling listand pressRemove Column.
10. PressAdd to grant the privilege and continue making changes.

Managing Object Privileges
TME 10 Module For Oracle - User Management User’s Guide 6–23
Managing O
racleD
atabase Users
--OR--
PressAdd & Close to grant the privilege and close the dialog.
--OR--
PressCancel to close the dialog. This option does not affect yourprevious selections.
TME 10 displays theObject Privileges dialog.
11. To display theEdit Database User dialog, press theClosebutton.
12. PressChange to save the object privilege grants and keep thedialog open.
--OR--

Managing Object Privileges
6–24 Version 1.0
PressChange & Close to save the object privilege grants andclose the dialog.
13. If theUser Controls Password box is checked, or if it has beenunchecked but the password not changed, TME 10 displays theObject Privilege Warning dialog.
a. To enable TME 10 to apply the object privileges, do thefollowing:
• Uncheck the check boxUser Controls Password.
• Enter a new password in thePassword field.
b. PressChange to save the object privilege grants and keep thedialog open.
--OR--

Deleting a User Record
TME 10 Module For Oracle - User Management User’s Guide 6–25
Managing O
racleD
atabase Users
PressChange & Close to save the object privilege grants andclose the dialog.
Note: Changes made in the profile are independent of thedatabase. To update the database with the changes,you must distribute the profile to the databaseendpoint.
Command LineFor information about using the command line to edit a user record ina profile, see the manual page for theosetuser command.
Deleting a User RecordTo drop users through TME 10 Module For Oracle - UserManagement, you delete the user’s record in the profile and distributethe profile to the database endpoint.
The following table provides the context and authorization rolerequired for this task.
You can perform this task from either the TME 10 desktop or thecommand line.
DesktopUse the following steps to drop a user from an Oracle User profile.
1. In theDatabase User Profile window, select the user that isgoing to be dropped, and press theDelete button to drop thedatabase user.
--OR--
Activity Context Required Role
Drop an Oracle user Oracle User profile admin

Deleting a User Record
6–26 Version 1.0
Select theDelete option from theEdit menu.
2. In theDelete Database User(s) dialog you have the followingchoices:
Press theDelete Without Cascade button to delete only theusers.
--OR--
Press theDelete With Cascade button to delete the users andtheir objects.
--OR--
Press theCancel button to cancel the delete.
Changes made in the profile are independent of the database. Toupdate the database with the changes, you must distribute theprofile to the database endpoint.

Viewing Granted Object Privileges
TME 10 Module For Oracle - User Management User’s Guide 6–27
Managing O
racleD
atabase Users
Command LineFor more information about using the command line to drop users froma profile, see the manual page for theodeluser command.
Viewing Granted Object PrivilegesYou can view the object privileges that a user has been granted. UsetheGranted Privileges... option from theView menu in theDatabaseUser Profilewindow.
The following table provides the context and authorization rolerequired for this task.
You can perform this task from the TME 10 desktop only.
DesktopUse the following steps to view a user’s object privileges from anOracle User profile.
Activity Context Required Role
View a user’s objectprivileges
Oracle User profile admin

Viewing Granted Object Privileges
6–28 Version 1.0
1. In theDatabase User Profilewindow, select the user record andchoose theGranted Privileges... option from theView menu.
2. TheObject Privilegesdialog displays the privileges granted tothe user. PressClose to dismiss the dialog and return to theDatabase User Profilewindow.

Setting the Tablespace List
TME 10 Module For Oracle - User Management User’s Guide 6–29
Managing O
racleD
atabase Users
Setting the Tablespace ListTME 10 Module For Oracle - User Management maintains a list oftablespaces for each Oracle User profile. You use this list when youselect a user’s default and temporary tablespaces in theAdd DatabaseUser dialog orEdit Database User dialog. You must manually updatethis list by adding or removing tablespaces from it. Each TME 10Module For Oracle - User Management profile maintains a separatelist. The list is internal to TME 10 Module For Oracle - UserManagement; this list does not update any Oracle data dictionarytables. Use theSet Tablespaces dialog to maintain this list.
The following table provides the context and authorization rolerequired for this task.
You can perform this task from the TME 10 desktop only.
DesktopUse the following steps to add a tablespace to the list of knowntablespaces.
Activity Context Required Role
View a user’s objectprivileges
Oracle User profile admin

Setting the Tablespace List
6–30 Version 1.0
1. Select theTablespaces... option from theEdit... option of theDatabase User Profile window.
2. In theSet Tablespaces dialog, enter the name of the newtablespace in theAdd Tablespace field and press<Return>.TME 10 adds the new tablespace to theCurrent Tablespacesscrolling list.
Note: To remove a tablespace from the list, select thetablespace and pressRemove Tablespace.

Setting the Tablespace List
TME 10 Module For Oracle - User Management User’s Guide 6–31
Managing O
racleD
atabase Users
3. PressSet to add (or remove) the tablespace, and continue makingchanges.
-- OR --
PressSet & Close to save the changes and close the dialog.

Setting the Tablespace List
6–32 Version 1.0

TME 10 Module For Oracle - User Management User’s Guide 7–1
Managing O
racleD
atabase Roles
7Managing Oracle Database Roles
This chapter explains how to use an Oracle Role profile to manageOracle database roles. It describes the following tasks:
■ Understanding TME 10 Oracle Role profiles
■ Adding a role record
■ Editing a Role Record
■ Editing multiple role records
■ Deleting a role record
Understanding TME 10 Oracle Role ProfilesTME 10 Oracle role profiles are created, populated, subscribed to,distributed, and deleted in exactly the same way as TME 10 Oracleuser profiles. The concepts of management policy,management-by-subscription, secure delegation, and profilecapabilities apply in exactly the same way to roles as they do to users.The managed resource is OracleRoleProfile. To create and manipulatea role profile, follow the instructions in Chapters 3, 4 and 5 of this userguide that relate to user profiles, substituting ‘role’ for ‘user’ asappropriate.
Adding a Role RecordThe following table provides the context and authorization rolerequired for this task.
7

Adding a Role Record
7–2 Version 1.0
You can perform this task from either the TME 10 desktop or thecommand line.
DesktopUse the following steps to add a role to an Oracle Role profile.
1. To display aProfile Manager window, double-click on a profilemanager icon in a policy region.
--OR--
Select theOpen...option from the profile manager icon's pop-upmenu.
Activity Context Required Role
Add a role Oracle Role profile admin

Adding a Role Record
TME 10 Module For Oracle - User Management User’s Guide 7–3
Managing O
racleD
atabase Roles
2. To display theDatabase Role Profile window, double-click onan Oracle Role profile icon.
--OR--
Select theEdit Properties... option from the Oracle Roleprofile's pop-up menu.

Adding a Role Record
7–4 Version 1.0
3. To display theAdd Database Role dialog, press theAdd...button in theDatabase Role Profile window.
--OR--
Select theAdd... option from theEdit menu.

Adding a Role Record
TME 10 Module For Oracle - User Management User’s Guide 7–5
Managing O
racleD
atabase Roles
The values defined by the default policies determine how TME10 displays theAdd Database Roledialog. In this example allareas are expanded, but on your desktop some of the areas maybe collapsed.
4. Type the name of the new role into theName field.
5. If a field is “grayed out,” default policy has been set for that field.Press the Set Defaults button to add any default values to thedialog. Once the default values are added to the dialog, TME 10activates those fields with default policy.
--OR--
Use theClear Defaultsbutton to clear any default values andenable new values to be entered.
Collapse
Button

Adding a Role Record
7–6 Version 1.0
6. Click on theAuthentication button to get an option list. SelectNONE if the role does not require a password, pressOS if youwant to allow the operating system to verify the user enabling therole, orPASSWORD if you want the user to enter a passwordwhen enabling the role. Enter the password in thePasswordfield. This will not be echoed on the screen.
7. If you want to grant roles to the role, press theAdd Role... buttonto display theAdd Role dialog.
Note: To revoke or change a role, highlight the role and presstheRemove Role button.
a. Select the role to be granted from theDatabase Rolesscrolling list. This list contains the standard, pre-definedOracle roles, plus any roles defined in Oracle Role profiles inthe current profile manager.
b. Check the boxGrant Role to Others: if you want to allowthe user to grant the role to other users.
c. PressAdd to grant the role.
--OR--
PressAdd & Close to grant the role and close the dialog.
--OR--
PressCancel to close the dialog. This option does not affectyour previous selections.
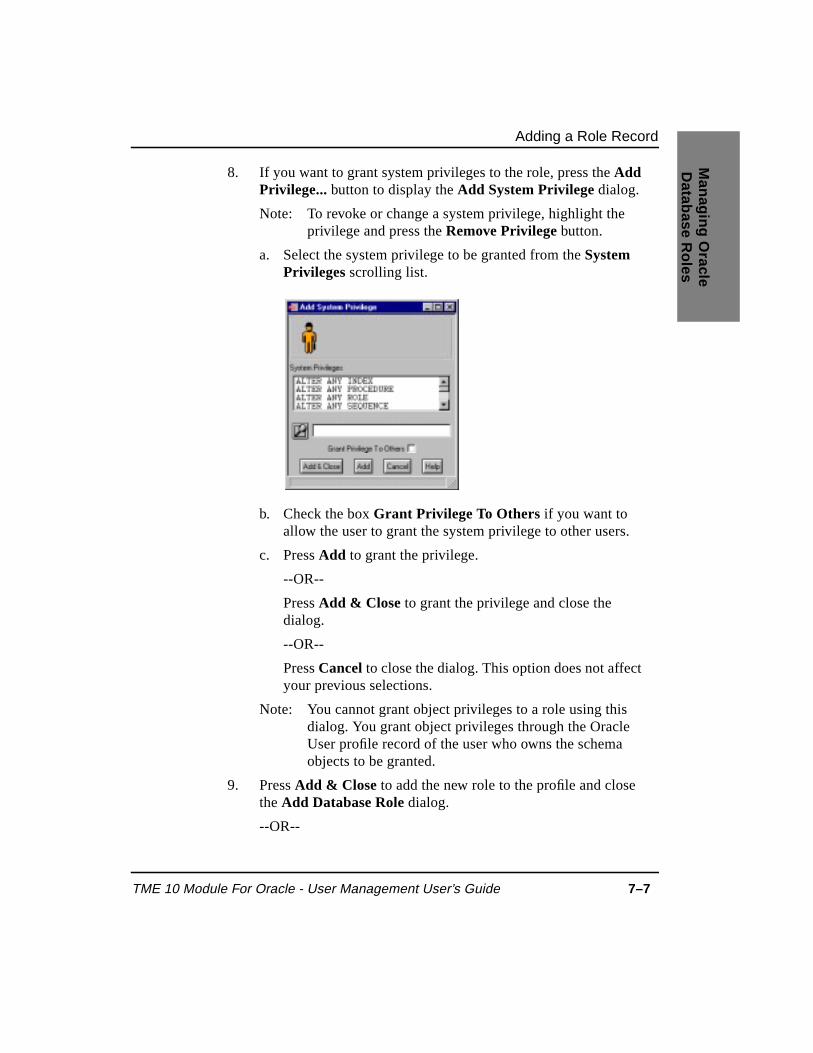
Adding a Role Record
TME 10 Module For Oracle - User Management User’s Guide 7–7
Managing O
racleD
atabase Roles
8. If you want to grant system privileges to the role, press theAddPrivilege...button to display theAdd System Privilege dialog.
Note: To revoke or change a system privilege, highlight theprivilege and press theRemove Privilege button.
a. Select the system privilege to be granted from theSystemPrivileges scrolling list.
b. Check the boxGrant Privilege To Others if you want toallow the user to grant the system privilege to other users.
c. PressAdd to grant the privilege.
--OR--
PressAdd & Close to grant the privilege and close thedialog.
--OR--
PressCancel to close the dialog. This option does not affectyour previous selections.
Note: You cannot grant object privileges to a role using thisdialog. You grant object privileges through the OracleUser profile record of the user who owns the schemaobjects to be granted.
9. Press Add & Close to add the new role to the profile and closetheAdd Database Roledialog.
--OR--

Editing a Role Record
7–8 Version 1.0
Press theAdd button to save the new role and keep the dialogopen to add additional roles.
--OR--
Press theReset button to cancel any unsaved changes in thedialog.
--OR--
Press theClose button to cancel any unsaved changes and closethe dialog.
Note: Changes made in the profile are independent of thedatabase. To update the database with the changes, youmust distribute the profile to the database endpoint.
Command LineFor information about using the command line to add a role to aprofile, see the manual page for theocrtrole command.
Editing a Role RecordYou can edit one or multiple roles in a profile. This section describesediting a single role in a profile.
The following table provides the context and authorization rolerequired for this task.
You can perform this task from either the TME 10 desktop or thecommand line.
DesktopUse the following steps to edit a role in an Oracle Role profile.
1. To display theEdit Database Roledialog, highlight the role intheDatabase Role Profile window and press theEdit... button.
--OR--
Activity Context Required Role
Edit a role Oracle Role profile admin

Editing a Role Record
TME 10 Module For Oracle - User Management User’s Guide 7–9
Managing O
racleD
atabase Roles
Highlight the role and select theEdit... option from theEditmenu.
In this example all areas are collapsed, but on your desktop allareas may be expanded. Use theExpand andCollapsebuttons tochange the view of the dialog box to suit your needs.
2. If you want to change any of the parameters for the role, enter thenew value in the appropriate field(s). See “Adding a RoleRecord” on page 7-1 for details on the various fields on thisscreen.
Expand
Button
Editing Multiple Role Records
7–10 Version 1.0
3. PressChange & Closeto save the parameters for this screen andclose theEdit Database Roledialog.
Note: Changes made in the profile are independent of thedatabase. To update the database with the changes, youmust distribute the profile to the database endpoint.
Command LineFor information about using the command line to edit a role in aprofile, see the manual page for theosetrole command.
Editing Multiple Role RecordsYou can edit one or multiple roles in a profile. This section describesediting multiple roles in a profile.
The following table provides the context and authorization rolerequired for this task.
You can perform this task from either the TME 10 desktop or thecommand line.
DesktopUse the following steps to edit a role in an Oracle Role profile.
1. In the profile manager, double-click on an Oracle Role profileicon.
--OR--
Select theEdit Properties... option from the Oracle Roleprofile’s pop-up menu.
Activity Context Required Role
Edit roles Oracle Role profile admin

Editing Multiple Role Records
TME 10 Module For Oracle - User Management User’s Guide 7–11
Managing O
racleD
atabase Roles
1. In theDatabase Role Profile window, select the roles you wishto edit.
Press the<Shift> key and click on each record to select multiplerecords. See “Editing Multiple User Records” on page 6-13 for adescription of using theFind... option from theView menu tosearch for records in a profile.
2. Press the column button above the column to edit a singleattribute. See “Editing Multiple User Records” on page 6-13 fora description of editing a single attribute.
--OR--
To edit several attributes at once, press theEdit... button in theDatabase Role Profile window.

Editing Multiple Role Records
7–12 Version 1.0
TME 10 displays theDatabase Role Profile dialog and theSelect Attributes To Edit dialog.
TME 10 displays any values that are common to the selectedroles in theDatabase Role Profile dialog. None of the fields areactive.

Deleting a Role Record
TME 10 Module For Oracle - User Management User’s Guide 7–13
Managing O
racleD
atabase Roles
3. In theSelect Attributes To Edit dialog, check the box of theattributes you want to edit to activate the fields in theDatabaseRole Profile dialog.
4. Edit the attributes in theDatabase Role Profile dialog.
5. Press Change & Closeto save the changes to the profile andclose theDatabase Role Profiledialog.
--OR--
Press theCancel button to cancel any unsaved changes and closethe dialog.
Note: Changes made in the profile are independent of thedatabase. To update the database with the changes, youmust distribute the profile to the database endpoint.
Command LineFor information about using the command line to edit multiple roles ina profile, see the manual page for theosetroles command.
Deleting a Role RecordTo drop roles through TME 10 Oracle User Management, you deletethe role’s record in the profile and distribute the profile to the databaseendpoint.
The following table provides the context and authorization rolerequired for this task.
Activity Context Required Role
Drop a role Oracle Role profile admin

Deleting a Role Record
7–14 Version 1.0
You can perform this task from either the TME 10 desktop or thecommand line.
DesktopUse the following steps to drop a role from an Oracle Role profile.
1. In theDatabase Role Profile window, select the role that isgoing to be dropped and press theDelete button.
--OR--
Select theDelete option from theEdit menu.
Note: Make certain that you want to delete the role(s). TME 10does not prompt for confirmation of the operation.
Changes made in the profile are independent of the database. Toupdate the database with the changes, you must distribute theprofile to the database endpoint.
Command Linefor information about using the command line to drop roles from aprofile, see the manual page for theodelrole command.

TME 10 Module For Oracle - User Management User’s Guide 8–1
Managing O
racleD
atabase Resource
8Managing Oracle DatabaseResource Profiles
This chapter explains how to use an Oracle Resource profile to manageOracle database resource profiles. This chapter describes the followingtasks:
■ Understanding TME 10 Oracle Resource profiles
■ Adding a resource record
■ Editing a Resource Record
■ Editing multiple resource records
■ Deleting a resource record
Understanding TME 10 Oracle Resource ProfilesTME 10 Oracle Resource profiles are created, populated, subscribedto, distributed, and deleted in exactly the same way as TME 10 Oracleuser profiles. The concepts of management policy,management-by-subscription, secure delegation and profilecapabilities apply in exactly the same way to resources as they do tousers. The managed resource is OracleResourceProfile. To create andmanipulate a resource profile, follow the instructions in Chapters 3, 4and 5 of this user guide that relate to user profiles, substituting‘resource’ for ‘user’ as appropriate.
8

Adding a Resource Record
8–2 Version 1.0
Adding a Resource RecordThe following table provides the context and authorization rolerequired for this task.
You can perform this task from either the TME 10 desktop or thecommand line.
DesktopUse the following steps to add a resource to an Oracle Resourceprofile.
1. To display aProfile Manager window, double-click on a profilemanager icon in a policy region.
--OR--
Select theOpen...option from the profile manager icon's pop-upmenu.
Activity Context Required Role
Add an Oracleresource profile
Oracle Resourceprofile
admin

Adding a Resource Record
TME 10 Module For Oracle - User Management User’s Guide 8–3
Managing O
racleD
atabase Resource
2. To display theDatabase Resource Profile window, double-clickon an Oracle Resource profile icon.
--OR--
Select theEdit Properties... option from the Oracle Resourceprofile's pop-up menu.

Adding a Resource Record
8–4 Version 1.0
3. To display theAdd Resource Profiledialog, press theAdd...button in theDatabase Resource Profilewindow.
--OR--
Select theAdd... option from theEdit menu.

Adding a Resource Record
TME 10 Module For Oracle - User Management User’s Guide 8–5
Managing O
racleD
atabase Resource
4. Type the name of the new resource into theName field.
5. If a field is “grayed out,” default policy has been set for that field.Press the Set Defaults button to add any default values to thedialog. Once the default values are added to the dialog, TME 10activates those fields with default policy.
--OR--
Use theClear Defaultsbutton to clear any default values andenable new values to be entered.
6. Enter the limits for each resource in the boxes below.
CompositeLimit Limits the total resource cost for a session. See
the relevant version of the Oracle Server SQLLanguage Reference Manual for details ofhow this is calculated.
SessionsPer User Limits the number of concurrent sessions for a
user.

Adding a Resource Record
8–6 Version 1.0
CPU Per Call Limits the CPU time for a parse, execute orfetch operation. Expressed in hundredths of asecond.
Logical Reads Per CallLimits the number of data blocks read for aparse, execute or fetch operation. Expressed asa number of blocks.
Idle Time Limits the continuous inactive time for asession. Expressed in minutes.
CPU PerSession Limits the CPU time for a session. Expressed
in hundredths of a second.
Logical ReadsPer Session Limits the number of data blocks read (from
disk and memory) in a session. Expressed as anumber of blocks.
Connect Time Limits the elapsed time of a session. Expressedin minutes.
Private SGA Limits the amount of private space a sessioncan allocate in the shared pool. Expressed as anumber of bytes.
Each resource has an option menu with three options:
DEFAULT Use the limit specified in the Oracle DEFAULTresource profile.
LIMITED Allows you to enter a value for this resource intheValue box.
UNLIMITED Use an unlimited amount of this resource.
7. Press Add & Close to add the new resource to the profile andclose theAdd Resource Profiledialog.
--OR--
Press theAdd button to save the new resource and keep thedialog open to add additional resources.
--OR--

Editing a Resource Record
TME 10 Module For Oracle - User Management User’s Guide 8–7
Managing O
racleD
atabase Resource
Press theReset button to cancel any unsaved changes in thedialog.
--OR--
Press theClose button to cancel any unsaved changes and closethe dialog.
Note: Changes made in the profile are independent of thedatabase. To update the database with the changes, youmust distribute the profile to the database endpoint.
Command LineFor further information about using the command line to add aresource profile to a profile, see the manual page for theocrtresourcecommand.
Editing a Resource RecordYou can edit one or multiple resource records in a profile. This sectiondescribes editing a single resource record in a profile.
The following table provides the context and authorization rolerequired for this task.
You can perform this task from either the TME 10 desktop or thecommand line.
DesktopUse the following steps to edit a record in an Oracle Resource profile.
1. To display theEdit Resource Profiledialog, select the recordthat is going to be edited in theDatabase Resource Profilewindow and press theEdit... button.
--OR--
Activity Context Required Role
Edit an Oracleresource profile
Oracle Resourceprofile
admin

Editing a Resource Record
8–8 Version 1.0
Select theEdit... option from theEdit menu.
2. Enter the new value in the appropriate field.

Editing Multiple Resource Records
TME 10 Module For Oracle - User Management User’s Guide 8–9
Managing O
racleD
atabase Resource
See “Adding a Resource Record” on page 8-2 for details on thevarious fields on this screen.
Command LineFor information about using the command line to edit information fora resource profile, see the manual page for theosetresource command.
Editing Multiple Resource RecordsYou can edit one or multiple resources in a profile. This sectiondescribes editing multiple resources in a profile.
The following table provides the context and authorization rolerequired for this task.
You can perform this task from either the TME 10 desktop or thecommand line.
DesktopUse the following steps to edit a resource in an Oracle Resourceprofile.
Activity Context Required Role
Edit Oracle resourceprofiles
Oracle Resourceprofile
admin

Editing Multiple Resource Records
8–10 Version 1.0
1. In theDatabase Resource Profile window, select the resourcesyou wish to edit.
Press the<Shift> key and click on each record to select multiplerecords. See “Editing Multiple User Records” on page 6-13 for adescription of using theFind... option from theView menu tosearch for records in a profile.
2. Press the column button above the column to edit a singleattribute. See “Editing Multiple User Records” on page 6-13 fora description of editing a single attribute.
--OR--
To edit several attributes at once, press theEdit... button in theDatabase Resource Profile window.

Editing Multiple Resource Records
TME 10 Module For Oracle - User Management User’s Guide 8–11
Managing O
racleD
atabase Resource
TME 10 displays the Select Attributes To Edit dialog and theEdit Multiple Resource Profiles dialog.
TME 10 displays any values that are common to the selectedresources in theEdit Multiple Resource Profiles dialog. Noneof the fields are active.

Deleting a Resource Record
8–12 Version 1.0
3. In theSelect Attributes To Edit dialog, check the box of theattributes you want to edit to activate the fields in theEditMultiple Resource Profiles dialog.
4. Edit the attributes in theEdit Multiple Resource Profiles dialog.
5. Press Change & Closeto save the changes to the profile anddismiss the dialog.
--OR--
Press theCancel button to cancel any unsaved changes and closethe dialog.
Note: Changes made in the profile are independent of thedatabase. To update the database with the changes, youmust distribute the profile to the database endpoint.
Command LineFor information about using the command line to edit information formultiple resource profiles, see the manual page for theosetresourcescommand.
Deleting a Resource RecordTo drop a resource profile through TME 10 Oracle User Management,you delete the resource’s record in the profile and distribute the profileto the database endpoint.

Deleting a Resource Record
TME 10 Module For Oracle - User Management User’s Guide 8–13
Managing O
racleD
atabase Resource
The following table provides the context and authorization rolerequired for this task.
You can perform this task from either the TME 10 desktop or thecommand line.
DesktopUse the following steps to drop a record from an Oracle Resourceprofile.
1. Select the record that is going to be dropped in theDatabaseResource Profile window and press theDelete button to drop theresource.
--OR--
Select theDelete option from theEdit menu.
Activity Context Required Role
Drop an Oracleresource profile
Oracle Resourceprofile
admin

Deleting a Resource Record
8–14 Version 1.0
2. Press theYes button to confirm the delete operation in theDeleteResource dialog.
Changes made in the profile are independent of the database. Toupdate the database with the changes, you must distribute theprofile to the database endpoint.
Command LineFor information about using the command line to drop resourcerecords from a profile, see the manual page for theodelresourcecommand.

TME 10 Module For Oracle - User Management User’s Guide A–1
Reference
AExamples
This chapter provides examples of profile validation policy and profilerecord locking. These examples demonstrate a number of concepts,including management-by-subscription and secure delegation, andshow how these concepts can by used by TME 10 Administrators tomanipulate Oracle User profiles at various levels within anorganization.
Profile Validation PolicyThis example shows how a corporate DBA can set profile validationpolicy on an attribute and distribute the information to subscribers.You will see what happens when the local DBA responsible forsubscribing a profile attempts to override the validation policy.
A

Profile Validation Policy
A–2 Version 1.0
Actions Performed by a Corporate DBA1. From theProfile Manager window, the corporate DBA
double-clicks on the Oracle User profile icon, or selects theEditProperties... option from the Oracle User profile’s pop-up menu.
2. The DBA is interested in the Temporary Tablespace attribute. IntheDatabase User Profile window she selects theSort-->

Profile Validation Policy
TME 10 Module For Oracle - User Management User’s Guide A–3
Reference
Attributes... option from theView menu to change the order thatattributes appear in the spreadsheet.
3. In theDisplay Attribute s dialog, the DBA highlights theTemporary Tablespace attribute in theAttributes Displayed:scrolling list and uses the up arrow button to re-position theattribute in the display order.

Profile Validation Policy
A–4 Version 1.0
TME 10 displays theDatabase User Profile window with thenew column order.
4. The DBA selects theValidation Policies...option from theEditmenu.
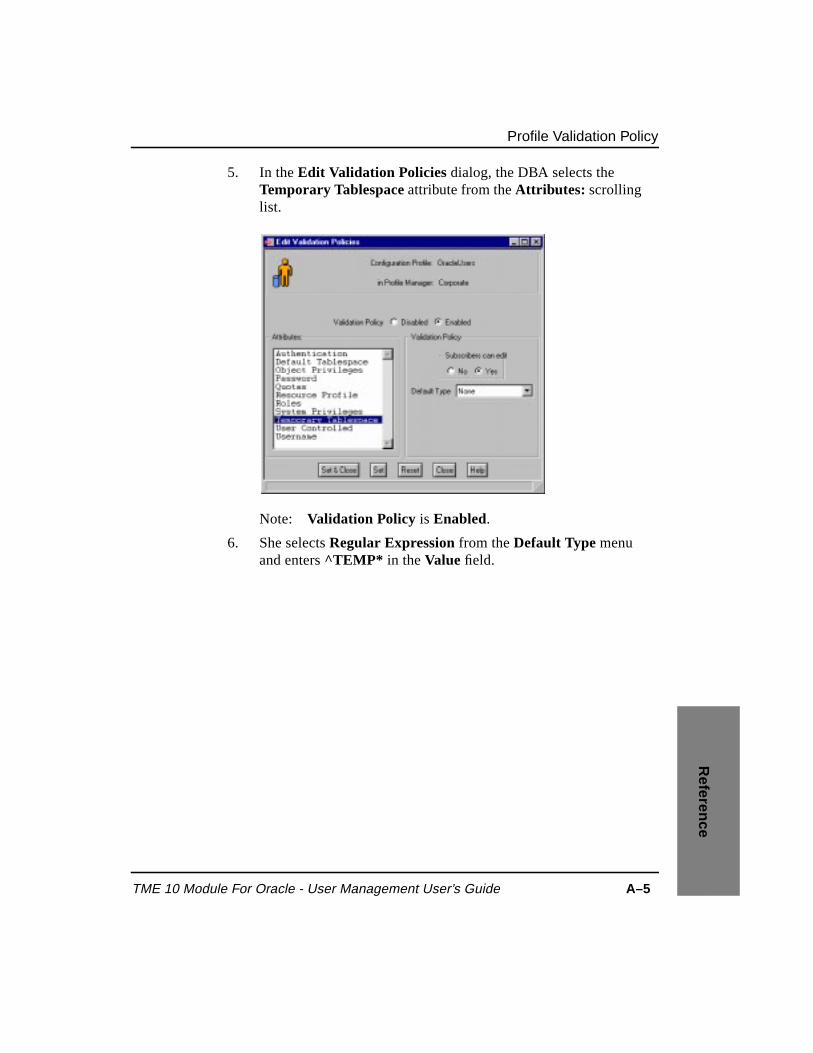
Profile Validation Policy
TME 10 Module For Oracle - User Management User’s Guide A–5
Reference
5. In theEdit Validation Policies dialog, the DBA selects theTemporary Tablespace attribute from theAttributes: scrollinglist.
Note: Validation Policy is Enabled.
6. She selectsRegular Expressionfrom theDefault Type menuand entersTEMP* in theValue field.

Profile Validation Policy
A–6 Version 1.0
7. She clicks on theSubscribers can edit Noradio button andpresses theSet & Close button. This action prevents subscribingadministrators from changing the policy on this specific attribute.
8. Back at theDatabase User Profile window, the DBA selects theValidate... option from theProfile menu to check the records inthe current profile.

Profile Validation Policy
TME 10 Module For Oracle - User Management User’s Guide A–7
Reference
TME 10 displays theResults of Policy Validation dialog.
9. The DBA wants to correct these records before distributing them.She selects theFind... option from theView menu.

Profile Validation Policy
A–8 Version 1.0
10. In the Find Records dialog, the DBA highlights theTemporaryTablespace attribute in theAttributes: scrolling list and entersSYSTEM as the search criteria.
11. She presses the Find All button.
12. Back in theDatabase User Profile window, the DBA presses theShow SelectedandSelect All buttons to display the records withinvalid values for attributeTemporary Tablespace.
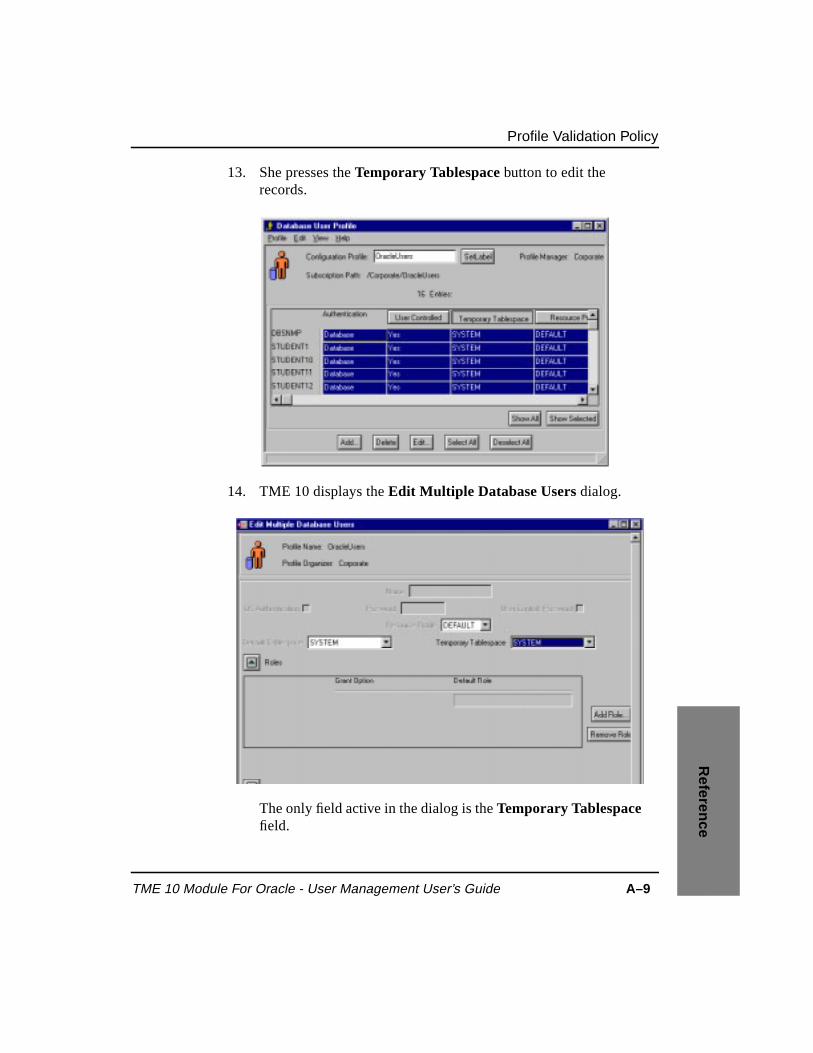
Profile Validation Policy
TME 10 Module For Oracle - User Management User’s Guide A–9
Reference
13. She presses theTemporary Tablespace button to edit therecords.
14. TME 10 displays theEdit Multiple Database Users dialog.
The only field active in the dialog is theTemporary Tablespacefield.

Profile Validation Policy
A–10 Version 1.0
15. The DBA changes the value to TEMP and presses theChange &Closebutton.
TME 10 displays theDatabase User Profile window with thechanges.
16. Ready to distribute the profile, the DBA selects theDistribute...option from theProfile menu.

Profile Validation Policy
TME 10 Module For Oracle - User Management User’s Guide A–11
Reference
17. In theDistribute Profile dialog, the DBA distributes the profileto the next level of subscribers only, and overwrites anymodifications made in the subscribers’ copies.

Profile Validation Policy
A–12 Version 1.0
Actions Performed by Local DBA1. From the NorthAmericaProfile Manager window, the local
DBA double-clicks on the Oracle User profile icon, or selects theEdit Properties... option from the Oracle User profile’s pop-upmenu.

Profile Validation Policy
TME 10 Module For Oracle - User Management User’s Guide A–13
Reference
2. In theDatabase User Profilewindow, the DBA presses theAdd... button to create a new user.
3. In theAdd Database User dialog, the DBA creates a new userwith aTemporary Tablespace of TOOLS and pressesAdd &Close.

Profile Validation Policy
A–14 Version 1.0
TME 10 displays anError dialog indicating that the editoperation failed, as the validation policy failed for theTemporary Tablespace attribute.
You will recall that the corporate DBA set the validation policyat a higher level, and pushed the information to a subscriber.
4. The local DBA now attempts to change the validation policy fortheTemporary Tablespace attribute. When he selects thisattribute in theEdit Validation Policies dialog, TME 10 displaysa lock symbol. He is not allowed to change (or view) thevalidation policy for this attribute.

Locking
TME 10 Module For Oracle - User Management User’s Guide A–15
Reference
LockingThis example shows how a corporate DBA can lock a record anddistribute the information to subscribers. It also shows what happenswhen the local DBA responsible for subscribing a profile attempts toedit the locked record.
Actions Performed by a Corporate DBA1. From theProfile Manager window, the corporate DBA
double-clicks on the Oracle User profile icon, or selects theEditProperties... option from the Oracle User profile’s pop-up menu.

Locking
A–16 Version 1.0
2. In the Database User Profile window, the DBA selects therecord she wants to lock and chooses theLock... option from theEdit menu.
TME 10 displays an icon next to the username indicating that therecord will be locked for subscribers.

Locking
TME 10 Module For Oracle - User Management User’s Guide A–17
Reference
3. The DBA is ready to distribute the profile. From theDatabaseUser Profile window, she selects theDistribute... option fromtheProfile menu.
4. In theDistribute Profile dialog, the DBA distributes the profileto the next level of subscribers only, and overwrites anymodifications made in the subscribers’ copies.

Locking
A–18 Version 1.0
Actions Performed by Local DBA1. From the NorthAmericaProfile Manager window, the local
DBA double-clicks on the Oracle User profile icon, or selects theEdit Properties... option from the Oracle User profile’s pop-upmenu.

Locking
TME 10 Module For Oracle - User Management User’s Guide A–19
Reference
2. In the Database User Profile window, the local DBA selects theuser record SCOTT and double-clicks on the record to display theEdit Database User dialog.
Note: The lock symbol against user SCOTT indicates that thisrecord is locked against editing.

Locking
A–20 Version 1.0
3. The DBA changes theDefault Tablespacefrom USER_DATA toUSERS and pressesChange & Close.
TME 10 displays anError dialog indicating that the editoperation failed, as the record is read-only.

TME 10 Module For Oracle - User Management User’s Guide Index–1
Index
AAdd Database Role dialog 7-4, 7-5Add Database User dialog 6-5Add Object Privilege dialog 6-22Add Resource Profile dialog 8-5Add Role dialog 6-7Add System Privilege dialog 6-8Add Tablespace Quota dialog 6-9
CCommands
ocpuser 5-9ocrtresource 8-7ocrtrole 7-8ocrtuser 6-10odelresource 8-14odelrole 7-14odeluser 6-27ogetuser 5-11olsuser 5-11omvuser 5-11opopusers 5-6osetresource 8-9osetresources 8-12osetrole 7-10osetroles 7-13osetuser 6-12, 6-25osetusers 6-19wcrtprf 3-11wcrtprfmgr 3-6wdel 5-20wdistrib 5-18wgetpolm 4-7, 4-12
wgetpr 3-4winstall 1-8wlspolm 4-7, 4-12wputpolm 4-7, 4-12wsetpr 3-4wsub 3-15wunsub 3-20
Copy Profile Records dialog 5-8Create Profile dialog 3-8Create Profile Manager dialog 3-5
DDatabase Resource Profile window 8-4Database Role Profile window 7-3Database User Profile window 4-2Default policy
setting 4-1Delete Database User(s) dialog 6-26Delete Profiles dialog 5-20Delete Resource dialog 8-14Display Attributes dialog A-3Distribute Profile dialog 5-14Distribute Profiles dialog 5-16
EEdit Database Role dialog 7-8Edit Database User dialog 6-12Edit Default Policies 4-2Edit Multiple Database Roles Profile dialog
7-12Edit Multiple Database Users dialog 6-17,
A-9Edit Multiple Resource Profiles dialog 8-11Edit Policy Script dialog 4-6Edit Resource Profile dialog 8-8Edit Validation Policies dialog 4-8, A-5

Index–2 Version 1.0
Examplelocking A-15validation policy A-1
FFile Browser dialog 1-5Find Records dialog 6-13, A-8
HHardware Requirements 1-1
IInstall Product dialog 1-4Installation 1-2
CLI 1-8GUI 1-4hardware requirements 1-1selecting media 1-5
LLocking 5-11
example A-15
MManaged resources
setting 3-1Management by Subscription 2-2Management Policy 2-2Move Records dialog 5-10
OObject Privilege Warning dialog 6-24Object privileges
granting 6-19revoking 6-19viewing granted privileges 6-27
Object Privileges dialog 6-21ocpuser command 5-9ocrtresource command 8-7ocrtrole command 7-8ocrtuser command 6-10odelresource command 8-14odelrole command 7-14odeluser command 6-27ogetuser command 5-11olsusers command 5-11omvuser command 5-11opopusers command 5-6Oracle Software Requirements xiOracle7ResourceProfile managed resource
3-1Oracle7RoleProfile managed resource 3-1Oracle7UserProfile managed resource 3-1osetresource command 8-9osetresources command 8-12osetrole command 7-10osetroles command 7-13osetuser command 6-12, 6-25osetusers command 6-19
PPolicy
constants for Resource profile 4-15constants for Role profile 4-13constants for User profile 4-13locking example A-15setting defaults for attributes 4-1

TME 10 Module For Oracle - User Management User’s Guide Index–3
setting profile policy 2-4setting validation for attributes 4-7using default values in a profile 7-5,
8-5validation example A-1validation policy 5-1
Policy Script Arguments dialog 4-5Populate Oracle7 Profile dialog 5-4Product Install dialog 1-7Profile
adding subscribers 3-11creating 3-6Database Configuration Information
2-3default policy 4-1deleting 5-18locking records example A-16setting managed resources 3-1validation policy 4-7, 5-1
Profile Capabilities 2-3Profile distribution
levels 5-11methods 5-11
Profile manageradding subscribers 3-11creating 3-4removing subscribers 3-16
Profile Manager window 3-7Profile records
copying 5-6distributing 5-11listing details 5-11locking/unlocking 5-11moving 5-9populating 5-1
RResource profiles 8-1Resource records
adding 8-2deleting 8-12editing 8-7editing multiple records 8-9
Results of Policy Validation dialog A-7Role records
adding 7-1deleting 7-13editing 7-8editing multiple records 7-10
SSecure Delegation 2-2Select Attributes To Edit dialog 7-12,
8-11Set Managed Resources dialog 3-3Set Tablespaces dialog 6-30String constants 4-13, 4-15Subscribers dialog 3-12
TTablespace picklist
setting 6-29
UUnsubscribe Subscribers dialog 3-19User records
adding 6-1deleting 6-25editing 6-10editing mulitple records 6-13
Usersgranting object privileges 6-19revoking object privileges 6-19viewing granted privileges 6-27

Index–4 Version 1.0
VValidation Error message dialog 5-5Validation policy
CONNECT, DBA,EXP_FULL_DATABASE,IMP_FULL_DATABASE,RESOURCE roles 5-1
DEFAULT resource profile 5-2disabling 4-8profile populate 5-1setting 4-7SYS and SYSTEM usernames 5-1
Wwcrtprf command 3-11wcrtprfmgr command 3-6wdel command 5-20wdistrib command 5-18wgetpolm command 4-7, 4-12wgetpr command 3-4winstall command 1-8wlspolm command 4-7, 4-12wputpolm
command 4-7, 4-12wsetpr command 3-4wsub command 3-15wunsub command 3-20