
TM-H6000III - Epsoncontent.epson.de/.../RSD/AnwenderhandPDFs/DE/TM-H6000III_multila… ·...
76
English TM-H6000III User’s Manual . . . . . . . . . . . . . . . . . . . . 1 Bedienungsanleitung . . . . . . . . . . . . . . 13 Gebruikershandleiding . . . . . . . . . . . . . 21 Manuel d’utilisation . . . . . . . . . . . . . . . 29 Manual do utilizador . . . . . . . . . . . . . . . 37 Manual del usuario. . . . . . . . . . . . . . . . 45 Manuale dell’utente . . . . . . . . . . . . . . . 53 Руководство по эксплуатации . . . . . . . . 61 410243300
Transcript of TM-H6000III - Epsoncontent.epson.de/.../RSD/AnwenderhandPDFs/DE/TM-H6000III_multila… ·...
English
TM-H6000III
User’s Manual. . . . . . . . . . . . . . . . . . . . 1
Bedienungsanleitung . . . . . . . . . . . . . . 13
Gebruikershandleiding . . . . . . . . . . . . . 21
Manuel d’utilisation . . . . . . . . . . . . . . . 29
Manual do utilizador . . . . . . . . . . . . . . . 37
Manual del usuario. . . . . . . . . . . . . . . . 45
Manuale dell’utente . . . . . . . . . . . . . . . 53
Руководство по эксплуатации . . . . . . . . 61
410243300
ii
English
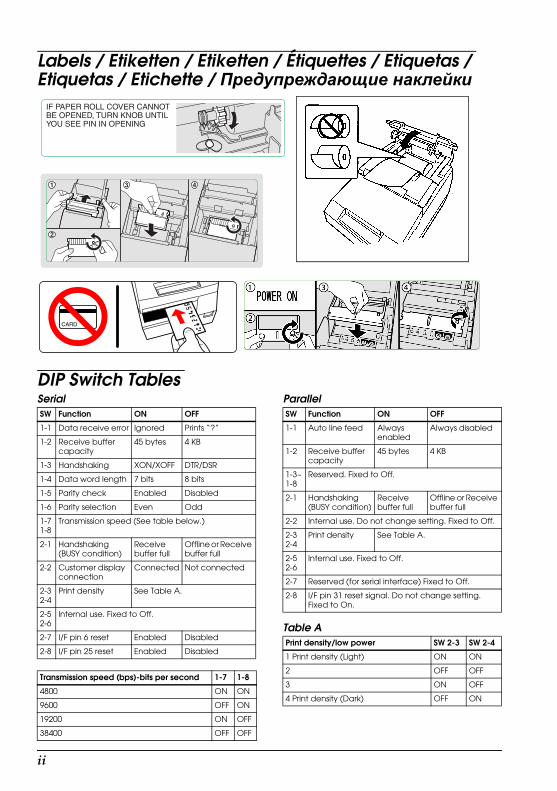
Labels / Etiketten / Etiketten / Étiquettes / Etiquetas / Etiquetas / Etichette / Предупреждающие наклейки
DIP Switch TablesSerialSW Function ON OFF
1-1 Data receive error Ignored Prints “?”
1-2 Receive buffer capacity
45 bytes 4 KB
1-3 Handshaking XON/XOFF DTR/DSR
1-4 Data word length 7 bits 8 bits
1-5 Parity check Enabled Disabled
1-6 Parity selection Even Odd
1-71-8
Transmission speed (See table below.)
2-1 Handshaking (BUSY condition)
Receive buffer full
Offline or Receive buffer full
2-2 Customer display connection
Connected Not connected
2-32-4
Print density See Table A.
2-52-6
Internal use. Fixed to Off.
2-7 I/F pin 6 reset Enabled Disabled
2-8 I/F pin 25 reset Enabled Disabled
Transmission speed (bps)-bits per second 1-7 1-8
4800 ON ON
9600 OFF ON
19200 ON OFF
38400 OFF OFF
ParallelSW Function ON OFF
1-1 Auto line feed Always enabled
Always disabled
1-2 Receive buffer capacity
45 bytes 4 KB
1-3~1-8
Reserved. Fixed to Off.
2-1 Handshaking(BUSY condition)
Receive buffer full
Offline or Receive buffer full
2-2 Internal use. Do not change setting. Fixed to Off.
2-32-4
Print density See Table A.
2-52-6
Internal use. Fixed to Off.
2-7 Reserved (for serial interface) Fixed to Off.
2-8 I/F pin 31 reset signal. Do not change setting. Fixed to On.
Table APrint density/low power SW 2-3 SW 2-4
1 Print density (Light) ON ON
2 OFF OFF
3 ON OFF
4 Print density (Dark) OFF ON
TM-H6000III User’s Manual 1
English
English
TM-H6000IIIUser’s Manual
All rights reserved. No part of this publication may be reproduced, stored in a retrieval system, or transmitted in any form or by any means, electronic, mechanical, photocopying, recording, or otherwise, without the prior written permission of Seiko Epson Corporation. No patent liability is assumed with respect to the use of the information contained herein. While every precaution has been taken in the preparation of this book, Seiko Epson Corporation assumes no responsibility for errors or omissions. Neither is any liability assumed for damages resulting from the use of the information contained herein.Neither Seiko Epson Corporation nor its affiliates shall be liable to the purchaser of this product or third parties for damages, losses, costs, or expenses incurred by purchaser or third parties as a result of: accident, misuse, or abuse of this product or unauthorized modifications, repairs, or alterations to this product, or (excluding the U.S.) failure to strictly comply with Seiko Epson Corporation’s operating and maintenance instructions.Seiko Epson Corporation shall not be liable against any damages or problems arising from the use of any options or any consumable products other than those designated as Original Epson Products or Epson Approved Products by Seiko Epson Corporation.
Epson and ESC/POS are registered trademarks of Seiko Epson Corporation.
NOTICE: The contents of this manual are subject to change without notice.
Copyright © 2005 by Seiko Epson Corporation, Nagano, Japan.

2 TM-H6000III User’s Manual
English
EMC and Safety Standards AppliedProduct Name: TM-H6000III Model Name: M147GThe following standards are applied only to the printers that are so labeled. (EMC is tested using the Epson power supply.) Europe: CE marking
Safety: EN 60950North America: EMI: FCC/ICES-003 Class A
Safety: UL 1950/CSA C22.2 No. 950Japan: EMI: VCCI Class AOceania: EMC: AS/NZS CISPR22 Class B
WARNINGThe connection of a non-shielded printer interface cable to this printer will invalidate the EMC standards of this device.You are cautioned that changes or modifications not expressly approved by Seiko Epson Corporation could void your authority to operate the equipment.
CE MarkingThe printer conforms to the following Directives and Norms:Directive 89/336/EEC EN 55022
Class BEN 55024
IEC 61000-4-2 IEC 61000-4-3 IEC 61000-4-4 IEC 61000-4-5 IEC 61000-4-6 IEC 61000-4-8IEC 61000-4-11
FCC Compliance Statement For American UsersThis equipment has been tested and found to comply with the limits for a Class A digital device, pursuant to Part 15 of the FCC Rules. These limits are designed to provide reasonable protection against harmful interference when the equipment is operated in a commercial environment.This equipment generates, uses, and can radiate radio frequency energy and, if not installed and used in accordance with the instruction manual, may cause harmful interference to radio communications. Operation of this equipment in a residential area is likely to cause harmful interference, in which case the user will be required to correct the interference at his own expense.
FOR CANADIAN USERSThis Class A digital apparatus complies with Canadian ICES-003.
Safety PrecautionsThis section presents important information intended to ensure safe and effective use of this product. Please read this section carefully and store it in an accessible location.
WARNING:Shut down your equipment immediately if it produces smoke, a strange odor, or unusual noise. Continued use may lead to fire. Immediately unplug the equipment and contact your dealer or a Seiko Epson service center for advice.Never attempt to repair this product yourself. Improper repair work can be dangerous.
TM-H6000III User’s Manual 3
English
Never disassemble or modify this product. Tampering with this product may result in injury or fire.Be sure to use the specified power source. Connection to an improper power source may cause fire.Do not allow foreign matter to fall into the equipment. Penetration by foreign objects may lead to fire.If water or other liquid spills into this equipment, unplug the power cord immediately, and then contact your dealer or a Seiko Epson service center for advice. Continued usage may lead to fire.
CAUTION:Do not connect cables in ways other than those mentioned in this manual. Different connections may cause equipment damage and burning.Be sure to set this equipment on a firm, stable, horizontal surface. Product may break or cause injury if it falls.Do not use in locations subject to high humidity or dust levels. Excessive humidity and dust may cause equipment damage or fire.Do not place heavy objects on top of this product. Never stand or lean on this product. Equipment may fall or collapse, causing breakage and possible injury.To ensure safety, unplug this product before leaving it unused for an extended period.Do not touch the thermal head or paper feed motor. Wait for the head and the motor to be cool. The head and the motor can be very hot after printing for a long time. Touching them may cause burns.
Labels
WARNING:Do not connect a telephone line to the drawer kick-out connector or the display module connector; otherwise the printer and the telephone line may be damaged.
CAUTION: Thermal head and paper feed motor for the thermal section are hot.
CAUTION: Caution label for autocutter blade.
UnpackingThe following items are included with the standard specification printer. If any item is damaged, contact your dealer.❏ Printer❏ Thermal roll paper❏ Dedicated ribbon cassette [ERC-32 (P)]❏ Power switch cover❏ User’s manual (This manual)

4 TM-H6000III User’s Manual
English
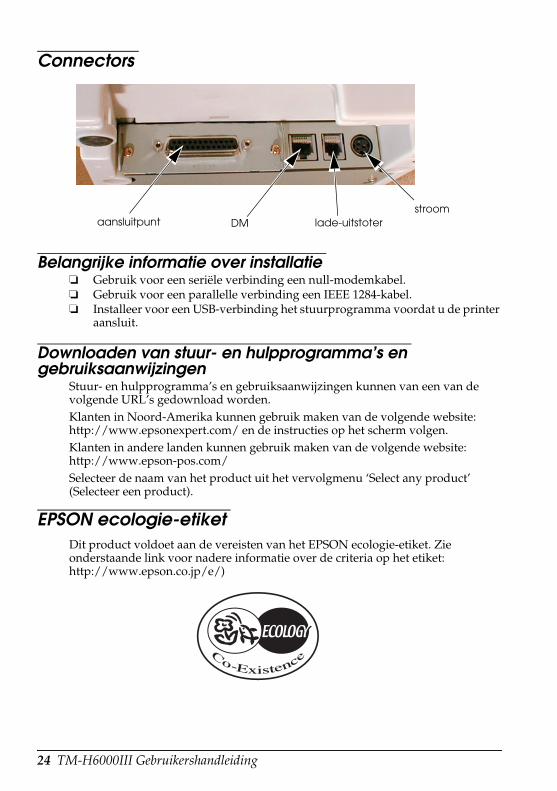
Connectors
Important Installation Notes❏ For a serial interface, use a null modem cable.❏ For a parallel interface, use an IEEE 1284 cable.❏ For a USB interface, install the driver before connecting the printer.
Downloading Drivers, Utilities, and ManualsDrivers, utilities, and manuals can be downloaded from one of the following URLs.For customers in North America, go to the following web site:http://www.epsonexpert.com/ and follow the on-screen instructions.For customers in other countries, go to the following web site: http://www.epson-pos.com/Select the product name from the “Select any product” pulldown menu.
drawer kick-out DM powerinterface
TM-H6000III User’s Manual 5
English
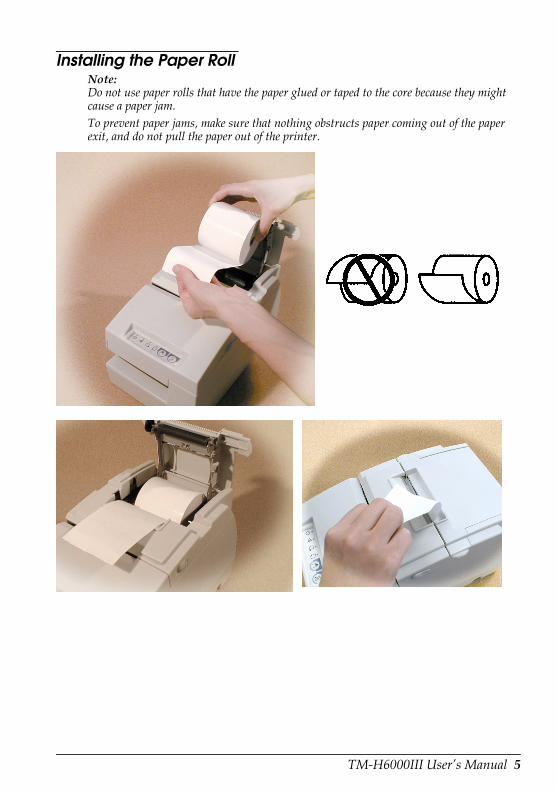
Installing the Paper RollNote:Do not use paper rolls that have the paper glued or taped to the core because they might cause a paper jam.To prevent paper jams, make sure that nothing obstructs paper coming out of the paper exit, and do not pull the paper out of the printer.

6 TM-H6000III User’s Manual
English
Installing the RibbonEpson recommends the use of genuine Epson ribbon cassettes. 1. Turn on the printer. Turn the knob on the ribbon cartridge. Open the front
cover of the printer, and insert the new ribbon. .
2. Turn the knob 2 or 3 times and check the ribbon position.
TM-H6000III User’s Manual 7
English
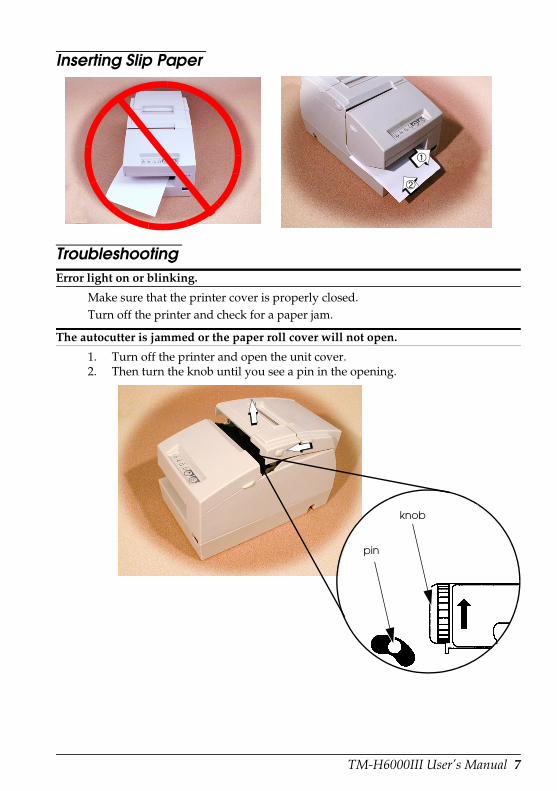
Inserting Slip Paper
TroubleshootingError light on or blinking.
Make sure that the printer cover is properly closed.Turn off the printer and check for a paper jam.
The autocutter is jammed or the paper roll cover will not open.
1. Turn off the printer and open the unit cover.2. Then turn the knob until you see a pin in the opening.
➀
➁
knob
pin
8 TM-H6000III User’s Manual
English
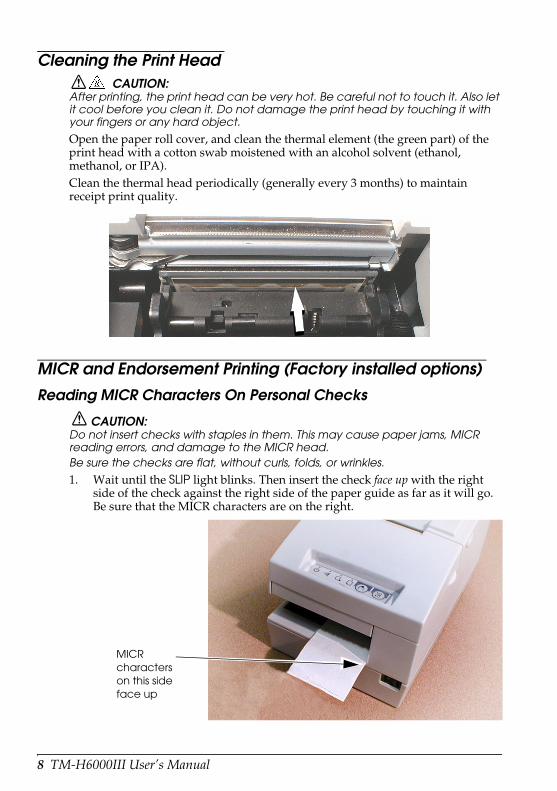
Cleaning the Print HeadCAUTION:
After printing, the print head can be very hot. Be careful not to touch it. Also let it cool before you clean it. Do not damage the print head by touching it with your fingers or any hard object.
Open the paper roll cover, and clean the thermal element (the green part) of the print head with a cotton swab moistened with an alcohol solvent (ethanol, methanol, or IPA).Clean the thermal head periodically (generally every 3 months) to maintain receipt print quality.
MICR and Endorsement Printing (Factory installed options)
Reading MICR Characters On Personal Checks
CAUTION: Do not insert checks with staples in them. This may cause paper jams, MICR reading errors, and damage to the MICR head.Be sure the checks are flat, without curls, folds, or wrinkles.
1. Wait until the SLIP light blinks. Then insert the check face up with the right side of the check against the right side of the paper guide as far as it will go. Be sure that the MICR characters are on the right.
MICR characters on this side face up
TM-H6000III User’s Manual 9
English
2. The printer will detect the check and start drawing it in. When the printer starts drawing it in, let go of the check immediately. When the printer ejects the check and the SLIP light starts blinking again; remove the check by pulling it straight up; do not pull it at an angle.
Cleaning the MICR MechanismApproximately every 12 months clean the MICR head with a moistened cleaning sheet.Use the following or an equivalent commercially available cleaning sheet:
PRESAT brand (KIC) “CHECK READER CLEANING CARD.”Note:Be sure not to use an adhesive cleaning sheet.Follow the steps below:1. Load a paper roll in the printer; turn off the power; then open the paper roll
cover and turn the power back on while holding down the RELEASE button.2. Press the RELEASE button 7 times; then close the paper roll cover. The printer
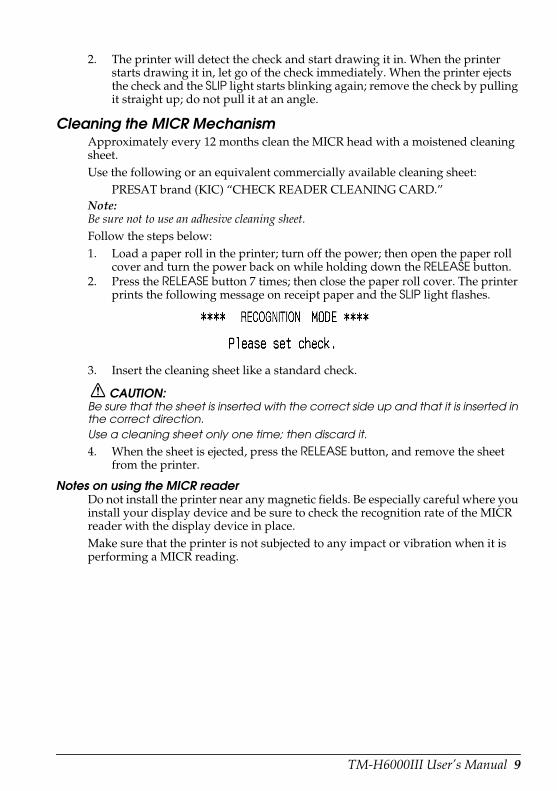
prints the following message on receipt paper and the SLIP light flashes.
3. Insert the cleaning sheet like a standard check.
CAUTION: Be sure that the sheet is inserted with the correct side up and that it is inserted in the correct direction.Use a cleaning sheet only one time; then discard it.
4. When the sheet is ejected, press the RELEASE button, and remove the sheet from the printer.
Notes on using the MICR reader Do not install the printer near any magnetic fields. Be especially careful where you install your display device and be sure to check the recognition rate of the MICR reader with the display device in place.Make sure that the printer is not subjected to any impact or vibration when it is performing a MICR reading.

10 TM-H6000III User’s Manual
English
Endorsement Printing If your printer has the optional endorsement printing mechanism, install the endorsement ribbon following the steps below:Note:Be sure to turn on the power before installing a ribbon cassette.1. Turn the ribbon cassette knob. Then open the unit cover. Inside the printer,
push the levers backward to open the unit.
2. Insert the ribbon into the printer in the position shown and turn the knob again to seat the ribbon. Then close the printer.
Note:Do not open the unit during printing.
TM-H6000III User’s Manual 11
English
Epson Ecology LabelThis product is in compliance with the Epson ecology label requirements. Please see the following link for detailed information on label criteria: http://www.epson.co.jp/e/
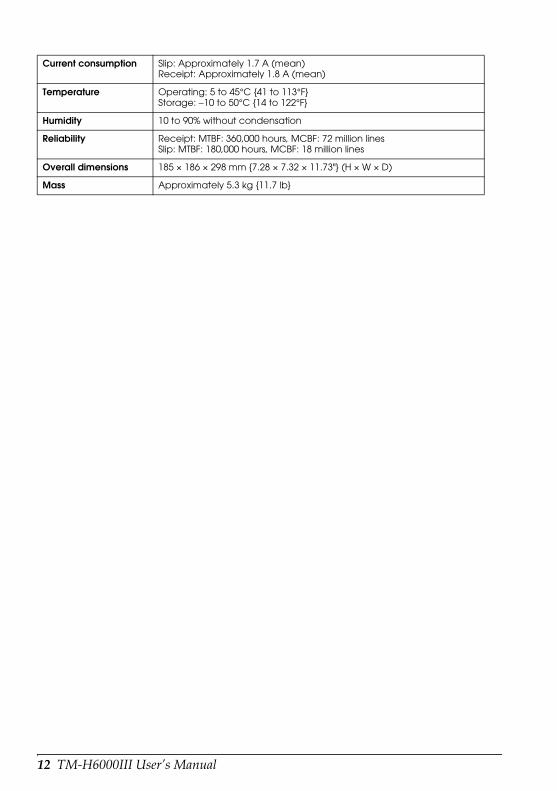
TM-H6000III Specifications.
Print method Receipt: Thermal lineSlip: 9-pin serial impact dot matrixEndorsement: 8-pin shuttle impact dot matrix
Print font Receipt: 9 × 17 / 12 × 24Slip: 5 × 9 / 7 × 9Endorsement: 5 × 7
Columns Receipt: 56/42Slip: 60/45Endorsement: 40
Character size(W × H)
Receipt: 0.99 × 2.40 mm {0.04 × 0.09"}1.41 × 3.39 mm {0.06 × 0.13"}
Slip: 1.56 × 3.1 mm {0.06 × 0.12"}1.24 × 3.1 mm {0.05 × 0.12"}
Endorsement: 1.1 × 2.42 mm {0.04 × 0.10"}
Character sets 95 alphanumeric, 37 international characters128 × 11 (slip: 12) pages extended graphic characters
Print speed Receipt: 63, Slip: 5.14, Endorsement: 1.9 (lines per second)
Paper dimensions Receipt: Thermal roll paper 79.5 ± 0.5 × 83 mm {3.1 ± 0.02 × 3.3"}Slip/endorsement: 70 ~148 × 150 ~ 210 mm {2.8 ~ 5.8 × 5.9 ~ 8.3"} (W × L)
Paper thickness Slip (single-ply): 0.09 ~ 0.2 mm {0.0035 ~ 0.0079"}Endorsement: 0.09 ~ 0.2 mm {0.0035 ~ 0.0079"}
Copy capability Receipt/Endorsement: Single-plySlip: 1 original + 3 copies
Inked ribbon Slip: ERC-32(P)Endorsement: ERC-41(P)
Ribbon life Slip: 6 million charactersEndorsement: 1 million characters
Interface (compatible) RS-232C/Bi-directional parallel/RS-485 (dealer option)
Data buffer Selectable for 45 bytes or 4 KB using DIP switch
D.K.D. function 2 drives
Power supply +24 VDC ± 10%
12 TM-H6000III User’s Manual
English
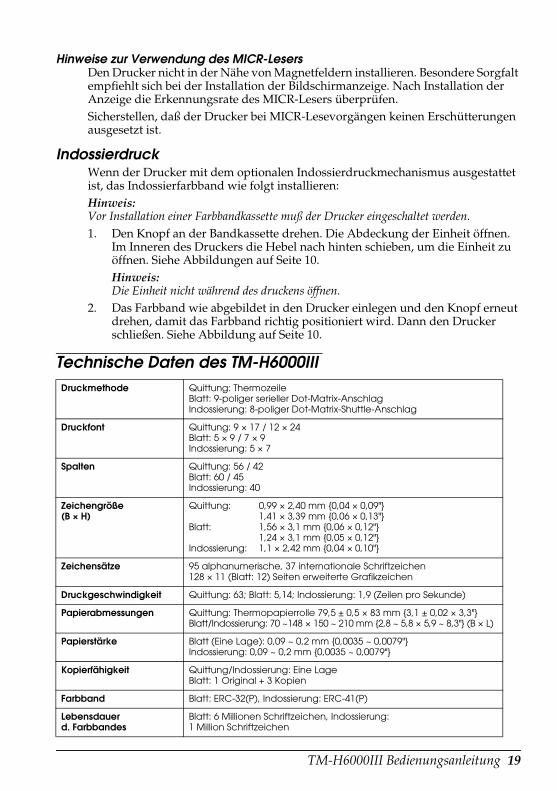
Current consumption Slip: Approximately 1.7 A (mean)Receipt: Approximately 1.8 A (mean)
Temperature Operating: 5 to 45°C {41 to 113°F} Storage: −10 to 50°C {14 to 122°F}
Humidity 10 to 90% without condensation
Reliability Receipt: MTBF: 360,000 hours, MCBF: 72 million linesSlip: MTBF: 180,000 hours, MCBF: 18 million lines
Overall dimensions 185 × 186 × 298 mm {7.28 × 7.32 × 11.73"} (H × W × D)
Mass Approximately 5.3 kg {11.7 lb}

TM-H6000III Bedienungsanleitung 13
English
Deutsch
TM-H6000IIIBedienungsanleitung
DIP-SchaltereinstellungenInformationen zu den DIP-Schaltereinstellungen sind auf der vorderen Innenseite des Umschlags dieser Anleitung zu finden.
AbbildungenDieses Handbuch ist in 8 Abschnitte unterteilt, einen pro Sprache. Die meisten Abbildungen sind im ersten Abschnitt zu finden und werden nicht wiederholt. Jeder Abschnitt enthält jedoch Seitenverweise auf die Abbildungen.
Alle Rechte vorbehalten. Diese Veröffentlichung darf ohne ausdrückliche schriftliche Genehmigung der Seiko Epson Corporation nicht reproduziert, in einem Abrufsystem gespeichert oder in beliebiger Form und auf jedwede Weise übermittelt werden, weder durch Fotokopieren, Aufzeichnen, noch auf elektronische, mechanische oder sonstige Weise. Für die hierin enthaltenen Informationen wird keine Patenthaftung übernommen. Obgleich bei der Zusammenstellung dieser Anleitung mit Sorgfalt vorgegangen wurde, übernimmt die Seiko Epson Corporation keine Verantwortung für Fehler und Auslassungen. Zudem wird keine Haftung übernommen für Schäden, die aus der Verwendung der hierin enthaltenen Informationen entstehen.Weder die Seiko Epson Corporation noch ihre Tochtergesellschaften sind dem Käufer dieses Produkts oder Drittparteien gegenüber für Schäden, Verluste, Kosten oder Ausgaben haftbar, die für den Käufer oder etwaige Drittparteien aufgrund von Unfall, Mißbrauch oder Zweckentfremdung dieses Produkts, nicht autorisierten Modifikationen, Reparaturen oder Produktumbauten sowie (mit Ausnahme USA) aufgrund des Versäumnisses anfallen, die Bedienungs- und Wartungsanleitungen der Seiko Epson Corporation genau einzuhalten.Die Seiko Epson Corporation ist nicht haftbar für Schäden oder Probleme, die bei Verwendung von Optionen oder Verschleißteilen auftreten, die nicht als Original-Epson-Produkte oder von der Seiko Epson Corporation zugelassene Epson Produkte gelten.
EPSON und ESC/POS sind eingetragene Warenzeichen der Seiko Epson Corporation.
HINWEIS: Änderungen am Inhalt dieser Anleitung ohne Vorankündigung vorbehalten.
Copyright © 2005 Seiko Epson Corporation, Nagano, Japan.

14 TM-H6000III Bedienungsanleitung
English
Geltende EMC- und SicherheitsnormenProduktname: TM-H6000IIITypenname: M147GDie folgenden Normen gelten nur für entsprechend gekennzeichnete Drucker. (Die EMC-Prüfung erfolgt anhand der EPSON Stromversorgung.) Europa: CE-Plakette
Sicherheit: EN 60950Nordamerika: EMI: FCC / ICES-003 Klasse A
Sicherheit: UL 1950 / CSA C22.2 No. 950Japan: EMI: VCCI Klasse AOzeanien: EMC: AS/NZS CISPR22 Klasse B
WARNUNGDie EMC-Normen für dieses Gerät werden ungültig, wenn ein nicht isoliertes Drucker-Schnittstellenkabel an den Drucker angeschlossen wird.Bitte beachten Sie, daß durch Änderungen oder Modifikationen, die nicht ausdrücklich von der SEIKO EPSON Corporation genehmigt wurden, die Bedienung des Geräts unter Umständen unzulässig wird.
CE-PlaketteDer Drucker entspricht den folgenden Direktiven and Normen:Direktive 89/336/EEC EN 55022
Klasse BEN 55024
IEC 61000-4-2 IEC 61000-4-3 IEC 61000-4-4 IEC 61000-4-5 IEC 61000-4-6 IEC 61000-4-8IEC 61000-4-11
GERÄUSCHPEGELGemäß der Dritten Verordnung zum Gerätesicherheitsgesetz (Maschinenlärminformations- Verordnung-3. GSGV) ist der arbeitsplatzbezogene Geräusch-Emissionswert kleiner als 70 dB(A) (basierend auf ISO 7779).
SicherheitsvorkehrungenDieser Abschnitt enthält wichtige Informationen, die beachtet werden müssen, damit dieses Produkt sicher und effektiv funktioniert. Bitte lesen Sie diese Informationen sorgfältig durch, und bewahren Sie sie leicht erreichbar auf.
WARNUNG:Schalten Sie das Gerät bei Rauchentwicklung, Abgabe eines eigenartigen Geruchs oder ungewöhnlichen Geräuschs sofort aus. Bei weiterer Verwendung besteht Feuergefahr. Ziehen Sie den Netzstecker des Gerätes sofort aus der Netzsteckdose und benachrichtigen Sie Ihren Händler oder ein SEIKO EPSON Service Center.Versuchen Sie keinesfalls das Gerät selbst zu reparieren. Falsch durchgeführte Reparaturarbeiten können Gefahren mit sich bringen. Das Produkt keineswegs auseinandernehmen oder umbauen. Nach unbefugten Eingriffen in dieses Produkt sind Verletzungs- und Feuergefahr nicht auszuschließen.Verwenden Sie nur das für dieses Produkt spezifizierte Netzteil. Beim Anschluss an das falsche Netzteil besteht Brandgefahr.

TM-H6000III Bedienungsanleitung 15
English
Keine Fremdkörper in das Gerät fallen lassen. Beim Eindringen von Fremdkörpern besteht Feuergefahr. Falls Wasser oder sonstige Flüssigkeiten in das Gerät gelangen, sofort den Netzstecker ziehen und den Händler oder den SEIKO EPSON Kundendienst zu Rate ziehen. Bei weiterer Verwendung besteht Feuergefahr.
VORSICHT:Schließen Sie Kabel nur auf die in diesem Handbuch beschriebene Weise an. Andere Kabelverbindungen können das Gerät beschädigen und einen Brand verursachen.Stellen Sie dieses Gerät unbedingt auf einer festen, stabilen, horizontalen Fläche auf. Das Produkt kann beim Fallen beschädigt werden oder Verletzungen verursachen.Verwenden Sie das Gerät nicht an Orten mit hohem Feuchtigkeits- oder Staubgehalt. Eine übermäßige Feuchtigkeits- oder Staubentwicklung kann das Gerät beschädigen oder einen Brand verursachen.Stellen Sie keine schweren Gegenstände auf dieses Produkt. Stellen Sie sich nie auf das Produkt und lehnen Sie sich nicht dagegen. Das Gerät kann fallen oder beschädigt werden und dabei Gegenstände beschädigen oder Personen verletzen.Aus Sicherheitsgründen ziehen Sie bitte den Netzstecker aus der Netzsteckdose wenn Sie beabsichtigen, das Gerät über einen längeren Zeitraum nicht zu verwenden.Den Thermodruckkopf und den Papiervorschubmotor nicht berühren. Warten, bis sich der Kopf bzw. Motor abgekühlt hat. Wenn das Gerät über längere Zeit hinweg im Einsatz ist, können der Kopf und der Motor sehr heiß sein. Eine Berührung kann zu Verbrennungen führen.
Etiketten
WARNUNG:Kein Telefonkabel an die Schnappsteckerbuchse oder an die Displaymodul-Buchse anschließen, da sonst der Drucker und die Telefonkabel beschädigt werden können.
VORSICHT: Der Thermokopf und der Papiervorschubmotor des Thermoabschnittes sind heiß.
VORSICHT: Warnetikett für automatischen Papierabschneider.
EntpackenDie folgenden Artikel sind standardmäßig im Lieferumfang des Druckers enthalten. Wenn Artikel beschädigt sind, verständigen Sie bitte Ihren Fachhändler.❏ Drucker❏ Thermopapierrolle❏ Dedizierte Bandkassette [ERC-32 (P)]❏ Netzschalterabdeckung❏ Benutzerhandbuch (das vorliegende Handbuch)

16 TM-H6000III Bedienungsanleitung
English
Anschlüsse
Wichtige Hinweise zur Installation❏ Bei Verwendung einer seriellen Schnittstelle verwenden Sie ein
Nullmodemkabel.❏ Bei Verwendung einer parallelen Schnittstelle verwenden Sie ein IEEE 1284-
Kabel.❏ Bei Verwendung einer USB-Schnittstelle installieren Sie den Treiber, bevor
Sie den Drucker anschließen.
Herunterladen von Treibern, Dienstprogrammen und Handbüchern
Treiber, Dienstprogramme und Handbücher können von folgenden Webadressen heruntergeladen werden.Für Kunden in Nordamerika: Besuchen Sie die Website http://www.epsonexpert.com/ und befolgen Sie die auf dem Bildschirm angezeigten Anweisungen.Kunden in anderen Ländern besuchen die Website http://www.epson-pos.com/Wählen Sie den Namen des Produkts im Menü “Select any product” aus.
EPSON Ökologie-PlakettenDieses Produkt entspricht den Anforderungen für die EPSON Ökologie-Plaketten. Unter dem folgenden Link finden Sie detaillierte Informationen über Plakettenkriterien: http://www.epson.co.jp/e/
Schnappsteckerbuchse DM Netz
Schnittstelle

TM-H6000III Bedienungsanleitung 17
English
Einlegen der PapierrolleHinweis:Keine Papierrollen verwenden, bei denen das Papier mit Klebstoff oder Klebeband an der Rolle befestigt ist. Andernfalls kann es zu einem Papierstau kommen.Um Papierstaus zu verhindern, sicherstellen, daß das aus dem Drucker austretende Papier nicht behindert wird. Das Papier nicht aus dem Drucker herausziehen. Siehe Abbildungen auf Seite 5.
Einlegen des FarbbandesEPSON empfiehlt die Verwendung von Original-EPSON-Farbbandkassetten.1. Den Drucker einschalten. Den Knopf an der Bandkassette drehen. Die
vordere Abdeckung des Druckers öffnen und ein neues Band einlegen. Siehe Abbildungen auf Seite 6.
2. Den Knopf zwei- oder dreimal drehen und die Bandposition überprüfen. Siehe Abbildung auf Seite 6.
Einlegen von PapierblätternSiehe Abbildungen auf Seite 7.
FehlerbehebungFehlerlämpchen leuchtet oder blinkt.
Sicherstellen, daß das Druckergehäuse richtig geschlossen ist.Den Drucker ausschalten und prüfen, ob ein Papierstau vorliegt.
Blockierung im automatischen Papierschneider oder Papierrollenabdeckung läßt sich nicht öffnen.
1. Den Drucker ausschalten und die Abdeckung der Einheit öffnen.2. Den Drehknopf drehen, bis ein Stift in der Öffnung zu sehen ist. Siehe
Abbildungen auf Seite 7 (Stift, Drehknopf).
Reinigung des DruckkopfesVORSICHT:
Nach dem Drucken kann der Druckkopf sehr heiß sein. Daher nicht berühren. Vor dem Reinigen abkühlen lassen. Den Druckkopf nicht durch Berühren mit den Fingern oder harten Gegenständen beschädigen.
Papierrollenabdeckung öffnen und das Thermoelement (der grüne Teil) des Druckkopfes mit einem Wattestäbchen reinigen, das in alkoholhaltiges Lösungsmittel (Äthanol, Methanol oder Isopropylalkohol) getaucht wurde. Siehe Abbildungen auf Seite 8.Den Thermokopf regelmäßig reinigen (im allgemeinen alle 3 Monate), damit die Druckqualität erhalten bleibt.

18 TM-H6000III Bedienungsanleitung
English
MICR- und Indossierdruck (werksseitig installierte Optionen)
Lesen von MICR-Zeichen auf Schecks
VORSICHT: Keine Schecks mit Heftklammern einlegen. Andernfalls kann es zu Papierstaus, MICR-Lesefehlern und einer Beschädigung des MICR-Kopfes kommen.Sicherstellen, daß die Schecks flach und nicht gewellt, gefalzt oder verknittert sind.
1. Warten, bis das Lämpchen SLIP blinkt. Dann den Scheck so einlegen, daß die Scheckvorderseite nach oben zeigt und die rechte Seite des Schecks so weit wie möglich an der rechten Seite der Papierführung anliegt. Sicherstellen, daß sich die MICR-Zeichen rechts befinden. Siehe Abbildungen auf Seite 8.
2. Der Drucker erkennt den Scheck und beginnt, ihn einzuziehen. Den Scheck sofort loslassen. Wenn der Drucker den Scheck auswirft und die Lampe SLIP erneut zu blinken beginnt, den Scheck gerade nach oben herausziehen - der Scheck darf nicht abgewinkelt herausgezogen werden!
Reinigen des MICR-MechanismusDen MICR-Kopf alle 12 Monate mit einem angefeuchteten Reinigungsblatt reinigen. Das folgende Produkt oder ein gleichwertiges kommerziell erhältliches Reinigungsblatt verwenden:
PRESAT brand (KIC) “CHECK READER CLEANING CARD”[Scheckleser-Reinigungskarte der Marke PRESAT (KIC)]
Hinweis:Kein Reinigungsblatt mit haftender Oberfläche verwenden.Folgende Schritte durchführen:1. Eine Papierrolle in den Drucker einlegen, den Drucker ausschalten, die
Papierrollenabdeckung öffnen, die Taste RELEASE gedrückt halten und den Drucker wieder einschalten.
2. Die Taste RELEASE siebenmal drücken und dann die Papierrollenabdeckung schließen. Der Drucker druckt die folgende Meldung auf Bonpapier, und die Lampe SLIP blinkt.
3. Das Reinigungsblatt wie einen normalen Scheck einlegen.
VORSICHT: Darauf achten, daß das Blatt mit der richtigen Seite nach oben und in der richtigen Richtung eingelegt wird.Das Reinigungsblatt nur einmal verwenden und dann entsorgen.
4. Wenn das Blatt ausgeworfen wird, die Taste RELEASE drücken und das Blatt aus dem Drucker herausnehmen.
TM-H6000III Bedienungsanleitung 19
English
Hinweise zur Verwendung des MICR-Lesers Den Drucker nicht in der Nähe von Magnetfeldern installieren. Besondere Sorgfalt empfiehlt sich bei der Installation der Bildschirmanzeige. Nach Installation der Anzeige die Erkennungsrate des MICR-Lesers überprüfen.Sicherstellen, daß der Drucker bei MICR-Lesevorgängen keinen Erschütterungen ausgesetzt ist.
IndossierdruckWenn der Drucker mit dem optionalen Indossierdruckmechanismus ausgestattet ist, das Indossierfarbband wie folgt installieren:Hinweis:Vor Installation einer Farbbandkassette muß der Drucker eingeschaltet werden.1. Den Knopf an der Bandkassette drehen. Die Abdeckung der Einheit öffnen.
Im Inneren des Druckers die Hebel nach hinten schieben, um die Einheit zu öffnen. Siehe Abbildungen auf Seite 10.Hinweis:Die Einheit nicht während des druckens öffnen.
2. Das Farbband wie abgebildet in den Drucker einlegen und den Knopf erneut drehen, damit das Farbband richtig positioniert wird. Dann den Drucker schließen. Siehe Abbildung auf Seite 10.
Technische Daten des TM-H6000IIIDruckmethode Quittung: Thermozeile
Blatt: 9-poliger serieller Dot-Matrix-AnschlagIndossierung: 8-poliger Dot-Matrix-Shuttle-Anschlag
Druckfont Quittung: 9 × 17 / 12 × 24Blatt: 5 × 9 / 7 × 9Indossierung: 5 × 7
Spalten Quittung: 56 / 42Blatt: 60 / 45Indossierung: 40
Zeichengröße(B × H)
Quittung: 0,99 × 2,40 mm {0,04 × 0,09"}1,41 × 3,39 mm {0,06 × 0,13"}
Blatt: 1,56 × 3,1 mm {0,06 × 0,12"}1,24 × 3,1 mm {0,05 × 0,12"}
Indossierung: 1,1 × 2,42 mm {0,04 × 0,10"}
Zeichensätze 95 alphanumerische, 37 internationale Schriftzeichen128 × 11 (Blatt: 12) Seiten erweiterte Grafikzeichen
Druckgeschwindigkeit Quittung: 63; Blatt: 5,14; Indossierung: 1,9 (Zeilen pro Sekunde)
Papierabmessungen Quittung: Thermopapierrolle 79,5 ± 0,5 × 83 mm {3,1 ± 0,02 × 3,3"}Blatt/Indossierung: 70 ~148 × 150 ~ 210 mm {2,8 ~ 5,8 × 5,9 ~ 8,3"} (B × L)
Papierstärke Blatt (Eine Lage): 0,09 ~ 0,2 mm {0,0035 ~ 0,0079"}Indossierung: 0,09 ~ 0,2 mm {0,0035 ~ 0,0079"}
Kopierfähigkeit Quittung/Indossierung: Eine LageBlatt: 1 Original + 3 Kopien
Farbband Blatt: ERC-32(P), Indossierung: ERC-41(P)
Lebensdauerd. Farbbandes
Blatt: 6 Millionen Schriftzeichen, Indossierung: 1 Million Schriftzeichen

20 TM-H6000III Bedienungsanleitung
English
Schnittstelle (kompatibel) RS-232C / bidirektional-parallel / RS-485 (Händleroption)
Datenpuffer 45 Byte oder 4 K Byte – mit DIP-Schalter wählbar
D.K.D.-Funktion 2 Laufwerke
Stromversorgung +24 V Gleichstrom ±10 %
Stromverbrauch Blatt: ~ 1,7 A (mittel)Quittung: ~ 1,8 A (mittel)
Temperatur Betrieb: 5 bis 45°C {41 bis 113°F}Lagerung: -10 bis 50°C {14 bis 122°F}
Luftfeuchtigkeit 10 bis 90 % kondensationsfrei
Zuverlässigkeit Quittung: Mittlerer Ausfallabstand: 360.000 Stunden, MCBF: 72 Millionen ZeilenBlatt: Mittlerer Ausfallabstand: 180.000 Stunden, MCBF: 18 Millionen Zeilen
Gesamtabmessungen 185 × 186 × 298 mm {7,28 × 7,32 × 11,73"} (H × B × T)
Gewicht ~ 5.3 kg {11.7 lb}
TM-H6000III Gebruikershandleiding 21
English
Nederland
TM-H6000IIIGebruikershandleiding
DIP-switchesZie binnenkant vooromslag van deze handleiding voor informatie over instelling van de DIP-switches.
IllustratiesDeze handleiding is verdeeld is 8 delen, een voor elke taal. De illustraties bevinden zich in het eerste gedeelte en worden niet herhaald. Echter de pagina referenties in de andere delen verwijzen naar de illustraties in het eerste deel.
Alle rechten voorbehouden. Niets uit deze uitgave mag worden verveelvoudigd, opgeslagen in een geautomatiseerd gegevensbestand of openbaar worden gemaakt in enige vorm of op enige wijze, hetzij elektronisch, mechanisch, door fotokopieën, opnamen of enige andere manier, zonder voorafgaande schriftelijke toestemming van Seiko Epson Corporation. Er wordt geen aansprakelijkheid in verband met octrooien aanvaard bij gebruik van de informatie in deze uitgave. Ondanks alle aan de samenstelling van de tekst bestede zorg kan Seiko Epson Corporation geen aansprakelijkheid aanvaarden voor fouten of omissies. Noch wordt aansprakelijkheid aanvaard voor schade die zou kunnen voortvloeien uit gebruik van de informatie in deze uitgave.Noch Seiko Epson Corporation, noch haar dochterondernemingen zijn aansprakelijk, tegenover de koper van dit product of derden, voor schade, verliezen, of kosten die door de koper of derden worden opgelopen als resultaat van: ongelukken, oneigenlijk gebruik of misbruik of onbevoegde aanpassing, reparatie of wijziging van dit product of (behalve in de VS) niet nauw in acht nemen van de door Seiko Epson Corporation verstrekte aanwijzingen voor gebruik en onderhoud.Seiko Epson Corporation is niet aansprakelijk voor schade of problemen die voortvloeien uit gebruik van andere optionele onderdelen of verbruiksgoederen dan die welke door Seiko Epson Corporation zijn voorzien van de aanduiding “Original Epson Products” of “Epson Approved Products”.
EPSON en ESC/POS zijn gedeponeerde handelsmerken van Seiko Epson Corporation.
BEKENDMAKING: Wijzigingen in de inhoud van deze handleiding onder voorbehoud.
Copyright 2005, Seiko Epson Corporation, Nagano, Japan.

22 TM-H6000III Gebruikershandleiding
English
Elektromagnetische compatibiliteit en veiligheidsnormenNaam product: TM-H6000IIINaam model: M147GDe volgende normen gelden alleen voor printers die van de desbetreffende aanduiding zijn voorzien. (EMC getest met EPSON voeding.) Europa: CE-keur
Veiligheid: EN 60950Noord-Amerika: EMI: FCC/ICES-003 klasse A
Veiligheid: UL 1950/CSA C22.2 No. 950
Japan: EMI: VCCI klasse AOceanië: EMC: AS/NZS CISPR22 klasse B
WAARSCHUWINGAansluiten van een niet-afgeschermde printerkabel op deze printer maakt de EMC-normen voor dit apparaat ongeldig.U wordt erop gewezen dat wijzigingen of aanpassingen die niet uitdrukkelijk door SEIKO EPSON Corporation zijn goedgekeurd, u het recht op gebruik van de apparatuur kunnen ontnemen.
CE-keurmerkDe printer voldoet aan de volgende richtlijnen en normen:Richtlijn 89/336/EEC EN 55022
klasse BEN 55024
IEC 61000-4-2 IEC 61000-4-3 IEC 61000-4-4 IEC 61000-4-5 IEC 61000-4-6 IEC 61000-4-8IEC 61000-4-11
WAARSCHUWINGM147C is een product van klasse A. In een residentiële omgeving kan dit product radiostoring veroorzaken; in dat geval zal de gebruiker soms aanvullende maatregelen moeten treffen.
VeiligheidsmaatregelenDit gedeelte bevat belangrijke informatie voor veilig en effectief gebruik van dit product. Lees dit gedeelte zorgvuldig door en bewaar het op een goed toegankelijke plaats.
WAARSCHUWING:Schakel de apparatuur onmiddellijk uit wanneer hij rook, een vreemde lucht of ongebruikelijk lawaai produceert. Verder gebruik kan tot brand leiden. Trek de stekker van het apparaat onmiddellijk uit het stopcontact en neem contact op met de leverancier of een servicecentrum van SEIKO EPSON.Niet proberen om zelf dit product te repareren. Onjuist uitgevoerde reparaties kunnen gevaarlijk zijn.Dit product nooit demonteren of wijzigen. Knoeien met dit product kan letsel of brand veroorzaken.

TM-H6000III Gebruikershandleiding 23
English
Gebruik de voorgeschreven voedingsbron. Aansluiten op een verkeerde voedingsbron kan brand veroorzaken.Voorkom dat er voorwerpen in de apparatuur vallen. Binnendringen van voorwerpen kan brand veroorzaken.Als er water of andere vloeistof in deze apparatuur wordt gemorst, moet u de stekker onmiddellijk uit het stopcontact trekken en voor nader advies contact opnemen met de leverancier of een SEIKO EPSON servicecentrum. Verder gebruik kan tot brand leiden.
LET OP:Sluit de snoeren niet anders aan dan beschreven in deze handleiding. Verkeerde aansluitingen kunnen apparatuurschade en brand veroorzaken.Plaats deze apparatuur op een stevig, stabiel, horizontaal oppervlak. Het product kan beschadigd raken of ongelukken veroorzaken als het valt.Niet gebruiken op plaatsen met een hoge vochtigheidsgraad of veel stof. Overmatig vocht en stof kunnen apparatuurschade of brand veroorzaken.Geen zware voorwerpen bovenop dit product plaatsen. Nooit op dit product leunen of staan. De apparatuur kan vallen of in elkaar klappen, wat schade en letsel kan veroorzaken.Trek voor alle veiligheid de stekker van dit product uit het stopcontact wanneer het langere tijd niet gebruikt wordt.De thermische kop en de papiertoevoermotor niet aanraken. Wacht totdat de kop en de motor zijn afgekoeld. De kop en de motor kunnen na het afdrukken lange tijd heet blijven. Aanraken kan brandwonden veroorzaken.
Etiketten
WAARSCHUWING:Geen telefoonlijn aansluiten op de connector van de lade-uitstoter; dat kan de telefoonlijn en de printer beschadigen.
LET OP: De thermische kop en de papiertoevoermotor voor het thermisch gedeelte zijn heet.
LET OP: Waarschuwingsetiket voor automatische papiersnijder.
UitpakkenDe printer met standaard specificaties omvat de volgende items. Neem contact op met de leverancier als er onderdelen beschadigd zijn.❏ Printer❏ Thermisch rolpapier❏ Exclusieve lintcassette [ERC-32 (P)]❏ Deksel voor stroomschakelaar❏ Gebruikershandleiding (deze handleiding)
24 TM-H6000III Gebruikershandleiding
English
Connectors
Belangrijke informatie over installatie❏ Gebruik voor een seriële verbinding een null-modemkabel.❏ Gebruik voor een parallelle verbinding een IEEE 1284-kabel.❏ Installeer voor een USB-verbinding het stuurprogramma voordat u de printer
aansluit.
Downloaden van stuur- en hulpprogramma’s en gebruiksaanwijzingen
Stuur- en hulpprogramma’s en gebruiksaanwijzingen kunnen van een van de volgende URL’s gedownload worden.Klanten in Noord-Amerika kunnen gebruik maken van de volgende website: http://www.epsonexpert.com/ en de instructies op het scherm volgen.Klanten in andere landen kunnen gebruik maken van de volgende website: http://www.epson-pos.com/Selecteer de naam van het product uit het vervolgmenu ‘Select any product’ (Selecteer een product).
EPSON ecologie-etiketDit product voldoet aan de vereisten van het EPSON ecologie-etiket. Zie onderstaande link voor nadere informatie over de criteria op het etiket: http://www.epson.co.jp/e/)
lade-uitstoter DM stroom
aansluitpunt
TM-H6000III Gebruikershandleiding 25
English
Installeren van de papierrolNB:Geen papierrollen gebruiken waarop het papier op de binnenrol is vastgelijmd of met plakband is vastgezet, aangezien dat vastlopen van papier kan veroorzaken.Om vastlopen van papier te voorkomen dient u ervoor te zorgen dat het papier uit de papieropening niet geblokkeerd wordt en mag u het papier niet uit de printer trekken. Zie de afbeeldingen op pagina 5.
Installeren van het lintEPSON beveelt gebruik aan van de originele EPSON lintcassettes. 1. Zet de printer aan. Draai aan de knop van de lintcassette. Open het
voorpaneel van de printer en installeer het nieuwe lint. Zie de afbeeldingen op pagina 6.
2. Draai de knop 2 of 3 keer rond en kijk naar de positie van het lint. Zie de afbeelding op pagina 6.
Inbrengen van het bonpapierZie de afbeeldingen op pagina 7.
Probleemoplossing
Error-lampje brandt of knippert.
Kijk of het printerdeksel goed is gesloten.Zet de printer uit en kijk of het papier misschien is vastgelopen.
De automatische papiersnijder is vastgelopen of het deksel voor de papierrol gaat niet open.
1. Zet de printer uit en open het deksel voor de unit.2. Draai vervolgens aan de knop totdat u een pen ziet in de opening. Zie de
afbeelding op pagina 7 (pen, knop).
Reinigen van de printkop
LET OP: Na het afdrukken kan de printkop zeer heet zijn. Pas op dat u hem niet aanraakt. Wacht tevens totdat hij is afgekoeld voordat u hem schoonmaakt. Beschadig de printerkop niet door hem met uw vingers of harde voorwerpen aan te raken.
Open het deksel voor de papierrol en maak het thermisch element (het groene gedeelte) van de printkop schoon met een wattenstaafje dat in een alcoholoplosmiddel is gedrenkt (ethanol, methanol of isopropanol). Zie de afbeelding op pagina 8.Reinig de thermische kop regelmatig (gewoonlijk om de 3 maanden) om een goede afdrukkwaliteit te behouden.

26 TM-H6000III Gebruikershandleiding
English
MICR-afdrukken en endosseren (in de fabriek te installeren opties)
Lezen van MICR-tekens op persoonlijke cheques
LET OP: Geen cheques met nietjes invoeren. Dat leidt tot vastlopen van papier, fouten bij het lezen van de MICR-tekens en beschadiging van de MICR-kop.Zorg ervoor dat de cheques plat zijn, zonder krullen, vouwen of rimpels.
1. Wacht totdat het lampje SLIP knippert. Plaats de cheque vervolgens met de voorkant omhoog en de rechterkant van de cheque zo ver mogelijk tegen de rechterkant van de papiergeleider. De MICR-tekens moeten aan de rechterkant liggen. Zie de afbeelding op pagina 8 (MICR-tekens aan deze kant met voorkant omhoog).
2. De printer neemt de cheque waar en trekt hem naar binnen. Zodra de printer de cheque naar binnen trekt, laat u de cheque los. Wanneer de printer de cheque uitstoot en het lampje SLIP weer begint te knipperen, verwijdert u de cheque door hem recht omhoog te trekken; niet schuin trekken.
Reinigen van het MICR-mechaniekMaak de MICR-kop ongeveer om de 12 maanden schoon met een bevochtigd reinigingsvel. Gebruik het volgende of een vergelijkbaar commercieel verkrijgbaar reinigingsvel:
PRESAT brand (KIC) “CHECK READER CLEANING CARD.”NB:Geen zelfklevende reinigingsvellen gebruiken.Doe het volgende:1. Plaats een papierrol in de printer; zet de stroom uit; open het deksel van de
papierrol en zet de stroom weer aan terwijl u de RELEASE-knop ingedrukt houdt.
2. Druk 7 keer op de RELEASE-knop; sluit vervolgens het deksel van de papierrol. De printer drukt het volgende bericht af op het bonpapier en het lampje SLIP knippert.
3. Breng het reinigingsvel in zoals een gewone cheque.
LET OP: Let op dat u het vel plaatst met de juiste kant omhoog en dat u het in de juiste richting plaatst.Gebruik het reinigingsvel slechts een keer en gooi het vervolgens weg.
4. Nadat het vel is uitgestoten, drukt u op de RELEASE-knop en verwijdert u het vel uit de printer.
(****HERKENNINGSMODUS**** Cheque nu plaatsen.)
TM-H6000III Gebruikershandleiding 27
English
Opmerkingen bij gebruik van de MICR-lezerInstalleer de printer niet in de nabijheid van magnetische velden. Wees uitermate voorzichtig als u de displayapparatuur installeert en controleer de herkenningssnelheid van de MICR-lezer terwijl de displayapparatuur is geïnstalleerd.Zorg ervoor dat de printer niet beweegt of trilt wanneer hij de MICR-lezing uitvoert.
EndosserenAls uw printer is voorzien van het optionele endosseermechaniek, dient u het endosseerlint op de volgende wijze te installeren:NB:Zet de stroom uit voordat u een lintcassette installeert.1. Draai aan de knop van de lintcassette. Open vervolgens het deksel van de
unit. Duw de hendels in de printer naar achteren om de unit te openen. Zie de afbeeldingen op pagina 10.NB:De unit niet openen tijdens het afdrukken.
2. Plaats het lint in de printer zoals afgebeeld en draai nogmaals aan de knop om het lint op zijn plaats te zetten. Sluit vervolgens de printer. Zie de afbeelding op pagina 10.
Specificaties voor de TM-H6000III
Afdrukmethode Ontvangst/Kassabon: Thermische regelBon: 9-pens seriële dot matrixEndosseren: 8-pens shuttle dot matrix
Afgedrukt lettertype Ontvangst/Kassabon: 9 × 17 / 12 × 24Bon: 5 × 9 / 7 × 9Endosseren: 5 × 7
Kolommen Ontvangst/Kassabon: 56 / 42Bon: 60 /45Endosseren: 40
Tekengrootte(B × H)
Ontvangst/Kassabon: 0,99 × 2,40 mm1,41 × 3,39 mm
Bon: 1,56 × 3,1 mm1,24 × 3,1 mm
Endosseren: 1,1 mm × 2,42 mm
Tekenverzamelingen 95 alfanumeriek, 37 internationale lettertekens128 × 11 (bon: 12) pagina’s uitgebreide grafische tekens
Afdruksnelheid Ontvangst/Kassabon: 63 (bon: 5,14) Endosseren: 1,9 (regels per seconde)
Papierafmetingen Ontvangst/Kassabon: Rol thermisch papier 79,5 ± 0,5 × 83 mmBon/endosseren: 70 ~148 × 150 ~ 210 mm
Papierdikte Bon (enkele laag): 0,09 ~ 0,2 mmEndosseren: 0,09 ~ 0,2 mm
Kopiëren Kassabon/endosseren: Enkele laagBon: 1 origineel + 3 kopieën

28 TM-H6000III Gebruikershandleiding
English
Inktlint Bon: ERC-32(P) Endosseren: ERC-41(P)
Levensduur lint Bon: 6 miljoen tekens Endosseren: 1 miljoen tekens
Interface (compatibel) RS-232C / bi-directioneel parallel / RS-485 (dealeroptie)
Gegevensbuffer 45 bytes of 4 K bytes selecteerbaar met DIP-switch
D.K.D.-functie 2 drives
Voeding +24 V DC ± 10 %
Stroomverbruik Bon: ongeveer 1,7 A (gem.)Ontvangst/Kassabon: ongeveer 1,8 A (gem.)
Temperatuur Bedrijf: 5 tot 45 °C Opslag: –10 tot 50 °C
Vochtigheid 10–90 % zonder condensatie
Betrouwbaarheid Ontvangst/Kassabon: MTBF: 360,000 uur, MCBF: 72 miljoen regelsBon: MTBF: 180.000 uur, MCBF: 18 miljoen regels
Afmetingen 185 × 186 × 298 mm (H×B×D)
Gewicht Ong. 5,3 kg
TM-H6000III Manuel d’utilisation 29
English
Français
TM-H6000IIIManuel d’utilisation
Micro-interrupteurs (DIP)Pour tous renseignements sur le réglage des micro-interrupteurs (DIP), voir l’intérieur de la couverture de ce manuel.
IllustrationsLe présent manuel comprend 8 parties, une pour chaque langue. La plupart des illustrations se trouvent dans la première partie exclusivement. Le numéro de page des illustrations est toutefois indiqué dans chaque partie.
Tous droits réservés. Toute reproduction, mémorisation dans un système informatique, transmission, intégrale ou partielle, par quelque procédé que ce soit (électronique, mécanique, photocopie, enregistrement ou autre), faite sans le consentement écrit de Seiko Epson Corporation est illicite. L’utilisation des renseignements contenus dans le présent manuel ne saurait engager la responsabilité de la société quant aux droits de brevet. Bien que le plus grand soin ait été accordé à la rédaction du présent ouvrage, Seiko Epson Corporation dénie toute responsabilité en cas d’erreurs ou d’omissions. La société ne saurait être responsable des préjudices découlant de l’utilisation des renseignements ci-dedans. Ni Seiko Epson Corporation, ni aucun des membres de la société, ne saurait être responsable des préjudices, pertes, coûts ou frais encourus par l’acheteur ou par un tiers en cas d’accident, d’emploi erroné ou abusif du présent produit, de modifications, de réparations ou d’altérations non autorisées du présent produit, ou (sauf aux États-Unis) en cas de non-respect des prescriptions d’emploi et d’entretien dictées par Seiko Epson Corporation.Seiko Epson Corporation ne saurait être responsable des préjudices ou problèmes découlant de l’utilisation des consommables ou options autres que les produits Epson d’origine ou les produits agréés Epson, tels que définis par Seiko Epson Corporation.
EPSON et ESC/POS sont des marques déposées de Seiko Epson Corporation.
REMARQUE : Le contenu du présent manuel est sujet à modification sans préavis.
Copyright © 2005 Seiko Epson Corporation, Nagano, Japon.
30 TM-H6000III Manuel d’utilisation
English
Normes EMC et de sécurité Nom du produit : TM-H6000IIIType : M147GLes normes ci-dessous ne concernent que les imprimantes portant le label pertinent. (Compatibilité électromagnétique testée avec l’alimentation EPSON.) Europe : Label CE
Sécurité : EN 60950Amérique du EMI : FCC/ICES-003 Classe ANord : Sécurité : UL 1950/CSA C22.2 N°. 950Japon : EMI : VCCI Classe AOcéanie : EMC : AS/NZS CISPR22 Classe B
MISE EN GARDELe raccordement d’un câble de liaison d’imprimante non blindé à cette imprimante annule la conformité de l’appareil aux normes EMC.Toutes modifications non explicitement approuvées par SEIKO EPSON Corporation sont susceptibles de rendre illicite l’utilisation de l’appareil.
Label CEL’imprimante est conforme aux directives et normes suivantes :Directive 89/336/EEC EN 55022
Classe BEN 55024
IEC 61000-4-2 IEC 61000-4-3 IEC 61000-4-4 IEC 61000-4-5 IEC 61000-4-6 IEC 61000-4-8IEC 61000-4-11
POUR LES UTILISATEURS CANADIENSCet appareil numérique de la classe A est conforme à la norme NMB-003 du Canada.
Consignes de sécuritéLa présente rubrique renferme des renseignements importants destinés à garantir la sécurité et l’efficacité d’emploi de l’appareil concerné. Veuillez la lire attentivement et la garder sous la main.
MISE EN GARDE :Mettre immédiatement l’équipement hors tension s’il dégage de la fumée ou une odeur étrange ou s’il émet des bruits inhabituels. En persistant à l’utiliser dans ces circonstances, on risquerait de provoquer un incendie. Débrancher immédiatement l’équipement et contacter le distributeur ou un centre de service SEIKO EPSON pour demander conseil.Ne jamais essayer de réparer ce produit soi-même. Toute réparation erronée peut être dangereuse.Ne jamais démonter ou modifier ce produit. Les interventions intempestives peuvent provoquer des blessures ou des incendies.Vérifier que la source d’alimentation électrique est conforme aux spécifications. Toute connexion à une source d’alimentation non conforme peut provoquer un incendie.Ne pas laisser tomber de corps étrangers dans l’équipement. La pénétration de corps étrangers peut provoquer un incendie.
TM-H6000III Manuel d’utilisation 31
English
En cas de pénétration d’eau ou d’un autre liquide renversé dans l’équipement, débrancher immédiatement le cordon d’alimentation et contacter le distributeur ou un centre de service SEIKO EPSON pour demander conseil. En persistant à utiliser l’équipement dans ces circonstances, on risquerait de provoquer un incendie.
ATTENTION :Se conformer strictement aux instructions relatives à la connexion de câbles du présent manuel. Tout écart peut provoquer l’endommagement de l’équipement ou un incendie.Veiller à poser cette unité sur une surface horizontale ferme et stable. Toute chute du produit peut casser celui-ci ou occasionner des blessures.Ne pas utiliser le produit dans des endroits très poussiéreux ou exposés à une forte humidité. Toute humidité ou poussière excessive peut provoquer l’endommagement de l’équipement ou un incendie.Ne pas poser d’objets lourds sur ce produit. Ne jamais s’y appuyer ou monter dessus. L’équipement pourrait tomber ou s’affaisser, et se casser ou causer des blessures.Pour plus de sécurité, débrancher ce produit lorsqu’il ne doit pas servir pendant une période de temps prolongée.Ne pas toucher la tête thermique ni le moteur d’avance papier. Attendre qu’ils refroidissent. La tête thermique et le moteur peuvent être extrêmement chauds après une longue tâche d’impression. Ne pas les toucher sous peine de se brûler.
Étiquettes
MISE EN GARDE :Ne pas relier de fil téléphonique au connecteur du dispositif d’ouverture du tiroir-caisse ou au connecteur du module d’affichage sous peine d’endommager l’imprimante et le fil.
ATTENTION : La tête thermique et le moteur d’avance papier sont chauds.
ATTENTION : Étiquette de mise en garde concernant la lame du coupe-papier automatique.
DéballageL’ensemble standard de l’imprimante comprend les éléments suivants. Si quelque élément que ce soit est endommagé, contactez le revendeur.❏ Imprimante❏ Rouleau de papier thermique❏ Ruban-cassette spécial [ERC-32 (P)]❏ Cache d’interrupteur❏ Manuel de l’utilisateur (le présent manuel)

32 TM-H6000III Manuel d’utilisation
English
Connecteurs
Remarques importantes concernant l’installation❏ Dans le cas d’une interface série, utilisez un câble nul modem.❏ Dans le cas d’une interface parallèle, utilisez un câble IEEE 1284.❏ Dans le cas d’une interface USB, installez le pilote avant de connecter
l’imprimante.
Téléchargement des pilotes, utilitaires et manuelsIl est possible de télécharger les pilotes, utilitaires et manuels à partir de l’une des URL suivantes.En Amérique du Nord, accédez au site web suivant : http://www.epsonexpert.com/ et suivez les instructions qui s’affichent à l’écran.Dans les autres pays, accédez au site web suivant : http://www.epson-pos.com/Sélectionnez le nom du produit dans le menu déroulant « Select any product » (Sélectionnez un produit quelconque).
Appellation écologique EPSONCe produit est conforme aux critères de l’appellation écologique EPSON. Pour plus d’informations sur ces critères, cliquez sur le lien ci-après : http://www.epson.co.jp/e/
ouverture du tiroir-caisse
module d’affichage alimentation
interface

TM-H6000III Manuel d’utilisation 33
English
Installation de la bobine papierRemarque:L’emploi de bobines dont le papier est fixé au mandrin par de la colle ou un ruban adhésif est à bannir. Ces bobines présentent des risques de bourrage de papier.Pour éviter les bourrages, vérifiez que la sortie papier n’est pas obstruée. Ne tirez pas sur le papier à la sortie de l’imprimante. Voir schémas, page 5.
Installation du rubanEPSON recommande l’emploi de cassettes de ruban EPSON. 1. Mettez l’imprimante sous tension. Tournez le bouton de la cassette de ruban.
Ouvrez le capot avant de l’imprimante et installez le ruban. Voir schémas, page 6.
2. Tournez le bouton de 2 ou 3 tours et vérifiez que le ruban est bien installé. Voir schéma, page 6.
Introduction d’un feuilletVoir schémas, page 7.
DépannageTémoin d’erreur allumé ou clignotant.
Vérifiez que le capot de l’imprimante est bien fermé.Éteignez l’imprimante et regardez si le papier est coincé.
Le coupe papier est coincé ou le capot du logement de la bobine papier refuse de s’ouvrir.
1. Éteignez l’imprimante et ouvrez le capot de l’unité.2. Tournez le bouton jusqu’à ce qu’un tenon apparaisse dans l’ouverture. Voir
schémas, page 7.
Nettoyage de la tête d’impressionATTENTION :
La tête d’impression chauffe pendant l’impression. Ne pas y toucher. La laisser refroidir avant de la nettoyer. Ne pas mettre les doigts dessus ni la toucher avec un objet dur sous peine de l’endommager.
Ouvrez le capot du logement de la bobine papier et nettoyez l’élément thermique (vert) de la tête d’impression au moyen d’un coton tige humecté d’un solvant à l’alcool (éthanol, méthanol ou alcool isopropylique). Voir schéma, page 8.Nettoyez la tête d’impression périodiquement (en général tous les 3 mois) pour garantir la qualité d’impression des reçus.
34 TM-H6000III Manuel d’utilisation
English
Lecture de caractères magnétiques et impression d’endos (Options installées à l’usine)
Lecture des caractères magnétiques des chèques personnels
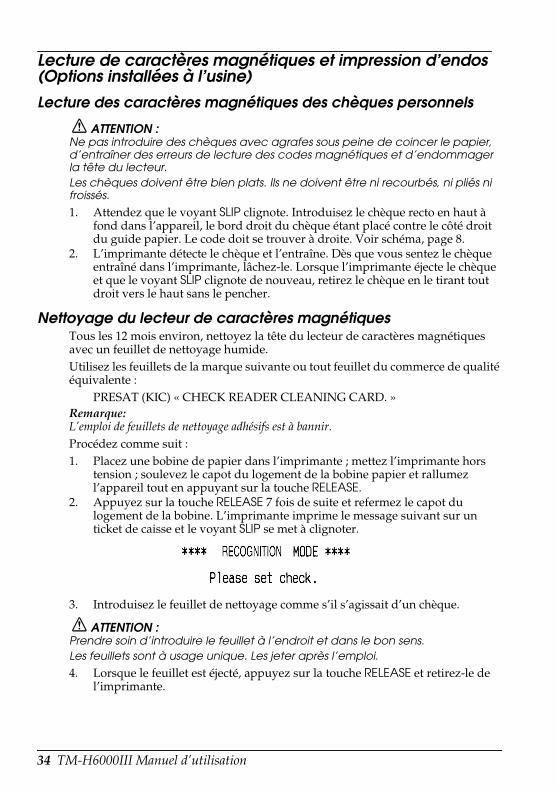
ATTENTION : Ne pas introduire des chèques avec agrafes sous peine de coincer le papier, d’entraîner des erreurs de lecture des codes magnétiques et d’endommager la tête du lecteur.Les chèques doivent être bien plats. Ils ne doivent être ni recourbés, ni pliés ni froissés.
1. Attendez que le voyant SLIP clignote. Introduisez le chèque recto en haut à fond dans l’appareil, le bord droit du chèque étant placé contre le côté droit du guide papier. Le code doit se trouver à droite. Voir schéma, page 8.
2. L’imprimante détecte le chèque et l’entraîne. Dès que vous sentez le chèque entraîné dans l’imprimante, lâchez-le. Lorsque l’imprimante éjecte le chèque et que le voyant SLIP clignote de nouveau, retirez le chèque en le tirant tout droit vers le haut sans le pencher.
Nettoyage du lecteur de caractères magnétiquesTous les 12 mois environ, nettoyez la tête du lecteur de caractères magnétiques avec un feuillet de nettoyage humide. Utilisez les feuillets de la marque suivante ou tout feuillet du commerce de qualité équivalente :
PRESAT (KIC) « CHECK READER CLEANING CARD. »Remarque:L’emploi de feuillets de nettoyage adhésifs est à bannir.Procédez comme suit :1. Placez une bobine de papier dans l’imprimante ; mettez l’imprimante hors
tension ; soulevez le capot du logement de la bobine papier et rallumez l’appareil tout en appuyant sur la touche RELEASE.
2. Appuyez sur la touche RELEASE 7 fois de suite et refermez le capot du logement de la bobine. L’imprimante imprime le message suivant sur un ticket de caisse et le voyant SLIP se met à clignoter.
3. Introduisez le feuillet de nettoyage comme s’il s’agissait d’un chèque.
ATTENTION : Prendre soin d’introduire le feuillet à l’endroit et dans le bon sens.Les feuillets sont à usage unique. Les jeter après l’emploi.
4. Lorsque le feuillet est éjecté, appuyez sur la touche RELEASE et retirez-le de l’imprimante.

TM-H6000III Manuel d’utilisation 35
English
Remarques sur l’emploi du lecteur de caractères magnétiques L’imprimante ne doit pas être installée à proximité d’un champ magnétique. Choisissez avec soin l’emplacement de l’unité d’affichage. Une fois l’afficheur installé, vérifiez le taux de reconnaissance du lecteur de caractères magnétiques.Évitez les chocs et les vibrations à l’imprimante pendant la lecture des codes de caractères magnétiques.
Impression d’endos Si l’imprimante est dotée de l’option d’impression d’endos, installez le ruban comme suit :Remarque:Toujours allumer l’imprimante avant d’installer une cassette de ruban.1. Tournez le bouton de la cassette de ruban. Ouvrez le capot de l’unité. À
l’intérieur, poussez les leviers en arrière pour ouvrir l’unité. Voir schémas, page 10.Remarque:Ne pas ouvrir l’unité pendant l’impression.
2. Placez le ruban dans l’imprimante selon le schéma et tournez le bouton pour l’enclencher. Refermez l’imprimante. Voir schéma, page 10.
Fiche technique des modèles TM-H6000IIIMéthode d’impression Ticket de caisse : thermique ligne
Feuillet : matrice de pointes à impact 9 broches sérieEndos : matrice de pointes à impact 8 broches à navette
Police d’impression Ticket de caisse : 9 × 17 / 12 × 24Feuillet : 5 × 9 / 7 × 9Endos : 5 × 7
Colonnes Ticket de caisse : 56 / 42Feuillet : 60 / 45Endos : 40
Taille des caractères (L × H)
Ticket de caisse : 0,99 × 2,40 mm {0,04 × 0,09"}1,41 × 3,39 mm {0,06 × 0,13"}
Feuillet : 1,56 × 3,1 mm {0,06 × 0,12"}1,24 × 3,1 mm {0,05 × 0,12"}
Endos : 1,1 × 2,42 mm {0,04 × 0,10"}
Jeux de caractères 95 caractères alphanumériques, 37 caractères internationaux128 × 11 (feuillet : 12) pages de caractères graphiques étendus
Cadence d’impression Ticket de caisse : 63, feuillet : 5,14, endos : 1,9 (lignes par seconde
Format du papier Ticket de caisse : papier thermique en bobine 79,5 ± 0,5 × 83 mm {3,1 ± 0,02 × 3,3"}Feuillet/endos : 70 ~148 × 150 ~ 210 mm {2,8 ~ 5,8 × 5,9 ~ 8,3"}
Épaisseur du papier Feuillet (simple épaisseur) : 0,09 ~ 0,2 mm {0,0035 ~ 0,0079"}Endos : 0,09 ~ 0,2 mm {0,0035 ~ 0,0079"}
Nombre de copies Ticket de caisse/endos : simple épaisseurFeuillet : 1 original + 3 copies
Ruban encreur Feuillet : ERC-32(P)Endos : ERC-41(P)

36 TM-H6000III Manuel d’utilisation
English
Durée de vie du ruban Feuillet : 6 millions de caractèresEndos : 1 million de caractères
Interface (compatible) RS-232C / parallèle bidirectionnelle / RS-485 (option revendeur)
Tampon de données Sélectionnable pour 45 octets ou 4 Ko à l’aide d’un sélecteur DIP
Fonction D.K.D 2 unités
Alimentation +24 V cont. ± 10 %
Consommation Feuillet : 1,7 A (en moyenne) environTicket de caisse : 1,8 A (en moyenne) environ
Température En service : 5 à 45°C {41 à 113°F}Au repos : -10 à 50°C {14 à 122°F}
Humidité 10 à 90 % sans condensation
Fiabilité Ticket de caisse : MTBF : 360.000 heures, MCBF : 72 millions de lignesFeuillet : MTBF : 180.000 heures, MCBF : 18 millions de lignes
Dimensions hors tout 185 × 186 × 298 mm {7,28 × 7,32 × 11,73"} (hauteur × largeur × profondeur)
Poids 5,3 kg {11,7 lb} environ
TM-H6000III Manual do utilizador 37
English
Português
TM-H6000IIIManual do utilizador
Interruptor DIPVeja a contracapa frontal deste manual para informações sobre as definições do interruptor DIP.
IlustraçõesEste manual é dividido em 8 seções, uma seção para cada idioma. A maioria das ilustrações está na primeira seção e não são repetidas. No entanto, cada seção menciona as páginas que se encontram as ilustrações.
Todos os direitos reservados. Nenhuma parte desta publicação pode ser reproduzida, armazenada em sistemas de recuperação de informações, nem transmitida sob nenhuma forma ou por nenhum meio, seja eletrônico, mecânico, por fotocópia, gravação ou de outro tipo, sem a autorização prévia expressa da Seiko Epson Corporation. Nenhuma responsabilidade sobre patente é assumida com relação ao uso das informações contidas neste. Todas as precauções foram tomadas na preparação deste livro, porém, a Seiko Epson Corporation não assume responsabilidade quanto a erros ou omissões. Nenhuma responsabilidade é assumida por danos resultantes do uso das informações contidas neste.A Seiko Epson Corporation e suas filiais não assumem responsabilidade perante o comprador deste produto nem perante terceiros, por danos, perdas, custos ou gastos incorridos pelo comprador ou por terceiros como conseqüência de acidentes, abuso ou uso indevido, modificações não autorizadas, reparos, alterações deste produto, ou (excluindo os Estados Unidos) falta de cumprimento estrito das instruções de funcionamento e manutenção da Seiko Epson Corporation.A Seiko Epson Corporation não assume responsabilidade por nenhum dano ou problema que resulte do uso de qualquer acessório opcional ou de consumo que não seja um produto designado como Produto Original Epson ou Produto Epson Aprovado pela Seiko Epson Corporation.
EPSON e ESC/POS são marcas registradas da Seiko Epson Corporation.
AVISO: o conteúdo deste manual está sujeito a modificações sem prévio aviso.
Direitos reservados © 2005 pela Seiko Epson Corporation, Nagano, Japão.

38 TM-H6000III Manual do utilizador
English
EMC e padrões de segurança aplicados Nome do produto: TM-H6000IIINome do tipo: M147GOs seguintes padrões aplicam-se somente a impressoras cujos rótulos incluam os mesmos. (A EMC [compatibilidade eletromagnética] é testada usando-se a fonte de alimentação EPSON). Europa: Marca EC
Segurança: EN 60950América do EMI: FCC/ICES-003 Classe ANorte: Segurança: UL 1950/CSA C22.2 Nº. 950Japão: EMI: VCCI Classe AOceania: EMC: AS/NZS CISPR22 Classe B
ADVERTÊNCIAA conexão de um cabo de interface de impressora sem proteção a esta impressora invalidará os padrões EMC deste dispositivo.O usuário é prevenido que alterações ou modificações não aprovadas expressamente pela SEIKO EPSON Corporation podem anular sua permissão para operar este equipamento.
Marca CEA impressora cumpre as seguintes Diretivas e Normas:Diretiva 89/336/EEC EN 55022
Classe BEN 55024
IEC 61000-4-2 IEC 61000-4-3 IEC 61000-4-4IEC 61000-4-5IEC 61000-4-6IEC 61000-4-8IEC 61000-4-11
Declaração de conformidade com a FCC para os usuários americanosEste equipamento foi testado e constatado como estando em conformidade com os limites para um dispositivo digital Classe A, de acordo com a Parte 15 das Normas da FCC. Esses limites são projetados para fornecer uma proteção condizente contra interferências prejudiciais se o equipamento for operado em um ambiente comercial.Este equipamento gera, usa e pode irradiar energia de radiofreqüência e, se não for instalado e usado de acordo com o manual de instruções, poderá causar interferência prejudicial à radiodifusão. Há a probabilidade de que a operação deste equipamento em áreas residenciais cause interferências prejudiciais, caso em que exigir-se-á do usuário a correção da interferência às custas do mesmo.
Precauções de segurançaEsta seção apresenta informações importantes que destinam-se a assegurar uma utilização segura e eficiente deste produto. Leia essa seção cuidadosamente e guarde-a em um local acessível.
ADVERTÊNCIA:Se o equipamento emitir fumo, um odor estranho ou um ruído invulgar, desligue-o imediatamente. Se o continuar a utilizar, poderá provocar um incêndio ou um choque eléctrico. Desligue imediatamente o equipamento da tomada e contacte o Serviço de Assistência a Clientes EPSON.Nunca tente reparar este produto; as reparações indevidas podem tornar-se perigosas.
TM-H6000III Manual do utilizador 39
English
Nunca desmonte ou modifique este produto; caso contrário pode ferir-se, provocar um incêndio ou um choque eléctrico.Utilize a fonte de energia especificada; caso contrário, poderá provocar um incêndio ou um choque eléctrico.Nunca insira ou retire a ficha com as mão húmidas; se o fizer, corre o risco de apanhar um choque eléctrico. Não permita a entrada de objectos estranhos no interior do equipamento; caso contrário, poderá provocar um incêndio ou um choque eléctrico.Se derramar água ou outro líquido no equipamento, desligue o cabo de corrente imediatamente e contacte o Serviço de Assistência a Clientes EPSON. Se continuar a utilizar o equipamento, poderá provocar um incêndio ou um choque eléctrico.
CUIDADO:Ao ligar os cabos, siga estritamente as instruções do manual. Diferentes ligações podem danificar ou queimar o equipamento.Instale o equipamento numa superfície firme, plana e estável, para evitar que o equipamento caia e fique danificado ou cause ferimentos.Evite locais sujeitos a níveis de humidade e pó elevados. Humidade e pó em excesso podem danificar o equipamento, provocar um incêndio ou um choque eléctrico.Não coloque objectos pesados em cima deste produto. Não se sente nem se apoie em cima do produto. O equipamento pode cair ou ceder e partir ou provocar ferimentos.Para maior segurança, desligue este produto se não o for utilizar durante um longo período.Não toque na cabeça térmica ou no motor de alimentação de papel. Aguarde até que a cabeça e o motor esfriem. A cabeça e o motor podem ficar extremamente quentes após a impressão por um longo período. Queimaduras poderão ocorrer se os mesmos forem tocados.
Etiquetas
ADVERTÊNCIA:Não conecte uma linha telefônica ao conector de abertura da gaveta ou ao conector do módulo de display, caso contrário a impressora e a linha telefônica poderão sofrer danos.
CUIDADO: A cabeça térmica e o motor de alimentação do papel para a seção térmica estão quentes.
CUIDADO: Rótulo de cuidado em relação à lâmina do dispositivo de corte.

40 TM-H6000III Manual do utilizador
English
DesembalagemOs itens abaixo estão inclusos com a impressora de especificação standard. Caso algum item esteja danificado, contacte o seu revendedor.❏ Impressora❏ Papel em rolo térmico❏ Cassete de fita dedicada [ERC-32 (P)]❏ Tampa do interruptor de alimentação❏ Manual do Utilizador (Este manual)
Conectores
Importantes Notas sobre a Instalação❏ Para um interface serial, utilize um cabo de modem nulo.❏ Para um interface paralelo, utilize um cabo IEEE 1284.❏ Para um interface USB, instale o driver antes de ligar a impressora.
Download de Drivers, Utilitários e ManuaisPode-se fazer o download dos drivers, utilitários e manuais a partir de um dos URL abaixo.Para clientes na América do Norte, visitar o seguinte sítio da web: http://www.epsonexpert.com/ e seguir as instruções no écran.Para clientes noutros países, visitar o seguinte sítio da web: http://www.epson-pos.com/Seleccione o nome do produto a partir do menu suspenso “Seleccionar qualquer produto”.
Requisitos Ecológicos EPSONEste produto obedece aos requisitos ecológicos da EPSON (etiqueta da ecologia EPSON). Consulte o endereço indicado para obter informações pormenorizadas sobre os critérios inerentes à etiqueta: http://www.epson.co.jp/e/
de abertura da gaveta
DM elétricode interface
TM-H6000III Manual do utilizador 41
English
Instalação do papel em roloObservação:Não use rolos cujo papel seja colado ou grudado com fita adesiva na bobina pois eles podem causar atolamentos de papel.Para prevenir atolamentos de papel, verifique se não há nada que impeça a saída do papel e não puxe o papel para tirá-lo da impressora.Veja as ilustrações na página 5.
Instalação da fitaA EPSON recomenda o uso de cassetes de fita genuínos EPSON.1. Ligue a impressora. Vire o botão giratório no cartucho de fita. Abra a tampa
frontal da impressora e introduza a fita nova. Veja as ilustrações na página 6.2. Vire o botão giratório 2 ou 3 vezes e verifique a posição da fita. Veja a ilustração
na página 6.
Introdução do papel tipo reciboVeja as ilustrações na página 7.
Resolução de problemasLuz de erro acesa ou piscando.
Verifique se a tampa da impressora está devidamente fechada.Desligue a impressora e verifique se há atolamento de papel.
O cortador automático está emperrado ou a tampa do rolo de papel não abre.
1. Desligue a impressora e abra a tampa da unidade. 2. Em seguida, vire o botão giratório até ver um pino na abertura. Veja a ilustração
na página 7 (pino, botão).
Limpeza da cabeça de impressão CUIDADO:
Após imprimir, a cabeça de impressão pode ficar muito quente. Tenha cuidado para não tocá-la. Deixe-a esfriar antes de limpá-la. Não danifique a cabeça de impressão ao tocá-la com os dedos ou com qualquer outro objeto rígido.
Abra a tampa do papel em rolo e limpe o elemento térmico (a parte verde) da cabeça de impressão com cotonete umedecido com um solvente de álcool (etanol, metanol ou IPA). Veja a ilustração na página 8.Limpe a cabeça térmica periodicamente (geralmente a cada 3 messes) para manter a qualidade de impressão do recibo. .

42 TM-H6000III Manual do utilizador
English
Impressão MICR (reconhecimento de caractere de tinta magnética) e de endosso (opções instaladas pela fábrica)
Leitura de caracteres MICR em cheques pessoais
CUIDADO: Não introduza cheques contendo grampos. Isto poderá causar atolamento do papel, erros de leitura MICR e danos à cabeça MICR.Verifique se os cheques estão lisos e sem dobras, enrolados ou amassados.
1. Espere até a luz SLIP piscar. Em seguida, introduza o cheque virado para cima com o lado direito do mesmo contra o lado direito do guia para papel o máximo possível. Verifique se os caracteres MICR estão à direita. Veja a ilustração na página 8.
2. A impressora irá detectar o cheque e começar a puxá-lo. Quando a impressora começar a puxar o cheque, solte-o imediatamente. Quando a impressora ejetar o cheque e a luz SLIP começar a piscar novamente, retire o cheque puxando-o em linha reta para cima. Não puxe-o numa posição inclinada.
Limpeza do mecanismo MICRAproximadamente a cada 12 meses, limpe a cabeça MICR com uma folha de limpeza umedecida.Use a folha de limpeza abaixo ou uma equivalente disponível no comércio:
Marca PRESAT (KIC) “VERIFIQUE A FICHA DE LIMPEZA DA LEITORA”.Observação:Assegure-se de não usar uma folha de limpeza adesiva.Siga os passos abaixo:1. Carregue um rolo de papel na impressora, desligue a energia, em seguida,
abra a tampa do rolo de papel e religue a energia ao mesmo tempo que mantém pressionado o botão RELEASE (LIBERAR).
2. Pressione o botão RELEASE 7 vezes, em seguida, feche a tampa do rolo de papel. A impressora imprime a mensagem abaixo no papel tipo recibo e a luz SLIP pisca.
3. Introduza a folha de limpeza da mesma forma que um cheque comum.
CUIDADO: Certifique-se de introduzir a folha com o lado correto para cima e de introduzi-la na direção correta.Use a folha de limpeza apenas uma vez e descarte-a.
4. Quando a folha for ejetada, pressione o botão RELEASE e retire a folha da impressora.

TM-H6000III Manual do utilizador 43
English
Notas sobre o uso da leitora MICRNão instale a impressora próxima de um campo magnético. Seja especialmente cuidadoso quanto ao local de instalação do dispositivo de exibição e não deixe de verificar a taxa de reconhecimento da leitora MICR com o dispositivo de exibição no lugar.Verifique se a impressora não está sujeita a impactos ou vibrações durante a execução de uma leitura MICR.
Impressão de endosso Se sua impressora tiver o mecanismo de impressão de endosso opcional, instale a fita de endosso seguindo os passos abaixo:Observação:Certifique-se de ligar a energia antes de instalar o cassete de fita.1. Vire o botão giratório do cassete de fita. Em seguida abra a tampa da unidade.
Dentro da impressora, empurre as alavancas para trás para abrir a unidade. Veja as ilustrações na página 10.Observação:Não abra a unidade durante a impressão.
2. Introduza a fita na impressora na posição mostrada e vire o botão giratório novamente para ajustar a fita. Em seguida feche a impressora. Veja a ilustração na página 10.
Especificações da TM-H6000IIIMétodo de impressão Recibo: linha térmica
Comprovante: matriz de pontos de impacto com 9 agulhasEndosso: matriz de pontos de impacto por transferência com 8 agulhas
Fonte de impressão Recibo: 9 × 17 / 12 × 24Comprovante: 5 × 9 / 7 × 9Endosso: 5 × 7
Colunas Recibo: 56 / 42Comprovante: 60 / 45Endosso: 40
Tamanho de caractere(L × A)
Recibo: 0,99 × 2,40 mm {0,04 × 0,09"}1,41 × 3,39 mm {0,06 × 0,13"}
Comprovante: 1,56 × 3,1 mm {0,06 × 0,12"}1,24 × 3,1 mm {0,05 × 0,12"}
Endosso: 1,1 × 2,42 mm {0,04 × 0,10"}
Conjuntos de caracteres
95 caracteres alfanuméricos, 37 internacionais128 × 11 (comprovante: 12) caracteres gráficos ampliados de páginas
Velocidade de impressão
Recibo: 63, Comprovante: 5,14Endosso: 1,9 (linhas por segundo)
Dimensões de papel Recibo: papel de rolo térmico de 79,5 ± 0,5 × 83 mm {3,1 ± 0,02 × 3,3"}Comprovante/endosso: 70 ~148 × 150 ~ 210 mm {2,8 ~ 5,8 × 5,9 ~ 8,3"}
Espessura do papel Comprovante (uma cópia): 0,09 ~ 0,2 mm {0,0035 ~ 0,0079"}Endosso: 0,09 ~ 0,2 mm {0,0035 ~ 0,0079"}
Capacidade de cópia Recibo/Endosso: uma cópiaComprovante: 1 original + 3 cópias

44 TM-H6000III Manual do utilizador
English
Fita de tinta Comprovante: ERC-32 (P) Endosso: ERC-41 (P)
Vida útil da fita Comprovante: 6 milhões de caracteres Endosso: 1 milhão de caracteres
Interface (compatível) RS-232C / Paralela bidirecional / RS-485 (opcional do revendedor)
Buffer de dados Selecionável para 45 bytes ou 4 K bytes usando chave DIP
Função D.K.D. 2 unidades
Fonte de alimentação +24 VCC ± 10%
Consumo de corrente Comprovante: Aproximadamente 1,7 A (média)Recibo: Aproximadamente 1,8 A (média)
Temperatura Em funcionamento: 5 a 45°C {41 a 113°F}De armazenamento: -10 a 50°C {14 a 122°F}
Umidade 10 a 90 % sem condensação
Confiabilidade Recibo: MTBF: 360.000 horas, MCBF: 72 milhões de linhasComprovante: MTBF: 180.000 horas, MCBF: 18 milhões de linhas
Dimensões gerais 185 × 186 × 298 mm {7,28 × 7,32 × 11,73"} (H×L×D)
Peso Aproximadamente 5,3 kg {11,7 lb}

TM-H6000III Manual del usuario 45
English
Español
TM-H6000IIIManual del usuario
Los interruptores DIPVea la información sobre la fijación de los interruptores DIP en el interior de la portada de este manual.
IllustracionesEste manual se divide en 8 secciones, una para cada idioma. La mayoría de las ilustraciones aparecen en la primera sección, y no se repiten. Sin embargo, cada sección hace referencia a las páginas de las ilustraciones.
Quedan reservados todos los derechos. Ninguna parte de esta publicación podrá ser reproducida, almacenada en un sistema de información, o transmitida de manera alguna o por medio alguno, sea éste electrónico, mecánico, de fotocopia, grabación, u otro cualquiera, sin el permiso previo por escrito de Seiko Epson Corporation. No se asume ninguna responsabilidad de patentes en lo referente a la información aquí contenida. Aún cuando se han tomado todas las precauciones en la preparación de este libro, Seiko Epson Corporation no asume ninguna responsabilidad por errores u omisiones. Tampoco se asume ninguna responsabilidad por daños resultantes del uso de la información contenida en este documento.Ni Seiko Epson Corporation ni sus afiliadas serán responsables ante el adquirente de este producto, ni ante terceros, por daños, pérdidas, costos, o gastos, incurridos por parte del adquirente o de terceros como resultado de: accidentes, uso inapropiado, o abuso de este producto, o de modificaciones, reparaciones, o alteraciones no autorizadas de este producto, o (excluyendo a los Estados Unidos) el no cumplimiento estricto de las instrucciones de operación y mantenimiento de Seiko Epson Corporation.Seiko Epson Corporation no será responsable de daños o problemas debidos al uso de opciones o productos consumibles, excepto aquellos designados por Seiko Epson Corporation como productos Epson originales o productos aprobados por Epson.
EPSON y ESC/POS son marcas registradas de Seiko Epson Corporation.
AVISO: El contenido de este manual está sujeto a cambios sin previo aviso.
Copyright © 2005 por Seiko Epson Corporation, Nagano, Japón.
46 TM-H6000III Manual del usuario
English
Normas de ECM y de seguridad aplicadas Nombre del producto: TM-H6000IIINombre del modelo: M147GLas siguientes normas se aplican solamente a las impresoras que estén marcadas con las correspondientes etiquetas. (EMC se ensaya utilizando la fuente de alimentación EPSON.) Europa: Marca de CE
Seguridad: EN 60950América del EMI: FCC/ICES-003 Clase ANorte: Seguridad: UL 1950/CSA C22.2 No. 950Japón: EMI: VCCI Clase AOceanía: EMC: AS/NZS CISPR22 Clase B
ADVERTENCIALa conexión de un cable de interface no blindado a esta impresora invalidará las normas EMC de este dispositivo.Se advierte que los cambios o modificaciones que se realicen sin la aprobación expresa de la SEIKO EPSON Corporation pueden invalidar su autoridad para utilizar el equipo.
Marcas de CELa impresora cumple con las siguientes Directrices y Normas:Directriz 89/336/EEC EN 55022
Clase BEN 55024
IEC 61000-4-2 IEC 61000-4-3 IEC 61000-4-4IEC 61000-4-5 IEC 61000-4-6 IEC 61000-4-8IEC 61000-4-11
Declaración de cumplimiento de las normas de FCC para usuarios de los Estados UnidosEste equipo ha sido probado y se ha verificado que cumple con los límites para un dispositivo digital de Clase A, de acuerdo con la Parte 15 de las Reglamentaciones de FCC. Estos límites han sido establecidos para proveer una protección razonable contra las interferencias perjudiciales cuando el equipo se utiliza en un entorno comercial.Este equipo genera, utiliza, y puede radiar energía de radiofrecuencia y, de no ser instalado y utilizado de acuerdo con el manual de instrucciones, puede causar interferencias perjudiciales con las comunicaciones por radio. Es probable que el uso de este equipo en una zona residencial cause interferencias perjudiciales, en cuyo caso el usuario deberá corregir las interferencias a su propia cosca.
Precauciones de seguridadEsta sección contiene información importante destinada a asegurar un uso seguro y eficaz de este producto. Lea esta sección cuidadosamente y guárdela en un lugar accesible.
ADVERTENCIA:Apague su equipo de inmediato si éste produce humo, un olor raro, o un ruido inusual. El seguir utilizándolo podría ocasionar un incendio. Desenchufe el equipo de inmediato y comuníquese con su distribuidor o con un servicio técnico EPSON.Nunca trate de reparar este producto usted mismo. Una reparación incorrecta puede ser peligrosa.
TM-H6000III Manual del usuario 47
English
Nunca desmonte o modifique este producto. La manipulación de este producto puede causar lesiones o un incendio.Cerciórese de usar la fuente de alimentación eléctrica especificada. La conexión a una fuente de alimentación eléctrica inadecuada puede causar un incendio.No deje que materiales extraños caigan dentro del equipo, ya que podría provocar un incendio.Si se derrama agua o algún otro líquido dentro del equipo, desenchufe el cable eléctrico inmediatamente, y después comuníquese con su distribuidor o con un servicio técnico EPSON. El seguir usándolo podría causar un incendio.
PRECAUCIÓN:No conecte los cables en formas que difieran a las mencionadas en este manual. Conexiones diferentes podrían causar daños e incendios.Cerciórese de poner este equipo sobre una superficie firme, estable, horizontal. El producto se puede romper o causar lesiones si se cae.No lo use en lugares sujetos a altos niveles de humedad o de polvo. El exceso de humedad o de polvo podría causar daños o incendios al equipo.No ponga objetos pesados encima de este producto. Nunca se apoye sobre este producto. El equipo podría caerse, causando roturas y posibles lesiones.Por razones de seguridad, por favor desenchufe este producto antes de dejarlo sin usar por un largo periodo de tiempo.No toque la cabeza térmica ni el motor de alimentación del papel. Espere a que la cabeza y el motor se enfríen. La cabeza y el motor pueden calentarse mucho tras imprimir durante mucho tiempo. Si los toca, puede quemarse.
Etiquetas
ADVERTENCIA:No conecte una línea telefónica al conector del cajón o al conector del módulo de visualización; de lo contrario, la impresora y la línea telefónica pueden dañarse.
PRECAUCIÓN: La cabeza térmica y el motor de alimentación del papel para la sección térmica están calientes.
PRECAUCIÓN: Etiqueta para la cuchilla del cortador automático.
DesembalajeLos siguientes artículos se incluyen con la impresora de especificaciones estándar. Si alguno de los artículos está dañado, comuníquese con su distribuidor.❏ Impresora❏ Rollo de papel térmico❏ Cartucho de cinta dedicado [ERC-32 (P)]❏ Tapa del interruptor de alimentación❏ Manual del Usuario (Este manual)
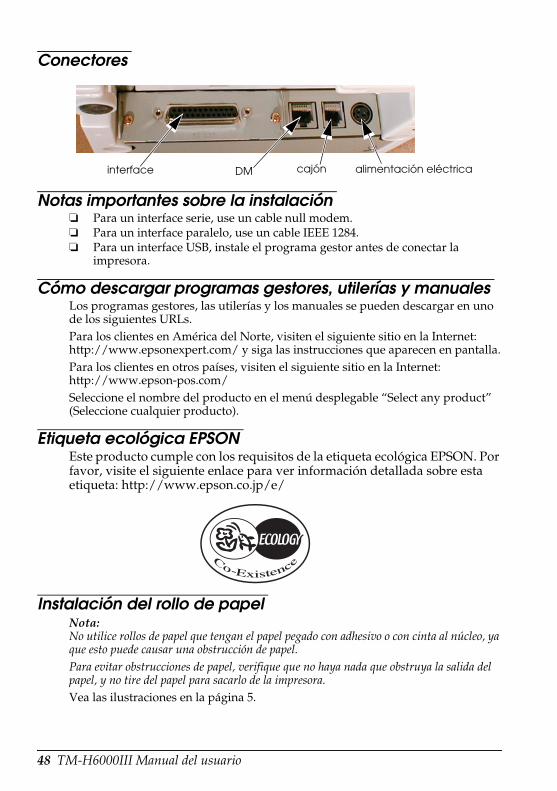
48 TM-H6000III Manual del usuario
English
Conectores
Notas importantes sobre la instalación❏ Para un interface serie, use un cable null modem.❏ Para un interface paralelo, use un cable IEEE 1284.❏ Para un interface USB, instale el programa gestor antes de conectar la
impresora.
Cómo descargar programas gestores, utilerías y manualesLos programas gestores, las utilerías y los manuales se pueden descargar en uno de los siguientes URLs.Para los clientes en América del Norte, visiten el siguiente sitio en la Internet: http://www.epsonexpert.com/ y siga las instrucciones que aparecen en pantalla.Para los clientes en otros países, visiten el siguiente sitio en la Internet: http://www.epson-pos.com/Seleccione el nombre del producto en el menú desplegable “Select any product” (Seleccione cualquier producto).
Etiqueta ecológica EPSONEste producto cumple con los requisitos de la etiqueta ecológica EPSON. Por favor, visite el siguiente enlace para ver información detallada sobre esta etiqueta: http://www.epson.co.jp/e/
Instalación del rollo de papelNota:No utilice rollos de papel que tengan el papel pegado con adhesivo o con cinta al núcleo, ya que esto puede causar una obstrucción de papel.Para evitar obstrucciones de papel, verifique que no haya nada que obstruya la salida del papel, y no tire del papel para sacarlo de la impresora. Vea las ilustraciones en la página 5.
cajón DM alimentación eléctricainterface

TM-H6000III Manual del usuario 49
English
Instalación de la cintaEPSON recomienda utilizar cartuchos de cinta EPSON genuinos.1. Encienda la impresora. Haga girar la perilla del cartucho de cinta. Abra la
cubierta frontal de la impresora y coloque la nueva cinta. Vea las ilustraciones en la página 6.
2. Haga girar la perilla 2 o 3 veces y verifique la posición de la cinta. Vea la ilustración en la página 6.
Inserción de papel para boletasVea las ilustraciones en la página 7.
Resolución de problemasLa luz de error está encendida o destella.
Verifique que la cubierta de la impresora esté bien cerrada.Apague la impresora y vea si hay una obstrucción de papel.
La cortadora automática está atascada, o la cubierta del rollo de papel no se abre.
1. Apague la impresora y abra la cubierta de la unidad. 2. Después haga girar la perilla hasta ver una clavija en la abertura. Vea las
ilustraciones en la página 7 (clavija, perilla).
Limpieza de la cabeza de impresiónPRECAUCIÓN:
Después de imprimir, la cabeza de impresión puede estar muy caliente. Tenga cuidado de no tocarla. Déjela enfriar también antes de limpiarla. No dañe la cabeza de impresión tocándola con los dedos ni con un objeto duro.
Abra la cubierta del rollo de papel y limpie el elemento térmico (la parte verde) de la cabeza de impresión con un algodón humedecido en un solvente alcohólico (etanol, metanol, o alcohol isopropílico). Vea la ilustración en la página 8.Limpie el cabezal térmico periódicamente (por lo general cada 3 meses) para mantener la calidad de la impresión de los recibos..
Impresión de MICR y de endosos (Opciones instaladas en la fábrica)
Lectura de caracteres MICR en los cheques personales
PRECAUCIÓN: No inserte cheques que tengan grapas. Esto puede causar obstrucciones de papel, errores de lectura de MICR, y daños a la cabeza MICR.Verifique que los cheques estén lisos, sin ondulaciones, dobleces, o arrugas.
1. Espere a que la luz SLIP destelle. En seguida, introduzca el cheque cara arriba, con la orilla derecha del cheque contra la guía de papel derecha. Verifique que los caracteres MICR estén a la derecha. Vea las ilustraciones en la página 8.

50 TM-H6000III Manual del usuario
English
2. La impresora detectará el cheque y comenzará a introducirlo. Cuando la impresora comience a introducirlo, suelte el cheque inmediatamente. Cuando la impresora expulse el cheque y las luces SLIP comience a destellar de nuevo, retire el cheque, tirando de él en línea recta hacia arriba; no tire de él en dirección oblicua.
Limpieza del mecanismo MICRAproximadamente una vez cada 12 meses, limpie la cabeza MICR con una hoja de limpieza humedecida. Utilice la siguiente hoja de limpieza o una equivalente que esté a la venta:
Marca PRESAT (KIC) “CHECK READER CLEANING CARD.”Nota:Tenga cuidado de no utilizar una hoja de limpieza adhesiva.Siga los pasos siguientes:1. Cargue un rollo de papel en la impresora; apáguela; abra la cubierta del rollo
de papel y encienda de nuevo la impresora, al tiempo que mantiene presionado el botón RELEASE.
2. Presione 7 veces el botón RELEASE; después, cierre la cubierta del rollo de papel. La impresora imprime el siguiente mensaje en papel de recibos, y la luz SLIP destella.
3. Inserte la hoja de limpieza como si fuera un cheque normal.
PRECAUCIÓN: Cuide de insertar la hoja con el lado correcto hacia arriba, y en la dirección correcta.Utilice cada hoja de limpieza solamente una vez; después, descártela.
4. Una vez expulsada la hoja, presione el botón RELEASE, y retire la hoja de la impresora.
Notas acerca del uso del lector MICR No instale la impresora cerca de campos magnéticos. Tenga especial cuidado al instalar el dispositivo de visualización, y examine el nivel de reconocimiento del lector MICR cuando el dispositivo de visualización esté instalado.Cuide de que la impresora no esté expuesta a impactos o vibraciones mientras está efectuando una lectura MICR.
TM-H6000III Manual del usuario 51
English
Impresión de endosos Si su impresora tiene el mecanismo opcional para imprimir endosos, instale la cinta para endosos siguiendo los pasos siguientes:Nota:Encienda la impresora antes de instalar un cartucho de cinta.1. Haga girar la perilla del cartucho de cinta. Después, abra la cubierta de la
unidad. En el interior de la impresora, empuje las palancas hacia atrás para abrir la unidad. Vea las ilustraciones en la página 10.Nota:No abra la unidad mientras ésta esté imprimiendo.
2. Inserte la cinta en la impresora en la posición mostrada en la figura, y haga girar la perilla de nuevo para asentar la cinta. Después, cierre la impresora. Vea la ilustración en la página 10.
Especificaciones de la impresora TM-H6000IIIMétodo de impresión Recibos: térmica de líneas
Boletas: matriz de puntos de impacto, serial, con 9 agujasEndosos: matriz de puntos de impacto con 8 agujas
Fuente de impresión Recibos: 9 × 17 / 12 × 24Boletas: 5 × 9 / 7 × 9Endosos: 5 × 7
Columnas Recibos: 56 / 42Boletas: 60 / 45Endosos: 40
Tamaños de caracteres(ancho × altura)
Recibos: 0,99 × 2,40 mm {0,04 × 0,09"}1,41 × 3,39 mm {0,06 × 0,13"}
Boletas: 1,56 × 3,1 mm {0,06 × 0,12"}1,24 × 3,1 mm {0,05 × 0,12"}
Endosos: 1,1 × 2,42 mm {0,04 × 0,10"}
Juegos de caracteres 95 caracteres alfanuméricos, 37 caracteres internacionales128 × 11 (boletas: 12) páginas, caracteres de gráficos extendidos
Velocidad de impresión Recibos: 63, Boletas: 5,14, Endosos: 1,9 (líneas por segundo)
Dimensiones del papel Recibos: rollo de papel térmico de 79,5 ± 0,5 × 83 mm {3,1 ± 0,02 × 3,3"}Boletas/Endosos: 70 ~148 × 150 ~ 210 mm {2,8 ~ 5,8 × 5,9 ~ 8,3"}
Grosor del papel Recibos (una sóla capa): 0,09 ~ 0,2 mm {0,0035 ~ 0,0079"}Endosos: 0,09 ~ 0,2 mm {0,0035 ~ 0,0079"}
Capacidad de copias Recibos/Endosos: una sóla capaBoletas: 1 original + 3 copias
Cinta entintada Recibos: ERC-32 (P)Endosos: ERC-41 (P)
Vida útil de la cinta Recibos: 6 millones de caracteresEndosos: 1 millón de caracteres
Interface (compatible) RS-232C / bidireccional paralela / RS-485 (opción del distribuidor)
Buffer de datos Seleccionable para 45 bytes o 4 K bytes utilizando un interruptor DIP
Función D.K.D. 2 unidades
Fuente de alimentación +24 VCC ± 10%
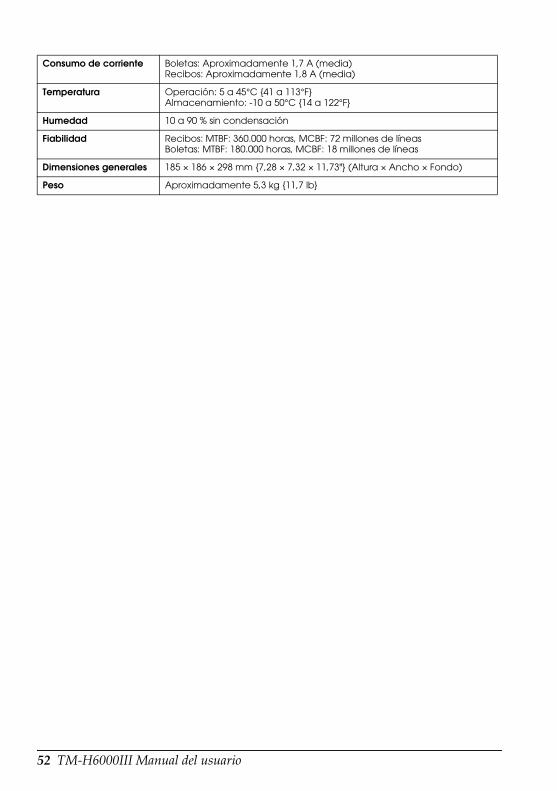
52 TM-H6000III Manual del usuario
English
Consumo de corriente Boletas: Aproximadamente 1,7 A (media)Recibos: Aproximadamente 1,8 A (media)
Temperatura Operación: 5 a 45°C {41 a 113°F}Almacenamiento: -10 a 50°C {14 a 122°F}
Humedad 10 a 90 % sin condensación
Fiabilidad Recibos: MTBF: 360.000 horas, MCBF: 72 millones de líneasBoletas: MTBF: 180.000 horas, MCBF: 18 millones de líneas
Dimensiones generales 185 × 186 × 298 mm {7,28 × 7,32 × 11,73"} (Altura × Ancho × Fondo)
Peso Aproximadamente 5,3 kg {11,7 lb}
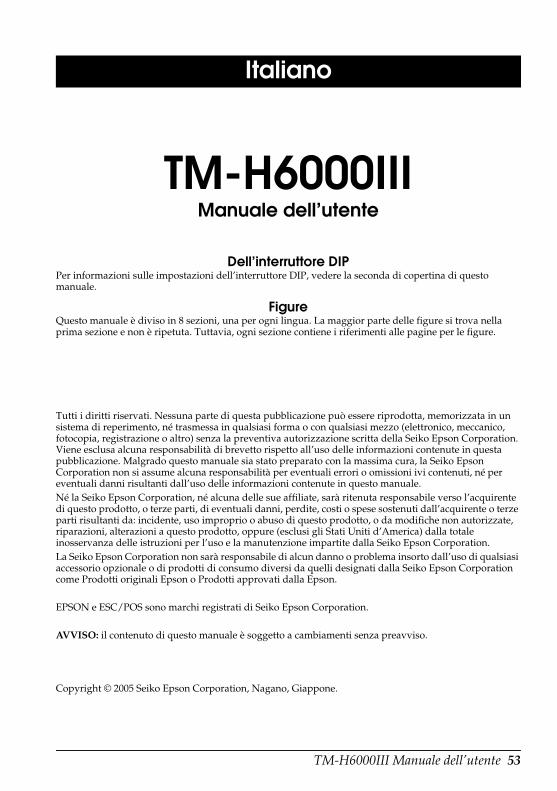
TM-H6000III Manuale dell’utente 53
English
Italiano
TM-H6000IIIManuale dell’utente
Dell’interruttore DIPPer informazioni sulle impostazioni dell’interruttore DIP, vedere la seconda di copertina di questo manuale.
FigureQuesto manuale è diviso in 8 sezioni, una per ogni lingua. La maggior parte delle figure si trova nella prima sezione e non è ripetuta. Tuttavia, ogni sezione contiene i riferimenti alle pagine per le figure.
Tutti i diritti riservati. Nessuna parte di questa pubblicazione può essere riprodotta, memorizzata in un sistema di reperimento, né trasmessa in qualsiasi forma o con qualsiasi mezzo (elettronico, meccanico, fotocopia, registrazione o altro) senza la preventiva autorizzazione scritta della Seiko Epson Corporation. Viene esclusa alcuna responsabilità di brevetto rispetto all’uso delle informazioni contenute in questa pubblicazione. Malgrado questo manuale sia stato preparato con la massima cura, la Seiko Epson Corporation non si assume alcuna responsabilità per eventuali errori o omissioni ivi contenuti, né per eventuali danni risultanti dall’uso delle informazioni contenute in questo manuale.Né la Seiko Epson Corporation, né alcuna delle sue affiliate, sarà ritenuta responsabile verso l’acquirente di questo prodotto, o terze parti, di eventuali danni, perdite, costi o spese sostenuti dall’acquirente o terze parti risultanti da: incidente, uso improprio o abuso di questo prodotto, o da modifiche non autorizzate, riparazioni, alterazioni a questo prodotto, oppure (esclusi gli Stati Uniti d’America) dalla totale inosservanza delle istruzioni per l’uso e la manutenzione impartite dalla Seiko Epson Corporation.La Seiko Epson Corporation non sarà responsabile di alcun danno o problema insorto dall’uso di qualsiasi accessorio opzionale o di prodotti di consumo diversi da quelli designati dalla Seiko Epson Corporation come Prodotti originali Epson o Prodotti approvati dalla Epson.
EPSON e ESC/POS sono marchi registrati di Seiko Epson Corporation.
AVVISO: il contenuto di questo manuale è soggetto a cambiamenti senza preavviso.
Copyright © 2005 Seiko Epson Corporation, Nagano, Giappone.

54 TM-H6000III Manuale dell’utente
English
Standard EMC e di sicurezza applicati in questo prodotto Nome del prodotto: TM-H6000IIINome del tipo: M147G Gli standard seguenti sono stati applicati solo alle stampanti così etichettate (il test EMC è stato fatto usando l’alimentatore EPSON). Europa: Contrassegno CE
Sicurezza: EN 60950Nord America: EMI: FCC/ICES-003 Classe A
Sicurezza: UL 1950/CSA C22.2 n. 950Giappone: EMI: VCCI Classe AOceania: EMC: AS/NZS CISPR22 Classe B
AVVERTENZAIl collegamento a questa stampante di un cavo d’interfaccia di stampante non schermato renderà non validi gli standard EMC di questa periferica.Si informa che cambiamenti o modifiche non espressamente approvati dalla SEIKO EPSON possono rendere nullo il diritto di usare l’unità.
Contrassegno CELa stampante è conforme alle direttive e norme seguenti:Direttiva 89/336/EEC EN 55022
Classe BEN 55024
IEC 61000-4-2 IEC 61000-4-3 IEC 61000-4-4 IEC 61000-4-5 IEC 61000-4-6 IEC 61000-4-8 IEC 61000-4-11
Precauzioni di sicurezzaQuesta sezione presenta informazioni importanti per l’uso efficiente e sicuro di questo prodotto. Leggere attentamente questa sezione e conservare queste informazioni in un posto accessibile.
AVVERTENZA:Spegnere immediatamente l’unità se produce fumo, un odore strano o un rumore inconsueto. L’uso continuato potrebbe costituire causa d’incendio. Staccare immediatamente la spina dell’unità e rivolgersi al rivenditore o alla SEIKO EPSON per assistenza in merito.Non riparare mai da soli questa unità. La riparazione impropria potrebbe creare un pericolo.Non smontare né modificare mai questo prodotto. La manomissione del prodotto potrebbe causare lesioni personali, incendio.Accertarsi di usare la fonte di alimentazione specificata. Il collegamento del prodotto ad una fonte di alimentazione impropria potrebbe causare incendio.Evitare che nell’unità entrino corpi estranei. Questi potrebbero causare incendio.Se acqua o altri liquidi cadono accidentalmente nell’unità, staccare immediatamente il cavo di alimentazione, quindi rivolgersi per consigli al rivenditore o al centro di assistenza della SEIKO EPSON. L’uso continuato dell’unità potrebbe causare incendio.
TM-H6000III Manuale dell’utente 55
English
Non assoggettare la stessa presa di corrente a carichi multipli. Il sovraccarico potrebbe causare un incendio.
ATTENZIONE:Non collegare i cavi in alcun modo diverso da quello indicato in questo manuale. Collegamenti non corretti possono causare danni all’unità e ustioni personali.Posare questa unità su una superficie piana, solida e stabile. Se cade, questa unità può rompersi o causare lesioni personali.Non usare questa unità in ambienti soggetti ad un elevato tasso di umidità o polvere. L’umidità o la polvere eccessiva può causare danni all’unità o incendio.Non mettere oggetti pesanti sopra questa unità. Non porsi sopra questa unità né appoggiarsi. L’unità potrebbe cadere e rompersi o causare lesioni personali.Per motivi di sicurezza, staccare sempre la spina dell’unità prima di lasciarla incustodita per un lungo periodo di tempo.Non toccare la testina termica né il motore di alimentazione della carta. Attendere che la testina ed il motore siano freddi.La testina ed il motore possono restare molto caldi a lungo dopo la stampa. Per evitare bruciature, non toccarli.
Etichette
AVVERTENZA:Non collegare una linea telefonica al connettore estraibile nel cassetto; la stampante e la linea telefonica possono danneggiarsi.
ATTENZIONE: La testina termica e il motore di alimentazione della carta per la sezione termica sono molto caldi.
ATTENZIONE: Etichetta di attenzione per la lama della taglierina automatica.
SpacchettamentoGli articoli seguenti sono inclusi con la stampante di specifiche standard. Mettersi in contatto con il rivenditore locale se ci sono articoli danneggiati.❏ Stampante❏ Rotolo di carta termosensibile❏ Cassetta nastro dedicata [ERC-32 (P)]❏ Copertura dell’interruttore di alimentazione❏ Manual per l’utente (il presente manuale)
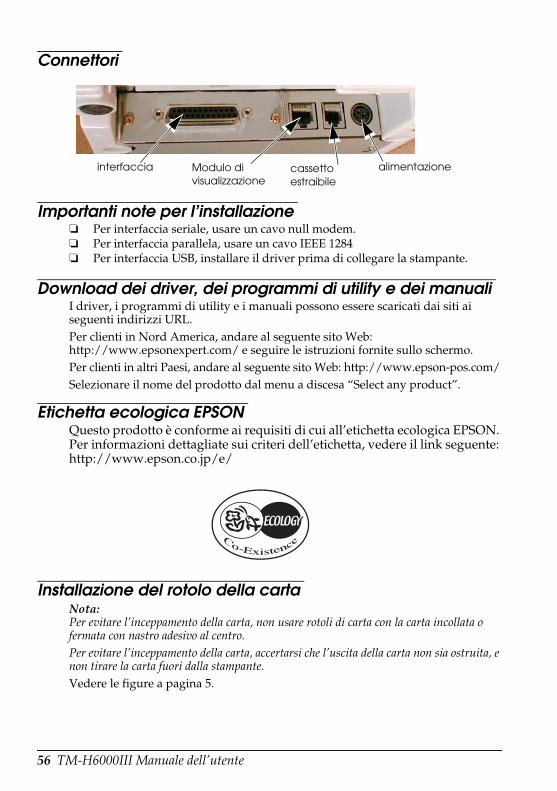
56 TM-H6000III Manuale dell’utente
English
Connettori
Importanti note per l’installazione❏ Per interfaccia seriale, usare un cavo null modem.❏ Per interfaccia parallela, usare un cavo IEEE 1284❏ Per interfaccia USB, installare il driver prima di collegare la stampante.
Download dei driver, dei programmi di utility e dei manualiI driver, i programmi di utility e i manuali possono essere scaricati dai siti ai seguenti indirizzi URL.Per clienti in Nord America, andare al seguente sito Web: http://www.epsonexpert.com/ e seguire le istruzioni fornite sullo schermo.Per clienti in altri Paesi, andare al seguente sito Web: http://www.epson-pos.com/Selezionare il nome del prodotto dal menu a discesa “Select any product”.
Etichetta ecologica EPSONQuesto prodotto è conforme ai requisiti di cui all’etichetta ecologica EPSON. Per informazioni dettagliate sui criteri dell’etichetta, vedere il link seguente: http://www.epson.co.jp/e/
Installazione del rotolo della cartaNota:Per evitare l’inceppamento della carta, non usare rotoli di carta con la carta incollata o fermata con nastro adesivo al centro.Per evitare l’inceppamento della carta, accertarsi che l’uscita della carta non sia ostruita, e non tirare la carta fuori dalla stampante.Vedere le figure a pagina 5.
cassetto estraibile
Modulo di visualizzazione
alimentazioneinterfaccia

TM-H6000III Manuale dell’utente 57
English
Installazione del nastroLa EPSON raccomanda di usare nastri originali EPSON.1. Accendere la stampante. Girare la manopola sulla cartuccia del nastro. Aprire
il pannello di copertura anteriore della stampante ed inserire il nuovo nastro. Vedere le figure a pagina 6.
2. Girare la manopola 2 o 3 volte e controllare la posizione del nastro. Vedere la figura a pagina 6.
Inserimento di un foglio di carta mobileVedere le figure a pagina 7.
Risoluzione di problemiLa luce spia di errore è accesa o lampeggia.
Controllare che il pannello di copertura della stampante sia correttamente chiuso.Spegnere la stampante e controllare che la carta non sia inceppata.
La taglierina automatica è inceppata oppure il pannello di copertura del rotolo della carta non si apre.
1. Spegnere la stampante e aprire il pannello di copertura dell’unità.2. Girare la manopola fino a quando si vede un perno nell’apertura. Vedere la
figura a pagina 7.
Pulizia della testina di stampa ATTENZIONE:
Dopo la stampa, la testina di stampa può essere molto calda. Non toccarla. Lasciarla raffreddare prima di pulirla. Non danneggiare la testina di stampa toccandola con le dita o con un qualsiasi altro oggetto duro.
Aprire il pannello di copertura del rotolo della carta e pulire l’elemento termico (la parte di colore verde) della testina di stampa servendosi di un tamponcino di cotone inumidito con solvente a base di alcol (etanolo, metanolo o IPA). Vedere la figura a pagina 8.Per mantenere la qualità della stampa di ricezione, pulire periodicamente la testina termica (generalmente ogni 3 mesi)..

58 TM-H6000III Manuale dell’utente
English
Stampa di MICR e del timbro bancario (opzioni installate dalla fabbrica)
Lettura di caratteri MICR sugli assegni bancari
ATTENZIONE: Non inserire gli assegni con le graffette attaccate su di essi. Ciò potrebbe causare inceppamenti della carta, errori nella lettura MICR e danni alla testina MICR.Verificare che gli assegni siano piatti, senza increspature, pieghe o grinze.
1. Attendere che la spia SLIP lampeggi. Quindi inserire fino in fondo l’assegno con il lato destro dell’assegno appoggiato sul lato destro della guida della carta. Controllare che i caratteri MICR siano a destra. Vedere la figura a pagina 8.
2. La stampante riconoscerà l’assegno e inizierà a prenderlo. Appena la stampante inizia a prendere l’assegno, lasciarlo andare immediatamente. Quando la stampante espelle l’assegno e la spia SLIP comincia a lampeggiare di nuovo, rimuovere l’assegno tirando diritto in fuori; non tirarlo piegandolo ad angolo.
Pulizia del meccanismo MICROgni 12 mesi circa, pulire la testina MICR con un foglio detergente inumidito.Usare il seguente foglio detergente o un altro simile disponibile in commercio:
Marca PRESAT (KIC) “CHECK READER CLEANING CARD”.Nota:Non usare un foglio detergente adesivo.Procedere come segue:1. Caricare un rotolo di carta nella stampante; spegnere la stampante; aprire il
pannello di copertura del rotolo della carta e riaccendere la stampante tenendo al tempo stesso premuto il pulsante RELEASE.
2. Premere 7 volte il pulsante RELEASE; quindi chiudere il pannello di copertura del rotolo della carta. La stampante stampa il seguente messaggio al ricevimento della carta e la spia SLIP lampeggia.
3. Inserire il foglio detergente come un normale assegno.
ATTENZIONE: Verificare che il foglio sia inserito con la faccia rivolta in alto e che sia inserito nella corretta direzione.Usare un foglio detergente una sola volta; quindi gettarlo.
4. Quando il foglio viene espulso, premere il pulsante RELEASE e rimuovere il foglio dalla stampante.

TM-H6000III Manuale dell’utente 59
English
Note sull’uso del lettore MICRNon installare la stampante vicino ad alcun campo magnetico. Prestare particolare attenzione a dove si installa la periferica di visualizzazione e ricordarsi di controllare la percentuale di riconoscimento del lettore MICR con la periferica di visualizzazione a posto.Verificare che la stampante non sia soggetta ad alcun urto o vibrazione quando esegue la lettura MICR.
Stampa del timbro bancario Se la stampante possiede il meccanismo opzionale di stampa del timbro bancario, installare il nastro del timbro bancario come segue:Nota:Ricordarsi di accendere la stampante prima di inserire la cassetta con il nastro.1. Girare il pomello della casetta del nastro. Quindi aprire il pannello di
copertura dell’unità. Dentro la stampante, spingere indietro le leve per aprire l’unità. Vedere le figure a pagina 10.Nota:Non aprire l’unità durante la stampa.
2. Inserire il nastro nella stampante nella posizione mostrata, quindi girare di nuovo il pomello per sistemare a posto il nastro. Chiudere la stampante. Vedere la figura a pagina 10.
Specifiche TM-H6000IIIMetodo di stampa Ricevuta: linea termica
Foglio mobile: a matrice di punti ad impatto, seriale a 9 aghiConvalida: a matrice di punti ad impatto, navetta, a 8 aghi
Font di stampa Ricevuta: 9 × 17 / 12 × 24Foglio mobile: 5 × 9 / 7 × 9Convalida: 5 × 7
Colonne Ricevuta: 56 / 42Foglio mobile: 60 / 45Convalida: 40
Dimensione caratteri(Largh. × Alt.)
Ricevuta: 0,99 × 2,40 mm {0,04 × 0,09"}1,41 × 3,39 mm {0,06 × 0,13"}
Foglio mobile: 1,56 × 3,1 mm {0,06 × 0,12"}1,24 × 3,1 mm {0,05 × 0,12"}
Convalida: 1,1 × 2,42 mm {0,04 × 0,10"}
Gruppi di caratteri 95 alfanumerici, 37 caratteri internazionali128 caratteri grafici estesi × 11 pagine (foglio mobile: 12)
Velocità di stampa Ricevuta: 63; Foglio mobile: 5,14; Convalida: 1,9 (righe/secondo)
Dimensioni della carta Ricevuta: Carta termica in rotolo: 79,5 ± 0,5 × 83 mm {3,1 ± 0,02 × 3,3"}Foglio mobile/Convalida: 70 ~148 × 150 ~ 210 mm {2,8 ~ 5,8 × 5,9 ~ 8,3"}
Spessore della carta Foglio carta mobile (strato singolo): 0,09 ~ 0,2 mm {0,0035 ~ 0,0079"}Convalida: 0,09 ~ 0,2 mm {0,0035 ~ 0,0079"}
Capacità di copia Ricevuta/Convalida: strato singoloFoglio mobile: 1 originale + 3 copie
Nastro inchiostrato Foglio mobile: ERC-32(P)Convalida: ERC-41(P)
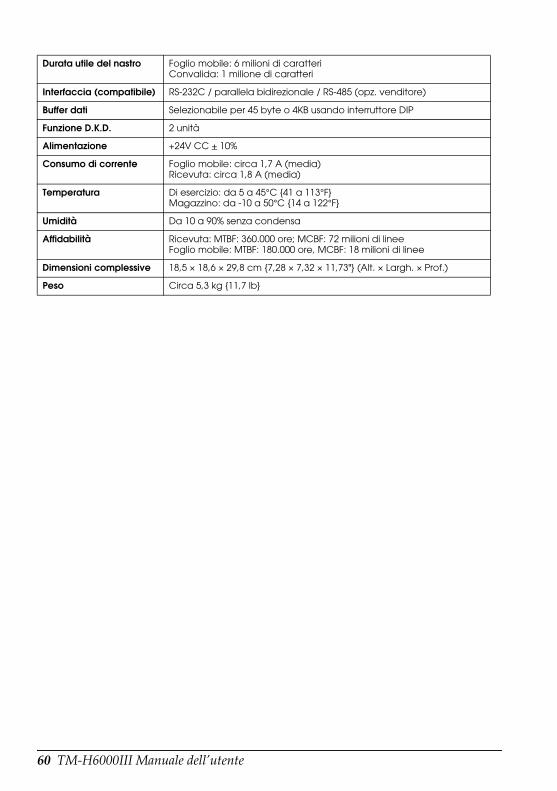
60 TM-H6000III Manuale dell’utente
English
Durata utile del nastro Foglio mobile: 6 milioni di caratteri Convalida: 1 milione di caratteri
Interfaccia (compatibile) RS-232C / parallela bidirezionale / RS-485 (opz. venditore)
Buffer dati Selezionabile per 45 byte o 4KB usando interruttore DIP
Funzione D.K.D. 2 unità
Alimentazione +24V CC + 10%
Consumo di corrente Foglio mobile: circa 1,7 A (media)Ricevuta: circa 1,8 A (media)
Temperatura Di esercizio: da 5 a 45°C {41 a 113°F}Magazzino: da -10 a 50°C {14 a 122°F}
Umidità Da 10 a 90% senza condensa
Affidabilità Ricevuta: MTBF: 360.000 ore; MCBF: 72 milioni di lineeFoglio mobile: MTBF: 180.000 ore, MCBF: 18 milioni di linee
Dimensioni complessive 18,5 × 18,6 × 29,8 cm {7,28 × 7,32 × 11,73"} (Alt. × Largh. × Prof.)
Peso Circa 5,3 kg {11,7 lb}
TM-H6000III Руководство по эксплуатации 61
English
На русском языке
TM-H6000IIIРуководство по эксплуатации
Все права защищены. Никакую часть данного документа нельзя воспроизводить, хранить в поисковых системах или передавать в любой форме и любыми способами (электронными, механическими, путем копирования, записи или иными) без предварительного письменного разрешения Seiko Epson Corporation. Информация, содержащаяся в документе, предназначена исключительно для использования с данным принтером Epson. Epson не несет ответственности за применение сведений, содержащихся в этом документе, к другим принтерам.Seiko Epson Corporation и ее филиалы не несут ответственности перед покупателями данного продукта или третьими сторонами за понесенные ими повреждения, потери, сборы или затраты, вызванные несчастными случаями, неправильным использованием продукта, недозволенной модификацией, ремонтом или изменением продукта и невозможностью (исключая США) строгого соблюдения инструкций по работе и обслуживанию, разработанных Seiko Epson Corporation.Seiko Epson Corporation не несет ответственности за любые повреждения или проблемы, возникшие из-за использования любых функций или расходных материалов, не являющихся оригинальными продуктами EPSON (Original EPSON Products) или продуктами, одобренными EPSON (EPSON Approved Products).
«Epson» и «ESC/POS» — зарегистрированные торговые марки корпорации Seiko Epson.
ПРИМЕЧАНИЕ: Содержание этого руководства может быть изменено без предварительного извещения.
Copyright © 2005, Seiko Epson Corporation, Нагано, Япония.
62 TM-H6000III Руководство по эксплуатации
English
Соответствие стандартам электромагнитной (ЭМ) совместимости и безопасностиНаименование продукции: TM-H6000III Наименование модели: M147GСледующие стандарты применимы только в отношении принтеров, обозначенных соответствующими наклейками. (Испытания на ЭМ совместимость проводятся с использованием источника электропитания EPSON). В Европе: Маркировка «CE»
Безопасность EN 60950В Северной Америке: ЭМ помехи FCC/ICES-003, класс A
Безопасность UL 1950/ CSA C22.2 No. 950В Японии: ЭМ помехи VCCI, класс AВ Тихоокеанском регионе: ЭМ совместимость AS/NZS CISPR22, класс B
ПРЕДУПРЕЖДЕНИЕПодключение к этому устройству неэкранированного интерфейсного кабеля с принтером приведет к несоблюдению применимых в отношении этого устройства стандартов электромагнитной совместимости.Учитывайте, что внесение каких-либо изменений в конструкцию оборудования без специального разрешения корпорации SEIKO EPSON может привести к потере пользователем прав на гарантийное обслуживание.
Маркировка «CE»Устройство соответствует требованиям, предусмотренным следующими директивами и стандартами:Директива 89/336/EEC: EN 55022
класс BEN 55024
IEC 61000-4-2 IEC 61000-4-3 IEC 61000-4-4 IEC 61000-4-5 IEC 61000-4-6 IEC 61000-4-8IEC 61000-4-11
ГОСТ Р 51318.22-99 (класс Б)ГОСТ Р 51318.24-99ГОСТ Р МЭК 60950-2002ГОСТ 26329-84 (пп. 1.2, 1.3)
Обеспечение безопасностиВ этом разделе содержится важная информация, способствующая обеспечению безопасного и эффективного использования описываемой продукции. Внимательно прочитайте этот раздел и храните инструкции по обеспечению безопасности в легкодоступном месте.
ПРЕДУПРЕЖДЕНИЕЕсли при использовании вашего оборудования будут замечены дым, непривычный запах или необычный шум, немедленно выключите оборудование. Его дальнейшее использование может привести к пожару. Сразу же отключите оборудование от сети и обратитесь за рекомендациями к торговому представителю изготовителя или в центр технического обслуживания оборудования, или в сервисный центр.Никогда не пытайтесь самостоятельно ремонтировать это оборудование. Неправильное выполнение ремонта может привести к возникновению опасной ситуации.

TM-H6000III Руководство по эксплуатации 63
English
Никогда не разбирайте оборудование и не изменяйте его конструкцию. Неумелое обращение с оборудованием может стать причиной травмы или привести к пожару.Пользуйтесь только указанным источником электропитания. Подключение оборудования к неисправному источнику электропитания может привести к пожару.Не допускайте попадания посторонних предметов внутрь оборудования. Попадание в оборудование постороннего предмета может привести к пожару.В случае попадания внутрь оборудования воды или какой-либо другой жидкости немедленно отсоедините от сети шнур электропитания оборудования и обратитесь за рекомендациями к торговому представителю изготовителя или в центр технического обслуживания оборудования, или в сервисный центр. Продолжение использования оборудования может привести к пожару.
ВНИМАНИЕ!Подключайте кабели только так, как указано в этом руководстве. Неправильное подсоединение кабелей может привести к повреждению и воспламенению оборудования.Убедитесь в том, что оборудование установлено на прочной, устойчивой горизонтальной поверхности. В случае падения оборудование может сломаться или стать причиной травмы.Не используйте оборудование в помещениях, отличающихся повышенной влажностью или запыленностью воздуха. Чрезмерные влажность и запыленность могут приводить к повреждению оборудования или пожару.Не кладите тяжелые предметы сверху на оборудование. Оборудование может упасть или перевернуться, что, в свою очередь, может привести к его поломке или стать причиной травмы.С целью обеспечения безопасности отключайте оборудование от сети в тех случаях, когда оно не используется в течение длительного времени.Не прикасайтесь к термопечатающей головке или к двигателю подачи бумаги, пока они не остынут. Если печать продолжается в течение длительного времени, головка и двигатель могут нагреваться до очень высокой температуры. Прикосновение к горячим компонентам может привести к ожогам.
Предупреждающие наклейки
ПРЕДУПРЕЖДЕНИЕНе подключайте телефонную линию к интерфейсу кассового ящика или к соединительному разъему для модуля дисплея; неправильное подключение может привести к повреждению принтера или телефонной линии.
ВНИМАНИЕ!Термопечатающая головка и двигатель подачи бумаги в секцию печати нагреваются до высокой температуры.
ВНИМАНИЕ!Соблюдайте осторожность при обращении с лезвием автоматического отрезного устройства.
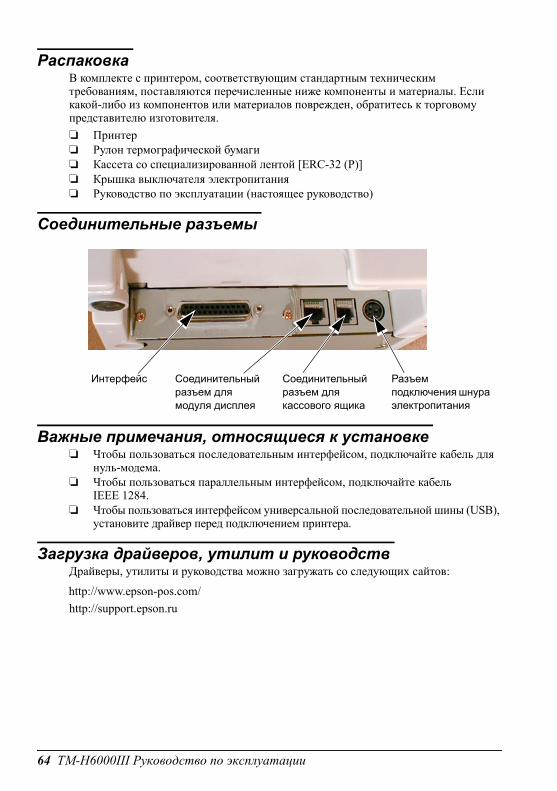
64 TM-H6000III Руководство по эксплуатации
English
РаспаковкаВ комплекте с принтером, соответствующим стандартным техническим требованиям, поставляются перечисленные ниже компоненты и материалы. Если какой-либо из компонентов или материалов поврежден, обратитесь к торговому представителю изготовителя.❏ Принтер❏ Рулон термографической бумаги❏ Кассета со специализированной лентой [ERC-32 (P)]❏ Крышка выключателя электропитания❏ Руководство по эксплуатации (настоящее руководство)
Соединительные разъемы
Важные примечания, относящиеся к установке❏ Чтобы пользоваться последовательным интерфейсом, подключайте кабель для
нуль-модема.❏ Чтобы пользоваться параллельным интерфейсом, подключайте кабель
IEEE 1284.❏ Чтобы пользоваться интерфейсом универсальной последовательной шины (USB),
установите драйвер перед подключением принтера.
Загрузка драйверов, утилит и руководствДрайверы, утилиты и руководства можно загружать со следующих сайтов:
http://www.epson-pos.com/http://support.epson.ru
Соединительный разъем для кассового ящика
Соединительный разъем для модуля дисплея
Разъем подключения шнура электропитания
Интерфейс
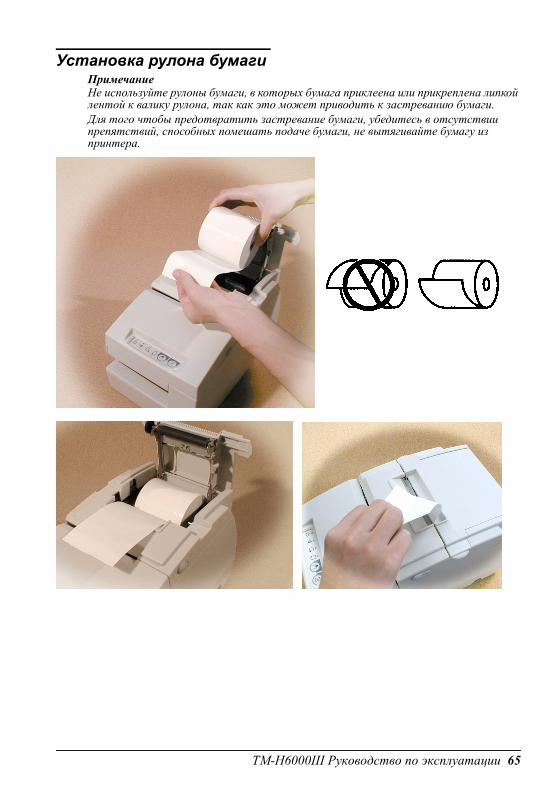
TM-H6000III Руководство по эксплуатации 65
English
Установка рулона бумагиПримечаниеНе используйте рулоны бумаги, в которых бумага приклеена или прикреплена липкой лентой к валику рулона, так как это может приводить к застреванию бумаги.Для того чтобы предотвратить застревание бумаги, убедитесь в отсутствии препятствий, способных помешать подаче бумаги, не вытягивайте бумагу из принтера.
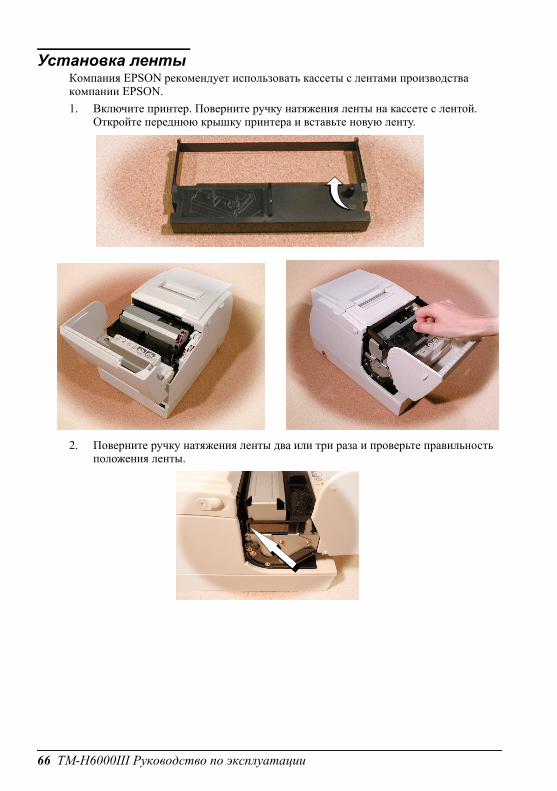
66 TM-H6000III Руководство по эксплуатации
English
Установка лентыКомпания EPSON рекомендует использовать кассеты с лентами производства компании EPSON.1. Включите принтер. Поверните ручку натяжения ленты на кассете с лентой.
Откройте переднюю крышку принтера и вставьте новую ленту..
2. Поверните ручку натяжения ленты два или три раза и проверьте правильность положения ленты.
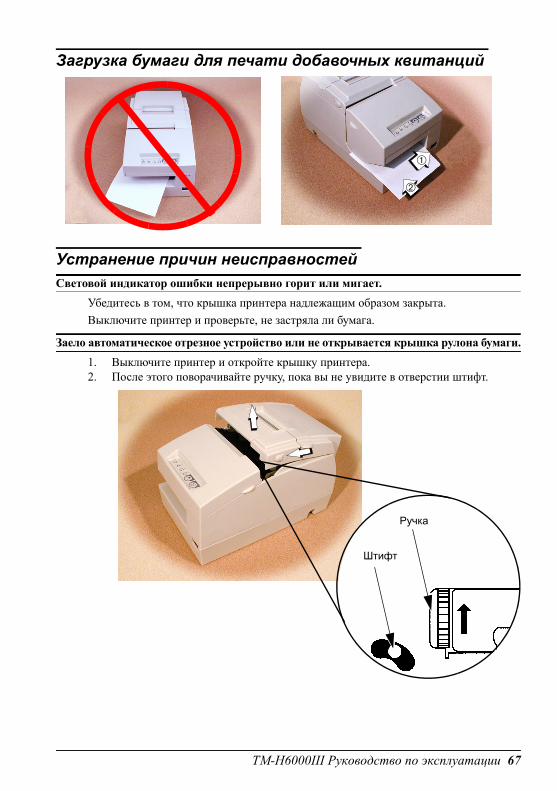
TM-H6000III Руководство по эксплуатации 67
English
Загрузка бумаги для печати добавочных квитанций
Устранение причин неисправностейСветовой индикатор ошибки непрерывно горит или мигает.
Убедитесь в том, что крышка принтера надлежащим образом закрыта.Выключите принтер и проверьте, не застряла ли бумага.
Заело автоматическое отрезное устройство или не открывается крышка рулона бумаги.1. Выключите принтер и откройте крышку принтера.2. После этого поворачивайте ручку, пока вы не увидите в отверстии штифт.
➀
➁
Ручка
Штифт
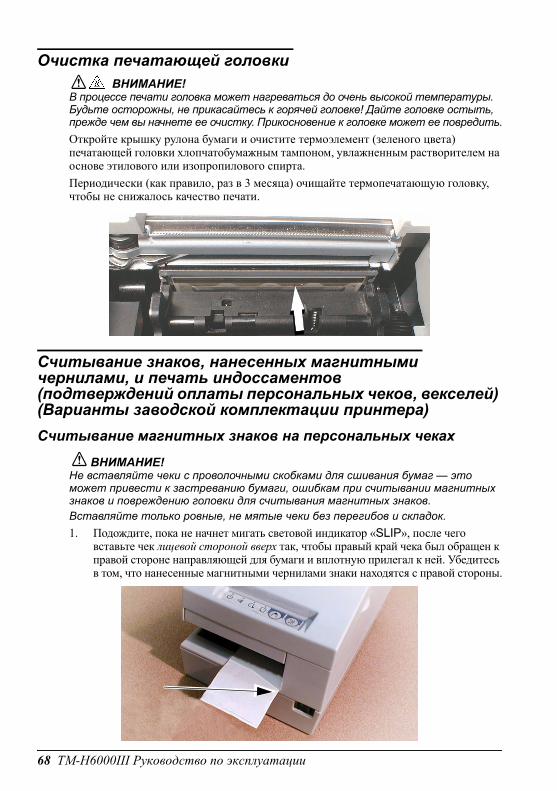
68 TM-H6000III Руководство по эксплуатации
English
Очистка печатающей головкиВНИМАНИЕ!
В процессе печати головка может нагреваться до очень высокой температуры. Будьте осторожны, не прикасайтесь к горячей головке! Дайте головке остыть, прежде чем вы начнете ее очистку. Прикосновение к головке может ее повредить.Откройте крышку рулона бумаги и очистите термоэлемент (зеленого цвета) печатающей головки хлопчатобумажным тампоном, увлажненным растворителем на основе этилового или изопропилового спирта.Периодически (как правило, раз в 3 месяца) очищайте термопечатающую головку, чтобы не снижалось качество печати.
Считывание знаков, нанесенных магнитными чернилами, и печать индоссаментов (подтверждений оплаты персональных чеков, векселей) (Варианты заводской комплектации принтера)Считывание магнитных знаков на персональных чеках
ВНИМАНИЕ!Не вставляйте чеки с проволочными скобками для сшивания бумаг — это может привести к застреванию бумаги, ошибкам при считывании магнитных знаков и повреждению головки для считывания магнитных знаков.Вставляйте только ровные, не мятые чеки без перегибов и складок.1. Подождите, пока не начнет мигать световой индикатор «SLIP», после чего
вставьте чек лицевой стороной вверх так, чтобы правый край чека был обращен к правой стороне направляющей для бумаги и вплотную прилегал к ней. Убедитесь в том, что нанесенные магнитными чернилами знаки находятся с правой стороны.

TM-H6000III Руководство по эксплуатации 69
English
2. Принтер зарегистрирует вставляемый чек и начнет втягивать его. Как только принтер начнет втягивать чек, отпустите чек. Когда принтер вытолкнет чек и световой индикатор «SLIP» снова начнет мигать, извлеките чек, потянув его прямо вверх; не тяните чек к себе под углом.
Очистка механизма устройства для считывания магнитных знаков
Примерно раз в год очищайте головку для считывания магнитных знаков специальной картой с нанесенным чистящим составом для очистки устройств считывания чеков.Пользуйтесь картой PRESAT (KIC) для очистки устройств считывания чеков (CHECK READER CLEANING CARD) или эквивалентной имеющейся в продаже чистящей картой.ПримечаниеНе пользуйтесь чистящими картами с клейкими поверхностями!Выполните следующую последовательность операций.1. Вставьте в принтер рулон бумаги и выключите электропитание принтера, после
чего откройте крышку рулона бумаги и снова включите электропитание, удерживая в нажатом положении кнопку «RELEASE».
2. Семь раз нажмите на кнопку «RELEASE», после чего закройте крышку рулона бумаги. Принтер распечатает сообщение на бумаге для квитанций, и начнет мигать световой индикатор «SLIP».
3. Вставьте чистящую карту так же, как вставляется стандартный чек.
ВНИМАНИЕ!Не забывайте, что чистящую карту следует вставлять, соблюдая правильную ориентацию, чтобы верхняя сторона карты была обращена вверх.Чистящая карта используется только один раз; использованную карту следует выбрасывать.4. После того как принтер вытолкнет чистящую карту, нажмите на кнопку
«RELEASE» и извлеките карту из принтера.
Замечания, относящиеся к использованию устройства для считывания магнитных знаков
Не устанавливайте принтер рядом с источниками любых электромагнитных полей. Будьте особенно осторожны, устанавливая дисплей, и проверьте, продолжает ли считывающее устройство правильно распознавать магнитные знаки после установки дисплея.Следите за тем, чтобы в процессе считывания магнитных знаков принтер не подвергался каким-либо ударным нагрузкам или вибрации.
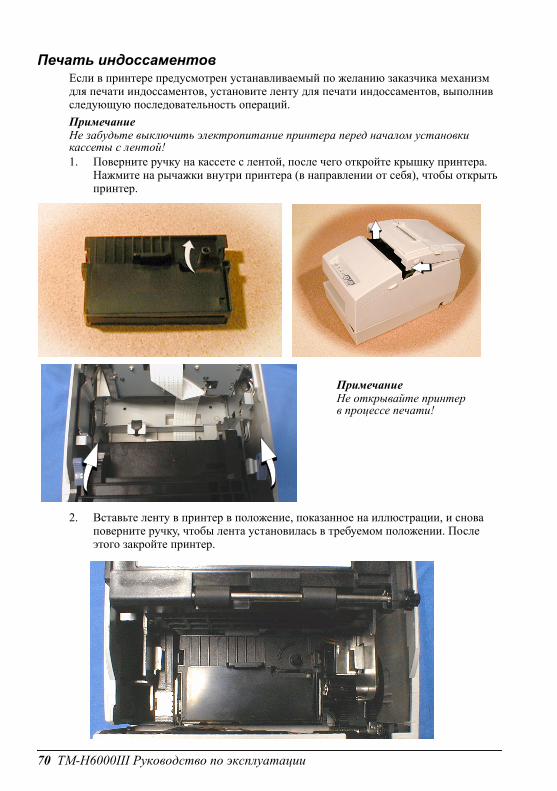
70 TM-H6000III Руководство по эксплуатации
English
Печать индоссаментовЕсли в принтере предусмотрен устанавливаемый по желанию заказчика механизм для печати индоссаментов, установите ленту для печати индоссаментов, выполнив следующую последовательность операций.ПримечаниеНе забудьте выключить электропитание принтера перед началом установки кассеты с лентой!1. Поверните ручку на кассете с лентой, после чего откройте крышку принтера.
Нажмите на рычажки внутри принтера (в направлении от себя), чтобы открыть принтер.
2. Вставьте ленту в принтер в положение, показанное на иллюстрации, и снова поверните ручку, чтобы лента установилась в требуемом положении. После этого закройте принтер.
ПримечаниеНе открывайте принтер в процессе печати!

TM-H6000III Руководство по эксплуатации 71
English
Экологический ярлык компании EPSONОписываемое в этом руководстве оборудование соответствует требованиям к продукции с экологическим ярлыком компании EPSON. Подробное изложение этих требований см. на сайте по адресу http://www.epson.co.jp/e/.
Технические характеристики принтера TM-H6000III.
Метод печати Подписываемые квитанции: термографическая печатьДобавочные квитанции: 9-игольная последовательная контактная матричная печатьИндоссаменты: 8-игольная челночная контактная матричная печать
Шрифтовой комплект Подписываемые квитанции: 9 × 17 / 12 × 24Добавочные квитанции: 5 × 9 / 7 × 9Индоссаменты: 5 × 7
Столбцы Подписываемые квитанции: 56 / 42Добавочные квитанции: 60 / 45Индоссаменты: 40
Размеры символов(ширина × высота)
Подписываемые квитанции: 0,99 × 2,40 мм1,41 × 3,39 мм
Добавочные квитанции: 1,56 × 3,1 мм1,24 × 3,1 мм
Индоссаменты: 1,1 × 2,42 мм
Наборы символов 95 алфавитно-цифровых символов, 37 международных символов128 × 11 (добавочные квитанции: 12) страниц дополнительных графических символов
Скорость печати (строк в секунду)
Подписываемые квитанции: 63. Добавочные квитанции: 5,14. Индоссаменты: 1,9.
Размеры бумаги (ширина × длина)
Подписываемые квитанции: рулон термографической бумаги 79,5 ± 0,5 × 83 мм.Добавочные квитанции и индоссаменты: 70 ~ 148 × 150 ~ 210 мм
Толщина бумаги Добавочные квитанции (однослойные): 0,09 ~ 0,2 мм Индоссаменты: 0,09 ~ 0,2 мм
Возможности копирования Подписываемые квитанции и индоссаменты: однослойная бумагаДобавочные квитанции: 1 оригинал + 3 копии
Красящая лента Добавочные квитанции: ERC-32(P).Индоссаменты: ERC-41(P).
Ресурс ленты Добавочные квитанции: 6 миллионов символов. Индоссаменты: 1 миллион символов.
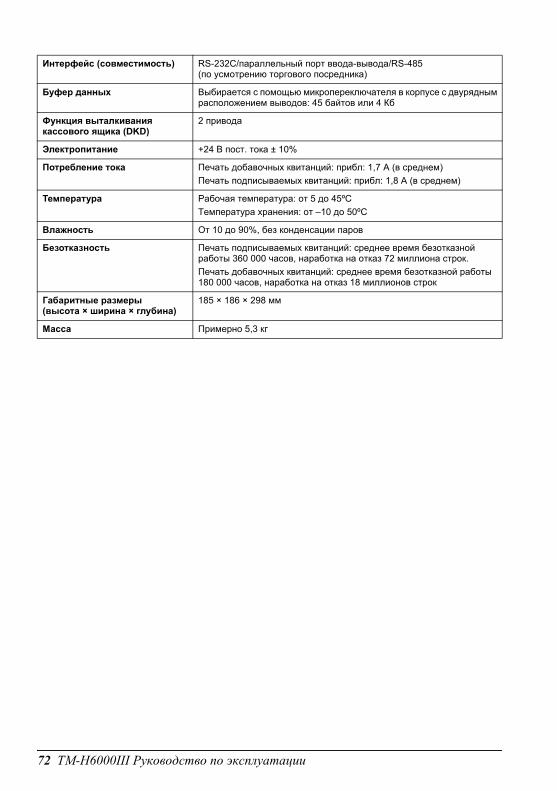
72 TM-H6000III Руководство по эксплуатации
English
Интерфейс (совместимость) RS-232C/параллельный порт ввода-вывода/RS-485 (по усмотрению торгового посредника)
Буфер данных Выбирается с помощью микропереключателя в корпусе с двурядным расположением выводов: 45 байтов или 4 Кб
Функция выталкивания кассового ящика (DKD)
2 привода
Электропитание +24 В пост. тока ± 10%
Потребление тока Печать добавочных квитанций: прибл: 1,7 A (в среднем)Печать подписываемых квитанций: прибл: 1,8 A (в среднем)
Температура Рабочая температура: от 5 до 45ºC Температура хранения: от –10 до 50ºC
Влажность От 10 до 90%, без конденсации паров
Безотказность Печать подписываемых квитанций: среднее время безотказной работы 360 000 часов, наработка на отказ 72 миллиона строк. Печать добавочных квитанций: среднее время безотказной работы 180 000 часов, наработка на отказ 18 миллионов строк
Габаритные размеры(высота × ширина × глубина)
185 × 186 × 298 мм
Масса Примерно 5,3 кг


Printed on Recycled Paper
Printed in China
2005.06


