Tivoli 5.5.3.0
208
Tivoli ® Storage Manager FastBack Storage Manager FastBack Installation and User's Guide Version 5.5.3.0 SC23-8562-02
-
Upload
jodyg35950 -
Category
Documents
-
view
1.434 -
download
2
Transcript of Tivoli 5.5.3.0
Tivoli® Storage Manager FastBack
Storage Manager FastBack Installation and User's Guide
Version 5.5.3.0
SC23-8562-02
���

Tivoli® Storage Manager FastBack
Storage Manager FastBack Installation and User's Guide
Version 5.5.3.0
SC23-8562-02
���

NoteBefore using this information and the product it supports, read the information in “Notices,” on page 187.
This edition applies to version 5, release 5, modification 3 of IBM Tivoli Storage Manager FastBack (product number5724-U93) and to all subsequent releases and modifications until otherwise indicated in new editions.
© Copyright International Business Machines Corporation 2008, 2009.US Government Users Restricted Rights – Use, duplication or disclosure restricted by GSA ADP Schedule Contractwith IBM Corp.

About this information
The purpose of this PDF is to provide the related topics from the IBM® Tivoli®
Storage Manager FastBack™ information center in a printable format.
Terms used in this informationThe following terms represent important concepts in the Tivoli Storage ManagerFastBack:
access permissionA privilege that permits the access or use of an object.
Administrative Command LineThe command line interface used to access Tivoli Storage ManagerFastBack functions. Most of the commands available through the graphicalinterface of FastBack Manager can also be used in the AdministrativeCommand Line. The Administrative Command Line can also sendcommands directly to FastBack Mount.
application quiescingAn offline back up of applications, for example a backup of a supportedMicrosoft Exchange server or SQL server. When you use applicationquiescing to back up an application, the server operations are disrupted.Services and applications that run on the server are shut down during theapplication quiescing backup. The Volume Shadow Copy service is a typeof application quiescing. IBM also provides application quiescing.
Bare Machine RecoveryA solution that you can use to recover entire systems to a comparableserver, to a new server with different hardware, or to a virtual machine(VMware or Microsoft® Virtual Server).
basic diskA disk initialized for basic storage that can hold primary partitions,extended partitions, and logical drives.
Central Control StationA Java-based graphical user interface that provides you with a graphicaluser interface to view status files stored for the Tivoli Storage ManagerFastBack Disaster Recovery Server database.
circular loggingA transaction logging method based on a fixed amount of disk space. If thedisk space allocated for transaction logs is filled, the application overwritesthe oldest transactions.
client groupIdentify the volumes that are backed up. In addition to volumes, clientgroups can back up SQL and Exchange databases. The SQL and Exchangedatabases that are backed up can span across multiple disk volumes.
consistent snapshotA snapshot that is compatible with the previous snapshot. The algorithmused to record the data synchronizes the recording of data withcheckpoints and messages to ensure the snapshot is coherent with theprevious snapshots.
© Copyright IBM Corp. 2008, 2009 iii
content aware snapshotIdentifies only the used areas of volumes during full and incrementalsnapshots. Deleted files are not backed up.
Continuous Data ProtectionA tool that records all activity between snapshots, permitting therestoration of a system to a point in time.
Continuous Data Protection rangeThe time between two snapshots.
data volumeA discrete unit of storage on disk, tape, or other recording medium thatsupports data.
destination volumeThe disk on which data will be restored.
differential snapshotSynonym for incremental delta block.
disaster recoveryThe process of restoring a database after a partial or complete site failurethat was caused by a catastrophic event such as an earthquake or fire.Typically, disaster recovery requires a full database backup at anotherlocation.
dynamic diskA disk that provides support for volumes spanning multiple disks.Dynamic disks use a hidden database to track information about dynamicvolumes on the disk and other dynamic disks.
FastBack ManagerA Java-based graphical user interface application that providesadministration and management operations. For example, FastBackManager supports snapshot configuration, scheduling, monitoring, andvolume-level and disk-level restoration. The FastBack Manager accesses theFastBack Server through the LAN.
FastBack MountAn application that enables the mounting of any snapshot volume from therepository. You can view the snapshot locally, with read-only access, andon the server.
FastBack ClientThis application tracks block-level changes with copy-on-write technologyfor the protected systems. The client provides block-level, incrementalsnapshots of New Technology File Systems (NTFS) and supports acontinuous data protection option.
FastBack Disaster Recovery ServerFor disaster recovery, this server supports the copy of snapshots fromFastBack Manager to a central location.
FastBack ServerThis server is a repository used to track snapshots. The server alsomanages the transfer of data.
FastBack WatchdogA service that monitors the status of the backup server. The servicedetermines if the server is down. If the status is down, the service sends anemail to the system administrator about the server status.
iv Installation and User's Guide

full snapshotA type of snapshot. Creates a complete image of the volume.
incremental delta blockA type of snapshot. A record of the differences between the aggregation ofall incremental snapshots in a chain, and the actual data on the disk.
incremental snapshotA type of snapshot. Instead of taking a complete image of the volume, theincremental snapshot records only the data that has changed since the fullsnapshot was completed.
Instant RestoreThe capability that enables applications to be up and running withinminutes after data loss. Data recovery is performed in the background.
integrityThe quality of data that exists as long as destruction, alteration, loss ofconsistency, or loss of data are prevented.
job scheduleAn object that contains entries for jobs to be submitted at a specified timeand date. These job schedule entries can also be used to schedule recurringjobs.
log volumeAn abstract representation of disk space that is used for storage. There aretwo types of log volumes: permanent and archival. Permanent volumes canbe stored on file or disk devices. Archival volumes can only be stored onfile devices. Internal log server data and log file groups must be stored onpermanent volumes. Log archive groups must be stored on archivalvolumes.
master databaseThe database that contains application data tables.
mounted volumeA removable area of storage on a hard disk attached to an empty folder.Mounted volumes should have an assigned drive letter.
network shareA location on a computer network, typically allowing multiple computerusers on the same network to have a centralized space on which to storefiles.
quiesceTo end a process or shut down a system after allowing normal completionof active operations.
quiescent backupAn offline backup. Requires interrupting the operation of the server.Services and applications associated with the server are also shut downduring the backup.
quiescing parameterThe option to take the object offline.
quorum diskA managed disk (MDisk) that contains a reserved area used exclusively forcluster management. The quorum disk is accessed in the event that it isnecessary to determine which half of the cluster will continue to read andwrite data.
About this information v
repository diskA storage device used as a persistent storage area for data and otherapplication resources.
repository poolA division of a persistent storage area for data and other applicationresources.
service groupA collection of resources of different types for a given application or task.Veritas Cluster Server manages resources in the form of service groups.
snapshotA record of backup data at a certain point in time.
snapshot chainsSeries of snapshots of the same volume in the same policy.
snapshot policyLinks client groups to a job schedule. A snapshot policy also specifies thenumber of snapshots that can be retained and identifies snapshot priority.
storage groupThe user-defined partition of a database.
storage poolA named set of storage volumes that is the destination that is used to storeclient data.
target volumeA discrete unit of storage on disk, tape, or other data recording mediummarked to support some form of identifier and parameter list, such as avolume label or input/output control.
transaction loggingA logging method where the database server maintains a record of eachchange made to the database during a transaction.
virtual machineAn instance of a data-processing system that appears to be at the exclusivedisposal of a single user, but whose functions are accomplished by sharingthe resources of a physical data-processing system.
virtual volumeAn archive file on a target server that represents a sequential mediavolume on a source server.
volumeA discrete unit of storage on disk, tape or other data recording mediumthat supports some form of identifier and parameter list, such as a volumelabel or input/output control.
volume managementA piece of code that provides a layer of physical abstraction, dataprotection, and performance.
Support informationYou can get support information for IBM products from a variety of sources.
vi Installation and User's Guide
Getting technical trainingInformation about Tivoli technical training courses is available online.
Go to the following Web site: http://www.ibm.com/software/tivoli/education/
Searching knowledge basesIf you have a problem with Tivoli Storage Manager FastBack, there are severalknowledge bases that you can search.
You can begin with the Tivoli Storage Manager Information Center at the followingWeb site: http://publib.boulder.ibm.com/infocenter/tivihelp/v1r1/topic/com.ibm.tsm.fb.doc/welcome.htm. From this Web site, you can search all TivoliStorage Manager publications.
Searching the InternetIf you cannot find an answer to your question in the Tivoli Storage Managerinformation center, search the Internet for the latest, most complete informationthat might help you resolve your problem.
To search multiple Internet resources, go to the support Web site for Tivoli StorageManager at http://www.ibm.com/software/tivoli/support/storage-mgr-fastback/.From there, you can search a variety of resources including:v IBM technotesv IBM downloadsv IBM Redbooks®
If you still cannot find the solution to the problem, you can search forums andnewsgroups on the Internet for the latest information that might help you resolveyour problem. To share your experiences and learn from others in the usercommunity, go to the Tivoli Storage Manager wiki at http://www.ibm.com/developerworks/wikis/display/tivolistoragemanager/Home.
Finding product fixesA product fix to resolve your problem might be available from the IBM SoftwareSupport Web site.
You can determine what fixes are available by checking the following Web site:http://www.ibm.com/software/tivoli/support/storage-mgr-fastback/N581227I00936B79-download.html. Click Fixes by version.
Getting e-mail notifications of product fixesYou can get notifications about fixes and other news about IBM products.
To receive weekly e-mail notifications about fixes and other news about IBMproducts, follow these steps:1. From the support page for any IBM product, click My notifications in the
upper-right corner of the page.2. If you have already registered, skip to the next step. If you have not registered,
click register now to establish your user ID and password.3. Sign in to My notifications.4. On the My notifications page, click Subscribe.5. Select a product family and check the appropriate boxes for the type of
information you want.
About this information vii

6. Click Submit.
Contacting IBM Software SupportYou can contact IBM Software Support if you have an active IBM softwaremaintenance contract and if you are authorized to submit problems to IBM.
Before you contact IBM Software support, follow these steps:1. “Setting up a software maintenance contract”2. “Determine the business impact”3. “Describe problems and gather background information” on page ix
Then see “Submit the problem to IBM Software Support” on page ix forinformation on contacting IBM Software Support.
Setting up a software maintenance contractSet up a software maintenance contract. The type of contract that you needdepends on the type of product you have.v For IBM distributed software products (including, but not limited to, Tivoli,
Lotus®, and Rational® products, as well as IBM DB2® and IBM WebSphere®
products that run on Windows® or UNIX® operating systems), enroll in IBMPassport Advantage® in one of the following ways:– Online: Go to the Passport Advantage Web page at http://www.ibm.com/
software/lotus/passportadvantage/, and click How to enroll, and follow theinstructions.
– By phone: For the phone number to call in your country, go to the IBMSoftware Support Handbook Web page at http://www14.software.ibm.com/webapp/set2/sas/f/handbook/home.html and click Contacts.
v For server software products, you can purchase a software maintenanceagreement by working directly with an IBM sales representative or an IBMBusiness Partner. For more information about support for server softwareproducts, go to the IBM Technical support advantage Web page athttp://www.ibm.com/servers/.
If you are not sure what type of software maintenance contract you need, call1–800–IBMSERV (1–800–426–7378) in the United States. For a list of telephonenumbers of people who provide support for your location, go to the SoftwareSupport Handbook page at http://www14.software.ibm.com/webapp/set2/sas/f/handbook/home.html.
Determine the business impactWhen you report a problem to IBM, you are asked to supply a severity level. Usethe following criteria to understand and assess the business impact of the problemthat you are reporting:
Severity 1The problem has a critical business impact. You are unable to use theprogram, resulting in a critical impact on operations. This conditionrequires an immediate solution.
Severity 2The problem has a significant business impact. The program is usable, butit is severely limited.
viii Installation and User's Guide
Severity 3The problem has some business impact. The program is usable, but lesssignificant features (not critical to operations) are unavailable.
Severity 4The problem has minimal business impact. The problem causes little impacton operations, or a reasonable circumvention to the problem wasimplemented.
Describe problems and gather background informationWhen explaining a problem to IBM, it is helpful to be as specific as possible.Include all relevant background information so that IBM Software Supportspecialists can help you solve the problem efficiently.
To save time, know the answers to these questions:v Which software versions were you running when the problem occurred?v Do you have logs, traces, and messages that are related to the problem
symptoms? IBM Software Support is likely to ask for this information.v Can the problem be recreated? If so, what steps led to the failure?v Have any changes been made to the system? For example, hardware, operating
system, networking software, and so on.v Are you currently using a workaround for the problem? If so, be prepared to
explain the workaround when you report the problem.
Submit the problem to IBM Software SupportYou can submit your problem to IBM Software Support online or by phone.
OnlineClick Submit and track problems on the IBM Software Support site athttp://www.ibm.com/software/support/probsub.html. Type yourinformation into the appropriate problem submission form.
By phoneFor the phone number to call in your country, go to the contacts page ofthe IBM Software Support Handbook at http://techsupport.services.ibm.com/guides/contacts.html and click the name of your geographic region.
If the problem you submit is for a software defect or for missing or inaccuratedocumentation, IBM Software Support creates an Authorized Program AnalysisReport (APAR). The APAR describes the problem in detail. If a workaround ispossible, IBM Software Support provides a workaround that you can implementuntil the APAR is resolved and a fix is delivered. IBM publishes resolved APARson the Software Support Web site at http://www.ibm.com/software/tivoli/support/storage-mgr-fastback/, so that other users who experience the sameproblem can benefit from the same resolution.
Conventions used in this informationThis information uses the Windows convention for specifying environmentvariables and for directory notation.
Documentation changesDocumentation changes were made in support of the information center refresh forIBM Tivoli Storage Manager FastBack, Version 5.5.3.0. The following changes werealso made to this version of the information center:
About this information ix

v Updates based on changes made to the software to fix defects and to respond toproblem reports.
v Improve the description of the cleanup process and tasks.v Provide more specific, scenario-based information about using Tivoli Storage
Manager FastBack.
The changes made to the information center for this refresh are available in Englishonly. The changes to the information center will be translated in the next release ofTivoli Storage Manager FastBack.
x Installation and User's Guide

Contents
About this information . . . . . . . . iiiTerms used in this information . . . . . . . . iiiSupport information . . . . . . . . . . . vi
Getting technical training . . . . . . . . viiSearching knowledge bases . . . . . . . . viiContacting IBM Software Support . . . . . viii
Conventions used in this information . . . . . . ixDocumentation changes . . . . . . . . . . ix
Chapter 1. Tivoli Storage ManagerFastBack . . . . . . . . . . . . . . 1System components . . . . . . . . . . . . 3
Chapter 2. Planning. . . . . . . . . . 7Supported operating systems . . . . . . . . . 7Hardware requirements . . . . . . . . . . 15
Dynamic disk support . . . . . . . . . . 18Software requirements . . . . . . . . . . . 20Microsoft Cluster Server (MSCS) and Veritas ClusterServer (VCS) . . . . . . . . . . . . . . 21
Local Continuous Replication . . . . . . . 22Cluster Continuous Replication . . . . . . . 22
Chapter 3. Installing . . . . . . . . . 23Performing prerequisite tasks . . . . . . . . 23Installing Tivoli Storage Manager FastBack . . . . 23
Installing the FastBack Server . . . . . . . 24Installing the FastBack Client . . . . . . . 26Installing Tivoli Storage Manager FastBackDisaster Recovery Server . . . . . . . . . 28Installing with Advanced options . . . . . . 29
Starting and running FastBack Server, FastBackClient , Tivoli Storage Manager FastBack DisasterRecovery Server, FastBack Mount, and FastBackWatchdog . . . . . . . . . . . . . . . 33Starting FastBack Manager . . . . . . . . . 33Navigating FastBack Manager . . . . . . . . 34
The Configuration tab . . . . . . . . . . 35Snapshots Monitor tab. . . . . . . . . . 39Recovery tab . . . . . . . . . . . . . 40
Using the FastBack Client Configurator . . . . . 40Configuration and log files . . . . . . . . . 41
Chapter 4. Uninstalling . . . . . . . . 43
Chapter 5. User management andsecurity . . . . . . . . . . . . . . 45Active Directory groups . . . . . . . . . . 45FastBack Manager user groups . . . . . . . . 46
Creating user groups . . . . . . . . . . 46Creating users . . . . . . . . . . . . 48Changing user properties . . . . . . . . . 48Deleting users . . . . . . . . . . . . 49Changing user group properties . . . . . . 49
Deleting user groups . . . . . . . . . . 49Access permissions . . . . . . . . . . . . 50Security and login . . . . . . . . . . . . 51
Active Directory integration . . . . . . . . 52Tivoli Storage Manager FastBack accounts . . . 53Switching between Tivoli Storage ManagerFastBack and Active Directory domains . . . . 53
Chapter 6. Configuring and using . . . 55Changing connection parameters to FastBack Server 56
Working with FastBack Manager in WANenvironment . . . . . . . . . . . . . 56Configuring SAN environment . . . . . . . 58
Setting the system clock . . . . . . . . . . 58Identifying repositories . . . . . . . . . . 59
Viewing storage pools . . . . . . . . . . 61Setting priority for storage pools . . . . . . 64Identifying DAS and SAN disks . . . . . . 65Adding disks to the repository . . . . . . . 65Adding volumes to the repository . . . . . . 65Removing a disk from the repository withsnapshot relocation . . . . . . . . . . . 66Effect of changes in the primary storage layout 67Creating repositories . . . . . . . . . . 67Maintaining repository pools . . . . . . . 73
Setting up snapshot policies . . . . . . . . . 75Using wizards to create snapshot policies . . . 76Creating snapshot policies manually . . . . . 83Managing snapshot policies . . . . . . . . 86Changing the global application-awareparameters . . . . . . . . . . . . . 86Manual snapshot back up . . . . . . . . 89
Volume restore . . . . . . . . . . . . . 90Performing a volume restore . . . . . . . 91
File recovery with FastBack Mount . . . . . . 91Starting FastBack Mount . . . . . . . . . 92Security . . . . . . . . . . . . . . 92Selecting the repository for FastBack Mount . . 93Mounting snapshots and volumes . . . . . . 94Instant Restore . . . . . . . . . . . . 95Using FastBack Mount and Tivoli StorageManager . . . . . . . . . . . . . . 99Using FastBack Mount and Veritas NetBackup 101
Continuous Data Protection . . . . . . . . 104Restoring data from Continuous Data Protectionsnapshots. . . . . . . . . . . . . . 105Stopping Continuous Data Protection . . . . 106Continuous Data Protection slider and FastBackServer events . . . . . . . . . . . . 107
Microsoft Exchange back up and restore . . . . 109Background . . . . . . . . . . . . . 109Tivoli Storage Manager FastBack for MicrosoftExchange back up and restore processes . . . 109Types of backup . . . . . . . . . . . 110Setting the global application aware parameters 110
© Copyright IBM Corp. 2008, 2009 xi

Creating an Exchange snapshot policy . . . . 111Exchange 2000, Exchange 2003, and Exchange2007 restore . . . . . . . . . . . . . 112Performing a full Exchange 2000 Serverdatabase restore . . . . . . . . . . . 112Backing up a clustered Exchange file server . . 113
SQL back up and restore . . . . . . . . . 113Tivoli Storage Manager FastBack SQL back up 115Creating an SQL Snapshot Policy . . . . . . 115Editing SQL Snapshot Policy . . . . . . . 116Tivoli Storage Manager FastBack SQL restore 117
Backing up and restoring Lotus Domino Databases 120Supported environments . . . . . . . . 120Snapshots of an offline Domino server . . . . 120Snapshots relying on Domino crash recovery 122Tips . . . . . . . . . . . . . . . 123Configuring Tivoli Storage Manager FastBackfor offline backup of Domino servers . . . . 123Considerations and usage notes for Dominobackup scripts . . . . . . . . . . . . 124
Backing up and restoring DB2 UDB databases . . 125Supported environments . . . . . . . . 126Best practices . . . . . . . . . . . . 126Configuring Tivoli Storage Manager FastBackfor online back up of DB2 UDB . . . . . . 127
Recovering operating system partitions using BareMachine Recovery . . . . . . . . . . . . 128
Chapter 7. Maintaining . . . . . . . 129Server status . . . . . . . . . . . . . 129Monitoring events and snapshots. . . . . . . 129
Viewing events . . . . . . . . . . . . 129Monitoring snapshots . . . . . . . . . 130
Disk open . . . . . . . . . . . . . . 133Handling multiple LAN cards on the samecomputer . . . . . . . . . . . . . . . 134Error recovery: Setting the number of retries . . . 134Limited mode . . . . . . . . . . . . . 135Alerts and notifications . . . . . . . . . . 136
Configuring periodic email notification . . . . 136Configurable parameters . . . . . . . . 137Environment variables . . . . . . . . . 137Disabling utilities . . . . . . . . . . . 138Using the FastBackSendMail utility . . . . . 138Defining filters . . . . . . . . . . . . 138The complete batch file . . . . . . . . . 140
Viewing software versions . . . . . . . . . 141Multi-language support limitations . . . . . . 141Cleanup . . . . . . . . . . . . . . . 142
Generations . . . . . . . . . . . . . 142Cleanup configuration . . . . . . . . . 143Manual repository cleanup options . . . . . 147Automatic disk clean up. . . . . . . . . 147
Chapter 8. Tivoli Storage ManagerFastBack Disaster Recovery . . . . . 149
Setting up FTP for the disaster recovery destination 149Disaster Recovery configuration . . . . . . . 150Problem determination for Disaster Recovery. . . 150Scheduling replication . . . . . . . . . . 152Using Disaster Recovery. . . . . . . . . . 153Locking snapshots during Disaster Recovery . . . 154Central Control Station . . . . . . . . . . 154
Starting Central Control Station . . . . . . 154Using Central Control Station . . . . . . . 154
Chapter 9. Administrative CommandLine . . . . . . . . . . . . . . . 157Starting the Administrative Command Line . . . 157Authentication . . . . . . . . . . . . . 157Command summary . . . . . . . . . . . 158
alerts . . . . . . . . . . . . . . . 158app. . . . . . . . . . . . . . . . 159client_group . . . . . . . . . . . . . 159dr . . . . . . . . . . . . . . . . 160irestore . . . . . . . . . . . . . . 160job . . . . . . . . . . . . . . . . 161log . . . . . . . . . . . . . . . . 164mount . . . . . . . . . . . . . . . 164net . . . . . . . . . . . . . . . . 166pjob . . . . . . . . . . . . . . . 166policy . . . . . . . . . . . . . . . 166set_connection . . . . . . . . . . . . 168snapshot . . . . . . . . . . . . . . 168util . . . . . . . . . . . . . . . . 170ver . . . . . . . . . . . . . . . . 170
Chapter 10. Best practices. . . . . . 171Best practices for consistent back ups of Oracledatabases. . . . . . . . . . . . . . . 171
Prerequisites. . . . . . . . . . . . . 171General guidelines . . . . . . . . . . 172Scripts. . . . . . . . . . . . . . . 172Preparing the system . . . . . . . . . . 172
Best practices for SQL server with named instancesback up . . . . . . . . . . . . . . . 174
Consistency point . . . . . . . . . . . 175Pre or Post Processes scripts . . . . . . . 175FastBack Server setup . . . . . . . . . 175
Chapter 11. Problem determination 177
Appendix. Notices . . . . . . . . . 187Trademarks . . . . . . . . . . . . . . 189
Index . . . . . . . . . . . . . . . 191
xii Installation and User's Guide

Chapter 1. Tivoli Storage Manager FastBack
Tivoli Storage Manager FastBack restores applications, files, volumes, or disks fromfile systems and applications using currently deployed disk arrays or lower coststorage technology such as ATA/IDE RAID. Microsoft Exchange Server andMicrosoft SQL Server are examples of applications that can be restored.
The technology maps blocks to files and application data, making it possible torestore from a single snapshot.
Tivoli Storage Manager FastBack also improves the efficiency of backup operations.After the software creates an initial baseline snapshot, Tivoli Storage ManagerFastBack moves only data blocks that have changed, minimizing storageconsumption.
By using the quick, reliable and more efficient backup and restore capabilities ofTivoli Storage Manager FastBack, IT organizations can meet the service demands oftheir users, and guarantee the continuity of critical business operations. Inaddition, Tivoli Storage Manager FastBack enables additional functionality in aSAN environment, such as server-less or off-host snapshots.
All monitoring and administration operations are run through the FastBackManager - a Java™-based, GUI application. Two parallel access securitymechanisms are provided:v Active Directory integrated securityv Built-in Tivoli Storage Manager FastBack user management
The following capabilities are available with Tivoli Storage Manager FastBack:v Block-level, point-in-time snapshotsv Copy-On-Write technology for production servers to continue working while
producing accurate, point-in-time snapshotsv Tivoli Storage Manager FastBack Disaster Recovery technology to replicate and
consolidate snapshots to a central location, as part of a disaster recovery systemv Incremental snapshots, after a full, baseline image is takenv Minimal storage consumption because only blocks containing data are saved in
the repositoryv Support for both direct-attached (DAS) and Storage Area Network (SAN) storagev Support for Microsoft clusters on Windows 2003 Enterprise Serverv Support for the Volume Shadow Copy (VSS) servicev For SAN environments, server-free and LAN-free snapshots that bypass the
protected system
Tivoli Storage Manager Backup/Archive Client integration
While Tivoli Storage Manager FastBack backs up and restores data, you need toarchive protected server data for long-term storage and disaster recovery. IBMTivoli Storage Manager Backup-Archive Client version 6.1 for Windows includes aconfiguration wizard that you can use to configure the Tivoli Storage ManagerBackup/Archive Client to protect FastBack Client data for long-term storage anddisaster recovery.
© Copyright IBM Corp. 2008, 2009 1
The wizard is available as a remote application using the Web client and as a localapplication. You can use the wizard to schedule when to store FastBack Client datain the Tivoli Storage Manager server.
The Tivoli Storage Manager Configuration wizard for FastBack is supported onsystems running with the following operating systems: Microsoft Windows XP 32bit or Microsoft Windows Server 2003 32 bit.
To use the wizard, the Tivoli Storage Manager Backup/Archive Client needs to beinstalled on the same system where the FastBack Server resides. If a Tivoli StorageManager FastBack Disaster Recovery Hub is deployed, the Tivoli Storage ManagerBackup/Archive Client needs to be installed on the system with the Tivoli StorageManager FastBack Disaster Recovery Hub server. There is no order required for theinstallation processes. When the Tivoli Storage Manager Configuration wizardstarts, the software checks for either a FastBack Server or a Tivoli Storage ManagerFastBack Disaster Recovery Hub server. If either server is not available on thesystem, the wizard is not usable.
The Configuration wizard for FastBack requires that the Tivoli Storage Managerclient is properly configured with a Tivoli Storage Manager server. In addition, theTivoli Storage Manager client acceptor service, dsmcad, must be running. Thissetup tasks can be completed by locally running the Tivoli Storage Manager JavaGUI configuration wizard after installing the Tivoli Storage ManagerBackup/Archive Client.
The FastBack Server or Tivoli Storage Manager FastBack Disaster Recovery Hubserver should be installed and configured for short-term data retention prior torunning the Tivoli Storage Manager Configuration wizard for FastBack. Inaddition, FastBack policies, clients, and volumes should already be defined in theFastBack Server and at least one snapshot should be taken.
After you install the software, a post-installation task must be completed. You haveto specify a FastBack user name and password with administrator authority to beused by the Tivoli Storage Manager Configuration wizard. The wizard uses theuser name and password to query and mount volumes from the FastBack Server orto run Tivoli Storage Manager Scheduler scripts.
To configure the user name and password, run the following command on thesystem where the Tivoli Storage Manager Backup/Archive Client and FastBackServer or Tivoli Storage Manager FastBack Disaster Recovery Hub server areinstalled:FastBackShell -c encrypt -u $(username) -d $(domain) -p $(password)-f <system_drive>\FastbackTSMScripts\credential.txt
The credential.txt file cannot be changed. The credential.txt file must be stored inthe FastbackTSMScripts directory of the system’s system drive for the wizard torun properly.
To start the Configuration wizard from the Tivoli Storage ManagerBackup/Archive Client GUI, complete the following steps:1. Select Utilities → Setup Wizard. The welcome page for the wizard is displayed.2. Select Help me configure the client to protect FastBack Client data.3. Click Next.4. To complete the configuration process, use the help provided with the wizard.
2 Installation and User's Guide
If you do not see the Help me configure the client to protect FastBack Client dataoption, the Tivoli Storage Manager Backup/Archive Client is not installed on thesame system with FastBack Server or Tivoli Storage Manager FastBack DisasterRecovery Hub server.
To start the wizard from the Tivoli Storage Manager Web client, complete thefollowing steps:1. Select Utilities → Setup Wizard.2. Click Next.3. To complete the configuration process, use the help provided with the wizard.
If you do not see the Setup Wizard menu displayed, the Tivoli Storage ManagerBackup/Archive Client is not installed on the same system with FastBack Server orTivoli Storage Manager FastBack Disaster Recovery Hub server.
For information about the Tivoli Storage Manager Client Configuration Wizard forFastBack, see http://www-01.ibm.com/support/docview.wss?rs=3508&context=SS9NW2&uid=swg21378128.
System componentsTivoli Storage Manager FastBack consists of the following services:
FastBack ServerA server dedicated to running Tivoli Storage Manager FastBack. TheFastBack Server performs block-level snapshots. The server connectsdirectly to the storage area network (SAN) and local area network (LAN),and, for direct-attached storage (DAS) environments, moves snapshot datathrough the LAN. If a SAN is present, the server can be configured tomove snapshot data directly through the SAN.
The snapshot data is copied from the protected system, through theFastBack Server, and into the repository. The repository can be anydesignated disk, for example, an ATA disk.
The FastBack Server provides the following functionality:v Tracking of all snapshots.v Transferring snapshot data through SAN or LAN.v Volume restoring and use of Tivoli Storage Manager FastBack for Bare
Machine Recovery through FastBack Manager.v Security with Active Directory and built-in mechanisms.
FastBack ClientThis service tracks block-level changes with Copy-On-Write technology forthe protected servers. The client provides block-level, incrementalsnapshots of New Technology File Systems (NTFS) and supports acontinuous data protection option.
FastBack MountThis service enables the mounting of any snapshot volume from therepository. You can view the snapshot locally, with read-only access, on theclient system. With FastBack Mount, you can complete the following tasks:v Verify snapshotsv Volume-level restorev Database verificationv Back up to tape
Chapter 1. Tivoli Storage Manager FastBack 3
FastBack WatchdogA service that monitors the status of the backup server. The servicedetermines if the server is down. If the status is down, the service sends anemail to the system administrator about the server status.
Tivoli Storage Manager FastBack Disaster Recovery ServerA server that stores the backup repository at an off-site location, oftenreferred to as a disaster recovery site. The FastBack Server replicates thebackup repository. The Tivoli Storage Manager FastBack Disaster RecoveryServer works on top of an existing standard FTP server.
The Tivoli Storage Manager FastBack Disaster Recovery Server uses aproprietary protocol with the standard FTP protocol. The Tivoli StorageManager FastBack Disaster Recovery protocol uses the standard FTP overSSL to ensure a secure transfer of data.
In addition, Tivoli Storage Manager FastBack provides the following interfaces:
FastBack ManagerFastBack Manager is a standalone, Java-based graphical user interface. Youcan use the FastBack Manager to initiate a variety of tasks, such as:v Managing the snapshot repositoryv Scheduling snapshotsv Performing volume level restoresv Performing bare machine recoveryv Determining the result of backup jobsv Monitoring which snapshots are completed, in-process and pendingv Monitoring Tivoli Storage Manager FastBack system eventsv Configuring and managing user group privileges and security
authentications for specific users
Multiple remote FastBack Manager sessions can be active simultaneouslyso different users can simultaneously access the FastBack Server.
Central Control StationA Java-based graphical user interface that provides a view of status filesstored for the Tivoli Storage Manager FastBack Disaster Recovery Serverdatabase. When at the disaster recovery location, you can use CentralControl Station with FastBack Manager to administer all remote FastBackServers.
Administrative Command LineThe command line interface used to access Tivoli Storage ManagerFastBack functions.
The following figure shows the high-level architecture of Tivoli Storage ManagerFastBack in the branches:
4 Installation and User's Guide

The following figure shows the global architecture for Tivoli Storage ManagerFastBack:
Figure 1. Tivoli Storage Manager FastBack high-level branch architecture
Figure 2. Tivoli Storage Manager FastBack global architecture
Chapter 1. Tivoli Storage Manager FastBack 5

6 Installation and User's Guide

Chapter 2. Planning
This release of Tivoli Storage Manager FastBack is supported on a limited numberof operating systems.
Before beginning the Tivoli Storage Manager FastBack installation, verify that yoursystem is running a supported operating system, and that you meet all hardwareand software requirements.
Tivoli Storage Manager FastBack supports any disk configuration that is supportedby the hardware and operating system. The disk configuration includes multi-pathdevice drivers.
The following device drivers have been tested as part of the Tivoli StorageManager FastBack 5.5.3.0 release:v DS3400 RDACv DS8000® - SDDv SVC - SDDv SVC - SDD (MPIO)v Clarion - PowerPathv Clarion - PowerPath (meta volume)v DS4300 RDAC
For those that have not been tested yet, if problems occur, the problems are treatedas technical support issues and will work with third party vendors to resolveissues that might occur. Multi-path device driver issues are not anticipated.However, if the controller is not on the list of controllers that have been tested aspart of the Tivoli Storage Manager FastBack 5.5.3.0 release, a Proof of Concept canhelp ensure controller compatibility with Tivoli Storage Manager FastBack.
Supported operating systemsBefore installing Tivoli Storage Manager FastBack, make sure you use a supportedoperating system and have read the information at the end of this section thatprovides tips for installation on the supported operating systems.
FastBack Server
The following table provides details about operating systems that are supportedfor FastBack Server.
Table 1. Supported operating systems for FastBack Server
Operating system andsupported release Support details
Microsoft Windows 2003Standard, Enterprise, Storage,and Storage R2 Server, ServicePack 1 or later
Boot and Windows operating system partitions must beNTFS.
Supports the following x86–based computers: 32–bitprocessors.
© Copyright IBM Corp. 2008, 2009 7

Table 1. Supported operating systems for FastBack Server (continued)
Operating system andsupported release Support details
Microsoft Windows XPProfessional Edition, ServicePack 1 or later
Boot and Windows operating system partitions must beNTFS.
Microsoft dynamic disk on GUID partition table (GPT) disks is not supported.
FastBack Client
The following table provides details about operating systems that are supportedfor FastBack Client.
Table 2. Supported operating systems for FastBack Client
Operating system andsupported release Support details
Microsoft Windows 2000Standard Server, AdvancedServer, and ProfessionalEditions, Service Pack 3 orlater
Supported on the x86 architecture only.
Boot and Windows operating system partitions must beNTFS.
Microsoft Windows 2003Standard, Enterprise, Storage,and Storage R2 Server, ServicePack 1 or later
Boot and Windows operating system partitions must beNTFS.
Supports the following x86–based computers:
v 32–bit processors
v x64 (AMD64 and EM64T)
Microsoft Windows 2003 64bit Edition
Supports the following 64-bit processors:
v x64 (AMD64 and EM64T),
v IA64 (Intel® Itanium®)
Boot and Windows operating system partitions must beNTFS.
Microsoft Windows XPProfessional Edition, ServicePack 1 or later
Boot and Windows operating system partitions must beNTFS.
8 Installation and User's Guide

Table 2. Supported operating systems for FastBack Client (continued)
Operating system andsupported release Support details
Microsoft Windows 2008Standard, Enterprise,Datacenter, Web, Storage,Small Business, and EssentialBusiness Server
Supports the following x86–based computers:
v 32–bit processors
v x64 (AMD64 and EM64T)
If you use a Windows 2008 server as a domain controller,you cannot use the FastBack Manager automatic log on.Using Windows 2008 server as a domain controller doesnot change how you can back up and restore data andapplications.
On Windows 2008 systems, the Tivoli Storage ManagerFastBack installation log is deleted after completing theinstallation process and rebooting the system. By default,the fastbackinstall.log file is created in the %temp%directory during installation.
On Windows 2008 systems, by default, all files that arelocated in the %temp% directory are deleted. To keep acopy of the fastbackinstall.log file, complete the followingsteps:
1. Run GPEDIT.MSC to open the Local Group Policy Editor.
2. Go to Computer Configuration → AdministrativeTemplate → Windows Components → Terminal Services→ Terminal Server → Temporary Folders.
3. Enable the following setting: Do not delete temp folderupon exit.
You can use this setting to maintain a user’ssession-specific temporary folders on a remote system,even if the user logs off from a session.
By default, Terminal Services deletes a user’s temporaryfolders when the user logs off. This setting only takes effectif per-session temporary folders are in use on the server.That is, if you enable the Do not use temporary foldersper session setting, this setting has no effect.
Microsoft Windows VistaStarter, Home Basic, HomePremium, Vista Business,Vista Enterprise, and VistaUltimate, Service Pack 1 orlater
Supports the following x86–based computers:
v 32–bit processors
v x64 (AMD64 and EM64T)
Microsoft dynamic disk on GUID partition table (GPT) disks is not supported.
Note: Support is not provided for applications that use SCSI Pass ThroughInterface (SPTI) or SCSI Pass Through Direct (SPTD) for performing readand write operations. You cannot back up or use Instant Restore whileapplications that use SPTI or SPTD are running. If you try to back up or useInstant Restore while applications that use SPTI or SPTD are running, itmight appear that the back up or Instant Restore was completed, but thedata can be corrupted.
Chapter 2. Planning 9

Administrative Command Line
The following table provides details about operating systems that are supportedfor Administrative Command Line.
Table 3. Supported operating systems for Administrative Command Line
Operating system andsupported release Support details
Microsoft Windows 2000Standard Server, AdvancedServer, and ProfessionalEditions, Service Pack 3 orlater
Supported on the x86 architecture only.
Microsoft Windows 2003Standard, Enterprise, Storage,and Storage R2 Server, ServicePack 1 or later
Supports the following x86–based computers:
v 32–bit processors
v x64 (AMD64 and EM64T)
Microsoft Windows 2003 64bit Edition
Supports the following 64-bit processors:
v x64 (AMD64 and EM64T)
v IA64 (Intel Itanium)
Microsoft Windows XPProfessional Edition, ServicePack 1 or later
None
10 Installation and User's Guide

Table 3. Supported operating systems for Administrative Command Line (continued)
Operating system andsupported release Support details
Microsoft Windows 2008Standard, Enterprise,Datacenter, Web, Storage,Small Business, and EssentialBusiness Server
Supports the following x86–based computers:
v 32–bit processors
v x64 (AMD64 and EM64T)
If you use a Windows 2008 server as a domain controller,you cannot use the FastBack Manager automatic log on.Using Windows 2008 server as a domain controller doesnot change how you can back up and restore data andapplications.
On Windows 2008 systems, the Tivoli Storage ManagerFastBack installation log is deleted after completing theinstallation process and rebooting the system. By default,the fastbackinstall.log file is created in the %temp%directory during installation.
On Windows 2008 systems, by default, all files that arelocated in the %temp% directory are deleted. To keep acopy of the fastbackinstall.log file, complete the followingsteps:
1. Run GPEDIT.MSC to open the Local Group Policy Editor.
2. Go to Computer Configuration → AdministrativeTemplate → Windows Components → Terminal Services→ Terminal Server → Temporary Folders.
3. Enable the following setting: Do not delete temp folderupon exit.
You can use this setting to maintain a user’ssession-specific temporary folders on a remote system,even if the user logs off from a session.
By default, Terminal Services deletes a user’s temporaryfolders when the user logs off. This setting only takes effectif per-session temporary folders are in use on the server.That is, if you enable the Do not use temporary foldersper session setting, this setting has no effect.
Microsoft Windows VistaStarter, Home Basic, HomePremium, Vista Business,Vista Enterprise, and VistaUltimate, Service Pack 1 orlater
Supports the following x86–based computers:
v 32–bit processors
v x64 (AMD64 and EM64T)
FastBack Mount
The following table provides details about operating systems that are supportedfor FastBack Mount.
Chapter 2. Planning 11

Table 4. Supported operating systems for FastBack Mount
Operating system andsupported release Support details
Microsoft Windows 2000Standard Server, AdvancedServer, and ProfessionalEditions, Service Pack 3 orlater
Supported on the x86 architecture only.
Boot and Windows operating system partitions must beNTFS.
Microsoft Windows 2003Standard, Enterprise, Storage,and Storage R2 Server, ServicePack 1 or later
Boot and Windows operating system partitions must beNTFS.
Supports the following x86–based computers:
v 32–bit processors
v x64 (AMD64 and EM64T)
Microsoft Windows 2003 64bit Edition
Supports the following 64-bit processors:
v x64 (AMD64 and EM64T)
v IA64 (Intel Itanium)
Boot and Windows operating system partitions must beNTFS.
Microsoft Windows XPProfessional Edition, ServicePack 1 or later
Boot and Windows operating system partitions must beNTFS.
12 Installation and User's Guide
Table 4. Supported operating systems for FastBack Mount (continued)
Operating system andsupported release Support details
Microsoft Windows 2008Standard, Enterprise,Datacenter, Web, Storage,Small Business, and EssentialBusiness Server
Supports the following x86–based computers:
v 32–bit processors
v x64 (AMD64 and EM64T)
If you use a Windows 2008 server as a domain controller,you cannot use the FastBack Manager automatic log on.Using Windows 2008 server as a domain controller doesnot change how you can back up and restore data andapplications.
On Windows 2008 systems, the Tivoli Storage ManagerFastBack installation log is deleted after completing theinstallation process and rebooting the system. By default,the fastbackinstall.log file is created in the %temp%directory during installation.
On Windows 2008 systems, by default, all files that arelocated in the %temp% directory are deleted. To keep acopy of the fastbackinstall.log file, complete the followingsteps:
1. Run GPEDIT.MSC to open the Local Group Policy Editor.
2. Go to Computer Configuration → AdministrativeTemplate → Windows Components → Terminal Services→ Terminal Server → Temporary Folders.
3. Enable the following setting: Do not delete temp folderupon exit.
You can use this setting to maintain a user’ssession-specific temporary folders on a remote system,even if the user logs off from a session.
By default, Terminal Services deletes a user’s temporaryfolders when the user logs off. This setting only takes effectif per-session temporary folders are in use on the server.That is, if you enable the Do not use temporary foldersper session setting, this setting has no effect.
Microsoft Windows VistaStarter, Home Basic, HomePremium, Vista Business,Vista Enterprise, and VistaUltimate, Service Pack 1 orlater
Supports the following x86–based computers:
v 32–bit processors
v x64 (AMD64 and EM64T)
Instant Restore, part of FastBack Mount, works only with mounted volumes(volumes that are assigned a drive letter).
Note: Support is not provided for applications that use SCSI Pass ThroughInterface (SPTI) or SCSI Pass Through Direct (SPTD) for performing readand write operations. You cannot back up or use Instant Restore whileapplications that use SPTI or SPTD are running. If you try to back up or useInstant Restore while applications that use SPTI or SPTD are running, itmight appear that the back up or Instant Restore was completed, but thedata can be corrupted.
Chapter 2. Planning 13

FastBack Manager
The following table provides details about operating systems that are supportedfor FastBack Manager.
Table 5. Supported operating systems for FastBack Manager
Operating system andsupported release Support details
Microsoft Windows 2000Standard Server, AdvancedServer, and ProfessionalEditions, Service Pack 3 orlater
Supported on the x86 architecture only.
Microsoft Windows 2003Standard, Enterprise, Storage,and Storage R2 Server, ServicePack 1 or later
Boot and Windows operating system partitions must beNTFS.
Supports the following x86–based computers: 32–bitprocessors.
Microsoft Windows XPProfessional Edition, ServicePack 1 or later
None
Tivoli Storage Manager FastBack Disaster Recovery Server
The following table provides details about operating systems that are supportedfor Tivoli Storage Manager FastBack Disaster Recovery Server, including TivoliStorage Manager FastBack Disaster Recovery and Central Control Station.
Table 6. Supported operating systems for Tivoli Storage Manager FastBack DisasterRecovery Server, including Tivoli Storage Manager FastBack Disaster Recovery and CentralControl Station
Operating system andsupported release Support details
Microsoft Windows 2000Standard Server, Service Pack3 or later
None
Microsoft Windows 2003Standard, Enterprise, Storage,and Storage R2 Server, ServicePack 1 or later
Boot and Windows operating system partitions must beNTFS.
Supports the following x86–based computers: 32–bitprocessors.
Microsoft Windows XPProfessional Edition, ServicePack 1 or later
None
For Tivoli Storage Manager FastBack Disaster Recovery with File Transfer Protocol,one of the following operating systems is required:v Microsoft Windows 2003, Service Pack 2v Microsoft Windows 2003, Service Pack 1 with hot fix KB931319
14 Installation and User's Guide
Hardware requirementsA local FastBack Server is required. If you do not want to use a separate server forback up, a FastBack Server needs to be collocated on an application server.
Hardware requirements vary and depend on the following items:v Number of protected serversv Number of protected volumesv Data set sizesv LAN and SAN connectivityv Repository disk throughput
FastBack Server requirements
The following table describes the hardware requirements that are needed to installa FastBack Server. The FastBack Server is sometimes referred to as a backup server.
Table 7. Hardware requirements for FastBack Server
Component Minimal requirement Preferred
System 3 GHz Dual Intel Pentium®
D processor or compatiblenot applicable
Memory 2 GB RAM, 2 GB VirtualMemory
3 GB RAM, 2 GB VirtualMemory
Available hard disk 200 MB for ’Documents andSettings’ folder
not applicable
NIC Card 1 NIC - 100 Mbps 1 NIC - 1 Gbps
LAN 100 Mbps 1 Gbps
FastBack Client requirements
The following table describes the hardware requirements that are needed to installa FastBack Client. In the installation wizard the FastBack Client is also referred toas a backup client.
Table 8. Hardware requirements for FastBack Client
Component Minimal requirement Preferred
System 733 MHz Intel Celeron® orcompatible
1 GHz Intel Pentium III orhigher
Memory 512 MB RAM, 2 GB VirtualMemory
1 GB RAM, 3 GB VirtualMemory
Available hard disk 200 MB for ’Documents andSettings’ folder
not applicable
NIC Card 1 NIC - 100 Mbps 1 NIC - 1 Gbps
LAN 100 Mbps 1 Gbps
Tivoli Storage Manager FastBack Disaster Recovery Serverrequirements
The following table describes the hardware requirements that are needed to installa Tivoli Storage Manager FastBack Disaster Recovery Server.
Chapter 2. Planning 15
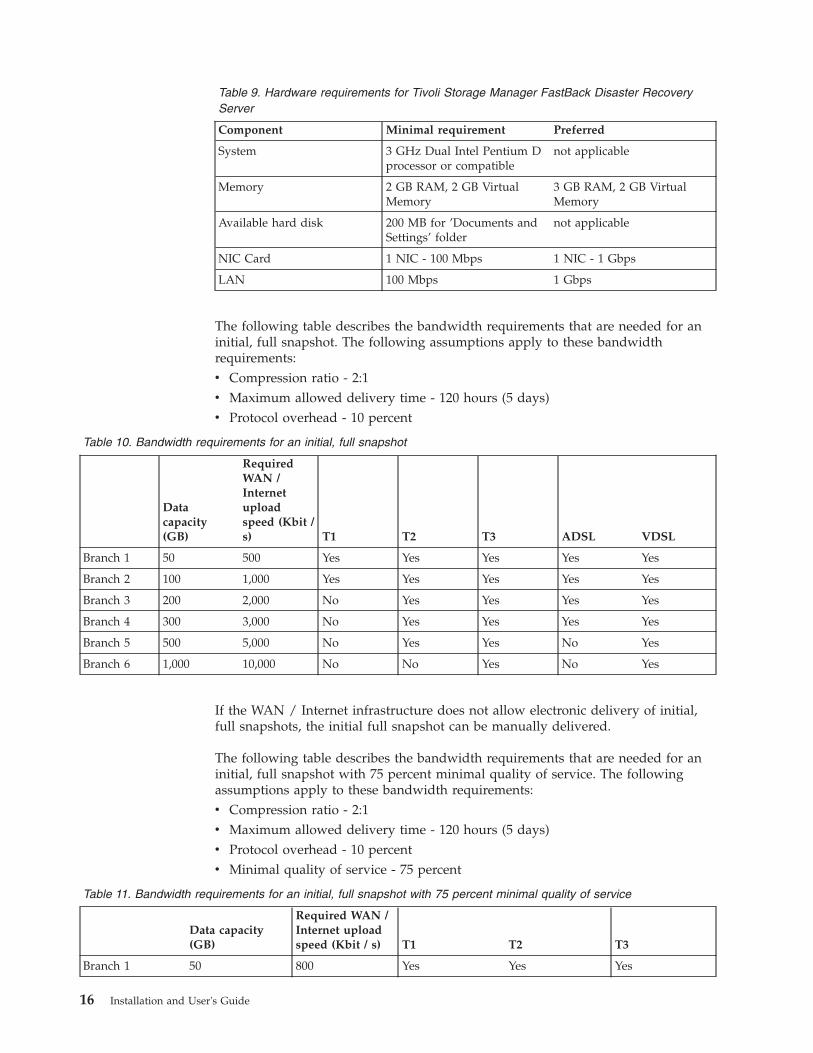
Table 9. Hardware requirements for Tivoli Storage Manager FastBack Disaster RecoveryServer
Component Minimal requirement Preferred
System 3 GHz Dual Intel Pentium Dprocessor or compatible
not applicable
Memory 2 GB RAM, 2 GB VirtualMemory
3 GB RAM, 2 GB VirtualMemory
Available hard disk 200 MB for ’Documents andSettings’ folder
not applicable
NIC Card 1 NIC - 100 Mbps 1 NIC - 1 Gbps
LAN 100 Mbps 1 Gbps
The following table describes the bandwidth requirements that are needed for aninitial, full snapshot. The following assumptions apply to these bandwidthrequirements:v Compression ratio - 2:1v Maximum allowed delivery time - 120 hours (5 days)v Protocol overhead - 10 percent
Table 10. Bandwidth requirements for an initial, full snapshot
Datacapacity(GB)
RequiredWAN /Internetuploadspeed (Kbit /s) T1 T2 T3 ADSL VDSL
Branch 1 50 500 Yes Yes Yes Yes Yes
Branch 2 100 1,000 Yes Yes Yes Yes Yes
Branch 3 200 2,000 No Yes Yes Yes Yes
Branch 4 300 3,000 No Yes Yes Yes Yes
Branch 5 500 5,000 No Yes Yes No Yes
Branch 6 1,000 10,000 No No Yes No Yes
If the WAN / Internet infrastructure does not allow electronic delivery of initial,full snapshots, the initial full snapshot can be manually delivered.
The following table describes the bandwidth requirements that are needed for aninitial, full snapshot with 75 percent minimal quality of service. The followingassumptions apply to these bandwidth requirements:v Compression ratio - 2:1v Maximum allowed delivery time - 120 hours (5 days)v Protocol overhead - 10 percentv Minimal quality of service - 75 percent
Table 11. Bandwidth requirements for an initial, full snapshot with 75 percent minimal quality of service
Data capacity(GB)
Required WAN /Internet uploadspeed (Kbit / s) T1 T2 T3
Branch 1 50 800 Yes Yes Yes
16 Installation and User's Guide

Table 11. Bandwidth requirements for an initial, full snapshot with 75 percent minimal quality of service (continued)
Data capacity(GB)
Required WAN /Internet uploadspeed (Kbit / s) T1 T2 T3
Branch 2 100 1,600 No Yes Yes
Branch 3 200 3,150 No Yes Yes
Branch 4 300 4,750 No Yes Yes
Branch 5 500 8,000 No No Yes
Branch 6 1,000 16,000 No No Yes
If the WAN / Internet infrastructure does not allow electronic delivery of initial,full snapshots, the initial full snapshot can be manually delivered.
The following table describes the bandwidth requirements that are needed for adaily incremental snapshot. The following assumptions apply to these bandwidthrequirements:v Compression ratio - 2:1v Maximum allowed delivery time - 11 hoursv Daily incremental changes - 3 percentv Protocol overhead - 10 percentv Minimal quality of service - 75 percent
Table 12. Bandwidth requirements for a daily incremental snapshot
Data capacity(GB)
Incrementalchangecapacity (GB)
RequiredWAN /InternetUpload Speed(Kbit/s) T1 T2 T3
Branch 1 50 1.5 250 Yes Yes Yes
Branch 2 100 3 500 Yes Yes Yes
Branch 3 200 6 1,000 Yes Yes Yes
Branch 4 300 9 1,500 Yes Yes Yes
Branch 5 500 15 2,500 No Yes Yes
Branch 6 1,000 30 5,000 No Yes Yes
If the WAN / Internet infrastructure does not allow electronic delivery of initial,full snapshots, the initial full snapshot can be manually delivered.
Connection and configuration hardware requirements
Before beginning the installation process, the following requirements must be met:1. At least one of the following disks must be available for the repository: IDE,
SCSI, or LUN in the SAN. GPT disks are not supported. Any GPT disk datathat is displayed is erroneous. Any number of LUNs in the SAN, DAS, or SCSImight be snapped or allocated to the repository at any time.For more information, including details about the maximum volume size, see“Add Repository wizard” on page 69.
Chapter 2. Planning 17

2. For the SAN environment, assuming that the servers and the disks are alreadyconnected to the SAN switch, you must have a fiber channel switch with atleast one available port reserved for the FastBack Server.You might use a fiber channel hub or point-to-point connection instead of aswitch.
3. The system that is used for FastBack Manager must be connected to the IPnetwork. This system could be one of the servers, a standard laptop, or astandard desktop system.
4. Use a static IP address for the network interface cards on the system used forthe FastBack Server.
5. To run FastBack Mount, the system that runs FastBack Mount must have accessto the repository through either the SAN (by direct access to disk) or LAN (byconnecting to the shared repository on the FastBack Server.
Dynamic disk supportFor all supported operating systems, restoring a volume to dynamic disk requiresrestoring the volume to a basic disk. After restore the volume to a basic disk,covert the disk to dynamic disk. You cannot restore a volume directly to a dynamicdisk.
The following types of dynamic disks are supported in a Windows environment.This list of dynamic disks assumes that the dynamic disks are created andconfigured with Windows Disk Administrator:v Simple volumesv Spanned volumesv Mirrored volumesv Striped volumesv RAID-5 volumes
Backup considerations
During the snapshot of any dynamic disk other than a simple volume, there is thepotential for increased memory utilization on the protected server that might resultin the snapshot process aborting. This exposure exists when there is a relativelyhigh amount of data changing during the time a snapshot process is running.
Backup success is based on the amount of memory available and the I/O load forCopy-On-Write (COW) during the snapshot process on the protected server. If theI/O activity causes available memory limits to be exceeded, a FastBack Clientsystem is limited to no more than 2 GB virtual memory (32–bit support limitation),the process aborts. The abort of a snapshot does not impact production I/O, but itdoes impact the Recovery Point Objective (RPO).
This exposure does not exist on volumes that are mapped to a single LUN (forexample, basic disks or simple dynamic disks).
To alleviate the risk of these types of snapshots being aborted, complete thefollowing tasks:1. Reduce the quantity of Copy-On-Write data during a snapshot. For example,
schedule snapshots during time periods with lower I/O activity.
18 Installation and User's Guide

2. Reduce the time required to complete a snapshot. For example, you canschedule more frequent snapshots. You need to balance the scheduling offrequent snapshots with the likelihood of encountering higher I/O activityduring the snapshot process.You can also reduce the time required to complete a snapshot by using a SANbackup, instead of a LAN backup.
3. Verify that the FastBack Server hardware is configured for optimal snapshotperformance. For example, make sure you use the highest performing storagedevice for the FastBack Server repository.
In addition, note that Continuous Data Protection is not supported for dynamicdisks.
Restore considerations
Volume restore and Instant Restore are only possible to basic disks and to simplevolumes, used in supported operating system environments, but not the othertypes of dynamic disks. Restoring a volume to dynamic disk requires restoring thevolume to a basic disk. After restore the volume to a basic disk, covert the disk todynamic disk. You cannot restore a volume directly to a dynamic disk.
For simple volumes, the restore is a two-step process that requires restoring to abasic disk and then a manual step to convert to a dynamic disk.
The snapshot associated with a spanned disk must be restored to a single volumebasic disk or simple volume dynamic disk. For example, one LUN with equivalentcapacity to the multiple LUNs that were part of the original spanned volume.
Regular bare machine recovery disks can be converted to dynamic disks bycompleting the following steps:1. Log on as Administrator, or as a member of the Administrators group.2. Open the Performance and Maintenance Control Panel, click Administrative
Tools, and then double-click Computer Management.3. In the left pane, click Disk Management.4. In the lower-right pane, right-click the basic disk that you want to convert;
then, click Convert to Dynamic Disk.
Note: Right-click the gray area that contains the disk title on the left side of theDetails pane.
5. If it is not selected, select the check box next to the disk that you want toconvert. Click OK.
6. If you want to view the list of volumes in the disk, click Details.7. Click Convert.8. When prompted, click Yes.9. Click OK.
If you remove one of the two disks in the software mirror, the remaining signaturechanges for the disk. If this happens, complete the following steps:1. Delete the new chain.2. In the history.txt file, replace old signatures with the new one in all the
snapshots of the old chain.
Chapter 2. Planning 19

Support for cluster environments
Microsoft Cluster Server (MSCS) does not natively support dynamic disks.
In the Veritas Cluster Server (VCS) environment, simple and spanned volumes arethe only types of supported dynamic disks. The backup and restore considerationsfor dynamic disks apply in a VCS environment.
Veritas Storage Foundation for Windows provides a Cluster Option for MSCS. Thisadds a cluster resource for dynamic disks to be used in a MSCS cluster. Thisconfiguration is not supported.
Dynamic disks created with Veritas Storage Foundation for Windows that are notin a cluster environment are not supported.
Software requirementsTo install Tivoli Storage Manager FastBack, ensure that you have a supportedoperating system installed.
There are no additional software requirements, but, if you use anti-virus andanti-spyware software, consider that anti-virus and anti-spyware applicationsmight interfere with Tivoli Storage Manager FastBack operations. The anti-virusand anti-spyware applications can damage the Tivoli Storage Manager FastBackdatabase and log files, resulting in data loss. In addition, when anti-virus andanti-spyware applications run simultaneously with FastBack Mount, there is highprocessor usage, resulting in snapshots running slowly or being aborted.
When using anti-virus and anti-spyware software, exclude the following foldersfrom file-level scanning:v Tivoli Storage Manager FastBack log and configuration files folder and all its
subfolders, including the default, C:\Documents and Settings\AllUsers\Application Data\Tivoli\TSM\FastBack\
v Tivoli Storage Manager FastBack program files folder and all its subfolders,default C:\Program Files\Tivoli\TSM\FastBack\
v Tivoli Storage Manager FastBack repository disks and folders. This exclusion isrequired when using Continuous Data Protection (CDP).
v Mount points to any repository disks.
If you move any Tivoli Storage Manager FastBack folders to a new location, forexample, changing the staging area path, or adding and moving repositories,remember to exclude those new folders or disks as well.
For information on how to add disks or folders to the exclusion list, refer to youranti-virus and anti-spyware software documentation.
Follow these guidelines when using anti-virus and anti-spyware software inconjunction with Tivoli Storage Manager FastBack :v Do not schedule scans and to run simultaneously with snapshots.v Before running manual or scheduled scans on the repository disks, you must
stop the FastBack Server service. Do not mount or restore snapshots from thisrepository using FastBack Mount during scans.
20 Installation and User's Guide

v Volume or disk restore can fail or run slowly if anti-virus and anti-spywaresoftware is configured to real-time or manual scan on one of the destinationvolumes or disks. Cancel scans of the volume or disk before starting the restoreprocess.
v Some anti-spyware software can falsely recognize some Tivoli Storage ManagerFastBack components as spyware, due to high traffic volume. Tivoli StorageManager FastBack does not contain any spyware, adware, or viruses.
v If you want to restore a large amount of files from a virtual volume, created byFastBack Mount, prior to restoring, this volume should be excluded fromanti-spyware, adware, and virus protection scanning.
Microsoft Cluster Server (MSCS) and Veritas Cluster Server (VCS)In a cluster environment, FastBack Server should be installed on a dedicated serverthat is not a cluster mode.
During the installation of the FastBack Client software on the cluster nodes, youhave to restart. The client installation should be run one system at a time for asmooth failover and failback operation.
When you install the FastBack Client, by default, the SAN Module option isdisabled. Use the FastBack Client Configurator to enable the SAN Module option.This setting is required for a cluster environment because when nodes switch,incremental delta block snapshots need to occur.
In a cluster environment, every local disk at each node should have a differentdisk signature. For example, if disk1 on node1 has the same signature as disk1 onnode2, an error might occur.
For information about the FastBack Client Configurator, see “Using the FastBackClient Configurator” on page 40.
When using Tivoli Storage Manager FastBack in a cluster environment, thefollowing statements of support apply:v FastBack Mount is supported in clustered environment.v Bare machine recovery to a clustered disk is not supported.v Volume restore to a volume on clustered disk is not supported.v FastBack Server does not support NT and Windows 2000 clusters. Only
Windows 2003 clusters are supported by Tivoli Storage Manager FastBack.v Although quorum disks can be backed up, volume restore and bare machine
recovery of a quorum disk is not supported. In this scenario, FastBack Mountshould be used to retrieve data.
v Clustered disks can only be backed up through the LAN.v Exchange 2003 clusters running on Windows 2003 are supported.v For Microsoft Exchange Server 2007 Service Pack 1, there are two types of
clustering supported: Local Continuous Replication (LCR) and ClusterContinuous Replication (CCR).
For information about managing the Microsoft Cluster Server (MSCS) and VeritasCluster Server (VCS) environments as part of restore a cluster volume using InstantRestore, see “Instant Restore for Microsoft Cluster Server” on page 96 and “InstantRestore for Veritas Cluster Server” on page 97.
Chapter 2. Planning 21
Local Continuous ReplicationYou can use Tivoli Storage Manager FastBack with Local Continuous Replication.
You can restore an Exchange Server 2007 volume back up, either snapshot or CDP,taken from an LCR or CCR replica or production volume.
While LCR provides protection for mailbox data, the protection cannot replaceregular database backups. A LCR copy is a near-time copy of the productiondatabase. The LCR copy is continuously updated and used for fast recoveryprocesses. The traditional Tivoli Storage Manager FastBack back ups arepoint-in-time copies of a database. You can use these copies to recover a databaseto a past point in time that you select.
Cluster Continuous ReplicationYou can use Tivoli Storage Manager FastBack with Cluster Continuous Replication(CCR).
Cluster Continuous Replication is like Local Continuous Replication (LCR) wheretwo copies of the Microsoft Exchange storage group are made. Both ClusterContinuous Replication and Local Continuous Replication log changes in aprimary copy of the database and transaction log files.
For Cluster Continuous Replication, the database and transaction log files arecopied to a secondary server that serves as a passive node in the two-node cluster.During the setup for Cluster Continuous Replication, database files are copied tothe secondary server. After the setup is complete, only transaction logs are sent tothe secondary server.
For CCR environments, backup is supported from both the active and passivenodes. You can restore an Exchange Server 2007 volume back up, either snapshotor CDP, taken from an LCR or CCR replica or production volume.
While CCR provides protection for mailbox data, the protection cannot replaceregular database backups. A CCR copy is a near-time copy of the productiondatabase. The CCR copy is continuously updated and used for fast recoveryprocesses. The traditional back ups are point-in-time copies of a database. You canuse these copies to recover a database to a past point in time that you select.
For more information about installation, see “FastBack Client support for Windows2003 CCR Exchange 2007” on page 28.
22 Installation and User's Guide

Chapter 3. Installing
Before beginning the installation, verify that your system meets all operatingsystem, hardware, and software requirements.
For the system requirements, see the Chapter 2, “Planning,” on page 7 section.
The installation instructions are the same for the following scenarios:v First time installation of Tivoli Storage Manager FastBack.v An upgrade from Tivoli Storage Manager FastBack, Version 5.5.2 or 5.5.1 to
Tivoli Storage Manager FastBack, Version 5.5.3.
If you upgrade from Tivoli Storage Manager FastBack, Version 5.5.2 or 5.5.1 toTivoli Storage Manager FastBack, Version 5.5.3, the data is migrated. For example,any users, user groups, schedules, and policies that you created, are availablewhen using Tivoli Storage Manager FastBack, Version 5.5.3.
The updates to Tivoli Storage Manager FastBack for Version 5.5.3 are displayed inEnglish-only. Although the interfaces updated to respond to a defect or problemreport, are English-only, the fixes work in all locales.
The information in this section is intended for network and storage administratorswho are experienced with SAN and DAS configurations. Documentation providedwith your network equipment might also be required.
Performing prerequisite tasksAdministrator privileges are required in order to install Tivoli Storage ManagerFastBack.
Before starting the installation process for FastBack Server, disconnect the computerfrom the storage area network (SAN) by disconnecting the fiber optic cable.
Reconnect the system only after the FastBack Server is installed and the system hasbeen restarted.
Installing Tivoli Storage Manager FastBack
During the Tivoli Storage Manager FastBack installation process, you can choose toinstall services and interfaces by selecting the appropriate options:
Backup ClientInstall on production and application servers that need backup protection.
Backup ServerInstall the FastBack Server software on the system you designate to be thebackup server.
Disaster Recovery ServerInstall on the server that you use to back up a FastBack Server. When youselect this option, you install the following components:v Tivoli Storage Manager FastBack Disaster Recovery Hub serverv Central Control Station
© Copyright IBM Corp. 2008, 2009 23

v FastBack Mount
AdvancedInstalls services and interfaces that you select. The space requirements forthe options you select are displayed below the list of options.
The descriptions provided for the modules are brief. For more information, see thewizard for the installation process.
Installing the FastBack Server
To install the FastBack Server, complete the following steps:1. Either download the code package or insert the Tivoli Storage Manager
FastBack Product CD into the CD drive.2. In the folder for Tivoli Storage Manager FastBack, go to the folder that
corresponds with your system. For example, there is a folder labeled X86.3. Start the installation program.4. The welcome page is displayed. Click Next. The Software License Agreement
page is displayed.5. Read the terms of the license agreement. Select I accept the terms in the
license agreement and click Next. You must accept the terms of the licenseagreement to continue the installation.
6. A page is displayed prompting you to specify the target directory where theFastBack Server is to be installed. Accept the default location displayed in theDirectory Name field, or type over it to specify the location, or click Browseto navigate to the location. Click Next.
7. A page is displayed prompting you to select the Installation Type. SelectBackup Server.
24 Installation and User's Guide
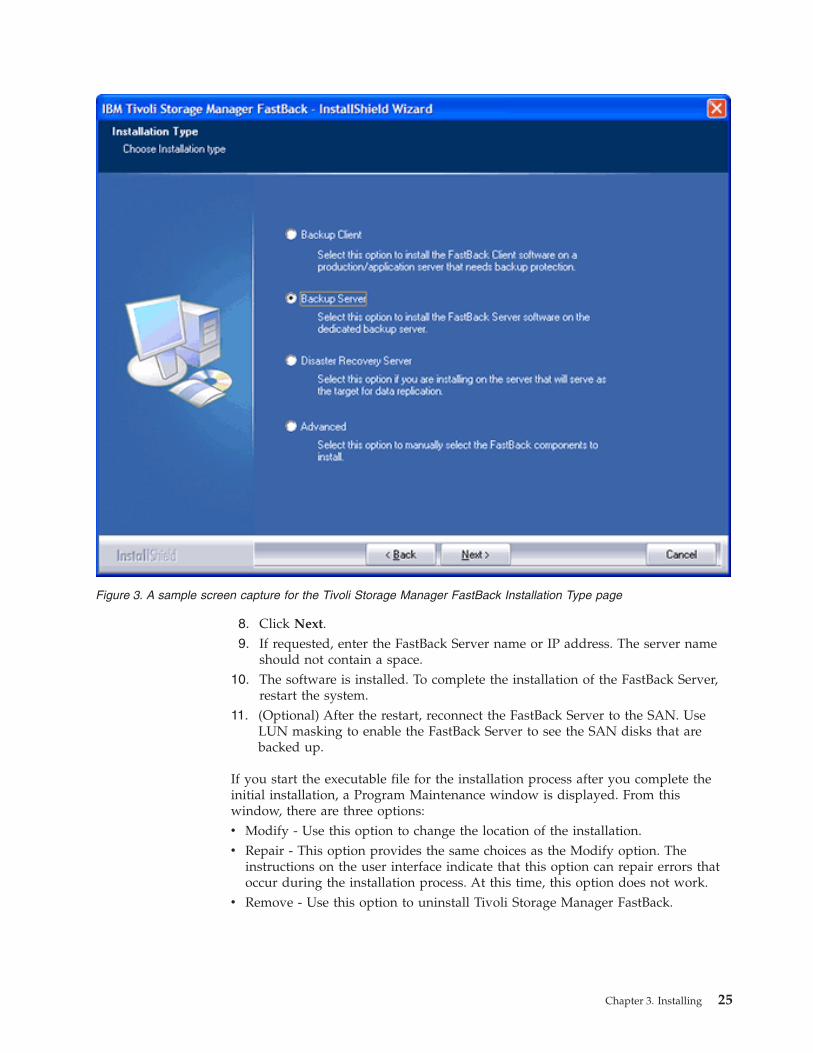
8. Click Next.9. If requested, enter the FastBack Server name or IP address. The server name
should not contain a space.10. The software is installed. To complete the installation of the FastBack Server,
restart the system.11. (Optional) After the restart, reconnect the FastBack Server to the SAN. Use
LUN masking to enable the FastBack Server to see the SAN disks that arebacked up.
If you start the executable file for the installation process after you complete theinitial installation, a Program Maintenance window is displayed. From thiswindow, there are three options:v Modify - Use this option to change the location of the installation.v Repair - This option provides the same choices as the Modify option. The
instructions on the user interface indicate that this option can repair errors thatoccur during the installation process. At this time, this option does not work.
v Remove - Use this option to uninstall Tivoli Storage Manager FastBack.
Figure 3. A sample screen capture for the Tivoli Storage Manager FastBack Installation Type page
Chapter 3. Installing 25
Installing the FastBack Client
If you are installing the FastBack Client on a 64 bit operating system, you mightnotice slight differences in the installation wizard pages.
To install the FastBack Client, complete the following steps:1. Either download the code package or insert the Tivoli Storage Manager
FastBack Product CD into the CD drive.2. In the folder for Tivoli Storage Manager FastBack, go to the folder that
corresponds with your system. For example, there are folders labeled IA64,X64, and X86. In addition, there are folders for the various language packs.
3. Start the installation program.4. The welcome page is displayed. Click Next. The Software License Agreement
page is displayed.5. Read the terms of the license agreement. Select I accept the terms in the
license agreement and click Next. You must accept the terms of the licenseagreement to continue the installation.
6. A page is displayed prompting you to specify the target directory where thesoftware is to be installed. Accept the default location displayed in theDirectory Name field, or type over it to specify the location, or click Browseto navigate to the location. Click Next.
7. A page is displayed prompting you to select the Installation Type. SelectBackup Client.
8. In a DHCP environment, type either the name of the FastBack Server (must beunique in the network), or, if a static IP address is used, enter the IP address.The name cannot contain a space.
26 Installation and User's Guide
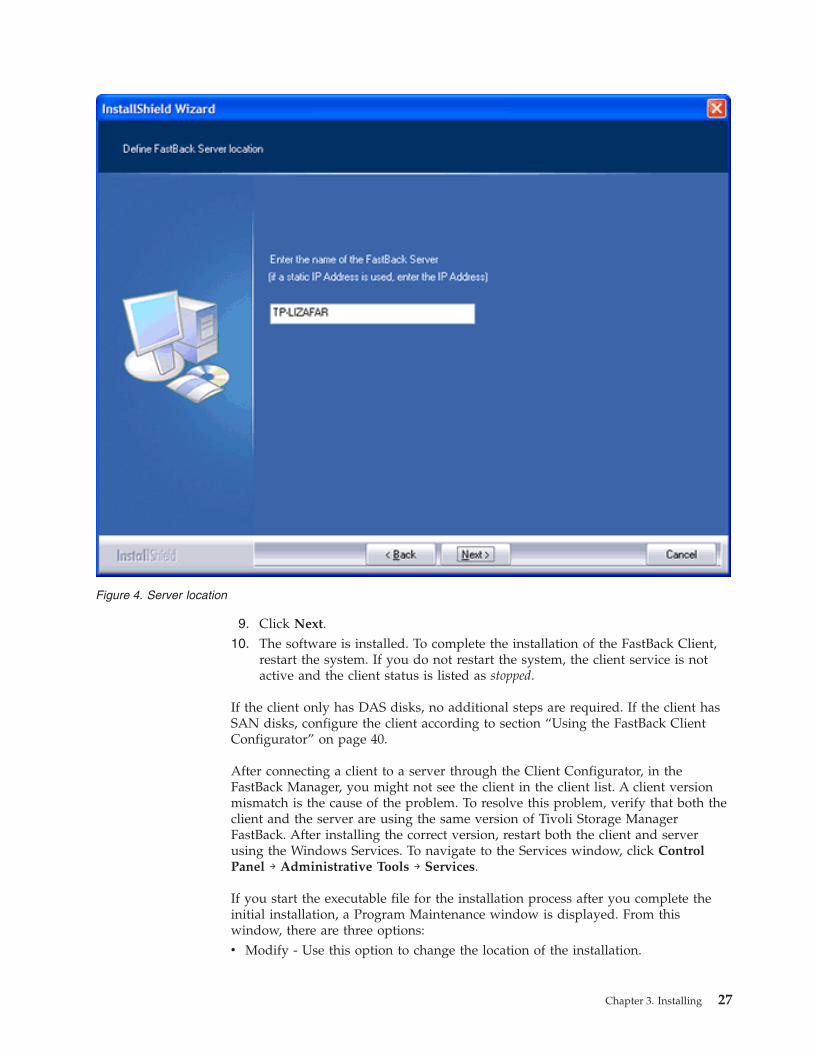
9. Click Next.10. The software is installed. To complete the installation of the FastBack Client,
restart the system. If you do not restart the system, the client service is notactive and the client status is listed as stopped.
If the client only has DAS disks, no additional steps are required. If the client hasSAN disks, configure the client according to section “Using the FastBack ClientConfigurator” on page 40.
After connecting a client to a server through the Client Configurator, in theFastBack Manager, you might not see the client in the client list. A client versionmismatch is the cause of the problem. To resolve this problem, verify that both theclient and the server are using the same version of Tivoli Storage ManagerFastBack. After installing the correct version, restart both the client and serverusing the Windows Services. To navigate to the Services window, click ControlPanel → Administrative Tools → Services.
If you start the executable file for the installation process after you complete theinitial installation, a Program Maintenance window is displayed. From thiswindow, there are three options:v Modify - Use this option to change the location of the installation.
Figure 4. Server location
Chapter 3. Installing 27
v Repair - This option provides the same choices as the Modify option. Theinstructions on the user interface indicate that this option can repair errors thatoccur during the installation process. At this time, this option does not work.
v Remove - Use this option to uninstall Tivoli Storage Manager FastBack.
FastBack Client support for Windows 2003 CCR Exchange 2007The following installation procedure enables Tivoli Storage Manager FastBackinstallation on Windows 2003 CCR nodes.
Note: The FastBack Client should be installed on the passive CCR node andsecond node should be active.
To complete the installation, complete the following steps:1. Stop Cluster service.2. Stop COM+ System Application service.3. Start Microsoft Distributed Transaction Coordinator service.4. Start COM+ System Application service.5. Install FastBack Client. If a system restart is required, delay the restart until
after step 9.6. Stop COM+ System Application service.7. Stop Microsoft Distributed Transaction Coordinator service.8. Start COM+ System Application service.9. Start Cluster service.
Installing Tivoli Storage Manager FastBack Disaster RecoveryServer
Installing the Tivoli Storage Manager FastBack Disaster Recovery Server is requiredif you want to back up a FastBack Server repository. In addition, install the TivoliStorage Manager FastBack Disaster Recovery Server if you want to have a centralsite in the Tivoli Storage Manager FastBack environment.
The communication between the FastBack Server in a remote location and theTivoli Storage Manager FastBack Disaster Recovery Server in a central site ordisaster recovery location is based on extensions to the standard FTP protocol. Assuch, the installation of the Tivoli Storage Manager FastBack Disaster RecoveryServer requires that you install a standard FTP server on the system that hosts theTivoli Storage Manager FastBack Disaster Recovery Server.
The installation process for the Tivoli Storage Manager FastBack Disaster RecoveryServer requires that you complete the following tasks:1. Install a FTP server on the system to be used as the Tivoli Storage Manager
FastBack Disaster Recovery Server. For installation instructions, see the productdocumentation for the FTP server.You can use compression and encryption with the Tivoli Storage ManagerFastBack Disaster Recovery if the FTP server supports these features. Select anFTP server that supports compression and encryption.
2. Install the Tivoli Storage Manager FastBack Disaster Recovery Server. To installthe Tivoli Storage Manager FastBack Disaster Recovery Server, complete thefollowing steps:a. Either download the code package or insert the Tivoli Storage Manager
FastBack Product CD into the CD drive.
28 Installation and User's Guide
b. In the folder for Tivoli Storage Manager FastBack, go to the folder thatcorresponds with your system. For example, there are folders labeled IA64,X64, and X86. In addition, there are folders for the various language packs.
c. Start the installation program.d. The welcome page is displayed. Click Next. The Software License
Agreement page is displayed.e. Read the terms of the license agreement. Select I accept the terms in the
license agreement and click Next. You must accept the terms of the licenseagreement to continue the installation.
f. A page is displayed prompting you to specify the target directory where thesoftware is to be installed. Accept the default location displayed in theDirectory Name field, or type over it to specify the location, or click Browseto navigate to the location. Click Next.
g. A page is displayed prompting you to select the Installation Type. SelectDisaster Recovery Server. When you install the Disaster Recovery Server,you install the Tivoli Storage Manager FastBack Disaster Recovery Server,Central Control Station, and FastBack Mount.
h. Click Next.i. In a DHCP environment, type either the name of the FastBack Server (must
be unique in the network), or, if a static IP address is used, enter the IPaddress. The name cannot contain a space.
j. Click Next.k. The software is installed. To complete the installation, restart the system.
3. Configure the Tivoli Storage Manager FastBack Disaster Recovery Server. Forconfiguration instructions, see “Setting up FTP for the disaster recoverydestination” on page 149 and “Disaster Recovery configuration” on page 150.
4. Configure the Central Control Station. For configuration instructions, see“Using Central Control Station” on page 154.
If you start the executable file for the installation process after you complete theinitial installation, a Program Maintenance window is displayed. From thiswindow, there are three options:v Modify - Use this option to change the location of the installation.v Repair - This option provides the same choices as the Modify option. The
instructions on the user interface indicate that this option can repair errors thatoccur during the installation process. At this time, this option does not work.
v Remove - Use this option to uninstall Tivoli Storage Manager FastBack.
Installing with Advanced optionsWhen you select the Advanced type of installation, you can select the services andinterfaces to install. The space requirements for the selected options are displayedunder the list of options in the installation wizard.
When installing FastBack Mount, you want to install FastBack Mount on thesystems where you want to mount snapshots and perform an instant volumerestore.
For Central Control Station, install at the central backup office or Data Center. Youcan use Central Control Station to browse for snapshots and events stored in theTivoli Storage Manager FastBack Disaster Recovery Server database.
Chapter 3. Installing 29

Installing FastBack Manager
To install FastBack Manager, complete the following steps:1. Either download the code package or insert the Tivoli Storage Manager
FastBack Product CD into the CD drive.2. In the folder for Tivoli Storage Manager FastBack, go to the folder that
corresponds with your system. For example, there are folders labeled IA64,X64, and X86. In addition, there are folders for the various language packs.
3. Start the installation program.4. The welcome page is displayed. Click Next. The Software License Agreement
page is displayed.5. Read the terms of the license agreement. Select I accept the terms in the
license agreement and click Next. You must accept the terms of the licenseagreement to continue the installation.
6. A page is displayed prompting you to specify the target directory where thesoftware is to be installed. Accept the default location displayed in theDirectory Name field, or type over it to specify the location, or click Browseto navigate to the location. Click Next.
7. A page is displayed prompting you to select the Installation Type. SelectAdvanced.
8. Click Next.9. Select FastBack Manager. The space requirements are displayed on the page,
below the list of items you can select for installation.10. Click Next.11. In a DHCP environment, type either the name of the FastBack Server (must be
unique in the network), or, if a static IP address is used, enter the IP address.The name cannot contain a space.
12. Click Next.13. The software is installed. To complete the installation, restart the system.
If you start the executable file for the installation process after you complete theinitial installation, a Program Maintenance window is displayed. From thiswindow, there are three options:v Modify - Use this option to change the location of the installation.v Repair - This option provides the same choices as the Modify option. The
instructions on the user interface indicate that this option can repair errors thatoccur during the installation process. At this time, this option does not work.
v Remove - Use this option to uninstall Tivoli Storage Manager FastBack.
Installing the Administrative Command Line
To install the Administrative Command Line, complete the following steps:1. Either download the code package or insert the Tivoli Storage Manager
FastBack Product CD into the CD drive.2. In the folder for Tivoli Storage Manager FastBack, go to the folder that
corresponds with your system. For example, there are folders labeled IA64,X64, and X86. In addition, there are folders for the various language packs.
3. Start the installation program.4. The welcome page is displayed. Click Next. The Software License Agreement
page is displayed.
30 Installation and User's Guide
5. Read the terms of the license agreement. Select I accept the terms in thelicense agreement and click Next. You must accept the terms of the licenseagreement to continue the installation.
6. A page is displayed prompting you to specify the target directory where thesoftware is to be installed. Accept the default location displayed in theDirectory Name field, or type over it to specify the location, or click Browseto navigate to the location. Click Next.
7. A page is displayed prompting you to select the Installation Type. SelectAdvanced.
8. Click Next.9. Select Administrative Command Line. The space requirements are displayed
on the page, below the list of items you can select for installation.10. Click Next.11. In a DHCP environment, type either the name of the FastBack Server (must be
unique in the network), or, if a static IP address is used, enter the IP address.The name cannot contain a space.
12. Click Next.13. The software is installed. To complete the installation, restart the system.
If you start the executable file for the installation process after you complete theinitial installation, a Program Maintenance window is displayed. From thiswindow, there are three options:v Modify - Use this option to change the location of the installation.v Repair - This option provides the same choices as the Modify option. The
instructions on the user interface indicate that this option can repair errors thatoccur during the installation process. At this time, this option does not work.
v Remove - Use this option to uninstall Tivoli Storage Manager FastBack.
Installing FastBack Mount
To install FastBack Mount, complete the following steps:1. Either download the code package or insert the Tivoli Storage Manager
FastBack Product CD into the CD drive.2. In the folder for Tivoli Storage Manager FastBack, go to the folder that
corresponds with your system. For example, there are folders labeled IA64,X64, and X86. In addition, there are folders for the various language packs.
3. Start the installation program.4. The welcome page is displayed. Click Next. The Software License Agreement
page is displayed.5. Read the terms of the license agreement. Select I accept the terms in the
license agreement and click Next. You must accept the terms of the licenseagreement to continue the installation.
6. A page is displayed prompting you to specify the target directory where thesoftware is to be installed. Accept the default location displayed in theDirectory Name field, or type over it to specify the location, or click Browseto navigate to the location. Click Next.
7. A page is displayed prompting you to select the Installation Type. SelectAdvanced.
8. Click Next.9. Select FastBack Mount. The space requirements are displayed on the page,
below the list of items you can select for installation.
Chapter 3. Installing 31

10. Click Next.11. In a DHCP environment, type either the name of the FastBack Server (must be
unique in the network), or, if a static IP address is used, enter the IP address.The name cannot contain a space.
12. Click Next.13. The software is installed. To complete the installation, restart the system.
If you start the executable file for the installation process after you complete theinitial installation, a Program Maintenance window is displayed. From thiswindow, there are three options:v Modify - Use this option to change the location of the installation.v Repair - This option provides the same choices as the Modify option. The
instructions on the user interface indicate that this option can repair errors thatoccur during the installation process. At this time, this option does not work.
v Remove - Use this option to uninstall Tivoli Storage Manager FastBack.
Installing Central Control Station
To install Central Control Station, complete the following steps:1. Either download the code package or insert the Tivoli Storage Manager
FastBack Product CD into the CD drive.2. In the folder for Tivoli Storage Manager FastBack, go to the folder that
corresponds with your system. For example, there are folders labeled IA64,X64, and X86. In addition, there are folders for the various language packs.
3. Start the installation program.4. The welcome page is displayed. Click Next. The Software License Agreement
page is displayed.5. Read the terms of the license agreement. Select I accept the terms in the
license agreement and click Next. You must accept the terms of the licenseagreement to continue the installation.
6. A page is displayed prompting you to specify the target directory where thesoftware is to be installed. Accept the default location displayed in theDirectory Name field, or type over it to specify the location, or click Browseto navigate to the location. Click Next.
7. A page is displayed prompting you to select the Installation Type. SelectAdvanced.
8. Click Next.9. Select Central Control Station. The space requirements are displayed on the
page, below the list of items you can select for installation.10. Click Next.11. In a DHCP environment, type either the name of the FastBack Server (must be
unique in the network), or, if a static IP address is used, enter the IP address.The name cannot contain a space.
12. Click Next.13. The software is installed. To complete the installation, restart the system.
If you start the executable file for the installation process after you complete theinitial installation, a Program Maintenance window is displayed. From thiswindow, there are three options:v Modify - Use this option to change the location of the installation.
32 Installation and User's Guide

v Repair - This option provides the same choices as the Modify option. Theinstructions on the user interface indicate that this option can repair errors thatoccur during the installation process. At this time, this option does not work.
v Remove - Use this option to uninstall Tivoli Storage Manager FastBack.
Starting and running FastBack Server, FastBack Client , Tivoli StorageManager FastBack Disaster Recovery Server, FastBack Mount, andFastBack Watchdog
By default, when you start the operating system, the FastBack Server, FastBackClient , Tivoli Storage Manager FastBack Disaster Recovery Server, FastBackMount, and FastBack Watchdog services are started under Local System Account. Ifyou experience a malfunction and suspect that the problem might be caused bylack of proper authorization, you can run the problematic service from an accountthat has more privileges. For example, you can log on as a Local or Domainadministrator. This workaround does not work for FastBack Mount.
You can stop and restart the services by using the Windows Services window. Tolocate the Services window, go to the Control Panel. Go to Administrative Tools →Services.
Starting FastBack Manager
To start FastBack Manager, complete the following steps:1. From the Windows Start menu, select Programs → Tivoli Storage Manager →
FastBack → FastBack Manager.2. In the login window, type your user name. The default user name is admin. The
authorization policy is case sensitive. Letters must be typed using the correctcase.
3. Type your password. The default password is admin123. The authorizationpolicy is case sensitive. Letters must be typed using the correct case.
4. Select a domain. The default domain is XPRESS-RESTORE. After you select thedomain, the configuration is loaded.
5. Click Login. A message is displayed.If this is the first time you start the FastBack Manager, you can click AddRepository to identify a repository. If you do not want to identify a repository,click Cancel.After FastBack Manager is displayed, you can add a repository by selectingGeneral Configuration → Storage Pool → Repository Pool. From the pop-upmenu, you can add or claim a repository. For more information, includingdetails about the maximum volume size, see “Add Repository wizard” on page69.For more information about configuring and using Tivoli Storage ManagerFastBack, see Chapter 6, “Configuring and using,” on page 55 and “Multipleways to identify repositories” on page 61.
If the FastBack Manager does not connect to the FastBack Server and the FastBackServer is running on a system that is part of an Active Directory domain, completethe following steps:1. Change the Active Directory settings to allow for anonymous enumeration SID
and name translations.2. Log off.
Chapter 3. Installing 33
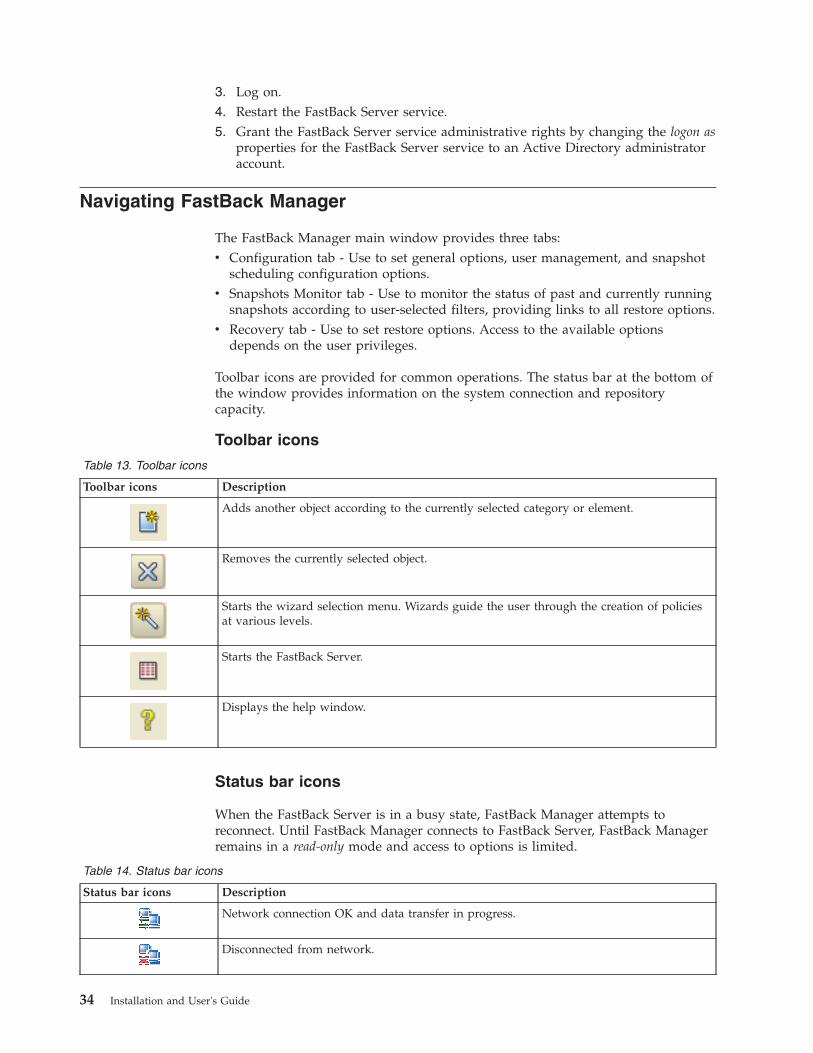
3. Log on.4. Restart the FastBack Server service.5. Grant the FastBack Server service administrative rights by changing the logon as
properties for the FastBack Server service to an Active Directory administratoraccount.
Navigating FastBack Manager
The FastBack Manager main window provides three tabs:v Configuration tab - Use to set general options, user management, and snapshot
scheduling configuration options.v Snapshots Monitor tab - Use to monitor the status of past and currently running
snapshots according to user-selected filters, providing links to all restore options.v Recovery tab - Use to set restore options. Access to the available options
depends on the user privileges.
Toolbar icons are provided for common operations. The status bar at the bottom ofthe window provides information on the system connection and repositorycapacity.
Toolbar icons
Table 13. Toolbar icons
Toolbar icons Description
Adds another object according to the currently selected category or element.
Removes the currently selected object.
Starts the wizard selection menu. Wizards guide the user through the creation of policiesat various levels.
Starts the FastBack Server.
Displays the help window.
Status bar icons
When the FastBack Server is in a busy state, FastBack Manager attempts toreconnect. Until FastBack Manager connects to FastBack Server, FastBack Managerremains in a read-only mode and access to options is limited.
Table 14. Status bar icons
Status bar icons Description
Network connection OK and data transfer in progress.
Disconnected from network.
34 Installation and User's Guide
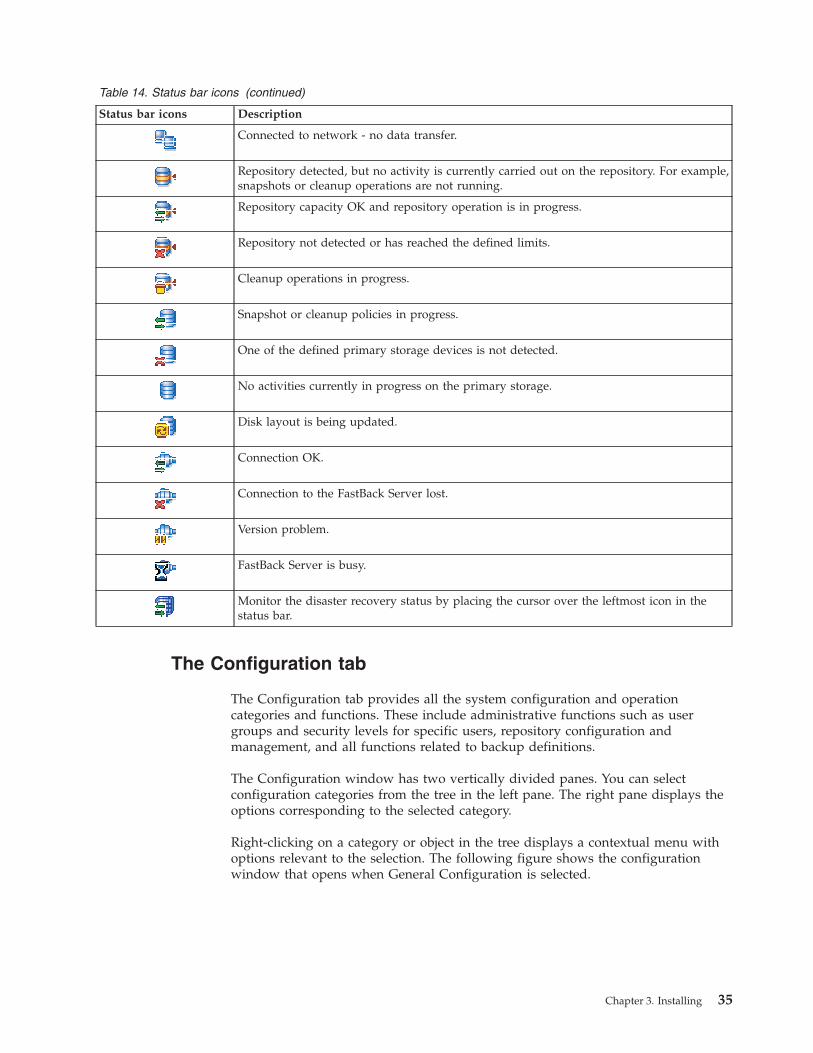
Table 14. Status bar icons (continued)
Status bar icons Description
Connected to network - no data transfer.
Repository detected, but no activity is currently carried out on the repository. For example,snapshots or cleanup operations are not running.
Repository capacity OK and repository operation is in progress.
Repository not detected or has reached the defined limits.
Cleanup operations in progress.
Snapshot or cleanup policies in progress.
One of the defined primary storage devices is not detected.
No activities currently in progress on the primary storage.
Disk layout is being updated.
Connection OK.
Connection to the FastBack Server lost.
Version problem.
FastBack Server is busy.
Monitor the disaster recovery status by placing the cursor over the leftmost icon in thestatus bar.
The Configuration tab
The Configuration tab provides all the system configuration and operationcategories and functions. These include administrative functions such as usergroups and security levels for specific users, repository configuration andmanagement, and all functions related to backup definitions.
The Configuration window has two vertically divided panes. You can selectconfiguration categories from the tree in the left pane. The right pane displays theoptions corresponding to the selected category.
Right-clicking on a category or object in the tree displays a contextual menu withoptions relevant to the selection. The following figure shows the configurationwindow that opens when General Configuration is selected.
Chapter 3. Installing 35
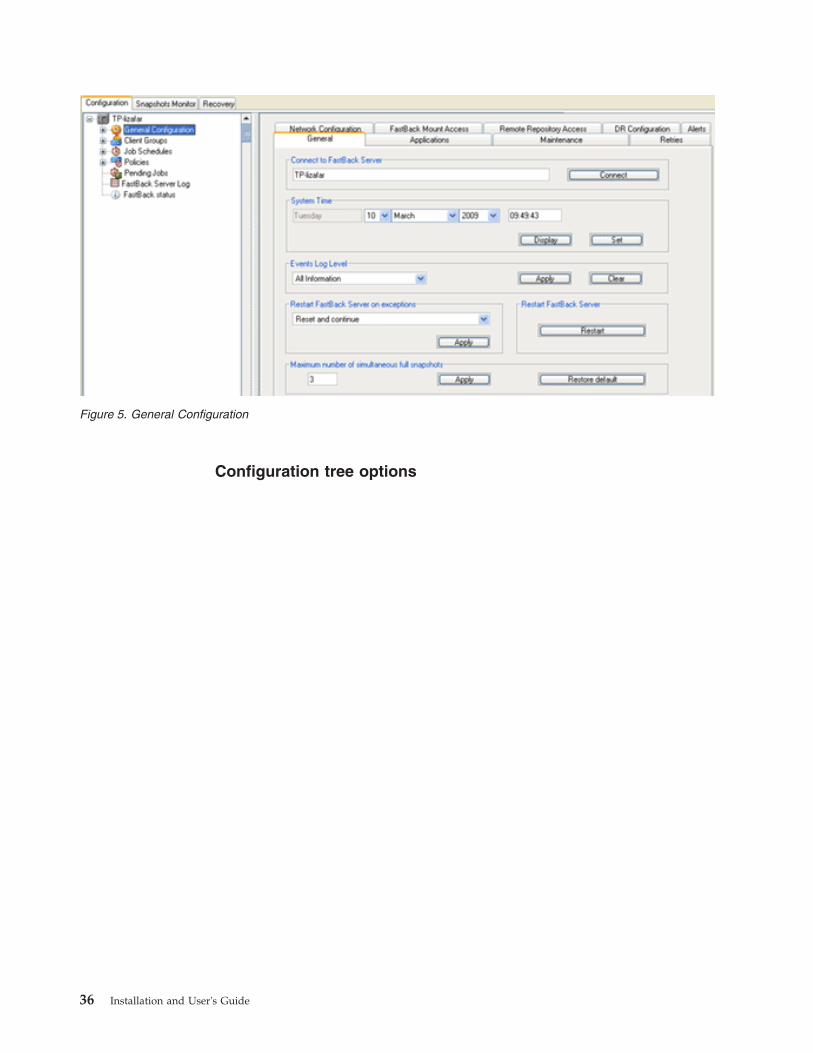
Configuration tree options
Figure 5. General Configuration
36 Installation and User's Guide

The following entries are available from the Configuration tab tree:v General Configuration - FastBack Server connection parameters, cleanup, and
global parametersv Storage Pool - Summary of disks and volumes attached to the FastBack Server
and each backed up clientv Users and Groups - User and group authentications and permissionsv Client Groups - Definitions of volumes to be snappedv Job Schedules - Backup schedules management optionsv Policies - Snapshot policies consisting of selected Client Groups and the
associated Job Schedulesv Pending Jobs - Jobs in queuev FastBack Server Log - Displays system related eventsv FastBack status - Status
Figure 6. Configuration tab tree
Chapter 3. Installing 37

Configuration tab iconsTable 15. Configuration tab icons
Toolbar icons Description
General configuration
Users
Groups
FastBack Client
Disconnected FastBack Client
FastBack Client is not responding to FastBack Server connection attempts
FastBack Client has incompatible version
Job schedules
Pending jobs
Job paused
Policy paused
Policies
Policy
FastBack Server log
Client groups
Warning
SAN disk (basic, dynamic, unknown)
Information
Repository disk
Error or alert
DAS disk
Cluster DAS disk
Cluster SAN disk
38 Installation and User's Guide

Table 15. Configuration tab icons (continued)
Toolbar icons Description
Disaster recovery
Snapshots Monitor tabYou can use the Snapshots Monitor tab to monitor the status and properties ofsnapshots and start various actions on the displayed snapshots and the respectivesnapshot chains. These include snapshots that have been completed, eithersuccessfully or unsuccessfully, and snapshots that are in progress.
This window has two panes: a pane that provides filter options and another panethat displays the snapshots according to the selected filter criteria. When acategory, for example, State or Date, is selected, the relevant options becomeavailable under the category. You can use these options to identify and filter thesnapshots displayed in the monitor according to various criteria.
In the right pane, an additional menu can be displayed by right-clicking on aselected snapshot. The menu options vary, depending on the type of snapshot. Forexample, an Aborted snapshot would only provide the following options: Events,Erase, and Snapshot Properties. When you select the Erase option, you can eraseall selected snapshots.
Right-click a snapshot to start snapshot-related tasks and view snapshot properties.
v Event - Display the snapshot events.v Erase - Right-click a snapshot and select Erase. Aborted snapshots can be
selected and erased.v Restore - Restore operations at volume and bare machine level.v Immediate operations.v Snapshot properties - Display the snapshot properties.
Retry policyWhen the execution of a snapshot fails, the snapshot is marked as Aborted with ayellow exclamation mark.
Tivoli Storage Manager FastBack attempts to run the snapshot again for thenumber of times specified in the policy setup. When the snapshot runs, thesnapshot is marked as Running. If the snapshot fails to complete within thespecified number of retries, it is marked as Aborted with a red exclamation markafter the last retry.
Figure 7. Monitor screen: Context menu
Chapter 3. Installing 39

Table 16. Snapshot icons
Toolbar icons Description
Initializing or running snapshot
Continuous data protection snapshot is running
Snapshot completed successfully
Continuous data protection Snapshot completed successfully
Successful snapshots whose retention time has expired
Aborted Continuous Data Protection snapshot, the Continuous Data Protection data beforethe aborting point might be available.
Aborted snapshots
Aborted snapshots whose retention time has expired
For more information about setting the number of retries to recover from a failedsnapshot attempt, see “Error recovery: Setting the number of retries” on page 134.
Recovery tabThe Recovery tab, part of the FastBack Manager window, provides access to allrestore options.
Access to specific options is limited by access rights of specific users. In order toaccess FastBack Mount from this tab, FastBack Mount must be installed on thesame system as the FastBack Manager.
The Recovery tab provides the following options:v Volume Level Restore - Use for restoration of entire volumes.v Bare machine recovery and disk restore - Creates a new disk from snapshots of
several volumes. The disk can be either a SAN or DAS disk. DAS disks with aboot and system designated volume are not supported. For these types of DASdisks, Tivoli Storage Manager FastBack for Bare Machine Recovery can be used.
v FastBack Mount and Instant Restore - Enables mounting snapshots and instantrestore of volumes for disaster recovery purposes.Instant Restore works only with mounted volumes (volumes that are assigned adrive letter).
Using the FastBack Client ConfiguratorYou can use the FastBack Client Configurator to connect a client to a FastBackServer.
To start and use the FastBack Client Configurator, complete the following steps:1. On the system where the FastBack Client is installed, from the Start menu,
choose Programs → Tivoli Storage Manager → FastBack → FastBack ClientConfigurator.
2. Type the host name or IP address for the FastBack Server.
40 Installation and User's Guide
3. (Optional) When you install the FastBack Client, by default, the SAN Moduleoption is disabled. Use the FastBack Client Configurator to enable the SANModule option. This setting is required for a cluster environment, because,when nodes switch, incremental delta block snapshots are required. In a clusterenvironment, every local disk at each node should have a different disksignature. For example, if disk1 on node1 has the same signature as disk1 onnode2, an error might occur.
4. Click OK.
Configuration and log filesConfiguration files are needed for Tivoli Storage Manager FastBack to run correctly.Do not edit any of the configuration files.
The Tivoli Storage Manager FastBack configuration information is stored in thefollowing locations:v Policy Configuration - ...\Documents and Settings\All Users\Application
Data\Tivoli\TSM\FastBack\conf.txtv User Configuration - ...\Documents and Settings\All Users\Application
Data\Tivoli\TSM\FastBack\users_enc.txtv Running and completed jobs - ...\Documents and Settings\All
Users\Application Data\Tivoli\TSM\FastBack\inprogress.txt, ...\Documentsand Settings\All Users\Application Data\Tivoli\TSM\FastBack\history.txt,...\Documents and Settings\All Users\Application Data\Tivoli\TSM\FastBack\state.txt
v Customer logs - all ...\Documents and Settings\All Users\ApplicationData\Tivoli\TSM\FastBack\clog.sf files
v Optimized disk access parameters - ...\Documents and Settings\AllUsers\Application Data\Tivoli\TSM\FastBack\disks.res
The default location for the log files is C:\Documents and Settings\AllUsers\Application Data\Tivoli\TSM\FastBack. In this path, there aresubdirectories with a folder for each Tivoli Storage Manager FastBack service. Forexample, there are folders labeled mount, shell, client, and server. These folderscontain the log files. The log file format is .SF.
The log files are named according to the Tivoli Storage Manager FastBack service.In addition, each log file is assigned a number. For example,FAST_BACK_MOUNT040.sf. The log file with the most recent data is stored in thelog file with the 040 number. When a log file reaches the maximum size limit, anew log file is created. When a new log file is created, the log file name is thesame except that the log file number decrements by one. For example, afterFAST_BACK_MOUNT040.sf reaches maximum file size, theFAST_BACK_MOUNT039.sf file is created.
Chapter 3. Installing 41

42 Installation and User's Guide
Chapter 4. Uninstalling
The uninstallation process is the same whether you completed a new installationor upgraded to this version of the software.
To uninstall Tivoli Storage Manager FastBack, use the standard Uninstall option inthe Add or Remove Applications window, part of the Control Panel for theWindows operating system.
A rollback from Tivoli Storage Manager FastBack, Version 5.5.3 to Version 5.5.2 or5.5.1 is not supported.
If FastBack Server was given read and write access to any non-repository SANdisk, the following steps must be completed:1. After uninstalling FastBack Server, before rebooting, use LUN masking to
disable access to the SAN disk from the FastBack Server.2. Disconnect the system from the Fiber Channel.
If you do not complete these steps, the Windows operating system might causedisk corruption.
© Copyright IBM Corp. 2008, 2009 43

44 Installation and User's Guide
Chapter 5. User management and security
With the correct user management definitions, the administrator can secure systemaccess.
With Tivoli Storage Manager FastBack, the administrator can control userpermissions by assigning users to user groups.
User groups are named, logical entities. You can assign permissions and users touser groups. There are two ways to set up user groups:v Create and configured user groups in FastBack Manager. User groups that you
create in FastBack Manager can have different access permissions. For example,one group might have administrator permissions and another group might havemore restrictive permissions. To create and configure user groups, you must beclassified as a super user with administrator permissions.Default user groups that are included with FastBack Manager cannot bechanged.
v Use Microsoft Active Directory user groups that are added to the ActiveDirectory group list in FastBack Manager. FastBack Manager recognizes thesegroup members for the Active Directory as super users. These users areautomatically assigned the correct access permissions.
There are some rules to follow when setting up user groups:v A user can be assigned to only one user group.v If you are the administrator, change the default password.
You can create new users or change existing users by using the Users and Groupswindow.
Active Directory groupsActive Directory groups are predefined groups of administrators with extensivesystem access permissions.
Use FastBack Server to use Active Directory groups as part of user loginmanagement. When you add an Active Directory group to the list, FastBackManager recognizes members of this group during the logon process, and logsthem on as administrators.
If you use a Windows 2008 server as a domain controller, you cannot use theFastBack Manager automatic log on. Using Windows 2008 server as a domaincontroller does not change how you can back up and restore data and applications.
To add an Active Directory group, complete the following steps:1. Go to Configuration → General Configuration → Users and Groups.2. Right-click Active Directory Groups; then, click New AD Group.3. In the window that is displayed, type the group name. The length of the group
name cannot exceed 15 characters.4. Click Apply.
© Copyright IBM Corp. 2008, 2009 45
FastBack Manager user groupsTo simplify administration, minimize the number of user groups.
When planning user groups, the following items should be considered:v Who requires access to the FastBack Manager system?v What tasks are the users going to complete?
When you know the answers to these questions, create the users and assign theusers to user groups. When you create a user, you have to immediately assign theuser to a group.
Creating user groupsTo create user groups, you must have administrator permissions.
To create a user group, complete the following steps:1. In the FastBack Manager Configuration tab, go to General Configuration →
Users and Groups.2. Right-click Groups; then, click New group.3. Type the following information:
v Group Name - Type up to 13 characters. Do not include trailing spaces.v Description - Type a description to characterize the user group.
4. Click Apply.
You have entered all the information required to create the user group. You canadd users to and associate permissions with the group.
Assigning permissions
To assign permission to a user group, complete the following steps:1. In the FastBack Manager Configuration tab, go to General Configuration →
Users and Groups → Groups.2. Select a group.3. In the User Group window, click Show Permissions. The following screen
capture is an example of the User Group window that is displayed.
46 Installation and User's Guide
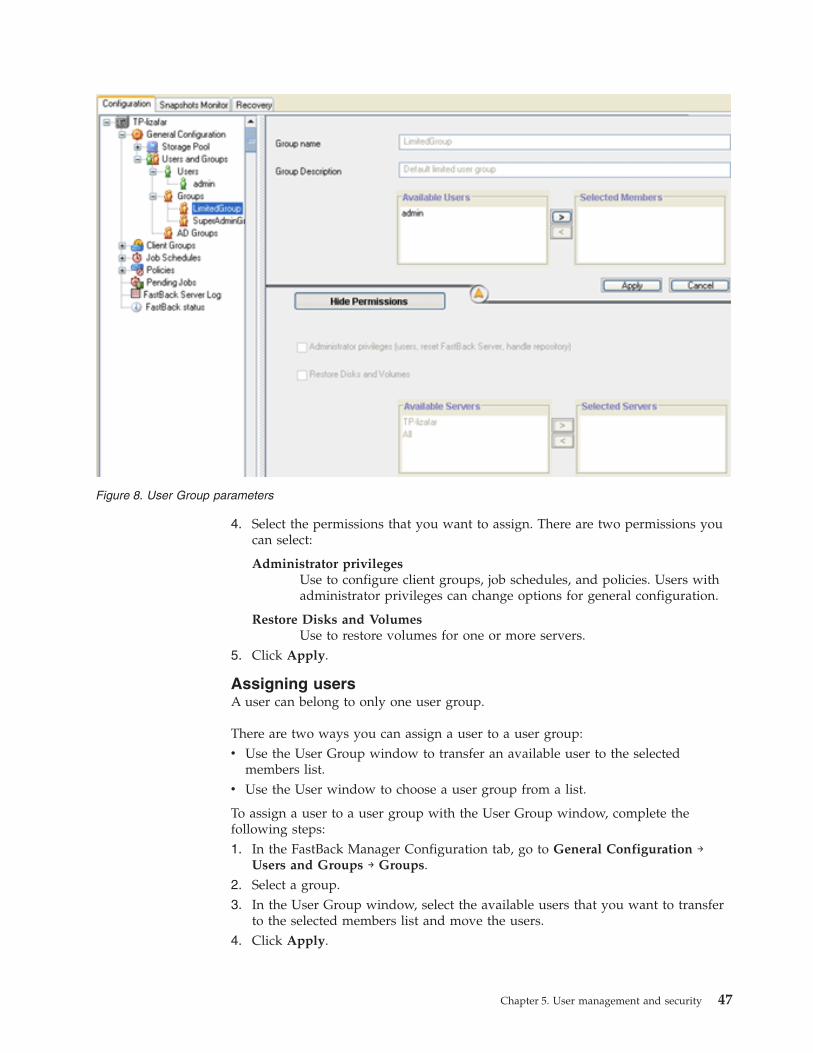
4. Select the permissions that you want to assign. There are two permissions youcan select:
Administrator privilegesUse to configure client groups, job schedules, and policies. Users withadministrator privileges can change options for general configuration.
Restore Disks and VolumesUse to restore volumes for one or more servers.
5. Click Apply.
Assigning usersA user can belong to only one user group.
There are two ways you can assign a user to a user group:v Use the User Group window to transfer an available user to the selected
members list.v Use the User window to choose a user group from a list.
To assign a user to a user group with the User Group window, complete thefollowing steps:1. In the FastBack Manager Configuration tab, go to General Configuration →
Users and Groups → Groups.2. Select a group.3. In the User Group window, select the available users that you want to transfer
to the selected members list and move the users.4. Click Apply.
Figure 8. User Group parameters
Chapter 5. User management and security 47

To assign a user to a user group with the User window, complete the followingsteps:1. In the FastBack Manager Configuration tab, go to General Configuration →
Users and Groups → Users.2. Select a user.3. Select a user group for the user.4. Click Apply.
Creating usersTo create users, you must have administrator permissions.
To create a user, complete the following steps:1. In the FastBack Manager Configuration tab, go to General Configuration →
Users and Groups.2. Right-click Users; then, click New user. The default properties for the user are
displayed.3. In the right-pane, type the following required information:
v User Name: The name that you want the user to type when logging on tothe FastBack Manager system. You can use a name with up to 24 characters;do not include trailing spaces.
v Password: The password that you initially assign to the user. Use thefollowing rules when assigning a password:– Passwords cannot match the user name.– Passwords cannot exceed 10 characters.– Passwords must include at least one digit and one letter.– The following characters can not be used: \*?\"<>|;^'.$#@&;
Users can change their passwords. Users with administrator permissions canchange passwords for other users.
v Confirm Password: A confirmation of the password you typed in theprevious field.
4. (Optional) For the user description, type descriptive information about the user.For example, you can type a job title, department, or organization name.
5. Select a user group. The default user group is LimitedGroup. Users must beassigned to a user group. To view the properties of the selected user group,click View Group.
Changing user propertiesAll changes take effect immediately, regardless of whether the user ID is logged inor logged out.
If you log in and, while the credentials are authenticated, your user ID is disabled,you can use Tivoli Storage Manager FastBack until you log off. The disabled userID can not be used to log on again.
To change the properties for a user, complete the following steps:1. Select the user from the tree.2. In the right-pane, change the properties.
The following properties can be changed:v User name
48 Installation and User's Guide

v Passwordv Descriptionv User group
3. Click Apply.
Deleting usersDeletions are effective immediately, unless the user being deleted is logged on tothe system. In this case, when the deleted user logs out, the user is deleted.
The administrator user cannot be deleted. To delete a user, complete the followingsteps:1. In the FastBack Manager Configuration tab, go to General Configuration →
Users and Groups → Users.2. Right-click the user that you want to delete; then, click Remove. A message is
displayed to confirm the deletion. Click Yes to delete the user group or No tocancel the deletion and leave the user group intact.
To delete all users, complete the following steps:1. In the FastBack Manager Configuration tab, go to General Configuration →
Users and Groups.2. Right-click Users; then, click Reset users. This action resets the user list to the
default set of users. In the default set of users, there is one user. This user is theadministrator.
3. A message is displayed to confirm the deletion. Click Yes to delete all users orNo to cancel the deletion.
Changing user group propertiesChanges to user group properties are effective immediately.
To change the properties of a user group, complete the following steps:1. In the FastBack Manager Configuration tab, go to General Configuration →
Users and Groups → Groups.2. Select a group.3. Change the properties as needed.
The following properties can be changed:v Name and descriptionv Assigned permissionsv Assigned users
4. Click Apply.
Deleting user groupsTo delete users, you must have administrator permissions. You cannot delete thedefault user groups: LimitedGroup and SuperAdminGroup.
To delete a user group, complete the following steps:1. In the FastBack Manager Configuration tab, go to General Configuration →
Users and Groups.2. Right click the user group that you want to delete; then, click Remove.3. When the system prompts you to confirm the deletion, click Yes to delete the
user group or click No to cancel the deletion and leave the user group intact.
Chapter 5. User management and security 49

To delete all user groups, complete the following steps:1. In the FastBack Manager Configuration tab, go to General Configuration →
Users and Groups.2. Right-click Groups; then, click Reset Groups to Default.3. When the system prompts you to confirm the deletion, click Yes to perform the
operation or click No to cancel the deletion.
Access permissionsAccess permissions gives specific groups of users authorization to access sourceand destination volumes.
Volume restore
Volume restore can only be performed if the currently logged user is authorized toaccess both the source and the destination volume.
SuperAdmin users have restore access to all domains. These SuperAdmin users canbe either Microsoft Active Directory users, or FastBack Manager domain users whobelong to the SuperAdmin group.
Users that are not administrators require read permissions, Share and ACL, to thesource volume root directory, and Modify permissions, network share and ACL, tothe destination volume root directory. The source permissions are those that werein effect when the backup was performed, while the destination permissions arethe current permissions during restore.
If a volume restore is attempted to or from a location where the logged user doesnot have access permissions, a message is posted in the status bar for FastBackManager.
Figure 9. Volume Restore Access Privileges
50 Installation and User's Guide

Instant Restore
Instant Restore can be run from source volumes to destination volumes that thecurrent user is authorized to access.
SuperAdmin users have unlimited restore rights. These SuperAdmin users can beeither Active Directory users, or Xpress-Restore domain users belong to theSuperAdmin group.
Active Directory users that are not administrators require read permissions forsharing to the source volume root directory, and change permissions (ACL) to thedestination volume root directory. The source permissions are those that weregranted at backup time, while the destination permissions are those granted atrestore time.
Source permissions are checked for only local and SAN repositories.
Security and loginTivoli Storage Manager FastBack provides two distinct security mechanisms:Microsoft Active Directory accounts and Tivoli Storage Manager FastBack localaccounts. The security mechanisms are defined by different domains, users, andpermissions. Different users can be logged-in simultaneously using different typesof accounts, but a single user cannot combine permissions from Active Directoryand Tivoli Storage Manager FastBack accounts.
By default, the FastBack Manager is accessed through the current Active Directoryaccess privileges. The user can log off and log on again at any time, using anydomain and any user name allocated to that domain.
Administrator privileges can only be granted to a user from the domain of thesystem. The AD group cannot be added from a domain other than the domain youare logged in to.
Figure 10. Instant Restore access privileges
Chapter 5. User management and security 51
Note: In order to use FastBack Manager, the user logged into the FastBackManager system must be a member of the Administrators user group.Alternatively, the user must be given write permissions to the followingfolder: C:\ProgramFiles\Tivoli\TSM\FastBack\Manager
Tivoli Storage Manager FastBack dual security provides significant advantages asfollows:v Integration with the organization’s directory. Because new users and groups do
not have to be defined specifically for Tivoli Storage Manager FastBack, there isno additional administrative overhead.
v Simplified access. FastBack Manager is accessed directly and the Windows loginpermissions for the user are applied.
v Redundancy. In case the Active Directory for the organization is unavailable,access mechanism for the FastBack Manager can be used to secure access.
Active Directory integrationActive Directory is a directory structure integrated in Windows 2000 and later thatcontrols account management security. It enables a user to log on to computers anddomains with an identity, which has been assigned access privileges to domainresources. This is done through the Access Control Lists (ACL). The ACLs are a setof data associated with a file, directory, or other resource, and defines thepermissions that users and groups have for accessing that resource. In the ActiveDirectory service, an ACL is a list of access control entries, stored with the object itprotects.
Share level and file level security information associated with a specific volume,folder, or file of the original volume, will be used to restore file, volume and disk.
If the login domain account does not have the share or file level permissionsrequired to access a specific file or volume, one can log off and log on again, usingan account with the required privileges, in order to acquire restore permissions.
Note: In Windows 2000, Active Directory users can open different domains (usingthe same user name) without reentering the password, while in Windows2003 the user is prompted to reenter the user name and user ID passwordevery time a new domain is being accessed.
Microsoft Active Directory user in the FastBack Manager
Active Directory groups are predefined groups of administrators with extensivesystem access privileges. You can use the FastBack Server to use these groups aspart of user log in management. When you add an Active Directory group to theActive Directory group list, in FastBack Manager (see “Active Directory groups” onpage 45), FastBack Manager recognizes members of this group during log on, andlog the users on as administrators. After installation, the set of Microsoft ActiveDirectory groups is empty. Adding and removing Active Directory groups to andfrom the Microsoft Active Directory group list in FastBack Manager requiressuperuser access privileges. To configure Microsoft Active Directory groups thefirst-time user must have Tivoli Storage Manager FastBack superuser privileges.
For non-administrator users that are not members of an Active Directory group,the non-administrator users can only view the configuration options, monitorsnapshots, and restore volumes, folders, and files to which they have accesspermissions on the network.
52 Installation and User's Guide
If you use a Windows 2008 server as a domain controller, you cannot use theFastBack Manager automatic log on. Using Windows 2008 server as a domaincontroller does not change how you can back up and restore data and applications.
Tivoli Storage Manager FastBack accountsFastBack Manager accounts are created with the FastBack Manager. Two defaultgroups are provided: LimitedGroup and SuperAdminGroup members are assigned allthe administrative and restore permissions for the XPRESS-RESTORE domain.
Tivoli Storage Manager FastBack users
The user names and user groups in this special domain are unrelated to thosedefined in the Microsoft Active Directory, even if some of the assigned users orgroups have the same names. User privileges are determined only by thedefinitions assigned to the FastBack Manager group to which they are allocated.
Switching between Tivoli Storage Manager FastBack andActive Directory domains
For volume restore, switch between accounts by logging off and then on again.
FastBack Manager login using a different user name
Use this option to login using a different user name for volume-level restores.1. From the FastBack Manager File menu, choose Login as... and respond to the
verification dialog by clicking Yes.2. Select the Domain. To enter the Tivoli Storage Manager FastBack environment,
select the Xpress-Restore domain and enter the User Name and Password. Toenter an Active Directory domain, select the appropriate domain and enter aUser Name and Password defined in that domain.
3. Click Login. If a difference is detected between the time on the FastBack Serverclock and the management console clock, you will be prompted to synchronizethe clock according to your console before the FastBack Manager window isdisplayed. See “Setting the system clock” on page 58, for more information onsetting the system clock.
Securing the FastBack Server application data directory
The user is responsible for securing the application data directory for FastBackServer, located in the Documents and Settings section for the user. The security ofthe system is not guaranteed if the FastBack Server application data directory isnot properly secured, for example, in case the application data directory for theFastBack Server is shared through sharing of the C: disk on the network.
Chapter 5. User management and security 53

54 Installation and User's Guide

Chapter 6. Configuring and using
After you install and start Tivoli Storage Manager FastBack, there are someconfiguration tasks to complete.
The following list summarizes the configuration tasks for Tivoli Storage ManagerFastBack:1. (Optional) Change connection parameters to the FastBack Server.2. Verify that the FastBack Server clock is set to match the system clock.3. Identify a repository. The following usage scenario explains why you want to
assign disks to a repository.4. Set up the snapshot policies. You can use the snapshot policy wizard to help
with this task. Again, the following usage scenario explains the importance ofthis task.
After you set up the snapshot policies and begin to backup data, you can useTivoli Storage Manager FastBack to recover data.
Steps for using Tivoli Storage Manager FastBack
The following scenario is a common usage scenario for Tivoli Storage ManagerFastBack:
Step 1: Identify a repository.A repository is the disk area used for storing client snapshots. TheFastBack Server uses the repository. The repository can be a folder, aphysical disk, a SAN, or NAS drive. Before you can use Tivoli StorageManager FastBack, at least one repository must be defined.
For more information about identifying repositories, see “Identifyingrepositories” on page 59.
Step 2: Schedule and run snapshots.A snapshot is a record of backup data at a certain point in time. Toschedule and run snapshots, you have to create a client group, jobschedule, and snapshot policy. A snapshot policy links one or more clientgroups to a job schedule.
For more information about scheduling and running snapshots, see“Setting up snapshot policies” on page 75.
Step 3: For critical servers, run Continuous Data Protection.Continuous Data Protection is a tool that records all activity betweensnapshots, permitting the restoration of a system to a point in time. UsingContinuous Data Protection requires additional processor, memory, andnetwork bandwidth resources. Because of these additional requirements, donot run Continuous Data Protection on volumes where page files or theoperating system files are installed.
For more information about running Continuous Data Protection, see“Continuous Data Protection” on page 104.
Step 4: Run volume and individual file recovery from the repository.With the snapshots that are stored on the FastBack Server, you can recoverdata that is backed up. You can restore volume level data from the
© Copyright IBM Corp. 2008, 2009 55

FastBack Server, or restore an individual file using FastBack Mount. If youhave the correct authority to access the files, you can restore to the samedisk or any disk on any system that is connected to the snapshot.
For more information about running volume recovery, see “Volumerestore” on page 90. For more information about individual file recovery,see “File recovery with FastBack Mount” on page 91.
Step 5: Recover data from applications and databases.You can use Tivoli Storage Manager FastBack to backup data fromapplications, for example, Microsoft Exchange server, and databases, forexample, Microsoft SQL Server.
For more information about recovering data from applications anddatabases, see the following sections:v For recovering Microsoft Exchange data, see “Microsoft Exchange back
up and restore” on page 109.v For recovering Microsoft SQL Server data, see “SQL back up and
restore” on page 113.v For recovering Lotus Domino database data, see “Backing up and
restoring Lotus Domino Databases” on page 120.v For recovering DB2 UDB database data, see “Backing up and restoring
DB2 UDB databases” on page 125.
Step 6: Recover operating system partitions from an uncorrupted system.You can use the Bare Machine Recovery tool to restore a physical server toa virtual or temporary server while a physical server is replaced orrepaired.
For more information about recovering operating system partitions from anuncorrupted system, see “Recovering operating system partitions usingBare Machine Recovery” on page 128.
Changing connection parameters to FastBack ServerAdministrator privileges are required to change the connection parameters used toconnect to FastBack Server.
In the following scenarios, changes in connection parameters might be required:v If the current connection is not available when the FastBack Manager is started,
you are prompted to enter the IP Address or name of an FastBack Server. Typethe entry and click Connect.If the FastBack Server runs on the Windows XP operating system, you need tochange the default Windows firewall setting from on to off.
v If the connection becomes unavailable while using the FastBack Manager, youcan type the IP Address or FastBack Server computer name in the GeneralConfiguration → General tab. Type the IP address or name, and click Connect.
Working with FastBack Manager in WAN environmentWhen working with FastBack Manager in a WAN environment, connect to theFastBack Server by IP address and not by name.
In case it takes too long for FastBack Manager to log on automatically using yourActive Directory user name, add the following parameter to theFastBackManager.ini file: AutoLogin=false
56 Installation and User's Guide

The FastBackManager.ini file is stored in the following directory : C:\ProgramFiles\Tivoli\TSM\FastBack\manager\
If you use a Windows 2008 server as a domain controller, you cannot use theFastBack Manager automatic log on. Using Windows 2008 server as a domaincontroller does not change how you can back up and restore data and applications.
One FastBack Manager system can control multiple branches by running multipleinstances of FastBack Manager GUI. If there is more than one FastBack Server in abranch, only one FastBack Server can be controlled by an external FastBackManager because a port can only be forwarded to one destination.
The following ports have to be opened in a firewall, and the ports must beforwarded to FastBack Manager and FastBack Server:
TCP 11460
UDP 11461
The following ports have to be opened in a firewall, and the ports must beforwarded to the FastBack Server and FastBack Client:
TCP 11406
TCP 1320
Figure 11. Controlling multiple branches from the Data Center
Chapter 6. Configuring and using 57

The following ports have to be opened in a firewall, and the ports must beforwarded to the FastBack Server and Tivoli Storage Manager FastBack DisasterRecovery Hub server:
TCP (Active FTP)20, 21, 1023
TCP (Passive FTP)21, 1023
All the sensitive information such as user names, passwords, and domain names, istransferred using Triple DES encryption. FastBack Manager can connect toFastBack Server over T Carrier lines (T1, T2, T3). Usability is subject to quality ofservice of the connection.
Configuring SAN environmentThe World Wide Name (WWN) of the FastBack Server HBA card must be obtainedin order to open LUN masking. Refer to your HBA documentation for instructions.
To configure a LUN, complete the following steps:1. LUN masking must be enabled for the disks on which the repository is
configured.2. If the LUN Management utility supports read/write configuration masking,
Write mode must be enabled for the Repository disks on the FastBack Serversystem only, other systems should have Read Only access to the repositorydisks.
3. LUN masking must be enabled on all disks that are to be backed up.4. If the LUN Management Utility supports read and write configuration
masking, enable Read Only access for FastBack Server to disks that are to bebacked up.
5. SAN zoning must be enabled on:v The switchv All disks to be backed upv The FastBack Serverv The server clients
6. The target disk for restored volumes must have LUN masking, and bewrite-enabled.
If there are SAN repository disks in the network, access to these disks should berestricted to a system that has either FastBack Server or FastBack Mount installed.FastBack Server must be able to access the repository in read and write mode.FastBack Mount should have access to the repository in read-only mode, however,FastBack Mount can access to the repository in read and write mode.
Setting the system clockVerify that the FastBack Server clock is set correctly because all backup and restoreoperations are referenced according to this clock.
Clock changes require resetting the FastBack Server. Examples of when you resetthe system clock and need to reset the FastBack Server include the following items:v Time synchronization of the Windows clock with the domain controllerv Change of time zone configuration
58 Installation and User's Guide

v Daylight savings time change
Each time that you start FastBack Manager, the system verifies that the time on theFastBack Server clock and the clock on the system the FastBack Manager isinstalled on is the same. If a significant difference is detected, you are prompted tosynchronize the values.
To prevent changes in the clock from affecting job schedules and labeling, allcurrently running jobs are cancelled when a reset is run on the FastBack Server.When the FastBack Server restarts, the jobs start automatically.
The FastBack Server clock can be changed at any time. To change the clock,complete the following steps:1. In the FastBack Manager Configuration pane, choose General Configuration
and select the General tab.2. You can complete the following tasks:
v To view the time on the FastBack Server, click Display.v To set the time on the FastBack Server, set the desired time in the appropriate
fields (in 24 hour format) and click Set.3. Close both FastBack Manager and FastBack Server and then change the time of
the system clock.4. If FastBack Server and FastBack Manager are not running on the same system,
a message is displayed. To respond to the message, choose one of the followingoptions:
Yes The FastBack Server automatically resets.
Sync Sets the FastBack Server clock according to the system time of thesystem where FastBack Manager is running.
Identifying repositoriesIdentifying and assigning disks to repositories is part of configuring and usingTivoli Storage Manager FastBack. Tivoli Storage Manager FastBack recognizesdifferent types of repositories. The repositories that you identify are organized intogroups called storage pools.
Storage pools
A storage pool is a system disk-management utility for managing disks and thevolumes that the disks contain. To create and manage repositories, and monitor thestorage layout, you can use options from the storage pool menus.
All disk-related tasks are performed without shutting down the system orinterrupting users. Most configuration changes take effect immediately.
Note: Tivoli Storage Manager FastBack runs automatic discovery to continuouslyupdate the display. However, if you suspect that the display requiresupdating, you can run a manual refresh by selecting Storage Pool; then,right click to select Rescan Volume Layout.
Repositories
FastBack Server supports several types of repositories: volumes, network folders(sometimes referred to as shares), and local drives. With network folders you can
Chapter 6. Configuring and using 59

use any available free storage space within the organization by using devices suchas Network Attached Storage (NAS) or other network share options.
FastBack Server supports attachment of up to 20 objects to one repository. A mix ofrepository types is also possible according to the type limitation.
Only the Tivoli Storage Manager FastBack product should be writing to the disk,volume, and share.
The following table sums up the advantages and disadvantages of using differentlocation types for backup images.
Location Advantages Disadvantages
Local hard drive v Standalone, dedicated storage forimages
v Can detect file system corruptionand recovery
v Inexpensive
v Fast, when compared to networkdisks
v Accurate capacity management
v Central management
v Vulnerable, no fault tolerance
v A dedicated disk is required
v Only Microsoft basic disks aresupported
SAN storage v Fast
v Fault tolerant
v Managed
v Can detect file system corruptionand recovery
v Instant recovery over the SAN byany system connected to the SAN
v Accurate capacity management
v Central management
v Expensive
Network storage v Storage agnostic - NAS or anynetwork location
v Appropriate accesses rights mustbe assigned
v Capacity management is notaccurate
v No detection of file systemcorruption or failure
v No central management
Volume or folder v Flexibility, no need for specialdedicated disk
v No accurate capacity management
v No central management
v Must be large enough to holdsnapshot (full or incremental)
v A large number of volumes andfolders can harm the restore andrecovery performance
Repository pools
Repositories are grouped and organized in repository pools. The repository poolsare associated with storage pools.
60 Installation and User's Guide
Multiple ways to identify repositories
The first time you start Tivoli Storage Manager FastBack, no repository has beenidentified. As such, the first screen that is displayed after you enter a user ID andpassword is a message that explains you need to add a repository. There is awizard that guides you through the initial identification of a repository. You canadd or migrate a repository using FastBack Manager, or connect a SAN repositorydisk.
When you add a disk to the repository, the entire disk is used by Tivoli StorageManager FastBack. In addition, when you add the disk, Tivoli Storage ManagerFastBack reformats the disk or partition. All data is erased. You cannot add a diskthat exceed 2 TB or is scanned by a virus scanning tool.
After you identify the repository, restart the FastBack Server. For more informationabout restarting FastBack Server, see “Starting and running FastBack Server,FastBack Client , Tivoli Storage Manager FastBack Disaster Recovery Server,FastBack Mount, and FastBack Watchdog” on page 33.
If a disk was a Tivoli Storage Manager FastBack repository for a FastBack Server,you cannot add it as a repository to a different FastBack Server. The disk must bereformatted. After reformatting the disk, you can add the repository as a new,blank disk to the FastBack Server.
For more information about adding disks to repositories, see “Adding disks to therepository” on page 65. For more information about adding volumes torepositories, see “Adding volumes to the repository” on page 65.
Viewing storage poolsTo view storage pools, open FastBack Manager.
In the main window, on the Configuration tab, click General Configuration →Storage Pool. The Storage Pool window is displayed. The Storage Pool window isdivided into two areas: the upper area provides a volume-based storage view andthe lower area shows a disk-based storage view. The relative size of these areas canbe changed by clicking and holding down the left mouse button on the bar thatseparates the two windows, and dragging it up and down.
The view depends on the selected category:v Selecting Storage Pool displays all of the storage in the system.v Selecting Repository shows the repository storage.v Selecting any other server shows the storage from the point of view of the
server.
Each type of storage pool is assigned an icon. The following table identifies theicons that can be displayed.
Table 17. Storage pool icons
Storage pool icons Description
SAN disk. Backed up by the FastBack Server through the SAN.
DAS (Direct Attached Storage). Backed up by the FastBack Server through the LAN.
Chapter 6. Configuring and using 61

Table 17. Storage pool icons (continued)
Storage pool icons Description
Identified as an Tivoli Storage Manager FastBack repository disk. If the capacity isdisplayed, it belongs to the connected FastBack Server; otherwise it belongs to a differentFastBack Server.
Repository on folder.
Viewing volume properties for storage pools
Basic information is available for each volume.
To view the information, right-click the volume in the Storage Pool window andselect Properties.
Label Volume Name
File SystemFile restore system (NTFS)
CapacityVolume capacity
Type Basic - Not managed by any volume management software.
Dynamic - Managed by a volume management software.
Unknown - Not identified by Tivoli Storage Manager FastBack. Forexample, AIX® formatting.
SignatureVolume signature
Figure 12. Volume Properties window
62 Installation and User's Guide
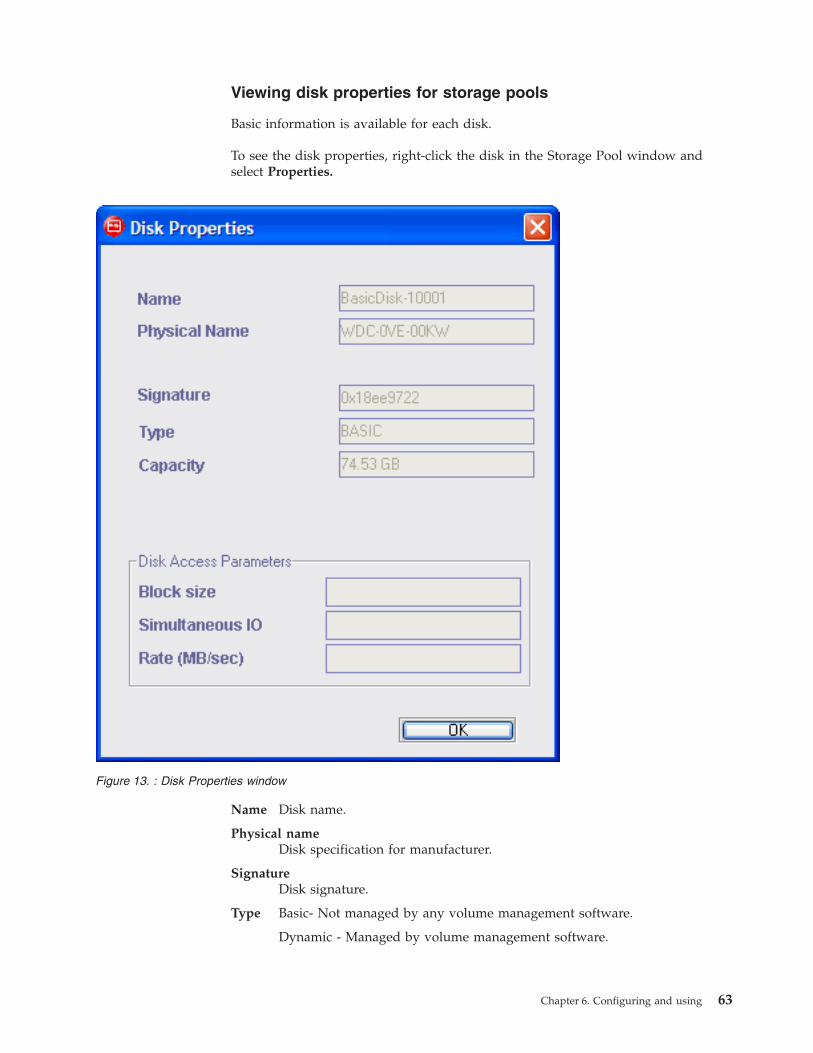
Viewing disk properties for storage pools
Basic information is available for each disk.
To see the disk properties, right-click the disk in the Storage Pool window andselect Properties.
Name Disk name.
Physical nameDisk specification for manufacturer.
SignatureDisk signature.
Type Basic- Not managed by any volume management software.
Dynamic - Managed by volume management software.
Figure 13. : Disk Properties window
Chapter 6. Configuring and using 63
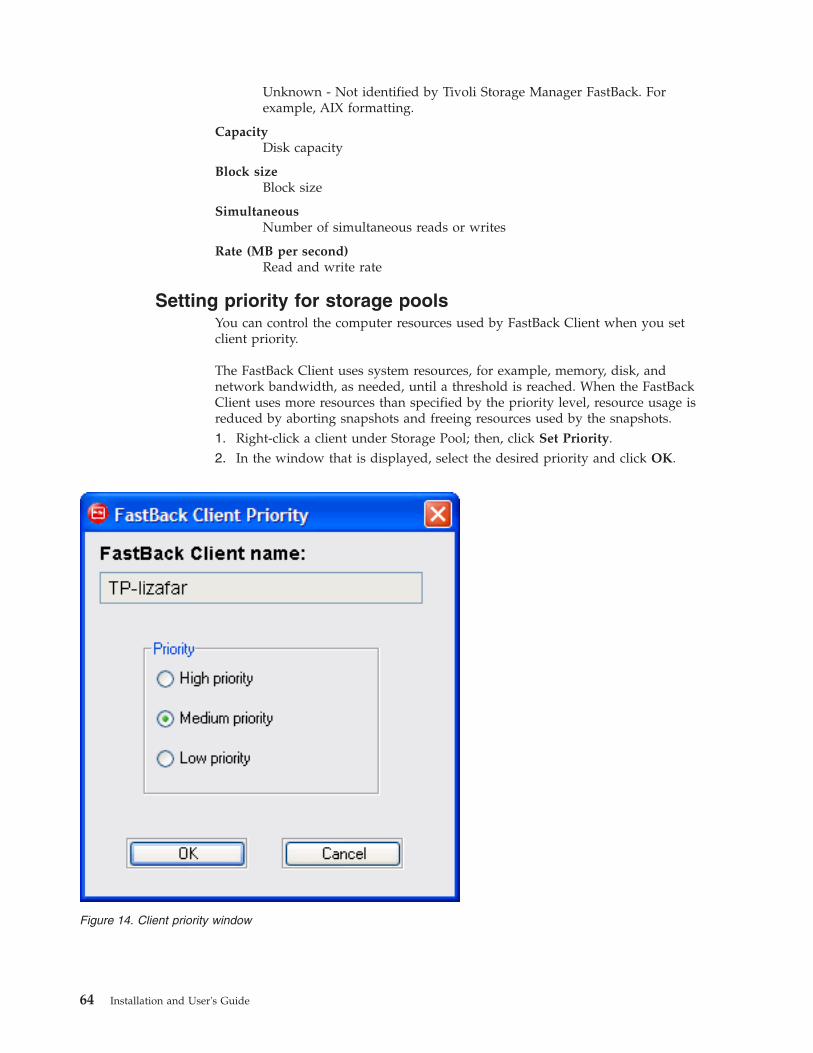
Unknown - Not identified by Tivoli Storage Manager FastBack. Forexample, AIX formatting.
CapacityDisk capacity
Block sizeBlock size
SimultaneousNumber of simultaneous reads or writes
Rate (MB per second)Read and write rate
Setting priority for storage poolsYou can control the computer resources used by FastBack Client when you setclient priority.
The FastBack Client uses system resources, for example, memory, disk, andnetwork bandwidth, as needed, until a threshold is reached. When the FastBackClient uses more resources than specified by the priority level, resource usage isreduced by aborting snapshots and freeing resources used by the snapshots.1. Right-click a client under Storage Pool; then, click Set Priority.2. In the window that is displayed, select the desired priority and click OK.
Figure 14. Client priority window
64 Installation and User's Guide

Identifying DAS and SAN disksv A SAN disk is seen as a DAS disk to the FastBack Server in the following
situations:– The disk is under LUN Masking and was enabled to a protected system, but
not enabled to the FastBack Server.– The disk is connected to a different SAN Island than the FastBack Server.– The fiber channel cable of the FastBack Server is disconnected.– The disk is owned by Microsoft cluster.– FastBack Server and FastBack Client see the same SAN disks, but FastBack
Client has a disabled SAN module.v A DAS disk is added to the storage layout only if during the connection of the
client the volume is not seen through the SAN. However, a DAS can become aSAN device. For example, you can reconnect the fiber channel cable.
v If a volume is not available, a snapshot is not scheduled for that volume.
Adding disks to the repositoryWhen you add a disk to a repository, Tivoli Storage Manager FastBack reformatsthe disk or partition.
Before you add a disk to the repository, meet the following requirements:v Disk cannot exceed 2 TB.v Disk cannot be scanned by a virus scanning tool.
Disks that are in use, also known as mounted, cannot be added to repositories. If,when you add a disk to a repository, a volume letter is not automatically assigned,manually assign a volume letter.
A volume chosen for the repository should be formatted as NTFS only.
To add a disk to the repository, complete the following steps:1. From FastBack Manager, select General Configuration → Storage Pool.2. Right-click the disk to be added; then, click Add to repository.3. Confirm that you want to add the disk to the repository.4. In the window that is displayed, verify the size of the repository.5. Click Apply. In the storage pool, the disk is labeled REP_<drive letter>. <driver
letter> is the letter than corresponds to the drive as identified by the operatingsystem.
When you add a disk that is not shared on the network to the repository, therepository works, but Instant Restore is not possible unless you install FastBackMount on the same system as the FastBack Server. If you do not want to installFastBack Mount and FastBack Server on the same system, but need to use InstantRestore for the repository, share the disk on the network and add the disk to therepository.
Adding volumes to the repositoryIf you want to add more space to the repository, but you want to add the space atthe folder level and not the entire disk, you can use FastBack Manager.
Before you add a volume to the repository, read the following considerations:
Chapter 6. Configuring and using 65

v Tivoli Storage Manager FastBack does not monitor the amount of other data thatis put on the disk. This means that it cannot track when the disk is full and triesto copy data into that volume, even if no space is available. You have to limitthe size of the folder volume that you add to the repository to ensure that thetotal size of the disk minus the amount allocated to the repository does notexceed the size threshold.
v Folders added to the repository must be empty. Specifically, you cannot add theroot directory of a data volume to the repository.
v You cannot add volume space from the primary boot disk to the repository.v If you need to add repository space that is on a shared volume over the
network, you must change the log on credentials from Local System toAdministrator. To change these log on credentials, complete the following steps:1. From the Windows Start menu, select Start → Control Panel → Administrative
Tools → Services.2. Right-click to select the FastBack Server service; then, click Properties.3. In the Properties window, go to the Log On tab.4. In the Log on as list, select This Account.5. Enter the administrator account and authenticate with the domain controller.6. Click OK.
To add a volume to the repository, complete the following steps:1. If you add a new drive to the FastBack Server and, then, add a folder volume
allocated on that drive, you must first use the Disk Open tool to establish readand write privileges to the drive. If you do not open the disk using the DiskOpen tool, you lose all data that is written to the drive when you disconnectthe drive or when you restart. For more information about Disk Open, seer_fast_diskopen.dita.
2. From FastBack Manager, select General Configuration → Storage Pool.3. Right click Repository Pool; then, click Add Repository Space.4. Enter the path or browse to the folder that you want to add. The folder must
be empty.5. Type the size you want to allocate for the repository to use on that volume.
Tivoli Storage Manager FastBack does not monitor when the disk is full. Type asize that is reasonably less than the capacity of the drive. For example, youcould allocate 16 GB on a 19 GB partition.
6. Click Apply.
Removing a disk from the repository with snapshot relocationDisks controlled by the connected FastBack Server can be removed from therepository.
At least two repository disks must be present in order to use this option. Selectingthis option distributes the data to other disks on condition that they have enoughfree space.
To remove a disk from the repository, right-click the disk and click Remove fromrepository (with snapshot relocation).
When relocating a repository, check the space requirements and the availablespace. If there is not enough space for the snapshots, the removed repositorycannot be relocated.
66 Installation and User's Guide

If there is not enough space to relocate the repository contents, the process stops.You can add more repository space for relocation, and initiate the process again.
No progress bar of removing the repository is displayed. The repository isremoved in the background.
Effect of changes in the primary storage layoutWhen changes to labels or volumes are made in any of the FastBack Client servers,the changes are automatically identified by the FastBack Server.
FastBack Manager is updated accordingly. The corresponding client groups are notautomatically updated.
The following rules apply when changing the primary storage layout:v If a storage layout is changed, for example, if a volume is removed or re-sized,
expanded or retracted, the corresponding client group must be updatedmanually. After volume deletion, the volume is displayed as an obsolete volumein the client group and the corresponding checkbox is not selected. For policiesthat are backed up, the deleted volume fails. Click Apply in each client groupthat contains the deleted volume. This action updates the client group andpolicies with the change.
v Changing the drive letters on protected servers brings up a dialog in FastBackManager that prompts you to review the relevant client groups.
v Deleting volumes or partitions while the corresponding snapshot is in progresscauses the snapshot to be stopped.
Creating repositoriesBefore a repository is created, configure the access, including the access rights, ofrepository objects on the network. Configuring access and access rights ofrepository objects ensures that the FastBack Server and FastBack Mount are able toaccess shared repository objects.
If no repository is assigned, the Add Repository Wizard is displayed. For moreinformation, see “Add Repository wizard” on page 69.
When you create a repository on a network share, you should complete thefollowing steps:1. From Windows Explorer, right-click to select the volume that contains the
repository; then, from the pop-up menu, click Properties.2. Go to the Security tab and click Advanced.3. Select the user that should have access to the repository.4. Select Replace permission entries on all child objects with entries shown here
that apply to child objects.5. Click OK to exit the Advance Security Settings window.6. Click OK to exit the Properties window.
Configuring network share accessTivoli Storage Manager FastBack, FastBack Mount must be assigned accessprivileges of an existing Active Directory member to access shared repositoryobjects on the network.
To assign access privileges of an existing Active Directory member for TivoliStorage Manager FastBack, complete the following steps:
Chapter 6. Configuring and using 67

1. Go to General Configuration > Remote Repository Access tab.
2. Type the user name and password of an existing Active Directory member thathas full access rights to the repository.
3. Click Apply. It takes 10 minutes for the new settings to be updated. FastBackServer uses this information to access shared repository objects on the network.
4. Test Tivoli Storage Manager FastBack network repository access.
To assign access privileges of an existing Active Directory member for FastBackMount, complete the following steps:1. In the FastBack Manager, click the Configuration tab. The Configuration
window appears.2. In the tree, select General Configuration.3. In the main window, click the FastBack Mount Access tab.
4. Select Assign FastBack Mount access to repository.
Figure 15. Tivoli Storage Manager FastBack- Remote Repository Access tab
Figure 16. FastBack Mount Access tab
68 Installation and User's Guide
5. Select the domain for an Active Directory member. This domain is used byFastBack Mount to access the repository.
6. Type a user or group name. The user or group name must have full accessrights to the repository.
7. Select Show FastBack Mount repository access reminder message to notassign repository access to FastBack Mount, but want to be reminded tocomplete this task.
8. Click Apply. It takes 10 minutes for the new settings to be updated.9. Test FastBack Mount network repository access.
Creating a repository on a different domain
To add a repository on a domain other than the local domain, complete thefollowing steps:1. Add a small local repository. For more information, see “Creating a new
repository.”2. Use the following steps to set a user name and password:
v Go to General configuration → Remote Repository Access tab.v Use the following format to enter the domain and user name: domain\user
name.v Enter a password.v Click Apply. Applying the new settings can take as many as 10 minutes.
3. Add the new repository on the desired domain.4. After you create the repository on a different domain, remove the small
repository you created on the local domain.
Creating a new repositoryWhen creating a new repository, if you assign any SAN disk using the Assignsignature wizard, part of the Windows operating system, ensure FastBack Mountor FastBack Server is installed. If you use this wizard without FastBack Mount orFastBack Server installed, the repository disk that is taken over by that server canbecome corrupted.
The repository can be created with one of the following methods:v Adding repository space - Use this method for adding network shared folders to
the repository.v Selecting a disk in the repository pool and adding it to the repository.
Add Repository wizardUse the Add Repository Wizard to detect and add potential volumes on the serverto the repository pool. If no repository has been identified, the Add RepositoryWizard is displayed.
To manually start the wizard, right-click the Repository Pool and select AddRepository Wizard from the menu.
The wizard scans the server, and lists the detected disks and volumes. Only emptydisks or volumes can be selected and defined as new repositories.
Select the disk or volume you want to add as a repository and click Apply. See thefollowing screen capture for an example.
Chapter 6. Configuring and using 69
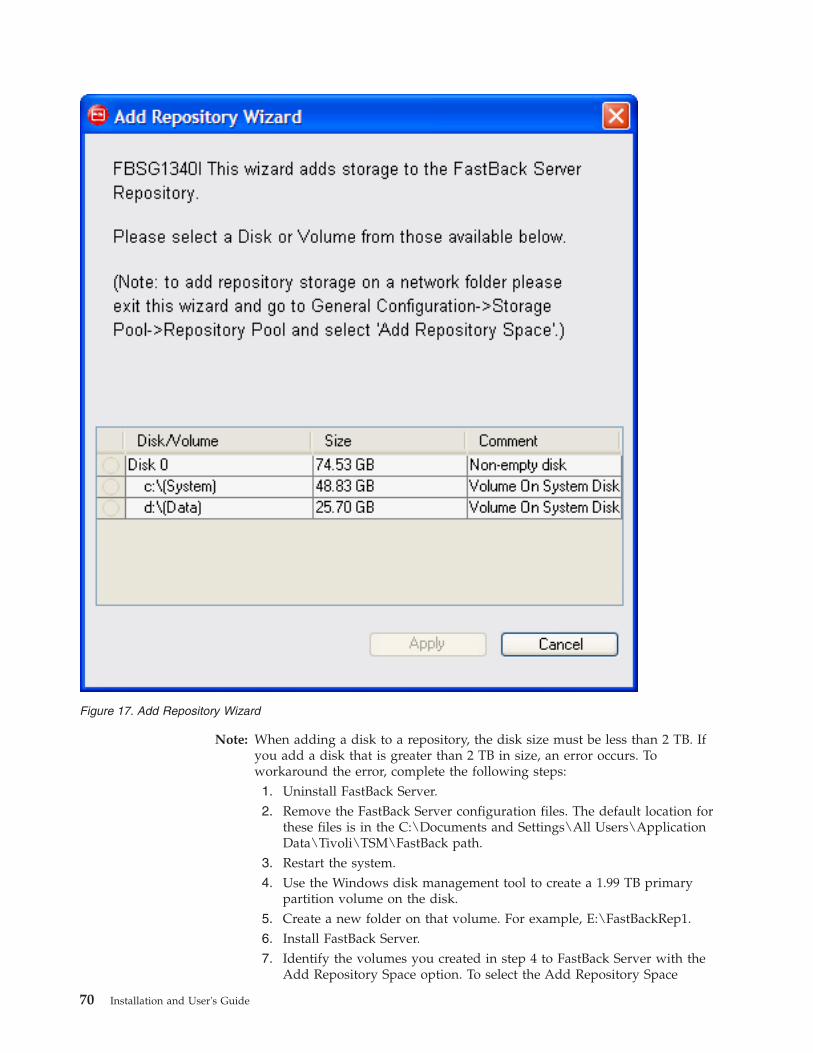
Note: When adding a disk to a repository, the disk size must be less than 2 TB. Ifyou add a disk that is greater than 2 TB in size, an error occurs. Toworkaround the error, complete the following steps:1. Uninstall FastBack Server.2. Remove the FastBack Server configuration files. The default location for
these files is in the C:\Documents and Settings\All Users\ApplicationData\Tivoli\TSM\FastBack path.
3. Restart the system.4. Use the Windows disk management tool to create a 1.99 TB primary
partition volume on the disk.5. Create a new folder on that volume. For example, E:\FastBackRep1.6. Install FastBack Server.7. Identify the volumes you created in step 4 to FastBack Server with the
Add Repository Space option. To select the Add Repository Space
Figure 17. Add Repository Wizard
70 Installation and User's Guide

option, from FastBack Manager, select General Configuration → StoragePool → Repository Pool. Right-click Repository Pool; then, click AddRepository Space.
8. In the Add Repository Space window, specify the path and size.9. Select the Detect FS Corruption option.
10. Click Apply.
Adding repository space1. Go to the Configuration tab and select General Configuration → Storage Pool →
Repository Pool. Right click a storage pool; then, click Repository Pool.2. Right-click to select a repository pool; then, click Add Repository Space. The
Add Repository Space window is displayed.
3. The path to the folder should be in the complete network path format (UNCformat). Either type in a path in UNC format, or click the button next to thePath field and select the required disk.
Note: A minimum repository size of 10 GB should be used. FastBack Serversupports up to five repositories on a folder.
4. For Detect FS corruption, when the primary file system is corrupted, the usedvolume bit map can not be corresponding to the actual volume structure. Insuch cases, the snapshot integrity is unpredictable. It is advisable to select thisoption. If file system corruption detection is selected and the file system iscorrupted, the system enters limited mode automatically. In such cases you canexit limited mode by deselecting the Detect file system corruption option.Exiting limited mode might take up to ten minutes. Exiting limited mode doesnot fix the file system problem. For more information on limited mode, see“Limited mode” on page 135.
5. The disk is formatted with the NT file system. While the repository is beingformatted, a message is displayed in the status bar. When the task is complete,the disk icon changes to indicate that the disk is a repository. When workingwith the repository, remember the following facts:v The total number of objects is limited to 20.
Figure 18. Add Repository Size window
Chapter 6. Configuring and using 71

v Folders or volumes that reside on a boot disk or boot disks cannot beassigned as a repository object.
v Disks or volumes that have open files or applications running cannot beassigned.
v An object that was selected as part of a repository cannot be backed up.v If you assign a folder, you cannot accurately control folder size. The size
depends on the disk capacity status.v The system administrator should make sure that the local system account on
the FastBack Server has access privileges to the network share where therepository folder resides.
Selecting and adding a disk to the repository1. In the Configuration pane, click General Configuration.2. Select FastBack Manager Storage Pool. The list of storage devices attached to
systems with FastBack Server and SAN disks, along with some basic attributes,are displayed according to volumes and disks.
3. Right-click each disk to be added to the repository; then, click Add toRepository. The disks already assigned to the repository are indicated by the
icon.4. If the disk you want to add to the repository includes partitions or is a
dynamic disk, a message window is displayed. The message warns that all dataon the selected disk is destroyed if you decide to proceed with the operation.The disk is formatted with the NTFS file system. While the repository is beingformatted, a message is displayed in the status bar. When the operation iscomplete, the disk icon changes to indicate that the disk is a repository.
Defining the repository usage alert level
The repository usage alert field in the General Configuration > Maintenance tabdefines the critical repository usage threshold. When this threshold is reached, theRepository Status field in the status bar at the bottom turns red. In addition, awarning is logged into the FastBack Server log. If the repository usage keepsgrowing, the message is logged again each time the level increases by 5 percent.
In addition, if configured, a periodic email alert is sent, notifying the definedrecipient about the repository space threshold crossing.
Configuring disks, added after FastBack Server installation, forrepository useAfter a FastBack Server is installed, if you add a disk to the server, the disk, bydefault, is read only. To use the disk as a repository volume, you have to enablewrite access.
You can use the disk open tool to enable the disk for write access and make it arepository volume. The disk open files are located in the following defaultdirectory: C:\Program Files\Tivoli\TSM\FastBack\utilities
For more information about disk open, see “Disk open” on page 133.
To add a disk to the FastBack Server repository using disk open, complete thefollowing steps:1. From the Windows Start menu, select Start → Control Panel → Administrative
Tools → Computer Management.
72 Installation and User's Guide

2. In the Computer Management window, click the + icon beside Storage andselect Disk Management.
3. In the lower right pane, a list of volumes is displayed. Locate the volume thatyou want to add and write the disk number of the volume. The disk number ofthe volume is reported in the first column.
4. Open a command prompt window and change to the directory that containsthe disk open tool. The default directory is C:\Program Files\Tivoli\TSM\FastBack\utilities.
5. Enter the following command:diskopen # forever
Where # is the number of the disk identified in step 3.6. If you want to use the disk you opened for write access as a repository, use the
Add Repository Wizard to add the disk to the repository. For more information,see “Add Repository wizard” on page 69.
Maintaining repository poolsThere are several tasks you can complete to perform maintenance for therepository pools.
You can edit the properties for repository pools. To edit the volume, folder, andshared folder for a repository pool, complete the following steps:1. On the Configuration tab, click General Configuration → Storage pool →
Repository Pool.2. In the table that identifies the repositories, select a row. Right click; then, click
Edit.3. As needed, edit the following properties:
v Folders and volumes - Path, size, and description.v Disks - Description.
4. Click OK.
Claiming a repositoryThe following scenarios provide examples of when you want to claim a repository:v When the name of the FastBack Server changes.v When the FastBack Server is corrupted and rebuilt.v When you want to acquire a repository from another repository.v When the FastBack Server moves to a new domain, you need to claim the
repository again.
To claim a repository, complete the following steps:1. Verify that no FastBack Server is using the repository. The claim repository
option is disabled if any FastBack Server, even a defective server, is using therepository.
2. In FastBack Manager, from the Configuration tab, select General Configuration→ Storage Pool.
3. Right click Repository Pool; then, click Claim Repository. If a repository hasopen files or an application running, you cannot claim the repository.
4. In the window that is displayed, specify the path to the location.ini file for therepository. You can type the file name or use Browse to locate the file.
5. Click OK.
Chapter 6. Configuring and using 73

CHKDSKCHKDSK can be run only if snapshots are not running.
CHKDSK is used to repair damaged or corrupted repository files. If the repositorycontains corrupted files that were removed while running CHKDSK, some of thedata might be lost.
In addition, in cases where the primary file system is corrupt, the bit map of theused volume or disk might not correspond to the actual volume structure. In thesecases, the snapshot integrity is unpredictable. To help alleviate this problem, runCHKDSK before using content-aware snapshots.
To run CHKDSK, complete the following steps:1. Go to Configuration Tab → General Configuration → Storage pool → Repository
Pool.2. From the lower left pane, select a disk.3. Right click a disk; then, click Run Check Disk. CHKDSK does not run on
repository folders.Do not run CHKDSK from a FastBack Manager system that is installed on adifferent operating system and NTFS version than the system where thesnapshot was taken. For example, a snapshot taken from a Windows Server2008 system or Windows Vista system cannot be repaired by CHKDSK inFastBack Manager on a Windows Server 2003 system.To run CHKDSK for a snapshot that is taken from a system running asupported Windows 2008 or Windows Vista operating system, mount thesnapshot to a FastBack Client system that is running a supported Windows2008 or Windows Vista operating system. You can run the CHKDSK scan fromthe FastBack Client system.
By default, when you run CHKDSK, it runs in read-only mode. CHKDSK isrunning in read mode to avoid the accidental deletion of snapshot files. IfCHKDSK fails, you can run CHKDSK in write mode. To run CHKDSK in writemode, complete the following steps:1. Identify the drive letter for the failed volume in the repository pool window.2. Go to the monitor window and verify that no snapshot is currently running. If
a snapshot is currently running, either wait for it to complete, or manuallyabort it.
3. Verify that no other background process is currently running, for example,cleanup and repository claim.
4. From Windows, click Start → Run.5. Enter cmd.6. Enter the following command to stop the FastBack Server:
net stop FastBackServer
7. Enter the following command to run CHKDSK:Chkdsk [drive letter] /F
8. Enter the following command to restart the FastBack Server: net startFastBackServer
Repository capacityYou can control the repository usage through the Cleanup tab.
74 Installation and User's Guide
If the repository fills to its capacity, the next snapshot attempt fails and the systemnotifies the user that new snapshots cannot be taken. In that case, add anadditional repository or erase chains with the Monitor view.
Optimizing disk accessYou can run an optimization test to determine the disk access parameters requiredby the system to provide optimum disk performance.
The test takes about 3 minutes per disk and only one test can run at a time. Thisoptimization test is available for SAN disks. In addition, disk access optimization isonly available for disks that are visible from the FastBack Server.
To run the optimization test, right-click the disk, click Optimize Disk Access. Amessage is displayed. Respond to the message. You can then view the results ofthe test in the Properties window for the disk. Select Storage Pool. Right-click thedisk; then, click Properties.
Setting up snapshot policiesSnapshot policies link client groups to a job schedule, specify the number ofsnapshots that should be retained, and identify snapshot priority.
Snapshots run according to the configured snapshot policies, where each snapshotpolicy requires two objects:v Client groupsv Job schedules
You can create a snapshot policy by using one of the following procedures:v Using a wizard to guide you through the required steps.v Using the Configuration tab to create client groups and job schedules manually,
and then to combine client groups and job schedules into a policy.
Snapshot policies that are created using a wizard can be managed and changedusing the Policies pane, from the Configuration tab.
After the policy has been created, clients groups can be added, changed, orremoved. The job schedule can be changed, but you cannot add a new schedule orremove the existing schedule.
When you change a snapshot policy, the changes are applied only after runningjobs, cleanup, and erase chain procedures are completed.
Client groups
Client groups identify the volumes that are backed up. In addition to volumes,client groups can also back up SQL and Exchange databases.
The SQL and Exchange databases that are backed up can span across multiple diskvolumes.
Job schedules
Job schedules are used to set the following attributes:v the time the snapshot is taken
Chapter 6. Configuring and using 75

v the type of snapshot that is taken
There are three types of snapshots:v Full: Select this type to create a full image of the volume. A full snapshot is the
first snapshot in every chain. The maximum number of simultaneous fullsnapshots is 99. For the maximum number of simultaneous full snapshots, thedefault should not be changed, but, if you make an update to this field, you canenter any integer between 1 and 99.
v Incremental: Select this type to take a full snapshot the first time a chain iscreated. After the first full snapshot, all subsequent snapshots are incremental.
v Incremental delta block: Select this type to use the difference between theaggregation of all incremental snapshots in a chain, and the actual data on thedisk. This type of snapshot cannot be manually set. This type of snapshot istaken in the following scenarios:– The client system is restarted.– The client service is restarted and more than seven days have passed since
the last delta block snapshot.– The client service has been inactive. A delta block snapshot does not always
occur when the client service becomes active after a period of inactivity. Thesoftware determines whether to run a delta block snapshot based on theamount of input/output on the system and the amount of time when theclient service was inactive.
– In an error recovery scenario when the client and server do not identify thesame snapshot as the base snapshot. If the client and server systems identifydifferent snapshots as the base snapshot, the next snapshot is a delta blocksnapshot, not an incremental snapshot.
Incremental delta block snapshots occupy as much disk space as the incrementalsnapshots, but the time required to perform the incremental delta block issimilar to the time required to complete a full snapshot.
Using wizards to create snapshot policiesAfter disks have been added to the repository, the snapshot policy can be set upusing the snapshot policy wizards.
Note: SQL Server 2008 databases are not displayed in the snapshot policy wizards.To workaround this issue, you can backup the entire volume that containsthe SQL database.
There are three wizards to guide you through the steps required to create snapshotpolicies at different complexity levels:
Create Snapshot Now WizardUse this wizard to create a single-instance snapshot of a user-definedgroup of volumes. The snapshot runs within two minutes unless themaximum number of simultaneous full snapshots is reached.
The maximum number of simultaneous full snapshots is 99. For themaximum number of simultaneous full snapshots, the default should notbe changed, but, if you make an update to this field, you can enter anyinteger between 1 and 99.
Simple Policy WizardUse this wizard to configure periodic snapshots of a user-defined group ofvolumes.
76 Installation and User's Guide

Advanced Policy WizardUse this wizard to guide you through the configuration of client group, jobschedule, and policy. When you use this wizard, you can use predefinedjob schedules and client groups.
If the client has an EISA partition, create a snapshot of the volume with this EISApartition. If the volume with the EISA partition is missing, problems can occurwhile performing bare machine recovery to the client.
Running defragmentation on volumes protected by Tivoli Storage ManagerFastBack results in very large incremental snapshots and might cause a failure.
For the supported Windows 2008 and Windows Vista operating systems, thedefragmentation task runs automatically on all volumes. To disable thedefragmentation task, open the Task Scheduler. You can open the Task Schedulerfrom the Windows Start menu. Click Programs → Accessories → System Tools →Task Scheduler. Navigate to Task Scheduler (local) → Task Scheduler Library →Microsoft → Windows → defrag. From this window, disable the ScheduledDefragtask.
Using the Create Snapshot Now wizardUse this wizard to take a single, full snapshot of a selected set of volumes. You cantake the snapshot immediately (within 2 minutes from the moment the commandis activated), or at a preset selected time.
The created policy is displayed in the tree, under Policies. The job schedule andclient group for the snapshot are also displayed under the correspondingcategories in the tree. The job schedule and client group can be edited foradditional use. For example, you might want to edit the schedule to createadditional snapshots.
1. Click the Wizard icon, .2. Select Create Snapshots Now.3. In the displayed window, select the volumes to back up. A client group name
corresponding to the selected volumes is automatically assigned.4. Select the start date and type a start time.5. Enable or disable Disaster Recovery for this snapshot. If enabled, the snapshot
is replicated by Tivoli Storage Manager FastBack Disaster Recovery Server.6. Click Apply. The snapshot is taken according to the specified start time. The
following three objects are created: client group, job schedule, and policy.
Using the Simple Policy WizardUse this option to configure snapshots that run periodically at user-definedintervals. You can also use this wizard to define a time of day when snapshots donot run. This exclusion period usually includes hours when workload is high.
1. Click the Wizard icon, .2. Click Simple Policy Wizard.3. Select the volumes to back up. A client group name corresponding to the
selected volume is automatically assigned.4. Select and complete parameters.
Chapter 6. Configuring and using 77
5. Enable or disable Disaster Recovery for this snapshot. If enabled, the snapshotis replicated by the Disaster Recovery procedure.
6. When you are finished, click Apply to save the configuration. The snapshotsare scheduled at the set times.
You can define daily periods of time when the snapshot does not run. Excludingdaily periods of time is useful for adjusting your bandwidth load and serverworkload during busy hours. To identify times to exclude, select Exclusion Period.Enter time values to exclude.
Using the Advanced Policy WizardThe Advanced Policy Wizard guides you through the process of creatingsnapshots, and provides most of the configuration options that are available whenthe policy elements are defined separately. To use the wizards to create snapshotsand to create new schedules, policies, client groups, users, and user groups, youmust have administrator permissions.
The procedure consists of the following steps:1. Select or create the client groups for the policy.2. Select or create the schedules for the policy.3. Assign the policy parameters.
The job schedule for the policy and client group elements, created by theAdvanced Policy Wizard, can be viewed and edited through the Browser pane.
In addition, you can define daily periods of time when the snapshot does not run.Excluding daily periods of time is useful for adjusting your bandwidth load andserver workload during busy hours. In the Job Schedule pane, activate theExclusion Period field and enter the From and To time values using 24–hour clockdefinitions (where 12:00 is noon and 24:00 is midnight).
To create a snapshot policy using the Advanced Policy Wizard, complete thefollowing steps:
1. Click the Scheduling Wizard icon, .2. Click Advanced Policy Wizard.3. The first step in the wizard requires that you specify a client group. You can
either create a new client group or use an existing client group. Use one of thefollowing procedures:v To define a new client group, complete the following steps:
a. Select the Define a New Client Group tab.b. Type a client group name.c. Select volumes to assign to this client group.d. Click Add.You can create more than one client group for the policy.
v To use an existing client group, complete the following steps:a. Select the Use an Existing Client Group tab. A list of client groups is
displayed.b. Select client groups from the list.c. Click Next.
78 Installation and User's Guide
4. The Job Schedule window is displayed. You can either create a new jobschedule or use an existing job schedule. Use one of the following procedures:v To define a new job schedule, complete the following steps:
a. Select the Define a New Job Schedule tab.b. Type a job schedule name.c. Select a type:
Full foreverAll snapshots are full snapshots.
Incremental foreverThe first snapshot is a full snapshot. All subsequent snapshots areincremental snapshots.
d. Decide whether to enable Continuous Data Protection (CDP). To enableCDP, select the checkbox. For more information about CDP, see“Continuous Data Protection” on page 104.
e. In the Run every section, specify how often the snapshot should run. Ifyou want to run the snapshot daily, type a time under Run once a dayat. The time you type is the time when the snapshot is run.For the Run every section, to prevent the job from running duringspecific periods of the day, enable and define the Exclusion Period.
f. In the Perform task on section, select the days that the policy should run.g. Click Application Aware to change the following parameters:
Preserve application consistencyCreates consistent database snapshots using quiescing. There aretwo quiescing options: either the Volume Shadow Copy service orIBM application quiescing.
You can not use application quiescing and the VSS service at thesame time. In addition, you cannot use VSS application quiescingto back up utility partitions.
Use IBM application quiescing for supported Windows 2000operating systems that run supported Microsoft SQL 2000 Serversor Microsoft Exchange 2000 Servers.
Use VSS application quiescing for supported Windows 2003 andlater operating systems, except for Microsoft Windows XP, thatrun supported Microsoft SQL 2005 and 2008 Servers or supportedMicrosoft Exchange 2003 and 2007 Servers. If you need anapplication-aware snapshot, do not use VSS application quiescing.
To back up applications that run on supported Microsoft SQL andMicrosoft Exchange servers, verify that the VSS service issupported to take snapshots of the application. If you use the VSSservice, enable the service with FastBack Manager. Do not useexternal scripts to enable the VSS service.
Purge Exchange server log filesDeletes Microsoft Exchange logs that are committed to thedatabase prior to the snapshot.
h. You can click Advanced to specify additional parameters. If you clickAdvanced, complete the following steps:1) The initial time that is displayed is the default. You can change this
time.
Chapter 6. Configuring and using 79

2) If you select Short range job, you can stop running the job on aspecific date or after a specific number of snapshots are taken.
3) Select Content aware snapshot if you want to identify only the usedareas of NTFS volumes during full and incremental snapshots. Bydefault, Content aware snapshot is selected. If you create contentaware snapshots, deleted files are not backed up. In addition, toolsthat recover corrupted file systems might not work correctly.When the primary file system is corrupted, the number of actualblocks in use might not correspond to the actual volume structure ifcontent aware snapshots are used. In such cases, the snapshotintegrity is unpredictable and you want to disable content awaresnapshots.
4) Click OK.
Note: In the user interface that you use, the format for the time fieldmight not exactly match the figure in this section. The time formatvaries depending on the regional settings for your system.
i. Click Apply to save the new job schedule.v To use an existing job schedule, complete the following steps:
a. Select the Use an Existing Job Schedule tab. A list of job schedules isdisplayed.
b. Select a job schedule from the list.c. Click Next.
5. A summary window is displayed. The window provides an overview of the jobschedules and client groups currently assigned to this policy. The window alsoincludes other options and parameters that you can set for this policy. You can
Figure 19. Advanced Job Schedule
80 Installation and User's Guide
use this window to change the policy setup before you save it. The followinglist details the additional options and parameters:
Enable DREnable or disable the Disaster Recovery function for this snapshot. Ifenabled, the snapshot is replicated by the Disaster Recovery procedure.
Number of generationsDetermine the number of snapshot generations that are retained. Oldersnapshots are cleaned up.
Snapshot prioritySet up the snapshot priority. If several snapshots are running at thesame time and exceed the system resources, the snapshots are taken ordiscarded according to their preset priority.
You can change the list of assigned client groups according to the followingrules.v To add a client group, click Add. Select a client group. Click OK.v To delete a client group, select the group and click Remove.v To edit a client group, select a client group and click Go To in the
corresponding pane.Job schedules cannot be added or deleted.
6. Click Finish. The policy is added to the list of policies. The policy runsaccording to the job schedule.
Pre or Post ProcessesThe Pre or Post Processes tab lets you customize the backup process by addingvarious scripts to the snapshot policy.
Snapshots run according to a policy. As a part of the policy, you can specify preand post processes, scripts that run when the snapshot is created. Pre and postprocesses run on a FastBack Client. You can specify a timeout parameter thatcancels the script if it does not complete with a predefined time period. In additionto cancelling the script, the snapshot is also cancelled.
There are sample scripts that are available in the FastBack Client directory:C:\Program Files\Tivoli\TSM\FastBack\client\scripts
In addition, there is information that describes how to use these sample scripts forspecific database applications in Chapter 10, “Best practices,” on page 171.
The Pre or Post Processes can be specified when creating a policy with theAdvanced Policy wizard. In addition, you can specify Pre or Post Processes whenmanually editing a policy.
Chapter 6. Configuring and using 81
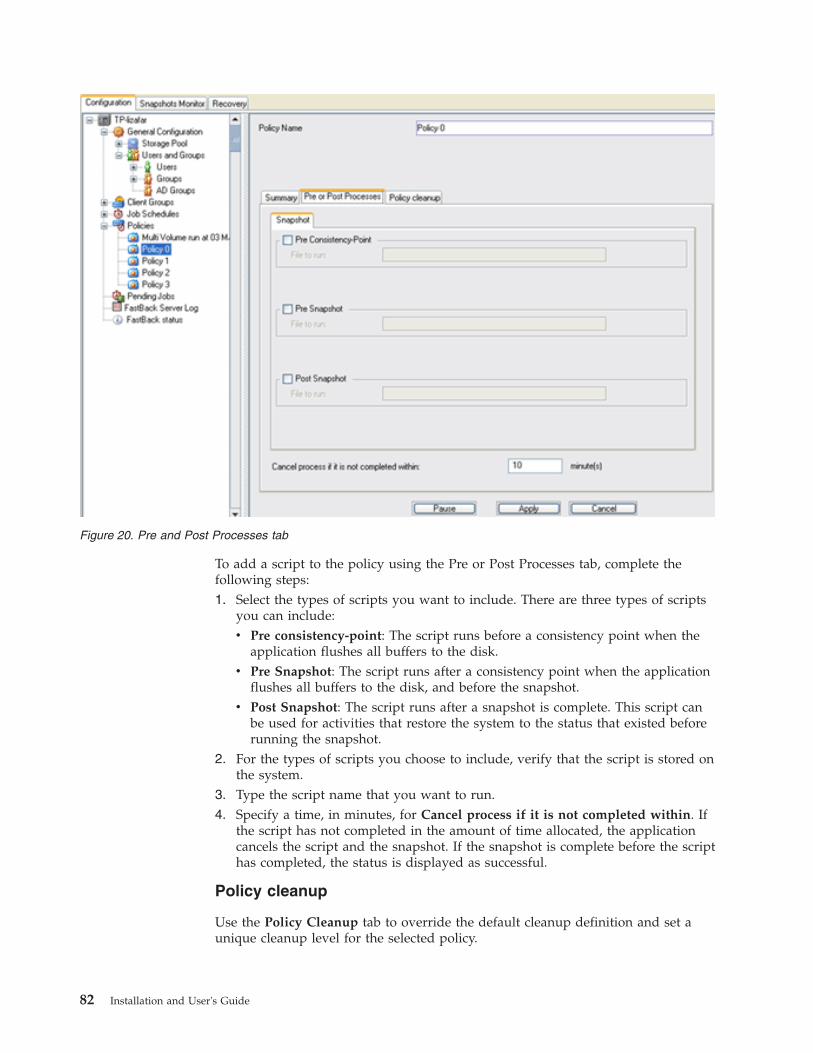
To add a script to the policy using the Pre or Post Processes tab, complete thefollowing steps:1. Select the types of scripts you want to include. There are three types of scripts
you can include:v Pre consistency-point: The script runs before a consistency point when the
application flushes all buffers to the disk.v Pre Snapshot: The script runs after a consistency point when the application
flushes all buffers to the disk, and before the snapshot.v Post Snapshot: The script runs after a snapshot is complete. This script can
be used for activities that restore the system to the status that existed beforerunning the snapshot.
2. For the types of scripts you choose to include, verify that the script is stored onthe system.
3. Type the script name that you want to run.4. Specify a time, in minutes, for Cancel process if it is not completed within. If
the script has not completed in the amount of time allocated, the applicationcancels the script and the snapshot. If the snapshot is complete before the scripthas completed, the status is displayed as successful.
Policy cleanup
Use the Policy Cleanup tab to override the default cleanup definition and set aunique cleanup level for the selected policy.
Figure 20. Pre and Post Processes tab
82 Installation and User's Guide
Note: The default definition is set through General Configuration → Maintenance→ Cleanup. For more information about policy cleanup, see “Cleanupconfiguration” on page 143.
1. Click Restore default.2. Set the policy’s cleanup level by selecting one of the options.3. Click Apply.
Verifying pending jobs
Pending jobs can be verified by clicking the Pending jobs category in the menutree.
Creating snapshot policies manuallyEach policy comprises one or more selected client groups and one job schedule.These client groups and job schedule are created either automatically through oneof the wizards or individually.
Regardless of how the policies are created, client groups and job schedules arelisted under the corresponding category in the tree. The client group and jobschedule pools can be used as a source for creating the policy manually. Thissection describes how to manually create client groups and a job schedule pool,and how to create various policies based on selected elements from the pools.
Creating client groups
To create a client group, complete the following steps:1. In the tree, right-click Client groups, and then click New client group.2. Type a client group name3. Select volumes to assign to this client group.4. Click Apply. The client group should be displayed under the Client groups
node in the tree.
You can create more than one client group for the policy.
If you have an EISA partition, back it up in case you need to perform baremachine recovery later on.
To remove a client group, right-click the group and click Remove.
Creating a job schedule
To create a job schedule, complete the following steps:1. In the Configuration tab, right-click Job Schedules and select New Job
Schedule.
Chapter 6. Configuring and using 83

2. Type the job schedule name. By default, a sequentially numbered job schedulename is assigned.
3. Select a job type:
Full foreverAll snapshots are full snapshots.
Incremental foreverThe first snapshot is a full snapshot. All subsequent snapshots areincremental snapshots.
4. Decide whether to enable Continuous Data Protection (CDP). To enable CDP,select the checkbox. For more information about CDP, see “Continuous DataProtection” on page 104.
5. In the Run every section, specify how often the snapshot should run. If youwant to run the snapshot daily, type a time under Run once a day at. The timeyou type is the time when the snapshot is run. For the Run every section, toprevent the job from running during specific periods of the day, enable anddefine the Exclusion Period.
6. In the Perform task on section, select the days that the policy should run.7. You can click Application Aware to change the following parameters:
Preserve application consistencyCreates consistent database snapshots using quiescing. There are twoquiescing options: either the Volume Shadow Copy service or IBMapplication quiescing.
You can not use application quiescing and the VSS service at the sametime. In addition, you cannot use VSS application quiescing to back uputility partitions.
Use IBM application quiescing for supported Windows 2000 operatingsystems that run supported Microsoft SQL 2000 Servers or MicrosoftExchange 2000 Servers.
Use VSS application quiescing for supported Windows 2003 and lateroperating systems, except for Microsoft Windows XP, that run
Figure 21. Job Schedule window
84 Installation and User's Guide

supported Microsoft SQL 2005 and 2008 Servers or supported MicrosoftExchange 2003 and 2007 Servers. If you need an application-awaresnapshot, do not use VSS application quiescing.
To back up applications that run on supported Microsoft SQL andMicrosoft Exchange servers, verify that the VSS service is supported totake snapshots of the application. If you use the VSS service, enable theservice with FastBack Manager. Do not use external scripts to enablethe VSS service.
Purge Exchange server log filesDeletes Exchange logs that are already committed to the database priorto the snapshot.
8. To specify additional parameters, click Advanced. If you click Advanced,complete the following steps:a. The initial time that is displayed is the default. You can change this time.b. If you select Short range job, you can stop running the job on a specific
date or after a specific number of snapshots are taken.c. Select Content aware snapshot if you want to identify only the used areas
of NTFS volumes during full and incremental snapshots. By default,Content aware snapshot is selected. If you create content aware snapshots,deleted files are not backed up. In addition, tools that recover corrupted filesystems might not work correctly.When the primary file system is corrupted, the number of actual blocks inuse might not correspond to the actual volume structure if content awaresnapshots are used. In such cases, the snapshot integrity is unpredictableand you want to disable content aware snapshots.
d. Click OK.
Figure 22. Advanced Job Schedule
Chapter 6. Configuring and using 85

Note: In the user interface that you use, the format for the time field might notexactly match the figure in this section. The time format variesdepending on the regional settings for your system.
9. Click Apply to create the job schedule.
Managing snapshot policiesPolicies can be created using either wizards, or manually by creating the separateelements consisting of client groups, job schedules, and policies. Whether thepolicies are created using wizards or manually, the policy elements are listed in theappropriate category in the tree under client groups, job schedules, and policies.These objects can be changed at any time through the appropriate configurationtree option.
To edit a policy, complete the following steps:1. Select a policy under Policies in the categories tree.2. Change parameters as desired. The Enable DR option cannot be changed after
the policy is created.3. To delete a client group, elect a client group and click Remove.4. To open a client group, click Go to.5. To add a client group, click Add, select the desired element, and click OK.6. Click Apply to apply the changes.
If you remove a policy from FastBack Server, all the snapshots that are related tothat policy are also deleted from the repository. During that time, there is noscheduling of new snapshots.
To delete a policy, right-click a policy; then, click Remove. You are prompted toremove the corresponding job schedules and client groups that are not connectedto any other policy.
Changing the global application-aware parametersThe global default settings for application-aware backups are set in the applicationtab. Some of these settings can also be set while configuring new policies.
To change the global application-aware parameters, complete the following steps:1. Click the Configuration → General Configuration category and select
Applications. The following window is displayed.
86 Installation and User's Guide
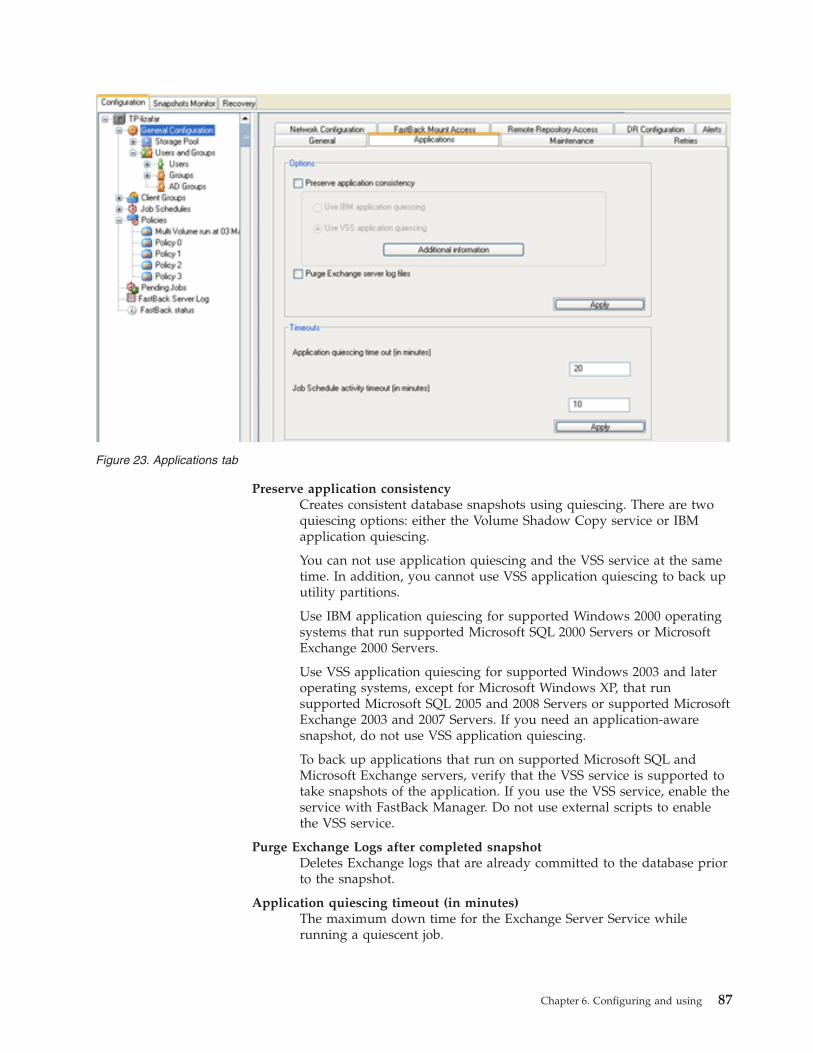
Preserve application consistencyCreates consistent database snapshots using quiescing. There are twoquiescing options: either the Volume Shadow Copy service or IBMapplication quiescing.
You can not use application quiescing and the VSS service at the sametime. In addition, you cannot use VSS application quiescing to back uputility partitions.
Use IBM application quiescing for supported Windows 2000 operatingsystems that run supported Microsoft SQL 2000 Servers or MicrosoftExchange 2000 Servers.
Use VSS application quiescing for supported Windows 2003 and lateroperating systems, except for Microsoft Windows XP, that runsupported Microsoft SQL 2005 and 2008 Servers or supported MicrosoftExchange 2003 and 2007 Servers. If you need an application-awaresnapshot, do not use VSS application quiescing.
To back up applications that run on supported Microsoft SQL andMicrosoft Exchange servers, verify that the VSS service is supported totake snapshots of the application. If you use the VSS service, enable theservice with FastBack Manager. Do not use external scripts to enablethe VSS service.
Purge Exchange Logs after completed snapshotDeletes Exchange logs that are already committed to the database priorto the snapshot.
Application quiescing timeout (in minutes)The maximum down time for the Exchange Server Service whilerunning a quiescent job.
Figure 23. Applications tab
Chapter 6. Configuring and using 87

Job Schedule activity timeout (in minutes)The maximum hang time for an in-progress snapshot. Only change theapplication quiescing and the job scheduler activity timeouts at therequest of support.
2. For consistent data backup, enable either IBM application quiescing or the VSSapplication quiescing. To enable deleting Exchange log files from the storagegroup after the snapshot is completed, verify that Purge Exchange Logs aftercompleted snapshot is enabled.
3. Click Apply to save changes. All Exchange-related snapshot policies createdfrom this point forward would be configured by default according to the newsettings.
Configuring Volume Shadow Copy serviceThe Volume Shadow Copy (VSS) service, referred to as VSS application quiescingon the Tivoli Storage Manager FastBack user interface, is available for supportedMicrosoft Windows Server 2003 and later operating systems, including WindowsVista and Windows 2008. There is one exception to later operating system support:Do not use the VSS service to back up systems that run Microsoft Windows XP.
Use VSS application quiescing for supported Windows 2003 and later operatingsystems, except for Microsoft Windows XP, that run supported Microsoft SQL 2005and 2008 Servers or supported Microsoft Exchange 2003 and 2007 Servers. If youneed an application-aware snapshot, do not use VSS application quiescing.
When you use the VSS service to take snapshots of servers, verify that the VSSservice is supported by the applications that run on the servers. If the applicationsdo not support VSS, the VSS service cannot run.
By default, for supported Microsoft Windows 64-bit operating systems, VSSapplication quiescing is enabled. You cannot disable VSS application quiescing onthe 64-bit operating systems.
You use the VSS service to create consistent, point-in-time copies of data known asshadow copies. Do not use IBM application quiescing and the VSS applicationquiescing simultaneously.
Tivoli Storage Manager FastBack implements a VSS software provider that createssnapshots, and ensures snapshot consistency and integrity. The following figuredescribes how the VSS interfaces with various components to create a shadowcopy of a volume.
88 Installation and User's Guide

By using FastBack Manager with the VSS service enabled, the VSS service signalsthe writer applications to stop operation and to start a backup. For Tivoli StorageManager FastBack, enable the VSS service with FastBack Manager. Do not useexternal scripts to enable the VSS service.
To enable the VSS service to run for all policies, complete the following steps inthe General Configuration window:v Click General Configuration.v Click Applications.v Select VSS.v Click Apply.
The VSS service can also be enabled for particular job schedules using the JobSchedule window:1. Select a Job Schedule.2. In the Job Schedule window, click Application Aware.3. Select Preserve application consistency → Use VSS application quiescing.4. Click OK → Apply.
Manual snapshot back upYou want to back up a snapshot manually before running server maintenanceprocedures or if you think a repository is corrupt.
There are three ways you can manually back up a snapshot:v Take an incremental snapshot to manually add an incremental snapshot at the
end of snapshots.
Figure 24. Volume Shadow Copy service architecture diagram
Chapter 6. Configuring and using 89

v Take a checkpoint snapshot to create an incremental delta block at the end of thesnapshots chain, according to the policy configuration. This incremental deltablock contains all changes from the last known good incremental delta block.
v Take a full snapshot of the policy volumes. This type of snapshot consumes a lotmore system resources, in particular disk space.
These repair functions can be applied to either a single chain or all snapshot chainsfor a policy. The outcome of using one of the functions is a new incremental or fullsnapshot at the end of the snapshot chain. This ensures the existence of a reliable,recent data backup for the volumes of the policy to which it is applied.
Manually backing up a snapshot affects all the snapshot chains of the policy. Forexample, Checkpoint Snapshot can be run on an Exchange database that is spreadover several volumes.
To manually back up a snapshot, in the Configuration tab, right-click the desiredpolicy and select Run Incremental Snapshot, Run Checkpoint, or Run FullSnapshot.
If you run defragmentation on volumes protected by Tivoli Storage ManagerFastBack, a large incremental snapshot is created.
For the supported Windows 2008 and Windows Vista operating systems, thedefragmentation task runs automatically on all volumes. To disable thedefragmentation task, open the Task Scheduler. You can open the Task Schedulerfrom the Windows Start menu. Click Programs → Accessories → System Tools →Task Scheduler. Navigate to Task Scheduler (local) → Task Scheduler Library →Microsoft → Windows → defrag. From this window, disable the ScheduledDefragtask.
Volume restoreVolume restore restores an image of the original volume. Volume restore andInstant Restore can restore an image only to a basic disk or to a simple volume,and not to dynamic disks.
When you complete a disk restore or bare machine recovery, if open, close the diskmanagement utility that is a part of Windows system management tools.Volume-level restore operations are performed from the Monitor pane or from theRecovery pane, by choosing the specific snapshot to be restored.
Before performing a volume restore, review the following list of possiblelimitations:v Volume restore cannot be performed in the following cases:
– The destination volume includes an operating system or page file.– The destination volume is part of software RAID.– The snapshot is running on the target volume, or on any volume that belongs
to the same policy.v Volume restore fails if there are open files or applications running on the
destination volume. You can force a restore on a destination volume that hasopen files or applications by selecting Ignore open handles on the destinationvolume. Ignoring open files and applications on the destination volume cancause a problem with applications, including the loss of data in files that areopen on the target volume.
90 Installation and User's Guide
v If the FastBack Server does not respond during volume restore, or the volumerestore is aborted, the restored volume stays dismounted and its data is invalid.In this case, either remove or format the volume. Alternatively, if another restoreattempt was successfully completed, the volume has to be mounted again.
Performing a volume restoreYou can perform a volume restore that restores the volume, in its entirety, to theselected destination, where all of the volume data can be accessed.
After the restore process is started, the target volume is dismounted. Any openfiles or applications that are running on the target volumes must be closed beforethe restore can complete. At the completion of the restore, the volume is mountedand ready for use. If the target was not mounted before the restore process isstarted, the operator must mount the volume using the Disk Management tool forthe server.
To perform a volume restore, complete the following steps:1. In the Monitor window, right-click the snapshot to be restored; then, click
Restore → Volume Restore.2. Choose the destination volume where you want the volume restored.
Important:
v Restoring a volume to a viewable storage volume involvesoverwriting data on the storage volume. FastBack Server doesnot monitor or check the target storage disk status, and thisoperation is performed at your own risk. Ensure that the targetdisk is not mounted as a local system drive, a local repository, ormounted on another server. Restoring data to one of theseviewable-storage volume types could cause serious damage,errors, and loss of data.
v The restore operation fails if there are open files or applicationsthat are running on the target restore volume. Selecting Ignoreopen handles on the destination volume causes Tivoli StorageManager FastBack to ignore the open files and applications thatare running on the destination volume. This situation can cause aproblem with applications and loss of data in files that are openon the target volume.
3. Click Apply. In response to the verification prompt, click Yes.
Verify that the size of the target is equal to, or greater than the size of the volumeto be restored; otherwise the restore process does not complete.
File recovery with FastBack MountAdministrators can use FastBack Mount for efficient file-level recovery and tominimize downtime by mounting snapshots to virtual volumes.
The virtual volume can be viewed using any file manager, for example WindowsExplorer. The directories and files in the snapshot can be viewed and managed likeany other file. If you edit the files and save your changes, after you dismount thevolume, your changes are lost because the changed data is held in memory andnever saved to disk. Because the changes are written to memory, FastBack Mountcan use a large amount of RAM when working in read/write mode.
Chapter 6. Configuring and using 91
You can copy the changed files to another volume before performing a dismount.On Microsoft Windows XP and Microsoft Windows 2003 operating systems, youcan select read only as a mounting option. For Windows 2000 servers, the read onlyoption is not supported.
FastBack Mount can mount snapshots from more than one source:v Local or SAN repositoryv Shared repositories on the network, either after replication or attached to
FastBack Server
FastBack Mount can be used for the following tasks:v Speeding up archiving to tape and other mediav Efficient copying of large amount of data on the SANv Mounting database applications for batch reportsv Quickly verifying snapshots and the database
Starting FastBack MountFastBack Mount can be installed and operated from any Windows 2000 and latersystem that can see the repository either through SAN or LAN. You can useFastBack Mount to mount any snapshot and use it in any application. FastBackMount can operate in two modes: GUI and command line interface.
For systems that run Windows Vista or Windows 2008, FastBack Mount can run inthe following two modes:v When no users are logged in, FastBack Mount runs as a service. The FastBack
Mount service enables remote connections through the AdministrativeCommand Line.
v When a user is logged in, FastBack Mount continues to run as a service untilyou start the FastBack Mount application and use the FastBack Mount graphicaluser interface. When you close the FastBack Mount application and graphicaluser interface, the FastBack Mount service restarts.To start FastBack Mount, from the Windows Start menu, select Programs →Tivoli Storage Manager → FastBack → FastBack Mount.You can only use the FastBack Mount application and graphical user interfacewhen running with administrator login credentials. Only one copy of theFastBack Mount application can be active at any time.
The FastBack Server does not have to be running when you use FastBack Mount.
SecuritySecurity restrictions for mounting virtual volumes depend on the type ofrepository.
Local/SAN repositoryNon-administrator Active Directory users can only mount snapshots ofvolumes when they have the correct share access privileges defined.Non-administrator Xpress-Restore domain users can mount volumes onservers they have access to, according to the permissions set by the TivoliStorage Manager FastBack user management mechanism. Administratorscan mount any volume. Click Login as to change the user ID you use tolog on.
92 Installation and User's Guide
Share repositoryAny user that has access to the share can mount any snapshot.
After the volume is mounted, NTFS security is applied automatically by Windowsoperating systems based on the current user’s account, regardless of the accountthat was used to mount the volume.
Selecting the repository for FastBack MountThe FastBack Mount window consists of three sections: General, FastBack Mount,and Instant Restore.
In the General section, you can use the Repository list to select the Tivoli StorageManager FastBack repository that serves as your source. By default, your localrepository is automatically detected and selected. You can also select anetwork-shared source, or a SAN repository.
To select a network-shared source or a SAN repository, complete the followingsteps:1. From the list of repositories, select Browse for folder.2. Type the path or click Browse to locate a shared directory.3. If necessary, enter the credentials for the user who has access to the remote
location specified in the previous step.
After you identify a shared-network source, a new line is added to the list ofrepositories. The policy, server, volume, and date lists are automatically updatedwith information for the snapshots that correspond to the selected repository.
If you select a repository that resides on a SAN disk, the policy, server, volume,and date lists are not automatically updated. Click Refresh to update these lists.
The following list summarizes some of the user interface elements that aredisplayed in the General section:
Policy Displays a list of all of the policies that are in the repository you selected.
Server Displays a list of servers that were backed up as part of the selected policy.
VolumeDisplays a list of volumes that were backed up on the selected server.
Date Displays a list of snapshots that were performed on the selected volume.You have two options:1. Select a specific snapshot.2. Select Last Snapshot. Last Snapshot mounts the snapshot that is last
on the list, at the moment the repository was loaded.
When mounting the last snapshot, if a new snapshot has been completedon the same volume, the mounted volume is not automatically updated.
RemoveUnloads the currently open repository. You cannot remove localrepositories or remove a repository that contains a currently mountedsnapshot.
RefreshUpdates the data according to the latest snapshots.
Chapter 6. Configuring and using 93

Login asUse to login as a different user from either the Active Directory orXpress-Restore domains.
Help Displays the help.
SettingsDisplays the following properties:
Enabling cachingSelect if you want to use a block of memory for temporary storageof data likely to be used again. By enabling caching, you use thecache to improve the speed of interaction with slower networks.No caching is required for local or SAN repositories.
Input temp folderIf caching is enabled, browse and select a temporary folder forcaching operations.
Access autocheckIf this option is selected, FastBack Mount grays out all thesnapshots that the current user does not have permissions toaccess.
Close Closes FastBack Mount.
Mounting snapshots and volumesYou can mount and dismount snapshots and volumes using the FastBack Mounttab of the FastBack Mount window.
To mount a snapshot, complete the following steps:1. In the General section, select a repository.2. From the corresponding lists, select the Policy, Server, and Volume.3. In the Date field, select from the list of snapshots. You can click Refresh to
update the list of snapshots.4. Click Mount. The following list provides detail about the options that are
displayed:v If you select Assign the following drive letter, select a drive letter from the
list.v If you select Mount in the following empty NTFS folder, either type in a
folder path, or click Browse and navigate to a folder. The selected foldermust be empty, or an error message is displayed. If the selected folder doesnot exist, the folder is created.
v Select Read Only to mount the volume in read-only mode. If you want thevolume to be used by an Exchange or SQL server that requires volumes to beenabled for read and write, you do not want to select this option. ForWindows 2000 servers, Read Only is not supported.
5. Click OK. A new line was added to the Mount section.
You can use files on the virtual volume that is created. After the snapshot ismounted, you can close this window. The snapshot remains mounted untildismounted. The same snapshot, specifically, the policy, server, volume, and date,can only be mounted one time. The mounted snapshot is not deleted in therepository by the FastBack Server cleanup process.
94 Installation and User's Guide

When volumes that were backed up on one operating system are mounted on adifferent operating system, running CHKDSK for the mounted volume on thesecond operating system might fail. CHKDSK failure in this case does not meanthat the mounted snapshot is damaged. To verify, mount the snapshot on theoriginal operating system where the snapshot was produced.
To remove a virtual volume, select the virtual volume and click Dismount. You canclick Dismount All to delete all virtual volumes.
Instant RestoreYou can use Instant Restore to start using data on the same disk where the volumeis being restored, while the restore operation is in progress.
Instant Restore works only with mounted volumes. Mounted volumes should havean assigned drive letter.
You can complete an Instant Restore of a volume in a supported clusteredenvironment. While Instant Restore process is running, you can access the volume.Other volumes in the cluster should not be affected and you can work with thecluster, as well as with that volume, in parallel. During the Instant Restore the diskbeing restored cannot fail over, in the event the node fails.
If a system is shutdown while Instant Restore is in progress, the Instant Restoreautomatically continues from the same point when power is restored.
Instant Restore destination volumes must be either on basic disks, or simplevolumes on dynamic disks. Destination volumes cannot be spanned volumes,mirrored volumes, or RAID-5 volumes. You can use a basic disk as a destinationvolume and then convert the basic disk to a dynamic disk.
To run an Instant Restore, complete the following steps:1. In the General section, select the repository.2. Select the Policy, Server, and Volume.3. In the Date section, select from the list of snapshots.4. Click Refresh to update the snapshot list.5. Click Restore. The following options are available:
v Select the volume letter where you want to restore the snapshot. For thevolume that you select, any existing data on the drive is overwritten. If amessage warns of open handles, close all files and applications that arerunning before continuing with Instant Restore.
v For Max CPU, move the slider to adjust the processor usage for the restoreprocess.
v If you want to cancel the restore process, select the restore that is in progressand click Abort. You can click Abort All to cancel all restore processes. Alldata on the target drive is removed.
v An Instant Restore session can be paused because of a temporary problemthat prohibits the session from running. You cannot manually pause asession. The software issues a command to pause the system if there is aproblem detected and that problem seems to be temporary. For example, ifthere is a network problem that results in a temporary loss of access to theremote repository, the Instant Restore session pauses. To continue to therestore process after it has been paused, select the appropriate line in theInstant Restore list and click Resume.
Chapter 6. Configuring and using 95

You can use Instant Restore to restore a simple volume on a dynamic disk. Thisrestore might cause the disk status to change to Online (Errors) and the status of allvolumes on the disk to change to At Risk. This change in disk status can occurwhen network traffic is too heavy for Instant Restore to operate. In this situation,the volumes are online and mounted. You can return the disk and volume status tonormal by going to the Computer Management Console. Right-click the disk; then,click Reactivate Disk.
Instant Restore for Microsoft Cluster Server
To manage the Microsoft Cluster Server (MSCS) environment as part of restoring acluster volume using Instant Restore, complete the following steps:1. To configure the cluster to not permit failover of the disk that you are
restoring to, complete the following steps:a. Double-click the icon for the disk that contains the volume that you want
to restore.b. Select the General tab.c. Click Modify. This button is next to the Possible Owners field. The Modify
Possible Owners window is displayed.d. In the Modify Possible Owners window, move all nodes, except for the
node that currently owns the disk, to the Available Nodes window.e. In the Modify Possible Owners, click OK.f. On the General tab, click OK.The cluster cannot remove the disk from the node.
2. To prevent the Instant Restore volume dismount from causing the resources tofail, right-click the disk; then, click Take Offline. All resources that aredisk-dependent are automatically taken offline.
3. Use the following procedure to change the Looks Alive and Is Alive pollintervals for the disk to prevent cluster intervention during the InstantRestore:a. Double-click the disk.b. Select the Advanced tab.c. For both Looks Alive and Is Alive parameters, select the radio button to
specify value.d. Take note of the current value for the Looks Alive and Is Alive parameters.
These parameters are required for restoring it back when the restore iscomplete.
e. Change the Looks Alive and Is Alive poll interval value to 604800000. Thischange means that the cluster does not attempt to check the disk withthese procedures for one week.
f. Click OK.4. To bring the disk online, right-click the disk icon and select Bring. This action
causes only the disk to go online.5. Wait 60 seconds to ensure the cluster has validated the disk before starting the
Instant Restore.6. Start the Instant Restore.7. To bring the other disks online after the restore starts, right-click the icon for
the group that contains the disk; then, click Bring Online.8. After the Instant Restore is complete, use the following steps to reconfigure
the cluster to permit failover of the disk that you restored. This step reversesthe action that you completed in step 1.
96 Installation and User's Guide

a. Double-click the icon for the disk that contains the volume that you wantto restore.
b. Select the General tab.c. Click Modify. This button is next to the Possible Owners field. The Modify
Possible Owners window is displayed.d. In the Modify Possible Owners window, move all nodes to the Possible
Owners window.e. In the Modify Possible Owners window, click OK.f. On the General tab, click OK.
9. Use the following procedure to restore the Looks Alive and Is Alive pollintervals of the disk back to the original values:a. Double click the disk.b. In the window that is displayed, select the Advanced tab.c. For both Looks Alive and Is Alive parameters, use one of the following
steps:v If the Use value from resource type button was selected before
changing the value, select it again.v If the Specify value radio button was selected before changing the
value, restore the value to the original value.10. Resume normal operation.
Instant Restore for Veritas Cluster ServerTo manage the Veritas Cluster Server (VCS) environment as part of restore a clustervolume using Instant Restore, complete one of the following procedures.
The first option is a simpler procedures that does not support the cluster to move aservice group or resource between nodes during the Instant Restore. The servicegroup and resource cannot move between nodes because all nodes, except for thenode containing the disk, are frozen during the Instant Restore.
The second option is more complicated, but the procedure does not freeze nodesthroughout the Instant Restore. The nodes are frozen only during the InstantRestore initiation phase. The service group that manages the disk is also frozenuntil the Instant Restore is complete.
Option 1: Simple procedure
1. Complete the following steps to configure the cluster to not failover tothe disk that you are restoring. These steps should be completed fromthe Veritas Cluster Manager user interface.a. In the left vertical panel, select the Systems tab.b. For every node that is not the current owner of the disk that you
want to restore, right-click the icon for the required node and selectFreeze → Persistent. The cluster cannot remove the disk from thecurrently owned node.
2. Complete the following steps to take all disk-dependent resourcesoffline to prevent the Instant Restore volume dismount from causingthem to fail.a. In the left vertical panel you used in step 1, select the Service
Group tab.b. Right-click the icon for the service group that contains the disk and
select Offline node name where the service group is online. Theservice group is taken offline.
Chapter 6. Configuring and using 97
c. Ensure that the service group is expanded in the console. If theservice group is not expanded, click the + icon that is located nextto the service group icon.
d. Right-click the VMDg resource that manages the disk and selectOnline the node that was online before. The resource is online.
e. If you are using a MountV resource to mount the volume that youwant to restore, bring it online. This step is required so Windowsconnects the volume with a volume letter that is needed for theInstant Restore.
3. Start the Instant Restore.4. Right-click the icon for the service group that contains the VMDg that
manages the disk and select Online the node that was online before.The service group is online.
5. After the Instant Restore is complete, use the following steps tore-configure the cluster to support failover to the disk that yourestored. This step reverses the task you completed in 1 on page 97.a. In the left vertical panel, select the Systems tab.b. For every node that is not the current owner of the disk that you
restored, right-click the icon for the required node and clickUnfreeze.
c. The cluster can remove the disk from the node.6. Resume normal operation.
Option 2: Advanced procedure for improved performance
1. Complete the following steps to configure the cluster to not failover tothe disk that you are restoring. These steps should be completed fromthe Veritas Cluster Manager user interface.a. In the left vertical panel, select the Systems tab.b. For every node that is not the current owner of the disk that you
want to restore, right-click the icon for the required node and selectFreeze → Persistent. The cluster cannot remove the disk from thecurrently owned node.
2. Complete the following steps to take all disk-dependent resourcesoffline to prevent the Instant Restore volume dismount from causingthem to fail.a. In the left vertical panel you used in step 1, select the Service
Group tab.b. Right-click the icon for the service group that contains the disk and
select Offline node name where the service group is online. Theservice group is taken offline.
c. Ensure that the service group is expanded in the console. If theservice group is not expanded, click the + icon that is located nextto the service group icon.
d. Right-click the VMDg resource that manages the disk and selectOnline the node that was online before. The resource is online.
e. If you are using a MountV resource to mount the volume that youwant to restore, bring it online. This step is required so Windowsconnects the volume with a volume letter that is needed for theInstant Restore.
3. Start the Instant Restore.
98 Installation and User's Guide

4. After the Instant Restore starts, you can bring the service group online.To bring the service group online, right-click the icon for the servicegroup that contains the VMDg that manages the disk. Select Onlinename of the node where the service group was online.
5. Right-click the service group icon and select Freeze → Persistent tofreeze the service group that contains the disk.
6. Complete the following steps to unfreeze the frozen nodes. This stepreverses the task you completed in 1 on page 98.a. In the left vertical panel, select the Systems tab.b. For every node that is not the current owner of the disk that you
restored, right-click the icon for the required node and clickUnfreeze.
c. The cluster can move all resources except for the service group thatcontains the VMDg that manages the disk.
7. After the Instant Restore is complete, right-click the service group iconand select Unfreeze to unfreeze the service group that contains thedisk.
8. Resume normal operation.
Using FastBack Mount and Tivoli Storage ManagerTivoli Storage Manager, version 5 release 2 and later is supported.
Previous knowledge of IBM Tivoli Storage Manager and FastBack Server isrequired. Tivoli Storage Manager should be installed in the C:\Program Files path.
To configure Tivoli Storage Manager for use with FastBack Mount, complete thefollowing steps:1. Install the Tivoli Storage Manager server and clients on different systems. The
Tivoli Storage Manager client must be installed on a system with Windows2000 Service Pack 3 or later.
2. Install FastBack Mount, the Administrative Command Line, and the TivoliStorage Manager client on the same system. Do not install firewall, antivirus,and anti-spyware software on the Tivoli Storage Manager client system. DuringFastBack Mount and Administrative Command Line installation, when askedfor IP address, type the system IP address. The IP address must be the IPaddress for the Tivoli Storage Manager client, which is on the same system.
An Active Directory user that is logged on to the Tivoli Storage Manager clientsystem, and has NTFS permissions to the volumes, can back up data with TivoliStorage Manager. The backups are run from the command line for Tivoli StorageManager. You can use the Windows task scheduler to schedule backups. Eachbackup is for a single volume.
To create a backup, complete the following steps:1. To receive information on volumes available for tape backup, run the following
command on the Tivoli Storage Manager Client system:fastbackshell.exe -c mount dump -type local-rep fastbackserverhostname@windowsdomain user=adminpass=admin123 domain=xpress-restore -for TapeBackup-file C:\dump.txt
For fastbackserverhostname, this variable is for the host name of the FastBackServer system. For windowsdomain, this variable is for the Windows domainname.
Chapter 6. Configuring and using 99

The resulting dump file, for example, C:\tape\dump_share.txt, looks like thefollowing sample:"%dir%FastBackShell.exe" -c mount add -ro -rep "share: \\computer_name\folder_path\London-FastBack\repository user=tapeadmin pass=admin123 domain=Taurus" -target "c:\ London-FastBack repository\Policy-DC\London-DC\C" -policy"Policy-DC" -server "London-DC" -volume "C:\\" -date "last snapshot"
If there are multiple volumes in the repository, separate lines will becreated for each one.
2. Create a new batch file in a directory on the Tivoli Storage Manager clientsystem. Name the batch files such that you know which volume they mount,and use the system name when labeling the folder. For example, create themount_volume_C.bat file in the following directory: C:\Tape_London_DCTo help complete this step, use the following code samples:set dir=c:\Program Files\Tivoli\TSM\FastBack\shell\
This section should be copied from the dump file created in theprevious step. For example:"%dir%FastBackShell.exe" -c mount add -ro -rep "share: \\computer_name\folder_path\London-FastBack\repository user=tapeadmin pass=admin123 domain=Taurus" -target "c:\ London-FastBack repository\Policy-DC\London-DC\C" -policy"Policy-DC" -server "London-DC" -volume "C:\\" -date "last snapshot"
IF %ERRORLEVEL% EQU 0 goto end
:error_end
echo could not mount
EXIT 1
:end
EXIT /B 0
"Dir" should contain a full path to FastBackShell.exe
You can replace c:\London-FastBack repository\Policy-DC\London-DC\C with a folder in which you want to mount the volume. For example,C:\mount. Use a mounted path that provides detailsabout the mounted volume, for example, computer name and volume letter.
If the dump file has more than one command, use only the command with thevolume that you want to backup in this particular backup.
3. To mount the latest snapshot to a mount point, enter the following command:mount_volume_C.bat
The following string is a sample mount point: c:\ London-FastBackrepository\Policy-DC\London-DC\C
4. Create another new batch file in a directory on the Tivoli Storage Managerclient system. Name the batch files such that you know which volume theymount, and use the system name when labeling the folder. For example, createthe dismount_volume_C.bat file in the following directory:C:\Tape_London_DCTo help complete this step, use the following code samples:set dir="c:\Program Files\Tivoli\TSM\FastBack\shell\"
"%dir%FastBackShell.exe" -c mount del -target C c:\ London-FastBackrepository\Policy-DC\London-DC\C -force
if %errorlevel% EQU 10 goto end
100 Installation and User's Guide

:error_end
echo could not dismount London-DC\C
EXIT 1
:end
EXIT /B 0
5. To dismount the previously mounted snapshot, enter the following command:dismount_volume_C.bat
If the volume is mounted, the next backup might fail.6. Create the third, and final, batch file for the backup process. Name the batch
file Backup_Volume_C.bat. Store this file in the directory where the other twobatch files are stored. In the examples provided, the C:\Tape_London_DCdirectory is used.To help complete this step, use the following code samples:call c:\Tape_London_DC\mount_volume_C.bat >> c:\Tape_London_DC\pre_volume_c.log 2>&1
if %errorlevel% equ 1 goto error_end
cd C:\"Program Files"\Tivoli\TSM\baclient\
dsmc.exe sel D:\mount\* -su=yes
call c:\ Tape_London_DC dismount_volume_C.bat >> c:\Tape_London_DC\pst_volume_c.log 2>&1
goto end
:error_end
echo %date% %time% backup London_dc\volume_C failed >>C:\TSM_Errors/error.log
:end
Create the three batch files, described in these steps, for each volume backup.7. Create a folder to store the log file that contains backup errors. For example:
C:\TSM_Errors
If you want to use incremental backups, use the following command:dsmc.exe inc D:\mount\* -su=yes
For a full, selective backup, use the following command:dsmc.exe sel D:\mount\* -su=yes
To perform a backup of volume C on the London_DC system to tape, manually runthe following batch file: Backup_Volume_C.bat
Using FastBack Mount and Veritas NetBackupVeritas NetBackup version 5.1 and later is supported.
Previous knowledge of Veritas NetBackup and Tivoli Storage Manager FastBack isrequired.
Chapter 6. Configuring and using 101

To configure Veritas NetBackup for use with FastBack Mount, complete thefollowing steps:1. Install the NetBackup server and clients on different systems.2. The NetBackup client must be installed on a system with Windows XP Service
Pack 1 or later.3. FastBack Mount and Administrative Command Line must be installed on the
same system as the client for NetBackup. During FastBack Mount andAdministrative Command Line installation, when asked for IP address, type theIP address for the NetBackup client. Alternatively, if FastBack Mount is alreadyinstalled, open the FastBackShell.ini, and manually configure the IP address forthe NetBackup client. The file FastBackShell.ini is located in the following pathC:\ProgramFiles\Tivoli\TSM\FastBack\shell.
4. Run full backups. In order to enable incremental backups to tape, in the clientsettings, select Based on Timestamps.
5. NetBackup client must be configured to 0 retries.6. For the Active Directory user that is logged on to the NetBackup client system,
give NTFS permissions to the volumes. These volumes are backed up byNetBackup.
7. For every NetBackup policy, backup a single volume.8. Increase the Client Read Timeout to 900 seconds.
Do not install firewall, antivirus, and anti-spyware software on the NetBackupclient system. Installing this software might slow the backup.
To create a backup, complete the following steps:1. To receive information on volumes available for tape backup, run the
following command on the NetBackup client system:FastBackShell -c mount dump -type share -rep P -for TapeBackup -reparseP [-file P]
Parameters:
- rep FastBackServer repository - network share followed by usernameand password with permissions to see the repositories.
"share: \\hostname\share user=username pass=password"
-reparse volume name for automatic reparse points (default "C:")
-file filename to store resulting dump
Example: set dir=c:\Program Files\Tivoli\TSM\FastBack\shell\
"%dir%FastBackShell.exe" -c mount dump -type share -rep "share:\\computer_name\folder_path\London-FastBack\repository user=tapeadmin pass=admin123 domain=Taurus" -for TapeBackup -reparse c: -file C:\tape\dump_con_share.txt
The resulting dump file, for example, C:\tape\dump_con_share.txt, looks likethe following sample:"%dir%FastBackShell.exe" -c mount add -ro -rep "share: \\Con\London-IBM\repository user=tapeadmin pass=admin123 domain=Taurus" -target "c:\Con(092)London-IBM (092) repository(092)\Policy-DC\London-DC\C\\" -policy "Policy-DC" -server"London-DC" -volume "C:\\" -date "last snapshot"
(092) stands for backslash in the part of the targetpath that represents the location of the repository.If there are multiple volumes in a repository, separate lines are createdfor each volume.
102 Installation and User's Guide

2. Create a new batch file in a directory on the NetBackup client system. Forexample, create the mount.bat file. You can use the following code samples tohelp complete this step:set dir=c:\Program Files\Tivoli\TSM\FastBack\shell\...
IF %ERRORLEVEL% EQU 0 goto end
:error_end
echo could not mount
EXIT 1
:end
EXIT /B 0
"Dir" should contain a full path to FastBackShell.exe
Paste the contents of the dump file into mount.bat insteadof the ... line.
Replace C:\Con(092)London-IBM (092)repository(092)\ with afolder that you want the volume to be mounted to. For example,C:\mount.
If the dump file has more than one command, use only the command with thevolume that you want to backup in this particular policy.
3. Run the following command to mount the latest snapshot to a mount point:mount.bat. A sample mount point follows: c:\ mount\Policy-DC\London-DC\C
4. Open the NetBackup Administration Console and create a new policy. In thesesteps, the new policy wizard is not used, but you can use the wizard. In theAdd New Policy window, go to Attributes and click Cross Mount Points.
5. Choose a predefined destination. For the policy type, select MS-Windows-NT.6. Go to the Schedules tab to create a schedule.7. Go to the Clients tab to select the NetBackup client system.8. Go to the Backup Selections tab to type the full path to the mount point. For
example, D:\Orion\rep\Policy-G\Appollo-Exchange\G9. A bpstart_notify.Tape_Backup.bat file must be create in the BIN directory on
the NetBackup client system. For example, C:\Program Files\VERITAS\NetBackup\bin. For additional policies, put the name of the policy instead ofTape_Backup in the file name. The bpstart_notify.***.bat file needs to be runbefore the backup. If the backup fails, the backup is aborted. Call mount.bat tomount the snapshot before backup starts:call c:\Tape\mount.bat >> c:\tape\pre.log 2>&1echo %errorlevel% > %6
10. A bpend_notify.Tape_Backup.bat file must also be created in the BIN directoryof NetBackup client system. The Bpend_notify.***.bat file is run after thebackup finishes. Name the file dismount.bat to dismount the snapshot afterthe backup is finished.call c:\Tape\dismount.bat >> c:\tape\pst.log 2>&1echo %errorlevel% > %6
11. Create a new batch file, for example, dismount.bat, in the following directoryon the NetBackup client system: C:\Tape. You can use the following codesamples to help complete this step:
Chapter 6. Configuring and using 103
set dir="c:\Program Files\Tivoli\TSM\FastBack\shell""%dir%FastBackShell.exe" -c mount del -target C:\mount\Policy-DC\London-DC\C\ -force
if %errorlevel% EQU 10 goto end
:error_endecho could not dismount London-DC\CEXIT 1:endEXIT /B 0
12. Run the dismount.bat file to dismount the previously mounted snapshot. Ifthe volume is not mounted, the next backup might fail.
13. Create a new batch file in a directory on the NetBackup client system. Forexample, create the start_backup.bat file in the C:\Tape. You can use thefollowing code samples to help complete this step:@ECHO OFF
bpbackup -i -p Tape_Backup -s diff_incrREM Checking group was not startedif %ERRORLEVEL% == 0 goto ENDecho Backup was not started:END
To perform a backup to tape, manually run start_backup.bat.
Continuous Data ProtectionNormal snapshots record backup data at a certain point in time. Continuous DataProtection records all the activity, even activity that occurs between snapshots.
If enabled, Continuous Data Protection supports data restore to any specific pointafter the last snapshot, and between the last snapshot and the one before last onthe same chain. The following list provides information that you need to knowbefore enabling Continuous Data Protection:v Continuous Data Protection is not supported for dynamic disks.v Using Continuous Data Protection requires additional processor, memory, and
network bandwidth resources. The amount of additional hardware requireddepends on the server activity.
v Running defragmentation on volumes protected with Tivoli Storage ManagerFastBack Continuous Data Protection generates a significant load on the serverrunning Continuous Data Protection, in addition to large incremental snapshots,and might result in failure.For the supported Windows 2008 and Windows Vista operating systems, thedefragmentation task runs automatically on all volumes. To disable thedefragmentation task, open the Task Scheduler. You can open the Task Schedulerfrom the Windows Start menu. Click Programs → Accessories → System Tools →Task Scheduler. Navigate to Task Scheduler (local) → Task Scheduler Library →Microsoft → Windows → defrag. From this window, disable the ScheduledDefragtask.
v Do not run Continuous Data Protection on system volumes.
When Continuous Data Protection is enabled, adhere to the following rules:1. Make sure that Tivoli Storage Manager FastBack repository disks and folders
are excluded from any file-level scanning, for example, anti virus and antispyware software.
104 Installation and User's Guide

2. Continuous Data Protection snapshots should be scheduled every hour.
While using Continuous Data Protection gives you the ability to restore a systemto a point in time, choosing a proper time point can be a complex decision. Thistask is simplified by adding log events of the FastBack Client operating systemapplication to the Continuous Data Protection slider layout. Because there aremany application log events, these events can be filtered by an external script onthe FastBack Server. For more information about filtering these events, see“Continuous Data Protection slider and FastBack Server events” on page 107.
Restoring data from Continuous Data Protection snapshots
Before restoring data from Continuous Data Protection snapshots, review thefollowing notes:
Notes:
v Snapshots with Continuous Data Protection data are marked with the
icon.
v Snapshots marked with a icon indicate a completed ContinuousData Protection snapshot, but a segment of the Continuous DataProtection data might be missing. This icon indicates that when youopen the details for this snapshot, some periods are marked red andunavailable for restore. You can restore other Continuous Data Protectionperiods. If the volume is very small and a small segment of data ismissing, the icon might not be displayed.
v If a Continuous Data Protection snapshot is still running, the following
icon is displayed: .v To view the size of the Continuous Data Protection data, right-click the
desired snapshot in the Monitor window and select Properties.
Overview of Continuous Data Protection icons:
Table 18. Continuous Data Protection icons
Continuous DataProtection icons Description
Continuous Data Protection Snapshot is running.
Continuous Data Protection Snapshot completed successfully.
Incomplete Continuous Data Protection snapshot, the Continuous Data Protection databefore the aborting point might be available.
v To restore Continuous Data Protection data between the last snapshot and theone before last, select a completed Continuous Data Protection snapshot.
v To restore Continuous Data Protection data recorded after the most recentsnapshot is complete, select a currently running Continuous Data Protectionsnapshot.
To restore a Continuous Data Protection snapshot complete the following steps:1. Click Snapshot Monitor
Chapter 6. Configuring and using 105

2. Right-click a Continuous Data Protection snapshot; then, click Restore →Continuous Data Protection Volume Restore.
Note: Only the last two Continuous Data Protection snapshots from each chainare available in the Monitor tab list.
3. In the window that is displayed, select a destination volume and click Next.4. Close any applications that are running on the destination volume. The restore
operation fails if there are applications that are running or files open on thetarget restore volume. If you select Ignore open handles on the destinationvolume, Tivoli Storage Manager FastBack ignores files that are open andapplications that are running on the destination volume. Files that are runningand applications that are running can cause a problem with the target volume.You must close the files and applications that are open on the destinationvolume. Use the Ignore open handles on the destination volume only if thereis no other choice.
5. Click Next Step.6. The window contains a scale that represents the time between two snapshots
(Continuous Data Protection range).v Events that took place during that time are marked as green lines.v Consistency points within that range are marked blue.v Hovering over an event or a consistency point shows a tool tip indicating the
event/consistency point name.v Parts of the Continuous Data Protection range that are marked with broken
red line are periods within the Continuous Data Protection range, in whichno activity was registered because the server was not available because ofnetwork issues. These periods cannot be restored using the Continuous DataProtection feature. To restore the data covered by the red area use the nextconsistent snapshot.
7. Move the sliding dial to the point where you want to restore.The time and date are indicated in the time and date fields below the time line.You can also enter the desired time in the time field. If the time field containsthe valid Continuous Data Protection restore time, its font color is black.Otherwise it is red. The date field is disabled and can be changed only bymoving the dial when the scale’s range exceeds one day.If you select Restore to consistency points or events only, the dial snaps to theclosest event or consistency point so you can restore to consistency points orevents.
8. Click Restore. The point you selected is restored to the destination volume youspecified. Restore is enabled only when a valid restore time is selected.
Stopping Continuous Data Protection
Continuous Data Protection is stopped automatically in the following cases andthen restarted at the beginning of the next scheduled snapshot:v When FastBack Client or FastBack Server is restarted.v When there is a communication problem between the FastBack Client and
FastBack Server.v When there is strong resource contention on the host. This limit is controlled by
the FastBackClient.ini file.v When another snapshot in the same chain starts Continuous Data Protection.
106 Installation and User's Guide

v By default, when a third Continuous Data Protection snapshot is started, thedata of the first Continuous Data Protection snapshot in the same chain isdeleted.
To abort Continuous Data Protection while it is running, go to the SnapshotMonitor, right-click the desired snapshot and select Immediate operations → AbortCDP. This option is only available if the selected snapshot is running ContinuousData Protection.
The next snapshot in the chain includes Continuous Data Protection unless youclear the checkbox from the relevant job schedule.
Continuous Data Protection slider and FastBack Server events
Using the Continuous Data Protection slider, you see a green mark with its tool tipshowing the exact event that occurred at a time on the FastBack Client. Forexample, the event can be the discovery of a virus. Knowing this would make iteasy to decide to restore the volume up to the point before this event. If the eventis not known, it would be difficult to decide which point to choose on theContinuous Data Protection dial for restore.
The events are extracted by FastBack Server every time a CDP slider layout iscreated.
FastBack Server creates a file named ContinuousEventsInOut.txt that contains allthe time-relevant events for the given CDP snapshot. The file is located inC:\Documents and Settings\All Users\Application Data\Tivoli\TSM\FastBack\Server\ContinuousEventsInOut.txt.
This file can be optionally filtered as described in the Filtering section, and thenintegrated into the information sent to the FastBack Manager. The events listed inthis file are displayed by the FastBack Manager as green marks on the CDP scale,with the event they represent appearing as a tool tip when hovering above thegreen line.
Note: For the events mechanism to work properly, the currently logged user onthe FastBack Server system must have sufficient permissions to access thelog events located on the FastBack Client.
If there are permission restrictions, the CDP restore window might fail to open. Inthis case, you can cancel the extraction of events from the FastBack Client. Eventsextraction can be canceled at run time by creating a special file at C:\Documentsand Settings\All Users\Application Data\Tivoli\TSM\FastBack\Server\DoNotAddEventsToJavaContinuousLayout.
Reminder: It takes up to 30 seconds for FastBack Server to detect the existence ofthis file.
Events filtering mechanism
When FastBack Server creates the file C:\Documents and Settings\AllUsers\Application Data\Tivoli\TSM\FastBack\server\ContinuousEventsInOut.txt,and before it sends it to FastBack Manager, FastBack Server tries to start a script atC:\Documents and Settings\All Users\Application Data\Tivoli\TSM\FastBack\server\FilterContinuousEventsScript.bat.
Chapter 6. Configuring and using 107

FastBack Server passes the path to ContinuousEventsInOut.txt in an environmentvariable called %EventsFileName%. This variable can be used inside the script tofilter the events. The content should be checked.
If the batch file is not present, the default is present, theContinuousEventsInOut.txt file is passed to FastBack Manager as is.
For example, the batch file, ContinuousEventsInOut.txt, contains a single line:echo %EventsFileName% > out.txt
In this case, when the Continuous Data Protection slider window is opened, a filenamed out.txt is created in the FastBack Server executable directory. This filecontains a single line; the result of the echo command:C:\Documents andSettings\All Users\Application Data\Tivoli\TSM\FastBack\server\ContinuousEventsInOut.txt.
Notes:
v One of the limitations of this mechanism is that the size of the filteredContinuousEventsInOut.txt file should not exceed the size of the originalfile. This means that the script should only remove the events, but notadd anything new.
v Any output to the screen, for example, the echo specified in the script, islost because the script does not have a window to show the output.However, output to files works and if no path is specified the files aresearched in the FastBack Server executable directory only and not in theDocuments and Settings directory.
Packaging
Events and filtering mechanism are already part of FastBack Server service and donot require any special installation.
The reference implementation of Oracle9i SCN number extraction to theContinuous Data Protection slider is packaged as a batch script called C:\ProgramFiles\Tivoli\TSM\FastBack\client\scripts\Oracle9i_GetSCNNumber.bat.
To run the Oracle9i_GetSCNNumber.bat script that is located in the C:\ProgramFiles\Tivoli\TSM\FastBack\client\scripts\ directory, complete the following steps:1. Open the Scheduled Tasks control panel and use the wizard to create a
scheduled task that runs the C:\Program Files\Tivoli\TSM\FastBack\client\scripts\Oracle9i_GetSCNNumber.bat script daily. The content should bechanged and related system variables should be updated.
2. In the final window of the Scheduled Tasks wizard, select Open advancedproperties. Alternatively, in the Scheduled Tasks folder, right-click the task youcreated and select Properties.
3. Select the Schedule tab.4. Click Advanced.5. Enable Repeat task.6. Select Every 5 minutes, and Duration: 24 hours.7. Go to the Windows Event Viewer, and check the resulting events. Verify that a
new event is created every five minutes.8. Right-click an event and select Properties to view the event details.
To add an event to the Event Viewer, use the eventcreate.exe command line utility.
108 Installation and User's Guide
Microsoft Exchange back up and restoreTivoli Storage Manager FastBack provides point-in-time copies of Exchange 2000,Exchange 2003, and Exchange 2007 databases and transaction logs, withoutcompromising either data integrity or performance of online operations.
You can use Individual Mailbox Restore (IMR) to perform an individual mailboxrestore for public folders. The IMR support is provided on an as-is basis.
Combined with Tivoli Storage Manager FastBack for Microsoft Exchange, TivoliStorage Manager FastBack enables restoring attachments, e-mails, folders,mailboxes, databases and entire servers.
BackgroundExchange 2000, 2003, and 2007 are based on the concept of partitioning thedatabase into user defined storage groups. On Exchange 2000 and 2003, up to fourstorage groups can be defined, where each storage group can contain a maximumof five databases for a maximum of 20 databases per server. On Exchange 2007, upto 50 storage groups can be defined and up to 50 databases. Exchange is atransaction-based e-mail system in which database transaction integrity is definedby Atomicity, Consistency, Isolation and Durability.
Database integrity is maintained by writing each transaction to the transaction logsbefore it is committed to the database, and by using checkpoint files as a referencepoint to determine database consistency. There is one set of transaction logs foreach storage group on Exchange 2000, 2003, 2007, and Exchange Enterprisesystems. Transaction log names are sequentially named log files. For example, thefirst file would be E0000001.log, the next would be E0000002.log. On Exchange2000 and 2003, each file has a size of 242 880 bytes. On Exchange 2007, thetransaction log size is 1 048 576.
To save on disk space, Exchange provides the Circular Logging option. CircularLogging enables maintaining a number of transaction logs, typically four or five,while overwriting the oldest transaction logs.
Exchange 2007 locale continuous replication files are not backed up by TivoliStorage Manager FastBack.
Tivoli Storage Manager FastBack for Microsoft Exchange backup and restore processes
The Tivoli Storage Manager FastBack for Microsoft Exchange back up and restoreprocess automatically detect the version of the Exchange system installed on theserver and the configured storage groups.
Snapshots are taken of each selected storage group. Each snapshot consists of the*.EDB, *.LOG, *.CHK and *.STM (2000 and 2003 only) files for each storage group.The backup of the Exchange system is performed at the volume. This backup islike a regular volume backup.
Disable the circular logging option and delete unnecessary log files using the PurgeLog option in FastBack Manager. After the backup is complete, the log files can beautomatically erased from the primary storage (set by selecting the Purge ExchangeLogs after completed snapshot in the General configuration → Application tab).The settings can also be modified per job at Job Schedule level.
Chapter 6. Configuring and using 109

Create a separate policy for each Exchange version.
Types of backupThere are two types of backup: quiescent and non-quiescent.
Quiescent backup is an offline backup. A quiescent backup results in a consistentdatabase, but requires interrupting the operation of the server. The application isreleased immediately, while the backup process continues to its completion. This isa longer process as services are temporarily shut down to bring databases to aconsistent state.
For Tivoli Storage Manager FastBack there are two types of quiescent backup:Volume Shadow Copy (VSS) service application quiescing and IBM applicationquiescing. You cannot use VSS application quiescing and IBM application quiescingat the same time. In addition, you cannot use VSS application quiescing to back uputility partitions.
The following list identifies scenarios when you should use VSS applicationquiescing and IBM application quiescing:v Use IBM application quiescing for supported Windows 2000 operating systems
that run supported Microsoft Exchange 2000 Servers.v Use VSS application quiescing for supported Windows 2003 and later operating
systems, except for Microsoft Windows XP, that run supported MicrosoftExchange 2003 and 2007 Servers. If you need an application-aware snapshot, donot use VSS application quiescing.
v To back up applications that run on supported Microsoft Exchange servers,verify that the VSS service is supported to take snapshots of the application. Ifyou use the VSS service, enable the service with FastBack Manager. Do not useexternal scripts to enable the VSS service.
A non-quiescent backup is an online backup. Non-quiescent backup is performedwithout interrupting the operation of the server. Because server operation is notinterrupted, the backup can be performed more often. A non-quiescent backup canlead to non-consistent databases with a longer restore process and can result insome data loss. To compensate for data loss, you might want to use a moreaggressive backup strategy with non-quiescent backups. Non-quiescent databasescan usually be repaired using standard Exchange tools, for example, ISINTEG andESEUTIL. Databases that suffer from severe corruption can still be restored usingTivoli Storage Manager FastBack for Microsoft Exchange.
To improve your chances for successful restore of both quiescent and non-quiescentbackups, turn off the Circular logging option in System Manager.
Note: The process of migrating from Exchange 5.5 to Exchange 2000 while theFastBack Client is running on the migrated server is not supported. Youmust restart the FastBack Client after the migration.
Setting the global application aware parameters
The Exchange backups are defined, by default, in the global application awareparameters as Non-Consistent. Non-Consistent means no quiescing. In addition, bydefault, purge logs are disabled. These settings can also be changed for specificjobs as listed in the Job category.
110 Installation and User's Guide
For more information about changing global application-aware parameters, see“Application Aware options” on page 116.
Creating an Exchange snapshot policyYou can use the Simple Snapshot wizard to create an Exchange snapshot policy.
When two job schedules are set to run on the same volume and at the same time,the full backup job schedule takes priority and is run before an incremental jobschedule. In addition, the quiescing job schedule has priority over thenon-quiescing job schedule.
When running an Exchange snapshot policy, verify that the Exchange server iscorrectly configured. The database should not be empty and should have volumes.An Exchange server with an empty database and no volumes does not create theagent information for the server. As a result, the FastBack Server resets itself everytime the FastBack Manager tries to connect to the server. To avoid this problem,either delete the empty database, or add volumes and correctly configure thedatabase.
To create an Exchange snapshot policy, complete the following steps:1. Right-click the snapshot policy category, for example, Jobs, Client Groups, or
Snapshot Groups; then, click New Policy.2. Under Exchange 2007/2003/2000, select the storage groups to be backed up.
The corresponding volumes are automatically selected. All data on theselected volumes is backed up. Dismounted Exchange 2007 databases are notdisplayed in FastBack Manager. If an Exchange Storage Group is renamed, thechange is not updated in the FastBack Manager, until the Mailbox Store isdismounted and remounted.
3. For Snapshot Every, choose the rate at which the snapshot is taken.4. (Optional) Select the Exclusion period and enter the times during the day
when a backup should not be performed.5. Click Apply. A new snapshot policy is created. For example, Multi Volume
Client1 Every 30 min.6. Click this snapshot policy to display the associated client group and job
names. You can edit the snapshot policy properties.7. Type a name for the snapshot policy.8. Enable DR - Enable or disable the Disaster Recovery function for this
snapshot. If enabled, all the snapshot data is replicated by the DR procedure.Do not enable DR on a policy on which CDP (Continuous Data Protection) isenabled. Enabling DR for a policy that has CDP enabled can overload thenetwork because the CDP data is replicated by the DR process. If DR isrequired, add another policy with DR in lower frequency, and without CDP.
9. Set the Number of generations and Snapshots Priority (which snapshot isrun first in situations in which the system capability for performing snapshotsis restricted for whatever reason). The Number of generations is the numberof snapshots that should be retained.
10. To edit the job, select the job name and click Go to.11. As necessary, make changes to the job name, range, and frequency.12. Click Advanced and make any additional changes.13. Under Application Aware, the Quiescing and Purge options are defined
according to the global definitions (under the Application tab). You can
Chapter 6. Configuring and using 111

change the settings for the job. To consistently back up a Microsoft SQL Serveror Microsoft Exchange 2003 client, use VSS application quiescing.If you select an Exchange volume and EISA partition in the same policy, theExchange logs are not deleted. To solve this problem, create two policies; onefor the Exchange volume, and one for the EISA partition.If you select Use VSS application quiescing, Exchange logs are, by default,not deleted. If you want to delete Exchange logs, select Purge Exchangeserver log files.
14. In some cases, if a database being backed up is spread across a large numberof volumes, the first full snapshot might not be consistent. However, thefollowing incremental snapshots are consistent. If quiescing is selected, userexit-point scripts do not run, even if the options are selected.Click OK to close the Application Aware window.
15. Click Apply to save changes.16. Change the storage groups to be backed up by editing the client group of the
same snapshot policy.
Exchange 2000, Exchange 2003, and Exchange 2007 restoreThe process for restoring Exchange 2003 and Exchange 2007 is the same as forrestoring Exchange 2000.
The Exchange 2000 restore procedures from inconsistent and consistent databasesare the same, unless the inconsistent database is severely damaged.
An Exchange database restore can be performed to the following systems:v Primary serverv Backup server
If you perform an Exchange database restore on a backup server, ensure theprimary server and backup server have the same Windows and Exchange servicepacks and updates installed. A separate Active Directory should also be installed.The backup server can run on the production network.
The Active Directory naming between the active server and the recovery serverdoes not have to match. The following information for the active server and therecovery server has to match:v Organization namev Administrative group namev Storage group namev Logical database namev LegacyExchangeDN names of administrative system objects
Performing a full Exchange 2000 Server database restore
To perform a full database restore for a Exchange 2000 Server, complete thefollowing steps:1. To ensure that the database can be overwritten, right-click the Exchange 2000
database targeted for the restore and select Properties → Database. Verify thatthe This database can be overwritten by a restore option is selected.
112 Installation and User's Guide

2. Before performing the volume level restore, dismount all the databases residingon this volume. In addition, one of the storage groups should be configured topoint to the restored volume prior to performing the restore procedure.
3. Perform transaction log verification on the production host. You can use theESEUTIL and ISINTEG tools.
4. Expand the Exchange System Manager + Servers folder and select the requiredserver or storage group.
5. Right-click Mailbox Store to mount the database.
Note: If you are restoring to the primary server, the procedure is completed atthis stage. If you are restoring to a backup server, continue to the nextstep.
6. Open the Mailbox Store folder. Right-click Mailboxes and run the Clean-upagent for the mailbox. All the mailboxes inside the database should be unlinkedfrom the live system, and crossed with a red X.
7. Create a new Active Directory user account. Verify that the Create an ExchangeMailbox option is cleared while creating a new Active Directory user account.
8. Choose the desired mailbox to be restored, and reconnect it to thenewly-created user. To reconnect many users, you can use the MailboxReconnect tool. The mbconn.exe files is located on the Exchange SDK CD.
9. The Exchange Migration wizard can be used to extract the contents of themailbox to a *.pst file. There is a password file created next to the *.pst file. The*.pst file can be attached to the Outlook software used at a later stage.
Backing up a clustered Exchange file server
The clustered volume is indicated by the icon.
The FastBack Client must be installed on each node in the cluster. Using theFastBack Client, verify that the SAN Module option is enabled. For moreinformation about using Tivoli Storage Manager FastBack in a cluster environment,see “Microsoft Cluster Server (MSCS) and Veritas Cluster Server (VCS)” on page21.
To back up the clustered Exchange file server, complete the following steps:1. On the cluster Exchange volume, create a client group.2. To move groups from one node to another node, use the Cluster Administrator.
After moving groups, by default, the next snapshot is an incremental deltablock snapshot.
SQL back up and restoreTivoli Storage Manager FastBack provides enhanced backup and restorecapabilities for Microsoft SQL Server 2000, 2005, and 2008 databases andtransaction logs, without compromising either data integrity or performance ofonline operations.
The following list details the support offered for Microsoft SQL Server 2000, 2005,and 2008 databases and transaction logs:v Transparent integration with the SQL server using a SQL native API for the
backup task.v Volume Shadow Copy (VSS) service, a type of application quiescing, for SQL
Server 2005 and SQL Server 2008 on Windows Server 2003 and Windows Server
Chapter 6. Configuring and using 113
2008. You cannot use VSS application quiescing to back up utility partitions. Ifyou need an application-aware snapshot, do not use VSS application quiescing.
v IBM application quiescing for SQL Server 2000 installed on Windows Server2000 and Windows Server 2003.
v Back up and restore of SQL databases that reside on a single volume, or arespanned over multiple volumes.
v Back up and restore of SQL databases that contain multiple data files or multiplelog files.
v Back up of multiple databases simultaneously, without interruption to SQLserver operation.
v Real time restore for tables, views, and other SQL elements using FastBackMount. You can mount virtual volume with backed up database and recoveranything you need without restoring the volume to disk.
v Named instances are supported, but are not automatically recognized by TivoliStorage Manager FastBack. Non-named instances are automatically recognizedby Tivoli Storage Manager FastBack.
Supported SQL versions
The following SQL versions are supported:v Microsoft SQL Server 2000 Standard Edition - On Windows 2003.v Microsoft SQL Server 2000 Enterprise Edition with Service Pack 2 and above -
On Windows 2000 Server with Service Pack 4 or Windows 2003 Enterprise.v Microsoft SQL Server 2005 Enterprise Edition (32 bit and 64 bit).v Microsoft SQL Server 2008 Standard Edition (32 bit).v Microsoft SQL Server 2008 Enterprise Edition (32 bit and 64 bit). For Microsoft
SQL Server 2008 Enterprise Edition 64 bit, the software is not supported on aWindows 2003 64-bit cluster.
If both Microsoft Exchange Server and Microsoft SQL Server are concurrentlyinstalled on the same computer, you must create a dedicated policy to individuallyback up each server.
The following table summarizes the best practices regarding how to use the VSSservice and SQL scripts on various operating systems and SQL servers:
Table 19. Using the VSS service and SQL scripts on operating systems and SQL Servers
SQL Server2000
SQL Server2005
SQL Server2008
Default NamedInstances
Default NamedInstances
Default NamedInstances
Windows 2000 FastBack ClientApplicationQuiescing
XRSQL Scripts - - - -
Windows 2003 FastBack ClientApplicationQuiescing
XRSQL Scripts VSS service VSS service VSS service VSS service
Windows 200364 bit
- - VSS service VSS service VSS service VSS service
If you run the supported SQL Server 2005 software, select both log and datavolumes, and select VSS application quiescing, the back up works.
114 Installation and User's Guide

If you run the supported SQL Server 2000 software, use the IBM applicationquiescing and back up both data and log files. If you run named instances, usescripts to back up.
Tivoli Storage Manager FastBack can also back up the SQL Server in a MicrosoftCluster Server environment. The FastBack Client needs to be installed on all nodesin the cluster. The following table provides you with an environment supportmatrix:
Table 20. Environment support matrix for SQL Servers in Cluster Server environments
Windows Server 2003Cluster Server (32bit)
Windows Server 2003Cluster Server (64bit)
Veritas ClusterServer / WindowsServer 2003 (32 bit)
Veritas ClusterServer / WindowsServer 2003 (64 bit)
Microsoft SQL Server2000
Yes SQL 2000 onlyavailable on Itanium
processors
No No
Microsoft SQL Server2005 (32 bit)
Yes No No No
Microsoft SQL Server2005 (64 bit)
No Yes No No
Microsoft SQL Server2008 (32 bit)
Yes No No No
Microsoft SQL Server2008 (64 bit)
No No No No
Both snapshot and CDP are supported for the SQL Server, both named andnon-named instances.
Tivoli Storage Manager FastBack SQL back up
SQL databases are based on data and log files. Back up of log files without datafiles is not supported; both data and log files must be backed up for successfulrestore. FastBack Server backs up entire volumes that contain data and log files,and restores either a volume, single folder or file, or single table using FastBackMount.
Creating an SQL Snapshot Policy
You can use the Simple Snapshot wizard to create an SQL snapshot policy andchange policy parameters.
Click the wizard icon, . Click Simple Snapshot Wizard.
Note: If two different job schedules that run on the same SQL volumes, arescheduled for the same time, the full backup job schedule is completedbefore the incremental job schedule.
1. For consistent backup you must select either SQL Server or each databaseseparately. All data, including the database, on the selected volumes is backedup. Volumes corresponding to selected databases are selected automatically.
2. Type the client group name.3. Select the job type:
Chapter 6. Configuring and using 115
v Full forever - a full snapshot of the client group is taken each time. The Fulloption is usually used when only a single full image of the volume isrequired at a certain point, rather than continuous incremental snapshots.
v Incremental forever - After the first full snapshot, only incremental snapshotsare taken.
4. Define and select options as follows:v Define how often the snapshot is run in the Run Every field.v To prevent the job from being run during specific times of the day, enable
and define the Exclusion Period.v For Perform task on, select the days that the policy should run.
5. If appropriate, enable disaster recovery.6. Click Apply to save changes.7. Change the storage groups to be backed up by editing the client group of the
same snapshot policy.
If you have a volume that contains several databases and you choose only onedatabase to backup, when you restore the volume, after the restore, only thatdatabase is consistent.
For improved performance, separate the internal, also known as system, andexternal, also known as user, databases to different volumes. If all of the databasesare on the same volume, you have to stop the SQL server to restore externaldatabases by using Volume Restore or Instant Restore.
Editing SQL Snapshot Policy
Editing an SQL snapshot policy follows the same steps as creating one, see“Creating an SQL Snapshot Policy” on page 115.
Advanced options1. Click Advanced.2. The default job schedule initial time is the current system time. You can change
the time, in the 24-hour time format, when the job is initiated.3. To stop running the job after a particular date, select End by and type the date
when the job schedule stops running. To stop running the job schedule after aspecified number of times, select End After and type the number ofoccurrences. You might not want this job to run during the peak usage hours ofthe day. To set a space of time, during which this job does not run, selectExclusion Period and type the From and To hours, during which the job doesnot run. The default value is none or zero hours.
Application Aware options
The global application aware parameters are inherited from the Applications tab(Configuration → General Configuration → Applications) for all the jobs. However,these parameters can be changed for each specific job.1. Click Application Aware.2. Define the parameters as follows:
Preserve application consistencyCreates consistent database snapshots using quiescing. There are twoquiescing options: either the Volume Shadow Copy service or IBMapplication quiescing.
116 Installation and User's Guide

You can not use application quiescing and the VSS service at the sametime. In addition, you cannot use VSS application quiescing to back uputility partitions.
Use IBM application quiescing for supported Windows 2000 operatingsystems that run supported Microsoft SQL 2000 Servers or MicrosoftExchange 2000 Servers.
Use VSS application quiescing for supported Windows 2003 and lateroperating systems, except for Microsoft Windows XP, that runsupported Microsoft SQL 2005 and 2008 Servers or supported MicrosoftExchange 2003 and 2007 Servers. If you need an application-awaresnapshot, do not use VSS application quiescing.
To back up applications that run on supported Microsoft SQL andMicrosoft Exchange servers, verify that the VSS service is supported totake snapshots of the application. If you use the VSS service, enable theservice with FastBack Manager. Do not use external scripts to enablethe VSS service.
Purge Exchange server log filesThis option might be displayed, but it does not apply to SQL.
In some cases, if a database being backed up is spread across a large number ofvolumes, the first full snapshot might not be consistent. However, the followingincremental snapshots are consistent.
If IBM application quiescing is selected, the user exit-point scripts do not run, evenif selected.
Tivoli Storage Manager FastBack SQL restore
With Tivoli Storage Manager FastBack, you can restore a single database ormultiple databases. The databases can be internal or external databases.
One snapshot provides several ways to restore a database in SQL server usingTivoli Storage Manager FastBack:v Volume Restorev Mount the snapshot to a virtual volume using FastBack Mountv Bare Machine Recovery and Disk Restorev Instant Restore
Restoring external databases
To restore an external database, complete the following steps:1. Disconnect all active users from the database.2. Detach all the external databases on the target volumes.3. In FastBack Manager, from the Monitor tab, choose a volume to restore.4. Right click the volume; then, click Restore → Volume Restore.5. Select the destination volume and click Apply.6. If you have additional volumes, complete the following steps:
a. Detach all the external databases on the target volumes.b. From the Monitor tab in FastBack Manager choose volume to restore.c. Right click the volume; then, click Restore → Volume Restore.
Chapter 6. Configuring and using 117
7. Use Enterprise Manager to attach the restored databases to SQL server. You canalso use the Attach T-SQL command using Query Analyzer, or batch processingusing the OSQLutility.
If internal databases are located on the target volume, instead of detaching andattaching the databases, you have to stop and start the SQL server service.
Rebuilding the Master databaseIf the Master database is lost, the SQL server is unable to start. The Masterdatabase needs to be rebuilt and restored from a recent backup.
To rebuild the Master database, complete the following steps:1. From the SQL installation CD, copy \x86\data folder to your local hard disk.2. Remove the read-only attribute on the files inside the \x86\data folder.3. Go to the folder that contains the rebuildm.exe file, and run it. Enter the path
for the files you just copied.4. Enter your server name and collation settings.5. After rebuildm finishes, a confirmation message is displayed.6. Start the SQL server service.7. Open Enterprise Manager and log on to SQL server.8. From Enterprise Manager, attach the selected database.9. Using SQL backup, you need to backup to a local backup device.
10. Stop the SQL server service.11. Start the SQL server service in single user mode by using the -c and -m
command line options. For example, sqlservr.exe -c -m
12. Using Query Analyzer, use the restore database master from backup devicecommand and add the WITH REPLACE clause to replace the new Masterdatabase with the old one from the backup. The backup device is yourpredefined backup device.
Restoring Model or MSDB databases
Model or MSDB databases are SQL server internal databases and need to berestored in a different way from external databases. To restore Model or MSDBdatabases use the following procedure:1. Stop SQL server service.2. Copy the backup files into the SQL /DATA directory.
Volume restoreVolume restore can be used to restore an external database that resides on onevolume, or that spans several volumes.
Restoring to the default location or to another location can be accomplished byusing the Enterprise Manager to attach the restored databases to the SQL server.You can also use the attach command using Query Analyzer, to attach it to theselected SQL Server.
The following example demonstrates the procedure:v An SQL server has an external database residing on volume E.v The database was backed up using the FastBack Server and then deleted from
the SQL server.
118 Installation and User's Guide
v The database was restored to the same or different location using the FastBackServer Volume Restore.
You can use the attach methods to attach the database to the SQL server again. Ifthe database contains less then 16 files, then use Enterprise Manager. If thedatabase contains more then 16 files use Query Analyzer to write the Transact-SQLcommand to attach the database.
The following example shows the command:CREATE DATABASE database_nameON PRIMARY (FILENAME = 'X:\filename.mdf')FOR ATTACH
Mount the snapshot to a virtual volume using FastBack MountYou can use FastBack Mount to mount a backup volume and attaching thedatabase to SQL without the need to restore. As a result, you can restore a singletable or any other data from a database to SQL server.
When a database is backed up it resides on the FastBack Server repository, so avirtual volume containing the database can be mounted on any SQL server.
Note: For Windows 2003 server users, to attach the database to SQL, the volumehas to be mounted as read/write. Make sure you do not select Mount asread only in the Add drive letter path at the beginning of the mountingprocess. If the read only option is selected, changes are not saved.
After the volume is mounted the database needs to be attached to the SQL server.Extract the necessary data and export it to the production SQL server.
To mount a snapshot, FastBack Mount must have access to a repository disk(through SAN or LAN). Do not write to the attached database on the mountedvolume, because all changes are lost after dismounting. If you want to keepchanges, copy the snapshot to another volume.
Bare Machine Recovery and Disk RestoreBare Machine Recovery is used in situations where system and disk level recoveryis required.
Because a restore is performed on disk- or volume-level, all SQL databases on thesource volumes are restored. When disk-level restore is performed while the targetoperating system is running, follow the instructions described in “Restoringexternal databases” on page 117.
When Bare Machine Recovery is performed, no additional actions are requiredbecause the entire system is brought back to a certain point in time.
When completing a bare machine recovery to a Hyper-V virtual machine, use thefollowing list of tips:v The target virtual machine for the bare machine recovery must have a legacy
network adapter. You can add a legacy network adapter to the virtual machineby going to the Hyper-V Manager, clicking Settings for the virtual machine, andthen clicking Add Hardware → Legacy Network Adapter.
v To have the mouse available on the Hyper-V virtual machine, install Hyper-VManager. Hyper-V Manager requires the Microsoft Windows Vista, Service Pack1 or Microsoft Windows Server 2008.
Chapter 6. Configuring and using 119

v The boot partition must be located on a virtual IDE disk. Hyper-V cannot bootfrom a SCSI disk.
Instant RestoreInstant Restore works only with mounted volumes. Mounted volumes are volumesthat are assigned a drive letter.
You can use Instant Restore to start using applications on the same disk to whichthe volume is being restored, while the restore operation is still in process. InstantRestore can restore a complete database that resides on a volume, and then attachit to SQL Server while restore is in progress. Refer to “Microsoft Cluster Server(MSCS) and Veritas Cluster Server (VCS)” on page 21 for more details.
Backing up and restoring Lotus Domino DatabasesLotus Domino® does not provide a mechanism to capture consistent snapshots ofDomino data volumes while the Domino server is online so the following twoapproaches can be used to backup Domino databases with Tivoli Storage ManagerFastBack:v Shut down and restart the Domino server around creation of the snapshot
consistency point to guarantee a consistent backup.v Rely on Domino crash recovery if transaction logging is employed (circular
mode) and most database files on the Domino server are logged.
The following sections that follow describe the characteristics of these twoapproaches. The procedures described assume that the Domino data and logvolumes are dedicated to the Domino server and do not contain data for otherapplications.
If any files not belonging to the Domino server exist on these volumes, they are inan unknown state and might be inconsistent when the snapshot is complete. Nonon-Domino data be placed on these volumes unless it does not matter if thesefiles are lost or corrupted by a volume level restore.
Supported environments
Tivoli Storage Manager FastBack supports the use of procedures described in thissection for the back up and restore of Domino servers in the followingenvironments:v Domino 6.5.5 or laterv Windows Server 2000 SP3 or later, or Windows Server 2003 SP1 or later (32-bit
or 64-bit) as supported by the Domino server used
For Domino servers using DB2 as the data store rather than NSF files, both theoffline and online snapshot approaches can be used for full server recovery, butindividual Domino database recovery is not available.
Domino servers using archival transaction logging are not supported by TivoliStorage Manager FastBack.
Snapshots of an offline Domino serverBecause the Domino server is shutdown prior to creation of a snapshot, aconsistent backup image of all Domino databases on the server is captured by thesnapshot of the data volumes.
120 Installation and User's Guide
Because Tivoli Storage Manager FastBack does volume level snapshots, eachsnapshot creates a new backup version of each Domino database on the datavolumes included in the backup.
This type of backup enables volume level recovery in disaster situations. Inaddition, you can use FastBack Mount to restore individual NSF files from asnapshot image.
Tivoli Storage Manager FastBack supports offline snapshots of Domino serversrunning without transaction logging or those running in circular log mode.Domino servers running in archival log mode are not supported by Tivoli StorageManager FastBack.
Although the transaction log is not needed to restore offline backups of NSF files,if the Domino server is employing transaction logging, the transaction log volumeshould be included in the snapshot for scenarios where the full Domino serverneeds to be restored. In that case, restoring the log volume together with the datavolumes improves the recovery time when the restored server is restarted.
Tivoli Storage Manager FastBack provides the scripts to shutdown a Dominoserver prior to establishing the consistency point and then to restart it after thecopy-on-write process is initiated. These scripts can be used by specifying them onthe Pre and Post Processes tab when defining the backup policy for Dominoservers using FastBack Manager.
Restoring an individual NSF file
To restore individual NSF files can be restored from an offline backup with theDomino server up and running, complete the following steps:1. Use FastBack Mount to select the snapshot image from where the NSF file is
restored and mount it to the Domino server system.2. Use the Domino Administrator interface to take the database to be restored
offline and to delete the database to be restored.3. Use Windows Explorer to copy the desired NSF file from the snapshot volume
mounted through FastBack Mount to the Domino data directory.
The restored database can be opened and used as normal.
Restoring all databases on a Domino server
To complete a full restore of all databases on the Domino server from an offlinebackup, complete the following steps:1. Shut down the Domino server that you want use for the restore.2. Restore the data and transaction log volumes using one of the following
methods:v Use the FastBack Mount interface to complete an Instant Restore of the
snapshot images representing the backup version to be restored. This shouldinclude the data and transaction log volumes, if Domino transaction loggingis being used.
v Use the FastBack Manager interface to do a volume restore of the data andtransaction log volumes from the desired snapshot.
3. Restart the Domino server and use it as normal.
Chapter 6. Configuring and using 121

Restoring an individual item from an NSF file
This procedure is similar to the one used to restore an individual NSF file as it canbe done with the Domino server up and running:1. Use FastBack Mount to select the snapshot image containing the NSF file
version from which an item is to be restored and mount it to the Dominoserver system.
2. Use Windows Explorer to copy the desired NSF file from the snapshot volume,mounted through FastBack Mount to a location where it can be accessed by theuser owning the database using a different name. For example,dbname_copy.nsf.
3. Use the Domino Administrator interface to disable replication for the copieddatabase.
4. Notify the database owner that the restored database copy is available.
The database owner can now open the database copy using the Notes® client tocopy the desired item to the primary database. This step should be completed bythe database owner to ensure the encrypted databases remain secure.
Snapshots relying on Domino crash recoveryWhen using a snapshot that relies on Domino crash recovery, no action is taken toquiesce the Domino server when the snapshot is complete.
Instead, the data and log volumes are snapped together while the Domino serveris online. This step ensures that, at restore time, Domino crash recovery processingcan be used to bring databases that were open, when the snapshot was created, toa consistent state. Any databases that are not logged, and that are open at the timeof the backup, require fixup to be run.
Although crash recovery can be completed when Domino transaction logging isnot used, the time required to run fixup against many databases makes thisapproach impractical. Using transaction logging makes crash recovery feasible.
Because crash recovery processing is needed to recover databases backed up usingthis approach, restore of individual NSF files from an online snapshot iscumbersome and complicated. It requires an alternate Domino server system.
To complete a full restore of all databases on the Domino server, complete thefollowing steps:1. Shut down the Domino server that you want to use for the restore.2. Restore the data and transaction log volumes using one of the following
methods:v Use the FastBack Mount interface to complete an Instant Restore of the
snapshot images representing the backup version to be restored. This InstantRestore should include the data and transaction log volumes, if Dominotransaction logging is being used.
v Use the FastBack Manager interface to complete a volume restore of the dataand transaction log volumes from the desired snapshot.
3. Restart the Domino server. When the server is restarted, the Domino crashrecovery processing is performed for any necessary cleanup. The cleanupmakes all databases, that were open at the time the snapshot was taken,consistent using the following tools:v For logged databases, the transaction log.
122 Installation and User's Guide

v For databases that are not logged, the fixup utility.
TipsTo backup Domino servers with Tivoli Storage Manager FastBack, use the offlinesnapshot method. This method ensures consistent backups. In addition, you canrecover an entire server and individual NSF files.
If an alternate backup and recovery solution is used for recovery of individual NSFfiles (for example, one that uses the Domino online backup API), the Tivoli StorageManager FastBack online snapshot might be useful to augment that solution. TivoliStorage Manager FastBack should provide for much faster disaster recoveryprocessing when a full Domino server needs to be restored.
Configuring Tivoli Storage Manager FastBack for offlinebackup of Domino servers
The following instructions for configuring Tivoli Storage Manager FastBack foroffline backup of Domino servers assume that you have created a client group anda policy for the Domino server.
The following scripts are installed in the Tivoli Storage Manager FastBack scriptsdirectory, when the FastBack Client is installed on the Domino system beingprotected:v domino_preconpoint.cmdv domino_presnapshot.cmd
The default directory for the scripts is C:\Program Files\Tivoli\TSM\FastBack\client\scripts\.1. Edit the scripts to contain the correct values for the variables to meet the
current environment. Each script has a variables section at the beginning. Youcan customize the following variables:
NotesProgramDomino product installation directory.
DirectoryDomino data directory.
DominoServiceNameName of the service that runs the Domino server instance.
isDominoServiceFlag if Domino server runs as a service. The possible values, not casesensitive, are true and false.
doLoggingFlag to log the script output. The possible values, not case sensitive, aretrue, to create a log, and false, to not create a log.
LogDir The absolute path of the log directory. For all operating systems, thedefault value is the installation directory: C:\Users\AllUsers\Tivoli\TSM\FastBack
Note: The LogDir directory must exist. The log file name are generated usingthis pattern: {script name}_{date}_{time}.log
2. Open FastBack Manager by selecting Start → Programs → Tivoli StorageManager → FastBack → FastBack Manager.
Chapter 6. Configuring and using 123

3. Log on to the console using the correct user name and password. The defaultuser name is admin. The default password is admin123.
4. Use the following procedure to configure the Domino backup. Each policycomprises one or more selected client groups and one job schedule.a. Under Client Groups, select the Domino application.b. Select the volumes allocated to Domino data and logs.c. Click Apply.
5. Use the following procedure to edit the Domino policy settings and set thescripts for Pre and Post Processes:a. Expand the Policies node, and select the Domino Policy.b. Click Pre and Post Processes.c. Select Pre consistency-point. For the script, type domino_preconpoint.cmd.d. Select Pre Snapshot. For the script, type domino_presnapshot.cmd.e. Do not select Post Snapshot. There is no need to perform any action using
the a post snapshot script.f. Click Apply.
You might also need to change the timeout interval in the Cancel process if it isnot completed within x minutes field. The default value of 10 minutes should beadequate for most environments, but if a normal shutdown of the Domino servertakes more than 8 minutes, then this value should be increased to be 2 minutesgreater than the time required for a normal shutdown of the server.
Considerations and usage notes for Domino backup scripts
Use the following list of considerations and usage notes for Domino backupscripts:1. You must edit the scripts to specify the correct values for the variables used
inside the script. These values have to meet the system environment. Thevariables section is at the beginning of the script.
2. If a clean shutdown does not complete within the timeout period, Domino hasa server shutdown timeout feature that does an nsd -kill. You must ensurethat this timeout value is greater than the Tivoli Storage Manager FastBacktimeout value on the Pre or Post Processes tab for the Domino backup policy.To ensure a consistent backup, the server must be shutdown cleanly, ratherthan with the nsd –kill function. By ensuring that the Domino servershutdown timeout value is greater than the Tivoli Storage Manager FastBacktimeout value, you avoid capturing a backup with potentially inconsistentdata.
3. If the Domino server is down when the backup process is started, the scriptsyou run check if the server was shutdown cleanly or if it crashed. The backupprocess continues only if it was a clean shutdown.
4. The scripts provided restart the Domino server only if the server is shutdownby the scripts. If the server is already down when the backup starts, the serveris not restarted by the scripts after the backup.
5. Running the scripts requires administrative privileges because they attend tostarting and stopping system services and processes. In other words, thescripts have to run as system administrator.
6. If the doLogging variable is set to TRUE, a trace log is created in the logdirectory. The trace log filename has the following pattern: {scriptname}_{date}_{time}.log.
124 Installation and User's Guide

7. The log directory can be customized by the logDir variable. For all operatingsystems, the default value is the installation directory: C:\Users\AllUsers\Tivoli\TSM\FastBack
8. If the doLogging variable is set to FALSE, no log is created.9. If a script runs without a problem, the return code is 0. If a problem occurs
when the scripts run, a non-zero value is returned. For example:v If domino_presnapshot.cmd runs as a standard user (a domain user)
without administrative permissions, and attempts to start Domino server asa service, the script fails to start the Domino server and returns the code 2.In this case, an error message is displayed in the log and on the userinterface.
v If domino_preconpoint.cmd runs as a standard user (domain user) withoutadministrative permissions, the script fails to stop the Domino server andreturns the code 128.
10. The pre snapshot script runs asynchronously. The script runs the volumebackup process to start when the server is restarting.
Backing up and restoring DB2 UDB databasesTivoli Storage Manager FastBack supports snapshots of online DB2 UDB databases.The restore procedure and the choice of available recovery points differ dependingon whether archive or circular logging is used. The snapshot procedure is thesame.
Scripts are provided with Tivoli Storage Manager FastBack to momentarilysuspend writes to the database, to initiate the snapshot, and then resume writesafter the Tivoli Storage Manager FastBack snapshot copy-on-write mechanism isinitiated.
When archive logging is used, restored databases can be rolled forward to anypoint in time up to the end of the current logs. This technique provides maximumflexibility for choosing a recovery point and provides recovery with no data loss.Native DB2 facilities or legacy backup solutions can be used to archive the log.Tivoli Storage Manager FastBack does not provide support for archiving thetransaction log.
When circular logging is used for a database, DB2 recovers only to the time abackup was completed so the number of recovery points available is limited by thenumber of available snapshot versions.
You should not use Continuous Data Protection with DB2 databases becauserecovery to an arbitrary point-in-time using continuous data protection does notguarantee a consistent database. Recovery to a specified point it time withconsistency can be accomplished by restoring a snapshot and applying transactionsfrom the transaction log to get to the desired point.
To back up DB2 databases with Tivoli Storage Manager FastBack, use the providedscripts by specifying them on the Pre or Post Processes tab when defining thebackup policy for DB2 databases through FastBack Manager.
Chapter 6. Configuring and using 125
Supported environments
Tivoli Storage Manager FastBack supports the use of procedures described in thissection for the back up and restore of DB2 UDB databases in the followingenvironments:v DB2 UDB V8 or laterv Windows Server 2000 SP3 or later, as supported by the DB2 UDB version usedv Windows Server 2003 SP1 or later (32-bit or 64-bit) as supported by the DB2
UDB version used
Best practices
The following best practices apply to backing up and restoring DB2 UDBdatabases:v Use separate volumes for data and logs. These volumes should be different than
the volume where you installed the DB2 server. If two or more databases shareat least one automatic storage path, the split mirror operation for one of thesedatabases might affect more than one database, causing I/O problems for thedatabases that were not intended to be split.
v The procedures described in the following sections assume that the DB2 dataand log volumes are dedicated to the DB2 database being backed up and do notcontain data for other applications or other DB2 databases. If any files notbelonging to the DB2 database exist on these volumes, they are in an unknownstate and might be inconsistent when the snapshot is complete. No non-DB2data files be placed on these volumes unless it is acceptable for these files to belost or corrupted by a volume level restore.
v Ensure that the snapshot contains all containers and directories that comprisethe database, including the volume directory. To gather this information, refer tothe DBPATHS administrative view, which shows all the files and directories ofthe database that need to be included in the snapshot.
v Both the log and data volumes should be included in the snapshot set for eachdatabase backup.
v In a partitioned database environment, it is not necessary to suspend writes onall partitions simultaneously. You can use the Tivoli Storage Manager FastBackDB2 scripts to backup each partition independently as long as archive logging isused. In that case, restore of an individual partition requires roll forwardrecovery to be done to the end of logs.
v Snapshots completed by Tivoli Storage Manager FastBack do not interfere withtraditional backups completed using the DB2 backup command and are notrecorded in the DB2 backup history.
Restoring a database using archive logging
When a failure occurs on the primary system necessitating a restore from backup,follow these steps to perform the recovery:1. Run the following command to stop the primary database instance: db2stop2. Restore the data volumes using one of the following procedures:
v Use FastBack Mount to complete an Instant Restore of the snapshot imagesrepresenting the backup version. This restore should include the datavolumes taken after roll forward recovery. The most current log files arerequired.
126 Installation and User's Guide

v Use FastBack Manager to complete a volume restore of the data volumesonly from the desired snapshot. Do not restore log volumes.
3. Run the following command to start the primary database instance: db2start4. Run the following command to initialize the restore database: db2inidb <alias
name> as mirror
5. Roll the primary database forward to the end of the logs, or to a point-in-timeand stop. For example,db2 rollforward db <alias name> to end of logs and stop
The restored database can now be opened and used as normal.
The following best practices apply:1. In a partitioned database environment, if only a subset of the database
partitions are restored, the restored partitions must be rolled forward to the endof logs.
2. In a partitioned database environment, the db2inidb command must be run onevery restored partition before the snapshot image from any of the partitionscan be used. The tool can be run on all partitions simultaneously using thedb2_all command.
3. Do not issue the db2 connect to <database> command before issuing thedb2inidb <database> as mirror command. Attempting to connect to a restoredsnapshot image before initializing it, erases the log files needed during rollforward recovery.
Restoring a database using circular logging
When a failure occurs on the primary system necessitating a restore from backup,complete the following steps to perform the recovery:1. Run the following command to stop the primary database instance: db2stop2. Restore the data volumes using either of the following methods:
a. Use FastBack Mount to complete an Instant Restore of the snapshot imagesrepresenting the backup version to be restored. This restore should includethe data volumes and log volumes after roll forward recovery cannot befinished.
b. Use FastBack Manager to compelte a volume restore of the data and logvolumes from the desired snapshot.
3. Run the following command to start the primary database instance: db2start4. Run the following command to initialize the restore database:
db2inidb <alias name> as snapshot
The restored database can now be opened and used as normal.
The following best practice applies: In a partitioned database environment, thedb2inidb command must be run on every partition before the snapshot image fromany of the partitions can be used. The tool can be run on all partitionssimultaneously using the db2_all command.
Configuring Tivoli Storage Manager FastBack for online backup of DB2 UDB
The procedure described below assumes that you have completed the followingtasks:
Chapter 6. Configuring and using 127

v Installed the FastBack Client on the DB2 system.v Created a client group for the DB2 database.v Created a backup policy for the DB2 database.
The default directory for the scripts is C:\Program Files\Tivoli\TSM\FastBack\client\scripts\.1. Edit the db2_executeSQL.cmd script to contain the correct values for the
following variables to meet the current environment. The variables section ismarked at the beginning of the script.
dbuser User ID that has the following authorities: sysadm, sysctrl, or sysmaint.
dbpass Password for the dbuser user ID.
dbinst DB2 instance name that runs the database.
dbnameDatabase alias to back up.
2. If you do not want to accept the default logging parameter values, edit thedb2_preconpoint, db2_presnapshot and db2_postsnapshot scripts to change thefollowing two variables.
doLoggingFlag to create a trace log. The possible values: TRUE and FALSE. Thedefault value is TRUE.
logDir The absolute path of the log directory. For all operating systems, thedefault value is: C:\Program Files\Tivoli\TSM\FastBack\DB2Agent
Note: The log file names are generated using this pattern: {scriptname}_{date}_{time}.log
3. Open FastBack Manager and login using the correct user name and password.4. Use the following procedure to configure the DB2 back up. Each policy
comprises one or more selected client groups and one job schedule:a. Under the Client Groups definition, select the volumes allocated to the DB2
data and logs.b. Click Apply.c. Edit the DB2 policy settings and set the scripts for Pre and Post Processes:
1) Expand the Policies node, and select the DB2 policy.2) Click Pre and Post Processes.3) Select Pre consistency-point. For the script, type db2_preconpoint.cmd.4) Select Pre Snapshot. For the script, type db2_presnapshot.cmd.5) Select Post Snapshot. For the script, type db2_postsnapshot.cmd.6) Click Apply.
Recovering operating system partitions using Bare Machine RecoveryTo use Bare Machine Recovery for the recovery of operating system partitions, goto FastBack Manager. Click the Recovery tab.
On the Recovery tab you should see a Bare machine recovery and disk restoreoption. Click this option to create a new disk from snapshots of several volumes.In addition, select this option to recover entire systems to a comparable server, to anew server with different hardware, or to a virtual machine (VMware or MicrosoftVirtual Server).
128 Installation and User's Guide
Chapter 7. Maintaining
This section describes the tasks you can complete to maintain the Tivoli StorageManager FastBack operations that you have configured and use.
Server statusIf the FastBack Server is working without error, status is reported as OK.
If the server is not working correct, the following list identifies some possiblesystem errors:v The remaining repository space exceeds the defined threshold. The threshold is
defined using the Maintenance tab.v An unprotected or disconnected FastBack Client has been identified.v The FastBack Server is down with one of the following errors reported:
– Limited mode: Limited mode is often caused by a repository that cannot beaccessed or the system finds corrupted files on one of the repositories.
– Fatal error: Notification initiated by server.– Not responding: Notification initiated by the FastBack Watchdog.
Monitoring events and snapshotsYou can monitor the status by viewing events and snapshots.
Viewing events
It is important to review the events of the last 24 hours daily. Tivoli StorageManager FastBack provides several means for viewing system and job relatedevents. In addition, Client and Server events can be viewed on the correspondingClient and Server computers through the Windows Event Viewer.
Three types of events, identified by different colors, are provided:
v White - informational events.
v Yellow - warnings events.
v Red - alert events.
Viewing FastBack Manager systems events
In the FastBack Manager tree, click FastBack Server log. The Event Viewer appears.
© Copyright IBM Corp. 2008, 2009 129
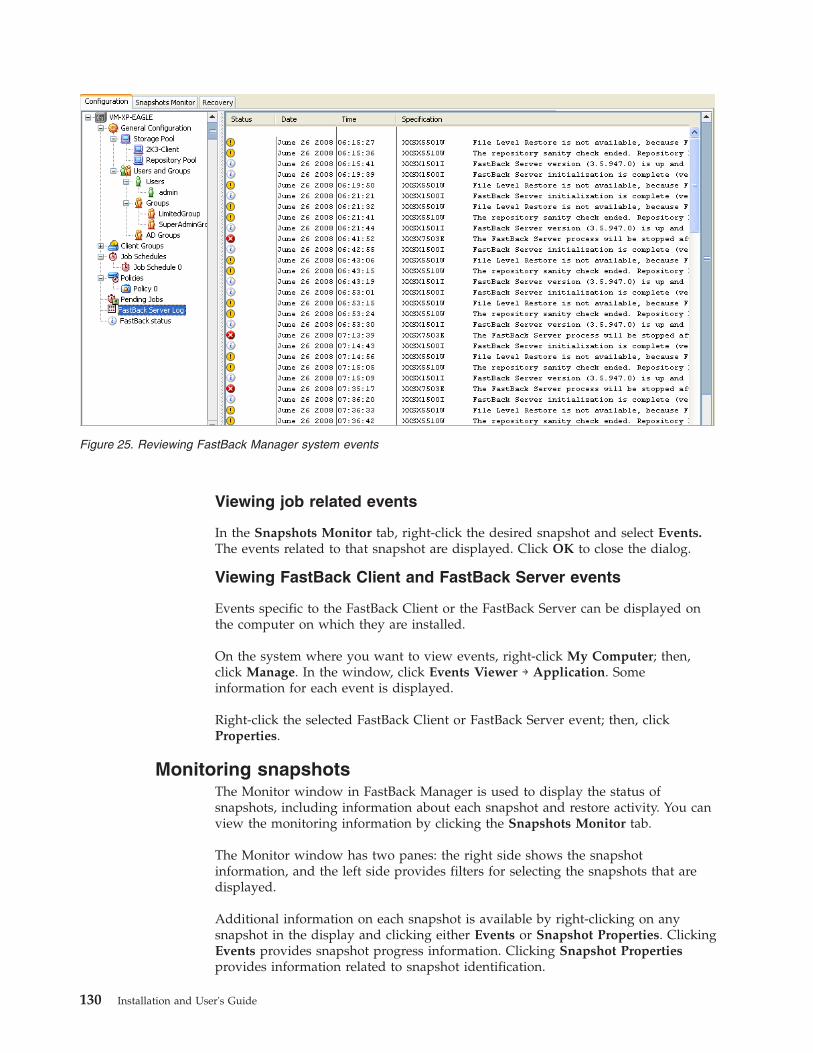
Viewing job related events
In the Snapshots Monitor tab, right-click the desired snapshot and select Events.The events related to that snapshot are displayed. Click OK to close the dialog.
Viewing FastBack Client and FastBack Server events
Events specific to the FastBack Client or the FastBack Server can be displayed onthe computer on which they are installed.
On the system where you want to view events, right-click My Computer; then,click Manage. In the window, click Events Viewer → Application. Someinformation for each event is displayed.
Right-click the selected FastBack Client or FastBack Server event; then, clickProperties.
Monitoring snapshotsThe Monitor window in FastBack Manager is used to display the status ofsnapshots, including information about each snapshot and restore activity. You canview the monitoring information by clicking the Snapshots Monitor tab.
The Monitor window has two panes: the right side shows the snapshotinformation, and the left side provides filters for selecting the snapshots that aredisplayed.
Additional information on each snapshot is available by right-clicking on anysnapshot in the display and clicking either Events or Snapshot Properties. ClickingEvents provides snapshot progress information. Clicking Snapshot Propertiesprovides information related to snapshot identification.
Figure 25. Reviewing FastBack Manager system events
130 Installation and User's Guide
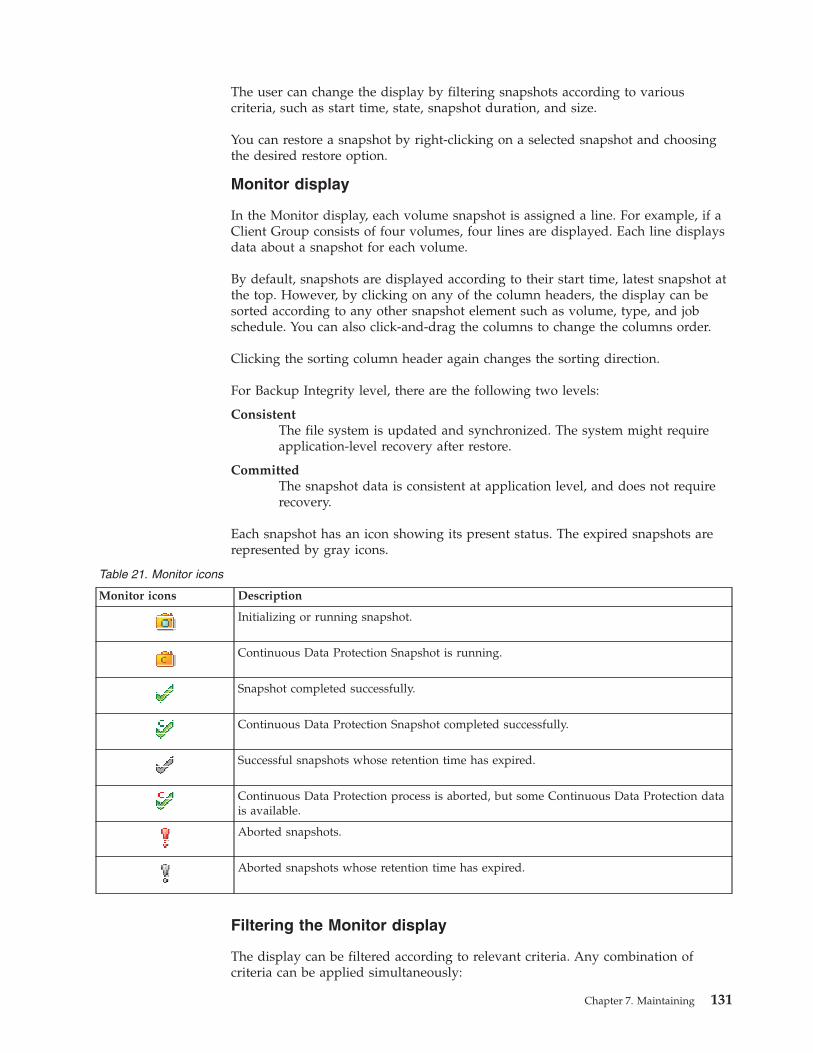
The user can change the display by filtering snapshots according to variouscriteria, such as start time, state, snapshot duration, and size.
You can restore a snapshot by right-clicking on a selected snapshot and choosingthe desired restore option.
Monitor display
In the Monitor display, each volume snapshot is assigned a line. For example, if aClient Group consists of four volumes, four lines are displayed. Each line displaysdata about a snapshot for each volume.
By default, snapshots are displayed according to their start time, latest snapshot atthe top. However, by clicking on any of the column headers, the display can besorted according to any other snapshot element such as volume, type, and jobschedule. You can also click-and-drag the columns to change the columns order.
Clicking the sorting column header again changes the sorting direction.
For Backup Integrity level, there are the following two levels:
ConsistentThe file system is updated and synchronized. The system might requireapplication-level recovery after restore.
CommittedThe snapshot data is consistent at application level, and does not requirerecovery.
Each snapshot has an icon showing its present status. The expired snapshots arerepresented by gray icons.
Table 21. Monitor icons
Monitor icons Description
Initializing or running snapshot.
Continuous Data Protection Snapshot is running.
Snapshot completed successfully.
Continuous Data Protection Snapshot completed successfully.
Successful snapshots whose retention time has expired.
Continuous Data Protection process is aborted, but some Continuous Data Protection datais available.
Aborted snapshots.
Aborted snapshots whose retention time has expired.
Filtering the Monitor display
The display can be filtered according to relevant criteria. Any combination ofcriteria can be applied simultaneously:
Chapter 7. Maintaining 131

v Date (last day, last 2 days, last week, 2 weeks, month)v State (initializing, running, aborting, aborted)v Selected volumes or client groupsv Job Schedulev Selected Policies
Note: To refresh the monitor display at any moment, click Filter or Refresh.
Filtering the display
In the Monitor Filter section, select the checkbox of the desired filters, and thedesired filter option. Once you select a filter, the corresponding parameters areenabled and can be defined. For example, when date is selected, the parametersLast 24 hours, Last 48 hours, and Last Weeks are available.
To apply the filtering process, click Filter button. Only snapshots matching all theselected criteria are displayed.
To clear the filters and reset the display, click Show All. The full, unfiltered list isdisplayed. In the Volume filter, only non-expandable items can be selected.
Viewing snapshot properties
Some basic information on the snapshot properties is provided along with eachsnapshot in the Monitor display. A summary of these properties and additionalinformation can be invoked by right-clicking on the snapshot in the Monitordisplay and choosing Properties.
The following information is provided on each snapshot:v Snapshot ID - Unique identifier for the snapshot.v Job Schedule Name - Snapshot schedule namev Policy Name - Snapshot policy name.v Type of snapshot - Incremental, full, or checkpoint.v Volume - Snapshot volume.v State - Current® snapshot status (completed, running, aborted).v Start and end time of the snapshotv Size - Snapshot size.v Rate - Rate at which the snapshot is taken.v Data type - Snapshot source (SQL, Exchange), if any (default file system).v Total Continuous Data Protection data size - The size of the Continuous Data
Protection data.v Performed Quiescing Before Backup - Services stopped before backup.v Purged Exchange Logs - Exchange log files deleted after backup.v Content aware - If checked, the snapshot is performed on used disk space only.
Unused disk space is not snapped.v Enable DR - This snapshot is replicated to a remote location.
Viewing the event log for a specific snapshot
In the Monitor window, right-click the snapshot; then, click Events. The Event Logdisplays the start and end time of the job, whether it has been completedsuccessfully, and any unusual events that have occurred during the job.
132 Installation and User's Guide

Viewing pending snapshotsYou can view a list of pending snapshots from FastBack Manager.
In FastBack Manager, click the Configuration tab. In the tree, select the PendingJobs. A list is displayed. The list includes the next 50 pending snapshots. The listincludes the time that the snapshot is scheduled to run, the volumes to besnapped, and the job schedule defined for the snapshot.
Disk openDisk open is a tool developed to establish read and write privileges to a physicaldisk after FastBack Server is installed.
After you install FastBack Server, any drive that you attach to the FastBack Serverneeds to be opened for read and write privileges before being used.
If the entire disk volume is going to be used for the repository, you do not need torun disk open. When you use FastBack Manager, add the entire disk, not just asingle volume on the disk, to the repository. The FastBack Manager automaticallyperforms the necessary operations for you, for example, partitioning, formatting,and assigning a drive letter.
Any time that you try to write data to the drive, all the data goes to the buffer. Itmight seem that data is being copied to the drive, but if you restart the server, thedata is gone. Depending on the amount of data written to the disk, you might seesome errors reported to the system. Specifically, Delayed Write Failed errormessage are logged in the Windows System Event logs.
To use disk open, run the tool from the command line. The DiskOpen commandtakes one argument. The argument is the disk number of the respective disk thatyou want to open for read and write privileges. To find the disk number in theWindows Disk Management window, complete the following steps:1. In the navigation tree, right click to select My Computer; then, click Manage.2. Expand the Storage menu and click Disk Management.3. In the main window, the volumes and disk numbers are displayed.
There are two modes for the disk open tool:
RegularOpens the disk one time. The next time you restart the server, the diskdoes not have write privileges. You want to use regular mode when youtemporarily add a drive to the server. For example, when you add a USBdrive.
ForeverPermanently grants write privileges to the disk. The forever mode shouldbe used when adding a new drive to the system. To use forever mode, putthe forever flag after the initial argument.
The following commands are example of how to use the DiskOpen command. Togive temporary write privileges, you could use the following command:DiskOpen 1
To always provide write privileges, you could use the following command:DiskOpen 1 forever
Chapter 7. Maintaining 133
Handling multiple LAN cards on the same computerHaving two LAN cards on the same computer can result in identification andcommunication problems that can prevent the FastBack Server and FastBack Clientfrom communicating properly.
To resolve these communication problems, only one LAN card should be registeredin the DNS server, and the entries of other LAN cards of the same computershould be removed from the DNS server. After completing these tasks, you shouldbe able to connect a FastBack Client to a FastBack Server.
To remove a LAN card entry from the DNS server, complete the following stepsfrom the Network Connections Control Panel:1. Choose a primary LAN card.2. Right click the non-primary LAN card; then, click Properties → General.3. From the list that is displayed, select Internet Protocol - TCP/IP.4. Click Properties.5. Enter a static IP address, and click Advanced. The Advanced TCP/IP Settings
dialog is displayed.6. Select the DNS tab.7. Clear the Register this connection’s addresses in DNS box, at the bottom of
the DNS tab.8. Ask your system administrator to help you locate the DNS server for your
system.9. In the DNS server, locate your computer, and delete your computer entry line
in the DNS server.10. Go to Run → cmd.11. Type ipconfig /flushdns. This command erases your computer from the DNS
server.
Error recovery: Setting the number of retriesSometimes a snapshot attempt fails. This failure can be caused by events such as amomentary overload on system resources, a SAN disconnection, or a FastBackClient disconnection (for example, for DAS backup).
Tivoli Storage Manager FastBack can be configured to reattempt a new snapshotautomatically.
You can set the number of repeated attempts and the delay between attempts. Ifafter the number of defined attempts, the snapshot is not performed successfully, afailed job notification is given for the next time frame. The next attempt is madeaccording to the schedule.1. Click General Configuration in the Browser tree and select the Retries tab.
134 Installation and User's Guide
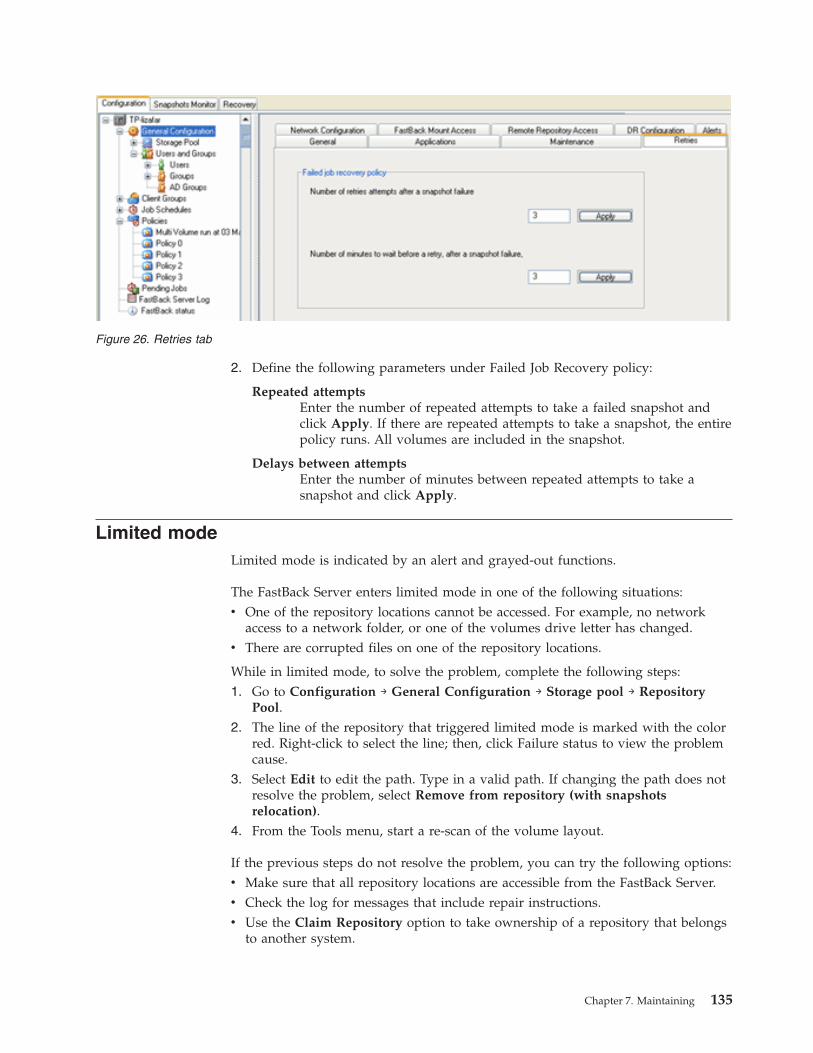
2. Define the following parameters under Failed Job Recovery policy:
Repeated attemptsEnter the number of repeated attempts to take a failed snapshot andclick Apply. If there are repeated attempts to take a snapshot, the entirepolicy runs. All volumes are included in the snapshot.
Delays between attemptsEnter the number of minutes between repeated attempts to take asnapshot and click Apply.
Limited modeLimited mode is indicated by an alert and grayed-out functions.
The FastBack Server enters limited mode in one of the following situations:v One of the repository locations cannot be accessed. For example, no network
access to a network folder, or one of the volumes drive letter has changed.v There are corrupted files on one of the repository locations.
While in limited mode, to solve the problem, complete the following steps:1. Go to Configuration → General Configuration → Storage pool → Repository
Pool.2. The line of the repository that triggered limited mode is marked with the color
red. Right-click to select the line; then, click Failure status to view the problemcause.
3. Select Edit to edit the path. Type in a valid path. If changing the path does notresolve the problem, select Remove from repository (with snapshotsrelocation).
4. From the Tools menu, start a re-scan of the volume layout.
If the previous steps do not resolve the problem, you can try the following options:v Make sure that all repository locations are accessible from the FastBack Server.v Check the log for messages that include repair instructions.v Use the Claim Repository option to take ownership of a repository that belongs
to another system.
Figure 26. Retries tab
Chapter 7. Maintaining 135

Alerts and notificationsYou can send alerts on specific events to an SMTP host. In addition, you canconfigure email alerts that are periodic alerts sent by email according to predefinedparameters.
The FastBack Server calls the ExternalNotification.bat batch file each time itproduces a notification. The batch file is a regular DOS batch file that can bechanged by the user in various ways. It can be configured to send alerts by email.You can also use the batch file to apply various user-configured filters to the sendnotifications.
The ExternalNotification.bat batch file is installed in the same directory as theFastBack Server. By default, this location is C:\Program Files\Tivoli\TSM\FastBack\utilities.
Configuring periodic email notificationThe FastBack Server sends periodic email notifications according to definitions inthe Alerts tab. The system-generated email messages include only criticalinformation.
To configure periodic email notification, complete the following steps:1. Select General Configuration → Alerts.2. Define the recipient mail server.3. Click Add and set the email address for the recipient. Add more addresses if
necessary.4. Set the notification frequency and start time using the Alerts Frequency tab
area.
Note: You can click Test E-mail to verify that the mail server and addresseswere defined correctly.
Figure 27. General Configuration > Alerts® tab
136 Installation and User's Guide

In case there is no error and the server is operating normally, an email message issent periodically, with only a subject line: FastBack Server Status: OK.
In the following cases, the periodic email notification alerts the recipient aboutpossible system errors and reports about unprotected volumes:v The remaining repository space exceeds the defined threshold. This threshold is
defined using the Maintenance tab (Repository Usage Alert).v An unprotected or disconnected FastBack Client has been detected.v FastBack Server is down because of the one of the following reasons:
– Limited Mode (server initiates notification)– Fatal error (server initiates notification)– Not responding (notification initiated by the FastBack Watchdog)
Configurable parameters
The following parameters must be configured in order to enable email messages.These parameters can be configured either during installation or later.v SMTP_SERVER - The SMTP server address (this field must be configured).
Variable: SET SMTP_SERVER=smtp.server.namev SMTP_PORT - The SMTP server port. The default is 25. Variable: SET
SMTP_PORT=25v SMTP_TO_ADDRESS - The receiver address (This field must be configured).
Variable: SET [email protected] SMTP_FROM_ADDRESS - The sender address. (This field can be changed).
Variable: SET
Environment variables
Before FastBack Server calls this batch, it sets the following environment variables.v COMPUTER_NAME - FastBack Server name.v XR_MSG - The message to send.v XR_TYPE - The notification type: JOB_EVENT or EVENT_LOG.v XR_EVENT_LEVEL - The level of the event: INFO, WARNING, ERROR.v XS_JOB_TYPE -The job type: FULL, INC, DIFF, RESTORE.v XS_JOB_SERVER_NAME - Server name, also known as agent name; to be
defined only in JOB_EVENT.v XS_JOB_VOLUME_NAME - Job volume name; to be defined only in
JOB_EVENT.v XS_JOB_ACTION_NAME - Action item name; to be defined only in JOB_EVENT.v XS_JOB_START_TIME - Job start time; to be defined only in JOB_EVENT.v XS_JOB_SNAPSHOT_SIZE - The snapshot size.v XS_JOB_DB_TYPE - The job database type: NONE, ORACLE, EXCHANGE, or
SQL.
These environment variables are used later by the batch file to send thenotifications. The batch uses the FastBackSendMail utility to send email messages.
The environment variables are the only way the script is built. The environmentvariables are not mandatory.
Chapter 7. Maintaining 137

Disabling utilities
To disable FastBackSendMail, add the following string before the command: REM.This string indicates the line of code is a remark. For example:REM FastBackSendMail.exe -s %SMTP_SERVER% -p %SMTP_PORT%-t %SMTP_TO_ADDRESS% -f %SMTP_FROM_ADDRESS% -a%SMTP_SUBJECT% -m %XR_BODY_FILE_NAME%
In this example, the FastBackSendMail script does not send any mail.
Using the FastBackSendMail utility
FastBackSendMail is an application that sends email. For FastBackSendMail, thefollowing command options are available:
Parameter name Description
-s SMTP server name
-p (Optional) SMTP port number; the default is 25
-t To: Address
-f From: Address
-b (Optional) Text body of message
-h Generate headers
-a (Optional) Subject
-m (Optional) File name; use the file as the body of the message
-h Help
Defining filtersThe batch files can be configured for specific filtering purposes.
Filters are useful for focusing the alerts to specific purposes and receivers, andavoid notifications overload. You can configure the batch file to send onlynotifications that meet certain criteria, for example, to send only error event lognotifications which means that event log notifications are sent only if an erroroccurs. Similarly, you can configure the batch file to exclude certain notifications,for example, notifications related to a RESTORE job type.
To configure the batch file, add a filtering command, for example, if, at thebeginning of the script, preferably after @Echo OFF.
After product installation is complete, you can find seven pre-configured text filesin the same directory as FastBack Server. By default, the path is C:\ProgramFiles\Tivoli\TSM\FastBack\utilities.
SMTP_SAMPLE_Only_Job_event.txtUse this file to send only job event notifications. The filter script at thebeginning of the file specifies that if the notification type is different fromJOB_EVENT, go to the end and do not send any notification. For example:IF /I NOT %XR_TYPE% == JOB_EVENT goto end
SMTP_SAMPLE_Only_event_log.txtUse this file to send only event log notifications. The filter script at the
138 Installation and User's Guide
beginning of the file specifies that if the notification type is different fromEVENT_LOG, go to the end and do not send any notification. For example:IF /I NOT %XR_TYPE% == EVENT_LOG goto end
SMTP_SAMPLE_All_Specific_server_snapshots.txtUse this file to send only all specific server snapshots. The filter script atthe beginning of the file specifies that if the server name is different fromapolo@Domain, go to the end and do not send any notification. Forexample:IF /I NOT %COMPUTER_NAME% == apolo@Domain goto end
SMTP_SAMPLE_Specific_volume_specific_server.txtUse this file to send only specific volumes on specific server notifications.The filter script at the beginning of the files uses two lines:v Line one specifies that the server name is different from apolo@Domain,
go to the end and do not send any notification. For example:IF /I NOT %COMPUTER_NAME% == apolo@Domain goto end
v Line two specifies that if the volume is different from C:\, go to the endand do not send any notification. For example:IF /I NOT %XS_JOB_VOLUME_NAME% == C:\ goto end
SMTP_SAMPLE_Only_Job_event_Exchange.txtUse this file to send only job event with exchange notifications. The filterscript at the beginning of the file uses two lines:v Line one specifies that if the notification type is different from
JOB_EVENT, go to the end and do not send any notification. Forexample:IF /I NOT %XR_TYPE% == JOB_EVENT goto end
v Line two specifies that if the Job Db type is different from EXCHANGE,go to the end and do not send any notification. For example:IF /I NOT %XS_JOB_DB_TYPE% == EXCHANGE goto end
SMTP_SAMPLE_Only_Error_event_log.txtUse this file to send only error event log notifications. The filter script atthe beginning of the files uses two lines:v Line one specifies that if the notification type is different from
EVENT_LOG, go to the end and do not send any notification. Forexample:IF /I NOT %XR_TYPE% == EVENT_LOG goto end
v Line two specifies that if the notification level is different from ERROR, goto the end and do not send any notification. For example:IF /I NOT %XR_EVENT_LEVEL% == ERROR goto end
SMTP_SAMPLE_Only_Error_event_log_or_Servers_snapshots.txtUse this file to send only error event log for only specific volume on aspecific server. The filter script at the beginning of the files uses four lines:v Line one specifies that if the notification type is different from
EVENT_LOG, go to the end and do not send any notification. Forexample:IF /I NOT %XR_TYPE% == EVENT_LOG goto JOB_EVENT_LABE
v Line two specifies that if the notification level is different from ERROR, goto the end and do not send any notification. For example:IF /I NOT %XS_EVENT_LEVEL% == ERROR goto end
Chapter 7. Maintaining 139
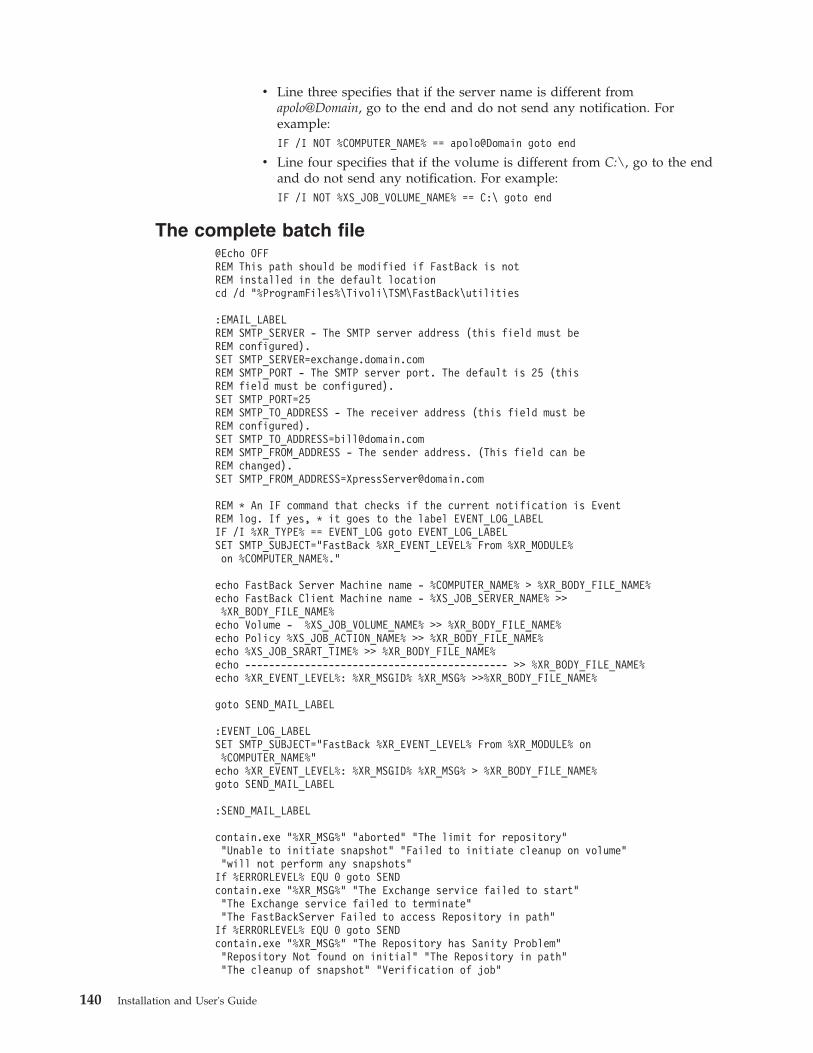
v Line three specifies that if the server name is different fromapolo@Domain, go to the end and do not send any notification. Forexample:IF /I NOT %COMPUTER_NAME% == apolo@Domain goto end
v Line four specifies that if the volume is different from C:\, go to the endand do not send any notification. For example:IF /I NOT %XS_JOB_VOLUME_NAME% == C:\ goto end
The complete batch file@Echo OFFREM This path should be modified if FastBack is notREM installed in the default locationcd /d "%ProgramFiles%\Tivoli\TSM\FastBack\utilities
:EMAIL_LABELREM SMTP_SERVER - The SMTP server address (this field must beREM configured).SET SMTP_SERVER=exchange.domain.comREM SMTP_PORT - The SMTP server port. The default is 25 (thisREM field must be configured).SET SMTP_PORT=25REM SMTP_TO_ADDRESS - The receiver address (this field must beREM configured).SET [email protected] SMTP_FROM_ADDRESS - The sender address. (This field can beREM changed).SET [email protected]
REM * An IF command that checks if the current notification is EventREM log. If yes, * it goes to the label EVENT_LOG_LABELIF /I %XR_TYPE% == EVENT_LOG goto EVENT_LOG_LABELSET SMTP_SUBJECT="FastBack %XR_EVENT_LEVEL% From %XR_MODULE%on %COMPUTER_NAME%."
echo FastBack Server Machine name - %COMPUTER_NAME% > %XR_BODY_FILE_NAME%echo FastBack Client Machine name - %XS_JOB_SERVER_NAME% >>%XR_BODY_FILE_NAME%echo Volume - %XS_JOB_VOLUME_NAME% >> %XR_BODY_FILE_NAME%echo Policy %XS_JOB_ACTION_NAME% >> %XR_BODY_FILE_NAME%echo %XS_JOB_SRART_TIME% >> %XR_BODY_FILE_NAME%echo -------------------------------------------- >> %XR_BODY_FILE_NAME%echo %XR_EVENT_LEVEL%: %XR_MSGID% %XR_MSG% >>%XR_BODY_FILE_NAME%
goto SEND_MAIL_LABEL
:EVENT_LOG_LABELSET SMTP_SUBJECT="FastBack %XR_EVENT_LEVEL% From %XR_MODULE% on%COMPUTER_NAME%"echo %XR_EVENT_LEVEL%: %XR_MSGID% %XR_MSG% > %XR_BODY_FILE_NAME%goto SEND_MAIL_LABEL
:SEND_MAIL_LABEL
contain.exe "%XR_MSG%" "aborted" "The limit for repository""Unable to initiate snapshot" "Failed to initiate cleanup on volume""will not perform any snapshots"If %ERRORLEVEL% EQU 0 goto SENDcontain.exe "%XR_MSG%" "The Exchange service failed to start""The Exchange service failed to terminate""The FastBackServer Failed to access Repository in path"If %ERRORLEVEL% EQU 0 goto SENDcontain.exe "%XR_MSG%" "The Repository has Sanity Problem""Repository Not found on initial" "The Repository in path""The cleanup of snapshot" "Verification of job"
140 Installation and User's Guide
If %ERRORLEVEL% EQU 0 goto SENDcontain.exe "%XR_MSG%" "The repository is cleared"If %ERRORLEVEL% GTR 0 goto END
:SENDFastBackSendMail.exe -s %SMTP_SERVER% -p %SMTP_PORT% -t %SMTP_TO_ADDRESS%-f %SMTP_FROM_ADDRESS% -a %SMTP_SUBJECT% -m %XR_BODY_FILE_NAME%
:enddel %XR_BODY_FILE_NAME%
Viewing software versions
Software version information for each component or device is available for display.Use the following methods to access version information:v FastBack Manager: Help → About
v FastBack Server: Help → About
v FastBack Client: Right-click a client that is listed under the Storage Pool; then,click Properties
Note: A message indicates that the versions of the system elements do notmatch. For example, the FastBack Manager or the FastBack Client versionsare not compatible with the FastBack Server version.
The icon is displayed in the status bar. The icon under the StoragePool tree branch indicates that the client is disconnected.
Multi-language support limitationsTivoli Storage Manager FastBack supports installation of component onnon-English version of Windows, as well as non-ASCII objects (for example, hostnames, volume names, user names, passwords, and policies).
The updates to Tivoli Storage Manager FastBack for Version 5.5.3 are displayed inEnglish-only. Although the interfaces updated to respond to a defect or problemreport, are English-only, the fixes work in all locales.
The following limitations apply to the multi-language support:v Tivoli Storage Manager FastBack Disaster Recovery Server supports branches
named using only ASCII characters.v A repository must be in a folder named using only ASCII characters.v Tivoli Storage Manager FastBack products display multi-language characters
correctly only if the corresponding font is installed. For example, FastBackMount can display a policy name in Spanish only if the font used to displaycharacters in the Spanish language are already installed on the system that runsFastBack Mount.
v Computer names should contain ASCII characters and only one internationallanguage. For example, Chinese and English is supported, while Chinese andHebrew is not supported.
v FastBack Client and FastBack Mount can communicate with an FastBack Serverdomain name with multi-language characters only if they support the samemulti-language encoding.
Chapter 7. Maintaining 141
Note: In case you cannot establish communication, connect by IP instead ofcomputer name.
v The Administrative Command Line supports multi-language input within aUTF-8 encoded script file, and not with command line input. Use the -s (scriptfile) option to refer to the script file.
v Tivoli Storage Manager FastBack for Bare Machine Recovery: The FastBack PEshare repository browse dialog does not display host names with multi-languagecharacters correctly. In addition, repository share user names and passwordsshould be in English.
v Oracle10g script is supported with an English SYSDBA user name.
CleanupThe FastBack Server snapshot repository is a disk-based solution. The repositorydisk space is limited. Tivoli Storage Manager FastBack uses several mechanisms tooptimize the use of repository space, and to automate the process of disk cleanup.During the disk cleanup, obsolete repository data is deleted.
Cleanup processes require considerable resources. You should schedule and runcleanup tasks during a time of day and week when snapshots are not scheduled.Running the cleanup during off-peak times reduces the risk of overload tobandwidth and FastBack Server activity.
You can schedule and run cleanup tasks when snapshots are running. The cleanuptasks use a locking mechanism to ensure consistency. Before any cleanup task runs,the cleanup process verifies that a snapshot chain is not locked. A snapshot chainis a full snapshot and the corresponding incremental snapshots of the same volumeand policy combination.
If a chain is locked, for example, when a volume is mounted, or when a snapshotor Instant Restore is running, the cleanup process runs on the next chain that is notlocked and scheduled for cleanup. When a chain is unlocked and available, thecleanup process can run. When the cleanup process starts, the cleanup processlocks the snapshot chain.
GenerationsWhen a snapshot it created, it is tagged with a number that is referred to as ageneration. During disk cleanup, generations are a parameter used by Tivoli StorageManager FastBack for disk cleanup.
You can set the number of snapshot generations that are saved. This number ofsnapshots is available for restore tasks. Older snapshots, beyond the number ofgenerations you set, are deleted during the cleanup process. For example, you cansetup snapshot occurrence to once a day, and the number of snapshot generationsto 14. This means that all snapshots performed in the preceding 14 days areavailable for restore tasks. Snapshots older than 14 days are deleted during thecleanup process.
In the Monitor tab, the oldest of the available generations is identified, by number.The number is surrounded by bracket characters, for example, [14]. This numberindicates the total size of data from all previous snapshots that are not visible oraccessible, but reside in the repository at that moment. The size of this informationcan grow and exceed the size of the backed up volume. The predefined cleanupfrequency affects this size.
142 Installation and User's Guide

The number of generations is defined per policy. To set the number of generations,complete the following steps:1. Select a policy to edit.2. Enter the number of generations in the Number of generations field.3. Click Apply.
When creating a new policy, you define the number of generations when using theAdvanced Policy Wizard.
Cleanup configurationSetting the cleanup parameters can affect disaster recovery. When more cleanupprocesses are running, there is more traffic for disaster recovery. You can use thecleanup level parameter to balance the time and effort of the cleanup process withthe amount of data that you need to cleanup.
The following list identifies the cleanup parameters:v Cleanup scope, schedule and occurrence are set under the General
Configuration → Maintenance → Cleanup tab. These parameters apply to allTivoli Storage Manager FastBack policies. You can override the parameters byediting parameters in the Policy Cleanup tab. For more information see section“Policy cleanup” on page 82.
v The number of generations to be retained is a parameter that is set for eachpolicy.
v If disaster recovery is used, there is an additional setup pertaining to disasterrecovery optimization. This setup applies to all policies handled by TivoliStorage Manager FastBack.
Defining cleanup parametersCleanup requires considerable resources. You should schedule and run cleanuptasks during a time of day and week when few snapshots are scheduled. Runningthe cleanup during off-peak times reduces the risk of overload to bandwidth andFastBack Server activity.
To define cleanup parameters, complete the following steps:1. In the FastBack Manager Configuration pane, choose Generation
Configuration and select the Maintenance → Cleanup tab.
Chapter 7. Maintaining 143
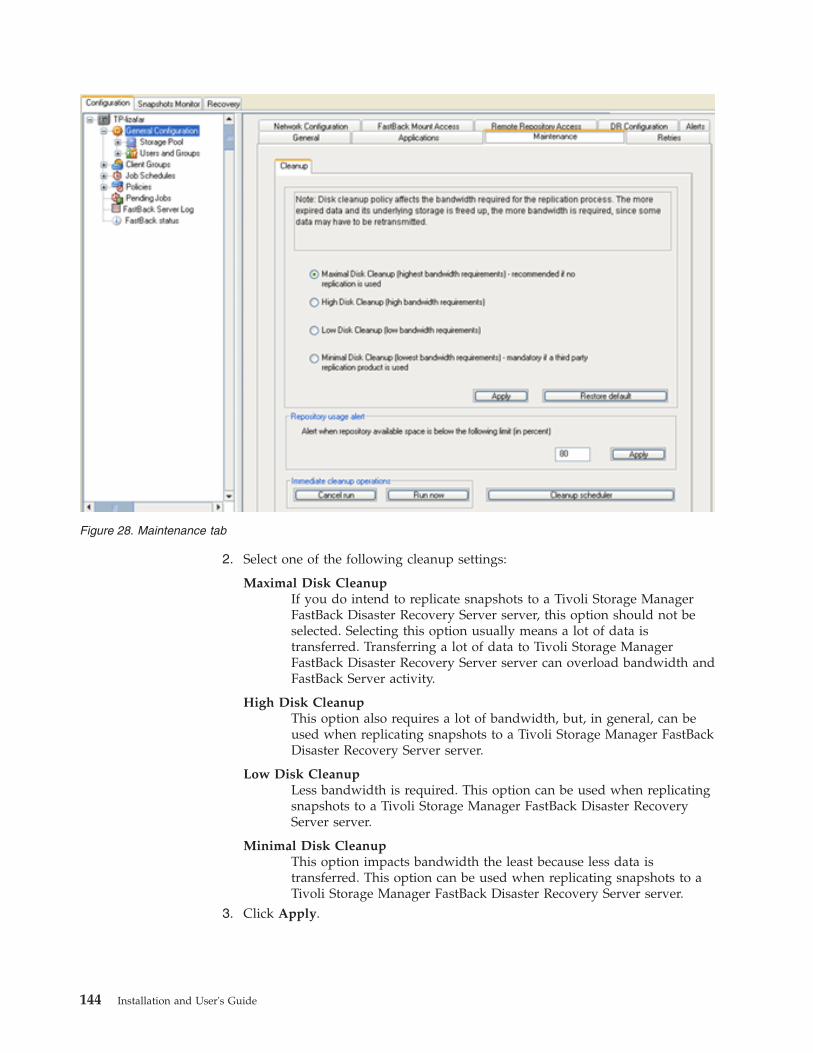
2. Select one of the following cleanup settings:
Maximal Disk CleanupIf you do intend to replicate snapshots to a Tivoli Storage ManagerFastBack Disaster Recovery Server server, this option should not beselected. Selecting this option usually means a lot of data istransferred. Transferring a lot of data to Tivoli Storage ManagerFastBack Disaster Recovery Server server can overload bandwidth andFastBack Server activity.
High Disk CleanupThis option also requires a lot of bandwidth, but, in general, can beused when replicating snapshots to a Tivoli Storage Manager FastBackDisaster Recovery Server server.
Low Disk CleanupLess bandwidth is required. This option can be used when replicatingsnapshots to a Tivoli Storage Manager FastBack Disaster RecoveryServer server.
Minimal Disk CleanupThis option impacts bandwidth the least because less data istransferred. This option can be used when replicating snapshots to aTivoli Storage Manager FastBack Disaster Recovery Server server.
3. Click Apply.
Figure 28. Maintenance tab
144 Installation and User's Guide

4. In the Repository usage alert section, you can adjust when an alert is sent. Analert is sent when repository available space is below a specific limit. The limitfor available repository space is defined by a percentage. You can type annumber between 0 and 100.
5. Click Apply.6. Click Cleanup Scheduler.7. Type the job schedule name. For example, this schedule is being defined for
cleanup so you can name the schedule Cleanup.
8. Set the parameters for the cleanup schedule. Remember that cleanup requiresconsiderable resources. You should schedule and run cleanup tasks during atime of day and week when few snapshots are scheduled. Running thecleanup during off-peak times reduces the risk of overload to bandwidth andFastBack Server activity.
9. Click Apply.10. Click Advanced.
Figure 29. Cleanup Scheduler window
Chapter 7. Maintaining 145
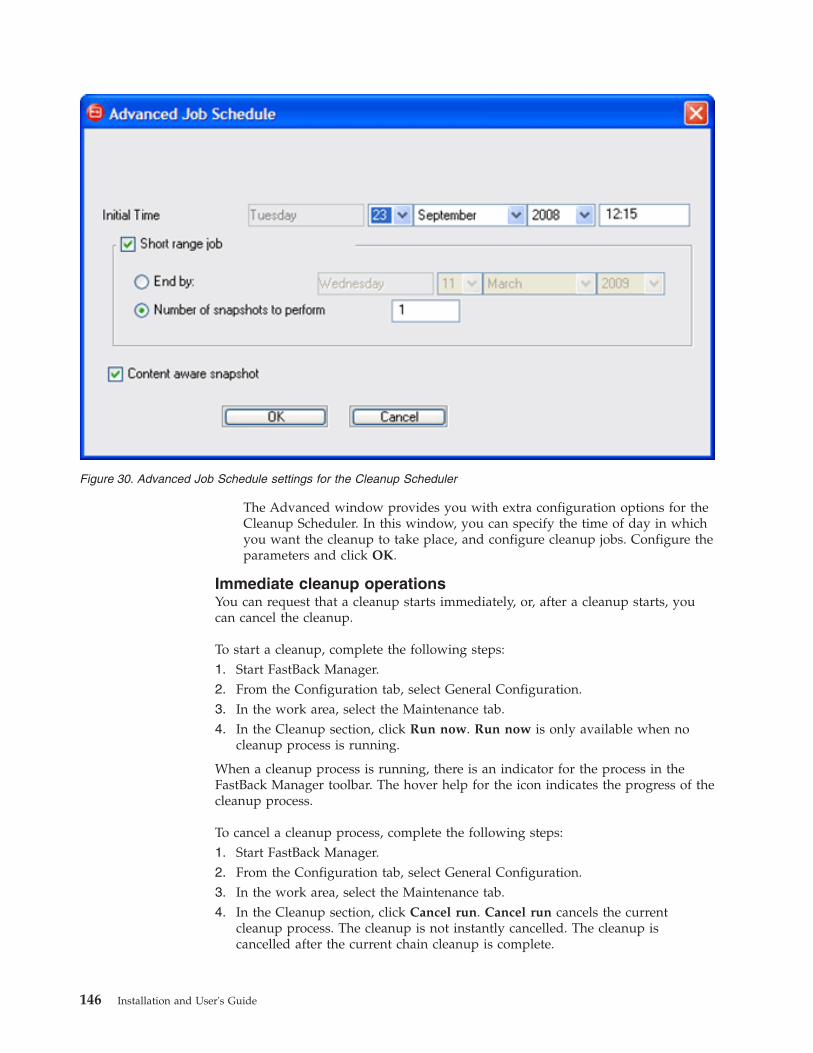
The Advanced window provides you with extra configuration options for theCleanup Scheduler. In this window, you can specify the time of day in whichyou want the cleanup to take place, and configure cleanup jobs. Configure theparameters and click OK.
Immediate cleanup operationsYou can request that a cleanup starts immediately, or, after a cleanup starts, youcan cancel the cleanup.
To start a cleanup, complete the following steps:1. Start FastBack Manager.2. From the Configuration tab, select General Configuration.3. In the work area, select the Maintenance tab.4. In the Cleanup section, click Run now. Run now is only available when no
cleanup process is running.
When a cleanup process is running, there is an indicator for the process in theFastBack Manager toolbar. The hover help for the icon indicates the progress of thecleanup process.
To cancel a cleanup process, complete the following steps:1. Start FastBack Manager.2. From the Configuration tab, select General Configuration.3. In the work area, select the Maintenance tab.4. In the Cleanup section, click Cancel run. Cancel run cancels the current
cleanup process. The cleanup is not instantly cancelled. The cleanup iscancelled after the current chain cleanup is complete.
Figure 30. Advanced Job Schedule settings for the Cleanup Scheduler
146 Installation and User's Guide
The cleanup process resumes according to the cleanup schedule.
Manual repository cleanup optionsTivoli Storage Manager FastBack offers several repository cleanup options. You canuse these options to save repository space, and to ease the automated cleanupprocess.
Snapshot chains are series of snapshots of the same volume in the same policy.They can be manually removed by right-clicking on a snapshot in the Monitor tab,click Erase, and selecting one of the following three options:
Previous snapshots in this chainSelect this option to erase all snapshots in the chain of the selectedsnapshot that are older than the selected snapshot. The selected snapshot isnot erased.
This option is only available if you select a full snapshot. If this option isnot enabled and you want to remove all older snapshots in a chain,complete a full snapshot.
This snapshot and newer ones in this chainSelect this option to remove a specific snapshot and all newer snapshots inthe same chain. A scenario for using this option is when classifiedinformation is included a snapshot, but the information needs to be hiddenand removed.
Removing all newer snapshots causes the next snapshot on the chain to bean incremental delta block snapshot instead of an incremental snapshot.For more information about the types of snapshots, see “Setting upsnapshot policies” on page 75.
All snapshots in this chainSelect this option to erase the selected snapshot and all of the snapshots inthe chain. After you select this option, a message is displayed that explainsthe next snapshot is going to be full snapshot.
After selecting an option, a confirmation message is displayed. The messageincludes a list with the snapshots to be removed. Click Yes to erase or click No tocancel.
A snapshot that is currently being restored by Instant Restore is not deleted fromthe repository by the cleanup process until the Instant Restore process is complete.A snapshot that is mounted by FastBack Mount is not be deleted until it has beenreleased from all mount processes. If an attempt is made to delete snapshots froma chain that is being used by FastBack Mount or the Instant Restore process, anerror message is displayed.
Automatic disk clean upWhen you run an automatic disk clean up, only one cleanup operation runs at atime.
After an automatic disk clean up starts, Erase Chain and Remove older snapshotprocesses cannot be stopped. You can run a snapshot concurrently with a cleanupjob.
Chapter 7. Maintaining 147

Extra repository space is required to complete cleanup jobs. In general, the amountof free space in the repository disk must be equal or greater than the full snapshotsize.
148 Installation and User's Guide

Chapter 8. Tivoli Storage Manager FastBack DisasterRecovery
Tivoli Storage Manager FastBack Disaster Recovery is a remote office dataprotection system that provides replication and disaster recovery to remotebranches.
Each FastBack Server can perform disaster recovery to only one Tivoli StorageManager FastBack Disaster Recovery Server.
A replicated repository can be used to back up snapshots to tape and to performdisaster recovery.
Tivoli Storage Manager FastBack Disaster Recovery can use the followingrepository sources:v FastBack - A repository that is divided across several volumes.v Local - A repository that is located in a single folder.v Network - A repository that is located on a network share (for example,
\\computer\share\...)
Tivoli Storage Manager FastBack Disaster Recovery uses the FTP protocol for thedisaster recovery destination. FTP is used to create a repository that is located onan FTP server. Using the FTP protocol, data can be sent over a regular FTPconnection, or FTP over a secure connection, using SSL.
Setting up FTP for the disaster recovery destinationWhen using FTP for the disaster recovery destination, there are some configurationtasks to complete.
After you install Tivoli Storage Manager FastBack Disaster Recovery Server andbefore using FTP for the disaster recovery destination, complete the followingsteps. For Tivoli Storage Manager FastBack Disaster Recovery Server installationinstructions, see “Installing Tivoli Storage Manager FastBack Disaster RecoveryServer” on page 28.1. Configure your FTP server. To configure the FTP server, complete the following
steps:a. Select the home directory tab and designate the DR repository directory as a
home directory for FTP functions.b. After designating the DR repository directory you have to change the rights
for the home directory from read only to all.c. Configure a local account within the FTP program. This account and
password are used by the remote FastBack Servers to communicate with theTivoli Storage Manager FastBack Disaster Recovery Server.
2. Open the FastBackDRHubServer.ini file for editing. TheFastBackDRHubServer.ini file is located in the following path:%ProgramFiles%\Tivoli\TSM\FastBack\drhub. Make the following changes tothe FastBackDRHubServer.ini file:a. Change the value of the FTPRootPath1 key to include the full path of the
FTP server root directory that was created in step 1
© Copyright IBM Corp. 2008, 2009 149

b. (Optional) If needed, add additional directories. For example, FTPRootPath2and FTPRootPath3.
c. Change the value for the ListenPath1 key to contain the full path of the FTPserver root directory that was create in step 1 on page 149
d. (Optional) If needed, add additional directories. For example, ListenPath2,ListenPath3.
e. Save and close the FastBackDRHubServer.ini file.3. Restart the Windows service for the FastBack DR Hub Server.4. In the FTP server root directory that was created in step 1 on page 149, create
the following folders:v Logsv Logevents
5. For each branch that is required to complete Disaster Recovery to this TivoliStorage Manager FastBack Disaster Recovery Server, create a REP_BranchNamefolder. The BranchName part of the name must match the value stored on theFastBack Manager Disaster Recovery Configuration tab, in the Branch Namefield. For more information about this field, see “Disaster Recoveryconfiguration.”
Disaster Recovery configurationDisaster Recovery configuration is required for each that sends snapshots to theTivoli Storage Manager FastBack Disaster Recovery Server.
For each FastBack Server that sends snapshots to the Tivoli Storage ManagerFastBack Disaster Recovery Server, complete the following steps:1. From FastBack Manager, go to Configuration → General Configuration. Select
the DR Configuration tab.2. In the DR target section, type the replication destination. The replication
destination is the location of the FTP server.3. In the Server field, type either the FTP server name or the FTP IP address.4. In the Login Credentials section, type the user name and password as they
were configured on the FTP server in 1 on page 149.5. In the Branch Name field, type the branch name. The branch name you enter
must match the branch name you used for the folder name in the followingsection: “Setting up FTP for the disaster recovery destination” on page 149. Thebranch name that you type should not include the REP_ prefix.
6. (Optional) To enable Disaster Recovery compression, select Compression. Thisoption should be used if the connection speed is less than 40 Mbps.
7. (Optional), To enable SSL-based Disaster Recovery encryption, selectEncryption. The FTP server must support encryption.
8. Click Apply to save the configuration settings.9. Click Test Configuration to check connectivity to the FTP site. By clicking Test
Configuration, you confirm that the Disaster Recovery is operational. After theconfiguration test is complete, a status message is displayed.
Problem determination for Disaster Recovery
If there are problems with the Disaster Recovery configuration, complete thefollowing steps to troubleshoot the problems:
150 Installation and User's Guide
1. Complete FTP Server configuration. On the Tivoli Storage Manager FastBackDisaster Recovery Server, a FTP user account must be configured, including apassword and a home directory that has full access permissions. The followingpermissions are required:
File permissionsRead, write, delete, and append permissions
Folder permissionsCreate, delete, list, and add subdirectories permissions
2. Create the three required folders. For more information about the threerequired folders, see 4 on page 150 and 5 on page 150.
3. Complete the configuration required for the FastBackDRHubServer.ini file.Configure the Tivoli Storage Manager FastBack Disaster Recovery Server file topoint to the FTP folder root from 1. The default location for the Tivoli StorageManager FastBack Disaster Recovery Server file is C:\ProgramFiles\Tivoli\TSM\FastBack\drhub\FastBackDRHubServer.ini. For example,make the following changes:ListenPath1 = E:\Path1FTPRootPath1 = E:\Path1
Uncomment the lines by removing the ; character.4. Start the Tivoli Storage Manager FastBack Disaster Recovery Hub server
service. If the previous steps have been completed correctly, the followingfolders are created at the root FTP folder path for the user:E:\path1\receiver_folderE:\path1\TempMsgFolder
In addition, in the following log file, there should be no error messages:C:\Documents and Settings\All Users\Application Data\Tivoli\FastBack\drhub\FAST_BACK_DR_SERVER_040.sfThe Tivoli Storage Manager FastBack Disaster Recovery Server is configured.
5. Set up the source FastBack Server to copy snapshot backups, that are indisaster recovery-enabled policies, to the Tivoli Storage Manager FastBackDisaster Recovery Server. Refer to the directions in “Disaster Recoveryconfiguration” on page 150. Make sure to point to the Tivoli Storage ManagerFastBack Disaster Recovery Server host system and the FTP account set up in 1.The name in the Branch Name field is critical to ensure that the snapshots areproperly identified by the software to the source FastBack Server.
6. Test the Tivoli Storage Manager FastBack Disaster Recovery Serverconfiguration. Click Test configuration. If the configuration is correct, thefollowing actions occur:a. Additional folders are, as needed, created in the root FTP path for the user
created in 1 For example, the following folders are created:E:\Path1\LogsE:\Path1\REP_FBServer1
The FBServer1 name is the name specified in the Branch Name field.b. On the FTP server, several temporary folders and files are created and
deleted to test permissions. All files that are created and deleted are part ofthe test configuration process and should result in no visible changes to thecontents of the folders created in 4.
c. A confirmation message is displayed. The message indicates that the testconfiguration is successful.
Chapter 8. Tivoli Storage Manager FastBack Disaster Recovery 151

Disaster Recovery configuration is complete and replication operations can beginfrom the FastBack Server to the Tivoli Storage Manager FastBack Disaster RecoveryServer.
Scheduling replicationSchedule replication for each FastBack Server that sends snapshots to the TivoliStorage Manager FastBack Disaster Recovery Server.
To schedule replication for a FastBack Server, complete the following steps:1. From FastBack Manager, go to Configuration → General Configuration. Select
the DR Configuration tab.2. Click the DR Scheduler tab to configure DR scheduling.
3. The default configuration for the DR Scheduler is Pause. Configure DRScheduling and click Resume. If you do not click Resume, the scheduler doesnot work.
4. Click Apply to complete the configuration.5. Click Advanced.
Figure 31. Disaster Recovery scheduler screen
152 Installation and User's Guide
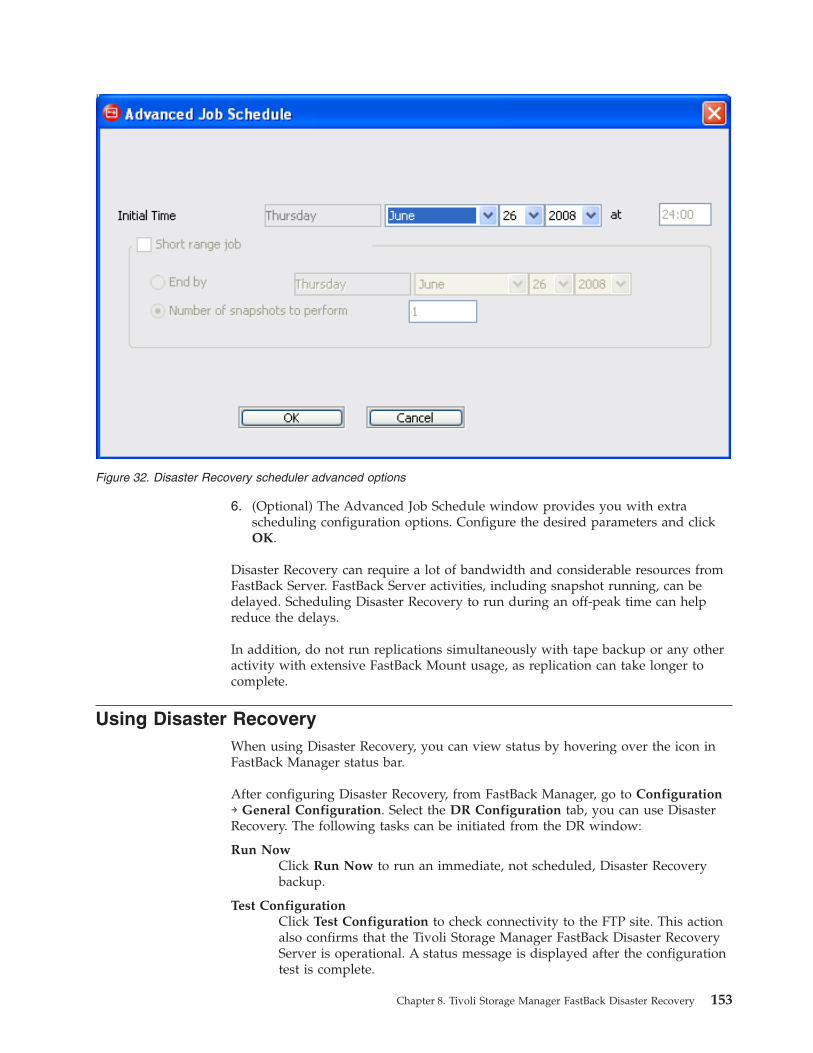
6. (Optional) The Advanced Job Schedule window provides you with extrascheduling configuration options. Configure the desired parameters and clickOK.
Disaster Recovery can require a lot of bandwidth and considerable resources fromFastBack Server. FastBack Server activities, including snapshot running, can bedelayed. Scheduling Disaster Recovery to run during an off-peak time can helpreduce the delays.
In addition, do not run replications simultaneously with tape backup or any otheractivity with extensive FastBack Mount usage, as replication can take longer tocomplete.
Using Disaster RecoveryWhen using Disaster Recovery, you can view status by hovering over the icon inFastBack Manager status bar.
After configuring Disaster Recovery, from FastBack Manager, go to Configuration→ General Configuration. Select the DR Configuration tab, you can use DisasterRecovery. The following tasks can be initiated from the DR window:
Run NowClick Run Now to run an immediate, not scheduled, Disaster Recoverybackup.
Test ConfigurationClick Test Configuration to check connectivity to the FTP site. This actionalso confirms that the Tivoli Storage Manager FastBack Disaster RecoveryServer is operational. A status message is displayed after the configurationtest is complete.
Figure 32. Disaster Recovery scheduler advanced options
Chapter 8. Tivoli Storage Manager FastBack Disaster Recovery 153
Abort DRClick Abort DR to stop any currently running Disaster Recovery. For theDisaster Recovery tasks that are running, the Disaster Recovery is abortedafter the task is complete, but before the entire Disaster Recovery isfinished.
Locking snapshots during Disaster RecoveryFiles that are updated during the Disaster Recovery process are categorized as newfiles, changed files, or deleted files.
When new files are replicated, the new files are immediately copied into the finaldestination repository. When changed files are replication, the changed filed areinitially copied to a temporary folder. When replication to the temporary folder iscomplete, the changed files are copied to the final destination repository. After thereplication process is complete, files that need to be removed from the replicatedrepository are deleted.
During the replication process for new files, changed files, and deleted files, TivoliStorage Manager FastBack Disaster Recovery locks snapshots. As a result, FastBackMount cannot mount the relevant replicated snapshots.
When FastBack Mount mounts a snapshot, it locks the entire policy, preventingTivoli Storage Manager FastBack Disaster Recovery from changing files. When thesnapshot is dismounted, the lock is removed. If FastBack Mount is idle for acertain amount of time, Tivoli Storage Manager FastBack Disaster Recovery canremove the lock. Tivoli Storage Manager FastBack Disaster Recovery tries toremove locks until all the files are copied.
Central Control StationThe Central Control Station provides you with a graphical user interface to browsethe remote repository that serves as the central storage area for the Tivoli StorageManager FastBack Disaster Recovery system.
The Central Control Station can be installed at a central backup office or DataCenter. You can use the Central Control Station to view the branches that haveperformed Disaster Recovery and view the status for each branch. In addition, youcan start FastBack Manager from the Central Control Station.
Starting Central Control Station
To startCentral Control Station, click Start → Programs → Tivoli Storage Manager →FastBack → Central Control Station.
Using Central Control StationAfter starting Central Control Station, you have to connect to a share before anydata is displayed. A share is a branch location where files are stored for the TivoliStorage Manager FastBack Disaster Recovery Server.
To connect to a share, click File → Connect. The Connect dialog is displayed.
Type or browse for the path to the shared snapshots and shared events. The pathto the shared snapshots is the path you used when you created the Logs folderduring the set up of FTP for the disaster recovery destination. Likewise, the path to
154 Installation and User's Guide
the shared events is the path you used when you created the Logevents folder.These folders are sub-folders under the replication destination folder. For moreinformation, see “Setting up FTP for the disaster recovery destination” on page149.
If you can access the share in Windows Explorer, with the current operating systemuser privileges, you do not have to type a user name, password, or domain. If theshare is not accessible, type information in these fields to ensure that the CentralControl Station can connect to the share.
After you connect to a share, the main window should display a branch tree, and,according to the selection in the branch tree, corresponding snapshot logs andsnapshots. At the bottom of the branch tree, there are four buttons that you canselect to filter data that is displayed in the Snapshot Log and Snapshot tables. Thefollowing list provides details about the buttons:
Day Displays snapshot information for the current day. Unless, in the branchtree, All branches is selected, Day is the default filter.
Week Displays snapshot information for the current week.
MonthDisplays snapshot information for the current month.
All Displays the information from all branches. All is disabled if All branches isselected in the branch tree. If, in the branch tree, All branches is selected,Month is the default filter.
The time that is displayed in the Snapshot Log and Snapshot tables is the localtime on the branch.
Viewing snapshot information
By default, most of the information about snapshots is displayed near the top ofthe window in the Snapshot table. You can right-click a row in the table; then, clickSnapshot Log. A detailed log for the snapshot is displayed.
The snapshot log includes a list of events related to the snapshot. This list ishelpful for snapshots that have not completed or that have failed. The log that isdisplayed to the customer might not include information about why the snapshotdid not complete or failed. In this list, the details about why the snapshot did notcomplete or failed should be available.
In the Snapshot Log table, you can sort data in alphabetic ascending or descendingorder, according to a specific column. To sort, click a column header.
Under the Snapshot Log table there is a Snapshots table. This Snapshots tableprovides more detail about the snapshots that have run. Status, start time, policyname, volume, and type are some of the details provided about the snapshots.
Icons in the Snapshots table might be grayed out. This icon color is used if theEnable DR field is set to no for the policy.
Refreshing data
You can refresh data that is displayed in the Central Control Station at any time byclicking View → Refresh. The information automatically updates according to atime parameter that is set for the application.
Chapter 8. Tivoli Storage Manager FastBack Disaster Recovery 155

When data is refreshed, the cursor changes appearance to indicate that data isbeing updated. When the refresh is complete, the cursor returns to normalappearance.
Starting FastBack Manager from Central Control Station
To start FastBack Manager from Central Control Station, go to the branch tree, inthe Central Control Station. Right-click an active branch; then, select Manage.Every time you select Manage, a new instance of FastBack Manager is started. Youcan run more than one instance of FastBack Manager.
Saving settings
When you close the Central Control Station the sorting settings for tables arestored by the application. In addition, connection information, except forpasswords, is saved.
156 Installation and User's Guide
Chapter 9. Administrative Command Line
The Administrative Command Line is a way to access most Tivoli Storage ManagerFastBack functions from a command line interface. Most of the commandsavailable through the graphic interface of FastBack Manager can also be used inthe command line interface.
The Administrative Command Line can be viewed as a command line API(application interface) to FastBack Server and FastBack Mount. Changes performedthrough Administrative Command Line to the FastBack Server and FastBackMount are immediately available.
You can use the Administrative Command Line to manage only one FastBackServer or FastBack Mount at a time. The command line can be run from anycomputer.
Starting the Administrative Command Line
To start the Administrative Command Line, complete the following steps:1. From the Windows Start menu, select Programs → Tivoli Storage Manager →
FastBack → Administrative Command Line.2. In the command prompt window, enter one of the following commands:
v To run the command line:FastBackShell.exe -c command type tag parameter
v To display the help for the command line:FastBackShell.exe -h
v To run the command line with a script file to run multiple commands:FastBackShell.exe -s "script_file_name"
AuthenticationAfter the installation process is complete, change the password for theadministrator user name.
The authentications privileges are allocated to the user name and password thatyou use when you log in. The authentication privileges determine the restoreoptions that you can use. You can override the current security setup by usingappropriate switches in Administrative Command Line:FastBackShell.exe -c -u UserName -p Password -d domain job add -jname <xxxxxx>FastBackShell.exe -s -u UserName -p Password -d domain
When you use the -u, -p, and -d switches, the current account is displayed andidentified as other login accounts. You can use these switches when there areinsufficient permissions to restore a snapshot.
You can also use the built-in administrator credentials:FastBackShell.exe -c -u admin -p admin123 -d xpress-restore
© Copyright IBM Corp. 2008, 2009 157
Command summaryWhen you use the following commands, all parameters are not required. See thefollowing sections for details about which parameters are required. For theparameters that are not required and not entered, the default values are used.
Parameters with spaces must be enclosed in quotation marks. For example, if youwant to use the Accounting, Daily parameter, type ″Accounting, Daily″.
The following list summarizes the commands available from the AdministrativeCommand Line:
alerts Alerts operations
app Application parameters configuration
client_groupClient group operations
dr Disaster recovery operations (for example, run_now, pause, and abort)
irestoreInstant restore command to FastBack Mount
job Backup job operations
log Get log files
mount Mount and view a virtual volume
net View network parameters configuration
pjob View pending jobs
policy Policy operations
set_connectionSetting the connection configuration
snapshotMonitor and manage snapshots
util Utilities operations
ver View versions
alertsUse the alerts command to create and send alerts.
There are two tags that you can use for the alerts command: send and create_file.The following list provides detail for these tags:
send Use this tag to sends alerts. The following code sample is an example ofhow to use the tag with the alerts command:FastBackShell.exe -c alerts send
create_fileUse this tag to create alerts file. The following code sample is an exampleof how to use the tag with the alerts command:FastBackShell.exe -c alerts create_file
158 Installation and User's Guide
appUse the app command for global parameters configuration.
The following code sample provides detail for the app command:FastBackShell -c app viewFastBackShell -c app set (-quiesc [y|n] | -purge [y|n] | -vss [y|n])
You cannot specify y for both -quiesc and -vss. You can enable either IBMapplication quiescing or the VSS service. The VSS service is a type of applicationquiescing.
client_groupUse the client_group command to administer client groups.
Use the following format for the client_group command:client_group command_type -command_tagcommand_tag_parameter
The following list summarizes the types that you can specify for the client_groupcommand. Tags and parameters for each type are listed.
add Use the add command type to add a client group. The valid command tagsare -cname and -agent. The -cname command tag indicates the client groupname. The -agent command tag indicates the server mount point. Thefollowing examples indicate the format to use:client_group add -cname command_tag_parameter -agentcommand_tag_parameter [-agentcommand_tag_parameter]*n
client_group add -cname "C and D" -agent winxp-1@C:\ -agent winxp-1@D:\
del Use the del command type to delete a client group. The valid commandtags are -cname and -all. The -cname command tag indicates the clientgroup name. The -all command tag indicates the command runs on allclient groups. For the -all command tag, specify y for yes or n for no as thecommand tag parameter. The following example indicates the format touse:client_group del -cname command_tag_parameter [-allcommand_tag_parameter]
edit Use the edit command type to edit a client group. The valid command tagsare -cname and -rename and -agent. The -cname command tag indicatesthe client group name. The -rename command tag indicates a new clientgroup name should be used. The -agent command tag indicates the servermount point. The following examples indicate the format to use:client_group edit -cname command_tag_parameter [-renamecommand_tag_parameter] [-agentcommand_tag_parameter]*n
client_group edit -cname "C and D" -rename "C on winxp-1" -agent winxp-1@C:\
info Use the info command type to access client group status. The validcommand tags are -cname and -request. The -cname command tagindicates the client group name. The -request command tag checks to see ifa specified job exists. The following examples indicate the format to use:client_group info -cname command_tag_parameter -requestcommand_tag_parameter
client_group info -cname "C and D" -request exist
Chapter 9. Administrative Command Line 159

view Use the view command type to view a client group. For example:client_group view
drUse the dr command for disaster recovery tasks.
The following format should be used for the dr command:dr -command_Tag
The following list summarizes the tags that you can specify for the dr command.Parameters for each tag are listed.
run_nowDisaster recovery starts immediately.
abort Disaster recovery is aborted immediately.
pause Pauses disaster recovery. Disaster recovery does not run on a schedule.
resumeResumes disaster recovery. Disaster recovery runs as scheduled.
test_configurationChecks the disaster recovery configuration.
is_runningChecks to determine if the disaster recovery is running.
irestoreUse the irestore command to send an Instant Restore command to FastBack Mount.
Use the following format for the irestore command:irestore -Command_Tag Command_Tag_Parameterirestore -target command_tag_parameter -server command_tag_parameter-policy command_tag_parameter -volume command_tag_parameter -datecommand_tag_parameter [-when command_tag_parameter] -rep command_tag_parameter[-login command_tag_parameter] [-pass command_tag_parameter][-domain command_tag_parameter] [-force]
The following list summarizes the tags that you can specify for the irestorecommand. Parameters for each tag are listed.
target Use this tag as the target for Instant Restore. A drive letter local toFastBack Mount. Only the first character is used. Only basic volumes aresupported.
rep The FastBack Server repository (local or network share). For local, usehostname@domain. You can also use the full path for the repository on thefolder. For example: share: 'share: \\hostname\share'
server The server that was the snapshot source or SAN_layout.
policy The policy for the snapshot.
volumeThe volume or reparse point that was the source of the snapshot.
date The date is formatted as yyyy-Mmm-dd hh:mm:ss or last snapshot. For yyyy,the range must be from 1971 to 2030.
when There are three options: after, before, or exact. The default is exact.
160 Installation and User's Guide
login The user name used to access the restored snapshot and target volume.
pass The password used with the login command.
domainThe domain used with the login and pass commands. The default isxpress-restore.
force Use this command to dismount the target volume when there are openfiles or applications running.
Sample
Refer to the following sample for an example of how the user should be able toperform an instant restore to volume I:\. The snapshot of the volume I is to becompleted on a specific server, according to a specific policy, volume, and time.Open files and applications running on the volume, called the target disk, I areignored.-c irestore -target I:\ -server winxp-leon -policy "I_ on winxp-leon at 81606 16_49" -volume I:\ -date "2006-Sep-12 19:29:01" -rep e:\repository-login admin -pass admin123 -domain xpress-restore -force:
jobUse the job command to add, edit, delete, and view jobs. You can also accessinformation about job status.
Use the following format for the job command:job command_type -command_tag command_tag_parameter
The following list summarizes the types that you can specify for the job command.Tags and parameters for each type are listed.
add Use the add command type to add a job. The following list provides thevalid command tags:v -cdp - Use this tag to set continuous data protection. The choices are y
for yes and n for no.v -contentaware - Use this tag to set the content aware option. The choices
are y for yes and n for no.v -exclude - Indicates a time period to exclude. The format is from HH:MM
to HH:MM. An example of the -exclude tag and parameter follows:-exclude from 21:00 to 07:00
v -interval - Indicates the interval for the job, for example, run every hour.The format is HH:00. The default is 1:00.You cannot specify the hours that you want the job to run. You mustdefine the interval time. For example, if you want to run the job onceevery two hours, use the following tag and parameter with the addcommand type: -interval 2:00
v -jname - Indicates the job name.v -occur - Indicates when the job ends. There are three parameters that
you can specify for this tag: end_by MM-DD-YYYY, end_after_NUMBER_, and no_end. Use end_by MM-DD-YYYY to specify a specificend date. Use end_after _NUMBER_ to end after a specified number oftimes. Use no_end for a continuous run. The default is no_end.
v -purge - Use this tag to specify that the Microsoft Exchange logs shouldbe purged. The choices are y for yes and n for no.
Chapter 9. Administrative Command Line 161

v -quiesc - Use this tag to set the quiescing option. The choices are y foryes and n for no.
v -schedule - Indicates when the job is scheduled to run. The format isWeekly Every _WeeksNumber_ on _DaysBitMap_.You need to specify the _WeeksNumber_ parameter. Use the default, 1, toensure the schedule runs every week.For the _DaysBitMap_ parameter, the software uses a 7–digit binarybitmap representation to specify the days for the schedule. Everynumber between 1 and 127 represents a set of days, for example:– 1 represents Sunday (0000001)– 3 represents Tuesday and Sunday (0000011)– 32 represents Friday (0100000)– 42 represents Monday, Wednesday, and Friday (0101010)– 62 represents Monday, Tuesday, Wednesday, Thursday, and Friday
(0111110)– 127 represents all days of the week (1111111)
The default schedule parameter is Weekly Every 1 on 1.v -start - Indicates the start time for the job schedule. The default is the
current time. The time format is MM-DD-YYYY HH:MM. An example ofthe -start tag and parameter follows: -start "01–19–2008 07:30"
v -type - Indicates the type of job. There are three choices: inc, full, and diff.Use inc for an incremental snapshot. Use full for a full snapshot. Use difffor a differential snapshot, also known as an incremental delta blocksnapshot. The default type parameter is inc, for an incremental snapshot.
v -vss - Use this tag to set the VSS service. The choices are y for yes and nfor no.
The following code sample is an example of how to specify the addcommand type and some of the available tags and parameters for the jobcommand:FastBackShell.exe -c -u admin -p admin123 -d xpress-restore jobadd -jname NightTest -interval "00:01" -schedule "Weekly Every 1 on 127"-purge n -vss n -contentaware y
del Use the del command type to delete a job. The valid command tags are-jname and -all. The -jname command tag indicates the job name. The -allcommand tag indicates the command runs on all jobs. For the -allcommand tag, specify y for yes or n for no as the command tag parameter.The following example indicates the format to use:job del -jname command_tag_parameter [-all command_tag_parameter]
edit Use the edit command type to edit a job. The following list provides thevalid command tags:v -cdp - Use this tag to set continuous data protection. The choices are y
for yes and n for no.v -contentaware - Use this tag to set the content aware option. The choices
are y for yes and n for no.v -exclude - Indicates a time period to exclude. The format is from HH:MM
to HH:MM. An example of the -exclude tag and parameter follows:-exclude from 21:00 to 07:00
v -interval - Indicates the interval for the job, for example, run every hour.The format is HH:00. The default is 1:00.
162 Installation and User's Guide
You cannot specify the hours that you want the job to run. You mustdefine the interval time. For example, if you want to run the job onceevery two hours, use the following tag and parameter with the addcommand type: [-interval 2:00]
v -jname - Indicates the job name.v -occur - Indicates when the job ends. There are three parameters that
you can specify for this tag: end_by MM-DD-YYYY, end_after_NUMBER_, and no_end. Use end_by MM-DD-YYYY to specify a specificend date. Use end_after _NUMBER_ to end after a specified number oftimes. Use no_end for a continuous run. The default is no_end.
v -purge - Use this tag to specify that the exchange logs should be purged.The choices are y for yes and n for no.
v -quiesc - Use this tag to set the quiescing option. The choices are y foryes and n for no.
v -rename - Indicates the new backup job name. The following sampleuses the -rename command:FastBackShell.exe -c -u admin -p admin123 -d xpress-restorejob edit -jname "Old Name" -rename "New Name"
The -jname argument specifies the job that you are referring to.v -schedule - Indicates when the job is scheduled to run. The format is
Weekly Every _WeeksNumber_ on _DaysBitMap_.You need to specify the _WeeksNumber_ parameter. Use the default, 1, toensure the schedule runs every week.For the _DaysBitMap_ parameter, the software uses a 7–digit binarybitmap representation to specify the days for the schedule. Everynumber between 1 and 127 represents a set of days, for example:– 1 represents Sunday (0000001)– 3 represents Tuesday and Sunday (0000011)– 32 represents Friday (0100000)– 42 represents Monday, Wednesday, and Friday (0101010)– 62 represents Monday, Tuesday, Wednesday, Thursday, and Friday
(0111110)– 127 represents all days of the week (1111111)
The default schedule parameter is Weekly Every 1 on 1.v -start - Indicates the start time for the job schedule. The default is the
current time. The time format is MM-DD-YYYY HH:MM. An example ofthe -start tag and parameter follows: -start "01–19–2008 07:30"
v -type - Indicates the type of job. There are three choices: inc, full, and diff.Use inc for an incremental snapshot. Use full for a full snapshot. Use difffor a differential snapshot, also known as an incremental delta blocksnapshot. The default type parameter is inc, for an incremental snapshot.
v -vss - Use this tag to set the VSS service. The choices are y for yes and nfor no.
The following code sample is an example of how to specify the editcommand type and some of the available tags and parameters for the jobcommand:job edit -jname "My Job" -rename "My Old Job"
info Use the info command type to access job status. The valid command tagsare -jname and -request. The -jname command tag indicates the job name.
Chapter 9. Administrative Command Line 163
The -request command tag checks to see if a specified job exists. Thefollowing examples indicate the format to use:job info -cname command_tag_parameter -request command_tag_parameter
client_group info -cname "C and D" -request exist
view Use the view command type to view a job. For example:job view
logUse the log command for log file options.
The following format should be used for the log command:log view -type event -file file_name
For example, if you want the event log information to be in the events.txt file, youcould enter the following command:log view -type event -file events.txt.
mountUse the mount command to enable the mounting and viewing of snapshots in asnapshot repository.
To mount snapshots in a snapshot repository, FastBack Mount must be started andrunning without problem. The FastBackShell.ini file must contain the name or IPaddress of the system where FastBack Mount is installed. The name or IP addressof the system is specified in the HOSTNAMES section. The FastBackShell.ini file isstored in the installation folder for the Administrative Command Line. The defaultlocation is C:\Program Files\Tivoli\TSM\FastBack\shell.
The snapshots are mounted as virtual disk volumes or as reparse points. Themount point is created on the system where FastBack Mount runs. The repositorycan be shared over the network or attached to a FastBack Server.
The mount command is supported in command and script file mode. Thefollowing types of commands are available. The tags and parameters that areavailable for these command types are also listed.
add Use this type to mount a snapshot. The following list identifies the tagsand parameters for the add type:v -target - Use this tag to specify the target for mounting. The target for
mounting can be a virtual volume or reparse point.v -rep - Use to specify the local or network share repository. For local, you
can specify ’hostname@domain’ or full path for repository on folder.If the repository is located on a network share, include the user name,password, and domain for the user who has access to the network share.Use the following format:"<path to network share> user=<username> pass=<password> domain=<domain>"
v -policy - Use to specify a policy for a snapshot.v -server - Use to specify a server that is the source of a snapshot or
SAN_layout.v -volume - Use to specify the volume or reparse point that is the source
of the snapshot.
164 Installation and User's Guide
v -date - Use the specify the date to mount the snapshot. You can specify″last snapshot″ or the date formatted as yyyy-Mmm-dd hh:mm:ss.
v -when - Use to specify when the snapshot is mounted. The threeparameter options are after, before, or exact. The default value is exact.
v -login - Use to specify the user name used when mounting. If this tag isnot specified, the user currently logged in to FastBack Mount is used.
v -domain - Use this domain when mounting. If no domain is specified,by default, the xpress-restore domain is used.
v -pass - Use this password when mounting the snapshot.v -ro|-fw - Specify this tag for the mount volume. The options are
read-only (-ro) and fake-write (-fw).
The following examples indicate how to specify the add type, and thecorresponding tags and parameters:v To mount a snapshot after the specified date as the current user using a
repository location on a network share, run the following command:mount add -target X: -rep "C:\My_Folder_Repository" -policy NightTest-server LAB0-2K -volume E:\ -date "2008-Sep-20 15:47:35" -when after
v To mount the most recent snapshot, as a read-only volume, as aparticular user, using a repository located on a network share, with atarget on volume X, run the following command:mount add -login admin -pass admin123 -domain xpress-restore -targetX: -rep "share:\\ftp2-2k3\Share_of_Rep user=administrator pass=12345domain=ABC -policy NightTest -server LAB551-2k3 -volume E:\ -date"last snapshot" -ro
del Use this type to dismount a snapshot. The following list identifies the tagsand parameters for the del type:v -target - Use this tag to specify the target for dismounting. The target for
dismounting can be a virtual volume or reparse point created using themount command. Use everything for dismounting all volumes.
v -force - Use this tag to force a dismount. The default option is not toforce a dismount.
For example, to force a dismount of currently mounted snapshot, use thefollowing command:mount del -target "c:\gever" -force
dump Use this type to get dumps of all available snapshots in various formats.To dump all snapshots from a network share repository, using a tapeformat, use the following command:mount dump -type local -rep "C:\My_Folder_Repository" -forTapeBackup -full -file "c:\dump.txt"
The following list identifies some of the parameters for the dump type:v -type - Use either -type local for a local repository or -type share for a
network-shared repository or a repository on the folder.If you want to run the mount dump command on a repository on folder,you need to use the -type share option. Do not use the -type localoption.
v -rep - Use to specify the local or network share repository. For local, youcan specify hostname@domain or full path for repository on folder.
v -full - Use this tag to perform a dump of all snapshots. The default is todump only the last snapshot.
Chapter 9. Administrative Command Line 165
v -file - Use this tag to identify a file name to store the buffer returningfrom FastBack Mount.
removeUse this type to remove the connection to a non-local repository. Toremove all network share repository connections, use the followingcommand:mount remove -rep "C:\My_Folder_Repository"
view Use this type to view a list of mounted snapshots. To view all mountedvolumes, use the following command:mount view
netUse the net command to view network parameters configuration.
Use the following format for the net command:net view
pjobUse the pjob command to view the list of pending jobs.
Use the following format for the pjob command:pjob view number_of_jobs
The number_of_jobs is the number of pending jobs that is displayed. The defaultvalue is 10. The maximum value is 1000. The following example identifies how toview the next 5 pending jobs:pjob view 5
For this command to work, the pending job must be in the queue. If there are nojobs in the queue, the jobs are not displayed.
policyThe policy command can help you to administer policy operations.
Use the following format for the policy command:policy Command_Type -Command_Tag Command_Tag_Parameter
The following list summarizes the types that you can specify for the policycommand. Tags and parameters for each type are listed.
add Use the add command type to add a policy by assigning it a predefinedclient group and job. The following example indicates the format to use:policy add -pname Command_Tag_Parameter -cname Command_Tag_Parameter[-generation Command_Tag_Parameter] [-priority Command_Tag_Parameter][-cname Command_Tag_Parameter]*n -jname Command_Tag_Parameter[-jname Command_Tag_Parameter]*n [-enabledr Command_Tag_Parameter]
The following list provides detail about the tags and parameters:v pname - Use to specify the policy name.v generation - Use to specify the number of generations. A generation is
an older version of a snapshot. A generation is not the most recentsnapshot.
166 Installation and User's Guide

v priority - Use to set the policy priority. There are three parameters youcan use: h for high, m for medium, and l for low.
v cname - Use to specify the client group name.v jname - Use to specify the backup job name.v enabledr - Use to enable DR. There are two parameters you can use: y
for yes and n for no.
The following example shows you how to use the tags and parameterswith the add type:policy add -pname Policy1 -generatino 60 -priority h -jname Job1 -jname Job2
del Use the del command type to delete an existing policy. The valid commandtags are -pname and -all. The -cname command tag indicates the clientgroup name. The -all command tag indicates the command runs on allexisting policies. For the -all command tag, specify y for yes or n for no asthe command tag parameter. The following example indicates the format touse:policy del [-pname command_tag_parameter] [-all command_tag_parameter]
edit Use the edit command type to edit an existing policy. The followingexample indicates the format to use:policy edit -pname Command_Tag_Parameter -rename Command_Tag_Parameter[-generation Command_Tag_Parameter] [-priority Command_Tag_Parameter][-cname Command_Tag_Parameter]*n [-jname Command_Tag_Parameter]*n
The following list provides detail about the tags and parameters:v pname - Use to specify the policy name.v rename - Use to specify a new name for the policy.v generation - Use to specify the number of generations. A generation is
an older version of a snapshot. A generation is not the most recentsnapshot.
v priority - Use to set the policy priority. There are three parameters youcan use: h for high, m for medium, and l for low.
v cname - Use to specify the client group name.v jname - Use to specify the backup job name.
The following code sample is an example of how to run the commandwith the edit type:policy edit -pname Policy1 -jname Job1 -jname Job2 -cname "F on winxp-2"
info Use the info command type to access policy status. The valid commandtags are -pname and -request. The -pname command tag indicates thepolicy name. The -request command tag checks to see if a specified jobexists. The following examples indicate the format to use:policy info -pname command_tag_parameter -request command_tag_parameter
view Use the view command type to view a list of policies. For example:policy view
pause Use the pause command type to pause an existing policy. For example:policy pause [-pname command_tag_parameter] [-all command_tag_parameter][-resume command_tag_parameter] [-abort command_tag_parameter]
The following list provides detail about the tags and parameters:v pname - Use to specify the policy name.
Chapter 9. Administrative Command Line 167

v all - Use to run a command on all existing policies. There are twoparameters you can use: y for yes and n for no.
v resume - Use to resume a paused policy. There are two parameters youcan use: y for yes and n for no.
v abort - Abort all running jobs of the paused policy. There are twoparameters you can use: y for yes and n for no.
run_nowUse the run_now command type to start snapshots on all volumes of apolicy. For example:policy run_now [-pname command_tag_parameter] [-type command_tag_parameter]
The following list provides detail about the tags and parameters:v pname - Use to specify the policy name.v type - Use to specify the type of snapshot. The first time you take a
snapshot, this parameter is not required. For subsequent snapshots, thisparameter is required.
set_connectionThe set_connection command sets the connection configuration.
Use the following format for the set_connection command:set_connection Command_Tag <hostname or IP address>
If the FastBack Server cannot connect to the Administrative Command Line, youcan manually set the FastBack Server name at the configuration file by running thefollowing command:FastBackShell.exe -c set_connection server_computer FB_SERVER_NAME
The following tags can be used with the set_connection command:v server_computer - Use to set the FastBack Server connection.v mount_computer - Use to set the FastBack Mount connection.
The following sample sets the Administrative Command Line to work withFastBack Server that uses the 155.155.155.155 IP address:set_connection server_computer 155.155.155.155
In the following sample, the Administrative Command Line is set to work withFastBack Mount on the ComputerName host.set_connection mount_computer ComputerName
snapshotThe snapshot command monitors jobs and manages snapshots.
The following command types can be used for the snapshot command:v del - Use to delete a specified snapshot. For example, you can use the following
command:snapshot del (-rid command_tag_parameter | -rdesccommand_tag_parameter) -type action_type
The following list provides details about tags and parameters:– rid - The snapshot ID.
168 Installation and User's Guide

– rdesc - The snapshot description.– type - There are two parameters for type: VIEW_TYPE and ACTION_TYPE.
For the VIEW_TYPE parameter, the options are running, history, info, andevents. Use running to view snapshots that are running. Use history to viewsnapshots that have been taken. Use info to view information for specificsnapshots. Use events to view events for running snapshots. For theACTION_TYPE parameter, the options are info and force. Use info to getinformation and not perform any action. Use force to perform the action andignore any warnings that are displayed.
v view - Use this type to view a list of jobs that are running. You can use thefollowing example when running the command:snapshot view type view_type [-ridcommand_tag_parameter | -rdesc command_tag_parameter]
To view a history of all jobs that have run, you can use the following command:snapshot view -type history
The following list provides details about tags and parameters:– rid - The snapshot ID.– rdesc - The snapshot description.– type - There are two parameters for type: VIEW_TYPE and ACTION_TYPE.
For the VIEW_TYPE parameter, the options are running, history, info, andevents. Use running to view snapshots that are running. Use history to viewsnapshots that have been taken. Use info to view information for specificsnapshots. Use events to view events for running snapshots. For theACTION_TYPE parameter, the options are info and force. Use info to getinformation and not perform any action. Use force to perform the action andignore any warnings that are displayed.
v restore - Use this type to restore a snapshot to a specified volume. You can usethe following example when running the command:snapshot restore (-rid command_tag_parameter | -rdesccommand_tag_parameter) -agent command_tag_parameter
The following list provides details about tags and parameters:– rid - The snapshot ID.– rdesc - The snapshot description.– agent - The volume description.
v restore_last - Use this type to restore the most recent snapshot of policy andvolue. The snapshot is restored to a specified volume. You can use the followingexample when running the command:snapshot restore_last -sourcePolicy command_tag_parameter-sourceVolume command_tag_parameter -destinationVolumecommand_tag_parameter -restoreType command_tag_parameter[-force command_tag_parameter]
The following list provides details about tags and parameters:– sourcePolicy - The name of the snapshot policy. This tag and parameter is
case sensitive.– sourceVolume - The signature of snapshot volume as displayed in FastBack
Manager volume properties. For example: 0x1234567a.– destinationVolume - The system name and signature of snapshot volume as
displayed in FastBack Manager volume properties. The following formatshould be used: server@signature. For example: winxp_station@0x1234567a
Chapter 9. Administrative Command Line 169

– restoreType - There are three restore types: full, incremental, andincremental-last. Full means a complete restoration. Incremental means only theaccumulated changes from the previous incremental restore are restore.Incremental-last means that only the previous valid snapshot is restored.
– force - Specify this tag to ignore open files and applications during therestore. Instead of using this option, close the open files and applications onthe target volume.
utilThe util command is used for utilities operations.
The following format should be used for the util command:util <command_type> command_tag_parameter
The following command types can be used for the util command:v view - Use to view util parameters. There are three parameters: time, log_level,
and IP. For example, you can use the following command:util view (time | log_level)
The log_level options are none, errors, warnings, and all.v exec - Use to reset the FastBack Server. For example, you can use the following
command:util exec reset_xpress_server
v set - Use to set util parameters. There are two parameters: time and log_level.The log_level options are none, errors, warnings, and all. You can use thefollowing examples when running the util command with these options:util set log_level warningsutil set time 09-20-2008 17:30:25 reset_xpress_server
verYou can use the ver command to view versions.
Use the following command for the ver command:ver view
170 Installation and User's Guide

Chapter 10. Best practices
There are best practices for Oracle consistent backup and SQL server with namedinstances backup. The following sections contain details about the best practices.
Best practices for consistent back ups of Oracle databasesThis section describes how to use external scripts to complete consistent backupsof Oracle databases. The following Oracle versions are supported: Oracle9i andOracle10g.
To avoid database inconsistency, databases and logs should be backed up at thesame time. The logs that you back up should include control logs and redo logs.When restoring a database, the logs should also be restored from the same point intime.
PrerequisitesBefore beginning a backup of the Oracle database, verify that all prerequisites aremet.
The following list identifies the prerequisites to complete before backing up theOracle database:v Open the Oracle database.v Verify that the database is in ARCHIVELOG mode. If the database is not in
ARCHIVELOG mode, use one of the following procedures to change toARCHIVELOG mode:– For version Oracle9i, complete the following steps:
1. Back up the database. Backing up the database is a safeguard in caseproblems occur while trying to change to ARCHIVELOG mode.
2. Use the Enterprise Management console to log on to the Oracle database.3. Click Network → Databases → Database_Name → Instance →
Configuration to open the database configuration window.4. Go to the Recovery tab.5. Select Archive Log Mode and click Apply.6. A Shutdown Options window is displayed. Choose a normal shutdown
and click Apply.7. After the pop-up database window is closed, click Network → Databases
→ Database_Name → Instance → Configuration to open the databaseconfiguration window.
8. Go to the General tab.9. Click All Initialization Parameters.
10. Set the log_archive_start to true.11. Click Apply.When the startup is complete, the settings are ready for performing a hotbackup.
– For version Oracle 10g, complete the following steps:1. Back up your database. Backing up the database is a safeguard in case
problems occur while trying to change to ARCHIVELOG mode.
© Copyright IBM Corp. 2008, 2009 171
2. Open Database Control.3. Go to Maintenance → Backup/recovery settings → Recovery settings.4. Select Archive Log Mode.5. In the Shutdown Options window, click Yes to restart the system.
General guidelines
To perform consistent application-aware snapshots, complete the following steps:1. Oracle databases should be switched to backup mode. Switching to backup
mode ensures database consistency. To switch to backup mode, use a preconsistency-point script.
2. After a snapshot is initiated, Oracle databases should be switched back tonormal mode, using a pre snapshot script.
3. After the snapshot is complete, create and use a post snapshot script to deleteall archived redo logs of the database that was backed up.
Scripts
The following two scripts should be customized to perform applicationconsistency:v Oracle9i_PreConsistencyPoint.bat or Oracle10g_PreConsistencyPoint.bat - A
batch file that switches the Oracle databases to a consistency state, suitable for ahot backup start. Running this batch file also creates a Recovery_[databasename].sql script.
v Oracle9i_postConsistencyPoint.bat or Oracle10g_PostConsistencyPoint.bat - Abatch file that switches the Oracle databases out of the consistency state.
The Recovery_[database name].sql file is used if the database does not open after abackup operation. [database name] is the name of your Oracle database. This file isautomatically created for every database that is backed up. Use this file when thedatabase tablespaces are in backup mode and the database cannot be opened. Thefile can also be used after a restore operation, if the database does not start up andprompts with a message about tablespaces in need of media recovery.
The following files should not be changed:v Oracle9i_CreatePreConsistencyPointScript.sqlv Oracle10g_CreatePreConsistencyPointScript.sqlv Oracle9i_CreatePostConsistencyPointScript.sqlv Oracle10g_CreatePostConsistencyPointScript.sql
Create a script that deletes all archived redo logs of the backed up database. Savethe script to the following path: C:\Program Files\Tivoli\TSM\FastBack\client\scripts.
Preparing the system
To prepare the system, install FastBack Client on the Oracle server.
172 Installation and User's Guide

FastBack Server setup
The following list provides instructions for performing scheduling of consistentsnapshots, using scripts provided with Tivoli Storage Manager FastBack andFastBack Manager:
Note: In the file names specified, XX stand for the Oracle version: 9i or 10g.1. Based on the existing databases, change the following fields in the
OracleXX_PreConsistencyPoint.bat and OracleXX_PostConsistencyPoint.batfiles:a. Change the system user name in the field ORACLE_USR at the top of the
file.b. Make sure the Oracle user name you use has Alter system and Alter table
spaces privileges.c. Change the system user password in the field ORACLE_PWD at the top of
the file.d. Change the database path field ORACLE_DB according to your databases
settings. For every Oracle database that you have, make sure that a sectionexists in OracleXX_PreConsistencyPoint.bat andOracleXX_PostConsistencyPoint.bat. For example, add lines to the script toperform the operation on additional databases.
2. Define a policy using FastBack Manager. The policy schedules the backup ofthe volumes that Oracle databases reside on.
3. Go to the Pre or Post Processes tab and complete the following steps:a. Select Pre Consistency-Point. For the script, type
OracleXX_PreConsistencyPoint.bat.b. Select Pre Snapshot. For the script, type
OracleXX_PostConsistencyPoint.bat.c. Select Post Snapshot. Type the name of the script you have written to delete
all archived redo logs of the backed up database.d. Click Apply.
Restore to separate host
The best way to test the usability of backups is to restore them to a separate hostand attempt to open the database, performing media recovery if necessary.
This option requires that you have a separate host available for the restoreprocedure.
Use DBVERIFY programYou should get all data file names and perform the physical data structureintegrity check that the DBVERIFY utility performs on each file.
The DBVERIFY utility is an external command-line utility that performs a physicaldata-structure integrity check on an offline data file.
Use DBVERIFY primarily when you need to make sure that a user-managedbackup of a data file is valid before it is restored, or as a diagnostic aid when youhave encountered data corruption problems.
The name and location of DBVERIFY depends on your operating system.
Chapter 10. Best practices 173
Restoring the Oracle databaseTo avoid database inconsistency, databases and logs should be backed up at thesame time. The logs that you back up should include control logs and redo logs.When restoring a database, the logs should also be restored from the same point intime.
To restore the backed up Oracle database, complete the following steps:1. Shut down the Oracle database.2. Perform volume restore, using the Snapshots Monitor tab of FastBack Manager,
or use FastBack Mount to perform an Instant Restore on Oracle databasevolumes.
3. Start the Oracle database.
Troubleshooting
Problem: The scripts log contains the following line:ALTER TABLESPACE ... BEGIN BACKUP*ERROR at line 1:ORA-03217: invalid option for alter of TEMPORARY TABLESPACE
Workaround: There is no problem. The message indicates that the temporary tablespace is not backed up.
Problem: After using the ApplicationConsistency.bat script file, the Oracle databasedoes not start, prompting a message about tablespaces that need media recovery.
Workaround: Use the Recovery.sql script from the SQL*PLUS worksheet.
Running the recovery script
For an Oracle 10g database, the recovery script is run using the SQL*PLUS editor.
For an Oracle 9i database, the recovery script is run using the Oracle SQL*PLUSworksheet. To run the recovery script for an Oracle 9i database, complete thefollowing steps:1. Open Oracle 9i SQL*PLUS worksheet for the desired database using the sysman
credentials.2. Use the Worksheet → Run Local Script option for navigating to the location of
the recovery script.3. From C:\Program Files\Tivoli\TSM\FastBack\client\scripts, select the
recovery batch file.4. In the SQL*PLUS editor, add inverted commas on the path edges. For example,
to run the command, you could enter the following command:@"C:\Program Files\Tivoli\TSM\FastBack\client\scripts\RecoveryMYDB.sql
Best practices for SQL server with named instances back upIf you are using an operating system that supports the VSS service, completevolume snapshots using the VSS service with FastBack Manager. Do not use theinstructions that describe how to use external scripts to perform a consistent backup of the SQL Server databases.
174 Installation and User's Guide
The information applies to SQL Server 2005, Version 9, SP2 or later. Theinstructions provided were tested on a SQL Server Enterprise Edition 2005, Version9, SP 3 database.
Consistency point
To initiate application-aware snapshots, complete the following steps:1. Disable the VSS service. The VSS service must be disabled before running the
snapshot.2. Notify the SQL Server database administrator that a snapshot is going to run.3. Initiate the snapshot.4. Notify the SQL Server database administrator that the snapshot is complete.
Pre or Post Processes scriptsThe XRSQL.ini file should be customized to perform application consistency.XRSQL_PreConsistencyPoint.bat runs XRSQL_Snap.exe one time for everydatabase.
XRSQL_PostConsistencyPoint.bat batch files notifies XRSQL_Snap.exe that thesnapshot is performed, and that the SQL Server can continue running normally.
FastBack Server setup
To schedule consistent snapshots using scripts for FastBack Server and FastBackManager, complete the following steps:1. In the XRSQL.ini file, for every database, add another [databaseN] section. The
section should include the following lines:instance=database_name=
2. In the XRSQL.ini file, in all [databaseN] sections, for the instance field, changethe instance name.
3. In the XRSQL.ini file, in all [databaseN] sections, for the database_name field,change the database name.
4. For each database, add a new section. Increment the database number. Forexample, database1, database2, and database3.
5. Define a policy using FastBack Manager. The policy schedules the volumebackup for the SQL Server databases reside. (Do not choose the SQL Servericon on the FastBack Manager)
6. Integrating consistency scripts - on the last step of the policy creation wizard,or after the policy was created:
7. Go to the Pre or Post Processes tab and complete the following steps:a. Select Pre Consistency-Point. For the script, type
XRSQL_PreConsistencyPoint.bat.b. Select Pre Snapshot. For the script, type XRSQL_PostConsistencyPoint.bat.c. Click Apply.
Master databases should be the last database frozen. For example,[database1]instance=database_name=DB_NIR
Chapter 10. Best practices 175

[database2]instance=database_name=MASTER
If a cluster is used, edit the following section:[server]name=
If a cluster is not used, do not edit this section.
176 Installation and User's Guide

Chapter 11. Problem determination
This information describes some common problems that you might have with theTivoli Storage Manager FastBack and provides possible solutions.
Messages
ProblemWhen you try to access a shared folder over the network the followingmessage is displayed:FBSG7354E: The specified location is not accessible.
SolutionThe cause of the problem is that the FastBack Server service does not havepermissions to open shared volumes. You can resolve this problem bychanging the log on credentials from Local System to Administrator. Tochange these log on credentials, complete the following steps:1. From the Windows Start menu, select Start → Control Panel →
Administrative Tools → Services.2. Right-click to select the FastBack Server service; then, click Properties.3. In the Properties window, go to the Log On tab.4. In the Log on as list, select This Account.5. Enter the administrator account and authenticate with the domain
controller.6. Click OK.
ProblemWhen you try to remove the only repository on the FastBack Server thefollowing message is displayed:FBSG4161W Snapshots relocation is impossible
SolutionYou cannot remove a repository volume from the repository space that hasonly one repository volume defined. To resolve this problem add anotherdisk or volume to the repository pool before deleting the repository.
ProblemWhen you start FastBack Manager, the following message is displayed:FBSG7072E FastBack Manager failed to initiate.Non-English system.
SolutionThis message is displayed if Tivoli Storage Manager FastBack, Version 5.5.0is installed on a non-English system. Install an National Language Support(NLS)-enabled version of Tivoli Storage Manager FastBack that supportsyour language.
ProblemWhen you right-click a selected snapshot; then, click Erase, the followingmessage is displayed:FBSS5013W Can't retrieve snapshot information.
SolutionThis message is displayed if a clean up or replication process is running.Stop all clean up and replication processes. Erase the snapshot.
© Copyright IBM Corp. 2008, 2009 177
ProblemWhen you add repository space on a system disk, the following message isdisplayed:FBSG7352E Cannot allocate repository object on a boot disk.
SolutionYou cannot create repository space on the operating system disk. To resolvethis problem, create the repository disk on a disk that is not the operatingsystem disk.
ProblemDuring a snapshot the following message is displayed in FastBackManager:FBSG7223E The operation failed on some or all of the volumes.
SolutionThe message indicates that the FastBack Client is not connected. FromFastBack Manager, select General Configuration → Storage Pool to see ifthe client is connected. If the client is not connected, go to the clientsystem, open the FastBack Client Configurator and type the correct hostname or IP address for the FastBack Server.
ProblemWhen you try to connect to the FastBack Server the following message isdisplayed:FBSG5804E Please verify IP/Computer name because ofconnection failure at <FastBack Server host name>
SolutionTo resolve this problem, complete the following steps:1. Verify that the FastBack Server service has started. To check status of a
service, from the Windows Start menu, go to Start → Control Panel →Administrative Tools → Services. In the Services window, make surethat the FastBack Server service is started.
2. If the FastBack Server service starts, but shuts down soon after starting,identify and resolve the start up problem. Check the Windows EventLogs by going to Start → Control Panel → Administrative Tools → EventViewer.
3. Verify that the FastBack Manager is configured to point to theappropriate host name for the FastBack Server. Use the Windows ping,tracert, and nslookup commands from the Windows command line todetermine if the FastBack Server host can be contacted using the nameor IP address identified in the message.
4. If there are multiple network adapters on the host where the FastBackManager is installed, verify that they are configured such that thenetwork where the FastBack Server host resides is on the primarynetwork connection for the host. You can check by using the WindowsNetwork Connections window. The Advanced Settings window shouldprovide this information.In addition, identify the network that the FastBack Server is located on.In the Advanced Settings window, on the Adapters and Bindings tab,make sure the network is at the top of the Connections list.
5. Save any changes.6. Restart the FastBack Server.
178 Installation and User's Guide

ProblemIn the Windows Event Viewer (Vista/Windows 2008) the followingwarning message is displayed:Volume Shadow Copy Service warning: ASR writer Error0x8007001. hr=0x00000000.
SolutionYou can ignore this message. The message is displayed only when thesnapshot starts while there is a mounted snapshot using FastBack Mount atthe backed up server. You can avoid the message by dismountingsnapshots before starting a new snapshot.
ProblemIn the Windows Event Viewer (Vista) the following message is displayed:Unexpected error VSS_E_WRITER_STATUS_NOT_AVAILABLEAn older active writer session state is being overwrittenby a newer session. The most common cause is that thenumber of parallel backups has exceeded the maximumsupported limit. hr = 0x80042409
SolutionYou can ignore this message. The message has no effect on the snapshot.
ProblemYou cannot mount the snapshot using FastBack Mount. The followingmessage is displayed:FBSM8014E Repository is locked by FastBack DR or Fastback Server
SolutionThe problem is caused by a permissions configuration error during theTivoli Storage Manager FastBack installation process. To correct theproblem, complete the following steps:1. Log on to the FastBack Manager.2. On the Configuration tab, click General Configuration. In the main
window, select the FastBack Mount Access tab. Note the User andDomain.
3. On the affected system, open Windows Explorer and navigate to theFastBackSync folder. The default folder location is: C:\Documents andSettings\All Users\Application Data\Tivoli\TSM\FastBack\FastBackSyncBy default, the Application Data folder is a hidden folder.
4. Right-click on the FastBackSync folder; then click Sharing andSecurity.
5. In the properties window, go to the Sharing tab.6. Click Permissions.7. Add the user account that is defined on the FastBack Mount Access
tab. Give the account Read and Change Permissions.8. If the Everyone account is listed, either remove the Everyone account
from the Group or user names list or remove all access permissionsfor the Everyone account. The access permissions are under thePermissions for Everyone heading.
9. Click OK to save the changes.10. Restart the FastBack Mount utility. Remount the volume.
ProblemWhen installing the FastBack Client the installation process fails with thefollowing error message:
Chapter 11. Problem determination 179
Error 1722. There is a problem with this Windows Installerpackage. A program run as part of the setup did not finishas expected. Contact your support personnel or package vendor.
This problem can also be indicated by the following error message:Error code: -2146368420 [0x8011045c]exit code 112No messages on com+ errors.
SolutionThe problem occurs when FastBack Client tries to register XR_VSS, butXR_VSS was previously registered. XR_VSS is the Tivoli Storage ManagerFastBack VSS provider. To resolve this problem, complete the followingsteps:1. Uninstall FastBack Client.2. Restart the system.3. Go to Control Panel → Administrative Tools → Component Services.4. Go to Console Root → Component Service → Computers → My
Computer → COM+ Application.5. Select XR_VSS and delete it.6. Reinstall FastBack Client.7. Restart the system.
ProblemDuring the FastBack Client installation, the following message is displayed:FBSM8007E Virtual Volume driver not enabled
The virtual volume driver is not installed. If you ignore this message, themessage is displayed during a mount of a snapshot on the FastBack Client.
SolutionInstall the virtual volume driver with the Windows Add Hardware wizard.For instructions about how to use the wizard, see the Microsoft Windowsdocumentation. After you install the virtual volume driver, open FastBackMount and mount a snapshot.
ProblemWhen you try to log on to the remote repository share, the log on failswhen the username and password are entered. The following message isdisplayed:FBSM8026E <sharename> is inaccessible or not a repository
SolutionWhen you enter the credentials to connect to remote share, use thefollowing domain and username: DomainName\administrator
FastBack Server
QuestionWhat is the maximum number of generations for a policy?
AnswerTivoli Storage Manager FastBack can support 1440 generations per policy.
The number of generations impacts the FastBack Server repository spacerequirements because clean up cannot run on any generation of snapshoton a policy until after the maximum number of generations are stored.
180 Installation and User's Guide

ProblemMoving an existing FastBack Server to a different system without losingthe configuration settings.
SolutionIf you upgrade your FastBack Server or move the FastBack Server toanother system, you can use this as a general guide for how to move andwhat files to move to another system.
This information applies to FastBack Servers that are running withaccessible data. This information maintains your backup data, repository,policies, and schedules.1. Shut down the FastBack Server.2. Remove the FastBack Server from the network.3. Attach the new server to the network.4. Start the new server.5. Move any physical drives that need to be attached to the system that
is the new FastBack Server. If you attach a drive or disk array to theFastBack Server after the Tivoli Storage Manager FastBack has beeninstalled, use the Disk Open tool. You use the Disk Open tool toidentify read and write privileges for the FastBack Server. By default,any disk added to the FastBack Server after Tivoli Storage ManagerFastBack is installed is read only. For more information about the DiskOpen tool, see “Disk open” on page 133
6. Verify that you the system that is the new FastBack Server meets allhardware and software requisites. For FastBack Server hardwarerequirements, see “FastBack Server requirements” on page 15. ForFastBack Server software requirements, see “Software requirements”on page 20.
7. Install the FastBack Server. For FastBack Server installationinstructions, see “Installing the FastBack Server” on page 24.If you change the network name or IP address for the server, open theFastBack Client Configurator on the client systems. Change the targetto the new FastBack Server.
8. Copy the following files from the C:\Documents and Settings\AllUsers\Application Data\Tivoli\TSM\FastBack\Server directory onthe old server:v History.txt and History.txt.sig - These files track all snapshots in the
repository.v Orabr_Conf.txt and Orabr_Conf.txt.sig - These files track the general
configuration. In the Orabr_Conf.txt file, you can configure theSMTP sender field. Look for the SMTP Sender Name setting, in the[Heart Beat] section.
v Conf.txt and Conf.txt.sig - These files track the policy andscheduling configurations.
v Clog10.sf - This file includes general log and error messages.
These files should be stored in the following directories on the newserver:v C:\Documents and Settings\All Users\Application
Data\Tivoli\TSM\FastBack\Serverv C:\Documents and Settings\All Users\Application
Data\Tivoli\TSM\FastBack\Server\Mirror
Chapter 11. Problem determination 181
v Root directory of each repository volume9. Start the new FastBack Server. The server does not, by default, know
the location of the repository space.10. Start FastBack Manager. If FastBack Manager starts in limited mode,
you cannot go to the next step until you fix the problem. For moreinformation about limited mode, see “Limited mode” on page 135.
11. Go to Configuration → General Configuration → Storage Pool →Repository Pool.
12. Right click to select the repository pool; then, click Claim Repository.You need to claim each repository space that you had for the oldserver.
13. Verify that the data transfer worked by making sure all of yoursettings are displayed in the Configuration menu.
14. Verify that the policies are displayed in FastBack Manager.15. Right click to select a policy; then, click Run Snapshot. This step
verifies that the new server communicates with clients.16. Go to the Snapshots Monitor tab to verify that the snapshot ran as
scheduled.
Administrative Command Line
ProblemWhen using the Administrative Command Line, when you run theinteractive mode command, an error message is displayed.
SolutionOpen a command prompt and run the following command:FastBackShell.exe -i
The FBSC6419E message is displayed. The interactive mode is notavailable. At this time, there is no workaround.
You can enter the following command to see a list of available commands:FastBackShell.exe -h
To run the Administrative Command Line from the command line, enterthe following command:FastBackShell.exe -c
To run the Administrative Command Line from a script file, enter thefollowing command:FastBackShell.exe -s
FastBack Mount
ProblemWhen you try to mount a volume, the mount fails because the correctcredentials for the remote repository share are not entered. The followingmessage is displayed:FSBM8011E not permitted to mount this job
SolutionTo mount a snapshot, complete the following steps to log on correctly:1. From FastBack Mount, the Select repository section, click Remove.2. From the Select repository list, select Browse for Folder.
182 Installation and User's Guide

3. Select a remote repository share.4. Enter the username and password. The username must be
domain\username.
ProblemThe FastBack Mount icon is not displayed in the Windows System Traywhen using the Windows Remote Desktop Connection. The WindowsRemote Desktop Connection is also known as the Microsoft TerminalService Client (mstsc.exe).
SolutionThe problem occurs when the Windows Remote Desktop Connection orMicrosoft Terminal Service Client is used without the /admin or /consoleswitches. To determine which switch to use, open a Windows commandline and enter the following command:mstsc.exe /?
Either the /admin or /console switch is displayed. Use the displayedswitch when starting sessions on the system. The following examplesprovide syntax for both options:mstsc.exe /v:system.domain.com /adminmstsc.exe /v:system.domain.com /console
The user that logs on using the /admin or /console switches must be amember of the Administrator Group on the target system.
ProblemAfter a backup, a restore file or folder inherits permissions from the parentfolder, rather than the original permissions associated with the file. If youuse Windows Explorer to drag and drop a file or folder from an imagemounted with FastBack Mount to a target folder, the original securitypermissions of the object are not restored. The file or folder inheritspermissions from the folder it was copied to.
SolutionTo restore a file or folder from a mounted image with the originalpermissions, use the Windows command line tool, XCOPY, to restore data.For more information about using the XCOPY command, see the Microsoftdocumentation.
ProblemContinuous Data Protection in unavailable with FastBack Mount andInstant Restore.
SolutionFastBack Mount and Instant Restore use incremental snapshots.Continuous Data Protection cannot work with incremental snapshotsbecause Continuous Data Protection restores an entire volume to a singlepoint in time based on the writes to the volume at a particular point intime. Snapshots with Continuous Data Protection must be restored usingthe Snapshot Monitor in FastBack Manager.
FastBack Manager
ProblemIn FastBack Manager, the following message is displayed:The volume configuration of the following Client has changed:Volume "C:" to "(C:\-Obsolete)" on Client 'filesxsrv'.Super user should delete and rebuild the affect Client Group if any.
Chapter 11. Problem determination 183
In addition, when incremental snapshots run, the following message mightbe displayed:The operation failed on some or all of the volumes.Refer to the Server log for details.Check the Client status and reset the Server.
SolutionThe message can display for any drive that belongs to any FastBack Client.The message is displayed because the disk signature of one of the volumeshas changed. The disk signature is calculated with the following values:v Physical signaturev Size of the partitionv Offset of the partitionv If not in SAN mode, the server name
If any of these values change on the FastBack Client, a new disk signatureis calculated. Within seconds of the change, the old disk signature isreported as nonexistent. The other drive with the new disk signature isrecognized.
To resolve this problem, complete the following steps:1. From FastBack Manager, select General Configuration → Client
Groups.2. Select all groups referenced in the message. One of the volumes that
you select should be labeled with the following status: Obsolete
3. The volume with the Obsolete status is the volume with the old disksignature. To update FastBack Client, click on the new volume and clickApply. The volume with the Obsolete status is removed.
For a cluster with the SAN Module enabled, the client group does not haveto be marked again.
ProblemFastBack Manager does not start after FastBack Server is installed. Themessage states that the operating system cannot find javaw.
SolutionFastBack Manager is a Java-based GUI and needs the following JavaRuntime Environment (JRE) to run: IBM 32-bit SDK for Windows, Java 2Technology Edition, Version 5.0
If the required JRE is installed on the FastBack Server, you do not have toinstall the JRE on the system with FastBack Manager. You can install theJRE on the system with FastBack Manager.
To check the version of the JRE that is installed, from a command promptwindow, enter the following command:java -version
ProblemFastBack Manager fails during the login process.
SolutionThe following list identifies reasons why FastBack Manager does not start,or starts and shuts down:v The FastBack Server service is not started.v A message reports that access is denied.
184 Installation and User's Guide

To verify that the FastBack Server service is started, from the WindowsStart menu, go to Start → Control Panel → Administrative Tools → Services.In the Services window, make sure that the FastBack Server service isstarted.
To determine if and why access is denied, check the Windows SecurityEvent Log for any access denied messages related to Tivoli StorageManager FastBack.
ProblemIn the FastBack Manager Storage Pool window, there are no FastBackClients displayed. This problem occurs when you use a firewall or add anew Network Interface Card (NIC). When you use a firewall or add a newNIC, the FastBack Server cannot communicate with or display FastBackClients in the FastBack Manager Storage Pool window.
SolutionTo resolve this problem, complete the following steps:1. From the Windows Start menu, select Start → All Programs →
Accessories → Communications → Network Connections.2. From the Advanced menu, select Advanced Settings.3. Go to the Adapters and Bindings tab, in the Connections section, see if
the NIC that should be used is at the top of the list.4. In the NIC is not at the top of the list, complete the following steps:
a. Click Start → Run.b. Type services.msc.c. Click OK.d. Find and stop the FastBack Server and FastBack Watchdog services.
5. In the Adapters and Bindings tab, in the Connections section, select theNIC that the FastBack Server should use and move it to the top of thelist by clicking the arrow to the right of the list.
6. Start the FastBack Server service.7. Start the FastBack Manager and look at the Storage Pool window. The
FastBack Clients should be displayed.8. If the FastBack Clients are not displayed, determine if a firewall is
active on the NIC that the FastBack Server should be using. If thefirewall is enabled, ensure the correct ports are open. For a list of portsthat should be open, see “Working with FastBack Manager in WANenvironment” on page 56.
FastBack Client
ProblemContinuous Data Protection incremental snapshots and regular incrementalsnapshots complete successfully, but, in the Snapshots Monitor tab, display0KB.
SolutionExcept for incremental delta blocks, all snapshots of the FastBack Clientcomplete successfully, but show 0KB in the size column. Incremental deltablocks that complete successfully display an actual size greater than 0KB.To resolve the problem, uninstall and reinstall FastBack Client.
Chapter 11. Problem determination 185

ProblemIncremental snapshot backups with FastBack Client process more data thanexpected and are larger than expected.
SolutionThe problem occurs because blocks are changing on the volume that isbacked up. The FastBack Client backs up any block-level change thatoccurs on the volume after the last snapshot backup is taken. This backupincludes any changes made by temporary or swap-based files, includingthe following changes:v Windows temporary folder (for example, C:\Windows\temp\)v Windows virtual paging file (for example, C:\pagefile.sys)v Recycle bin contents (for example, C:\Recycle Bin\)v Hibernation profiles (for example, C:\hiberfil.sys)v System volume cache (for example, C:\Sysvol)v Windows system restorev Disk defragmentation (for example, Windows defragmentation tool)v Anti-virus scans (for example, Symantec Anti-Virus)
To minimize the data that is backed up with each snapshot, identify andisolate any applications or Windows configuration that use space on thevolume. Make attempts to relocate file or folder locations used by theseapplications to volumes that are not part of the snapshot. In addition, donot disable or enable features that would suddenly delete or create largefiles, for example, configuring hibernation profiles.
186 Installation and User's Guide

Appendix. Notices
This information was developed for products and services offered in the U.S.A.IBM may not offer the products, services, or features discussed in this document inother countries. Consult your local IBM representative for information on theproducts and services currently available in your area. Any reference to an IBMproduct, program, or service is not intended to state or imply that only that IBMproduct, program, or service may be used. Any functionally equivalent product,program, or service that does not infringe any IBM intellectual property right maybe used instead. However, it is the user’s responsibility to evaluate and verify theoperation of any non-IBM product, program, or service.
IBM may have patents or pending patent applications covering subject matterdescribed in this document. The furnishing of this document does not give youany license to these patents. You can send license inquiries, in writing, to:
IBM Director of LicensingIBM CorporationNorth Castle DriveArmonk, NY 10504-1785 U.S.A.
For license inquiries regarding double-byte (DBCS) information, contact the IBMIntellectual Property Department in your country or send inquiries, in writing, to:
IBM World Trade Asia CorporationLicensing2-31 Roppongi 3-chome, Minato-kuTokyo 106, Japan
The following paragraph does not apply to the United Kingdom or any othercountry where such provisions are inconsistent with local law:
INTERNATIONAL BUSINESS MACHINES CORPORATION PROVIDES THISPUBLICATION ″AS IS″ WITHOUT WARRANTY OF ANY KIND, EITHEREXPRESS OR IMPLIED, INCLUDING, BUT NOT LIMITED TO, THE IMPLIEDWARRANTIES OF NON-INFRINGEMENT, MERCHANTABILITY OR FITNESSFOR A PARTICULAR PURPOSE.
Some states do not allow disclaimer of express or implied warranties in certaintransactions, therefore, this statement might not apply to you.
This information could include technical inaccuracies or typographical errors.Changes are periodically made to the information herein; these changes will beincorporated in new editions of the publication. IBM may make improvementsand/or changes in the product(s) and/or the program(s) described in thispublication at any time without notice.
Any references in this information to non-IBM Web sites are provided forconvenience only and do not in any manner serve as an endorsement of those Websites. The materials at those Web sites are not part of the materials for this IBMproduct and use of those Web sites is at your own risk.
© Copyright IBM Corp. 2008, 2009 187
IBM may use or distribute any of the information you supply in any way itbelieves appropriate without incurring any obligation to you.
Licensees of this program who wish to have information about it for the purposeof enabling: (i) the exchange of information between independently createdprograms and other programs (including this one) and (ii) the mutual use of theinformation which has been exchanged, should contact:
IBM Corporation2Z4A/10111400 Burnet RoadAustin, TX 78758 U.S.A.
Such information may be available, subject to appropriate terms and conditions,including in some cases payment of a fee.
The licensed program described in this document and all licensed materialavailable for it are provided by IBM under terms of the IBM Customer Agreement,IBM International Program License Agreement or any equivalent agreementbetween us.
Any performance data contained herein was determined in a controlledenvironment. Therefore, the results obtained in other operating environments mayvary significantly. Some measurements may have been made on development-levelsystems and there is no guarantee that these measurements will be the same ongenerally available systems. Furthermore, some measurement may have beenestimated through extrapolation. Actual results may vary. Users of this documentshould verify the applicable data for their specific environment.
Information concerning non-IBM products was obtained from the suppliers ofthose products, their published announcements or other publicly available sources.IBM has not tested those products and cannot confirm the accuracy ofperformance, compatibility or any other claims related to non-IBM products.Questions on the capabilities of non-IBM products should be addressed to thesuppliers of those products.
COPYRIGHT LICENSE:
This information contains sample application programs in source language, whichillustrate programming techniques on various operating platforms. You may copy,modify, and distribute these sample programs in any form without payment toIBM, for the purposes of developing, using, marketing or distributing applicationprograms conforming to the application programming interface for the operatingplatform for which the sample programs are written. These examples have notbeen thoroughly tested under all conditions. IBM, therefore, cannot guarantee orimply reliability, serviceability, or function of these programs. You may copy,modify, and distribute these sample programs in any form without payment toIBM for the purposes of developing, using, marketing, or distributing applicationprograms conforming to IBM‘s application programming interfaces.
Each copy or any portion of these sample programs or any derivative work, mustinclude a copyright notice as follows:
© (your company name) (year). Portions of this code are derived from IBM Corp.Sample Programs. © Copyright IBM Corp. _enter the year or years_. All rightsreserved.
188 Installation and User's Guide
If you are viewing this information in softcopy form, the photographs and colorillustrations might not be displayed.
TrademarksIBM, the IBM logo, and ibm.com are trademarks or registered trademarks ofInternational Business Machines Corporation in the United States, other countries,or both. If these and other IBM trademarked terms are marked on their firstoccurrence in this information with a trademark symbol (® or ™), these symbolsindicate U.S. registered or common law trademarks owned by IBM at the time thisinformation was published. Such trademarks may also be registered or commonlaw trademarks in other countries. A current list of IBM trademarks is available onthe Web at ″Copyright and trademark information″ at http://www.ibm.com/legal/copytrade.shtml.
Intel and Pentium are trademarks or registered trademarks of Intel Corporation orits subsidiaries in the United States and other countries.
Linux is a trademark of Linus Torvalds in the United States, other countries, orboth.
Microsoft and Windows are trademarks of Microsoft Corporation in the UnitedStates, other countries, or both.
UNIX is a registered trademark of The Open Group in the United States and othercountries.
Java and all Java-based trademarks and logos are trademarks or registeredtrademarks of Sun Microsystems, Inc. in the United States, other countries, or both.
Other company, product, and service names may be trademarks or service marksof others.
Appendix. Notices 189

190 Installation and User's Guide

Index
AActive Directory
adding groups 45Microsoft Active Directory
adding groups 45
Ddatabases
restoring 118
MModel database 118MSDB database
restoring 118
Rrestoring 118
Model or MSDB databases 118
Uuser accounts
creating 48deleting 49properties 48
user groupscreating 46
© Copyright IBM Corp. 2008, 2009 191

192 Installation and User's Guide


����
Printed in USA
SC23-8562-02