Tip Sheet Template Epic - memorialcare.org
13
TIP SHEET Scheduling_COVID-19 Community Vaccine Scheduling Workflows Page 1 of 13 © 2020 Epic Systems Corporation. Used with Permission. 01_2021 COVID-19 Community Vaccine Scheduling Workflows Overview.....................................................................................................................................................................1 Epic Log In Department and Resource Schedule ....................................................................................................1 Scheduling an Existing Patient in Epic ....................................................................................................................2 Scheduling a New Patient not in Epic .....................................................................................................................6 Schedule the 2 nd Dose Vaccine Appointment...................................................................................................... 10 Check In a Scheduled Appointment .................................................................................................................... 11 Overview Patients that qualify for the COVID-19 Vaccine will be administered by either the MMF Community Vaccine Clinic or MMF department. Users will schedule and arrive the patient in Epic using the Appointment Desk functionality. This tipsheet will review the Scheduling and Check In workflows needed to administer the vaccine. Epic Log In Department and Resource Schedule It is important that the user is logged into the correct department and resource schedule. 1. Validate that the user is logged into the MMF Comm Vacc Clinic department. 2. On the MPS (Multi Provider Schedule), navigate to the MMF LB Bellflower FM (All Providers) field and click the arrow to expand.
Transcript of Tip Sheet Template Epic - memorialcare.org
TIP SHEET
Scheduling_COVID-19 Community Vaccine Scheduling Workflows
Page 1 of 13 © 2020 Epic Systems Corporation. Used with Permission. 01_2021
COVID-19 Community Vaccine Scheduling Workflows
Overview .....................................................................................................................................................................1
Epic Log In Department and Resource Schedule ....................................................................................................1
Scheduling an Existing Patient in Epic ....................................................................................................................2
Scheduling a New Patient not in Epic .....................................................................................................................6
Schedule the 2nd Dose Vaccine Appointment...................................................................................................... 10
Check In a Scheduled Appointment .................................................................................................................... 11
Overview
Patients that qualify for the COVID-19 Vaccine will be administered by either the MMF Community Vaccine Clinic or MMF department. Users will schedule and arrive the patient in Epic using the Appointment Desk functionality. This tipsheet will review the Scheduling and Check In workflows needed to administer the vaccine.
Epic Log In Department and Resource Schedule
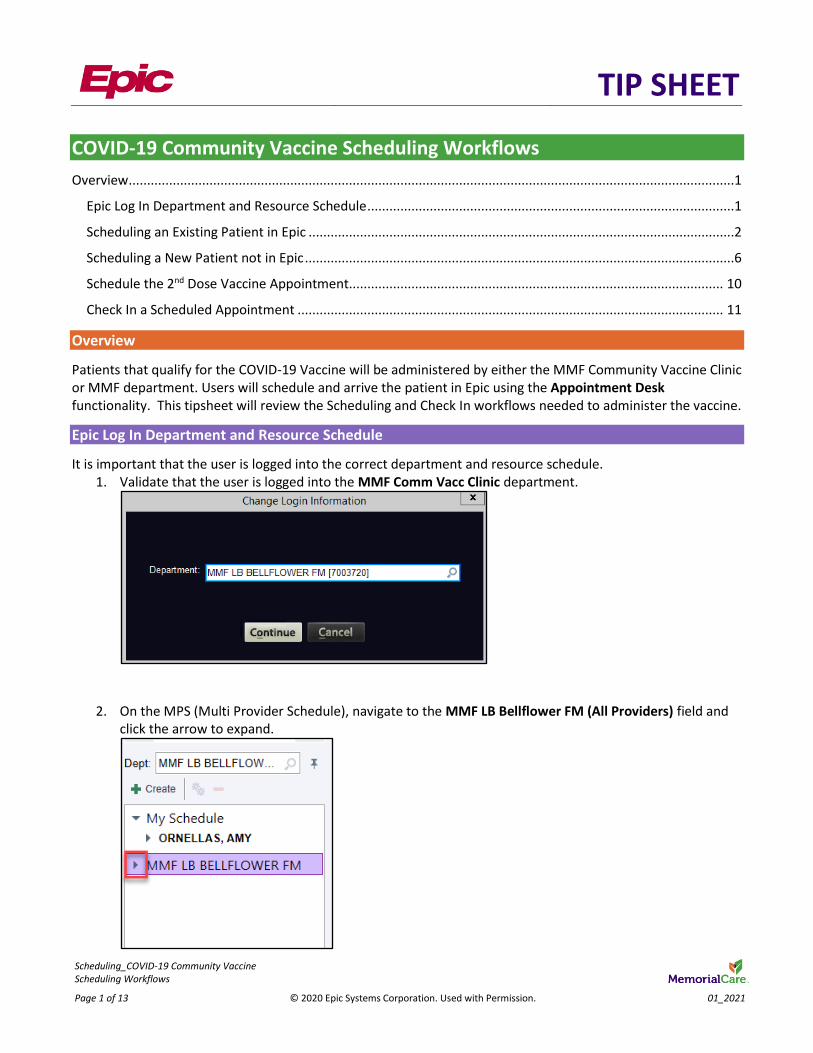
It is important that the user is logged into the correct department and resource schedule. 1. Validate that the user is logged into the MMF Comm Vacc Clinic department.
2. On the MPS (Multi Provider Schedule), navigate to the MMF LB Bellflower FM (All Providers) field and click the arrow to expand.
TIP SHEET
Scheduling_COVID-19 Community Vaccine Scheduling Workflows
Page 2 of 13 © 2020 Epic Systems Corporation. Used with Permission. 01_2021
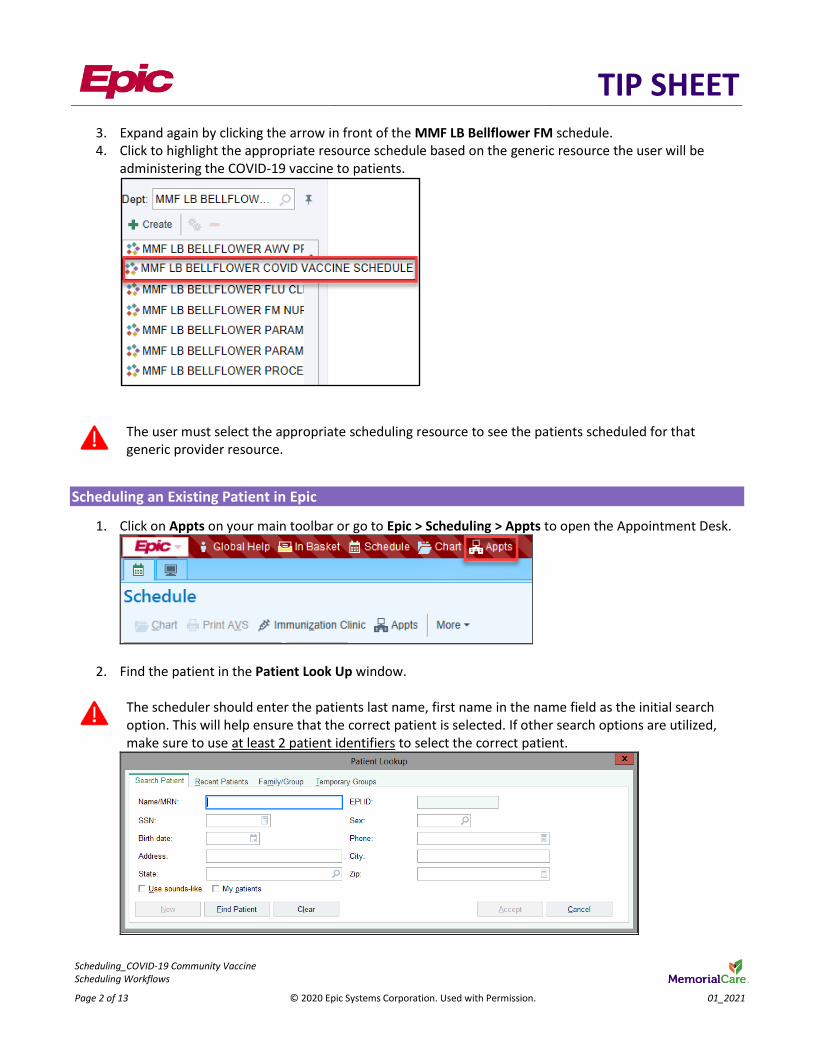
3. Expand again by clicking the arrow in front of the MMF LB Bellflower FM schedule. 4. Click to highlight the appropriate resource schedule based on the generic resource the user will be
administering the COVID-19 vaccine to patients.
The user must select the appropriate scheduling resource to see the patients scheduled for that generic provider resource.
Scheduling an Existing Patient in Epic
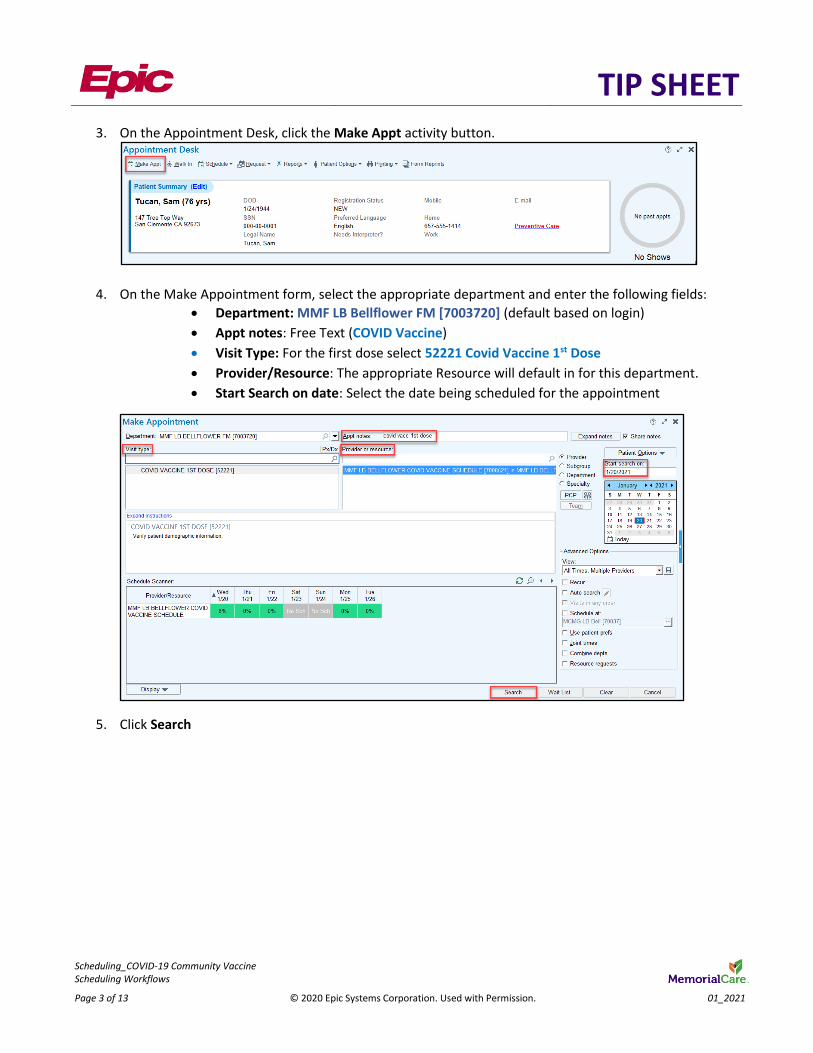
1. Click on Appts on your main toolbar or go to Epic > Scheduling > Appts to open the Appointment Desk.
2. Find the patient in the Patient Look Up window.
The scheduler should enter the patients last name, first name in the name field as the initial search option. This will help ensure that the correct patient is selected. If other search options are utilized, make sure to use at least 2 patient identifiers to select the correct patient.
TIP SHEET
Scheduling_COVID-19 Community Vaccine Scheduling Workflows
Page 3 of 13 © 2020 Epic Systems Corporation. Used with Permission. 01_2021
3. On the Appointment Desk, click the Make Appt activity button.
4. On the Make Appointment form, select the appropriate department and enter the following fields:
• Department: MMF LB Bellflower FM [7003720] (default based on login)
• Appt notes: Free Text (COVID Vaccine)
• Visit Type: For the first dose select 52221 Covid Vaccine 1st Dose
• Provider/Resource: The appropriate Resource will default in for this department.
• Start Search on date: Select the date being scheduled for the appointment
5. Click Search
TIP SHEET
Scheduling_COVID-19 Community Vaccine Scheduling Workflows
Page 4 of 13 © 2020 Epic Systems Corporation. Used with Permission. 01_2021
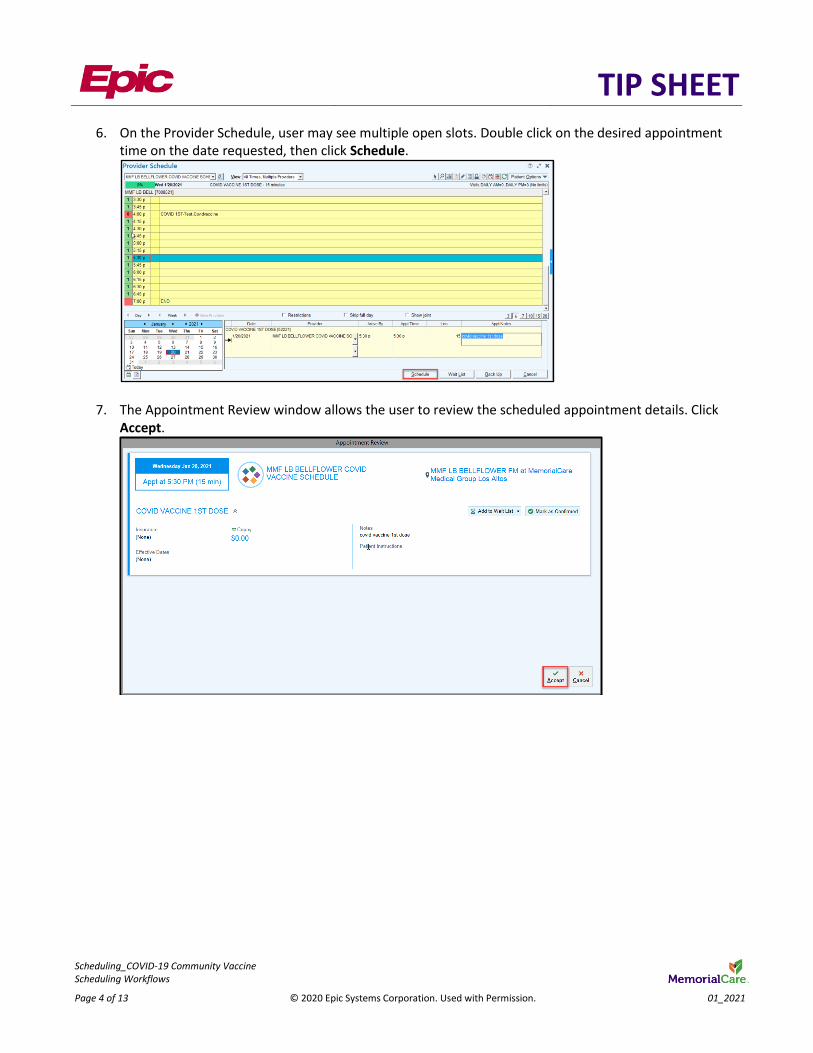
6. On the Provider Schedule, user may see multiple open slots. Double click on the desired appointment time on the date requested, then click Schedule.
7. The Appointment Review window allows the user to review the scheduled appointment details. Click Accept.

TIP SHEET
Scheduling_COVID-19 Community Vaccine Scheduling Workflows
Page 5 of 13 © 2020 Epic Systems Corporation. Used with Permission. 01_2021
8. The Appointment Information screen opens. Click Accept.
9. On the Interactive Face Sheet (IFS) confirm demographic and guarantor account information is correct, click Finish.
TIP SHEET
Scheduling_COVID-19 Community Vaccine Scheduling Workflows
Page 6 of 13 © 2020 Epic Systems Corporation. Used with Permission. 01_2021
Scheduling a New Patient not in Epic
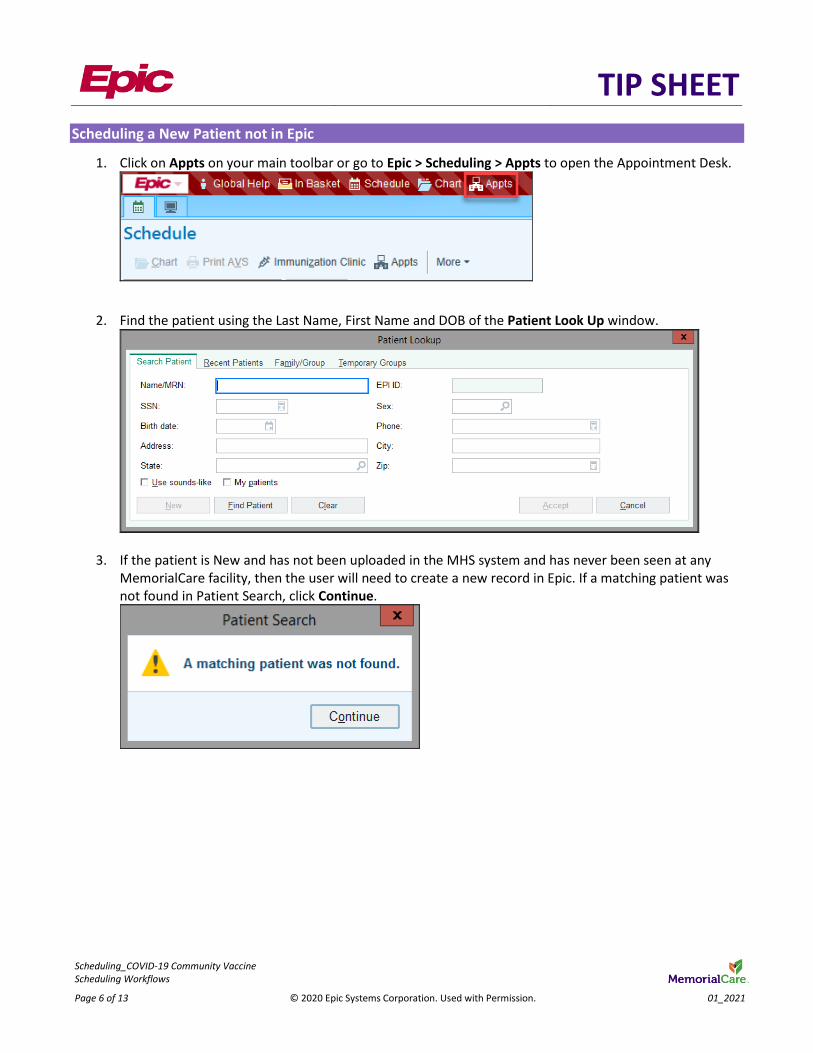
1. Click on Appts on your main toolbar or go to Epic > Scheduling > Appts to open the Appointment Desk.
2. Find the patient using the Last Name, First Name and DOB of the Patient Look Up window.
3. If the patient is New and has not been uploaded in the MHS system and has never been seen at any MemorialCare facility, then the user will need to create a new record in Epic. If a matching patient was not found in Patient Search, click Continue.
TIP SHEET
Scheduling_COVID-19 Community Vaccine Scheduling Workflows
Page 7 of 13 © 2020 Epic Systems Corporation. Used with Permission. 01_2021
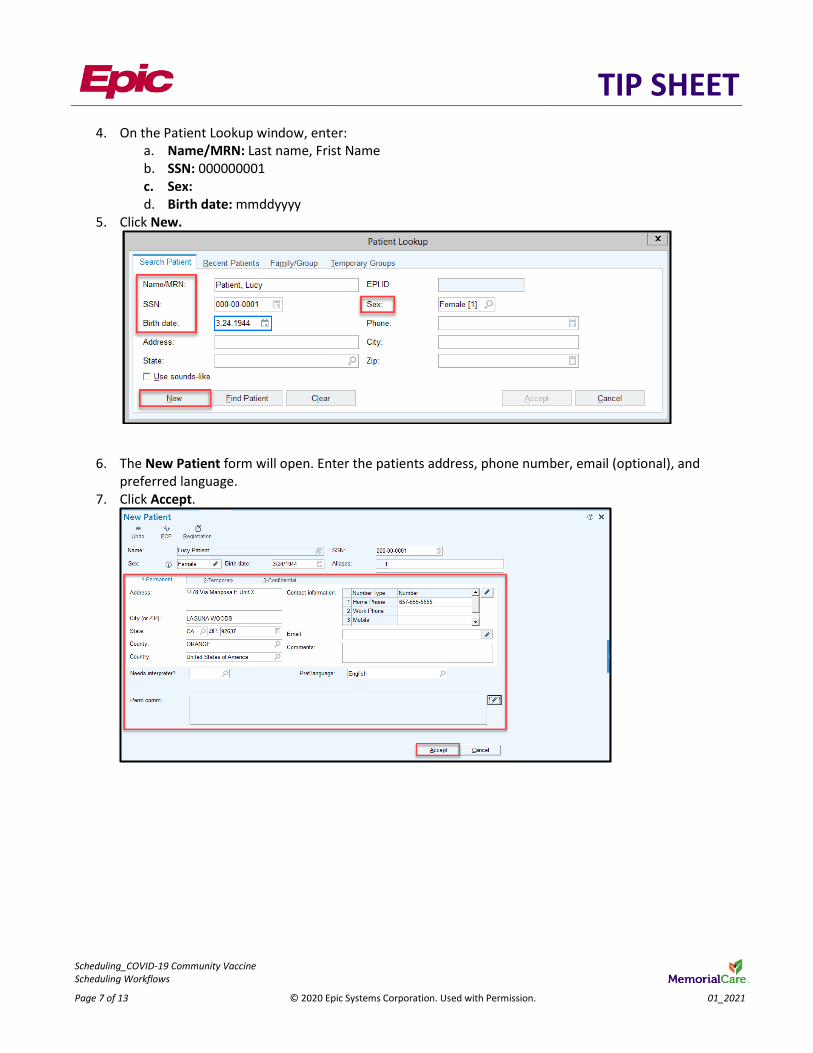
4. On the Patient Lookup window, enter: a. Name/MRN: Last name, Frist Name b. SSN: 000000001 c. Sex: d. Birth date: mmddyyyy
5. Click New.
6. The New Patient form will open. Enter the patients address, phone number, email (optional), and preferred language.
7. Click Accept.
TIP SHEET
Scheduling_COVID-19 Community Vaccine Scheduling Workflows
Page 8 of 13 © 2020 Epic Systems Corporation. Used with Permission. 01_2021
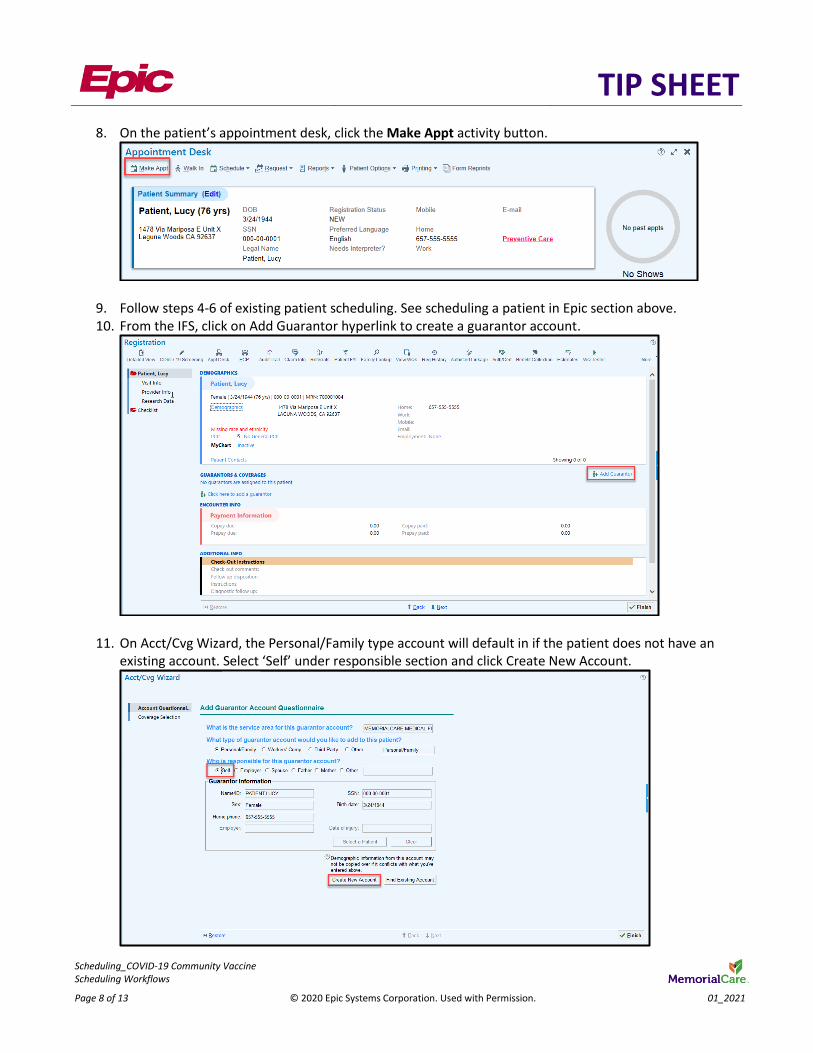
8. On the patient’s appointment desk, click the Make Appt activity button.
9. Follow steps 4-6 of existing patient scheduling. See scheduling a patient in Epic section above. 10. From the IFS, click on Add Guarantor hyperlink to create a guarantor account.
11. On Acct/Cvg Wizard, the Personal/Family type account will default in if the patient does not have an existing account. Select ‘Self’ under responsible section and click Create New Account.
TIP SHEET
Scheduling_COVID-19 Community Vaccine Scheduling Workflows
Page 9 of 13 © 2020 Epic Systems Corporation. Used with Permission. 01_2021
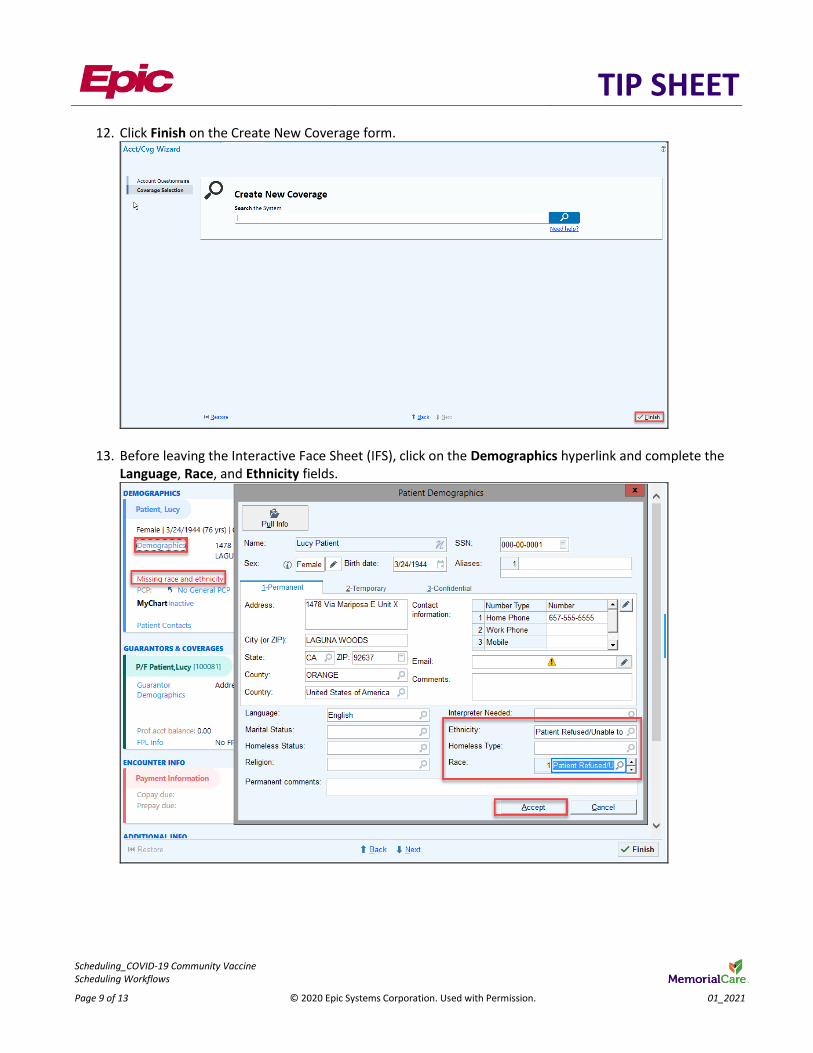
12. Click Finish on the Create New Coverage form.
13. Before leaving the Interactive Face Sheet (IFS), click on the Demographics hyperlink and complete the Language, Race, and Ethnicity fields.
TIP SHEET
Scheduling_COVID-19 Community Vaccine Scheduling Workflows
Page 10 of 13 © 2020 Epic Systems Corporation. Used with Permission. 01_2021
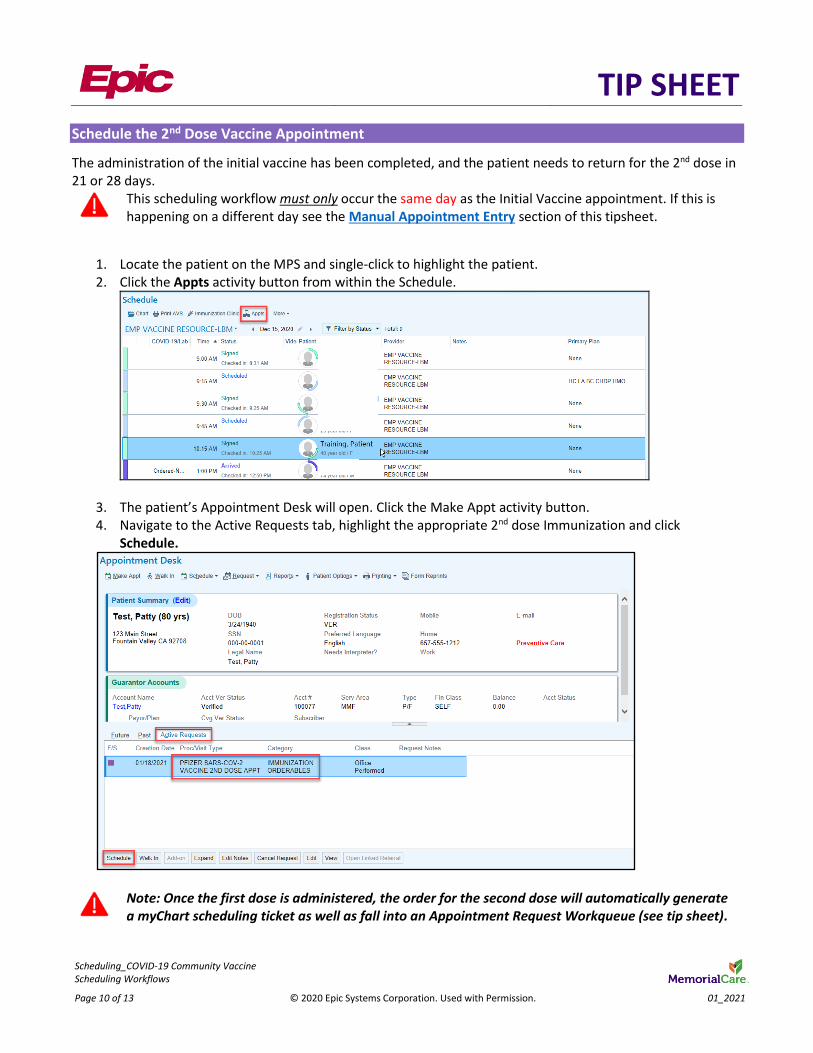
Schedule the 2nd Dose Vaccine Appointment
The administration of the initial vaccine has been completed, and the patient needs to return for the 2nd dose in 21 or 28 days.
This scheduling workflow must only occur the same day as the Initial Vaccine appointment. If this is happening on a different day see the Manual Appointment Entry section of this tipsheet.
1. Locate the patient on the MPS and single-click to highlight the patient. 2. Click the Appts activity button from within the Schedule.
3. The patient’s Appointment Desk will open. Click the Make Appt activity button. 4. Navigate to the Active Requests tab, highlight the appropriate 2nd dose Immunization and click
Schedule.
Note: Once the first dose is administered, the order for the second dose will automatically generate a myChart scheduling ticket as well as fall into an Appointment Request Workqueue (see tip sheet).
TIP SHEET
Scheduling_COVID-19 Community Vaccine Scheduling Workflows
Page 11 of 13 © 2020 Epic Systems Corporation. Used with Permission. 01_2021
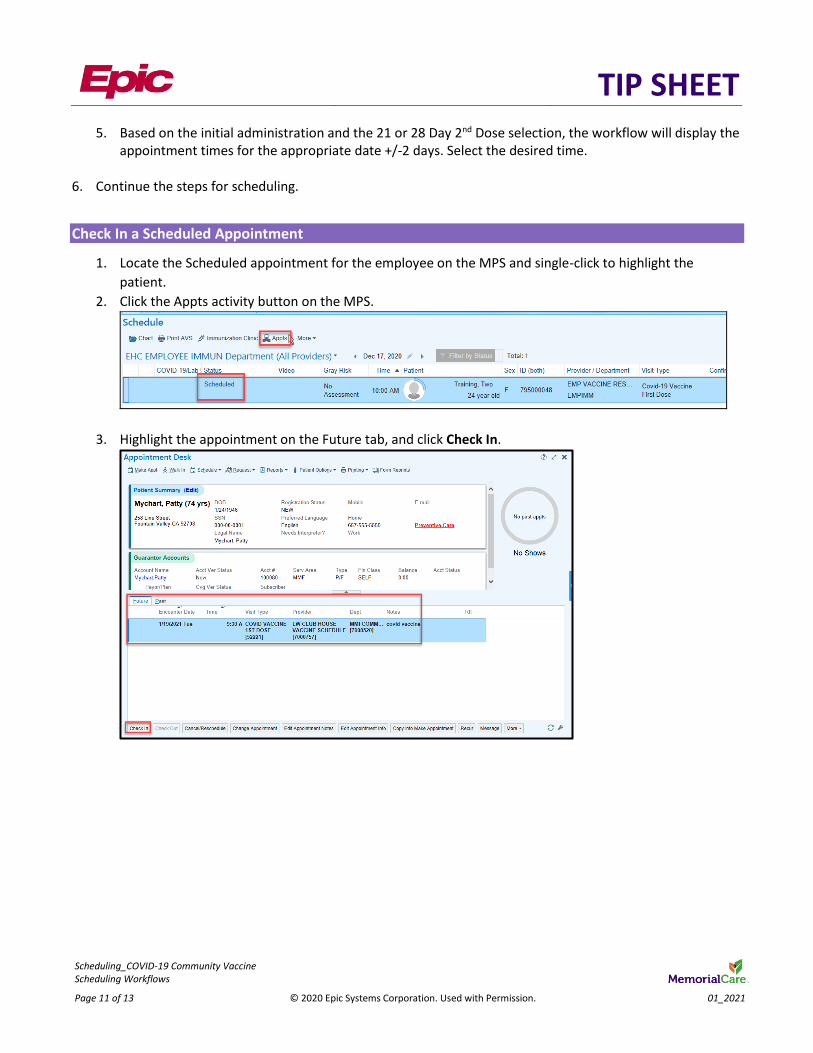
5. Based on the initial administration and the 21 or 28 Day 2nd Dose selection, the workflow will display the appointment times for the appropriate date +/-2 days. Select the desired time.
6. Continue the steps for scheduling.
Check In a Scheduled Appointment
1. Locate the Scheduled appointment for the employee on the MPS and single-click to highlight the
patient.
2. Click the Appts activity button on the MPS.
3. Highlight the appointment on the Future tab, and click Check In.
TIP SHEET
Scheduling_COVID-19 Community Vaccine Scheduling Workflows
Page 12 of 13 © 2020 Epic Systems Corporation. Used with Permission. 01_2021
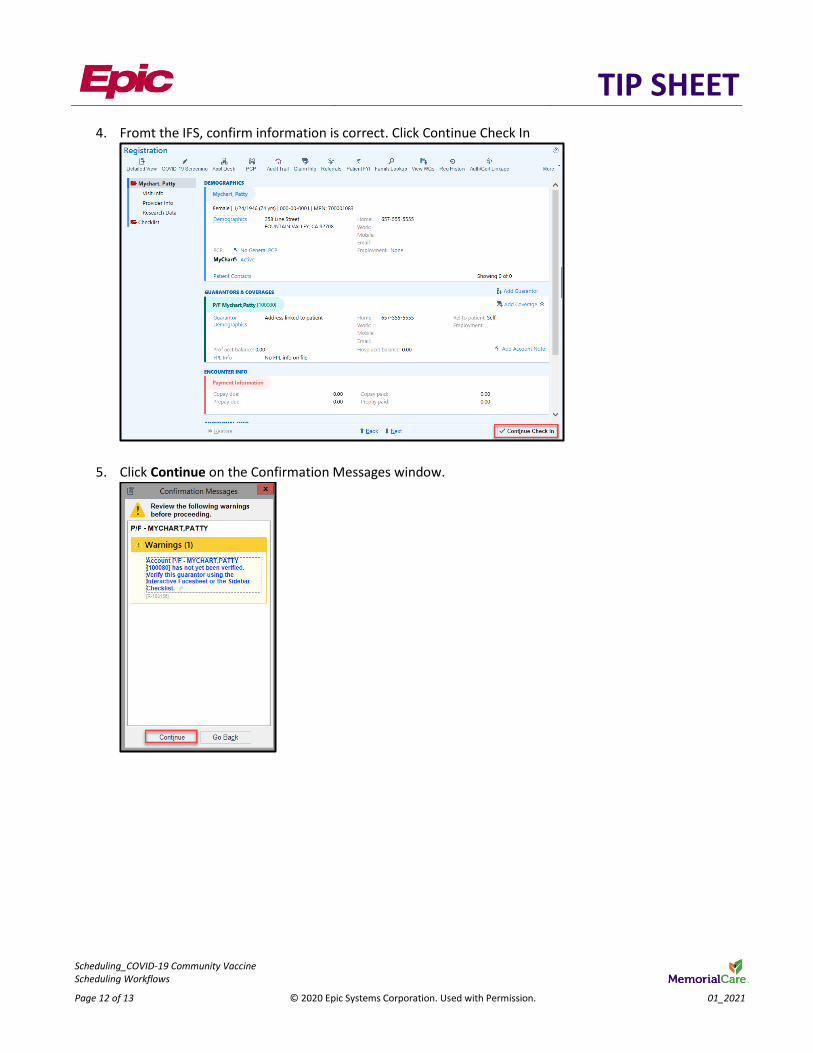
4. Fromt the IFS, confirm information is correct. Click Continue Check In
5. Click Continue on the Confirmation Messages window.
TIP SHEET
Scheduling_COVID-19 Community Vaccine Scheduling Workflows
Page 13 of 13 © 2020 Epic Systems Corporation. Used with Permission. 01_2021
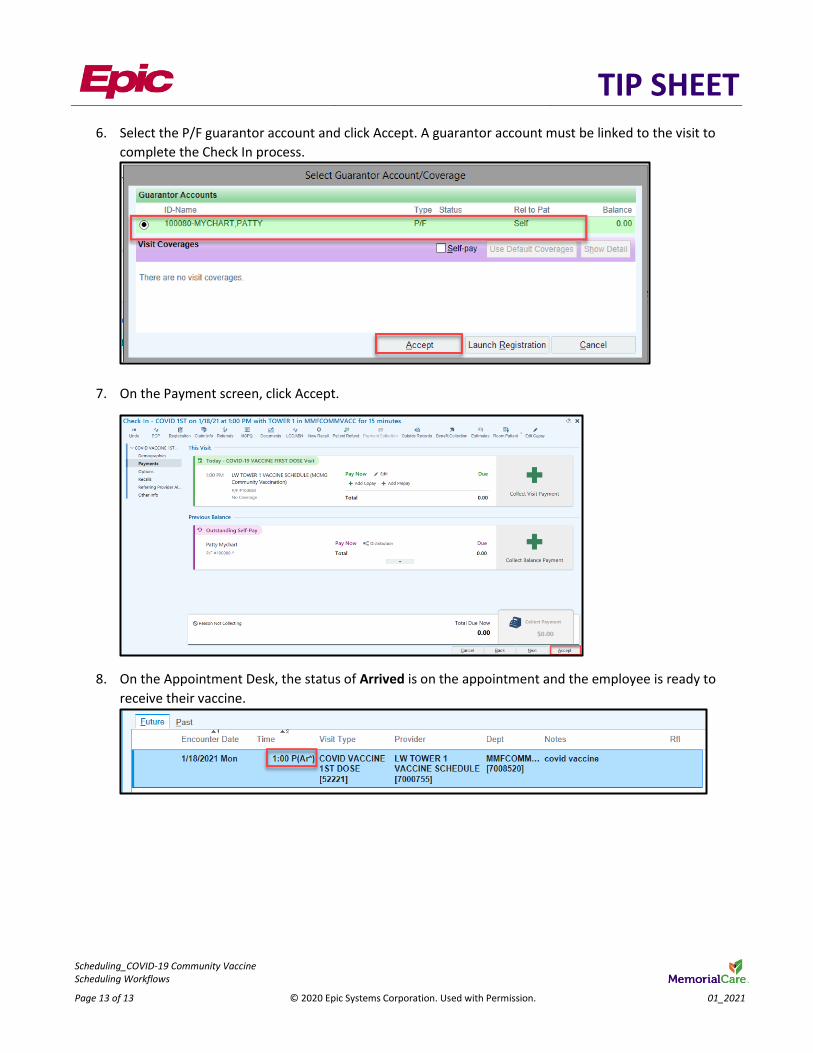
6. Select the P/F guarantor account and click Accept. A guarantor account must be linked to the visit to
complete the Check In process.
7. On the Payment screen, click Accept.
8. On the Appointment Desk, the status of Arrived is on the appointment and the employee is ready to
receive their vaccine.