
Timspec CERTCLAD Bevel Back Cavity System … Back - Cavity/CERTCLAD Bevel... · Timspec CERTCLAD...
73
Timspec CERTCLAD Weatherboards Bevel Back Cavity System Installation Manual
Transcript of Timspec CERTCLAD Bevel Back Cavity System … Back - Cavity/CERTCLAD Bevel... · Timspec CERTCLAD...

Timspec CERTCLAD Weatherboards
Bevel Back Cavity System
Installation Manual

Timspec CERTCLAD Weatherboards Bevel Back Cavity System Installation Manual
Version 1-3
© Timber Specialists Limited 2011 Page 1 of 72 Updated: 2nd Nov 2012
TIMSPEC
The Timber Specialists
Email: [email protected]
Website: www.timspec.co.nz
AUCKLAND
64 Stoddard Road, Mt Roskill
Ph: (09) 620-0260
Fax: (09) 620-0261
CARTERTON
30 Kent Street
Ph: (06) 379-9381
Fax: (06) 379-9382
CHRISTCHURCH
69 Hayton Road, Sockburn
Ph: (03) 341-0242
Fax: (03) 341-0243
TABLE OF CONTENTS
Scope ...................................................................... 2
Health and Safety .................................................... 6
Site Preparation ....................................................... 7
Pre-Installation ....................................................... 9
Materials ............................................................... 10
Installing Cavity Battens ........................................ 25
Fixing Details for Weatherboard ............................ 28
Inter-Storey Cavity Junctions ................................. 33
Within-Board Joins ................................................ 34
External 90° Corner Details ................................... 35
External 135° Corner Details ................................. 39
Internal 90° Corner Details .................................... 40
Internal 135° Corner Details .................................. 44
Bottom Plate (Base of Wall) Details ........................ 46
Enclosed Deck Details ........................................... 50
Top Plate (Top of Wall) Details ............................... 53
Parapet/Enclosed Balustrade Details ...................... 58
Pipe Penetration Details ........................................ 64
Meter Box ............................................................. 66
Site Clean-up ........................................................ 70
On-going Maintenance ......................................... 71

Timspec CERTCLAD Weatherboards Bevel Back Cavity System Installation Manual
Version 1-3
© Timber Specialists Limited 2011 Page 2 of 72 Updated: 2nd Nov 2012
TIMSPEC
The Timber Specialists
Email: [email protected]
Website: www.timspec.co.nz
AUCKLAND
64 Stoddard Road, Mt Roskill
Ph: (09) 620-0260
Fax: (09) 620-0261
CARTERTON
30 Kent Street
Ph: (06) 379-9381
Fax: (06) 379-9382
CHRISTCHURCH
69 Hayton Road, Sockburn
Ph: (03) 341-0242
Fax: (03) 341-0243
SCOPE
INTENDED USE
This Bevel Back Weatherboard Cavity System has been designed for use as cladding for
residential and small commercial buildings. It is only suitable for buildings with a „Risk Score‟
of 20 or below as per the „Risk Matrix‟ outlined in E2/AS1. Refer to the Department of Building
and Housing‟s booklet titled „External moisture - a guide to using the risk matrix‟ for more
information.
This is an Alternative Solution in terms of NZBC compliance.
VALIDITY
CodeMark certification is only valid when all products in the weatherboard system are
CERTCLAD branded or Timspec approved and all methods and procedures outlines in this
manual are followed. This is to ensure that all products are up to the standards required by
CodeMark and are installed in the correct manner.

Timspec CERTCLAD Weatherboards Bevel Back Cavity System Installation Manual
Version 1-3
© Timber Specialists Limited 2011 Page 3 of 72 Updated: 2nd Nov 2012
TIMSPEC
The Timber Specialists
Email: [email protected]
Website: www.timspec.co.nz
AUCKLAND
64 Stoddard Road, Mt Roskill
Ph: (09) 620-0260
Fax: (09) 620-0261
CARTERTON
30 Kent Street
Ph: (06) 379-9381
Fax: (06) 379-9382
CHRISTCHURCH
69 Hayton Road, Sockburn
Ph: (03) 341-0242
Fax: (03) 341-0243
SCOPE (CONTINUED)
PERFORMANCE
When installed and maintained as specified in this manual and the work is done by a qualified
tradesman using accepted trade practices, it will meet the applicable sections of the following
requirements of the NZBC (New Zealand Building Code as contained in the Building Regulations
Act 1992):
B1 Structure
B2 Durability
E2 External Moisture
F2 Hazardous Building Materials
This is evidenced by conformance with the objectives of the following Department of Building
and Housing Compliance documents:
B1/AS1 (amendment 10, effective from 19 May 2011)
B2/AS1 (amendment 7, effective from 4 April 2011)
E2/AS1 (third edition, amendment 5, effective from 1 August 2011)
F2/AS1 (amendment 2, effective from 1 December 2000)
Timspec CERTCLAD Weatherboards Bevel Back Cavity System Installation Manual
Version 1-3
© Timber Specialists Limited 2011 Page 4 of 72 Updated: 2nd Nov 2012
TIMSPEC
The Timber Specialists
Email: [email protected]
Website: www.timspec.co.nz
AUCKLAND
64 Stoddard Road, Mt Roskill
Ph: (09) 620-0260
Fax: (09) 620-0261
CARTERTON
30 Kent Street
Ph: (06) 379-9381
Fax: (06) 379-9382
CHRISTCHURCH
69 Hayton Road, Sockburn
Ph: (03) 341-0242
Fax: (03) 341-0243
SCOPE (CONTINUED)
WIND ZONES
This solution is only acceptable for wind zones up to and including „Very High‟ as defined in
NZS 3604 (New Zealand Standard 3604:2011 Timber Framed Buildings).
Note: Extra High wind zones are outside the scope of this document. Please refer to E2/AS1
for construction details as rigid underlays and larger flashings will be required.
MASS
The mass of Timspec Bevel Back Weatherboard is approximately 12 kg/m2 and therefore is
considered a lightweight cladding by NZS 3604.
Weatherboard
Material
Timber Density
(Air Dried)
Approx Mass
Accoya® wood 512 kg/m3 10.5 - 14.9 kg/m²
Radiata Pine 500 kg/m3 10.3 - 14.6 kg/m²
Western Red Cedar 385 kg/m3 7.7 - 11.4 kg/m²
LIFESPAN
MINIMUM LIFE
This Bevel Back Weatherboard Cavity System has 15-year durability as required by NZS 3602
(New Zealand Standard 3602:2003 Timber and wood-based products for use in building).
Timspec CERTCLAD Weatherboards Bevel Back Cavity System Installation Manual
Version 1-3
© Timber Specialists Limited 2011 Page 5 of 72 Updated: 2nd Nov 2012
TIMSPEC
The Timber Specialists
Email: [email protected]
Website: www.timspec.co.nz
AUCKLAND
64 Stoddard Road, Mt Roskill
Ph: (09) 620-0260
Fax: (09) 620-0261
CARTERTON
30 Kent Street
Ph: (06) 379-9381
Fax: (06) 379-9382
CHRISTCHURCH
69 Hayton Road, Sockburn
Ph: (03) 341-0242
Fax: (03) 341-0243
SCOPE (CONTINUED)
LIFESPAN (CONTINUED)
SERVICEABLE LIFE
In addition to the above minimum life, this Bevel Back Weatherboard Cavity System is expected
to have a serviceable life of at least:
50 years for Accoya® wood; or
15 years for H3.1 treated Radiata Pine when painted; or
40 years for H3.2 treated Radiata Pine when painted; or
40 years for Western Red Cedar when coated.
This serviceable life is subject to the paint, coating and maintenance requirements below.
More importantly some Cedar and Radiata Pine boards may require replacement over the
lifetime of the cladding.
COATING REQUIREMENTS
To achieve the above serviceable life all hidden faces of Western Red Cedar must be coated
with a minimum of one coat of penetrating oil and all exposed faces must be coated with a
further two coats, refer to page 17 for more information. For Radiata Pine all hidden face must
be coated with one coat of primer and all exposed faces coated with a further two coats of a
suitable topcoat, refer to page 15 for more detail.
MAINTENANCE REQUIREMENTS
The above serviceable life spans assume regular maintenance. Appearance will degrade over
time unless timber is coated and both the coatings and all aspects of the cladding system are
maintained.
Please refer to the On-Going Maintenance section on page 71 for more information about the
required maintenance.

Timspec CERTCLAD Weatherboards Bevel Back Cavity System Installation Manual
Version 1-3
© Timber Specialists Limited 2011 Page 6 of 72 Updated: 2nd Nov 2012
TIMSPEC
The Timber Specialists
Email: [email protected]
Website: www.timspec.co.nz
AUCKLAND
64 Stoddard Road, Mt Roskill
Ph: (09) 620-0260
Fax: (09) 620-0261
CARTERTON
30 Kent Street
Ph: (06) 379-9381
Fax: (06) 379-9382
CHRISTCHURCH
69 Hayton Road, Sockburn
Ph: (03) 341-0242
Fax: (03) 341-0243
HEALTH AND SAFETY
CUTTING OF TIMBER
Cutting of timber is to be done in a well ventilated area and a suitable dust mask, eye
protection, and ear protection must be worn.
COATING AND PRIMING
Coating and priming is to be done in a well ventilated area, refer to the coating/primer
supplier for all matters relating to health and safety. All relevant sections of standard AS/NZS
2311:2009 (Guide to the painting of buildings) should be adhered to.

Timspec CERTCLAD Weatherboards Bevel Back Cavity System Installation Manual
Version 1-3
© Timber Specialists Limited 2011 Page 7 of 72 Updated: 2nd Nov 2012
TIMSPEC
The Timber Specialists
Email: [email protected]
Website: www.timspec.co.nz
AUCKLAND
64 Stoddard Road, Mt Roskill
Ph: (09) 620-0260
Fax: (09) 620-0261
CARTERTON
30 Kent Street
Ph: (06) 379-9381
Fax: (06) 379-9382
CHRISTCHURCH
69 Hayton Road, Sockburn
Ph: (03) 341-0242
Fax: (03) 341-0243
SITE PREPARATION
STRUCTURE AND FRAMING
NEW ZEALAND STANDARD 3604
Generally, the timber framing must comply with NZS 3604 (Timber-framed buildings), however
where specific engineering design is required the framing shall be at least of equivalent
stiffness as the framing provisions of NZS 3604.
LAYOUT
Studs must be at a spaced at a maximum of 600mm between centres. Dwangs (noggins) must
be spaced at a maximum of 800mm between centres. Studs and dwangs must form a flush
plane for cavity battens and weatherboards to be fixed to.
Additional framing may be required at soffits, corners, window and door openings.
MOISTURE CONTENT
The moisture content of the framing must not exceed 20% at the time of fixing the
weatherboard as problems may occur later due to excessive timber movement if framing is too
wet.

Timspec CERTCLAD Weatherboards Bevel Back Cavity System Installation Manual
Version 1-3
© Timber Specialists Limited 2011 Page 8 of 72 Updated: 2nd Nov 2012
TIMSPEC
The Timber Specialists
Email: [email protected]
Website: www.timspec.co.nz
AUCKLAND
64 Stoddard Road, Mt Roskill
Ph: (09) 620-0260
Fax: (09) 620-0261
CARTERTON
30 Kent Street
Ph: (06) 379-9381
Fax: (06) 379-9382
CHRISTCHURCH
69 Hayton Road, Sockburn
Ph: (03) 341-0242
Fax: (03) 341-0243
SITE PREPARATION (CONTINUED)
BUILDING WRAP
MATERIAL
Building wrap must comply with properties stipulated in Table 23 (Properties of roof underlays
and building wraps) of E2/AS1.
INSTALLATION
Install the building wrap (also called wall underlay) directly over the framing i.e. under the
cavity battens. No additional building wrap is required over the cavity battens.
INTERMEDIATE SUPPORT
If studs are greater than 450mm between centres a polypropylene strap or galvanised wire
must be run vertically between studs to provide intermediate support to prevent the building
wrap from bulging into the cavity as referred to in paragraph 9.1.8.5 of E2/AS1.
HORIZONTAL JOINS
At horizontal joins (e.g. between stories) ensure that the upper layer overlaps the lower layer
by minimum 75mm.
VERTICAL JOINS
Ensure that at vertical joins, the lap is minimum 150mm and situated over a stud.
TRIMMED OPENINGS
Trimmed openings are to be prepared in accordance with E2/AS1 paragraph 9.1.5 or an
approved alternative solution.
We recommend that building wrap be turned into the opening and secured over the framing.
Flexible flashing tape should be applied to the full width of the sill, and at the corners of the
jamb and head, have minimum 100mm turn-up along jambs and heads have minimum 50mm
lap over the exterior wall.

Timspec CERTCLAD Weatherboards Bevel Back Cavity System Installation Manual
Version 1-3
© Timber Specialists Limited 2011 Page 9 of 72 Updated: 2nd Nov 2012
TIMSPEC
The Timber Specialists
Email: [email protected]
Website: www.timspec.co.nz
AUCKLAND
64 Stoddard Road, Mt Roskill
Ph: (09) 620-0260
Fax: (09) 620-0261
CARTERTON
30 Kent Street
Ph: (06) 379-9381
Fax: (06) 379-9382
CHRISTCHURCH
69 Hayton Road, Sockburn
Ph: (03) 341-0242
Fax: (03) 341-0243
PRE-INSTALLATION
ON-SITE STORAGE AND HANDLING
Care must be taken to ensure that timber and accessories are kept clean and dry, and are not
damaged whilst in storage awaiting application.
Extra care is to be taken while handling timber to ensure that they are not damaged.
Timber is to be stacked on flat level bearers/dunage that are a maximum of 900mm apart and
at least 100mm off the ground. Timber should either be stored inside an enclosed building or
covered and protected from the elements when stored outside.
Important: Timber weatherboards should not be installed if their moisture content is
outside the range of 14 - 18%.
DOCKING OUT DEFECTS
Before coating or installing boards, check for any defects that may require docking out.
Important: All docked ends of stained or painted weatherboards will require priming
with a minimum of one coat of primer or stain.
PRIMING AND SEALING (APPLIES TO STAINED OR PAINTED WEATHERBOARDS ONLY)
Apply the first coat of stain or primer to all sides and edges of the weatherboard prior to
installation. Remember that all docked ends will require priming as noted above. Follow the
coating manufacturer‟s directions and ensure further coats are applied as required. All
relevant sections of standard AS/NZS 2311:2009 (Guide to the painting of buildings) should be
adhered to.
Note: It is usually easier to order your weatherboards to arrive on-site
preprimed/precoated.
Timspec CERTCLAD Weatherboards Bevel Back Cavity System Installation Manual
Version 1-3
© Timber Specialists Limited 2011 Page 10 of 72 Updated: 2nd Nov 2012
TIMSPEC
The Timber Specialists
Email: [email protected]
Website: www.timspec.co.nz
AUCKLAND
64 Stoddard Road, Mt Roskill
Ph: (09) 620-0260
Fax: (09) 620-0261
CARTERTON
30 Kent Street
Ph: (06) 379-9381
Fax: (06) 379-9382
CHRISTCHURCH
69 Hayton Road, Sockburn
Ph: (03) 341-0242
Fax: (03) 341-0243
MATERIALS
SUPPLY AND ALTERNATIVE ITEMS
WEATHERBOARDS
All Weatherboards must be CERTCLAD brand weatherboard supplied by Timspec either directly
or through an agent/merchant. This is to ensure that the weatherboard is up to standard
(profile, grade, treatment, moisture content, etc). Any alternative or competitor supplied
weatherboard will invalidate the CodeMark certification.
ANCILLARY ITEMS
All Ancillary Items (Cavity Battens, Soakers, Flashings, Profiles, and Nails) must be supplied or
approved by Timspec. This is to ensure that the compatibility and suitability of the ancillary
items.
ITEMS PRECEDING OR SUCCESSIVE TO THE WEATHERBOARD SYSTEM
All items that precede the installation of the weatherboard system (building wrap, roofing
underlay, flashing tape, etc) and all consumables and items successive to the weatherboard
system (PEF backing rods, flexible sealants, etc) will not be supplied by Timspec as these are
outside their role.

Timspec CERTCLAD Weatherboards Bevel Back Cavity System Installation Manual
Version 1-3
© Timber Specialists Limited 2011 Page 11 of 72 Updated: 2nd Nov 2012
TIMSPEC
The Timber Specialists
Email: [email protected]
Website: www.timspec.co.nz
AUCKLAND
64 Stoddard Road, Mt Roskill
Ph: (09) 620-0260
Fax: (09) 620-0261
CARTERTON
30 Kent Street
Ph: (06) 379-9381
Fax: (06) 379-9382
CHRISTCHURCH
69 Hayton Road, Sockburn
Ph: (03) 341-0242
Fax: (03) 341-0243
MATERIALS (CONTINUED)
ACCOYA® WOOD BEVEL BACK WEATHERBOARD
MATERIAL
New Zealand grown Radiata Pine modified to the core by a non-toxic, proprietary acetylation
process.
DURABILITY
Accoya is class one durable, furthermore it is guaranteed not to rot for 50 years in above-
ground applications.
For the purpose of this guarantee, rot is defined as fungal decay that materially damages the timber caused by the soft-rot fungal
species: Poria placenta, Coniophora puteana, Gloeophyllum trabeum, Corriolus versicolor or Serpula lacrymans but does not
include common surface mould, mildew or any other organism either bacteria or fungi.
Scion (New Zealand Forest Research Institute) compared Accoya to commonly used hardwoods,
H3.2 and H4 CCA treated Radiata Pine as both ground contact stakes and fungus cellar
stakelets (an accelerated decay environment). In both tests Accoya dramatically outperformed
the durability of all the other timbers (including H4 treated Pine). The report “The Durability of
Accoya Radiata Pine Sapwood Results from Ground Contact Tests after Five Years Exposure” is
available from www.accoya-timspec.co.nz.
ABOUT ACETYLATION
Accoya woods exceptional durability is a result of the acetylation process. Acetylation is a
chemical process which effectively changes the free hydroxyls (chemical groups that readily
absorb and release water, causing shrinkage and swelling) within the wood into acetyl groups.
This is done by reacting the wood with acetic anhydride, which comes from acetic acid (known
as vinegar when in its dilute form). When the free hydroxyl group is transformed to an acetyl
group, the ability of the wood to absorb water is greatly reduced, rendering the wood more
dimensionally stable and extremely durable.

Timspec CERTCLAD Weatherboards Bevel Back Cavity System Installation Manual
Version 1-3
© Timber Specialists Limited 2011 Page 12 of 72 Updated: 2nd Nov 2012
TIMSPEC
The Timber Specialists
Email: [email protected]
Website: www.timspec.co.nz
AUCKLAND
64 Stoddard Road, Mt Roskill
Ph: (09) 620-0260
Fax: (09) 620-0261
CARTERTON
30 Kent Street
Ph: (06) 379-9381
Fax: (06) 379-9382
CHRISTCHURCH
69 Hayton Road, Sockburn
Ph: (03) 341-0242
Fax: (03) 341-0243
MATERIALS (CONTINUED)
ACCOYA® WOOD BEVEL BACK WEATHERBOARDS (CONTINUED)
MATERIAL RESOURCE
FSC Certified - All Accoya® wood supplied from Timspec is from New Zealand grown FSC
Certified resources and is sold under the Mixed Credit classification.
ABOUT FSC
The Forest Stewardship Council (FSC) is an independent, non-governmental, not-for-profit
organisation established to promote the responsible management of the world‟s forests. FSC
has 10 principles and 56 associated criteria which describe how forests have to be managed in
order to meet the social, economic, ecological, cultural and spiritual needs of present and
future generations.
They include managerial aspects, chain-of-custody requirements, as well as environmental
and social requirements. FSC rules are the strictest and FSC‟s social and environmental
requirements are the highest of any certification scheme. This is probably why FSC is the only
forest certification system that is supported by all major environmental groups.
COATING
We recommend a fungicidal coating be applied to prevent unsightly (but non-detrimental)
surface mould.
IMPORTANT NOTES
Accoya wood has higher acidity levels than most timber and will cause oxidization or corrosion
when in direct contact with certain metals and moisture. Do not use Accoya in direct contact
with copper, galvanized steel, powder-coated aluminium, zinc-alum, or zinc plated steel.
Stainless Steel (304 or 316) or brass fastenings and fixings must be used as these will not
degrade like other metals.

Timspec CERTCLAD Weatherboards Bevel Back Cavity System Installation Manual
Version 1-3
© Timber Specialists Limited 2011 Page 13 of 72 Updated: 2nd Nov 2012
TIMSPEC
The Timber Specialists
Email: [email protected]
Website: www.timspec.co.nz
AUCKLAND
64 Stoddard Road, Mt Roskill
Ph: (09) 620-0260
Fax: (09) 620-0261
CARTERTON
30 Kent Street
Ph: (06) 379-9381
Fax: (06) 379-9382
CHRISTCHURCH
69 Hayton Road, Sockburn
Ph: (03) 341-0242
Fax: (03) 341-0243
MATERIALS (CONTINUED)
ACCOYA® WOOD BEVEL BACK WEATHERBOARDS (CONTINUED)
PROFILES DRAWINGS

Timspec CERTCLAD Weatherboards Bevel Back Cavity System Installation Manual
Version 1-3
© Timber Specialists Limited 2011 Page 14 of 72 Updated: 2nd Nov 2012
TIMSPEC
The Timber Specialists
Email: [email protected]
Website: www.timspec.co.nz
AUCKLAND
64 Stoddard Road, Mt Roskill
Ph: (09) 620-0260
Fax: (09) 620-0261
CARTERTON
30 Kent Street
Ph: (06) 379-9381
Fax: (06) 379-9382
CHRISTCHURCH
69 Hayton Road, Sockburn
Ph: (03) 341-0242
Fax: (03) 341-0243
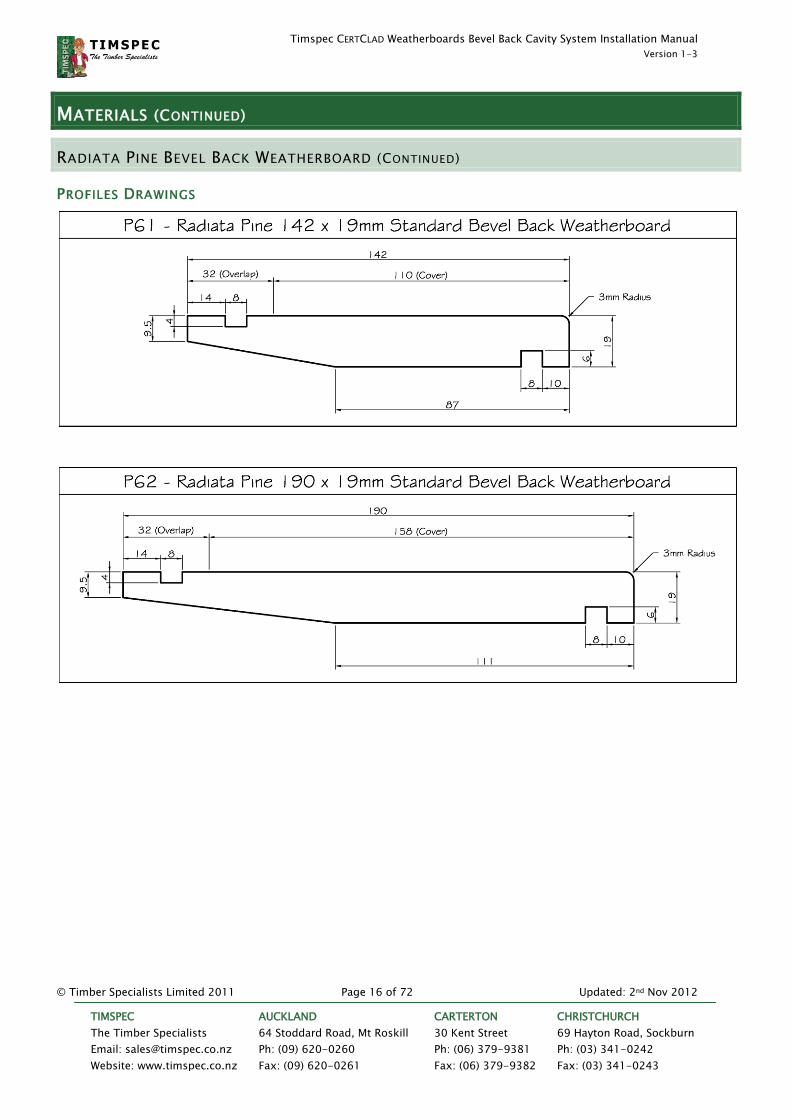
MATERIALS (CONTINUED)
RADIATA PINE BEVEL BACK WEATHERBOARD
MATERIAL
New Zealand grown Radiata Pine preservative treated to an H3.1 or H3.2 level.
DURABILITY
H3.1 treated Radiata Pine has an above-ground durability of 15 years when adequately
painted.
H3.2 treated Radiata Pine has above-ground durability of 40 years when adequately stained or
painted.
MATERIAL RESOURCE
FSC Certified where available - Radiata Pine supplied from Timspec is New Zealand grown and
from a mixture of FSC Certified resources and non-contentious resources, please refer to
invoice for details.
IMPORTANT NOTES
Timber treated with a copper-based treatment (ACQ, CCA, etc) should not be in contact with
metal wall claddings as this may lead to corrosion.
Timspec CERTCLAD Weatherboards Bevel Back Cavity System Installation Manual
Version 1-3
© Timber Specialists Limited 2011 Page 15 of 72 Updated: 2nd Nov 2012
TIMSPEC
The Timber Specialists
Email: [email protected]
Website: www.timspec.co.nz
AUCKLAND
64 Stoddard Road, Mt Roskill
Ph: (09) 620-0260
Fax: (09) 620-0261
CARTERTON
30 Kent Street
Ph: (06) 379-9381
Fax: (06) 379-9382
CHRISTCHURCH
69 Hayton Road, Sockburn
Ph: (03) 341-0242
Fax: (03) 341-0243
MATERIALS (CONTINUED)
RADIATA PINE BEVEL BACK WEATHERBOARD (CONTINUED)
COATING H3.1 TREATED WEATHERBOARD
H3.1 treated Radiata Pine must be coated with a minimum one coat of primer and two further
coats of alkyd or 100 percent acrylic. All relevant sections of standard AS/NZS 2311:2009
(Guide to the painting of buildings) should be adhered to.
Weatherboards will arrive onsite with one coat of Dulux Ultraprime already applied.
All cut ends must be coated with a minimum of one coat of primer before installation.
Immediately after fixing the weatherboards, all nail holes should be filled and spot-primed.
As soon as possible after fixing the weatherboards they should be over-coated with a
minimum of two coats of a suitable premium paint. Follow the paint manufactures directions.
If the weatherboard has been exposed to the elements for an extended period of time
(generally 4 weeks) or if there is evidence of the primer chalking, then repriming will be
necessary. This involves sanding the primer back to a sound surface and re-priming using a
premium oil based primer.
COATING H3.2 TREATED WEATHERBOARD
For painting, please refer to the information above for H3.1 treated weatherboard.
Upon request we can supply H3.2 treated weatherboard uncoated for you to coat as you wish.
Please be aware that a stain or penetrating oil will not last as long as a painted product.
A suitable coating must be used to achieve the 15 year lifespan.
COLOURS
Dark colours attract more heat which will exacerbate any timber movement and/or resin bleed.
For this reason we recommend the use of colours with a LRV (light reflective value) of 45% or
more.
Timspec CERTCLAD Weatherboards Bevel Back Cavity System Installation Manual
Version 1-3
© Timber Specialists Limited 2011 Page 16 of 72 Updated: 2nd Nov 2012
TIMSPEC
The Timber Specialists
Email: [email protected]
Website: www.timspec.co.nz
AUCKLAND
64 Stoddard Road, Mt Roskill
Ph: (09) 620-0260
Fax: (09) 620-0261
CARTERTON
30 Kent Street
Ph: (06) 379-9381
Fax: (06) 379-9382
CHRISTCHURCH
69 Hayton Road, Sockburn
Ph: (03) 341-0242
Fax: (03) 341-0243
MATERIALS (CONTINUED)
RADIATA PINE BEVEL BACK WEATHERBOARD (CONTINUED)
PROFILES DRAWINGS

Timspec CERTCLAD Weatherboards Bevel Back Cavity System Installation Manual
Version 1-3
© Timber Specialists Limited 2011 Page 17 of 72 Updated: 2nd Nov 2012
TIMSPEC
The Timber Specialists
Email: [email protected]
Website: www.timspec.co.nz
AUCKLAND
64 Stoddard Road, Mt Roskill
Ph: (09) 620-0260
Fax: (09) 620-0261
CARTERTON
30 Kent Street
Ph: (06) 379-9381
Fax: (06) 379-9382
CHRISTCHURCH
69 Hayton Road, Sockburn
Ph: (03) 341-0242
Fax: (03) 341-0243
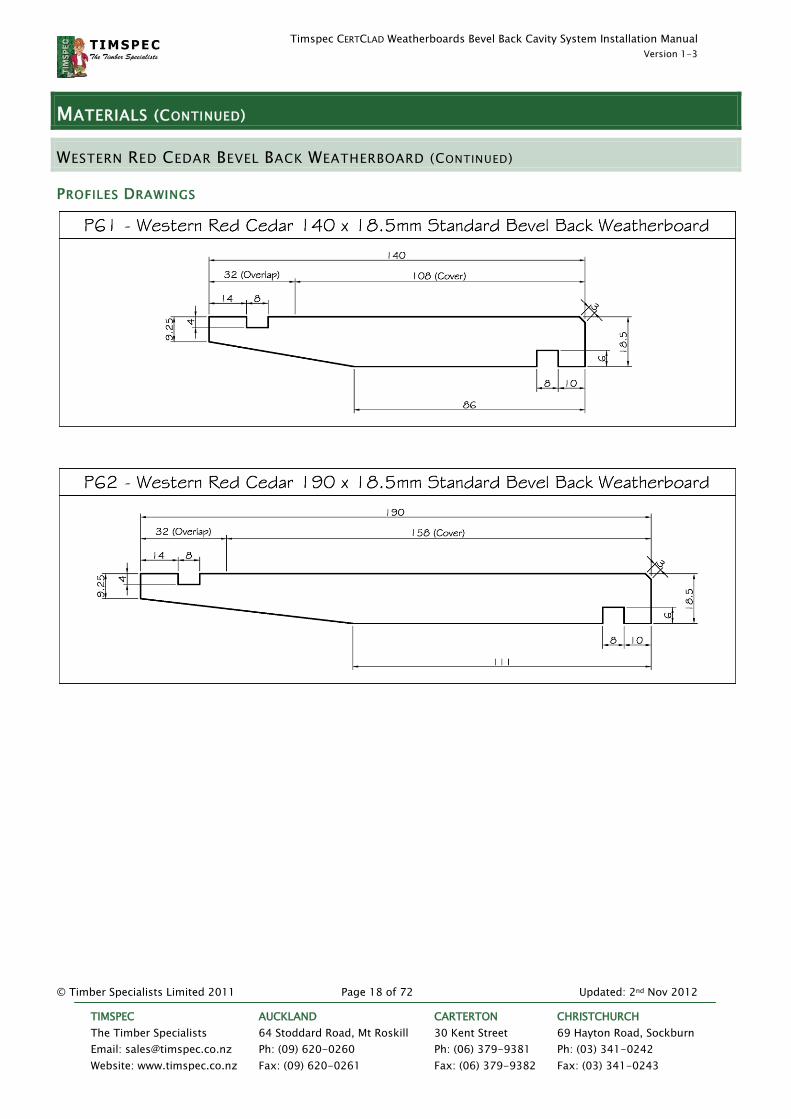
MATERIALS (CONTINUED)
WESTERN RED CEDAR BEVEL BACK WEATHERBOARD
MATERIAL
North American grown Western Red Cedar (Thuja plicata).
DURABILITY
Western Red Cedar is naturally durable for 25 years; however some boards will require
replacement during this time.
MATERIAL RESOURCE
FSC or PEFC Certified where available - Western Red Cedar supplied from Timspec is North
American grown and from a mixture of FSC Certified, PEFC Certified resources and non-
contentious resources, please refer to invoice for details.
COATING
No coating is required, however a coating and will dramatically improve the appearance,
performance and durability of the cladding. Timspec recommend a coating system comprising
a base coat of a penetrating oil to all sides of the weatherboard followed by two top coats to all
exposed faces.
Dark colours attract more heat which will exacerbate any timber movement, for this reason we
only recommend light colours.
IMPORTANT NOTES
Careful board selection will help improve the lifespan of your cladding. Quarter sawn boards
should be selected for use in higher exposure areas, such as north facing walls and lower parts
of the wall (where boards are less protected by eaves).
Timspec CERTCLAD Weatherboards Bevel Back Cavity System Installation Manual
Version 1-3
© Timber Specialists Limited 2011 Page 18 of 72 Updated: 2nd Nov 2012
TIMSPEC
The Timber Specialists
Email: [email protected]
Website: www.timspec.co.nz
AUCKLAND
64 Stoddard Road, Mt Roskill
Ph: (09) 620-0260
Fax: (09) 620-0261
CARTERTON
30 Kent Street
Ph: (06) 379-9381
Fax: (06) 379-9382
CHRISTCHURCH
69 Hayton Road, Sockburn
Ph: (03) 341-0242
Fax: (03) 341-0243
MATERIALS (CONTINUED)
WESTERN RED CEDAR BEVEL BACK WEATHERBOARD (CONTINUED)
PROFILES DRAWINGS
Timspec CERTCLAD Weatherboards Bevel Back Cavity System Installation Manual
Version 1-3
© Timber Specialists Limited 2011 Page 19 of 72 Updated: 2nd Nov 2012
TIMSPEC
The Timber Specialists
Email: [email protected]
Website: www.timspec.co.nz
AUCKLAND
64 Stoddard Road, Mt Roskill
Ph: (09) 620-0260
Fax: (09) 620-0261
CARTERTON
30 Kent Street
Ph: (06) 379-9381
Fax: (06) 379-9382
CHRISTCHURCH
69 Hayton Road, Sockburn
Ph: (03) 341-0242
Fax: (03) 341-0243
MATERIALS (CONTINUED)
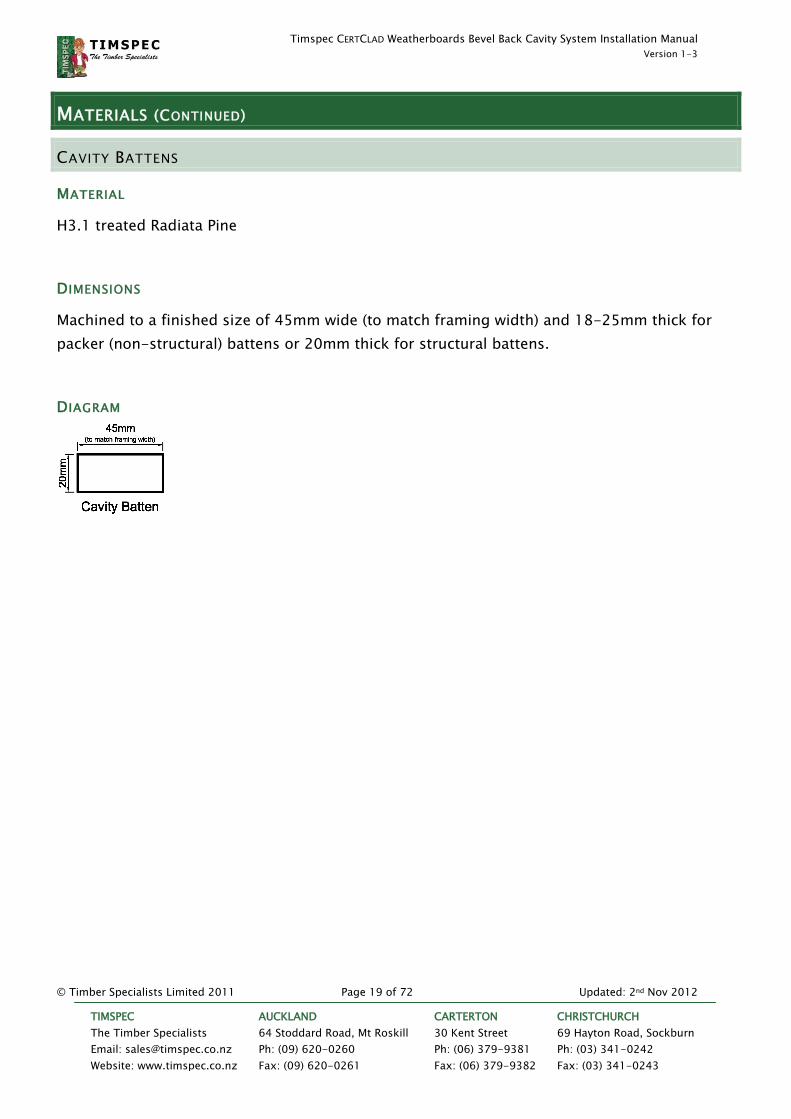
CAVITY BATTENS
MATERIAL
H3.1 treated Radiata Pine
DIMENSIONS
Machined to a finished size of 45mm wide (to match framing width) and 18-25mm thick for
packer (non-structural) battens or 20mm thick for structural battens.
DIAGRAM

Timspec CERTCLAD Weatherboards Bevel Back Cavity System Installation Manual
Version 1-3
© Timber Specialists Limited 2011 Page 20 of 72 Updated: 2nd Nov 2012
TIMSPEC
The Timber Specialists
Email: [email protected]
Website: www.timspec.co.nz
AUCKLAND
64 Stoddard Road, Mt Roskill
Ph: (09) 620-0260
Fax: (09) 620-0261
CARTERTON
30 Kent Street
Ph: (06) 379-9381
Fax: (06) 379-9382
CHRISTCHURCH
69 Hayton Road, Sockburn
Ph: (03) 341-0242
Fax: (03) 341-0243
MATERIALS (CONTINUED)
NAILS
MATERIAL
Nails can be either: Galvanised Steel, Silicone Bronze or Stainless Steel (316).
COMPATIBILITY
Refer to the table below to check the compatibility of Nails and Weatherboard materials:
Weatherboard Material
Accoya
wood
H3.1 treated
Radiata Pine
H3.2 treated
Radiata Pine
Western Red
Cedar
Nail M
ate
rial
Silicone Bronze No Yes Yes Yes
Galvanised Steel No Yes Conditional See Note Below
No
Stainless Steel (316) Yes Yes Yes Yes
Note: In Sea-spray zones, all nails are to be Stainless Steel as per NZS 3604 paragraph 4.2.3.
Note: All of the following conditions must be met in order to use Galvanised Steel nails in H3.2
treated Radiata Pine weatherboards:
1. Timber treatment must be CCA; and
2. Nails must be punched below timber surface and filled with a suitable filler to prevent
water from accessing the nail; and
3. Weatherboards must be painted as detailed in Coating H3.1 Treated Weatherboards on
page 15.
Important:
If the timber treatment is ACQ or CuAz then you must use stainless steel nails as these treatments are more corrosive.
If the nails are rosehead or pentagon-head then you must use stainless steel nails as the nail will sit above the timber surface and
be exposed to water.
If the weatherboard is not painted you must use stainless steel nails.

Timspec CERTCLAD Weatherboards Bevel Back Cavity System Installation Manual
Version 1-3
© Timber Specialists Limited 2011 Page 21 of 72 Updated: 2nd Nov 2012
TIMSPEC
The Timber Specialists
Email: [email protected]
Website: www.timspec.co.nz
AUCKLAND
64 Stoddard Road, Mt Roskill
Ph: (09) 620-0260
Fax: (09) 620-0261
CARTERTON
30 Kent Street
Ph: (06) 379-9381
Fax: (06) 379-9382
CHRISTCHURCH
69 Hayton Road, Sockburn
Ph: (03) 341-0242
Fax: (03) 341-0243
MATERIALS (CONTINUED)
SOAKERS
MATERIAL
Soakers can be either: Galvanised Steel, Aluminium, Stainless Steel (304) or Copper.
COMPATIBILITY
Refer to the table below to check the compatibility of Soakers and Weatherboard materials:
Weatherboard Material
Accoya
wood
H3.1 treated
Radiata Pine
H3.2 treated
Radiata Pine
Western Red
Cedar
Soaker
Mate
rial Aluminium No Yes No Yes
Copper No Yes Yes Yes
Galvanised Steel No Yes No No
Stainless Steel (304) Yes Yes Yes Yes
PRODUCT CODES
Refer to the table below for the appropriate product code:
Soaker
Product Code
Galvanised
Steel Aluminium
Stainless
Steel (304) Copper
150mm Flat Soaker 42060 42700 42632 42170
150mm 90° Corner Soaker 42000 42690 42620 42110
150mm 135° Corner Soaker 42005 42696 42626 42115
200mm Flat Soaker 42070 42702 42634 42180
200mm 90° Corner Soaker 42010 42692 42622 42120
200mm 135° Corner Soaker 42015 42698 42628 42125
Timspec CERTCLAD Weatherboards Bevel Back Cavity System Installation Manual
Version 1-3
© Timber Specialists Limited 2011 Page 22 of 72 Updated: 2nd Nov 2012
TIMSPEC
The Timber Specialists
Email: [email protected]
Website: www.timspec.co.nz
AUCKLAND
64 Stoddard Road, Mt Roskill
Ph: (09) 620-0260
Fax: (09) 620-0261
CARTERTON
30 Kent Street
Ph: (06) 379-9381
Fax: (06) 379-9382
CHRISTCHURCH
69 Hayton Road, Sockburn
Ph: (03) 341-0242
Fax: (03) 341-0243
MATERIALS (CONTINUED)
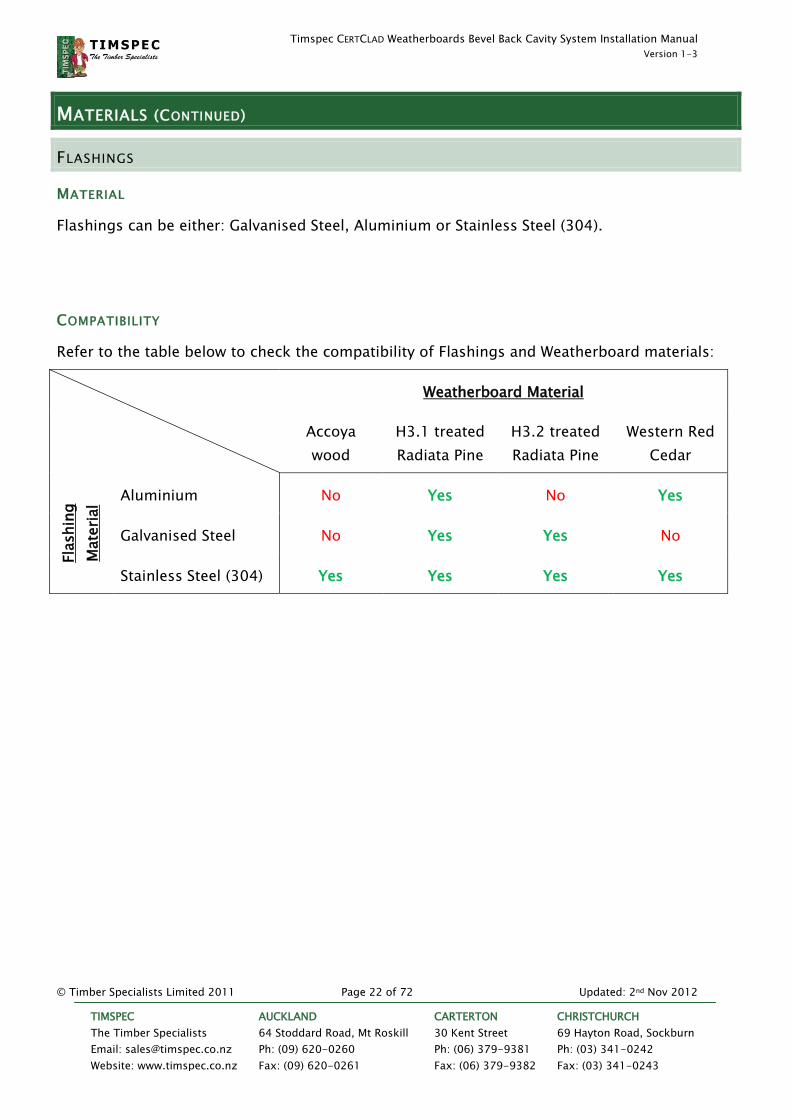
FLASHINGS
MATERIAL
Flashings can be either: Galvanised Steel, Aluminium or Stainless Steel (304).
COMPATIBILITY
Refer to the table below to check the compatibility of Flashings and Weatherboard materials:
Weatherboard Material
Accoya
wood
H3.1 treated
Radiata Pine
H3.2 treated
Radiata Pine
Western Red
Cedar
Fla
shin
g
Mate
rial
Aluminium No Yes No Yes
Galvanised Steel No Yes Yes No
Stainless Steel (304) Yes Yes Yes Yes
Timspec CERTCLAD Weatherboards Bevel Back Cavity System Installation Manual
Version 1-3
© Timber Specialists Limited 2011 Page 23 of 72 Updated: 2nd Nov 2012
TIMSPEC
The Timber Specialists
Email: [email protected]
Website: www.timspec.co.nz
AUCKLAND
64 Stoddard Road, Mt Roskill
Ph: (09) 620-0260
Fax: (09) 620-0261
CARTERTON
30 Kent Street
Ph: (06) 379-9381
Fax: (06) 379-9382
CHRISTCHURCH
69 Hayton Road, Sockburn
Ph: (03) 341-0242
Fax: (03) 341-0243
MATERIALS (CONTINUED)
FLASHINGS (CONTINUED)
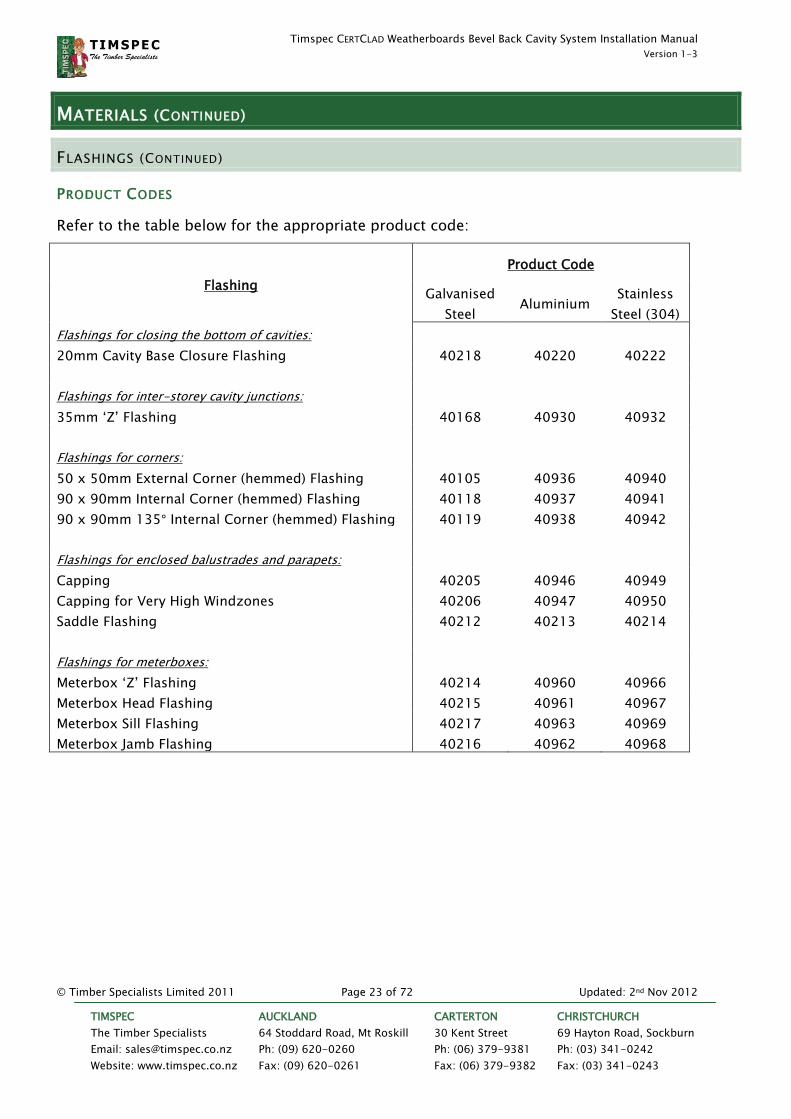
PRODUCT CODES
Refer to the table below for the appropriate product code:
Flashing
Product Code
Galvanised
Steel Aluminium
Stainless
Steel (304)
Flashings for closing the bottom of cavities:
20mm Cavity Base Closure Flashing 40218 40220 40222
Flashings for inter-storey cavity junctions:
35mm „Z‟ Flashing 40168 40930 40932
Flashings for corners:
50 x 50mm External Corner (hemmed) Flashing 40105 40936 40940
90 x 90mm Internal Corner (hemmed) Flashing 40118 40937 40941
90 x 90mm 135° Internal Corner (hemmed) Flashing 40119 40938 40942
Flashings for enclosed balustrades and parapets:
Capping 40205 40946 40949
Capping for Very High Windzones 40206 40947 40950
Saddle Flashing 40212 40213 40214
Flashings for meterboxes:
Meterbox „Z‟ Flashing 40214 40960 40966
Meterbox Head Flashing 40215 40961 40967
Meterbox Sill Flashing 40217 40963 40969
Meterbox Jamb Flashing 40216 40962 40968

Timspec CERTCLAD Weatherboards Bevel Back Cavity System Installation Manual
Version 1-3
© Timber Specialists Limited 2011 Page 24 of 72 Updated: 2nd Nov 2012
TIMSPEC
The Timber Specialists
Email: [email protected]
Website: www.timspec.co.nz
AUCKLAND
64 Stoddard Road, Mt Roskill
Ph: (09) 620-0260
Fax: (09) 620-0261
CARTERTON
30 Kent Street
Ph: (06) 379-9381
Fax: (06) 379-9382
CHRISTCHURCH
69 Hayton Road, Sockburn
Ph: (03) 341-0242
Fax: (03) 341-0243
MATERIALS (CONTINUED)
FLASHINGS (CONTINUED)
DIAGRAMS

Timspec CERTCLAD Weatherboards Bevel Back Cavity System Installation Manual
Version 1-3
© Timber Specialists Limited 2011 Page 25 of 72 Updated: 2nd Nov 2012
TIMSPEC
The Timber Specialists
Email: [email protected]
Website: www.timspec.co.nz
AUCKLAND
64 Stoddard Road, Mt Roskill
Ph: (09) 620-0260
Fax: (09) 620-0261
CARTERTON
30 Kent Street
Ph: (06) 379-9381
Fax: (06) 379-9382
CHRISTCHURCH
69 Hayton Road, Sockburn
Ph: (03) 341-0242
Fax: (03) 341-0243
INSTALLING CAVITY BATTENS
Cavities must comply with E2/AS1 paragraphs 9.1.8 to 9.1.9.4
Refer to Department of Building and Housing‟s booklet titled „Constructing Cavities for Wall
Claddings‟ for further information about installing cavity battens.
PACKER VS STRUCTURAL CAVITY BATTENS
There are two methods available for installing Cavity Battens:
Packer Cavity Battens: which are only temporarily fixed to the framing until the
weatherboard is installed at which point the weatherboard fixing permanently fixes the
cavity batten to the framing. The main disadvantage of this method is it requires a
larger nail to penetrate the weatherboard and cavity batten to attain the required
framing penetration.
Structural Cavity Battens: which are permanently fixed to the framing by larger and
more frequent nails. This results in the batten being considered part of the framing in
respect to the fixing of Weatherboard, which means that a 35mm fixing penetration can
be achieved with 20mm in the batten and 15mm in the framing so that a smaller nail
can be used for fixing the weatherboard. The disadvantage of this method is that it
requires a more rigorous fixing of the cavity batten to the framing.
Refer to BRANZ bulletin 475 (August 2006) for more details on Structural Cavity Battens.
MATERIAL
As per the requirements on the materials page 19: Cavity battens are to be H3.1 treated
Radiata Pine machined to a finished size of 45mm wide (to match framing width) and 18-
25mm thick for packer (non-structural) battens or 20mm thick for structural battens.
PRECAUTIONS
As solvents in LOSP treatments can affect bitumen used in some building papers, it is
necessary to fillet stack timber for 7 days after treatment to ensure that solvent has evaporated
before contact with any bitumen-based building paper.

Timspec CERTCLAD Weatherboards Bevel Back Cavity System Installation Manual
Version 1-3
© Timber Specialists Limited 2011 Page 26 of 72 Updated: 2nd Nov 2012
TIMSPEC
The Timber Specialists
Email: [email protected]
Website: www.timspec.co.nz
AUCKLAND
64 Stoddard Road, Mt Roskill
Ph: (09) 620-0260
Fax: (09) 620-0261
CARTERTON
30 Kent Street
Ph: (06) 379-9381
Fax: (06) 379-9382
CHRISTCHURCH
69 Hayton Road, Sockburn
Ph: (03) 341-0242
Fax: (03) 341-0243
INSTALLING CAVITY BATTENS (CONTINUED)
LOCATION
The cavity battens must be fixed over the building wrap.
FIXING STRUCTURAL CAVITY BATTENS
Structural cavity battens are to be fixed to the framing with either:
60 x 2.8mm jolt or flat head, hot dipped galvanised nails; or
75 x 3.15mm jolt or flat head, hot dipped galvanised nails; or
Paslode Impulse 65 x 2.87mm „D‟ flat head, power-driven, galvanised nails.
Structural cavity battens are to be fixed to the framing at 300mm centres with fixings
staggered 12mm either side of the batten centreline.
Note: Cavity Structural Battens must be 20mm thick as stipulated in the Materials section on page 19.
FIXING PACKER (NON-STRUCTURAL) CAVITY BATTENS
Packer cavity battens are to be fixed to the framing with either:
40 x 2.5mm flat head, hot dipped galvanised nails; or
Paslode Impulse 50 x 2.8mm „D‟ flat head, power-driven, galvanised nails.
Packer cavity battens are to be fixed to the framing at 800mm centres.
Note: Fixing is only temporary for packer cavity battens as the weatherboard fasteners are used to permanently fix the batten.

Timspec CERTCLAD Weatherboards Bevel Back Cavity System Installation Manual
Version 1-3
© Timber Specialists Limited 2011 Page 27 of 72 Updated: 2nd Nov 2012
TIMSPEC
The Timber Specialists
Email: [email protected]
Website: www.timspec.co.nz
AUCKLAND
64 Stoddard Road, Mt Roskill
Ph: (09) 620-0260
Fax: (09) 620-0261
CARTERTON
30 Kent Street
Ph: (06) 379-9381
Fax: (06) 379-9382
CHRISTCHURCH
69 Hayton Road, Sockburn
Ph: (03) 341-0242
Fax: (03) 341-0243
INSTALLING CAVITY BATTENS (CONTINUED)
TOP OF WALL DETAIL
No ventilation is required at the top of the cavity. Use a horizontal batten at the top of the wall
to close off the top of the cavity. This prevents damp air circulating from the cavity space into
interior spaces such as roof framing or eaves and is extremely important where the cavity
finishes beneath an area that is open to a roof space (such as a wall finishing under a soffit).
BOTTOM OF WALL DETAIL
Use a „Cavity Base Closure Flashing‟ at the bottom of the wall to allow drainage and ventilation
but prevent the entry of vermin. This also applies where cavities end over a window, door or
other opening. Ensure building wrap laps over the cavity base closure or use flashing tape to
seal the top of the cavity base closure to the building wrap.
HORIZONTAL BATTENS OR SPACERS
If you use a horizontal batten (apart from at the top of a wall), for example to provide
intermediate support, then make sure there is minimum 50mm clearance on each side to the
vertical batten and the horizontal batten must have a minimum 5° slope to allow water to run
off.
Timspec CERTCLAD Weatherboards Bevel Back Cavity System Installation Manual
Version 1-3
© Timber Specialists Limited 2011 Page 28 of 72 Updated: 2nd Nov 2012
TIMSPEC
The Timber Specialists
Email: [email protected]
Website: www.timspec.co.nz
AUCKLAND
64 Stoddard Road, Mt Roskill
Ph: (09) 620-0260
Fax: (09) 620-0261
CARTERTON
30 Kent Street
Ph: (06) 379-9381
Fax: (06) 379-9382
CHRISTCHURCH
69 Hayton Road, Sockburn
Ph: (03) 341-0242
Fax: (03) 341-0243
FIXING DETAILS FOR WEATHERBOARD
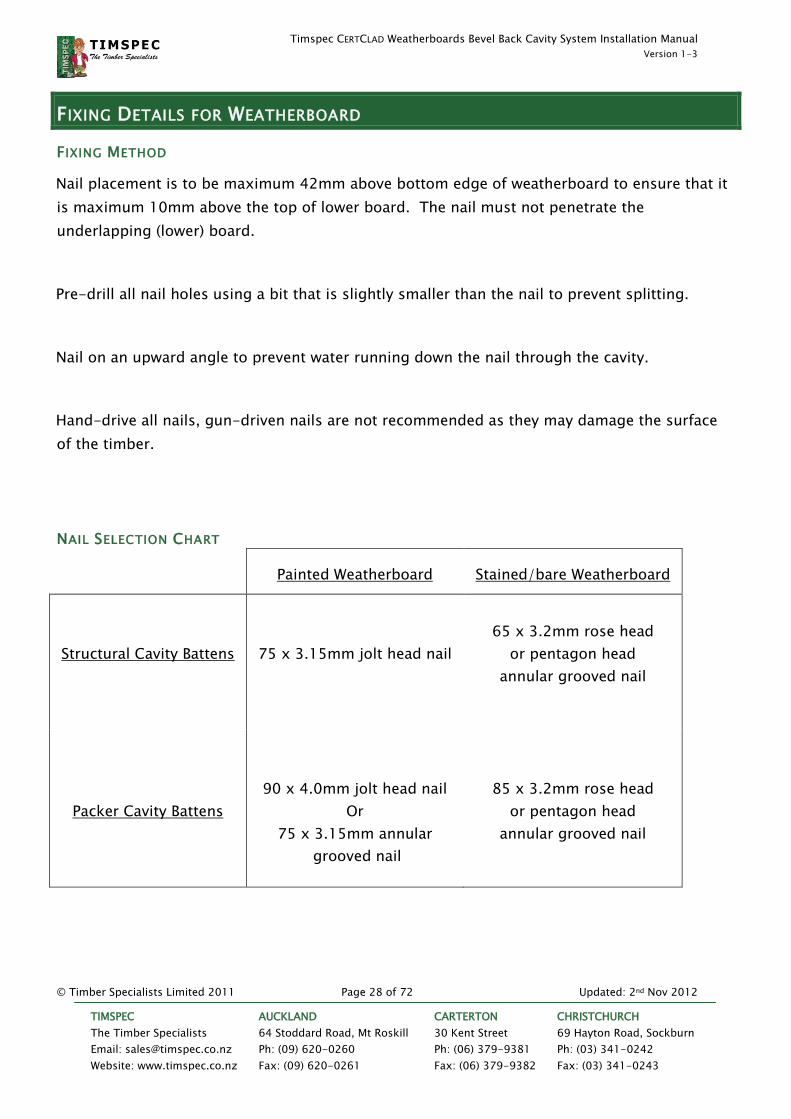
FIXING METHOD
Nail placement is to be maximum 42mm above bottom edge of weatherboard to ensure that it
is maximum 10mm above the top of lower board. The nail must not penetrate the
underlapping (lower) board.
Pre-drill all nail holes using a bit that is slightly smaller than the nail to prevent splitting.
Nail on an upward angle to prevent water running down the nail through the cavity.
Hand-drive all nails, gun-driven nails are not recommended as they may damage the surface
of the timber.
NAIL SELECTION CHART
Painted Weatherboard Stained/bare Weatherboard
Structural Cavity Battens
75 x 3.15mm jolt head nail
65 x 3.2mm rose head
or pentagon head
annular grooved nail
Packer Cavity Battens
90 x 4.0mm jolt head nail
Or
75 x 3.15mm annular
grooved nail
85 x 3.2mm rose head
or pentagon head
annular grooved nail
Timspec CERTCLAD Weatherboards Bevel Back Cavity System Installation Manual
Version 1-3
© Timber Specialists Limited 2011 Page 29 of 72 Updated: 2nd Nov 2012
TIMSPEC
The Timber Specialists
Email: [email protected]
Website: www.timspec.co.nz
AUCKLAND
64 Stoddard Road, Mt Roskill
Ph: (09) 620-0260
Fax: (09) 620-0261
CARTERTON
30 Kent Street
Ph: (06) 379-9381
Fax: (06) 379-9382
CHRISTCHURCH
69 Hayton Road, Sockburn
Ph: (03) 341-0242
Fax: (03) 341-0243
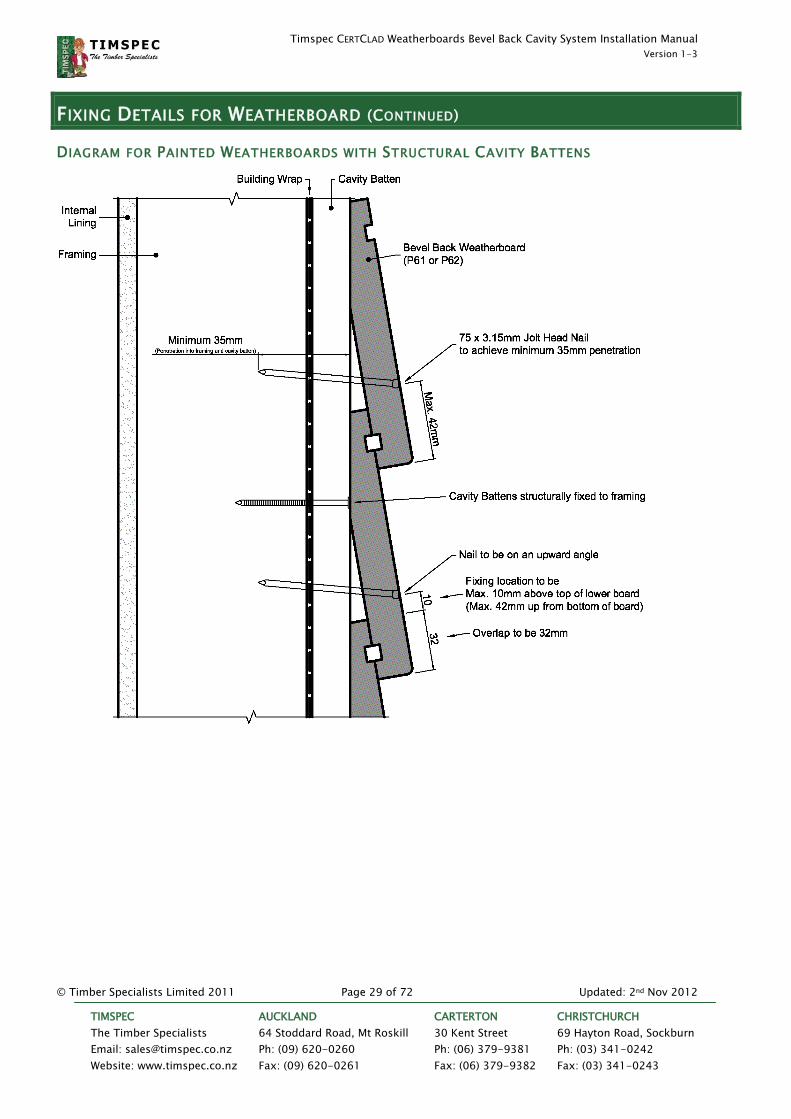
FIXING DETAILS FOR WEATHERBOARD (CONTINUED)
DIAGRAM FOR PAINTED WEATHERBOARDS WITH STRUCTURAL CAVITY BATTENS

Timspec CERTCLAD Weatherboards Bevel Back Cavity System Installation Manual
Version 1-3
© Timber Specialists Limited 2011 Page 30 of 72 Updated: 2nd Nov 2012
TIMSPEC
The Timber Specialists
Email: [email protected]
Website: www.timspec.co.nz
AUCKLAND
64 Stoddard Road, Mt Roskill
Ph: (09) 620-0260
Fax: (09) 620-0261
CARTERTON
30 Kent Street
Ph: (06) 379-9381
Fax: (06) 379-9382
CHRISTCHURCH
69 Hayton Road, Sockburn
Ph: (03) 341-0242
Fax: (03) 341-0243
FIXING DETAILS FOR WEATHERBOARD (CONTINUED)
DIAGRAM FOR PAINTED WEATHERBOARDS WITH PACKER CAVITY BATTENS
Note: Although a 90 x 4.0mm jolt head nail is shown (achieving 35mm framing penetration), a
smaller 75 x 3.15mm nail may be used if it is annular grooved (which only needs to achieve a
25mm framing penetration).

Timspec CERTCLAD Weatherboards Bevel Back Cavity System Installation Manual
Version 1-3
© Timber Specialists Limited 2011 Page 31 of 72 Updated: 2nd Nov 2012
TIMSPEC
The Timber Specialists
Email: [email protected]
Website: www.timspec.co.nz
AUCKLAND
64 Stoddard Road, Mt Roskill
Ph: (09) 620-0260
Fax: (09) 620-0261
CARTERTON
30 Kent Street
Ph: (06) 379-9381
Fax: (06) 379-9382
CHRISTCHURCH
69 Hayton Road, Sockburn
Ph: (03) 341-0242
Fax: (03) 341-0243
FIXING DETAILS FOR WEATHERBOARD (CONTINUED)
DIAGRAM FOR STAINED OR BARE WEATHERBOARDS WITH STRUCTURAL CAVITY BATTENS
Care must be taken when nailing rose head or pentagon head nails, they must be hand driven.
Too much force will damage the face of the timber.
When nailing rose head or pentagon head nails on an upward angle, care should be taken to
get the nails finishing on the face of the weatherboard.

Timspec CERTCLAD Weatherboards Bevel Back Cavity System Installation Manual
Version 1-3
© Timber Specialists Limited 2011 Page 32 of 72 Updated: 2nd Nov 2012
TIMSPEC
The Timber Specialists
Email: [email protected]
Website: www.timspec.co.nz
AUCKLAND
64 Stoddard Road, Mt Roskill
Ph: (09) 620-0260
Fax: (09) 620-0261
CARTERTON
30 Kent Street
Ph: (06) 379-9381
Fax: (06) 379-9382
CHRISTCHURCH
69 Hayton Road, Sockburn
Ph: (03) 341-0242
Fax: (03) 341-0243
FIXING DETAILS FOR WEATHERBOARD (CONTINUED)
DIAGRAM FOR STAINED OR BARE WEATHERBOARDS WITH PACKER CAVITY BATTENS
Care must be taken when nailing rose head or pentagon head nails, they must be hand driven.
Too much force will damage the face of the timber.
When nailing rose head or pentagon head nails on an upward angle, care should be taken to
get the nails finishing on the face of the weatherboard.
Timspec CERTCLAD Weatherboards Bevel Back Cavity System Installation Manual
Version 1-3
© Timber Specialists Limited 2011 Page 33 of 72 Updated: 2nd Nov 2012
TIMSPEC
The Timber Specialists
Email: [email protected]
Website: www.timspec.co.nz
AUCKLAND
64 Stoddard Road, Mt Roskill
Ph: (09) 620-0260
Fax: (09) 620-0261
CARTERTON
30 Kent Street
Ph: (06) 379-9381
Fax: (06) 379-9382
CHRISTCHURCH
69 Hayton Road, Sockburn
Ph: (03) 341-0242
Fax: (03) 341-0243
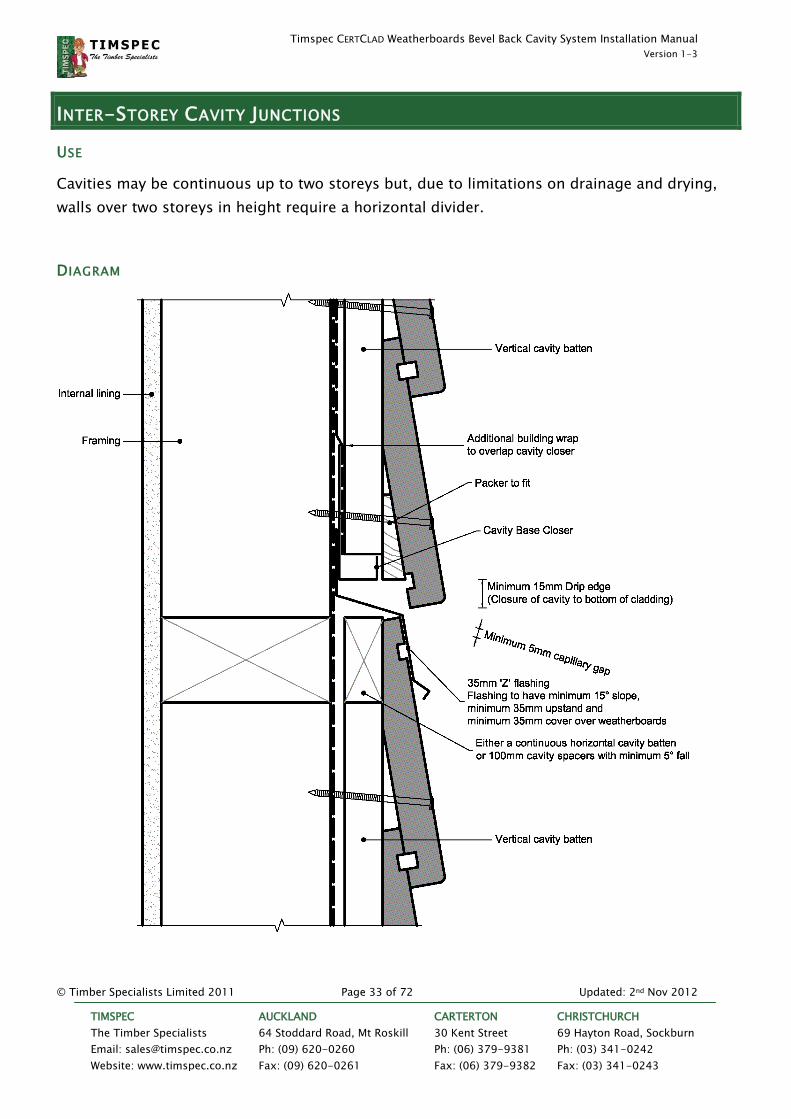
INTER-STOREY CAVITY JUNCTIONS
USE
Cavities may be continuous up to two storeys but, due to limitations on drainage and drying,
walls over two storeys in height require a horizontal divider.
DIAGRAM

Timspec CERTCLAD Weatherboards Bevel Back Cavity System Installation Manual
Version 1-3
© Timber Specialists Limited 2011 Page 34 of 72 Updated: 2nd Nov 2012
TIMSPEC
The Timber Specialists
Email: [email protected]
Website: www.timspec.co.nz
AUCKLAND
64 Stoddard Road, Mt Roskill
Ph: (09) 620-0260
Fax: (09) 620-0261
CARTERTON
30 Kent Street
Ph: (06) 379-9381
Fax: (06) 379-9382
CHRISTCHURCH
69 Hayton Road, Sockburn
Ph: (03) 341-0242
Fax: (03) 341-0243
WITHIN-BOARD JOINS
USE
Use a within-board join to join two weatherboards together for longer length walls.
METHOD
Weatherboards may be joined by scarfing two boards together over a stud. Use an appropriate
adhesive to bond the boards together and nail through the top board only. Space the nail
21mm from the edge of the join to avoid hitting the underlapping board. Care should be
taken to select and use two boards that have equal moisture contents; otherwise one board
may shrink or expand at a differing rate putting stress on the joint.
An optional flat soaker may be nailed in place over the join.
DIAGRAM
Timspec CERTCLAD Weatherboards Bevel Back Cavity System Installation Manual
Version 1-3
© Timber Specialists Limited 2011 Page 35 of 72 Updated: 2nd Nov 2012
TIMSPEC
The Timber Specialists
Email: [email protected]
Website: www.timspec.co.nz
AUCKLAND
64 Stoddard Road, Mt Roskill
Ph: (09) 620-0260
Fax: (09) 620-0261
CARTERTON
30 Kent Street
Ph: (06) 379-9381
Fax: (06) 379-9382
CHRISTCHURCH
69 Hayton Road, Sockburn
Ph: (03) 341-0242
Fax: (03) 341-0243
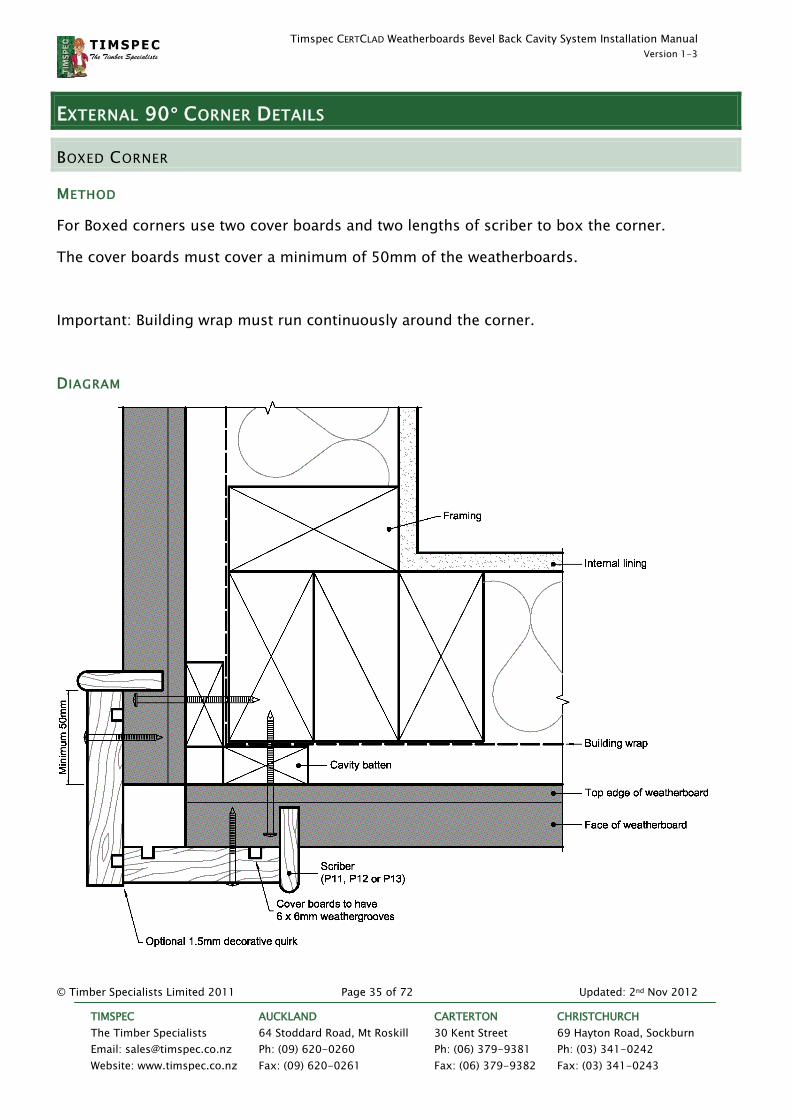
EXTERNAL 90° CORNER DETAILS
BOXED CORNER
METHOD
For Boxed corners use two cover boards and two lengths of scriber to box the corner.
The cover boards must cover a minimum of 50mm of the weatherboards.
Important: Building wrap must run continuously around the corner.
DIAGRAM

Timspec CERTCLAD Weatherboards Bevel Back Cavity System Installation Manual
Version 1-3
© Timber Specialists Limited 2011 Page 36 of 72 Updated: 2nd Nov 2012
TIMSPEC
The Timber Specialists
Email: [email protected]
Website: www.timspec.co.nz
AUCKLAND
64 Stoddard Road, Mt Roskill
Ph: (09) 620-0260
Fax: (09) 620-0261
CARTERTON
30 Kent Street
Ph: (06) 379-9381
Fax: (06) 379-9382
CHRISTCHURCH
69 Hayton Road, Sockburn
Ph: (03) 341-0242
Fax: (03) 341-0243
EXTERNAL 90° CORNER DETAILS (CONTINUED)
MITRED CORNER WITHOUT SOAKERS
USE
Mitred corners without soakers are only recommended for use with Accoya® wood, as Radiata
Pine and Western Red Cedar lack the stability and may open up.
METHOD
For Mitred corners use a 50 x 50mm External Corner (hemmed) Flashing behind the
weatherboards (over the cavity battens). Make sure the mitres are tight and sealed to try to
prevent the corner opening up. Avoid nailing too forcibly as undue stress on the mitred corner
could cause it to open up.
Important: Building wrap must run continuously around the corner.

Timspec CERTCLAD Weatherboards Bevel Back Cavity System Installation Manual
Version 1-3
© Timber Specialists Limited 2011 Page 37 of 72 Updated: 2nd Nov 2012
TIMSPEC
The Timber Specialists
Email: [email protected]
Website: www.timspec.co.nz
AUCKLAND
64 Stoddard Road, Mt Roskill
Ph: (09) 620-0260
Fax: (09) 620-0261
CARTERTON
30 Kent Street
Ph: (06) 379-9381
Fax: (06) 379-9382
CHRISTCHURCH
69 Hayton Road, Sockburn
Ph: (03) 341-0242
Fax: (03) 341-0243
EXTERNAL 90° CORNER DETAILS (CONTINUED)
MITRED CORNER WITHOUT SOAKERS (CONTINUED)
DIAGRAM

Timspec CERTCLAD Weatherboards Bevel Back Cavity System Installation Manual
Version 1-3
© Timber Specialists Limited 2011 Page 38 of 72 Updated: 2nd Nov 2012
TIMSPEC
The Timber Specialists
Email: [email protected]
Website: www.timspec.co.nz
AUCKLAND
64 Stoddard Road, Mt Roskill
Ph: (09) 620-0260
Fax: (09) 620-0261
CARTERTON
30 Kent Street
Ph: (06) 379-9381
Fax: (06) 379-9382
CHRISTCHURCH
69 Hayton Road, Sockburn
Ph: (03) 341-0242
Fax: (03) 341-0243
EXTERNAL 90° CORNER DETAILS (CONTINUED)
SOAKERS CORNER
METHOD
For a soakers corner; the weatherboards can be roughly mitred and then covered with an
appropriate soaker.
The soaker must cover a minimum of 15mm over the weatherboards.
Use four 19 x 1.6mm annular grooved nails per soaker to fasten it to the weatherboards.
Important: Building wrap must run continuously around the corner.
DIAGRAM

Timspec CERTCLAD Weatherboards Bevel Back Cavity System Installation Manual
Version 1-3
© Timber Specialists Limited 2011 Page 39 of 72 Updated: 2nd Nov 2012
TIMSPEC
The Timber Specialists
Email: [email protected]
Website: www.timspec.co.nz
AUCKLAND
64 Stoddard Road, Mt Roskill
Ph: (09) 620-0260
Fax: (09) 620-0261
CARTERTON
30 Kent Street
Ph: (06) 379-9381
Fax: (06) 379-9382
CHRISTCHURCH
69 Hayton Road, Sockburn
Ph: (03) 341-0242
Fax: (03) 341-0243
EXTERNAL 135° CORNER DETAILS
SOAKERS CORNER
METHOD
For a soakers corner; the weatherboards can be roughly mitred and then covered with an
appropriate soaker.
The soaker must cover a minimum of 15mm over the weatherboards.
Use four 19 x 1.6mm annular grooved nails per soaker to fasten it to the weatherboards.
Important: Building wrap must run continuously around the corner.
DIAGRAM

Timspec CERTCLAD Weatherboards Bevel Back Cavity System Installation Manual
Version 1-3
© Timber Specialists Limited 2011 Page 40 of 72 Updated: 2nd Nov 2012
TIMSPEC
The Timber Specialists
Email: [email protected]
Website: www.timspec.co.nz
AUCKLAND
64 Stoddard Road, Mt Roskill
Ph: (09) 620-0260
Fax: (09) 620-0261
CARTERTON
30 Kent Street
Ph: (06) 379-9381
Fax: (06) 379-9382
CHRISTCHURCH
69 Hayton Road, Sockburn
Ph: (03) 341-0242
Fax: (03) 341-0243
INTERNAL 90° CORNER DETAILS
SCRIBED AND NOTCHED CORNER
METHOD
For Scribed and Notched corners use a 90 x 90mm Internal Corner (hemmed) Flashing behind
the corner (over the cavity battens). Then cut a scribe out of one weatherboard and notch it so
that the other weatherboard fits into it.
IMAGE
Note: Top boards suppressed for clarity

Timspec CERTCLAD Weatherboards Bevel Back Cavity System Installation Manual
Version 1-3
© Timber Specialists Limited 2011 Page 41 of 72 Updated: 2nd Nov 2012
TIMSPEC
The Timber Specialists
Email: [email protected]
Website: www.timspec.co.nz
AUCKLAND
64 Stoddard Road, Mt Roskill
Ph: (09) 620-0260
Fax: (09) 620-0261
CARTERTON
30 Kent Street
Ph: (06) 379-9381
Fax: (06) 379-9382
CHRISTCHURCH
69 Hayton Road, Sockburn
Ph: (03) 341-0242
Fax: (03) 341-0243
INTERNAL 90° CORNER DETAILS (CONTINUED)
SCRIBED AND NOTCHED CORNER (CONTINUED)
DIAGRAM
Timspec CERTCLAD Weatherboards Bevel Back Cavity System Installation Manual
Version 1-3
© Timber Specialists Limited 2011 Page 42 of 72 Updated: 2nd Nov 2012
TIMSPEC
The Timber Specialists
Email: [email protected]
Website: www.timspec.co.nz
AUCKLAND
64 Stoddard Road, Mt Roskill
Ph: (09) 620-0260
Fax: (09) 620-0261
CARTERTON
30 Kent Street
Ph: (06) 379-9381
Fax: (06) 379-9382
CHRISTCHURCH
69 Hayton Road, Sockburn
Ph: (03) 341-0242
Fax: (03) 341-0243
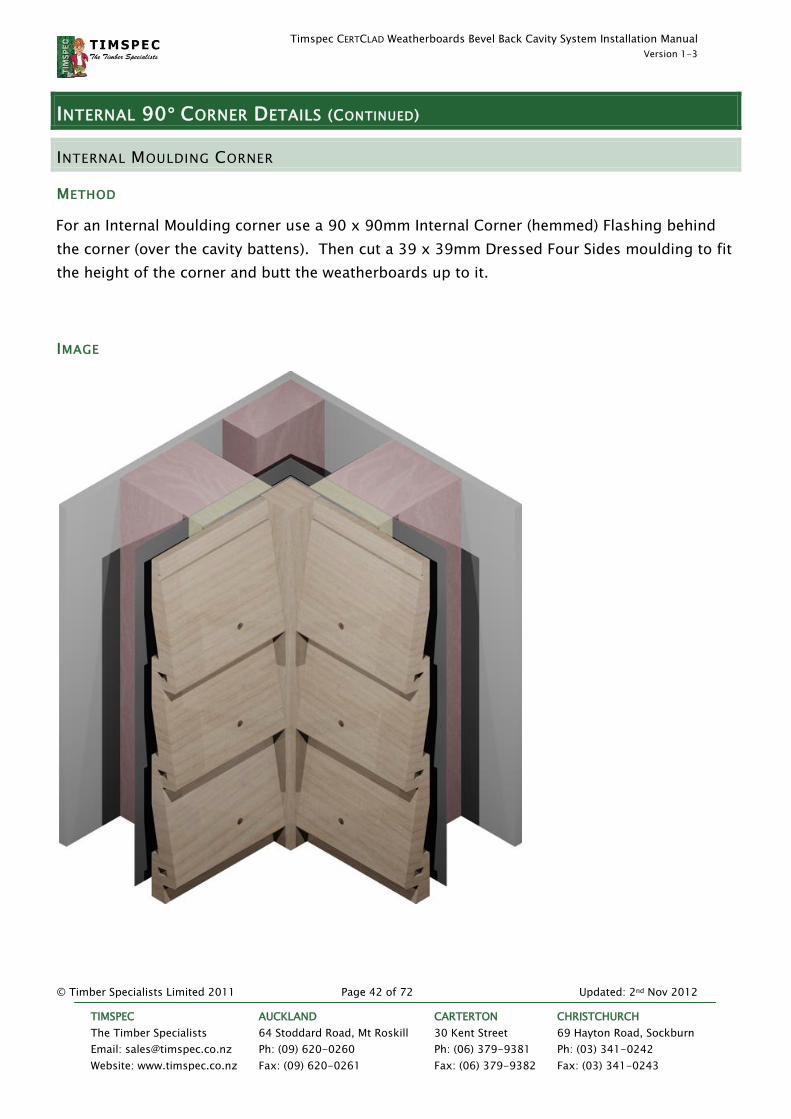
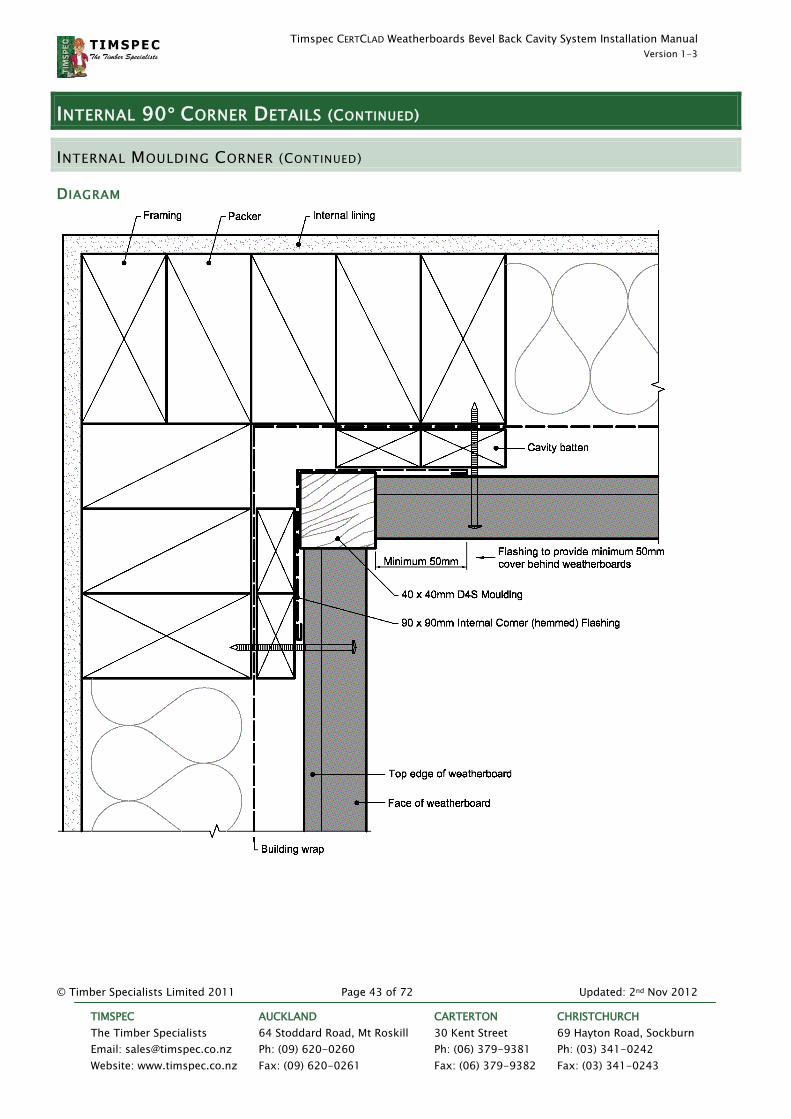
INTERNAL 90° CORNER DETAILS (CONTINUED)
INTERNAL MOULDING CORNER
METHOD
For an Internal Moulding corner use a 90 x 90mm Internal Corner (hemmed) Flashing behind
the corner (over the cavity battens). Then cut a 39 x 39mm Dressed Four Sides moulding to fit
the height of the corner and butt the weatherboards up to it.
IMAGE
Timspec CERTCLAD Weatherboards Bevel Back Cavity System Installation Manual
Version 1-3
© Timber Specialists Limited 2011 Page 43 of 72 Updated: 2nd Nov 2012
TIMSPEC
The Timber Specialists
Email: [email protected]
Website: www.timspec.co.nz
AUCKLAND
64 Stoddard Road, Mt Roskill
Ph: (09) 620-0260
Fax: (09) 620-0261
CARTERTON
30 Kent Street
Ph: (06) 379-9381
Fax: (06) 379-9382
CHRISTCHURCH
69 Hayton Road, Sockburn
Ph: (03) 341-0242
Fax: (03) 341-0243
INTERNAL 90° CORNER DETAILS (CONTINUED)
INTERNAL MOULDING CORNER (CONTINUED)
DIAGRAM

Timspec CERTCLAD Weatherboards Bevel Back Cavity System Installation Manual
Version 1-3
© Timber Specialists Limited 2011 Page 44 of 72 Updated: 2nd Nov 2012
TIMSPEC
The Timber Specialists
Email: [email protected]
Website: www.timspec.co.nz
AUCKLAND
64 Stoddard Road, Mt Roskill
Ph: (09) 620-0260
Fax: (09) 620-0261
CARTERTON
30 Kent Street
Ph: (06) 379-9381
Fax: (06) 379-9382
CHRISTCHURCH
69 Hayton Road, Sockburn
Ph: (03) 341-0242
Fax: (03) 341-0243
INTERNAL 135° CORNER DETAILS
SCRIBED AND NOTCHED CORNER
METHOD
For Scribed and Notched corners use a 90 x 90mm Flashing behind the corner (over the cavity
battens). Then cut a scribe out of one weatherboard and notch it so that the other
weatherboard fits into it.

Timspec CERTCLAD Weatherboards Bevel Back Cavity System Installation Manual
Version 1-3
© Timber Specialists Limited 2011 Page 45 of 72 Updated: 2nd Nov 2012
TIMSPEC
The Timber Specialists
Email: [email protected]
Website: www.timspec.co.nz
AUCKLAND
64 Stoddard Road, Mt Roskill
Ph: (09) 620-0260
Fax: (09) 620-0261
CARTERTON
30 Kent Street
Ph: (06) 379-9381
Fax: (06) 379-9382
CHRISTCHURCH
69 Hayton Road, Sockburn
Ph: (03) 341-0242
Fax: (03) 341-0243
INTERNAL 135° CORNER DETAILS (CONTINUED)
SCRIBED AND NOTCHED CORNER (CONTINUED)
DIAGRAM
Timspec CERTCLAD Weatherboards Bevel Back Cavity System Installation Manual
Version 1-3
© Timber Specialists Limited 2011 Page 46 of 72 Updated: 2nd Nov 2012
TIMSPEC
The Timber Specialists
Email: [email protected]
Website: www.timspec.co.nz
AUCKLAND
64 Stoddard Road, Mt Roskill
Ph: (09) 620-0260
Fax: (09) 620-0261
CARTERTON
30 Kent Street
Ph: (06) 379-9381
Fax: (06) 379-9382
CHRISTCHURCH
69 Hayton Road, Sockburn
Ph: (03) 341-0242
Fax: (03) 341-0243
BOTTOM PLATE (BASE OF WALL) DETAILS
CONCRETE SLAB-ON-GROUND
METHOD
Wall framing is to be separated from the concrete slab by a damp-proof-course (DPC).
Minimum 150mm from floor level to pavings (or 225mm to uncovered ground).
Ground to be sloped (minimum 1:30) to carry water away from building

Timspec CERTCLAD Weatherboards Bevel Back Cavity System Installation Manual
Version 1-3
© Timber Specialists Limited 2011 Page 47 of 72 Updated: 2nd Nov 2012
TIMSPEC
The Timber Specialists
Email: [email protected]
Website: www.timspec.co.nz
AUCKLAND
64 Stoddard Road, Mt Roskill
Ph: (09) 620-0260
Fax: (09) 620-0261
CARTERTON
30 Kent Street
Ph: (06) 379-9381
Fax: (06) 379-9382
CHRISTCHURCH
69 Hayton Road, Sockburn
Ph: (03) 341-0242
Fax: (03) 341-0243
BOTTOM PLATE (BASE OF WALL) DETAILS (CONTINUED)
CONCRETE SLAB-ON-GROUND (CONTINUED)
DIAGRAM

Timspec CERTCLAD Weatherboards Bevel Back Cavity System Installation Manual
Version 1-3
© Timber Specialists Limited 2011 Page 48 of 72 Updated: 2nd Nov 2012
TIMSPEC
The Timber Specialists
Email: [email protected]
Website: www.timspec.co.nz
AUCKLAND
64 Stoddard Road, Mt Roskill
Ph: (09) 620-0260
Fax: (09) 620-0261
CARTERTON
30 Kent Street
Ph: (06) 379-9381
Fax: (06) 379-9382
CHRISTCHURCH
69 Hayton Road, Sockburn
Ph: (03) 341-0242
Fax: (03) 341-0243
BOTTOM PLATE (BASE OF WALL) DETAILS (CONTINUED)
TIMBER FLOOR
METHOD
Wall framing is to be separated from the foundation by a damp-proof-course (DPC).
Minimum 150mm from top of foundation wall to pavings (or 225mm to uncovered ground).
Ground to be sloped (minimum 1:30) to carry water away from building

Timspec CERTCLAD Weatherboards Bevel Back Cavity System Installation Manual
Version 1-3
© Timber Specialists Limited 2011 Page 49 of 72 Updated: 2nd Nov 2012
TIMSPEC
The Timber Specialists
Email: [email protected]
Website: www.timspec.co.nz
AUCKLAND
64 Stoddard Road, Mt Roskill
Ph: (09) 620-0260
Fax: (09) 620-0261
CARTERTON
30 Kent Street
Ph: (06) 379-9381
Fax: (06) 379-9382
CHRISTCHURCH
69 Hayton Road, Sockburn
Ph: (03) 341-0242
Fax: (03) 341-0243
BOTTOM PLATE (BASE OF WALL) DETAILS (CONTINUED)
TIMBER FLOOR (CONTINUED)
DIAGRAM

Timspec CERTCLAD Weatherboards Bevel Back Cavity System Installation Manual
Version 1-3
© Timber Specialists Limited 2011 Page 50 of 72 Updated: 2nd Nov 2012
TIMSPEC
The Timber Specialists
Email: [email protected]
Website: www.timspec.co.nz
AUCKLAND
64 Stoddard Road, Mt Roskill
Ph: (09) 620-0260
Fax: (09) 620-0261
CARTERTON
30 Kent Street
Ph: (06) 379-9381
Fax: (06) 379-9382
CHRISTCHURCH
69 Hayton Road, Sockburn
Ph: (03) 341-0242
Fax: (03) 341-0243
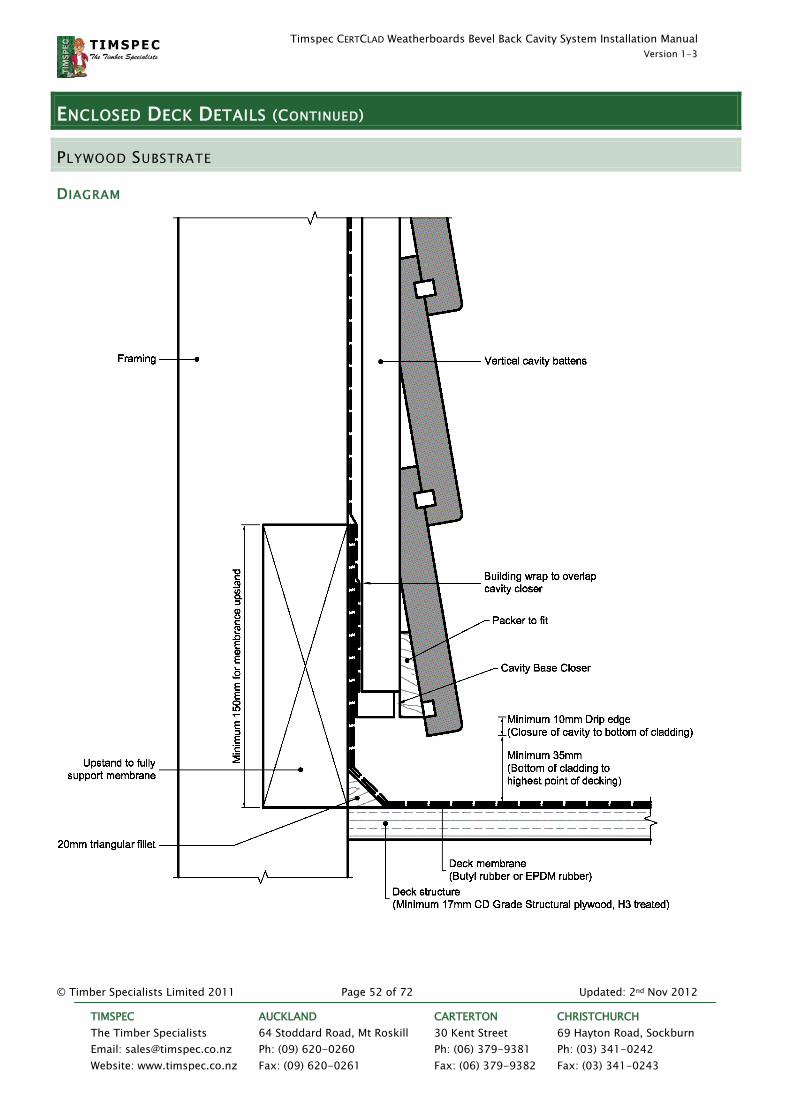
ENCLOSED DECK DETAILS
GENERAL DETAILS
Careful forward planning is required to ensure that an enclosed deck will meet all
requirements.
Enclosed decks may only be up to 40 m2 in area and there needs to be a minimum 100mm
from the finished deck surface height to the internal flooring height. Refer to E2/AS1 for other
requirements including drainage and surface fall.
Cladding must finish a minimum 35mm from the finished decking surface and have a 10mm
drip edge.
Butyl rubber or EPDM rubber is to be used as a deck membrane and it must have a fully
supported 150mm upstand. Refer to the deck membrane supplier as to whether timber or
tiles duck boards can be used on raised feet on the membrane. Note: If using duck boards
forward planning is required to ensure that cladding finishes a minimum 35mm above the
finished deck surface.
Refer to the following two diagrams for the base of wall details.

Timspec CERTCLAD Weatherboards Bevel Back Cavity System Installation Manual
Version 1-3
© Timber Specialists Limited 2011 Page 51 of 72 Updated: 2nd Nov 2012
TIMSPEC
The Timber Specialists
Email: [email protected]
Website: www.timspec.co.nz
AUCKLAND
64 Stoddard Road, Mt Roskill
Ph: (09) 620-0260
Fax: (09) 620-0261
CARTERTON
30 Kent Street
Ph: (06) 379-9381
Fax: (06) 379-9382
CHRISTCHURCH
69 Hayton Road, Sockburn
Ph: (03) 341-0242
Fax: (03) 341-0243
ENCLOSED DECK DETAILS (CONTINUED)
CONCRETE SUBSTRATE
DIAGRAM
Timspec CERTCLAD Weatherboards Bevel Back Cavity System Installation Manual
Version 1-3
© Timber Specialists Limited 2011 Page 52 of 72 Updated: 2nd Nov 2012
TIMSPEC
The Timber Specialists
Email: [email protected]
Website: www.timspec.co.nz
AUCKLAND
64 Stoddard Road, Mt Roskill
Ph: (09) 620-0260
Fax: (09) 620-0261
CARTERTON
30 Kent Street
Ph: (06) 379-9381
Fax: (06) 379-9382
CHRISTCHURCH
69 Hayton Road, Sockburn
Ph: (03) 341-0242
Fax: (03) 341-0243
ENCLOSED DECK DETAILS (CONTINUED)
PLYWOOD SUBSTRATE
DIAGRAM
Timspec CERTCLAD Weatherboards Bevel Back Cavity System Installation Manual
Version 1-3
© Timber Specialists Limited 2011 Page 53 of 72 Updated: 2nd Nov 2012
TIMSPEC
The Timber Specialists
Email: [email protected]
Website: www.timspec.co.nz
AUCKLAND
64 Stoddard Road, Mt Roskill
Ph: (09) 620-0260
Fax: (09) 620-0261
CARTERTON
30 Kent Street
Ph: (06) 379-9381
Fax: (06) 379-9382
CHRISTCHURCH
69 Hayton Road, Sockburn
Ph: (03) 341-0242
Fax: (03) 341-0243
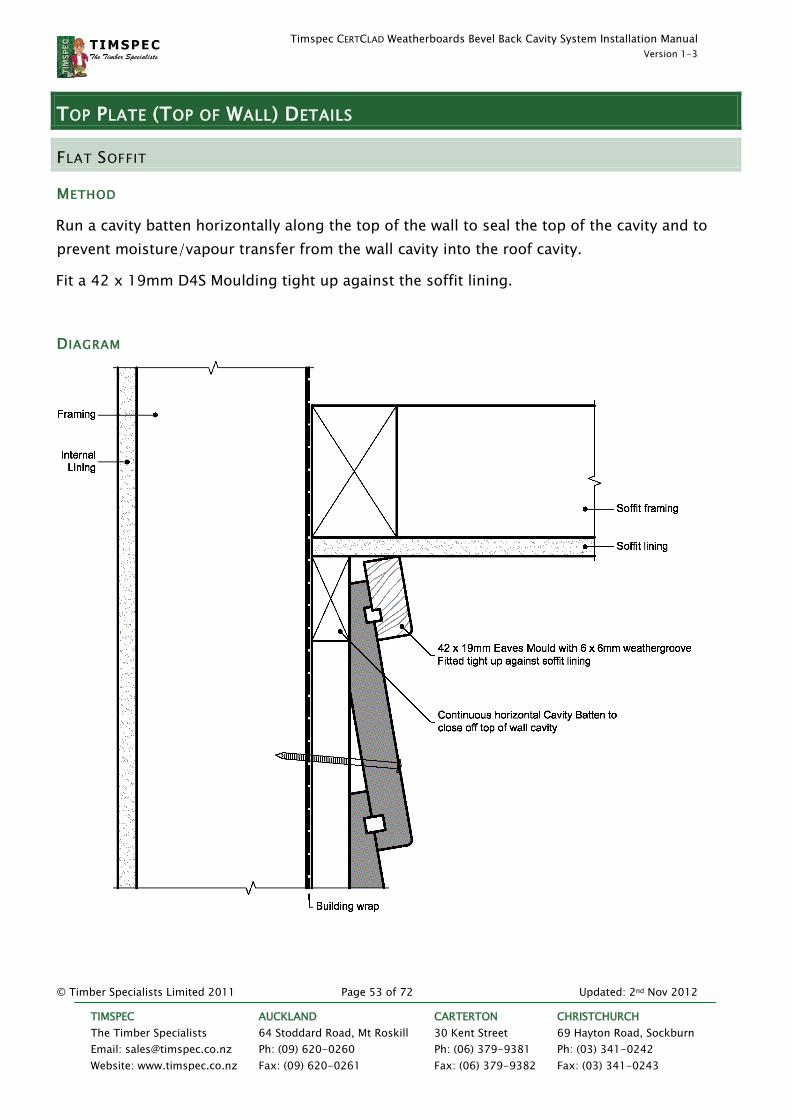
TOP PLATE (TOP OF WALL) DETAILS
FLAT SOFFIT
METHOD
Run a cavity batten horizontally along the top of the wall to seal the top of the cavity and to
prevent moisture/vapour transfer from the wall cavity into the roof cavity.
Fit a 42 x 19mm D4S Moulding tight up against the soffit lining.
DIAGRAM

Timspec CERTCLAD Weatherboards Bevel Back Cavity System Installation Manual
Version 1-3
© Timber Specialists Limited 2011 Page 54 of 72 Updated: 2nd Nov 2012
TIMSPEC
The Timber Specialists
Email: [email protected]
Website: www.timspec.co.nz
AUCKLAND
64 Stoddard Road, Mt Roskill
Ph: (09) 620-0260
Fax: (09) 620-0261
CARTERTON
30 Kent Street
Ph: (06) 379-9381
Fax: (06) 379-9382
CHRISTCHURCH
69 Hayton Road, Sockburn
Ph: (03) 341-0242
Fax: (03) 341-0243
TOP PLATE (TOP OF WALL) DETAILS (CONTINUED)
ANGLED SOFFIT
METHOD
Run a cavity batten horizontally along the top of the wall to seal the top of the cavity and to
prevent moisture/vapour transfer from the wall cavity into the roof cavity.
Fit a 42 x 19mm D4S Moulding tight up against the soffit lining.

Timspec CERTCLAD Weatherboards Bevel Back Cavity System Installation Manual
Version 1-3
© Timber Specialists Limited 2011 Page 55 of 72 Updated: 2nd Nov 2012
TIMSPEC
The Timber Specialists
Email: [email protected]
Website: www.timspec.co.nz
AUCKLAND
64 Stoddard Road, Mt Roskill
Ph: (09) 620-0260
Fax: (09) 620-0261
CARTERTON
30 Kent Street
Ph: (06) 379-9381
Fax: (06) 379-9382
CHRISTCHURCH
69 Hayton Road, Sockburn
Ph: (03) 341-0242
Fax: (03) 341-0243
TOP PLATE (TOP OF WALL) DETAILS (CONTINUED)
ANGLED SOFFIT (CONTINUED)
DIAGRAM
Timspec CERTCLAD Weatherboards Bevel Back Cavity System Installation Manual
Version 1-3
© Timber Specialists Limited 2011 Page 56 of 72 Updated: 2nd Nov 2012
TIMSPEC
The Timber Specialists
Email: [email protected]
Website: www.timspec.co.nz
AUCKLAND
64 Stoddard Road, Mt Roskill
Ph: (09) 620-0260
Fax: (09) 620-0261
CARTERTON
30 Kent Street
Ph: (06) 379-9381
Fax: (06) 379-9382
CHRISTCHURCH
69 Hayton Road, Sockburn
Ph: (03) 341-0242
Fax: (03) 341-0243
TOP PLATE (TOP OF WALL) DETAILS
NO SOFFIT
METHOD
Run a cavity batten horizontally along the top of the wall to seal the top of the cavity and to
prevent moisture/vapour transfer from the wall cavity to the roof cavity.
When boxed corners are used: Use a packer to provide a flush surface to mount the fascia onto
so that fascia is flush with boxed corners.
When soakers or mitred corners are used: A fillet can be used to provide a flat surface flush
with the outside of the weatherboards to mount the spounting to.
Roofing must over hang the fascia by minimum of 50mm.
An eaves flashing may be required in certain situations (for example in high and very high wind
zones), the roofer is to determine if necessary and install.

Timspec CERTCLAD Weatherboards Bevel Back Cavity System Installation Manual
Version 1-3
© Timber Specialists Limited 2011 Page 57 of 72 Updated: 2nd Nov 2012
TIMSPEC
The Timber Specialists
Email: [email protected]
Website: www.timspec.co.nz
AUCKLAND
64 Stoddard Road, Mt Roskill
Ph: (09) 620-0260
Fax: (09) 620-0261
CARTERTON
30 Kent Street
Ph: (06) 379-9381
Fax: (06) 379-9382
CHRISTCHURCH
69 Hayton Road, Sockburn
Ph: (03) 341-0242
Fax: (03) 341-0243
TOP PLATE (TOP OF WALL) DETAILS (CONTINUED)
NO SOFFIT (CONTINUED)
DIAGRAM

Timspec CERTCLAD Weatherboards Bevel Back Cavity System Installation Manual
Version 1-3
© Timber Specialists Limited 2011 Page 58 of 72 Updated: 2nd Nov 2012
TIMSPEC
The Timber Specialists
Email: [email protected]
Website: www.timspec.co.nz
AUCKLAND
64 Stoddard Road, Mt Roskill
Ph: (09) 620-0260
Fax: (09) 620-0261
CARTERTON
30 Kent Street
Ph: (06) 379-9381
Fax: (06) 379-9382
CHRISTCHURCH
69 Hayton Road, Sockburn
Ph: (03) 341-0242
Fax: (03) 341-0243
PARAPET/ENCLOSED BALUSTRADE DETAILS
CAPPING
METHOD
Wrap a continuous layer of building wrap over the framing (under the cavity battens).
Use a sloped packer continuously along the top of the parapet/enclosed balustrade to support
the capping flashing.
Parapets are to be capped with a metal flashing that meets all of the following criteria:
Capping is to have 50 year durability; and
No penetrations through the top of capping (fix through the side); and
Slope of top is to be minimum 5° (1:12); and
Capping is to be separated from timber by the use of roofing underlay or another
suitable material; and
Capping is to have minimum 50mm cover over weatherboards (70mm for very high
wind-zones); and
Capping is to have a „birds beak‟ style drip edge.
Enclosed balustrades must also comply with all the above criteria, except that cappings for
enclosed balustrades only require 15 year durability (this is because they are easier to inspect).
EXPANSION JOINTS
Metal cappings longer than 8 metres may require an expansion gap. Refer to E2/AS1 for
details.

Timspec CERTCLAD Weatherboards Bevel Back Cavity System Installation Manual
Version 1-3
© Timber Specialists Limited 2011 Page 59 of 72 Updated: 2nd Nov 2012
TIMSPEC
The Timber Specialists
Email: [email protected]
Website: www.timspec.co.nz
AUCKLAND
64 Stoddard Road, Mt Roskill
Ph: (09) 620-0260
Fax: (09) 620-0261
CARTERTON
30 Kent Street
Ph: (06) 379-9381
Fax: (06) 379-9382
CHRISTCHURCH
69 Hayton Road, Sockburn
Ph: (03) 341-0242
Fax: (03) 341-0243
PARAPET/ENCLOSED BALUSTRADE DETAILS (CONTINUED)
CAPPING (CONTINUED)
DIAGRAM
Timspec CERTCLAD Weatherboards Bevel Back Cavity System Installation Manual
Version 1-3
© Timber Specialists Limited 2011 Page 60 of 72 Updated: 2nd Nov 2012
TIMSPEC
The Timber Specialists
Email: [email protected]
Website: www.timspec.co.nz
AUCKLAND
64 Stoddard Road, Mt Roskill
Ph: (09) 620-0260
Fax: (09) 620-0261
CARTERTON
30 Kent Street
Ph: (06) 379-9381
Fax: (06) 379-9382
CHRISTCHURCH
69 Hayton Road, Sockburn
Ph: (03) 341-0242
Fax: (03) 341-0243
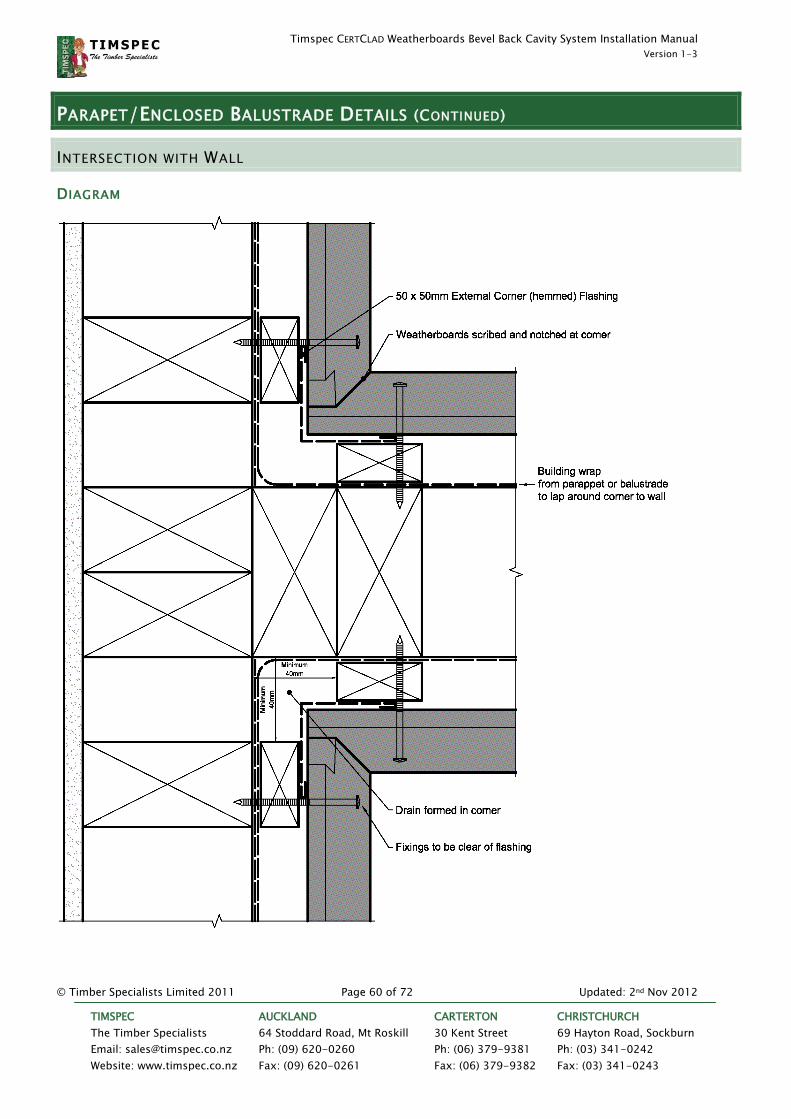
PARAPET/ENCLOSED BALUSTRADE DETAILS (CONTINUED)
INTERSECTION WITH WALL
DIAGRAM

Timspec CERTCLAD Weatherboards Bevel Back Cavity System Installation Manual
Version 1-3
© Timber Specialists Limited 2011 Page 61 of 72 Updated: 2nd Nov 2012
TIMSPEC
The Timber Specialists
Email: [email protected]
Website: www.timspec.co.nz
AUCKLAND
64 Stoddard Road, Mt Roskill
Ph: (09) 620-0260
Fax: (09) 620-0261
CARTERTON
30 Kent Street
Ph: (06) 379-9381
Fax: (06) 379-9382
CHRISTCHURCH
69 Hayton Road, Sockburn
Ph: (03) 341-0242
Fax: (03) 341-0243
PARAPET/ENCLOSED BALUSTRADE DETAILS (CONTINUED)
INSTALLATION
STEP-BY-STEP
1: Cover the framed wall with building
wrap.
2: Frame the balustrade/parapet
3: Cover the balustrade/parapet with
building wrap ensuring that‟s its one
continuous piece over the top.
4: Apply battens to wall.
5: Apply cavity battens to
balustrade/parapet.
6: Fit a sloped packer to making sure it
extends all the way into the cavity of the
wall.

Timspec CERTCLAD Weatherboards Bevel Back Cavity System Installation Manual
Version 1-3
© Timber Specialists Limited 2011 Page 62 of 72 Updated: 2nd Nov 2012
TIMSPEC
The Timber Specialists
Email: [email protected]
Website: www.timspec.co.nz
AUCKLAND
64 Stoddard Road, Mt Roskill
Ph: (09) 620-0260
Fax: (09) 620-0261
CARTERTON
30 Kent Street
Ph: (06) 379-9381
Fax: (06) 379-9382
CHRISTCHURCH
69 Hayton Road, Sockburn
Ph: (03) 341-0242
Fax: (03) 341-0243
PARAPET/ENCLOSED BALUSTRADE DETAILS (CONTINUED)
INSTALLATION (CONTINUED)
STEP-BY-STEP
7: Fit corner flashings to corners.
8: Fix lower weatherboards to
balustrade/parapet.
9: Scribe and notch weatherboards on the
wall to the weatherboards on the
balustrade/parapet.
10: Fix weatherboards to
balustrade/parapet.
11: Continue to scribe and notch
weatherboards on the wall to the
balustrade/parapet.
12: Fit triangular packers to top of
balustrade/parapet to give a solid surface
for capping.
Timspec CERTCLAD Weatherboards Bevel Back Cavity System Installation Manual
Version 1-3
© Timber Specialists Limited 2011 Page 63 of 72 Updated: 2nd Nov 2012
TIMSPEC
The Timber Specialists
Email: [email protected]
Website: www.timspec.co.nz
AUCKLAND
64 Stoddard Road, Mt Roskill
Ph: (09) 620-0260
Fax: (09) 620-0261
CARTERTON
30 Kent Street
Ph: (06) 379-9381
Fax: (06) 379-9382
CHRISTCHURCH
69 Hayton Road, Sockburn
Ph: (03) 341-0242
Fax: (03) 341-0243
PARAPET/ENCLOSED BALUSTRADE DETAILS (CONTINUED)
INSTALLATION (CONTINUED)
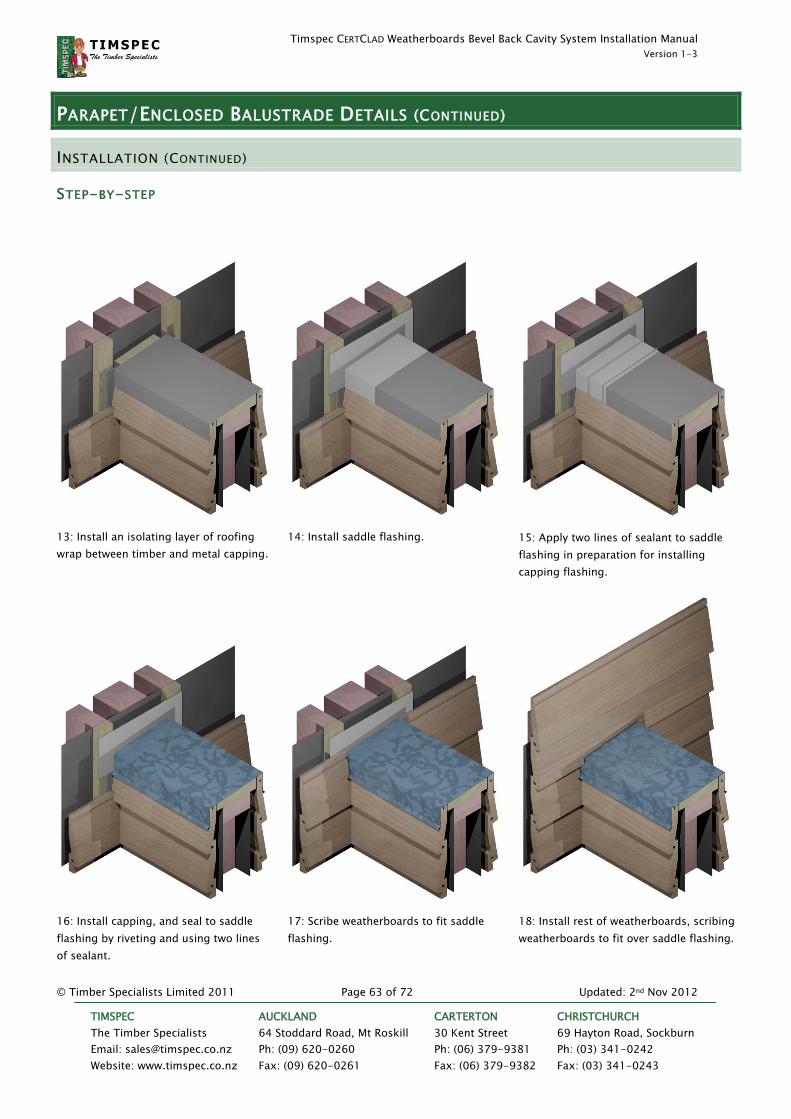
STEP-BY-STEP
13: Install an isolating layer of roofing
wrap between timber and metal capping.
14: Install saddle flashing.
15: Apply two lines of sealant to saddle
flashing in preparation for installing
capping flashing.
16: Install capping, and seal to saddle
flashing by riveting and using two lines
of sealant.
17: Scribe weatherboards to fit saddle
flashing.
18: Install rest of weatherboards, scribing
weatherboards to fit over saddle flashing.

Timspec CERTCLAD Weatherboards Bevel Back Cavity System Installation Manual
Version 1-3
© Timber Specialists Limited 2011 Page 64 of 72 Updated: 2nd Nov 2012
TIMSPEC
The Timber Specialists
Email: [email protected]
Website: www.timspec.co.nz
AUCKLAND
64 Stoddard Road, Mt Roskill
Ph: (09) 620-0260
Fax: (09) 620-0261
CARTERTON
30 Kent Street
Ph: (06) 379-9381
Fax: (06) 379-9382
CHRISTCHURCH
69 Hayton Road, Sockburn
Ph: (03) 341-0242
Fax: (03) 341-0243
PIPE PENETRATION DETAILS
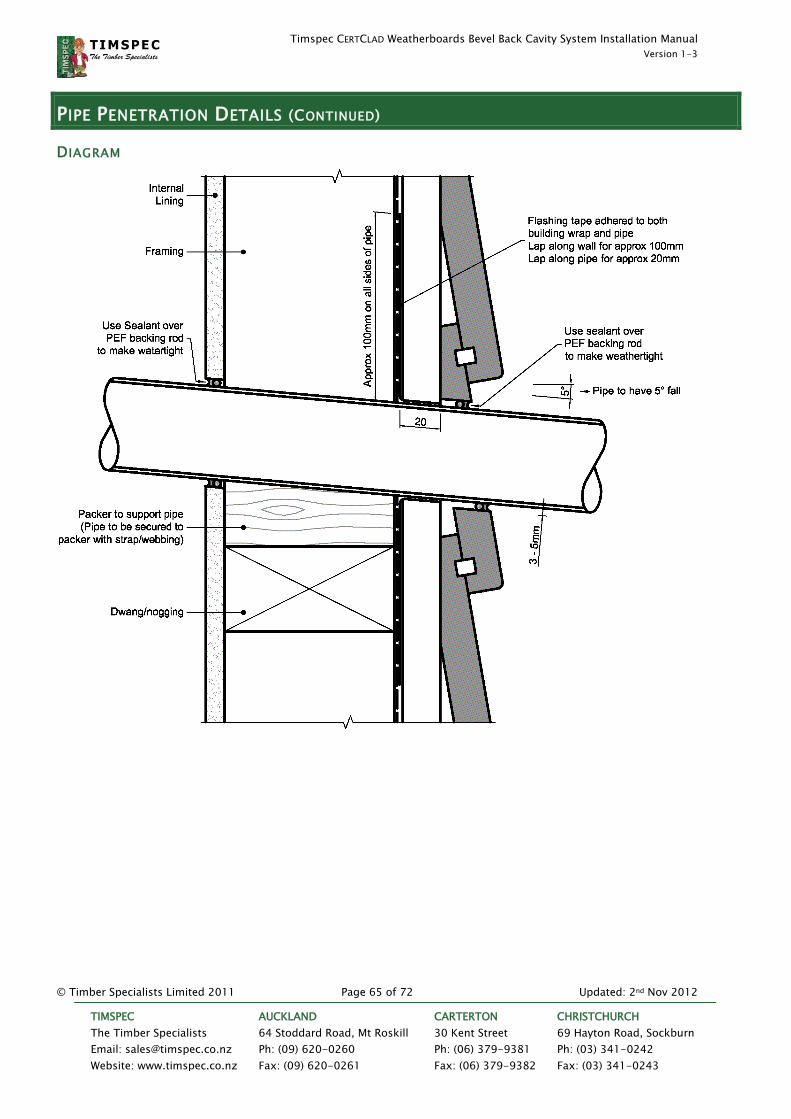
METHOD
Cut a hole in the building wrap just large enough for the pipe.
Pipe to be on 5° slope downward, so that any water in the cavity will run away from the
building wrap (towards the weatherboard).
Rest a bevelled packer on a noggin under the pipe to support it, and secure the pipe to the
packer with a strap/webbing fastened with screws.
Use flashing tape to create a flange that is adhered to both the building wrap and the pipe.
Lap along the building wrap for 100mm in all directions and 20mm along the pipe.
Cut a 6-10mm diameter hole through internal lining and weatherboard (so that there is 3-
5mm between pipe and internal lining/weatherboard) and apply a suitable sealant over PEF rod
to make weathertight.
IMAGE
Timspec CERTCLAD Weatherboards Bevel Back Cavity System Installation Manual
Version 1-3
© Timber Specialists Limited 2011 Page 65 of 72 Updated: 2nd Nov 2012
TIMSPEC
The Timber Specialists
Email: [email protected]
Website: www.timspec.co.nz
AUCKLAND
64 Stoddard Road, Mt Roskill
Ph: (09) 620-0260
Fax: (09) 620-0261
CARTERTON
30 Kent Street
Ph: (06) 379-9381
Fax: (06) 379-9382
CHRISTCHURCH
69 Hayton Road, Sockburn
Ph: (03) 341-0242
Fax: (03) 341-0243
PIPE PENETRATION DETAILS (CONTINUED)
DIAGRAM
Timspec CERTCLAD Weatherboards Bevel Back Cavity System Installation Manual
Version 1-3
© Timber Specialists Limited 2011 Page 66 of 72 Updated: 2nd Nov 2012
TIMSPEC
The Timber Specialists
Email: [email protected]
Website: www.timspec.co.nz
AUCKLAND
64 Stoddard Road, Mt Roskill
Ph: (09) 620-0260
Fax: (09) 620-0261
CARTERTON
30 Kent Street
Ph: (06) 379-9381
Fax: (06) 379-9382
CHRISTCHURCH
69 Hayton Road, Sockburn
Ph: (03) 341-0242
Fax: (03) 341-0243
METER BOX
HEAD
METHOD
An additional layer of building wrap is required to lap over the „Z‟ flashing to direct water
outwards from the wall. The „Z‟ flashing is to be riveted and sealed to the meterbox top
flashing with minimum 10mm cover. The top flashing must also be riveted and sealed to the
meterbox.
It is important to install a flexible air seal to all sides of the meterbox. This must be a self-
expanding polyurethane foam or sealant installed over a closed cell polyethylene foam (PEF)
backing rod or a similar backing rod.
The self-expanding polyurethane foam or sealant used, must meet one of the following
requirements:
Type F, Class 20LM of ISO 11600; or
Class 25LM of ISO11600; or
Low modulus Type II, Class A of Federal Specification TT-S-00230c.
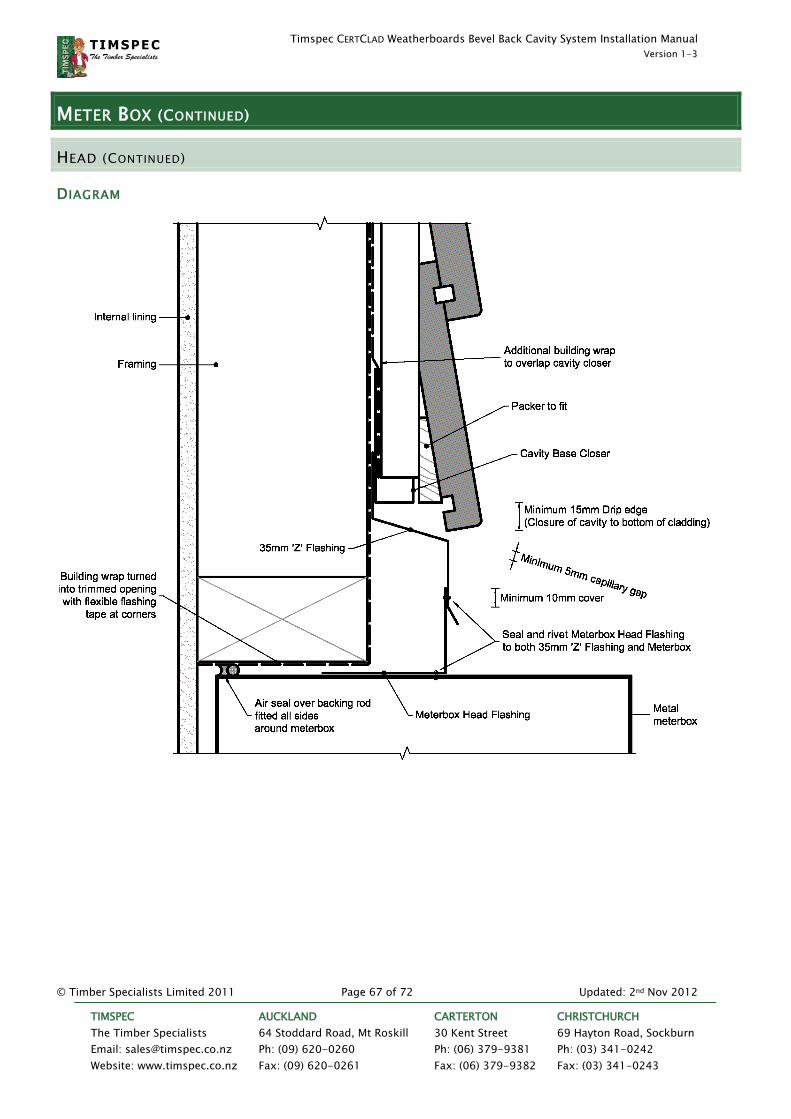
Timspec CERTCLAD Weatherboards Bevel Back Cavity System Installation Manual
Version 1-3
© Timber Specialists Limited 2011 Page 67 of 72 Updated: 2nd Nov 2012
TIMSPEC
The Timber Specialists
Email: [email protected]
Website: www.timspec.co.nz
AUCKLAND
64 Stoddard Road, Mt Roskill
Ph: (09) 620-0260
Fax: (09) 620-0261
CARTERTON
30 Kent Street
Ph: (06) 379-9381
Fax: (06) 379-9382
CHRISTCHURCH
69 Hayton Road, Sockburn
Ph: (03) 341-0242
Fax: (03) 341-0243
METER BOX (CONTINUED)
HEAD (CONTINUED)
DIAGRAM
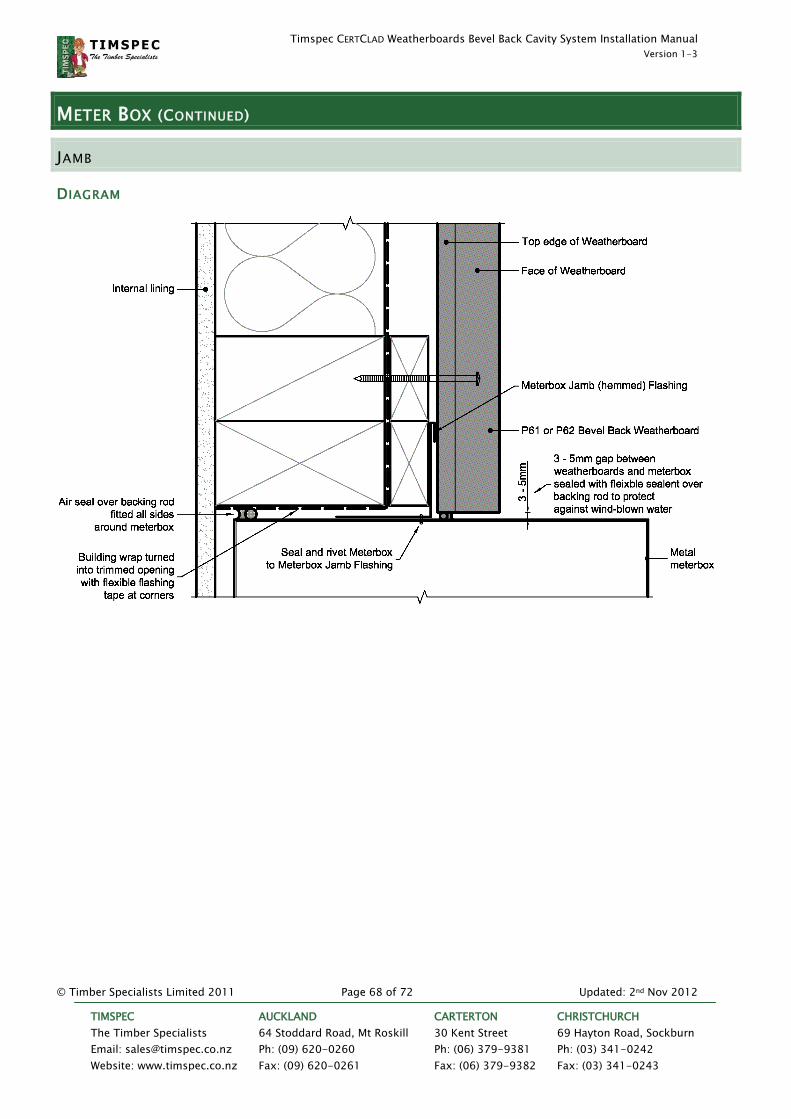
Timspec CERTCLAD Weatherboards Bevel Back Cavity System Installation Manual
Version 1-3
© Timber Specialists Limited 2011 Page 68 of 72 Updated: 2nd Nov 2012
TIMSPEC
The Timber Specialists
Email: [email protected]
Website: www.timspec.co.nz
AUCKLAND
64 Stoddard Road, Mt Roskill
Ph: (09) 620-0260
Fax: (09) 620-0261
CARTERTON
30 Kent Street
Ph: (06) 379-9381
Fax: (06) 379-9382
CHRISTCHURCH
69 Hayton Road, Sockburn
Ph: (03) 341-0242
Fax: (03) 341-0243
METER BOX (CONTINUED)
JAMB
DIAGRAM

Timspec CERTCLAD Weatherboards Bevel Back Cavity System Installation Manual
Version 1-3
© Timber Specialists Limited 2011 Page 69 of 72 Updated: 2nd Nov 2012
TIMSPEC
The Timber Specialists
Email: [email protected]
Website: www.timspec.co.nz
AUCKLAND
64 Stoddard Road, Mt Roskill
Ph: (09) 620-0260
Fax: (09) 620-0261
CARTERTON
30 Kent Street
Ph: (06) 379-9381
Fax: (06) 379-9382
CHRISTCHURCH
69 Hayton Road, Sockburn
Ph: (03) 341-0242
Fax: (03) 341-0243
METER BOX (CONTINUED)
SILL
DIAGRAM

Timspec CERTCLAD Weatherboards Bevel Back Cavity System Installation Manual
Version 1-3
© Timber Specialists Limited 2011 Page 70 of 72 Updated: 2nd Nov 2012
TIMSPEC
The Timber Specialists
Email: [email protected]
Website: www.timspec.co.nz
AUCKLAND
64 Stoddard Road, Mt Roskill
Ph: (09) 620-0260
Fax: (09) 620-0261
CARTERTON
30 Kent Street
Ph: (06) 379-9381
Fax: (06) 379-9382
CHRISTCHURCH
69 Hayton Road, Sockburn
Ph: (03) 341-0242
Fax: (03) 341-0243
SITE CLEAN-UP
After completion the installer is to leave the site in a clean and tidy manner, including:
1. Replacing or repairing any damaged or marked items; and
2. Removing all rubbish, debris and unused items from the building site.
Any treated and/or coated timber off-cuts or rubbish are to be disposed with according to
local council requirements.
Note: Accoya ® wood is not treated with dangerous chemicals and can be disposed by burning, or as untreated timber at refuse
sites.
Timspec CERTCLAD Weatherboards Bevel Back Cavity System Installation Manual
Version 1-3
© Timber Specialists Limited 2011 Page 71 of 72 Updated: 2nd Nov 2012
TIMSPEC
The Timber Specialists
Email: [email protected]
Website: www.timspec.co.nz
AUCKLAND
64 Stoddard Road, Mt Roskill
Ph: (09) 620-0260
Fax: (09) 620-0261
CARTERTON
30 Kent Street
Ph: (06) 379-9381
Fax: (06) 379-9382
CHRISTCHURCH
69 Hayton Road, Sockburn
Ph: (03) 341-0242
Fax: (03) 341-0243
ON-GOING MAINTENANCE
It is the building owner‟s responsibility to ensure that the cladding system receives regular
maintenance so that it continues to perform at its required level.
MAINTENANCE INTERVAL
For most areas (especially coastal, industrial, and inner-city area) maintenance should be
performed at least once every 12 months. Maintenance may be required as often as once
every six months, depending on the level of pollution, dirt and dust in the environment.
For sheltered, inland locations, maintenance should be performed once every 12 to 18 months.
MAINTENANCE REQUIREMENTS
Regular maintenance is to include the following 5 steps:
1. Wash all exterior surfaces with low pressure water to remove dust, dirt and other
contaminants;
a. Extra attention should be given to areas that are not exposed to rain such as
sheltered areas below eaves;
b. Do not direct high pressure water at any part of the cladding system, especially
sensitive junctions such as joinery surrounds and other flashings were you must
avoid forcing water past anti-capillary gaps and flashings into the wall cavity.
2. Use a soft bristle brush or broom with water and an appropriate cleaning agent (refer to
paint manufacturer for correct cleaning agent specific to their paint system) to remove
stubborn or persistent dirt and contaminants.

Timspec CERTCLAD Weatherboards Bevel Back Cavity System Installation Manual
Version 1-3
© Timber Specialists Limited 2011 Page 72 of 72 Updated: 2nd Nov 2012
TIMSPEC
The Timber Specialists
Email: [email protected]
Website: www.timspec.co.nz
AUCKLAND
64 Stoddard Road, Mt Roskill
Ph: (09) 620-0260
Fax: (09) 620-0261
CARTERTON
30 Kent Street
Ph: (06) 379-9381
Fax: (06) 379-9382
CHRISTCHURCH
69 Hayton Road, Sockburn
Ph: (03) 341-0242
Fax: (03) 341-0243
ON-GOING MAINTENANCE (CONTINUED)
MAINTENANCE REQUIREMENTS (CONTINUED)
3. Inspect all surfaces and junctions for signs of damage, wear-and-tear, or coating
breakdown. Where coating surface has broken or remedial action is required:
a. Remove all damaged or loose coating (may involve sanding back to solid timber);
b. Spot prime any bare timber (if repairing paint);
c. Recoat with minimum two coats of the product originally used to initially overcoat
the timber.
4. Repairing or replacing any damaged or deteriorated items in order to preserve the
weathertightness of the building:
a. Small isolated areas of dry rot in timber can be cut out and filled then primed and
coated;
b. For larger areas of deterioration: remove and replace either the damaged section
or the entire board for any deteriorated timber boards either (includes scribers,
cover boards and weatherboards). Prime and coat the replacements as required;
c. Other items (soakers, flashings and cappings) may need to be replaced in their
entirety.
5. Where a coating is applied, periodic recoating is required to ensure the integrity of the
coating is sustained. This will generally mean applying another exterior coat every 4 to
10 years (dependant on the coating used and building location) after washing and
maintenance.


