
TimeTec Smart License Plate Recognition System · TimeTec Smart License Plate Recognition System...
15
License Plate Recognition LPR Camera Software Installation Guide TimeTec Smart License Plate Recognition System Securely Automate Authorized Vehicle Access
Transcript of TimeTec Smart License Plate Recognition System · TimeTec Smart License Plate Recognition System...
License Plate Recognition
LPR
Camera Software Installation Guide
TimeTec Smart License Plate Recognition SystemSecurely Automate Authorized Vehicle Access

�
License Plate Recognition
LPR
CONTENTS
1 • Camera Specifications 3
2 • Configuring IP Camera To 4-8 Use with TimeTec LPR System
3 • Installation of TimeTec LPR System 9-14

3
License Plate Recognition
LPR
1 • Camera Specifications
Camera Type System
Camera
Video
Audio
Alarm
Network
General
Effective Pixels
Frames Rates
Image Sensor
DSP
Min. Illumination
Adjust Parameters
CompressionStreamBit RateFrame Rates
Input and output
Compression
Types
WEB Browser
Smart Phone
CMS Software
Cloud P2P
Network
ONVIF
POE
WIFI
Language
IR Cut Filter
Lens Mount
Infrared Luminary
Infrared Wavelength
Waterproof Criterion
I/O Connector
Supplied Voltage
Power Consumption
Working Enviroment
IP Camera
Embedded RTOS design
3.0 Mega Pixels
Main stream:2048*1536;1920*1080
Sub stream:704*576
PAL:20fps(2048*1536), 25fps(1920*1080)
NTSC:20fps(2048*1536), 30fps(1920*1080)
1/3 Aptina CMOS Sensor
3.5 Megapixel resolution (2304H*1536V)
Dual core 32-bit DSP
(A5S88)
Color 0.01Lux/F1.2
B/W 0.001 Lux/F1.2
DWDR,BLC,DNR,AE,AGC,D&N,Mirror,Flip,etc.
H.264 Main profile
support dual stream,AVI format
support 0.1M ~8Mpbs bit rate adjustable
support 1~30fps adjust
1ch input( micphone), 1ch output( Speaker&micphone) Optional
G.711 compression,support two-way audio intercom,support audio & video synchronized output
Motion Detection, Video Blind , Video Loss
Support WEB remote config( IE, Safari, Google Chrome, Firefox etc.)
mobile remote Monitoring (iPhone,Android,Windows Mobile,BlackBerry,Symbian)
Uniform CMS Software(multiple devices management system)
www.p2pipc.net,MYEYE platform and other program,Offer SDK
1 * RJ45,10/100M,Support RTSP/FTP/PPPOE/DHCP/DDNS/NTP/UPnP/SMTP
Support (ONVIF 2.0)
Support(optional)
N/A
English, Finnish, French, German, Greek,Italian, Japanese, Polish, Portuguese, Russian, Spanish,
Thai, Chinese & Turkish
Set of double light switch IR-CUT filter
Varicoal Lens 9-22mm (3MP)
4 pieces Array White light LED
More than 30 M
IP 66
1*DC Connector ,1* RJ45(10/100M Network)
DC12V/PoE(802.3af/820.3at)
IR On: 600mA max., IR Off: Less than 200mA
-10°C~+60°C, 10%~90% ( Built in Heater being optional added for enviroment lower than -20° )

4
License Plate Recognition
LPR
2 • Configuring IP Camera To Use with TimeTec LPR System
Before the IP camera can be used with TimeTec LPR, you must connect it to the same network with the computer that has been installed with TimeTec LPR. Every IP camera has been in-tegrated with a web-based software to allow admin to access via Internet Explorer 11 and below to do configuration and to view footages.
The default login credentials and network settings are as be-low:
IP address: 19�.168.1.10Subnet mask: �55.�55.�55.0Gateway: 19�.168.1.1Login username: adminpassword: [leave it blank]
To secure the IP camera from unauthorized access, make sure you change the login credentials and network settings after your first time login.

5
License Plate Recognition
LPR
Step • 1 Connect IP camera to a power source to power up the device and plug in a network cable RJ45 to link it to a network.
Step • 2 Open Internet Explorer and insert the IP camera’s default IP ad-dress into the address bar to connect it to the camera. Insert the default login credentials to access into the IP camera.
Note: The system will alert you to install ActiveX plugin before you can login. Please allow the installation to proceed. If you have already installed ActiveX plugin, you will not receive this system alert.

6
License Plate Recognition
LPR
Step • 3 Define the preview video streaming quality as Main Stream when this window pops up.
Step • 4 From the main menu, Click DeviceCfg at the top navigation bar to see the details of configuration for Record, Alarm, System, Ad-vanced, and Info.

�
License Plate Recognition
LPR
Step • 5 Select the System icon to view the configuration details.
Step • 6 Select Network to start configuring your IP camera’s network set-tings.
8
License Plate Recognition
LPR
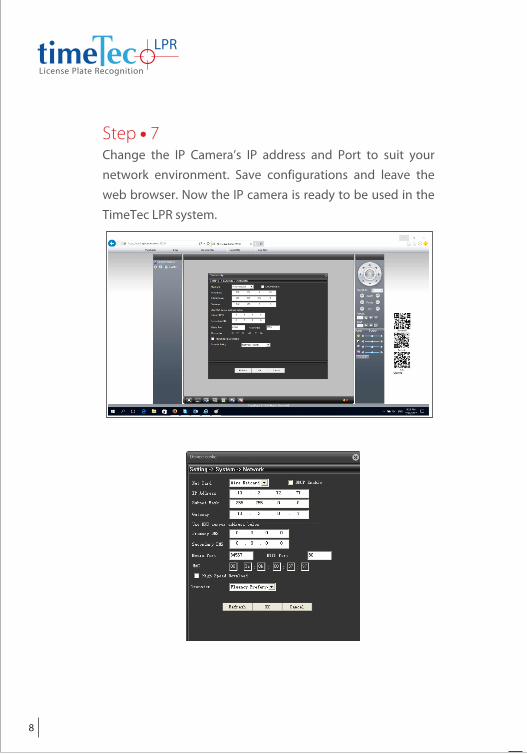
Step • 7Change the IP Camera’s IP address and Port to suit your network environment. Save configurations and leave the web browser. Now the IP camera is ready to be used in the TimeTec LPR system.
9
License Plate Recognition
LPR
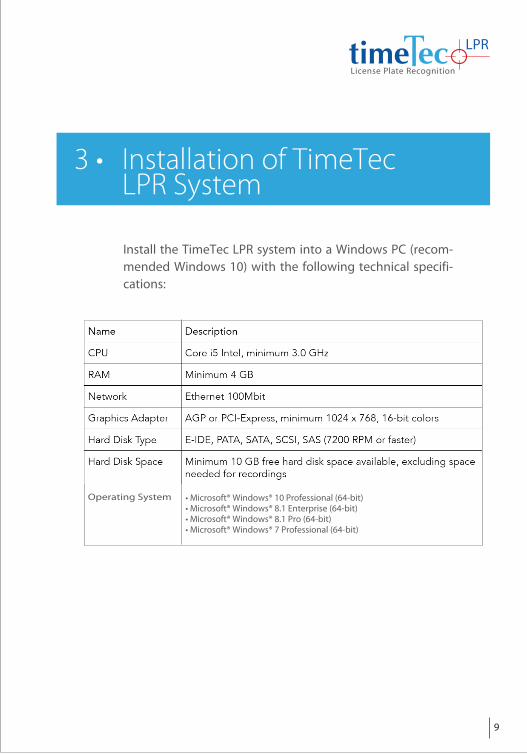
3 • Installation of TimeTec LPR System
Install the TimeTec LPR system into a Windows PC (recom-mended Windows 10) with the following technical specifi-cations:
• Microsoft® Windows® 10 Professional (64-bit)• Microsoft® Windows® 8.1 Enterprise (64-bit)• Microsoft® Windows® 8.1 Pro (64-bit)• Microsoft® Windows® � Professional (64-bit)
Operating System

10
License Plate Recognition
LPR
Step • 1
Run the installer to install TimeTec LPR. Follow the onscreen in-structions to complete the installation.
Step • 2For a first time setup, you must connect TimeTec LPR system to the database.

11
License Plate Recognition
LPR
Step • 3 Run the TimeTec LPR and login by using the default login cre-dentials. It is recommended to change the login credentials af-ter you have login.
Username: AdminPassword: 1�3456

1�
License Plate Recognition
LPR
Step • 4From the TimeTec LPR main screen, go into Settings.
Step • 5 Fill up the LPR App Key obtained from i-Neighbour

13
License Plate Recognition
LPR
Step • 6 Fill up the camera’s IP address, Port, Username and Password.
Step • 7Select the COM Port for Barrier Gate Control

14
License Plate Recognition
LPR
Step • 8Save & restart TimeTec LPR
Step • 9 After the restart, you will be able to capture and display the resi-dent’s and visitor’s car plate number list. Then you can proceed to test the LPR with your car.
License Plate Recognition
LPR
© �01� Timetec Computing Sdn Bhd. All rights reserved • 0��01�


