Timetable Development Lesson 3€¦ · Timetable Development Lesson 3 LESSON 3 ENTER CLASS...
19
Timetable Development Enter Class Information – Part 1 Fully Blocked Curriculum Lesson 3 THE IMPORT PROCESS – ELECTIVE LINES ................................................................................................ 3 PREPARE THE STUDENT OPTIONS FILES FOR IMPORTING ...................................................................... 4 LINK THE TIMETABLE DEVELOPMENT FILE TO THE STUDENT OPTIONS FILE...................................... 4 ASSIGN A ROLL CLASS TO EACH CLASS................................................................................................ 6 CHECK CLASS CODES ARE CORRECT .................................................................................................. 10 ENSURE EACH STUDENT IS IN A ROLL CLASS .................................................................................... 11 IMPORT GRID LINES INTO TIMETABLE DEVELOPMENT ........................................................................ 12 LINK A STUDENT OPTIONS FILE ......................................................................................................... 12 IMPORT GRID LINES .......................................................................................................................... 14 TRANSLATE THE CURRICULUM INTO CLASS INFORMATION................................................................. 16 CHECK NUMBER OF PERIODS............................................................................................................ 17 ENTER NUMBER OF DOUBLE LESSONS ............................................................................................. 17 CHECK AND ADJUST NUMBER OF PERIODS AND DOUBLES FOR YR11 ............................................. 19
-
Upload
trinhthuan -
Category
Documents
-
view
251 -
download
0
Transcript of Timetable Development Lesson 3€¦ · Timetable Development Lesson 3 LESSON 3 ENTER CLASS...
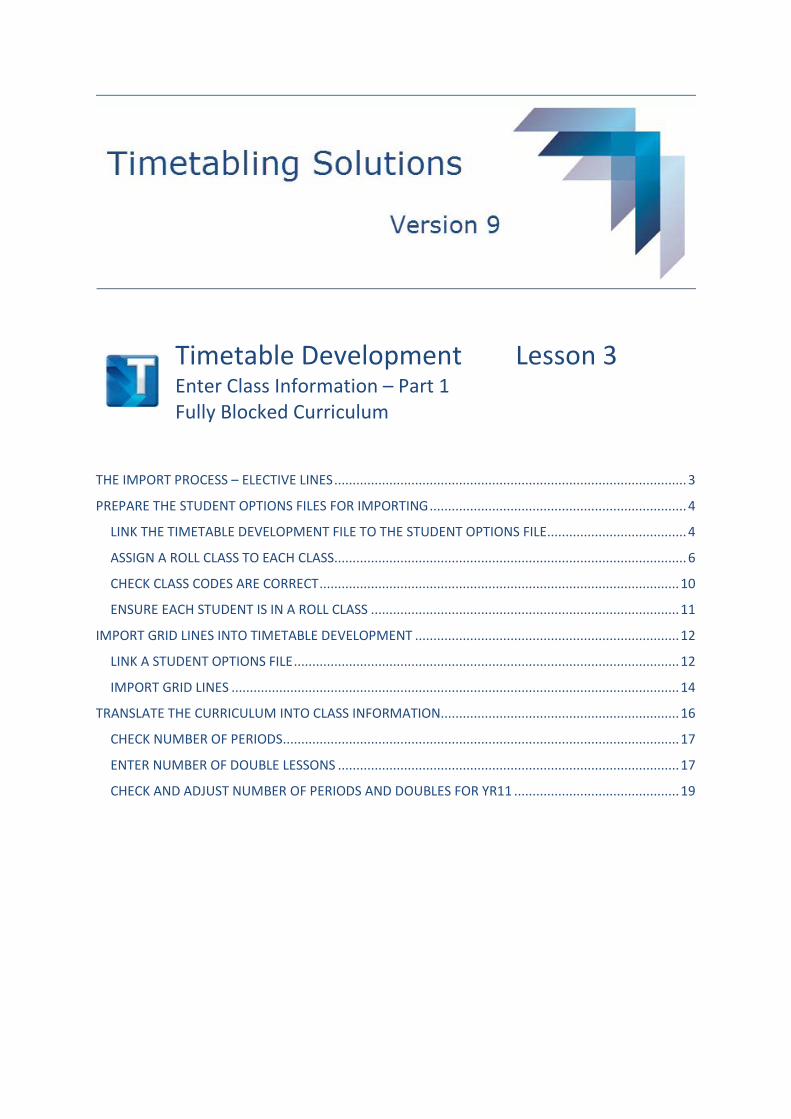
Timetable Development Enter Class Information – Part 1 Fully Blocked Curriculum
Lesson 3
THE IMPORT PROCESS – ELECTIVE LINES ................................................................................................ 3
PREPARE THE STUDENT OPTIONS FILES FOR IMPORTING ...................................................................... 4
LINK THE TIMETABLE DEVELOPMENT FILE TO THE STUDENT OPTIONS FILE ...................................... 4
ASSIGN A ROLL CLASS TO EACH CLASS ................................................................................................ 6
CHECK CLASS CODES ARE CORRECT .................................................................................................. 10
ENSURE EACH STUDENT IS IN A ROLL CLASS .................................................................................... 11
IMPORT GRID LINES INTO TIMETABLE DEVELOPMENT ........................................................................ 12
LINK A STUDENT OPTIONS FILE ......................................................................................................... 12
IMPORT GRID LINES .......................................................................................................................... 14
TRANSLATE THE CURRICULUM INTO CLASS INFORMATION................................................................. 16
CHECK NUMBER OF PERIODS ............................................................................................................ 17
ENTER NUMBER OF DOUBLE LESSONS ............................................................................................. 17
CHECK AND ADJUST NUMBER OF PERIODS AND DOUBLES FOR YR11 ............................................. 19
Timetable Development Lesson 3
LESSON 3 ENTER CLASS INFORMATION – PART 1 FULLY BLOCKED CURRICULUM
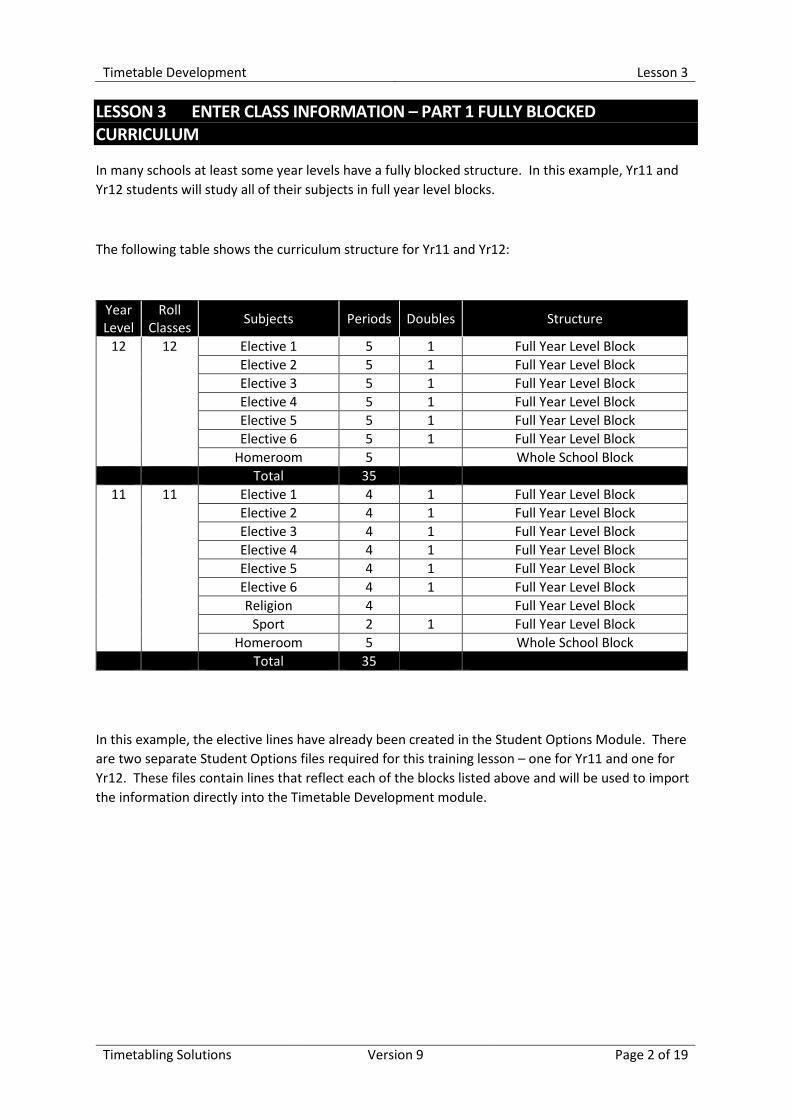
In many schools at least some year levels have a fully blocked structure. In this example, Yr11 and Yr12 students will study all of their subjects in full year level blocks.
The following table shows the curriculum structure for Yr11 and Yr12:
Year Level
Roll Classes Subjects Periods Doubles Structure
12 12 Elective 1 5 1 Full Year Level Block Elective 2 5 1 Full Year Level Block Elective 3 5 1 Full Year Level Block Elective 4 5 1 Full Year Level Block Elective 5 5 1 Full Year Level Block Elective 6 5 1 Full Year Level Block
Homeroom 5 Whole School Block Total 35
11 11 Elective 1 4 1 Full Year Level Block Elective 2 4 1 Full Year Level Block Elective 3 4 1 Full Year Level Block Elective 4 4 1 Full Year Level Block Elective 5 4 1 Full Year Level Block Elective 6 4 1 Full Year Level Block Religion 4 Full Year Level Block
Sport 2 1 Full Year Level Block Homeroom 5 Whole School Block
Total 35
In this example, the elective lines have already been created in the Student Options Module. There are two separate Student Options files required for this training lesson – one for Yr11 and one for Yr12. These files contain lines that reflect each of the blocks listed above and will be used to import the information directly into the Timetable Development module.
Timetabling Solutions Version 9 Page 2 of 19
Timetable Development Lesson 3
THE IMPORT PROCESS – ELECTIVE LINES
The process of importing elective lines requires work to be carried out in both the Student Options file and the Timetable Development file.
In the Student Options file, the following steps are required:
1. Assign a roll class to each class
2. Ensure each class code is correct
3. Ensure each student is assigned a roll class
In the Timetable Development file, the following steps are required:
1. Link a Student Options file
2. Import grid lines
Important Note on the Terminology Used
The terms “card”, “block”, “line” and “group” that are used in these lessons are synonymous.
Often the terms “block” or “line” are used to describe the curriculum structure from a student’s point of view and are commonly used in the context of “Students will need to take one subject from each block/line”. These terms are most commonly used in the program when describing the structure in the Student Options module.
The terms “group” (group of classes) or “card” are generally used to describe the curriculum structure from the timetable construction point of view. Traditionally, school timetables were constructed using a pin board and the term “card” was used to describe a piece of cut cardboard containing the information relating to a class to be timetabled, which was then attached to the pin board. The Timetable Development module was originally designed around this traditional method of constructing school timetables and both terms are used in the software.
In the traditional timetabling method using pin boards, the Timetablers would often “sticky tape” pieces of cardboard together to represent classes which would be timetabled at the same time. In The Timetabler software, these grouped classes are called Multi Roll Class Groups (MRCGs).
Timetabling Solutions Version 9 Page 3 of 19
Timetable Development Lesson 3
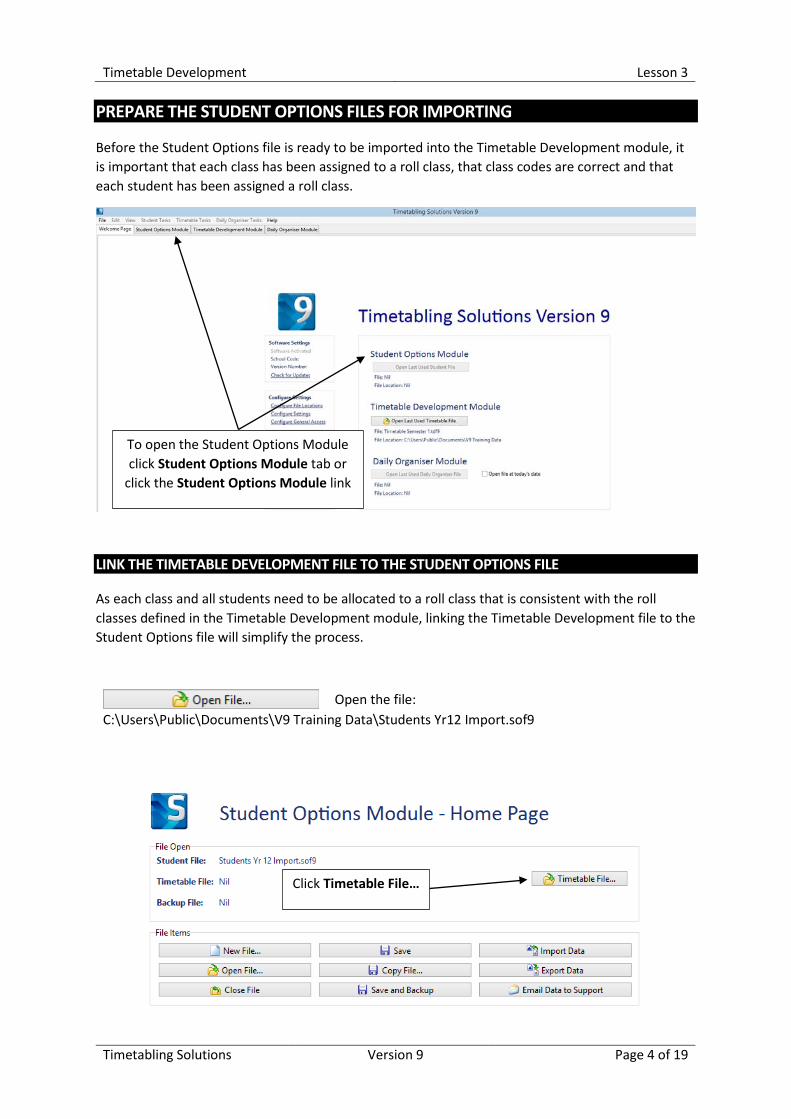
PREPARE THE STUDENT OPTIONS FILES FOR IMPORTING
Before the Student Options file is ready to be imported into the Timetable Development module, it is important that each class has been assigned to a roll class, that class codes are correct and that each student has been assigned a roll class.
LINK THE TIMETABLE DEVELOPMENT FILE TO THE STUDENT OPTIONS FILE
As each class and all students need to be allocated to a roll class that is consistent with the roll classes defined in the Timetable Development module, linking the Timetable Development file to the Student Options file will simplify the process.
Open the file: C:\Users\Public\Documents\V9 Training Data\Students Yr12 Import.sof9
Click Timetable File…
To open the Student Options Module click Student Options Module tab or
click the Student Options Module link
Timetabling Solutions Version 9 Page 4 of 19
Timetable Development Lesson 3
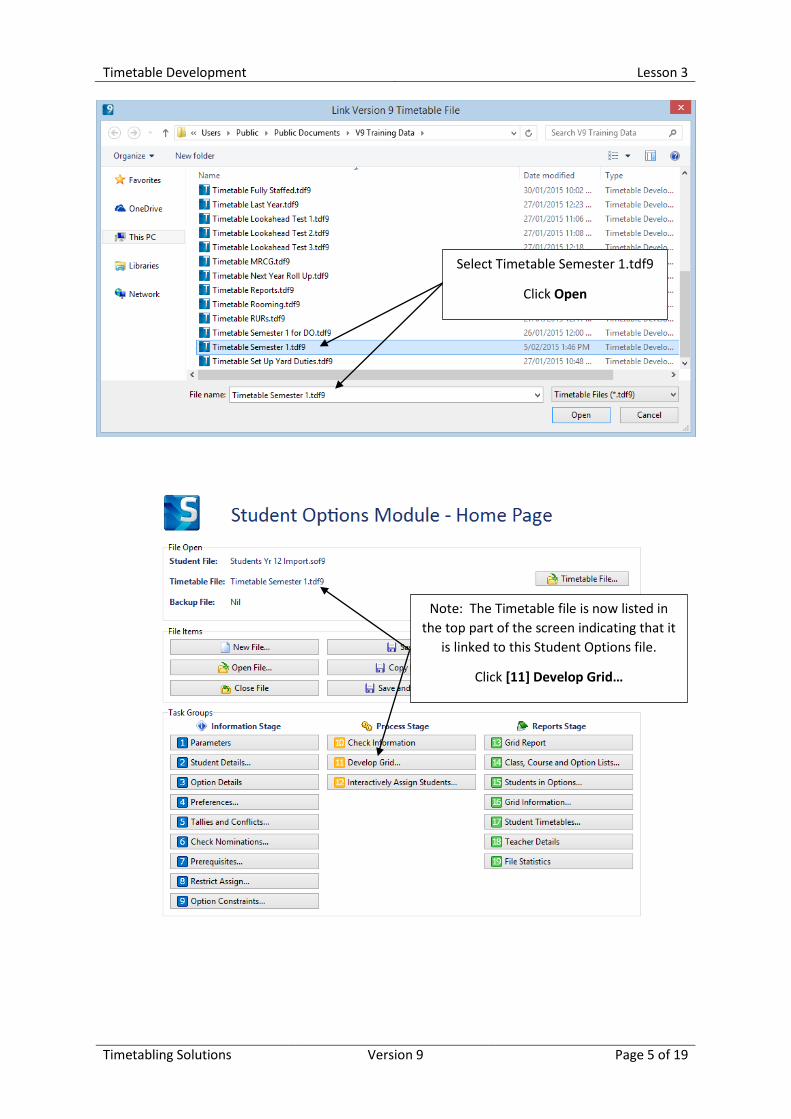
Note: The Timetable file is now listed in the top part of the screen indicating that it
is linked to this Student Options file.
Click [11] Develop Grid…
Select Timetable Semester 1.tdf9
Click Open
Timetabling Solutions Version 9 Page 5 of 19
Timetable Development Lesson 3
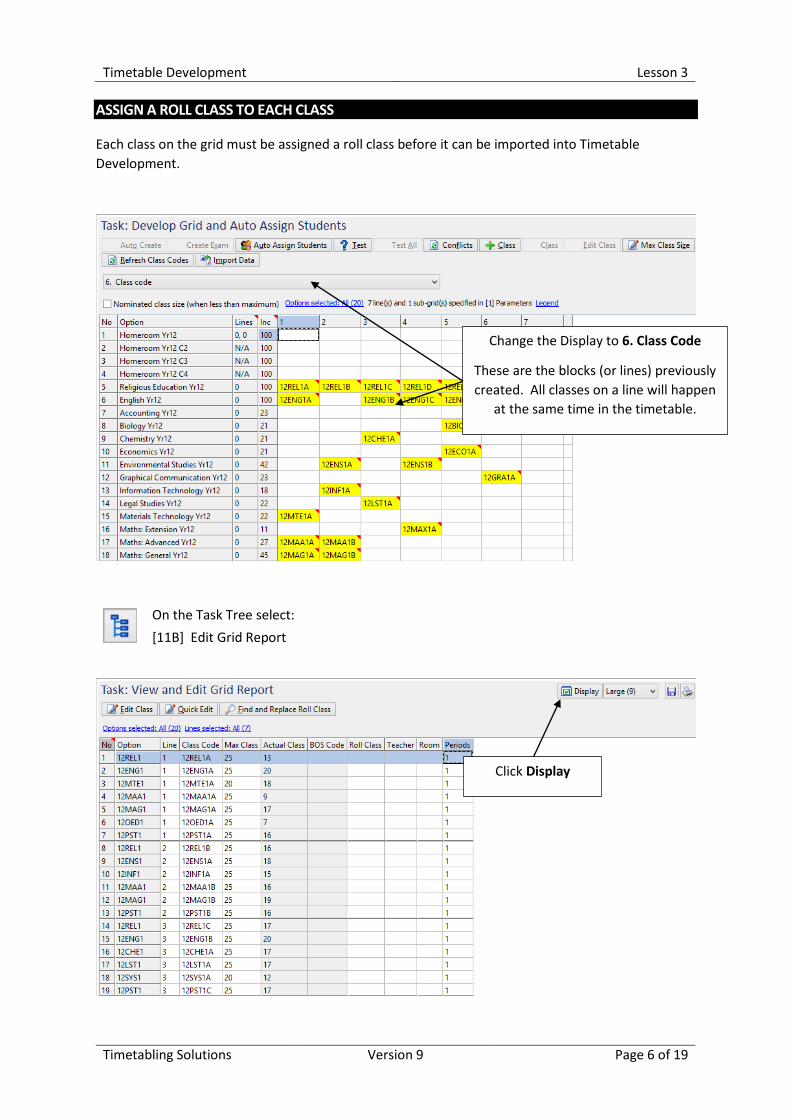
ASSIGN A ROLL CLASS TO EACH CLASS
Each class on the grid must be assigned a roll class before it can be imported into Timetable Development.
On the Task Tree select: [11B] Edit Grid Report
Change the Display to 6. Class Code
These are the blocks (or lines) previously created. All classes on a line will happen
at the same time in the timetable.
Click Display
Timetabling Solutions Version 9 Page 6 of 19
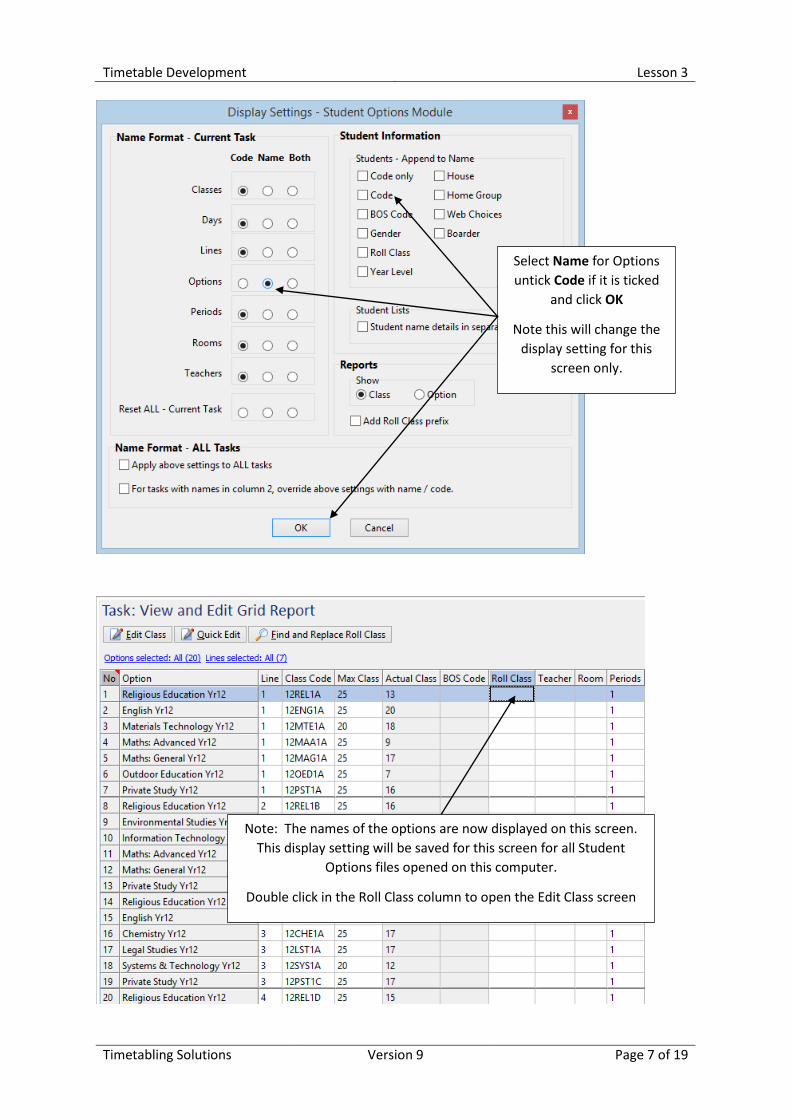
Timetable Development Lesson 3
Select Name for Options untick Code if it is ticked
and click OK
Note this will change the display setting for this
screen only.
Note: The names of the options are now displayed on this screen. This display setting will be saved for this screen for all Student
Options files opened on this computer.
Double click in the Roll Class column to open the Edit Class screen
Timetabling Solutions Version 9 Page 7 of 19

Timetable Development Lesson 3
Click on the drop down arrow for Roll Class Code.
Note: The list is populated from the roll class codes used in the Timetable
Development file attached.
Select Roll Class 12
Type “5” into the Number of Periods Cell
Select All classes on grid for both Roll Class Code and Number of Periods.
This will apply the changes to all classes on the grid
Timetabling Solutions Version 9 Page 8 of 19

Timetable Development Lesson 3
Note: The drop down lists can also be used to allocate teachers and rooms to classes. However, it is recommended that this task is done within the
Timetable Development Module.
Click OK
Note: All classes have now been assigned to Roll Class 12 and are taught for 5 periods.
Click Save
Timetabling Solutions Version 9 Page 9 of 19
Timetable Development Lesson 3
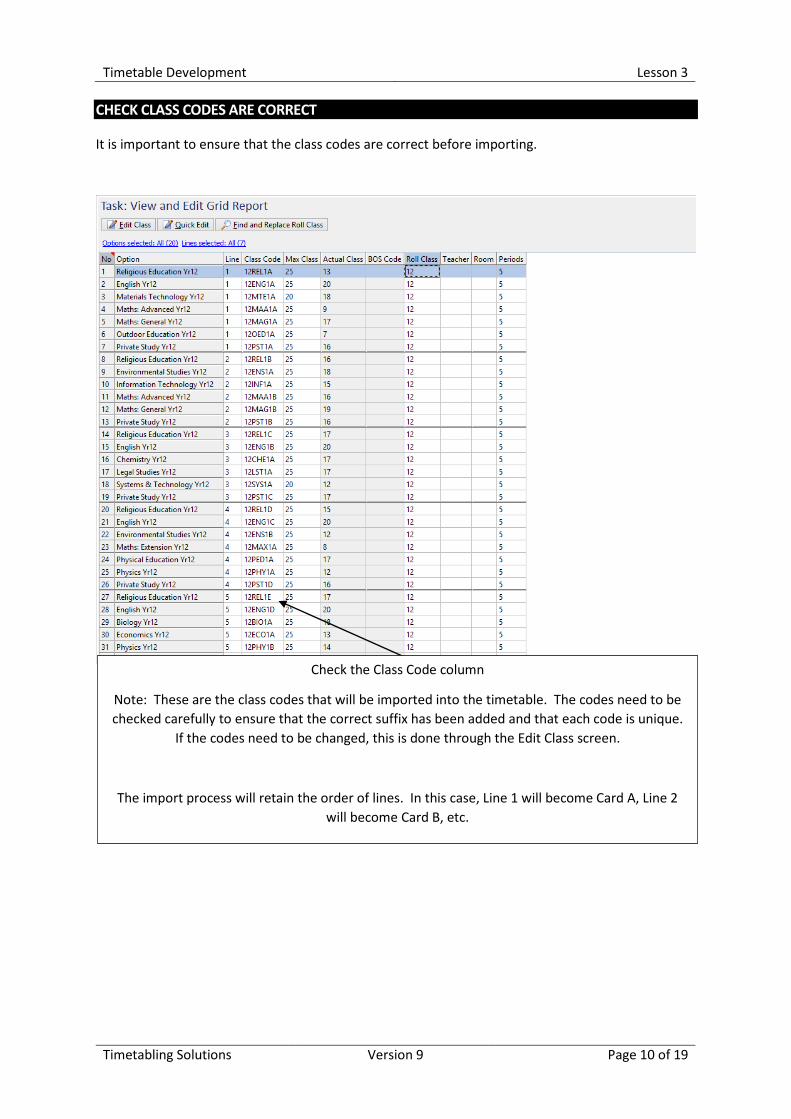
CHECK CLASS CODES ARE CORRECT
It is important to ensure that the class codes are correct before importing.
Check the Class Code column
Note: These are the class codes that will be imported into the timetable. The codes need to be checked carefully to ensure that the correct suffix has been added and that each code is unique.
If the codes need to be changed, this is done through the Edit Class screen.
The import process will retain the order of lines. In this case, Line 1 will become Card A, Line 2 will become Card B, etc.
Timetabling Solutions Version 9 Page 10 of 19
Timetable Development Lesson 3
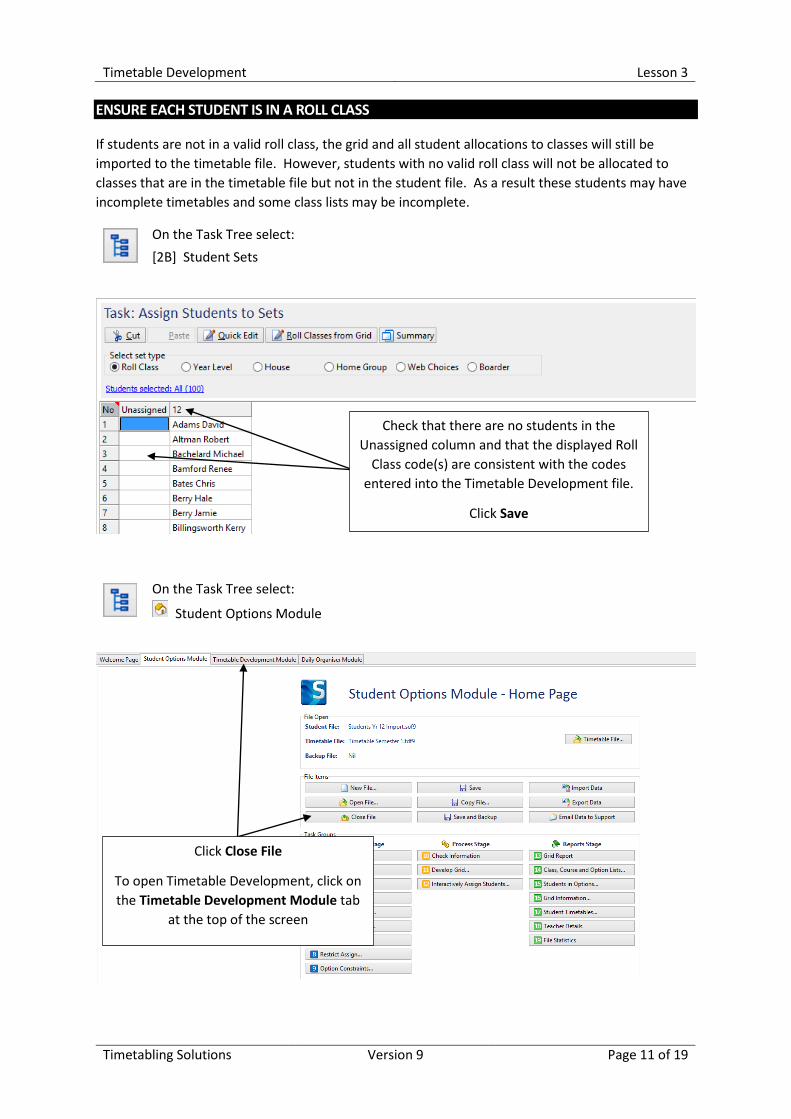
ENSURE EACH STUDENT IS IN A ROLL CLASS
If students are not in a valid roll class, the grid and all student allocations to classes will still be imported to the timetable file. However, students with no valid roll class will not be allocated to classes that are in the timetable file but not in the student file. As a result these students may have incomplete timetables and some class lists may be incomplete.
On the Task Tree select: [2B] Student Sets
On the Task Tree select:
Student Options Module
Check that there are no students in the Unassigned column and that the displayed Roll
Class code(s) are consistent with the codes entered into the Timetable Development file.
Click Save
Click Close File
To open Timetable Development, click on the Timetable Development Module tab
at the top of the screen
Timetabling Solutions Version 9 Page 11 of 19
Timetable Development Lesson 3
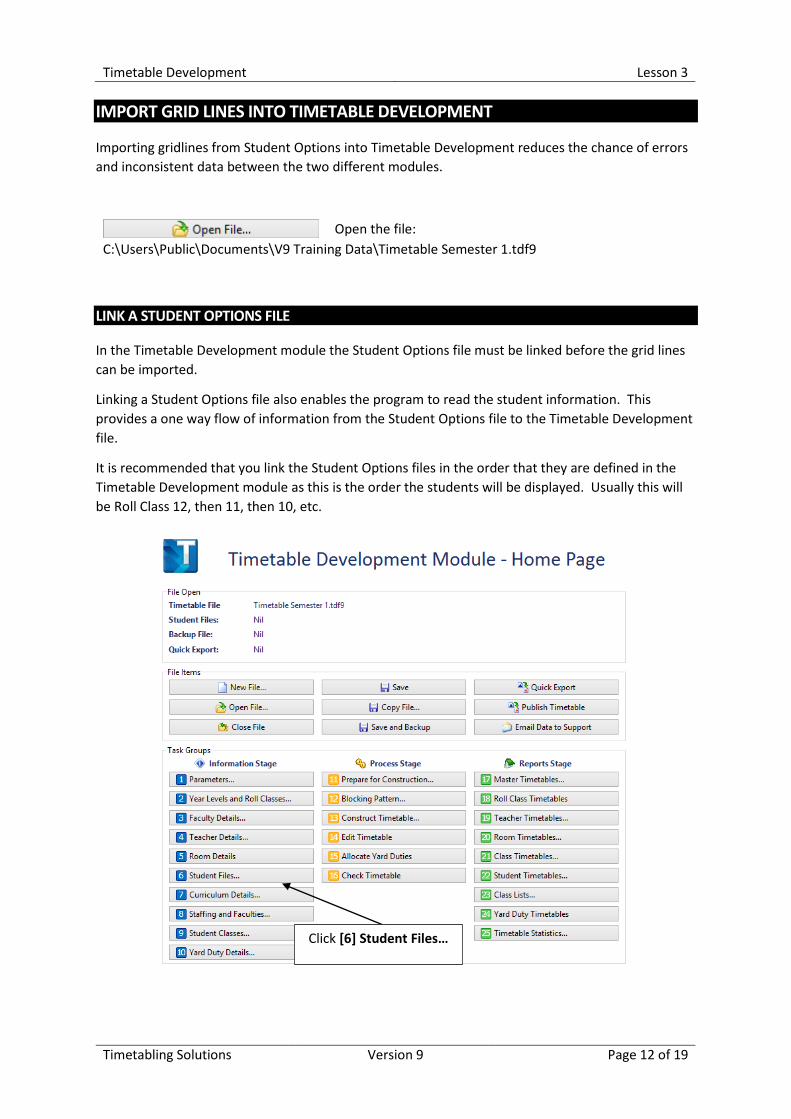
IMPORT GRID LINES INTO TIMETABLE DEVELOPMENT
Importing gridlines from Student Options into Timetable Development reduces the chance of errors and inconsistent data between the two different modules.
Open the file: C:\Users\Public\Documents\V9 Training Data\Timetable Semester 1.tdf9
LINK A STUDENT OPTIONS FILE
In the Timetable Development module the Student Options file must be linked before the grid lines can be imported.
Linking a Student Options file also enables the program to read the student information. This provides a one way flow of information from the Student Options file to the Timetable Development file.
It is recommended that you link the Student Options files in the order that they are defined in the Timetable Development module as this is the order the students will be displayed. Usually this will be Roll Class 12, then 11, then 10, etc.
Click [6] Student Files…
Timetabling Solutions Version 9 Page 12 of 19
Timetable Development Lesson 3
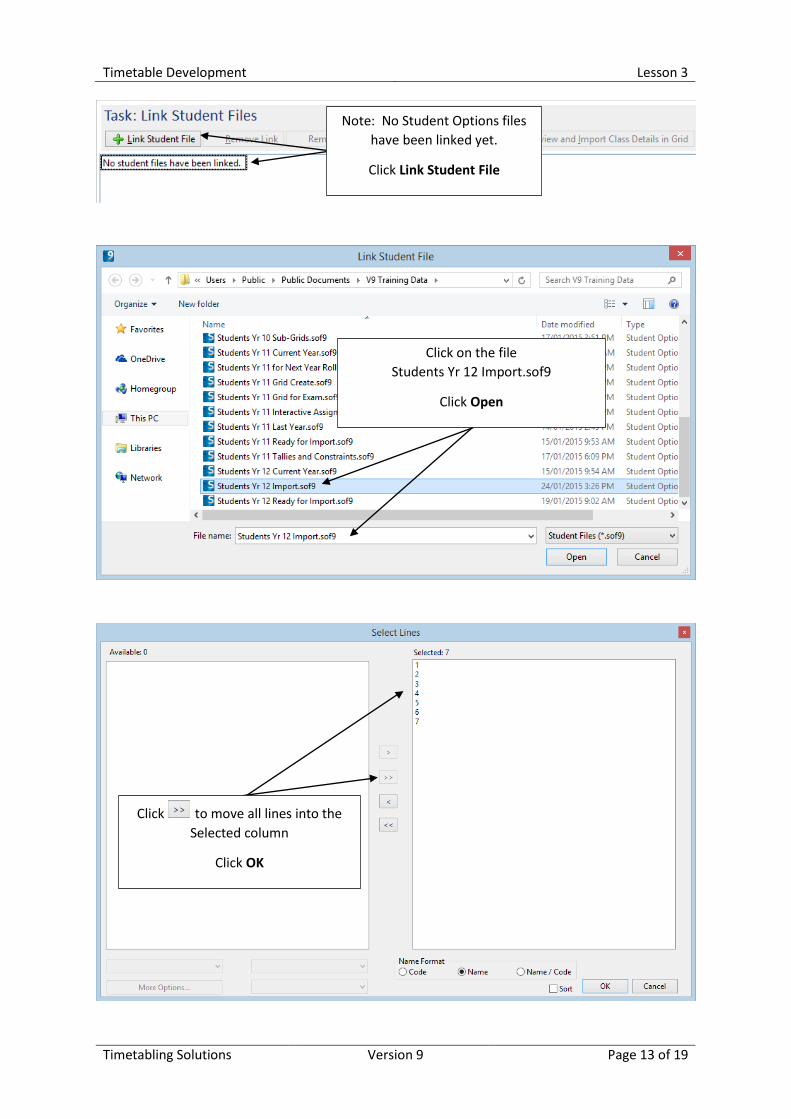
Note: No Student Options files have been linked yet.
Click Link Student File
Click on the file Students Yr 12 Import.sof9
Click Open
Click to move all lines into the Selected column
Click OK
Timetabling Solutions Version 9 Page 13 of 19
Timetable Development Lesson 3
IMPORT GRID LINES
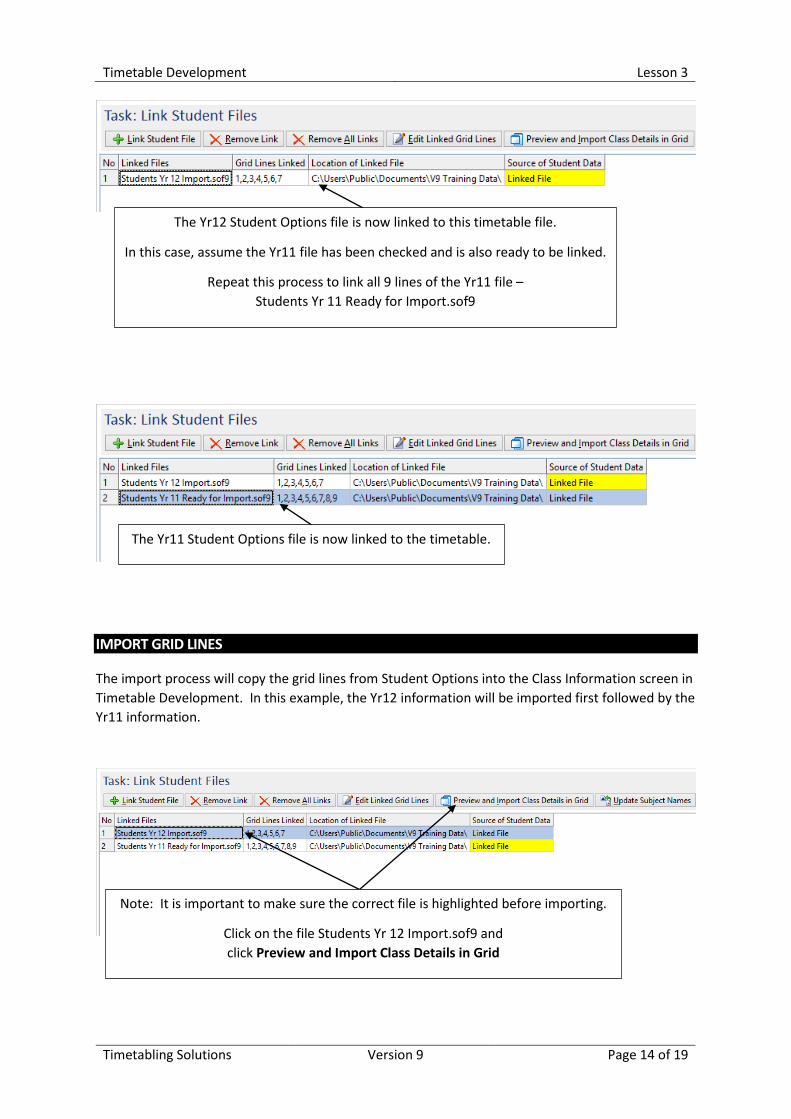
The import process will copy the grid lines from Student Options into the Class Information screen in Timetable Development. In this example, the Yr12 information will be imported first followed by the Yr11 information.
The Yr11 Student Options file is now linked to the timetable.
Note: It is important to make sure the correct file is highlighted before importing.
Click on the file Students Yr 12 Import.sof9 and click Preview and Import Class Details in Grid
The Yr12 Student Options file is now linked to this timetable file.
In this case, assume the Yr11 file has been checked and is also ready to be linked.
Repeat this process to link all 9 lines of the Yr11 file – Students Yr 11 Ready for Import.sof9
Timetabling Solutions Version 9 Page 14 of 19
Timetable Development Lesson 3
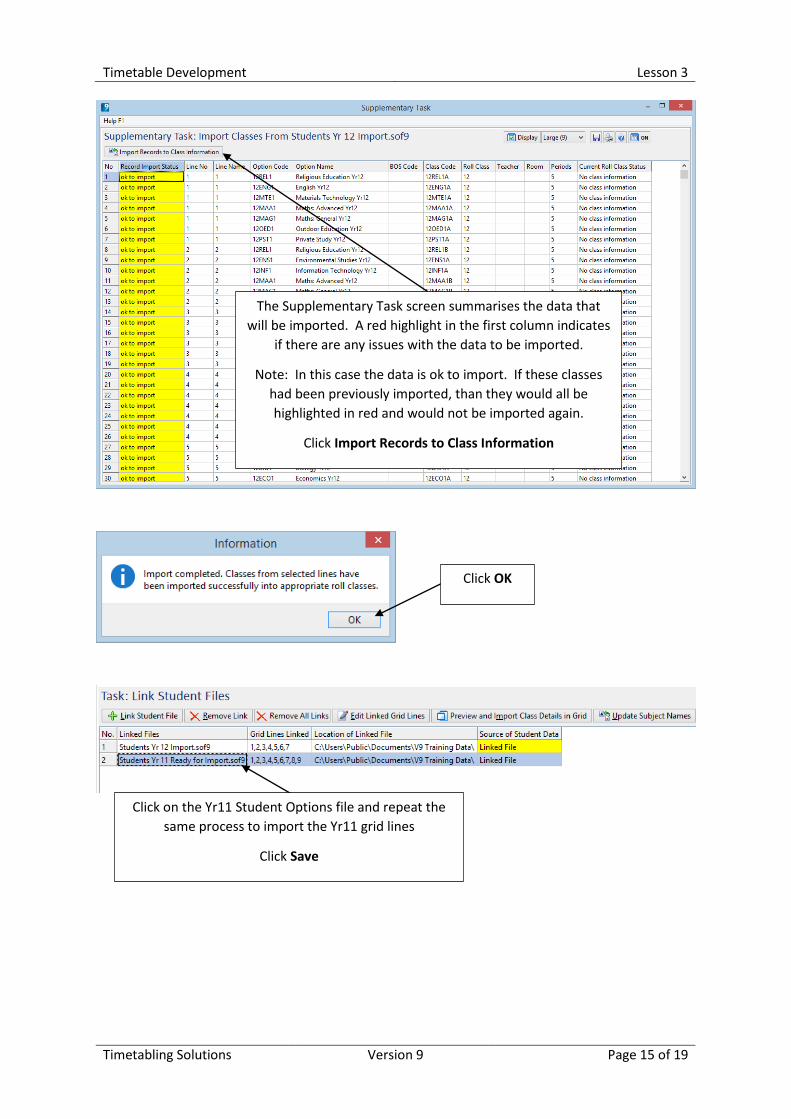
The Supplementary Task screen summarises the data that will be imported. A red highlight in the first column indicates
if there are any issues with the data to be imported.
Note: In this case the data is ok to import. If these classes had been previously imported, than they would all be highlighted in red and would not be imported again.
Click Import Records to Class Information
Click OK
Click on the Yr11 Student Options file and repeat the same process to import the Yr11 grid lines
Click Save
Timetabling Solutions Version 9 Page 15 of 19
Timetable Development Lesson 3
TRANSLATE THE CURRICULUM INTO CLASS INFORMATION
Once the grid lines have been imported, the classes should be edited to reflect the number of periods and number of doubles required for each card. New cards can also be inserted.
The following table shows the curriculum structure for Yr12 and Yr11 students that will be used in this example.
Year Level
Roll Classes Subjects Periods Doubles Structure
12 12 Elective 1 5 1 Full Year Level Block Elective 2 5 1 Full Year Level Block Elective 3 5 1 Full Year Level Block Elective 4 5 1 Full Year Level Block Elective 5 5 1 Full Year Level Block Elective 6 5 1 Full Year Level Block
Homeroom 5 Whole School Block Total 35
11 11 Elective 1 4 1 Full Year Level Block Elective 2 4 1 Full Year Level Block Elective 3 4 1 Full Year Level Block Elective 4 4 1 Full Year Level Block Elective 5 4 1 Full Year Level Block Elective 6 4 1 Full Year Level Block Religion 4 Full Year Level Block
Sport 2 1 Full Year Level Block Homeroom 5 Whole School Block
Total 35
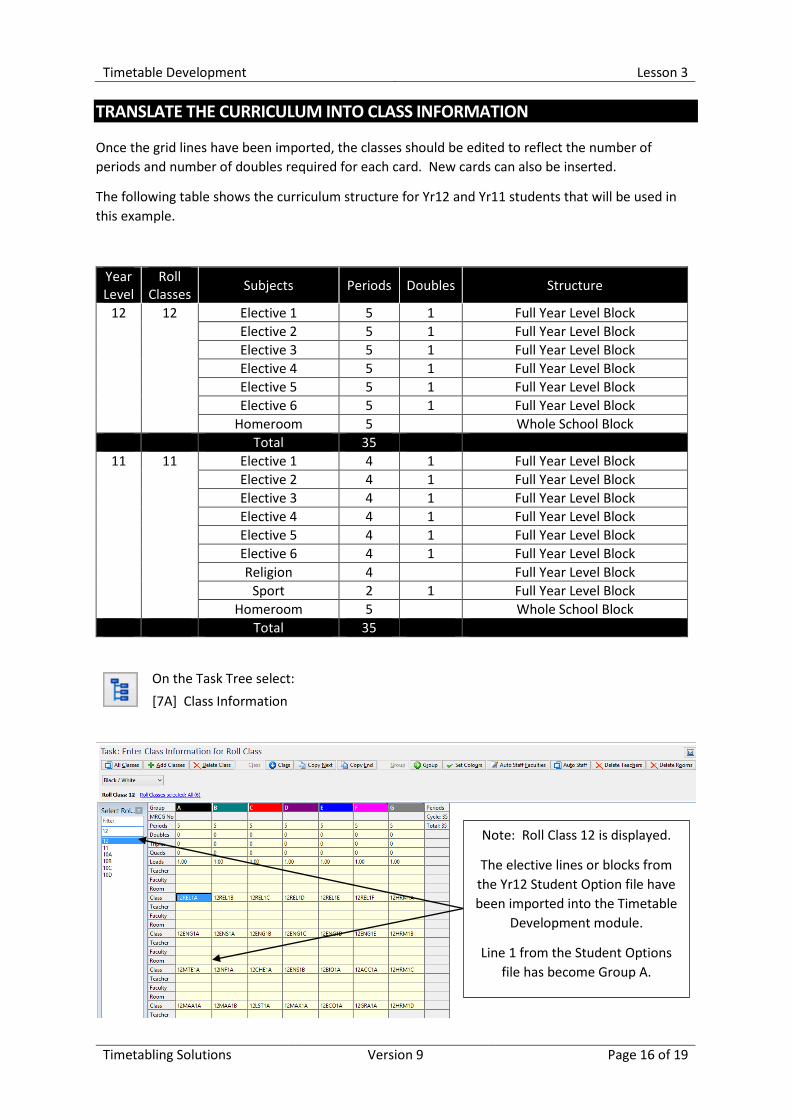
On the Task Tree select: [7A] Class Information
Note: Roll Class 12 is displayed.
The elective lines or blocks from the Yr12 Student Option file have been imported into the Timetable
Development module.
Line 1 from the Student Options file has become Group A.
Timetabling Solutions Version 9 Page 16 of 19
Timetable Development Lesson 3
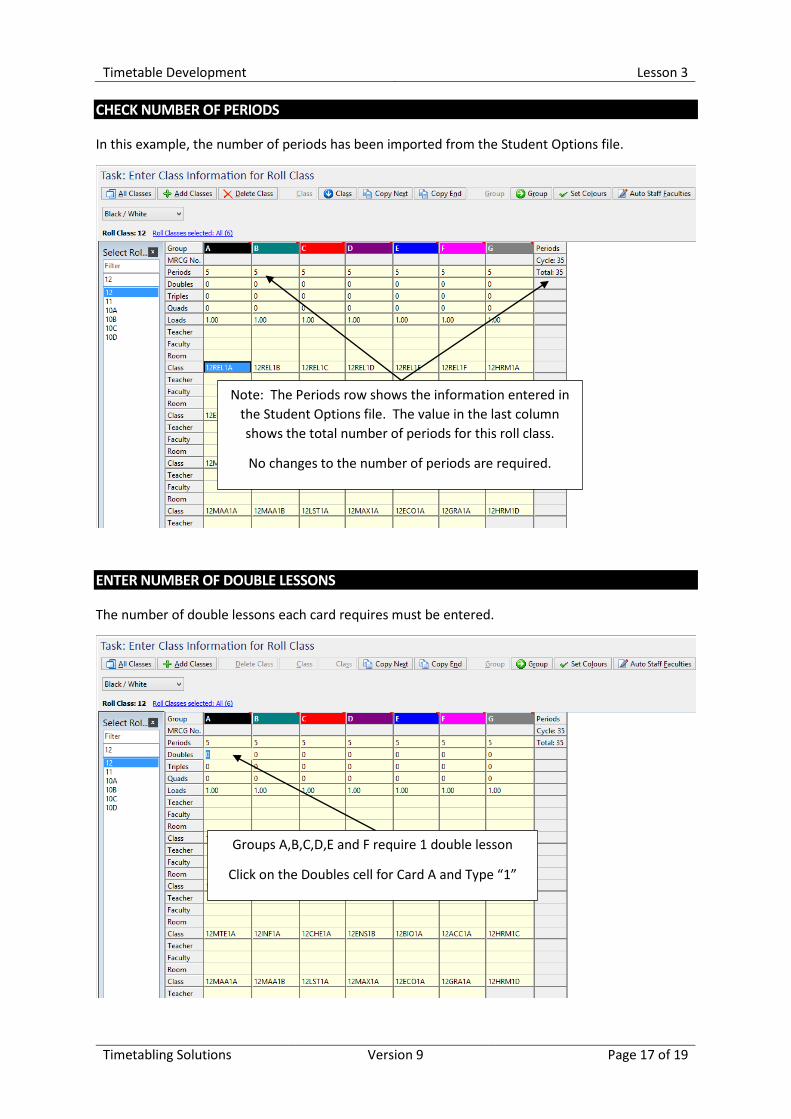
CHECK NUMBER OF PERIODS
In this example, the number of periods has been imported from the Student Options file.
ENTER NUMBER OF DOUBLE LESSONS
The number of double lessons each card requires must be entered.
Note: The Periods row shows the information entered in the Student Options file. The value in the last column shows the total number of periods for this roll class.
No changes to the number of periods are required.
Groups A,B,C,D,E and F require 1 double lesson
Click on the Doubles cell for Card A and Type “1”
Timetabling Solutions Version 9 Page 17 of 19
Timetable Development Lesson 3
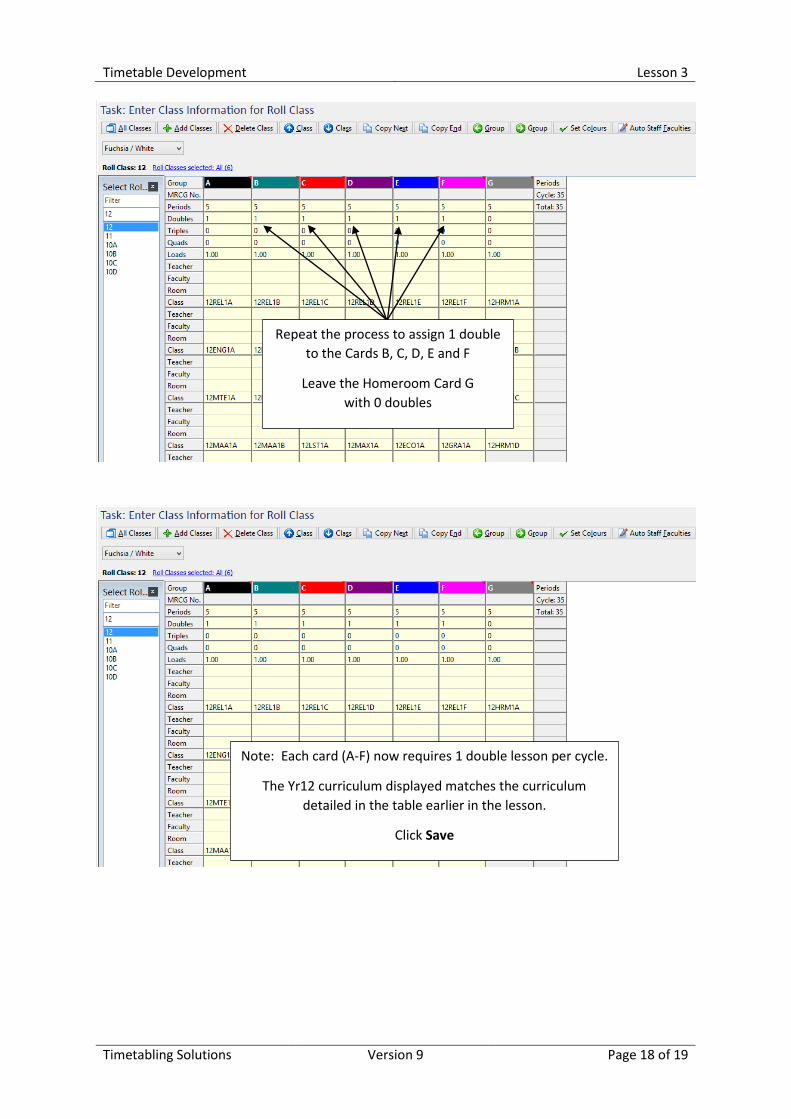
Repeat the process to assign 1 double to the Cards B, C, D, E and F
Leave the Homeroom Card G with 0 doubles
Note: Each card (A-F) now requires 1 double lesson per cycle.
The Yr12 curriculum displayed matches the curriculum detailed in the table earlier in the lesson.
Click Save
Timetabling Solutions Version 9 Page 18 of 19
Timetable Development Lesson 3
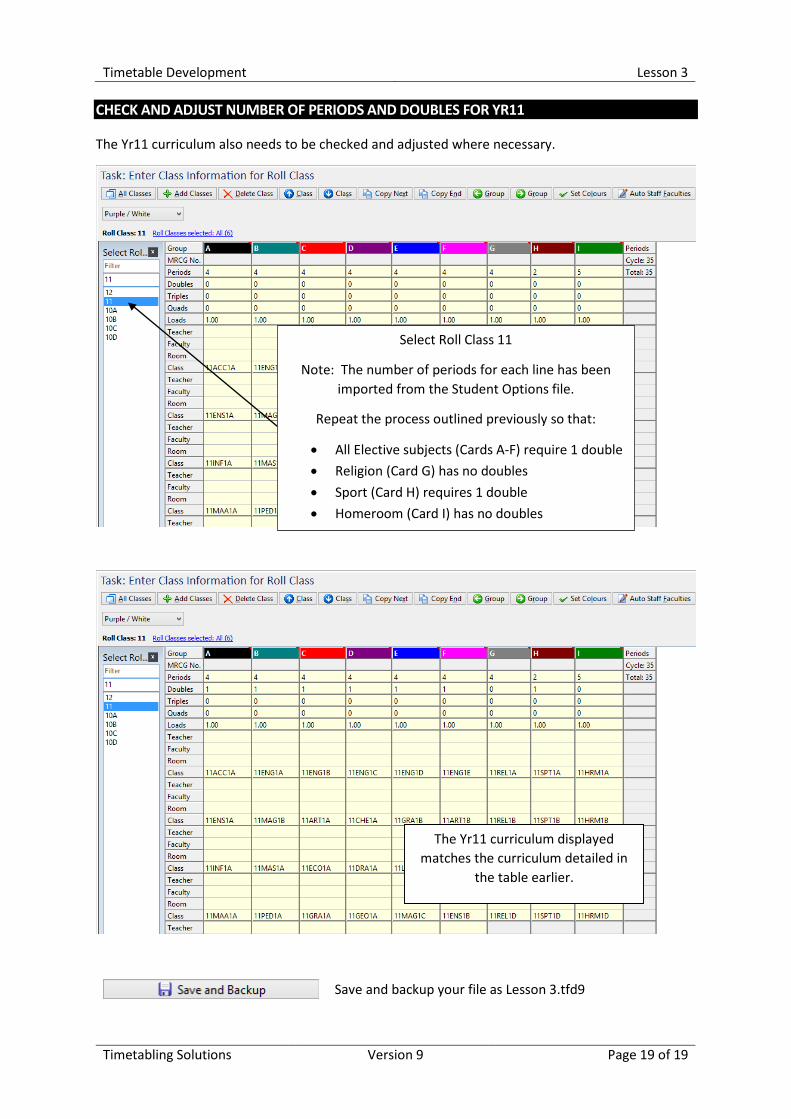
CHECK AND ADJUST NUMBER OF PERIODS AND DOUBLES FOR YR11
The Yr11 curriculum also needs to be checked and adjusted where necessary.
Save and backup your file as Lesson 3.tfd9
Select Roll Class 11
Note: The number of periods for each line has been imported from the Student Options file.
Repeat the process outlined previously so that:
• All Elective subjects (Cards A-F) require 1 double • Religion (Card G) has no doubles • Sport (Card H) requires 1 double • Homeroom (Card I) has no doubles
The Yr11 curriculum displayed matches the curriculum detailed in
the table earlier.
Timetabling Solutions Version 9 Page 19 of 19