Time Warner Cable Business Class Cloud Solutions Control …...Time Warner Cable Business Class...
36
Chapter Title Time Warner Cable Business Class Cloud Solutions Control Panel User Guide Hosted Microsoft ® Exchange 2007 Hosted Microsoft SharePoint ® 2007 Version 1.1
Transcript of Time Warner Cable Business Class Cloud Solutions Control …...Time Warner Cable Business Class...
Chapter Title
Time Warner Cable Business Class Cloud Solutions Control Panel
User Guide Hosted Microsoft® Exchange 2007 Hosted Microsoft SharePoint® 2007
Version 1.1


Table of Contents
Table of Contents ................................................................................................................................. 3
Chapter 1: Introduction ........................................................................................................................ 5 Planning Checklist ................................................................................................................................................................ 5 User Control Panel ............................................................................................................................................................... 5 Additional Resources ............................................................................................................................................................ 5
Chapter 2: Getting Started with Exchange ......................................................................................... 7 Setup Overview .................................................................................................................................................................... 7 Accessing Your Account ....................................................................................................................................................... 8 Setting Up the Email Client ................................................................................................................................................... 9
A. Download Client ..................................................................................................................................................................................... 9 B. Install Client ......................................................................................................................................................................................... 10 C. Configure Client ................................................................................................................................................................................... 11 D. Moving Mail from Internet Mail Accounts ............................................................................................................................................. 19 E. Moving Existing Outlook Mail to New Account ..................................................................................................................................... 20
Connecting to Mobile Devices ............................................................................................................................................ 22 ActiveSync ................................................................................................................................................................................................. 22 BlackBerry Access .................................................................................................................................................................................... 27
Chapter 3: Configuration ................................................................................................................... 29 Overview ............................................................................................................................................................................. 29 Editing Your Information ..................................................................................................................................................... 29 Changing Password ............................................................................................................................................................ 30 Changing Password Hint .................................................................................................................................................... 30
Chapter 4: Managing Services .......................................................................................................... 31 Hosted Exchange Email ...................................................................................................................................................... 31
View Configuration .................................................................................................................................................................................... 31 Outlook Web Access ................................................................................................................................................................................. 32 Email Forwarding ...................................................................................................................................................................................... 32 Out of Office Assistant (requires Premium mailbox) ................................................................................................................................. 33 Mailbox Rights Delegation ......................................................................................................................................................................... 34 Mobile Device Remote Wipe (requires Premium mailbox) ........................................................................................................................ 35
BlackBerry Access .............................................................................................................................................................. 35 Overview ................................................................................................................................................................................................... 35 Kill Device .................................................................................................................................................................................................. 35
Microsoft SharePoint........................................................................................................................................................... 36 Overview ................................................................................................................................................................................................... 36 SharePoint Access .................................................................................................................................................................................... 36

Cloud Solutions User Guide (CS_EXCH2007_USER-0911) Page 4
Time Warner Cable Business Class is a trademark of Time Warner Inc. Used under license. ©2011 Time Warner Cable. All rights reserved. All other trademarks are the property of their respective owners.

Cloud Solutions User Guide (CS_EXCH2007_USER-0911) Page 5
Time Warner Cable Business Class is a trademark of Time Warner Inc. Used under license. ©2011 Time Warner Cable. All rights reserved. All other trademarks are the property of their respective owners.
Chapter 1: Introduction
The purpose of this guide is to provide instructions on how users can set up and manage the following Time Warner Cable Business Class Cloud Solutions services: Hosted Microsoft® Exchange and Microsoft SharePoint®. This guide focuses primarily on how to use the Cloud Solutions user control panel. For specific details on using email clients, including Microsoft Outlook®, Entourage® and SharePoint, please go to www.twcbc.com/cloudsupport for links to additional resources.
The following topics are discussed in this chapter:
Planning Checklist
User Control Panel
Additional Resources
Planning Checklist
Before you start the setup process for Exchange, you should perform the following tasks:
Requirement
Ensure your computer is setup with the following: 1. Windows® XP with Service Pack 2 or higher, or Mac® OS X version 10.4.9 or later 2. Outlook Web Access requires Internet Explorer® 6.0 or later or Firefox® 3.0 or later 3. Internet connection, broadband speeds recommended
Mobile device access requires mobile devices with data plans in place* *Please contact your administrator to see if your mailbox type will allow you to set up mobile device access.
User Control Panel
You can manage your Cloud Solutions services online by logging in to https://connect.AppsOnline.com. The user control panel is organized into the following areas:
• Configuration: View and edit your account information as well as changing your password.
• Services: View details on services that your administrator has enabled for you.
• Help: Access online help for using the control panel.
• Email Client Download: Access links to download email client.
Additional Resources
Please visit www.twcbc.com/cloudsupport for additional resources on managing and using Cloud Solutions. For further assistance, please contact your company administrator.

Cloud Solutions User Guide (CS_EXCH2007_USER-0911) Page 6
Time Warner Cable Business Class is a trademark of Time Warner Inc. Used under license. ©2011 Time Warner Cable. All rights reserved. All other trademarks are the property of their respective owners.

Cloud Solutions User Guide (CS_EXCH2007_USER-0911) Page 7
Time Warner Cable Business Class is a trademark of Time Warner Inc. Used under license. ©2011 Time Warner Cable. All rights reserved. All other trademarks are the property of their respective owners.
Chapter 2: Getting Started with Exchange
The following topics are discussed in this chapter:
Setup Overview
Accessing Your Account
Setting Up Email Client
Connecting to Mobile Device
Setup Overview
The typical steps required to set up Hosted Exchange are provided in the diagram below.
Most of the activities in setting up Exchange are performed by your email administrator. Your administrator may ask that you perform the steps indicated in light blue, Steps 4 and 6. If you have any questions, please contact your email administrator.
1. Access Account
2. Prepare DNS
3. Add Users
5. Update DNS
*6. Connect Mobile Device
*4. Set Up Client
*Steps applicable to Premium mailboxes
Setting Up Exchange
Admin/UserAdmin/User Admin
AdminAdmin Admin
Chapter 2: Getting Started with Exchange
Cloud Solutions User Guide (CS_EXCH2007_USER-0911) Page 8
Time Warner Cable Business Class is a trademark of Time Warner Inc. Used under license. ©2011 Time Warner Cable. All rights reserved. All other trademarks are the property of their respective owners.
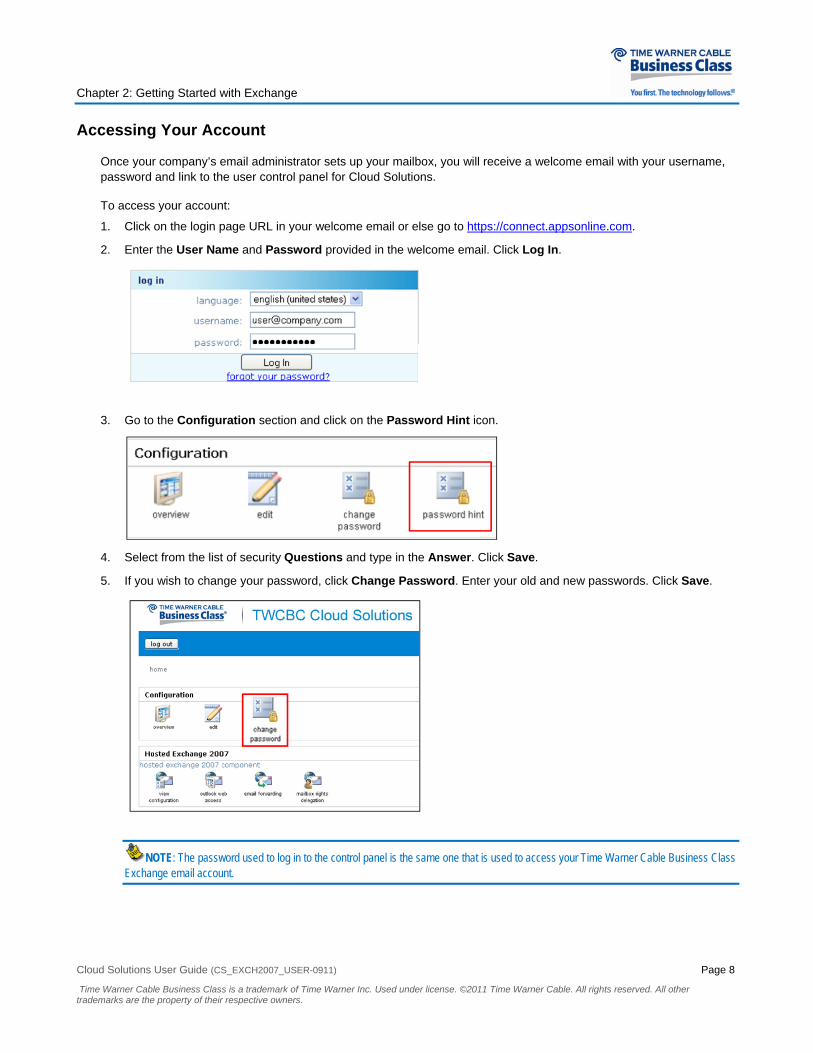
Accessing Your Account
Once your company’s email administrator sets up your mailbox, you will receive a welcome email with your username, password and link to the user control panel for Cloud Solutions.
To access your account:
1. Click on the login page URL in your welcome email or else go to https://connect.appsonline.com.
2. Enter the User Name and Password provided in the welcome email. Click Log In.
3. Go to the Configuration section and click on the Password Hint icon.
4. Select from the list of security Questions and type in the Answer. Click Save.
5. If you wish to change your password, click Change Password. Enter your old and new passwords. Click Save.
NOTE: The password used to log in to the control panel is the same one that is used to access your Time Warner Cable Business Class Exchange email account.

Chapter 2: Getting Started with Exchange
Cloud Solutions User Guide (CS_EXCH2007_USER-0911) Page 9
Time Warner Cable Business Class is a trademark of Time Warner Inc. Used under license. ©2011 Time Warner Cable. All rights reserved. All other trademarks are the property of their respective owners.
Setting Up the Email Client
If you have been set up with a Premium mailbox, you can use a free copy of the following Microsoft’s email client for Windows and Mac: Outlook 2007, Outlook 2010, Entourage 2008 and Outlook 2011 for the Mac. For more information on these products, please visit http://office.microsoft.com/en-us/outlook or http://www.facebook.com/MicrosoftOutlook.
If your company is already using Outlook 2010 or Outlook 2011 for the Mac, or you do not wish to change your current email client, then please proceed directly to B. Connect Client.
A. Download Client
To access the email client:
1. Go to https://connect.appsonline.com and log in with your user ID and password.
2. At the bottom of the home page, click on Download Outlook and Entourage Media link.
3. Review the terms and conditions for downloading and using the client. If you agree to the terms and conditions, select I Accept and click Continue to Download Page.
4. Click on the email client that you wish to download. When prompted, select the Save option. Note the location where you save the file. Due to the large size of the file (over 200 MB for Windows clients and over 400 MB for Mac clients), it will take some time to download, depending on the speed of your Internet connection.
Chapter 2: Getting Started with Exchange
Cloud Solutions User Guide (CS_EXCH2007_USER-0911) Page 10
Time Warner Cable Business Class is a trademark of Time Warner Inc. Used under license. ©2011 Time Warner Cable. All rights reserved. All other trademarks are the property of their respective owners.
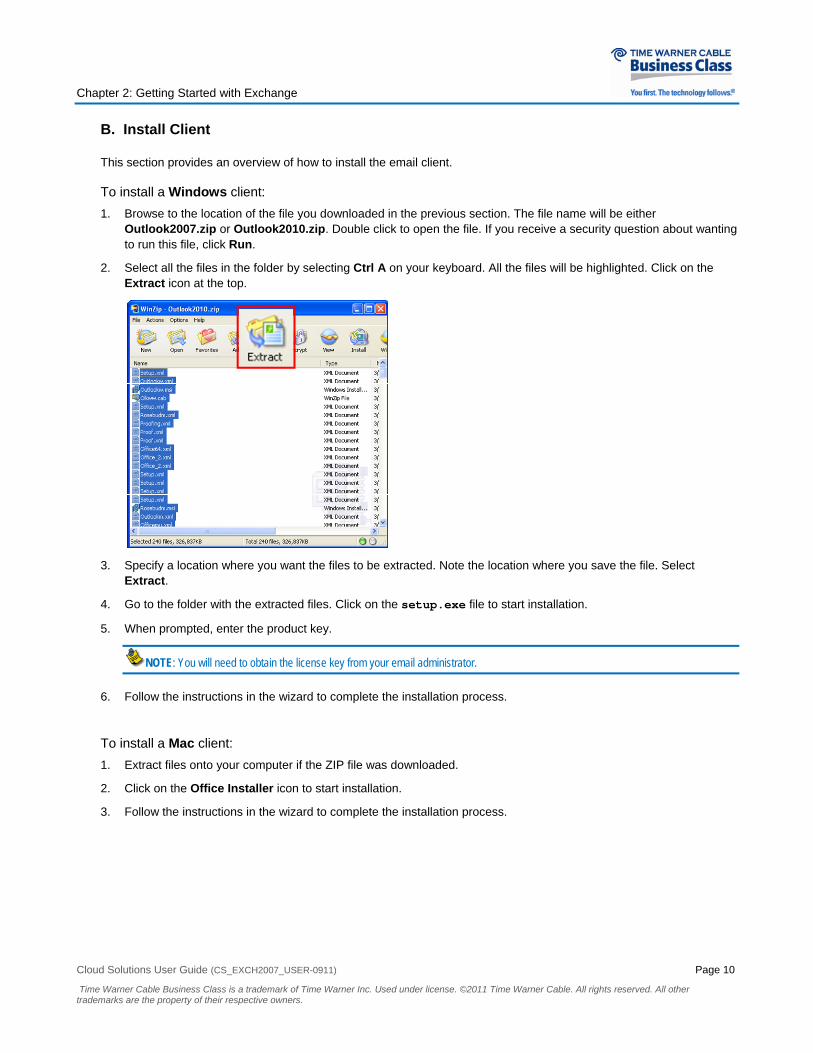
B. Install Client
This section provides an overview of how to install the email client.
To install a Windows client: 1. Browse to the location of the file you downloaded in the previous section. The file name will be either
Outlook2007.zip or Outlook2010.zip. Double click to open the file. If you receive a security question about wanting to run this file, click Run.
2. Select all the files in the folder by selecting Ctrl A on your keyboard. All the files will be highlighted. Click on the Extract icon at the top.
3. Specify a location where you want the files to be extracted. Note the location where you save the file. Select Extract.
4. Go to the folder with the extracted files. Click on the setup.exe file to start installation.
5. When prompted, enter the product key.
NOTE: You will need to obtain the license key from your email administrator.
6. Follow the instructions in the wizard to complete the installation process.
To install a Mac client: 1. Extract files onto your computer if the ZIP file was downloaded.
2. Click on the Office Installer icon to start installation.
3. Follow the instructions in the wizard to complete the installation process.
Chapter 2: Getting Started with Exchange
Cloud Solutions User Guide (CS_EXCH2007_USER-0911) Page 11
Time Warner Cable Business Class is a trademark of Time Warner Inc. Used under license. ©2011 Time Warner Cable. All rights reserved. All other trademarks are the property of their respective owners.
C. Configure Client
You will now need to configure the email client to connect to the Time Warner Cable Hosted Exchange server. This section provides instructions on configuring:
• Outlook 2010 for Windows
• Outlook 2007 for Windows
• Manual Configuration (Windows Clients)
• Outlook 2011 for Mac
• Entourage 2008
• Mac Mail
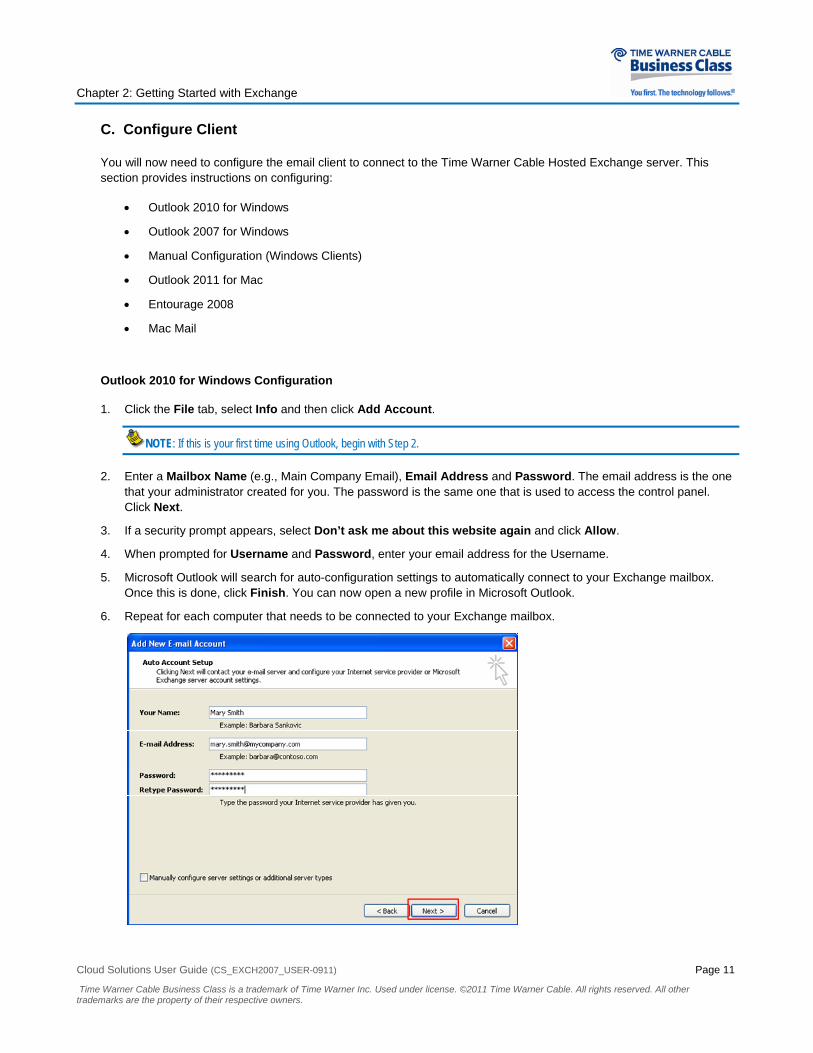
Outlook 2010 for Windows Configuration
1. Click the File tab, select Info and then click Add Account.
NOTE: If this is your first time using Outlook, begin with Step 2.
2. Enter a Mailbox Name (e.g., Main Company Email), Email Address and Password. The email address is the one that your administrator created for you. The password is the same one that is used to access the control panel. Click Next.
3. If a security prompt appears, select Don’t ask me about this website again and click Allow.
4. When prompted for Username and Password, enter your email address for the Username.
5. Microsoft Outlook will search for auto-configuration settings to automatically connect to your Exchange mailbox. Once this is done, click Finish. You can now open a new profile in Microsoft Outlook.
6. Repeat for each computer that needs to be connected to your Exchange mailbox.

Chapter 2: Getting Started with Exchange
Cloud Solutions User Guide (CS_EXCH2007_USER-0911) Page 12
Time Warner Cable Business Class is a trademark of Time Warner Inc. Used under license. ©2011 Time Warner Cable. All rights reserved. All other trademarks are the property of their respective owners.
Outlook 2007 for Windows Configuration
1. Click Start, then Control Panel and Mail. Click the Show Profiles button to begin the profile creation process.
NOTE: If this is your first time using Outlook, go to Step 4.
2. Click Add and type in a name to refer to the profile (e.g., Main Company Email). Click OK.
3. In the Add New Email Account window, enter your Name, Email Address and Password. The email address is the one that your administrator created for you. The password is the same one that is used to access the control panel. Click Next.
4. If a security prompt appears, select Don’t ask me about this website again and click Allow.
5. When prompted for Username and Password, enter your email address for the Username.
6. Microsoft Outlook will search for auto-configuration settings to automatically connect to your Exchange mailbox. Once this is done, click Finish. You can now open a new profile in Microsoft Outlook.
7. Repeat for each computer that needs to be connected to your Exchange mailbox.

Chapter 2: Getting Started with Exchange
Cloud Solutions User Guide (CS_EXCH2007_USER-0911) Page 13
Time Warner Cable Business Class is a trademark of Time Warner Inc. Used under license. ©2011 Time Warner Cable. All rights reserved. All other trademarks are the property of their respective owners.
Manual Configuration (Windows Clients)
1. Click Start, then Control Panel and Mail. Click the Show Profiles button to begin the profile creation process.
2. Click Add and type in a name to refer to the profile (e.g., Main Company Email). Click OK.
3. In the Add New Email Account window, click on Manually configure server settings or additional server types box in the lower left corner. Click Next.
4. Select Microsoft Exchange. Click Next.
5. In the Microsoft Exchange Settings dialog box, enter the following information:
• Microsoft Exchange Server: Enter ex-003.mail.navisite.com • Used Cached Exchange Mode: Checked • User Name: Enter your email address or display name
6. In the Microsoft Exchange dialog box, click on the Connection tab. Check the Connect to Microsoft Exchange using HTTP box. Click on Exchange Proxy Settings.
Chapter 2: Getting Started with Exchange
Cloud Solutions User Guide (CS_EXCH2007_USER-0911) Page 14
Time Warner Cable Business Class is a trademark of Time Warner Inc. Used under license. ©2011 Time Warner Cable. All rights reserved. All other trademarks are the property of their respective owners.
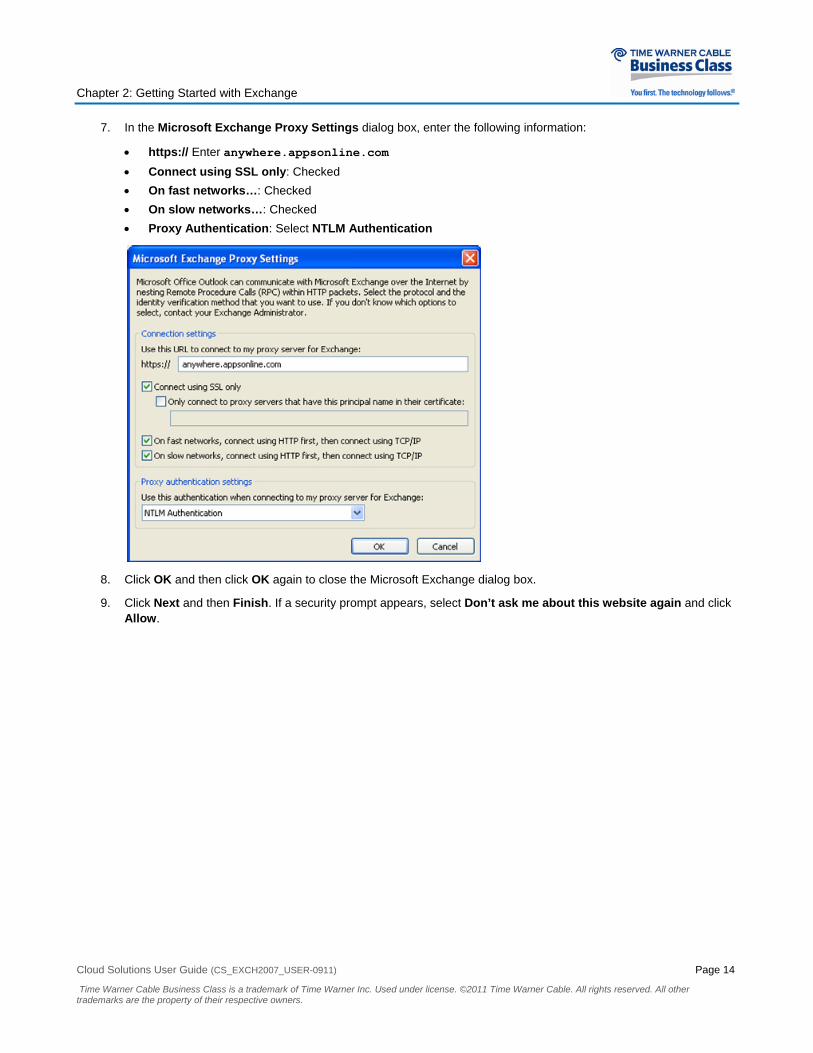
7. In the Microsoft Exchange Proxy Settings dialog box, enter the following information:
• https:// Enter anywhere.appsonline.com • Connect using SSL only: Checked • On fast networks…: Checked • On slow networks…: Checked • Proxy Authentication: Select NTLM Authentication
8. Click OK and then click OK again to close the Microsoft Exchange dialog box.
9. Click Next and then Finish. If a security prompt appears, select Don’t ask me about this website again and click Allow.
Chapter 2: Getting Started with Exchange
Cloud Solutions User Guide (CS_EXCH2007_USER-0911) Page 15
Time Warner Cable Business Class is a trademark of Time Warner Inc. Used under license. ©2011 Time Warner Cable. All rights reserved. All other trademarks are the property of their respective owners.
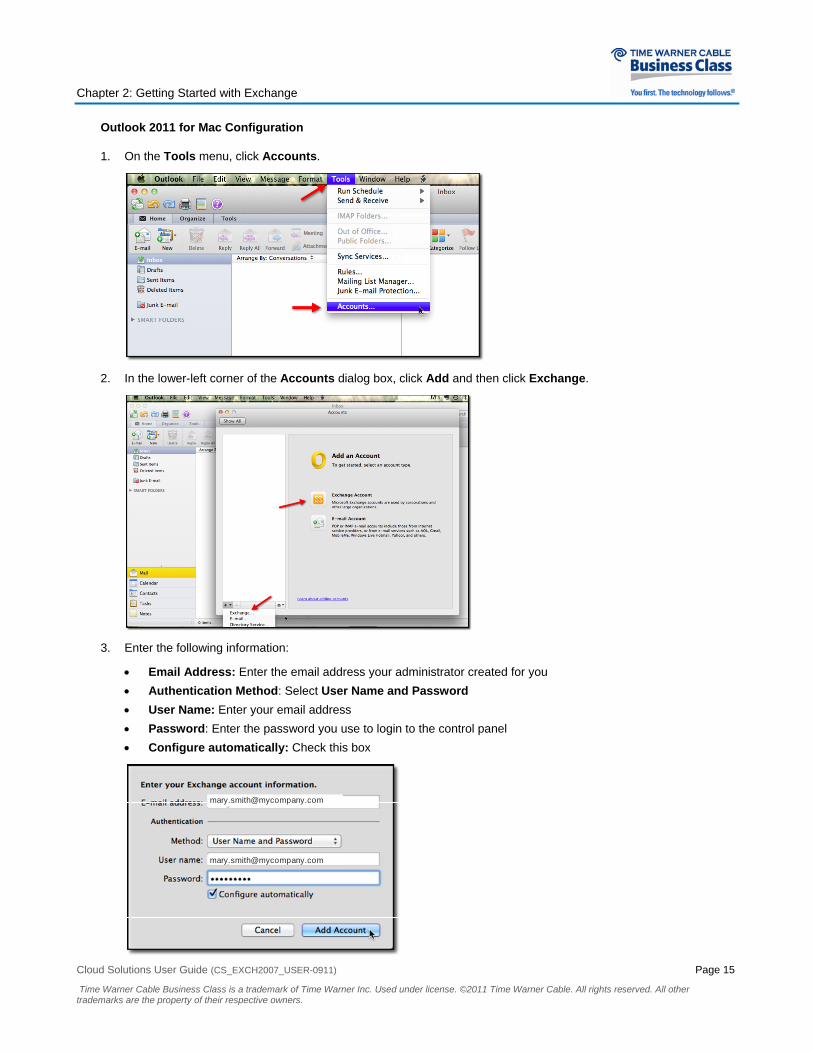
Outlook 2011 for Mac Configuration
1. On the Tools menu, click Accounts.
2. In the lower-left corner of the Accounts dialog box, click Add and then click Exchange.
3. Enter the following information:
• Email Address: Enter the email address your administrator created for you • Authentication Method: Select User Name and Password • User Name: Enter your email address • Password: Enter the password you use to login to the control panel • Configure automatically: Check this box
Chapter 2: Getting Started with Exchange
Cloud Solutions User Guide (CS_EXCH2007_USER-0911) Page 16
Time Warner Cable Business Class is a trademark of Time Warner Inc. Used under license. ©2011 Time Warner Cable. All rights reserved. All other trademarks are the property of their respective owners.
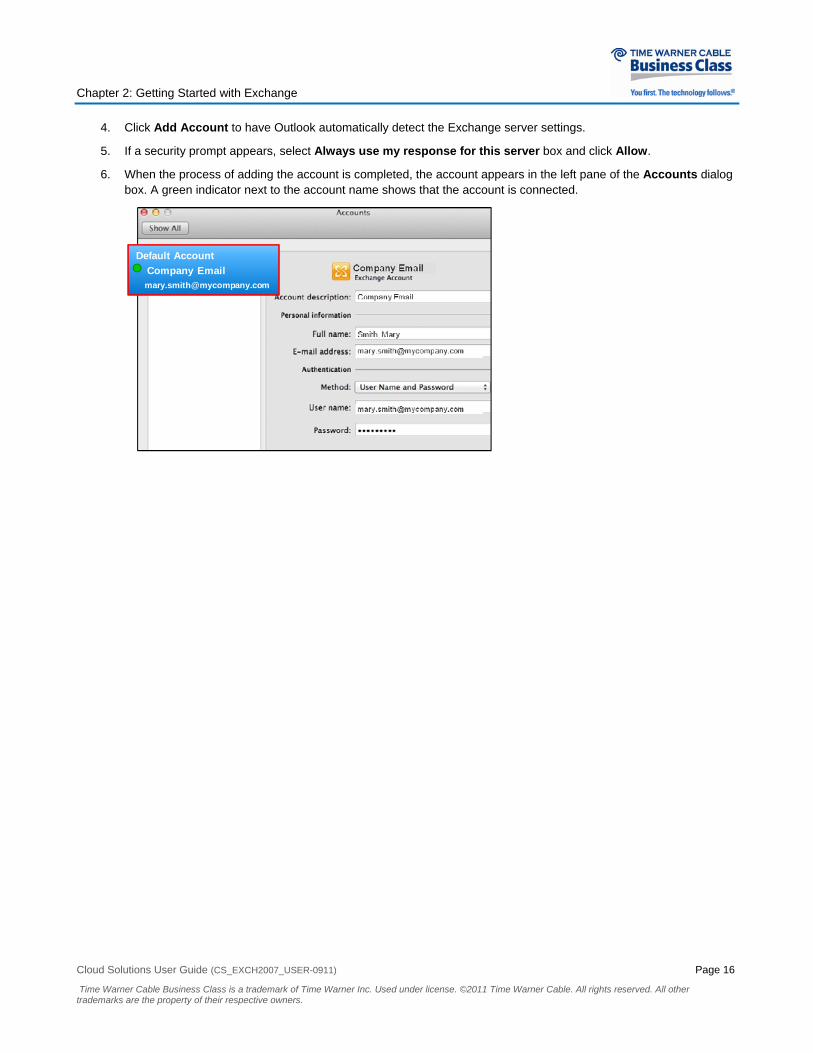
4. Click Add Account to have Outlook automatically detect the Exchange server settings.
5. If a security prompt appears, select Always use my response for this server box and click Allow.
6. When the process of adding the account is completed, the account appears in the left pane of the Accounts dialog box. A green indicator next to the account name shows that the account is connected.
Default AccountCompany [email protected]

Chapter 2: Getting Started with Exchange
Cloud Solutions User Guide (CS_EXCH2007_USER-0911) Page 17
Time Warner Cable Business Class is a trademark of Time Warner Inc. Used under license. ©2011 Time Warner Cable. All rights reserved. All other trademarks are the property of their respective owners.
Entourage 2008 Configuration
1. Select Tools from the menu bar and then Accounts. Click on the Exchange tab.
2. Click New and select Exchange. In the Account Setup Assistant window, click Configure Account Manually.
3. In the Account Settings dialog box, enter the following information:
• Account name: A descriptive name to identify the mailbox account (e.g., My Company Email) • Name: Display name (e.g., Steve Johnson) • Email Address: Enter the email address your administrator created for you • Select Use my account information • Account ID: Enter user#domain.com. You must use “#” between the user name and domain. This field is
limited to 20 characters. • Domain: Enter mail • Password: Enter the password you use to login to the control panel • Save password in my Mac OS keychain: Check this box if you wish to save the password on the computer • Exchange Server: Type in https://mail.AppsOnline.com/exchange/[email protected] • This DAV service requires a secure connection (SSL): Check this box
4. Click OK to save settings.
Chapter 2: Getting Started with Exchange
Cloud Solutions User Guide (CS_EXCH2007_USER-0911) Page 18
Time Warner Cable Business Class is a trademark of Time Warner Inc. Used under license. ©2011 Time Warner Cable. All rights reserved. All other trademarks are the property of their respective owners.
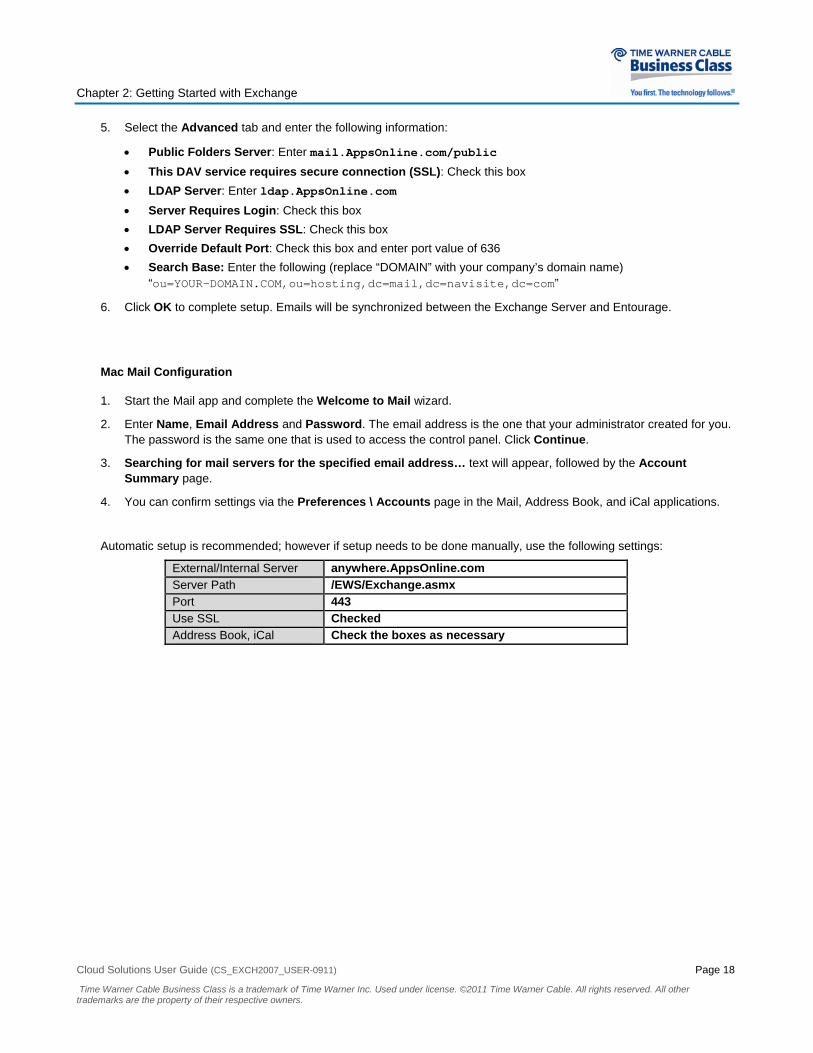
5. Select the Advanced tab and enter the following information:
• Public Folders Server: Enter mail.AppsOnline.com/public • This DAV service requires secure connection (SSL): Check this box • LDAP Server: Enter ldap.AppsOnline.com • Server Requires Login: Check this box • LDAP Server Requires SSL: Check this box • Override Default Port: Check this box and enter port value of 636 • Search Base: Enter the following (replace “DOMAIN” with your company’s domain name)
“ou=YOUR-DOMAIN.COM,ou=hosting,dc=mail,dc=navisite,dc=com”
6. Click OK to complete setup. Emails will be synchronized between the Exchange Server and Entourage.
Mac Mail Configuration
1. Start the Mail app and complete the Welcome to Mail wizard.
2. Enter Name, Email Address and Password. The email address is the one that your administrator created for you. The password is the same one that is used to access the control panel. Click Continue.
3. Searching for mail servers for the specified email address… text will appear, followed by the Account Summary page.
4. You can confirm settings via the Preferences \ Accounts page in the Mail, Address Book, and iCal applications.
Automatic setup is recommended; however if setup needs to be done manually, use the following settings:
External/Internal Server anywhere.AppsOnline.comServer Path /EWS/Exchange.asmxPort 443Use SSL CheckedAddress Book, iCal Check the boxes as necessary
Chapter 2: Getting Started with Exchange
Cloud Solutions User Guide (CS_EXCH2007_USER-0911) Page 19
Time Warner Cable Business Class is a trademark of Time Warner Inc. Used under license. ©2011 Time Warner Cable. All rights reserved. All other trademarks are the property of their respective owners.
D. Moving Mail from Internet Mail Accounts
If your company is switching from an Internet-based email application, such as Gmail, Yahoo Mail or Hotmail, messages, calendars, contacts and tasks can be moved to your Time Warner Cable Business Class Exchange account.
NOTE: If you are switching to Time Warner Cable Business Class Exchange from a Microsoft Exchange email platform, please contact your email administrator for assistance.
The first step is to configure Outlook to receive emails from the Internet mail account by following these steps:
1. Go to the Tools menu and click Account Settings.
2. On the Email tab, click the New button.
3. On the Choose Email Service page, confirm that Microsoft Exchange, POP3, IMAP, or HTTP is selected. Click Next.
4. In Auto Account Setup, select Manually configure server settings or additional server types. Click Next.
5. In Choose Email Service, select Internet Email and click Next.
6. In Internet Email Settings, enter the account details for the user’s Internet email account. If the outgoing server requires authentication, after entering the SMTP server information, click More Settings and select the Outgoing Server tab. Check the My outgoing (SMTP) requires authentication box and provide the authentication details. Select OK.
7. After entering all the information, click Test Account Settings to confirm that Outlook can connect to the your existing mail servers.
8. Click Next and Finish. The Internet email is now shown in Outlook’s Email Accounts listing. Click Close.
9. Outlook will now connect to the existing email account and download messages to a .PST file on the user’s computer.
After setting up Outlook to receive emails from the Internet mail account, follow these steps to move information:
1. In Outlook, click the folder icon to see a folder view.
2. To copy contacts, click Contacts, select a single contact, press CTRL+A to select all of them, and then drag them to the Contacts folder.
3. To copy calendar, click Calendar, and choose View, Current view, View all Appointments, highlight one appointment, and then press CTRL+A to select all appointments. Drag them onto the Calendar icon under Mailbox
4. To copy email messages, highlight one e-mail message, press CTRL+A to select all e-mail, and then drag it to your inbox under Mailbox at the top of your mail items.
5. To copy tasks, highlight one task, press CTRL+A to select all tasks, and then drag them to your tasks under Mailbox at the top of your mail items.
6. To copy any additional email folders, select the folder and drag it onto Mailbox at the top of your mail items
Chapter 2: Getting Started with Exchange
Cloud Solutions User Guide (CS_EXCH2007_USER-0911) Page 20
Time Warner Cable Business Class is a trademark of Time Warner Inc. Used under license. ©2011 Time Warner Cable. All rights reserved. All other trademarks are the property of their respective owners.
E. Moving Existing Outlook Mail to New Account
If your company is already using Outlook, messages, calendars and contacts can be moved from your current email account to the Time Warner Cable Hosted Exchange account by following these instructions.
To create a .PST file of the messages, calendars and contacts from the current account:
1. Open Outlook using the profile associated with your existing email account.
2. Select File and then Import and Export. (In Outlook 2010, select File > Open > Import.)
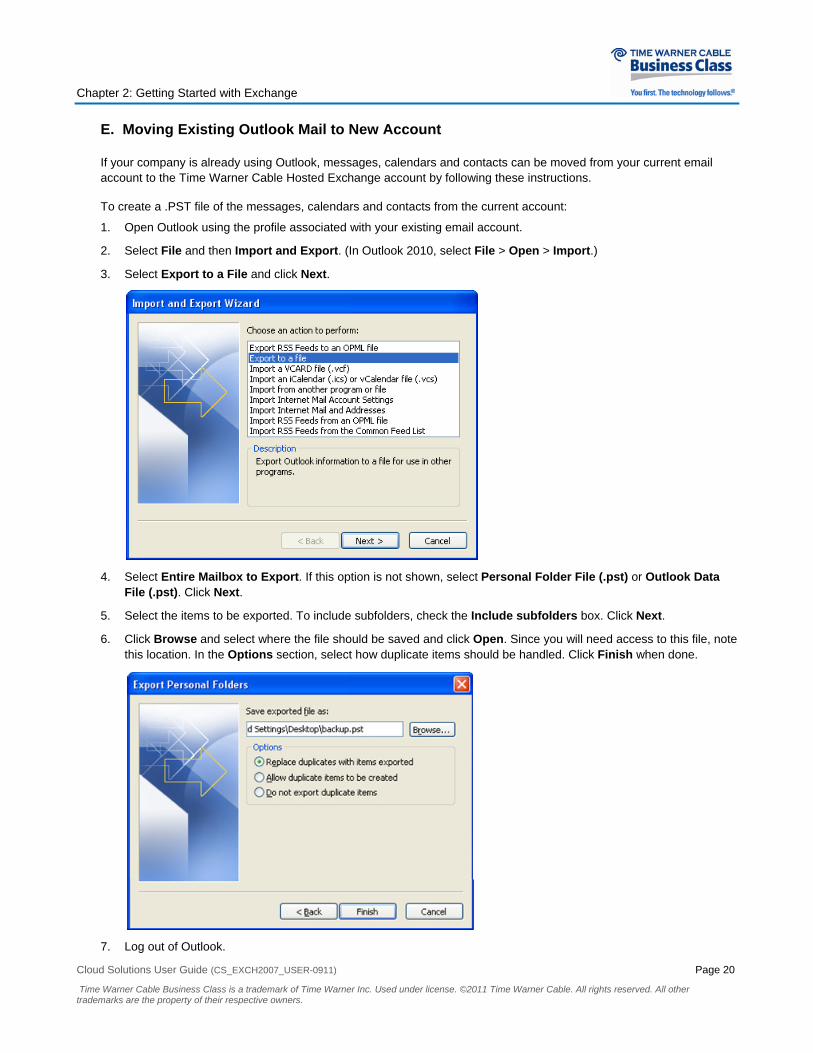
3. Select Export to a File and click Next.
4. Select Entire Mailbox to Export. If this option is not shown, select Personal Folder File (.pst) or Outlook Data File (.pst). Click Next.
5. Select the items to be exported. To include subfolders, check the Include subfolders box. Click Next.
6. Click Browse and select where the file should be saved and click Open. Since you will need access to this file, note this location. In the Options section, select how duplicate items should be handled. Click Finish when done.
7. Log out of Outlook.

Chapter 2: Getting Started with Exchange
Cloud Solutions User Guide (CS_EXCH2007_USER-0911) Page 21
Time Warner Cable Business Class is a trademark of Time Warner Inc. Used under license. ©2011 Time Warner Cable. All rights reserved. All other trademarks are the property of their respective owners.
To import the .PST file to your new email account:
1. Open Outlook using the profile associated with the your new Time Warner Cable’s email account.
2. Select File and then Import and Export. (In Outlook 2010, select File > Open > Import.)
3. Select Import from another program or file and click Next.
4. Select Personal Folder File (.pst) or Outlook Data File (.pst). Click Next.
5. Click Browse and select where the file should be saved and click Open. Click Next.
6. Check the Include subfolders box and Import items into the same folder in box. From the dropdown list, select your Time Warner Cable Hosted Exchange email address. Click Finish.
Chapter 2: Getting Started with Exchange
Cloud Solutions User Guide (CS_EXCH2007_USER-0911) Page 22
Time Warner Cable Business Class is a trademark of Time Warner Inc. Used under license. ©2011 Time Warner Cable. All rights reserved. All other trademarks are the property of their respective owners.
Connecting to Mobile Devices
If you have a Premium mailbox type, you can connect your mobile device to the Exchange server for anytime, anywhere access to your emails, calendars, contact lists and tasks using Microsoft ActiveSync®. If you need to connect to a BlackBerry® device, go to the BlackBerry Access section.
ActiveSync
ActiveSync allows you to access Exchange through mobile devices that are compatible with ActiveSync, which includes iPhone®, iPad™, Windows Mobile, Android™ and Palm® devices. ActiveSync is included with Premium mailboxes and can be used to automatically synchronize e-mail, contacts, calendar and other information from Exchange to mobile devices.
Configuration settings for connecting mobile devices to ActiveSync are as follows:
• Username / Email: [your email address] • Password: [your password] • Server: anywhere.appsonline.com • Requires SSL: [if available, yes/checked]
The actual steps for setting up different mobile devices will vary based on the operating system and version, device type and data plan provider and the setup instructions provided in this section should be used as a reference.
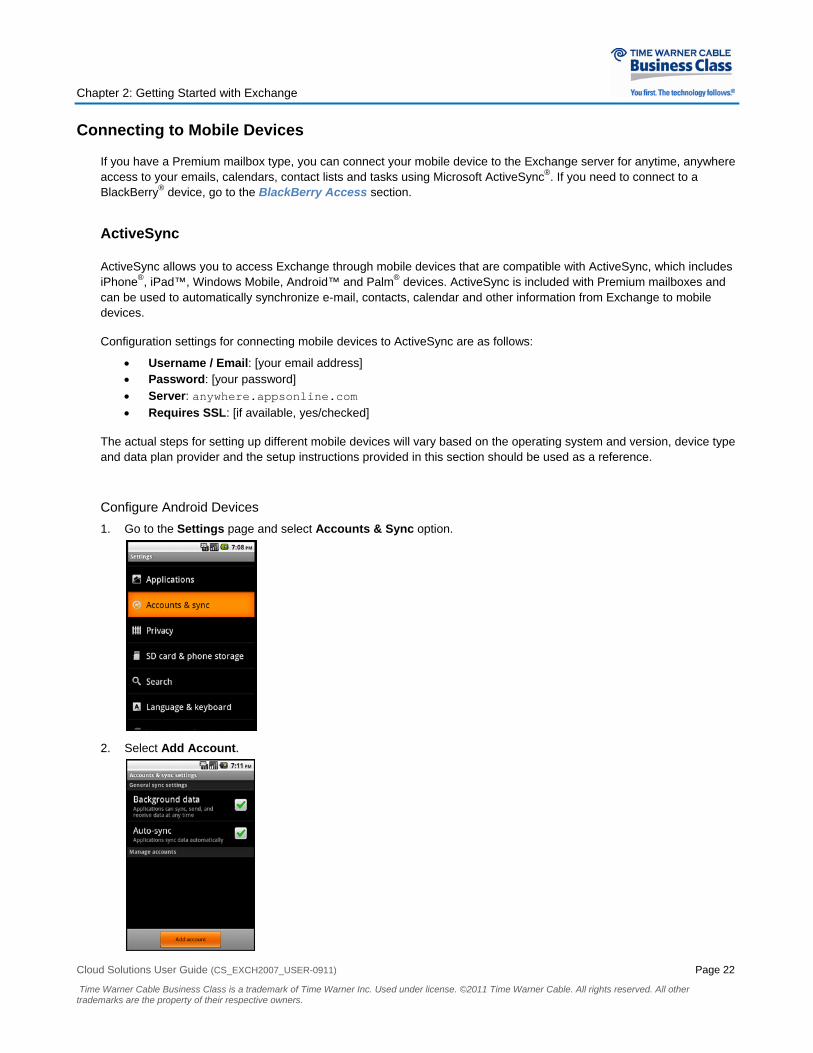
Configure Android Devices 1. Go to the Settings page and select Accounts & Sync option.
2. Select Add Account.
Chapter 2: Getting Started with Exchange
Cloud Solutions User Guide (CS_EXCH2007_USER-0911) Page 23
Time Warner Cable Business Class is a trademark of Time Warner Inc. Used under license. ©2011 Time Warner Cable. All rights reserved. All other trademarks are the property of their respective owners.
3. When prompted, enter the following information: • User Name / Email: [your email address] • Password: [your password] • Server: anywhere.appsonline.com • Use secure connections (SSL): checked • Accept all SSL certificates: checked
4. To synchronize calendar and contact data, check Sync calendar from this account and Sync contacts from this account. Select Next to start data synchronization between the phone and Exchange.
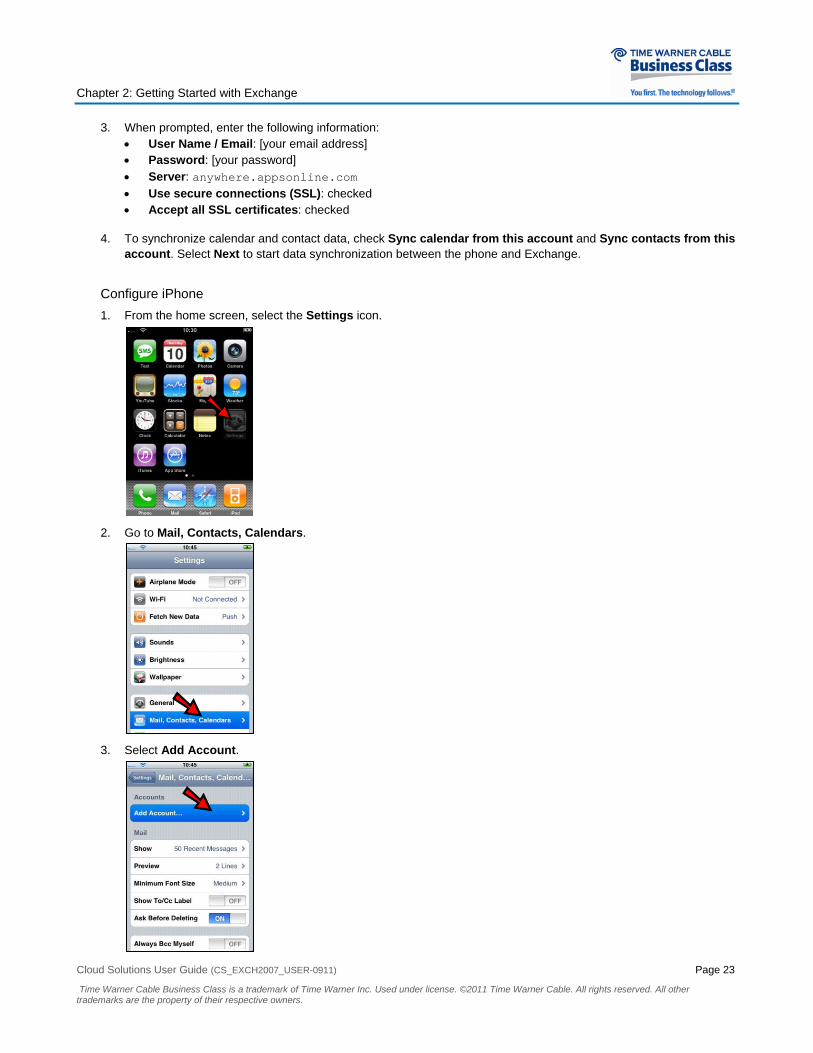
Configure iPhone 1. From the home screen, select the Settings icon.
2. Go to Mail, Contacts, Calendars.
3. Select Add Account.
Chapter 2: Getting Started with Exchange
Cloud Solutions User Guide (CS_EXCH2007_USER-0911) Page 24
Time Warner Cable Business Class is a trademark of Time Warner Inc. Used under license. ©2011 Time Warner Cable. All rights reserved. All other trademarks are the property of their respective owners.
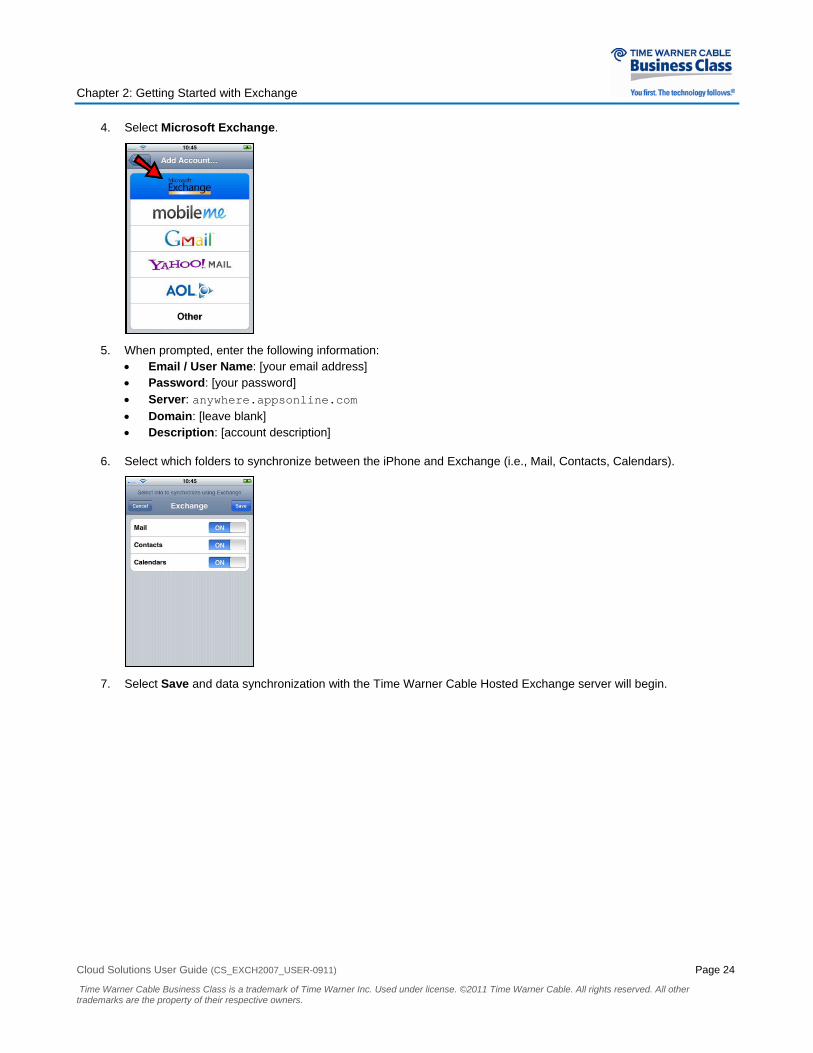
4. Select Microsoft Exchange.
5. When prompted, enter the following information: • Email / User Name: [your email address] • Password: [your password] • Server: anywhere.appsonline.com • Domain: [leave blank] • Description: [account description]
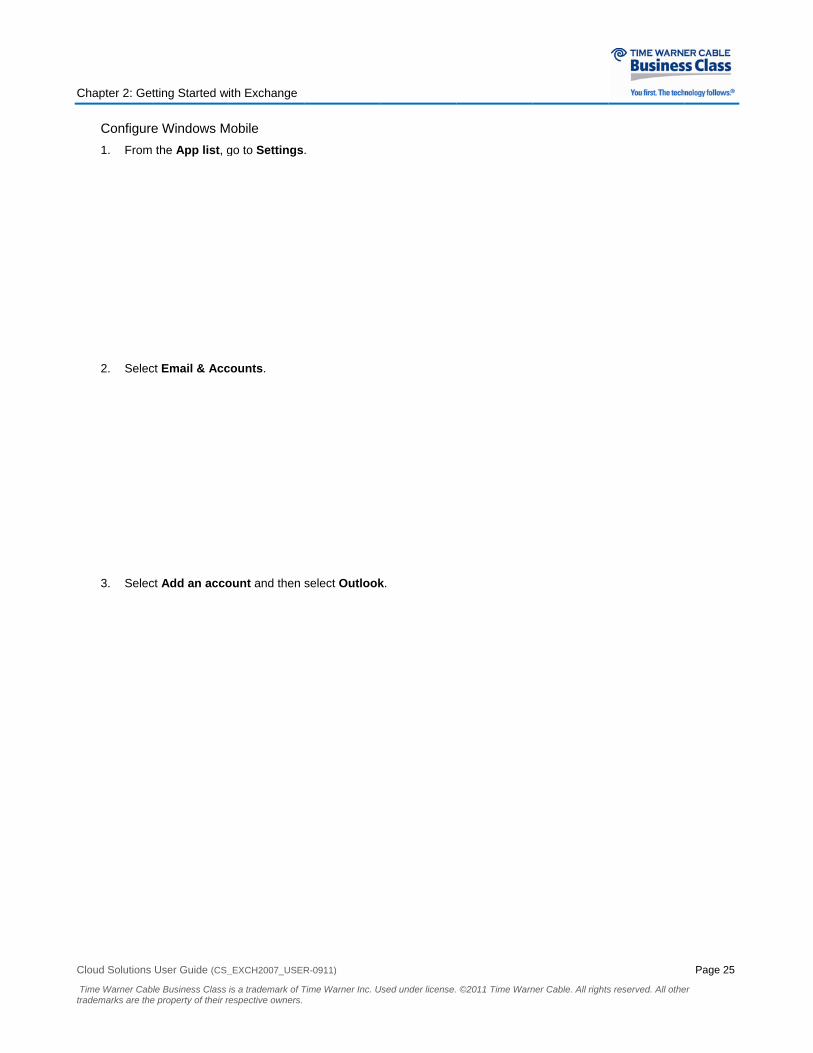
6. Select which folders to synchronize between the iPhone and Exchange (i.e., Mail, Contacts, Calendars).
7. Select Save and data synchronization with the Time Warner Cable Hosted Exchange server will begin.
Chapter 2: Get
Cloud Solutions
Time Warner Cabtrademarks are the
Configure1. From
2. Selec
3. Selec
tting Started w
User Guide (CS_
ble Business Class e property of their r
e Windows M the App list, g
ct Email & Acc
ct Add an acco
with Exchange
_EXCH2007_USER
is a trademark of Trespective owners.
Mobile go to Settings
counts.
ount and then
R-0911)
Time Warner Inc. U
.
select Outlook
Used under license.
k.
©2011 Time Warnner Cable. All rightss reserved. All othe
Page 25
er

Chapter 2: Get
Cloud Solutions
Time Warner Cabtrademarks are the
4. Enter
5. Exchasettin
• P
• If
tting Started w
User Guide (CS_
ble Business Class e property of their r
r your Email Ad
ange informationgs are not foun
Perform the foll
Field Email addrPassword User Name
Domain
f account settin
– Go to Ser– Select Sh– Select Sig
with Exchange
_EXCH2007_USER
is a trademark of Trespective owners.
ddress and Pa
on will be syncnd, then try the
lowing actions
ress
e
ngs still are not
rver and enter how All Settinggn In
R-0911)
Time Warner Inc. U
assword and th
chronized to theese additional s
to verify the inf
ActionVerify youSelect ShVerify youappears bjohnd@doThis field
t found, then se
anywhere.ap
gs and verify th
Used under license.
hen select Sig
e phone and yosteps:
formation and
ur email addreshow Passwordur user name isbefore the “@” omain.com, “joshould be emp
elect Advance
ppsonline.co
hat Server req
©2011 Time Warn
n In.
ou are finished
then select Sig
ss is correct d and verify thes correct. The usign (e.g., for ehnd” is the use
pty.
ed and perform
om uires (SSL) co
ner Cable. All rights
setting up Acti
gn In.
e password is cuser name is wemail address er name)
the following a
onnection sett
s reserved. All othe
iveSync. If acc
correct what
actions:
ting is enabled
Page 26
er
count
d
Chapter 2: Get
Cloud Solutions
Time Warner Cabtrademarks are the
BlackBe
The Blackwith Prembetween a
NOTE: been enable
Your admcontact thhours of w
To configu
1. Perfoerase
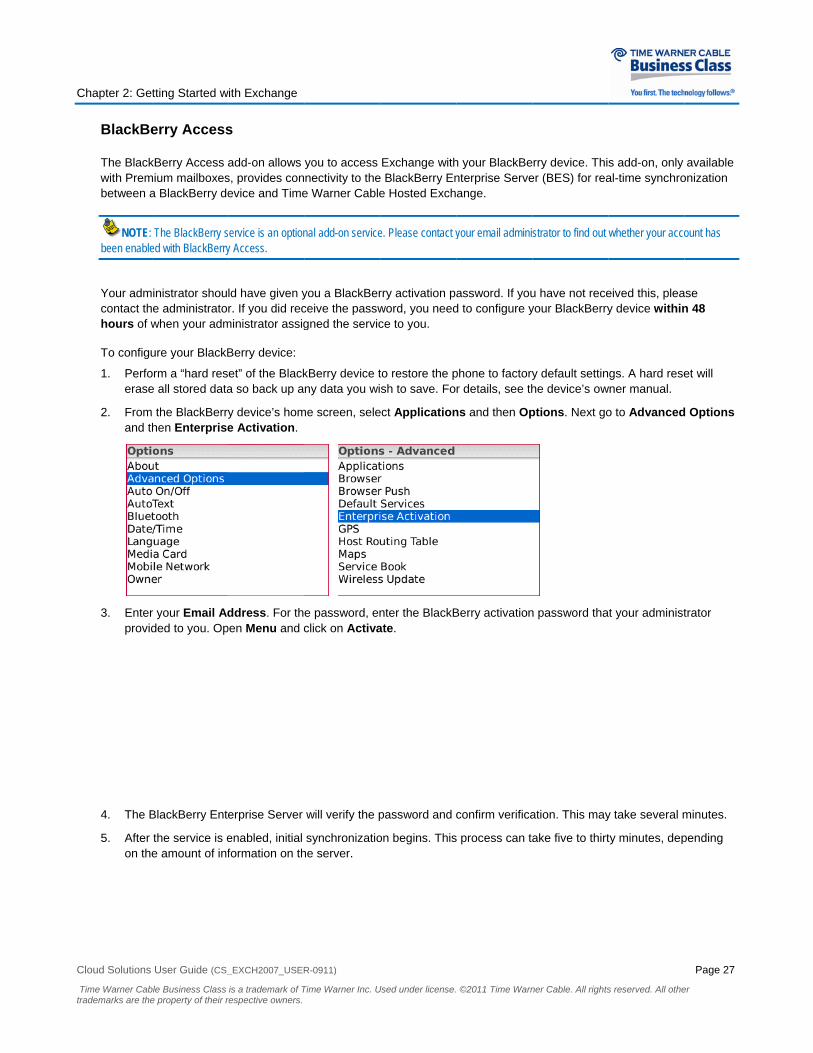
2. Fromand th
3. Enterprovid
4. The B
5. After on the
tting Started w
User Guide (CS_
ble Business Class e property of their r
erry Access
kBerry Access amium mailboxesa BlackBerry de
The BlackBerry sed with BlackBerry
inistrator shoue administratowhen your adm
ure your BlackB
orm a “hard rese all stored data
the BlackBerryhen Enterprise
r your Email Added to you. Op
BlackBerry Ente
the service is ee amount of inf
with Exchange
_EXCH2007_USER
is a trademark of Trespective owners.
s
add-on allows s, provides conevice and Time
service is an optiony Access.
ld have given yr. If you did rec
ministrator assig
Berry device:
et” of the Blacka so back up a
y device’s home Activation.
ddress. For thpen Menu and c
erprise Server
enabled, initial formation on th
R-0911)
Time Warner Inc. U
you to access nectivity to thee Warner Cable
nal add-on service
you a BlackBerceive the passwgned the servic
kBerry device tny data you wi
me screen, sele
e password, enclick on Activa
will verify the p
synchronizatiohe server.
Used under license.
Exchange withe BlackBerry Ene Hosted Exch
e. Please contact y
rry activation paword, you needce to you.
to restore the psh to save. Fo
ect Application
nter the BlackBate.
password and c
on begins. This
©2011 Time Warn
h your BlackBenterprise Serveange.
your email admini
assword. If youd to configure y
phone to factoryr details, see th
ns and then Op
Berry activation
confirm verifica
s process can ta
ner Cable. All rights
erry device. Thier (BES) for rea
strator to find out
u have not receyour BlackBerry
y default settinhe device’s ow
ptions. Next go
n password tha
ation. This may
ake five to thirt
s reserved. All othe
s add-on, only al-time synchro
whether your acco
eived this, pleay device within
gs. A hard resewner manual.
o to Advanced
t your administ
y take several m
ty minutes, dep
Page 27
er
available onization
ount has
ase n 48
et will
d Options
trator
minutes.
pending

Cloud Solutions User Guide (CS_EXCH2007_USER-0911) Page 28
Time Warner Cable Business Class is a trademark of Time Warner Inc. Used under license. ©2011 Time Warner Cable. All rights reserved. All other trademarks are the property of their respective owners.
Cloud Solutions User Guide (CS_EXCH2007_USER-0911) Page 29
Time Warner Cable Business Class is a trademark of Time Warner Inc. Used under license. ©2011 Time Warner Cable. All rights reserved. All other trademarks are the property of their respective owners.
Chapter 3: Configuration
The following topics are discussed in this chapter:
Overview
Editing Your Information
Changing Password
Changing Password Hint
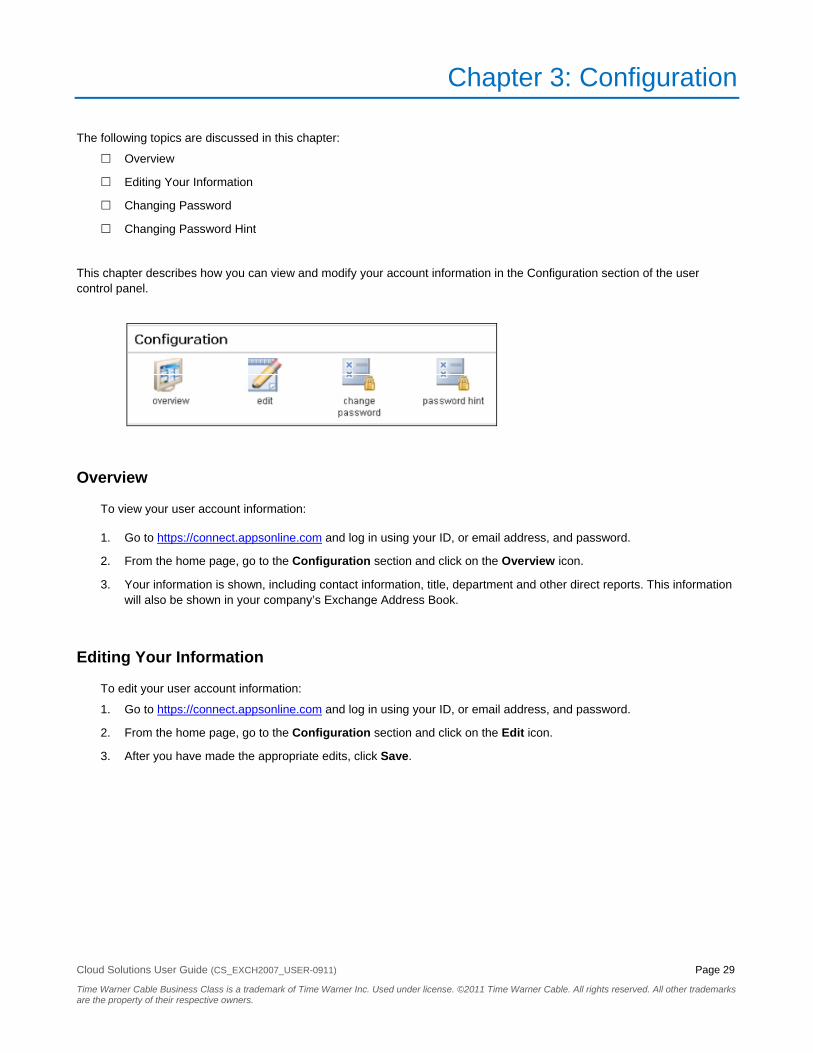
This chapter describes how you can view and modify your account information in the Configuration section of the user control panel.
Overview
To view your user account information:
1. Go to https://connect.appsonline.com and log in using your ID, or email address, and password.
2. From the home page, go to the Configuration section and click on the Overview icon.
3. Your information is shown, including contact information, title, department and other direct reports. This information will also be shown in your company’s Exchange Address Book.
Editing Your Information
To edit your user account information:
1. Go to https://connect.appsonline.com and log in using your ID, or email address, and password.
2. From the home page, go to the Configuration section and click on the Edit icon.
3. After you have made the appropriate edits, click Save.
Chapter 3: Con
Cloud Solutions
Time Warner Cabtrademarks are the
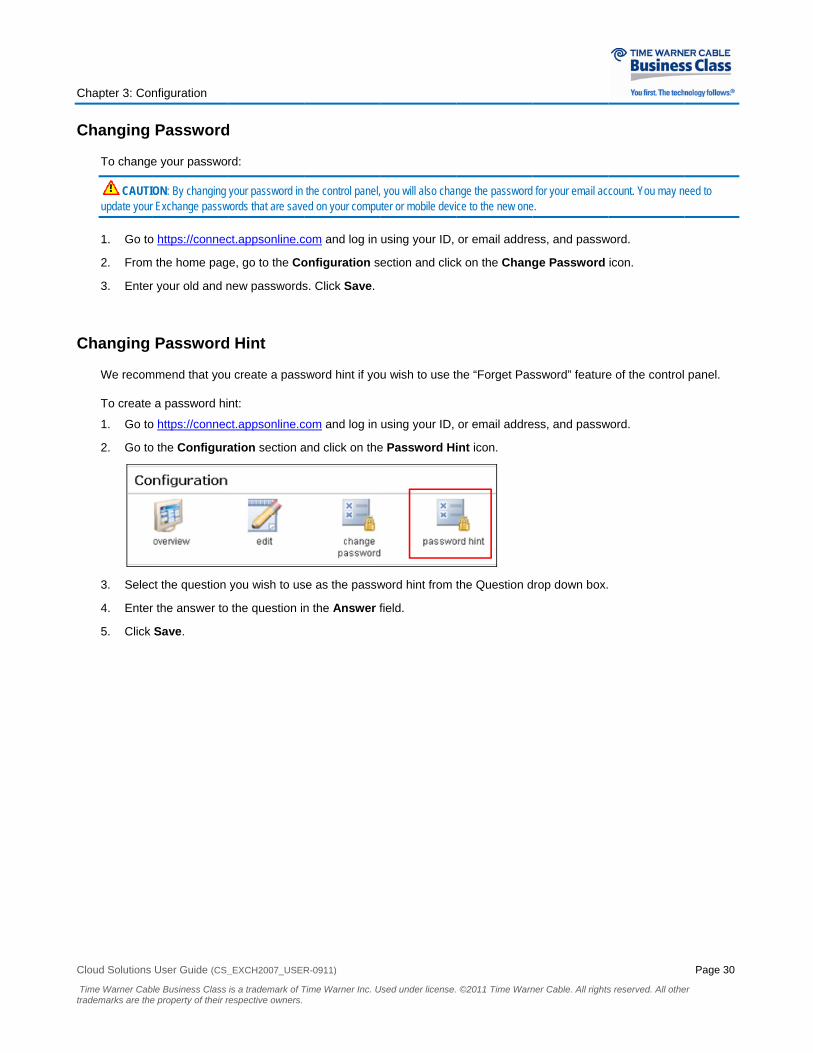
Changing
To change
CAUTIupdate your
1. Go to
2. From
3. Enter
Changing
We recom
To create
1. Go to
2. Go to
3. Selec
4. Enter
5. Click
nfiguration
User Guide (CS_
ble Business Class e property of their r
Password
e your passwo
ON: By changing r Exchange passw
o https://connec
the home pag
r your old and n
Password
mmend that you
a password hi
o https://connec
o the Configura
ct the question
r the answer to
Save.
_EXCH2007_USER
is a trademark of Trespective owners.
d
rd:
your password in words that are save
ct.appsonline.c
e, go to the Co
new passwords
d Hint
u create a pass
nt:
ct.appsonline.c
ation section a
you wish to us
the question in
R-0911)
Time Warner Inc. U
the control panel,ed on your compu
com and log in
onfiguration s
s. Click Save.
sword hint if yo
com and log in
and click on the
se as the passw
n the Answer f
Used under license.
you will also chanter or mobile devi
using your ID,
ection and clic
u wish to use t
using your ID,
e Password Hi
word hint from t
field.
©2011 Time Warn
nge the passwordce to the new one
or email addre
k on the Chang
the “Forget Pas
or email addre
int icon.
the Question d
ner Cable. All rights
for your email acce.
ess, and passw
ge Password
ssword” feature
ess, and passw
drop down box.
s reserved. All othe
count. You may n
word.
icon.
e of the control
word.
Page 30
er
eed to
panel.

Cloud Solutions User Guide (CS_EXCH2007_USER-0911) Page 31
Time Warner Cable Business Class is a trademark of Time Warner Inc. Used under license. ©2011 Time Warner Cable. All rights reserved. All other trademarks are the property of their respective owners.
Chapter 4: Managing Services
The following topics are discussed in this chapter:
Hosted Exchange Email
BlackBerry Access
Microsoft SharePoint
This chapter describes how you can view, modify and/or access your services from the user control panel.
Hosted Exchange Email
Based on the services that are assigned to you by your email administrator, you will see all of some of the options in the Hosted Exchange section of your home page as described in this section.
View Configuration
If you click on the View Configuration icon, you will be able to see details on your Exchange email account, including:
Header DetailsMailbox Information Information on your email account’s storage. Depending on the mailbox type, can
be up to 25,000 MB (or 25GB) Mailbox Access Options Indicates the options available with the mailbox type that was assigned to you by
your email administrator. Other Options & Login Information
Information on distribution lists as well your email address and user name that should be used when setting up your email client.
Mail Server Information Information on mail servers that you may need when first setting up email. Mailbox Limits Indicates the number of days in which deleted emails are available from the server
(set at 30 days) and maximum email size (set at 51.2 MB).
Chapter 4: Managing Services
Cloud Solutions User Guide (CS_EXCH2007_USER-0911) Page 32
Time Warner Cable Business Class is a trademark of Time Warner Inc. Used under license. ©2011 Time Warner Cable. All rights reserved. All other trademarks are the property of their respective owners.
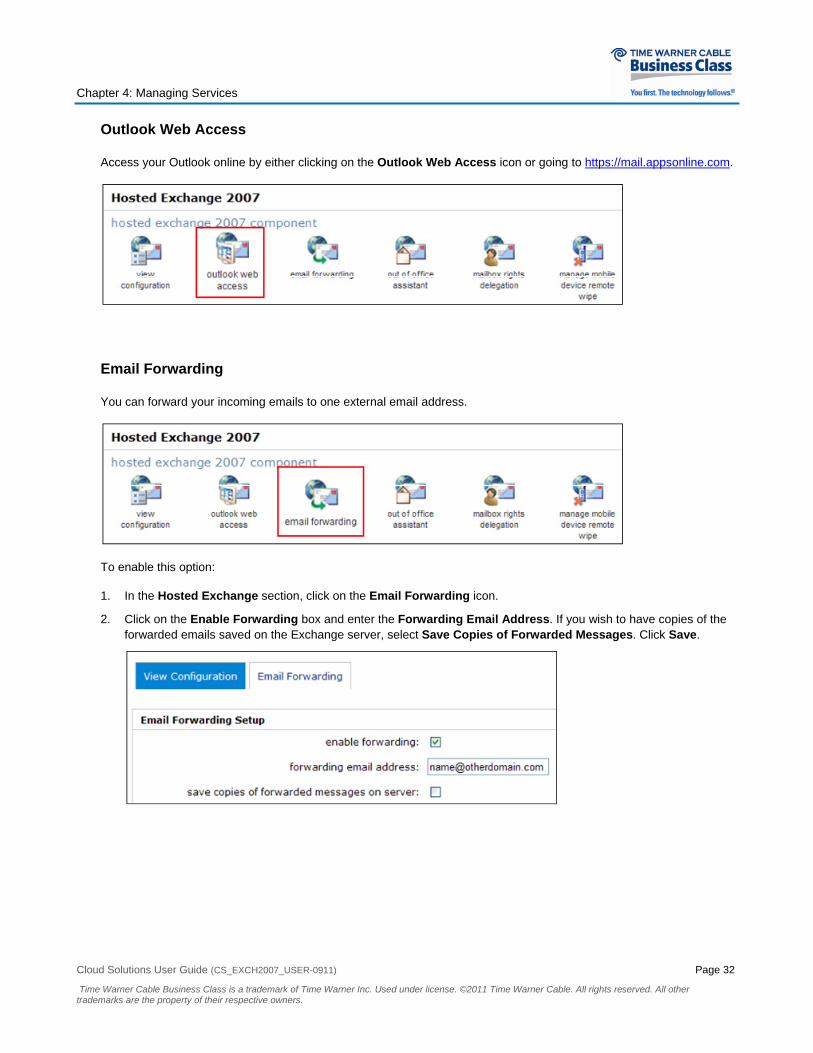
Outlook Web Access
Access your Outlook online by either clicking on the Outlook Web Access icon or going to https://mail.appsonline.com.
Email Forwarding
You can forward your incoming emails to one external email address.
To enable this option:
1. In the Hosted Exchange section, click on the Email Forwarding icon.
2. Click on the Enable Forwarding box and enter the Forwarding Email Address. If you wish to have copies of the forwarded emails saved on the Exchange server, select Save Copies of Forwarded Messages. Click Save.
Chapter 4: Managing Services
Cloud Solutions User Guide (CS_EXCH2007_USER-0911) Page 33
Time Warner Cable Business Class is a trademark of Time Warner Inc. Used under license. ©2011 Time Warner Cable. All rights reserved. All other trademarks are the property of their respective owners.
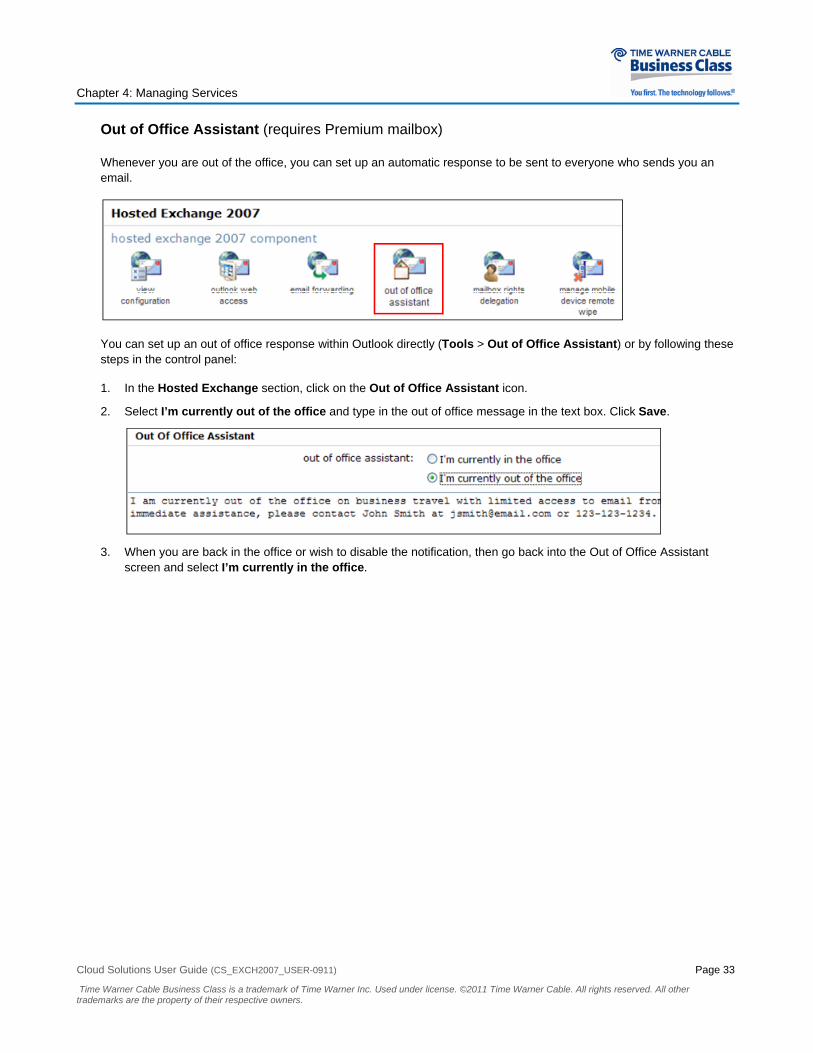
Out of Office Assistant (requires Premium mailbox)
Whenever you are out of the office, you can set up an automatic response to be sent to everyone who sends you an email.
You can set up an out of office response within Outlook directly (Tools > Out of Office Assistant) or by following these steps in the control panel:
1. In the Hosted Exchange section, click on the Out of Office Assistant icon.
2. Select I’m currently out of the office and type in the out of office message in the text box. Click Save.
3. When you are back in the office or wish to disable the notification, then go back into the Out of Office Assistant screen and select I’m currently in the office.

Chapter 4: Managing Services
Cloud Solutions User Guide (CS_EXCH2007_USER-0911) Page 34
Time Warner Cable Business Class is a trademark of Time Warner Inc. Used under license. ©2011 Time Warner Cable. All rights reserved. All other trademarks are the property of their respective owners.
Mailbox Rights Delegation
To give other users access to your email account:
1. In the Hosted Exchange section, click on the Mailbox Rights Delegation icon.
2. Click Add.
3. Click Find to see a list of users or else type in a user’s email address or username and click on Find.
NOTE: The user must be in your company’s Address Book. If the user is not found, then please contact your email administrator.
4. Select from the following mailbox rights for the user:
• Send Options
– None: User cannot send emails on your behalf. – Send As: User can send emails in which the “From” field will only include your email address and the
recipient will not know that it was sent by someone else. – Send On Behalf: User can send emails on your behalf in which the “From” field in the email will indicate
that the email is being sent on your behalf by the user (e.g., “Assistant on behalf of John Smith”)
• Select Full mailbox access if you wish the user to have full access to your email account.
5. Click Add to finish.
6. To change or remove permissions, select user from the Mailbox Delegation Rights page and select Edit or Remove.

Chapter 4: Managing Services
Cloud Solutions User Guide (CS_EXCH2007_USER-0911) Page 35
Time Warner Cable Business Class is a trademark of Time Warner Inc. Used under license. ©2011 Time Warner Cable. All rights reserved. All other trademarks are the property of their respective owners.
Mobile Device Remote Wipe (requires Premium mailbox)
The Mobile Device Remote Wipe page shows all mobile devices that have been configured to your Exchange account using ActiveSync.
If your mobile device is lost or stolen, you can remotely delete all Exchange information from the device by using the Wipe or Wipe All options. For more information, click on the question mark icon on the top right corner of the screen.
BlackBerry Access
If your email administrator has assigned your email account with the BlackBerry Access option, you will see the BlackBerry Service section.
Overview
Click on the Overview icon to view the device PIN of your BlackBerry and the activation password. The activation password is only valid for 48 hours. If the activation password has expired before you activated your BlackBerry device, please contact your email administrator to receive a new activation password.
Kill Device
If your BlackBerry device is lost or stolen, click on Kill Device to erase all the Exchange data associated with the device PIN number.
Chapter 4: Managing Services
Cloud Solutions User Guide (CS_EXCH2007_USER-0911) Page 36
Time Warner Cable Business Class is a trademark of Time Warner Inc. Used under license. ©2011 Time Warner Cable. All rights reserved. All other trademarks are the property of their respective owners.
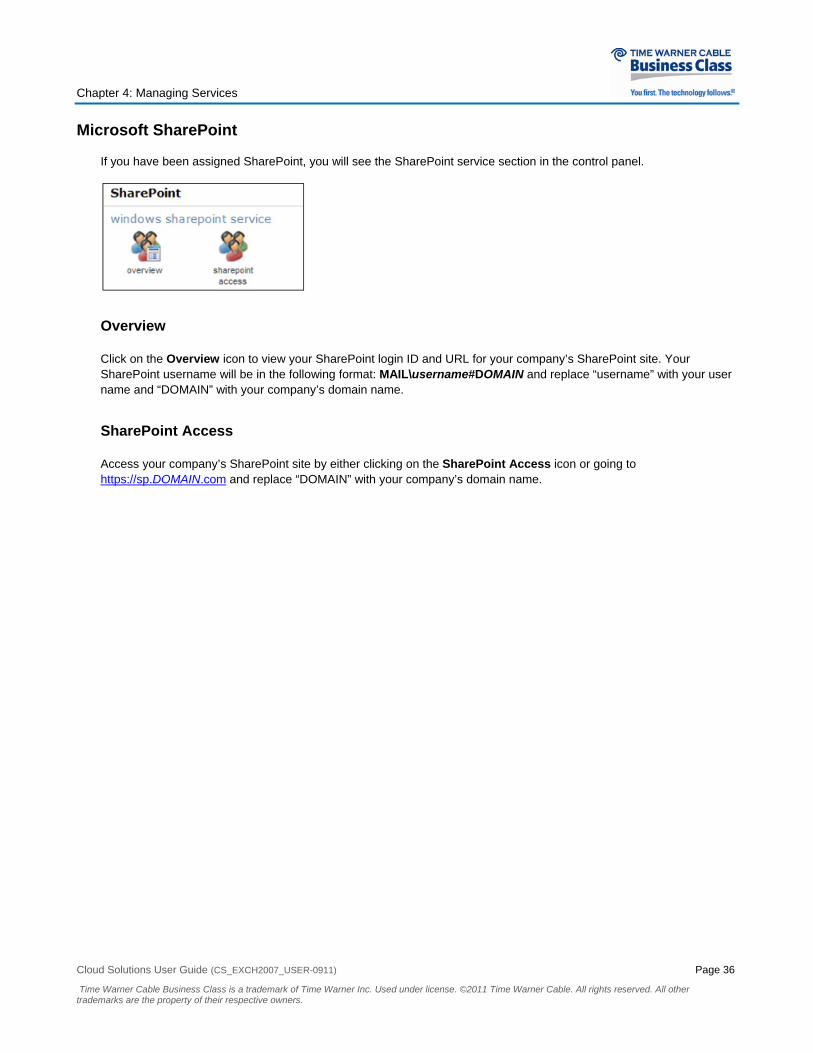
Microsoft SharePoint
If you have been assigned SharePoint, you will see the SharePoint service section in the control panel.
Overview
Click on the Overview icon to view your SharePoint login ID and URL for your company’s SharePoint site. Your SharePoint username will be in the following format: MAIL\username#DOMAIN and replace “username” with your user name and “DOMAIN” with your company’s domain name.
SharePoint Access
Access your company’s SharePoint site by either clicking on the SharePoint Access icon or going to https://sp.DOMAIN.com and replace “DOMAIN” with your company’s domain name.