PowerShell Studio 2020 is the premier Windows PowerShell ...

Brought to you by Windows IT Pro Sponsored by NetApp
sponsored by
Time-Saving PowerShellSolutions for the Busy Admin
NetApp
By Rod Trent

Brought to you by Windows IT Pro Sponsored by NetApp
Tech Advisor • Windows IT Pro | p. 2
Time-Saving PowerShell Solutions for the Busy Admin
PowerShell One-liner: Quickly Finding the IP Address for Hostname and Vice Versas 4
Run the Access Control App to Configure Windows Remote Management with PowerShell 5
Pausing PowerShell Script Execution 6
PowerShell One-Liner: Getting Local Environment Variables 6
PowerShell Tip: Outputting Information to HTML 8
Forcing PowerShell to Wait for a Process to Complete 9
Simple Hyper-V Virtual Machine Management Using PowerShell
Creating a new VM 10
Removing an Existing VM 10
Starting an Existing VM 10
Stop a Running VM 10
Pause a Running VM 11
Restart a Paused VM 11
Save and Hibernate a VM 11
Changing the Name of a VM 11
Moving a VM to another Hyper-V Server 11
Export and Importing a Working VM 11
C o n t e n t s

Brought to you by Windows IT Pro Sponsored by NetApp
Tech Advisor • Windows IT Pro | p. 3
IntroductionPowershell is the scripting language now embedded into every Microsoft business software product, allowing seemingly simple commands to expose powerful, automated solutions. For many Microsoft products, Powershell is required to control, extend and manage various processes. Powershell can be used to initiate simple tasks and inquiries and can also be strung together to automate more complex sets of operations, for instance within a private cloud environment. In the past, various scripting languages required months of study to do simple things, but Powershell has changed all of that. Learning Powershell seems extremely daunting to some, but once study starts, users find the simplicity to be refreshing.
Powershell is a hugely powerful (pun intended) scripting language and Microsoft has invested a lot of resources and support behind making it an integrated part of every piece of the company’s software offerings. It’s really nothing to be afraid of and those that start down the path to learning find it simple and easy to understand. And, as the education progresses, it gets easier and easier.
this guide is intended to help It professionals build a relationship with Powershell, and aid in understanding how powerful simple, one-line commands can be.
Rod Trent is the It Community Manager for Windows It Pro. He is a leading expert on Microsoft system Center technologies and has more than 25 years of It experience, with over 20 years dedicated to system Center. Rod has written many books, thousands of articles, and speaks at various conferences and user groups. His professional focus is evangelizing technical community on the web and in person. Rod was a Microsoft MVP for 10 years and is a charter member of the Dell techCenter Rockstar program.
Sponsored by NetAppnetApp creates innovative storage and data management solutions that deliver outstanding cost efficiency and accelerate business breakthroughs. our deep integration with Microsoft products and technologies has been recognized and awarded by Microsoft when netApp was named their 2012 Private Cloud Partner of the Year and 2013 server Platform Partner of the Year. netApp provides a comprehensive Powershell Module with over 1,400 Powershell cmdlets in our Data ontAP Powershell toolkit for everything from simple task initiation to complex private cloud, back-up, and disaster recovery automation. Learn more at netApp’s Powershell toolkit Community
Brought to you by Windows IT Pro Sponsored by NetApp
Tech Advisor • Windows IT Pro | p. 4
Time-Saving PowerShell Solutions for the Busy Admin
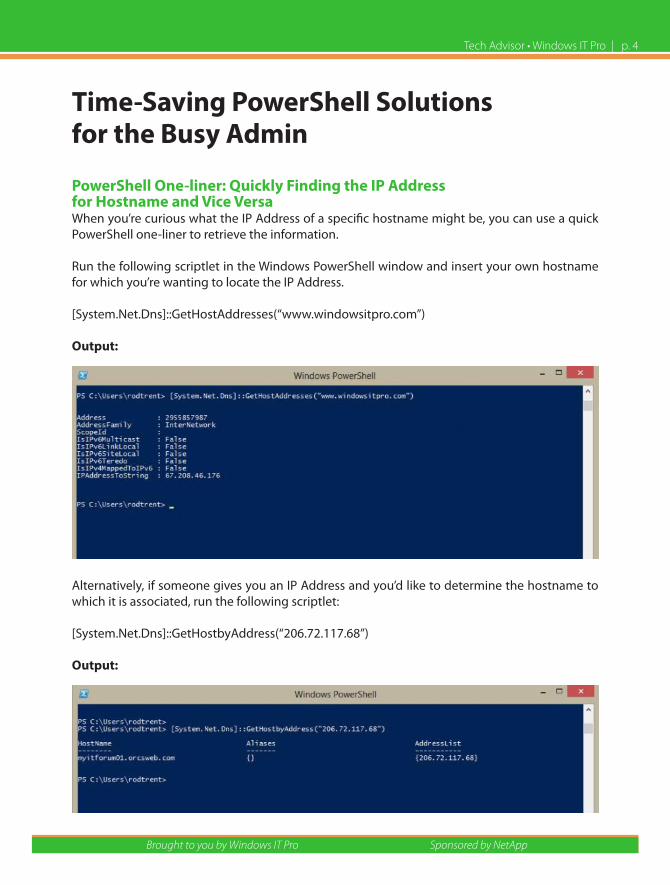
PowerShell One-liner: Quickly Finding the IP Address for Hostname and Vice VersaWhen you’re curious what the IP Address of a specific hostname might be, you can use a quick Powershell one-liner to retrieve the information.
Run the following scriptlet in the Windows Powershell window and insert your own hostname for which you’re wanting to locate the IP Address. [system.net.Dns]::GetHostAddresses(“www.windowsitpro.com”) Output:
Alternatively, if someone gives you an IP Address and you’d like to determine the hostname to which it is associated, run the following scriptlet: [system.net.Dns]::GetHostbyAddress(“206.72.117.68”) Output:

Brought to you by Windows IT Pro Sponsored by NetApp
Tech Advisor • Windows IT Pro | p. 5
Run the Access Control App to Configure Windows Remote Management with PowerShellPowershell is powerful, for sure. But, with that power comes great, uh, responsibility. Part of that responsibility is ensuring commands can be run remotely, and by the right people. If you need to adjust the Access Control List for utilizing Powershell commands on remote computers, you’ll first need to know how to open the UI for managing and modifying the ACLs.
Do this:
1. As an Administrator, run the following at a Powershell prompt:
set-PssessionConfiguration -showsecurityDescriptorUI -name Microsoft.Powershell –Force
2. You’ll be prompted to ensure that the WinRM service is running. Answer “Y” (Yes) to start the Windows service.
3. once the service is started the Access Control applet will run, allowing you to make modifi-cations:
We’ll go deeper into Powershell remoting in future articles, but, this will get you started down the path and give you another “cool thing” to know.

Brought to you by Windows IT Pro Sponsored by NetApp
Tech Advisor • Windows IT Pro | p. 6
Pausing PowerShell Script Executionthere are various reasons to pause a script. For one, you may need to verify that a section of your script has processed correctly before allowing it to continue. In other cases, you may want to halt the script’s execution so you can perform some manual tasks or run a second script to compare results. And, another example might simply be that you want to give the end-user some instruc-tions or allow them to take part in the flow of what is happening on their PC.
Here’s a quick scriptlet to add to your own scripts that displays a message and also waits for a key to be pressed before the Powershell script continues.
Write-Host “Press any key to continue …”
$x = $host.UI.RawUI.ReadKey(“noecho,IncludeKeyDown”)
PowerShell One-Liner: Getting Local Environment VariablesBefore you can start working with the computer’s environment variables, it helps to be able to retrieve the current list to show what’s available to work with. In some upcoming articles, I’ll show how to add, modify, and delete environment variables, and then give some examples of how to utilize them. But, let’s start by finding out what’s available for use.
Retrieving the list of current environment variables is as simple as running this in Windows Powershell:

Brought to you by Windows IT Pro Sponsored by NetApp
Tech Advisor • Windows IT Pro | p. 7
Get-ChildItem env:
once you kick off that quick command, something similar to the following will display for you:
After you have the names and values, you can even pare down your results to specific environ-ment variables. Using the PAtHeXt from the namecolumn, run the same command as before except insert PAtHeXt at the end like this:
Get-ChildItem env:PAtHeXt
Quick and simple, that single modification retrieves just the Value for the PAtHeXt as shown in the following image:

Brought to you by Windows IT Pro Sponsored by NetApp
Tech Advisor • Windows IT Pro | p. 8
PowerShell Tip: Outputting Information to HTMLWorking within the Powershell cmd window can be somewhat limiting, particularly if the command you entered contains lines and lines of return data. For example, running the Get-service command on its own will retrieve and list all of the installed services on the computer. As shown in the following image, the displayed information scrolls the informa-tion off the screen.
Yes, you can use the scrollbar to review the retrieved data, but what if the information is 10, 20, or 50 scroll pages long?
Here’s a quick tip.
Using the ConvertTo-HTML command, you can push collected information to an HtML file in the file system. this is useful, too, if you simply want to store the data to read later, or use as an archive for comparative processes.
Here’s the format (still using the Get-service example):
Get-Service | ConvertTo-HTML > C:\temp\services.htm
Here’s an example output:

Brought to you by Windows IT Pro Sponsored by NetApp
Tech Advisor • Windows IT Pro | p. 9
Forcing PowerShell to Wait for a Process to Completethose who were once used to writing batch files will like this tip. In the old days, using the old ways, you could use the start/Wait command in batch files to cause the script to pause, wait for a process to complete, and then move on to the next steps in the script.
You can do the same thing with Powershell using the Out-null cmdlet. out-null actually deletes output instead of routing it to the Powershell console, so the script will sit and wait for the content to be deleted before moving on.
this will work with practically any process you choose. Just stick the following at the end of the line (notice the pipe character before the command):
| out-null
to test this out for yourself, create a text file and then use notepad.exe to open the file:
notepad.exe myfile.txt | out-null

Brought to you by Windows IT Pro Sponsored by NetApp
Tech Advisor • Windows IT Pro | p. 10
Simple Hyper-V Virtual Machine Management Using PowerShell
Powershell, of course, is integrated with just about every single piece of Microsoft technology these days. As the name applies, it’s a ‘powerful shell,’ and through included or custom cmdlets can simplify and automate functions. A lot of times it takes only a single line of code to produce the desired result.
As more and more companies switch to using Microsoft’s Hyper-V, managing the hypervisor becomes important, and Powershell cmdlets are the key to success.
In this article I want to give you some simple commands that really work to help get you started. the cmdlets associated with the simple commands I’m including actually offer much more depth than what I’m providing, but they’re a good start.
these commands must be run in a Powershell instance and they all apply to Windows Power-shell 4.0, Windows 8.1, and Windows server 2012 R2.
Creating a new VMthe following command simply creates a new VM instance called “myVM” and configures it to utilize 512MB of memory.
1.New-VM–Name"myVM"–MemoryStartupBytes512MB
Removing an Existing VMthe following command removes the VM called “myVM.”
1.Remove-VM"myVM"
Starting an Existing VMthe following command takes a VM called “myVM” and makes it active.
1.Start-VM–NamemyVM
Stop a Running VMthis command will halt the VM called “myVM.”
1.Stop-VM–NamemyVM

Brought to you by Windows IT Pro Sponsored by NetApp
Tech Advisor • Windows IT Pro | p. 11
Pause a Running VMInstead of just stopping a VM completely, this command will pause (or suspend) the VM called “myVM.”
1.Suspend-VM–NamemyVM
Restart a Paused VMthis command resumes the “myVM” VM that has been paused using the suspend-VM command.
1.Resume-VM–NamemyVM
Save and Hibernate a VMthe following command saves the current running configuration of the “myVM” VM and puts it to sleep. this is similar to when a computer hibernates.
1.Save-VM–NamemyVM
Changing the Name of a VMIf you don’t like the name of a VM, or need to make adjustments based on company policy, the follow-ing command will enable you to do change the VM name. this command changes “myVM” to “yourVM.”
1.Rename-VMmyVM–NewNameyourVM
Moving a VM to another Hyper-V ServerIf you need to migrate a current VM to a remote Hyper-V host, this command will do it. this moves “myVM” to a server called “tatooine.”
1.Move-VM“myVM”Tatooine
Export and Importing a Working VMthe export and Import VM commands are pretty useful and work great together. Using the export command you can take a good, working VM and export it to disk. the following com-mand exports “myVM” to a local drive and path (D:\myVMDirectory).
1.Export-VM–NamemyVM–PathD:\myVMDirectory
Alternatively, you can use the Import command to pull an exported VM from the file path into the Hyper-V host. Make sure to include the full path and exported filename.
1.Import-VM–Path'D:\myVMDirectory\VMFileName.XML'