Til Aqua THMS · set up and run an efficient hatchery based upon the Til-Aqua Tilapia Hatchery...
29
Copyright Til-Aqua International bv. Nothing from this manual may be copied or otherwise multiplied without written permission from Til-Aqua. Til-Aqua THMS: Tilapia Hatchery Management System The Concept Hatchery Introduction March 2016 Version 1.00 www.til-aqua.com [email protected] The Concept The Kit The Training The Broodstock
-
Upload
hoanghuong -
Category
Documents
-
view
231 -
download
4
Transcript of Til Aqua THMS · set up and run an efficient hatchery based upon the Til-Aqua Tilapia Hatchery...
Copyright Til-Aqua International bv. Nothing from this manual may be copied or otherwise multiplied without written permission from Til-Aqua.
Til-Aqua THMS: Tilapia Hatchery Management System
The Concept Hatchery Introduction
March 2016 Version 1.00
www.til-aqua.com [email protected]
Th e Co n ce p t
Th e K i t
Th e T ra i n i n g
Th e B ro o d s to ck

Tilapia Hatchery Management System
2

Tilapia Hatchery Management System
3
This Training Manual is part of the Til-Aqua Tilapia Hatchery Management System (THMS):
Figure 1. Schematic overview of Til-Aqua Tilapia Hatchery Management System. A description of the various components can be found below.
1. Til-Aqua Hatchery Concept Hatchery Introduction: Introduction on constructing and running a tilapia hatchery, referring to the detailed information in our factsheets. Factsheets: Detailed information sheets on activities and processes occurring in a hatchery. Tools Interactive forms and software to indicate hatchery performance The Til-Aqua Hatchery Concept information will be covered in the training program and supplied together with the Til-Aqua Hatchery and Nursery Kit. 2. Til-Aqua Hatchery and Nursery Kit A simple and affordable well-functioning Hatchery- Nursery Kit to be assembled by the customer with our support. Construction Manual: Step-by-step instructions to assemble the Til-Aqua Hatchery and Nursery Kit, including pictures for the various steps. Construction Video: Step-by-step instructions to assemble the Til-Aqua Hatchery and Nursery Kit, including pictures for the various steps. 3. Internship and/or Externship intensive training program in Til-Aqua THMS In an one-week or two-weeks intensive training program we teach how to produce good quality fingerlings. All information in our factsheets will be covered after which they can serve as a reference book. 4. Broodstock – YY Males and Mixed Sex Broodstock fish to produce all-male Tilapia without the use of hormones for both our strains; Til-Aqua Silver (wildtype) and Til-Aqua Red.
Til-Aqua Tilapia Hatchery Management System
Til-Aqua Hatchery Concept
Til-Aqua Hatchery and Nursery Kit
Hatchery Information
Factsheets
Tools
Construction Manual
Til-Aqua Broodstock
Construction Video
Til-Aqua intensive training program

Tilapia Hatchery Management System
4

Tilapia Hatchery Management System
5
Table of Contents
1 INTRODUCTION ............................................................................................................................................7
1.1 SCOPE AND PURPOSE .......................................................................................................................................................7 1.2 CHAPTERS AND SUBJECTS ..................................................................................................................................................7 1.3 HATCHERY OPTIONS .........................................................................................................................................................7 1.4 SUPPLIERS .....................................................................................................................................................................7
2 BASIC CONDITIONS ......................................................................................................................................8
2.1 SITE CHARACTERISTICS ......................................................................................................................................................8 2.1.1 Permits ..........................................................................................................................................................8 2.1.2 Climate – Temperature .................................................................................................................................8 2.1.3 Soil .................................................................................................................................................................8 2.1.4 Access ............................................................................................................................................................8 2.1.5 Water ............................................................................................................................................................9
2.2 WATER .........................................................................................................................................................................9 2.2.1 Borehole ........................................................................................................................................................9 2.2.2 Surface water (river/lake/dam) ....................................................................................................................9
2.3 ELECTRICITY .................................................................................................................................................................11 2.3.1 Generator ....................................................................................................................................................11 2.3.2 UPC ..............................................................................................................................................................12 2.3.3 Alarm ...........................................................................................................................................................12 2.3.4 Emergency oxygen supply ...........................................................................................................................12 2.3.5 Sun collector ................................................................................................................................................12
2.4 GREENHOUSE AND SHADE NETTING ...................................................................................................................................12 2.4.1 Green water ................................................................................................................................................13
3 BROODSTOCK ............................................................................................................................................. 14
3.1 SOURCE.......................................................................................................................................................................14 3.2 HORMONE SEX REVERSAL ................................................................................................................................................14 3.3 YY-TECHNOLOGY ..........................................................................................................................................................14 3.4 TIL-AQUA STRAINS ........................................................................................................................................................14 3.5 QUANTITY ...................................................................................................................................................................14
4 TILAPIA HATCHERY AND NURSERY ............................................................................................................. 16
4.1 QUARANTINE ...............................................................................................................................................................16 4.1.1 Background .................................................................................................................................................16 4.1.2 Design..........................................................................................................................................................17 4.1.3 Materials and construction .........................................................................................................................17 4.1.4 Purchase ......................................................................................................................................................17 4.1.5 Procedure (s) ...............................................................................................................................................17
4.2 SPAWNING ..................................................................................................................................................................18 4.2.1 Background .................................................................................................................................................18 4.2.2 Design..........................................................................................................................................................18 4.2.3 Materials and construction .........................................................................................................................18 4.2.4 Purchase ......................................................................................................................................................19 4.2.5 Procedure(s) ................................................................................................................................................19
4.3 INCUBATION .................................................................................................................................................................20 4.3.1 Background .................................................................................................................................................20 4.3.2 Design..........................................................................................................................................................20 4.3.3 Materials and construction .........................................................................................................................20 4.3.4 Purchase ......................................................................................................................................................20 4.3.5 Procedure (s) ...............................................................................................................................................20

Tilapia Hatchery Management System
6
4.4 SWIM-UP ....................................................................................................................................................................21
4.4.1 Background .................................................................................................................................................21 4.4.2 Design..........................................................................................................................................................21 4.4.3 Materials and construction .........................................................................................................................21 4.4.4 Procedure(s) ................................................................................................................................................21
4.5 PRIMARY NURSERY ........................................................................................................................................................22 4.5.1 Background .................................................................................................................................................22 4.5.2 Design..........................................................................................................................................................22 4.5.3 Materials and construction .........................................................................................................................22 4.5.4 Procedure(s) ................................................................................................................................................22
5 BIO-SECURITY ............................................................................................................................................. 24
5.1 MAINTAINING A HIGH BIOSECURITY ...................................................................................................................................24
6 DISEASE PREVENTION AND TREATMENTS .................................................................................................. 25
6.1 IMMUNITY DIP ..............................................................................................................................................................25 6.2 PARASITIC INFECTIONS....................................................................................................................................................25
7 STOCKING AND FEEDING ............................................................................................................................ 27
7.1 AGE AND DENSITIES .......................................................................................................................................................27 7.2 FEED AND FEEDING ........................................................................................................................................................27
8 TOOLS AND OTHER MATERIALS .................................................................................................................. 28
8.1 SPARE PARTS ................................................................................................................................................................28 8.2 HANDLING EQUIPMENT ..................................................................................................................................................28 8.3 HATCHERY EQUIPMENT ..................................................................................................................................................28 8.4 WATER QUALITY EQUIPMENT ...........................................................................................................................................28
Tilapia Hatchery Management System
7
1 Introduction
1.1 Scope and purpose
Til-Aqua International has been producing All Male seeds for the Tilapia industry world-wide in a very intensive way since 1995. Our hatcheries are based in The Netherlands with relatively high costs for energy and labor. This forced us to develop a very efficient Tilapia Hatchery Management System. Next to that, we are aware there is a demand for well-functioning hatcheries with a relatively low initial investment. From the beginning, Til-Aqua has put great focus on Africa, Central America and South America with the transfer of special Broodstock , (prefab-) systems and know-how such as hatchery design. Also Asia is becoming more and more interested in our products.
The aim of this Hatchery Introduction is to give a summary of tools and conditions required to set up and run an efficient hatchery based upon the Til-Aqua Tilapia Hatchery Management System (THMS) with a relatively low investment. It refers to a vast amount of information (Factsheets and Tools) that can be transferred through our educational program. Together with the Til-Aqua Hatchery and Nursery Kit a complete package is provided for setting up and running an efficient hatchery and nursery.
1.2 Chapters and subjects
The following subjects will be covered:
1. Basic conditions 2. Broodstock source and management 3. Tilapia hatchery and nursery 4. Bio-security 5. Disease prevention and control 6. Stocking and feeding 7. Tools and materials
For most subjects, the information is structured in a way to 1) supply background information, 2) show a proposed design, 3) provide a list of materials required and 4) explain the procedures related to this subject in detail.
1.3 Hatchery options There are several options to construct a hatchery. The Hatchery-Nursery Concept provided in this manual could be self-made with or without our support. Next to that a ‘turn-key’ hatchery is an option that is guaranteed to work, but of course requires a larger initial investment.
1.4 Suppliers Local suppliers – investigate your local options
Til-Aqua International BV, The Netherlands – www.til-aqua.com
1.

Tilapia Hatchery Management System
8
2 Basic conditions Site selection depends on various aspects and therefore these need to be examined for each unique site. This manual does not further elaborate on this subject, but through the following link you can find more information about various subjects : http://www.fao.org/fishery/static/FAO_Training/FAO_Training/General/t0581e/Index.htm
2.1 Site characteristics
2.1.1 Permits Check which permits are required before constructing and running a hatchery. Ask both local and national authorities.
2.1.2 Climate – Temperature - Ideal water temperature for Tilapia ranges from 27oC till 32oC year-round.
- Difference of day and night temperature not more than 3o C. If necessarily this can be realized with a plastic tunnel or plastic greenhouse.
2.1.3 Soil - For pond construction the soil needs to consist of a certain percentage of clay. - Also using a liner (UV-resistant!) could be an option.
2.1.4 Access - Year-round decent road - Controlled access to keep out unauthorized persons.
IMPORTANT NOTICE
Below 23 oC Tilapia stops spawning
Below 20 oC Tilapia stops eating

Tilapia Hatchery Management System
9
2.1.5 Water A hatchery-nursery requires enough water of good quality year-round.
2.2 Water For a tilapia hatchery borehole water is preferred. This water, not in contact with any life forms of the open, is normally free of diseases, parasites etc. When the fingerlings reach an age of 4-6 weeks, they can be stocked in structures in open water. Related to the different stages in the hatchery-nursery, borehole water is preferred for the hatchery and swim-up stage (if possible). For the nursery and on-growing surface water suffices. The salinity of the water should not be too high for the Til-Aqua Silver (wildtype) tilapia. The Til-Aqua Red tilapia performs excellent in higher salinities; even in actual seawater. The incubation and first swim-up systems should run with fresh water after which the fry can be slowly acclimated to increasing salinity.
2.2.1 Borehole
2.2.1.1 Background Borehole is the best water source for a hatchery. Since it is most of the time not in contact with open water, it is free of parasites and no contamination risks exist. The main risk with borehole water is its chemical quality. High nitrogen levels might occur due to inflow of organic material or the water might contain high amounts of iron which is not suitable for aquaculture.
2.2.1.2 Design The deeper the borehole the higher the quality most of the time. Very deep boreholes have the additional advantage of providing water with a higher temperature.
2.2.1.3 Materials and construction Piping and submersible borehole pump.
2.2.1.4 Procedure (s) Always have the water analyzed for instance by a drinking water company. Water with iron (and manganese) is not suitable for aquaculture. Borehole water which is rich in carbon dioxide (CO2) needs to be aerated. Borehole water which is poor in oxygen (O2) needs to be aerated.
2.2.2 Surface water (river/lake/dam) If a borehole is not an option (for instance a rocky soil) the surface water available has to be used. However, this water requires some serious treatments before it can be used in the hatchery-nursery.
2.2.2.1 Background Water from non-polluted rivers, lakes and dams can be used. Again, a year-round steady supply is a precondition!
2.2.2.2 Design 1. If the shore is sandy, it could be used as a filter unit. Make a shaft of big concrete rings as deep as possible until far under the water level and pump water from this shaft to the water treatment units. 2. When taking water from an open water source, place a submergible pump upstream of the facilities. Don’t pump from too deep as the temperature of the water will be lower.
IMPORTANT NOTICE
Spawning does not take place in higher salinities

Tilapia Hatchery Management System
10
3. Water from a river/lake is stocked in a reservoir after sedimentation or moving through a sand filter 4. From the reservoir the water is pumped into a header tank while passing through a UV disinfection unit.
The water would run the following course before ending up in the tanks: Waterbody Sedimentation tank/sand filter Reservoir UV unit Header tank System
2.2.2.3 Materials and construction 1. Pump and spare parts (depending on the water source). 2. Sedimentation tank or sand filter (See picture 1 and 2).
3. Disinfection unit (UV). After mechanical filtration, the system water is treated with UV-C light. This light is electromagnetic radiation just below the visible light spectrum (see picture 3).
IMPORTANT NOTICE
Verification of water quality risks surface water include: - Possible upstream pollution risks : f.i. a plantation disinfecting soil, chemical fishing, insecticides, herbicides, etc. - Organic pollution; nitrate levels - Chemical pollution; heavy metals, iron, etc. - Infected wild fish - Parasites intake - Suspended solids
Figure 1. Sandfilter. Figure 2. Water treatment: UV with sedimentation tank connected to concrete storage tank (Ghana).
Figure 3. UV-C disinfection unit with electromagnetic spectrum.

Tilapia Hatchery Management System
11
UV-C light is highly germicidal and has an antiseptic effect. With the use of irradiation of UV-C light in running water, it is possible to control excessive growth of micro-organisms including bacteria. UV disinfection is a proven method to kill off bacteria, viruses and fungi, but first and foremost to keep the system water clear and free of small particles even at low dosage. 4. Header tank. The header tank acts as a clean water supply for the system (see picture 4).
Figure 4. Header tank with pipe to the system (Nigeria)
5. Piping to guide water from the header tank to the systems and their tanks.
2.3 Electricity Electricity is needed 24 hours a day to run the water supply (pump), incubation system (pump+UV), swim-up system (pump+UV), light and the aeration of ponds.
2.3.1 Generator A diesel generator (see picture 5) is needed to guarantee 24 hours of electricity. Obviously there are multiple types available - from simple hand-driven to automatic starting engines - one being more suited than the other. Please calculate the KvA needed and buy one (or two) conform. A regular check-up is required and a sufficient amount of diesel should always(!) be available.
Figure 5. Diesel generators.

Tilapia Hatchery Management System
12
2.3.2 UPC The incubation-system requires electricity every minute of the day. Even 5 minutes can be fatal for the eggs and hatchlings. Therefor connect the pump of the incubation-system with a UPC (like for computers) which gives a certain amount of time to solve an occasional problem (see picture 6).
2.3.3 Alarm All devices should be connected to an alarm system. When a pump breaks down, a warning will be sent (to a telephone) so action can be taken. Ask a local electrician for support or installation.
2.3.4 Emergency oxygen supply The most important systems are the incubation system and the swim-up systems. It is advisable to connect the swim-up systems to an emergency oxygen system. Tubes in the swim-up tanks should/could be connected with bottle(s) of pure oxygen with an automatic valve that opens when electricity goes down.
2.3.5 Sun collector Solar energy is free of charge and an excellent source for electricity.
2.4 Greenhouse and shade netting A greenhouse (picture 7) can limit the temperature difference between day and night. Shade netting (picture 8) avoids high temperature and sunburn (yes, also in fish!). The hatchery greenhouse / hatchery shade netting only has one entrance where bio-security procedures (shower, boots, clothes, etc.) can be applied.
IMPORTANT NOTICE
During night and cloudy days there is no or not enough sunlight!
When you have a big reservoir for water stocking you can pump the water f.i. only during daytime with enough sunlight.
Batteries for stocking the energy is not (yet) easy and still expensive.
Always have an alternative - secure - energy source available that is guaranteed!
Figure 8.
Figure 6. UPC; a short electrical back-up for a small pump.
Figure 7. Hatchery and nursery in a plastic greenhouse (Ghana). Figure 8 : Spawning in concrete tank under shade net (Mali)
Tilapia Hatchery Management System
13
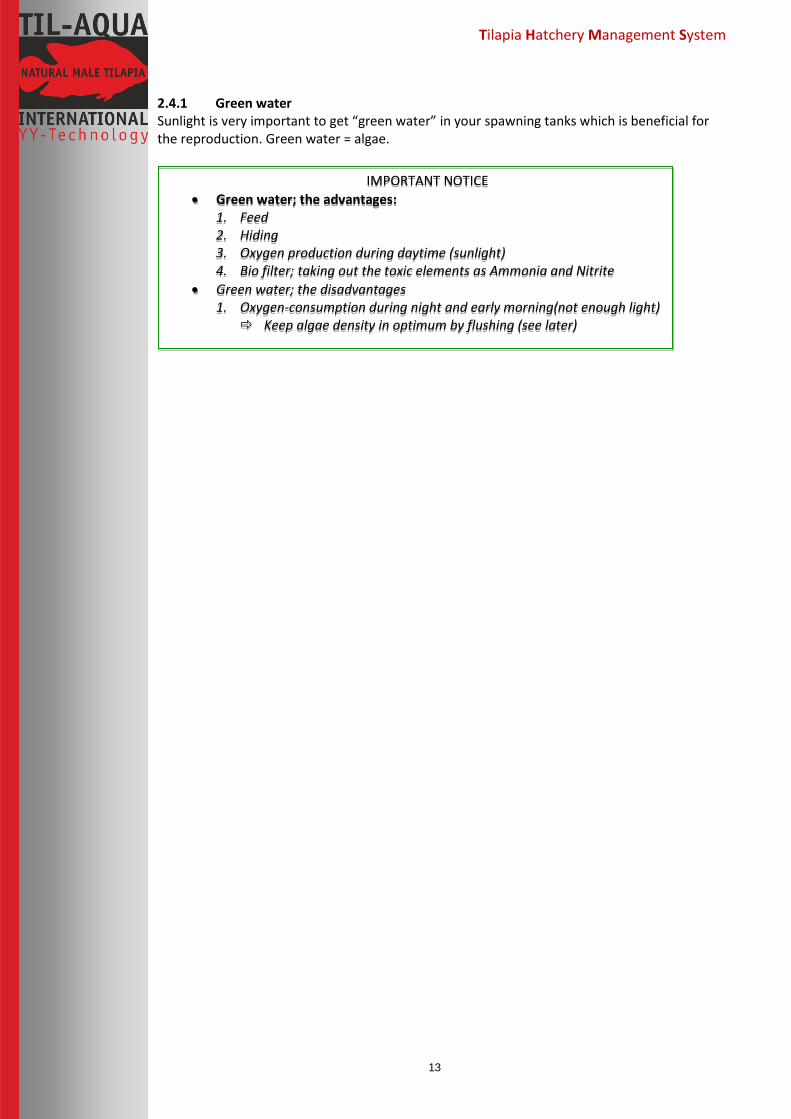
2.4.1 Green water Sunlight is very important to get “green water” in your spawning tanks which is beneficial for the reproduction. Green water = algae.
IMPORTANT NOTICE
Green water; the advantages: 1. Feed 2. Hiding 3. Oxygen production during daytime (sunlight) 4. Bio filter; taking out the toxic elements as Ammonia and Nitrite
Green water; the disadvantages 1. Oxygen-consumption during night and early morning(not enough light)
Keep algae density in optimum by flushing (see later)
Tilapia Hatchery Management System
14
3 Broodstock
3.1 Source A reliable source of Broodstock is very important. - Oreochromis niloticus L. is the fastest growing Tilapia species. - Choose between the Silver (Wildtype) strain and the Red strain depending on the market. - Males grow faster: make your choice between hormone sex-reversed tilapia (SRT) or Natural Male Tilapia (NMT).
3.2 Hormone sex reversal Hormone sex-reversal - using 17α Methyl testosterone - is commonly used but has several disadvantages: - Negative effect on the development of the immune system: expect high mortality which forces to triple your production capacity - SRT males are genotypically still female (XX-chromosomes) which can cause high female ratio in the wild (escapees, restocking programs). - Success rate (65% - 100%) is depending on management skills. - Human handling should be careful (employees preparing the feed and the feeders).
3.3 YY-technology - Always works: Til-Aqua Silver gets 96-98% male Til-Aqua Red gets 95% male. - Normal - natural - male (XY-chromosomes). - No hormones involved in the entire process; possible value increase. - No effect on immune system development. - No inbreeding (separate YY and female lines). - No ecological harm from hormones or from escapees.
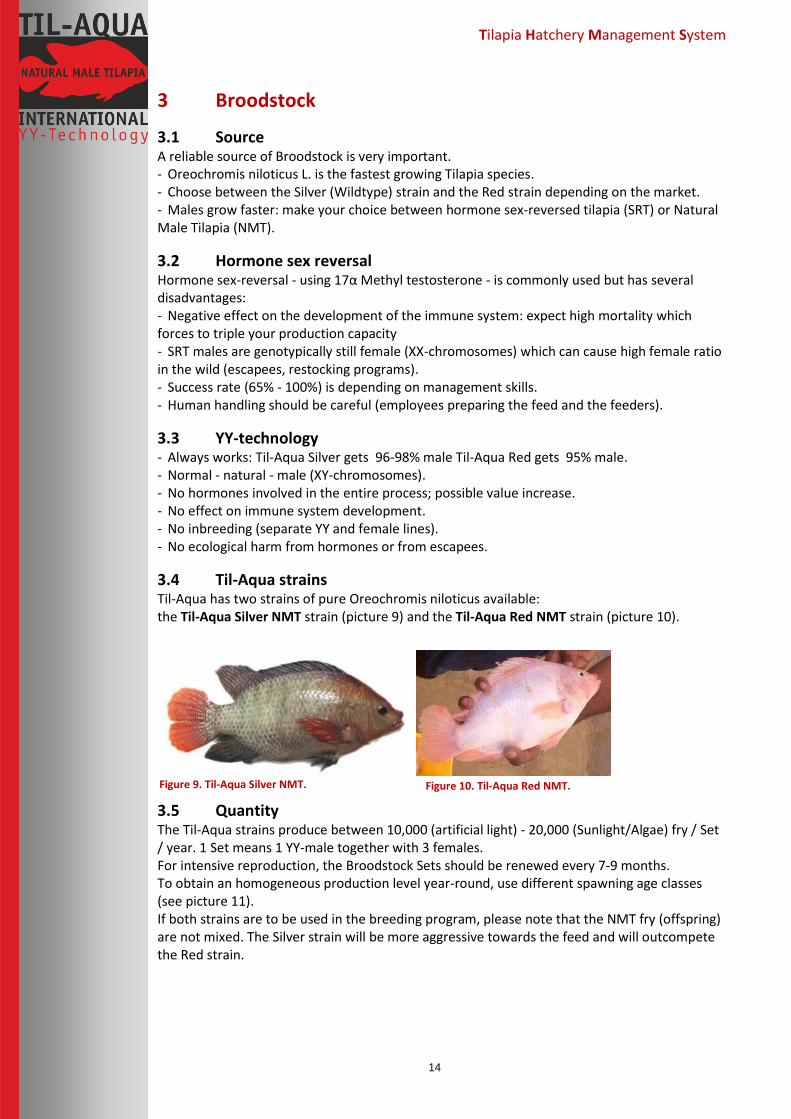
3.4 Til-Aqua strains Til-Aqua has two strains of pure Oreochromis niloticus available: the Til-Aqua Silver NMT strain (picture 9) and the Til-Aqua Red NMT strain (picture 10).
3.5 Quantity The Til-Aqua strains produce between 10,000 (artificial light) - 20,000 (Sunlight/Algae) fry / Set / year. 1 Set means 1 YY-male together with 3 females. For intensive reproduction, the Broodstock Sets should be renewed every 7-9 months. To obtain an homogeneous production level year-round, use different spawning age classes (see picture 11). If both strains are to be used in the breeding program, please note that the NMT fry (offspring) are not mixed. The Silver strain will be more aggressive towards the feed and will outcompete the Red strain.
Figure 9. Til-Aqua Silver NMT. Figure 10. Til-Aqua Red NMT.

Tilapia Hatchery Management System
15
If you encounter issues not addressed by this Introduction, please contact your account
manager for additional support.
IMPORTANT NOTICE
To obtain homogeneous batches : order first time 100% of sets you need and from there every 6 months 50%
FACTSHEETS
Factsheet 00020 Til-Aqua Red NMT
Factsheet 00021 Til-Aqua Silver NMT
Factsheet 00028 Receiving Broodstock
Factsheet 00029 Handling Broodstock
Factsheet 00030 Silver NMT strain vs Red NMT strain
Factsheet 00044 Advantages of YY-technology
Constant production level
Spawning-age classes
Time interval Figure 11. Different spawning age classes enable a homogenous production in time.
Tilapia Hatchery Management System
16
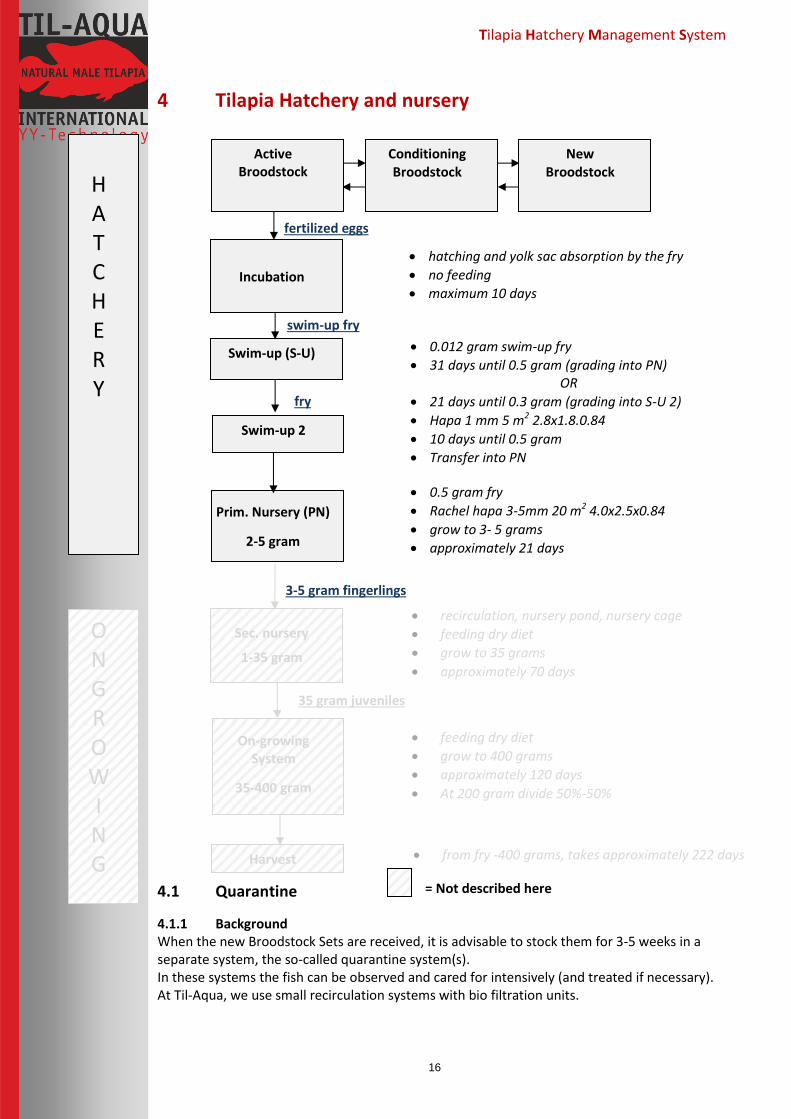
4 Tilapia Hatchery and nursery
4.1 Quarantine
4.1.1 Background When the new Broodstock Sets are received, it is advisable to stock them for 3-5 weeks in a separate system, the so-called quarantine system(s). In these systems the fish can be observed and cared for intensively (and treated if necessary). At Til-Aqua, we use small recirculation systems with bio filtration units.
New Broodstock
Conditioning Broodstock
H A T C H E R Y
Active Broodstock
Incubation
Prim. Nursery (PN)
2-5 gram
Swim-up (S-U)
fertilized eggs
swim-up fry
fry
hatching and yolk sac absorption by the fry
no feeding
maximum 10 days
0.012 gram swim-up fry
31 days until 0.5 gram (grading into PN) OR
21 days until 0.3 gram (grading into S-U 2)
Hapa 1 mm 5 m2 2.8x1.8.0.84
10 days until 0.5 gram
Transfer into PN
0.5 gram fry
Rachel hapa 3-5mm 20 m2 4.0x2.5x0.84
grow to 3- 5 grams
approximately 21 days
3-5 gram fingerlings
O N G R O W I N G
Sec. nursery
1-35 gram
On-growing System
35-400 gram
Harvest
35 gram juveniles
recirculation, nursery pond, nursery cage
feeding dry diet
grow to 35 grams
approximately 70 days
feeding dry diet
grow to 400 grams
approximately 120 days
At 200 gram divide 50%-50%
from fry -400 grams, takes approximately 222 days
= Not described here
Swim-up 2

Tilapia Hatchery Management System
17
4.1.2 Design The small recirculation systems with bio filtration units are straightforward and efficient systems (picture 12 and 13). They are based upon recirculation and are convenient for low budget facilities as well. This system is also advised to be used as a swim-up system. The small size has the advantage of being cleaned easily after all fish are out of the system; i.e. “all in – all out”.
4.1.3 Materials and construction 1. 2x Tank of about 500L 2. Sedimentation tank 3. UV-C device - 40 watt 4. Submergible pump 40 watt 5. 2x Bio filter (trickling tower) (picture 14)
4.1.4 Purchase Could be ordered as a complete Hatchery and Nursery Kit from Til-Aqua International (2.80x1.70 (LxW).
4.1.5 Procedure (s)
IMPORTANT NOTICE
At least 3 systems are needed.
Flush and change water of sedimentation tank 2x/week
If connected to main water + float installed: close valve until float can add enough water until sedimentation tank is full again (and float stops).
If you have to treat (parasites): stop pump, add f.i. (…) ml formalin for (…) minutes. After treatment flush the tank until 10 cm from bottom and start pump again (with valve just enough open that float can follow) See Factsheet on Parasite control
Figure 12. Schematic overview of small recirculation system f.i. for quarantaine and Swim-up
Figure 13. Input, output and processes taking place in various compartments of the recirculation system.
Figure 14. Actual recirculation system for swim-up.
Fishtank
Sedimentation
Pumptank
Biofiltration

Tilapia Hatchery Management System
18
If you encounter issues not addressed by this Introduction, please contact your account
manager for additional support.
4.2 Spawning
4.2.1 Background In Tilapia farming, only natural breeding is possible. Males and females in a ratio of 1 male + 3 females (Til-Aqua Red) or 1 male + 2 females (Til-Aqua Silver) are stocked in spawning tanks with a density of 750 gram fish / M2 (Til-Aqua Red) or 1,000 gram fish / m2 (Til-Aqua Silver). To facilitate harvesting, a hapa is used which is hung in a concrete tank.
4.2.2 Design Concrete tank of inside: 800cm x 250cm x 80cm with standard hapa of 800cm x 250cm x 84cm. The mesh wide of the hapa is of 1mm and water level is only 80cm. The hapa is held with steel cable and tie-rips. All spawning tanks are housed in a greenhouse or construction with shadow net. Flower pots are used as ‘nests’ for the males.
4.2.3 Materials and construction 1. Standard Spawning hapa, 1mm 20 m2 (8x2.5x0.84), picture 15 2. Concrete blocks (see picture 16) or ponds 3. Flowerpots as artificial nests 4. Steel cables with clips for hanging hapa 5. Tension device for tightening the steel cable 6. Aquarium pump with hose pipe for harvesting eggs 7. 4 plastic harvest tanks 8. Counting device to register number of nests and average size of nests.
FACTSHEETS
Factsheet 00045 Quarantaine new broodstock
Factsheet 00003 Waterchange and cleansing sedimentation tank
Factsheet 00047 Cleansing and disinfection
Factsheet 00042 Treatments
Factsheet 00052 Parasite control
Figure 15. Spawning hapa. Figure 16. Concrete spawning tanks (Til-Aqua).
Tilapia Hatchery Management System
19
4.2.4 Purchase Most components can be ordered from Til-Aqua International: hapas, steel cable, tie-rips, and eventually some PVC units like valves, outlet, pond drain, etc.
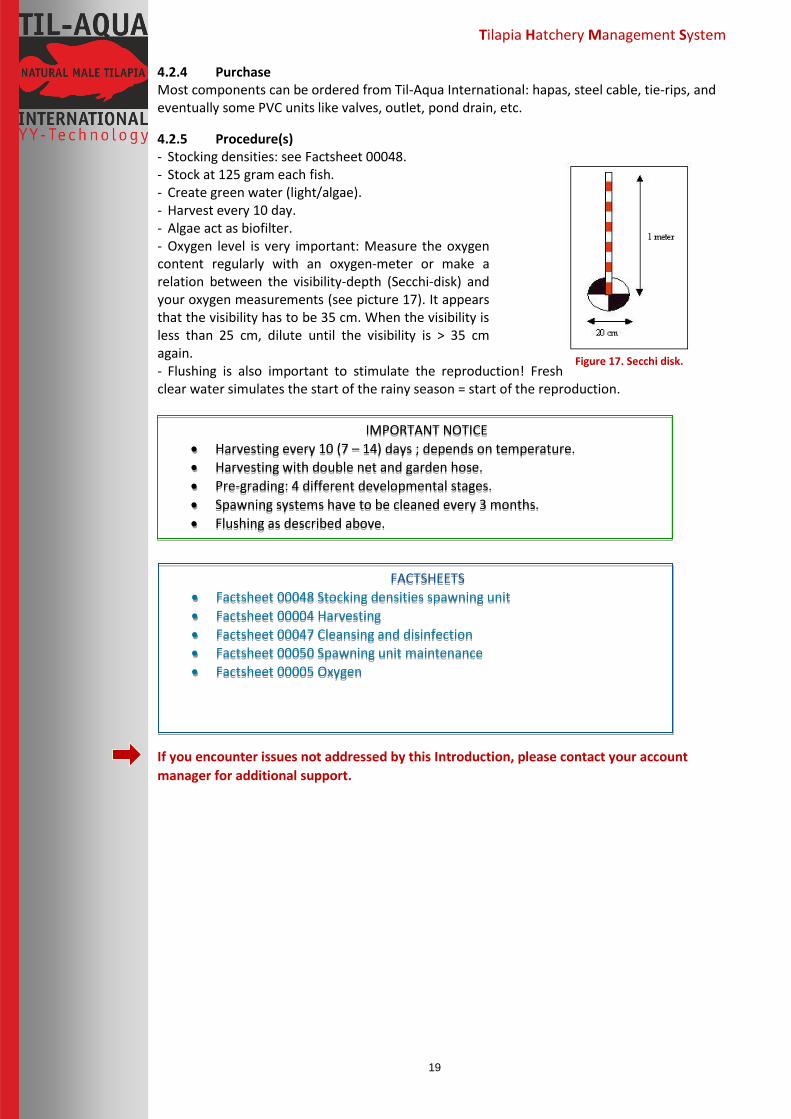
4.2.5 Procedure(s) - Stocking densities: see Factsheet 00048. - Stock at 125 gram each fish. - Create green water (light/algae). - Harvest every 10 day. - Algae act as biofilter. - Oxygen level is very important: Measure the oxygen content regularly with an oxygen-meter or make a relation between the visibility-depth (Secchi-disk) and your oxygen measurements (see picture 17). It appears that the visibility has to be 35 cm. When the visibility is less than 25 cm, dilute until the visibility is > 35 cm again. - Flushing is also important to stimulate the reproduction! Fresh clear water simulates the start of the rainy season = start of the reproduction.
If you encounter issues not addressed by this Introduction, please contact your account
manager for additional support.
IMPORTANT NOTICE
Harvesting every 10 (7 – 14) days ; depends on temperature.
Harvesting with double net and garden hose.
Pre-grading: 4 different developmental stages.
Spawning systems have to be cleaned every 3 months.
Flushing as described above.
FACTSHEETS
Factsheet 00048 Stocking densities spawning unit
Factsheet 00004 Harvesting
Factsheet 00047 Cleansing and disinfection
Factsheet 00050 Spawning unit maintenance
Factsheet 00005 Oxygen
Figure 17. Secchi disk.

Tilapia Hatchery Management System
20
4.3 Incubation
4.3.1 Background To keep the spawning interval as short as possible and to guarantee a high survival, the Broodstock should be harvested every 10 days and artificially incubated in an incubation system.
4.3.2 Design The eggs will be transferred to hatching jars with a volume of 2,4 liter. After a period of 3 to 5 days, the eggs will start hatching. After hatching and developing the yolk sac fry will flow out of the jar into a plastic tank of 12 liter. After complete yolk sac absorption the fry can be transferred to the swim-up fry systems.
4.3.3 Materials and construction 1. Alu frame 2. Sedimentation tank 3. UV-C device - 40 watt 4. Submergible pump 40 watt 5. 3 hatching jars 6. 3 PP tanks of about 12L 7. 3 Valves 32mm
4.3.4 Purchase Could be ordered as a complete Hatchery and Nursery Kit from Til-Aqua International. (Floorsize: 1.70x0.7m only Incubation add-on; total with Swim-up: 2.80x1.70)
4.3.5 Procedure (s)
If you encounter issues not addressed by this Introduction, please contact your account manager for additional support.
IMPORTANT NOTICE
Only stage 1,2 and 3 go into incubation.
A maximum of about 10.000 developing eggs in one jar.
Refresh rate : 2-3 times / day.
FACTSHEETS
Factsheet 00010 Incubation management
Factsheet 00047 Cleansing and disinfection
Factsheet 00009 Weighing eggs and fry
Figure 18. Example of an incubation system
Tilapia Hatchery Management System
21
4.4 Swim-up
4.4.1 Background The first 6 weeks of the lives of the fish are the most important period. During this time the body – in specific the immune system, enzymatic system, hormone system - is developed. The fry needs to be observed very well and treated if necessary. The best feed available will definitely give the fry a head start. It is during this period that their performance is determined for the grow-out phase later on (f.i. intestine development!). We use the same small recirculation systems as for quarantine which are easily cleansed and disinfected.
4.4.2 Design See quarantine For bigger projects; only 21 days in Swim-up, transfer to 1mm hapas in nursery pond. Standard Hapa: 5 m2 2.8x1.8x0.84 with 1mm mesh size. Hapas hung on steel cable as hapas of spawning tanks.
4.4.3 Materials and construction See quarantine
4.4.4 Procedure(s)
If you encounter issues not addressed by this Introduction, please contact your account
manager for additional support.
IMPORTANT NOTICE
Each system can be stocked with 50.000 pieces in each tank
After first grading density = 30.000 – 40.000 pieces
After third grading = 20.000 pieces
Change water of sedimentation tank 2x/week
Continues inlet of fresh water
If connected to main water + float installed: close valve until float can add enough water until sedimentation tank is full again (and float stops)
If you have to treat (parasites): stop pump, add f.i. (…) ml formalin for (…) minutes. After treatment flush the tank until 10 cm from bottom and start pump again (with valve just enough open that float can follow)
FACTSHEETS
Factsheet 00041 Stocking and feeding
Factsheet 00025 Grading
Factsheet 00047 Cleansing and disinfection
Tilapia Hatchery Management System
22
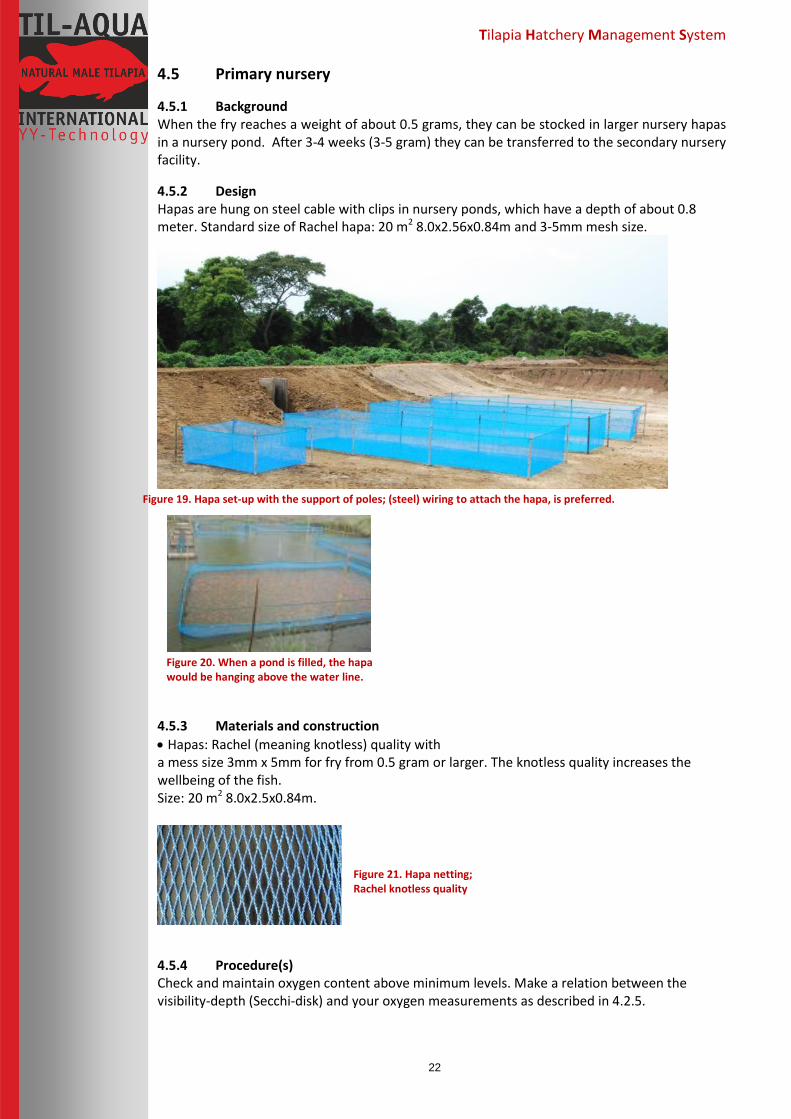
4.5 Primary nursery
4.5.1 Background When the fry reaches a weight of about 0.5 grams, they can be stocked in larger nursery hapas in a nursery pond. After 3-4 weeks (3-5 gram) they can be transferred to the secondary nursery facility.
4.5.2 Design Hapas are hung on steel cable with clips in nursery ponds, which have a depth of about 0.8 meter. Standard size of Rachel hapa: 20 m2 8.0x2.56x0.84m and 3-5mm mesh size.
4.5.3 Materials and construction
Hapas: Rachel (meaning knotless) quality with a mess size 3mm x 5mm for fry from 0.5 gram or larger. The knotless quality increases the wellbeing of the fish. Size: 20 m2 8.0x2.5x0.84m.
4.5.4 Procedure(s) Check and maintain oxygen content above minimum levels. Make a relation between the visibility-depth (Secchi-disk) and your oxygen measurements as described in 4.2.5.
Figure 21. Hapa netting; Rachel knotless quality
Figure 19. Hapa set-up with the support of poles; (steel) wiring to attach the hapa, is preferred.
Figure 20. When a pond is filled, the hapa would be hanging above the water line.

Tilapia Hatchery Management System
23
If you encounter issues not addressed by this Introduction, please contact your account
manager for additional support.
IMPORTANT NOTICE
Adjust the size of the hapa to the number of fish and their size. If possible, decrease the size of the hapa at the beginning to optimize feeding and control.
Attaching the hapa to a wire also makes it easier to clean the hapa and as a result increase flow-through of fresh water.
FACTSHEETS
Factsheet 00005 Oxygen
Factsheet 00041 Stocking and feeding
Factsheet 00047 Cleansing and disinfection

Tilapia Hatchery Management System
24
5 Bio-security
5.1 Maintaining a high biosecurity A lowered biosecurity is the largest cause of poor fish performance or even mortality. First of all; avoid contamination with any disease threats. Set up procedures to create a quality assurance system. There are a four main aspects to consider. First, the isolation of the fish and water to prevent contact with possible threats. Secondly, the hygiene standards which can reduce or eliminate threats that somehow got close to the fish and the water. Next, monitoring can prevent or at least detect any infection of the water or fish in an early stage, so appropriate action can be taken. Finally, management practices can prevent a slow build-up of a problem by consequently maintaining a healthy environment.
If you encounter issues not addressed by this Introduction, please contact your account
manager for additional support.
IMPORTANT NOTICE
Only hatchery employees are allowed in the hatchery; they could have their own (color) T-shirt.
The hatchery should have only one entrance.
Disinfect when entering the hatchery: change boots or boots bath.
Disinfect when entering the hatchery: wash and disinfect hands with soap and alcohol (dispensers).
FACTSHEETS
Factsheet 00051 Bio-security and hygiene protocols
Tilapia Hatchery Management System
25
6 Disease prevention and treatments
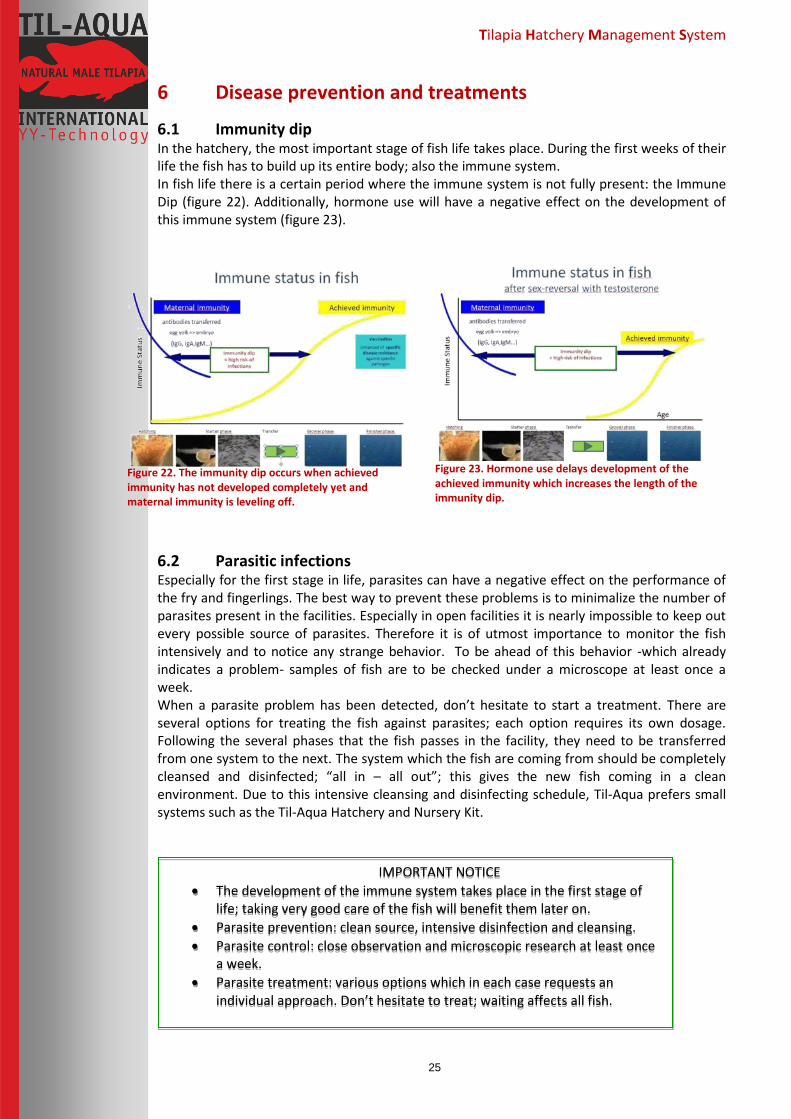
6.1 Immunity dip In the hatchery, the most important stage of fish life takes place. During the first weeks of their life the fish has to build up its entire body; also the immune system. In fish life there is a certain period where the immune system is not fully present: the Immune Dip (figure 22). Additionally, hormone use will have a negative effect on the development of this immune system (figure 23).
6.2 Parasitic infections Especially for the first stage in life, parasites can have a negative effect on the performance of the fry and fingerlings. The best way to prevent these problems is to minimalize the number of parasites present in the facilities. Especially in open facilities it is nearly impossible to keep out every possible source of parasites. Therefore it is of utmost importance to monitor the fish intensively and to notice any strange behavior. To be ahead of this behavior -which already indicates a problem- samples of fish are to be checked under a microscope at least once a week. When a parasite problem has been detected, don’t hesitate to start a treatment. There are several options for treating the fish against parasites; each option requires its own dosage. Following the several phases that the fish passes in the facility, they need to be transferred from one system to the next. The system which the fish are coming from should be completely cleansed and disinfected; “all in – all out”; this gives the new fish coming in a clean environment. Due to this intensive cleansing and disinfecting schedule, Til-Aqua prefers small systems such as the Til-Aqua Hatchery and Nursery Kit.
IMPORTANT NOTICE
The development of the immune system takes place in the first stage of life; taking very good care of the fish will benefit them later on.
Parasite prevention: clean source, intensive disinfection and cleansing.
Parasite control: close observation and microscopic research at least once a week.
Parasite treatment: various options which in each case requests an individual approach. Don’t hesitate to treat; waiting affects all fish.
Figure 22. The immunity dip occurs when achieved immunity has not developed completely yet and maternal immunity is leveling off.
Figure 23. Hormone use delays development of the achieved immunity which increases the length of the immunity dip.

Tilapia Hatchery Management System
26
If you encounter issues not addressed by this Introduction, please contact your account
manager for additional support.
FACTSHEETS
Factsheet 00052 Parasite control
Factsheet 00042 Treatments

Tilapia Hatchery Management System
27
7 Stocking and feeding
7.1 Age and densities From hatching until market size, the fish undergoes several phases. The relation between size and age is considered as the performance. This is affected by various factors such as water quality, feeding regime and management. Part of this management is the stocking density for each weight class as well as grading to minimize the variance within these weight classes. Weight (size) variance creates aggression and lowered performance for the smaller fish.
7.2 Feed and feeding The feeding regime should ensure the fish to get enough feed as well as the correct type of feed. The composition of the feed is often a fact, which cannot be changed easily. Not only there are often few distributors to choose from, also most distributors have a fixed assortment. Til-Aqua is convinced that the first feed that the fish receives, could give them a head start in the rest of their lives. A more expensive feed during the first weeks might therefore be a wise investment which could easily earned back at the end. Also, the size of the feed should be well considered; a tilapia esophagus is significantly smaller than its mouth. Feed that is too large for some of the fish increases size difference and decreases overall performance. The amount of feed that should be given could be derived from feeding lists; feeding too much will cause poor water quality, feeding too little will cause poor performance.
If you encounter issues not addressed by this Introduction, please contact your account
manager for additional support.
IMPORTANT NOTICE
Use the best feed available for the first 6 weeks
Use different sizes
FACTSHEETS
Factsheet 00041 Stocking and feeding

Tilapia Hatchery Management System
28
8 Tools and other materials
8.1 Spare parts Broodstock hapas
Nursery hapas
UV device 40 Watts complete
UV spare PL light bulbs 40 Watts
40 watt pump
8.2 Handling equipment Broodstock catcher (1 piece)
Broodstock catcher with egg collecting net (2 sets)
Digital scales max. 15 kg
Fry nets (12 pieces)
Floating grading plate 2 and 4 mm for swim up fry
Fingerling net (4 pieces)
Floating Tilapia grader boxes 5, 6, 7 and 8 mm in PVC
Balance Figure 24. Nets and graders
8.3 Hatchery equipment Pipe cleansing brush (4 piece)
Plastic brush for cleansing tanks (4 pieces)
Plastic brush for cleansing floor (2 pieces)
Disinfection tanks for nets etc. (3 pieces)
Disinfection tanks for feet (2 pieces)
Hand disinfection P3 manodes dispenser (1 piece)
Microscope with add-ons needed
Disinfection material; Virocid, high pressure spray tank, P3 manodes for one year
8.4 Water quality equipment pH meter
NH4 and NO2 test kit
Thermometer
Figure 25. Water quality kit

Tilapia Hatchery Management System
29