ThreatStream Splunk App - · PDF fileUser Guide. v3.3.9 . ThreatStream Splunk User Guide ....
22
User Guide v3.3.9 ThreatStream Splunk User Guide Published: 4/27/2016 Anomali, Inc. Twitter: @anomali ThreatStream ® Splunk App
Transcript of ThreatStream Splunk App - · PDF fileUser Guide. v3.3.9 . ThreatStream Splunk User Guide ....
User Guide
v3.3.9 ThreatStream Splunk User Guide Published: 4/27/2016 Anomali, Inc. Twitter: @anomali
ThreatStream® Splunk App

THREATSTREAM SPLUNK USER GUIDE 2
COMPANY OVERVIEW .......................................................................................................................................... 3
THREATSTREAM APP OVERVIEW .................................................................................................................... 3
HIGH LEVEL APP INSTALL OVERVIEW ....................................................................................................................... 4
THREATSTREAM SPLUNK APP INSTALLATION .......................................................................................... 4
SPLUNK SUPPORTED VERSION AND CONFIGURATION: ............................................................................................. 4 THREATSTREAM APP SPLUNK INSTALLATION: ........................................................................................................ 5 INSTALLATION THREATSTREAM APP ........................................................................................................................ 5 UNINSTALL THREATSTREAM APP ............................................................................................................................. 6
OPTICLINK SETUP ................................................................................................................................................. 6
OPTICLINK API KEY ................................................................................................................................................... 6 SUPPORTED PLATFORMS ............................................................................................................................................................ 6 WINDOWS INSTALLATION .......................................................................................................................................... 6 LINUX INSTALLATION ................................................................................................................................................. 7 WINDOWS AND LINUX CONFIGURATION ................................................................................................................... 7 ADDITIONAL WINDOWS INSTALLATION INSTRUCTIONS ....................................................................................................... 9 ADDITIONAL LINUX INSTALLATION INSTRUCTIONS ............................................................................................................. 10 WATCHING OPTICLINK LOGS ................................................................................................................................................... 10 ADDITIONAL WINDOWS OPTIONS ........................................................................................................................................... 11 ADDITIONAL LINUX OPTIONS ................................................................................................................................................... 11
DATA MODEL ACCELERATION ....................................................................................................................... 12
ENABLE ACCELERATION .......................................................................................................................................... 12
TAKE A TOUR OF THE INTERFACE ................................................................................................................ 13
LOCAL THREATSTREAM INTEL MATCHES .............................................................................................................. 13 GEO MAPS OF INDEXED DATA ................................................................................................................................. 18 THREATSTREAM INTEL OVERVIEW ........................................................................................................................ 19 INTEGRATED WORKFLOW ....................................................................................................................................... 20
INTELLIGENCE TYPES ........................................................................................................................................ 21
APPENDIX A: SSH CLIENT CONFIGURATION ............................................................................................. 22
THREATSTREAM SPLUNK USER GUIDE 3
COMPANY OVERVIEW Anomali is a SaaS based Cyber Threat Intelligence company that automates the process of collecting, maintaining, and integrating threat intelligence data via the ThreatStream 6.0 Platform. ThreatStream 6.0 is the first crowd-enabled Cyber intelligence platform of its kind spanning the collection of its open source, community, and private threat intelligence data. ThreatStream allows you to counter adversaries by fusing ever-evolving indicators of compromise (IOCs) with your existing security infrastructure. In real-time, ThreatStream aggregates and analyzes threat intelligence from hundreds of sources. This is in addition to the hundreds of organizations that contribute to the ThreatStream community in both public and trusted relationship manners. Each individual indicator of compromise is categorized and risk ranked for severity and confidence using true machine learning to identify relationships with known threats. A risk score is then assigned to each indicator before it is delivered to your security infrastructure. The ThreatStream platform also includes a web based portal which analysts can use to improve their existing impact analysis process or interact with via the API for a complete automation in a bi-directional manner for the retrieval of data as well as the upload of data such as indicators or files to be detonated in the sandbox.
THREATSTREAM APP OVERVIEW The ThreatStream App is packaged as a standard Splunk application for use on a Splunk search head. The primary goal of the application is to add threat intelligence context to existing customer event data based on common industry accepted Indicators of Compromise (IOC) keys such as file hash, domain, src/dest ip address, e-mail address, etc. The ThreatStream App provides the following functionality that can be used in a standalone manner or integrated into existing customer workflows as a value add on top of existing business processes:
1. Event Dashboard which details recent customer event containing an indicator match 2. Graphical Dashboard depicting various aspects of the customer event data containing an
indicator match. 3. Graphical Dashboard providing a high-level overview of the local ThreatStream Indicator
database. It is important to note that the app contains a database populated with a small sampling of the overall ThreatStream Intelligence database. You will need to install OpticLink to obtain the full ThreatStream Intelligence database.
THREATSTREAM SPLUNK USER GUIDE 4
HIGH LEVEL APP INSTALL OVERVIEW This document covers the below high level tasks in detail:
1. Download the ThreatStream App from the portal and install on a Splunk search head. 2. Download the Opticlink binary from the portal (Downloads tab) and copy to your Splunk
search head 3. Obtain your API key from the portal (Org Settings->API). 4. Take notes of your username which is called “Login ID” within the portal (Org Settings-
>Profile). 5. Run the initial configuration for the Opticlink binary (provide username and API key) to
download the initial full db. 6. Determine how best to optimize performance in your environment. This app now utilizes
accelerated data models and you need to refine the scope of the data that the app will perform lookups against.
7. Enable Acceleration for the Data Model (TS_OPTIC) that ships with the App.
THREATSTREAM SPLUNK APP INSTALLATION This App has been tested to function on Linux (64 bit) and Windows (32/64 bit) installs running a 6.X version of Splunk. Here is what you need to consider prior to installing the app:
• The App performs automated lookups and needs to be installed on one of your Splunk search heads.
• The standalone app ships with a partial database, if you would like to test the full DB and automated integration with the OPTIC platform, your firewall with need to allow communications with https://api.threatstream.com (tcp port 443).
SPLUNK SUPPORTED VERSION AND CONFIGURATION: Splunk 6.1 Splunk 6.2 Splunk 6.3 Note: It is necessary to have one of the following configured in Splunk:
• CIM-compatible TAs installed for all sourcetypes to be used with the ThreatStream app • Field extractions for relevant CIM fields for all sourcetypes to be used with the ThreatStream
app (i.e. src, dest, url, filehash, etc…). A listing of these can be found in the datamodel’s configuration.
THREATSTREAM SPLUNK USER GUIDE 5
THREATSTREAM APP SPLUNK INSTALLATION:
INSTALLATION THREATSTREAM APP 1) Installing ThreatStream Optic App. a. Download and install using Splunk Web:
1. Download ThreatStream Splunk App from https://splunkbase.splunk.com. 2. From the Splunk web interface, navigate to the Apps menu in the upper left-hand, and select
"Manage Apps". 3. Click on the "Install app from file" button > click on the "Choose File" button > the file you
downloaded > "Upload" to install the app OR Click the Browse more apps button to locate the ThreatStream Splunk App. Click Install free.
4. Restart Splunk.
b. Download and install using the command line: 1. Download ThreatStream Splunk App from https://splunkbase.splunk.com. 2. Decompress the downloaded file to the $SPLUNK_HOME/etc/apps directory:
tar –zxvf threatstream-splunk-app-3.3.9.x.tgz –C $SPLUNK_HOME/etc/apps 3. Restart Splunk.
2) Updating ThreatStream Splunk App with the latest threat Intelligence data
Splunk users can add threat Intelligence and relevance to an existing event data using threat level score, severity and confidence level based on indicators of Compromise (IOC) keys such as src/dest address, domain, file hash, url domain, e-mail address, etc. By default Splunk contains a small DB sampling of the overall ThreatStream Intelligence feed. To update Splunk with the latest and complete list Threat Intelligence, users need to install Optic Link Client and have active ThreatStream Optic account. For more details refer to the OpticLink Setup section.
3) Accessing the ThreatStream Splunk Dashboard.
As a starter, users can access Intel Matches dashboards, then navigate to specific dashboards. The “Intel Matches” dashboards provide an overview for matching indicators. To access the dashboards navigate to Intel Matches > Matched Indicators Overview dashboard.
THREATSTREAM SPLUNK USER GUIDE 6
UNINSTALL THREATSTREAM APP To remove previous versions of the ThreatStream installed app from a Splunk installation: 1. Manually delete the app directory: $SPLUNK_HOME/etc/apps/OPTIC_Splunk_App 2. Restart Splunk.
OPTICLINK SETUP The OpticLink software can be downloaded from the ThreatStream 6.0 website. You must first register and be vetted by Anomali prior to gaining access to this secure site. If you need to register follow this link and an Anomali representative will contact you.
OPTICLINK API KEY Once you have access you will need to obtain your API Key in the ThreatStream 6.0Opti site. To access your key click login to https://ui.threatstream.com then click your name in the upper right hand corner. Then select settings. At the top of the page your API key is listed. Copy and paste your key into your favorite text editor for later use.
SUPPORTED PLATFORMS The following platforms are supported by OpticLink (32/64 bit):
• Linux: o RedHat, Centos, Fedora 2.6 Kernel and greater o Ubuntu & Debian 2.6 Kernel and greater
• Windows: o Server 2003 o Server 2008 o Server 2012
• Splunk: o 6.1 o 6.2
• OpticLink 5.0.3 or greater required for Splunk integration • Hardware or VM Requirements
o 256MB Ram o 200MB Disk Space o 1 Core o Internet access to https://api.threatstream.com
WINDOWS INSTALLATION Start the install by copying the file over to the windows server. Double click the .msi file and the file will be installed in the following locations.
THREATSTREAM SPLUNK USER GUIDE 7
Server Version Install Location Windows Server 2003 c:\program files\threatstream\optic Windows Server 2008 c:\program files(x86)\threatstream\optic Windows Server 2012 c:\program files(x86)\threatstream\optic
The configuration files and logs are contained in the following directories
Server Version Configuration Location Windows 2003 c:\documents and settings\all users\application data\OpticLink\ Windows Server 2008 c:\programdata\OpticLink\ Windows Server 2012 c:\programdata\OpticLink\
LINUX INSTALLATION The default installation directory for ThreatStream Linux installation files are contained in /opt/threatstream/optic/
Start the install by copying the install binary (.bin) file to the Linux server. You may have to make the install executable. For example: chmod +x opticlink_5.2.X_linux64.bin or chmod 755 opticlink_5.2.X_linux64.bin
Start the install by executing the binary install file. ./opticlink_5.2.X_linux64.bin
Once installed you will be prompted to configure the OpticLink client. Follow the below steps to configure OpticLink. If you would like to install into another directory you can use the following command ./opticlink_5.2.X_linux64.bin -–target /opt/threatstream/newlocation
WINDOWS AND LINUX CONFIGURATION On Windows open a command prompt as administrator and enter the directory listed in the install location listed above based upon your Windows server version. To start the configuration enter opticlink_windows_service -s
Linux will start the configuration prompt as soon as you install the binaries. Enter the following information: ThreatStream Settings
THREATSTREAM SPLUNK USER GUIDE 8
* Threat Stream Username: <username used to login to optic> * ThreatStream API Key: <API key from above step> * Is this a fresh install? <Enter ‘yes’ to download all intel and content> * Do you want to use your Org's configured whitelist: ['yes', 'no'] default ['yes']
Proxy Settings * Proxy support(yes/no):<Select yes if proxy, if no skip section> * Proxy Type:<windows proxy use ntlm, otherwise use http> * Proxy Host:<hostname of proxy server> * Proxy Port:<proxy port> * Proxy Authentication (yes/no): <enter yes if proxy required to reach internet> * Proxy User:<If auth is enabled, enter username> * Proxy Password:<If auth is enabled>
Configure Integration You have no configured entries What would you like to do?: ['add'] default ['add'] Which product(s) would you like to integrate with: ['arcsight_esm', 'qradar', 'syslog', 'cef', 'csv', 'bro_intel', 'splunk', 'nitro', 'optic_appliance'] default ['arcsight_esm'] splunk
Splunk Settings – Local Configuration Options Splunk version: ['6.1', '6.2'] default ['6.2'] 6.1 Splunk ThreatStream integration: ['app', 'addon'] default ['app'] Splunk ThreatStream absolute path: default ['/opt/splunk/etc/apps/threatstream'] Splunk deployment server or search head: default ['localhost']
Or Splunk Settings – Remote Configuration Options Splunk ------ Splunk version: ['6.1', '6.2'] default ['6.2'] Splunk ThreatStream integration: ['app', 'addon'] default ['app'] Splunk ThreatStream absolute path: default ['/opt/splunk/etc/apps/threatstream'] Splunk deployment server or search head: default ['localhost'] prod1-splunk.test.ts SSH port: default ['22'] SSH Auth: ['public key', 'password'] default ['public key'] password SSH User: default ['root'] splunkuser SSH Password: *************
*Note: You can utilize a ssh key pair for authentication. If you choose to use a key pair, steps to create an ssh key pair can be found in Appendix A. OpticLink Settings
THREATSTREAM SPLUNK USER GUIDE 9
Friendly name to track this installation: default ['localhost.localdomain'] Filter expression (blank for no filter): Update Optic Link software when upgrades become available: ['yes', 'no'] default ['yes'] Install Optic Link as a service (If not, use OS scheduling): ['yes', 'no'] default ['yes'] Poll frequency for new indicator/software/content (eg. 5m = 5 min, 1w = 1 week): default ['1h'] Unix user to run the Optic Link process run as (root not recommended): default ['root']
Note: Both the Windows and Linux installation options are exactly the same.
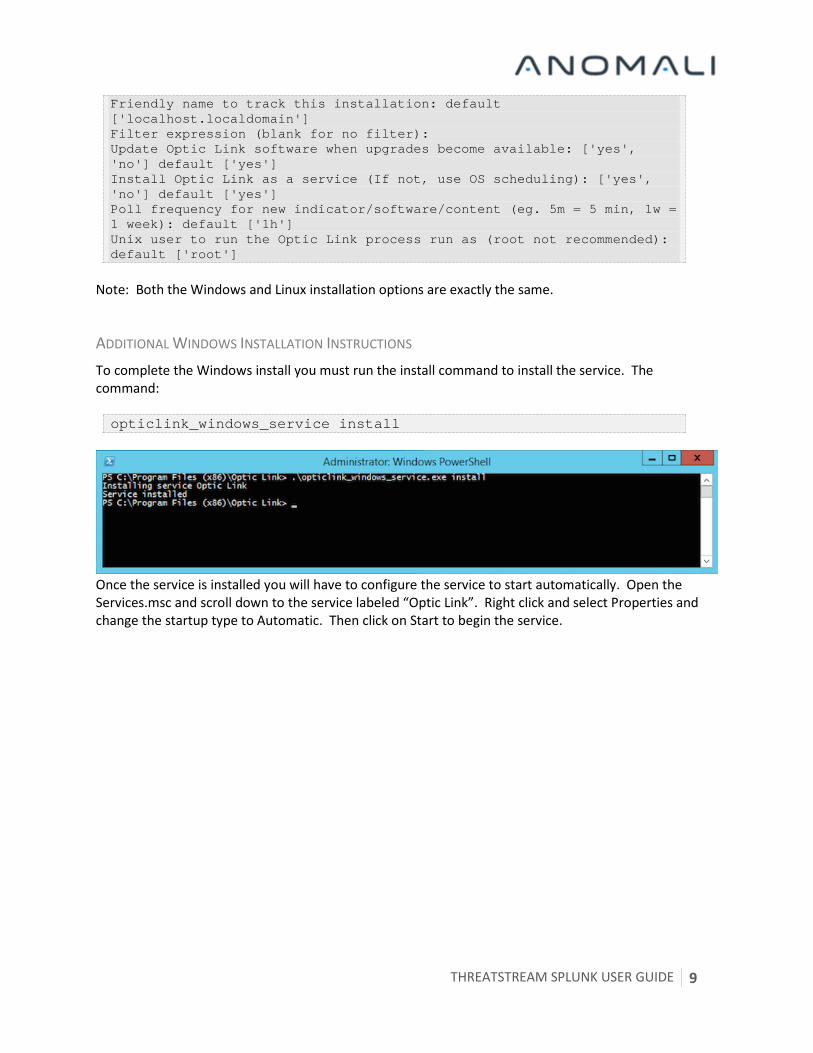
ADDITIONAL WINDOWS INSTALLATION INSTRUCTIONS To complete the Windows install you must run the install command to install the service. The command: opticlink_windows_service install
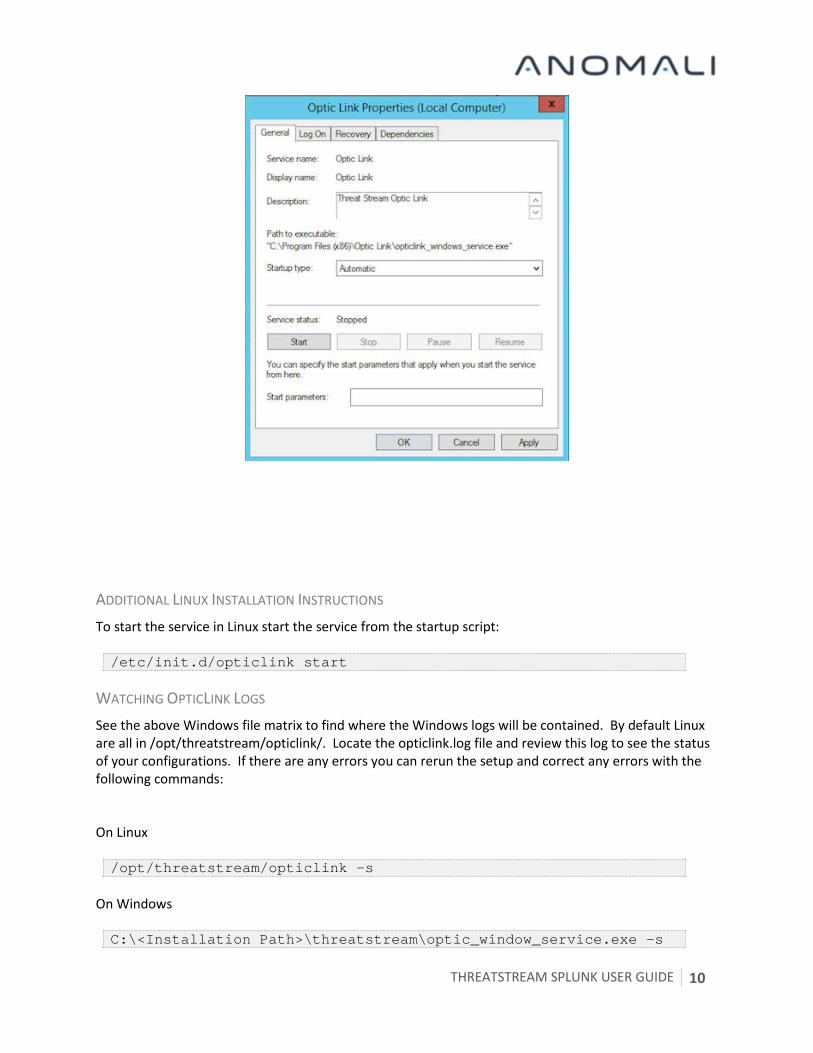
Once the service is installed you will have to configure the service to start automatically. Open the Services.msc and scroll down to the service labeled “Optic Link”. Right click and select Properties and change the startup type to Automatic. Then click on Start to begin the service.
THREATSTREAM SPLUNK USER GUIDE 10
ADDITIONAL LINUX INSTALLATION INSTRUCTIONS To start the service in Linux start the service from the startup script: /etc/init.d/opticlink start
WATCHING OPTICLINK LOGS See the above Windows file matrix to find where the Windows logs will be contained. By default Linux are all in /opt/threatstream/opticlink/. Locate the opticlink.log file and review this log to see the status of your configurations. If there are any errors you can rerun the setup and correct any errors with the following commands: On Linux /opt/threatstream/opticlink –s
On Windows C:\<Installation Path>\threatstream\optic_window_service.exe -s
THREATSTREAM SPLUNK USER GUIDE 11
See the configuration file in the same directory of the log file to view the configuration. Any item not obfuscated can be edited manually. Just restart the service to apply those new configurations. Any obfuscated fields that need to be adjusted will need to be set by running the opticlink setup wizard (-s) above.
ADDITIONAL WINDOWS OPTIONS Uninstall: Opticlink can be found in Add/Remove Programs To remove the service C:\<Path>\threatstream\optic_window_service.exe remove
ADDITIONAL LINUX OPTIONS Uninstall Opticlink: /opt/threatstream/opticlink/scripts/uninstall

THREATSTREAM SPLUNK USER GUIDE 12
DATA MODEL ACCELERATION Most of the App dashboards use pivots that are based on Data Model Acceleration. It is important to note that the acceleration IS NOT enabled by default. Search time looks-ups involving a large dataset are painfully slow and this approach allows us to amortize the search over time and scale the search process horizontally across the indexers. On average, we should expect the typical large Enterprise with an acceleration window of several weeks to consume roughly 100 MB of tsidx space. Data Model acceleration builds out a time sensitive index and we want to make sure the indexed data is based on a full threat intelligence dataset. Data Model Definition: By default ThreatStream Optic DM ‘TS2’, has predefined filter for specific source type and fields. Click Settings->Data Models. Select Search and make sure the App context is set to “ThreatStream OPTIC (OPTIC_Splunk_App)”.
ENABLE ACCELERATION Click Settings->Data Models and make sure you App is set to “ThreatStream OPTIC (OPTIC_Splunk_App)” as detailed below. Expand the model and click Add under ACCELERATION. Click the Accelerate checkbox and define your summary range. Monitor the progress of the data model acceleration by observing the acceleration status and size of disk. All dashboards will still function during the build out.
THREATSTREAM SPLUNK USER GUIDE 13
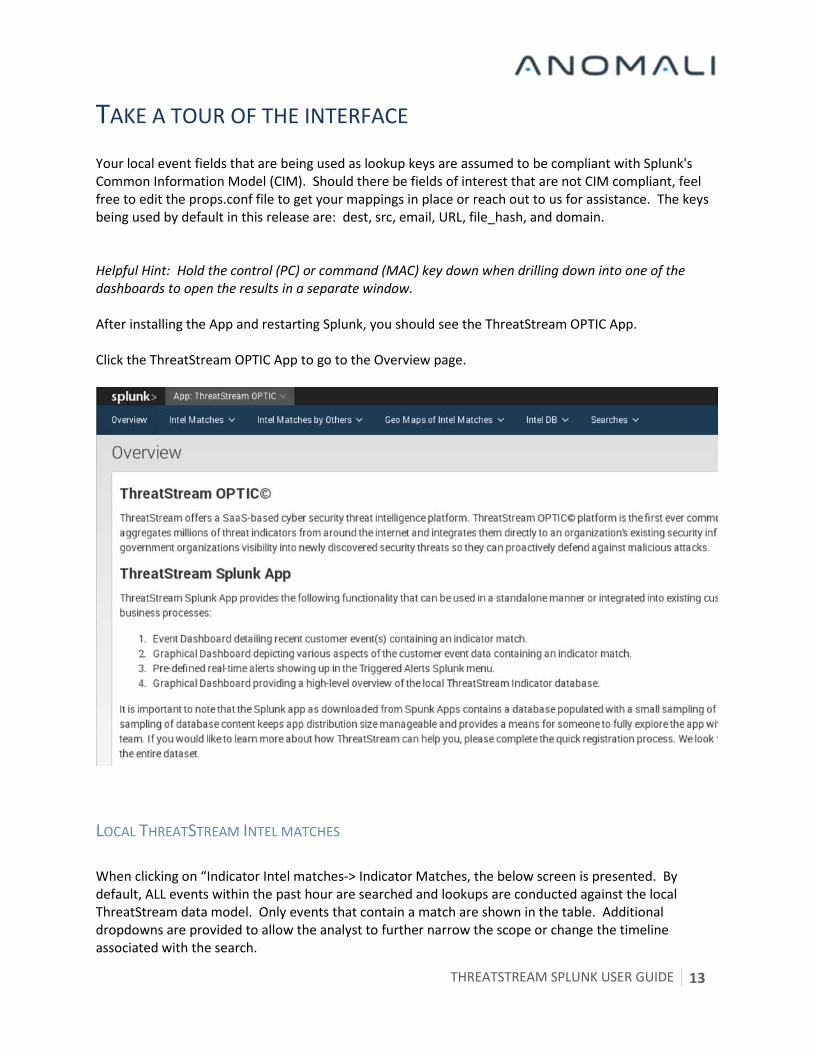
TAKE A TOUR OF THE INTERFACE Your local event fields that are being used as lookup keys are assumed to be compliant with Splunk's Common Information Model (CIM). Should there be fields of interest that are not CIM compliant, feel free to edit the props.conf file to get your mappings in place or reach out to us for assistance. The keys being used by default in this release are: dest, src, email, URL, file_hash, and domain. Helpful Hint: Hold the control (PC) or command (MAC) key down when drilling down into one of the dashboards to open the results in a separate window. After installing the App and restarting Splunk, you should see the ThreatStream OPTIC App. Click the ThreatStream OPTIC App to go to the Overview page.
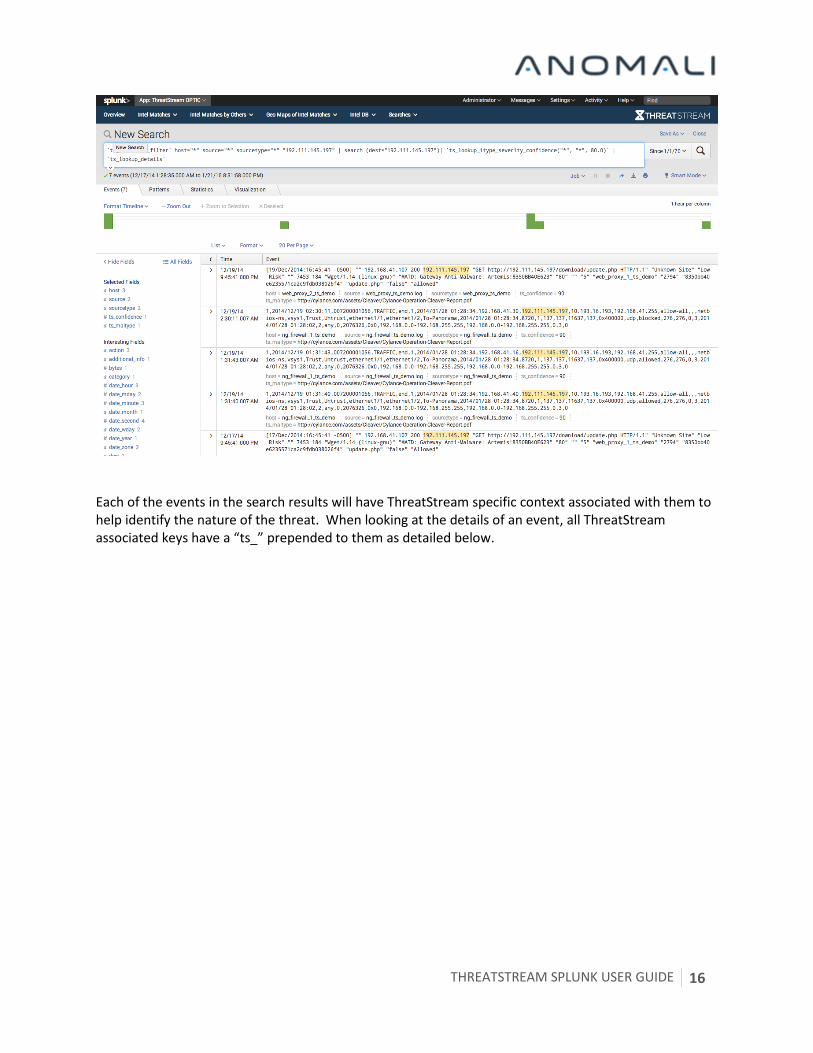
LOCAL THREATSTREAM INTEL MATCHES When clicking on “Indicator Intel matches-> Indicator Matches, the below screen is presented. By default, ALL events within the past hour are searched and lookups are conducted against the local ThreatStream data model. Only events that contain a match are shown in the table. Additional dropdowns are provided to allow the analyst to further narrow the scope or change the timeline associated with the search.

THREATSTREAM SPLUNK USER GUIDE 14
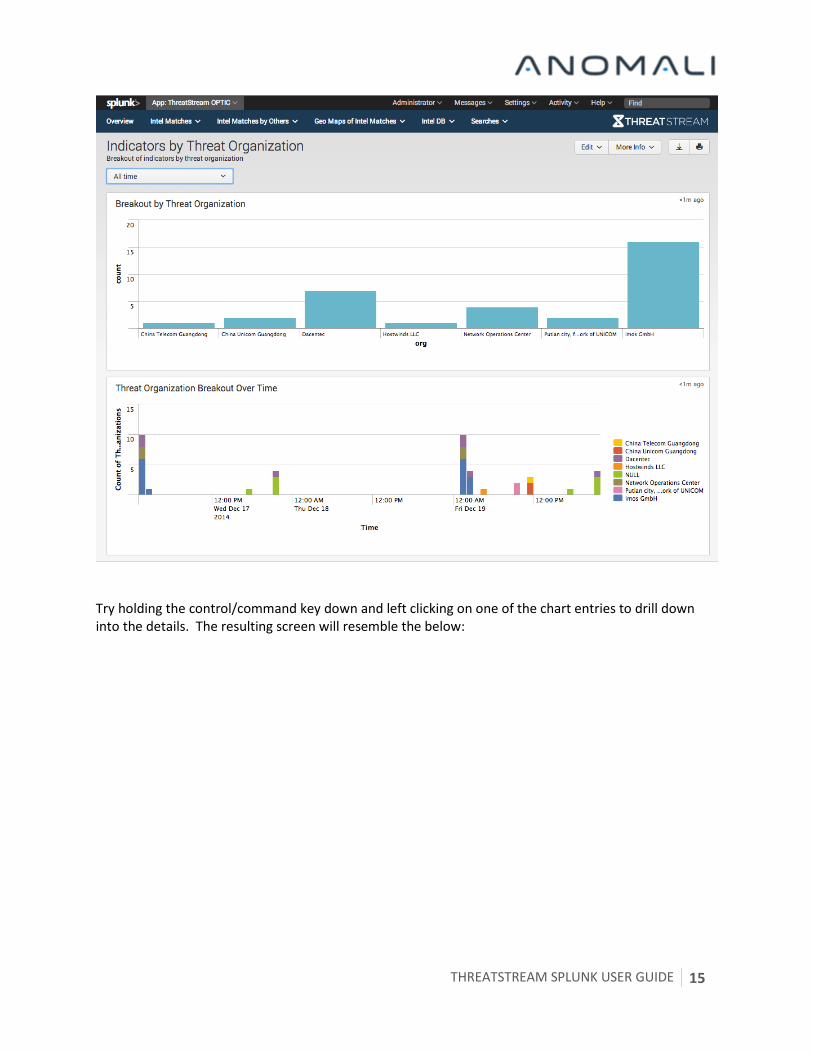
Once again, it is very important to note that performance is highly dependent on how you limit the scope of the ThreatStream lookups and the completion of the data model acceleration process as describe in the above sections. There are many other dashboards associated with ThreatStream indicator matches including the below dashboard (Indicator Intel matches->Indicators by Threat Organization).
THREATSTREAM SPLUNK USER GUIDE 15
Try holding the control/command key down and left clicking on one of the chart entries to drill down into the details. The resulting screen will resemble the below:
THREATSTREAM SPLUNK USER GUIDE 16
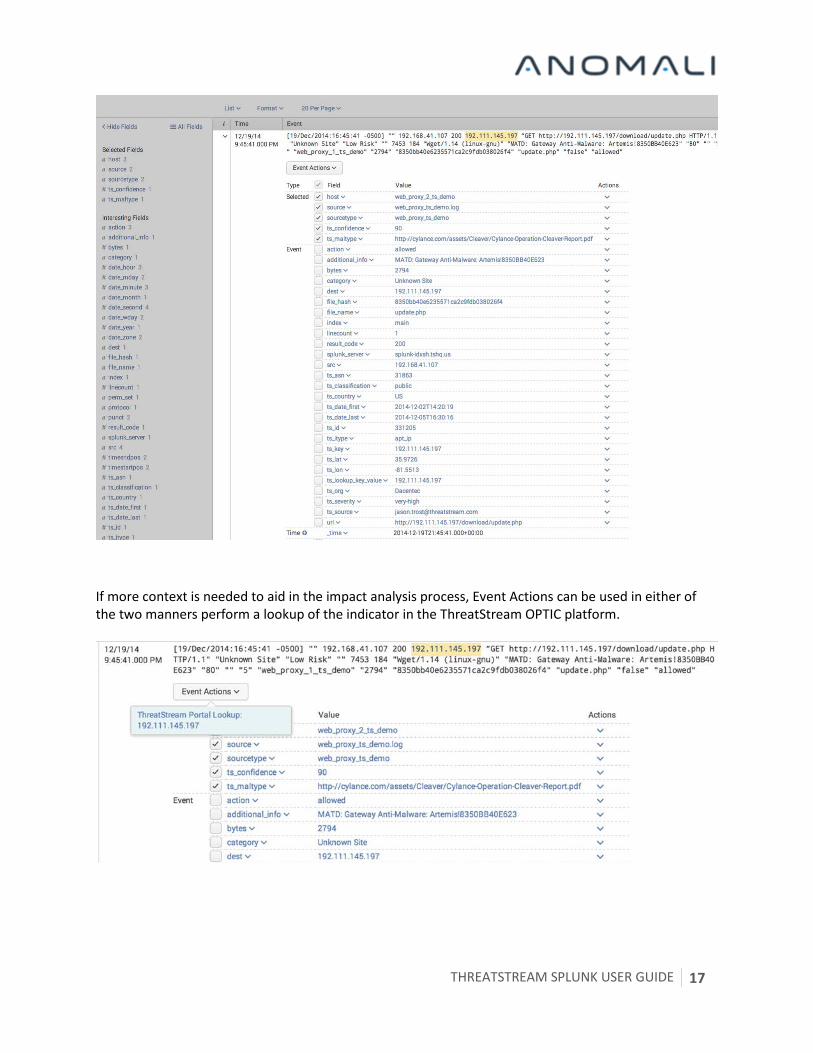
Each of the events in the search results will have ThreatStream specific context associated with them to help identify the nature of the threat. When looking at the details of an event, all ThreatStream associated keys have a “ts_” prepended to them as detailed below.
THREATSTREAM SPLUNK USER GUIDE 17
If more context is needed to aid in the impact analysis process, Event Actions can be used in either of the two manners perform a lookup of the indicator in the ThreatStream OPTIC platform.
THREATSTREAM SPLUNK USER GUIDE 18
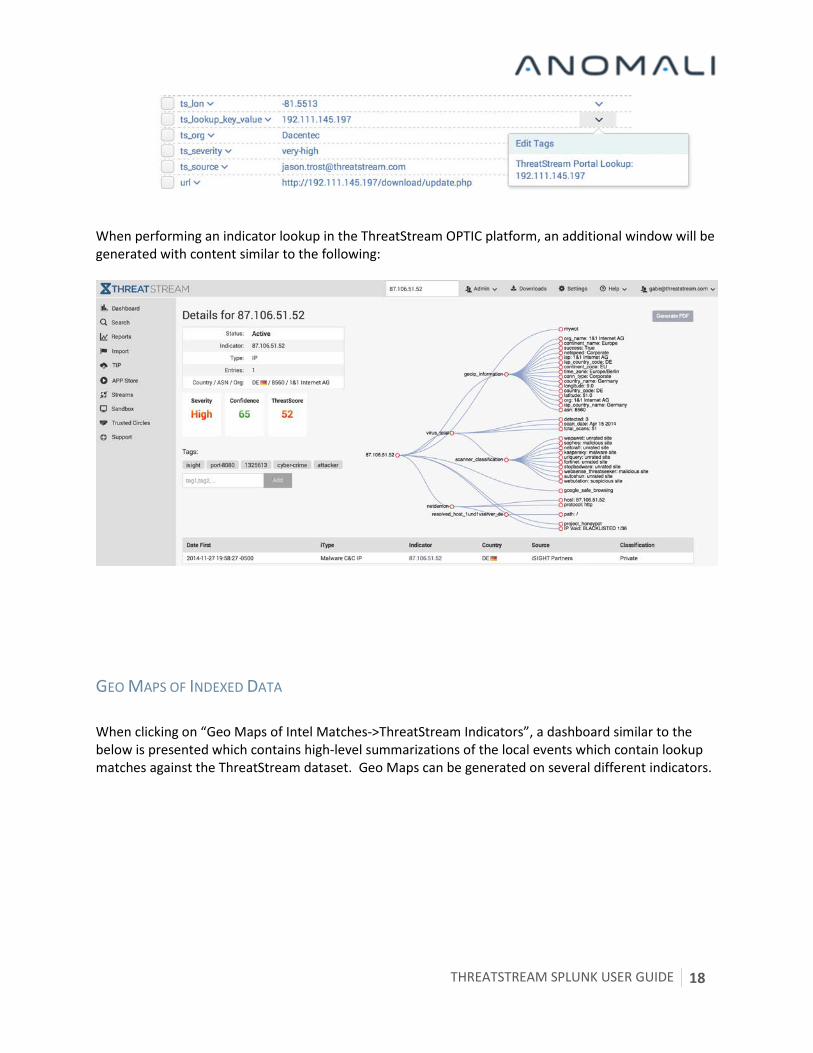
When performing an indicator lookup in the ThreatStream OPTIC platform, an additional window will be generated with content similar to the following:
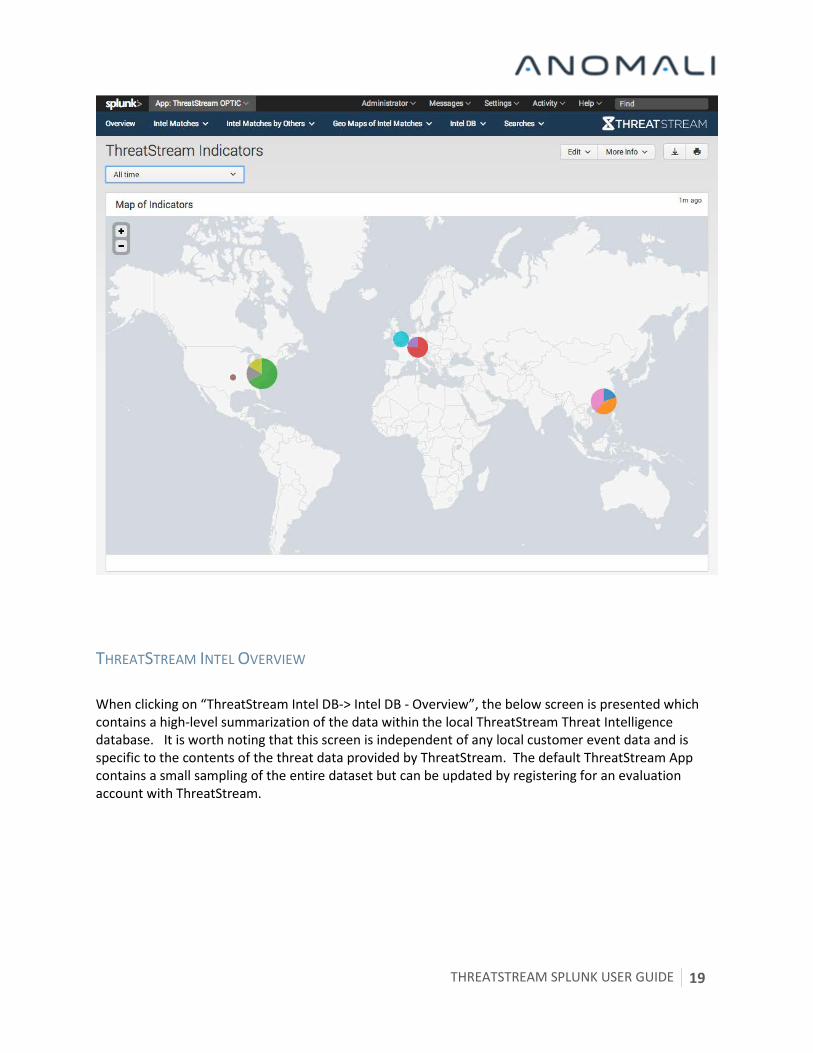
GEO MAPS OF INDEXED DATA When clicking on “Geo Maps of Intel Matches->ThreatStream Indicators”, a dashboard similar to the below is presented which contains high-level summarizations of the local events which contain lookup matches against the ThreatStream dataset. Geo Maps can be generated on several different indicators.
THREATSTREAM SPLUNK USER GUIDE 19
THREATSTREAM INTEL OVERVIEW When clicking on “ThreatStream Intel DB-> Intel DB - Overview”, the below screen is presented which contains a high-level summarization of the data within the local ThreatStream Threat Intelligence database. It is worth noting that this screen is independent of any local customer event data and is specific to the contents of the threat data provided by ThreatStream. The default ThreatStream App contains a small sampling of the entire dataset but can be updated by registering for an evaluation account with ThreatStream.

THREATSTREAM SPLUNK USER GUIDE 20
INTEGRATED WORKFLOW There are several places where Event Actions are built into the Splunk interface with the goal of provide a streamlined workflow process as it pertains to gathering info more quickly for a given threat indicator. When one of the actions is selected, you will be directed to the ThreatStream portal for detailed analysis of the indicator being analyzed. The below screenshot show how the app populates the Event Actions button with the appropriate ThreatStream Portal lookup options.
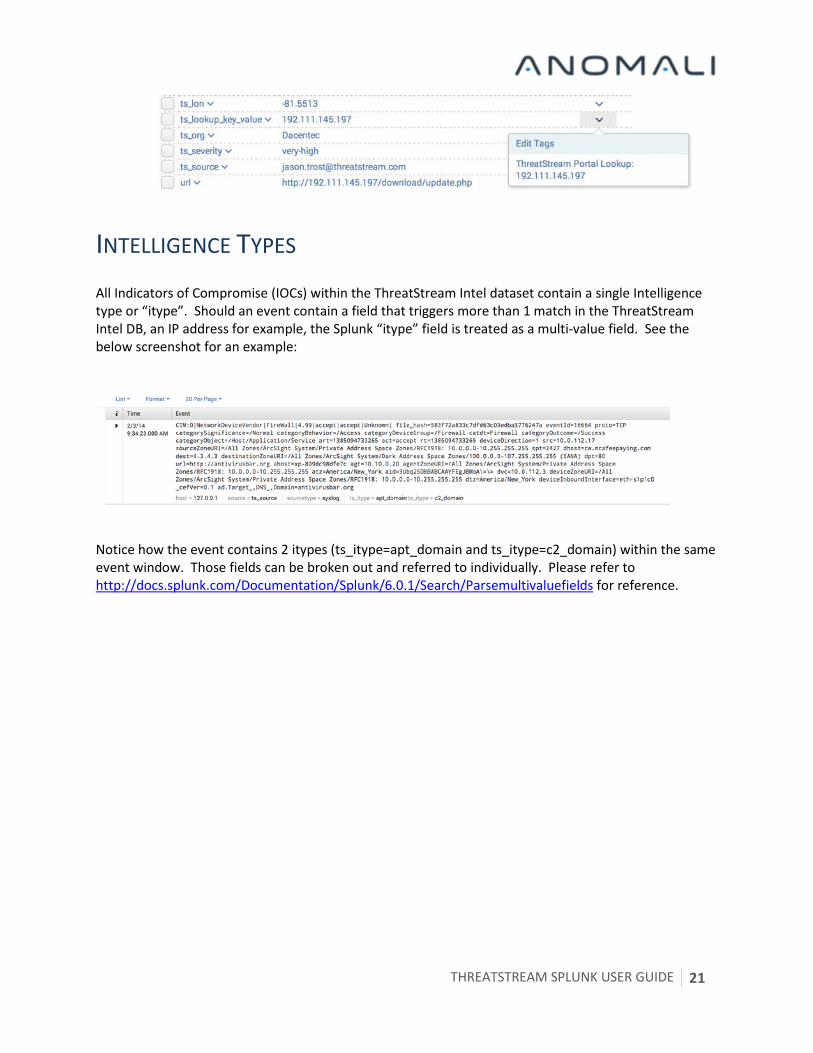
Additionally, individual Field Actions are available for keys that are associated with ThreatStream indicator matches. The below screenshot shows a Field Action specific to IP Address that was identified by ThreatStream as being interesting.
THREATSTREAM SPLUNK USER GUIDE 21
INTELLIGENCE TYPES All Indicators of Compromise (IOCs) within the ThreatStream Intel dataset contain a single Intelligence type or “itype”. Should an event contain a field that triggers more than 1 match in the ThreatStream Intel DB, an IP address for example, the Splunk “itype” field is treated as a multi-value field. See the below screenshot for an example:
Notice how the event contains 2 itypes (ts_itype=apt_domain and ts_itype=c2_domain) within the same event window. Those fields can be broken out and referred to individually. Please refer to http://docs.splunk.com/Documentation/Splunk/6.0.1/Search/Parsemultivaluefields for reference.
THREATSTREAM SPLUNK USER GUIDE 22
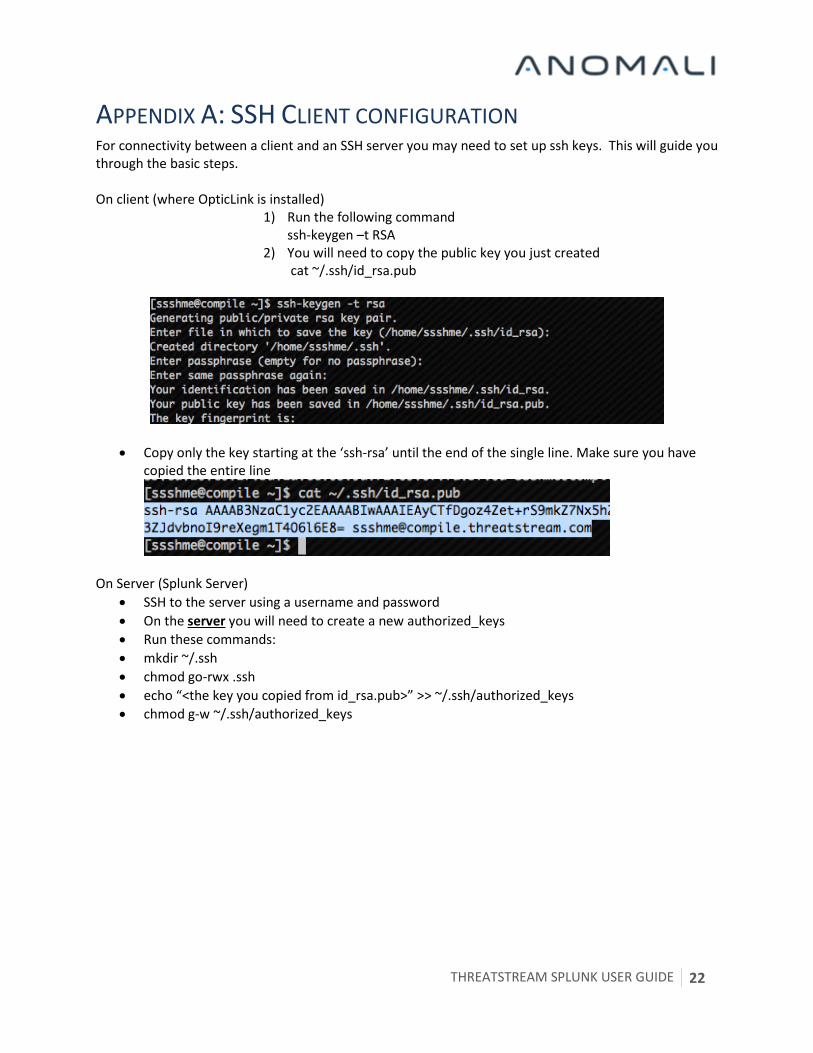
APPENDIX A: SSH CLIENT CONFIGURATION For connectivity between a client and an SSH server you may need to set up ssh keys. This will guide you through the basic steps. On client (where OpticLink is installed)
1) Run the following command ssh-keygen –t RSA
2) You will need to copy the public key you just created cat ~/.ssh/id_rsa.pub
• Copy only the key starting at the ‘ssh-rsa’ until the end of the single line. Make sure you have copied the entire line
On Server (Splunk Server) • SSH to the server using a username and password • On the server you will need to create a new authorized_keys • Run these commands: • mkdir ~/.ssh • chmod go-rwx .ssh • echo “<the key you copied from id_rsa.pub>” >> ~/.ssh/authorized_keys • chmod g-w ~/.ssh/authorized_keys