THIS SIDEBAR DOES NOT SHOW QUICK START (cont.) DESIGN ... · Save your template as a...
9
1 DO Program and 2 Department of Biomedical Sciences, GA Campus Philadelphia College of Osteopathic Medicine, Suwanee, GA Study of Purkinje Cell Response to alternating current stimulation (ACS) as a treatment modality for Cerebellar ataxia: An in vitro approach Silvia Cherian 1 , Hye Rhee Chi 1 , Marc Eli Faldas 1 , and Huo Lu 2 Cerebellum plays an important role in movement coordination and balance. One possible treatment for cerebellar ataxia is transcranial electrical stimulation (tES) a non-invasive procedure to alleviate cerebellar ataxia. However, the underlying mechanism of tES is not fully understood. In the last two years we have studied the response of Purkinje cell to the direct current stimulation (DCS) at the cellular level. In this project, in vitro experiments were conducted to test the hypothesis that ACS used as a treatment for cerebellar ataxia changes the excitability of the Purkinje cell by decreasing its firing rate during and after the treatment. With this effort, we can have a better understanding about the mechanism of tES. Hypothesis Experimental Design 1 Experimental Design 2 Data Analysis Results 1 Results 2 Results 3 Figure 1. Cerebellum A. Visual representation of the cerebellar network that Purkinje cells are found in. A. Essential Neuroscience 2014 Results 4 Conclusion TAP TO GO BACK TO KIOSK MENU
Transcript of THIS SIDEBAR DOES NOT SHOW QUICK START (cont.) DESIGN ... · Save your template as a...

QUICK START (cont.)
How to change the template color theme You can easily change the color theme of your poster by going to the THEMES
menu, select from THEME OPTIONS, and choose the color theme of your
choice. You can also customize your own color theme.
You can also manually change the color of your background by going to
FORMAT, click on THEME COLORS, or SLIDE BACKGROUND
How to add Text The template comes with a number of pre-formatted placeholders for headers
and text blocks. You can add more blocks by copying and pasting the existing
ones or by adding a text box from the HOME menu.
Text size Adjust the size of your text based on how much content you have to present. The
default template text offers a good starting point. The text should not be less than
28 points.
How to add Tables To add a table from scratch go to the INSERT menu and
click on TABLE. A drop-down box will help you select rows and
columns.
You can also copy and a paste a table from Word or another PowerPoint
document. A pasted table may need to be re-formatted by RIGHT-CLICK >
FORMAT SHAPE, TEXT BOX, Margins.. If you are adding a table from excel,
always insert as an image.
Graphs / Charts You will have to convert your graphs/charts/formulas/equations into images such
as a .png file and insert them into your presentation. This will help maintain the
values as different operating systems can distort your work.
Save your work Save your template as a lastname.firstname and as a .pptx file.
This is an ePosterBoards template www.eposterboards.com
(—THIS SIDEBAR DOES NOT SHOW—)
DESIGN GUIDE
This PowerPoint 2011 template produces a 40.97 inches by 23.04
inches presentation poster. You can use it to create your research
poster and save valuable time placing titles, subtitles, text, and
graphics.
We provide a series of YouTube tutorials that will guide you through
the poster design process and answer your poster production
questions. To view our template tutorials, go online to
https://www.youtube.com/playlist?list=PLBz4JvE0AKmweXsMNGeyR
XgWgN_lj_b5L
If you are uploading ahead of time, please go to our website:
http://www.eposterboards.com/eposterupload/
Need assistance? Call us at 617-588-3508 option 2
QUICK START
Title, Authors, and Affiliations Start designing your poster by adding the title, the names of the authors, and the
affiliated institutions. You can type or paste text into the provided boxes. The
template will automatically adjust the size of your text to fit the title box. You can
manually override this feature and change the size of your text.
TIP: The font size of your title should be bigger than your name(s) and institution
name(s). The smallest font size should be 28 points.
Adding Logos / Seals Most often, logos are added on each side of the title. You can insert a logo by
dragging and dropping it from your desktop, copy and paste or by going to
INSERT > PICTURES. Logos taken from web sites are likely to be low quality
when printed. Zoom it at 100% to see what the logo will look like on the final
poster and make any necessary adjustments.
TIP: If there is a conference website, you can pull logos from there. Please
keep in mind that we will be adding navigational buttons or a kiosk menu button
on the right side of each slide. Please make the appropriate space for that.
Photographs / Graphics You can add images by dragging and dropping from your desktop, copy and
paste, or by going to INSERT > PICTURES. Resize images proportionally by
holding down the SHIFT key and dragging one of the corner handles. For a
professional-looking poster, do not distort your images by enlarging them
disproportionally.
ORIGINAL DISTORTED
1DO Program and 2Department of Biomedical Sciences, GA Campus Philadelphia College of Osteopathic Medicine, Suwanee, GA
Study of Purkinje Cell Response to alternating current stimulation (ACS) as a treatment modality for Cerebellar ataxia: An in vitro approach
Silvia Cherian1, Hye Rhee Chi1, Marc Eli Faldas1, and Huo Lu2
Cerebellum plays an important role in movement coordination and balance. One possible treatment for cerebellar ataxia is transcranial electrical stimulation (tES) a non-invasive procedure to alleviate cerebellar ataxia. However, the underlying mechanism of tES is not fully understood. In the last two years we have studied the response of Purkinje cell to the direct current stimulation (DCS) at the cellular level. In this project, in vitro experiments were conducted to test the hypothesis that ACS used as a treatment for cerebellar ataxia changes the excitability of the Purkinje cell by decreasing its firing rate during and after the treatment. With this effort, we can have a better understanding about the mechanism of tES.
Hypothesis
Experimental
Design 1
Experimental
Design 2
Data Analysis
Results 1
Results 2
Results 3
Figure 1. Cerebellum
A. Visual representation of the cerebellar network that Purkinje cells are found in.
A.
Essential Neuroscience 2014
Results 4
Conclusion
TAP TO GO
BACK TO
KIOSK MENU

QUICK START (cont.)
How to change the template color theme You can easily change the color theme of your poster by going to the THEMES
menu, select from THEME OPTIONS, and choose the color theme of your
choice. You can also customize your own color theme.
You can also manually change the color of your background by going to
FORMAT, click on THEME COLORS, or SLIDE BACKGROUND
How to add Text The template comes with a number of pre-formatted placeholders for headers
and text blocks. You can add more blocks by copying and pasting the existing
ones or by adding a text box from the HOME menu.
Text size Adjust the size of your text based on how much content you have to present. The
default template text offers a good starting point. The text should not be less than
28 points.
How to add Tables To add a table from scratch go to the INSERT menu and
click on TABLE. A drop-down box will help you select rows and
columns.
You can also copy and a paste a table from Word or another PowerPoint
document. A pasted table may need to be re-formatted by RIGHT-CLICK >
FORMAT SHAPE, TEXT BOX, Margins.. If you are adding a table from excel,
always insert as an image.
Graphs / Charts You will have to convert your graphs/charts/formulas/equations into images such
as a .png file and insert them into your presentation. This will help maintain the
values as different operating systems can distort your work.
Save your work Save your template as a lastname.firstname and as a .pptx file.
This is an ePosterBoards template www.eposterboards.com
(—THIS SIDEBAR DOES NOT SHOW—)
DESIGN GUIDE
This PowerPoint 2011 template produces a 40.97 inches by 23.04
inches presentation poster. You can use it to create your research
poster and save valuable time placing titles, subtitles, text, and
graphics.
We provide a series of YouTube tutorials that will guide you through
the poster design process and answer your poster production
questions. To view our template tutorials, go online to
https://www.youtube.com/playlist?list=PLBz4JvE0AKmweXsMNGeyR
XgWgN_lj_b5L
If you are uploading ahead of time, please go to our website:
http://www.eposterboards.com/eposterupload/
Need assistance? Call us at 617-588-3508 option 2
QUICK START
Title, Authors, and Affiliations Start designing your poster by adding the title, the names of the authors, and the
affiliated institutions. You can type or paste text into the provided boxes. The
template will automatically adjust the size of your text to fit the title box. You can
manually override this feature and change the size of your text.
TIP: The font size of your title should be bigger than your name(s) and institution
name(s). The smallest font size should be 28 points.
Adding Logos / Seals Most often, logos are added on each side of the title. You can insert a logo by
dragging and dropping it from your desktop, copy and paste or by going to
INSERT > PICTURES. Logos taken from web sites are likely to be low quality
when printed. Zoom it at 100% to see what the logo will look like on the final
poster and make any necessary adjustments.
TIP: If there is a conference website, you can pull logos from there. Please
keep in mind that we will be adding navigational buttons or a kiosk menu button
on the right side of each slide. Please make the appropriate space for that.
Photographs / Graphics You can add images by dragging and dropping from your desktop, copy and
paste, or by going to INSERT > PICTURES. Resize images proportionally by
holding down the SHIFT key and dragging one of the corner handles. For a
professional-looking poster, do not distort your images by enlarging them
disproportionally.
ORIGINAL DISTORTED
1DO Program and 2Department of Biomedical Sciences, GA Campus Philadelphia College of Osteopathic Medicine, Suwanee, GA
Study of Purkinje Cell Response to alternating current stimulation (ACS) as a treatment modality for Cerebellar ataxia: An in vitro approach
Silvia Cherian1, Hye Rhee Chi1, Marc Eli Faldas1, and Huo Lu2
Cerebellar Tissue Preparation
This study follows the protocol (#A17-009) approved by the
PCOM IACUC. Sprague-Dawley (SD) rats were used for all
experiments. Young pups were used to maximize the quality
of recording. Each rat was placed in an induction chamber
with isoflurane for 2-4 minutes.
Rats were then weighed and decapitated using a guillotine.
An incision was made along the midline of the dermis using
surgical scissors. Excess cervical muscles and fascia at the
base of the skull was excised. The parietal bone was then
removed and the cerebellum was cut with a scalpel. Vessels
and meninges were removed from the specimen and placed
in ice-cold artificial cerebrospinal fluid (ACSF) before being
staged onto the vibratome loading block.
Parasagittal sections of 200-300 μm in thickness were
obtained. Slices were then incubated in a 37o C chamber.
Figure 2. Whole-Cell Patch Clamp Recording Chamber
A. These two wires in parallel induce a uniform electric field across
the cerebellar slice. Voltage gradient is indicated by false color in the
background. Tips of recording and ground electrodes will be aligned
(dotted line) to have the same gradient. Notice that, the Purkinje cells
can be oriented differently by following the folds in each folium.
Hypothesis
Experimental
Design 1
Experimental
Design 2
Data Analysis
Results 1
Results 2
Results 3
A.
Results 4
Conclusion

QUICK START (cont.)
How to change the template color theme You can easily change the color theme of your poster by going to the THEMES
menu, select from THEME OPTIONS, and choose the color theme of your
choice. You can also customize your own color theme.
You can also manually change the color of your background by going to
FORMAT, click on THEME COLORS, or SLIDE BACKGROUND
How to add Text The template comes with a number of pre-formatted placeholders for headers
and text blocks. You can add more blocks by copying and pasting the existing
ones or by adding a text box from the HOME menu.
Text size Adjust the size of your text based on how much content you have to present. The
default template text offers a good starting point. The text should not be less than
28 points.
How to add Tables To add a table from scratch go to the INSERT menu and
click on TABLE. A drop-down box will help you select rows and
columns.
You can also copy and a paste a table from Word or another PowerPoint
document. A pasted table may need to be re-formatted by RIGHT-CLICK >
FORMAT SHAPE, TEXT BOX, Margins.. If you are adding a table from excel,
always insert as an image.
Graphs / Charts You will have to convert your graphs/charts/formulas/equations into images such
as a .png file and insert them into your presentation. This will help maintain the
values as different operating systems can distort your work.
Save your work Save your template as a lastname.firstname and as a .pptx file.
This is an ePosterBoards template www.eposterboards.com
(—THIS SIDEBAR DOES NOT SHOW—)
DESIGN GUIDE
This PowerPoint 2011 template produces a 40.97 inches by 23.04
inches presentation poster. You can use it to create your research
poster and save valuable time placing titles, subtitles, text, and
graphics.
We provide a series of YouTube tutorials that will guide you through
the poster design process and answer your poster production
questions. To view our template tutorials, go online to
https://www.youtube.com/playlist?list=PLBz4JvE0AKmweXsMNGeyR
XgWgN_lj_b5L
If you are uploading ahead of time, please go to our website:
http://www.eposterboards.com/eposterupload/
Need assistance? Call us at 617-588-3508 option 2
QUICK START
Title, Authors, and Affiliations Start designing your poster by adding the title, the names of the authors, and the
affiliated institutions. You can type or paste text into the provided boxes. The
template will automatically adjust the size of your text to fit the title box. You can
manually override this feature and change the size of your text.
TIP: The font size of your title should be bigger than your name(s) and institution
name(s). The smallest font size should be 28 points.
Adding Logos / Seals Most often, logos are added on each side of the title. You can insert a logo by
dragging and dropping it from your desktop, copy and paste or by going to
INSERT > PICTURES. Logos taken from web sites are likely to be low quality
when printed. Zoom it at 100% to see what the logo will look like on the final
poster and make any necessary adjustments.
TIP: If there is a conference website, you can pull logos from there. Please
keep in mind that we will be adding navigational buttons or a kiosk menu button
on the right side of each slide. Please make the appropriate space for that.
Photographs / Graphics You can add images by dragging and dropping from your desktop, copy and
paste, or by going to INSERT > PICTURES. Resize images proportionally by
holding down the SHIFT key and dragging one of the corner handles. For a
professional-looking poster, do not distort your images by enlarging them
disproportionally.
ORIGINAL DISTORTED
1DO Program and 2Department of Biomedical Sciences, GA Campus Philadelphia College of Osteopathic Medicine, Suwanee, GA
Study of Purkinje Cell Response to alternating current stimulation (ACS) as a treatment modality for Cerebellar ataxia: An in vitro approach
Silvia Cherian1, Hye Rhee Chi1, Marc Eli Faldas1, and Huo Lu2
Cell Recording
In vitro recordings of Purkinje cells were obtained using
whole-cell patch-clamp and Axoclamp-200B amplifier. A
ground electrode and a glass pipette filled with internal
solution was used to patch the cell prior to applying
alternating current stimulation (ACS, 20 Hz). Pre-, during-
and post- stimulation recordings were obtained.
While establishing a membrane potential to between -60 mV
and -75 mV with bias current, a series of current commands
(-0.5 nA to +0.5 nA at 0.1 nA per step) were given to test the
basic properties of the cell under the control condition. In
addition, spontaneous activity was recorded without bias
current.
Figure 3. Whole-Cell Patch Clamp Recording Cell
A. Relationship between stimulation electrodes and cerebellar slice. B. Micropipette coming in contact
with the surface of a Purkinje cell.
A.
B.
Hypothesis
Experimental
Design 1
Experimental
Design 2
Data Analysis
Results 1
Results 2
Results 3
Results 4
Conclusion
QUICK START (cont.)
How to change the template color theme You can easily change the color theme of your poster by going to the THEMES
menu, select from THEME OPTIONS, and choose the color theme of your
choice. You can also customize your own color theme.
You can also manually change the color of your background by going to
FORMAT, click on THEME COLORS, or SLIDE BACKGROUND
How to add Text The template comes with a number of pre-formatted placeholders for headers
and text blocks. You can add more blocks by copying and pasting the existing
ones or by adding a text box from the HOME menu.
Text size Adjust the size of your text based on how much content you have to present. The
default template text offers a good starting point. The text should not be less than
28 points.
How to add Tables To add a table from scratch go to the INSERT menu and
click on TABLE. A drop-down box will help you select rows and
columns.
You can also copy and a paste a table from Word or another PowerPoint
document. A pasted table may need to be re-formatted by RIGHT-CLICK >
FORMAT SHAPE, TEXT BOX, Margins.. If you are adding a table from excel,
always insert as an image.
Graphs / Charts You will have to convert your graphs/charts/formulas/equations into images such
as a .png file and insert them into your presentation. This will help maintain the
values as different operating systems can distort your work.
Save your work Save your template as a lastname.firstname and as a .pptx file.
This is an ePosterBoards template www.eposterboards.com
(—THIS SIDEBAR DOES NOT SHOW—)
DESIGN GUIDE
This PowerPoint 2011 template produces a 40.97 inches by 23.04
inches presentation poster. You can use it to create your research
poster and save valuable time placing titles, subtitles, text, and
graphics.
We provide a series of YouTube tutorials that will guide you through
the poster design process and answer your poster production
questions. To view our template tutorials, go online to
https://www.youtube.com/playlist?list=PLBz4JvE0AKmweXsMNGeyR
XgWgN_lj_b5L
If you are uploading ahead of time, please go to our website:
http://www.eposterboards.com/eposterupload/
Need assistance? Call us at 617-588-3508 option 2
QUICK START
Title, Authors, and Affiliations Start designing your poster by adding the title, the names of the authors, and the
affiliated institutions. You can type or paste text into the provided boxes. The
template will automatically adjust the size of your text to fit the title box. You can
manually override this feature and change the size of your text.
TIP: The font size of your title should be bigger than your name(s) and institution
name(s). The smallest font size should be 28 points.
Adding Logos / Seals Most often, logos are added on each side of the title. You can insert a logo by
dragging and dropping it from your desktop, copy and paste or by going to
INSERT > PICTURES. Logos taken from web sites are likely to be low quality
when printed. Zoom it at 100% to see what the logo will look like on the final
poster and make any necessary adjustments.
TIP: If there is a conference website, you can pull logos from there. Please
keep in mind that we will be adding navigational buttons or a kiosk menu button
on the right side of each slide. Please make the appropriate space for that.
Photographs / Graphics You can add images by dragging and dropping from your desktop, copy and
paste, or by going to INSERT > PICTURES. Resize images proportionally by
holding down the SHIFT key and dragging one of the corner handles. For a
professional-looking poster, do not distort your images by enlarging them
disproportionally.
ORIGINAL DISTORTED
1DO Program and 2Department of Biomedical Sciences, GA Campus Philadelphia College of Osteopathic Medicine, Suwanee, GA
Study of Purkinje Cell Response to alternating current stimulation (ACS) as a treatment modality for Cerebellar ataxia: An in vitro approach
Silvia Cherian1, Hye Rhee Chi1, Marc Eli Faldas1, and Huo Lu2
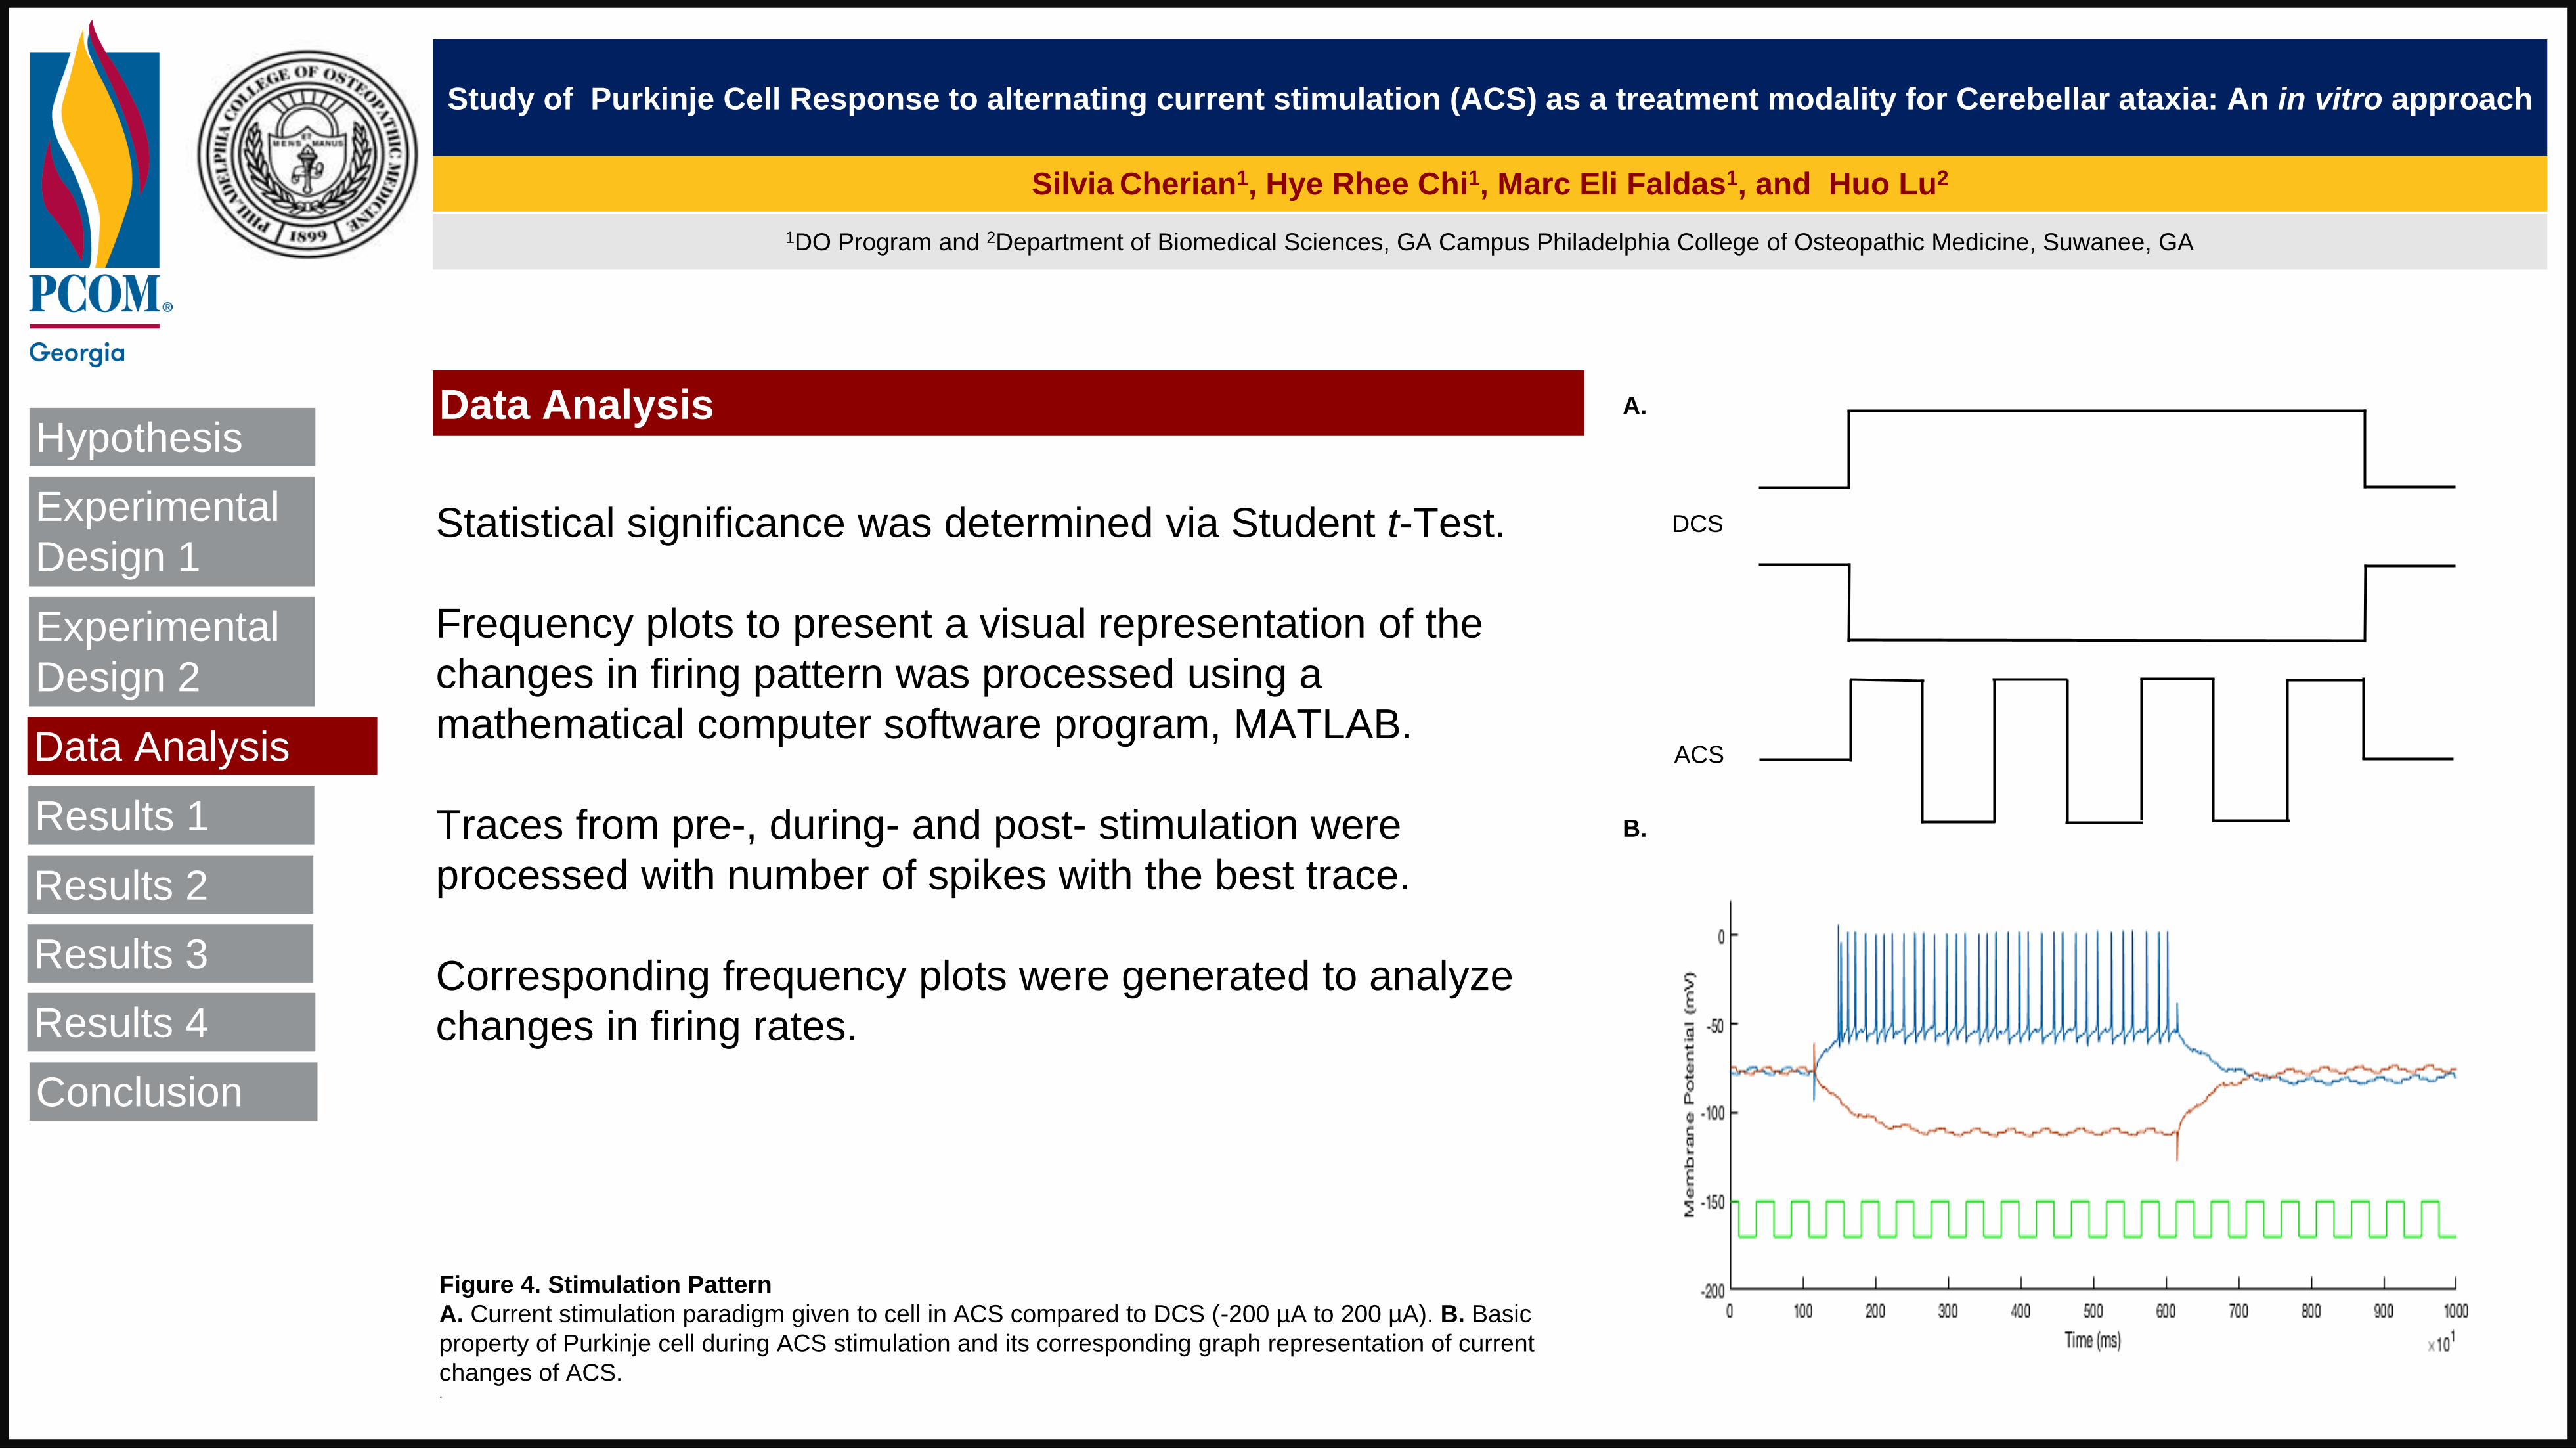
Data Analysis
Statistical significance was determined via Student t-Test.
Frequency plots to present a visual representation of the
changes in firing pattern was processed using a
mathematical computer software program, MATLAB.
Traces from pre-, during- and post- stimulation were
processed with number of spikes with the best trace.
Corresponding frequency plots were generated to analyze
changes in firing rates.
Figure 4. Stimulation Pattern
A. Current stimulation paradigm given to cell in ACS compared to DCS (-200 µA to 200 µA). B. Basic
property of Purkinje cell during ACS stimulation and its corresponding graph representation of current
changes of ACS. .
A.
B.
Hypothesis
Experimental
Design 1
Experimental
Design 2
Data Analysis
DCS
ACS
Results 1
Results 2
Results 3
Results 4
Conclusion

QUICK START (cont.)
How to change the template color theme You can easily change the color theme of your poster by going to the THEMES
menu, select from THEME OPTIONS, and choose the color theme of your
choice. You can also customize your own color theme.
You can also manually change the color of your background by going to
FORMAT, click on THEME COLORS, or SLIDE BACKGROUND
How to add Text The template comes with a number of pre-formatted placeholders for headers
and text blocks. You can add more blocks by copying and pasting the existing
ones or by adding a text box from the HOME menu.
Text size Adjust the size of your text based on how much content you have to present. The
default template text offers a good starting point. The text should not be less than
28 points.
How to add Tables To add a table from scratch go to the INSERT menu and
click on TABLE. A drop-down box will help you select rows and
columns.
You can also copy and a paste a table from Word or another PowerPoint
document. A pasted table may need to be re-formatted by RIGHT-CLICK >
FORMAT SHAPE, TEXT BOX, Margins.. If you are adding a table from excel,
always insert as an image.
Graphs / Charts You will have to convert your graphs/charts/formulas/equations into images such
as a .png file and insert them into your presentation. This will help maintain the
values as different operating systems can distort your work.
Save your work Save your template as a lastname.firstname and as a .pptx file.
This is an ePosterBoards template www.eposterboards.com
(—THIS SIDEBAR DOES NOT SHOW—)
DESIGN GUIDE
This PowerPoint 2011 template produces a 40.97 inches by 23.04
inches presentation poster. You can use it to create your research
poster and save valuable time placing titles, subtitles, text, and
graphics.
We provide a series of YouTube tutorials that will guide you through
the poster design process and answer your poster production
questions. To view our template tutorials, go online to
https://www.youtube.com/playlist?list=PLBz4JvE0AKmweXsMNGeyR
XgWgN_lj_b5L
If you are uploading ahead of time, please go to our website:
http://www.eposterboards.com/eposterupload/
Need assistance? Call us at 617-588-3508 option 2
QUICK START
Title, Authors, and Affiliations Start designing your poster by adding the title, the names of the authors, and the
affiliated institutions. You can type or paste text into the provided boxes. The
template will automatically adjust the size of your text to fit the title box. You can
manually override this feature and change the size of your text.
TIP: The font size of your title should be bigger than your name(s) and institution
name(s). The smallest font size should be 28 points.
Adding Logos / Seals Most often, logos are added on each side of the title. You can insert a logo by
dragging and dropping it from your desktop, copy and paste or by going to
INSERT > PICTURES. Logos taken from web sites are likely to be low quality
when printed. Zoom it at 100% to see what the logo will look like on the final
poster and make any necessary adjustments.
TIP: If there is a conference website, you can pull logos from there. Please
keep in mind that we will be adding navigational buttons or a kiosk menu button
on the right side of each slide. Please make the appropriate space for that.
Photographs / Graphics You can add images by dragging and dropping from your desktop, copy and
paste, or by going to INSERT > PICTURES. Resize images proportionally by
holding down the SHIFT key and dragging one of the corner handles. For a
professional-looking poster, do not distort your images by enlarging them
disproportionally.
ORIGINAL DISTORTED
1DO Program and 2Department of Biomedical Sciences, GA Campus Philadelphia College of Osteopathic Medicine, Suwanee, GA
Study of Purkinje Cell Response to alternating current stimulation (ACS) as a treatment modality for Cerebellar ataxia: An in vitro approach
Silvia Cherian1, Hye Rhee Chi1, Marc Eli Faldas1, and Huo Lu2
Purkinje Cell Firing Rate Change
Figure 5. Basic properties and firing rate changes of Purkinje cell before, during, and after stimulation
Control recordings with current injections at -0.7 and +0.2 nA. Recordings with the same current injections; A. Pre-ACS. B. During-ACS. C. Post-ACS. D. Firing rate changes of 10
Purkinje cells under control settings. E. Firing rate changes of 8 Purkinje cells during ACS. F. Firing rate changes of 10 Purkinje cells post ACS. Average firing rate is shown in red.
Post Stimulation During Stimulation Control A. B. C.
D. E. F.
Hypothesis
Experimental
Design 1
Experimental
Design 2
Data Analysis
Results 1
Results 2
Results 3
Results 4
Conclusion

QUICK START (cont.)
How to change the template color theme You can easily change the color theme of your poster by going to the THEMES
menu, select from THEME OPTIONS, and choose the color theme of your
choice. You can also customize your own color theme.
You can also manually change the color of your background by going to
FORMAT, click on THEME COLORS, or SLIDE BACKGROUND
How to add Text The template comes with a number of pre-formatted placeholders for headers
and text blocks. You can add more blocks by copying and pasting the existing
ones or by adding a text box from the HOME menu.
Text size Adjust the size of your text based on how much content you have to present. The
default template text offers a good starting point. The text should not be less than
28 points.
How to add Tables To add a table from scratch go to the INSERT menu and
click on TABLE. A drop-down box will help you select rows and
columns.
You can also copy and a paste a table from Word or another PowerPoint
document. A pasted table may need to be re-formatted by RIGHT-CLICK >
FORMAT SHAPE, TEXT BOX, Margins.. If you are adding a table from excel,
always insert as an image.
Graphs / Charts You will have to convert your graphs/charts/formulas/equations into images such
as a .png file and insert them into your presentation. This will help maintain the
values as different operating systems can distort your work.
Save your work Save your template as a lastname.firstname and as a .pptx file.
This is an ePosterBoards template www.eposterboards.com
(—THIS SIDEBAR DOES NOT SHOW—)
DESIGN GUIDE
This PowerPoint 2011 template produces a 40.97 inches by 23.04
inches presentation poster. You can use it to create your research
poster and save valuable time placing titles, subtitles, text, and
graphics.
We provide a series of YouTube tutorials that will guide you through
the poster design process and answer your poster production
questions. To view our template tutorials, go online to
https://www.youtube.com/playlist?list=PLBz4JvE0AKmweXsMNGeyR
XgWgN_lj_b5L
If you are uploading ahead of time, please go to our website:
http://www.eposterboards.com/eposterupload/
Need assistance? Call us at 617-588-3508 option 2
QUICK START
Title, Authors, and Affiliations Start designing your poster by adding the title, the names of the authors, and the
affiliated institutions. You can type or paste text into the provided boxes. The
template will automatically adjust the size of your text to fit the title box. You can
manually override this feature and change the size of your text.
TIP: The font size of your title should be bigger than your name(s) and institution
name(s). The smallest font size should be 28 points.
Adding Logos / Seals Most often, logos are added on each side of the title. You can insert a logo by
dragging and dropping it from your desktop, copy and paste or by going to
INSERT > PICTURES. Logos taken from web sites are likely to be low quality
when printed. Zoom it at 100% to see what the logo will look like on the final
poster and make any necessary adjustments.
TIP: If there is a conference website, you can pull logos from there. Please
keep in mind that we will be adding navigational buttons or a kiosk menu button
on the right side of each slide. Please make the appropriate space for that.
Photographs / Graphics You can add images by dragging and dropping from your desktop, copy and
paste, or by going to INSERT > PICTURES. Resize images proportionally by
holding down the SHIFT key and dragging one of the corner handles. For a
professional-looking poster, do not distort your images by enlarging them
disproportionally.
ORIGINAL DISTORTED
1DO Program and 2Department of Biomedical Sciences, GA Campus Philadelphia College of Osteopathic Medicine, Suwanee, GA
Study of Purkinje Cell Response to alternating current stimulation (ACS) as a treatment modality for Cerebellar ataxia: An in vitro approach
Silvia Cherian1, Hye Rhee Chi1, Marc Eli Faldas1, and Huo Lu2
Membrane Resistance Change Responses to ACS
Figure 6. Membrane resistance change in Response to ACS
Five traces of basic properties in response to negative current injection during A. Pre-ACS. B. During-
ACS. C. Post-ACS were used to obtain voltage change at the steady state. D. Membrane resistance (MΩ)
of Purkinje cell is generated by best fit line using the V/I plot. E. Comparison of membrane resistance (MΩ)
of Purkinje cells (n=6) before, during, and after stimulation.
A
B
C
D E
Hypothesis
Experimental
Design 1
Experimental
Design 2
Data Analysis
Results 1
Results 2
Results 3
Results 4
Conclusion

QUICK START (cont.)
How to change the template color theme You can easily change the color theme of your poster by going to the THEMES
menu, select from THEME OPTIONS, and choose the color theme of your
choice. You can also customize your own color theme.
You can also manually change the color of your background by going to
FORMAT, click on THEME COLORS, or SLIDE BACKGROUND
How to add Text The template comes with a number of pre-formatted placeholders for headers
and text blocks. You can add more blocks by copying and pasting the existing
ones or by adding a text box from the HOME menu.
Text size Adjust the size of your text based on how much content you have to present. The
default template text offers a good starting point. The text should not be less than
28 points.
How to add Tables To add a table from scratch go to the INSERT menu and
click on TABLE. A drop-down box will help you select rows and
columns.
You can also copy and a paste a table from Word or another PowerPoint
document. A pasted table may need to be re-formatted by RIGHT-CLICK >
FORMAT SHAPE, TEXT BOX, Margins.. If you are adding a table from excel,
always insert as an image.
Graphs / Charts You will have to convert your graphs/charts/formulas/equations into images such
as a .png file and insert them into your presentation. This will help maintain the
values as different operating systems can distort your work.
Save your work Save your template as a lastname.firstname and as a .pptx file.
This is an ePosterBoards template www.eposterboards.com
(—THIS SIDEBAR DOES NOT SHOW—)
DESIGN GUIDE
This PowerPoint 2011 template produces a 40.97 inches by 23.04
inches presentation poster. You can use it to create your research
poster and save valuable time placing titles, subtitles, text, and
graphics.
We provide a series of YouTube tutorials that will guide you through
the poster design process and answer your poster production
questions. To view our template tutorials, go online to
https://www.youtube.com/playlist?list=PLBz4JvE0AKmweXsMNGeyR
XgWgN_lj_b5L
If you are uploading ahead of time, please go to our website:
http://www.eposterboards.com/eposterupload/
Need assistance? Call us at 617-588-3508 option 2
QUICK START
Title, Authors, and Affiliations Start designing your poster by adding the title, the names of the authors, and the
affiliated institutions. You can type or paste text into the provided boxes. The
template will automatically adjust the size of your text to fit the title box. You can
manually override this feature and change the size of your text.
TIP: The font size of your title should be bigger than your name(s) and institution
name(s). The smallest font size should be 28 points.
Adding Logos / Seals Most often, logos are added on each side of the title. You can insert a logo by
dragging and dropping it from your desktop, copy and paste or by going to
INSERT > PICTURES. Logos taken from web sites are likely to be low quality
when printed. Zoom it at 100% to see what the logo will look like on the final
poster and make any necessary adjustments.
TIP: If there is a conference website, you can pull logos from there. Please
keep in mind that we will be adding navigational buttons or a kiosk menu button
on the right side of each slide. Please make the appropriate space for that.
Photographs / Graphics You can add images by dragging and dropping from your desktop, copy and
paste, or by going to INSERT > PICTURES. Resize images proportionally by
holding down the SHIFT key and dragging one of the corner handles. For a
professional-looking poster, do not distort your images by enlarging them
disproportionally.
ORIGINAL DISTORTED
1DO Program and 2Department of Biomedical Sciences, GA Campus Philadelphia College of Osteopathic Medicine, Suwanee, GA
Study of Purkinje Cell Response to alternating current stimulation (ACS) as a treatment modality for Cerebellar ataxia: An in vitro approach
Silvia Cherian1, Hye Rhee Chi1, Marc Eli Faldas1, and Huo Lu2
Spontaneous Activity Changes of
Purkinje Cells by ACS
A
D
B
C
Figure 7. Changes of spontaneous
activity of Purkinje cell by ACS
A. Purkinje cell firing rate changes with
stimulation at the 60 second mark.
B. Original trace of action potentials to
generate the plot in A.
C and D. A closer look of recordings
under beginning and during ACS.
Hypothesis
Experimental
Design 1
Experimental
Design 2
Data Analysis
Results 1
Results 2
Results 3
Results 4
Conclusion

QUICK START (cont.)
How to change the template color theme You can easily change the color theme of your poster by going to the THEMES
menu, select from THEME OPTIONS, and choose the color theme of your
choice. You can also customize your own color theme.
You can also manually change the color of your background by going to
FORMAT, click on THEME COLORS, or SLIDE BACKGROUND
How to add Text The template comes with a number of pre-formatted placeholders for headers
and text blocks. You can add more blocks by copying and pasting the existing
ones or by adding a text box from the HOME menu.
Text size Adjust the size of your text based on how much content you have to present. The
default template text offers a good starting point. The text should not be less than
28 points.
How to add Tables To add a table from scratch go to the INSERT menu and
click on TABLE. A drop-down box will help you select rows and
columns.
You can also copy and a paste a table from Word or another PowerPoint
document. A pasted table may need to be re-formatted by RIGHT-CLICK >
FORMAT SHAPE, TEXT BOX, Margins.. If you are adding a table from excel,
always insert as an image.
Graphs / Charts You will have to convert your graphs/charts/formulas/equations into images such
as a .png file and insert them into your presentation. This will help maintain the
values as different operating systems can distort your work.
Save your work Save your template as a lastname.firstname and as a .pptx file.
This is an ePosterBoards template www.eposterboards.com
(—THIS SIDEBAR DOES NOT SHOW—)
DESIGN GUIDE
This PowerPoint 2011 template produces a 40.97 inches by 23.04
inches presentation poster. You can use it to create your research
poster and save valuable time placing titles, subtitles, text, and
graphics.
We provide a series of YouTube tutorials that will guide you through
the poster design process and answer your poster production
questions. To view our template tutorials, go online to
https://www.youtube.com/playlist?list=PLBz4JvE0AKmweXsMNGeyR
XgWgN_lj_b5L
If you are uploading ahead of time, please go to our website:
http://www.eposterboards.com/eposterupload/
Need assistance? Call us at 617-588-3508 option 2
QUICK START
Title, Authors, and Affiliations Start designing your poster by adding the title, the names of the authors, and the
affiliated institutions. You can type or paste text into the provided boxes. The
template will automatically adjust the size of your text to fit the title box. You can
manually override this feature and change the size of your text.
TIP: The font size of your title should be bigger than your name(s) and institution
name(s). The smallest font size should be 28 points.
Adding Logos / Seals Most often, logos are added on each side of the title. You can insert a logo by
dragging and dropping it from your desktop, copy and paste or by going to
INSERT > PICTURES. Logos taken from web sites are likely to be low quality
when printed. Zoom it at 100% to see what the logo will look like on the final
poster and make any necessary adjustments.
TIP: If there is a conference website, you can pull logos from there. Please
keep in mind that we will be adding navigational buttons or a kiosk menu button
on the right side of each slide. Please make the appropriate space for that.
Photographs / Graphics You can add images by dragging and dropping from your desktop, copy and
paste, or by going to INSERT > PICTURES. Resize images proportionally by
holding down the SHIFT key and dragging one of the corner handles. For a
professional-looking poster, do not distort your images by enlarging them
disproportionally.
ORIGINAL DISTORTED
1DO Program and 2Department of Biomedical Sciences, GA Campus Philadelphia College of Osteopathic Medicine, Suwanee, GA
Study of Purkinje Cell Response to alternating current stimulation (ACS) as a treatment modality for Cerebellar ataxia: An in vitro approach
Silvia Cherian1, Hye Rhee Chi1, Marc Eli Faldas1, and Huo Lu2
Example of Purkinje Cell Response to ACS
A
Pre-
Stimulation
B
During
Stimulation
C
Post-
Stimulation
Figure 8. Purkinje cell responses to ACS
Basic property, spontaneous activity, and change in firing rates in A. Pre-ACS stimulation
B. During ACS stimulation. C. Post-ACS stimulation. Hypothesis
Experimental
Design 1
Experimental
Design 2
Data Analysis
Results 1
Results 2
Results 3
Results 4
Conclusion

QUICK START (cont.)
How to change the template color theme You can easily change the color theme of your poster by going to the THEMES
menu, select from THEME OPTIONS, and choose the color theme of your
choice. You can also customize your own color theme.
You can also manually change the color of your background by going to
FORMAT, click on THEME COLORS, or SLIDE BACKGROUND
How to add Text The template comes with a number of pre-formatted placeholders for headers
and text blocks. You can add more blocks by copying and pasting the existing
ones or by adding a text box from the HOME menu.
Text size Adjust the size of your text based on how much content you have to present. The
default template text offers a good starting point. The text should not be less than
28 points.
How to add Tables To add a table from scratch go to the INSERT menu and
click on TABLE. A drop-down box will help you select rows and
columns.
You can also copy and a paste a table from Word or another PowerPoint
document. A pasted table may need to be re-formatted by RIGHT-CLICK >
FORMAT SHAPE, TEXT BOX, Margins.. If you are adding a table from excel,
always insert as an image.
Graphs / Charts You will have to convert your graphs/charts/formulas/equations into images such
as a .png file and insert them into your presentation. This will help maintain the
values as different operating systems can distort your work.
Save your work Save your template as a lastname.firstname and as a .pptx file.
This is an ePosterBoards template www.eposterboards.com
(—THIS SIDEBAR DOES NOT SHOW—)
DESIGN GUIDE
This PowerPoint 2011 template produces a 40.97 inches by 23.04
inches presentation poster. You can use it to create your research
poster and save valuable time placing titles, subtitles, text, and
graphics.
We provide a series of YouTube tutorials that will guide you through
the poster design process and answer your poster production
questions. To view our template tutorials, go online to
https://www.youtube.com/playlist?list=PLBz4JvE0AKmweXsMNGeyR
XgWgN_lj_b5L
If you are uploading ahead of time, please go to our website:
http://www.eposterboards.com/eposterupload/
Need assistance? Call us at 617-588-3508 option 2
QUICK START
Title, Authors, and Affiliations Start designing your poster by adding the title, the names of the authors, and the
affiliated institutions. You can type or paste text into the provided boxes. The
template will automatically adjust the size of your text to fit the title box. You can
manually override this feature and change the size of your text.
TIP: The font size of your title should be bigger than your name(s) and institution
name(s). The smallest font size should be 28 points.
Adding Logos / Seals Most often, logos are added on each side of the title. You can insert a logo by
dragging and dropping it from your desktop, copy and paste or by going to
INSERT > PICTURES. Logos taken from web sites are likely to be low quality
when printed. Zoom it at 100% to see what the logo will look like on the final
poster and make any necessary adjustments.
TIP: If there is a conference website, you can pull logos from there. Please
keep in mind that we will be adding navigational buttons or a kiosk menu button
on the right side of each slide. Please make the appropriate space for that.
Photographs / Graphics You can add images by dragging and dropping from your desktop, copy and
paste, or by going to INSERT > PICTURES. Resize images proportionally by
holding down the SHIFT key and dragging one of the corner handles. For a
professional-looking poster, do not distort your images by enlarging them
disproportionally.
ORIGINAL DISTORTED
1DO Program and 2Department of Biomedical Sciences, GA Campus Philadelphia College of Osteopathic Medicine, Suwanee, GA
Study of Purkinje Cell Response to alternating current stimulation (ACS) as a treatment modality for Cerebellar ataxia: An in vitro approach
Silvia Cherian1, Hye Rhee Chi1, Marc Eli Faldas1, and Huo Lu2
Summary and Conclusion
1. Thirteen sets of data were recorded before, during, and after ACS to monitor the
average firing rate of Purkinje cells.
2. Average firing rate of Basic Property decreased after ACS (p=0.000799, n=8).
3. No significant changes were observed in average firing rate before and during ACS
(p=0.399, n=5).
4. No significant difference was observed for spontaneous firing rate change before and
after ACS (p=0.662, n=5).
5. No significant difference was observed in membrane resistance before, during, and
after ACS.
6. The future direction of this study is to include frequency change and input resistance
of Purkinje cells. This tests our hypothesis, that the dendrite tree of individual PC
orientation of each folium determines the final output change caused by ACS. This
experiment can be used as a basis for future behavioral studies.
Hypothesis
Experimental
Design 1
Experimental
Design 2
Data Analysis
Results 1
Results 2
Results 3
Results 4
Conclusion