This lesson covers the following topics - SERFF 5.pdf · is a customizable, user specific, view....
55
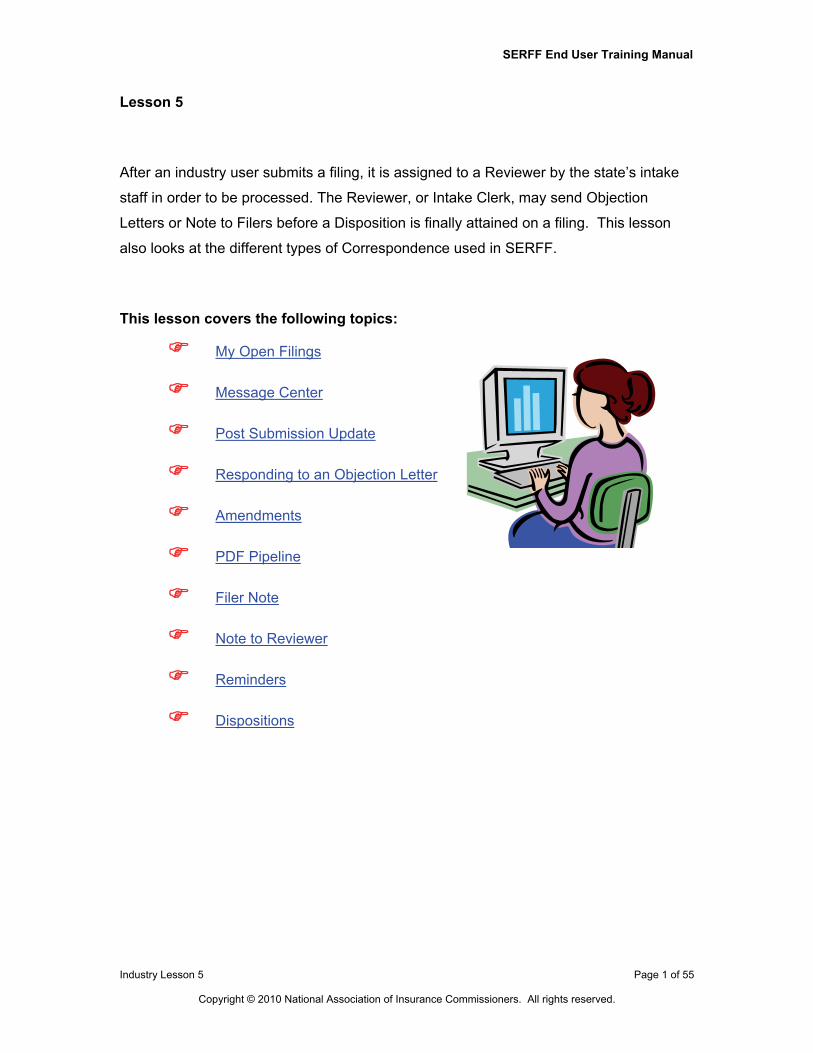
SERFF End User Training Manual Industry Lesson 5 Page 1 of 55 Copyright © 2010 National Association of Insurance Commissioners. All rights reserved. Lesson 5 After an industry user submits a filing, it is assigned to a Reviewer by the state’s intake staff in order to be processed. The Reviewer, or Intake Clerk, may send Objection Letters or Note to Filers before a Disposition is finally attained on a filing. This lesson also looks at the different types of Correspondence used in SERFF. This lesson covers the following topics: My Open Filings Message Center Post Submission Update Responding to an Objection Letter Amendments PDF Pipeline Filer Note Note to Reviewer Reminders Dispositions
Transcript of This lesson covers the following topics - SERFF 5.pdf · is a customizable, user specific, view....
SERFF End User Training Manual
Industry Lesson 5 Page 1 of 55
Copyright © 2010 National Association of Insurance Commissioners. All rights reserved.
Lesson 5
After an industry user submits a filing, it is assigned to a Reviewer by the state’s intake
staff in order to be processed. The Reviewer, or Intake Clerk, may send Objection
Letters or Note to Filers before a Disposition is finally attained on a filing. This lesson
also looks at the different types of Correspondence used in SERFF.
This lesson covers the following topics:
My Open Filings
Message Center
Post Submission Update
Responding to an Objection Letter
Amendments
PDF Pipeline
Filer Note
Note to Reviewer
Reminders
Dispositions

SERFF End User Training Manual
Industry Lesson 5 Page 2 of 55
Copyright © 2010 National Association of Insurance Commissioners. All rights reserved.
My Open Filings
All filings that have been assigned to an analyst appear under the link.
Open filings can be moved to by placing a check mark in the check box
next to the filing(s) that the user wishes to move and clicking the
button to execute the move.
Filing Managers will not see filings in the ‘My Open Filings’ view unless they are
added as an Author to the filing. Filing Managers must use the Search feature to
locate filings that are not assigned to them.
Most Recently Viewed Filings
When a user logs into SERFF, they are able to view their most recently viewed files by
clicking on the ‘Most Recently Viewed Filings’ link. This provides an easy and fast way to
access the last 10 filings that they have been working with most recently.

SERFF End User Training Manual
Industry Lesson 5 Page 3 of 55
Copyright © 2010 National Association of Insurance Commissioners. All rights reserved.
View Filing
1. Click anywhere on the filing row to open a filing you wish to view.
is a customizable, user specific, view. The Workfolder may
contain draft filings, open filings, and closed filings. Filings can be moved to My
Workfolder from any view on the Filings tab.

SERFF End User Training Manual
Industry Lesson 5 Page 4 of 55
Copyright © 2010 National Association of Insurance Commissioners. All rights reserved.
Move to My Workfolder
1. Place a check mark in the box next to the filing by clicking inside the box. To
remove the check, click in the box again.
2. Click on the button.
3. The user is notified that the selected filing has been moved to their Workfolder.
Remove from My Workfolder
1. Click on link.
2. Place a check mark in the box next to the filing(s) to be removed from My
Workfolder.
3. Click the button.

SERFF End User Training Manual
Industry Lesson 5 Page 5 of 55
Copyright © 2010 National Association of Insurance Commissioners. All rights reserved.
Removing filings from My Workfolder will not remove or delete the filing from
SERFF. The filings can still be found under the My Open Filings link or the My
Draft Filings link.
Message Center
The Message Center contains notifications about activity on SERFF Filings.
Messages can be viewed by clicking on the link under the Filings tab. There
are a number of messages that are generated to notify the user of their filings’ status.
Authors receive messages for all events on filings to which they are assigned. Managers
receive messages for all events on all filings in their instance.
Messages are identified by a distinct subject line. Once the message is opened,
additional information is displayed and the user can link directly to the filing referenced.
If two Authors receive messages on the same filing, and one user opens the message,
the icon will disappear for the filer who reads the message. The message for the other
Author will be displayed with a push-pin icon indicating that the message has not
been read.
Types of Messages:
• Assigned/Changed Reviewer
• Note to Filer received
• Filer Note created
• Objection Letter received
• Disposition received
• Filing submitted with Default Public Access
• Public Access status change
• Reopened Filing
• Compact Filing Acknowledgement
• Effective/Implementation Date Updated
• Filing State Info Changed
• Billing Low Block Warning

SERFF End User Training Manual
Industry Lesson 5 Page 6 of 55
Copyright © 2010 National Association of Insurance Commissioners. All rights reserved.
The Message Center View
Like the other views in SERFF, the columns in the Message Center can be sorted. Click
once to sort the column in ascending order, click again to sort in descending order. The
default sort for the Message Center is descending by date. The column on which the
view is currently sorted is highlighted in yellow.
The Message Center displays 50 messages at a time. To view additional messages,
use the First, Previous, Next and Last links.
Remove a Message
From the Message Center view, messages can be removed individually or several at a
time.
1. Select the messages to be removed by clicking in the box to the left of the
Message Subject. Click the box in the column header to select the entire page of
messages.
SERFF End User Training Manual
Industry Lesson 5 Page 7 of 55
Copyright © 2010 National Association of Insurance Commissioners. All rights reserved.
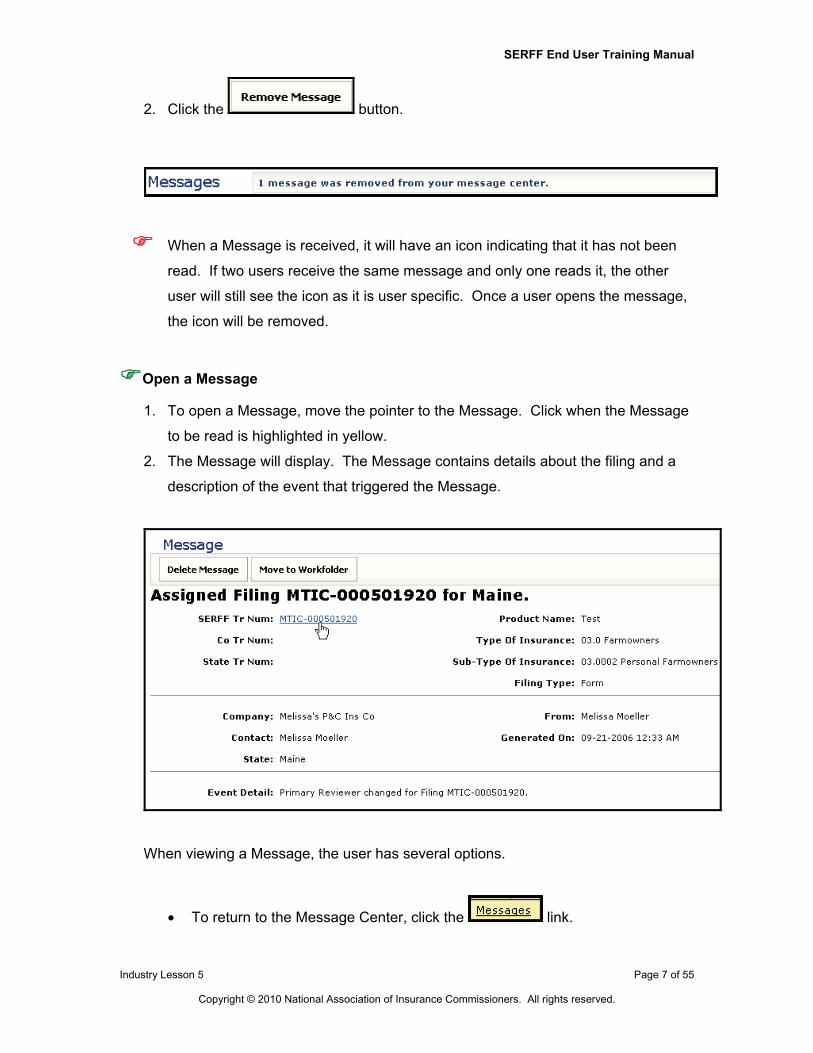
2. Click the button.
When a Message is received, it will have an icon indicating that it has not been
read. If two users receive the same message and only one reads it, the other
user will still see the icon as it is user specific. Once a user opens the message,
the icon will be removed.
Open a Message
1. To open a Message, move the pointer to the Message. Click when the Message
to be read is highlighted in yellow.
2. The Message will display. The Message contains details about the filing and a
description of the event that triggered the Message.
When viewing a Message, the user has several options.
• To return to the Message Center, click the link.

SERFF End User Training Manual
Industry Lesson 5 Page 8 of 55
Copyright © 2010 National Association of Insurance Commissioners. All rights reserved.
• To delete the Message for the current user, click the
button.
• To move the referenced filing to the user’s Workfolder, click the
button.
Moving a filing to the Workfolder from within the Message also removes the
Message from the Message Center.
• To open the filing referenced in the Message, click the blue, underlined
SERFF Tracking Number.
Message Suppression
Message Suppression allows users to control the types of Messages they receive so
that their Message view remains manageable. For example, if a particular user is a
Filing Manager, he/she may not want to receive a Message each time a Filer Note is
created on a filing. To access this feature, click on the Settings tab and then click on
Message Suppression Settings.

SERFF End User Training Manual
Industry Lesson 5 Page 9 of 55
Copyright © 2010 National Association of Insurance Commissioners. All rights reserved.
The following screen shows all pieces of Correspondence that can be suppressed:
Suppress a Message(s)
1. Click on the Settings tab.
2. Click on - the left side of the page.
3. Click on the type of Message(s) that are to be suppressed. In the example below,
‘Filer Note Created’ has been selected.

SERFF End User Training Manual
Industry Lesson 5 Page 10 of 55
Copyright © 2010 National Association of Insurance Commissioners. All rights reserved.
4. Click .
5. The user preferences have now been saved.
All Message Suppression options are specific to each individual user. Users can
update their Message Suppression settings at any time by following the same
steps as above.

SERFF End User Training Manual
Industry Lesson 5 Page 11 of 55
Copyright © 2010 National Association of Insurance Commissioners. All rights reserved.
Post Submission Update
The Post Submission Update feature of SERFF gives industry users the ability to
update various filing fields after the filing has been submitted. Depending upon a
state setting, these updates will be allowed on open filings, both open and closed
filings, or none at all. Once received, the state will review the request and allow
or disallow the changes.
Note: The filers will only be able to submit post submission updates if the
state allows the functionality on their instance. If the state does not accept
updates, the link will be replaced by explanatory text.
Creating a Post-Submission Update
1. Click on the Filing Correspondence tab.
2. Click on the Create Post Submission update link
SERFF End User Training Manual
Industry Lesson 5 Page 12 of 55
Copyright © 2010 National Association of Insurance Commissioners. All rights reserved.
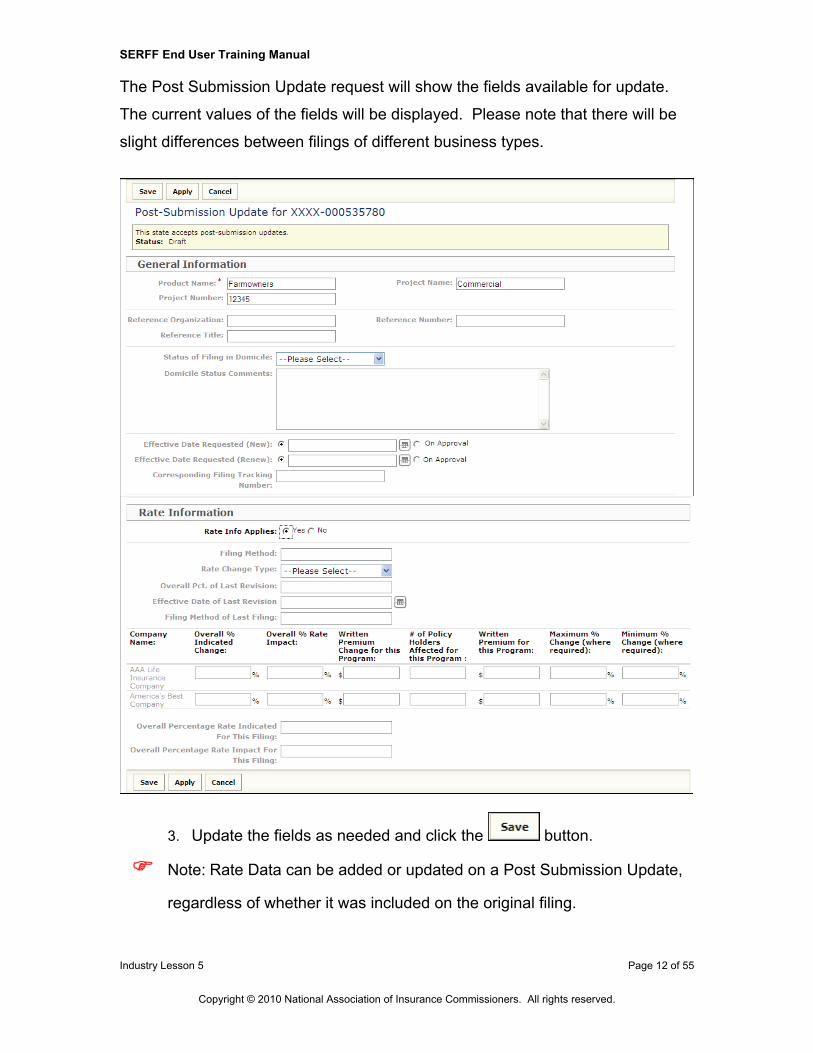
The Post Submission Update request will show the fields available for update.
The current values of the fields will be displayed. Please note that there will be
slight differences between filings of different business types.
3. Update the fields as needed and click the button.
Note: Rate Data can be added or updated on a Post Submission Update,
regardless of whether it was included on the original filing.

SERFF End User Training Manual
Industry Lesson 5 Page 13 of 55
Copyright © 2010 National Association of Insurance Commissioners. All rights reserved.
4. After saving the update the author will receive confirmation that the
submission has been saved.
5. Click the button to send to the state.
6. Click the button to submit.
Note: Once submitted, the request cannot be changed and another
request cannot be created until the state takes action on the current
request.
Filings with pending Post Submission Updates will have an icon above Filing at a
Glance. The full request can be accessed from the Correspondence tab.

SERFF End User Training Manual
Industry Lesson 5 Page 14 of 55
Copyright © 2010 National Association of Insurance Commissioners. All rights reserved.
On the filing correspondence tab the filing author can view the post submission
update request that was submitted to the state.
Once the state has reviewed your Post Submission Update, the filer will receive a
message in your SERFF Message Center advising that your request has been
allowed or disallowed.
After allowing the update, the icon and wording in Filing at a Glance changes, as
does the status of the request. If the request is disallowed, the icon above Filing
at a Glance is removed and the request status is changed to Disallowed.
When a request is allowed, the applicable fields on the filing are updated. Fields
that has been changed post submission will have an icon next to them
representing changed data. This icon does not appear if the change was not
allowed.

SERFF End User Training Manual
Industry Lesson 5 Page 15 of 55
Copyright © 2010 National Association of Insurance Commissioners. All rights reserved.
View Approved Post Submission Updates
1. Click on the schedule tab to view the approved updates.
2. Clicking the icon for a field with changes will trigger the display of
the history of changes for that field, including prior values and the date
the field was changed.
3. The user can click the link to be taken to the Post Submission
Update for that change
Note: The post submission update will show the changes in bold.

SERFF End User Training Manual
Industry Lesson 5 Page 16 of 55
Copyright © 2010 National Association of Insurance Commissioners. All rights reserved.
Responding to an Objection Letter
If a filing does not meet all of a state’s filing requirements, an Objection Letter will be
created by the state. An Objection Letter requires the Author or another user to submit a
Response Letter, which may include one or more Schedule Item revisions or additions.
The Reviewer will create Objections while reviewing the filing, which will be inserted into
an Objection Letter and sent to the Author indicating what needs to be revised and/or
added. The Author will receive a message in the Message Center stating that an
Objection Letter has been received.
Review the State’s Objections
An ‘Open Objection’ icon will appear next to any Schedule Item that has an open
Objection. In cases where an Objection Letter has no Objections, or has Objections not
related to a specific Schedule Item, the icon will display in the Filing at a Glance section.
Clicking on the icon provides the user with the details of the related Objections.

SERFF End User Training Manual
Industry Lesson 5 Page 17 of 55
Copyright © 2010 National Association of Insurance Commissioners. All rights reserved.
SERFF End User Training Manual
Industry Lesson 5 Page 18 of 55
Copyright © 2010 National Association of Insurance Commissioners. All rights reserved.
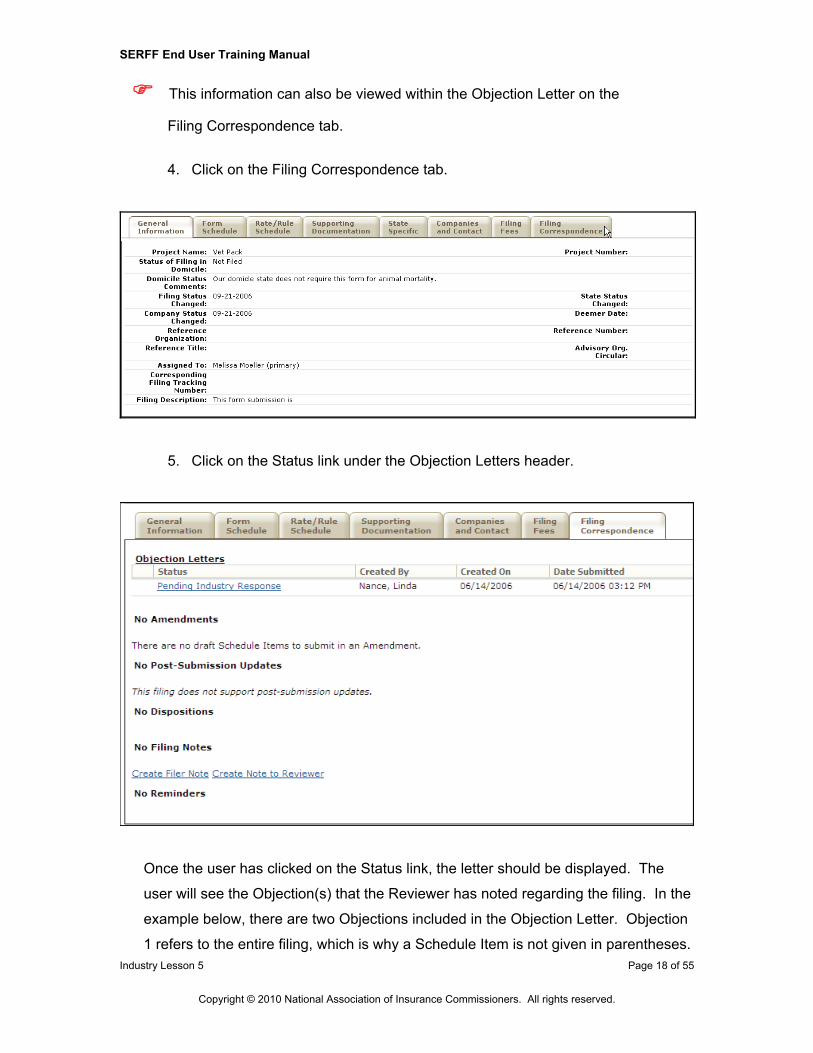
This information can also be viewed within the Objection Letter on the
Filing Correspondence tab.
4. Click on the Filing Correspondence tab.
5. Click on the Status link under the Objection Letters header.
Once the user has clicked on the Status link, the letter should be displayed. The
user will see the Objection(s) that the Reviewer has noted regarding the filing. In the
example below, there are two Objections included in the Objection Letter. Objection
1 refers to the entire filing, which is why a Schedule Item is not given in parentheses.

SERFF End User Training Manual
Industry Lesson 5 Page 19 of 55
Copyright © 2010 National Association of Insurance Commissioners. All rights reserved.
Objection 2 refers to an item from the Form Schedule, with the Form Name ‘Animal
Mortality Policy Form.’
The Objection Letter Status is state specific and set by the Reviewer. The Objection
Letter Date is the date that the Reviewer sent the Objection Letter. The Respond by
Date is a date by which the state expects the Author to respond. The Submitted
Date is the date that the Objection Letter was actually submitted and viewable by the
Author.
6. Click on the button after reviewing.
The first step in the Response Letter process is to make the requested changes to the
Schedule Items. **NOTE: Do not click on the ‘Respond’ button. This will be the last
step in the process.
Revising Schedule Items
1. Click from the filing view.

SERFF End User Training Manual
Industry Lesson 5 Page 20 of 55
Copyright © 2010 National Association of Insurance Commissioners. All rights reserved.
2. The filing will be put into “Revise Mode.”
3. Click to the left of the item to be changed.
New items may also be added while in ‘Revise mode’ by clicking on the ‘Add
Schedule Items’ button.
4. Make necessary changes to the Schedule Item.
When revising a Schedule Item, a new line (in white) is automatically populated
with the information from the original version (in grey) because many of the items
may not change. (Please refer to the area pertaining to Forms Schedule Item
Changes.) All fields and attachments can be changed in order to respond
appropriately to the Objection Letter.

SERFF End User Training Manual
Industry Lesson 5 Page 21 of 55
Copyright © 2010 National Association of Insurance Commissioners. All rights reserved.
5. Click on the ‘Remove’ link next to the document on the revision line (white) to
remove the duplicated original document.
6. Attach the revised files by clicking on the button.
a. Click to find the file.
b. After selecting the appropriate file, click button to add the
attachment to your file list.

SERFF End User Training Manual
Industry Lesson 5 Page 22 of 55
Copyright © 2010 National Association of Insurance Commissioners. All rights reserved.
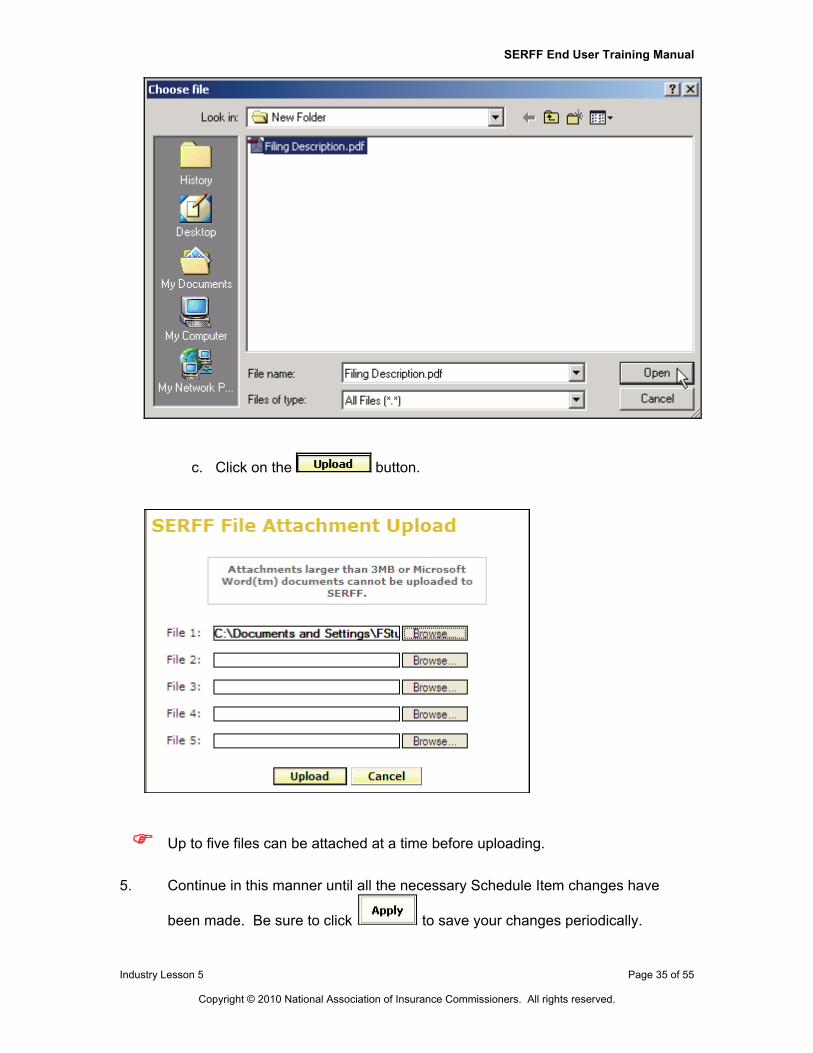
c. Click on the button.
Up to five files can be attached at a time before uploading.
7. Continue in this manner until all the necessary Schedule Item changes have
been made. Be sure to click to save your changes periodically.

SERFF End User Training Manual
Industry Lesson 5 Page 23 of 55
Copyright © 2010 National Association of Insurance Commissioners. All rights reserved.
Clicking on the link that is after the attachment will remove the previous
version of the attachment and enable the user to submit an amended file. The
user should remove the attachment that is being revised and attach the updated
version. The original attachment is still seen below the attachment in the grayed
out area and cannot be removed or changed.
8. Click to save changes and exit Revise mode.

SERFF End User Training Manual
Industry Lesson 5 Page 24 of 55
Copyright © 2010 National Association of Insurance Commissioners. All rights reserved.
If a Schedule Item has been replaced in error, click the Undo Draft button.
Build the Response Letter
1. Click button located next to the Objection Letter on the Filing
Correspondence tab. This will generate your Response Letter.
SERFF will automatically pull all Draft Schedule Items (the filing revisions) into the
Response Letter. Each Response will automatically match up with the corresponding
Objection.
2. Enter an Introduction, Comments (per Objection) and Conclusion in the
respective fields. The Comments field is required and must be completed for
each Objection.

SERFF End User Training Manual
Industry Lesson 5 Page 25 of 55
Copyright © 2010 National Association of Insurance Commissioners. All rights reserved.
If there are no Schedule Item changes for a given Objection, enter a comment
relating to the particular Objection.
3. Throughout the process, click to periodically save updates.
4. Click once all updates have been made.
After clicking on the button, the user can Submit, Edit, Delete or Close
the Response Letter. The user can also View the original Objection Letter sent
by the Reviewer.
5. After reviewing the Response Letter and the changes, click .
SERFF End User Training Manual
Industry Lesson 5 Page 26 of 55
Copyright © 2010 National Association of Insurance Commissioners. All rights reserved.
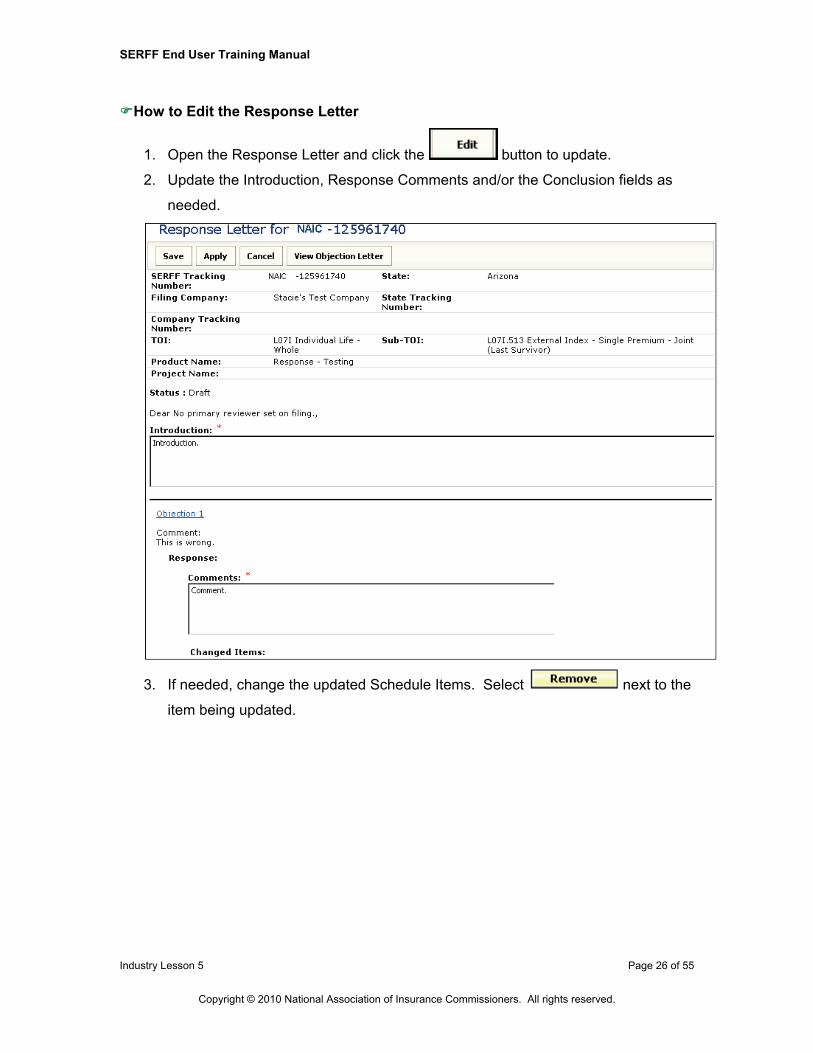
How to Edit the Response Letter
1. Open the Response Letter and click the button to update.
2. Update the Introduction, Response Comments and/or the Conclusion fields as
needed.
3. If needed, change the updated Schedule Items. Select next to the
item being updated.

SERFF End User Training Manual
Industry Lesson 5 Page 27 of 55
Copyright © 2010 National Association of Insurance Commissioners. All rights reserved.
4. Click and select Schedule Item changes that
belong with the Objection.
If updates need to be made to individual Schedule Items, please refer to the
section titled ‘Revising Schedule Items’ for complete instructions.
5. Click the button.
6. The Response has now been changed. The user may Submit, Edit, Delete,
Close, or View Objection Letter.

SERFF End User Training Manual
Industry Lesson 5 Page 28 of 55
Copyright © 2010 National Association of Insurance Commissioners. All rights reserved.
7. Click if you would like to see the Objection Letter again.
If the Response Letter is incorrect, click the button to delete the
entire Response Letter.

SERFF End User Training Manual
Industry Lesson 5 Page 29 of 55
Copyright © 2010 National Association of Insurance Commissioners. All rights reserved.
How to View the Response Letter
The draft of the Response Letter is located under the Filing Correspondence tab.
The user will be able to view the Response Letter two ways (please see the following
two examples).
Example 1:
When clicking on the Objection Letter link, the user will be directed to the
Objection Letter sent by the Reviewer.
• By clicking the button, the user is directed to the
Response Letter.

SERFF End User Training Manual
Industry Lesson 5 Page 30 of 55
Copyright © 2010 National Association of Insurance Commissioners. All rights reserved.

SERFF End User Training Manual
Industry Lesson 5 Page 31 of 55
Copyright © 2010 National Association of Insurance Commissioners. All rights reserved.
Example 2:
By clicking on the Author’s name (under Responded by), the user will be able to
view the draft Response Letter.
Click the button to close the Response Letter when finished
reviewing.
How to Submit the Response Letter
1. Click the button to send the Response Letter.
2. A confirmation message appears confirming this action.

SERFF End User Training Manual
Industry Lesson 5 Page 32 of 55
Copyright © 2010 National Association of Insurance Commissioners. All rights reserved.
3. Click the button.
*The Response Submitted on Date is now populated with the date sent to the State.

SERFF End User Training Manual
Industry Lesson 5 Page 33 of 55
Copyright © 2010 National Association of Insurance Commissioners. All rights reserved.
Amendments
*This is only used when the amendment is not in response to an Objection Letter (i.e. -
The filer has decided to add a schedule item.).
Revising/Adding Schedule Items
1. Click from the filing view.
2. The filing will be put into “Revise Mode.”
3. Click to the left of the item to be revised.
New items may also be added while in ‘Revise mode’ by clicking on the ‘Add
Schedule Item(s)’ button.

SERFF End User Training Manual
Industry Lesson 5 Page 34 of 55
Copyright © 2010 National Association of Insurance Commissioners. All rights reserved.
When revising a Schedule Item, a new line (in white) is automatically populated
with the information from the original version (in grey) because many of the items
may not change. (Please refer to the area pertaining to Forms Schedule Item
Changes.) All fields and attachments can be changed.
4. Attach any appropriate files by clicking on the button.
a. Click to find the file.
b. After selecting the appropriate file, click button to add the
attachment to your file list.
SERFF End User Training Manual
Industry Lesson 5 Page 35 of 55
Copyright © 2010 National Association of Insurance Commissioners. All rights reserved.
c. Click on the button.
Up to five files can be attached at a time before uploading.
5. Continue in this manner until all the necessary Schedule Item changes have
been made. Be sure to click to save your changes periodically.

SERFF End User Training Manual
Industry Lesson 5 Page 36 of 55
Copyright © 2010 National Association of Insurance Commissioners. All rights reserved.
Clicking on the after the attachment will remove the previous version of
the attachment and enable the user to submit an amended file. The user should
remove the attachment that is being revised and attach the updated version. The
original attachment is still seen below the attachment in the grayed out area and
cannot be removed or changed.
6. Click to save changes and exit Revise mode.
Build the Amendment
1. Click on the Filing Correspondence tab.
2. Click the link.
3. Enter Comments in the Comment field.
4. To make an association between draft Schedule Items and the Amendment, click
and select Schedule Item changes that belong
with the update.

SERFF End User Training Manual
Industry Lesson 5 Page 37 of 55
Copyright © 2010 National Association of Insurance Commissioners. All rights reserved.
5. From the ‘Draft Schedule Items for Filing’ window, select the draft items to be
included in the Response Letter. Click .

SERFF End User Training Manual
Industry Lesson 5 Page 38 of 55
Copyright © 2010 National Association of Insurance Commissioners. All rights reserved.
5. Throughout the process, click to periodically save updates.
6. Click once all updates have been made.
7. The user may then Submit, Edit, Delete or Close the Amendment.

SERFF End User Training Manual
Industry Lesson 5 Page 39 of 55
Copyright © 2010 National Association of Insurance Commissioners. All rights reserved.
The Date Submitted field is now populated with the date and time the
Amendment was sent to the State.

SERFF End User Training Manual
Industry Lesson 5 Page 40 of 55
Copyright © 2010 National Association of Insurance Commissioners. All rights reserved.
PDF Pipeline
PDF Pipeline provides users with the ability to create a single PDF file of their entire
filing or selected parts of their filing. The PDF Pipeline is generated on demand. The
results will be displayed instantly and the user can save the PDF locally to their network
or review online.
All Schedule Items and Correspondence including Reviewer Notes and Filer Notes will
be available to PDF Pipeline.
PDF Pipeline
1. Open the SERFF filing.
2. Click the button.
When selecting the Form, Rate and Supporting Documentation Schedules, at least one
item must be selected for the Schedule to print. If just an item from the Schedule is
chosen and not the Schedule itself, only the attachment and/or details for that item will
generate. Nothing will print if just the Schedule is selected and no items.
A dialog box will appear that lists all of the pieces of the filing that can be included in the
PDF.

SERFF End User Training Manual
Industry Lesson 5 Page 41 of 55
Copyright © 2010 National Association of Insurance Commissioners. All rights reserved.
3. Select the individual items or click the button.
4. Click the button to deselect all the items.
5. Click the button to cancel the action.
6. Click the button to create the PDF.

SERFF End User Training Manual
Industry Lesson 5 Page 42 of 55
Copyright © 2010 National Association of Insurance Commissioners. All rights reserved.
After clicking on the button the PDF file will open in a new window.
Click on the individual bookmarks to navigate to the different sections of the filing.
Click on the button to save the PDF file outside of the SERFF system.
Non-PDF attachments and attachments that are larger than 3 MB will not work
with PDF Pipeline.

SERFF End User Training Manual
Industry Lesson 5 Page 43 of 55
Copyright © 2010 National Association of Insurance Commissioners. All rights reserved.
A Non- PDF attachment will be displayed with a symbol. That symbol indicates the
attached file is not a PDF document. If the box is checked prior to selecting the
button it will display Non-PDF attachment in the bookmarks and on the
page.
SERFF End User Training Manual
Industry Lesson 5 Page 44 of 55
Copyright © 2010 National Association of Insurance Commissioners. All rights reserved.
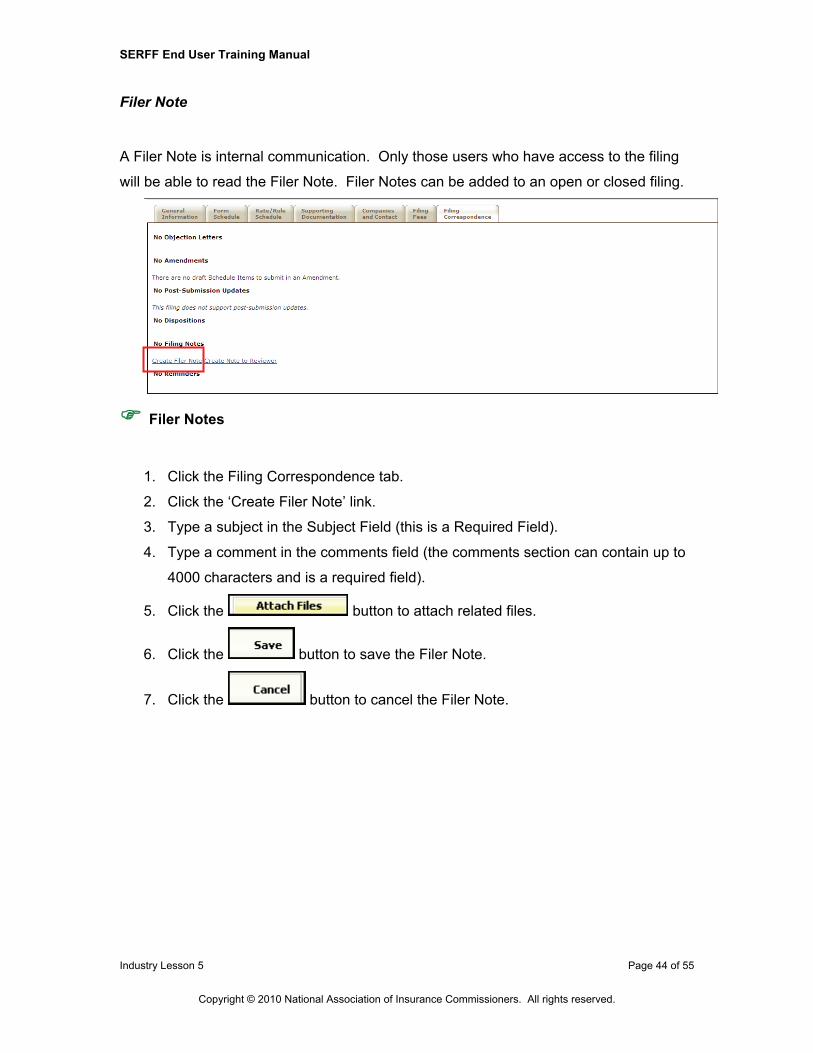
Filer Note
A Filer Note is internal communication. Only those users who have access to the filing
will be able to read the Filer Note. Filer Notes can be added to an open or closed filing.
Filer Notes
1. Click the Filing Correspondence tab.
2. Click the ‘Create Filer Note’ link.
3. Type a subject in the Subject Field (this is a Required Field).
4. Type a comment in the comments field (the comments section can contain up to
4000 characters and is a required field).
5. Click the button to attach related files.
6. Click the button to save the Filer Note.
7. Click the button to cancel the Filer Note.

SERFF End User Training Manual
Industry Lesson 5 Page 45 of 55
Copyright © 2010 National Association of Insurance Commissioners. All rights reserved.
After clicking the button, the user can then click on the Filing Note subject
link. The user can then Edit, Delete, or close the Filer Note.

SERFF End User Training Manual
Industry Lesson 5 Page 46 of 55
Copyright © 2010 National Association of Insurance Commissioners. All rights reserved.
All Filer Notes are located under the Filing Correspondence tab of the filing. The Filing
Notes section lists all notes, whether it is a Filer Note or a Note to Reviewer, as well as
the respective ‘Created On’ date.

SERFF End User Training Manual
Industry Lesson 5 Page 47 of 55
Copyright © 2010 National Association of Insurance Commissioners. All rights reserved.
Note to Reviewer
A Note to Reviewer is sent to the Reviewer from the user. It becomes part of the filing.
Note to Reviewer
1. Click the Filing Correspondence tab.
2. Click the ‘Create Note to Reviewer’ link.
3. Type a subject in the Subject Field (this is a required field).
4. Type a comment in the Comments Field (the comments section can contain up to
4000 characters and is a required field).
5. Click the button to attach related files.
6. Click the button to save the Note to Reviewer.
7. Click the button to cancel the Note to Reviewer.

SERFF End User Training Manual
Industry Lesson 5 Page 48 of 55
Copyright © 2010 National Association of Insurance Commissioners. All rights reserved.
After clicking on the button a preview of the note is displayed. The user
can Submit, Edit, Delete, or Close the note.

SERFF End User Training Manual
Industry Lesson 5 Page 49 of 55
Copyright © 2010 National Association of Insurance Commissioners. All rights reserved.
1. Click the button to edit the Reviewer Note.
2. Click the button to delete the Reviewer Note.
3. A confirmation message appears confirming this action.
4. Click the button.

SERFF End User Training Manual
Industry Lesson 5 Page 50 of 55
Copyright © 2010 National Association of Insurance Commissioners. All rights reserved.
5. If you choose not to Delete, click the button to save the Note to
Reviewer as a draft.
The Submitted On field is blank. When the Note to Reviewer has been
submitted, the Submitted On field will be populated with the date submitted and
the draft icon will no longer be displayed.
6. Click the button to send the Note to Reviewer.
7. A confirmation message appears confirming the action.
8. Click the button.

SERFF End User Training Manual
Industry Lesson 5 Page 51 of 55
Copyright © 2010 National Association of Insurance Commissioners. All rights reserved.
A Note to Reviewer may be sent with the original submission of the filing, as well
as on a closed filing (provided the states have not disabled this option).
Submitting a Note to Reviewer on a closed filing is beneficial if the user needs to
change an effective or implementation date or to ask that the filing be re-opened
for another purpose. It is important to note that attachments may not be added to
a Note to Reviewer on a closed filing.
When States Restrict NTR on Closed Filings
Some states will not accept a ‘Note to Reviewer’ on a Closed Filing. In this instance,
there will not be a ‘Create Note to Reviewer’ link at the bottom of the page. Some
states my provide an explanation in place of the link, if there is no explanation, then
that area will just be left blank.

SERFF End User Training Manual
Industry Lesson 5 Page 52 of 55
Copyright © 2010 National Association of Insurance Commissioners. All rights reserved.
Reminders
Reminders are user defined messages that will be sent to the Message Center on the
due date set by the user.
Create a reminder
1. Open the filing, click the button.
2. Type the Subject and Due Date (required fields) and comments.

SERFF End User Training Manual
Industry Lesson 5 Page 53 of 55
Copyright © 2010 National Association of Insurance Commissioners. All rights reserved.
3. If the creator radio button is selected upon creation, then the message will
appear in the creator message center. If the all radio button is selected, then
everyone who has access to the filing will receive the message in their message
center.
4. Click the button.
5. The reminder will be displayed under the filing correspondence tab.
Dispositions
When a Disposition Report is created for a filing, the SERFF status of that filing is
changed to "Closed.” The filing is then removed from the “My Open Filings” view. The
user can find any closed filings by using the Advanced Search. The Disposition can be
found on the Filing Correspondence Tab of the filing. The user receives a message in
the Message Center indicating that there is a Disposition.

SERFF End User Training Manual
Industry Lesson 5 Page 54 of 55
Copyright © 2010 National Association of Insurance Commissioners. All rights reserved.
View a Disposition
1. To open a message, move the pointer to the message. Click when the message
to be read is highlighted in yellow.
2. The message will display.
3. To open the filing referenced in the message, click the blue, underlined SERFF
Tracking Number.
4. Click on the Filing Correspondence tab.
5. Click the blue link under Dispositions.
The Disposition is now viewable.

SERFF End User Training Manual
Industry Lesson 5 Page 55 of 55
Copyright © 2010 National Association of Insurance Commissioners. All rights reserved.
SERFF End User Training Manual
Industry Lesson 5 Page 55 of 55
Copyright © 2010 National Association of Insurance Commissioners. All rights reserved.