This document is a step-by-step review 2 · This document is a step-by-step review of the barcode...
32
GM 2 online barcodes 1 This document is a step-by-step review of the barcode updates and enhancements that are now available and ready to use for GM 2 online. The barcode updates are included in the 2012.2 release. Table of Contents Create Barcode Batches (page 2) Add individual items to a batch (page 5) Print Barcode tickets (page 10) Add items from a purchase order to the batch (page 12) Quick item barcode Entry/Print (page 17) Create Class Price Barcodes (page 19) Create Shelf Tags (page 22) Enter Classes (to print all items in the class) (page 23) Enter Individual Items (page 25) List Purchase Orders by Selected Shipping Dates (page 28) Samples of Ticket Types (page 30)
Transcript of This document is a step-by-step review 2 · This document is a step-by-step review of the barcode...
GM2online barcodes 1
This document is a step-by-step review of the barcode updates and enhancements that are now available and ready to use for GM2online. The barcode updates are included in the 2012.2 release. Table of Contents
Create Barcode Batches (page 2)
Add individual items to a batch (page 5)
Print Barcode tickets (page 10)
Add items from a purchase order to the batch (page 12)
Quick item barcode Entry/Print (page 17)
Create Class Price Barcodes (page 19)
Create Shelf Tags (page 22)
Enter Classes (to print all items in the class) (page 23)
Enter Individual Items (page 25)
List Purchase Orders by Selected Shipping Dates (page 28)
Samples of Ticket Types (page 30)

GM2online barcodes 2
Create Barcode Batches The Create Barcode option allows for the entry of multiple SKUs, UPCs, and general book ISBNs that need to have barcodes. If needed, this option creates a batch based on the items on a PO. 1. Click the Merchandise option from the GM2online Main Menu.
2. Click the Barcode menu option.

GM2online barcodes 3
3. Click the Create Barcode Batches option.
4. Click Add.

GM2online barcodes 4
Batch date. This field is automatically populated.
Batch number. Depending on the control file setup, this option may be automatically populated. If this is not populated, enter a batch number.
Use store prices? Click Yes to use the retail shelf prices that have been set in store prices. Click No and the prices are pulled-in from the SKU master file.
Default store for manual entry. Enter the store number that will be printed on the tickets. This is only necessary for manual entry.
Add Items for selected P/Os? Clicking Yes allows specific items to be added from purchase orders. Clicking No allows items to be entered individually.
5. Click Forward to confirm changes. 6. Click Forward again. The blank Barcode Batch screen displays as shown in the next screenshot.

GM2online barcodes 5
Add individual items to a batch This example shows how to add individual items to a batch. 1. This screen displays after adding the batch header and selecting Work with Detail. 2. The Store number field is automatically populated if a default store number is selected on the Barcode Batch entry screen from page 4. 3. Enter/Scan a number in the SKU number field or select a SKU from the dropdown menu. 4. Enter the number of barcodes to print in the Qty to print field. 5. Enter a Logo, Color, or Size code, if needed, in the corresponding field or use the dropdown menu to view additional options. If the barcode is scanned from an existing barcode tag, these fields will default.

GM2online barcodes 6
The following screenshot shows the dropdown grid used to select a Logo. Similar grids display for Color and Size. 6. Highlight a logo and click the Select button. The logo now populates the field on the previous main screen as shown in the screenshot at the bottom of page 6.
7. Enter a color in the COLOR field or use the corresponding dropdown to view additional options.

GM2online barcodes 7
8. Highlight an entry on the list and click the Select button. The selected color now populates the COLOR field as shown in the screenshot at the bottom of this page.
9. Enter a size in the SIZE field or use the corresponding dropdown to select a size option.

GM2online barcodes 8
10. Enter ticket type in the corresponding field or use the dropdown menu to view ticket type options. If the ticket type is entered on the SKU record this field defaults. See page 30 for ticket type details. 11. If the SKU has a Ticket Type on the SKU master file, it automatically populates this field. 12. Select a Ticket Type and click Forward.
13. Click Forward to populate the remaining fields. 14. Click Previous and the selected size now populates the SIZE field along with the Logo and Color fields on the main screen as shown in the next screenshot.

GM2online barcodes 9
15. To review entries, click List Entry and the following screen displays with all the items selected for the barcode batch. 16. Items may be added to this screen by using the SKU Number dropdown or by clicking the Add with scanner option at the top of the page. 17. Click the Add with scanner option to add items to the batch list using a scanner. This blank screen toggles with the main entry screen. 18. Click Previous and the following screen displays.

GM2online barcodes 10
Print Barcode tickets (tags)
Print edit listing. This option generates a report of SKUs in the batch.
Complete Batch. This will complete the process to have the tickets ready to print.
Add items for selected P/O’s. This allows for the entry of a PO. When using this option, all items on the entered PO will be included in the batch. See page 12 for details for using this option.
Change. This allows batch header information to be changed.
Display. Click this option to show batch header details.
Work with detail. Click this option to display a screen that shows a listing of the items in the batch. Entered items may be deleted, changed, or displayed.
Delete. This option deletes the batch.
Print. This option sends tickets to the print queue.

GM2online barcodes 11
1. Before printing tickets, it is recommended to print and review the print edit listing button. Highlight a batch in the list and click the Print edit listing option. The following screen displays a confirmation message that the selected batch has been sent to the job queue for printing. 2. Click Exit. Go to your printer queue.
3. The following screenshot is an example of the Edit Listing report.

GM2online barcodes 12
Add items from a purchase order to the batch The next example shows how to add items from a purchase order. If during batch creation “Y” is the selection for Add items for Selected P/O’s, the system automatically returns to the screen shown at the top of page 13. 1. Highlight the batch. Click the Add items for selected P/Os to add additional purchase orders to the existing batch.

GM2online barcodes 13
2. The entry screen displays after clicking the Add Items for selected P/Os option. 3. Enter a PO Number or use the dropdown menu to select from a list to add to the batch. Additional POs can be entered on this screen prior to clicking Forward.
4. Click the Forward option and the following screen displays.

GM2online barcodes 14
5. After adding purchase orders to the batch, click Previous to return to the main screen. Click the Complete Batch option.
6. Highlight a batch and click the Print edit listing option at the top of the screen. 7. The main screen displays after printing the report. Click Exit and go to the printer queue. 8. An example of the report that is generated after clicking the Print Edit listing button is shown on page 11.

GM2online barcodes 15
9. Highlight a batch and click Print on the following screen. Clicking Print will automatically take you into the printer queue.
10. There is an option to Print All My Barcodes or to print single batches. Select the batches in the spool files that to be printed or select the Print All My Barcodes option to print all batches listed.

GM2online barcodes 16
Quick item barcode entry/print This option allows for the quick entry and printing of additional barcodes. These may be printed on demand to replace lost, torn or unscannable barcodes. 1. Click the Quick Item Barcode Entry/Print option from the Barcode printing main screen.
2. The main Quick Item Barcode Entry/Print screen displays as shown on the next page.

GM2online barcodes 17
3. Enter/scan a SKU or select a SKU from the dropdown. Select a LOGO, COLOR, SIZE, if needed, as previously discussed on page 6. If an item is scanned, these fields will default in. 4. Enter ticket type for select from the dropdown.
The following screenshot displays and shows the Ticket Type options.
GM2online barcodes 18
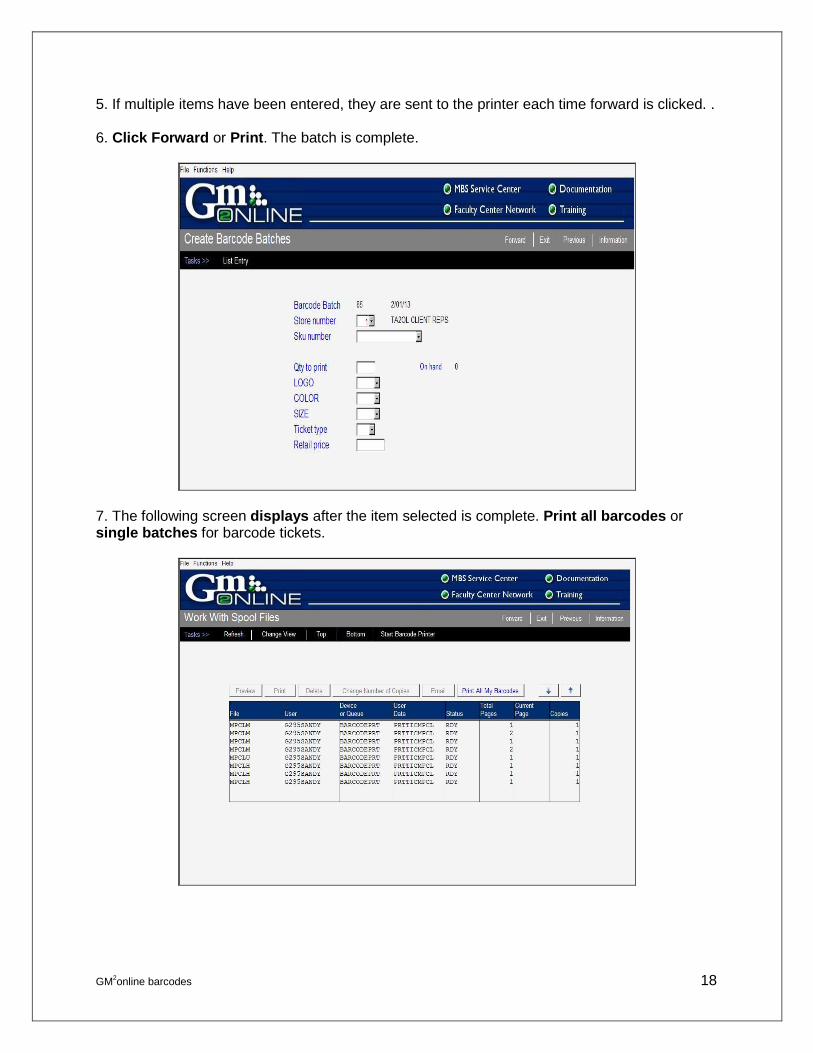
5. If multiple items have been entered, they are sent to the printer each time forward is clicked. . 6. Click Forward or Print. The batch is complete.
7. The following screen displays after the item selected is complete. Print all barcodes or single batches for barcode tickets.

GM2online barcodes 19
Create Class Price Barcodes Use this option for items that report to class level. The price on the barcode is manually entered on each ticket (shown in the following steps). 1. Click the Create Class Price Barcodes option from the Barcode main menu.
2. The following screen displays.

GM2online barcodes 20
3. Enter a class or select a class from the dropdown menu. Enter a retail price and the number of tickets to be entered in the corresponding fields. Multiple entries can be made in this screen before clicking Forward.
4. After entering a class or once all entries have been made click Forward. The screen updates and populates the Class Description field. A confirmation message displays at the bottom of the screen (All records processed successfully – continue). 5. Continue to add classes or click the Print button. The following screen displays a confirmation message.

GM2online barcodes 21
6. Click Print All My Barcodes or select a single batch of tickets to print.

GM2online barcodes 22
Create Shelf Tags 1. Click the Create Shelf Tags option from the Barcode Printing Menu.
2. There are two options on the main Create Shelf Tags screen: Enter Classes and Enter Individual Items.
.

GM2online barcodes 23
Enter Classes (to print all items in the class) 1. Click the Enter Classes (to print all items in the class) option. This option is used to print tags for every item in a class. 2. Enter the class in the Class field. Enter the Subclass field (optional). 3. Enter the letter S in the S (SKU), U (UPC) field to print by SKU. Enter the letter U in this field to print by UPC. 4. Leave the Class Description field blank. This field automatically populates after clicking Forward. 5. Enter the number of tags to print in the # of Tags (Default is 1) field. 6. Click Forward. 7. Click Exit or Print and the tickets are sent to the printer queue.

GM2online barcodes 24
8. The following screen displays. Click Menus and locate the printer. This takes the user to the printer queue to print the tickets.

GM2online barcodes 25
Enter Individual Items 1. Select the Enter Individual Items option from the main screen.

GM2online barcodes 26
2. Enter a SKU or UPC Code in the SKU or UPC Code field. 3. Enter the number of tags to print in the # of Tags (Default is 1) heading. 4. Click Forward. The class description field is automatically populated. A confirmation message displays in red text at the bottom of the screen (All records processed successfully – continue). 5. Click Exit or Print. The tickets are sent to the printer queue.

GM2online barcodes 27
6. The following screen displays. Click Menus and locate the printer. This takes the user to the printer queue to print the tickets.

GM2online barcodes 28
List purchase orders by selected shipping dates This option prints a listing of purchase orders by ship date that may be used to pre-print barcodes. 1. Click the List purchase orders by selected shipping dates to generate a report of purchase dates. The screenshot displays as shown on at the top of page 29.

GM2online barcodes 29
2. Enter a date range (use mm/dd/yy format) in the Beginning date field and the Ending date field or use the dropdown to select the dates from the calendar icon. 3. Click Forward. A confirmation message asks to confirm the dates. Click Forward again.
4. Below is a copy of the report.

GM2online barcodes 30
Ticket Types

GM2online barcodes 31

GM2online barcodes 32
5. Class Price Barcodes
6. Peg Hook Tag


![Setac asia pacific 2014 - pharmaceutical era [gm2]](https://static.fdocuments.us/doc/165x107/55862258d8b42a7d428b521f/setac-asia-pacific-2014-pharmaceutical-era-gm2.jpg)