Final countdown: Rod Cross The Final Countdown – Summer 1967

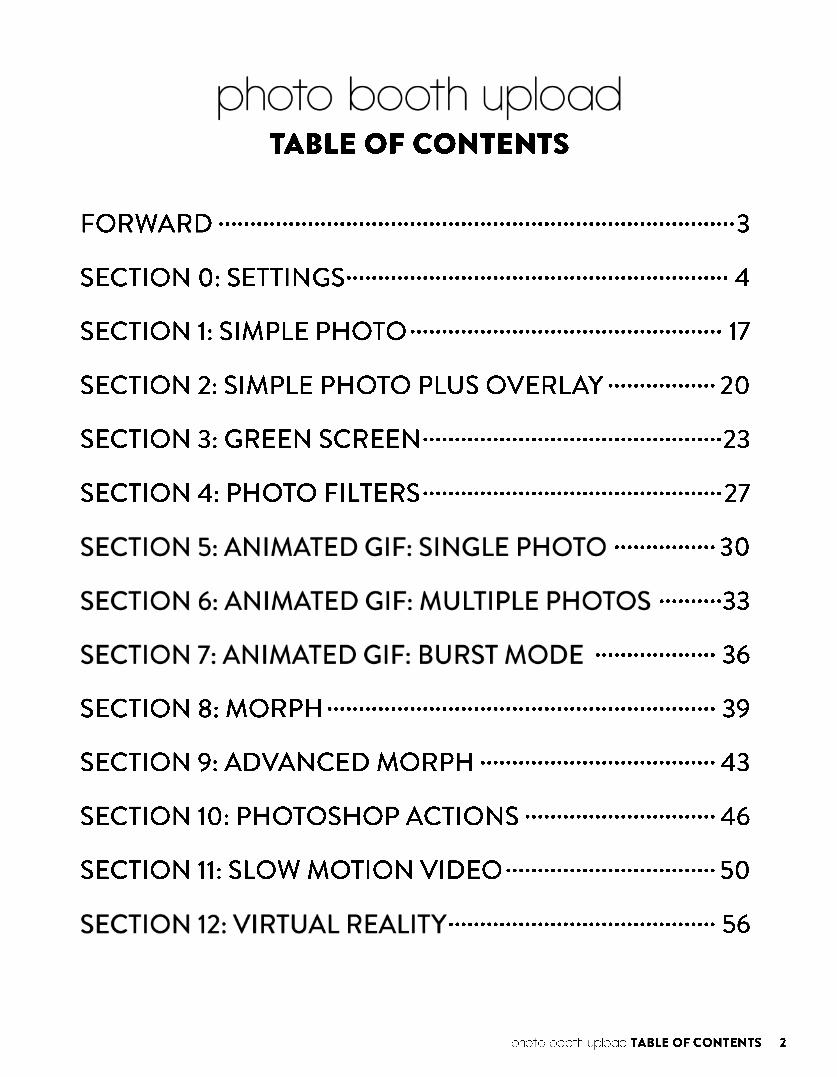
This manual is designed so that after the initial walkthrough of the settings of Photo Booth Upload (PBU), each section guides you through creating a different kind of activation. Each section builds off of the knowledge of the previous section.
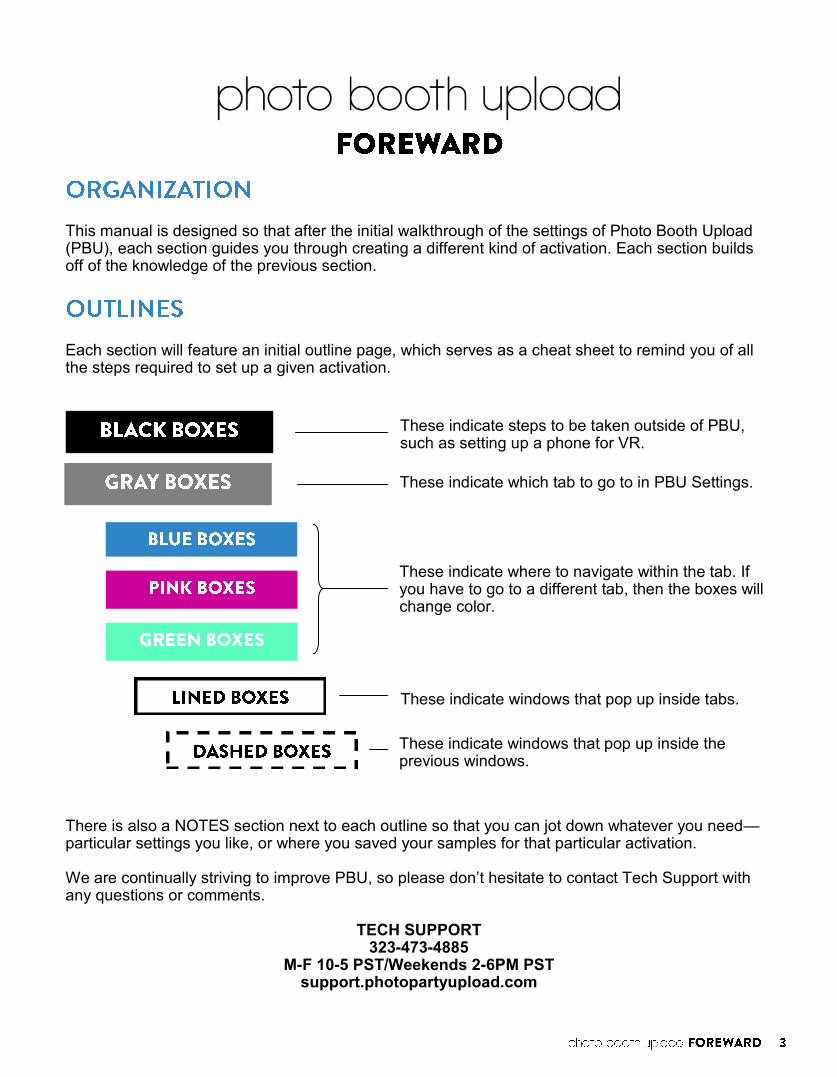
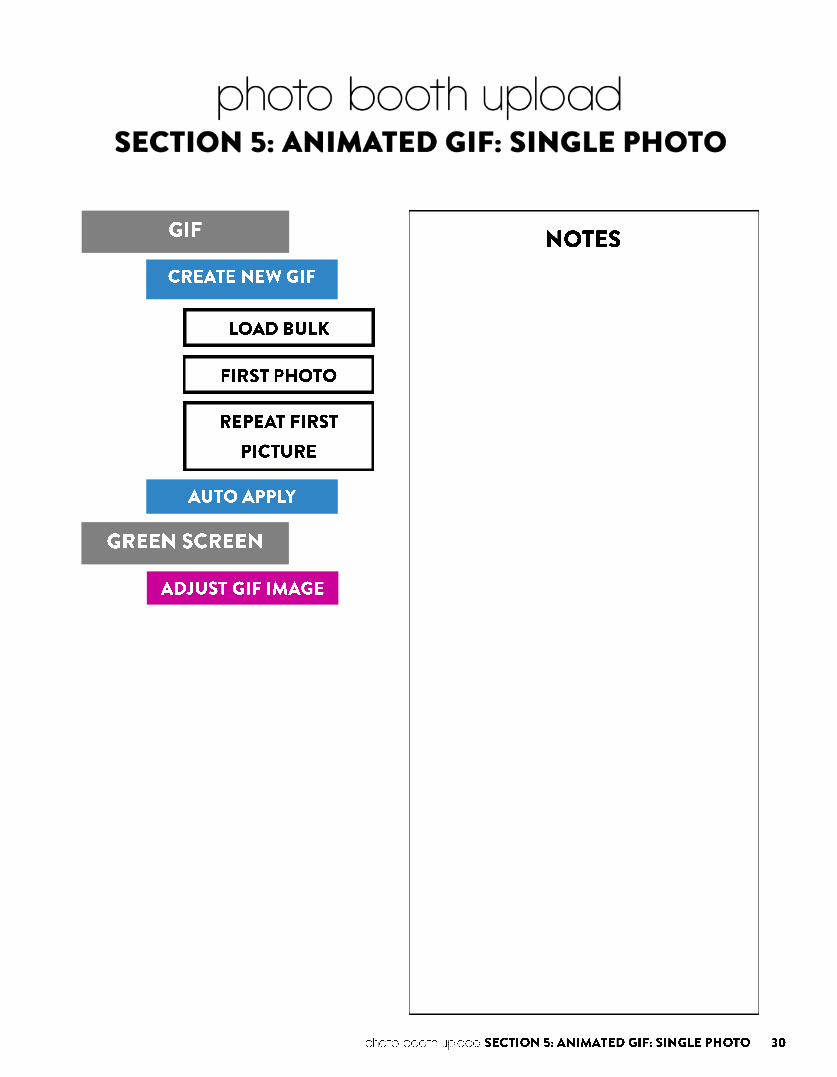
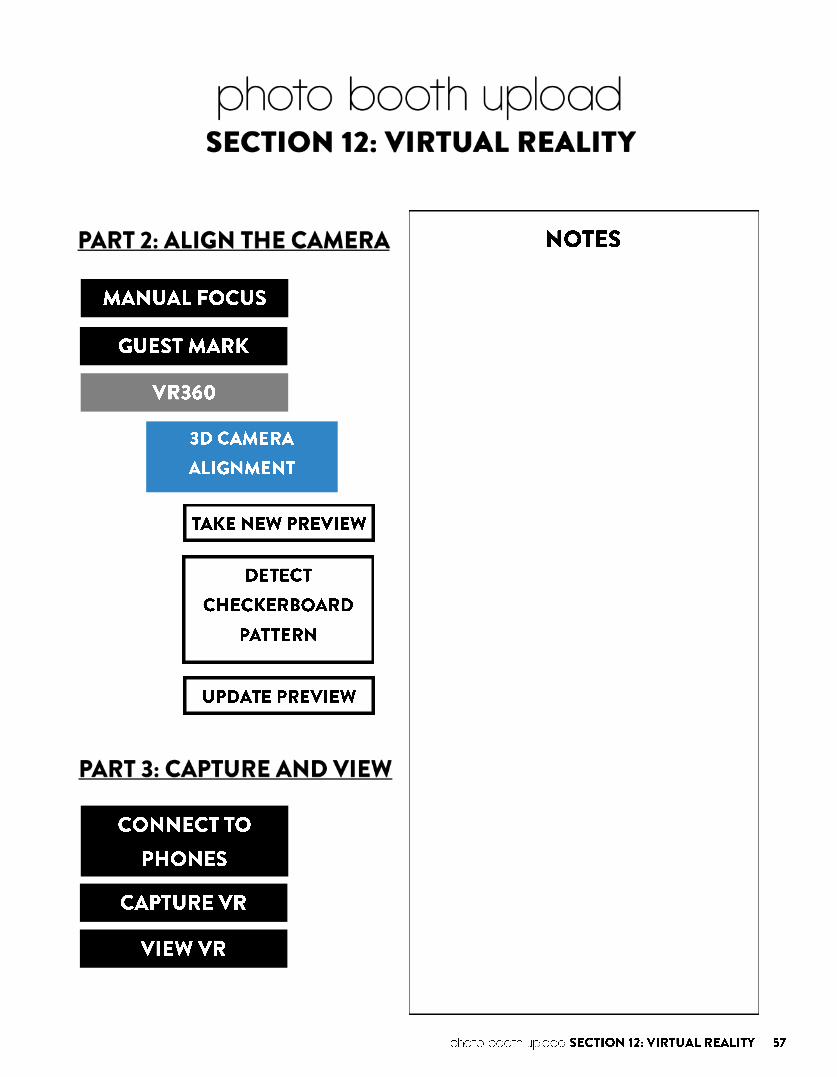
Each section will feature an initial outline page, which serves as a cheat sheet to remind you of all the steps required to set up a given activation.
These indicate steps to be taken outside of PBU, such as setting up a phone for VR.
These indicate which tab to go to in PBU Settings.
These indicate where to navigate within the tab. If you have to go to a different tab, then the boxes will change color.
These indicate windows that pop up inside tabs.
These indicate windows that pop up inside the previous windows.
There is also a NOTES section next to each outline so that you can jot down whatever you need—particular settings you like, or where you saved your samples for that particular activation. We are continually striving to improve PBU, so please don’t hesitate to contact Tech Support with any questions or comments.
TECH SUPPORT 323-473-4885
M-F 10-5 PST/Weekends 2-6PM PST support.photopartyupload.com


Photo Booth Upload (PBU) is a versatile tool for photo activations. These instructions will go into detail about every option in the Preferences tab, the Camera Settings tab, and the PPU/Printing tab. (PPU stands for Photo Party Upload, our sharing software.) These may be referenced in other Sections. To get into PBU Settings, run PBU and press S on your keyboard or triple tap the bottom right corner of the screen.
The Preferences tab is the first tab you see when you open PBU Settings. Here you will be able to adjust many options including where to save your photos, how to trigger a photo, and many other interactions.

You can set the Hotkeys to open Settings, Minimize PBU, or Exit PBU. These actions only function outside of PBU Settings, so you’ll have to press OK or Cancel and return to the main screen to use them. If you press the Hotkeys button, a menu will appear allowing you to minimize or escape PBU. This is useful if your keyboard stops working, but the mouse or touchscreen still works.
Originals Folder (1) is where the original, unprocessed photos/videos are kept after being transferred from your camera. The files therein are used to create all Green Screen images, GIFs, Videos, etc. Output Folder (2) is where the final, processed images, GIFs, videos, etc., are saved. Both Folders can be individually assigned, but we recommend checking the box Make Sub-folder of output folder (3) to keep things tidy. Filename Prefix (4) will add whatever you enter in the field to the beginning of every photo taken in PBU.
Software Background (5) will change the background of the software from the default graphic to a background of your choosing. The file you choose will be stretched to fit the screen. We recommend your background image dimensions match your screen resolution.
1
2
3
4
5

Restore Generic will restore the generic graphics included with each copy of PBU. You have similar options as Import to choose which generic graphics you would like to import. Clear All will remove all graphics, return all fields to their default values EXCEPT for the Prefer-ences tab and LED patterns. Settings Backup stores backups on your computer. It ONLY stores backups of settings like check boxes, and settings for individual graphics like a Page Design. IT DOES NOT store the graphics themselves, as that would take up too much disk space. If the graphics files are in the same disk location as when the settings backup was created, the graphics will be restored. If the graphics are not in the same location, photo holders, image path locations, and item names will be retained, but graphics will be missing.
Export will save all your Settings (camera settings, all check boxes, Chroma Key settings, etc.) as well as your graphics and settings for GIFs, green screens, Videos, LED patterns (Infinite only), custom buttons, etc. in a .pbu file. We HIGHLY recommend doing this before every event. Import will import a .pbu file. A dialogue box will appear during the import process asking what items you would like to import. These items are for each tab, so ALL Green Screens, ALL GIFs, etc. You have the option of keeping only the imported items, both imported and old items, or to keep the old items. You can keep or discard the imported Camera Settings, LED Patterns, and/or Custom Buttons.

Disable Photo will remove the photo button on the main screen preventing you from taking regular photos, green screen photos, or using a Page Design. Disable Share Screen will remove the sharing options you have enabled in your event from appearing after a session. It does not disable sharing in the Kiosk. Quick Mode disables 80% of the transition animations between session phases. It will also automatically start a new session after the previous session is complete, if there is only one choice. Enable Home Button adds a button on the bottom left corner of the screen. Pressing it will enable you to cancel a session without saving it. If Trigger Photo With is set to Mouse, Key, or Mouse with Countdown, you can cancel a mutli-photo session like a Page Design part way through. Full Screen Live View will enlarge the Live View window. Full Screen Preview will show a preview of the final image, GIF, Video, etc, at the end of the session. It will remain on the screen until you click out of it. If it is disabled, the preview will remain on the screen for a few seconds before returning to the home screen. Disable Live Preview will remove the preview window. Save “Processing” Preview will save a thumbnail of your GIF or video that the guests can share. The fully processed GIF or video will be sent when it is ready. This is useful when processing times become long. Enable Photo Edit will allow you to edit the photo after it has been taken. This only affects photos, green screen photos, and Page Design. Enable Redo will allow you to redo a photo. You must “Accept” the photo before it is saved. This only affects photos, green screen photos, and Page Design. Edit Final Message will allow you to display a message after every session. You can customize font, duration, and color. Edit Welcome Video will play a video before each session. You can have a different video for each activation type. Edit Splash Image will allow you to display an image on the screen at the start of every session.
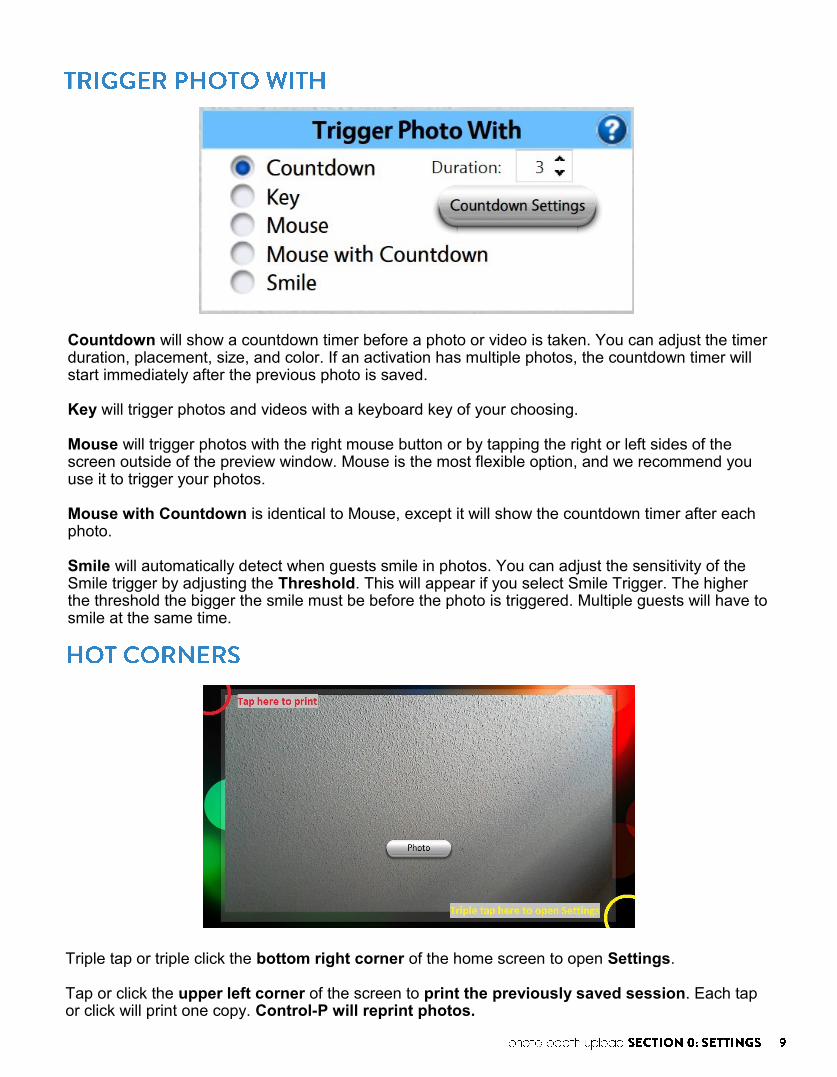
Countdown will show a countdown timer before a photo or video is taken. You can adjust the timer duration, placement, size, and color. If an activation has multiple photos, the countdown timer will start immediately after the previous photo is saved. Key will trigger photos and videos with a keyboard key of your choosing. Mouse will trigger photos with the right mouse button or by tapping the right or left sides of the screen outside of the preview window. Mouse is the most flexible option, and we recommend you use it to trigger your photos. Mouse with Countdown is identical to Mouse, except it will show the countdown timer after each photo. Smile will automatically detect when guests smile in photos. You can adjust the sensitivity of the Smile trigger by adjusting the Threshold. This will appear if you select Smile Trigger. The higher the threshold the bigger the smile must be before the photo is triggered. Multiple guests will have to smile at the same time.
Triple tap or triple click the bottom right corner of the home screen to open Settings. Tap or click the upper left corner of the screen to print the previously saved session. Each tap or click will print one copy. Control-P will reprint photos.

Photo Camera will allow you to choose the camera used with regular photos, green screen photos, and standard GIFs. Video Camera will allow you to choose the camera used with all videos including slow motion videos. Main Screen Camera is the camera used before you select your activation. If the camera used for the activation is different than the Main Screen Camera, you will not see the Main Screen Camera preview when that activation is selected.
Camera Settings is the second tab from left in PBU Settings. In this tab you will be able to modify exposure, orientation, resolution, and crop for all cameras. You can also specify which cameras will be used for Photos, Videos, The Main Screen, and Burst GIF. Cameras supported by PBU are Canon DSLRs, Windows compatible webcams, and the Point Grey Flea 3 and Grasshopper USB 3 cameras. DSLRs must be set to Manual mode, and they must contain an SD card.

Video Device will allow you to choose which webcam (currently connected to the computer) you would like to use for webcam photos and videos. The Configure button will open the webcam configuration window. This window is different for every model of webcam. It is usually the webcam software installed for that camera in Windows. Audio Device will allow you to choose the microphone used with webcam videos. To function, it must be a USB microphone. Enable Recording Pause will allow you to pause webcam videos while recording. Video Mode is the pixel dimensions and frame rate of the webcam. Volume will adjust the recorded Volume of all videos. Note: You can adjust the recording volume for individual videos in the Video Edit window in the Video tab. Keep Aspect Ratio will crop the webcam image to a specific aspect ratio. Webcam Orientation will rotate the webcam image. Unlike Mirror Camera Preview, Orientation will affect the final image. Crop % will allow you to crop small portions of the webcam image from each side.
Burst Camera will allow you to choose the camera used with Burst Mode Gifs. It will not affect regular GIFs. Mirror Camera Preview will mirror the preview image for all cameras horizontally. This will make it easier for guests to position themselves while looking at the screen. Only the preview image is mir-rored; the final image will not be affected. The Preview Window on the right will show a preview of the camera selected (webcam, DSLR, or Photo Party Station Slow Motion Camera). You will see changes to camera settings reflected in the Preview window.
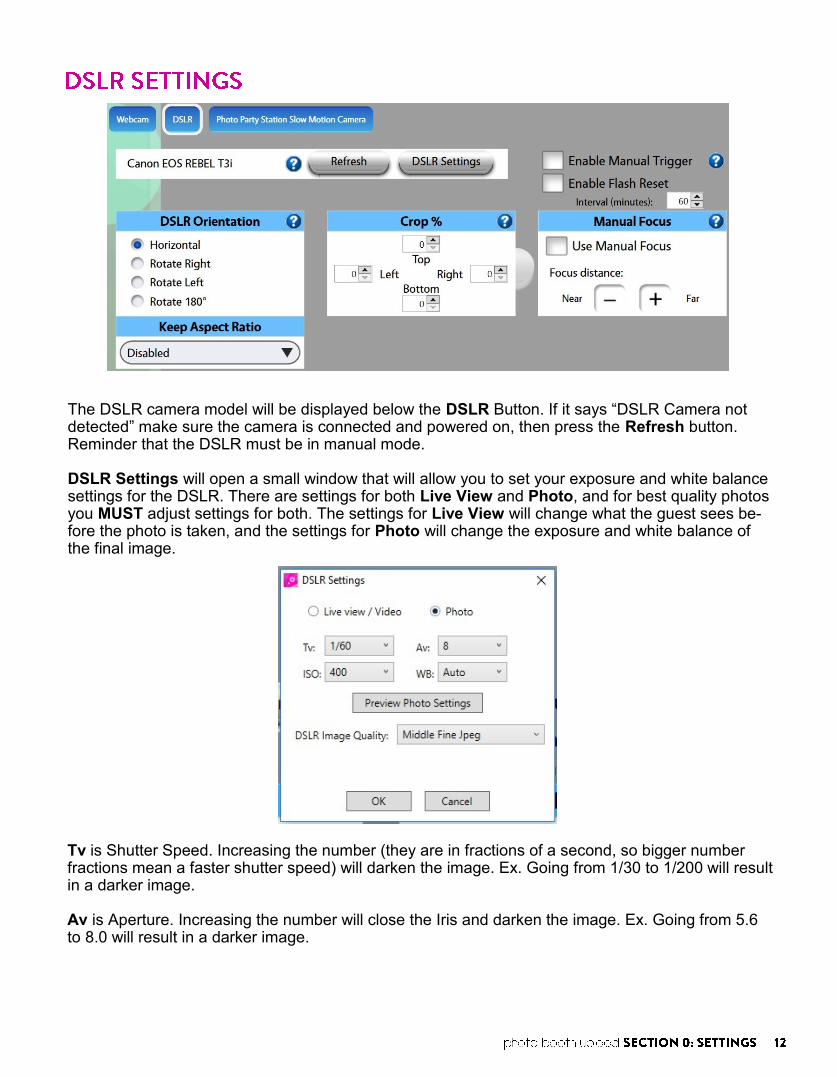
The DSLR camera model will be displayed below the DSLR Button. If it says “DSLR Camera not detected” make sure the camera is connected and powered on, then press the Refresh button. Reminder that the DSLR must be in manual mode. DSLR Settings will open a small window that will allow you to set your exposure and white balance settings for the DSLR. There are settings for both Live View and Photo, and for best quality photos you MUST adjust settings for both. The settings for Live View will change what the guest sees be-fore the photo is taken, and the settings for Photo will change the exposure and white balance of the final image.
Tv is Shutter Speed. Increasing the number (they are in fractions of a second, so bigger number fractions mean a faster shutter speed) will darken the image. Ex. Going from 1/30 to 1/200 will result in a darker image. Av is Aperture. Increasing the number will close the Iris and darken the image. Ex. Going from 5.6 to 8.0 will result in a darker image.

ISO is sensor sensitivity. Increasing the number will brighten the image. Ex. Going from 400 to 800 will brighten the image. For the Photo setting, we recommend not exceeding 1600 ISO. Any more will result in noticeable image noise. WB is white balance. This will affect the color temperature of the image. It should be set depending on your lighting conditions. Ex. If you are outside in the shade, set WB to Cloudy. DSLR Image Quality (only for photo) is the pixel size and compression of the raw photo. We recommend leaving this at the default value of Medium Fine JPEG.
Each of these options, except for DSLR Image Quality, has an Auto option. We DO NOT recommend you use Auto for any of the settings. Doing so will result in inconsistent image quality. To see a preview of the Photo settings, press Preview Photo Settings. This will take a photo and you will see it for a few seconds in the Preview Window. DSLR Orientation will rotate the DSLR image. Unlike Mirror Camera Preview, Orientation will affect the final image. Keep Aspect Ratio will crop the DSLR image to a specific aspect ratio. Crop % will allow you to crop small portions of the DSLR image from each side. Enable Manual Trigger will allow you to take photos by using the shutter button on the camera, instead of the PBU interface. Enable Manual Trigger will disable the Live Preview on the main screen of PBU. Enable Flash Reset will fire the flash connected to the DSLR every 60 minutes, or at whatever interval you input in the box below. Some flashes go to sleep if they are not used after a period of time, and Flash Reset will make sure they stay active. Use Manual Focus will disable Autofocus on the DSLR. If the lens of the DSLR is still set to Autofocus, you can adjust the focus length with the + and - buttons.

Photo Booth Upload is compatible with two Point Grey USB 3 cameras: The Flea 3, and Grasshopper 2. You should see Camera Ready to the left of the Refresh button. If you see Camera Not Detected, make sure your camera is plugged into a USB 3 port in your booth and press the Refresh button. Maximum Record Time is dependent on the amount of RAM in your system. Video Mode will allow you to select the pixel dimensions and maximum frame rate of the slow motion camera. We recommend 960x720 @ 120fps. Orientation will rotate the slow motion camera image. Unlike Mirror Camera Preview, Orientation will affect the final video. Keep Aspect Ratio will crop the slow motion camera image to a specific aspect ratio. Crop % will allow you to crop small portions of the slow motion camera image from each side. Color Settings will affect the image Brightness, Exposure, White Balance in the Red channel, White Balance in the Blue channel, and Gain Reset Defaults will reset the values in Color Settings.

Get Helper Settings will retrieve the Watched Folder, Selected Event, and selected printers from the Helper tool. Refresh Events will refresh the event list in the Helper. Auto Sync will sync the Watched Folder of the Helper to whatever folder is selected as the Output Folder in the Preferences tab. Watched Folder will display the currently selected Watched Folder in the Helper. If Auto Sync is not checked, there will be a Browse button to the right enabling you to change it manually. Change Output Folder will allow you to change the Output Folder as if you were doing so in the Preferences tab. This button will only appear if Auto Sync is checked. Selected Event will show you the currently selected event in the Helper, and allow you to change the currently selected event. Printer will show you the currently selected printers in the Helper, and allow you to change the currently selected printers.
The PPU/Printing tab can control many of the settings in the Helper tool, as well as how printing is handled through PBU.

Flipbook Printer will show you the currently selected Flipbook printers in the Helper, and allow you to change the currently selected Flipbook printers. Allow print only after share will force the guests to share their photo before any printing is al-lowed. It will not affect printing from Photo Party Upload Kiosk.
Remove Print Button will remove the Print option from the share screen in PBU. It will not affect PPU Kiosk. Auto Print will control how PBU automatically prints your photos after they are saved. Disable means PBU will not automatically print anything. Number of Copies will automatically print a number of cop-ies that you set in a box to the right. Count Faces will count the number of faces in a photo and print the same amount. Disable GIF Auto Print will prevent GIFs from being auto-matically printed after they are saved. Disable Morph Auto Print will prevent Morphs from being automatically printed after they are saved. Disable Flipbook Printing will prevent guests from printing flipbooks. Max number of prints will limit the number of prints a guest can print after pressing the print button. This number will not affect the Auto Print. Rotate / Flip Printed Image will affect how the selected print-er prints the final image. You may rotate the image in 90° in-crements or flip the image vertically or horizontally.
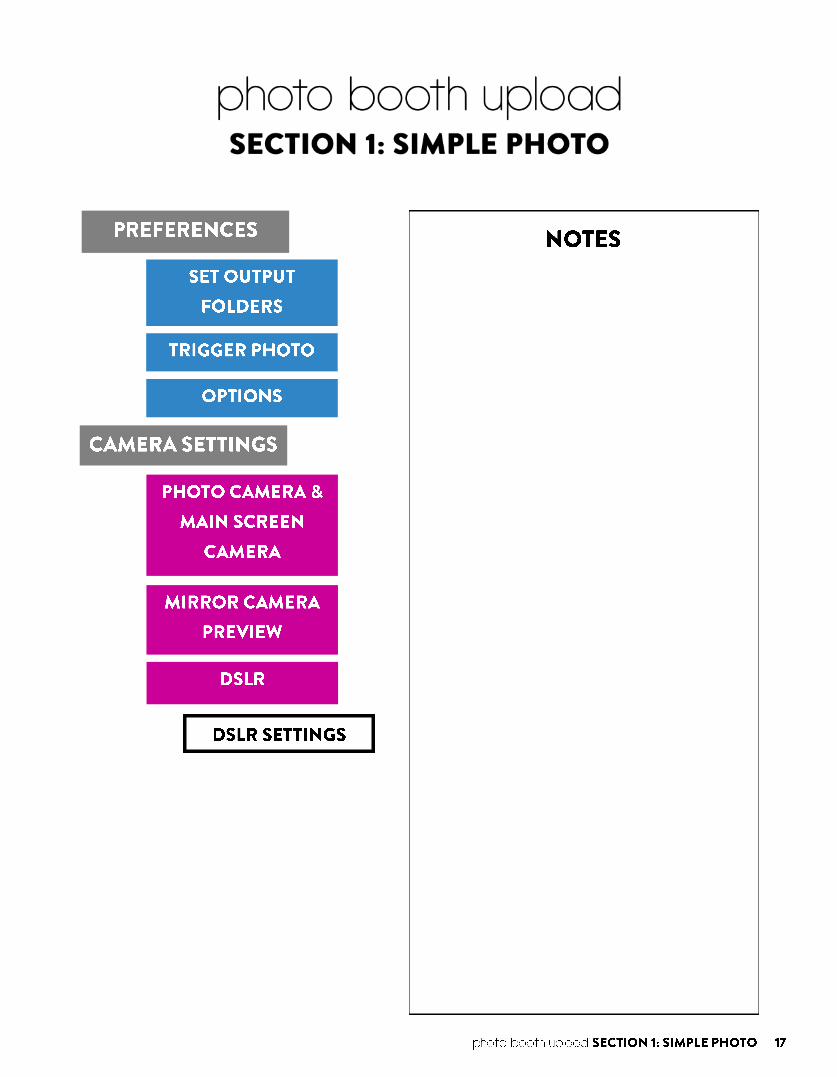
Taking a plain photo is the most basic function of Photo Booth Upload. We’ll start with a basic config-uration of the settings. For Photos, we highly recommend using a DSLR camera. Before you start, make sure your DSLR is connected to the computer with a USB cable, it has an SD card inside, is powered on, and is set to Manual mode. Your DSLR must be made by Canon. This tutorial will assume you have the Photo Party Upload Helper running, are signed in with your PPU account, have an event selected, and have set a Watched folder.
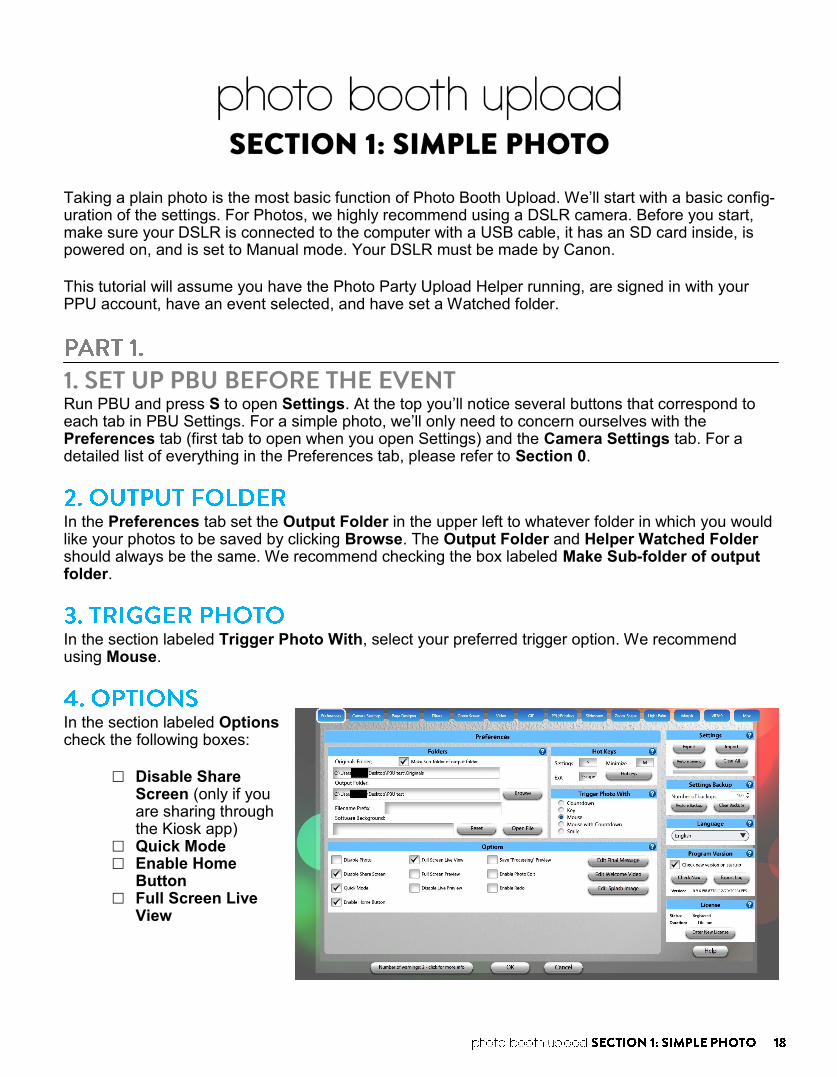
Run PBU and press S to open Settings. At the top you’ll notice several buttons that correspond to each tab in PBU Settings. For a simple photo, we’ll only need to concern ourselves with the Preferences tab (first tab to open when you open Settings) and the Camera Settings tab. For a detailed list of everything in the Preferences tab, please refer to Section 0.
In the Preferences tab set the Output Folder in the upper left to whatever folder in which you would like your photos to be saved by clicking Browse. The Output Folder and Helper Watched Folder should always be the same. We recommend checking the box labeled Make Sub-folder of output folder.
In the section labeled Trigger Photo With, select your preferred trigger option. We recommend using Mouse.
In the section labeled Options check the following boxes:
Disable Share
Screen (only if you are sharing through the Kiosk app)
Quick Mode Enable Home
Button Full Screen Live
View

Click Camera Settings at the top of the screen.
If you are using a DSLR (recommended) set Photo Camera and Main Screen Camera to DSLR.
Check the box labeled Mirror Camera Preview to make it easier for guests to position themselves. Only the preview is mirrored, the final image will not be mirrored.
Make sure you adjust the DSLR Settings to account for the lighting at your event. You can find a de-tailed description of DSLR settings in Section 0. Press OK at the bottom of the screen to save your settings. If you hit Cancel at the bottom of the screen any changes you made while Settings was open will not be saved.
With Settings closed you should see a full screen preview of what the DSLR sees and a Photo button. Press Photo to start a photo session. Help the guests or have the guests arrange themselves for the photo. If you have Mouse selected for your trigger, press the right mouse button or tap the left or right side of the screen outside of the preview window and a photo will be taken. You will see a short preview of the final image before a new session will start.
If you have Quick Mode enabled in preferences you will be ready to take another photo without having to press the Photo button again. If you did not check Disable Share Screen, you will see the sharing options enabled in your event after the photo is taken. That’s it! All your photos will be saved in the Output Folder and ready to share through the Photo Party Upload Kiosk.

There are several ways to add an overlay to a simple photo in PBU. You can use the Page Designer or the Green Screen feature. This tutorial will use the Green Screen feature. For a 6 x 4 image, your overlay graphic should be 1800 x 1200 in size, and it must be a PNG with transparency.
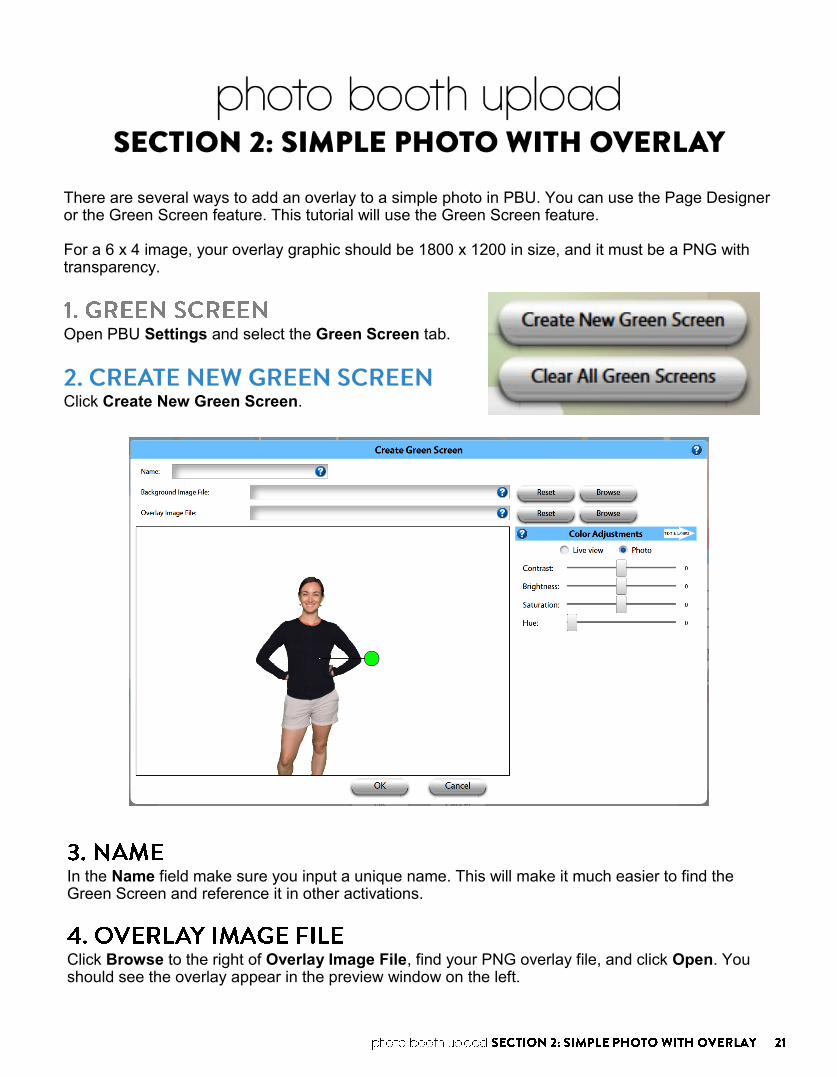
Open PBU Settings and select the Green Screen tab.
Click Create New Green Screen.
In the Name field make sure you input a unique name. This will make it much easier to find the Green Screen and reference it in other activations.
Click Browse to the right of Overlay Image File, find your PNG overlay file, and click Open. You should see the overlay appear in the preview window on the left.

Click the photo holder and you should see a green circular handle appear. Drag the handle to the right and enlarge the photo holder to 100%. You can also rotate the photo holder by moving the handle up or down, and move it by dragging the photo holder itself.
You can use keyboard shortcuts to do the same. First, click the photo holder, and when the green handle appears use the following:
Arrow Keys to move the photo holder up, down, left, or right
N and M will change the size of the photo holder
Z and X will rotate the photo holder
Press OK to save your Green Screen. If you want to make changes to your Green Screen, double click the thumbnail of your green screen.
In the main Green Screen tab select Auto Apply in the Green Screen Mode section.
Click the Select button on the thumbnail of your newly created Green Screen. Note: you may have to scroll to the right to see the thumbnail.
On the right side of the Green Screen tab, you should see a box labeled Chromakey Settings. Set all values for DSLR to 0, so that greens are not keyed out. You must set all values to 0 for BOTH Live View and Photo.
Press OK to save all your settings.
That’s it! Whenever you take a photo, your overlay will be applied.

If your guests will be standing in front of a green screen backdrop, you can remove the green color and replace it with whatever background image you want.
For a 6 x 4 image, your overlay graphic should be 1800 x 1200 in size, and it must be a PNG with transparency.
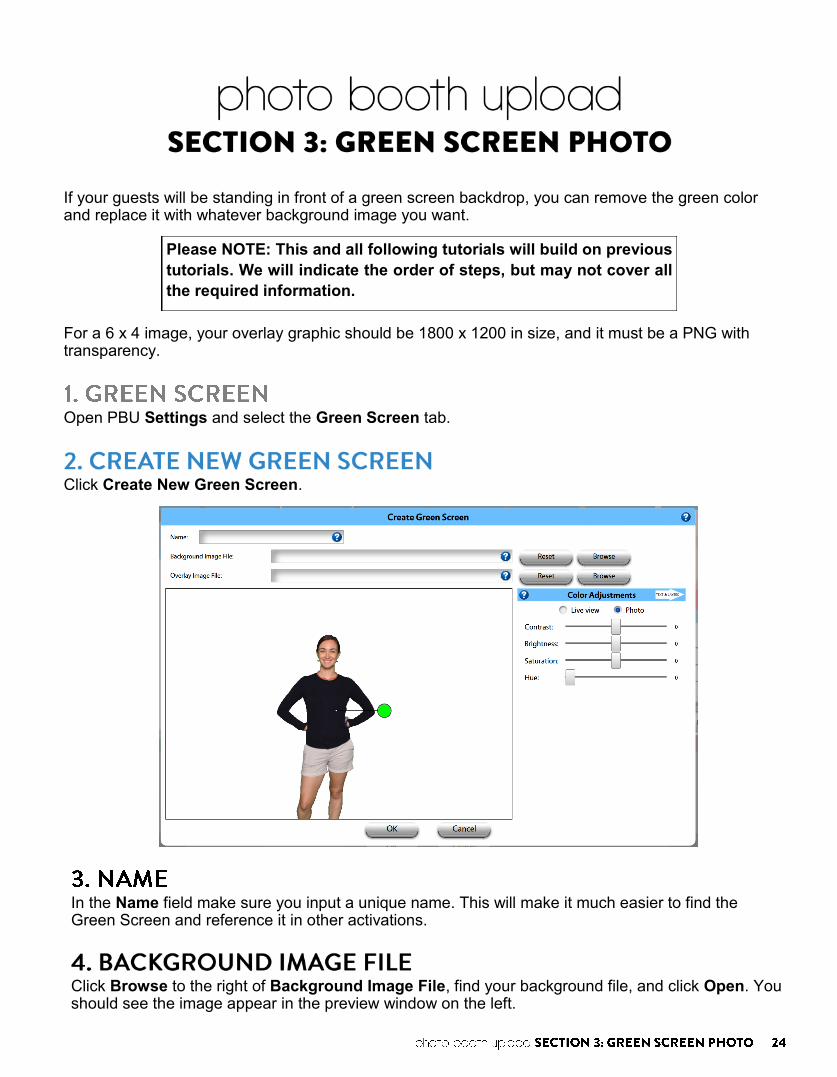
Open PBU Settings and select the Green Screen tab.
Click Create New Green Screen.
In the Name field make sure you input a unique name. This will make it much easier to find the Green Screen and reference it in other activations.
Click Browse to the right of Background Image File, find your background file, and click Open. You should see the image appear in the preview window on the left.
Please NOTE: This and all following tutorials will build on previous
tutorials. We will indicate the order of steps, but may not cover all
the required information.
Add your Overlay like you did in SECTION 2: SIMPLE PHOTO WITH OVERLAY.
Resize your image like you did in SECTION 2: SIMPLE PHOTO WITH OVERLAY.
Press OK to save your Green Screen. If you want to make changes to your Green Screen, double click the thumbnail of your green screen.
In the main Green Screen tab select Auto Apply in the Green Screen Mode section.
Click the Select button on the thumbnail of your newly created Green Screen. You may have to scroll to the right to see the thumbnail.
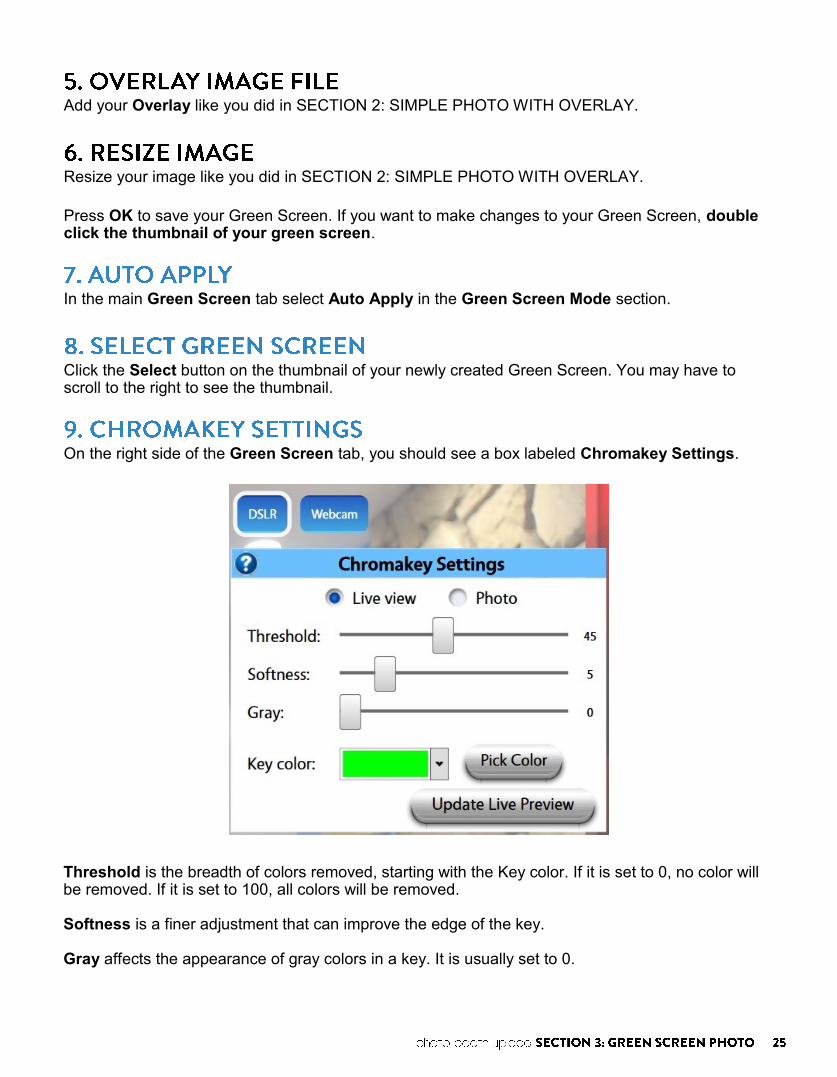
On the right side of the Green Screen tab, you should see a box labeled Chromakey Settings.
Threshold is the breadth of colors removed, starting with the Key color. If it is set to 0, no color will be removed. If it is set to 100, all colors will be removed. Softness is a finer adjustment that can improve the edge of the key. Gray affects the appearance of gray colors in a key. It is usually set to 0.
Key Color is the color that will be removed by PBU. The default color usually works best, but you can press Pick Color to change it. Update Live/Photo Preview will update the preview you see in the Green Screen Preview window on the left. You can use that to make adjustments to your Chromakey. Once you are satisfied with your key, press OK to save your settings.
That’s it! Whenever you take a photo, your green screen will be applied.


PBU has robust filter options, and you can apply them to all photos, Green Screens, GIFs, and Videos.
Open PBU Settings and navigate to the Filters tab.
This will show you how to apply a Filter to the Green Screen you created
in Section 3, using steps 1-9. Make sure the Green Screen is still select-
ed in the Green Screen tab before continuing with step 10.
Select Auto Apply or User Select in the Filter Mode section. Auto Apply will automatically use your selected filter with all photos, and User Select will give the guests a choice of whatever filters you select. Live Filter is only available with Auto Apply. For these instructions, select Auto Apply.
Some filters have adjustable options and others are simple filters without any adjustments. If you choose a Filter that has adjustments, you will see them in the Filter Settings box on the right. Press Select under the Hefe Filter and check Enable Live Filter. The Live Filter drop down menu should auto populate with Hefe.
Normally, any Filters you select will apply to the entire image. If you check Apply Filters Before Green Screen the Filter will only apply to your photo and not to your Green Screen Background or Overlay. Leave it unchecked for this tutorial.
Press OK to save your settings. You’re all set! You should see the Filter applied in your live view and in the final image.
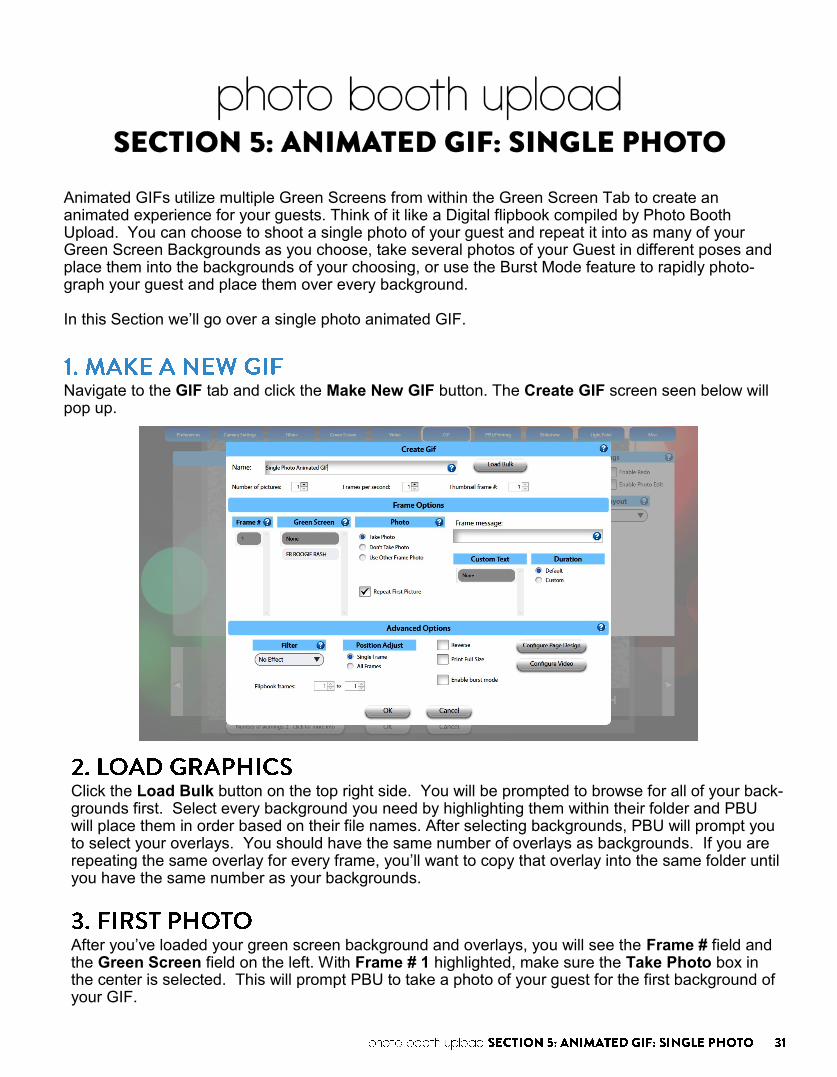
Animated GIFs utilize multiple Green Screens from within the Green Screen Tab to create an animated experience for your guests. Think of it like a Digital flipbook compiled by Photo Booth Upload. You can choose to shoot a single photo of your guest and repeat it into as many of your Green Screen Backgrounds as you choose, take several photos of your Guest in different poses and place them into the backgrounds of your choosing, or use the Burst Mode feature to rapidly photo-graph your guest and place them over every background. In this Section we’ll go over a single photo animated GIF.
Navigate to the GIF tab and click the Make New GIF button. The Create GIF screen seen below will pop up.
Click the Load Bulk button on the top right side. You will be prompted to browse for all of your back-grounds first. Select every background you need by highlighting them within their folder and PBU will place them in order based on their file names. After selecting backgrounds, PBU will prompt you to select your overlays. You should have the same number of overlays as backgrounds. If you are repeating the same overlay for every frame, you’ll want to copy that overlay into the same folder until you have the same number as your backgrounds.
After you’ve loaded your green screen background and overlays, you will see the Frame # field and the Green Screen field on the left. With Frame # 1 highlighted, make sure the Take Photo box in the center is selected. This will prompt PBU to take a photo of your guest for the first background of your GIF.

Check the Repeat First Picture box. With this checked, PBU will automatically apply the photo taken for Frame # 1 to each green screen of your GIF. Press OK to save your GIF.
Like in the Green Screen and Filters tab, you have to select Auto Apply or User Select in the GIF Mode menu to use your GIF. Select Auto Apply and then press the Select button under your GIF.
Navigate to the Green Screen tab and adjust the position of your guest photo. You should see a folder with the same name of your graphic files. Right click your adjusted green screen and hit set all if you’d like each green screen to have the same position. Press OK to save your settings.
That’s it! On the Main Screen you should see the Animate button. Press it and you will be prompted to take a photo.

As well as single photo GIFs, Photo Booth Upload can create GIFs with multiple photos. The process is very similar to creating a single photo GIF with a few changes. In this tutorial we’ll make a 10 frame GIF with 3 photos.
Open the GIF tab of PBU Settings and click Make New GIF.
Click Load Bulk to import your backgrounds and overlays. For this tutorial you should have 10 of each. Your GIF should now have a number of frames linked to Green Screens that matches the number of backgrounds you imported.
If you think a 10 second GIF is too long, you can increase the Frames per Second at the top of the window.
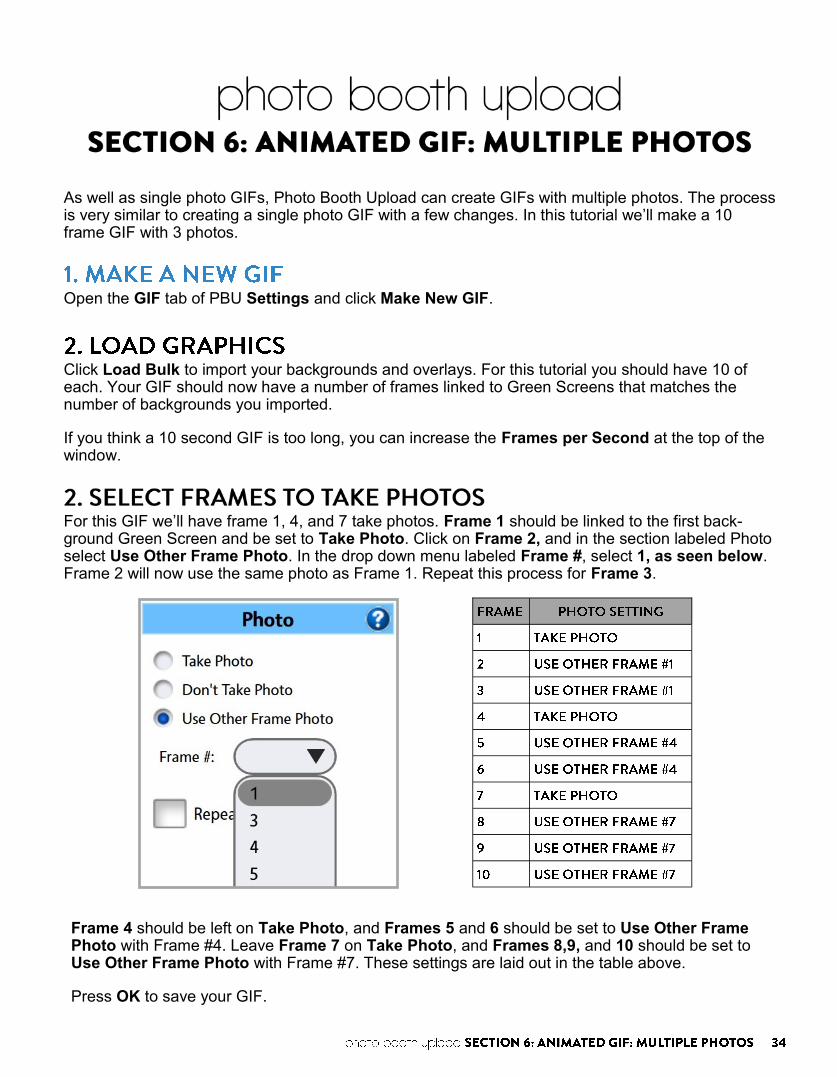
For this GIF we’ll have frame 1, 4, and 7 take photos. Frame 1 should be linked to the first back-ground Green Screen and be set to Take Photo. Click on Frame 2, and in the section labeled Photo select Use Other Frame Photo. In the drop down menu labeled Frame #, select 1, as seen below. Frame 2 will now use the same photo as Frame 1. Repeat this process for Frame 3.
Frame 4 should be left on Take Photo, and Frames 5 and 6 should be set to Use Other Frame Photo with Frame #4. Leave Frame 7 on Take Photo, and Frames 8,9, and 10 should be set to Use Other Frame Photo with Frame #7. These settings are laid out in the table above.
Press OK to save your GIF.

Select Auto Apply in the GIF Mode section and press the Select button under your GIF.
Navigate to the Green Screen tab and find the Green Screens created with the Load Bulk feature. Adjust the Photo Holder of the first Green Screen to your liking. Click OK to save and then right click the thumbnail of the Green Screen you edited and click Set All. All your Green Screens for your GIF should now have the same Photo Holder placement.
Press OK to save your settings.
There you go! On the Main Screen clicking Animate will prompt you to start taking three pictures.


A Burst Mode GIF lies somewhere between a GIF and a video. It is much smoother than a standard GIF, but has a slower frame rate than a video, giving it a unique look. Burst Mode GIFs are usually made up of 30 or more frames, so if you want animated backgrounds/overlays you will have to create a substantial amount of graphics.
Burst Mode GIFs can use either webcams or DSLRs. Webcams are much easier to use, but DSLRs can work well with the proper setup. To record Burst GIFs, DSLRs use a modified Live View which is limited to about 10 or 12 frames per second. Because of the slower frame rate, Shutter Speed (Tv) will have a great effect on the appearance of images in your GIF. We recommend you use a Shutter Speed of 1/30 or faster to avoid blurry images.
We also highly recommend using a constant light for Burst GIFs, as the flash will not fire during cap-ture.
Just like with other GIFs, you can use Load Bulk to import your graphics into Green Screens, and associate each with a frame. Press Load Bulk in the Create New GIF window and import your Backgrounds and Overlays. With Burst Mode, usually every frame takes a photo, so there’s no rea-son to adjust individual frame settings. Make sure you name your GIF!
At the bottom of the Create New GIF window, select Enable burst mode. You should see Burst delay (ms) appear next to a number. This refers to the amount of time between photos in milliseconds. Ex: If Burst delay is set to 100, you will take 10 photos per second; if it’s set to 500, you will take 2 per second.
Burst GIFs are usually played back at the same frame rate at which they were captured. If you set your Burst delay to 100 (10 photos per second) you should set your Frame Rate to 10. It can be fun to speed up or slow down GIF playback, so play with the frame rate setting for different results.
Burst GIFs benefit a lot from Reverse, also known as Boomerang. If your Burst GIF doesn’t have any full screen logos or graphics at the end, we recommend you enable Reverse.
Press OK to save your GIF.
Make sure Auto Apply is selected under GIF Mode, and press Select under your GIF.
Navigate to the Camera Settings tab and select either Webcam or DSLR as your Burst Camera.
Press OK to save your settings.
That’s it! Press the Animate button and you can start recording your Burst GIF. You’ll only have to trigger the camera once as each frame will capture based on the delay you set in GIF Settings.

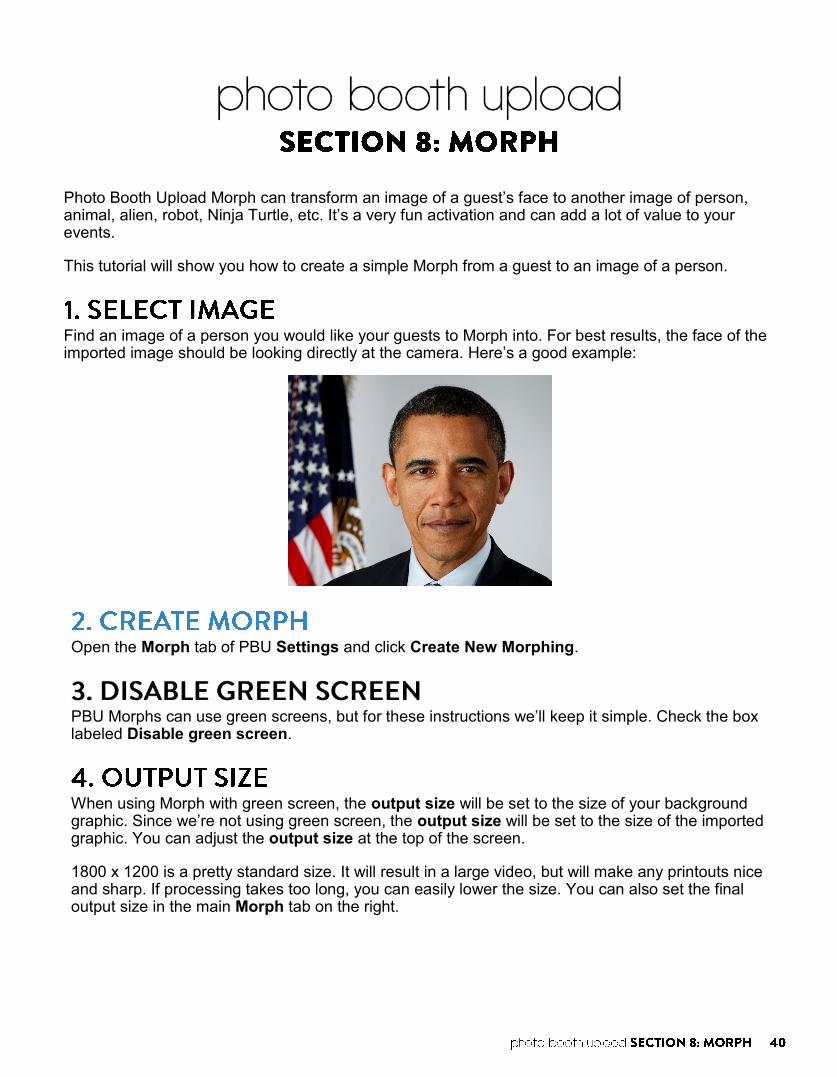
Photo Booth Upload Morph can transform an image of a guest’s face to another image of person, animal, alien, robot, Ninja Turtle, etc. It’s a very fun activation and can add a lot of value to your events.
This tutorial will show you how to create a simple Morph from a guest to an image of a person.
Find an image of a person you would like your guests to Morph into. For best results, the face of the imported image should be looking directly at the camera. Here’s a good example:
Open the Morph tab of PBU Settings and click Create New Morphing.
PBU Morphs can use green screens, but for these instructions we’ll keep it simple. Check the box labeled Disable green screen.
When using Morph with green screen, the output size will be set to the size of your background graphic. Since we’re not using green screen, the output size will be set to the size of the imported graphic. You can adjust the output size at the top of the screen.
1800 x 1200 is a pretty standard size. It will result in a large video, but will make any printouts nice and sharp. If processing takes too long, you can easily lower the size. You can also set the final output size in the main Morph tab on the right.

To the right of the Morph Images box, press the + button and select Static Image (human face). Press Open File and select your image. Press OK. Resize the image you imported to fit the screen. Your screen should look something like this:
Press the + button next to the box labeled Face Place Holders. This will add an outline of a face to the image. Resize it to fit the face of your static image. The Face Place Holder will tell PBU where the facial features are and allow your guests to line themselves up properly.
Press the + button next to Morph Images and select Guest Photo. Press OK. You should see a camera preview, much like you see in the green screen tab. Resize it to an appropriate size. Your guests should not have to move forward and back too much during a session, so try to get the sizing just right.
Duration is how long it will take to go through one entire cycle of morphing from the first face to the second face and so on (if you are doing multiple morphs in one video), all the way back to the first. Framerate will adjust the smoothness the morph. You can also choose if you’d like to save it as a Video or GIF. If you choose Video, you can add an audio track and loops by clicking the Settings button.
You can also set a specific frame to be printed or add several frames to a Page Design. Frames are chosen by fractions, and they correspond to the order of photos. Ex. Picture 1 will appear if you choose 1, and choosing 1.50 will save the frame half way between the first image and the second image. Thumbnail Image number allows you to choose which frame will be used as the thumbnail in kiosk, and uses the same numbering system. We suggest setting the thumbnail to whichever image number is the picture of the guest, so that they can more easily find their photos. Print Full Size prints the full size image from original files (usually 1800x1200) instead of from processed video (usually 960x720).
Press OK to save your Morph.
Make sure Auto Apply is selected under Morphing Mode, and press Select under your Morph.
Press OK to save all your changes.
That’s it! On the Main Screen press the Morph button. Line your face up with the Face Place Holder and capture the photo.


In addition to Morphing human faces, PBU can create Morphs that transform your guests faces into non-human faces. The process is very similar to a standard Morph except for one crucial step.
Find an image of an animal you would like your guests to Morph into. For best results, the face of the imported image should be looking directly at the camera. Here’s a good example:
Open the Morph tab of PBU Settings and click Create New Morphing. Check the box labeled Disable green screen.
When using Morph with green screen, the output size will be set to the size of your background graphic. Since we’re not using green screen, the output size will be set to the size of your imported image. This one is 1200x800, which should work quite well. You can also set the final output size of all Morphs in the main Morph tab on the right.
In the Morph Images box, press the + button and select Static Image (non-human face). Press Open File and select your image. Press OK. Resize the image you imported to fit the screen.

Press the + button next to the box labeled Face Place Holders. This will add an outline of a face to the image. Resize it to fit the face of your static image. Since the face you imported is a non-human face, you will have to adjust the individual tracking points to fit the non-human face you imported.
Press the + button next to Morph Images and select Guest Photo. Press OK. You should see an a camera preview, like you did in SECTION 8: SIMPLE MORPH.
Select your morph settings, as described in detail in SECTION 8: SIMPLE MORPH.
Press OK to save your Morph. Make sure Auto Apply is selected under Morphing Mode, and press Select under your Morph. Press OK to save all your changes.
And there you have it! On the Main Screen press the Morph button. Line your face up with the Face Place Holder and capture the photo.
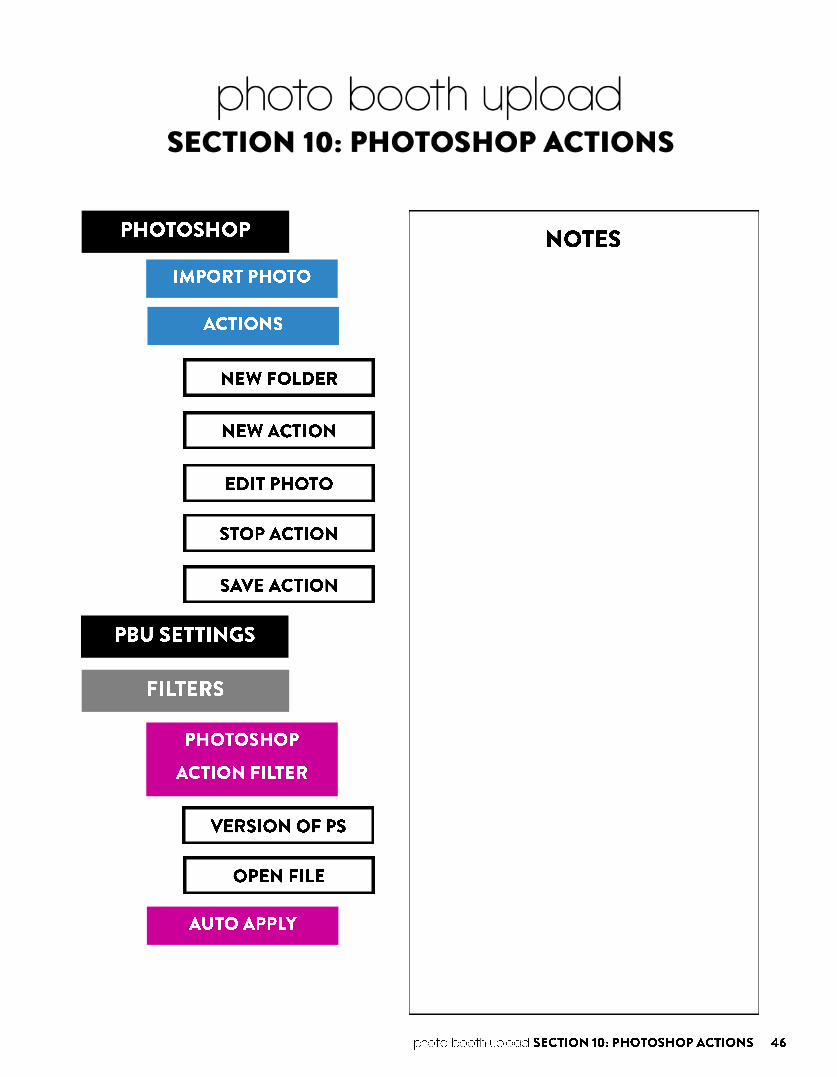
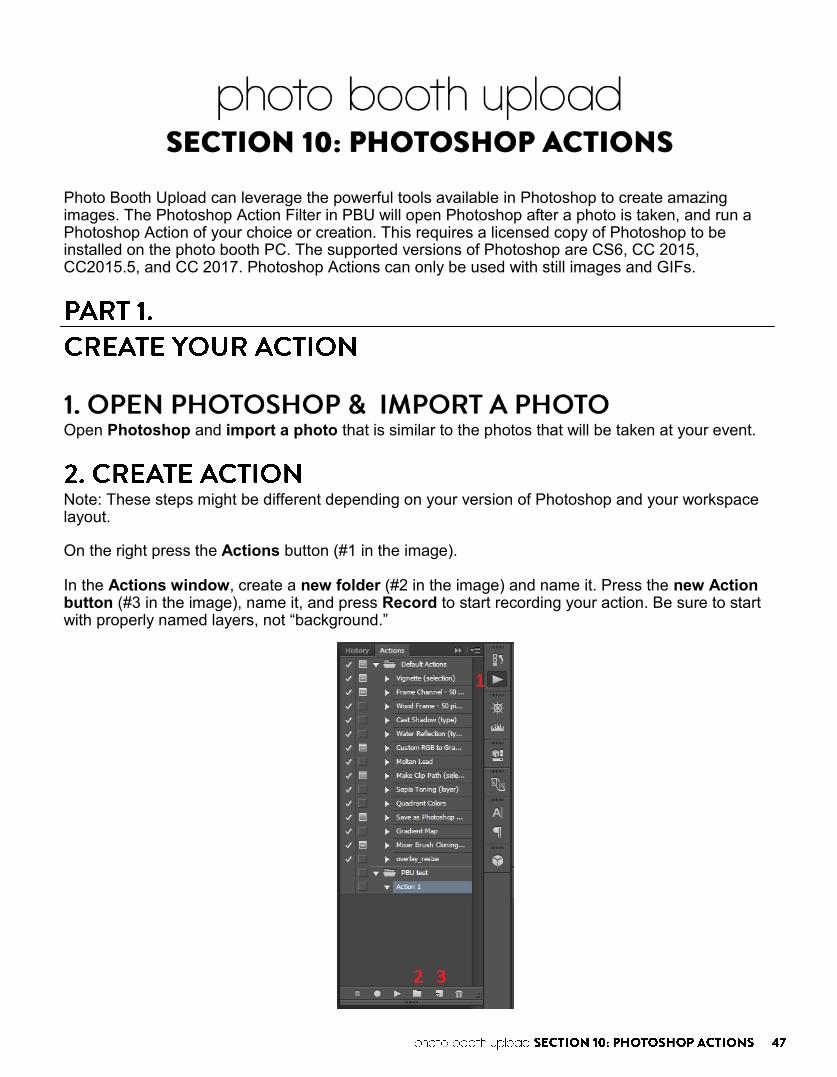
Photo Booth Upload can leverage the powerful tools available in Photoshop to create amazing images. The Photoshop Action Filter in PBU will open Photoshop after a photo is taken, and run a Photoshop Action of your choice or creation. This requires a licensed copy of Photoshop to be installed on the photo booth PC. The supported versions of Photoshop are CS6, CC 2015, CC2015.5, and CC 2017. Photoshop Actions can only be used with still images and GIFs.
Open Photoshop and import a photo that is similar to the photos that will be taken at your event.
Note: These steps might be different depending on your version of Photoshop and your workspace layout.
On the right press the Actions button (#1 in the image). In the Actions window, create a new folder (#2 in the image) and name it. Press the new Action button (#3 in the image), name it, and press Record to start recording your action. Be sure to start with properly named layers, not “background.”

For these instructions we’ll apply a simple curve, but you can get far more complex. Above the layers palette, click Adjustments then Curves. In the Adjustment window click the diagonal line to change contrast and brightness.
Press the Actions button and press the stop button to the left of the red record light to stop and save your Action.
In the Actions panel, select the folder you created and click the dropdown menu on the upper right corner. Select Save Actions… and save your Action where you can find it.
You should see a small red recording light in the Actions window in Photoshop. Anything you do in Photoshop will now be recorded, so be careful!
Open Photo Booth Upload Settings and Navigate to the Filters tab. Find the Photoshop Action Filter and click it once to view the settings.
Select the version of Photoshop that you have in the dropdown menu. Important: If you change the version of Photoshop while Photo Booth Upload is open, you must restart both PBU and the PBU Processor in the system tray.
Press Open File and open the Photoshop Action you made.
In the Filter Mode box select Auto Apply and then click Select below Photoshop Action. Press OK to save your settings.
Done! Take a photo as you would normally, and you should see Photoshop open briefly. It will run the Action, save the image, and return to Photo Booth Upload.

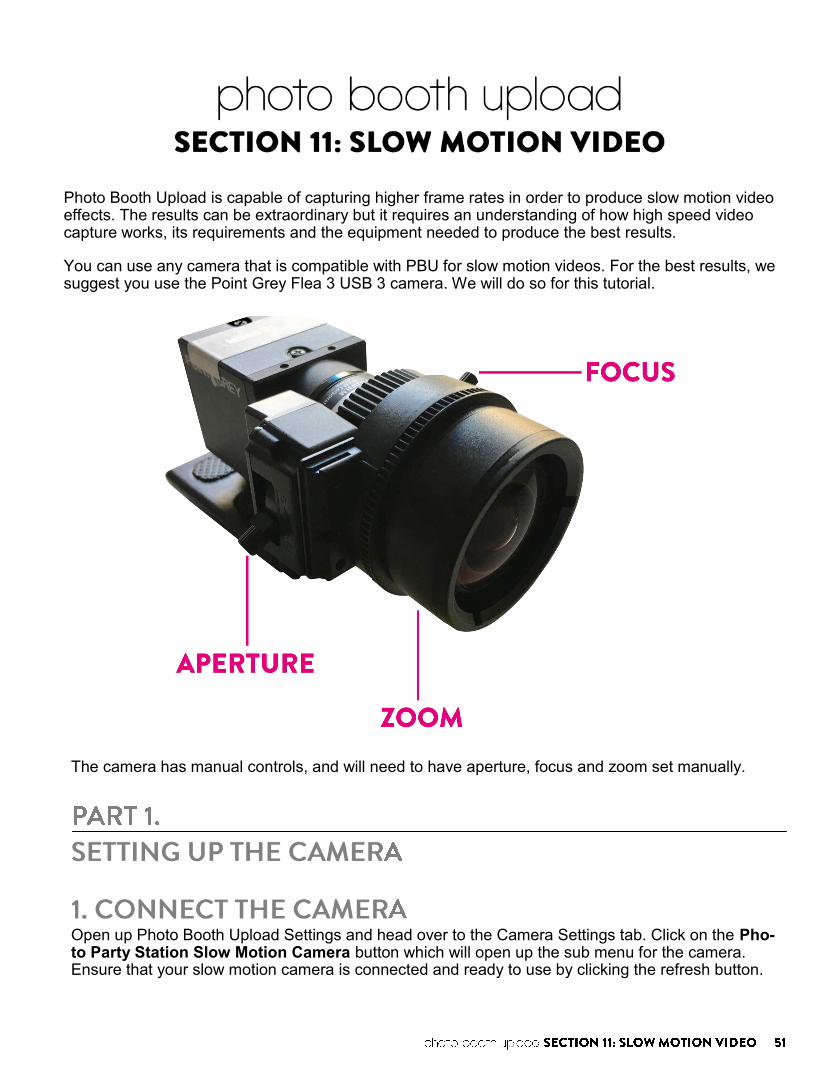
Photo Booth Upload is capable of capturing higher frame rates in order to produce slow motion video effects. The results can be extraordinary but it requires an understanding of how high speed video capture works, its requirements and the equipment needed to produce the best results.
You can use any camera that is compatible with PBU for slow motion videos. For the best results, we suggest you use the Point Grey Flea 3 USB 3 camera. We will do so for this tutorial.
The camera has manual controls, and will need to have aperture, focus and zoom set manually.
Open up Photo Booth Upload Settings and head over to the Camera Settings tab. Click on the Pho-to Party Station Slow Motion Camera button which will open up the sub menu for the camera. Ensure that your slow motion camera is connected and ready to use by clicking the refresh button.
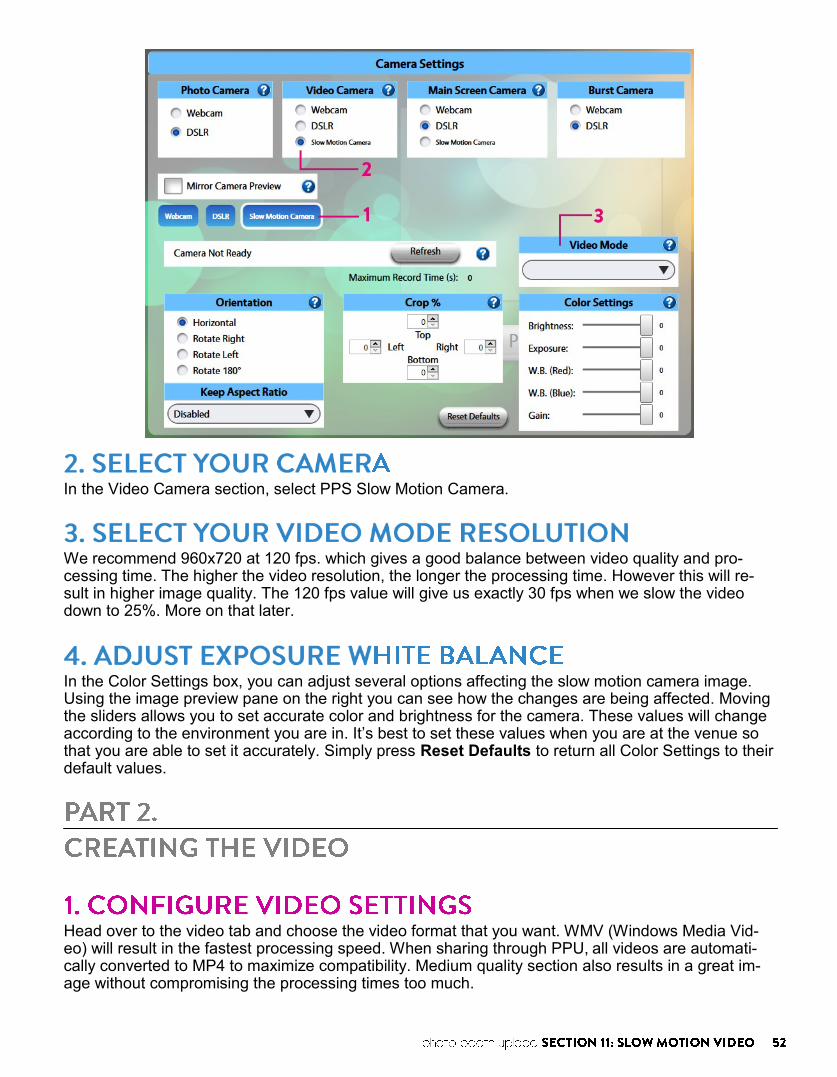
In the Video Camera section, select PPS Slow Motion Camera.
We recommend 960x720 at 120 fps. which gives a good balance between video quality and pro-cessing time. The higher the video resolution, the longer the processing time. However this will re-sult in higher image quality. The 120 fps value will give us exactly 30 fps when we slow the video down to 25%. More on that later.
In the Color Settings box, you can adjust several options affecting the slow motion camera image. Using the image preview pane on the right you can see how the changes are being affected. Moving the sliders allows you to set accurate color and brightness for the camera. These values will change according to the environment you are in. It’s best to set these values when you are at the venue so that you are able to set it accurately. Simply press Reset Defaults to return all Color Settings to their default values.
Head over to the video tab and choose the video format that you want. WMV (Windows Media Vid-eo) will result in the fastest processing speed. When sharing through PPU, all videos are automati-cally converted to MP4 to maximize compatibility. Medium quality section also results in a great im-age without compromising the processing times too much.
Set your recording duration to 5 seconds. The actual processed completed video will be significantly longer than 5 seconds due to the slow down effect. The longer you specify the recording time, the significantly longer the processing time takes. The recording duration has the biggest impact on processing time next to video resolution.
Keep the video size as Original as this will then use the settings that you had specified in the camera settings. You may change this value but bear in mind that higher resolutions will result in longer processing times.
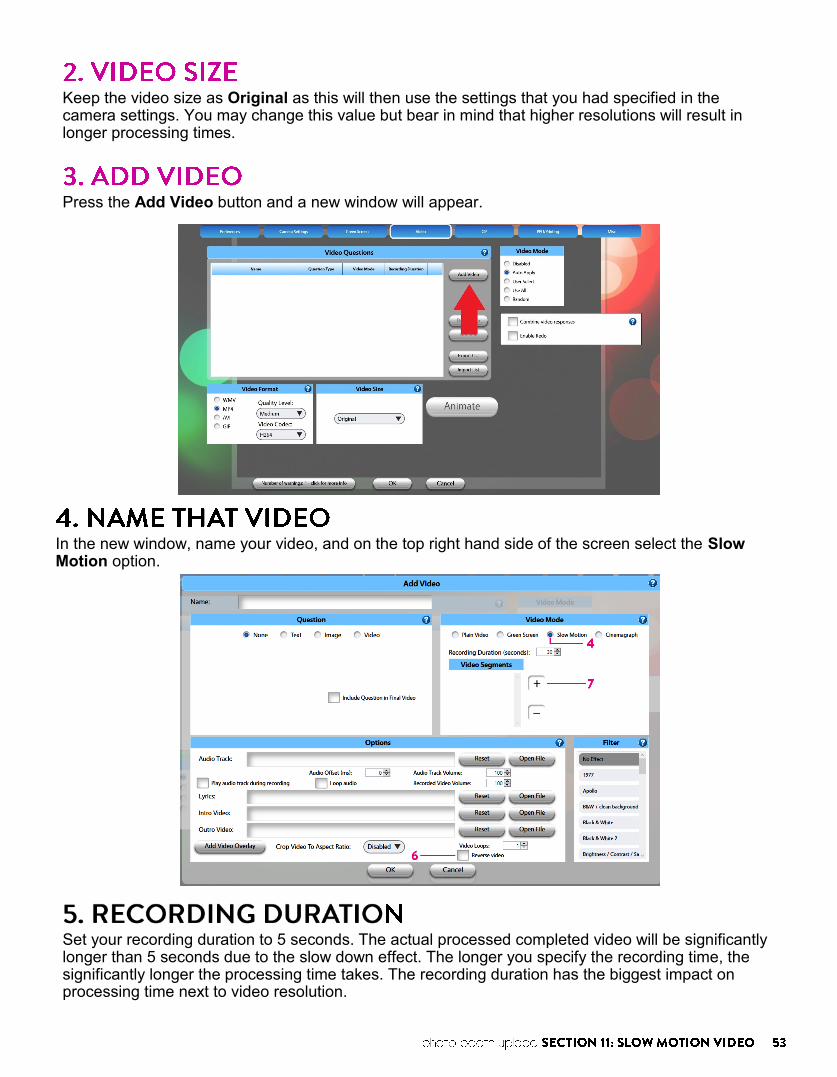
Press the Add Video button and a new window will appear.
In the new window, name your video, and on the top right hand side of the screen select the Slow Motion option.
You can add an audio track, an overlay, intro and outro videos, and a filter to your slow motion video. For a spectacular effect, we recommend you select Reverse video (highlighted in previous image) to play the video forward and then backward.
Our next step is to add a video segment by clicking on the + symbol on the right hand side of the screen. This will open up yet another sub menu and this is where the magic of slow motion can begin.
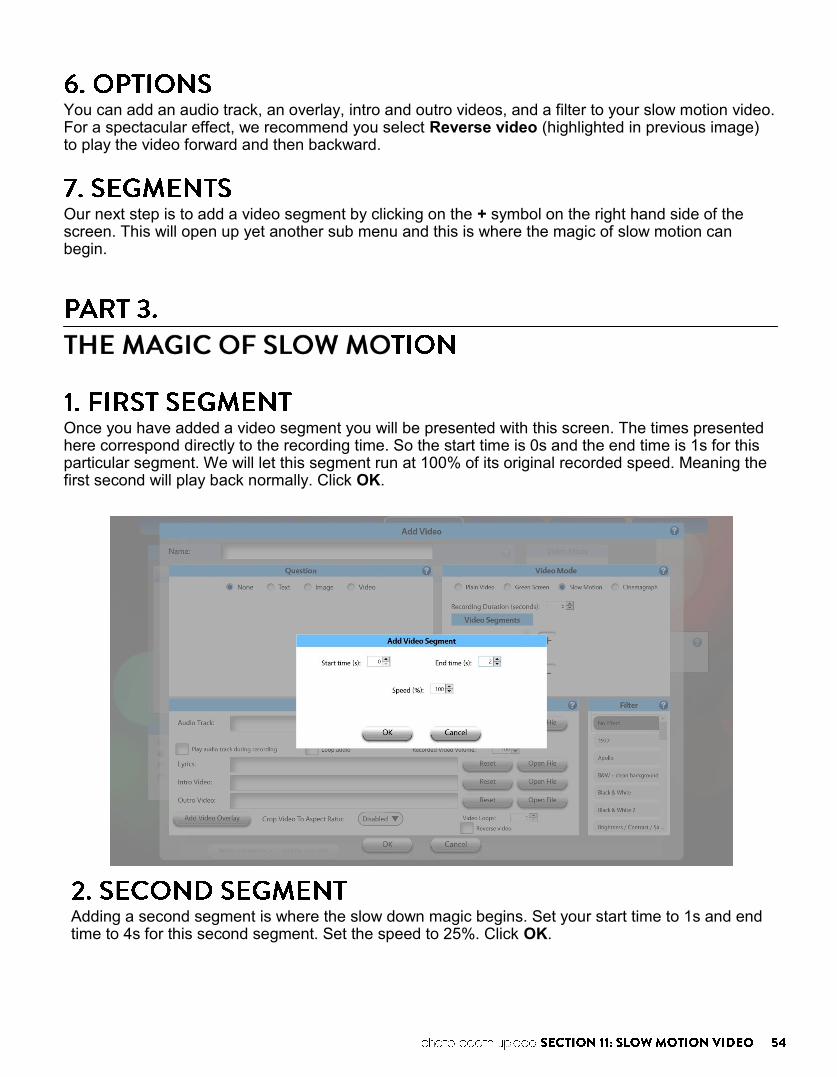
Once you have added a video segment you will be presented with this screen. The times presented here correspond directly to the recording time. So the start time is 0s and the end time is 1s for this particular segment. We will let this segment run at 100% of its original recorded speed. Meaning the first second will play back normally. Click OK.
Adding a second segment is where the slow down magic begins. Set your start time to 1s and end time to 4s for this second segment. Set the speed to 25%. Click OK.
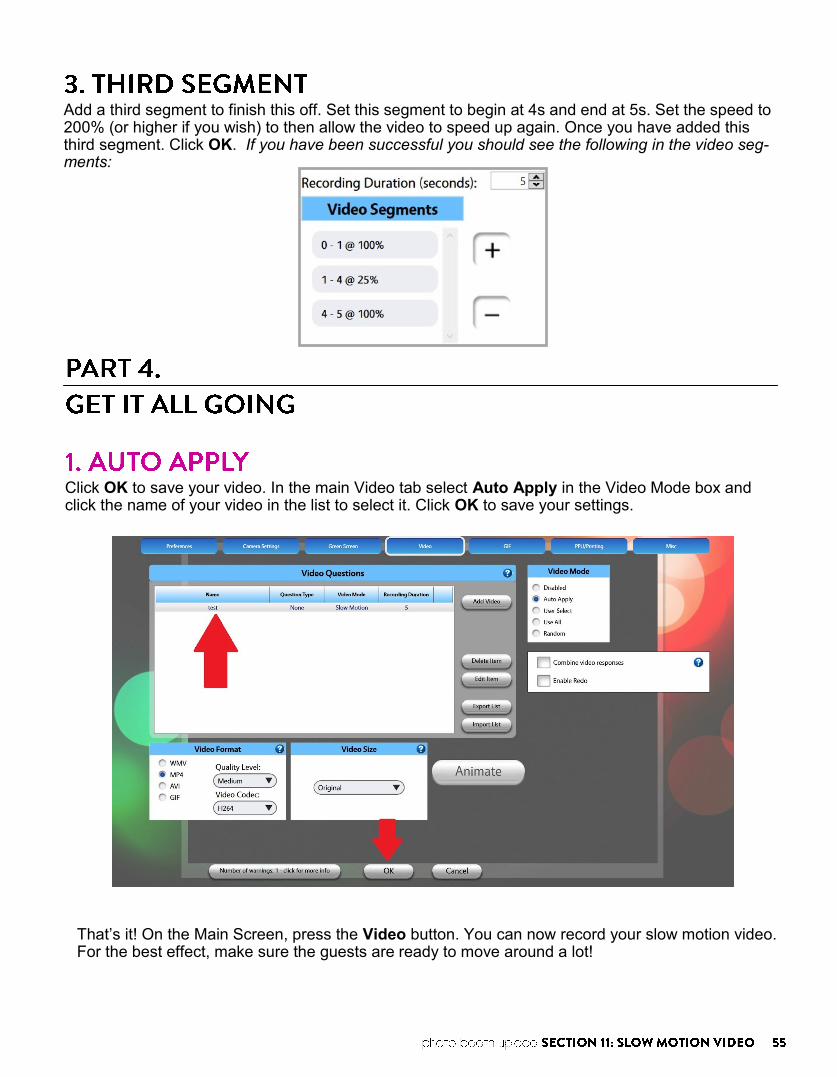
Add a third segment to finish this off. Set this segment to begin at 4s and end at 5s. Set the speed to 200% (or higher if you wish) to then allow the video to speed up again. Once you have added this third segment. Click OK. If you have been successful you should see the following in the video seg-ments:
Click OK to save your video. In the main Video tab select Auto Apply in the Video Mode box and click the name of your video in the list to select it. Click OK to save your settings.
That’s it! On the Main Screen, press the Video button. You can now record your slow motion video. For the best effect, make sure the guests are ready to move around a lot!

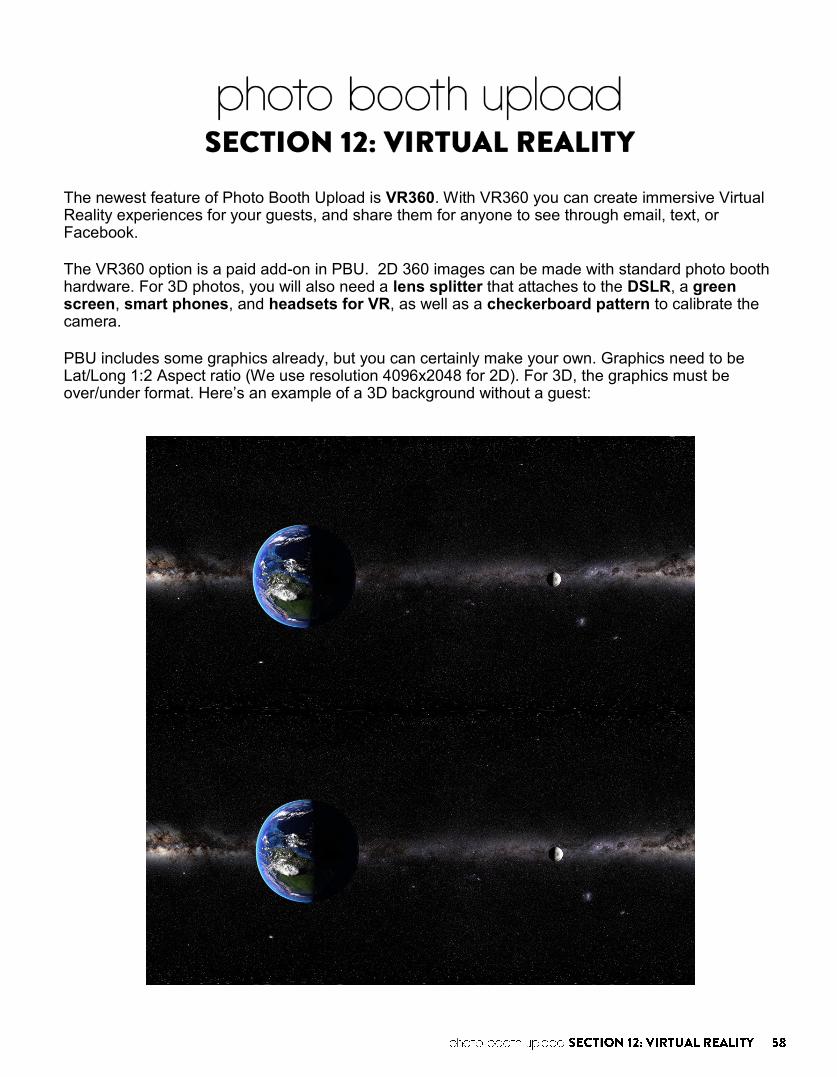
The newest feature of Photo Booth Upload is VR360. With VR360 you can create immersive Virtual Reality experiences for your guests, and share them for anyone to see through email, text, or Facebook. The VR360 option is a paid add-on in PBU. 2D 360 images can be made with standard photo booth hardware. For 3D photos, you will also need a lens splitter that attaches to the DSLR, a green screen, smart phones, and headsets for VR, as well as a checkerboard pattern to calibrate the camera. PBU includes some graphics already, but you can certainly make your own. Graphics need to be Lat/Long 1:2 Aspect ratio (We use resolution 4096x2048 for 2D). For 3D, the graphics must be over/under format. Here’s an example of a 3D background without a guest:

Open PBU Settings and navigate to the VR360 tab. Click Make New VR 360.
Name your VR360 in the upper left. Click Browse next to the Background Image field and select your background. Do the same for Overlay if you have one.
Below the Browse buttons, check the box labeled Is 3D. If you were making a 2D 360 activation, you would leave this box unchecked.
Your window should look something like this:

To the right of the image, click Edit Placement. You will several different things in the new screen. On the left you can adjust the position and size of the image much like in a Green Screen. You can only adjust the position on a certain section of your 360 background. Those sections are called Cube Faces, and you can select the Cube Face in which you want to place the picture on the right of the screen in the section labeled Cube Face Selection.
If you're taking a green screen photo, you must adjust the Chromakey Settings in the Edit Placement window. You can see the Chromakey Settings button at the top to the right of the Cube Face Selection Button. The controls are identical to the Chromakey controls in the Green Screen tab of PBU. You should always adjust Chromakey settings for both Live View and Photo.
Press OK to save your settings.
Press OK at the bottom of the Create VR360 window to save it. Under VR 360 Mode, select Auto Apply and press Select on the thumbnail of your VR 360. Press OK to save your settings.
If you are creating a 3D image with a lens splitter, the software has to align the two halves of the split image. We suggest setting the DSLR to Manual Focus and setting a mark for your guests to stand on. Make sure you’re zoomed in enough to not see any black edges of the lens splitter.
In the main VR360 tab of PBU Settings, click 3D Camera Alignment.
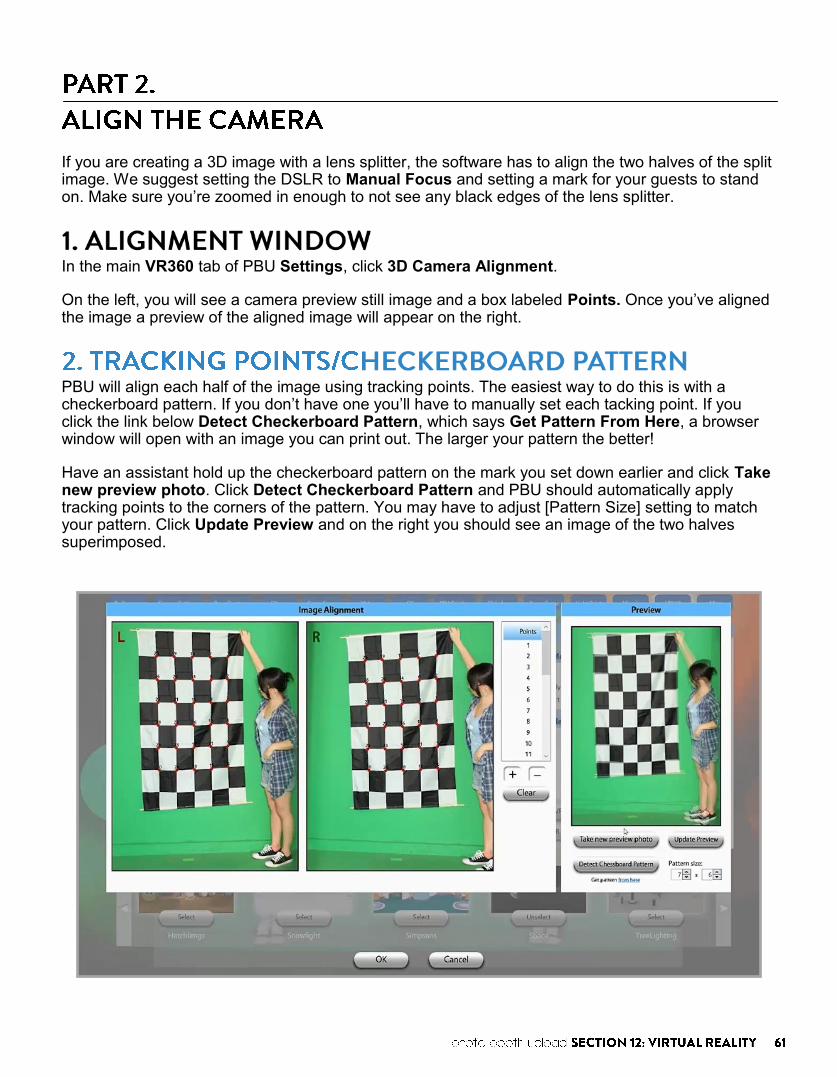
On the left, you will see a camera preview still image and a box labeled Points. Once you’ve aligned the image a preview of the aligned image will appear on the right.
PBU will align each half of the image using tracking points. The easiest way to do this is with a checkerboard pattern. If you don’t have one you’ll have to manually set each tacking point. If you click the link below Detect Checkerboard Pattern, which says Get Pattern From Here, a browser window will open with an image you can print out. The larger your pattern the better!
Have an assistant hold up the checkerboard pattern on the mark you set down earlier and click Take new preview photo. Click Detect Checkerboard Pattern and PBU should automatically apply tracking points to the corners of the pattern. You may have to adjust [Pattern Size] setting to match your pattern. Click Update Preview and on the right you should see an image of the two halves superimposed.
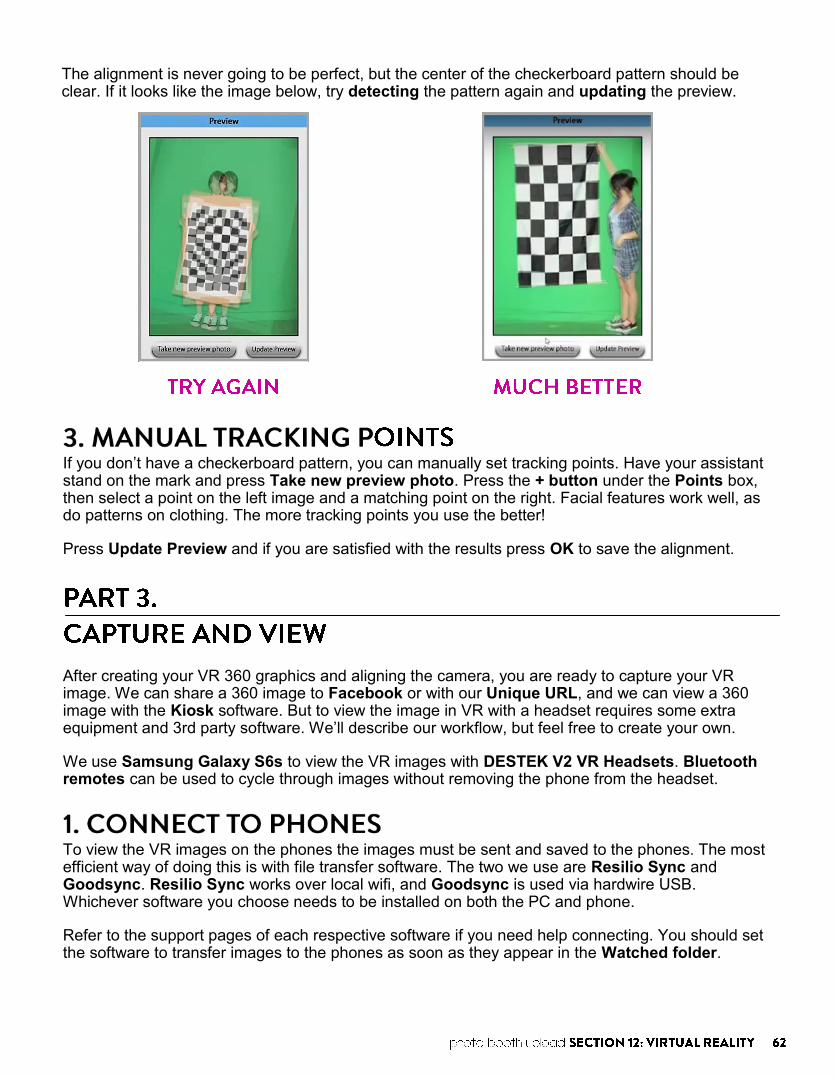
The alignment is never going to be perfect, but the center of the checkerboard pattern should be clear. If it looks like the image below, try detecting the pattern again and updating the preview.
If you don’t have a checkerboard pattern, you can manually set tracking points. Have your assistant stand on the mark and press Take new preview photo. Press the + button under the Points box, then select a point on the left image and a matching point on the right. Facial features work well, as do patterns on clothing. The more tracking points you use the better!
Press Update Preview and if you are satisfied with the results press OK to save the alignment.
After creating your VR 360 graphics and aligning the camera, you are ready to capture your VR image. We can share a 360 image to Facebook or with our Unique URL, and we can view a 360 image with the Kiosk software. But to view the image in VR with a headset requires some extra equipment and 3rd party software. We’ll describe our workflow, but feel free to create your own.
We use Samsung Galaxy S6s to view the VR images with DESTEK V2 VR Headsets. Bluetooth remotes can be used to cycle through images without removing the phone from the headset.
To view the VR images on the phones the images must be sent and saved to the phones. The most efficient way of doing this is with file transfer software. The two we use are Resilio Sync and Goodsync. Resilio Sync works over local wifi, and Goodsync is used via hardwire USB. Whichever software you choose needs to be installed on both the PC and phone.
Refer to the support pages of each respective software if you need help connecting. You should set the software to transfer images to the phones as soon as they appear in the Watched folder.

In PBU, press VR 360 on the main screen and capture your VR image. It should save to the Watched folder and transfer automatically to your phones.
We use VRTV by Chai Software to view the images in VR. There is a free and paid version, but they work the same.
Run the app and set it to look at the folder you configured in step 1. You should see your recently captured VR image. Press the green play button and place the phone in your headset. Viola! Enjoy your VR Experience! You can also watch the VR Video Tutorial for a detailed walk through: laphotoparty.com/VRtutorial

There are video tutorials, webinars, and FAQs on our website. support.photopartyupload.com
If you have any further questions, tech support is happy to help!
M-F 10-5 PST/Weekends 2-6PM PST 323-473-4885
We also have a Facebook group for users of PBU. Members support each other by answering questions and offering feedback. Our tech support guru, Guy Helperton, also assists.
https://www.facebook.com/groups/PhotoPartyUsers