THE ULTIMATE PIPING GUIDE - mwpba.org
58
THE ULTIMATE PIPING GUIDE by VINCENT JANOSKI PIPER’S MIND the portable piping workshop � � � � � � � � � � ��� ��� piping guides
Transcript of THE ULTIMATE PIPING GUIDE - mwpba.org
THE ULTIMATE PIPING GUIDE
by VINCENT JANOSKI
PIPER’S MINDthe portable piping workshop
����������������
piping guides

3
the ultimate
piping guide
•by Vincent
Janoski
CONTENTS
PREFACE 5
PART I:YOU AND YOUR MUSIC
THE MUSIC IS YOURS 8THINK SMALL 9EXPAND YOUR LIBRARY 9STUDY 10LISTEN 10EXPERIMENT 11CONCLUSION 11
REHEARSAL TRACKING 12
PERFORMANCE TRACKING 15
BAGPIPE MIND GAMES 18
PART II:YOU AND YOUR INSTRUMENT
PIPING T.L.C. 23
AN OPEN LETTER TO THE BAD BAGPIPE 25
THE CHANTER REED 29
SYNTHETIC DRONE REEDS 31
PIPEHACKER 34

4
the ultimate
piping guide
•by Vincent
Janoski
PART III:YOU AS MUSICIAN
ON CREATING AND COMPOSING FOR THE BAGPIPE 41
THE IMAGINARY PIPER 43
THE PIPER’S BREATH 48THE BREATH 49EXERCISE 50PREPARATION 50
TEN PIPING THINGS TO PLAN AND DO 54
contents

5
the ultimate
piping guide
•by Vincent
Janoski
PREFACE
If current brain research is to be believed, we can literally rewire our brains based on our dedi-cation and our desire for self-improvement, our need for growth, basically develop any skill we desire. Our brains literally grow to meet the chal-lenge of pushing our artistic or emotional bound-aries, and at any age! Whether it is learning a new medley, progressing the next solo competi-tion level, or learning piobaireachd, it truly is “all in our mind.”
Is our passion and desire, or our level of artist-ry on the bagpipe or drum only measured by the number of Clasps or World Championships we manage to, or not manage to accrue as pipers and drummers? Comparisons will get you nowhere. The world of piping and drumming is big enough to contain many experts. It is really up to the individual piper or drummer to set out on their own personal path of growth and discovery.
Just as practicing your gracenoting for a new tune, or running through singles to build up sticking strength will cement the skills in your body, what is really happening is that the skill is cementing itself in your head. Our thoughts and mental processes require just as much of a workout when building new skills or other things that require large amounts of concentration and

6
the ultimate
piping guide
•by Vincent
Janoski
effort—and bagpipes and drums require that in spades!
It is your choice. You can choose to rewire your brain with “dirty” thinking and negativity, or you can rewire your mental processes with the positive things that will help you on your path to becom-ing a better piper or drummer. This guide contains numerous exercises and helpful tips and activities to get pipers of all ability levels thinking and acting differently, as well as thinking creatively. If there is one thing that can help you “build the piper’s mind,” it is to break free of your habitual thinking and introduce new ways to challenge known skills and situations. New challenges to your piping will help your “piper’s mind” build positive habits that will help your music for the long term.
Happy piping!
preface

PART I: YOU AND YOUR MUSIC
8
the ultimate
piping guide
•by Vincent
Janoski
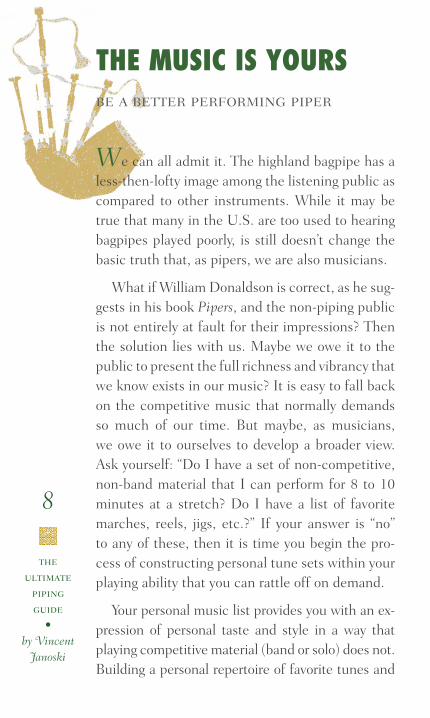
THE MUSIC IS YOURSbe a better performing piper
We can all admit it. The highland bagpipe has a less-then-lofty image among the listening public as compared to other instruments. While it may be true that many in the U.S. are too used to hearing bagpipes played poorly, is still doesn’t change the basic truth that, as pipers, we are also musicians.
What if William Donaldson is correct, as he sug-gests in his book Pipers, and the non-piping public is not entirely at fault for their impressions? Then the solution lies with us. Maybe we owe it to the public to present the full richness and vibrancy that we know exists in our music? It is easy to fall back on the competitive music that normally demands so much of our time. But maybe, as musicians, we owe it to ourselves to develop a broader view. Ask yourself: “Do I have a set of non-competitive, non-band material that I can perform for 8 to 10 minutes at a stretch? Do I have a list of favorite marches, reels, jigs, etc.?” If your answer is “no” to any of these, then it is time you begin the pro-cess of constructing personal tune sets within your playing ability that you can rattle off on demand.
Your personal music list provides you with an ex-pression of personal taste and style in a way that playing competitive material (band or solo) does not. Building a personal repertoire of favorite tunes and
9
the ultimate
piping guide
•by Vincent
Janoski
sets is also both educational and rewarding. Not only will your understanding of the various types of tunes improve as a result, but so will your sight reading skills and your overall artistry on the instrument.
So, how do you get there? If all you’ve got are competitive MSRs, how do you go about building a personal repertoire of music?
THINK SMALLSmall reels, strathspeys, two-parted quick marches and jigs, they are the true core of the piper’s rep-ertoire. And there is a gazillion of them, and some really exciting stuff too. The potential combina-tions of tune sets are endless, and spending time learning these types of tunes and constructing new sets is a creative exercise that will make you a bet-ter musician. And let’s face it, these tunes are easy and more fun to play!
EXPAND YOUR LIBRARYBuild a strong personal library of music collections. Get in the habit of acquiring tune books—new and old. The expense is worth it. If you buy books over time, before you know it, you will be surprised at the breadth of material that is suddenly at your fin-gertips. In the days before the competition boards took control of our repertoire, pipers of old played and composed small tunes to play for entertain-ment. These tunes found their place in the old collections such as Ross and Glen, and these are starting to see “print” again thanks to publishers such as Ceol Sean.
the music is yours
10
the ultimate
piping guide
•by Vincent
Janoski
STUDYSpend time with your books. Once you’ve amassed your library and are “thinking small,” spend study time with your collections armed with a practice chanter and a pad of sticky notes. Work through humming, singing, or playing the first few phrases of random tunes. A tune will probably “click” with you in the first few bars. If something does click, work through the whole piece and decide if it is a “keeper” or move on to another. By the end of your study session, your book or books should be flapping with dangling sticky note flags. Spend enough time doing this, and any difficulties you have with sight reading music will vanish. As your skills build, you will be able to digest and rattle off the basic melody of any tune when seeing the music for the first time. Not only that, you will be-come more familiar with the phrase patterns and rhythyms found in various types of tunes.
LISTENAs you flag tunes, listen for similarities in the melody lines or rythym patterns. Pay attention to similarities or compatibilities in major key notes and pulses. Mark some of these tunes for possible combination and experimentation in a future set. Listen to your personal CD or tape library—tradi-tional celtic music, straight bagpiping—and notice the tune types these bands are putting together. Do you hear a string of reels? Jigs into reels? Ask your-self: Why do these tunes sound so good together? What is exciting about them? Melody, rhythm, key?
the music is yours
11
the ultimate
piping guide
•by Vincent
Janoski
The answers will condition you to think along the same lines so that you will instinctively combine compatible tunes.
EXPERIMENTOnce you have a handful of small tunes, start play-ing them together in different sequences on the pipe. Experiment with different phrasings and ex-pressions. Stick with them and work through any difficult fingering. Eventually, you will give up on tunes that are not working and adopt others that suit your personal style. Keep at it. Make the tunes your own.
CONCLUSIONBagpipe music has a lot of character. One can spend a lifetime immersed in it and still find something new and interesting. There is a wealth of music out there to enhance your personal enjoyment of the Highland bagpipe, and your enjoymnet can only make your public peformances that much better for the audience. The more exposure people have to the richness of our music the more the image of the bagpipe and bagpipe players in general will benefit. The music is yours, make it so.
the music is yours

12
the ultimate
piping guide
•by Vincent
Janoski
REHEARSAL TRACKINGrecord and measure your progress
Time is a valuable thing. Given the demands of everyday living, it is often hard for one to fit in the full amount of time needed for one’s rehearsals. An active solo competing piper can reach a point where he or she is developing and polishing 15 or more separate pieces of music. A band player can also find themselves working on 25 minutes worth of performance material for competition alone. Put the active solo piper in a band, and that is quite a list of music to prepare and keep fresh.
Very few of us have the good fortune or lifestyle that will allow full run-throughs and detailed work on all of one’s repertoire at every rehearsal session. Breaking up your material and alternating music session to session is a good approach, but how do you keep track of your musical progress? Active pipers and drummers may have a lot of music to master, but professional musician will sometimes have hours of material that must be worked. Many professional musicians keep detailed logs of their rehearsal sessions. A musical log or diary is a good place to keep notes from instructors, personal notes on music, a list of personal goals and achievements, as well as keep a documentation of just how you’ve done over time.
13
the ultimate
piping guide
•by Vincent
Janoski
The chart of on the following page can serve as a template for a typical rehearsal log to get you started. Print multiple sheets of the page and use it as your master page for each session. You can also attach additional pages, music, or notes and use the template as a place to summarize your thoughts. Before your session, think of some im-mediate general goals that you would like to ac-complish, specific tunes you’re on, or areas of technique or expression you would like to exercise. Then, after your session, write in what you thought went particularly well, and what you think might need more work (be honest). Break up your ses-sion into focused parts with specific goals for each part. Write the amount of time spent on specific areas. Keeping good notes will allow you to track your personal progress as well as help create more balanced rehearsal sessions so that all of your mu-sic will get a workout.
rehearsal tracking

� � � � � � � � � � � � � � � � � � � � � �
� � � � � � � � � � �
������
������
� � �� � � � � � � � � � � �
� � �� � � � � � � � � � � � �
� � �� � � � � � � � � � � �
� � �� � � � � � � � � � � � �
� � � � � � � � � ��
� � � � � � � � � ��
�����
����� ������ �������
� � � � � � � � � � � � � � � � � � � � � �
�������������������������
�������������
© C
opyr
ight
200
5 by
The
Voi
ce
15
the ultimate
piping guide
•by Vincent
Janoski
PERFORMANCE TRACKINGrecord your appearences
Keeping track of all the details that go into learning and rehearsing bagpipes and drums is a daunting task. Competition schedules can be as demanding as one’s day-to-day work and home schedule. We’ve already discussed how keeping a running log of your lessons and rehearsals can help keep track of playing goals and progress in “Track-ing Your Rehearsals.” With all the things that keep modern pipers and drummers busy, it certainly can help to document things for easy reference and re-call. But what about performances? After all, the biggest reason we rehearse music is to eventually perform it. It is a good idea to also keep track of the fruits of your labors—competition and other performances.
One’s bagpipe or drum playing career—whether band or solo—can span years. The performances will be many and can be varied and special and it can become nearly impossible to remember every-thing about each one. Your performances deserve as much attention as your rehearsals in order to evolve and progress. Keeping track of your perfor-mance activities, music played, unique circum-stances, mistakes, and achievements can work toward making you a better “performing” musician,

16
the ultimate
piping guide
•by Vincent
Janoski
and give you guidance to structure and focus your rehearsal time.
The grid on the following page provides a tem-plate for keeping track of the key facts about your competitions, gigs, and concerts, and provides space for quick notes. Jot down what went well, what worked, what didn’t, the material played, and anything else that will help you. Copy the grid and create a small “recipe-style” file that collects them. Over time you just might be amazed (and impressed) by where you’ve been and what you’ve accomplished.
performance tracking

NAME OF EVENT
LOCATION
P E R F O R M A N C E N O T E S
DATE OF PERFORMANCE
MUSIC PLAYED:
COMMENTS:
NAME OF EVENT
LOCATION
P E R F O R M A N C E N O T E S
DATE OF PERFORMANCE
MUSIC PLAYED:
COMMENTS:
18
the ultimate
piping guide
•by Vincent
Janoski
BAGPIPE MIND GAMESit’s all in your head
Dale Carnegie is quoted as saying: “The one who goes farthest is generally the one who is willing to do and dare.”
How much risk and uncertainty do you allow in your own life? We all have our own way of handling risk in our lives, and any artistic or creative pursuit involves risk. We never really know what kind of results our hard work will bring or even the best way to achieve them. The emotional investment in one’s chosen art brings with it a certain amount of uncertainty and vulnerability. Competition of any kind is a creative pursuit that involves psychologi-cal risk taking. And anyone who belittles the activ-ity of bagpipe competition has likely never been involved in anything more psychologically arduous than buying a toaster oven. They have no idea how personally grueling it can be.
As competing pipers and drummers we lay out our egos to a knowledgeable community of peers—perhaps the harshest audience of all—sometimes on a weekly basis during active parts of the com-petitive calendar. The overall effect can be elation, confusion, anxiety, abject terror, or simply butter-flies. Either way, many pipers and drummers can be hampered by the psychological baggage that ac-companies the risk of performance or competition.
19
the ultimate
piping guide
•by Vincent
Janoski
So, how do you handle uncertainty and risk? The answer can be as defining an aspect in your playing as the quality of your expression in a strath-spey. It is a truism to say that a great amount of risk can also bring the greatest rewards. Developing the mental skills for creative risk taking can allow you to channel uncertainty and derive the greatest joy from your piping pursuits. If you want something to practice that will work toward the rewards of a personal best, general competitive success, or just plain personal satisfaction, work on the tactics in the following list to play bagpiping mind games with yourself for your own good.
BE PREPARED TO MAKE MISTAKES AND LEARN TO IGNORE SOCIAL DISAPPROVAL. Mistakes on the bagpipe happen and a “flawless” performance for any level of player is a rare thing. Prepare your-self to make mistakes, make them often, and get over them. It is almost anathema to bagpipe com-petition since it is all about what “others” think when your are being evaluated by a judge, but, stop worrying about what others think.
FACE YOUR MISTAKES, AND YOUR FRUSTRA-TIONS, HEAD ON. If it bothers you that something has not gone right in piping or drumming perfor-mance, deal with it directly. Figure out why it both-ers you and work on ways to resolve whatever it might be.
Tolerate the anxiety of uncertainty to find the best results. The first solution is not always the best. The best way to get the results you want in your
bagpipe mind games

20
the ultimate
piping guide
•by Vincent
Janoski
piping or drumming comes from exploration. Only a fool is convinced of a “sure thing.” Practice being adventurous.
DEVELOP AN ACCURATE PERCEPTION OF REAL-ITY RATHER THAN TWIST IT TO SUIT YOUR OWN ENDS. Admit your mistakes. Be honest with your-self. The “blame game” in bagpipe competition is popular one: “That judge just doesn’t like me;” “I heard so-and-so play and there is no way I placed behind him;” “If only the judging were better.” Stop playing that game. If things have, or haven’t gone your way, there is probably a valid reason amidst the clamor of your own narcisism. Find that reason and use it to build on your further development.
STOP WASTING TIME ON “GROWTH” AND “DE-VELOPMENT.” Get out there. Meet new people and find new experiences. Incessant bagpipe rehearsal or tuition will only get you so far. Stop waiting for your playing to reach a certain quality before you reveal it to the world. Get your kilted arse out there and perform.
TAKE NOTHING FOR GRANTED. Never settle. Your bagpipe can always be better. A tune can always be played with more feeling, your playing can always be more musical and exciting. Find the way.
ENJOY THE CONTRADICTIONS IN LIFE. Even though things don’t go your way, even after you’ve done all the right things, it’s okay. Playing bagpipes can be infuriating, but that is part of its charm.
BE YOURSELF. Opinions abound in bagpiping.
bagpipe mind games

21
the ultimate
piping guide
•by Vincent
Janoski
Everyone you meet will have their own personal “vision” on piping and drumming and pipe bands. Teachers and other bagpipers and drummers are certainly good guides to navigate the pesky art of bagpiping. But in the end, you should feel free to develop your own ideas and opinions, develop your own approach to the music, and create your own musical statement.
bagpipe mind games

PART II: YOU AND YOUR INSTRUMENT
23
the ultimate
piping guide
•by Vincent
Janoski
PIPING T.L.C.take care of your bagpipe
Your instrument wants you. The long hours of practice and competition can make the average piper take his or her instrument for granted. All pip-ers have their regular maintenance routine to keep their pipes in top shape, but think about it, you’ve taken your stand up and down the bumpy roads to the games in cars, airplanes, and buses. You’ve carried it around all over the field and played it in all kinds of weather. It’s time to take some extra effort to make sure your instrument has held up. Pipers can be as active in the winter as they are at other times of year. But things do slow down in the winter months, so take the time to give your instru-ment a Valentine and some tender loving care.
CHECK YOUR BAG FOR AIR LEAKAGE. Remove all the parts of your pipe save the blowstick and cork the stocks. Inflate the bag fully and apply “playing-strength” pressure with your arm for several seconds. Blow into the bag again. If you can inflate the bag any, you’ve probably got a small leak somewhere. Use your detective skills and find it.
EXAMINE THE OUTER SURFACE OF YOUR DRONES FOR CRACKS OR DAMAGE. While the

24
the ultimate
piping guide
•by Vincent
Janoski
drones are apart, carefully examine each piece. Check the wood for hairline fissures, chips or other early signs of damage. Long term, even the smallest chip or crack can become a major problem down the road.
CLEAN THE OUTER SURFACE OF YOUR DRONES AND MOUNTS. Things get dirty just being out-doors. Use a soft cloth and mild dish soap to wash the outside of your instrument.
CHECK ALL THE CONNECTION POINTS WHERE ANY “FOREIGN” OBJECTS ATTACH. All the points where the various gadgets—such as water traps, moisture systems, and the like—attach to your pipes can collect gunk and just get plain dirty. Take these items apart and clean them.
CHECK THE SEAL ON ALL HEMPED JOINTS. Normal use will wear out the hemp and wax on all of your joints and loosen the seal. Check for any part that requires a fresh wrap.
RETIE YOUR CORDS. Normal use can loosen the ties on your drone cords and have your drones flopping around on your shoulder. Cut the hemp or plastic that binds your cords and retie. Re-place them if necessary.
WASH YOUR BAG COVER. All that squeezing under a sweaty arm during the summer months can take its toll on even the most durable fabric. You wouldn’t wear the shirt you play in for three months straight without washing it, so take off that bag cover and give it a cleaning.
piping t.l.c.
25
the ultimate
piping guide
•by Vincent
Janoski
AN OPEN LETTER TO THE BAD BAGPIPEwhy you stink
Dear piper,
You have been playing a short while and you’ve finally made the jump to play in public or play in solo competitions. Your fingering is progressing nicely. Congratulations. While I’m glad that you’re working hard on your piping, and you’re out there on the boards, waking up bright and early to get to the games, your number pinned neatly to your kilt, I have to be blunt: Your pipes stink!
There, I said it. Somebody had to, for your own good. Now, I know we are all supposed to encour-age each other and play nice together, but man, your instrument sounds like a tortured feline. It is what makes the average spectator ridicule bag-pipes. You give meaning to the joke: What do you call a pile of bagpipes in a fireplace? Answer: A start. Why do you hate your fellow pipers so?
In this day and age, with a multitude of prod-ucts and materials to alleviate all the problems that might cause your pipes to sound like rubbish, there is no excuse. The good news is, there is hope. The noise you’re making is probably coming from one, some, or all of the points listed below. So, do ev-
26
the ultimate
piping guide
•by Vincent
Janoski
eryone a favor, put the pipes down and take them apart. We’re going to going to take care of things.
1. BLOWING. Your blowing and squeezing is awkward and irregular. Air is not getting to your reeds under full pressure, or worse, it is hitting the reeds in al-ternating pressures—squeaking in, squawking out. Check your bag for leakage. Make sure it is airtight. Even the tiniest leak will affect your blowing, caus-ing you to blow harder, too hard, causing your reed to squawk, causing you to alter your blowing…it’s a viscous cycle. Check the hemped joints of your intstrument. Make sure they are tight and rehemp as needed. Practice on achieving a natural rythym of blowing and squeezing until a steady, consistent sound is emanating from your instrument.
2. GET SOME DECENT REEDS. You will not save anything using very old or handmedown reeds. You owe it to yourself and your music to use new, good clean reeds. Yes, chanter reeds are pricey these days, and you will need to buy several. Save your pennies and buy some. Play one, then when it wears out, trash it and play another. When you’ve gone through all of them, buy more. That’s what pipers do. Save some more pennies and spend them on decent drone reeds. Pick an easy to maintain synthetic drone reed make. Yes, yes, they are also expensive. But there are many good ones these days, and you will never need another set. Just buy them. We will all love you for it.
an open letter to the bad bagpipe
27
the ultimate
piping guide
•by Vincent
Janoski
3. MAKE SURE YOUR REEDS ARE THE PROPER STRENGTH FOR YOU. You do not earn extra competitive points for play-ing gut busting reeds and working hard to blow. You get extra points for playing good music. To do that, your reeds should be comfortable and easy to play. A nice comfortable chanter reed will also allow your drone reeds to take less air and you won’t have to work so hard to blow and squeeze (see point 1). A good bet that your drone reeds are set to take far too much air. This results in too much blowing effort to keep a steady sound, your chanter reed wavers, and your drones start and stop. You sound like you’re trying to have relations with a goat. Reedsmanship is a subtle art. Assume you need proper advice and get some. There isn’t a piper alive of some experience and success with reeds who will not blather endlessly about the craft of setting them up. Find one and indulge him (or her). If you can’t, then fiddle with your drone reeds until you figure it out on your own. Don’t worry about ruining the reeds. If you botch them, buy another set. I know, your credit card is maxing out now, but that’s the way it goes. Nothing ventured, nothing gained. This is your piping we’re talking about.
4. ALWAYS ASSUME YOU CAN MAKE IT BETTER. No matter how comfortable you feel your reeds and bagpipe are, always think you can make it more comfortable and easier to play while getting a better quality of sound. No matter how good you think you sound, or how good others think you sound, always as-
an open letter to the bad bagpipe

28
the ultimate
piping guide
•by Vincent
Janoski
sume you can sound even better. Necessity is the mother of invention, they say. Your need will drive you to find solutions and try new things. Not sure of your abilities? Learn. Practice. Fail. Try again. It’s the only way.
Go now, you don’t stink anymore.
Sincerely,
Your fellow pipers.
an open letter to the bad bagpipe

29
the ultimate
piping guide
•by Vincent
Janoski
THE CHANTER REEDthe anatomy of a reed
Working with chanter reeds is probably the most important of all the skills one develops in their bagpiping careers. Certainly, the fickle cane that supports a piper’s music is not so willing to give up its secrets. Whether it is picking the “right” reed, adjusting for tuning and tone, or fixing sound prob-lems, it is not such an occult craft to develop the right skills. Apply a little trial and error and plain old common sense.
But where do you start? The task of tackling your chanter reed can be a daunting one for the beginning piper. Below is a quick guide to some of the basic facts and attributes of a chanter reed. Make a copy of the diagram that follows and keep them in your pipe case for a quick reminder as you experiment with your own reeds.
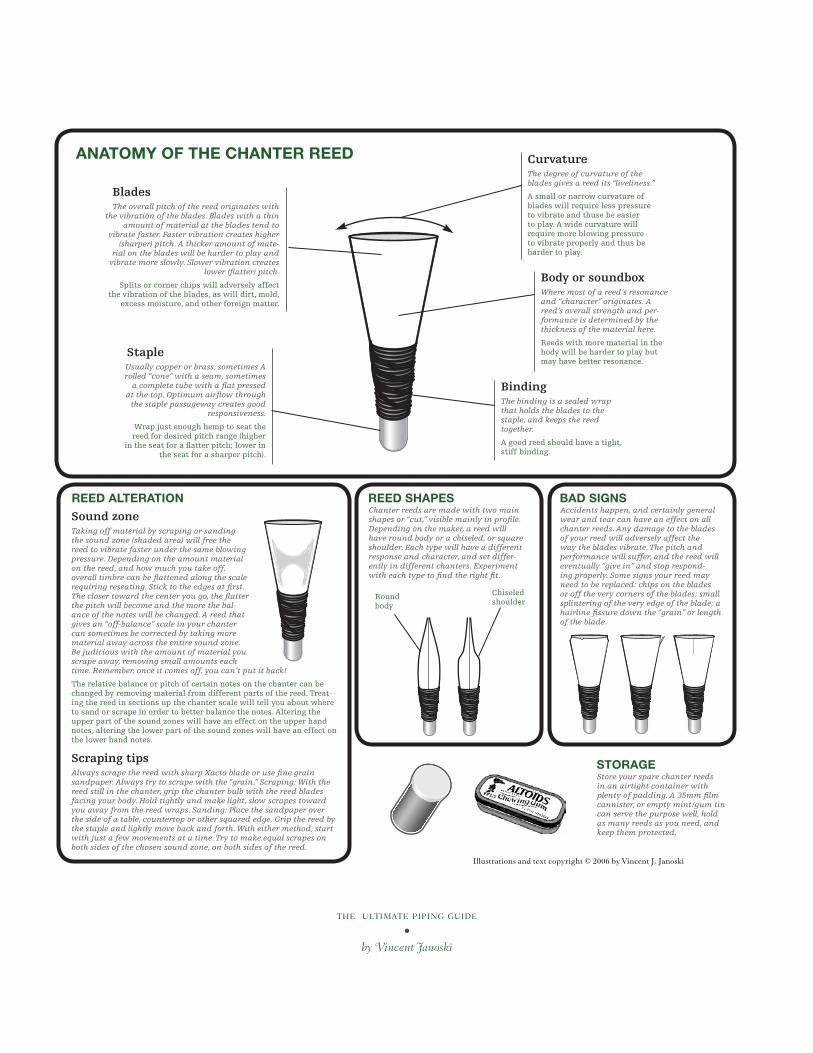
ANATOMY OF THE CHANTER REED
Illustrations and text copyright © 2006 by Vincent J. Janoski
StapleUsually copper or brass, sometimes A rolled “cone” with a seam, sometimes
a complete tube with a flat pressed at the top. Optimum airflow through
the staple passageway creates good responsiveness.
Wrap just enough hemp to seat the reed for desired pitch range (higher
in the seat for a flatter pitch; lower in the seat for a sharper pitch).
BladesThe overall pitch of the reed originates with
the vibration of the blades. Blades with a thin amount of material at the blades tend to
vibrate faster. Faster vibration creates higher (sharper) pitch. A thicker amount of mate-
rial on the blades will be harder to play and vibrate more slowly. Slower vibration creates
lower (flatter) pitch.
Splits or corner chips will adversely affect the vibration of the blades, as will dirt, mold,
excess moisture, and other foreign matter.
Body or soundboxWhere most of a reed’s resonance and “character” originates. A reed’s overall strength and per-formance is determined by the thickness of the material here.
Reeds with more material in the body will be harder to play but may have better resonance.
CurvatureThe degree of curvature of the blades gives a reed its “liveliness.”
A small or narrow curvature of blades will require less pressure to vibrate and thuse be easier to play. A wide curvature will require more blowing pressure to vibrate properly and thus be harder to play.
BindingThe binding is a sealed wrap that holds the blades to the staple, and keeps the reed together.
A good reed should have a tight, stiff binding.
REED SHAPES
Sound zoneTaking off material by scraping or sanding the sound zone (shaded area) will free the reed to vibrate faster under the same blowing pressure. Depending on the amount material on the reed, and how much you take off, overall timbre can be flattened along the scale requiring reseating. Stick to the edges at first. The closer toward the center you go, the flatter the pitch will become and the more the bal-ance of the notes will be changed. A reed that gives an “off-balance” scale in your chanter can sometimes be corrected by taking more material away across the entire sound zone. Be judicious with the amount of material you scrape away, removing small amounts each time. Remember, once it comes off, you can’t put it back!
The relative balance or pitch of certain notes on the chanter can be changed by removing material from different parts of the reed. Treat-ing the reed in sections up the chanter scale will tell you about where to sand or scrape in order to better balance the notes. Altering the upper part of the sound zones will have an effect on the upper hand notes, altering the lower part of the sound zones will have an effect on the lower hand notes.
Scraping tipsAlways scrape the reed with sharp Xacto blade or use fine grain sandpaper. Always try to scrape with the “grain.” Scraping: With the reed still in the chanter, grip the chanter bulb with the reed blades facing your body. Hold tightly and make light, slow scrapes toward you away from the reed wraps. Sanding: Place the sandpaper over the side of a table, countertop or other squared edge. Grip the reed by the staple and lightly move back and forth. With either method, start with just a few movements at a time. Try to make equal scrapes on both sides of the chosen sound zone, on both sides of the reed.
REED ALTERATION BAD SIGNSAccidents happen, and certainly general wear and tear can have an effect on all chanter reeds. Any damage to the blades of your reed will adversely affect the way the blades vibrate. The pitch and performance will suffer, and the reed will eventually “give in” and stop respond-ing properly. Some signs your reed may need to be replaced: chips on the blades or off the very corners of the blades; small splintering of the very edge of the blade; a hairline fissure down the “grain” or length of the blade.
Chanter reeds are made with two main shapes or “cut,” visible mainly in profile. Depending on the maker, a reed will have round body or a chiseled, or square shoulder. Each type will have a different response and character, and set differ-ently in different chanters. Experiment with each type to find the right fit.
Chiseled shoulder
Round body
STORAGEStore your spare chanter reeds in an airtight container with plenty of padding. A 35mm film cannister, or empty mint/gum tin can serve the purpose well, hold as many reeds as you need, and keep them protected.
the ultimate piping guide•
by Vincent Janoski
31
the ultimate
piping guide
•by Vincent
Janoski
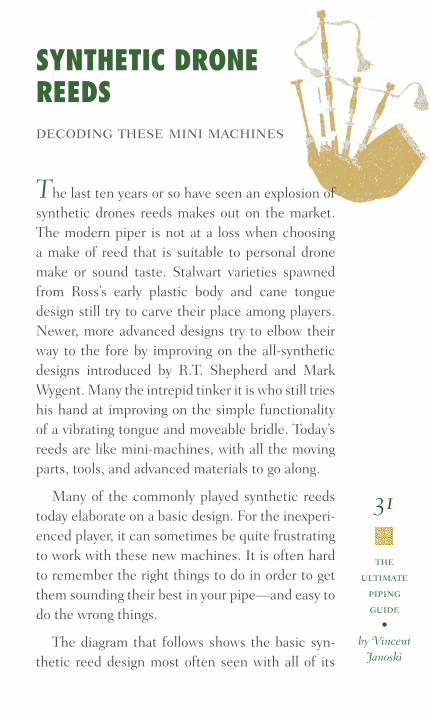
SYNTHETIC DRONE REEDSdecoding these mini machines
The last ten years or so have seen an explosion of synthetic drones reeds makes out on the market. The modern piper is not at a loss when choosing a make of reed that is suitable to personal drone make or sound taste. Stalwart varieties spawned from Ross’s early plastic body and cane tongue design still try to carve their place among players. Newer, more advanced designs try to elbow their way to the fore by improving on the all-synthetic designs introduced by R.T. Shepherd and Mark Wygent. Many the intrepid tinker it is who still tries his hand at improving on the simple functionality of a vibrating tongue and moveable bridle. Today’s reeds are like mini-machines, with all the moving parts, tools, and advanced materials to go along.
Many of the commonly played synthetic reeds today elaborate on a basic design. For the inexperi-enced player, it can sometimes be quite frustrating to work with these new machines. It is often hard to remember the right things to do in order to get them sounding their best in your pipe—and easy to do the wrong things.
The diagram that follows shows the basic syn-thetic reed design most often seen with all of its

32
the ultimate
piping guide
•by Vincent
Janoski
parts identified and some of the more common actions and results explained. Most of the reeds seen are variations of this same design. Getting the reeds set “just right” for you is often the most tedious work—but it is also the most rewarding. If properly set, today’s synthetics will perform con-sistently and remove the frustrations and variabil-ity in performance that can inhibit development. Copy the diagram and keep it in your pipe box as a reminder when you have to make adjustments to your reeds. You will then always be ready to get the most these reeds have to offer.
synthetic drone reeds

FIG
URE
1. C
OM
MO
N S
YNTH
ETIC
DRO
NE
REED
DES
IGN
Sea
tin
g p
inW
rap
ped
wit
h h
emp
an
d s
eate
d i
nto
d
ron
e. G
ives
ext
ra le
ngt
h f
or g
rea
ter
ran
ge o
f se
ati
ng
ad
just
men
ts.
Seat
ree
d d
eep
er t
o sh
arp
en r
eed
p
itch
; sea
t re
ad f
urt
her
ou
t to
flat
ten
p
itch
.
Ton
gue
seat
Ton
gue
is s
ecu
red
to
reed
bod
y w
ith
a b
an
d o
r O
-rin
g. S
ecu
res
the
vibr
ati
ng
ton
gue
to t
he
reed
bod
y a
nd
kee
ps
it s
tabl
e.
Ton
gue
Ma
de
of fi
berg
lass
, pla
stic
, or
thic
ker
carb
on c
omp
osit
e. H
eat
set
an
d c
urv
ed f
or p
rop
er v
ibra
tin
g a
ctio
n.
No
flic
kin
g! T
ongu
e sh
ould
vib
rate
op
tim
ally
wit
hou
t m
anip
ula
tion
.
Tun
ing,
or
“pit
ch”
scre
wH
ex-h
ead
Alle
n o
r st
an
da
rd s
crew
, p
lug,
or
slid
ing
pin
.
Ch
ange
s th
e le
ngt
h o
f th
e in
sid
e ch
am-
ber
of
the
reed
an
d t
hu
s ov
eral
l p
itch
. T
urn
scr
ew c
lock
wis
e (i
n) t
o sh
arp
en
reed
an
d t
un
e d
ron
e h
igh
er u
p o
n t
un
-in
g p
in; t
urn
scr
ew c
oun
ter-
cloc
kwis
e (o
ut)
to
flat
ten
ree
d a
nd
tu
ne
dro
ne
low
er o
n p
in.
Ree
d b
ody
Hol
low
“tu
be.”
Fash
ion
ed o
f p
las-
tic,
fibe
rgla
ss, o
r co
mp
osit
e. S
et
wit
h s
ma
ll h
ole
ben
eath
ton
gue
for
rele
ase
of
sou
nd
.
Inn
er w
alls
can
som
etim
es c
ol-
lect
dir
t ov
er t
ime.
Blo
w o
r ri
nse
ou
t oc
casi
onal
ly.
B
rid
leR
ubb
er O
-rin
g. S
lid
es u
p a
nd
d
own
th
e to
ngu
e a
nd
ree
d b
ody.
Slid
e b
rid
le i
n s
mal
l am
oun
ts.
Slid
ing
bri
dle
dow
n t
he
reed
sh
orte
ns
the
ton
gue,
sh
arp
ens
the
pit
ch, a
nd
all
ows
the
reed
to
pla
y w
ith
les
s ai
r; s
lid
ing
the
bri
dle
up
th
e re
ed l
engt
hen
s th
e to
ngu
e, fl
atte
ns
the
pit
ch, a
nd
ca
use
s th
e re
ed t
o p
lay
wit
h m
ore
air
and
blo
win
g.
Illu
stra
tion
copy
righ
t © 2
005
by V
ince
nt J
. Jan
oski

34
the ultimate
piping guide
•by Vincent
Janoski
PIPEHACKERcarve your own path
Pipers have ever been a handy bunch. We have devised all sorts of methods for instrument self-sufficiency. Whether it is making our own bags or reeds, brewing our own seasoning, or some other creation to improve the playing experience, the in-stinct to create would seem to be a prerequisite for a Highland piper.
Pipers of all stripes will eventually dabble in a DIY project or two. Just as computer hackers “hack” software code and remodel it to their needs, these pipers’ projects are a “hack” as well. Thus, we are all “pipehackers.”
The projects on the following pages can achieve several things. They are creative, they help build pride and ownership over your instrument, and they will get you thinking differently about all as-pects of your art. Give them a try and create your own pipehack.
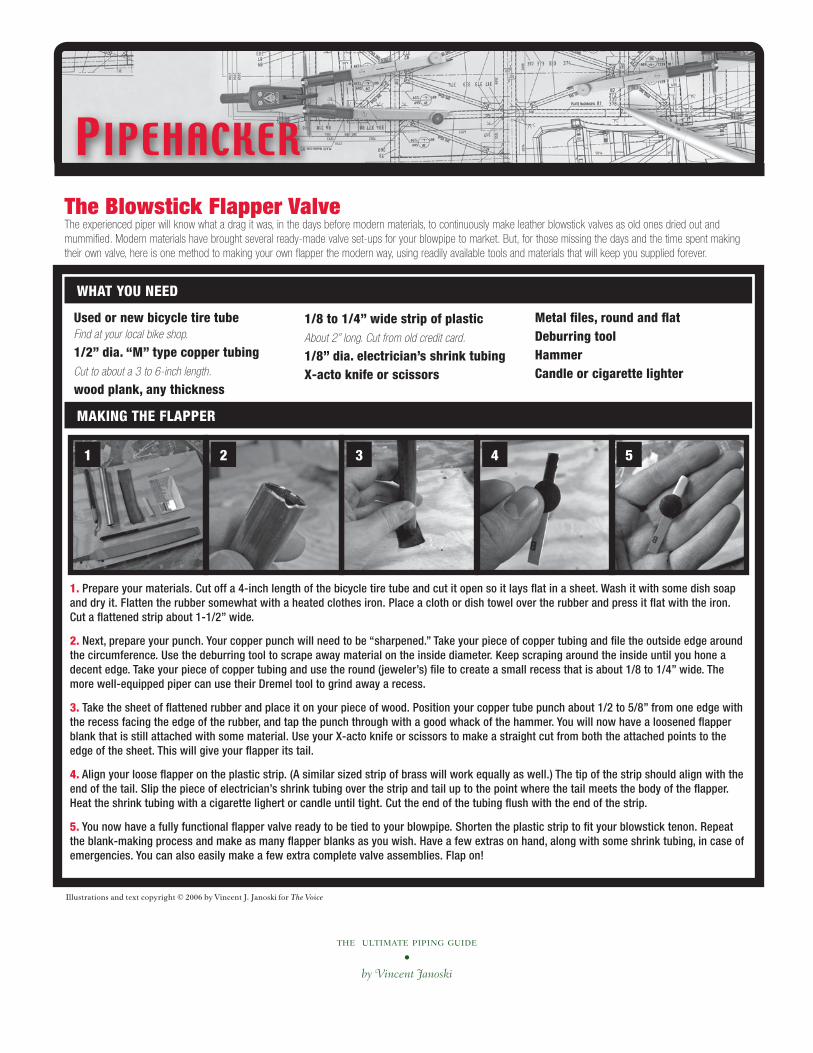
The Blowstick Flapper ValveThe experienced piper will know what a drag it was, in the days before modern materials, to continuously make leather blowstick valves as old ones dried out and mummified. Modern materials have brought several ready-made valve set-ups for your blowpipe to market. But, for those missing the days and the time spent making their own valve, here is one method to making your own flapper the modern way, using readily available tools and materials that will keep you supplied forever.
WHAT YOU NEED
Used or new bicycle tire tubeFind at your local bike shop.
1/2” dia. “M” type copper tubing Cut to about a 3 to 6-inch length.
wood plank, any thickness
1/8 to 1/4” wide strip of plastic About 2” long. Cut from old credit card.
1/8” dia. electrician’s shrink tubingX-acto knife or scissors
Metal files, round and flatDeburring toolHammerCandle or cigarette lighter
1. Prepare your materials. Cut off a 4-inch length of the bicycle tire tube and cut it open so it lays flat in a sheet. Wash it with some dish soap and dry it. Flatten the rubber somewhat with a heated clothes iron. Place a cloth or dish towel over the rubber and press it flat with the iron. Cut a flattened strip about 1-1/2” wide.
2. Next, prepare your punch. Your copper punch will need to be “sharpened.” Take your piece of copper tubing and file the outside edge around the circumference. Use the deburring tool to scrape away material on the inside diameter. Keep scraping around the inside until you hone a decent edge. Take your piece of copper tubing and use the round (jeweler’s) file to create a small recess that is about 1/8 to 1/4” wide. The more well-equipped piper can use their Dremel tool to grind away a recess.
3. Take the sheet of flattened rubber and place it on your piece of wood. Position your copper tube punch about 1/2 to 5/8” from one edge with the recess facing the edge of the rubber, and tap the punch through with a good whack of the hammer. You will now have a loosened flapper blank that is still attached with some material. Use your X-acto knife or scissors to make a straight cut from both the attached points to the edge of the sheet. This will give your flapper its tail.
4. Align your loose flapper on the plastic strip. (A similar sized strip of brass will work equally as well.) The tip of the strip should align with the end of the tail. Slip the piece of electrician’s shrink tubing over the strip and tail up to the point where the tail meets the body of the flapper. Heat the shrink tubing with a cigarette lighert or candle until tight. Cut the end of the tubing flush with the end of the strip.
5. You now have a fully functional flapper valve ready to be tied to your blowpipe. Shorten the plastic strip to fit your blowstick tenon. Repeat the blank-making process and make as many flapper blanks as you wish. Have a few extras on hand, along with some shrink tubing, in case of emergencies. You can also easily make a few extra complete valve assemblies. Flap on!
1 2 3 4 5
PIPEHACKER
MAKING THE FLAPPER
Illustrations and text copyright © 2006 by Vincent J. Janoski for The Voice
the ultimate piping guide•
by Vincent Janoski

The Personal Pipe SwabPlaying bagpipes outdoors on the eastern U.S. is a crapshoot. Every season will bring just about all kinds of weather conditions. Excessive moisture is your enemy. Whether it’s straight rain, or cool mornings turning into blazing heat, all pipers need to be aware of how much moisture is collecting on the insides of their drones. A good wipe with a musician’s pull through swab is always a good measure to keep moisture at bay. But the drones on the Highland bagpipe are long, and pulling through a swab on each piece of your drone is cumbersome. In addition, there isn’t a brush made that can reach all the way through a typical drone piece. So what is an intrepid pipehacker to do? Why make your own of course! Below are instructions for a handy swab/brush tool with a full length to reach through all your pipe parts.
WHAT YOU NEED
Wire clothes hangerPanty hose or similar stockings1 piece; cut to about 3 to 5 inches
Wire cuttersPliers (2)Scissors
Metal fileElectrician’s tape
1. Prepare your materials. Unwind the wire hanger and straighten it out as best you can. Use the pliers to help work out bends. Snip off the “twist” part of the end with the wire cutters and file off sharp edges.
2. Measure about 7 inches from one end of the straightened hanger. Use your pliers at this point and bend the 7-inch length to just past a right angle. You can also do this by placing the wire against a table and bending the length over the edge. Try to make as tight a bend as you can.
3. Place the first piece of hose inside the bend. Center the piece. Cross the 7-inch bent length to close the bend over the hose. Keep bending until you have closed a tight enough “loop” to secure the hose. You may need a second pair of pliers to hold the wire as you bend it.
4. After you have completed the bend and the piece of hose is secured, make a final few loose twists to keep the remaining length of wire from sticking out. Snip off excess with the wire cutters. Secure with tight wraps of electrician’s tape.
5. Measure to about 20 inches from the swab’s tip. Make a “handle” for your swab by bending a hand-sized loop at the 20-inch point. Wrap the entire length, handle and all with electrician’s tape for extra support.
6. Your swab is now long enough to wipe out the entire length of a drone. Keep your new swab in your pipe case for a quick wipe-through at those wet and rainy contests.
MAKING THE SWAB
1 2 3
5
4
6
Illustrations and text copyright © 2006 by Vincent J. Janoski for The Voice
the ultimate piping guide•
by Vincent Janoski

The Personal Reed CaseAn enterprising piper can accumulate a large number of chanter reeds over time. But once you find those choice bits of cane, what do you do with them? Active players will normally several good reeds going and need others close at hand. Do you keep them in a cardboard box? Store them in the back of your fridge? Keep them loose in a small jar? Many a good, unplayed reed has suffered from bouncing around loose in some sort of container in the bottom of a pipe case, or worse, been sitting safely stored at home when needed at a performance. Here is a nifty, quickly-made pipehack that will not only keep your reeds dry in airtight fashion, but protected when kept in your pipe box, and kept secure so they are undamaged in your travels.
WHAT YOU NEED
Metal mint or gum tinEmpty a ubiquitous Altoids tin or similar knock off.Children’s EVA foam1 8.5” x 11” sheet about 1/8” thick
Foam cushioningFrom an old chair or sofa. A new appliance or electronic gizmo will often have stiff foam packing.Hot glue gun/ Elmer’s glueSmall paint brush
X-acto knife or hobby bladeLong box cutter or carpet knifeRulerSharpie markerSpray or hobby paint (optional)
1. Prepare your materials. Measure and cut a sizeable block or piece of foam cushioning for your reed holder. Pieces of the EVA foam will line the inside of your tin.
2. Place the Altoid tin on the sheet of EVA foam and trace the shape of the base.
3. Trim your traced shape to fit flatly and snugly in the bottom of the tin.
4. Cut a strip of EVA foam to line the walls of your reed case. Measure a strip 11-3/8 inches long and cut to 21/32 inches wide (the depth of the tin minus the thickness of the EVA foam base).
5. Make your reed holder insert. Slice off a “block” of foam cushioning, 2-3/8 x 3/8 x 3/4.
6. Place your reed holder slots. These slots will secure your reeds in place. Start at one end of the block and measure 1/2 inches. Mark a line with your sharpie marker. Then mark additional lines 5/8 inches apart. You should have five lines. Make a cut with your hobby knife along each mark straight down through the width of the block to about halfway through the depth of the block.
7. Line the bottom portion of your reed case with EVA foam piece you traced and trimmed. Brush on
MAKING THE CASE
1 2 3 4
5
Illustrations and text copyright © 2006 by Vincent J. Janoski for The Voice
the ultimate piping guide•
by Vincent Janoski

some glue over the surface of the tin or dot the area with your glue gun. Glue down your trimmed base to the bottom of the tin. If you’re using hot glue, be sure to get the edges glued down.
8. Line the walls of your reed case. Brush on the glue over a small bit of the EVA foam strip. Glue the EVA foam strip to one corner and work your way around the perimeter of the tin, pushing in the foam tight under the metal “lip.” Brush on or dot glue as you go while pressing in the strip underneath the tin “lip” little bits at a time for a tight fit. Let dry.
9. Secure your reed holder insert into your reed case. Measure and mark the center of the tin’s base. Brush on glue or hot glue the bottom of the block. Line up the center of the tin’s base with the center of your foam block and insert the foam block. Compress the block slightly to fit inside against the edges. Glue the ends to the inside walls.
10. Curiously strong reeds! Insert the staple/bindng end of your chanter reeds into the slot in the foam holder alternating sides of the foam with each reed. You can now indulge your artistic tendencies and personalize the case. Sand down the exterior and coat with your favorite color spray or hobby paint.
SPECIAL SPORRAN SIZE: Repeat all the steps above but use an Altoid chewing gum tin. They are the perfect size for the sporran. Alter your measurements as needed for the foam insert. These tins are smaller, narrower, and will fit about 2 or 3 chanter reeds.
6 7 8
10
9
Illustrations and text copyright © 2006 by Vincent J. Janoski for The Voice
the ultimate piping guide•
by Vincent Janoski
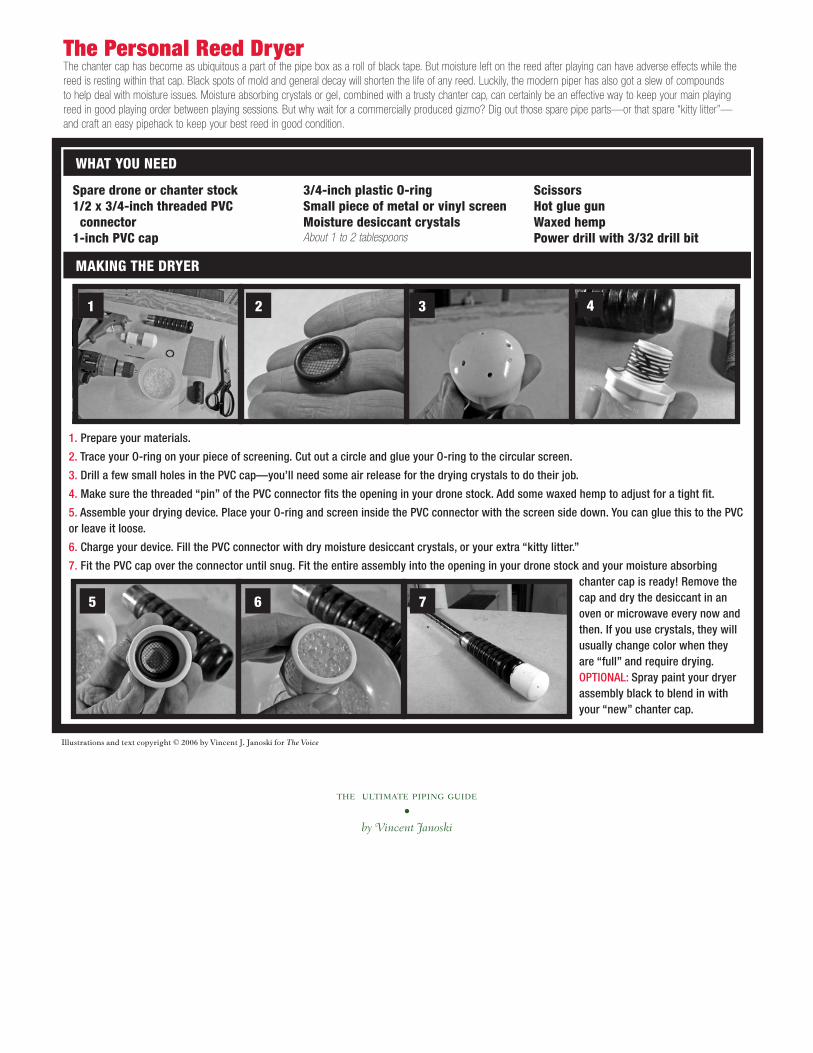
The Personal Reed DryerThe chanter cap has become as ubiquitous a part of the pipe box as a roll of black tape. But moisture left on the reed after playing can have adverse effects while the reed is resting within that cap. Black spots of mold and general decay will shorten the life of any reed. Luckily, the modern piper has also got a slew of compounds to help deal with moisture issues. Moisture absorbing crystals or gel, combined with a trusty chanter cap, can certainly be an effective way to keep your main playing reed in good playing order between playing sessions. But why wait for a commercially produced gizmo? Dig out those spare pipe parts—or that spare “kitty litter”—and craft an easy pipehack to keep your best reed in good condition.
WHAT YOU NEED
Spare drone or chanter stock1/2 x 3/4-inch threaded PVC connector1-inch PVC cap
3/4-inch plastic O-ringSmall piece of metal or vinyl screenMoisture desiccant crystalsAbout 1 to 2 tablespoons
ScissorsHot glue gunWaxed hempPower drill with 3/32 drill bit
1. Prepare your materials.
2. Trace your O-ring on your piece of screening. Cut out a circle and glue your O-ring to the circular screen.
3. Drill a few small holes in the PVC cap—you’ll need some air release for the drying crystals to do their job.
4. Make sure the threaded “pin” of the PVC connector fits the opening in your drone stock. Add some waxed hemp to adjust for a tight fit.
5. Assemble your drying device. Place your O-ring and screen inside the PVC connector with the screen side down. You can glue this to the PVC or leave it loose.
6. Charge your device. Fill the PVC connector with dry moisture desiccant crystals, or your extra “kitty litter.”
7. Fit the PVC cap over the connector until snug. Fit the entire assembly into the opening in your drone stock and your moisture absorbing chanter cap is ready! Remove the cap and dry the desiccant in an oven or microwave every now and then. If you use crystals, they will usually change color when they are “full” and require drying.OPTIONAL: Spray paint your dryer assembly black to blend in with your “new” chanter cap.
MAKING THE DRYER
1 2 3 4
5 6 7
Illustrations and text copyright © 2006 by Vincent J. Janoski for The Voice
the ultimate piping guide•
by Vincent Janoski

PART III: YOU AS MUSICIAN

41
the ultimate
piping guide
•by Vincent
Janoski
ON CREATING AND COMPOSING FOR THE BAGPIPEunleash your muse
Have you ever tried composing a piece of bag-pipe music? What was the result? Composition skills are like anything else, they require learning and practice. Remember back to a time when you could not read a piece of music. How good are those skills now?
If you repeat something often enough, you will develop habits related to that something. So it is with music. Music composition, aside from com-prising a set of skills that can be learned, is also a creative exercise. Tapping into your own creativity means habitually placing yourself in the right mind-set to allow your personal creativity to flourish.
A general axiom among learning experts states that if something is done for thirty days, it will be-come ingrained and habitual.
Try this exercise: Each day, for thirty days, cre-ate an original piece of pipe music. It could be a phrase, a melodic line, a full tune, anything. Scribble it down immediately. Carry some music staff paper, or a notebook around with you. Think about it during the course of your normal day and

42
the ultimate
piping guide
•by Vincent
Janoski
pick a set time to jot down what’s going through your head. Don’t worry if the result is any good, or if it sounds like something else. The idea is to get used to the process of creating and document-ing. Review your results at a later time and expand on your scribblings. You can then decide whether what you’ve written is junk or not.
After a while, you may find yourself jotting down several phrases, or even an entire four-parted tune. You may find that things just pop into your head unprompted. That is the point. Once it be-comes easier to tap into those mental resources, you might be surprised by the changes in the way you approach the music. And who knows? You just might end up getting a good tune or two you can call your own.
on creating and composing

43
the ultimate
piping guide
•by Vincent
Janoski
THE IMAGINARY PIPERmaking the most of your practice time in a busy world
There is a great quote by franz liszt: “Think 10 times, play once.”
Franz Liszt was a virtuouso. A musician who amazed even his peers at the time (Wagner, Shum-man) with his musical abilities. So when someone of such prodigious talent utters such a line, take note. It’s the kind of quote that professional mu-sicians will tack above their work areas. It’s also the kind of quote that could mean different things on different days. But in the end, it speaks to the value of mental practice.
How many of us wish we had more personal time to practice our music? Are you a piper or drummer who is constantly pressured to find the time in a busy life to schedule regular, consistent rehearsal to learn new music, or practice your cur-rent repertoire? Engaging in mental practice ses-sions is something that can fit into even the busiest of schedules, and provide the additional time we crave.
Mental practice is what it suggests: practice in the imagination. It is daydreaming, put simply. But it is directed daydreaming. It is visualizing yourself running through physical routines in your mind the way you would perform them. For musicians, this

44
the ultimate
piping guide
•by Vincent
Janoski
is simply imagining yourself playing or performing your music in the way you desire to hear it, without weaknesses and without any flaws.
For more insight into the idea of mental practice, read a book called Psycho-Cybernetics by Maxwell Maltz. In it, Maltz explains the basis of mental prac-tice, which is the fact that the nervous system can-not tell the difference between a vividly imagined experience, and an actual one. Maltz conducted sev-eral experiments to support this idea. One involves piano music and children. The experiment centered around a single piece of new music. Control groups were given a daily regimen of physical practice and rehearsal, while another group was given minimal amounts of physical rehearsal, while spending regu-lar periods of time imagining themselves playing the piece. In the end, the group who spent most of their time playing the piece in their minds showed equal and sometimes greater aptitude in actual playing of the piece, and developed this aptitude more quickly than the control group.
How many bagpipers complain of difficulty memorizing music, or consider certain tunes too difficult to play? How many pipers worry that they cannot play a certain tune as well as “so-and-so” on the latest CD? The solution to these dilemma lies in actually imagining “ourselves” playing the piece well, or the way we wish it heard—creating an “imaginary piper.” Kinetic memory or the physi-cal habits that are required to play bagpipes (and
the imaginary piper
45
the ultimate
piping guide
•by Vincent
Janoski
drums), normal recall, as well as aural memory, all start in the brain. There are no physical barriers to imagining yourself playing even the most difficult tune flawlessly. As you get used to the idea of your imaginary piper doing things “right” in your head, you are that much closer to having it emerge in the physical act.
Probably no one needs tips on how to daydream, but the table on the following pages provides some things you can do to start working in a routine of mental practice for your piping. Working on these tactics is as quick and easy as being awake. Learn-ing and playing the Highland bagpipe can be as much about unlocking personal potential as it is about playing music. Muscles take a long time to develop, and physical habits can take ages to take hold before they become natural. The mind is a far superior instrument and will adapt and develop quicker than your body, and it is the mind calling the shots. Including a regimen of mental practice in your musical routine is the fastest way to get re-sults out of the hard physical practice (time spent on the practice chanter or pad, time spent playing the bagpipe) you may already be doing.
PICK A TIME where you are not engaged in par-ticularly demanding physical task, but a time that occupies each day the same way. This can be a regular walk for exercise, driving or riding the train to work, taking a shower. Make this your “practice time.”
the imaginary piper

46
the ultimate
piping guide
•by Vincent
Janoski
USE YOUR CHOSEN TIME to run through your repertoire. If you’re new to this kind of day-dreaming, start with tunes you know well, that are almost second nature. Imagine yourself playing the big pipe, the physical act of blow-ing, squeezing, and fingering the chanter. This is your “imaginary piper.” Focus on how it feels. Then start a tune or set and run through the whole thing start to finish, at tempo, note-for-note. Try to actually “hear” the tone of your in-strument. Try to hear the sound of movements the way you want to play them. Picture your fin-gers playing certain movements with clean and clear gracings.
Lock into subtleties of rhythym and phrasing. For an automatic, or habitual tune, this should come easy, but do this for a while until you get used to forming a strong picture in your head without distraction.
ONCE YOU’RE USED TO CREATING a solid pic-ture of yourself playing, or, if you are already used to this sort of daydreaming, start alternat-ing with other parts of your repertoire. Imagine running through your entire piobaireachd, as if you were in competition, with all the phrasing and feeling the tune deserves. Picture perfect execution, and good timing.
Alternate with new tunes you might be work-ing on. Hear them played and recalled perfectly. Imagine playing your march, strathspey & reel
the imaginary piper
47
the ultimate
piping guide
•by Vincent
Janoski
sets with all the musical expression and clear fingering that should be there.
AFTER YOU’VE SPENT REGULAR TIME mentally practicing your material, start to use this time to bring other aspects of musicality into your play-ing. Imagine playing your tune(s) a little differ-ently—change your phrasing; pick up the tempo or slow down. Try to really hear what the tune might sound like with these alterations. The benefit of playing in your imagination means that there is no pressure—no judge to score you, and no audience. You can also start using other time to “practice.” Waiting for the bus, sitting in your doctor’s waiting room, standing in line at the bank—all of these moments can be used to add more mental practice.
the imaginary piper

48
the ultimate
piping guide
•by Vincent
Janoski
THE PIPER’S BREATHbreathing your way to good blowing
Pipe bands, and individual pipers these days seem to get a pretty decent sound at just about any grade level. Many Pipe Majors and instructors have the necessary skills to set a band’s sound well. There is nothing more impressive in a lower grade contest than to hear, say, a Grade 4 pipe band come onto the field with a clean, well set tone. Other bands may not be so lucky though, despite their best ef-forts. Probably the biggest contributor to a pipe band’s overall poor sound has got to be pipers’ poor blowing of the instrument.
Just about every band you’ve played with or en-countered can claim to have had comments about “poor blowing” from a judge on their competition scoresheets. Lower grade bands are plagued with this problem. You can hear it as a spectator. Bands will start off great in an opening tune, then by the end of their set or medley, chanter tone is wavering. Sometimes certain notes sound okay, sometimes not. A band will attribute this to “blowing issues” and almost shrug it off as “nerves” or “inexperi-ence,” as if these troubles will fix themselves over time. Not so. Pipers are taught to play a proper toarluath with each gracing properly articulated, and similarly pipers must also be taught to blow
49
the ultimate
piping guide
•by Vincent
Janoski
their pipe to project a full and resonant sound. Of-ten, little detail is shown to the learning piper on how to blow the bagpipe fully and properly.
THE BREATHThe key to good blowing is, simply, good breathing. Mastery of your own breathing process will enable you to control when and how much you should blow. Aside from setting up your instrument to be comfortable and air-efficient (as well as regular practice), how you breathe makes the greatest con-tribution to what we all consider “good blowing.”
It may seem silly to think about breathing since we all know how to breathe, and pipers must worry about a host of other things as they play. A piper doesn’t need to think about something as easily and automatically done as breathing as he or she plays, right? Not so right. Breathing is an important part of the wind musician’s skillset. Woodwind players will spend hours training their breathing patterns to achieve the proper intonation, volume, and tonal quality on their instruments.
But, “the bagpipe is not like other woodwinds,” you say? Perhaps. The bagpipe does not respond to the subtleties of breathing the way a flute or oboe might, or does it? Isn’t the dreaded “sagging D” or “dullness” in chanter sound a result of poor intona-tion, or the inability to sustain pressure in the bag? A Highland piper may not be trying to achieve a sustained note or altered volume with the breath, but the piper’s breathing must have sufficient sus-
the piper’s breath

50
the ultimate
piping guide
•by Vincent
Janoski
tained energy at key points in his or her music in order to get a full sound on their instrument.
In order to change the way you blow, you must first be aware of the way you breathe. Being aware of your own breathing will also allow you to notice when it is changing as you play. You will pinpoint the spots where your blowing suffers and your pipe is not sounding its fullest.
EXERCISE The good news is, as with any pipe music move-ment or tune you might be working on, it is exer-cise and practice that will help you develop better control over your breathing. Incorporating some short, basic breathing exercises into your normal rehearsal routine will enhance your breath aware-ness and ultimately, your control. Awareness and control will then allow you to better achieve a full sound on your pipe.
The following exercises are brief enough to in-clude in total or in part either before a practice ses-sion, during the day at some point, before bedtime, whichever is convenient. The best part: They’re easy! They progress in “difficulty,” but they take no more energy than sitting and breathing. Stay with them, and you will start to feel the difference when you play.
PREPARATION For each of the exercises, stand comfortably and straight. Maintain good relaxed posture. Keep your
the piper’s breath

51
the ultimate
piping guide
•by Vincent
Janoski
back straight and your chin up. Lay your arms com-fortably at your sides. Most important of all: Relax. Close your eyes and focus on your breathing. Con-duct each of the exercises by breathing through the mouth, not the nose. Each exercise will be using normal counts of music time. Imagine a tune in the proper meter as you go through each exercise.
You can adapt each exercise to fit different tune types. If you like, conduct each progression of ex-ercises through a typical competition MSR using the rhythms of each tune as your count.
❑ BREATH CONTROL EXERCISE 1: WARM-UP1. Exhale fully
2. Breathe in fully in 2 counts of a normal common time
beat.
3. Exhale immediately and fully in 4 counts using an “S”
sound. Push from the diaphragm.
4. Repeat steps 1 through 3 six times.
❑ BREATH CONTROL EXERCISE 2: MARCH I1. Exhale fully.
2. Breathe in fully in 2 counts of a normal 2/4 time beat.
3. Exhale fully in 6 counts suing an “S” sound. Push all air out.
4. Repeat 1 through 3 five times.
❑ BREATH CONTROL EXERCISE 3: MARCH II1. Exhale fully.
2. Breathe in fully in 2 counts of a normal 2/4 time beat.
the piper’s breath
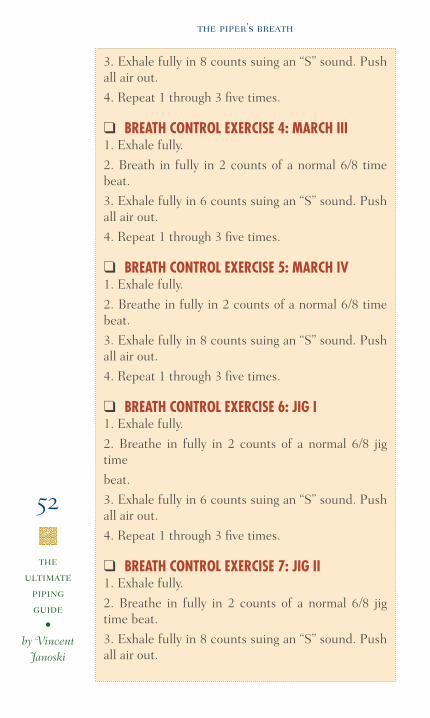
52
the ultimate
piping guide
•by Vincent
Janoski
3. Exhale fully in 8 counts suing an “S” sound. Push all air out.
4. Repeat 1 through 3 five times.
❑ BREATH CONTROL EXERCISE 4: MARCH III1. Exhale fully.
2. Breath in fully in 2 counts of a normal 6/8 time beat.
3. Exhale fully in 6 counts suing an “S” sound. Push all air out.
4. Repeat 1 through 3 five times.
❑ BREATH CONTROL EXERCISE 5: MARCH IV1. Exhale fully.
2. Breathe in fully in 2 counts of a normal 6/8 time beat.
3. Exhale fully in 8 counts suing an “S” sound. Push all air out.
4. Repeat 1 through 3 five times.
❑ BREATH CONTROL EXERCISE 6: JIG I1. Exhale fully.
2. Breathe in fully in 2 counts of a normal 6/8 jig time
beat.
3. Exhale fully in 6 counts suing an “S” sound. Push all air out.
4. Repeat 1 through 3 five times.
❑ BREATH CONTROL EXERCISE 7: JIG II1. Exhale fully.
2. Breathe in fully in 2 counts of a normal 6/8 jig time beat.
3. Exhale fully in 8 counts suing an “S” sound. Push all air out.
the piper’s breath

53
the ultimate
piping guide
•by Vincent
Janoski
4. Repeat 1 through 3 five times.
❑ BREATH CONTROL EXERCISE 8: REEL I1. Exhale fully.
2. Breathe in fully in 2 counts of a doubled 2/2 reel time
beat.
2. Exhale fully in 8 counts of doubled reel time suing an
“S” sound. Push all air out.
3. Repeat 1 through 3 five times.
❑ BREATH CONTROL EXERCISE 9: REEL II1. Exhale fully.
2. Breathe in fully in 1 count of 2/2 reel time.
3. Exhale fully in 16 counts of doubled up reel time using
an “S” sound. Push all air out.
4. Repeat 1 through 3 five times.
❑ EXERCISE 10: EXPANDING AIR CAPACITY1. Exhale fully.
2. Breathe in fully in 8 counts of normal common time.
3. Hold your breath for 2 counts.
4. Sip a fast breath in for 1 count.
5. Hold for 1 count.
6. Sip a fast breath again in 1 count.
7. Hold for 1 count.
8. Sip another fast breath in 1 count.
9. Hold for 1 count.
10. Exhale for 8 counts. Rest.
11. Repeat two to three times.
the piper’s breath

54
the ultimate
piping guide
•by Vincent
Janoski
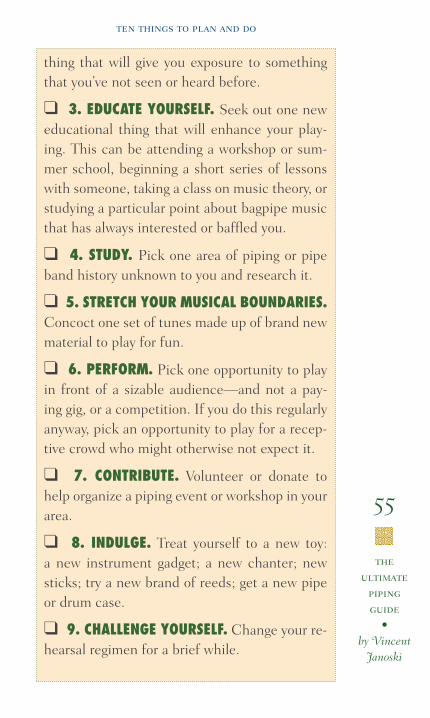
TEN PIPING THINGS TO PLAN AND DOexpand your horizons
The end of another year approaches, and you’ve been busy. You review all that you have, and have not accomplished and revel or regret. The end of the year also will bring, everywhere and anywhere, lists of “the year’s best,” “the year’s worst,” “top trends to watch for the coming year,” and on and on. Why not fall into step and compile your own list for the coming year: “Ten piping and drumming things to plan and do for the coming year.” You have 365 days…go!
❑ 1. STRETCH YOUR COMPETITIVE BOUND-ARIES. If you are an active competitor, pick the highest-end bagpipe contest (solo or band) you can think of for your playing grade or level and enter. Work for it, and make giving your best go at it your goal.
❑ 2. EXPOSE YOURSELF TO BIGGER AND BETTER PIPING AND DRUMMING. Pick the highest-level solo or pipe band event you can think of and attend as a spectator. Pick some-
55
the ultimate
piping guide
•by Vincent
Janoski
thing that will give you exposure to something that you’ve not seen or heard before.
❑ 3. EDUCATE YOURSELF. Seek out one new educational thing that will enhance your play-ing. This can be attending a workshop or sum-mer school, beginning a short series of lessons with someone, taking a class on music theory, or studying a particular point about bagpipe music that has always interested or baffled you.
❑ 4. STUDY. Pick one area of piping or pipe band history unknown to you and research it.
❑ 5. STRETCH YOUR MUSICAL BOUNDARIES. Concoct one set of tunes made up of brand new material to play for fun.
❑ 6. PERFORM. Pick one opportunity to play in front of a sizable audience—and not a pay-ing gig, or a competition. If you do this regularly anyway, pick an opportunity to play for a recep-tive crowd who might otherwise not expect it.
❑ 7. CONTRIBUTE. Volunteer or donate to help organize a piping event or workshop in your area.
❑ 8. INDULGE. Treat yourself to a new toy: a new instrument gadget; a new chanter; new sticks; try a new brand of reeds; get a new pipe or drum case.
❑ 9. CHALLENGE YOURSELF. Change your re-hearsal regimen for a brief while.
ten things to plan and do

56
the ultimate
piping guide
•by Vincent
Janoski
❑ 10. ALLOW YOURSELF SOME CREATIVITY. Sit down and compose a piece of music.
As you might tell, this list is really about bust-ing through your usual habits. So much of mod-ern life forces us to adopt “schedules” and “pro-cedures” that become second nature and only add a humdrum quality to our lives. If there is only one thing you do for your piping or drum-ming in 2006, it should be to examine your cur-rent routines and identify those things that have become thoughtless, stale, and boring. Once you’ve identified those things, change them. Shake up your piping and drumming to keep it interesting and try to bring some creativity and style into your pursuit. It can’t hurt. You’ve got nothing to lose and everything to gain.
ten things to plan and do

ABOUT THE AUTHORVINCENT JANOSKI is an active competing solo piper in the eastern United States. He has played in pipe bands for many years and has taught numerous beginning pipers the finer points of playing and instrument maintenance. He is currently co-editor of The Voice, the quarterly magazine of the Eastern United States Pipe Band Associaion and regularly maintains The Voicelog, the online journal of The Voice.

���������������
����������������������������������������������������������������������������������������������������������������������������������������������������������������
��������������������������������������������������������������������
�������������������������������
�������������������������
����������������������������
���������������������������
����������������������������
�������������������������
�����������������������������
�����������������������������
������������������������������
���������������������������� �����������
�������������������������������������������������������
��������������