The step-by-step protocol for storing bitcoins in a highly ... · they might do so in the future....
78
The step-by-step protocol for storing bitcoins in a highly secure way Version 0.94 Beta Check the latest version (https://glacierprotocol.org/)
Transcript of The step-by-step protocol for storing bitcoins in a highly ... · they might do so in the future....

The step-by-step protocol for storingbitcoins in a highly secure way
Version 0.94 BetaCheck the latest version (https://glacierprotocol.org/)

1. Glacier overview
1.1. About Glacier
1.2. Key concepts
1.3. Multi-signature security
1.4. Attack surface and failure points
2. Before you start
2.1. Protocol overview
2.2. Hardware required
2.3. Protocol structure
3. Setup
3.1. Verify and print protocol document
3.2. Prepare non-quarantined hardware
3.3. Prepare quarantined hardware
3.4. Create boot USBs
3.5. Create App USBs
3.6. Prepare quarantined workspaces
4. Deposit
4.1. Generate cold storage data
4.2. Transfer cold storage data to paper
4.3. Test deposit and withdrawal
4.4. Deposit execution
4.5. Store cold storage data
5. Withdrawal
5.1. Preparation
5.2. Transaction construction
5.3. Transaction execution and verification
6. Balance and maintenance
6.1. Check your balance
6.2. Maintenance
7. Extend Glacier
7.1. Extend Glacier security
7.2. Possible improvements to Glacier
7.3. Ecosystem improvements
8. Contribute
8.1. License
8.2. Acknowledgments
9. Design documents
9.1. Design document
2/78

1. Glacier overview
3/78

1.1. About GlacierGlacier is a step-by-step protocol for storing bitcoins in a highly secure manner. It is intended for:
• Personal storage: Glacier does not address institutional security needs such as internal controls,
transparent auditing, and preventing access to funds by a single individual.
• Large amounts of money ($100,000+): Glacier thoroughly considers corner cases such as
obscure vectors for malware infection, personal estate planning, human error resulting in loss of
funds, and so on. Even if your Bitcoin holdings are more modest, it’s worth considering using
Glacier. If Bitcoin proves successful as a global currency, it will appreciate 10x (or much more) in
the coming years. Security will become increasingly important if your holdings appreciate and
Bitcoin becomes a more attractive target for thieves. The “Protocol Overview” section also
describes some lower-security, lower-cost approaches to self-managed storage that may be more
appropriate for smaller amounts of funds.
• Long-term storage: Glacier not only considers the Bitcoin security landscape today, but also a
future world where Bitcoin is much more valuable and attracts many more security threats.
• Infrequently-accessed funds: Accessing highly secure bitcoins is cumbersome and introduces
security risk through the possibility of human error, so it is best done infrequently.
• Technically unskilled users: Although the Glacier protocol is long, it is clear and straightforward
to follow. No technical expertise is required.
The Glacier protocol covers bitcoin storage, not procurement. It assumes you already possess bitcoins
and wish to store them more securely.
If you are already familiar with Bitcoin security concepts and are certain that you want high security cold
storage, you may prefer to read Trusting This Protocol and then skip to the section Choosing a
Multisignature Withdrawal Policy.
Trusting this protocolFunds secured using Glacier can only be as secure as its design. Here’s what you can trust about this
protocol:
• Expert advisors: The development of Glacier was guided with input from Bitcoin technology and
security experts. See our advisor list.
• Open source: GlacierScript, the Glacier companion software, is open source. The code is
straightforward and well-commented to facilitate easy review for flaws or vulnerabilities. View it
on Github (https://github.com/GlacierProtocol/GlacierProtocol).
4/78

• Community review: The protocol has evolved in conjunction with the wider Bitcoin community.
Early versions were circulated during development, and community feedback integrated. See our
list of contributors.
• Natural selection: All documentation and code related to this protocol is under open licenses
(Creative Commons for the document, MIT license for the code), enabling others to publish their
own revisions. Inferior alternatives will tend to lose popularity over time.
If you like, you may review the design document for details on the technical design.
BackgroundSelf-Managed Storage vs. OnlineLet’s start by assessing whether Glacier is right for you.
There is no such thing as perfect security. There are only degrees of security, and those degrees come at
a cost (in time, money, convenience, etc.) So the first question is: How much security are you willing to
invest in? For most people, most of the time, the authors recommend storing Bitcoin using a high-quality
online storage service. The pros and cons of the various online services are beyond the scope of this
document, but most popular ones are fairly secure and easy to use. Some popular options are
Blockchain (https://blockchain.info/), Coinbase (https://www.coinbase.com/), Gemini (https://
gemini.com/), and Kraken (https://www.kraken.com/).
However, all online storage services still come with some notable risks which self-managed storage does
not have:
1. Identity spoofing: Your account on the service could be hacked (including through methods such
as identity theft, where someone convinces the service they are you).
2. Network exposure: Online services still need to transmit security-critical information over the
Internet, which creates an opportunity for that information to be stolen. In contrast, self-managed
storage can be done with no network exposure.
3. Under constant attack: Online services can be hacked by attackers from anywhere in the world.
People know these services store lots of funds, which makes them much larger targets. If there’s
a flaw in their security, it’s more likely to be found and exploited.
4. Internal theft: They have to protect against internal theft from a large group of employees &
contractors.
5. Intentional seizure: They have the ability (whether of their own volition, or under pressure from
governments) to seize your funds. There is historical precedent for this, even if funds are not
suspected of criminal involvement. In 2010, Cyprus unilaterally seized many bank depositors’
funds (https://www.theguardian.com/world/2013/mar/25/cyprus-bailout-deal-eu-closes-bank) to
cope with an economic crisis. In 1933, the US abruptly demanded citizens surrender almost all
gold they owned to the government (https://en.wikipedia.org/wiki/Executive_Order_6102).
5/78
Regardless of how one views the political desirability of these particular decisions, there is
precedent for governments taking such an action, and one cannot necessarily predict the reasons
they might do so in the future. Furthermore,Bitcoin still operates in a political and legal grey zone,
which increases these political risks.
Some online wallet services have insurance to cover losses, although that insurance doesn’t protect
against all of these scenarios, and often has limits on the amount insured.
These risks are not theoretical. Many online services have lost customers’ funds (and not reimbursed
them), including Mt. Gox (https://www.bloomberg.com/news/articles/2014-02-28/mt-gox-exchange-
files-for-bankruptcy), Bitfinex (http://www.bbc.com/news/technology-37009319), and many more.
Recently, some providers are rolling out services which are a hybrid of an online service and self-
managed storage. Examples include Coinbase’s multisig vault (https://www.coinbase.com/vault) and
Green Address (https://greenaddress.it/en/). The design of these services significantly reduces (though
does not eliminate) the risks described above.
However, they also require some care and technical competence to securely manage the electronic
“keys” which provide access to funds.
Many people do use online or hybrid solutions to store sizeable amounts of money. We recommend self-
managed storage for large investments, but ultimately it’s a personal decision based on your risk
tolerance and costs you’re willing to pay (in money and time) for security.
Glacier focuses exclusively on self-managed storage.
Glacier vs. Hardware WalletsMany people who choose self-managed storage (as opposed to an online storage service) use “hardware
wallets” such as the Trezor (https://trezor.io/), Ledger (https://www.ledgerwallet.com/), and KeepKey
(https://www.keepkey.com/) to store their bitcoins. While these are great products that provide strong
security, Glacier is intended to offer an even higher level of protection than today’s hardware wallets can
provide.
The primary security consideration is that all hardware wallets today operate via a physical USB link to a
regular computer. While they employ extensive safeguards to prevent any sensitive data (such as private
keys) from being transmitted over this connection, it’s possible that an undiscovered vulnerability could
be exploited by malware to steal private keys from the device.
For details on this and other security considerations, see the “No Hardware Wallets” section of the
design document As with online multisig vaults, many people do use hardware wallets to store sizeable
amounts of money. We personally recommend Glacier for large investments, but ultimately it’s a
personal decision based on your risk tolerance and costs you’re willing to pay (in money and time) for
security.
6/78

1.2. Key conceptsPrivate KeyYour currency balance is effectively stored in the Bitcoin blockchain – the global decentralized ledger.
You can imagine a locked box with all of your bitcoins sitting inside of it. This box is unlocked with a
piece of information known as “private key”. (Some boxes require multiple private keys to unlock; see the
section “Multisignature Security” below.)
Unlike a password, a private key is not meant for you to remember. It’s a long string of gibberish. The
private key is what you need to keep secure. If anyone gets it, they can take your money. Unlike
traditional financial instruments, there is no recourse. There is no company that is liable, because Bitcoin
is a decentralized system not run by any person or entity. And no law enforcement agency is likely to
investigate your case.
Offline Key Storage (“Cold Storage”)You don’t want to store your private key on any computer that’s connected to the Internet (“hot storage”),
because that exposes it to more hacking attempts. There are viruses out there that search computers for
private keys and steal them (thereby stealing your money).
One way to protect against this is by encrypting your private key, so even if a thief steals it, they can’t
read it. This helps, but is not foolproof. For example, a thief might install keylogger malware (https://
en.wikipedia.org/wiki/Keystroke_logging) so that they steal your password too.
Online keys are inherently exposed to hackers. You therefore need to make sure your private key stays
offline (“cold storage”) at all times.
Paper Key StorageBecause the private key is a relatively small piece of information, it can be stored on paper as easily as it
can be stored on a computer. And when it comes to key storage, paper has various advantages
compared to computers: It’s always offline (no chance of accidentally connecting it to the Internet!), it’s
easy & cheap to make multiple copies for backups (and different keys for multisignature security – see
below), and it’s not susceptible to mechanical failure.
7/78

1.3. Multi-signature securityCentral to our security protocols is a technique called “multisignature security.” You’ll need a quick primer
on this topic to understand the Glacier protocol.
Regular Private Keys are RiskyRemember that anybody with access to your private key can access your funds. And if you lose your
private key, you cannot access your money; it is lost forever. There is no mechanism for reversal, and
nobody to appeal to.
This makes it difficult to keep funds highly secure. For example, you might store a private key on paper in
a safe deposit box at a bank, and feel fairly safe. But even this is not the most robust solution. The box
could be destroyed in a disaster, or be robbed (perhaps via identity theft), or intentionally seized (http://
abcnews.go.com/GMA/story?id=4832471).
You can try to mitigate these risks by storing the key yourself, perhaps in a fireproof home safe (as
opposed to a bank). But this introduces new risks. A determined thief (perhaps a professional who
brings safe-drilling tools on their burglary jobs, or who somehow got wind of the fact that you have a
$100,000 slip of paper sitting in a safe) might break into the safe and steal the wallet.
Or a major natural disaster might prevent you from returning home for an extended period, during which
time your safe is looted.
What is Multisignature Security?To address these issues, Bitcoin provides a way to secure funds with a set of private keys, such that
some of the keys (but not necessarily all) are required to withdraw funds. For example, you might secure
your bitcoins with 3 keys but only need any 2 of those keys to withdraw funds. (This example is known as
a “2-of-3” withdrawal policy.)
The keys are then stored in different locations, so someone who gets access to one key will not
automatically have access to the others. Sometimes, a key is entrusted to the custody of another person,
known as a “signatory.”
This approach of using multiple keys is known as “multisignature security.” The “signature” part of
“multisignature” comes from the process of using a private key to access bitcoins, which is referred to as
“signing a transaction.” Multisignature security is analogous to a bank requiring signatures from multiple
people (for example, any 2 of a company’s 3 designated officers) to access funds in an account.
8/78

How Does Multisignature Security Help?Multisignature security protects against the following scenarios:
• Theft: Even if somebody physically breaks into a safe, any one key is not enough to steal the
money.
• Loss: If a key is destroyed or simply misplaced, you can recover your money using the remaining
keys.
• Betrayal: You may want to entrust one or more signatories with keys to facilitate access to your
funds when you are dead or incapacitated. With multisignature security, entrusting them with a
key will not enable them to steal your funds (unless they steal additional key(s), or collude with
another signatory).
Choosing a Multisignature WithdrawalPolicyBelow are common options for withdrawal policies. You will need to select one before beginning the
protocol.
Option 1: Self-custody of keysOur default recommendation is a 2-of-4 withdrawal policy where you manage all of your own keys (i.e.
you do not entrust any to the custody of friends or family). 2-of-4 means there are four keys, and any two
of those keys can be combined to access your money, ensuring access even if two keys are lost or
stolen.
The keys will be distributed as follows:
• One in a safe at home
• The remaining three in safe deposit boxes or private vaults (https://www.google.com/search?
q=private+safe+deposit+box) at different locations
It’s important to think about estate planning – making arrangements for your designated agents to be
able to access your funds when you are dead (e.g. for distribution to your heirs) or incapacitated (e.g. to
pay medical bills). This usually requires significant legal arrangements to be made in advance.
The most failsafe way to ensure your agents will have access to your safe deposit box is to check with
the bank. Standard estate planning legal documents should allow your agent to access the box upon
your incapacity, and to get into it upon your death. But banks can be fussy and sometimes prefer their
own forms.
9/78
If you have a living trust, one option may be to have your trust as the co-owner of your safe deposit box.
That generally allows a successor trustee to access the box.
Option 2: Distributed custody of keysAnother option is to distribute some of your keys to individuals who you trust (“signatories”). This can
offer some advantages:
• Availability: If you live in a rural area, there may not be many vaults or safe deposit boxes that are
practical to get to.
• Ease of setup: It may be simpler to distribute keys to signatories than to find available vaults,
travel to them, and set up accounts.
• Ease of estate planning: You don’t need to make complicated legal arrangements for your
signatories to access your funds. They’ll have the keys they need to do so.
However, there are significant drawbacks:
• Privacy: Other signatories will have the ability to see your balance. Technical details: Every private
key needs to be packaged with the multisig redemption script (since losing all redemption scripts
is just as bad as losing all keys). Redemption scripts, however, allow one to view funds. An
alternate version of this protocol could be created using a different multisig approach besides
P2SH transactions, which would eliminate the ability of signatories to view balances; see
Appendix C for details.
• Signatory collusion: Although possessing one key won’t allow a signatory to access your funds,
two signatories might collude with each other to steal your money.
• Signatory reliability: A signatory may fail to store the key securely, or they may lose it.
• Signatory safety: Giving your signatories custody of a valuable key may expose them to the risk of
targeted physical theft.
• Kidnapping risk: If you anticipate traveling in high-crime areas with kidnapping risk (http://
www.nytimes.com/2012/05/03/business/kidnapping-becomes-a-growing-travel-risk.html), your
funds will be at greater risk because you’ll have the ability to access them remotely (by contacting
your signatories and asking for their keys). Financially-motivated kidnapping hinges on your ability
to access funds to give to the kidnappers. If you are literally unable to access additional funds
(because the keys are stored in remote vaults which you must be physically present to access, as
opposed to held by friends or family who you can call), kidnappers will have no incentive to hold
you.
For distributed custody, we recommend a 2-of-5 withdrawal policy. The extra key (5 keys, rather than the
recommended 4 keys in Option 1) is recommended since you have less control over whether a signatory
effectively protects their key against theft or loss
10/78

If you have estate planning arrangements which you are confident will allow your agents to access the
keys in your custody when needed, you should be fine with 4 keys instead of 5 (two keys going to trusted
signatories rather than three). Make sure your executors and signatories know to get in touch with each
other when needed.
1.4. Attack surface and failurepointsThis list describes the attack surface and other failure points for Glacier. We include only attacks and
failures limited in scope to specific coins. Attacks and failures related to the Bitcoin ecosystem as a
whole (newly discovered cryptographic flaws, critical Bitcoin protocol security or scalability failures, etc.)
are not included as most are equally likely to impact the value of all Bitcoins whether or not they are
secured with Glacier.
This list assumes no security measures from Extend Glacier security are implemented.
Most attacks require the presence of malware, either in or near the quarantined environment. We’ll
therefore inventory two layers of Glacier’s attack surface:
• Ways in which a malware infection might occur
• Ways in which a critical failure might happen (possibly, but not necessarily, due to a malware
infection)
Malware infection vectors• Software
◦ OS/App software has malware (i.e. malicious code) built into official distributions. In
particular, Glacier relies on the following packages and their dependencies NOT to
distribute malicious code:
▪ Ubuntu desktop
▪ Bitcoin Core
▪ zbar-tools (via Ubuntu Package archive)
▪ qrencode (via Ubuntu Package archive)
◦ Malware on Setup Computer infects Setup USB software AND malware on Setup USB
infects Quarantined USB software AND checksum verifications produces false positives
▪ Checksum false positives could happen becuase:
▪ Malware might interfere with the verification process (or the display of its
results).
11/78

▪ The checksum verification software could be compromised.
▪ Verifying the integrity of GnuPG requires one have access to a trusted
installation of GnuPG, but many Glacier users won’t have that. Glacier
currently recommends users simply trust the version of GnuPG they
download.
◦ Malware on Setup Computer infects OS/App USB software AFTER checksum verification
produces a true positive (i.e. before/during copying of software to the USB, or during USB
ejection)
• Firmware
◦ Malware on Setup Computer infects Setup Boot USB firmware AND malware on Setup Boot
USB infects Quarantined Boot/App USB
◦ Laptop or USB firmware has malware in the shrinkwrapped package
• Hardware
◦ Laptop or USB hardware has “malware” in the shrinkwrapped package
e.g. a USB JTAG exploit (http://www.itnews.com.au/news/intel-debugger-interface-open-to-hacking-via-
usb-446889) or chip-level backdoors (such as this rootkit (https://www.wired.com/2016/06/demonically-
clever-backdoor-hides-inside-computer-chip/)). “Malware” usually refers to software, but we’re using it
here more broadly to mean “computing technology which undermines the integrity of the computing
environment in which it resides.”
Failure scenariosElectronic failures
• Exfiltration of critically sensitive data (e.g. private keys)
◦ A Quarantined Computer leaks critically sensitive data over a side channel (https://
en.wikipedia.org/wiki/Side-channel_attack) (possibly due to malware) AND complementary
malware on a (networked or attacker-controlled) device in range steals the data
▪ Visual side channel (does not require malware on the quarantined computer, since
sensitive data is displayed on the screen as part of the protocol). If the protocol is
followed, the attack surface here should be narrow, as users are instructed to block
all visual side channels. However, at a minimum, they are using their smartphone for
reading QR codes, and that has a camera on it.
▪ Acoustic side channel, if inadequately blocked (i.e. insufficient sound blockage or
masking noise). See example (https://www.wired.com/2016/06/clever-attack-uses-
sound-computers-fan-steal-data/).
▪ Radio side channel ( example 1 (https://www.usenix.org/legacy/event/sec09/tech/
full_papers/vuagnoux.pdf) , example 2 (http://cyber.bgu.ac.il/content/how-leak-
sensitive-data-isolated-computer-air-gap-near-mobile-phone-airhopper) , example 3
12/78

(https://www.wired.com/2015/06/radio-bug-can-steal-laptop-crypto-keys-fits-inside-
pita/) )
▪ Seismic side channel ( example (https://www.cc.gatech.edu/fac/traynor/papers/
traynor-ccs11.pdf))
▪ Thermal side channel ( example (http://cyber.bgu.ac.il/blog/bitwhisper-heat-air-
gap))
▪ Magnetic side channel ( example (http://fc15.ifca.ai/preproceedings/
paper_14.pdf) )
◦ Malware on a Quarantined Computer exfiltrates critically sensitive data via QR codes AND
cooperating malware on the QR reading device steals the data. The risk of this scenario is
negligible; unless the attacker simultaneously compromised every major smartphone QR
reader with cooperating malware, any manipulation of QR codes would be quickly detected
by people using non-compromised QR reader software, leading to widespread awareness
and isolation of the threat. This makes it a very unattractive attack vector.
◦ Critically sensitive data is leaked (intentionally or otherwise) as part of the payload of valid
data (e.g. if the nonce used for a transaction signature contains bits of the private key)
• Undetected generation of flawed sensitive data. (Requires compatible malware present on BOTH
quarantined environments)
◦ Private key creation is compromised to make keys easily guessable
◦ Transaction creation is compromised to use output addresses belonging to an attacker,
AND cooperating malware on a networked computer sends the malicious transaction
before the manual address verification is done)
Physical failures• Two paper keys are stolen by an attacker
• All (or all but one) paper keys are lost or destroyed
• An attacker with physical line-of-sight to the laptop takes a photo of the screen while sensitive
data is displayed
• Malware on the quarantined machines writes sensitive data to persistent media (USB or laptop
hard drive) AND the hardware is physically stolen afterward
Glacier protocol failures• Glacier hosting (i.e. DNS, Github, website hosting, etc.) is compromised to inject weaknesses into
the protocol documentation or GlacierScript
• Protocol delivery is compromised (e.g. with a man-in-the-middle attack on the user’s computer or
network) to deliver or display a weakened version of the protocol documentation or software
• Protocol hardcopy is compromised (e.g. by malware to alter the user’s hardcopy as it is printed)
• A flaw in GlacierScript causes sensitive data to be leaked or flawed
• Human error during protocol execution
• Design failure in the protocol misses or inadequately addresses a risk
13/78

For potential man-in-the-middle vulnerabilities, we mitigate this by signing a checksum of the Glacier
document itself, and including steps in the protocol for users to verify the signature and checksum. But
this is not foolproof:
An attacker could remove the self-verification procedure from the protocol document, and many users
would not notice.
• An attacker could compromise our keypair and create a fraudulent signature (although this is
exceedingly unlikely, due to Keybase’s key verification systems)
• The protocol document does begin with document self-verification on one Setup Computer.
However, it doesn’t guide the user through self-verification on the second Setup Computer. Nor
does it have them re-verify the document when they first boot into Ubuntu on the Setup
Computers to create the Quarantined Boot USBs. If the portion of the protocol document related
to creating the Quarantined Boot USBs were compromised between the initial self-validation & the
later re-validation (when creating the Quarantined App USBs), the user would probably not notice,
even without a forged signature.
• Protocol hardcopy is compromised (e.g. by malware to alter the user’s hardcopy as it is printed)
• A flaw in GlacierScript causes sensitive data to be leaked or flawed
• Human error during protocol execution
• Design failure in the protocol misses or inadequately addresses a risk
14/78

2. Before you start
15/78

2.1. Protocol overviewThis section establishes a basic understanding of the Glacier protocol in order to facilitate its execution.
For more background on the protocol’s design, see the Glacier design document.
As described previously, the Glacier protocol involves putting bitcoins in cold storage, using
multisignature security, with the keys stored only on paper.
Eternally Quarantined HardwareThis bulk of the Glacier protocol consists of ways to safeguard against theft of private keys due to
malware infection. To accomplish this, Glacier uses eternally quarantined hardware.
Quarantined hardware means we drastically limit the ways in which a piece of hardware interfaces with
the outside world in order to prevent the transmission of sensitive data (e.g. private keys) or harmful data
(e.g. malware). We consider all interfaces – network, USB, printer, and so on – because any of them
might be used to transmit malware or private keys.
Eternally quarantined hardware means we use factory-new hardware for this purpose (to minimize risk of
prior malware infection), and never lift the quarantine. The quarantine is permanent because any
malware infection which does somehow get through the quarantine might wait indefinitely for an
opportunity to use an available interface (e.g. the Internet, if a quarantined laptop is later used to access
the web). Eternal quarantining renders the hardware essentially useless for anything else but executing
this protocol.
Parallel Hardware StacksThere is a class of attacks which rely not on stealing your sensitive data (e.g. private keys), but in
subverting the process of generating your sensitive data so it can be more easily guessed by a third
party. We call this “flawed data.”
For example, a variant of the Trojan.Bitclip attack which replaces keys displayed on your screen (or keys
stored in your clipboard) with insecure keys.
Because we are generating our data in eternally quarantined environments, any malware infection
attempting this is unlikely to have come from your other computers – it would likely have already been
present when the quarantined system arrived from the manufacturer. For example, the Lenovo rootkit or
this Dell firmware malware infection.
16/78
The way to defeat these attacks is to detect them before we actually use the flawed data. We can detect
such an attack by replicating the entire data generation process on two sets of eternally quarantined
hardware, from different manufacturers. If the process generates identical data on both sets of
hardware, we can be highly confident the data is not flawed because it would have to be an identical
attack present on both sets of hardware, factory-new from different manufacturers. This is exceptionally
unlikely.
Bitcoin Core and GlacierScriptGlacier uses the Bitcoin Core (https://bitcoincore.org/) software for all cryptographic and financial
operations, as its open source code is the most trustworthy. This is due to its track record of securing
large amounts of money for many years, and the high degree of code review scrutiny it has received.
Glacier also utilizes GlacierScript, a software program that automates much of the manual work involved
in executing the protocol. GlacierScript’s open source code (https://github.com/GlacierProtocol/
GlacierProtocol) is straightforward and extensively commented to facilitate easy review for flaws or
vulnerabilities.
Protocol OutputThe end result of the Glacier protocol is a set of paper information packets, one for each private key
needed for the multisignature withdrawal policy. Each packet includes the following information:
• One private key – an alphanumeric string used to secure the funds
• The cold storage address – an alphanumeric string designating the virtual “location” of the funds
• The “redemption script” – an additional code needed to access funds, shared by all private keys.
Technical details: The Glacier protocol reuses Bitcoin addresses. See the design document for a detailed
analysis.
Protocol CostThe Glacier protocol requires over $600 in equipment, and approximately 8 hours of work to perform an
initial cold storage deposit. This excludes time for:
• Obtaining equipment
• Printing documents
• Downloading files
• Physically storing the resulting Bitcoin keys
Subsequent deposits and withdrawals re-use the same equipment and take a fraction of the time.
17/78
No Formal SupportAs a free, volunteer-developed community project, there is no formal support channel for Glacier should
you encounter any issues. However, you may be able to ask advice of community members on our Gitter
chat room (https://gitter.im/glacierprotocol/Lobby) or other Bitcoin community forums.
Privacy ConsiderationsBecause the Bitcoin blockchain is public, the way you route and store funds has privacy implications. For
example, any person to whom you give your cold storage address (because, for example, they’re sending
you funds which you want to keep in cold storage) can see your total cold storage balance. This is easy
to do with many free services (e.g. Blockr (https://www.coinbase.com/) ).
This is true not just of individuals, but entities. That is, any online wallet service which you use to send
funds to cold storage can see your cold storage balance, and may deduce that it belongs to you. They
may, of course, also choose to share this information with others.
If this is a concern for you, the easiest way to keep your cold storage balance private from a particular
entity is to route the payment through one (or more) intermediary addresses before sending it to your
cold storage address, with a few transactions going to each intermediate address. This does not provide
perfect privacy, but each intermediate address provides increasing levels of obfuscation and uncertainty.
If privacy is very important to you, you might consider using a service like Shapeshift (https://
shapeshift.io/#/coins) to exchange your Bitcoins for an more anonymous cryptocurrency, such as
Monero (http://monero.org/), and then exchange them back to Bitcoins. However, this will cost you fees,
and importantly, it requires you trust the operator of the exchange service not to steal or lose your funds.
This guide (https://bitcoinnewsmagazine.com/how-to-use-monero-to-anonymize-bitcoin/) gives
additional detail about how to increase Bitcoin anonymity using Monero & Tor.
Lower-security Protocol VariantsIf you are willing to accept lower security for lower cost, you can do so with only slight modifications:
1. Perform this protocol using only one quarantined computer. Glacier protocol repeats all
operations on two computers to detect defects or tampering in the key generation process.
However, this is costly and adds significantly to the labor required to execute the protocol. The
risks it mitigates are small: that malware conducting flawed key-generation attacks found its way
onto the eternally quarantined systems, or that the computer firmware was tampered with at the
18/78

manufacturer to include such malware. If you are willing to accept this risk, you could skip buying
the parallel hardware stack (and needing the second setup computer) and skip the process of re-
generating and verifying keys & transactions on the parallel hardware stack.
2. Use existing hardware. An even lower-security variant is to use nothing but existing laptops you
already possess, disabling all network connections during protocol execution, instead of
purchasing new quarantined hardware. This fails to protect against some malware attacks, but
provides additional savings in cost and effort.
Such as an existing infection of a laptop’s firmware (https://www.youtube.com/watch?v=sNYsfUNegEA),
malware which overrides OS settings to disable wireless connectivity, or certain undiscovered
vulnerabilities in the software used by the protocol.
These modifications are left as an exercise to the reader.
Out of scopeThere’s always more one could do to increase security. While Glacier is designed to provide strong
protection for almost everyone, some situations (e.g. being the focus of a targeted attack by a
sophisticated, well-resourced criminal organization) are beyond its scope.
For some additional security precautions beyond those provided in the standard protocol, see the
possible improvements to Glacier.
2.2. Hardware requiredGlacier has been written and tested around these specific equipment recommendations.
Eternally quarantined hardware: Set 1• Factory-sealed computer with 2 USB ports and a camera: 2016 Dell Inspiron 11.6” (http://a.co/
1E6HEQA)
• Two factory-sealed USB drives (2GB+) from the same manufacturer: SanDisk Cruzer 8GB (http://
a.co/1Us66ze).
We’ll be using two USB drives at the same time. If the computer has only one USB port, you’d need to use
a USB hub, which is a separate piece of USB hardware subject to malware infection of its firmware.
We’ll use the camera for reading QR codes.
Eternally quarantined hardware: Set 2• Factory-sealed computer from a different manufacturer, also with 2 USB ports and a camera: Acer
Aspire One Cloudbook 11” (http://a.co/1ZMSB3Y)
19/78
• Two factory-sealed USB drives (2GB+) from the same manufacturer, but a different manufacturer
than the drives for Set 1: Verbatim 2GB (http://a.co/jdzEf8O)
Used/existing computing equipment• Two computers with Internet connectivity, administrator access, and about 2GB of free disk
space. Each computer must be running Windows 10, macOS, or Linux.
One of these two computers should be a computer that you do not own (unless purchased brand
new), or that has spent much time on your home or office network.
• Printer
• Smartphone with a working camera
Other Equipment• Two factory-sealed USB drives (2GB+): Verbatim 2GB (http://a.co/jieluaE)
• Precision screwdrivers (http://a.co/bbvj16a), for removing WiFi cards from laptops
• Electrical tape (http://a.co/gZZiEdA)
• Casino-grade six-sided dice (http://a.co/ghbdiak). Regular dice are insufficient.
• Faraday bag (http://a.co/3wiNPLT). Used to prevent smartphone malware from stealing sensitive
data using radio frequencies (https://www.usenix.org/legacy/event/sec09/tech/full_papers/
vuagnoux.pdf).
• Table fan (http://a.co/98PrpMs). White noise can prevent malware on nearby devices from
stealing sensitive data using sound (https://www.wired.com/2016/06/clever-attack-uses-sound-
computers-fan-steal-data/).
• Home safe (http://a.co/6sRoaPv). Consider bolting it to your floor to deter theft.
• TerraSlate paper (http://a.co/7pk5fJN). Waterproof, heat resistant, and tear-resistant.
• Cardboard envelopes (http://a.co/7jUPLMR), for opacity
• Tamper-resistant seals (http://a.co/96KlsAl)
NotesStandard software algorithms that generate random numbers, such as those used to generate Bitcoin
private keys, are vulnerable to exploitation (https://bitcoin.org/en/alert/2013-08-11-android), either due
to malware or algorithmic weakness (i.e. they often provide numbers that are not truly random). Dice
offer something closer to true randomness.
Casino dice are created specifically to remove any potential dice bias (square corners, filled in pips, low
manufacturing tolerance, etc.) That’s why casinos use them!
TerraSlate paper is extremely rugged, but you might also consider laminating the paper for additional
protection. You’ll need a thermal laminator (http://a.co/cZBN1YU) and laminating pouches (http://a.co/
ifISzje).
20/78

2.3. Protocol structureThe overall Glacier protocol consists of several distinct subprotocols:
• Setup: Prepares hardware, and downloads and verifies needed software & documentation.
• Deposit: For securely storing bitcoins.
• Withdrawal: For transferring some or all of your stored funds to another bitcoin address.
• Viewing: For viewing the balance of your funds in secure storage.
• Maintenance: For ensuring funds in cold storage remain accessible and secure.
Sensitive DataCritically-sensitive data (e.g. private keys) will be highlighted in red, like this: critically-sensitive-data-
here .
Critically sensitive data can be used by thieves to to steal your bitcoins. If you follow the protocol
precisely, your critically sensitive data will remain secure.
Do not do anything with critically sensitive data that the protocol does not specifically instruct you to. In
particular:
• Never send it over email or instant messenger
• Never save it to disk (hard drive, USB drive, etc.)
• Never paste or type it into any non-eternally-quarantined device
• Never take a picture of it
• Never let any untrusted person see it
Moderately-sensitive data (e.g. a cold storage address or redemption script) will be highlighted in yellow,
like this: moderately-sensitive-data-here .
Moderately sensitive data impacts privacy, but does not directly impact security. It cannot be used to
steal your bitcoins, but it can be used to see how many bitcoins you own (if someone knows that the
moderately sensitive data in question belongs to you).
It does indirectly impact security, in that if someone knows you own a lot of difficult-to-trace money, they
have some incentive to rob, extort, or attack you to get it.
The protocol recommends storing copies of moderately-sensitive data electronically, in a “conventionally
secure” manner (for example, in a password manager such as 1Password (https://1password.com/)). If
you’re particularly concerned about privacy, you can forego electronic storage, because the protocol also
stores copies of moderately-sensitive data in cold storage with each private key. However, this is not
recommended.
21/78

This means that knowledge of your cold storage balance will be as secure as access to any accounts
which have their credentials stored in your password manager. For most people, this is sufficient.
If you use only hardcopies, you’ll need to manually type in a large amount of gibberish data, by hand, with
no errors, every time you withdraw funds from cold storage.
Terminal UsageMany protocol steps involve typing commands into a terminal window. Working in a terminal window is
analogous to working under the hood of a car. It allows you to give the computer more precise
commands than you can through the regular interface.
Commands to be entered into a terminal window will be displayed in a fixed-width font like this:
The $ at the beginning of the line represents a terminal prompt, indicating readiness for user input. The
actual prompt varies depending on your operating system and its configuration; it may be $ , > , or
something else. Usually the terminal will show additional information (such as a computer name, user ID
and/or folder name) preceding every prompt.
In the above example, the text splits across two lines because of the margins of this document. Each line
is not a separate command; it is all one command, meant to be entered all at once. This is clear because
there is no terminal prompt at the beginning of the second line. Proceed Carefully
If you encounter anything that is different from what the protocol says you should expect, the
recommendation is that you stop and seek help unless your expert opinion gives you high confidence
that you understand all possible causes and implications of the discrepancy.
In general, follow the protocol carefully, keep track of what step you are on, and double-check your
work. Any errors or deviations can undermine your security.
$ echo "everything after the $ could be copy-pasted into a terminal window"
22/78
3. Setup
23/78
3.1. Verify and print protocoldocumentThe Setup Protocol is used to prepare hardware, and download and verify needed software &
documentation.
The first thing we need to do is verify the integrity of the Glacier protocol document (the one you are
reading) to ensure that it has not been tampered with. After verifying the document, we’ll print a
hardcopy.
Printing is important, because a verified electronic copy will not be accessible at all times during
protocol execution due to reboots and other changes to the computing environment. Printing a hardcopy
ensures there is always a verified copy of the document available.
1. Find a computer which has Internet access, printer access, and which you have permission to
install new software on. We’ll refer to this computer as the “SETUP 1” computer.
2. Review the errata for the version of Glacier you are using at https://github.com/GlacierProtocol/
GlacierProtocol/releases.
3. Download the latest full release of Glacier (not just the protocol document) at https://github.com/
GlacierProtocol/GlacierProtocol/releases.
4. If your browser does not automatically extract the ZIP file contents into a folder within your
downloads directory, do so.
5. Rename the folder to “glacier.”
6. If you have used Glacier before, and you know you have the Glacier public key imported into a
local GPG keyring, skip the next step. (If you don’t know, that’s fine; proceed as normal.)
7. Obtain the Glacier “public key,” used to cryptographically verify the protocol document.
If you are ever using Glacier in the future and notice that this step has changed (or that this
warning has been removed), there is a security risk. Stop and seek assistance.
a. Access Glacier’s Keybase profile at https://keybase.io/glacierprotocol (https://keybase.io/
glacierprotocol).
b. Click the string of letters and numbers next to the key icon.
c. In the pop-up that appears, locate the link reading “this key”.
d. Right-click the link and select “Save Link As…” or “Download Linked File As…”
e. Name the file “glacier.asc”.
24/78

8. Download and install GnuPG (https://gnupg.org/), the software we’ll use for doing the
cryptographic verification. See tech details.
a. Windows: Download and install the latest available version of Gpg4win (https://
www.gpg4win.org/). Use the default options.
b. macOS: Download and install the latest available version of GPG Suite (https://
gpgtools.org/).
c. Linux: GnuPG comes pre-installed with Linux distributions.
9. Open a terminal window:
a. Windows: Press Windows-R, type “powershell” and click OK.
b. macOS: Click the Searchlight (magnifying glass) icon in the menu bar, and type a terminal
window. “terminal”. Select the Terminal application from the search results.
c. Linux: Varies; on Ubuntu, press Ctrl-Alt-T.
10. Change the terminal window’s active folder to your downloads folder. The commands below are
based on common default settings; if you put your downloads is in a different place, you will need
to customize this command.
a. Windows: > cd $HOME/Downloads/glacier
b. macOS: $ cd $HOME/Downloads/glacier
c. Linux: $ cd $HOME/Downloads/glacier
11. Verify the integrity of the downloaded document.
a. Import the Glacier public key into your local GPG installation:
b. Use the public key to verify that the Glacier “fingerprint file” is legitimate:
Expected output (timestamp will vary, but e-mail and fingerprint should match):
The warning message is expected, and is not cause for alarm.
$ gpg --import $HOME/Downloads/glacier.asc
$ gpg --verify SHA256SUMS.sig SHA256SUMS
gpg: Signature made Fri Feb 10 22:23:45 2017 PST using RSA key ID 4B43EAB0
gpg: Good signature from "Glacier Team <[email protected]>"
gpg: WARNING: This key is not certified with a trusted signature!
gpg: There is no indication that the signature belongs to the owner.
Primary key fingerprint: E1AA EBB7 AC90 C1FE 80F0 1034 9D1B 7F53 4B43 EAB0
25/78

c. Verify the fingerprints in the fingerprint file match the fingerprints of the downloaded
Glacier files.
i. On Linux or Mac:
Linux: $ sha256sum -c SHA256SUMS 2>&1
Mac: $ shasum -a 256 -c SHA256SUMS 2>&1
Expected output:
ii. On Windows 10:
Ensure that the hash output from the first command matches the output by the
second command. Upper/lower case doesn’t matter.
d. If you do not see the expected output, your copy of the document has not been verified.
Stop and seek assistance.
12. Switch to use the new document.
a. Open the version of the document that you just verified.
b. Close this window (of the unverified version of the document you had been using).
c. Delete the old, unverified copy of the document.
13. Print the verified document.
You are strongly encouraged to use the printed copy as a checklist, physically marking off each step as
you complete it. This reduces the risk of execution error by ensuring you don’t lose your place.
3.2. Prepare non-quarantinedhardware
1. Select two (2) computers which will be used as “Setup Computers” to set up USB drives.
a. Both Setup Computers must have Internet access.
b. You should have administrator access to both Setup Computers.
Glacier.pdf: OK glacierscript.py: OK
base58.py: OK README.md: OK
> Get-FileHash -a sha256 Glacier.pdf
> cat SHA256SUMS | select-string -pattern "Glacier.pdf"
26/78

c. Importantly, at least one computer should be a computer that you do not own, or that
doesn’t spend much time on your home or office network.
It’s not technically ownership that’s important. But computers you own are more likely to
run the same software, have visited the same websites, or have been exposed to the same
USB drives or networks – and therefore to have the same malware.
2. Using sticky notes, label the two Setup Computers “SETUP 1” and “SETUP 2”.
3. With a permanent marker, label two USB drives “SETUP 1 BOOT” and “SETUP 2 BOOT”.
a. Remember that, per the equipment list, you should have 4 remaining USB drives – two from
one manufacturer, and two from a different manufacturer.
4. Run a virus scan on the Setup Computers. If you don’t have virus scanning software installed, here
are some options:
◦ Windows: Kaspersky (https://usa.kaspersky.com/) ($39.99/yr), Avira (https://
www.avira.com) (Free)
◦ macOS: BitDefender (https://www.bitdefender.com/) ($59.95/yr), Sophos (https://
home.sophos.com/) (Free)
◦ Linux: Unnecessary
5. If the virus scan comes up with any viruses, take steps to remove them.
6. Once you have a clean virus scan, your Setup Computers are ready.
3.3. Prepare quarantinedhardware
1. Separate your quarantined hardware into two parallel sets. Each set should contain:
◦ One laptop
◦ Two USB drives from the same manufacturer
Each component should be supplied by different manufacturers from the other set. I.e. your two
laptops should be from two different manufacturers, and the USB drives in one set should be from
a different manufacturer than the USB drives in the other set.
2. In each set, label all hardware with a permanent marker. Write directly on the hardware.
a. Label the laptops (“Quarantined Computers”) “Q1” and “Q2”.
b. Label one USB drive from each set with “Q1 BOOT” or “Q2 BOOT”. These USBs will have the
operating system you’ll boot the computer with.
c. Label the other USB drive from each set with “Q1 APP” or “Q2 APP”. These USBs will have
the software applications you’ll use.
27/78

3. Labeled hardware should only be used with hardware that shares the same label (“Q1”, “Q2”, or
“SETUP 1”, or “SETUP 2”). For example:
a. Don’t plug a “Q1” USB drive into a “Q2” laptop.
b. Don’t plug a “SETUP 2” USB drive into a “Q1” or “Q2” laptop.
c. Don’t plug an unlabeled USB drive into a “Q1” or “Q2” laptop.
4. Quarantine the network and wireless interfaces for both laptops:
a. Unbox laptop. Do not power it on.
b. Put a tamper-resistant seal (https://www.amazon.com/Security-Warranty-Hologram-
Sequential-Numbering/dp/B0051JNB6A/ref=sr_1_1?
ie=UTF8&qid=1471760406&sr=8-1&keywords=tamper+resistant+stickers) over the
Ethernet port, if it has one.
c. Physically remove the wireless card.
i. For the recommended Dell laptop, Dell’s official instructions for doing so are here
(http://topics-cdn.dell.com/pdf/inspiron-11-3162-laptop_Service%20Manual_en-
us.pdf). A YouTube video showing an abbreviated procedure is here (https://
www.youtube.com/watch?v=nFYXQQPoh90).
ii. For the recommended Acer laptop, the process is similar to the Dell. Note there are
two cover screws hidden underneath rubber feet on the bottom of the laptop.
d. After removing the wireless card, cover the ends of the internal wi-fi antennae with
electrical tape.
e. If the computer has separate cards for WiFi and Bluetooth, be sure to remove both. (Most
modern laptops, including the recommended Acer and Dell, have a single wireless card
which handles both.)
5. Fully charge both laptops.
3.4. Create boot USBsBecause the eternally quarantined computers cannot connect to a network, they cannot download
software. We’ll be using USB drives to transfer the necessary software to them.
We will prepare four bootable Ubuntu (https://en.wikipedia.org/wiki/Ubuntu_(operating_system)) USB
drives. (“Bootable” means that the Ubuntu operating system will be booted directly from the USB drive,
without using the computer’s hard drive in any way.)
The first two USB drives (“Setup Boot USBs”) are the USB drives you labeled “SETUP 1 BOOT” and
“SETUP 2 BOOT” in Section II. They will be prepared using your Setup Computers, which may be running
Windows, macOS, or something else.
28/78

The last two USB drives (“Quarantined Boot USBs”) are the USB drives you labeled “Q1 BOOT” and “Q2
BOOT” in Section II. They will be prepared using your Setup Computers while booted off a Setup Boot
USB.
Technical details: The Non-Quarantined OS USBs serve two purposes:
• First, they are used for creating the Quarantined App USBs in the next section, which greatly
simplifies the process of doing so because we know it’ll always be done from an Ubuntu
environment. (We can’t use the Quarantined OS USBs for this – they’re eternally quarantined, so
they need to be permanently unplugged from their Setup Computer the moment they are created.)
• Second, it will be harder for any malware infections on a Setup Computer’s default OS to
undermine a Quarantined USB setup process (the malware would first have to propagate itself to
the Non-Quarantined OS USB).
1. Perform the following steps on your SETUP 1 computer.
2. If you are not already reading this document on the SETUP 1 computer, open a copy there.
3. Download Ubuntu by going to this link:
http://old-releases.ubuntu.com/releases/xenial/ubuntu-16.04.1-desktop-amd64.iso (http://old-
releases.ubuntu.com/releases/xenial/ubuntu-16.04.1-desktop-amd64.iso) Wait until the
download is complete.
4. Open a terminal window.
a. Windows: Press Windows-R, type “powershell” and click OK.
b. macOS: Click the Searchlight (magnifying glass) icon in the menu bar, and type “terminal”.
Select the Terminal application from the search results.
c. Linux: Varies; on Ubuntu, press Ctrl-Alt-T. (On Ubuntu, press Ctrl-Alt-T.)
5. Verify the integrity of the Ubuntu download.
a. Change the terminal window’s active folder to the folder where you downloaded Ubuntu,
customizing the folder name if necessary:
i. Windows: > cd $HOME/Downloads
ii. macOs: $ cd $HOME/Downloads
iii. Linux: $ cd $HOME/Downloads
b. View the fingerprint of the file:
i. Windows: > Get-FileHash -a sha256 ubuntu-16.04.1-desktop-amd64.iso
ii. macOs: $ shasum -a 256 ubuntu-16.04.1-desktop-amd64.iso
iii. Linux: $ sha256sum ubuntu-16.04.1-desktop-amd64.iso
c. The following fingerprint should be displayed:
dc7dee086faabc9553d5ff8ff1b490a7f85c379f49de20c076f11fb6ac7c0f34
29/78

It’s not important to check every single character when visually verifying a fingerprint. It’s
sufficient to check the first 8 characters, last 8 characters, and a few somewhere in the
middle.
Technical details: Because you verified the checksum & checksum signature for this
document in Section I, we are omitting the GPG verification of some other fingerprints in
the protocol. For a detailed security analysis, see the design document.
You can verify this is the official Ubuntu fingerprint here (http://releases.ubuntu.com/
16.04/SHA256SUMS), or follow Ubuntu’s full verification process using this guide.
6. Create the SETUP 1 BOOT USB.
a. Windows
i. Download the Rufus disk utility (https://rufus.akeo.ie/) and run it.
ii. Insert the SETUP 1 BOOT USB in an empty USB slot.
iii. In the “Device” dropdown at the top of the Rufus window, ensure the empty USB
drive is selected.
iv. Next to the text “Create a bootable disk using”, select “ISO Image” in the dropdown.
v. Click the CD icon next to the “ISO Image” dropdown.
vi. A file explorer will pop up. Select ubuntu-16.04.1-desktop-amd64.iso from your
downloads folder and click Open.
vii. Click Start.
viii. If prompted to download Syslinux software, click “Yes”.
ix. When asked to write in “ISO Image Mode (Recommended)” or “DD Image Mode”,
select “ISO Image Mode” and press OK.
x. The program will take a few minutes to write the USB.
b. macOS
i. Prepare the Ubuntu download for copying to the USB.
ii. Determine the macOS “device identifier” for the Boot USB.
1. $ diskutil list
2. Insert the SETUP 1 BOOT USB in an empty USB slot.
3. Wait 10 seconds for the operating system to recognize the USB.
4. Once more: $ diskutil list
5. The output of the second command should include an additional section that
was not present in the first command’s output.
i. This section will have (external, physical) in the header.
$ cd $HOME/Downloads
$ hdiutil convert ubuntu-16.04.1-desktop-amd64.iso -format
UDRW -o ubuntu-16.04.1-desktop-amd64.img
30/78

ii. The first line of the section’s SIZE column should reflect the capacity
of the USB drive.
6. Make a note of the device identifier.
i. The device identifier is the part of the new section header that comes
before (external, physical) (for example /dev/disk2).
iii. Put Ubuntu on the SETUP 1 BOOT USB.
1. First, unmount the usb
2. Enter the following command, making sure to use the correct device
identifier; using the wrong one could overwrite your hard drive!
Example:
3. Enter your administrator password when requested.
4. Wait several minutes for the copying process to complete. When it does, you
may see an error box pop up. This is expected; it’s because the USB is written
in a format readable by Ubuntu, but not readable by macOS.
5. Click Ignore.
iv. Verify the integrity of the SETUP 1 BOOT USB (i.e. no errors or malware infection).
1. Remove the USB drive from the USB slot and immediately reinsert it.
2. Wait 10 seconds for the operating system to recognize the USB.
3. You may see the same error box pop up again. Select Ignore.
4. The USB’s device identifier may have changed. Find it again:
5.
6.
7. Wait a few minutes for the verification process to complete.
$ diskutil unmountDisk USB-device-identifier-here
$ sudo dd if=ubuntu-16.04.1-desktop-amd64.img.dmg \
of=USB-device-identifier-here bs=1m
$ sudo dd if=ubuntu-16.04.1-desktop-amd64.img.dmg of=/dev/
disk2 bs=1m
$ diskutil list
$ cd $HOME/Downloads
$ sudo cmp -n `stat -f '%z' ubuntu-16.04.1-desktop-
amd64.img.dmg ubuntu-16.04.1-desktop-amd64.img.dmg` USB-
device-identifier-here
31/78

8. If all goes well, the command will output no data, returning to your usual
terminal prompt.
9. If there is a discrepancy, you’ll see a message like:
If you see a message like this, STOP – this may be a security risk. Restart this
section from the beginning. If the issue persists, try using a different USB
drive or a different Setup Computer.
c. Ubuntu
i. If this is your first time using Ubuntu, note:
1. You can copy-paste text in most applications (e.g. Firefox) by pressing Ctrl-C
or Ctrl-V.
2. You can copy-paste text in a terminal window by pressing Ctrl-Shift-C or Ctrl-
Shift-V.
ii. Put Ubuntu on the SETUP BOOT 1 USB.
1. Open the Ubuntu search console by clicking the purple circle/swirl icon in the
upper-left corner of the screen.
2. Type “startup disk creator” in the text box that appears
3. Click on the “Startup Disk Creator” icon that appears.
4. The “Source disc image” panel should show the.iso file you downloaded. If it
does not, click the “Other” button and find it in the folder you downloaded it
to.
5. In the “Disk to use” panel, you should see two lines. They may vary from
system to system, but each line will have a device identifier in it, highlighted
in the example below.
6. Select the line containing SETUP 1 BOOT USB.49 Make note of the disk
identifier (e.g. /dev/sdb).
7. Click “Make Startup Disk” and then click “Yes”.
8. Wait a few minutes for the copying process to complete.
iii. Verify the integrity of the SETUP 1 BOOT USB (i.e. no errors or malware
1. On your desktop, right-click the corresponding USB drive icon in your dock
and select Eject from the pop-up menu.
2. Remove the USB drive from the USB slot and immediately re-insert it.
3. Wait 10 seconds for the operating system to recognize the USB.
ubuntu-16.04.1-desktop-amd64.img.dmg /dev/disk2
differ: byte 1, line 1
Generic Flash Disk (/dev/sda)
Kanguru Flash Trust (/dev/sdb)
32/78
4.
5.
6. If prompted for a password, enter the computer’s root password.
7. Wait a few minutes for the verification process to complete.
8. If all goes well, the command will output no data, returning to your usual
terminal prompt.
9. If there is an issue, you’ll see a message like:
If you see a message like this, STOP – this may be a security risk. Restart this
section from the beginning. If the issue persists, try using a different USB
drive or a different Setup Computer.
7. Create the Q1 BOOT USB
a. Boot the SETUP 1 computer from the SETUP 1 BOOT USB.
i. Reboot the computer.
ii. Press your laptop’s key sequence to bring up the boot device selection menu. (Some
PCs may offer a boot device selection menu; see below.)
1. PC: Varies by manufacturer, but is often F12 or Del. The timing may vary as
well; try pressing it when the boot logo appears.
i. On the recommended Dell laptop, press F12. You should see a
horizontal blue bar appear underneath the Dell logo.
ii. The recommended Acer laptop does not have a boot menu. See below
for instructions.
2. Mac: When you hear the startup chime, press and hold Option (⌥).
iii. Select the proper device to boot from.
1. PC: Varies by manufacturer; option will often say “USB” and/or “UEFI”.
i. On the recommended Dell laptop, select “USB1” under “UEFI
OPTIONS”.
ii. The recommended Acer laptop does not have a boot menu. See below
for instructions.
2. Mac: Click the “EFI Boot” option and then click the up arrow underneath it.
You do not need to select a network at this time. If more than one identical
“EFI boot” option is shown, you may need to guess and reboot if you pick the
wrong one.
$ cd $HOME/Downloads
$ sudo cmp -n `stat -c '%s' ubuntu-16.04.1-desktop-amd64.iso`
ubuntu-16.04.1-desktop-amd64.iso /dev/sda differ:
byte 1, line 1
33/78
iv. Some laptops don’t have a boot device selection menu, and you need to go into the
BIOS configuration and change the boot order so that the USB drive is first.
1. On the recommended Acer laptop:
i. Press F2 while booting to enter BIOS configuration.
ii. Navigate to the Boot menu.
iii. Select USB HDD, and press F6 until it is at the top of the list.
iv. Press F10 to save and automatically reboot from the USB.
v. If the computer boots into its regular OS rather than presenting you with a boot
device or BIOS configuration screen, you probably pressed the wrong button, or
waited too long.
1. Hold down your laptop’s power button for 10 seconds. (The screen may turn
black sooner than that; keep holding it down.)
2. Turn the laptop back on and try again. Spam the appropriate button(s)
repeatedly as it boots.
3. If the computer boots immediately to where it left off, you probably didn’t
hold down the power button long enough.
vi. You’ll see a menu that says “GNU GRUB” at the top of the screen. Select the option
“Try Ubuntu without installing” and press Enter.
vii. The computer should boot into the USB’s Ubuntu desktop.
b. Enable WiFi connectivity.
i. Click the cone-shaped WiFi icon near the right side of the menu bar.
ii. If the dropdown says “No network devices available” at the top, you need to enable
your networking drivers:
1. Click on “System Settings”. It’s the gear-and-wrench icon along the left side of
the screen.
2. A System Settings window will appear. Click the “Software & Updates” icon.
3. A Software & Updates window will appear. Click the “Additional Drivers” tab.
4. In the Additional Drivers tab, you’ll see a section for a Wireless Network
Adapter. In that section, “Do not use the device” will be selected. Select any
other option besides “Do not use the device.””
5. Click “Apply Changes”.
6. Click the cone-shaped WiFi icon near the right side of the menu bar again.
There should be a list of WiFi networks this time.
iii. Select your WiFi network from the list and enter the password.
c. Repeat steps 1-6 using the SETUP 1 computer to create the Q1 BOOT USB rather than the
SETUP 1 BOOT USB.
i. The instruction to plug a Quarantined Boot USB into your Setup computer should
raise a red flag for you, because you should never plug a quarantined USB into
anything other than the quarantined computer it is designated for!
34/78

This setup process is the ONE exception.
ii. Because you have booted the SETUP 1 computer off the SETUP 1 BOOT USB, you
will follow the instructions for Ubuntu, even if your computer normally runs Windows
or macOS.
iii. Immediately after you are finished executing steps 1-6 with the Q1 BOOT USB,
remove the Q1 BOOT USB from the SETUP 1 computer.
1. On your desktop, right-click the corresponding USB drive icon in your dock
and select Eject from the pop-up menu.
2. Remove the USB drive from the USB slot.
iv. The Q1 BOOT USB is now eternally quarantined. It should never again be plugged
into anything besides the Q1 computer.
8. Create the SETUP 2 BOOT USB and Q2 BOOT USB
a. Repeat steps 1-7 using the SETUP 2 computer, SETUP 2 BOOT USB, and Q2 BOOT USB.
3.5. Create App USBsWe will prepare two (2) “Quarantined App USB” drives with the software needed to execute the remainder
of the protocol. These are the USB drives you labeled “Q1 APP” and “Q2 APP” in Section III.
1. Boot the SETUP 1 computer off the SETUP 1 BOOT USB if it is not already. (See the instructions in
Section III for details.)
2. Insert the Q1 APP USB into the the SETUP 1 computer.
a. The instruction to plug a Quarantined App USB into your Setup computer should raise a
red flag for you, because you should never plug a quarantined USB into anything other
than the quarantined computer it is designated for!
This setup process is the ONE exception.
3. Press Ctrl-Alt-T to open a terminal window.
4. Install the Glacier document and GlacierScript on the Q1 APP USB.
a. Download the latest full release of Glacier (not just the protocol document) at https://
github.com/GlacierProtocol/GlacierProtocol/releases (https://github.com/GlacierProtocol/
GlacierProtocol/releases).
b. Unpack the Glacier ZIP file into a staging area.
i. When the download starts, Firefox will ask you if you want to open the ZIP file with
Archive Manager. Click OK.
When the ZIP file download completes, it will be opened with Archive Manager.
35/78
ii. There will be a single entry in a list named “GlacierProtocol- version-here ”, where
version-here is replaced with the current version number (like “v1.0”). Click on that
and then click the “Extract” button.
iii. The Archive Manager will ask you where you want to extract the ZIP file to. Select
“Home” on the left panel and then press the extract button.
iv. When the Archive Manager is finished extracting the ZIP archive it will ask you what
to do next. Click “Show the Files”.
v. Rename the unzipped folder from “GlacierProtocol- version-here ” to “glacier”.
c. Obtain the Glacier “public key,” used to cryptographically verify the Glacier document and
GlacierScript.
If you are ever using Glacier in the future and notice that this step has changed (or that
this warning has been removed), there is a security risk. Stop and seek assistance.
i. Access Glacier’s Keybase profile at https://keybase.io/glacierprotocol.
ii. Click the string of letters and numbers next to the key icon.
iii. In the pop-up that appears, locate the link reading “this key”.
iv. Right-click the link and select “Save Link As…”
v. Name the file “glacier.asc”.
d. Verify the integrity of the Glacier download.
i. Import the Glacier public key into your local GPG installation:
ii. Switch to the glacier folder:
iii. Use the public key to verify that the Glacier “fingerprint file” is legitimate:
Expected output (timestamp will vary, but e-mail and fingerprint should match):
The warning message is expected, and is not cause for alarm.
$ gpg --import ~/Downloads/glacier.asc
$ cd ~/glacier
$ gpg --verify SHA256SUMS.sig SHA256SUMS
gpg: Signature made Thu Jan 19 13:45:48 2017 PST using RSA key ID 4B43EAB0
gpg: Good signature from "Glacier Team <[email protected]>"
gpg: WARNING: This key is not certified with a trusted signature!
gpg: There is no indication that the signature belongs to the owner.
Primary key fingerprint: E1AA EBB7 AC90 C1FE 80F0 1034 9D1B 7F53 4B43
36/78

iv. Verify the fingerprints in the fingerprint file match the fingerprints of the downloaded
Glacier files:
Expected output:
e. Copy the glacier folder to the Q1 APP USB.
i. Click on the File Manager icon in the launching dock along the left side of the
screen.
ii. Find the “glacier” folder under “Home”.
iii. Click and drag the glacier folder to the icon representing the USB drive on the left.
The USB drive will look like this, but may have a different name:
iv. If you see an “Error while copying” pop-up, you may be suffering from this Ubuntu
bug (https://bugs.launchpad.net/ubuntu/+source/nautilus/+bug/1021375). To fix it,
do the following and then retry copying the files:
1.
2. Log out of Ubuntu: Click the power icon in the top right of the screen and
select “logout” from the drop-down menu.
3. Login again with user “ubuntu” and leave the password blank.
5. Open the Glacier protocol document so that it is available for copy-pasting terminal commands.
6. Install the remaining application software on the Q1 APP USB.
a. Configure our system to enable access to the software we need in Ubuntu’s “package
repository”.On Ubuntu 16.04.01 there is a bug (https://bugs.launchpad.net/ubuntu/
+source/appstream/+bug/1601971) in Ubuntu’s package manager that affects systems
running off a bootable Ubuntu USB. The commands in steps a and b are a workaround.
i.
ii.
iii.
$ sha256sum -c SHA256SUMS 2>&1
Glacier.pdf: OK
glacierscript.py: OK
base58.py: OK
README.md: OK
$ mv ~/.config/nautilus ~/.config/nautilus-bak
$ sudo mv /var/cache/app-info/xapian/default /var/cache/app-
info/xapian/default_old
$ sudo mv /var/cache/app-info/xapian/default_old /var/cache/
app-info/xapian/default
$ sudo apt-add-repository universe
37/78
iv.
v.
b. Download and perform integrity verification59 of software available from Ubuntu’s package
repository:
▪ bitcoind: Bitcoin Core (https://bitcoincore.org/): , which we’ll use for cryptography &
financial operations
▪ qrencode: Used for creating QR codes to move data off quarantined computers
▪ zbar-tools: Used for reading QR codes to import data into quarantined computers
c. Copy that software to the Q1 APP USB.
i. Create a folder for the application files that will be moved to the USB:
ii. Copy the software into the apps folder:
iii. Copy the contents of the apps folder to the Q1 APP USB:
1. Click on the File Manager icon in the launching dock:
2. Navigate to the “Home” folder.
3. Click and drag “apps” folder to the icon representing the USB drive on the left
panel. The USB drive will look like this, but may have a different name:
7. Click on the USB drive icon to verify that it has the correct files. The contents should look like this
Click the apps folder. It will have the following content. Note that the version number of the
Bitcoin package may change as new versions are released. Future versions of Glacier may pin to a
specific version.
$ sudo apt-add-repository ppa:bitcoin/bitcoin
$ sudo apt-get update
$ sudo apt-get install qrencode=3.4.4-1 zbar-
tools=0.10+doc-10ubuntu1 bitcoind
$ mkdir ~/apps
$ cp /var/cache/apt/archives/*.deb ~/apps
apps
glacier
38/78

Click the glacier folder. It will have the following content:
8. Eject and physically remove the Q1 APP USB from the SETUP 1 computer.
The Q1 APP USB is now eternally quarantined. It should never again be plugged into anything
besides the Q1 computer.
9. Repeat all above steps using the SETUP 2 computer, SETUP 2 BOOT USB, and Q2 APP USB.
10. Find a container in which to store all of your labeled hardware, along with the Glacier document
hardcopy, when you are finished.
3.6. Prepare quarantinedworkspacesThis section is meant to be done immediately before executing the Deposit or Withdrawal protocols. If
you are executing the Setup Protocol for the first time and do not plan on executing the Deposit or
Withdrawal protocol now, you can stop here.
1. Block side channels
bitcoind_0.13.2-xenial1_amd64.deb
libboost-chrono1.58.0_1.58.0+dfsg-5ubuntu3.1_amd64.deb
libboost-program-options1.58.0_1.58.0+dfsg-5ubuntu3.1_amd64.deb
libboost-thread1.58.0_1.58.0+dfsg-5ubuntu3.1_amd64.deb
libdb4.8++_4.8.30-xenial2_amd64.deb
libevent-core-2.0-5_2.0.21-stable-2_amd64.deb
libevent-pthreads-2.0-5_2.0.21-stable-2_amd64.deb
libqrencode3_3.4.4-1_amd64.deb
libsodium18_1.0.8-5_amd64.deb
libzbar0_0.10+doc-10ubuntu1_amd64.deb libzmq5_4.1.4-7_amd64.deb
qrencode_3.4.4-1_amd64.deb zbar-tools_0.10+doc-10ubuntu1_amd64.deb
base58.py
Glacier.pdf
glacierscript.py
LICENSE README.md
SHA256SUMS
SHA256SUMS.sig
39/78

Side-channel attacks (https://en.wikipedia.org/wiki/Side-channel_attack) are a form of electronic
threat based on the physical nature of computing hardware (as opposed to algorithms or their
software implementations). Side channel attacks are rare, but it’s relatively straightforward to
defend against most of them.
a. Visual side channel
i. Ensure that no humans or cameras (e.g. home security cameras, which can be
hacked) have visual line-of-sight to the Quarantined Computers.
ii. Close doors and window shades.
b. Acoustic side channel (https://en.wikipedia.org/wiki/Acoustic_cryptanalysis)
i. Choose a room where sound will not travel easily outside.
ii. Shut down nearby devices with microphones (e.g. smartphones and other laptops).
iii. Plug in and turn on a table fan to generate white noise.
c. Power side channel (http://sharps.org/wp-content/uploads/CLARK-ESORICS13.pdf)
i. Unplug both Quarantined Computers from the wall.
ii. Run them only on battery power throughout this protocol.
iii. Make sure they are fully charged first! If you run out of battery, you’ll need to start
over.
d. Radio (https://cyber.bgu.ac.il/how-leak-sensitive-data-isolated-computer-air-gap-near-
mobile-phone-airhopper/) and other side channels. Including seismic (https://
www.cc.gatech.edu/fac/traynor/papers/traynor-ccs11.pdf), thermal (https://
cyber.bgu.ac.il/bitwhisper-heat-air-gap/), and magnetic (http://fc15.ifca.ai/preproceedings/
paper_14.pdf).
i. Turn off all other computers and smartphones in the room.
ii. Put portable computing devices in the Faraday bag and seal the bag.
iii. Unplug desktop computers.
2. Put your Q1 BOOT USB into an open slot in your Q1 computer.
3. Boot off the USB drive. If you’ve forgotten how, refer to the procedure in Section IV.
4. Plug the Q1 APP USB into the Q1 computer
5. Copy the software from the Q1 computer’s RAM disk.
a. Click the File Manager icon from the launchpad on the left side of the screen.
b. Click on the App USB on the left of the file manager. It will look like the image on the right,
but may have a different name.
c. Drag the contents of the USB to the “Home” directory on the left side of file manager.
6. Open a copy of this document on the Q1 computer.
a. In the File Manager find the glacier folder. The PDF file for this document should be visible
with the name “Glacier.pdf.” Open it.
You won’t be able to click any external links in the document, since you don’t have a
network connection. If you need to look something up on the internet, do so in a distant
room. Do not remove devices from the Faraday bag before doing going to the other room.
40/78

7. Open a Terminal window by pressing Ctrl-Alt-T.
8. Install the application software on the Q1 computer’s RAM disk.
9. Change into the glacier directory. You’ll be using this directory to execute software for the
protocol.
10. Prepare GlacierScript for execution.
11. Prepare the “Quarantined Scratchpad” – an empty file you’ll use as a place to jot notes.
a. Click the “Search your computer” icon at the top of the launcher along the left side of the
screen.
b. Type “text editor”.
c. Click the Text Editor icon.
d. A blank window should appear.
12. Repeat the above steps using the Q2 computer, Q2 SETUP USB and Q2 APP USB.
$ cd ~/apps
$ sudo dpkg -i *.deb
$ cd ~/glacier
$ chmod +x glacierscript.py
41/78
4. Deposit
42/78

4.1. Generate cold storagedataThe Deposit Protocol is used to transfer bitcoins into high-security cold storage. If you have previously
used the Deposit Protocol to deposit funds into cold storage, and want to deposit additional funds to the
same cold storage address, skip to Section IV.
By the end of this section, you will generate the following information.
• The N private keys : These are the keys that will later be used to unlock your funds. You’ll create
several private keys, depending on the multisignature withdrawal policy you chose (e.g. 4 keys for
a 2-of-4 withdrawal policy).
In this protocol, the total number of private keys you’re creating will be referred to as N.
• The cold storage address : An alphanumeric string indicating the virtual location of your funds.
• The redemption script : An additional key needed to access any funds deposited. There is only
one redemption script for each set of private keys. A copy will be stored with each private key.
Only quarantined hardware should be used during the execution of the Deposit Protocol unless
explicitly instructed otherwise.
1. If this is not your first time working with Glacier:
a. Use a networked computer to access the latest full release of Glacier ( not just the protocol
document) at https://github.com/GlacierProtocol/GlacierProtocol/releases (https://
github.com/GlacierProtocol/GlacierProtocol/releases).
b. Open the protocol document (Glacier.pdf) within the ZIP file.
c. Check the Release Notes (Appendix E) of the protocol document to see if there are any new
versions of Glacier recommended.
d. Whether or not you decide to upgrade, review the errata for the version of Glacier you are
using at https://github.com/GlacierProtocol/GlacierProtocol/releases (https://github.com/
GlacierProtocol/GlacierProtocol/releases).
2. Execute Section VI of the Setup Protocol to prepare your quarantined workspace.
3. Create entropy for private keys
Creating an unguessable private key requires entropy – random data. We’ll combine two sources
of entropy to generate our keys. This ensures securely random keys even if one entropy source is
somehow flawed or compromised to be less-than-perfectly random.
a. Generate dice entropy
i. Type “DICE ENTROPY” into both Quarantined Scratchpads.
43/78

ii. Roll 62 six-sided dice, shaking the dice thoroughly each roll. 62 dice rolls
corresponds to 160 bits of entropy. See the design document for details.
iii. If you are rolling multiple dice at the same time, read the dice left-to-right. This is
important. Humans are horrible at generating random data (http://journals.plos.org/
plosone/article?id=10.1371/journal.pone.0041531) and great at noticing patterns.
Without a consistent heuristic like “read the dice left to right”, you may
subconsciously read them in a non-random order (like tending to record lower
numbers first). This can drastically undermine the randomness of the data, and
could be exploited to guess your private keys.
iv. Manually enter the numbers into the Quarantined Scratchpads on both quarantined
computers. Put all rolls on the same line to create one line of 62 numbers . (It’s fine
to add spaces for readability.)
Repeat this process a total of N times, so that you have a total of N lines of numbers in
each Quarantined Scratchpad.
b. Generate computer entropy
i. Type “COMPUTER ENTROPY” into both computers’ Quarantined Scratchpads. (This
is a descriptive heading to keep your notes organized and minimize risk of error.)
ii. Make sure you are in the ~/glacier folder :
iii. On the Q1 computer enter the following command. You’ll need to supply the number
of keys required for your multisignature withdrawal policy (4 by default).
Example:
Example output:
iv. Copy-paste the N lines of entropy into the Quarantined Scratchpad.
v. Manually enter the N lines of entropy into the Quarantined Scratchpad on the other
quarantined computer.
c. Generate new cold storage data information using your entropy
$ cd ~/glacier
$ ./glacierscript.py entropy --num-keys number-of-keys-here
$ ./glacierscript.py entropy --num-keys 4
Computer entropy #1: f8e1 39f4 8dd2 129c 689c 1cb1 1280 79fe db56 573f
Computer entropy #2: c36b 0f66 3344 cd74 1d03 c659 0e7a 92e7 5d1a 663b
Computer entropy #3: 6873 b3a9 f1b6 5a06 064a 6e84 7faf f61c 1ef6 5407
Computer entropy #4: 5668 abd2 a7d9 5eb8 f7db 211d fc82 0c15 d4e4 0a04
44/78

On the Q1 computer:
i. Run GlacierScript to generate the private keys.
In the command below, you’ll need to specify the number of keys required by your
multisignature withdrawal policy.
For example, for a 2-of-4 withdrawal policy:
ii. GlacierScript will prompt you to enter N 62-number lines of dice entropy and N lines
of computer entropy.
iii. GlacierScript will output your cold storage data:
▪ N private keys
▪ A cold storage address
▪ A redemption script
Example output:
$ ./glacierscript.py create-deposit-data -m required-keys \
-n total-keys
$ ./glacierscript.py create-deposit-data -m 2 -n 4
Private keys:
Key #1: 5JAwK9bihMRFe9zw32csUUEn7N5MvLvuwXKv5qUnQVjbthZyuwQ
Key #2: 5KC6MNFkqN665YAbb1wrveGWmygainm99wX8fSxA779UZh3yP2t
Key #3: 5J4DNddHjUkSoG2GZAkxwqmz1T5TTVbnf7Q5ho8Eqkinbc2hvSe
Key #4: 5K7idDARSfWLGjA926DFvVL8igZANsJsUcGo8vztmPH45iScp8K
Cold storage address:
3Hy6A3rSXKRumyVqURBoiv4QpQLt6vMCzt
Redemption script:
51410421167f7dac2a159bc3957e3498bb6a7c2f16874bf1fbbe5b523b3632d2
c0c43f1b491f6f2f449ae45c9b0716329c0c2dbe09f3e5d4e9fb6843af083e22
2a70a441043704eafafd73f1c32fafe10837a69731b93c0179fa268fc325bdc0
8f3bb3056b002eac4fa58c520cc3f0041a097232afbe002037edd5ebdab2e493
f18ef19e9052ae
QR code for cold storage address in address.png
QR code for redemption script in redemption.png
45/78

d. Verify the integrity of the cold storage data.
i. On the Q2 computer, repeat step (c) above.
ii. Verify that the output of GlacierScript shown in the terminal window is identical on
both computers:
1. All private keys
2. Cold storage address
3. Redemption script
For the private keys and cold storage address, verify every character. For the
redemption script, it’s sufficient to check the first 8 characters, last 8 characters, and
a few somewhere in the middle.
There are attack vectors which could replace just a portion of private keys or a cold
storage address, making the private keys easier to brute force, so it’s important to
check them thoroughly. If we know the private keys and cold storage address are
good, then the redemption script is almost certainly good as well. And if there are
any errors in the redemption script, they will be caught during the test deposit &
withdrawal process later in the protocol; a painstaking manual verification is not
required.
iii. If there are any discrepancies, do not proceed.
1. Check whether the entropy in both Quarantined Scratchpads matches
precisely.
i. If they are different by 1-3 characters (presumably due to transcription
errors), manually tweak them to make them match. It doesn’t matter
which scratchpad is tweaked.
ii. If they are different by more than 3 characters, restart the Deposit
Protocol.
iii. If the are identical, restart the Deposit Protocol.
2. Seek assistance if discrepancies persist.
46/78

4.2. Transfer cold storage datato paperIn this section, you’ll move the cold storage data you generated in Section I from the quarantined
computing environments onto physical paper. This will be done using a combination hand transcription
and QR codes (https://en.wikipedia.org/wiki/QR_code).
1. Transfer the private keys to paper.
a. Write each private key on a separate piece of TerraSlate paper (one key per page).
i. Do not write anything else on the paper unless specifically instructed (such as
“Bitcoin”, “Glacier”, “private key”, etc.) In the event the key is seen by someone
untrustworthy or stolen by a random thief, such clues help them understand the
significance of the key and give them an incentive to plot further thefts or attacks.
ii. Transcribe by hand. Do not use QR codes or any other method to transfer.
iii. Private keys are case-sensitive.
iv. Write clearly.
1. Use care when transcribing “o” (lower-case “o”). Note that private keys do not
contain “O” (upper-case “o”) or “0” (number zero).
2. Use care when transcribing “1” (number one). Note that private keys do not
contain “I” (uper case “i”) or “l” (lower-case “L”)
3. Use care to distinguish between “t” and “+” (private keys do not contain plus
signs)
4. Use care to distinguish between “2” and “Z”
5. Use care to distinguish between “5” and “S”
6. Use care to distinguish between “6” and “b”
7. Use care to distinguish between “6” and “G”
8. Use care to distinguish between “K” and “k”
9. Use care to distinguish between “5” and “S”
10. Use care to distinguish between “u” and “v”
11. Use care to distinguish between “U” and “v”
b. Double-check that you transcribed all private keys correctly. If you make a mistake, you’ll
have to redo a lot of work.
c. Label each page with:
i. Today’s date
ii. The version of Glacier used (listed on the front page of this document)
2. Visually hide all critically sensitive data.
47/78

We’ll be using a smartphone with a live Internet connection to read QR codes from the
quarantined computer screens. Any malware (or a malicious QR reader app) could steal sensitive
data if it is not visually hidden.
This step is important. Failing to execute it properly creates a substantial security risk.
a. Put your handwritten private keys out of sight (don’t just turn them face down; paper is not
completely opaque). This prevents a smartphone camera from accidentally seeing them.
b. Delete all text from the Quarantined Scratchpad on the Q1 and Q2 computers.
c. On the Q1 computer:
i. Type “COLD STORAGE ADDRESS” into the Quarantined Scratchpad.
ii. Copy-paste the cold storage address from the terminal window to the Quarantined
Scratchpad.
iii. Type “REDEMPTION SCRIPT” into the Quarantined Scratchpad.
iv. Copy-paste the redemption script from the terminal window to the Quarantined
Scratchpad.
v. Enable line wrapping so the entire redemption script can be seen.
1. With the Quarantined Scratchpad window active, go to the menu bar at the
top of the screen.
2. Select Edit.
3. Select Preferences.
4. Select the View tab.
5. Uncheck “Do not split words over two lines”.
d. Clear the terminal windows on the Q1 and Q2 computers.
3. QR reader setup
a. Remove a smartphone from the Faraday bag and turn it on.
b. If the smartphone doesn’t already have a QR code reader on it, install one.
Any reader is fine as long as it can read all types of QR codes, but here are recommendations
we’ve tested with Glacier: iOS (https://itunes.apple.com/us/app/qr-reader-for-iphone/
id368494609?mt=8), Android (https://play.google.com/store/apps/details?
id=com.application_4u.qrcode.barcode.scanner.reader.flashlight&hl=en).
4. Transfer the cold storage address to a non-quarantined computer.
a. On the Q1 computer, display the cold storage address as a QR code on the screen:
i. In File Manager, navigate to the “Home” folder, then the “glacier” folder, and double-
click “address.png”.
b. Use the smartphone’s QR code reader to read the QR code . When the QR code is
successfully read, the smartphone should display the text cold storage address .
$ clear
48/78
c. Verify the cold storage address on the smartphone matches the cold storage address in
the Quarantined Scratchpad.
If it does not match, do not proceed. Try using a different QR reader application or
restarting the Deposit Protocol. Seek assistance if discrepancies persist.
d. Use the smartphone to send the cold storage address to yourself using a messaging app
which you’ll be able to access from a laptop. (E-mail is not recommended for security
reasons.)
5. Repeat the previous step for the redemption script , stored in “redemption.png.”
When comparing the redemption script shown on the smartphone to the redemption script in the
Quarantined Scratchpad, it’s sufficient to check the first 8 characters, the last 8 characters, and a
handful of characters somewhere in the middle.
6. Power down the smartphone and return it to the Faraday bag.
7. Shut down both quarantined computers entirely. As a precaution against side channel attacks, the
quarantined computers should not be active except when they absolutely need to be.
The recommended Acer laptop may require you to hold down the power button for several
seconds to complete the shutdown.
8. Create Cold Storage Information Pages .
Using any Internet-connected computer:
a. Access the copies of the cold storage address and redemption script you sent yourself
from your smartphone previously.
b. Open an empty document in any text editing application. This will be used to create the
Cold Storage Information Page .
c. Put the following information into the document:
i. Copy-paste the cold storage address
ii. Copy-paste the redemption script
iii. Type today’s date
iv. Type the version of Glacier used (listed on the first page of this document)
d. Do not put anything else in the document (such as “Bitcoin”, “Glacier”, “private key”, etc.)
e. Save an electronic copy of the Cold Storage Information Page in a “conventionally secure”
location of your choosing, such as a “Secure Note” in 1Password (https://1password.com/)
or a comparable password manager. Because the Cold Storage Information Page contains
moderately-sensitive data, there are some privacy considerations with keeping and
electronic copy of it. See the Sensitive Data subsection for details.
f. Print N copies of the Cold Storage Information Page .
$ sudo shutdown now
49/78

g. Shut down the computer. (It has a camera, and you will be working with critically sensitive
data in a moment.)
9. Prepare Cold Storage Information Packets
a. Put each handwritten private key page along with one Cold Storage Information Page in
its own opaque envelope. While this obviously won’t deter a determined thief, it makes it
quite difficult for a thief to steal a key without leaving evidence they have done so – and
noticing theft of a single key gives you a chance to move your funds away before the thief
can steal a second key.
b. Each pair of pages will be referred to as a Cold Storage Information Packet .
c. Put your Cold Storage Information Packets somewhere out of sight for the moment.
4.3. Test deposit andwithdrawalIt’s important to make sure everything is working properly before proceeding. You’ll verify this by making
a token deposit to, and withdrawal from, your cold storage address.
Depositing funds requires the Internet, and does not require handling any critically sensitive cold storage
data, so you can use any Internet-connected computer for this section.
1. Open your electronic copy of the Cold Storage Information Page (see Section II for details).
2. Perform a test deposit.
a. Use the wallet software or service of your choice to send the approximate equivalent to
fund 1000 bytes of transactions to your cold storage address . As of January 17, 2018, with
a fee rate of 510 sat/B and $11185 USD/BTC this is a deposit of approximately $57. Fees
have since declined, but the user is advised to check the current fee rate before making the
test deposit. The Bitcoin network requires a very small, flat fee to process transactions. We
recommend you use a wallet service that recommends (or pays) a fee for you
automatically, which most do.
i. Copy-paste your cold storage address from the Cold Storage Information Page into
the wallet software.
b. Wait for the Bitcoin network to confirm the transaction at least once. The way you tell
whether a transaction has been confirmed varies depending on the software or service you
are using to send funds, but it should be displayed prominently.
3. Perform a test withdrawal.
a. Execute the Withdrawal Protocol to withdraw the remaining balance ($6 USD - deposit fees)
from cold storage to a regular Bitcoin address of your choice.
b. Wait for the Bitcoin network to confirm the transaction at least once. (Instructions for doing
this are in the Withdrawal protocol.)
50/78
4.4. Deposit executionDepositing funds requires the Internet, and does not require handling any critically sensitive cold storage
data, so you can use any Internet-connected computer for this section.
You will need access to an electronic and paper copy of your Cold Storage Information Page .
1. Consider whether you want to route your funds through one or more intermediary non-cold-
storage addresses for privacy purposes. (Review the Privacy Considerations subsection for
details.)
If you do, make those intermediate transfers using whatever means you normally use to transfer
bitcoins.
2. If you are depositing a large amount, consider making a small deposit as a test followed by a
second deposit for the remainder.
3. Verify cold storage address.
a. Get one of the paper Cold Storage Information Pages containing your cold storage
address.
b. Open your electronic copy of the Cold Storage Information Page (see Section II for
details). If you’ve lost access to it, you’ll need to recreate a new electronic copy by
transcribing one of the hardcopies (attached to each public key) by hand.
c. Visually verify that the cold storage addresses are identical in the electronic copy and
paper copy. This is to insure that the electronic copy was not damaged, hacked,
accidentally changed due to a typo, etc.
d. Return the paper Cold Storage Information Page to its normal secure storage.
4. Perform the deposit.
a. Use the wallet software or service of your choice to prepare to send the desired amount of
funds to your cold storage address . The Bitcoin network requires a fee to process
transactions. We recommend you use a wallet service that either covers the fees for you or
recommends a fee amount automatically, which most do.
Enter all necessary transaction information, but do not actually execute the transaction.
i. Copy-paste your cold storage address from the Cold Storage Information Page into
the wallet software.
b. Double-check that the address you pasted matches the address in the Cold Storage
Information Page. If you use the wrong address, you will lose all of your funds with no
recourse.
c. Execute the transaction.
51/78
5. Verify the deposit on the public blockchain.
a. Go to Blockr, paste the address into the search bar, and press Enter. You’ll be taken to a
page that says “Bitcoin Address” at the top, with your cold storage address listed
underneath.
b. Within a couple of minutes (and often much faster), you should be able to refresh this page
and see your funds listed under “Unconfirmed”.
c. Periodically refresh the page until you see the funds moved from “Unconfirmed” to be
reflected in “Balance”. This generally happens within 15 minutes; if the Bitcoin network is
unusually congested, it may take longer.
Your funds are now secured in cold storage.
If this was your first deposit to this cold storage address , proceed to the next section. Otherwise, you
have completed the Deposit Protocol.
4.5. Store cold storage data1. Shut down any nearby computers or smartphones, or other devices with cameras.
2. Immediate storage of Cold Storage Information Packets
a. Double-check to make sure each envelope contains a handwritten private key and a Cold
Storage Information Page .
b. Seal each envelope.
c. Use tamper-resistant seals in addition to the envelope’s normal adhesive to seal it.
d. Immediately put all Cold Storage Information Packets in the safest possible location in
your home or office that is immediately accessible.
e. No, really. Like right now. That’s basically a huge pile of cash you have just sitting there in
envelopes on your desk.
3. Hardware storage
a. Put tamper-resistant seals on the ends of all USB drives.
b. Close the quarantined laptops, and seal the screen shut with a tamper-resistant seal.
c. Store the hardware somewhere where it is unlikely to be used by accident.
4. Maintenance planning
5. Create a reminder for yourself in six months to execute the Maintenance Protocol . (If you don’t
have a reminder system you trust, find one on the web.)
6. Long-term storage of Cold Storage Information Packets
a. As soon as possible, transfer each Cold Storage Information Packet to its secure storage
location (e.g. safe deposit box).
b. Don’t put more than one packet in long-term storage in the same building! Storing two keys
in the same building increases the risk of losing both keys in a disaster (e.g. fire) or to a
thorough thief.
52/78

c. If you are entrusting any packets to trusted signatories:
i. Do not send them the packet electronically – no e-mail, no photograph, no “secure
instant message”. If they are distant, using a courier service is probably fine, as long
as you get tracking and send packets on different days and/or from different
locations. (Prevents an opportunistic thief from happening across two of your
private keys. Also avoids a case where you send all your keys out in the same batch,
and that entire batch is lost – along with your access to your money.)
ii. Tell them verbally who the other signatories are, to facilitate access to funds if you
are dead or incapacitated.
iii. Instruct them not to keep any related notes on or with the packets . In the event the
key is seen by someone untrustworthy or stolen by a random thief, such clues help
them understand the significance of the key and give them an incentive to plot
further thefts or attacks.
iv. Remember that signatories will have the ability to know your cold storage balance!
You have finished securing your cold storage funds.
53/78

5. Withdrawal
54/78

5.1. PreparationThe Withdrawal Protocol is used to transfer bitcoins out of high-security cold storage.
Before beginning, consider whether you want to route your funds through one or more intermediary non-
cold-storage addresses for privacy purposes. (Review the Privacy Considerations subsection for details.)
If you do, you may want to withdraw the funds to an intermediary address first before sending them on to
their final destination.
In this first section, we’ll gather physical hardcopies of all information needed to do the withdrawal. This
is done with the help of a regular networked computer to find some of this information online and
translate it into printed QR codes.
On any Internet-connected computer:
1. If this is not your first time working with Glacier:
a. Use a networked computer to access the latest full release of Glacier ( not just the protocol
document) at https://github.com/GlacierProtocol/GlacierProtocol/releases (https://
github.com/GlacierProtocol/GlacierProtocol/releases).
b. Open the protocol document (Glacier.pdf) within the ZIP file.
c. Check the Release Notes (Appendix E) of the protocol document to see if there are any new
versions of Glacier recommended.
d. Whether or not you decide to upgrade, review the errata for the version of Glacier you are
using at https://github.com/GlacierProtocol/GlacierProtocol/releases (https://github.com/
GlacierProtocol/GlacierProtocol/releases).
2. Open your electronic copy of the Cold Storage Information Page (see Section II of the Deposit
Protocol for details).
3. Identify the blockchain transactions associated with the funds you’d like to withdraw.
a. Go to Blockchain.info (https://blockchain.info/), paste your cold storage address into the
search bar, and press Enter.
b. You’ll be taken to a page that says “Bitcoin Address” at the top, with your cold storage
address listed underneath.
c. Click the “Unspent Outputs” link. The page will show a list of transaction IDs (in horizontal
gray bars) and their corresponding amounts (in green boxes). Each transaction ID
corresponds to a deposit you made, the remainder of a deposit you made after doing a
partial withdrawal, or a deposit someone else made to your cold storage address. If you’re
taken to a page that says “No free outputs to spend”, this indicates a zero balance at the
address. Verify you pasted the address correctly.
d. Identify a set of transaction IDs whose amounts are cumulatively greater than or equal to
the amount you would like to withdraw. If a transaction ID is listed more than once (i.e. the
55/78

same transaction has more than one unspent output going to your cold storage address),
you just need to include the transaction ID once. GlacierScript will include all UTXOs in
every supplied transaction ID.
e. Copy-paste these transaction IDs to a temporary scratchpad for reference.
f. These will be referred to as unspent transaction IDs .
4. Get raw data for blockchain transactions.
a. For each unspent transaction ID from your temporary scratchpad:
i. Go to the following URL, substituting the unspent transaction ID in the specified
place: https://blockchain.info/tx/ transaction-id-here ?format=hex (https://
blockchain.info/tx/transaction-id-here?format=hex)
Example page contents:
b. This entire page be referred to as a raw unspent transaction .
c. Copy-paste the raw unspent transaction next to the unspent transaction ID in your
temporary scratchpad.
5. Create QR codes
a. Find an online QR code generator, such as http://goqr.me (http://goqr.me).
b. For each unspent transaction ID in your temporary scratchpad:
i. Copy-paste the raw unspent transaction into the QR code generator.
NOTE: Some raw unspent transactions are too long to be converted into a single QR
code – or the QR code may be such high resolution that some QR code readers may
struggle to read it.
In these cases, you will need to split the data into multiple QR codes, and manually
splice them back together on the quarantined computer after decoding each QR
codes.
Make sure there is no extra whitespace (i.e. a space, or pressing “Enter”) at the
end of any copy-pastes! This can change the QR code.
ii. Print out the resulting QR code . (If printing from goqr.me, just print the first page.)
iii. Write “raw unspent transaction” somewhere on the printout.
01000000016847105309a8604c7e4f5773d0a16c45248acce057dab62e
db0fedc2810d49a4010000006b48304502210093e6b4154d42c1bba27c
548a80488673967be32c8de2f11e01a1402a5500e13302203e20874e5d
0af516c902d3b600ee94571a7ce68a14a384dc05d4346e1009fe000121
039fd6f25c87f183260c1d4a3a3ae33a2c06414db4c40d0c2ab76a7192
1fef0939ffffffff01e0930400000000001976a914e770a7c13f977478
3e80607f40be4547780315b688ac00000000
56/78

c. Repeat step (b) above for other needed information:
i. Cold storage address (from the Cold Storage Information Page )
ii. Redemption script (from the Cold Storage Information Page )
iii. Destination address to which you will be withdrawing the funds
1. Carefully transcribe the destination address by hand on the printed page with
its QR code. (This will facilitate verification in the quarantined environment.)
2. Double-check that the transcribed address is correct.
3. If you are sending funds directly to another party with whom you do not have
high trust, be mindful of the risk of transaction malleability fraud.
6. Gather other information.
a. Make sure you have the necessary number of Cold Storage Information Packets on hand
(you’ll need the private keys).
i. For the recommended 2-of-n multisignature withdrawal policy, you’ll need any 2
Cold Storage Information Packets .
ii. If you are performing an initial test withdrawal, you’ll need all Cold Storage
Information packets .
b. Get transaction fee market data.
The operators of the Bitcoin network require a (very small) fee for processing transactions.
There is not a fixed fee schedule; if the fee is too low, the withdrawal will never get
processed, and if the fee is too high, you unnecessarily waste money. This data will be
used to calculate a reasonable fee for expedient transaction processing.
i. Go to https://bitcoinfees.21.co/api/v1/fees/recommended
Example page content:
ii. Note the number next to “fastestFee” – in the above example, 100. This indicates
that paying 100 satoshis/byte is sufficient to be among the transactions processed
most quickly by the Bitcoin network.(1satoshi=10^-8 BTC,and a typical transaction is
under 1000 bytes).
As of January 2017, the number 100 is typical. If the number is radically different
(not between 10 and 1000), stop; something may be wrong. Seek assistance.
iii. Write that number down on a piece of paper labeled “Fee rate”.
{"fastestFee":100,"halfHourFee":100,"hourFee":70}
57/78

5.2. Transaction constructionIn this section, we construct a “signed transaction” in our quarantined environments, verify it, and then
use QR codes to extract it from the quarantined environments (for execution in the following section).
1. Execute Section VI of the Setup Protocol to prepare your quarantined workspace.
2. Construct the withdrawal transaction.
On the Q1 computer:
a. Import QR code data
i. Start the QR code reader:
A window will appear with your laptop’s video feed.
ii. For each QR code you printed out in Section I:
1. Hold the QR code up to the webcam.
2. When a green square appears around the QR code on the video feed, it has
been successfully read.
3. Verify the decoded QR code is shown in the terminal window. Example:
4. Copy-paste the decoded data (everything after, but not including, “QR-code:”)
into the Quarantined Scratchpad.
5. Make a note of what the data is, based on your handwritten label from the
printed QR code (i.e. “raw unspent transaction” or “redemption script”).
b. Close the window with the live video feed.
c. Verify the destination address in the Quarantined Scratchpad matches your handwritten
copy of the destination address.
d. Transcribe the other information you will be using into the Quarantined Scratchpad. If you
make a transcription error, it will be easier to identify and fix in the scratchpad compared to
a situation where you transcribed it directly into GlacierScript.
i. Private keys
ii. Fee rate
$ zbarcam
QR-Code:51410421167f7dac2a159bc3957e3498bb6a7c2f16874bf1f
bbe5b523b3632d2c0c43f1b491f6f2f449ae45c9b0716329c0c2dbe09f
3e5d4e9fb6843af083e222a70a441043704eafafd73f1c32fafe10837a
69731b93c0179fa268fc325bdc08f3bb3056b002eac4fa58c520cc3f00
41a097232afbe002037edd5ebdab2e493f18ef19e9052ae
58/78
Transcribe the private keys with reasonable care, but painstaking verification is not
critical. (If you make an error, the withdrawal will simply fail, prompting you to fix
your transcription error.)
e. If any raw unspent transactions are too long, move each too-long transaction to its own file.
GlacierScript normally takes input by copy-pasting values, but it can only accept copy-
pasted values up to about 4000 characters in size.
i. If any raw unspent transaction is longer than 4000 characters, you’ll need to save it
to its own file on disk.
1. If you’re not sure if it’s 4000 characters, you can try the copy-paste method. If
it’s too long (or if there is some other problem with it), you’ll receive a “TX
decode” error (code 22).
ii. You can do this by opening a new TextEdit window, pasting the raw unspent
transaction into it, and saving the file.
iii. Make sure to save it to the folder containing glacierscript.py .
f. Begin construction of the withdrawal transaction:
g. When prompted for the number of private keys to use:
i. If you are doing an initial test withdrawal for a new cold storage address, choose N
(i.e. the total number of keys in your multisignature withdrawal policy – 4 if you use
the default recommendation).
ii. Otherwise, select 2 (assuming you’re using the recommended 2-of-n withdrawal
policy).
h. Enter all data as prompted by copy-pasting from the Quarantined Scratchpad.
i. Technical note for experienced Bitcoin users: If the withdrawal amount & fee are
cumulatively less than the total amount of the unspent transactions, the remainder
will be sent back to the same cold storage address as change.
i. The script will output a “raw signed transaction” and a fingerprint of the signed transaction
for verification purposes.
Example output:
$ cd ~/glacier
$ ./glacierscript.py create-withdrawal-data
59/78

3. Verify transaction construction
a. On the Q2 computer, repeat step 2 above.
i. Note: it is important to enter the private keys in the same order on each of the
quarantined computers.
b. Verify that the “Transaction fingerprint” output by GlacierScript is identical on both
computers. It is possible for malware to exfiltrate bits of the private key in the transaction
signature by choosing the nonce in a particular way. Bitcoin Core generates the nonce
deterministically, as a function of a hash of the transaction, so we can detect the presence
of any environment-specific malware by comparing the transaction generated in each
quarantined environment.
c. If there are any discrepancies, do not proceed. Restart the Withdrawal Protocol and seek
assistance if discrepancies persist.
4. Visually hide all critically sensitive data.
We’ll be using a smartphone with a live Internet connection to read QR codes from the
quarantined computer screens. Any malware (or a malicious QR reader app) could steal sensitive
data if it is not visually hidden.
Sufficient private keys to execute transaction?
True
Raw signed transaction (hex): 01000000013cd6b24735801ad3d04c40e6da34
04278b0d38dbc896df6ae50bf11c3043a49600000000fda001004730440220199d247
cd11c14fa4960a52467e69ca6b77596e94c14f27ba956315f2d1c852302201b6f41ec
fc62a1a7c7a423425ab150301cfffc47c1a78a5bf13b8232f767e4130148304502210
0e7ae7e5a77da47d5e622f974683a43d312e72a1eed329d4fdbd8fba2c22f84b40220
50358fb63cf182e81905417d6e38a2981563495dd00c3177ee650ff7cd2d511a014d0
b01524104fe0fcd054a31130749467f07e272426f7dd7a3029ab5b076d7285a931bd1
31d34ed9f28b2cc2fe266aa62c4cada3e82b70a4416966902201c4d73759f7f0425e4
1044f2ec9f80ef2c4f385f3d27b6167f77236de63548723ba1c90a324f4ec46dfd14a
2fba5a9c048a5ec310aedfe875d8a254f336e8f7d5d17338d9451dc6f2188c4104aef
b86098442adc6c3dffd9b0e27fe8e918462469a5ec5363e26920f09facea70b63e4f4
d2736089286d4dd2352ca65016e7d593f105009f9a35c03a2464aa20410451e7f31ea
2f5cb14ba76ca20952c1d453fe3a85959ebbefee8912ad6f74c443a03e52ef8a842f8
90f1ab2d69c6bb418e6de0f15bef944be2883887be3bb75cc054aeffffffff0194960
700000000001976a914c018da1cb43c5d7b9e7757805ee78709f8a61ede88ac000000
00
Transaction fingerprint (md5):
c49c366908296ae12478539d29fb4146
QR code for transaction in transaction.png
60/78
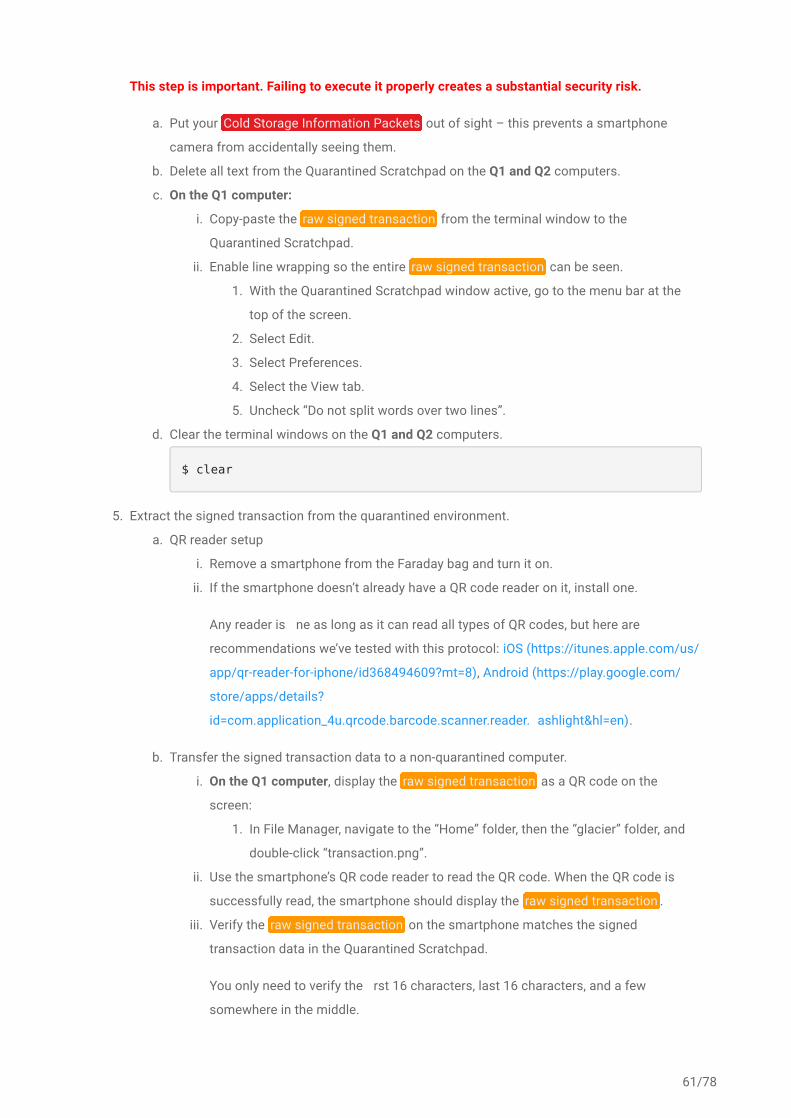
This step is important. Failing to execute it properly creates a substantial security risk.
a. Put your Cold Storage Information Packets out of sight – this prevents a smartphone
camera from accidentally seeing them.
b. Delete all text from the Quarantined Scratchpad on the Q1 and Q2 computers.
c. On the Q1 computer:
i. Copy-paste the raw signed transaction from the terminal window to the
Quarantined Scratchpad.
ii. Enable line wrapping so the entire raw signed transaction can be seen.
1. With the Quarantined Scratchpad window active, go to the menu bar at the
top of the screen.
2. Select Edit.
3. Select Preferences.
4. Select the View tab.
5. Uncheck “Do not split words over two lines”.
d. Clear the terminal windows on the Q1 and Q2 computers.
5. Extract the signed transaction from the quarantined environment.
a. QR reader setup
i. Remove a smartphone from the Faraday bag and turn it on.
ii. If the smartphone doesn’t already have a QR code reader on it, install one.
Any reader is fine as long as it can read all types of QR codes, but here are
recommendations we’ve tested with this protocol: iOS (https://itunes.apple.com/us/
app/qr-reader-for-iphone/id368494609?mt=8), Android (https://play.google.com/
store/apps/details?
id=com.application_4u.qrcode.barcode.scanner.reader.flashlight&hl=en).
b. Transfer the signed transaction data to a non-quarantined computer.
i. On the Q1 computer, display the raw signed transaction as a QR code on the
screen:
1. In File Manager, navigate to the “Home” folder, then the “glacier” folder, and
double-click “transaction.png”.
ii. Use the smartphone’s QR code reader to read the QR code. When the QR code is
successfully read, the smartphone should display the raw signed transaction .
iii. Verify the raw signed transaction on the smartphone matches the signed
transaction data in the Quarantined Scratchpad.
You only need to verify the first 16 characters, last 16 characters, and a few
somewhere in the middle.
$ clear
61/78

iv. If it does not match, do not proceed. Try using a different QR reader application or
restarting the Withdrawal Protocol. Seek assistance if discrepancies persist.
v. Use the smartphone to send the raw signed transaction to yourself using a
messaging app which you’ll be able to access from a laptop.
6. Shut down both quarantined computers entirely. As a precaution against side channel attacks, the
quarantined computers should not be active except when they absolutely need to be.
The recommended Acer laptop may require you to hold down the power button for several
seconds to complete the shutdown.
5.3. Transaction executionand verificationOn any Internet-connected computer:
1. Access the raw signed transaction you sent yourself from your smartphone previously.
2. Verify the transaction data.
a. Go to https://coinb.in/#verify (https://coinb.in/#verify).
b. Copy-paste the raw signed transaction into the webpage and click Submit.
c. Under “Outputs”:
i. Verify the destination address is correct.
ii. Verify the amount going to the destination address is correct.
iii. If you did not withdraw all funds from these unspent transactions, you’ll also see a
second output which “sends” the remainder of the funds “back” to your cold storage
address . This is necessary; it’s how Bitcoin is designed to operate.
3. Execute the transaction.
a. Go to https://coinb.in/#broadcast (https://coinb.in/#broadcast) (or any comparable public
service which can broadcast a raw signed transaction to the Bitcoin network).
b. Copy-paste the raw signed transaction into the webpage and click Submit.
c. You should see a green bar appear with a transaction ID in it. This is the transaction ID for
your withdrawal; make a note of it.
4. Verify the withdrawal on the public blockchain.
a. Go to Blockr (https://www.coinbase.com/) , paste the destination address into the search
bar, and press Enter. You’ll be taken to a page that says “Bitcoin Address” at the top, with
the destination address listed underneath.
b. Within a couple of minutes (and often much faster), you should be able to refresh this page
and see your funds listed under “Unconfirmed”.
$ sudo shutdown now
62/78

c. Periodically refresh the page until you see the funds moved from “Unconfirmed” to be
reflected in “Balance”. This generally happens within 15 minutes; if the Bitcoin network is
unusually congested, it may take longer.
63/78

6. Balance andmaintenance
64/78

6.1. Check your balanceThe Viewing Protocol is a simple procedure for viewing your balance of funds currently in one cold
storage address.
1. Open your electronic copy of the Cold Storage Information Page (see Section II for details). If
you’ve lost access to it, you’ll need to recreate a new electronic copy by transcribing one of the
hardcopies (stored with each private key) by hand.
2. Go to Blockr (https://www.coinbase.com/), paste your cold storage address into the search bar,
and press Enter.
3. You’ll be taken to a page that says “Bitcoin Address” at the top, with your cold storage address
listed underneath.
4. Your balance will be listed on the page.
6.2. MaintenanceThe Maintenance Protocol is designed to minimize the risk of losing funds due to:
• Loss of private keys: Obviously if too many keys are compromised or lost (due to theft, damage,
or misplacement), your funds are lost. It’s therefore important to know ASAP if even a single key is
lost, so you can generate a replacement before more keys are lost.
• New security threats: Glacier may contain weaknesses which are currently undiscovered –
perhaps related to attacks which are not part of the current security landscape.
• Bit rot (https://en.wikipedia.org/wiki/Software_rot): The Withdrawal Protocol depends on the
availability of certain software (including not just the applications themselves, but also software
libraries those applications depend on), plus hardware and networks that are compatible with that
software. If your funds are in storage for a long time, the withdrawal tools may become obsolete
and no longer function.
We recommend the Maintenance Protocol be executed six months after the initial deposit into cold
storage, and annually thereafter.
1. Execute the Viewing Protocol to view the balance of the cold storage address and ensure that it
is as expected.
2. Check for Glacier security upgrades
a. Access the latest full release of Glacier (not just the protocol document) at https://
github.com/GlacierProtocol/GlacierProtocol/releases (https://github.com/GlacierProtocol/
GlacierProtocol/releases).
b. Open the protocol document (Glacier.pdf) within the ZIP file.
65/78

c. In Appendix E, locate release notes for all versions since the last time you executed the
Maintenance Protocol (or if it’s the first time, since the Glacier version specified on your
Cold Storage Information Page ).
d. See whether any of those releases recommend any security upgrades. (Any
recommendations are prominently mentioned at the top of the notes for each version.)
e. Whether or not you decide to upgrade, review the errata for the version of Glacier you are
using at https://github.com/GlacierProtocol/GlacierProtocol/releases (https://github.com/
GlacierProtocol/GlacierProtocol/releases).
3. Have each Cold Storage Information Packet visually inspected (either by you, or the signatory
that has it in custody):
a. Verify the packet is in its expected location.
b. Verify the packet’s location is secured as expected (any locks in working order, etc.)
c. Verify the packet is in good physical condition.
d. Verify the tamper-resistant seals appear to be intact.
4. Execute the Withdrawal Protocol for a small test amount.
5. Create a reminder for yourself in one year to execute the Maintenance Protocol again. (If you don’t
have a reminder system you trust, find one on the web.)
66/78

7. Extend Glacier
67/78

7.1. Extend Glacier securityGlacier is designed to provide strong protection for almost everyone – even those storing many millions
of dollars.
However, it is not designed to provide adequate protection for truly exceptional circumstances, such as a
targeted attack/surveillance effort (electronic or physical) by a well-resourced criminal organization. This
appendix briefly outlines additional measures one might consider if further security were needed above
and beyond those in the formal Glacier protocol.
We do not recommend considering these measures unless you feel you have a strong need. This list is
neither complete nor are the practices cost-effective for almost any circumstances. In addition,
implementing these measures incorrectly may decrease security rather than increase it.
Digital software security• Verify GnuPG installation: When downloading a new copy of GnuPG on the setup computer, one
would ideally also verify the integrity of the download using the signed checksum. This requires
having a pre-existing trusted installation of GnuPG available for verifying the checksum signature.
• Cross-network checksum sourcing: Using two different computers on two different networks,
obtain all the software checksums from the Internet and verify they are identical, to reduce the
risk that the checksums are being compromised by a man-in-the-middle attack.
• Quarantined checksum verification: Verify all USB checksums on the quarantined computers to
eliminate any risk that software was altered between checksum verification on the Setup
Computers and when the USB is used in the quarantined environment. The only reason Glacier
doesn’t currently do this is because the process of verifying the App USB checksums happens as
part of Ubuntu’s apt-get application, which requires network connectivity. It can be done by hand
without apt-get, but it’s significantly more involved and so was not included in the protocol.
• Greater differentiation of quarantined environments: Instead of simply using different hardware
in each quarantined environment, use different software (including a non-Linux-derived OS and a
different Bitcoin wallet), different smartphones (and different smartphone software, i.e. QR code
readers). Different software stacks eliminate the risk that a software bug or vulnerability may
generate a flawed key. See the design document for details on why this risk is small enough to
justify leaving it unaddressed in the formal protocol.
• Dedicated pair of environments for each private key: Use extra environments such that each
environment only touches one key both when generating keys and signing transactions. Expand
the definition of “environment” to include the physical location in which Glacier is executed. This
way, compromising one environment will only compromise one key.
68/78

• Deposit transaction verification: If depositing bitcoins out of self-managed storage, don’t
immediately send a transaction directly from one’s own wallet software. Instead, first export a raw
signed transaction, and use a service like Blockr to verify the transaction is actually sending the
funds to the correct address.
• Avoid software random number generators: Use a hardware random number generator (https://
en.wikipedia.org/wiki/Comparison_of_hardware_random_number_generators) instead.
Side channel security• Faraday cage: Use a Faraday cage (https://en.wikipedia.org/wiki/Faraday_cage) to protect against
electromagnetic side channels (example (https://www.usenix.org/legacy/event/sec09/tech/
full_papers/vuagnoux.pdf)). Faraday cages can be self-built (https://www.thesurvivalistblog.net/
build-your-own-faraday-cage-heres-how/) or professionally built (https://www.faradaycages.com/
server-rooms).
• No QR codes: Reading and relaying QR codes to a printer requires a networked device, such as a
smartphone, which could potentially receive data from side channels. Instead of using QR codes,
copy all redemption scripts and transactions by hand, and keep all nearby smartphones powered
off and in Faraday bags through protocol execution. Note that transcription of redeem scripts and
transactions is not only a painstakingly long process, but dangerously vulnerable to human error:
any mistakes in the initial transcription & storage of the redemption script will cause all funds to
be lost.
Hardware security• Purchase factory-new Setup Computers: Don’t use existing computers for your Setup Computers.
Purchase them factory-new, and never use them on the same network (to reduce the risk of
infection by identical malware).
• Use firmware-protected USBs: Some USBs have extra features to protect against malware
targeting their firmware (e.g. BadUSB (https://arstechnica.com/information-technology/2014/07/
this-thumbdrive-hacks-computers-badusb-exploit-makes-devices-turn-evil/) or Psychson (https://
github.com/brandonlw/Psychson)). Examples include Kanguru drives (https://www.kanguru.com/
secure-storage/defender-secure-flash-drives.shtml) and IronKey drives (http://www.ironkey.com/
en-US/encrypted-storage-drives/250-basic.html).
• Purchase a factory-new printer: Printers can have malware, which could conceivably interfere
with printing the hardcopy of the Glacier document. Use a new printer for printing the Glacier
document. Choose one without wireless capabilities.
• Purchase non-recommended equipment: Don’t purchase any of the suggested equipment linked
in this document – if Glacier achieves widespread adoption, that particular equipment may be
69/78

targeted for sabotage to undermine the protocol (e.g. loaded dice, malware pre-installed on
computers, etc.) Select your own comparable equipment from different manufacturers.
• Purchase from stores: Buy all equipment from stores, to reduce the risk it will be tampered with
before it is delivered to you (https://arstechnica.com/tech-policy/2014/05/photos-of-an-nsa-
upgrade-factory-show-cisco-router-getting-implant/). Don’t choose the stores nearest your home
or office. Don’t leave the equipment unattended until you are done using it.
• Improved tamper-evident seals on laptops: After you are done using the laptop, paint over the
hinge joints and cover screws with glitter nail polish and take a picture. The randomness of the
glitter is difficult to recreate, so if the laptop is tampered with, you can see it, and know not to use
it for future protocol operations.
• Secure or destroy quarantined hardware after use: If sensitive data was somehow stored on
quarantined hardware’s permanent media due to a protocol error or malware, then physical theft
of the hardware becomes a concern. Store the hardware somewhere secure such as a vault, or
physically destroy it first. Glacier is designed to only use a RAM disk, but it’s possible some data is
saved to permanent media (hard drive or USB) without us realizing it.
Paper key security• Paper key encryption: Encrypt the contents of your paper keys using BIP38 (https://github.com/
bitcoin/bips/blob/master/bip-0038.mediawiki) to further protect against physical theft. Note that
the question of how to securely store the passphrase is non-trivial. It should be unique and hard to
guess, which means it is non-trivial to remember. If you are confident you can remember it, storing
it only in your own memory will not address estate planning needs. If you record it on paper, you
need to make sure those papers are stored securely – they should not be stored with the keys,
and there should be a process for checking on them periodically to make sure they are not lost or
damaged.
• Durable storage medium: TerraSlate paper is extremely rugged, but you might also consider
laminating the paper for additional protection. You’ll need a thermal laminator (http://a.co/
cZBN1YU) and laminating pouches (http://a.co/ifISzje). An even more durable approach would be
to engrave the private keys in metal.
• High-security vaults: Store keys in high-security vaults that are more resistant to theft and
disaster. See example (http://mountainvault.net/).
• Geographically distributed storage: Store keys in distant cities for resilience against a major
disaster that wipes out all keys at once.
• Multiple fund stores: Mitigate risk by splitting funds across more than one Bitcoin address, each
secured using Glacier, and don’t keep printed keys from different store in the same place.
70/78

Personal security• Unique protocol execution site: Rather than executing Glacier at your home, office, or anywhere
else you frequent, choose a new location (e.g. a hotel) that is unlikely to have compromised or
surveillance devices present.
• Avoid location tracking: To avoid surveillance (including from adjacent rooms, via side channels
like radio waves), take steps to avoid location tracking when executing Glacier. Don’t carry a GPS-
enabled smartphone with you, don’t use credit cards for purchases, etc.
• Deliver keys by hand: Don’t use couriers or phones (https://www.cbsnews.com/news/60-minutes-
hacking-your-phone/) to send keys to trusted associates. Hand-deliver them personally or using a
trusted party.
• Conventional personal security: Home surveillance systems, bodyguards, etc.
7.2. Possible improvements toGlacierDon’t store electronic copy of ColdStorage Information PageGlacier recommends stores an electronic copy of the Cold Storage Information Page for easy copy-
pasting for subsequent deposits or withdrawals. However, this is slightly less secure & complicated –
and it’s still a good idea to check a physical copy of the Cold Storage Information Page to verify the
electronic copy hasn’t been tampered with.
Printing QR codes on the Cold Storage Information Page would be another way to avoid the need to
manually transcribe the deposits and withdrawals
No Address ReuseCurrently, Glacier reuses addresses for both depositing and withdrawing funds. As discussed in the
protocol design document (../design-doc/overview.md), this has both privacy and security implications.
This could be implemented with HD wallets, which would allow one to generate one master key and then
use new derived addresses for each deposit or change transaction. Bitcoin Core does not yet support
importing user-generated HD wallets in a straightforward way.
71/78

Avoiding address re-use would also prevent the use of a test withdrawal. Careful consideration would
need to be given as to whether there is another way to safely test funds access, perhaps using
something like the signrawtransaction Bitcoin Core RPC.
BIP39 Mnemonic SupportBIP39 (https://github.com/bitcoin/bips/blob/master/bip-0039.mediawiki) supports the creation of
private keys encoded as an English mnemonic for ease and reliability of transcription. It’s not yet
supported by Glacier because it’s not supported by Bitcoin Core.
Sign Withdrawal Transactions WithIndividual SignaturesBringing multiple private keys together in the same physical location for the Withdrawal Protocol entails
risk (they could be physically stolen). It would be good to have an option to sign the withdrawal one
transaction at a time, probably by bringing a QR-encoded physical hardcopy of the partially-signed
transaction to the storage location of each private key.
Consider Shamir’s Secret Sharing orVanilla Multisig vs. P2SH TransactionsGlacier currently uses P2SH transactions. This allows all signatories storing private keys to view the
user’s balance, because a copy of the redeem script must be kept with each private key.
Vanilla multisig transactions would address this, but it’s not clear if it’s possible to do vanilla multisig
configurations with over 3 keys (https://bitcoin.stackexchange.com/questions/23893/what-are-the-
limits-of-m-and-n-in-m-of-n-multisig-addresses). Another option is to use a single Bitcoin private key, split
into n pieces using Shamir’s Secret Sharing (https://en.wikipedia.org/wiki/Shamir%27s_Secret_Sharing),
which would not have any limitations on the number of keyholders, but would require additional
cryptographic software be integrated into Glacier.
Automate Quarantined USB creationMany of the steps for creating the Quarantined USBs could be automated in a simple script.
72/78

Security With Biased DiceAssess integration of this paper and/or this algorithm (http://pit-claudel.fr/clement/blog/generating-
uniformly-random-data-from-skewed-input-biased-coins-loaded-dice-skew-correction-and-the-von-
neumann-extractor/) so that the quality of our randomness is not vulnerable to dice bias.
Entropy Quality TestingUse an entropy test suite such as ent (http://www.fourmilab.ch/random/) to verify the quality of
generated entropy before it’s used.
Bitcoin Core VersionPinning Currently, we download Bitcoin Core on to the Quarantined App USBs via the Ubuntu Package
archive. However, because Bitcoin is a privately-managed archive, it only hosts the latest release, rather
than all previous versions. This prevents us from pinning the protocol to use a specific release
(desireable for ongoing compatibility).
7.3. Ecosystem improvementsThe Glacier protocol is lengthy and complex because the tools for high-security cold storage do not
exist. This appendix briefly outlines some of the tool functionality that would address this gap. For
additional technical details, see the Glacier design document.
Ideally, the Bitcoin community (and other cryptocurrency communities) will create these tools as soon as
possible and render Glacier obsolete. We invite inquiry and consultation by others interested in
developing these tools.
Cold Storage Hardware Wallets• Function like conventional hardware wallets, but eternally quarantined (no wireless or wired
connections)
• I/O
◦ Keyboard for entering data (key recovery, user entropy for key generation)
◦ Camera for reading QR codes (for unsigned transactions)
◦ Screen for displaying data, including QR codes (for complex data such as signed
transactions)
• Generate keys from user-provided entropy (ideally two combined sources)
• Support for BIP39 and HD keys
73/78

• Multisig support
◦ Each wallet storing one key is probably the way to go
◦ Ability to for each device to add one single signature to a transaction, so only one key
needs to be stored on a given device
◦ Compatibility with HD keys
• Verifiability
◦ All deterministic algorithms (for key generation, transaction generation, etc.)
◦ Multiple wallet products on the market which use as many different hardware components
as possible (to minimize the possibility of a common flaw / vulnerability)
• Simple to use
• Display steps user through security steps – how to safely generate their entropy, double-checking
that addresses are correct, verifying duplicate algorithm results on an alternate device, etc.
• Optional side channel protection
◦ Partner with a company that manufactures some sort of Faraday glove box, and market it
to customers who have extra-high security concerns
Bitcoin Core improvementsUntil robust cold storage hardware wallets are created, improvements in Bitcoin Core could go a long
way towards improving and simplifying Glacier, including reducing the necessary complexity of
GlacierScript.
• Add support for importing and using BIP32 HD keys.
• Generate keys based on raw user entropy so that key generation can be deterministically checked
by a second quarantine computer.
• BIP39 key generation support
◦ Promotes security through ease of use, and reduces risk of transcription errors
74/78

8. Contribute
75/78
8.1. LicenseAll the documents are distributed under the Creative Commons Attribution-ShareAlike 4.0 International
License (https://creativecommons.org/licenses/by-sa/4.0/).
The GlacierScript software is distributed under the MIT license (https://opensource.org/licenses/MIT).
8.2. AcknowledgmentsThe following individuals have offered feedback or other contributions that were incorporated into
Glacier:
• Andrew C.
• Julian Borrey
• Kristov Atlas
• Lasse Birk Olesen
• /u/dooglus
76/78

9. Designdocuments
77/78

9.1. Design documentIf you want to learn more about the security considerations for Glacier, check the Glacier design
document:
• v0.9 Beta (latest version)
• v0.1 Alpha
78/78