The Sealed Attic System with DuPontTM Tyvek …philwrites.com/AW_Manual_12_1_all_LR.pdfThe Sealed...
32
The Sealed Attic System with DuPont TM Tyvek ® AtticWrap TM INSTALLATION MANUAL
Transcript of The Sealed Attic System with DuPontTM Tyvek …philwrites.com/AW_Manual_12_1_all_LR.pdfThe Sealed...

The Sealed Attic System with DuPontTM Tyvek® AtticWrapTM INSTALLATION MANUAL

DuPontTM Tyvek® AtticWrapTM RevealedThe sealed attic vented roof system uses DuPontTM Tyvek® AtticWrapTM airtight membrane to establish an air barrier beneath the roof sheathing.
The blue arrows indicate the path air follows from eave to ridge between the layer of Tyvek® AtticWrapTM and the roof sheathing.
Functioning as an air barrier, Tyvek® AtticWrapTM helps prevent interior conditioned air from leaking into the attic by blocking air loss from the attic.
Tyvek® AtticWrapTM is vapor permeable so water vapor that reaches the attic from inside the house can diffuse through it and into the vent channels.

CONTENTS
Introduction 2
Science Behind Sealed Attic Vented Roof System 3
Benefits 5
Installation Overview 6
Safety 7
Installation Methods
Furring Method 8
Rafter Cap Method 12
Drape Method 16
Common Details 20
Glossary 23
Frequently Asked Questions 24
Product Specifications 26
DuPontTM Tyvek® AtticWrapTM Installation Manual

At DuPont, we use science to develop innovative products
that work together to create healthier, safer, more attractive
and more environmentally-sustainable buildings and homes.
With more than 75 research and development facilities
around the world, we’re focused on creating revolutionary
new products to help today’s builders, architects and
contractors create structures that are stronger, safer,
more comfortable and longer-lasting. From materials that
can help a room withstand storm and blast impacts, to
improved glass performance, durable wood alternatives and
breathable barriers to seal the building envelope against
moisture, mold and air penetration, DuPont has a blueprint
for the future of construction.
DuPontTM Tyvek® is a true miracle of science. Made from
very fine, high-density polyethylene fibers, DuPontTM Tyvek®
offers all the best characteristics of paper, film and fabric in
one material. It has provided new dimensions of protection,
security and safety for a wide variety of industries.
DuPont continues to invent new products and techniques.
Now, the DuPontTM Tyvek® weatherization systems products
include Tyvek® HomeWrap®, Tyvek® CommercialWrap®,
Tyvek® StuccoWrap®, Tyvek® DrainWrapTM, DuPontTM
FlexWrapTM, DuPontTM StraightFlashTM, DuPontTM Tyvek® Tape,
DuPontTM Tyvek® Fasteners, and our newest miracles of
science, Tyvek® AtticWrapTM and Tyvek® ThermaWrapTM.
Our specialist network is a national group of over 160
highly-trained field representatives available to assist
customers with their installations. From the latest updates
on building codes to on-site consulting and training, your
local DuPontTM Tyvek® Specialist will help make sure each
installation is done right.
BUILDING TODAY FOR A BETTER TOMORROW
Tyvek® AtticWrap™ allows water vapor through while it repels bulk water. Above, the release liner is pulled back to reveal the integrated adhesive strip; at left, Tyvek® AtticWrap™
is positioned on a roof prior to fastening.
3

This installation guide contains information on
the function, use and installation of the DuPontTM
Tyvek® AtticWrapTM membrane. Tyvek®
AtticWrapTM, along with other DuPontTM Tyvek®
products, can help improve the durability and
energy effi ciency of buildings by helping to control
heat, moisture and air movement through the
building envelope.
Modern North American attic spaces are vented
with exterior air. The exterior ventilation air is
intended to dilute moisture vapor entering the
attic through air leaks from inside the building.
This helps reduce the chance of the moisture
condensing on the roof sheathing and framing,
which can lead to mold and rot.
However, introducing exterior ventilation air into
an attic can have some unintended negative
side effects. Vent air can shortcut and circulate
through insulation such as fi berglass and reduce
its effectiveness through a process called “wind
wash.” Vent air can also accelerate the leakage
of conditioned air from inside the building. And
in humid climates, external vent air can introduce
moisture into the roof structure.
Ventilation space between the membrane and the roof sheathing provides continuous eave-to-ridge air ventilation
Tyvek® AtticWrap™ establishes an air barrier over the roof framing and eaves, and ties into Tyvek® HomeWrap® on the walls to create a whole-house weather seal
Tyvek® AtticWrap™ cuts off the stack effect, which helps prevent interior-conditioned air from escaping
Outside air travelsthrough ceiling insulation,reducing the effective R-value
Roof ventilation depends on hot air rising, but the draw pulls conditioned air through holes in the ceiling and partition walls
Air escaping from inside the building introduces moisture into the roof structure, where it can condense on attic surfaces and lead to mold and rot
Tyvek® AtticWrap™ helps keep moisture introduced by ventilating air away from the roof structure and ceiling insulation
SEALED ATTIC VENTED ROOF SYSTEM
3

The sealed attic vented roof system establishes
an air barrier beneath the roof sheathing using
DuPontTM Tyvek® AtticWrapTM airtight membrane.
Tyvek® AtticWrapTM is applied over the roof
rafters to create vent channels beneath the
roof sheathing. This space provides continuous
eave-to-ridge air ventilation to cool the roofi ng
material and to help carry away moisture vapor.
Functioning as an air barrier, Tyvek® AtticWrapTM
helps prevent interior conditioned air from leaking
into the attic by blocking air loss from the attic.
Tyvek® AtticWrapTM is moisture permeable so
moisture vapor that reaches the attic from inside
the house can diffuse through it and into the
vent channels.
Tyvek® AtticWrapTM is also water resistant and
serves as a secondary drainage plane for the
roof. In the event water leaks through the roofi ng
material or fl ashings due to ice damming, damage,
wear or improper installation, or from water driven
up through the eave vents during a storm, Tyvek®
AtticWrapTM channels water through the vent space
down to the eaves where it can drain. Tyvek®
AtticWrapTM helps provide back-up water intrusion
protection in case of roof leaks, keeping the attic
space and the inside of the home safe and dry.
Tyvek® AtticWrap™ provides a secondary drainage plane for the roof. Moisture vapor that migrates into the attic diffuses through Tyvek® AtticWrap™ and into the vent channels where it is carried away by exterior ventilation air. The airtight attic creates a dry, semi-conditioned space.
Moisture diffuses into ventilation space
Conditioned Air
Metalized surface
Wind
Tyvek® AtticWrap™
serves as a secondary drainage plane
Sealed soffi ts and rafter bays
Air channel
Conditioned Air
Semi-conditioned air is kept within attic space
The metalized surface on Tyvek® AtticWrap™ helps reduce heat build up in the attic. Air channels beneath the sheathing cools the roofi ng materials. The sealed rafter bays drain roof leaks and wrapped eaves resist water intrusion in high-wind areas.
4 5
SEALED ATTIC VENTED ROOF SYSTEM continued

THE SEALED ATTIC SYSTEM WITH DUPONTTM TYVEK® ATTICWRAPTM PROVIDES A WEALTH OF BENEFITS
Helps cut overall cooling and heating costs
Radiant heat gain in the attic during summer
adds to cooling costs. The underside of DuPontTM
Tyvek® AtticWrapTM is layered with a radiantly
reflective metalized material and the low
emissivity of the surface reduces heat gain and
keeps the attic cooler. During the heating season,
the radiant layer reflects heat back into the attic
and reduces heat loss.
Regulates attic temperature
An airtight attic seals in warm air during the
winter. In the summer an airtight attic stays
cooler because the cooling ventilation air
circulates directly beneath the roof sheathing,
while the Tyvek® AtticWrapTM reflects the heat
away from the attic. Tyvek® AtticWrapTM also
helps prevent insect pests, dust and pollen from
entering the attic while still permitting moisture
vapor to pass through and exit. The result is a
semi-conditioned attic space suitable for storage
without concern of contamination.
Reduces energy use
Because Tyvek® AtticWrapTM creates an
airtight attic, conditioned interior air is less likely
to leak through the ceiling from the living space
and into the attic. Air conditioning, heating
equipment and ductwork installed in a sealed
attic lose less energy as well.
Improves insulation performance
When conventional ventilation air moves
through attic shortcuts and around attic insulation,
it reduces the insulation’s effectiveness and robs
energy from the building. But a sealed attic helps
stop adverse effects by eliminating air movement,
resulting in improved insulation performance.
Tyvek® AtticWrapTM protects the installed R-value
of attic insulation.
Enhances roof ventilation air flow
Tyvek® AtticWrapTM keeps insulation from
blocking off the ventilation air channel, which
allows air to flow freely between the roof
sheathing and membrane. The ventilation air
dissipates moisture vapor that passes through
Tyvek® AtticWrapTM as it cools the roof.
Channels moisture vapor Moisture vapor passes safely through Tyvek®
AtticWrapTM, so vapor that enters the attic from
inside the living space can diffuse through the
membrane and into the vent channel where it
mixes with ventilation air and is carried away.
Acts as a secondary weather barrier Roofs can leak due to ice damming, storm
damage, improper or damaged flashings, or
severe weather. Tyvek® AtticWrapTM collects
leaking water and channels it to the eaves where
it can drain outside the building. In coastal, high
wind and hurricane prone areas where rain can
penetrate the attic through the soffits, Tyvek®
AtticWrapTM blocks water infiltration into the
building and allows it to drain safely out
of the house.
Reduces chance of ice damming Ice dams form when snow on the roof melts
and refreezes near the edge of the eaves. This
can lead to roof leaks. Tyvek® AtticWrapTM helps
reduce ice dams by keeping the roof surface
cold in two ways. First, it creates an airtight attic
that prevents warm air from reaching the roof
sheathing where it would accelerate melting.
Second, the air channel created by Tyvek®
AtticWrapTM directs ventilation air directly
beneath the roof, helping to keep it cold.
Helps protect asphalt shingles
The air channel created by Tyvek® AtticWrapTM
directs ventilation air directly beneath the roof
sheathing. The ventilation air moves faster in the
air channel than it does in a conventionally vented
roof. Therefore, the moving air cools the roof
sheathing and shingles, helping to protect the
whole roof system.
Moisture diffuses into ventilation space
4 5

6 7
OVERVIEW OF THREE PRIMARY DUPONTTM TYVEK® ATTICWRAPTM INSTALLATION METHODS
There are three basic installation methods
for applying DuPontTM Tyvek® AtticWrapTM:
the Furring, the Rafter Cap and the Drape
methods. With each method, DuPontTM
Tyvek® AtticWrapTM is applied over the roof
rafters or trusses before the roof sheathing
is installed. Each method creates vent
channels beneath the roof sheathing
between the rafters or trusses. Air flowing
through the vent channels cools the roof
surface and carries away moisture vapor
that diffuses through the membrane. The
vent channels also act as “gutters” to
collect water that leaks through the roofing
or flashings and to drain it out through
the soffits. Each Tyvek® AtticWrapTM
installation method is described separately:
Furring method, pp. 8-11; Rafter Cap
method, pp. 12-15; and Drape method pp.
16-20. After reviewing all three methods,
choose one that best suits your project.
In some cases, more than one installation
method will be appropriate and can be
used on the same roof.
Eave Details for Venting
To create a sealed airtight attic, DuPontTM
Tyvek® AtticWrapTM must wrap around
the eaves of the roof and be sealed to
the housewrap such as DuPontTM Tyvek®
HomeWrapTM. There are numerous
strategies you can use to seal Tyvek®
AtticWrapTM at the eaves and to the
housewrap. With some strategies the
Tyvek® AtticWrapTM membrane wraps
around the eaves, and with others, the
membrane is slit and folded between rafter
tails or terminated at the exterior wall line.
Each detail is constructed to maintain a
free flow of ventilation air and to drain
water as well. The choice of which detail
to use depends on the type of soffit, facia
or eave vent used on the building.
The Tyvek® AtticWrapTM eave installation
details are grouped together on the pages
following each installation method. Many
eave details have alternates showing rafter
or truss tails with and without subfacias.
Plan the air intake as well as water
drainage when choosing an installation
detail. It’s important to permit a free-flow
of ventilation air entering along the eave
edge or soffit and into the vent channels.
Some less common eave detail designs are
included near the end of the guide.
FURRING METHOD
RAFTER CAP METHOD
DRAPE METHOD

While we have tried to include DuPontTM
Tyvek® AtticWrapTM sealing and eave venting
details for most common roof configurations
and obstructions, not every possibility is
addressed. When constructing Tyvek®
AtticWrapTM details not described here, it
is important to provide a clear ventilation
air channel, to seal the membrane at
penetrations and edges keeping it watertight
and airtight, and to maintain the slope of the
membrane to prevent water from ponding.
Tyvek® AtticWrapTM product informationTyvek® AtticWrapTM comes in rolls 4 ft.
11 in. wide by 164 feet long with an
integrated adhesive strip along the top edge.
Successive sheets are overlapped 6 inches.
One roll of Tyvek® AtticWrapTM covers about
7 squares (700 sq. ft.) of roof area when
using the Furring method of installation, and
6 squares (600 sq. ft.) using the Rafter Cap
or Drape methods.
General installation notesTyvek® AtticWrapTM is usually installed
horizontally across rafters or trusses but
can be installed vertically as well. Install roof
sheathing after each horizontal course of
Tyvek® AtticWrapTM is applied. The sheathing
acts as a work and walk surface to apply
successive Tyvek® AtticWrapTM courses from.
The optimal installation crew size is 2 to 3
workers.
Full rolls of Tyvek® AtticWrapTM are bulky to
work with. Precut Tyvek® AtticWrapTM on the
ground to make handling easier on the roof.
Cut lengths of Tyvek® AtticWrapTM 12 in.
longer than the roof length when using
the Furring installation method. Add an
additional 3 in. per rafter or truss bay when
using the Rafter Cap or Drape methods.
For the purposes of this installation guide,
we will use the terms “rafter” to refer to
both rafters and fabricated roof trusses.
In some instances we will refer to “truss”
where trussed roof installation procedures
differ from those roofs framed with rafters.
Whenever you’re working on the roof, you are at high-risk. Falls can
result in serious injury, so it’s essential that you adhere to high-
safety standards while you are installing Tyvek® AtticWrapTM. For
your own safety and the safety of other workers, you should use fall
protection suitable for the jobsite conditions.
To find out more about a fall protection plan, refer to the OSHA
safety regulations 29 CFR1926. Other good sources for fall protection
guidance are the NAHB-OSHA Jobsite Safety Handbook and the
NAHB-OSHA Scaffold Safety Handbook.
Please remember that Tyvek® AtticWrapTM is a durable membrane,
but it is not intended to be walked or leaned on. It is not designed
to support your weight between rafters.
WHEN WORKING ON A ROOF, PLEASE FOLLOW THESE GUIDELINES:
•Always ask “What if” in every situation that is potentially unsafe.
•Do not walk on Tyvek® AtticWrapTM or leave it rolled out on floors so
others may walk on it. This represents a slipping hazard.
•Do not put your weight on the membrane once it’s installed. It is
not designed to support your weight.
•Take the time to evaluate each job for the safest and most expedient
way to access the elevated work areas.
•Your fall protection plan will help you identify and avoid hazards on
the site. Your regional OSHA office or local builder’s association can
help you draft your plan. The person developing your plan needs to
know that:
•Lifelines and lanyards must have no less than
5000 lbs. breaking strength.
•The anchorage for those lifelines must be able to
support 5000 lbs.
•The whole system of harness, lanyard, lifeline and anchor
must be strong enough to withstand twice the impact energy
of a worker free-falling a distance of 6 ft., or the free-fall
distance permitted by the system, whichever is less.
•Use a complete rope and harness system made by a reputable
manufacturer and follow the instructions carefully.
•There are more than two dozen types of scaffolds mentioned in
OSHA’s safety rules for construction. Read the instructions carefully.
•If you are using ladders, be sure to secure them at the top and
bottom. Ladders need to extend 3 ft. above the landing to provide a
safe handhold when getting on or off.
•Remember, there is no substitute for your own alertness and
common sense.
ROOF SAFETY
6 7

Air fl ow
Tyvek® AtticWrap™
Furring strip
The Furring method is the simplest installation method
for installing DuPontTM Tyvek® AtticWrapTM. Air vent
channels are created between the roof sheathing and the
Tyvek® AtticWrapTM membrane by applying furring strips
(strips of wood 1 in. or thicker by 11/2 in. or wider) on top
of each rafter over the taut stretched membrane. Vent
space continuity is easy to achieve at the eave edges,
hips, valleys and ridges using this method.
Installers should account for the extra thickness that the
furring adds to the roof when planning facia boards, rake
boards and other roof trim.
Contractors building in high wind and seismic zones
should check with an engineer or local building
department before using the Furring method. The furring
strips may diminish the rigidity of the roof sheathing
diaphragm. The Rafter Cap or Drape installation methods
may be better choices for these locales.
The Furring method is compatible with any insulation type
or installation method including direct contact.
Preparation: Select the DuPontTM Tyvek® AtticWrapTM
eave detail you wish to use and install the required
framing, including subfacias, wall nailers, soffi t blocking
and rafter blocking. Complete all framing work before
installing Tyvek® AtticWrapTM.
Apply the eave course of Tyvek® AtticWrapTM: Snap a chalk line parallel to the eave edge
approximately 12 in. to 16 in. up from the rafter tails.
Roll out a section of Tyvek® AtticWrapTM with the
integrated
adhesive strip at
the top, aligning
the edge of
the membrane
with the chalk
line. Pull the
membrane taut
and staple it to
the tops of the
rafters across
the entire length
of the roof.
Roll out the next course of Tyvek® AtticWrapTM: Align the bottom edge of the roll with the dotted
line on the top edge of the course below. Staple the
membrane taut
to the tops of
rafters, but be
sure to leave
the bottom
6 in. loose for
sealing. Lift the
bottom edge of
overlying course
and peel the
release liner
from the
integrated
adhesive strip
on the course
beneath.
Press the
layers of Tyvek®
AtticWrapTM
together along
the integrated
adhesive strip to
create an airtight
seal.
Align Tyvek® AtticWrapTM to chalk line and fasten to the tops of the rafters
DUPONTTM TYVEK® ATTICWRAPTM INSTALLATION USING FURRING METHOD
STEP ONE
Remove release liner, press sheets together
Align bottom edge with dotted overlap line
STEP TWO
8 9
WRAP TIP Sometimes the integrated adhesive strip doesn’t bond completely in cold weather. After installation is complete, check joints from inside the attic and press loose areas to ensure a tight seal.

Install furring strips over Tyvek® AtticWrapTM: Next, apply a furring strip on top of each rafter
starting at the end of the rafter tail and extending
up to the dotted “overlap” line along the top of
the Tyvek® AtticWrapTM. Furring strips should be a
minimum of 1 in. thick by a minimum of 11/2 in. wide.
Fasten each
furring strip
with 10d or
longer common
nails spaced
approximately
12 in. apart or
according to the
local building
code nailing
schedule.
Install roof sheathing over furring strips: Snap a chalk line across the furring strips as a guide
line for the top
edge of the roof
sheathing.
Install roof
sheathing
following the
local building
code nailing
schedule.
Install successive courses of Tyvek® AtticWrapTM, furring strips and roof sheathing: Install the next course of Tyvek® AtticWrapTM across
the rafters, again aligning it with the dotted line on
the course
below. Seal
the lower edge
to the top of
the course
below using
the integrated
adhesive strip.
Install a furring
strip on each rafter up to the integrated adhesive
strip of the overlying course of Tyvek® AtticWrapTM.
Install roof sheathing over furring strips. Follow the
same sequence until you reach the ridge.
Wrap Tyvek® AtticWrapTM over the ridge: Wrap the top course of Tyvek® AtticWrapTM over the
ridge and onto the other side. Seal the
overlapping
edge with
DuPontTM Tyvek®
Tape. If the
edge of the
membrane
overlaps less
than 10 in. over
the ridge, apply
an additional
sheet of Tyvek®
AtticWrapTM at
least 20 in. wide
over the ridge
to protect this
vulnerable area.
Cut furring strips to top of ridge and sheath: Cut and install furring strips so that they end within
2 in. of the center of ridge board. Rip sheathing to
leave an air slot
at least 11/2 in.
wide at the ridge
to exhaust the
vent channels
between Tyvek®
AtticWrapTM
and the roof
sheathing. Ridge
vent caps the
slot and permits
ventilation air to
exhaust.
Nail furring strips over rafters
STEP THREE
Nail roof sheathing over furring strips
STEP FOUR
STEP FIVE
Install successive courses of Tyvek® AtticWrapTM
Install sheathing with air slot at least 11/2 in. wide at ridge
STEP SIX
Fold Tyvek® AtticWrapTM over the ridge and over the membrane on the other side, then tape overlap
STEP SEVEN
8 9

FURRING INSTALLATION METHOD HIP AND VALLEY DETAILS
Install valley liner:Line the valley from the top of ridge to the eave
with a half
width sheet of
DuPontTM Tyvek®
AtticWrapTM.
Staple the
membrane taut
into the valley
center.
Cross-lap Tyvek® AtticWrapTM courses:Extend each Tyvek® AtticWrapTM course through the
valley center
and onto the
opposite roof
plane by at least
12 in. Where
the courses
overlap, seal
the top course
of Tyvek®
AtticWrapTM
to the bottom
course with
DuPontTM Tyvek®
Tape.
Attach furring strips to valley jack rafters:Cut and install furring strips over the valley jack
rafters ending
them 1 in. short
of the valley
center. This
leaves a 2 in.
air vent channel
in the valley.
Sheath over the
furring and the
2 in. space.
Cross-lap Tyvek® AtticWrapTM over the hip:Extend the sheets of Tyvek® AtticWrapTM from
adjacent roof
planes so that
they overlap
at the hip by
a minimum of
12 in. Tape the
overlap joint
with DuPontTM
Tyvek® Tape.
Finish the
cross-lap from
both sides
before installing
furring strips.
Install furring strips over hip jack rafters and sheathe:Cut and install furring strips on top of each jack
rafter up to the hip rafter. Furring strips should
extend to within 1 in. of the hip rafter. Cut and install
roof sheathing leaving a gap of at least 11/2 in. along
the hip for an air slot to exhaust the vent channels.
Ridge vent caps the hip slot and permits ventilation
air to exhaust. It may be necessary to apply blocking
to the tail of
the hip rafter
to support the
edge of the
roof sheathing.
Blocks may also
be installed to
the hip rafter
between jacks
to support the
edge of the
sheathing.
Line valley with half width sheet of Tyvek® AtticWrapTM
VALLEY HIP
FURRING INSTALLATION METHOD continued
STEP ONE
STEP THREE
Cross-lap Tyvek® AtticWrapTM courses
STEP TWO
STEP ONE
Cross-lap Tyvek® AtticWrapTM courses over hip
STEP TWO
Fasten furring strips over hip jacks
Nail furring strips over valley jack rafters
10 11

INTAKE VENT AND EAVE SEALING DETAILS - FURRING METHOD
Install blocking and nailers before wrapping the eaves with
DuPontTM Tyvek® AtticWrapTM. Subfacias may be installed before
or after Tyvek® AtticWrapTM is applied. Wrap the membrane
around the eave and back to the wall. Lap Tyvek® AtticWrapTM
over the housewrap by 6 in. and seal the joint with DuPontTM
Tyvek® Tape.
The Venting Drip Edge Eave details use specialty slotted drip edge as an air intake
VENTING DRIP EDGE EAVE DETAIL
Detail 2 uses a perforated soffi t or any soffi t vent product as an air intake
SOFFIT VENTED EAVE DETAIL 2
Detail 1 uses a continuous soffi t vent immediately behind the facia boardas an air intake
SOFFIT VENTED EAVE DETAIL 1
Wrap Tyvek® AtticWrapTM around the rafter tails and back to the wall
Venting drip edge
WRAP TIP Full rolls of Tyvek® AtticWrapTM are bulky to work with. Precut Tyvek® AtticWrapTM on the ground to make handling easier on the roof. Cut lengths of Tyvek® AtticWrapTM 12 in. longer than the roof length when using the Furring installation method. Add an additional 3 in. per rafter or truss bay when using the Rafter Cap or Drape methods.
Leave 11/2 in. space between facia and sheathing
Wrap membrane over rafter, attach to blocking
DuPontTM Tyvek® Tape DuPontTM Tyvek® TapeWrap membrane over rafter and subfacia, attach to nailer
Facia
Wrap membrane over rafter, attach to blockingContinuous soffi t vent
5/4 in. x 2 in. spacer
Facia
5/4 in. x 2 in. spacer
Continuous soffi t vent
DuPontTM Tyvek® Tape DuPontTM Tyvek® TapeWrap membrane over rafter and subfacia, attach to nailer
Facia
Continuous ventilated soffi t
Attach 5/4 in. x 2 in. spacers at rafter tail and along blocking
DuPontTM Tyvek® Tape
Wrap membrane over rafter, attach to blocking
Standard drip edge Facia
Continuous ventilated soffi t
Attach 5/4 in. x 2 in. spacersat rafter tails and blocking
DuPontTM Tyvek® Tape
Standard drip edge
Wrap membrane over rafter and subfacia, attach to nailer
Blocking
Blocking
Blocking
Solid soffi t
Nailer
Solid soffi t
Nailer
Nailer
Solid soffi t
Solid soffi t
Venting drip edge
Leave 11/2 in. space between facia and sheathing
Standard drip edge
Standard drip edge
10 11

The Rafter Cap method uses “U” shaped plastic
channels designed to fi t tight over the top of rafters. DuPontTM RafterCap creates air vent channels by holding
Tyvek® AtticWrapTM taut between the rafters about 11/2 in.
below the roof sheathing. Tyvek® AtticWrapTM wrinkles and
bunches where the surface plane of the roof changes at
rafter tails, hips, valleys and ridges. Extra care must taken
when detailing the membrane at these areas to maintain
open vent channels.
The Rafter Cap method can be combined with the Drape
method during installation.
The Rafter Cap method is compatible with any type of
insulation, including direct contact, provided the Tyvek®
AtticWrapTM membrane is taut between rafters.
Preparation: Select the Tyvek® AtticWrapTM eave detail
you wish to use. Install the required framing, including
subfacias, wall nailers, soffi t blocking and rafter blocking.
Apply the eave course of Tyvek® AtticWrapTM: Pre-cut one 6 in. piece of DuPontTM RafterCap for
each rafter tail. Snap a chalk line parallel to the eave
edge approximately 12 in. to 16 in. up from the rafter
tails. Roll out about 6 ft. of Tyvek® AtticWrapTM with
the integrated adhesive strip at the top. Align the
top edge of the membrane with the chalk line and
staple the end of the sheet to the fi rst rafter. As
one worker unrolls the Tyvek® AtticWrapTM, a second
worker places a rafter cap over each rafter. Nail or
staple the rafter caps securely to the rafters. Keep
the membrane
taut between
rafters and
aligned with
the chalk line.
Do not place
the rafter caps
above the
dotted overlap
line at the top of
the sheet.
Apply a full course of Tyvek® AtticWrapTM: After completing the eaves course, begin the fi rst
full course with the bottom edge of the roll aligned
with the dotted line on the course below. Slide
a full length DuPontTM RafterCap over the Tyvek®
AtticWrapTM and rafter, centering the rafter caps
between the
“overlap”
lines printed
on Tyvek®
AtticWrapTM.
Again nail or
staple the rafter
caps to the
rafters to hold
them securely in
place.
Staple the rafter caps to the rafters
Fasten the rafter caps to the rafters
STEP ONE
STEP TWO
Rafter cap
12 13
Air fl ow
Tyvek® AtticWrap™
DUPONTTM TYVEK® ATTICWRAPTM INSTALLATION USING RAFTER CAP METHOD
DuPontTM RafterCap holds Tyvek® AtticWrapTM
taut between rafters

Seal Tyvek® AtticWrapTM layers:Lift the bottom edge of overlying course and peel
the release liner from the integrated adhesive strip
on the course
beneath. Press
the layers
of Tyvek®
AtticWrapTM
together along
the integrated
adhesive strip to
create an airtight
seal.
Install roof sheathing over rafter caps: Snap a chalk line across the rafter caps as a guide
line for the top
edge of the
roof sheathing.
Install roof
sheathing
following the
local building
code nailing
schedule.
Install successive courses of Tyvek® AtticWrapTM and roof sheathing: Install the next course of Tyvek® AtticWrapTM using
rafter caps. Align the membrane with the dotted
overlap line on the previous course. Seal the joint
between the
layers with
the integrated
adhesive strip
and cover with
roof sheathing.
Continue the
sequence until
you reach the
ridge.
Wrap Tyvek® AtticWrapTM over the ridge: Wrap the top course of Tyvek® AtticWrapTM over the
ridge and onto the other side. Seal the overlapping
edge with DuPontTM Tyvek® Tape. If the edge of the
membrane overlaps less than 10 in. over the ridge,
apply an additional sheet of Tyvek® AtticWrapTM
at least 20 in. wide over the ridge to protect this
vulnerable area. Cut and install short pieces of rafter
cap over the ridge between the rafters to prevent
loose Tyvek®
AtticWrapTM from
blocking the
vent channels.
Leave vent slot at ridge: Rip sheathing to leave an air slot at least 11/2 in. wide
at the ridge to
exhaust the
vent channels
between Tyvek®
AtticWrapTM
and the roof
sheathing.
Ridge vent
covers the slot
and permits
ventilation air to
exhaust.
Seal the layers of Tyvek® AtticWrapTM
together
Work off the roof sheathing to install successive Tyvek® AtticWrapTM courses
Fold Tyvek® AtticWrapTM over the ridge and tape overlap
Nail on sheathing ripped to provide a 11/2 in. vent slot
Install roof sheathing over rafter caps
STEP THREE
STEP FOUR
STEP FIVE
STEP SIX
STEP SEVEN
WRAP TIP If the roof pitch is greater than 5:12, install toeboards or roof staging along the roof sheathing as required by safety regulations.
12 13

FURRING INSTALLATION METHOD HIP AND VALLEY DETAILS
RAFTER CAP INSTALLATION METHOD continued
Drop valley rafter:Cut the valley rafter seat an additional 2 in. deep so
the valley rafter
rests lower.
Use a 2 in.
spacer block to
gauge the valley
jack installation.
Install Tyvek® AtticWrapTM through valley:Cross-lap the two sheets of DuPontTM Tyvek®
AtticWrapTM meeting at the valley by 12 in. minimum.
Leave enough slack in each layer to install the
DuPontTM RafterCap.
Cap jack and valley rafters:Apply a 1/8 in. to 1/4 in. strip of wood or plastic on top
of the valley rafter to hold the Tyvek® AtticWrapTM
in position and
keep the vent
space open.
Install rafter
caps over the
valley jacks
and staple any
loose Tyvek®
AtticWrapTM to
the rafters. Seal
the cross-lap
joints with
DuPontTM Tyvek®
Tape.
Drop valley rafter lower than jacks
DROPPED VALLEY RAFTER VENTING METHOD
STEP ONE
STEP TWO
Apply rafter caps over valley jacks
STEP THREE
Install Tyvek® AtticWrapTM through valley:Cross-lap the two sheets of Tyvek® AtticWrapTM
meeting at the valley by 12 in. minimum. Leave
enough slack in each layer to install rafter caps over
the jacks.
Apply rafter caps to jacks:Apply a DuPontTM RafterCap over each valley jack.
Tape the end
of the Tyvek®
AtticWrapTM
sheet to seal
the joint.
Install ValleyVent and sheath: Apply DCI Products’TM ValleyVent at the bottom of
each valley jack.
Place the thick
(three ply) end
of ValleyVent
to the valley
rafter and nail in
position. Apply
roof sheathing
over the valley
jacks and
ValleyVent.
Apply DCI Products’TM ValleyVent over jacks before installing roof sheathing
VALLEYVENT VENTING METHOD
STEP ONE
STEP TWO
STEP THREE
Apply rafter caps over valley jacks
Valleys can be vented two different ways. The valley rafter can be dropped by 2 in. to
create a vent channel or the valley jacks can be
vented laterally to an adjacent common rafter
bay by applying DCI Products’TM ValleyVent over
the lower portion of each jack.
14 15

INTAKE VENT AND EAVE SEALING DETAILS - RAFTER CAP METHOD
Cross-lap Tyvek® AtticWrapTM over hip:Cross-lap courses
of DuPontTM Tyvek®
AtticWrapTM a
minimum of 12 in.
across hip. Leave
enough slack in
each layer to install
rafter caps.
Install rafter caps: Cut and install DuPontTM RafterCap over the jack
rafters. Install short pieces of rafter caps over the
hip rafter between the jacks and inset staple any
loose Tyvek® AtticWrapTM to prevent it from blocking
the vent channel. Tape Tyvek® AtticWrapTM joints
with DuPontTM Tyvek® Tape.
Install roof sheathing:Cut and install roof sheathing up to the hip. Leave
a 11/2 in. minimum air slot between the panel edge
and the hip rafter to exhaust the vent channels.
Install blocking to hip rafter to support panel edges
if needed. Cut the bottom sheathing panels so the
lower one foot
laps over the
hip rafter for
support. Ridge
vent will cap
the vent slot
and permit
ventilation
air to exhaust.
HIP RAFTER VENTING METHOD
STEP ONE
Overlay Tyvek® AtticWrapTM from second roof plane onto the fi rst plane
STEP TWO
Apply rafter caps over jacks
STEP THREE
Install blocking and nailers before wrapping the eaves with
DuPontTM Tyvek® AtticWrapTM. Wrap the membrane around the
eave and back to the wall. Lap Tyvek® AtticWrapTM over the
housewrap by 6 in. and seal the joint with DuPontTM Tyvek®
Tape. With soffi t vented eave details, clinch staple the loose
Tyvek® AtticWrapTM between the rafter tails to prevent air
channels from being closed off.
The Venting Drip Edge Eave details use specialty slotted drip edge as an air intake
VENTING DRIP EDGE EAVE DETAIL
The Soffi t Vented Eave details use soffi t vents or perforated venting soffi t
SOFFIT VENTED EAVE DETAIL
Wrap membrane over rafter, attach to blocking
Wrap membrane over rafter and subfacia, attach to nailer
Nailer
Solid soffi t
Solid soffi t
DuPontTM Tyvek® Tape
DuPontTM Tyvek® Tape
Facia
Continuous ventilated soffi tDuPontTM Tyvek® Tape
Wrap membrane over rafter, attach to blocking
Standard drip edge
Facia
Continuous ventilated soffi t
DuPontTM Tyvek® Tape
Standard drip edge
Wrap membrane over rafter, attach to nailer
Blocking
Nailer
Blocking
Venting drip edge
Leave 11/2 in. space between facia and sheathing
Venting drip edge
Leave 11/2 in. space between facia and sheathing
Wrap Tyvek® AtticWrapTM around the rafter tails and back to the wall
Subfacias may be installed before or after Tyvek® AtticWrapTM is applied
Install subfacias after Tyvek® AtticWrap™ is applied
RAFTER CAP INSTALLATION METHOD continued
14 15

The Drape method requires no additional materials
like furring strips or rafter caps to be installed. Tyvek®
AtticWrapTM is draped between rafters leaving about a
11/2 in. space below the tops of the rafters. Using a jig,
the Drape method can be the fastest to install; however,
the eave, hip and valley details can be more time
consuming than the Furring or Rafter Cap methods.
When using the Drape method, extra care must be taken
to prevent the attic insulation from pressing against
the draped Tyvek® AtticWrapTM and closing off the vent
channels. This situation is most likely to occur along the
exterior wall plates or anywhere insulation comes into
contact with draped Tyvek® AtticWrapTM. To prevent this
problem, we recommend that rafter caps be installed
4 ft. up each rafter from the eave edge and in any other
locations where insulation may be installed in contact
with Tyvek® AtticWrapTM such as above knee walls.
Short pieces of rafter caps can also be installed over ridge
boards, hip rafters and the ends of valley and hip jacks to
prevent loose Tyvek® AtticWrapTM from blocking exhaust
vents.
Preparation: Select the Tyvek® AtticWrapTM eave detail
you wish to use and install the required framing including
subfacias, wall nailers, soffi t blocking and rafter blocking.
Complete all framing work before installing Tyvek®
AtticWrapTM.
DUPONTTM TYVEK® ATTICWRAPTM INSTALLATION USING DRAPE METHOD
Apply the eave course of Tyvek® AtticWrapTM: Snap a chalk line parallel to the eave edge
approximately 12 in. to 16 in. up from the rafter tails.
Roll out about 6 ft. of Tyvek® AtticWrapTM with the
adhesive layer at the top. Align the top edge of the
membrane with the chalk line and staple the end of
the sheet to the fi rst rafter. Drape the membrane
11/2 in. to 2 in. between rafters, using a small spacing
jig to achieve a consistent drape. Staple Tyvek®
AtticWrapTM to the top of rafters, then inset staple
the membrane to the inside edges of the rafters
11/2 in. to 2 in. down from the top. Space staples
2 in. to 3 in. apart. Inset stapling keeps the Tyvek®
AtticWrapTM
taut between
the rafters and
keeps the air
vent channels
from being
closed off when
insulation is
installed.
STEP ONE
We recommend that the fi rst two courses of
DuPontTM Tyvek® AtticWrapTM be installed with
DuPontTM RafterCaps when following the Drape
method of installation. Refer to rafter cap steps
1- 4 on pp. 12-13. The steps for installing the
Drape method using the inset stapling technique
instead of rafter caps are described in steps 1- 5 on
pp. 16-17. Where insulation comes in contact with
Tyvek® AtticWrapTM, rafter caps or inset stapling are
necessary to prevent the air vent channels from
being closed off.
16 17
Use jig to gauge drape depth
Build drape jig from blocks cut on the jobsite
2x2 13 in. long for 16 in. OC spacing,21 in. for 24 in. OC spacing
11/2 in. to 2 in. drape depth
2x3 18 in. long for 16 in. OC spacing,26 in. for 24 in. OC spacing
Air fl ow
Tyvek® AtticWrap™
drapes between rafters

Apply a full course of Tyvek® AtticWrapTM: After completing the eaves course, begin the fi rst
full course with the bottom edge of the roll aligned
with the dotted line on the course below. Staple
the top corner and roll out about 6 ft. of Tyvek®
AtticWrapTM across the rafters. Use a multi-block
spacing jig for consistent drapes between rafters
and to speed the installation process (previous page).
Staple Tyvek® AtticWrapTM to the top of the rafters
and inset staple 3 ft. in from the exterior wall. Be
sure to leave the
bottom 6 in.
loose for
sealing. Use
cap nails or
cap staples
during windy
conditions to
prevent Tyvek®
AtticWrapTM from
being blown
loose.
Seal Tyvek® AtticWrapTM layers:Lift the bottom edge of overlying course and peel
the release liner from the integrated adhesive strip
on the course
beneath. Press
the layers
of Tyvek®
AtticWrapTM
together along
the integrated
adhesive strip
to create an
airtight seal.
Install roof sheathing: Snap a chalk line across the Tyvek® AtticWrapTM as
a guide line for
the top edge
of the roof
sheathing.
Install roof
sheathing
following the
local building
code nailing
schedule.
Drape successive courses of Tyvek® AtticWrapTM: Drape the next course of Tyvek® AtticWrapTM across
the rafters. Align the membrane with the dotted
overlap line on the previous course and fasten.
Inset stapling is not necessary unless insulation will
come in direct contact with the membrane. Seal the
joint between
layers with
the integrated
adhesive strip
and cover with
roof sheathing.
Continue the
sequence up to
the ridge.
Drape Tyvek® AtticWrapTM between rafters with multi-block jig
Seal the layers of Tyvek® AtticWrapTM together
STEP THREE
Assemble a simple multi-block drape jig from jobsite scraps
3 ft. 2x2
Install successive courses of Tyvek® AtticWrapTM with multi-block drape jig
STEP FIVE
STEP FOUR
STEP TWO
Install roof sheathing over draped Tyvek® AtticWrapTM
1/2 in. plywood strip 18 in. long x 11/2 in. attached to 2x2 blocks 13 in. wide
DUPONTTM TYVEK® ATTICWRAPTM INSTALLATION USING DRAPE METHOD
16 17

Wrap Tyvek® AtticWrapTM over the ridge: Wrap the top course of Tyvek® AtticWrapTM over the
ridge and onto the other side. Seal the overlapping
edge with DuPontTM Tyvek® Tape. If the edge of the
membrane overlaps less than 10 in. over the ridge,
apply an additional sheet of Tyvek® AtticWrapTM
at least 20 in. wide over the ridge to protect this
vulnerable area.
Install short
pieces of rafter
cap over the
ridge board (see
pp. 13, step six)
or inset staple
to the ridge
board to prevent
loose Tyvek®
AtticWrapTM from
blocking the
ridge vent.
Leave vent slot at ridge: Rip sheathing to leave an air slot at least 11/2 in.
wide at the ridge to exhaust the vent channels
between Tyvek®
AtticWrapTM
and the roof
sheathing.
Ridge vent
covers the slot
and permits
ventilation air to
exhaust.
Inset staple Tyvek® AtticWrapTM to the ridgeboard and seal the overlap with DuPontTM Tyvek® Tape
Drop valley rafter:Cut the valley rafter seat an additional 2 in. deep so
the valley rafter
rests lower. Use
a 2 in. spacer
block to gauge
the valley jack
installation.
Install Tyvek® AtticWrapTM through valley:Cross-lap the two sheets of Tyvek® AtticWrapTM
meeting at the valley by 12 in. minimum. Leave
enough slack in the membranes to inset staple.
Inset staple jack and valley rafters:Apply a 1/8 in. to 1/4 in. strip of wood or plastic on
top of the valley rafter to hold Tyvek® AtticWrapTM in
position and keep the vent space open. Inset staple
the membrane to the valley jacks and valley rafter.
When available,
install pieces
of rafter caps
where the valley
jacks meet the
valley rafter.
Tape seams of
the the Tyvek®
AtticWrapTM
cross-laps with
DuPontTM Tyvek®
Tape.
Install and nail roof sheathing at ridge
STEP SEVEN
STEP SIX
DROPPED VALLEY RAFTER VENTING METHOD
STEP ONE
Valley dropped 2 in. to create air channel for venting jack bays
Apply a strip of wood or plastic on top of the valley rafter to hold Tyvek® AtticWrapTM in position and keep the vent space open
STEP TWO
STEP THREE
DRAPE INSTALLATION METHOD continued
Valleys can be vented two different ways. The valley rafter can be dropped by 2 in. to
create a vent channel or the valley jacks can be
vented laterally to an adjacent common rafter
bay by applying DCI Products’TM ValleyVent over
the lower portion of each jack.
18 19

HIP – DRAPE METHOD
Install Tyvek® AtticWrapTM through valley:Cross lap the two sheets of Tyvek® AtticWrapTM
meeting at the valley by 12 in. minimum. Leave
enough slack in the membranes to inset staple.
Inset staple Tyvek® AtticWrapTM to jacks and valley rafter:Inset staple Tyvek® AtticWrapTM to the valley rafter
and bottom 12 in. of each valley jack. When
available, install
pieces of rafter
caps where
the valley jacks
meet the valley
rafter instead of
inset stapling.
Tape the end
of the Tyvek®
AtticWrapTM
sheet to seal
the joint.
Install ValleyVent and sheath:Apply DCI Products’TM ValleyVent at the bottom of
each valley
jack. Position
the thick (three
ply) end of
ValleyVent to
the valley rafter
and fasten it in
place. Apply
roof sheathing
over the valley
jacks and
ValleyVent.
VALLEYVENT VENTING METHOD
Cross-lap Tyvek® AtticWrapTM over the hip:Cross-lap the two sheets of Tyvek® AtticWrapTM
meeting at the hip by 12 in. minimum. Leave
enough slack in the membranes to inset staple.
Inset staple Tyvek® AtticWrapTM: Inset staple Tyvek® AtticWrapTM to the hip rafter and
the top 12 in. of each jack rafter. When available,
install short
pieces of rafter
caps over the hip
rafter between
the jacks and at
the end of the
jacks instead of
inset stapling.
Seal Tyvek®
AtticWrapTM joints
with DuPontTM
Tyvek® Tape.
Install roof sheathing:Cut and install roof sheathing up to the hip. Leave
a 11/2 in. minimum air slot between the panel edge
and the hip rafter to exhaust the vent channels.
Install blocking to hip rafter to support panel edges
if needed. Cut
the bottom
sheathing
panels so the
lower one foot
laps over the
hip rafter for
support. Ridge
vent will cap
the vent slot
and permit
ventilation air to
exhaust.
STEP ONE
STEP TWO
Inset staple Tyvek® AtticWrapTM to jack rafters
STEP THREE
Apply DCI Products’TM ValleyVent at the bottom of valley jacks
STEP ONE
STEP TWO
Inset staple Tyvek® AtticWrapTM to hip and jack rafters
STEP THREE
Install sheathing at hip to create vent slot
18 19
COMMON DETAILS USING DUPONTTM TYVEK® ATTICWRAPTM
DuPontTM Tyvek® AtticWrapTM can be directly sealed
to pipes or ducts that penetrate the roof plane
and do not carry heated exhaust. Some examples
are: bathroom exhaust duct, plumbing vent
stack, evaporator condensate drain, and electrical
conduit. Cut an ‘X’ slightly larger than the pipe or
duct in Tyvek®
AtticWrapTM
where it will
penetrate the
roof. Install the
pipe or duct. Lift
the membrane
towards the roof
sheathing and
tape it to the
pipe or duct with
DuPontTM Tyvek®
Tape. This
will help drain
water around
the penetration
should the roof
leak above it.
Tyvek® AtticWrapTM should not be attached directly
to metal pipes that exhaust heating appliances.
A 4 in. wide (minimum) collar should be affi xed
to the duct just beneath the rafter plane. Screw
and seal the
collar with an
intumescent
elastomeric
fi restop sealant
to the pipe.
Tape Tyvek®
AtticWrapTM to the
metal collar to
create an air seal.
NON-HEATING PIPE AND DUCT PENETRATION
Cut an ‘X’ into Tyvek® AtticWrapTM slightly larger than the pipe or duct
Tape Tyvek® AtticWrapTM to the pipe or duct
20 21
Seal Tyvek® AtticWrapTM to the metal collar or exhaust duct
METAL HEATING EXHAUST PIPE
INTAKE VENT AND EAVE SEALING DETAILS - DRAPE METHOD
Install blocking and nailers before wrapping the eaves with
DuPontTM Tyvek® AtticWrapTM. Wrap the membrane around
the eave and back to the wall. Inset staple the membrane
taut between the rafter tails. Lap Tyvek® AtticWrapTM over the
housewrap by 6 in. and seal the joint with DuPontTM Tyvek®
Tape. With soffi t vented eave details, clinch staple the loose
Tyvek® AtticWrapTM between the rafter tails to prevent air
channels from being closed off.
The Venting Drip Edge Eave details use specialty slotted drip edge as an air intake
VENTING DRIP EDGE EAVE DETAIL
The Soffi t Vented Eave details use soffi t vents or perforated venting soffi t
SOFFIT VENTED EAVE DETAIL
Wrap membrane over rafter, attach to blocking
Nailer
Solid soffi t
Solid soffi t
DuPontTM Tyvek® Tape
DuPontTM Tyvek® Tape
Facia
Continuous ventilated soffi t
DuPontTM Tyvek® Tape
Wrap membrane over rafter, attach to blocking
Standard drip edge
Facia
Continuous ventilated soffi tDuPontTM Tyvek® Tape
Standard drip edge
Wrap membrane over rafter, attach to nailer
Blocking
Nailer
Blocking
Venting drip edge
Leave 11/2 in. space between facia and sheathing
Venting drip edge
Leave 11/2 in. space between facia and sheathing
Wrap Tyvek® AtticWrapTM around the rafter tails and back to the wall
Subfacias may be installed before or after Tyvek® AtticWrapTM is applied
Wrap membrane over rafter and subfacia, attach to nailer
Install subfacias after Tyvek® AtticWrap™ is applied
SOFFIT VENTED EAVE DETAIL
Facia
Continuous ventilated soffi t
DuPontTM Tyvek® Tape
Wrap membrane over rafter, attach to blocking
Standard drip edge
Blocking
COMMON DETAILS USING DUPONTTM TYVEK® ATTICWRAPTM
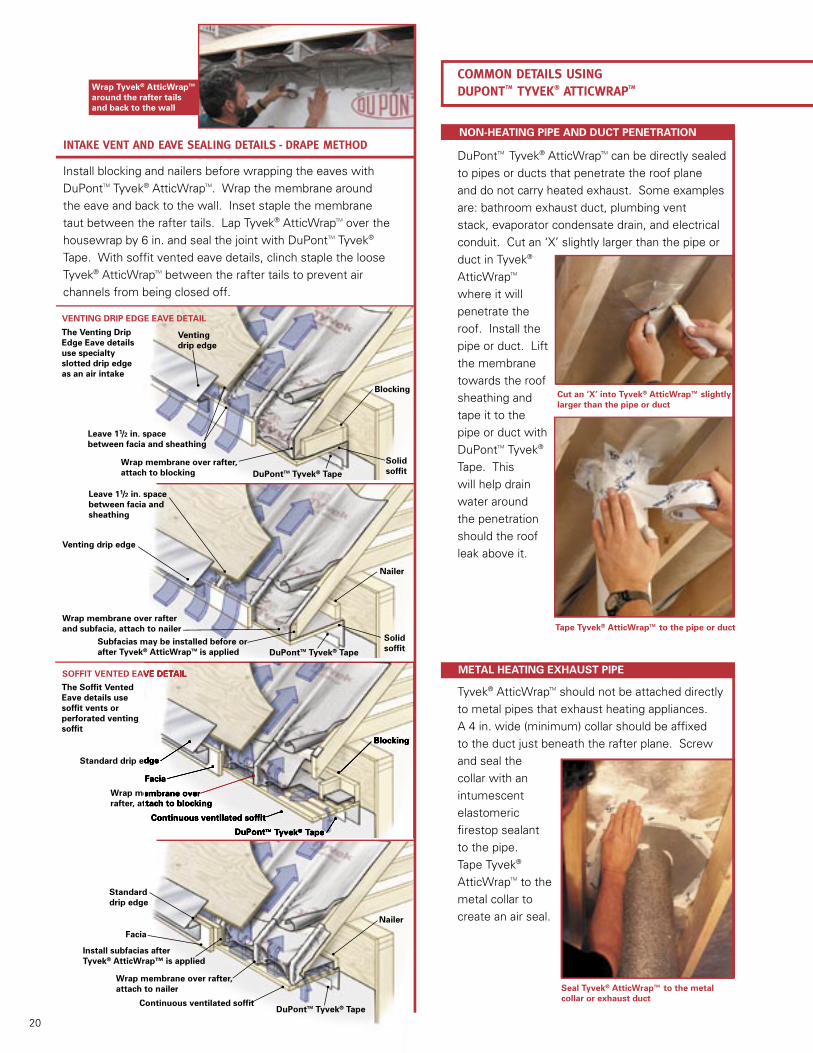
Lap Tyvek® AtticWrapTM up onto sidewalls by a minimum
of 6 in. and staple. Lap housewrap over the Tyvek®
AtticWrapTM. Leave the bottom edge of the housewrap loose to insert roof fl ashing later.
ROOF TO SIDEWALL
SKYLIGHT OPENING 1
Tape DuPontTM Tyvek® AtticWrapTM to the housewrap,
such as DuPontTM Tyvek® HomeWrap®, at gable
ends. Lap Tyvek® AtticWrapTM over the gable end
rake wall and seal to the housewrap with DuPontTM
Tyvek® Tape. If the housewrap extends abovethe roof line, overlap
the Tyvek®
AtticWrapTM and tape along the gable rafter or top of the rake wall.
GABLE END (RAKE WALL)
There are two methods to seal Tyvek® AtticWrapTM
to housewrap on walls with rake overhangs.
1: Wrap the entire overhang in a similar fashion to
wrapping rafter
tails.
2: Cut Tyvek®
AtticWrapTM at
each horizontal
block supporting
the overhang
and wrap the
membrane
between them.
GABLE END (WITH RAKE OVERHANG)
Tape Tyvek® AtticWrapTM to housewrap along gable end
Cut Tyvek® AtticWrapTM and tape between horizontal framing to the housewrap
Lift up housewrap and staple Tyvek® AtticWrapTM to wall
Overlap vertical joints in Tyvek® AtticWrapTM by a
minimum of one rafter bay and two rafters. This
ensures a
mechanical
connection as
well as a taped
joint. Seal
the joint with
DuPontTM Tyvek®
Tape.
VERTICAL JOINTS IN TYVEK® ATTICWRAPTM
Overlap vertical joints in Tyvek® AtticWrapTM by a minimum of one rafter bay and two rafters
Skylight openings cut into the roof after Tyvek® AtticWrapTM
and roof sheathing are applied require extra detailing.
There are no provisions with this detail for cross-ventilation
of rafter bays that dead-end at the skylight.
Cut the skylight opening in the roof sheathing. ‘X’ cut Tyvek® AtticWrapTM and fold the fl aps out onto the roof sheathing
Tape pieces of Tyvek® AtticWrapTM at the corners to fi ll the void in the membrane
Trim the fl aps so 11⁄2 in. of Tyvek® AtticWrapTM folds onto the surface of the roof sheathing
Seal the Tyvek® AtticWrapTM edges to the roof sheathing using DuPontTM Tyvek® Tape or seal with elastomeric caulk and staple
SKYLIGHT OPENING 2
Skylight openings framed before Tyvek® AtticWrapTM and
the roof sheathing are installed are the easiest to prepare.
‘X’ cut out Tyvek® AtticWrapTM in the skylight opening Fold the fl aps back over the
rafters and headers, staple and trim excess membrane
Apply a 3 ft. length of DCI Products’TM RafterVent over each cripple rafter and trimmer rafters beginning 6 in. above and below the skylight opening to provide cross-ventilation between rafter bay air channels
Apply sealant around the perimeter of opening and bed the roof sheathing into it to form an airtight seal
Install and fl ash the skylight following manufacturer’s instructions
20 21
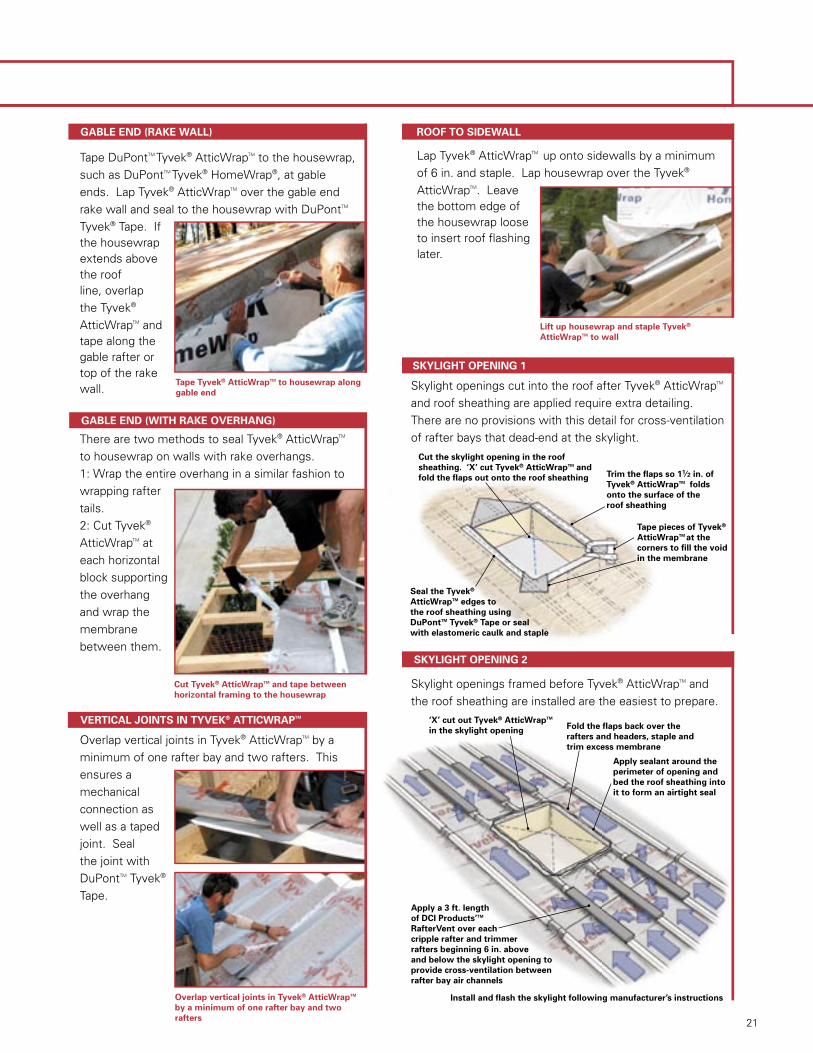
ROOF TO FACE WALL (VERTICAL WALL)
Where rafters terminate at a wall (as in the case of a shed roof) the air vent channels should be vented.
Use a vent product such as DCI Products’TM SmartVent. Install according to manufacturer’s instructions.
Install the roof sheathing leaving a 11⁄2 in. air space to vertical wall
22 23
COMMON DETAILS USING DUPONTTM TYVEK® ATTICWRAPTM continued
DuPontTM Tyvek® AtticWrapTM should not be attached directly to masonry chimneys. A 4 in. wide metal fl ashing or a metal collar should be affi xed just beneath the rafter plane to the masonry. Install
using masonry screws and seal with an intumescent elastomeric fi restop sealant to the masonry.
Tape Tyvek® AtticWrapTM to the metal collar to create an air seal
4 in. wide metal fl ashing or a metal collar
MASONRY CHIMNEY CONNECTION ALTERNATE EAVE DETAILS
There are numerous ways to seal the eaves with Tyvek®
AtticWrapTM and provide ventilation air intake. Several
common details follow each intallation method. The
following details depict the Rafter Cap method of installation
and can be modifi ed to suit the Furring and Drape methods.
Extend wall sheathing above plate to 11⁄2 in. below top ofrafters (or to the top of the rafters when using the Furring method)
Install Tyvek® AtticWrapTM fl ush with the end of the rafter tails but do not install rafter caps or staple the membrane to the rafters beyond the exterior wall line
Cut Tyvek® AtticWrapTM at the centerline of each rafter or truss up to the line of wall sheathing
Run a bead of elastomeric sealant on both sides of each rafter where it meets the wall sheathing
Fold the Tyvek® AtticWrapTM fl aps down to wall and embed in sealant
Tape the bottom edge of Tyvek® AtticWrapTM to the housewrap
Flashing
Vent
Lap Tyvek® AtticWrapTM up and onto the wall by a minimum of 6 in. and staple
Lap housewrap over Tyvek® AtticWrapTM
Exposed Rafter Tails
Apply sealant where collar meets masonry
Some styles of eave framing leave the rafter tails exposed.
Solid blocking installed between the rafters closes off the
rafter bays. Rip framing lumber for solid blocking 1 in.
narrower than the space between the wall plate and the top
of the rafter. Cut and install solid blocking between rafters.
Cut and install vent strip, 1 in. thick by 11/2 in. wide, over the
top of the blocking. Install roof sheathing.
Rip bevel on blocks to match roof pitch
Seal block to framing with caulkingInstall the membrane
fl ush with the blocks
Vented soffi t
Tyvek® AtticWrapTM bedded into sealant on blocks and sides of rafters
Vent strip
Vent stripTyvek® AtticWrapTM bedded into sealant on blocks and sides of rafters
Rip blocks to fi tSeal block to framing with caulking

Air Tight: A condition by which the perimeter of a space
is enclosed to minimize the air movement into or out of
the space.
Air Vent Channel / Vent Channel / Air Channel / Vent Space: These four phrases are used to identify
the space bordered by the rafters and in-between the
underside of the roof sheathing and the DuPontTM Tyvek®
AtticWrapTM. Air flows into the space at eave vents and
follows the space up to the exhaust vent.
Cap Nails / Cap Staples: A fastener with a broad
(1 in. or greater) plastic or metal disc that increases the
contact area to increase wind resistance to pulling out.
Diffusion: The flow of water vapor trough a building
component, caused by the vapor pressure difference
across the two sides of a component.
Eave: The edge of a steep roof that may or may not
project beyond the supporting wall. The eave may be
covered by roof sheathing, a facia and soffit.
Furring Strip: For the purposes of this guide, a furring
strip is a strip of lumber minimum of 1 in. thick by
11/2 in. located over each roof rafter and applied after
Tyvek® AtticWrapTM is installed over the rafters. Furring
strips are nailed to the roof rafters and they create the
vent space between Tyvek® AtticWrapTM and the roof
sheathing.
Integrated Adhesive Strip: A 2 in. wide strip of adhesive
pre-applied to Tyvek® AtticWrapTM and covered by a plastic
“release liner.” When the release liner is removed, the
sealant can bond to the underside of the overlying sheet
of Tyvek® AtticWrapTM forming an airtight seal.
GLOSSARY OF TERMS
Local Building Code: The building code that is enforced
in the jurisdiction where building is located.
Membrane: Typically a water resistive sheet, a term used
interchangeably with Tyvek® AtticWrapTM.
Radiant Barrier: A surface that reflects 99% or more of
the radiant energy back towards the energy source.
Radiantly Reflective: A low emissivity surface that
reflects most of the radiant energy back towards the
energy source.
Rafter Cap: A thin U-shaped channel that fits tightly
over a rafter or truss. DuPontTM RafterCap is used to set
the Tyvek® AtticWrapTM plane 11/2 in. below the decking to
create the air space for venting and drainage.
Ridge Vent: A class of roof vent products that is applied
over a slot in the roof sheathing left along the ridge or hip
of a house and permits air and water vapor to exhaust.
Sealed Attic: An attic designed to eliminate (or minimize)
the air flow into and out of the attic.
Subfacia: Solid lumber applied over the face of the rafter
tails that serves as a base to apply facia and soffit boards.
Common subfacia materials are 2x4 or 2x6.
Venting / Ventilation: The process of air flowing
through the vent channel between the roof sheathing
and the Tyvek® AtticWrapTM that carries away moisture
vapor and heat. Typically this is free air flow, not assisted
mechanically by fans or blowers.
22 23

Can I achieve a Sealed Attic by simply putting Tyvek® AtticWrap™ on top of the roof sheathing?
The Sealed Attic System relies on providing a
method for attic moisture vapor release through
the Tyvek® AtticWrapTM membrane and into an
active air space. This cannot be accomplished
with the Tyvek® AtticWrapTM installed over
the roof deck because conventional decking,
such as OSB and plywood, does not provide
adequate moisture vapor flow through.
Does the Sealed Attic System with Tyvek® AtticWrap™ work in all regions and climates?
Yes. The Sealed Attic System work in all
regions and climates, controlling moisture
within the attic space and improving the
thermal performance of the entire roof.
How does the Sealed Attic System work in hot and cold areas?
In both climates, the sealed attic eliminates outside
airflow into the attic space. The attic temperature
then tends to approach the temperature of the
living space rather than the outside temperature.
The heat flow between the attic and the living
space is therefore reduced along with the utility
cost. In a hot climate, the metalized “low-e”
surface of the Tyvek® AtticWrapTM membrane
works as a radiant barrier, cutting down the
radiant heat transfer from the shingles into the
attic space, keeping the attic cool. In turn, this
heat reflection by Tyvek® AtticWrapTM increases
the speed of the venting air in the channel right
beneath the roof sheathing, which helps to cool
down the OSB, felt and shingles. This overall
reduction of the heat load from the roof cuts
down the air conditioning needs of the home.
In a cold climate, the metalized reflective surface
of the Tyvek® AtticWrapTM membrane reflects the
radiant heat rising from the ceiling back into the
attic space. This keeps the attic warmer and
helps reduce the energy loss through the roof.
By increasing the attic temperature, the
Sealed Attic System with DuPontTM Tyvek®
AtticWrapTM helps prevent condensation,
mold and rot inside the attic.
Why is the metalized surface of Tyvek® AtticWrap™ installed facing down, to the inside of the attic space?
This is to keep the surface shinny by helping
prevent dust accumulation on the reflective
“low-e” surface. A Sealed Attic System
with a metalized surface facing down to
the inside of the attic is the best practical
solution for keeping the thermal performance
of the low-e surface effective over time.
Which installation method is preferred (furring strips, rafter caps, or drape)?
DuPont has developed three practical methods
to accomplish a Sealed Attic System with
DuPontTM Tyvek® AtticWrapTM. The selection of
one method vs. another will be influenced by
the builder’s preference, local framing practices
and local code compliance requirements.
Is the Sealed Attic System with Tyvek® AtticWrap™ applicable to all types of new residential roof designs that include valleys, dormers, hips and chimneys?
Yes. The Sealed Attic System is applicable to
all types of new residential roof designs, no
matter the roof size and complexity. DuPont has
developed extensive installation instructions to
deal with the complexity of most roofing details
such as valleys, hips, dormers and chimneys.
Can I use Tyvek® AtticWrap™ installation details not described in the installation guide?
Yes. There are too many roof configurations to
show all in one installation guide. When using any
detail to install Tyvek® AtticWrapTM, keep in mind
that there must be continuity of each vent channel
from intake to exhaust in order for moisture
vapor that diffuses through the membrane to be
carried away, and also for potential roof leaks.
FREQUENTLY ASKED QUESTIONS FOR THE SEALED ATTIC SYSTEM USING DUPONTTM TYVEK® ATTICWRAPTM
24 25
Is the Sealed Attic System with Tyvek® AtticWrap™ compatible with all types of roof coverings, including asphalt shingles, tiles, slates or metal?
Yes. The Sealed Attic System can be used with any
type of roof covering. Test data indicates that this
system will not adversely affect the life of the roof.
Does the Tyvek® AtticWrap™ installation method comply with OSHA requirements?
Installation of Tyvek® AtticWrapTM with conventional
harness and fall protection systems does comply
with OSHA requirements. When installing Tyvek®
AtticWrapTM on a roof, all local OSHA requirements
for working on roofs must be followed at all times.
Can Tyvek® AtticWrap™ be installed in a cathedral ceiling?
Yes. A Sealed Attic System with DuPontTM Tyvek®
AtticWrapTM is an ideal addition to a cathedral
ceiling assembly. Tyvek® AtticWrapTM holds the
insulation away from the vent channel and stops
air leakage from inside the house at the same
time. Always use the Rafter Cap or Furring
installation methods for cathedralized ceilings.
Will the installation of Tyvek® AtticWrap™ affect my ability to finish off part of my attic for living space?
The use of Tyvek® AtticWrapTM will improve your
ability to finish the attic and use it for living space.
In addition, it will increase the attic’s storage value.
Tyvek® AtticWrapTM keeps the attic drier and dust
free, while moderating the extreme temperature
differences experienced in a traditional vented attic.
Should I expect my attic to be warmer during the summer and colder during the winter?
No. Tyvek® AtticWrapTM will keep the attic
space temperature closer to the living space
temperature than will a traditional vented
attic. Tyvek® AtticWrapTM will make your attic
a “semi-conditioned” space, helping keep
it cooler in the summer and warmer in the
winter than a traditional open vented attic.
How does the Sealed Attic System with DuPontTM Tyvek® AtticWrap™ help prevent water damage caused by ice damming?
The Sealed Attic System helps reduce the heat
loss through the attic and roof during winter. This
keeps the roof surface cooler so ice dams aren’t
as likely to form in the first place. In the event an
ice dam does form, Tyvek® AtticWrapTM serves as
a secondary weather barrier to collect and safely
drain water that leaks through the roofing material.
Is the Sealed Attic System a totally new concept? How many homes have been built with this system?
The Sealed Attic System, pioneered by DuPont
during the last decade, was introduced in Europe in
1996. Since then, hundreds of thousands of homes
have been successfully protected with the Sealed
Attic System in several countries in Europe. In the
United States and Canada, DuPont has carried out
an extensive field testing program which involved
the construction and monitoring of 15 homes with
the Sealed Attic System across different regions
and different climates during the last three years.
Which official third party accreditation bodies have been involved in the field testing of the Sealed Attic System?
Part of the field testing program of the Sealed
Attic System has been carried out under the
supervision of Prof. Tang Lee from Calgary
University, Joe Lstiburek of Building Science
Corporation, Oak Ridge National Laboratory
and the Florida Solar Energy Center.
24 25

PRODUCT PROPERTIES
Properties Method DuPontTM Tyvek® AtticWrapTM
weather resistive barrier
Air Penetration Gurley Hill (TAPPI T-460) (sec/100cc)
Water Vapor Transmission ASTM E-96 Method B (g/m2 -24 hrs) (US perms)
Water Penetration Resistance AATCC-127 (cm)
Breaking Strength ASTM D-882 MD/CD (lbs/in)
Tear Resistance ASTM-1922 (Elmendorf) MD/CD (grams)
Surface Burning ASTM E-84 Characteristics Flame Spread
Indexed Smoke Developed Value
Data listed above was measured by an accredited independent laboratory. Individual roll results may differ due to normal manufacturing variations.
WARNING: DuPontTM Tyvek® is combustible and should be protected from a flame and other high heat sources. If the temperature
of DuPontTM Tyvek® reaches 750˚F (400̊ C), it will burn and the fire may spread and fall away from the point of ignition.
1100
185 27
200
26/29
4100/4800
5Class A
40Class A

BUILDING CODE REPORTSProduct has been submitted to ICC-ES with an
Engineering Report as an alternate method. ICC-ES
Evaluation Report is pending.
TECHNICAL SPECIFICATIONSDuPontTM Tyvek® used in construction products is
made from 100% flash spun-bonded high density
polyethylene fibers which have been bonded together
by heat and pressure, without binders or fillers, into
a tough, durable sheet structure. Additives have
been incorporated into the polyethylene to provide
ultraviolet light resistance. DuPontTM Tyvek® AtticWrapTM
has a thin aluminum coating on one side protected
with a thin acrylic layer. DuPont suggests that Tyvek®
AtticWrapTM be covered within 4 months (120 days) of
installation.
PRODUCT REPLACEMENTDuPont will replace any Tyvek® Weatherization
System product damaged during installation by
weather or normal handling if it is installed according
to procedures published by DuPont. If you have
any questions, call DupontTM Tyvek® Weatherization
Systems at 1-800-44-TYVEK.
WARNINGDuPontTM Tyvek® is slippery and should not be used
in any application where it will be walked on. In
addition, because it is slippery, DuPont recommends
using kickjacks or scaffolding for exterior work above
the first floor. If ladders must be used, extra caution
must be taken to use them safely by following the
requirements set forth in ANSI Standards 14.1,
14.2 and 14.5 for ladders made of wood, aluminum,
and fiberglass, respectively. DupontTM Tyvek® is
combustible and should be protected from a flame
and other high heat sources. DupontTM Tyvek® will melt
at 275°F (135°C) and if the temperature of DupontTM
Tyvek® reaches 750°F (400°C), it will burn and the fire
may spread and fall away from the point of ignition.
For more information, call 1-800-44-TYVEK.
NOTETo achieve greater potential, energy savings and
weather resistance, any tears, breaks, holes, etc.
created during normal construction should be repaired
by taping or patching with DuPontTM Tyvek® AtticWrapTM
weather resistive barriers. DuPontTM Tyvek® products
are weather resistive barriers, not the primary water
barrier (the outer facade is the primary barrier).
Contamination of any DuPontTM Tyvek® weather
resistive barriers and building papers with building
site chemicals which increase their wettability (e.g.,
surfactants) will adversely affect their water resistance
and therefore, their contribution to the overall water
resistance of the wall system. For superior protection
against bulk water penetration DuPont suggests a
system combining a quality exterior facade, a good
secondary weather resistive membrane and an
exterior sheathing, appropriate flashing materials
and details; and high quality windows and doors
with particular attention to proper installation of each
component. In a system where no exterior sheathing
is used and DuPontTM Tyvek® is installed directly over
the wall studs, exterior facade materials should be
selected to ensure maximum protection against water
intrusion. Careful workmanship and proper installation
of each component is very important.
DuPont believes this information to be reliable and
accurate. The information may be subject to revision
as additional experience and knowledge is gained. It
is the user’s responsibility to determine the proper
construction materials needed. Because conditions
are outside of our control, DUPONT MAKES NO
WARRANTIES, EXPRESSED OR IMPLIED, AND
ASSUMES NO LIABILITY WHATSOEVER AS TO
THE PERFORMANCE OF THE PRODUCTS FOR A
PARTICULAR USE. This information is not intended to
be used by others for advertising, promotion or other
publication for commercial purposes.

DuPont -Where Building Science and Technology Meet
Backed by over 200 years of science, DuPont works closely with the
world’s leading architects, building engineers and designers to create
products that help you build more beautiful, durable, energy-efficient
and healthier homes and buildings. We introduce timeless materials
that builders, contractors, dealers and homeowners depend on.
DuPont remains at the forefront of building science, and we’re
committed to finding new ways to create homes and buildings that
cost less to operate, are easier to maintain and provide more comfort
for people around the world. It’s all part of our commitment to
real-world, innovative solutions that can help everyone live a better life.
Strong Family of DuPont ProductsWhether you’re building new, remodeling, or re-siding, DuPont has
developed a family of weatherization systems products engineered
to address all your building needs. DuPont weatherization systems
products includes Tyvek® HomeWrap®, Tyvek® CommercialWrap®,
Tyvek® StuccoWrap®, Tyvek® DrainWrapTM, DuPontTM FlexWrapTM, DuPontTM
StraightFlashTM, Tyvek® Tape, Tyvek® Fasteners, and our newest miracles
of science, Tyvek® AtticWrapTM and Tyvek® ThermaWrapTM.
The DuPont™ Tyvek® Specialist NetworkThere are over 160 professionals who have the tools, training and
knowledge to help you build profits, quality and customer satisfaction.
Every time you work with a DuPontTM Tyvek® Specialist, you’re working
with someone who knows wall systems, R-values and construction
“best practices.” In short, when you have a question about materials,
techniques, codes or costs, your DuPontTM Tyvek® Specialist will provide
you with an answer. If your Specialist cannot answer you directly,
he or she will find someone who can.
For more information, Call us at: 1-800-44-TYVEKVisit us at: www.tyvek.comWrite us at: PO Box 80728, Wilmington, DE 19880-0728
BUILT BY SCIENCE
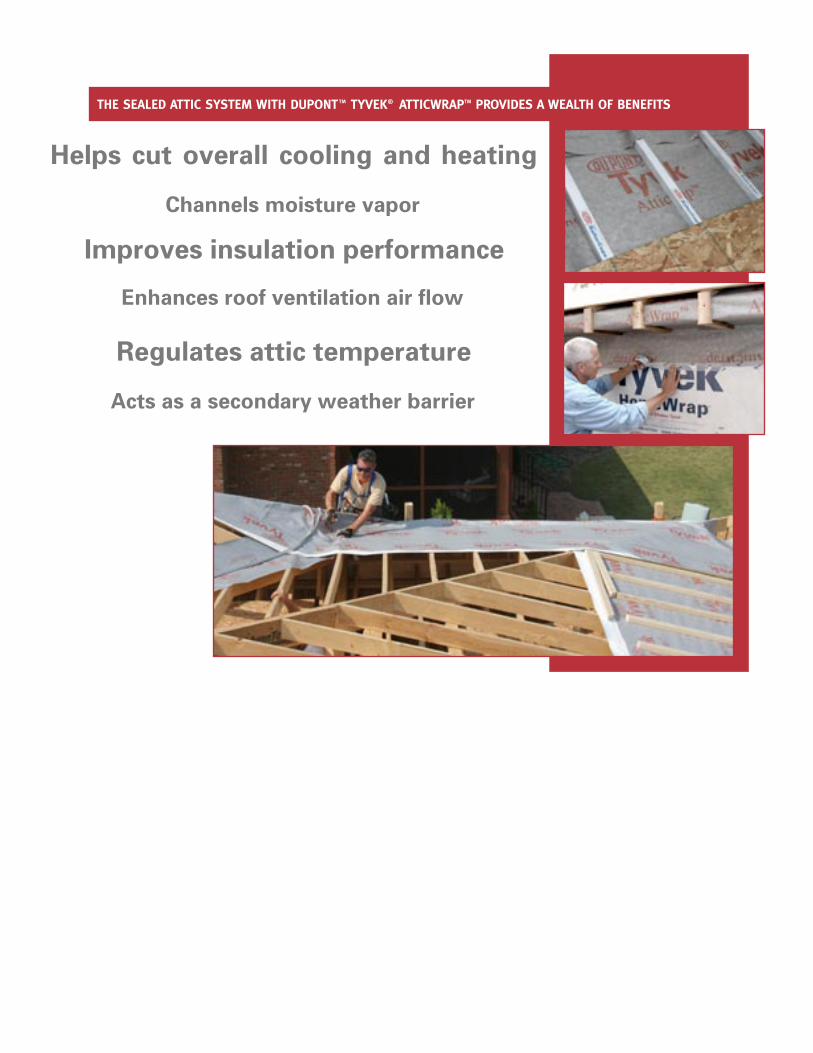
THE SEALED ATTIC SYSTEM WITH DUPONTTM TYVEK® ATTICWRAPTM PROVIDES A WEALTH OF BENEFITS
Helps cut overall cooling and heating
Regulates attic temperature
Acts as a secondary weather barrier
Enhances roof ventilation air flow
Channels moisture vapor
Improves insulation performance

©2005 by E.I. du Pont de Nemours and Company. All rights reserved. Tyvek® AtticWrapTM, The DuPont Oval
Logo, The miracles of scienceTM and DuPontTM are registered trademarks or trademarks of E.I. du Pont de
Nemours and Company or its affiliates.
For more information, Call us at: 1-800-44-TYVEKVisit us at: www.tyvek.comWrite us at: PO Box 80728, Wilmington, DE 19880-0728