
The Reed Sections - paradisewinds.org · Resonance fingerings should be used to help throat tone...
20
Transcript of The Reed Sections - paradisewinds.org · Resonance fingerings should be used to help throat tone...


The Reed Sections Troubleshooting | Optimizing | Resources
Copyright 2017 v1.0
Table of Contents
Clarinet & Bass Clarinet ...................................................................................................... 1
Saxophone ......................................................................................................................... 8
Oboe................................................................................................................................. 10
Bassoon ............................................................................................................................ 13
Visit our website for more resources:
www.paradisewinds.org
If you have any questions about anything in this document, please contact us:
Joshua Gardner, clarinet: [email protected]
Stefanie Gardner, bass clarinet: [email protected]
Joseph Kluesener, bassoon: [email protected]
Patrick Murphy, saxophones: [email protected]
Tiffany Pan, oboe: [email protected]
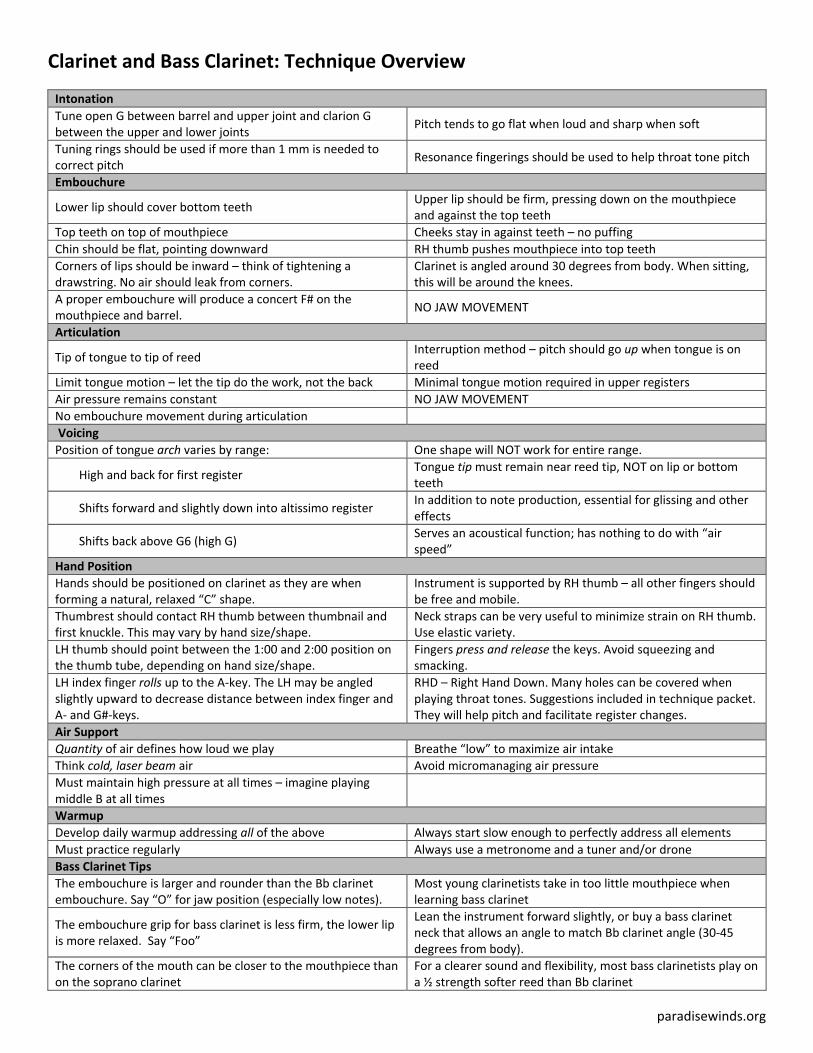
Clarinet and Bass Clarinet: Technique Overview
Intonation Tune open G between barrel and upper joint and clarion G between the upper and lower joints Pitch tends to go flat when loud and sharp when soft
Tuning rings should be used if more than 1 mm is needed to correct pitch Resonance fingerings should be used to help throat tone pitch
Embouchure
Lower lip should cover bottom teeth Upper lip should be firm, pressing down on the mouthpiece and against the top teeth
Top teeth on top of mouthpiece Cheeks stay in against teeth – no puffing Chin should be flat, pointing downward RH thumb pushes mouthpiece into top teeth Corners of lips should be inward – think of tightening a drawstring. No air should leak from corners.
Clarinet is angled around 30 degrees from body. When sitting, this will be around the knees.
A proper embouchure will produce a concert F# on the mouthpiece and barrel. NO JAW MOVEMENT
Articulation
Tip of tongue to tip of reed Interruption method – pitch should go up when tongue is on reed
Limit tongue motion – let the tip do the work, not the back Minimal tongue motion required in upper registers Air pressure remains constant NO JAW MOVEMENT No embouchure movement during articulation Voicing Position of tongue arch varies by range: One shape will NOT work for entire range.
High and back for first register Tongue tip must remain near reed tip, NOT on lip or bottom teeth
Shifts forward and slightly down into altissimo register In addition to note production, essential for glissing and other effects
Shifts back above G6 (high G) Serves an acoustical function; has nothing to do with “air speed”
Hand Position Hands should be positioned on clarinet as they are when forming a natural, relaxed “C” shape.
Instrument is supported by RH thumb – all other fingers should be free and mobile.
Thumbrest should contact RH thumb between thumbnail and first knuckle. This may vary by hand size/shape.
Neck straps can be very useful to minimize strain on RH thumb. Use elastic variety.
LH thumb should point between the 1:00 and 2:00 position on the thumb tube, depending on hand size/shape.
Fingers press and release the keys. Avoid squeezing and smacking.
LH index finger rolls up to the A-key. The LH may be angled slightly upward to decrease distance between index finger and A- and G#-keys.
RHD – Right Hand Down. Many holes can be covered when playing throat tones. Suggestions included in technique packet. They will help pitch and facilitate register changes.
Air Support Quantity of air defines how loud we play Breathe “low” to maximize air intake Think cold, laser beam air Avoid micromanaging air pressure Must maintain high pressure at all times – imagine playing middle B at all times
Warmup Develop daily warmup addressing all of the above Always start slow enough to perfectly address all elements Must practice regularly Always use a metronome and a tuner and/or drone Bass Clarinet Tips The embouchure is larger and rounder than the Bb clarinet embouchure. Say “O” for jaw position (especially low notes).
Most young clarinetists take in too little mouthpiece when learning bass clarinet
The embouchure grip for bass clarinet is less firm, the lower lip is more relaxed. Say “Foo”
Lean the instrument forward slightly, or buy a bass clarinet neck that allows an angle to match Bb clarinet angle (30-45 degrees from body).
The corners of the mouth can be closer to the mouthpiece than on the soprano clarinet
For a clearer sound and flexibility, most bass clarinetists play on a ½ strength softer reed than Bb clarinet
paradisewinds.org

Clarinet and Bass Clarinet: Troubleshooting
2
Symptom Problem Solution Sound & Intonation
Unfocused sound Bottom lip not firm (bunched chin), embouchure too relaxed, reed too hard
Flatten chin, press upper lip on top of mouthpiece, use softer reed
Small, thin sound Embouchure too tight, too little mouthpiece in mouth, too much bottom lip in mouth, reed too soft, clarinet too close to body, reed too low
Check for proper embouchure formation, more mouthpiece in mouth, try harder reeds, adjust angle (30o), adjust reed to align with mouthpiece tip.
Wild sound Too much mouthpiece in mouth, not enough bottom lip in mouth, clarinet too far from body
Less mouthpiece in mouth, check for proper embouchure formation, adjust angle (30o)
Very flat Reed too soft, embouchure too loose, tongue in incorrect position,
Use harder reeds, check for proper embouchure formation, see voicing below
Very sharp Reed too hard, embouchure too firm, Use softer reeds, check for proper embouchure formation
Articulation
“Dirty” articulation Too much tongue touching the reed, tongue touching too low on reed, reed too high
Tip-to-tip articulation style, regular practice, adjust reed to align with mouthpiece tip.
Cannot articulation above staff
Too much tongue movement, tongue touching too low on reed
Maintain a more constant tongue shape (think vowels) during articulation,
Slow articulation Stopping air, too much tongue movement, not enough practice,
Maintain constant air pressure – the tongue stops the reed, not the air, maintain constant tongue shape, regular articulation practice
Subtones, especially above staff
Tongue touching too low on reed, incorrect tongue shape
Tip-to-tip articulation style, address voicing (below)
Pitch Scooping embouchure “chewing,” tongue touching too low on reed
Keep embouchure still (use mirror), Tip-to-tip articulation style
Voicing
Flat upper register Tongue arch too far forward Long tones, voicing exercises (glisses, controlled squeaking, bugle calls), expand range, aim for “uu” tongue position
Squeaking Embouchure too firm, too much mouthpiece in mouth, tongue arch too for back,
Check for proper embouchure formation, Long tones, voicing exercises (glisses, controlled squeaking, bugle calls), expand range, aim for “ee” tongue position
Subtones Tongue in wrong position or embouchure too loose
Use “SSSSS” syllable, push up with right thumb, more mouthpiece in the mouth
Hand Position
Limited technique Flat fingers Fingers should form a natural “C” position. Drag fingers across table without allowing knuckles to collapse
Limited technique Incorrect RH thumb placement Thumbrest should contact RH thumb between thumbnail and joint. Exact placement will vary by hand size.
Limited technique Anchoring RH index finger on RH Eb/Bb key Place double-sided tape on key to sensitize finger. Check hand angle and thumb position on thumbrest.
Limited technique Excess finger motion Practice in front of mirror to minimize motion – slow F and F# scales.
Difficulty crossing break Fingers too far from keys/holes, excess motion RHD – Right Hand Down: encourage “resonance” fingerings for throat tones (G-Bb4)
paradisewinds.org

Clarinet Equipment Recommendations
3
Clarinets
Beginner
Beginner clarinets are usually constructed of plastic or resin for durability and cost. They are typically molded rather than machined and include nickel-plated keys. In most situations, a student’s first instrument should be made of a composite material since they are both affordable and durable. While wooden models are available at prices cheaper than professional instruments, they will likely be more expensive than a composite instrument. If a student decides to switch to a different instrument early in their playing career, it’s a better investment to prioritize affordability. Buffet, Selmer, and Yamaha make excellent student instruments. Used student instruments are widely available, often at bargain prices. However, be aware that used instruments may require substantial maintenance and/or repair to be playable. Prices range from $250-500. Used instruments can be found for under $100, but may require substantial work.
Intermediate
Most major manufacturers offer an intermediate, or “step-up,” instrument option. These instruments are typically constructed of grenadilla wood and have silver-plated keys, although some have nickel-plated keys. Intermediate instruments often have a reamed bore, as opposed to molded, undercut tone holes for improved pitch and evenness, and blued steel needle springs. Price tends to be approximately $1000-2000. Intermediate instruments are recommended for advancing students on a budget or students who are not interested in pursuing a degree in music. Note that wooden instruments need to be broken-in, meaning they have to be gradually acclimated to being played. This also applies to older wooden instruments that have not been played for a long time. In our arid desert climate, I recommend using a case humidifier, such as the Humistat, for wooden instruments. I DO NOT recommend any humidifier that you insert into the bore.
Professional
Professional instruments are generally made of premium materials, including select wood (grenadilla, cocobolo, or Brazilian or Honduran rosewood), silver-plated keys, and high-end pad options. They may also have additional keywork, including a left hand Ab/Eb key. Pro instruments tend to have optimal pitch, evenness from note to note, and workmanship. Manufacturers may offer optional keywork, including automatic low F compensation, an automatic throat Bb mechanism, an articulated C#/G# key, and plating options. Prices range from approximately $3500 to over $8000. Professional instruments are recommended for serious students who are interested in playing at the highest level. University music programs typically require professional instruments, so students interested in upgrading from student models should consider saving for a pro instrument. It should be noted, however, that professional instruments will require routine maintenance to operate optimally.
Auxiliary Clarinets
Your clarinetists will very likely start on a Bb soprano clarinet; however, many other types of clarinets are used for solo, chamber, and symphonic music. Most band literature will include a bass clarinet part. Bass clarinets are available with ranges to low Eb or C. Low Eb instruments are available from beginner to professional models while low C basses tend to be professional only. Much of the standard band literature will also include an Eb clarinet part. Eb clarinets are generally available as professional or step-up models; however, it is worth spending the extra money on a professional instrument—pitch, sound, and response will be much better. If your program includes full orchestra programming, some repertoire may require an A clarinet. Most high school students will not own an A clarinet, so it is advisable for the school to own two—one for first and second clarinet. Other auxiliary clarinets often found in band literature include Eb alto, Eb contra-alto, and Bb contra-bass clarinet. Generally speaking, it is worth purchasing the highest level instrument that your budget will allow. The pay off in pitch and sound will be worth it!
paradisewinds.org

Clarinet Equipment
4
alto, Eb contra-alto, and Bb contra-bass clarinet. Generally speaking, it is worth purchasing the highest level instrument that your budget will allow. The pay off in pitch and sound will be worth it!
Note: While it may be appealing to have dedicated students playing auxiliary instruments, rotating personnel is often better for their musical development, particularly with the low clarinets. Most college music programs require an audition on Bb soprano clarinet, greatly limiting post-secondary education options for your most aspiring players who have only played bass clarinet, for example.
Mouthpieces
A high-quality mouthpiece can make a huge difference in the sound of any instrument, and should therefore be a student’s first major equipment upgrade. Likewise, a bad mouthpiece can make the best of instruments sound terrible. Mouthpieces are a very personal choice, and MANY options are available. Typically the mouthpiece that is included with a new instrument is less than optimal. This is not always the case, but generally, your students should find another option. Clarinet mouthpieces are constructed of various materials. Student models and mouthpieces included with many instruments (including some professional models) are made from plastic. Professional mass-produced and handmade mouthpieces are usually made from hard rubber—this is the most common material. Other materials are used as well, including wood, metal, and glass. Wood mouthpieces tend to warp; metal mouthpieces are very heavy and a generally faced for jazz; and glass mouthpieces are very fragile.
Mouthpieces have a tremendous effect on pitch, sound, articulation, and playing comfort. They are generally categorized by two (of many) important dimensions: the tip opening (how far the reed tip rests from the mouthpiece tip) and the facing length (defined by where the reed makes contact with the mouthpiece). These dimensions also dictate what strength reed will be appropriate. Large tip openings and short facings will need a softer reed while close tips and long facings will require a harder reed. This is a very important factor when recommending reed strength! A strength 3 reed might be perfect for a student playing a Vandoren B40 (open/medium) mouthpiece, but that same reed on a Vandoren M13 (closed/long) would be much too soft. One size does not fit all!
Vandoren is probably the largest mass producer of clarinet mouthpieces. Prices range from around $90-$140 for professional models. D’Addario Woodwinds makes fine clarinet mouthpieces as well within the same price range. While handmade mouthpieces are plentiful, local availability is often limited, so it is easier to recommend mass-produced models. The Vandoren B45 is an often-recommended mouthpiece, but it should be noted that these have a very open tip and are pitched at A442. All Vandoren mouthpieces are A442 EXCEPT their Series 13 models. If you have a student interested in upgrading or switching to a Vandoren mouthpiece, make sure they opt for the A440 Series 13 models. The M30 Series 13 is an excellent option—it has a medium tip with a long facing with excellent pitch characteristics.
Since the mouthpiece has such a tremendous impact on tone, pitch, projection, and comfort, it should be one of the first upgrades. A student instrument with a good mouthpiece will likely sound better than a professional clarinet with a mediocre mouthpiece!
Barrels and Bells
Aftermarket barrels and bells are available in many different materials and styles, and prices range from under $100 for a barrel to over $600 for a bell. While these items can have a positive effect on sound and pitch, upgrading the mouthpiece and instrument should be prioritized.
paradisewinds.org

Clarinet Equipment
5
Ligatures
The ligature simply affixes the reed to the mouthpiece. However, because it touches the part of the instrument that is vibrating—the reed—it can affect the sound. Ligatures are made from various materials, including metal, cloth, leather, plastic, or cord. For young players, the more durable options are favorable, including cloth, cord, and leather. These materials can be dropped or stepped on without destroying them. Metal ligatures, on the other hand, are fairly fragile and expensive. They are often plated with gold or silver and constructed using very thin metal. They can deform if dropped or break if over-tightened. Rovner makes an excellent leather-like material ligature that is incredibly durable, has only a single screw, and is very affordable (under $30). I am particularly fond of Silverstein Works ligatures, which use a cord with a single screw tightening system.
Reeds
Again, MANY reed options are available. The big makers include Vandoren and D’Addario. I generally recommend that students first try the offerings from these two manufacturers, using a reed strength that is appropriate for their particular mouthpiece. I use Silverstein Works reeds. They guarantee that their reeds will work, otherwise they will replace them! Reeds are not an area on which to skimp! High quality reeds will sound better and last longer. While Vandoren and D’Addario offer various styles of reeds, the strength is the most important factor to get right. Again, the optimal strength will be determined by the student’s mouthpiece and the reed make/model—not all strengths are the same! Most mass-manufacturers, including Vandoren and D’Addario, have reed strength recommendations for their mouthpiece models available on their respective websites. Avoid blanket strength recommendations based on year in school or level of playing—the mouthpiece dictates what will be optimal. Students should have a minimum of four reeds with them at any given time.
Other Items
Every clarinetist needs a few items to help clean and protect their setup.
A high-quality swab is essential! While I personally prefer microfiber swabs, I recommend silk swabs for younger students. Microfiber is more absorbent, but silk is less prone to getting stuck in the bore. The clarinet should be swabbed after every use or if water is accumulating in tone holes, and tenon sockets should be dried completely. Good swabs are generally under $20. Swabs should be neatly folded when stored in the case, rather than wadded up and crammed into the case. Folding minimizes the chances of it getting stuck on the register tube of the upper joint. If a student’s swab does get stuck, take the instrument to a reputable repair technician. Do not stick anything in the bore in an effort to remove it! Always make sure a swab is completely unfolded before pulling it through any part of the clarinet.
ALL clarinetists need a mouthpiece cap (and use it)! Many ligatures (including Rovner, Silverstein, and Vandoren) include a mouthpiece cap. Make sure they are using them when not playing—it’ll protect the reed and the fragile mouthpiece tip while keeping the reed from drying out.
I highly recommend using a mouthpiece patch on the top of the mouthpiece. These cushions provide a soft barrier between the mouthpiece and top teeth, maximizing comfort and minimizing movement against the teeth. They also protect the mouthpiece from indentions created by the teeth. Mouthpiece patches are available in thin or thick sizes—this is a personal preference.
A tube of cork grease will help keep instrument assembly smooth and easy, minimizing the chance of bending keys from squeezing the mechanism. Cork grease should be used sparingly. I recommend applying a small amount to each cork and

Clarinet Equipment
6
rubbing it gently into the cork with the fingers. If done at the end of the day, the cork will absorb some of the grease, providing long-lasting smooth assembly. This also minimizes the “squeegee effect,” which results in globs of excess grease accumulating on the tenons.
Every clarinetist needs a reed case. The plastic or cardboard sleeves that come with reeds will not suffice. Vandoren makes excellent reed cases that hold 4 to 8 reeds. Good reed cases will help the reeds dry evenly, protect them from damage, and provide some organization. I do not recommend glass reed cases, especially for young students.
I use a neck strap and recommend them to my students. They take much of the weight off of the right hand thumb. Elastic models are preferred.
A soft cleaning cloth is useful for keeping keys clean, which can minimize tarnishing and corrosion. It can also help stabilize the clarinet in the case. Some cases allow the instrument to flop around when closed. This movement can wreak havoc on the mechanism.
Pad dryer. While swabs are essential for removing condensed water from the bore, some water will find its way into a tone hole, which can affect pitch, cause squeaks and/or gargling sounds, and cause pads to stick. Water can often be blown out of a tone hole with a sharp blast of air, but sometimes an absorbent material is necessary to wick the water from the hole and dry the pad. Traditionally, un-gummed cigarette paper has been used to remove water. BG makes a microfiber pad dryer that is reusable and works quite well. Yamaha makes a special disposable paper for the same purpose.
An instrument stand can help prevent costly accidents, such as instruments rolling off a chair or being stepped on. Many models are available, from flimsy plastic folding stands to heavy steel stationary stands. K & M and Hercules make excellent portable stands that should fit in most clarinet cases.
Things your students DO NOT need:
Mouthpiece brush. These brushes often have metal wire as the core, which can destroy a mouthpiece.
Key oil. Properly oiling the keys is something that should be handled by an experienced technician since it requires removing and replacing keys. Many of the products labeled “key oil” are too thin and very messy. Residual oil can easily destroy pads and key corks and attract dust.
Bore oil. This is a debated topic; however, oiling the body and bore of a wooden clarinet should be handled by an experienced technician to avoid doing more damage than good.
Pad savers. These are long wire-core brushes that are stored in the bore. Since they stay in the bore, moisture is not removed, which can result in swollen pads, mold, and cracked wood. Do not use these.
paradisewinds.org

Clarinet Equipment
7
Example Setups (prices from online retailers)
Beginner Soprano Clarinet Beginner Bass Clarinet Clarinet: Conn-Selmer Prelude ($399) or Buffet Premium ($599) Mouthpiece: Clark W. Fobes Debut ($30), Yamaha 4C ($30), Behn Overture ($35) Ligature: Rovner Dark ($22) Reeds: Vandoren Traditional or equivalent ($22/box of 10) Total Cost: $473-$673
Bass Clarinet: Selmer 1430LP Bb Bass Clarinet ($2009) Mouthpiece: Hite Bass clarinet mouthpiece ($79), Yamaha 4C bass clarinet mouthpiece ($36) Ligature: Silverstein Prelude Ligature ($99) Reeds: Vandoren Traditional or equivalent ($21/box of 5) Total Cost: $2165-$2208
Intermediate Clarinet Clarinet: Buffet Crampon E12F ($1920) or Selmer Paris Prologue ($1999) Mouthpiece: Vandoren M30 Series 13 ($90) Ligature: BG Silver Revelation ($47) Reeds: Vandoren Traditional or equivalent ($22/box of 10) Total Cost: $2079-$2158
Professional Clarinet Professional Bass Clarinet Clarinet: Buffet Crampon ($3300-$8200), Selmer Paris ($2800-$6500), Backun ($4000-$8600), Yamaha ($3100-$4500) Mouthpiece: Vandoren M30 Series 13 ($90), Handmade ($80-$700+) Ligature: Many options used professionally Reeds: Many options used professionally Total Cost: $3000+
Bass Clarinet: Selmer Privilege Low C Model 67 ($13,559 - $18,000), Buffet Crampon 1193 Prestige Low C ($11,410), pro low Eb models available as well Mouthpiece: Vandoren B50 ($146), Selmer Concept ($339), Selmer Focus ($339) Ligature: Many options used professionally Reeds: Many options used professionally Total Cost: $11,500+
What Do We Play? Clarinet: Selmer Paris Privilege ($6500) Mouthpiece: Vandoren B40 Series 13 ($90) Ligature: Silverstein CRYO4 ($240) Reeds: Silverstein Alta 3.5 ($45/box of 10) Total Cost: $6875
Bass Clarinet: Selmer Privilege Low C Model 67 ($13,559 - $18,000) Mouthpiece: Selmer Concept Mouthpiece ($339) Ligature: Maestro Silverstein Ligature ($1200) Reeds: Vandoren Traditional Strength 3 Bass clarinet reeds ($21) Total Cost: $15,119-$19,560
paradisewinds.org

Saxophone: Technique Overview
8
Posture Sitting: Upright, feet flat on floor, back perpendicular to ground, sitting towards front of chair. Beginners hold all saxophones to the side with bell resting against right leg. Taller students can hold saxophone between legs with bell resting slightly against left leg. Standing: Larger saxophones held to the right side. Alto and smaller can be held towards the middle of the body. Embouchure Concept is circular with pressure being applied evenly inward in all directions and chin drawn slightly down. “Whistling face” is the perfect concept.
Classical playing has little jaw movement (jaw is reserved for producing vibrato). Jazz playing has significantly more flexibility and freedom of jaw movement.
Top teeth placed directly on mouthpiece (not optional). The mouthpiece should enter the mouth almost parallel to the ground. The saxophone is NOT a clarinet.
Upper lip drawn inward towards upper teeth, lower lip rolled slightly over lower teeth as a cushion.
Firm but relaxed grip on mouthpiece with no biting. Embouchure begins in the diaphragm (see Breathing).
Skin of chin should be flat against bone (ski slope) Larger instruments allow for greater relaxation of embouchure while smaller instruments call for increased firmness.
A proper embouchure will produce a concert A on the alto saxophone mouthpiece alone (G on tenor, D on baritone)
Hand Position
Hold a baseball; That hand-shape is ideal for the saxophone. LH Pinky may rest on or around G# key. RH pinky may rest on or around Eb key.
LH Thumb placed towards top of thumbrest ready for octave key motion. RH Thumb placed under hook thumbrest. Embouchure, LH thumb, and RH thumb are the three anchor points for stabilizing smaller saxophones (soprano and alto). Larger saxophones may additionally rest against the body.
Hands must remain rounded and arched to avoid unwanted contact with side keys.
LH Thumb serves as a hinge when pressing octave key, never losing contact with rest. LH Side keys accessed using palm of LH.
Pointer-, middle-, and ring-fingers of both hands placed directly on large pearls and should not lose contact with pearls unless absolutely necessary.
RH Side keys accessed using the side of the RH pointer finger towards the palm
Fingers should never be flattened as they press down; always maintain the curve.
When playing, keep fingers close to the instrument, never lift them up too high. Keep finger movements to a minimum.
Breathing The most important part of a wind instrument is the wind. Can be practiced without the instrument with the shoulders isolated (lying down, with elbows on knees while sitting in chair, and/or with elbows pressed towards a wall while facing forward). Stomach area (diaphragm) expands as one breathes in, followed by the chest, and only then followed by shoulder movement (if any). While exhaling, abdominal pressure is maintained providing support for the embouchure (poor abdominal support = biting embouchure) Voicing Soft tissue in the mouth (tongue, soft palate, and some throat muscles) must move depending on the range being performed on the instrument.
Interior of mouth can be likened to vowel sounds in the following progression: (hee)-ee-ih-uh-ah-oo-oh-ohl.
Progression from “ee” to “ohl” is continuous and smooth with upper register favoring “ee” formation.
Altissimo voicing depends largely on the mode/partial (i.e., fingering) selected.
Intonation Tendencies: Written B3 and Bb3 are sharp notes. C4 to C#5 tends towards flatness. D5 and up tends toward sharpness. Concert Bb or A are good tuning notes and those notes should be tuned both with and without the octave key. Mouthpiece is pushed in to compensate for flatness, pulled out for sharpness (keep the neck cork well-greased). The neck CAN be pulled out a maximum of an eighth of an inch to compensate for sharpness.
paradisewinds.org

Saxophone: Equipment
9
Gear Recommendations
Instruments: With so many brands proliferating, it’s hard to make specific recommendations. Yamaha, Conn-Selmer, Selmer Paris, Yanagisawa and Keilworth make great student, intermediate, and professional grade saxophones. Student model alto saxophones range from $800-1500, professional models cost $3,500 and more.
Mouthpieces: Classical and Jazz mouthpieces are incredibly different and are not necessarily interchangeable. Some performers will use a traditionally classical mouthpiece for jazz, but the reverse is almost never true.
- Classical Mouthpieces: Selmer S-80 Series (C* especially), Selmer S-90 Series (180 and 190 Especially), and Selmer Concept Series, Vandoren Optimum Series (AL3 & AL4), Rousseau, and Yamaha.
- Jazz Mouthpieces: Vandoren Java and Jumba Java, Meyer, Beechler, Berg Larsen, Ponzol and many, many others.
Ligatures - Rovner, Rovner Eddie Daniels, Bay, Vandoren Optimum, Ishimori, Silverstein.
Reeds: Cane reeds are still ideal. Composite and synthetic are not bad options for doublers.
- Beginners do perfectly well with Rico reeds (they’re easy to produce a sound on and, importantly, cheap)
- Intermediate and Professional Classical performers tend to prefer so-called French-cut reed in classical performance (Vandoren Blue Box and D’Addario are the primary competitors).
- Plenty of jazz performers use Vandoren (Blue Box) reeds in addition to Java, V16, and ZZ reeds.
Neckstraps: Never optional. A cushioned, non-elastic strap is the basic for soprano, alto, and tenor. Anything larger than a tenor should be played with a harness or over-the-shoulder (sash-style) strap. Neckstraps should feature a closed ring.
Mouthpiece Patches: Good for students who complain that the instrument vibration hurts their teeth. Adhere directly to the mouthpiece and provide a cushion for the top teeth. Manufactured by Vandoren, BG, Yamaha, and others.
Reed Case: A place to store reeds so that they are kept flat (once they are fully dried) and protected from damage.
paradisewinds.org

Oboe: Technique Overview
10
Posture
Stand/sit up straight. Shoulders above hips and head above shoulders. Avoid shrugging shoulders. Keep body relaxed in this good posture.
Embouchure Jaw relaxed, creating the largest oral space Round embouchure, push corners of mouth toward the middle. Like sucking a very thick milk shake through a straw, then turn the shape inward. Avoid biting down on the reed. Avoid “smiling” with the lips. Place the tip of the reed on the bottom lip, on the line between lip and skin, then roll lips inward over the teeth. The ideal reed placement should only have a few millimeters of reed in the mouth. Tension should be kept in the corners of the mouth, never in the middle.
Hand Position Fingers should have a natural curvature. Hang hands down to the side of body and observe the natural finger shape, transfer that to hold the instrument. Place the right hand under the thumb rest with the pad of thumb touching the oboe bore. The thumb rest should be on the side of the thumb, between the nail and the first knuckle. The thumb rest should NOT be on the nail side of thumb. When holding the oboe, rest fingers on the keys gently. When pressing down a key, use just enough pressure to close the tone hole. Never squeeze the instrument. Wrists should be parallel to the hands. Elbows are a few inches away from the body, in a position that allows wrists to be parallel to hands. When playing, keep fingers close to the instrument, never lift them up too high. Keep finger movements to a minimum.
Breathing Practice breathing deeply to fill lungs entirely, it should have the same sensation as a deep yawn. When taking an inhale, shoulders should stay relaxed, never shrugged. Oboe playing requires highly-pressured air but not a lot of it, due to the small opening of the oboe reed. Therefore, unlike the tuba or flute where the players constantly need to inhale more air, it is essential for oboists to plan exhale points to let out old, stale air. When inhaling air does not make the player feel refreshed or better, it is probably time to exhale instead.
Blowing
Support air from below the belly button toward middle back. The support should be firm and elastic, not stiff.
Important Tips NEVER, EVER, buy machine-made reeds from local general music stores. They are not only bad, but often simply do not work. ALWAYS buy reeds from human reed-makers (sources listed in the Resource section below) Soak reeds for a few minutes before playing. Store reeds in a proper reed box, not the plastic coffins the reeds come in from the store. Swab the instrument before putting it away every time. Lubricate the joint cork with cork grease. Be careful not to bend the rods when assembling and disassembling the instrument. Do not leave oboe in extreme climatic conditions, for example, cold or hot cars. Instruments should be taken to a qualified oboe technician every year for a general cleaning. They will also check for necessary adjustments, and replace old pads and corks. 1
1 Schuring, Martin, Oboe Art & Method.
paradisewinds.org

Oboe: Troubleshooting, Equipment, & Resources
11
Instruments & Essentials Essentials Properly adjusted instrument Good quality reeds Reed soaking cup Swab or feather Reed case Cork grease Instrument Maker Model Notes Student, around $2000 Yamaha 241 Howarth S20C Intermediate, $3000-5000 Fox 333 MCW (Mark Chudnow Woodwinds) Modified Conservatory System Howarth S40C Rigoutat Delphine, Riec Professional, $7000-10000 Howarth XL, XM, LXV Laubin New oboes start at $13000 with an 8-
year wait. Lorée AK, Royal Marigaux 901, 2001, M2 Puchner, Joseph, Yamaha
Symptom Problem Solution
Tone thin and pitch sharp Biting on the reed Round embouchure, tighten the corners of mouth toward the middle but let lips relax. Never bite down on the reed.
Tone wild and pitch flat Embouchure too loose Tighten corners of mouth toward the middle.
Tone wild and pitch sharp Too much reed in the mouth Pull reed out. The lips should contact the heart (thickest part) of the reed, no further toward the thread.
Pitch sagging in the high register Lack of support Push reed in slightly (only for high notes) and
support air from the lower abdominal area.
Slow/heavy articulation Not tonguing properly (tongue traveling too far from the reed, using parts of the tongue other than the tip to tongue)
The tongue should be in the middle of the mouth, close to the reed, when resting. When tonguing, the player should aim to touch the tip of reed with the tip of their tongue with the smallest movement possible. Practice this movement with the lightest attacks until attacks are consistent.
Low notes not responding Biting on the reed, reed opening too small, or too much reed in the mouth.
Make sure reed placement in mouth is correct, round the embouchure and drop the jaw slightly. Blow with well-supported air.
paradisewinds.org

Oboe: Troubleshooting, Equipment, & Resources
12
Resources Instruments Hannah's Oboes “The Oboe Fairy” (Largest selection of new and used oboes in the US) http://www.hannahsoboes.com Double Reed Supplies (all these retailers also sell instruments, hand-made reeds, and some sheet music) Advantage USA Reeds http://www.advantage-usa.com Charles Double Reeds http://www.charlesmusic.com Forrests Music https://www.forrestsmusic.com Midwest Musical Imports https://www.mmimports.com RDG Woodwinds https://www.rdgwoodwinds.com Weber Reeds http://webreeds.com/wrstore/ Music Trevco Varner Music https://www.trevcomusic.com Trevco Music Publishing http://www.trevcomusicpublishing.com Reeds Obonik http://www.obonik.com Recommended Reading Oboe Art & Method by Martin Schuring Arizona State University Oboe website http://www.public.asu.edu/~schuring/main.html
paradisewinds.org

Bassoon: Technique Overview - Gaining control of bassoon technique is both a muscular matter and a matter of perceiving and managing appropriate amounts of tension in the body position, embouchure and breath.
13
Intonation
Tuning should be set by the reed and the player Pitch tends to go flat when loud and sharp when soft Rubber gaskets occasionally used between boot and long joints to extend air stream and lower pitch, but player ultimately has control and should develop it
Resonance/alternate fingerings available for various stylistic needs
Embouchure
Cover teeth with lips and say “mmm” Create space between teeth, wrap lips around teeth Lower lip should cover bottom teeth Top lip should cover top teeth
Chin pulled somewhat downward Corners of lips should be mildly rounded or left in natural position. No air should leak from corners.
Cheeks stay in against teeth – no puffing (common) Reed should crow C-sharp (no higher than E-flat) NO JAW MOVEMENT
Articulation
Just above tip of tongue targets bottom blade No embouchure movement during articulation
Limit tongue motion – ride the air stream and resistance Pressure can change for varying tone and dynamic levels; must compensate for pitch
NO JAW MOVEMENT
Voicing
Position of tongue arch varies by range: One shape will NOT work for entire range. Low Register, jaw down Voice “O” as in “toe” Middle Register, jaw relaxed Voice “UU” as in “two” High Register, jaw closer, lips tighter but not biting Voice “EE” as in “tree”
Hand Position Use neutral wrist position (not flexed or extended), orient fingers around bassoon with curved, relaxed knuckles
Bassoon supported by combo strap/harness and left hand of player. Condition these strengths slowly.
RH crutch or hand-rest should allow for neutral wrist position and fleshy part of finger tips placed over tone holes
Fingers press and release the keys. Avoid squeezing and smacking.
LH thumb requires mobility and flexibility while hand bears some weight of bassoon Use rollers when available on the keys
Air Support
Quantity of air defines how loud we play Breathe by dropping jaw, avoid popping head upwards for breath (somewhat common)
Blow air from chair (use lower back muscles and lower abs) Maintain constant crow quality, then maintain constant tone quality
Must maintain high pressure at all times – imagine flexed abs firm enough to take a punch
Warmup
Develop daily warmup for full range, various articulations, dynamics, and scale patterns.
Improvise or rote perform holiday tunes, show tunes, commercial jingles, pop music, etc.
Must practice regularly Always use a metronome and a tuner and/or drone

Bassoon: Troubleshooting, Equipment, & Resources
14
Symptom Problem Solution
Sound & Intonation
Unfocused sound/Wild sound
Gear: unbalanced or store-bought reed; leaking pads on bassoon; air leaking around cork on bocal tenon Player: loose embouchure, inconsistent air processes, air too weak, air too aggressive. Player lacks strength in embouchure and consistent air production. Wrong fingering. Vibrato failure.
Gear: Adjust reed, service the bassoon and properly seat pads, replace cork or treat cork with appropriate products (slippery elm bark extract) Player: review and tighten embouchure slightly, generate appropriate and consistent air stream, increase ab support. Locate proper fingering of the note or try alternative. Coach vibrato usage according to style.
Small, thin sound
Reed is too old (common), too little reed in embouchure, or trimmed too thin during adjustment. Player may also have overly tight embouchure (common).
Garbage can or collectibles…that reed is dead.
Very flat
Gear: reed is too heavy, reed aperture is too wide, bocal too long (rare, but possible) Player: loose embouchure, reed too far out of embouchure, air too “slow” or “cool.” Player lacks strength in embouchure and consistent air production.
Gear: trim reed or start with a better reed overall, close reed aperture slightly, use proper bocal (2 by most brands) Player: review reed position in embouchure and tighten embouchure slightly. Explore air production concepts to get results (temperature, speed, etc.)
Very sharp
Gear: reed is too thin or aged, reed aperture too closed, bocal too short (rare, but possible) Player: biting or overly tight embouchure, not enough resistance from reed on air stream
Gear: proper reed resistance, proper reed aperture, use proper bocal (2 by most brands) Player: review reed position, loosen embouchure enough (not too much),
Wrong note, right fingering
Some fingerings overblow the octave on bassoon and another regular pitch emerges, even though the expected note is in the low register.
Conceive of three zones for register and voicing: blow high (ceiling, lights, sky, etc.) for high notes, blow across (sheet music, conductor, chalk board) for mid, and blow down (my feet, power strip, carpet, tile) for low register response and good tone. This adjusts voicing by altering tongue and jaw position.
Articulation
“Dirty” articulation Player creates inconsistent or inappropriate articulation style(s)
Tongue touches reed from bottom blade directly on top of tongue tip. Model “DAH” for regular and “TAH” with extra air for accents
Cannot articulate based on range (similar to Wrong note, right fingering)
Player plays in mid register aka prep octave with relative stability and consistency, but other ranges fail
Conceive of three zones for register and voicing: blow high (ceiling, lights, sky, etc.) for high notes, blow across (sheet music, conductor, chalk board) for mid, and blow down (my feet, power strip, carpet, tile) for low register response and good tone. This adjusts voicing by altering tongue and jaw position.
Delayed or slow articulation Player failing to touch reed with tongue
Common among non-woodwind players switching to bassoon. Review proper tonguing: Tongue touches reed from bottom blade directly on top of tongue tip. Model “DAH” for regular and “TAH” with extra air for accents
paradisewinds.org

Bassoon: Troubleshooting, Equipment, & Resources
15
Screech-y & unexpected overtones/Squeaking
Player failing to use proper half-hole technique, player venting another key/tone-hole on accident, player biting or over-squeezing reed with embouchure (all common)
Control half-hole with consistent awareness and practice. Relax embouchure in order for sound to sink in tune and stay supported by abdominals.
Voicing
Flat upper register Tongue behind teeth and curled, jaw dropped Flatten tongue, tighten embouchure enough and produce “E” vowel
Sharp lower register Embouchure too closed Lower jaw, reduce amount of reed in embouchure and make “O” vowel
Screech-y & unexpected overtones/Squeaking
Player failing to use proper half-hole technique, player venting another key/tone-hole on accident, player biting or over-squeezing reed with embouchure (all common)
Control half-hole with consistent awareness and practice. Relax embouchure in order for sound to sink in tune and stay supported by abdominals.
Hand Position & Fingering Passage-work failing to bling and bust Poor choice of fingering There are “easier” but lesser quality fingerings
that allow for rapid passages.
Pain in wrists/hands Lactic acid builds up in various muscles and joints, student lacking basic bassoon strength
Bassoon is heavier and awkwardly built, requiring unique finger dexterity so the student needs to slowly condition and strengthen their hand position. Avoid over-practice (rare, but possible)
Difficulty crossing break Student fingers for high-note, but low-note comes out (Wrong note/right fingering)
Conceive of three zones for register and voicing: blow high (ceiling, lights, sky, etc.) for high notes, blow across (sheet music, conductor, chalk board) for mid, and blow down (my feet, power strip, carpet, tile) for low register response and good tone. This adjusts voicing by altering tongue and jaw position.
paradisewinds.org
Bassoon: Troubleshooting, Equipment, & Resources
16
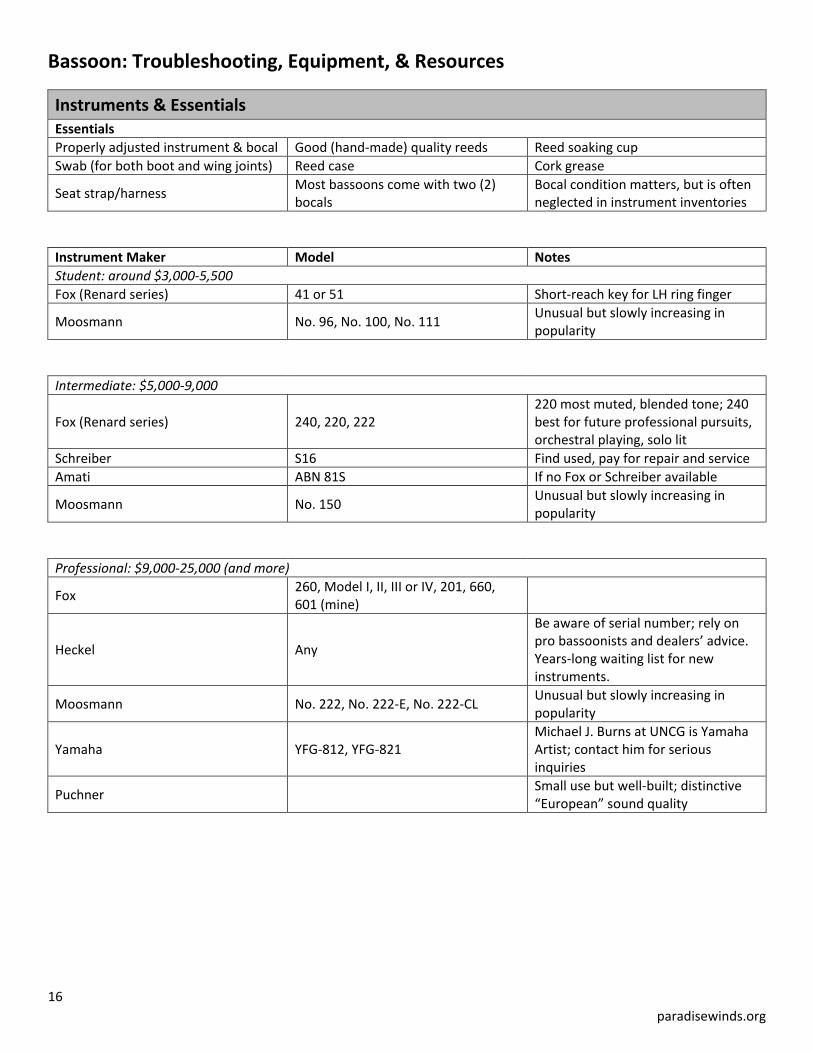
Instruments & Essentials Essentials Properly adjusted instrument & bocal Good (hand-made) quality reeds Reed soaking cup Swab (for both boot and wing joints) Reed case Cork grease
Seat strap/harness Most bassoons come with two (2) bocals
Bocal condition matters, but is often neglected in instrument inventories
Instrument Maker Model Notes Student: around $3,000-5,500 Fox (Renard series) 41 or 51 Short-reach key for LH ring finger
Moosmann No. 96, No. 100, No. 111 Unusual but slowly increasing in popularity
Intermediate: $5,000-9,000
Fox (Renard series) 240, 220, 222 220 most muted, blended tone; 240 best for future professional pursuits, orchestral playing, solo lit
Schreiber S16 Find used, pay for repair and service Amati ABN 81S If no Fox or Schreiber available
Moosmann No. 150 Unusual but slowly increasing in popularity
Professional: $9,000-25,000 (and more)
Fox 260, Model I, II, III or IV, 201, 660, 601 (mine)
Heckel Any
Be aware of serial number; rely on pro bassoonists and dealers’ advice. Years-long waiting list for new instruments.
Moosmann No. 222, No. 222-E, No. 222-CL Unusual but slowly increasing in popularity
Yamaha YFG-812, YFG-821 Michael J. Burns at UNCG is Yamaha Artist; contact him for serious inquiries
Puchner Small use but well-built; distinctive “European” sound quality
paradisewinds.org

Bassoon: Troubleshooting, Equipment, & Resources
17
Fundamental Concept of Bassoon Technique
Gaining control of bassoon technique is both a muscular matter and a matter of perceiving appropriate amounts of tension.
Body position: avoid excess tension but maintain the necessary amount. Place wrists in neutral position. Sit on the back of thighs, head/spine aligned and straight, bocal-with-reed inserts into embouchure slightly below horizontal (avoid exaggerated postures).
Hand position: fingers and knuckles slightly curved/curled; fleshy part of finger tips control tone holes and keys
Tone production: inhale by lowering jaw and fill abdomen followed by rib cage (demo on floor). Exhale through proper embouchure and blow into the resistance of reed/bassoon.
Reed in embouchure: lips should touch about .5-.75 the length of the blades; placing in embouchure more or less reed impacts elements of playing like register response, pitch and tone quality. Experiment to find best nature of sound for repertoire.
Articulation: average ‘Mozartian’ articulation is “DAH” and forceful articulation is “TAH” w/extra breath pressure.
Reeds – Crowing; First Wire Adjustments
Reed selection: prefer hand-made reeds (machine-made reeds are problematic for several reasons) with balanced arches or bowed blades visible while looking down at aperture.
Sound Production/Playing the Reed: testing the reed’s “crow”: for many professionals/teachers, the crow is an important and revealing aspect of tone production and reed control. If the reed crows around C-sharp4 to E-flat4 fundamental with an equal mix of low, mid and high-range overtone pitches, the player is more likely to have a good tone quality and control the reed.
Reed tip adjustments: with mandrel, plaque and pliers one can basically adjust reeds for the player focusing on wire closest to blades of reed. This will make the aperture more close or more open.
MORE CLOSED1:
Less resistant (requires less air pressure/abdominal support), Softer dynamic/less projection, Sharper pitch, Favors high register response, Favors legato/delicate articulation, Smaller sound profile/brighter tone
MORE OPEN:
More resistant (requires more air pressure/abdominal support), Louder dynamic/more projection, Flatter pitch, Favors low register, Favors accents/strong articulations, Bigger sound profile/darker tone
1 Spaniol, Douglas E., The New Weissenborn Method for Bassoon

Bassoon: Troubleshooting, Equipment, & Resources
18
Resources Selecting an Instrument: https://www.mmimports.com/2013/11/choosing-the-right-bassoon/ Instruments
Midwest Musical Imports https://www.mmimports.com/
Miller Marketing http://www.millermarketingco.com/
Double Reed Supplies (all these retailers also sell instruments, hand-made reeds, and some sheet music) Advantage USA Reeds http://www.advantage-usa.com Charles Double Reeds http://www.charlesmusic.com Forrests Music https://www.forrestsmusic.com Midwest Musical Imports https://www.mmimports.com RDG Woodwinds https://www.rdgwoodwinds.com
Music
Trevco Varner Music https://www.trevcomusic.com Trevco Music Publishing http://www.trevcomusicpublishing.com
Resources & Reading (web & print)
● International Double Reed Society o https://www.idrs.org/resources/
● Kristin Wolfe Jensen (progressive lessons, play-along and recordings, technical advice) o http://www.musicandthebassoon.org/introduction/about-author
● David Wells (fingering charts, repertoire, technical advice) o http://davidawells.com/resources/
● Fox Products (oboe & bassoon) o http://www.foxproducts.com/resources/
● (Print) Julius Weissenborn (ed. Douglas Spaniol) o The New Weissenborn Method for Bassoon
● (Print) Christopher Weait o http://weaitmusic.com/books o I use these for myself and students often; he has several titles that are useful for technical and reed-
making needs ● (Print) William Waterhouse
o Bassoon ● (Print) David McGill
o Sound in Motion ● (Print) Arthur Weisberg
o The Art of Wind Playing