The Photographer’s Ephemeris - … Photographer’s Ephemeris TPE for Desktop web app Quick Start...
3
The Photographer’s Ephemeris TPE for Desktop web app Quick Start Guide 10/180316 https://photoephemeris.com 1 TPE Desktop Web App – Quick Start Guide The TPE web app is intended for use on desktops or laptops equipped with a mouse or track pad. • Map TPE uses Google Maps™. Pan around to find a location, then drag and drop the red pin on a chosen position. Click centre pin to centre the red pin on the map, (shift- clicking centre pin centres the map on the red pin). Rise and set azimuth lines for sun and moon are always displayed. • Events timeline The timeline shows sunrise, sunset, moonrise and moonset times and azimuths as well as moon phase, new moon visibility and twilight times for the day. On small screens scroll across to view all events. Toggle timeline hides/shows the timeline. • Chart The chart shows 24-hour sun and moon altitudes at the red pin position. Drag the time slider to adjust the time and see the azimuth and altitude information displayed numerically. Clicking an event in the timeline sets the selected time of day to that moment. Toggle full screen to hide/show chart and timeline. • Calendar Use the calendar to set the date. To change the month, click on the month name. To change the year, click on the month name and then the year number. Today sets the date to that used by your computer. Clear empties the date field. Use close or tap outside the calendar to dismiss it. The chosen date and the time zone of the red pin position are displayed above the map, as are its elevation above sea level, latitude and longitude. Now moves to your computer’s current time displayed in the time zone of the red pin position. Click next or previous to move one day at a time. Use next moon phase event or previous moon phase event to jump the date and time forward or back to track moon phase events. • Horizon Manually enter the elevation above sea level at the horizon or toggle the lock button on to set the elevation from the grey pin. To clear the horizon delete the input elevation value and then hit Return. • Sun and Moon +6° shadow circle The Sun and Moon shadow circle is displayed as you adjust the time slider. Extensions of the sun and moon azimuth lines represent the sun and moon shadow direction. If the shadow falls outside the circle, then the sun or moon is below +6° above the horizon. When the sun is below +6° the shadow circle turns orange. An altitude of less than +6° corresponds to golden light or a large, yellow moon, both effects arising due to refraction and atmospheric scattering of light. • Geodetics Toggle geodetics to display or hide the grey pin. The geodetics panel shows distance, change in elevation, azimuth and apparent altitude from the red pin to the grey. The altitudes of the sun and moon for the selected time are also displayed. Use the pin swap button to swap the red and grey pin positions. • Keyboard shortcuts - E to view the Ephemeris - P for previous day - Shift P for previous moon phase event - N for next day - Shift N for next moon phase event - L opens Locations page - B or Shift + (plus) to add new location to list - C moves red pin to the centre of visible map - Shift C (or Shift “centre red pin button”) moves visible map to centre on red pin - G toggles geodetics on and off - Shift G (or Shift “grey pin button”) centres map on grey pin (if geodetics enabled) - S swap positions of red and grey pins (if geodetics enabled) - Z zooms and pans visible map to show both red and grey pin positions (if geodetics enabled) - F toggles full screen on and off - T toggles timeline on and off - Left and right cursor (click slider first) move time slider in one minute increments - , (comma) and . (full stop) use to show next or previous events within the event timeline the calendar calendar red pin centre red pin timeline chart time slider full screen previous day now next day selected date & timezone elevation, latitude & longitude geodetics swap horizon location text field geodetics panel search bookmark locations sun and moon +6° shadow circle next moon phase event previous moon phase event toggle timeline
Transcript of The Photographer’s Ephemeris - … Photographer’s Ephemeris TPE for Desktop web app Quick Start...
The Photographer’s Ephemeris
TPE for Desktop web app Quick Start Guide 10/180316 https://photoephemeris.com 1
TPE Desktop Web App – Quick Start Guide
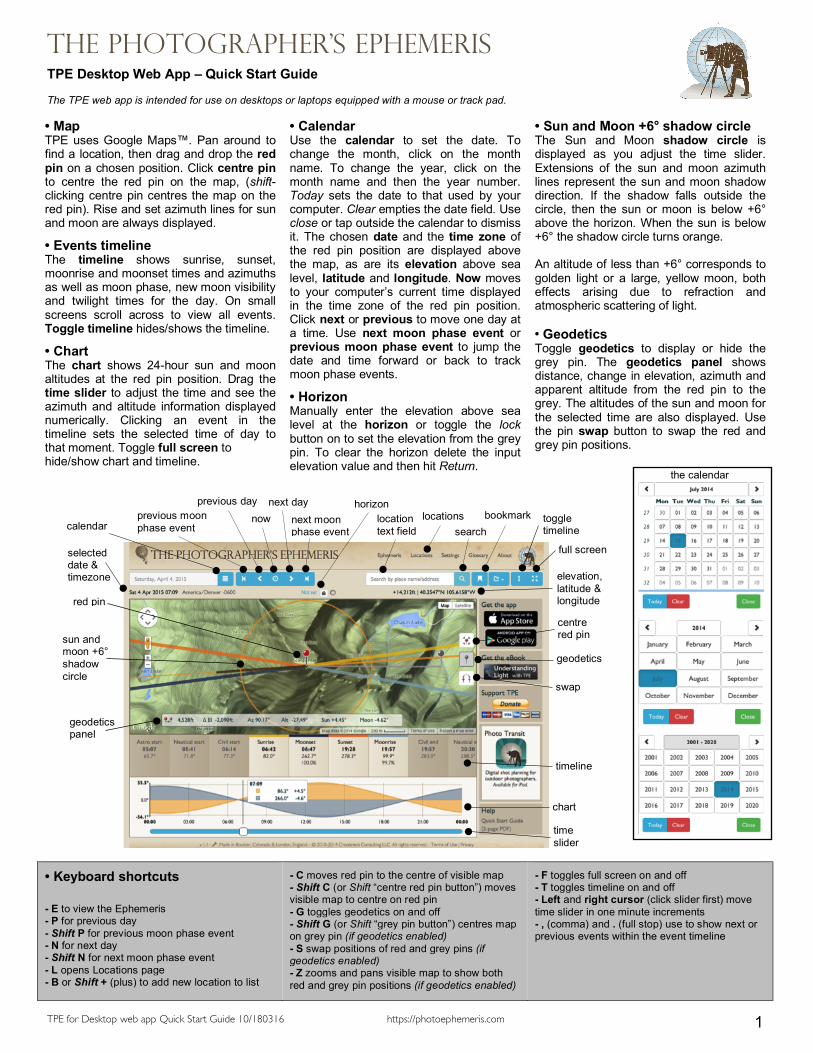
The TPE web app is intended for use on desktops or laptops equipped with a mouse or track pad. • Map TPE uses Google Maps™. Pan around to find a location, then drag and drop the red pin on a chosen position. Click centre pin to centre the red pin on the map, (shift-clicking centre pin centres the map on the red pin). Rise and set azimuth lines for sun and moon are always displayed.
• Events timeline The timeline shows sunrise, sunset, moonrise and moonset times and azimuths as well as moon phase, new moon visibility and twilight times for the day. On small screens scroll across to view all events. Toggle timeline hides/shows the timeline.
• Chart The chart shows 24-hour sun and moon altitudes at the red pin position. Drag the time slider to adjust the time and see the azimuth and altitude information displayed numerically. Clicking an event in the timeline sets the selected time of day to that moment. Toggle full screen to hide/show chart and timeline.
• Calendar Use the calendar to set the date. To change the month, click on the month name. To change the year, click on the month name and then the year number. Today sets the date to that used by your computer. Clear empties the date field. Use close or tap outside the calendar to dismiss it. The chosen date and the time zone of the red pin position are displayed above the map, as are its elevation above sea level, latitude and longitude. Now moves to your computer’s current time displayed in the time zone of the red pin position. Click next or previous to move one day at a time. Use next moon phase event or previous moon phase event to jump the date and time forward or back to track moon phase events.
• Horizon Manually enter the elevation above sea level at the horizon or toggle the lock button on to set the elevation from the grey pin. To clear the horizon delete the input elevation value and then hit Return.
• Sun and Moon +6° shadow circle The Sun and Moon shadow circle is displayed as you adjust the time slider. Extensions of the sun and moon azimuth lines represent the sun and moon shadow direction. If the shadow falls outside the circle, then the sun or moon is below +6° above the horizon. When the sun is below +6° the shadow circle turns orange. An altitude of less than +6° corresponds to golden light or a large, yellow moon, both effects arising due to refraction and atmospheric scattering of light. • Geodetics Toggle geodetics to display or hide the grey pin. The geodetics panel shows distance, change in elevation, azimuth and apparent altitude from the red pin to the grey. The altitudes of the sun and moon for the selected time are also displayed. Use the pin swap button to swap the red and grey pin positions.
• Keyboard shortcuts - E to view the Ephemeris - P for previous day - Shift P for previous moon phase event - N for next day - Shift N for next moon phase event - L opens Locations page - B or Shift + (plus) to add new location to list
- C moves red pin to the centre of visible map - Shift C (or Shift “centre red pin button”) moves visible map to centre on red pin - G toggles geodetics on and off - Shift G (or Shift “grey pin button”) centres map on grey pin (if geodetics enabled) - S swap positions of red and grey pins (if geodetics enabled) - Z zooms and pans visible map to show both red and grey pin positions (if geodetics enabled)
- F toggles full screen on and off - T toggles timeline on and off - Left and right cursor (click slider first) move time slider in one minute increments - , (comma) and . (full stop) use to show next or previous events within the event timeline
the calendar
calendar
red pin
centre red pin
timeline
chart
time slider
full screen
previous day now
next day
selected date & timezone elevation,
latitude & longitude
geodetics
swap
horizon location text field
geodetics panel
search bookmark locations
sun and moon +6° shadow circle
next moon phase event
previous moon phase event
toggle timeline
The Photographer’s Ephemeris
TPE for Desktop web app Quick Start Guide 10/180316 https://photoephemeris.com 2
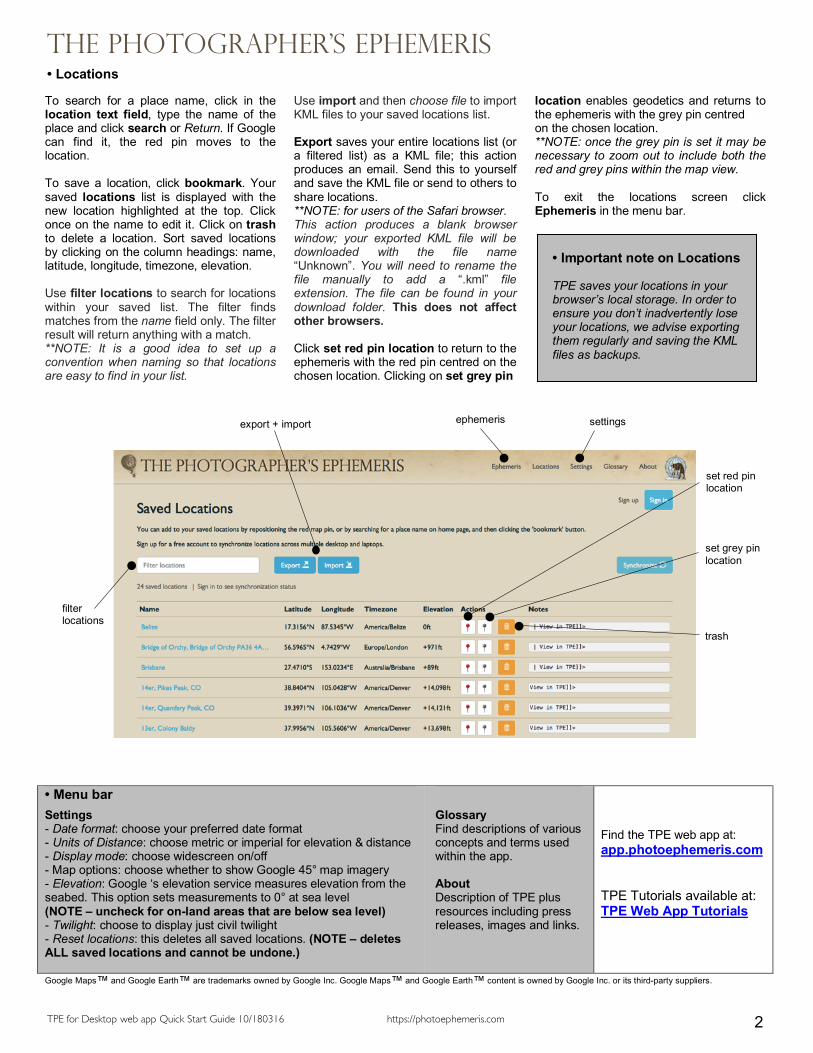
• Locations
To search for a place name, click in the location text field, type the name of the place and click search or Return. If Google can find it, the red pin moves to the location. To save a location, click bookmark. Your saved locations list is displayed with the new location highlighted at the top. Click once on the name to edit it. Click on trash to delete a location. Sort saved locations by clicking on the column headings: name, latitude, longitude, timezone, elevation. Use filter locations to search for locations within your saved list. The filter finds matches from the name field only. The filter result will return anything with a match. **NOTE: It is a good idea to set up a convention when naming so that locations are easy to find in your list.
Use import and then choose file to import KML files to your saved locations list. Export saves your entire locations list (or a filtered list) as a KML file; this action produces an email. Send this to yourself and save the KML file or send to others to share locations. **NOTE: for users of the Safari browser. This action produces a blank browser window; your exported KML file will be downloaded with the file name “Unknown”. You will need to rename the file manually to add a “.kml” file extension. The file can be found in your download folder. This does not affect other browsers. Click set red pin location to return to the ephemeris with the red pin centred on the chosen location. Clicking on set grey pin
location enables geodetics and returns to the ephemeris with the grey pin centred on the chosen location. **NOTE: once the grey pin is set it may be necessary to zoom out to include both the red and grey pins within the map view. To exit the locations screen click Ephemeris in the menu bar.
• Menu bar
Settings - Date format: choose your preferred date format - Units of Distance: choose metric or imperial for elevation & distance - Display mode: choose widescreen on/off - Map options: choose whether to show Google 45° map imagery - Elevation: Google ‘s elevation service measures elevation from the seabed. This option sets measurements to 0° at sea level (NOTE – uncheck for on-land areas that are below sea level) - Twilight: choose to display just civil twilight - Reset locations: this deletes all saved locations. (NOTE – deletes ALL saved locations and cannot be undone.)
Glossary Find descriptions of various concepts and terms used within the app. About Description of TPE plus resources including press releases, images and links.
Find the TPE web app at: app.photoephemeris.com TPE Tutorials available at: TPE Web App Tutorials
Google Maps™ and Google Earth™ are trademarks owned by Google Inc. Google Maps™ and Google Earth™ content is owned by Google Inc. or its third-party suppliers.
• Important note on Locations TPE saves your locations in your browser’s local storage. In order to ensure you don’t inadvertently lose your locations, we advise exporting them regularly and saving the KML files as backups.
filter locations
set red pin location
set grey pin location
settings ephemeris export + import
trash
The Photographer’s Ephemeris
TPE for Desktop web app Quick Start Guide 10/180316 https://photoephemeris.com 3
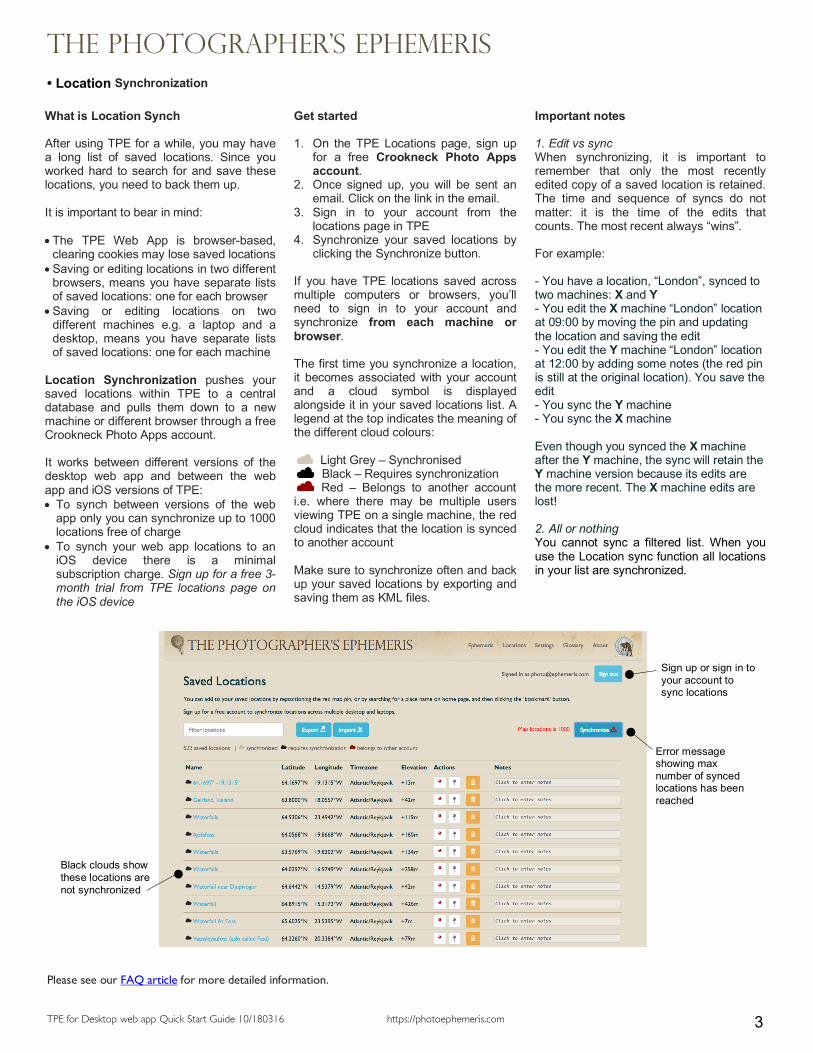
• Location Synchronization
What is Location Synch After using TPE for a while, you may have a long list of saved locations. Since you worked hard to search for and save these locations, you need to back them up. It is important to bear in mind: • The TPE Web App is browser-based,
clearing cookies may lose saved locations • Saving or editing locations in two different
browsers, means you have separate lists of saved locations: one for each browser
• Saving or editing locations on two different machines e.g. a laptop and a desktop, means you have separate lists of saved locations: one for each machine
Location Synchronization pushes your saved locations within TPE to a central database and pulls them down to a new machine or different browser through a free Crookneck Photo Apps account. It works between different versions of the desktop web app and between the web app and iOS versions of TPE: • To synch between versions of the web
app only you can synchronize up to 1000 locations free of charge
• To synch your web app locations to an iOS device there is a minimal subscription charge. Sign up for a free 3-month trial from TPE locations page on the iOS device
Get started 1. On the TPE Locations page, sign up
for a free Crookneck Photo Apps account.
2. Once signed up, you will be sent an email. Click on the link in the email.
3. Sign in to your account from the locations page in TPE
4. Synchronize your saved locations by clicking the Synchronize button.
If you have TPE locations saved across multiple computers or browsers, you’ll need to sign in to your account and synchronize from each machine or browser. The first time you synchronize a location, it becomes associated with your account and a cloud symbol is displayed alongside it in your saved locations list. A legend at the top indicates the meaning of the different cloud colours:
Light Grey – Synchronised Black – Requires synchronization Red – Belongs to another account
i.e. where there may be multiple users viewing TPE on a single machine, the red cloud indicates that the location is synced to another account Make sure to synchronize often and back up your saved locations by exporting and saving them as KML files.
Important notes 1. Edit vs sync When synchronizing, it is important to remember that only the most recently edited copy of a saved location is retained. The time and sequence of syncs do not matter: it is the time of the edits that counts. The most recent always “wins”. For example: - You have a location, “London”, synced to two machines: X and Y - You edit the X machine “London” location at 09:00 by moving the pin and updating the location and saving the edit - You edit the Y machine “London” location at 12:00 by adding some notes (the red pin is still at the original location). You save the edit - You sync the Y machine - You sync the X machine Even though you synced the X machine after the Y machine, the sync will retain the Y machine version because its edits are the more recent. The X machine edits are lost! 2. All or nothing You cannot sync a filtered list. When you use the Location sync function all locations in your list are synchronized.
Please see our FAQ article for more detailed information.
Black clouds show these locations are not synchronized
Error message showing max number of synced locations has been reached
Sign up or sign in to your account to sync locations