The Morrowind Animation Tutorial - Absolute Games · The Morrowind Animation Tutorial Written by...
31
1 The Morrowind Animation Tutorial Written by DarkIllusion This tutorial remains property of DarkIllusion. Revision 0 5 July 2003 Welcome, today we will be making this cute little fish come alive. Put the UltimaFish.bmp texture into your Morrowind/Data Files/Textures directory. First make sure that your model has a separate mesh for each body part. Also make sure that none of the body parts have the same name as this will cause major problems. The names are unimportant at the moment so feel free to call them what you like. 1. Position the creature properly. It is to be standing up, and should lie on top of the plane. Select All, and then rotate everything 90 degrees, and then move everything so it sits nicely at the origin. It doesn’t really matter of bits of the creature go underneath the plane. The plane is there to just remind you where the ground in Morrowind will be.
Transcript of The Morrowind Animation Tutorial - Absolute Games · The Morrowind Animation Tutorial Written by...

1
The Morrowind Animation Tutorial Written by DarkIllusion This tutorial remains property of DarkIllusion. Revision 0 5 July 2003 Welcome, today we will be making this cute little fish come alive. Put the UltimaFish.bmp texture into your Morrowind/Data Files/Textures directory. First make sure that your model has a separate mesh for each body part. Also make sure that none of the body parts have the same name as this will cause major problems. The names are unimportant at the moment so feel free to call them what you like.
1. Position the creature properly. It is to be standing up, and should lie on top of the plane. Select All, and then rotate everything 90 degrees, and then move everything so it sits nicely at the origin. It doesn’t really matter of bits of the creature go underneath the plane. The plane is there to just remind you where the ground in Morrowind will be.
2
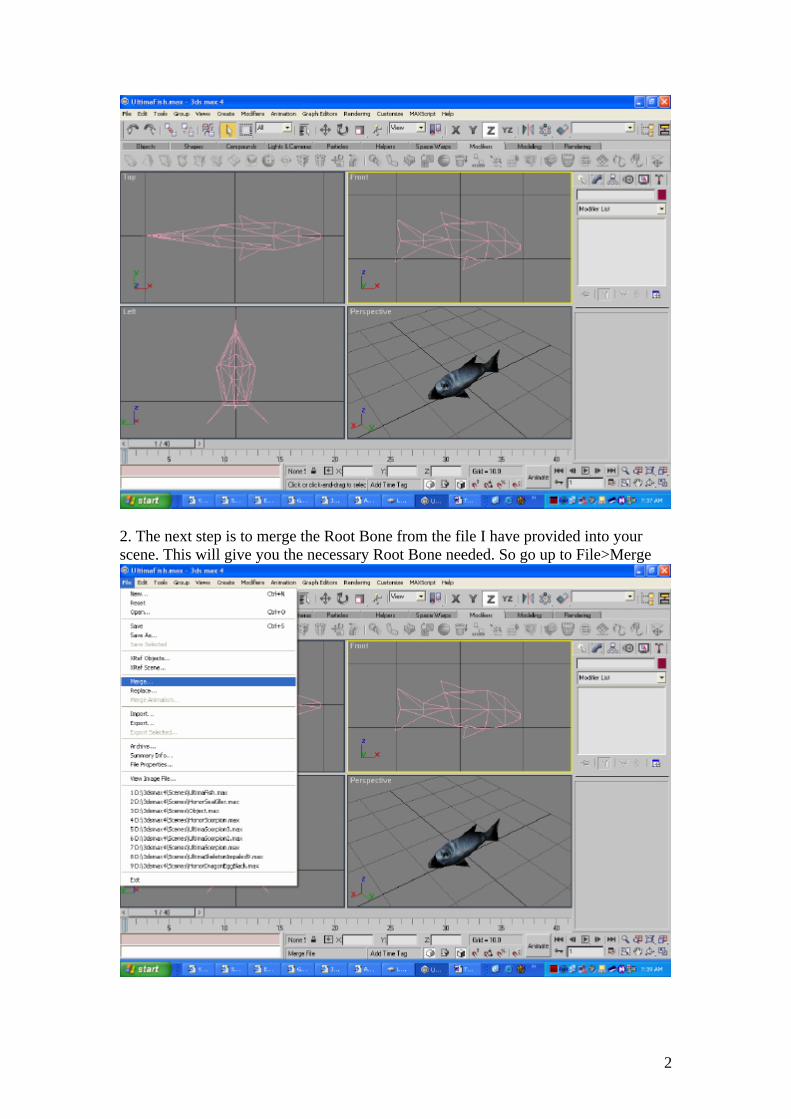
2. The next step is to merge the Root Bone from the file I have provided into your scene. This will give you the necessary Root Bone needed. So go up to File>Merge
3
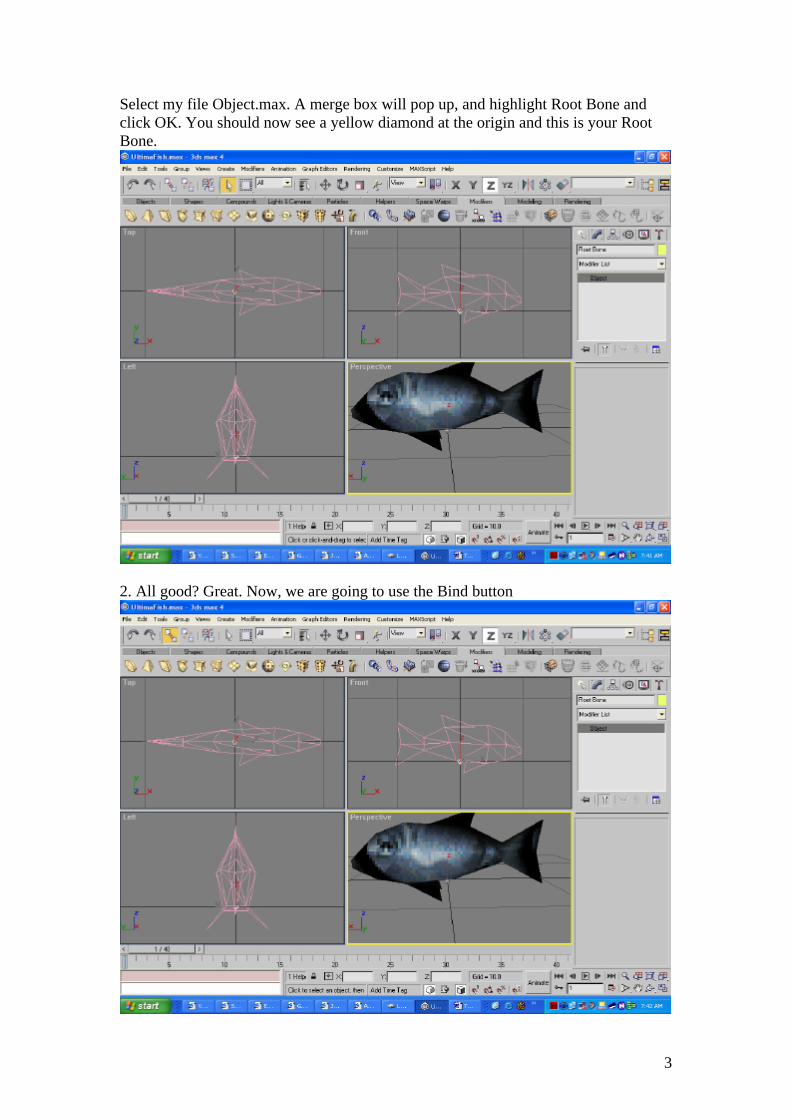
Select my file Object.max. A merge box will pop up, and highlight Root Bone and click OK. You should now see a yellow diamond at the origin and this is your Root Bone.
2. All good? Great. Now, we are going to use the Bind button
4
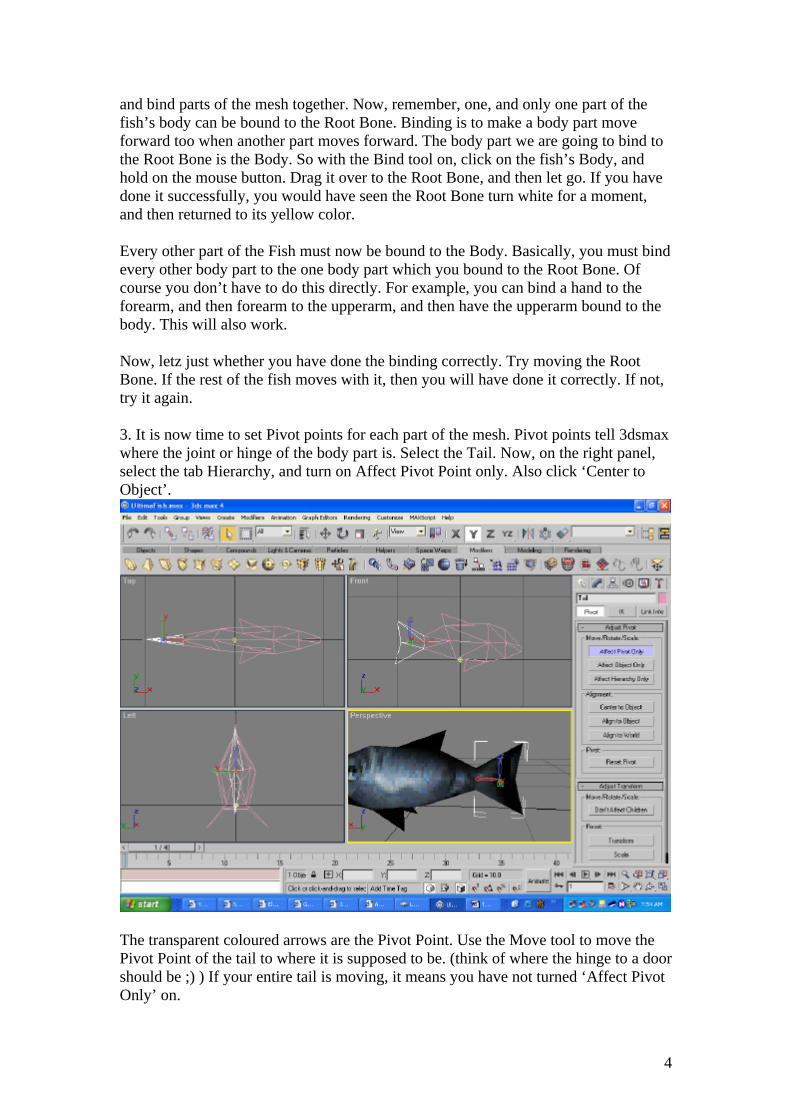
and bind parts of the mesh together. Now, remember, one, and only one part of the fish’s body can be bound to the Root Bone. Binding is to make a body part move forward too when another part moves forward. The body part we are going to bind to the Root Bone is the Body. So with the Bind tool on, click on the fish’s Body, and hold on the mouse button. Drag it over to the Root Bone, and then let go. If you have done it successfully, you would have seen the Root Bone turn white for a moment, and then returned to its yellow color. Every other part of the Fish must now be bound to the Body. Basically, you must bind every other body part to the one body part which you bound to the Root Bone. Of course you don’t have to do this directly. For example, you can bind a hand to the forearm, and then forearm to the upperarm, and then have the upperarm bound to the body. This will also work. Now, letz just whether you have done the binding correctly. Try moving the Root Bone. If the rest of the fish moves with it, then you will have done it correctly. If not, try it again. 3. It is now time to set Pivot points for each part of the mesh. Pivot points tell 3dsmax where the joint or hinge of the body part is. Select the Tail. Now, on the right panel, select the tab Hierarchy, and turn on Affect Pivot Point only. Also click ‘Center to Object’.
The transparent coloured arrows are the Pivot Point. Use the Move tool to move the Pivot Point of the tail to where it is supposed to be. (think of where the hinge to a door should be ;) ) If your entire tail is moving, it means you have not turned ‘Affect Pivot Only’ on.

5
Make sure you turn ‘Affect Pivot Only’ off once you are done. Do the same for the pivots of the Left Fin and Right Fin. All the body parts must be ‘hinged’ correctly. 4. How are you feeling? Tired? Well, you have only prepared the fish for animation! Lol. So we are not even half way there yet. Now, turn on the Animate button and slide the Time slider to some time. Letz say 5.
6
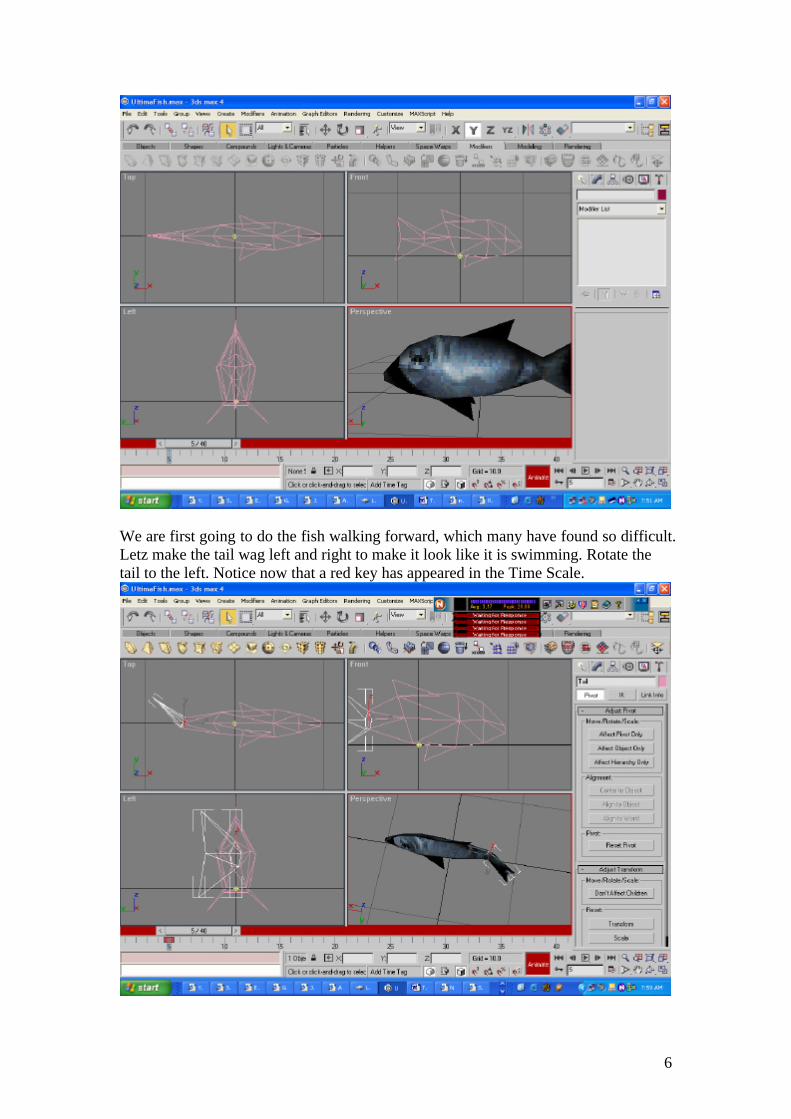
We are first going to do the fish walking forward, which many have found so difficult. Letz make the tail wag left and right to make it look like it is swimming. Rotate the tail to the left. Notice now that a red key has appeared in the Time Scale.
7
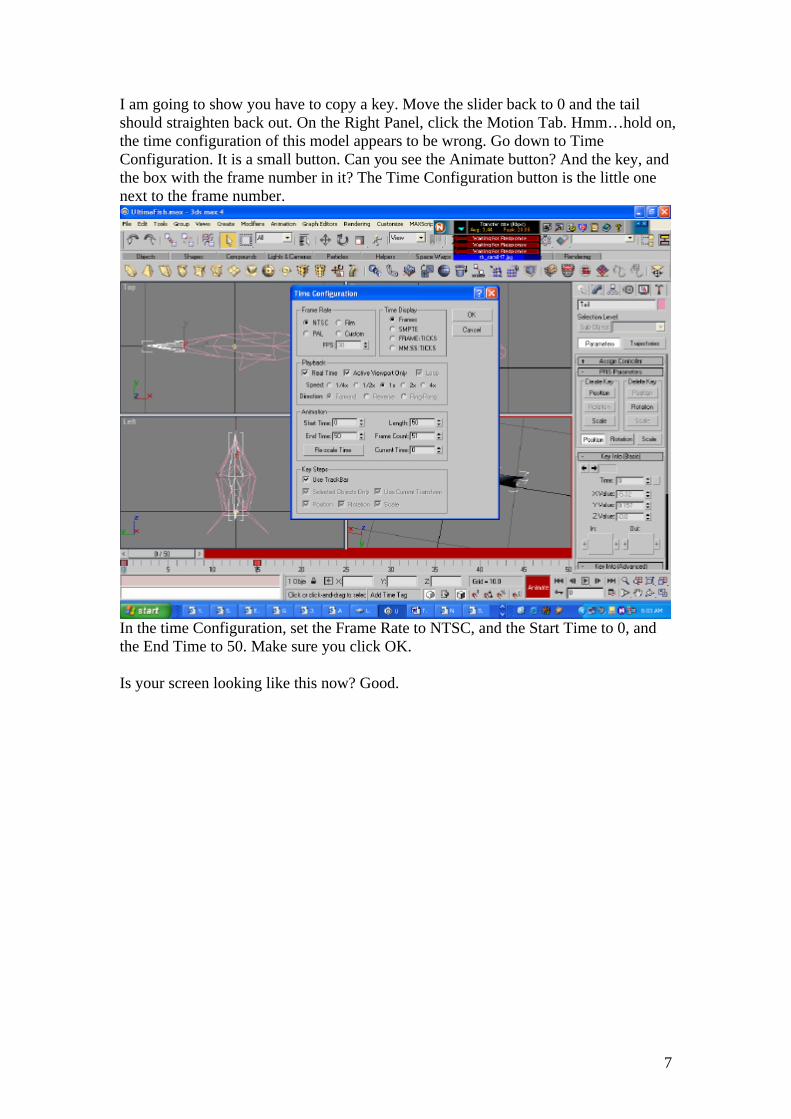
I am going to show you have to copy a key. Move the slider back to 0 and the tail should straighten back out. On the Right Panel, click the Motion Tab. Hmm…hold on, the time configuration of this model appears to be wrong. Go down to Time Configuration. It is a small button. Can you see the Animate button? And the key, and the box with the frame number in it? The Time Configuration button is the little one next to the frame number.
In the time Configuration, set the Frame Rate to NTSC, and the Start Time to 0, and the End Time to 50. Make sure you click OK. Is your screen looking like this now? Good.
8
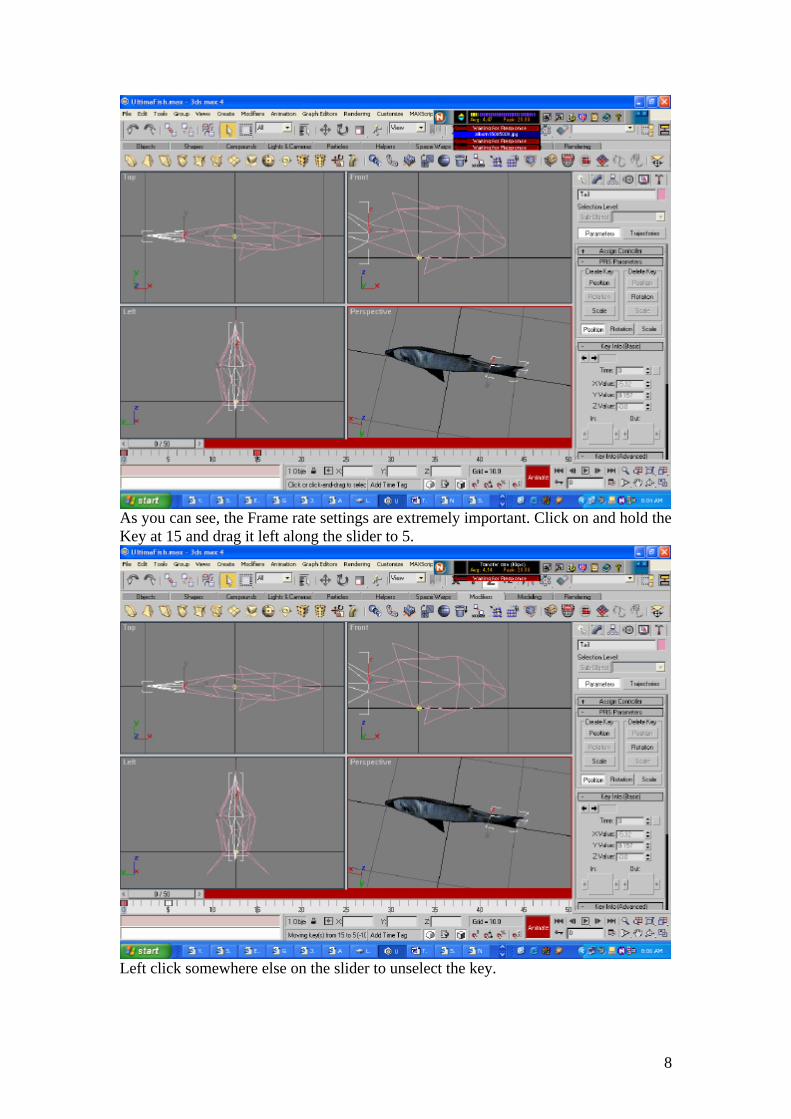
As you can see, the Frame rate settings are extremely important. Click on and hold the Key at 15 and drag it left along the slider to 5.
Left click somewhere else on the slider to unselect the key.
9
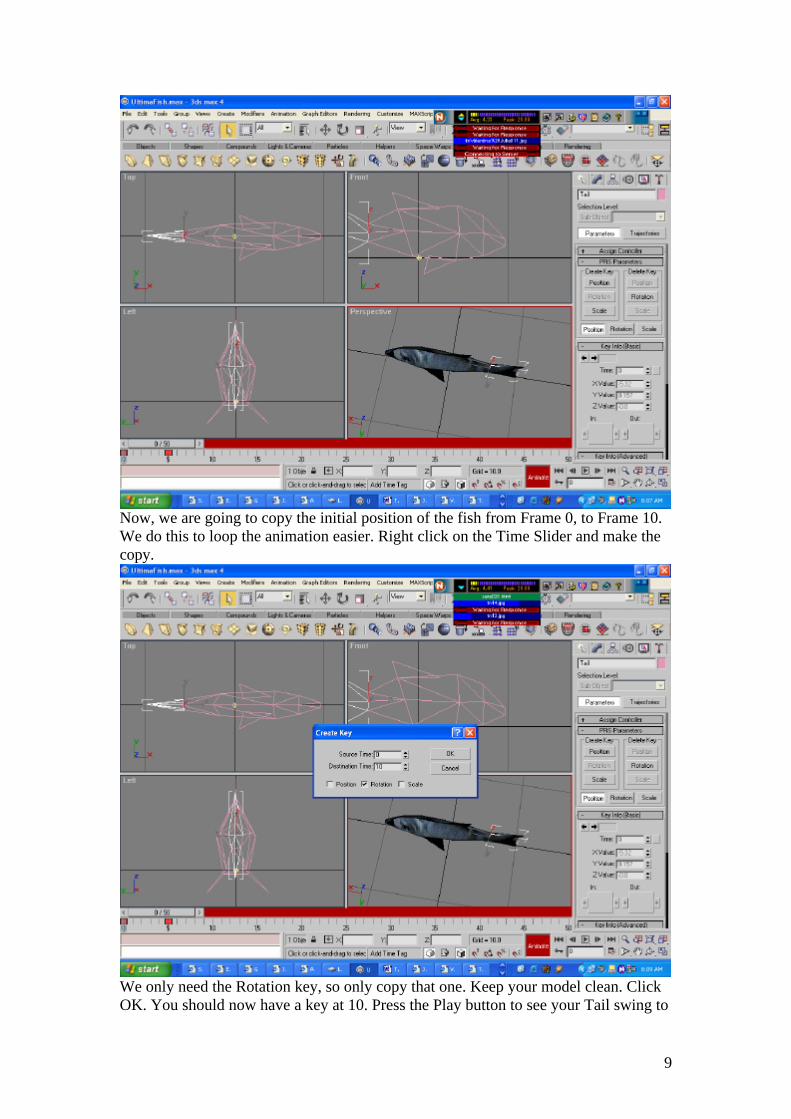
Now, we are going to copy the initial position of the fish from Frame 0, to Frame 10. We do this to loop the animation easier. Right click on the Time Slider and make the copy.
We only need the Rotation key, so only copy that one. Keep your model clean. Click OK. You should now have a key at 10. Press the Play button to see your Tail swing to
10
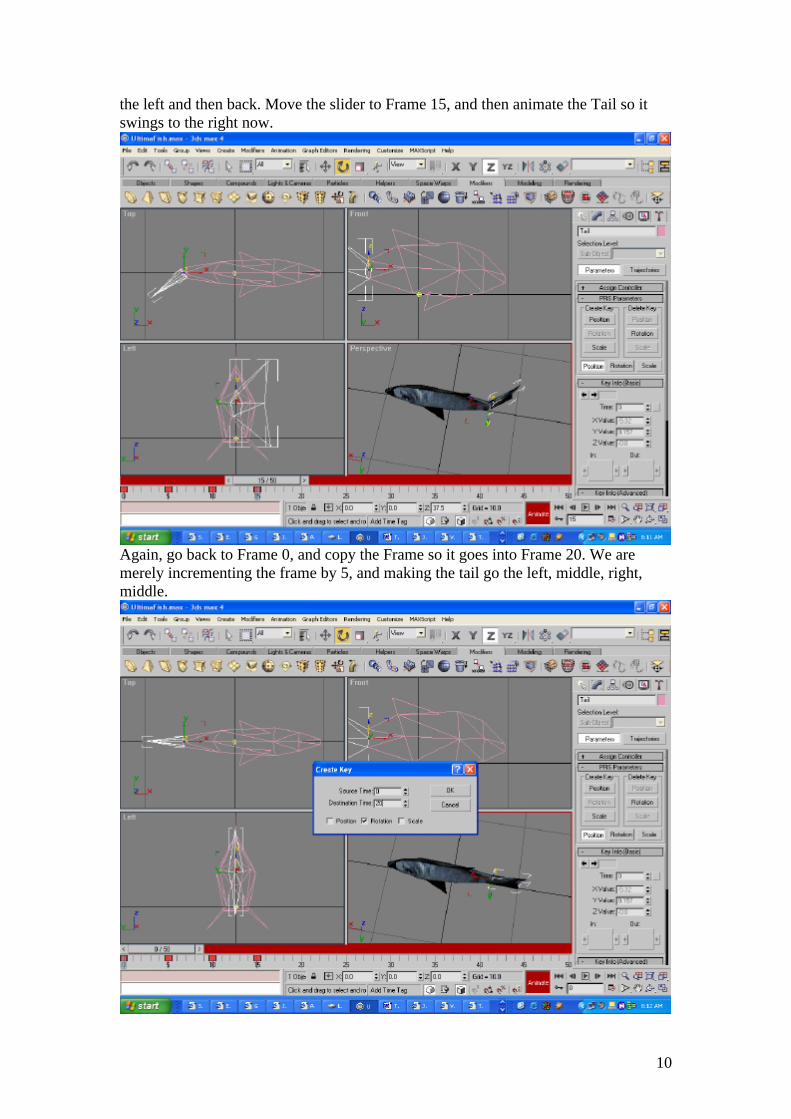
the left and then back. Move the slider to Frame 15, and then animate the Tail so it swings to the right now.
Again, go back to Frame 0, and copy the Frame so it goes into Frame 20. We are merely incrementing the frame by 5, and making the tail go the left, middle, right, middle.
11
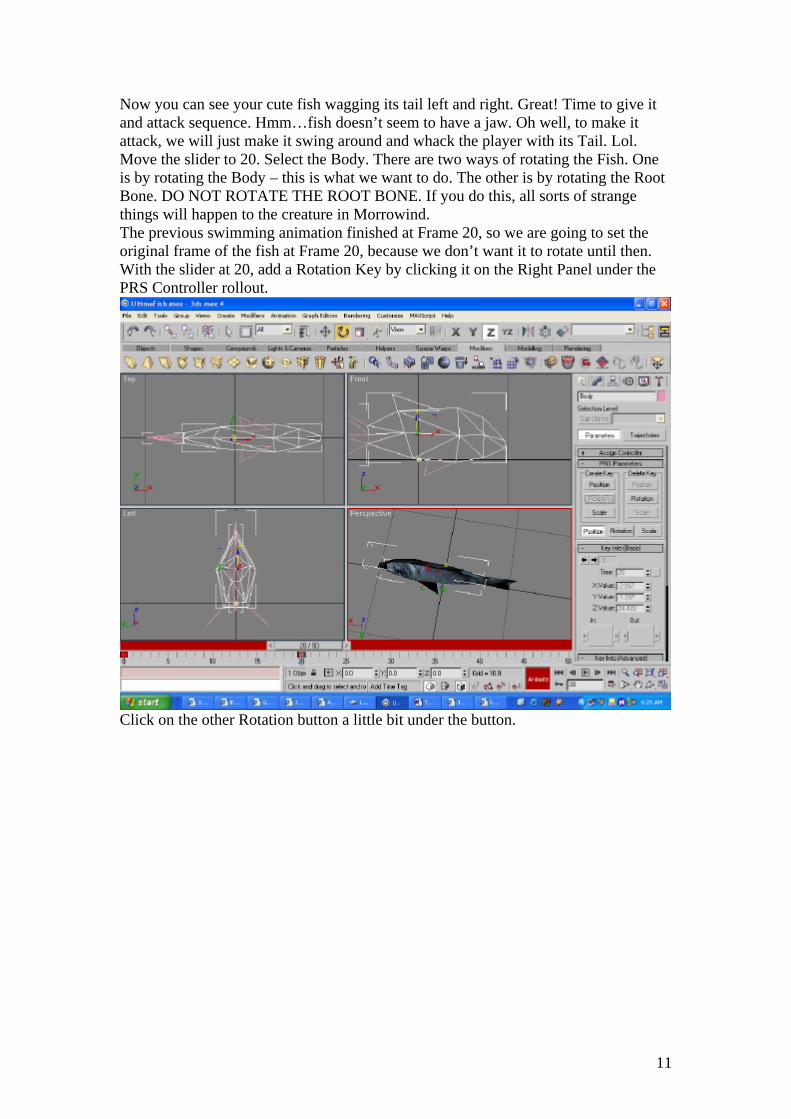
Now you can see your cute fish wagging its tail left and right. Great! Time to give it and attack sequence. Hmm…fish doesn’t seem to have a jaw. Oh well, to make it attack, we will just make it swing around and whack the player with its Tail. Lol. Move the slider to 20. Select the Body. There are two ways of rotating the Fish. One is by rotating the Body – this is what we want to do. The other is by rotating the Root Bone. DO NOT ROTATE THE ROOT BONE. If you do this, all sorts of strange things will happen to the creature in Morrowind. The previous swimming animation finished at Frame 20, so we are going to set the original frame of the fish at Frame 20, because we don’t want it to rotate until then. With the slider at 20, add a Rotation Key by clicking it on the Right Panel under the PRS Controller rollout.
Click on the other Rotation button a little bit under the button.
12
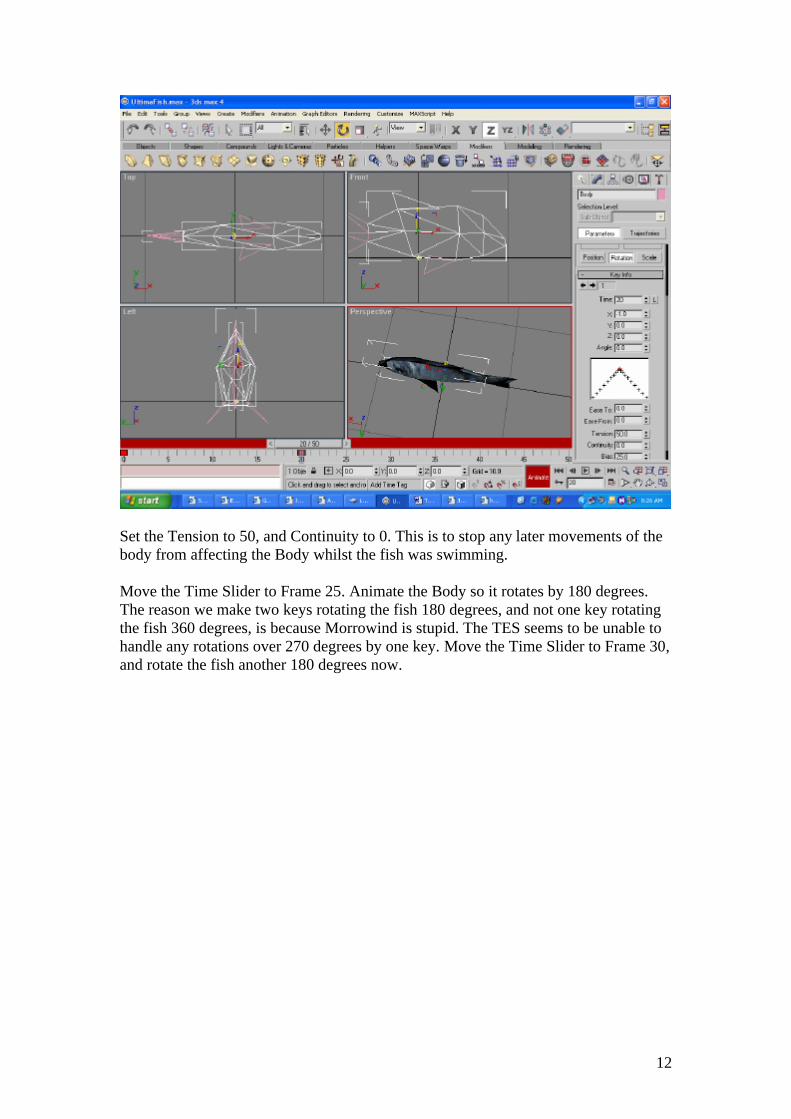
Set the Tension to 50, and Continuity to 0. This is to stop any later movements of the body from affecting the Body whilst the fish was swimming. Move the Time Slider to Frame 25. Animate the Body so it rotates by 180 degrees. The reason we make two keys rotating the fish 180 degrees, and not one key rotating the fish 360 degrees, is because Morrowind is stupid. The TES seems to be unable to handle any rotations over 270 degrees by one key. Move the Time Slider to Frame 30, and rotate the fish another 180 degrees now.
13
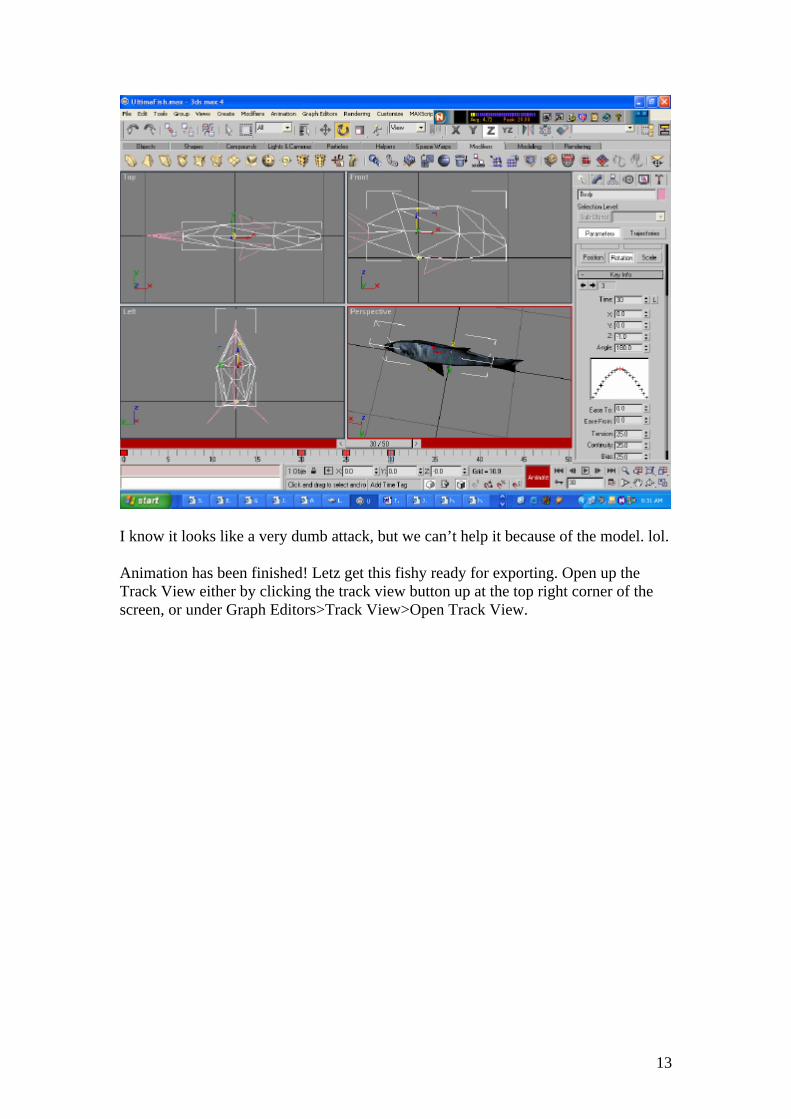
I know it looks like a very dumb attack, but we can’t help it because of the model. lol. Animation has been finished! Letz get this fishy ready for exporting. Open up the Track View either by clicking the track view button up at the top right corner of the screen, or under Graph Editors>Track View>Open Track View.
14
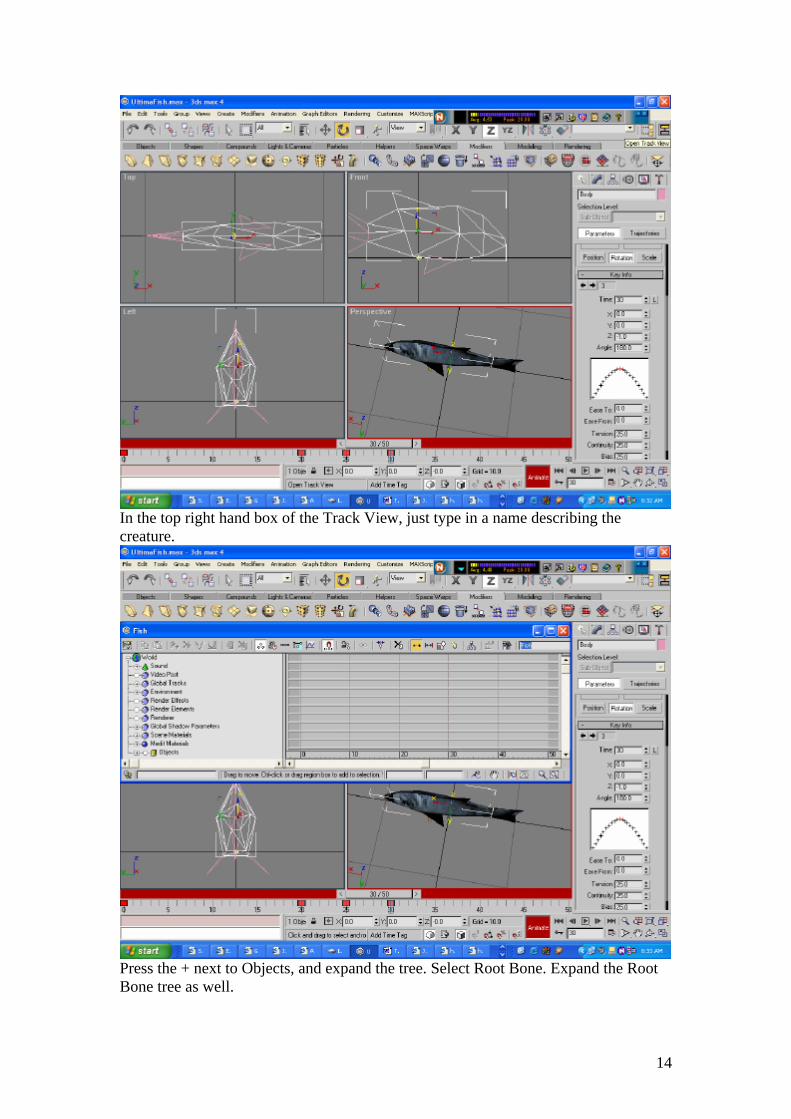
In the top right hand box of the Track View, just type in a name describing the creature.
Press the + next to Objects, and expand the tree. Select Root Bone. Expand the Root Bone tree as well.
15
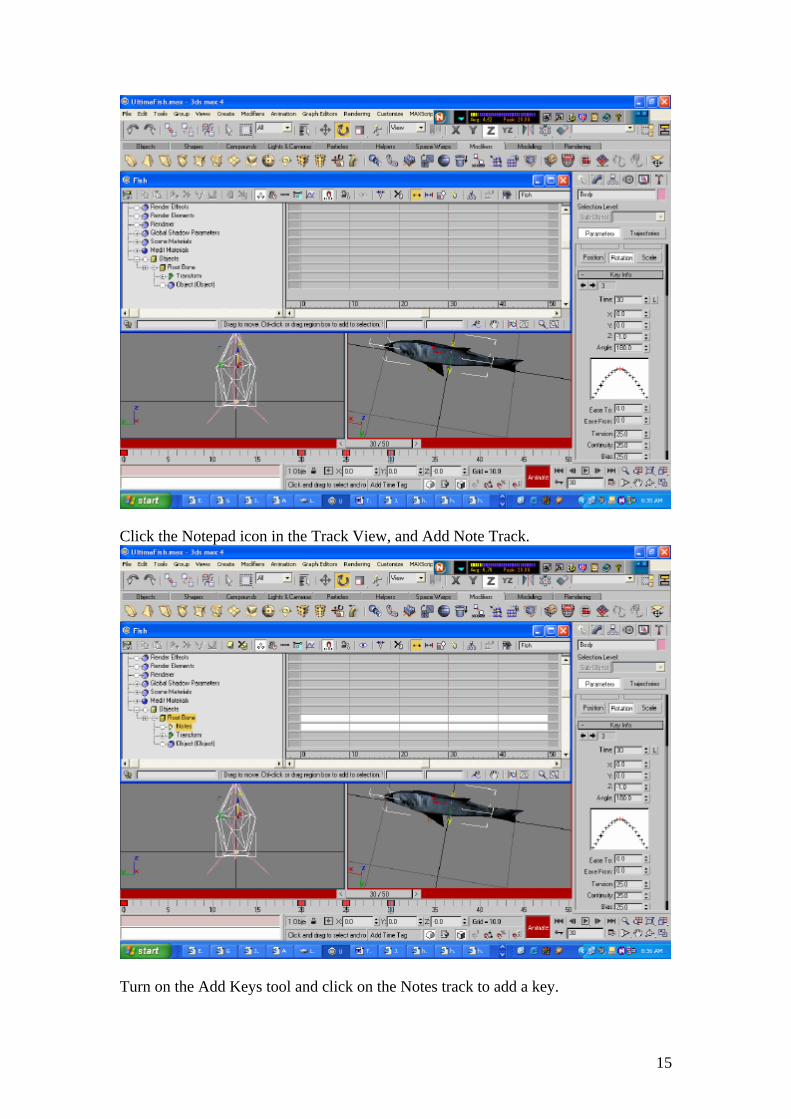
Click the Notepad icon in the Track View, and Add Note Track.
Turn on the Add Keys tool and click on the Notes track to add a key.
16
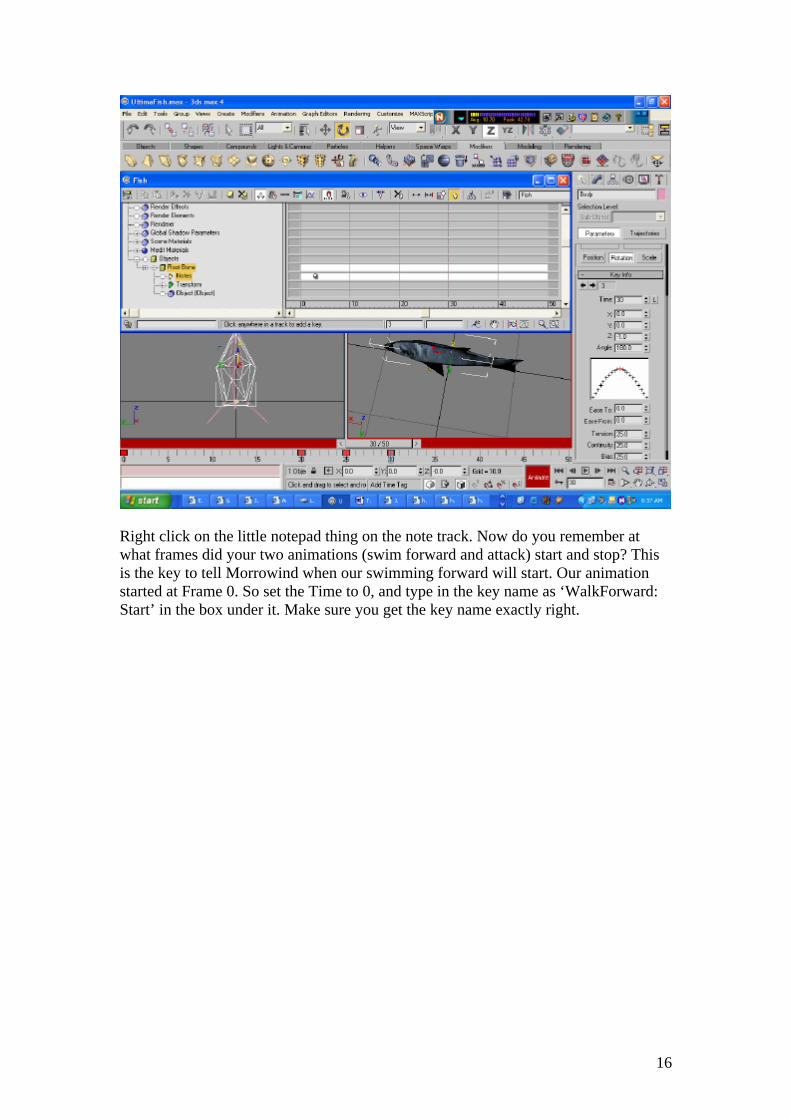
Right click on the little notepad thing on the note track. Now do you remember at what frames did your two animations (swim forward and attack) start and stop? This is the key to tell Morrowind when our swimming forward will start. Our animation started at Frame 0. So set the Time to 0, and type in the key name as ‘WalkForward: Start’ in the box under it. Make sure you get the key name exactly right.
17
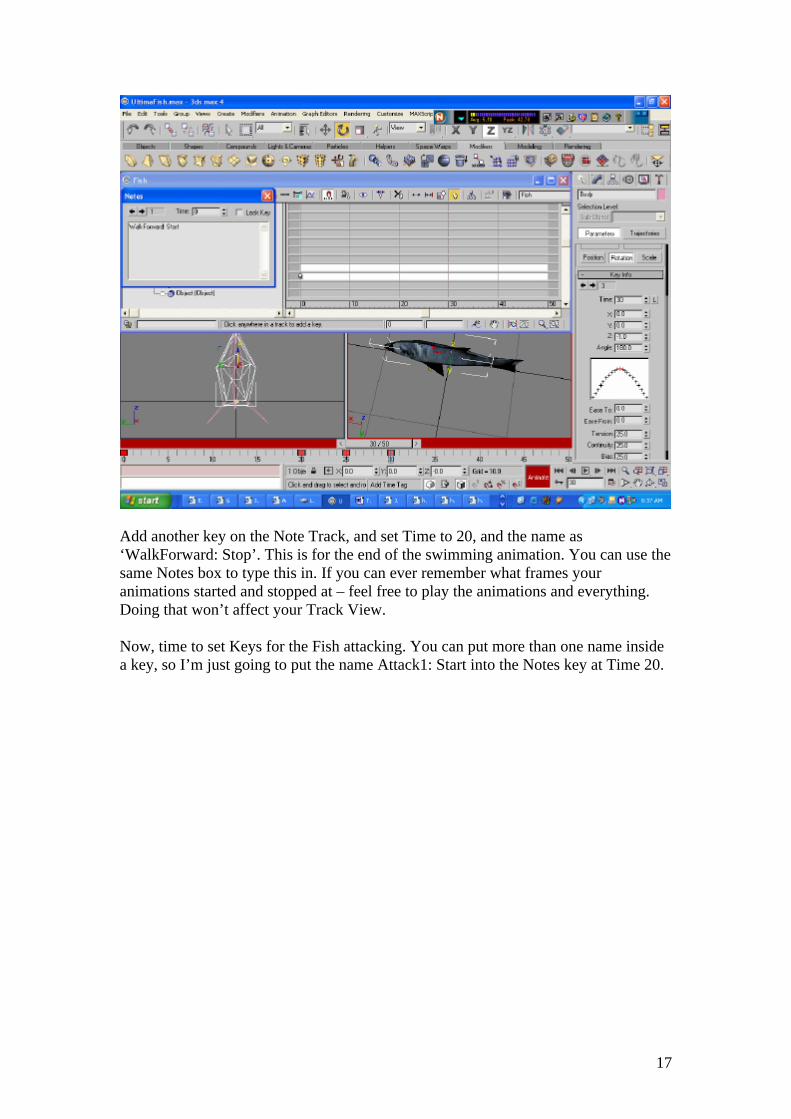
Add another key on the Note Track, and set Time to 20, and the name as ‘WalkForward: Stop’. This is for the end of the swimming animation. You can use the same Notes box to type this in. If you can ever remember what frames your animations started and stopped at – feel free to play the animations and everything. Doing that won’t affect your Track View. Now, time to set Keys for the Fish attacking. You can put more than one name inside a key, so I’m just going to put the name Attack1: Start into the Notes key at Time 20.
18
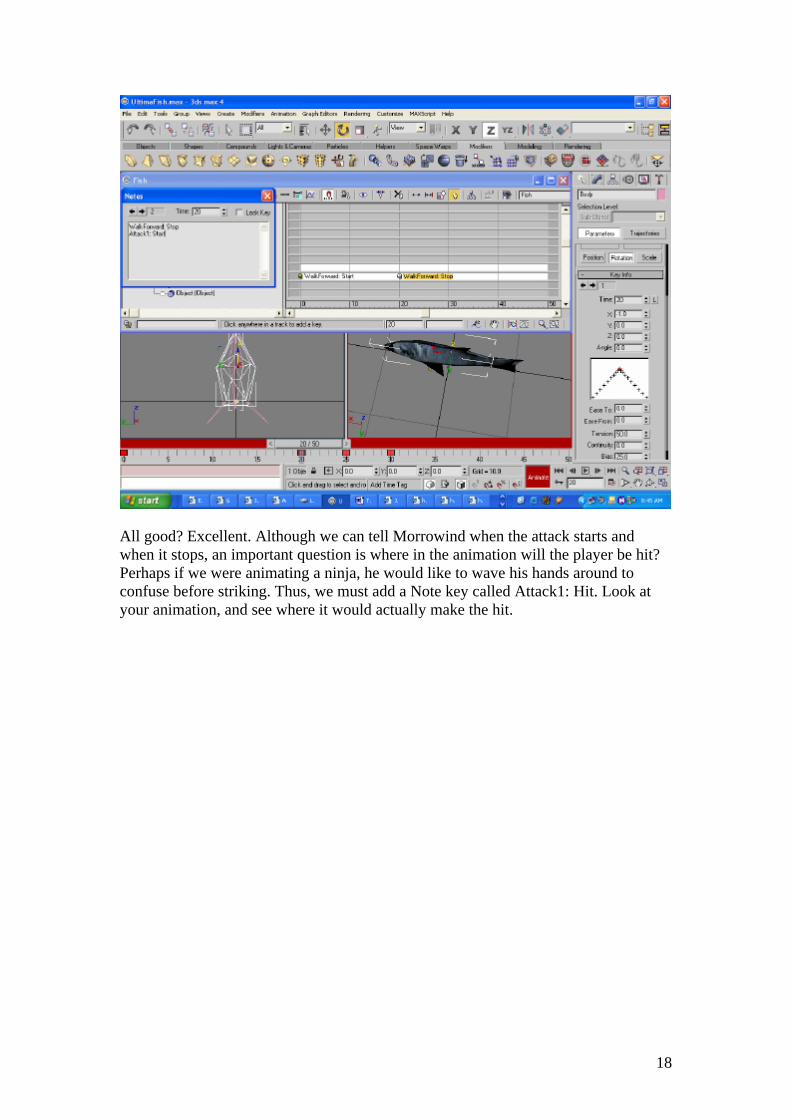
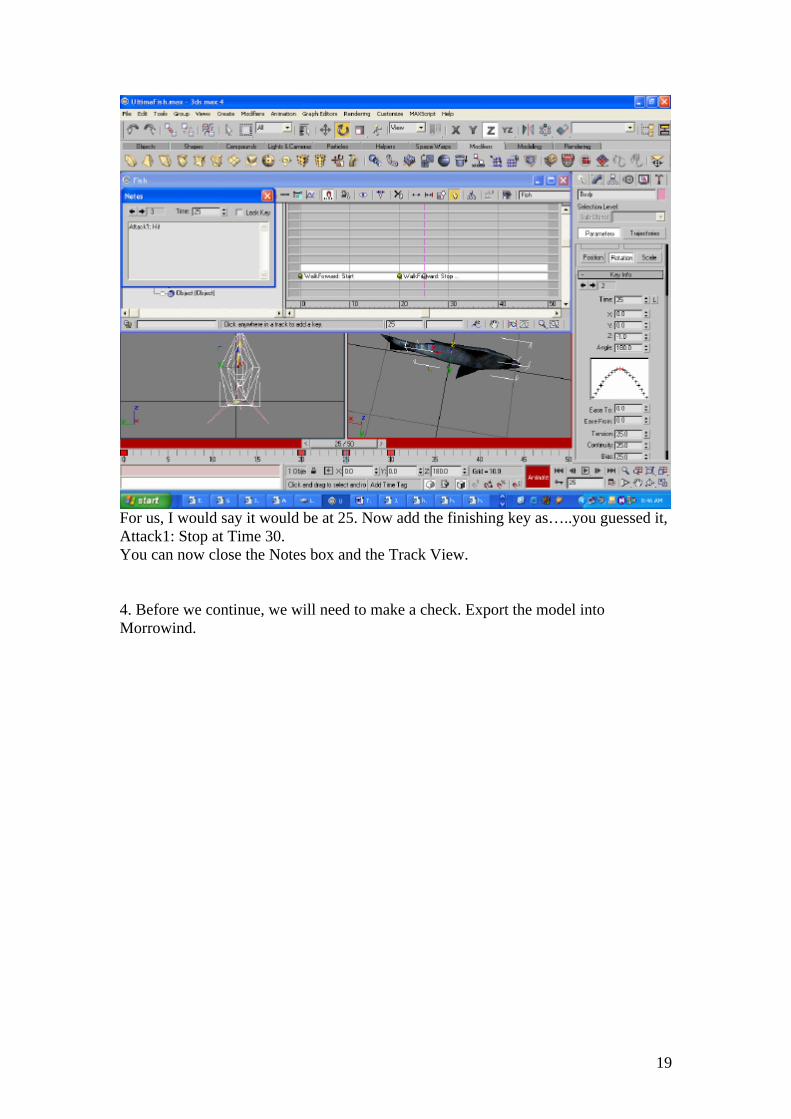
All good? Excellent. Although we can tell Morrowind when the attack starts and when it stops, an important question is where in the animation will the player be hit? Perhaps if we were animating a ninja, he would like to wave his hands around to confuse before striking. Thus, we must add a Note key called Attack1: Hit. Look at your animation, and see where it would actually make the hit.
19
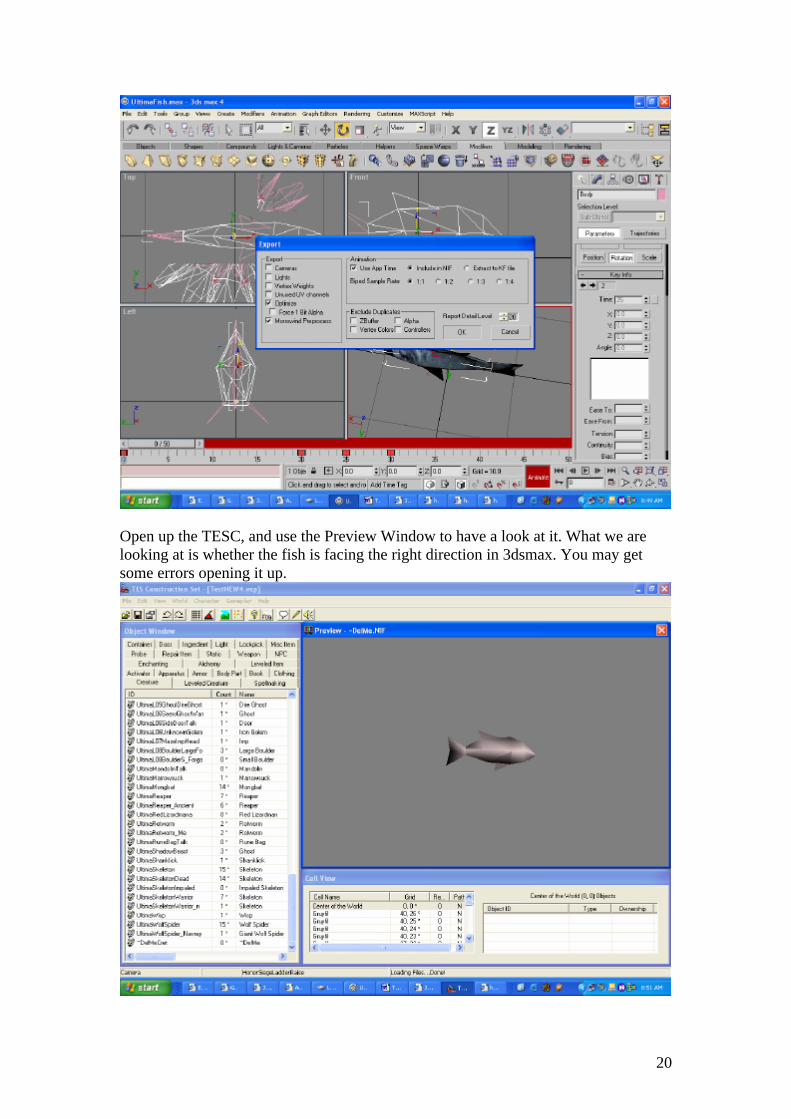
For us, I would say it would be at 25. Now add the finishing key as…..you guessed it, Attack1: Stop at Time 30. You can now close the Notes box and the Track View. 4. Before we continue, we will need to make a check. Export the model into Morrowind.
20
Open up the TESC, and use the Preview Window to have a look at it. What we are looking at is whether the fish is facing the right direction in 3dsmax. You may get some errors opening it up.
21
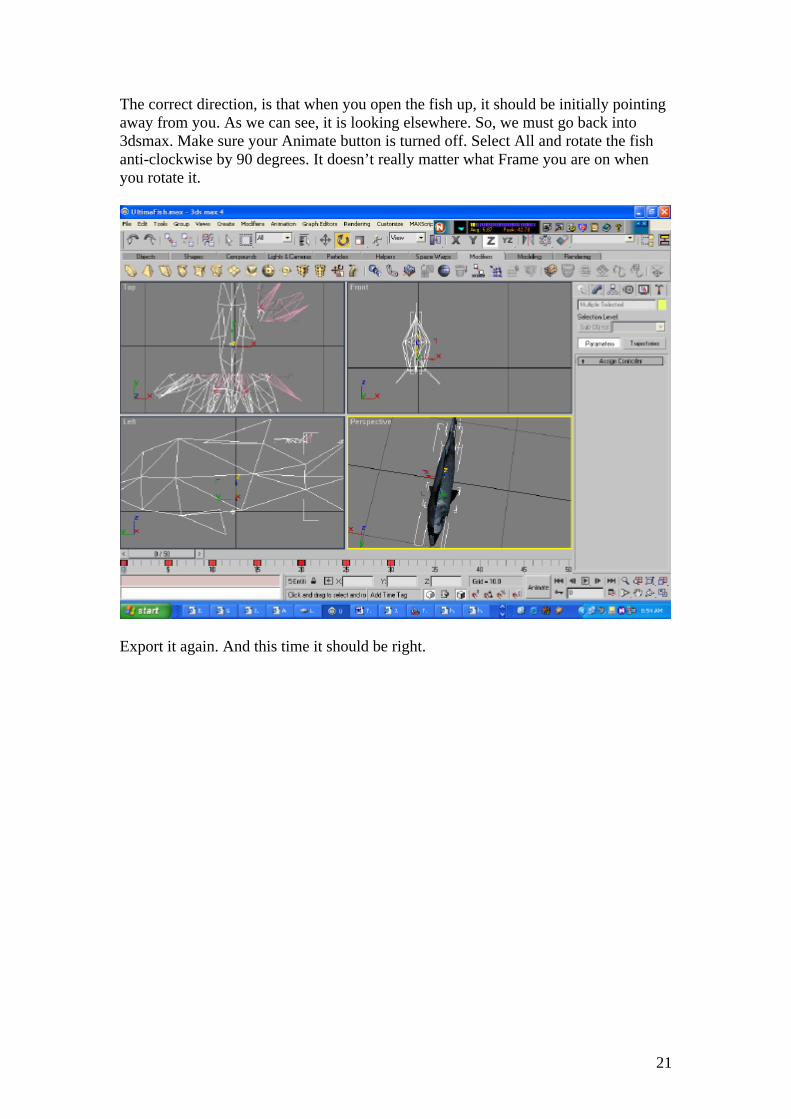
The correct direction, is that when you open the fish up, it should be initially pointing away from you. As we can see, it is looking elsewhere. So, we must go back into 3dsmax. Make sure your Animate button is turned off. Select All and rotate the fish anti-clockwise by 90 degrees. It doesn’t really matter what Frame you are on when you rotate it.
Export it again. And this time it should be right.
22
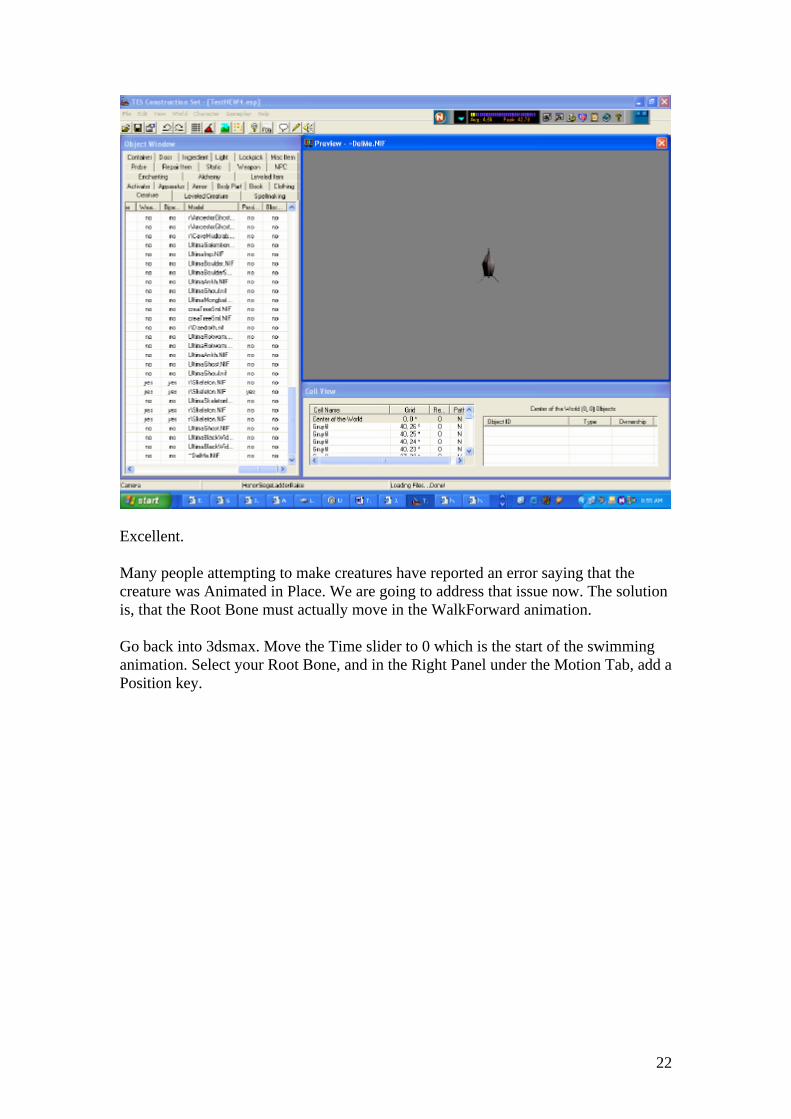
Excellent. Many people attempting to make creatures have reported an error saying that the creature was Animated in Place. We are going to address that issue now. The solution is, that the Root Bone must actually move in the WalkForward animation. Go back into 3dsmax. Move the Time slider to 0 which is the start of the swimming animation. Select your Root Bone, and in the Right Panel under the Motion Tab, add a Position key.
23
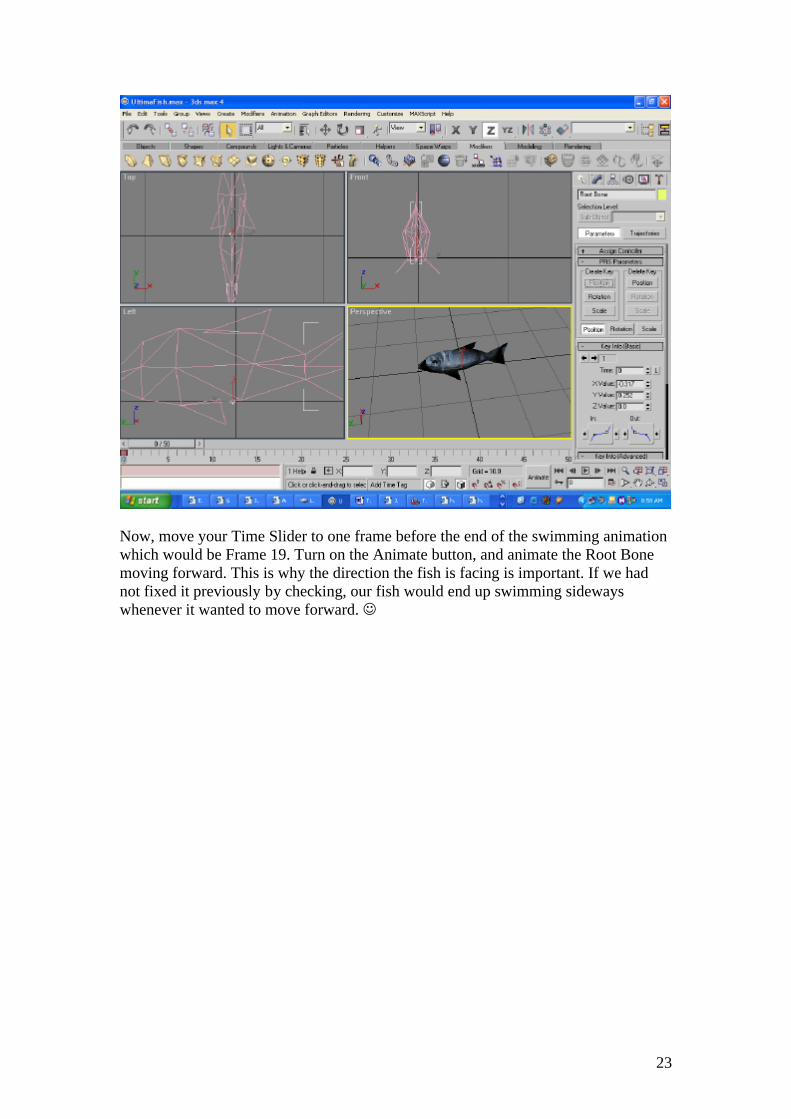
Now, move your Time Slider to one frame before the end of the swimming animation which would be Frame 19. Turn on the Animate button, and animate the Root Bone moving forward. This is why the direction the fish is facing is important. If we had not fixed it previously by checking, our fish would end up swimming sideways whenever it wanted to move forward. ☺

24
Set the ‘Out’ setting of the Position key to break.
This stops the Root Bone’s movement from affecting any later movement, and this is because we want the fish to ‘jump’ back to its original position. Right-click the Time
25
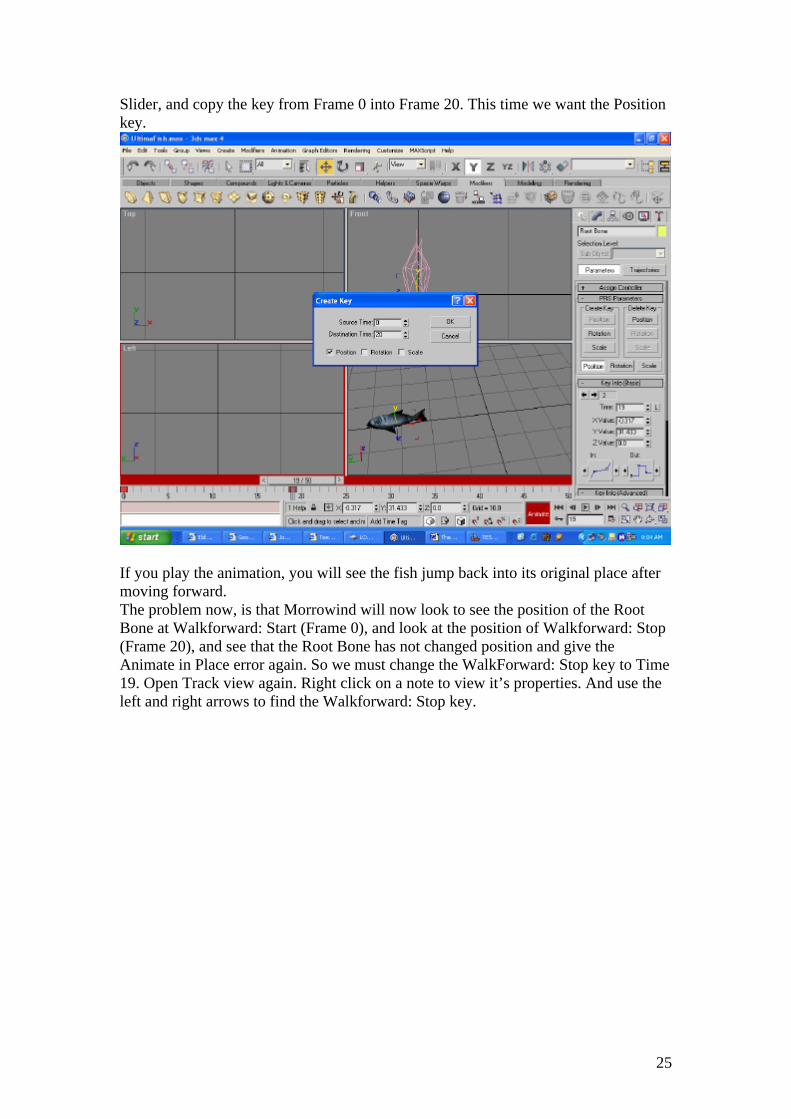
Slider, and copy the key from Frame 0 into Frame 20. This time we want the Position key.
If you play the animation, you will see the fish jump back into its original place after moving forward. The problem now, is that Morrowind will now look to see the position of the Root Bone at Walkforward: Start (Frame 0), and look at the position of Walkforward: Stop (Frame 20), and see that the Root Bone has not changed position and give the Animate in Place error again. So we must change the WalkForward: Stop key to Time 19. Open Track view again. Right click on a note to view it’s properties. And use the left and right arrows to find the Walkforward: Stop key.
26
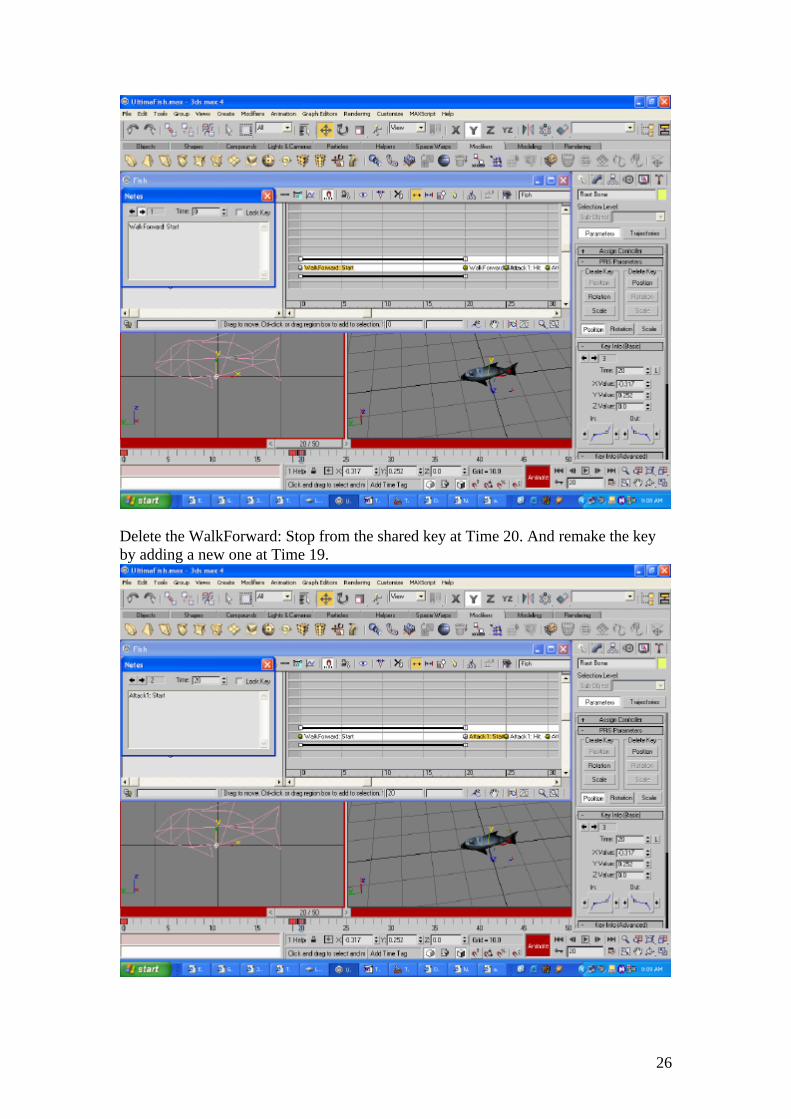
Delete the WalkForward: Stop from the shared key at Time 20. And remake the key by adding a new one at Time 19.
27
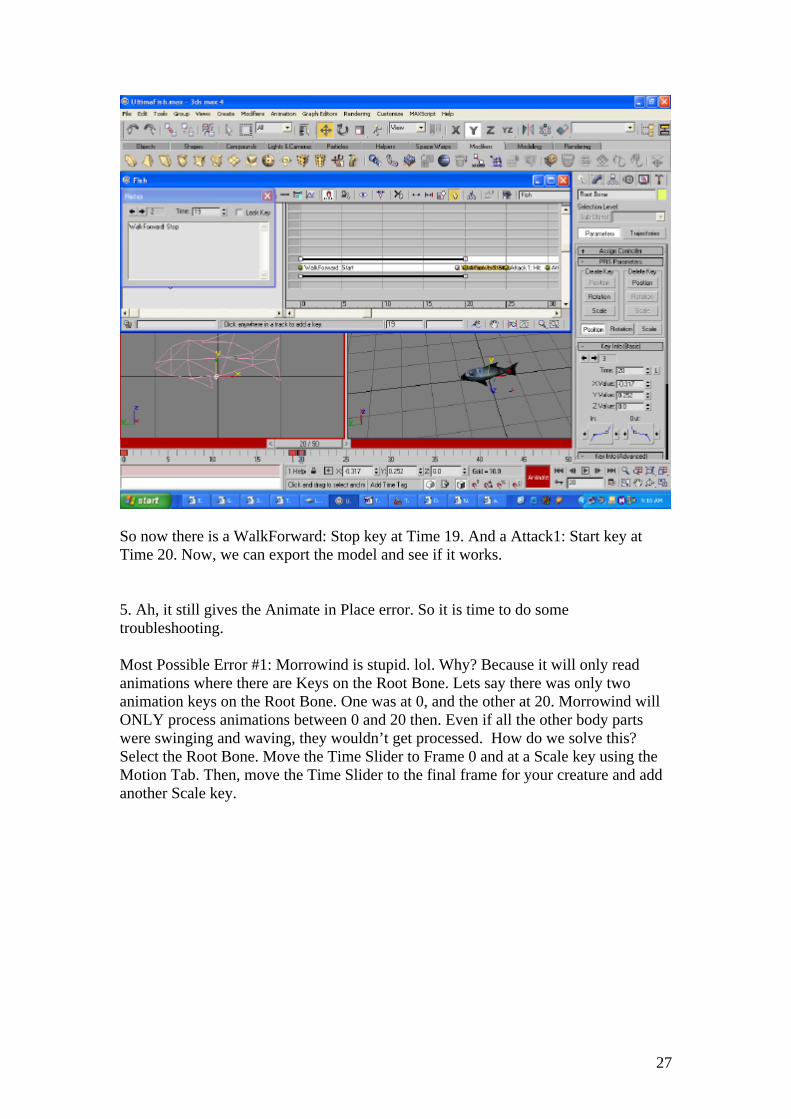
So now there is a WalkForward: Stop key at Time 19. And a Attack1: Start key at Time 20. Now, we can export the model and see if it works. 5. Ah, it still gives the Animate in Place error. So it is time to do some troubleshooting. Most Possible Error #1: Morrowind is stupid. lol. Why? Because it will only read animations where there are Keys on the Root Bone. Lets say there was only two animation keys on the Root Bone. One was at 0, and the other at 20. Morrowind will ONLY process animations between 0 and 20 then. Even if all the other body parts were swinging and waving, they wouldn’t get processed. How do we solve this? Select the Root Bone. Move the Time Slider to Frame 0 and at a Scale key using the Motion Tab. Then, move the Time Slider to the final frame for your creature and add another Scale key.
28
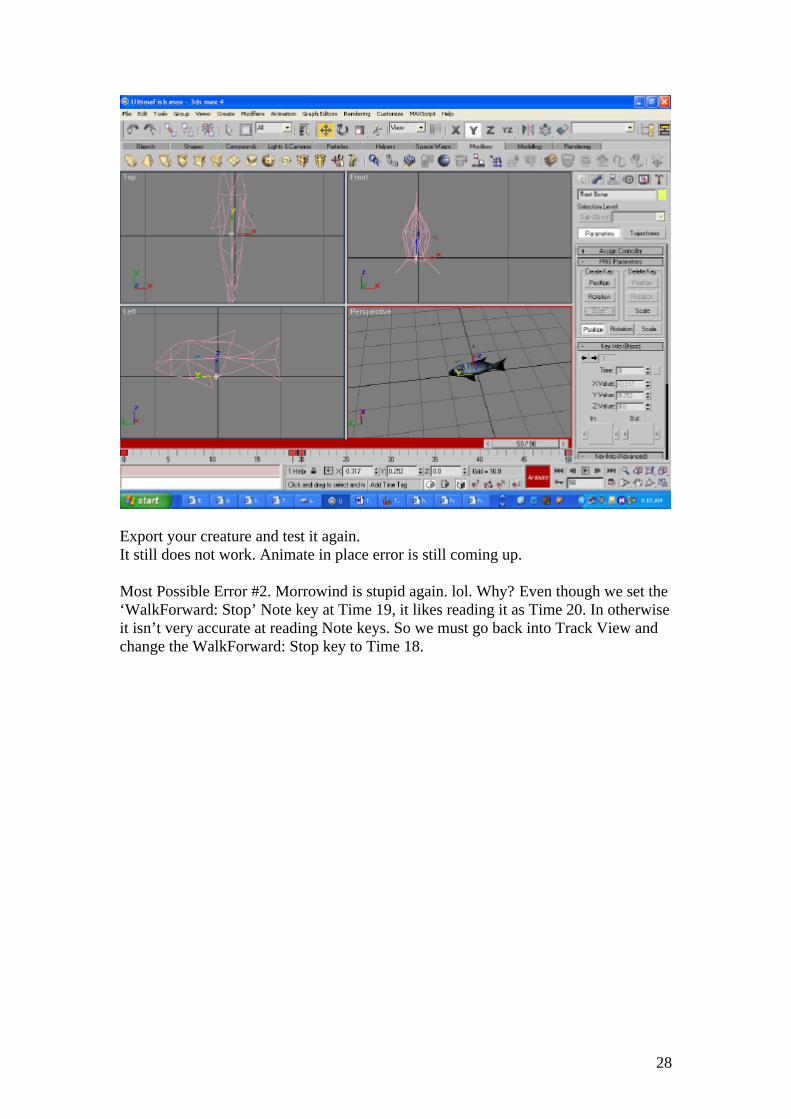
Export your creature and test it again. It still does not work. Animate in place error is still coming up. Most Possible Error #2. Morrowind is stupid again. lol. Why? Even though we set the ‘WalkForward: Stop’ Note key at Time 19, it likes reading it as Time 20. In otherwise it isn’t very accurate at reading Note keys. So we must go back into Track View and change the WalkForward: Stop key to Time 18.
29
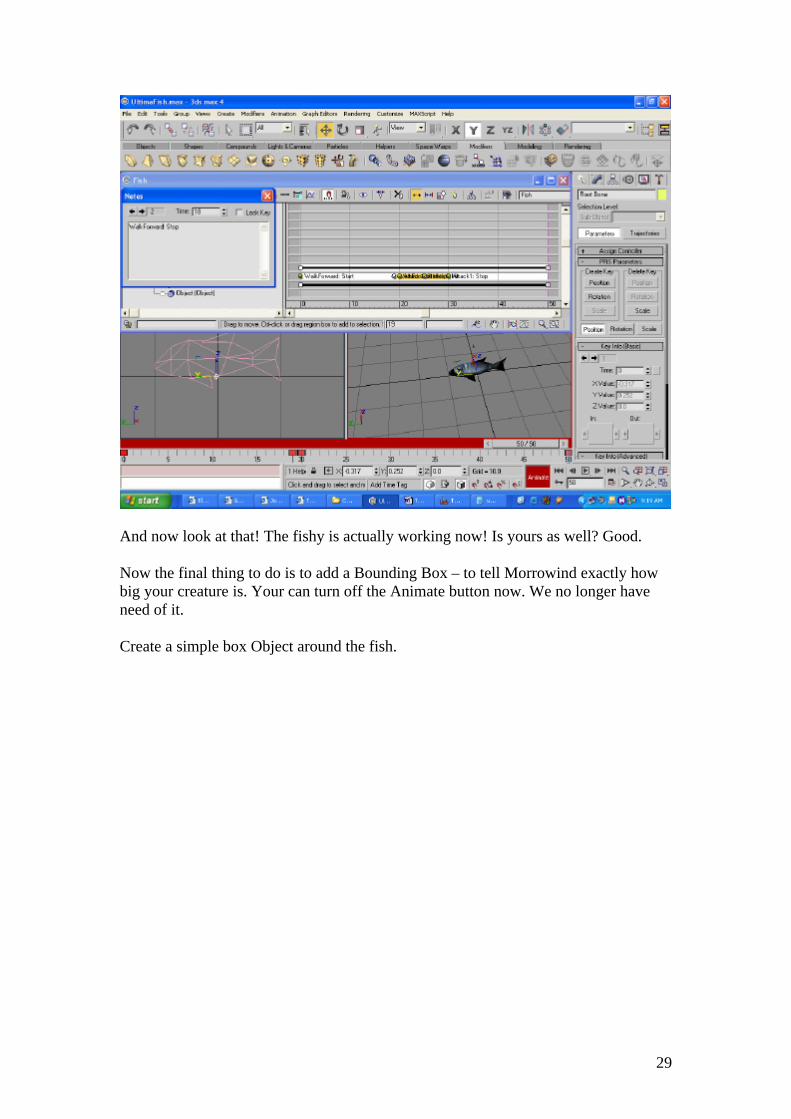
And now look at that! The fishy is actually working now! Is yours as well? Good. Now the final thing to do is to add a Bounding Box – to tell Morrowind exactly how big your creature is. Your can turn off the Animate button now. We no longer have need of it. Create a simple box Object around the fish.
30
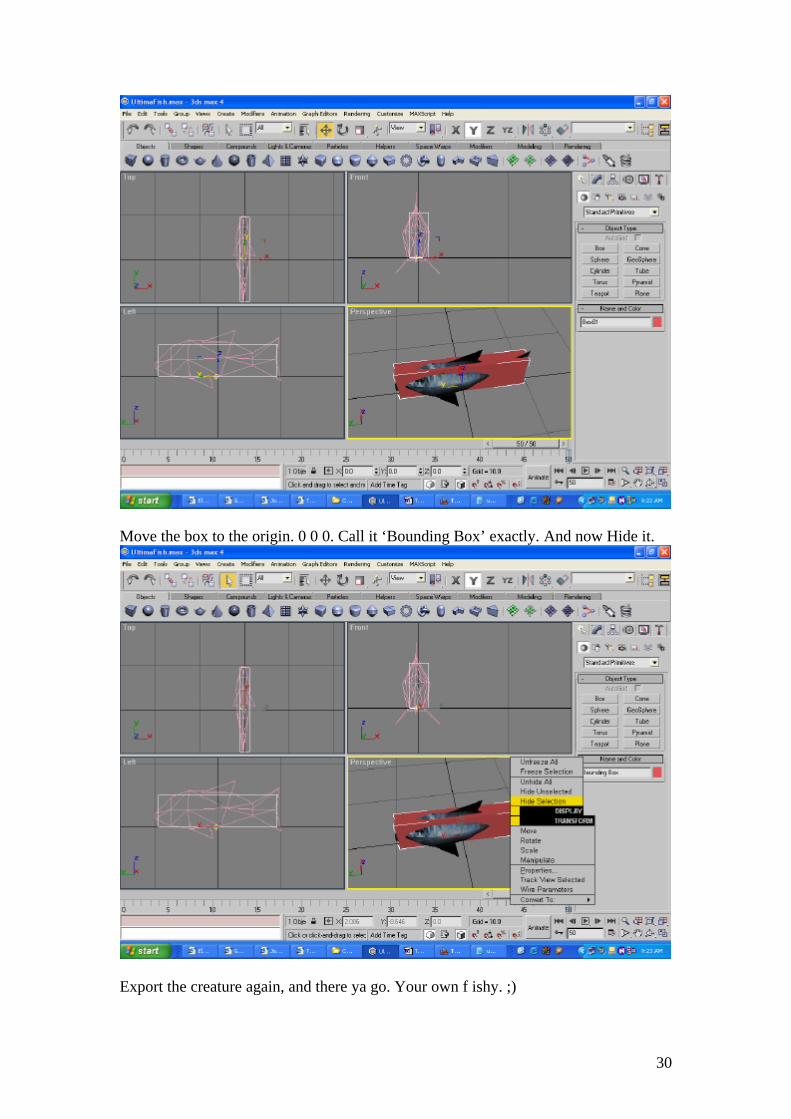
Move the box to the origin. 0 0 0. Call it ‘Bounding Box’ exactly. And now Hide it.
Export the creature again, and there ya go. Your own f ishy. ;)

31
Written by DarkIllusion ([email protected]) Any questions or suggestions? Please contact me. For some of the creatures I have animated, visit my site at rpgplanet.com/morrowind/underworld/Illusion.htm You can download them and use them in your Mod!