The LATEX Track Changes Manual v1.0.9 Linda Briesemeister...
93
The L A T E X Track Changes Manual v1.0.9 Linda Briesemeister [email protected] SRI International August 12, 2015
Transcript of The LATEX Track Changes Manual v1.0.9 Linda Briesemeister...

Acknowledgements and Disclaimer
This project would not exist without Peter Karp, who had the original idea to bring trackchanges to the LaTeX world. My colleagues Grit Denker and Tomer Altman have also beeninvolved in furthering this project. Recently, Skip Breidbach has joined the developmenteffort. Finally, we thank everyone who tested the prototype and gave us feedback and SRIInternational to provide the funding to pursue this project.
Please note that LaTeX Track Changes (LTC) is free software: you can redistribute itand/or modify it under the terms of the GNU General Public License as published by theFree Software Foundation, either version 3 of the License, or (at your option) any laterversion. This program is distributed in the hope that it will be useful, but WITHOUT ANYWARRANTY; without even the implied warranty of MERCHANTABILITY or FITNESS FORA PARTICULAR PURPOSE. See the GNU General Public License for more details.
See Appendix A or http://www.gnu.org/licenses/ for the complete license.
2
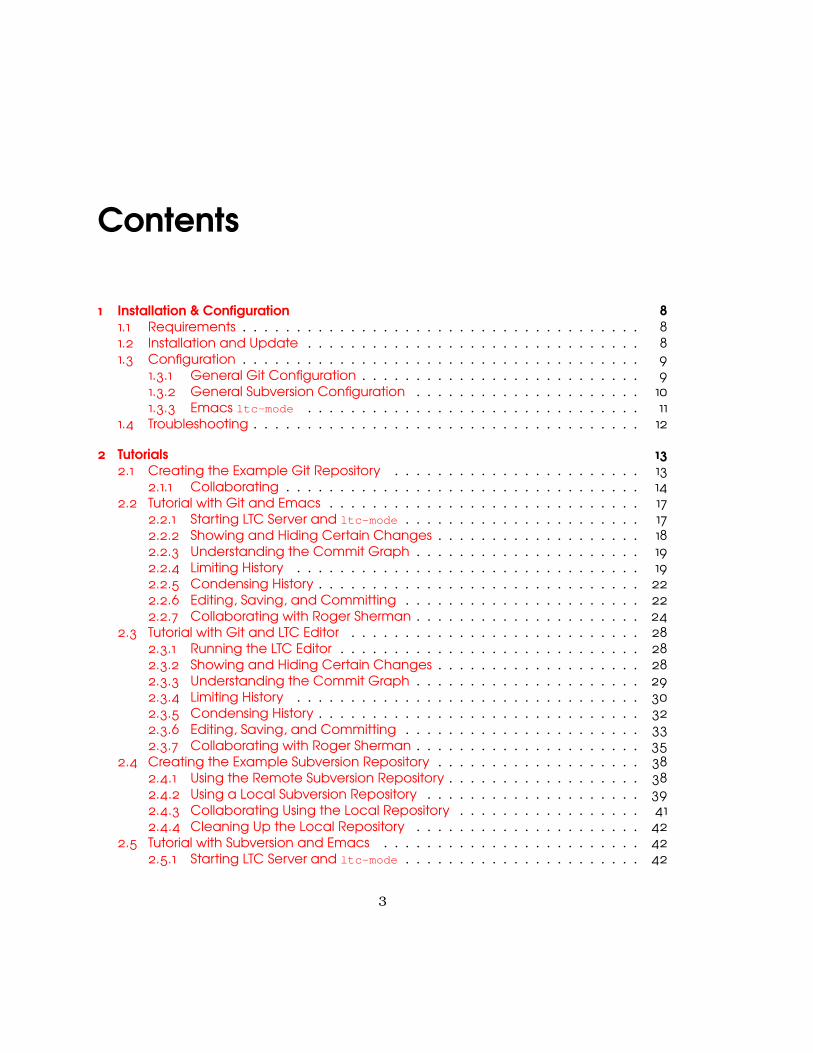
Contents
1 Installation & Configuration 81.1 Requirements . . . . . . . . . . . . . . . . . . . . . . . . . . . . . . . . . . . . . 81.2 Installation and Update . . . . . . . . . . . . . . . . . . . . . . . . . . . . . . . 81.3 Configuration . . . . . . . . . . . . . . . . . . . . . . . . . . . . . . . . . . . . . 9
1.3.1 General Git Configuration . . . . . . . . . . . . . . . . . . . . . . . . . . 91.3.2 General Subversion Configuration . . . . . . . . . . . . . . . . . . . . . 101.3.3 Emacs ltc-mode . . . . . . . . . . . . . . . . . . . . . . . . . . . . . . . 11
1.4 Troubleshooting . . . . . . . . . . . . . . . . . . . . . . . . . . . . . . . . . . . . 12
2 Tutorials 132.1 Creating the Example Git Repository . . . . . . . . . . . . . . . . . . . . . . . 13
2.1.1 Collaborating . . . . . . . . . . . . . . . . . . . . . . . . . . . . . . . . . 142.2 Tutorial with Git and Emacs . . . . . . . . . . . . . . . . . . . . . . . . . . . . . 17
2.2.1 Starting LTC Server and ltc-mode . . . . . . . . . . . . . . . . . . . . . . 172.2.2 Showing and Hiding Certain Changes . . . . . . . . . . . . . . . . . . . 182.2.3 Understanding the Commit Graph . . . . . . . . . . . . . . . . . . . . . 192.2.4 Limiting History . . . . . . . . . . . . . . . . . . . . . . . . . . . . . . . . 192.2.5 Condensing History . . . . . . . . . . . . . . . . . . . . . . . . . . . . . . 222.2.6 Editing, Saving, and Committing . . . . . . . . . . . . . . . . . . . . . . 222.2.7 Collaborating with Roger Sherman . . . . . . . . . . . . . . . . . . . . . 24
2.3 Tutorial with Git and LTC Editor . . . . . . . . . . . . . . . . . . . . . . . . . . . 282.3.1 Running the LTC Editor . . . . . . . . . . . . . . . . . . . . . . . . . . . . 282.3.2 Showing and Hiding Certain Changes . . . . . . . . . . . . . . . . . . . 282.3.3 Understanding the Commit Graph . . . . . . . . . . . . . . . . . . . . . 292.3.4 Limiting History . . . . . . . . . . . . . . . . . . . . . . . . . . . . . . . . 302.3.5 Condensing History . . . . . . . . . . . . . . . . . . . . . . . . . . . . . . 322.3.6 Editing, Saving, and Committing . . . . . . . . . . . . . . . . . . . . . . 332.3.7 Collaborating with Roger Sherman . . . . . . . . . . . . . . . . . . . . . 35
2.4 Creating the Example Subversion Repository . . . . . . . . . . . . . . . . . . . 382.4.1 Using the Remote Subversion Repository . . . . . . . . . . . . . . . . . . 382.4.2 Using a Local Subversion Repository . . . . . . . . . . . . . . . . . . . . 392.4.3 Collaborating Using the Local Repository . . . . . . . . . . . . . . . . . 412.4.4 Cleaning Up the Local Repository . . . . . . . . . . . . . . . . . . . . . 42
2.5 Tutorial with Subversion and Emacs . . . . . . . . . . . . . . . . . . . . . . . . 422.5.1 Starting LTC Server and ltc-mode . . . . . . . . . . . . . . . . . . . . . . 42
3
2.5.2 Showing and Hiding Certain Changes . . . . . . . . . . . . . . . . . . . 442.5.3 Understanding the Commit Graph . . . . . . . . . . . . . . . . . . . . . 452.5.4 Limiting History . . . . . . . . . . . . . . . . . . . . . . . . . . . . . . . . 462.5.5 Condensing History . . . . . . . . . . . . . . . . . . . . . . . . . . . . . . 472.5.6 Editing and Saving . . . . . . . . . . . . . . . . . . . . . . . . . . . . . . 482.5.7 Collaborating Through Commits . . . . . . . . . . . . . . . . . . . . . . 49
2.6 Tutorial with Subversion and LTC Editor . . . . . . . . . . . . . . . . . . . . . . . 522.6.1 Running the LTC Editor . . . . . . . . . . . . . . . . . . . . . . . . . . . . 522.6.2 Showing and Hiding Certain Changes . . . . . . . . . . . . . . . . . . . 542.6.3 Understanding the Commit Graph . . . . . . . . . . . . . . . . . . . . . 542.6.4 Limiting History . . . . . . . . . . . . . . . . . . . . . . . . . . . . . . . . 552.6.5 Condensing History . . . . . . . . . . . . . . . . . . . . . . . . . . . . . . 572.6.6 Editing and Saving . . . . . . . . . . . . . . . . . . . . . . . . . . . . . . 572.6.7 Collaborating Through Commits . . . . . . . . . . . . . . . . . . . . . . 58
3 Using LTC 633.1 Using a Git Repository . . . . . . . . . . . . . . . . . . . . . . . . . . . . . . . . 63
3.1.1 Initializing a Local Repository . . . . . . . . . . . . . . . . . . . . . . . . 643.1.2 Uploading Your Initial Repository . . . . . . . . . . . . . . . . . . . . . . 653.1.3 Cloning from a Remote Repository . . . . . . . . . . . . . . . . . . . . . 663.1.4 Push and Pull . . . . . . . . . . . . . . . . . . . . . . . . . . . . . . . . . 66
3.2 Using a Subversion Repository . . . . . . . . . . . . . . . . . . . . . . . . . . . . 673.2.1 Initializing a Repository . . . . . . . . . . . . . . . . . . . . . . . . . . . . 673.2.2 Other Typical Subversion Commands . . . . . . . . . . . . . . . . . . . 68
3.3 General Usage . . . . . . . . . . . . . . . . . . . . . . . . . . . . . . . . . . . . 693.3.1 Filtering What is Shown . . . . . . . . . . . . . . . . . . . . . . . . . . . . 703.3.2 History of a File . . . . . . . . . . . . . . . . . . . . . . . . . . . . . . . . 71
3.4 Using Emacs . . . . . . . . . . . . . . . . . . . . . . . . . . . . . . . . . . . . . . 723.4.1 Starting the LTC Server . . . . . . . . . . . . . . . . . . . . . . . . . . . . 723.4.2 Entering and Exiting ltc-mode . . . . . . . . . . . . . . . . . . . . . . . . 733.4.3 Customizing LTC Mode . . . . . . . . . . . . . . . . . . . . . . . . . . . . 743.4.4 Filtering Changes . . . . . . . . . . . . . . . . . . . . . . . . . . . . . . . 743.4.5 Author Color Keys . . . . . . . . . . . . . . . . . . . . . . . . . . . . . . . 753.4.6 Emacs Help . . . . . . . . . . . . . . . . . . . . . . . . . . . . . . . . . . 753.4.7 Table of Commands . . . . . . . . . . . . . . . . . . . . . . . . . . . . . 763.4.8 Misc . . . . . . . . . . . . . . . . . . . . . . . . . . . . . . . . . . . . . . 76
3.5 Using the “LTC Editor” . . . . . . . . . . . . . . . . . . . . . . . . . . . . . . . . 76
4 Writing Your Own Front End 77
5 Algorithms & Utilities 815.1 How Are Changes Calculated? . . . . . . . . . . . . . . . . . . . . . . . . . . 815.2 Utility Programs . . . . . . . . . . . . . . . . . . . . . . . . . . . . . . . . . . . . 81
5.2.1 LTC Editor . . . . . . . . . . . . . . . . . . . . . . . . . . . . . . . . . . . 815.2.2 LTC File Viewer . . . . . . . . . . . . . . . . . . . . . . . . . . . . . . . . 815.2.3 LatexDiff . . . . . . . . . . . . . . . . . . . . . . . . . . . . . . . . . . . . 815.2.4 Lexicographical Analysis . . . . . . . . . . . . . . . . . . . . . . . . . . . 81
4

5.2.5 Testing the XML-RPC Server . . . . . . . . . . . . . . . . . . . . . . . . . 81
A License 82

List of Figures
1.1 Setting LTC port number in Emacs . . . . . . . . . . . . . . . . . . . . . . . . 12
2.1 Investigating example git repository with a graphical tool such as GitX . . . 152.2 Starting ltc-mode in Emacs with tutorial file under git . . . . . . . . . . . . . . 182.3 Opening the LTC menu from the mode line in Emacs . . . . . . . . . . . . . 192.4 Effect of hiding “small” changes and deletions . . . . . . . . . . . . . . . . . 192.5 Example of commit graph . . . . . . . . . . . . . . . . . . . . . . . . . . . . . 202.6 Effect on commit graph of limiting authors . . . . . . . . . . . . . . . . . . . 202.7 Effect on commit graph of going back to first revision . . . . . . . . . . . . . 212.8 Effect on commit graph of limiting history to date of third version . . . . . . 212.9 Effect of condensing authors . . . . . . . . . . . . . . . . . . . . . . . . . . . 222.10 Example of markup change when condensing authors . . . . . . . . . . . . 222.11 After editing the text as John Adams . . . . . . . . . . . . . . . . . . . . . . . 232.12 File history after committing latest version and updating Emacs . . . . . . . 242.13 Git conflict markers in merged file . . . . . . . . . . . . . . . . . . . . . . . . 252.14 After resolving conflict, committing, and updating in Emacs . . . . . . . . . 262.15 Initial opening of tutorial file under git in LTC Editor . . . . . . . . . . . . . . . 292.16 Effect of hiding “small” changes and deletions . . . . . . . . . . . . . . . . . 302.17 Example of commit graph . . . . . . . . . . . . . . . . . . . . . . . . . . . . . 302.18 Selecting authors for filtering . . . . . . . . . . . . . . . . . . . . . . . . . . . 312.19 Effect of limiting authors . . . . . . . . . . . . . . . . . . . . . . . . . . . . . . 312.20 Selecting revision for filtering . . . . . . . . . . . . . . . . . . . . . . . . . . . . 312.21 Effect of going back to first revision . . . . . . . . . . . . . . . . . . . . . . . . 312.22 Selecting date for filtering . . . . . . . . . . . . . . . . . . . . . . . . . . . . . 322.23 Effect of limiting history to date of third version . . . . . . . . . . . . . . . . . 322.24 Effect of condensing authors . . . . . . . . . . . . . . . . . . . . . . . . . . . 322.25 Example of condensing authors . . . . . . . . . . . . . . . . . . . . . . . . . 322.26 After editing the text as John Adams . . . . . . . . . . . . . . . . . . . . . . . 342.27 Updated commit graph after command line commit . . . . . . . . . . . . . 352.28 Committing a comment but not showing it as an addition . . . . . . . . . . 352.29 Committing a comment and showing it as an addition . . . . . . . . . . . . 352.30 Git conflict markers in merged file . . . . . . . . . . . . . . . . . . . . . . . . 362.31 After resolving conflict, committing, and updating in LTC Editor . . . . . . . 372.32 Starting ltc-mode in Emacs with tutorial file under svn . . . . . . . . . . . . . . 432.33 Emacs info buffer after setting current author to “adams” . . . . . . . . . . . 442.34 Opening the LTC menu from the mode line in Emacs . . . . . . . . . . . . . 45
6

2.35 Effect of hiding “small” changes and deletions . . . . . . . . . . . . . . . . . 452.36 Effect on commit graph of limiting authors . . . . . . . . . . . . . . . . . . . 462.37 Effect on commit graph of going back to first revision . . . . . . . . . . . . . 472.38 Effect on commit graph of limiting history to date of third version . . . . . . 472.39 Effect of condensing authors . . . . . . . . . . . . . . . . . . . . . . . . . . . 482.40 Example of markup change when condensing authors . . . . . . . . . . . . 482.41 After editing the text as “adams” . . . . . . . . . . . . . . . . . . . . . . . . . 492.42 Subversion conflict markers in merged file . . . . . . . . . . . . . . . . . . . . 512.43 After resolving conflict and updating in Emacs . . . . . . . . . . . . . . . . . 522.44 Initial opening of tutorial file under svn in LTC Editor . . . . . . . . . . . . . . . 532.45 Effect of hiding “small” changes and deletions . . . . . . . . . . . . . . . . . 542.46 Example of commit graph . . . . . . . . . . . . . . . . . . . . . . . . . . . . . 542.47 Selecting authors for filtering . . . . . . . . . . . . . . . . . . . . . . . . . . . 552.48 Effect of limiting authors . . . . . . . . . . . . . . . . . . . . . . . . . . . . . . 552.49 Selecting revision for filtering . . . . . . . . . . . . . . . . . . . . . . . . . . . . 562.50 Effect of going back to first revision . . . . . . . . . . . . . . . . . . . . . . . . 562.51 Selecting date for filtering . . . . . . . . . . . . . . . . . . . . . . . . . . . . . 562.52 Effect of limiting history to date of third version . . . . . . . . . . . . . . . . . 562.53 Effect of condensing authors . . . . . . . . . . . . . . . . . . . . . . . . . . . 572.54 Example of condensing authors . . . . . . . . . . . . . . . . . . . . . . . . . 572.55 After editing the text as “adams” . . . . . . . . . . . . . . . . . . . . . . . . . 582.56 Subversion conflict markers in merged file . . . . . . . . . . . . . . . . . . . . 602.57 Resolving subversion conflict through editing file . . . . . . . . . . . . . . . . 612.58 After resolving conflict and updating in LTC Editor . . . . . . . . . . . . . . . 61
3.1 A typical work cycle for a version controlled file and when using LaTeX TrackChanges . . . . . . . . . . . . . . . . . . . . . . . . . . . . . . . . . . . . . . . 69
3.2 Traversing a history graph of revisions . . . . . . . . . . . . . . . . . . . . . . . 713.3 Starting ltc-mode in Emacs . . . . . . . . . . . . . . . . . . . . . . . . . . . . 733.4 Hiding changes in the preamble using the “LTC” menu . . . . . . . . . . . . 75
4.1 Flow for turning LTC on and off . . . . . . . . . . . . . . . . . . . . . . . . . . 784.2 Flow for editing while viewing changes . . . . . . . . . . . . . . . . . . . . . 794.3 Flow when saving or committing while LTC is on . . . . . . . . . . . . . . . . 80

Chapter 1
Installation & Configuration
1.1 Requirements
We have tested the system on Mac OS X and Linux. It is designed to run on Unix plat-forms. Windows is not supported although it may run with a Unix-like shell under Win-dows.
Further requirements for running LTC are as follows.
Java 1.6 or above. The Java Runtime Environment (JRE) should suffice.
Version Control System One of the version control systems below:
git 1.7.2 or above.
svn 1.6.3 or above.
Emacs 23 or above. Only if the user wants to use ltc-mode in Emacs to interact with LTC.XEmacs is not supported.
1.2 Installation and Update
Currently, we provide a shell script ltc-install.sh to perform LTC installation and up-dates. It can be downloaded from http://sourceforge.net/projects/latextrack/files/.Use it to install the LTC JAR file in a location of your choice. Also, if you use the Emacsltc-mode, be prepared to supply the location where to put the Emacs Lisp files (see moredetails below in Section 1.3.3).
In the future, we may provide installers for the target platforms.
8 © SRI International LTC v1.0.9

Chapter 1. Installation & Configuration 1.3. Configuration
Let us assume for the remainder of this manual, that you have used a directory called $LTCas the installation location. Then, you would install LTC using the script in the followingway. Note that you will need a second argument to install LTC for Emacs. In this case,you can jump to Section 1.3.3 below for details on the installation of LTC.
$> bash ltc-install.sh -h[... prints help message about using LTC install script]$> bash ltc-install.sh $LTC[...]Done with installing LTC in $LTCTo start LTC server with default options, use the following command:
java -jar $LTC/LTC.jar
To update from an earlier LTC version, run the ltc-install.sh script again with the sameargument(s). The script will download the latest version from the web site and configurethe link in $LTC/LTC.jar so that future invocations will resolve to the newest version.
After installing LTC, you can look at the command line options of LTC Server using theswitch -h or omit the switch to start LTC Server with default values.
$> java -jar $LTC/LTC.jar -h[... prints help message about using LTC Server]
1.3 Configuration
This section contains details of configuring git or svn, LTC and Emacs to work together.These steps typically only need to be carried out once per installation of LTC.
Note that the system decides automatically whether your LaTeX file is under git or svnversion control.
1.3.1 General Git Configuration
If you are already using git for other things, you may skip the following few steps as yourgit is probably already configured. However, we do recommend to add the common LaTeXbuild products with wildcards to the list of ignored files as outlined at the end of thissection, which may not be configured if git has not been used to manage repositorieswith LaTeX files.
You may want to check the version of your git installation:
$> git --versiongit version 1.7.2
LTC v1.0.9 © SRI International 9

1.3. Configuration Chapter 1. Installation & Configuration
If you haven’t done already, configure git with your name and email address:
$> git config --global user.name ”John Doe”$> git config --global user.email [email protected]
Typically, you don’t want to track automatic backups and build products of your LaTeXproject, so create a file ~/.gitignore_global (or any name and location of your choice) andadd the following lines as contents.
*~*.out*.aux*.bbl*.blg*.bst*.dvi*.idx*.lof*.log*.toc*.lol*.lot
Then, issue the git config command below (with a possibly adjusted file name and loca-tion).
$> git config --global core.excludesfile ~/.gitignore_global
To learn how to set up a new writing project under a git repository for using it with LTCrefer to Section 3.1.
1.3.2 General Subversion Configuration
If you are already using svn for other things, you may skip the following steps. However,we do recommend to add the common LaTeX build products with wildcards to the list ofignored files as outlined below, which may not be configured if svn has not been used tomanage repositories with LaTeX files.
You may want to check the version of your subversion installation:
$> svn --versionsvn, version 1.6.18 (r1303927)
compiled Aug 4 2012, 19:46:53
...
Subversion uses only your Unix user name but not your email address to attribute changes.Hence, we do not need to configure these.
10 © SRI International LTC v1.0.9
Chapter 1. Installation & Configuration 1.3. Configuration
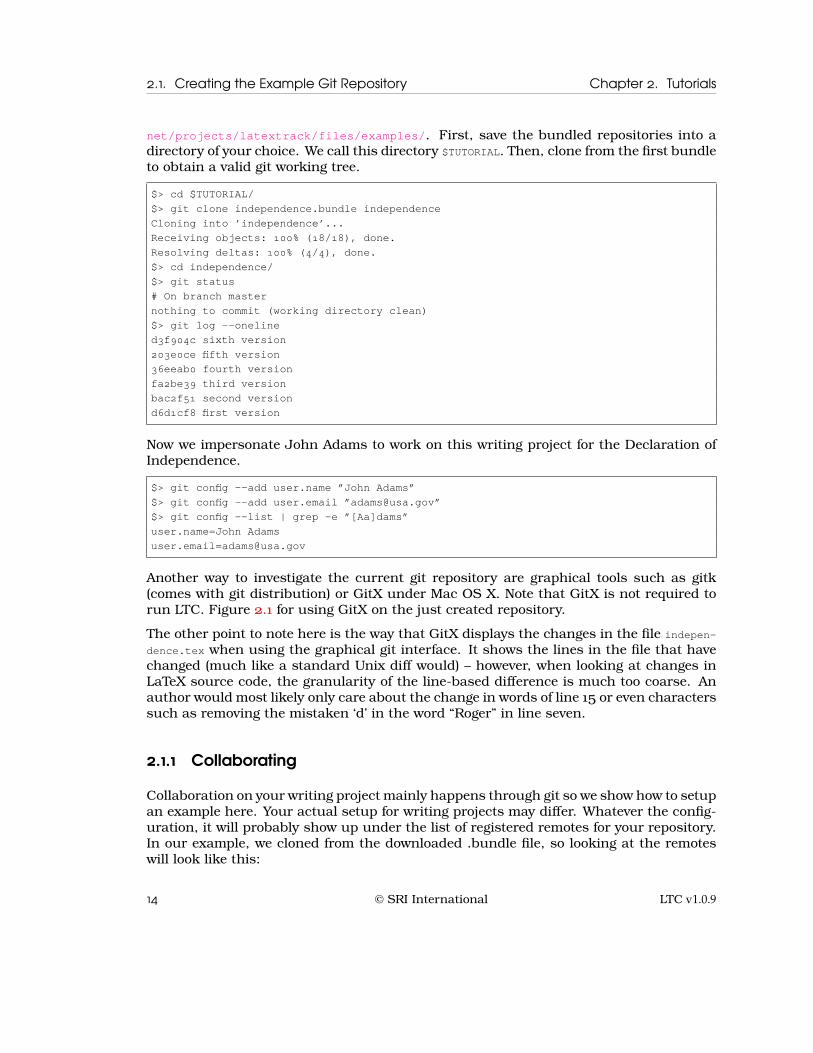
Typically, you don’t want to track build products of your LaTeX project, so you may wantto edit your file ~/.subversion/config to change the line with globale-ignores in your favoritetext editor. You will want to add these patterns to the existing line:
global-ignores = <current values> \*.out *.aux *.bbl *.blg *.bst *.dvi *.idx *.lof *.log *.toc *.lol *.lot
To learn how to set up a new writing project under a subversion repository for using itwith LTC refer to Section 3.2.
1.3.3 Emacs ltc-mode
To use the supplied ltc-mode in Emacs, you will have to put the relevant mode files into adirectory where Emacs can load them. There are two alternatives of letting Emacs knowwhere to find Emacs Lisp files:
1. Use a location that is already included in the load-path. To view the contents of thispath in your Emacs, execute the command C-h v load-path. On Mac OS X systemswith Aquamacs, this could be for example ~/Library/Preferences/Emacs/.
2. Add a new directory where you will extract the Emacs Lisp files to the load-path.Assuming the Emacs Lisp files will be installed in directory ~/.emacs.d/, add thefollowing line to your .emacs or other Emacs configuration file:
(add-to-list ’load-path ”~/.emacs.d”)
Now based on which method of the above you choose, supply the chosen directory as$EMACS_DIR in the second argument to the install script:
$> bash ltc-install.sh $LTC $EMACS_DIR
In order to enable the LTC mode in Emacs, add the following line to your Emacs con-figuration file (for example, ~/Library/Preferences/Emacs/Preferences.el is the default forAquamacs under Mac OS X; ~/.emacs is the default on Unix systems):
(autoload ’ltc-mode ”ltc-mode” ”” t)
We recommend to avoid loading LTC automatically when opening .tex files. Therefore, donot add a hook from latex-mode to ltc-mode (usually done with add-hook). The reason isthat our mode requires the latex-mode to be fully executed before LTC works. The hooksare not guaranteed to be executed in particular order, so it is best to manually invokeltc-mode after you have opened a .tex file.
If you need to change the port number that Emacs uses to communicate with the LTCServer (for example, if the default number is already in use on your computer), you firsthave to load LTC mode at least once using command M-x ltc-mode, possibly with a failureas the server is not running or not using the default port. Then, you can view the current
LTC v1.0.9 © SRI International 11

1.4. Troubleshooting Chapter 1. Installation & Configuration
Figure 1.1: Using M-x customize-variable <RET> ltc-port <RET> to set LTC port number in Emacs
port setting using C-h v ltc-port <RET>. You can customize the port number using M-xcustomize-variable <RET> ltc-port <RET> or open the customization buffer and browse to theLTC group under the Tex group, which may be located under the Wp (word processing)top-level group. See Figure 1.1 for a screenshot when customizing the port number inAquamacs under Mac OS X.
1.4 Troubleshooting
We are keeping a list of frequently-asked-questions at the project’s web site http://latextrack.sourceforge.net that may help for troubleshooting.
12 © SRI International LTC v1.0.9

Chapter 2
Tutorials
This chapter contains a number of tutorials adjusted to the user’s preference of text editorand version control system. The following diagram allows to easily identify the best fit foryour situation and names the specific tutorial sections. Whether you are using git or svnas a version control system, you will want to visit the respective section to setup yourexample repository first (Sec. 2.1 or Sec. 2.4). Then move on to the respective section forthe editor you will be using, Emacs or the bundled Java application LTC Editor (sections2.2, 2.3, 2.5, or 2.6).
....
Sec. .Creating the ExampleGit Repository
.
Sec. .Creating the ExampleSubversion Repository
...
Sec. .Tutorial withGit andEmacs
.
Sec. .Tutorial withGit and LTCEditor
.
Sec. .Tutorial withSubversionand Emacs
.
Sec. .Tutorial withSubversionand LTC Editor
.
which editor?
.which version control? .git . svn.
Emacs
.
LTC Editor
.
Emacs
.
LTC Editor
2.1 Creating the Example Git Repository
The git-based tutorials use two example git repositories called “independence.bundle” and“independence-sherman.bundle,” which can be downloaded from http://sourceforge.
LTC v1.0.9 © SRI International 13
2.1. Creating the Example Git Repository Chapter 2. Tutorials
net/projects/latextrack/files/examples/. First, save the bundled repositories into adirectory of your choice. We call this directory $TUTORIAL. Then, clone from the first bundleto obtain a valid git working tree.
$> cd $TUTORIAL/$> git clone independence.bundle independenceCloning into ’independence’...Receiving objects: 100% (18/18), done.Resolving deltas: 100% (4/4), done.$> cd independence/$> git status# On branch masternothing to commit (working directory clean)$> git log --onelined3f904c sixth version203e0ce fifth version36eeab0 fourth versionfa2be39 third versionbac2f51 second versiond6d1cf8 first version
Now we impersonate John Adams to work on this writing project for the Declaration ofIndependence.
$> git config --add user.name ”John Adams”$> git config --add user.email ”[email protected]”$> git config --list | grep -e ”[Aa]dams”user.name=John [email protected]
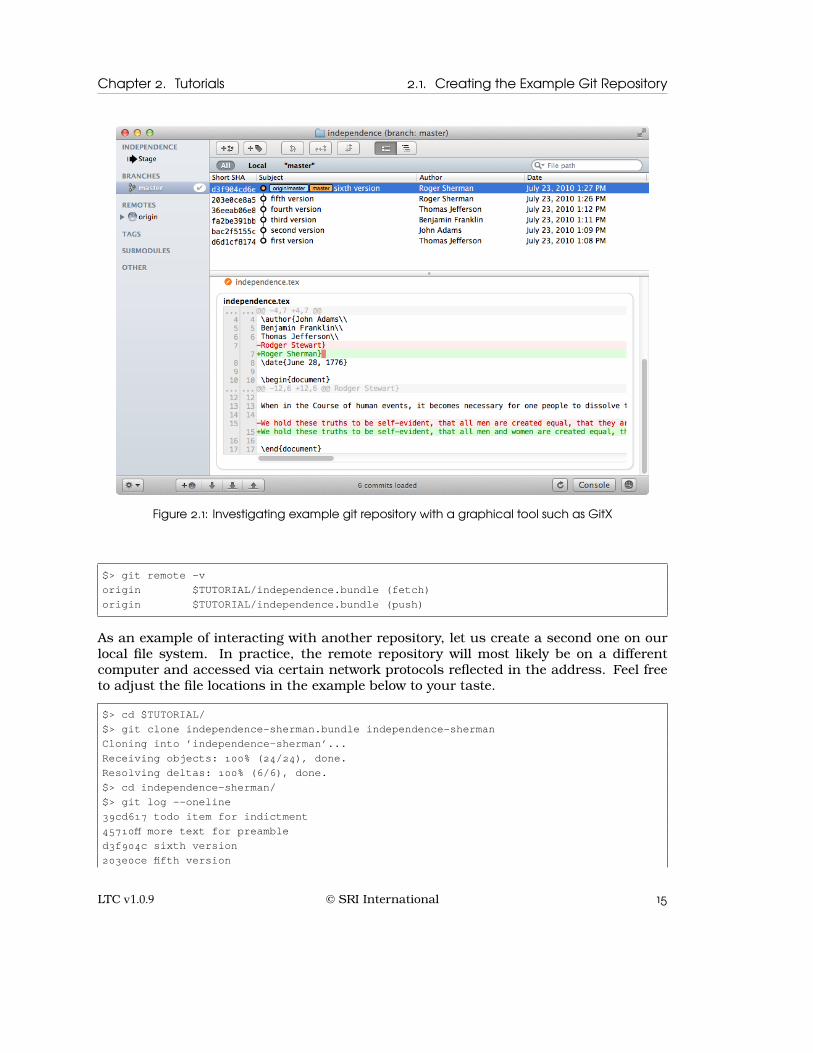
Another way to investigate the current git repository are graphical tools such as gitk(comes with git distribution) or GitX under Mac OS X. Note that GitX is not required torun LTC. Figure 2.1 for using GitX on the just created repository.
The other point to note here is the way that GitX displays the changes in the file indepen-dence.tex when using the graphical git interface. It shows the lines in the file that havechanged (much like a standard Unix diff would) – however, when looking at changes inLaTeX source code, the granularity of the line-based difference is much too coarse. Anauthor would most likely only care about the change in words of line 15 or even characterssuch as removing the mistaken ‘d’ in the word “Roger” in line seven.
2.1.1 Collaborating
Collaboration on your writing project mainly happens through git so we show how to setupan example here. Your actual setup for writing projects may differ. Whatever the config-uration, it will probably show up under the list of registered remotes for your repository.In our example, we cloned from the downloaded .bundle file, so looking at the remoteswill look like this:
14 © SRI International LTC v1.0.9
Chapter 2. Tutorials 2.1. Creating the Example Git Repository
Figure 2.1: Investigating example git repository with a graphical tool such as GitX
$> git remote -vorigin $TUTORIAL/independence.bundle (fetch)origin $TUTORIAL/independence.bundle (push)
As an example of interacting with another repository, let us create a second one on ourlocal file system. In practice, the remote repository will most likely be on a differentcomputer and accessed via certain network protocols reflected in the address. Feel freeto adjust the file locations in the example below to your taste.
$> cd $TUTORIAL/$> git clone independence-sherman.bundle independence-shermanCloning into ’independence-sherman’...Receiving objects: 100% (24/24), done.Resolving deltas: 100% (6/6), done.$> cd independence-sherman/$> git log --oneline39cd617 todo item for indictment45710ff more text for preambled3f904c sixth version203e0ce fifth version
LTC v1.0.9 © SRI International 15

2.1. Creating the Example Git Repository Chapter 2. Tutorials
36eeab0 fourth versionfa2be39 third versionbac2f51 second versiond6d1cf8 first version
Now we impersonate Roger Sherman in the newly created repository above, and also checkthe setting for its remotes.
$> git config --add user.name ”Roger Sherman”$> git config --add user.email ”[email protected]”$> git config --list | grep -e ”[Ss]herman”remote.origin.url=$TUTORIAL/independence-sherman.bundleuser.name=Roger [email protected]$> git remote -vorigin $TUTORIAL/independence-sherman.bundle (fetch)origin $TUTORIAL/independence-sherman.bundle (push)
Next, we make the first repository aware of the second and vice versa. At the same time,we may want to remove the reference to the original bundle so as to not get confused withwhich repository to synchronize. So in both repositories do
$> git remote remove origin # this is optional!
Then, we go into the first one and add a new remote location there:
$> cd $TUTORIAL/independence/$> git remote add sherman $TUTORIAL/independence-sherman$> git remote -vsherman $TUTORIAL/independence-sherman (fetch)sherman $TUTORIAL/independence-sherman (push)
Afterwards, we go into the second one and add a new remote location there:
$> cd $TUTORIAL/independence-sherman/$> git remote add adams $TUTORIAL/independence$> git remote -vadams $TUTORIAL/independence (fetch)adams $TUTORIAL/independence (push)
Now you can pull from each directory what the other person has done. Notice that youcannot push changes to the other directory, as these git repositories are not “bare.” Thismeans, they contain working copies and thus cannot be altered remotely. However, inmost situations you may be using a central repository (such as GitHub or a server) thatindeed contains a bare repository. Then, you are typically able to pull and push changeswith such a remote repository while your coauthors can do the same to synchronize yourwork.
16 © SRI International LTC v1.0.9
Chapter 2. Tutorials 2.2. Tutorial with Git and Emacs
We will see examples below in Sections 2.2.7 and 2.3.7 how John Adams and Roger Sher-man synchronize changes with each other.
2.2 Tutorial with Git and Emacs
In this section, we assume that the example git repository has been created accordingto the instructions in Section 2.1 above. And we assume that LTC has been installedusing the Emacs directory, as well as Emacs configuration adjustments made that arementioned in Section 1.3.3.
2.2.1 Starting LTC Server and ltc-mode
First, we start the LTC Server from the command line. Assuming you have installed LTCin the directory $LTC, we run this command line for the server. The output will be similarto the following. Leave the server running while performing the rest of this tutorial.
$> java -jar $LTC/LTC.jarLaTeX Track Changes (LTC) Copyright (C) 2009-2013 SRI InternationalThis program comes with ABSOLUTELY NO WARRANTY; for details use command line switch -c.This is free software, and you are welcome to redistribute it under certain conditions.
<current date> | CONFIG: Logging configured to level CONFIG<current date> | CONFIG: LTC version: <version info><current date> | INFO: Started RPC server on port 7777.
Next, we switch to Emacs and open the tutorial file $TUTORIAL/independence/independence.tex.This should put Emacs into latex-mode but any other mode should work as well. Then,start LTC mode using the command M-x ltc-mode in Emacs. You will see a few messagesappearing briefly in the mini buffer (you can also look at them in the *Messages* buffer),such as the following.
Starting LTC mode for file ”\$TUTORIAL/independence/independence.tex”...Using ‘xml-rpc’ package version: 1.6.8.2LTC session ID = 1Starting LTC update...LTC updates received
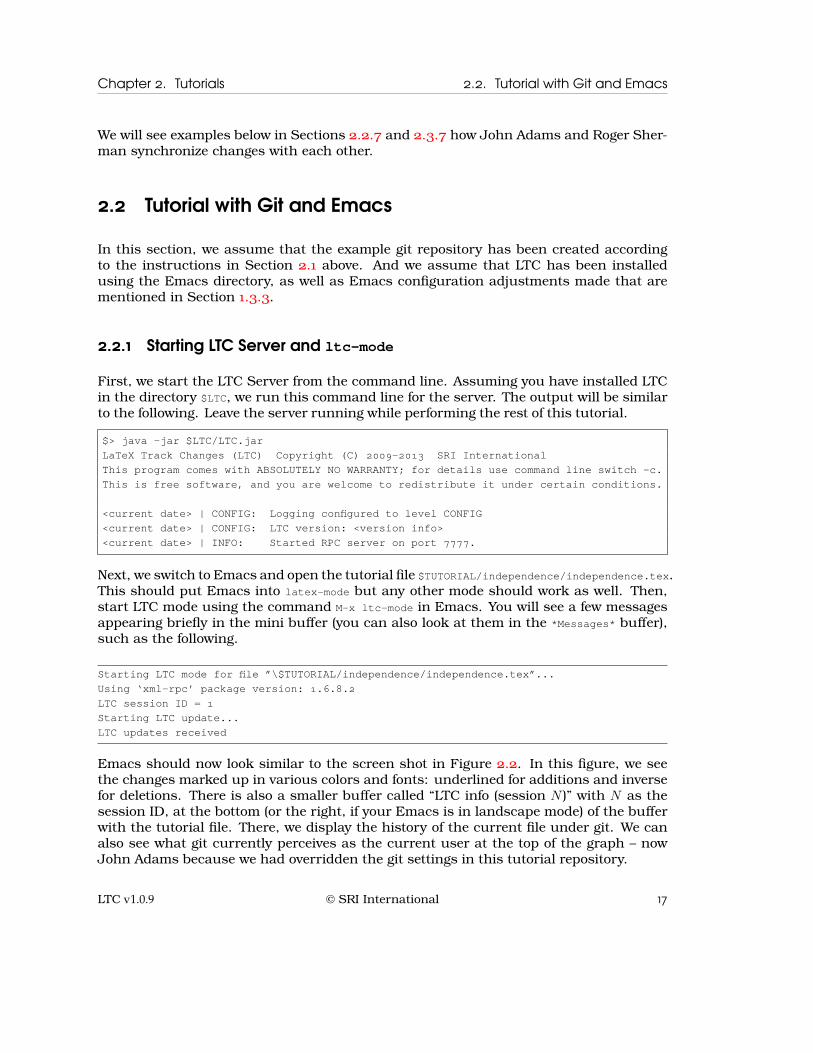
Emacs should now look similar to the screen shot in Figure 2.2. In this figure, we seethe changes marked up in various colors and fonts: underlined for additions and inversefor deletions. There is also a smaller buffer called “LTC info (session N )” with N as thesession ID, at the bottom (or the right, if your Emacs is in landscape mode) of the bufferwith the tutorial file. There, we display the history of the current file under git. We canalso see what git currently perceives as the current user at the top of the graph – nowJohn Adams because we had overridden the git settings in this tutorial repository.
LTC v1.0.9 © SRI International 17
2.2. Tutorial with Git and Emacs Chapter 2. Tutorials
Figure 2.2: Starting ltc-mode in Emacs with tutorial file under git
2.2.2 Showing and Hiding Certain Changes
The LTC menu and “LTC info” buffer in Emacs allow us to customize the way LTC displaysthe changes of the file. Section 3.3 contains all the details of how LTC displays the changesincluding limiting the file history and filtering. In this tutorial, we will just use some ofthe options and see their effect.
First, notice the colors assigned to each of the authors. To change an author color, forexample Roger Sherman’s, perform a single left-click on the name of Roger Sherman.This opens another buffer called *Colors* with a preview of colors and their names. Alsolook at the mini buffer that requests input. You can enter a name or an RGB value in hexnotation. The color names can also be auto-completed, for example type Bro<TAB> (if TAB isyour completion key in Emacs) to see Brown. You will want something with contrast to thewhite background, so brown is a fine choice. When clicking the RETURN key, notice howthe text in the editor panel on the top changes color for those parts that are attributed toRoger Sherman’s edits. To abort choosing a color simply enter an empty value.
Next, focus on the typographical errors in the command “\maketitle” in line 11 and thebeginning of the first paragraph in line thirteen as well as the spelling errors in the word“political.” Open the LTC menu (in the menu bar and in the mode line) and then the sub-menu “Show/Hide” as seen in Figure 2.3. If you first uncheck the item LTC ▷ Show/Hide
▷ Show small changes , and second, also the item LTC ▷ Show/Hide ▷ Show deletions ,notice how the text rendering in the editor panel changes. Figures 2.4 show that “\maketi-tle” as well as the typos in the word “political” are no longer marked up, and in the third
18 © SRI International LTC v1.0.9

Chapter 2. Tutorials 2.2. Tutorial with Git and Emacs
Figure 2.3: Opening the LTC menu from the mode line in Emacs
Figure 2.4: Effect of hiding “small” changes first (middle) and then also deletions (right)
image, the deletion beginning with “If” at the beginning of the paragraph is now omit-ted.
2.2.3 Understanding the Commit Graph
Now draw your attention back to LTC info buffer with the history of the current file undergit (located at the bottom or right of your tracked file). The Emacs representation is usingsmall box characters to draw the graph and its edges. In our current tutorial repository,there are no branches and the graph is a sequential line. Refer to Figure 2.5 for a screenshot of the example file history. Versions that are included in the tracked changes are notprinted in gray. How far we go back in history depends on some filtering settings, whichare discussed further in Section 2.2.4 below. By default, we first include all version ofthe current author at the top. In our example with impersonating John Adams, thereare currently no further recent commits of him. Then, we continue down the path andcollect all versions of different authors until we find the next version of John Adams inthe commit with the message “second version.”
2.2.4 Limiting History
We allow the user to filter and customize how the potentially rich history of a .tex file isselected, so as to provide a better view of the tracked changes. The user can show and
LTC v1.0.9 © SRI International 19

2.2. Tutorial with Git and Emacs Chapter 2. Tutorials
Figure 2.5: Example of commit graph
Figure 2.6: Effect on commit graph of limiting authors to Roger Sherman and Thomas Jefferson
hide changes as seen above, limit the authors of interest, and specify a date or revisionnumber to tell LTC how far back in time the history should be considered.
To limit the history by authors, choose menu item LTC ▷ Limit by ▷ Set of authors... .This will prompt the user to enter author names to limit by in the mini buffer. Again,automatic completion works, so you can enter Ro<TAB> <RET> and Th<TAB> <RET> <RET> toselect authors Roger Sherman and Thomas Jefferson and exit the dialog. After the lastauthor was selected, the system automatically updates the displayed changes.
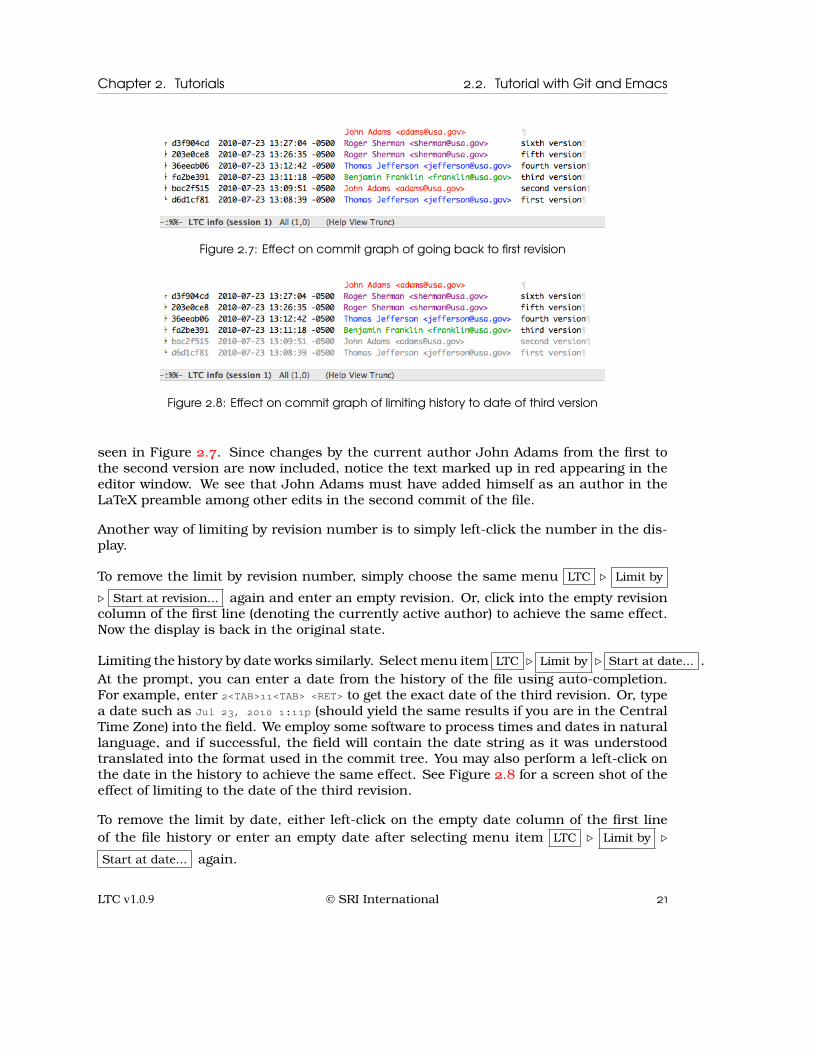
Notice how any version by the ignored authors Benjamin Franklin and John Adams isnow gray as only commits from the selected authors are considered. The first line in theLTC info buffer still shows the currently active author John Adams, so this line is not gray.Again, the history is only taken until the next revision of the current author but since heis being ignored, we go all the way back to the first revision. Compare your Emacs nowwith the screen shot in Figure 2.6 and see how the file history has changed.
To reset limiting by authors, simply choose the same menu LTC ▷ Limit by ▷ Set of authors...again and enter an empty author as the first one. Now the display is back in the originalstate.
Next, we apply limits on revision and date to control how far back the history of thefile is considered. As we had seen, the first version is not taken into account because itwas committed before the next commit by the current author John Adams. Let us nowchoose menu item LTC ▷ Limit by ▷ Start at revision... . This will prompt the user tospecify a known revision number. Type the first few characters d6d<RET> of the SHA-1 keyof the first commit. If unique, it is not necessary to expand the revision number usingthe TAB key (or whatever key is used for completion in your Emacs configuration). Seehow the first version is listed in color and considered in the tracked changes above as
20 © SRI International LTC v1.0.9
Chapter 2. Tutorials 2.2. Tutorial with Git and Emacs
Figure 2.7: Effect on commit graph of going back to first revision
Figure 2.8: Effect on commit graph of limiting history to date of third version
seen in Figure 2.7. Since changes by the current author John Adams from the first tothe second version are now included, notice the text marked up in red appearing in theeditor window. We see that John Adams must have added himself as an author in theLaTeX preamble among other edits in the second commit of the file.
Another way of limiting by revision number is to simply left-click the number in the dis-play.
To remove the limit by revision number, simply choose the same menu LTC ▷ Limit by
▷ Start at revision... again and enter an empty revision. Or, click into the empty revisioncolumn of the first line (denoting the currently active author) to achieve the same effect.Now the display is back in the original state.
Limiting the history by date works similarly. Select menu item LTC ▷ Limit by ▷ Start at date... .At the prompt, you can enter a date from the history of the file using auto-completion.For example, enter 2<TAB>11<TAB> <RET> to get the exact date of the third revision. Or, typea date such as Jul 23, 2010 1:11p (should yield the same results if you are in the CentralTime Zone) into the field. We employ some software to process times and dates in naturallanguage, and if successful, the field will contain the date string as it was understoodtranslated into the format used in the commit tree. You may also perform a left-click onthe date in the history to achieve the same effect. See Figure 2.8 for a screen shot of theeffect of limiting to the date of the third revision.
To remove the limit by date, either left-click on the empty date column of the first lineof the file history or enter an empty date after selecting menu item LTC ▷ Limit by ▷
Start at date... again.
LTC v1.0.9 © SRI International 21
2.2. Tutorial with Git and Emacs Chapter 2. Tutorials
Figure 2.9: Effect of condensing authors: ignoring the fifth version by Roger Sherman
Figure 2.10: Example of markup change before (left) and after (right) condensing authors
2.2.5 Condensing History
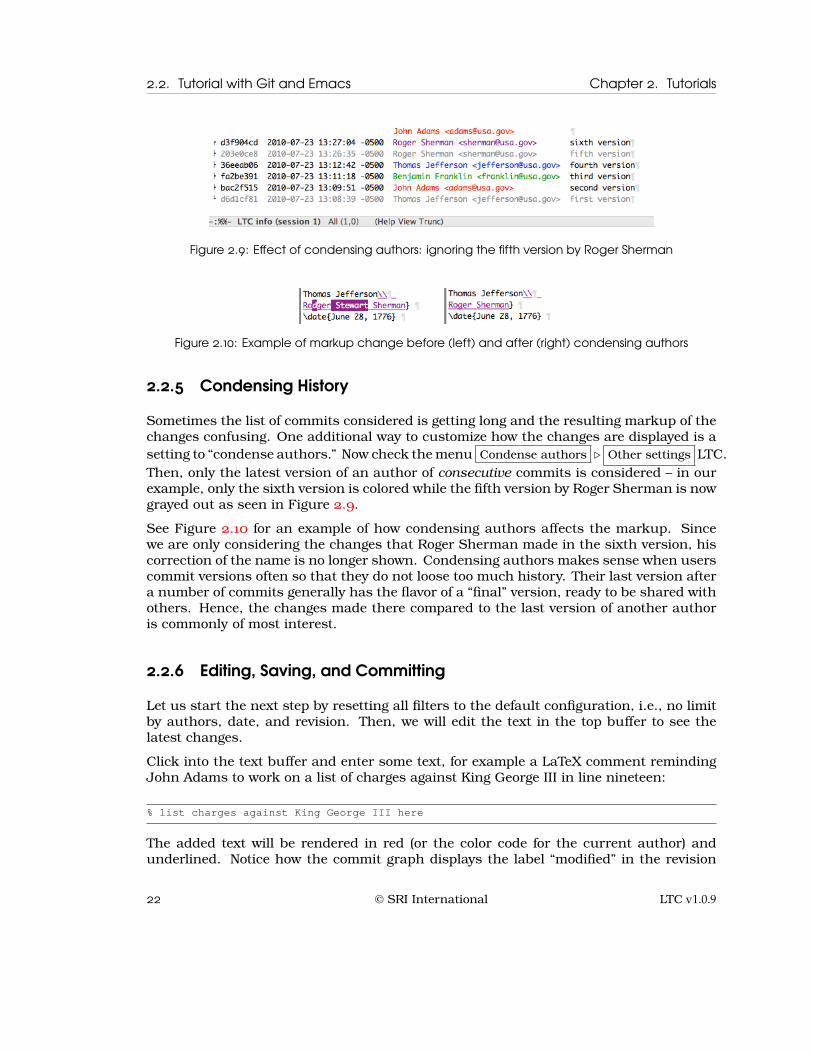
Sometimes the list of commits considered is getting long and the resulting markup of thechanges confusing. One additional way to customize how the changes are displayed is asetting to “condense authors.” Now check the menu Condense authors ▷ Other settings LTC.Then, only the latest version of an author of consecutive commits is considered – in ourexample, only the sixth version is colored while the fifth version by Roger Sherman is nowgrayed out as seen in Figure 2.9.
See Figure 2.10 for an example of how condensing authors affects the markup. Sincewe are only considering the changes that Roger Sherman made in the sixth version, hiscorrection of the name is no longer shown. Condensing authors makes sense when userscommit versions often so that they do not loose too much history. Their last version aftera number of commits generally has the flavor of a “final” version, ready to be shared withothers. Hence, the changes made there compared to the last version of another authoris commonly of most interest.
2.2.6 Editing, Saving, and Committing
Let us start the next step by resetting all filters to the default configuration, i.e., no limitby authors, date, and revision. Then, we will edit the text in the top buffer to see thelatest changes.
Click into the text buffer and enter some text, for example a LaTeX comment remindingJohn Adams to work on a list of charges against King George III in line nineteen:
% list charges against King George III here
The added text will be rendered in red (or the color code for the current author) andunderlined. Notice how the commit graph displays the label “modified” in the revision
22 © SRI International LTC v1.0.9

Chapter 2. Tutorials 2.2. Tutorial with Git and Emacs
Figure 2.11: After editing the text as John Adams
column of the first line of the file history. The mode line of Emacs also displays thesymbol ** to denote a modified buffer. Now delete some of the characters you have justentered, for example the word here at the end. The characters simply disappear as theywere added by the same author.
Now delete other characters that are either rendered black or a different color than redbut not marked as deletions (inverse color). Notice how these characters remain visiblebut are now colored red and marked up with inverse colors. If you tried to delete anythingthat is already marked as deletion (i.e., anything in inverse color), nothing will happen asthis text is already deleted in a prior version. See Figure 2.11 for a screen shot of the aboveedits: text in red and underlined was added and text in inverse red was deleted.
Finally, you will want to save the current file to disk. This will cause the label “modified”to change to “on disk” after saving in Emacs, for example with C-x s. If you would thenagain edit, the label would switch back to “modified” of course.
Saving the file, however, does not tell git to create a new version under its management.In order to commit the current file to git, first, make sure that the .tex file is saved underEmacs and the first line of the commit graph does not say “modified.” Then, on a com-mand line, switch to the directory with the tutorial file and perform the following commitcommand (printed in bold below). You may want to check the status of git before andafter the commit:
$> git status# On branch master# Changes not staged for commit:
LTC v1.0.9 © SRI International 23

2.2. Tutorial with Git and Emacs Chapter 2. Tutorials
Figure 2.12: File history after committing latest version and updating Emacs
# (use ”git add <file>...” to update what will be committed)# (use ”git checkout -- <file>...” to discard changes in working directory)## modified: independence.tex#no changes added to commit (use ”git add” and/or ”git commit -a”)$> git commit -am ”added comment about list of charges”[master 8629257] added comment about list of charges1 file changed, 3 insertions(+), 1 deletion(-)$> git status# On branch master# Your branch is ahead of ’origin/master’ by 1 commit.# (use ”git push” to publish your local commits)#nothing to commit, working directory clean
To make Emacs aware of the underlying commit, use menu item LTC ▷ Update buffer oruse the command M-x ltc-update. Notice how the recent commit gets included at the topof the list as seen in Figure 2.12.
2.2.7 Collaborating with Roger Sherman
Next we perform an example collaboration with Roger Sherman’s example repository assetup in Section 2.1.1 above. Remember that Roger Sherman’s repository has had twomore commits than the original one we used for John Adams. Since we have made editsand commits as John Adams, both repositories have diverged. To synchronize them, wefirst pull Roger Sherman’s changes into our working copy after checking that we are in agood state:
$> git pull sherman masterremote: Counting objects: 8, done.remote: Compressing objects: 100% (3/3), done.remote: Total 6 (delta 2), reused 5 (delta 1)Unpacking objects: 100% (6/6), done.From $TUTORIAL/independence-sherman* branch master -> FETCH_HEADAuto-merging independence.tex
24 © SRI International LTC v1.0.9

Chapter 2. Tutorials 2.2. Tutorial with Git and Emacs
Figure 2.13: Git conflict markers in merged file
CONFLICT (content): Merge conflict in independence.texAutomatic merge failed; fix conflicts and then commit the result.
Unfortunately, the two repositories have diverged too much and a so-called “merge con-flict” has arisen. Now we have to tell git how to fix this before we can proceed. Next, welook at the markers that git has put into our file. You can run M-x ltc-update in Emacsto see these markers as seen in Figure 2.13. On the command line, the file looks similarto this:
$> cat independence.tex[...]
<<<<<<< HEAD% list charges against King George III=======That to secure these rights, Governments are instituted among Men, [...]
%TODO: indictment here>>>>>>> 39cd6172613d1065a4cddc854cf30067869fc727
We decide that the comment in the version HEAD means the same as the last comment inthe merged version 39cd617... so we modify the text so that it looks like this:
$> cat independence.tex[...]
That to secure these rights, Governments are instituted among Men, [...]
% list charges against King George III
It is important to remove the git marker lines starting with «««<, =======, and »»»> for gitto recognize that we have resolved the conflicts. Now committing on the command lineyields:
$> git commit -am ”merging Roger Sherman’s edits”[master 34c1bde] merging Roger Sherman’s edits
This has resolved the conflict and incorporated Roger Sherman’s prior changes, as a lookat the git log with the graphing function reveals:
LTC v1.0.9 © SRI International 25
2.2. Tutorial with Git and Emacs Chapter 2. Tutorials
Figure 2.14: After resolving conflict, committing, and updating in Emacs
$> git log --oneline --graph --date-order* 34c1bde merging Roger Sherman’s edits|\* | 8629257 added comment about list of charges| * 39cd617 todo item for indictment| * 45710ff more text for preamble|/* d3f904c sixth version* 203e0ce fifth version* 36eeab0 fourth version* fa2be39 third version* bac2f51 second version* d6d1cf8 first version
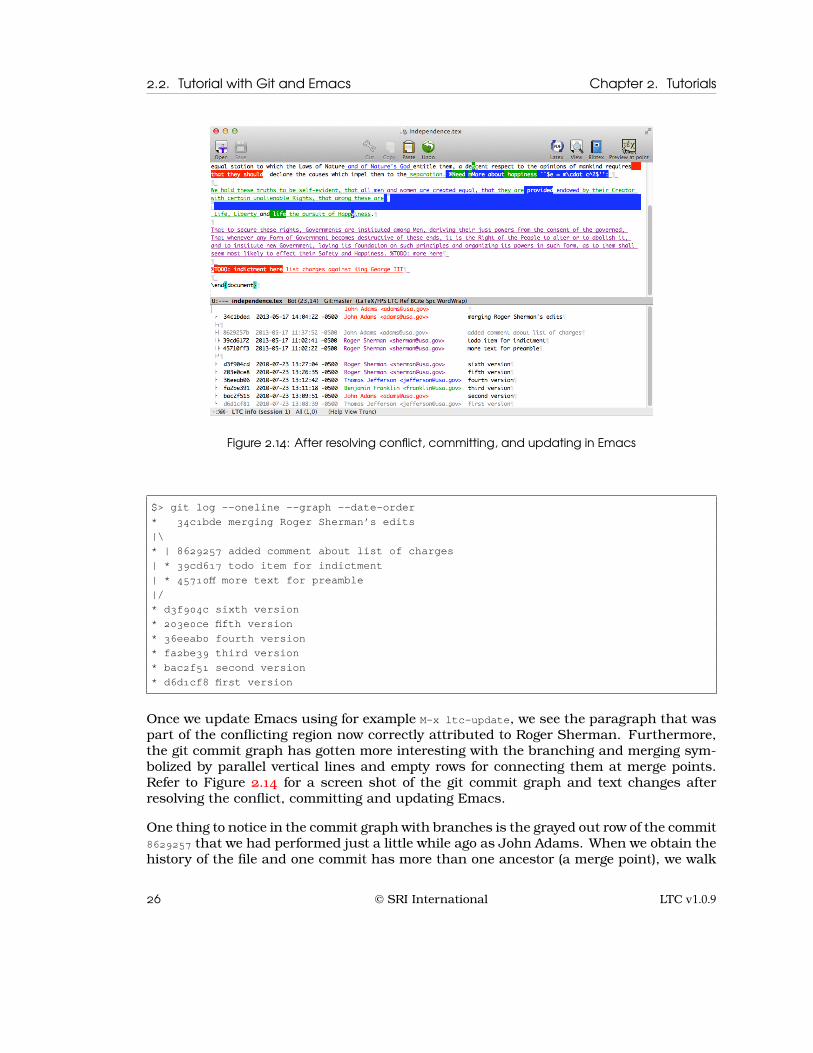
Once we update Emacs using for example M-x ltc-update, we see the paragraph that waspart of the conflicting region now correctly attributed to Roger Sherman. Furthermore,the git commit graph has gotten more interesting with the branching and merging sym-bolized by parallel vertical lines and empty rows for connecting them at merge points.Refer to Figure 2.14 for a screen shot of the git commit graph and text changes afterresolving the conflict, committing and updating Emacs.
One thing to notice in the commit graph with branches is the grayed out row of the commit8629257 that we had performed just a little while ago as John Adams. When we obtain thehistory of the file and one commit has more than one ancestor (a merge point), we walk
26 © SRI International LTC v1.0.9

Chapter 2. Tutorials 2.2. Tutorial with Git and Emacs
the branch that has the older commit time in order to create a sequential path throughthe commits. In the future, we want to allow the user to select the branch to use or evenoverlay parallel branches for better control of the system. You can watch ticket #15 forwhen we address this problem.
Next we make sure to tell Roger Sherman about our effort to merge changes in the currentdocument. He will want to pull our effort using the following commands.
$> cd $TUTORIAL/independence-sherman$> git pull adams masterremote: Counting objects: 10, done.remote: Compressing objects: 100% (4/4), done.remote: Total 6 (delta 2), reused 0 (delta 0)Unpacking objects: 100% (6/6), done.From ../independence* branch master -> FETCH_HEADUpdating 39cd617..34c1bdeFast-forwardindependence.tex | 4 ++--1 file changed, 2 insertions(+), 2 deletions(-)
A look at the git graph on the command line shows that the merge has been appliedwithout conflict.
$> git log --oneline --graph --date-order* 34c1bde merging Roger Sherman’s edits|\* | 8629257 added comment about list of charges| * 39cd617 todo item for indictment| * 45710ff more text for preamble|/* d3f904c sixth version* 203e0ce fifth version* 36eeab0 fourth version* fa2be39 third version* bac2f51 second version* d6d1cf8 first version
Now both can continue working on their versions but to prevent future merge conflictsit would be wise if they told each other immediately about newer versions and deviseda plan to edit the file at different times. In larger writing projects, we recommend tobreak up the document into smaller .tex files to be included in a master .tex file. Then,editing different files at the same time for multiple authors minimizes the risk of mergeconflicts.
LTC v1.0.9 © SRI International 27

2.3. Tutorial with Git and LTC Editor Chapter 2. Tutorials
2.3 Tutorial with Git and LTC Editor
In this section, we assume that the example git repository has been created according tothe instructions in Section 2.1 above.
2.3.1 Running the LTC Editor
First, we start the LTC Editor to interact with LTC and track the changes of the file.Assuming you have installed LTC in the directory $LTC, we can look at the command lineoptions of the editor:
$> java -cp $LTC/LTC.jar com.sri.ltc.editor.LTCEditor -hLaTeX Track Changes (LTC) Copyright (C) 2009-2013 SRI InternationalThis program comes with ABSOLUTELY NO WARRANTY; for details use command line switch -c.This is free software, and you are welcome to redistribute it under certain conditions.
usage: java -cp ... com.sri.ltc.editor.LTCEditor [options...] [FILE]withFILE : load given file to track changes-c : display copyright/license information and exit-h : display usage and exit-l LEVEL : set console log level
SEVERE, WARNING, INFO, CONFIG (default), FINE, FINER, FINEST-r : reset to default settings
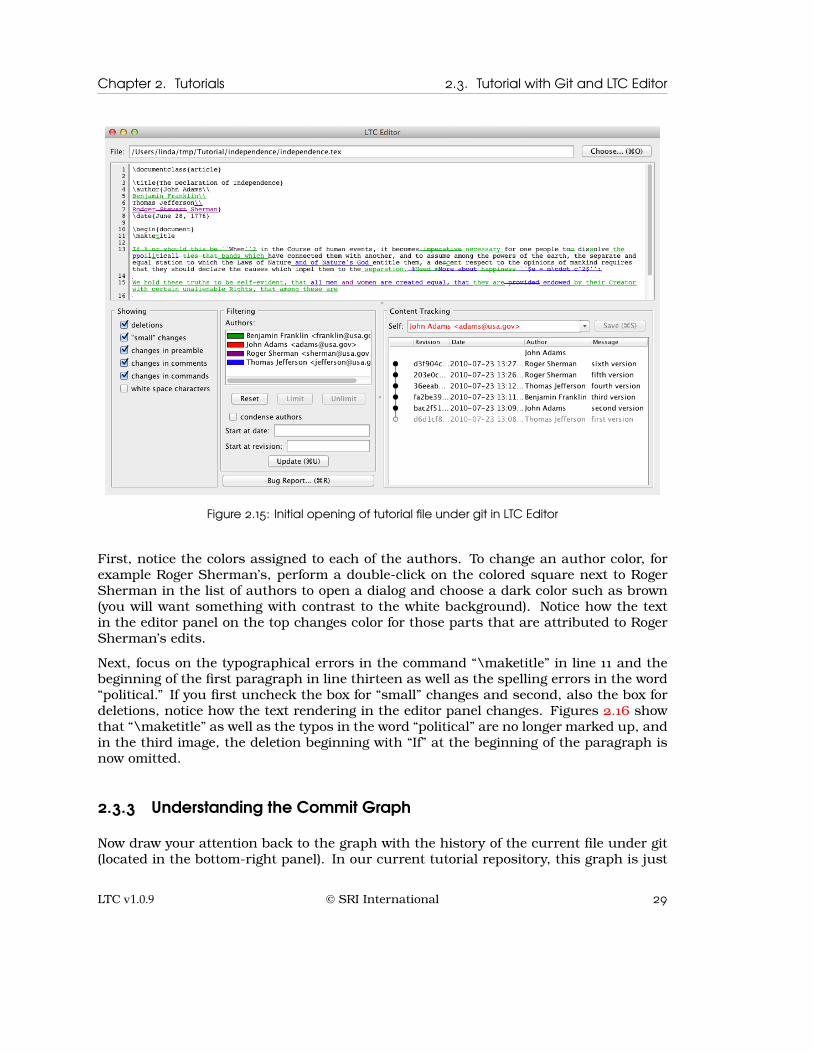
To open our tutorial file at $TUTORIAL/independence/independence.tex when starting the edi-tor, execute the following command. This will open the editor as a window similar to thescreen shot in Figure 2.15.
$> java -cp $LTC/LTC.jar \com.sri.ltc.editor.LTCEditor $TUTORIAL/independence/independence.tex
In this figure, we see a panel at the bottom-right that resembles the upper part of theGitX graphical interface to git. There, we display the history of the current LaTeX fileunder git. We can also see what git currently perceives as the current user – now JohnAdams because we had overridden the git settings in this tutorial repository.
2.3.2 Showing and Hiding Certain Changes
The bottom-left panels of the editor allows us to customize the way LTC displays thechanges of the file. Section 3.3 contains all the details of how LTC displays the changesincluding limiting the file history and filtering. In this tutorial, we will just use some ofthe options and see their effect.
28 © SRI International LTC v1.0.9
Chapter 2. Tutorials 2.3. Tutorial with Git and LTC Editor
Figure 2.15: Initial opening of tutorial file under git in LTC Editor
First, notice the colors assigned to each of the authors. To change an author color, forexample Roger Sherman’s, perform a double-click on the colored square next to RogerSherman in the list of authors to open a dialog and choose a dark color such as brown(you will want something with contrast to the white background). Notice how the textin the editor panel on the top changes color for those parts that are attributed to RogerSherman’s edits.
Next, focus on the typographical errors in the command “\maketitle” in line 11 and thebeginning of the first paragraph in line thirteen as well as the spelling errors in the word“political.” If you first uncheck the box for “small” changes and second, also the box fordeletions, notice how the text rendering in the editor panel changes. Figures 2.16 showthat “\maketitle” as well as the typos in the word “political” are no longer marked up, andin the third image, the deletion beginning with “If” at the beginning of the paragraph isnow omitted.
2.3.3 Understanding the Commit Graph
Now draw your attention back to the graph with the history of the current file under git(located in the bottom-right panel). In our current tutorial repository, this graph is just
LTC v1.0.9 © SRI International 29

2.3. Tutorial with Git and LTC Editor Chapter 2. Tutorials
Figure 2.16: Effect of hiding “small” changes first (middle) and then also deletions (right)
Figure 2.17: Example of commit graph
a line as the authors committed their versions in sequential order. Refer to Figure 2.17for a screen shot of the example file history. The first line always contains the currentauthor. Then, revisions that are included in the tracked changes are printed in blackand denoted with a filled circle. How far we go back in history depends on some filteringsettings, which are discussed further in Section 2.3.4 below. By default, we first includeall versions of the current author at the top. In our example with impersonating JohnAdams, there are currently no further recent commits of him. Then, we continue downthe path and collect all versions of different authors until we find the next version of JohnAdams in the commit with the message “second version.”
2.3.4 Limiting History
We allow the user to filter and customize how the potentially rich history of a .tex file isselected, so as to provide a better view of the tracked changes. The user can show andhide changes as seen above, limit the authors of interest, and specify a date or revisionnumber to tell LTC how far back in time the history should be considered.
To limit the history by authors, select both authors Roger Sherman and Thomas Jeffersonthrough clicking while holding down the CTRL or CMD key in the list of authors in themiddle lower panel. Then, click the button “Limit” below the list, which will gray out theunselected authors. For a limiting action to take effect, you need to click “Update.” Thisis different from showing and hiding various changes as well as changing author colors,which is applied instantly.
Notice how any version by the ignored authors Benjamin Franklin and John Adams isnow gray as only commits from the selected authors are considered. Again, the historyis only taken until the next revision of the current author but since he is being ignored,
30 © SRI International LTC v1.0.9

Chapter 2. Tutorials 2.3. Tutorial with Git and LTC Editor
Figure 2.18: Selecting authors forfiltering
Figure 2.19: Effect of limiting authors to Roger Sherman andThomas Jefferson after clicking “Update”
Figure 2.20: Selecting revision forfiltering
Figure 2.21: Effect of going back to first revision after clicking“Update”
we go all the way back to the first revision. Compare your editor window with the screenshot in Figure 2.19 and see how the commit graph has changed.
Then, clicking the “Reset” button followed by “Update” will remove and limits on the his-tory by author, so the original view is restored.
Next, we apply limits on revision and date to control how far back the history of the fileis considered. As we had seen, the first version is not taken into account because it wascommitted before the next commit by the current author John Adams. Let us now typethe first few characters d6d of the SHA-1 key of the first commit into the field labeled “Startat revision:” (refer to Figure 2.20) or simply drag the key from the entry in the commitgraph, which will copy the complete SHA-1 sequence. Now click “Update” and see howthe first version is listed in black and considered in the tracked changes above as seenin Figure 2.21. Since changes by the current author John Adams from the first to thesecond version are now included, notice the text marked up in red appearing in the editorwindow. We see that John Adams must have added himself as an author in the LaTeXpreamble among other edits.
To remove the limit by revision number, simply erase the text in the field “Start at revision:”and click “Update” again.
LTC v1.0.9 © SRI International 31
2.3. Tutorial with Git and LTC Editor Chapter 2. Tutorials
Figure 2.22: Selecting date for fil-tering
Figure 2.23: Effect of limiting history to date of third versionafter clicking “Update”
Figure 2.24: Effect of condensing authors:ignoring the 5th version by Roger Sherman
Figure 2.25: Example of markupchange before (left) andafter (right) condensingauthors
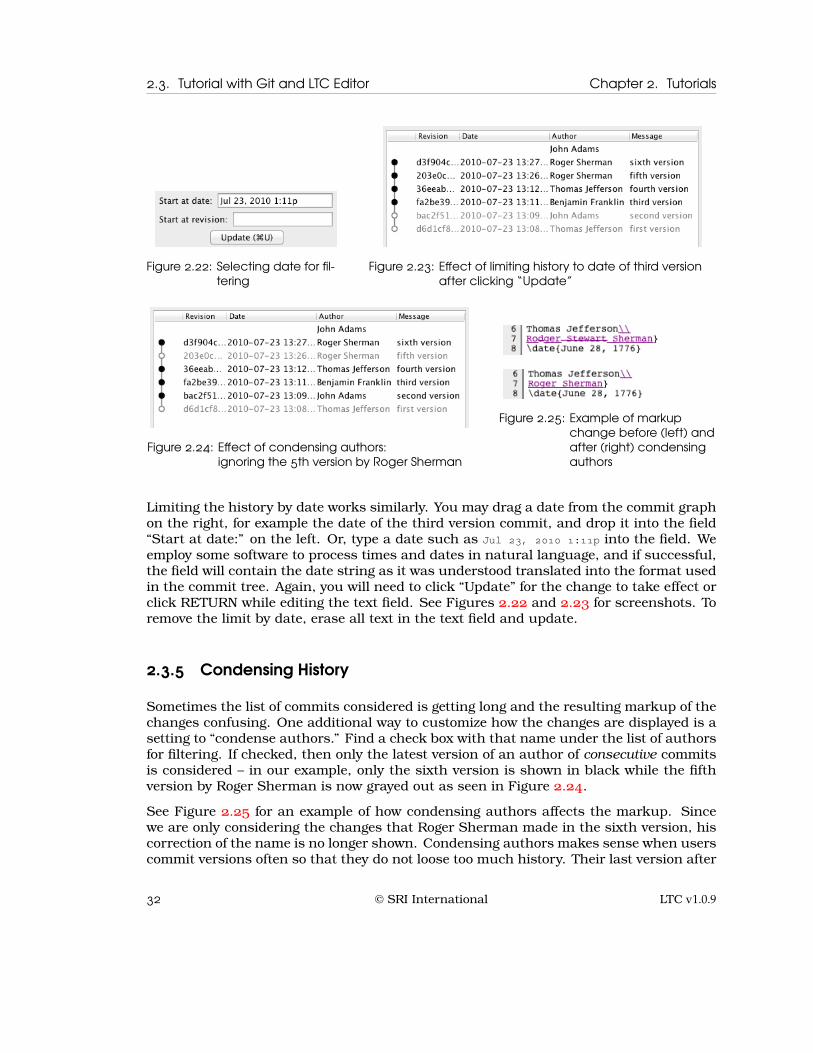
Limiting the history by date works similarly. You may drag a date from the commit graphon the right, for example the date of the third version commit, and drop it into the field“Start at date:” on the left. Or, type a date such as Jul 23, 2010 1:11p into the field. Weemploy some software to process times and dates in natural language, and if successful,the field will contain the date string as it was understood translated into the format usedin the commit tree. Again, you will need to click “Update” for the change to take effect orclick RETURN while editing the text field. See Figures 2.22 and 2.23 for screenshots. Toremove the limit by date, erase all text in the text field and update.
2.3.5 Condensing History
Sometimes the list of commits considered is getting long and the resulting markup of thechanges confusing. One additional way to customize how the changes are displayed is asetting to “condense authors.” Find a check box with that name under the list of authorsfor filtering. If checked, then only the latest version of an author of consecutive commitsis considered – in our example, only the sixth version is shown in black while the fifthversion by Roger Sherman is now grayed out as seen in Figure 2.24.
See Figure 2.25 for an example of how condensing authors affects the markup. Sincewe are only considering the changes that Roger Sherman made in the sixth version, hiscorrection of the name is no longer shown. Condensing authors makes sense when userscommit versions often so that they do not loose too much history. Their last version after
32 © SRI International LTC v1.0.9

Chapter 2. Tutorials 2.3. Tutorial with Git and LTC Editor
a number of commits generally has the flavor of a “final” version, ready to be shared withothers. Hence, the changes made there compared to the last version of another authoris commonly of most interest.
2.3.6 Editing, Saving, and Committing
Let us start the next step by resetting all filters to the default configuration, i.e., no limitby authors, date, and revision. Also make sure to turn “condense authors” off. Then, wewill edit the text in the editor panel to see the latest changes.
Click into the text panel and enter some text, for example a LaTeX comment remindingJohn Adams to work on a list of charges against King George III in line nineteen:
% list charges against King George III here
The added text will be rendered in red (or the color code for the current author) andunderlined. Notice how the commit graph adds a first line with the label “modified” andthe “Save” button becomes enabled. Now delete some of the characters you have justentered, for example the word here at the end. The characters simply disappear as theywere added by the same author.
Now delete other characters that are either rendered black or a different color than redbut not marked as deletions (strike-through font). Notice how these characters remainvisible but are now colored red and marked up with strike-through. If you tried to deleteanything that is already marked as deletion (i.e., anything in strike-through font), nothingwill happen as this text is already deleted in a prior version. See Figure 2.26 for a screenshot of the above edits: text in red and underlined was added and text in red and strike-through was deleted.
Finally, you will want to click “Save” to save the current file to disk. This will cause thelabel “modified” to change to “on disk.” If you would then again edit, the label wouldswitch back to “modified” of course.
Saving the file, however, does not tell git to create a new version under its management.In order to commit the current file to git, first, make sure that the .tex file is saved andthe first line in the commit graph is set to “on disk.” Then, on a command line, switch tothe directory with the tutorial file and perform the following commit command (printed inbold below). You may want to check the status of git before and after the commit:
$> git status# On branch master# Changes not staged for commit:# (use ”git add <file>...” to update what will be committed)# (use ”git checkout -- <file>...” to discard changes in working directory)## modified: independence.tex#no changes added to commit (use ”git add” and/or ”git commit -a”)
LTC v1.0.9 © SRI International 33

2.3. Tutorial with Git and LTC Editor Chapter 2. Tutorials
Figure 2.26: After editing the text as John Adams
$> git commit -am ”added comment about list of charges”[master 9438e4f] added comment about list of charges1 file changed, 3 insertions(+), 1 deletion(-)
To make LTC Editor aware of the underlying commit from the command line, click the“Update” button. Notice how the recent commit gets included at the top of the list asseen in Figure 2.27. Also see that we still include all revisions up to John Adams’ secondrevision a while ago—all revisions at the top of the graph before any other authors areskipped before looking for the default end point in history.
Now two things can happen depending on your setting for showing changes in comments(lower-left most panel). If the checkbox was off, the newly added comment is no longermarked up in red with underlining. After updating the editor from the commit history,the settings of which changes to show influence the markup of the text. Now the newlyentered comment is recognized as such, and if we hide changes in comments, the markupwill not show. If the box for “changes in comments” is checked, you will see your latesttext still marked up as an addition. Your editor should now look similar to the part shownin either Figure 2.28 or Figure 2.29.
34 © SRI International LTC v1.0.9

Chapter 2. Tutorials 2.3. Tutorial with Git and LTC Editor
Figure 2.27: Updated commit graph after command line commit
Figure 2.28: Committing a comment but notshowing it as an addition
Figure 2.29: Committing a comment andshowing it as an addition
2.3.7 Collaborating with Roger Sherman
Next we perform an example collaboration with Roger Sherman’s example repository assetup in Section 2.1.1 above. Remember that Roger Sherman’s repository has had twomore commits than the original one we used for John Adams. Since we have made editsand commits as John Adams, both repositories have diverged. To synchronize them, wefirst pull Roger Sherman’s changes into our working copy using the git pull commandbelow:
$> git pull sherman masterremote: Counting objects: 8, done.remote: Compressing objects: 100% (3/3), done.remote: Total 6 (delta 2), reused 5 (delta 1)Unpacking objects: 100% (6/6), done.From $TUTORIAL/independence-sherman* branch master -> FETCH_HEADAuto-merging independence.texCONFLICT (content): Merge conflict in independence.tex
LTC v1.0.9 © SRI International 35

2.3. Tutorial with Git and LTC Editor Chapter 2. Tutorials
Figure 2.30: Git conflict markers in merged file
Automatic merge failed; fix conflicts and then commit the result.
Unfortunately, the two repositories have diverged too much and a so-called “merge con-flict” has arisen. Now we have to tell git how to fix this before we can proceed. So we lookat the markers that git has put into our file. You can click the “Update” button in LTCEditor to see these markers there similar to Figure 2.30. On the command line, the filelooks similar to this:
$ cat independence.tex[...]
<<<<<<< HEAD% list charges against King George III=======That to secure these rights, Governments are instituted among Men, [...]
%TODO: indictment here>>>>>>> 39cd6172613d1065a4cddc854cf30067869fc727
We decide that the comments in the HEAD version means the same as the last comment inthe merged version 39cd617... so we modify the text so that it looks like this:
$> cat independence.tex[...]
That to secure these rights, Governments are instituted among Men, [...]
% list charges against King George III
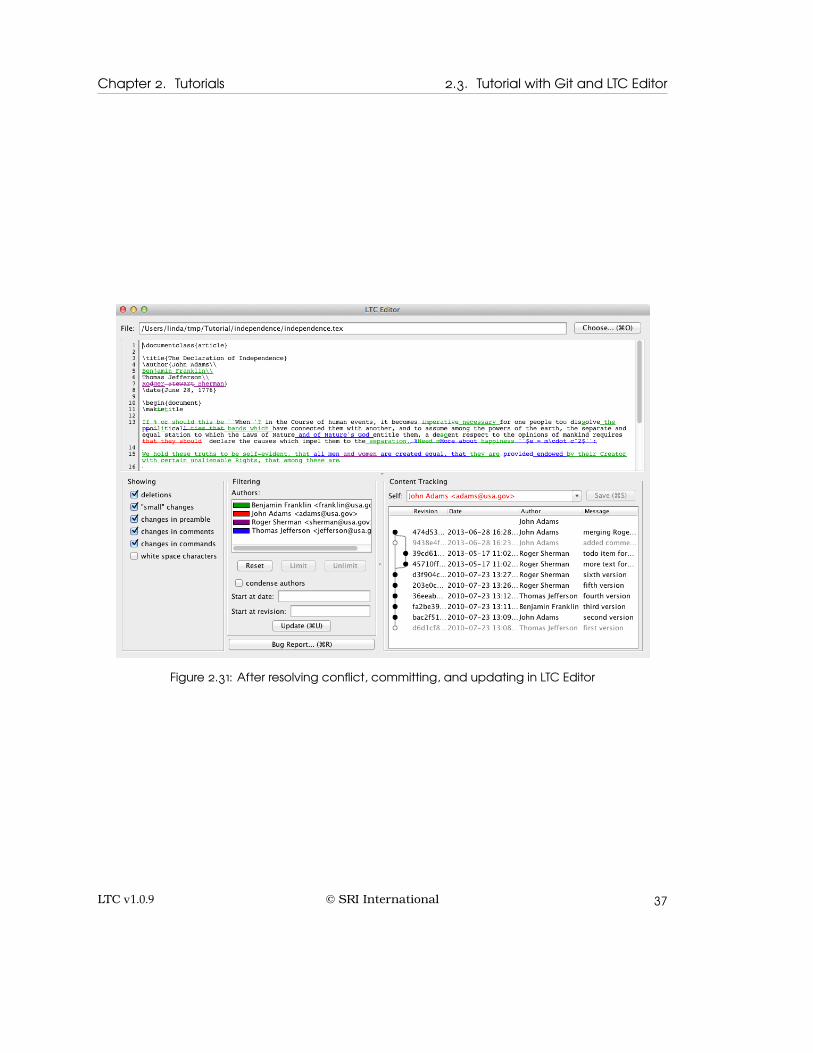
It is important to remove the git marker lines starting with «««<, =======, and »»»> forgit to recognize that we have resolved the conflicts. Notice that if you are editing in LTCEditor, all changes are currently marked up in the color of John Adams even though weimported a paragraph from Roger Sherman. This is because we still have not committedthe changes to git and the current version on disk is attributed to John Adams. However,we now save and then commit on the command line:
$> git commit -am ”merging Roger Sherman’s edits”[master 474d53b] merging Roger Sherman’s edits
36 © SRI International LTC v1.0.9
Chapter 2. Tutorials 2.3. Tutorial with Git and LTC Editor
Figure 2.31: After resolving conflict, committing, and updating in LTC Editor
LTC v1.0.9 © SRI International 37

2.4. Creating the Example Subversion Repository Chapter 2. Tutorials
This has resolved the conflict and incorporated Roger Sherman’s prior changes, as a lookat the git log with the graphing function reveals:
$> git log --oneline --graph --date-order* 474d53b merging Roger Sherman’s edits|\* | 9438e4f added comment about list of charges| * 39cd617 todo item for indictment| * 45710ff more text for preamble|/* d3f904c sixth version* 203e0ce fifth version* 36eeab0 fourth version* fa2be39 third version* bac2f51 second version* d6d1cf8 first version
Once we update LTC Editor, we see the paragraph that was part of the conflicting regionnow correctly attributed to Roger Sherman. Furthermore, the git commit graph hasgotten more interesting with the branching and merging in the first column of the commitgraph. Refer to Figure 2.31 for a screen shot of the git commit graph and text changesafter resolving the conflict, committing and updating LTC Editor.
2.4 Creating the Example Subversion Repository
This tutorial uses an example svn repository, which is either hosted on the Internet oron your local computer. The first Section 2.4.1 shows how to use a publicly accessiblerepository with an example file. This is the quickest way to try out LTC with Subversionbut you cannot commit new versions to this repository so we cannot go through suchadvanced topics in the later parts of the tutorial. The second Section 2.4.2 shows howto create a local svn server and populates it with an example repository. This takes a bitmore time to setup but then you can go through more advanced topics such as committingto the repository.
2.4.1 Using the Remote Subversion Repository
To create the example file that is under remote svn version control, go into a directory ofyour choice (say $TUTORIAL) and do the following. If the server causes a certificate alert,you can accept it permanently by using p as shown in bold below.
$> cd $TUTORIAL$> svn co https://rfs.csl.sri.com/svn/public/LTC/tutorial-svn independenceError validating server certificate for ’https://rfs.csl.sri.com:443’:- The certificate is not issued by a trusted authority. Use thefingerprint to validate the certificate manually!
38 © SRI International LTC v1.0.9

Chapter 2. Tutorials 2.4. Creating the Example Subversion Repository
Certificate information:- Hostname: rfs.csl.sri.com- Valid: from Mon, 06 May 2013 00:00:00 GMT until Tue, 06 May 2014 23:59:59 GMT- Issuer: Thawte, Inc., US- Fingerprint: da:09:85:34:fc:19:86:bf:3d:79:3a:8c:f1:90:41:63:57:40:5b:14(R)eject, accept (t)emporarily or accept (p)ermanently? pA independence/independence.texChecked out revision 6.
Now change into the new directory and confirm that the file has six revisions in its his-tory
$> cd independence/$> svn log -q independence.tex------------------------------------------------------------------------r6 | sherman | 2012-11-13 13:01:00 -0600 (Tue, 13 Nov 2012)------------------------------------------------------------------------r5 | sherman | 2012-11-13 13:00:35 -0600 (Tue, 13 Nov 2012)------------------------------------------------------------------------r4 | jefferson | 2012-11-13 12:59:45 -0600 (Tue, 13 Nov 2012)------------------------------------------------------------------------r3 | franklin | 2012-11-13 12:59:03 -0600 (Tue, 13 Nov 2012)------------------------------------------------------------------------r2 | adams | 2012-11-13 12:58:04 -0600 (Tue, 13 Nov 2012)------------------------------------------------------------------------r1 | jefferson | 2012-11-13 12:51:35 -0600 (Tue, 13 Nov 2012)------------------------------------------------------------------------
Unfortunately, we cannot accept changes to this repository so the tutorials based on svndo not cover how to commit new revisions and how to collaborate. We advise to install alocal svn server and repository per the instructions below or to go through the git-basedtutorial to cover those points.
2.4.2 Using a Local Subversion Repository
The following will show you how to run a local subversion server on your machine. Then,we will create a subversion repository there and add a few users to it, so that you canimpersonate different users throughout the later parts of the tutorial below.
First, perform the following steps from a directory of your choice. We assume that this isagain $TUTORIAL. There, you will create the root location of your tutorial repositories calledsvnrepos. You may choose another name but will then have to adjust the commandsaccordingly.
$> cd $TUTORIAL$> svnadmin create svnrepos
Now edit the two files
LTC v1.0.9 © SRI International 39
2.4. Creating the Example Subversion Repository Chapter 2. Tutorials
• $TUTORIAL/svnrepos/conf/svnserve.conf
• $TUTORIAL/svnrepos/conf/passwd
to contain the following lines:
$> grep -v ”^#” svnrepos/conf/svnserve.conf | sed ’/^$/d’[general]anon-access = noneauth-access = writepassword-db = passwd[sasl]$> grep -v ”^#” svnrepos/conf/passwd | sed ’/^$/d’[users]franklin = ltcadams = ltcsherman = ltcjefferson = ltc
Finally, start the SVN server in daemon mode using:
$> svnserve -d -r svnrepos
Now download the file tutorialsvn.dump from http://sourceforge.net/projects/latextrack/files/examples/ to, say, directory $TUTORIAL and load the repository into your server:
$> svnadmin load svnrepos < tutorialsvn.dump<<< Started new transaction, based on original revision 1
* adding path : tutorial-svn ... done.* adding path : tutorial-svn/independence.tex ... done.
------- Committed revision 1 >>>
<<< Started new transaction, based on original revision 2* editing path : tutorial-svn/independence.tex ... done.
------- Committed revision 2 >>>
<<< Started new transaction, based on original revision 3* editing path : tutorial-svn/independence.tex ... done.
------- Committed revision 3 >>>
<<< Started new transaction, based on original revision 4* editing path : tutorial-svn/independence.tex ... done.
------- Committed revision 4 >>>
<<< Started new transaction, based on original revision 5* editing path : tutorial-svn/independence.tex ... done.
40 © SRI International LTC v1.0.9

Chapter 2. Tutorials 2.4. Creating the Example Subversion Repository
------- Committed revision 5 >>>
<<< Started new transaction, based on original revision 6* editing path : tutorial-svn/independence.tex ... done.
------- Committed revision 6 >>>
Now, we will check out from this repository in a new directory, say independence. If yousee a message svn: Can’t connect to host ’localhost’: Connection refused then most likethe SVN server process is not running. Restart the server with the svnserve commandabove.
$> svn co --username adams svn://localhost/tutorial-svn independenceA independence/independence.texChecked out revision 6.$> cd independence$> svn log -q------------------------------------------------------------------------r6 | sherman | 2012-11-13 13:01:00 -0600 (Tue, 13 Nov 2012)------------------------------------------------------------------------r5 | sherman | 2012-11-13 13:00:35 -0600 (Tue, 13 Nov 2012)------------------------------------------------------------------------r4 | jefferson | 2012-11-13 12:59:45 -0600 (Tue, 13 Nov 2012)------------------------------------------------------------------------r3 | franklin | 2012-11-13 12:59:03 -0600 (Tue, 13 Nov 2012)------------------------------------------------------------------------r2 | adams | 2012-11-13 12:58:04 -0600 (Tue, 13 Nov 2012)------------------------------------------------------------------------r1 | jefferson | 2012-11-13 12:51:35 -0600 (Tue, 13 Nov 2012)------------------------------------------------------------------------
2.4.3 Collaborating Using the Local Repository
Collaboration on your writing project happens through the subversion repository so herewe show you how to set up an example with a secondary checkout that Roger Shermanuses. You will need to download an additional file independence-sherman.tex from http://sourceforge.net/projects/latextrack/files/examples/, for example to the directory$TUTORIAL.
Now do the following to create the secondary repository with a new version of the file thatis not yet committed.
$> cd $TUTORIAL/$> svn co --username sherman svn://localhost/tutorial-svn independence-shermanA independence-sherman/independence.texChecked out revision 6.$> cd independence-sherman/$> cp ../independence-sherman.tex independence.tex
LTC v1.0.9 © SRI International 41
2.5. Tutorial with Subversion and Emacs Chapter 2. Tutorials
$> svn statusM independence.tex
2.4.4 Cleaning Up the Local Repository
To clean up when you are done with the tutorial, you should stop the running svn serverprocess by finding out the process ID <PID> as seen below. Then, replace it in the killcommand before deleting the files associated with the repository.
$> ps ax | grep svnserve<PID> ?? Ss 0:00.00 svnserve -d -r svnrepos$> kill <PID>$> rm -rf $TUTORIAL/svnrepos
Finally, you will also want to remove the working copies you had made from the nowdeleted local repository:
$> rm -rf $TUTORIAL/independence$> rm -rf $TUTORIAL/independence-sherman
2.5 Tutorial with Subversion and Emacs
In this section, we assume that the example svn repository has been created according tothe instructions in Section 2.4 above. The latter subsections require a local svn repositorybut the beginning can be done with either the remote example repository or a local one.And we assume that LTC has been installed using the Emacs directory, as well as Emacsconfiguration adjustments made that are mentioned in Section 1.3.3.
2.5.1 Starting LTC Server and ltc-mode
First, we start the LTC Server from the command line. Assuming you have installed LTCin the directory $LTC, we run this command line for the server. The output will be similarto the following. Leave the server running while performing the rest of this tutorial.
$> java -jar $LTC/LTC.jarLaTeX Track Changes (LTC) Copyright (C) 2009-2013 SRI InternationalThis program comes with ABSOLUTELY NO WARRANTY; for details use command line switch -c.This is free software, and you are welcome to redistribute it under certain conditions.
<current date> | CONFIG: Logging configured to level CONFIG<current date> | CONFIG: LTC version: <version info><current date> | INFO: Started RPC server on port 7777.
42 © SRI International LTC v1.0.9
Chapter 2. Tutorials 2.5. Tutorial with Subversion and Emacs
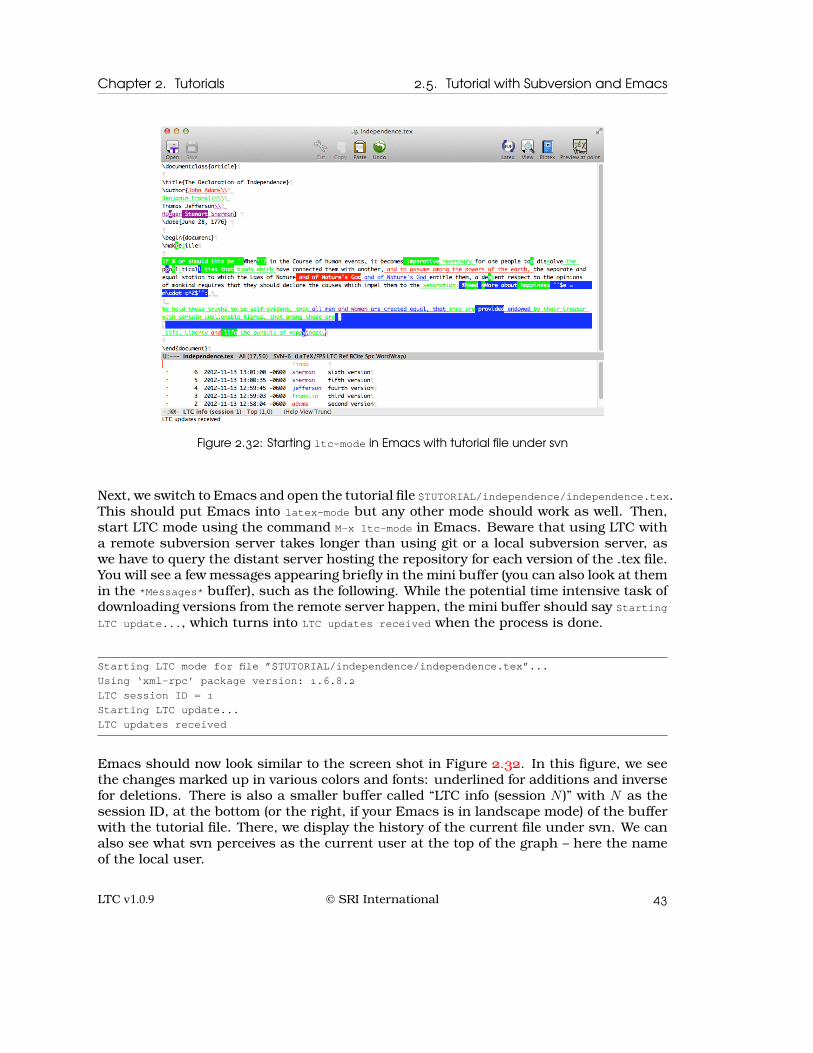
Figure 2.32: Starting ltc-mode in Emacs with tutorial file under svn
Next, we switch to Emacs and open the tutorial file $TUTORIAL/independence/independence.tex.This should put Emacs into latex-mode but any other mode should work as well. Then,start LTC mode using the command M-x ltc-mode in Emacs. Beware that using LTC witha remote subversion server takes longer than using git or a local subversion server, aswe have to query the distant server hosting the repository for each version of the .tex file.You will see a few messages appearing briefly in the mini buffer (you can also look at themin the *Messages* buffer), such as the following. While the potential time intensive task ofdownloading versions from the remote server happen, the mini buffer should say StartingLTC update..., which turns into LTC updates received when the process is done.
Starting LTC mode for file ”$TUTORIAL/independence/independence.tex”...Using ‘xml-rpc’ package version: 1.6.8.2LTC session ID = 1Starting LTC update...LTC updates received
Emacs should now look similar to the screen shot in Figure 2.32. In this figure, we seethe changes marked up in various colors and fonts: underlined for additions and inversefor deletions. There is also a smaller buffer called “LTC info (session N )” with N as thesession ID, at the bottom (or the right, if your Emacs is in landscape mode) of the bufferwith the tutorial file. There, we display the history of the current file under svn. We canalso see what svn perceives as the current user at the top of the graph – here the nameof the local user.
LTC v1.0.9 © SRI International 43

2.5. Tutorial with Subversion and Emacs Chapter 2. Tutorials
Figure 2.33: Emacs info buffer after setting current author to “adams”
First, we will override what LTC thinks is the current author in order to make the followingtutorial more meaningful. In real life situations you will rarely have to use this commandas you typically want the changes in the repository attributed to yourself. In Emacs, typethe command M-x ltc-set-self<RET>adams<RET> to impersonate John Adams. This updatesthe contents in the main buffer and info buffer at the bottom automatically, which mayagain take a little time with a remote subversion server. The info buffer will then look likethe screen shot in Figure 2.33.
2.5.2 Showing and Hiding Certain Changes
The LTC menu and “LTC info” buffer in Emacs allow us to customize the way LTC displaysthe changes of the file. Section 3.3 contains all the details of how LTC displays the changesincluding limiting the file history and filtering. In this tutorial, we will just use some ofthe options and see their effect.
First, notice the colors assigned to each of the authors. To change an author color, forexample Roger Sherman’s, perform a single left-click on the name of Roger Sherman.This opens another buffer called *Colors* with a preview of colors and their names. Alsolook at the mini buffer that requests input. You can enter a name or an RGB value in hexnotation. The color names can also be auto-completed, for example type Bro<TAB> (if TAB isyour completion key in Emacs) to see Brown. You will want something with contrast to thewhite background, so brown is a fine choice. When clicking the RETURN key, notice howthe text in the editor panel on the top changes color for those parts that are attributed toRoger Sherman’s edits. To abort choosing a color simply enter an empty value.
Next, focus on the typographical errors in the command “\maketitle” in line 11 and thebeginning of the first paragraph in line thirteen as well as the spelling errors in the word“political.” Open the LTC menu (in the menu bar and in the mode line) and then thesub-menu “Show/Hide” as seen in Figure 2.34. If you first uncheck the item LTC▷ Show/Hide ▷ Show small changes , and second, also the item LTC ▷ Show/Hide ▷
Show deletions , notice how the text rendering in the editor panel changes. Again, ifyou work with the remote repository, it might take a little while until all the updatesare received from the server and the mini buffer shows the message “LTC updates re-ceived.” Figures 2.35 show that “\maketitle” as well as the typos in the word “political”
44 © SRI International LTC v1.0.9

Chapter 2. Tutorials 2.5. Tutorial with Subversion and Emacs
Figure 2.34: Opening the LTC menu from the mode line in Emacs
Figure 2.35: Effect of hiding “small” changes first (middle) and then also deletions (right)
are no longer marked up, and in the third image, the deletion beginning with “If” at thebeginning of the paragraph is now omitted.
2.5.3 Understanding the Commit Graph
Now draw your attention back to LTC info buffer with the history of the current file undersvn (located at the bottom or right of your .tex file). The Emacs representation is usingsmall box characters to draw the graph and its edges. In our current tutorial repository,there are no branches and the graph is a sequential line.
Refer back to Figure 2.33 for the screen shot of the example file history. Versions that areincluded in the tracked changes are not printed in gray. How far we go back in historydepends on some filtering settings, which are discussed further in Section 2.5.4 below.By default, we first include all version of the current author at the top. In our examplewith impersonating John Adams with the user name “adams,” there are currently nofurther recent commits of him. Then, we continue down the path and collect all versionsof different authors until we find the next version of John Adams in the commit with themessage “second version.”
LTC v1.0.9 © SRI International 45
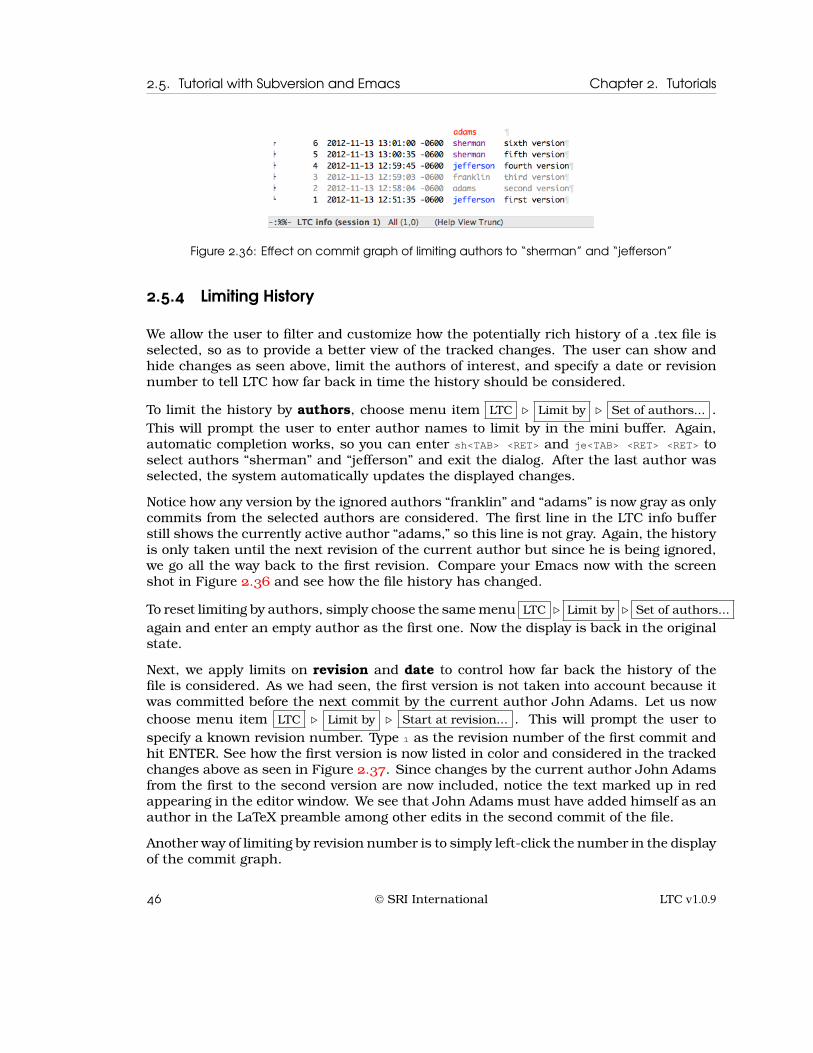
2.5. Tutorial with Subversion and Emacs Chapter 2. Tutorials
Figure 2.36: Effect on commit graph of limiting authors to “sherman” and “jefferson”
2.5.4 Limiting History
We allow the user to filter and customize how the potentially rich history of a .tex file isselected, so as to provide a better view of the tracked changes. The user can show andhide changes as seen above, limit the authors of interest, and specify a date or revisionnumber to tell LTC how far back in time the history should be considered.
To limit the history by authors, choose menu item LTC ▷ Limit by ▷ Set of authors... .This will prompt the user to enter author names to limit by in the mini buffer. Again,automatic completion works, so you can enter sh<TAB> <RET> and je<TAB> <RET> <RET> toselect authors “sherman” and “jefferson” and exit the dialog. After the last author wasselected, the system automatically updates the displayed changes.
Notice how any version by the ignored authors “franklin” and “adams” is now gray as onlycommits from the selected authors are considered. The first line in the LTC info bufferstill shows the currently active author “adams,” so this line is not gray. Again, the historyis only taken until the next revision of the current author but since he is being ignored,we go all the way back to the first revision. Compare your Emacs now with the screenshot in Figure 2.36 and see how the file history has changed.
To reset limiting by authors, simply choose the same menu LTC ▷ Limit by ▷ Set of authors...again and enter an empty author as the first one. Now the display is back in the originalstate.
Next, we apply limits on revision and date to control how far back the history of thefile is considered. As we had seen, the first version is not taken into account because itwas committed before the next commit by the current author John Adams. Let us nowchoose menu item LTC ▷ Limit by ▷ Start at revision... . This will prompt the user tospecify a known revision number. Type 1 as the revision number of the first commit andhit ENTER. See how the first version is now listed in color and considered in the trackedchanges above as seen in Figure 2.37. Since changes by the current author John Adamsfrom the first to the second version are now included, notice the text marked up in redappearing in the editor window. We see that John Adams must have added himself as anauthor in the LaTeX preamble among other edits in the second commit of the file.
Another way of limiting by revision number is to simply left-click the number in the displayof the commit graph.
46 © SRI International LTC v1.0.9

Chapter 2. Tutorials 2.5. Tutorial with Subversion and Emacs
Figure 2.37: Effect on commit graph of going back to first revision
Figure 2.38: Effect on commit graph of limiting history to date of third version
To remove the limit by revision number, simply choose the same menu LTC ▷ Limit by
▷ Start at revision... again and enter an empty revision. Or, click into the empty revisioncolumn of the first line (denoting the currently active author) to achieve the same effect.Now the display is back in the original state.
Limiting the history by date works similarly. Select menu item LTC ▷ Limit by ▷ Start at date... .At the prompt, you can enter a date from the history of the file using auto-completion. Forexample, enter 2<TAB>2:59:0<TAB> <RET> to get the exact date of the third revision. Or, typea date such as Nov 13, 2012 12:59p (should yield the same results if you are in the CentralTime Zone) into the field. We employ some software to process times and dates in naturallanguage, and if successful, the field will contain the date string as it was understoodtranslated into the format used in the commit tree. You may also perform a left-click onthe date in the history to achieve the same effect. See Figure 2.38 for a screen shot of theeffect of limiting to the date of the third revision.
To remove the limit by date, either left-click on the empty date column of the first lineof the file history or enter an empty date after selecting menu item LTC ▷ Limit by ▷
Start at date... again.
2.5.5 Condensing History
Sometimes the list of commits considered is getting long and the resulting markup of thechanges confusing. One additional way to customize how the changes are displayed isa setting to “condense authors.” Now check the menu LTC ▷ Condense authors . Then,only the latest version of an author of consecutive commits is considered – in our example,
LTC v1.0.9 © SRI International 47

2.5. Tutorial with Subversion and Emacs Chapter 2. Tutorials
Figure 2.39: Effect of condensing authors: ignoring the fifth version by Roger Sherman
Figure 2.40: Example of markup change before (left) and after (right) condensing authors
only the sixth version is colored while the fifth version by Roger Sherman is now grayedout as seen in Figure 2.39.
See Figure 2.40 for an example of how condensing authors affects the markup. Sincewe are only considering the changes that Roger Sherman made in the sixth version, hiscorrection of the name is no longer shown. Condensing authors makes sense when userscommit versions often so that they do not loose too much history. Their last version aftera number of commits generally has the flavor of a “final” version, ready to be shared withothers. Hence, the changes made there compared to the last version of another authoris commonly of most interest.
2.5.6 Editing and Saving
Let us start the next step by resetting all filters to the default configuration, i.e., no limitby authors, date, and revision. Then, we will edit the text in the top buffer to see thelatest changes.
Click into the text buffer and enter some text, for example a LaTeX comment remindingJohn Adams to work on a list of charges against King George III in line nineteen:
% list charges against King George III here
The added text will be rendered in red (or the color code for the current author) andunderlined. Notice how the commit graph displays the label “modified” in the revisioncolumn of the first line of the file history. The mode line of Emacs also displays thesymbol ** to denote a modified buffer. Now delete some of the characters you have justentered, for example the word here at the end. The characters simply disappear as theywere added by the same author.
Now delete other characters that are either rendered black or a different color than red
48 © SRI International LTC v1.0.9
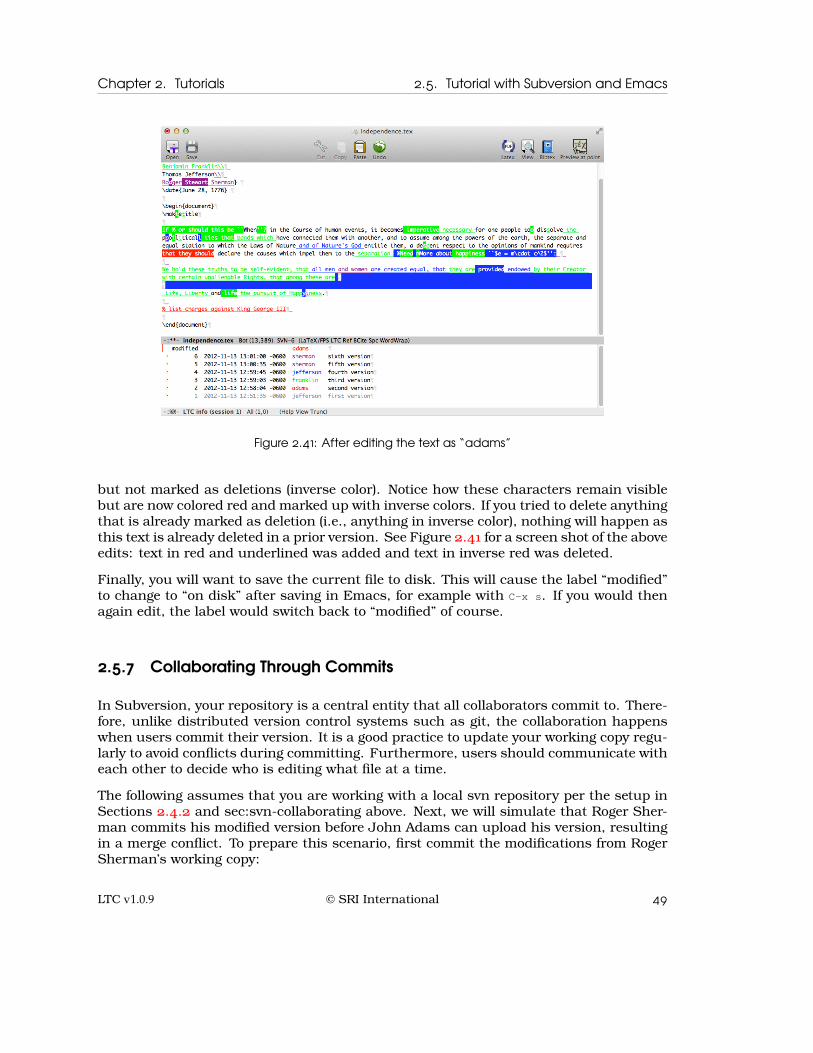
Chapter 2. Tutorials 2.5. Tutorial with Subversion and Emacs
Figure 2.41: After editing the text as “adams”
but not marked as deletions (inverse color). Notice how these characters remain visiblebut are now colored red and marked up with inverse colors. If you tried to delete anythingthat is already marked as deletion (i.e., anything in inverse color), nothing will happen asthis text is already deleted in a prior version. See Figure 2.41 for a screen shot of the aboveedits: text in red and underlined was added and text in inverse red was deleted.
Finally, you will want to save the current file to disk. This will cause the label “modified”to change to “on disk” after saving in Emacs, for example with C-x s. If you would thenagain edit, the label would switch back to “modified” of course.
2.5.7 Collaborating Through Commits
In Subversion, your repository is a central entity that all collaborators commit to. There-fore, unlike distributed version control systems such as git, the collaboration happenswhen users commit their version. It is a good practice to update your working copy regu-larly to avoid conflicts during committing. Furthermore, users should communicate witheach other to decide who is editing what file at a time.
The following assumes that you are working with a local svn repository per the setup inSections 2.4.2 and sec:svn-collaborating above. Next, we will simulate that Roger Sher-man commits his modified version before John Adams can upload his version, resultingin a merge conflict. To prepare this scenario, first commit the modifications from RogerSherman’s working copy:
LTC v1.0.9 © SRI International 49

2.5. Tutorial with Subversion and Emacs Chapter 2. Tutorials
$> cd $TUTORIAL/independence-sherman/$> svn statusM independence.tex$> svn commit -m ”todo item for indictment” --username shermanSending independence.texTransmitting file data .Committed revision 7.
Now the shared repository is already at revision 7 while we (as John Adams) are stillediting from revision six. First, check again that you have saved the file in Emacs andthat the first entry in the commit graph says “on disk.” When we try to commit our latestchanges from the Section 2.5.6 above, using the command line, we get the following errormessage.
$> cd $TUTORIAL/independence/$> svn statusM independence.tex$> svn commit -m ”added comment about list of charges” --username adamsSending independence.texTransmitting file data .svn: Commit failed (details follow):svn: File ’/tutorial-svn/independence.tex’ is out of date
Then, we try to update our repository first to mend the situation, which results in anothererror message about the conflicting versions. If Roger Sherman and John Adams hadbeen modifying different .tex files in the same repository, we would have not gotten thisconflict. To resolve, we choose to postpone so that we can see the differences in Emacsand resolve it there. Our input is marked in bold below.
$> svn updateConflict discovered in ’independence.tex’.Select: (p) postpone, (df) diff-full, (e) edit,
(mc) mine-conflict, (tc) theirs-conflict,(s) show all options: p
C independence.texUpdated to revision 7.Summary of conflicts:Text conflicts: 1
Our current file is now marked as in conflict, so let us update Emacs using menu itemLTC ▷ Update buffer or M-x ltc-update, to see something similar to the screen shot in
Figure 2.42. The conflicting portion at the end is marked with additional lines and wesee revision 7 in the history of the file. On the command line, the file looks similar tothis:
$> cat independence.tex[...]
<<<<<<< .mine
50 © SRI International LTC v1.0.9

Chapter 2. Tutorials 2.5. Tutorial with Subversion and Emacs
Figure 2.42: Subversion conflict markers in merged file
% list charges against King George III
=======That to secure these rights, Governments are instituted among Men, [...]%TODO: indictment here
>>>>>>> .r7
We decide that the comments in the version .mine version means the same as the lastcomment in version .r7 so we modify the text in Emacs and save, so that it looks like thison the command line:
$> cat independence.tex[...]
That to secure these rights, Governments are instituted among Men, [...]
% list charges against King George III
It is important to remove the svn marker lines starting with «««<, =======, and »»»> for svnto recognize that we have resolved the conflicts. We also have to tell svn that the conflicthas been resolved. Then we can finally perform the following commit command. The twoimportant commands are printed in bold below. You may want to check the status of svnbefore and after the commit:
$> svn resolved independence.texResolved conflicted state of ’independence.tex’$> svn statusM independence.tex$> svn commit -m ”added comment about list of charges” --username adamsSending independence.texTransmitting file data .Committed revision 8.
LTC v1.0.9 © SRI International 51

2.6. Tutorial with Subversion and LTC Editor Chapter 2. Tutorials
Figure 2.43: After resolving conflict and updating in Emacs
$> svn status
Once we update Emacs using for example M-x ltc-update, we see the latest revision 8 inthe commit graph and the marked up latest edits attributed to John Adams and RogerSherman similar to Figure 2.43.
2.6 Tutorial with Subversion and LTC Editor
In this section, we assume that the example svn repository has been created accordingto the instructions in Section 2.4 above. The latter subsections require a local svn repos-itory but the beginning can be done with either the remote example repository or a localone.
2.6.1 Running the LTC Editor
First, we start the LTC Editor to interact with LTC and track the changes of the file.Assuming you have installed LTC in the directory $LTC, we can look at the command lineoptions of the editor:
$> java -cp $LTC/LTC.jar com.sri.ltc.editor.LTCEditor -hLaTeX Track Changes (LTC) Copyright (C) 2009-2013 SRI InternationalThis program comes with ABSOLUTELY NO WARRANTY; for details use command line switch -c.This is free software, and you are welcome to redistribute it under certain conditions.
usage: java -cp ... com.sri.ltc.editor.LTCEditor [options...] [FILE]withFILE : load given file to track changes-c : display copyright/license information and exit-h : display usage and exit-l LEVEL : set console log level
52 © SRI International LTC v1.0.9

Chapter 2. Tutorials 2.6. Tutorial with Subversion and LTC Editor
Figure 2.44: Initial opening of tutorial file under svn in LTC Editor
SEVERE, WARNING, INFO, CONFIG (default), FINE, FINER, FINEST-r : reset to default settings
To open our tutorial file at $TUTORIAL/independence/independence.tex when starting the ed-itor, execute the following command. After the editor opens as a window, we open thecombo box under the name for “Self:” by clicking on the small arrow right next to thename and select the author “adams” to impersonate John Adams for the remainder ofthis tutorial. This will again contact the server to obtain updates about the file history,which may take a little time if you are working with a remote repository. Finally, thewindow should look similar to the screen shot in Figure 2.44.
$> java -cp $LTC/LTC.jar \com.sri.ltc.editor.LTCEditor $TUTORIAL/independence/independence.tex
In this figure, we see a panel at the bottom-right that displays the history of the currentLaTeX file under svn as well as the name of the current user – now John Adams becausewe had overridden the default, which was your user name.
LTC v1.0.9 © SRI International 53
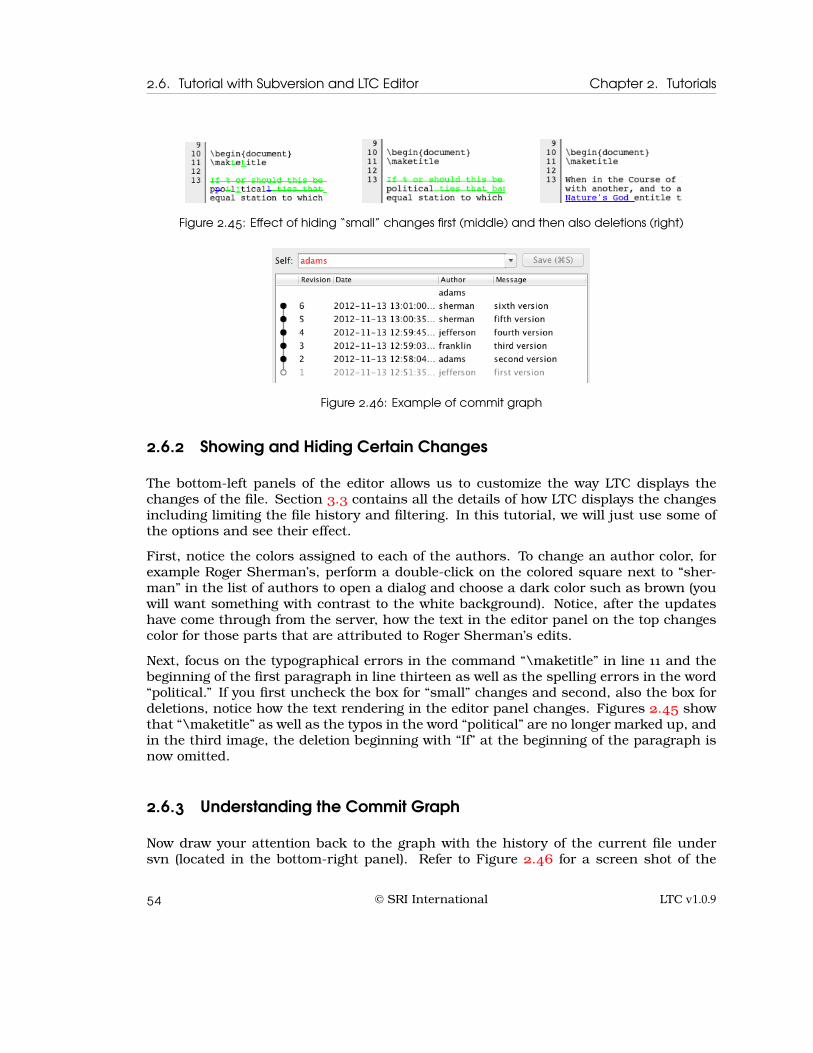
2.6. Tutorial with Subversion and LTC Editor Chapter 2. Tutorials
Figure 2.45: Effect of hiding “small” changes first (middle) and then also deletions (right)
Figure 2.46: Example of commit graph
2.6.2 Showing and Hiding Certain Changes
The bottom-left panels of the editor allows us to customize the way LTC displays thechanges of the file. Section 3.3 contains all the details of how LTC displays the changesincluding limiting the file history and filtering. In this tutorial, we will just use some ofthe options and see their effect.
First, notice the colors assigned to each of the authors. To change an author color, forexample Roger Sherman’s, perform a double-click on the colored square next to “sher-man” in the list of authors to open a dialog and choose a dark color such as brown (youwill want something with contrast to the white background). Notice, after the updateshave come through from the server, how the text in the editor panel on the top changescolor for those parts that are attributed to Roger Sherman’s edits.
Next, focus on the typographical errors in the command “\maketitle” in line 11 and thebeginning of the first paragraph in line thirteen as well as the spelling errors in the word“political.” If you first uncheck the box for “small” changes and second, also the box fordeletions, notice how the text rendering in the editor panel changes. Figures 2.45 showthat “\maketitle” as well as the typos in the word “political” are no longer marked up, andin the third image, the deletion beginning with “If” at the beginning of the paragraph isnow omitted.
2.6.3 Understanding the Commit Graph
Now draw your attention back to the graph with the history of the current file undersvn (located in the bottom-right panel). Refer to Figure 2.46 for a screen shot of the
54 © SRI International LTC v1.0.9

Chapter 2. Tutorials 2.6. Tutorial with Subversion and LTC Editor
Figure 2.47: Selecting authors forfiltering
Figure 2.48: Effect of limiting authors to to “sherman” and“jefferson” after clicking “Update”
example file history. The first line always contains the current author as set in the textfield labeled “Self” above. Then, revisions that are included in the tracked changes are notprinted in gray. How far we go back in history depends on some filtering settings, whichare discussed further in Section 2.6.4 below. By default, we first include all versionsof the current author at the top. In our example with impersonating John Adams withthe user name “adams,” there are currently no further recent commits of him. Then, wecontinue down the path and collect all versions of different authors until we find the nextversion of John Adams in the commit with the message “second version.”
2.6.4 Limiting History
We allow the user to filter and customize how the potentially rich history of a .tex file isselected, so as to provide a better view of the tracked changes. The user can show andhide changes as seen above, limit the authors of interest, and specify a date or revisionnumber to tell LTC how far back in time the history should be considered.
To limit the history by authors, select both authors “sherman” and “jefferson” throughclicking while holding down the CTRL or CMD key in the list of authors in the middle lowerpanel. Then, click the button “Limit” below the list, which will gray out the unselectedauthors. For a limiting action to take effect, you need to click “Update.” This is differentfrom showing and hiding various changes as well as changing author colors, which isapplied instantly.
Notice how any version by the ignored authors Benjamin Franklin and John Adams isnow gray as only commits from the selected authors are considered. Again, the historyis only taken until the next revision of the current author but since he is being ignored,we go all the way back to the first revision. Compare your editor window with the screenshot in Figure 2.48 and see how the commit graph has changed.
Then, clicking the “Reset” button followed by “Update” will remove and limits on the his-tory by author, so the original view is restored.
LTC v1.0.9 © SRI International 55
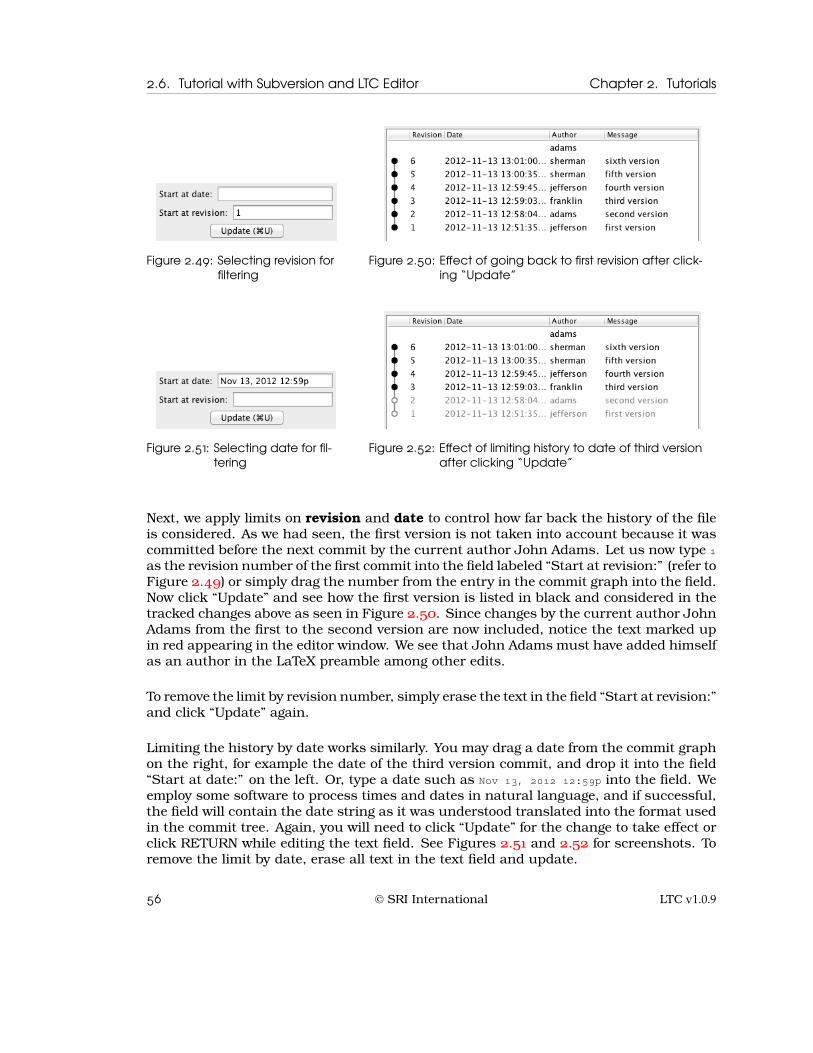
2.6. Tutorial with Subversion and LTC Editor Chapter 2. Tutorials
Figure 2.49: Selecting revision forfiltering
Figure 2.50: Effect of going back to first revision after click-ing “Update”
Figure 2.51: Selecting date for fil-tering
Figure 2.52: Effect of limiting history to date of third versionafter clicking “Update”
Next, we apply limits on revision and date to control how far back the history of the fileis considered. As we had seen, the first version is not taken into account because it wascommitted before the next commit by the current author John Adams. Let us now type 1as the revision number of the first commit into the field labeled “Start at revision:” (refer toFigure 2.49) or simply drag the number from the entry in the commit graph into the field.Now click “Update” and see how the first version is listed in black and considered in thetracked changes above as seen in Figure 2.50. Since changes by the current author JohnAdams from the first to the second version are now included, notice the text marked upin red appearing in the editor window. We see that John Adams must have added himselfas an author in the LaTeX preamble among other edits.
To remove the limit by revision number, simply erase the text in the field “Start at revision:”and click “Update” again.
Limiting the history by date works similarly. You may drag a date from the commit graphon the right, for example the date of the third version commit, and drop it into the field“Start at date:” on the left. Or, type a date such as Nov 13, 2012 12:59p into the field. Weemploy some software to process times and dates in natural language, and if successful,the field will contain the date string as it was understood translated into the format usedin the commit tree. Again, you will need to click “Update” for the change to take effect orclick RETURN while editing the text field. See Figures 2.51 and 2.52 for screenshots. Toremove the limit by date, erase all text in the text field and update.
56 © SRI International LTC v1.0.9

Chapter 2. Tutorials 2.6. Tutorial with Subversion and LTC Editor
Figure 2.53: Effect of condensing authors:ignoring the 5th version by Roger Sherman
Figure 2.54: Example of markupchange before (left) andafter (right) condensingauthors
2.6.5 Condensing History
Sometimes the list of commits considered is getting long and the resulting markup of thechanges confusing. One additional way to customize how the changes are displayed is asetting to “condense authors.” Find a check box with that name under the list of authorsfor filtering. If checked, then only the latest version of an author of consecutive commitsis considered – in our example, only the sixth version is shown in black while the fifthversion by Roger Sherman is now grayed out as seen in Figure 2.53.
See Figure 2.54 for an example of how condensing authors affects the markup. Sincewe are only considering the changes that Roger Sherman made in the sixth version, hiscorrection of the name is no longer shown. Condensing authors makes sense when userscommit versions often so that they do not loose too much history. Their last version aftera number of commits generally has the flavor of a “final” version, ready to be shared withothers. Hence, the changes made there compared to the last version of another authoris commonly of most interest.
2.6.6 Editing and Saving
Let us start the next step by resetting all filters to the default configuration, i.e., no limitby authors, date, and revision. Also make sure to turn “condense authors” off. Then, wewill edit the text in the editor panel to see the latest changes.
Click into the text panel and enter some text, for example a LaTeX comment remindingJohn Adams to work on a list of charges against King George III in line nineteen:
% list charges against King George III here
The added text will be rendered in red (or the color code for the current author) andunderlined. Notice how the commit graph adds a first line with the label “modified” andthe “Save” button becomes enabled. Now delete some of the characters you have justentered, for example the word here at the end. The characters simply disappear as theywere added by the same author.
LTC v1.0.9 © SRI International 57
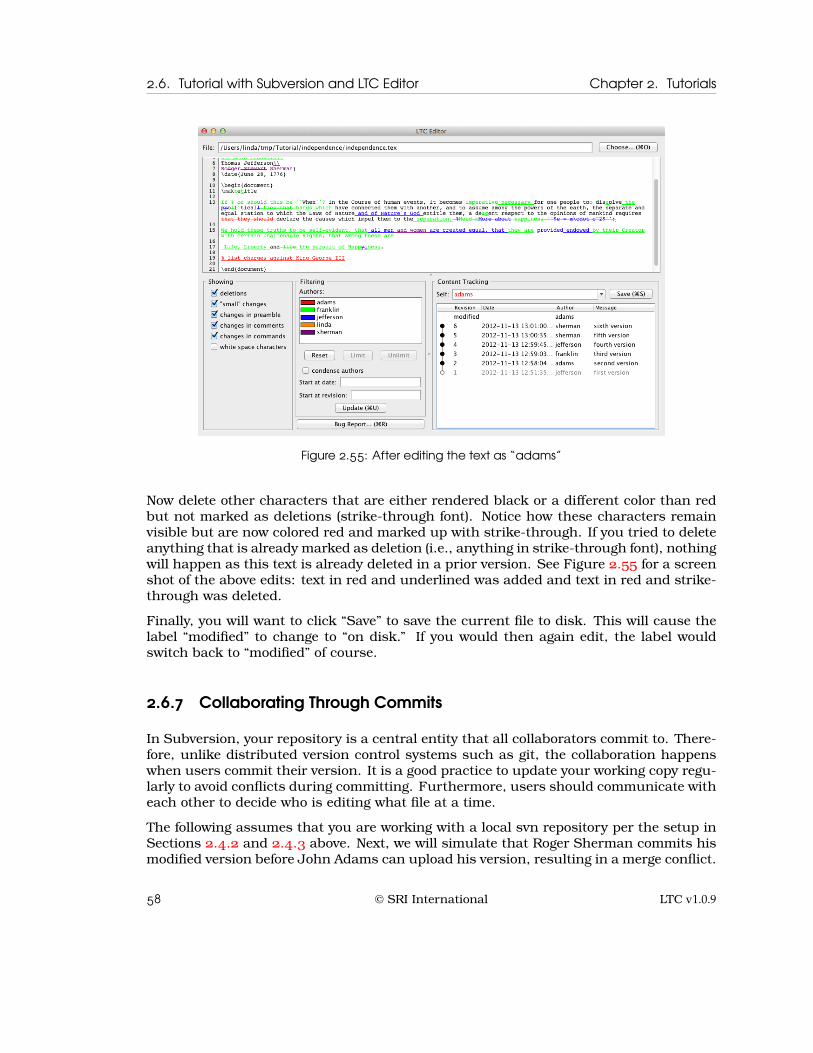
2.6. Tutorial with Subversion and LTC Editor Chapter 2. Tutorials
Figure 2.55: After editing the text as “adams”
Now delete other characters that are either rendered black or a different color than redbut not marked as deletions (strike-through font). Notice how these characters remainvisible but are now colored red and marked up with strike-through. If you tried to deleteanything that is already marked as deletion (i.e., anything in strike-through font), nothingwill happen as this text is already deleted in a prior version. See Figure 2.55 for a screenshot of the above edits: text in red and underlined was added and text in red and strike-through was deleted.
Finally, you will want to click “Save” to save the current file to disk. This will cause thelabel “modified” to change to “on disk.” If you would then again edit, the label wouldswitch back to “modified” of course.
2.6.7 Collaborating Through Commits
In Subversion, your repository is a central entity that all collaborators commit to. There-fore, unlike distributed version control systems such as git, the collaboration happenswhen users commit their version. It is a good practice to update your working copy regu-larly to avoid conflicts during committing. Furthermore, users should communicate witheach other to decide who is editing what file at a time.
The following assumes that you are working with a local svn repository per the setup inSections 2.4.2 and 2.4.3 above. Next, we will simulate that Roger Sherman commits hismodified version before John Adams can upload his version, resulting in a merge conflict.
58 © SRI International LTC v1.0.9
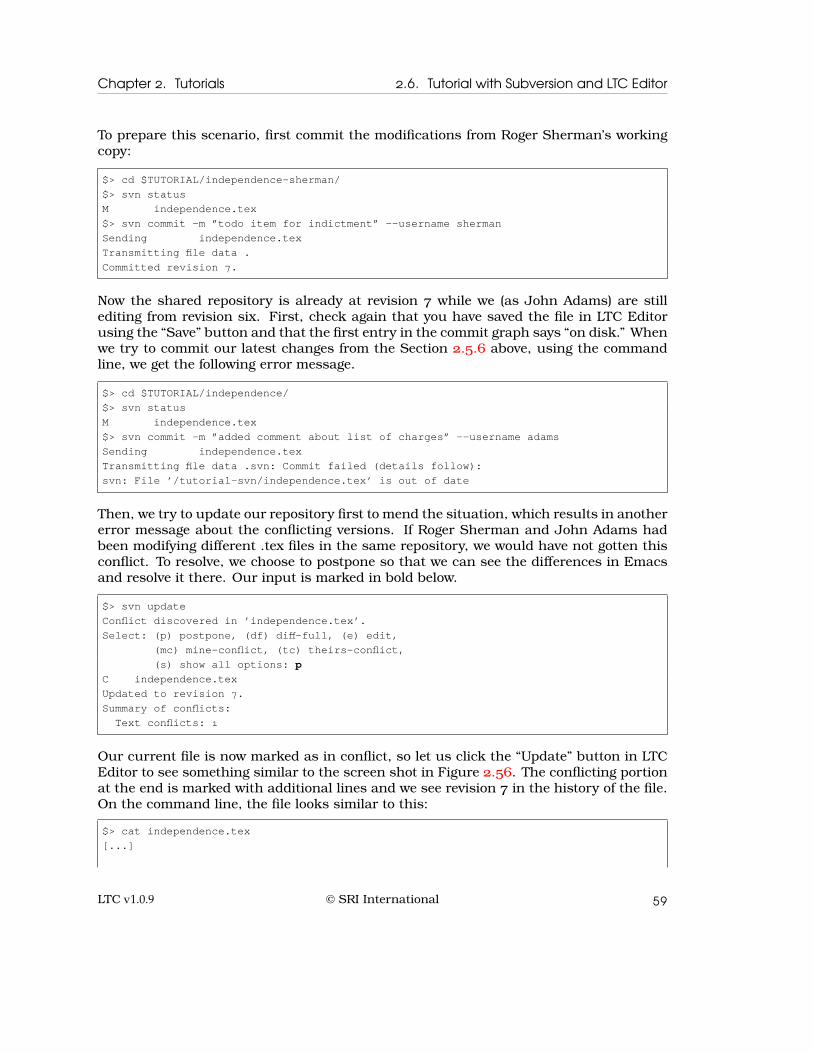
Chapter 2. Tutorials 2.6. Tutorial with Subversion and LTC Editor
To prepare this scenario, first commit the modifications from Roger Sherman’s workingcopy:
$> cd $TUTORIAL/independence-sherman/$> svn statusM independence.tex$> svn commit -m ”todo item for indictment” --username shermanSending independence.texTransmitting file data .Committed revision 7.
Now the shared repository is already at revision 7 while we (as John Adams) are stillediting from revision six. First, check again that you have saved the file in LTC Editorusing the “Save” button and that the first entry in the commit graph says “on disk.” Whenwe try to commit our latest changes from the Section 2.5.6 above, using the commandline, we get the following error message.
$> cd $TUTORIAL/independence/$> svn statusM independence.tex$> svn commit -m ”added comment about list of charges” --username adamsSending independence.texTransmitting file data .svn: Commit failed (details follow):svn: File ’/tutorial-svn/independence.tex’ is out of date
Then, we try to update our repository first to mend the situation, which results in anothererror message about the conflicting versions. If Roger Sherman and John Adams hadbeen modifying different .tex files in the same repository, we would have not gotten thisconflict. To resolve, we choose to postpone so that we can see the differences in Emacsand resolve it there. Our input is marked in bold below.
$> svn updateConflict discovered in ’independence.tex’.Select: (p) postpone, (df) diff-full, (e) edit,
(mc) mine-conflict, (tc) theirs-conflict,(s) show all options: p
C independence.texUpdated to revision 7.Summary of conflicts:Text conflicts: 1
Our current file is now marked as in conflict, so let us click the “Update” button in LTCEditor to see something similar to the screen shot in Figure 2.56. The conflicting portionat the end is marked with additional lines and we see revision 7 in the history of the file.On the command line, the file looks similar to this:
$> cat independence.tex[...]
LTC v1.0.9 © SRI International 59

2.6. Tutorial with Subversion and LTC Editor Chapter 2. Tutorials
Figure 2.56: Subversion conflict markers in merged file
<<<<<<< .mine% list charges against King George III
=======That to secure these rights, Governments are instituted among Men, [...]%TODO: indictment here
>>>>>>> .r7\end{document}
We decide that the comments in the version .mine version means the same as the lastcomment in version .r7 so we modify the text in LTC Editor and save, so that it looks likethe following on the command line or as seen in the screen shot in Figure 2.57.
$> cat independence.tex[...]
That to secure these rights, Governments are instituted among Men, [...]
% list charges against King George III
It is important to remove the svn marker lines starting with «««<, =======, and »»»> for svnto recognize that we have resolved the conflicts. We also have to tell svn that the conflicthas been resolved. Then we can finally perform the following commit command. The two
60 © SRI International LTC v1.0.9

Chapter 2. Tutorials 2.6. Tutorial with Subversion and LTC Editor
Figure 2.57: Resolving subversion conflict through editing file
Figure 2.58: After resolving conflict and updating in LTC Editor
important commands are printed in bold below. You may want to check the status of svnbefore and after the commit:
$> svn resolved independence.texResolved conflicted state of ’independence.tex’$> svn statusM independence.tex$> svn commit -m ”added comment about list of charges” --username adamsSending independence.texTransmitting file data .Committed revision 8.
Once we click the “Update” button in LTC Editor, we see the latest revision 8 in the commitgraph and the marked up latest edits attributed to John Adams and Roger Shermansimilar to Figure 2.58. Also see that we still include all revisions up to John Adams’
LTC v1.0.9 © SRI International 61
2.6. Tutorial with Subversion and LTC Editor Chapter 2. Tutorials
second revision a while ago—all revisions at the top of the graph before any other authorsare skipped before looking for the default end point in history.
62 © SRI International LTC v1.0.9

Chapter 3
Using LTC
The intended use of LTC is running the base system as a server and have a plugin of theuser’s preferred LaTeX editor connect to it. The provided Emacs ltc-mode is an exampleof such a plugin and its use is described in Section 3.4. We hope to add more plugins forother popular LaTeX editors in the future.
As a minimum implementation of a user interface to LTC, we also provide a Java applica-tion “LTC Editor” that uses the base system API but does not rely on running a separateLTC server. Its use is explained in Section 3.5.
Before we address using these specific user interfaces, we discuss how to setup yourrepository for a LaTeX writing project with git (Section 3.1) or svn (Section 3.2) and thenthe general usage of LTC in Section 3.3.
3.1 Using a Git Repository
For each writing project, LTC expects the history of the .tex files managed by a versioncontrol system, for example contained in a git repository. As git is a distributed versioncontrol system, this repository is local to your machine. If you need to exchange data witha collaborating author, you will push your repository or pull their repository and mergeit with your local copy.
This section only covers a small subset of what git can do with respect to setting up arepository for your writing project. Please refer to other git documentation about gen-eral git usage and how to further manage your writing project with git. Also note oursuggestions for general, one-time git configuration in Section 1.3.1.
LTC v1.0.9 © SRI International 63
3.1. Using a Git Repository Chapter 3. Using LTC
3.1.1 Initializing a Local Repository
Assuming that your current LaTeX source files (and other files) are located in a directorystructure called $PROJECT. To initialize the top-level directory for git perform the followingcommands.
$> cd $PROJECT/$> git initInitialized empty Git repository in $PROJECT
Decide, what the final build products in your project will be. These should be ignored bygit so as not to complain every time you recompile your LaTeX project. Let’s assume yourproject will create a file called “proposal.pdf,” then create a file called .gitignore in thisdirectory that contains in each line the name of every build product. In a bash shell, youcan do the following.
$> cat > .gitignore <<EOF> proposal.pdf> EOF
Then check the contents of the file:
$> less .gitignoreproposal.pdf
If you decide on more build products (e.g., files called “proposal-vol1.pdf” and “proposal-vol2.pdf”) in the future, simply edit the .gitignore file to include these file names in newlines. Make sure to do this before using a command such as git add ., which would markany existing build products for addition.
Checking the current status of git, the output should be similar to the following.
$> git status# On branch master## Initial commit## Untracked files:# (use ”git add <file>...” to include in what will be committed)## .gitignore# proposal.texnothing added to commit but untracked files present (use ”git add” to track)
Then, add the files already in your directory as well as the newly created file .gitignoreand commit the first version, for example this way:
$> git add .$> git commit -a -m ”initial commit of project”[master (root-commit) dfbf239] initial commit of project
64 © SRI International LTC v1.0.9
Chapter 3. Using LTC 3.1. Using a Git Repository
2 files changed, 7 insertions(+), 0 deletions(-)create mode 100644 .gitignorecreate mode 100644 proposal.tex
The option -m stands for a brief message that you would like to attach to your commit.Note that you have to give some sort of message for every commit you make. Do not tryto skip the message part. Moreover, having meaningful one-line message for commit isalways useful as other and you yourself can refer to later on to see what changes youmade and why.
3.1.2 Uploading Your Initial Repository
To share your local git repository, you can clone it to a shared file system or to a fileserver that each collaborator can access via ssh. Another option is that your systemadministrators provide you with a central git repository server. Contact them for detailson how to upload your git repository there.
In the following commands, we are giving the remote repository the name project.git butyou can choose whatever you want. The ending .git is somewhat standard, though, sowe advise to keep it.
To clone to a shared file system, you will want to find a suitable directory $SHARED_PATHwhere you want to create the shared repository. The following command is issued frominside your initial repository.
$> cd $PROJECT/$> git clone --bare . $SHARED_PATH/project.git
To clone to a file server accessible via ssh and scp, you would do the following from the top-level directory of your initial repository. The remote repository should be located under$REMOTE_PATH on the server. We assume that you have performed at least one commit sinceinitializing the git repository.
$> cd $PROJECT/..$> git clone --bare $PROJECT project.gitCloning into bare repository ’project.git’...done.$ touch project.git/git-daemon-export-ok$ scp -rq project.git username@server:$REMOTE_PATH
In either case, make sure that file permissions allow collaborators to access and read thefiles on the server.
Next, you will want to add a short name for the newly designated shared location called“origin” so that the push and pull command below work as if you had cloned the repositoryfrom someone else. If you used a git server, your system administrators can tell you howto configure your original repository to include the new remote location, or you can clonethe remote repository anew as shown in the next section.
LTC v1.0.9 © SRI International 65

3.1. Using a Git Repository Chapter 3. Using LTC
$> git remote add origin $SHARED_PATH/project.git
or
$> git remote add origin username@server:$REMOTE_PATH/project.git
Finally, your system administrator may already have a server for git repositories set upthat you and your collaborators can use. Refer to their instructions on how to upload orcreate an initial repository.
3.1.3 Cloning from a Remote Repository
To start a git repository from an existing one (either on a shared file server or a centralrepository), you want to clone it. You need to know the remote location in terms of username, server address and path to the git repository. Your system administrator can tellyou these in the form of username@server:path-to-git-repos/project.git, or, if you used ashared file system as in Section 3.1.2, you simply use $SHARED_PATH/project.git instead ofthe address above.
Assuming that your local copy should be located in a directory my_project, you would needto execute the following command from the parent directory of my_project. Feel free to callyour new working directory something else by substituting the last argument.
$> git clone username@server:path-to-git-repos/project.git my_projectCloning into my_project...done.$> cd my_project$> git remote -v
3.1.4 Push and Pull
To exchange data with the central repository, you typically push and pull. In the simplestcase, the following should work (if this is the original and not a cloned repository, youmust have added the new short name “origin” via the git remote add origin commandabove).
$> git push origin master$> git pull origin master
If git complains about uncommitted changes and that the working copy is not clean, youmay have to commit or stash changes before these commands can run successfully.
Please refer to the many online resources to learn more about git, or ask you systemadministrator.
66 © SRI International LTC v1.0.9

Chapter 3. Using LTC 3.2. Using a Subversion Repository
3.2 Using a Subversion Repository
For each writing project, LTC expects the history of the .tex files managed by a versioncontrol system, for example contained in a svn repository. As svn is a centralized versioncontrol system, the repository is typically in a remote location. To use LTC meaningfully,it has to download the different versions of the file history so you will need constantconnectivity with the server. If you need to exchange data with a collaborating author,you will update from and commit to your remote repository, which also requires onlineaccess.
This section only covers a small subset of what svn can do with respect to setting up arepository for your writing project. Please refer to other svn documentation about gen-eral svn usage and how to further manage your writing project with svn. Also note oursuggestions for general, one-time svn configuration in Section 1.3.2.
3.2.1 Initializing a Repository
To create a working copy of an existing svn repository your system administrator will tellyou the URL where the repository is hosted. Then, you will check out a working copy in adirectory, say $PROJECT with that URL, which we call $REPOSITORY_URL. From the directorywhere you want $PROJECT to reside, call:
$> svn checkout $REPOSITORY_URL $PROJECT
If this a new writing project, you may want to perform some initializations. For example,decide what the final build products in your project will be. These should be ignored bysvn so as not to complain every time you recompile your LaTeX project. Let’s assumeyour project will create a file called “proposal.pdf,” then perform the following. First, wecheck whether there are already files ignored. Then, we will set a property to ignore“proposal.pdf” using a few bash commands. If you are running a different shell, you mayhave to adjust these commands.
$> cd $PROJECT/$> svn propget svn:ignore .$> svn propedit svn:ignore . # will open temporary editor in your terminal, \
where you type proposal.pdf, save and exitSet new value for property ’svn:ignore’ on ’.’
Setting or updating a property puts a modification flag on the current directory ., whichyou will have to commit to the repository at the next opportunity for others to obtain thissetting. Also, check that the property is now active in your working copy.
$> svn statusM .$> svn commit -m ”ignoring build product proposal.pdf”Sending .
LTC v1.0.9 © SRI International 67

3.2. Using a Subversion Repository Chapter 3. Using LTC
Committed revision XXX.$> svn propget svn:ignore .proposal.pdf
3.2.2 Other Typical Subversion Commands
If you have a new FILE.tex file to add to the repository, do
$> $ svn st? FILE.tex$> svn add FILE.texA FILE.tex$> svn commit -m ”adding first version of FILE.tex”Adding FILE.texTransmitting file data ...Committed revision XXX.
When editing a FILE.tex file and saving it, it will have the modification flag set, which youcan check using the status command. It is also a good idea to update your working copybefore you start editing a file, in case others have committed any changes.
$> svn update[...] # any potential updatesAt revision XXX.$> svn statusM FILE.tex$> svn commit -m ”<message about recent edits in FILE.tex>”Sending FILE.texTransmitting file data ...Committed revision XXX.
If you decide on more build products (e.g., files called “proposal-vol1.pdf” and “proposal-vol2.pdf”) in the future, call svn propedit svn:ignore . to edit the property and committhe changes to the svn repository. Make sure to do this before using a command such assvn add *, which would mark any existing build products for addition.
With a centralized repository, it is even more important to coordinate writing and editingactivities among collaborators. Many say “commit early, commit often” and also make ita habit to update your working copy regularly and before beginning work. LaTeX is verywell suited to be managed under version control as you can split the writing documentinto various files and then assign writing tasks on a one-author-per-file-at-a-time to avoidmerge conflicts.
68 © SRI International LTC v1.0.9

Chapter 3. Using LTC 3.3. General Usage
Figure 3.1: A typical work cycle for a version controlled file and when using LaTeX Track Changes
3.3 General Usage
In this section we describe abstractly how one would use LTC as a pattern of a workcycle. See the tutorials for more concrete examples. Also, the Sections 3.4 and 3.5 belowcontain more details on the specific user interface of interest, namely Emacs and the LTCEditor, respectively.
Typically, more than one author collaborate on a writing project that is kept under ver-sion control but it might be a good practice to put all your work under version control.Especially git is a well suited version control system to run locally on your computer andkeeping track of your own changes if you are just interested in how a .tex file evolves overtime.
We are assuming that the .tex file or files of interest are kept under version control so asto obtain a history of significant changes that have been made in the past. Significantchanges are usually made through a “commit” action to the version control system. Thisis in contrast to merely saving edits to the file on the local file system. Such an operationcan be done many more times just to preserve your current work in case of a problemwith the editor or computer.
See Figure 3.1 on the left hand side for a diagram that shows a typical work cycle for aversion controlled file from the perspective of one author. Often a user starts working bydownloading changes that others have done—this step may be omitted if only one authoris working with the revision control system, thus the action is drawn with dashed lines.Then, an author may edit and save the file. Finally, when significant changes have beenmade, it is often time to commit those and possibly upload them to a server where otherauthors can update from.
Now look at the right hand side of Figure 3.1; here we added a state for tracking changes.
LTC v1.0.9 © SRI International 69

3.3. General Usage Chapter 3. Using LTC
The user typically switches from editing and saving into tracking changes. In this mode,one can still edit and save the file. And also perform version control commands suchas downloading and uploading changes. While in track changes mode, the .tex file ofinterest is marked up with information about changes in past versions of the file, so thetext looks busier and can be longer when displaying deletions. Thus, most authors willwant to switch in and out of tracking changes in order to work at times with only thelatest version of the file to avoid being overwhelmed by the information shown.
3.3.1 Filtering What is Shown
Since the amount of change information displayed can be quite large, we offer a fewswitches to tailor the view for the user. These switches can be turned on or off, meaningthat certain changes are shown or hidden (not marked up or not included if deleted text).We currently support the following five switches.
my friend has (show)friend has (hide)
Deletions Deletions are text that was part of an earlier ver-sion but cannot be located in the latest version anymore. Ifshown, the deleted text is inserted where it was found andmarked up as a deletion; i.e., with strike-through font in the LTC Editor and (unlessthe user customizes this setting) with inverse colors in Emacs. In the example on theright, the text “my” was deleted in the newer version.
my freiend has (show)my friend has (hide)
“Small” Changes We employ the following heuristic to de-tect so-called “small” changes, which attempts to find thingssuch as typographical error corrections. If two lexemes1 arebeing compared and their Levenshtein distance2 is less than three and the shorter lexemeis longer than this metric, then we declare it a “small” change. For example, let us con-sider the two words “freind” and “friend” with the former being part of an earlier versionand the latter part of the current text version. Someone had corrected the typographicalerror. The Levenshtein distance between the two words is two, as one of the characters ‘e’and ‘i’ has to be removed and inserted at the correct position to change the older versioninto the newer one. Both words have length five, which is longer than two. Hence, wewould mark up only the character difference in these words rather than mark the wholeword as a deletion and addition. If users want to omit seeing such small changes to focuson the bigger changes, they can switch off seeing these. See the example on the right forhow the markup on this small change looks.
\usepackage{something}\begin{document}
(show)
\usepackage{something}\begin{document}
(hide)
In Preamble If the file of interest contains the La-TeX preamble and the text “\begin{document},” thisswitch shows or hides any changes that occurs be-fore this text. If turned off, it will suppress any
1A lexeme is an abstract unit of morphological analysis in linguistics, that roughly corresponds to a set offorms taken by a single word.
2The Levenshtein distance is a string metric for measuring the difference between two sequences. Informally,the Levenshtein distance between two words is the minimum number of single-character edits (insertion, dele-tion, substitution) required to change one word into the other.
70 © SRI International LTC v1.0.9
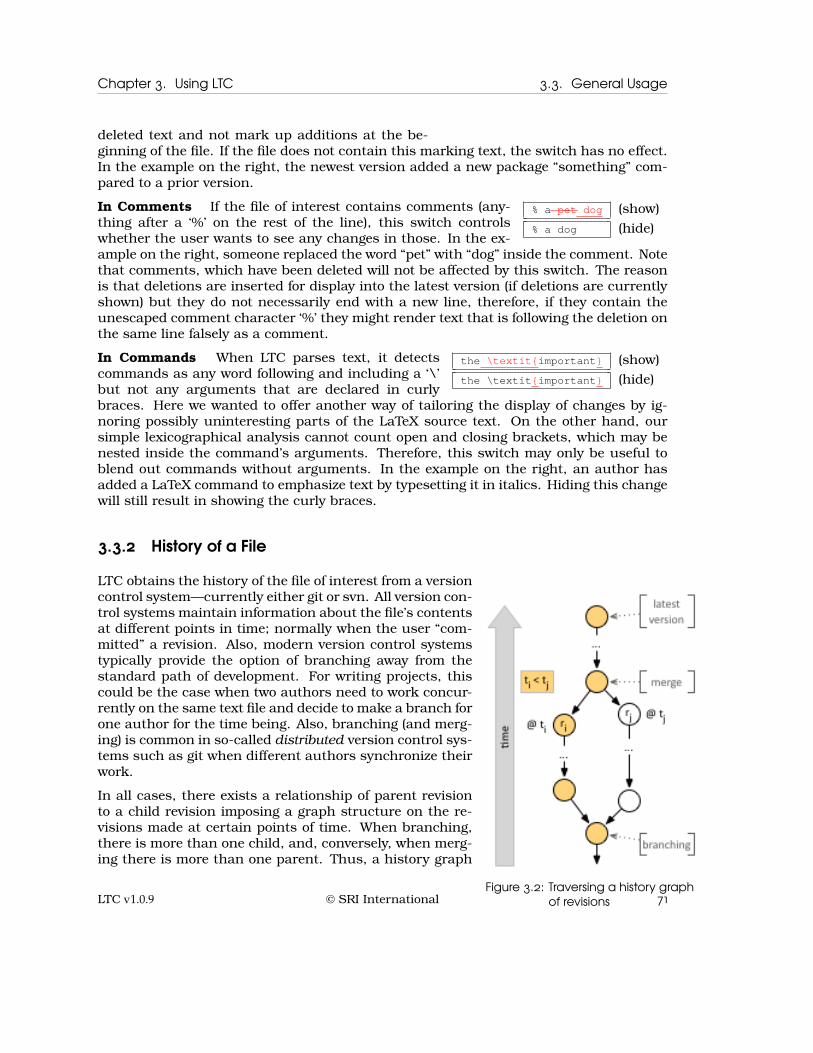
Chapter 3. Using LTC 3.3. General Usage
deleted text and not mark up additions at the be-ginning of the file. If the file does not contain this marking text, the switch has no effect.In the example on the right, the newest version added a new package “something” com-pared to a prior version.
% a pet dog (show)% a dog (hide)
In Comments If the file of interest contains comments (any-thing after a ‘%’ on the rest of the line), this switch controlswhether the user wants to see any changes in those. In the ex-ample on the right, someone replaced the word “pet” with “dog” inside the comment. Notethat comments, which have been deleted will not be affected by this switch. The reasonis that deletions are inserted for display into the latest version (if deletions are currentlyshown) but they do not necessarily end with a new line, therefore, if they contain theunescaped comment character ‘%’ they might render text that is following the deletion onthe same line falsely as a comment.
the \textit{important} (show)the \textit{important} (hide)
In Commands When LTC parses text, it detectscommands as any word following and including a ‘\’but not any arguments that are declared in curlybraces. Here we wanted to offer another way of tailoring the display of changes by ig-noring possibly uninteresting parts of the LaTeX source text. On the other hand, oursimple lexicographical analysis cannot count open and closing brackets, which may benested inside the command’s arguments. Therefore, this switch may only be useful toblend out commands without arguments. In the example on the right, an author hasadded a LaTeX command to emphasize text by typesetting it in italics. Hiding this changewill still result in showing the curly braces.
3.3.2 History of a File
Figure 3.2: Traversing a history graphof revisions
LTC obtains the history of the file of interest from a versioncontrol system—currently either git or svn. All version con-trol systems maintain information about the file’s contentsat different points in time; normally when the user “com-mitted” a revision. Also, modern version control systemstypically provide the option of branching away from thestandard path of development. For writing projects, thiscould be the case when two authors need to work concur-rently on the same text file and decide to make a branch forone author for the time being. Also, branching (and merg-ing) is common in so-called distributed version control sys-tems such as git when different authors synchronize theirwork.
In all cases, there exists a relationship of parent revisionto a child revision imposing a graph structure on the re-visions made at certain points of time. When branching,there is more than one child, and, conversely, when merg-ing there is more than one parent. Thus, a history graph
LTC v1.0.9 © SRI International 71

3.4. Using Emacs Chapter 3. Using LTC
is a directed acyclic graph, which can be inferred from therevisions of a file in the past. See Figure 3.2 for an exampleof such a history graph. In version control systems, we typ-ically draw the latest version as the top-most node.
LTC needs to transform this graph into a sequence of revisions therefore traversing thegraph from the latest version. We do so by traversing the graph from the latest versionto an oldest one in reverse direction. When a revision is a merge and thus has multipleparents, we currently choose the oldest revision as the next one in the list leaving outany other branches. However, we plan to make the branch selection the user’s choice infuture releases as this heuristic does not always apply.
Figure 3.2 shows that LTC selects the shaded path on the left as revision ri happened ata later time than revision rj. It doesn’t matter when the versions just after the branchingevent were committed as we are traversing the graph in opposite direction to obtain apath.
Once we have a sequence of versions in LTC, we
condensing authors
3.4 Using Emacs
In this section, we explain how to use Emacs as the editor of the .tex file with LTC.
3.4.1 Starting the LTC Server
Before you can use ltc-mode in Emacs, you must start the LTC server first. To do so,you call Java with the JAR-file that you installed in directory $LTC. This should produceoutput similar to the one below.
$> java -jar $LTC/LTC.jar[...]<current date> | INFO: Started RPC server on port 7777.
If you need to customize LTC, for example to change the port number, start the basesystem with option -p <PORT>:
$> java -jar $LTC/LTC.jar -p 5555[...]<current date> | INFO: Started RPC server on port 5555.
The log messages from the LTC server are also saved in file ~/.LTC.log. This log file iscreated every time that the server starts, so if you need the contents, please make a copybefore starting the server anew.
72 © SRI International LTC v1.0.9

Chapter 3. Using LTC 3.4. Using Emacs
..
Figure 3.3: Starting ltc-mode in Emacs
3.4.2 Entering and Exiting ltc-mode
Once your Emacs has a .tex file loaded in plain latex-mode as seen on the left in Figure 3.3,you can invoke the minor-mode ltc-mode in different ways. Usually, the mode launchingcommand M-x ltc-mode is available. If Emacs has its own window and supports contextmenus, you may be able to right-click on the word “LaTeX” in the mode line at the bottomof Emacs. Then, a list of minor modes appears from which you can select “LTC Mode.”Once the mode starts successfully, a number of status messages, a smaller window atthe bottom of the text that contains LTC information, and changes in the text marked upby color and style appear. Emacs then looks similar to the right in Figure 3.3.
The mode can be toggled, i.e., the same command starts and stops ltc-mode.
Once the mode is started, a new menu “LTC” should appear in Emacs. This can be partof Emacs’ main menu or included in the mode line. From there, you can interact withthe LTC system as shown in the following examples.
The “LTC info” Buffer
The new, smaller window at the bottom of the frame is called “LTC info” and contains atable resembling the commit graph of the current file. Newer versions of the file are atthe top of the list. An asterisk at the beginning indicated that this version is taken intoaccount when the history of changes is calculated. Conversely, if the asterisk is missingand the whole row is shown in gray color, then this version is currently skipped whencalculating changes. The next column contains the SHA-1 key (abbreviated) and the third
LTC v1.0.9 © SRI International 73
3.4. Using Emacs Chapter 3. Using LTC
column the date of the corresponding git revision. The author colored in his or her keyand finally the commit message follow. The first row of the commit table contains thecurrent author.
Updating the Buffer
An important command is M-x ltc-update or the menu item LTC ▷ Update buffer . Thiswill update the view of the file based on current filtering and other settings. Use thiscommand when the “LTC info” buffer ended up in a different frame or tab, or when youmake changes such as a git commit from the command line.
3.4.3 Customizing LTC Mode
To customize LTC mode, you can use the command M-x customize-group RET ltc RET. It willshow you a list of options that can be changed. Once you have changed options, you maywant to click “Save for future sessions” or abort using “Exit.”
Port This denotes the port of the LTC server running on your local machine. Leave thedefault value unless there are problems and the port is already in use by anotherapplication.
Ltc Command Prefix This is a global command prefix for all interactive LTC commandsin Emacs. The Emacs convention for modes is to use ^C and another character(default is ^C ’) but you can adjust this to your liking if you like to use shortcuts tothe LTC functions.
Ltc Addition and Deletion faces Here you can customize how LTC marks up additionsand deletions respectively. You will not want to set the Foreground or Backgroundcolor, as this will be overridden by the colors of the authors who made the change.On Mac OS X, the strike-through fonts may not be available so the default for dele-tions is also to invert the foreground and background coloring. On Linux, you maywant to turn the color inversion off for a less intrusive scheme as the strike-throughfont is available there.
3.4.4 Filtering Changes
To show and hide certain changes, simply choose from the menu LTC > Show/Hide > ...the appropriate entry. Figure 3.4 shows for example hiding changes in the preamble viathe context menu. After selecting any of the menu items to show or hide certain changes,the contents in the main Emacs window is immediately updated to reflect the filteringsettings.
To change the default limitation of the file’s history that is taken into account for viewingchanges, you can do so by specifying a set of authors to limit to, and a revision numberor date to indicate how far back in time you want to go. These functions are available via
74 © SRI International LTC v1.0.9

Chapter 3. Using LTC 3.4. Using Emacs
Figure 3.4: Hiding changes in the preamble using the “LTC” menu
the menu LTC > Limit by > ... Each of these actions require additional input, thereforethe menu item ends with ellipsis.
To define a set of authors to limit the history to, select the menu item or use command M-xltc-limit-authors. This will prompt you to input the names of authors in the mini-buffer.You may use auto-completion with the TAB key. End the input of names by providing anempty name. If the first name is empty, this will reset to taking all known authors intoaccount (i.e., not limiting by authors anymore).
Similarly, you can define how far back the file history is taken into account. Use com-mands M-x ltc-limit-rev and M-x ltc-limit-date respectively. Again, user input is neededvia the mini-buffer. Use auto completion with the TAB key in order to automatically ex-tend to known SHA-1 keys or revision dates. To reset the limit to the default, simply enteran empty value when prompted.
3.4.5 Author Color Keys
To customize the color used to designate changes in the marked up text, click on theauthor name in the “LTC info” buffer. [TODO: MORE NEEDED]
3.4.6 Emacs Help
[TODO]
LTC v1.0.9 © SRI International 75
3.5. Using the “LTC Editor” Chapter 3. Using LTC
3.4.7 Table of Commands
[TODO]
3.4.8 Misc
Customize ltc-mode:
M-x describe-face RET <face> to describe faces ltc-addition and ltc-deletion
C-u C-x = shows the face under point (among other information)
3.5 Using the “LTC Editor”
The LTC Editor is a Java application that allows to use LTC without a separate LTC server.It may also serve as a reference implementation showing how to use our API. Chapter 4contains more details on writing your own editor plugin using our LTC API.
76 © SRI International LTC v1.0.9

Chapter 4
Writing Your Own Front End
In this chapter, we explain the general flow that a new editor plugin should follow. Wefollow these flows in general in our reference implementation of the Emacs ltc-mode andthe Java LTC Editor.
LTC v1.0.9 © SRI International 77

Chapter 4. Writing Your Own Front End
Figure 4.1: Flow for turning LTC on and off
78 © SRI International LTC v1.0.9

Chapter 4. Writing Your Own Front End
Figure 4.2: Flow for editing while viewing changes
LTC v1.0.9 © SRI International 79

Chapter 4. Writing Your Own Front End
Figure 4.3: Flow when saving or committing while LTC is on
80 © SRI International LTC v1.0.9
Chapter 5
Algorithms & Utilities
5.1 How Are Changes Calculated?
[or is this too technical for the manual?]
5.2 Utility Programs
5.2.1 LTC Editor
5.2.2 LTC File Viewer
5.2.3 LatexDiff
5.2.4 Lexicographical Analysis
Lexer
5.2.5 Testing the XML-RPC Server
HelloLTC
LTC v1.0.9 © SRI International 81
Appendix A
License
GNU GENERAL PUBLIC LICENSEVersion 3, 29 June 2007
Copyright (C) 2007 Free Software Foundation, Inc. <http://fsf.org/>Everyone is permitted to copy and distribute verbatim copiesof this license document, but changing it is not allowed.
Preamble
The GNU General Public License is a free, copyleft license forsoftware and other kinds of works.
The licenses for most software and other practical works are designedto take away your freedom to share and change the works. By contrast,the GNU General Public License is intended to guarantee your freedom toshare and change all versions of a program--to make sure it remains freesoftware for all its users. We, the Free Software Foundation, use theGNU General Public License for most of our software; it applies also toany other work released this way by its authors. You can apply it toyour programs, too.
When we speak of free software, we are referring to freedom, notprice. Our General Public Licenses are designed to make sure that youhave the freedom to distribute copies of free software (and charge forthem if you wish), that you receive source code or can get it if youwant it, that you can change the software or use pieces of it in newfree programs, and that you know you can do these things.
To protect your rights, we need to prevent others from denying youthese rights or asking you to surrender the rights. Therefore, you havecertain responsibilities if you distribute copies of the software, or ifyou modify it: responsibilities to respect the freedom of others.
For example, if you distribute copies of such a program, whethergratis or for a fee, you must pass on to the recipients the samefreedoms that you received. You must make sure that they, too, receiveor can get the source code. And you must show them these terms so they
82 © SRI International LTC v1.0.9

Appendix A. License
know their rights.
Developers that use the GNU GPL protect your rights with two steps:(1) assert copyright on the software, and (2) offer you this Licensegiving you legal permission to copy, distribute and/or modify it.
For the developers’ and authors’ protection, the GPL clearly explainsthat there is no warranty for this free software. For both users’ andauthors’ sake, the GPL requires that modified versions be marked aschanged, so that their problems will not be attributed erroneously toauthors of previous versions.
Some devices are designed to deny users access to install or runmodified versions of the software inside them, although the manufacturercan do so. This is fundamentally incompatible with the aim ofprotecting users’ freedom to change the software. The systematicpattern of such abuse occurs in the area of products for individuals touse, which is precisely where it is most unacceptable. Therefore, wehave designed this version of the GPL to prohibit the practice for thoseproducts. If such problems arise substantially in other domains, westand ready to extend this provision to those domains in future versionsof the GPL, as needed to protect the freedom of users.
Finally, every program is threatened constantly by software patents.States should not allow patents to restrict development and use ofsoftware on general-purpose computers, but in those that do, we wish toavoid the special danger that patents applied to a free program couldmake it effectively proprietary. To prevent this, the GPL assures thatpatents cannot be used to render the program non-free.
The precise terms and conditions for copying, distribution andmodification follow.
TERMS AND CONDITIONS
0. Definitions.
”This License” refers to version 3 of the GNU General Public License.
”Copyright” also means copyright-like laws that apply to other kinds ofworks, such as semiconductor masks.
”The Program” refers to any copyrightable work licensed under thisLicense. Each licensee is addressed as ”you”. ”Licensees” and”recipients” may be individuals or organizations.
To ”modify” a work means to copy from or adapt all or part of the workin a fashion requiring copyright permission, other than the making of anexact copy. The resulting work is called a ”modified version” of theearlier work or a work ”based on” the earlier work.
A ”covered work” means either the unmodified Program or a work basedon the Program.
To ”propagate” a work means to do anything with it that, withoutpermission, would make you directly or secondarily liable forinfringement under applicable copyright law, except executing it on acomputer or modifying a private copy. Propagation includes copying,
LTC v1.0.9 © SRI International 83
Appendix A. License
distribution (with or without modification), making available to thepublic, and in some countries other activities as well.
To ”convey” a work means any kind of propagation that enables otherparties to make or receive copies. Mere interaction with a user througha computer network, with no transfer of a copy, is not conveying.
An interactive user interface displays ”Appropriate Legal Notices”to the extent that it includes a convenient and prominently visiblefeature that (1) displays an appropriate copyright notice, and (2)tells the user that there is no warranty for the work (except to theextent that warranties are provided), that licensees may convey thework under this License, and how to view a copy of this License. Ifthe interface presents a list of user commands or options, such as amenu, a prominent item in the list meets this criterion.
1. Source Code.
The ”source code” for a work means the preferred form of the workfor making modifications to it. ”Object code” means any non-sourceform of a work.
A ”Standard Interface” means an interface that either is an officialstandard defined by a recognized standards body, or, in the case ofinterfaces specified for a particular programming language, one thatis widely used among developers working in that language.
The ”System Libraries” of an executable work include anything, otherthan the work as a whole, that (a) is included in the normal form ofpackaging a Major Component, but which is not part of that MajorComponent, and (b) serves only to enable use of the work with thatMajor Component, or to implement a Standard Interface for which animplementation is available to the public in source code form. A”Major Component”, in this context, means a major essential component(kernel, window system, and so on) of the specific operating system(if any) on which the executable work runs, or a compiler used toproduce the work, or an object code interpreter used to run it.
The ”Corresponding Source” for a work in object code form means allthe source code needed to generate, install, and (for an executablework) run the object code and to modify the work, including scripts tocontrol those activities. However, it does not include the work’sSystem Libraries, or general-purpose tools or generally available freeprograms which are used unmodified in performing those activities butwhich are not part of the work. For example, Corresponding Sourceincludes interface definition files associated with source files forthe work, and the source code for shared libraries and dynamicallylinked subprograms that the work is specifically designed to require,such as by intimate data communication or control flow between thosesubprograms and other parts of the work.
The Corresponding Source need not include anything that userscan regenerate automatically from other parts of the CorrespondingSource.
The Corresponding Source for a work in source code form is thatsame work.
84 © SRI International LTC v1.0.9
Appendix A. License
2. Basic Permissions.
All rights granted under this License are granted for the term ofcopyright on the Program, and are irrevocable provided the statedconditions are met. This License explicitly affirms your unlimitedpermission to run the unmodified Program. The output from running acovered work is covered by this License only if the output, given itscontent, constitutes a covered work. This License acknowledges yourrights of fair use or other equivalent, as provided by copyright law.
You may make, run and propagate covered works that you do notconvey, without conditions so long as your license otherwise remainsin force. You may convey covered works to others for the sole purposeof having them make modifications exclusively for you, or provide youwith facilities for running those works, provided that you comply withthe terms of this License in conveying all material for which you donot control copyright. Those thus making or running the covered worksfor you must do so exclusively on your behalf, under your directionand control, on terms that prohibit them from making any copies ofyour copyrighted material outside their relationship with you.
Conveying under any other circumstances is permitted solely underthe conditions stated below. Sublicensing is not allowed; section 10makes it unnecessary.
3. Protecting Users’ Legal Rights From Anti-Circumvention Law.
No covered work shall be deemed part of an effective technologicalmeasure under any applicable law fulfilling obligations under article11 of the WIPO copyright treaty adopted on 20 December 1996, orsimilar laws prohibiting or restricting circumvention of suchmeasures.
When you convey a covered work, you waive any legal power to forbidcircumvention of technological measures to the extent such circumventionis effected by exercising rights under this License with respect tothe covered work, and you disclaim any intention to limit operation ormodification of the work as a means of enforcing, against the work’susers, your or third parties’ legal rights to forbid circumvention oftechnological measures.
4. Conveying Verbatim Copies.
You may convey verbatim copies of the Program’s source code as youreceive it, in any medium, provided that you conspicuously andappropriately publish on each copy an appropriate copyright notice;keep intact all notices stating that this License and anynon-permissive terms added in accord with section 7 apply to the code;keep intact all notices of the absence of any warranty; and give allrecipients a copy of this License along with the Program.
You may charge any price or no price for each copy that you convey,and you may offer support or warranty protection for a fee.
5. Conveying Modified Source Versions.
You may convey a work based on the Program, or the modifications toproduce it from the Program, in the form of source code under the
LTC v1.0.9 © SRI International 85

Appendix A. License
terms of section 4, provided that you also meet all of these conditions:
a) The work must carry prominent notices stating that you modifiedit, and giving a relevant date.
b) The work must carry prominent notices stating that it isreleased under this License and any conditions added under section7. This requirement modifies the requirement in section 4 to”keep intact all notices”.
c) You must license the entire work, as a whole, under thisLicense to anyone who comes into possession of a copy. ThisLicense will therefore apply, along with any applicable section 7additional terms, to the whole of the work, and all its parts,regardless of how they are packaged. This License gives nopermission to license the work in any other way, but it does notinvalidate such permission if you have separately received it.
d) If the work has interactive user interfaces, each must displayAppropriate Legal Notices; however, if the Program has interactiveinterfaces that do not display Appropriate Legal Notices, yourwork need not make them do so.
A compilation of a covered work with other separate and independentworks, which are not by their nature extensions of the covered work,and which are not combined with it such as to form a larger program,in or on a volume of a storage or distribution medium, is called an”aggregate” if the compilation and its resulting copyright are notused to limit the access or legal rights of the compilation’s usersbeyond what the individual works permit. Inclusion of a covered workin an aggregate does not cause this License to apply to the otherparts of the aggregate.
6. Conveying Non-Source Forms.
You may convey a covered work in object code form under the termsof sections 4 and 5, provided that you also convey themachine-readable Corresponding Source under the terms of this License,in one of these ways:
a) Convey the object code in, or embodied in, a physical product(including a physical distribution medium), accompanied by theCorresponding Source fixed on a durable physical mediumcustomarily used for software interchange.
b) Convey the object code in, or embodied in, a physical product(including a physical distribution medium), accompanied by awritten offer, valid for at least three years and valid for aslong as you offer spare parts or customer support for that productmodel, to give anyone who possesses the object code either (1) acopy of the Corresponding Source for all the software in theproduct that is covered by this License, on a durable physicalmedium customarily used for software interchange, for a price nomore than your reasonable cost of physically performing thisconveying of source, or (2) access to copy theCorresponding Source from a network server at no charge.
c) Convey individual copies of the object code with a copy of the
86 © SRI International LTC v1.0.9

Appendix A. License
written offer to provide the Corresponding Source. Thisalternative is allowed only occasionally and noncommercially, andonly if you received the object code with such an offer, in accordwith subsection 6b.
d) Convey the object code by offering access from a designatedplace (gratis or for a charge), and offer equivalent access to theCorresponding Source in the same way through the same place at nofurther charge. You need not require recipients to copy theCorresponding Source along with the object code. If the place tocopy the object code is a network server, the Corresponding Sourcemay be on a different server (operated by you or a third party)that supports equivalent copying facilities, provided you maintainclear directions next to the object code saying where to find theCorresponding Source. Regardless of what server hosts theCorresponding Source, you remain obligated to ensure that it isavailable for as long as needed to satisfy these requirements.
e) Convey the object code using peer-to-peer transmission, providedyou inform other peers where the object code and CorrespondingSource of the work are being offered to the general public at nocharge under subsection 6d.
A separable portion of the object code, whose source code is excludedfrom the Corresponding Source as a System Library, need not beincluded in conveying the object code work.
A ”User Product” is either (1) a ”consumer product”, which means anytangible personal property which is normally used for personal, family,or household purposes, or (2) anything designed or sold for incorporationinto a dwelling. In determining whether a product is a consumer product,doubtful cases shall be resolved in favor of coverage. For a particularproduct received by a particular user, ”normally used” refers to atypical or common use of that class of product, regardless of the statusof the particular user or of the way in which the particular useractually uses, or expects or is expected to use, the product. A productis a consumer product regardless of whether the product has substantialcommercial, industrial or non-consumer uses, unless such uses representthe only significant mode of use of the product.
”Installation Information” for a User Product means any methods,procedures, authorization keys, or other information required to installand execute modified versions of a covered work in that User Product froma modified version of its Corresponding Source. The information mustsuffice to ensure that the continued functioning of the modified objectcode is in no case prevented or interfered with solely becausemodification has been made.
If you convey an object code work under this section in, or with, orspecifically for use in, a User Product, and the conveying occurs aspart of a transaction in which the right of possession and use of theUser Product is transferred to the recipient in perpetuity or for afixed term (regardless of how the transaction is characterized), theCorresponding Source conveyed under this section must be accompaniedby the Installation Information. But this requirement does not applyif neither you nor any third party retains the ability to installmodified object code on the User Product (for example, the work hasbeen installed in ROM).
LTC v1.0.9 © SRI International 87

Appendix A. License
The requirement to provide Installation Information does not include arequirement to continue to provide support service, warranty, or updatesfor a work that has been modified or installed by the recipient, or forthe User Product in which it has been modified or installed. Access to anetwork may be denied when the modification itself materially andadversely affects the operation of the network or violates the rules andprotocols for communication across the network.
Corresponding Source conveyed, and Installation Information provided,in accord with this section must be in a format that is publiclydocumented (and with an implementation available to the public insource code form), and must require no special password or key forunpacking, reading or copying.
7. Additional Terms.
”Additional permissions” are terms that supplement the terms of thisLicense by making exceptions from one or more of its conditions.Additional permissions that are applicable to the entire Program shallbe treated as though they were included in this License, to the extentthat they are valid under applicable law. If additional permissionsapply only to part of the Program, that part may be used separatelyunder those permissions, but the entire Program remains governed bythis License without regard to the additional permissions.
When you convey a copy of a covered work, you may at your optionremove any additional permissions from that copy, or from any part ofit. (Additional permissions may be written to require their ownremoval in certain cases when you modify the work.) You may placeadditional permissions on material, added by you to a covered work,for which you have or can give appropriate copyright permission.
Notwithstanding any other provision of this License, for material youadd to a covered work, you may (if authorized by the copyright holders ofthat material) supplement the terms of this License with terms:
a) Disclaiming warranty or limiting liability differently from theterms of sections 15 and 16 of this License; or
b) Requiring preservation of specified reasonable legal notices orauthor attributions in that material or in the Appropriate LegalNotices displayed by works containing it; or
c) Prohibiting misrepresentation of the origin of that material, orrequiring that modified versions of such material be marked inreasonable ways as different from the original version; or
d) Limiting the use for publicity purposes of names of licensors orauthors of the material; or
e) Declining to grant rights under trademark law for use of sometrade names, trademarks, or service marks; or
f) Requiring indemnification of licensors and authors of thatmaterial by anyone who conveys the material (or modified versions ofit) with contractual assumptions of liability to the recipient, forany liability that these contractual assumptions directly impose on
88 © SRI International LTC v1.0.9

Appendix A. License
those licensors and authors.
All other non-permissive additional terms are considered ”furtherrestrictions” within the meaning of section 10. If the Program as youreceived it, or any part of it, contains a notice stating that it isgoverned by this License along with a term that is a furtherrestriction, you may remove that term. If a license document containsa further restriction but permits relicensing or conveying under thisLicense, you may add to a covered work material governed by the termsof that license document, provided that the further restriction doesnot survive such relicensing or conveying.
If you add terms to a covered work in accord with this section, youmust place, in the relevant source files, a statement of theadditional terms that apply to those files, or a notice indicatingwhere to find the applicable terms.
Additional terms, permissive or non-permissive, may be stated in theform of a separately written license, or stated as exceptions;the above requirements apply either way.
8. Termination.
You may not propagate or modify a covered work except as expresslyprovided under this License. Any attempt otherwise to propagate ormodify it is void, and will automatically terminate your rights underthis License (including any patent licenses granted under the thirdparagraph of section 11).
However, if you cease all violation of this License, then yourlicense from a particular copyright holder is reinstated (a)provisionally, unless and until the copyright holder explicitly andfinally terminates your license, and (b) permanently, if the copyrightholder fails to notify you of the violation by some reasonable meansprior to 60 days after the cessation.
Moreover, your license from a particular copyright holder isreinstated permanently if the copyright holder notifies you of theviolation by some reasonable means, this is the first time you havereceived notice of violation of this License (for any work) from thatcopyright holder, and you cure the violation prior to 30 days afteryour receipt of the notice.
Termination of your rights under this section does not terminate thelicenses of parties who have received copies or rights from you underthis License. If your rights have been terminated and not permanentlyreinstated, you do not qualify to receive new licenses for the samematerial under section 10.
9. Acceptance Not Required for Having Copies.
You are not required to accept this License in order to receive orrun a copy of the Program. Ancillary propagation of a covered workoccurring solely as a consequence of using peer-to-peer transmissionto receive a copy likewise does not require acceptance. However,nothing other than this License grants you permission to propagate ormodify any covered work. These actions infringe copyright if you donot accept this License. Therefore, by modifying or propagating a
LTC v1.0.9 © SRI International 89
Appendix A. License
covered work, you indicate your acceptance of this License to do so.
10. Automatic Licensing of Downstream Recipients.
Each time you convey a covered work, the recipient automaticallyreceives a license from the original licensors, to run, modify andpropagate that work, subject to this License. You are not responsiblefor enforcing compliance by third parties with this License.
An ”entity transaction” is a transaction transferring control of anorganization, or substantially all assets of one, or subdividing anorganization, or merging organizations. If propagation of a coveredwork results from an entity transaction, each party to thattransaction who receives a copy of the work also receives whateverlicenses to the work the party’s predecessor in interest had or couldgive under the previous paragraph, plus a right to possession of theCorresponding Source of the work from the predecessor in interest, ifthe predecessor has it or can get it with reasonable efforts.
You may not impose any further restrictions on the exercise of therights granted or affirmed under this License. For example, you maynot impose a license fee, royalty, or other charge for exercise ofrights granted under this License, and you may not initiate litigation(including a cross-claim or counterclaim in a lawsuit) alleging thatany patent claim is infringed by making, using, selling, offering forsale, or importing the Program or any portion of it.
11. Patents.
A ”contributor” is a copyright holder who authorizes use under thisLicense of the Program or a work on which the Program is based. Thework thus licensed is called the contributor’s ”contributor version”.
A contributor’s ”essential patent claims” are all patent claimsowned or controlled by the contributor, whether already acquired orhereafter acquired, that would be infringed by some manner, permittedby this License, of making, using, or selling its contributor version,but do not include claims that would be infringed only as aconsequence of further modification of the contributor version. Forpurposes of this definition, ”control” includes the right to grantpatent sublicenses in a manner consistent with the requirements ofthis License.
Each contributor grants you a non-exclusive, worldwide, royalty-freepatent license under the contributor’s essential patent claims, tomake, use, sell, offer for sale, import and otherwise run, modify andpropagate the contents of its contributor version.
In the following three paragraphs, a ”patent license” is any expressagreement or commitment, however denominated, not to enforce a patent(such as an express permission to practice a patent or covenant not tosue for patent infringement). To ”grant” such a patent license to aparty means to make such an agreement or commitment not to enforce apatent against the party.
If you convey a covered work, knowingly relying on a patent license,and the Corresponding Source of the work is not available for anyoneto copy, free of charge and under the terms of this License, through a
90 © SRI International LTC v1.0.9

Appendix A. License
publicly available network server or other readily accessible means,then you must either (1) cause the Corresponding Source to be soavailable, or (2) arrange to deprive yourself of the benefit of thepatent license for this particular work, or (3) arrange, in a mannerconsistent with the requirements of this License, to extend the patentlicense to downstream recipients. ”Knowingly relying” means you haveactual knowledge that, but for the patent license, your conveying thecovered work in a country, or your recipient’s use of the covered workin a country, would infringe one or more identifiable patents in thatcountry that you have reason to believe are valid.
If, pursuant to or in connection with a single transaction orarrangement, you convey, or propagate by procuring conveyance of, acovered work, and grant a patent license to some of the partiesreceiving the covered work authorizing them to use, propagate, modifyor convey a specific copy of the covered work, then the patent licenseyou grant is automatically extended to all recipients of the coveredwork and works based on it.
A patent license is ”discriminatory” if it does not include withinthe scope of its coverage, prohibits the exercise of, or isconditioned on the non-exercise of one or more of the rights that arespecifically granted under this License. You may not convey a coveredwork if you are a party to an arrangement with a third party that isin the business of distributing software, under which you make paymentto the third party based on the extent of your activity of conveyingthe work, and under which the third party grants, to any of theparties who would receive the covered work from you, a discriminatorypatent license (a) in connection with copies of the covered workconveyed by you (or copies made from those copies), or (b) primarilyfor and in connection with specific products or compilations thatcontain the covered work, unless you entered into that arrangement,or that patent license was granted, prior to 28 March 2007.
Nothing in this License shall be construed as excluding or limitingany implied license or other defenses to infringement that mayotherwise be available to you under applicable patent law.
12. No Surrender of Others’ Freedom.
If conditions are imposed on you (whether by court order, agreement orotherwise) that contradict the conditions of this License, they do notexcuse you from the conditions of this License. If you cannot convey acovered work so as to satisfy simultaneously your obligations under thisLicense and any other pertinent obligations, then as a consequence you maynot convey it at all. For example, if you agree to terms that obligate youto collect a royalty for further conveying from those to whom you conveythe Program, the only way you could satisfy both those terms and thisLicense would be to refrain entirely from conveying the Program.
13. Use with the GNU Affero General Public License.
Notwithstanding any other provision of this License, you havepermission to link or combine any covered work with a work licensedunder version 3 of the GNU Affero General Public License into a singlecombined work, and to convey the resulting work. The terms of thisLicense will continue to apply to the part which is the covered work,but the special requirements of the GNU Affero General Public License,
LTC v1.0.9 © SRI International 91
Appendix A. License
section 13, concerning interaction through a network will apply to thecombination as such.
14. Revised Versions of this License.
The Free Software Foundation may publish revised and/or new versions ofthe GNU General Public License from time to time. Such new versions willbe similar in spirit to the present version, but may differ in detail toaddress new problems or concerns.
Each version is given a distinguishing version number. If theProgram specifies that a certain numbered version of the GNU GeneralPublic License ”or any later version” applies to it, you have theoption of following the terms and conditions either of that numberedversion or of any later version published by the Free SoftwareFoundation. If the Program does not specify a version number of theGNU General Public License, you may choose any version ever publishedby the Free Software Foundation.
If the Program specifies that a proxy can decide which futureversions of the GNU General Public License can be used, that proxy’spublic statement of acceptance of a version permanently authorizes youto choose that version for the Program.
Later license versions may give you additional or differentpermissions. However, no additional obligations are imposed on anyauthor or copyright holder as a result of your choosing to follow alater version.
15. Disclaimer of Warranty.
THERE IS NO WARRANTY FOR THE PROGRAM, TO THE EXTENT PERMITTED BYAPPLICABLE LAW. EXCEPT WHEN OTHERWISE STATED IN WRITING THE COPYRIGHTHOLDERS AND/OR OTHER PARTIES PROVIDE THE PROGRAM ”AS IS” WITHOUT WARRANTYOF ANY KIND, EITHER EXPRESSED OR IMPLIED, INCLUDING, BUT NOT LIMITED TO,THE IMPLIED WARRANTIES OF MERCHANTABILITY AND FITNESS FOR A PARTICULARPURPOSE. THE ENTIRE RISK AS TO THE QUALITY AND PERFORMANCE OF THE PROGRAMIS WITH YOU. SHOULD THE PROGRAM PROVE DEFECTIVE, YOU ASSUME THE COST OFALL NECESSARY SERVICING, REPAIR OR CORRECTION.
16. Limitation of Liability.
IN NO EVENT UNLESS REQUIRED BY APPLICABLE LAW OR AGREED TO IN WRITINGWILL ANY COPYRIGHT HOLDER, OR ANY OTHER PARTY WHO MODIFIES AND/OR CONVEYSTHE PROGRAM AS PERMITTED ABOVE, BE LIABLE TO YOU FOR DAMAGES, INCLUDING ANYGENERAL, SPECIAL, INCIDENTAL OR CONSEQUENTIAL DAMAGES ARISING OUT OF THEUSE OR INABILITY TO USE THE PROGRAM (INCLUDING BUT NOT LIMITED TO LOSS OFDATA OR DATA BEING RENDERED INACCURATE OR LOSSES SUSTAINED BY YOU OR THIRDPARTIES OR A FAILURE OF THE PROGRAM TO OPERATE WITH ANY OTHER PROGRAMS),EVEN IF SUCH HOLDER OR OTHER PARTY HAS BEEN ADVISED OF THE POSSIBILITY OFSUCH DAMAGES.
17. Interpretation of Sections 15 and 16.
If the disclaimer of warranty and limitation of liability providedabove cannot be given local legal effect according to their terms,reviewing courts shall apply local law that most closely approximatesan absolute waiver of all civil liability in connection with the
92 © SRI International LTC v1.0.9

Appendix A. License
Program, unless a warranty or assumption of liability accompanies acopy of the Program in return for a fee.
END OF TERMS AND CONDITIONS
How to Apply These Terms to Your New Programs
If you develop a new program, and you want it to be of the greatestpossible use to the public, the best way to achieve this is to make itfree software which everyone can redistribute and change under these terms.
To do so, attach the following notices to the program. It is safestto attach them to the start of each source file to most effectivelystate the exclusion of warranty; and each file should have at leastthe ”copyright” line and a pointer to where the full notice is found.
<one line to give the program’s name and a brief idea of what it does.>Copyright (C) <year> <name of author>
This program is free software: you can redistribute it and/or modifyit under the terms of the GNU General Public License as published bythe Free Software Foundation, either version 3 of the License, or(at your option) any later version.
This program is distributed in the hope that it will be useful,but WITHOUT ANY WARRANTY; without even the implied warranty ofMERCHANTABILITY or FITNESS FOR A PARTICULAR PURPOSE. See theGNU General Public License for more details.
You should have received a copy of the GNU General Public Licensealong with this program. If not, see <http://www.gnu.org/licenses/>.
Also add information on how to contact you by electronic and paper mail.
If the program does terminal interaction, make it output a shortnotice like this when it starts in an interactive mode:
<program> Copyright (C) <year> <name of author>This program comes with ABSOLUTELY NO WARRANTY; for details type ‘show w’.This is free software, and you are welcome to redistribute itunder certain conditions; type ‘show c’ for details.
The hypothetical commands ‘show w’ and ‘show c’ should show the appropriateparts of the General Public License. Of course, your program’s commandsmight be different; for a GUI interface, you would use an ”about box”.
You should also get your employer (if you work as a programmer) or school,if any, to sign a ”copyright disclaimer” for the program, if necessary.For more information on this, and how to apply and follow the GNU GPL, see<http://www.gnu.org/licenses/>.
The GNU General Public License does not permit incorporating your programinto proprietary programs. If your program is a subroutine library, youmay consider it more useful to permit linking proprietary applications withthe library. If this is what you want to do, use the GNU Lesser GeneralPublic License instead of this License. But first, please read<http://www.gnu.org/philosophy/why-not-lgpl.html>.
LTC v1.0.9 © SRI International 93