The Joy of Six-Dworsky
96
The Joy of Six for Solo Piano or Keyboard A polyrhythmic journey in 6/8 time Alan Dworsky Edited by Betsy Sansby DANCING HANDS MUSIC Cover art by Toni Pawlowsky
-
Upload
daniel-lazarov -
Category
Documents
-
view
45 -
download
0
description
The JOy of Six
Transcript of The Joy of Six-Dworsky

�c h a p t e r t i t l e w i l l g o h e r e
the Joy of Sixfor Solo piano or Keyboard
a polyrhythmic journey in 6/8 time
alan Dworskyedited by Betsy Sansby
Da n c i n g h a n D S m u S i c
Cover art by Toni Pawlowsky

t h e J o y o f S i x�
Copyright © 2006 by Alan Dworsky All rights reserved.
Published by: Dancing Hands Music 4275 Churchill Circle Minnetonka, MN 55345 U.S.A.
www.dancinghands.com phone or fax: 952.933.0781 email: [email protected]
Edited by Betsy Sansby Cover art by Toni Pawlowsky Portrait on page 89 by Molly Sansby Dworsky Illustration on the title page and page 79 by Robert Jackson Music engraving by Paul Gerike Pattern testing by Dan Rubenstein Recording set-up by Jake Swanson Book design and production by Mighty Media
Printed in the United States of America with soy ink on recycled, acid-free paper by Banta ISG
ISBN 0-9638801-8-7
In memory of my mom

�c h a p t e r t i t l e w i l l g o h e r e
contents
how this book works 4
Basic terms and concepts 6
lesson 1 3-over-2 and 3-over-4 9
Invention 1 ��
lesson 2 the shuffle feel �9
Invention 2 40
lesson 3 3-then-2 50
Invention 3 60
lesson 4 the 6/8 bell 68
Invention 4 80
glossary 89
About the Author 91
Also available from Dancing Hands Music 92

t h e J o y o f S i x4
how this book works
t his book is different from most other books for keyboards because it focuses on rhythm. In particular, it focuses on African
and Afro-Cuban polyrhythms in 6/8 time – ”six” for short. I originally learned these rhythms during my years as a drummer. When I returned to the piano – my original instrument – I adapted them to the keyboard using my own melodies and harmonies.
The results surprised me. Rhythms that had sounded fierce on drums sounded sweet on the piano when I played them in what I can only describe as a world-beat classical style. But the feeling in my body was the the same one I’d experienced as a drummer – a deep sense of poly-rhythmic pleasure. That’s why I’ve called this book “The Joy of Six.”
I’ve organized the book around four original pieces – which I call “rhythmic inventions” – that are designed to teach a variety of rhythms and rhythmic concepts. Each invention is covered in a separate lesson, where it’s broken down into bite-sized patterns. The patterns start easy and gradually get more difficult. Once you can play each pattern in a lesson separately, you’ll be able to put them all together and play the invention at the end of the lesson.
Although this book is for intermediate to advanced players, there’s nothing here that’s difficult from the standpoint of piano technique. In fact, what each hand does separately is actually pretty easy. It’s the rhythms that are tricky – getting the hands to dance together in time. But if you’re patient and you like playing in a state of intense rhythmic awareness, you’ll do just fine.
As you work through the lessons, I’ll be with you every step of the way, explaining every pattern, anticipating your questions, and pointing out whatever I think will make your journey easier. For example, I often show you how to experience a polyrhythm in your body before you play it at the keyboard. Whenever I introduce a new rhythmic concept, I highlight it in bold, define it on the spot, and put it in the margin and in the glossary at the back of the book for easy reference. And I use box

5
charts – the kind hand-drummers use – whenever I think they’ll make it easier for you to see rhythmic relationships.
The CD contains a recording of every pattern and invention in the book. To make it easy for you to find the one you want to work on, I put each one on a separate track. All you have to do is check the track number at the top of each chart and punch in that number on your CD player.
If you want a preview of where you’re headed, you can start by listening to the four inventions. You’ll find them on the following tracks:
Invention 1 – Track 1 Invention 2 – Track 18 Invention 3 – Track 40 Invention 4 – Track 57
That’s all you need to know for now. I’ll explain everything else along the way.
h o w t h i S B o o K w o r K S

t h e J o y o f S i x6
Basic terms and concepts
the pulse
The most basic and important rhythmic concept is the pulse. The pulse is the steady underlying rhythm you feel in your body when you listen to music. It’s usually called “the beat” – but since the word “beat” has so many meanings, I like the more precise term “pulse.”
The pulse is a kinesthetic phenomenon – something you feel in your body even when it’s not being played by any instrument. When you tap your foot to music, chances are you’re tapping on the pulse. When you dance, chances are you’re moving your feet to the pulse.
Just like your own pulse, the pulse in music is made up of evenly-spaced individual pulses. In 6/8 time – “six” for short – there are 2 pulses in each measure. Each of those pulses is a dotted quarter note:
the subdivisions of the pulse
Each pulse in six is felt as being divided into 3 subdivisions or beats, and each of those beats is an eighth note. Since there are 2 pulses to a measure, and each pulse is divided into 3 eighth notes, in 6/8 there are 6 eighth notes to a measure:
Like the silent pulse that’s felt even when it isn’t played, these subdivi-sions of the pulse create a silent grid that’s felt even when each eighth note isn’t played.
rhy thmic concept
the pulse = the steady underlying
beat you feel in your body when
you listen to music, made up of evenly-
spaced individual pulses
rhy thmic concept
beat = a subdivision of the
pulse – in 6/8, an eighth note

�
the two-measure cycle
The grouping of pulses that is felt as repeating in a rhythm creates the rhythm’s cycle. And although a measure in 6/8 has two pulses, rhythms in 6/8 – especially African and Afro-Cuban rhythms – are generally felt in cycles of four pulses. That means the next largest rhythmic unit after the pulse is not the individual measure, but rather the two-measure cycle. This two-measure cycle has four pulses divided into 3 eighth notes each, for a total of 12 beats:
This two-measure cycle can also be represented as a single measure of 12/8, which also has four pulses divided into 3 eighth notes each, for a total of 12 beats:
Why did I choose to notate the music in this book in 6/8 instead of 12/8? Because two bite-sized measures of 6/8 are easier to read than one long measure of 12/8. And the advantage of having a bar line every 6 beats only increases as the complexity of the music increases.
the charts
There are two kinds of charts in this book. Most are written in standard music notation. To cut down on clutter, I’ve left off the 6/8 time signa-ture on the charts of the individual patterns. I’ve also left off any repeat signs, but I want you to imagine that there’s one at each end of every chart. I’d like you to learn the patterns the way a drummer would, by repeating each one over and over until it grooves.
The other kind of chart is called a box chart. These charts are used by hand drummers because they make rhythmic relationships easy to see. I use them to introduce new rhythms or to explain rhythmic concepts.
B a S i c t e r m S a n D c o n c e p t S
rhy thmic concept
cycle = the grouping of pulses that is felt as repeating in a rhythm

t h e J o y o f S i x8
Here’s an example:
1 2 3 4 5 6 1 2 3 4 5 6
,,,,,,
,,,,
This chart represents two measures of 6/8 time. Each individual box represents an eighth note. The 6 beats in each measure are numbered across the top row, with the pulse shaded on beats 1 and 4. Rhythms are indicated with X’s on the rows below.
polyrhythm
The term “polyrhythm” is used to describe a wide variety of rhythmic phenomena. In its broadest sense, it means “two or more rhythms going at the same time.”
I use a more narrow definition: A polyrhythm exists when there are two or more rhythms going at the same time that create or imply different pulses. A polyrhythm can also exist when two or more rhythms going at the same time create or imply different subdivisions of a pulse, but that’s for another book.
Most of the patterns in this book have two or more pulses going at the same time. When that happens, the pulse you feel in your feet will be the primary pulse and any other one will be a secondary pulse. The formula for naming such a polyrhythm is: secondary pulse over primary pulse – for example, “3-over-2.”
If any of this seems a little confusing, don’t worry about it. Everything will make sense when you get into lesson 1, where you’ll have a direct, physical experience of polyrhythms.
rhy thmic concept
polyrhythm = two or more rhythms going at the same
time that create or imply different
pulses (or different subdivisions of the
pulse)

9
l e s s o n 13-over-2 and 3-over-4In this lesson, you’ll experience what it’s like to have more than one pulse going in your body at the same time, starting with the polyrhythm 3-over-2 and then adding 3-over-4. Along the way, you’ll also learn some new ways of looking at rhythms in six that will help illuminate the patterns in this lesson and the lessons to come.
Let’s start with 3-over-2, the most basic and important polyrhythm in six. As a first step, listen to this polyrhythm on track 2. You’ll hear 3 played on a cowbell over 2 played on a drum. Here’s what it looks like on a box chart:
3-over-2 track 2
1 2 3 4 5 6
,,,
,,
Here’s the same polyrhythm in standard music notation – 3 quarter notes over 2 dotted quarter notes:
3-over-2 track 2
Now that you know what 3-over-2 sounds like and looks like, the next step is to experience what it feels like. I recommend that you experience 3-over-2 away from the keyboard at first. That way you can concentrate on the rhythm without having to worry about which notes to play. Then when you get to the keyboard, you’ll already have the polyrhythm in your muscle memory.
3 - o v e r - 2 a n D 3 - o v e r - 4

t h e J o y o f S i x�0
The simplest way to get 3 and 2 going in your body at the same time is to put the 3 in one hand and the 2 in the other. To distinguish one from the other, it’s best if each hand makes a different sound. So put your right hand on a table top and your left hand on your thigh. Then steadily tap 3 times in your right hand for every 2 taps in your left. The hand pattern goes: together-right-left-right, together-right-left-right. If you need help, try playing along with track 2.
Once you can tap 3 and 2 at the same time, the next step is to make sure you’re feeling the 3 over the 2, with the 2 as the primary pulse. The best way to do that is to tap the primary pulse with your foot.
So put your right hand at your side for a moment, and start tapping your left foot along with your left hand: 1, 2, 1, 2. You can tap with your toe or your heel. Or you can rock your foot back and forth, heel-toe, heel-toe – an efficient motion that distinguishes the 1 from the 2. The main point is to do whatever feels most natural. When your left foot and hand are working together on the 2, then bring in the 3 in your right hand.
Once you can do this exercise, you’re ready to go to the keyboard and play pattern 1. But first, I recommend you listen to it on track 3. In fact, I recommend that you listen to every pattern before you play it.
In pattern 1, your hands are going to be doing basically the same thing they did in the exercises. The right hand plays the 3 while the left plays the 2. The only difference is that now they’re playing different notes – in this case the first five notes of the A♭ major scale.
If you want to make sure you continue feeling the 2 as the primary pulse, tap it in your left foot, just as you did in the exercises. And remember to play this pattern – and every pattern – over and over without stopping until it grooves:
pattern 1 track 3
If you find it hard to tap the 2 in your left foot while you play, it may be because you’re feeling the 3 in your right hand as the primary pulse. That’s only natural, because the 3 in your right hand is the melody.

��
Neither way of experiencing the polyrhythm is right or wrong. Each is simply a different point of view, and each point of view is valid and pleasurable in its own way. As long as you’re feeling two pulses in your body at the same time, you’re doing it right.
Neither way of experiencing the polyrhythm is right or wrong. Each is simply a different
point of view, and each point of view is valid and pleasurable in its own way.
The next pattern and all the patterns that follow should be felt in two-measure cycles with 4 pulses each. And since you’re repeating 3-over-2 twice in the span of two measures, it becomes 6-over-4:
6-over-4
1 2 3 4 5 6 1 2 3 4 5 6
,,,,,,
,,,,
3-over-2 3-over-2
From now on I’ll be referring to this polyrhythm as 6-over-4. But remember, 6-over-4 is the same as 3-over-2 – it’s just twice as long.
In pattern 2, you’re going to be playing 6 in your right hand over 4 in your left. Feel the two-measure cycle start every time you hit that C with your right thumb:
pattern 2 track 4
3 - o v e r - 2 a n D 3 - o v e r - 4

t h e J o y o f S i x��
The next pattern is the first one that’s actually part of the invention. The right hand is the same as it was in pattern 2. But the left hand now starts an octave lower and spans a ninth:
pattern 3 track 5
I play this pattern – and all the rest of the patterns in this lesson – using the sustain pedal at the start of each two-measure cycle. And I’ve noticed that once I start working the sustain pedal with my right foot, it’s hard to keep a pulse going in my left. So I take the pulse out of my left foot and stick it in my midsection. I basically just start rocking in my chair. If this works for you, great. If not, try nodding your head, or doing the funky-chicken motion. If that doesn’t work, at least take the feeling of the pulse in your left hand and let it spread as far as possible up your arm and into your torso.
Take the feeling of the pulse in your left hand and let it spread as far as possible up your arm and into your torso.
In pattern 4, notice that the left hand only spans an octave instead of a ninth. Also notice how relaxed your right hand is with the thumb on a white key and the longer fingers on black keys. Don’t you just love A♭?
pattern 4 track 6
��
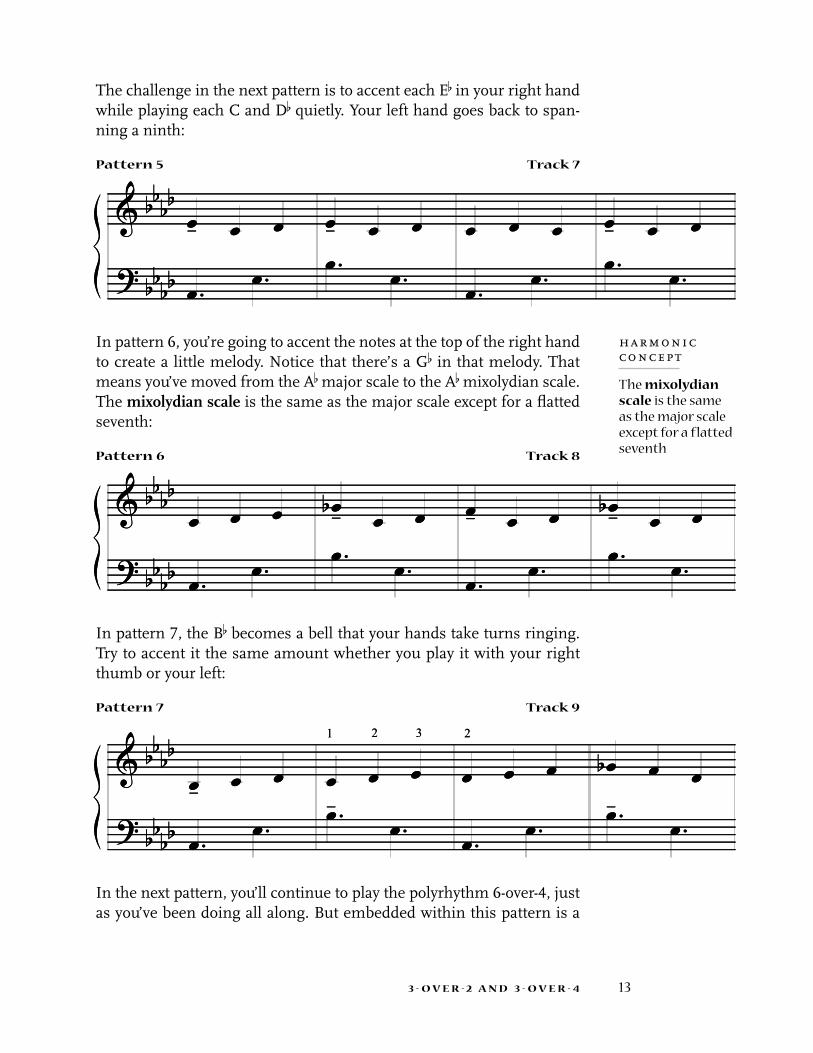
The challenge in the next pattern is to accent each E♭ in your right hand while playing each C and D♭ quietly. Your left hand goes back to span-ning a ninth:
pattern 5 track 7
In pattern 6, you’re going to accent the notes at the top of the right hand to create a little melody. Notice that there’s a G♭ in that melody. That means you’ve moved from the A♭ major scale to the A♭ mixolydian scale. The mixolydian scale is the same as the major scale except for a flatted seventh:
pattern 6 track 8
In pattern 7, the B♭ becomes a bell that your hands take turns ringing. Try to accent it the same amount whether you play it with your right thumb or your left:
pattern 7 track 9
In the next pattern, you’ll continue to play the polyrhythm 6-over-4, just as you’ve been doing all along. But embedded within this pattern is a
1 2 3 21 2 3 2
harmonic concept
The mixolydian scale is the same as the major scale except for a flatted seventh
3 - o v e r - 2 a n D 3 - o v e r - 4

t h e J o y o f S i x�4
new two-measure polyrhythm: 3-over-4. The 3 is created by the 3 A♭s in the right hand. The 4 is still the 4 pulses in the left:
pattern 8 track 10
You now have three pulses going at the same time in a two-measure cycle of six. To make talking about them easier, I’m going to start calling the 4 the “4-pulse,” the 6 the “6-pulse,” and the 3 the “3-pulse.” Here are all three on a box chart:
two-measure pulses in six
1 2 3 4 5 6 1 2 3 4 5 6
,,,
,,,,,,
,,,,
Although I’ve called this book “The Joy of Six,” as you can see from this chart, the true magic number is 12. Because it’s evenly divisible by 4, 6, and 3, it’s uniquely rich in polyrhythmic possibilities.
Here are the same three pulses in standard notation:
3
4
3
4
3
4
�-pulse p
6-pulse p
4-pulse p

�5
two-measure pulses in six
musical time-out: “Different” pulses
Back in the chapter on basic terms and concepts, I said that a polyrhythm exists when there are two or more rhythms going at the same time that create or imply different pulses. Now I want to define “different.”
Two pulses are “different” when neither contains all the beats of the other. Under this definition, the 3-pulse creates a polyrhythm with the 4-pulse because neither contains all the beats of the other. The same goes for the 6-pulse and the 4-pulse. But the 3-pulse doesn’t create a polyrhythm with the 6-pulse because the 6-pulse contains all the beats of the 3-pulse.
Now let’s go back to pattern 8. When I play this pattern in the invention, I rock my hand harder on the thumb side and lighter on the pinkie side. This brings out the melody created by the three descending notes – E♭, D♭, and C:
pattern 8 track 11
3 - o v e r - 2 a n D 3 - o v e r - 4
f �-pulse
f 6-pulse
f 4-pulse

t h e J o y o f S i x�6
These three descending notes fall exactly midway between the beats of the 3-pulse (the A♭s). And there’s a term for beats that fall exactly midway between pulses: upbeats. So the E♭, D♭, and C are the upbeats of the 3-pulse.
Beats that aren’t pulses or upbeats are offbeats. Beats 2 & 3 and 5 & 6 are all offbeats in relation to the 4-pulse:
the offbeats of the 4-pulse
1 2 3 4 5 6 1 2 3 4 5 6
,,,,,,,,
musical time-out: categorizing a beat or note
I’ve now defined three categories of beats: pulses, upbeats, and offbeats. But how you categorize a particular beat or note will often change depending on what pulse you’re relating it to.
For example, suppose a note falls on beat 3 in the first measure of a two-measure cycle in six. In relation to the 6-pulse, it’s a pulse:
in relation to the 6-pulse
1 2 3 4 5 6 1 2 3 4 5 6
,
,,,,,,
In relation to the 3-pulse, it’s an upbeat:
in relation to the 3-pulse
1 2 3 4 5 6 1 2 3 4 5 6
,
,,,
rhy thmic concept
upbeats = beats that fall exactly
midway between pulses
rhy thmic concept
offbeats = beats that aren’t pulses
or upbeats
6-pulse p
�-pulse p

��
And in relation to the 4-pulse, it’s an offbeat:
in relation to the 4-pulse
1 2 3 4 5 6 1 2 3 4 5 6
,
,,,,
Whenever I simply call a beat or note a pulse or an offbeat, you can assume I’m categorizing it in relation to the 4-pulse, the fundamental pulse in six. But when I’m categorizing a beat or note in relation to the 6-pulse or 3-pulse, I’ll always state that explicitly.
Now back to the patterns. In pattern 9, the melody created by the moving notes is now on the 3-pulse while the A♭s are on the upbeats of the 3-pulse:
pattern 9 track 12
Pattern 10 really gets me rocking in my chair, because the left hand finally gets to break out of its support role and sing along with the right hand. The chords outlined by the left hand divide the pattern into three 8-measure sections. In the first section, the left hand starts on A♭, in the second on F, and in the third on D♭. I’ve combined all three sections into one pattern because they fit together musically, but you may want to work on them one at a time. The right hand is the same in all three sections, and it’s almost the same as in pattern 9 except for the B♭ in the next-to-last measure of each section:
f 4-pulse
3 - o v e r - 2 a n D 3 - o v e r - 4

t h e J o y o f S i x�8
pattern 10 track 13
(Pattern 10 is continued on the next page)

�9
Pattern 11 is a variation of the third section of pattern 10:
pattern 11 track 14
In pattern 12, the right hand plays a quiet melody in the alto voice on the 3-pulse while the left hand quietly sings along on the 4-pulse:
3 - o v e r - 2 a n D 3 - o v e r - 4

t h e J o y o f S i x�0
pattern 12 track 15
To explain the last two patterns in this lesson, I need to introduce one more rhythmic concept: cross-rhythm. A cross-rhythm is a repeating figure that doesn’t fit evenly in the cycle of a rhythm. In 6/8, that cycle is two measures long.
The repeating figure that creates a cross-rhythm in pattern 13 is the four-note sequence in the right hand that goes A♭-E♭-A♭-D♭. Since this sequence repeats every 8 beats, I call it an 8-beat cross-rhythm. It takes this cross-
rhy thmic concept
cross-rhythm = a repeating figure
that doesn’t fit evenly in a two-
measure cycle of 6/8

��
rhythm a full four measures before it comes out evenly and starts again on ONE – the first beat in the two-measure cycle:
pattern 13 track 16
Cross-rhythms are often disorienting. And the longer you play them, the more disorienting they become. They’re like revolving doors. It’s easy enough to get in and go around and around. But if you want to get out on the right side, you need to keep track of where you are.
Cross-rhythms are like revolving doors. It’s easy enough to get in and go around and around.
But if you want to get out on the right side, you need to keep track of where you are.
In pattern 14, your right hand plays a cross-rhythm similar to the one it played in pattern 13 while your left hand plays the same part it played in pattern 12. I consider this the climax of the invention:
pattern 14 track 17
Congratulations! If you’ve mastered all the patterns in this lesson, you’re an advanced polyrhythmic swimmer. Now you’re ready to put them all together and play Invention 1. The best way to get a sense of the form and the dynamics of this invention is to listen to it on the CD.
8 beats 8 beats 8 beats8 beats 8 beats 8 beats
rhy thmic concept
ONE = the first beat in a two-measure cycle in 6/8
3 - o v e r - 2 a n D 3 - o v e r - 4

t h e J o y o f S i x��
æ.=112
5
simile9
13
17
Invention 13 Over 2
invention 1
t r ac K 1

��
211 2 3 2
25
29
33
slight cresc.
37
i n v e n t i o n 1

t h e J o y o f S i x�4
41
45
49
cresc.
53
(bring out left hand)57

�5
61
65
69
73
77
i n v e n t i o n 1

t h e J o y o f S i x�6
81
decresc.
85 (melody in middle voice)
89
93
97
��
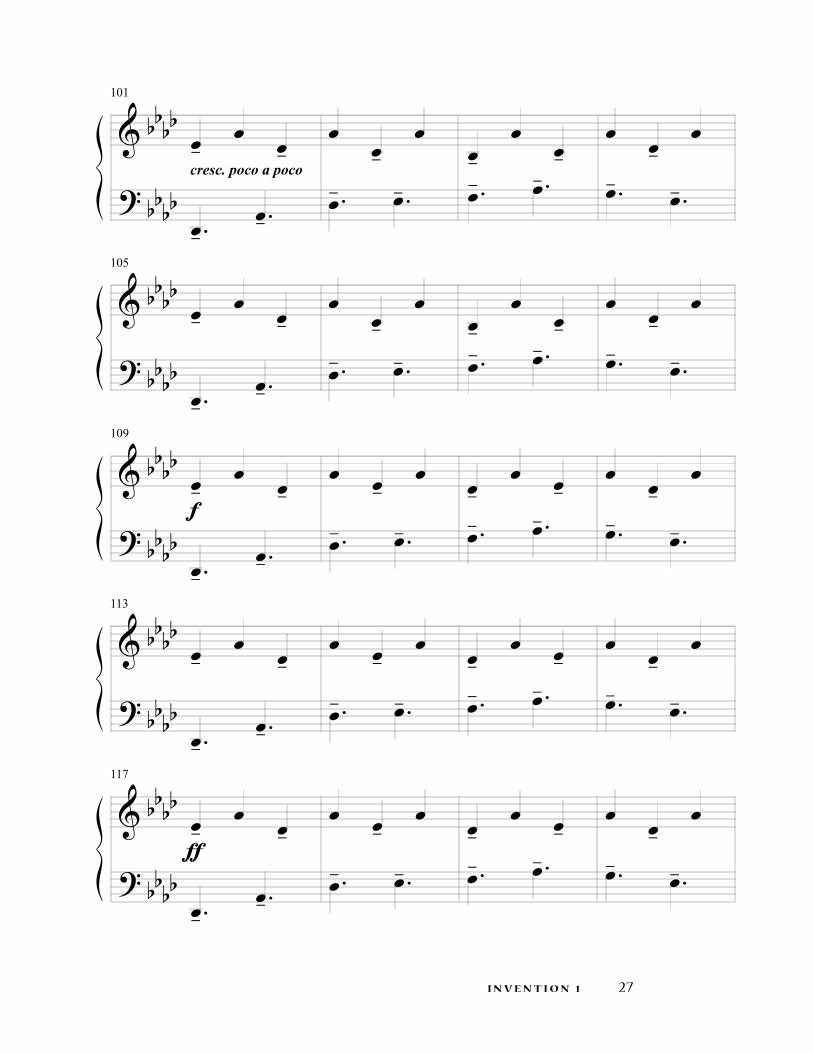
101
cresc. poco a poco
105
109
113
117
i n v e n t i o n 1

t h e J o y o f S i x�8
121
125
(all notes equal)
129
133
137

�9
l e s s o n 2the shuffle feelWhen rock or blues songs are played in six, they’re often played with what’s called a shuffle feel. To create the shuffle feel, you play each pulse in the 4-pulse plus the offbeat before each pulse:
Shuffle feel
1 2 3 4 5 6 1 2 3 4 5 6
,,,,,,,,
Shuffle feel
In this lesson, you’re going to be creating a shuffle feel in your left hand while your right hand plays a variety of rhythms on top of it. Both hands will spend the entire piece playing in the D dorian mode, which is the same as the C major scale starting on D. That means you’re only going to be playing the white keys. And since we covered most rhythmic terms and concepts in lesson 1, we’ll be able to move more quickly through the patterns.
Here’s the first pattern in your left hand. Notice that you hold each note on the pulse for a full quarter note, so there’s no rest between each pair of notes on the chart:
pattern 1 track 19
harmonic concept
The D dorian mode is the same as the C major scale starting on D
t h e S h u f f l e f e e l

t h e J o y o f S i x�0
In pattern 2, your right hand plays a three-note figure over the shuffle in your left. You’ll probably find it easier to get the groove going in your left hand before bringing in the figure in your right. And while you’re learning to put the hands together, you also may find it easier to wade in one note at a time with your right hand. Notice that you hold down the A with your right thumb until it’s joined by the C to create a third:
pattern 2 track 20
I play this pattern – and all the patterns in this lesson – without using the sustain pedal. This leaves my left foot free to pound away on the pulse.
In the next pattern, the right hand figure is two notes longer. Again you hold down the A in the right thumb each time you play it:
pattern 3 track 21
In the first and third measures of the next pattern, the figure in the right hand is the same as in the last pattern. In the second measure the figure is slightly different but it has the same rhythm:
pattern 4 track 22

��
In the next pattern, if you remember to play the second note in your right hand – the C – with your third finger, everything else should fall into place:
pattern 5 track 23
In pattern 6, the first figure in the right hand falls on the same beats as the figure in pattern 2. But the second figure has been shifted so it starts one beat earlier on the pulse.
This is the kind of repeating figure that will lead to a cross-rhythm if you keep going (and please feel free to give it a try if you’re feeling adven-turous). Here the pattern just hints at a 5-beat cross-rhythm without following through on it:
pattern 6 track 24
The rhythm in the next pattern is the same as in pattern 2. But the melody changes and the sound thins out as both hands move higher and get quieter. In the first four measures, I anchor myself on my right thumb by holding down the E after I play it. In the last four measures I hold down the G after I play it:
t h e S h u f f l e f e e l

t h e J o y o f S i x��
pattern 7 track 25
Pattern 8 is a variation of pattern 7:
pattern 8 track 26
In pattern 9, the hands start to move together in a pattern that has an almost baroque sound to it. I’ve included the fingering that works for me. I start by playing the first note in the left hand with my fifth finger, but when the pattern repeats I play it with my left thumb:

��
pattern 9 track 27
Pattern 10 is a variation of pattern 9. In the last measure, the notes in the right hand should be played as if they were a separate phrase emerging from the continuous flow of notes. And while I’m holding down the last note in the right hand, I switch from my second finger to my pinkie in order to get in position to start the pattern over:
pattern 10 track 28
The first half of pattern 11 is the same as pattern 10. The second half is also the same except for the last measure:
pattern 11 track 29
4 3 4 1 3 15
1 4 3 4 1 3 15
4 3 4 1 3 15
1 4 3 4 1 3 15
t h e S h u f f l e f e e l

t h e J o y o f S i x�4
In the first measure of the next pattern, the right hand plays pairs consisting of each pulse and the offbeat after it. That means both hands are playing pairs and both hands are playing on the pulse. But the pairs in the left hand end on the pulse while the pairs in the right hand start on the pulse.
In the second measure, the first pair in the right hand is shifted one beat to the right. This closes the gap between the two pairs in the second measure and creates a four-note figure. I play all these pairs as if my right hand were sinking into the keyboard. I don’t lift a finger until I have to:
pattern 12 track 30
In the first five measures of the next pattern, the figures in the right hand have the same rhythm as in pattern 6. But in the sixth measure the repeating figure starts to create a cross-rhythm. And it’s not the 5-beat cross-rhythm that the figures hint at. In this cross-rhythm the repeating figure consists of the six-note sequence A-C-D, A-C-D, which I’ve brack-eted on the chart. It’s a 9-beat cross-rhythm – a rare bird:
pattern 13 track 31
9-beats 9-beats9-beats 9-beats

�5
As you may recall from lesson 1, the 6-pulse falls on beats 1, 3, and 5 in each measure – the odd-numbered beats. In most of the remaining patterns, your right hand is going to play on the upbeats of the 6-pulse. Those are beats 2, 4, and 6 in each measure – the even-numbered beats:
the 6-pulse and the upbeats of the 6-pulse
1 2 3 4 5 6 1 2 3 4 5 6
,,,,,,
,,,,,,
musical time-out: counting in six
There are three ways to count a two-measure cycle in six with a 4-pulse. Here are all three on a single box chart. The top two rows show you two different ways to count in 6/8. The bottom row shows you how to count in 12/8:
1 2 3 4 5 6 1 2 3 4 5 6
1 + a 2 + a 1 + a 2 + a
1 + a 2 + a 3 + a 4 + a
I like the first way of counting for most rhythms because each beat gets a number, as opposed to an “and” (+) or an “uh” (a). But if I’m only counting pulses, I like the third way – the 12/8 way – because each pulse in the 4-pulse gets its own number. Counting is just a tool for working with rhythms, so you should use whichever way works best in a particular situation.
f Upbeats of the 6-pulse
f 6-pulse
t h e S h u f f l e f e e l

t h e J o y o f S i x�6
On track 32, you can hear the upbeats of the 6-pulse played on a cowbell over a 4-pulse played on a drum. Here’s what that looks like on a box chart:
the upbeats of the 6-pulse over the 4-pulse track 32
1 2 3 4 5 6 1 2 3 4 5 6
,,,,,,
,,,,
Notice that the upbeats of the 6-pulse coincide with the 4-pulse on beat 4 in each measure. This is the backbeat, which is every second pulse in the 4-pulse:
the upbeats of the 6-pulse over the 4-pulse track 32
1 2 3 4 5 6 1 2 3 4 5 6
,,,,,,
,,,,
Backbeats
In 12/8, the backbeats fall on beats 2 and 4, just as they do in 4/4 time:
the upbeats of the 6-pulse over the 4-pulse track 32 counted in 12/8
1 + a 2 + a 3 + a 4 + a
,,,,,,
,,,,
Backbeats
Here are the upbeats of the 6-pulse over the 4-pulse in 6/8 in standard music notation:
rhy thmic concept
backbeat = every second pulse in the
4-pulse
Upbeats of the 6-pulse p
4-pulse p

��
the upbeats of the 6-pulse over the 4-pulse track 32
Before you go to the keyboard, tap the 4-pulse in your left hand and then add the upbeats of the 6-pulse in your right hand over it. Make sure you keep feeling the 4-pulse as the primary pulse by tapping it in your left foot. And to make sure you know where ONE is, call it out each time it comes around.
Now back to the keyboard. In the patterns that follow, your left hand continues to play the shuffle rhythm. Here’s the first left hand part all by itself. Imagine you’re playing bass in a smoky Chicago nightclub:
pattern 14 track 33
In the next pattern, your right hand alternates between playing the upbeats of the 6-pulse for a measure and then resting for a measure – which gives you time to regroup. I like to let my right hand just sort of melt into the keys:
pattern 15 track 34
BackbeatsBackbeatsBackbeats
t h e S h u f f l e f e e l

t h e J o y o f S i x�8
The next pattern is just like the last one except for the last measure, where instead of resting you push on. At the end of the pattern, on the last note in my right hand – the F – I switch from my third finger to my thumb while holding the key down. That puts my right hand in position to start the pattern over again without a hitch:
pattern 16 track 35
In the first two measures of the next pattern, you’re going to play the complete series of upbeats of the 6-pulse. The notes in both hands center on an F major seventh chord. In the third and fourth measures, the right hand switches to a different rhythm while both hands switch to a G chord. This is one of the most difficult patterns in the book, so take your time. If you need to, cut the pattern in half and work on each half separately:
pattern 17 track 36
Pattern 18 is a variation of pattern 17. Here the right hand starts on the F instead of working up to it:

�9
pattern 18 track 37
The first three measures of pattern 19 are the same as in pattern 18. In the last measure, the right hand hits a high G:
pattern 19 track 38
The last pattern in this lesson is similar to the last three patterns you played. But this time you transition back to pattern 1:
pattern 20 track 39
Now you’re ready to put all the patterns together and play Invention 2.
t h e S h u f f l e f e e l

t h e J o y o f S i x40
no pedal
æ.=96
5
9
13
Invention 2Shuffle
invention 2
t r ac K 18

4�
17
21
5 4 3 4 1 3 15
1 4 3 2
1 2 1 3 1 2
1 3 24
25
29
33
i n v e n t i o n 2
t h e J o y o f S i x4�
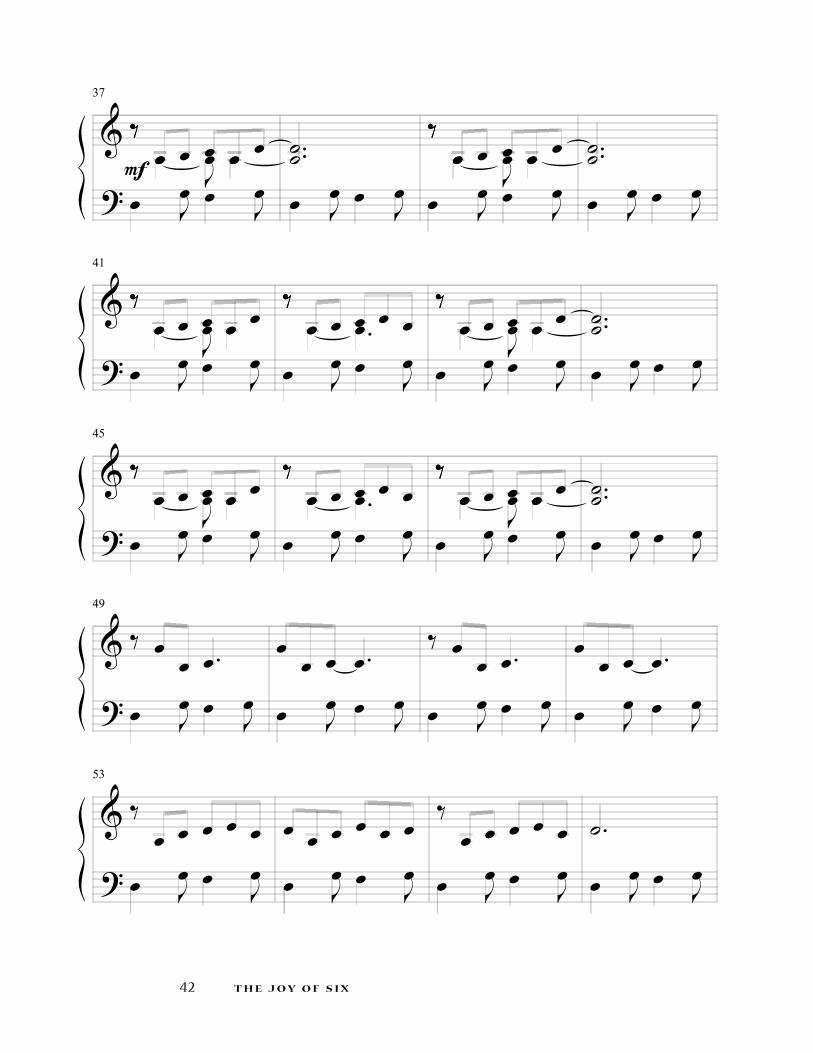
37
41
45
49
53

4�
57
61
65
69
73
i n v e n t i o n 2

t h e J o y o f S i x44
77
81
85
89
93

45
97
101
105
109
113
i n v e n t i o n 2

t h e J o y o f S i x46
117
121
125
129
133

4�
137
141
145
149
153
i n v e n t i o n 2
t h e J o y o f S i x48
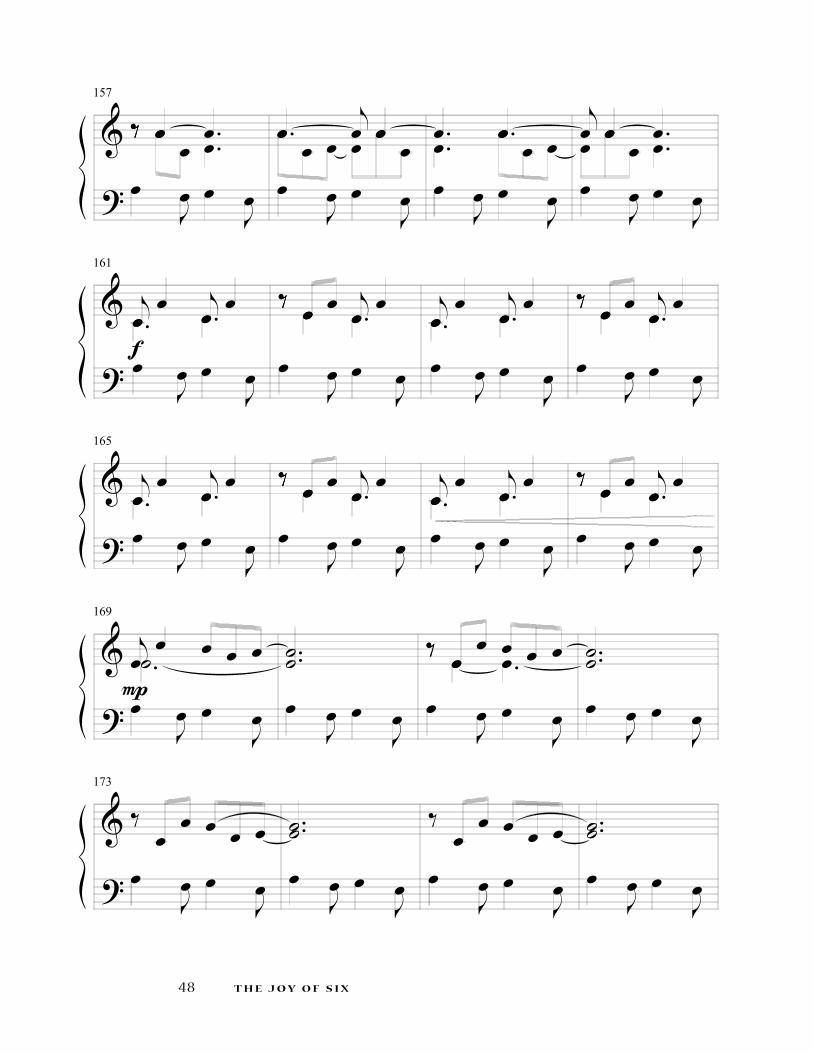
157
161
165
169
173

49
177
181 slight rit.
i n v e n t i o n 2

t h e J o y o f S i x50
l e s s o n 33-then-2In every pattern in this lesson, your right hand is going to play the second and third eighth notes in each group of three. These are the offbeats of the 4-pulse. I call them the “offbeat pairs”:
These pairs are hard to play in time unless you’re also playing the pulse. I learned this the hard way during an African drum class. While everyone else was drumming, the teacher handed me a cowbell and asked me to play these offbeat pairs. No matter how hard I tried, I couldn’t do it. I kept drifting back onto the pulse. Finally, the teacher grabbed the bell out of my hand and showed me how to mark each pulse by banging the bell on the hardwood floor between strokes. That made playing the offbeat pairs a lot easier, although I’m pretty sure I damaged the floor.
To make the offbeat pairs easier for you to play, I’m going to have you start by doing basically the same thing I did with the cowbell. Only instead of banging the pulse on the floor, you’re going to fill it in with your left hand. Then, later in the lesson, your right hand will be able to rely on muscle memory to play these pairs while your left hand plays a pattern I call “3-then-2.”
All the patterns in this lesson are in the key of D major. In pattern 1, your right hand plays the two pairs it will play throughout most of this lesson – D-A, D-E. For efficiency of motion, I recommend that you think of each pair as one fluid gesture. Play each one with a slight down-up motion of your wrist – down on the D and up on the A or the E. In between the pairs in your right hand, your left hand plays a single A on the pulse. I use the sustain pedal on this pattern:
pattern 1 track 41

5�
In pattern 2, your left hand continues to play the pulse, but this time it creates a little melody. I still use the sustain pedal on this pattern, but now I press it down at the start of each measure:
pattern 2 track 42
In pattern 3, the melody in your left hand moves to its highest point. I press down the sustain pedal on every pulse in this pattern:
pattern 3 track 43
3 - t h e n - 2

t h e J o y o f S i x5�
In pattern 4, the left hand starts lower and covers more ground. The feeling is one of quiet majesty:
pattern 4 track 44
In pattern 5, your left hand plays the same part it played in pattern 4. But this time, it becomes a support part for a melody played by your right hand. This melody is created only by the second note in each offbeat pair – the offbeat right before the pulse – so you’ll want to bring out just those notes.
Because the notes in this melody are exactly the same distance apart as the pulses, they create a shifted 4-pulse in your right hand that forms a polyrhythm with the primary 4-pulse in your left. To make sure you don’t get turned around and start feeling this melody as the pulse, keep the primary 4-pulse going somewhere in your body while you play:
pattern 5 track 45
The next pattern is a combination of patterns 4 and 5. Notice that the melody in the right hand carries all the way through to the first A in measure 5. I always feel my spirits rise when this melody comes in:

5�
pattern 6 track 46
Hopefully by now the offbeat pairs are firmly programmed into the muscle memory of your right hand. They need to be, because you’re about to take off the training wheels and let go of the primary pulse in your left hand.
To get you ready to do that at the keyboard, I want you to start by doing a couple exercises away from your instrument. In the first exercise, you’re going to tap the offbeat pairs in your right hand while you tap the 6-pulse in your left. You can hear this polyrhythm on track 47, with the offbeat pairs played on a cowbell and the 6-pulse played on a drum. Since this pattern can be pretty challenging, don’t worry about tapping your foot yet. And notice that your hands play together on beats 3 and 5 in each measure:
the offbeat pairs and the 6-pulse track 47
1 2 3 4 5 6 1 2 3 4 5 6
,,,,,,,,
,,,,,,
Here’s the same pattern in standard music notation:
3 - t h e n - 2

t h e J o y o f S i x54
the offbeat pairs and the 6-pulse track 47
Notice that even though you’re not playing the 4-pulse in your left hand anymore, it’s still being implied by the offbeat pairs in your right. They imply the pulse by the beat they leave out.
The next exercise is designed to help you learn to feel a 4-pulse in your body while you play a 6-pulse with your left hand. All you’re going to do is tap the 4-pulse in your left foot while you tap the 6-pulse in your left hand. The pattern goes “together-hand-foot-hand, together-hand-foot-hand”:
the 6-pulse over the 4-pulse
1 2 3 4 5 6 1 2 3 4 5 6
,,,,,,
,,,,
Now go to the keyboard and do the exact same exercise you just did. But this time, instead of tapping with your left hand, play three different notes in each measure:
Now you’re ready to play pattern 7. Your left hand plays the same notes it played in the last exercise while your right hand plays the offbeat pairs. Here’s the tricky part: even though the 6-pulse in your left hand is under your right hand in terms of pitch, it still should be felt as being rhythmi-
Left hand p
Left foot p
Left hand p
Left foot p

55
cally over the 4-pulse implied by your right hand. So tap your foot on the 4-pulse or find some other place in your body to feel that pulse:
pattern 7 track 48
Ready for the next challenge? In pattern 8, you’re going to play 3 in your left hand in the first measure and 2 in your left hand in the second. I call this sequence “3-then-2.” Since this pattern is rhythmically challenging, it’s worth spending some extra time listening to it on the CD before you try playing it. You’ll hear me using the sustain pedal at the start of each repetition to tie the notes together:
pattern 8 track 49
To better understand what’s going on in this two-measure pattern, let’s take a closer look at it one measure at a time. In the first measure there’s a polyrhythm, because your left hand plays 3 pulses while your right hand implies 2 by the beats it leaves out. In the second measure there’s no polyrhythm, because both hands reinforce the same pulse. So a key feature of this two-measure pattern is that the first measure is poly-rhythmic while the second is not. The polyrhythm appears and disap-pears in each two-measure cycle.
I’ve tried to prepare you to be able to feel the 4-pulse as the primary pulse throughout this pattern, but I know it’s hard to do. So if you find yourself feeling the 3 in your left hand as the primary pulse in the first measure, that’s okay. You’ll still be experiencing a polyrhythm. It’s just that in the first measure you’ll be feeling it as 2-over-3 instead of 3-over-2.
3 - t h e n - 2
t h e J o y o f S i x56
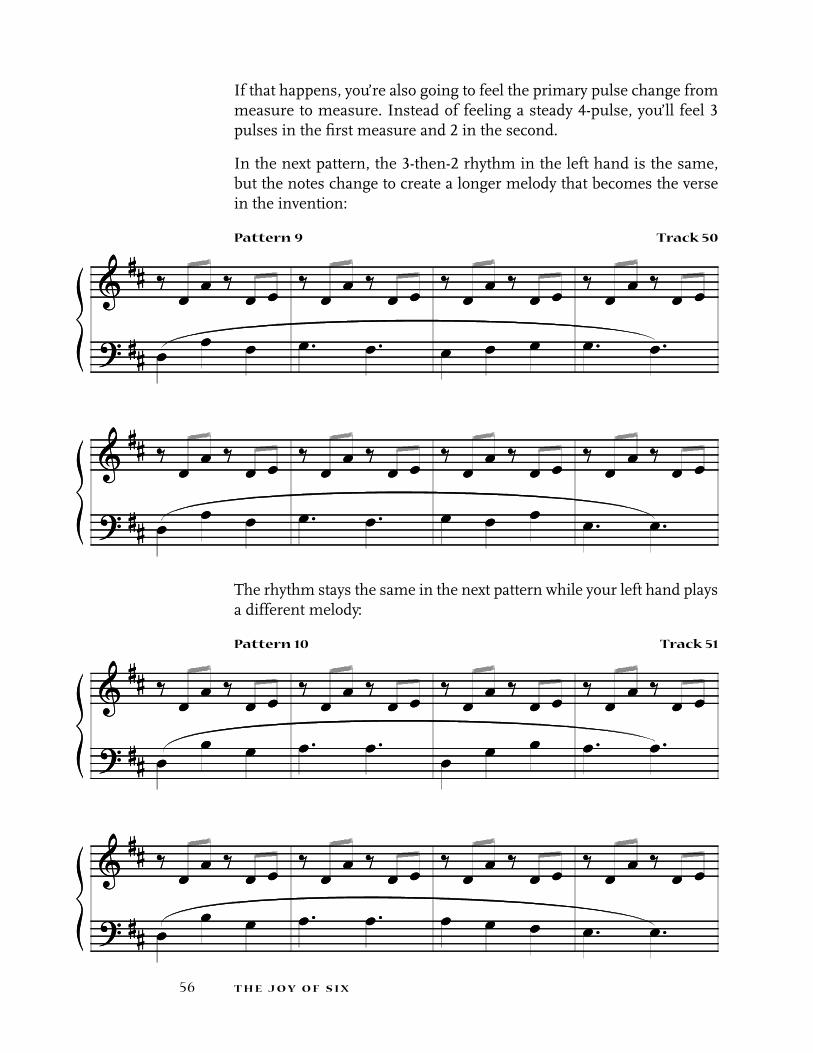
If that happens, you’re also going to feel the primary pulse change from measure to measure. Instead of feeling a steady 4-pulse, you’ll feel 3 pulses in the first measure and 2 in the second.
In the next pattern, the 3-then-2 rhythm in the left hand is the same, but the notes change to create a longer melody that becomes the verse in the invention:
pattern 9 track 50
The rhythm stays the same in the next pattern while your left hand plays a different melody:
pattern 10 track 51

5�
In pattern 11, the left hand sticks with its 3-then-2 rhythm as the melody moves to its highest point:
pattern 11 track 52
In pattern 12, the left hand alternates between playing the 4-pulse and 3-then-2:
pattern 12 track 53
3 - t h e n - 2

t h e J o y o f S i x58
In the next pattern, the left hand plays all three of its rhythmic variations – 3-then-2, a 6-pulse, and finally the 4-pulse. I’ve included the fingering I use in the left hand while I’m holding down the low A. If your left hand isn’t big enough to hold down the low A, make sure to hold it with the sustain pedal:
pattern 13 track 54
Pattern 14 is almost the same as pattern 13. The main difference is that your left hand dips down to a low G. My hand isn’t big enough to hold that G and play the notes that follow, so I hold it with the sustain pedal. The only other difference between this pattern and pattern 13 is that in the last two-measure cycle, the left hand goes into its 3-then-2 pattern:
1 2 1 2 1 2 1 11 2 1 2 1 2 1 1

59
pattern 14 track 55
In the last pattern, your right hand plays offbeat pairs throughout the pattern. But your left hand plays just the first two notes of its 3-then-2 pattern. After your left hand stops moving, check in with your body to see what pulse you’re feeling:
pattern 15 track 56
Onward to Invention 3!
3 - t h e n - 2

t h e J o y o f S i x60
æ.=102
5
9
13
pedal freely
(melody in left hand)
17
Invention 33 Then 2
invention 3
t r ac K 4 0

6�
21
12 1 2 1 2 1 1
25
29
32
35
i n v e n t i o n 3

t h e J o y o f S i x6�
39
43
47
51
55
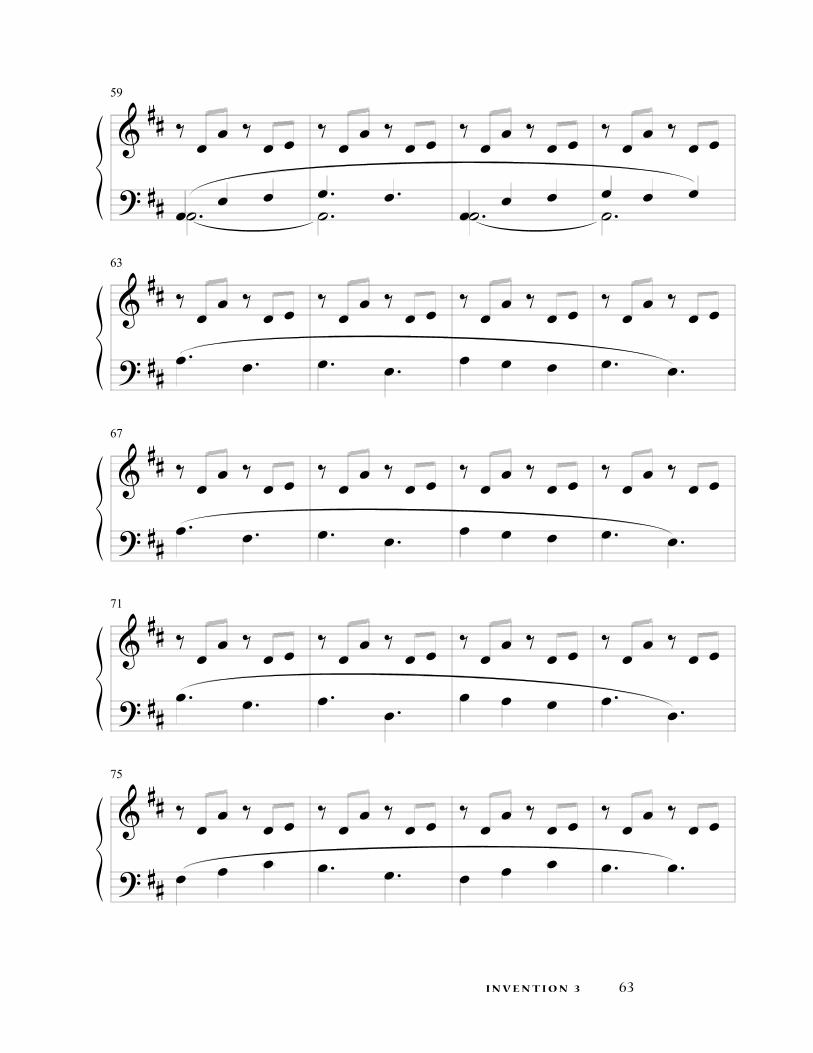
6�
59
63
67
71
75
i n v e n t i o n 3

t h e J o y o f S i x64
79
83
87
91
95

65
99
103
107
111
115
i n v e n t i o n 3

t h e J o y o f S i x66
119
123
127
131
135
(hands equal)

6�
139
143
147
151
155
i n v e n t i o n 3

t h e J o y o f S i x68
l e s s o n 4the 6/8 bellIf my house were on fire and I could only take one rhythm with me, it would be the 6/8 bell pattern. Although there are actually countless bell patterns in six, this one is called “the” 6/8 bell pattern because it’s the most popular and well-known. You can hear it on track 58 played on a cowbell over the 4-pulse played on a drum.
In African and Afro-Cuban music, this bell pattern serves as a time-line – an asymmetrical repeating figure used as a reference rhythm by everyone in an ensemble. To function as a reference rhythm, a timeline must be played over and over without variation from the start of a song or rhythm to the end. And to be heard by everyone, a timeline must be played on an instrument that has a cutting sound – like a cowbell.
Here’s what the 6/8 bell pattern looks like over a 4-pulse on a box chart. Notice that the bell pattern is two measures long. Also notice that it coin-cides with the 4-pulse on 1 in the first measure and 4 in the second:
the 6/8 bell pattern over the 4-pulse track 58
1 2 3 4 5 6 1 2 3 4 5 6
,,,,,,,
,,,,
Here’s the same chart in standard music notation:
the 6/8 bell pattern over the 4-pulse track 58
rhy thmic concept
timeline = an asymmetrical
repeating figure used as a reference
rhythm by everyone in an
ensemble
69
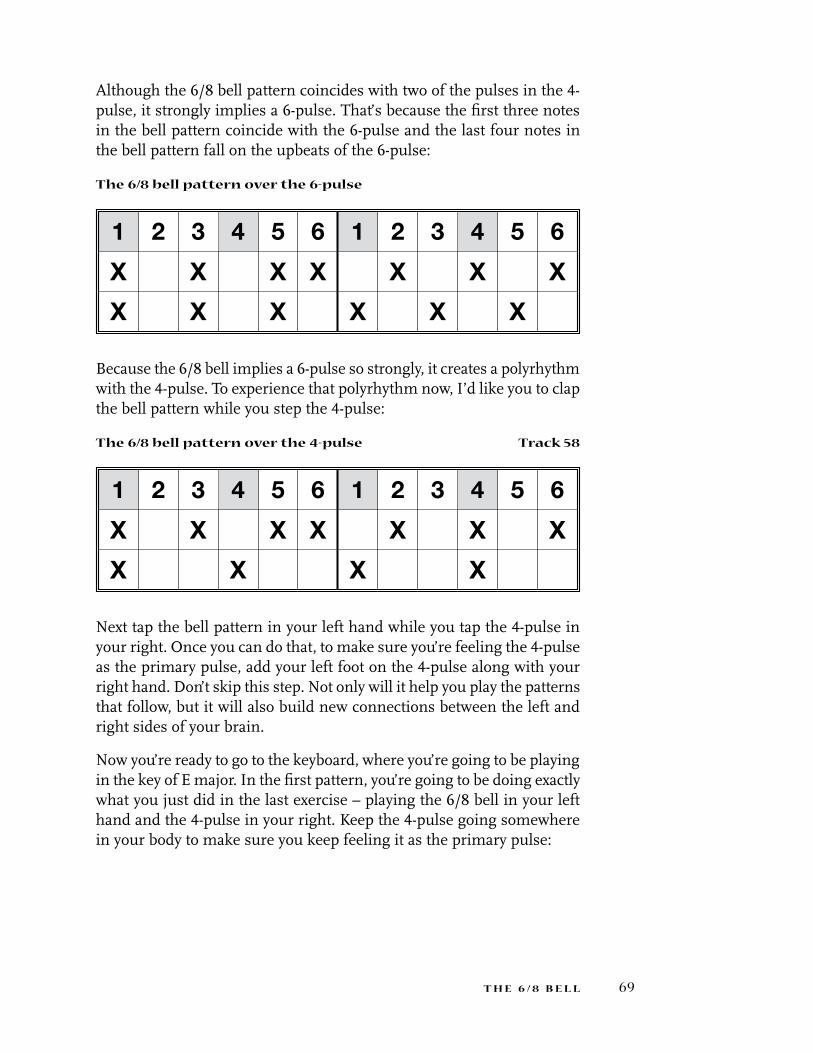
Although the 6/8 bell pattern coincides with two of the pulses in the 4-pulse, it strongly implies a 6-pulse. That’s because the first three notes in the bell pattern coincide with the 6-pulse and the last four notes in the bell pattern fall on the upbeats of the 6-pulse:
the 6/8 bell pattern over the 6-pulse
1 2 3 4 5 6 1 2 3 4 5 6
,,,,,,,
,,,,,,
Because the 6/8 bell implies a 6-pulse so strongly, it creates a polyrhythm with the 4-pulse. To experience that polyrhythm now, I’d like you to clap the bell pattern while you step the 4-pulse:
the 6/8 bell pattern over the 4-pulse track 58
1 2 3 4 5 6 1 2 3 4 5 6
,,,,,,,
,,,,
Next tap the bell pattern in your left hand while you tap the 4-pulse in your right. Once you can do that, to make sure you’re feeling the 4-pulse as the primary pulse, add your left foot on the 4-pulse along with your right hand. Don’t skip this step. Not only will it help you play the patterns that follow, but it will also build new connections between the left and right sides of your brain.
Now you’re ready to go to the keyboard, where you’re going to be playing in the key of E major. In the first pattern, you’re going to be doing exactly what you just did in the last exercise – playing the 6/8 bell in your left hand and the 4-pulse in your right. Keep the 4-pulse going somewhere in your body to make sure you keep feeling it as the primary pulse:
t h e 6 / 8 B e l l

t h e J o y o f S i x�0
pattern 1 track 59
In the next pattern, your right hand continues to play the 4-pulse, but this time it plays four different notes:
pattern 2 track 60
Now a quick review on the subject of pairs. In lesson 2, you played the shuffle pairs – the beat before each pulse and the pulse. In lesson 3, you played the offbeat pairs. Now you’re going to play the third set of pairs in relation to the 4-pulse: each pulse and the beat after it. Here are all three sets on a box chart:
the three sets of pairs in six
1 2 3 4 5 6 1 2 3 4 5 6
,,,,,,,,
,,,,,,,,
,,,,,,,,
In the next pattern, your right hand plays the pulse-and-the-beat-after pairs. To emphasize the 4-pulse even further, hold down the first note in each pair for a full pulse.
The harmony in this pattern can be analyzed in more than one way. I find it easiest to think of the pattern as a B chord and then an A chord
Shuffle pairs p
Offbeat pairs p
Pulse-and-the-
beat-after pairs p
��
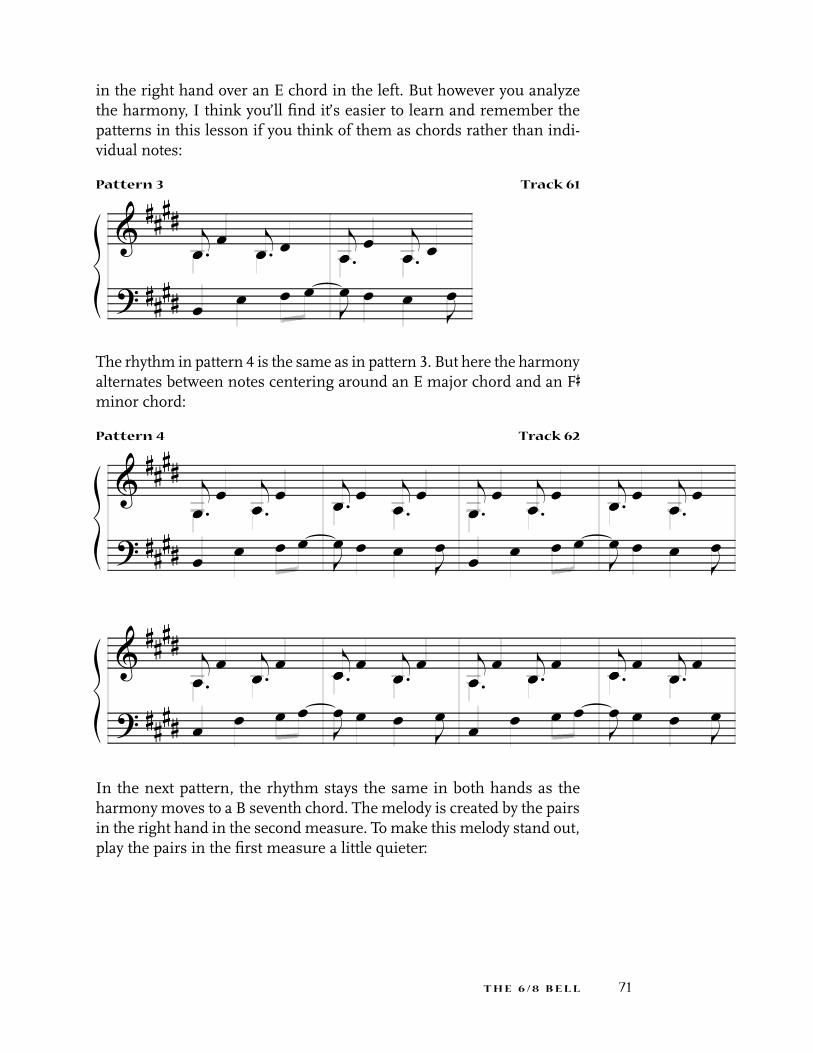
in the right hand over an E chord in the left. But however you analyze the harmony, I think you’ll find it’s easier to learn and remember the patterns in this lesson if you think of them as chords rather than indi-vidual notes:
pattern 3 track 61
The rhythm in pattern 4 is the same as in pattern 3. But here the harmony alternates between notes centering around an E major chord and an F♯ minor chord:
pattern 4 track 62
In the next pattern, the rhythm stays the same in both hands as the harmony moves to a B seventh chord. The melody is created by the pairs in the right hand in the second measure. To make this melody stand out, play the pairs in the first measure a little quieter:
t h e 6 / 8 B e l l

t h e J o y o f S i x��
pattern 5 track 63
In pattern 6, the melody in the right hand moves between three-note figures and the pulse. In the three-note figures, I hold down each note after I play it, so the three notes end up forming chords – either a B major triad or an A major triad:
pattern 6 track 64
In the next pattern, the right hand starts on beat 2. Notice that the first two notes in the right hand fall in between the first two notes of the bell pattern. Then the last four notes in the right hand coincide with the bell pattern. Also notice the fingering – I slide my right thumb from the G♯ to the A that follows it:
2 1 3 1

��
pattern 7 track 65
In the first two measures of pattern 8, the rhythm of the right hand is almost the same as in pattern 7. All that’s different is that it follows the bell pattern one note further. The left hand is the same except for the second measure. And notice that this time I also slide my left thumb off the G♯ to play the A above it:
pattern 8 track 66
In pattern 9, the pairs in the right hand continue to reinforce the 4-pulse. But the left hand switches to a part that implies a 6-pulse even more strongly than the bell pattern does. Now that you’ve learned to feel the 4-pulse as the primary pulse, you can feel comfortable leaving it for a while, secure in the knowledge that you can return to it whenever you want. So if you want to switch to feeling the 6-pulse as the primary pulse in this pattern, be my guest:
pattern 9 track 67
1 1 23
1 1 2
1
3
1
t h e 6 / 8 B e l l
t h e J o y o f S i x�4
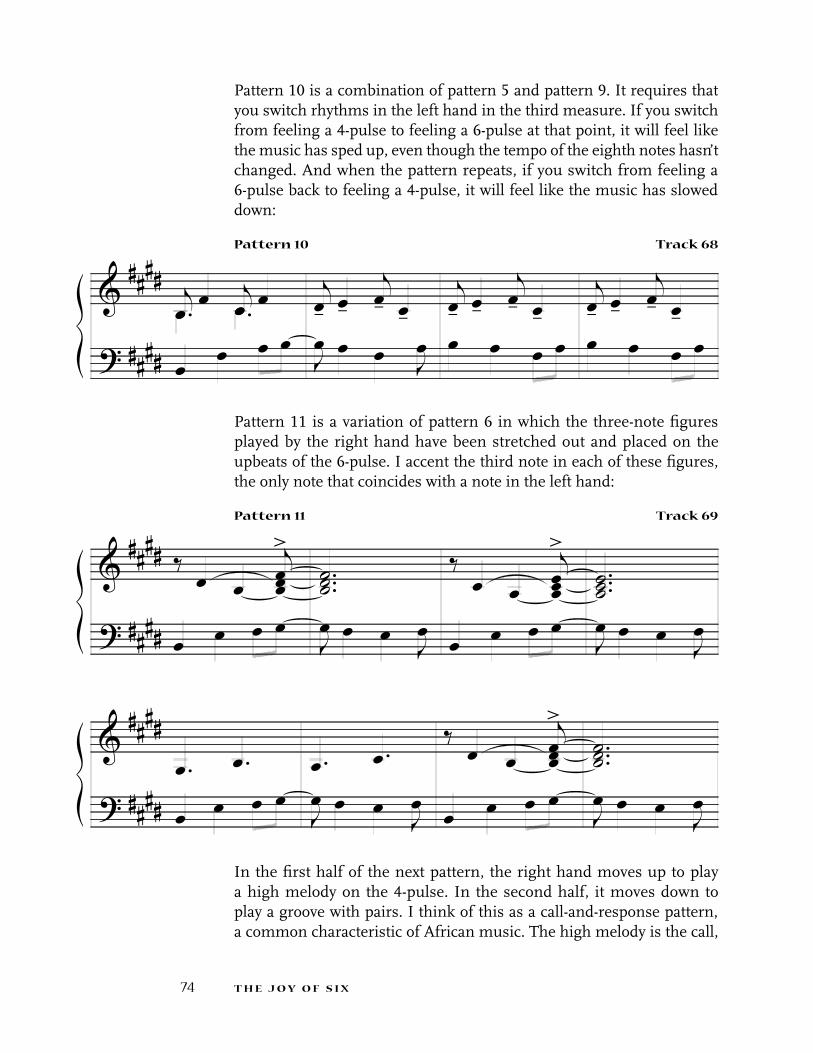
Pattern 10 is a combination of pattern 5 and pattern 9. It requires that you switch rhythms in the left hand in the third measure. If you switch from feeling a 4-pulse to feeling a 6-pulse at that point, it will feel like the music has sped up, even though the tempo of the eighth notes hasn’t changed. And when the pattern repeats, if you switch from feeling a 6-pulse back to feeling a 4-pulse, it will feel like the music has slowed down:
pattern 10 track 68
Pattern 11 is a variation of pattern 6 in which the three-note figures played by the right hand have been stretched out and placed on the upbeats of the 6-pulse. I accent the third note in each of these figures, the only note that coincides with a note in the left hand:
pattern 11 track 69
In the first half of the next pattern, the right hand moves up to play a high melody on the 4-pulse. In the second half, it moves down to play a groove with pairs. I think of this as a call-and-response pattern, a common characteristic of African music. The high melody is the call,
�5
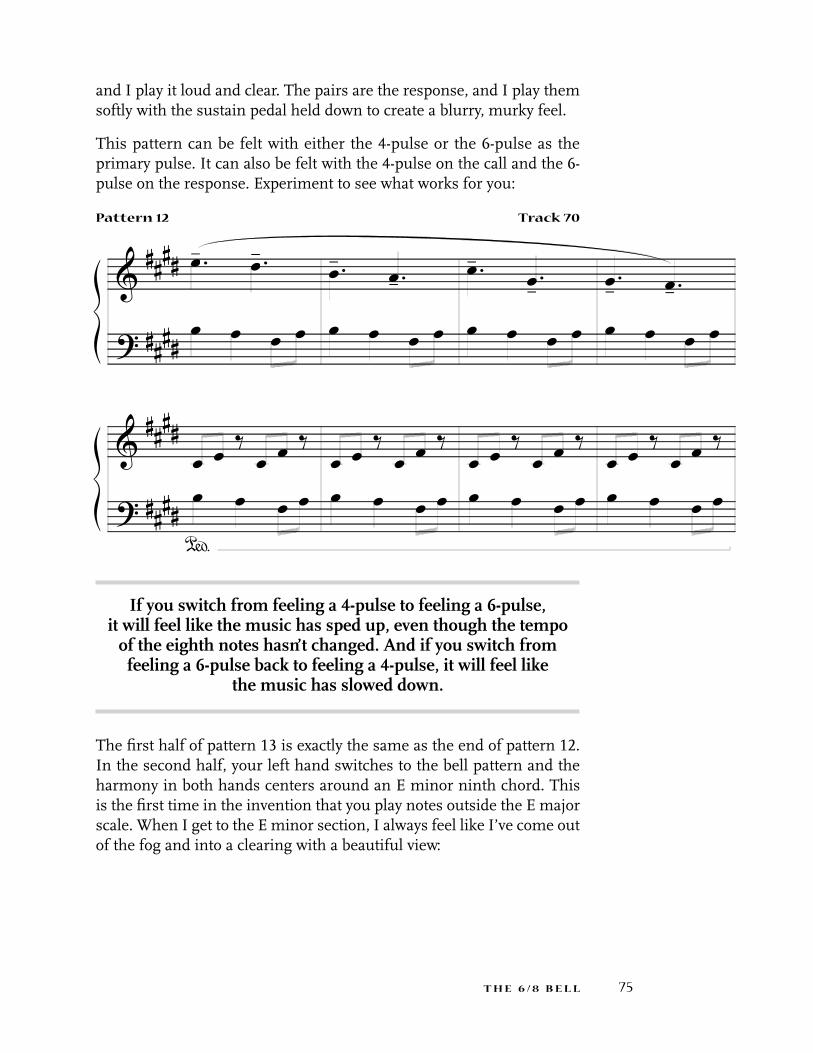
and I play it loud and clear. The pairs are the response, and I play them softly with the sustain pedal held down to create a blurry, murky feel.
This pattern can be felt with either the 4-pulse or the 6-pulse as the primary pulse. It can also be felt with the 4-pulse on the call and the 6-pulse on the response. Experiment to see what works for you:
pattern 12 track 70
If you switch from feeling a 4-pulse to feeling a 6-pulse, it will feel like the music has sped up, even though the tempo
of the eighth notes hasn’t changed. And if you switch from feeling a 6-pulse back to feeling a 4-pulse, it will feel like
the music has slowed down.
The first half of pattern 13 is exactly the same as the end of pattern 12. In the second half, your left hand switches to the bell pattern and the harmony in both hands centers around an E minor ninth chord. This is the first time in the invention that you play notes outside the E major scale. When I get to the E minor section, I always feel like I’ve come out of the fog and into a clearing with a beautiful view:
t h e 6 / 8 B e l l

t h e J o y o f S i x�6
pattern 13 track 71
The first half of pattern 14 is the same as the second half of pattern 13. Then the pattern moves up, where it’s centered around an A major seventh chord:
pattern 14 track 72
You can think of the harmony in the first four measures of pattern 15 as an E chord and then a D chord over an A chord. In the next two measures, the pattern is transposed down a whole step so you’re playing a D chord

��
and then a C chord over a G chord. In the last two measures, you return to same pattern you played in pattern 3:
pattern 15 track 73
The last pattern is simply the E major scale in thirds played to the rhythm of the 6/8 bell:
pattern 16 track 74
t h e 6 / 8 B e l l

t h e J o y o f S i x�8
By the way, since the 6/8 bell pattern has seven notes – just like all the major and minor scales – you can make practicing scales more fun and interesting by playing them in the rhythm of the 6/8 bell.
Make practicing scales more fun and interesting by playing them in the rhythm of the 6/8 bell.
Before you move on to the last invention, I can’t resist pointing out what I think is an amazing correspondence between the structure of the 6/8 bell pattern and the structure of the major scale. The relationship of the notes of the 6/8 bell to its background of 12 beats exactly matches the relation-ship of the notes of the major scale to its background of 12 tones.
This correspondence is easiest to understand if you think of the boxes on a two-measure box chart in six as the keys on a piano, with the box on ONE as C. The notes of the bell pattern line up perfectly with the white keys on the piano. The empty boxes on the chart line up perfectly with the black keys.
This correspondence is either one of the most amazing coincidences in the history of the planet or it reflects a mysterious underlying unity between tonality and rhythm.

�9
[temple of the 6/8 bell illustration]
t h e 6 / 8 B e l l

t h e J o y o f S i x80
æ.=86
pedal freely
5
9
13
Invention 4The 6/8 Bell
invention 4
t r ac K 57

8�
17
21
1 1 23
25
1 1 2
1
3
129
(melody in middle voice)
33
i n v e n t i o n 4

t h e J o y o f S i x8�
37
2 1 3 141
44
47
50

8�
53
57
61
65
69
i n v e n t i o n 4

t h e J o y o f S i x84
73
77
5 3 2 1 1 3 2
81
85
89

85
93
96
99
103
107
i n v e n t i o n 4

t h e J o y o f S i x86
111
115
119
123
127

8�
131
135
139
143
147
i n v e n t i o n 4

t h e J o y o f S i x88
151
1553 1 2 3
1 3 2 1
4 1 2
4 3 2
3
1

89
glossary
the pulse = the steady underlying beat you feel in your body when you listen to music, made up of evenly-spaced individual pulses
beat = a subdivision of the pulse – in 6/8, an eighth note
cycle = the grouping of pulses that is felt as repeating in a rhythm
upbeats = beats that fall exactly midway between pulses
offbeats = beats that aren’t pulses or upbeats
4-pulse = the basic pulse in 6/8 – four dotted quarter notes in a two-measure cycle
backbeat = every second pulse in the 4-pulse
one = the first beat in a two-measure cycle in 6/8
polyrhythm = two or more rhythms going at the same time that create or imply different pulses (or different subdivisions of the pulse)
primary pulse = the pulse you feel in your feet when two or more pulses are going at the same time
secondary pulse = any pulse other than the primary pulse when two or more pulses are going at the same time
cross-rhythm = a repeating figure that doesn’t fit evenly in a two-measure cycle of 6/8
timeline = an asymmetrical repeating figure used as a reference rhythm by everyone in an ensemble
g l o S S a r y
t h e J o y o f S i x90

9�
about the author
Alan Dworsky spent the first half of his musical life as a keyboard player, studying classical piano and playing in rock and funk bands. In his forties he became a drummer, playing and studying African and Afro-Cuban rhythms. He has written seven instructional books on drumming and rhythm, all co-authored by his wife Betsy Sansby. Now in his fifties, he has returned to his original instrument. This book is the result of that musical homecoming.

$24.95
also available from Dancing hands music
conga Drumminga Beginner’s guide to playing with time
by Alan Dworsky and Betsy Sansby
This 160-page book with CD is a complete, step-by-step course on conga drumming. It teaches families of drum parts for several authentic Afro-Caribbean rhythms, including rumba, bomba, calypso, conga, and bembe. We use the same box charts and friendly teaching style as in The Joy of Six. Life-like illustra-tions show you the proper technique for each stroke. And the CD that’s included contains a sample recording of each of the 175 drum parts taught in the book as well examples of how the parts sound together.
“fantastic!” – Rhythm Magazine
“there is no other source for this kind of information that is as simply and sensibly explained, and contains such a wealth of rhythms. Conga Drumming welcomes rather than intimidates beginners. Dig into this book and in a very short time you will be playing well. Bravo and muchas gracias Alan and Betsy!” – Drum Magazine
“the best book of its kind.” – Arthur Hull
DR
UMMAGAZIN
E
20
00
READERS' PO
LL
Best Percussion
MethodBook

With sizzling solos on congas and bongos
by special guest raul rekow of
Santana
“a must-see for all beginners.” – Mickey Hart
conga Drumming a Beginner’s video guide
This DVD brings the book Conga Drumming to life, and gives you a chance to see how all the basic patterns are supposed to be played. It’s also a great chance to learn proper playing technique, because we teach each stroke using multiple camera angles and slow-motion photography.
$19.95You can see sample clips at www.dancinghands.com
Featuring instruction by renowned percussionist Jorge Bermudez
“luminous”– New Music Review
“gorgeous melodies and mesmerizing rhythms”– Dirty Linen
Jaguar at half moon lakeby Dancing Hands
This CD of original music features Indie-award winning Dean Magraw on acoustic guitar and several world percussionists, including Congolese master drummer Coster Massamba on djembe, Jorge Bermudez on bongos, Marc Anderson on talking drum, and Alan Dworsky on congas. You can hear excerpts from Jaguar on track 75 of the CD that comes with The Joy of Six.
$13.95
“Slammin! the best video for learning to play congas.”– Chalo Eduardo, percussionist with Sergio Mendes
now on
DvD!

how to play Djembewest african rhythms for Beginners
by Alan Dworsky and Betsy Sansby
This book is a complete, step-by-step course for beginners on how to play djembe. Right from the start you’ll be learning interlocking parts for some of the most popular West African rhythms: Kuku, Djole, Kassa, Madan, Suku, Sunguru Bani, and Tiriba.
While you learn the patterns, you’ll also learn how to make each of the basic strokes – bass, tone, and slap
– with proper playing technique. We use life-like illustrations to show how each stroke looks from the outside and give detailed descriptions to explain how each stroke feels from the inside.
The CD that comes with the book gives you a chance to hear how each part sounds separately and how the parts for each rhythm fit together. It was recorded by Joh Camara, a master drummer from Bamako, Mali. Each rhythm lasts at least five minutes, so you’ll have plenty of time to play along. And when Joh solos during the final three minutes of each track, you’ll feel the thrill of playing your part along with an ensemble and lead drummer.
$24.95
$14.95You can see sample clips at www.dancinghands.com
how to play Djembe DvDwith Alan Dworsky
Now you can see how every pattern in the book How to Play Djembe is played. This new
DVD is designed to be used with the book and the audio CD to create a complete learning
package: use the book for the charts and expla-nations, use the CD to hear how every pattern sounds and for play-along practicing, and use the DVD to see how the hands move on every
pattern.
new DvD!

hip grooves DvDwith Alan Dworsky
Now you can see how every pattern in the Hip Grooves book is played. This new DVD is designed to be used with the book and audio CD to create a complete learning package: use the book for the charts and explanations, use the CD to hear how every pattern sounds and for play-along practicing, and use the DVD to see how the hands move on every pattern.
new DvD!
Slap happyhow to play world-Beat rhythms with Just your Body and a Buddy
by Alan Dworsky and Betsy Sansby
Slap Happy is a fun, funky way for kids of all ages to learn about rhythm. We’ve taken drum rhythms from Africa and the Caribbean and turned them into body rhythms you can step, clap, and slap with a buddy. You can do Slap Happy in pairs or in groups, indoors or out, at home or at school. If you’re a parent, it’s a great way to do something fun and educational with your kids. If you’re a music teacher, you can use Slap Happy to give your students a hands-on experience of world rhythms without having to buy any instruments. And you can hear how every pattern sounds on the slap-along CD that comes with the book.
$19.95See kids doing Slap Happy at www.dancinghands.com
hip grooves for hand Drumshow to play funk, rock & world-Beat patterns on any Drum
by Alan Dworsky and Betsy Sansby
If you want to play in a band or a church group, or play along with pop, rock, or funk music, this is the book for you. Many of the grooves were adapted from drumset patterns, and all of them sound great even when you’re the only drummer on a djembe or a conga drum. Hip Grooves uses easy-to-read box charts like the ones in The Joy of Six. And the CD that comes with the book has samples of every pattern and extended tracks so you can play along.
$24.95
$14.95You can see sample clips at www.dancinghands.com
a rhythmic vocabularya musician’s guide to understanding and improvising with rhythm
by Alan Dworsky and Betsy Sansby
“a goldmine” – Drum Magazine
If you want to deepen your understanding of rhythm, this 208-page book is for you. It organizes and explains hundreds of African and Afro-Cuban patterns in step-by-step lessons so that you can learn how to create patterns of your own at the keyboard. And it comes with a Timelines CD for you to use as a practice partner.
$29.95
the and of 2 for Solo piano or Keyboardrhythmic inventions in cut-time
by Alan Dworsky
In The And of 2, Alan Dworsky applies rhythms in cut-time to the keyboard, just as he did with rhythms in 6/8 time in The Joy of Six. Cut-time – or 2/2 – is the time signature used to notate Afro-Cuban rhythms. It’s similar to 4/4, but easier to read. Within cut-time, the and of 2 is a special beat, the beat that gives the rhythms their special kick.
You’ll experience that special kick in the four rhythmic inventions in The And of 2. Just as in The Joy of Six, each invention is taught in a sepa-rate lesson, where it’s broken down into bite-sized patterns. And The And of 2 comes with a CD containing a recording of every pattern and inven-tion in the book.
To find out exactly when The And of 2 will be available, just check at www.dancinghands.com. You can also get on the mailing list there and receive an email when the book comes out.
You can call toll-free to order at 1-800-898-8036or check out our full catalog and order online at
www.dancinghands.com
coming Soon!