The design and construction of an inertia welder
56
Scholars' Mine Scholars' Mine Masters Theses Student Theses and Dissertations 1970 The design and construction of an inertia welder The design and construction of an inertia welder Arthur Ferdinand Grimm Follow this and additional works at: https://scholarsmine.mst.edu/masters_theses Part of the Mechanical Engineering Commons Department: Department: Recommended Citation Recommended Citation Grimm, Arthur Ferdinand, "The design and construction of an inertia welder" (1970). Masters Theses. 5406. https://scholarsmine.mst.edu/masters_theses/5406 This thesis is brought to you by Scholars' Mine, a service of the Missouri S&T Library and Learning Resources. This work is protected by U. S. Copyright Law. Unauthorized use including reproduction for redistribution requires the permission of the copyright holder. For more information, please contact [email protected].
Transcript of The design and construction of an inertia welder

Scholars' Mine Scholars' Mine
Masters Theses Student Theses and Dissertations
1970
The design and construction of an inertia welder The design and construction of an inertia welder
Arthur Ferdinand Grimm
Follow this and additional works at: https://scholarsmine.mst.edu/masters_theses
Part of the Mechanical Engineering Commons
Department: Department:
Recommended Citation Recommended Citation Grimm, Arthur Ferdinand, "The design and construction of an inertia welder" (1970). Masters Theses. 5406. https://scholarsmine.mst.edu/masters_theses/5406
This thesis is brought to you by Scholars' Mine, a service of the Missouri S&T Library and Learning Resources. This work is protected by U. S. Copyright Law. Unauthorized use including reproduction for redistribution requires the permission of the copyright holder. For more information, please contact [email protected].

THE DESIGN AND CONSTRUCTION
OF AN INERTIA WELDER
BY
ARTHUR FERDINAND GRIMM, 1928-
A
THESIS
submitted to the faculty of
UNIVERSITY OF MISSOURI - ROLLA
in partial fulfillment of the requirements for the
Degree of
MASTER OF SCIENCE IN MECHANICAL ENGINEERING
Rolla, Missouri
1970
Approved by
~~·~~~~~~~~~~~--(Advisor)

ii
ABSTRACT
The purpose of this investigation was the design and
fabrication of a machine to bond metal to metal using the in
ertia method of friction welding. This method of bonding is
considered far superior to the heretofore employed friction
welding processes as will be explained later. The inertia
method controls the energy imparted to the weld by using a
flywheel which has been brought to a state of predetermined
kinetic energy due to rotation. This energy is then trans
ferred to the weld zone in the form of heat due to rotational
friction.
Hollow specimens with a cross-sectional area of 0.306
square inches have been successfully welded on the present
machine. The results show that the machine as designed would
be capable of welding materials 1 inch in diameter were it
not for the flywheel velocity being limited to 1,000 revo
lutions per minute due to unbalance.

iii
ACKNOWLEDGEMENT
The author wishes to extend his sincere thanks to Pro
fessor Lyman L. Francis for his guidance, assistance, and
motivation.
He would like to thank Professor Ralph E. Schowalter for
lending the pump and cylinder used in this investigation, and
his help in obtaining accessories for this equipment; Profes
sor Robert V. Wolf for the help with the metallurgical test
of the welded specimens; Mr. Lee Anderson for his guidance in
the machining operations; Mr. Richard Smith for the electrical
hook-up and many other aids; Mr. Lee Clover for his help in
machining; Mr. Marvin Vogeler for his help in testing welded
specimens; and Dr. Thomas R. Faucett for his support, patience,
and counsel.

TABLE OF CONTENTS
Page
ABSTRACT .......•.....•................................ ii
ACKNOWLEDGEMENT •••••••••••••••••••••••••••••••••••••• iii
LIST OF FIGURES •••••••••••••••••••••••••••••••••••••••• v
LIST OF TABLES . ...•................................... vi
I. INTRODUCTION •••••••••••••••••••••••••••••••••••• 1
II.
III.
IV.
v.
VI.
VII.
VIII.
REVIEW OF LITERATURE •••••••••••••••••••••••••••• 3
A. Metallurgy ................................. 8
B. Welding Criteria •••••••••••••••••••••••••• 14
C. Design .................................... 15
DISCUSSION ••••••••••••••••••••••••••••••••••••• 31
A. Set-Up .................................... 31
B. Test Procedure •.•••••••••••••••••••••••••• 35
c. Results ••••••••••••••••••••••••••••••••••• 37
TEST DATA •••••••••••••••••••••••••••••.•••••••• 43
CONCLUSIONS •••••••••••••••••••••••••••••••••••• 46
RECOMMENDATIONS •••.•••.•••••••••••••••.•••.•••. 4 7
BIBLIOGRAPHY ••••••••••••••••••••••••••••••••••• 48
VITA ...................................... ·.·· .49
iv

v
LIST OF FIGURES
Figure Page
1 Temperatures and Heat Zones .......................... 4
2 Optimum and Permissible Speeds ....................... 6
3 Stages of Welding Cycle .............................. 6
4 Effects of Parameter Variation ....................... 9
5 Microstructure of Weld Area ......................... l2
6 Microstructure of Weld Area ......................... l3
7 Flywheel Plate Set-Up ............................... 22
8 Brace Assembly ...................................... 27
9 Initial Specimens . .................................. 3 3
10 Second Welding Set-Up ............................... 33
11 Third Welding Set-Up ................................ 34
12 Fourth Welding Set-Up ............................... 34
13 Final Welding Set-Up ................................ 36
14 Specimen After Welding .............................. 36
15 Test Specimens . ..................................... 41
16 Entire Inertia Welder ............................... 42

Vl.
LIST OF TABLES
Table Page
I Standard Parts . .................................... 2 8
II Test Data: 1/2 Inch Solid Bar ..................... 43
III Test Data: Hollow Tubes ........................... 44
IV Test Data: Hollow Tubes ........................... 45

l
I. INTRODUCTION
Friction welding is a welding process in which the en
ergy is supplied by a motor and delivered directly to the weld
zone. This method requires large motors to prevent stalling
when the two parts are brought together under pressure and
the rate of energy transfer is restricted by the size of the
motor used. Due to the relatively slow rate of energy trans
fer, the time necessary to build up heat at the weld zone is
sufficient to allow much of the heat produced to be conducted
away from the weld zone by the adjacent material. This re
quires more energy than should be needed and, for example,
makes welding of rod to flat plate very difficult due to the
large area of the plate acting as a heat sink. Also, after
the weld zone is heated to a plastic state, it is necessary to
stop rotation which requires brakes or reversing of the motor
or both. It can be readily understood that, as larger motors
are needed, the braking requirement also increases. This
method of friction welding, even when automated, rarely uses
more than 50 percent of the energy expended in actually mak
ing the weld, due to heat loss to surrounding material and
energy required to stop the process. Because of the large
volume of material to be heated and the length of time during
which heating occurs, cooling of the weld zone 1s relatively
slow, allowing grain growth and oxidation to impair the quality
of the weld.
The inertia method uses a smaller motor to bring a fly
wheel to a desired level of energy after which the flywheel,

2
disconnected from its power source, transfers its energy to
the weld zone quite rapidly as the parts are brought together
under pressure. This energy transfer is rapid and the heat
sink effect does not occur. Since the weld cycle is complete
when the flywheel stops after transferring all of its energy
to the weld zone, no braking is required. This means that
approximately 95 percent of the energy required is used
directly in making the weld. Also, the relatively small
volume of material heats quickly, cools quickly, and prohibits
grain growth and oxide formation thus giving a stronger weld.

3
II. REVIEW OF LITERATURE
In recent years most metal bonding processes which con
tributed significantly to commercial application were either
pressure, fusion, or brazing processes. These processes have
not filled all needs since they do not give high-strength
bonds under certain conditions. For example, arc welding
leaves a course-grained structure in the weld zone which de
tracts from the mechanical properties of the weld and cannot
be used to join metals whose atomic diameters vary greatly.
In the inertia welding process, the mechanical energy
of the flywheel is rapidly converted to heat energy at the
weld interface due to friction. When transfer is complete,
the flywheel comes to rest and the cycle is complete. Figure
1 shows the temperatures achieved and the width of the heat
affected zones for friction welding and inertia welding. The
complete inertia welding cycle takes from 0.2 seconds to 3.0
seconds as compared with 20.0 seconds to 40.0 seconds, or
more, for friction welding. The rapid heat build up in the
inertia welding process, and subsequent rapid cooling, leaves
a fine-grained structure. Figure 2 shows the optimum and
permissible speeds in surface feet per minute for solid bars
1/4 inch to 4 inches in diameter. Tubular parts can be run
at slower speeds. The pressure applied, and the rotation of
one part against the other, forces some of the plastic materi
al out of the weld zone as flash. This flash carries any sur
face contamination with it and leaves a weld zone with very

~ 0
I I I I I I I I I I
4
Friction Welding Process
Inertia Process ___________ j L _________ _
I I t I I I I 1 I I I I I
1 . 0 .9 .8 . 7 .6 .5 .4 . 3 • 2 • 1 0 . 1 .2 .3 .4 . 5 . 6 . 7 . 8 . 9 1. 0
Distance from Interface (in)
Figure 1. Temperatures and Heat Zones
Courtesy of Caterpillar Tractor Company Peoria, Illinois

5
few inclusions in most cases. This gives excellent mechanical
properties without the need for heat treating. Figure 3 shows
the three stages of the weld cycle. During the third stage,
which is approximately the last 1/3 to 1/2 revolution of the
flywheel, the bonded material is plastically worked. This
plastic working is a process of slip occurring between planes
of atoms reorienting them and giving a stronger and tougher
structure. This plastic working also leaves flow lines that
run parallel, or tangent to, the outer edge of the part rather
than intersecting it normally as in the upset stage of fric
tion welding.
The parameters affecting inertia welding are:
1. Flywheel mass & configuration
2. Flywheel angular velocity
3. Pressure applied
The Caterpillar Tractor Company, in their investigations,
used flywheels up to 2,000 pounds, angular velocities up to
12,000 revolutions per minute, and forces as high as 500,000
pounds.
Each of the three parameters mentioned has its own sig
nificant effects on the operation and the finished weld.
The use of inertial weights has the advantage of lower
power requirements since the flywheel is used to store, after
accumulation, the energy required for the weld. The ability
to change weights makes for ease of adjusting energy

6
l/2 Ul QJ ..c u s:: H
l
H QJ +J QJ
l/4 / v vv/ v /''
/// // ,/
/ v / 27 5 / /
)'
~?/ LV ~'
v 1_
/ v 350 v ,
/ v //
/ v SFM /, / /
_,' v v r:i 2 cu
·rl 0
4
// 1/ v
~ /
~../ / v I-/
M
/
/ / /
/' /v v //
/ 1500 SFM
200 300 500 700 1,000 2,000 3,000 5,000 10,000
Speed rpm 7,000
Figure 2. Optimum and Permissible Speeds
Stage III Stage I Stage II
Torque
Time
Figure 3. Stages of Welding Cycle
Ibid

7
requirements to achieve more uniform results. The amount of
plastic working of the bonded material can also be regulated
in part by the use of inertial weights.
The amount of pressure applied can be varied to achieve
desired results. In general, bonding pressures used are
approximately one-half of the yield-point strength of the
materials bonded; however, pressures nearer the yield-point
strength produce bonds with narrower heat-affected zones in
shorter cycle times. Pressures very near the yield strength
can reduce the temperature required at the interface to give
a high-strength bond. This is advantageous when bonding
materials with high thermal conductivity where it is difficult
to retain the high temperatures required for bonding with low
er pressures. Higher pressures are also advantageous when
bonding dissimilar materials where the melting temperatures
are different, and it would be difficult to obtain high enough
temperatures in the higher melting point material with lower
operating pressures.
The angular velocity is readily varied either by pulley
changes or the use of a Variac and a variable speed motor.
The variation of angular velocity 1s advantageous in varying
the energy stored in the flywheel while the flywheel size is
held constant. It is also necessary to use different angular
velocities for different materials or sizes of materials to
be bonded. Angular velocity is used in conjunction with fly
wheel mass inertia in setting the energy level of the flywheel
prior to the start of the welding cycle.

8
The energy stored in the flywheel is determined by the
formula:
where
where
2
Ek = kinetic energy of rotation - ft. lbs.
w = angular velocity - radians per second
I0
=moment of inertia- lb. ft. sec. 2
WR 2
= ~ (for a right circular cylinder)
W = weight - pounds
g = acceleration of gravity - feet per second 2
R = radius of weight - ft.
The energy imparted to the weld is in the range of 15 to 50
horsepower per square inch of weld cross-sectional area, one
horsepower being equal to 550 foot-pounds per second. This
rapid energy transfer cannot be achieved using standard fric-
tion welding. The effects on the weld zone of varying the
three parameters are shown in Figure 4.
A. Metallurgy
It is necessary to consider the following points con-
cerning metallurgy when making a weld:
1. Oxide formation
2. Non-metallic inclusions
3. Effects of heat
4. Cooling rate
5. Plastic working

Low
Low
Low
ENERGY Medium
PRESSURE Medium
VELOCITY Medium
High
High
High
Figure 4. Effects of Parameter Variation
Ibid
9

10
The formation of metallic oxides occurs when most metals
are in contact with air, and the rate of oxide formation
increases with increasing temperature. The inertia process
builds up heat at the interface so rapidly that little volume
of material is heated, and cooling is quite rapid after the
weld is complete. Therefore, the time during which oxide
formation would be the most rapid is very limited. Oxides
that may have formed on the interface prior to welding are
expelled from the weld zone with the flash and do not affect
the strength of the finished weld.
Non-metallic substances, such as cutting oil, dirt, slag,
or other foreign substances which might be located at the
interface, are also usually expelled with the flash. If this
inclusion were in the metal itself, not all would be expelled.
The remainder would be distributed throughout the weld zone
by plastic working during the third stage so that its effect
would be minimized.
Heating of metals, for example carbon steel, brings
about the possibility of physical changes taking place in
the area of heat application. Since the rate of heat build
up is rapid, as is the rate of cooling, a very fine-grained
and hardened structure is accomplished in the weld zone.
This gives added strength, toughness, and corrosion resistance
to the weld zone.
Plastic working during the third stage, after the bond
is formed, has a work hardening effect as well as refining

11
grain size and fragmenting and mixing inclusions throughout
the weld zone. It also tends to fill in any voids that might
be present due primarily to the applied pressure. This
working also mixes metal from each part into an alloy, more
noticeable with dissimilar metals, to give a strong homoge
neous bond.
As a specimen is welded, the following metallurgical
changes take place:
1. Heat is generated at the interface due to friction.
Relative motion and axial force accomplish plastic
deformation of the heated interface material.
2. Plastic deformation tends to elongate the grains
of the material in the direction of motion.
3. The high temperature present at the interface
allows a recrystallization of the plastically
deformed material.
4. After the flywheel comes to rest, the heated
mass cools relatively quickly, preventing
severe grain growth from occurring after the
recrystallization.
5. The photographs taken at lOOX, 250X, and 500X
show the progressively smaller grain size as the
weld interface is approached and there is no
apparent interface, as can be seen in Figures
5 and 6.

12
Magnification lOOX
Magnification 250X
Figure 5. Microstructure of Weld Area

Magnification SOOX Magnification SOOX Weld Zone
Figure 6 . Microstructure of Weld Area ...... w

14
B. Welding Criteria
The welding, or joining of metals, brings into consider-
ation the following questions:
1. How is the heat supplied?
In this investigation, heat is supplied
by friction obtained from a combination
of flywheel energy and axially applied
pressure.
2. What temperatures are required?
For this type of solid-state welding of
0 SAE 1020 steel, a temperature of 2300 F.
to 2400° F. is required.
3. What changes occur in the properties of the metal?
The heat-affected zone is quite narrow due
to the speed of welding and the lower temp-
erature involved. There is some grain
refining and hardening near the interface
of the weld.
4. Can these changes in properties be controlled?
The changes that occur can be controlled
so that each successive weld is identical
to the previous weld within close
tolerances.
5. Is a flux required?
No flux is required. Any impurities or sur-
face contamination at the weld interface is

15
forced out of the weld zone, due to rotation
and pressure, and forms a flash or upset type
of residue around the outside of the weldment.
This can, if required, be machined off.
6. Is pressure needed?
Pressure is needed in order to produce friction
which, with the flywheel inertia, generates
heat to assist welding. It also aids in ejec-
ting impurities from the weld area and bringing
fresh parent material in contact for good
bonding.
7. Is the process adaptable to mass production?
The use of automating controls makes for ease
of operation, and the fast cycle time makes
this method quite adaptable to mass production.
8. Is the cost compatible with other methods?
c. Design
Although no estimates of cost of production
were made in this study, the saving in labor
time for a given production quota, plus the
saving on post-welding operations should make
inertia welding quite attractive on a cost
of-production basis.
It was necessary initially to determine the amount of
heat required to bring about a plastic condition at the weld

16
interface. Very little has been written on friction welding,
especially on the heating due to friction, since the coeffi
cient of friction is continually changing in value. This
continual change can be explained as follows: as the parts
are brought together, they are at room temperature and the
interface has some degree of roughness due to whatever
method of machining is used. The temperature and surface
finish of the specimen, together with the load applied and
the angular velocity of the specimen, gives a certain value
for the coefficient of friction. Some of the surface rough
ness is immediately ground off and/or flattened by the pressure
exerted, which by itself would change the value of the coef
ficient, even though temperature and angular velocity might
remain constant. However, the angular velocity must be
continually decreasing due to the friction and the fact that
no additional energy is being added to compensate for this
energy transfer. Also, friction has caused heating of the
interface material which affects the value of the coefficient.
Since all parameters, except the pressure exerted, are con
tinually changing from start to finish of a cycle, the value
of the coefficient must also continually change. Due to
this, it was necessary to make the following assumptions:
1. The amount of heat required is proportional to
the cross-sectional area of the weld.
2. The pressure required is proportional to the cross
sectional area of the weld and must be less than

17
that which would exceed the yield point stress for
the material.
3. The flywheel size necessary to store sufficient en
ergy to produce the required head due to friction
is proportional to the cross-sectional area of the
weld.
The fact that the Caterpillar Company, who originally
built an inertia welder, used a 2,000 pound flywheel and
200,000 pounds of axial force to weld a 4-inch diameter bar
was the basis for design. A 4-inch diameter bar has a cross
sectional area of 12.56 square inches, whereas a l-inch diam
eter bar has a cross-sectional area of 0.785 square inches.
Therefore, the l-inch diameter bar has 1/16 the cross-sec
tional area of the 4-inch diameter bar. Using this ratio and
the afore stated assumptions, the following design criteria
were found:
Flywheel weight
Axial force
W = 2,000 pounds ~ 16 = 125 pounds
F = 200,000 pounds 7 16 = 12,500 pounds
The flywheel size is also related to moment of inertia and radius
of gyration; in this study weight alone was used for design.
Since these values were based on assumptions, a safety fac-
tor was necessary. The hydraulic cylinder that was available
for use had a capacity of 16,000 pounds, which was 28 percent
above the assumed value of 12,500 pounds. The flywheel weight
was selected to be 200 pounds. With these criteria, the ma
chine was then designed.

18
The four main columns of the machine each sustain 1/4 of
the 16,000 pounds of axial thrust or 4,000 pounds. A l-inch
diameter bar (0.785 square inch cross-sectional area) would
have a tensile force of 4,000 pounds 7 0.785 square inches or
5,100 pounds per square inch, which is well below the yield
point stress of 40,000 psi for low quality 1020 carbon steel.
Due to the fact that the material available was of unknown
composition, and because of the required amount of steel bar,
2-inch diameter stock was used for the columns. The columns
were cut to 32 inches in length and both ends were turned to
1.750 inches for 2.500 inches in order to fit through the top
and bottom plates. Both ends were then threaded to accept
1 1/2-12 NF semi-finished hex nuts. Flat washers and split
ring lock washers were used under the nuts. The stress the
columns will actually be under is dependent on the stress
area of the threads. For a 1 1/2-12 NF thread, the stress
area is 1.5799 square inches; therefore, the actual stress
in the weakest part of the column would be 4,000 pounds 7
1.5799 square inches, or 2,530 psi.
The top plate was machined from a piece of 1 1/4-inch
thick steel plate which, due to a badly rusted and pitted
surface, was milled to a thickness of 1 1/16 inches and 16
inches square. A center hole 2 1/4 inches in diameter was
machined to accept the hydraulic cylinder ram. Four holes,
11/16 inch in diameter, were drilled 90° apart at a radius
from the center of 2.31 inches to accept the longer tie-rods
necessary to affix the cylinder to the top plate. All five

19
of these holes were slightly larger than needed to allow
alignment of the cylinder axially with the flywheel shaft
during assembly. Four 1 3/4-inch diameter holes were then
drilled at the radius of 8 inches from the center to accept
the main columns. All but the center hole were centered on
the diagonals drawn between opposite corners of the plate.
The plate was then set up in a testing machine under loading
conditions similar to those it would sustain under maximum
conditions of actual use. The following loads and deflections
were noted:
Load In Pounds
5,000
10,000
15,000
20,000
Deflection In Inches
0.0110
0.0150
0.0185
0.0220
These deflections were taken near the center hole and were
less than 1/32 inch. On releasing the load, the plate re
turned to zero deflection, which indicated the yield point of
the material had not been exceeded. Since this loading was
25 percent in excess of maximum loading under actual condi
tions, the plate was acceptable for use in the machine.
The base plate was machined from l-inch thick steel
plate, and its use based on the test made on the top plate.
It proved adequate under maximum loading. It was machined
16 inches square and four holes drilled for the main columns
as with the top plate. A hole, 2.375 inches in diameter, was
drilled and bored through the center of the plate to allow

20
the rear of the bearing shaft to protrude. Four holes were
drilled and tapped at a radius of 2.750 inches from the center
and 90° apart to accept 5/16-24 NF hex head cap screws which
were used to secure the bearing cover to the base plate.
The bearing cover was machined from l-inch thick steel
plate. A center hole was drilled and bored to 2.720 inches
in diameter. It was then turned to a 4 1/2-inch diameter,
leaving a l-inch flange 5/16-inch thick all around. The cover
was then counter-bored from the flange side to a diameter of
3.935 inches and a depth of 0.827 inches to receive a new
departure bearing #3211. Four 11/32-inch diameter holes 90°
apart at a radius from the center of 5 1/2 inches were drilled
to allow mounting to the bottom plate, using 5/16-24 NF hex
head cap screws along with flat washers and split-ring lock
washers. The stress in the four 5/16-24 NF threads was the
limiting factor for the bearing cover and bearing. The total
load supported by the bearing is one-half of the flywheel,
flywheel shaft, and chuck and is less than 150 pounds. The
load in each thread is 150 pounds/4 threads = 37 1/2 pounds.
The stress is 37 1/2 pounds 7 .058 square inches = 646.55 psi.
The thread is capable of carrying 40,000 psi 7 .058 square
inches = 2,620 pounds.
The bearing shaft was made from 3-inch diameter steel
and was turned to 2.750 inches in diameter. The one end was
then turned to a diameter of 2.167 inches to conform to the
bore of the #3211 bearing, for a distance of 2.000 inches.

21
The center portion, for a distance of 1.125 inches, was left
as previously turned and the remaining 2.000 inches was turned
to a diameter of 1.375 inches to press fit into the flywheel
shaft, after the flywheel base plate was attached. Loading
was too small to require calculation.
The flywheel base plate was made from 1 1/8-inch thick
steel plate. A center hole was threaded 2 1/2-12 NF to accept
the flywheel shaft and the rear of this threaded hole was
counter-bored to a diameter of 5.248 inches and a depth of
0.500 inches to accommodate a #T-302 Timken thrust bearing,
press-fit. The outside diameter of the plate was turned to
11.875 inches and four holes were threaded 1/2-20 NF, 90°
apart at a radius of 5.500 inches to accommodate the flywheel
rods.
The flywheel rods were 5/8-inch diameter steel, 8 inches
long. Each end was threaded 1/2-20 NF, for a distance of 1
inch. Since the method of crossing each successive pair of
flywheel plates, Figure 7, as the flywheel was built up,
would prohibit their movement due to the interference of the
flywheel shaft, it was necessary only to determine if the
flywheel rods would deflect sufficiently to allow the plates
to slip past the flywheel shaft and exert a high shear stress
on the rods. Assuming that each rod acts as a cantilever
beam, the loading was determined as follows:
F c Wr w2
= 0 g

Figure 7. Flywheel Plate Set-Up (Not to Scale)
22

where
F = force in pounds c
W = weight in pounds
g =acceleration of gravity in inches per second 2
w = angular velocity in radians per second
r = 0
radius to center of gravity in inches
R 4 4
= 3/16n( -r ) R3-r3
R = outer radius of half shell in inches
r = inner radius of half shell in inches
therefore
and
r 0
= 3/16 (3 14) (1296- 5 ) = • 216-3 3.57 inches
F = 15(3.57) (183)2 = 4 660 pounds c 386 '
23
or 2,330 pounds on one rod. The next plate gives an equal
0 force but at 90 to the first which, when vectorally added,
gives a resultant force for the two plates of 3,300 pounds
outward from the center axis. There are six such loads when
the entire flywheel is in use. The deflection due to this
load is
Ymax = WL 3 8EI
where
Ymax = maximum deflection in inches
w = total load in pounds
L = total length of beam in inches
E = modulus of elasticity
I = moment of inertia

24
= nD 4 64
where
D = diameter in inches
therefore
Ymax = 19,800(6)4 -- 0.117 . h 1nc es 8(30 X 10 6
) (0.153)
This deflection is not sufficient to allow the plates to slip
past the flywheel shaft and bring force to bear on the rods
that might cause failure.
The flywheel shaft was made from 3-inch diameter steel
rod. One end was turned and threaded 2 1/2-12 NF for 5/8
inches, to screw into the flywheel base plate. A portion
7.750 inches long was left at a diameter of 3.000 inches, and
the 2.156 inches remaining were turned to a diameter of 2.167
to accommodate a second #3211 bearing. The other end was
turned and threaded 2 1/4-8 Pitch for 1.500 inches to accept
the flywheel chuck. Compressive loading and flywheel weight
are insignificant in this size shaft and need no stress cal-
culations.
The flywheel shaft, flywheel base plate, bearing shaft,
and thrust bearing were then assembled.
The bearing plate was made from 1/2-inch thick steel
plate. It was milled to 16 inches square and four 2-inch
diameter holes were drilled to accept the four main columns
as with the top and bottom plates. A center hole was bored
3.935 inches in diameter to accommodate a #3211 bearing.

25
Four holes, two each on opposite sides, located 1 3/8 inches
from the ends were drilled and tapped 1/2-20 NC for cup point
set screws to lock the plate to the main columns. Four holes
at a radius of 2 1/2 inches from the center, 90° apart, were
drilled and tapped 5/16-24 NF to accommodate the bearing
retainer.
The bearing retainer was made from 1/8-inch thick alu
minum plate. It was turned to a 6-inch diameter and a
2 23/32-inch diameter hole was bored in the center. Four
holes, 11/32-inch in diameter, 90° apart were drilled at a
radius from the center of 2 1/2 inches. The retainer was then
fastened to the bearing plate using 5/16-24 NF hex head cap
screws, 5/16 washers, and 5/16 split-ring lock washers.
The ram adapter was made from 3-inch diameter steel rod.
The right end was turned to a diameter of 2 1/8 inches for a
distance of 1 1/8 inches. The center portion, 7/8 inch wide,
was turned to a diameter of 2 inches. The remaining 1 1/8
inches was turned and threaded 2 1/4-8 Pitch to accommodate
one of the chucks. The other end was drilled and threaded
1-14 NC for 1 5/8 inches to allow the adaptor to be screwed
onto the cylinder ram. This part was later changed in the
following manner. A hole, 1 inch in diameter, was drilled
in the center of the chuck end to a depth of 2 inches. Four
holes, 90° apart and 1 inch from the end, were drilled and
tapped 3/8-16 NC to receive hex socket, full dog, set screws.
This hole and set screw set up was then used as one specimen
holder in lieu of a chuck.

26
The ram brace was made from 1/4-inch thick steel plate,
5/8-inch diameter steel rod, and l-inch diameter steel rod.
Since this is an assembly, the brace components and assembly
are shown in Figure 8.
The flywheel plates were made from 1/2-inch thick steel
plate. There were 12 required (24 half plates). 12 inch
diameter circles were marked off on steel plate and were then
torch cut slightly oversize. A 2-inch diameter hole was
drilled in the center of each for mounting on a lathe chuck.
The outside was turned to 11 7/8-inch diameter. The plate
was remounted and the center hole enlarged to a 3-inch diam-
eter to match the flywheel shaft. 0 Four holes, 90 apart and
21/32 inch in diameter, were drilled at a radius from the
center of 5 1/2 inches to accommodate the flywheel rods. The
plates were then sawed in half along a line midway between
the flywheel rod holes so they could be mounted without
partial disassembly of the machine. Finally, a small trian-
gular piece was sawed from each corner at the junction of the
circumference and the diametral saw line so that the halves
would fit between the main columns during assembly.
The remaining parts of the machine, as well as fasteners
mentioned previously, were available in the shop or were pur-
chased. These items are listed in Table I.

This Brace Arm is Duplicated on
all Four Sides of Center Plate.
lR
27
1/4 Steel Plate
1 Steel Rod 2 Long
5/8-11 NC 1 1/4 Deep
1 Steel Rod 1 Long
5/8 Steel Rod 2 l/4 Long
5/8 Mill 1/4 Deep
3 Bore
1/4 Steel Plate
~5.00~ Figure 8. Brace Assembly
XXX Idicate Weld Both Sides Tolerance +0.005
5.00

Hydraulic Cylinder
TABLE I STANDARD PARTS
Miller Model 84H Heavy-Duty
3 1/4" Bore 6" Stroke
Hydraulic Pump
Enerpac Series III Hodel PM-742
Control Valve - 4 Way (Manual)
Gage Adaptor
Enerpac P-16.99
Hi-Pressure Hose (2 required)
Enerpac HC-914
6' with C-604 Coupling
XX Steel Pipe (2 required)
3/4" X 4u Threaded Both Ends
Steel Couplings (2 required)
3/4" 6000 psi
Steel Bushing (2 required)
3/4" X 3/8"
Pressure Gage
Blackhawk 0 to 10,000 psi
Lathe Chucks
Wescott #58 4-Jaw (2 required)
Skinner #4207-46 4-Jaw (1 required)
28

Bearings
Timken T-302-W Thrust (1 required)
New Departure #3211 (2 required)
Hex Nuts
1 1/2-12 Nf (8 required)
1/2-20 NF {4 required)
5/16-18 NC {12 required)
flat Washers
1 1/2 (8 required)
1 (2 required)
5/8 (12 required)
1/2 (4 required)
5/16 (2 8 required)
Lock Washers - Split-Ring
1 1/2
1/2
5/16
(8 required)
{4 required)
( 8 required)
Set Screws
3/8-16 NC X 1 Half-Dog, Hex-Socket (8 required)
1/4-20 NC X 1 1/2 Cup Pt., Hex Socket (4 required)
Hex Head Cap Screws
5/16-24 NF X 3/4 {4 required)
5/16-24 NF X 1/2 (4 required)
29

30
Round Head Machine Screws
5/16-18 NC X 2 1/2 (4 required)
Square Nuts
5/16-18 NC (4 required)
U Clamps
5/16-18 NC X 2 X 3 1/2 (2 required)
Note: XX Steel Pipe is heavy-wall pipe testing 6,000 psi.

31
III. DISCUSSION
A. Set Up
The machine, prior to any changes, used a 1 horsepower,
variable speed motor with a 2-inch diameter drive pulley to
drive the flywheel by using the 4-inch diameter rear flange
of the chuck as the driven pulley.
The first test was a no-load run to check for balance
and vibration. There was some vibration observed at various
motor speeds but was not found to be excessive, nor did the
amplitude of vibration increase at any given speed. Because
of this, the flywheel speed was limited to 1,000 revolutions
per minute.
Following the initial testing of the machine, test spec
imens of l-inch diameter were made; and, since the machine
used 4 jaw chucks, flats were machined on the test specimens
to provide a firm grip for the chuck jaws against the torque
developed during welding.
The first runs were made at various angular velocities
and pressures. It was evident from these runs that, with the
angular velocity restricted to 1,000 revolutions per minute,
it would not be possible to weld a specimen having a l-inch
diameter.
As a consequence, the specimen size was reduced to 1/2-
inch diameter which could be successfully welded but which

32
introduced a problem of axial alignment, shown in Figure 9.
The applied pressures were sufficiently large and the chuck
jaws loose enough to allow the two halves of the specimen to
move during the initial contact portion of the welding cycle.
It was assumed that the unsupported extension of the
hydraulic cylinder shaft was being misaligned by the torque
forces exerted. To remedy this situation, supporting braces,
Figure 8, were made and are shown in position in Figure 10.
A number of runs were made with no significant improvement in
the alignment of the welds.
A second attempt was then made by moving the braces
closer to the weld zone and attaching them to the chuck jaws
as shown in Figure 11. Again, there was no significant im
provement in the weld alignment.
The chucks were then inspected, and it was concluded
that, due to the large amount of previous use, the jaws
should be moved toward the outer edge of the chuck, out of
the worn area, and an adapter made to hold the specimen. The
adapter would then be held in the chuck. This set-up is
shown in Figure 12. A number of runs were made and it was
noted that the chuck on the cylinder end was not holding
properly. It was decided to do away with this chuck entirely
and drill a hole in the ram adapter with four set screws to
hold the specimen.
After several runs with this set-up, it was decided to
replace the flywheel chuck with a heavier one to give more

33
'
- · .. o,::,,...,.., ,,: ,, -

34

35
rigidity to the specimen. There was still no significant
change in the alignment of the finished weld, so this chuck
was discarded also. An adapter was made to fit onto the fly
wheel shaft, as previously described, and this adapter was
installed and tested. With this final set-up, the alignment
problem was sufficiently corrected due to the fact that the
specimen holder was now considerably more rigid and because
the flywheel shaft support bearing w~s moved some 5 inches
closer to the weld interface. This final set-up is shown in
Figure 13, with a specimen ready to be welded, and in Figure
14 after the weld was complete.
The following were the steps involved in the set-up of
the hydraulic system:
1. An Enerpac Series III Model PM-742 hydraulic pump
fitted with a four-way manual valve was placed to
the left of the machine.
2. A gage adapter was screwed into the right hand port
and a 10,000 psi gage was screwed into the adapter.
3. 6-foot high-pressure hoses, with high-flow couplings,
were screwed into both the adapter and the left valve
port.
4. The hoses were then attached to a Miller Model 84-H
hydraulic cylinder using high-pressure pipe fittings.
5. The pressure is adjusted by the use of an Allen
wrench prior to making a run.
B. Test Procedure
The following steps were involved 1n making a run

36
M ..-I

37
and refer to the final set-up:
1. A specimen was placed in the flywheel specimen hold
er and the four set screws tightened against the
flats on the specimen to prevent it from turning in
the holder.
2. The same procedure as above was used to mount a spec
imen in the ram holder.
3. The ram was advanced until the specimen halves were
approximately 1/32 inch apart.
4. The alignment braces were positioned and tightened.
5. The motor was started and the flywheel brought up
to speed.
6. The motor was then cut off and simultaneously the
valve to activate the ram was closed.
7. After the flywheel came to a stop, the valve was
opened to relieve the axial force.
8. The braces were then removed.
9. The set screws were loosened to release the specimen.
10. The ram was withdrawn and the welded specimen removed.
c. Results
While making changes in the set-ups, no test data was
taken other than to save a few specimens showing the alignment
problem. These tests were run using 5/8" diameter rod turned
down to 1/2" diameter on the ends.
in the photograph in Figure 7.
Several of these are shown
With the final set-up and the alignment problem corrected,

38
data was taken to determine if the weld made fulfilled the
requirements for an acceptable weld.
Run Numbers 1 through 17 were made with a 1/2-inch diam
eter solid specimen and a cross-sectional area of 0.196 square
inches. It was determined after Run Number 3 that, due to an
error in calculation, the axial force being used was creating
stresses in the specimen much larger than the yield point
stress of the material. This error was corrected in the
following runs.
Different combinations of axial loads and angular veloc
ities were tried until it was determined in Run 14 that the
optimum conditions were achieved. Three more runs were made
with the same parameters as Run 14. These specimens indicated
that the angular velocity was too high since the flash was
thrown out of the weld area rather than being squeezed out.
To reduce the angular velocity would also reduce the amount
of flywheel energy available for the weld and, due to the
indications of previous runs, this would not give an acceptable
weld. Two specimens, Run 14 and Run 16, were tested under
tension and withstood 58,200 psi and 57,800 psi of stress re
spectively before fracture. The ultimate stress of the mate
rial is approximately 64,000 ps1. This would be acceptable
under normal conditions where design is based on the yield
point stress and a safety factor considered as well. The
yield point of the material welded was 40,000 psi.
Inspection of the fracture indicated a small spot in the

39
center of the cross-sectional area that did not weld suffi
ciently, which was believed to be due to the fact that the
exact center has zero velocity and, therefore, no heating due
to friction. This area must receive heat by conduction from
areas farther from the center. Since the process is so fast,
the heat did not have time to transfer to this center area.
A hollow specimen would have no area of zero velocity,
therefore, it was decided to use a hollow specimen but to
retain the 0.196 square inch cross-sectional area. This was
done for Runs 20 through 25. Run 26 was made using a specimen
of 0.440 square inch cross-sectional area. The weld was made
but the torque lifted the rear of the machine about 1/4 inch
off the stand. No further runs with this larger area were
made.
Runs 27 through 31 were made with specimens of 0.306
square inch cross-sectional area, and Specimens 28 through
31 were subjected to a tension test. Specimens 28 and 30
fractured at 65,450+ psi tensile stress. Specimen 29 frac
tured at 63,800 psi and Specimen 31 fractured at 60,800 psi
of tensile stress. A test sample was taken from Specimen 27
and mounted and polished. Microscopic pictures were taken to
show the grain structure at lOOX, 250X, and 500X and gave
excellent results. The weld zone shows no trace of an inter
face, but rather is a homogeneous small-grained structure
showing no voids or irregularities.
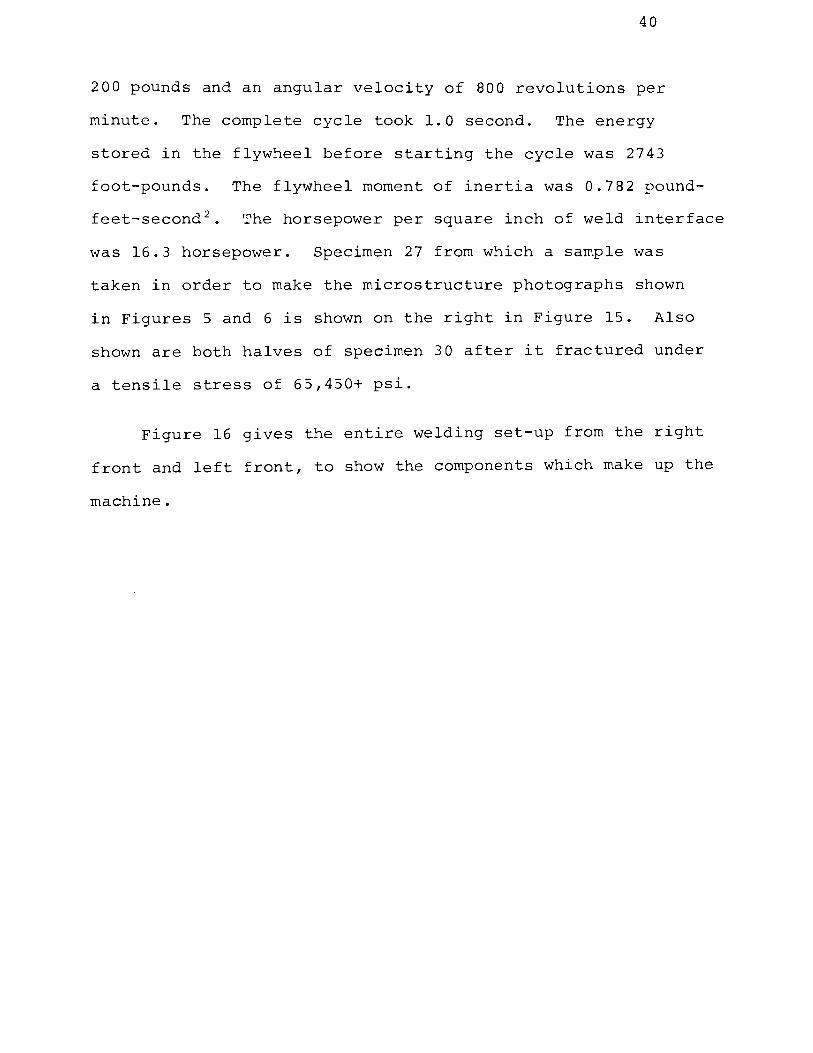
Runs 27 through 31 were made with a flywheel weight of
40
200 pounds and an angular velocity of 800 revolutions per
minute. The complete cycle took 1.0 second. The energy
stored in the flywheel before starting the cycle was 2743
foot-pounds. The flywheel moment of inertia was 0.782 pound
feet-second2. The horsepower per square inch of weld interface
was 16.3 horsepower. Specimen 27 from which a sample was
taken in order to make the microstructure photographs shown
in Figures 5 and 6 is shown on the right in Figure 15. Also
shown are both halves of specimen 30 after it fractured under
a tensile stress of 65,450+ psi.
Figure 16 gives the entire welding set-up from the right
front and left front, to show the components which make up the
machine.

41
Figure 15. Test Specimens

42
Figure 16. Entire Inertia Welder

Run No.
1
2
3
4
5
6
7
8
9
10
11
12
13
14
15
16
17
Pressure psig
2,000
2,000
800
800
500
500
800
800
500
500
600
500
500
500
500
IV. TEST DATA
TABLE II 1/2 INCH SOLID BAR
Thrust lbs.
16,600
16,600
6,640
6,640
4,150
4,150
6,640
6,640
4,150
4,150
4,980
4,150
4,150
4,150
4,150
Stress psi
84,700
84,700
34,000
34,000
21,200
21,200
34,000
34,000
21,200
21,200
25,400
21,200
21,200
21,200
21,200
Motor rpm
3,000
2,500
3,000
2,500
2,000
2,500
2,250
2,250
2,500
2,250
2,250
43
Remarks
2,375 Fractured at 58,200 psi under tension
2,375
2,375
2,375 Fractured at 57,800 psi under tension
Note: Specimens used were of 0.196 square-inch cross-sectional
area solid bar.

44
TABLE III HOLLOW TUBES
Run Pressure Thrust Stress Motor No. psig lbs. psi rpm
20 600 4,980 25,400 1,500
21 600 4,980 25,400 2,000
22 750 6,230 31,750 2,000
23 750 6,230 31,750 2,250
24 650 5,400 27,500 2,250
25 550 4,560 23,200 2,250
26 1,100 9,150 22,600 2,500
Note: Specimens 20 through 25 were hollow with 0.196 square
inch cross-sectional area 1n the wall. The outside
diameter was 0.750 inches and the center hole of
0.562-inch diameter. Specimen 26 was of 0.440 square
inch cross-sectional area. The outside diameter was
0.900 inches and the center hole of 0.500-inch diameter.

TABLE IV HOLLOW TUBES
Run Pressure Thrust Stress No. psig lbs. psi
27 900 7,470 24,200
28 900 7,470 24,200
29 900 7,470 24,200
30 900 7,470 24,200
31 900 7,470 24,200
Motor rpm
2,500
2,500
2,500
2,500
2,500
45
Tensile Strength
psi
65,450+
63,800
65,450+
60,800
Note: These specimens were hollow with 0.306 square inch
cross-sectional area in the wall. The outside
diameter was of 0.800-inch diameter and the center
hole of 0.500-inch diameter.

46
V. CONCLUSIONS
From the results obtained, it can be concluded that:
1. Imparting the same amount of energy to each weld for
identical specimens gives results with a close toler
ance.
2. The heat-affected zone is relatively small.
3. Heat requirements are lower for inertia welding than
for friction welding.
4. Axial force required remains approximately that re
quired to achieve 60% of the yield point stress for
the material being welded.
5. Small diameter welds are increasingly harder to make
due to the exceptionally high angular velocities needed
to generate the necessary heat.
6. Welding of hollow parts requires less time and energy
for a given cross-sectional area since no heat trans
fer to the center area is necessary.
7. Inertia welding gives greater uniformity than that
obtained with friction welding.
47
VI. RECO~~MENDATIONS
The following are the author's recommendations regarding
this investigation.
1. Three-jaw, self-centering, heavy-duty chucks, oper
ated either pneumatically or hydraulically, should
be used.
2. The chucks should be enclosed in a bearing to keep
them rigid during welding.
3. A more positive drive than that achieved with a single
V-belt should be used.
4. Hollow spindles, onto which the chucks are attached,
are preferable to facilitate the welding of specimens
of longer length.
5. The flywheel should have a center of mass much far
ther from the axis of rotation than the 10 or so
inches for the flywheel used in this investigation.
6. The mass of the flywheel should be easy to change
to allow for different energy requirements.

48
VII. BIBLIOGRAPHY
1. Oberle, T. L. , and others, "Method of Bonding Metal Work
pieces", U. S. Patent Office 3,273,233, 1966,
issued to the Caterpillar Tractor Company.
2. Keyser, Carl A. Basic Engineering Metallurgy, 2nd Ed.
New Jersey: Prentice-Hall, 1959, Chapters l,
2, 3, 17.
3. Jastrazebski, Zbigniew D. Nature and Properties of
Engineering Materials. New York: Wiley,
1959, Chapters 1, 4, 5, 8.
4. Lancaster, J. F. The ~etallurgy of Welding, Brazing and
Soldering. New York: American Elsevier, 1965,
Chapter 4.
5. Higdon, A., Ohlsen, E., Stiles, w. Mechanics of Materials.
New York: Wiley, 1960.
6. Spotts, M. F. Mechanical Design Analysis. New Jersey:
Prentice-Hall, 1964, Chapters 1, 2, 3, 5, 16.

49
VIII. VITA
The author, Arthur Ferdinand Grimm, was born in St. Louis,
Missouri, on April 25, 1928. He received his primary and sec
ondary education at Wyman Grammar School and Roosevelt High
School in St. Louis, Missouri. He received a Bachelor of
Science Degree in Mechanical Engineering from the University
of Missouri-Rolla in January, 1966.
He has been enrolled in the Graduate School of the Uni
versity of Missouri-Rolla since January, 1966 and has held the
position of Graduate Assistant in Mechanical Engineering from
January, 1966 through May, 1966; Assistant Instructor in
Engineering Graphics from September, 1966 through May, 1967;
Instructor in Mechanical Engineering from June, 1967 through
July, 1967; Assistant Instructor in Engineering Graphics from
September, 1967 through May, 1968; and Instructor in Engineer
ing Graphics from September, 1968 through May, 1969.
He worked for the Great Atlantic and Pacific Tea Company
for 12 years prior to entering college and has also served in
the United States Army for a period of two years.