The courseeplus teacher guide - Social Learning Platform
12
COURSEEPLUS Teacher Guide The social learning Platform for classroom http://courseeplus.in
-
Upload
courseeplus -
Category
Education
-
view
119 -
download
2
description
COURSEEPLUS is a Social Learning Platform which connects Knowledge Providers and Seekers.Courseeplus have a motto to flip the classroom using Social Enabled Technology and we provide world class learning to the Seekers from the Experts and Engage the Learners Never before any platform. Any User can sign up for free in this platform to enjoy the learning seamlessly and the Gaming Mechanics we introduce give the Learners a WOW Moment in each Learning.
Transcript of The courseeplus teacher guide - Social Learning Platform

COURSEEPLUS Teacher Guide
The social learning Platform for classroom
http://courseeplus.in

What is COURSEEPLUS?
COURSEEPLUS is a Social Learning Platform which connects Knowledge Providers and
Seekers. Courseeplus have a motto to flip the classroom using Social Enabled Technology
and we provide world class learning to the Seekers from the Experts and Engage the Learners
Never before any platform.
Any User can sign up for free in this platform to enjoy the learning seamlessly and the
Gaming Mechanics we introduce give the Learners a WOW Moment in each Learning.
Main Features of Courseeplus:
Teacher-student communication
Teachers and students can collaborate in a secure, closed platform.
Groups & Forums
The students can join various groups and forums related to their subjects, where they
can engage in constructing conversations.
Online courses
There are more than 100 online free courses which the students can enrol and develop
their knowledge further.
Events
All the college and industry events will be posted in the events section.
Job board
Latest job opening in all top companies will be available in the job board.

Sign Up: 1. Go to http://courseeplus.in
2. Click “sign up”
3. Complete Sign Up Form
1) Choose a username of your choice.
2) Enter your email address.
3) Choose a unique password.
4) Confirm the password.
5) Type your name.
6) Click complete sign up form.
4. Activating your account.
i. Once you click sign up you will receive an activation mail to your email address.
ii. Once your click the link sent in the mail, your account will be activated.

Log in:
Once you finish the activation, you have to log in with your user name and password.
Getting started:
Once you sign up you can view your dashboard. This is how your dashboard looks like.
The dashboard allows you to access all the features of courseeplus.
Courses tab will allow you to access all the courses.
Activity tab will allow you to view all the activities of you and your students.
Profile tab will allow you to change your profile settings.
Groups and Forums tab will allow you to manage all the groups and forums.
Send invites tab will allow you to invite all your students.
Settings tab will allow you to change password, email notifications etc.

Click the Profile tab:
Once you click the profile tab,
Click the edit tab.
Once you click the edit tab, you can change your name.
Click change avatar tab.
Choose a picture and upload image.
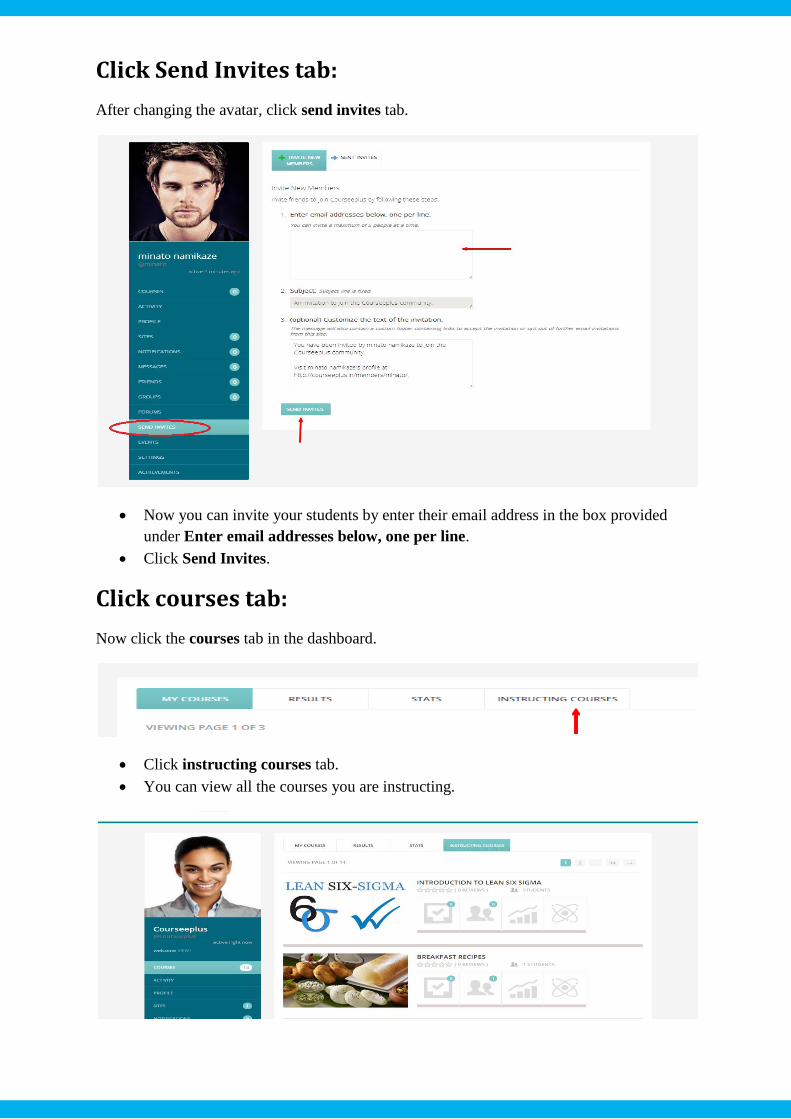
Click Send Invites tab:
After changing the avatar, click send invites tab.
Now you can invite your students by enter their email address in the box provided
under Enter email addresses below, one per line.
Click Send Invites.
Click courses tab:
Now click the courses tab in the dashboard.
Click instructing courses tab.
You can view all the courses you are instructing.

Under the title of each course you can see 4 buttons.
1. The Evaluate course submission button will show you how many students have
submitted assignments and by clicking the button you can evaluate them.
2. The Manage student button will show you how many students have enrolled in the
course and you can manage the students by clicking it.
3. The See stats button shows you the status of each student enrolled.
4. The See all activity button shows the activity of all the students.
Creating Course:
Click the courses tab in the menu bar.
Once you click the courses tab you can view all the courses listed in the site.
All courses tab will show all the free courses.
My courses tab will show the courses you are enrolled to.
Instructing courses tab will allow you to access all the courses your instructing.
To Create Course, Click Create Course button.
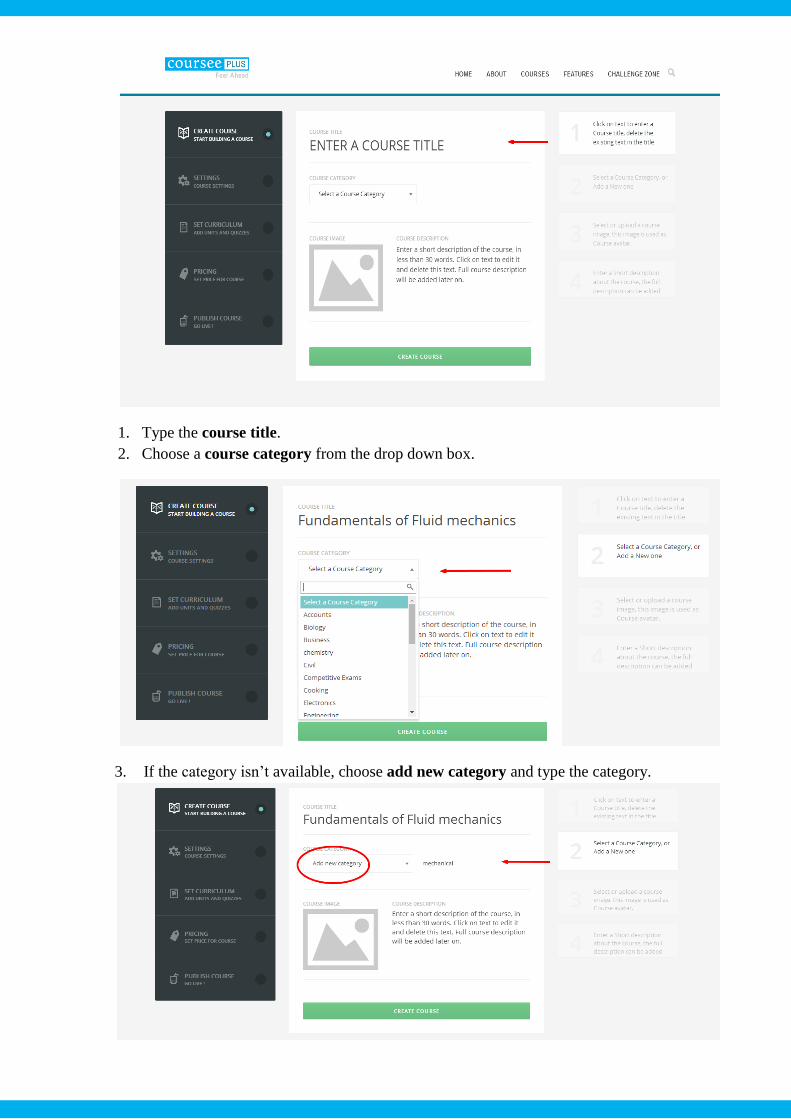
1. Type the course title.
2. Choose a course category from the drop down box.
3. If the category isn’t available, choose add new category and type the category.

4. Choose an image for your course.
5. Give a small introduction to your course in the description column.
6. Click create course.

Settings:
The second step will be making course settings.
Choose the course duration.
Select evaluation mode, either manual or automatic.
Set certificate percentage, and badge percentage.
Set number of student per course.
Set a start date for the course.
Select add new group in connect a course group.
Select connect to group forum in connect a course forum.
Click save settings.

Set Curriculum:
Now you have to set curriculum for the subject, by adding unit and quizzes.
Click add section.
Give a title to the section.
Click add unit.
Choose add new unit from the drop down box and give a title.
Click the green button and choose publish.
After publishing the unit, again click the green button and choose edit unit.

Now add the video and text contents and publish.
Click save curriculum.
Pricing:
Click yes button in the free course option.
Choose no product from the drop down list in the set a course product option.
Click save course pricing.
Publish course:
Click Go live.
Once the course is approved by the admin. It will be online to all your students.