THE COMPLETE GUIDE TO OLYMPUS' OM- D E-M1 FIRMWARE ...
30
THE COMPLETE GUIDE TO OLYMPUS’ OM- D E-M1 FIRMWARE UPDATE 4.0 by Gary L. Friedman Published by The Friedman Archives Press Copyright © 2016 Gary L. Friedman All rights reserved. No portion of this book may be reproduced either in print or in any digital format without express written permission. Contact the author at [email protected] This is an addendum to the best-selling "The Complete Guide to Olympus' OM- D E-M1" by Gary Friedman. The original book can be purchased at the author's website in three different electronic formats at http://friedmanarchives.com/OlympusE-M1
Transcript of THE COMPLETE GUIDE TO OLYMPUS' OM- D E-M1 FIRMWARE ...

THE COMPLETE GUIDE TO OLYMPUS’ OM-
D E-M1 FIRMWARE UPDATE 4.0
by Gary L. Friedman
Published by The Friedman Archives Press
Copyright © 2016 Gary L. Friedman All rights reserved. No portion of this book may be
reproduced either in print or in any digital format without express written permission.
Contact the author at [email protected]
This is an addendum to the best-selling "The Complete Guide to Olympus' OM-
D E-M1" by Gary Friedman. The original book can be purchased at the author's
website in three different electronic formats at
http://friedmanarchives.com/OlympusE-M1

ii Table of Contents
TABLE OF CONTENTS
CHAPTER 1 ....................................................................................................3
MENU ITEMS THAT HAVE MOVED ....................................................................... 3 HIGHER BURSTRATE ........................................................................................... 4 IMPROVED ANTI-SHOCK MODE ........................................................................... 4 SILENT SHOOTING ............................................................................................. 5 FOCUS BRACKETING & FOCUS STACKING ............................................................... 8
Focus Bracketing ..................................................................................... 10 Focus Stacking ........................................................................................ 12
VIDEO IMPROVEMENTS .................................................................................... 14 New Frame Rates .................................................................................... 14 4K Timelapse Movies .............................................................................. 14 Smooth Aperture Control ........................................................................ 15 Cable Release Support ............................................................................ 16 New Image Stabilization Options ........................................................... 16 Slate Tone / Synchronized PCM Audio Recording ................................... 17 Timecode Support ................................................................................... 18 Shutter Function ..................................................................................... 21 Four New “Monitor Display” Icons ......................................................... 21
DISABLE THE SNAP RING ................................................................................. 22 O.I.S. IMPROVEMENTS .................................................................................... 22
Start / Stop Movies with your Smartphone ............................................ 22 Live Composite on OI.Share .................................................................... 23
MENU RECALL ................................................................................................ 23 ADVANCED FOCUS PEAKING .............................................................................. 24 LIVE VIEW BOOST II ......................................................................................... 24 S-OVF .......................................................................................................... 26 KEYSTONE COMPENSATION ............................................................................... 26 "UNDERWATER" PICTURE MODE ....................................................................... 26 OLYMPUS CAPTURE DESKTOP SOFTWARE ............................................................ 27 TWO NEW MONITOR DISPLAY ICONS .................................................................. 29

CHAPTER 1
I have to tell you that as a former engineer, the things Olympus does with
its cameras continues to impress me. I’m not just talking about adding new
features via firmware updates (which itself is a nice thing). No, I’m talking
about adding new features that ordinarily would require hardware re-
engineering in order to be realized.
Take the Anti-Shock and Silent Shutter modes, for example, which
normally require a total redesign of the light-gathering elements of the
sensor. Or the smooth aperture control when taking movies, which would
require a complete redesign of the lens <--> camera communications
interface. Or the ability to send images over USB in tethered mode much
faster than before. Olympus did it via a firmware upgrade, making what is
arguably the most versatile camera on the planet even more so!
So it is with equal amounts of awe, amazement, and frustration (the last
part from trying to figure all this stuff out) that I explain the new features
that were added via Firmware versions 3.0 through 4.0 for the Olympus
OM-D E-M1.
But before we begin, here are some menu changes you should know about:
MENU ITEMS THAT HAVE MOVED
Item Old Location New Location Page # in
original ebook
Image Stabilizer Camera 2 Gear C 95
Anti-Shock Gear E Camera 2 269
Sequential Shooting / Self
Timer menu
Camera 2 Camera 1 85
Time Lapse Settings Camera 2 Camera 1 217
Keystone Compensation Camera 1 Camera 2 (See Firmware
v2 guide pg. 16)

4 E-M1 Firmware v4.0 Supplement
Contents of this book Copyright © 2016 Gary L. Friedman. All rights reserved.
HIGHER BURSTRATE
When the E-M1 was first introduced, the fastest frame rate you could shoot
(and still autofocus between shots) was 6.5 pictures per second. Olympus
has now increased that to a whopping 9 frames per second! As I said on the
previous page, usually such improvements require redesigned hardware.
Not this time – they were able to achieve the improvement by increasing
the speed of the autofocus system.
If you don’t require autofocusing between shots – for example if you’re set
to Manual Focus mode, or have the focusing mode set to S-AF (Single-Shot
Autofocus), then the maximum frame rate remains at 10 pictures-per-
second.
To set your camera to the highest shooting rate possible, invoke
MENU 1
IMPROVED ANTI-SHOCK MODE
Before I get into this feature, let me give you a high level reminder of the
differences between normal shooting, Anti-Shock, and Silent Shooting.
With regular shooting, each time you take a picture, the shutter closes to
zero out the pixel’s light value, then opens to start the exposure, then closes
again to hide light from the sensor while the light values are read out, then
opens again to enable live view. Kind of noisy but it works great.
With Anti-Shock, Olympus figured out a way to eliminate the first close-
open cycle (plus allowed an optional delay). Once enabled (described
shortly), Sequential Shooting modes with a diamond next to it invoke the
Anti-shock feature (Figure 1-1).
Silent Shutter takes the Anti-shock feature one step further – it eliminates
both the first close-open cycle and the 2nd
close-open cycle as well! (Hard
TIP: Want to shoot at 11 pictures-per-second? You can using the Silent Shooting
feature, described on page 4.

Focus Bracketing 5
to do this as an afterthought!!) Once enabled (described next), Sequential
Shooting modes with hearts next to them invoke the Silent Shutter feature
(Figure 1-1).
There are two steps required to use Anti-Shock mode:
1. Go to MENU Camera 2 Anti-Shock / Silent Anti-Shock
and choose a delay (0 is recommended)
2. Go to MENU Camera 1 Sequential Shooting / Self Timer
and choose an icon that has a small diamond next to it.
Anti-shock mode was discussed in the original book starting on page 269.
Since then, the feature has been moved to MENU Camera 2, and two
additional settings have been added:
1. Silent Shooting mode has been added (next section)
2. Although there is no mention of it in the menus or the
documentation, the improvement here is you can now use anti-
shock in the Sequential Shooting / Self-timer menu’s 5 pictures-
per-second mode
SILENT SHOOTING
The “Silent Shooting” feature is a big addition to firmware v4. With it, the
camera captures the image using no shutter sound at all. It’s a purely
electronic capture.
Figure 1-1: In the Shooting Mode menu, icons with diamonds next to
them invoke Anti-Shock; whereas icons with hearts next to them are
Silent Shooting.

6 E-M1 Firmware v4.0 Supplement
Contents of this book Copyright © 2016 Gary L. Friedman. All rights reserved.
Usually this requires a sensor re-design. But Olympus has been tackling
the necessity of a shutter slowly; first with the Anti-Shock function (which
eliminated the need for the first shutter curtain entirely), and now with this
Silent Shooting feature, which does away with the 2nd
shutter curtain as
well.
I’ll skip all the details of how it was done technically, and jump straight to
the part you need to know: This silent shooting feature has a tradeoff: It’s
not great for shooting sports or things that move in general.
The reason is that once the exposure ends, the sensor’s design makes it
impossible to read out all of the pixel values at the same time. And so the
way the data is offloaded involves a video technique called “rolling
shutter”, which reads out the captured image one row at a time rather than
all at once, starting at the top and ending at the bottom a fraction of a
second later. Although it works great, it can create what videographers call
the “jello effect” when your subject or camera is moving during exposure –
vertical lines can look like diagonal lines, for example, because of the way
the sensor is being read out during the exposure. This may or may not
affect you depending on how much your subject (or you) move when
you’re taking stills.
You can create this effect on purpose - just shoot a picture of subjects with
vertical lines while you’re panning the camera from left to right (Figure
1-2). To get this result I set the shutter speed to 1/500th of a second and
panned the camera from left to right very quickly.

Focus Bracketing 7
Some other characteristics about Silent Shooting:
1. Your maximum pictures-per-second speed goes to 11. (Sounds like
a “This is Spinal Tap” reference. )
2. Your shutter speed range goes from 1/8th to 1/16,000
th (!)
3. Your ISO range goes from “Lo” to 3200.
4. You can’t use flash unless your shutter speed is 1/13th of a second
or slower. (See Figure 1-3.)
5. You can’t use it with HDR.
Silent Shooting Off Silent Shooting On
Figure 1-2: Silent Shooting uses the rolling shutter technique, making things that
move fast look distorted (right). In this example the camera was panning with a
shutter speed of 1/500th
.
To invoke the Silent Shooting feature:
1. MENU Camera 2 Anti-Shock / Silent Silent
[Choose a delay time – 0 recommended.]
2. Go to MENU Camera 1 Sequential Shooting / Self Timer
and choose an icon that has a small heart next to it.
3. Strut around and shoot quietly, like you’re using a rangefinder or
something.

8 E-M1 Firmware v4.0 Supplement
Contents of this book Copyright © 2016 Gary L. Friedman. All rights reserved.
FOCUS BRACKETING & FOCUS STACKING
This has to be the most exciting feature of the new update, for it represents
a HUGE timesaver for folks who shoot macro and commercial photography
using a manual technique called Focus Stacking.
Generally the way it works is like this: If you’re taking a photo of
something very close using a macro lens, your depth-of-field is so shallow
that only a tiny part of the composition will be in focus. Yes, you can make
the f/stop smaller to get more in focus, but under those conditions it’s
usually not enough; plus when you make the f/stop too small you encounter
a phenomenon called diffraction which actually makes the subject a tiny bit
LESS sharp.
And so advertising photographers the world over started taking multiple
photos, tweaking the focus between each one so different parts of the
subject would be in perfect focus, and then merge just the sharp parts
together later on in Photoshop. (Just as with exposure bracketing, where
the exposure changes slightly for each shot, focus bracketing changes the
focusing for each shot. Automatically.) Doing this process manually
presents an additional problem, though: Usually when you change focus,
the magnification of the image changes a little bit too, making the merging
of “just the sharp parts” extra challenging. It was a tedious process that
1/60th
1/30th
1/15th
Figure 1-3: I put the camera on “Silent Shutter” and pointed it a white wall
illuminaed by a studio strobe. This is another manifestation of the rolling shutter
effect as demonstrated in Figure 1-2. This is why Olympus recommends keeping
your shutter speed at 1/13th
of a second or slower when using flash.

Focus Bracketing 9
took a lot of practice to get right. Photoshop has tools to tackle this
problem, but now Olympus has made this process insanely easy by
automating both halves:
1) Focus Bracketing allows you to have the camera take a series of photos
(you can specify how many), with the focusing being adjusted by an
amount of your choosing for each shot.
2) Focus Stacking is a special version of Focus Bracketing – it will take a
series of 8 images using the bracketing adjustment of your choice, and
then automatically adjust the magnification and then merge just the
sharp parts into one .jpg image.
Frequently Asked Questions
Q: I don’t understand… I thought using a small f/stop was the key to
getting everything in focus?
A: It is, but there are situations where you can’t make the f/stop small
enough. Or you can make it small enough, but a new fuzzifying mechanism
kicks in called diffraction. (That’s why pro’s will always tell you to use the
lens’ “sweet spot” to get the sharpest image.) Focus Bracketing and Focus
Stacking hold the promise of doing it better than a small f/stop.
Q: So what kinds of photographers use Focus Stacking?
A: Product and Macro photographers mostly. With macro photography, the
laws of physics say that the closer you get to your subject, the shallower the
depth of field will be. So Focus Stacking gets everything into the sharpest
focus without having to worry about diffraction. I know a jewelry
company that uses focus stacking to take ALL of its catalog photos of rings
to make sure the back of the ring is just as sharp as the front.
Q: Will this feature work with all lenses?
A: Focus Bracketing will; however the Focus Stacking feature will only
work with three lenses as of now: The 60mm f/2.8 Macro, the 12-40mm
f/2.8 Pro, and 40-150mm f/2.8 Pro.
An example of focus bracketing can be found in Figure 1-4.
10 E-M1 Firmware v4.0 Supplement
Contents of this book Copyright © 2016 Gary L. Friedman. All rights reserved.
So how do you use it?
FOCUS BRACKETING
With Focus Bracketing the camera takes a series of pictures and you will
have to merge the sharpest parts together using the software of your choice
(like Photoshop). Here are the menu items you need to invoke in order to
use it:
1. MENU Camera 2 Bracketing On Focus BKT On and
then the menu screen of Figure 1-5 appears.
2. The first menu item, Focus Stacking, needs to be off. (The next
section covers what happens when you turn it on.)
3. Set Number of Shots lets you specify how many shots you want to
take in the bracket sequence – anywhere from 3 to 999. Generally the
greater the distance between your closest and furthest parts of your
subject, the larger this number should be. Try the bracketing function a
few times and you’ll get a good feel for what is best for the shot you’re
taking now. The sequence will stop either after the number of specified
shots has been taken, or when focus reaches infinity, whichever comes
first.
4. Set Focus Differential – This is essentially “How much do you want
the camera to adjust focusing between shots?”. You can only choose a
number between 1 and 10, with 10 being the further distance (which in
my tests was just a few centimeters in distance).
Figure 1-4: Examples of using focus bracketing. Left: Standard shot at f/2.8.
Center: standard shot at f/22. Right: After focusing bracketing and merging in
Photoshop. (The merging isn’t always perfect. )

Focus Bracketing 11
5. Flash Charge Time – This variable allows you to specify a wait time
between shots to allow for the flash to recharge. How long you should
wait depends on several variables, including your ISO, camera to
subject distance, how hard your flash has to work considering your
f/stop and shutter speed choice. So I can’t make a recommendation
here. Just remember that with this feature your shutter speed must be
1/13th of a second or less to prevent a partially black frame.
6. With all the variables set, keep hitting the OK button until you’re out of
the menu. You’re now in Focus Bracketing mode.
7. Now for the focusing part. Put your camera into Manual Focusing
mode (MENU Gear A AF / MF AF Mode Still Picture
MF (or hopefully you’ve assigned it to a button!)) and then
manually focus on the part of your subject that is closest to the camera.
The Focusing Bracketing feature will start from that point and then re-
focus further away from that point.
8. Initiate the Focus Bracketing sequence by pressing the Shutter Release
button.
9. You’ll now have to merge the sharpest parts of the images together
using 3rd
party software. (Here’s how to do it in Photoshop:
http://bit.ly/1tm1xNH ).
10. Starting a new bracketing sequence? Make sure to reset the focus point
to the closest point once again. The camera won’t remember.
Figure 1-5: The Focus Bracket and Focus Stacking
menu.

12 E-M1 Firmware v4.0 Supplement
Contents of this book Copyright © 2016 Gary L. Friedman. All rights reserved.
Important TIP: For reasons I don’t understand, both Focus Bracketing and Focus
stacking features insist on using the Silent Shutter feature. This means you’re
limited in your shutter speeds and ISO, and (most important) your use of flash is
restricted to 1/13th
of a second shutter speed or slower. This is tied to the
extended flash duration of the Super Focal Plane Flash Mode which these
bracketing modes require.
FOCUS STACKING
Recall that with Focus Stacking, no Photoshop is necessary – all the
merging of the sharp parts of the image happens in the camera. This
feature is limited to small objects only, since the number of frames is fixed
at 8 and the largest interval you can move the lens’ focusing is 10 “distance
units” (the amount of change is lens dependent). So the Focus Stacking
feature was not a good fit for the example in Figure 1-4. Instead, small
subjects such as that in Figure 1-6 are ideal. In both of these examples, the
amazingly sharp Olympus 60mm f/2.8 Macro lens was used.
The method for using Focus Stacking is similar to the Focus Bracketing
method above. But there are some differences:
1. When you enable Focus Stacking via MENU Camera 2
Bracketing On Focus BKT On Focus Stacking On,
the “set number of shots” setting is greyed out since the number of
shots the camera will take is 8 (plus a 9th shot which merges all of the
sharp parts from the first 8. The 9th shot can only be a .jpg).
2. When composing your shot, leave extra room around your subject.
This is because the Focus Stacking feature will crop the final image a
little as its way of dealing with the different magnifications that
different focusing distances impart.
3. Since the Focus Stacking feature shoots both closer and further away
from your initial focus point, I strongly suggest manually focusing your
lens to be one third the distance between the closest and further parts
of your subject.
4. Press the shutter release button!

Focus Stacking 13
Here’s more info from Olympus regarding focus stacking:
http://cameras.olympus.com/stack/en/
Figure 1-6: Focus Stacking in action. Left: A straight shot at f/2.8. Center: A
straight shot at f/22. Right: Focus Stacking in-camera. The bottom row shows a
close-up of the details – Focus Stacking produces sharper results than just
stopping it down. (And diamonds are very difficult to shoot so they look sharp!)

14 E-M1 Firmware v4.0 Supplement
Contents of this book Copyright © 2016 Gary L. Friedman. All rights reserved.
VIDEO IMPROVEMENTS
NEW FRAME RATES
The E-M1 has added two new frame rates for videographers who have
always loved that blurry-motion-when-you-pan 24 frames-per-second
cinema look. (Hey, I just call ‘em as I seem ‘em.)
The original book explained all of the other Movie Image Quality settings
on page 248 (“Movie Resolutions”). So in addition to Movie Format,
resolution, and compression level, Olympus has now added 2 new frame
rates: 24 and 25 frames per second (this is in addition to the 30 fps of
Firmware version 1). 24 is for emulating traditional cinema speeds, and
25… well, that’s for European countries who have 50 HZ alternating
current electricity and want a little less flicker when shooting under
incandescent light. (Apparently 24 fps under 60 Hz as is the standard in
North America doesn’t produce an interference pattern.)
Don’t know which frame rate to choose? I recommend sticking to 30
unless you have a compelling reason to go slower.
4K TIMELAPSE MOVIES
Movie resolution now has 4K in addition to HD (720p) and Full HD
(1080p). In addition, the frame rate for Full HD is now 15 fps in addition
to 10 and 5. The table below summarizes the options you now have:
Movie Resolution Available Frame Rates
HD (720p) 5, 10, 15, 30
Full HD (1080p) 5, 10, 15
4K 5
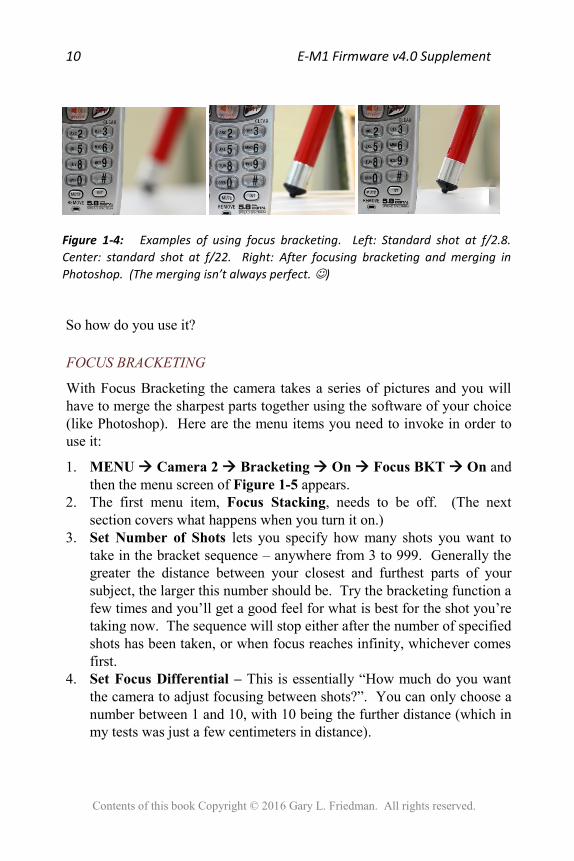
How much bigger is a 4K movie than a Full HD one? The illustration in
Figure 1-7 below gives a pretty good idea.
Smooth Aperture Control 15
Figure 1-7: The image size comparison between HD, Full HD,
and 4K video. 4K is pretty big.
SMOOTH APERTURE CONTROL
When you’re shooting movies in Shutter priority mode, and you’re pointing
the lens at all sorts of different kinds of light, the camera will try to adjust
by either adjusting the ISO or, if the ISO is fixed, it will adjust the f/stop.
But doing so with an f/stop mechanism that wasn’t necessarily designed for
movies might make for a noisy, non-smooth adjustment in the light levels
(as happened with version 1 of the firmware).
Well, v4 of the firmware still won’t let you fix the ISO in movie mode,
which means this is still the preferred method of adjusting the exposure.
But the camera will change the f/stop when you hit the limits of the ISO
range.
Want to see for yourself? Try this:
TIP 1: The camera may make the 4K movie for you from your timelapse shots,
but it won’t be able to play it back in-camera. For that you need a computer and
software that knows 4K.
TIP 2: As before, the maximum number of frames you can shoot for timelapse
movies is 999, giving a maximum length of 200 seconds.

16 E-M1 Firmware v4.0 Supplement
Contents of this book Copyright © 2016 Gary L. Friedman. All rights reserved.
Set the Exposure Mode dial set to “Movie”
MENU Gear I Mode “S”
Rotate the control dial (the one that controls shutter speeds – you
may have changed the default configuration if you took my
recommendations in the book) and set a shutter speed to something
low, like 1/30th.
Press the red button (start shooting a movie) and look into the lens
at the f/stop blades. Then point the camera to a bright light source
then a dark area and watch the f/stop change a little bit. Quietly!
As I have said many times in this supplement, some of these mostly
mechanical features are extremely difficult to add as an afterthought in
software. I congratulate Olympus once again!
This will not work with all lenses, though. As of now it only works on all
M.Zuiko Premium primes and the 14-42mm EZ kit lens (make sure the
firmware on the lens is up to date).
CABLE RELEASE SUPPORT
Want to be able to start/stop recording movies? In
addition to being able to do it from your
smartphone (another improvement with firmware
v4), you can now also do it using Olympus’
standard cable release accessory.
NEW IMAGE STABILIZATION OPTIONS
In the original E-M1, you had two options for image stabilization for
movies: On or Off. With v4, “On” has been renamed “M-IS2”, and a new
option, “M-IS1”, now appears which combines electronic correction with
the sensor-based mechanical correction.
What’s electronic correction?
Well, it doesn’t involve sensor movement. With electronic correction, the
camera shoots a little wider than your viewfinder tells you you’re shooting,
and then uses the same kind of in-camera image alignment technique used
in the HDR feature. The extra overlap is used to fill in the edges of the
frame so you don’t have fuzzy edges when shooting with an unsteady hand.

Slate Tone / Synchronized PCM Audio Recording 17
This technique may be CPU-intensive, but it does a better job of correcting
the greater amount of shakiness that tends to happen with handheld movies.
Recommendation: Use M-IS1 when shooting movies. Just keep in mind
that this improvement in steadiness comes at the expense of a slight amount
of cropping.
SLATE TONE / SYNCHRONIZED PCM AUDIO RECORDING
If you’re a professional videographer, there’s a good chance you won’t be
relying on the camera’s built-in microphones (good as they are) for your
video’s sound. You usually use a shotgun or other mic and record the audio
separately, adding it (and synchronizing it) to the video in post-production.
These two features are designed to help in that regard, and both rely on the
use of Olympus’ digital audio recorder called the LS-100, shown in Figure
1-8. (And before you ask, this is called an “IC” recorder, with “IC”
meaning “Integrated Circuit” – as opposed to tape.)
When connected to the camera via USB cable, the camera and recorder
work together in two different ways:
1. The audio recorder will start and stop automatically, in sync with
the camera.
2. The camera will produce a short audio time code burst called a
“slate tone” on demand which is recorded on both the camera and
an external audio recorder for easy synchronizing when editing.
To use, you must use two cables between the two devices: A USB and a
3.5” audio cable. In addition, the following configurations to the camera
must be made:
1. MENU Gear I PCM Recorder Link should be set accordingly:
TIP 1: The image stabilization option has moved, from Menu Camera 2
Image Stabilizer to MENU Gear C Image Stabilizer.
TIP 2: There’s also a similarly-sounding “Image Stabilization” feature in the Gear
C menu. What’s that for? It’s the new name for the MENU Gear C
+IS Off function described in the book on page 88. (Got that?)

18 E-M1 Firmware v4.0 Supplement
Contents of this book Copyright © 2016 Gary L. Friedman. All rights reserved.
a. Camera Rec. Volume: Operative for
the camera’s mics, Inoperative to have
the LC-100’s audio recorded on the E-
M1’s movie audio.
b. Slate Tone: On
c. Synchronized Recording: On
2. MENU Gear D USB Mode
PCM Recorder
What are slate tones?
“Slate” refers to those clapboards that were
used during the old Hollywood days to help
synchronize film and audio, and later on
scene numbers and time codes were added as
well. In this instance the E-M1 can generate
a short “slate tone” burst which is recorded
on the audio track of both devices – it is an audio version of a time code,
and once both tracks are on your computer your video editing software
should be able to synchronize the audio and video automatically. To
generate the slate tone, press the OK button for a second or two at the
beginning of your take (before the action happens).
TIMECODE SUPPORT
Time Codes have many purposes in the world of post-production, but the
main reason to have them in a camera is to enable the easy synchronization
of footage shot with multiple cameras at a live event. It is an invisible code
– not actually part of the visual video image – that is written within the file
in an industry-standard way. (It is formally known as “SMPTE Time
Code”, SMPTE being an acronym for the Society of Motion Picture and
Television Engineers.) High-end video editors such as Adobe Premier,
Final Cut Pro, and Sony Vegas know how to import and read this info.
When present, when you import the tracks into your video editor, all of the
tracks line themselves up on the timeline effortlessly, even if they had been
Figure 1-8: This is the
Olympus LS-100 audio
recorder that can couple
tightly with the E-M1 when
shooting video.
TIP: Make sure the LS-100’s firmware is up to date before attempting this.

Timecode Support 19
started and stopped many times during the live event. That’s a huge
timesaver in post-production.
Traditionally, professional cameras would all be tethered to an external
time-code generator so they would all be synchronized and to prevent drift;
regretfully there is no such ability to accept an external sync signal with
this camera. The best workaround is for many people to manually “type
in” a starting point in the TIME CODE SETTINGS MANUAL INPUT
MENU. I talk about how to do this in this section.
To invoke and configure the Time Code feature, go to MENU Gear I
(Movie) Time Code Settings. You then have three options, which I’ll
talk more about below.
Time Code Mode
[Note: This only applies to NTSC video modes. PAL is a more civilized
video standard and doesn’t need to worry about drop frame time codes.]
Here you can specify either a “drop frame” (DF) or “Non-Drop Frame”
(NDF). You can think of a “drop frame” in the context of a leap year –
there’s not an even number of days per year – in fact there are 365 ¼. So to
compensate for this non-whole number we actually do an “add frame” –
add one day every 4 years.
Well, there’s not exactly 30 frames per second in NTSC video. There’s
actually 29.97 – slightly less. (Don't ask.) And so to make sure that the
SMPTE time code always matches the exact length of the video, the
concept of Drop Frame was invented – the time code will skip the first two
numbers each minute (except every 10th minute) so that no drift will result
and the time code will always match the actual video length. (That’s for
30p. At 60p, the first four frame numbers are dropped every minute.)
Want more detail? Here’s a good site from Apple that explains it:
http://bit.ly/1BlCL49 .
Count Up
In the synchronized, multi-camera scenario I outlined in the beginning of
this section, I talked about having several people set the Starting Time (next
section) all at the same time to make sure all cameras were synchronized to
the same time code. In that scenario, you also want to have the Count Up

20 E-M1 Firmware v4.0 Supplement
Contents of this book Copyright © 2016 Gary L. Friedman. All rights reserved.
variable set to “Free Run”, meaning “the timecode is always counting up,
regardless of whether you’re shooting video or not” (or even whether the
camera is on or not). (And when this is set you can always see the time
code running in the upper-left-hand corner of the viewfinder when the
exposure mode dial is set to “Movie”.) If you’re an editor of a multi-
camera event, you can see the benefit of this setting: When you pull the
video clips into your editing program, the clips will automatically organize
themselves on the timeline properly, even if some cameras were starting
and stopping throughout the event.
The other option for this setting is “Record Run” (commonly called “Rec
Run”) where the time code doesn’t advance unless video is actually
recording.
Starting Time
This one’s a little intuitive. With this feature you can Reset the time code
to zero, manually type in a time of your choice, or set the time code based
on the system clock. No wrong way to go as long as the timecode values
on the other cameras match yours.
TIP 1: What’s the difference between this timecode feature and the Slate Tone
described on page 17? The slate tone was designed to be used by one camera
and an external audio recorder; whereas the Time Codes are necessary when
you’re synchronizing multiple cameras in editing.
TIP 2: True professional camcorders have the ability to accept an external
SMTE Time Code signal so that multiple cameras are synchronized and there is
no drift. This camera can’t accept a timecode signal; however if you really
want to Jam Sync your time code to multiple cameras, there's a third-party
product called LockIt Buddy which injects a signal into your microphone jack
and records the timecode onto one of your two audio channels. Hey, it's an
option and pretty affordable at $155 USD: http://www.lockitbuddy.com
TIP 3: The time code will not be recorded with Motion JPEG movies shot in
or .

Shutter Function 21
SHUTTER FUNCTION
Another new feature can be found in MENU Gear I (Movie)
Shutter Function, which lets you define what the shutter release button
does when you’re shooting movies in Movie mode:
Mode 1: When shooting movies, pressing the shutter release button will
take a picture. (Recall that this means “movie stops, an image is captured,
and the movie starts again”.)
Mode 2: The shutter release button starts / stops the video. The red button
becomes inert and you CANNOT take stills during movies like you can
with Mode 1. Mode 2 is for videographers who feel that the red button is
not ergonomically placed.
FOUR NEW “MONITOR DISPLAY” ICONS
This one is kind of self-explanatory. Four new icons are now selectable to
appear when you’re shooting video. You can see all 4 in Figure 1-9.
You can make these and other icons appear or disappear in movie mode via
MENU Gear I Info Settings [Check all the icons you want to
see].
Figure 1-9: 4 new icons are available in Movie mode: 1) Audio level
meter 2) Shooting mode (P, A, S, or M) 3) Movie Effect (page 249 of the
original ebook) 4) Time Code (two sections ago).

22 E-M1 Firmware v4.0 Supplement
Contents of this book Copyright © 2016 Gary L. Friedman. All rights reserved.
DISABLE THE SNAP RING
On page 22 of my original book, I talked about the “Snap Ring” which
appears on only a handful of Zuiko lenses. Most new owners found out
about it only when they accidentally moved it and then couldn’t figure out
why their camera wouldn’t autofocus anymore.
Well, to address that problem, Olympus has given you the ability to disable
that functionality entirely (as long as the lens' firmware is updated as well).
This can prevent confusion out in the field if you accidently slide the ring
back and wonder why your lens isn't focusing.
To invoke it, visit MENU Gear A MF Clutch and choose either
“Operative” or “Inoperative”. (I suppose that would be a tad bit clearer
than “On” or “Off”.) “Inoperative” means the snap ring is disabled; its
position has no effect on autofocus mode.
O.I.S. IMPROVEMENTS
START / STOP MOVIES WITH YOUR SMARTPHONE
The other improvement has to do
with pairing your camera with
Olympus’ smartphone app called
Olympus Image Share (O.I.S). In
addition to being able to shoot a
picture remotely (and have your
phone act as the electronic
viewfinder), you can now start and
stop movies with your phone as
well. I guess the technical
problem they had to overcome was
to have the camera capture full-on
video while at the same time transmit subsampled video (every few frames
or so) to the smartphone. Anyway, they did it.
Figure 1-10: You can now shoot
movies via the smartphone app!

Live Composite on OI.Share 23
To use, go to the “Remote Control”
section of the smartphone app (Full
instructions on how to do this appear in
the original book on page 275), hit the
icon in the upper-right-hand corner
(normally it says “P” for Program mode
as the factory default), and choose the
rightmost “movie” icon from the range of
options that appear. You’re now shooting
movies. Mind you, you have no control
over things like focusing – even if you
have your focus mode set to “Manual
Focus”, when shooting movies with your
smartphone it will always be in C-AF
(Continuous Autofocus) mode.
Now you can hide your camera near that
bird’s nest and take all the voyeuristic
videos you want. More about the
smartphone app can be found in Chapter 9
of the original book.
LIVE COMPOSITE ON OI.SHARE
This simply means that Live Composite now joins the other extremely long
shutter speeds in Manual exposure mode, such as Live Time, and Live Bulb
(Figure 1-11).
MENU RECALL
Have you ever played with some features in a menu, and got frustrated that
each time you hit the Menu button you had to navigate back to that feature
starting from the “Camera 1” menu? (I know I did – of course you do that
a lot when writing a book on a camera.)
Anyway, this feature will take you to the menu you last visited when you
press the Menu button instead of Camera 1 each time. To enable it, go to
MENU Gear D Menu recall Recall. (Or you can choose
“Reset”, which restores the camera to the old behavior.)
Figure 1-11: Live Composite
now joins Live Bulb and Live Time
on the Smartphone app.

24 E-M1 Firmware v4.0 Supplement
Contents of this book Copyright © 2016 Gary L. Friedman. All rights reserved.
ADVANCED FOCUS PEAKING
The original E-M1 had only two colors for focus peaking: Black and white
(Page 34 of the book). Now you have more choices of colors (Yellow and
Red in addition to Black and white), three different intensity levels (I prefer
“High” myself), and a new feature called “Image Brightness Adjustment”
which plays with the live view image in order to make the Peaking Color
more visible in certain circumstances. (I’d keep that last item “off” since
you’ll be nullifying one of the great benefits of Live View, which is seeing
how your images will turn out before you shoot.)
Like most features, there are two ways to change the Peaking Settings:
Either by pressing INFO when the peaking function is working, or via
MENU Gear D Peaking Settings.
LIVE VIEW BOOST II
The original Live View Boost feature was described in the original book on
page 313, and it was designed to allow studio photographers to compose
their shot even when the f/stop, shutter speed, and ISO let in so little light
that the viewfinder looks black.
Now this feature, reachable via MENU Gear D Live View Boost has
been expanded to accommodate astrophotographers who need to frame
their shots in near total darkness. The feature lets you specify how it will
behave in four types of shooting conditions:
When shooting on manual exposure (this is the original studio
scenario outlined above)
Bulb / Time – When you are taking time exposures with the camera
on a tripod, the exposure mode dial set to “M”, and the shutter
speed set to “Live Bulb” or “Live Time”.
Live Composite
TIP: Focus Peaking only works for stills, not video.

Live Composite on OI.Share 25
“Others” (And I’m honestly not certain what other scenarios this
covers.)
And the choices you have for all of the above settings are:
Off: (Obvious)
On1: The Live View image is amplified so it looks “normal”. The
Live View image updates in real time.
On2: The Live View image is amplified and oversampled so it
looks “normal” in almost total darkness. The Live View image
updates every ½ second. Try this in a totally dark room - you really
will be able to compose your shot!
Where would you use this new feature? The figure below shows a situation
where the Live Boost II feature would have been VERY HANDY.
Figure 1-12: This Star Trails picture was taken on a moonless night with very little
ambient lighting. The Live View display looked pitch black. How can you compose
your shot if your viewfinder is black? Live Boost II was made to handle just such
situations. (And “Live Composite” was born to get these star trail shots with a
minimum of noise!)

26 E-M1 Firmware v4.0 Supplement
Contents of this book Copyright © 2016 Gary L. Friedman. All rights reserved.
S-OVF
This used to be called MENU Gear D Expand LV Dyn. Range
(page 225 in the original book). This feature attempted to give you a
preview of what your final results would look like beforehand when you’re
in HDR mode. Now with the new firmware release, it’s available when
you’re shooting stills too.
It was ostensibly designed for those times when you’re using the EVF (only
the EVF; this doesn’t apply to the LCD) outdoors on a very bright day.
Under those conditions it’s not uncommon to perceive the EVF as being
dim compared to its surroundings, making it difficult to compose. Hardest
hit in this scenario are the blacks in your scene – your eye just won’t be
able to tell if there are details in the shadows or not. There’s a good chance
you’ve experienced this yourself already.
So this function is designed to be assigned to a button via MENU Gear
B Button Function, and then when actuated, it will brighten the
shadows in the EVF so you can get a better idea of what you’re shooting on
a bright day. The lightened blacks will NOT show up in the final image;
however.
KEYSTONE COMPENSATION
The ability to straighten lines (like when doing architectural shooting, for
example) isn’t a new feature; however now it can be assigned to a button
via MENU Gear B Button Function. Keystone Compensation was
covered in the Firmware v2.0 ebook supplement starting on page 16.
"UNDERWATER" PICTURE MODE
There was already an “Underwater” white balance setting in the original E-
M1…and now there’s a new Underwater option for MENU 1
Picture Mode. What does it do? It lightens the shadows and adds a
slight yellowish tint to the image, and saturates the colors ever so slightly –
just the kind of corrections usually needed when shooting with an
underwater housing. The kinds of corrections it applies goes further than
simply the yellowish tinge that the Underwater White Balance would
produce on its own.

Live Composite on OI.Share 27
OLYMPUS CAPTURE DESKTOP SOFTWARE
This very powerful Mac / PC software was first described in the Firmware
v2 ebooklet starting on page 9. Originally designed to support tethered
shooting, Olympus has since added new features to the program to allow
much greater computer control of the camera’s shooting variables.
Before I get into the new features, let me remind you that you can
download the software here: http://goo.gl/VIgmlO Once installed, check
for updates and then download version 1.1 which contains the new features.
A wonderful video overview of the new features can be found here:
http://bit.ly/20w6DZb And a video tutorial showing how to use it can be
viewed here: https://youtu.be/rKdNy7l2XRU .
TIP: In the documentation, Olympus is assuming that you’ll be using this
Underwater Picture Mode using an underwater housing with its own flash, which
is why they recommend disabling the Flash+WB feature when in Underwater
mode: MENU Gear G +WB Off.
Figure 1-13: The desktop view of Olympus Capture software v1.1.

28 E-M1 Firmware v4.0 Supplement
Contents of this book Copyright © 2016 Gary L. Friedman. All rights reserved.
Here’s an overview of the new features provided. Hitting the “?” icon in
the upper-right-hand corner of the Olympus Capture software will bring up
their help guide which can walk you through the details of how they’re all
used.
The Super Control Panel can now be customized to suit your
personal needs.
Keystone compensation control has been added as well.
The transfer speeds from the camera to the computer have been
increased, negating the need for a memory card to be in the camera
while shooting tethered-ly. (That’s a word!)
You can control the Live Bulb, Live Time, and Live Composite
modes from your computer, and also watch as the image
“develops” in real time.
Full control over movie mode as well.
You can see the AF point display – that is, which autofocus points
the camera used.
Full control of the new features outlined in this ebooklet:
o Underwater mode added to “Finishing Modes”
o Live View Boost II
o Silent Shooting
More detail on the program’s full feature set can be found here:
http://bit.ly/1NE3Hk4 .
There’s one feature, though, that left me scratching my head: “It is now
possible to use an image with a transparent background (PNG) as an
overlay image”. What’s THAT for?
If you’ve ever gone shopping on a website that offers a product in multiple
colors, it’s tools like this that allow the photographer to line up the product
position EXACTLY from shot to shot. The software allows you to
“overlay” a transparent version of your previous shot so you can place the
new product so that it lines up exactly with the previous shot. Very handy!

Live Composite on OI.Share 29
TWO NEW MONITOR DISPLAY ICONS
“Monitor Display” is Olympus language for “New Icons will be shown to
you when you’re shooting in Live View mode”. There are two new icons
when shooting stills, and four new ones when shooting movies. (The one
on movies was covered in this e-booklet starting on page 21.) I reckon
these are two camera settings you don’t really need to be aware of as you’re
shooting… but here they are.
The first tells you when the Simulated Optical Viewfinder (S-OVF) has
been invoked. Because this feature only applies to the electronic
viewfinder, the icon will only appear there when your eye is looking
through it.
The second tells you when the enhanced anti-shock or Silent Shooting
modes are active. (See Figure 1-14.)
Figure 1-14: These are the two new icons that can appear in your Live View
image. Because the first one (Simulated Optical Viewfinder, or S-OVF) only
appears in the EVF, I had to use this example from the Olympus manual to
illustrate it. (The 2nd
icon shows you when you’re shooting with Anti-Shock or
Silent Shutter.)
30 E-M1 Firmware v4.0 Supplement
Contents of this book Copyright © 2016 Gary L. Friedman. All rights reserved.
THE END
I hope you found this free update helpful! If you did, there’s something
you can do: please tell the world! Word-of-mouth from extremely satisfied
customers is my only means of advertising. So please let people know
about my ebooks on this and several other camera brands at
FriedmanArchives.com/ebooks .
Also, if you feel that you’re spending too much time trying to understand
your camera’s features and not enough time on actual photography, know
that you’re not alone. We never had any of this technology in the old day,
yet we were still able to get “Wow!” images on slides – without shooting
RAW and without requiring Photoshop.
With the Friedman Archives Seminars, I can teach you how to take
“Wow!” images while keeping your camera on auto. (Really!) And now
they’re available in a streaming format, so you can enjoy this back-to-
photography’s-roots course in a signature friendly, clear, and intuitive way.
Check it out!
Sincerely, Gary Friedman