The art of papercraft
104
1 The art of papercraft Techniques and inspirations Monica Giunchi
-
Upload
monica-giunchi -
Category
Documents
-
view
231 -
download
1
description
Level 2 "Everything about one thing" brief, Typography and Print Module www.monicagiunchi.com
Transcript of The art of papercraft

1
The art ofpapercraft
Techniquesand
inspirations
Monica Giunchi

2

1

“With just a few foldsor drops of glue,the basic sheet morphsfrom flat plane into an actualbodythat represents and defines its occupiedspace”


5
ContentIntroduction
Mixed Techniques Do it yourself Paper Blossoms Pillow Box Rosy Stationery
Papercutting Do it yourself Snowflake Garland Papercut Cards Silhouttes Artists' Work Made by Juliene Rob Ryan
Origami Do it yourself Symbols Basic Folds Origami Fox Papercrane Origami Bear Artists' Work Roman Diaz Robert J. Lang Paul Jackson
Stop-motion Sean Pecknold, "Mykonos" Nadiah Almahdaly, "Kami"
#1 7
1317182026
2933363842474850
5361626466707479808284
879094
#2
#3
#4
#5

6
7
01Intro

8
In the landscape of the contemporary life, where we seem to increasingly spend
our time in front of a computer, I think it is important to regather the manuality
and tactility of handmade crafts.
The aim of my book is therefore to give a starting point to all those who wants
to rediscover creativity through a simple medium like paper.
Why this book
9
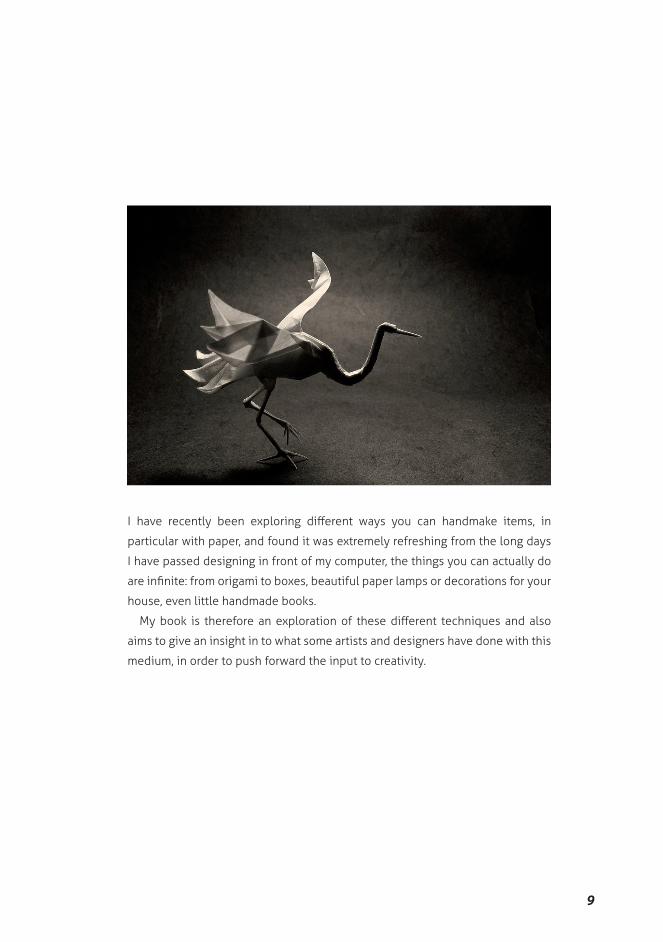
I have recently been exploring different ways you can handmake items, in
particular with paper, and found it was extremely refreshing from the long days
I have passed designing in front of my computer, the things you can actually do
are infinite: from origami to boxes, beautiful paper lamps or decorations for your
house, even little handmade books.
My book is therefore an exploration of these different techniques and also
aims to give an insight in to what some artists and designers have done with this
medium, in order to push forward the input to creativity.
10
The earliest example of ‘paper-folding’ was an ancient
Egyption map, drawn on a paper like substance and folded
into a rectangle, like modern road maps.
Back then, it wasn’t possible to create intricate paper
folding, because the right paper had not been invented.
When the Chinese invented wood based paper, it became
possible to fold the paper more crisply and with more
precision (2nd century B.C.). It is not known exactally when
it started, but the first Japanease oragami dates from the
6th century A.D.
A brief history
11
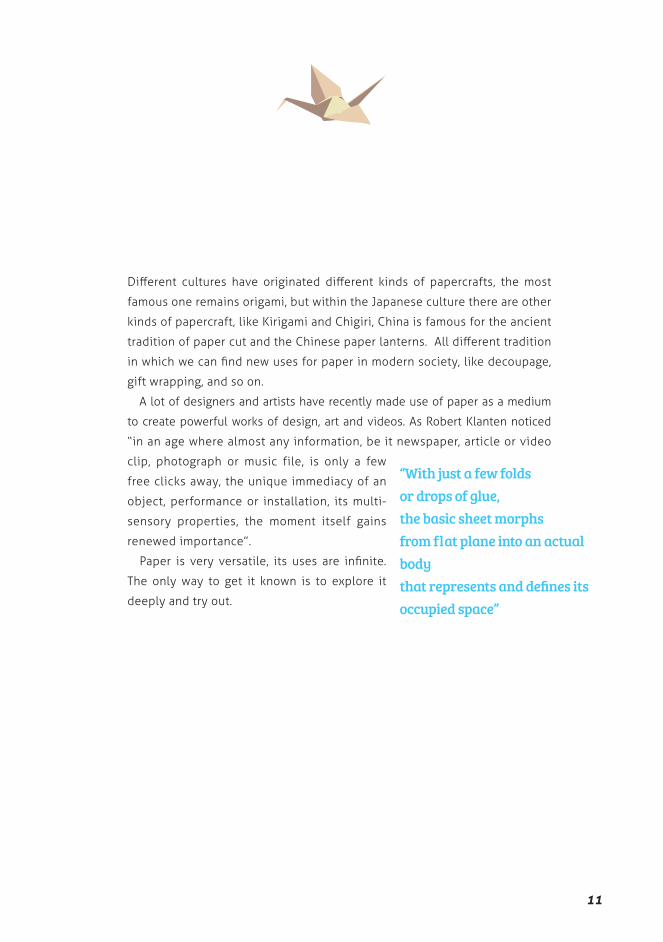
Different cultures have originated different kinds of papercrafts, the most
famous one remains origami, but within the Japanese culture there are other
kinds of papercraft, like Kirigami and Chigiri, China is famous for the ancient
tradition of paper cut and the Chinese paper lanterns. All different tradition
in which we can find new uses for paper in modern society, like decoupage,
gift wrapping, and so on.
A lot of designers and artists have recently made use of paper as a medium
to create powerful works of design, art and videos. As Robert Klanten noticed
“in an age where almost any information, be it newspaper, article or video
clip, photograph or music file, is only a few
free clicks away, the unique immediacy of an
object, performance or installation, its multi-
sensory properties, the moment itself gains
renewed importance”.
Paper is very versatile, its uses are infinite.
The only way to get it known is to explore it
deeply and try out.
“With just a few foldsor drops of glue,the basic sheet morphsfrom flat plane into an actual bodythat represents and defines its occupied space”

12
13
02Mixed Techniques
14
15
To familiarize with papercraft I thought it was a good
idea to start off with easy to make artworks, gradually
progressing to harder pieces of works.
In this chapter you will therefore find a variety of
examples of papercrafts, from house decorations to
stationery items, with the relative instructions on how
to remake them, and also some works of different
practitioners which have used paper in the most
diverse ways.
To start off

16

17
02.01Mixed Techniques
Do ityourself

18
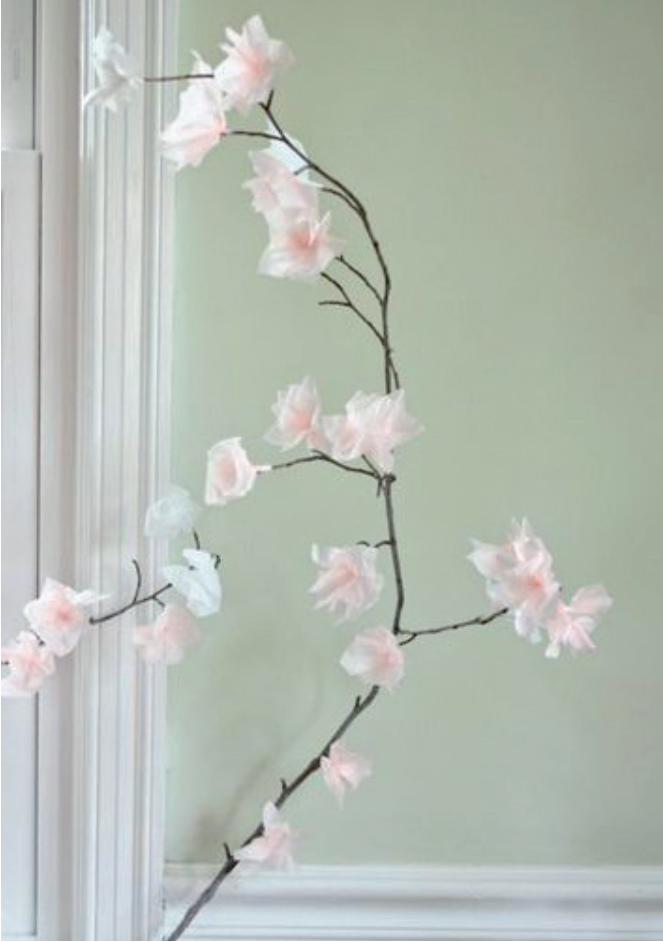
Cut tissue paper into squares
of 2 inches and overlap them
in a star.
Pinch them in the middle
to form a light crease, then
pinch in the other direction.
Twist the pinched parts to form
a “stem”.
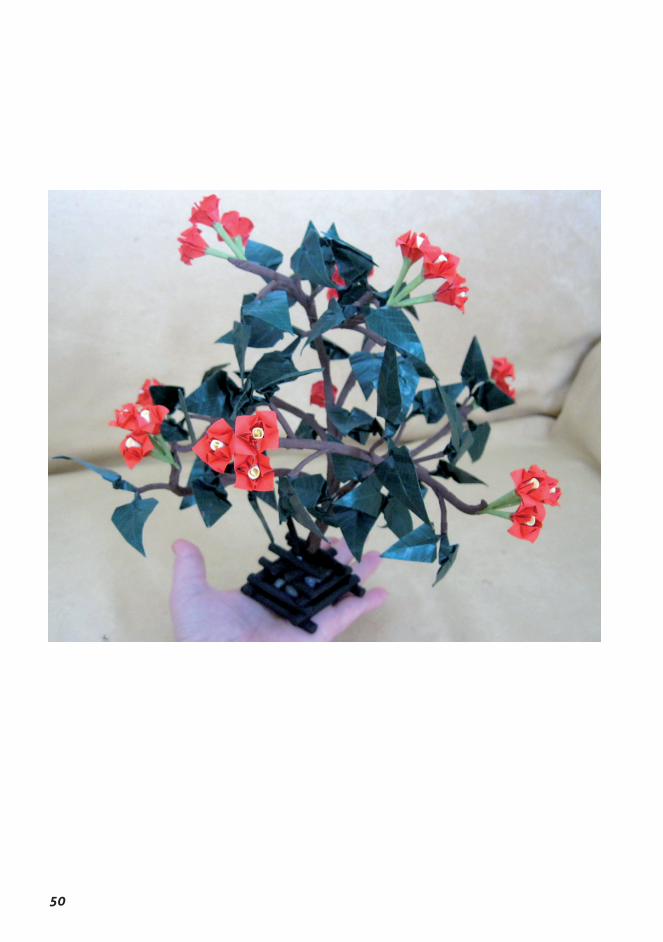
Paper Blossoms
Wrap the tape around an
offshoot of the branch to
secure the blossom.
Attach a small piece of scotch
tape to the edge of the stem.
Repeat until you create a
beautiful blossomed branch.
These paper blossoms could be a really nice decoration for a bedroom or living
room, and are very quick and cheap to realize.
Material: Tree Bunches,Tissue Paper, Scissors, Scotch Tape, Fishing Line
#1
#1
#4
#4
#2
#2
#5
#5
#3
#3
#6
19
#1
20
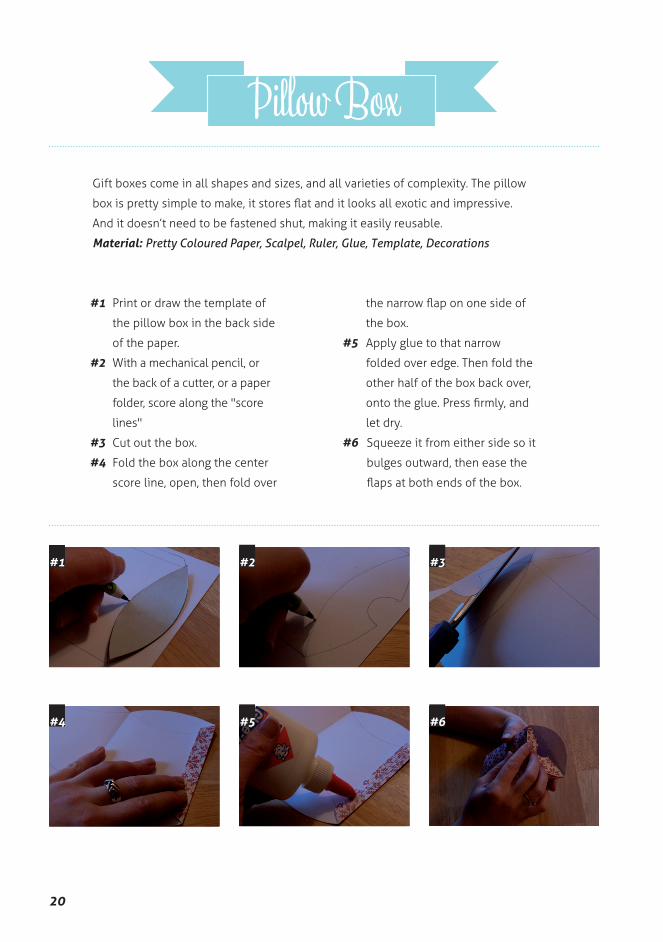
Print or draw the template of
the pillow box in the back side
of the paper.
With a mechanical pencil, or
the back of a cutter, or a paper
folder, score along the "score
lines"
Cut out the box.
Fold the box along the center
score line, open, then fold over
Apply glue to that narrow
folded over edge. Then fold the
other half of the box back over,
onto the glue. Press firmly, and
let dry.
the narrow flap on one side of
the box.
Squeeze it from either side so it
bulges outward, then ease the
flaps at both ends of the box.
Gift boxes come in all shapes and sizes, and all varieties of complexity. The pillow
box is pretty simple to make, it stores flat and it looks all exotic and impressive.
And it doesn’t need to be fastened shut, making it easily reusable.
Material: Pretty Coloured Paper, Scalpel, Ruler, Glue, Template, Decorations
#1
#1
#4
#4
#2
#2
#5
#5 #6
#3
#3
#6
Pillow Box

21
Fill with good things, then tie some ribbon around the box.
You can get fancy and make all kinds of wraps, ribbons and other
decorations for the box.
22
Pillow BoxTemplate

23

24
Cut off stem end with a
sharp knife.
Stand the stem on a paper
towel, cut-side down, for 5
minutes to dry.
Press cut side onto a large
stamp pad the onto cards,
stationery, and more,
blotting on paper towel
between presses.
Leafy vegetables make great-tasting salads, and sumptuous floral-shaped stamps,
too. Here, the end of a head of Treviso radicchio yields a roselike print. You can vary
stamp shapes with other vegetables, such as romaine lettuce stems or even brussels
sprouts cut in half.
Material: Stamp pad, Treviso radicchio, knife, Card.
#1
#2
#3
Rosy Stationery

25
26
27
03Papercutting

28
Papercutting is an ancient form of folk art and its history lies in China, where the
art is known as jian zhi. Long traditions in papercutting exist in other countries too,
including kirie in Japan, sanjihi in India, and the famous papel picados in Mexico.
Creative working in this medium use a number of different techniques. Some cut
straight into chosen paper, essentially drawing with their cutting tool. Others first
sketch or print out their design and then cut around its marked-out lines. Tools may
include may include scissors, scalpels, X-Acto knives, or other forms of blade.
The art of papercutting and paper crafting as a whole has seen a considerable rise in popularity in recent years, but in existence since as far back as the sixth century.
Introduction

29
Most papercutters tend to start each new piece by cutting out the most difficult
parts first, before moving on to the rest of the artwork.
Curved areas are best cut with a swift, confident movement; angular areas with
shorter stabbing motions.
Another good tip is to cut toward yourself and rotate the artwork on a table to
make that possible. That is not practical when working on large pieces but works
well for small pieces.
Technique Tips
30
Paper
It is best to use a light-to-medium weight paper when cutting more
intricate, detailed designs, but for simpler designs a heavier stock can
be used. As a general rule, try not to use a highly textured stock as the
fibers in the paper will drag when you cut it.
Scalpel
Also known as a lancet, a scalpel is a sharp, steel-bladed instrument
used for cutting. Scalpels are either disposable or have replaceable
blades.
Craft Mat
Otherwise known as a self-healing mat, this is important as it protects
both the work surface and your blade and provide a solid base on which
to work.
Paper cutting tools
31
03.01Papercutting
Do ityourself
03.01Paper Cutting
Do ityourself

32

33
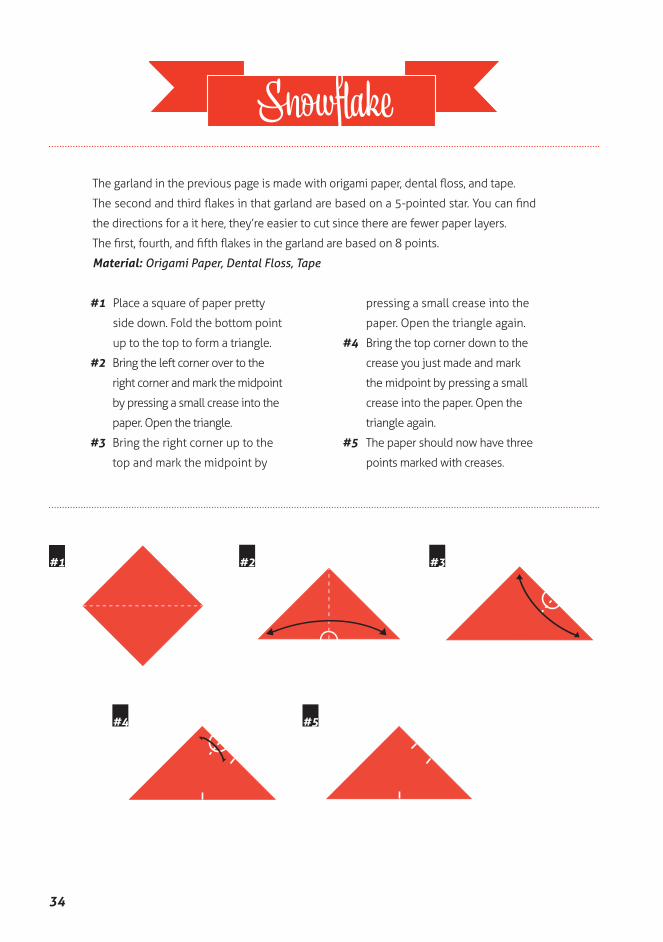
34
Place a square of paper pretty
side down. Fold the bottom point
up to the top to form a triangle.
Bring the left corner over to the
right corner and mark the midpoint
by pressing a small crease into the
paper. Open the triangle.
Bring the right corner up to the
top and mark the midpoint by
Bring the top corner down to the
crease you just made and mark
the midpoint by pressing a small
crease into the paper. Open the
triangle again.
pressing a small crease into the
paper. Open the triangle again.
Snowflake
The paper should now have three
points marked with creases.
The garland in the previous page is made with origami paper, dental floss, and tape.
The second and third flakes in that garland are based on a 5-pointed star. You can find
the directions for a it here, they’re easier to cut since there are fewer paper layers.
The first, fourth, and fifth flakes in the garland are based on 8 points.
Material: Origami Paper, Dental Floss, Tape
#1
#1
#4
#4
#2
#2
#5
#5
#3
#3
Snowflake

35
Fold the right corner upward so
the bottom edge of the triangle
#6 #8#7
meets the upper crease.
Fold the left corner upward so
the bottom edge of the triangle
Fold the resulting shape in half
so the right edge aligns with the
opposite side.
aligns with the opposite side.
Cut your design and open.
#7
#8
#9
#6
#9

36
Draw by pencil, or on graphic
software like Illustrator for your
initial design.
Cut off the parts with a scalpel, Stick the papercut on your card.
it is advisable to cut on the
opposite side that you want as
final piece.
With simply a pencil and a scalpel you can create beautiful papercut designs. You
can also draw your design on graphic software and print it if you find that easier.
Get creative and try to be precise with your scalpel.
Material: Coloured Card, Scalpel. Cutting Mat, Glue
#1
#2 #3
Papercut Cards
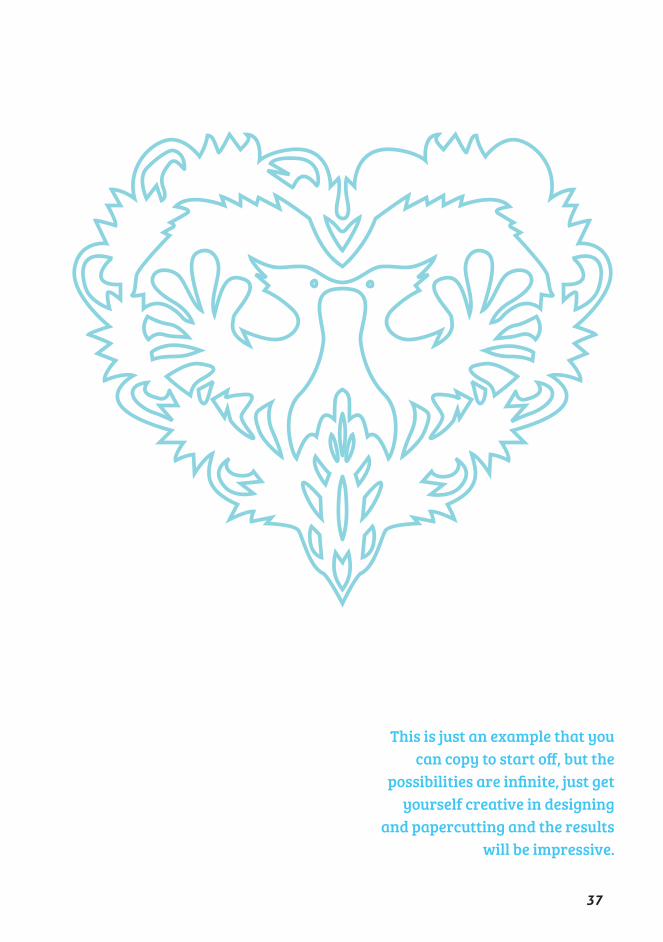
37
This is just an example that you can copy to start off, but the
possibilities are infinite, just get yourself creative in designing
and papercutting and the results will be impressive.

38

39

40
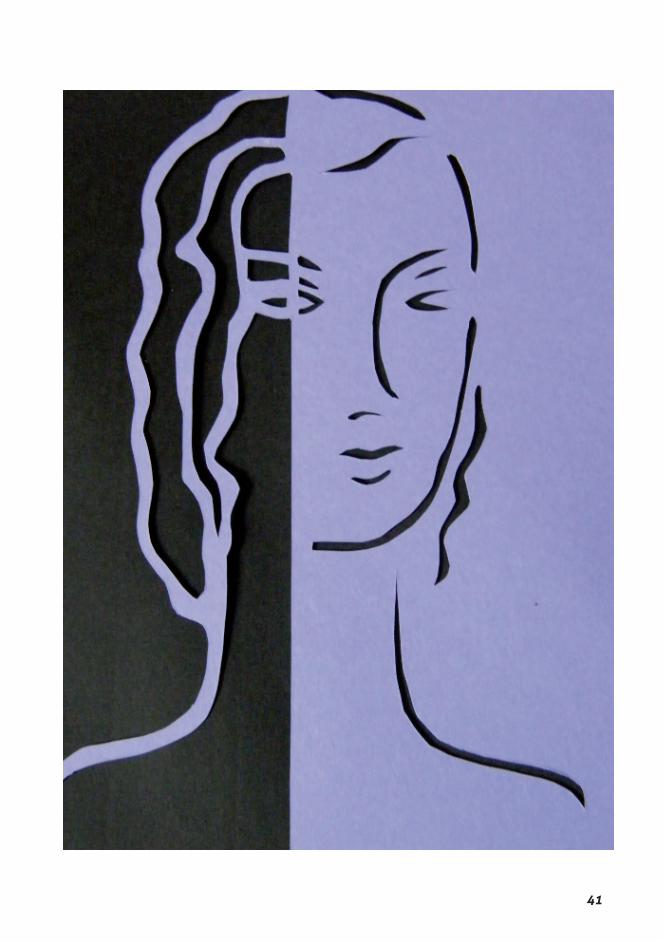
Here is another idea for a papercut card or just for a beautiful piece to hang on
your walls.
Material: Coloured Card, Scalpel. Cutting Mat, Glue
Draw by pencil, or on graphic
software like Illustrator your
design.
Cut off the parts with a scalpel,
it is advisable to cut on the
Stick the papercut on your card
or get creative and invent your
final output!
opposite side that you want as
final piece.
#1
#2
#3
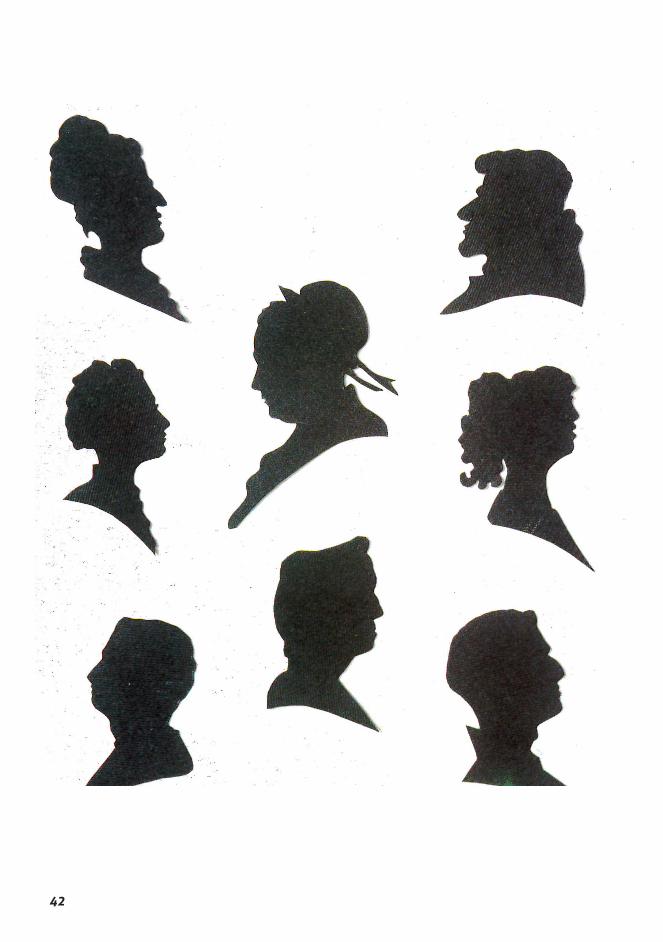
Silhouettes
41
42

43

44
45
03.02Paper Cutting
Artist'swork

46
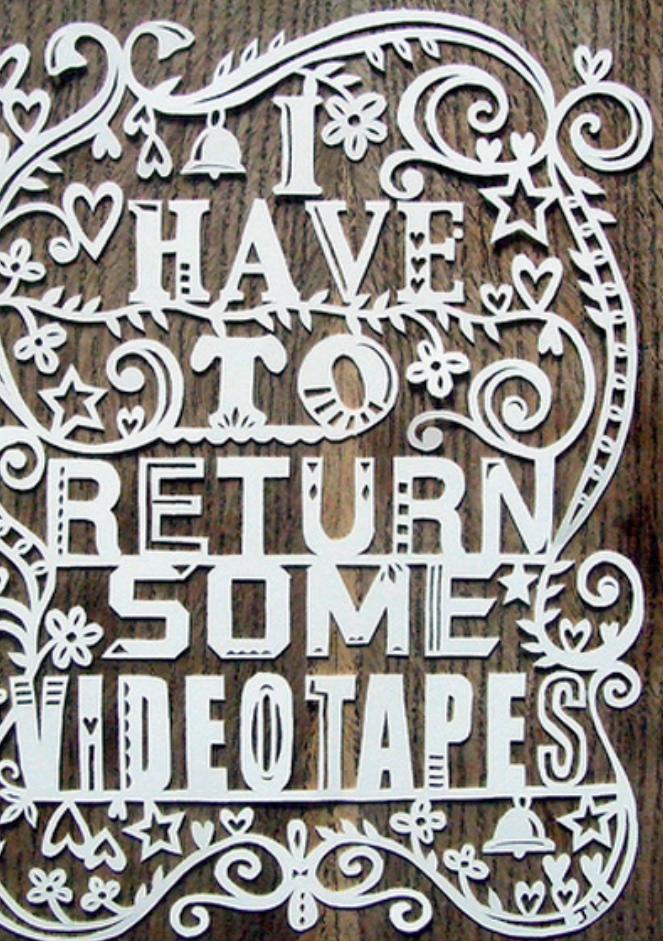
Made by Juliene is
papercutting artist Julene
Harrison’s company. She
makes handmade papercuts
to order, from invitations to
cards to letterheads, in her
distinctive illustrative and
typographic style.
Harrison starts her designs in
rough in Adobe Photoshop,
working out a layout and
sketching details of more
specific elements. She then
prints out her rough design
ready for the cutting process,
for which she uses a scalpel.
“Originally a constructed textile designer, I have now started papercutting. It’s a medium I have quickly grown to love. I get a lot of pleasure turning a single sheet of paper into something people seem to enjoy”.
Made by Juliene
47
48
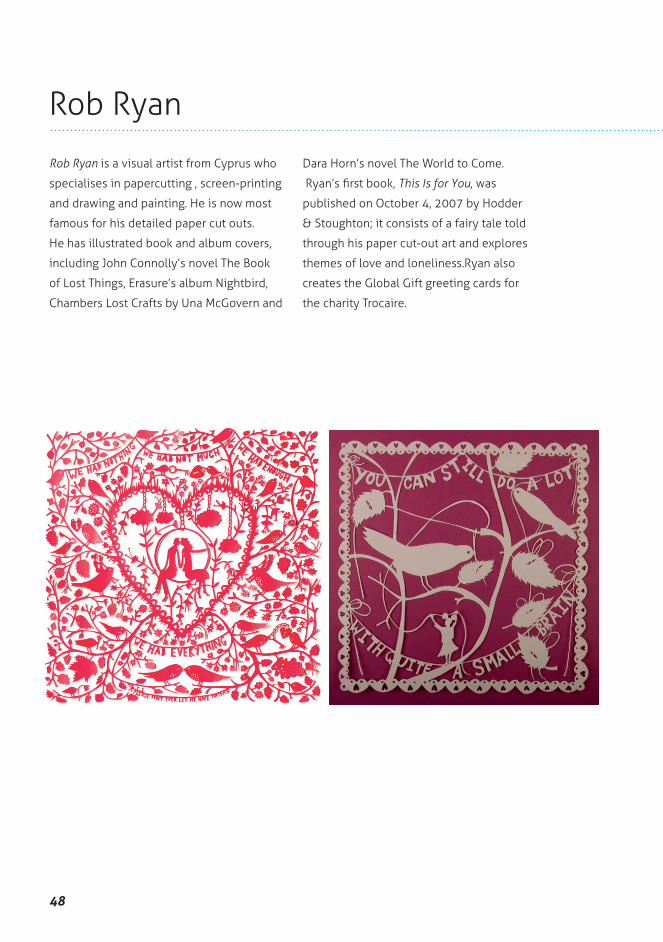
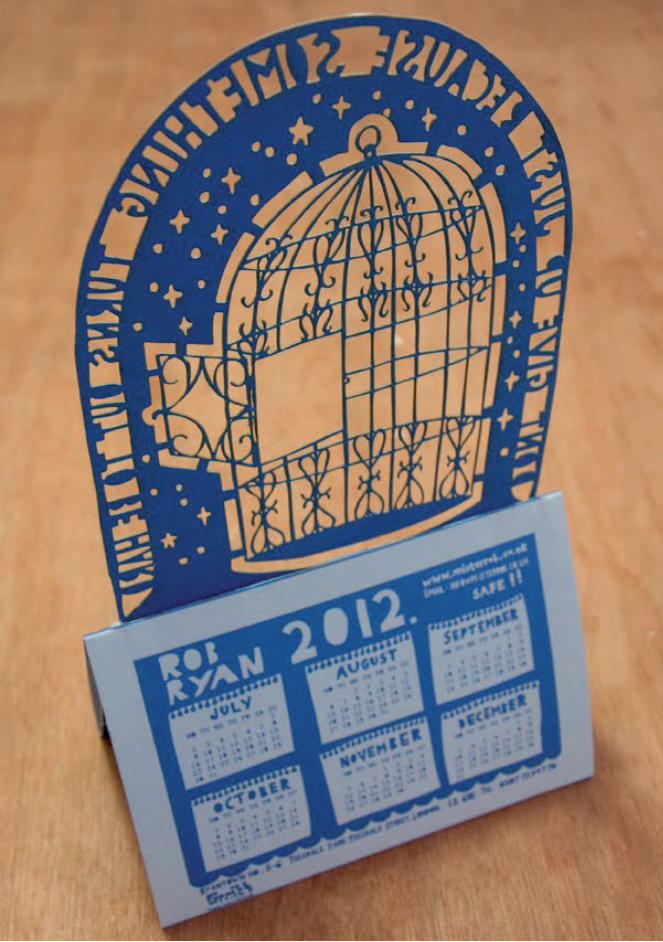
Rob Ryan is a visual artist from Cyprus who
specialises in papercutting , screen-printing
and drawing and painting. He is now most
famous for his detailed paper cut outs.
He has illustrated book and album covers,
including John Connolly’s novel The Book
of Lost Things, Erasure’s album Nightbird,
Chambers Lost Crafts by Una McGovern and
Dara Horn’s novel The World to Come.
Ryan’s first book, This Is for You, was
published on October 4, 2007 by Hodder
& Stoughton; it consists of a fairy tale told
through his paper cut-out art and explores
themes of love and loneliness.Ryan also
creates the Global Gift greeting cards for
the charity Trocaire.
Rob Ryan
49
50

51
04Origami
52
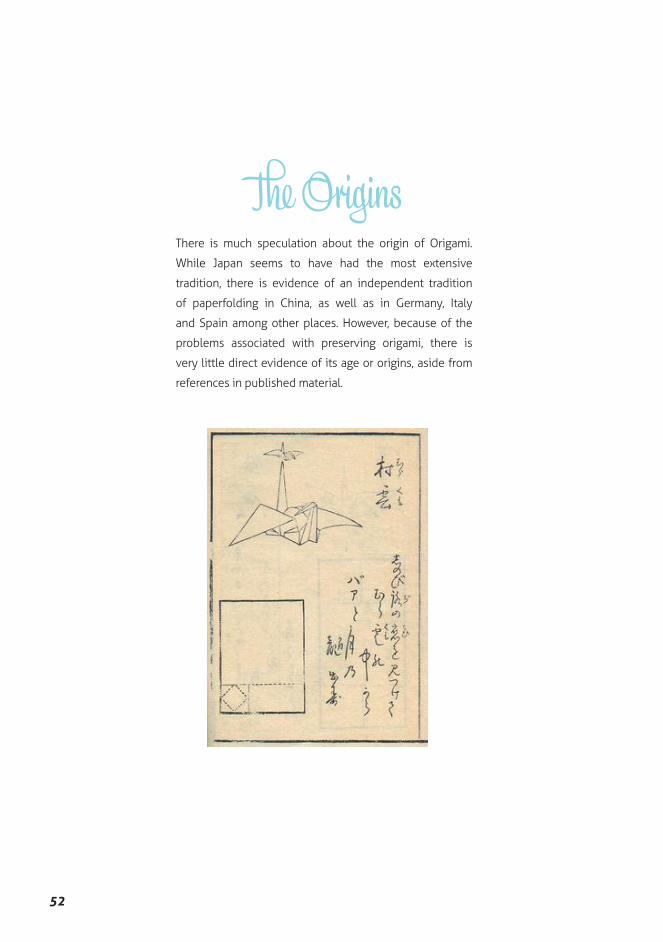
� OriginsThere is much speculation about the origin of Origami.
While Japan seems to have had the most extensive
tradition, there is evidence of an independent tradition
of paperfolding in China, as well as in Germany, Italy
and Spain among other places. However, because of the
problems associated with preserving origami, there is
very little direct evidence of its age or origins, aside from
references in published material.

53
In China, traditional funerals include burning
folded paper, most often representations of
gold nuggets (yuanbao). It is not known when
this practice started, but it seems to have
become popular during the Sung Dynasty
(905–1125 CE). The paper folding has typically
been of objects like dishes, hats or boats rather
than animals or flowers.
The earliest evidence of paperfolding in
Europe is a picture of a small paper boat in
Tractatus de sphaera mundi from 1490. There
is also evidence of a cut and folded paper
box from 1440. It is probable paperfolding
in the west originated with the Moors much
earlier, it is not known if it was independently
discovered or knowledge of origami came
along the silk route.
54
In Japan, the earliest unambiguous reference to a paper
model is in a short poem by Ihara Saikaku in 1680 which
describes paper butterflies in a dream. Origami butterflies
were used during the celebration of Shinto weddings to
represent the bride and groom, so paperfolding had already
become a significant aspect of Japanese ceremony by the
Heian period (794–1185) of Japanese history, enough that
the reference in this poem would be recognized. Samurai
warriors would exchange gifts adorned with noshi, a sort of
good luck token made of folded strips of paper.

55
In the early 1900s, Akira Yoshizawa, Kosho Uchiyama,
and others began creating and recording original origami
works. Akira Yoshizawa in particular was responsible for
a number of innovations, such as wet-folding and the
Yoshizawa-Randlett diagramming system, and his work
inspired a renaissance of the art form. During the 1980s
a number of folders started systematically studying the
mathematical properties of folded forms, which led to
a steady increase in the complexity of origami models,
which continued well into the 1990s, after which some
designers started returning to simpler forms.
56
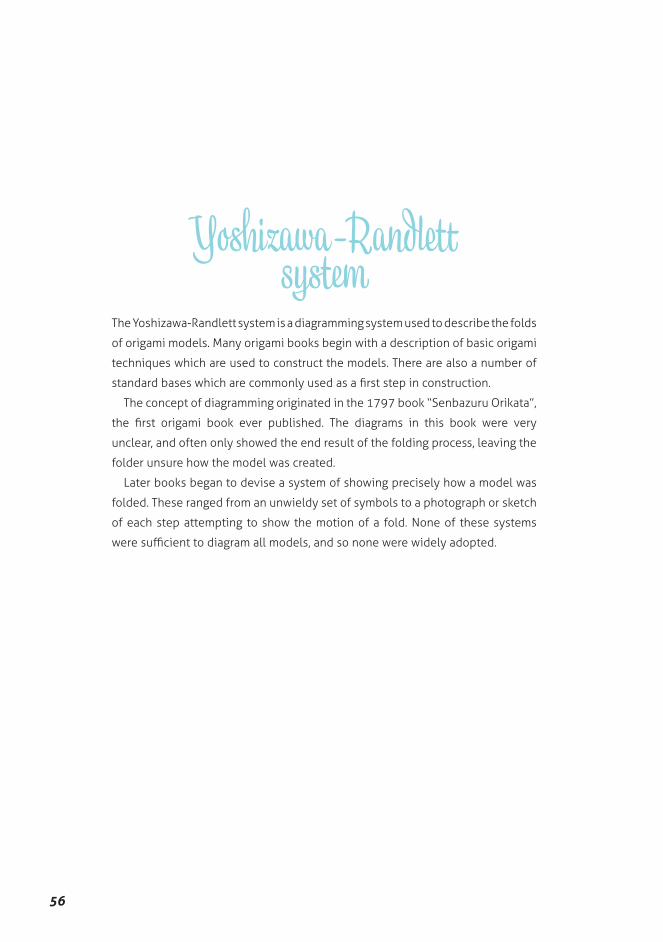
The Yoshizawa-Randlett system is a diagramming system used to describe the folds
of origami models. Many origami books begin with a description of basic origami
techniques which are used to construct the models. There are also a number of
standard bases which are commonly used as a first step in construction.
The concept of diagramming originated in the 1797 book “Senbazuru Orikata”,
the first origami book ever published. The diagrams in this book were very
unclear, and often only showed the end result of the folding process, leaving the
folder unsure how the model was created.
Later books began to devise a system of showing precisely how a model was
folded. These ranged from an unwieldy set of symbols to a photograph or sketch
of each step attempting to show the motion of a fold. None of these systems
were sufficient to diagram all models, and so none were widely adopted.
Yoshizawa-Randlettsystem

57
In the 1950’s and 60’s, Akira Yoshizawa proposed a system of diagramming.
He introduced for the first time its diagramming notation in his first published
monograph, Atarashi Origami Geijutsu (New Origami Art) in 1954. He employed
dotted and dashed lines to represent mountain and valley folds, and a few other
symbols such as the “inflate” and “round” symbols. This system caught the
attention of Samuel Randlett and Robert Harbin, who added a few symbols such
as “rotate” and “zoom in”, and then adopted it as the standard. The Yoshizawa-
Randlett system was first described in Samuel Randlett’s Art of Origami in
1961. It was then accepted as the default throughout the international origami
community, and is still in general use today.

58

59
04.01Origami
Do ityourself
60
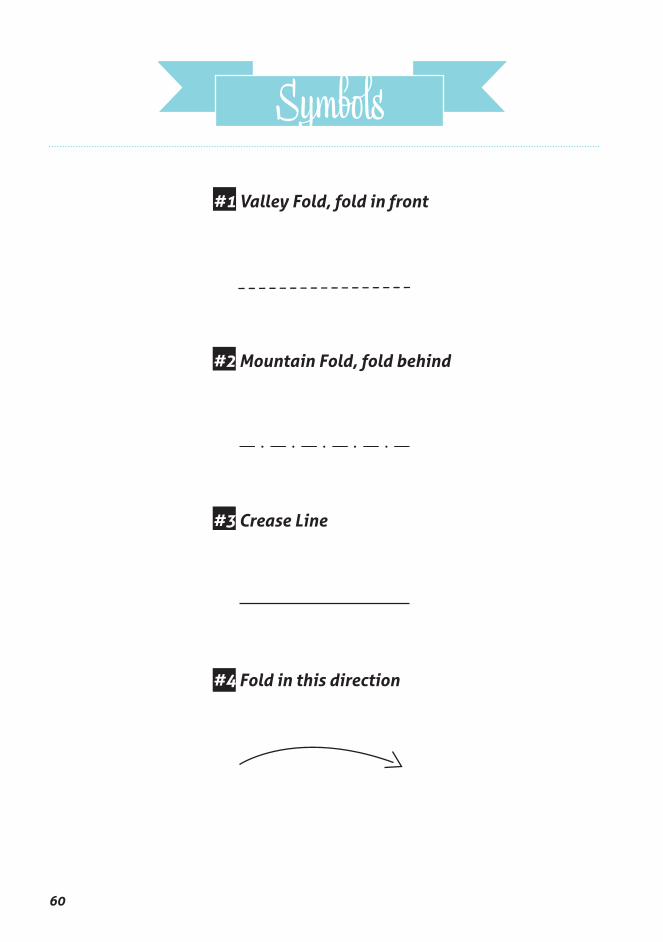
Symbols
#1
#2
#3
#4
Valley Fold, fold in front
Mountain Fold, fold behind
Crease Line
Fold in this direction
61
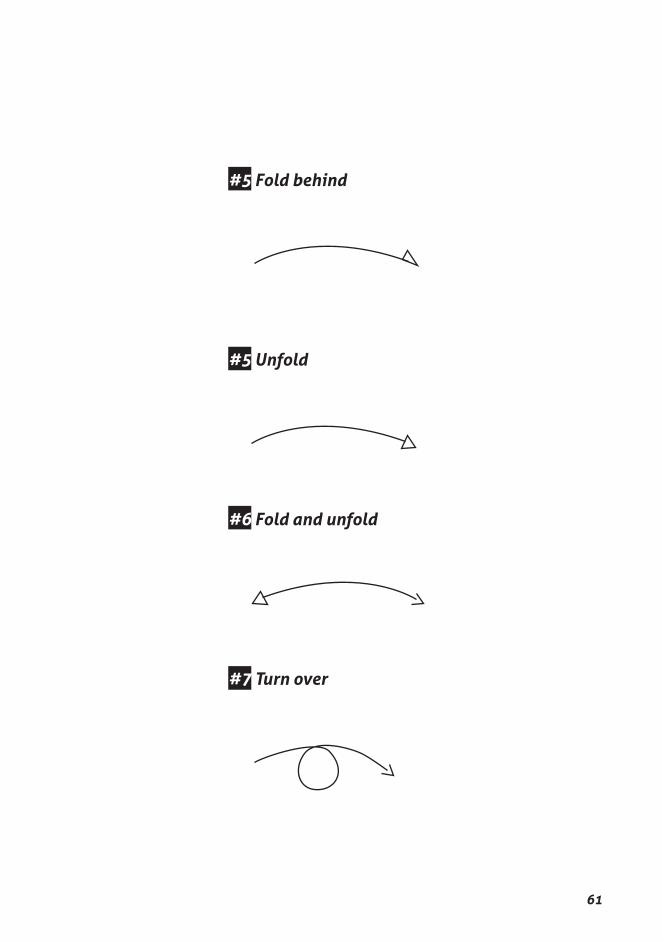
#5
#5
#6
#7
Fold behind
Unfold
Fold and unfold
Turn over

62
Basic Folds
These folds often recurr in origami folding diagrams so it is good to understand them
from the beginning so that when you will be looking at more complex diagrams you
will be able to follow all the passages easily.
Material: Origami Paper
#1
#2
#3
Valley Fold
Mountain Fold
Pleat Fold

63
#4
#5
#6
#7
Inside Crimp Fold
Outside Crimp Fold
Inside Reverse Fold
Outside Reverse Fold

64
Fold in half to create creases,
and then unfold.
Fold in half on the opposite side.
Fold to meet the centre line.
Fold in half.
Open on the right as indicated,
and flatten.
Origami Fox
Turn around
Fold as indicated by the dashed
line.
An easy origami to start with, the next origami will be more challenging.
Material: Origami Paper,
#1
#1
#4
#2
#2
#6
#5
#3
#4
#5
#3
#7
65
#6 #7
66

67
68
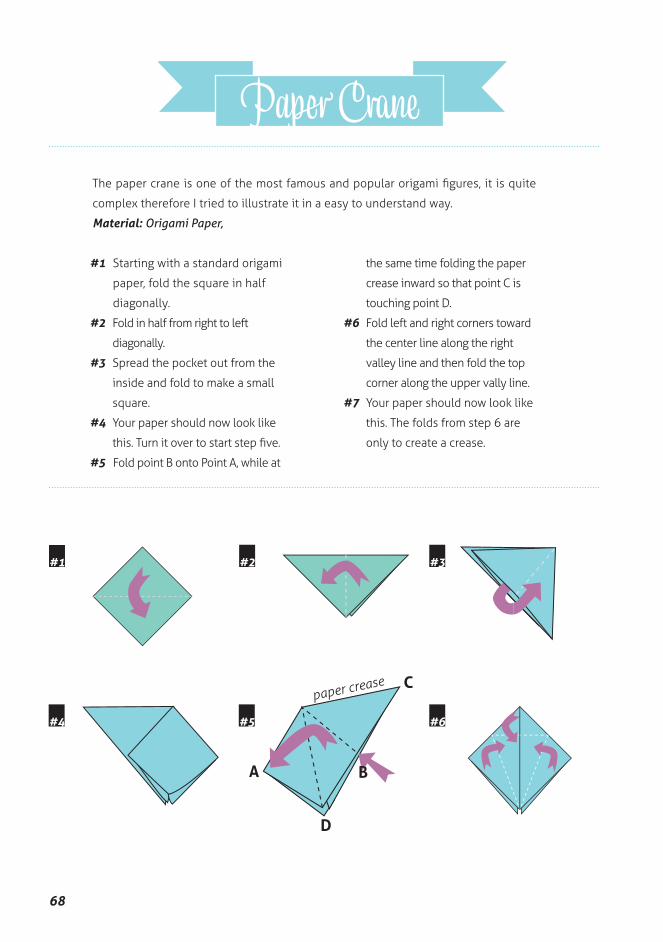
Starting with a standard origami
paper, fold the square in half
diagonally.
Fold in half from right to left
diagonally.
Spread the pocket out from the
inside and fold to make a small
square.
Your paper should now look like
this. Turn it over to start step five.
the same time folding the paper
crease inward so that point C is
touching point D.
Fold point B onto Point A, while at
Paper Crane
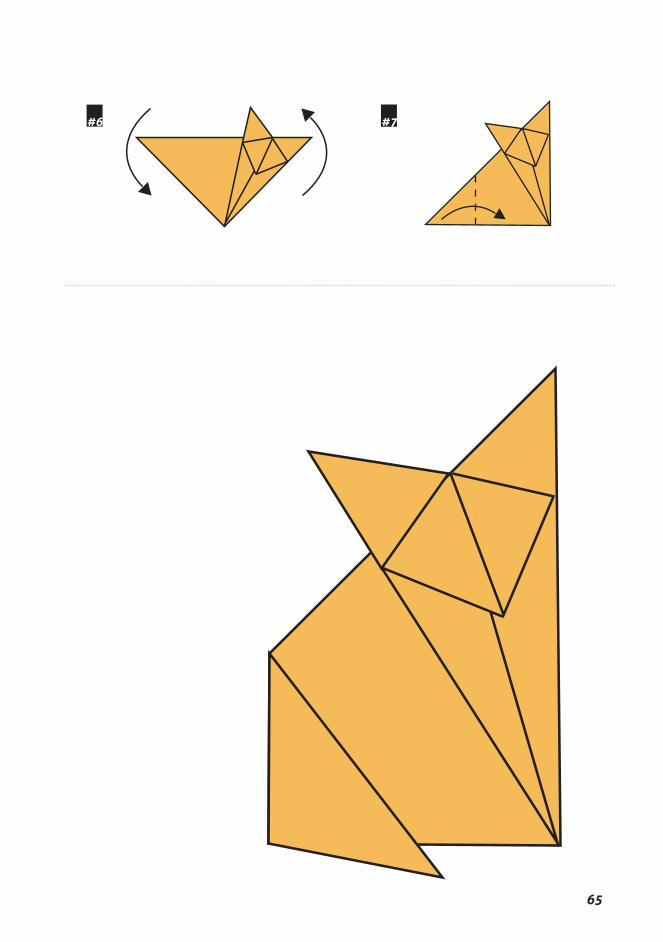
Fold left and right corners toward
the center line along the right
valley line and then fold the top
corner along the upper vally line.
Your paper should now look like
this. The folds from step 6 are
only to create a crease.
The paper crane is one of the most famous and popular origami figures, it is quite
complex therefore I tried to illustrate it in a easy to understand way.
Material: Origami Paper,
#1
#1
#4
#2
#2
#6
#5 #6
#3
#4
#5
#3
#7
A
D
B
paper crease C

69
Now, open the pocket by
pulling the bottom corner
up and fold inward along the
crease. Some creases will
become inverted.
The figure should look like this.
Be careful to score the edges and
corners cleanly. Turn over and do
the same (Steps 6, 7, 8).
Fold in the lower flaps made in
step 9. Now you have the base of
your papercrane.
Make sure you have the right side
up, valley fold on the dotted lines
using the top layer only..
The figure should look like this.
Turn over.
#8
#7
#10
#11
#12
#10 #11 #12
#8
#9
#9
70
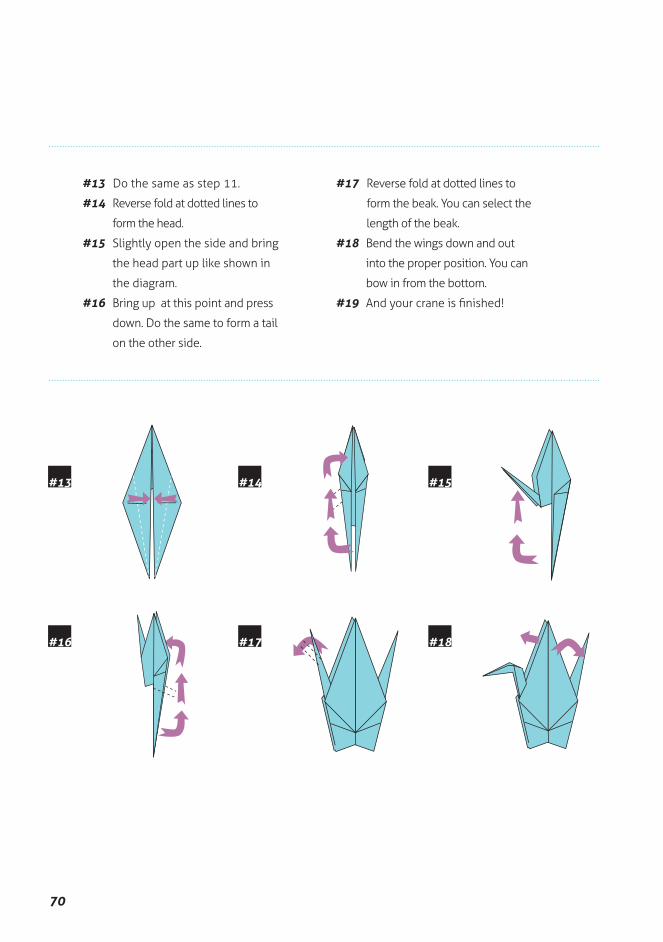
Do the same as step 11.
Reverse fold at dotted lines to
form the head.
Slightly open the side and bring
the head part up like shown in
the diagram.
Bring up at this point and press
down. Do the same to form a tail
on the other side.
Reverse fold at dotted lines to
form the beak. You can select the
length of the beak.
Bend the wings down and out
into the proper position. You can
bow in from the bottom.
And your crane is finished!
#17#13
#18
#14
#19
#15
#16
#13
#16
#14
#17
#15
#18
71
72
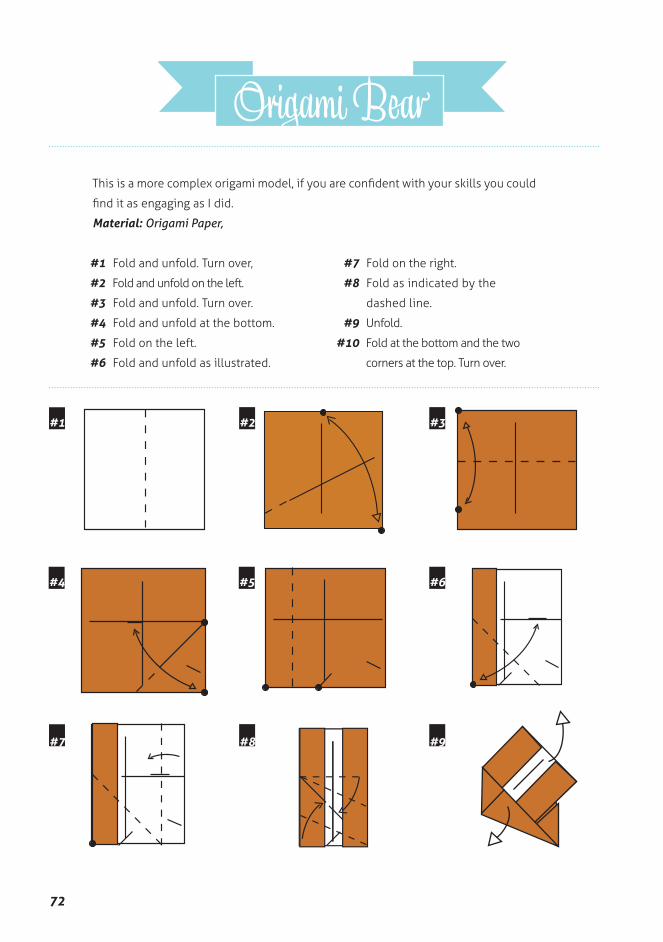
Fold and unfold. Turn over,
Fold and unfold. Turn over.
Fold and unfold at the bottom.
Fold on the left.
Fold and unfold as illustrated.
Fold on the right.
Fold as indicated by the
dashed line.
Fold and unfold on the left.
Origami Bear
Unfold.
Fold at the bottom and the two
corners at the top. Turn over.
This is a more complex origami model, if you are confident with your skills you could
find it as engaging as I did.
Material: Origami Paper,
#1
#1
#7
#4
#2
#2
#8
#9
#10
#5 #6
#3
#4
#5
#6
#8
#7
#3
#9

73
Rotate.
Repeat behind.
Crimp-fold the tail. Repeat
behind at the front leg.
Fold as indicated by the normal
arrows and unfold behind as
indicated by the "unfold arrows"
Fold as illustrated. Turn over.
Fold as illustrated.
Petal folds.
#15
#16
#17
#10
#13
#11
#14
#12
#15
#11
#12
#13
#14
#16 #17
74
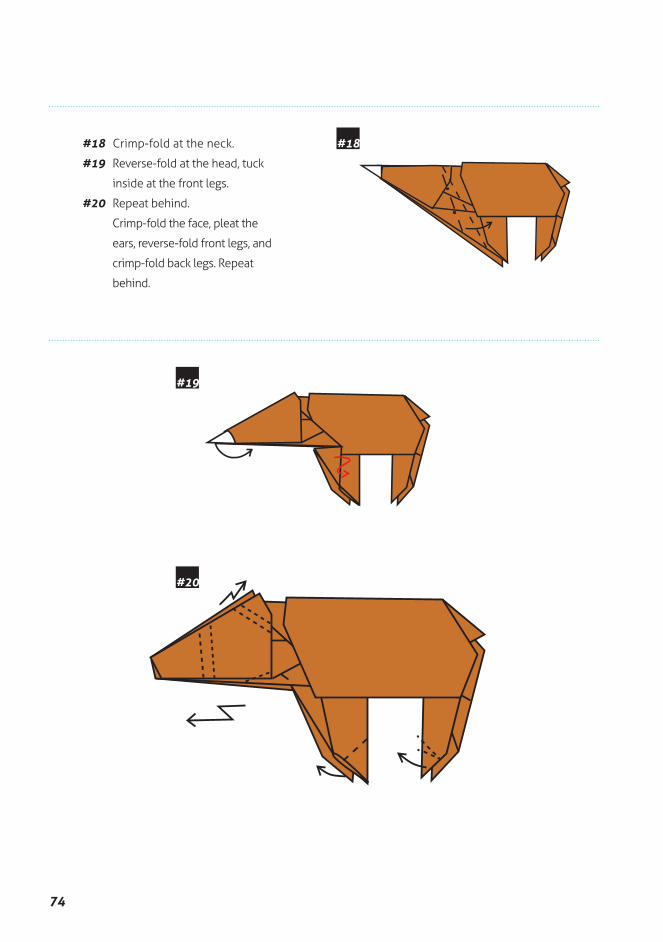
#18
#19
#20
#18
#19
#20
Crimp-fold at the neck.
Reverse-fold at the head, tuck
inside at the front legs.
Repeat behind.
Crimp-fold the face, pleat the
ears, reverse-fold front legs, and
crimp-fold back legs. Repeat
behind.

75

76

77
04.02Origami
Artists'work

78
Roman Diaz is an origami artist from
Uruguay, who I discovered on the book
“Masters of Origami”. Most of his works
are focused on figures of animals, whose
fractals and instructions can be found on
his blog.
Roman Diaz

79
80
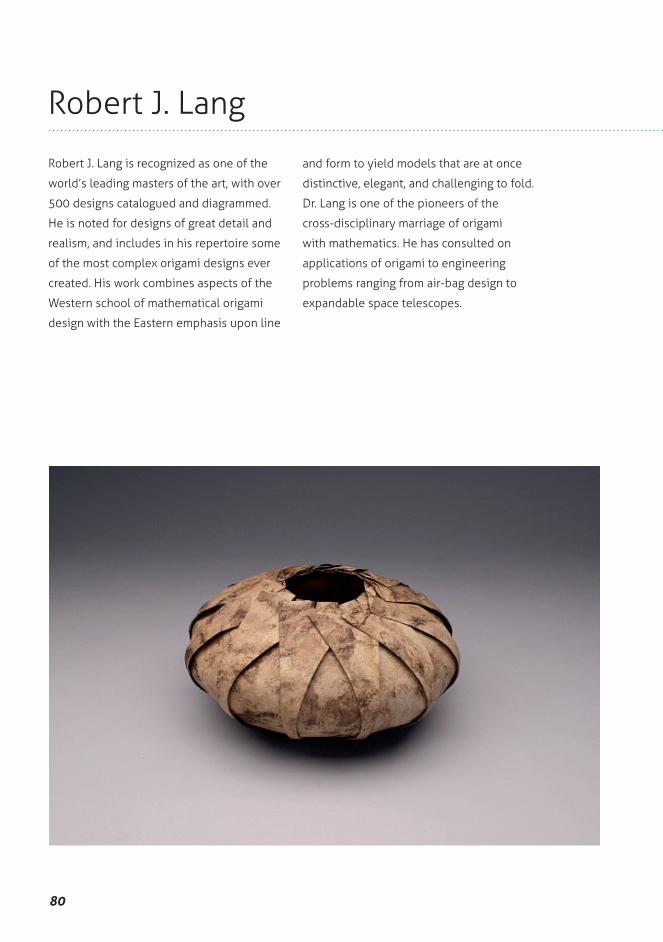
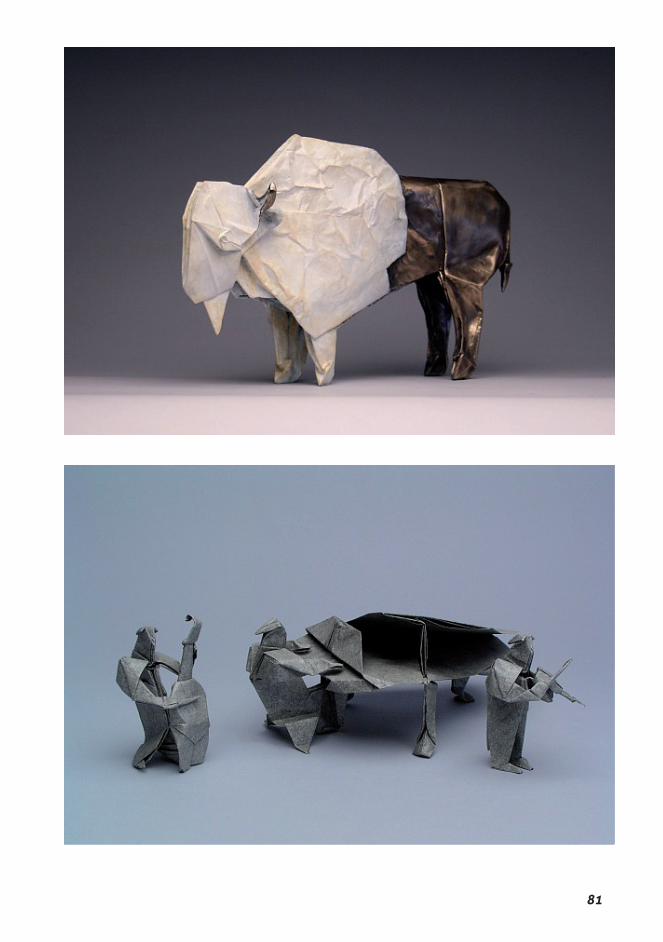
Robert J. Lang is recognized as one of the
world’s leading masters of the art, with over
500 designs catalogued and diagrammed.
He is noted for designs of great detail and
realism, and includes in his repertoire some
of the most complex origami designs ever
created. His work combines aspects of the
Western school of mathematical origami
design with the Eastern emphasis upon line
and form to yield models that are at once
distinctive, elegant, and challenging to fold.
Dr. Lang is one of the pioneers of the
cross-disciplinary marriage of origami
with mathematics. He has consulted on
applications of origami to engineering
problems ranging from air-bag design to
expandable space telescopes.
Robert J. Lang
81

82
The practice of Paul Jackson divides
between the free application of traditional
paper folding techniques in the media,
design and education, and the creative
exposition of these techniques in the
context of a Fine Art practice.
He has worked for many leading advertising
agencies and design groups creating
origami models to their specifications that
have been photographed for different
outputs like newspaper or magazine
advertisements, and occasionally also used
for motion pictures and trade exhibitions.
His origami are often "faked" from many
pieces of paper that are folded, cut and
glued together to make a model over which
he can have absolute control in terms of
construction, proportions and scale.
Paul Jackson

83

84

85
05Stop-motion

86
87
In this final chapter I will show two pieces of animations, in order to give an
insight into another huge possibility that a simple medium as paper can offer.
The first one is the video for Fleet Foxes' song "Mykonos" realized by Jesse
Brown and Sean Pecknold, which is entirely realized with paper.
The second one is the animation "KAMI" by Nadiah Almahdaly, an animator
from Malasia currently working in Bristol, who used paper as a medium for her
animation, using different techniques of papercraft to represent the different
characters of her story. I have decided to include her personal description of this
work, which I think expresses it the best.
88
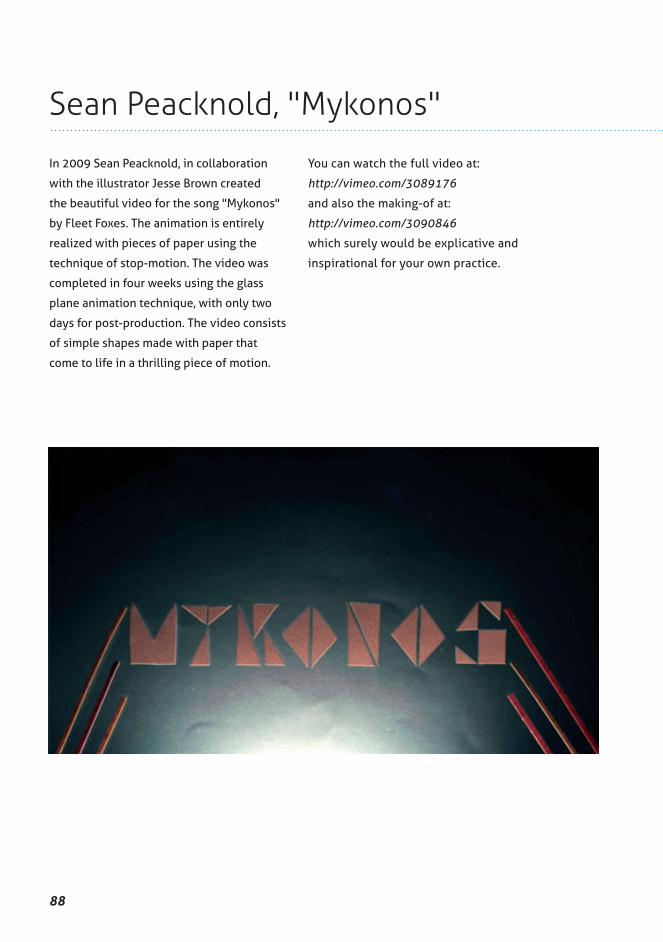
In 2009 Sean Peacknold, in collaboration
with the illustrator Jesse Brown created
the beautiful video for the song "Mykonos"
by Fleet Foxes. The animation is entirely
realized with pieces of paper using the
technique of stop-motion. The video was
completed in four weeks using the glass
plane animation technique, with only two
days for post-production. The video consists
of simple shapes made with paper that
come to life in a thrilling piece of motion.
You can watch the full video at:
http://vimeo.com/3089176
and also the making-of at:
http://vimeo.com/3090846
which surely would be explicative and
inspirational for your own practice.
Sean Peacknold, "Mykonos"

89
90
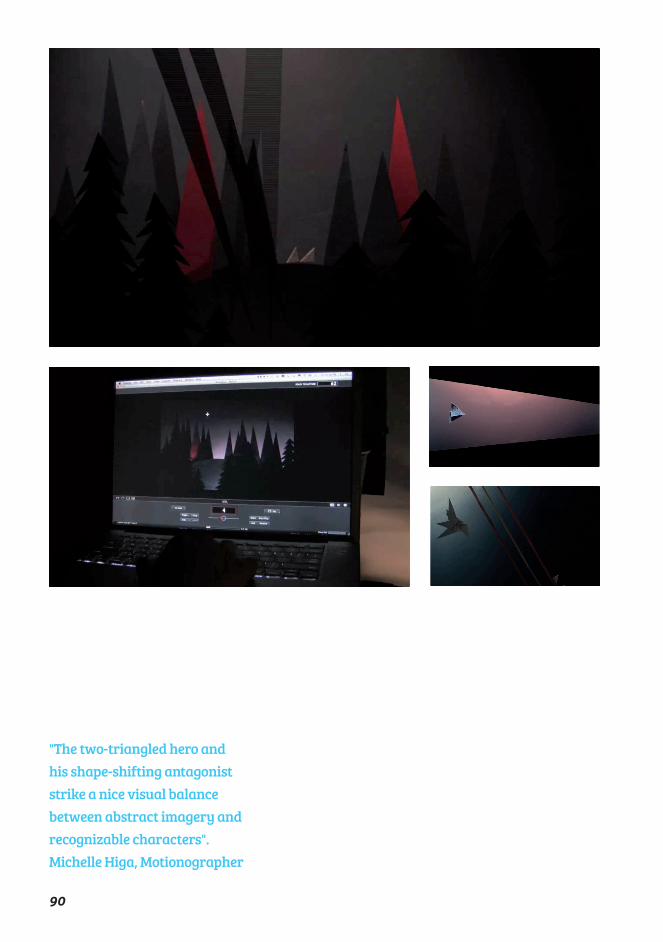
"The two-triangled hero and his shape-shifting antagonist strike a nice visual balance between abstract imagery and recognizable characters".Michelle Higa, Motionographer

91
92
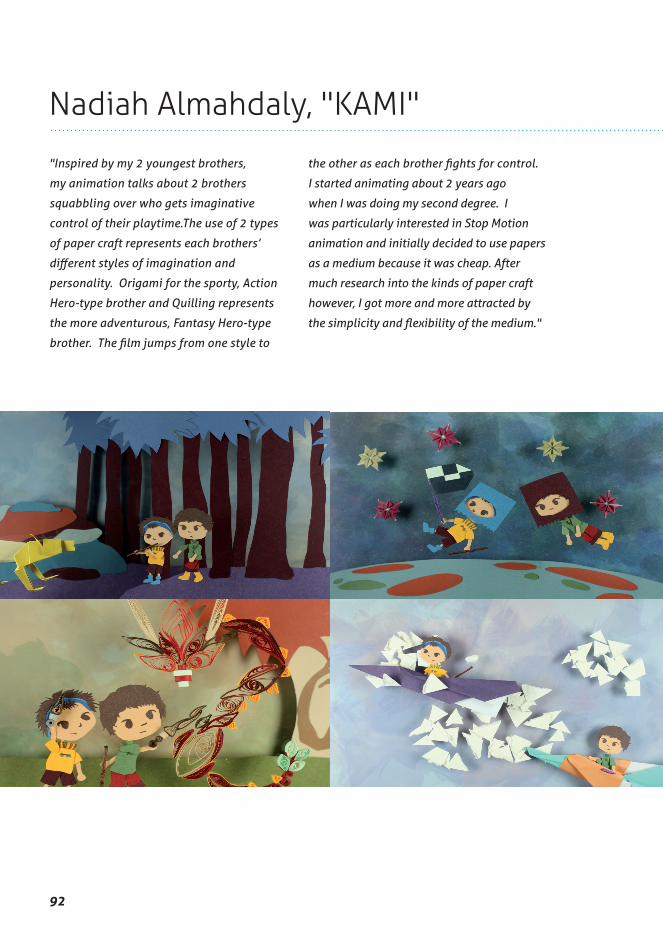
"Inspired by my 2 youngest brothers,
my animation talks about 2 brothers
squabbling over who gets imaginative
control of their playtime.The use of 2 types
of paper craft represents each brothers’
different styles of imagination and
personality. Origami for the sporty, Action
Hero-type brother and Quilling represents
the more adventurous, Fantasy Hero-type
brother. The film jumps from one style to
the other as each brother fights for control.
I started animating about 2 years ago
when I was doing my second degree. I
was particularly interested in Stop Motion
animation and initially decided to use papers
as a medium because it was cheap. After
much research into the kinds of paper craft
however, I got more and more attracted by
the simplicity and flexibility of the medium."
Nadiah Almahdaly, "KAMI"
93

94

95
Full video:
http://vimeo.com/29433046
Nadiah Almahdaly's Blog:
http://preoccupiedbymoonlight.blogspot.co.uk/

96
97
This is just the start, now it is up to you to improve your
skills and expand your knowledge of papercraft. There
are hundreds of origami diagrams and handcraft tutorials
that are easily accessed via the internet, I have included
some of them in the next pages.
The gaining of manual ability and practical skills is
both important and useful to have in life no matter what
profession you hold.
You have seen what can be made with something
as simple as a piece of paper, take what you can find,
explore new techniques and get creative.
Monica Giunchi
Good luck!

98
99
Useful ResourcesBooks "Papercraft, Design and Art with Paper", Gestalten "I Heart Stationery: Fresh Inspirations for Handcrafted Cards, Note Cards, Journals, & Other Paper Goods", Charlotte Rivers
Websites
http://papercraftinspirations.themakingspot.com/
http://www.origami-resource-center.com/
http://elsita.typepad.com/allaboutpapercutting/ http://www.webdesignerdepot.com/2009/05/100-extraordina-ry-examples-of-paper-art/
http://www.juriannematter.nl/
#1
#2


“The art of Papercraft, techniques and inspiration” is a book for those who are interested in handcrafts and in particular papercraft.Paper is a simple medium, easy and cheap to find, which you can manipulate to create sensational outcomes. The book gives a basic background on the origins of some of the different forms of papercraft whilst summing up the basic techniques within this art form, from general stationery work, to papercutting, to origami, concluding with a brief overview on stop-motion created with this medium.You will find both tutorials and inspiration from artists, designers and animators, as a starting point to this precise and delicate art form.


![[Papercraft] Panda](https://static.fdocuments.us/doc/165x107/5528876c49795921048b499c/papercraft-panda.jpg)