The Art and Science of Better Landings - Purdue...
65
The Art and Science of Better Landings by Russell Still, CFI, CFII, IGI, Gold Seal, Master CFI Bring Consistency and Mastery to your Touchdowns With Applied Science and Just a Little Bit of Zen December 2007
Transcript of The Art and Science of Better Landings - Purdue...

The Art and Science ofBetter Landings
by Russell Still, CFI, CFII, IGI, Gold Seal, Master CFI
Bring Consistency and Mastery to your TouchdownsWith Applied Science and Just a Little Bit of Zen
December 2007

4
Copyright 2007 by Gold Seal Ventures, LLC. All rights reserved.The author may be reached via email at [email protected]
For more information, visit the Gold Seal network at www.flightcentral.net.
Your best choice for airport, weather,and planning information is
www.FlightCentral.net.
5
The Art and Science of Better Landings
Table of Contents
Introduction
Chapter 1 – The Big Picture
Chapter 2 – The Traffic Pattern
Chapter 3 – The Anatomy of a Good Landing
Chapter 4 – Fundamentals of Control
Chapter 5 – Making it Yours
Chapter 6 – How an Airplane Lands
Chapter 7 – Ten Tips for Better Landings
Chapter 8 – Changes in the Plan
Chapter 9 – The Real World
3
5
9
13
21
27
31
37
49
57

6
The Big Picture
3
Introduction
As pilots, we judge our own worth by the quality of our landings. Wemight be great at holding altitudes and headings, but the real measure of our skillis decided by the smoothness with which we touch tires to pavement.
A CFI has the benefit of analyzing the rights and wrongs demonstratedby hundreds of pilots making tens of thousands of landings. Personalities vary,weather comes and goes, but the same problems exhibit themselves over andover again. Where landings are concerned, it is obvious that virtually all pilotscommit errors from the same pool of common mistakes.
Unfortunately, professional instruction has operated on the premise thatif a pilot performs enough landings, he or she will eventually get them right.And, yes, the School of Hard Landings will eventually graduate all of its pupils.But the time, expense, and stress that a pilot incurs while trying to perfectlandings could be significantly decreased if he or she were simply shown exactlywhat to do and what not to do.
Much of the landing process is art. It can be roughly explained, but thereal teacher is repetition. But before art is attempted, the science that supports itmust be understood. Without the knowledge of types of paints, complimentarycolors and shapes, perspective, and basic technique, it is highly unlikely that anew artist will paint any masterpieces. The same thing goes for pilots. Trying tomaster the art of landing without a thorough understanding of the supportingscience is a terribly inefficient way to go about it.
You may be surprised to find out that the majority of the landing profileis pure technology – no art required. Science dictates 80% of the traits requiredfor a good landing. That removes an awful lot of the gray area. If you are willingto invest the time to simply learn this stuff – make it yours – you will berewarded with better landings. I say this without equivocation. You learn it andyou will get noticeably better touchdowns. Learn it and apply every bit of it and Iguarantee you will achieve your goal of consistent smooth landings.
The Zen of it all is that we shouldn’t be constrained by custom. Weshould be willing to do whatever it takes to master landings with the minimumeffort. And that is precisely what I intend to teach you in this book.
Although the fundamentals for good landings are very similar in almostall piston-engine airplanes, this book assumes that the reader is flying a singleengine airplane with tricycle landing gear.

The Big Picture
4
The Big Picture
5
Chapter 1 The Big Picture
Whether you are a pre-solo student or a 300-hour private pilot, odds arethat good landings are one of the issues that cross your mind on a fairly regularbasis.
At one end of that spectrum, you are desperately seeking confidence thatyou can produce smooth, controlled landings consistently. You feel pretty goodabout being able to survive your own landings, but it would be nice to know thatthe airplane would be reusable afterwards.
At the other end of the spectrum, you know from experience that you arecapable of smooth, controlled landings, but your ability to reproduce them ondemand is questionable. You grease it in two-thirds of the time, but you seemunable to schedule the other third of your landings when there are no passengersaboard.
In either case, you are a student at the University of Hard Knocks. Everyone of us has attended.
It doesn’t matter where you are in your training. The factors involved ingood landings are the same. Experience – the School of Hard Landings (at theUniversity of Hard Knocks) - makes it easier for pilots to identify these factorsand line them up in a neat row. That’s why student pilots have more trouble withit than more experienced aviators. They have simply done the drill fewer times.
Students have seen the good sight pictures and the bad sight pictures, butnot enough times for the differences to be instantly apparent. With enoughclasses at the School of Hard Landings, it gradually sinks in, but this brute forcemethod is less than ideal. There is a better way.
On Art, Science, and Zen
As with everything else in aviation, landings require a mastery of skillswhich are a little bit art and a little bit science. The two blur into a homogenousreflex, their default state, unless we take the time to carefully separate andexamine them. And to understand them that is exactly what we need to do.
Without becoming intimately knowledgeable with every aspect of agiven flight envelope, we can never expect to take complete control. And it isprecisely the uncontrolled nature of things that keeps our goal - consistently softlandings down the centerline - just barely out of reach. Through ignorance, we
The Big Picture
6
allow ourselves to be controlled by the process instead of asserting command andtaking charge ourselves.
This bears repeating. In order to be in control, we must becomeknowledgeable regarding every aspect of a given flight envelope. If we are not incontrol of our landings, we place ourselves at the mercy of other powers. The onethat comes to my mind is the power of physics and it can be brutally unforgiving.Personally, I’d rather be the one in control and I will do anything it takes toachieve that.
Using the scientific process, others before us have discovered the lawsthat rule the operations of flight. They are finite, determinate, and cut-and-dried.If we fly an airplane at a specific setting of pitch and power, we will get apredetermined level of performance. The airplane will either climb, remain level,or descend, and whatever it does, it will do so at a predicted airspeed. There is noneed to think about it or weigh alternatives. We don’t have to worry about how itmakes us feel. If we know what we want the airplane to do, we can configure itto known settings and it will comply with our wishes every time.
When we consider the artistic aspects of landings, they are not parts ofthe landing at all. They are aspects of the way we witness and react to thelanding environment. Multiple overlapping factors, each quantifiableindividually, meld into a compound that we process more by feel. Differences aresubtle and hard to distinguish. The environment at that instant cannot beevaluated in terms of precise readings of attitude and airspeed. Instead we rollwith it, feeling our way with our senses of sight, sound, and equilibrium. Weinteract with the process in the same way that a surfer shifts his weight to staybalanced in the sweet spot of a wave.
Art gives us a shortcut. It allows us to develop reflexes that handle split-second fine-tuning. Certain parts of a landing flux too quickly and are toocomplex for considered cause-and-effect processing. It is during these periodsthat we call on our artistic abilities.
After the roundout, for example, we have neither the time nor the mentalbandwidth to calculate the precise ratios of airspeed and pitch needed to maintainan altitude just a few inches above the pavement. Art, however, gives us thisability. We control the airplane by feel without regard to the exact numbers.
Art is developed, not learned. But the factors that coalesce, requiring anartistic response from the pilot, can be learned and understood in terms of theirscience.
The science of landing is relatively easy to learn. You simply have todedicate the time and effort. The art of it may seem easier to master since youdon’t have to spend time buried nose-deep in a book. You improve your artisticresponse through practice. But don’t underestimate this fact: you will more easilyand quickly master the art if you understand the science that supports it.
The Big Picture
7
Art – Doing it by feel. Humans are intrinsically lazy. Thus, by default wetry to do everything by feel. It’s easy and doesn’t require anyforethought. But it doesn’t always work so well, either. Sciencefrequently dictates the easiest and most efficient way to succeed at atask. We simply have to invest the time to learn the proper technique.
Science – Doing it by the numbers. Certain parts of the flight envelopeare best controlled by specific settings, deduced by science. But otherparts are too complex or occur too quickly to allow rote responses. Thisis where we must rely on our instincts and apply artistic solutions.
Zen – Achieving enlightenment through the most direct methodpossible. Zen tells us to do art or science as needed. Our job is to learnwhich one is preferable in a given situation.
Our goal is to improve our touchdowns. It doesn’t matter how weachieve that goal. Tradition be damned; all that matters is the end result –consistently good landings.
We will develop rules and we will do things the same way every time weare presented with a given set of circumstances. We can learn physics, line upbug splatters on the windshield, peek out the side windows, or wait for thenumbers at the far end of the runway to disappear. Or all of the above. Or none ofthe above. There is no such thing as cheating. We will learn any technique thatworks, take any shortcut that eases our workload, and recite any mnemonic thathelps us get the job done.
If there is one key point to embrace, it is one mentioned by TomBenenson, a longtime writer for Flying magazine. “The trick to performingsmooth passenger-pleasing landings is to make every landing approach asconsistent as possible.” That is it in a nutshell – learn your procedures and dothem the same way each time you are greeted with a given scenario.
As pilots we must always keep one tenet in mind: we may be able toinfluence which circumstances are presented to us, but the environment we areconfronted with at any given instant is the one we must respond to. There is nogray area. Our wishes are totally irrelevant. Yes, it would be nice if we didn’thave this fifteen-knot crosswind. But we do.
Pilots must be able to ascertain and objectively understand what ishappening to them and their craft at all times. There is no room for emotion whenmaking decisions in the cockpit. Save that for the end of the day, after you’vetied the airplane down.
Please visit www.betterlandings.com/multimedia and read thesupplemental article entitled Decision by Indecision.

The Big Picture
8
Master Your Radios with Squawk VFR
Landings are generally considered to be one ofthe biggest challenges facing new pilots. Butthere is one more issue that is repeatedlymentioned: Talking on the Radio.
Mastering radio use and dialog remains one ofthe major hurdles for all pilots.
Gold Seal has solved the problem for you withSquawk VFR. This tutorial on audio CD usesreal in-flight recordings of pilot and controllercommunications. Divided by airspace, SquawkVFR carefully describes the concepts anddemonstrates them with actual dialog. Each isbroken down into component parts andanalyzed, piece by piece. This is not ademonstration of radio use, it is a true tutorialthat shows you exactly what to do and when todo it.
Included with Squawk VFR is a free bonus disk:Understanding Weather Briefings. It containsmultiple recordings of real-life weather briefingsconducted with FSS weather briefers. Using thesame techniques, briefings are described,dissected, and analyzed. Learn to get betterbriefings with less stress.
Squawk VFR two CD set - $24.95
For more information about Squawk VFR, please visit:
www.sqvfr.com
“Just sit back and listen.”
The Traffic Pattern
9
Chapter 2 The Traffic Pattern
Now if you are really sure you understand the geography of the trafficpattern, I suppose you can skip this section. But I really hope you won’t. It isimportant that we join together in agreement regarding names and objectives.
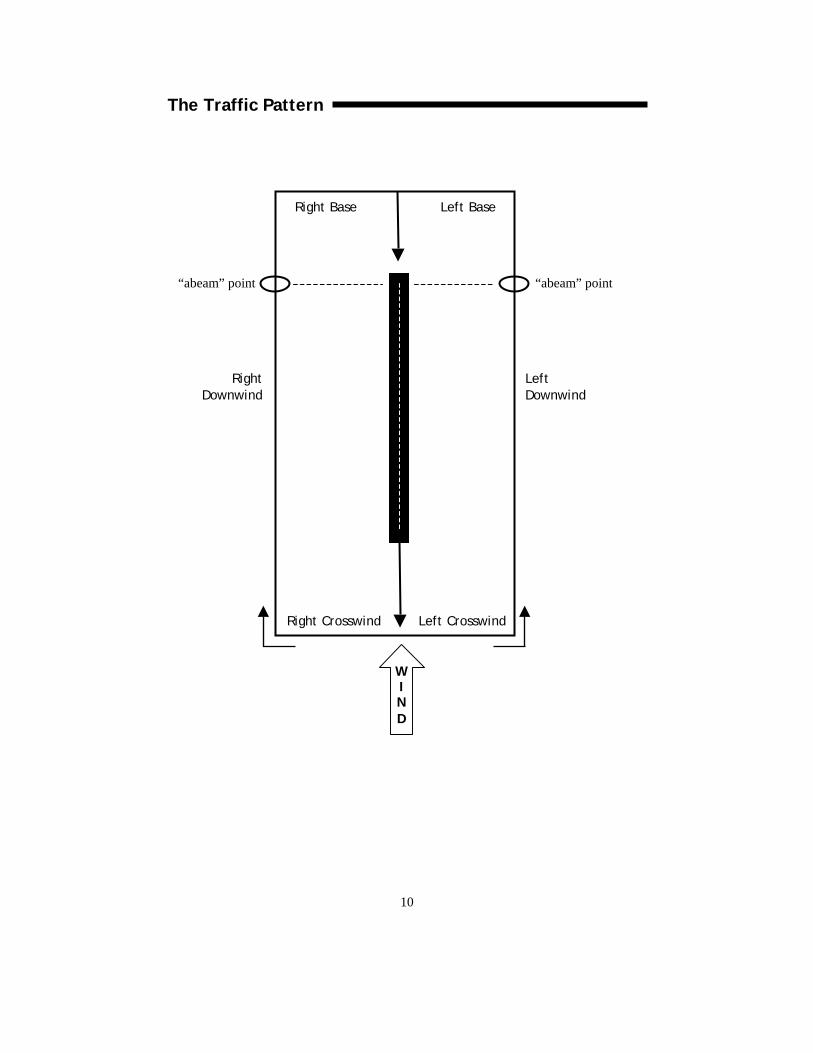
The Pilot/Controller Glossary defines a traffic pattern like this:
All right, we are all in agreement on the names of the legs. But there is a qualifierthat is needed to fully define any individual leg. It specifies the direction of turnsin the pattern.
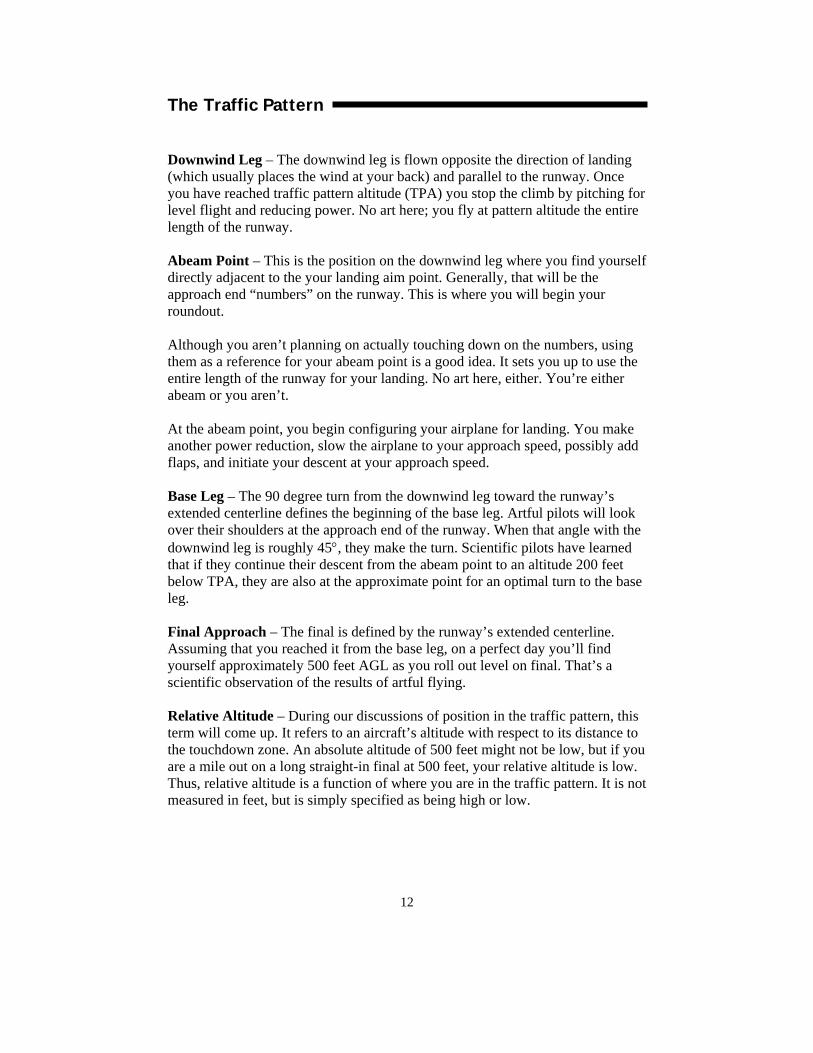
Pattern legs, with the exceptions of the upwind and final, are all properlyqualified as being “right” or “left”. Thus, there is a right downwind and a leftdownwind. Traffic on both are sequencing to land on the same runway eventhough they are on different sides of the airport.
In the interest of safety, it is absolutely crucial that you qualify all ofyour position calls by referring to the legs as being “right” or “left”.
TPA (traffic pattern altitude) is generally 1000 feet AGL (above groundlevel) for single engine aircraft. Be aware, though, that this number is notuniversal. There are exceptions. 800 feet AGL is not terribly unusual so makesure you know what the correct TPA is at the airport at which you are landing.
The traffic flow that is prescribed for aircraft landing at, taxiing on, ortaking off from an airport. The components of a typical traffic pattern areupwind leg, crosswind leg, downwind leg, base leg, and final approach.
• a. Upwind Leg- A flight path parallel to the landing runway in thedirection of landing.
• b. Crosswind Leg- A flight path at right angles to the landingrunway off its upwind end.
• c. Downwind Leg- A flight path parallel to the landing runway inthe direction opposite to landing. The downwind leg normallyextends between the crosswind leg and the base leg.
• d. Base Leg- A flight path at right angles to the landing runway offits approach end. The base leg normally extends from thedownwind leg to the intersection of the extended runwaycenterline.
• e. Final Approach. A flight path in the direction of landing alongthe extended runway centerline. The final approach normallyextends from the base leg to the runway. An aircraft making astraight-in approach VFR is also considered to be on final approach.
The Traffic Pattern
10
RightDownwind
LeftDownwind
Right Base Left Base
Right Crosswind Left Crosswind
WIND
“abeam” point“abeam” point
The Traffic Pattern
11
Upwind Leg – The AIM and Pilot/Controller Glossary are not in explicitagreement on this one. Both specify the common definition that the upwind leg isany leg parallel to the runway centerline in the direction of landing. Thus, aninbound airplane could enter the pattern on the left upwind (which is the same asthe right downwind) and proceed on around the left crosswind, to the leftdownwind, and then on to the left base leg and final.
The AIM, however, also defines a departure leg. This is the straight out leg thatan airplane flies immediately after takeoff. Thus, the departure leg is an upwindleg that exists on the extended centerline. I mention this to alert you to potentialconfusion when you hear an unexpected call from an aircraft saying he is upwindfor 2-5. Is he taking off from runway 25, or is he entering the pattern for 25 on anupwind leg?
We will add clarity by going with the AIM. When discussing the upwind leg aftera takeoff, we will refer to it as the departure leg.
Departure Leg – This leg is defined by the AIM as “The flight path whichbegins after takeoff and continues straight ahead along the extended centerline.The departure climb continues until reaching a point at least ½ mile beyond thedeparture end of the runway and within 300 feet of the traffic pattern altitude.”
Keeping in mind that the AIM is not regulatory, I, along with a lot of otherinstructors, believe it is generally better to begin your turnout at 500 feet aboveground level (AGL). This increases your chances of being able to turn back to theairport during an emergency. Additionally, at busy airports, it gets slower aircraftoff the departure course more quickly.
Your goal on the departure leg is to climb to the appropriate altitude whilemaintaining the runway’s extended centerline.
Crosswind Leg – The leg 90 degrees from the departure leg is the crosswind leg.Its purpose is to provide a path to the downwind leg. Continue your climb on thecrosswind leg until you reach that artfully defined point where you turn to thedownwind, or you reach traffic pattern altitude, whichever occurs first.
Deciding where we make the turn from the crosswind to the downwind leg isprimarily art. It is based on the aircraft, the speed you will fly in the pattern,obstacles on the ground track, and local customs. Generally, in most singleengine airplanes, you will turn to the downwind when you reach a point thatplaces the downwind leg approximately ½ mile from the runway.
The Traffic Pattern
12
Downwind Leg – The downwind leg is flown opposite the direction of landing(which usually places the wind at your back) and parallel to the runway. Onceyou have reached traffic pattern altitude (TPA) you stop the climb by pitching forlevel flight and reducing power. No art here; you fly at pattern altitude the entirelength of the runway.
Abeam Point – This is the position on the downwind leg where you find yourselfdirectly adjacent to the your landing aim point. Generally, that will be theapproach end “numbers” on the runway. This is where you will begin yourroundout.
Although you aren’t planning on actually touching down on the numbers, usingthem as a reference for your abeam point is a good idea. It sets you up to use theentire length of the runway for your landing. No art here, either. You’re eitherabeam or you aren’t.
At the abeam point, you begin configuring your airplane for landing. You makeanother power reduction, slow the airplane to your approach speed, possibly addflaps, and initiate your descent at your approach speed.
Base Leg – The 90 degree turn from the downwind leg toward the runway’sextended centerline defines the beginning of the base leg. Artful pilots will lookover their shoulders at the approach end of the runway. When that angle with thedownwind leg is roughly 45°, they make the turn. Scientific pilots have learnedthat if they continue their descent from the abeam point to an altitude 200 feetbelow TPA, they are also at the approximate point for an optimal turn to the baseleg.
Final Approach – The final is defined by the runway’s extended centerline.Assuming that you reached it from the base leg, on a perfect day you’ll findyourself approximately 500 feet AGL as you roll out level on final. That’s ascientific observation of the results of artful flying.
Relative Altitude – During our discussions of position in the traffic pattern, thisterm will come up. It refers to an aircraft’s altitude with respect to its distance tothe touchdown zone. An absolute altitude of 500 feet might not be low, but if youare a mile out on a long straight-in final at 500 feet, your relative altitude is low.Thus, relative altitude is a function of where you are in the traffic pattern. It is notmeasured in feet, but is simply specified as being high or low.
The Anatomy of a Good Landing
13
Chapter 3 The Anatomy of a Good Landing
Good landings follow a standard profile starting on the downwind leg. Inclosed traffic (e.g. a touch-and-go) a climbing entry from the crosswind leg willbe the norm. Coming into the pattern from the outside (i.e. an arrival) willgenerally entail a descent to traffic pattern altitude. In either case, your goodlanding is a process that begins as soon as you attain TPA on the downwind leg.
Let’s break the landing profile into its individual pieces and analyze theirscientific and artistic qualities. This will allow us to define what we do and whenwe do it.
Downwind Leg – All science. Set your power and maintain level flight at TPA.Do your GUMP check, and talk to the tower or make your position report.
Abeam Point – Mostly science. Reduce power to the predetermined setting andgently raise the nose. This allows a deceleration and a descent to begin. Trim forthe desired airspeed. (Possibly flaps and/or carburetor heat depending on yourairplane model.)
Base Leg – Mostly science. If you were at TPA at the abeam point and did yoursetup properly, turn onto the base leg when your altitude is 200 feet less thantraffic pattern altitude. This assumes a TPA of 1000 feet AGL. If the TPA is 800feet AGL, turn base after descending only 100 feet.
Continue the descent. You may or may not opt to add more flaps. If all is ideal,your descent rate will probably be between 400 and 500 feet per minute.
The Anatomy of a Good Landing
14
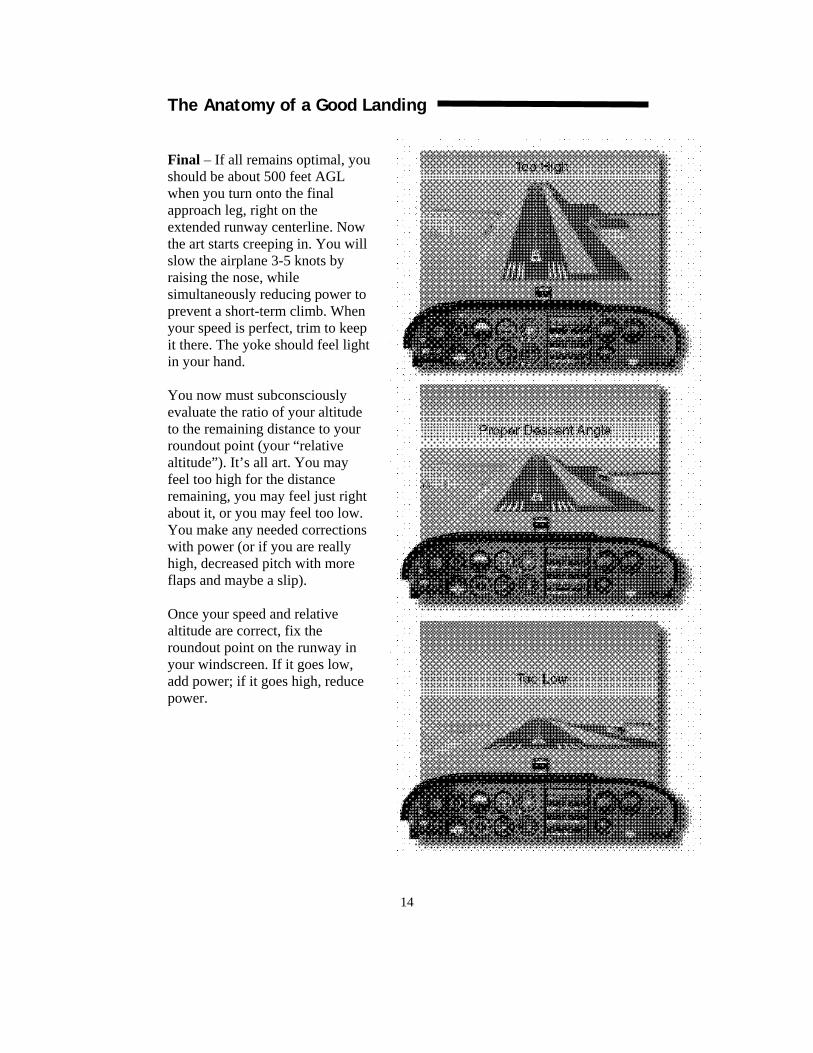
Final – If all remains optimal, youshould be about 500 feet AGLwhen you turn onto the finalapproach leg, right on theextended runway centerline. Nowthe art starts creeping in. You willslow the airplane 3-5 knots byraising the nose, whilesimultaneously reducing power toprevent a short-term climb. Whenyour speed is perfect, trim to keepit there. The yoke should feel lightin your hand.
You now must subconsciouslyevaluate the ratio of your altitudeto the remaining distance to yourroundout point (your “relativealtitude”). It’s all art. You mayfeel too high for the distanceremaining, you may feel just rightabout it, or you may feel too low.You make any needed correctionswith power (or if you are reallyhigh, decreased pitch with moreflaps and maybe a slip).
Once your speed and relativealtitude are correct, fix theroundout point on the runway inyour windscreen. If it goes low,add power; if it goes high, reducepower.
The Anatomy of a Good Landing
15
Roundout – The roundout is the action of stopping the descent and transitioningthe airplane into level flight, just a few feet above the runway surface. All art, buteasy to judge. The FAA’s definition of the roundout equates it with the entireprocess of stopping the descent, slowing to flare speed, and flaring. We willbreak these apart into discrete steps. We will not use the FAA definition. Ourroundout begins when the nose is raised to stop the descent and ends once a zerofeet/minute descent rate is attained.
Float – After the roundout, the airplane will float down the runway centerline.Your goal is to maintain altitude while slowing the airplane. You literally holdthe airplane off the runway while waiting for the airspeed to dissipate. Dependingon your model, you will probably have the power reduced to idle. As the airplaneslows, extremely subtle increases in pitch are required to keep it fromdescending. Be patient! Too much pitch and you get a “balloon”. There is notime to look at numbers on your gages. You do this all by visual estimates, basedon your view of the runway well ahead of you. Note that better landings willexhibit shorter amounts of time in the float phase. The length of time spent in thefloat is directly proportional to the amount of excess airspeed the aircraft carriesinto the roundout.
Roundout or Flare?
One of the most imprecise terms in primary training surely must be theword roundout. Considered by many CFIs to be a separate phase from theflare event, it is considered by the FAA to be synonymous with flare. In thePrivate Pilot Practical Test Standards (2006), the word flare never appears.
From Airplane Flying Handbook (FAA-H-8083-3A)
ROUNDOUT (FLARE)The roundout is a slow, smooth transition from a normal approachattitude to a landing attitude, gradually rounding out the flightpath toone that is parallel with, and within a very few inches above, therunway. When the airplane, in a normal descent, approaches withinwhat appears to be 10 to 20 feet above the ground, the roundout orflare should be started, and once started should be a continuousprocess until the airplane touches down on the ground.
The Anatomy of a Good Landing
16
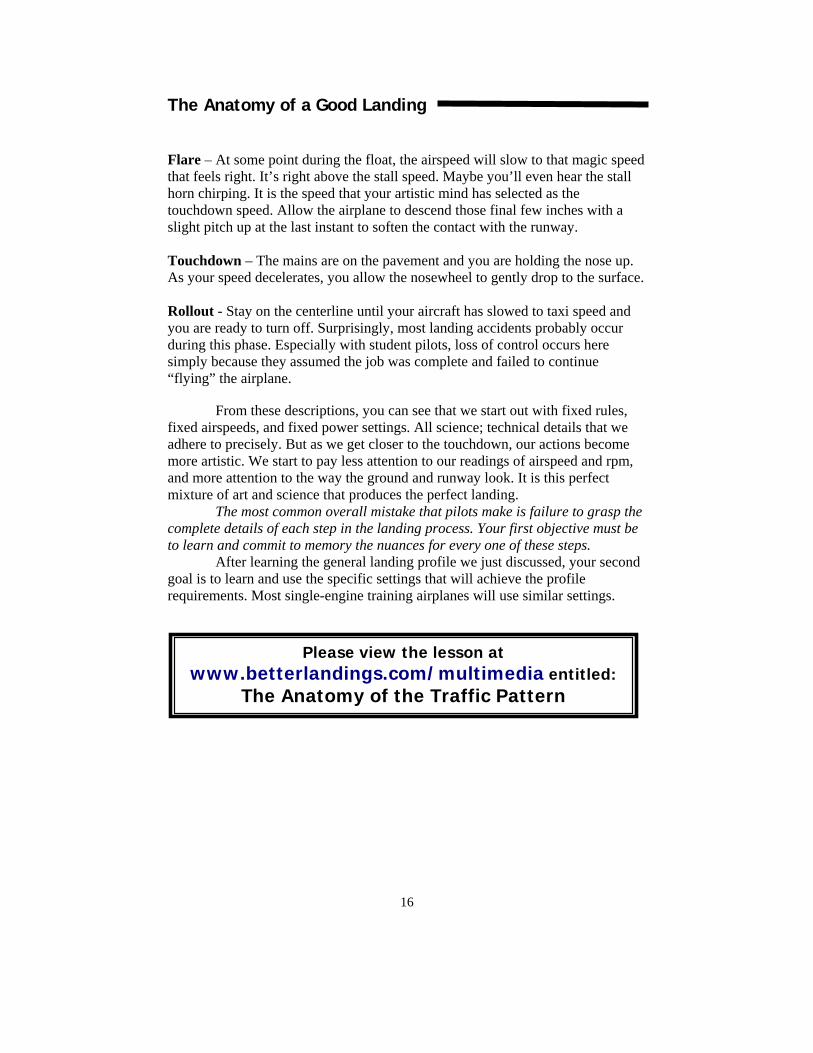
Flare – At some point during the float, the airspeed will slow to that magic speedthat feels right. It’s right above the stall speed. Maybe you’ll even hear the stallhorn chirping. It is the speed that your artistic mind has selected as thetouchdown speed. Allow the airplane to descend those final few inches with aslight pitch up at the last instant to soften the contact with the runway.
Touchdown – The mains are on the pavement and you are holding the nose up.As your speed decelerates, you allow the nosewheel to gently drop to the surface.
Rollout - Stay on the centerline until your aircraft has slowed to taxi speed andyou are ready to turn off. Surprisingly, most landing accidents probably occurduring this phase. Especially with student pilots, loss of control occurs heresimply because they assumed the job was complete and failed to continue“flying” the airplane.
From these descriptions, you can see that we start out with fixed rules,fixed airspeeds, and fixed power settings. All science; technical details that weadhere to precisely. But as we get closer to the touchdown, our actions becomemore artistic. We start to pay less attention to our readings of airspeed and rpm,and more attention to the way the ground and runway look. It is this perfectmixture of art and science that produces the perfect landing.
The most common overall mistake that pilots make is failure to grasp thecomplete details of each step in the landing process. Your first objective must beto learn and commit to memory the nuances for every one of these steps.
After learning the general landing profile we just discussed, your secondgoal is to learn and use the specific settings that will achieve the profilerequirements. Most single-engine training airplanes will use similar settings.
Please view the lesson atwww.betterlandings.com/multimedia entitled:
The Anatomy of the Traffic Pattern
The Anatomy of a Good Landing
17
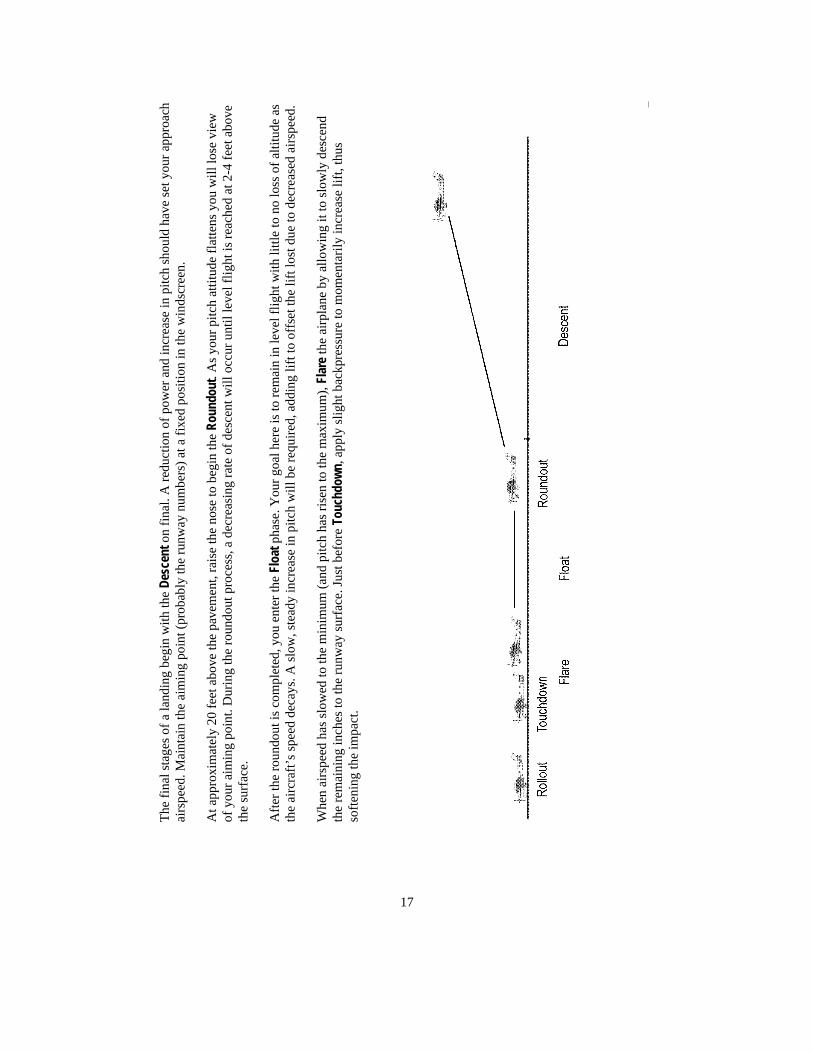
The
final
stag
es o
f a la
ndin
g be
gin
with
the
Desc
ent o
n fin
al. A
redu
ctio
n of
pow
er a
nd in
crea
se in
pitc
h sh
ould
hav
e se
t you
r app
roac
hai
rspe
ed. M
aint
ain
the
aim
ing
poin
t (pr
obab
ly th
e ru
nway
num
bers
) at a
fixe
d po
sitio
n in
the
win
dscr
een.
At a
ppro
xim
atel
y 20
feet
abo
ve th
e pa
vem
ent,
rais
e th
e no
se to
beg
in th
e Ro
undo
ut. A
s you
r pitc
h at
titud
e fla
ttens
you
will
lose
vie
wof
you
r aim
ing
poin
t. D
urin
g th
e ro
undo
ut p
roce
ss, a
dec
reas
ing
rate
of d
esce
nt w
ill o
ccur
unt
il le
vel f
light
is re
ache
d at
2-4
feet
abo
veth
e su
rfac
e.
Afte
r the
roun
dout
is c
ompl
eted
, you
ent
er th
e Fl
oat p
hase
. You
r goa
l her
e is
to re
mai
n in
leve
l flig
ht w
ith li
ttle
to n
o lo
ss o
f alti
tude
as
the
airc
raft’
s spe
ed d
ecay
s. A
slow
, ste
ady
incr
ease
in p
itch
will
be
requ
ired,
add
ing
lift t
o of
fset
the
lift l
ost d
ue to
dec
reas
ed a
irspe
ed.
Whe
n ai
rspe
ed h
as sl
owed
to th
e m
inim
um (a
nd p
itch
has r
isen
to th
e m
axim
um),
Flar
e the
airp
lane
by
allo
win
g it
to sl
owly
des
cend
the
rem
aini
ng in
ches
to th
e ru
nway
surf
ace.
Just
bef
ore
Touc
hdow
n, a
pply
slig
ht b
ackp
ress
ure
to m
omen
taril
y in
crea
se li
ft, th
usso
fteni
ng th
e im
pact
.
The Anatomy of a Good Landing
18
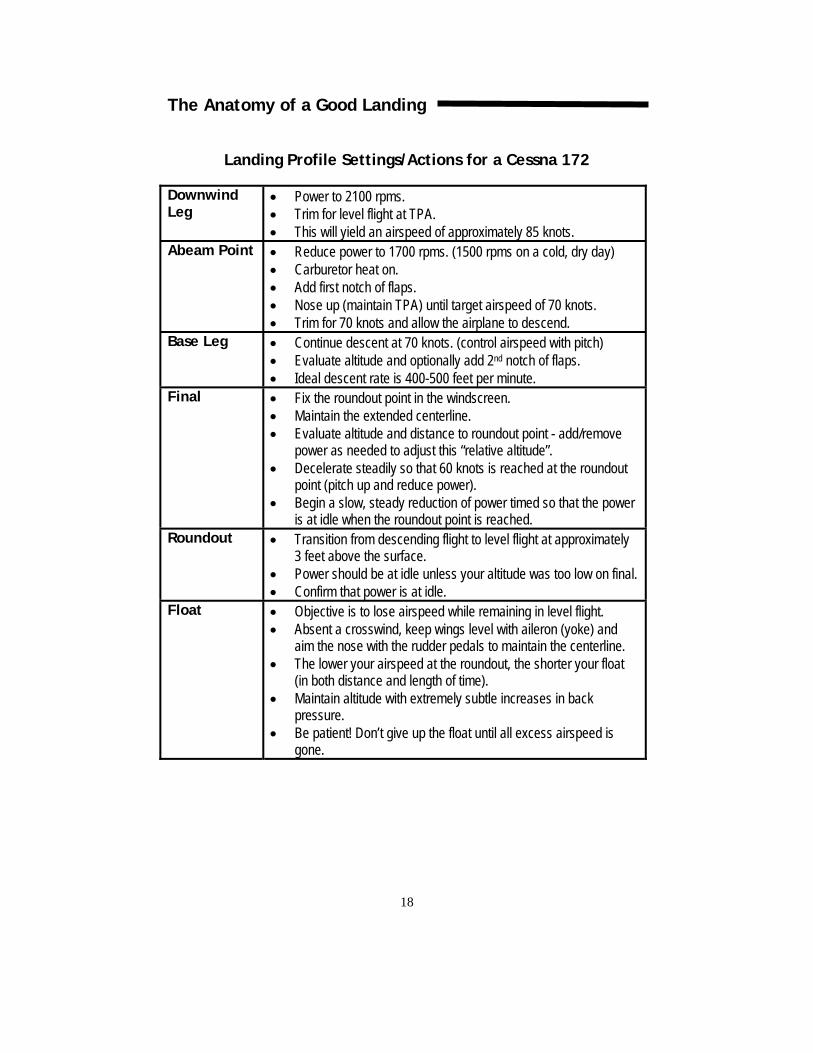
Landing Profile Settings/Actions for a Cessna 172
DownwindLeg
• Power to 2100 rpms.• Trim for level flight at TPA.• This will yield an airspeed of approximately 85 knots.
Abeam Point • Reduce power to 1700 rpms. (1500 rpms on a cold, dry day)• Carburetor heat on.• Add first notch of flaps.• Nose up (maintain TPA) until target airspeed of 70 knots.• Trim for 70 knots and allow the airplane to descend.
Base Leg • Continue descent at 70 knots. (control airspeed with pitch)• Evaluate altitude and optionally add 2nd notch of flaps.• Ideal descent rate is 400-500 feet per minute.
Final • Fix the roundout point in the windscreen.• Maintain the extended centerline.• Evaluate altitude and distance to roundout point - add/remove
power as needed to adjust this “relative altitude”.• Decelerate steadily so that 60 knots is reached at the roundout
point (pitch up and reduce power).• Begin a slow, steady reduction of power timed so that the power
is at idle when the roundout point is reached.Roundout • Transition from descending flight to level flight at approximately
3 feet above the surface.• Power should be at idle unless your altitude was too low on final.• Confirm that power is at idle.
Float • Objective is to lose airspeed while remaining in level flight.• Absent a crosswind, keep wings level with aileron (yoke) and
aim the nose with the rudder pedals to maintain the centerline.• The lower your airspeed at the roundout, the shorter your float
(in both distance and length of time).• Maintain altitude with extremely subtle increases in back
pressure.• Be patient! Don’t give up the float until all excess airspeed is
gone.
The Anatomy of a Good Landing
19
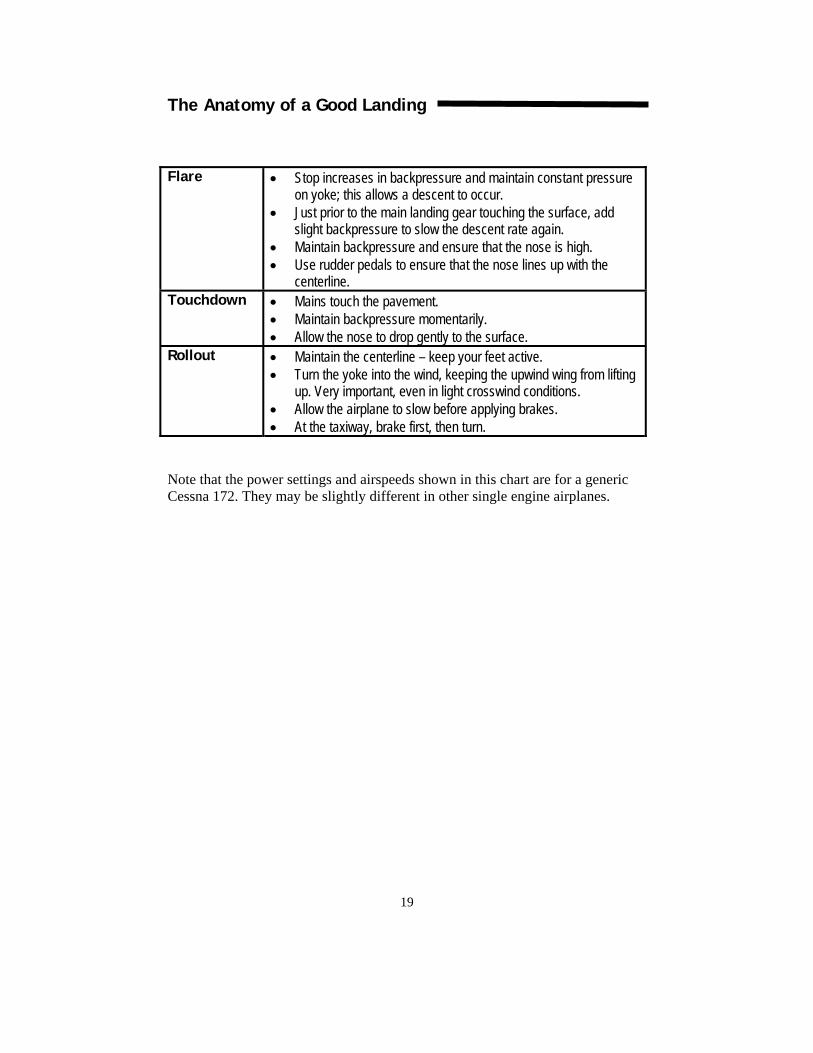
Flare • Stop increases in backpressure and maintain constant pressureon yoke; this allows a descent to occur.
• Just prior to the main landing gear touching the surface, addslight backpressure to slow the descent rate again.
• Maintain backpressure and ensure that the nose is high.• Use rudder pedals to ensure that the nose lines up with the
centerline.Touchdown • Mains touch the pavement.
• Maintain backpressure momentarily.• Allow the nose to drop gently to the surface.
Rollout • Maintain the centerline – keep your feet active.• Turn the yoke into the wind, keeping the upwind wing from lifting
up. Very important, even in light crosswind conditions.• Allow the airplane to slow before applying brakes.• At the taxiway, brake first, then turn.
Note that the power settings and airspeeds shown in this chart are for a genericCessna 172. They may be slightly different in other single engine airplanes.
Fundamentals of Control
20
What’s In a Name?
The FAA Airplane Flying Handbook, defines the roundout/flare as a singleentity and describes the pilot actions needed in a mere two sentences. Sincethese final few seconds of the landing process traditionally contain the mostdifficult control issues for new students, an abbreviated breakdown in twosentences is less than helpful.
A study published in The International Journal of Aviation Psychology in2005 recognized that “Transitioning . . . from the approach attitude to thelanding attitude is one of the first obstacles that confront new students.” Thestudy indicated that the process is “poorly understood and underreported.”
Depending on the source, the final phases of flight are often listed:• Descent, Roundout/Flare• Descent, Roundout, Flare• Descent, Leveloff, Roundout, Flare• Descent, Roundout, Float, Flare• Descent, Roundout, Holdoff, Flare• Descent, Flare
There is no consensus about the exact definitions of “roundout” and “flare”.Talk to three pilots and you’ll likely get three explanations of where theroundout ends and the flare begins.
During interviews for this book, one pilot commented, “The problem is thatyou are looking for names for discrete parts of the landing process. Inactuality, it is one continuous process where each of your ‘parts’ blends intothe next with no finite boundary. It is one continuous slow pull on the yoke.”
The IJAP study found that pilots regarded the roundout (their definition) tobe more difficult when presented with a diagram and less difficult whenpresented with a textual definition. The study went on to conclude that “60%of expert pilots attributed roundout difficulty to difficulty in perceivingaltitude AGL. This difficulty is symptomatic of the leveloff, not theroundout.” The more likely conclusion is that the pilots were unclear of thedefinitions begin used.
This problem of definition is indicative of the wider problem – too muchemphasis is put on the indeterminate art of landing. Pilots and instructorshave not developed a standard model of the landing process.
Fundamentals of Control
21
Chapter 4 Fundamentals of Control
Consistently good landings share important commonalities. If you’regreasing a Stearman in every time, listening to the wind whistle through thewires, you have mastered the art to the point where you need pay little attentionto the science. But in that case, you probably have a lot more experience than therest of the readers bending the pages of this book. So, for all the rest of us, let’sidentify the fundamentals commonly found to exist in every good landing.
For any given position in the traffic pattern, there is a configuration resultingin an ideal:
• Airspeed• Altitude• Descent Rate
These ideals are:
• Controllable by you• Quantifiably specific• Impact the successive steps in the landing profile
As pilots, and therefore intelligent human beings, we can identify andlearn these ideal configurations. That’s the science. If we fail to maintain any ofthese ideals, the next step in the landing process will be thrown out of sync.
On the downwind leg, for example, we should have leveled off at TPA(traffic pattern altitude) and stayed precisely on that altitude. The descent wewere planning to initiate at the abeam point assumes that it begins at trafficpattern altitude. So, if we allow ourselves to lose altitude on the downwind, theconfiguration change we planned to make at the abeam point (for the descent)will cause us to remain too low for the remainder of the approach. Lose 200 feeton the downwind, and you’ll carry it all the way to the crash site unless you makeadditional configuration changes midstream.
In an example like this, making unplanned configuration changes maycertainly solve the problem. Add some power, maybe pitch the nose up, regainthe altitude. But they also throw off your timing for subsequent configurationchanges.
Varying from our ideal airspeed, altitude, and/or descent rate at anypoint in the pattern will adversely affect the remainder of our approach. You willexperience an increase in workload as you’re forced to make extra decisions.
Fundamentals of Control
22
Small mistakes in the pattern are cumulative unless corrected early.There is much truth to the old axiom that “a good approach makes for a goodlanding.” And a good approach is dependent on your understanding of thesefundamental factors:
Rectangular Pattern
One the most important fundamentals of flying a good approach is tomake your traffic pattern rectangular in shape. Keep the legs 90 degrees to eachother and make sure that the ground track on the downwind leg is parallel to therunway. Seems so easy doesn’t it? Obvious, too. Yet, this simple thing is one ofthe most common fundamentals that pilots discard once they get airborne.
A non-rectangular leg will guarantee that the subsequent leg is eitherlonger or shorter than originally planned. That will have a huge impact on yourtiming.
Lift
Forget Newton. Forget Bernoulli. As far as we’re concerned, lift iscontrolled by two factors: angle of attack and airspeed. Reduce either and theaircraft descends. Increase either and it climbs. At least momentarily.
We have two controls for modulating lift: the throttle and the yoke (or stick).
Therefore, we have two means for increasing lift:(1) Increase power and more air flows over the wings, increasing lift.(2) Pull back on the yoke and the angle of attack is increased, increasing lift.
Getting a firm mental grasp on the regulation of lift is critical to yourability to make good landings. Memorize these relationships now.
Balance
Airspeed and altitude are controlled by a careful balance of pitch andpower. One can argue that we’re really talking about thrust, drag, and angle ofattack. But the easiest, most Zen-full way of envisioning it is via pitch andpower. We have controls for both in the airplane. Power is controlled with thethrottle and pitch is controlled with the stick or yoke.
Fundamentals of Control
23
This correlation of pitch and power is always confusing to student pilots.It takes a while to get the hang of it.
Airspeed
In the landing profile we are going to control altitude with power, andairspeed with pitch. But that just seems so backwards at first. And it is very easyto demonstrate that a pitch up of the nose does cause a climb, not just a reductionin airspeed. Does this refute the prior claim about pitch and power? No. Thereason why has to do with the longer-term tendency.
In a car, we always add power (foot on the gas pedal) to make it gofaster. We equate power with speed. But a car has no option of changing altitude.The tires are going to remain on the asphalt no matter what we do, short ofrolling it over in the ditch. Lift is zero and no amount of power is going to changethat.
In an airplane, if we push the throttle in to add power, we increase theairflow over the wings, thereby increasing lift. Instead of accelerating, theairplane goes into a shallow climb at roughly the same airspeed. Reduce thepower and the opposite occurs, a descent at roughly the same airspeed.
The proper method of changing airspeed in an airplane is to alter thepitch. Whatever short-term change in altitude is experienced is then damped witha change in power.
Increase pitch to decrease speed, and simultaneously reduce power toprevent a climb.
Reduce pitch to increase airspeed and add power to reverse thesubsequently developing descent, thus maintaining constant altitude.
Imagine that we’re somewhere in the pattern, and at that position there isan ideal airspeed. We know what that airspeed is. The artful method of reachingthat airspeed is to jiggle the power in and out, pitching as necessary to maintainaltitude, and tweaking it all until the desired airspeed is reached.
The scientific approach is much easier. Through earlier test flights, orfrom information provided to us by some other source, we realize that a specificpower setting will yield our target airspeed if we’ll just set it and trim for levelflight. It is easy and it always works the same (we’ll talk about density altitudeconsiderations later).
Let’s reiterate.In situations of level flight or where the fine control of descent rate is not
critical, the easiest way to achieve a target airspeed is to set the power to aknown setting and pitch to achieve the desired airspeed.
Set the power, then pitch and trim for your target airspeed. Quick, easy,and results in a minimal workload. Make a note of this.
Fundamentals of Control
24
Altitude
An airplane trimmed for level flight at a constant airspeed will, absent ofgusts and thermals, tend to stay at that altitude. Add a little power to increase liftand a climb results. Remove power and lift is lost resulting in a descent. Theairspeed remains essentially unchanged. Power controls altitude (and VSI rate).
Now again, we can consider that experiment that we did for altitude.Pitch the nose up and the airplane climbs – in the short term. During the climb,however, airspeed is bleeding away. Loss of airspeed equates to loss of lift. Andwhat do we get when lift is reduced? Loss of climb. So, changing the pitch of thenose without changing power will result in a temporary change in altitude, butthe longer-term effect is to return to level flight, but at a different airspeed.
Fine Control
Fine control is most critical during the float and flare stages of thelanding. This is where your art really kicks in. But setting the airplane upscientifically, prior to this final portion of your flight, will give you more timeand require fewer gross corrections.
Art is most effective when you set up for it scientifically. Tune yourguitar before you start playing it.
Timing
We started by discussing they way that non-rectangular legs destroy yourtiming. We started with it and we’ll end with it. Timing is crucial to a goodlanding.
Imagine that the traffic pattern is a rectangular string of dominoes. In anideal situation, you push one end, and the wave of tumbling blocks propagatessteadily through to the predicted finish. This describes a pattern flown withperfect timing.
Imperfect timing could be demonstrated with the dominoes by holdingone back somewhere on the downwind leg. The wave tumbles to that point andthen stops. When you release it and allow the wave to continue, it sequences onto its final disposition, but not at the originally chosen time.
When something happens in the traffic pattern that causes a plannedchange in configuration to occur too early or too late, the rest of the plannedevents are impacted. It forces us to make unplanned decisions and increases ourworkload. This can only have a detrimental effect on our final touchdown.
Fundamentals of Control
25
Failures in timing are almost always due to pilot error. Either the pilothas become distracted, or has taken too long on a previous task, or has simplyforgotten something. We can all learn to be masters of timing. It just requires alittle self-discipline and practice.
Without question, one of the best things you can do to improve yourlandings is to learn your procedures and execute them on time. I cannot stressenough the importance of this. By remaining on time in terms of proceduresaccomplished at every point in the pattern, your workload will be minimized.Minimize your workload, adhere to the proper settings, maintain proper relativealtitude and airspeed. If you do these things you are guaranteed to reduce yourtask of touching down softly on the centerline to the bare minimum effort.

Fundamentals of Control
26
Making it Yours
27
Chapter 5 Making it Yours
Believe it or not, we have now discussed everything you need to know tomake consistently good landings in calm air. No crosswinds yet. We’ll master theairplane under the default conditions first. That is calm or negligible winds.
We know and believe these things:
We accept these fundamental facts about control:
For any given position in the traffic pattern,there is a configuration resulting in an ideal:
• Airspeed• Altitude• Descent Rate (VSI rate)
These ideals are:
• Controllable by the pilot (with pitch and power)• Quantifiably specific• Impact the successive steps in the landing profile
Rectangular Pattern – all legs must be squared off
Lift – we modulate lift with pitch and power
Airspeed – our primary control for airspeed is pitch
Altitude – our primary control for altitude (and VSI rate) is power
Fine Control – is most important after the roundout
Timing – each event in the approach should happen at a specifictime (if one event is delayed, the effects are passed on)
Making it Yours
28
To define your perfect landing profile, you will need two sheets of paper.This is where you will identify and note every action involved.
Divide the first page into four sections. Label them:
• Downwind Leg• Abeam Point• Base Leg• Final Approach
Divide the second page into five sections. Label them:
• Roundout• Float• Flare• Touchdown• Rollout
Now, go through each of the sections and write down your actions andthe events that occur, in order, during that time period. Don’t leave anything out.Use the example for the Cessna 172 on pages 18 and 19 as a guide. Once youhave completed this, you have a precise checklist for a perfect landing.
These two pages, as great as they are for study, are totally useless in theairplane. I’m sure you realize that there is just no way that you can read off andcomply with these items in the busy environment of a traffic pattern. Yet, youneed to do every one of these actions at the time indicated to get your airplaneonto the ground as smoothly as possible.
You have one choice: you have to learn it. There is no way around it.Make this a two step process. Study and attempt to memorize your two pages.Give it your best effort to really learn it well.
Next, place a chair facing a blank wall, eight-ten feet away. In front ofthat chair, place a card table or TV-stand. On the tabletop, place a banana on theleft, a screwdriver on the right, and your two pages neatly spread in the center.Prop the pages up at an angle so you can read them more easily. Congratulations.You have just built your first procedures trainer.
Arm Chair Flight
All right, have a seat in your cockpit. In the real airplane you fly, whereis the trim wheel? In a Cessna 172, it will be on the center console, just besideyour right knee. In a Piper Warrior, it will be on the floor to your right. Now holdthat thought for a moment.
Making it Yours
29
Take the banana in your left hand. That’s your yoke. Pretty handy if youget hungry, too. The screwdriver will be your throttle. Hold it as you would holdthe throttle control in your real airplane. You will move them just as you wouldmanipulate the real controls they represent.
During trim changes, you will need to lay the screwdriver momentarilyin your lap or on the tabletop. For a Cessna-style trim, hold your right-handthumb and index fingers together and brush the side of your knee with the backof your thumb, simulating turns of the wheel. If Piper is your style, make asimilar motion, but brush the side of your right hip to represent the turning of thetrim wheel.
This probably isn’t going to work very well if you have spectators so Iwould recommend you schedule some quality time with just yourself. Block offabout twenty minutes and put everything else out of your mind. You are going tofly this dad-gummed chair around the traffic pattern, you are going to do itexactly as you’ve written on your pages, and heck, you might even have somefun doing it. It’s okay to make airplane sounds with your mouth if you like.
Your goal is to make consistently good landings, right? To applytechniques consistently, a requirement for consistently good landings, you haveto first learn them. Flying your armchair with a banana in your hand may feel abit foolish, but it will work.
Psyche yourself up. Imagine that you really are flying the traffic pattern.Make your power and trim corrections. Say your altitude out loud. If you do thisfor twenty minutes a day, three days in a row, and allow zero tolerance formissed checklist items, you will learn them.
It is a very small effort really. And your guaranteed reward will be moreconfidence and less stress in the cockpit during your next flight. It will give youcommand of the science, leaving you less distracted and more capable ofdiscovering and mastering the art.
Summary
The act of landing truly does begin on the downwind leg. Your objectiveis to lose altitude and airspeed in a carefully timed sequence of events.
Starting on the downwind, you have a series of configuration changesyou must enact at specific points in the pattern. This is your landing profile. Youmust memorize it. Each configuration change is precise. Any mistake in aconfiguration change must be corrected prior to touchdown (and causes anincrease in your workload). Along with aircraft-specific configuration changes(e.g. flaps, carburetor heat, props, and pumps) you control your landing profileby managing the altitude and airspeed with power and pitch. That is about asconcise as we can make it.

How an Airplane Lands
30
How an Airplane Lands
31
Chapter 6 How an Airplane Lands
It may seem a bit odd to you, just now getting to the explanation of howan airplane transitions from flight to ground operations. We’ve been talkingabout airspeeds and descent rates and bananas for quite a few pages already.
I waited because I wanted you to learn the easy stuff first. The rotematerial. This volume of knowledge is now, hopefully, reflex for you. You cancall on it without any effort. Otherwise, trying to implement it in the air willbecome a self-created distraction. There you are, trying to remember the throttlesettings, and oh, heck! you forgot the carb heat. Meanwhile, you’ve lost threehundred feet and your airspeed is 20 knots too fast. All that because of thecumulative effects of one or two distractions.
Flying has a lot of busy work to it. Learn all the little items thoroughly sothat you don’t have to expend any brainpower to implement them. Keep yourmind free for the artistic decisions you’ll have to make.
Lift Modulation
An airplane remains in level flight when its lift vector, the upward forcegenerated by the wings, is equal to the gravity vector, the downward force of theairplane’s weight. When the lift vector is greater than the gravity vector, theairplane goes into a climb. When the lift vector is less, it enters a descent.
We can control the lift vector. The gravity vector, however, is a constant.We cannot do a single thing about it. So, to fly our aircraft, we’ll have to settlewith being in control of the force of lift.
As pilots, we modulate lift with the throttle and the yoke.If we increase power with the throttle, the airflow over the wings
increases and that increases the lift vector.If we pull back on the stick or yoke, the elevators force the tail down and
the nose up. This changes the angle of attack, the angle between the wing’s chordline and the relative wind. As angle of attack is increased, lift is increased – up toa point.
During the landing profile, we transition through various stages of levelflight and descending flight. We control this by manipulating the lift vector withthe throttle and yoke. The only trick is learning which is the more appropriatecontrol at any given instant.
During unaccelerated flight, that is flight at a constant airspeed, thethrottle is the primary control for lift modulation. Reduce the throttle slightly and

How an Airplane Lands
32
we reduce the lift vector. The nose subsequently drops, the aircraft descends, butthe airspeed remains relatively unchanged.
Larger and more sudden decreases in power will allow an excessivepitch-down of the nose. Airspeed may tend to increase in these cases. But as itincreases, more air races over the wings, the lift vector grows, and the nose willagain begin to pitch up. As it pitches up, the airspeed will tend to move backtoward its original value. This type of operation will frequently set up a series ofoscillations that may take some amount of time to damp out. But the point to noteis that a reduction of power, when the airplane is trimmed for a constantairspeed, results in a loss of lift (and a descent) without a meaningful increase inthat airspeed.
The yoke also allows us to modulate the lift vector. If we push the stickforward we force the nose down, thus reducing the angle of attack. When angleof attack is reduced, the lift vector is reduced. But something else also happens inthis example.
We’ve pushed the nose down without making any change to the throttle.Lift is lost, a descent begins, and the airspeed climbs. Remember, we didn’ttouch the power so now we’re in a power-on descent.
As airspeed builds, more air rushes over the wings, the lift vector startsto grow again and the airplane wants to pull out of the dive. The only way tokeep it there is to either hold the yoke forcefully forward or reduce the power tolower the growing lift vector. If you let go of the yoke, the airplane’s nose risesas it seeks its previous airspeed.
During a descent to a landing, we won’t normally wish to dive theairplane. We’ll be looking for more gentle descent rates, ones that give us plentyof time to respond and do other things. The more flexible tool for fine-control ofdescents is the throttle. Certainly there will be times when we change the pitch,but the general rule of pitch for airspeed, power for altitude (and thus, descentrate) gives us the most Zen-like answer to our questions of lift management anddescent rates in a landing profile.
Final Approach
To get the airplane from the final approach onto the runway pavementrequires some significant changes in the airplane’s state. Three things inparticular must occur:
(1) The airplane must lose altitude.(2) The airplane must lose airspeed.(3) The lift vector must be gracefully reduced to zero.
How an Airplane Lands
33
Ignoring all the requirements like maintaining the centerline and clearingobstructions, we are talking about a very precise balancing act between pitch andpower. On short final our goal is to keep a smooth 3° (approximate) glideslopewhile allowing a subtle but steady decrease in airspeed. We want to continue thatall the way to the roundout, timing it so that our power is as low as possible whenwe lift the nose to stop the descent.
Two common problems on short final are being either too high or toolow. We could also be too fast or too slow, but let’s keep it simple for themoment.
Assuming that the airspeed is correct but the airplane is too low, thenatural reflex is to pull back on the yoke, raising the nose. Wrong answer.Raising the nose will slow the descent rate (your obvious goal when you findyourself too low) but only in the short term. Raising the nose also causes a loss ofairspeed. And what do we get when we reduce airspeed? Loss of lift.
So, in an effort to increase lift to reduce the descent rate, our response ofpulling the nose up had the ultimate effect of losing lift. Exactly opposite of whatwe wanted. Down in the weeds we go.
The proper response when we find ourselves low on final is to add a littlepower. It probably won’t take much. Maybe just 50-100 rpms. A little powercauses a little increase in the lift vector. A little increase in the lift vector causes alittle reduction in our descent rate. And that means we will go further beforehitting ground zero.
If we are high on final a similar situation exists. Our innate response is topush the nose down to lose altitude. But what happens when we push the nosedown without reducing power? Answer: airspeed increases along with the liftvector. The end result would be finding ourselves with elbows locked, forcing theyoke forward as the airspeed goes through the roof. We’d get down all right, butwith a large excess of airspeed.
The proper response when we find ourselves high on final is to reducepower. Again, it probably won’t take much. Remove 100-200 rpms and ourdescent rate will increase nicely without impacting our airspeed. If we find thatwe are still too high, a forward push of the yoke coupled with another reductionin power (maybe all the way to idle) will probably do the trick.
Another way of viewing these two cases (too low or too high) is toimagine that you are too far out from the runway or too close in. Consider thatyou are 200 feet above the ground and runway is still nearly a mile away. Youmay have the perception that the distance to the runway is the problem. Butreally, there is nothing wrong with being a mile out. The real issue is being thereat only 200 feet AGL.
Regardless of how you look at it - whether you imagine that you are toolow or too far out - add power to solve the problem. Increase the lift vector withpower to reduce the descent rate while leaving the airspeed constant.
How an Airplane Lands
34
Roundout
The roundout is where the descent ends. It is the point where you raisethe nose to produce a zero reading on the vertical speed indicator. True, youcould add power to increase the lift vector, but that would not give you the resultyou wanted. The roundout is a transition from descending flight to level flight.Adding power would cause the airplane to climb again. Or, if you forced it tostay level, the additional power would be manifested as increased airspeed. Inboth cases, not at all the intended result.
Changing from the descent to level flight is done with pitch at theroundout. Not a difficult decision. It seems pretty obvious when you see therunway numbers coming at you. You should start this process 10-20 above theground. The smooth pitch up should place you in level flight about 2 feet abovethe runway surface.
Float
After transitioning to level flight, your next goal is to just stay at thataltitude (anywhere from six inches to two feet above the runway surface) andpatiently wait for the airspeed to decay. This phase is probably the most difficultpart of the landing profile to master. It is all art and requires the most extremelyprecise control.
As the airspeed bleeds away, lift is lost and the airplane wants todescend. But you don’t want that – not quite yet. Your goal is lose all excessairspeed before allowing it to descend those last few inches. So, your lift vectormanagement skills are called on for peak performance after the roundout.
After the roundout, you “hold the airplane off” while it continues toslow. In the face of decreasing airspeed, the only way to keep the lift vectorconstant is to increase pitch. Subtle increases in yoke backpressure are thusrequired until you feel the magic moment when the pitch is maximized and theairspeed is minimized.
Note that the amount of time you spend floating along in ground effect isa function of airspeed. If you come in a little faster than normal, you shouldexpect to float along in this phase for a few extra seconds. This will place yourtouchdown point further down the runway. Be patient and don’t try to force theairplane to the pavement early.
How an Airplane Lands
35
Touchdown!
You and the airplane are just seconds away from touching Earth andleaving the world of flight. Your goal is to begin another descent, but anexceedingly slow one of just a few inches. The lift vector is still greater thanzero, but you allow it to shrink by discontinuance of further backpressure.Decreasing airspeed with a constant angle of attack = loss of lift.
It is all art at this point. The split second before the rubber touches, theslightest amount of additional backpressure causes a tiny spike in the lift vector,stopping the descent at the exact instant when the main gear meets the runway.
Once the main gear is on the ground, a rapid unloading of the wingsoccurs. The lift vector is less than the gravity vector at this point, but it is still notzero. The wings are supporting some amount of the airplane’s weight, althoughmost of the weight is on the two main gear tires.
As the airplane continues to slow, the lift vector becomes negligible andthe elevator becomes incapable of holding the nose up. With a gentle “plop,” thenose gear drops to the tarmac

How an Airplane Lands
36
Ten Tips for Better Landings
37
Chapter 7 Ten Tips for Better Landings
Just as all good landing have the same characteristics, pilots fail at one ormore issues from a common bank of mistakes on landings that aren’t so good.They are easy to identify because the same issues have been cropping up sinceWilbur and Orville taught themselves to fly.
While much of landing prowess is more art than science, there are thingswe can do to consistently stack the deck in our favor. In fact, there are tenspecific issues that can be addressed. You might consider them ten mistakes toavoid, or ten points to get right. But these ten issues combine to form the perfectlanding profile.
It doesn’t take all ten to make your landings better. Improvement in asingle one of these issues will translate into better timing and control. Quitesimply, if you will pick just one and apply it in the air, your landings willimprove. Master it and you will see results.
1 - Setup on the Downwind
Whether you are climbing into the downwind from a touch-and-go or descendinginto it at your destination airport, the downwind leg marks the beginning of yourlanding profile. Your goal on the downwind is to transition to a specific powersetting while maintaining traffic pattern altitude (TPA). The power setting,usually the bottom of the green arc on the tachometer, will result in a relativelyslow airspeed. That is exactly what you want since any excess airspeed must bedisposed of. The object of your desire is that specific power setting and levelflight.
A climb into the downwind will likely be at full power. But full power in levelflight produces entirely too much airspeed. Thus, climbing into the downwindrequires that you pitch the nose down and reduce power at TPA. You want toattain level flight, at pattern altitude, at your new speed. This power reduction isthe first of three that you will perform prior to landing.
If you are descending into the traffic pattern, your power will probably already bereduced. Upon reaching the downwind at TPA, your goal remains the same. Setthe power to that magic setting, the same one you use every time, and adjust thepitch to attain level flight.

Ten Tips for Better Landings
38
Perform this setup smoothly and quickly and the rest of your approach will beconsiderably easier. If you are too high or too fast, all of the remaining timing inthe approach will be thrown off.
2 – Rushing on the Downwind
Students learning to land think the downwind leg is just too short. They have somany things to do, yet so little time to get them done. With practice, thedownwind leg does appear to grow in length because the student learns his or hertasks and performs them more quickly. More time, less stress.
But even after getting comfortable setting the power and pitch, doing prelandingGUMP checks, and talking on the radio, there are going to be times when youfind yourself rushing.
The reasons for rushing on the downwind are simple. Either you are waiting toolate to get started or you haven’t learned the procedures well enough. One or theother, and you can learn to avoid either mistake.
Waiting too late is usually caused by distraction. Let’s just say that it will takeyou 45 seconds to reach the abeam-the-numbers point from your intercept ofTPA on the downwind. That gives you 45 seconds to set your power, get ittrimmed, do your prelanding checklist, and talk on the radio. Sounds like plentyof time, doesn’t it? So you reduce your power to the bottom of the green arc, holdthe nose to level, then tweak the pressure off of the yoke with the trim wheel. It’sa beautiful day and you smile confidently at your passenger. The runway lookscool down there. This is just about the time that the tower clears someone to land,but you’re not sure of the callsign. You’ll be abeam the numbers in just 10 moreseconds and now you’re having to ask the grumpy controller to “say again”. Youdread making the call. And heck, there was that GUMP check you should havealready done.
The result is a compressed timeline. You have too much to do, and not enoughtime to do it. Had you simply gotten right to your downwind tasks and completedthem without interruption, handling the radio call would have been a non-event.Now you’re going to be stressed and behind schedule as you pass the abeampoint where the next phase of preparation is scheduled to begin.
Learning the tasks required on downwind isn’t really that difficult. Think aboutwhat you have to do: pitch, power, altimeter, tachometer, trim, altimeter, GUMP,talk. Not really that much if you’ll be honest. In the air, however, all tasks
Ten Tips for Better Landings
39
become more complicated – they haven’t changed, but you have. Even a smallamount of stress reduces your cognitive abilities. So, just being in the air flyingan airplane will make these tasks slightly more difficult. To offset this, simplylearn them exceedingly well. In fact, get so good with them that they becomereflex. You don’t want to have to stop and think about them.
3 – Setup at the Abeam Point
Your arrival at the abeam-the-numbers point marks the real beginning of yourlanding. Up until now, you were maintaining altitude. At the abeam point, youbegin your descent.
At the abeam point, your goals are to slow the airplane (your second powerreduction), configure it for landing, and start your descent. When you see theapproach end numbers off of your wingtip, you reduce power, probably add onenotch of flaps, and possibly add carburetor heat. The trick is to do these thingswithout any initial loss of altitude. Yes, you do want to descend, but not until youhave slowed the airplane to its target airspeed. Next to the actual flare, this seemsto give student pilots the most trouble. Let’s talk about that.
What happens if you reduce power, but do not raise the pitch? Think about it. Ifyou simply reduce power, the airplane will start a descent, but with anapproximately unchanging airspeed. Reduce the power but leave the pitch andtrim alone and you get a constant speed descent. Not at all what you wanted.Instead of slowing the airplane, you end up too low and too fast.
Reminisce for a moment about slow flight. As you reduced power, you had toraise the nose to maintain altitude. Since your goal was to slow the airplane, youcouldn’t allow a descent to creep in. The descent would prevent the slowerairspeed you sought.
The same fundamental of aerodynamics applies at the abeam point. To slow theairplane, you must reduce power while smoothly increasing pitch. Once you haveslowed to your target airspeed, then and only then do you allow the descent tobegin. Trim for the target airspeed and you will have navigated one of the moretouchy transitions in the landing profile.
At the abeam point you have to do your chores quickly and precisely. This iswhere armchair practice will pay you huge dividends. Get it right at the abeampoint and you may be astonished at how easy the landing becomes.
Ten Tips for Better Landings
40
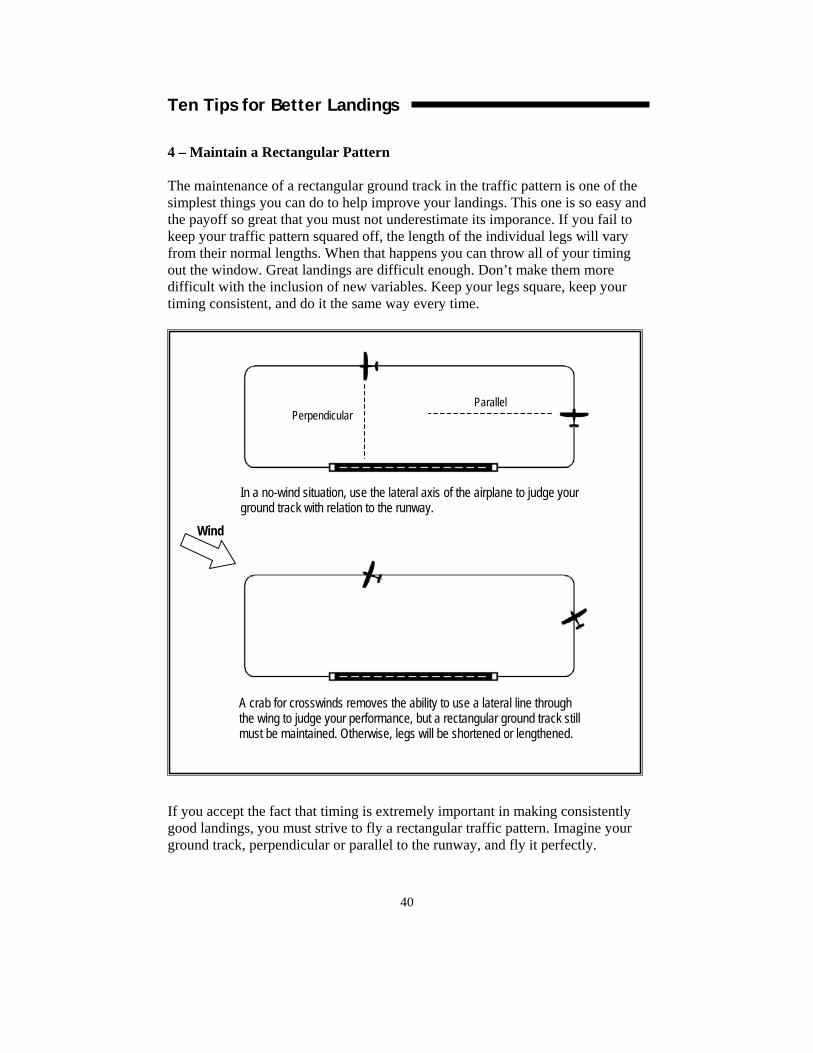
4 – Maintain a Rectangular Pattern
The maintenance of a rectangular ground track in the traffic pattern is one of thesimplest things you can do to help improve your landings. This one is so easy andthe payoff so great that you must not underestimate its imporance. If you fail tokeep your traffic pattern squared off, the length of the individual legs will varyfrom their normal lengths. When that happens you can throw all of your timingout the window. Great landings are difficult enough. Don’t make them moredifficult with the inclusion of new variables. Keep your legs square, keep yourtiming consistent, and do it the same way every time.
If you accept the fact that timing is extremely important in making consistentlygood landings, you must strive to fly a rectangular traffic pattern. Imagine yourground track, perpendicular or parallel to the runway, and fly it perfectly.
ParallelPerpendicular
In a no-wind situation, use the lateral axis of the airplane to judge yourground track with relation to the runway.
A crab for crosswinds removes the ability to use a lateral line throughthe wing to judge your performance, but a rectangular ground track stillmust be maintained. Otherwise, legs will be shortened or lengthened.
Wind
Ten Tips for Better Landings
41
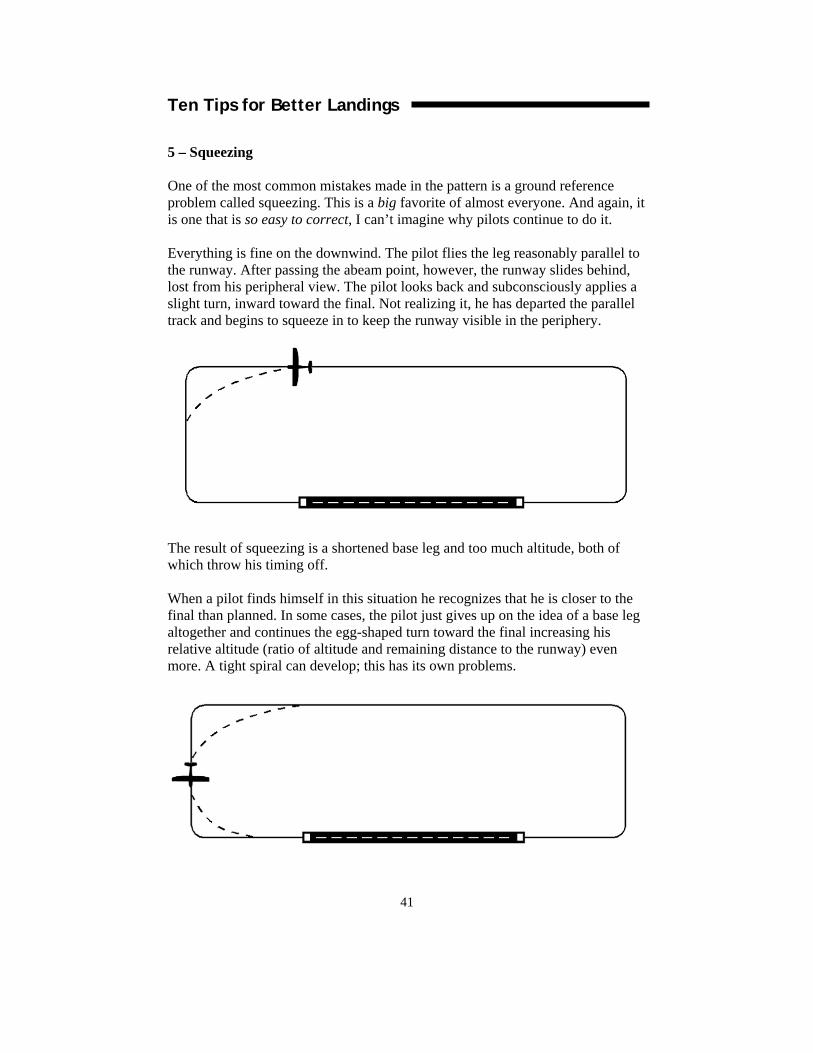
5 – Squeezing
One of the most common mistakes made in the pattern is a ground referenceproblem called squeezing. This is a big favorite of almost everyone. And again, itis one that is so easy to correct, I can’t imagine why pilots continue to do it.
Everything is fine on the downwind. The pilot flies the leg reasonably parallel tothe runway. After passing the abeam point, however, the runway slides behind,lost from his peripheral view. The pilot looks back and subconsciously applies aslight turn, inward toward the final. Not realizing it, he has departed the paralleltrack and begins to squeeze in to keep the runway visible in the periphery.
The result of squeezing is a shortened base leg and too much altitude, both ofwhich throw his timing off.
When a pilot finds himself in this situation he recognizes that he is closer to thefinal than planned. In some cases, the pilot just gives up on the idea of a base legaltogether and continues the egg-shaped turn toward the final increasing hisrelative altitude (ratio of altitude and remaining distance to the runway) evenmore. A tight spiral can develop; this has its own problems.
Ten Tips for Better Landings
42
Up at altitude, a steep spiral is pretty much a non-issue. Level the wings toredirect the lift vector and the airplane will seek level flight on its own. Thisdoes, however, take a few seconds to occur. Close to the ground, those fewseconds may represent the amount of time it takes to impact the earth. Plenty ofpilots will succumb to the urge to pull back on the yoke when they see the groundcoming up at them unexpectedly fast. This can be a recipe for disaster. Increasingbackpressure on the yoke increases load factor which, in turn, increases the stallspeed. Already flying at a reduced airspeed, the increased load factor may put theairplane into a stall/spin configuration with just too little altitude to recover.
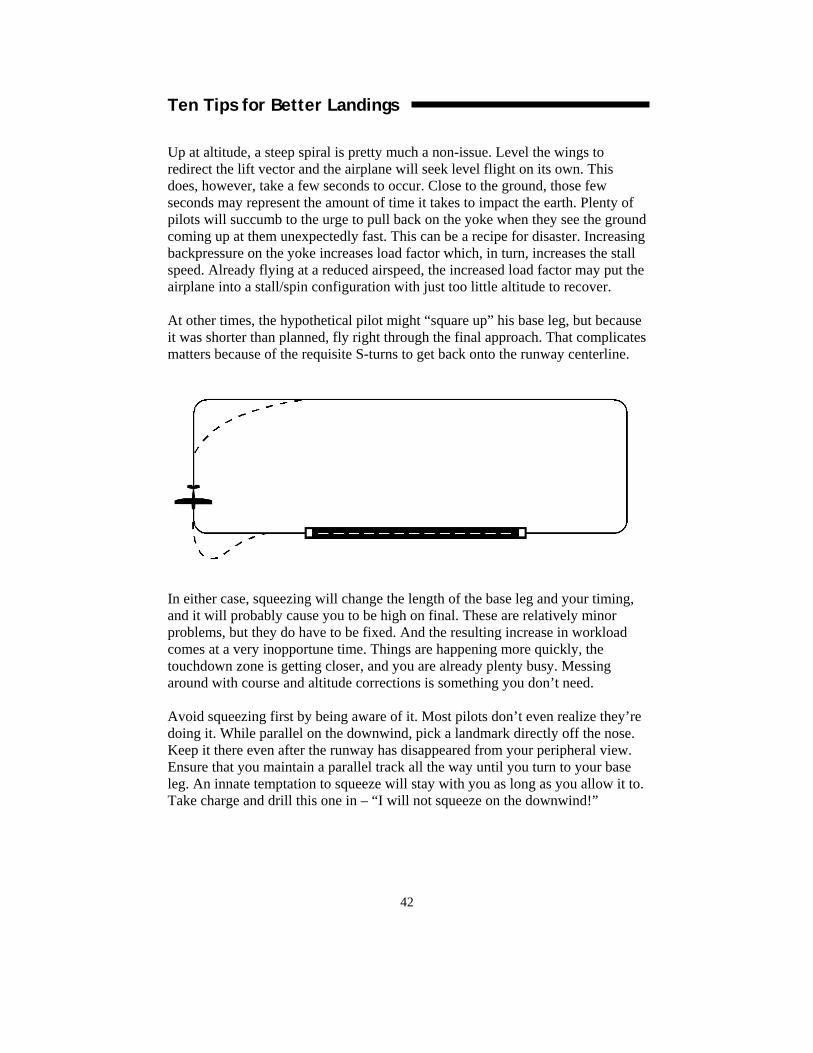
At other times, the hypothetical pilot might “square up” his base leg, but becauseit was shorter than planned, fly right through the final approach. That complicatesmatters because of the requisite S-turns to get back onto the runway centerline.
In either case, squeezing will change the length of the base leg and your timing,and it will probably cause you to be high on final. These are relatively minorproblems, but they do have to be fixed. And the resulting increase in workloadcomes at a very inopportune time. Things are happening more quickly, thetouchdown zone is getting closer, and you are already plenty busy. Messingaround with course and altitude corrections is something you don’t need.
Avoid squeezing first by being aware of it. Most pilots don’t even realize they’redoing it. While parallel on the downwind, pick a landmark directly off the nose.Keep it there even after the runway has disappeared from your peripheral view.Ensure that you maintain a parallel track all the way until you turn to your baseleg. An innate temptation to squeeze will stay with you as long as you allow it to.Take charge and drill this one in – “I will not squeeze on the downwind!”
Ten Tips for Better Landings
43
6 – Wind Correction
Crosswind takeoffs and landings have their own technique. But generalcorrections for winds in the pattern are needed to keep that square ground trackwe’ve been talking about. On windy days you must be proactive and applyneeded corrections, anticipating in advance what the winds will do to yourground track.
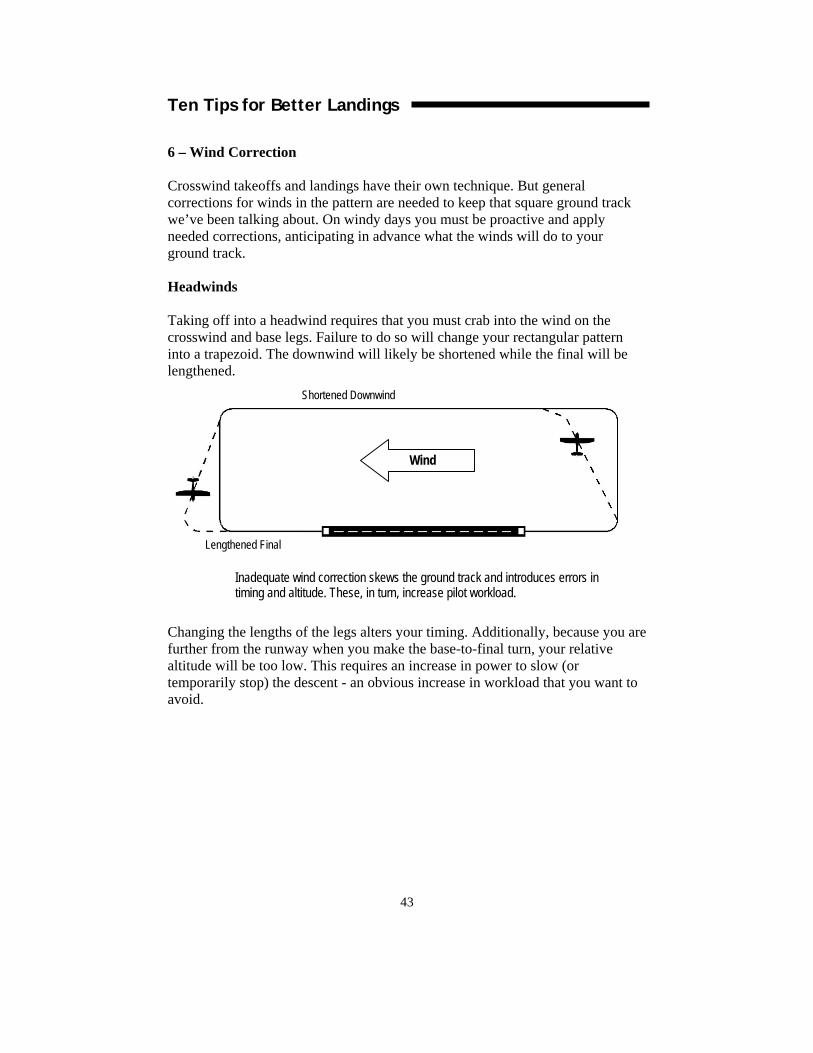
Headwinds
Taking off into a headwind requires that you must crab into the wind on thecrosswind and base legs. Failure to do so will change your rectangular patterninto a trapezoid. The downwind will likely be shortened while the final will belengthened.
Changing the lengths of the legs alters your timing. Additionally, because you arefurther from the runway when you make the base-to-final turn, your relativealtitude will be too low. This requires an increase in power to slow (ortemporarily stop) the descent - an obvious increase in workload that you want toavoid.
Wind
Shortened Downwind
Lengthened Final
Inadequate wind correction skews the ground track and introduces errors intiming and altitude. These, in turn, increase pilot workload.
Ten Tips for Better Landings
44
Crosswinds
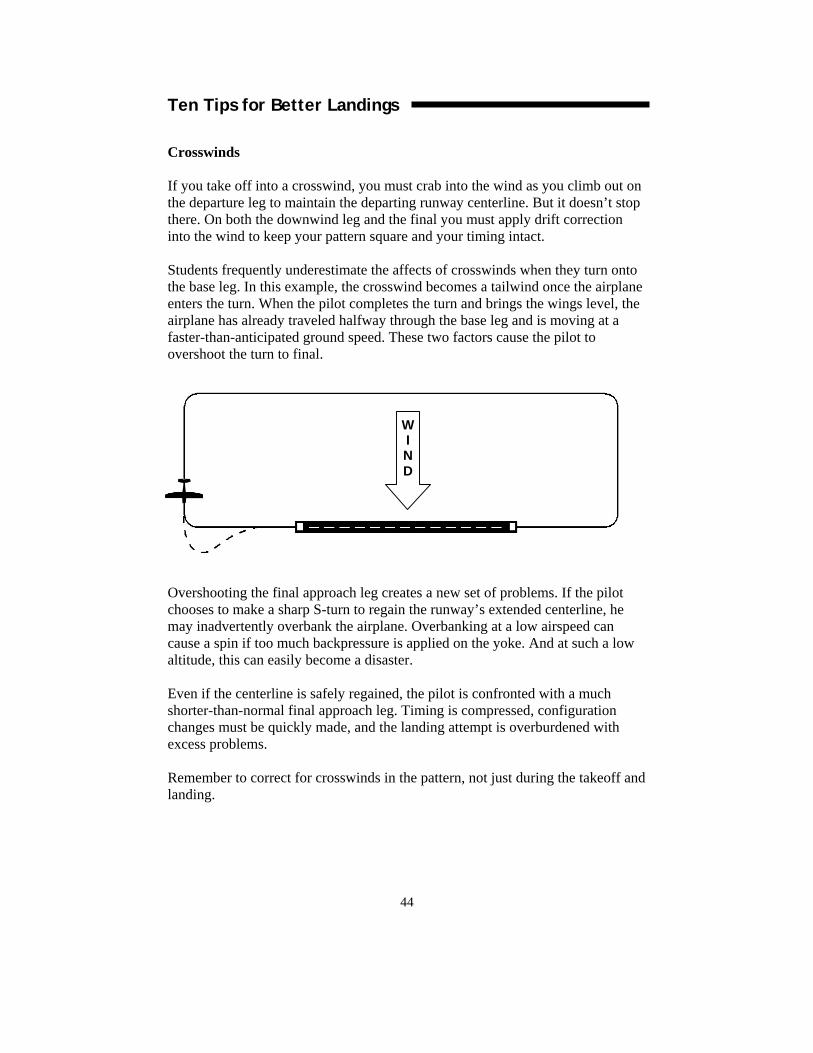
If you take off into a crosswind, you must crab into the wind as you climb out onthe departure leg to maintain the departing runway centerline. But it doesn’t stopthere. On both the downwind leg and the final you must apply drift correctioninto the wind to keep your pattern square and your timing intact.
Students frequently underestimate the affects of crosswinds when they turn ontothe base leg. In this example, the crosswind becomes a tailwind once the airplaneenters the turn. When the pilot completes the turn and brings the wings level, theairplane has already traveled halfway through the base leg and is moving at afaster-than-anticipated ground speed. These two factors cause the pilot toovershoot the turn to final.
Overshooting the final approach leg creates a new set of problems. If the pilotchooses to make a sharp S-turn to regain the runway’s extended centerline, hemay inadvertently overbank the airplane. Overbanking at a low airspeed cancause a spin if too much backpressure is applied on the yoke. And at such a lowaltitude, this can easily become a disaster.
Even if the centerline is safely regained, the pilot is confronted with a muchshorter-than-normal final approach leg. Timing is compressed, configurationchanges must be quickly made, and the landing attempt is overburdened withexcess problems.
Remember to correct for crosswinds in the pattern, not just during the takeoff andlanding.
WIND
Ten Tips for Better Landings
45
7 – Extended Centerline
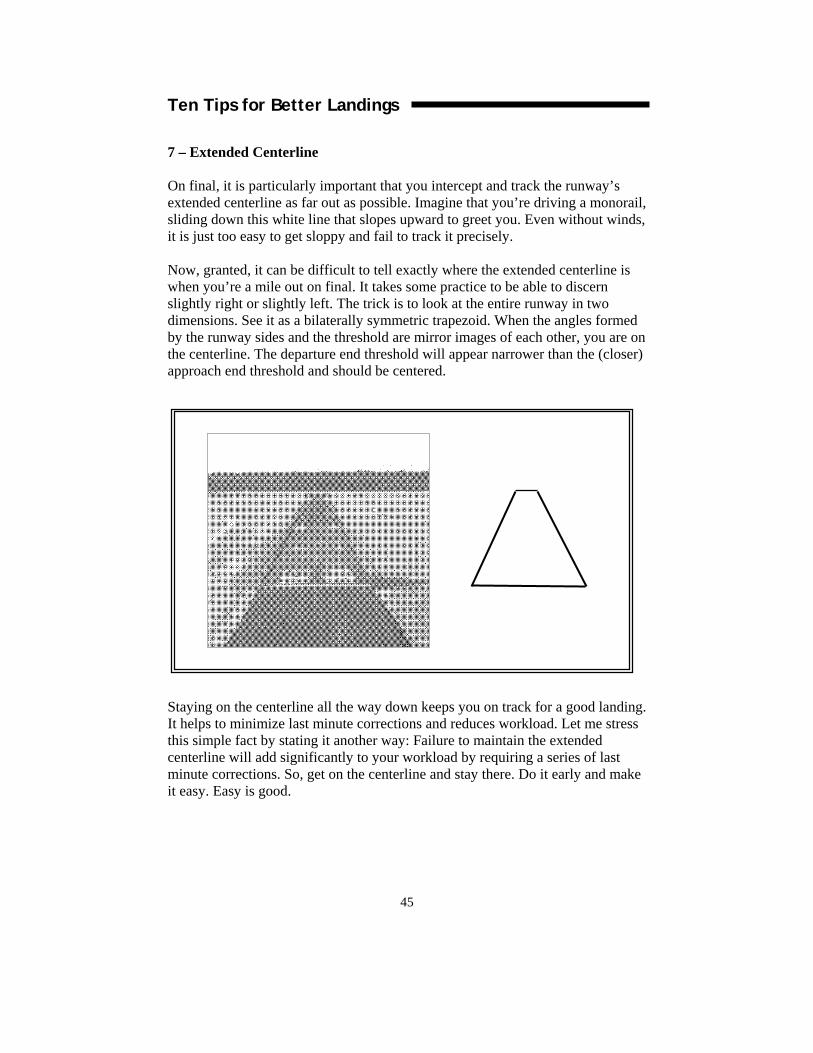
On final, it is particularly important that you intercept and track the runway’sextended centerline as far out as possible. Imagine that you’re driving a monorail,sliding down this white line that slopes upward to greet you. Even without winds,it is just too easy to get sloppy and fail to track it precisely.
Now, granted, it can be difficult to tell exactly where the extended centerline iswhen you’re a mile out on final. It takes some practice to be able to discernslightly right or slightly left. The trick is to look at the entire runway in twodimensions. See it as a bilaterally symmetric trapezoid. When the angles formedby the runway sides and the threshold are mirror images of each other, you are onthe centerline. The departure end threshold will appear narrower than the (closer)approach end threshold and should be centered.
Staying on the centerline all the way down keeps you on track for a good landing.It helps to minimize last minute corrections and reduces workload. Let me stressthis simple fact by stating it another way: Failure to maintain the extendedcenterline will add significantly to your workload by requiring a series of lastminute corrections. So, get on the centerline and stay there. Do it early and makeit easy. Easy is good.
Ten Tips for Better Landings
46
8 – Trim on Final
Being smooth in the roundout and flare requires advance fine-tuning in terms ofpitch. You will have the most fine-motor control if your arm muscles are relaxed.Trim the airplane for neutral pitch pressure at your approach airspeed on shortfinal. This can dramatically improve your ability to apply subtle corrections. Inaddition to improving your finesse, this will allow the airplane to maintain theglidepath even if a distraction causes you to relax your pressure on the yoke.
Short final is a busy time. As simple as this sounds, you have to really thinkabout this one. Forgetting to trim the airplane on final is a very commonoversight. Practice it on the ground and do it in the air.
9 – Rudder After Roundout
If a student pilot is asked to recite one phrase heard most often from theinstructor it would probably be, “Right Rudder!” While heard more often ontakeoff, it is still a common command given during landing.
Prior to the touchdown it is imperative that the airplane’s longitudinal axis isaligned with the runway centerline. Translated from FAA-speak, this says thatyou better land with the nose straight. Touch down with it one side or the otherand you’ll feel the side-loaded jerk as the airplane tries to line up the tail with therunway-induced ground track. It’s uncomfortable to passengers and hard on theairplane’s structure.
As the airplane slows in ground effect, you apply small increases in pitch to keepit off of the ground. Remember, you’re still trying to slow it to touchdown speed.Subtle pitch increases are required to keep it in the air as the airspeed bleeds off.As the pitch comes up and the airspeed goes down, the nose is likely to drift fromthe centerline. This is when the instructor pipes in with the command to give itsome rudder. The most common mistake at this point is to apply the appropriaterudder correction, but keeping it in for too long. The nose swings to the oppositeside as a result and you have the same problem, just going the other way.
While slowing to your touchdown speed, be aware of the nose’s angle to thecenterline. If it is off to one side, give it a little rudder to swing it straight. Butthen remember to release the rudder correction. Put the rudder in, straighten thenose, then take the rudder back out. Repeat as needed.

Ten Tips for Better Landings
47
10 - Patience
Patience is a true virtue when landing an airplane. It also falls quickly by thewayside when your timing is off. You’ve gotten all the way through the pattern.You’ve rounded out right above the runway. Now, why screw it all up bybecoming impatient?
Your goal after the roundout is to slow the airplane and wait. That’s right, waitfor the airplane to decelerate to your appropriate touchdown speed. Then andonly then should you allow the airplane to descend those last few inches.
Here’s the problem scenario: You turn in on final either just a little high or a littlefast. You swoop down to the roundout and bring the nose up level, but with just atad too much residual airspeed. This vestigial momentum has to be reducedbefore you touch down. So you float along and wait. After a few seconds, yoursubconscious starts chattering. “Shouldn’t you be down already? Look how faryou’ve floated.”
The impatient pilot tries to solve the problem by lowering the nose. It’s ever soslight, but that subtle loss of lift is just enough to smack the airplane down uponthe pavement. It makes him marvel that the engineers could design such a robustundercarriage.
Now the patient pilot hears the same questions from his subconscious. “Wow,we’re still in the air.” His response, however, is different. Hold the nose up, letthe plane slow. As long as there is plenty of runway remaining, patiently waitingfor the airspeed to dissipate is the true key to a soft landing.
Summary
There are no simple answers to mastery of a complicated system of events suchas landing an airplane. But there are multiple steps that, applied incrementally,will improve your performance. Such are these ten tips. Ultimately, you need tomaster them all. But for now, just pick one or two. Master those and you will seepositive results. Guaranteed.
Please view the lesson atwww.betterlandings.com/multimedia entitled:
Ten Tips for Better Landings

Ten Tips for Better Landings
48
Changing the Plan
49
Chapter 8 Changing the Plan
The techniques and practices we’ve developed up until now work justfine on a calm, standard temperature day. We needed these constants in order todefine a baseline for our landing model. But circumstances do not always adhereto standards. Strong headwinds, gusts, varying density altitudes, and topographicfactors influence our landing profiles.
Pilots must be ready to modify portions of their approaches based onnon-standard conditions.
Strong Headwinds
A headwind, right on the nose, can be a blessing in many ways.Assuming that it doesn’t include a significant crosswind component, a headwindwill slow your ground speed. At touchdown, the rubber meets the road at a lowerspeed, generally resulting in a softer contact. But a headwind does requiremodifications to the standard landing profile.
An airplane sitting still in the takeoff position experiencing a 15-knotheadwind really isn’t sitting still at all. At least in terms of the airmass. Theairplane’s wings think they are moving through the air with an airspeed of 15knots before the pilot ever touches the throttle. When the power goes in and theairplane starts its takeoff roll, the airspeed will exceed the groundspeed by 15knots. If the airplane rotates at 60 knots, a look out the window would give theillusion that the aircraft and its passengers are trundling along at only 45 knots.Thus, the airplane would become airborne with less runway and in less time thanis normal.
Likewise, the climb would seem steeper although the time to climbwould be unaffected.
In relation to the ground, it would appear that the airplane is performingbetter than on a calm day. It would launch more quickly, and would reach theturnout altitude closer to the departure end of the runway. Yet the airplane itself,in relation to the airmass, would be flying just as it normally does. The only thingthat would change would be its status (in terms of timing and altitude) over thenormal ground track.
Landing into a steady headwind also presents differences in theairplane’s status.
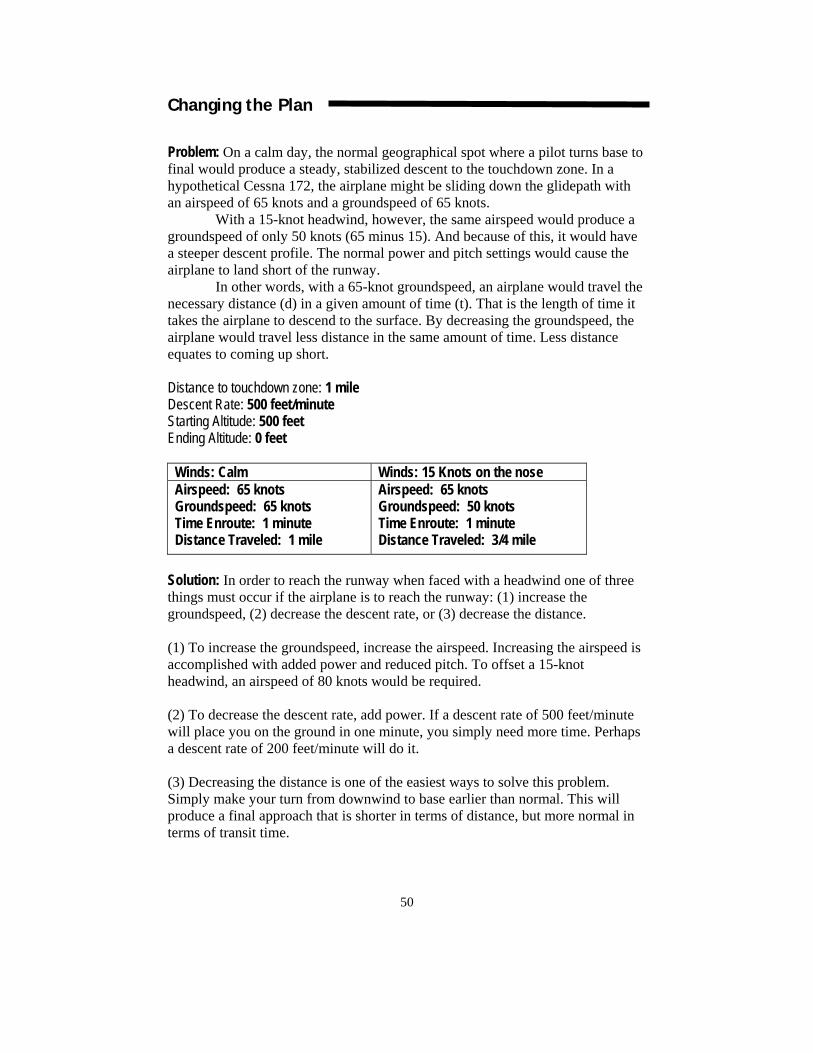
Changing the Plan
50
Problem: On a calm day, the normal geographical spot where a pilot turns base tofinal would produce a steady, stabilized descent to the touchdown zone. In ahypothetical Cessna 172, the airplane might be sliding down the glidepath withan airspeed of 65 knots and a groundspeed of 65 knots.
With a 15-knot headwind, however, the same airspeed would produce agroundspeed of only 50 knots (65 minus 15). And because of this, it would havea steeper descent profile. The normal power and pitch settings would cause theairplane to land short of the runway.
In other words, with a 65-knot groundspeed, an airplane would travel thenecessary distance (d) in a given amount of time (t). That is the length of time ittakes the airplane to descend to the surface. By decreasing the groundspeed, theairplane would travel less distance in the same amount of time. Less distanceequates to coming up short.
Distance to touchdown zone: 1 mileDescent Rate: 500 feet/minuteStarting Altitude: 500 feetEnding Altitude: 0 feet
Winds: Calm Winds: 15 Knots on the noseAirspeed: 65 knotsGroundspeed: 65 knotsTime Enroute: 1 minuteDistance Traveled: 1 mile
Airspeed: 65 knotsGroundspeed: 50 knotsTime Enroute: 1 minuteDistance Traveled: 3/4 mile
Solution: In order to reach the runway when faced with a headwind one of threethings must occur if the airplane is to reach the runway: (1) increase thegroundspeed, (2) decrease the descent rate, or (3) decrease the distance.
(1) To increase the groundspeed, increase the airspeed. Increasing the airspeed isaccomplished with added power and reduced pitch. To offset a 15-knotheadwind, an airspeed of 80 knots would be required.
(2) To decrease the descent rate, add power. If a descent rate of 500 feet/minutewill place you on the ground in one minute, you simply need more time. Perhapsa descent rate of 200 feet/minute will do it.
(3) Decreasing the distance is one of the easiest ways to solve this problem.Simply make your turn from downwind to base earlier than normal. This willproduce a final approach that is shorter in terms of distance, but more normal interms of transit time.
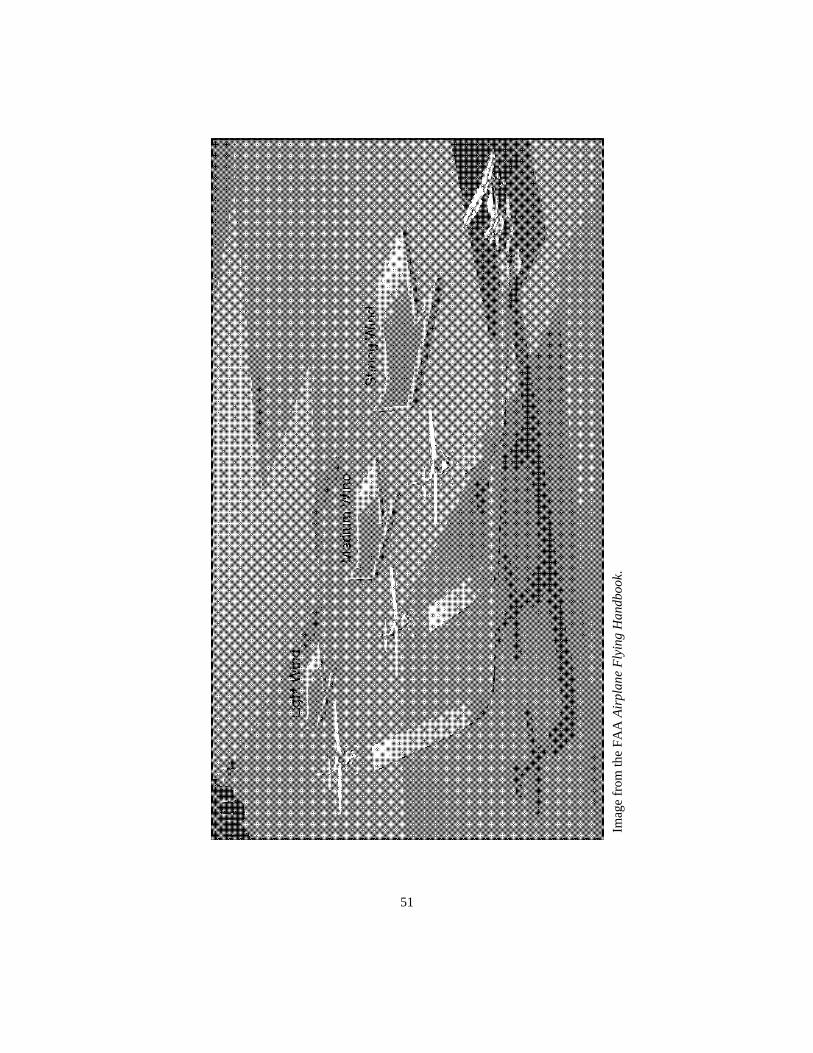
Changing the Plan
51
Imag
e fr
om th
e FA
A A
irpl
ane
Flyi
ng H
andb
ook.
Changing the Plan
52
Gusts
Gusts provide a garden variety of problems for a landing airplane. Theymay be more likely during certain seasons and may be common with passingfronts and nearby storm activity. Gusts can create particularly dangeroussituations and should not be trifled with. Always be prepared to execute a go-around when landing in gusty conditions.
Problem: Gusts from the side.
Solution: Gusts from the side will frequently lift the upwind wing, exacerbatingthe problem. With a wing up, more surface area is offered to the offending gusts.Be prepared to quickly lower any raised wing while yawing with the rudderpedals to maintain coordinated flight with a centered ball. Close to the groundthis becomes even more critical. Extensive practice in crosswind technique with atalented instructor should be mandatory before you attempt gusty landings.
Problem: Gusts on the nose or tail.
Solution: First recognize that gusts affect an airplane when they hit as well aswhen they abate. Imagine a gust of wind as a ball of air impacting the airplane.When the ball hits, an increase in indicated airspeed (but not groundspeed) is feltby the airplane as well as the pilot. Once the airplane has exited this bolus of air,another bump will be felt, this time from the sudden decrease in indicatedairspeed. In either case, an abrupt change in airspeed will occur. As airspeedchanges, lift changes.
To protect yourself from a potentially sudden decrease in airspeed due to a gust,carry extra airspeed during takeoff and landing. This implies a flatterclimb/descent gradient. Typically, pilots subtract the gust speed from the steadystate wind speed to produce a gust factor. Then, half of that factor (in terms ofknots) is added to takeoff and landing speeds.
Changing the Plan
53
Density Altitude
By definition, density altitude is pressure altitude corrected for non-standard temperature. Does that help much? No, I didn’t think it would. Howabout this: Density altitude is used to express the density of air in terms of avolume of standard air existing at some altitude on a standard day. Is that anybetter? No? I can’t say I am surprised. This concept of density altitude remainsone of the most confusing issues to pilots of all experience levels.
Density altitude is a measure of air density, nothing more. Think of it thisway: high density altitude describes low density air. When we ascend, theambient air pressure (which is another way to describe its density) is decreased.The air density we expect at high altitudes is less than the air density experiencedat lower altitudes. High density altitude = low density air.
Air density is a function of its temperature and its relative humidity.High values of either lower the air density. Hot air is less dense than cold air.Damp air is less dense than dry air.
Expect a high density altitude on hot and humid days.Humid + Hot = High Density Altitude = Low Density Air.Density altitude is important to pilots because airfoils and air-breathing
engines are less efficient in lower density air. We can expect poorer-than-normalperformance in both the takeoff and the landing on a day with a relatively highdensity altitude.
Why does air density vary with temperature and humidty?Air density is a function of its temperature and its relative humidity.
High values of either lower the air density. Hot air is less dense than cold air.Damp air is less dense than dry air. Here’s why:
The molecules of hot air are more excited and exhibit moremovement. Banging around against each other, fewer of them can squeezeinto a given volume of space. Hot air = fewer molecules = lower density.
Humid air is less dense for a completely different reason. Air is madeup primarily of oxygen and nitrogen. In humid air, some of these elements arereplaced by water vapor. The molecular weight of H20 is less than themolecular weight of the molecules replaced. Thus, damp air contains lessmolecular mass than an identical volume of relatively dry air.
Changing the Plan
54
Problem: Airplane tends to sink more when density altitude is high.
Solution: Consider the abeam-point settings we described for a Cessna 172. Wetypically use 1700 rpms, one notch of flaps, and expect to descend atapproximately 500 feet/minute. On a particularly hot and humid day, however,your normal settings might produce a greater descent rate. The answer isobvious: on a high density altitude day, expect to add extra rpms to all the“normal” power settings. Usually, 100-200 rpms is sufficient.
This increased sink rate can also be noticed in the flare. The precise amount ofbackpressure you are accustomed to using on a cooler, drier day may result inmore pronounced drop to the touchdown. Be prepared to add a tiny bit of powerat the last minute. The resulting extra lift might just get you that soft touchdownyou want.
Problem: Airplane doesn’t want to descend when density altitude is low.
Solution: Exactly opposite the example given above. The air is more dense on alow density altitude day. At 1700 rpms, your airplane might not descend at all.Try a lower power setting. Again, a reduction in power of 100-200 rpms willprobably be plenty.
Changing the Plan
55
Unfamiliar Airports
Most of us learned to land over a series of lessons at one or two airports.We became very familiar with their geography and naturally picked outlandmarks on the ground. We used these landmarks to know how far out ourparallel downwind leg ran, where to perform power reductions, and where to turnonto the base and final legs. A very normal result of operating in familiarsurroundings.
Using landmarks as a crutch in the initial stages of learning to land canbe very helpful, and all because of the timing issue I have stressed so muchthroughout this book.
Learning to land is all about timing and workload management.Workload requires less effort once we improve our understanding of the tasks.Another way to look at this would be to say that work takes less time after wemaster a task. We don’t have to expend a lot of extra effort just rememberingwhat to do and where to do it. The result of this is that we have more time todevote to the tasks that follow.
When first learning to land, a student hasn’t mastered much of anything.Thus, anything he or she can do to make the process easier – any crutch that canbe employed – will have a positive effective in the ultimate outcome.
Crutches, though, eventually must be discarded. As a student becomesmore skilled, a crutch becomes more of a hindrance. And landing at a new airportwhere you know nothing of the positions of local landmarks illustrates this pointperfectly. If you have made landmarks a crucial part of your traffic patternoperations, you will find yourself in a heap of it the first time you go to an airportwith which you are unfamiliar.
Changing the Plan
56
Problem: You enter the traffic pattern at an airport that is new to you and areunsure where make your turns.
Answer: Forgive me if this comes off as sarcastic, but the real answer to this issueis don’t rely on landmarks to identify points in the pattern to begin with. Developa different method. The only landmark you should use is the runway itself.
The downwind leg is generally flown approximately ½ mile from the runway inlight single engine airplanes. But don’t get too stressed if you are not preciselyseparated from the runway off your wingtip. True, being the same distance awayon the downwind leg on every landing will help keep your timing intact. But it isnot critical to be exceedingly precise. Use your best judgement. Pick a distancethat looks right; it does not have to be exact. If there are other airplanes in thepattern, follow the path they are using. Once you are established on thedownwind, put it any needed wind correction, then pick a point out in thedistance along your line of flight and fly towards that. Done effectively, this willkeep you on a course parallel to the runway.
The abeam point is where you do your second power reduction and prepare theairplane for its descent. The abeam point, that spot on the downwind leg whenyou are adjacent to your roundout point (generally the runway numbers), is thesame for every airstrip. No problem here. Just wait until it is off your wingtip.
Next, where to turn base? Most instructors will teach that the turn is made whenyou intercept a 45-degree imaginary line that extends from the runway thresholdout to the extended downwind leg. This is a good reference to get used to. Butremember what we discovered in Chapter 3? If you are right on your numbersand everything is perfect at the abeam point, descend 200 feet (100 feet if theTPA is only 800 feet above ground) and you are ready to turn to the base leg.(Important caveat: this only works in relatively calm air. A headwind or tailwindmay place you geographically at a point too short or too long after descending200 feet below pattern altitude. Be aware of what the wind is doing to you.)
57
Chapter 9 The Real World
No pilot trying to improve his or her landings need ever feel alone. Everyone of us has been there, and many of us still are. The internet provides a placewhere more and more pilots go, everyday, to share their joys and frustrations. Inthis growing virtual community, you can find people just like yourself having thesame problems and asking the same questions.
Following are questions I have excerpted from some of the popularonline forums. I have chosen ones that I believe express the most commonly feltissues.
Question: I have been introduced to all the maneuvers and I have a littleover twelve hours in. I seem to come in high most of the time, but thething I struggle with the most is the flare. I am flaring too early! I haveabout 25 landings to date and my CFI says I am close to solo. Am I beingtoo critical?
Answer: Too critical? Of course you are being too critical. Landing an airplane isa skill that only the tiniest percentage of the human population has ever mastered.To become a member of this elite society takes time. Twelve hours and twentyfive landings and you are coming in too high and having trouble with the flare?Well of course you are! That is completely normal.
Now one advantage that you, the reader, has over this student is that youunderstand how to correct his problems. Too high on final – clearly the result ofinadequate management of relative altitude. This could have started as early asthe downwind leg. If he simply paid more attention to altitude sooner he wouldnot have to struggle with it at the last minute. There is nothing easier to correctthan an altitude problem. Nail the TPA on the downwind, keep it there as youslow the airplane at the abeam point, make your base and final turns at the rightspots and you are unlikely to find yourself high on final.
As far as flaring too early, wow, this is another one that is so easily corrected.Remember #10 in the Ten Tips for Better Landings? That is the one where Iextolled the virtues of patience. Flaring too early? Well, stop doing that. Bepatient. Let the airplane slow down and accept a longer float if necessary.
The Real World
58
Question: I’ve been stuck on landings for several lessons now. Forwhatever reasons, I can usually get it into the flare, but I don’t have agood feel for the amount of backpressure to apply as the airplanesinks. If I apply too much, we balloon. If I don’t apply enough, we landhard.
Answer: This is probably the most difficult technique to learn (and possibly evenmore difficult to teach). Although understanding the operation of the lift vector inconditions of decreasing airspeed and increasing angle of attack are required,when you are in this phase of a landing, you have darn little extra brain poweravailable to analyze the physics. Things are happening quickly and your numberof options are decreasing.
Chances for success in the final moments of flare are improved by adhering tothe timing and procedures that start on the downwind leg. But remember, thisultimate event, touching tires to pavement, has the smallest performanceenvelope of any part of a flight. It consists of a precision balance of airspeed anddescent rate, modulated primarily by angle of attack. I know, sounds prettyabstract. All the more reason to lean heavily on your artistic skills during thisevent.
While the flare and touchdown will improve with practice, you can definitelyspeed up the process by flying the airplane to that point using proper procedure.This allows you to enter the flare phase of the landing under the best possiblecircumstances. You have probably heard that a good landing begins on thedownwind. That quaint aphorism is completely true.
Ballooning in either the float or flare phases is generally the result of carrying toomuch airspeed during final. If you get your airspeed correct early, it is easier tokeep it correct than to apply extra correction at the last moment. Slow theairplane down and your chances of ballooning will be minimized.
Ballooning can also result from flaring too early, that is, flaring before theairplane has slowed sufficiently. This is usually the result of impatience. Wait abit longer, increase backpressure just enough to prevent further descent. Let theairspeed dissipate prior to that last descent to the pavement.
Every student smacks it in more than a few times learning to touch down.Learning to apply enough backpressure without applying too much seems like animpossible task, but it is one you will master with practice. Slowing the airplaneas much as possible, sitting high in the seat, and looking far down the runwaywill help. And if things just are not coming together, put the power in and

The Real World
59
execute a go around. Don’t try to salvage an approach that is getting worse by themillisecond. Make ten go arounds if needed. Do not touch the tires to the runwayunless everything is going perfectly.
Question: I keep dropping it in hard and my instructor says “Don’t try toland the airplane, try NOT to land it.” I just don’t get that.
Answer: A common admonition and one that can be confusing. What theinstructor means is that you need to exhibit more patience, keep the airplane inthe air a bit longer, and bleed off more airspeed. Your goal is to land it as slowlyas possible. Holding it in the air for what seems like an inordinate period of time,however, can feel very uncomfortable for many students.
Imagine yourself to be a pre-solo cadet. Maybe you are and maybe you have 300hours. It doesn’t really matter. Understanding the psychology at work may helpyou get a better grip on your own landings. So there you are, rounded out andfloating down the runway. You came in just slightly faster than normal, perhapsby only a couple of knots. Nonetheless, this extra speed is something you need toloose prior to flaring the airplane.
“Hold it off! Don’t let it land!” your instructor instructs. You hold the yoke backtrying to keep the airplane aloft. Time ticks by and you’re still in the air. And thatis when you get this nagging feeling. It is not really a conscious thought, but youhave this sense that you have been floating down the runway for too long. Youcan almost hear the little voice in your head saying, “Shouldn’t you be on theground by now?” By telling you to “hold it off” your instructor is trying to tellyou to ignore that little voice and keep the airplane flying so that more airspeedcan be lost before settling to the asphalt.
Unfortunately, the little voice has a backup plan if he cannot convince you thatyou have been in the air too long. He tells you to concentrate on your armmuscles. “See? Feel that? That can’t be right – you are having to pull too hard!”Doubt creeps in and you want to succumb. “Don’t let it land.” You hear thewords in your headset. It’s the same thing as before. Be patient, continue to holdthe needed backpressure and let the airplane decelerate.
To sum it up, yes, you do want the airplane to land. But you do NOT want it toland until you have slowed it adequately. And what is adequate? Absentsignificant winds or other special problems, you want the airplane to fly as slowas you can get it while maintaining directional control. Next time you practiceslow flight, concentrate on the amount of control you retain at various airspeeds.
The Real World
60
Question: I have 32 hours and still haven’t soloed. I am having a realproblem keeping the airplane the level over the runway. I feel like I’mbouncing up and down, ballooning and descending like a rollercoaster.Any ideas on how to correct this? I need help!
Answer: You can hear the frustration in this student’s lament. The hours arebuilding in his logbook to an embarrassing level and still no solo. As if learningto land wasn’t hard enough by itself, this poor guy is adding stress to the mix.
Handling the yoke, especially in terms of elevator control, is a very precise affairduring the roundout and flare. Your goal, to keep the airplane skimming justinches over the surface, is momentarily defeated by the slightest over correction.
Remember that the yoke is controlled by the muscles of your arm. You expectthem to give you fine motor control in order to make tiny corrections in pitch. Ifyou expect them to conform, you have to allow them to relax. Try thisexperiment.
Take a pen or pencil in your hand and flex your biceps muscle in your upper arm.Now, holding it as tightly as you can, write your name on a piece of paper. Next,totally relax your arm and sign your name again. Big difference. You clearlyhave better muscular control when your arm muscles are more relaxed.
Understanding this, it should be obvious that we can control the yoke or stick inan airplane with more precision if our muscles are already relaxed. So how do wedo that and still maintain backpressure? Another one that is so easy, you’llwonder how you could overlook it. The trim wheel.
Trim the airplane for neutral during short final. Let go of the yoke and yourairspeed should not budge. Now, when you perform the roundout, it will takevery little strength to hold the yoke back. You will maintain fine control and thelittle voice won’t start questioning you about pulling back too hard.
If you find yourself in an extended float, don’t be afraid to turn in a little morenose-up trim. Having the airplane trimmed properly means its natural tendencywill be to fly relatively level. It will require only the slightest effort from you tofine tune it and maintain level flight while the last of your airspeed bleeds away.
The Real World
61
Question: I’ve already soloed, but my landings are still pretty sloppy. Aconsistent problem I’ve developed is bouncing. I can see why it happenswhen I drop it in a little hard, but even when I’m slow, I can rarelystick it to the pavement. I’m getting tired of logging three landings onevery trip around the pattern.
Answer: Bouncing is almost universally the result of touching down with toomuch airspeed. But it is more complicated than simply that. A good, experiencedpilot can land an airplane at significantly higher airspeeds without bouncing, butthat pilot is managing his lift vector with a precision that a student is unlikely tomatch. In fact, this technique of landing at faster speed can be a requirementunder certain wind conditions or when trying to land an ice-laden airplane.
For the less experienced pilot landing in good conditions, there is no reason tocarry any excess airspeed onto short final.
When an airplane drops to the pavement too hard, much of the downward energyis redirected upwards upon impact. The airplane arcs back into the air, but at adecreased airspeed. The inexperienced pilot pushes the nose down to limit theascent. This reduces the angle of attack. So now the airplane is in a condition ofdecreasing lift for two reasons: reduced angle of attack and reduced airflow overthe wings. The result is a second impact, frequently harder than the first. And ifthe pilot allows the nose to drop enough that the nose wheel touches first, loss ofcontrol and structural damage are very possible results.
The best option for an inexperienced pilot is to add full power immediately afterthe first bounce and execute a go around. Salvaging a soft landing instead of asecond impact requires skillful application of power and backpressure. Becausethere is very little margin for error in this situation, a go around is the moreprudent choice.
Bouncing can also be the result of flaring too high. This is another one of thoseartistic determinations. The pilot flares too high and the airplane has a chance toaccelerate because it has further to travel from the flare point down to thepavement. Gritting your teeth and squeezing the yoke won’t help. If you findyourself too high with an airspeed decaying to flare speed, either add power andland further down the runway, or better yet, go around.
The Real World
62
Question: I have completed all my requirements and am getting readyfor my checkride. I seem to make all my landings soft enough but Iconsistently drift off to the left of the centerline. Any hints forkeeping it in the middle?
Answer: This is another extremely common problem. With a wide runway and nocrosswind, it is not necessarily a safety issue. But limit the lateral width ofasphalt available and you will quickly see the value of landing on the centerline.
Solving this problem is a two step affair. First, master tracking of the extendedcenterline on your final approach. It is not difficult and most students fail to do itvery well not for lack of ability, but simply because they are not paying enoughattention to it.
Once the ability to stay on the extended centerline on final approach is mastered,the second part of the problem must be addressed. And this one involves that left-turning tendency that pilots learn about in the books, but rarely give thought towhen they are actually in the air.
On final approach, an airplane is descending at a speed and pitch attitude whichis very stable. The airplane’s nose and tail retain the tendency to follow the sametrack. But after the roundout, speed decreases and pitch increases. Torque effectsare allowed to perform their function of swinging the nose ever so slightly to theleft. Because students tend to under-utilize their feet on the rudder pedals,nothing is done to counter the leftward yaw.
Small, short rudder corrections are required to keep the airplane tracking straightdown the runway centerline. Add enough to straighten the nose, then take half ofthat back out. Be conscious of the painted centerline and use it to gauge your lineof travel.
Remember that if you put in enough rudder correction to swing the nose from theleft to the center, that swing will continue if you don’t reduce the rudderdeflection you added. Next thing you know, the airplane is now on the other sideof the centerline. Add only enough rudder correction to line up the nose and tailand to stop continued drift to the side.
63
Epilog
Consistent success with smooth landings is a skill that anyone canacquire. I suspect the way you would like to differentiate yourself is to acquire orimprove that skill in the quickest fashion. No reason to hang around at theUniversity of Hard Knocks any longer than necessary, right?
A good landing is much more than the touchdown, that instant of contactwhere rubber touches pavement. But that single moment is the test, marked byeither a smooth deceleration, a sudden bump that jars an unspoken expletive fromyour lips, or something in between. You score represents your performance inthis fleeting window of time that opens and closes in less than three seconds.
That moment of touchdown is the culmination of a series of events thatstarted on the downwind leg. You maximize your chances for a happy ending byperforming well at all the checkpoints that lead to the final event. By doing so,you fly through that open window with every advantage you can possibly have.
Good Flying!
Please view the lesson atwww.betterlandings.com/multimedia entitled:
Of Space and Time