THE ARCHIVES CATALOGdescription for archival material have been detailed in the ISAD(G),...
30
8 THE ARCHIVES CATALOG The Archives catalog is for cataloging unpublished materials such as documents, manuscripts, oral histories, videotapes, personal papers, maps, and music collec- tions. This chapter will explain how to create data for the various catalog fields. Detailed definitions are provided as we go through the catalog screens to help clar- ify the type of entry for each field. As in all the catalogs, you may choose to enter data in only those fields that are appropriate to the item being cataloged. The Archives catalog field names are based on the work of the International Coun- cil on Archives (ICA) Ad Hoc Commission on Descriptive Standards. The rules of description for archival material have been detailed in the ISAD(G), International Standard Archival Description (General) document. For more information about the ICA, visit their website at www.ica.org. Archives may be cataloged as a single item, such as a letter, manuscript, or diary, or as a complex set of documents, such as the complete records of a corporation. This chapter will show you how to catalog large collections of documents, such as corporate records, using multilevel linking. You will also learn how to catalog indi- vidual items, such as letters, diaries, original manuscripts, newspaper clippings, receipts, ledger books, and other personal papers. Here are two definitions that will help you navigate through the field names in the Archives catalog. Unit of Description - A unit of description may be a single item, a series contain- ing multiple folders, a folder containing multiple documents, or a full set of corpo- 169
Transcript of THE ARCHIVES CATALOGdescription for archival material have been detailed in the ISAD(G),...

8THE ARCHIVES CATALOG
The Archives catalog is for cataloging unpublished materials such as documents, manuscripts, oral histories, videotapes, personal papers, maps, and music collec-tions. This chapter will explain how to create data for the various catalog fields. Detailed definitions are provided as we go through the catalog screens to help clar-ify the type of entry for each field. As in all the catalogs, you may choose to enter data in only those fields that are appropriate to the item being cataloged.
The Archives catalog field names are based on the work of the International Coun-cil on Archives (ICA) Ad Hoc Commission on Descriptive Standards. The rules of description for archival material have been detailed in the ISAD(G), International Standard Archival Description (General) document. For more information about the ICA, visit their website at www.ica.org.
Archives may be cataloged as a single item, such as a letter, manuscript, or diary, or as a complex set of documents, such as the complete records of a corporation. This chapter will show you how to catalog large collections of documents, such as corporate records, using multilevel linking. You will also learn how to catalog indi-vidual items, such as letters, diaries, original manuscripts, newspaper clippings, receipts, ledger books, and other personal papers.
Here are two definitions that will help you navigate through the field names in the Archives catalog.
Unit of Description - A unit of description may be a single item, a series contain-ing multiple folders, a folder containing multiple documents, or a full set of corpo-
169

rate records that are treated as a single entity. You can enter any of these units of description as a single catalog record in Archives.
Fonds/Collection - The whole of the documents, regardless of form or extent, cre-ated and/or accumulated by a particular person, family, or corporate body in the course of that creator’s activities and functions.
GETTING STARTED
From the PastPerfect Main Menu Collections section, click on the Archives button to open the Archives catalog.
If the catalog already contains data, the catalog record that was last viewed will display. If this is the first item entered,
the screen will display blank data fields. Click the Add button in the top Naviga-tion Bar to begin.
Enter an Accession#, Object ID and Object Name into the Add New Catalog Record screen fields, then click Add New Record. In Add Mode, you will be able
170 PastPerfect Museum Software User’s Guide
Enter the new Object ID number and Object Name.
Figure 8-1 Add New Catalog Record screen

to add information about the item. Once you complete data entry for the fields common to all catalogs at the top of the Archives screen, you will start entering information in screen views with fields tailored for archival materials. For more information about the Add New Catalog Record screen please see the section for “Adding a Catalog Record” in Chapter 6 - The Objects Catalog. For more information about the common fields at the top of the screen, please see the section for “Fixed Fields at the Top of the Screen” in Chapter 6 - The Objects Catalog.
THE ARCHIVES SCREEN EXAMINEDThe top of the Archives catalog screen is essentially the same as the top portion of other catalogs we have discussed. It contains the Collection name, Object ID, Object Name, Other#, Old#, Accession#, Source, Home Location, dates, cataloger, status information and Image Management (for MultiMedia Upgrade users).
NOTEIf the Archive record was added without an accession number, you may link to an
existing Accession record, or create the Accession record from the Archive record. Click the file folder icon to the right of the Accession# field. You will be asked if you want to link to an existing Accession record, or create a new Accession record. The next screen will allow you to find the existing Acces-sion records or create a new record.
Unlike the other catalogs, Archives has a Reference Code field. The Reference Code is used to provide a unique identifier for the archival record and a link to the description that represents it. The reference code is made up of three parts; a country code, a repository code, and a specific local object id number. For exam-ple: US MnHi P2141. This reference code indicates that the item, P2141, is located at the Minnesota Historical Society in the United States.
Just below the Home Location field, you will notice the screen view name on the left and five radio buttons on the right. These buttons represent the differ-ent screen views available for this catalog: Archive, Map, Music Collection, Oral History, and Custom fields. You may set a default screen view for each catalog record so that whenever you open that particular record, the selected screen view appears. Please note that you need to be in Add Mode or Edit Mode to select the default screen view.
The Archives Catalog 171

Each type of archive record has a particular set of fields that are needed to catalog that type of item. These fields are grouped in Screen Views. At the top of the left Sidebar, you will see buttons for each screen view. Although you will probably not use all fields for all archival records, you may find fields in multiple screen views useful for describing items. While you can set the default screen view for this record using the radio buttons, you can access any field in any view from the Sidebar. To view fields, click the desired screen view button. To edit fields, please click on the screen view button and then click Edit in the Navigation Bar at the top of the screen. Screen views with completed fields will have a green data light.
In the Sidebar below the Screen View section, you will see Other Views. These but-tons open additional information screens which are common to all four catalogs and are explained in depth in Chapter 6 - The Objects Catalog. The exception is Con-tainer List, which is unique to Archives. At the bottom of the Sidebar in the Actions section is the button for View/Set Up Links. This screen enables you to create, change and view links between archival records at different levels of description.
172 PastPerfect Museum Software User’s Guide
Figure 8-2 Archives Catalog screen
While in Edit Mode, select the default screen view for each Archive record.
For access to additional ISAD(G) archi-val fields, click on one of the six tabs.
With the exception of Container List, the Other Views are the same as in the other catalogs. (See Chapter 6 for details.)

This chapter includes more information on entering a container list and performing multilevel linking.
In the Archive view, you will find six tabs that contain ISAD(G) archival fields. The tabs are: Identity Statement, Context, Structure, Conditions of Access and Use, Allied Materials, and Description Control. This chapter will discuss how to enter data for each field in these tabs.
We will also describe how to enter data in the Map, Music Collection, Oral History, and Custom screens.
THE ARCHIVE SCREEN VIEW
THE ISAD(G) TABS EXAMINED
Identity Statement Tab
The Identity Statement tab is used to identify and describe the archival material represented by the record. Please enter a description for the item or group of items in the Scope and Content / Abstract field located on the left of this tab. To the right of the Scope and Content, you will find the fields Multilevel Linking, Title, Dates of Creation, Dates of Accumulation, and Extent and Medium of the Unit of Description.
Multilevel Linking Level of Description - The position of the item in the hier-archy of the fonds or collection. This may be Fonds/Collection, Series, Subseries, Folder, or Item. This will be explained further in the multilevel linking portion of this chapter.
Title - A word, phrase, character, or group of characters that names an archival item. When the material bears a formal title, transcribe it exactly as it is worded, ordered and spelled. When generating your own title, use a phrase that reflects function, activity, subject, location, or theme.
Dates of Creation - The actual date or range of dates during which the archival material was created. For example, 1916-1945.
The Archives Catalog 173

174 PastPerfect Museum Software User’s Guide
Dates of Accumulation - This date range can be different from the Dates of Cre-ation. It is used to record the period over which the material has been accumulated by a collector.
Extent and Medium of the Unit of Description - Use this field to record the num-ber of physical units in Arabic numerals and the unit of measurement. Alternatively, give the linear shelf space or cubic storage space occupied by the archival material. For example: “143 rolls of microfilm, 35 mm” or “100 cubic feet (65 boxes).” Please also record the type of material being described, such as “1 book, folded leather cover with 32 paper leaves.”
Event - Use this field to refer to a named occasion associated with these materials. Using the file folder icon button, you can access the Event authority file to complete this field and learn the details recorded about this event.
Site/Site # - If this material is associated with a site, please record the site name and link it to your Sites & Localities record using the Site field. Use the plus sign button to the right of the field to link to additional sites.
The Context Tab
This tab is used to identify the creator of the archival material and place the material in context. This tab displays the Scope and Content and contains the following fields:
174 PastPerfect Museum Software User’s Guide
Figure 8-3 Archives Catalog Identity Statement tab
Select level of description.
Dates of creation are entered here.

Name of Creator - Enter the name of the organization or individual responsible for the creation of the material. Notice the file folder icon to the right of this field. This indicates that there is a subscreen available where you may record biographical information about the creator. For both the Creator and Other Creators fields, you may access the Artist/Authors/Creators/Photographer authority file by pressing F7 or right clicking on the field with your mouse.
Other Creators - Enter the names of any other creators associated with the unit of description. Enter names: Last, First, Middle Initial to facilitate research.
Administrative/Biographical History - Provide a history of the corporation, or a biography of the creator of the archival material. This will help place the material in context. Record any significant information on the origin, progress, development, and work of the corporation or on the life and work of the creator of the material.
The Archives Catalog 175
Figure 8-4 Archives Catalog Context tab
Click on the file folder icon to add, edit, or view biographical information about the creator.

Archival History - Record the successive transfers of ownership, responsibility and/or custody of the unit of description. Indicate any actions, such as history of arrangement, creation of finding aids, re-use, software migration or reorganization of records that have resulted in its present structure and arrangement.
The Structure Tab
This tab provides information about future additions to or destruction of materi-als, and a guide to the arrangement of the materials.
Appraisal, Destruction, and Scheduling Information - Enter information on any appraisal, destruction, or scheduling action taken. Where appropriate, record the authority by which the action has been taken. Example: “This item is to be kept permanently in the PastPerfect Museum Archives. The item shall be appraised every ten years for insurance purposes.”
Accruals - Detail any possible changes in the extent of the materials or item. Indi-cate if future accruals, additional transfers, or deposits are expected. Where appro-priate, give an estimate of their quantity and frequency. This field applies to the cataloging of corporate records.
System of Arrangement - Enter information in this field about the arrangement
176 PastPerfect Museum Software User’s Guide
Figure 8-5 Archives Structure tab

of the material. Specify the order of the materials and, if appropriate, how these have been altered by the archivist.
Disposition - Enter the type of disposition planned for this record, such as “Return to creator” or “Destroy.”
Disposition Date - Record the date when the archival items were disposed.
The Conditions of Access and Use Tab
This tab contains fields that are designed to record the legal status of the materials and to outline conditions under which the material may be used or reproduced.
Conditions Governing Access - Identify any conditions that restrict or affect access to the item. Indicate the extent of the period of restriction and the date at which the material will open. Example: “Family correspondence closed until 2020.”
Conditions Governing Reproduction/Copyright - Identify any restrictions on the use or reproduction of the material. If the conditions governing the use, reproduc-tion, or publication of the material are unknown, or if there are no conditions, then no statement is necessary.
The Archives Catalog 177
Figure 8-6 Archives Catalog Conditions of Access and Use tab

Language/Scripts of Material - Record the predominant language(s) of the materi-als comprising the item. If documents contain multiple languages, please list all applicable languages separated by forward slashes.
Physical Characteristics & Technical Requirements - Indicate any important phys-ical details and any permanent physical condition of the material that limits its use.
Finding Aids - Give information about any finding aids that the repository may have that provide information relating to the item. If appropriate, include infor-mation on where to obtain a copy. Example: “See: Guide to Historical Document Holdings in Spokane County. 1999.”
The Allied Materials Tab
This tab provides fields for recording information about the location of the origi-nal item and any information about the existence of copies or other materials that are related and that may be held in other repositories.
Existence & Location of Originals - If the item is a reproduction and another repository holds the original, record the name of the other repository. Also give any identifying numbers and other information that may help in locating the original material. If the original no longer exists, give that information.
178 PastPerfect Museum Software User’s Guide
Figure 8-7 Archives Catalog Allied Materials tab
Existence & Location of Copies - If the item is available in another format, record the formats together with any significant Object ID numbers and the location where they may be found. Example: “Photocopies available for researchers. File Cabinet 4 Drawer 2.”
Related Units of Description in this Repository - Use this field to identify related items in the same repository. If the item consists of material that has a direct and significant connection to another item in your repository, indicate the relationship. For example: “See Series 2003.1.2 for World War II correspondence from/to Han-ley, Warren T. See also 2004.1.1 for his War Ration Book.”
Associated Material in Other Repositories - If there is any material in another repository that has a relationship by provenance to the material, provide infor-mation about the associated items and the other repository. Example: “Cheney Museum of History owns the diaries of Hanley, Warren T. See Catalog #85.1.2.”
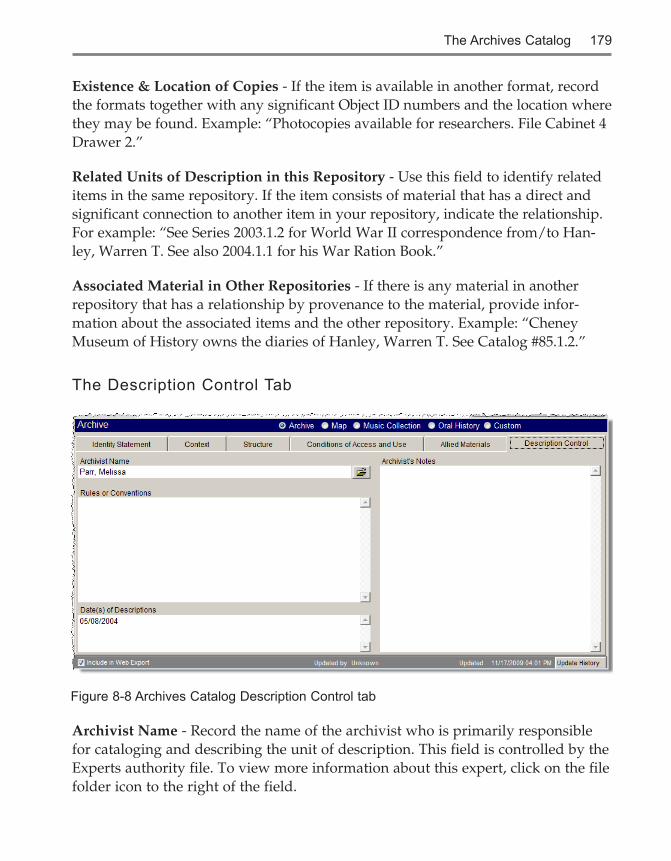
The Description Control Tab
Archivist Name - Record the name of the archivist who is primarily responsible for cataloging and describing the unit of description. This field is controlled by the Experts authority file. To view more information about this expert, click on the file folder icon to the right of the field.
The Archives Catalog 179
Figure 8-8 Archives Catalog Description Control tab

Rules or Conventions - Identify the international, national, and/or local rules or conventions followed in preparing the description.
Date(s) of Description - Indicate when this material was prepared and/or revised.
Archivist’s Notes - Explain how the description was prepared.
THE CONTAINER LIST
Use the Container List when cataloging an archival record that describes materials contained in multiple storage units. The Container List tracks the physical location of the materials. For example, the Container List can be used when cataloging the document boxes that house a collection, series, or other unit of description.
To add a new item to the Container List, click on the Container List button in the Sidebar on the left side of the screen. Once in the screen view, click on the plus sign button towards the right side of the screen. At the Add/Edit Container List screen, enter information in the Location, Container, Folder, Title, Description, Date, Year Range, Creator and Subjects fields. Click Save when finished.
You can Add, Delete, Edit, Spell check, Preview and Print container list records using the file folder icon button. If you want to add similar records using the Fill with Current Data when Adding check box, please be sure you are viewing the record to be copied. You will want to Edit that record and check the Fill with Cur-rent Data when Adding box. Save the record, then click Add. At the Add/Edit Container List screen, complete the data fields for the new record and click Save, then click Close. Your new record will appear in the list.
The Query button allows you to search this record’s Container List for a word or phrase in all or selected fields. For example, if you want to search the Container field for “MS Box 122,” you would uncheck the Location, Folder, Creator, Date, Title, Subjects and Description boxes. Then type “MS Box 122” in the Search for field. Your Container List will show the query results. When you want to view all Container List records, click the View All button. You can query all Archives records using Container List fields by clicking the Query button located within the Navigation Bar on the top of the catalog record screen.
180 PastPerfect Museum Software User’s Guide
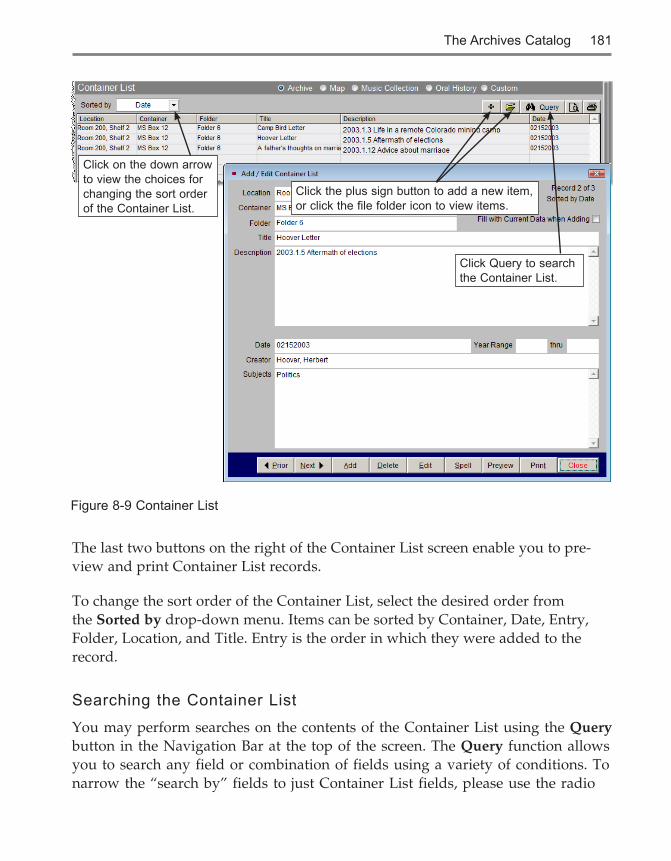
The last two buttons on the right of the Container List screen enable you to pre-view and print Container List records.
To change the sort order of the Container List, select the desired order from the Sorted by drop-down menu. Items can be sorted by Container, Date, Entry, Folder, Location, and Title. Entry is the order in which they were added to the record.
Searching the Container List
You may perform searches on the contents of the Container List using the Query button in the Navigation Bar at the top of the screen. The Query function allows you to search any field or combination of fields using a variety of conditions. To narrow the “search by” fields to just Container List fields, please use the radio
The Archives Catalog 181
Click on the down arrow to view the choices for changing the sort order of the Container List.
Click the plus sign button to add a new item, or click the file folder icon to view items.
Click Query to search the Container List.
Figure 8-9 Container List

button to select Container List at the top of the Search Archives Catalog screen. Select the field to search from its drop-down menu, choose a condition from its drop-down list, then enter a value. Once your statement is complete, click the Add to Statement button. You may add more statements using the “and” or “or” operators to build the filter statement. Once you have your desired search conditions, click the Run Query to Select Records button. The Archive records that meet your filter statement will appear in Query Results. Click the View Records button in the Sidebar to view those Archive records, then click the Con-tainer List button on each record to see the Container List entries. The Query function is discussed further in detail in Chapter 14 - Research.
MULTILEVEL LINKING
For many historical societies and small museums, the item and folder level with container list are enough to catalog most archival materials. However, for large col-lections of corporate documents or a collection of personal papers, you may want to use the multilevel linking capability built into PastPerfect. This allows you to link collection records together in a hierarchical system from the general to the spe-
182 PastPerfect Museum Software User’s Guide
To begin the search, click the Container List radio button.
Select the Container List field from the drop-down menu.
Select the condition statement from the drop-down menu.
Enter the text or value you are searching for.
Figure 8-10 Container List Search through Archives Query

cific. Separate records can be entered for each level of description: fonds/collection, series, subseries, folder, or item.
A fonds/collection is defined by the ICA as the whole of the documents, regardless of form or medium, organically created and/or accumulated and used by a person, family, or corporate body in the course of the creator’s activities and function.
A series is defined as documents arranged in accordance with a filing system or maintained as a unit because they result from the same accumulation or filing process. For example, in a collection of corporate documents, the minutes of board of directors meetings arranged in folders by year could be considered a series. A series may be divided into subseries based on filing arrangement or content.
Let’s catalog a parent record for the Hanley Family Collection personal papers. The parent record encompasses the whole collection, briefly describing all the items contained in the fonds.
The Archives Catalog 183
Figure 8-11 Archive parent record
At the Fonds/Collection level, the Scope and Content field contains a brief description of all the items in the collection.
In a parent record, the Level of Description is Fonds or Fonds/Collection.
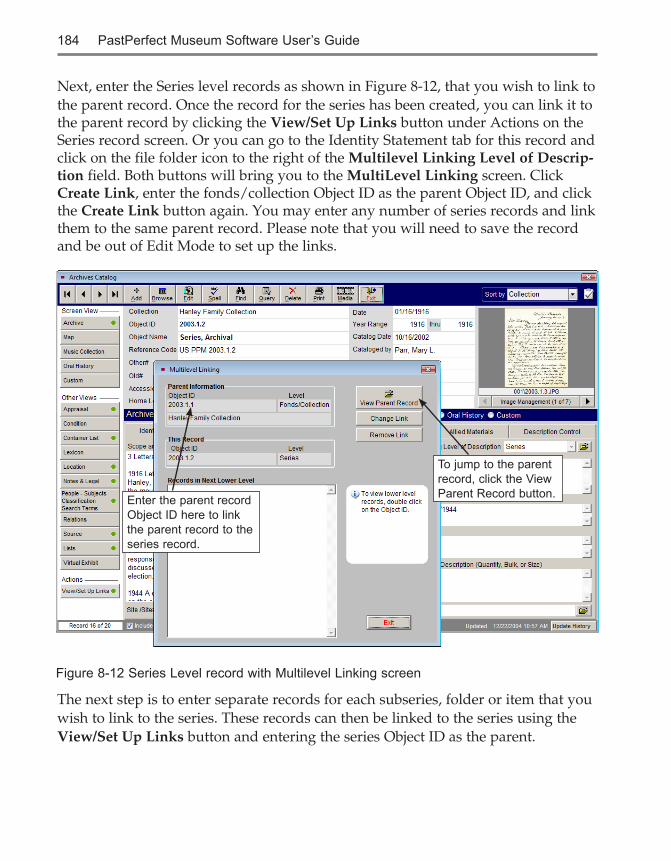
Next, enter the Series level records as shown in Figure 8-12, that you wish to link to the parent record. Once the record for the series has been created, you can link it to the parent record by clicking the View/Set Up Links button under Actions on the Series record screen. Or you can go to the Identity Statement tab for this record and click on the file folder icon to the right of the Multilevel Linking Level of Descrip-tion field. Both buttons will bring you to the MultiLevel Linking screen. Click Create Link, enter the fonds/collection Object ID as the parent Object ID, and click the Create Link button again. You may enter any number of series records and link them to the same parent record. Please note that you will need to save the record and be out of Edit Mode to set up the links.
The next step is to enter separate records for each subseries, folder or item that you wish to link to the series. These records can then be linked to the series using the View/Set Up Links button and entering the series Object ID as the parent.
184 PastPerfect Museum Software User’s Guide
To jump to the parent record, click the View Parent Record button.Enter the parent record
Object ID here to link the parent record to the series record.
Figure 8-12 Series Level record with Multilevel Linking screen
PastPerfect does not require you to provide all levels of data. In some cases, you may need to enter a record only for the fonds and records for the associated items, linking the items directly to the fonds, without a series. You can also enter a single record for the fonds without series or items, or you can enter items without an associated fonds or series.
Multilevel Linking allows you to create hierarchical document cataloging, in com-pliance with ICA standards and using the rules of description as documented in the ISAD(G) manual.
Remember, when cataloging with multilevel linking, you do not have to repeat information in lower levels that you have already entered in the higher level. You will save time in cataloging by starting with the fonds/collection level and working your way down through series, subseries, folders, and items.
THE MAP SCREEN VIEW
The Map screen allows you to catalog maps in your collection. This view contains specialized fields required for these items. The field names and field descriptions
The Archives Catalog 185
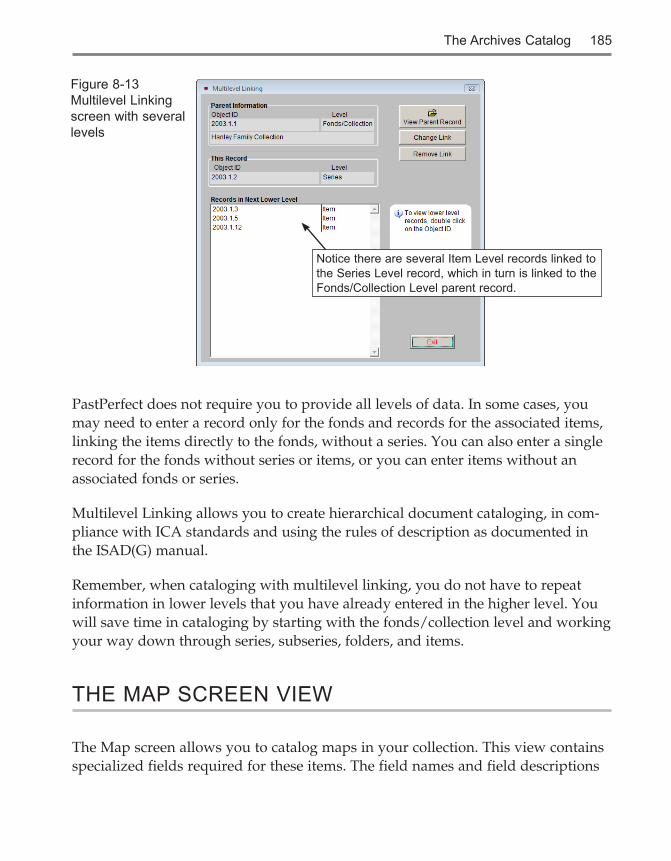
Figure 8-13Multilevel Linking screen with several levels
Notice there are several Item Level records linked to the Series Level record, which in turn is linked to the Fonds/Collection Level parent record.

are derived from the Guide for a Small Map Collection, by Barbara E. Farrell and Aileen Desbarats.
Please include a description of the map in the Scope and Content field at the left of the Map screen. If the map has unusual characteristics, such as a round or irregular shape, please note them in this field. The following are explanations of fields spe-cific to maps.
Area/Region - Use this field to enter the name of the area or region covered by the map being cataloged.
Projection - Enter the type of projection used in the map being cataloged. It is impossible to transfer information from a sphere to a flat surface without distor-tion. On maps that include enough of the earth’s surface for the curvature to be significant, the properties of distance, angular measurement, area, and shape must in some way be distorted. Projections have been devised to preserve a specific
186 PastPerfect Museum Software User’s Guide
Figure 8-14 Archives Catalog Map Screen View

property or combination of properties. An example of a projection is the Mercator Projection.
Insets - An inset is a small map or illustration set within a larger map. For example, a map of the state of Maryland may have an inset of the city of Baltimore.
Publisher - The name of the entity that published the map.
Published Place - The location where the map was published. Include city, state and country.
Published Date - The year in which the map was published.
Language - The predominant language of the map.
Series - You may acquire multiple related maps or a map of one area that covers multiple sheets. Record the name of the map series.
Edition - The map may have been republished. Please record the edition that you are cataloging.
Size - Use this field to record the size of the map being cataloged. This is usually expressed as in this example: 24” x 36.”
Number of Sheets - This field is used to record the number of sheets that comprise the map being cataloged.
Medium - This field is used to list all media from which a map is made. You may choose to record a single entry such as “Paper” or “Vellum.” However, you have the option to choose several entries separated by forward slashes, as in “Paper/Watercolor.” Record multiple entries in descending order of percentage of compo-sition. This field is controlled by an authority file from which you may choose pre-defined media types.
Scale - Scale refers to the proportion used in determining the dimensional rela-tionship between map distance and ground distance. For example, if one inch on the map represents 50,000 inches on the ground, the scale can be expressed as 1 to 50,000, or 1:50,000. This is called the representative fraction. Use the Scale field to record the scale of the map.
The Archives Catalog 187

188 PastPerfect Museum Software User’s Guide
Longitude - Use the Longitude fields to record the angular distance on the earth’s surface east or west from the Prime Meridian, expressed in degrees, minutes and seconds. East Longitude describes the eastern boundary of the map. West Longi-tude describes the western boundary of the map.
Latitude - Use the Latitude fields to record the angular distance north or south of the earth’s equator measured in degrees along a meridian. North Latitude describes the northern boundary of the map. South Latitude describes the southern boundary of the map.
Prime Meridian - Prime Meridian is the zero meridian used as a reference line from which longitude east and west is measured. It passes through Greenwich, England. The Prime Meridian at Greenwich is accepted as such by international convention (1884). Many maps produced in non-English speaking nations may have numbering systems based on other meridians, such as the meridian of Ferro Island or the Paris meridian. Use the Prime Meridian field to record the Prime Meridian for the map being cataloged.
THE MUSIC COLLECTION SCREEN VIEW
The Music Collection screen view provides a comprehensive database program for cataloging music collections within PastPerfect. This screen view allows you to create and track information about music recordings including: album title, group name, primary artist, instrument, genre, recording label, recording media, and other artists and instruments. You may also create a complete track list for each recording that includes: track number and track length, media ID, song title, com-poser, up to ten individual artists and their associated instruments, group, orches-tra, and conductor for each track. As with cataloging any item in PastPerfect, you should enter data only in the fields needed to accomplish your cataloging goal.
To catalog a music collection item, begin by adding a new Archive catalog record. Enter information at the top of the screen for the fields common to all catalogs and select the radio button for Music Collection to set the default screen view. Click on the Music Collection button in the Sidebar to reveal the music fields. Please describe the recording using the Scope and Content, Other Art-ists & Instruments, Album Title, Group, Primary Artist, Instrument(s), Genre, Recording Label and Recording Media fields.

The Archives Catalog 189
Scope and Content / Abstract - Use this field to describe the album, tape, or CD. Record subject matter and the form of the item to enable users to judge its poten-tial relevance. Give a brief summary of the content. This is an unlimited field, so the entry may be as long as you like.
Album Title - Enter the title or name of the compact disc, record album, or record-ing.
Group - Enter the name of the group, band, or ensemble responsible for creating the music.
Primary Artist - Enter the name of the individual who is primarily responsible for the content of the music. This field is controlled by the Artist/Author/Creator/Photographer authority file. To access the authority file, press F7 or right click with your mouse. Double click on the entry to populate the field. The file folder icon to the right of the field indicates there is more information available for the artist.
Click the Music Collection radio button to set the screen view.
Use the Genre authority file to select an entry for this field.
Figure 8-15 Scope and Content/Abstract and Genre fields

190 PastPerfect Museum Software User’s Guide
Instrument - Enter the instrument(s) played by the individual who is primarily responsible for the content of the music. This field is controlled by the Instrument authority file. To access the authority file, press F7 or right click in the field. Double click on the entry to populate the field. You may add, edit, or delete entries in the authority file from this screen or you may go to Main Menu| Setup | Authority Files | Archives. Highlight Instruments and press the Next > button at the bottom of the screen. You may Add, Edit, and Delete entries.
Other Artists & Instruments - Enter any other artists and their instruments who are responsible for the content of the music.
Genre - Genre refers to a category of music composition marked by a distinctive style, form, or content. This field is controlled by the Music Genre authority file.
Recording Label - Use this field to list the record company name, if applicable.
Recording Media - Enter the media upon which the music is recorded. This field is controlled by a drop-down menu. Click on the down arrow on the right of the field to reveal the choices. You may add, edit and delete the terms on the list by going to the Main Menu | Setup| Authority Files.
Track List
The lower portion of the screen contains the Track List for the recording. The track list contains the following fields: Track, Length, Media ID, Song Title, Composer, Artist 1-10, Instrument 1-10, Group, Conductor and Orchestra. To add a new track, first make sure you have saved your new Archive record and are not in Edit Mode. Then click on the plus sign button above the Track List, enter data in the pertinent fields, and click Save.
Figure 8-16 Right side of Music Collection screen
To enter, edit, or view additional information about the primary artist, click on the file folder icon.

The Archives Catalog 191
To edit a track, click the file folder icon button. You will be able to Add, Delete, and Edit the track and Preview and Print the track list.
If your PastPerfect system is equipped with the optional MultiMedia Upgrade, you may create links to audio files that allow you to play music files while you are viewing the PastPerfect record. These audio files may be stored either on your hard drive or on other removable media. For details about multimedia links, see Chapter 26 - Multimedia.
Searching the Track List
You may perform searches on the contents of the track list by using Query in the top Navigation Bar. The Query function allows you to search any field or combination of fields using a variety of conditions. The Query function is dis-cussed in detail in Chapter 14 - Research. Press Query at the top of the Archives catalog screen and select the “Music Track List” radio button to begin a search
Click on the plus sign to add a new track or click the file folder icon to edit a track. Enter information in the Track List screen and click Save.
Figure 8-17 Track List

192 PastPerfect Museum Software User’s Guide
using the track list fields. You may add multiple statements joined by “and” or “or” to create your filter statement. Select the field from the field drop-down menu, select a condition from its drop-down menu, then enter a value. For instance, if you wanted to find all recordings with the composer Philip Glass and conductor Michael Riesman, you would choose the field Composer, then the condition “Begins with,” and enter a value “Glass, Philip.” Click the Add to Statement button. Make sure that the radio button for “and” is selected, so the results meet both requirements. Choose the field Conductor from its drop-down menu, then “Begins with” from the Condition list. Enter the value “Riesman, Michael,” and click Add to Statement. Click Run Query to Select Records to find your Archives catalog results.
As with all queries, results may be viewed as catalog records or as images in a light box. You can print the list, print a catalog card or other report, and export the list to Excel. Queries may also be saved and retrieved at a later time.
THE ORAL HISTORY SCREEN VIEW
Oral history interviews can be an important part of local history. They offer vibrant first-hand accounts of historic events both big and small. They are an excellent way to collect primary source information about people, events, com-munities, and social changes in both private and public affairs. Many oral histories are stored on tape or other media. The PastPerfect Oral History screen view con-tains the fields and forms necessary for cataloging oral histories.
Figure 8-18 Query - Track List fields

The Archives Catalog 193
Select the radio button for Oral History to set the catalog record’s default view and click on the Oral History screen view in the Sidebar to reveal the oral history cata-loging fields. This screen contains all the fields needed to catalog an oral history record.
Scope and Content / Abstract - Use this field to describe the oral history. Record subject matter and the form of the item to enable users to judge its potential rel-evance. Give a brief summary of the content. This is an unlimited field so the entry may be as long as you like.
Recording Media - Enter the type of media upon which the original recording was made. This field is controlled by a drop-down menu with terms to select. You may add, edit and delete terms on the list by going to the Main Menu | Setup | Author-ity Files. You will want to select the Archives screen, then double click on the Recording Media field in the Combo Box column.
Figure 8-19 Oral History Screen View

194 PastPerfect Museum Software User’s Guide
Media Quantity - Indicate how many videotapes, cassettes, reels, or other media are part of the oral history being described.
Restrictions - Enter any restrictions that may apply to the use of the oral history interview tapes, transcripts, or other facsimiles of the oral history interview.
Narrator’s Name - The narrator is the person being interviewed. This field is con-trolled by the Experts authority file. Press F7 or right click in the field to access the authority file. This field may also be linked to a Contact record. Enter the narrator’s Contact ID# in the ID# field to the right of the name, or click the file folder icon to the right of the field to view the list of all contacts and double click on a name to select it. Once an Id# is entered, you may jump to the Contact record by clicking on the file folder icon.
Interviewer - Enter the name of the person who conducted the oral history inter-view. This field is controlled by the Experts authority file. To access the file, press F7 or right click in the field. To add, edit, or delete entries in the authority file use the buttons at the top of the screen. For more information about the expert, click on the file folder icon to the right of the field.
Interview Place - Enter information about where the interview took place.
Interview Date - Enter the date of the interview.
Figure 8-20 Oral History Donor Release Form

The Archives Catalog 195
Length of Interview - Enter the length of the interview in hours and minutes.
Date Donor Form Signed - Enter the date the donor signed the agreement giving your organization the rights to this interview.
View/Print Donor Release Form - It is important for the subject of the interview to understand that the information contained in the oral history interview may be published or broadcast for various purposes. Having the narrator review and sign the Oral History Donor Release Form, shown in Figure 8-20, will help clarify the legal conditions governing the use of the oral history.
Transcriptionist - Enter the name of the person who transcribed the oral history interview. This field is controlled by the Experts authority file. To access the file press F7 or right click in the field. To add, edit, or delete entries in the authority file, use the buttons at the top of the screen. For more information about the expert, click on the file folder icon to the right of the field.
Transcript Location - Enter the location of the transcript of the interview.
Transcription Date - Enter the date of the transcription.
Transcript Reviewed - Enter the date that the narrator reviewed and approved the transcript of the oral history interview.
Click the plus sign to add a new entry, or click the file folder icon to edit an entry on the Recording List screen.
Figure 8-21 Oral History Recording List

196 PastPerfect Museum Software User’s Guide
Oral History Recording List - To add to the Recording List, first make sure you have saved your new Archive record and are not in Edit Mode. Then click on the plus sign button above the Recording List. In the Recording List screen, seen in Figure 8-21, you will be able to enter details from the recording including: Media ID, Side, Start Time and Subjects. To add, delete or edit entries on the Oral History Recording List, click the file folder icon button. This screen also enables you to pre-view and print the recording list.
If your PastPerfect system is equipped with the optional MultiMedia Upgrade, you may create links to audio or video files that allow you to play the audio (or video) while you are viewing the PastPerfect record. These files may be stored either on your hard drive or on other removable media. For details about multimedia links, see Chapter 26 - Multimedia.
Searching the Recording List
You may perform searches on the contents of the recording list using Query in the top Navigation Bar. The Query function allows you to search any field or combination of fields using a variety of conditions. The Query function is dis-cussed in detail in Chapter 14 - Research. Press the Query button at the top of the Archives Catalog screen and click the “Oral History Recordings” radio button to begin a search using the recording list fields. You may add multiple statements joined by “and” or “or” to create your filter statement. Select the field from the field drop-down menu, select a condition from its drop-down menu, then enter a value. Click the Add to Statement button. Once you have built the filter state-ment, click Run Query to Select Records to see results from your Archives cata-log.
As with all queries, results may be viewed as catalog records or as images in a light box. You can print the list, print a catalog card or other report, and export the list to Excel. Queries may also be saved and retrieved at a later time.
THE CUSTOM SCREEN VIEW
Clicking the button below the Oral History button under Screen View on the Side-bar will display the custom fields for the Archives catalog. This screen provides twenty-two custom user-defined fields. You may assign your own name to this

The Archives Catalog 197
screen view and these fields. For more information on the custom fields, please see Chapter 6 - The Objects Catalog. A green data light will appear on the Custom but-ton when there is data in this view. Please note if you rename the screen view, the button will display the new name instead of “Custom.” You may set this Custom screen view as the default (rather than Archive, Map, Music Collection or Oral History) by clicking the radio button next to Custom (or the new name).
BUTTONS IN EDIT MODEClicking the Edit button at the top of the screen will reveal options for making changes to the record.
Change Access#, Object ID or Loan# - Allows you to edit the Accession number, Incoming Loan number, and Object ID for this record. Use this to correct records where the numbers were entered incorrectly.
Deaccession - This button enables you to transfer the record from the Archives catalog to the Deaccession catalog. For more information about deaccessioning items, please see Chapter 5 - The Accession Process.
Change Catalog - Allows you to move the Archives record to one of the different catalogs - Objects, Photos, or Library. From this screen you may select the correct catalog for the item and click OK. This will move the catalog record to the other catalog and mark the record in the Archives catalog for deletion. Note the large yellow warning box near the top of the catalog screen. The record in the original catalog will be sent to the Recycle Bin and no longer displayed. Because each cata-log contains different fields, not all data may be transferred to the new catalog. We suggest printing a copy of your record before using the Change Catalog function.

198 PastPerfect Museum Software User’s Guide