The Anatomy of Selected Joint Locks - Funfolks€¦ · 253 The Anatomy of Selected Joint Locks Hien...
21
253 The Anatomy of Selected Joint Locks Hien N. Nguyen Introduction My initial foray into martial arts came when my dad took me to an aikido dojo in the Little Saigon district of Westminster. We arrived in time to watch the weekend youth class warming up. I watched as the instructor led the excitable students through trips of rolls and falls across the mat. I had never seen any of these techniques performed before, and watched in fascination as other kids my age rolled nimbly and effortlessly, forwards, backwards, or even after flying through the air. Being the shortest and smallest seventh grader in my class, I was a little intimidated when my dad first suggested I take up martial arts. After seeing kids having fun with nothing reminiscent of the Cobra Kai school in The Karate Kid, though, I said I might like to try it out. As we stayed to watch the remainder of class and warm-ups ended, the students all knelt in a line along one length of the mat. The head instructor, Sensei Dang Thong Phong came out, called upon the senior black belt, and proceeded to demonstrate aikido techniques, three different ones for varying skill levels of the class. Each time, as the black belt reached to grab his wrist, Sensei Phong would turn like a bullfighter, leading his attacker around in a flurry of
Transcript of The Anatomy of Selected Joint Locks - Funfolks€¦ · 253 The Anatomy of Selected Joint Locks Hien...
253
The Anatomy of Selected Joint Locks
Hien N. Nguyen
Introduction
My initial foray into martial arts came when my
dad took me to an aikido dojo in the Little Saigon
district of Westminster. We arrived in time to watch
the weekend youth class warming up. I watched as the
instructor led the excitable students through trips of
rolls and falls across the mat. I had never seen any of
these techniques performed before, and watched in
fascination as other kids my age rolled nimbly and
effortlessly, forwards, backwards, or even after flying
through the air. Being the shortest and smallest
seventh grader in my class, I was a little intimidated
when my dad first suggested I take up martial arts.
After seeing kids having fun with nothing reminiscent
of the Cobra Kai school in The Karate Kid, though, I
said I might like to try it out.
As we stayed to watch the remainder of class and
warm-ups ended, the students all knelt in a line along
one length of the mat. The head instructor, Sensei
Dang Thong Phong came out, called upon the senior
black belt, and proceeded to demonstrate aikido
techniques, three different ones for varying skill levels
of the class. Each time, as the black belt reached to
grab his wrist, Sensei Phong would turn like a
bullfighter, leading his attacker around in a flurry of
The Anatomy of Selected Joint Locks
254
off-balanced steps before throwing or directing the
black belt to the ground with manipulations of his
hand or arm. Even with my untrained eye, it was
evident that these techniques were performed with
simple, elegant twists and turns of the arms and
hands. As a youngster, I had seen my share of
playground contortionists who could demonstrate
feats of flexibility that would unnerve any mother who
saw. But here, kids swiftly (and sometimes gleefully)
locked up each other’s shoulders, elbows, and wrists,
with efficient movements. I realized if these
techniques could work on the Gumby-limbs of my
peers, they could work on anyone, a fact that has
become more painfully evident as I’ve gotten older.
I never thought too much about why wrist
techniques worked while I practiced aikido through
high school. I could tell when a technique was
effective on me and would simply try to duplicate the
experience for my partner when I executed it. This
allowed me some comprehension of locks, holds, and
controls, but any insight into what was happening
structurally was limited to the most intuitive
observations. This allowed me to develop my
techniques to meet the casual ambitions I had at the
time, though, so I was satisfied. After coming to
college and having started my career in Hankido, I
wanted martial arts not to be an isolated activity in
which to challenge myself, but I wanted to apply it as
a part of learning and growing in general. Wanting
more out of practicing martial arts, I realized I had to
put more in.
While helping Dr. Ken Min teach his UC Berkeley
Hankido physical education classes, I was often asked
Hien Nguyen
255
why one manipulates an arm or hand a certain way for
a given technique. Initially, I gave no verbal responses
and simply demonstrating on the students instead.
When there were winces of pain, eyes opened wide,
and lips mouthed “O,” I knew there was some
comprehension. As this continued, though, I grew
dissatisfied with not knowing myself exactly why
some techniques were painful or effective locks.
Hence, the premise of this paper: what is the
relationship between joint anatomy and the
effectiveness of various wrist techniques? While such
knowledge is not necessary to learn proper execution
of these techniques, I felt greater insight could only
deepen my appreciation of what I was doing.
There are many types of joints in the arm and
hand, and these allow for specific types of movement.
The structures of these joints balance stability and
strength with mobility and flexibility. Joints must
make tradeoffs between these two aspects, and wrist
techniques exploit their shortcomings to cause pain,
threaten injury, or immobilize.
Joints and Joint Structure
Technically, joints are simply where separate, rigid
parts of the skeleton meet in one way or another.
Although not always immediately associated with
joints because they are rigid, such articulations as the
sutures between the bones of the skull are joints, as
are bones held together in place by ligaments, but not
designed to move, such as where the tibia and fibula
articulate. Where two bones are separated by cartilage,
some movement may be allowed, such as in the
The Anatomy of Selected Joint Locks
256
vertebrae. In other cases, bone movement can be
largely absent, such as between the ribs and the
sternum. The most movable joints, and those we will
be most concerned with, however, are synovial joints.
These are the joints that one most often associates
with the term, and they allow the greatest mobility
exhibited by our bodies. These joints are named for
the fluid, synovia, which cushions the articulating
bones and allows for their characteristic flexibility.
Synovial fluid contains special proteins which provide
its slippery, lubricating nature.1
The movement and flexibility of synovial joints are
allowed by their structure. Where the bones come
together, the ends are protected by articular cartilage,
spongy coverings which absorb compression between
the bones and prevent damage to the bone ends.2
Surrounding the joint is the articular capsule, which
links together the two bones and encloses the synovial
cavity, the space in which synovial fluid separates the
articulating bones.3 Externally, this capsule is made of
fibrous connective tissue, which binds the joint.
Internally, the synovial membrane consists of looser
connective tissue, which is in contact with the
synovial fluid and covers any bone surfaces not
covered by articular cartilage. Aside from cushioning,
synovial fluid also seeps into the articular cartilage to
lubricate and nourish its cells.4 To provide support
and stability, ligaments reinforce the joint, running
within the articular capsule matrix, outside the
capsule, and even within the joint cavity itself.5 Lastly,
the joint is richly innervated throughout the articular
capsule, monitoring both pain and degree of capsule
stretch.6 Joints are also stabilized by muscle tendons
Hien Nguyen
257
just external to their capsules,7 which are also
innervated to monitor position and stretch.8 The
receptors for these nerves—various joint kinesthetic
receptors—detect rapid movements and accelerations
of joints, monitor position and slow stretches, and
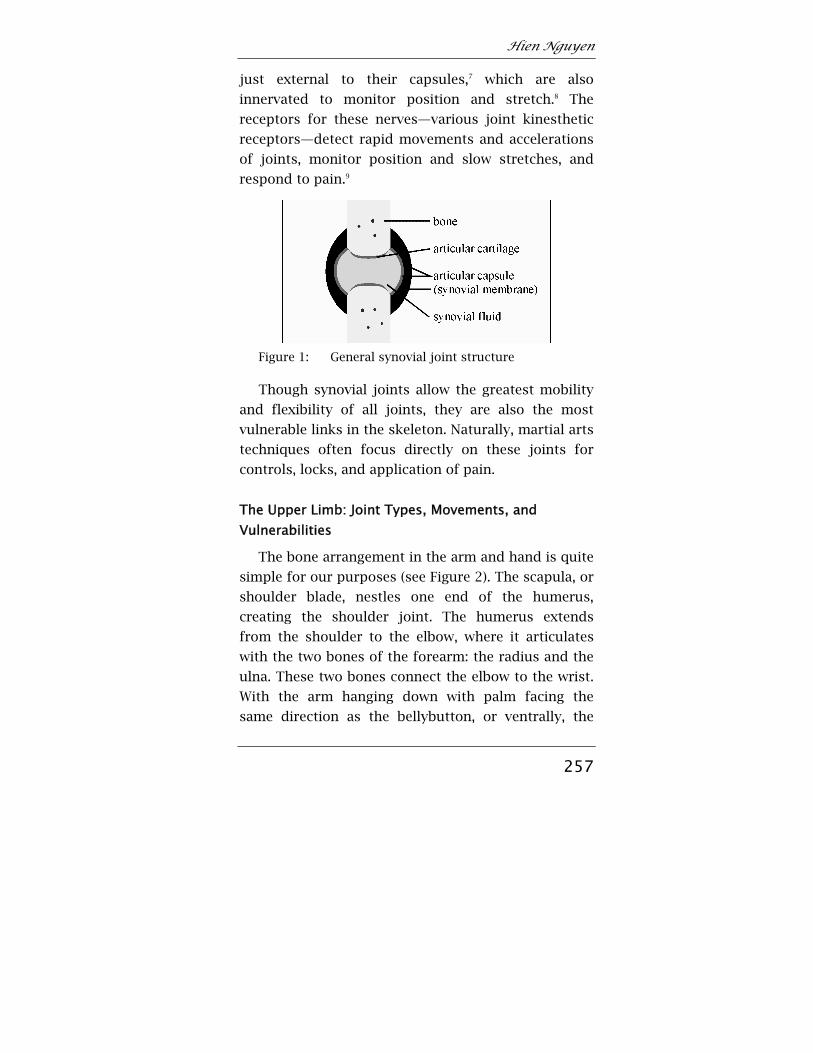
respond to pain.9
Figure 1: General synovial joint structure
Though synovial joints allow the greatest mobility
and flexibility of all joints, they are also the most
vulnerable links in the skeleton. Naturally, martial arts
techniques often focus directly on these joints for
controls, locks, and application of pain.
The Upper Limb: Joint Types, Movements, and Vulnerabilities
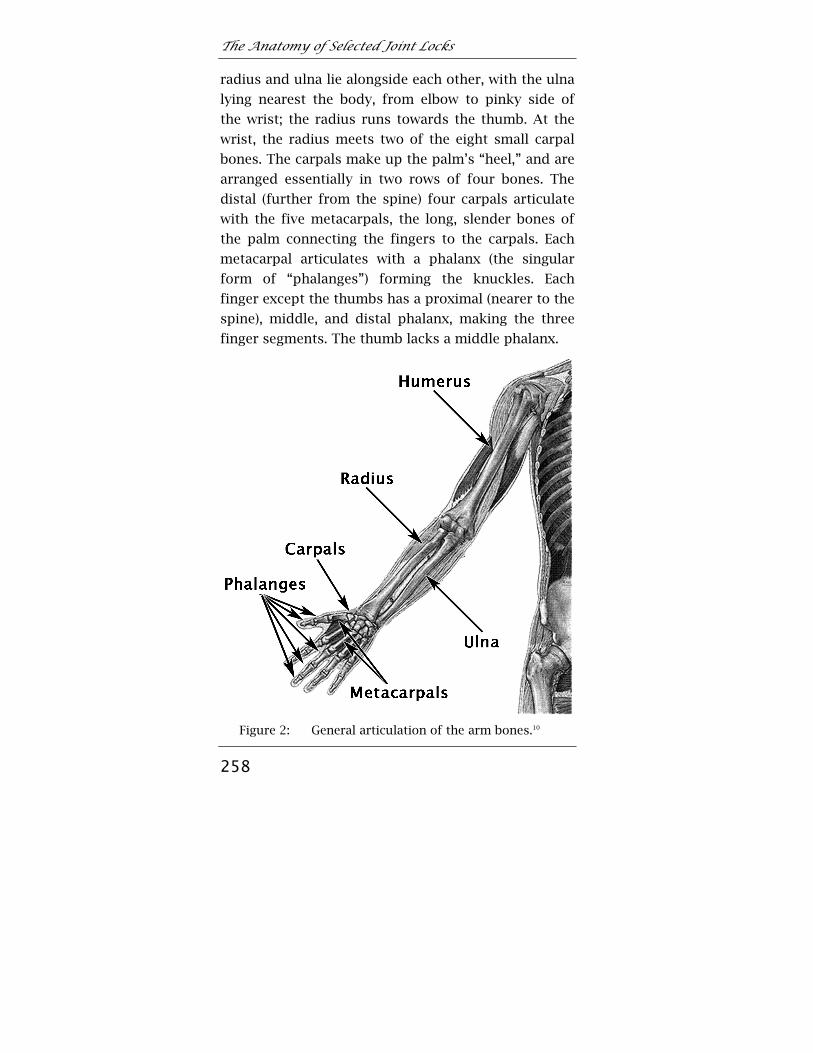
The bone arrangement in the arm and hand is quite
simple for our purposes (see Figure 2). The scapula, or
shoulder blade, nestles one end of the humerus,
creating the shoulder joint. The humerus extends
from the shoulder to the elbow, where it articulates
with the two bones of the forearm: the radius and the
ulna. These two bones connect the elbow to the wrist.
With the arm hanging down with palm facing the
same direction as the bellybutton, or ventrally, the
The Anatomy of Selected Joint Locks
258
radius and ulna lie alongside each other, with the ulna
lying nearest the body, from elbow to pinky side of
the wrist; the radius runs towards the thumb. At the
wrist, the radius meets two of the eight small carpal
bones. The carpals make up the palm’s “heel,” and are
arranged essentially in two rows of four bones. The
distal (further from the spine) four carpals articulate
with the five metacarpals, the long, slender bones of
the palm connecting the fingers to the carpals. Each
metacarpal articulates with a phalanx (the singular
form of “phalanges”) forming the knuckles. Each
finger except the thumbs has a proximal (nearer to the
spine), middle, and distal phalanx, making the three
finger segments. The thumb lacks a middle phalanx.
Figure 2: General articulation of the arm bones.10
Hien Nguyen
259
The surfaces between the articulating bones
determine how joints function in their movement.
Marieb and Mallatt (1997) describe six characteristic
synovial joint types: plane, hinge, pivot, condyloid,
saddle, and ball-and-socket.11 All six can be found
within the wrist-elbow-shoulder unit. Together, these
joints allow the arm and hand amazing mobility and
dexterity. Taken in isolation, though, each joint allows
only certain types of movement. This is a key point
underlying why wrist techniques work.
In plane joints, bones meet at fairly flat surfaces,
and movement occurs as the two faces or planes glide
past each other. This is akin to two flat hands pressed
and rubbed against each together. Of interest to wrist
techniques, plane joints are found between carpal
bones, and between the carpals and metacarpals –
virtually all of the wrist.12 Plane joints cannot rotate
along any axis, and are therefore perhaps the synovial
joints with the least mobility.
The elbow is an example of a hinge joint,13 with the
ulna bearing a trough-like ridge, which nestles the
cylinder-like end of the humerus. This allows the
swinging flexion and extension of the forearm at the
elbow. Though quite stable, hinge joints can only
allow a wide range of motion within a specific plane.
With the upper arm held still, one can only swing the
forearm in a single arc, the plane of which is
determined by the orientation of the upper arm. Also,
the elbow can only extend to where the arm is
approximately straight, whereupon the ulna can not
move further without elbow injury.
With the elbow held still, the forearm can still twist
back and forth, which is allowed by a pivot joint

The Anatomy of Selected Joint Locks
260
between the proximal (closer to the spine) ends of the
radius and ulna.14 Here, a ring of ligament attached to
the ulna allows longitudinal rotation of the radius.
This is the joint used to change forearm orientation
from “thumb up” to “thumb down.” When the two
bones are brought parallel—thumb up—the arm
movement is called supination; pronation brings the
radius to cross the ulna—thumb down.
In condyloid joints, the concave surface of one
bone articulates with the convex surface of another
bone allowing flexible movement back and forth and
side to side like a joystick, but virtually no rotation is
enabled. Condyloid joints are found in the knuckles
and between where the radius meets the carpals.15
This may be surprising, because intuitively, it may
seem that the wrist can rotate when it actually can
not. Consisting only of plane joints in the carpals, and
a condyloid joint between radius and carpals, the
wrist itself is allowed essentially no longitudinal
rotation. Try holding your forearm still with the other
hand: the wrist can move back and forth, rock side to
side, but there’s no switching from thumbs up to
thumbs down.
The carpometacarpal joint of the thumb is a saddle
joint, where both articulating bone surfaces are
shaped like saddles, and nestle in one another.16
Saddle joints allow essentially the same movements as
condyloid joints. However, the thumb can be twisted
slightly by another hand, due perhaps more to the
looseness and flexibility of the joint than its natural
articulation.
Lastly, in the shoulder, the round head of the
humerus and the cupped surface of the scapula is an
Hien Nguyen
261
example of a ball-and-socket joint.17 The shoulder can
move back and forth, side to side, and rotate. Ball-and-
socket joints are the most flexible, but also the most
easily dislocated. The shoulder is especially
vulnerable, since its extreme range of flexible motion
is allowed by sparse support from the bone structures
themselves; the joint relies greatly on tendons for
stability and support. The fact that the articular
capsule of the joint and its associated ligaments are
extremely thin also contributes to the great mobility
and vulnerability of the shoulder joint.18
Again, the upper limb combines the six basic joint
types, allowing a complex, infinite variety of
movements of the arm and hand. However, when
taken individually, each joint is limited in the
movement it allows, making each individual joint less
flexible than the limb as a whole appears to be. This
lack of flexibility can be a potential subject of attack
or control in terms of wrist techniques. The shoulder,
in allowing its great flexibility, is less strong and is
easily dislocated, making it also vulnerable to attack
and control.
Care must be taken when practicing wrist
techniques to prevent joint injuries, especially sprains
and dislocations. Sprains occur when joint ligaments
are overstretched, torn, or even completely ruptured.
Without prompt surgical repair of ruptured ligaments,
serious, irreversible damage will occur.19 Even partially
torn ligaments can be quite painful, and are slow to
heal. Dislocations occur when joint bones are forcibly
displaced from their proper alignment. Dislocations
are often accompanied by sprains, pain, and
inflammation.20 With the upper limb, the shoulder and
The Anatomy of Selected Joint Locks
262
digits are the two locations most prone to
dislocation,21 which can be attributed to their
structural emphasis on mobility and flexibility. Joints
are at greater risk of dislocation when ligaments are
overstretched.22 Ligaments can take years to readjust
after being stretched and can only stretch about 6%
beyond rest length before rupturing.23
Analysis of Techniques
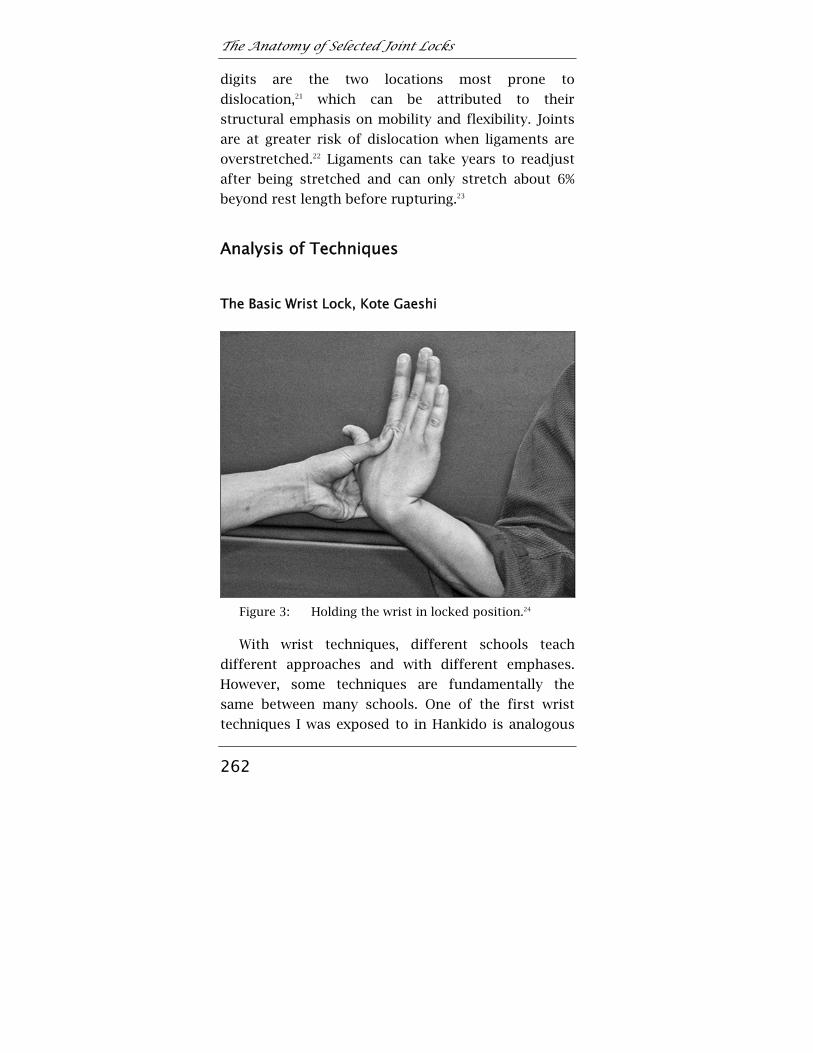
The Basic Wrist Lock, Kote Gaeshi
Figure 3: Holding the wrist in locked position.24
With wrist techniques, different schools teach
different approaches and with different emphases.
However, some techniques are fundamentally the
same between many schools. One of the first wrist
techniques I was exposed to in Hankido is analogous
Hien Nguyen
263
to the position Jujitsu Professor Wally Jay describes as
“basic wrist lock”.25 I had practiced this same
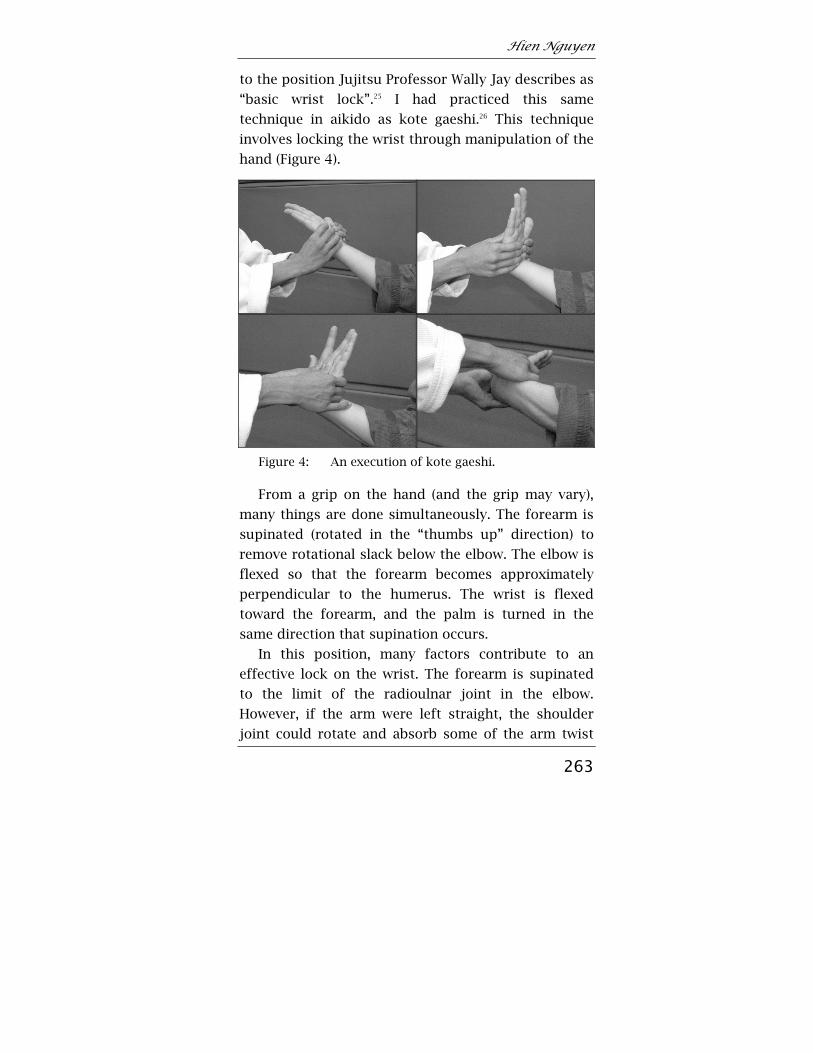
technique in aikido as kote gaeshi.26 This technique
involves locking the wrist through manipulation of the
hand (Figure 4).
Figure 4: An execution of kote gaeshi.
From a grip on the hand (and the grip may vary),
many things are done simultaneously. The forearm is
supinated (rotated in the “thumbs up” direction) to
remove rotational slack below the elbow. The elbow is
flexed so that the forearm becomes approximately
perpendicular to the humerus. The wrist is flexed
toward the forearm, and the palm is turned in the
same direction that supination occurs.
In this position, many factors contribute to an
effective lock on the wrist. The forearm is supinated
to the limit of the radioulnar joint in the elbow.
However, if the arm were left straight, the shoulder
joint could rotate and absorb some of the arm twist
The Anatomy of Selected Joint Locks
264
that the elbow alone cannot. This is why the elbow is
flexed to 90°; with the arm in this position, the
shoulder joint cannot alleviate twisting of the
forearm. With the forearm thus supinated, further
twisting of the hand stresses the various wrist joints
as they bear pressures and forces not allowed by their
natural motion. The wrist is still capable of other
movements, though, and pressure can be taken off the
wrist by proper evasive techniques or resistance.
Hence, flexion of the wrist is used to limit the back
and forth motion of the wrist, and turning the palm in
the direction of supination removes the last bit of
slack. From here, further pressure on the lock will
force the recipient either to compromise his or her
balance, or to accept injury to the wrist.
Anatomically, it can be seen that when properly
performed, this technique, in order to overcome the
large degree to which the arm can be rotated, isolates
the wrist as the target of rotation. When executed as
described above, the wrist is what is attacked, so the
mobility of the shoulder and elbow are prevented
from aiding the wrist. As seen in figure 3, one can
twist the hand itself to maximize the tightness of the
wrist twist. The executor’s thumb is placed firmly on
the back of the recipient’s hand and the executor’s
fingers grip around the base of the recipient’s thumb.
From here, the executor’s left hand in figure 3 can
push with its thumb and pull with its fingers while
also executing the technique to lock out the
recipient’s carpometacarpal joints and the thumb.
Hien Nguyen
265
The Bent-Elbow Wrist Lock, Nikyo
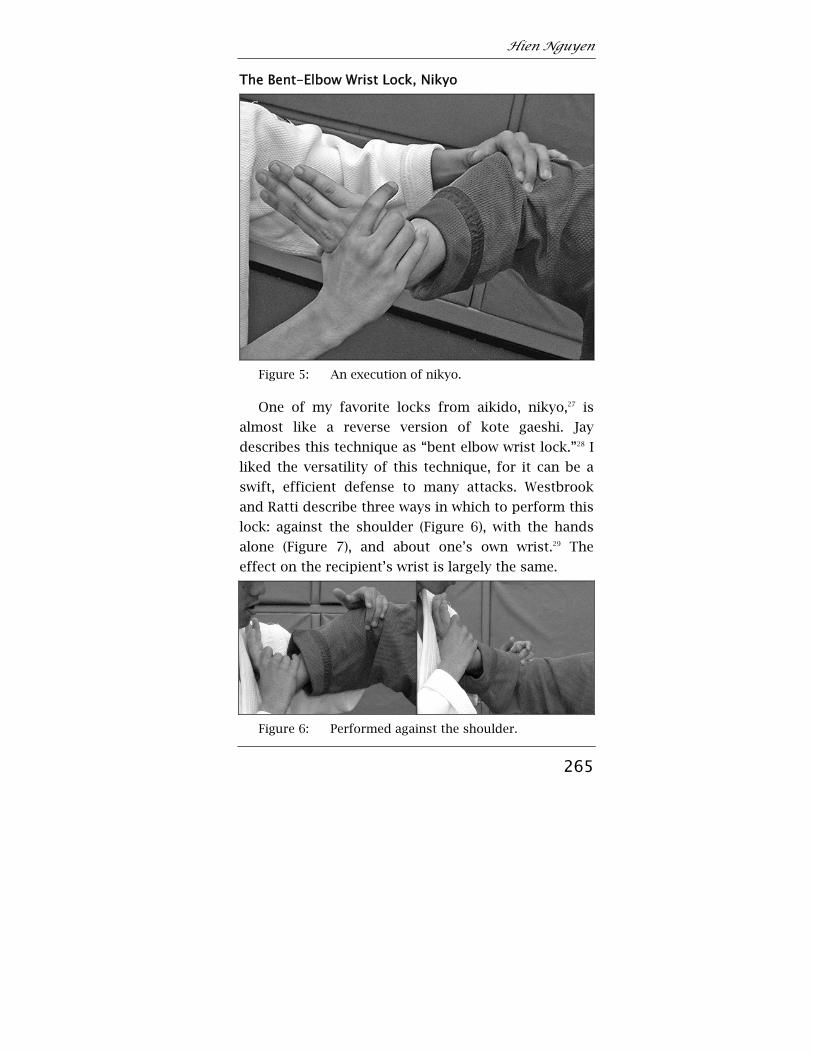
Figure 5: An execution of nikyo.
One of my favorite locks from aikido, nikyo,27 is
almost like a reverse version of kote gaeshi. Jay
describes this technique as “bent elbow wrist lock.”28 I
liked the versatility of this technique, for it can be a
swift, efficient defense to many attacks. Westbrook
and Ratti describe three ways in which to perform this
lock: against the shoulder (Figure 6), with the hands
alone (Figure 7), and about one’s own wrist.29 The
effect on the recipient’s wrist is largely the same.
Figure 6: Performed against the shoulder.
The Anatomy of Selected Joint Locks
266
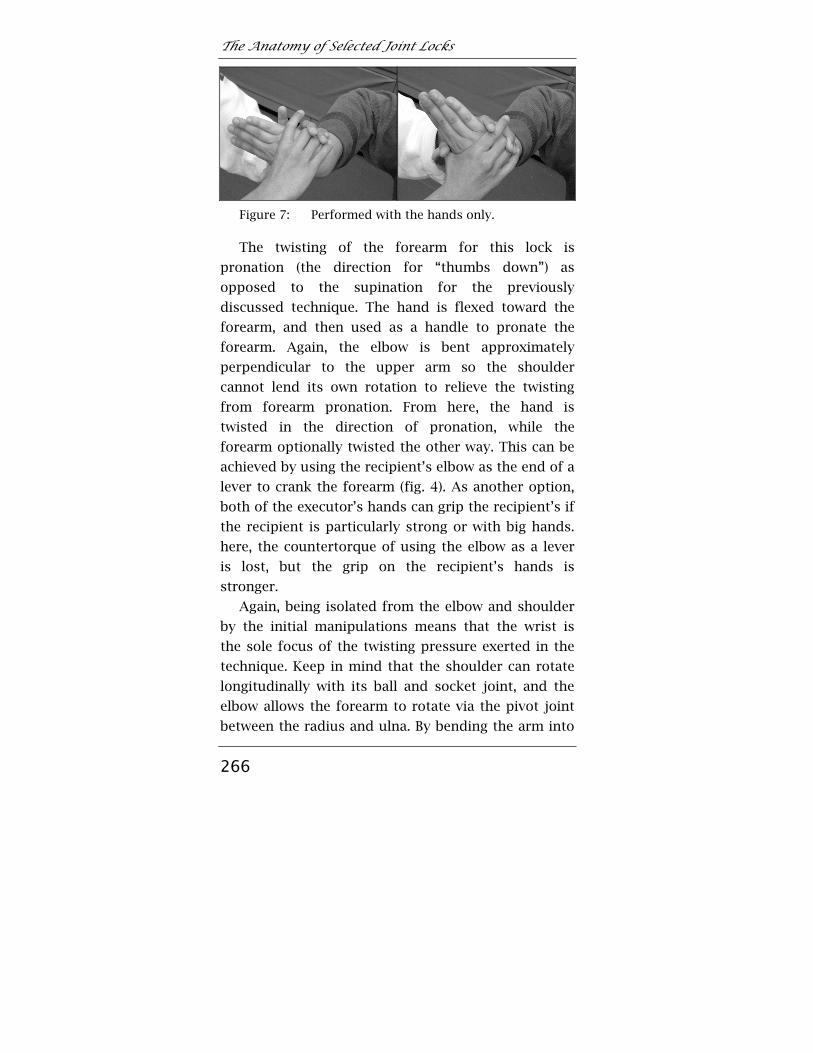
Figure 7: Performed with the hands only.
The twisting of the forearm for this lock is
pronation (the direction for “thumbs down”) as
opposed to the supination for the previously
discussed technique. The hand is flexed toward the
forearm, and then used as a handle to pronate the
forearm. Again, the elbow is bent approximately
perpendicular to the upper arm so the shoulder
cannot lend its own rotation to relieve the twisting
from forearm pronation. From here, the hand is
twisted in the direction of pronation, while the
forearm optionally twisted the other way. This can be
achieved by using the recipient’s elbow as the end of a
lever to crank the forearm (fig. 4). As another option,
both of the executor’s hands can grip the recipient’s if
the recipient is particularly strong or with big hands.
here, the countertorque of using the elbow as a lever
is lost, but the grip on the recipient’s hands is
stronger.
Again, being isolated from the elbow and shoulder
by the initial manipulations means that the wrist is
the sole focus of the twisting pressure exerted in the
technique. Keep in mind that the shoulder can rotate
longitudinally with its ball and socket joint, and the
elbow allows the forearm to rotate via the pivot joint
between the radius and ulna. By bending the arm into
Hien Nguyen
267
a chicken-wing shape at the elbow, neither of these
rotational capacities can be used to alleviate the
pressure on the wrist that results from proper
application of this technique. Since the wrist joints
don’t allow the wrist itself to twist, the efficacy of this
technique is not surprising.
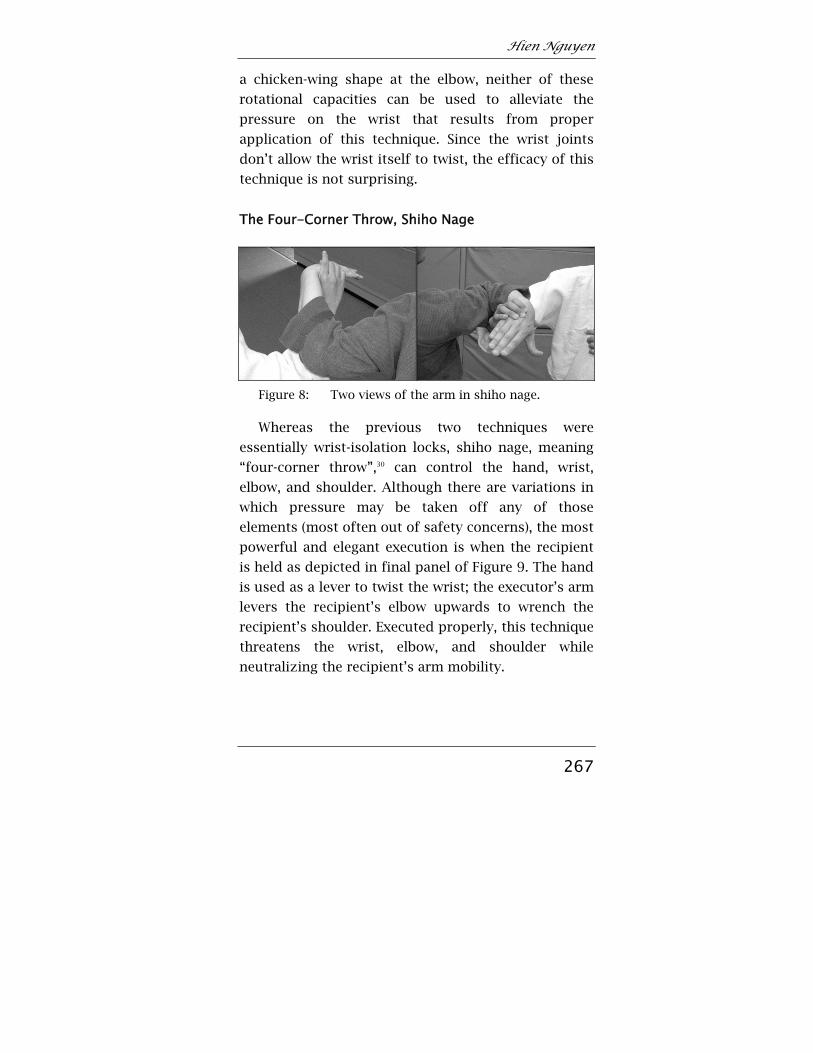
The Four-Corner Throw, Shiho Nage
Figure 8: Two views of the arm in shiho nage.
Whereas the previous two techniques were
essentially wrist-isolation locks, shiho nage, meaning
“four-corner throw”,30 can control the hand, wrist,
elbow, and shoulder. Although there are variations in
which pressure may be taken off any of those
elements (most often out of safety concerns), the most
powerful and elegant execution is when the recipient
is held as depicted in final panel of Figure 9. The hand
is used as a lever to twist the wrist; the executor’s arm
levers the recipient’s elbow upwards to wrench the
recipient’s shoulder. Executed properly, this technique
threatens the wrist, elbow, and shoulder while
neutralizing the recipient’s arm mobility.
The Anatomy of Selected Joint Locks
268
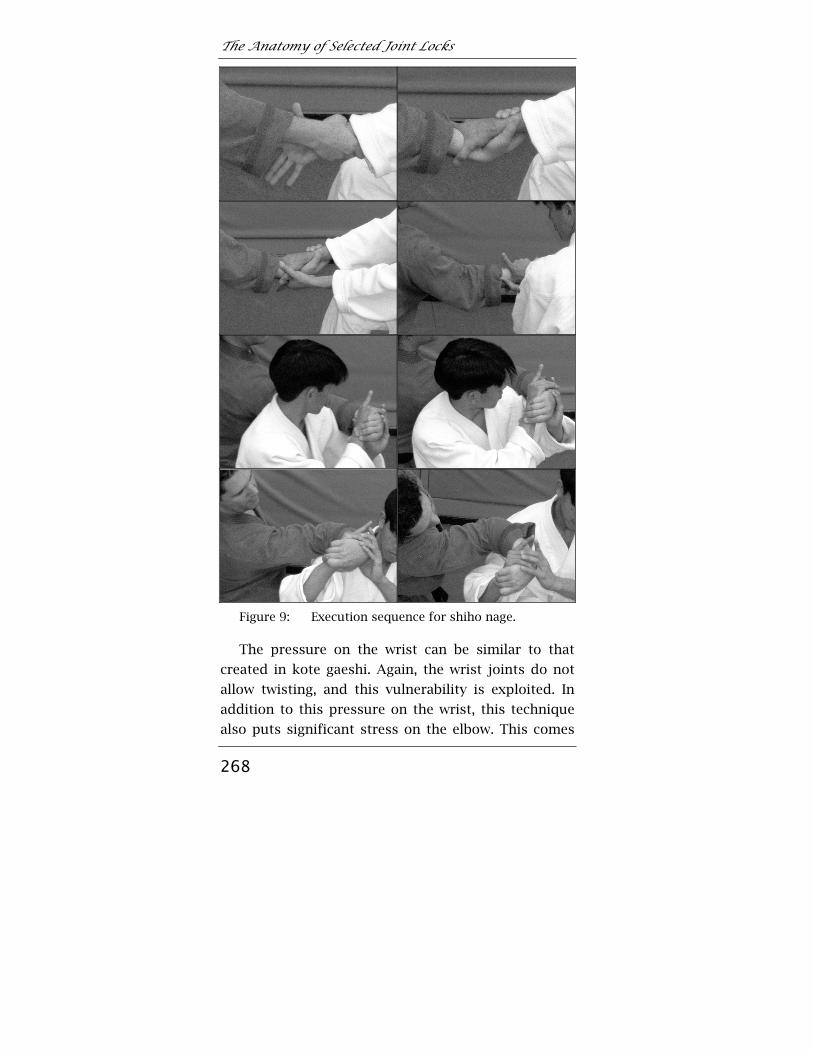
Figure 9: Execution sequence for shiho nage.
The pressure on the wrist can be similar to that
created in kote gaeshi. Again, the wrist joints do not
allow twisting, and this vulnerability is exploited. In
addition to this pressure on the wrist, this technique
also puts significant stress on the elbow. This comes
Hien Nguyen
269
from torquing the forearm like a propeller blade
about the axis of the humerus. Although the elbow
does allow twisting, this technique can twist it beyond
the joint’s range of motion. In addition, the
cumulative stress generated at the shoulder by the
sum of these spiraling twists threatens to dislocate
the joint inferiorly where its reinforcements are
weakest.31
Since it can be dangerous if executed or received
improperly, mollifying variations are useful for
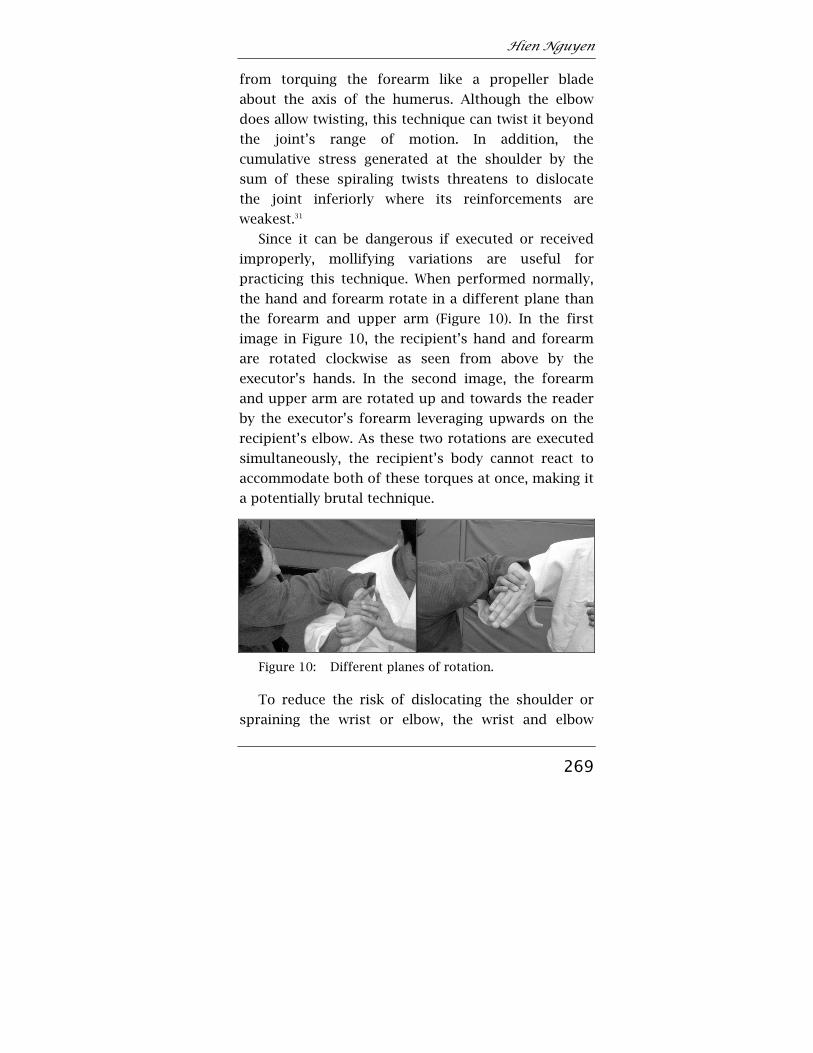
practicing this technique. When performed normally,
the hand and forearm rotate in a different plane than
the forearm and upper arm (Figure 10). In the first
image in Figure 10, the recipient’s hand and forearm
are rotated clockwise as seen from above by the
executor’s hands. In the second image, the forearm
and upper arm are rotated up and towards the reader
by the executor’s forearm leveraging upwards on the
recipient’s elbow. As these two rotations are executed
simultaneously, the recipient’s body cannot react to
accommodate both of these torques at once, making it
a potentially brutal technique.
Figure 10: Different planes of rotation.
To reduce the risk of dislocating the shoulder or
spraining the wrist or elbow, the wrist and elbow
The Anatomy of Selected Joint Locks
270
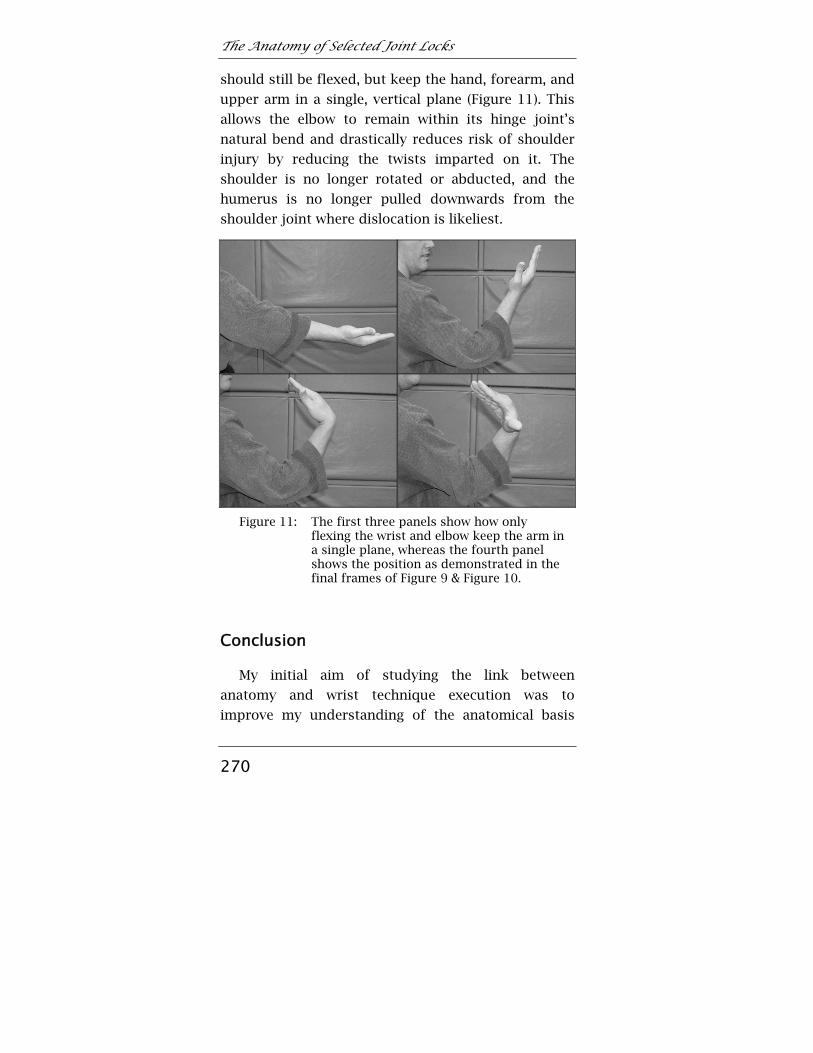
should still be flexed, but keep the hand, forearm, and
upper arm in a single, vertical plane (Figure 11). This
allows the elbow to remain within its hinge joint’s
natural bend and drastically reduces risk of shoulder
injury by reducing the twists imparted on it. The
shoulder is no longer rotated or abducted, and the
humerus is no longer pulled downwards from the
shoulder joint where dislocation is likeliest.
Figure 11: The first three panels show how only
flexing the wrist and elbow keep the arm in a single plane, whereas the fourth panel shows the position as demonstrated in the final frames of Figure 9 & Figure 10.
Conclusion
My initial aim of studying the link between
anatomy and wrist technique execution was to
improve my understanding of the anatomical basis

Hien Nguyen
271
which underlies the effectiveness of wrist techniques.
Some joint attacks, such as arm bars, which simply
force single joints in the wrong direction, are not hard
to conceptualize and understand. I knew how to
perform the techniques discussed in this paper
passably long before joining U.C. Berkeley’s Hankido
program. Understanding more fundamentally how
each works, though, I can both execute them better
and teach them more effectively. However, the martial
arts are still rife with techniques where anatomical
and physiological analysis could provide deeper
insights into how to train and perform better.
The Anatomy of Selected Joint Locks
272
References
Jay, Wally. Small-Circle Jujitsu. Santa Clarita, CA: Ohara
Publications, Incorprated, 1989, ISBN# 0897501225.
Marieb, Elaine Nicpon, and Jon Mallatt. Human Anatomy,
2nd Edition. Menlo Park, CA: Benjamin Cummings, 1997,
ISBN# 96007345
Westbrook, Adele, and Oscar Ratti. Aikido and the Dynamic
Sphere: An Illustrated Introduction. Rutland, VT & Tokyo,
Japan: Charles E. Tuttle Company, 1970, ISBN#
0804800049.
Endnotes
1 Marieb and Mallatt, p. 193. 2 Ibidem, p. 191. 3 Ibidem, p. 191-193. 4 Ibidem, p. 193. 5 Ibidem. 6 Ibidem. 7 Ibidem, p. 198. 8 Ibidem, p. 365. 9 Ibidem, p. 367. 10 Illustration adapted from the UNC Biology 45 self-test
graphic posted at http://tinyurl.com/6753j. 11 Marieb and Mallatt, p. 198. 12 Ibidem. 13 Ibidem. 14 Ibidem, p. 199. 15 Ibidem. 16 Ibidem. 17 Ibidem.
Hien Nguyen
273
18 Ibidem, p. 201-202. 19 Ibidem, p. 208. 20 Ibidem. 21 Ibidem. 22 Ibidem. 23 Ibidem, p. 194-195. 24 All photographs by Ting Vogel, © 2004.
Higher resolution color photographs can be found at http://www.funfolks.net/UCMAP_M6/Nguyen.
25 Jay, p. 74. 26 Westbrook and Ratti, p. 216. or Westbrook and Ratti, p.
174-175. 27 Westbrook and Ratti, pp. 207, 209. 28 Jay, p. 77. 29 Westbrook and Ratti, p. 174. 30 Westbrook and Ratti, p. 206. 31 Marieb and Mallatt, p. 202.