Thank you for downloading -...
121
THANK YOU FOR DOWNLOADING THE ARKITREK DESIGN BUILD HANDBOOK. is book was created by Arkitrek’s design build camp participants to demonstrate what they learned during their experience. If you would like to follow in their foot steps in designing and building a sustainable building in Borneo please enquire below. www.arkitrek.com/arkitrek-camp/ is book is intended as an open source educational tool. It will continue to grow with every camp but if you have anything to contribute to this book please don’t hesitate to contact us. Regards, Rory or Dickens Team Leader at Arkitrek [email protected]
Transcript of Thank you for downloading -...
Thank you for downloading The arkiTrek design Build
handBook.
This book was created by arkitrek’s design build camp participants to
demonstrate what they learned during their experience. if you would like to follow in their foot steps in designing and building a sustainable building in
Borneo please enquire below.
www.arkitrek.com/arkitrek-camp/
This book is intended as an open source educational tool. it will continue to
grow with every camp but if you have anything to contribute to this book please don’t hesitate to contact us.
regards,
rory Thor dickensTeam leader at arkitrek


2014

Arkitrek.com - conserving nature through design & education
Arkitrek.com - conserving nature through design & education
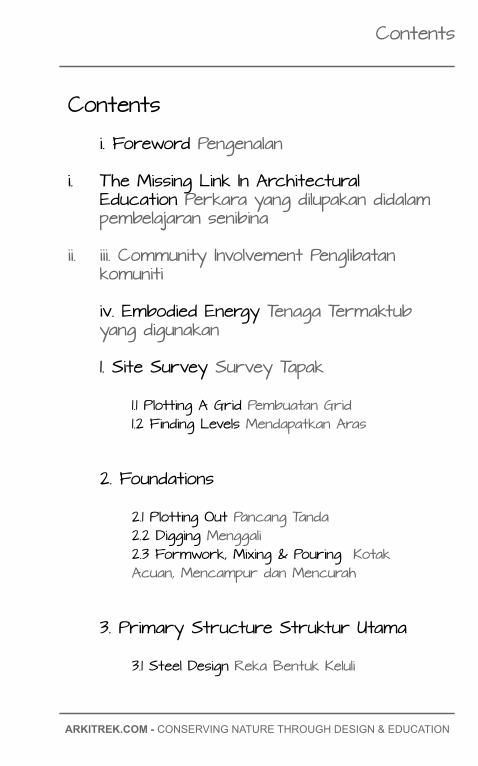
Contents
i. Foreword Pengenalan
i. The Missing Link In Architectural Education Perkara yang dilupakan didalam pembelajaran senibina
ii. iii. Community Involvement Penglibatan komuniti
iv. Embodied Energy Tenaga Termaktub yang digunakan
1. Site Survey Survey Tapak
1.1 Plotting A Grid Pembuatan Grid1.2 Finding Levels Mendapatkan Aras
2. Foundations
2.1 Plotting Out Pancang Tanda2.2 Digging Menggali2.3 Formwork, Mixing & Pouring Kotak Acuan, Mencampur dan Mencurah
3. Primary Structure Struktur Utama
3.1 Steel Design Reka Bentuk Keluli
Contents
Arkitrek.com - conserving nature through design & education
3.2 Columns Tiang3.3 Floor Beams, Roof Beams and Rafters Rasuk Papak, Rasuk Atap dan Kuda-kuda
4. Secondary Structure Struktur Sekunder
4.1 Floor Joists Gelagar Lantai4.2 Bracing Perembatan4.3 Purlins Gulung-gulung
5. Roof Atap
5.1 Fitting Pemasangan5.2 Facias Papan Cantik5.3 Gutter Longkang
6. Tertiary Structure Struktur Tertier
6.1 Flooring Lantai6.2 Stud Walls Dinding Stud6.3 Biocrete Biocrete6.4 Earthbags Beg Tanah6.5 Silou/Bamboo Cladding Silou/ Pelapisan Bambu6.6 Bottle Wall Dinding Botol6.7 Bamboo Panels Anyaman Bambu
7. Plumbing Paip
7.1 Watertank Tangki Air
Arkitrek.com - conserving nature through design & education
Contents
7.2 First Flush Diverter Diverter Flush Pertama7.3 Toilets & Sinks Tandas & Sinki7.4 Drainage Saliran Air
8. Landscaping Landskap
8.1 Planting Bamboo Penanaman buluh8.2 Carving Steps Langkah langkah mengukir8.3 Random Rubble Wall Dinding batu acak
9. Extras Tambahan
9.1 Important Phrases Ayat-ayat penting9.2 Glossary of Building Terms Istilah Bangunan

Arkitrek.com - conserving nature through design & education
i
Arkitrek.com - conserving nature through design & education
Forward
Every year Arkitrek holds a design build. 8-12 participants work together sharing their views and skills, to design a piece of architecture. Together with the community, they build it over the course of a few weeks. During this time a huge number of valuable lessons are learnt about construction. Some of these are learnt through trial and error, with others being secret techniques handed down through the generations to be shared with the group during community participation. Sadly though, at the end of each camp these lessons leave with the participants. With the new participants the following year having to relearn and make the mistakes once again. This book was created to prevent this and to share the knowledge collected over the camps, so that the new participants can have something to reference during their build period, and at the end add their own newly learnt skills.
Rory Thor DickensCamp Leader 2014

Arkitrek.com - conserving nature through design & education
ii
Arkitrek.com - conserving nature through design & education
When I left university in my 3rd year searching for a part one placement I discovered a problem. As I wrote my CV I realised I had no experience of dealing with real architecture. I only had an arsenal of drawings and sketches, just like everyone else from almost every other university. I wasn’t very hire-able unless they only wanted someone to copy and draw like a human photocopier. After 3 years of intense study, I hadn’t actually been taught any-thing about the real architectural world of tough clients, budgets, and construction sites. As a student I had learnt to design, but not the other half. Build.
Arkitrek provided me the opportunity to grow my skills and C.V. Over the last 2 years I have built them 3 buildings during their Design + Build Camps and on my first project I realised what those items in my detailed sections really look like in real life. They weren’t the crisp lines perfectly spaced set distances apart at true right angles, instead they were rugged, rough, and full of wavy lines with bracing in every direction to keep those angles close to something near 90 degrees. In my drawings there was no gravity, my lines could never snap or splinter nor were they to heavy to lift. Because of this in the space of one month I had learnt more about architecture and construction than a whole year in uni.
The camp experience taught me another thing. Often at university I would be given a site to design on, do a site survey and then de-sign, without sometimes ever visiting the site again. In practice for some international projects it isn’t possible to send the whole de-sign team to site. Leaving designers and architects to design based on the survey alone. I realised after sleeping within meters of the site even then I couldn’t truly understand the site conditions, but from what I did understand I was able to adapt the design on the fly to accommodate for the poor soil quality, supply demands, building complications and weather conditions. Never mind the add-ed value of living and working alongside your client almost every day, understanding what they enjoy in architecture, their cultural values, and have the ability to learn their methods of construction.
Design + Build also forces me to develop my team building skills in the most intense way possible. There is nothing more testing than working, living and sleeping along side your work mates 7 days a week 24/7 often in testing climates. Regardless at the end you will, through rigorous designing and constructive arguments, find a building designed by yourself and your colleagues sitting delicately on the landscape. Letting you fill your portfolio with something slightly different from renders and your CV with hands on expe-rience, teamwork skills and possibly a magazine article on your building.
Rory Thor DickensCamp Leader 2014
The Missing Link In Architecture Education

Arkitrek.com - conserving nature through design & education
iii
Arkitrek.com - conserving nature through design & education
Right from the very first day the community received us warmly and were very eager to help us and interact with us. Our main challenge was to find a meaningful way of in-teraction so that there is a mutual exchange of knowledge contradictory to the urban practice where the workers are perceived only as labourers or man power. Our interactions also took forward Arkitrek’s theme of stainability outside the site by organising an awareness program about plastic for the children and having them help us incorporate it as a building component. As we spent more time and interacted with the community we built interpersonal relations binding us emotionally with the community.
Means of InteractionsCommunity meetingOur first formal discussion with the community was through meetings at the community centre where they helped us un-derstand the Tagal system and together we derived a de-sign brief. Taking their requirement into consideration, we designed the Tagal hut and presented it to them. Our presen-tation involved a variety of mediums of representation includ-ing a walk through, physical model along with other drawings to help us communicate our design as comprehensively as possible. We left the physical model and drawings in the com-munity centre for everyone to see and displayed a copy of the presentation outside the church.Gotong RoyongIt is a traditional agrarian practice where members of the village come together to help their neighbors with their fields during times when large manpower is required. This practice also extends into community life and the village activities (such as cooking feasts or clean-ups). When announced over the tannoy system in the church members of the community made time to come help us on site.
Communication on SiteInitially we relied on the 3 Bahasa Malay speakers in our group to communicate the details or tasks that need to be done every day. But this led to some difficulties as it put all the pressure on the translators to convince both sides as the kampong way of doing things is not necessarily the same as our way. We attempted to resolve this by communicating entirely through sketches. I recommend that in the future the locals are also invited for the evening meetings (where the details are finalised) and a list in Malay is posted on site every day of the order of activities.
Community Involvement
Arkitrek.com - conserving nature through design & education
iii/iv
Exchange of KnowledgeThere were several discussions on site where we tried to explain the advantage and properties of the new building mate-rials or techniques we were bringing to the building. The locals mistrusted bamboo as a building material (even after the bo-rax treatment) so much that even after our insistence they were not eager to store the remaining borax for future use. As an experiment to alter their perception the toilet block has bamboo purlins but the other buildings have timber purlins. The bamboo should last as long as the timber (since it’s well protected).The project has brought several new elements such as the leech field, first flush diverter, biocrete etc, to the community but I’m not sure how far these ideas were explained and communicated with the villagers and if they now have the knowledge or interest to take it forward. I recom-mend the next camp to find better ways of communicating these ideas.
Interacting with the ChildrenOur initial idea was to spark an interest in environmental is-sues in these kids. We brainstormed on issues which con-cerned them and decided to tackle the issue of plastics since the kampong has no recycling system. On our first meeting we had a dialogue with kids about plastics and had them col-lect bottles lying around their school. We then played a few games with them with the bottles. Over the next two weeks we encouraged them to collect as many bottles as possible and with their help incorporated them into the building.
Revathi Roopini.Camp Participant 2014
Arkitrek.com - conserving nature through design & education
Before coming to Arkitrek I had the impression that sustainable architecture was the built environment being self-sustaining, post-construction. Whilst this is important I have learnt that architecture has a greater responsibility in a sustainable world. Embodied energy is something I knew about but hadn’t really considered when thinking about design. In architecture, embodied energy is the amount of carbon it takes for a material to be sourced, manufactured and transported to site. Being involved in a design build project like Arkitrek Camp, where we know where all the building materials we used are sourced has taught me the importance of locally sourced materials and the impact that materials with high embodied carbon have on the environment.Materials that require extensive quarrying such as cement and steel have a negative impact on the environment. The carbon used to remove these materials from the ground is highly unsustainable, meaning these materials should be used sparingly. Obviously in some cases it is unavoidable, such as in foundations where a viable alternative isn’t available. Other materials such as plastic have an equally high embodied energy due to the carbon used during the manufacturing process. It is these man made products that are having an adverse effect on the environment.Using building materials that utalise waste products is important in lowering the embodied energy of the built environment and is something that should be seriously pursued in architecture. Reclaimed timber and biocrete are two materials that make use of waste products. Biocrete uses organic waste materials, such as rice husk or saw dust, mixed with lime to form a solid building material. These materials should be maximised in construction as they have low impact on the environment and are realistic alternatives to concrete in-fill walls and sawn hardwood.Working in the design build camp I have learnt that transporting materials long distances not only provides logistical challenges but causes materials to have an increased embodied energy. Transporting materials hundreds of miles is highly unsustainable, especially when locally sourced alternatives are available. Using materials located near the site, such as bamboo and river stones, meant that we could transport them without producing any additional embodied carbon.By understanding the importance of embodied energy we, as professionals of the built environment, can substantially reduce the use of carbon in the construction process.
James CoeCamp Participant 2014
Embodied Energy in Sustainable Design

Arkitrek.com - conserving nature through design & education
1
Arkitrek.com - conserving nature through design & education
Site Survey
Arkitrek.com - conserving nature through design & education
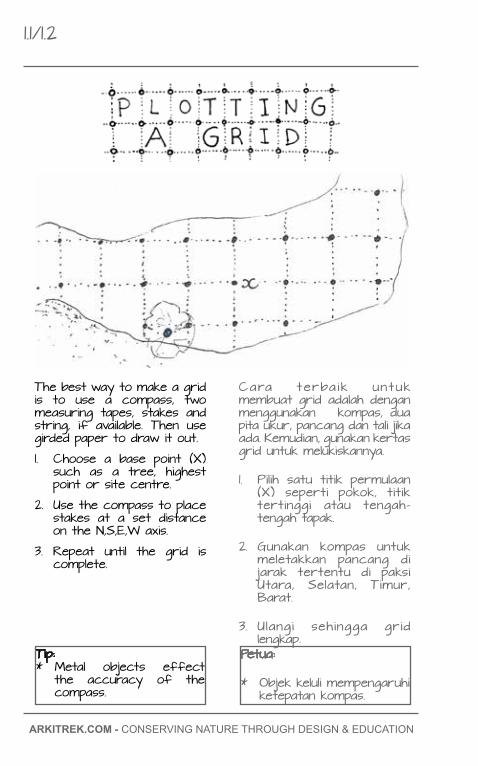
The best way to make a grid is to use a compass, two measuring tapes, stakes and string, if available. Then use girded paper to draw it out.1. Choose a base point (X)
such as a tree, highest point or site centre.
2. Use the compass to place stakes at a set distance on the N,S,E,W axis.
3. Repeat until the grid is complete.
Cara terba ik untuk membuat grid adalah dengan menggunakan kompas, dua pita ukur, pancang dan tali jika ada. Kemudian, gunakan kertas grid untuk melukiskannya.
1. Pilih satu titik permulaan (X) seperti pokok, titik tertinggi atau tengah-tengah tapak.
2. Gunakan kompas untuk meletakkan pancang di jarak tertentu di paksi Utara, Selatan, Timur, Barat.
3. Ulangi sehingga grid lengkap.
1.1/1.2
Tip:* Metal objects effect
the accuracy of the compass.
Petua:
* Objek keluli mempengaruhi ketepatan kompas.
Arkitrek.com - conserving nature through design & education
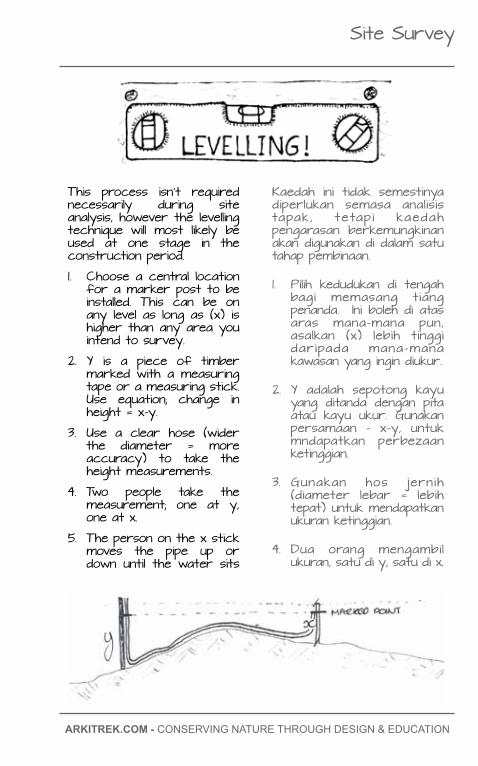
This process isn’t required necessarily during site analysis, however the levelling technique will most likely be used at one stage in the construction period.1. Choose a central location
for a marker post to be installed. This can be on any level as long as (x) is higher than any area you intend to survey.
2. Y is a piece of timber marked with a measuring tape or a measuring stick. Use equation; change in height = x-y.
3. Use a clear hose (wider the diameter = more accuracy) to take the height measurements.
4. Two people take the measurement; one at y, one at x.
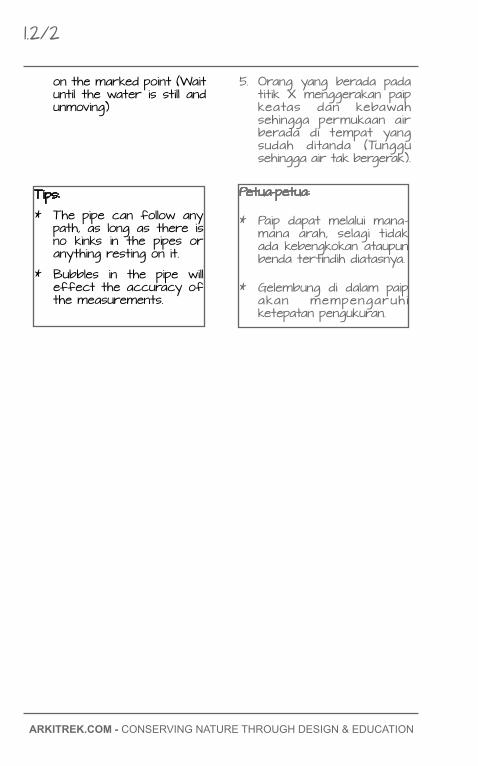
5. The person on the x stick moves the pipe up or down until the water sits
Kaedah ini tidak semestinya diperlukan semasa analisis tapak , tetap i kaedah pengarasan berkemungkinan akan digunakan di dalam satu tahap pembinaan.
1. Pilih kedudukan di tengah bagi memasang tiang penanda. Ini boleh di atas aras mana-mana pun, asalkan (x) lebih tinggi daripada mana-mana kawasan yang ingin diukur.
2. Y adalah sepotong kayu yang ditanda dengan pita atau kayu ukur. Gunakan persamaan - x-y, untuk mndapatkan perbezaan ketinggian.
3. Gunakan hos jernih (diameter lebar = lebih tepat) untuk mendapatkan ukuran ketinggian.
4. Dua orang mengambil ukuran, satu di y, satu di x.
Site Survey
Arkitrek.com - conserving nature through design & education
1.2/2
on the marked point (Wait until the water is still and unmoving)
5. Orang yang berada pada titik X menggerakan paip keatas dan kebawah sehingga permukaan air berada di tempat yang sudah ditanda (Tunggu sehingga air tak bergerak).
Tips: * The pipe can follow any
path, as long as there is no kinks in the pipes or anything resting on it.
* Bubbles in the pipe will effect the accuracy of the measurements.
Petua-petua:
* Paip dapat melalui mana-mana arah, selagi tidak ada kebengkokan ataupun benda tertindih diatasnya.
* Gelembung di dalam paip akan mempengaruh i ketepatan pengukuran.
Arkitrek.com - conserving nature through design & education
Foundations
Arkitrek.com - conserving nature through design & education
2.1
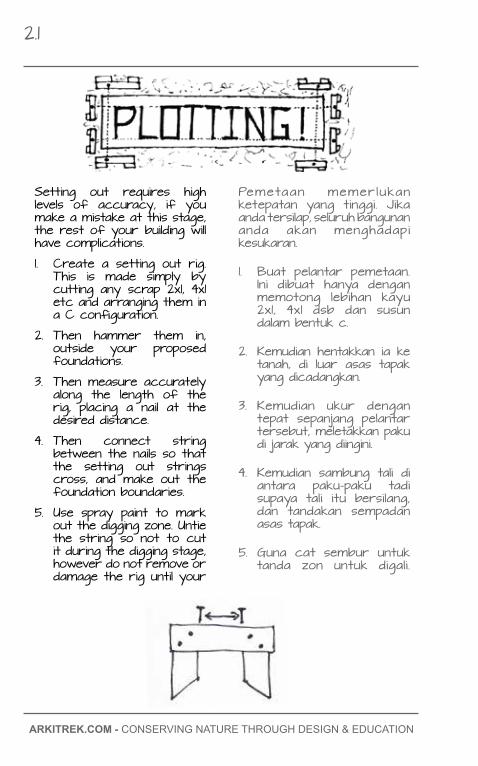
Setting out requires high levels of accuracy, if you make a mistake at this stage, the rest of your building will have complications.1. Create a setting out rig.
This is made simply by cutting any scrap 2x1, 4x1 etc and arranging them in a C configuration.
2. Then hammer them in, outside your proposed foundations.
3. Then measure accurately along the length of the rig, placing a nail at the desired distance.
4. Then connect string between the nails so that the setting out strings cross, and make out the foundation boundaries.
5. Use spray paint to mark out the digging zone. Untie the string so not to cut it during the digging stage, however do not remove or damage the rig until your
Pemetaan memer lukan ketepatan yang tinggi. Jika anda tersilap, seluruh bangunan anda akan menghadapi kesukaran.
1. Buat pelantar pemetaan. Ini dibuat hanya dengan memotong lebihan kayu 2x1, 4x1 dsb dan susun dalam bentuk c.
2. Kemudian hentakkan ia ke tanah, di luar asas tapak yang dicadangkan.
3. Kemudian ukur dengan tepat sepanjang pelantar tersebut, meletakkan paku di jarak yang diingini.
4. Kemudian sambung tali di antara paku-paku tadi supaya tali itu bersilang, dan tandakan sempadan asas tapak.
5. Guna cat sembur untuk tanda zon untuk digali.
Arkitrek.com - conserving nature through design & education
Foundations
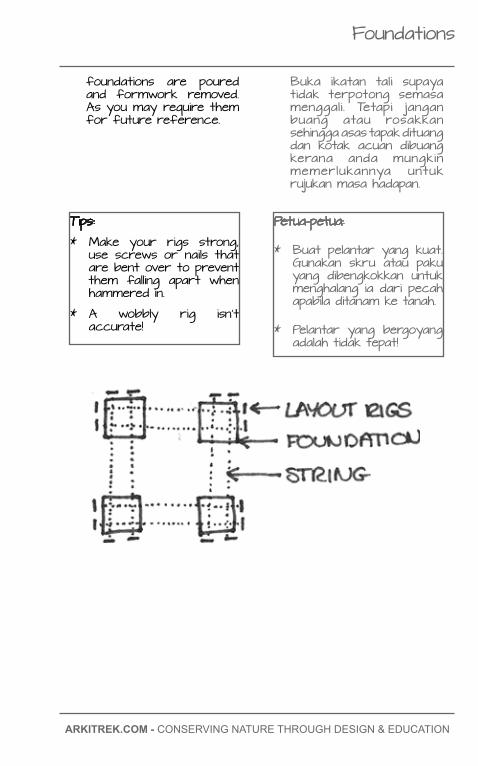
foundations are poured and formwork removed. As you may require them for future reference.
Buka ikatan tali supaya tidak terpotong semasa menggali. Tetapi jangan buang atau rosakkan sehingga asas tapak dituang dan kotak acuan dibuang kerana anda mungkin memerlukannya untuk rujukan masa hadapan.
Tips:* Make your rigs strong,
use screws or nails that are bent over to prevent them falling apart when hammered in.
* A wobbly rig isn’t accurate!
Petua-petua:
* Buat pelantar yang kuat. Gunakan skru atau paku yang dibengkokkan untuk menghalang ia dari pecah apabila ditanam ke tanah.
* Pelantar yang bergoyang adalah tidak tepat!
Arkitrek.com - conserving nature through design & education
2.2/2.3
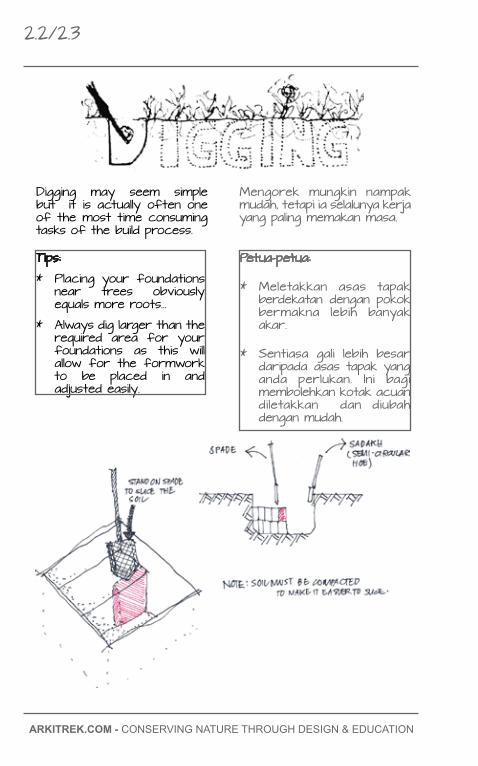
Digging may seem simple but it is actually often one of the most time consuming tasks of the build process.
Mengorek mungkin nampak mudah, tetapi ia selalunya kerja yang paling memakan masa.
Tips: * Placing your foundations
near trees obviously equals more roots...
* Always dig larger than the required area for your foundations as this will allow for the formwork to be placed in and adjusted easily.
Petua-petua:
* Meletakkan asas tapak berdekatan dengan pokok bermakna lebih banyak akar.
* Sentiasa gali lebih besar daripada asas tapak yang anda perlukan. Ini bagi membolehkan kotak acuan diletakkan dan diubah dengan mudah.
Arkitrek.com - conserving nature through design & education
Foundations
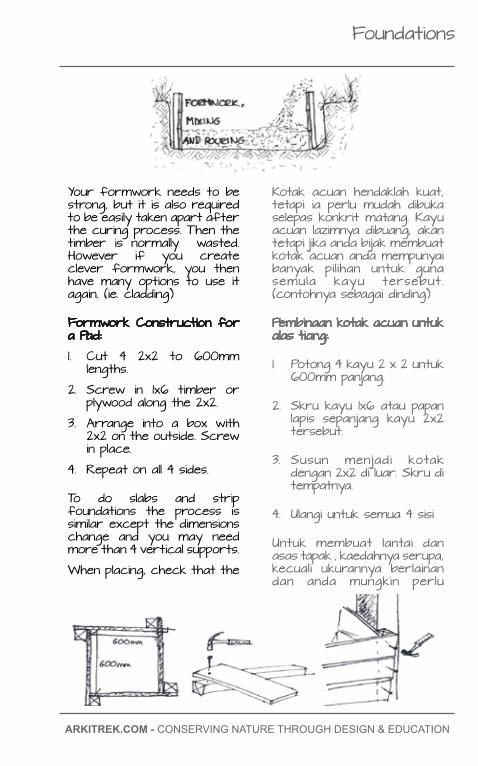
Your formwork needs to be strong, but it is also required to be easily taken apart after the curing process. Then the timber is normally wasted. However if you create clever formwork, you then have many options to use it again. (ie. cladding)
Formwork Construction for a Pad: 1. Cut 4 2x2 to 600mm
lengths.2. Screw in 1x6 timber or
plywood along the 2x2.3. Arrange into a box with
2x2 on the outside. Screw in place.
4. Repeat on all 4 sides.
To do slabs and strip foundations the process is similar except the dimensions change and you may need more than 4 vertical supports. When placing, check that the
Kotak acuan hendaklah kuat, tetapi ia perlu mudah dibuka selepas konkrit matang. Kayu acuan lazimnya dibuang, akan tetapi jika anda bijak membuat kotak acuan anda mempunyai banyak pilihan untuk guna semula kayu tersebut. (contohnya sebagai dinding)
Pembinaan kotak acuan untuk alas tiang:
1. Potong 4 kayu 2 x 2 untuk 600mm panjang.
2. Skru kayu 1x6 atau papan lapis sepanjang kayu 2x2 tersebut.
3. Susun menjadi kotak dengan 2x2 di luar. Skru di tempatnya.
4. Ulangi untuk semua 4 sisi
Untuk membuat lantai dan asas tapak , kaedahnya serupa, kecuali ukurannya berlainan dan anda mungkin perlu
Arkitrek.com - conserving nature through design & education
2.3
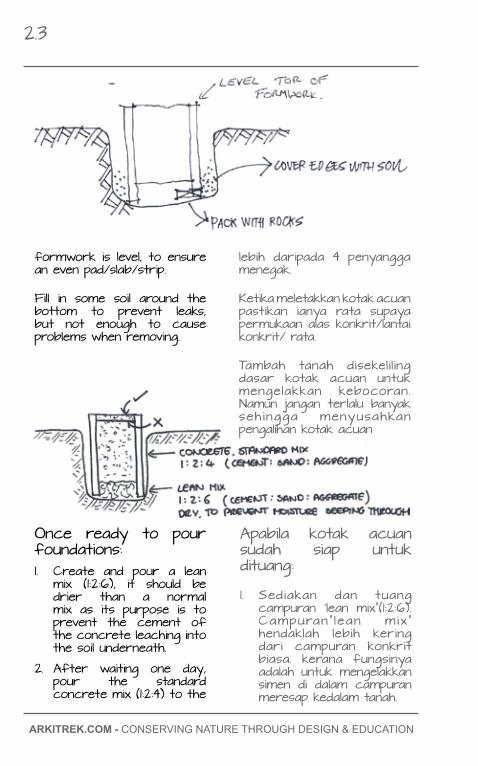
formwork is level, to ensure an even pad/slab/strip.
Fill in some soil around the bottom to prevent leaks, but not enough to cause problems when removing.
lebih daripada 4 penyangga menegak.
Ketika meletakkan kotak acuan pastikan ianya rata supaya permukaan alas konkrit/lantai konkrit/ rata.
Tambah tanah disekelil ing dasar kotak acuan untuk mengelakkan kebocoran. Namun jangan terlalu banyak seh ingga menyusahkan pengalihan kotak acuan
Apabila kotak acuan sudah siap untuk dituang:
1. Sediakan dan tuang campuran ‘lean mix”(1:2:6). Campuran “ l ean m ix ” hendaklah lebih kering dari campuran konkrit biasa. kerana fungsinya adalah untuk mengelakkan simen di dalam campuran meresap kedalam tanah.
Once ready to pour foundations:1. Create and pour a lean
mix (1:2:6), it should be drier than a normal mix as its purpose is to prevent the cement of the concrete leaching into the soil underneath.
2. After waiting one day, pour the standard concrete mix (1:2:4) to the
Arkitrek.com - conserving nature through design & education
Foundations
top of the formwork.
Once full, level with a stick that spans the formwork ,tapping gently up and down while sliding horizontally across the surface, or use a trowel to create a smooth finish. Don’t forget to insert your threaded bar now if required.
Tip:* Ensure the concrete
mix is constantly tapped during the pouring process with a spade or timber to ensure no air pockets.
Mixing Concrete By Hand:1. Layout plywood boards
with a small overlap.2. Add aggregate, sand and
cement at the correct ratios, and prepare buckets of water.
3. Begin spreading out the mix, without water over the plyboard and then spread the water over evenly.
4. Half of the group now spread out the mix whilst the other half moves
Petua:* Pastikan campuran konkrit
ditekap secara konsisteen semasa penuangan dengan menggunakan skop atau kayu untuk mengelakkan gelembung udara.
2. Selepas satu hari, tuang campuran konkrit biasa (1:2:4) kedalam kotak acuan sehingga kepermukaan kotak acuan.
Selepas ia penuh, ratakannya dengan batang yang panjangnya sama dengan kotak acuan. Ketika meratakan tekapkan batang perlahan lahan atau menggunakan kulir untuk mendapatkan permukaan yang rata dan licin. Jangan lupa untuk memasukkan threaded bar apabila diperlukan.
Mencampur konkrit dengan tangan:
1. Letakkan papan plywood dengan sedikit pertindihan.
2. Tambah batu-batu, tanah dan simen pada nisbah yang betul, dan sediakan sebaldi air.
3. Sebarkan dan ratakan campuran tanpa air diatas papan plywood dan
Arkitrek.com - conserving nature through design & education
2.3
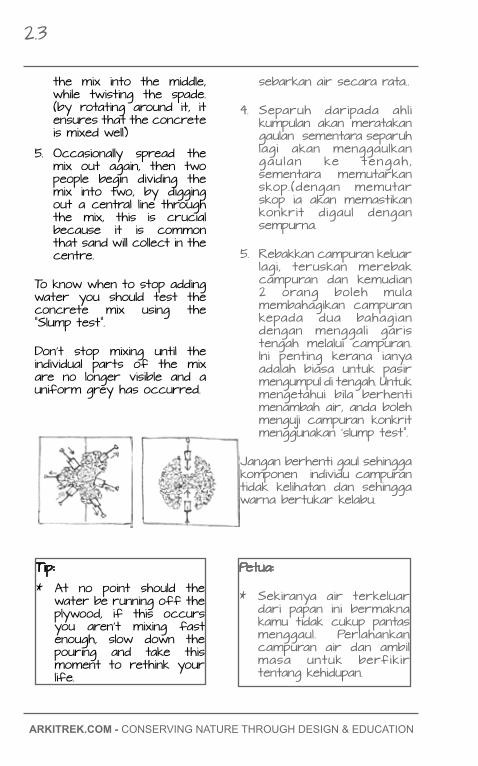
the mix into the middle, while twisting the spade. (by rotating around it, it ensures that the concrete is mixed well)
5. Occasionally spread the mix out again, then two people begin dividing the mix into two, by digging out a central line through the mix, this is crucial because it is common that sand will collect in the centre.
To know when to stop adding water you should test the concrete mix using the “Slump test”.
Don’t stop mixing until the individual parts of the mix are no longer visible and a uniform grey has occurred.
Tip:* At no point should the
water be running off the plywood, if this occurs you aren’t mixing fast enough, slow down the pouring and take this moment to rethink your life.
Petua:
* Sekiranya air terkeluar dari papan ini bermakna kamu tidak cukup pantas menggaul. Perlahankan campuran air dan ambil masa untuk berfikir tentang kehidupan.
sebarkan air secara rata..
4. Separuh daripada ahli kumpulan akan meratakan gaulan sementara separuh lagi akan menggaulkan gau lan ke tengah , sementara memutarkan skop.(dengan memutar skop ia akan memastikan konkrit digaul dengan sempurna.
5. Rebakkan campuran keluar lagi, teruskan merebak campuran dan kemudian 2 orang boleh mula membahagikan campuran kepada dua bahagian dengan menggali garis tengah melalui campuran. Ini penting kerana ianya adalah biasa untuk pasir mengumpul di tengah. Untuk mengetahui bila berhenti menambah air, anda boleh menguji campuran konkrit menggunakan ‘slump test”.
Jangan berhenti gaul sehingga komponen individu campuran tidak kelihatan dan sehingga warna bertukar kelabu.

Arkitrek.com - conserving nature through design & education
Foundations
Slump Test
The slump test is a simple way of getting the right kind of concrete mix. You will need a bucket and a level surface. 1. Fill the bucket of your
test mix to the top.2. Quickly tip the bucket
upside down, like you are building a sand castle and lift the bucket off. The outcome should be that the mix slumps a little, into more of a mound. If the mix stays rigid its too dry, if it slumps flat like a pancake, too much water has been added. (Don’t
Slump Test
“Slump test” adalah cara yang paling mudah untuk mendapatkan bancuhan konkrit dengan tepat.Apa yang anda perlukan adalah baldi dan permukaan yang rata
1. Isi baldi dengan campuran konkrit yang akan diuji sehingga keatas permukaan baldi.
2. Kemudian, terus terbalikkan baldi,sepertimana anda membuat istana pasir dengan menelangkupkan pasir ke tanah. Keputusannya harus likat sedikit,lebih
panic!) If this occurs add more cement, sand and aggregate.
Concrete mixing takes a long time, so if possible reduce your use as much as you can when designing, hence also reducing a large amount of carbon. If this isn’t possible try sourcing a cement mixer. You wont regret it.
kepada bukit.Sekiranya campuran tersebut kekal bermaksud ia terlampau kering, sekiranya campuran tersebut rata seperti lempeng, ia bermakna campuran tersebut terlebih air. (Jangan risau) jika ini berlaku tambah lebih banyak simen, pasir dan batu.
Campuran konkrit mengambil masa yang lama, jika boleh kurangkan penggunaan konkrit semasa merekabentuk, kerana
Arkitrek.com - conserving nature through design & education
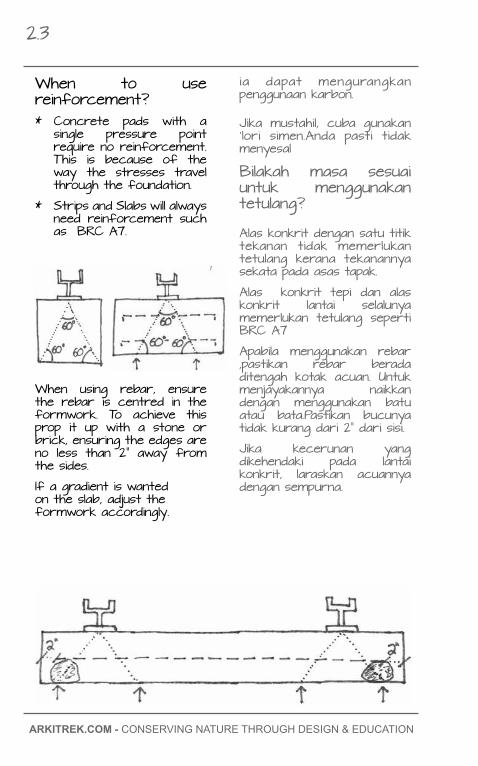
When to use reinforcement?* Concrete pads with a
single pressure point require no reinforcement. This is because of the way the stresses travel through the foundation.
* Strips and Slabs will always need reinforcement such as BRC A7.
ia dapat mengurangkan penggunaan karbon.
Jika mustahil, cuba gunakan ‘lori simen.Anda pasti tidak menyesal
Bilakah masa sesuai untuk menggunakan tetulang?
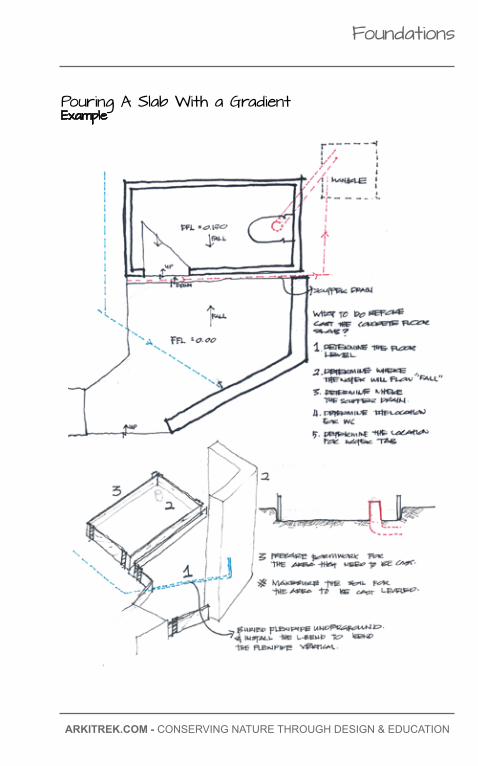
Alas konkrit dengan satu titik tekanan tidak memerlukan tetulang kerana tekanannya sekata pada asas tapak.Alas konkrit tepi dan alas konkrit lantai selalunya memerlukan tetulang seperti BRC A7Apabila menggunakan rebar ,pastikan rebar berada ditengah kotak acuan. Untuk menjayakannya naikkan dengan menggunakan batu atau bata.Pastikan bucunya tidak kurang dari 2” dari sisi.Jika kecerunan yang dikehendaki pada lantai konkrit, laraskan acuannya dengan sempurna.
2.3
When using rebar, ensure the rebar is centred in the formwork. To achieve this prop it up with a stone or brick, ensuring the edges are no less than 2” away from the sides.If a gradient is wanted on the slab, adjust the formwork accordingly.
Arkitrek.com - conserving nature through design & education
Foundations
Pouring A Slab With a GradientExample
Arkitrek.com - conserving nature through design & education
Membuka kotak acuan
* Konkrit akan semakin keras dari semasa ke semasa, sebaiknya buka kotak acuan selepas 1 minggu. Walau bagaimanapun jika kesuntukan masa, boleh juga untuk membuka kotak acuan selepas 48 jam, tetapi ia akan menjadi sangat rapuh.
* Apabila membuka kotak acuan, cuba untuk memel iharanya . Jad i longgarkan skru dengan teliti dan simpan untuk kegunaan masa depan. Jika perlu tukul boleh digunakan untuk memisahkannya daripada konkrit, tetapi berhati-hati untuk tidak menghakis konkrit.
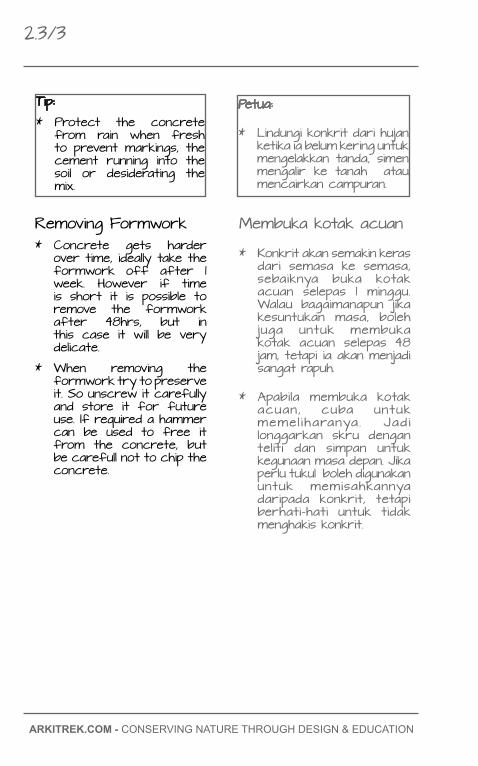
Removing Formwork* Concrete gets harder
over time, ideally take the formwork off after 1 week. However if time is short it is possible to remove the formwork after 48hrs, but in this case it will be very delicate.
* When removing the formwork try to preserve it. So unscrew it carefully and store it for future use. If required a hammer can be used to free it from the concrete, but be carefull not to chip the concrete.
2.3/3
Tip:* Protect the concrete
from rain when fresh to prevent markings, the cement running into the soil or desiderating the mix.
Petua:
* Lindungi konkrit dari hujan ketika ia belum kering untuk mengelakkan tanda, simen mengalir ke tanah atau mencairkan campuran.
Arkitrek.com - conserving nature through design & education
Foundations / Primary Structure
Arkitrek.com - conserving nature through design & education
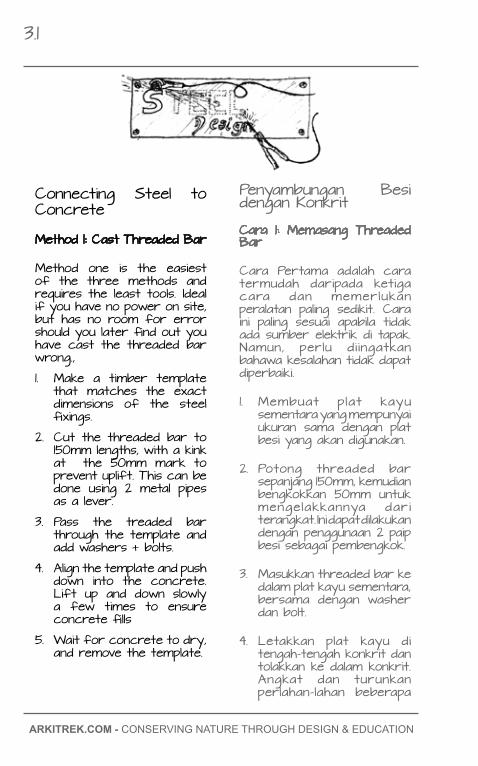
Connecting Steel to Concrete
Method 1: Cast Threaded Bar
Method one is the easiest of the three methods and requires the least tools. Ideal if you have no power on site, but has no room for error should you later find out you have cast the threaded bar wrong.,1. Make a timber template
that matches the exact dimensions of the steel fixings.
2. Cut the threaded bar to 150mm lengths, with a kink at the 50mm mark to prevent uplift. This can be done using 2 metal pipes as a lever.
3. Pass the treaded bar through the template and add washers + bolts.
4. Align the template and push down into the concrete. Lift up and down slowly a few times to ensure concrete fills
5. Wait for concrete to dry, and remove the template.
Penyambungan Besi dengan Konkrit
Cara 1: Memasang Threaded Bar
Cara Pertama adalah cara termudah daripada ketiga cara dan memerlukan peralatan paling sedikit. Cara ini paling sesuai apabila tidak ada sumber elektrik di tapak. Namun, perlu diingatkan bahawa kesalahan tidak dapat diperbaiki.
1. Membuat plat kayu sementara yang mempunyai ukuran sama dengan plat besi yang akan digunakan.
2. Potong threaded bar sepanjang 150mm, kemudian bengkokkan 50mm untuk mengelakkannya dari terangkat. Ini dapat dilakukan dengan penggunaan 2 paip besi sebagai pembengkok.
3. Masukkan threaded bar ke dalam plat kayu sementara, bersama dengan washer dan bolt.
4. Letakkan plat kayu di tengah-tengah konkrit dan tolakkan ke dalam konkrit. Angkat dan turunkan perlahan-lahan beberapa
3.1
Arkitrek.com - conserving nature through design & education
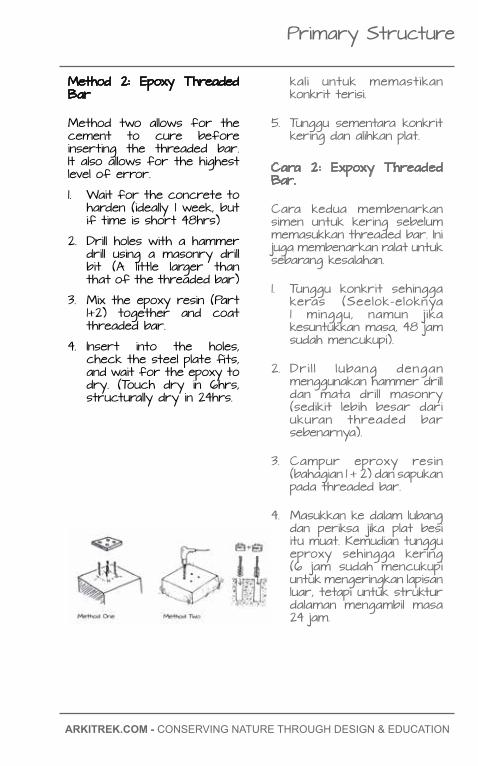
Method 2: Epoxy Threaded Bar
Method two allows for the cement to cure before inserting the threaded bar. It also allows for the highest level of error. 1. Wait for the concrete to
harden (ideally 1 week, but if time is short 48hrs)
2. Drill holes with a hammer drill using a masonry drill bit (A little larger than that of the threaded bar)
3. Mix the epoxy resin (Part 1+2) together and coat threaded bar.
4. Insert into the holes, check the steel plate fits, and wait for the epoxy to dry. (Touch dry in 6hrs, structurally dry in 24hrs.
Cara 2: Expoxy Threaded Bar.
Cara kedua membenarkan simen untuk kering sebelum memasukkan threaded bar. Ini juga membenarkan ralat untuk sebarang kesalahan.
1. Tunggu konkrit sehingga keras (Seelok-eloknya 1 minggu, namun jika kesuntukkan masa, 48 jam sudah mencukupi).
2. Dri l l lubang dengan menggunakan hammer drill dan mata drill masonry (sedikit lebih besar dari ukuran threaded bar sebenarnya).
3. Campur eproxy resin (bahagian 1 + 2) dan sapukan pada threaded bar.
4. Masukkan ke dalam lubang dan periksa jika plat besi itu muat. Kemudian tunggu eproxy sehingga kering (6 jam sudah mencukupi untuk mengeringkan lapisan luar, tetapi untuk struktur dalaman mengambil masa 24 jam.
Primary Structure
kali untuk memastikan konkrit terisi.
5. Tunggu sementara konkrit kering dan alihkan plat.
Arkitrek.com - conserving nature through design & education
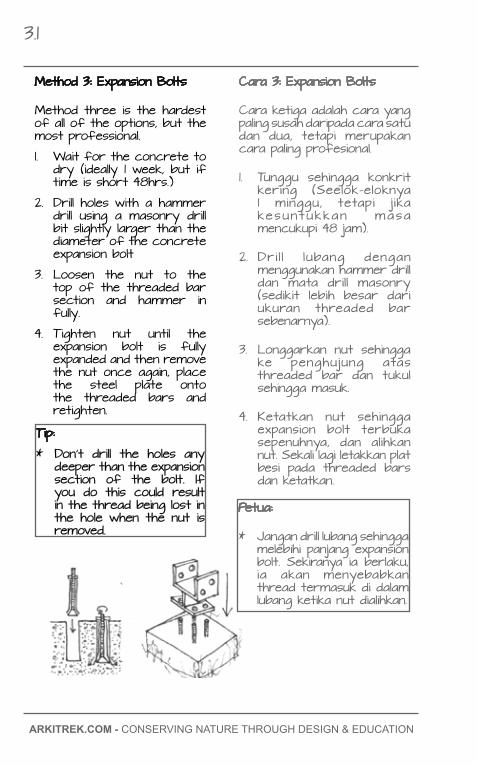
Method 3: Expansion Bolts
Method three is the hardest of all of the options, but the most professional.1. Wait for the concrete to
dry (ideally 1 week, but if time is short 48hrs.)
2. Drill holes with a hammer drill using a masonry drill bit slightly larger than the diameter of the concrete expansion bolt
3. Loosen the nut to the top of the threaded bar section and hammer in fully.
4. Tighten nut until the expansion bolt is fully expanded and then remove the nut once again, place the steel plate onto the threaded bars and retighten.
Cara 3: Expansion Bolts
Cara ketiga adalah cara yang paling susah daripada cara satu dan dua, tetapi merupakan cara paling profesional.
1. Tunggu sehingga konkrit kering (Seelok-eloknya 1 minggu, tetapi j ika ke s u n t u kkan masa mencukupi 48 jam).
2. Dri l l lubang dengan menggunakan hammer drill dan mata drill masonry (sedikit lebih besar dari ukuran threaded bar sebenarnya).
3. Longgarkan nut sehingga ke penghujung atas threaded bar dan tukul sehingga masuk.
4. Ketatkan nut sehingga expansion bolt terbuka sepenuhnya, dan alihkan nut. Sekali lagi letakkan plat besi pada threaded bars dan ketatkan.
3.1
Tip:* Don’t drill the holes any
deeper than the expansion section of the bolt. If you do this could result in the thread being lost in the hole when the nut is removed.
Petua:
* Jangan drill lubang sehingga melebihi panjang expansion bolt. Sekiranya ia berlaku, ia akan menyebabkan thread termasuk di dalam lubang ketika nut dialihkan.
Arkitrek.com - conserving nature through design & education
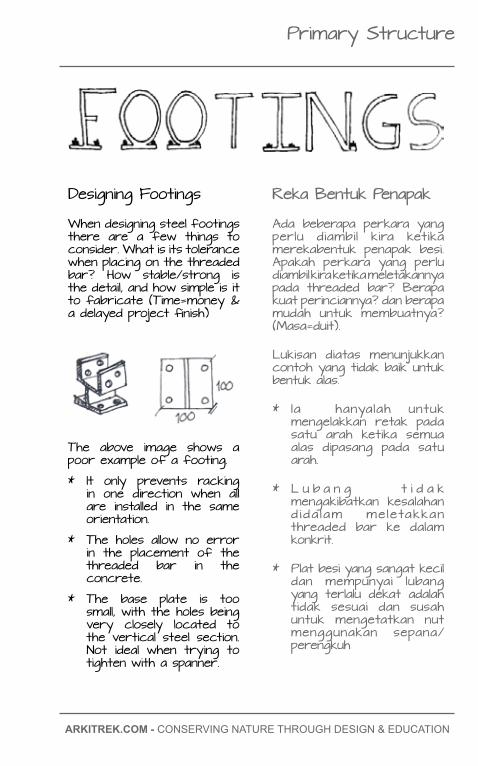
Designing Footings
When designing steel footings there are a few things to consider. What is its tolerance when placing on the threaded bar? How stable/strong is the detail, and how simple is it to fabricate (Time=money & a delayed project finish)
Reka Bentuk Penapak
Ada beberapa perkara yang perlu diambil kira ketika merekabentuk penapak besi. Apakah perkara yang perlu diambil kira ketika meletakannya pada threaded bar? Berapa kuat perinciannya? dan berapa mudah untuk membuatnya? (Masa=duit).
Lukisan diatas menunjukkan contoh yang tidak baik untuk bentuk alas.
* Ia hanyalah untuk mengelakkan retak pada satu arah ketika semua alas dipasang pada satu arah.
* L u b a n g t i d a k mengakibatkan kesalahan d ida lam me letakkan threaded bar ke dalam konkrit.
* Plat besi yang sangat kecil dan mempunyai lubang yang terlalu dekat adalah tidak sesuai dan susah untuk mengetatkan nut menggunakan sepana/perengkuh
Primary Structure
The above image shows a poor example of a footing. * It only prevents racking
in one direction when all are installed in the same orientation.
* The holes allow no error in the placement of the threaded bar in the concrete.
* The base plate is too small, with the holes being very closely located to the vertical steel section. Not ideal when trying to tighten with a spanner.
Arkitrek.com - conserving nature through design & education
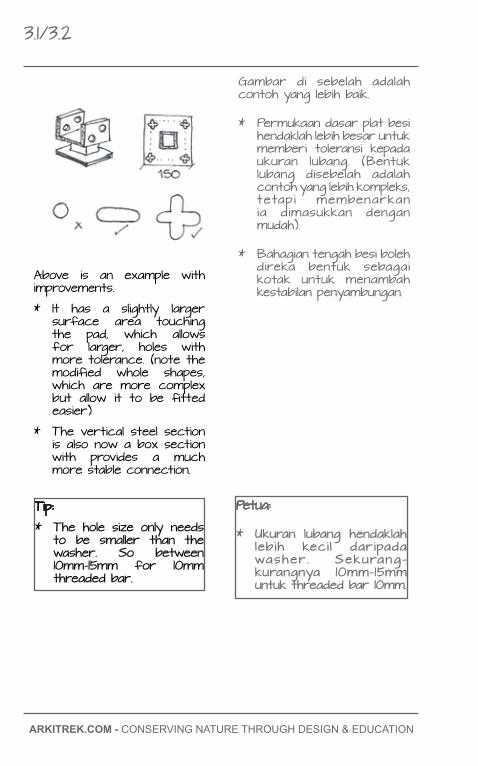
Above is an example with improvements.* It has a slightly larger
surface area touching the pad, which allows for larger, holes with more tolerance. (note the modified whole shapes, which are more complex but allow it to be fitted easier)
* The vertical steel section is also now a box section with provides a much more stable connection.
Gambar di sebelah adalah contoh yang lebih baik.
* Permukaan dasar plat besi hendaklah lebih besar untuk memberi toleransi kepada ukuran lubang. (Bentuk lubang disebelah adalah contoh yang lebih kompleks, tetap i membenarkan ia dimasukkan dengan mudah).
* Bahagian tengah besi boleh direka bentuk sebagai kotak untuk menambah kestabilan penyambungan.
3.1/3.2
Tip: * The hole size only needs
to be smaller than the washer. So between 10mm-15mm for 10mm threaded bar.
Petua:
* Ukuran lubang hendaklah lebih keci l daripada washer . Sekurang -kurangnya 10mm-15mm untuk threaded bar 10mm.
Arkitrek.com - conserving nature through design & education
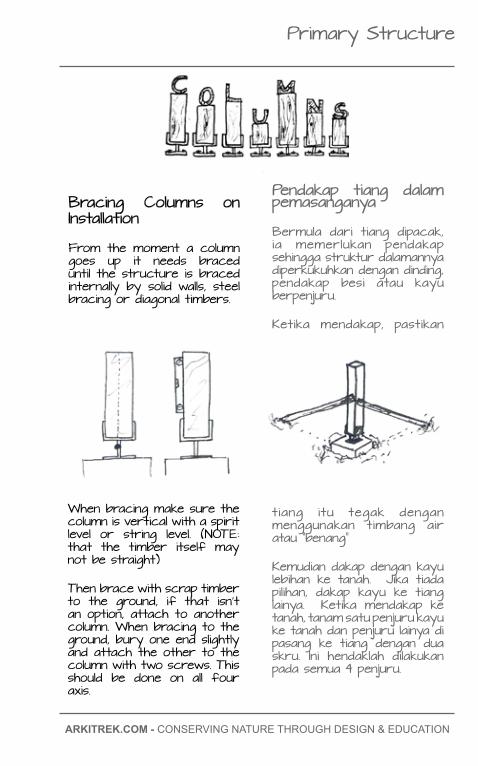
Bracing Columns on Installation
From the moment a column goes up it needs braced until the structure is braced internally by solid walls, steel bracing or diagonal timbers.
Pendakap tiang dalam pemasanganya
Bermula dari tiang dipacak, ia memerlukan pendakap sehingga struktur dalamannya diperkukuhkan dengan dinding, pendakap besi atau kayu berpenjuru.
Ketika mendakap, pastikan
Primary Structure
When bracing make sure the column is vertical with a spirit level or string level. (NOTE: that the timber itself may not be straight)
Then brace with scrap timber to the ground, if that isn’t an option, attach to another column. When bracing to the ground, bury one end slightly and attach the other to the column with two screws. This should be done on all four axis.
tiang itu tegak dengan menggunakan timbang air atau “benang”
Kemudian dakap dengan kayu lebihan ke tanah. Jika tiada pilihan, dakap kayu ke tiang lainya. Ketika mendakap ke tanah, tanam satu penjuru kayu ke tanah dan penjuru lainya di pasang ke tiang dengan dua skru. Ini hendaklah dilakukan pada semua 4 penjuru.
Arkitrek.com - conserving nature through design & education
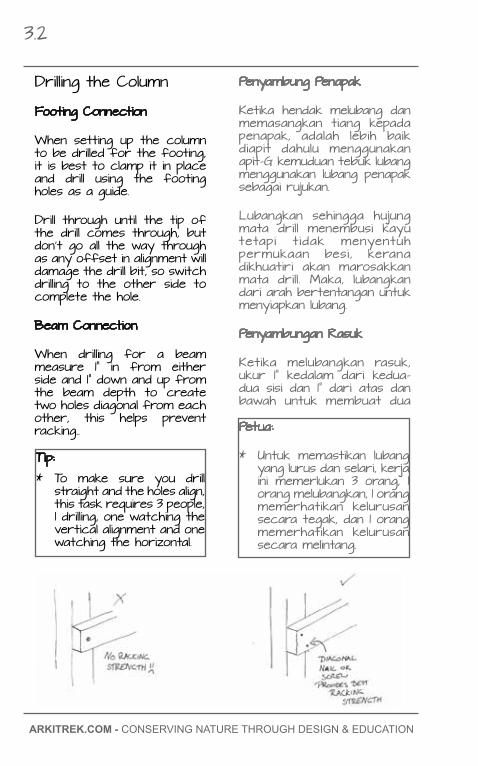
Drilling the Column
Footing Connection
When setting up the column to be drilled for the footing, it is best to clamp it in place and drill using the footing holes as a guide.
Drill through until the tip of the drill comes through, but don’t go all the way through as any offset in alignment will damage the drill bit, so switch drilling to the other side to complete the hole.
Beam Connection
When drilling for a beam measure 1” in from either side and 1” down and up from the beam depth to create two holes diagonal from each other, this helps prevent racking..
Penyambung Penapak
Ketika hendak melubang dan memasangkan tiang kepada penapak, adalah lebih baik diapit dahulu menggunakan apit-G kemuduan tebuk lubang menggunakan lubang penapak sebagai rujukan.
Lubangkan sehingga hujung mata drill menembusi kayu tetapi tidak menyentuh permukaan besi, kerana dikhuatiri akan marosakkan mata drill. Maka, lubangkan dari arah bertentangan untuk menyiapkan lubang.
Penyambungan Rasuk
Ketika melubangkan rasuk, ukur 1” kedalam dari kedua-dua sisi dan 1” dari atas dan bawah untuk membuat dua
3.2
Tip: * To make sure you drill
straight and the holes align, this task requires 3 people, 1 drilling, one watching the vertical alignment and one watching the horizontal.
Petua:
* Untuk memastikan lubang yang lurus dan selari, kerja ini memerlukan 3 orang, 1 orang melubangkan, 1 orang memerhatikan kelurusan secara tegak, dan 1 orang memerhatikan kelurusan secara melintang.
Arkitrek.com - conserving nature through design & education
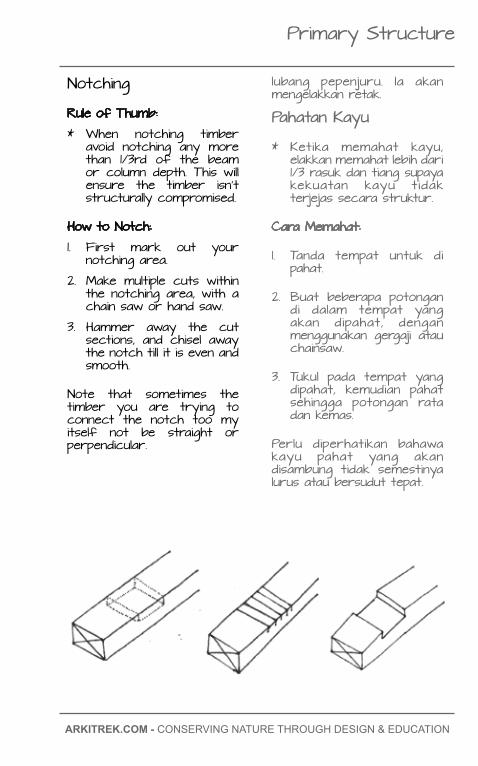
Notching
Rule of Thumb: * When notching timber
avoid notching any more than 1/3rd of the beam or column depth. This will ensure the timber isn’t structurally compromised.
How to Notch: 1. First mark out your
notching area.2. Make multiple cuts within
the notching area, with a chain saw or hand saw.
3. Hammer away the cut sections, and chisel away the notch till it is even and smooth.
Note that sometimes the timber you are trying to connect the notch too my itself not be straight or perpendicular.
lubang pepenjuru. Ia akan mengelakkan retak.
Pahatan Kayu
* Ketika memahat kayu, elakkan memahat lebih dari 1/3 rasuk dan tiang supaya kekuatan kayu tidak terjejas secara struktur.
Cara Memahat:
1. Tanda tempat untuk di pahat.
2. Buat beberapa potongan di dalam tempat yang akan dipahat, dengan menggunakan gergaji atau chainsaw.
3. Tukul pada tempat yang dipahat, kemudian pahat sehingga potongan rata dan kemas.
Perlu diperhatikan bahawa kayu pahat yang akan disambung tidak semestinya lurus atau bersudut tepat.
Primary Structure
Arkitrek.com - conserving nature through design & education
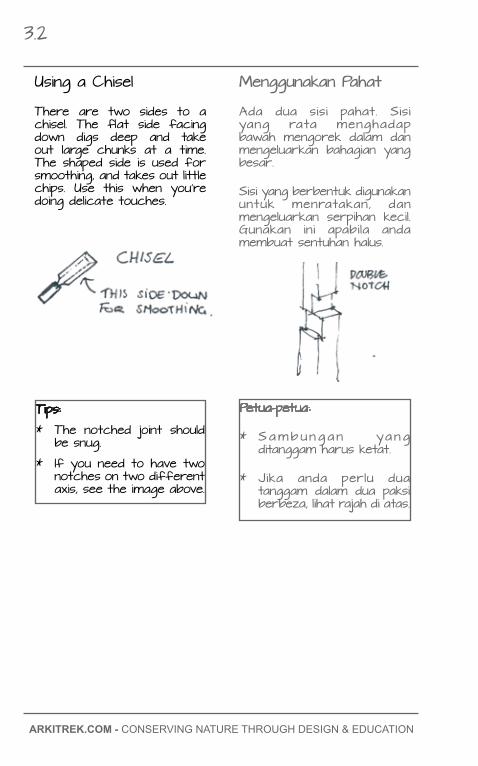
Using a Chisel
There are two sides to a chisel. The flat side facing down digs deep and take out large chunks at a time. The shaped side is used for smoothing, and takes out little chips. Use this when you’re doing delicate touches.
Menggunakan Pahat
Ada dua sisi pahat. Sisi yang rata menghadap bawah mengorek dalam dan mengeluarkan bahagian yang besar.
Sisi yang berbentuk digunakan untuk menratakan, dan mengeluarkan serpihan kecil. Gunakan ini apabila anda membuat sentuhan halus.
3.2
Tips:* The notched joint should
be snug.* If you need to have two
notches on two different axis, see the image above.
Petua-petua:
* S amb u n g a n ya n g ditanggam harus ketat.
* Jika anda perlu dua tanggam dalam dua paksi berbeza, lihat rajah di atas.
Arkitrek.com - conserving nature through design & education
Primary Structure

Arkitrek.com - conserving nature through design & education
Why Bamboo?* Bamboo can grow to
structural strength in just 5 years. This means in theory if it stays a part of your building longer than 5 yrs your design sequesters carbon.
* It can be locally sourced, which helps support local businesses.
* Gram for gram it is stronger than steel
What Bamboo is Strong Enough?
There are many types of bamboo:
Structural Bamboo can be easily recognised by its large diameter (100-150mm) with each node being close together. (closer the better) You also want the bamboo walls to be as thick as possible 15mm+.
Decorative Bamboo for panels and siliu etc is best when the nodes are far apart with a thinner wall.
Kenapa Buluh?
* Buluh boleh tumbuh ke kekuatan kerangka dalam hanya 5 tahun. Ini bermakna secara teori, j ika ia kekal sebagai sebahagian daripada bangunan anda lebih daripada 5 tahun, rekaan anda menyerap karbon..
* Ia boleh didapati daripada sumber tempatan, lalu menyokong perniagaan tempatan.
* Gram dengan gram, ia lebih kuat daripada keluli.
Buluh apa yang cukup kuat?
Ada banyak jenis buluh:
Buluh kerangka mudah dikenali dengan diameternya yang besar (100-150mm), dengan jarak antara buku-buku yang dekat. ( lebih dekat lebih baik). Anda juga mahu dinding buluh yang setebal mungkin 15mm+.
Buluh perhiasan untuk panel dan siliu dsb adalah terbaik apabila jarak buku-bukunya jauh dengan dinding yang lebih nipis
3.2
Arkitrek.com - conserving nature through design & education
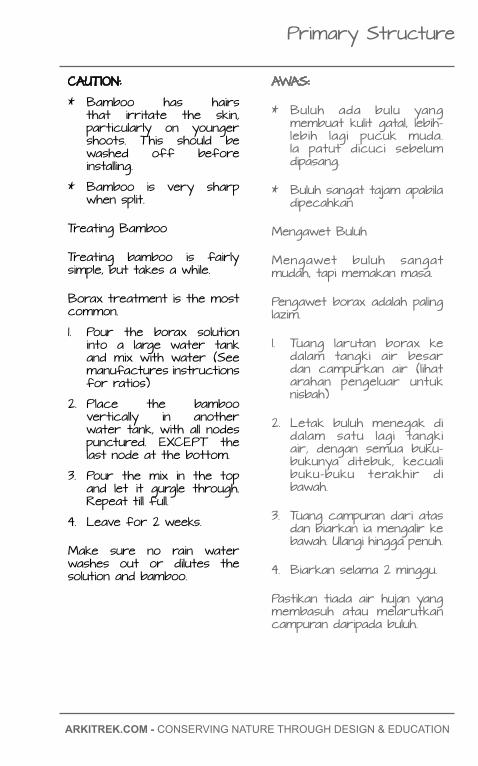
CAUTION: * Bamboo has hairs
that irritate the skin, particularly on younger shoots. This should be washed off before installing.
* Bamboo is very sharp when split.
Treating Bamboo
Treating bamboo is fairly simple, but takes a while.
Borax treatment is the most common. 1. Pour the borax solution
into a large water tank and mix with water (See manufactures instructions for ratios)
2. Place the bamboo vertically in another water tank, with all nodes punctured. EXCEPT the last node at the bottom.
3. Pour the mix in the top and let it gurgle through. Repeat till full.
4. Leave for 2 weeks.
Make sure no rain water washes out or dilutes the solution and bamboo.
AWAS:
* Buluh ada bulu yang membuat kulit gatal, lebih-lebih lagi pucuk muda. Ia patut dicuci sebelum dipasang.
* Buluh sangat tajam apabila dipecahkan
Mengawet Buluh
Mengawet buluh sangat mudah, tapi memakan masa.
Pengawet borax adalah paling lazim.
1. Tuang larutan borax ke dalam tangki air besar dan campurkan air (lihat arahan pengeluar untuk nisbah)
2. Letak buluh menegak di dalam satu lagi tangki air, dengan semua buku-bukunya ditebuk, kecuali buku-buku terakhir di bawah.
3. Tuang campuran dari atas dan biarkan ia mengalir ke bawah. Ulangi hingga penuh.
4. Biarkan selama 2 minggu.
Pastikan tiada air hujan yang membasuh atau melarutkan campuran daripada buluh.
Primary Structure
Arkitrek.com - conserving nature through design & education
3.2/3.3
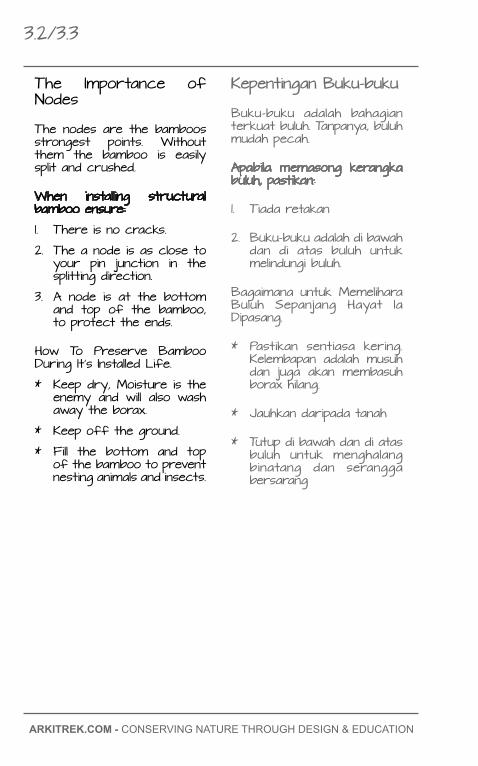
The Importance of Nodes
The nodes are the bamboos strongest points. Without them the bamboo is easily split and crushed.
When installing structural bamboo ensure: 1. There is no cracks.2. The a node is as close to
your pin junction in the splitting direction.
3. A node is at the bottom and top of the bamboo, to protect the ends.
How To Preserve Bamboo During It’s Installed Life.* Keep dry, Moisture is the
enemy and will also wash away the borax.
* Keep off the ground.* Fill the bottom and top
of the bamboo to prevent nesting animals and insects.
Kepentingan Buku-buku
Buku-buku adalah bahagian terkuat buluh. Tanpanya, buluh mudah pecah.
Apabila memasong kerangka buluh, pastikan:
1. Tiada retakan
2. Buku-buku adalah di bawah dan di atas buluh untuk melindungi buluh.
Bagaimana untuk Memelihara Buluh Sepanjang Hayat Ia Dipasang.
* Pastikan sentiasa kering. Kelembapan adalah musuh dan juga akan membasuh borax hilang.
* Jauhkan daripada tanah
* Tutup di bawah dan di atas buluh untuk menghalang binatang dan serangga bersarang
Arkitrek.com - conserving nature through design & education
Primary Structure
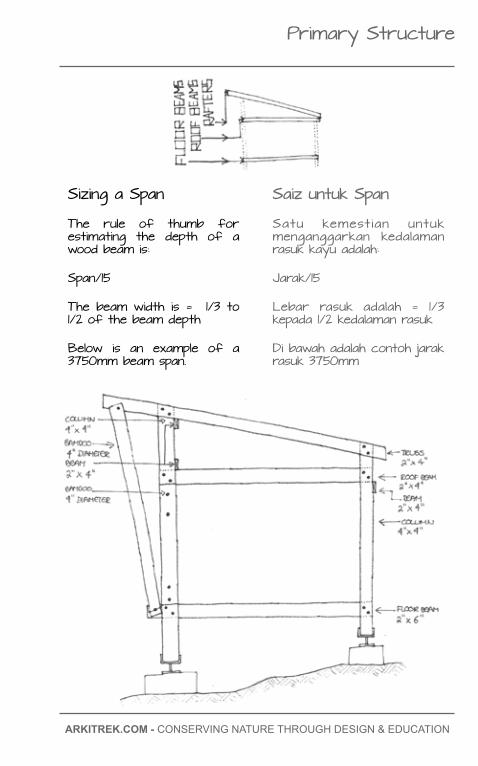
Sizing a Span
The rule of thumb for estimating the depth of a wood beam is:
Span/15
The beam width is = 1/3 to 1/2 of the beam depth
Below is an example of a 3750mm beam span.
Saiz untuk Span
Satu kemestian untuk menganggarkan kedalaman rasuk kayu adalah:
Jarak/15
Lebar rasuk adalah = 1/3 kepada 1/2 kedalaman rasuk
Di bawah adalah contoh jarak rasuk 3750mm
Arkitrek.com - conserving nature through design & education
3.3
Arkitrek.com - conserving nature through design & education
Primary Structure
Fixings 1. Is two threaded bars
clamping the timber.2. Same as above but has
an additional support underneath.
3. Same as option one. However the notch provides extra strength and support should the threaded bar weaken.
Permasangan
1. Dua threaded bar mengapit kayu.
2. Sama seperti di atas tetapi mempunyai sokongan tambahan di bawahnya..
3. Sama seperti pilihan satu. Walau bagaimanapun tanggam memberikan kekuatan tambahan dan sokongan jika threaded bar patah.
Arkitrek.com - conserving nature through design & education
3.3/4
Trusses & Rafters
Splicing
Splicing requires two strong pieces of timber longer than 900mm. each with four holes (two on each end of the timber)
Alignment is key for aesthetics. The nuts need to be tight to ensure a strong joint.
Steel splicing is also an option
Remember with all horizontals timber should bend away from the ground if its warped..
Kekuda dan Kasau
Penyambungan
Penyambungan memerlukan dua batang kayu yang panjangnya lebih dari 900mm setiap satu dengan empat lubang (dua pada setiap hujung kayu itu)
Penjajaran adalah kunci untuk estetika. Nat perlu diketatkan untuk memastikan sendi yang kuat.
Penyambungan besi juga bole digunakan.
Perlu diingatkan semua kayu melintang perlu bengkok dari tanah jika ia meleding.
Arkitrek.com - conserving nature through design & education
Secondary Structure
Arkitrek.com - conserving nature through design & education
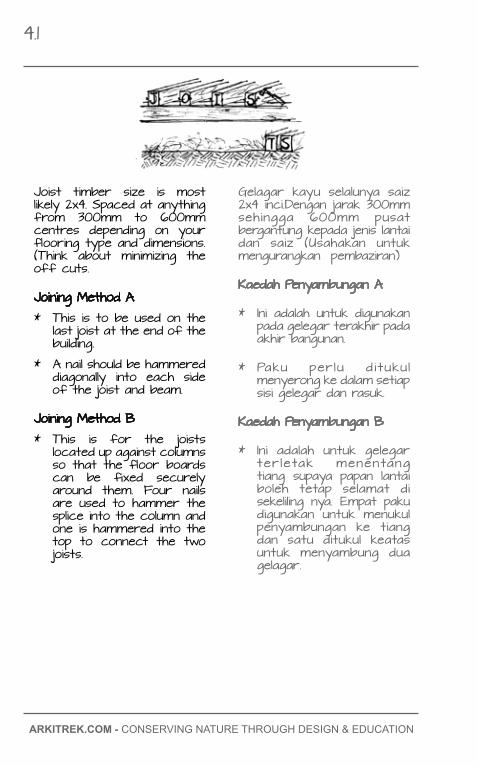
Joist timber size is most likely 2x4. Spaced at anything from 300mm to 600mm centres depending on your flooring type and dimensions. (Think about minimizing the off cuts.
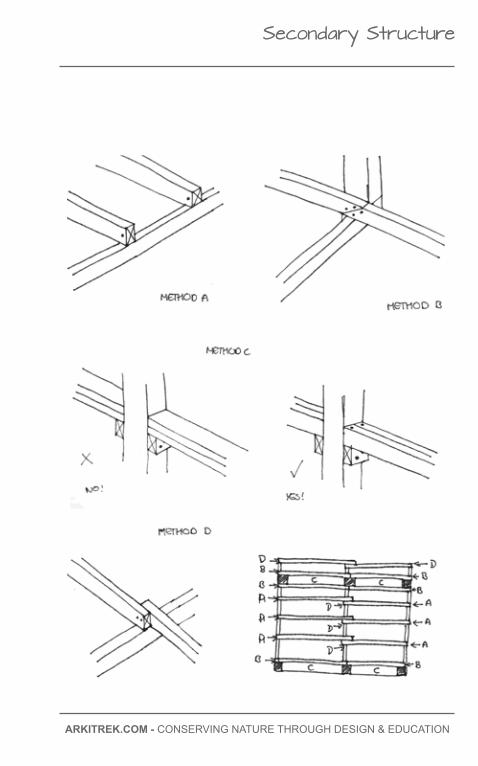
Joining Method A * This is to be used on the
last joist at the end of the building.
* A nail should be hammered diagonally into each side of the joist and beam.
Joining Method B* This is for the joists
located up against columns so that the floor boards can be fixed securely around them. Four nails are used to hammer the splice into the column and one is hammered into the top to connect the two joists.
Gelagar kayu selalunya saiz 2x4 inci.Dengan jarak 300mm sehingga 600mm pusat bergantung kepada jenis lantai dan saiz (Usahakan untuk mengurangkan pembaziran)
Kaedah Penyambungan A
* Ini adalah untuk digunakan pada gelegar terakhir pada akhir bangunan.
* Paku per lu d i tuku l menyerong ke dalam setiap sisi gelegar dan rasuk.
Kaedah Penyambungan B
* Ini adalah untuk gelegar ter letak menentang tiang supaya papan lantai boleh tetap selamat di sekeliling nya. Empat paku digunakan untuk menukul penyambungan ke tiang dan satu ditukul keatas untuk menyambung dua gelagar.
4.1
Arkitrek.com - conserving nature through design & education
Secondary Structure
Arkitrek.com - conserving nature through design & education
Joining Method C * Is for between columns
when a stud wall/ railing will be fitted.
* This requires two 2x4 to be placed in portrait, and a piece of 2x4 bolted through to the column.
* The joists should fit tightly and should be nailed to each other and into the column diagonally.
Joining Method D* Is for joists on intermediate
beams. This is the simplest connection and the most common.
* Nail two nails on each side of the beam and one connecting the two.
* All joists need to be solid and shouldn’t wobble. Even when walked on.
Kaedah Penyambungan C
* Ia adalah untuk antara tiang apabila stud dinding / pagar akan dipasang.
* Ini memerlukan dua 2x4 untuk diletakkan secara menegak dan salah satu daripada 2x4 diperketatkan melalui tiang.
* Gelagar hendaklah dipasang dengan ketat dan perlu dipaku antara satu sama lain kedalam tiang secara menyerong.
Kaedah Penyambungan D
* Untuk gelagar pada rasuk pertengahan. Ini adalah sambungan yang paling mudah dan biasa digunakan
* Tukul dua paku pada setiap bahagian rasuk dan satu yang menghubungkan kedua-dua.
* Semua gelagar hendaklah kukuh dan tidak bergegar.Walaupun ketika berjalan diatasnya.
4.1/4.2
Arkitrek.com - conserving nature through design & education
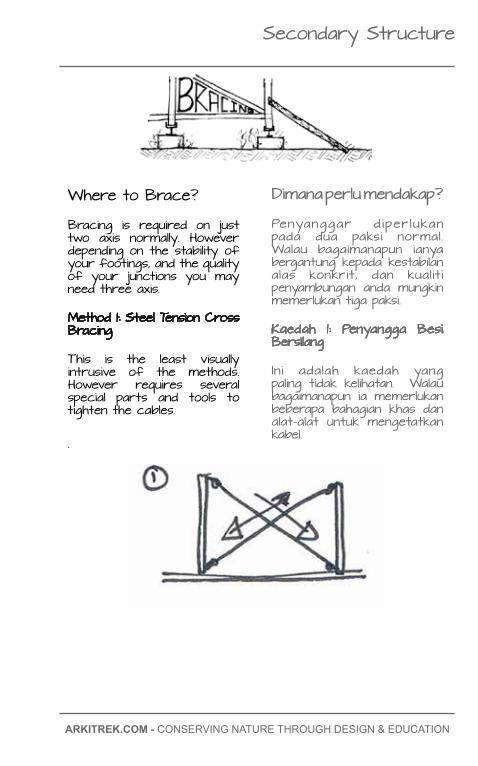
Where to Brace?
Bracing is required on just two axis normally. However depending on the stability of your footings, and the quality of your junctions you may need three axis.
Method 1: Steel Tension Cross Bracing
This is the least visually intrusive of the methods. However requires several special parts and tools to tighten the cables.
.
Dimana perlu mendakap?
Penyanggar d iper lukan pada dua paksi normal. Walau bagaimanapun ianya bergantung kepada kestabilan alas konkrit, dan kualiti penyambungan anda mungkin memerlukan tiga paksi.
Kaedah 1: Penyangga Besi Bersilang
Ini adalah kaedah yang paling tidak kelihatan. Walau bagaimanapun ia memerlukan beberapa bahagian khas dan alat-alat untuk mengetatkan kabel.
Secondary Structure
Arkitrek.com - conserving nature through design & education
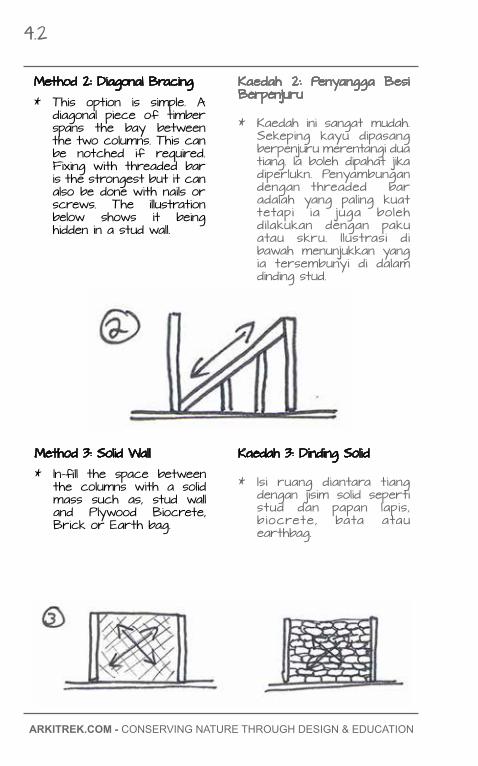
Method 2: Diagonal Bracing* This option is simple. A
diagonal piece of timber spans the bay between the two columns. This can be notched if required. Fixing with threaded bar is the strongest but it can also be done with nails or screws. The illustration below shows it being hidden in a stud wall.
Kaedah 2: Penyangga Besi Berpenjuru
* Kaedah ini sangat mudah.Sekeping kayu dipasang berpenjuru merentangi dua tiang. Ia boleh dipahat jika diperlukn. Penyambungan dengan threaded bar adalah yang paling kuat tetapi ia juga boleh dilakukan dengan paku atau skru. Ilustrasi di bawah menunjukkan yang ia tersembunyi di dalam dinding stud.
4.2
Method 3: Solid Wall* In-fill the space between
the columns with a solid mass such as, stud wall and Plywood Biocrete, Brick or Earth bag.
Kaedah 3: Dinding Solid
* Isi ruang diantara tiang dengan jisim solid seperti stud dan papan lapis, biocrete, bata atau earthbag.
Arkitrek.com - conserving nature through design & education
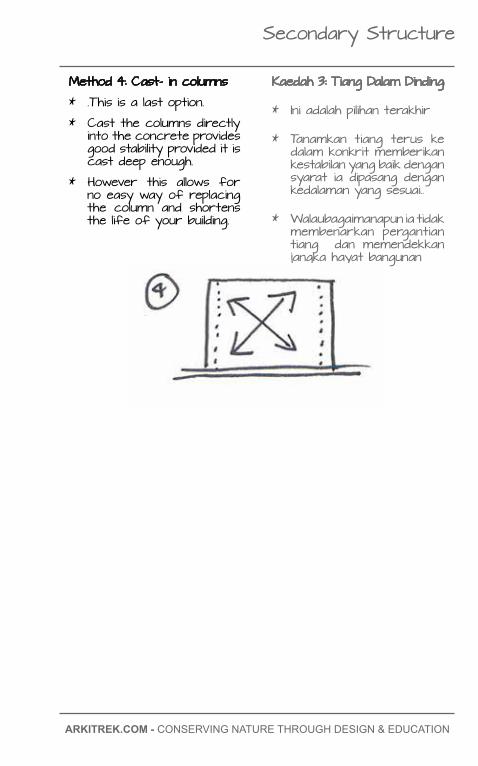
Method 4: Cast- in columns* .This is a last option. * Cast the columns directly
into the concrete provides good stability provided it is cast deep enough.
* However this allows for no easy way of replacing the column and shortens the life of your building.
Kaedah 3: Tiang Dalam Dinding
* Ini adalah pilihan terakhir
* Tanamkan tiang terus ke dalam konkrit memberikan kestabilan yang baik dengan syarat ia dipasang dengan kedalaman yang sesuai..
* Walaubagaimanapun ia tidak membenarkan pergantian tiang dan memendekkan jangka hayat bangunan
Secondary Structure
Arkitrek.com - conserving nature through design & education
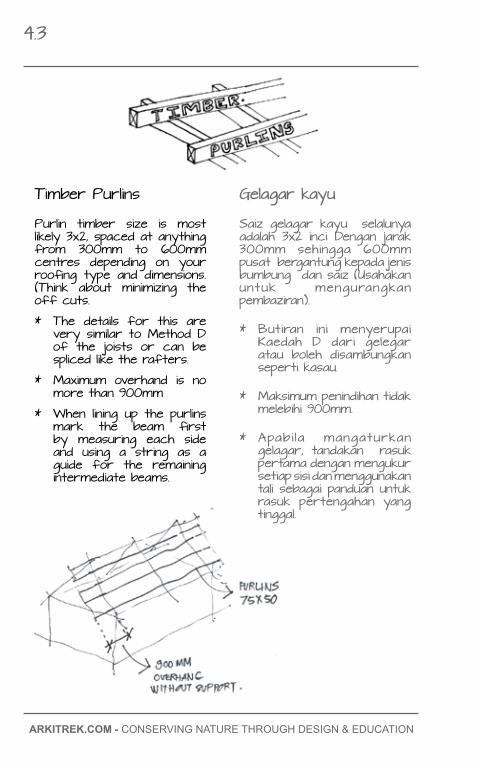
Timber Purlins
Purlin timber size is most likely 3x2, spaced at anything from 300mm to 600mm centres depending on your roofing type and dimensions. (Think about minimizing the off cuts.* The details for this are
very similar to Method D of the joists or can be spliced like the rafters.
* Maximum overhand is no more than 900mm
* When lining up the purlins mark the beam first by measuring each side and using a string as a guide for the remaining intermediate beams.
Gelagar kayu
Saiz gelagar kayu selalunya adalah 3x2 inci Dengan jarak 300mm sehingga 600mm pusat bergantung kepada jenis bumbung dan saiz (Usahakan untuk mengurangkan pembaziran).
* Butiran ini menyerupai Kaedah D dari gelegar atau boleh disambungkan seperti kasau.
* Maksimum penindihan tidak melebihi 900mm.
* Apabi la mangaturkan gelagar, tandakan rasuk pertama dengan mengukur setiap sisi dan menggunakan tali sebagai panduan untuk rasuk pertengahan yang tinggal.
4.3

Arkitrek.com - conserving nature through design & education
Bamboo Purlins 1. Cut a piece of treated
bamboo to length and then split it by using a parang + hammer.
2. Place the bamboo across the trusses to determine where it should be fixed and drill in these locations. Then fix with self tapping screws (not nails as they split the bamboo.)
Gelagar buluh
1. Potong sekeping buluh dirawat dengan panjang dan kemudian belahkan dengan menggunakan parang + tukul.
2. Letakkan buluh di seluruh kekuda untuk menentukan di mana ia perlu dipasang
Secondary Structure
To fix roofing materials connect through the ridge, enough to pull the two pieces together but not enough for the roofing material to deform.
dan digerudi. Kemudian pasang dengan “self tapping screw”(elakkan penggunaan paku kerana ia akan memecahkan buluh)
Untuk memasang bahan bumbung melalui rabung, adalah mencukupi untuk menarik kedua-dua keping bersama-sama tetapi tidak cukup untuk bahan bumbung untuk berubah bentuk.

Arkitrek.com - conserving nature through design & education
5
Arkitrek.com - conserving nature through design & education
Roof
Arkitrek.com - conserving nature through design & education
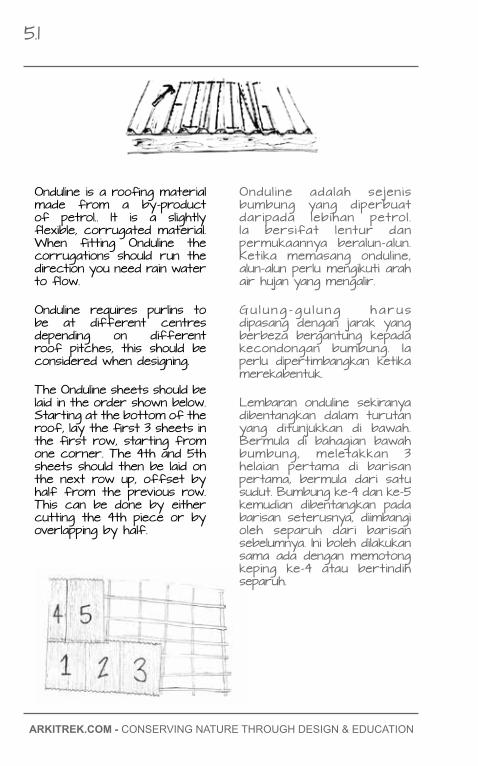
Onduline is a roofing material made from a by-product of petrol.. It is a slightly flexible, corrugated material. When fitting Onduline the corrugations should run the direction you need rain water to flow.
Onduline requires purlins to be at different centres depending on different roof pitches, this should be considered when designing.
The Onduline sheets should be laid in the order shown below. Starting at the bottom of the roof, lay the first 3 sheets in the first row, starting from one corner. The 4th and 5th sheets should then be laid on the next row up, offset by half from the previous row. This can be done by either cutting the 4th piece or by overlapping by half.
Ondul ine adalah sejenis bumbung yang diperbuat daripada lebihan petrol . Ia bersifat lentur dan permukaannya beralun-alun. Ketika memasang onduline, alun-alun perlu mengikuti arah air hujan yang mengalir.
Gu l u n g - g u l u n g h a r u s dipasang dengan jarak yang berbeza bergantung kepada kecondongan bumbung. Ia perlu dipertimbangkan ketika merekabentuk.
Lembaran onduline sekiranya dibentangkan dalam turutan yang ditunjukkan di bawah. Bermula di bahagian bawah bumbung, meletakkan 3 helaian pertama di barisan pertama, bermula dari satu sudut. Bumbung ke-4 dan ke-5 kemudian dibentangkan pada barisan seterusnya, diimbangi oleh separuh dari barisan sebelumnya. Ini boleh dilakukan sama ada dengan memotong keping ke-4 atau bertindih separuh.
5.1
Arkitrek.com - conserving nature through design & education
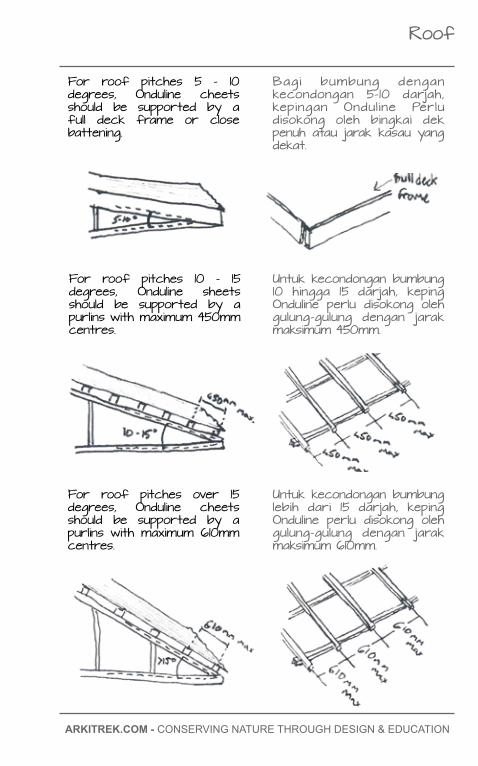
For roof pitches 5 - 10 degrees, Onduline cheets should be supported by a full deck frame or close battening.
Bagi bumbung dengan kecondongan 5-10 darjah, kepingan Onduline Perlu disokong oleh bingkai dek penuh atau jarak kasau yang dekat.
Roof
For roof pitches 10 - 15 degrees, Onduline sheets should be supported by a purlins with maximum 450mm centres.
For roof pitches over 15 degrees, Onduline cheets should be supported by a purlins with maximum 610mm centres.
Untuk kecondongan bumbung 10 hingga 15 darjah, keping Onduline perlu disokong oleh gulung-gulung dengan jarak maksimum 450mm.
Untuk kecondongan bumbung lebih dari 15 darjah, keping Onduline perlu disokong oleh gulung-gulung dengan jarak maksimum 610mm.
Arkitrek.com - conserving nature through design & education
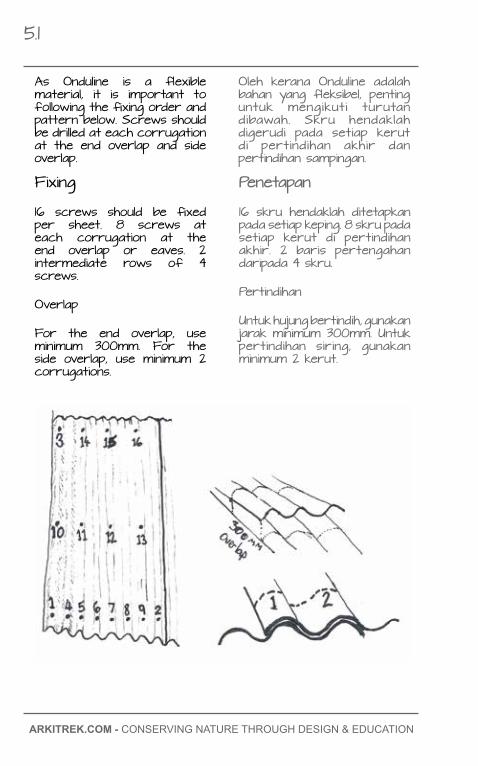
As Onduline is a flexible material, it is important to following the fixing order and pattern below. Screws should be drilled at each corrugation at the end overlap and side overlap.
Oleh kerana Onduline adalah bahan yang fleksibel, penting untuk mengikuti turutan dibawah. Skru hendaklah digerudi pada setiap kerut di pertindihan akhir dan pertindihan sampingan.
5.1
Fixing
16 screws should be fixed per sheet. 8 screws at each corrugation at the end overlap or eaves. 2 intermediate rows of 4 screws.
Overlap
For the end overlap, use minimum 300mm. For the side overlap, use minimum 2 corrugations.
Penetapan
16 skru hendaklah ditetapkan pada setiap keping. 8 skru pada setiap kerut di pertindihan akhir. 2 baris pertengahan daripada 4 skru.
Pertindihan
Untuk hujung bertindih, gunakan jarak minimum 300mm. Untuk pertindihan siring, gunakan minimum 2 kerut.
Arkitrek.com - conserving nature through design & education
Roof
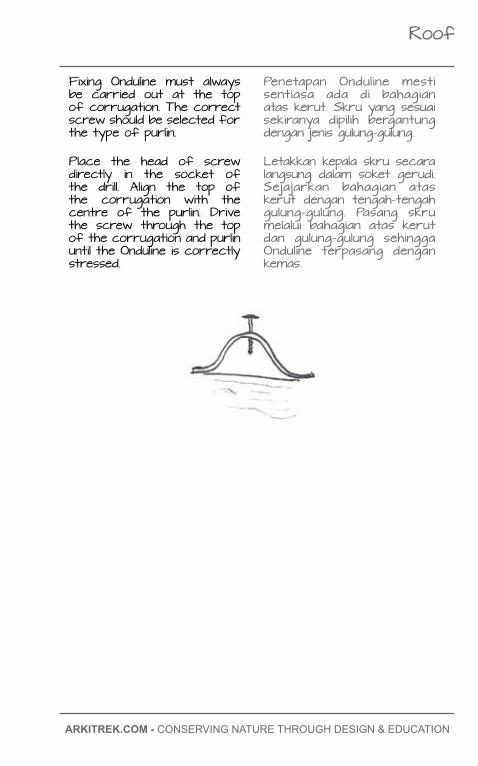
Fixing Onduline must always be carried out at the top of corrugation. The correct screw should be selected for the type of purlin.
Place the head of screw directly in the socket of the drill. Align the top of the corrugation with the centre of the purlin. Drive the screw through the top of the corrugation and purlin until the Onduline is correctly stressed.
Penetapan Onduline mesti sentiasa ada di bahagian atas kerut. Skru yang sesuai sekiranya dipilih bergantung dengan jenis gulung-gulung.
Letakkan kepala skru secara langsung dalam soket gerudi. Sejajarkan bahagian atas kerut dengan tengah-tengah gulung-gulung. Pasang skru melalui bahagian atas kerut dan gulung-gulung sehingga Onduline terpasang dengan kemas.
Arkitrek.com - conserving nature through design & education
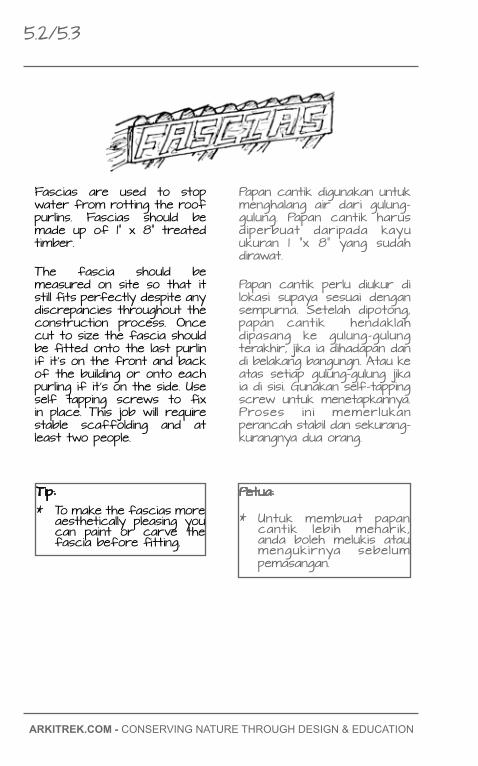
Fascias are used to stop water from rotting the roof purlins. Fascias should be made up of 1” x 8” treated timber.
The fascia should be measured on site so that it still fits perfectly despite any discrepancies throughout the construction process. Once cut to size the fascia should be fitted onto the last purlin if it’s on the front and back of the building or onto each purling if it’s on the side. Use self tapping screws to fix in place. This job will require stable scaffolding and at least two people.
Papan cantik digunakan untuk menghalang air dari gulung-gulung. Papan cantik harus diperbuat daripada kayu ukuran 1 “x 8” yang sudah dirawat.
Papan cantik perlu diukur di lokasi supaya sesuai dengan sempurna. Setelah dipotong, papan cantik hendaklah dipasang ke gulung-gulung terakhir, jika ia dihadapan dan di belakang bangungn. Atau ke atas setiap gulung-gulung jika ia di sisi. Gunakan self-tapping screw untuk menetapkannya. Proses ini memerlukan perancah stabil dan sekurang-kurangnya dua orang.
5.2/5.3
Tip:* To make the fascias more
aesthetically pleasing you can paint or carve the fascia before fitting.
Petua:
* Untuk membuat papan cantik lebih menarik, anda boleh melukis atau mengukirnya sebelum pemasangan.
Arkitrek.com - conserving nature through design & education
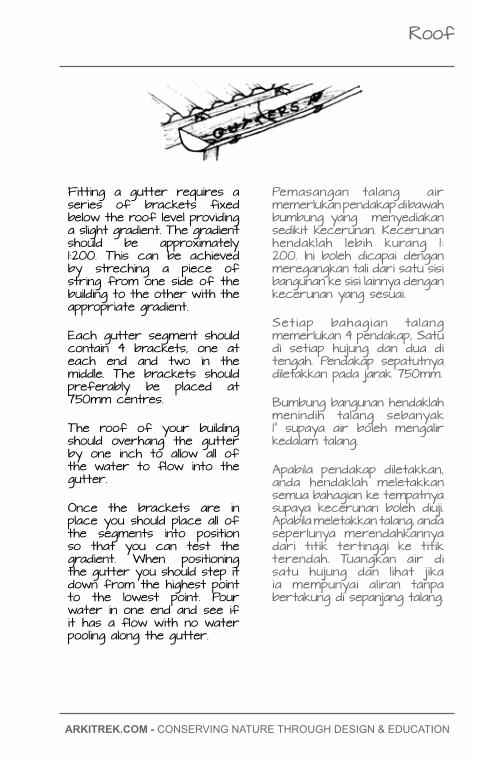
Fitting a gutter requires a series of brackets fixed below the roof level providing a slight gradient. The gradient should be approximately 1:200. This can be achieved by streching a piece of string from one side of the building to the other with the appropriate gradient.
Each gutter segment should contain 4 brackets, one at each end and two in the middle. The brackets should preferably be placed at 750mm centres.
The roof of your building should overhang the gutter by one inch to allow all of the water to flow into the gutter.
Once the brackets are in place you should place all of the segments into position so that you can test the gradient. When positioning the gutter you should step it down from the highest point to the lowest point. Pour water in one end and see if it has a flow with no water pooling along the gutter.
Pemasangan talang air memerlukan pendakap di bawah bumbung yang menyediakan sedikit kecerunan. Kecerunan hendaklah lebih kurang 1: 200. Ini boleh dicapai dengan meregangkan tali dari satu sisi bangunan ke sisi lainnya dengan kecerunan yang sesuai.
Setiap bahagian talang memerlukan 4 pendakap, Satu di setiap hujung dan dua di tengah. Pendakap sepatutnya diletakkan pada jarak 750mm.
Bumbung bangunan hendaklah menindih talang sebanyak 1” supaya air boleh mengalir kedalam talang.
Apabila pendakap diletakkan, anda hendaklah meletakkan semua bahagian ke tempatnya supaya kecerunan boleh diuji. Apabila meletakkan talang, anda seperlunya merendahkannya dari titik tertinggi ke titik terendah. Tuangkan air di satu hujung dan lihat jika ia mempunyai aliran tanpa bertakung di sepanjang talang.
Roof

Arkitrek.com - conserving nature through design & education
6
Arkitrek.com - conserving nature through design & education
Tertiary Structure
Arkitrek.com - conserving nature through design & education
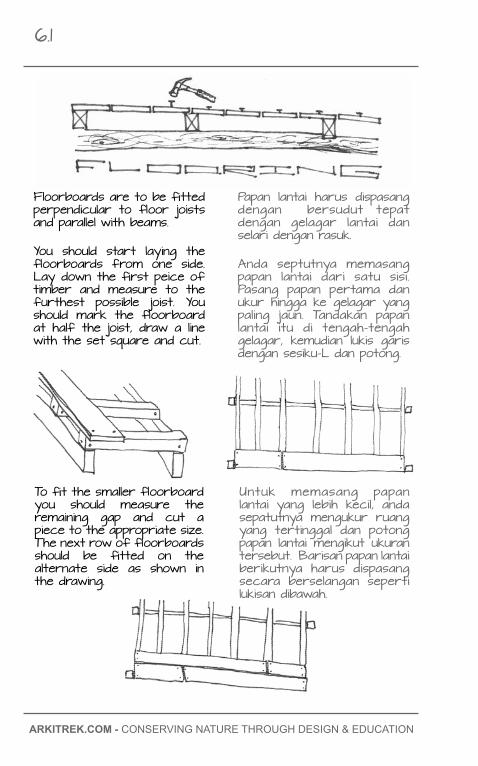
Floorboards are to be fitted perpendicular to floor joists and parallel with beams.
You should start laying the floorboards from one side. Lay down the first peice of timber and measure to the furthest possible joist. You should mark the floorboard at half the joist, draw a line with the set square and cut.
Papan lantai harus dispasang dengan bersudut tepat dengan gelagar lantai dan selari dengan rasuk.
Anda septutnya memasang papan lantai dari satu sisi. Pasang papan pertama dan ukur hingga ke gelagar yang paling jaun. Tandakan papan lantai itu di tengah-tengah gelagar, kemudian lukis garis dengan sesiku-L dan potong.
To fit the smaller floorboard you should measure the remaining gap and cut a piece to the appropriate size. The next row of floorboards should be fitted on the alternate side as shown in the drawing.
Untuk memasang papan lantai yang lebih kecil, anda sepatutnya mengukur ruang yang tertinggal dan potong papan lantai mengikut ukuran tersebut. Barisan papan lantai berikutnya harus dispasang secara berselangan seperti lukisan dibawah.
6.1
Arkitrek.com - conserving nature through design & education
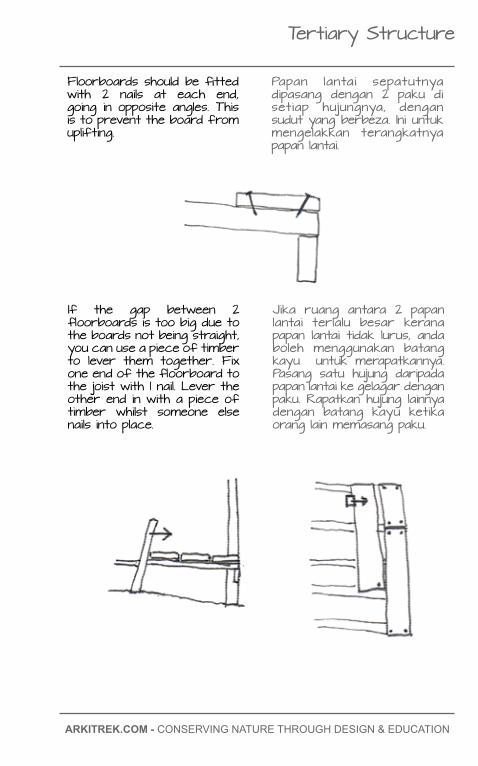
Floorboards should be fitted with 2 nails at each end, going in opposite angles. This is to prevent the board from uplifting.
Papan lantai sepatutnya dipasang dengan 2 paku di setiap hujungnya, dengan sudut yang berbeza. Ini untuk mengelakkan terangkatnya papan lantai.
Tertiary Structure
If the gap between 2 floorboards is too big due to the boards not being straight, you can use a piece of timber to lever them together. Fix one end of the floorboard to the joist with 1 nail. Lever the other end in with a piece of timber whilst someone else nails into place.
Jika ruang antara 2 papan lantai terlalu besar kerana papan lantai tidak lurus, anda boleh menggunakan batang kayu untuk merapatkannya. Pasang satu hujung daripada papan lantai ke gelagar dengan paku. Rapatkan hujung lainnya dengan batang kayu ketika orang lain memasang paku.
Arkitrek.com - conserving nature through design & education
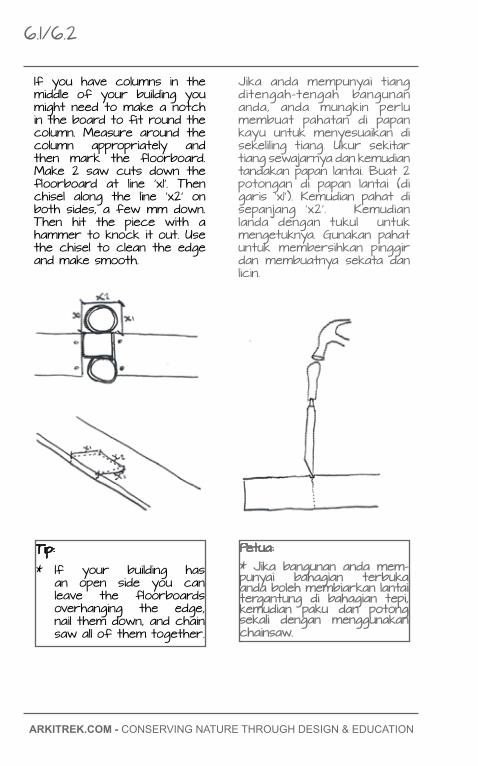
If you have columns in the middle of your building you might need to make a notch in the board to fit round the column. Measure around the column appropriately and then mark the floorboard. Make 2 saw cuts down the floorboard at line ‘x1’. Then chisel along the line ‘x2’ on both sides, a few mm down. Then hit the piece with a hammer to knock it out. Use the chisel to clean the edge and make smooth.
Jika anda mempunyai tiang ditengah-tengah bangunan anda, anda mungkin perlu membuat pahatan di papan kayu untuk menyesuaikan di sekeliling tiang. Ukur sekitar tiang sewajarnya dan kemudian tandakan papan lantai. Buat 2 potongan di papan lantai (di garis ‘x1’). Kemudian pahat di sepanjang ‘x2’. Kemudian landa dengan tukul untuk mengetuknya. Gunakan pahat untuk membersihkan pinggir dan membuatnya sekata dan licin.
6.1/6.2
Tip:* If your building has
an open side you can leave the floorboards overhanging the edge, nail them down, and chain saw all of them together.
Petua:* Jika bangunan anda mem-punyai bahagian terbuka anda boleh membiarkan lantai tergantung di bahagian tepi, kemudian paku dan potong sekali dengan menggunakan chainsaw.
Arkitrek.com - conserving nature through design & education
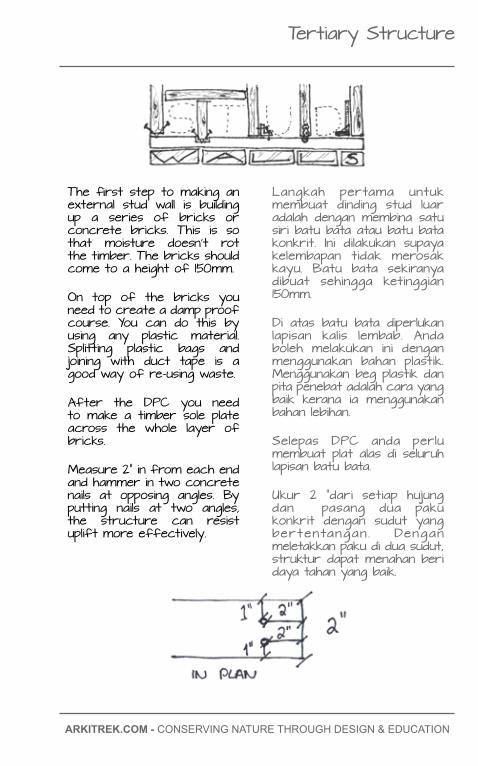
The first step to making an external stud wall is building up a series of bricks or concrete bricks. This is so that moisture doesn’t rot the timber. The bricks should come to a height of 150mm.
On top of the bricks you need to create a damp proof course. You can do this by using any plastic material. Splitting plastic bags and joining with duct tape is a good way of re-using waste.
After the DPC you need to make a timber sole plate across the whole layer of bricks.
Measure 2” in from each end and hammer in two concrete nails at opposing angles. By putting nails at two angles, the structure can resist uplift more effectively.
Langkah pertama untuk membuat dinding stud luar adalah dengan membina satu siri batu bata atau batu bata konkrit. Ini dilakukan supaya kelembapan tidak merosak kayu. Batu bata sekiranya dibuat sehingga ketinggian 150mm.
Di atas batu bata diperlukan lapisan kalis lembab. Anda boleh melakukan ini dengan menggunakan bahan plastik. Menggunakan beg plastik dan pita penebat adalah cara yang baik kerana ia menggunakan bahan lebihan.
Selepas DPC anda perlu membuat plat alas di seluruh lapisan batu bata.
Ukur 2 “dari setiap hujung dan pasang dua paku konkrit dengan sudut yang bertentangan . Dengan meletakkan paku di dua sudut, struktur dapat menahan beri daya tahan yang baik.
Tertiary Structure
Arkitrek.com - conserving nature through design & education
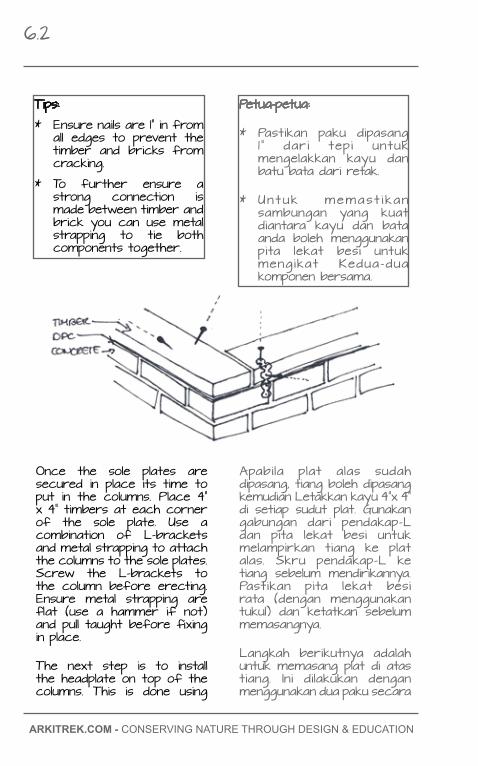
Once the sole plates are secured in place its time to put in the columns. Place 4” x 4” timbers at each corner of the sole plate. Use a combination of L-brackets and metal strapping to attach the columns to the sole plates. Screw the L-brackets to the column before erecting. Ensure metal strapping are flat (use a hammer if not) and pull taught before fixing in place.
The next step is to install the headplate on top of the columns. This is done using
Apabila plat alas sudah dipasang, tiang boleh dipasang kemudian Letakkan kayu 4“x 4” di setiap sudut plat. Gunakan gabungan dari pendakap-L dan pita lekat besi untuk melampirkan tiang ke plat alas. Skru pendakap-L ke tiang sebelum mendirikannya. Pastikan pita lekat besi rata (dengan menggunakan tukul) dan ketatkan sebelum memasangnya.
Langkah berikutnya adalah untuk memasang plat di atas tiang. Ini dilakukan dengan menggunakan dua paku secara
6.2
Tips:* Ensure nails are 1” in from
all edges to prevent the timber and bricks from cracking.
* To further ensure a strong connection is made between timber and brick you can use metal strapping to tie both components together.
Petua-petua:
* Pastikan paku dipasang 1 “ dari tepi untuk mengelakkan kayu dan batu bata dari retak.
* Un tuk memast i kan sambungan yang kuat diantara kayu dan bata anda boleh menggunakan pita lekat besi untuk mengikat Kedua-dua komponen bersama.
Arkitrek.com - conserving nature through design & education
two nails at diagonal angles, like the previous step. Using a spirit level make sure the headplate is horizontal before fixing down.
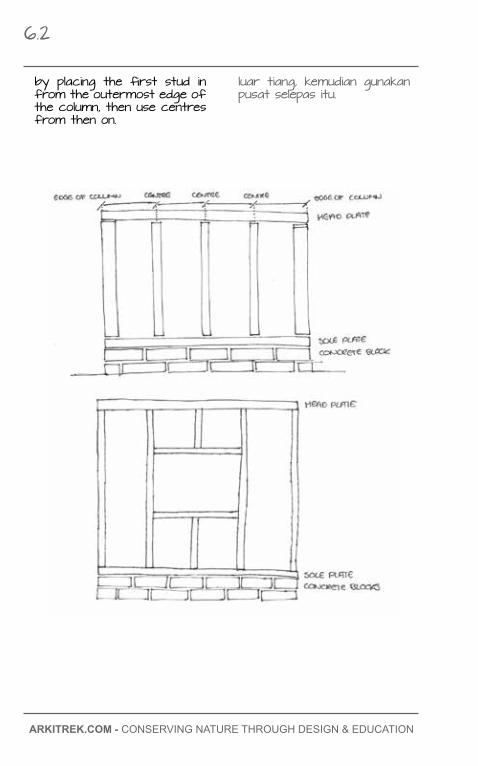
Once the head plate is in place you need to fix in the intermediate studs. The centres of the studs should be determined by the cladding material. To ensure all structure is protected, begin
songsang. Gunakan timbang air untuk memastikan plat rata sebelum menetapkannya.
Apabila plat atas sudah d ipasang , anda per lu menetapkannya dalam stud pertengahan. Pusat-pusat stud sekiranya ditentukan oleh pelapisan dinding. Pastikan semua structur dilindungi, bermula dengan meletakkan stud pertama dari tepi paling
Tertiary Structure
Petua:
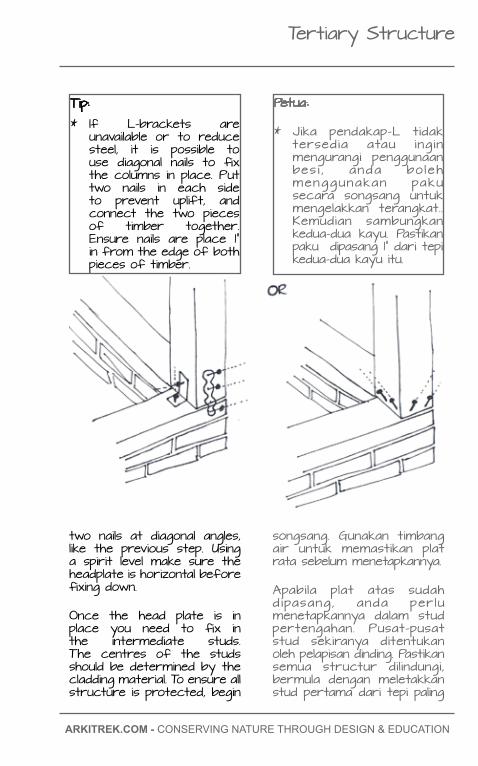
* Jika pendakap-L tidak tersedia atau ingin mengurangi penggunaan bes i , anda bo l eh menggunakan paku secara songsang untuk mengelakkan terangkat.. Kemudian sambungkan kedua-dua kayu. Pastikan paku dipasang 1” dari tepi kedua-dua kayu itu.
Tip:* If L-brackets are
unavailable or to reduce steel, it is possible to use diagonal nails to fix the columns in place. Put two nails in each side to prevent uplift, and connect the two pieces of timber together. Ensure nails are place 1” in from the edge of both pieces of timber.
Arkitrek.com - conserving nature through design & education
6.2
by placing the first stud in from the outermost edge of the column, then use centres from then on.
luar tiang, kemudian gunakan pusat selepas itu.
Arkitrek.com - conserving nature through design & education
Tertiary Structure
Petua-petua:
* Stud di dalam dinding boleh diatur untuk membuat tingkap dan pintu, seperti yang ditunjukkan dalam lukisan. Dwang juga boleh digunakan untuk memberikan kestabilan kepada struktur.
* Dinding stud ini menunjukkan kaedah untuk pemasangan stud pada pangkal batu bata. Teknik ini juga boleh diulangi untuk dinding stud dalaman dengan menggunakan struktur kayu.
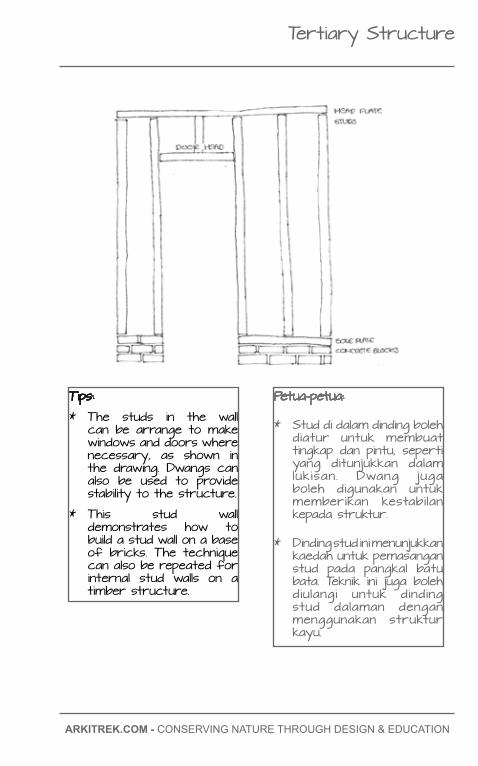
Tips: * The studs in the wall
can be arrange to make windows and doors where necessary, as shown in the drawing. Dwangs can also be used to provide stability to the structure.
* This stud wall demonstrates how to build a stud wall on a base of bricks. The technique can also be repeated for internal stud walls on a timber structure.
Arkitrek.com - conserving nature through design & education
Biocrete menggunakan bahan sisa organik,: seperti hampas padi atau habuk kayu, dicampur dengan kapur untuk membentuk bahan binaan yang kukuh. Ini Memberi potensi yang besar di kawasan luar bandar dan pedalaman kerana bahan buangan boleh didapati daripada bahan alternatif seperti konkrit. Juga Biocrete adalah bahan yang sangat mampan kerana ia menggunakan produk yang mempunyai sifar tenaga termaktub . S ifat-s ifat termalnya juga berfaedah di kawasan iklim panas dan lembap. Apabila suhu tinggi, permukaan berliang boleh mengekalkan kelembapan dari atmosfera, menambah baik keselesaan haba bangunan.
Biocrete memerlukan dinding stud tanpa dwang, supaya
6.3
Biocrete uses organic waste, such as rice husks or saw dust, mixed with lime to form a solid building material. This gives it immense potential in rural and remote areas as the waste products are more readily available than alternatives like concrete. Biocrete is also a highly sustainable material as it uses was products that have zero embodied energy. The material also has thermal properties that are beneficial in hot and humid climates. When temperature is high, the porous surface can retain moisture from the atmosphere, improving the thermal comfort of the building.
A biocrete wall requires a stud wall without any dwangs, in order for the material to
Petua:
* Untuk mengurangkan pembaziran, pusat-pusat stud harus sepadan dengan bahan lembaran yang digunakan di luar dinding stud itu. Dua stud dengan jarak 400mm dan lainnya dengan jarak 420mm sama dengan ukuran satu papal lapis atau papan plaster.
Tip: * To minimize waste and
cutting, the centres of the studs should match that of the sheet material used on the outside of the stud wall. Two studs at 400mm and one at 420mm equals the size of one sheet of plywood or plasterboard.
Arkitrek.com - conserving nature through design & education
Tertiary Structure
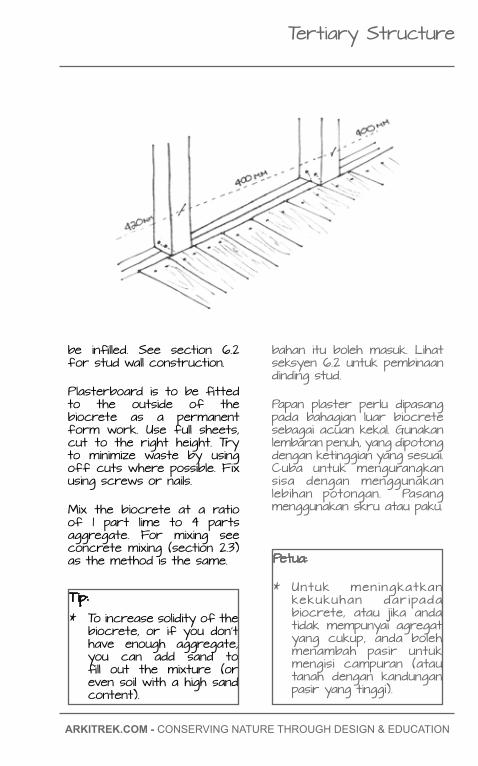
be infilled. See section 6.2 for stud wall construction.
Plasterboard is to be fitted to the outside of the biocrete as a permanent form work. Use full sheets, cut to the right height. Try to minimize waste by using off cuts where possible. Fix using screws or nails.
Mix the biocrete at a ratio of 1 part lime to 4 parts aggregate. For mixing see concrete mixing (section 2.3) as the method is the same.
bahan itu boleh masuk. Lihat seksyen 6.2 untuk pembinaan dinding stud.
Papan plaster perlu dipasang pada bahagian luar biocrete sebagai acuan kekal. Gunakan lembaran penuh, yang dipotong dengan ketinggian yang sesuai. Cuba untuk mengurangkan sisa dengan menggunakan lebihan potongan. Pasang menggunakan skru atau paku.
Tip: * To increase solidity of the
biocrete, or if you don’t have enough aggregate, you can add sand to fill out the mixture (or even soil with a high sand content).
Petua:
* Untuk meningkatkan kekukuhan dar ipada biocrete, atau jika anda tidak mempunyai agregat yang cukup, anda boleh menambah pasir untuk mengisi campuran (atau tanah dengan kandungan pasir yang tinggi).
Arkitrek.com - conserving nature through design & education
6.3
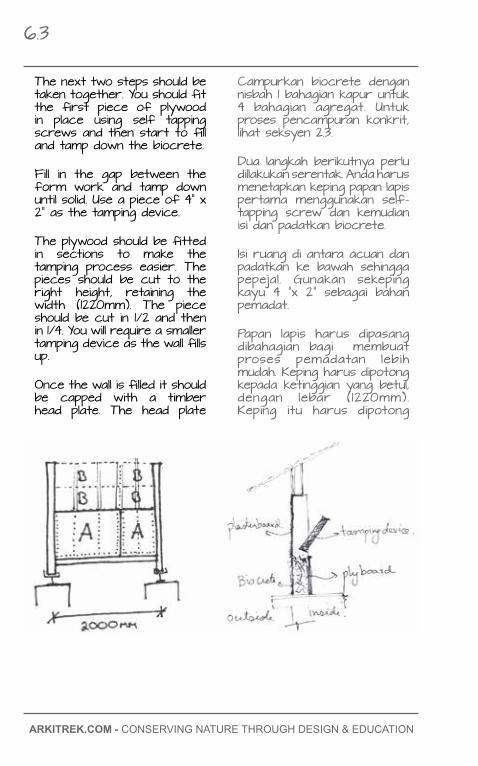
The next two steps should be taken together. You should fit the first piece of plywood in place using self tapping screws and then start to fill and tamp down the biocrete.
Fill in the gap between the form work and tamp down until solid. Use a piece of 4” x 2” as the tamping device.
The plywood should be fitted in sections to make the tamping process easier. The pieces should be cut to the right height, retaining the width (1220mm). The piece should be cut in 1/2 and then in 1/4. You will require a smaller tamping device as the wall fills up.
Once the wall is filled it should be capped with a timber head plate. The head plate
Campurkan biocrete dengan nisbah 1 bahagian kapur untuk 4 bahagian agregat. Untuk proses pencampuran konkrit, lihat seksyen 2.3.
Dua langkah berikutnya perlu dillakukan serentak. Anda harus menetapkan keping papan lapis pertama menggunakan self-tapping screw dan kemudian isi dan padatkan biocrete.
Isi ruang di antara acuan dan padatkan ke bawah sehingga pepejal. Gunakan sekeping kayu 4 “x 2” sebagai bahan pemadat.
Papan lapis harus dipasang dibahagian bagi membuat proses pemadatan lebih mudah. Keping harus dipotong kepada ketinggian yang betul, dengan lebar (1220mm). Keping itu harus dipotong
Arkitrek.com - conserving nature through design & education
Tertiary Structure
should fit in between the two form works.
The biocrete should be left at least 3 months before removing the form work and 6 month before it is fully hardened. Once hardened it is possible to plaster over the biocrete, or it can be left exposed.
separuhnya dan kemudian 1/4. Anda akan memerlukan alat pemadat yang lebih kecil apabila ketinggian dinding semakin bertambah.
Setelah dinding dipenuhi ia perlu ditutup dengan plat kayu. Plat sepatutnya muat di antara dua acuan.
Biocrete harus dibiarkan sekurang-kurangnya 3 bulan sebelum membuka acuan dan 6 bulan sebelum ia keras sepenuhnya. Setelah keras ia boleh diplaster atau dibiarkan terdedah.
Arkitrek.com - conserving nature through design & education
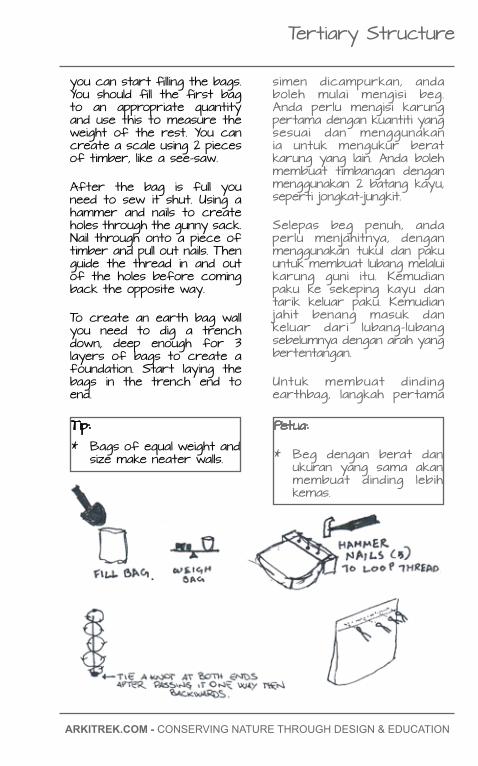
Earth bags use soil, sand and re-used gunny sacks, as well as cement, to create a structural or retaining wall. As it doesn’t require any form work you can create curved walls without requiring form work.
To make the earth bags you use a ratio of 3 wheelbarrows of clay, 2 wheelbarrows of sand and 125kg bag of cement.
Once the sand, soil and cement is mixed together
Earthbags menggunakan tanah, pasir dan karung guni guna semula, dan juga simen, untuk mewujudkan satu struktur atau dinding penahan. Kerana ia tidak memerlukan acuan anda boleh membuat dinding melengkung tanpa memerlukan acuan.
Untuk membuat earthbags anda menggunakan nisbah 3 kereta sorong tanah liat, 2 kereta sorong pasir dan 125kg simen.
Selepas pasir, tanah dan
6.4
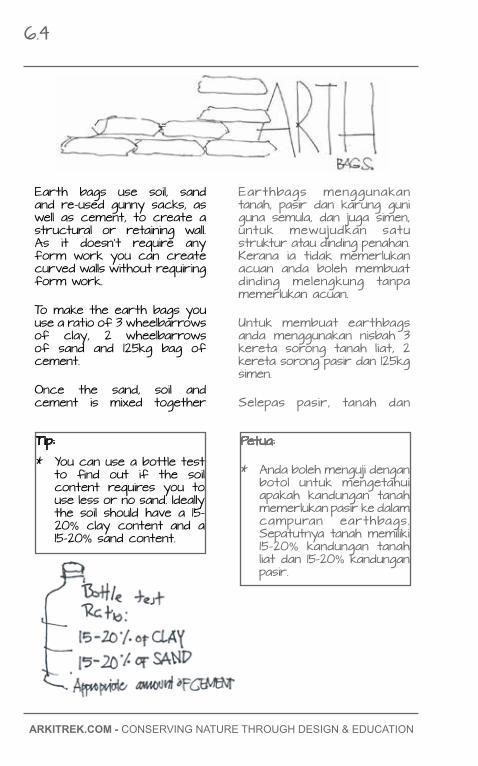
Tip: * You can use a bottle test
to find out if the soil content requires you to use less or no sand. Ideally the soil should have a 15-20% clay content and a 15-20% sand content.
Petua:
* Anda boleh menguji dengan botol untuk mengetahui apakah kandungan tanah memerlukan pasir ke dalam campuran earthbags. Sepatutnya tanah memiliki 15-20% kandungan tanah liat dan 15-20% kandungan pasir.
Arkitrek.com - conserving nature through design & education
simen dicampurkan, anda boleh mulai mengisi beg. Anda perlu mengisi karung pertama dengan kuantiti yang sesuai dan menggunakan ia untuk mengukur berat karung yang lain. Anda boleh membuat timbangan dengan menggunakan 2 batang kayu, seperti jongkat-jungkit.
Selepas beg penuh, anda perlu menjahitnya, dengan menggunakan tukul dan paku untuk membuat lubang melalui karung guni itu. Kemudian paku ke sekeping kayu dan tarik keluar paku. Kemudian jahit benang masuk dan keluar dari lubang-lubang sebelumnya dengan arah yang bertentangan.
Untuk membuat dinding earthbag, langkah pertama
you can start filling the bags. You should fill the first bag to an appropriate quantity and use this to measure the weight of the rest. You can create a scale using 2 pieces of timber, like a see-saw.
After the bag is full you need to sew it shut. Using a hammer and nails to create holes through the gunny sack. Nail through onto a piece of timber and pull out nails. Then guide the thread in and out of the holes before coming back the opposite way.
To create an earth bag wall you need to dig a trench down, deep enough for 3 layers of bags to create a foundation. Start laying the bags in the trench end to end.
Tertiary Structure
Tip: * Bags of equal weight and
size make neater walls.
Petua:
* Beg dengan berat dan ukuran yang sama akan membuat dinding lebih kemas.
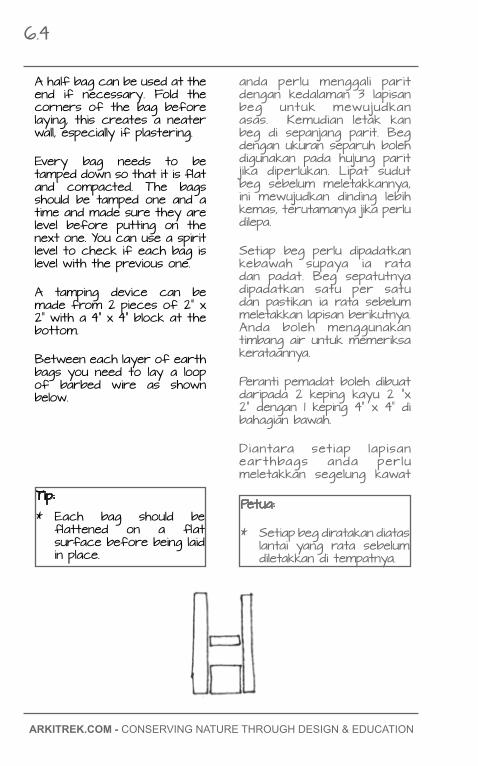
Arkitrek.com - conserving nature through design & education
6.4
A half bag can be used at the end if necessary. Fold the corners of the bag before laying, this creates a neater wall, especially if plastering.
Every bag needs to be tamped down so that it is flat and compacted. The bags should be tamped one and a time and made sure they are level before putting on the next one. You can use a spirit level to check if each bag is level with the previous one.
A tamping device can be made from 2 pieces of 2” x 2” with a 4” x 4” block at the bottom.
Between each layer of earth bags you need to lay a loop of barbed wire as shown below.
anda perlu menggali parit dengan kedalaman 3 lapisan beg untuk mewujudkan asas. Kemudian letak kan beg di sepanjang parit. Beg dengan ukuran separuh boleh digunakan pada hujung parit jika diperlukan. Lipat sudut beg sebelum meletakkannya, ini mewujudkan dinding lebih kemas, terutamanya jika perlu dilepa.
Setiap beg perlu dipadatkan kebawah supaya ia rata dan padat. Beg sepatutnya dipadatkan satu per satu dan pastikan ia rata sebelum meletakkan lapisan berikutnya. Anda boleh menggunakan timbang air untuk memeriksa kerataannya.
Peranti pemadat boleh dibuat daripada 2 keping kayu 2 “x 2” dengan 1 keping 4” x 4” di bahagian bawah.
Diantara setiap lapisan earthbags anda perlu meletakkan segelung kawat
Petua:
* Setiap beg diratakan diatas lantai yang rata sebelum diletakkan di tempatnya.
Tip: * Each bag should be
flattened on a flat surface before being laid in place.
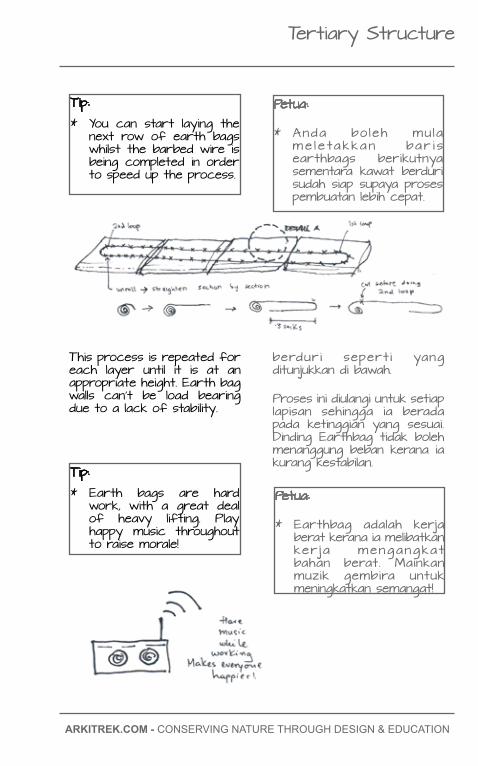
Arkitrek.com - conserving nature through design & education
Tertiary Structure
This process is repeated for each layer until it is at an appropriate height. Earth bag walls can’t be load bearing due to a lack of stability.
berdur i sepert i yang ditunjukkan di bawah.
Proses ini diulangi untuk setiap lapisan sehingga ia berada pada ketinggian yang sesuai. Dinding Earthbag tidak boleh menanggung beban kerana ia kurang kestabilan.
Tip:* You can start laying the
next row of earth bags whilst the barbed wire is being completed in order to speed up the process.
Tip:* Earth bags are hard
work, with a great deal of heavy lifting. Play happy music throughout to raise morale!
Petua:
* Anda bo leh mu la me l e ta k ka n ba r i s earthbags berikutnya sementara kawat berduri sudah siap supaya proses pembuatan lebih cepat.
Petua:
* Earthbag adalah kerja berat kerana ia melibatkan ker j a mengangka t bahan berat. Mainkan muzik gembira untuk meningkatkan semangat!
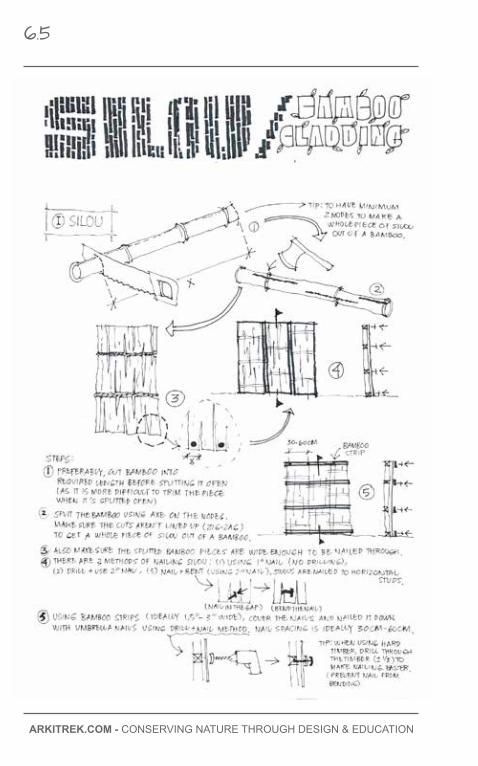
Arkitrek.com - conserving nature through design & education
6.5
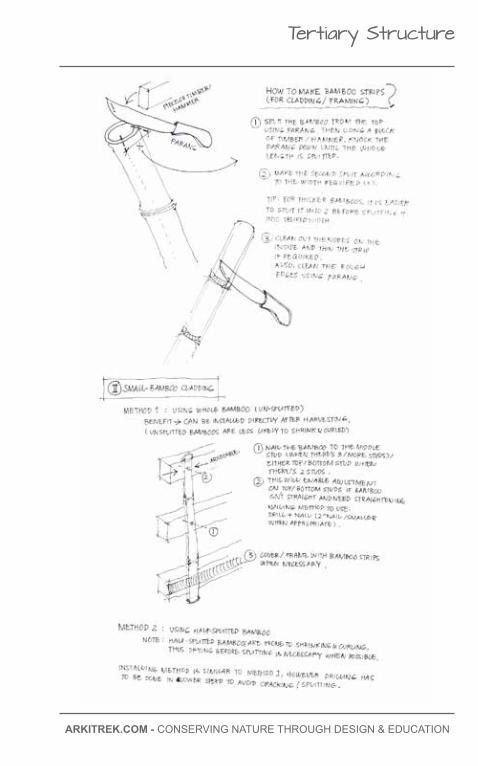
Arkitrek.com - conserving nature through design & education
Tertiary Structure
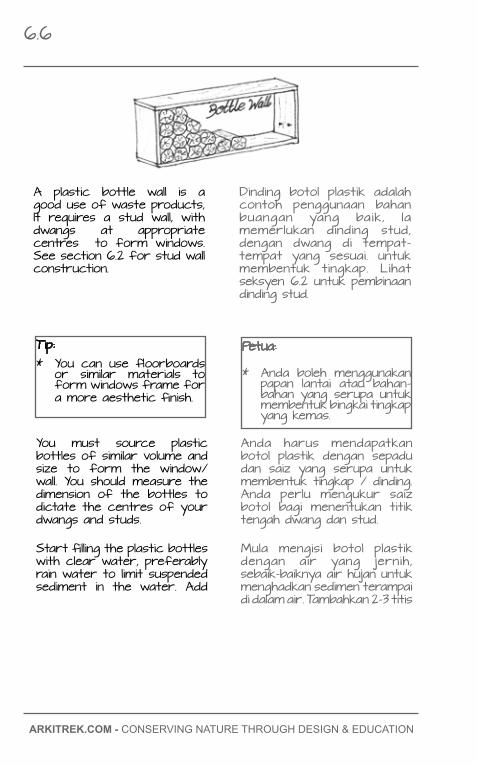
Arkitrek.com - conserving nature through design & education
A plastic bottle wall is a good use of waste products, It requires a stud wall, with dwangs at appropriate centres to form windows. See section 6.2 for stud wall construction.
Dinding botol plastik adalah contoh penggunaan bahan buangan yang baik, Ia memerlukan dinding stud, dengan dwang di tempat-tempat yang sesuai. untuk membentuk tingkap. Lihat seksyen 6.2 untuk pembinaan dinding stud.
6.6
You must source plastic bottles of similar volume and size to form the window/wall. You should measure the dimension of the bottles to dictate the centres of your dwangs and studs.
Start filling the plastic bottles with clear water, preferably rain water to limit suspended sediment in the water. Add
Anda harus mendapatkan botol plastik dengan sepadu dan saiz yang serupa untuk membentuk tingkap / dinding. Anda perlu mengukur saiz botol bagi menentukan titik tengah dwang dan stud.
Mula mengisi botol plastik dengan air yang jernih, sebaik-baiknya air hujan untuk menghadkan sedimen terampai di dalam air. Tambahkan 2-3 titis
Tip: * You can use floorboards
or similar materials to form windows frame for a more aesthetic finish.
Petua:
* Anda boleh menggunakan papan lantai atau bahan-bahan yang serupa untuk membentuk bingkai tingkap yang kemas.
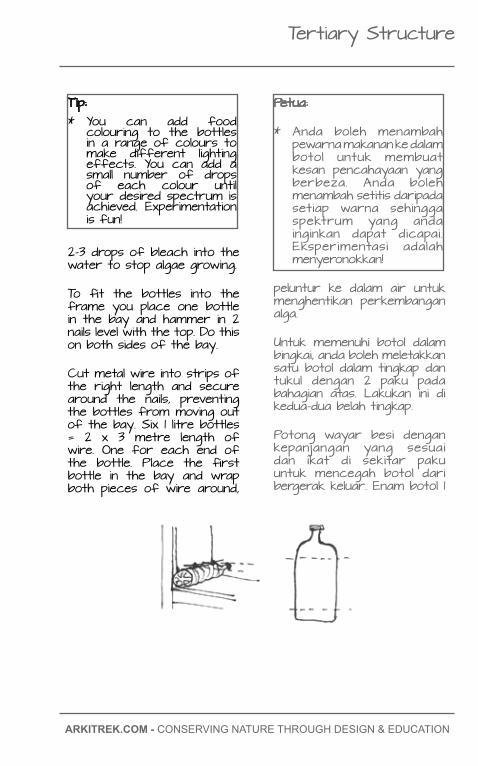
Arkitrek.com - conserving nature through design & education
Tertiary Structure
Tip:* You can add food
colouring to the bottles in a range of colours to make different lighting effects. You can add a small number of drops of each colour until your desired spectrum is achieved. Experimentation is fun!
2-3 drops of bleach into the water to stop algae growing.
To fit the bottles into the frame you place one bottle in the bay and hammer in 2 nails level with the top. Do this on both sides of the bay.
Cut metal wire into strips of the right length and secure around the nails, preventing the bottles from moving out of the bay. Six 1 litre bottles = 2 x 3 metre length of wire. One for each end of the bottle. Place the first bottle in the bay and wrap both pieces of wire around,
Petua:
* Anda boleh menambah pewarna makanan ke dalam botol untuk membuat kesan pencahayaan yang berbeza. Anda boleh menambah setitis daripada setiap warna sehingga spektrum yang anda inginkan dapat dicapai. Eksperimentasi adalah menyeronokkan!
peluntur ke dalam air untuk menghentikan perkembangan alga.
Untuk memenuhi botol dalam bingkai, anda boleh meletakkan satu botol dalam tingkap dan tukul dengan 2 paku pada bahagian atas. Lakukan ini di kedua-dua belah tingkap.
Potong wayar besi dengan kepanjangan yang sesuai dan ikat di sekitar paku untuk mencegah botol dari bergerak keluar. Enam botol 1
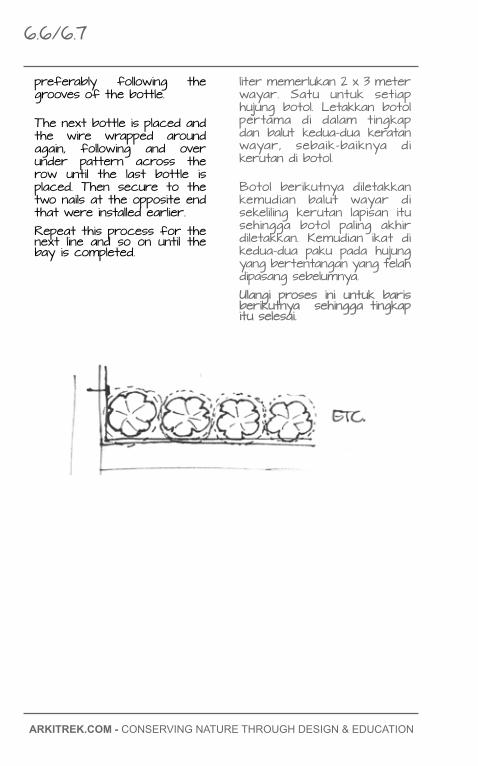
Arkitrek.com - conserving nature through design & education
6.6/6.7
preferably following the grooves of the bottle.
The next bottle is placed and the wire wrapped around again, following and over under pattern across the row until the last bottle is placed. Then secure to the two nails at the opposite end that were installed earlier.Repeat this process for the next line and so on until the bay is completed.
liter memerlukan 2 x 3 meter wayar. Satu untuk setiap hujung botol. Letakkan botol pertama di dalam tingkap dan balut kedua-dua keratan wayar, sebaik-baiknya di kerutan di botol.
Botol berikutnya diletakkan kemudian balut wayar di sekeliling kerutan lapisan itu sehingga botol paling akhir diletakkan. Kemudian ikat di kedua-dua paku pada hujung yang bertentangan yang telah dipasang sebelumnya.Ulangi proses ini untuk baris berikutnya sehingga tingkap itu selesai.
Arkitrek.com - conserving nature through design & education
Bamboo panels can be used as a cladding material. They are quite delicate and flexible so they don’t provide and racking strength.
To make a bamboo panel you must source the correct bamboo. We use bamboo with nodes far apart for weaving as this allows bigger panels. The nodes that are closer together are better for structure.
Panel buluh boleh digunakan sebagai bahan pelapisan. ia bersifat rapuh dan fleksibel kerananya mereka tidak member ikan kekuatan sokongan.
Untuk membuat panel buluh anda harus mendapatkan buluh yang sesuai. Gunakan buluh dengan jarak buku yang jauh untuk mengayam kerana ini membolehkan pembuatan panel yang lebih besar. Buku-
Tertiary Structure
The bamboo should be cut at an angle, with the node rested on a surface to prevent splitting.
buku yang lebih dekat lebih baik untuk kegunaan struktur.
Buluh harus dipotong dengan sudut yang sesuai, dan letakkan
Arkitrek.com - conserving nature through design & education
Bamboo panels can come in open or closed weave. Open weave allows a gap between each strip of bamboo, this can be varied depending on your needs. Closed weave is when there are no gaps between the strips of
buku pada permukaan rata untuk mengelakkannya dari terbelah.
Panel buluh boleh dibuat dengan anyaman jenis tertutup/ terbuka. Anyaman terbuka membolehkan jarak antara setiap jalur buluh, ini boleh diubah bergantung kepada keperluan anda. Anyaman tertutup tidak memiliki jarak di antara jalur buluh.
Proses anyaman adalah proses yang sukar dan memakan masa.
Ada banyak jenis-jenis corak dan ia boleh direka untuk dipadankan dengan estetik bangunan anda ataupun menggambarkan satu corak kebudayaan yang penting. Arang boleh digunakan sebagai pewarna semula jadi supaya anda boleh mempunyai dua warna dalam corak.
6.7/7
Tip: * Bamboo panels should be
treated for 48 hours in borax before being fitted as external cladding.
Petua:
* Panel Buluh perlu dirawat selama 48 jam dalam larutan boraks sebelum ia dipasang sebagai pelapisan luar bangunan
bamboo.
The weaving process is difficult and time consuming.
The types of patterns are infinite and can be designed to match the aesthetic of your building or portray a pattern of cultural significance. Charcoal is added as a natural dye so that you can have two contrasting colours in the pattern.
Arkitrek.com - conserving nature through design & education
Plumbing
Arkitrek.com - conserving nature through design & education
Water System Layout / Plan1. Rainwater harvesting
from the roof into the gutter with a pitch of 15o and 450mm purlin centres
2. Gutter fixed with brackites at a negative gradient of 1:200
3. First flush diverter to prevent leaves and debris settling in the water tank.
4. Water tank with inlet from the gutter and three outlets to the toilet, sink and outside tap.
5. Manhole with inlets of grey water from the toilet, sink and drainage area of the outside tap.
6. Septic tank, correctly levelled to ensure the inlet is above the outlet height.
7. Leachfield manhole with 4 outlets to the leachfield
8. Leachfield with a combined length of 36m2
1. Pengumpulan air hujan daripada bumbung ke dalam talang air dengan kecerunan 15o dan 450mm jarak gulung-gulung
2. Talang air dipasang dengan pendakap dengan kecerenunan negatif 1:200
3. First flush diverter untuk menghalang daun dan puing daripada masuk ke dalam tangki air.
4. Tangki air dengan saluran masuk daripada talang dan 3 saluran keluar ke dalam tandas, sinki dan kepala paip di luar.
5. Lurang dengan saluran masuk air kelabu daripada tandas, sinki dan ruang saliran kepala paip di luar.
6. Ta n g k i k umba h a n , ditegakkan supaya saluran masuk lebih tinggi daripada saluran keluar.
7. Lurang bagi padang larut lesap dengan 4 saluran keluar ke padang larut lesap
8. Padang larut lesap dengan jumlah panjang 36m
7.1
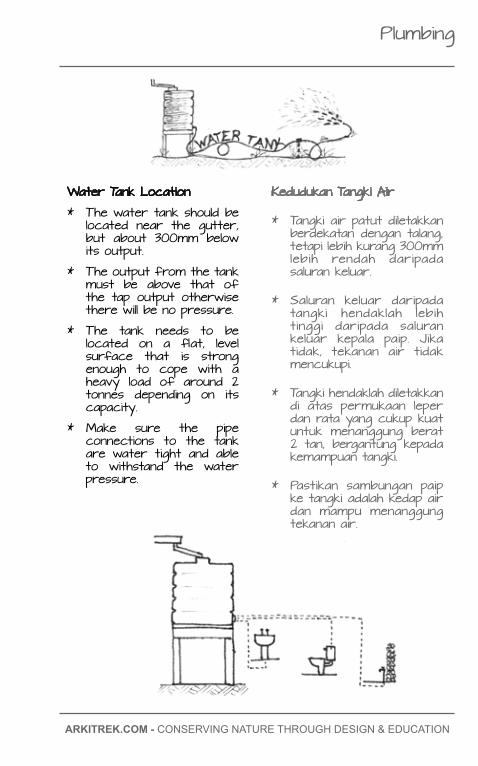
Arkitrek.com - conserving nature through design & education
Water Tank Location* The water tank should be
located near the gutter, but about 300mm below its output.
* The output from the tank must be above that of the tap output otherwise there will be no pressure.
* The tank needs to be located on a flat, level surface that is strong enough to cope with a heavy load of around 2 tonnes depending on its capacity.
* Make sure the pipe connections to the tank are water tight and able to withstand the water pressure.
Kedudukan Tangki Air
* Tangki air patut diletakkan berdekatan dengan talang, tetapi lebih kurang 300mm lebih rendah daripada saluran keluar.
* Saluran keluar daripada tangki hendaklah lebih tinggi daripada saluran keluar kepala paip. Jika tidak, tekanan air tidak mencukupi.
* Tangki hendaklah diletakkan di atas permukaan leper dan rata yang cukup kuat untuk menanggung berat 2 tan, bergantung kepada kemampuan tangki.
* Pastikan sambungan paip ke tangki adalah kedap air dan mampu menanggung tekanan air.
Plumbing
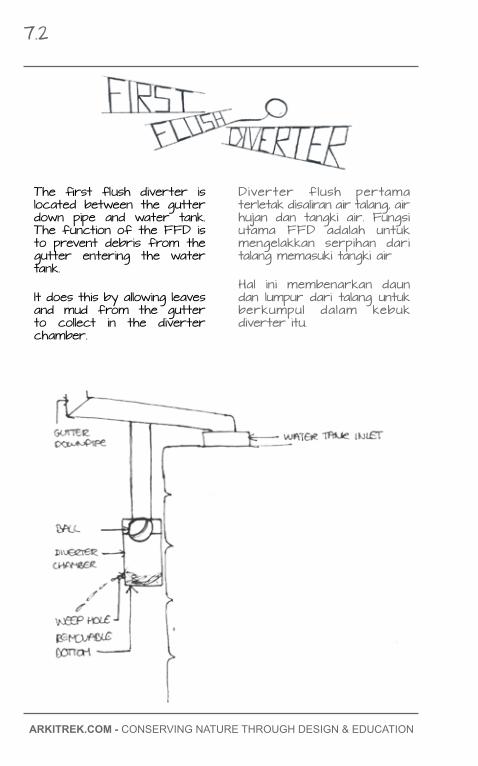
Arkitrek.com - conserving nature through design & education
The first flush diverter is located between the gutter down pipe and water tank. The function of the FFD is to prevent debris from the gutter entering the water tank.
It does this by allowing leaves and mud from the gutter to collect in the diverter chamber.
Diverter flush pertama terletak disaliran air talang, air hujan dan tangki air. Fungsi utama FFD adalah untuk mengelakkan serpihan dari talang memasuki tangki air
Hal ini membenarkan daun dan lumpur dari talang untuk berkumpul dalam kebuk diverter itu.
7.2
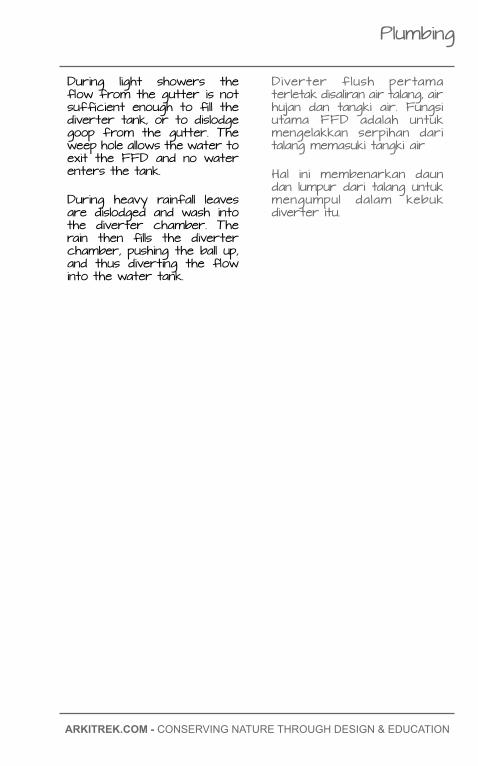
Arkitrek.com - conserving nature through design & education
During light showers the flow from the gutter is not sufficient enough to fill the diverter tank, or to dislodge goop from the gutter. The weep hole allows the water to exit the FFD and no water enters the tank.
During heavy rainfall leaves are dislodged and wash into the diverter chamber. The rain then fills the diverter chamber, pushing the ball up, and thus diverting the flow into the water tank.
Diverter flush pertama terletak disaliran air talang, air hujan dan tangki air. Fungsi utama FFD adalah untuk mengelakkan serpihan dari talang memasuki tangki air
Hal ini membenarkan daun dan lumpur dari talang untuk mengumpul dalam kebuk diverter itu.
Plumbing
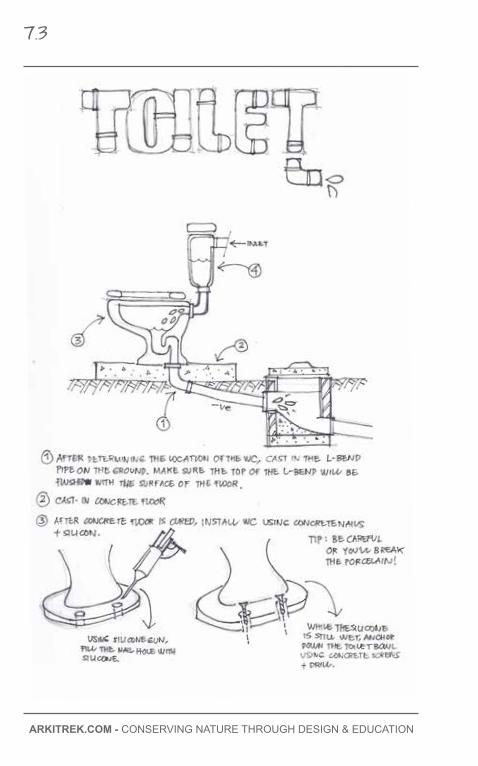
Arkitrek.com - conserving nature through design & education
7.3
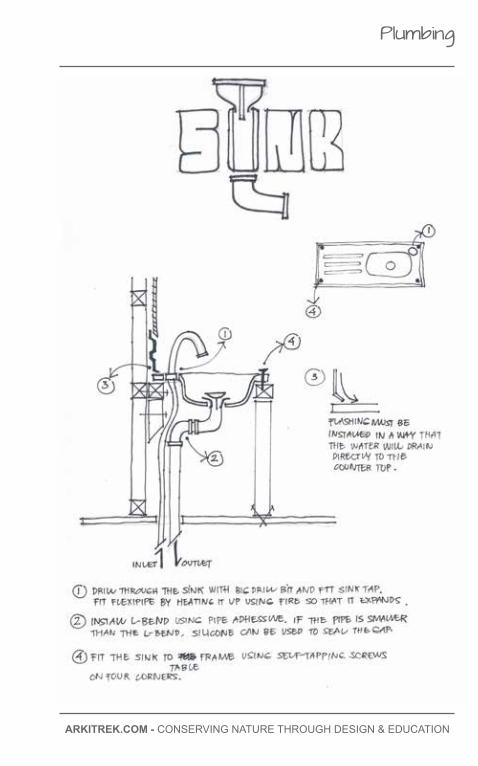
Arkitrek.com - conserving nature through design & education
Plumbing
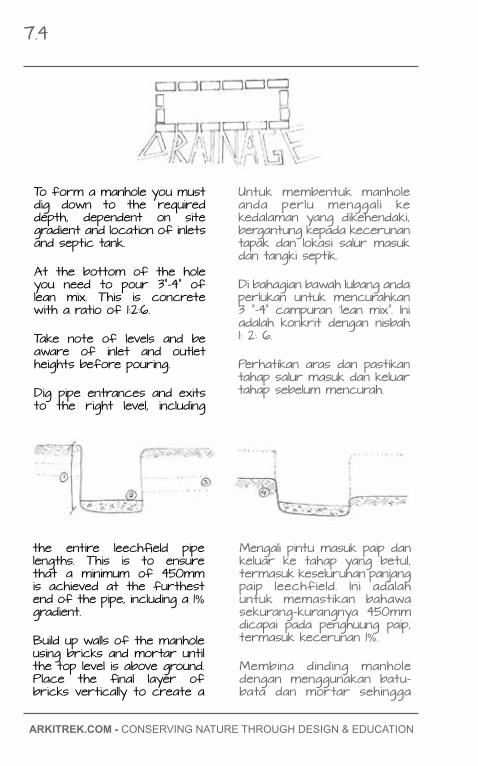
Arkitrek.com - conserving nature through design & education
To form a manhole you must dig down to the required depth, dependent on site gradient and location of inlets and septic tank.
At the bottom of the hole you need to pour 3”-4” of lean mix. This is concrete with a ratio of 1:2:6.
Take note of levels and be aware of inlet and outlet heights before pouring.
Dig pipe entrances and exits to the right level, including
Untuk membentuk manhole anda perlu menggali ke kedalaman yang dikehendaki, bergantung kepada kecerunan tapak dan lokasi salur masuk dan tangki septik.
Di bahagian bawah lubang anda perlukan untuk mencurahkan 3 “-4” campuran ‘lean mix”. Ini adalah konkrit dengan nisbah 1: 2: 6.
Perhatikan aras dan pastikan tahap salur masuk dan keluar tahap sebelum mencurah.
7.4
the entire leechfield pipe lengths. This is to ensure that a minimum of 450mm is achieved at the furthest end of the pipe, including a 1% gradient.
Build up walls of the manhole using bricks and mortar until the top level is above ground. Place the final layer of bricks vertically to create a
Mengali pintu masuk paip dan keluar ke tahap yang betul, termasuk keseluruhan panjang paip leechfield. Ini adalah untuk memastikan bahawa sekurang-kurangnya 450mm dicapai pada penghuung paip, termasuk kecerunan 1%.
Membina dinding manhole dengan menggunakan batu-bata dan mortar sehingga
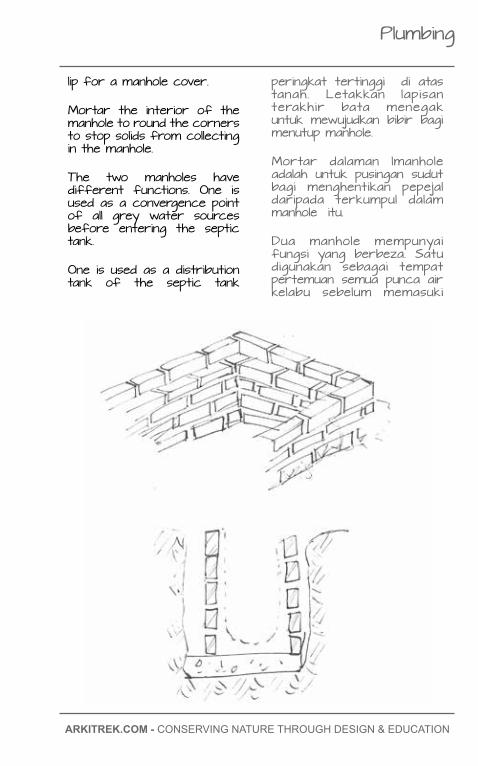
Arkitrek.com - conserving nature through design & education
peringkat tertinggi di atas tanah. Letakkan lapisan terakhir bata menegak untuk mewujudkan bibir bagi menutup manhole.
Mortar dalaman lmanhole adalah untuk pusingan sudut bagi menghentikan pepejal daripada terkumpul dalam manhole itu.
Dua manhole mempunyai fungsi yang berbeza. Satu digunakan sebagai tempat pertemuan semua punca air kelabu sebelum memasuki
lip for a manhole cover.
Mortar the interior of the manhole to round the corners to stop solids from collecting in the manhole.
The two manholes have different functions. One is used as a convergence point of all grey water sources before entering the septic tank.
One is used as a distribution tank of the septic tank
Plumbing
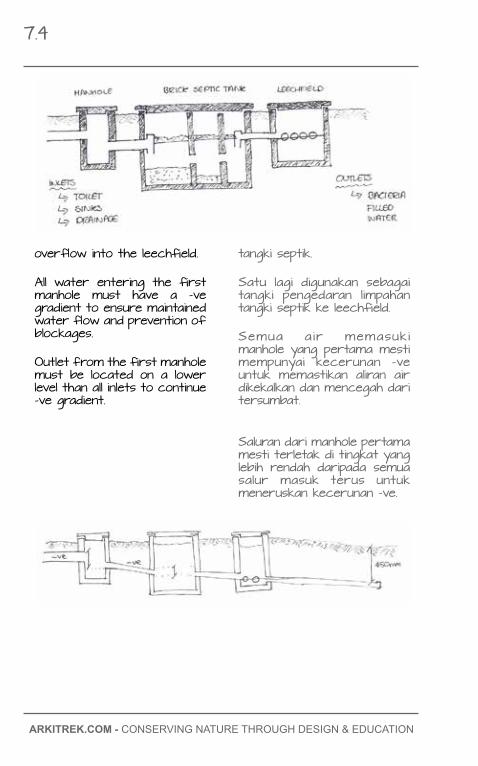
Arkitrek.com - conserving nature through design & education
7.4
overflow into the leechfield.
All water entering the first manhole must have a -ve gradient to ensure maintained water flow and prevention of blockages.
Outlet from the first manhole must be located on a lower level than all inlets to continue -ve gradient.
tangki septik.
Satu lagi digunakan sebagai tangki pengedaran limpahan tangki septik ke leechfield.
Semua a ir memasuk i manhole yang pertama mesti mempunyai kecerunan -ve untuk memastikan aliran air dikekalkan dan mencegah dari tersumbat.
Saluran dari manhole pertama mesti terletak di tingkat yang lebih rendah daripada semua salur masuk terus untuk meneruskan kecerunan -ve.
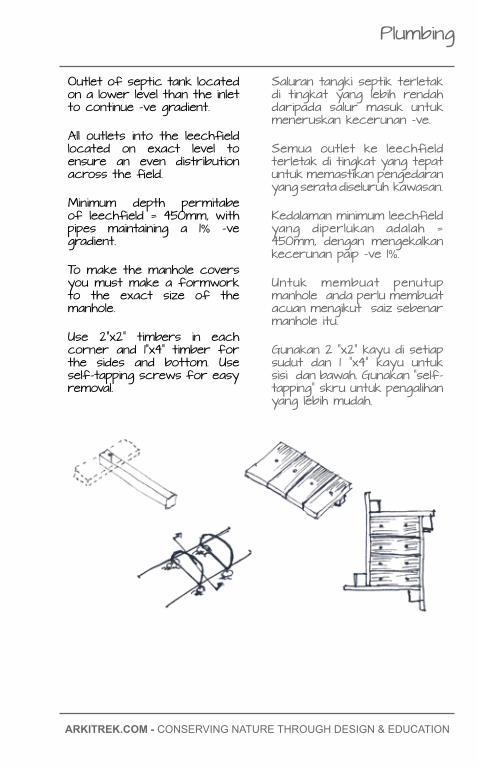
Arkitrek.com - conserving nature through design & education
Outlet of septic tank located on a lower level than the inlet to continue -ve gradient.
All outlets into the leechfield located on exact level to ensure an even distribution across the field.
Minimum depth permitabe of leechfield = 450mm, with pipes maintaining a 1% -ve gradient.
To make the manhole covers you must make a formwork to the exact size of the manhole.
Use 2”x2” timbers in each corner and 1”x4” timber for the sides and bottom. Use self-tapping screws for easy removal.
Saluran tangki septik terletak di tingkat yang lebih rendah daripada salur masuk untuk meneruskan kecerunan -ve.
Semua outlet ke leechfield terletak di tingkat yang tepat untuk memastikan pengedaran yang serata diseluruh kawasan.
Kedalaman minimum leechfield yang diperlukan adalah = 450mm, dengan mengekalkan kecerunan paip -ve 1%.
Untuk membuat penutup manhole anda perlu membuat acuan mengikut saiz sebenar manhole itu.
Gunakan 2 “x2” kayu di setiap sudut dan 1 “x4” kayu untuk sisi dan bawah. Gunakan “self-tapping” skru untuk pengalihan yang lebih mudah.
Plumbing
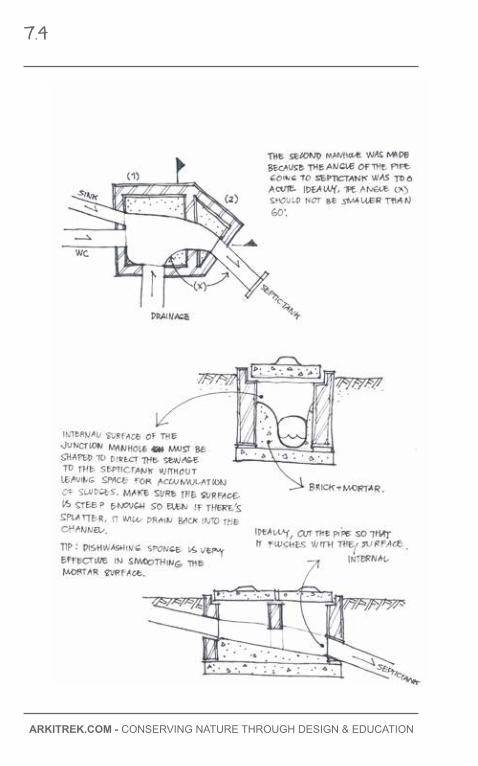
Arkitrek.com - conserving nature through design & education
7.4
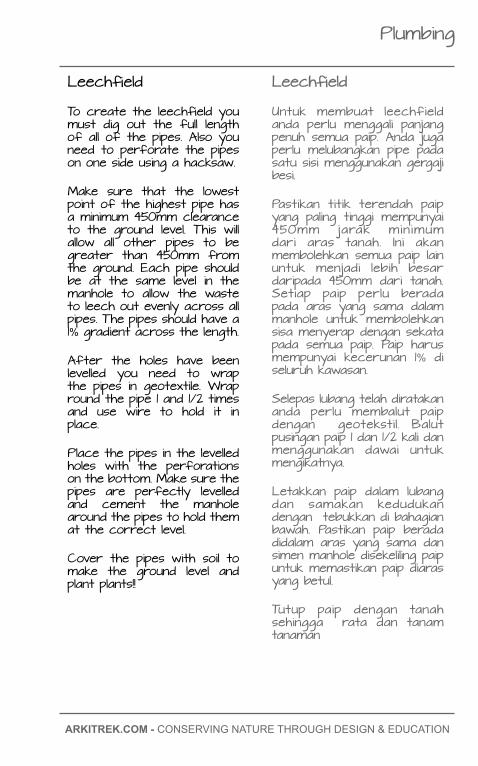
Arkitrek.com - conserving nature through design & education
Leechfield
To create the leechfield you must dig out the full length of all of the pipes. Also you need to perforate the pipes on one side using a hacksaw.
Make sure that the lowest point of the highest pipe has a minimum 450mm clearance to the ground level. This will allow all other pipes to be greater than 450mm from the ground. Each pipe should be at the same level in the manhole to allow the waste to leech out evenly across all pipes. The pipes should have a 1% gradient across the length.
After the holes have been levelled you need to wrap the pipes in geotextile. Wrap round the pipe 1 and 1/2 times and use wire to hold it in place.
Place the pipes in the levelled holes with the perforations on the bottom. Make sure the pipes are perfectly levelled and cement the manhole around the pipes to hold them at the correct level.
Cover the pipes with soil to make the ground level and plant plants!!
Leechfield
Untuk membuat leechfield anda perlu menggali panjang penuh semua paip. Anda juga perlu melubangkan pipe pada satu sisi menggunakan gergaji besi.
Pastikan titik terendah paip yang paling tinggi mempunyai 450mm jarak minimum dari aras tanah. Ini akan membolehkan semua paip lain untuk menjadi lebih besar daripada 450mm dari tanah. Setiap paip perlu berada pada aras yang sama dalam manhole untuk membolehkan sisa menyerap dengan sekata pada semua paip. Paip harus mempunyai kecerunan 1% di seluruh kawasan.
Selepas lubang telah diratakan anda perlu membalut paip dengan geotekstil. Balut pusingan paip 1 dan 1/2 kali dan menggunakan dawai untuk mengikatnya.
Letakkan paip dalam lubang dan samakan kedudukan dengan tebukkan di bahagian bawah. Pastikan paip berada didalam aras yang sama dan simen manhole disekeliling paip untuk memastikan paip diaras yang betul.
Tutup paip dengan tanah sehingga rata dan tanam tanaman
Plumbing
Arkitrek.com - conserving nature through design & education
8
Arkitrek.com - conserving nature through design & education
Landscaping
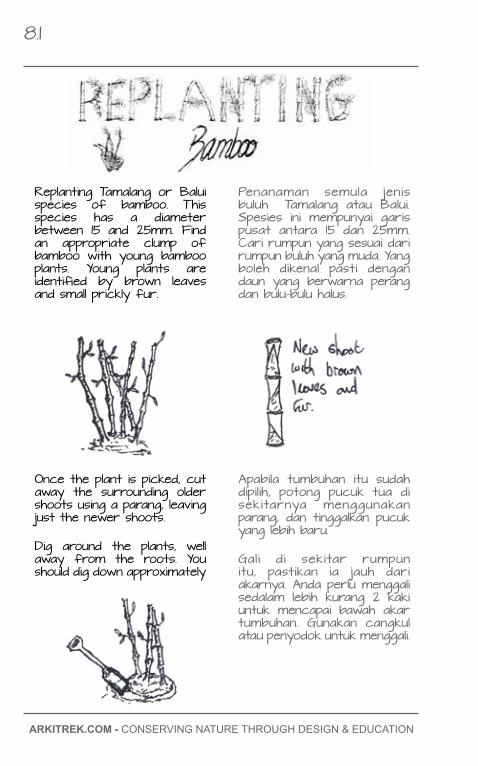
Arkitrek.com - conserving nature through design & education
Replanting Tamalang or Balui species of bamboo. This species has a diameter between 15 and 25mm. Find an appropriate clump of bamboo with young bamboo plants. Young plants are identified by brown leaves and small prickly fur.
Penanaman semula jenis buluh Tamalang atau Balui. Spesies ini mempunyai garis pusat antara 15 dan 25mm. Cari rumpun yang sesuai dari rumpun buluh yang muda. Yang boleh dikenal pasti dengan daun yang berwarna perang dan bulu-bulu halus.
8.1
Once the plant is picked, cut away the surrounding older shoots using a parang, leaving just the newer shoots.
Dig around the plants, well away from the roots. You should dig down approximately
Apabila tumbuhan itu sudah dipilih, potong pucuk tua di sekitarnya menggunakan parang, dan tinggalkan pucuk yang lebih baru.
Gali di sekitar rumpun itu, pastikan ia jauh dari akarnya. Anda perlu menggali sedalam lebih kurang 2 kaki untuk mencapai bawah akar tumbuhan. Gunakan cangkul atau penyodok untuk menggali.
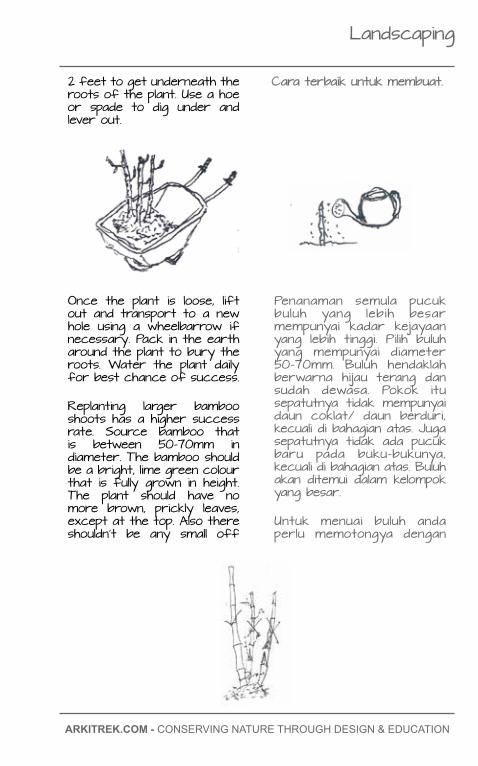
Arkitrek.com - conserving nature through design & education
2 feet to get underneath the roots of the plant. Use a hoe or spade to dig under and lever out.
Cara terbaik untuk membuat.
Landscaping
Penanaman semula pucuk buluh yang lebih besar mempunyai kadar kejayaan yang lebih tinggi. Pilih buluh yang mempunyai diameter 50-70mm. Buluh hendaklah berwarna hijau terang dan sudah dewasa. Pokok itu sepatutnya tidak mempunyai daun coklat/ daun berduri, kecuali di bahagian atas. Juga sepatutnya tidak ada pucuk baru pada buku-bukunya, kecuali di bahagian atas. Buluh akan ditemui dalam kelompok yang besar.
Untuk menuai buluh anda perlu memotongya dengan
Once the plant is loose, lift out and transport to a new hole using a wheelbarrow if necessary. Pack in the earth around the plant to bury the roots. Water the plant daily for best chance of success.
Replanting larger bamboo shoots has a higher success rate. Source bamboo that is between 50-70mm in diameter. The bamboo should be a bright, lime green colour that is fully grown in height. The plant should have no more brown, prickly leaves, except at the top. Also there shouldn’t be any small off
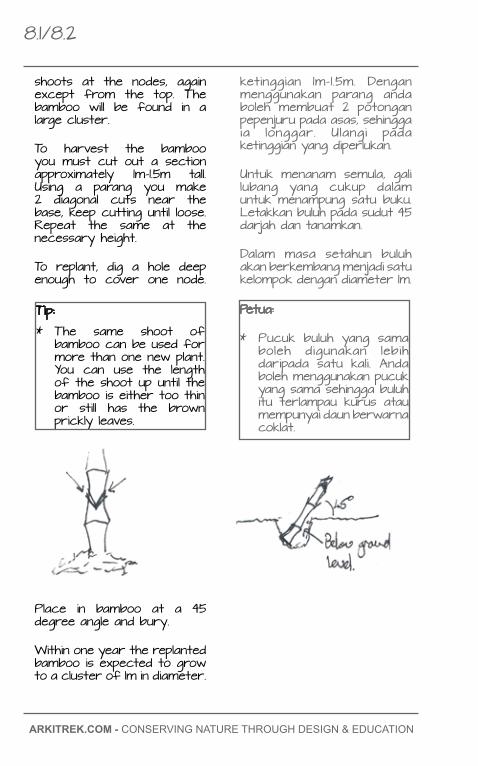
Arkitrek.com - conserving nature through design & education
8.1/8.2
shoots at the nodes, again except from the top. The bamboo will be found in a large cluster.
To harvest the bamboo you must cut out a section approximately 1m-1.5m tall. Using a parang you make 2 diagonal cuts near the base, keep cutting until loose. Repeat the same at the necessary height.
To replant, dig a hole deep enough to cover one node.
ketinggian 1m-1.5m. Dengan menggunakan parang anda boleh membuat 2 potongan pepenjuru pada asas, sehingga ia longgar. Ulangi pada ketinggian yang diperlukan.
Untuk menanam semula, gali lubang yang cukup dalam untuk menampung satu buku. Letakkan buluh pada sudut 45 darjah dan tanamkan.
Dalam masa setahun buluh akan berkembang menjadi satu kelompok dengan diameter 1m.
Place in bamboo at a 45 degree angle and bury.
Within one year the replanted bamboo is expected to grow to a cluster of 1m in diameter.
Tip: * The same shoot of
bamboo can be used for more than one new plant. You can use the length of the shoot up until the bamboo is either too thin or still has the brown prickly leaves.
Petua:
* Pucuk buluh yang sama boleh digunakan lebih daripada satu kali. Anda boleh menggunakan pucuk yang sama sehingga buluh itu terlampau kurus atau mempunyai daun berwarna coklat.
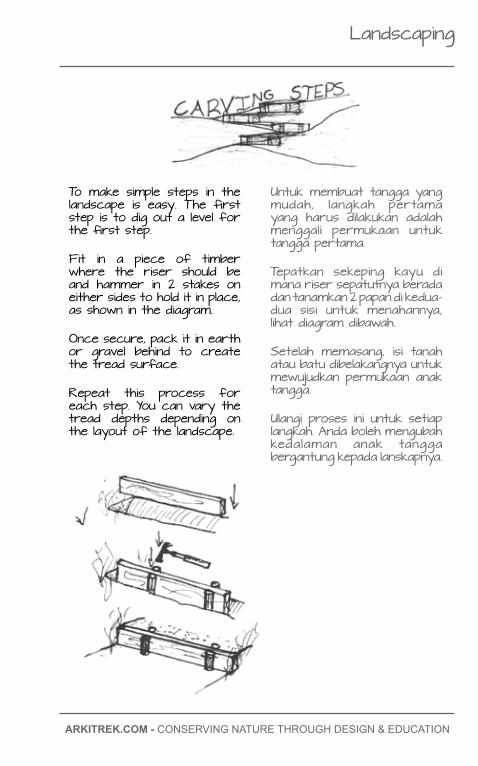
Arkitrek.com - conserving nature through design & education
To make simple steps in the landscape is easy. The first step is to dig out a level for the first step.
Fit in a piece of timber where the riser should be and hammer in 2 stakes on either sides to hold it in place, as shown in the diagram.
Once secure, pack it in earth or gravel behind to create the tread surface.
Repeat this process for each step. You can vary the tread depths depending on the layout of the landscape.
Untuk membuat tangga yang mudah, langkah pertama yang harus dilakukan adalah menggali permukaan untuk tangga pertama.
Tepatkan sekeping kayu di mana riser sepatutnya berada dan tanamkan 2 papan di kedua-dua sisi untuk menahannya, lihat diagram dibawah.
Setelah memasang, isi tanah atau batu dibelakangnya untuk mewujudkan permukaan anak tangga.
Ulangi proses ini untuk setiap langkah. Anda boleh mengubah kedalaman anak tangga bergantung kepada lanskapnya.
Landscaping
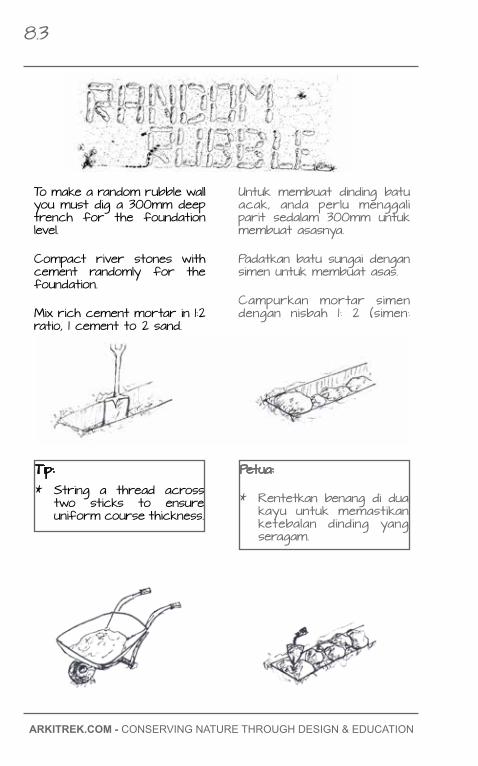
Arkitrek.com - conserving nature through design & education
To make a random rubble wall you must dig a 300mm deep trench for the foundation level.
Compact river stones with cement randomly for the foundation.
Mix rich cement mortar in 1:2 ratio, 1 cement to 2 sand.
Untuk membuat dinding batu acak, anda perlu menggali parit sedalam 300mm untuk membuat asasnya.
Padatkan batu sungai dengan simen untuk membuat asas.
Campurkan mortar simen dengan nisbah 1: 2 (simen:
8.3
Tip: * String a thread across
two sticks to ensure uniform course thickness.
Petua:
* Rentetkan benang di dua kayu untuk memastikan ketebalan dinding yang seragam.
Arkitrek.com - conserving nature through design & education
Coursing
Set a layer of facing stone on either side. In between set a long, flat horizontal stone to tie horizontally.
Also set a vertical tie to tie two courses together.
Fill the smaller gaps with pebbles and dry mortar.
Wipe the stone face with a wet cloth to remove traces of mortar before it dries.
Landscaping
pasir)
Peletakkan Batu
Letakkan lapisan batu di kedua-dua sisi. Di antaranya, letakkan batu yang panjang, rata mendatar untuk mengikat dinding secara melintang.
Juga tetapkan ikatan secara menegak untuk mengikat dua lapisan.
Isi lubang-lubang dengan batu-batu kecil dan mortar kering.
Sapu muka batu dengan kain basah untuk menghilangkan lebihan mortar sebelum ia kering.
Arkitrek.com - conserving nature through design & education
9.1
Boleh datang tolong kami besok?
Please help us tomorrow
Tolong pakukan iniPlease nail this
Please cut this Tolong potong ini
Slowly Perlahan lahan
Not this Bukan ini
Don’t Jangan
Can you? Boleh kah?
This Ini
That Itu
What? Apa?
Here Sini
What’s your opinion? Apa kamu rasa?
Sorry, this is wrong Maaf, ini salah
How? Macam mana?
Tomorrow come at ___ o’clock.
Besok datang jam ___
Thank you for helping us Terima kasih tolong kami
Please help him/her Tolong bantu dia
Take a rest first Rehat dulu
Timber Kayu
Hammer Tukul
Chisel Pahat
Saw Gergaji
Boleh tolong ambil ___ Can you pass me ___
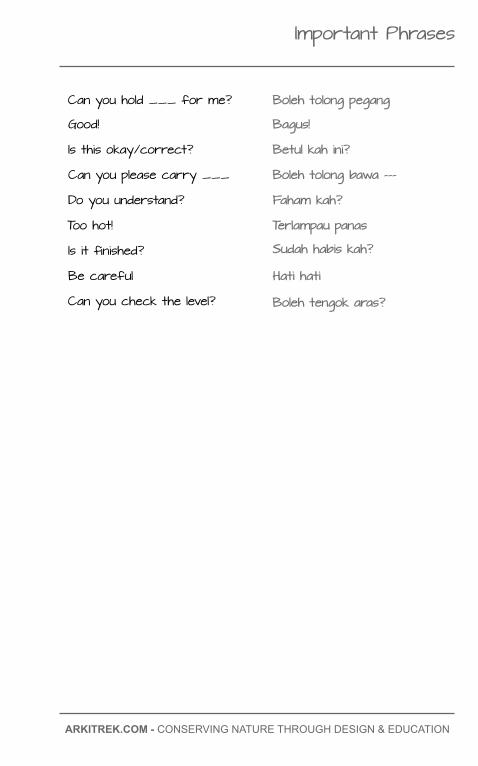
Arkitrek.com - conserving nature through design & education
Important Phrases
Can you hold ___ for me? Boleh tolong pegang
Good! Bagus!
Is this okay/correct? Betul kah ini?
Can you please carry ___ Boleh tolong bawa ---
Do you understand? Faham kah?
Too hot! Terlampau panas
Is it finished? Sudah habis kah?
Be careful Hati hati
Can you check the level? Boleh tengok aras?

Arkitrek.com - conserving nature through design & education
9.2
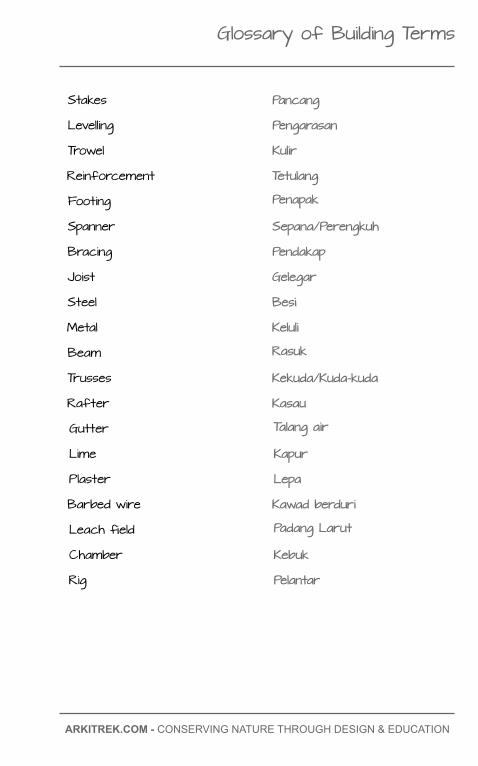
Arkitrek.com - conserving nature through design & education
Stakes Pancang
Levelling Pengarasan
Trowel Kulir
Reinforcement Tetulang
Footing Penapak
Spanner Sepana/Perengkuh
Bracing Pendakap
Joist Gelegar
Steel Besi
Metal Keluli
Beam Rasuk
Trusses Kekuda/Kuda-kuda
Rafter Kasau
Gutter Talang air
Lime Kapur
Plaster Lepa
Barbed wire Kawad berduri
Leach field Padang Larut
Chamber Kebuk
Rig Pelantar
Glossary of Building Terms

Arkitrek.com - conserving nature through design & education
Arkitrek.com - conserving nature through design & education
This book is designed by the Arkitrek participants of Camp 2014
Rory Thor DickensJames Coe
Johanna MayrErica MalagutiRevathi RoopiniShafinaz ShazalliPutri Yulandari
Syazwani Shaharir

Arkitrek.com - conserving nature through design & education

Arkitrek.com - conserving nature through design & education