tgbvpn ug deployment en 6.62 - TheGreenBo- VPN Tunnel management: open, close, status - Etc. 1.2...
30
Property of TheGreenBow © 2019 www.thegreenbow.com TheGreenBow VPN Client Deployment Guide
Transcript of tgbvpn ug deployment en 6.62 - TheGreenBo- VPN Tunnel management: open, close, status - Etc. 1.2...

Property of TheGreenBow © 2019
www.thegreenbow.com
TheGreenBow VPN Client
Deployment Guide

TheGreenBow VPN Client Deployment Guide Sept. 2019
Deployment Guide TheGreenBow VPN Property of TheGreenBow © 2019 2/30
Table of Contents
1 Introduction ............................................................................................................................................................. 3
1.1 Management and deployment of VPN Client ................................................................................................ 3
1.2 Deployment tools .......................................................................................................................................... 3
1.3 VPN Standard, VPN Premium and VPN Certified ......................................................................................... 3
1.4 Older versions ............................................................................................................................................... 3
2 Security recommendations ..................................................................................................................................... 4
2.1 Configuration of the host workstation ............................................................................................................ 4
2.2 Execution rights ............................................................................................................................................. 4
2.3 End user configuration .................................................................................................................................. 4
2.4 Multiple users management .......................................................................................................................... 5
2.5 VPN security policy management ................................................................................................................. 5
2.6 User authentication ....................................................................................................................................... 5
2.7 Sensitive data protection ............................................................................................................................... 5
2.8 Reset ............................................................................................................................................................. 5
3 VPN Client deployment ........................................................................................................................................... 6
3.1 Silent installation ........................................................................................................................................... 6
3.2 Create a silent installation ............................................................................................................................. 6
3.3 Deployment from a CD-ROM ........................................................................................................................ 6
3.4 Deployment from a network drive or a shortcut ............................................................................................. 7
3.5 Deployment from a script .............................................................................................................................. 8
3.6 Update deployment ....................................................................................................................................... 8
3.7 Setup configuration file: vpnsetup.ini ............................................................................................................. 8
4 Software Activation Deployment ............................................................................................................................. 9
4.1 Activation parameters ................................................................................................................................... 9
4.2 Activation deployment and automation ......................................................................................................... 9
4.3 Activations Identification .............................................................................................................................. 10
5 VPN Client configuration for the user.................................................................................................................... 11
5.1 Introduction ................................................................................................................................................. 11
5.2 Restrict the interface using the Configuration panel .................................................................................... 11
5.3 Restrict the interface during installation ...................................................................................................... 12
6 VPN security policy deployment ........................................................................................................................... 13
6.1 Including a VPN security policy in the installation ....................................................................................... 13
6.2 Deploying a new VPN security policy .......................................................................................................... 13
6.3 Protecting a VPN security policy before deployment................................................................................... 13
7 Automatic operations in the VPN Client ................................................................................................................ 15
7.1 Batch/script to open or close a tunnel ......................................................................................................... 15
7.2 Automatically open a web page when the tunnel opens ............................................................................. 15
7.3 Open a tunnel with a double-click on a desktop icon .................................................................................. 16
7.4 The difference between "import", "importonce", "add" and "replace" .......................................................... 16
7.5 Export options "/export" and "/exportonce" ................................................................................................. 17
8 Reference manual ................................................................................................................................................ 18
8.1 VPN Client installation command-line options ............................................................................................. 18
8.2 Setup configuration file: vpnsetup.ini ........................................................................................................... 22
8.3 VPN Client installation command-line options ............................................................................................. 24
9 Contact ................................................................................................................................................................. 29
9.1 Information .................................................................................................................................................. 29
9.2 Sales ........................................................................................................................................................... 29
9.3 Support ........................................................................................................................................................ 29
TheGreenBow VPN Client Deployment Guide Sept. 2019
Deployment Guide TheGreenBow VPN Property of TheGreenBow © 2019 3/30
1 Introduction
1.1 Management and deployment of VPN Client
TheGreenBow VPN Client has been designed to be easily deployed and managed. As such, the software comes equipped with many features that allow the network administrator to preconfigure the installation before deployment, to install or update the software remotely or even to manage the software and the VPN security policies in a centralised manner. This document presents the various management and configuration options of TheGreenBow VPN Client. Examples of how these options can be implemented are also presented. They illustrate how the software can be managed. Many features can be configured during the installation of the TheGreenBow VPN Client software:
- Software activation features: license number, activation e-mail, hidden activation, etc. - Display features: interface hidden from the user, menu customisation, etc. - PKI integration features: certificate, token or smart card reader characterisation, etc. - VPN security policy to be deployed - Installation features: hidden installation, etc. - Etc.
Additional features can be used with the software itself once the installation is completed:
- VPN configuration management: import, export, signature, etc. - Software management: start, stop, etc. - VPN Tunnel management: open, close, status - Etc.
1.2 Deployment tools
This document also describes the various ways the software can be deployed: - From a network drive - From a CD-ROM/DVD - From a removable, preconfigured USB-type drive
1.3 VPN Standard, VPN Premium and VPN Certified
The management and deployment features described in the present document are available both in the PREMIUM and CERTIFIED versions of the VPN Client. Only part of those features are available in the standard version of the VPN Client. When relevant, "VPN Premium only" or "VPN Certified only" are indicated.
1.4 Older versions
All features and functions described in this document are applicable on version 4.2 and above of TheGreenBow VPN Client. For older versions, please refer to the documents available at TheGreenBow website.
TheGreenBow VPN Client Deployment Guide Sept. 2019
Deployment Guide TheGreenBow VPN Property of TheGreenBow © 2019 4/30
2 Security recommendations
2.1 Configuration of the host workstation
The computer on which TheGreenBow VPN Client is installed and run must be safe and properly managed. Specifically: 1/ It must be equipped with an antivirus software with a regularly updated database, 2/ It must be protected by a firewall which controls the inbound and outbound communications of the workstation which are not already going through the VPN Client, 3/ Its operating system is up-to-date when it comes to the different security patches, 4/ Its configuration means that it is protected against local attacks (memory analysis, patch or binary corruption). Configuration recommendations to strengthen the workstation are available on the ANSSI website, for example (in French, the list is non-exhaustive):
- Computer health guide (Guide d'hygiène informatique, document in French) - Configuration guide (Guide de configuration, document in French) - Security updates (Mises à jour de sécurité, document in French) - Password (Mot de passe, document in French)
If installing on Windows 7, the following Microsoft guide can also be checked for information: Common Criteria Security Target, Windows 7 and Windows Server 2008 R2
It is recommended to install TheGreenBow VPN Client on a machine with no previous installed versions. In this regard, it is recommended to uninstall all previous versions of the software from the machine before installation, if any. Also, it is recommended to execute the installation from an empty directory, especially in the case of customised installations using additional configuration files.
2.2 Execution rights
TheGreenBow VPN Client has been designed to be installed using "administrator" rights and be subsequently used using "user" only privileges, regardless of the Windows OS used. Since some functionalities are forbidden in "user" mode (e.g. uninstalling the software), it is strongly recommended to abide by these guidelines during deployment:
- Installation in "administrator" mode - Use in "user" mode
2.3 End user configuration
TheGreenBow VPN Client is designed to be used simultaneously and independently by an administrator (installation, initial configuration, customisation) and the end user. The entire interface of the software can be customised so that the number of functionalities available to the end user is very limited (open and close a VPN tunnel). In a similar fashion, the software can be entirely customised from the moment of the installation or deployment so that access to the VPN security policies is solely restricted to the administrator (hiding features, password for access control, etc.).
TheGreenBow VPN Client Deployment Guide Sept. 2019
Deployment Guide TheGreenBow VPN Property of TheGreenBow © 2019 5/30
The software configuration options described further down in this document make such restrictions possible so that the VPN Client is run in the most secure and reliable manner.
2.4 Multiple users management
TheGreenBow VPN Client will apply the same VPN configuration (security policy) to all users of a multiple-user workstation. As a consequence, it is recommended to run the software on a dedicated workstation (for instance by keeping an administrator account and a user account, as previously mentioned).
2.5 VPN security policy management
TheGreenBow VPN Client comes equipped with a standard set of command-line options to import, export, replace or add new VPN security policies. The purpose of these options is to be used with software deployment scripts, update or remote maintenance operations or diverse automatic operations such as automatically opening and closing VPN tunnels. This document explains how to use these various command-line options without jeopardising the integrity or confidentiality of the VPN security policies.
2.6 User authentication
As detailed in the "User Guide for TheGreenBow VPN Client" (tgbvpn_ug_en.pdf), it is recommended to use, preferentially, certificates to ensure a solid authentication of the user when opening a VPN tunnel. These certificates should be stored on tokens or smart cards, if possible. Software configuration options relative to this function are detailed in a dedicated document: "Management of PKI,certificates, tokens and smart cards" (tgbvpn_ug_pki_smartcard_en.pdf).
2.7 Sensitive data protection
As presented in the "TheGreenBow VPN Certified User Guide" (tgbvpn_ug_en.pdf), it is recommended that no sensitive data should be stored in the VPN configuration file: X-auth login/password, pre-shared key or certificate.
2.8 Reset
The Windows environment offers the possibility to uninstall then re-install the software. During uninstallation, the security policy is deleted as well. This procedure essentially restores the software's initial configuration.

TheGreenBow VPN Client Deployment Guide Sept. 2019
Deployment Guide TheGreenBow VPN Property of TheGreenBow © 2019 6/30
3 VPN Client deployment The software deployment mostly relies on the fact that it can be installed in a silent manner, that is without interacting (question or warning) with the user. All the software configuration options can therefore be transmitted to the installation, either through initialisation files or the command-line options.
3.1 Silent installation
A "silent" installation is an installation that is carried out without any user interaction, without any questions or warnings. The installation is carried out in an entirely transparent manner. The installation parameters are, in this case, configured through the set of command-line options or through the initialisation file "vpnsetup.ini" that accompanies the installation. Note: Depending on the security policy of the target workstation, a Windows notification warning about the program launch can be displayed. To avoid displaying this notification, please contact the TheGreenBow support.
3.2 Create a silent installation
In order to start the installation in silent mode, use the command-line option "/S". 1/ Download the setup file TheGreenBow_VPN_Client.exe from http://www.thegreenbow.com 2/ Open the Windows command prompt and enter the command-line:
TheGreenBow_VPN_Client.exe /S (for additional options, see chap.8.1)
Example:
[setup_dir]/TheGreenBow_VPN_Client.exe /S –license=123456 /D=[install_dir]
[setup_dir] is the setup directory [install_dir] is the directory where the software will be installed (the default installation folder is: " C:\Program Files\TheGreenBow\TheGreenBow VPN") [install_dir] must be entirely specified, as the /D option does not recognise the relative folders The "/D" option must be used at the end of the command-line, without any blank spaces between the option, the "=" sign and the value.
3.3 Deployment from a CD-ROM
1/ Create a text file named "autorun.inf" whose contents are as follows:
[autorun]
OPEN=TheGreenBow_VPN_Client.exe /S /D=c:\Program Files\TheGreenBow\TheGreenBow VPN (+ additional
options, see chapter 8)
ICON=TheGreenBow_VPN_Client.exe

TheGreenBow VPN Client Deployment Guide Sept. 2019
Deployment Guide TheGreenBow VPN Property of TheGreenBow © 2019 7/30
Example:
2/ Copy on the root directory of the CD-ROM: - The "autorun.inf" file - The "TheGreenBow_VPN_Client.exe" file The installation will start automatically and silently as soon as it is inserted into the target workstation. Note: See Section 8 for more details on the syntax of all the options. Note: See also "Enabling and Disabling AutoRun" on some versions of Windows (i.e. http://msdn.microsoft.com/en-us/library/windows/desktop/cc144204%28v=vs.85%29.aspx#floppy).
3.4 Deployment from a network drive or a shortcut
1/ Download TheGreenBow VPN Client 2/ Right-click on the executable file "TheGreenBow_VPN_Client.exe" 3/ Select "Create a shortcut" 4/ Right-click on the shortcut that has just been created 5/ Select "Properties" 6/ In the "Shortcut" tab, in the field "Target:", add the desired options to the command-line, keeping in mind to leave blank spaces between each option 7/ Copy the shortcut where the user can execute it (e.g. on the Windows desktop) Example:
"F:\TheGreenBow_VPN_Client.exe /S --start=1 --lang=1036 /D=C:\Program Files\TheGreenBow\TheGreenBow VPN" Important: Make sure that there are blank spaces between each argument

TheGreenBow VPN Client Deployment Guide Sept. 2019
Deployment Guide TheGreenBow VPN Property of TheGreenBow © 2019 8/30
3.5 Deployment from a script
1/ Create a text file named "vpn_setup.bat" 2/ Edit this file (right-click and select "Modify") 3/ Input the command lines that should be executed 4/ Deploy this batch file with the executable TheGreenBow_VPN_Client.exe Example:
cd .\setup
TheGreenBow_VPN_Client.exe /S --lang=1036
cd ..
copy myvpnconfig.tgb C:\Program Files\TheGreenBow\TheGreenBow VPN
cd C:\Program Files\TheGreenBow\TheGreenBow VPN
vpnconf.exe /importonce:myvpnconfig.tgb
In this example: - The directory containing the installation file is called "setup" and is located in the directory that contains the batch file - This installation finishes with the import of the security policy "myvpnconfig.tgb" Note: See Section 8 for more details on the syntax of all the options.
3.6 Update deployment
The deployment of a TheGreenBow VPN Client update is carried out just like the deployment of a new installation. In the case of a silent update, the entire updating process will be silent, including the saving of the previous version's VPN security policy, the installation of the new version and the restoration of the previous version's VPN security policy. Note: If the installed VPN Client version is older than version 4.2, updating the software will require that this software is uninstalled. By default, this operation is not silent. In order to make it silent, please contact the TheGreenBow support. Note: Updating or installing a "Certified" VPN Client as a replacement of a "Standard" or "Premium" version will also require uninstalling these softwares prior to the update. If the VPN configuration needs to be transferred from one version to the next, please contact the TheGreenBow support. Note: When a Certified VPN Client is installed as a replacement of a version protected with a password, this password is required to uninstall the old version. The new version is installed, protected with the default password "admin". Note: When a Certified VPN Client is installed as a replacement of a version protected with a password, this password is required to uninstall the old version. The new version is installed, protected with the default password "admin".
3.7 Setup configuration file: vpnsetup.ini
The vpnsetup.ini file allows the user to customise the installation of TheGreenBow VPN Client. It allows the definition of the following parameters: - software activation parameters - PKI parameters for token, smart card reader and certificate management - general operating parameters The commands and operating conditions of the vpnsetup.ini file are described in Section 8.2.
TheGreenBow VPN Client Deployment Guide Sept. 2019
Deployment Guide TheGreenBow VPN Property of TheGreenBow © 2019 9/30
4 Software Activation Deployment
4.1 Activation parameters
TheGreenBow software need to be activated in order to be used after the evaluation period. Note: For any explanation and details about the software activation mechanisms, please see the document "tgb_ug_activation_management". Any TheGreenBow software activation is realized through a request to the TheGreenBow activation server, which is reachable through Internet. For customers who deploy TheGreenBow software on a network which has no Internet connection, TheGreenBow provides a Corporate Activation Server : the TheGreenBow Activation Server (TAS server) which can be installed on the customer network. The standard software activation requires the parameters "license number" and "activation email". The activation with TheGreenBow Activation Server (TAS) additionnally requires the following parameters: address, port and certificate of the Activation Server. The parameters "license number" and "activation email" can be specified in the command line of the software installation program. Cf. chapter 8.1 "VPN Client installation command-line options" The "TAS server" parameters must be specified in the VpnSetup.ini file which comes with the installation program. Cf. chapter 8.2 "Setup configuration file: vpnsetup.ini"
4.2 Activation deployment and automation
Using the activation parameters enables the software activation to be completely integrated in the deployment process. It enables the activation to be processed automatically and silently (with no interaction with to the final user). In order to run a software activation with no interaction with the final user, the following setup command line parameters must be used: "--autoactiv" (in order the activation is processed automatically) and "--noactiv" (in order the activation window is hidden), together with the parameters "--license" and "--activmail" as described in chapter 8.1 (VPN Client installation command-line options). Command line for an automatic and silent activation:
TheGreenBow_VPN_Client.exe /S --license=[numero_de_licence] --activmail=[email_activation] --
noactiv=1 --autoactiv=1
In order to run a software activation with a TAS server, the TAS Server parameters (URL, Port, Certificate) must be specified in the VpnSetup.ini file which comes with the installer during the installation process (See chapter 8.2 "Setup configuration file: vpnsetup.ini"). Example of a VpnSetup.ini file for a TAS Server activation:
[Activation]
OSAUrl = 192.168.217.102/osace_activation.php
OSAPort = 80
Cert = "MIICGjCCAYOgAwIBAgIBADANBg [........] muHf58kMO0jvhkyq24GryqptSaSJqVIA="
TheGreenBow VPN Client Deployment Guide Sept. 2019
Deployment Guide TheGreenBow VPN Property of TheGreenBow © 2019 10/30
"In the tunnel" Software Activation
TheGreenBow VPN Client enables to process the activation function "in the VPN tunnel". As soon as the options "--autoactiv" and "--noactiv" are configured (as described in the previous chapter), the software automatically checks its activation in the tunnel it just opened. This automation enables the software, when it is in a subscription mode, to automatically check and update its activation when the subscription is renewed. It also enables the software to automatically re-activate after an upgrade, in a silent (hidden) manner for the final user.
4.3 Activations Identification
During a software deployment, it is possible to automatically identify the workstation on which the activation is processed. This enables to easily manage the activation/reset of the installed licenses. This workstation identification can be addressed by using the value "activation email", which can be used during the installation process, to indicate the name of the workstation and the user. Automatic installation script with a workstation identifier:
TheGreenBow_VPN_Client.exe /S --license=[license_number] --activmail=%ComputerName%@company.com
--noactiv=1 --autoactiv=1
PowerShell batch for an automatic installation with a workstation identifier:
TheGreenBow_VPN_Client.exe /S --license=[license_number]--activmail=$env:[email protected]
--noactiv=1 --autoactiv=1
Another example for an automatic installation with a workstation identifier:
set ActivationEmail=%ComputerName%@worldcompany.com
TheGreenBow_VPN_PREMIUM.exe /S --license=xxx --activmail=%ActivationEmail% --noactiv=1 --autoactiv=1
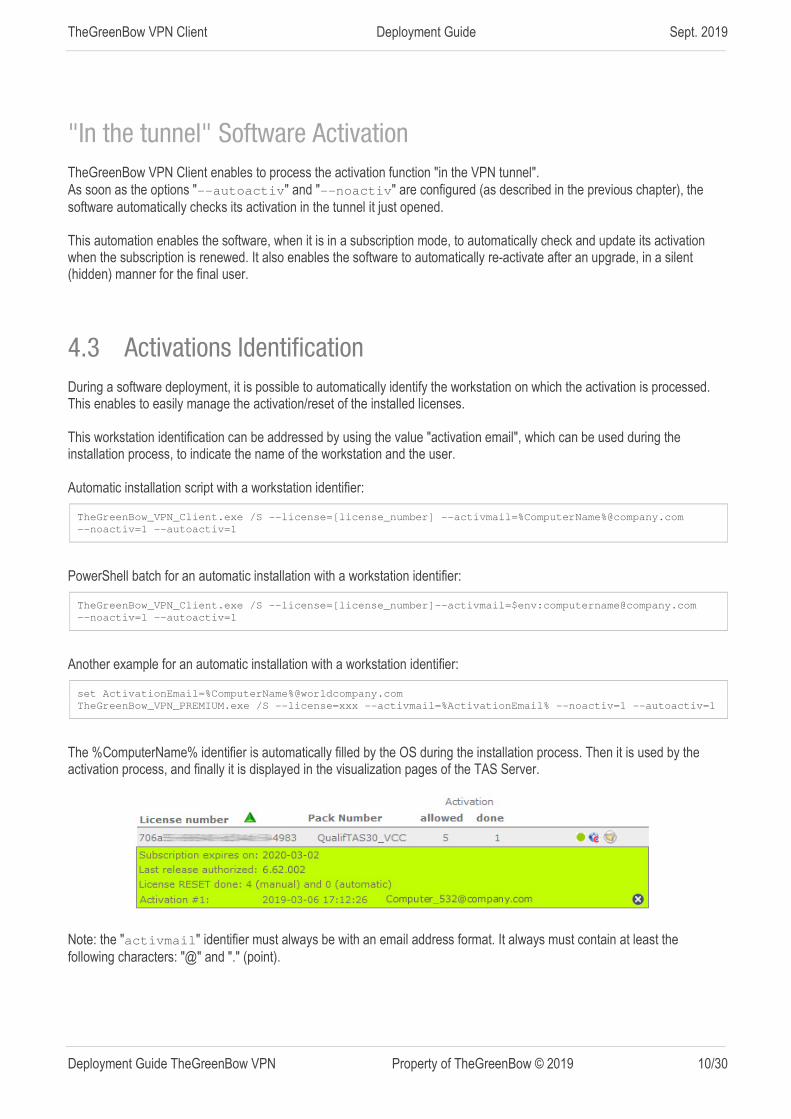
The %ComputerName% identifier is automatically filled by the OS during the installation process. Then it is used by the activation process, and finally it is displayed in the visualization pages of the TAS Server.
Note: the "activmail" identifier must always be with an email address format. It always must contain at least the following characters: "@" and "." (point).

TheGreenBow VPN Client Deployment Guide Sept. 2019
Deployment Guide TheGreenBow VPN Property of TheGreenBow © 2019 11/30
5 VPN Client configuration for the user
5.1 Introduction
TheGreenBow VPN Client displays three main interfaces to the user: 1/ The Configuration panel: This interface is used to configure the VPN security policy. From there all the VPN security policy management operations are available: create, modify, save, export, import. 2/ The Connection panel: Used for opening and closing tunnels and informing the user of possible VPN incidents. 3/ The Taskbar menu: Some of the software's operations can be accessed directly from the menu associated with the
software's icon on the taskbar. The Configuration panel grants access to the VPN security policy: It allows the user to modify, save, import, export and apply any new VPN security policy. Therefore, it is strongly recommended that the access to this panel, or even its display, be restricted to the administrator only. The Connection panel and the Taskbar menu can also be restricted so that only the end user has access to a small set of authorised operations: It is possible to configure TheGreenBow VPN Client installation in such a way that the end user can only open and close a VPN tunnel, all other functions being off limits. These limitations and access restrictions can be configured during the software's installation. These various configuration options are the topic of the present Section.
5.2 Restrict the interface using the Configuration panel
The Configuration panel can be hidden or protected by a password and the available items in the Taskbar menu can be limited. These limitations can be configured in the software's Configuration panel, as described in the "User Guide for TheGreenBow VPN Client" (reference: tgbvpn_ug_en).
Example
1/ From the Configuration panel, open "Tools > Options > Display",
enter and confirm a password and untick the items that should be removed from the Taskbar menu.
2/ Switch to the Connection panel (Ctrl+Enter) 3/ Close the Connection panel if needed
In this mode, the Configuration panel is no longer accessible from the Taskbar menu. From the Connection panel, the access to the Configuration panel is protected with a password.

TheGreenBow VPN Client Deployment Guide Sept. 2019
Deployment Guide TheGreenBow VPN Property of TheGreenBow © 2019 12/30
No operations involving the VPN security policy are available or authorised to the end user any more.
5.3 Restrict the interface during installation
The user interface can be restricted using the following installation options: The option "--guidefs=user", added as a command line in the setup, configures the software in such a way that it will only open the Connection panel. The option "--password=[password]", added as a command line in the setup, specifies during installation the password which will be used to restrict the access to the Configuration panel.
TheGreenBow_VPN_Client.exe --guidefs=user --password=Adm1#34Vo
In this configuration, the user cannot open the Connection panel and access to the Configuration panel is protected with a password. No operations involving the VPN security policy are authorised. This is the recommended configuration because it makes the access to the VPN security policy fully secure. The option "--guidefs=hidden", added as a command line in the setup, prevents the software from opening any interface, such as the Connection panel or the Configuration panel. With this configuration, the user only sees the software as an icon on the taskbar. Warning: In the releases older than version 6.4, the right-click menu of the taskbar icon listed the VPN connections. The user was then able to open/close a VPN connection from this taskbar menu. Since the version 6.4, the VPN connections don't appear anymore in the taskbar menu. This means that the user cannot open/close a VPN Connection. This function needs to be activated with a script or an automatic routine such as "automatically open tunnel when traffic is detected". See User Guide for TheGreenBow VPN Client.
Default password:
In The Certified VPN Client, the access to the Configuration Panel is systematically protected by a password. When it is not specified by the administrator during the installation or via the Configuration Panel, its default value is "admin". Cf. chapter 8.1 "VPN Client installation command-line options".

TheGreenBow VPN Client Deployment Guide Sept. 2019
Deployment Guide TheGreenBow VPN Property of TheGreenBow © 2019 13/30
6 VPN security policy deployment
6.1 Including a VPN security policy in the installation
A preconfigured VPN security policy (VPN configuration) can be included in the installation of TheGreenBow VPN Client. This security policy will be automatically imported and applied during software installation. Therefore, it immediately becomes operational for the end user, from the moment of the first launch of VPN Client. The steps to create such an installation are as follows: 1/ Create the VPN security policy (VPN Configuration) intended for the target workstation 2/ Export this VPN security policy ("Configuration" menu > "Export", see User Guide for TheGreenBow VPN Client)
without protecting it with a password 3/ Copy the VPN security policy in the directory in which the VPN Client setup is located (TheGreenBow_VPN_Client.exe
file) 4/ Transfer the package (setup + VPN security policy) to the target workstation 5/ Execute the VPN Client installation: At the end of the installation, the VPN Client will have been installed with the
imported VPN security policy taken into account. From a deployment security perspective, this method relies on the integrity control function of the VPN security policies (a standard function of the VPN Client). This function ensures that the security policy imported during installation has not been corrupted. For a deployment that also uses the confidentiality function of the VPN security policy, see the procedure described below.
6.2 Deploying a new VPN security policy
6.2.1 Procedure 1/ Create the VPN security policy (VPN Configuration) intended for the target workstation 2/ Export this security policy ("Configuration" menu > "Export", see User Guide for TheGreenBow VPN Client). It can be
protected with a password. 3/ Transfer this VPN security policy to the workstation that needs to be updated (mail, fileshare, etc.) 4/ On the target workstation, open (double-click on the ".tgb" file) the VPN security policy and the protection password will
be requested automatically. Once the password has been successfully entered, the VPN security policy will be imported and applied.
Note: In the "TheGreenBow VPN Certified" version, directly opening a ".tgb" file is not authorised. However, importing a new VPN security policy is still possible: 1/ Through the "Configuration > Import" menu of the Configuration panel. 2/ Through command lines, and by specifying (if applicable) the password used to protect the exported configuration (see
the /import and /pwd options detailed in Section 8)
6.3 Protecting a VPN security policy before deployment
As explained before, as a standard feature, the VPN Client checks the integrity of the imported and exported security policies. It is also possible to ensure their confidentiality by specifying a protection password during export. This password will be requested for import.

TheGreenBow VPN Client Deployment Guide Sept. 2019
Deployment Guide TheGreenBow VPN Property of TheGreenBow © 2019 14/30
6.3.1 Integrity of an exported VPN security policy It is possible to force the software to systematically apply the integrity calculation on an exported VPN security policy with the following registry key. In TheGreenBow VPN Certified, this function is activated by default. HKEY_LOCAL_MACHINE\SOFTWARE\TheGreenBow\TheGreenBow VPN\SignFile=1(binary)
6.3.2 Procedure 1/ Create the VPN security policy (VPN Configuration) intended for the target workstation 2/ Export this security policy ("Configuration" menu > "Export", see User Guide for TheGreenBow VPN Client) and protect
it with a password 3/ Execute the VPN Client installation on the target workstation 4/ Once the software has been installed, transfer the VPN security policy to the target workstation 5/ Import this VPN security policy: either by directly opening the ".tgb" file, by using command lines (see the /import
and /pwd options detailed in Section 8) or by using the "Configuration > Import" menu of the Configuration panel; the protection password will be required.
Note: In the "TheGreenBow VPN Certified" version, directly opening a ".tgb" file is not authorised. However, importing a new VPN security policy is still possible: 1/ Through the "Configuration > Import" menu of the Configuration panel. 2/ Through command lines, and by specifying (if applicable) the password used to protect the exported configuration (see
the /import and /pwd options detailed in Section 8)
TheGreenBow VPN Client Deployment Guide Sept. 2019
Deployment Guide TheGreenBow VPN Property of TheGreenBow © 2019 15/30
7 Automatic operations in the VPN Client
7.1 Batch/script to open or close a tunnel
Since version 4.1, VPN Client enables the user to open or close a tunnel using the command lines listed below and which can be used in a script: vpnconf.exe /open:TunnelName
vpnconf.exe /close:TunnelName
The Tunnel Name should be composed as follows:
Tunnel Name
IKEv1 Phase1-Phase2
IKEv2 IKEAuth-ChildSA
SSL TLS
It is also possible in all versions of the VPN Client software to open or close a tunnel using a script, by following the steps below: 1/ Create a VPN security policy (VPN Configuration) with the box "Automatically open this tunnel when VPN Client starts"
ticked. 2/ Export the VPN security policy (VPN Configuration) in a file (e.g. "MyTunnel.tgb"). 3/ Create the script with the following command line: vpnconf.exe /import:MyTunnel.tgb. This script will launch VPN Client while importing the VPN security policy (VPN Configuration) "MyTunnel.tgb", and automatically open the VPN tunnel. In order to close the tunnel, it is possible to use the command line vpnconf.exe /stop, which will close the opened VPN tunnel before closing the software.
7.2 Automatically open a web page when the tunnel opens
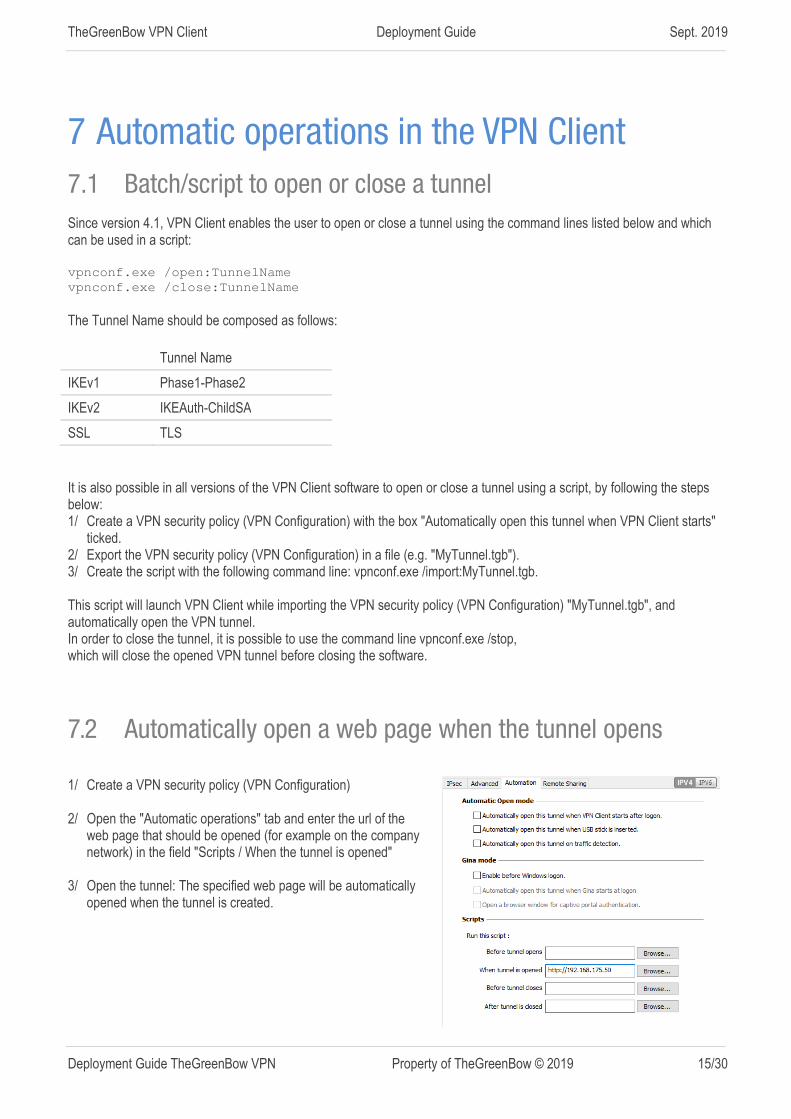
1/ Create a VPN security policy (VPN Configuration) 2/ Open the "Automatic operations" tab and enter the url of the
web page that should be opened (for example on the company network) in the field "Scripts / When the tunnel is opened"
3/ Open the tunnel: The specified web page will be automatically
opened when the tunnel is created.
TheGreenBow VPN Client Deployment Guide Sept. 2019
Deployment Guide TheGreenBow VPN Property of TheGreenBow © 2019 16/30
7.3 Open a tunnel with a double-click on a desktop icon
TheGreenBow VPN Client gives the possibility to open a VPN tunnel by double-clicking on a Windows desktop icon
7.3.1 Double-click on a ".tgb" file 1/ Create a VPN security policy (VPN Configuration) with the box "Automatically open this tunnel when VPN Client starts"
ticked 2/ Export this VPN Configuration in a file (e.g. "MyTunnel.tgb") 3/ Move the file or create a shortcut to the file on the Windows desktop Double-clicking on the icon created on the Windows desktop will open the VPN Client software, which will then automatically import the VPN Configuration "MyTunnel.tgb" and open the VPN tunnel. Note: For security reasons, this function is not available in "TheGreenBow VPN Certified".
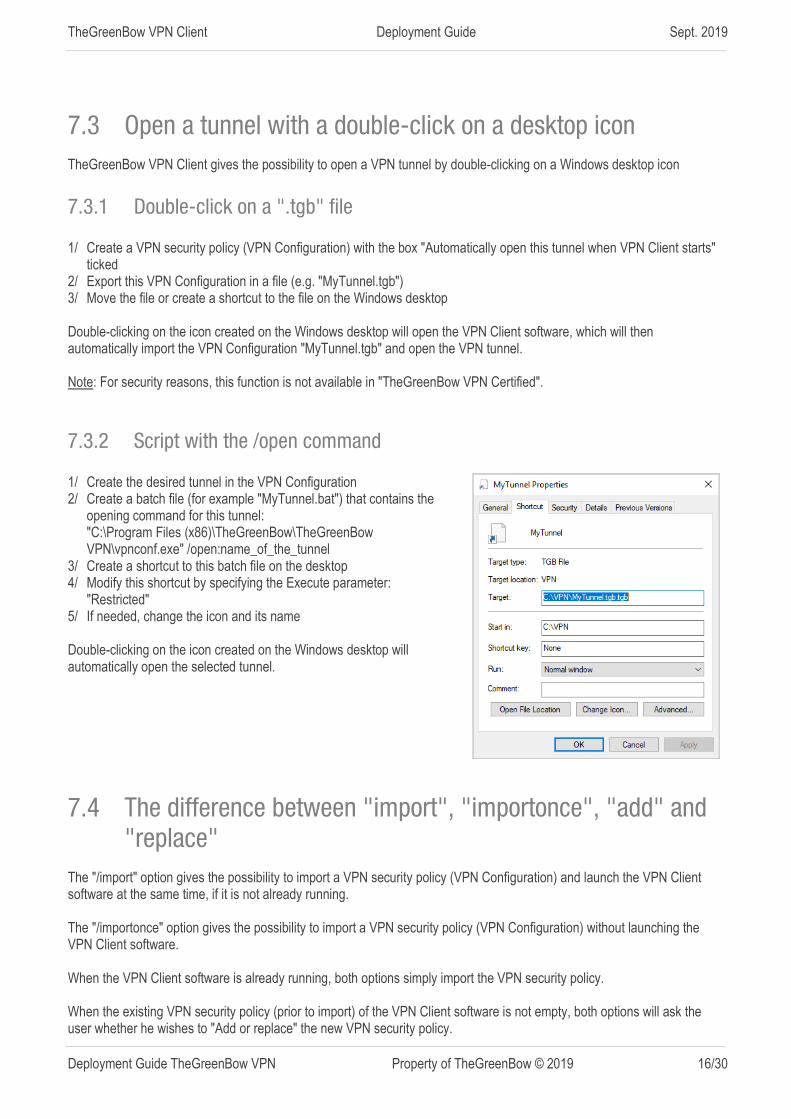
7.3.2 Script with the /open command 1/ Create the desired tunnel in the VPN Configuration 2/ Create a batch file (for example "MyTunnel.bat") that contains the
opening command for this tunnel: "C:\Program Files (x86)\TheGreenBow\TheGreenBow
VPN\vpnconf.exe" /open:name_of_the_tunnel 3/ Create a shortcut to this batch file on the desktop 4/ Modify this shortcut by specifying the Execute parameter:
"Restricted" 5/ If needed, change the icon and its name Double-clicking on the icon created on the Windows desktop will automatically open the selected tunnel.
7.4 The difference between "import", "importonce", "add" and
"replace"
The "/import" option gives the possibility to import a VPN security policy (VPN Configuration) and launch the VPN Client software at the same time, if it is not already running. The "/importonce" option gives the possibility to import a VPN security policy (VPN Configuration) without launching the VPN Client software. When the VPN Client software is already running, both options simply import the VPN security policy. When the existing VPN security policy (prior to import) of the VPN Client software is not empty, both options will ask the user whether he wishes to "Add or replace" the new VPN security policy.
TheGreenBow VPN Client Deployment Guide Sept. 2019
Deployment Guide TheGreenBow VPN Property of TheGreenBow © 2019 17/30
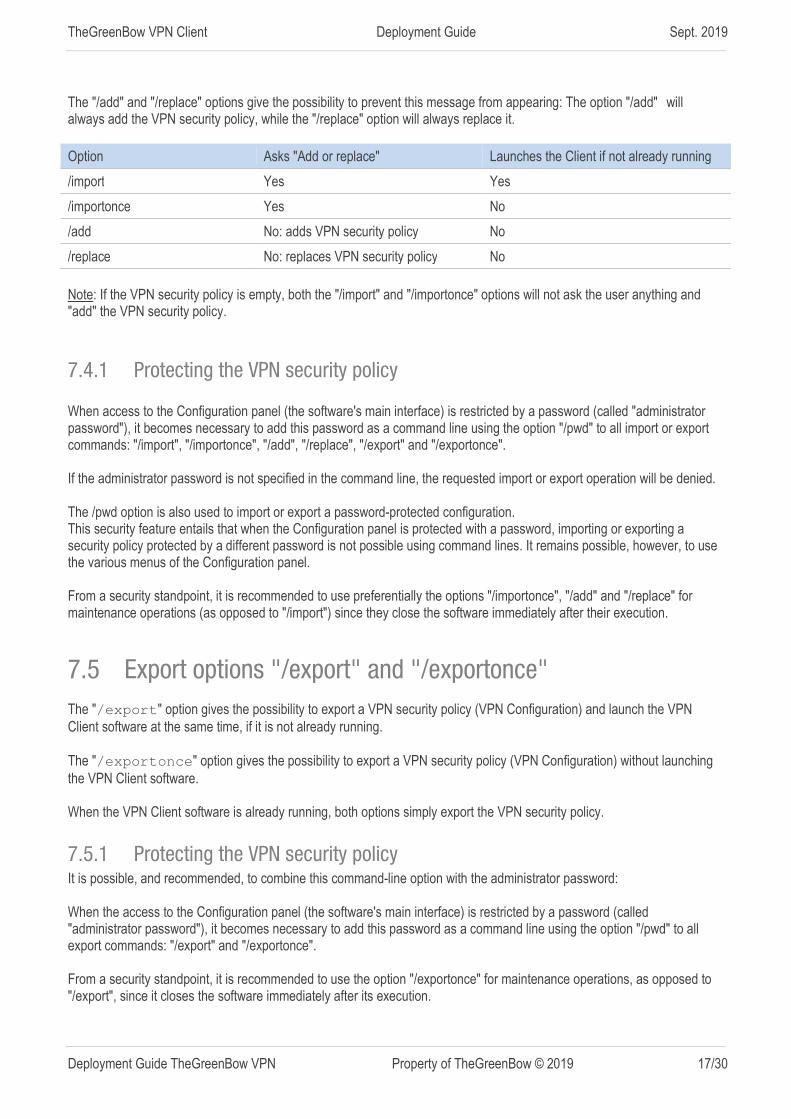
The "/add" and "/replace" options give the possibility to prevent this message from appearing: The option "/add" will always add the VPN security policy, while the "/replace" option will always replace it.
Option Asks "Add or replace" Launches the Client if not already running
/import Yes Yes
/importonce Yes No
/add No: adds VPN security policy No
/replace No: replaces VPN security policy No
Note: If the VPN security policy is empty, both the "/import" and "/importonce" options will not ask the user anything and "add" the VPN security policy.
7.4.1 Protecting the VPN security policy When access to the Configuration panel (the software's main interface) is restricted by a password (called "administrator password"), it becomes necessary to add this password as a command line using the option "/pwd" to all import or export commands: "/import", "/importonce", "/add", "/replace", "/export" and "/exportonce". If the administrator password is not specified in the command line, the requested import or export operation will be denied. The /pwd option is also used to import or export a password-protected configuration. This security feature entails that when the Configuration panel is protected with a password, importing or exporting a security policy protected by a different password is not possible using command lines. It remains possible, however, to use the various menus of the Configuration panel. From a security standpoint, it is recommended to use preferentially the options "/importonce", "/add" and "/replace" for maintenance operations (as opposed to "/import") since they close the software immediately after their execution.
7.5 Export options "/export" and "/exportonce"
The "/export" option gives the possibility to export a VPN security policy (VPN Configuration) and launch the VPN Client software at the same time, if it is not already running. The "/exportonce" option gives the possibility to export a VPN security policy (VPN Configuration) without launching the VPN Client software. When the VPN Client software is already running, both options simply export the VPN security policy.
7.5.1 Protecting the VPN security policy It is possible, and recommended, to combine this command-line option with the administrator password: When the access to the Configuration panel (the software's main interface) is restricted by a password (called "administrator password"), it becomes necessary to add this password as a command line using the option "/pwd" to all export commands: "/export" and "/exportonce". From a security standpoint, it is recommended to use the option "/exportonce" for maintenance operations, as opposed to "/export", since it closes the software immediately after its execution.

TheGreenBow VPN Client Deployment Guide Sept. 2019
Deployment Guide TheGreenBow VPN Property of TheGreenBow © 2019 18/30
8 Reference manual
8.1 VPN Client installation command-line options
The installation wizard (setup) of TheGreenBow VPN Client can be configured using a set of command-line options. Syntax rules: Options that call for a specific value must be entered without any blank spaces between the option and the value assigned to it. Values that contain blank spaces, such as directory names, must be place between quotation marks.
/S
Syntax: /S (uppercase "S")
Usage: Configures the installation in silent mode (no messages or warnings to the user)
Example: TheGreenBow_VPN_Client.exe /S
/D
Syntax: /D=[install_dir] (uppercase "D")
Usage: [install_dir] is the directory where VPN Client must be installed. Quotation marks on each side of [install_dir] are not required, even if the directory name contains blank spaces The directory must be written out in full. This option does not take into account the relative directories (such as "../../mydir"). Warning: This option is required to be the last of the command line.
Example: TheGreenBow_VPN_Client.exe /S /D=C:\my directory\vpn
Note The default installation directory of VPN Client is "C:\Program Files\TheGreenBow\TheGreenBow VPN".
--license
Syntax: --license=[license_number] (two hyphens must be placed before "licence")
Usage: Configures the license number used for activating the software. (See "User Guide for TheGreenBow VPN Client" for more details on this license number).
Example: TheGreenBow_VPN_Client.exe --license=1234567890ABCDEF12345678
--activmail
Syntax: --activmail=[email_activation] (two hyphens must be placed before "activmail")
Usage: Configures the email address used for activating the software.
Example: TheGreenBow_VPN_Client.exe [email protected]
Note : This field can be used to reference another information than the email address, for example an identifier of the workstation on which the software is activated. Nevertheless, its syntax must be an email address syntax, containing always the "@" and "." (point) characters. With the VPN PREMIUM version, the "activation email" field is filled by default with the "username" and the "hostname" of the computer where the software is installed: "%username%%hostname%@company.com".
TheGreenBow VPN Client Deployment Guide Sept. 2019
Deployment Guide TheGreenBow VPN Property of TheGreenBow © 2019 19/30
This mechanism allows the administrator who manages a Master license to identify uniquely each activated workstation. It enables a deterministic management of the software activations/de-activations
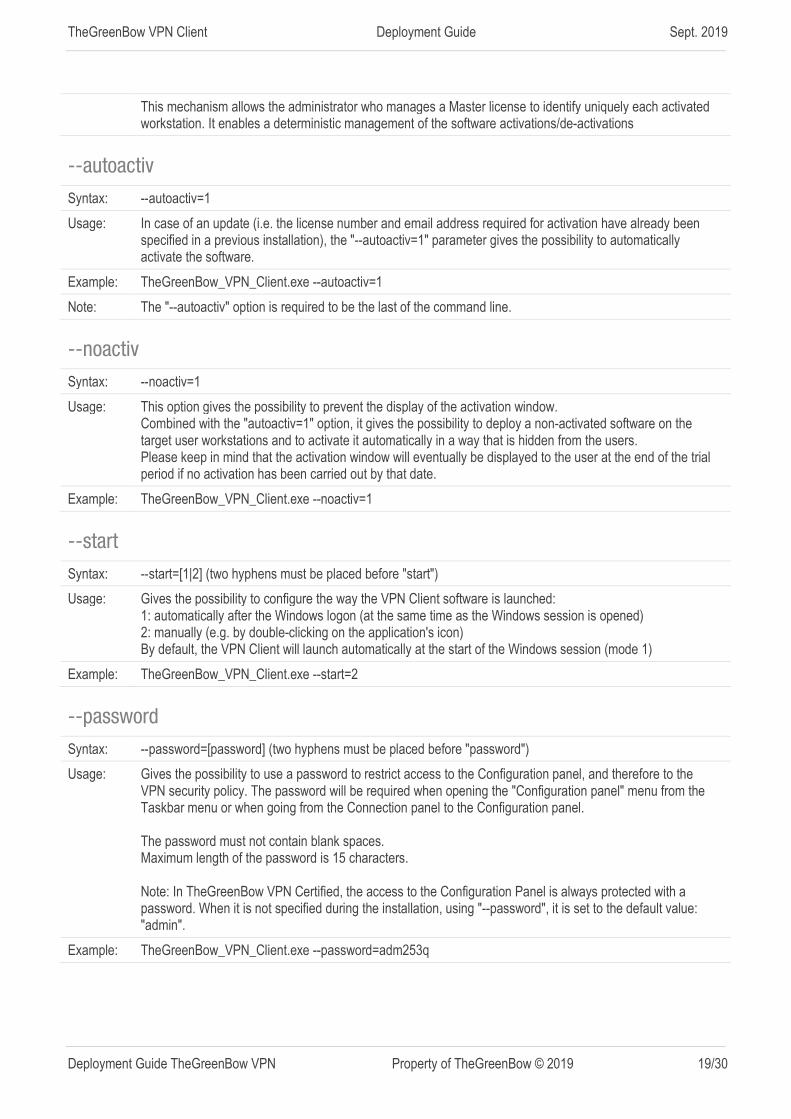
--autoactiv
Syntax: --autoactiv=1
Usage: In case of an update (i.e. the license number and email address required for activation have already been specified in a previous installation), the "--autoactiv=1" parameter gives the possibility to automatically activate the software.
Example: TheGreenBow_VPN_Client.exe --autoactiv=1
Note: The "--autoactiv" option is required to be the last of the command line.
--noactiv
Syntax: --noactiv=1
Usage: This option gives the possibility to prevent the display of the activation window. Combined with the "autoactiv=1" option, it gives the possibility to deploy a non-activated software on the target user workstations and to activate it automatically in a way that is hidden from the users. Please keep in mind that the activation window will eventually be displayed to the user at the end of the trial period if no activation has been carried out by that date.
Example: TheGreenBow_VPN_Client.exe --noactiv=1
--start
Syntax: --start=[1|2] (two hyphens must be placed before "start")
Usage: Gives the possibility to configure the way the VPN Client software is launched: 1: automatically after the Windows logon (at the same time as the Windows session is opened) 2: manually (e.g. by double-clicking on the application's icon) By default, the VPN Client will launch automatically at the start of the Windows session (mode 1)
Example: TheGreenBow_VPN_Client.exe --start=2
--password
Syntax: --password=[password] (two hyphens must be placed before "password")
Usage: Gives the possibility to use a password to restrict access to the Configuration panel, and therefore to the VPN security policy. The password will be required when opening the "Configuration panel" menu from the Taskbar menu or when going from the Connection panel to the Configuration panel. The password must not contain blank spaces. Maximum length of the password is 15 characters. Note: In TheGreenBow VPN Certified, the access to the Configuration Panel is always protected with a password. When it is not specified during the installation, using "--password", it is set to the default value: "admin".
Example: TheGreenBow_VPN_Client.exe --password=adm253q
TheGreenBow VPN Client Deployment Guide Sept. 2019
Deployment Guide TheGreenBow VPN Property of TheGreenBow © 2019 20/30
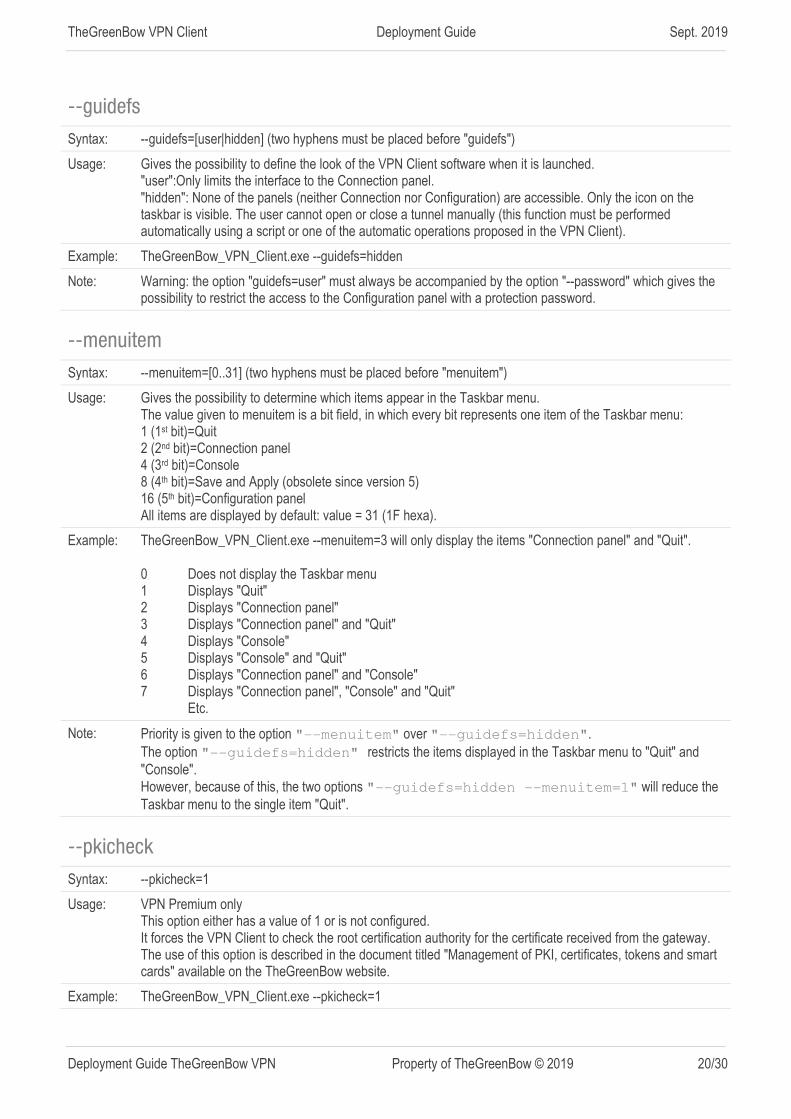
--guidefs
Syntax: --guidefs=[user|hidden] (two hyphens must be placed before "guidefs")
Usage: Gives the possibility to define the look of the VPN Client software when it is launched. "user":Only limits the interface to the Connection panel. "hidden": None of the panels (neither Connection nor Configuration) are accessible. Only the icon on the taskbar is visible. The user cannot open or close a tunnel manually (this function must be performed automatically using a script or one of the automatic operations proposed in the VPN Client).
Example: TheGreenBow_VPN_Client.exe --guidefs=hidden
Note: Warning: the option "guidefs=user" must always be accompanied by the option "--password" which gives the possibility to restrict the access to the Configuration panel with a protection password.
--menuitem
Syntax: --menuitem=[0..31] (two hyphens must be placed before "menuitem")
Usage: Gives the possibility to determine which items appear in the Taskbar menu. The value given to menuitem is a bit field, in which every bit represents one item of the Taskbar menu: 1 (1st bit)=Quit 2 (2nd bit)=Connection panel 4 (3rd bit)=Console 8 (4th bit)=Save and Apply (obsolete since version 5) 16 (5th bit)=Configuration panel All items are displayed by default: value = 31 (1F hexa).
Example: TheGreenBow_VPN_Client.exe --menuitem=3 will only display the items "Connection panel" and "Quit". 0 Does not display the Taskbar menu 1 Displays "Quit" 2 Displays "Connection panel" 3 Displays "Connection panel" and "Quit" 4 Displays "Console" 5 Displays "Console" and "Quit" 6 Displays "Connection panel" and "Console" 7 Displays "Connection panel", "Console" and "Quit" Etc.
Note: Priority is given to the option "--menuitem" over "--guidefs=hidden". The option "--guidefs=hidden" restricts the items displayed in the Taskbar menu to "Quit" and "Console". However, because of this, the two options "--guidefs=hidden --menuitem=1" will reduce the Taskbar menu to the single item "Quit".
--pkicheck
Syntax: --pkicheck=1
Usage: VPN Premium only This option either has a value of 1 or is not configured. It forces the VPN Client to check the root certification authority for the certificate received from the gateway. The use of this option is described in the document titled "Management of PKI, certificates, tokens and smart cards" available on the TheGreenBow website.
Example: TheGreenBow_VPN_Client.exe --pkicheck=1
TheGreenBow VPN Client Deployment Guide Sept. 2019
Deployment Guide TheGreenBow VPN Property of TheGreenBow © 2019 21/30
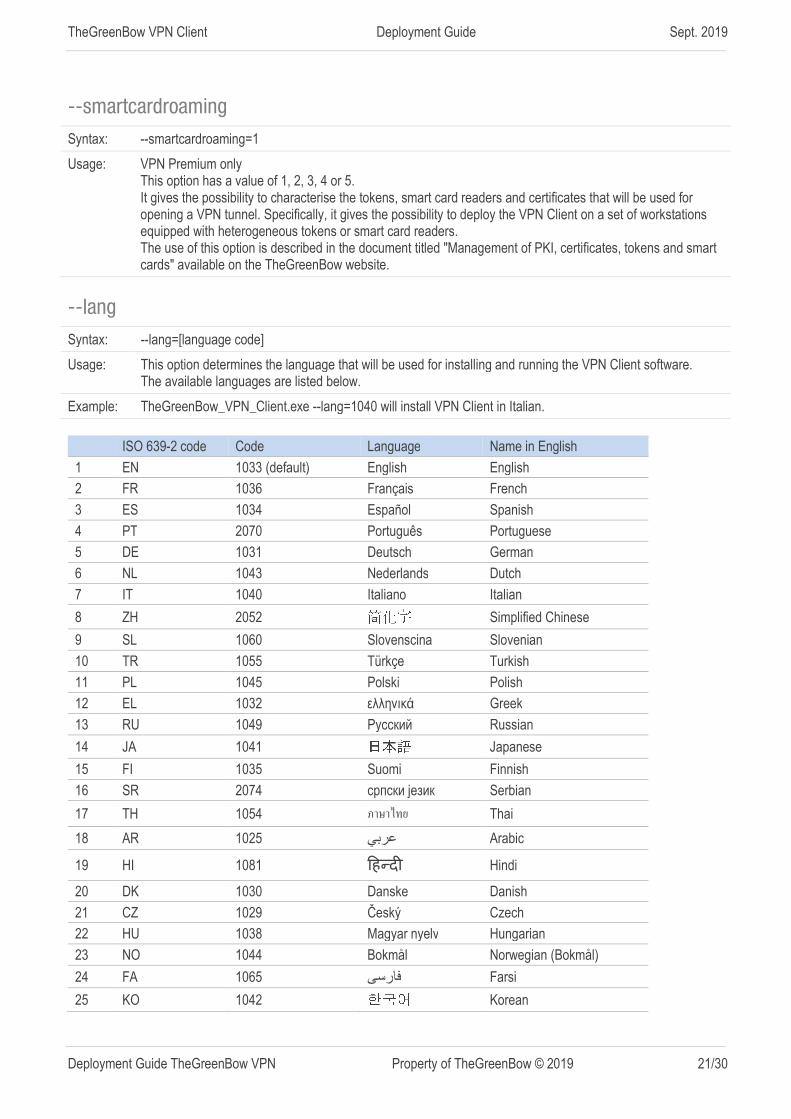
--smartcardroaming
Syntax: --smartcardroaming=1
Usage: VPN Premium only This option has a value of 1, 2, 3, 4 or 5. It gives the possibility to characterise the tokens, smart card readers and certificates that will be used for opening a VPN tunnel. Specifically, it gives the possibility to deploy the VPN Client on a set of workstations equipped with heterogeneous tokens or smart card readers. The use of this option is described in the document titled "Management of PKI, certificates, tokens and smart cards" available on the TheGreenBow website.
--lang
Syntax: --lang=[language code]
Usage: This option determines the language that will be used for installing and running the VPN Client software. The available languages are listed below.
Example: TheGreenBow_VPN_Client.exe --lang=1040 will install VPN Client in Italian.
ISO 639-2 code Code Language Name in English
1 EN 1033 (default) English English
2 FR 1036 Français French
3 ES 1034 Español Spanish
4 PT 2070 Português Portuguese
5 DE 1031 Deutsch German
6 NL 1043 Nederlands Dutch
7 IT 1040 Italiano Italian
8 ZH 2052 简化字 Simplified Chinese
9 SL 1060 Slovenscina Slovenian
10 TR 1055 Türkçe Turkish
11 PL 1045 Polski Polish
12 EL 1032 ελληνικά Greek
13 RU 1049 Руccкий Russian
14 JA 1041 日本語 Japanese
15 FI 1035 Suomi Finnish
16 SR 2074 српски језик Serbian
17 TH 1054 ภาษาไทย Thai
18 AR 1025 عربي Arabic
19 HI 1081 �ह�द� Hindi
20 DK 1030 Danske Danish
21 CZ 1029 Český Czech
22 HU 1038 Magyar nyelv Hungarian
23 NO 1044 Bokmål Norwegian (Bokmål)
24 FA 1065 فارسی Farsi
25 KO 1042 한국어 Korean
TheGreenBow VPN Client Deployment Guide Sept. 2019
Deployment Guide TheGreenBow VPN Property of TheGreenBow © 2019 22/30
8.2 Setup configuration file: vpnsetup.ini
The vpnsetup.ini file allows the user to customise the installation of TheGreenBow VPN Client. It must be located in the same folder as the executable installation file: TheGreenBow_VPN_Client.exe. The vpnsetup.ini file can be edited with any standard text editor (e.g. notepad). This file is an "ini" type file. It is organised in sections, and defines the parameters described below.
8.2.1 Activation Section This section defines the activation parameters. These parameters enable the software to activate with the TAS server (TheGreenBow Activation Server).
OSAUrl
Syntax: OSAUrl = [activation server URL]
Usage: OSAUrl is the network address of the activation server. It is used to activate the software licenses. The URL may contain an IP Address or a DNS name. It's not required to add the url prefix "http://".
OSAPort
Syntax: OSAPort = 80
Usage: OSAPort is the TCP port used for the activation exchange between the VPN Client and the activation server.
Cert
Syntax: Cert = "[certificate]"
Usage: Cert is the certificate used for the activation. It is provided by TheGreenBow. It must not be modified.
8.2.2 PKIOptions Section This section defines PKI parameters for token, smart card reader and certificate management. These parameters are described in the document "tgbvpn_ug_pki_smartcard": "Management of PKI, certificates, tokens and smart cards", Section 5.2.
8.2.3 Section AddRegKey this section defines the general operating parameters.
NoSplitTunneling
Syntax: NoSplitTunneling=01
Usage: This parameter deactivates the default route of the physical interface (using the parameter IgnoreDefaultRoute) when the tunnel is established. Only applies to tunnels with the configuration "All traffic through the tunnel".
TheGreenBow VPN Client Deployment Guide Sept. 2019
Deployment Guide TheGreenBow VPN Property of TheGreenBow © 2019 23/30
NoSplitDNS
Syntax: NoSplitDNS=01
Usage: This parameter takes the virtual interface DNS and applies them to the physical interface as well when the tunnel is established. Only applies to tunnels with the configuration "All traffic through the tunnel".
NoPinCode
Syntax: NoPinCode=01
Usage: This parameter gives the possibility not to ask for a PIN code for the tokens which do not require it. For example, Ercom's microSD is one such token.
PinTimeOut
Syntax: PinTimeOut=120
Usage: Specifies a timeout duration in seconds which will automatically close the PIN code dialog box when the time is up.
nocfgpktid
Syntax: nocfgpktid=01
Usage: This parameter will configure IKEv1 so that it becomes compatible with the Cisco ASA routers for the Mode Config function (IKEv1 accepts the "truncated" exchange Mode Config of the Cisco ASA routers).
PwdUTF8
Syntax: PwdUTF8=01
Usage: This parameter codes the X-Auth password in UTF8 before sending it to the gateway. This enables, for instance, the use of accents in X-Auth passwords.
RoutingMode
Syntax: RoutingMode=01
Usage: This parameter gives the possibility to prevent the local traffic coming from the physical interface from using the tunnel. Only the traffic coming from the virtual interface will be allowed through.
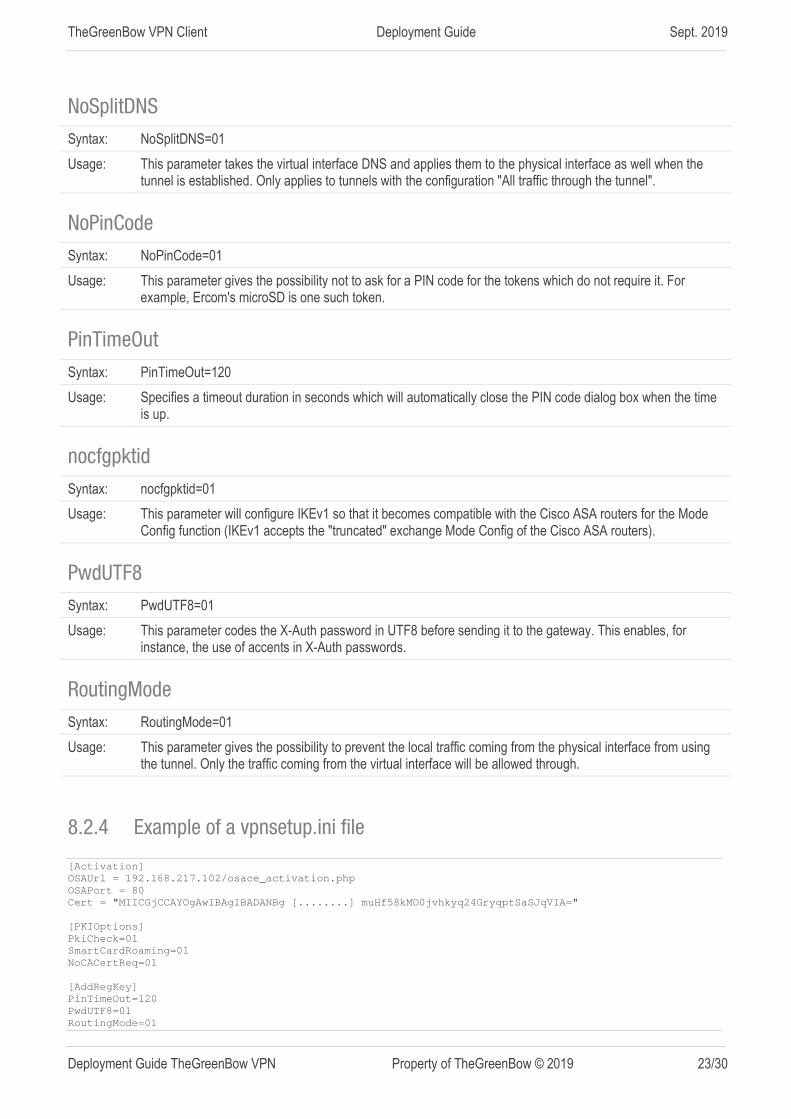
8.2.4 Example of a vpnsetup.ini file
[Activation]
OSAUrl = 192.168.217.102/osace_activation.php
OSAPort = 80
Cert = "MIICGjCCAYOgAwIBAgIBADANBg [........] muHf58kMO0jvhkyq24GryqptSaSJqVIA="
[PKIOptions]
PkiCheck=01
SmartCardRoaming=01
NoCACertReq=01
[AddRegKey]
PinTimeOut=120
PwdUTF8=01
RoutingMode=01
TheGreenBow VPN Client Deployment Guide Sept. 2019
Deployment Guide TheGreenBow VPN Property of TheGreenBow © 2019 24/30
8.3 VPN Client installation command-line options
TheGreenBow VPN Client comes equipped with a standard set of command-line options that can be used in scripts or batch files. These options give the possibility to carry out several different operations, such as opening or closing a VPN tunnel, importing or exporting a VPN security policy, etc. The syntax of these command-line options never changes: [directory]\vpnconf.exe [/option[:value]]
- [directory] is the directory in which the "vpnconf.exe" executable file is located (typically the installation directory of the VPN Client).
- If the value contains blank spaces (e.g. a directory name), it must be placed between quotation marks. - All available options are detailed below.
TheGreenBow website, accessible at the following address, contains several examples that illustrate the implementation of these command-line options: www.thegreenbow.fr/vpn_tool.html
/import
Syntax: /import:[ConfigFileName]
Usage: This option is used for importing a VPN configuration when the VPN Client is launched. This option can be used to launch the VPN Client with a specific VPN configuration. If the VPN Client is already running, this option will import and update the VPN configuration without stopping the software. [ConfigFileName] is the complete path to the file that will be imported. If the path contains blank spaces, quotation marks must be added before and after.
Example: vpnconf.exe /import:"c:\my documents\myvpnconf.tgb"
Note: If the imported VPN configuration or the access to the configuration interface (Configuration panel) is protected with a password, then /import must be used with the /pwd option. Cf Section 7.4.1 and the "/pwd" option below. Note: If the current VPN configuration is not empty, the software will display a message window asking the user whether to add or replace the imported VPN configuration. Use "/add" or "/replace" to avoid displaying this window. See below.
/importonce
Syntax: /importonce:[ConfigFileName]
Usage: This option is used to import a VPN configuration without launching the VPN Client. It can be used, among other things, in an installation or update script. If the VPN Client is already running, this option will import and update the VPN configuration without stopping the software. [ConfigFileName] is the complete path to the file that will be imported. If the path contains blank spaces, quotation marks must be added before and after.
Return: See Note on the return code below. 0: command has been executed successfully 1: file not found 2: error in the file signature 3: wrong password (the configuration is protected)
TheGreenBow VPN Client Deployment Guide Sept. 2019
Deployment Guide TheGreenBow VPN Property of TheGreenBow © 2019 25/30
4: a password is required and couldn't be obtained (password prompt window cancelled)
Example: vpnconf.exe /importonce:"c:\my documents\myvpnconf.tgb"
Note: If the imported VPN configuration or the access to the configuration interface (Configuration panel) is protected with a password, then /importonce must be used with the /pwd option. Cf Section 7.4.1 and the "/pwd" option below. Note: If the current VPN configuration is not empty, the software will display a message window asking the user whether to add or replace the imported VPN configuration. Use "/add" or "/replace" to avoid displaying this window. See below. Note: The /importonce command is preemptive and will pause the rest of the command line until it has been successfully completed. An error code will be returned in the ERRORLEVEL variable (see return codes below). If /importonce is not specified with a password, but a password is required, a dialog box opens. Note: If the user cancels the Add/Replace question, a return code of value 1 will be written in ERRORLEVEL (in a script, a user is not supposed to use /importonce if the execution should be silent).
/export
Syntax: /export:[ConfigFileName]
Usage: Gives the possibility to export a VPN security policy when launching the VPN Client software. If the software is already running, the /export option will export the VPN configuration without stopping it. [ConfigFileName] is the complete path to the file that will be imported. If the path contains blank spaces, quotation marks must be added before and after. /export can be used with /pwd in order to export a VPN security policy and protect it with a password. Cf Section 7.4.1 and the "/pwd" option below.
Example: vpnconf.exe /export:"c:\my documents\myvpnconf.tgb" vpnconf.exe /export:"c:\my documents\myvpnconf.tgb" /pwd:gq1aRe7
Note: If access to the configuration interface (Configuration panel) is password-protected, then this password must be specified in the command line with the /pwd option. Cf Section 7.4.1 and the "/pwd" option below.
/exportonce
Syntax: /exportonce:[ConfigFileName]
Usage: Gives the possibility to export a VPN security policy without launching the VPN Client software. If the software is already running, the /exportonce option will export the VPN configuration without stopping it. [ConfigFileName] is the complete path to the file that will be imported. If the path contains blank spaces, quotation marks must be added before and after. /exportonce can be used with /pwd in order to export a VPN security policy and protect it with a password. Cf Section 7.4.1 and the "/pwd" option below.
Example: vpnconf.exe /exportonce:"c:\my documents\myvpnconf.tgb" /pwd:gg1
Note: If access to the configuration interface (Configuration panel) is password-protected, then this password must be specified in the command line with the /pwd option. Cf Section 7.4.1 and the "/pwd" option below.
TheGreenBow VPN Client Deployment Guide Sept. 2019
Deployment Guide TheGreenBow VPN Property of TheGreenBow © 2019 26/30
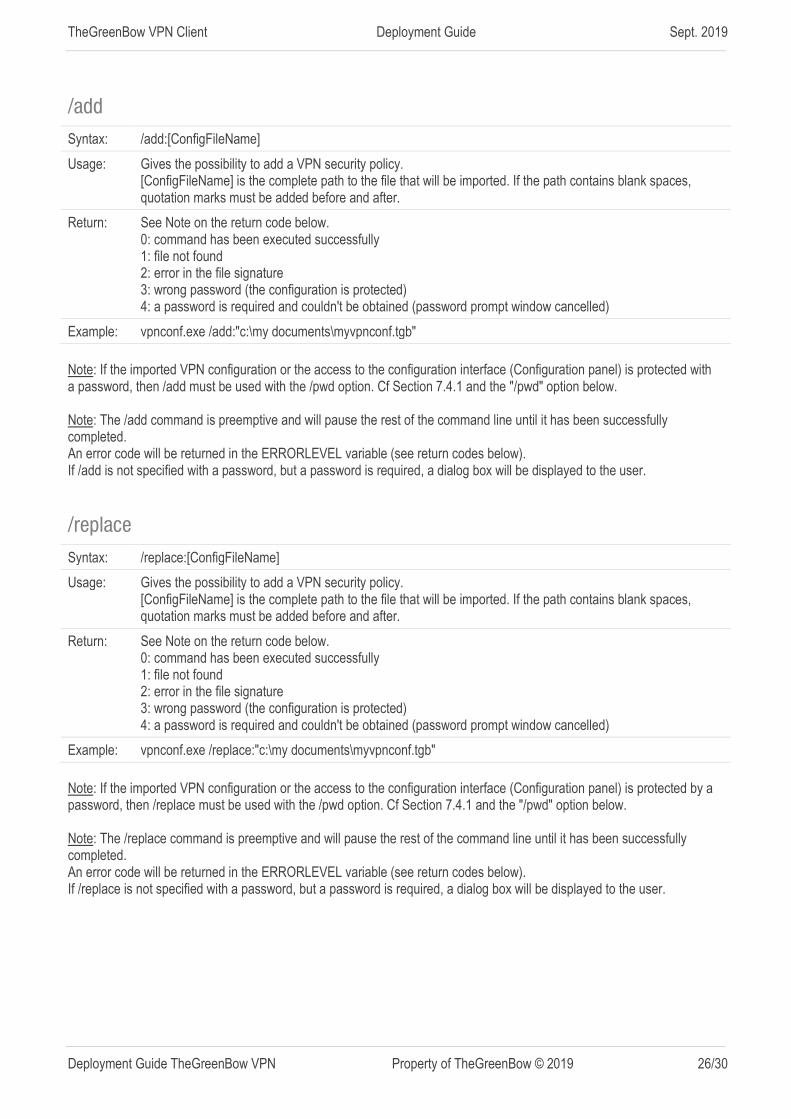
/add
Syntax: /add:[ConfigFileName]
Usage: Gives the possibility to add a VPN security policy. [ConfigFileName] is the complete path to the file that will be imported. If the path contains blank spaces, quotation marks must be added before and after.
Return: See Note on the return code below. 0: command has been executed successfully 1: file not found 2: error in the file signature 3: wrong password (the configuration is protected) 4: a password is required and couldn't be obtained (password prompt window cancelled)
Example: vpnconf.exe /add:"c:\my documents\myvpnconf.tgb"
Note: If the imported VPN configuration or the access to the configuration interface (Configuration panel) is protected with a password, then /add must be used with the /pwd option. Cf Section 7.4.1 and the "/pwd" option below. Note: The /add command is preemptive and will pause the rest of the command line until it has been successfully completed. An error code will be returned in the ERRORLEVEL variable (see return codes below). If /add is not specified with a password, but a password is required, a dialog box will be displayed to the user.
/replace
Syntax: /replace:[ConfigFileName]
Usage: Gives the possibility to add a VPN security policy. [ConfigFileName] is the complete path to the file that will be imported. If the path contains blank spaces, quotation marks must be added before and after.
Return: See Note on the return code below. 0: command has been executed successfully 1: file not found 2: error in the file signature 3: wrong password (the configuration is protected) 4: a password is required and couldn't be obtained (password prompt window cancelled)
Example: vpnconf.exe /replace:"c:\my documents\myvpnconf.tgb"
Note: If the imported VPN configuration or the access to the configuration interface (Configuration panel) is protected by a password, then /replace must be used with the /pwd option. Cf Section 7.4.1 and the "/pwd" option below. Note: The /replace command is preemptive and will pause the rest of the command line until it has been successfully completed. An error code will be returned in the ERRORLEVEL variable (see return codes below). If /replace is not specified with a password, but a password is required, a dialog box will be displayed to the user.

TheGreenBow VPN Client Deployment Guide Sept. 2019
Deployment Guide TheGreenBow VPN Property of TheGreenBow © 2019 27/30
/pwd
Syntax: /pwd:[Password]
Usage: Gives the possibility to specify a password for import and export operations on VPN security policies. This option is used with the options: "/import", "/importonce", "/add", "/replace", "/export" and "/exportonce". In the command line, the "/pwd" option must be specified after the import or export options.
Example: vpnconf.exe /import:"c:\my documents\myvpnconf.tgb" /pwd=mypwd
Note: If access to the Configuration panel is password-protected, then this password must be specified for every import/export operation. The very same "/pwd" option is used to specify this password. This means that when the access to the Configuration panel is protected by a password, it is not possible to import a configuration that is protected by a different password. See Section 7.4.1 for more details on all possible operations.
/stop
Syntax: /stop
Usage: Closes all VPN tunnels currently open and quits VPN Client.
Example: vpnconf.exe /stop
/open
Syntax: /open:[TunnelName(1)]
Usage: Gives the possibility to open a VPN tunnel from a command line.
Return: 0 : Tunnel is closed 2 : Tunnel is open Others: See the list of return codes below
Example: "C:\Program Files\TheGreenBow\TheGreenBow VPN\vpnconf" /open:tgbtest-tgbtest
@echo return = %ERRORLEVEL%
Pause
/status
Syntax: /status:[TunnelName(1)]
Usage: Gives the possibility to get the status of a VPN tunnel from a command line.
Return: 0 : VPN tunnel is closed 1 : VPN tunnel is being opened 2 : VPN tunnel is open 3 : VPN tunnel is being closed 4 : Error opening VPN tunnel Others: See the list of return codes below
Example:
"C:\Program Files\TheGreenBow\TheGreenBow VPN\vpnconf" /status:tgbtest-tgbtest
@echo return = %ERRORLEVEL%
pause

TheGreenBow VPN Client Deployment Guide Sept. 2019
Deployment Guide TheGreenBow VPN Property of TheGreenBow © 2019 28/30
/close
Syntax: /close:[TunnelName(1)]
Usage: Gives the possibility to close a VPN tunnel from a command line.
Return: 0 : VPN tunnel is closed Others: See the list of return codes below
Example: vpnconf.exe /close:"Home gateway-cnx1"
(quotation marks are necessary because the name of the tunnel contains blank spaces)
/closeall
Syntax: vpnconf.exe /closeall
Usage: Closes all VPN tunnels currently open.
Return: 0 : All VPN tunnels are closed Others: See the list of return codes below
Example: vpnconf.exe /closeall
/resetike
Syntax: vpnconf.exe /resetike
Usage: Restarts the IKE service from a command line.
Return: 0 : IKE service has restarted Others: See the list of return codes below
Example: vpnconf.exe /resetike
TunnelName
(1) In this section the tunnel name is composed as follows:
Tunnel Name
IKEv1 Phase1-Phase2
IKEv2 IKEAuth-ChildSA
SSL TLS
Return codes for the command-line options
Several command-line options (/open, /close, /status, /closeall, /resetike) can return the following codes: -1, -2, -3: Unable to find the VPN Client instance which should execute the command. 100 to 199: Command execution timeout. 200 to 299: Command execution timeout: software is not responding. 300: Internal error. 500: Unable to find the specified VPN tunnel. 1000 to 1999: An error occurred while opening the VPN tunnel. > 10000: Internal error.
TheGreenBow VPN Client Deployment Guide Sept. 2019
Deployment Guide TheGreenBow VPN Property of TheGreenBow © 2019 29/30
9 Contact
9.1 Information
All the information on TheGreenBow products is available on the website: www.thegreenbow.com
9.2 Sales
Phone: +33.1.43.12.39.30 Email: [email protected]
9.3 Support
Several links related to support activities are available on the TheGreenBow website:
Support
http://www.thegreenbow.fr/support.html
Online help
http://www.thegreenbow.com/support_flow.html?product=vpn&lang=fr
FAQ
http://www.thegreenbow.fr/vpn_faq.html
Contact
The Technical Support department can be contacted using the forms available online or at the following address: [email protected]

Secure, Strong, Simple TheGreenBow Security Software
![[MS-WDSOSD]: Windows Deployment Services · PDF fileWindows Deployment Services Operation System ... Services Operation System Deployment Protocol . Windows Deployment Services Operation](https://static.fdocuments.us/doc/165x107/5ab28f017f8b9abc2f8dbd37/ms-wdsosd-windows-deployment-services-deployment-services-operation-system.jpg)