Textiles Committee Govt. of India Ministry of...
35
Textiles Committee Govt. of India Ministry of Textiles Course material under ISDS for Dobby Hand loom Weaver (Frame Loom)
Transcript of Textiles Committee Govt. of India Ministry of...
Textiles Committee
Govt. of India
Ministry of Textiles
Course material under ISDS for Dobby
Hand loom Weaver (Frame Loom)
2
TABLE OF CONTENTS
Contents Page No.
Basic textile terms 4
Weaving 4
Introduction of Handloom and Dobby 5
Classification of Dobby 6-7
Sequence of operations in weaving 8
Identification of parts 9
Major Parts of Hand Loom 10-12
Motions of loom
13-14
BASIC WEAVES 14-16
Mounting of Hand Loom 17
Preparation of Hand Loom for weaving 18
Operations for Handloom 19-21
Scope of Dobby 22
Working of dobby and pegging 22-28
Other work practices 28-29
Weavers knot
29-31
Fabric defects 31-33
Precautionary Measures
34-35
Contingencies
35-36
TABLE OF CONTENTS
3
1. BASIC TEXTILES TERMS:
Yarn: A continuous strand of fibers/filament, twisted /non twisted, it is basic raw
material for weaving.
Type of Yarns: single yarn, double or multi fold yarn, spun yarn & filament yarn
etc.
Yarn count:
Yarn count is the numerical expression of yarn, which defines its fineness or
coarseness. (Linear density).
Yarn count system:
Indirect system: English count (Ne), Worsted Count etc.
i.e. Higher the yarn number, finer the yarn.
Direct System: Tex, Denier
i.e. Higher the yarn number , Coarser the yarn.
Similarly numerical expression of fineness or coarseness of sliver & roving are
called Hank.
Note: English (Ne) count system is commonly followed India.
English Count: No. of Hanks of length 840 yds weighing in 1 pound
1yds: 0.9144mtrs
1lbs: 0.453 Kgs.
e.g. 40s Ne = 40 hanks of 840 yds weighs 1 lbs.
20s Ne = 20 hanks of 840 yds weighs 1 lbs.
2. WEAVING:
Weaving is a process of fabric production in which two distinct sets of yarns are
interlaced at right angles to each other to form a fabric or cloth.
The lengthwise yarns are called the warp yarn and the widthwise yarns are called
the weft yarn. Selvedge: The length wise running edges of woven fabric are known as
selvedges. It prevents unraveling of warp yarns.
4
What is HANDLOOM?
Hand loom
1. A hand loom is a simple machine used for weaving. In a wooden vertical-shaft looms, the heddles are fixed in place in the shaft. This loom is powered by hand. The warp threads pass alternately through a heddle, and through a space between the heddles (the shed), so that raising the shaft raises half the threads (those passing through the heddles), and lowering the shaft lowers the same threads—the threads passing through the spaces between the heddles remain in place. 2. It is a manual operating system. 3. Shedding is done by pedal and picking and beating is done manually. 4. Less production as compare to power loom. 5. Slow running speed as compare to power loom. 6. Initial investment is low as compare to power loom. Basically there are two types of handloom: 1. Frame loom 2. Pit loom These could be further divided in to fly shuttle and throw shuttle looms.
What is Dobby? Dobby:
The Dobby is a shedding device placed on the top of a loom in order to produce figure
patterns by using a larger no of healds than the capacity of Tappet.
Dobby is the mechanism which attached with the loom to control the movement heald
shaft.
Scope of Dobby Shedding Mechanism:
When a pattern is beyond the range of a tappet either in the number of shafts to be
manipulated or in the picks to a repeat of the pattern and is at the same item too small
to be economically produced by a jacquard, a machine is employed which is known as a
Dobby. The number of shafts it may be called upon to actuate varies between 6 to 40.
The no of heald shaft in a dobby is given below:
Dobby- Theoretical: 48
Practical (Wool & allied):36
Practical (cotton & allied): Maximum 24
(At least 12 heald shafts are used)

5
In this case the healds are all operated by jacks and levers and occupy less space as
compared to tappet shedding mechanism. The Dobby Shedding mechanism gives a
good scope for weaving designs repeating a large no of picks and ends.
It is very easy to change the pattern, whenever a new design is required to be woven.
Classification of dobby:
1. According to lift:
(a) Single lift
(b) Double lift
2. According to figuring capacity (no. of heald shaft):
48’s, 36’s, 24’s, 20’s, 16’s, 12’s
3. According to position of heald shaft:
(a) Vertical
(b) Horizontal
4. According to driving of heald shaft:
(a) Positive
(b) Negative
5. According to shed:
(a) Bottom close shed
(b) Centre close shed
(c) Semi-open shed
(d) Open shed
6. According to no. of jack lever:
(a) Single jack lever
(b) Double jack lever
7. Broadly dobby shedding can be classified as below:
(a) Ordinary dobby (i.e. single jack lever, single lift dobby)
(b) Special dobby (i.e. double jack lever, 48’s dobby)
Positive and negative dobby:
Positive dobby: The dobby which can raise and lower the heald frame without the
use of an additional reversing motion is called positive dobby.For weaving heavy fabrics
such as fancy woolen and worsteds, it is better to use a positive dobby.
Negative dobby: This kind of dobby only raises the shafts. Lowering is carried out
by spring under motion. Negative dobbies are used for light to low medium weight
fabrics.
6
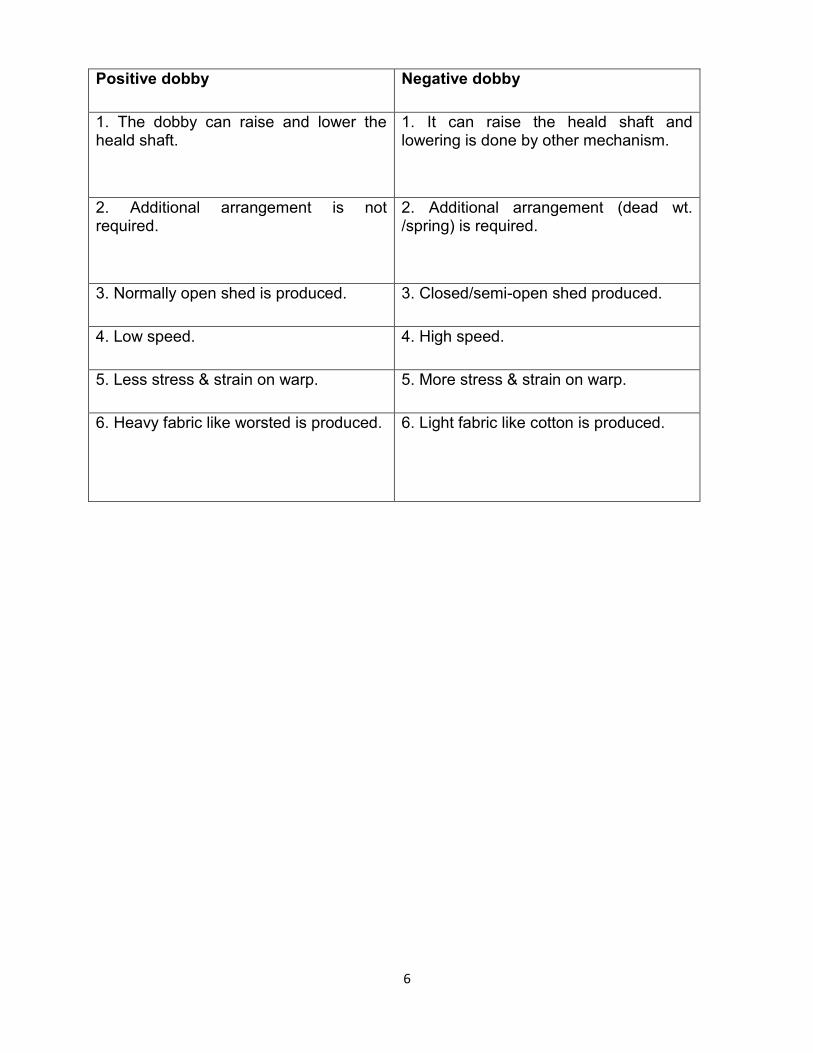
Positive dobby Negative dobby
1. The dobby can raise and lower the heald shaft.
1. It can raise the heald shaft and lowering is done by other mechanism.
2. Additional arrangement is not required.
2. Additional arrangement (dead wt. /spring) is required.
3. Normally open shed is produced. 3. Closed/semi-open shed produced.
4. Low speed. 4. High speed.
5. Less stress & strain on warp. 5. More stress & strain on warp.
6. Heavy fabric like worsted is produced. 6. Light fabric like cotton is produced.
7
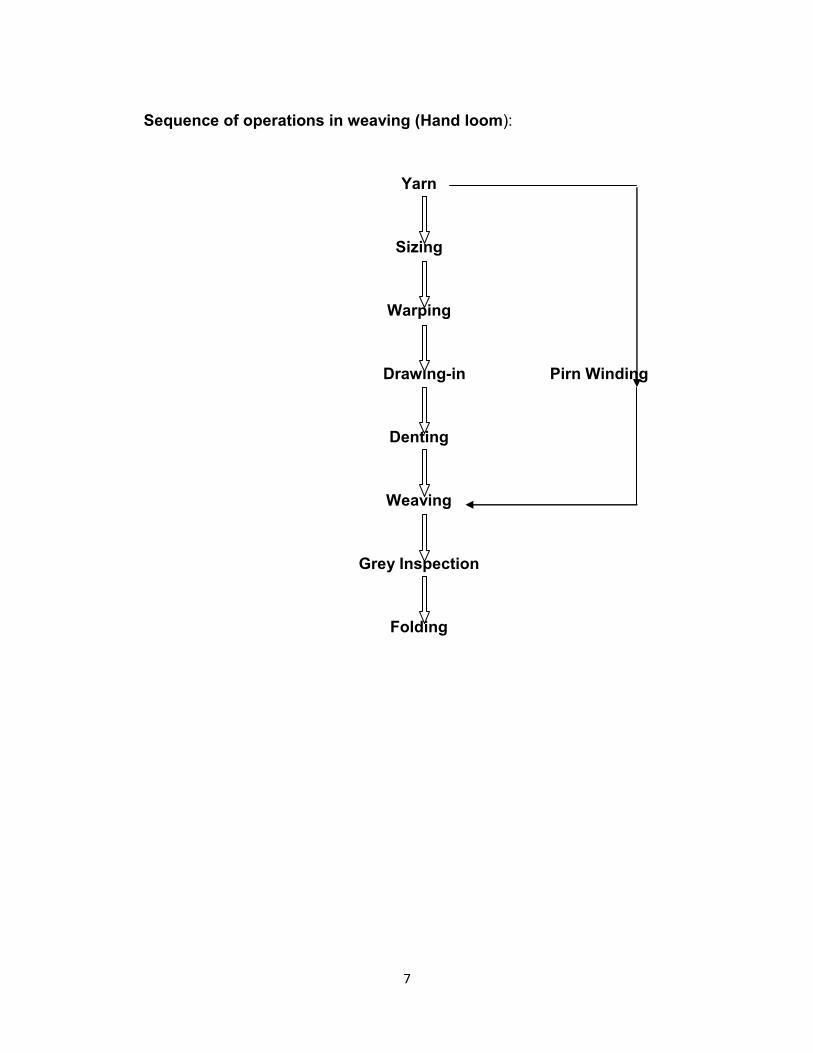
Sequence of operations in weaving (Hand loom):
Yarn
Sizing
Warping
Drawing-in Pirn Winding
Denting
Weaving
Grey Inspection
Folding
8
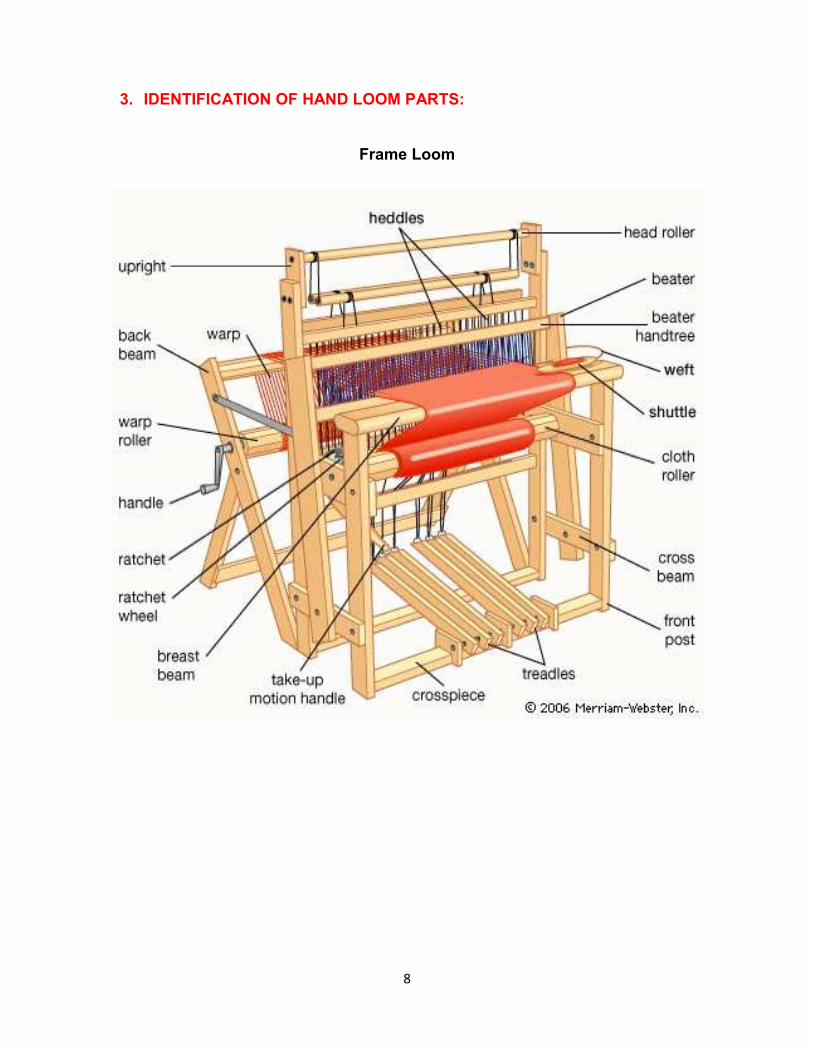
3. IDENTIFICATION OF HAND LOOM PARTS:
Frame Loom
9
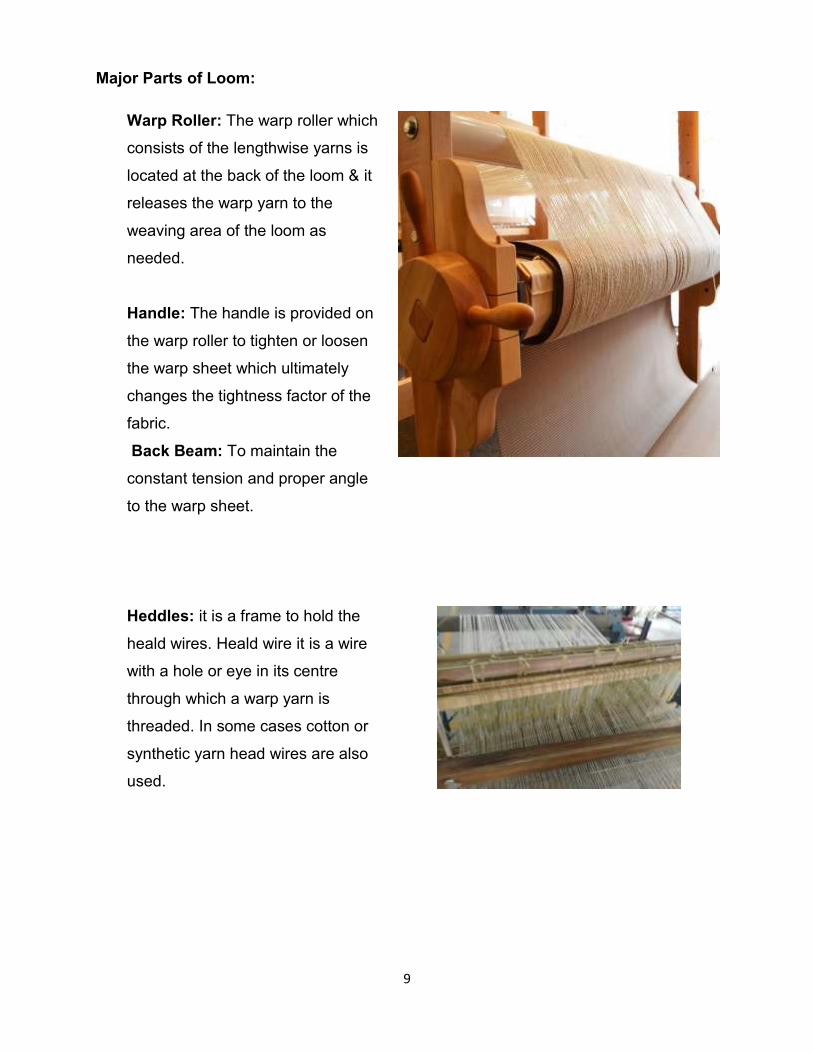
Major Parts of Loom:
Warp Roller: The warp roller which
consists of the lengthwise yarns is
located at the back of the loom & it
releases the warp yarn to the
weaving area of the loom as
needed.
Handle: The handle is provided on
the warp roller to tighten or loosen
the warp sheet which ultimately
changes the tightness factor of the
fabric.
Back Beam: To maintain the
constant tension and proper angle
to the warp sheet.
Heddles: it is a frame to hold the
heald wires. Heald wire it is a wire
with a hole or eye in its centre
through which a warp yarn is
threaded. In some cases cotton or
synthetic yarn head wires are also
used.
10
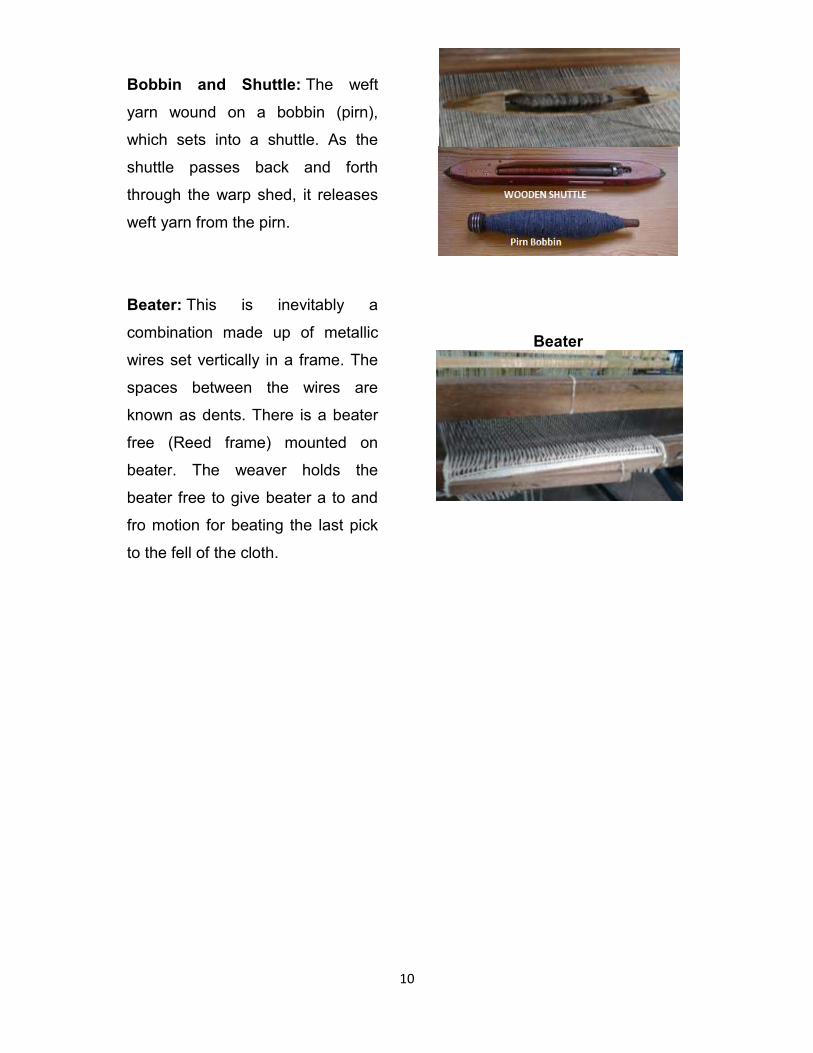
Bobbin and Shuttle: The weft
yarn wound on a bobbin (pirn),
which sets into a shuttle. As the
shuttle passes back and forth
through the warp shed, it releases
weft yarn from the pirn.
Beater: This is inevitably a
combination made up of metallic
wires set vertically in a frame. The
spaces between the wires are
known as dents. There is a beater
free (Reed frame) mounted on
beater. The weaver holds the
beater free to give beater a to and
fro motion for beating the last pick
to the fell of the cloth.
Beater
11
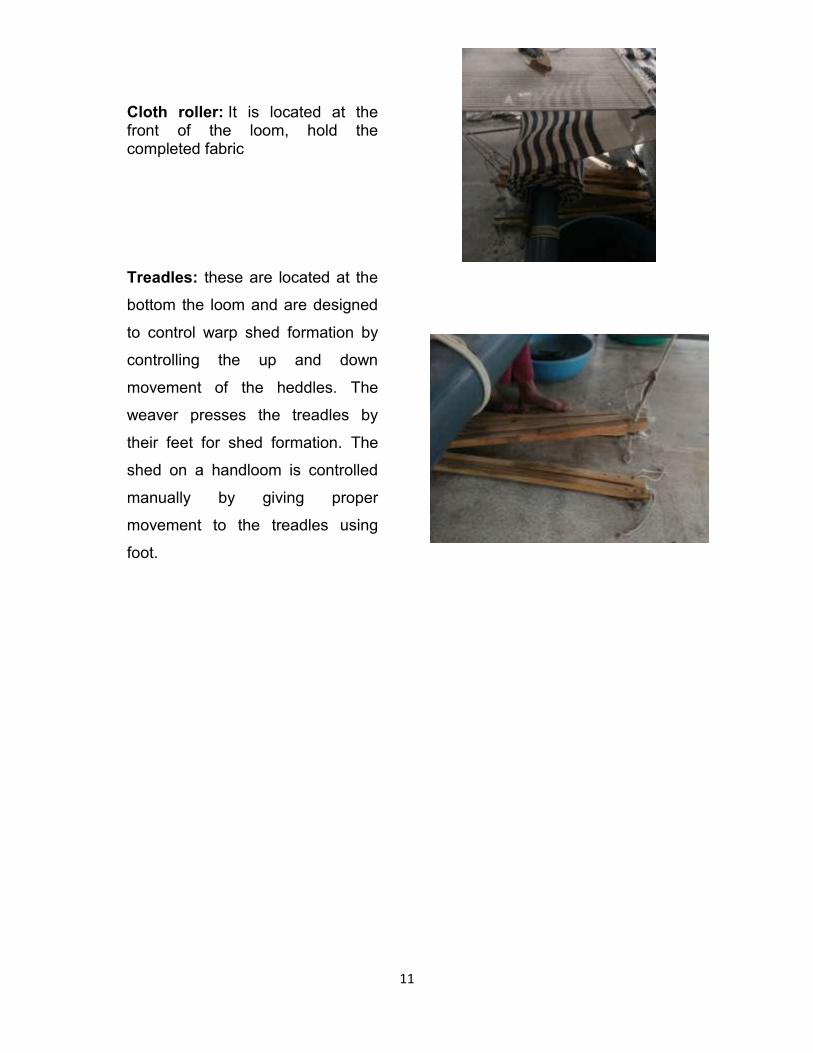
Cloth roller: It is located at the front of the loom, hold the completed fabric
Treadles: these are located at the
bottom the loom and are designed
to control warp shed formation by
controlling the up and down
movement of the heddles. The
weaver presses the treadles by
their feet for shed formation. The
shed on a handloom is controlled
manually by giving proper
movement to the treadles using
foot.
12
MOTIONS OF LOOM:
Primary motions:
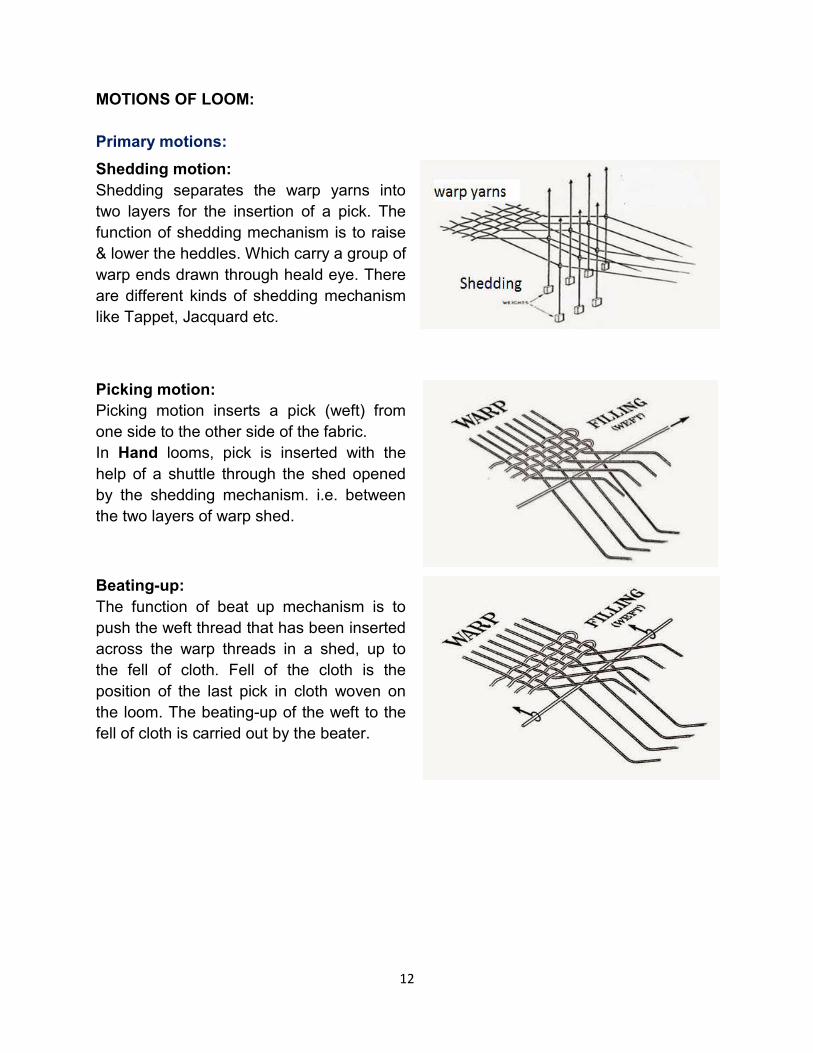
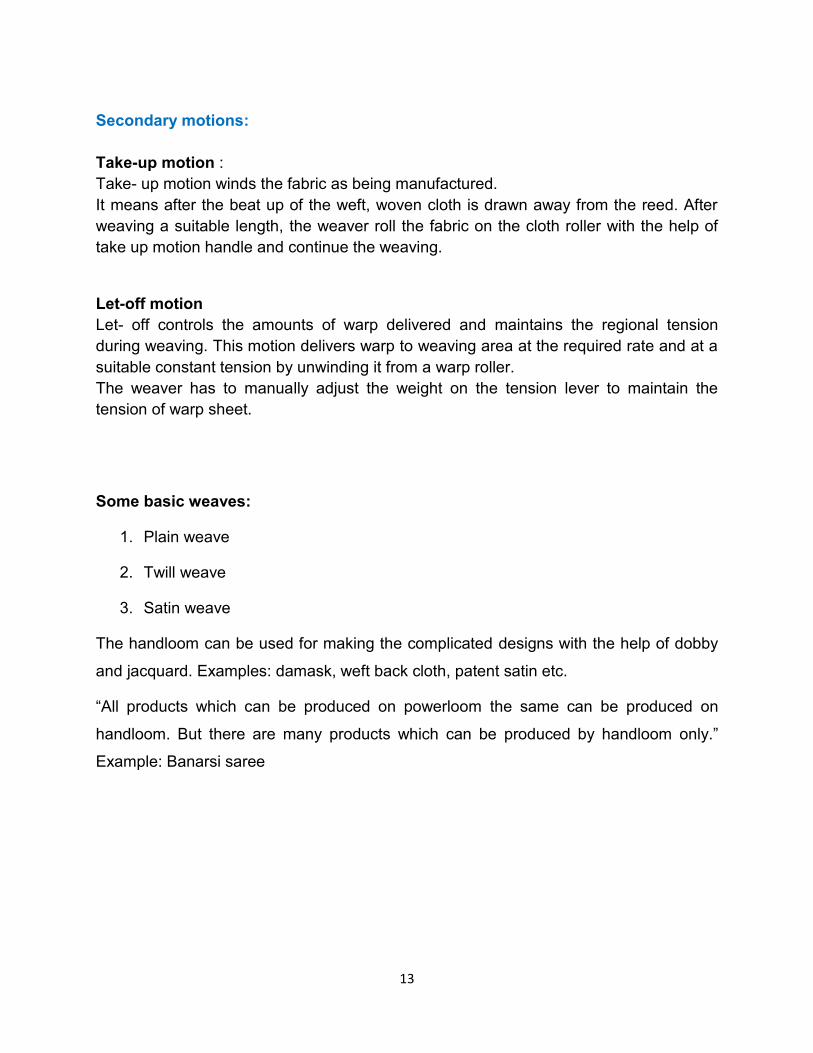
Shedding motion:
Shedding separates the warp yarns into
two layers for the insertion of a pick. The
function of shedding mechanism is to raise
& lower the heddles. Which carry a group of
warp ends drawn through heald eye. There
are different kinds of shedding mechanism
like Tappet, Jacquard etc.
Picking motion:
Picking motion inserts a pick (weft) from
one side to the other side of the fabric.
In Hand looms, pick is inserted with the
help of a shuttle through the shed opened
by the shedding mechanism. i.e. between
the two layers of warp shed.
Beating-up:
The function of beat up mechanism is to
push the weft thread that has been inserted
across the warp threads in a shed, up to
the fell of cloth. Fell of the cloth is the
position of the last pick in cloth woven on
the loom. The beating-up of the weft to the
fell of cloth is carried out by the beater.
13
Secondary motions:
Take-up motion :
Take- up motion winds the fabric as being manufactured.
It means after the beat up of the weft, woven cloth is drawn away from the reed. After
weaving a suitable length, the weaver roll the fabric on the cloth roller with the help of
take up motion handle and continue the weaving.
Let-off motion
Let- off controls the amounts of warp delivered and maintains the regional tension
during weaving. This motion delivers warp to weaving area at the required rate and at a
suitable constant tension by unwinding it from a warp roller.
The weaver has to manually adjust the weight on the tension lever to maintain the
tension of warp sheet.
Some basic weaves:
1. Plain weave
2. Twill weave
3. Satin weave
The handloom can be used for making the complicated designs with the help of dobby
and jacquard. Examples: damask, weft back cloth, patent satin etc.
“All products which can be produced on powerloom the same can be produced on
handloom. But there are many products which can be produced by handloom only.”
Example: Banarsi saree

14
Figure 1: Plain Weave
Denting plan H2 X
0
0
Drafting plan H1 X
Plain weave
(T1: Treadle 1; T2: Treadle 2;
H1: Heddle 1; H2 Heddle 2
X: Heddle is tied with treadle)
T2 T1
Tie up plan
15
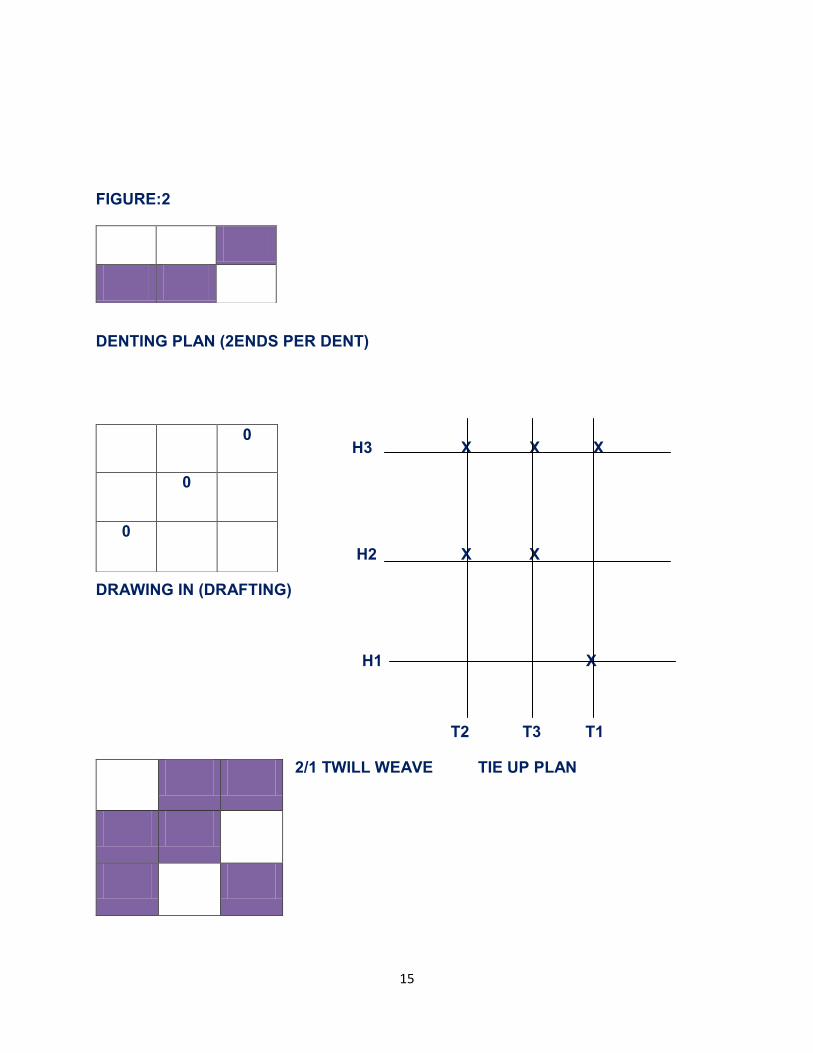
FIGURE:2
DENTING PLAN (2ENDS PER DENT)
H3 X X X
H2 X X
DRAWING IN (DRAFTING)
H1 X
T2 T3 T1
2/1 TWILL WEAVE TIE UP PLAN
0
0
0
16
Mounting of Loom:
First of all it has to be decided how many heddles and treadles need to be used to make
a particular design or weave. It is decided by drawing one repeat of the weave as
shown in figure 1&2. How many different warp and weft interlacements are there, that
will decide the number of treadles and heddles required? As shown in the figure the
plain weave is having only two different interlacement for warp and weft so only two
treadles and heddles are required.
In the handloom weaving, weaver has to do drafting, denting, as well as the tying up of
the treadles with the heddles according to the design required. The related terms are
explained as below:
Drafting or drawing in: After getting the warp beam the weaver has to pass the warp
through the heddles (heald eye) as per the drafting order. This is called drafting or
drawing in. As shown in the above figure 1 the 1st end will be passed through the first
heald and 2nd through the second heald. the 3rd end will again pass through the first
heddle and so on.
Denting: it is the process of passing the drawing in ends through the reed for beating
purpose. There can be two ends per dent or three ends per dent as per the
requirement. More clearly the number of ends per dent depends upon the number and
warp count. In the above figures two ends per dent is shown. In case of selvedge the
denting order may be different as compared to the main body of the fabric.
Tie up: Once the weaver finishes the drawing in and denting, the next process he/she
has to do is to tie the healds with the treadles. As shown in figure 1 the first treadle is
tied with first heald and second treadle is tied with second heald.
Number of heald and treadles to be used depends upon the weave. In figure 2 only two
healds are required as it is a plain weave. Likewise for weave 2/1 twill 3 healds and 3
treadles will be required.
17
Preparation of the loom:
To check the looms parameter like warp tension, proper opening of shed, reed
movement etc, whether the loom is compatible for weaving or not. Adjustments have to
be done by the weaver accordingly, the weaver should take precautions, to minimize or
avoid the yarn breakages. Weaver should check the shed opening by false picking and
reed movement by false beating.
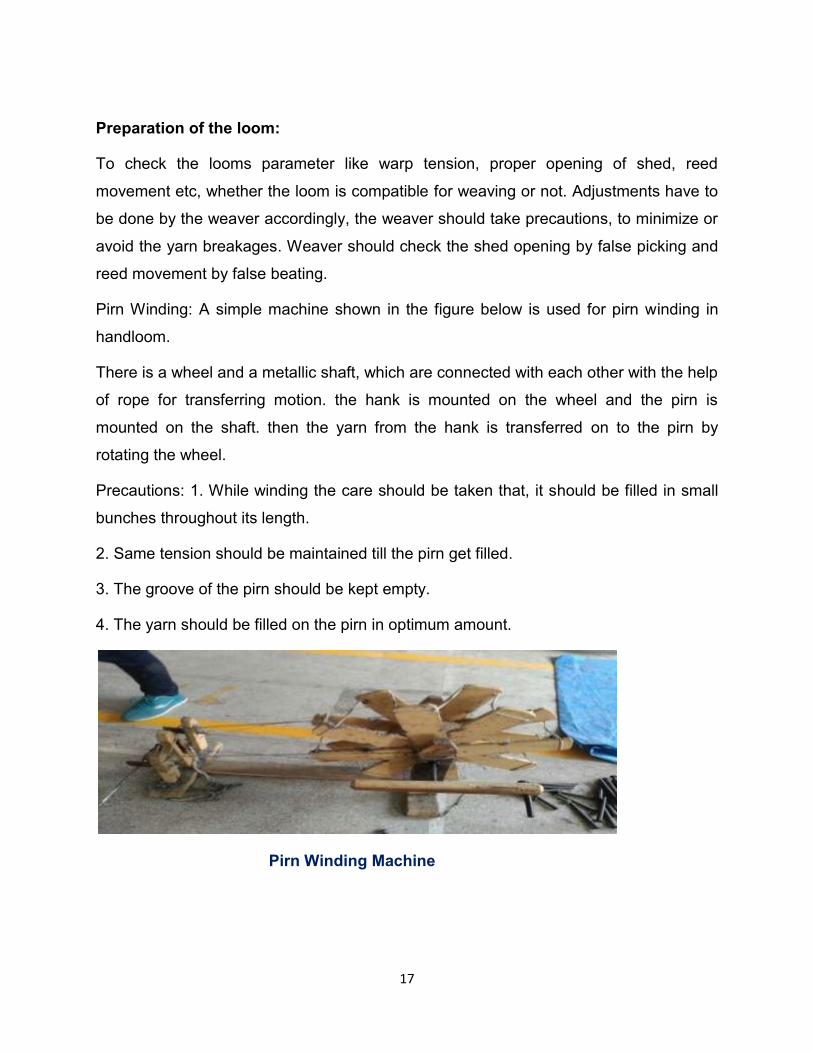
Pirn Winding: A simple machine shown in the figure below is used for pirn winding in
handloom.
There is a wheel and a metallic shaft, which are connected with each other with the help
of rope for transferring motion. the hank is mounted on the wheel and the pirn is
mounted on the shaft. then the yarn from the hank is transferred on to the pirn by
rotating the wheel.
Precautions: 1. While winding the care should be taken that, it should be filled in small
bunches throughout its length.
2. Same tension should be maintained till the pirn get filled.
3. The groove of the pirn should be kept empty.
4. The yarn should be filled on the pirn in optimum amount.
Pirn Winding Machine
18
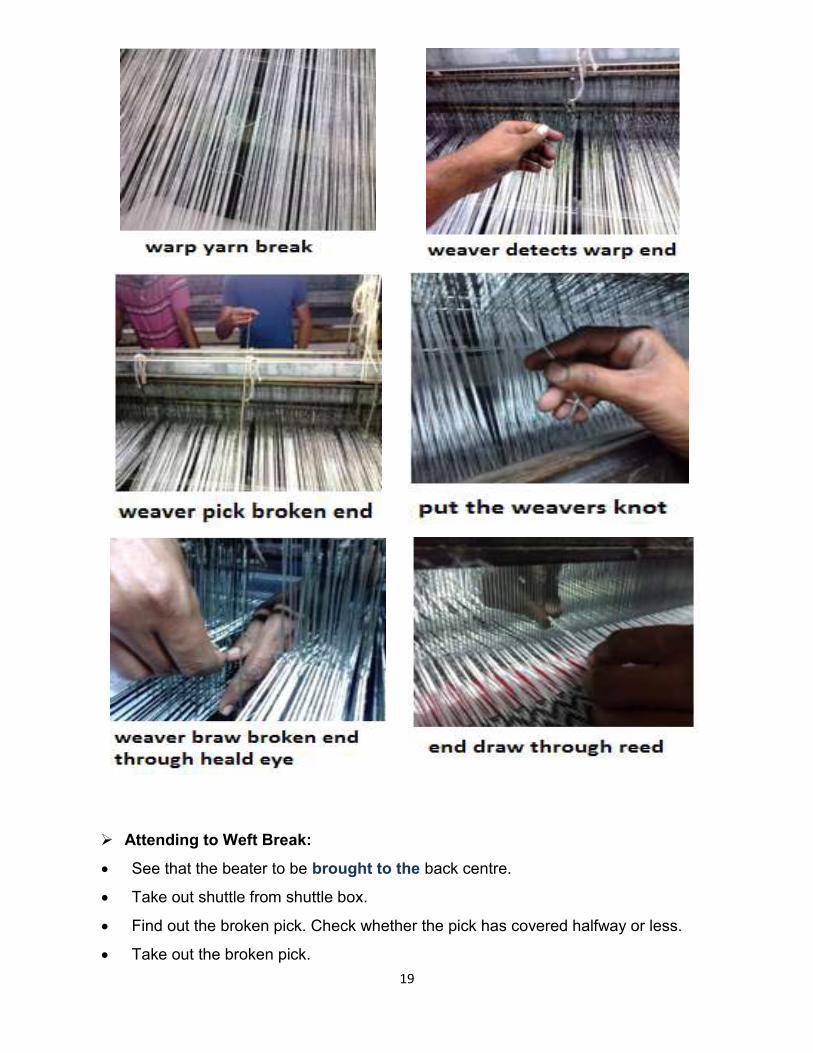
4. Operations for Handloom
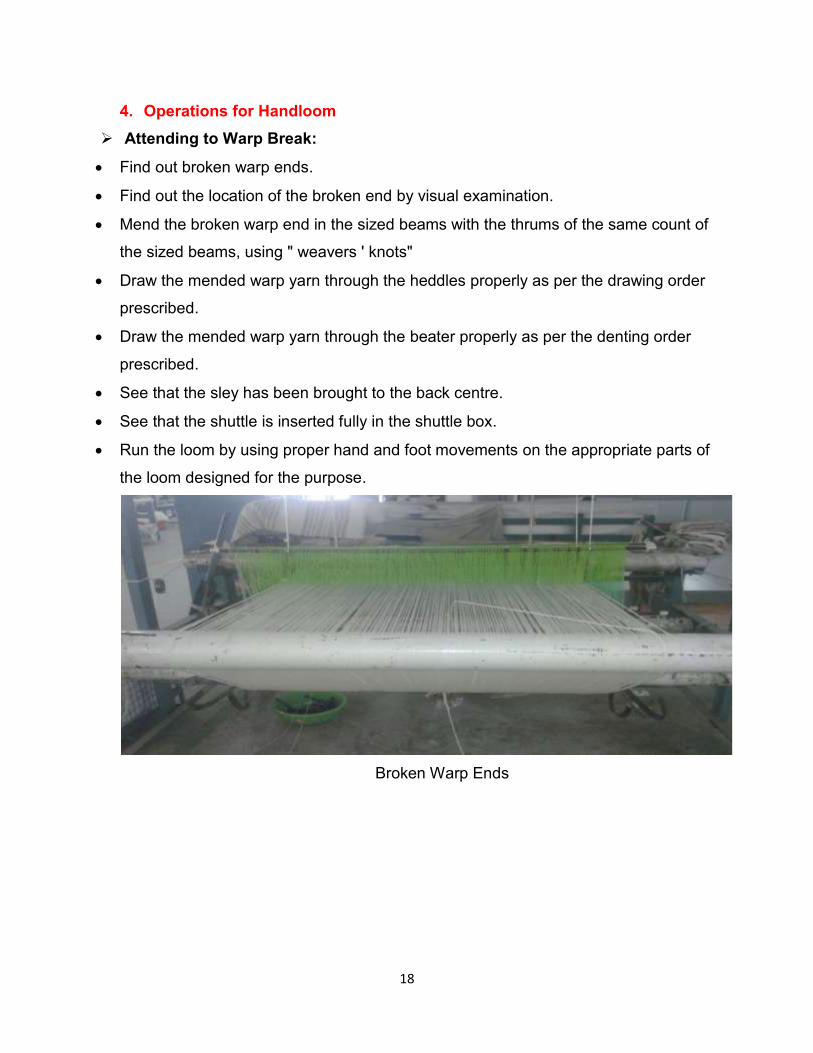
Attending to Warp Break:
Find out broken warp ends.
Find out the location of the broken end by visual examination.
Mend the broken warp end in the sized beams with the thrums of the same count of
the sized beams, using " weavers ' knots"
Draw the mended warp yarn through the heddles properly as per the drawing order
prescribed.
Draw the mended warp yarn through the beater properly as per the denting order
prescribed.
See that the sley has been brought to the back centre.
See that the shuttle is inserted fully in the shuttle box.
Run the loom by using proper hand and foot movements on the appropriate parts of
the loom designed for the purpose.
Broken Warp Ends
19
Attending to Weft Break:
See that the beater to be brought to the back centre.
Take out shuttle from shuttle box.
Find out the broken pick. Check whether the pick has covered halfway or less.
Take out the broken pick.
20
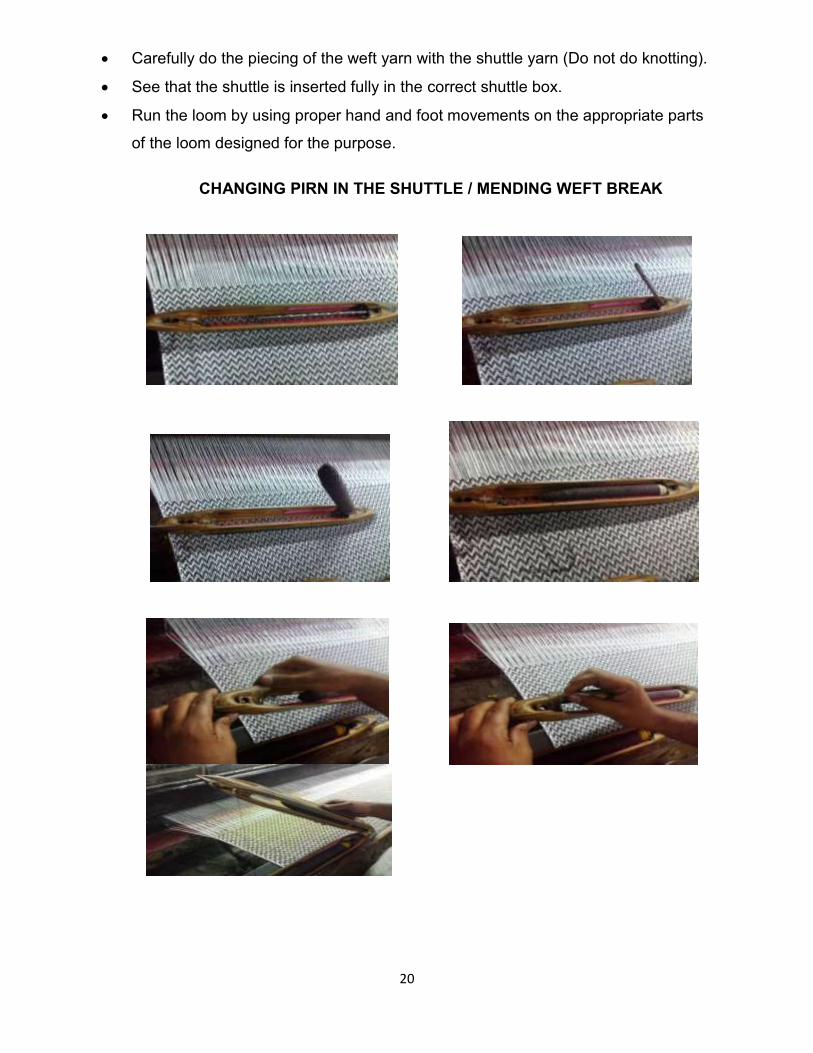
Carefully do the piecing of the weft yarn with the shuttle yarn (Do not do knotting).
See that the shuttle is inserted fully in the correct shuttle box.
Run the loom by using proper hand and foot movements on the appropriate parts
of the loom designed for the purpose.
CHANGING PIRN IN THE SHUTTLE / MENDING WEFT BREAK
21
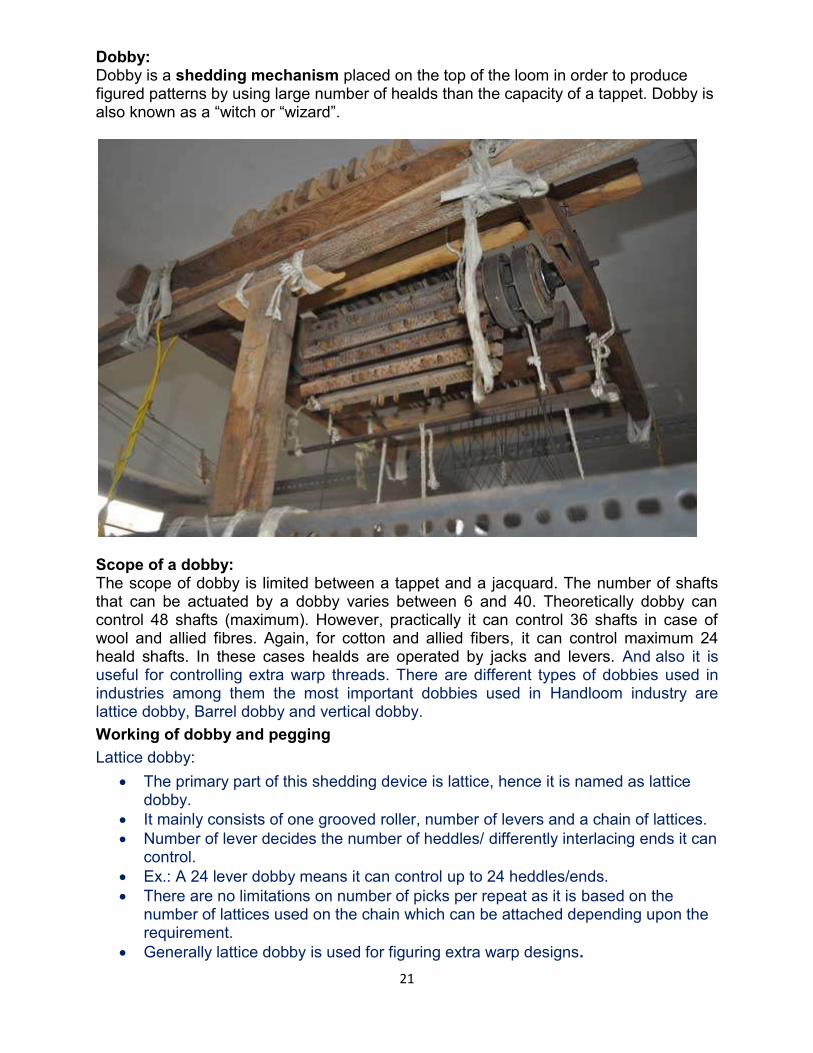
Dobby: Dobby is a shedding mechanism placed on the top of the loom in order to produce figured patterns by using large number of healds than the capacity of a tappet. Dobby is also known as a “witch or “wizard”.
Scope of a dobby: The scope of dobby is limited between a tappet and a jacquard. The number of shafts that can be actuated by a dobby varies between 6 and 40. Theoretically dobby can control 48 shafts (maximum). However, practically it can control 36 shafts in case of wool and allied fibres. Again, for cotton and allied fibers, it can control maximum 24 heald shafts. In these cases healds are operated by jacks and levers. And also it is useful for controlling extra warp threads. There are different types of dobbies used in industries among them the most important dobbies used in Handloom industry are lattice dobby, Barrel dobby and vertical dobby.
Working of dobby and pegging
Lattice dobby:
The primary part of this shedding device is lattice, hence it is named as lattice dobby.
It mainly consists of one grooved roller, number of levers and a chain of lattices.
Number of lever decides the number of heddles/ differently interlacing ends it can control.
Ex.: A 24 lever dobby means it can control up to 24 heddles/ends.
There are no limitations on number of picks per repeat as it is based on the number of lattices used on the chain which can be attached depending upon the requirement.
Generally lattice dobby is used for figuring extra warp designs.
22
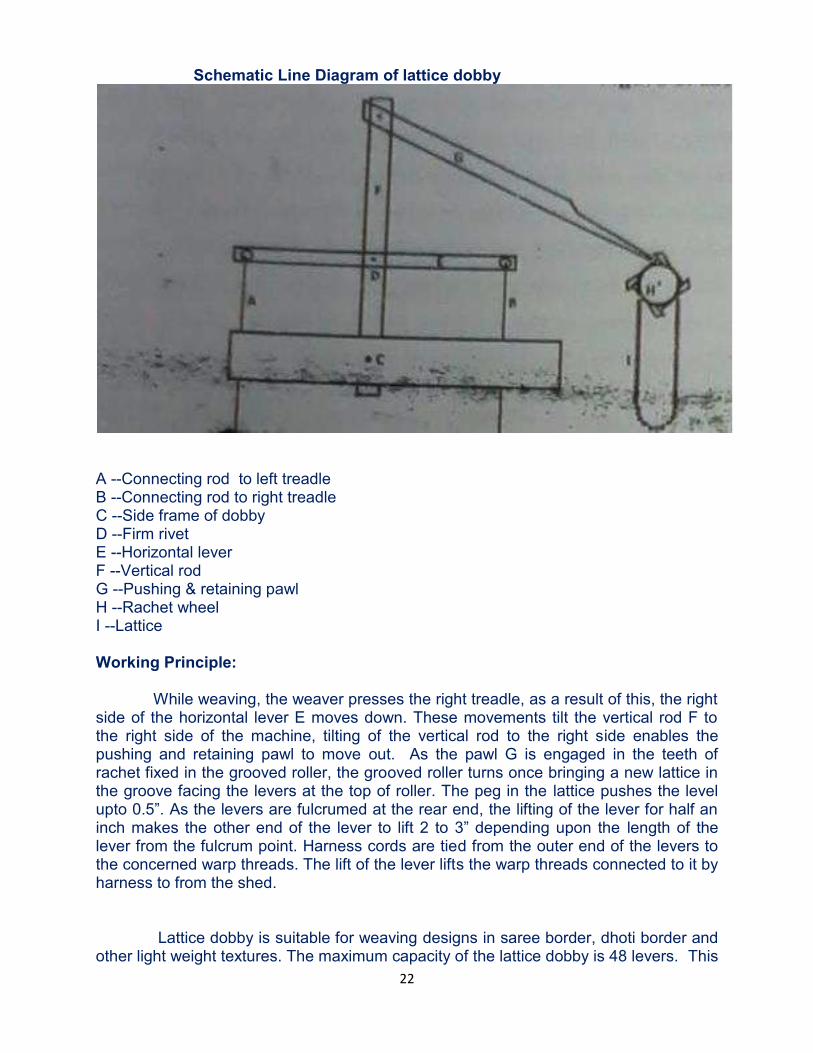
Schematic Line Diagram of lattice dobby
A --Connecting rod to left treadle B --Connecting rod to right treadle C --Side frame of dobby D --Firm rivet E --Horizontal lever F --Vertical rod G --Pushing & retaining pawl H --Rachet wheel I --Lattice Working Principle: While weaving, the weaver presses the right treadle, as a result of this, the right side of the horizontal lever E moves down. These movements tilt the vertical rod F to the right side of the machine, tilting of the vertical rod to the right side enables the pushing and retaining pawl to move out. As the pawl G is engaged in the teeth of rachet fixed in the grooved roller, the grooved roller turns once bringing a new lattice in the groove facing the levers at the top of roller. The peg in the lattice pushes the level upto 0.5”. As the levers are fulcrumed at the rear end, the lifting of the lever for half an inch makes the other end of the lever to lift 2 to 3” depending upon the length of the lever from the fulcrum point. Harness cords are tied from the outer end of the levers to the concerned warp threads. The lift of the lever lifts the warp threads connected to it by harness to from the shed. Lattice dobby is suitable for weaving designs in saree border, dhoti border and other light weight textures. The maximum capacity of the lattice dobby is 48 levers. This
23
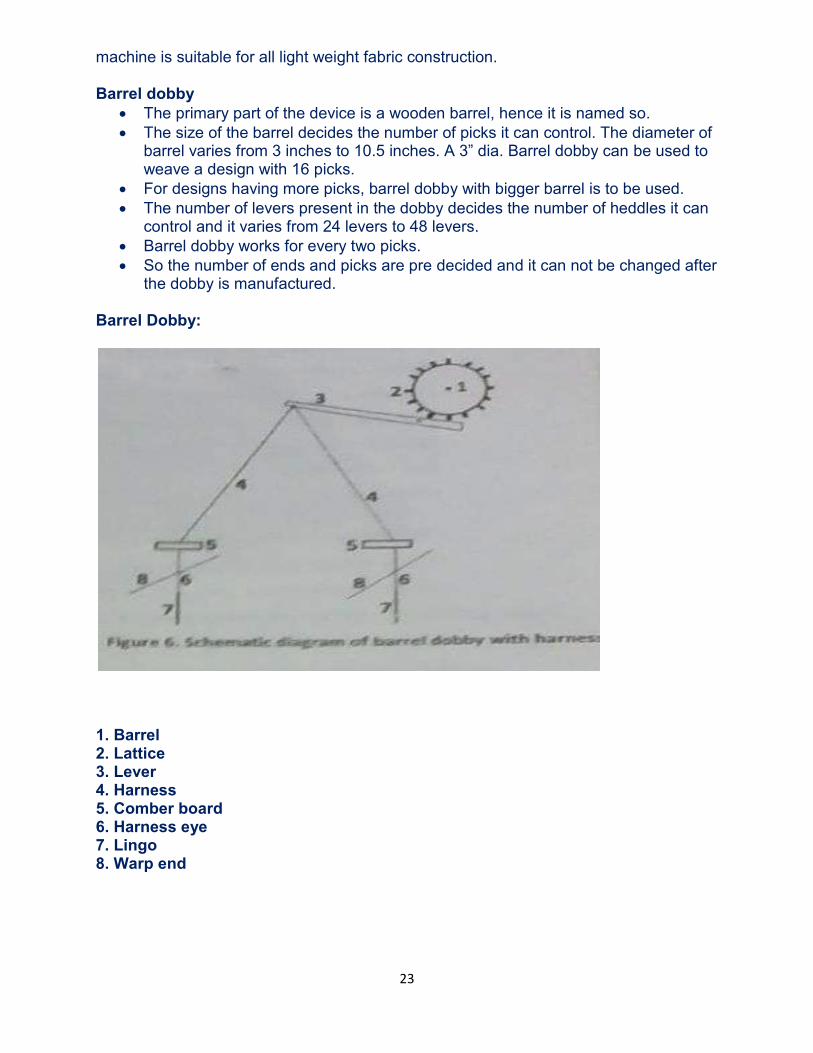
machine is suitable for all light weight fabric construction. Barrel dobby
The primary part of the device is a wooden barrel, hence it is named so.
The size of the barrel decides the number of picks it can control. The diameter of barrel varies from 3 inches to 10.5 inches. A 3” dia. Barrel dobby can be used to weave a design with 16 picks.
For designs having more picks, barrel dobby with bigger barrel is to be used.
The number of levers present in the dobby decides the number of heddles it can control and it varies from 24 levers to 48 levers.
Barrel dobby works for every two picks.
So the number of ends and picks are pre decided and it can not be changed after the dobby is manufactured.
Barrel Dobby:
1. Barrel 2. Lattice 3. Lever 4. Harness 5. Comber board 6. Harness eye 7. Lingo 8. Warp end
24
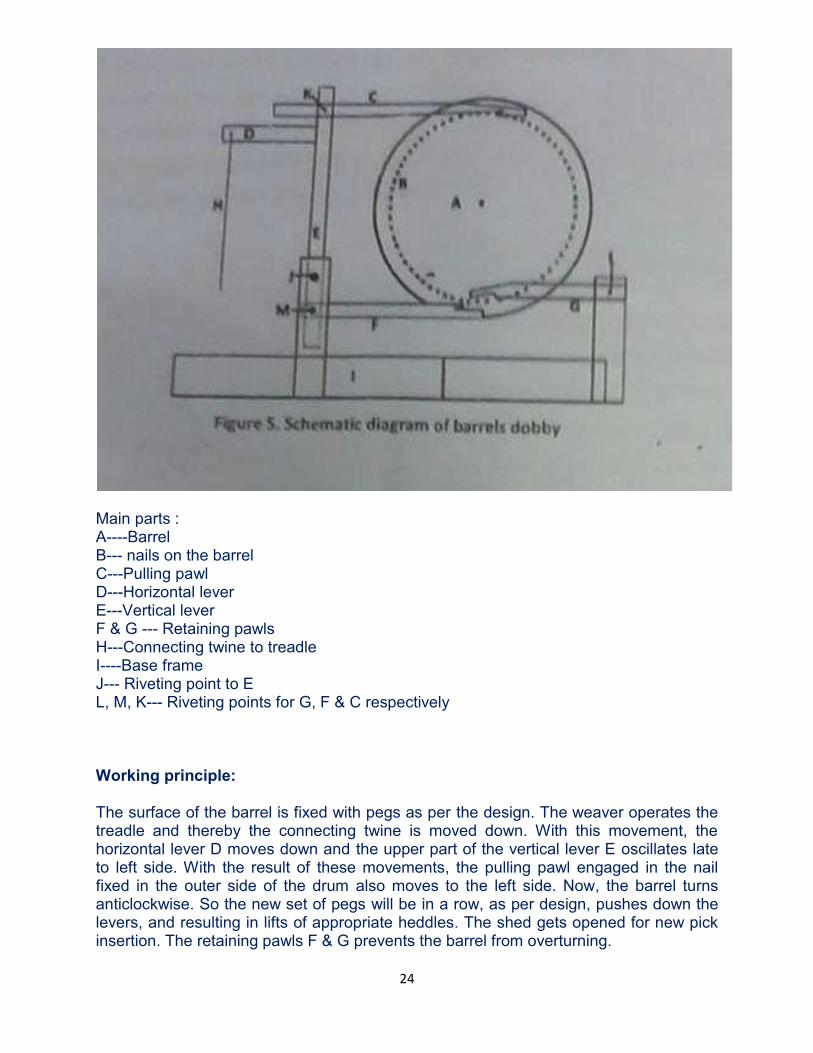
Main parts : A----Barrel B--- nails on the barrel C---Pulling pawl D---Horizontal lever E---Vertical lever F & G --- Retaining pawls H---Connecting twine to treadle I----Base frame J--- Riveting point to E L, M, K--- Riveting points for G, F & C respectively Working principle: The surface of the barrel is fixed with pegs as per the design. The weaver operates the treadle and thereby the connecting twine is moved down. With this movement, the horizontal lever D moves down and the upper part of the vertical lever E oscillates late to left side. With the result of these movements, the pulling pawl engaged in the nail fixed in the outer side of the drum also moves to the left side. Now, the barrel turns anticlockwise. So the new set of pegs will be in a row, as per design, pushes down the levers, and resulting in lifts of appropriate heddles. The shed gets opened for new pick insertion. The retaining pawls F & G prevents the barrel from overturning.
25
For a weaver working on a dobby loom the most important work is to know the pegging. For every different design there will be a different pegging. The method of pegging is explained below with an example:
System of Pegging & working:
Dobby for heddle shaft control:
Draw the design in the point paper
Prepare the drafting plan
Prepare the peg plan from drafting plan.
Connect the heddles with the dobby lever as per the draft order prepared.
Dobby for Extra warp/ Extra weft/ Buta designs:
In this case the ground weave/design is controlled by regular shedding mechanism.
The extra warp or designing threads are controlled by dobby.
Draw the design in the point paper
Prepare the drafting plan
Prepare the peg plan from drafting plan.
Tie the harness with the dobby lever so as to control the figuring threads.
Do the drawing in process for figuring threads as per the draft prepared. Lattice preparation :
Take the required number of lattices as planned in peg plan.
Read the first pick and fit the log in the respective hole of lattice for end up/heddle up.
Repeat the process for each pick till the completion of all the picks.
Now join the pegged lattices so as to form a circular chain.
Mount this lattice chain on the dobby.
The Drafting plan is given in the following figure
Example: System of Pegging & working:
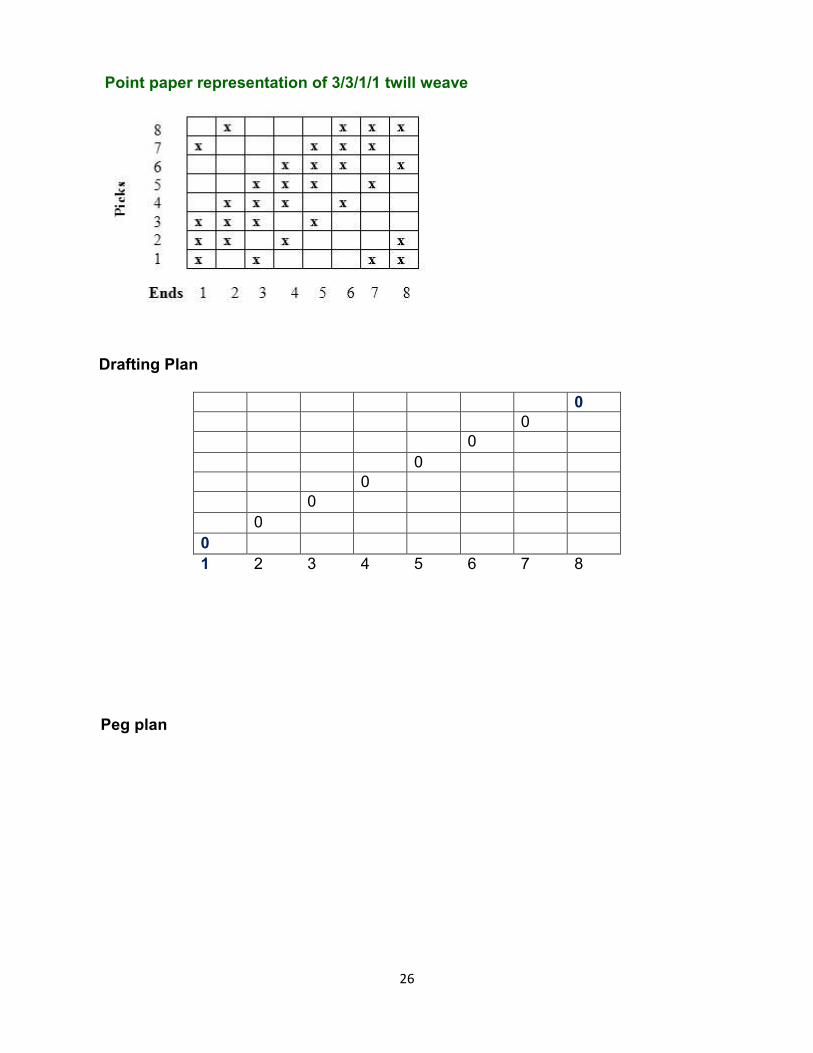
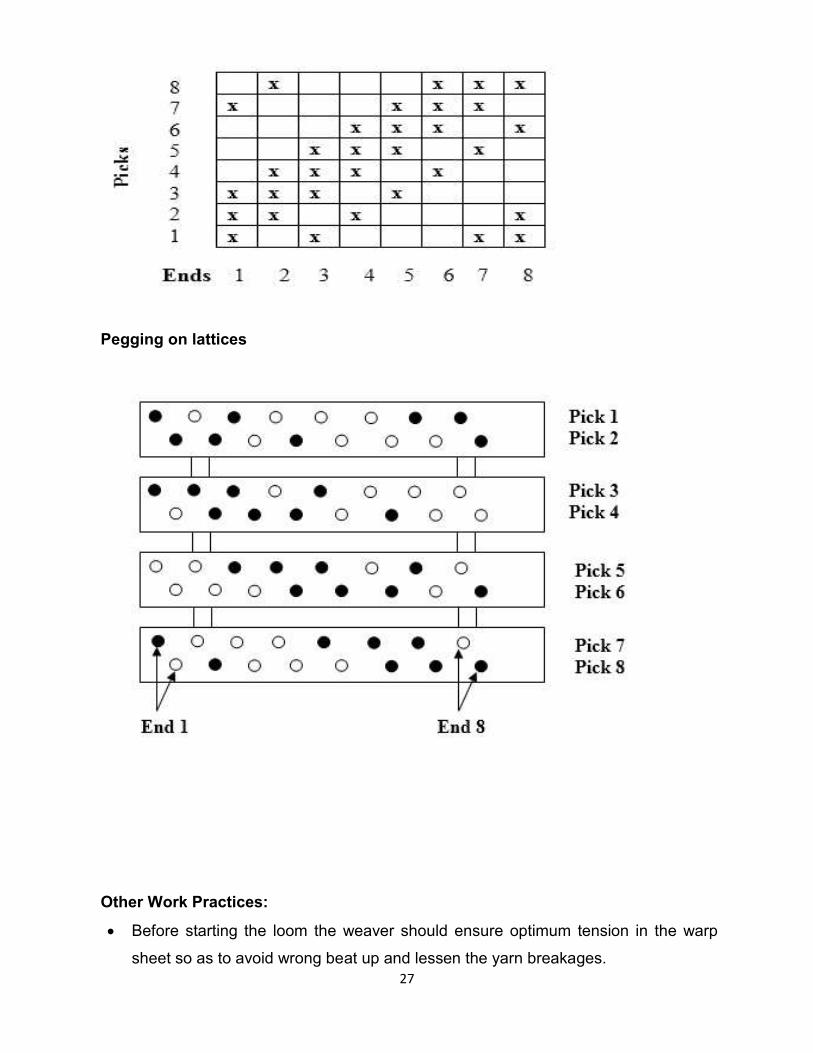
Twill weave (3/3/1/1) which repeats on eight ends and eight picks has been considered here for demonstrating the pegging plan. The system of pegging is depicted in the following Figure. This design can be produced by using eight healds and straight draft. The selection for heald movement is controlled by wooden pegs which can be inserted within the circular holes made on the wooden lags. The wooden lags inked together into a lattice which is mounted on the pattern wheel (or barrel). The pattern barrel is rotated by a certain degree once in two peaks. For example, if the barrel is hexagonal then it must rotate by 60° after every two picks. The presence of a peg within the hole results raised position of the heald and vice versa. The position of two holes corresponding to the same heald is not on the same line. The lateral shifting of holes is done so that two adjacent feelers can be accommodated.
26
Point paper representation of 3/3/1/1 twill weave
Drafting Plan
0
0
0
0
0
0
0
0
1 2 3 4 5 6 7 8
Peg plan
27
Pegging on lattices
Other Work Practices:
Before starting the loom the weaver should ensure optimum tension in the warp
sheet so as to avoid wrong beat up and lessen the yarn breakages.
28
Correct the fabric defects like wrong drawing, wrong denting, end out, double end
etc., immediately and also ensure that the other fabric defects too are corrected at
the earliest, before continuing further production.
Clean the machines & work area, so as to ensure good working atmosphere,
without damaging the fabrics in the looms where the cleaning work is carried out
as well as in the adjacent & opposite looms
Run the machine without " starting mark or crack"
Ensure that the loose threads are hanged in higher length (not more than 4 mm).
Accordingly, and trimmed, after attending to the warp breaks.
Ensure that the correct weft yarn is used
See that the weft yarn is completely used, without giving room for additional
wastage of raw materials.
Ensure correct quality of thrums are there & see that the same are properly tied
Check the knotted loom for knotting quality etc. double ends have to be removed
should report to supervisors for any deviation in the same & for any other quality
issue
Ensure that no raw material/ cloth/ spare/ tool / any other material is thrown under/
near the machines or in the other work areas.
Check for the reasons for the frequent warp/ weft breaks. The reasons that could
be corrected by himself/ herself should be corrected. Otherwise, the same has to
be reported to the mechanics/ fitters/ supervisors.
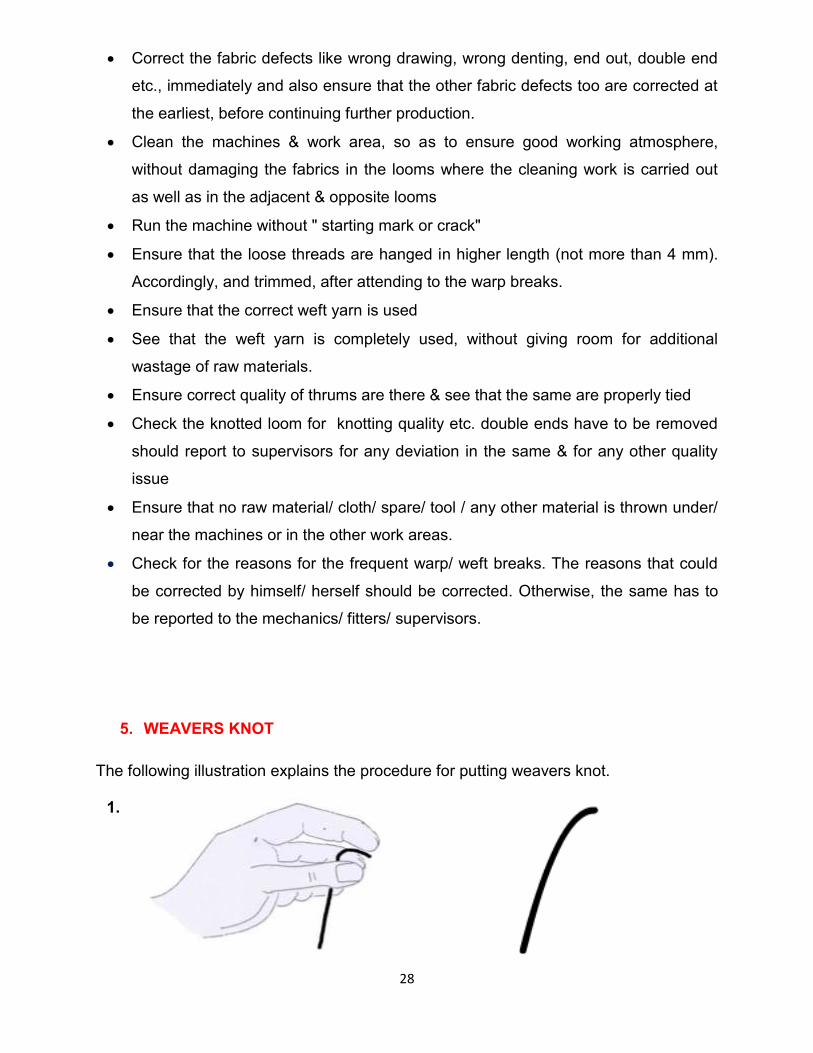
5. WEAVERS KNOT
The following illustration explains the procedure for putting weavers knot.
1.
29
Pick up the broken end 6 mm from its end with the left hand thumb and second (middle) finger.
2.
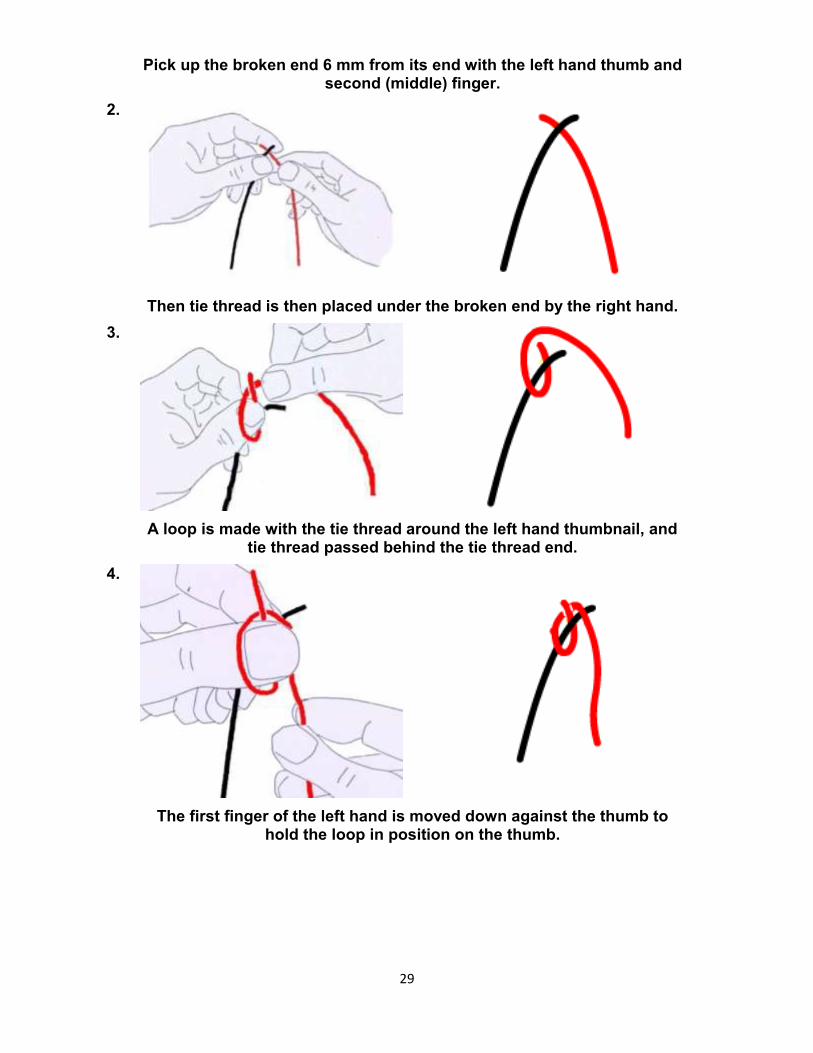
Then tie thread is then placed under the broken end by the right hand.
3.
A loop is made with the tie thread around the left hand thumbnail, and tie thread passed behind the tie thread end.
4.
The first finger of the left hand is moved down against the thumb to hold the loop in position on the thumb.
30
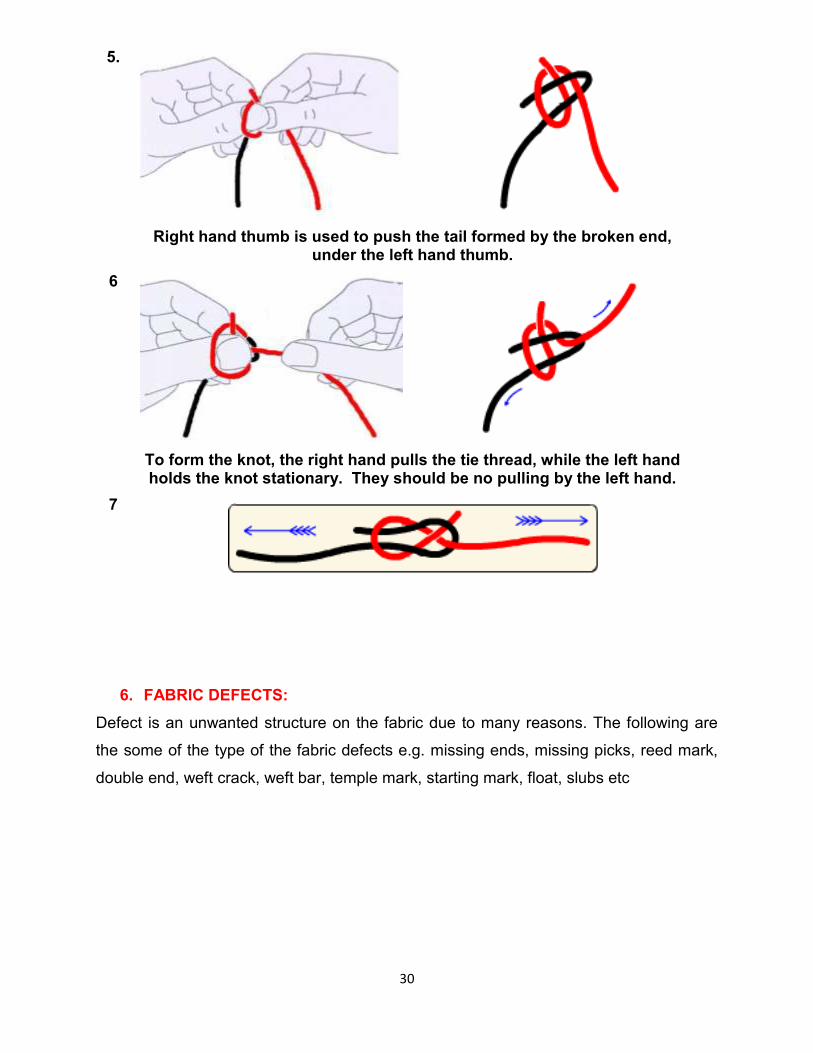
5.
Right hand thumb is used to push the tail formed by the broken end, under the left hand thumb.
6
To form the knot, the right hand pulls the tie thread, while the left hand holds the knot stationary. They should be no pulling by the left hand.
7
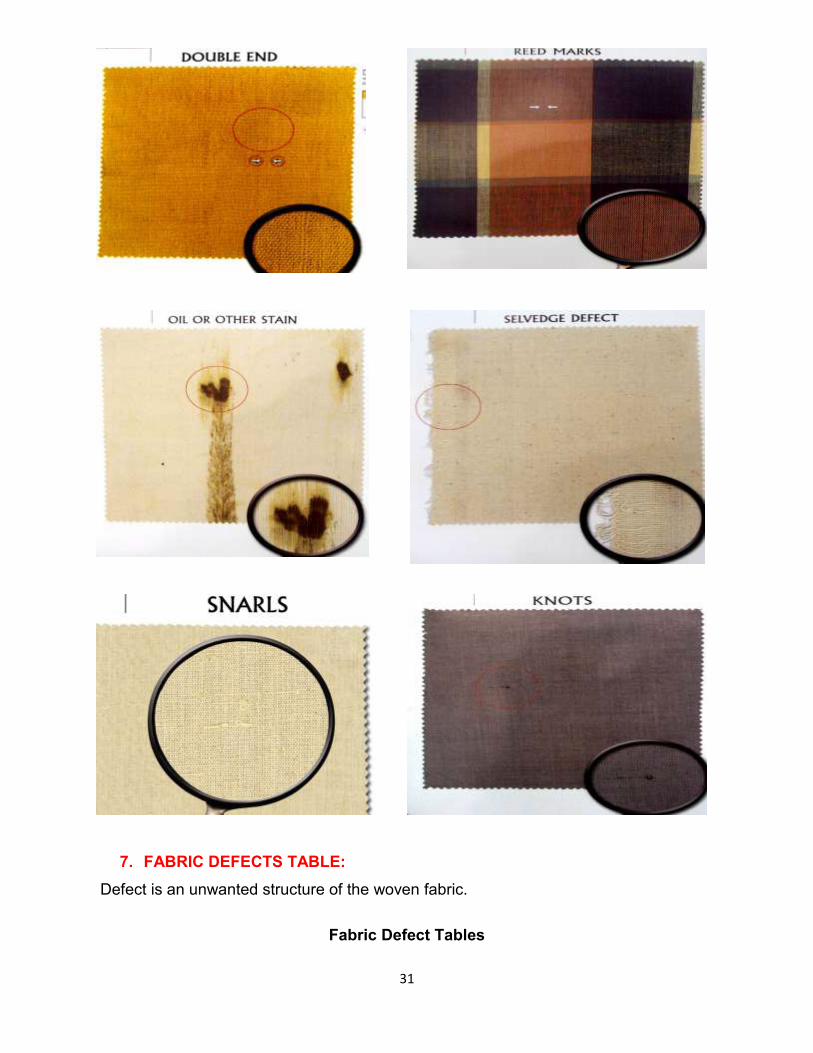
6. FABRIC DEFECTS:
Defect is an unwanted structure on the fabric due to many reasons. The following are
the some of the type of the fabric defects e.g. missing ends, missing picks, reed mark,
double end, weft crack, weft bar, temple mark, starting mark, float, slubs etc
31
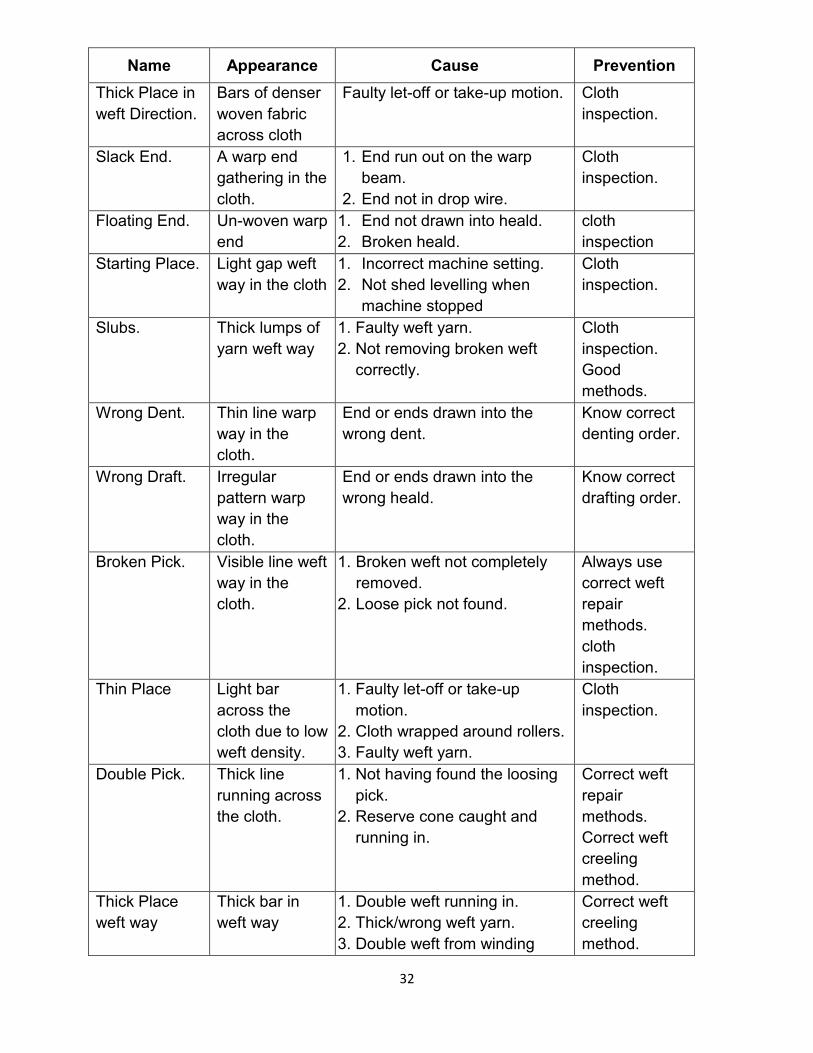
7. FABRIC DEFECTS TABLE:
Defect is an unwanted structure of the woven fabric.
Fabric Defect Tables
32
Name Appearance Cause Prevention
Thick Place in
weft Direction.
Bars of denser
woven fabric
across cloth
Faulty let-off or take-up motion. Cloth
inspection.
Slack End. A warp end
gathering in the
cloth.
1. End run out on the warp
beam.
2. End not in drop wire.
Cloth
inspection.
Floating End. Un-woven warp
end
1. End not drawn into heald.
2. Broken heald.
cloth
inspection
Starting Place. Light gap weft
way in the cloth
1. Incorrect machine setting.
2. Not shed levelling when
machine stopped
Cloth
inspection.
Slubs. Thick lumps of
yarn weft way
1. Faulty weft yarn.
2. Not removing broken weft
correctly.
Cloth
inspection.
Good
methods.
Wrong Dent. Thin line warp
way in the
cloth.
End or ends drawn into the
wrong dent.
Know correct
denting order.
Wrong Draft. Irregular
pattern warp
way in the
cloth.
End or ends drawn into the
wrong heald.
Know correct
drafting order.
Broken Pick. Visible line weft
way in the
cloth.
1. Broken weft not completely
removed.
2. Loose pick not found.
Always use
correct weft
repair
methods.
cloth
inspection.
Thin Place Light bar
across the
cloth due to low
weft density.
1. Faulty let-off or take-up
motion.
2. Cloth wrapped around rollers.
3. Faulty weft yarn.
Cloth
inspection.
Double Pick. Thick line
running across
the cloth.
1. Not having found the loosing
pick.
2. Reserve cone caught and
running in.
Correct weft
repair
methods.
Correct weft
creeling
method.
Thick Place
weft way
Thick bar in
weft way
1. Double weft running in.
2. Thick/wrong weft yarn.
3. Double weft from winding
Correct weft
creeling
method.
33
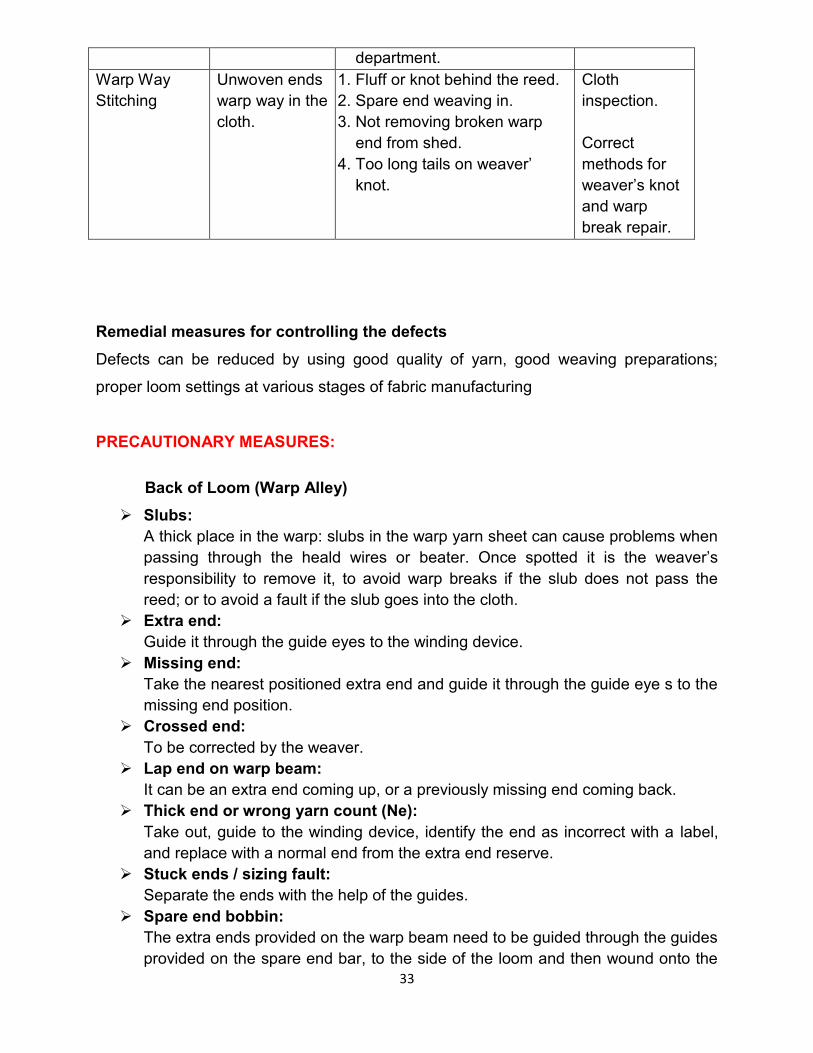
department.
Warp Way
Stitching
Unwoven ends
warp way in the
cloth.
1. Fluff or knot behind the reed.
2. Spare end weaving in.
3. Not removing broken warp
end from shed.
4. Too long tails on weaver’
knot.
Cloth
inspection.
Correct
methods for
weaver’s knot
and warp
break repair.
Remedial measures for controlling the defects
Defects can be reduced by using good quality of yarn, good weaving preparations;
proper loom settings at various stages of fabric manufacturing
PRECAUTIONARY MEASURES:
Back of Loom (Warp Alley)
Slubs:
A thick place in the warp: slubs in the warp yarn sheet can cause problems when
passing through the heald wires or beater. Once spotted it is the weaver’s
responsibility to remove it, to avoid warp breaks if the slub does not pass the
reed; or to avoid a fault if the slub goes into the cloth.
Extra end:
Guide it through the guide eyes to the winding device.
Missing end:
Take the nearest positioned extra end and guide it through the guide eye s to the
missing end position.
Crossed end:
To be corrected by the weaver.
Lap end on warp beam:
It can be an extra end coming up, or a previously missing end coming back.
Thick end or wrong yarn count (Ne):
Take out, guide to the winding device, identify the end as incorrect with a label,
and replace with a normal end from the extra end reserve.
Stuck ends / sizing fault:
Separate the ends with the help of the guides.
Spare end bobbin:
The extra ends provided on the warp beam need to be guided through the guides
provided on the spare end bar, to the side of the loom and then wound onto the
34
spare end bobbin. These need to be kept tidy otherwise a tangled mess will
quickly result. When the bobbin is full it needs to be stripped.
Fluff and fly:
When pieces of fluff or fly have settled on the warp they should be removed
immediately to prevent them from being woven in. Fluff and fly attached to
machinery should be removed before it becomes detached and also weave into
the cloth.
Waste / wild yarn:
Extra piece of yarn, which have either been left on a beam or have dropped onto
a loom, remove them immediately before they become entangled or woven in.
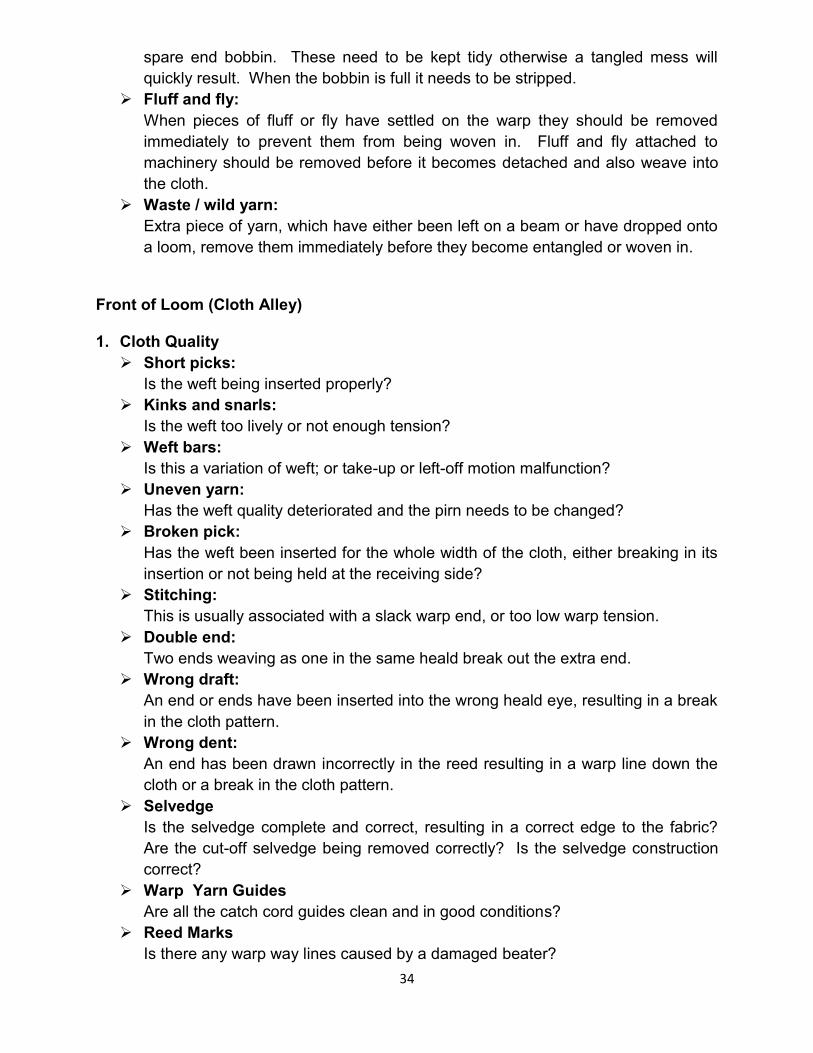
Front of Loom (Cloth Alley) 1. Cloth Quality
Short picks:
Is the weft being inserted properly?
Kinks and snarls:
Is the weft too lively or not enough tension?
Weft bars:
Is this a variation of weft; or take-up or left-off motion malfunction?
Uneven yarn:
Has the weft quality deteriorated and the pirn needs to be changed?
Broken pick:
Has the weft been inserted for the whole width of the cloth, either breaking in its
insertion or not being held at the receiving side?
Stitching:
This is usually associated with a slack warp end, or too low warp tension.
Double end:
Two ends weaving as one in the same heald break out the extra end.
Wrong draft:
An end or ends have been inserted into the wrong heald eye, resulting in a break
in the cloth pattern.
Wrong dent:
An end has been drawn incorrectly in the reed resulting in a warp line down the
cloth or a break in the cloth pattern.
Selvedge
Is the selvedge complete and correct, resulting in a correct edge to the fabric?
Are the cut-off selvedge being removed correctly? Is the selvedge construction
correct?
Warp Yarn Guides
Are all the catch cord guides clean and in good conditions?
Reed Marks
Is there any warp way lines caused by a damaged beater?
35
CONTINGENCIES
Warp related:
Extra end: guide it through the spring to the winding device.
Missing end: take the nearest positioned extra end and guide it through the
spring into the missing end position.
Crossed end: to be corrected by the weaver during his patrol.
Lap end on warp beam: it can be an extra end coming up, or a previously
missing end coming back.
Thick end: take out, guide to the winding device and replace by a normal end
from the reserve.
Stuck ends (sizing fault): separate ends, with the help of the guide spring.
Slub (thick place in the yarn): once spotted it is the weavers responsibility to
remove it, to avoid warp breaks (if the slub does not pass the reed), or to avoid a
fault (if the slub goes into the cloth).
Warp beam cleanliness: dust and extra ends on the warp beam cause warp
breaks. The weaver has to keep the beam clean.
Heddle change: when a heald breaks the weaver has to change it. If there are
several healds to change the weaver should call the fitter in order to avoid
stopping his patrolling for a long time.
Wrong draw in the reed: the weaver must correct it immediately.
Weft related:
Weft variation: when weft mixing small variations between cones is hidden.
However, if a particular thick or thin yarn is introduced, an irregular appearance
will result. The offending cone needs to be replaced and the supervisor informed.