
Test Case GFE Smart Tools (sm 001-024)
67
HARDCOPY UNCONTROLLED Contract DG133W-05-CQ-1067; GFE Smart Tools (sm001-024) Use or disclosure of data contained on this sheet is subject to the restriction on the title page of this document. Test Case GFE Smart Tools (sm 001-024) for the AWIPS Contract DG133W-05-CQ-1067 Prepared for: U.S. Department of Commerce NOAA/NWS Acquisition Management Division SSMC2, Room 17364 1325 East-West Highway Silver Spring, MD 20910 Prepared by: Raytheon Company STC Office 6825 Pine Street Omaha, NE 68106
Transcript of Test Case GFE Smart Tools (sm 001-024)

HARDCOPY UNCONTROLLED
Contract DG133W-05-CQ-1067; GFE Smart Tools (sm001-024) Use or disclosure of data contained on this sheet is subject to the restriction on the title page of this document.
Test Case GFE Smart Tools (sm 001-024) for the AWIPS
Contract DG133W-05-CQ-1067
Prepared for:
U.S. Department of Commerce NOAA/NWS Acquisition Management Division
SSMC2, Room 17364 1325 East-West Highway Silver Spring, MD 20910
Prepared by:
Raytheon Company STC Office
6825 Pine Street Omaha, NE 68106
HARDCOPY UNCONTROLLED
Contract DG133W-05-CQ-1067; Test Case GFE Smart Tools (sm001-024) Use or disclosure of data contained on this sheet is subject to the restriction on the title page of this document.
i
Submitted By:
___________________________________________________________ ___________ Test Engineer Date
Approved By:
___________________________________________________________ __________ Program Manager Date ___________________________________________________________ __________ Mission Assurance Quality Date

HARDCOPY UNCONTROLLED
Contract DG133W-05-CQ-1067; Test Case GFE Smart Tools (sm001-024) Use or disclosure of data contained on this sheet is subject to the restriction on the title page of this document.
ii
Revision History
Revision Date Affected Pages Explanation of Change
1.0 27 July 2008 ALL Initial Draft
2.0 8 August 2008 6-62 Redlines per PDT
3.0 4 September 2008 ALL Redlines per DT

HARDCOPY UNCONTROLLED
Contract DG133W-05-CQ-1067; Test Case GFE Smart Tools (sm001-024) Use or disclosure of data contained on this sheet is subject to the restriction on the title page of this document.
iii
Table of Contents
1.0 SCOPE ........................................................................................................................... 4 2.0 APPLICABLE DOCUMENTS.......................................................................................... 5
2.1 Source Documents...................................................................................................... 5 2.2 Reference Documents................................................................................................. 5
3.0 TEST CASE DESCRIPTION .......................................................................................... 6 3.1 Assumptions, Constraints and Preconditions .............................................................. 6 3.2 Recommended Hardware ........................................................................................... 6 3.3 Test Inputs .................................................................................................................. 6 3.4 Test Outputs................................................................................................................ 6
3.4.1 GFE GUIs Tested................................................................................................................ 6 4.0 TEST SCENARIO........................................................................................................... 7 5.0 REQUIREMENTS VERIFICATION TRACEABILITY MATRIX (RVTM)......................... 65

HARDCOPY UNCONTROLLED
Contract DG133W-05-CQ-1067; Test Case GFE Smart Tools (sm001-024) Use or disclosure of data contained on this sheet is subject to the restriction on the title page of this document.
4
1.0 SCOPE
See Software Test Plan.

HARDCOPY UNCONTROLLED
Contract DG133W-05-CQ-1067; Test Case GFE Smart Tools (sm001-024) Use or disclosure of data contained on this sheet is subject to the restriction on the title page of this document.
5
2.0 APPLICABLE DOCUMENTS
2.1 Source Documents • None
2.2 Reference Documents
• Legacy NWS GFE Acceptance Test Case ID Numbers: sm001 – sm024. • Legacy NWS GFE Test Cases for Test Areas AC – VP. • Section 3.1.3 of the AWIPS D-2D User’s Manual Build 8.1. • Software Test Plan for the Advanced Weather Information Processing System
Project, Contract #DG133W-05-CQ-1067, August 2008. • The Silver Spring NWS AWIPS 1 test bed application. • Release OB8.1 and OB8.2 of the Weather Event Simulator (WES). • Rational RequisitePro.
HARDCOPY UNCONTROLLED
Contract DG133W-05-CQ-1067; Test Case GFE Smart Tools (sm001-024) Use or disclosure of data contained on this sheet is subject to the restriction on the title page of this document.
6
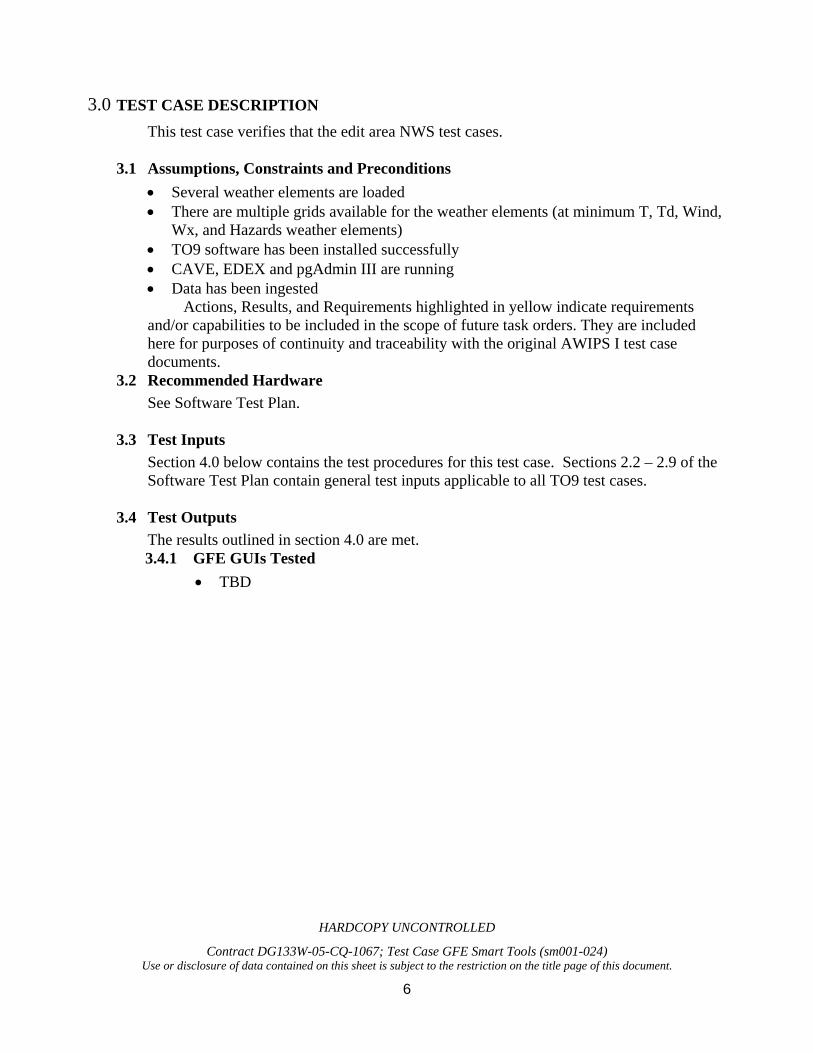
3.0 TEST CASE DESCRIPTION This test case verifies that the edit area NWS test cases.
3.1 Assumptions, Constraints and Preconditions • Several weather elements are loaded • There are multiple grids available for the weather elements (at minimum T, Td, Wind,
Wx, and Hazards weather elements) • TO9 software has been installed successfully • CAVE, EDEX and pgAdmin III are running • Data has been ingested Actions, Results, and Requirements highlighted in yellow indicate requirements and/or capabilities to be included in the scope of future task orders. They are included here for purposes of continuity and traceability with the original AWIPS I test case documents.
3.2 Recommended Hardware See Software Test Plan.
3.3 Test Inputs Section 4.0 below contains the test procedures for this test case. Sections 2.2 – 2.9 of the Software Test Plan contain general test inputs applicable to all TO9 test cases.
3.4 Test Outputs
The results outlined in section 4.0 are met. 3.4.1 GFE GUIs Tested
• TBD

HARDCOPY UNCONTROLLED
Contract DG133W-05-CQ-1067; Test Case GFE Smart Tools (sm001-024) Use or disclosure of data contained on this sheet is subject to the restriction on the title page of this document.
7
4.0 TEST SCENARIO
Step # Action Result Pass/Failsm001 – Create, Modify, and Delete smart tools to modify scalar weather elements
1. From the CAVE window, Mouse Button (MB) 1 click the ‘Open Perspective’ icon and select ‘GFE’ from the dropdown menu.
The GFE perspective displays in CAVE.
CREATE 2. MB1 click on a ‘T’ grid in the Grid
Manager (GM). The temperature grid displays in the Spatial Editor (SE).
3. Bring up the Edit Actions dialog using
the toolbar button.
The Edit Actions dialog opens.
4. MB3 popup over the Edit Actions dialog and select ‘New’. On the MyTool dialog, ensure the ‘Numeric’ radio button is selected (at the bottom) and enter sm001 for the tool name in the text window at the top. Ensure that ‘T’ is chosen as the weather element to edit. MB1 click ‘OK’.
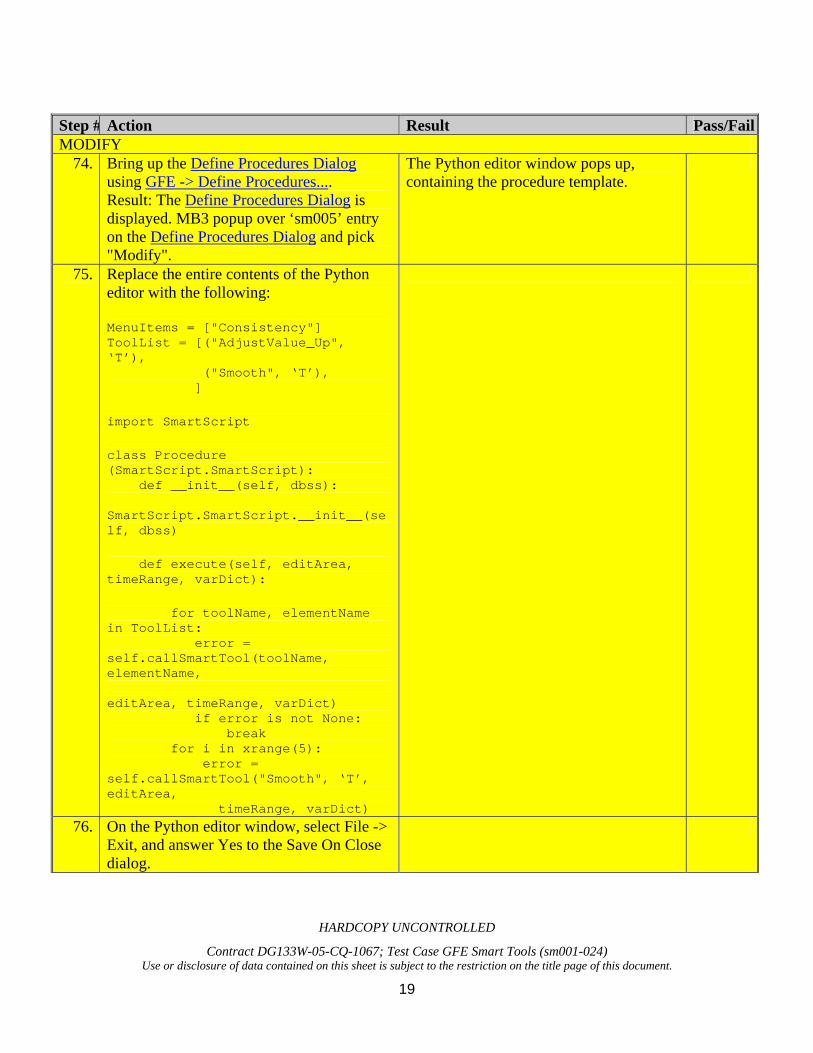
The MyTool dialog opens. The Python Perspective opens containing the smart tool template (tab).
5. Replace the execute() function in the template with the following code, leaving the rest of the template alone:
def execute(self, T): "Increment T"
# Determine new value T = T + 5
# Return the new value return T
The template is modified accordingly.
6. In the Python Perspective, MB1 click the ‘X’ on the smart tool tab. Answer ‘Yes’ in the Save Resource dialog. Then MB3 click on the Python Perspective and select ‘Close’ to close the Python Perspective.
The Save Resource dialog opens. The Save Resource dialog closes. The smart tool tab closes. The Python Perspective closes.
7. Using the Draw Edit Area tool , draw a closed area using MB1 drag on the displayed grid.
The edit area is created.
8. MB1 click the Sample Tool in the toolbar to activate the tool. Then add a couple sample points within and outside the edit area.
Sample points display in the SE.

HARDCOPY UNCONTROLLED
Contract DG133W-05-CQ-1067; Test Case GFE Smart Tools (sm001-024) Use or disclosure of data contained on this sheet is subject to the restriction on the title page of this document.
8
Step # Action Result Pass/Fail
9. MB1 click on the ‘sm001’ entry in the Edit Actions dialog.
The smart tool is executed and the data values in the edit area increases by 5.0.
10. MB1 drag across several ‘T’ grids in the GM (GM) to select them. MB1 click on the ‘sm001’ entry in the Edit Actions dialog.
The smart tool is executed and the data values in the edit area increases by 5.0 in each of the grids.
MODIFY 11. MB3 popup over the ‘sm001’ entry in the
Edit Actions dialog and select ‘Modify’. The Python Perspective appears containing the smart tool template.
12. Replace the execute() function in the template with the following code, leaving the rest of the template alone:
def execute(self, T, Td): "Assign T to Td+10"
# Determine new value T = Td + 10
# Return the new value return T
The modifications are made.
13. On the Python editor window, select ‘File’ -> ‘Save’. Then close the smart tool tab. Close the Python Perspective.
The Python code is saved. The smart tool tab closes. The Python Perspective closes.
14. With the edit area still displayed, MB1 click on a ‘T’ grid in the GM to make the ‘T’ grid visible and editable. Note: The ‘T’ grid selected must have a corresponding ‘Td’ grid (i.e., valid at the same time). If not, create from scratch a Td grid at the same time and then MB1 click again on the ‘T’ grid.
The temperature grid displays in the SE. The temperature grid has a corresponding Td grid.
15. MB1 click on the ‘sm001’ entry in the Edit Actions dialog. Verify the ‘T’ grid is 10 degrees above the Td grid.
The smart tool is executed and the data values are set to 10 degrees above the corresponding Td field.
DELETE 16. MB3 popup over the ‘sm001’ entry on the
Edit Actions dialog and select ‘Delete’. MB1 click ‘OK’ in the Item Delete confirmation dialog.
The Item Delete dialog opens. The sm001 entry is removed from the Edit Actions dialog.

HARDCOPY UNCONTROLLED
Contract DG133W-05-CQ-1067; Test Case GFE Smart Tools (sm001-024) Use or disclosure of data contained on this sheet is subject to the restriction on the title page of this document.
9
Step # Action Result Pass/Failsm002 – Create, Modify, and Delete smart tools to modify vector weather elements CREATE
17. MB1 click on a ‘Wind’ grid in the GM to make the ‘Wind’ grid visible and editable.
The Wind grid displays in the SE.
18. MB3 popup over the Edit Actions dialog and select ‘New’. On the MyTool dialog, ensure that ‘Numeric’ is selected on the radio buttons (at the bottom) and enter sm002 for the tool name at the top. Ensure that ‘Wind’ is chosen as the weather element to edit. MB1 click ‘OK’.
The MyTool dialog opens. The Python Perspective opens containing the smart tool template (tab).
19. Replace the execute() function in the template with the following code, leaving the rest of the template alone:
def execute(self, Wind): "sm002 tool"
# Determine new value mag = Wind[0] dir = Wind[1]
mag = mag * 1.5 dir = dir + 90.0 dir = where(greater_equal(dir, 360.0), dir - 360.0, dir)
# Return the new value return (mag, dir)
The Python code is modified accordingly.
20. On the Python editor window, select ‘File’ -> ‘Save’. Then close the smart tool tab. Close the Python Perspective.
The Python code is saved. The smart tool tab closes. The Python Perspective closes.
21. With the edit area still displayed, MB1 click ‘GFE’ -> ‘Editing Preferences’ -> ‘Vector Edit Mode’ -> ‘Direction Only’.
The Vector Edit Mode is set to ‘Direction Only’.
22. MB1 click on the ‘sm002’ entry in the Edit Actions dialog.
The smart tool executes. The direction values increase by 90 degrees. No changes are made with the magnitude (since the vector edit mode is direction only).
23. MB1 click ‘GFE’ -> ‘Editing Preferences’ -> ‘Vector Edit Mode’ -> ‘Magnitude Only’.
The Vector Edit Mode is set to ‘Magnitude Only’.

HARDCOPY UNCONTROLLED
Contract DG133W-05-CQ-1067; Test Case GFE Smart Tools (sm001-024) Use or disclosure of data contained on this sheet is subject to the restriction on the title page of this document.
10
Step # Action Result Pass/Fail
24. MB1 click on the ‘sm002’ entry in the Edit Actions dialog.
The smart tool executes. The magnitude values increase by 50%. No changes are made with the direction (since the vector edit mode is magnitude only).
25. MB1 click ‘GFE’ -> ‘Editing Preferences’ -> ‘Vector Edit Mode’ -> ‘Both’.
The Vector Edit Mode is set to ‘Both’.
26. MB1 click on the ‘sm002’ entry in the Edit Actions dialog.
The smart tool executes. The magnitude values increase by 50% and direction values increase by 90 degrees.
MODIFY 27. MB3 popup over the Edit Actions dialog
entry of sm002 and select ‘Modify’. The Python Perspective appears containing the smart tool template.
28. Replace the execute() function in the template with the following code, leaving the rest of the template alone:
def execute(self, Wind, T, Td): "sm002 tool"
# Determine new value mag = Wind[0] dir = Wind[1]
mag = T dir = Td * 6.0 mag = where(less_equal(mag, 0), 0, mag) dir = where(less_equal(dir, 0), dir + 360.0, dir) dir = where(greater(dir, 360.0), dir - 360.0, dir)
# Return the new value return (mag, dir)
The modifications are made.
29. On the Python editor window, select ‘File’ -> ‘Save’. Then close the smart tool tab. Close the Python Perspective.
The Python code is saved. The smart tool tab closes. The Python Perspective closes.
HARDCOPY UNCONTROLLED
Contract DG133W-05-CQ-1067; Test Case GFE Smart Tools (sm001-024) Use or disclosure of data contained on this sheet is subject to the restriction on the title page of this document.
11
Step # Action Result Pass/Fail
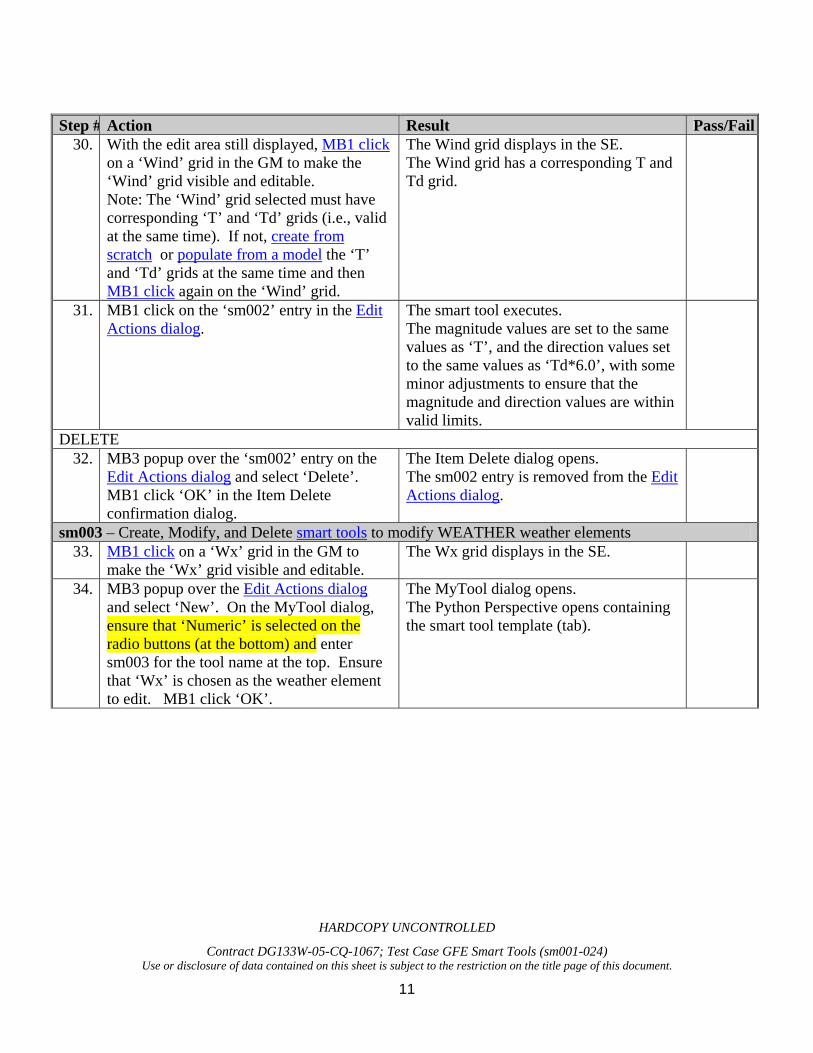
30. With the edit area still displayed, MB1 click on a ‘Wind’ grid in the GM to make the ‘Wind’ grid visible and editable. Note: The ‘Wind’ grid selected must have corresponding ‘T’ and ‘Td’ grids (i.e., valid at the same time). If not, create from scratch or populate from a model the ‘T’ and ‘Td’ grids at the same time and then MB1 click again on the ‘Wind’ grid.
The Wind grid displays in the SE. The Wind grid has a corresponding T and Td grid.
31. MB1 click on the ‘sm002’ entry in the Edit Actions dialog.
The smart tool executes. The magnitude values are set to the same values as ‘T’, and the direction values set to the same values as ‘Td*6.0’, with some minor adjustments to ensure that the magnitude and direction values are within valid limits.
DELETE 32. MB3 popup over the ‘sm002’ entry on the
Edit Actions dialog and select ‘Delete’. MB1 click ‘OK’ in the Item Delete confirmation dialog.
The Item Delete dialog opens. The sm002 entry is removed from the Edit Actions dialog.
sm003 – Create, Modify, and Delete smart tools to modify WEATHER weather elements 33. MB1 click on a ‘Wx’ grid in the GM to
make the ‘Wx’ grid visible and editable. The Wx grid displays in the SE.
34. MB3 popup over the Edit Actions dialog and select ‘New’. On the MyTool dialog, ensure that ‘Numeric’ is selected on the radio buttons (at the bottom) and enter sm003 for the tool name at the top. Ensure that ‘Wx’ is chosen as the weather element to edit. MB1 click ‘OK’.
The MyTool dialog opens. The Python Perspective opens containing the smart tool template (tab).

HARDCOPY UNCONTROLLED
Contract DG133W-05-CQ-1067; Test Case GFE Smart Tools (sm001-024) Use or disclosure of data contained on this sheet is subject to the restriction on the title page of this document.
12
Step # Action Result Pass/Fail
35. Replace the execute() function in the template with the following code, leaving the rest of the template alone:
def execute(self, Wx): "sm003 tool"
# Determine new value grid = Wx[0] keys = Wx[1]
# Change NoWx to Fog fogkey = self.getIndex("Patchy:F:<NoInten>:<NoVis>:", keys) nowxkey = self.getIndex("<NoCov>:<NoWx>:<NoInten>:<NoVis>:", keys) grid = where(equal(grid, nowxkey), fogkey, grid) # Return the new value return (grid, keys)
The Python code is modified accordingly.
36. On the Python editor window, select ‘File’ -> ‘Save’. Then close the smart tool tab. Close the Python Perspective.
The Python code is saved. The smart tool tab closes. The Python Perspective closes.
37. With the edit area still displayed, MB1 click ‘GFE’ -> ‘Editing Preferences’ -> ‘Wx/Discrete: Combine’ to off.
The Wx/Discrete: Combine is set to off.
38. MB1 click on the ‘sm003’ entry in the Edit Actions dialog.
The smart tool is executed. The grid is set to ‘Patchy F’ everywhere that the grid was previously ‘<NoWx>’ (within the edit area).
MODIFY 39. MB1 click ‘GFE’ -> ‘Editing Preferences’ -
> ‘Wx/Discrete: Combine’ to on. The Wx/Discrete: Combine is set to on. DR
#1371 40. MB3 popup over the ‘sm003’ entry in the
Edit Actions dialog and select ‘Modify’. The Python Perspective appears containing the smart tool template.
HARDCOPY UNCONTROLLED
Contract DG133W-05-CQ-1067; Test Case GFE Smart Tools (sm001-024) Use or disclosure of data contained on this sheet is subject to the restriction on the title page of this document.
13
Step # Action Result Pass/Fail
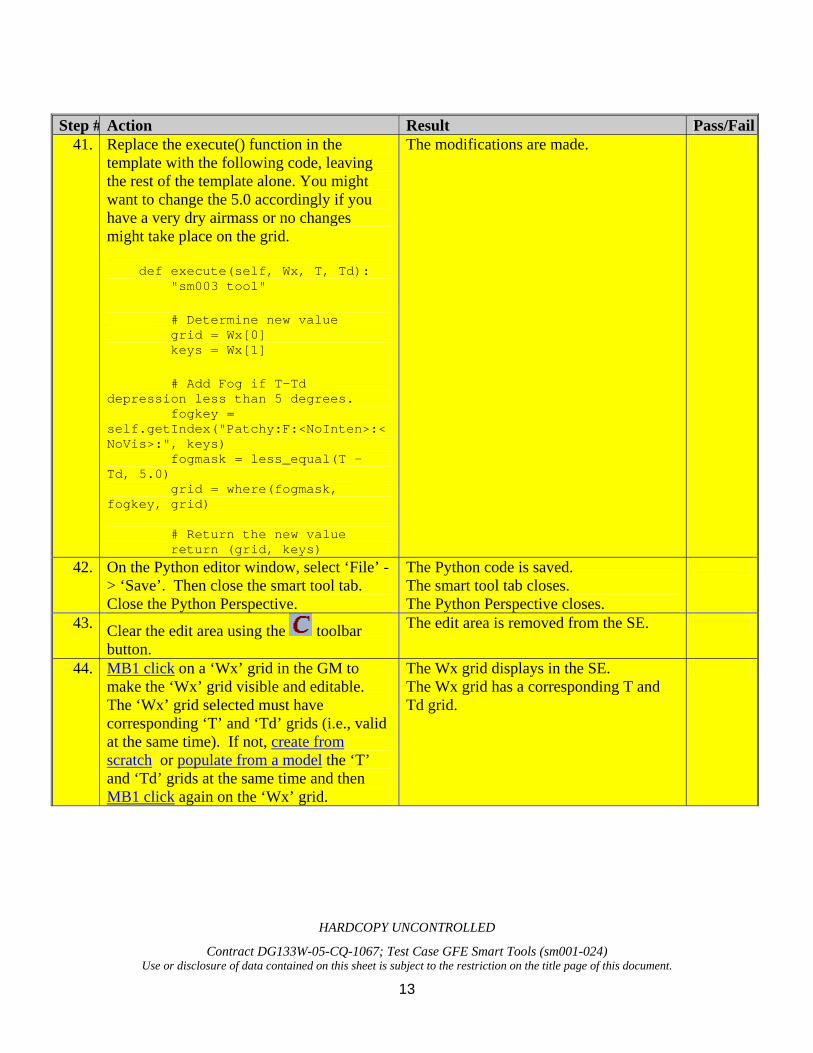
41. Replace the execute() function in the template with the following code, leaving the rest of the template alone. You might want to change the 5.0 accordingly if you have a very dry airmass or no changes might take place on the grid.
def execute(self, Wx, T, Td): "sm003 tool"
# Determine new value grid = Wx[0] keys = Wx[1]
# Add Fog if T-Td depression less than 5 degrees. fogkey = self.getIndex("Patchy:F:<NoInten>:<NoVis>:", keys) fogmask = less_equal(T - Td, 5.0) grid = where(fogmask, fogkey, grid) # Return the new value return (grid, keys)
The modifications are made.
42. On the Python editor window, select ‘File’ -> ‘Save’. Then close the smart tool tab. Close the Python Perspective.
The Python code is saved. The smart tool tab closes. The Python Perspective closes.
43. Clear the edit area using the toolbar button.
The edit area is removed from the SE.
44. MB1 click on a ‘Wx’ grid in the GM to make the ‘Wx’ grid visible and editable. The ‘Wx’ grid selected must have corresponding ‘T’ and ‘Td’ grids (i.e., valid at the same time). If not, create from scratch or populate from a model the ‘T’ and ‘Td’ grids at the same time and then MB1 click again on the ‘Wx’ grid.
The Wx grid displays in the SE. The Wx grid has a corresponding T and Td grid.

HARDCOPY UNCONTROLLED
Contract DG133W-05-CQ-1067; Test Case GFE Smart Tools (sm001-024) Use or disclosure of data contained on this sheet is subject to the restriction on the title page of this document.
14
Step # Action Result Pass/Fail
45. MB1 click on the ‘sm003’ entry in the Edit Actions dialog.
The smart tool is executed and everywhere that the dew point depression is less than or equal to 5.0 degrees, fog is added to the existing weather types. Thus if there was ‘Sct T’ in an area previously, now there should be ‘Sct T’ with ‘Patchy F’.
46. Undo the grid edit with the toolbar button.
The modifications to the grid are undone.
47. MB1 click ‘GFE’ -> ‘Editing Preferences’ -> ‘Wx/Discrete: Combine’ to on.
The Wx/Discrete: Combine is set to on.
48. MB1 click on the ‘sm003’ entry in the Edit Actions dialog.
The smart tool is executed and everywhere that the dew point depression is less than or equal to 5.0 degrees, fog replaces the existing weather types. Thus if there was ‘Sct T’ in an area previously (with a dew point depression of less than 5.0 degrees), now there should be only ‘Patchy F’.
DELETE 49. MB3 popup over the ‘sm003’ entry on the
Edit Actions dialog and select ‘Delete’. MB1 click ‘OK’ in the Item Delete confirmation dialog.
The Item Delete dialog opens. The sm003 entry is removed from the Edit Actions dialog.
sm004 – Create, Modify, and Delete smart tools to modify DISCRETE weather elements. CREATE
50. MB1 click on a "Hazards" grid in the GM to make the "Hazards" grid visible and editable.
The Hazards grid displays in the SE.
51. MB3 popup over the Edit Actions dialog and select ‘New’. On the MyTool dialog, ensure that ‘Numeric’ is selected on the radio buttons (at the bottom) and enter sm004 for the tool name at the top. Ensure that ‘Hazards’ is chosen as the weather element to edit. MB1 click ‘OK’.
The MyTool dialog opens. The Python Perspective opens containing the smart tool template (tab).

HARDCOPY UNCONTROLLED
Contract DG133W-05-CQ-1067; Test Case GFE Smart Tools (sm001-024) Use or disclosure of data contained on this sheet is subject to the restriction on the title page of this document.
15
Step # Action Result Pass/Fail
52. Replace the execute() function in the template with the following code, leaving the rest of the template alone:
def execute(self, Hazards): "sm004 tool"
# Determine new value grid = Hazards[0] keys = Hazards[1]
# Change HW.A to HW.W watchkey = self.getIndex("HW.A", keys) warnkey = self.getIndex("HW.W", keys)
grid = where(equal(grid, watchkey), warnkey, grid)
# Return the new value return (grid, keys)
The Python code is modified accordingly.
53. On the Python editor window, select ‘File’ -> ‘Save’. Then close the smart tool tab. Close the Python Perspective.
The Python code is saved. The smart tool tab closes. The Python Perspective closes.
54. Edit the Hazards grid to have an area of ‘HW.A’ on it. Use the Draw Edit Area tool
to draw a closed area using MB1 drag on the displayed grid. MB3 popup on the colorbar and select ‘Set Pickup Value...’ to assign ‘HW.A’ to the SE.
The edit area is drawn on the SE. The PickUp Value dialog opens. ‘HW.A’ is assigned to the edit area. The PickUp Value dialog closes.
55. Using the Draw Edit Area tool , draw a different closed area using MB1 drag on the displayed grid. Be sure to include some of the previously set HW.A area.
A different edit area is drawn on the SE.
56. MB1 click ‘GFE’ -> ‘Editing Preferences’ -> ‘Wx/Discrete: Combine’ to off.
57. MB1 click on the ‘sm004’ entry in the Edit Actions dialog.
The smart tool is executed everywhere in the drawn edit area. Any exact occurrences of "HW.A" will be changed to "HW.W".

HARDCOPY UNCONTROLLED
Contract DG133W-05-CQ-1067; Test Case GFE Smart Tools (sm001-024) Use or disclosure of data contained on this sheet is subject to the restriction on the title page of this document.
16
Step # Action Result Pass/FailMODIFY
58. MB3 popup over the Edit Actions dialog entry of sm004 and pick "Modify".
The Python editor window pops up, containing the smart tool template.
59. Replace the execute() function in the template with the following code, leaving the rest of the template alone:
def execute(self, Hazards, Wind): "sm004 tool"
# set the combine mode self.setCombineMode("Combine")
# Determine new value grid = Hazards[0] keys = Hazards[1] mag = Wind[0] dir = Wind[1]
# Add HW.W if winds over 30 kts. warnkey = self.getIndex("HW.W", keys) windmask = greater(mag, 30.0) grid = where(windmask, warnkey, grid)
# Return the new value return (grid, keys)
DR #1371
60. On the Python editor window, select File -> Exit, and answer Yes to the Save On Close dialog.
61. Clear the edit area using the toolbar button.

HARDCOPY UNCONTROLLED
Contract DG133W-05-CQ-1067; Test Case GFE Smart Tools (sm001-024) Use or disclosure of data contained on this sheet is subject to the restriction on the title page of this document.
17
Step # Action Result Pass/Fail
62. MB1 click on a "Hazards" grid in the GM to make the "Hazards" grid visible and editable. The "Hazards" grid selected must have a corresponding ‘Wind’ grid (i.e., valid at the same time). If not, create from scratch or populate from a model the ‘Wind’ grids at the same time. Make sure there are some values in the Wind grid that are over 30 kts. MB1 click again on the ‘Hazards’ grid after modifying its values as necessary.
63. MB1 click on the ‘sm004’ entry in the Edit Actions dialog.
The smart tool is executed and everywhere that the wind is greater than 30 kts, the Hazards grid will be assigned HW.W. The HW.W will be combined with existing weather types.
64. Undo the grid edit with the toolbar button.
DR #1399
DELETE 65. Remove the ‘sm004’ smart tool by MB3
popup over the sm004 entry on the Edit Actions dialog and selecting ‘Delete’. Answer ‘OK’ to the confirmation dialog.
66. The sm004 entry is removed from the Edit Actions dialog.
sm005 – Create, Modify, and Delete a Procedure that consists of tools that modify the same weather element CREATE
67. Bring up the Define Procedures Dialog using GFE -> Define Procedures....
The Define Procedures Dialog is displayed.
68. MB3 popup over the Define Procedures Dialog and pick ‘New’. On the dialog that is displayed, enter sm005 as the name of the new procedure.
The Python editor window pops up, containing the procedure template.

HARDCOPY UNCONTROLLED
Contract DG133W-05-CQ-1067; Test Case GFE Smart Tools (sm001-024) Use or disclosure of data contained on this sheet is subject to the restriction on the title page of this document.
18
Step # Action Result Pass/Fail
69. Replace the entire contents of the Python editor with the following:
MenuItems = ["Populate"] ToolList = [("AdjustValue_Down", ‘T’), ("Smooth", ‘T’), ]
import SmartScript
class Procedure (SmartScript.SmartScript): def __init__(self, dbss): SmartScript.SmartScript.__init__(self, dbss)
def execute(self, editArea, timeRange, varDict):
for toolName, elementName in ToolList: error = self.callSmartTool(toolName, elementName, editArea, timeRange, varDict) if error is not None: break
70. On the Python editor window, select File -> Exit, and answer Yes to the Save On Close dialog. Dismiss the Define Procedures Dialog.
71. Using the Draw Edit Area tool , draw a closed area using MB1 drag on the displayed grid.
72. Select Grids -> Select Grids by Time -> Hour 0-240 to select a time period.
73. Select Populate -> sm005 to run the procedure.
The smart tool is executed and the data values for ‘T’ are adjusted downward by the pickup value, and then the results are smoothed.
HARDCOPY UNCONTROLLED
Contract DG133W-05-CQ-1067; Test Case GFE Smart Tools (sm001-024) Use or disclosure of data contained on this sheet is subject to the restriction on the title page of this document.
19
Step # Action Result Pass/FailMODIFY
74. Bring up the Define Procedures Dialog using GFE -> Define Procedures.... Result: The Define Procedures Dialog is displayed. MB3 popup over ‘sm005’ entry on the Define Procedures Dialog and pick "Modify".
The Python editor window pops up, containing the procedure template.
75. Replace the entire contents of the Python editor with the following:
MenuItems = ["Consistency"] ToolList = [("AdjustValue_Up", ‘T’), ("Smooth", ‘T’), ]
import SmartScript
class Procedure (SmartScript.SmartScript): def __init__(self, dbss): SmartScript.SmartScript.__init__(self, dbss)
def execute(self, editArea, timeRange, varDict):
for toolName, elementName in ToolList: error = self.callSmartTool(toolName, elementName, editArea, timeRange, varDict) if error is not None: break for i in xrange(5): error = self.callSmartTool("Smooth", ‘T’, editArea, timeRange, varDict)
76. On the Python editor window, select File -> Exit, and answer Yes to the Save On Close dialog.

HARDCOPY UNCONTROLLED
Contract DG133W-05-CQ-1067; Test Case GFE Smart Tools (sm001-024) Use or disclosure of data contained on this sheet is subject to the restriction on the title page of this document.
20
Step # Action Result Pass/Fail
77. Using the Draw Edit Area tool , draw a closed area using MB1 drag on the displayed grid.
78. Select Consistency -> sm005 to run the procedure.
The smart tool is executed and the data values for ‘T’ are adjusted upward by the pickup value, and then the results are smoothed multiple times.
DELETE 79. Remove the ‘sm005’ procedure by MB3
popup over the sm005 entry on the Define Procedures Dialog and selecting Delete. Answer ‘Delete’ to the confirmation dialog.
The sm005 entry is removed from the Define Procedures Dialog.
sm006 – Create, Modify, and Delete a Procedure that consists of tools that modify various weather elements. CREATE
80. Bring up the Define Procedures Dialog using GFE -> Define Procedures....
The Define Procedures Dialog is displayed.
81. MB3 popup over the Define Procedures Dialog and pick ‘New’. On the dialog that is displayed, enter sm006 as the name of the new procedure.
The Python editor window pops up, containing the procedure template.

HARDCOPY UNCONTROLLED
Contract DG133W-05-CQ-1067; Test Case GFE Smart Tools (sm001-024) Use or disclosure of data contained on this sheet is subject to the restriction on the title page of this document.
21
Step # Action Result Pass/Fail
82. Replace the entire contents of the Python editor with the following:
import SmartScript
class Procedure (SmartScript.SmartScript): def __init__(self, dbss): SmartScript.SmartScript.__init__(self, dbss)
def execute(self, editArea, varDict): databaseID = self.findDatabase("NAM12") timeRange = self.createTimeRange(0, 48, "Database", databaseID) timeRange2 = self.createTimeRange(24, 48, "Database", databaseID) elements = ['T', 'Wind','Wx'] self.copyCmd(elements, databaseID, timeRange) self.createFromScratchCmd(['T'], timeRange, repeat=3, duration=1) self.callSmartTool("Smooth",’T’, editArea, timeRange2)
83. On the Python editor window, select File -> Exit, and answer Yes to the Save On Close dialog. Dismiss the Define Procedures Dialog.
84. Select Grids -> Select Grids by Time -> Hour 0-240 to select a time period.
85. Select Populate -> sm006 to run the procedure.
Weather elements 'T', ‘Wind’, and ‘Wx’ are copied from the latest NAM12 model from 0 through 48 hours. 'T' grids are created from scratch from 0 through 48 hours every 3 hours. The 'T' grids from 24 through 48 hours are smoothed (as shown by the "m" modified indicated on the GM rather than the "S" from the create from scratch operation).

HARDCOPY UNCONTROLLED
Contract DG133W-05-CQ-1067; Test Case GFE Smart Tools (sm001-024) Use or disclosure of data contained on this sheet is subject to the restriction on the title page of this document.
22
Step # Action Result Pass/FailMODIFY
86. Bring up the Define Procedures Dialog using GFE -> Define Procedures.... Result: The Define Procedures Dialog is displayed. MB3 popup over ‘sm006’ entry on the Define Procedures Dialog and pick "Modify".
The Python editor window pops up, containing the procedure template.
87. Replace the entire contents of the Python editor with the following:
import SmartScript
class Procedure (SmartScript.SmartScript): def __init__(self, dbss): SmartScript.SmartScript.__init__(self, dbss)
def execute(self, editArea, varDict): dbNAM12 = self.findDatabase("NAM12") dbGFS80 = self.findDatabase("GFS80") trNAM12 = self.createTimeRange(0, 48, "Database", dbNAM12) trGFS80 = self.createTimeRange(48, 120, "Database", dbGFS80) elemNAM12 = ['T', 'Td'] elemGFS80 = ['MaxT', 'MinT'] self.copyCmd(elemNAM12, dbNAM12, trNAM12) self.copyCmd(elemGFS80, dbGFS80, trGFS80) self.callSmartTool("Smooth",’T’, editArea, trNAM12) self.callSmartTool("Smooth", ‘Td’, editArea, trNAM12)
88. On the Python editor window, select File -> Exit, and answer Yes to the Save On Close dialog.

HARDCOPY UNCONTROLLED
Contract DG133W-05-CQ-1067; Test Case GFE Smart Tools (sm001-024) Use or disclosure of data contained on this sheet is subject to the restriction on the title page of this document.
23
Step # Action Result Pass/Fail
89. Select Populate -> sm006 to run the procedure.
T and Td from the NAM12 are copied into the first 48 hours, MaxT and MinT are copied from the GFS80 for hours 48-120. The T and Td fields are smoothed over the first 48 hours.
DELETE 90. Remove the ‘sm006’ procedure by MB3
popup over the sm006 entry on the Define Procedures Dialog and selecting Delete. Answer ‘Delete’ to the confirmation dialog.
The sm006 entry is removed from the Define Procedures Dialog.
sm007 – Multiple Grid Warning, Empty Edit Area Warning 91. MB1 click on a ‘T’ grid in the GM to make
the ‘T’ grid visible and editable The temperature grid displays as an image in the SE.
92. Clear any edit area using the toolbar button.
All edit areas are cleared.
93. MB1 click ‘GFE’ -> ‘Show Warnings’ -> ‘Show Empty Edit Area Warning’ to turn on the entry.
The ‘Show Empty Edit Area Warning’ option is selected on.
94. MB3 popup over the main (non-legend) area of the SE and select ‘Assign_Value’.
A dialog is presented which indicates "EMPTY EDIT AREA. EDIT ACTION WILL BE APPLIED OVER THE ENTIRE GRID!".
95. Select ‘Yes’ on the dialog. The data is correctly modified for the entire grid.
96. MB1 click ‘GFE’ -> ‘Show Warnings’ -> ‘Show Edit Action Time Range Warning’ to turn on the entry.
The ‘Show Edit Action Time Range Warning’ option is selected on.
97. Select several grids using MB1 drag over ‘T’ grids in the GM.
Select several grids using MB1 drag over ‘T’ grids in the GM.
98. MB3 popup over the main (non-legend) area of the SE and select ‘Assign_Value’.
A dialog is presented which indicates "EDIT ACTION WILL BE APPLIED OVER A TIME RANGE!".
DR #1426
99. Select ‘Yes’ on the dialog. The empty edit area warning dialog is presented which indicates: "EMPTY EDIT AREA. EDIT ACTION WILL BE APPLIED OVER THE ENTIRE GRID!".
100. Select ‘Yes’ on the dialog. The data is correctly modified for all of the grids defined by the selection time range and for all data points.

HARDCOPY UNCONTROLLED
Contract DG133W-05-CQ-1067; Test Case GFE Smart Tools (sm001-024) Use or disclosure of data contained on this sheet is subject to the restriction on the title page of this document.
24
Step # Action Result Pass/Failsm008 – Smart tool syntax checker.
101. MB1 click on a ‘T’ grid in the GM to make the ‘T’ grid visible and editable.
The temperature grid displays as an image in the SE.
102. Bring up the Edit Actions dialog using
the toolbar button.
The Edit Actions dialog opens.
103. MB3 popup over the Edit Actions dialog and select ‘New’. On the dialog that is displayed, ensure that ‘Numeric’ is selected on the radio buttons (at the bottom) and enter sm008 for the tool name at the top. Ensure that ‘T’ is chosen as the weather element to edit. MB1 click ‘OK’.
The Python editor window pops up, containing the smart tool template.
DR #1427
104. Replace the execute() function in the template with the following code (which has an error in it), leaving the rest of the template alone:
def execute(self, T): "Increment T
# Determine new value T = T + 5
Return the new value return T
The code is modified accordingly.
105. On the Python editor window, MB1 click ‘File’ -> ‘Save’.
A Python Error dialog displays indicating the line number and position, and the error type that was found in the smart tool. The Python editor window remains displayed.
106. Correct the execute function with this section of code:
def execute(self, T): "Increment T"
# Determine new value T = T + 5
Return the new value return T
The code is modified accordingly.
HARDCOPY UNCONTROLLED
Contract DG133W-05-CQ-1067; Test Case GFE Smart Tools (sm001-024) Use or disclosure of data contained on this sheet is subject to the restriction on the title page of this document.
25
Step # Action Result Pass/Fail
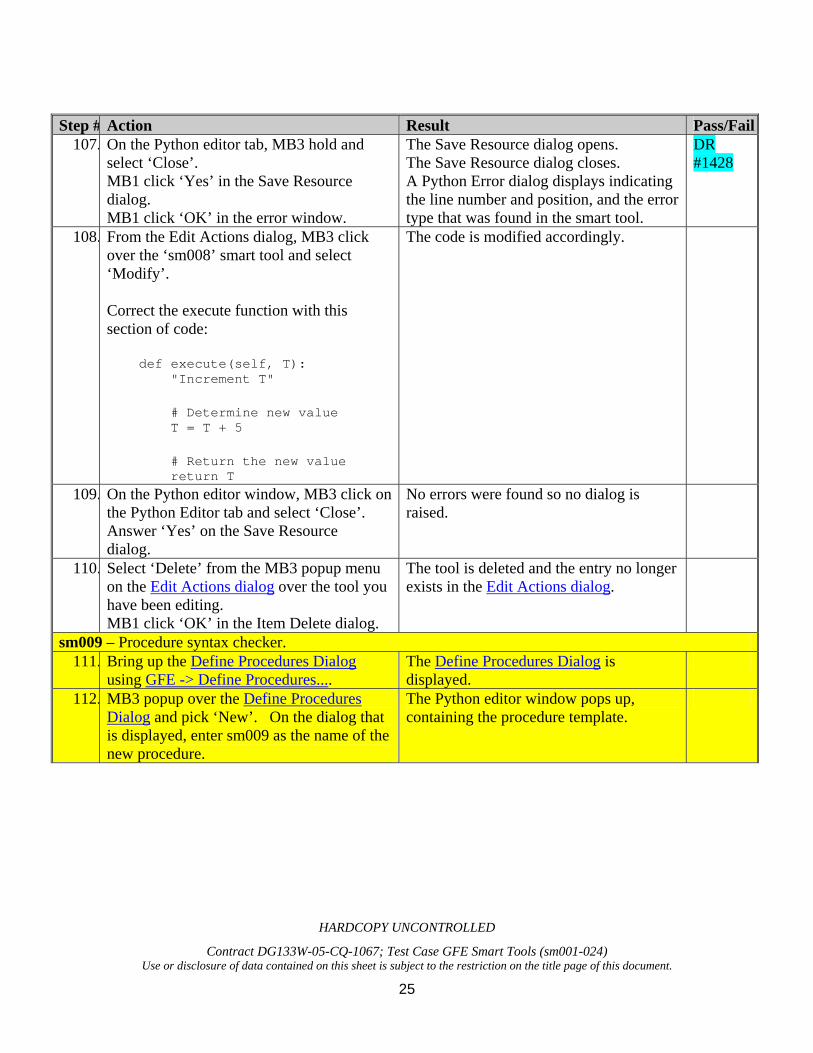
107. On the Python editor tab, MB3 hold and select ‘Close’. MB1 click ‘Yes’ in the Save Resource dialog. MB1 click ‘OK’ in the error window.
The Save Resource dialog opens. The Save Resource dialog closes. A Python Error dialog displays indicating the line number and position, and the error type that was found in the smart tool.
DR #1428
108. From the Edit Actions dialog, MB3 click over the ‘sm008’ smart tool and select ‘Modify’.
Correct the execute function with this section of code:
def execute(self, T): "Increment T"
# Determine new value T = T + 5
# Return the new value return T
The code is modified accordingly.
109. On the Python editor window, MB3 click on the Python Editor tab and select ‘Close’. Answer ‘Yes’ on the Save Resource dialog.
No errors were found so no dialog is raised.
110. Select ‘Delete’ from the MB3 popup menu on the Edit Actions dialog over the tool you have been editing. MB1 click ‘OK’ in the Item Delete dialog.
The tool is deleted and the entry no longer exists in the Edit Actions dialog.
sm009 – Procedure syntax checker. 111. Bring up the Define Procedures Dialog
using GFE -> Define Procedures.... The Define Procedures Dialog is displayed.
112. MB3 popup over the Define Procedures Dialog and pick ‘New’. On the dialog that is displayed, enter sm009 as the name of the new procedure.
The Python editor window pops up, containing the procedure template.

HARDCOPY UNCONTROLLED
Contract DG133W-05-CQ-1067; Test Case GFE Smart Tools (sm001-024) Use or disclosure of data contained on this sheet is subject to the restriction on the title page of this document.
26
Step # Action Result Pass/Fail
113. Replace the entire contents of the Python editor with the following:
MenuItems = ["Populate"] ToolList = [("AdjustValue_Down", ‘T’), ("Smooth", ‘T’), ]
import SmartScript
class Procedure (SmartScript.SmartScript): def __init__(self, dbss): SmartScript.SmartScript.__init__(self, dbss)
def execute(self, editArea, timeRange, varDict):
for toolName, elementName in ToolList: error = self.callSmartTool(toolName, elementName, editArea, timeRange, varDict) if error is not None: break
114. On the Python editor window, select File -> Exit.
A Python Error dialog is displayed indicating the line number and position, and the error type that was found in the procedure. The type of error is the "unident does not match any outer identation level". The Python editor is still displayed.

HARDCOPY UNCONTROLLED
Contract DG133W-05-CQ-1067; Test Case GFE Smart Tools (sm001-024) Use or disclosure of data contained on this sheet is subject to the restriction on the title page of this document.
27
Step # Action Result Pass/Fail
115. Replace the entire contents of the Python editor with the following:
MenuItems = ["Populate"] ToolList = [("AdjustValue_Down", ‘T’), ("Smooth", ‘T’), ]
import SmartScript
class Procedure (SmartScript.SmartScript): def __init__(self, dbss): SmartScript.SmartScript.__init__(self, dbss)
def execute(self, editArea, timeRange, varDict):
for toolName, elementName in ToolList: error = self.callSmartTool(toolName, elementName, editArea, timeRange, varDict) if error is not None: break
116. On the Python editor window, select File -> Exit, answer Yes to the "Save On Close" dialog.
The dialogs are closed.
117. Select ‘Delete’ from the MB3 popup menu on the Define Procedures Dialog over the tool you have been editing.
the procedure is deleted and the entry no longer exists in the Define Procedures Dialog.
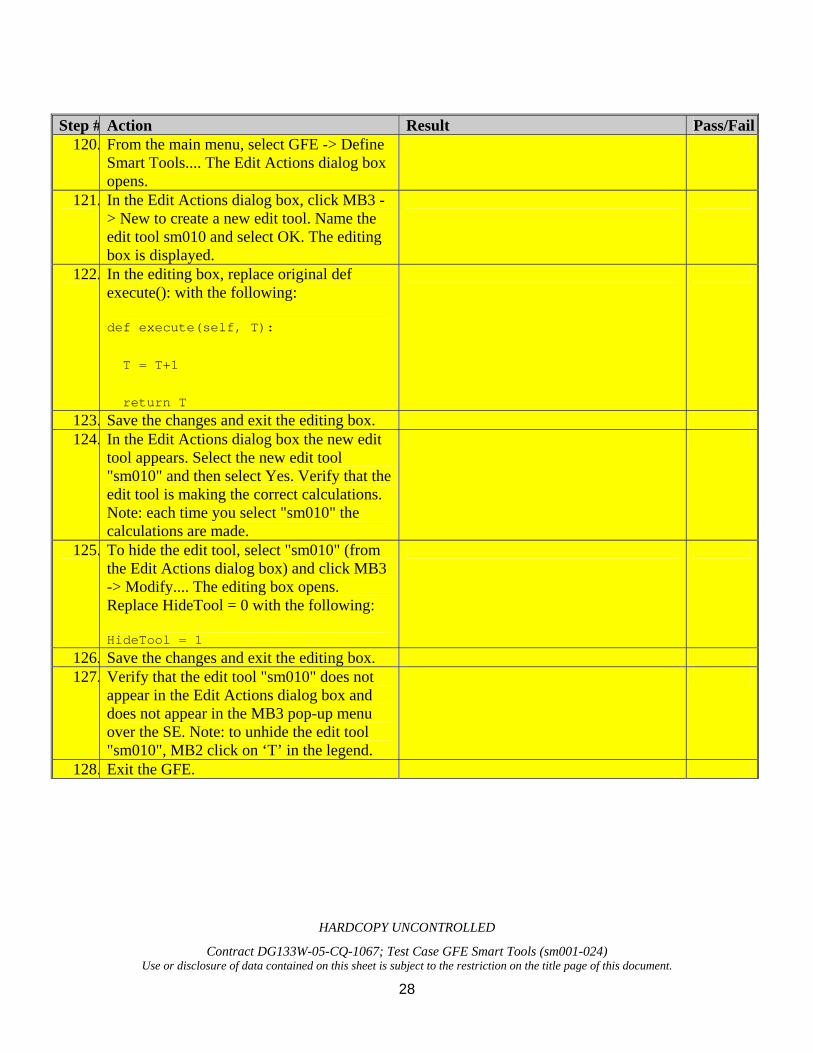
sm010 – To test hide edit tool capability. 118. From the GFE bin directory, run GFE. The
GFE Startup menu appears. Select "User" and "Config" and then select Start. The GFE display is displayed.
119. From the GM, click MB3 -> Create From Scratch over a ‘T’ forecast grid to make it editable and visible.
HARDCOPY UNCONTROLLED
Contract DG133W-05-CQ-1067; Test Case GFE Smart Tools (sm001-024) Use or disclosure of data contained on this sheet is subject to the restriction on the title page of this document.
28
Step # Action Result Pass/Fail
120. From the main menu, select GFE -> Define Smart Tools.... The Edit Actions dialog box opens.
121. In the Edit Actions dialog box, click MB3 -> New to create a new edit tool. Name the edit tool sm010 and select OK. The editing box is displayed.
122. In the editing box, replace original def execute(): with the following:
def execute(self, T):
T = T+1
return T
123. Save the changes and exit the editing box. 124. In the Edit Actions dialog box the new edit
tool appears. Select the new edit tool "sm010" and then select Yes. Verify that the edit tool is making the correct calculations. Note: each time you select "sm010" the calculations are made.
125. To hide the edit tool, select "sm010" (from the Edit Actions dialog box) and click MB3 -> Modify.... The editing box opens. Replace HideTool = 0 with the following:
HideTool = 1
126. Save the changes and exit the editing box. 127. Verify that the edit tool "sm010" does not
appear in the Edit Actions dialog box and does not appear in the MB3 pop-up menu over the SE. Note: to unhide the edit tool "sm010", MB2 click on ‘T’ in the legend.
128. Exit the GFE.

HARDCOPY UNCONTROLLED
Contract DG133W-05-CQ-1067; Test Case GFE Smart Tools (sm001-024) Use or disclosure of data contained on this sheet is subject to the restriction on the title page of this document.
29
Step # Action Result Pass/Fail
129. Restart the GFE and delete the created edit tool "sm010" from the Edit Actions dialog box. Exit the GFE.
Note: to delete the edit tool "sm010", select GFE -> Define Smart Tools... from the main menu. The Edit Actions dialog box opens. Select the edit tool "sm010" and click MB3 -> Delete.
sm011 – Renaming tools to existing tools. 130. From the GFE bin directory, run GFE. The
GFE Startup menu is displayed. Select "User" and "Config", then select Start. The GFE display opens.
131. From the GM, create a new ‘T’ forecast grid by clicking MB3 -> Create From Scratch.
132. From the main menu, select GFE -> Define Smart Tools.... The Edit Actions dialog box appears.
133. Create a new edit tool by clicking MB3 -> New in the "white space" of the Edit Actions dialog box. Name the edit tool sm011 and select OK. The editing box opens.
134. In the editing box, replace the def execute(): function with the following:
def execute(self, T):
T=T+1
return T
135. Save the changes and exit the editing box. 136. From the Edit Actions dialog box, create
another new edit tool by clicking MB3 -> New in the "white space". Name the edit tool sm011_2 and select OK. The editing box opens.

HARDCOPY UNCONTROLLED
Contract DG133W-05-CQ-1067; Test Case GFE Smart Tools (sm001-024) Use or disclosure of data contained on this sheet is subject to the restriction on the title page of this document.
30
Step # Action Result Pass/Fail
137. In the editing box, replace the def execute(): function with the following:
def execute(self, T):
T=T+2
return T
138. Save the changes and exit the editing box. 139. From the Edit Actions dialog box, rename
sm011_2 by clicking MB3 -> Rename over the edit tool. Rename the edit tool sm011 and select OK. Verify the dialog box that says "sm011 already exists and will be replaced by your new file". Select Rename. Verify that the edit tool "sm011" stays and "sm011_2" is now gone.
140. From the Edit Actions dialog box, rename "sm011" by clicking MB3 -> Rename over the edit tool. Rename the edit tool "Smooth" and select OK. Verify the dialog box that says "Read-only entry already exists: Smooth". Select OK and then select Cancel.
141. Exit the GFE. 142. Restart the GFE and delete the created edit
tool "sm011". Note: to delete the edit tool, select GFE -> Define Smart Tools... from the main menu. The Edit Actions dialog box appears. Click MB3 -> Delete over the edit tool. Select Delete and exit the GFE.
sm012 – Ensure no Duplicate Procedures in menu 143. Invoke the GFE by issuing the runGFE
command. Start the GFE as any User and Config.
144. From the GFE menu on the main menu, select Define Procedures.... The Define Procedures window opens.

HARDCOPY UNCONTROLLED
Contract DG133W-05-CQ-1067; Test Case GFE Smart Tools (sm001-024) Use or disclosure of data contained on this sheet is subject to the restriction on the title page of this document.
31
Step # Action Result Pass/Fail
145. From the Define Procedures menu, click MB3 and select New.... Name the new procedure and then select Ok. The new procedure window opens.
146. From the File menu, select Save and then close the window.
147. In the Define Procedures menu, verify the name of the new procedure appears only once. Note: If the name of the new procedure is listed more than one time, then the test fails.
148. In the Define Procedures menu, select the new procedure and click MB3 -> Delete... to delete the procedure.
149. Exit the Define Procedures menu. 150. Exit the GFE.
sm013 – This test requires that you first install a file into the ifpServer called BinaryWCLData. Then you will need to run the VTECDecoder specifying a particular file. Finally you will run the ViewWCL program to ensure that it does not crash. Install the file
151. Using your favorite text editor, create a new file called: /tmpBinaryWCLData. The contents of the file are not important. Just type some characters so the file is not empty. Save the file under the name: /tmp/BinaryWCLData.
152. From a terminal window, set the current directory to the GFE bin directory (e.g., cd /awips/GFESuite/primary/bin for AWIPS on the server machines, /awips/GFESuite/bin for AWIPS on the workstations, or the appropriate releaseDir/bin if a standalone installation)
153. From this directory run the following command: ./ifpServerText -s -n BinaryWCLData -c Utility -u SITE -f /tmp/BinaryWCLData
You should see a message that confirms that the file was properly stored in the ifpServer. If you see an error, check the command line again for any errors in the directory name or the filename.
HARDCOPY UNCONTROLLED
Contract DG133W-05-CQ-1067; Test Case GFE Smart Tools (sm001-024) Use or disclosure of data contained on this sheet is subject to the restriction on the title page of this document.
32
Step # Action Result Pass/FailCreate a WCL file and run the VTECDecoder
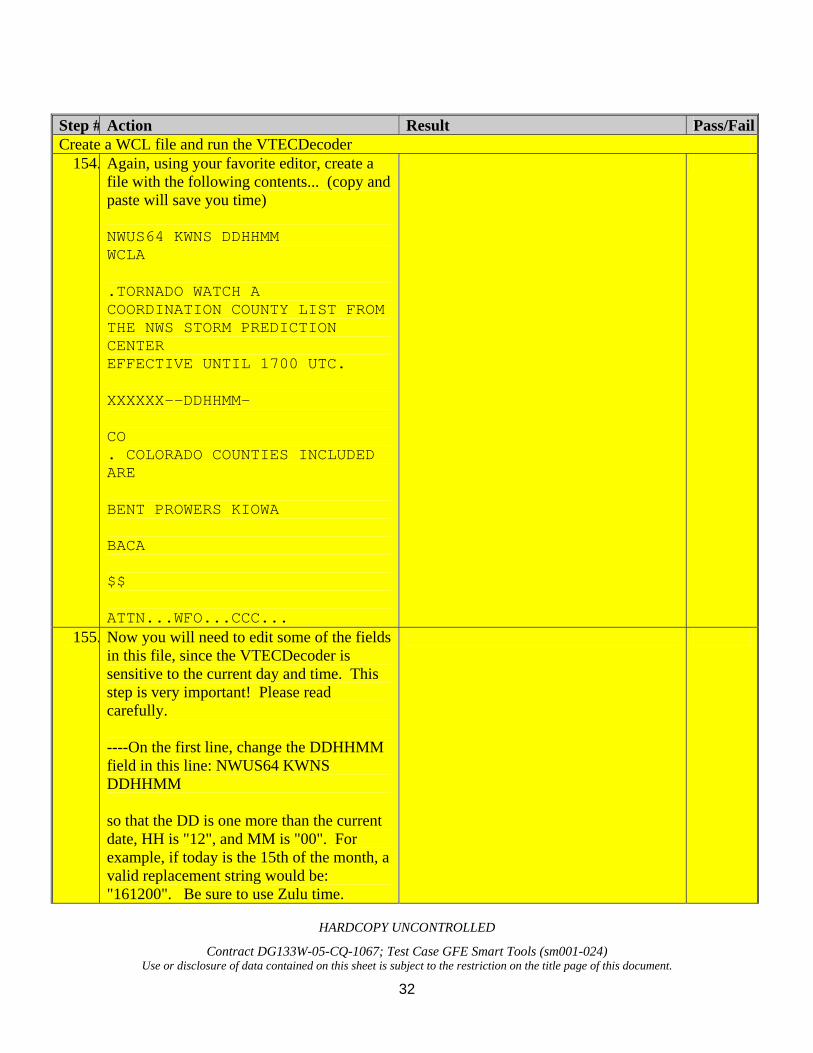
154. Again, using your favorite editor, create a file with the following contents... (copy and paste will save you time)
NWUS64 KWNS DDHHMM WCLA
.TORNADO WATCH A COORDINATION COUNTY LIST FROM THE NWS STORM PREDICTION CENTER EFFECTIVE UNTIL 1700 UTC.
XXXXXX--DDHHMM- CO . COLORADO COUNTIES INCLUDED ARE
BENT PROWERS KIOWA BACA $$ ATTN...WFO...CCC...
155. Now you will need to edit some of the fields in this file, since the VTECDecoder is sensitive to the current day and time. This step is very important! Please read carefully. ----On the first line, change the DDHHMM field in this line: NWUS64 KWNS DDHHMM so that the DD is one more than the current date, HH is "12", and MM is "00". For example, if today is the 15th of the month, a valid replacement string would be: "161200". Be sure to use Zulu time.
HARDCOPY UNCONTROLLED
Contract DG133W-05-CQ-1067; Test Case GFE Smart Tools (sm001-024) Use or disclosure of data contained on this sheet is subject to the restriction on the title page of this document.
33
Step # Action Result Pass/Fail
156. In this line: XXXXXX--DDHHMM- change the XXXXXX field to a valid FIPS code for your configured WFO. You can find a list of these on the GFE by selecting from the main menu: Edit Areas->FIPS_XXX, where XXX is your site id. Any single FIPS code should work fine as long as it is in the list of FIPS.
157. Next, Replace the DDHHMM in this same line with almost the same time string that you used in the first part of Step 2b (e.g., "161200"), but add one day (and change to 01 if it becomes the first day of the month).
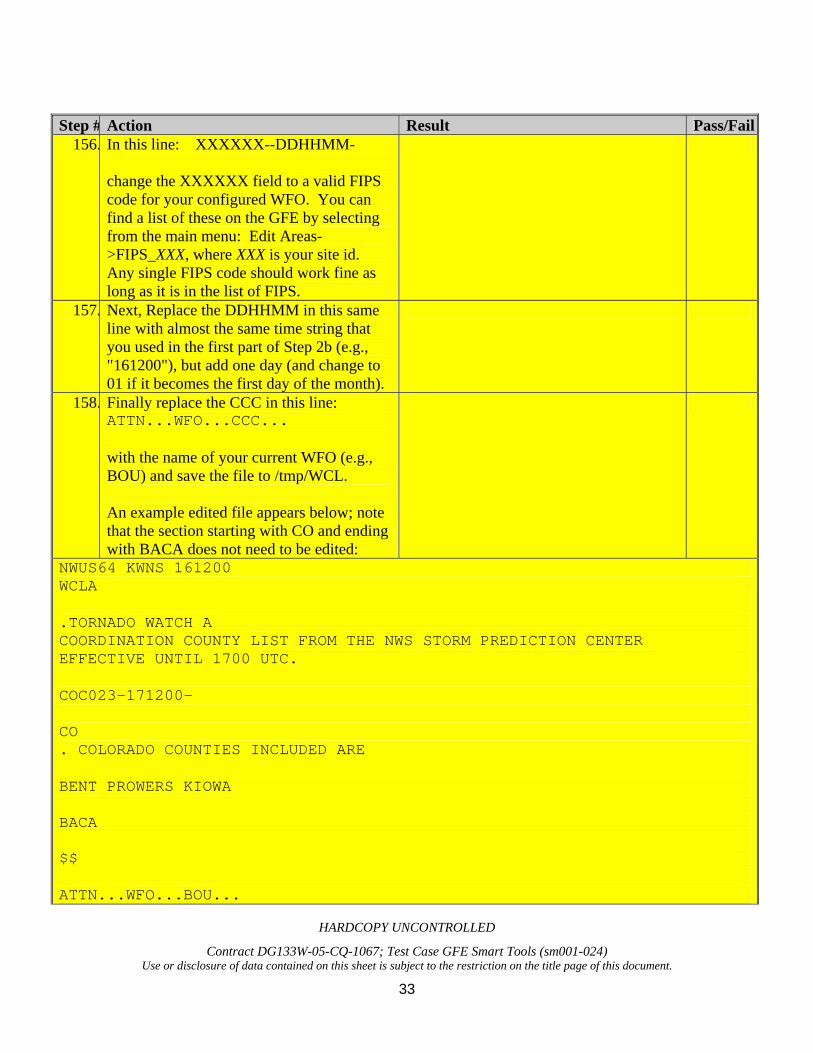
158. Finally replace the CCC in this line: ATTN...WFO...CCC... with the name of your current WFO (e.g., BOU) and save the file to /tmp/WCL. An example edited file appears below; note that the section starting with CO and ending with BACA does not need to be edited:
NWUS64 KWNS 161200 WCLA
.TORNADO WATCH A COORDINATION COUNTY LIST FROM THE NWS STORM PREDICTION CENTER EFFECTIVE UNTIL 1700 UTC.
COC023-171200- CO . COLORADO COUNTIES INCLUDED ARE
BENT PROWERS KIOWA BACA $$ ATTN...WFO...BOU...

HARDCOPY UNCONTROLLED
Contract DG133W-05-CQ-1067; Test Case GFE Smart Tools (sm001-024) Use or disclosure of data contained on this sheet is subject to the restriction on the title page of this document.
34
Step # Action Result Pass/Fail
159. Set your current directory to the GFE bin directory.
160. From the terminal enter this command: run/VTECDecoder -f /tmp/WCL
You should see a message that states the file has been successfully decoded. A yellow dialog will appear instructing you to run the ViewWLC procedure. Just select Acknowledge All to dismiss the dialog.
Run the ViewWCL procedure 161. From the GFE main menu bar select,
Hazards->ViewWCL
162. If the message was properly decoded, a dialog will appear that identifies the type, date, and time of the WCL product. Select Run/Dismiss to continue. If running the ViewWCL procedure produces an error, double check that the WCL file that you created in Step 2 has a valid date string that identifies a time in the future. Dates in the past may cause the ViewWCL procedure to fail.
163. The procedure should run to completion and a new grid will appear in the GM. You should see no error messages. The test succeeds if you saw no error messages. The test fails if you see the error message:"NameError: name 'expTime' is not defined".
164. To clean up, you will need to remove the BinaryWCLFile from the ifpServer database. From a terminal window... a) cd to the bin directory b) Run this command: ifpServerText -d -n BinaryWCLData -c Utility -u SITE
You should see messages like this: 17:12:20.320 IFPServerText.py 334 EVENT: Deleted BinaryWCLData 17:12:20.320 IFPServerText.py 760 EVENT: ifpServerText Finished
sm014 – Make Hazard procedure is in working order 165. Invoke the GFE by issuing the runGFE
command. Start the GFE as any User and Config.

HARDCOPY UNCONTROLLED
Contract DG133W-05-CQ-1067; Test Case GFE Smart Tools (sm001-024) Use or disclosure of data contained on this sheet is subject to the restriction on the title page of this document.
35
Step # Action Result Pass/Fail
166. From the Hazards menu on the GFE main menu, select MakeHazard. The MakeHazard window opens.
167. Select the zone(s), time range, and WS.W - WINTER STORM WARNING from the Select Hazard list. Select Run/Dismiss.
168. Repeat Step 3, but select Hydrology, then select FA.A - Flood Watch, select zones and times, then select Run/Dismiss.
169. Click MB1 on the hazWSW and hazFAA hazard grids in the SE to verify they are available.
170. From the Hazards menu on the GFE main menu, select MergeHazards.
If the MakeHazard procedure worked, i.e., created hazard grids, and the MergeHazard procedure worked, combined the hazards back into the Hazard element, then this test has passed.
171. Exit the GFE. sm015 – TCV and PlotTCVEvents - ensures no areas are removed when running PlotTPCEvents. Because this test is data dependent, this test must be run on a GFE installed as the MFL office. When you install the GFE, make sure you include the -s MFL switch. Clear the PRACTICE active table by issuing this command: cd release/data/vtec cp empty.tbl PRACTICE.tbl Stop the ifpServer (if running). Create an release/etc/SITE/localConfig.py file that changes the MFL domain. The file is located here and should be saved as release/etc/SITE/localConfig.py. Start the ifpServer as in the other tests. Start the GFE, but in this test use the -z switch to start it in displaced real-time and the -f switch for practice mode. runGFE -z 20111022_2100 -f PRACTICE Note the lovely pumpkin color of the background. The current time GFE should be set to 22 Oct. 2011 at 2100 GMT.
172. When the GFE UI appears, from the GFE main menu bar, select Weather Element->Weather Element Groups -> Hazards
This will cause the GFE to load only the Hazards grid into the GFE.

HARDCOPY UNCONTROLLED
Contract DG133W-05-CQ-1067; Test Case GFE Smart Tools (sm001-024) Use or disclosure of data contained on this sheet is subject to the restriction on the title page of this document.
36
Step # Action Result Pass/FailMake a Hazard Grid, Save and Publish
173. Begin by making sure there are no Hazards grids currently defined. If any Hazards grids do exist, remove all of them by MB3 press over each grid and select Delete Grid. Then save the Hazards Weather element by
clicking on the Save button.
174. Make a new Hazards grid by selecting from the GFE main menu, Hazards->MakeHazard. When the dialog appears, you will see that it is divided into three sections from left to right: Map, Hazard, and Time. Start with the Map section on the left. Within this section click the Select All button. This will select the entire area in the CWA. Next, in the middle Hazards section, select the Hydrology button located near the bottom of this section. This will cause the list of hazards above to change. From that list select FA.A. Finally, in the Time section located on the right, define the start time of the hazard as 16Z 23-Oct-2011. Just move the top slider to the right until the start time reads 16Z 23-Oct-2011. Set the end time in a similar way, but set it to 22Z Oct-24-2011. Once you're done setting all the values, click Run/Dismiss. A new Hazards grid will appear in the GFE.
175. Merge this temporary Hazards grid in with the main Hazards weather element by selecting from the main menu bar, Hazards->MergeHazards.
176. Save the grid you just made by clicking on
the Save button . When the dialog appears, click the Save Weather Element(s) button.

HARDCOPY UNCONTROLLED
Contract DG133W-05-CQ-1067; Test Case GFE Smart Tools (sm001-024) Use or disclosure of data contained on this sheet is subject to the restriction on the title page of this document.
37
Step # Action Result Pass/FailRun the FFA formatter
177. Now you will need to run the FAA formatter to populate the VTEC active table. From the GFE main menu, select Products->Formatter Launcher. When this dialog appears, select from the dialog's main menu, Products->Hazard->Hazard_FFA. Then in the button bar, select the Run Formatter button that looks like . When the dialog appears, click the OK button.
178. The FFA formatter will take a few seconds to run. When it's complete, the formatted text will appear in the edit window. Within this window remove all text lines that contain any RED text, by simply selecting these lines with the mouse and pressing the backspace key.
179. Click on the Transmit button. 180. When the dialog appears, click on the
Simulated Transmit button. The VTEC active table is now populated with the new Hazard.
Run the VTECDecoder 181. Next you will need to run the
VTECDecoder to simulate the creation of the TCV product. Start by opening a terminal window and set the directory to the bin directory.
182. From the bin directory type the following command: cp ../doc/test/testdata/sm015_20111023_0000.txt /tmp/ or alternatively, click on this link and use Save As and save the data as /tmp/sm015_20111023_0000.txt.
This copies the TCV text bulletin to the /tmp directory.
HARDCOPY UNCONTROLLED
Contract DG133W-05-CQ-1067; Test Case GFE Smart Tools (sm001-024) Use or disclosure of data contained on this sheet is subject to the restriction on the title page of this document.
38
Step # Action Result Pass/Fail
183. Now you can run the VTECDecoder by issuing this command: run/VTECDecoder -a ../data/vtec/PRACTICE.tbl -f /tmp/sm015_20111023_0000.txt
You should see some messages that end with something like this... 21:36:49.313 SendGfeMessage.py 82 EVENT: SendUserMessage finished 21:36:49.352 VTECDecoder.py 1155 EVENT: VTECDecoder Finished A yellow dialog/banner will appear on the GFE.
184. Click Acknowledge All to dismiss the banner.
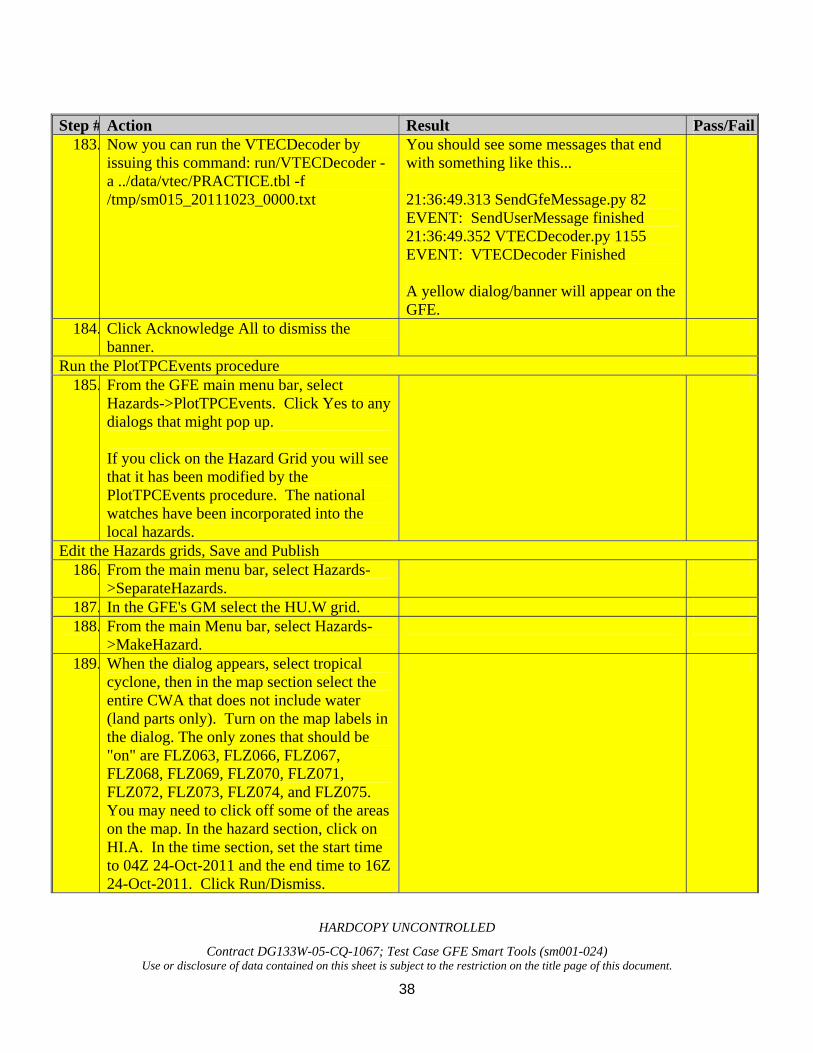
Run the PlotTPCEvents procedure 185. From the GFE main menu bar, select
Hazards->PlotTPCEvents. Click Yes to any dialogs that might pop up. If you click on the Hazard Grid you will see that it has been modified by the PlotTPCEvents procedure. The national watches have been incorporated into the local hazards.
Edit the Hazards grids, Save and Publish 186. From the main menu bar, select Hazards-
>SeparateHazards.
187. In the GFE's GM select the HU.W grid. 188. From the main Menu bar, select Hazards-
>MakeHazard.
189. When the dialog appears, select tropical cyclone, then in the map section select the entire CWA that does not include water (land parts only). Turn on the map labels in the dialog. The only zones that should be "on" are FLZ063, FLZ066, FLZ067, FLZ068, FLZ069, FLZ070, FLZ071, FLZ072, FLZ073, FLZ074, and FLZ075. You may need to click off some of the areas on the map. In the hazard section, click on HI.A. In the time section, set the start time to 04Z 24-Oct-2011 and the end time to 16Z 24-Oct-2011. Click Run/Dismiss.

HARDCOPY UNCONTROLLED
Contract DG133W-05-CQ-1067; Test Case GFE Smart Tools (sm001-024) Use or disclosure of data contained on this sheet is subject to the restriction on the title page of this document.
39
Step # Action Result Pass/Fail
190. Merge the Grids by selecting from the GFE main menu Hazards->MergeHazards.
191. Finally save the grids by clicking the Save
Grids button and clicking Save Weather Element(s).
Run the NPW formatter, and Transmit 192. Select from the main menu Products-
>Formatter Launcher.
193. When the Formatter Launcher dialog appears, select from this dialog's main menu Products->Hazard->Hazard_NPW.
194. Click the Run Formatter button that looks like .
195. When the text appears, remove all lines that contain any RED text.
196. Click the Transmit button. When the dialog appears, select the Simulated Transmit button.
Run the VTECDeocder 197. From a terminal window set the directory to
the bin directory.
198. Issue the following command: cp ../doc/test/testdata/sm015_20111023_0600.txt /tmp/ or click on this link and select save as and save the data as /tmp/sm015_20051023_0600.txt.
199. Next, run the VTECDecoder with the following command: run/VTECDecoder -a ../data/vtec/PRACTICE.tbl -f /tmp/sm015_20111023_0600.txt
You should see some messages that end with something like this... 21:36:49.313 SendGfeMessage.py 82 EVENT: SendUserMessage finished 21:36:49.352 VTECDecoder.py 1155 EVENT: VTECDecoder Finished
200. A yellow dialog/banner will appear on the GFE. Click Acknowledge All to dismiss the banner.
HARDCOPY UNCONTROLLED
Contract DG133W-05-CQ-1067; Test Case GFE Smart Tools (sm001-024) Use or disclosure of data contained on this sheet is subject to the restriction on the title page of this document.
40
Step # Action Result Pass/FailRun PlotTPCEvents
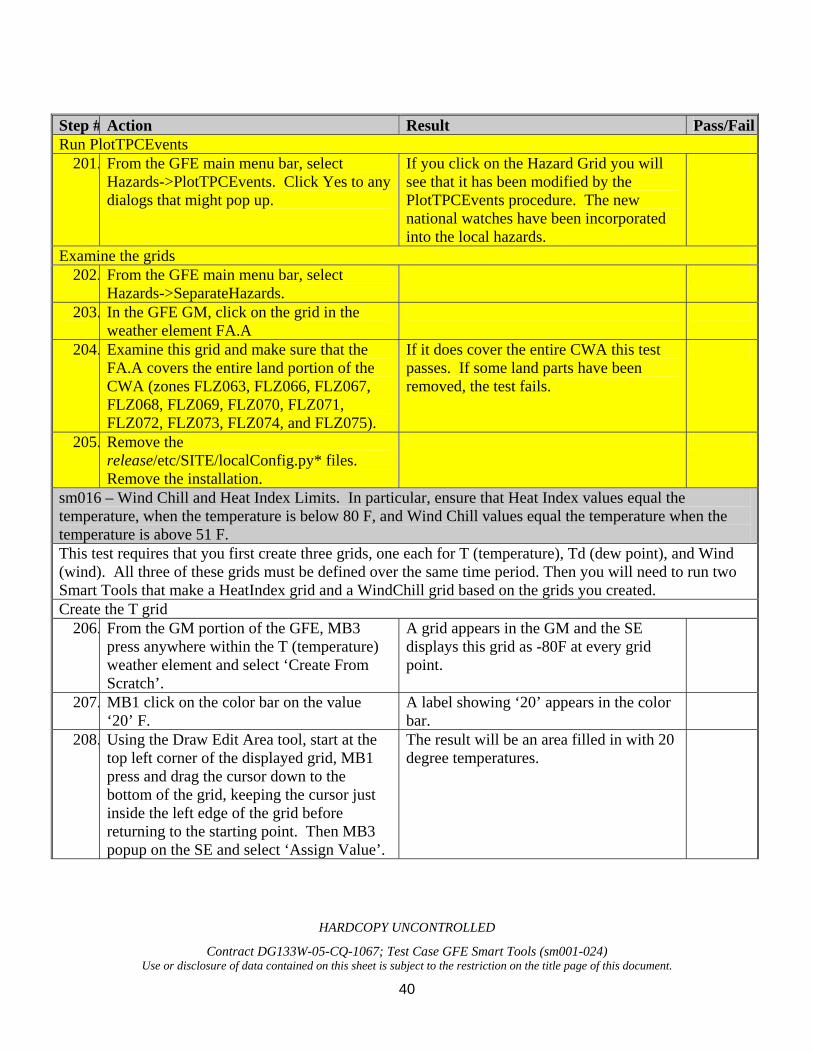
201. From the GFE main menu bar, select Hazards->PlotTPCEvents. Click Yes to any dialogs that might pop up.
If you click on the Hazard Grid you will see that it has been modified by the PlotTPCEvents procedure. The new national watches have been incorporated into the local hazards.
Examine the grids 202. From the GFE main menu bar, select
Hazards->SeparateHazards.
203. In the GFE GM, click on the grid in the weather element FA.A
204. Examine this grid and make sure that the FA.A covers the entire land portion of the CWA (zones FLZ063, FLZ066, FLZ067, FLZ068, FLZ069, FLZ070, FLZ071, FLZ072, FLZ073, FLZ074, and FLZ075).
If it does cover the entire CWA this test passes. If some land parts have been removed, the test fails.
205. Remove the release/etc/SITE/localConfig.py* files. Remove the installation.
sm016 – Wind Chill and Heat Index Limits. In particular, ensure that Heat Index values equal the temperature, when the temperature is below 80 F, and Wind Chill values equal the temperature when the temperature is above 51 F. This test requires that you first create three grids, one each for T (temperature), Td (dew point), and Wind (wind). All three of these grids must be defined over the same time period. Then you will need to run two Smart Tools that make a HeatIndex grid and a WindChill grid based on the grids you created. Create the T grid
206. From the GM portion of the GFE, MB3 press anywhere within the T (temperature) weather element and select ‘Create From Scratch’.
A grid appears in the GM and the SE displays this grid as -80F at every grid point.
207. MB1 click on the color bar on the value ‘20’ F.
A label showing ‘20’ appears in the color bar.
208. Using the Draw Edit Area tool, start at the top left corner of the displayed grid, MB1 press and drag the cursor down to the bottom of the grid, keeping the cursor just inside the left edge of the grid before returning to the starting point. Then MB3 popup on the SE and select ‘Assign Value’.
The result will be an area filled in with 20 degree temperatures.

HARDCOPY UNCONTROLLED
Contract DG133W-05-CQ-1067; Test Case GFE Smart Tools (sm001-024) Use or disclosure of data contained on this sheet is subject to the restriction on the title page of this document.
41
Step # Action Result Pass/Fail
209. On the colorbar, select ‘30’ and repeat step 208, but this time draw the area about an inch wide to the right and adjacent of the 20 F area.
A label showing ‘30’ appears in the color bar. The result will be an area filled in with 30 degree temperatures.
210. Repeat step 209 again, but this time select 40 from the color bar before drawing the area.
A label showing ‘40’ appears in the color bar. The result will be an area filled in with 40 degree temperatures.
211. Repeat this operation until a 90F area has been drawn on the right edge of the grid.
The result should be a new grid that looks like a rainbow with bands of similar colors running vertically. The values of the contours match the values of the grid points underneath.
Create the Td grid 212. Repeat steps 206 through 211 for a Td (dew
point) weather element. Be sure to select the same time period as whatever you defined in the T weather element. Also, this time start with the 0F area and continue to draw contours in 10F increments until the 70F area has been drawn.
The result should be a new grid that looks like a rainbow with bands of similar colors running vertically. The values of the contours match the values of the grid points underneath.
Create the Wind grid 213. To create a wind grid, move the cursor to
the Wind weather element at same time as the T and Td grids, press MB3 and select ‘Create From Scratch’.
A grid appears in the GM and the SE displays this grid as 0kts at every grid point.
214. Move the cursor to the color bar located on top of the SE display. MB1 click on the value ‘30’.
The label will indicate that you selected "30" as the pickup value. The direction is not important.
215. From anywhere in the SE display, MB3 press and select ‘Assign Value’.
The wind grid should have a value of 30 knots everywhere.
Now that the T, Td, and Wind grids are defined we can test the HeatIndex tool and the Wind Chill Tool to see if they generate grids with the proper values. Run the HeatIndex tool and verify the results.
216. Create a HeatIndex grid just like you create the T, Td, or Wind Grid in the previous steps. MB3 click on a shadow box for the HeatIndex weather element and select ‘Create From Scratch’. Make sure you select the same time as the T, Td, and Wind grids.
The HeatIndex grid appears in the GM and the SE legend.
HARDCOPY UNCONTROLLED
Contract DG133W-05-CQ-1067; Test Case GFE Smart Tools (sm001-024) Use or disclosure of data contained on this sheet is subject to the restriction on the title page of this document.
42
Step # Action Result Pass/Fail
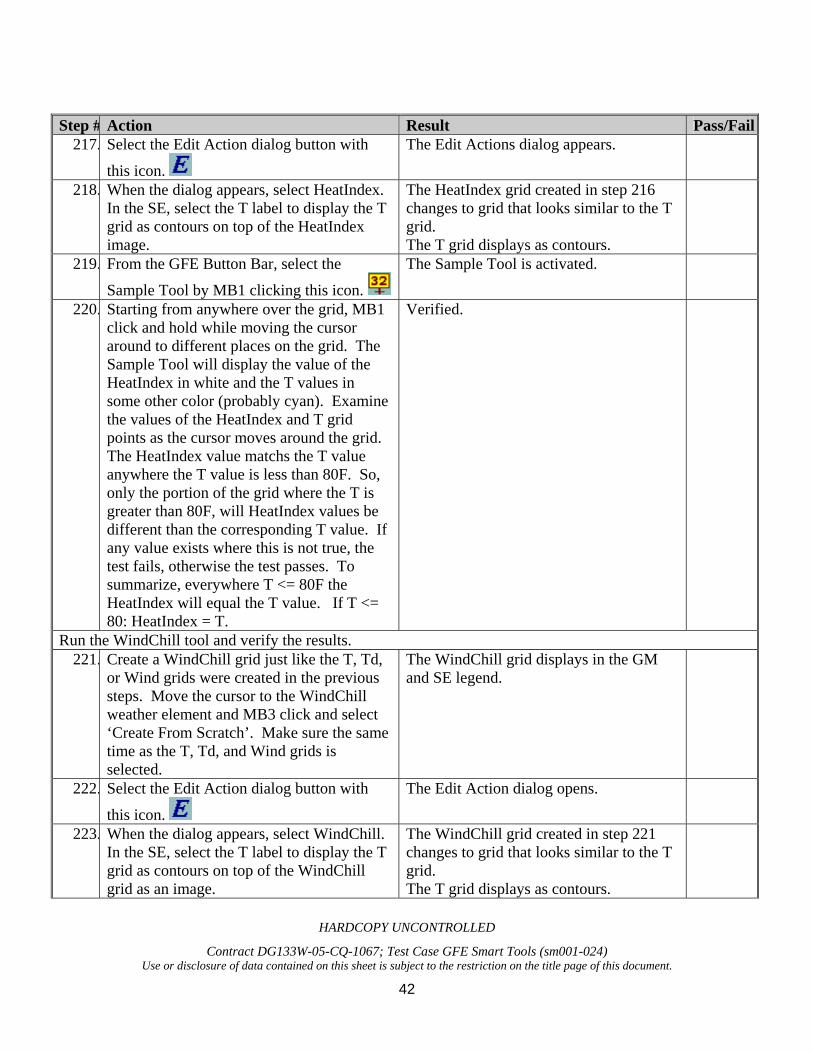
217. Select the Edit Action dialog button with
this icon.
The Edit Actions dialog appears.
218. When the dialog appears, select HeatIndex. In the SE, select the T label to display the T grid as contours on top of the HeatIndex image.
The HeatIndex grid created in step 216 changes to grid that looks similar to the T grid. The T grid displays as contours.
219. From the GFE Button Bar, select the
Sample Tool by MB1 clicking this icon.
The Sample Tool is activated.
220. Starting from anywhere over the grid, MB1 click and hold while moving the cursor around to different places on the grid. The Sample Tool will display the value of the HeatIndex in white and the T values in some other color (probably cyan). Examine the values of the HeatIndex and T grid points as the cursor moves around the grid. The HeatIndex value matchs the T value anywhere the T value is less than 80F. So, only the portion of the grid where the T is greater than 80F, will HeatIndex values be different than the corresponding T value. If any value exists where this is not true, the test fails, otherwise the test passes. To summarize, everywhere T <= 80F the HeatIndex will equal the T value. If T <= 80: HeatIndex = T.
Verified.
Run the WindChill tool and verify the results. 221. Create a WindChill grid just like the T, Td,
or Wind grids were created in the previous steps. Move the cursor to the WindChill weather element and MB3 click and select ‘Create From Scratch’. Make sure the same time as the T, Td, and Wind grids is selected.
The WindChill grid displays in the GM and SE legend.
222. Select the Edit Action dialog button with
this icon.
The Edit Action dialog opens.
223. When the dialog appears, select WindChill. In the SE, select the T label to display the T grid as contours on top of the WindChill grid as an image.
The WindChill grid created in step 221 changes to grid that looks similar to the T grid. The T grid displays as contours.

HARDCOPY UNCONTROLLED
Contract DG133W-05-CQ-1067; Test Case GFE Smart Tools (sm001-024) Use or disclosure of data contained on this sheet is subject to the restriction on the title page of this document.
43
Step # Action Result Pass/Fail
224. From the GFE Button Bar, select the Sample Tool by MB1 clicking the Sample
Tool button in the toolbar.
The Sample Tool is activated.
225. Starting from anywhere over the grid, MB1 click and hold while moving the cursor around to different places on the grid. The Sample Tool displays the value of the WindChill in white and the T values in some other color (probably cyan). Examine the values of each of the HeatIndex and T grid points as the cursor moves around the grid. The WindChill value matchs the T value anywhere the T value is greater than 51F. So, only the portion of the grid where the T is less than 51F, will the WindChill values be different than the T value. If any value exists where this is not true, the test fails, otherwise the test passes. To summarize, everywhere T >= 51F the WindChill will equal the T value. If T >= 51: WindChill = T.
Verified.
226. Remove all the grids you created by moving the cursor over each and MB3 popup and select ‘Delete Grid’. Then MB1 click ‘Edit’ -> ‘Revert Fcst’.
sm017 – Verify that the Make Hazard procedure properly displays descriptors for non-headline event codes.227. Invoke the GFE by issuing the runGFE
command from the bin directory.
228. When the GFE displays, from the main menu bar select, Hazards. This item is located on the right side of the interface.
229. From the displayed list of Hazard procedures, select MakeHazard.
230. When the Make Hazard dialog displays select the hazard category Marine.
231. Examine the list of marine hazards that is displayed in center window. In particular, check the following hazard entry: MA.S

HARDCOPY UNCONTROLLED
Contract DG133W-05-CQ-1067; Test Case GFE Smart Tools (sm001-024) Use or disclosure of data contained on this sheet is subject to the restriction on the title page of this document.
44
Step # Action Result Pass/Fail
232. Make sure that the above entry has a descriptor following the hazard identifier. For example, MA.S - MARINE WEATHER STATEMENT
233. Next, select from the hazards category menu, Coastal Flood.
234. Examine the list of marine hazards that is displayed in center window. In particular, check the following hazard entries: CF.S LS.S
235. Verify that each of the above entries has a descriptor following the hazard identifier. For example, CF.S - COASTAL FLOOD STATEMENT LS.S - LAKESHORE FLOOD STATEMENT
sm018 – Verify that the Make Hazard procedure displays the hazard identifier LB.Y. 236. Invoke the GFE by issuing the runGFE
command from the bin directory.
237. When the GFE displays, from the main menu bar select, Hazards. This item is located on the right side of the interface.
238. From the displayed list of Hazard procedures, select MakeHazard.
239. When the MakeHazard dialog displays, select the hazard category Winter Weather, unless it is already selected by default.
240. Examine the list of winter weather hazards that is displayed in center window. In particular, check to see if the following entry exists: LB.Y -- LAKE EFFECT SNOW AND BLOWING SNOW ADVISORY Note that the descriptor is too large to fit in the list of hazards. This is expected.
If this entry is displayed in the list of hazards, this test succeeds.

HARDCOPY UNCONTROLLED
Contract DG133W-05-CQ-1067; Test Case GFE Smart Tools (sm001-024) Use or disclosure of data contained on this sheet is subject to the restriction on the title page of this document.
45
Step # Action Result Pass/Failsm019 – Verify that the MergeHazards Procedure is writable - tk4608
241. Use GFE -> Define Procedures to bring up the Define Procedures Dialog.
242. In the Procedures list on the dialog, MB3 over MergeHazards and observe the popup menu.
There is a "Modify..." option but no "View..." option.
sm020 – Smart Script getSite4ID verification 243. Select GFE -> Define Smart Tools from the
GFE main menu bar. The Edit Actions dialog is displayed.
244. Select Windows -> Show All Windows from the Edit Actions dialog menu bar.
The Edit Actions dialog is expanded and shows Utilities on the right side of the dialog.
245. Position the cursor over SmartScript, MB3 press and select "View".
A Python editor window appears with the contents of Smart Script.
246. From the Python editor window, choose Edit -> Find, and then enter getSite4ID into the dialog, and press "Find".
The editor scrolls to the getSite4ID function.
247. Examine the code, the return statement for the first "elif" should read: return "P" + id3 and should NOT read: return "P" + id
Verified.
248. Close the editor window using the "X" in the window manager. Close the Edit Actions dialog using the "X" in the window manager. Exit the GFE using GFE-> Exit.
sm021 – Invalid WeatherKey/DiscreteKey prints useful string for debugging 249. Invoke the GFE by issuing the runGFE
command and log on as user GFETEST with Config set to TestConfig.
250. Bring up the Define iTools Dialog using GFE-->Define iTools.
The Define iTools Dialog is displayed.
251. Press MB1 over "TextProductTest". The TextProductTest Values dialog will appear.
252. Choose "RoutineLevel3_1_TestScript" and radio button "Individual Tests". Click OK.
The Choose Individual Tests Dialog will appear.

HARDCOPY UNCONTROLLED
Contract DG133W-05-CQ-1067; Test Case GFE Smart Tools (sm001-024) Use or disclosure of data contained on this sheet is subject to the restriction on the title page of this document.
46
Step # Action Result Pass/Fail
253. Choose "testInvWxMessage" and click OK. A Yellow Banner will appear with the message (note that the times may be different): S ReplaceGriddedData aborted for Wx_SFC:TBW_GRID__Fcst_00000000_0000 (Jan 10 06 11:00:00 GMT, Jan 10 06 23:00:00 GMT) Invalid WeatherKey found in Grid. Key Position is 0 Key is: Sct:T:-:<NoVis>: Then, another Yellow Banner message will appear over the first message: ['RoutineLevel3_1_TestScript'] TESTING COMPLETE 0.08 minutes 1 SCRIPTS RUN 1 TESTS PASSED 0 TESTS FAILED:
254. Click "Acknowledge" on the Yellow Banner.
The first Yellow Banner message will display.
255. Check that the first message is giving the correct information about the invalid weather key as shown above. In particular, the last part of the message indicates the invalid key (Sct:T:-:<NoVis>:)
sm022 – MakeHazard/MergeHazards HZ.A and HZ.W VTEC Codes 256. Invoke the GFE by issuing the runGFE
command. If you are running the GFE on an operational system, start the GFE in PRACTICE mode.
257. We clear out any existing hazard grids in this step. Find the Hazards weather element in the GM. MB3 popup over the weather element and select "Select All Times". From the GFE main menu, select Grids -> Delete Grids.
All hazard grids are removed.
258. Bring up the Hazards -> Make Hazards tool. The Make Hazards dialog is presented.

HARDCOPY UNCONTROLLED
Contract DG133W-05-CQ-1067; Test Case GFE Smart Tools (sm001-024) Use or disclosure of data contained on this sheet is subject to the restriction on the title page of this document.
47
Step # Action Result Pass/FailTesting Availability of HZ.W and HA.Z
259. Click on the Non-Precipitation Category. Verify that there are HZ.W - HARD FREEZE WARNING and a HZ.A - HARD FREEZE WATCH entries available.
Verified.
Testing Merge Conflicts with HZ.W and HA.Z 260. Select a time period on the start and ending
time slides on the Make Hazards tool. Select HZ.W on the hazard list, and then select several zones on the map. Press Run. Select HZ.A on the hazard list, and leave the zone selection the same. Press Run/Dismiss.
261. From the GFE main menu, select Hazards -> MergeHazards. Verify that the MakeHazard dialog is displayed and it shows that there is a conflict with the hazHZW and hazHZA grids.
Verified.
262. Click on the "Cancel Merge" button on the Make Hazard.
The dialog is dismissed.
263. From the GM, find the hazHZA grid. MB3 popup over the grid and select "Delete Grid".
The hazHZA grid is removed.
Testing Normal Merge 264. From the GFE main menu, select Hazards -
> MergeHazards. No "conflict" dialog is displayed and the hazard grids are merged.
265. Examine the Hazard grid by finding the Hazards grid in the GM, and then MB1 clicking on the grid. Verify that the values set within the grid are HZ.W.
Hazard grid is displayed and values are HZ.W within the grid.
Testing Setting Values with MakeHazards and Good Merge 266. Bring up the Hazards -> Make Hazards
tool. The Make Hazards dialog is presented.
267. Select Non-Precipitation, HZ.A, select a time period, and select some zones that do not overlap the previously selected HZ.W zones. Select Run. Select FZ.W, select a different time period, and select different zones that do not overlap the previously selected HZ.W nor HZ.A zones. Select Run/Dismiss.
The temporary elements hazFZW, hazHZA, and hazHZW are available in the GM and their contents reflect the values entered into the Make Hazard dialog.

HARDCOPY UNCONTROLLED
Contract DG133W-05-CQ-1067; Test Case GFE Smart Tools (sm001-024) Use or disclosure of data contained on this sheet is subject to the restriction on the title page of this document.
48
Step # Action Result Pass/Fail
268. From the GFE main menu, select Hazards -> MergeHazards.
the hazards are merged into the Hazards weather element.
269. Examine the grids in the GM's Hazard element to ensure that the HZ.A, HZ.W, and FZ.W all appear in the available grids. Note that they may not appear in all of the grids.
sm023 – TCV Changes to Coastal Zones, PlotTPCEvents, HazardRecovery, ETNs local to WFO Test Setup: The GFESuite software is installed as site TBW. The IFP server is running. The PRACTICE vtec table is cleared by going to the server machine (upon which ifpServer is running), to the GFESuite's data/vtec directory, and performing "cp empty.tbl PRACTICE.tbl Clearing out Existing Hazard Grids
270. Invoke the GFE by issuing the runGFE command in displaced real-time mode and in PRACTICE mode with the following command: ./runGFE -z 20100502_1200 -f PRACTICE
271. When the GFE UI appears, from the GFE main menu bar, select Weather Element->Weather Element Groups -> Hazards. This will cause the GFE to load only the Hazards grid into the GFE. From the GFE main menu, choose Hazards -> HazardRecovery and answer Yes or OK to any dialogs that are presented.
All Hazard grids are removed.
272. Press the save button to save the modified grids. Note: depending upon the state of the GFE prior to running the HazardRecovery procedure, there may or may not be modified grids to save.
All modified grids are saved.

HARDCOPY UNCONTROLLED
Contract DG133W-05-CQ-1067; Test Case GFE Smart Tools (sm001-024) Use or disclosure of data contained on this sheet is subject to the restriction on the title page of this document.
49
Step # Action Result Pass/FailInitializing the Hazard Grids to the Tropical Event
273. We copy test data to a temporary location and then run the VTECDecoder to simulate the creation of the TCV product. Start by opening a terminal window and set the directory to the bin directory on the server machine.
274. From the bin directory type the following command:
cp ../doc/test/testdata/sm023_20100502_1200.txt /tmp/ or alternatively, click on this link and use Save As and save the data as /tmp/sm023_20100502_1200.txt. This copies the TCV text bulletin to the /tmp directory.
275. Now you can run the VTECDecoder by issuing this command: run/VTECDecoder -a ../data/vtec/PRACTICE.tbl -f /tmp/sm023_20100502_1200.txt -z 20100502_1200
A yellow dialog/banner will appear on the GFE saying to run the PlotTCVEvents. Click Acknowledge All to dismiss the banner.

HARDCOPY UNCONTROLLED
Contract DG133W-05-CQ-1067; Test Case GFE Smart Tools (sm001-024) Use or disclosure of data contained on this sheet is subject to the restriction on the title page of this document.
50
Step # Action Result Pass/FailRunning the PlotTPCEvents procedure
276. From the GFE main menu bar, select Hazards->PlotTPCEvents. Click Yes to any dialogs that might pop up. Click on the Hazard Grid you will see that it has been modified by the PlotTPCEvents procedure. The grids now contain the tropical hazards. Notice that only the coastal zones are populated with the hazards -- this is because the TCV now only contains coastal zones and there weren't any other hazards present in the grids previously.
Verified that the zones look like this:
You can also verify proper operation by examining the TCV product and comparing it to the zones with hazards in the hazard grids.
Adding Local Hazards 277. We now add local hazards which consist of
other tropical hazards to zones that are not covered by the TCV. Bring up the MakeHazards dialog by using the Hazards -> MakeHazard menu.
The MakeHazard dialog is displayed.
278. Select "Tropical Cyclone" on the dialog, then select TR.W for the hazard type. Set the time sliders to the minimum (earliest) time. Select the GMZ853 and GMZ873 marine zones (hint: turn on the Zone Labels and zoom if necessary to identify the correct zones). Press Run.
A hazTRW grid is created or modified and now contains TR.W in zones GMZ853 and GMZ873. There are also TR.W in other coastal zones from step 3. Note that the TR.W event in the marine zones are only one hour long.
279. Select TI.W on the dialog. Set the start time slider to the earliest possible time, and set the end time slider to May 3, 2010 at 1200z. Select the following inland zones: FLZ060, FLZ055, FLZ056, FLZ051 (hint: turn on the Zone Labels and zoom if necessary to identify the correct zones). Press Run/Dismiss.
A hazTIW grid is created or modified and now contains TI.W in zones FLZ060, FLZ055, FLZ056, and FLZ051and the dialog is removed.

HARDCOPY UNCONTROLLED
Contract DG133W-05-CQ-1067; Test Case GFE Smart Tools (sm001-024) Use or disclosure of data contained on this sheet is subject to the restriction on the title page of this document.
51
Step # Action Result Pass/Fail
280. Merge the hazards using Hazards -> MergeHazards.
the hazards are merged without conflicts.
281. Press the save button to save the modified grids.
All modified grids are saved.
Running the CWF and NPW Formatters 282. Bring up the Formatter Launcher with
Products -> Formatter Launcher. The Formatter Launcher is displayed.
283. From the Formatter Launcher, select Products -> CWF. From the Zone Combiner, select Combo Actions -> Clear and then Combo Options -> Include All Zones. Then select the icon to run. Press OK on the CWF Values dialog.
The formatter is running and when finished the tab will turn "green" and the product will be displayed in the Product Editor.
284. Examine the output from the CWF formatter in the Product Editor. Note that the marine zones GMZ853 and GMZ873 will have a "TROPICAL STORM WARNING IN EFFECT" headline and the VTEC code will have an ETN of 0001. The VTEC ETN should NOT be anything but 0001 since the ETN in the WFO-issued products no longer mirror the ETN in the TCV. Verify that the ending time on the VTEC line is all zeros, indicating "Until Further Notice".
Verified. Example of UGC and VTEC for GMZ853: GMZ853-022115- /O.NEW.KTBW.TR.W.0001.100502T1212Z-000000T0000Z/ COASTAL WATERS FROM ENGLEWOOD TO TARPON SPRINGS FL OUT 20 NM- 812 AM EDT SUN MAY 2 2010 ...TROPICAL STORM WARNING IN EFFECT...
285. Transmit the product by pressing the "Transmit" button on the Product Editor, and then pressing the "Simulated Transmit" on the Transmit Dialog.
The product is transmitted.
286. From the Formatter Launcher, select Products -> Hazard -> Hazard_NPW. Select the icon to run.
The formatter is running and when finished the tab will turn "green" and the product will be displayed in the Product Editor.

HARDCOPY UNCONTROLLED
Contract DG133W-05-CQ-1067; Test Case GFE Smart Tools (sm001-024) Use or disclosure of data contained on this sheet is subject to the restriction on the title page of this document.
52
Step # Action Result Pass/Fail
287. Examine the output from the NPW formatter in the Product Editor. Note that the zones FLZ060, FLZ055, FLZ056, and FLZ051 will have a "INLAND TROPICAL STORM WARNING IN EFFECT" with times headline and the VTEC code will have an ETN of 0001.
Verified. Example UGC and VTEC: FLZ051-055-056-060-022015- /O.NEW.KTBW.TI.A.0001.100502T1213Z-100503T1200Z/ HILLSBOROUGH-MANATEE-HARDEE-SARASOTA- INCLUDING THE CITIES OF...TAMPA...BRANDON...BRADENTON... BAYSHORE GARDENS...PALMETTO...WAUCHULA...BOWLING GREEN... ZOLFO SPRINGS...SARASOTA...NORTH PORT...VENICE...ENGLEWOOD...SOUTH VENICE 813 AM EDT SUN MAY 2 2010 ...INLAND TROPICAL STORM WATCH IN EFFECT THROUGH MONDAY MORNING...
288. remove the framing codes (in red text). Transmit the product by pressing the "Transmit" button on the Product Editor, and then pressing the "Simulated Transmit" on the Transmit Dialog.
The product is transmitted.
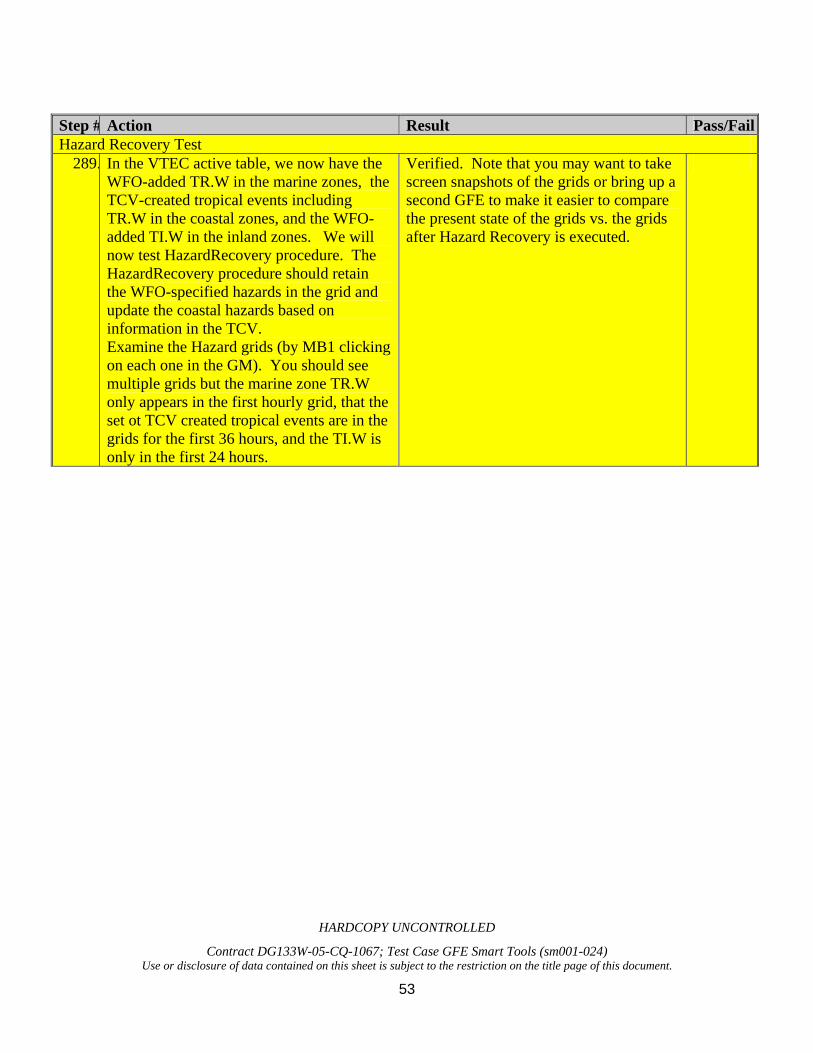
HARDCOPY UNCONTROLLED
Contract DG133W-05-CQ-1067; Test Case GFE Smart Tools (sm001-024) Use or disclosure of data contained on this sheet is subject to the restriction on the title page of this document.
53
Step # Action Result Pass/FailHazard Recovery Test
289. In the VTEC active table, we now have the WFO-added TR.W in the marine zones, the TCV-created tropical events including TR.W in the coastal zones, and the WFO-added TI.W in the inland zones. We will now test HazardRecovery procedure. The HazardRecovery procedure should retain the WFO-specified hazards in the grid and update the coastal hazards based on information in the TCV. Examine the Hazard grids (by MB1 clicking on each one in the GM). You should see multiple grids but the marine zone TR.W only appears in the first hourly grid, that the set ot TCV created tropical events are in the grids for the first 36 hours, and the TI.W is only in the first 24 hours.
Verified. Note that you may want to take screen snapshots of the grids or bring up a second GFE to make it easier to compare the present state of the grids vs. the grids after Hazard Recovery is executed.

HARDCOPY UNCONTROLLED
Contract DG133W-05-CQ-1067; Test Case GFE Smart Tools (sm001-024) Use or disclosure of data contained on this sheet is subject to the restriction on the title page of this document.
54
Step # Action Result Pass/Fail
290. Choose Hazards -> HazardRecovery to run the Hazard Recovery procedure. You may need to answer "YES" to the edit area warning dialog, and will have to answer OK to the "Hazard Recovery Values" dialog. Examine the Hazard grids (hint: use Hazards -> SeparateHazards to examine the grids closer).
The configuration of the hazard grids may have changed. Note that the TR.W in the marine zones time duration now match the other tropical events of 36 hours and that the TI.W is only in the first 24 hours. Be sure that the correct zones are covered. The same hazards as observed in step 6a should be present in each zone. Only the timing should be different on the TR.W in the marine zones since that is defined as a "Until Further Notice" hazard which are represented as a 0 to 36 hour grid by Hazard Recovery. Here are what the grids should look like:
291. If you used Hazards-> SeparateHazards to view the grids, please use Hazards->MergeHazards to bring them back
together. Save the grids using on the GFE toolbar.
292. Shut down the GFE.

HARDCOPY UNCONTROLLED
Contract DG133W-05-CQ-1067; Test Case GFE Smart Tools (sm001-024) Use or disclosure of data contained on this sheet is subject to the restriction on the title page of this document.
55
Step # Action Result Pass/FailNext TCV Test
293. We now send another TCV through the VTEC decoder and have the tester run the PlotTPCEvents procedure when requested. We are ensuring that the PlotTPCEvents will only replace the coastal zone hazards identified in the TCV and not affect WFO-specified hazards. We copy test data to a temporary location and then run the VTECDecoder to simulate the creation of the TCV product. This TCV changes the tropical coastal events. The GFE needs to be restarted with a later displaced real-time. Invoke the GFE by issuing the runGFE command in displaced real-time mode and in PRACTICE mode with the following command: ./runGFE -z 20100502_1800 -f PRACTICE When the GFE UI appears, from the GFE main menu bar, select Weather Element->Weather Element Groups -> Hazards. This will cause the GFE to load only the Hazards grid into the GFE.
294. Open a terminal window and set the directory to the bin directory on the server machine.
295. From the bin directory type the following command:
cp ../doc/test/testdata/sm023_20100502_1800.txt /tmp/ or alternatively, click on this link and use Save As and save the data as /tmp/sm023_20100502_1800.txt. This copies the TCV text bulletin to the /tmp directory.

HARDCOPY UNCONTROLLED
Contract DG133W-05-CQ-1067; Test Case GFE Smart Tools (sm001-024) Use or disclosure of data contained on this sheet is subject to the restriction on the title page of this document.
56
Step # Action Result Pass/Fail
296. Now you can run the VTECDecoder by issuing this command: run/VTECDecoder -a ../data/vtec/PRACTICE.tbl -f /tmp/sm023_20100502_1800.txt -z 20100502_1800
A yellow dialog/banner will appear on the GFE saying to run the PlotTPCEvents.
297. Click Acknowledge All to dismiss the banner.
298. On the GFE, run the PlotTPCEvents procedure by choosing Hazards -> PlotTPCEvents.
299. Examine the Hazard grids. The TR.W in the marine zones and the TI.W on the coast and inland remain intact and have not changed. The coastal hazards have changed to match what was issued in the TCV product.
300. Save the grids using on the toolbar.
301. Bring up the Formatter Launcher with Products -> Formatter Launcher.
The Formatter Launcher is displayed.
302. From the Formatter Launcher, select Products -> CWF. Select the CWF tab. Then select the icon to run. Press OK on the CWF Values dialog.
The formatter is running and when finished the tab will turn "green" and the product will be displayed in the Product Editor.
303. Examine the output from the CWF formatter in the Product Editor. Note that the marine zones GMZ853 and GMZ873 will have a "TROPICAL STORM WARNING REMAINS IN EFFECT" headline and the VTEC code will have an ETN of 0001 and the action code is CON. The VTEC ETN should NOT be anything but 0001 since the ETN in the WFO-issued products no longer mirror the ETN in the TCV. Verify that the ending time on the VTEC line is all zeros, indicating "Until Further Notice".
Verified.
304. Transmit the product by pressing the "Transmit" button on the Product Editor, and then pressing the "Simulated Transmit" on the Transmit Dialog.
The product is transmitted.

HARDCOPY UNCONTROLLED
Contract DG133W-05-CQ-1067; Test Case GFE Smart Tools (sm001-024) Use or disclosure of data contained on this sheet is subject to the restriction on the title page of this document.
57
305. From the Formatter Launcher, select Products -> Hazard_NPW. Select the Hazard_NPW tab. Select the icon to run.
The formatter is running and when finished the tab will turn "green" and the product will be displayed in the Product Editor.
306. Examine the output from the NPW formatter in the Product Editor. Note that the zones FLZ060, FLZ055, FLZ056, and FLZ051 will have a "INLAND TROPICAL STORM WARNING REMAINS IN EFFECT" with times headline and the VTEC code will have an ETN of 0001. The action code is CON.
Verified.
307. Transmit the product by pressing the "Transmit" button on the Product Editor, and then pressing the "Simulated Transmit" on the Transmit Dialog.
The product is transmitted.
308. Shut down the GFE.

HARDCOPY UNCONTROLLED
Contract DG133W-05-CQ-1067; Test Case GFE Smart Tools (sm001-024) Use or disclosure of data contained on this sheet is subject to the restriction on the title page of this document.
58
Step # Action Result Pass/FailFinal TCV Test
309. We now send another TCV through the VTEC decoder and have the tester run the PlotTPCEvents procedure when requested. We are ensuring that the PlotTPCEvents will only replace the coastal zone hazards identified in the TCV and not affect WFO-specified hazards. We copy test data to a temporary location and then run the VTECDecoder to simulate the creation of the TCV product. This TCV cancels the coastal tropical events. We need to restart the GFE in order to reset the displaced real time. Invoke the GFE by issuing the runGFE command in displaced real-time mode and in PRACTICE mode with the following command: ./runGFE -z 20100503_0000 -f PRACTICE When the GFE UI appears, from the GFE main menu bar, select Weather Element->Weather Element Groups -> Hazards. This will cause the GFE to load only the Hazards grid into the GFE.
310. Open a terminal window and set the directory to the bin directory on the server machine.
311. From the bin directory type the following command:
cp ../doc/test/testdata/sm023_20100503_0000.txt /tmp/ or alternatively, click on this link and use Save As and save the data as /tmp/sm023_20100503_0000.txt. This copies the TCV text bulletin to the /tmp directory.
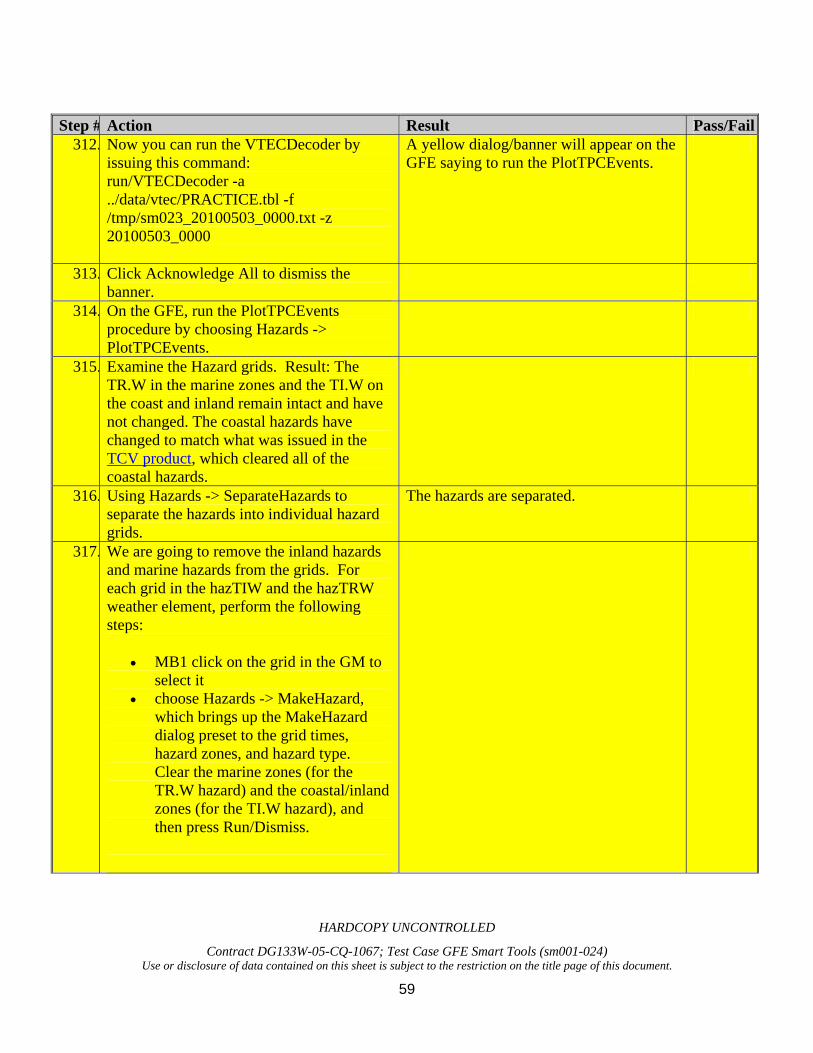
HARDCOPY UNCONTROLLED
Contract DG133W-05-CQ-1067; Test Case GFE Smart Tools (sm001-024) Use or disclosure of data contained on this sheet is subject to the restriction on the title page of this document.
59
Step # Action Result Pass/Fail
312. Now you can run the VTECDecoder by issuing this command: run/VTECDecoder -a ../data/vtec/PRACTICE.tbl -f /tmp/sm023_20100503_0000.txt -z 20100503_0000
A yellow dialog/banner will appear on the GFE saying to run the PlotTPCEvents.
313. Click Acknowledge All to dismiss the banner.
314. On the GFE, run the PlotTPCEvents procedure by choosing Hazards -> PlotTPCEvents.
315. Examine the Hazard grids. Result: The TR.W in the marine zones and the TI.W on the coast and inland remain intact and have not changed. The coastal hazards have changed to match what was issued in the TCV product, which cleared all of the coastal hazards.
316. Using Hazards -> SeparateHazards to separate the hazards into individual hazard grids.
The hazards are separated.
317. We are going to remove the inland hazards and marine hazards from the grids. For each grid in the hazTIW and the hazTRW weather element, perform the following steps:
• MB1 click on the grid in the GM to select it
• choose Hazards -> MakeHazard, which brings up the MakeHazard dialog preset to the grid times, hazard zones, and hazard type. Clear the marine zones (for the TR.W hazard) and the coastal/inland zones (for the TI.W hazard), and then press Run/Dismiss.

HARDCOPY UNCONTROLLED
Contract DG133W-05-CQ-1067; Test Case GFE Smart Tools (sm001-024) Use or disclosure of data contained on this sheet is subject to the restriction on the title page of this document.
60
Step # Action Result Pass/Fail
318. Use Hazards -> MergeHazards to merge the grids back into the Hazards weather
element, then save the grids using on the toolbar.
319. Bring up the Formatter Launcher with Products -> Formatter Launcher.
The Formatter Launcher is displayed.
320. From the Formatter Launcher, select the CWF tab. Then select the icon to run. Press OK on the CWF Values dialog.
The formatter is running and when finished the tab will turn "green" and the product will be displayed in the Product Editor.
321. Examine the output from the CWF formatter in the Product Editor. Note that the marine zones GMZ853 and GMZ873 will have the "TROPICAL STORM WARNING IS CANCELLED" headline and the VTEC code will have an ETN of 0001 and the action code is CAN. The VTEC ETN should NOT be anything but 0001 since the ETN in the WFO-issued products no longer mirror the ETN in the TCV. Verify that the ending time on the VTEC line is all zeros, indicating "Until Further Notice".
Verified.
322. Transmit the product by pressing the "Transmit" button on the Product Editor, and then pressing the "Simulated Transmit" on the Transmit Dialog.
The product is transmitted.
323. From the Formatter Launcher, select the Hazard_NPW tab. Select the icon to run.
The formatter is running and when finished the tab will turn "green" and the product will be displayed in the Product Editor.
324. Examine the output from the NPW formatter in the Product Editor. Note that the zones FLZ060, FLZ055, FLZ056, and FLZ051 will have a "INLAND TROPICAL STORM WARNING IS CANCELLED" headline and the VTEC code will have an ETN of 0001. The action code is CAN.
Verified.

HARDCOPY UNCONTROLLED
Contract DG133W-05-CQ-1067; Test Case GFE Smart Tools (sm001-024) Use or disclosure of data contained on this sheet is subject to the restriction on the title page of this document.
61
325. Removing the framing codes in the product (|* and *|), then transmit the product by pressing the "Transmit" button on the Product Editor, and then pressing the "Simulated Transmit" on the Transmit Dialog.
The product is transmitted.
Final HazardRecovery Test 326. We test the hazard recovery procedure one
last time. There should be no active hazards and the procedure should state that. Choose Hazards -> HazardRecovery to run the Hazard Recovery procedure. You may need to answer "YES" to the edit area warning dialog, and will have to answer OK to the "Hazard Recovery Values" dialog. You should get a dialog stating that there are no active hazards and the hazard grids have been cleared.
Verified that there are no hazard grids.
sm024 – Testing Wx Key Crash/Hang (DR17955) 327. Open a terminal window and change
directory (cd) to the GFE's bin directory.
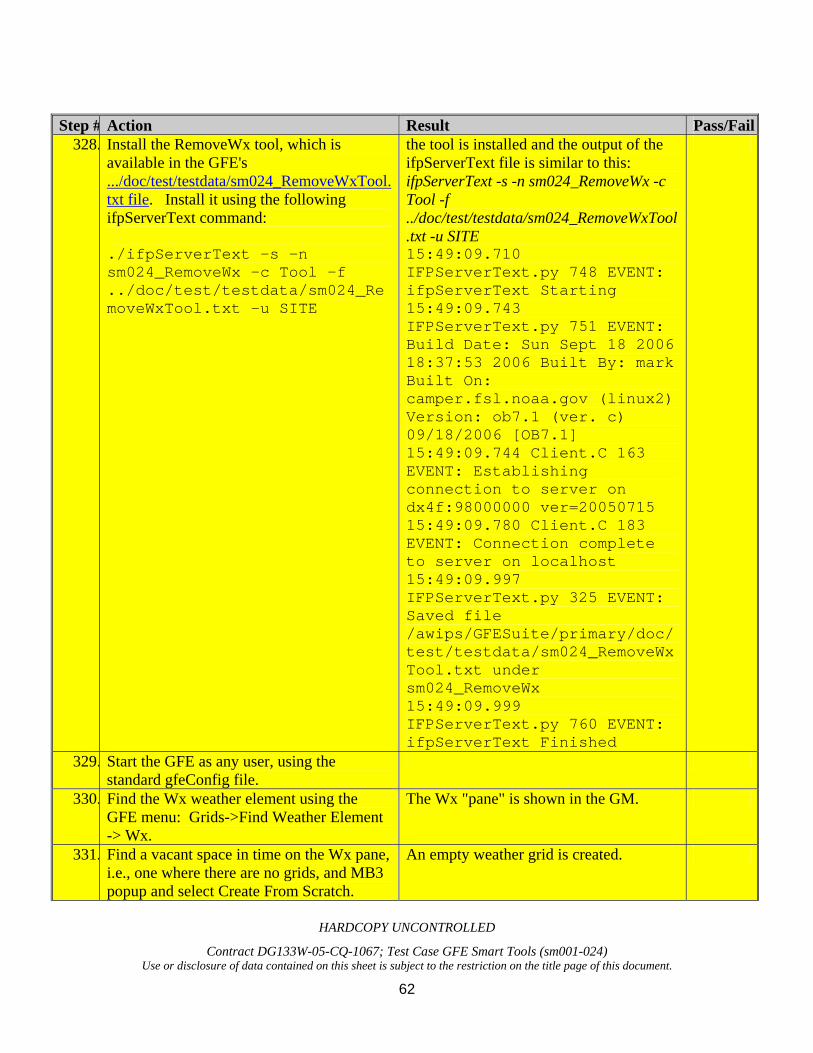
HARDCOPY UNCONTROLLED
Contract DG133W-05-CQ-1067; Test Case GFE Smart Tools (sm001-024) Use or disclosure of data contained on this sheet is subject to the restriction on the title page of this document.
62
Step # Action Result Pass/Fail
328. Install the RemoveWx tool, which is available in the GFE's .../doc/test/testdata/sm024_RemoveWxTool.txt file. Install it using the following ifpServerText command: ./ifpServerText -s -n sm024_RemoveWx -c Tool -f ../doc/test/testdata/sm024_RemoveWxTool.txt -u SITE
the tool is installed and the output of the ifpServerText file is similar to this: ifpServerText -s -n sm024_RemoveWx -c Tool -f ../doc/test/testdata/sm024_RemoveWxTool.txt -u SITE 15:49:09.710 IFPServerText.py 748 EVENT: ifpServerText Starting 15:49:09.743 IFPServerText.py 751 EVENT: Build Date: Sun Sept 18 2006 18:37:53 2006 Built By: mark Built On: camper.fsl.noaa.gov (linux2) Version: ob7.1 (ver. c) 09/18/2006 [OB7.1] 15:49:09.744 Client.C 163 EVENT: Establishing connection to server on dx4f:98000000 ver=20050715 15:49:09.780 Client.C 183 EVENT: Connection complete to server on localhost 15:49:09.997 IFPServerText.py 325 EVENT: Saved file /awips/GFESuite/primary/doc/test/testdata/sm024_RemoveWxTool.txt under sm024_RemoveWx 15:49:09.999 IFPServerText.py 760 EVENT: ifpServerText Finished
329. Start the GFE as any user, using the standard gfeConfig file.
330. Find the Wx weather element using the GFE menu: Grids->Find Weather Element -> Wx.
The Wx "pane" is shown in the GM.
331. Find a vacant space in time on the Wx pane, i.e., one where there are no grids, and MB3 popup and select Create From Scratch.
An empty weather grid is created.

HARDCOPY UNCONTROLLED
Contract DG133W-05-CQ-1067; Test Case GFE Smart Tools (sm001-024) Use or disclosure of data contained on this sheet is subject to the restriction on the title page of this document.
63
Step # Action Result Pass/Fail
332. Select the Draw Edit Area tool from the toolbar. Draw an area (using MB1 drags) on the displayed grid in the SE. From the color bar, MB3 popup and choose Set Pickup Value...
an area is shown to be selected on the SE and the Pickup Value Dialog is displayed.
333. From the "Type:" field on the Pickup Value Dialog, select R (Rain), and then click Assign Value.
the previously selected area is assigned Rain.
334. Draw a different area (using MB1 drags) on the displayed grid in the SE. From the Pickup Value Dialog, select S (Snow) from the Type: field, then click Assign Value.
The selected area is assigned Snow.
335. Draw a different area (using MB1 drags) on the displayed grid in the SE. From the Pickup Value Dialog, click "Add", then change the rightmost "Type:" field to R (Rain). Click Assign Value.
The selected area is assigned Snow and Rain.
336. Dismiss the Pickup Value Dialog. Verify that there are three areas on the SE with weather: one with Rain, one with Snow, and one with Rain and Snow mixed. Verify that the color bar shows four entries: <NoWx>, Wide R-, Wide S-, and Wide R-S-.
Verified.
337. Very important! Select the "C" to clear the edit area.
Test of Fix 338. Click on the "E" toolbar icon. The Edit Actions dialog is presented.
339. Scroll and find the sm024_RemoveWx tool. MB1 click on the entry. If the Empty Edit Area Warning Dialog appears, answer YES to the "Empty Edit Area Warning" Dialog.
The sm024_RemoveWx Values dialog is displayed.

HARDCOPY UNCONTROLLED
Contract DG133W-05-CQ-1067; Test Case GFE Smart Tools (sm001-024) Use or disclosure of data contained on this sheet is subject to the restriction on the title page of this document.
64
Step # Action Result Pass/Fail
340. Click "R" for Rain and click Run/Dismiss. If the software is working properly, there should only be two entries on the color bar (<NoWx> and Wide S-) and the data in the SE should only reflect Snow as the Rain area was removed and the Rain combined with Snow is now just Snow. Note: Prior to this fix, the result would be two <NoWx> entries in the color bar and the image in the SE would not quite repaint properly. The CPU for the GFE would reach 99%+ and the GFE would hang.
341. Remove the installed edit tool using the following command from the GFE's bin directory: ./ifpServerText -d -c Tool -n sm024_RemoveWx -u SITE
End of test.

HARDCOPY UNCONTROLLED
Contract DG133W-05-CQ-1067; Test Case GFE Smart Tools (sm001-024) Use or disclosure of data contained on this sheet is subject to the restriction on the title page of this document.
65
5.0 REQUIREMENTS VERIFICATION TRACEABILITY MATRIX (RVTM)
Number Description Test Step(s)
SYSR2597 The AWIPS GFESuite shall implement Create, Modify, and Delete smart tools to modify scalar weather elements. 1-16
SYSR2598 The AWIPS GFESuite shall implement Create, Modify, and Delete smart tools to modify vector weather elements.
17-32
SYSR2599 The AWIPS GFESuite shall implement Create, Modify, and Delete smart tools to modify WEATHER weather elements.
33-49
SYSR2600 The AWIPS GFESuite shall implement Create, Modify, and Delete smart tools to modify DISCRETE weather elements.
50-66
SYSR2601 The AWIPS GFESuite shall implement Create, Modify, and Delete a Procedure that consists of tools that modify the same weather element.
67-79
SYSR2602 The AWIPS GFESuite shall implement Create, Modify, and Delete a Procedure that consists of tools that modify various weather elements.
80-90
SYSR2603 The AWIPS GFESuite shall implement Multiple Grid Warning, Empty Edit Area Warning.
91-100
SYSR2604 The AWIPS GFESuite shall implement Smart tool syntax checker.
101-110
SYSR2605 The AWIPS GFESuite shall implement Procedure syntax checker.
111-117
SYSR2606 The AWIPS GFESuite shall test hide edit tool capability.
118-129
SYSR2607 The AWIPS GFESuite shall implement Renaming tools to existing tools.
130-142
SYSR2608 The AWIPS GFESuite shall Ensure no Duplicate Procedures in menu.
143-150
SYSR2609 The AWIPS GFESuite shall implement Running the ViewWCL program will not crash if there are any other files with "WCL" in their name.
151-164
SYSR2610 The AWIPS GFESuite shall implement Make Hazard procedure is in working order.
165-171
SYSR2611 The AWIPS GFESuite shall implement TCV and PlotTCVEvents - ensures no areas are removed when running PlotTPCEvents.
172-205
SYSR2612 The AWIPS GFESuite shall implement Wind Chill and Heat Index Limits.
206-226
SYSR2613 The AWIPS GFESuite shall Verify that the Make Hazard procedure properly displays descriptors for non-headline event codes.
227-235
SYSR2614 The AWIPS GFESuite shall Verify that the Make Hazard procedure displays the hazard identifier LB.Y.
236-240
SYSR2615 The AWIPS GFESuite shall Verify that the MergeHazards Procedure is writable - tk4608.
241-242
SYSR2616 The AWIPS GFESuite shall implement Smart Script getSite4ID verification. 243-

HARDCOPY UNCONTROLLED
Contract DG133W-05-CQ-1067; Test Case GFE Smart Tools (sm001-024) Use or disclosure of data contained on this sheet is subject to the restriction on the title page of this document.
66
248 SYSR2617 The AWIPS GFESuite shall implement Invalid WeatherKey/DiscreteKey
prints useful string for debugging. 249-255
SYSR2618 The AWIPS GFESuite shall implement MakeHazard/MergeHazards HZ.A and HZ.W VTEC Codes.
256-269