Teradata Material2
228
What is Teradata? Teradata database is a Relational Database Management System(RDBMS). It has been designed to run the world’s largest commercial databases. Preferred solution for enterprise data warehousing Executes on UNIX MP-RAS and Windows 2000 operating systems It is compliant with ANSI industry standards Runs on a single or multiple nodes It is a “database server” Uses parallelism to manage “terabytes” of data Capable of supporting many concurrent users from various client platforms Teradata –A Brief History 1979 –Teradata Corp founded in Los Angeles, California Visualpath, #306, Niligiri Block, Aditya Enclave, Ameerpet, Hyderabad. ph-8374187525 Page 1
description
New TDM Material
Transcript of Teradata Material2
What is Teradata?
Teradata database is a Relational Database Management
System(RDBMS).
It has been designed to run the world’s largest commercial databases.
Preferred solution for enterprise data warehousing
Executes on UNIX MP-RAS and Windows 2000 operating systems
It is compliant with ANSI industry standards
Runs on a single or multiple nodes
It is a “database server”
Uses parallelism to manage “terabytes” of data
Capable of supporting many concurrent users from various client
platforms
Teradata –A Brief History
1979 –Teradata Corp founded in Los Angeles, California
–Development begins on a massively parallel computer
1982–YNET technology is patented
1984–Teradata markets the first database computer DBC/1012
–First system purchased by Wells Fargo Bank of Cal.
–Total revenue for year -$3 million
1987–First public offering of stock
1989–Teradata and NCR partner on next generation of DBC
1991–NCR Corporation is acquired by AT&T
–Teradata revenues at $280 million
Visualpath, #306, Niligiri Block, Aditya Enclave, Ameerpet, Hyderabad.ph-8374187525 Page 1
1992–Teradata is merged into NCR
1996–AT&T spins off NCR Corp. with Teradata product
1997–The Teradata Database becomes the industry leader
in data warehousing
2000–First 100+ Terabyte system in production
2002–Teradata V2R5 released 12/2002;
major release including featuressuch as PPI, roles and profiles,
multi-value compression, and more.
2003–Teradata V2R5.1 released 12/2003;
includes UDFs, BLOBs, CLOBs, and more.
2005–Teradata V2R6 Released Collect Statistics enhancement
2007–Teradata Td12 Released Query Rewrite,
2009–Teradata TD13 Released Scalar Subquery, NOPI
Ongoing Development TD14 Temporal feature
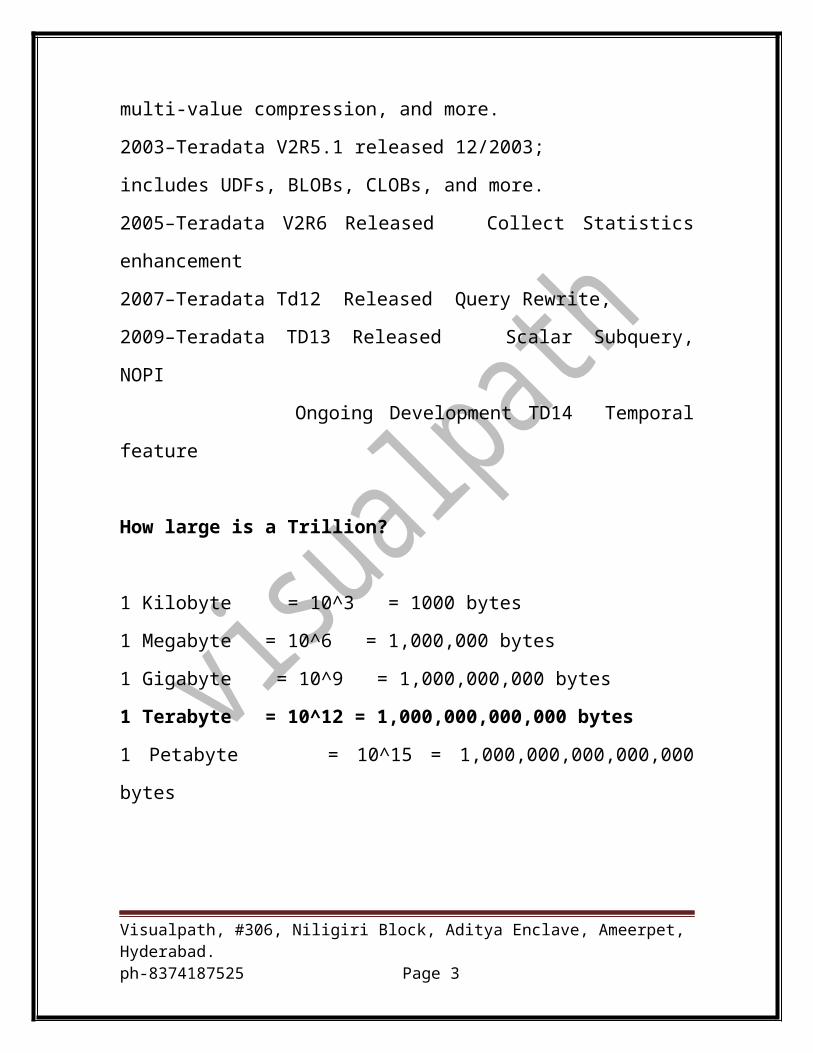
How large is a Trillion?
1 Kilobyte = 10^3 = 1000 bytes
1 Megabyte = 10^6 = 1,000,000 bytes
1 Gigabyte = 10^9 = 1,000,000,000 bytes
1 Terabyte = 10^12 = 1,000,000,000,000 bytes
1 Petabyte = 10^15 = 1,000,000,000,000,000 bytes
Visualpath, #306, Niligiri Block, Aditya Enclave, Ameerpet, Hyderabad.ph-8374187525 Page 2
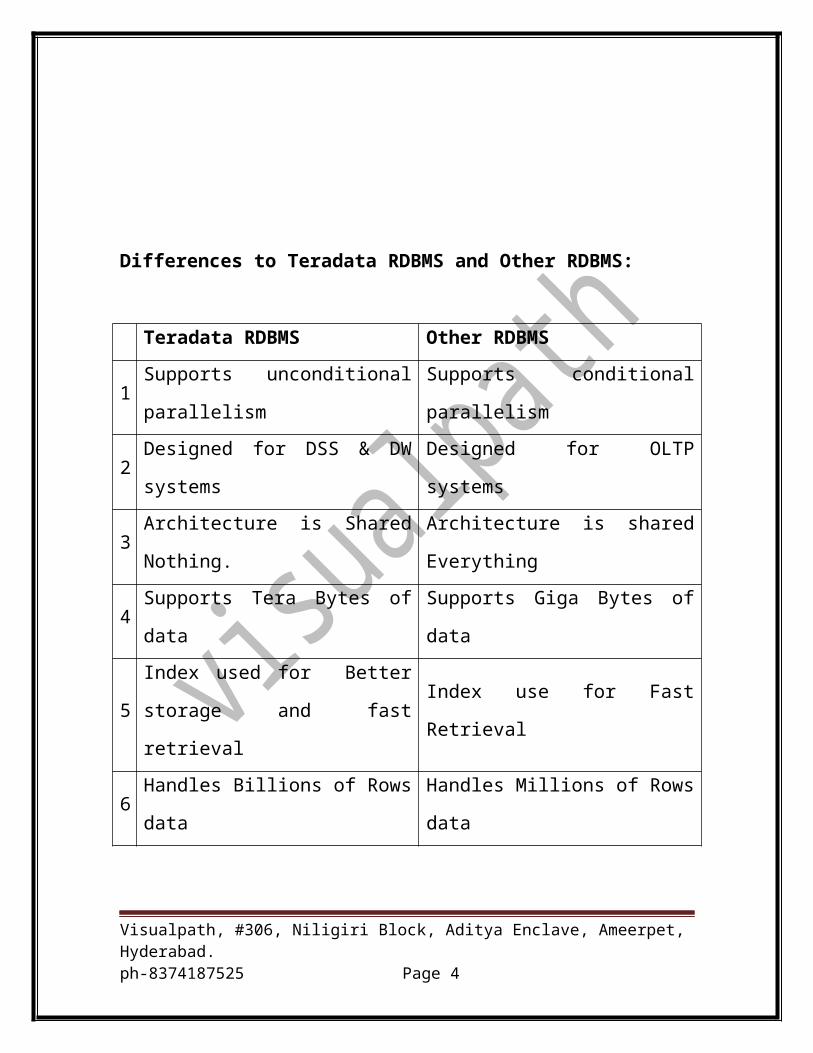
Differences to Teradata RDBMS and Other RDBMS:
Teradata RDBMS Other RDBMS
1 Supports unconditional parallelism Supports conditional parallelism
2 Designed for DSS & DW systems Designed for OLTP systems
3 Architecture is Shared Nothing. Architecture is shared Everything
4 Supports Tera Bytes of data Supports Giga Bytes of data
5Index used for Better storage and
fast retrievalIndex use for Fast Retrieval
6 Handles Billions of Rows data Handles Millions of Rows data
Teradata in the Enterprise
Large capacity database machine: The Teradata Database handles the
large data storage requirements to process the large amounts of detail data
for decision support. Thisincludes Terabytes of detailed data stored in
billions of rows and Thousands of Millions of Instructions per Second
(MIPS) to process data.
Parallel processing:Parallel processingis the key thing which makes
Teradata RDBMS faster than other relational systems.
Single data store: Teradata RDBMS can be accessed by network-attached
and channel-attached systems. It also supports the requirements of many
diverse clients.
Visualpath, #306, Niligiri Block, Aditya Enclave, Ameerpet, Hyderabad.ph-8374187525 Page 3
Fault tolerance: Teradata RDBMS automatically detects and recovers from
hardware failures.
Data integrity: Teradata RDBMS ensures that transactions either complete
or rollback to a stable state if a fault occurs.
Scalable growth: Teradata RDBMS allows expansion without sacrificing
performance.
SQL: Teradata RDBMS serves as a standard access language that permits
customers to control data.
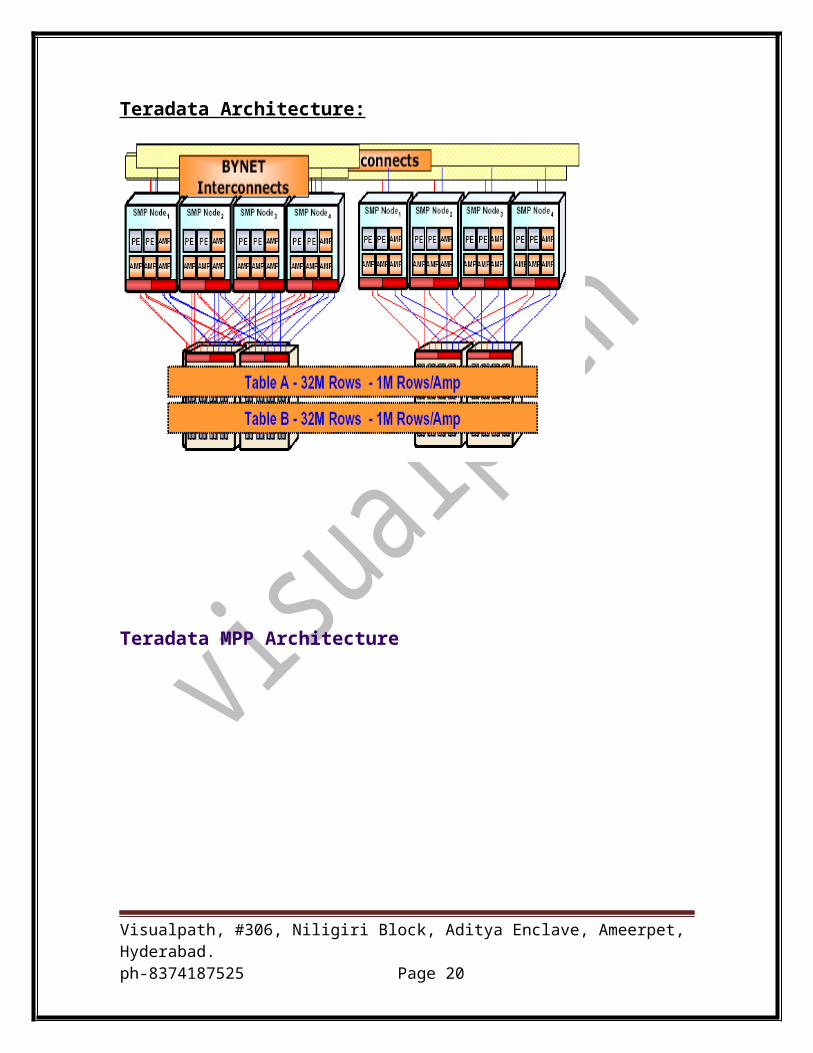
Teradata Architecture and Components:
The BYNET
At the most elementary level, you can look at the BYNET as a bus that
loosely couples all the SMP nodes in a multinode system. However, this
view does an injustice to the BYNET, because the capabilities of the
network range far beyond those of a simple system bus.
The BYNET also possesses high-speed logic arrays that provide
bidirectional broadcast, multicast, and point-to-point communication and
merge functions.
A multinode system has at leas two BYNETs. This creates a fault-tolerant
Visualpath, #306, Niligiri Block, Aditya Enclave, Ameerpet, Hyderabad.ph-8374187525 Page 4
environment and enhances interprocessor communication. Load-balancing
software optimizes the transmission of messages over the BYNETs. If one
BYNET should fail, the second can handle the traffic.
The total bandwidth for each network link to a processor node is ten
megabytes. The total throughput available for each node is 20 megabytes,
because each node has two network links and the bandwidth is linearly
scalable. For example, a 16-node system has 320 megabytes of bandwidth
for point-to-point connections.
The total, available broadcast bandwidth for any size system is 20
megabytes.The BYNET software also provides a standard TCP/IP interface
for communication among the SMP nodes.The following figure shows how
the BYNET connects individual SMP nodes tocreate an MPP system.
Boardless BYNET
Single-node SMP systems use Boardless BYNET (or virtual BYNET)
software tosimulate the BYNET hardware driver. Both the SMP and MPP
machines run theset of software processes called vprocs on a node under the
Parallel DatabaseExtensions (PDE) software layer.
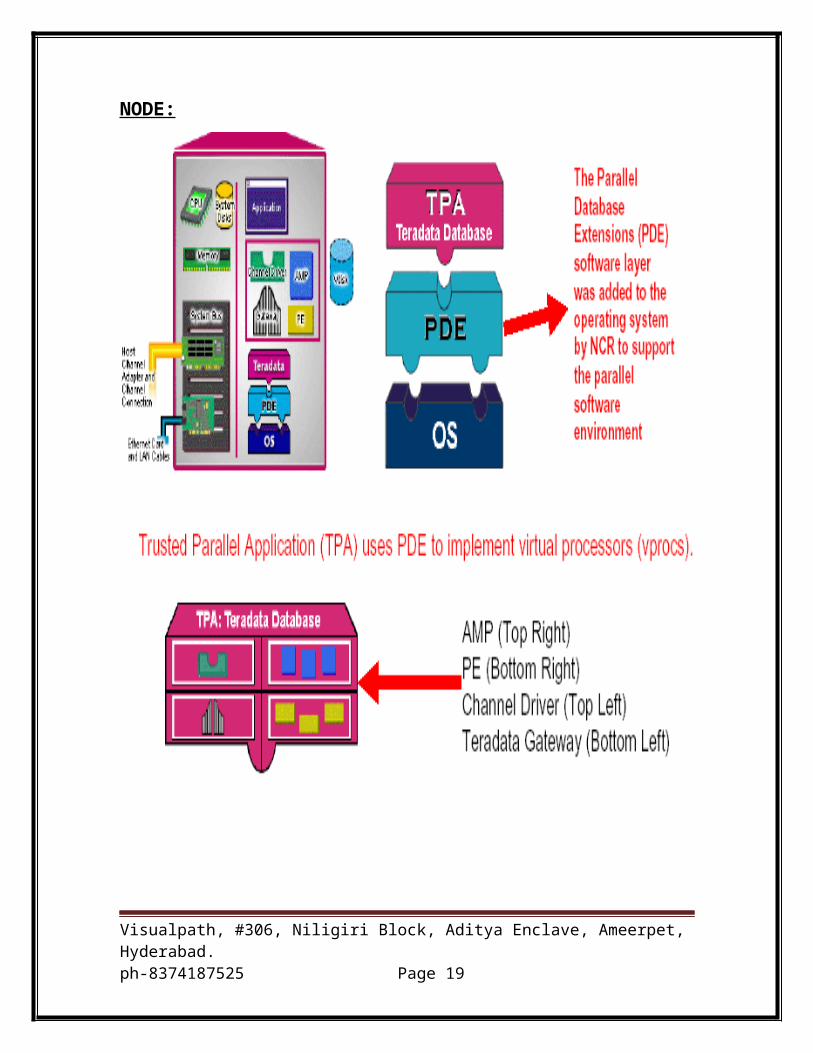
Parallel Database Extensions
Parallel Database Extensions (PDE) software is an interface layer on top of
theoperating system.
The PDE provides the ability to:
• Execute vprocs
Visualpath, #306, Niligiri Block, Aditya Enclave, Ameerpet, Hyderabad.ph-8374187525 Page 5
• Run the Teradata RDBMS in a parallel environment
• Apply a flexible priority scheduler to Teradata RDBMS sessions
•Debug the operating system kernel and the Teradata RDBMS using
resident debugging facilities
The PDE also enables an MPP system to:
• Take advantage of hardware features such as the BYNET and shared disk
arrays
• Process user applications written for the underlying operating system on
non-Trusted Parallel Application (non-TPA) nodes and disks different
fromthose configured for the parallel database
PDE can be start, reset, and stop on Windows systems using the
TeradataMultiTool utility and on UNIX MP-RAS systems using the xctl
utility.
Virtual Processors:
The versatility of the Teradata RDBMS is based on virtual processors
(vprocs)that eliminate dependency on specialized physical processors.
Vprocs are a setof software processes that run on a node under the Teradata
Parallel DatabaseExtensions (PDE) within the multitasking environment of
the operatingsystem.
The two types of vprocs are
PE: The PE performs session control and dispatching tasks as well as
parsing functions.
Visualpath, #306, Niligiri Block, Aditya Enclave, Ameerpet, Hyderabad.ph-8374187525 Page 6
AMP: The AMP performs database functions to retrieve and update data on
the virtual disks (vdisks).
A single system can support a maximum of 16,384 vprocs. The maximum
number of vprocs per node can be as high as 128.
Each vproc is a separate, independent copy of the processor software,
isolatedfrom other vprocs, but sharing some of the physical resources of the
node, suchas memory and CPUs. Multiple vprocs can run on an SMP
platform or a node.
Vprocs and the tasks running under them communicate using unique-address
messaging, as if they were physically isolated from one another. This
messagecommunication is done using the Boardless BYNET Driver
software on singlenodeplatforms or BYNET hardware and BYNET Driver
software on multinodeplatforms.
Visualpath, #306, Niligiri Block, Aditya Enclave, Ameerpet, Hyderabad.ph-8374187525 Page 7
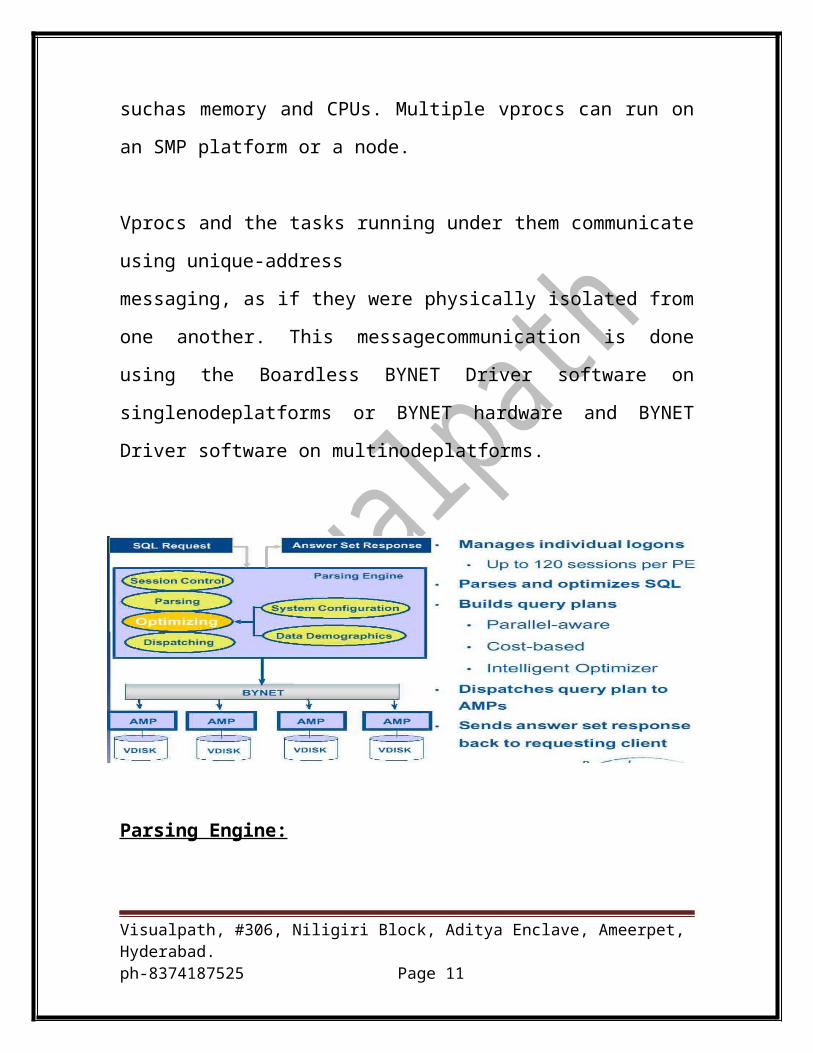
Parsing Engine:
A Parsing Engine (PE) is a virtual processor (vproc) that manages the
dialogue between a client application and the Teradata Database, once a
valid session has been established. Each PE can support a maximum of
120 sessions.
The PE handles an incoming request in the following manner:
The Session Control component verifies the request for session
authorization (user names and passwords), and either allows or disallows the
request.
The Parser does the following:
Interprets the SQL statement received from the application.Verifies SQL
requests for the proper syntax and evaluates them semantically. Consults
theData Dictionary to ensure that all objects exist and that the user has
authority to access them.
The Optimizer is cost-based and develops the least expensive plan (in terms
of time) to return the requested response set. Processing alternatives are
evaluated and the fastest alternative is chosen. This alternative is converted
into executable steps, to be performed by the AMPs, which are then
passed to the Dispatcher.
The Dispatcher controls the sequence in which the steps are executed and
passes the steps received from the optimizer onto the BYNET for execution
by the AMPs. After the AMPs process the steps, the PE receives their
Visualpath, #306, Niligiri Block, Aditya Enclave, Ameerpet, Hyderabad.ph-8374187525 Page 8
responses over the BYNET.The Dispatcher builds a response message and
sends the message back to the user
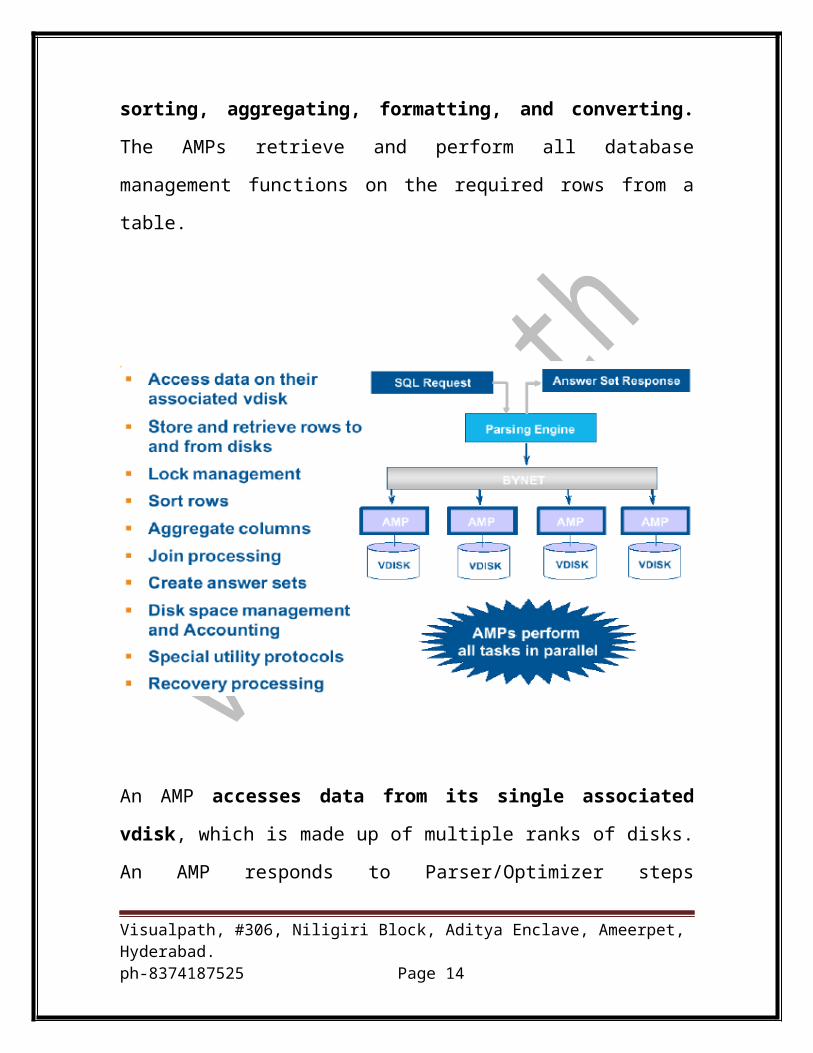
Access Module Processor (AMP )
The AMP is a vproc in the Teradata Database's shared-nothing architecture
that is responsible for managing a portion of the database. Each AMP will
manage some portion of each table on the system. AMPs do the physical
work associated with generating an answer set (output) including sorting,
aggregating, formatting, and converting. The AMPs retrieve and perform
all database management functions on the required rows from a table.
Visualpath, #306, Niligiri Block, Aditya Enclave, Ameerpet, Hyderabad.ph-8374187525 Page 9
An AMP accesses data from its single associated vdisk, which is made up
of multiple ranks of disks. An AMP responds to Parser/Optimizer steps
transmitted across the BYNET by selecting data from or storing data to its
disks. For some requests, the AMPs may redistribute a copy of the data to
other AMPs.
Database Manager subsystem resides on each AMP. This subsystem will:
Lock databases and tables.
Create, modify, or delete definitions of tables.
Insert, delete, or modify rows within the tables.
Retrieve information from definitions and tables.
Return responses to the Dispatcher.
Teradata Directory Program
The Teradata Director Program (TDP) is a Teradata-supplied program that
must run on any client system that will be channel-attached to the Teradata
RDBMS. The TDP manages the session traffic between the Call-Level
Interface and the RDBMS.
Functions of TDP include the following:
• Session initiation and termination
• Logging, verification, recovery, and restart
• Physical input to and output from the Teradata server, including session
balancing and queue maintenance
• Security
Visualpath, #306, Niligiri Block, Aditya Enclave, Ameerpet, Hyderabad.ph-8374187525 Page 10
The Call Level Interface (CLI) is a library of routines that resides on the
client side. Client application programs use these routines to perform
operations such as logging on and off, submitting SQL queries and receiving
responses which contain the answer set. These routines are 98% the same in
a network-attached environment as they are in a channel-attached.
The Teradata ODBC™ (Open Database Connectivity) or JDBC (Java)
drivers use open standards-based ODBC or JDBC interfaces to provide
client applications access to Teradata across LAN-based environments.
The Micro Teradata Director Program (MTDP)is a Teradata-supplied
program that must be linked to any application that will be network-attached
to the Teradata RDBMS. The MTDP performs many of the functions of the
channel based TDP including session management. The MTDP does not
control session balancing across PEs. Connect and Assign Servers that run
on the Teradata system handle this activity.
The Micro Operating System Interface (MOSI) is a library of routines
providing operating system independence for clients accessing the RDBMS.
By using MOSI, we only need one version of the MTDP to run on all
network-attached platforms.
Trusted Parallel Applications
The PDE provide a series of parallel operating system services to a special
classof tasks called a Trusted Parallel Application (TPA).
On an SMP or MPP system, the TPA is the Teradata RDBMS.
Visualpath, #306, Niligiri Block, Aditya Enclave, Ameerpet, Hyderabad.ph-8374187525 Page 11

TPA services include:
• Facilities to manage parallel execution of the TPA on multiple nodes
• Dynamic distribution of execution processes
• Coordination of all execution threads, whether on the same or on different
nodes
• Balancing of the TPA workload within a clique
• Resident debugging facilities in addition to kernel and application
Debuggers
Visualpath, #306, Niligiri Block, Aditya Enclave, Ameerpet, Hyderabad.ph-8374187525 Page 12
NODE:
Teradata Architecture:
Visualpath, #306, Niligiri Block, Aditya Enclave, Ameerpet, Hyderabad.ph-8374187525 Page 13
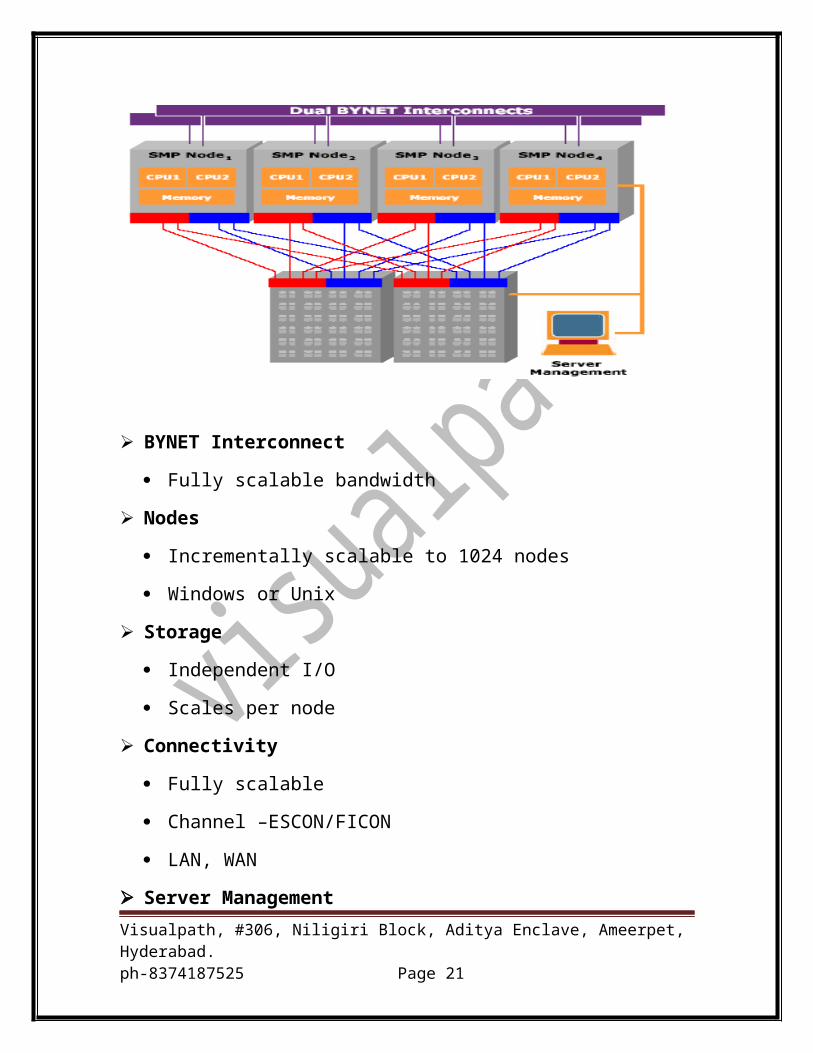
Teradata MPP Architecture
Visualpath, #306, Niligiri Block, Aditya Enclave, Ameerpet, Hyderabad.ph-8374187525 Page 14
BYNET Interconnect
Fully scalable bandwidth
Nodes
Incrementally scalable to 1024 nodes
Windows or Unix
Storage
Independent I/O
Scales per node
Connectivity
Fully scalable
Channel –ESCON/FICON
LAN, WAN
Server Management
One console to view the entire system
Shared Nothing Architecture
“Virtual processors” (vprocs) do the work
Two types
o AMP: owns and operates on the data
o PE: handles SQL and external interaction
Configure multiple vprocs per hardware node
o Take full advantage of SMP CPU and memory
Each vproc has many threads of execution
o Many operations executing concurrently
o Each thread can do work for any user or transaction
Software is equivalent regardless of configuration
Visualpath, #306, Niligiri Block, Aditya Enclave, Ameerpet, Hyderabad.ph-8374187525 Page 15
o No user changes as system grows from small SMP to huge MPP
Delivers linear scalability
o Maximizes utilization of SMP resources
o To any size configuration
o Allows flexible configurations
o Incremental upgrades
SMP vs. MPP:
A Teradata Database system contains one or more nodes. A node is a term
for a processing unit under the control of a single operating system. The
node is where the processing occurs for the Teradata Database. There are
two types of Teradata Database systems:
Symmetric multiprocessing (SMP) - An SMP Teradata Database has a
single node that contains multiple CPUs sharing a memory pool.
Massively parallel processing (MPP) - Multiple SMP nodes working
together comprise a larger, MPP implementation of a Teradata Database.
The nodes are connected using the BYNET, which allows multiple virtual
processors on multiple nodes to communicate with each other.
Benefits of Teradata :
Shared Nothing - Dividing the Data
Data automatically distributed to AMPs via hashing
Even distribution results in scalable performance
Visualpath, #306, Niligiri Block, Aditya Enclave, Ameerpet, Hyderabad.ph-8374187525 Page 16
The Teradata Database virtual processors, or vprocs (which are the PEs
and AMPs), share the components of the nodes (memory and cpu). The
main component of the "shared-nothing" architecture is that each AMP
manages its own dedicated portion of the system's disk space (called the
vdisk) and this space is not shared with other AMPs. Each AMP uses
system resources independently of the other AMPs so they can all work
in parallel for high system performance overall.
Prime Index (PI) column(s) are hashes
Hash is always the same - for the same value
No partitioning or repartitioning ever required
Space Allocation:
Space allocation is entirely dynamic
o No tablespaces or journal spaces or any pre-allocation
o Spool (temp) and tables share space pool, no fixed reserved
allocations
If no cylinder free, combine partial cylinders
o Dynamic and automatic
o Background compaction based on tunable threshold
Quotas control disk space utilization
o Increase quota (trivial online command) to allow user to use more
space
Data Management - Bottom Line
No reorgs
o Don’t even have a reorg utility
Visualpath, #306, Niligiri Block, Aditya Enclave, Ameerpet, Hyderabad.ph-8374187525 Page 17
No index rebuilds
No re-partitioning
No detailed space manageme
Easy database and table definition
Minimum ongoing maintenance
o All performed automatically
Optimizer - Parallelization
Cost based optimizer
o Parallel aware
Rewrites built-in and cost based
Parallelism is automatic
Parallelism is unconditional
Each query step fully parallelized
No single threaded operations
o Scans, Joins, Index access, Aggregation, Sort, Insert, Update,
Delete
Visualpath, #306, Niligiri Block, Aditya Enclave, Ameerpet, Hyderabad.ph-8374187525 Page 18
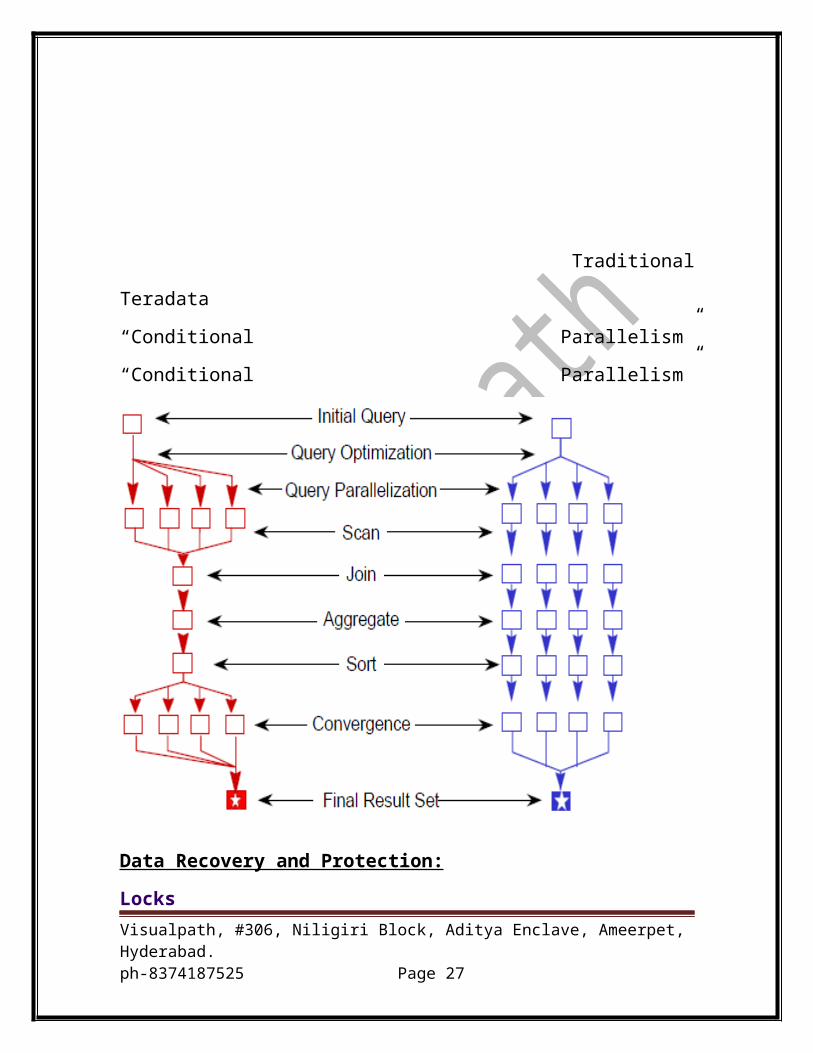
Traditional Teradata
“Conditional Parallelism” “Conditional Parallelism”
Data Recovery and Protection:
Locks
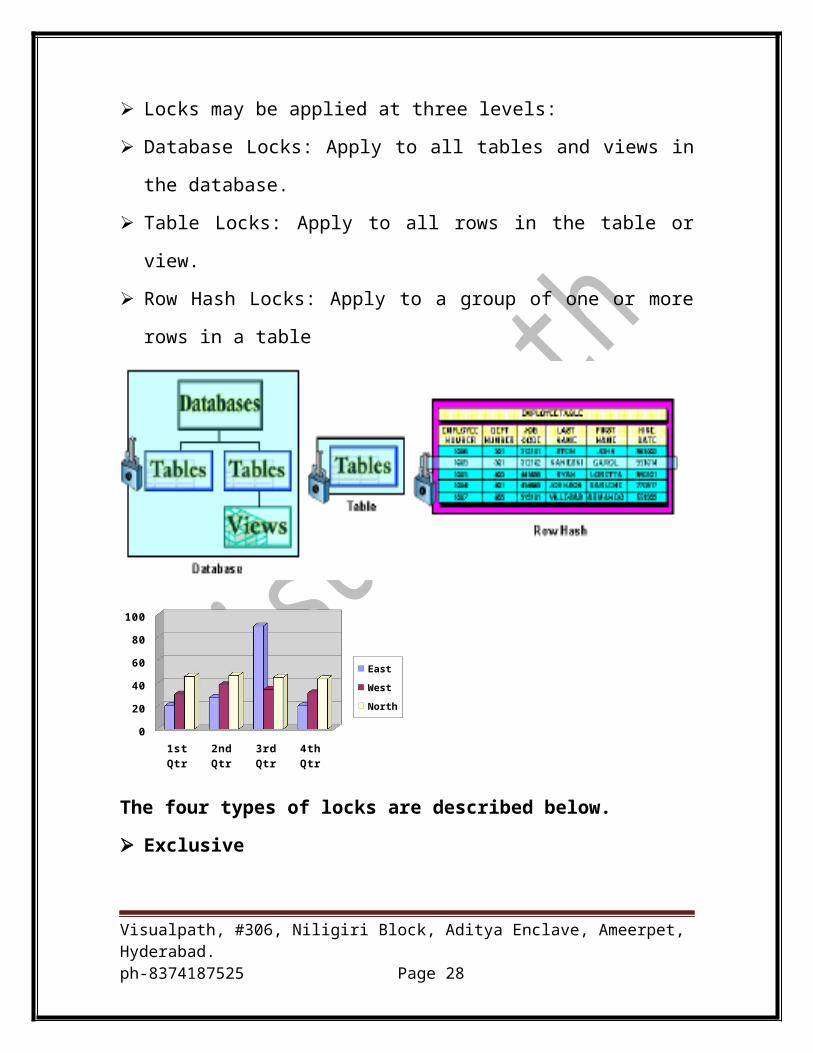
Locks may be applied at three levels:
Database Locks: Apply to all tables and views in the database.
Table Locks: Apply to all rows in the table or view.
Row Hash Locks: Apply to a group of one or more rows in a table
Visualpath, #306, Niligiri Block, Aditya Enclave, Ameerpet, Hyderabad.ph-8374187525 Page 19
1st Qtr 2nd Qtr 3rd Qtr 4th Qtr
0102030405060708090
East
West
North
The four types of locks are described below.
Exclusive
Exclusive locks are applied to databases or tables, never to rows. They
are the mostrestrictive type of lock. With an exclusive lock, no other
user can access the database ortable. Exclusive locks are used when a
Data Definition Language (DDL) command isexecuted (i.e., CREATE
TABLE). An exclusive lock on a database or table prevents otherusers
from obtaining any lock on the locked object.
Write
Write locks enable users to modify data while maintaining data
consistency. While the datahas a write lock on it, other users can only
obtain an access lock. During this time, all otherlocks are held in a
queue until the write lock is released.
Visualpath, #306, Niligiri Block, Aditya Enclave, Ameerpet, Hyderabad.ph-8374187525 Page 20
Read
Read locks are used to ensure consistency during read operations.
Several users may holdconcurrent read locks on the same data, during
which time no data modification ispermitted. Read locks prevent other
users from obtaining the following locks on the lockeddata:
Exclusive locks and Write locks
Access
Access locks can be specified by users unconcerned about data
consistency. The use of anaccess lock allows for reading data while
modifications are in process. Access locks aredesigned for decision
support on tables that are updated only by small, single-row changes.
Access locks are sometimes called "stale read" locks, because you
may get "stale data"that has not been updated. Access locks prevent
other users from obtaining the followinglocks on the locked data:
Exclusive locks
Raid1 - Hardware Data Protection
RAID 1 is a data protection scheme that uses mirrored pairs of disks to
protect data from a single drive failure
RAID 1 requires double the number of disks because every drive has an
identical mirrored copy. Recovery with RAID 1 is faster than with RAID 5.
The highest level of data protection is RAID 1 with Fallback.
Visualpath, #306, Niligiri Block, Aditya Enclave, Ameerpet, Hyderabad.ph-8374187525 Page 21
Raid5 - Hardware Data Protection
RAID 5 uses a data parity scheme to provide data protection.
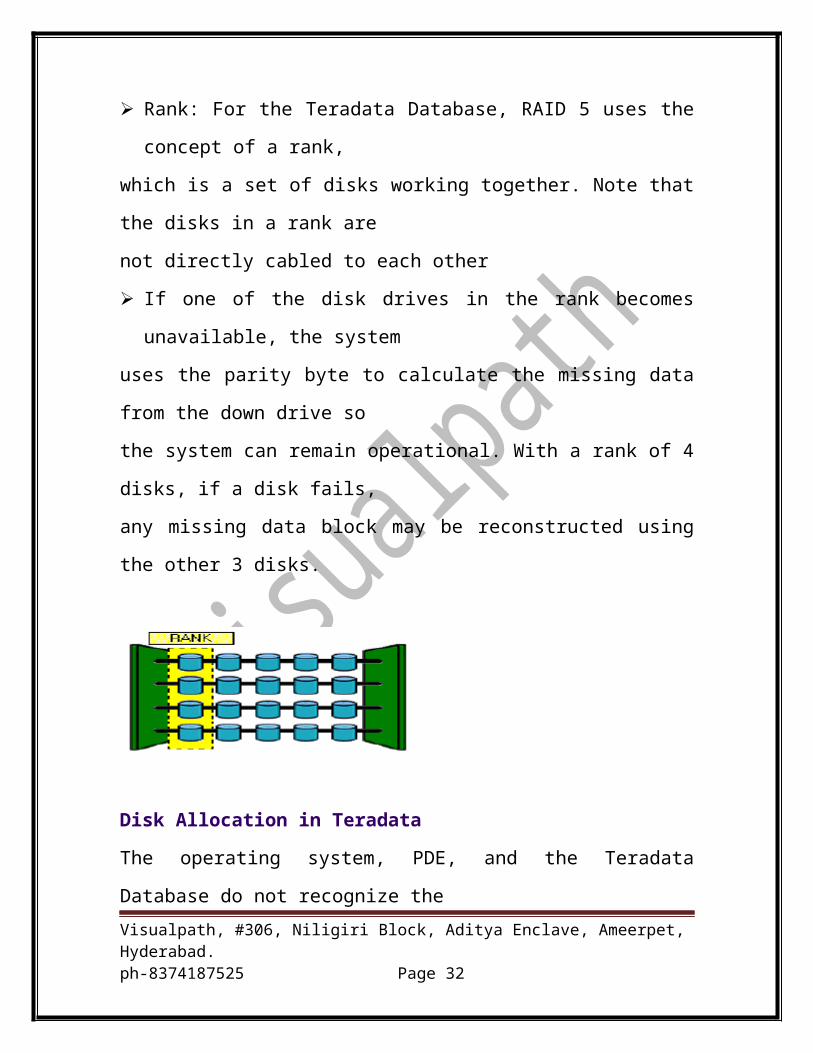
Rank: For the Teradata Database, RAID 5 uses the concept of a rank,
which is a set of disks working together. Note that the disks in a rank are
not directly cabled to each other
If one of the disk drives in the rank becomes unavailable, the system
uses the parity byte to calculate the missing data from the down drive so
the system can remain operational. With a rank of 4 disks, if a disk fails,
any missing data block may be reconstructed using the other 3 disks.
Disk Allocation in Teradata
The operating system, PDE, and the Teradata Database do not recognize the
Visualpath, #306, Niligiri Block, Aditya Enclave, Ameerpet, Hyderabad.ph-8374187525 Page 22
physical disk hardware. Each software component recognizes and interacts
withdifferent components of the data storage environment:
Operating system: Recognizes a logical unit (LUN). The operating system
recognizes the LUN as its "disk," and is not aware that it is actually writing
tospaces on multiple disk drives. This technique enables the use of
RAIDtechnology to provide data availability without affecting the operating
system.
PDE: Translates LUNs into vdisks using slices (in UNIX) or partitions (in
MicrosoftWindows and Linux) in conjunction with the Teradata Parallel
Upgrade Tool.
Teradata Database: Recognizes a virtual disk (vdisk). Using vdisks instead
ofdirect connections to physical disk drives enables the use of RAID
technologywith the Teradata Database.
Pdisks: User Data Space
Space on the physical disk drives is organized into LUNs ,After a LUN
iscreated, it is divided into partitions.
In UNIX systems, a LUN consists of one partition, which is further
dividedinto slices:
o Boot slice (a very small slice, taking up only 35 sectors)
o User slices for storing data. These user slices are called "pdisks" in
theTeradata Database.
Visualpath, #306, Niligiri Block, Aditya Enclave, Ameerpet, Hyderabad.ph-8374187525 Page 23
o In summary, pdisks are the user slices (UNIX),
partitions(Microsoft Windows), or partitions (Linux) and are
usedfor storage of the tables in a database. A LUN may haveone or
more pdisks.
Vdisks
The pdisks (user slices or partitions, depending on the operating system) are
assigned to an AMP through the software. No cabling is involved.
The combined space on the pdisks is considered the AMP's vdisk. AnAMP
manages only its own vdisk (disk space assigned to it), not thevdisk of any
other AMP. All AMPs then work in parallel, processing theirportion of the
data.
Each AMP in the system is assigned one vdisk. Although
numerousconfigurations are possible, generally all pdisks from a rank
(RAID 5) ormirrored pair (RAID 1) are assigned to the same AMP for
optimalperformance.
However, an AMP recognizes only the vdisk. The AMP has no controlover
the physical disks or ranks that compose the vdisk
Fall Back
Fallback provides data protection at the table level by automatically storing a
Visualpath, #306, Niligiri Block, Aditya Enclave, Ameerpet, Hyderabad.ph-8374187525 Page 24
copy of each permanent data row of a table on a different or “fallback”
AMP. If an AMP fails, the Teradata Database can access the fallback copy
and continue operation. If you cluster your AMPs, fallback also provides for
automatic recovery of the down AMP once you bring it back online
The benefits are
• Permits access to table data when an AMP is offline.
• Adds a level of data protection beyond disk array RAID.
• Automatically applies changes to the offline AMP when it is back online.
The disadvantage of fallback is that this method doubles the storage space
and the I/O (on inserts, updates, and deletes) for tables.
Clique:
A clique is a collection of nodes with shared access to the same disk
arrays. Each multi-nodesystem has at least one clique.
Nodes are interconnected via the BYNET. Nodes and disks are
interconnected via shared busesand thus can communicate directly.Whilethe
shared access is defined to the configuration, it is not activelyusedwhen the
Visualpath, #306, Niligiri Block, Aditya Enclave, Ameerpet, Hyderabad.ph-8374187525 Page 25
systemis up and running. On a running system, each rankof disks is
addressed by exactly one node.
The shared access allows the system to continue operating during a node
failure. The vprocsremain operational and can access stored data.
If a node fails and then resets:
o Teradata Database restarts across all the nodes.
o Teradata Database recovers, the BYNET redistributes the vprocs of
the node to theothernodes within the clique.
o Processing continues while the node is being repaired.
Clustering
Clustering provides data protection at the system level. A cluster is a logical
group of AMPs that provide fallback capability. If an AMP fails, the
remainingAMPs in the same cluster do their own work plus the work of the
down AMP.Teradata recommends the cluster size of 2.
Visualpath, #306, Niligiri Block, Aditya Enclave, Ameerpet, Hyderabad.ph-8374187525 Page 26
Although AMPs are virtual processes and cannot experience a hardware
failure, they can be “down” if the AMP cannot get to the data on the disk
array. If two disks in a rank go down, an AMP will be unable to access its
data, which is the only situation where an AMP will stay down.
AMP Clustering and Fallback
If the primary AMP fails, the system can still access data on the fallback
AMP.This ensures that one copy of a row is available if one or more
hardware orsoftware failures occur within an entire array, or an entire node.
The following figure illustrates eight AMPs grouped into two clusters of
fourAMPs each. In this configuration, if AMP 3 (or its vdisk) fails and stays
offline, itsdata remains available on AMPs 1, 2, and 4. Even if AMPs 3 and
5 failsimultaneously and remain offline, the data for each remains available
on the other AMPs in its cluster.
Other AMPs in its cluster.
Visualpath, #306, Niligiri Block, Aditya Enclave, Ameerpet, Hyderabad.ph-8374187525 Page 27
Down AMP Recovery Journal
The DownAMP Recovery Journal provides automatic data recovery on
fallback-protected data tables when a clustered AMP is out of service. This
journal consists of two system files stored in user DBC:
DBC.ChangedRowJournal and DBC.OrdSysChngTable.
When a clustered AMP is out of service, the Down AMP Recovery Journal
automatically captures changes to fallback-protected tables from the other
Amps in the cluster
Each time a change is made to a fallback-protected row that has a copy that
resides on a down AMP, the Down AMP Recovery Journal stores the table
ID and row ID of the committed changes. When the AMP comes back
online, Teradata Database opens the Down AMP Recovery Journal to
update, or roll forward, any changes made while the AMP was down.
The recovery operation uses fallback rows to replace primary rows and
primary rows to replace fallback rows. The journal ensures that the
information on the fallback AMP and on the primary AMP is identical. Once
Visualpath, #306, Niligiri Block, Aditya Enclave, Ameerpet, Hyderabad.ph-8374187525 Page 28
the transfer of information is complete and verified, the Down AMP
Recovery Journal is discarded automatically.
Transient Journal
The Teradata Database system offers a variety of methods to protect
data.Some data protection methods require that you set options when you
createtables such as specifying fallback. Other methods are automatically
activated
when particular events occur in the system. Each data protection
techniqueoffers different types of advantages under different circumstances.
The followinglist describes a few of automatic data protection methods:
• The Transient Journal (TJ) automatically protects data by storing the image
ofan existing row before a change is made, or the ID of a new row after an
insertis made. It enables the snapshot to be copied back to, or a new row to
bedeleted from, the data table if a transaction fails or is aborted.The TJ
protects against failures that may occur during transaction processing.To
safeguard the integrity of your data, the TJ stores:
• A snapshot of a row before an UPDATE or DELETE
• The row ID after an INSERT
• A control record for each CREATE and DROP statement
• Control records for certain operations
Visualpath, #306, Niligiri Block, Aditya Enclave, Ameerpet, Hyderabad.ph-8374187525 Page 29
Permanent journal
Is active continuously
Is available for tables or databases
Can contain "before" images, which permit rollback, or after images,
which permit rollforward, or both before and after images
Provides rollforward recovery
Provides rollback recovery
Provides full recovery of nonfallback tables
Reduces need for frequent, full-table archives
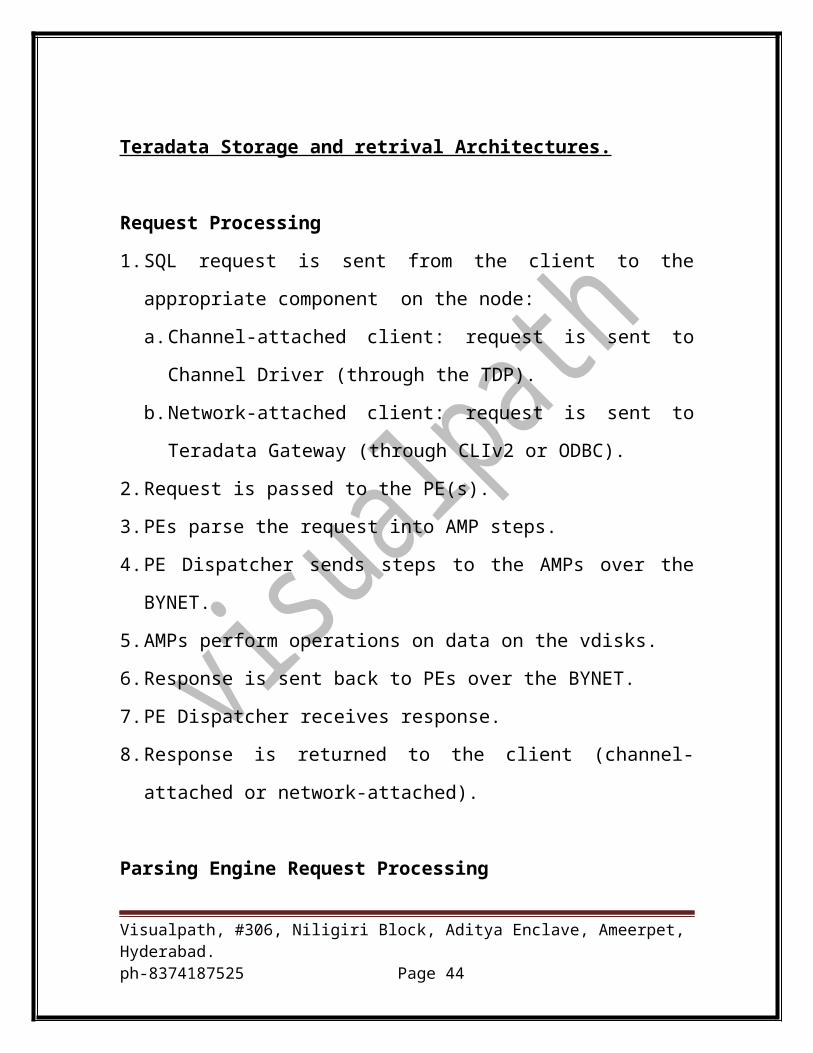
Teradata Storage and retrival Architectures.
Request Processing
1. SQL request is sent from the client to the appropriate component on the
node:
a. Channel-attached client: request is sent to Channel Driver (through
the TDP).
b. Network-attached client: request is sent to Teradata Gateway (through
CLIv2 or ODBC).
2. Request is passed to the PE(s).
3. PEs parse the request into AMP steps.
4. PE Dispatcher sends steps to the AMPs over the BYNET.
5. AMPs perform operations on data on the vdisks.
6. Response is sent back to PEs over the BYNET.
7. PE Dispatcher receives response.
Visualpath, #306, Niligiri Block, Aditya Enclave, Ameerpet, Hyderabad.ph-8374187525 Page 30

8. Response is returned to the client (channel-attached or network-attached).
Parsing Engine Request Processing
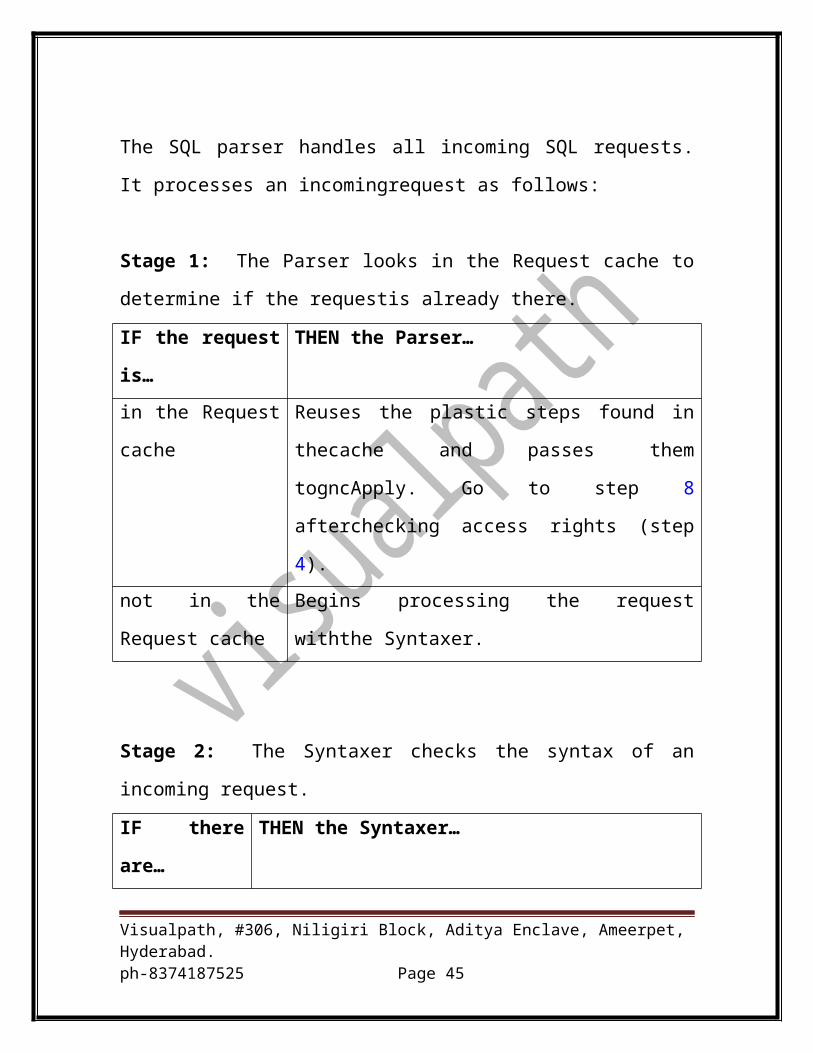
The SQL parser handles all incoming SQL requests. It processes an
incomingrequest as follows:
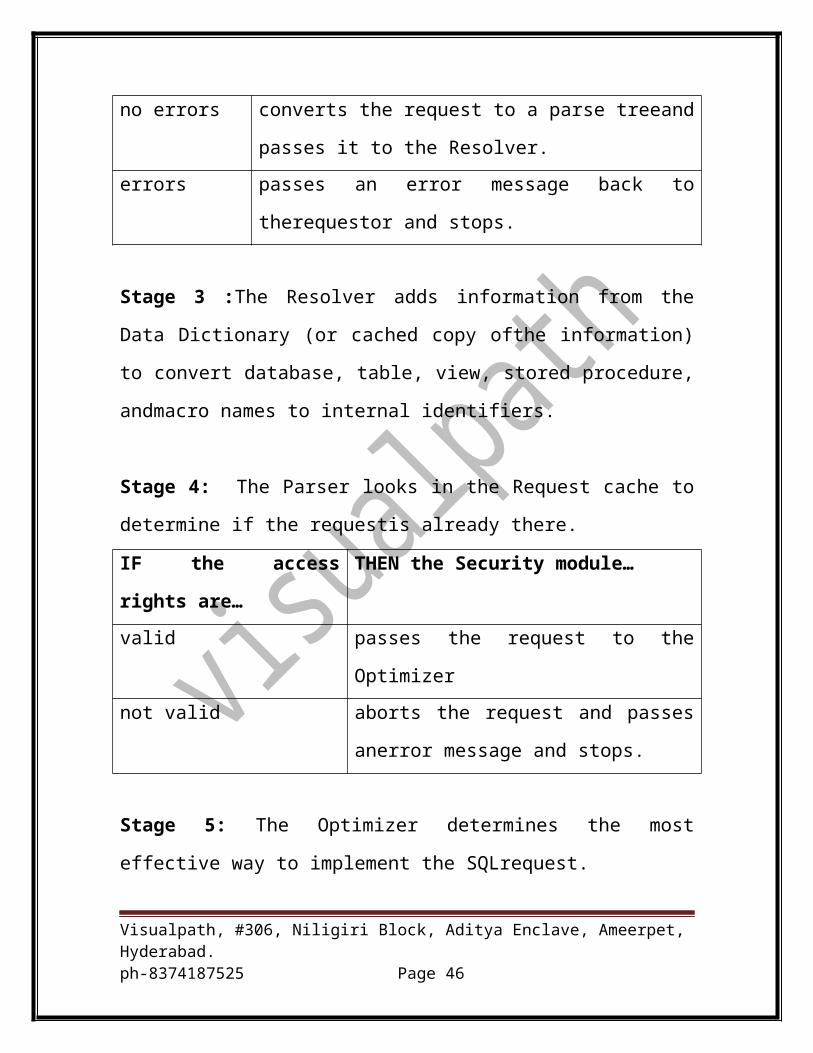
Stage 1: The Parser looks in the Request cache to determine if the requestis
already there.
IF the request is… THEN the Parser…
in the Request cache Reuses the plastic steps found in thecache and passes
them togncApply. Go to step 8 afterchecking access
rights (step 4).
not in the Request
cache
Begins processing the request withthe Syntaxer.
Stage 2: The Syntaxer checks the syntax of an incoming request.
IF there are… THEN the Syntaxer…
no errors converts the request to a parse treeand passes it to the
Resolver.
errors passes an error message back to therequestor and stops.
Stage 3 :The Resolver adds information from the Data Dictionary (or cached
copy ofthe information) to convert database, table, view, stored procedure,
andmacro names to internal identifiers.
Visualpath, #306, Niligiri Block, Aditya Enclave, Ameerpet, Hyderabad.ph-8374187525 Page 31
Stage 4: The Parser looks in the Request cache to determine if the requestis
already there.
IF the access rights are… THEN the Security module…
valid passes the request to the Optimizer
not valid aborts the request and passes anerror
message and stops.
Stage 5: The Optimizer determines the most effective way to implement the
SQLrequest.
Stage 6: The Optimizer scans the request to determine where locks should
be placed,then passes the optimized parse tree to the Generator.
Stage 7: The Generator transforms the optimized parse tree into plastic steps
andpasses them to gncApply.Plastic steps are directives to the database
management system that do notcontain data values.
Stage 8 :gncApply takes the plastic steps produced by the Generator and
transformsthem into concrete steps.Concrete steps are directives to the
AMPs that contain any needed user- orsession-specific values and any
needed data parcels.
Stage 9: gncApply passes the concrete steps to the Dispatcher.
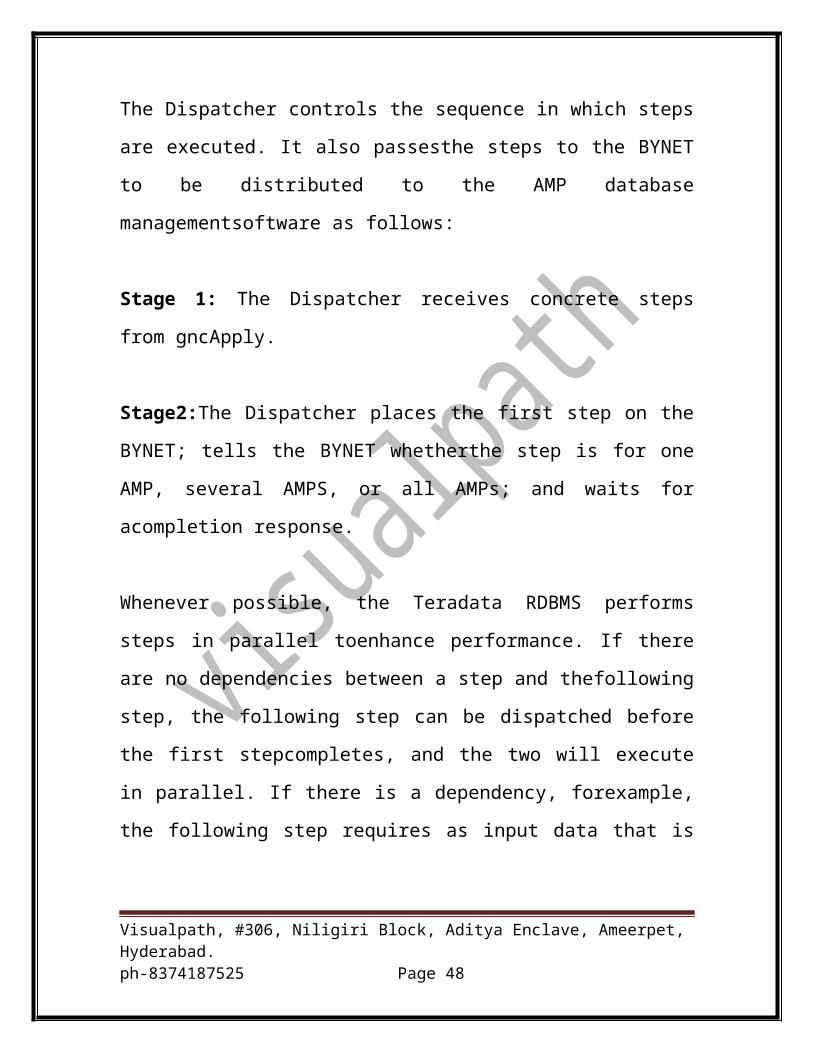
The Dispatcher
Visualpath, #306, Niligiri Block, Aditya Enclave, Ameerpet, Hyderabad.ph-8374187525 Page 32
The Dispatcher controls the sequence in which steps are executed. It also
passesthe steps to the BYNET to be distributed to the AMP database
managementsoftware as follows:
Stage 1: The Dispatcher receives concrete steps from gncApply.
Stage2:The Dispatcher places the first step on the BYNET; tells the BYNET
whetherthe step is for one AMP, several AMPS, or all AMPs; and waits for
acompletion response.
Whenever possible, the Teradata RDBMS performs steps in parallel
toenhance performance. If there are no dependencies between a step and
thefollowing step, the following step can be dispatched before the first
stepcompletes, and the two will execute in parallel. If there is a dependency,
forexample, the following step requires as input data that is produced by
thefirst step, then the following step can't be dispatched until the first
stepcompletes.
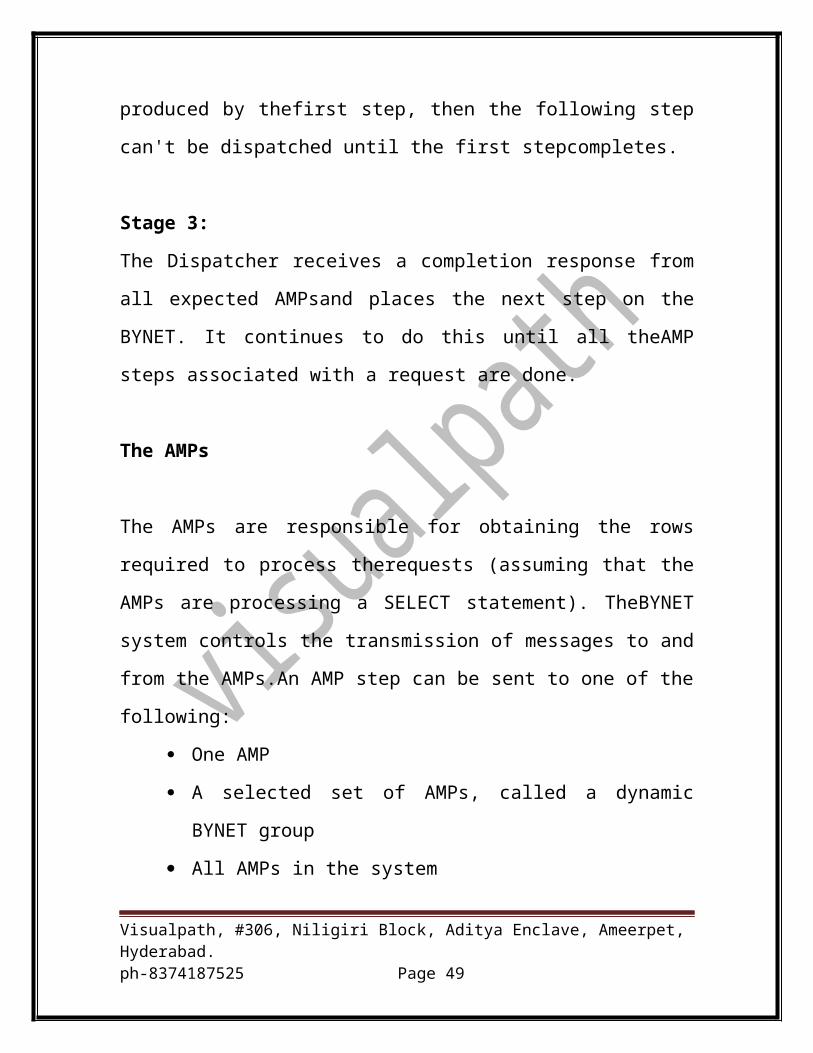
Stage 3:
The Dispatcher receives a completion response from all expected AMPsand
places the next step on the BYNET. It continues to do this until all theAMP
steps associated with a request are done.
The AMPs
Visualpath, #306, Niligiri Block, Aditya Enclave, Ameerpet, Hyderabad.ph-8374187525 Page 33
The AMPs are responsible for obtaining the rows required to process
therequests (assuming that the AMPs are processing a SELECT statement).
TheBYNET system controls the transmission of messages to and from the
AMPs.An AMP step can be sent to one of the following:
One AMP
A selected set of AMPs, called a dynamic BYNET group
All AMPs in the system
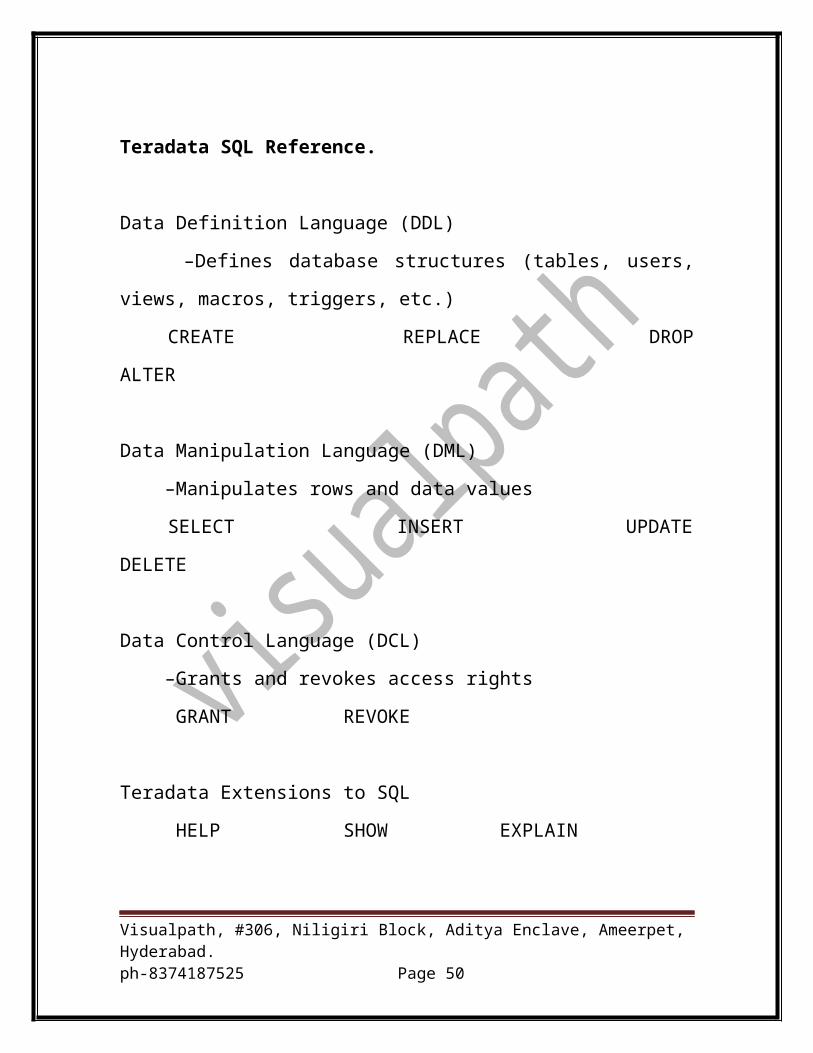
Teradata SQL Reference.
Data Definition Language (DDL)
–Defines database structures (tables, users, views, macros, triggers, etc.)
CREATE REPLACE DROP ALTER
Data Manipulation Language (DML)
–Manipulates rows and data values
SELECT INSERT UPDATE DELETE
Data Control Language (DCL)
–Grants and revokes access rights
GRANT REVOKE
Teradata Extensions to SQL
HELP SHOW EXPLAIN
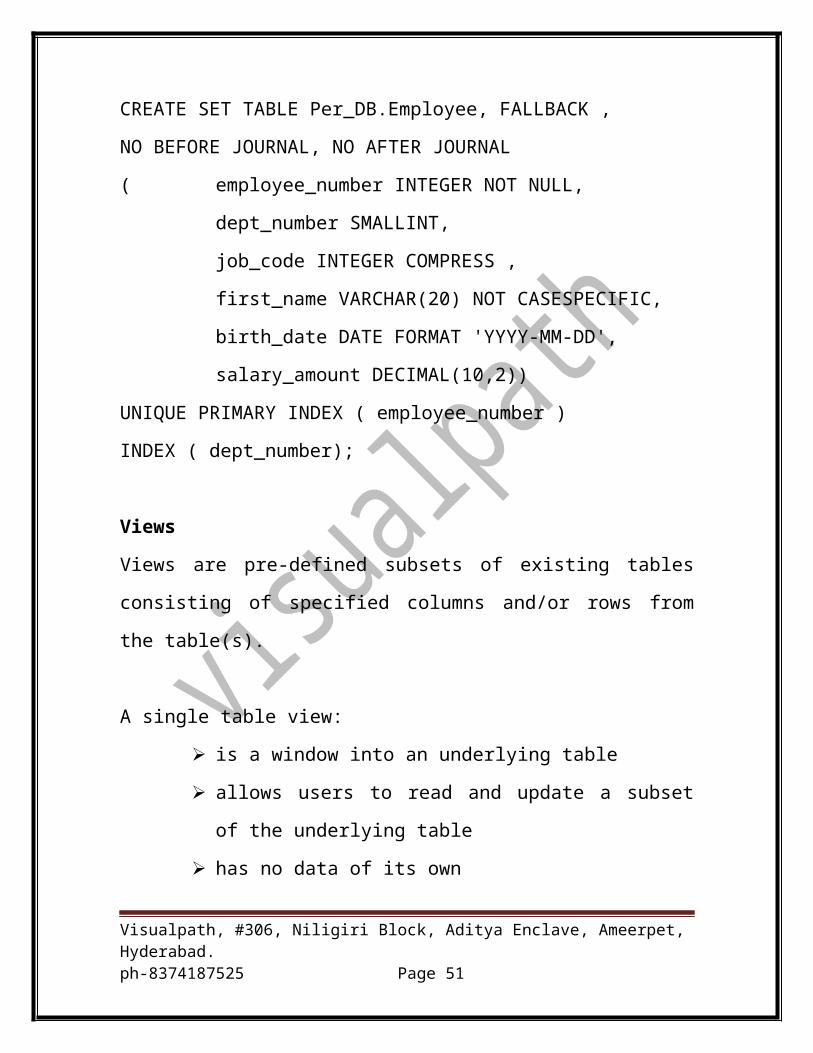
CREATE SET TABLE Per_DB.Employee, FALLBACK ,
Visualpath, #306, Niligiri Block, Aditya Enclave, Ameerpet, Hyderabad.ph-8374187525 Page 34
NO BEFORE JOURNAL, NO AFTER JOURNAL
( employee_number INTEGER NOT NULL,
dept_number SMALLINT,
job_code INTEGER COMPRESS ,
first_name VARCHAR(20) NOT CASESPECIFIC,
birth_date DATE FORMAT 'YYYY-MM-DD',
salary_amount DECIMAL(10,2))
UNIQUE PRIMARY INDEX ( employee_number )
INDEX ( dept_number);
Views
Views are pre-defined subsets of existing tables consisting of specified
columns and/or rows from the table(s).
A single table view:
is a window into an underlying table
allows users to read and update a subset of the underlying table
has no data of its own
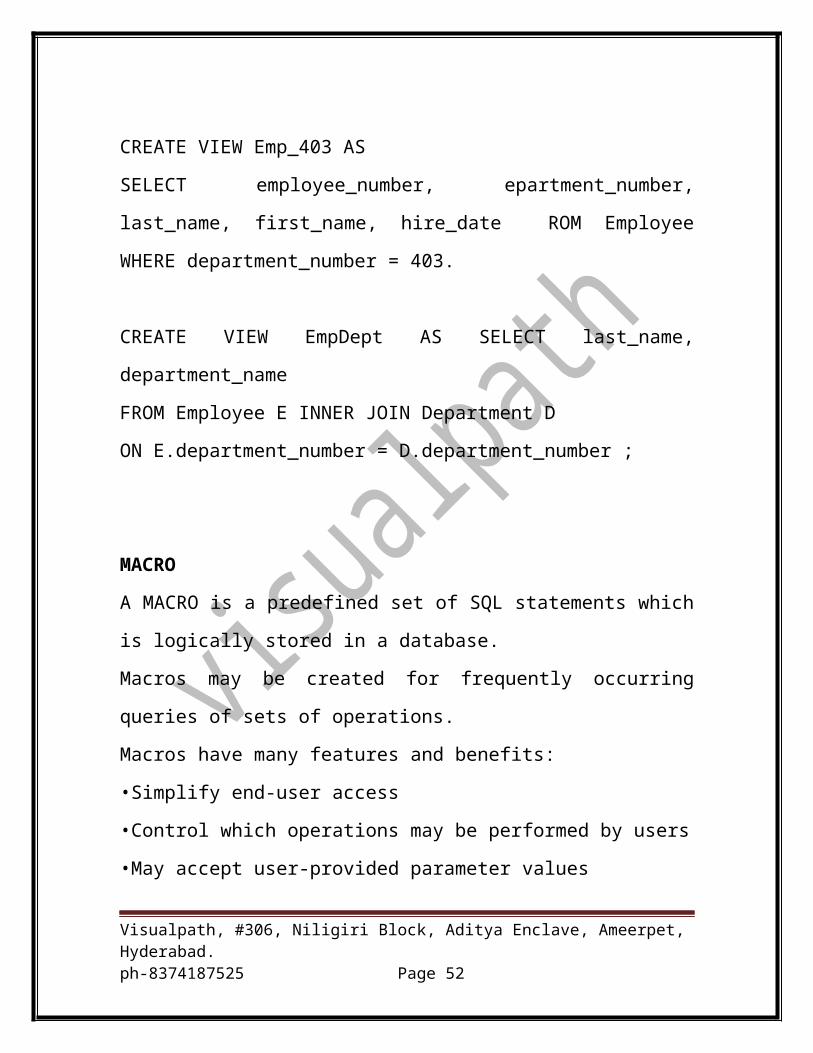
CREATE VIEW Emp_403 AS
SELECT employee_number, epartment_number, last_name, first_name,
hire_date ROM Employee WHERE department_number = 403.
CREATE VIEW EmpDept AS SELECT last_name, department_name
FROM Employee E INNER JOIN Department D
ON E.department_number = D.department_number ;
Visualpath, #306, Niligiri Block, Aditya Enclave, Ameerpet, Hyderabad.ph-8374187525 Page 35
MACRO
A MACRO is a predefined set of SQL statements which is logically stored
in a database.
Macros may be created for frequently occurring queries of sets of
operations.
Macros have many features and benefits:
•Simplify end-user access
•Control which operations may be performed by users
•May accept user-provided parameter values
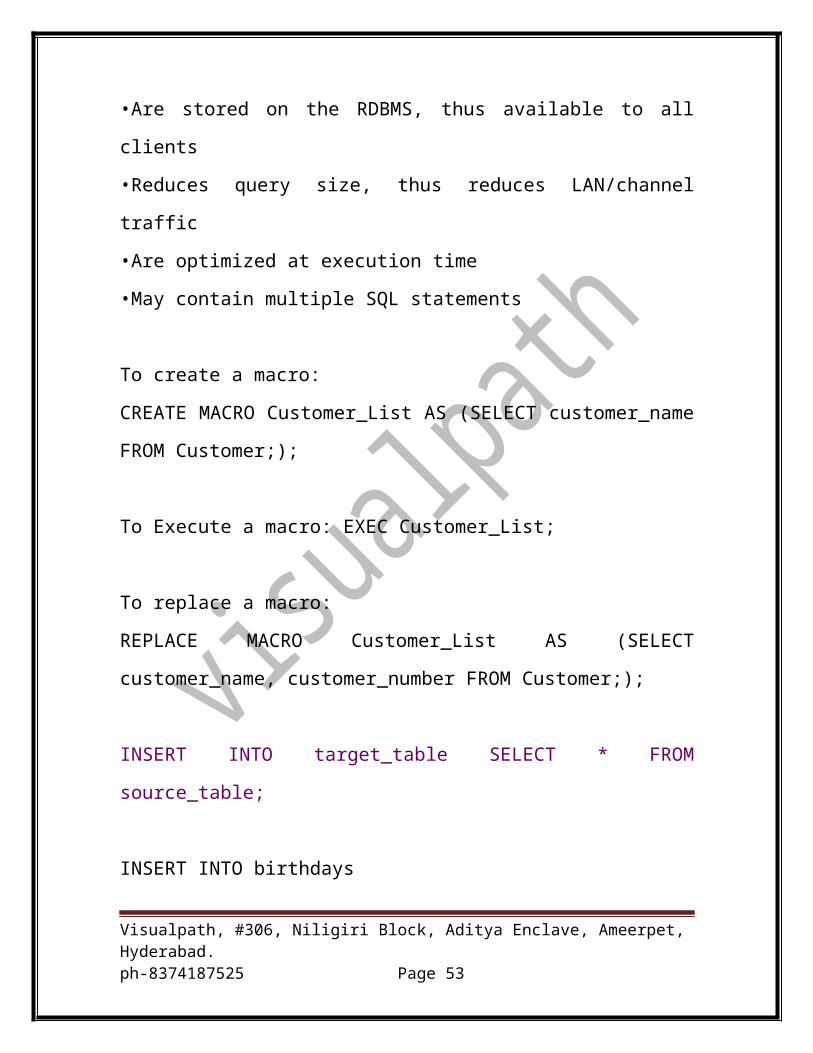
•Are stored on the RDBMS, thus available to all clients
•Reduces query size, thus reduces LAN/channel traffic
•Are optimized at execution time
•May contain multiple SQL statements
To create a macro:
CREATE MACRO Customer_List AS (SELECT customer_name FROM
Customer;);
To Execute a macro: EXEC Customer_List;
To replace a macro:
REPLACE MACRO Customer_List AS (SELECT customer_name,
customer_number FROM Customer;);
Visualpath, #306, Niligiri Block, Aditya Enclave, Ameerpet, Hyderabad.ph-8374187525 Page 36
INSERT INTO target_table SELECT * FROM source_table;
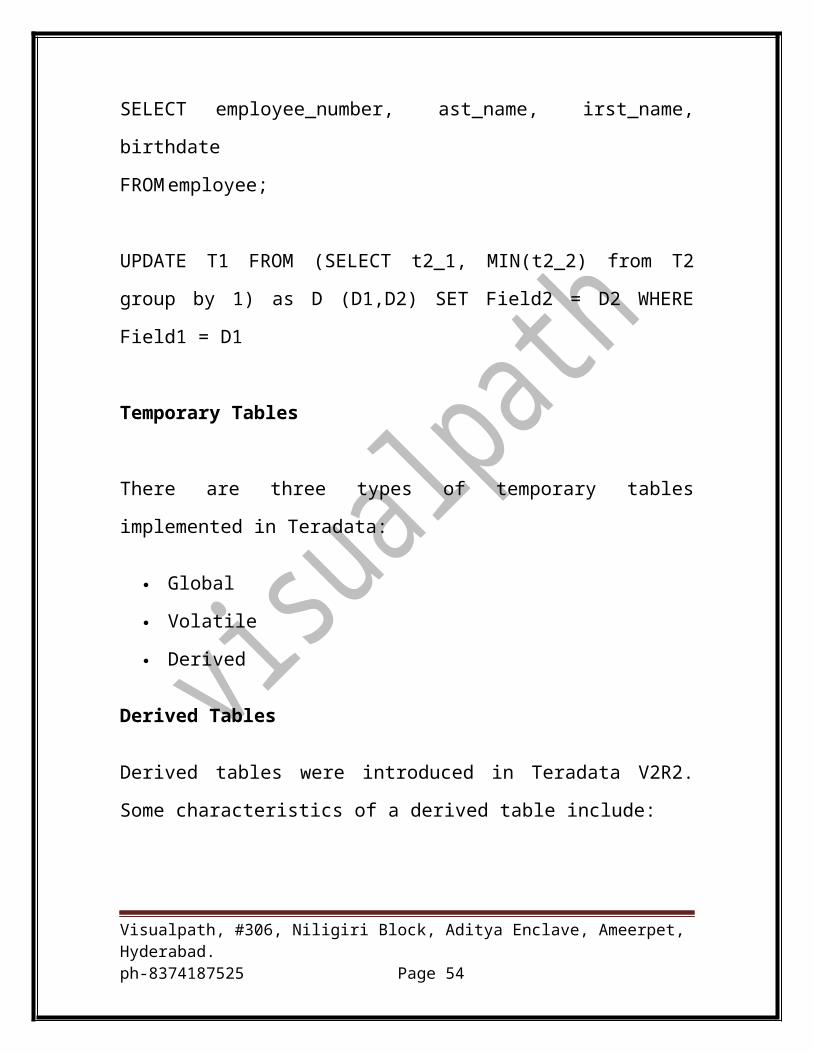
INSERT INTO birthdays
SELECT employee_number, ast_name, irst_name, birthdate
FROM employee;
UPDATE T1 FROM (SELECT t2_1, MIN(t2_2) from T2 group by 1) as D
(D1,D2) SET Field2 = D2 WHERE Field1 = D1
Temporary Tables
There are three types of temporary tables implemented in Teradata:
Global
Volatile
Derived
Derived Tables
Derived tables were introduced in Teradata V2R2. Some characteristics of a
derived table include:
Local to the query - it exists for the duration of the query.
When the query is done the table is discarded.
Incorporated into SQL query syntax.
Spool rows are also discarded when query finishes.
There is no data dictionary involvement - less system overhead.
Visualpath, #306, Niligiri Block, Aditya Enclave, Ameerpet, Hyderabad.ph-8374187525 Page 37

Volatile Temporary Tables
Volatile tables have a lot of the advantages of derived tables, and additional
benefits such as:
Local to a session - it exists throughout the entire session, not just a
single query.
It must be explicitly created using the CREATE VOLATILE
TABLEsyntax.
It is discarded automatically at the end of the session.
There is no data dictionary involvement.
Global Temporary Tables
The major difference between a global temporary table and a volatile
temporary table is that the global table has a definition in the data dictionary,
thus the definition may be shared by many users. Each user session can
materialize its own local instance of the table. Attributes of a global
temporary table include:
Local to a session, however each user session may have its own
instance.
Uses CREATE GLOBAL TEMPORARY TABLE syntax.
Materialized instance of table discarded at session end.
Creates and keeps table definition in data dictionary.
Eg derived table
To get the top three selling items across all stores.
Visualpath, #306, Niligiri Block, Aditya Enclave, Ameerpet, Hyderabad.ph-8374187525 Page 38
Solution
SELECT t.prodid, t.sumsales, RANK(t.sumsales)FROM
(SELECT prodid, SUM(sales) FROM salestblGROUP BY 1)
AS t(prodid, sumsales)QUALIFY RANK(sumsales)<=3;
Result
prodid Sumsales Rank
A 170000.00 1
C 115000.00 2
D 110000.00 3
Some things to note about the above query include:
The name of the Derived table is 't'.
The Derived column names are 'prodid' and 'sumsales'.
The table is created in spool using the inner SELECT.
The SELECT statement is always in parenthesis following the FROM
clause.
Derived tables are a good choice if:
The temporary table is required for this query but no others.
The query will be run only one time with this data.
Visualpath, #306, Niligiri Block, Aditya Enclave, Ameerpet, Hyderabad.ph-8374187525 Page 39
Volatile Temporary Tables
Volatile temporary tables are similar to derived tables in that they:
Are materialized in spool.
Require no Data Dictionary access or transaction locks.
Have a table definition that is kept in cache.
Are designed for optimal performance.
They are different from derived tables in that they:
Are local to the session, not the query.
Can be used with multiple queries in the session.
Are dropped manually anytime or automatically at session end.
Must be explicitly created with the CREATE VOLATILE TABLE
statement.
Example
CREATE VOLATILE TABLE vt_deptsal, LOG
(deptno SMALLINT,avgsal DEC(9,2),maxsal DEC(9,2)
,minsal DEC(9,2),sumsal DEC(9,2),empcnt SMALLINT)
ON COMMIT PRESERVE ROWS;
In the example above, we stated ON COMMIT PRESERVE ROWS. This
statement allows us to use the Volatile table again for other queries in the
session. The default statement is ON COMMIT DELETE ROWS, which
means the data is deleted when the query is committed.
Visualpath, #306, Niligiri Block, Aditya Enclave, Ameerpet, Hyderabad.ph-8374187525 Page 40
LOG indicates that a transaction journal is maintained, while NO LOG
allows for better performance. LOG is the default.
Volatile tables do not survive a system restart.
Examples
CREATE VOLATILE TABLE username.table1 (Explicit)
CREATE VOLATILE TABLE table1 (Implicit)
CREATE VOLATILE TABLE databasename.table1
(Error if databasename not username)
Limitations on Volatile Tables
The following commands are not applicable to VT's:
COLLECT/DROP/HELP STATISTICS
CREATE/DROP INDEX
ALTER TABLE
GRANT/REVOKE privileges
DELETE DATABASE/USER (does not drop VT's)
VT's may not:
Use Access Logging.
Be Renamed.
Be loaded with Multiload or Fastload utilities.
VT's may be referenced in views and macros
Visualpath, #306, Niligiri Block, Aditya Enclave, Ameerpet, Hyderabad.ph-8374187525 Page 41
Example
CREATE MACRO vt1 AS (SELECT * FROM vt_deptsal;);
Session A Session B
EXEC vt1 EXEC vt1
Each session has its own materialized instance of vt_deptsal, so each session
may return different results.
VT's may be dropped before session ends
Example
DROP TABLE vt_deptsal;
Global Temporary Tables
Global Temporary Tables are created using the CREATE GLOBAL
TEMPORARY command. They require a base definition which is stored in
the Data Dictionary(DD). Global temporary tables are materialized by the
first SQL statement from the following list to access the table:
CREATE INDEX.... ON TEMPORARY.......
DROP INDEX.... ON TEMPORARY.......
COLLECT STATISTICS
DROP STATISTICS
INSERT
INSERT SELECT
Global Temporary Tables are different from Volatile Tables in that:
Visualpath, #306, Niligiri Block, Aditya Enclave, Ameerpet, Hyderabad.ph-8374187525 Page 42
Their base definition is permanent and kept in the DD.
They require a privilege to materialize the table (see list above).
Space is charged against the user's 'temporary space' allocation.
The User can materialize up to 32 global tables per session.
They can survive a system restart.
Global Temporary Tables are similar to Volatile Tables because:
Each instance of a global temporary table is local to a session.
Materialized tables are dropped automatically at the end of the
session.
(But the base definition is still in the DD)
They have LOG and ON COMMIT PRESERVE/DELETE options.
Materialized table contents are not sharable with other sessions.
Example
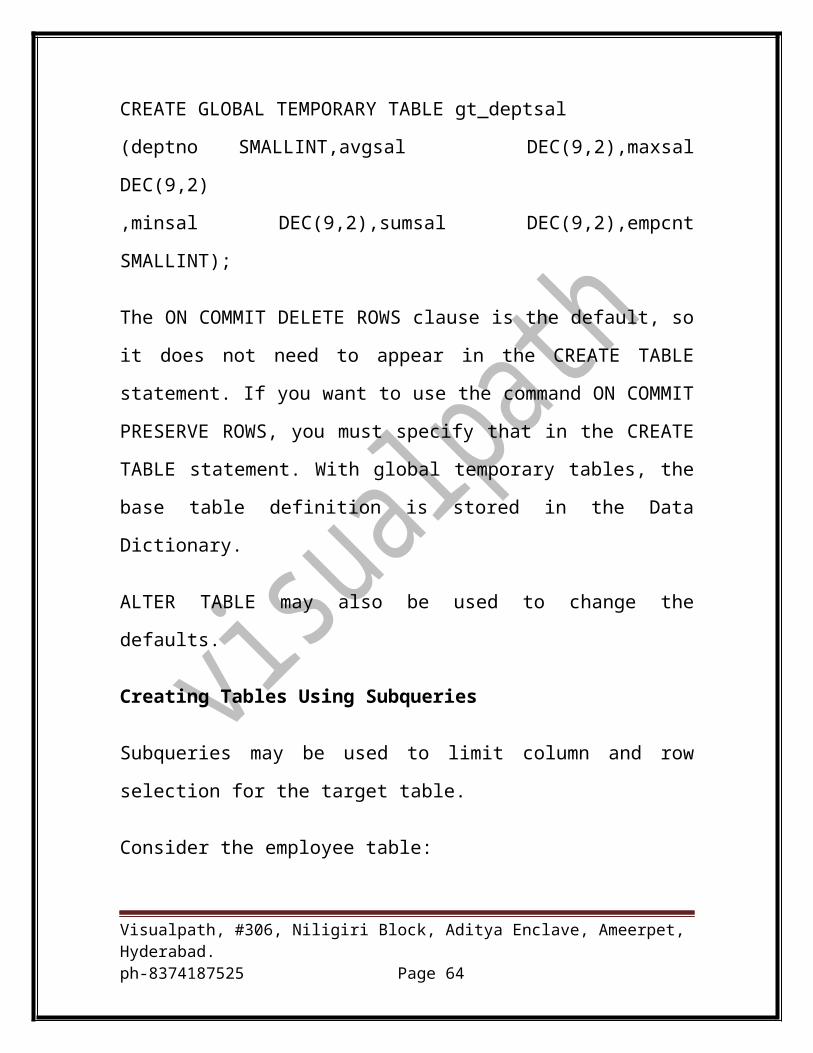
CREATE GLOBAL TEMPORARY TABLE gt_deptsal
(deptno SMALLINT,avgsal DEC(9,2),maxsal DEC(9,2)
,minsal DEC(9,2),sumsal DEC(9,2),empcnt SMALLINT);
The ON COMMIT DELETE ROWS clause is the default, so it does not
need to appear in the CREATE TABLE statement. If you want to use the
command ON COMMIT PRESERVE ROWS, you must specify that in the
CREATE TABLE statement. With global temporary tables, the base table
definition is stored in the Data Dictionary.
ALTER TABLE may also be used to change the defaults.
Visualpath, #306, Niligiri Block, Aditya Enclave, Ameerpet, Hyderabad.ph-8374187525 Page 43
Creating Tables Using Subqueries
Subqueries may be used to limit column and row selection for the target
table.
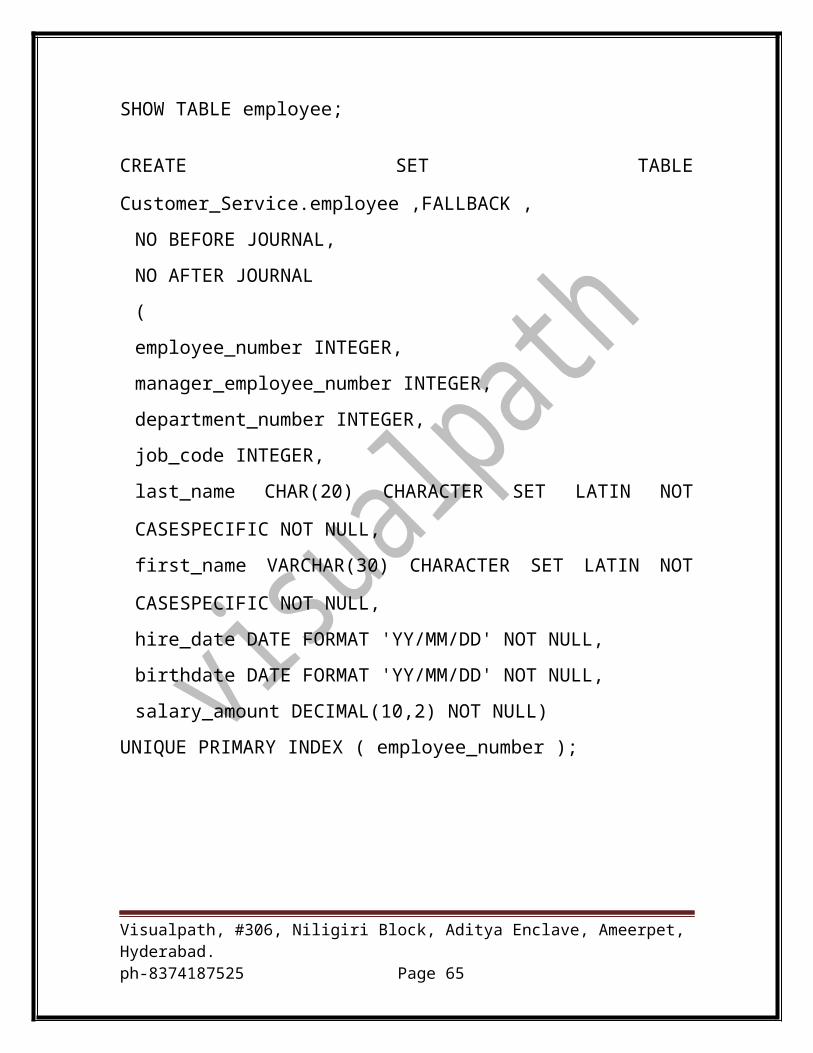
Consider the employee table:
SHOW TABLE employee;
CREATE SET TABLE Customer_Service.employee ,FALLBACK ,
NO BEFORE JOURNAL,
NO AFTER JOURNAL
(
employee_number INTEGER,
manager_employee_number INTEGER,
department_number INTEGER,
job_code INTEGER,
last_name CHAR(20) CHARACTER SET LATIN NOT CASESPECIFIC
NOT NULL,
first_name VARCHAR(30) CHARACTER SET LATIN NOT
CASESPECIFIC NOT NULL,
hire_date DATE FORMAT 'YY/MM/DD' NOT NULL,
birthdate DATE FORMAT 'YY/MM/DD' NOT NULL,
salary_amount DECIMAL(10,2) NOT NULL)
UNIQUE PRIMARY INDEX ( employee_number );
Visualpath, #306, Niligiri Block, Aditya Enclave, Ameerpet, Hyderabad.ph-8374187525 Page 44
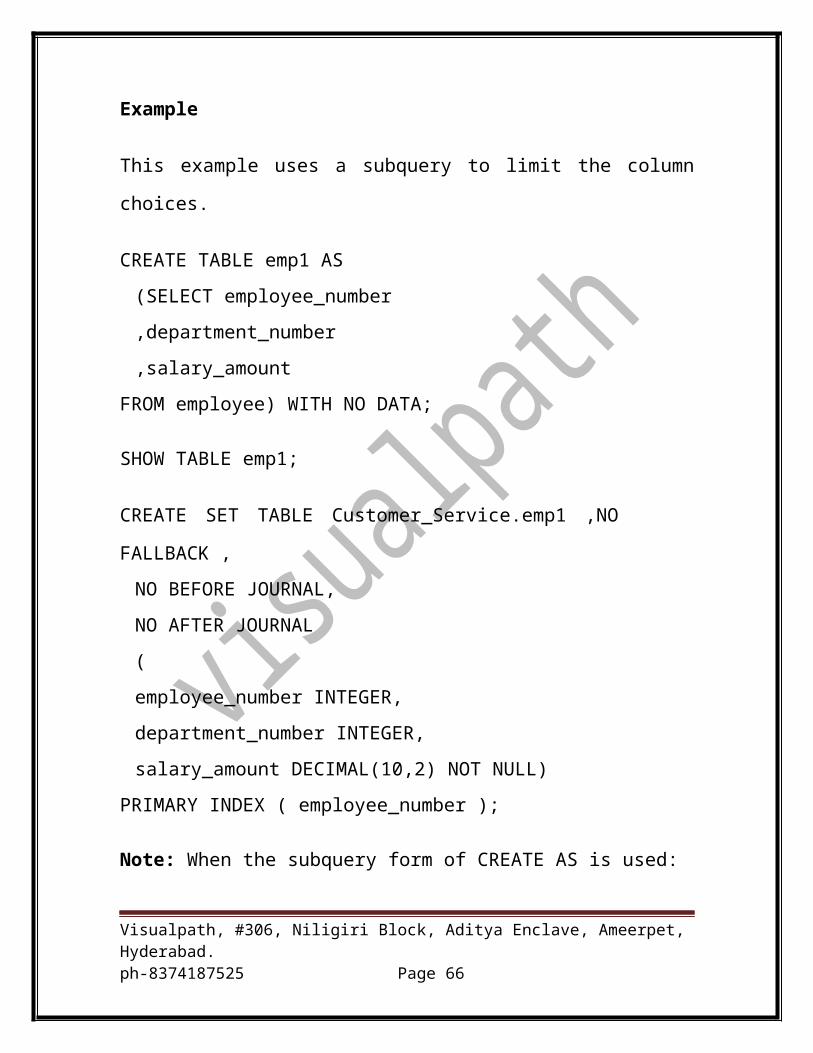
Example
This example uses a subquery to limit the column choices.
CREATE TABLE emp1 AS
(SELECT employee_number
,department_number
,salary_amount
FROM employee) WITH NO DATA;
SHOW TABLE emp1;
CREATE SET TABLE Customer_Service.emp1 ,NO
FALLBACK ,
NO BEFORE JOURNAL,
NO AFTER JOURNAL
(
employee_number INTEGER,
department_number INTEGER,
salary_amount DECIMAL(10,2) NOT NULL)
PRIMARY INDEX ( employee_number );
Note: When the subquery form of CREATE AS is used:
Table attributes (such as FALLBACK) are not copied from the source
table.
Table attributes are copied from standard system defaults (e.g., NO
FALLBACK) unless otherwise specified.
Secondary indexes, if present, are not copied from the source table.
Visualpath, #306, Niligiri Block, Aditya Enclave, Ameerpet, Hyderabad.ph-8374187525 Page 45
The first column specified (employee_number) is created as a NUPI
unless otherwise specified
There are some limitations on the use of subqueries for table
creation:
The ORDER BY clause is not allowed.
All columns or expressions must have an assigned or
defaulted name.
Renaming Columns
Columns may be renamed using the AS clause (the Teradata NAMED
extension may also be used).
Example
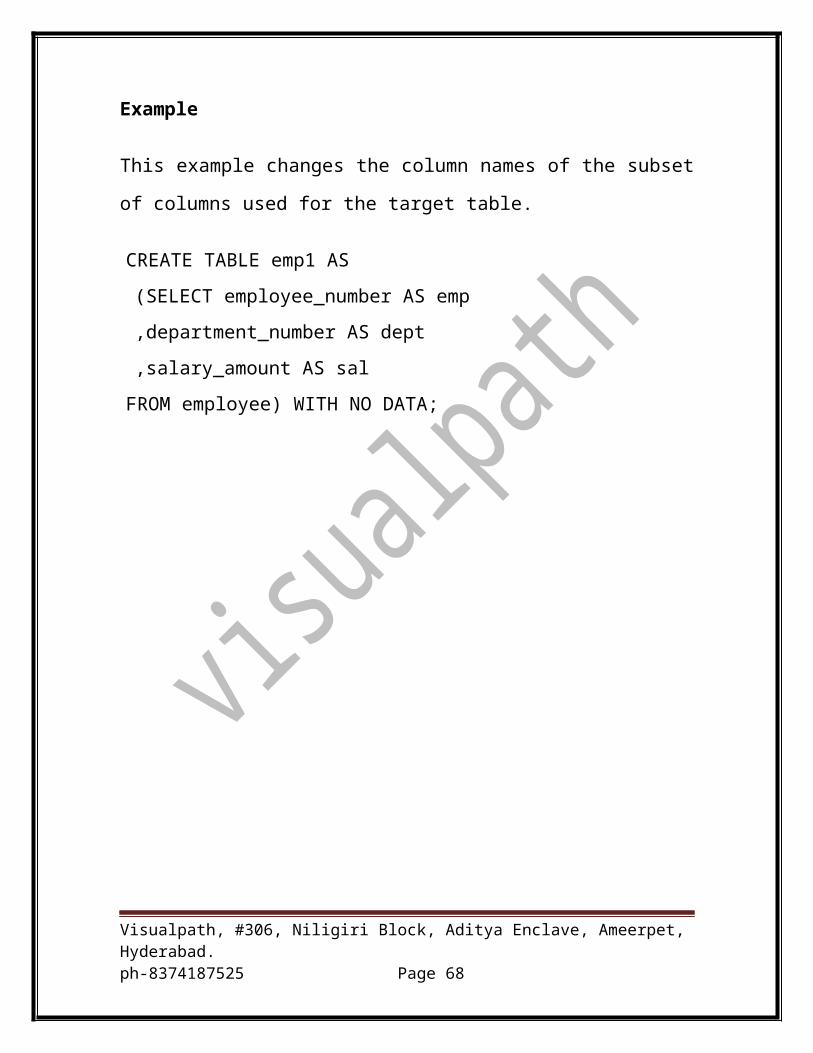
This example changes the column names of the subset of columns used for
the target table.
CREATE TABLE emp1 AS
(SELECT employee_number AS emp
,department_number AS dept
,salary_amount AS sal
FROM employee) WITH NO DATA;
Visualpath, #306, Niligiri Block, Aditya Enclave, Ameerpet, Hyderabad.ph-8374187525 Page 46

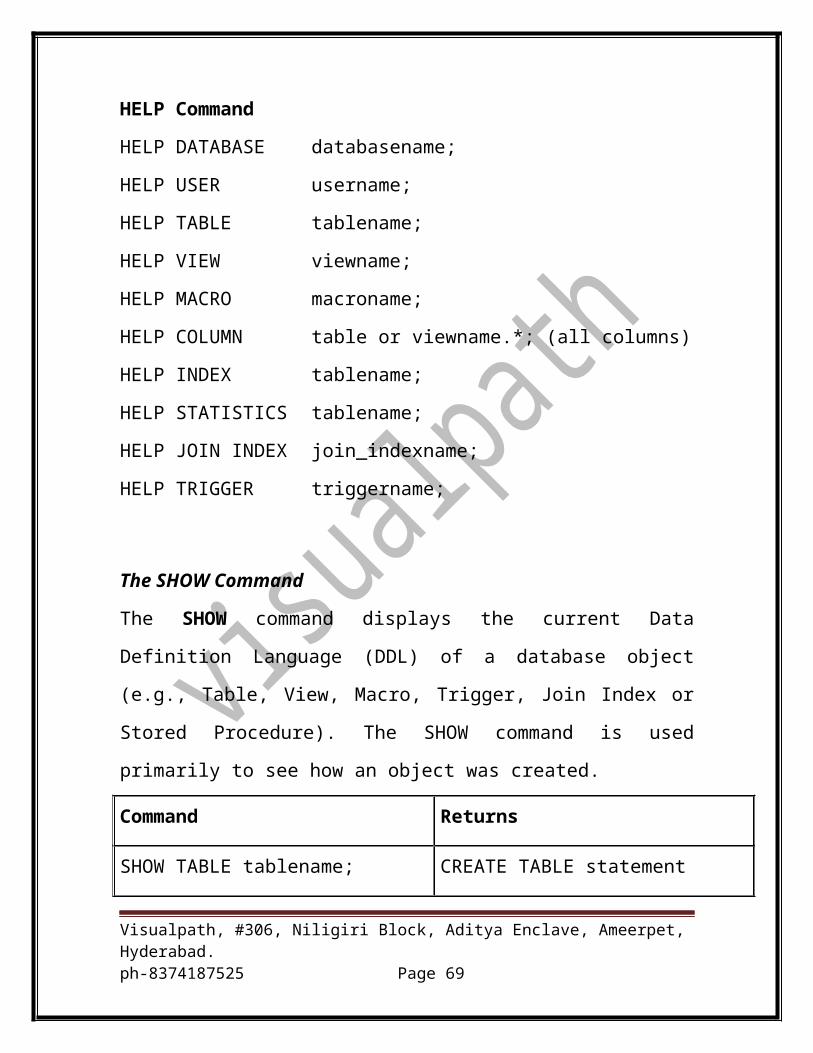
HELP Command
HELP DATABASE databasename;
HELP USER username;
HELP TABLE tablename;
HELP VIEW viewname;
HELP MACRO macroname;
HELP COLUMN table or viewname.*; (all columns)
HELP INDEX tablename;
HELP STATISTICS tablename;
HELP JOIN INDEX join_indexname;
HELP TRIGGER triggername;
The SHOW Command
The SHOW command displays the current Data Definition Language (DDL)
of a database object (e.g., Table, View, Macro, Trigger, Join Index or Stored
Procedure). The SHOW command is used primarily to see how an object
was created.
Command Returns
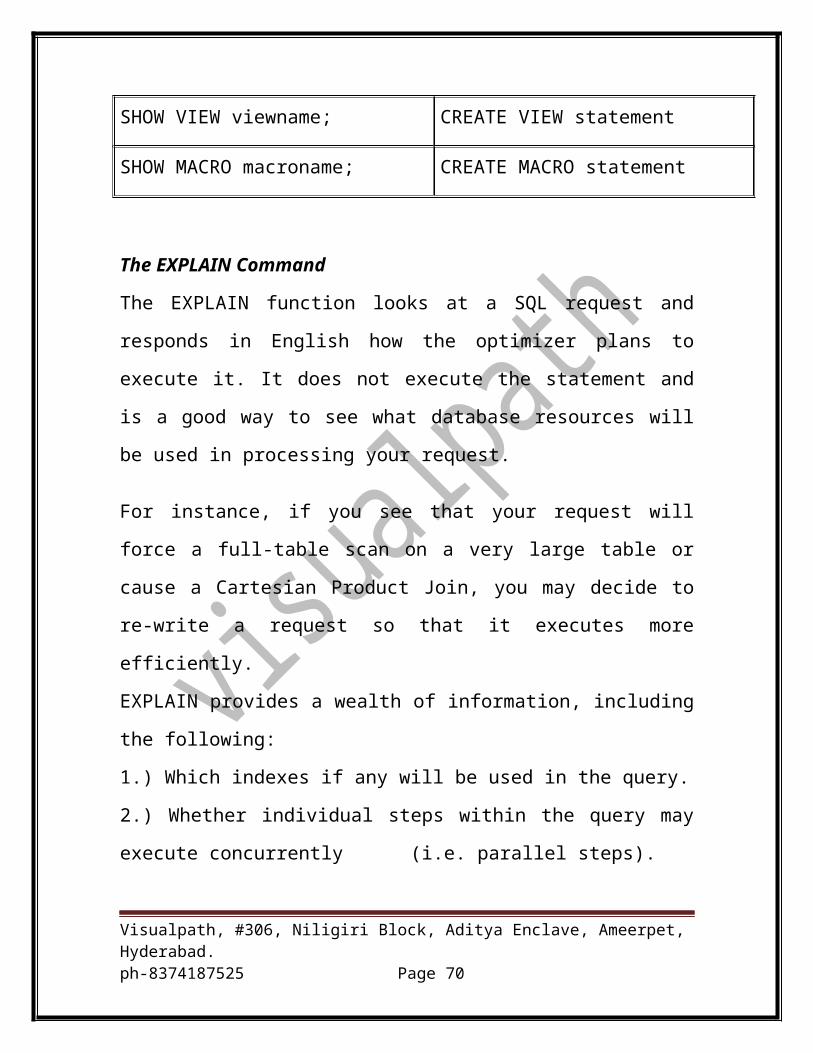
SHOW TABLE tablename; CREATE TABLE statement
SHOW VIEW viewname; CREATE VIEW statement
SHOW MACRO macroname; CREATE MACRO statement
Visualpath, #306, Niligiri Block, Aditya Enclave, Ameerpet, Hyderabad.ph-8374187525 Page 47
The EXPLAIN Command
The EXPLAIN function looks at a SQL request and responds in English how
the optimizer plans to execute it. It does not execute the statement and is a
good way to see what database resources will be used in processing your
request.
For instance, if you see that your request will force a full-table scan on a
very large table or cause a Cartesian Product Join, you may decide to re-
write a request so that it executes more efficiently.
EXPLAIN provides a wealth of information, including the following:
1.) Which indexes if any will be used in the query.
2.) Whether individual steps within the query may execute concurrently
(i.e. parallel steps).
3.) An estimate of the number of rows which will be processed.
4.) An estimate of the cost of the query (in time increments).
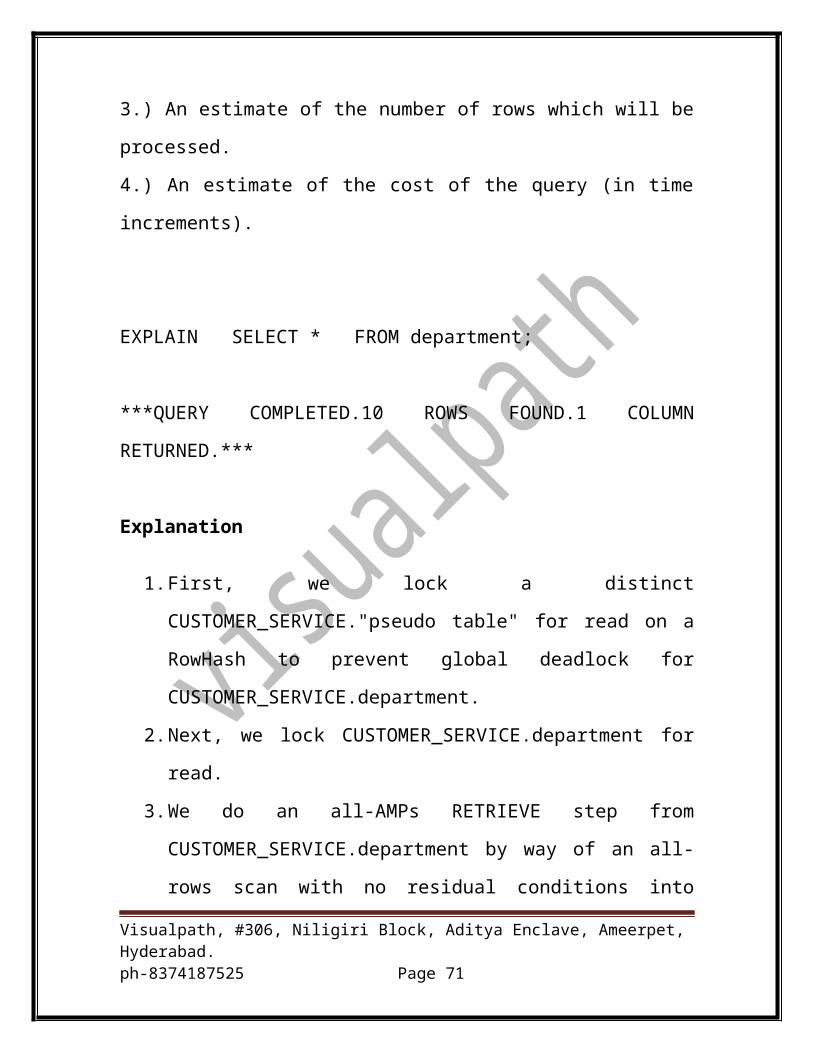
EXPLAIN SELECT * FROM department;
***QUERY COMPLETED.10 ROWS FOUND.1 COLUMN
RETURNED.***
Explanation
1. First, we lock a distinct CUSTOMER_SERVICE."pseudo table" for
read on a RowHash to prevent global deadlock for
CUSTOMER_SERVICE.department.
Visualpath, #306, Niligiri Block, Aditya Enclave, Ameerpet, Hyderabad.ph-8374187525 Page 48
2. Next, we lock CUSTOMER_SERVICE.department for read.
3. We do an all-AMPs RETRIEVE step from
CUSTOMER_SERVICE.department by way of an all-rows scan with
no residual conditions into Spool 1, which is built locally on the
AMPs. The size of Spool 1 is estimated with low confidence to be 4
rows. The estimated time for this step is 0.15 seconds.
4. Finally, we send out an END TRANSACTION step to all AMPs
involved in processing the request.
-> The contents of Spool 1 are sent back to the user as the result of
statement 1. The total estimated time is 0.15 seconds.
BETWEEN
The BETWEEN operator looks for values between the given lower limit <a>
and given upper limit <b> as well as any values that equal either <a> or <b>
(BETWEEN is inclusive.)
Example
Select the name and the employee's manager number for all employees
whose job codes are in the 430000 range.
SELECT first_name ,last_name
,manager_employee_number
FROM employee WHERE
job_code BETWEEN 430000 AND 439999;
Visualpath, #306, Niligiri Block, Aditya Enclave, Ameerpet, Hyderabad.ph-8374187525 Page 49
IN Clause
Use the IN operator as shorthand for when multiple values are to be tested.
Select the name and department for all employees in either department 401
or 403. This query may also be written using the OR operator which we shall
see shortly.
SELECT first_name ,last_name ,department_number
FROM employee WHERE
department_number IN (401, 403);
NOT IN Clause
Use the NOT IN operator to locate rows for which a column does not match
any of a set of values. Specify the set of values which disqualifies the row.
SELECT first_name ,last_name ,department_number
FROM employee WHERE
department_number NOT IN (401, 403);
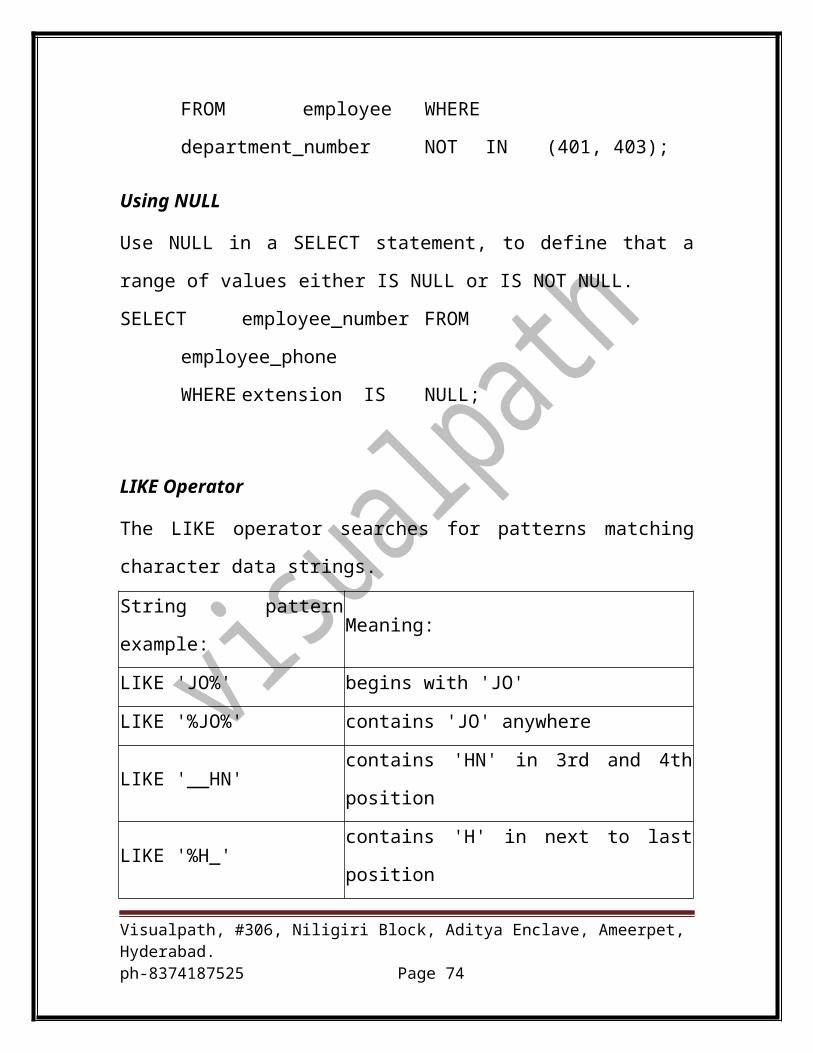
Using NULL
Use NULL in a SELECT statement, to define that a range of values either IS
NULL or IS NOT NULL.
SELECT employee_number FROM employee_phone
WHERE extension IS NULL;
LIKE Operator
The LIKE operator searches for patterns matching character data strings.
String pattern example: Meaning:
LIKE 'JO%' begins with 'JO'
Visualpath, #306, Niligiri Block, Aditya Enclave, Ameerpet, Hyderabad.ph-8374187525 Page 50
LIKE '%JO%' contains 'JO' anywhere
LIKE '__HN' contains 'HN' in 3rd and 4th position
LIKE '%H_' contains 'H' in next to last position
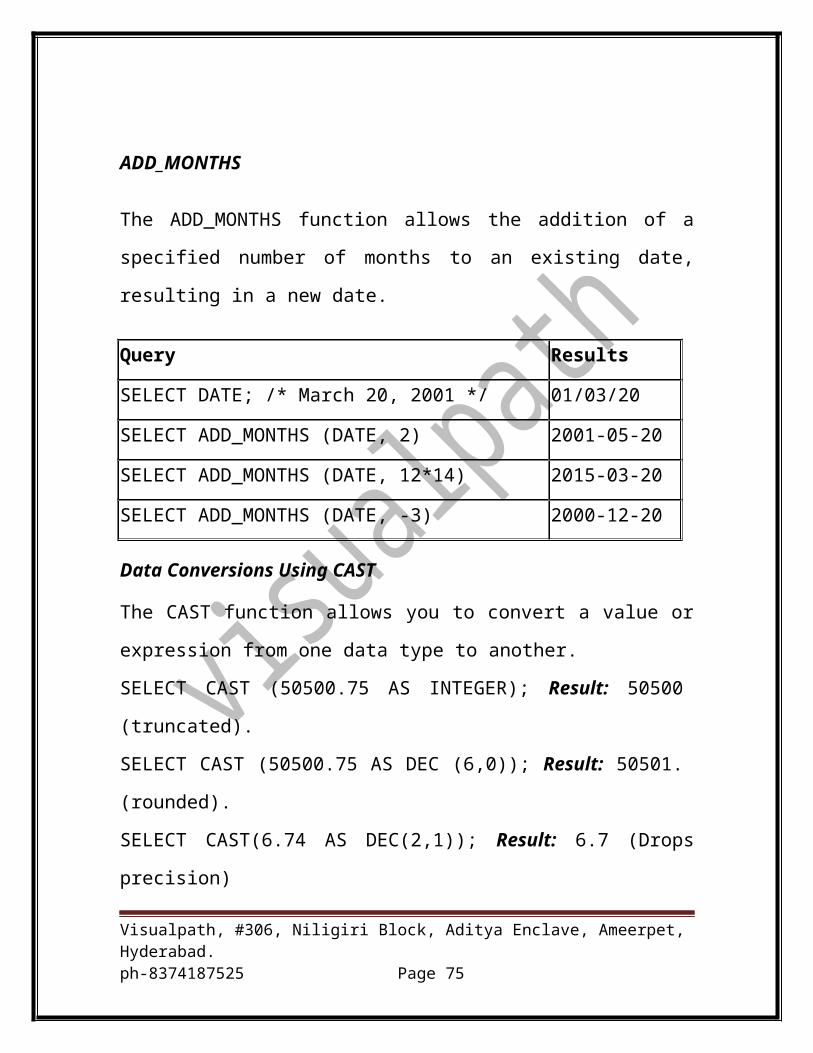
ADD_MONTHS
The ADD_MONTHS function allows the addition of a specified number of
months to an existing date, resulting in a new date.
Query Results
SELECT DATE; /* March 20, 2001 */ 01/03/20
SELECT ADD_MONTHS (DATE, 2) 2001-05-20
SELECT ADD_MONTHS (DATE, 12*14) 2015-03-20
SELECT ADD_MONTHS (DATE, -3) 2000-12-20
Data Conversions Using CAST
The CAST function allows you to convert a value or expression from one
data type to another.
SELECT CAST (50500.75 AS INTEGER); Result: 50500 (truncated).
SELECT CAST (50500.75 AS DEC (6,0)); Result: 50501. (rounded).
SELECT CAST(6.74 AS DEC(2,1)); Result: 6.7 (Drops precision)
SELECT CAST(6.75 AS DEC(2,1)); Result: 6.8 (Rounds up to even
number)
SELECT CAST(6.85 AS DEC(2,1)); Result: 6.8 (Rounds down to even
number)
Visualpath, #306, Niligiri Block, Aditya Enclave, Ameerpet, Hyderabad.ph-8374187525 Page 51
Attributes and Functions
Use TITLE to add a heading to your output that differs from the
column or expression name.
Use AS to specify a name for a column or expression in a SELECT
statement.
Use CHARACTERS to determine the number of characters in a
string.
Use TRIM to Trim blank characters or binary zeroes from data.
Use FORMAT to alter the display of a column or expression.
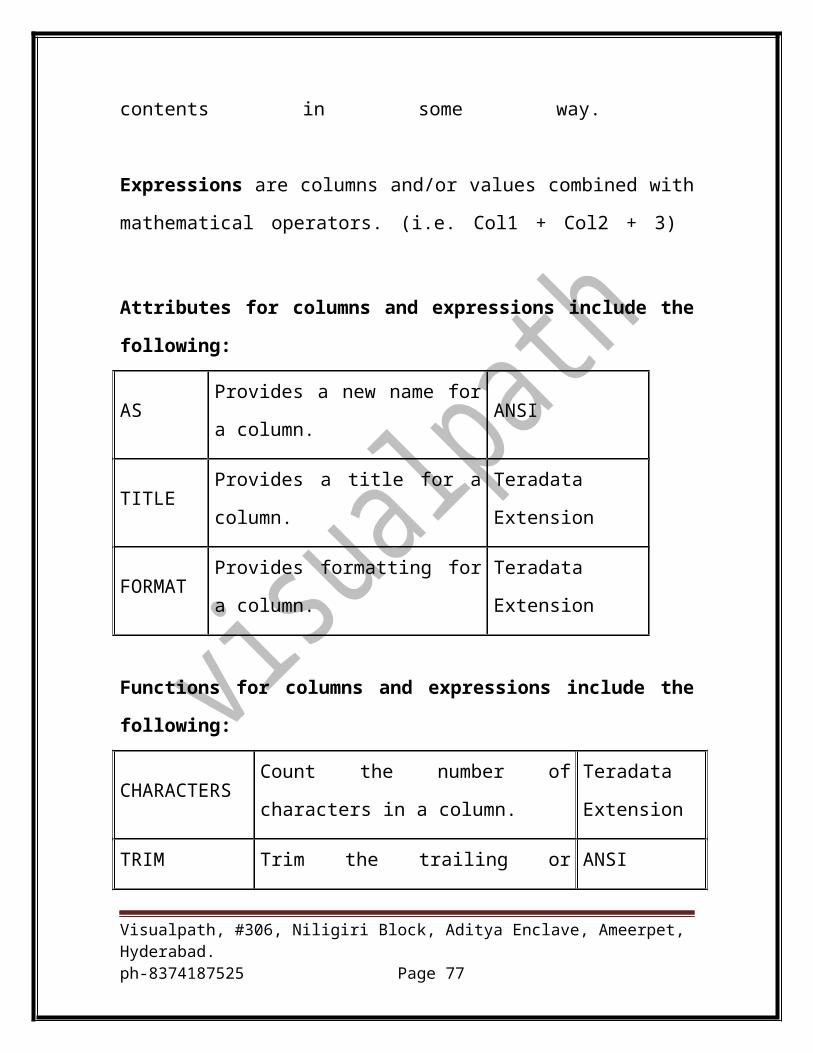
Attributes are characteristics which may be defined for columns, such as
titlesand formats.
Functions are performed on columns to alter their contents in some way.
Expressions are columns and/or values combined with mathematical
operators. (i.e. Col1 + Col2 + 3)
Attributes for columns and expressions include the following:
AS Provides a new name for a column. ANSI
TITLE Provides a title for a column. Teradata Extension
FORMAT Provides formatting for a column. Teradata Extension
Functions for columns and expressions include the following:
Visualpath, #306, Niligiri Block, Aditya Enclave, Ameerpet, Hyderabad.ph-8374187525 Page 52
CHARACTERSCount the number of characters in a
column.
Teradata
Extension
TRIM Trim the trailing or leading blanks or
binary zeroes from a column.
ANSI
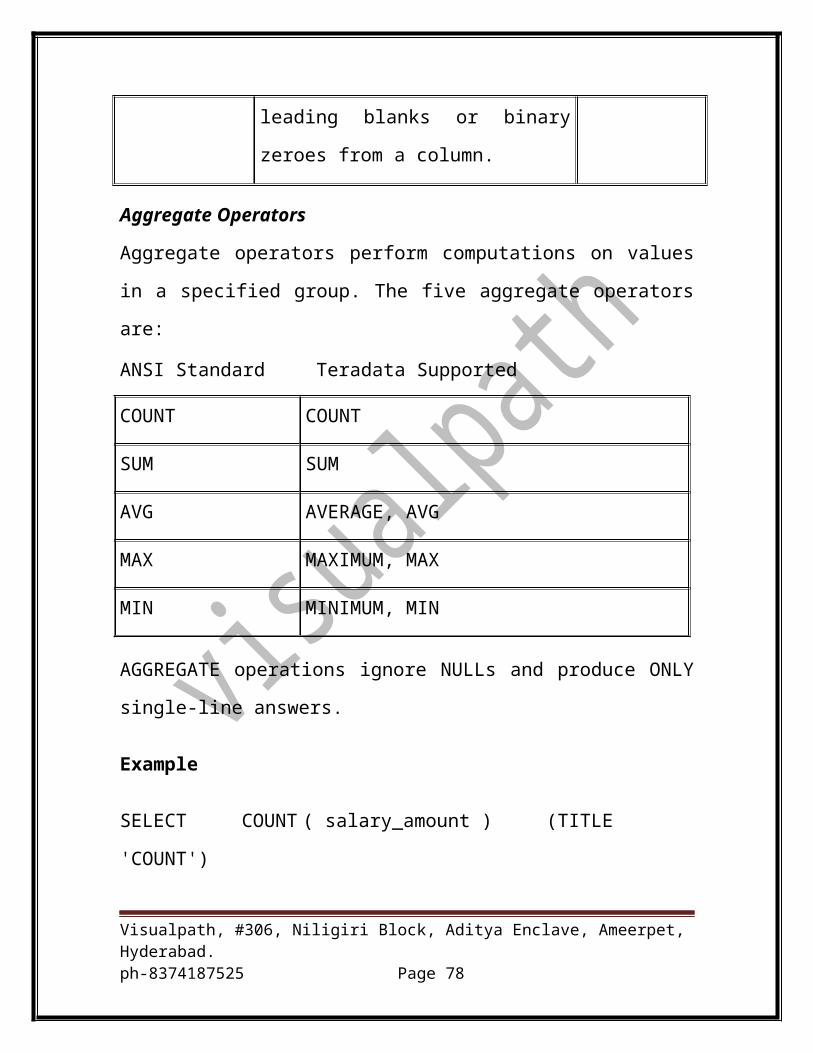
Aggregate Operators
Aggregate operators perform computations on values in a specified group.
The five aggregate operators are:
ANSI Standard Teradata Supported
COUNT COUNT
SUM SUM
AVG AVERAGE, AVG
MAX MAXIMUM, MAX
MIN MINIMUM, MIN
AGGREGATE operations ignore NULLs and produce ONLY single-line
answers.
Example
SELECT COUNT ( salary_amount ) (TITLE 'COUNT')
,SUM ( salary_amount ) (TITLE 'SUM SALARY')
,AVG ( salary_amount ) (TITLE 'AVG SALARY')
,MAX ( salary_amount ) (TITLE 'MAX SALARY')
,MIN ( salary_amount ) (TITLE 'MIN SALARY')
Visualpath, #306, Niligiri Block, Aditya Enclave, Ameerpet, Hyderabad.ph-8374187525 Page 53
FROM employee ;
Result
COUNTSUM SALARYAVG SALARYMAX SALARYMIN SALARY
6 213750.00 35625.00 49700.00 29250.00
NOTE: If one salary amount value had been NULL, the COUNT would
have returned a count of 5. In this case, the average would have reflected an
average of only five salaries. To COUNT all table rows use COUNT (*),
which will count rows regardless of the presence of NULLs.
Aggregation using GROUP BY
To find the total amount of money spent by each department on employee
salaries. Without the GROUP BY clause, we could attempt to get an answer
by running a separate query against each department. GROUP BY provides
the answer with a single query, regardless of how many departments there
are.
SELECT department_number ,SUM (salary_amount) FROM employee
GROUP BY department_number ;
department_number Sum(salary_amount)
401 74150.00
403 80900.00
301 58700.00
GROUP BY and ORDER BY
GROUP BY does not imply any ordering of the output. An ORDER BY
clause is needed to control the order of the ouput.
Visualpath, #306, Niligiri Block, Aditya Enclave, Ameerpet, Hyderabad.ph-8374187525 Page 54
GROUP BY and HAVING Condition
HAVING is just like WHERE , except that it applies to groups rather than
rows. HAVING qualifies and selects only those groups that satisfy a
conditional expression.
GROUP BY Summary
Here is the order of evaluation within a SQL statement if all four clauses are
present:
WHERE
Eliminates some or all rows immediately based on condition.
Only rows which satisfy a WHERE condition are eligible for
inclusion in groups.
GROUP BY
Puts qualified rows into desired groupings.
HAVING
Eliminates some (or all) of the groupings based on condition.
ORDER BY
Visualpath, #306, Niligiri Block, Aditya Enclave, Ameerpet, Hyderabad.ph-8374187525 Page 55
Sorts final groups for output.
(ORDER BY is not implied by GROUP BY)
Using WITH...BY
The WITH...BY clause is a Teradata extension that creates subtotal lines for
a detailed list. It differs from GROUP BY in that detail lines are not
eliminated. The WITH...BY clause allows subtotal "breaks" on more than
one column and generates an automatic sort on all "BY" columns.
SELECT last_name AS NAME, salary_amount AS SALARY
,department_number AS DEPT FROM employee
WHERE employee_number BETWEEN 1003 AND 1008
WITH SUM(salary)(TITLE 'Dept Total'), AVG(salary)(TITLE 'Dept Avg
')BY DEPT;
Result
NAME SALARY DEPT
Stein
Kaniesk
29450.00
29250.00
301
301
------------
Dept Total
Dept Avg
58700.00
29350.00
Johnson
Trader
36300.00
37850.00
401
401
------------
Visualpath, #306, Niligiri Block, Aditya Enclave, Ameerpet, Hyderabad.ph-8374187525 Page 56
Dept Total
Dept Avg
74150.00
37075.00
CHARACTERS Function
The CHARACTERS function is a Teradata-specific function which counts
the number of characters in a string. It is particularly useful for working with
VARCHAR fields where the size of the string can vary from row to row.
To find all employees who have more than five characters in their first
name.
Solution
SELECT first_name FROM employee WHERE
CHARACTERS (first_name) > 5;
TRIM Function
Use the TRIM function to suppress leading and/or trailing blanks in a CHAR
column or leading and/or trailing binary zeroes in a BYTE or VARBYTE
column. TRIM is most useful when performing string concatenations.
There are several variations of the TRIM function:
TRIM ([expression]) leading and trailing blanks/binary
zeroes
Visualpath, #306, Niligiri Block, Aditya Enclave, Ameerpet, Hyderabad.ph-8374187525 Page 57
TRIM (BOTH FROM [expression]) leading and trailing blanks/binary
zeroes
TRIM (TRAILING FROM[expression]) trailing blanks/binary zeroes
TRIM (LEADING FROM[expression]) leading blanks/binary zeroes
Solution 1
SELECT first_name ,last_name (TITLE 'last') FROM employee
WHERE CHAR (TRIM (TRAILING FROM last_name)) = 4;
Solution 2
SELECT first_name ,last_name (TITLE 'last') FROM employee
WHERE CHAR(TRIM(last_name))=4;
TRIM with Concatenation
The || (double pipe) symbol is the concatenation operator that creates a new
string from the combination of the first string followed by the second.
Example 1:
Concatenating of literals without the TRIM function:
SELECT 'Jones' || ',' || 'Mary' AS Name;
Name
------------------------------
Jones , Mary
TRIM with Other Characters
Visualpath, #306, Niligiri Block, Aditya Enclave, Ameerpet, Hyderabad.ph-8374187525 Page 58
Example 1:
SELECT TRIM(BOTH '?' FROM '??????PAUL??????') AS Trim_String;
Trim_String
----------------
PAUL
Example 2:
SELECT TRIM(LEADING '?' FROM '??????PAUL??????') AS
Trim_String;
Trim_String
----------------
PAUL??????
Example 3:
SELECT TRIM(TRAILING '?' FROM '??????PAUL??????') AS
Trim_String;
Trim_String
----------------
??????PAUL
FORMAT Phrase
Visualpath, #306, Niligiri Block, Aditya Enclave, Ameerpet, Hyderabad.ph-8374187525 Page 59
The FORMAT phrase can be used to format column output and override the
default format. For example:
SELECT salary_amount (FORMAT '$$$,$$9.99') FROM employee
WHERE employee_number = 1004;
Some Examples
FORMAT '999999' Data: 08777 Result: 008777
FORMAT 'ZZZZZ9' Data: 08777 Result: 8777
FORMAT '999-9999' Data: 6495252 Result: 649-5252
FORMAT 'X(3)' Data: 'Smith' Result: Smi
FORMAT '$$9.99' Data: 85.65 Result: $85.65
FORMAT '999.99' Data: 85.65 Result: 085.65
FORMAT 'X(3)' Data: 85.65 Result: Error
String Functions
Several functions are available for working with strings in SQL. Also, the
concatenation operator is provided for combining strings.
The string functions and the concatenation operator are listed here.
String Operator Description
| | Concatenates (combines) character strings together.
SUBSTRING Obtains a section of a character string.
INDEX Locates a character position in a string.
TRIM * Trims blanks from a string.
UPPER Converts a string to uppercase.
Visualpath, #306, Niligiri Block, Aditya Enclave, Ameerpet, Hyderabad.ph-8374187525 Page 60
SELECT SUBSTRING ('catalog' FROM 5 for 3); Result 'log'
SELECT SUBSTR ('catalog', 5,3); Result 'log'
SUBSTRING
Result
SUBSTR Result
SUBSTRING(‘catalog’ FROM 5
FOR 4)
‘log’ ‘log’
SUBSTRING(‘catalog’ FROM 0
FOR 3)
‘ca’ ‘ca’
SUBSTRING(‘catalog’ FROM -1
FOR 3)
‘c’ ‘c’
SUBSTRING(‘catalog’ FROM 8
FOR 3)
0 length string 0 length string
SUBSTRING(‘catalog’ FROM 1
FOR 0)
0 length string 0 length string
SUBSTRING(‘catalog’ FROM 5
FOR -2)
error error
SUBSTRING(‘catalog’ FROM 0) ‘catalog’ ‘catalog’
SUBSTRING(‘catalog’ FROM 10) 0 length string 0 length string
SUBSTRING(‘catalog’ FROM -1) 0 length string 0 length string
SUBSTRING(‘catalog’ FROM 3) ‘talog’ ‘talog’
Visualpath, #306, Niligiri Block, Aditya Enclave, Ameerpet, Hyderabad.ph-8374187525 Page 61
COALESCE Function
Normally, concatenation of any string with a null produces a null result.
The COALESCE Function allows values to be substituted for nulls. (The
COALESCE function is described in more detail in Level 3 Module 6.)
Example: Assume col1 = 'a', col2 = 'b'
SELECT col1 | | col2 From tblx; Result is: 'ab'
If either column contains a null, the result is null.
Solution: Assume col1 = 'a', col2 = null
SELECT col1 | | (COALESCE (col2,'x')) FROM tblx; Result is: 'ax'
INDEX Function
The INDEX function locates a character position in a string.
SELECT INDEX ('cat', 't'); returns 3
SELECT INDEX ('Adams', 'a'); returns 1
SELECT INDEX ('dog', 'e'); returns 0
DATE Formats
SYNTAX RESULT
FORMAT 'YYYY/MM/DD’ 1996/03/27
Visualpath, #306, Niligiri Block, Aditya Enclave, Ameerpet, Hyderabad.ph-8374187525 Page 62

FORMAT 'DDbMMMbYYYY' 27 Mar 1996
FORMAT 'mmmBdd,Byyyy' Mar 27, 1996
FORMAT 'DD.MM.YYYY' 27.03.1996
SELECT last_name ,first_name ,hire_date (FORMAT
'mmmBdd,Byyyy')
FROM employee ORDER BY last_name;
last_name first_name hire_date
Johnson Darlene Oct 15, 1976
Kanieski Carol Feb 01, 1977
Ryan Loretta Oct 15, 1976
Extracting Portions of DATEs
The EXTRACT function allows for easy extraction of year, month and day
from any DATE data type. The following examples demonstrate its usage.
Query Result
SELECT DATE; /* March 20,2001 */ 01/03/20 (Default format)
SELECT EXTRACT(YEAR FROM DATE); 2001
SELECT EXTRACT(MONTH FROM
DATE);03
SELECT EXTRACT(DAY FROM DATE); 20
Date arithmetic may be applied to the date prior to the extraction. Added
values always represent days.
Query Result
Visualpath, #306, Niligiri Block, Aditya Enclave, Ameerpet, Hyderabad.ph-8374187525 Page 63
SELECT EXTRACT(YEAR FROM DATE + 365); 2002
SELECT EXTRACT(MONTH FROM DATE + 30); 04
SELECT EXTRACT(DAY FROM DATE + 12); 01
Extracting From Current Time
The EXTRACT function may also be applied against the current time. It
permits extraction of hours, minutes and seconds.
Query Result
SELECT TIME; /* 2:42 PM */ 14:42:32 (Default format)
SELECT EXTRACT(HOUR FROM TIME); 14
SELECT EXTRACT(MINUTE FROM TIME); 42
SELECT EXTRACT(SECOND FROM
TIME);32
Set Operators
The following are graphic representations of the three set operators,
INTERSECT, UNION and EXCEPT
The INTERSECT operator returns rows from multiple sets which share
some criteria in common.
SELECT manager_employee_number FROM employee
INTERSECT
SELECT manager_employee_number FROM department ORDER
BY 1;
Visualpath, #306, Niligiri Block, Aditya Enclave, Ameerpet, Hyderabad.ph-8374187525 Page 64
Results
manager_employee_number
801
1003
1005
1011
The UNION operator returns all rows from multiple sets, displaying
duplicate rows only once.
SELECT first_name ,last_name ,'employee' (TITLE
'employee//type')
FROM employee WHERE manager_employee_number = 1019
UNION
SELECT first_name ,last_name ,' manager ' FROM employee
WHERE employee_number = 1019 ORDER BY 2
The EXCEPT operator subtracts the contents of one set from the contents of
another.
SELECT manager_employee_number FROM department
EXCEPT
SELECT manager_employee_number FROM employee ORDER BY
1;
Result
Visualpath, #306, Niligiri Block, Aditya Enclave, Ameerpet, Hyderabad.ph-8374187525 Page 65
manager_employee_
number
1016
1099
NOTE: Using the Teradata keyword ALL in conjuction with the UNION
operator allows duplicate rows to remain in the result set.
What is a Trigger?
A trigger is an object in a database, like a macro or view. A trigger is
created with a CREATE TRIGGER statement and defines events that will
happen when some other event, called a triggering event, occurs.
A trigger consists of one or more SQL statements which are associated with
a table and which are executed when the trigger is 'fired'.
In summary, a Trigger is:
One or more stored SQL statements associated with a table.
An event driven procedure attached to a table.
An object in a database, like tables, views and macros.
Many of the DDL commands which apply to other database objects, also
apply to triggers. All of the following statements are valid with triggers:
CREATE TRIGGER
DROP TRIGGER
SHOW TRIGGER
ALTER TRIGGER
Visualpath, #306, Niligiri Block, Aditya Enclave, Ameerpet, Hyderabad.ph-8374187525 Page 66
RENAME TRIGGER
REPLACE TRIGGER
HELP TRIGGER
Triggers may not be used in conjunction with:
The FastLoad utility
The MultiLoad utility
Updatable Cursors (Stored Procedures or Preprocessor)
Join Indexes
To use the FastLoad or MultiLoad utilities, or to create stored procedures
with updatable cursors (covered in a later module), you must first disable
any triggers defined on the affected tables via an ALTER TRIGGER
command.
Join indexes are never permitted on tables which have defined triggers.
You can drop all Triggers using:
DELETE DATABASE
DELETE USER
Privileges are required to CREATE and DROP Triggers:
GRANT CREATE Trigger
GRANT DROP Trigger
REVOKE CREATE Trigger
REVOKE DROP Trigger
Visualpath, #306, Niligiri Block, Aditya Enclave, Ameerpet, Hyderabad.ph-8374187525 Page 67
These new privileges have been created in the the Data
Dictionary/Directory.
Note: The Teradata implementation of triggers is updated with Release
V2R5.1 (January 2004) to conform to the ANSI specification. The
changes are fully demonstrated in Level 6, Module 15 of this SQL Web-
based training. In the current module (Module 3), notation will be
provided to indicated which features are no longer supported in
V2R5.1.
Triggered and Triggering Statements
A trigger is said to ‘fire’ when the triggering event occurs and various
conditions are met. When a trigger fires, it causes other events, called
triggered events to occur. A triggered event consists of one or more
triggered statements.
A triggering statement is an SQL statement which causes a trigger to fire.
It is the 'launching' statement.
Triggering statements may be any of the following:
INSERT
UPDATE
DELETE
INSERT SELECT
A triggered statement is the statement (or statements) which are executed
as a result of firing the trigger.
Visualpath, #306, Niligiri Block, Aditya Enclave, Ameerpet, Hyderabad.ph-8374187525 Page 68
Triggered statements may be any of these:
INSERT
UPDATE
DELETE
INSERT SELECT
ABORT/ROLLBACK
EXEC (macro)
A macro may only contain the approved DML statements.
Triggered statements may never be any of these:
BEGIN TRANSACTION
CHECKPOINT
COMMIT
END TRANSACTION
SELECT
You can do transaction processing in a triggered statement without using
Begin Transaction/End Transaction (BTET). We will see how to do this
later.
Visualpath, #306, Niligiri Block, Aditya Enclave, Ameerpet, Hyderabad.ph-8374187525 Page 69
Visualpath, #306, Niligiri Block, Aditya Enclave, Ameerpet, Hyderabad.ph-8374187525 Page 70
Trigger Types
There are two types of triggers:
ROW triggers
STATEMENT triggers
ROW triggers
fire once for each row affected by the triggering statement.
reference OLD and NEW rows of the subject table.
permit only simple inserts, rollbacks, or macros containing them in a
triggered statement.
STATEMENT triggers
fire once per statement.
reference OLD_TABLE and NEW_TABLE subject tables.
Example 1
CREATE TABLE tab1 (a INT, b INT, c INT);
CREATE TABLE tab2 (d INT, e INT, f INT);
CREATE TABLE tab3 (g INT, h INT, i INT);
Example 2
CREATE TRIGGER trig1 AFTER INSERT ON tab1
REFERENCING NEW_TABLE AS newtable
FOR EACH STATEMENT
Visualpath, #306, Niligiri Block, Aditya Enclave, Ameerpet, Hyderabad.ph-8374187525 Page 71

(INSERT INTO tab2 SELECT a + 10, b + 10, c FROM newtable;);
Example 3
CREATE TRIGGER trig2 AFTER INSERT ON tab2
REFERENCING NEW_TABLE AS newtable
FOR EACH STATEMENT
(INSERT INTO tab3 SELECT d + 100, e + 100, f FROM
newtable;);
Example 4
INSERT INTO tab1 VALUES (1,2,3);
SELECT * FROM tab1;
a
-----------
1
b
-----------
2
c
-----------
3
SELECT * FROM tab2;
d
-----------
11
e
-----------
12
f
-----------
3
SELECT * FROM tab3;
g
-----------
111
h
-----------
112
i
-----------
3
Visualpath, #306, Niligiri Block, Aditya Enclave, Ameerpet, Hyderabad.ph-8374187525 Page 72
RANDOM Function
The RANDOM function may be used to generate a random number
between a specified range.
RANDOM (Lower limit, Upper limit) returns a random number between the
lower and upper limits inclusive. Both limits must be specified, otherwise a
random number between 0 and approximately 4 billion is generated.
Consider the department table, which consists of nine rows.
SELECT department_number FROM department;
department_number
-----------------
501
301
201
600
100
402
403
302
401
Limitations On Use Of RANDOM
RANDOM is non-ANSI standard
RANDOM may be used in a SELECT list or a WHERE clause, but
not both
RANDOM may be used in Updating, Inserting or Deleting rows
Visualpath, #306, Niligiri Block, Aditya Enclave, Ameerpet, Hyderabad.ph-8374187525 Page 73
RANDOM may not be used with aggregate or OLAP functions
RANDOM cannot be referenced by numeric position in a GROUP BY
or ORDER BY clause
Join processing:
Inner Join
Suppose we need to display employee number, last name, and department
name for all employees. The employee number and last name come from the
employee table. The department name comes from the department table.
A join, by definition, is necessary whenever data is needed from more than
one table or view, In order to perform a join, we need to find a column that
both tables have in common. Fortunately, both tables have a department
number column, which may be used to join the rows of both tables.
Solution
SELECT
employee.employee_number ,employee.last_name ,department.departme
nt_name FROM employee INNER JOIN department
ON employee.department_number = department.department_number;
employee_number last_name department_name
1006 Stein research and development
1008 Kanieski research and development
1005 Ryan education
1004 Johnson customer support
Visualpath, #306, Niligiri Block, Aditya Enclave, Ameerpet, Hyderabad.ph-8374187525 Page 74
1007 Villegas education
1003 Trader customer support
We fully qualified every column referenced in our SELECT statement to
include the table that the column is in ( e.g., employee.employer_number). It
is only necessary to qualify columns that have identical names in both tables
(i.e., department_number).
The ON clause is used to define the join condition used to link the two tables
Cross Joins
A Cross Join is a join that requires no join condition (Cross Join syntax does
not allow an ON clause).
Each participating row of one table is joined with each participating row of
another table. The WHERE clause restricts which rows participate from
either table.
SELECTe.employee_number,d.department_numberFROM
employeeeCROSS JOINdepartmentd
WHEREe.employee_number=1008;
employee_number department_number
1008 301
1008 501
1008 402
1008 201
Visualpath, #306, Niligiri Block, Aditya Enclave, Ameerpet, Hyderabad.ph-8374187525 Page 75
1008 302
1008 600
1008 401
1008 100
1008 403
The employee table has 26 rows. The department table has 9 rows. Without
the WHERE clause, we would expect that 26 x 9 = 234 rows in our result
set. With the constraint that the employee_number must equal 1008 (which
only matches one row in the employee table), we now get 1 x 9 = 9 rows in
our result set.
Cross Joins by themselves often do not produce meaningful results. This
result shows employee 1008 associated with each department. This is not
meaningful output.
Self Joins
A self join occurs when a table is joined to itself. Which employees share the
same surname Brown and to whom do they report?
SELECT emp.first_name (TITLE 'Emp//First Name')
,emp.last_name (TITLE 'Emp//Last Name')
,mgr.first_name (TITLE 'Mgr//First Name')
,mgr.last_name (TITLE 'Mgr//Last Name')
Visualpath, #306, Niligiri Block, Aditya Enclave, Ameerpet, Hyderabad.ph-8374187525 Page 76
FROM employee emp INNER JOIN employeemgr
ON emp.manager_employee_number = mgr.employee_number
WHERE emp.last_name = 'Brown';
Results
Emp First Name Emp Last Name Mgr First Name Mgr Last Name
Allen Brown Loretta Ryan
Alan Brown James Trader
Join Processing:
Rows must be on the same AMP to be joined.
•If necessary, the system creates spool copies of one or both rows and
Moves them to a common AMP.
•Join processing NEVER moves or changes the original table rows.
Typical kinds of joins are:
•Merge Join
•Product Join
•Nested Join
•Exclusion Join
The Optimizer chooses the best join strategy based on:
•Available Indexes
Visualpath, #306, Niligiri Block, Aditya Enclave, Ameerpet, Hyderabad.ph-8374187525 Page 77
•Demographics (Collected STATISTICS or Dynamic Sample)
EXPLAIN shows what kind of join a query uses.
Join Redistribution:
The Primary Index is the major consideration used by the Optimizer in
determining how to join two tables and deciding which rows to move.
Three general scenarios may occur when two tables are to be Merge
Joined:
1. The Join column(s) is the Primary Index of both tables (best case).
2. The Join column is the Primary Index of one of the tables.
3. The Join column is not a Primary Index of either table (worst case).
Nested Joins:
This is a special join case.
•This is the only join that doesn't always use all of the AMPs.
•It is the most efficient in terms of system resources.
•It is the best choice for OLTP applications.
To choose a Nested Join, the Optimizer must have:
–An equality value for a unique index (UPI or USI) on Table1.
–A join on a column of that single row to any index on Table2.
•The system retrieves the single row from Table1.
•It hashes the join column value to access matching Table2 row(s).
Visualpath, #306, Niligiri Block, Aditya Enclave, Ameerpet, Hyderabad.ph-8374187525 Page 78
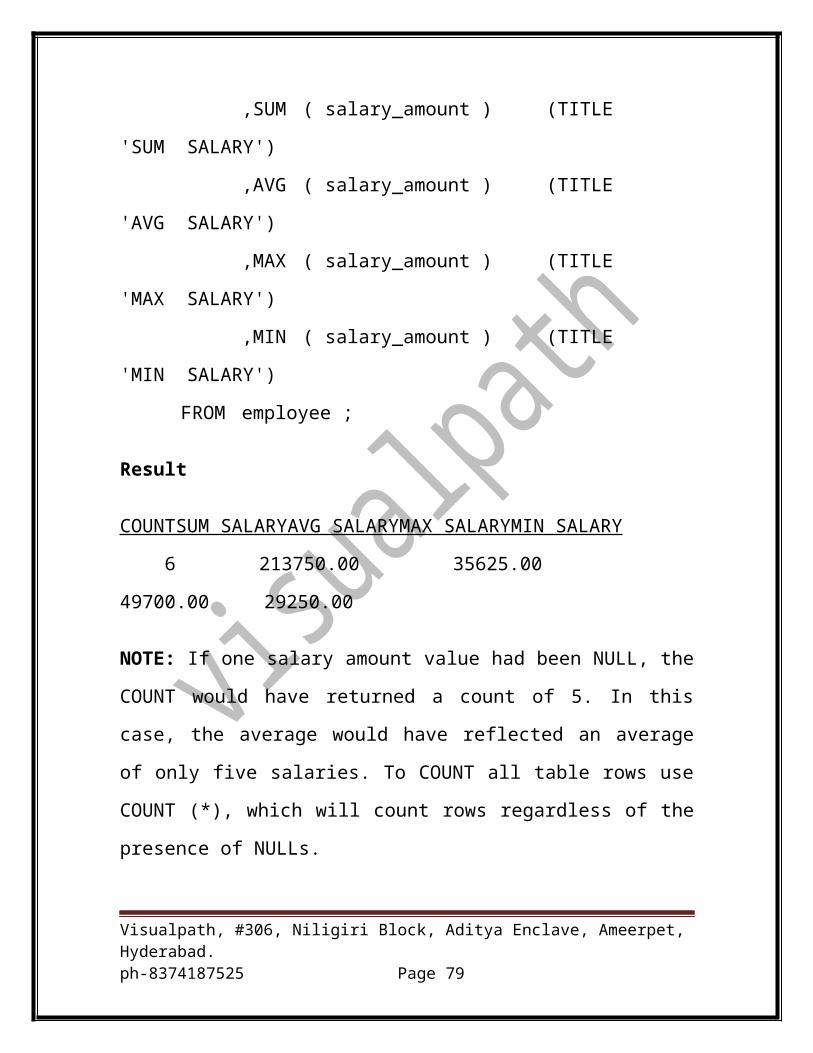
Utilities:Bteq:
Steps for submitting SQL in BTEQ’s Batch Mode
1. Invoke BTEQ2. Type in the input file name3. Type in the location and output file name.
BTEQ is invoked and takes instructions from a file called BatchScript.txt. The output file is called Output.txt.
C:/>BTEQ < BatchScript.txt > Output.txt
BatchScript.txt File
Using BTEQ Conditional Logic
Below is a BTEQ batch script example. The initial steps of the script will establish the logon, the database, and the delete all the rows from the Employee_Table. If the table does not exist, the BTEQ conditional logic will instruct Teradata to create it. However, if the table already exists, then Teradata will move forward and insert data.
.RUN FILE = mylogon.txt Logon to Teradata
DATABASE SQL_Class; Make the default database SQL_Class
DELETE FROM Employee_Table; Deletes all the records from the Employee_Table.
.IF ERRORCODE = 0 THEN .GOTOINSEMPS/* ERRORCODE is a reserved word that
BTEQ conditional logic that will check to ensure that the delete worked or if the table
Visualpath, #306, Niligiri Block, Aditya Enclave, Ameerpet, Hyderabad.ph-8374187525 Page 79
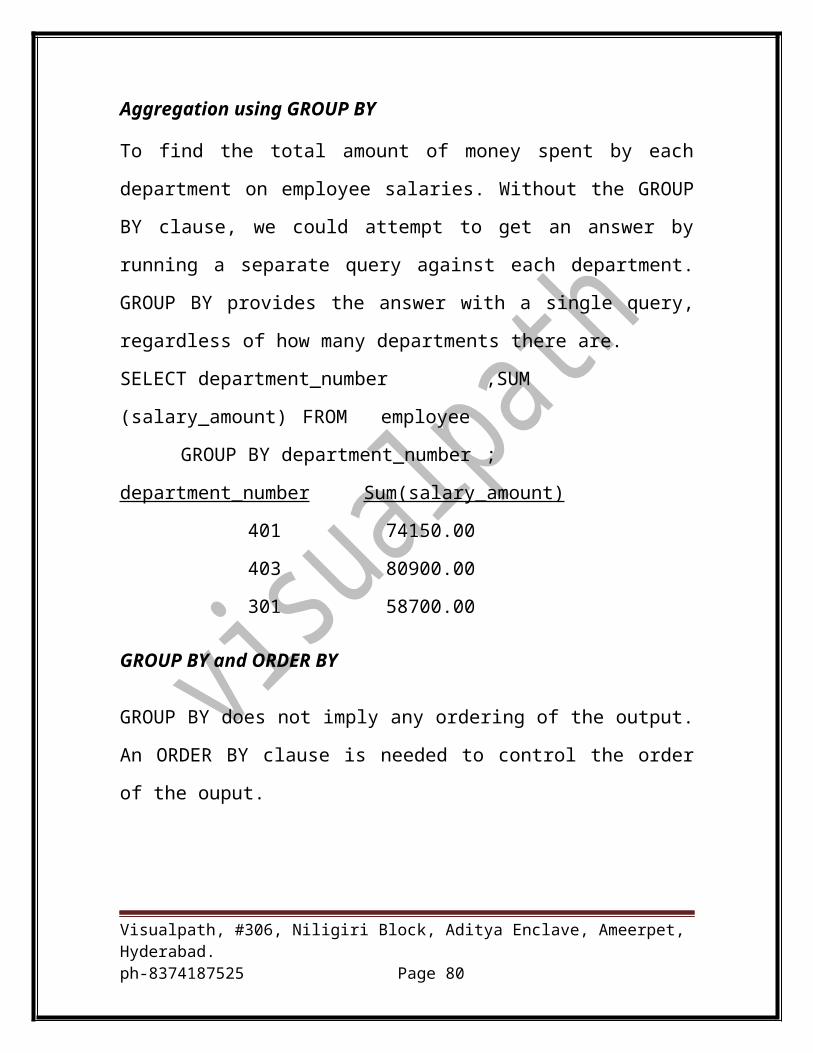
contains the outcome status for every SQL statement executed in BTEQ. A zero (0) indicates that statement worked. */
even existed.
.LABEL INSEMPS INSERT INTO Employee_Table (1232578, 'Chambers', 'Mandee', 48850.00, 100);INSERT INTO Employee_Table (1256349, 'Harrison' ,'Herbert', 54500.00, 400);.QUIT
The Label INSEMPS provides code so the BTEQ Logic can go directly to inserting records into the Employee_Table.
Using BTEQ to Export Data
BTEQ allows data to be exported directly from Teradata to a file on a mainframe or network-attached computer. In addition, the BTEQ export function has several export formats that a user can choose depending on the desired output. Generally, users will export data to a flat file format that is composed of a variety of characteristics. These characteristics include: field mode, indicator mode, or dif mode. Below is an expanded explanation of the different mode options.
Format of the EXPORT command:
.EXPORT <mode> {FILE | DDNAME } = <filename> [, LIMIT=n]
Record Mode: (also called DATA mode): This is set by .EXPORT DATA. This will bring data back as a flat file. Each parcel will contain a complete record. Since it is not a report, there are no headers or white space between the data contained in each column and the data is written to the file (e.g., disk drive file) in native format. For example, this means that INTEGER data is written as a 4-byte binary field. Therefore, it cannot be read and understood using a normal text editor.
Field Mode (also called REPORT mode): This is set by .EXPORT REPORT. This is the default mode for BTEQ and brings the data back as if it was a standard SQL SELECT statement. The output of this BTEQ export
Visualpath, #306, Niligiri Block, Aditya Enclave, Ameerpet, Hyderabad.ph-8374187525 Page 80

would return the column headers for the fields, white space, expanded packed or binary data (for humans to read) and can be understood using a text editor.
Indicator Mode: This is set by .EXPORT INDICDATA. This mode writes the data in data mode, but also provides host operating systems with the means of recognizing missing or unknown data (NULL) fields. This is important if the data is to be loaded into another Relational Database System (RDBMS).
The issue is that there is no standard character defined to represent either a numeric or character NULL. So, every system uses a zero for a numeric NULL and a space or blank for a character NULL. If this data is simply loaded into another RDBMS, it is no longer a NULL, but a zero or space.
To remedy this situation, INDICATA puts a bitmap at the front of every record written to the disk. This bitmap contains one bit per field/column. When a Teradata column contains a NULL, the bit for that field is turned on by setting it to a “1”. Likewise, if the data is not NULL, the bit remains a zero. Therefore, the loading utility reads these bits as indicators of NULL data and identifies the column(s) as NULL when data is loaded back into the table, where appropriate.
Since both DATA and INDICDATA store each column on disk in native format with known lengths and characteristics, they are the fastest method of transferring data. However, it becomes imperative that you be consistent. When it is exported as DATA, it must be imported as DATA and the same is true for INDICDATA.
Again, this internal processing is automatic and potentially important. Yet, on a network-attached system, being consistent is our only responsibility. However, on a mainframe system, you must account for these bits when defining the LRECL in the Job Control Language (JCL). Otherwise, your length is too short and the job will end with an error.
To determine the correct length, the following information is important. As mentioned earlier, one bit is needed per field output onto disk. However, computers allocate data in bytes, not bits. Therefore, if one bit is needed a minimum of eight (8 bits per byte) are allocated. Therefore, for every eight fields, the LRECL becomes 1 byte longer and must be added. In other
Visualpath, #306, Niligiri Block, Aditya Enclave, Ameerpet, Hyderabad.ph-8374187525 Page 81
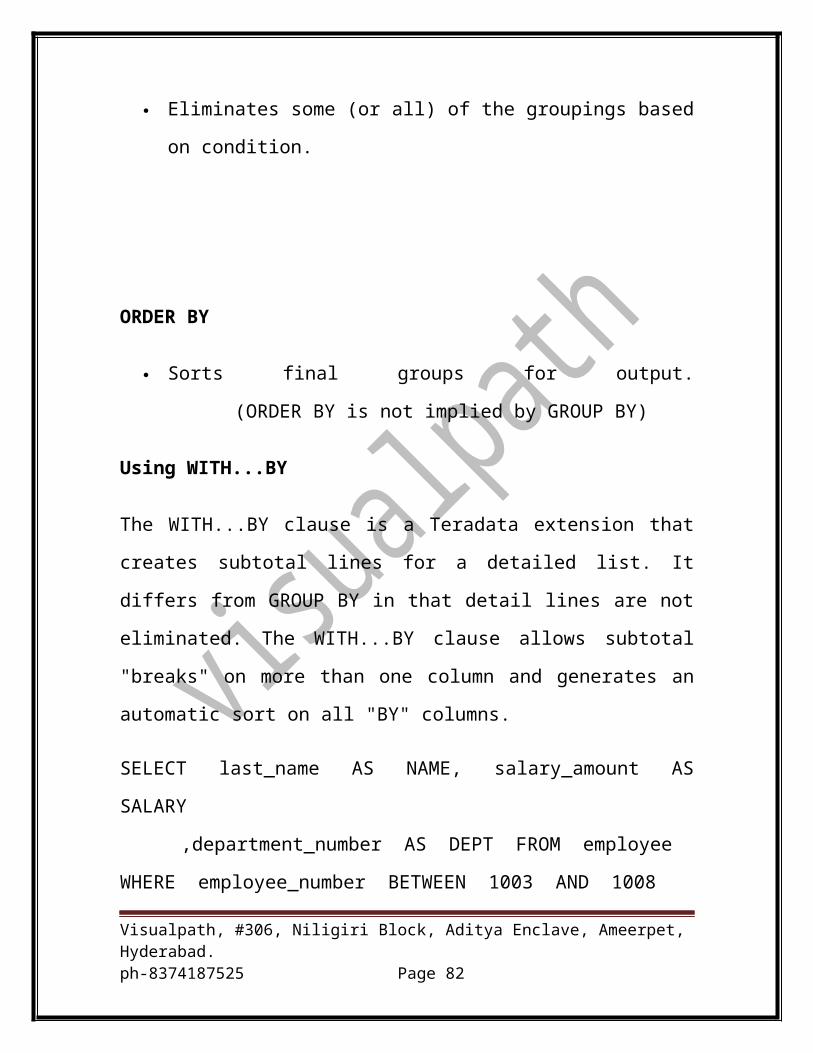
words, for nine columns selected, 2 bytes are added even though only nine bits are needed.
With this being stated, there is one indicator bit per field selected. INDICDATA mode gives the Host computer the ability to allocate bits in the form of a byte. Therefore, if one bit is required by the host system, INDICDATA mode will automatically allocate eight of them. This means that from one to eight columns being referenced in the SELECT will add one byte to the length of the record. When selecting nine to sixteen columns, the output record will be two bytes longer.
When executing on non-mainframe systems, the record length is automatically maintained. However, when exporting to a mainframe, the JCL (LRECL) must account for this addition length.
DIF Mode: Known as Data Interchange Format, which allows users to export data from Teradata to be directly utilized for spreadsheet applications like Excel, FoxPro and Lotus.
The optional limit is to tell BTEQ to stop returning rows after a specific number (n) of rows. This might be handy in a test environment to stop BTEQ before the end of transferring rows to the file.
Determining Out Record Lengths
Some hosts, such as IBM mainframes, require the correct LRECL (Logical Record Length) parameter in the JCL, and will abort if the value is incorrect. The following page will discuss how to figure out the record lengths.
There are three issues involving record lengths and they are:
Fixed columns
Variable columns
NULL indicators
Fixed Length Columns: For fixed length columns you merely count the length of the column. The lengths are:
INTEGER 4 bytes
Visualpath, #306, Niligiri Block, Aditya Enclave, Ameerpet, Hyderabad.ph-8374187525 Page 82
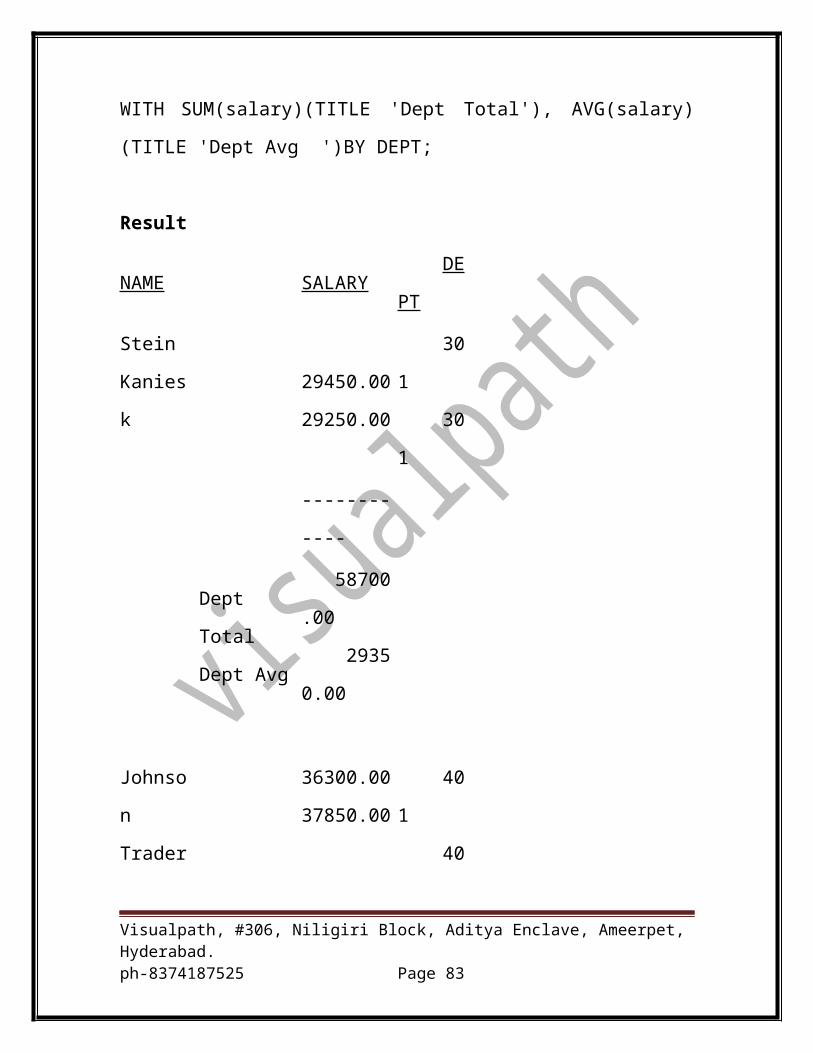
SMALLINT 2 bytes
BYTEINT 1 byte
CHAR(10) 10 bytes
CHAR(4) 4 bytes
DATE 4 bytes
DECIMAL(7,2) 4 bytes (packed data, total digits / 2 +1 )
DECIMAL(12,2) 8 bytes
Variable columns: Variable length columns should be calculated as the maximum value plus two. This two bytes is for the number of bytes for the binary length of the field. In reality you can save much space because trailing blanks are not kept. The logical record will assume the maximum and add two bytes as a length field per column.
VARCHAR(8) 10 Bytes
VARCHAR(10) 12 Bytes
Indicator columns: As explained earlier, the indicators utilize a single bit for each field. If your record has 8 fields (which require 8 bits), then you add one extra byte to the total length of all the fields. If your record has 9-16 fields, then add two bytes.
BTEQ Return Codes
Return codes are two-digit values that BTEQ returns to the user after completing each job or task. The value of the return code indicates the completion status of the job or task as follows:
Return Code Description
00 Job completed with no errors.
02 User alert to log on to the Teradata DBS.
04 Warning error.
08 User error.
12 Severe internal error.
Visualpath, #306, Niligiri Block, Aditya Enclave, Ameerpet, Hyderabad.ph-8374187525 Page 83
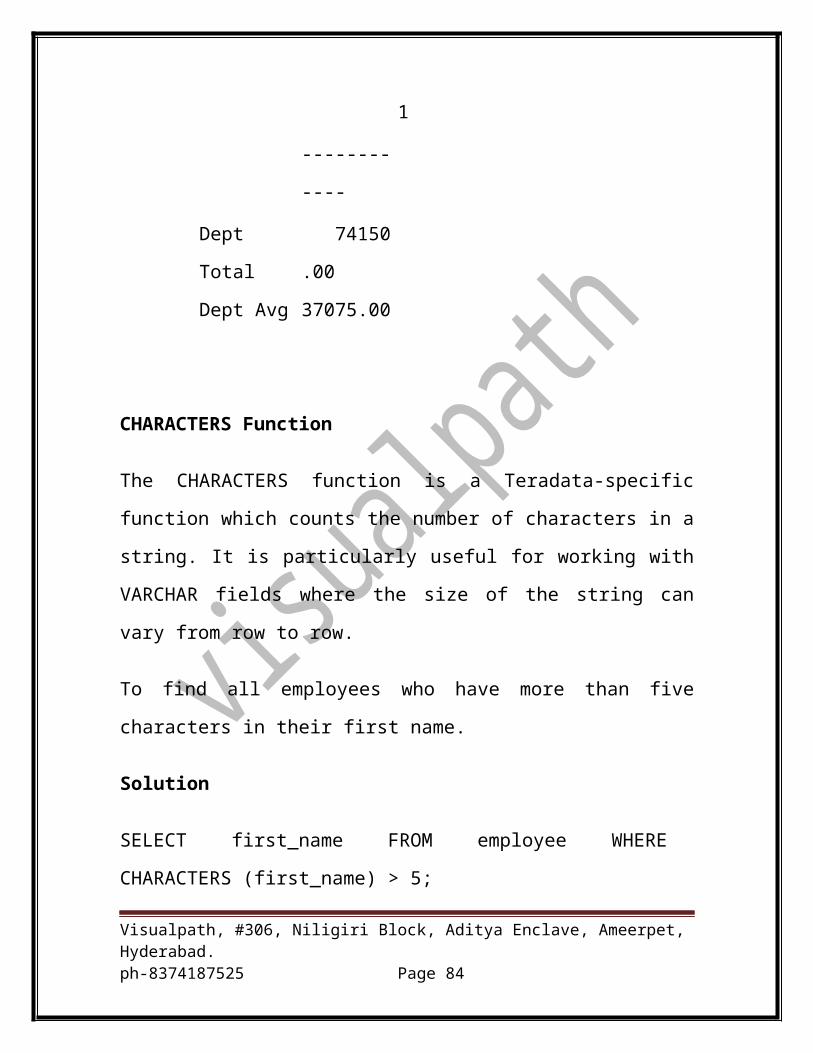
You can over-ride the standard error codes at the time you terminate BTEQ. This might be handy for debug purposes. The error code or “return code” can be any number you specify using one of the following:
Fast Export:
An Introduction to FastExport
Why it is called “FAST”Export
FastExport is known for its lightning speed when it comes to exporting vast amounts of data from Teradata and transferring the data into flat files on either a mainframe or network-attached computer. In addition, FastExport has the ability to except OUTMOD routines, which provides the user the capability to write, select, validate, and preprocess the exported data. Part of this speed is achieved because FastExport takes full advantage of Teradata’s parallelism.
As the demand increases to store data, the ever-growing requirement for tools to export massive amounts of data.
This is the reason why FastExport (FEXP) is brilliant by design. A good rule of thumb is that if you have more than half a million rows of data to export to either a flat file format or with NULL indicators, then FastExport is the best choice to accomplish this task.
Keep in mind that FastExport is designed as a one-way utility — that is, the sole purpose of FastExport is to move data out of Teradata. It does this by harnessing the parallelism that Teradata provides.
FastExport is extremely attractive for exporting data because it takes full advantage of multiple sessions, which leverages Teradata parallelism. FastExport can also export from multiple tables during a single operation. In addition, FastExport utilizes the Support Environment, which provides a job restart capability from a checkpoint if an error occurs during the process of executing an export job.
Visualpath, #306, Niligiri Block, Aditya Enclave, Ameerpet, Hyderabad.ph-8374187525 Page 84

How FastExport Works
When FastExport is invoked, the utility logs onto the Teradata database and retrieves the rows that are specified in the SELECT statement and puts them into SPOOL. From there, it must build blocks to send back to the client. In comparison, BTEQ starts sending rows immediately for storage into a file.
If the output data is sorted, FastExport may be required to redistribute the selected data two times across the AMP processors in order to build the blocks in the correct sequence. Remember, a lot of rows fit into a 64K block and both the rows and the blocks must be sequenced. While all of this redistribution is occurring, BTEQ continues to send rows. FastExport is getting behind in the processing. However, when FastExport starts sending the rows back a block at a time, it quickly overtakes and passes BTEQ’s row at time processing.
The other advantage is that if BTEQ terminates abnormally, all of your rows (which are in SPOOL) are discarded. You must rerun the BTEQ script from the beginning. However, if FastExport terminates abnormally, all the selected rows are in worktables and it can continue sending them where it left off. Pretty smart and very fast!
Also, if there is a requirement to manipulate the data before storing it on the computer’s hard drive, an OUTMOD routine can be written to modify the result set after it is sent back to the client on either the mainframe or LAN. Just like the BASF commercial states, “We don’t make the products you buy, we make the products you buy better”. FastExport is designed off the same premise, it does not make the SQL SELECT statement faster, but it does take the SQL SELECT statement and processes the request with lighting fast parallel processing!
FastExport Fundamentals
#1: FastExport EXPORTS data from Teradata. The reason they call it FastExport is because it takes data off of Teradata (Exports Data). FastExport does not import data into Teradata. Additionally, like BTEQ it can output multiple files in a single run.
#2: FastExport only supports the SELECT statement. The only DML statement that FastExport understands is SELECT. You SELECT the data you want exported and FastExport will take care of the rest.
Visualpath, #306, Niligiri Block, Aditya Enclave, Ameerpet, Hyderabad.ph-8374187525 Page 85
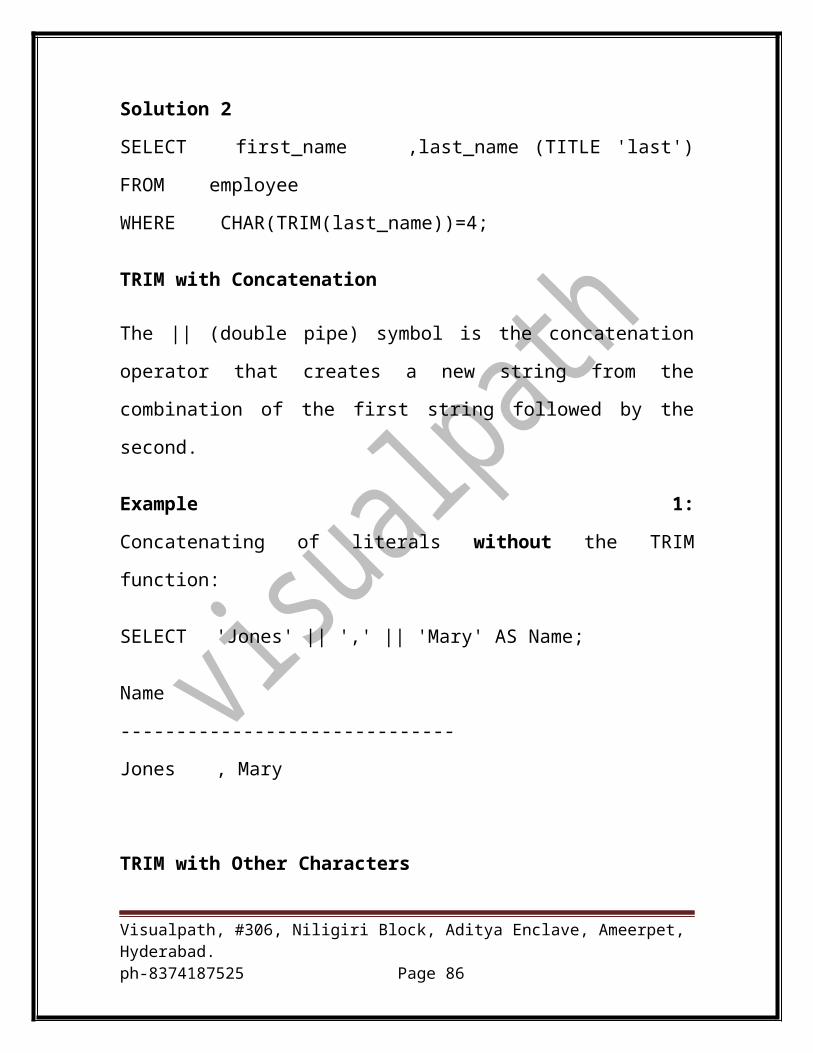
#3: Choose FastExport over BTEQ when Exporting Data of more than half a million+ rows. When a large amount of data is being exported, FastExport is recommended over BTEQ Export. The only drawback is the total number of FastLoads, FastExports, and MultiLoads that can run at the same time, which is limited to 15. BTEQ Export does not have this restriction. Of course, FastExport will work with less data, but the speed may not be much faster than BTEQ.
#4: FastExport supports multiple SELECT statements and multiple tables in a single run. You can have multiple SELECT statements with FastExport and each SELECT can join information up to 64 tables.
#5: FastExport supports conditional logic, conditional expressions, arithmetic calculations, and data conversions.FastExport is flexible and supports the above conditions, calculations, and conversions.
#6: FastExport does NOT support error files or error limits. FastExport does not record particular error types in a table. The FastExport utility will terminate after a certain number of errors have been encountered.#7: FastExport supports user-written routines INMODs and OUTMODs. FastExport allows you write INMOD and OUTMOD routines so you can select, validate and preprocess the exported data.
Maximum of 15 Loads
The Teradata RDBMS will only support a maximum of 15 simultaneous FastLoad, MultiLoad, or FastExport utility jobs. This maximum value is determined and configured by the DBS Control record. This value can be set from 0 to 15. When Teradata is initially installed, this value is set at 5.
The reason for this limitation is that FastLoad, MultiLoad, and FastExport all use large blocks to transfer data. If more then 15 simultaneous jobs were supported, a saturation point could be reached on the availability of resources. In this case, Teradata does an excellent job of protecting system resources by queuing up additional FastLoad, MultiLoad, and FastExport jobs that are attempting to connect.
For example, if the maximum numbers of utilities on the Teradata system is reached and another job attempts to run that job does not start. This limitation should be viewed as a safety control feature. A tip for
Visualpath, #306, Niligiri Block, Aditya Enclave, Ameerpet, Hyderabad.ph-8374187525 Page 86
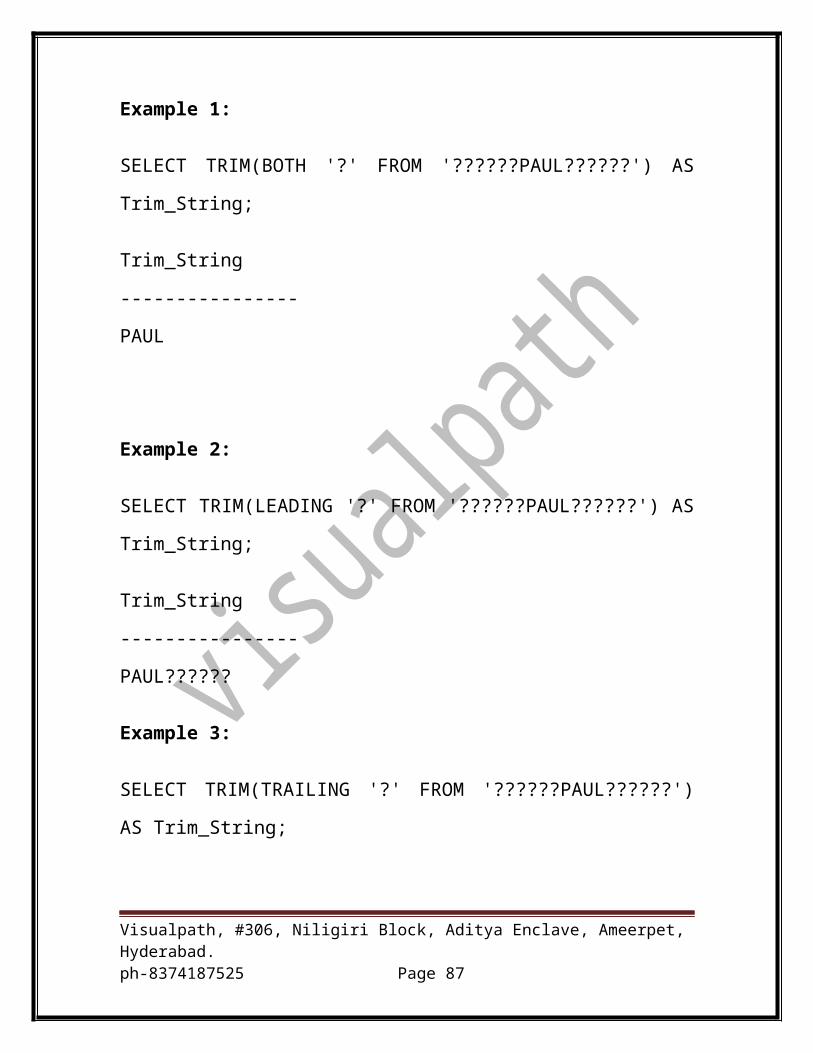
remembering how the load limit applies is this, “If the name of the load utility contains either the word “Fast” or the word “Load”, then there can be only a total of fifteen of them running at any one time”.
BTEQ does not have this load limitation. FastExport is clearly the better choice when exporting data. However, if two many load jobs are running. BTEQ is an alternate choice for exporting data.
A FastExport in its Simplest Form
The hobby of racecar driving can be extremely frustrating, challenging, and rewarding all at the same time. I always remember my driving instructor coaching me during a practice session in a new car around a road course racetrack. He said to me, “Before you can learn to run, you need to learn how to walk.” This same philosophy can be applied when working with FastExport. If FastExport is broken into steps, then several things that appear to be complicated are really very simple. With this being stated, FastExport can be broken into the following steps:
Logging onto Teradata
Retrieves the rows you specify in your SELECT statement
Exports the data to the specified file or OUTMOD routine
Logs off of Teradata
LOGTABLE sql01.SWA_Log; Creates the logtable -Required
.LOGON demo/usr01,demopwd; Logon to Teradata
BEGIN EXPORT SESSIONS 12; Begin the Export and set the number of sessions on Teradata
.EXPORT OUTFILE Student.txt Defines the output file name.
Visualpath, #306, Niligiri Block, Aditya Enclave, Ameerpet, Hyderabad.ph-8374187525 Page 87
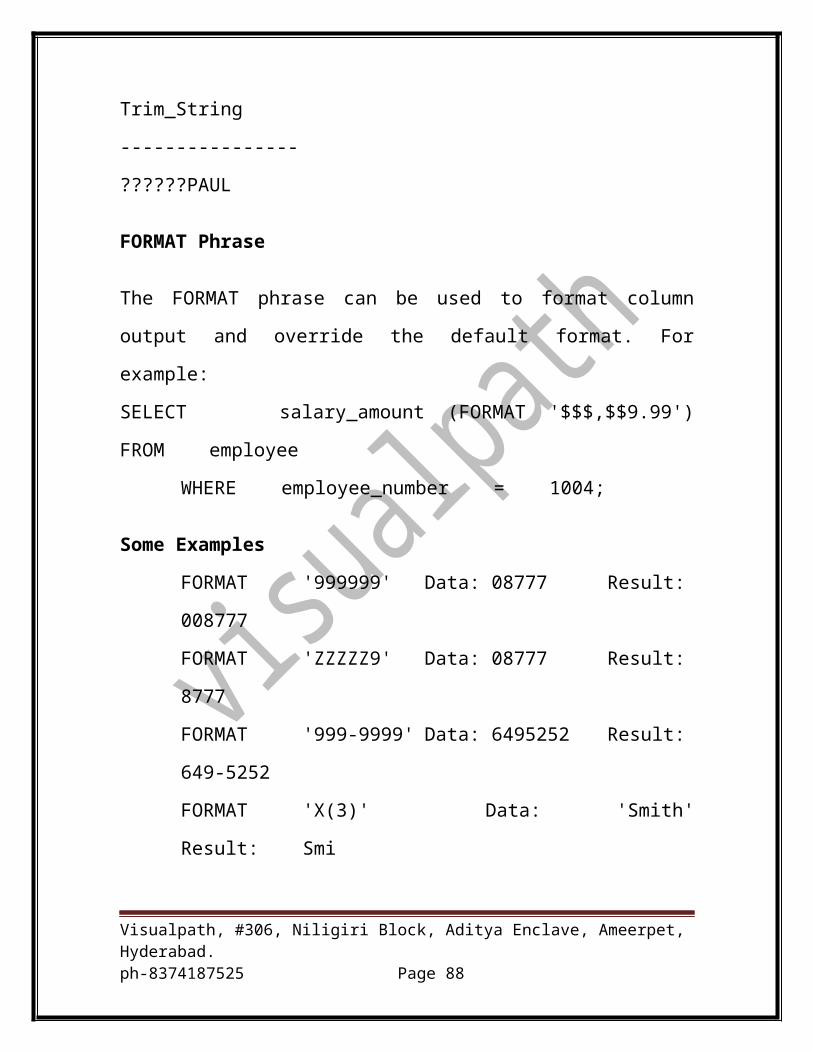
MODE RECORD FORMAT TEXT; In addition, specifies the output mode and format (LAN – ONLY)
The SELECT defines the column used to create the export file.NOTE: The selected columns for the export are being converted to character types. This will simplify the importing process into a different database.
/* Finish the Export Job and Write to File */.END EXPORT;.LOGOFF;
End the Export and logoff Teradata.
FastExport Modes and Formats
FastExport Modes
FastExport has two modes: RECORD or INDICATOR. In the mainframe world, only use RECORD mode. In the UNIX or LAN environment, RECORD mode is the default, but you can use INDICATOR mode if desired. The difference between the two modes is INDICATOR mode will set the indicator bits to 1 for column values containing NULLS.
Both modes return data in a client internal format with variable-length records. Each individual record has a value for all of the columns specified by the SELECT statement. All variable-length columns are preceded by a two-byte control value indicating the length of the column data. NULL columns have a value that is appropriate for the column data type. Remember, INDICATOR mode will set bit flags that identify the columns that have a null value.
FastExport Formats
FastExport has many possible formats in the UNIX or LAN environment. The FORMAT statement specifies the format for each record being exported which are:
Visualpath, #306, Niligiri Block, Aditya Enclave, Ameerpet, Hyderabad.ph-8374187525 Page 88
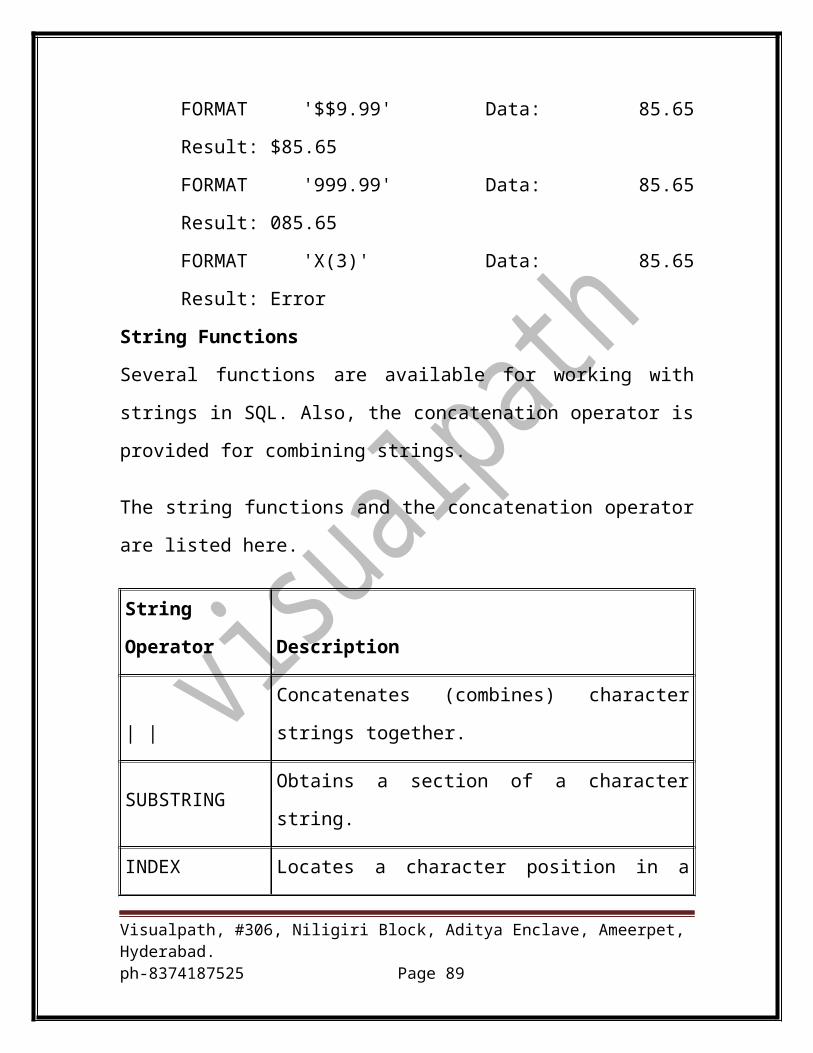
FASTLOAD
BINARY
TEXT
UNFORMAT
The default FORMAT is FASTLOAD in a UNIX or LAN environment.
FASTLOAD Format is a two-byte integer, followed by the data, followed by an end-of-record marker. It is called FASTLOAD because the data is exported in a format ready for FASTLOAD.
BINARY Format is a two-byte integer, followed by data.
TEXT is an arbitrary number of bytes followed by an end-of-record marker.
UNFORMAT is exported as it is received from CLIv2 without any client modifications.
Fast load:
FastLoad Has Two Phases
Teradata is famous for its end-to-end use of parallel processing. Both the data and the tasks are divided up among the AMPs. Then each AMP tackles its own portion of the task with regard to its portion of the data. This same “divide and conquer” mentality also expedites the load process. FastLoad divides its job into two phases, both designed for speed. They have no fancy names but are typically known simply as Phase 1 and Phase 2. Sometimes they are referred to as Acquisition Phase and Application Phase.
PHASE 1: Acquisition
The primary function of Phase 1 is to transfer data from the host computer to the Access Module Processors (AMPs) as quickly as possible. For the sake of speed, the Parsing Engine of Teradata does not does not take the time to hash each row of data based on the Primary Index. That will be done later. Instead, it does the following:
Visualpath, #306, Niligiri Block, Aditya Enclave, Ameerpet, Hyderabad.ph-8374187525 Page 89
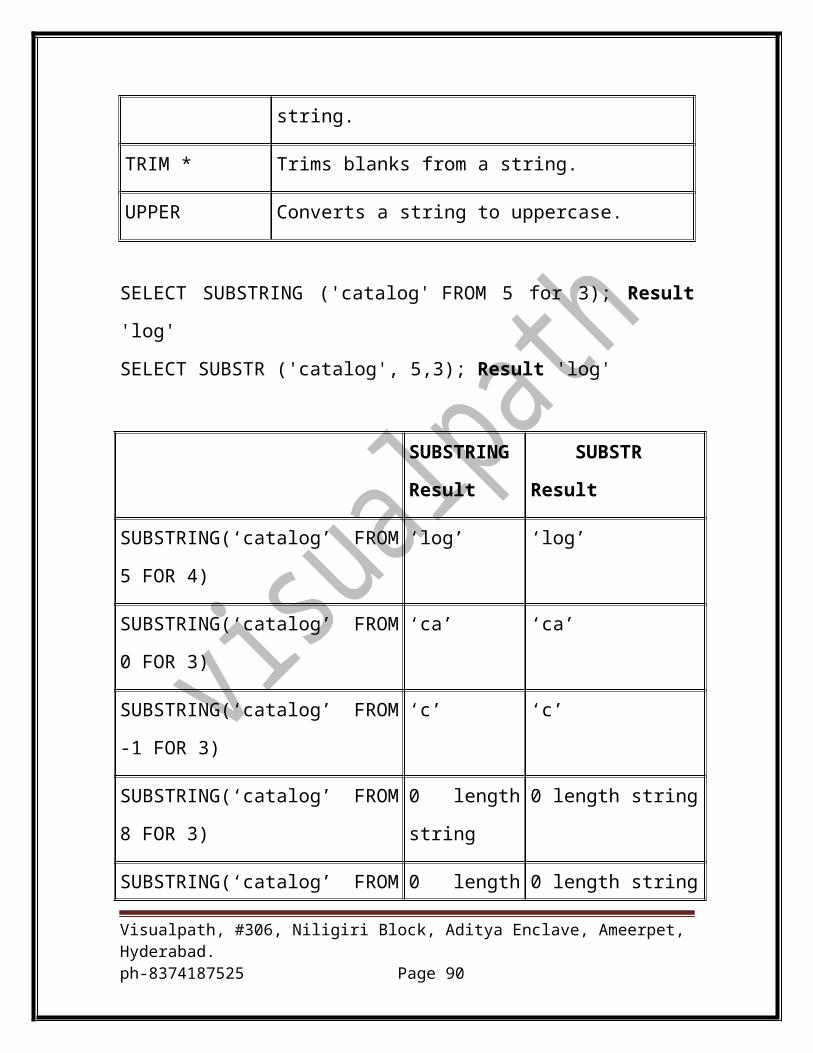
When the Parsing Engine (PE) receives the INSERT command, it uses one session to parse the SQL just once. The PE is the Teradata software processor responsible for parsing syntax and generating a plan to execute the request. It then opens a Teradata session from the FastLoad client directly to the AMPs. By default, one session is created for each AMP. Therefore, on large systems, it is normally a good idea to limit the number of sessions using the SESSIONS command. This capability is shown below.
Simultaneously, all but one of the client sessions begins loading raw data in 64K blocks for transfer to an AMP. The first priority of Phase 1 is to get the data onto the AMPs as fast as possible. To accomplish this, the rows are packed, unhashed, into large blocks and sent to the AMPs without any concern for which AMP gets the block. The result is that data rows arrive on different AMPs than those they would live, had they been hashed.
So how do the rows get to the correct AMPs where they will permanently reside? Following the receipt of every data block, each AMP hashes its rows based on the Primary Index, and redistributes them to the proper AMP. At this point, the rows are written to a worktable on the AMP but remain unsorted until Phase 1 is complete.
Phase 1 can be compared loosely to the preferred method of transfer used in the parcel shipping industry today. How do the key players in this industry handle a parcel? When the shipping company receives a parcel, that parcel is not immediately sent to its final destination. Instead, for the sake of speed, it is often sent to a shipping hub in a seemingly unrelated city. Then, from that hub it is sent to the destination city. FastLoad’s Phase 1 uses the AMPs in much the same way that the shipper uses its hubs. First, all the data blocks in the load get rushed randomly to any AMP. This just gets them to a “hub” somewhere in Teradata country. Second, each AMP forwards them to their true destination. This is like the shipping parcel being sent from a hub city to its destination city!
PHASE 2: Application
Following the scenario described above, the shipping vendor must do more than get a parcel to the destination city. Once the packages arrive at the destination city, they must then be sorted by street and zip code, placed onto local trucks and be driven to their final, local destinations.
Visualpath, #306, Niligiri Block, Aditya Enclave, Ameerpet, Hyderabad.ph-8374187525 Page 90
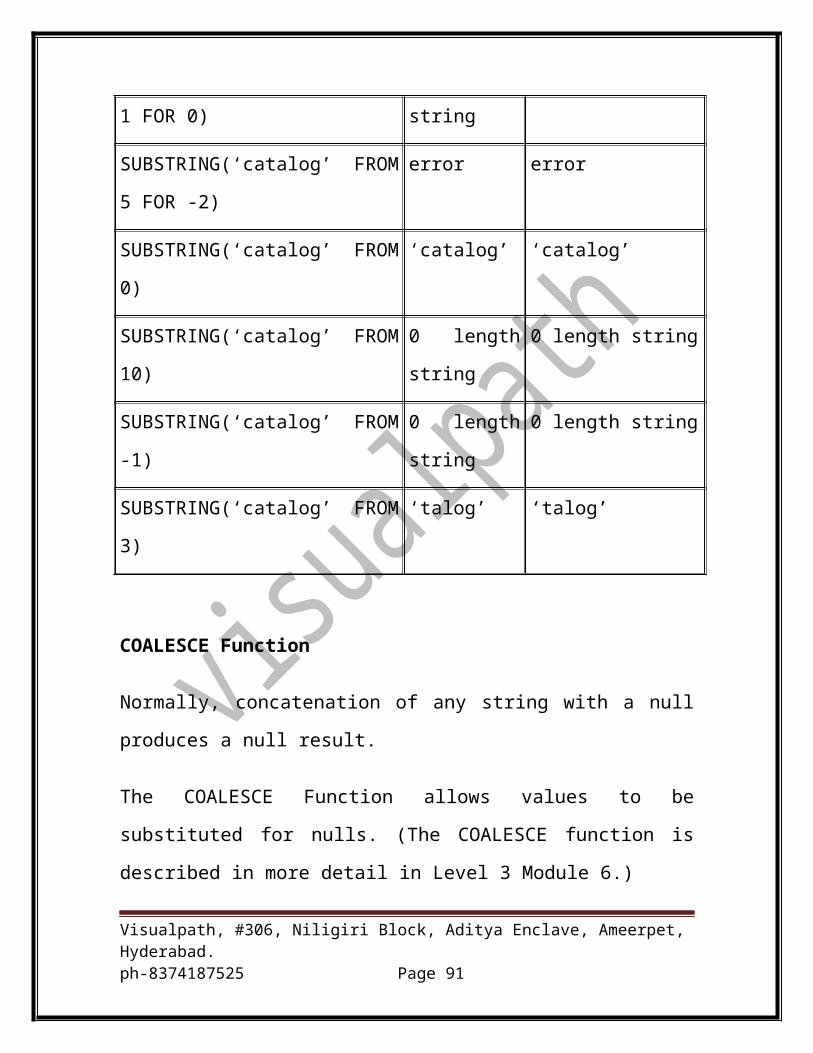
Similarly, FastLoad’s Phase 2 is mission critical for getting every row of data to its final address (i.e., where it will be stored on disk). In this phase, each AMP sorts the rows in its worktable. Then it writes the rows into the table space on disks where they will permanently reside. Rows of a table are stored on the disks in data blocks. The AMP uses the block size as defined when the target table was created. If the table is Fallback protected, then the Fallback will be loaded after the Primary table has finished loading. This enables the Primary table to become accessible as soon as possible. FastLoad is so ingenious, no wonder it is the darling of the Teradata load utilities!.
Steps to write Fastexport script:
Step One: Before logging onto Teradata, it is important to specify how many sessions you need. The syntax is [SESSIONS {n}].
Step Two: Next, you LOGON to the Teradata system. You will quickly see that the utility commands in FastLoad are similar to those in BTEQ. FastLoad commands were designed from the underlying commands in BTEQ. However, unlike BTEQ, most of the FastLoad commands do not allow a dot [“.”] in front of them and therefore need a semi-colon. At this point we chose to have Teradata tell us which version of FastLoad is being used for the load. Why would we recommend this? We do because as FastLoad’s capabilities get enhanced with newer versions, the syntax of the scripts may have to be revisited.
Step Three: If the input file is not a FastLoad format, before you describe the INPUT FILE structure in the DEFINE statement, you must first set the RECORD layout type for the file being passed by FastLoad. We have used VARTEXT in our example with a comma delimiter. The other options are FastLoad, TEXT, UNFORMATTED OR VARTEXT. You need to know this about your input file ahead of time.
Step Four: Next, comes the DEFINE statement. FastLoad must know the structure and the name of the flat file to be used as the input FILE, or source file for the load.
Visualpath, #306, Niligiri Block, Aditya Enclave, Ameerpet, Hyderabad.ph-8374187525 Page 91

Step Five: FastLoad makes no assumptions from the DROP TABLE statements with regard to what you want loaded. In the BEGIN LOADING statement, the script must name the target table and the two error tables for the load. Did you notice that there is no CREATE TABLE statement for the error tables in this script? FastLoad will automatically create them for you once you name them in the script. In this instance, they are named “Emp_Err1” and “Emp_Err2”. Phase 1 uses “Emp_Err1” because it comes first and Phase 2 uses “Emp_Err2”. The names are arbitrary, of course. You may call them whatever you like. At the same time, they must be unique within a database, so using a combination of your userid and target table name helps insure this uniqueness between multiple FastLoad jobs occurring in the same database.
In the BEGIN LOADING statement we have also included the optional CHECKPOINT parameter. We included [CHECKPOINT 100000]. Although not required, this optional parameter performs a vital task with regard to the load. In the old days, children were always told to focus on the three “R’s’ in grade school (“reading, ‘riting, and ‘rithmatic”). There are two very different, yet equally important, R’s to consider whenever you run FastLoad. They are RERUN and RESTART. RERUN means that the job is capable of running all the processing again from the beginning of the load. RESTART means that the job is capable of running the processing again from the point where it left off when the job was interrupted, causing it to fail. When CHECKPOINT is requested, it allows FastLoad to resume loading from the first row following the last successful CHECKPOINT. We will learn more about CHECKPOINT in the section on Restarting FastLoad.
Step Six: FastLoad focuses on its task of loading data blocks to AMPs like little Yorkshire terrier’s do when playing with a ball! It will not stop unless you tell it to stop. Therefore, it will not proceed to Phase 2 without the END LOADING command.
In reality, this provides a very valuable capability for FastLoad. Since the table must be empty at the start of the job, it prevents loading rows as they arrive from different time zones. However, to accomplish this processing, simply omit the END LOADING on the load job. Then, you can run the same FastLoad multiple times and continue loading the worktables until the last file is received. Then run the last FastLoad job with an END LOADING and you have partitioned your load jobs into smaller segments instead of one huge job. This makes FastLoad even faster!
Visualpath, #306, Niligiri Block, Aditya Enclave, Ameerpet, Hyderabad.ph-8374187525 Page 92
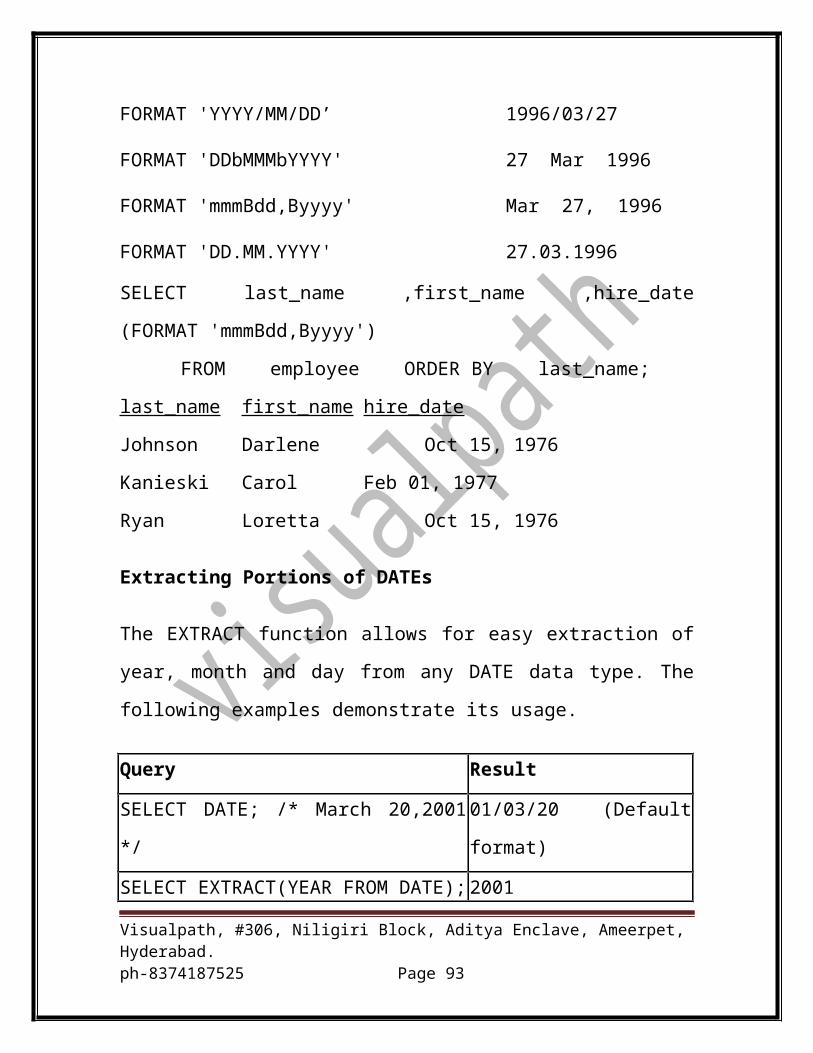
Of course to make this work, FastLoad must be restartable. Therefore, you cannot use the DROP or CREATE commands within the script. Additionally, every script is exactly the same with the exception of the last one, which contains the END LOADING causing FastLoad to proceed to Phase 2. That’s a pretty clever way to do a partitioned type of data load.
Step Seven: All that goes up must come down. And all the sessions must LOGOFF. This will be the last utility command in your script. At this point the table lock is released and if there are no rows in the error tables, they are dropped automatically. However, if a single row is in one of them, you are responsible to check it, take the appropriate action and drop the table manually.
Converting Data Types with FastLoad
Converting data is easy. Just define the input data types in the input file. Then, FastLoad will compare that to the column definitions in the Data Dictionary and convert the data for you! But the cardinal rule is that only one data type conversion is allowed per column. In the example below, notice how the columns in the input file are converted from one data type to another simply by redefining the data type in the CREATE TABLE statement.
FastLoad allows six kinds of data conversions. Here is a chart that displays them:
IN FASTLOAD YOU MAY CONVERT
CHARACTER DATA TO NUMERIC DATA
FIXED LENGTH DATA TO VARIABLE LENGTH DATA
CHARACTER DATA TO DATE
INTEGERS TO DECIMALS
DECIMALS TO INTEGERS
DATE TO CHARACTER DATA
NUMERIC DATA TO CHARACTER DATA
Figure 4-4
Visualpath, #306, Niligiri Block, Aditya Enclave, Ameerpet, Hyderabad.ph-8374187525 Page 93
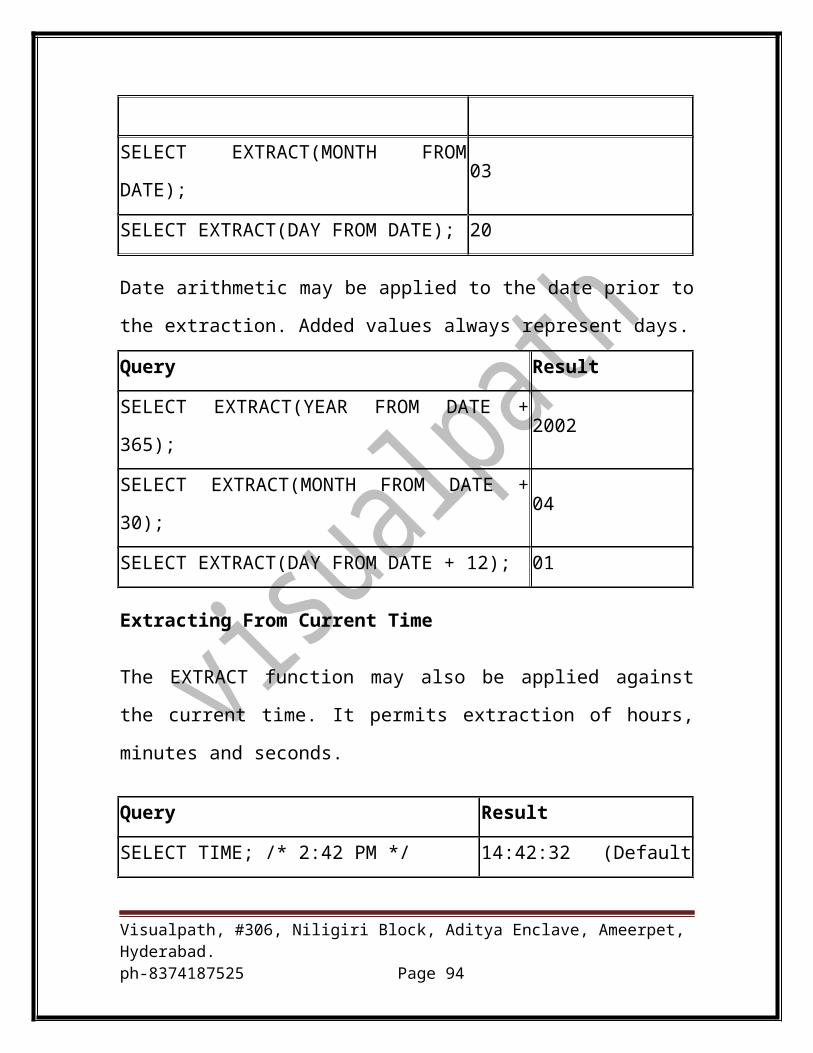
When we said that converting data is easy, we meant that it is easy for the user. It is actually quite resource intensive, thus increasing the amount of time needed for the load. Therefore, if speed is important, keep the number of columns being converted to a minimum!
When You Cannot RESTART FastLoad
There are two types of FastLoad scripts: those that you can restart and those that you cannot without modifying the script. If any of the following conditions are true of the FastLoad script that you are dealing with, it is NOT restartable:
The Error Tables are DROPPED
The Target Table is DROPPED
The Target Table is CREATED
Why might you have to RESTART a FastLoad job, anyway? Perhaps you might experience a system reset or some glitch that stops the job one half way through it. Maybe the mainframe went down. Well, it is not really a big deal because FastLoad is so lightning-fast that you could probably just RERUN the job for small data loads.
However, when you are loading a billion rows, this is not a good idea because it wastes time. So the most common way to deal with these situations is simply to RESTART the job. But what if the normal load takes 4 hours, and the glitch occurs when you already have two thirds of the data rows loaded? In that case, you might want to make sure that the job is totally restartable. Let’s see how this is done.
When You Can RESTART FastLoad
If all of the following conditions are true, then FastLoad is ALWAYS restartable:
The Error Tables are NOT DROPPED in the script
The Target Table is NOT DROPPED in the script
The Target Table is NOT CREATED in the script
You have defined a checkpoint
Visualpath, #306, Niligiri Block, Aditya Enclave, Ameerpet, Hyderabad.ph-8374187525 Page 94
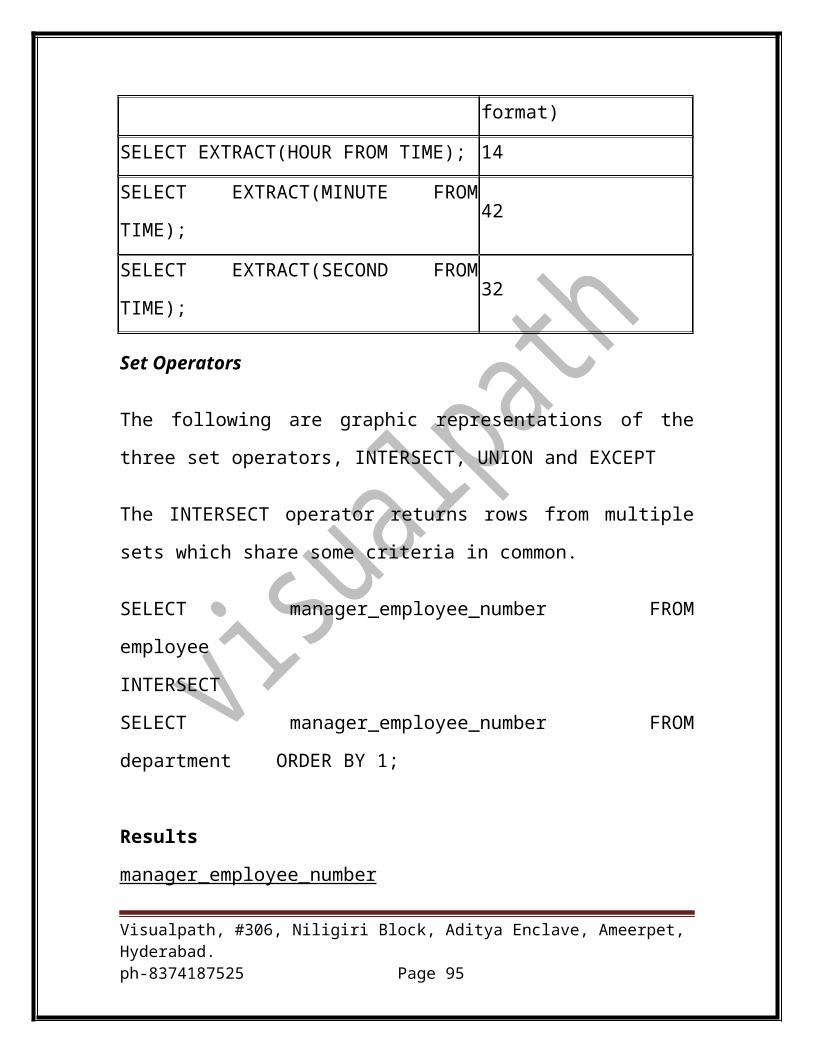
So, if you need to drop or create tables, do it in a separate job using BTEQ. Imagine that you have a table whose data changes so much that you typically drop it monthly and build it again. Let’s go back to the script we just reviewed above and see how we can break it into the two parts necessary to make it fully RESTARTABLE. It is broken up below.
STEP ONE: Run the following SQL statements in Queryman or BTEQ before you start FastLoad:
DROP TABLE SQL01.Department;DROP TABLE SQL01.Dept_Err1;DROP TABLE SQL01.Dept_Err2;
DROPS TARGET TABLE AND ERROR TABLES
CREATES THE DEPARTMENT TARGET TABLE IN THE SQL01 DATA BASE IN TERADATA
Figure 4-6
First, you ensure that the target table and error tables, if they existed previously, are blown away. If there had been no errors in the error tables, they would be automatically dropped. If these tables did not exist, you have not lost anything. Next, if needed, you create the empty table structure needed to receive a FastLoad.
STEP TWO: Run the FastLoad script
This is the portion of the earlier script that carries out these vital steps:
Defines the structure of the flat file
Tells FastLoad where to load the data and store the errors
Specifies the checkpoint so a RESTART will not go back to row one
Loads the data
If these are true, all you need do is resubmit the FastLoad job and it starts loading data again with the next record after the last checkpoint. Now, with
Visualpath, #306, Niligiri Block, Aditya Enclave, Ameerpet, Hyderabad.ph-8374187525 Page 95
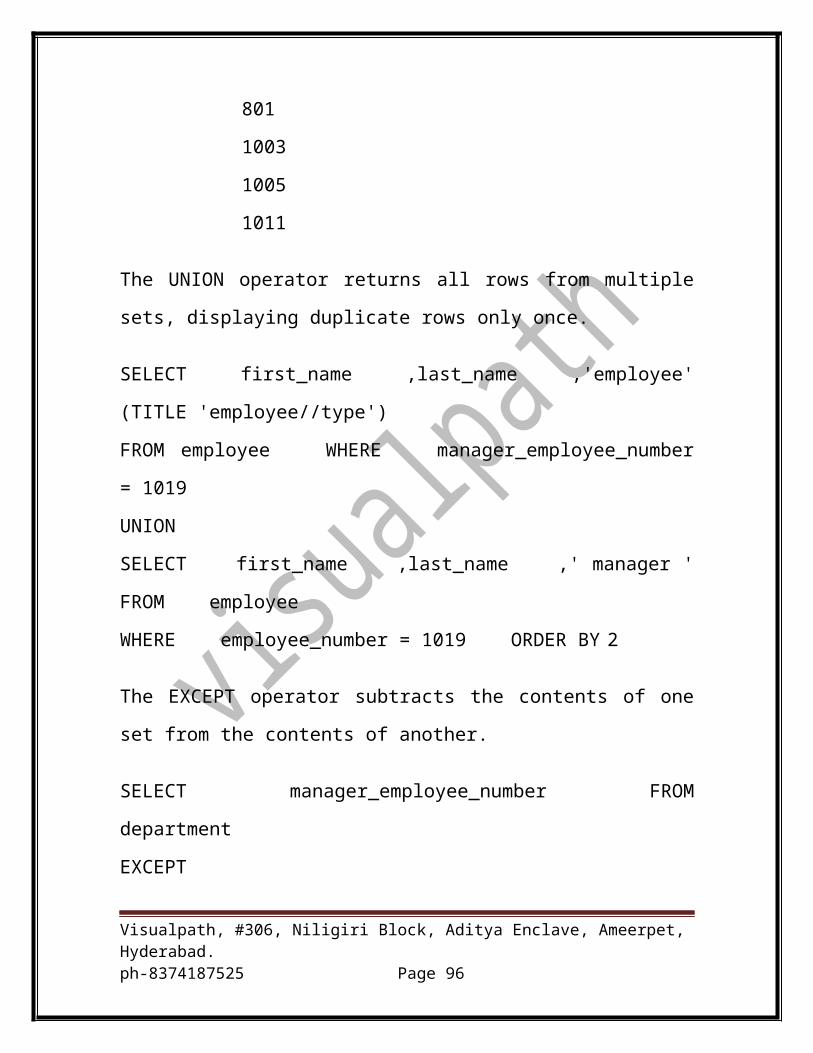
that said, if you did not request a checkpoint, the output message will normally indicate how many records were loaded.
You may optionally use the RECORD command to manually restart on the next record after the one indicated in the message.
Now, if the FastLoad job aborts in Phase 2, you can simply submit a script with only the BEGIN LOADING and END LOADING. It will then restart right into Phase 2.
What Happens When FastLoad Finishes
You Receive an Outcome Status
The most important thing to do is verify that FastLoad completed successfully. This is accomplished by looking at the last output in the report and making sure that it is a return code or status code of zero (0). Any other value indicates that something wasn’t perfect and needs to be fixed.
The locks will not be removed and the error tables will not be dropped without a successful completion. This is because FastLoad assumes that it will need them for its restart. At the same time, the lock on the target table will not be released either. When running FastLoad, you realistically have two choices once it is started. First choice is that you get it to run to a successful completion, or lastly, rerun it from the beginning. As you can imagine, the best course of action is normally to get it to finish successfully via a restart.
You Receive a Status Report
What happens when FastLoad finishes running? Well, you can expect to see a summary report on the success of the load. Following is an example of such a report.
Line 1:Line 2:Line 3:Line 4:Line 5:
TOTAL RECORDS READ = 1000000TOTAL ERRORFILE1 = 50TOTAL ERRORFILE2 = 0TOTAL INSERTS APPLIED = 999950TOTAL DUPLICATE ROWS = 0
Figure 4-7
Visualpath, #306, Niligiri Block, Aditya Enclave, Ameerpet, Hyderabad.ph-8374187525 Page 96
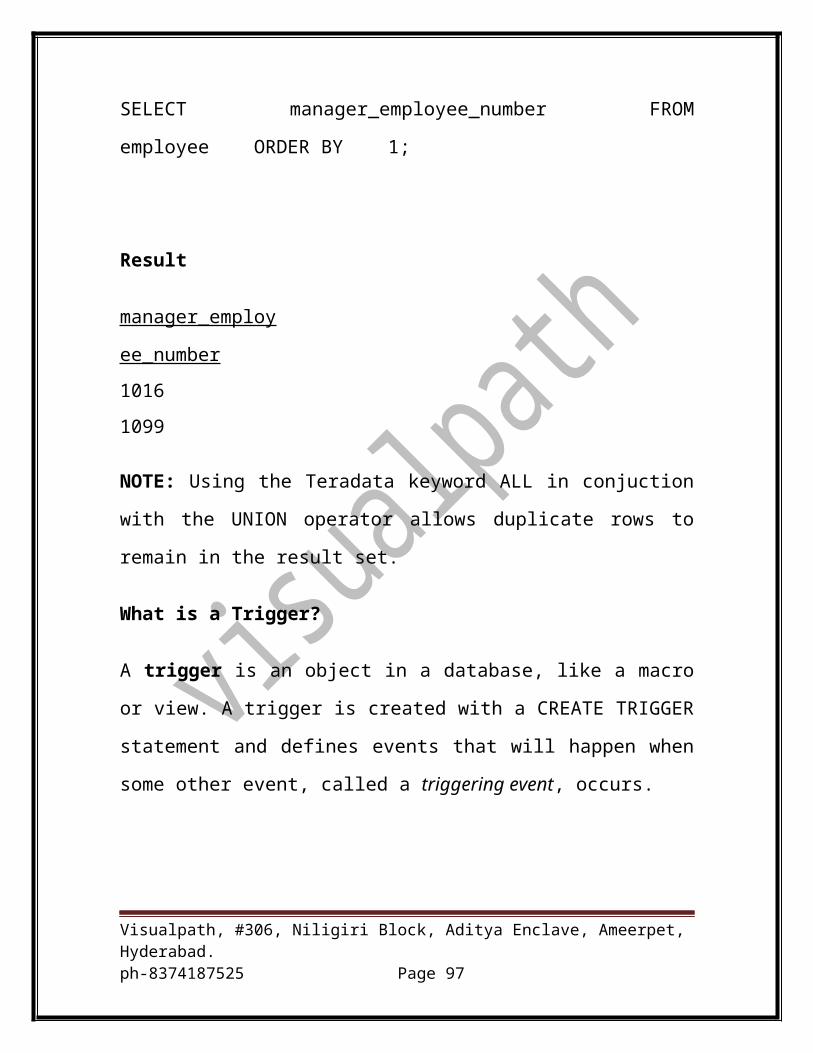
The first line displays the total number of records read from the input file. Were all of them loaded? Not really. The second line tells us that there were fifty rows with constraint violations, so they were not loaded. Corresponding to this, fifty entries were made in the first error table. Line 3 shows that there were zero entries into the second error table, indicating that there were no duplicate Unique Primary Index violations. Line 4 shows that there were 999950 rows successfully loaded into the empty target table. Finally, there were no duplicate rows. Had there been any duplicate rows, the duplicates would only have been counted. They are not stored in the error tables anywhere. When FastLoad reports on its efforts, the number of rows in lines 2 through 5 should always total the number of records read in line 1.
Note on duplicate rows: Whenever FastLoad experiences a restart, there will normally be duplicate rows that are counted. This is due to the fact that a error seldom occurs on a checkpoint (quiet or quiescent point) when nothing is happening within FastLoad. Therefore, some number of rows will be sent to the AMPs again because the restart starts on the next record after the value stored in the checkpoint. Hence, when a restart occurs, the first row after the checkpoint and some of the consecutive rows are sent a second time. These will be caught as duplicate rows after the sort. This restart logic is the reason that FastLoad will not load duplicate rows into a MULTISET table. It assumes they are duplicates because of this logic.
You Can Troubleshoot
In the example above, we know that the load was not entirely successful. But that is not enough. Now we need to troubleshoot in order identify the errors and correct them. FastLoad generates two error tables that will enable us to find the culprits. The first error table, which we named Errorfile1, contains just three columns: The column ErrorCode contains the Teradata FastLoad code number to a corresponding translation or constraint error. The second column, named ErrorField, specifies which column in the table contained the error. The third column, DataParcel, contains the row with the problem. Both error tables contain the same three columns; they just track different types of errors.
As a user, you can select from either error table. To check errors in Errorfile1 you would use this syntax:
Visualpath, #306, Niligiri Block, Aditya Enclave, Ameerpet, Hyderabad.ph-8374187525 Page 97
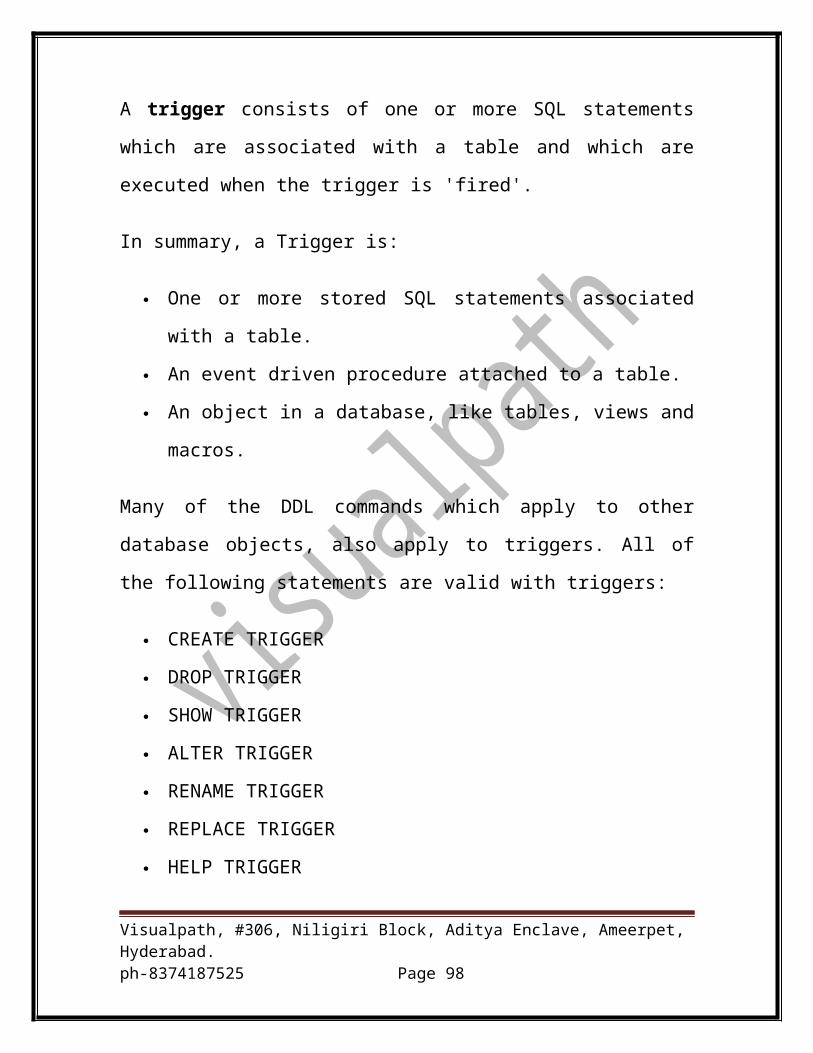
Corrected rows may be inserted to the target table using another utility that does not require an empty table.
To check errors in Errorfile2 you would the following syntax:
The definition of the second error table is exactly the same as the target table with all the same columns and data types.
How the CHECKPOINT Option Works
CHECKPOINT option defines the points in a load job where the FastLoad utility pauses to record that Teradata has processed a specified number of rows. When the parameter “CHECKPOINT [n]” is included in the BEGIN LOADING clause the system will stop loading momentarily at increments of [n] rows.
At each CHECKPOINT, the AMPs will all pause and make sure that everything is loading smoothly. Then FastLoad sends a checkpoint report (entry) to the SYSADMIN.Fastlog table. This log contains a list of all currently running FastLoad jobs and the last successfully reached checkpoint for each job. Should an error occur that requires the load to restart, FastLoad will merely go back to the last successfully reported checkpoint prior to the error. It will then restart from the record immediately following that checkpoint and start building the next block of data to load. If such an error occurs in Phase 1, with CHECKPOINT 0, FastLoad will always restart from the very first row.
Restarting with CHECKPOINT
Sometimes you may need to restart FastLoad. If the FastLoad script requests a CHECKPOINT (other than 0), then it is restartable from the last successful checkpoint. Therefore, if the job fails, simply resubmit the job. Here are the two options: Suppose Phase 1 halts prematurely; the Data Acquisition phase is incomplete. Resubmit the FastLoad script. FastLoad will begin from RECORD 1 or the first record past the last checkpoint. If you wish to manually specify where FastLoad should restart, locate the last successful checkpoint record by referring to the SYSADMIN.FASTLOG table. To specify where a restart will start from, use the RECORD command.
Visualpath, #306, Niligiri Block, Aditya Enclave, Ameerpet, Hyderabad.ph-8374187525 Page 98
2A0C022C00000
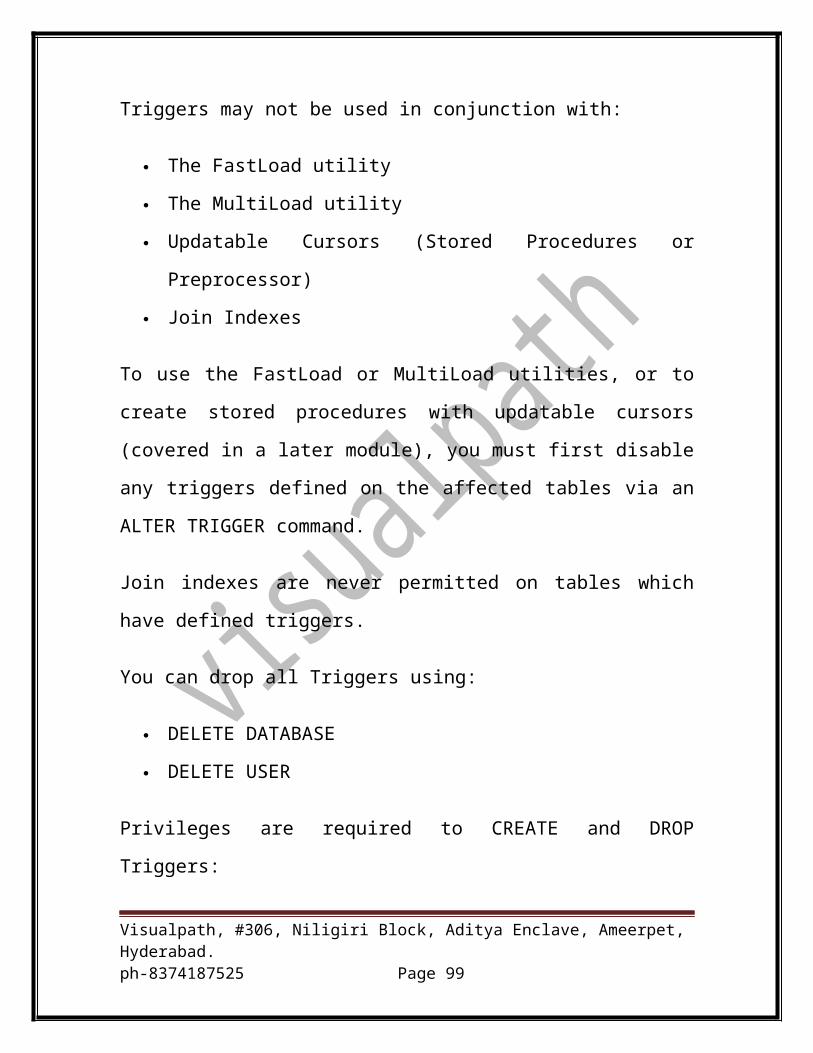
Normally, it is not necessary to use the RECORD command — let FastLoad automatically determine where to restart from.
If the interruption occurs in Phase 2, the Data Acquisition phase has already completed. We know that the error is in the Application Phase. In this case, resubmit the FastLoad script with only the BEGIN and END LOADING Statements. This will restart in Phase 2 with the sort and building of the target table.
Restarting without CHECKPOINT (i.e., CHECKPOINT 0)
When a failure occurs and the FastLoad Script did not utilize the CHECKPOINT (i.e., CHECKPOINT 0), one procedure is to DROP the target table and error tables and rerun the job. Here are some other options available to you:
Resubmit job again and hope there is enough PERM space for all the rows already sent to the unsorted target table plus all the rows that are going to be sent again to the same target table. Other than using space, these rows will be rejected as duplicates. As you can imagine, this is not the most efficient way since it processes many of the same rows twice.
If CHECKPOINT wasn’t specified, then CHECKPOINT defaults to 100,000. You can perform a manual restart using the RECORD statement. If the output print file shows that checkpoint 100000 occurred, use something like the following command: [RECORD 100001;]. This statement will skip records 1 through 10000 and resume on record 100001.
Using INMODs with FastLoad
When you find that FastLoad does not read the file type you have or you wish to control the access for any reason, then it might be desirable to use an INMOD. An INMOD (Input Module), is fully compatible with FastLoad in either mainframe or LAN environments, providing that the appropriate programming languages are used. However, INMODs replace the normal mainframe DDNAME or LAN defined FILE name with the following statement: DEFINE INMOD=<INMOD-name>. For a more in-depth discussion of INMODs, see the chapter of this book titled “INMOD Processing”.
Visualpath, #306, Niligiri Block, Aditya Enclave, Ameerpet, Hyderabad.ph-8374187525 Page 99
Multiload:
Why it is called “Multi”Load
If we were going to be stranded on an island with a Teradata Data Warehouseand we could only take along one Teradata load utility, clearly, MultiLoad would be our choice. MultiLoad has the capability to load multiple tables at one time from either a LAN or Channel environment. This is in stark contrast to its fleet-footed cousin, FastLoad, which can only loadone table at a time. And it gets better, yet!
This feature rich utility can perform multiple types of DML tasks, including INSERT, UPDATE, DELETE and UPSERT on up to five (5) empty or populated target tables at a time. These DML functions may be run either solo or in combinations, against one or more tables. For these reasons, MultiLoad is the utility of choice when it comes to loading populated tables in the batch environment. As the volume of data being loaded or updated in a single block, the performance of MultiLoad improves. MultiLoad shines when it can impact more than one row in every data block. In other words, MultiLoad looks at massive amounts of data and says, “Bring it on!”
Leo Tolstoy once said, “All happy families resemble each other.” Like happy families, the Teradata load utilities resemble each other, although they may have some differences. You are going to be pleased to find that you do not have to learn all new commands and concepts for each load utility. MultiLoad has many similarities to FastLoad. It has even more commands in common with TPump. The similarities will be evident as you work with them. Where there are some quirky differences, we will point them out for you.
Two MultiLoad Modes: IMPORT and DELETE
MultiLoad provides two types of operations via modes: IMPORT and DELETE. In MultiLoad IMPORT mode, you have the freedom to “mix and match” up to twenty (20) INSERTs, UPDATEs or DELETEs on up to five target tables. The execution of the DML statements is not mandatory for all rows in a table. Instead, their execution hinges upon the conditions contained in the APPLY clause of the script. Once again, MultiLoad demonstrates its user-friendly flexibility. For UPDATEs or DELETEsto be
Visualpath, #306, Niligiri Block, Aditya Enclave, Ameerpet, Hyderabad.ph-8374187525 Page 100
successful in IMPORT mode, they must reference the Primary Index in the WHERE clause.
The MultiLoad DELETE mode is used to perform a global (all AMP) delete on just one table. The reason to use .BEGIN DELETE MLOAD is that it bypasses the Transient Journal (TJ) and can be RESTARTed if an error causes it to terminate prior to finishing. When performing in DELETE mode, the DELETE SQL statement cannot referencethe Primary Index in the WHERE clause. This due to the fact that a primary index access is to a specific AMP; this is a global operation.
The other factor that makes a DELETE mode operation so good is that it examines an entire block of rows at a time. Once all the eligible rows have been removed, the block is written one time and a checkpoint is written. So, if a restart is necessary, it simply starts deleting rows from the next block without a checkpoint. This is a smart way to continue. Remember, when using the TJ all deleted rows are put back into the table from the TJ as a rollback. A rollback can take longer to finish then the delete. MultiLoad does not do a rollback; it does a restart.
The Purpose of DELETE MLOAD
In the above diagram, monthly data is being stored in a quarterly table. To keep the contents limited to four months, monthly data is rotated in and out.
Visualpath, #306, Niligiri Block, Aditya Enclave, Ameerpet, Hyderabad.ph-8374187525 Page 101

At the end of every month, the oldest month of data is removed and the new month is added. The cycle is “add a month, delete a month, add a month, delete a month.” In our illustration, that means that January data must be deleted to make room for May’s data.
Here is a question for you: What if there was another way to accomplish this same goal without consuming all of these extra resources? To illustrate, let’s consider the following scenario: Suppose you have Table A that contains 12 billion rows. You want to delete a range of rows based on a date and then load in fresh data to replace these rows. Normally, the process is to perform a MultiLoad DELETE to DELETE FROM Table A WHERE <date-column>< ‘2002-02-01’. The final step would be to INSERT the new rows for May using MultiLoad IMPORT.
Block and Tackle Approach
MultiLoad never loses sight of the fact that it is designed for functionality, speed, and the ability to restart. It tackles the proverbial I/O bottleneck problem like FastLoad by assembling data rows into 64K blocks and writing them to disk on the AMPs. This is much faster than writing data one row at a time like BTEQ. Fallback table rows are written after the base table has been loaded. This allows users to access the base table immediately upon completion of the MultiLoad while fallback rows are being loaded in the background. The benefit is reduced time to access the data.
Amazingly, MultiLoad has full RESTART capability in all of its five phases of operation. Once again, this demonstrates its tremendous flexibility as a load utility. Is it pure magic? No, but it almost seems so. MultiLoad makes effective useof two error tables to save different types of errors and a LOGTABLE that stores built-in checkpoint information for restarting. This is why MultiLoad does not use the Transient Journal, thus averting time-consuming rollbacks when a job halts prematurely.
Here is a key difference to note between MultiLoad and FastLoad. Sometimes an AMP (Access Module Processor) fails and the system administrators say that the AMP is “down” or “offline.” When using FastLoad, you must restart the AMP to restart the job. MultiLoad, however, can RESTART when an AMP fails, if the table is fallback protected. As the same time, you can use the AMPCHECK option to make it work like FastLoad if you want.
Visualpath, #306, Niligiri Block, Aditya Enclave, Ameerpet, Hyderabad.ph-8374187525 Page 102
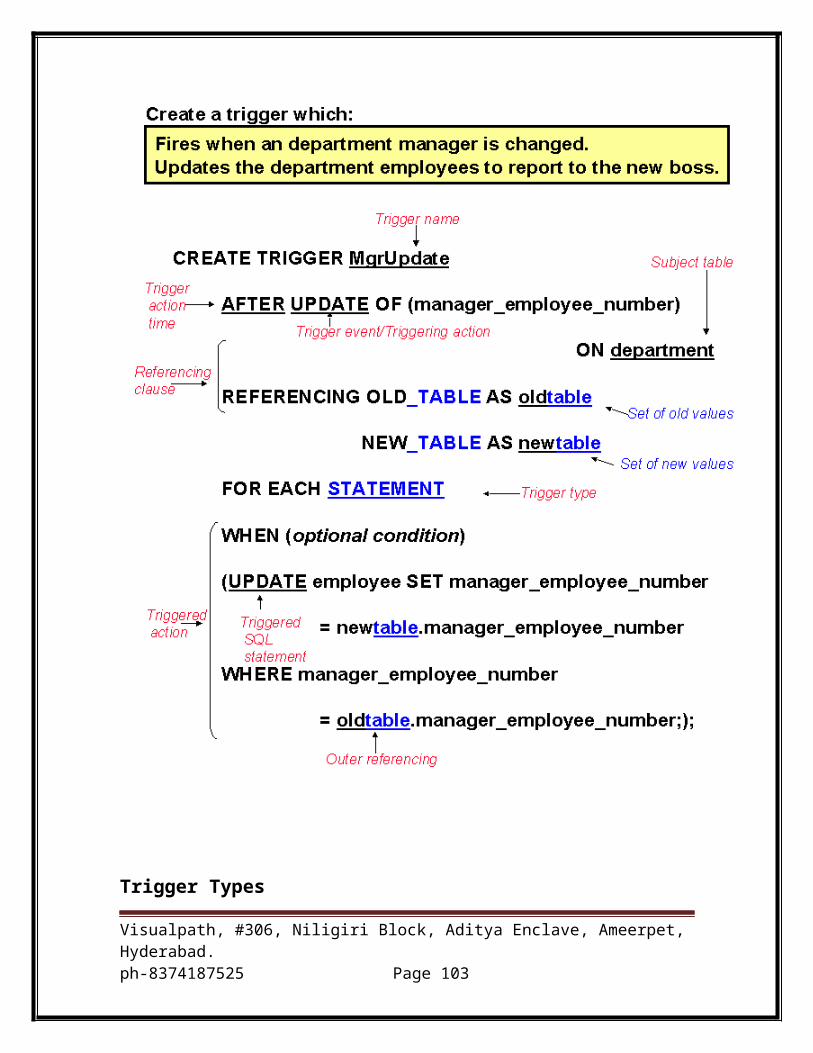
MultiLoad Imposes Limits
Rule #1: Unique Secondary Indexes are not supported on a Target Table. LikeFastLoad, MultiLoad does not support Unique Secondary Indexes (USIs). But unlike FastLoad, it does support the use of Non-Unique Secondary Indexes (NUSIs) because the index subtable row is on the same AMP as the data row. MultiLoad uses every AMP independently and in parallel. If two AMPs must communicate, they are not independent. Therefore, a NUSI (same AMP) is fine, but a USI (different AMP) is not.
Rule #2: Referential Integrity is not supported. MultiLoad will not load data into tables that are defined with Referential Integrity (RI). Like a USI, this requires the AMPs to communicate with each other. So, RI constraints must be dropped from the target table prior to using MultiLoad.
Rule #3: Triggers are not supported at load time. Triggers cause actions on related tables based upon what happens in a target table. Again, this is a multi-AMP operation and to a different table. To keep MultiLoad running smoothly, disable all Triggers prior to using it.
Rule #4: No concatenation of input files is allowed. MultiLoad does not want you to do this because it could impact are restart if the files were concatenated in a different sequence or data was deleted between runs.
Rule #5: The host will not process aggregates, arithmetic functions or exponentiation. If you need data conversions or math, you might be better off using an INMOD to prepare the data prior to loading it.
Error Tables, Work Tables and Log Tables
Besides target table(s), MultiLoad requires the use of four special tables in order to function. They consist of two error tables (per target table), one worktable (per target table), and one log table. In essence, the Error Tables will be used to store any conversion, constraint or uniqueness violations during a load. Work Tables are used to receive and sort data and SQL on each AMP prior to storing them permanently to disk. A Log Table (also called, “Logtable”) is used to store successful checkpoints during load processing in case a RESTART is needed.
HINT: Sometimes a company wants all of these load support tables to be housed in a particular database. When these tables are to be stored in any
Visualpath, #306, Niligiri Block, Aditya Enclave, Ameerpet, Hyderabad.ph-8374187525 Page 103
database other than the user’s own default database, then you must give them a qualified name (<databasename>.<tablename>) in the script or use the DATABASE command to change the current database.
Where will you find these tables in the load script? The Logtable is generally identified immediately prior to the .LOGON command. Worktables and error tables can be named in the BEGIN MLOAD statement. Do not underestimate the value of these tables. They are vital to the operation of MultiLoad. Without them a MultiLoad job can not run. Now that you have had the “executive summary”, let’s look at each type of table individually.
Two Error Tables: Here is another place where FastLoad and MultiLoad are similar. Both require the use of two error tables per target table. MultiLoad will automatically create these tables. Rows are inserted into these tables only when errors occur during the load process. The first error table is the acquisition Error Table (ET). It contains all translation and constraint errors that may occur while the data is being acquired from the source(s).
The second is the Uniqueness Violation (UV)table that stores rows with duplicate values for Unique Primary Indexes (UPI). Since a UPI must be unique, MultiLoad can only load one occurrence into a table. Any duplicate value will be stored in the UV error table. For example, you might see a UPI error that shows a second employee number “99.” In this case, if the name for employee “99” is Kara Morgan, you will be glad that the row did not load since Kara Morgan is already in the Employee table. However, if the name showed up as David Jackson, then you know that further investigation is needed, because employee numbers must be unique.
Each error table does the following:
Identifies errors
Provides some detail about the errors
Stores the actual offending row for debugging
You have the option to name these tables in the MultiLoad script (shown later). Alternatively, if you do not name them, they default to ET_<target_table_name> and UV_<target_table_name>. In either case, MultiLoad will not accept error table names that are the same as target table names. It does not matter what you name them. It is recommended that you
Visualpath, #306, Niligiri Block, Aditya Enclave, Ameerpet, Hyderabad.ph-8374187525 Page 104
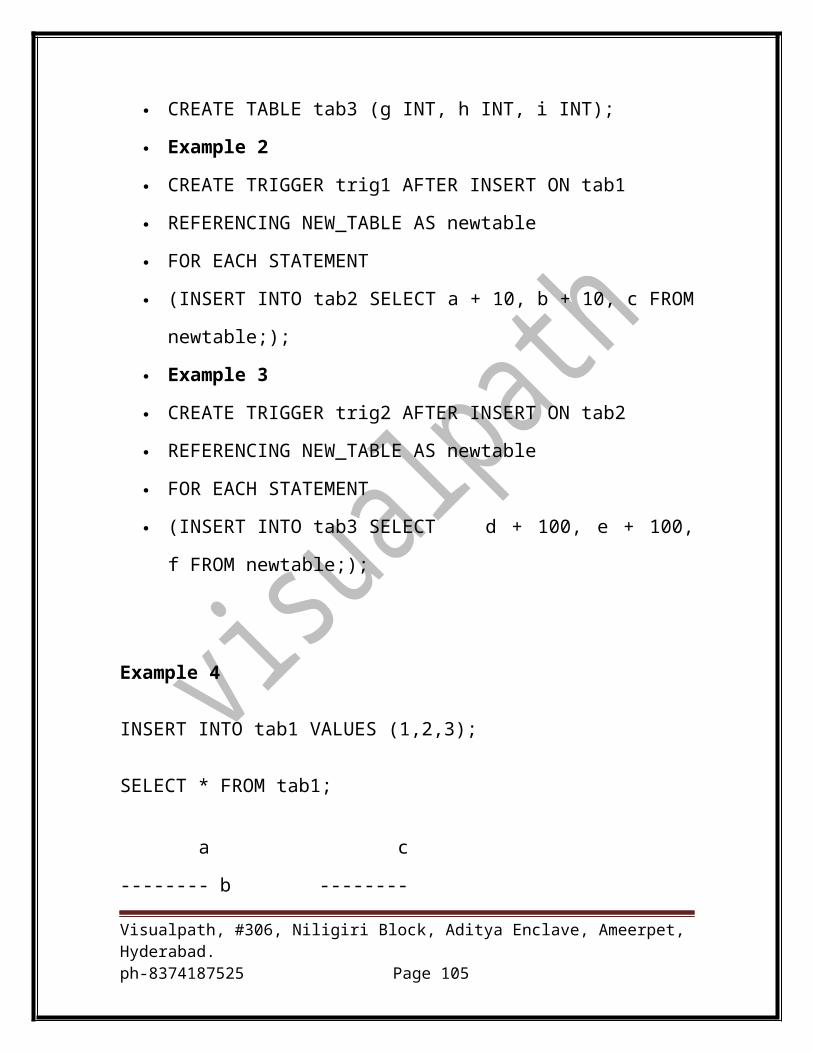
standardize on the naming convention to make it easier for everyone on your team. For more details on how these error tables can help you, see the subsection in this chapter titled, “Troubleshooting MultiLoad Errors.”
Log Table: MultiLoad requires a LOGTABLE. This table keeps a record of the results from each phase of the load so that MultiLoad knows the proper point from which to RESTART. There is one LOGTABLE for each run. Since MultiLoad will not resubmit a command that has been run previously, it will use the LOGTABLE to determine the last successfully completed step.
Work Table(s): MultiLoad will automatically create one worktable for each target table. This means that in IMPORT mode you could have one or more worktables. In the DELETE mode, you will only have one worktable since that mode only works on one target table. The purpose of worktables is to hold two things:
The Data Manipulation Language (DML) tasks
The input data that is ready to APPLY to the AMPs
The worktables are created in a database using PERM space. They can become very large. If the script uses multiple SQL statements for a single data record, the data is sent to the AMP once for each SQL statement. This replication guarantees fast performance and that no SQL statement will ever be done more than once. So, this is very important. However, there is no such thing as a free lunch, the cost is space. Later, you will see that using a FILLER field can help reduce this disk space by not sending unneeded data to an AMP. In other words, the efficiency of the MultiLoad run is in your hands.
MultiLoad Has Five IMPORT Phases
MultiLoad IMPORT has five phases, but don’t be fazed by this! Here is the short list:
Phase 1: Preliminary Phase
Phase 2: DML Transaction Phase
Phase 3: Acquisition Phase
Visualpath, #306, Niligiri Block, Aditya Enclave, Ameerpet, Hyderabad.ph-8374187525 Page 105

Phase 4: Application Phase
Phase 5: Cleanup Phase
Let’s take a look at each phase and see what it contributes to the overall load process of this magnificent utility. Should you memorize every detail about each phase? Probably not. But it is important to know the essence of each phase because sometimes a load fails. When it does, you need to know in which phase it broke down since the method for fixing the error to RESTART may vary depending on the phase. And if you can picture what MultiLoad actually does in each phase, you will likely write better scripts that run more efficiently.
Phase 1: Preliminary Phase
The ancient oriental proverb says, “Measure one thousand times; Cut once.” MultiLoad uses Phase 1 to conduct several preliminary set-up activities whose goal is to provide a smooth and successful climate for running your load. The first task is to be sure that the SQL syntax and MultiLoad commands are valid. After all, why try to run a script when the system will just find out during the load process that the statements are not useable? MultiLoad knows that it is much better to identify any syntax errors, right up front. All the preliminary steps are automated. No user intervention is required in this phase.
Second, all MultiLoad sessions with Teradata need to be established. The default is the number of available AMPs. Teradata will quickly establish this number as a factor of 16 for the basis regarding the number of sessions to create. The general rule of thumb for the number of sessions to use for smaller systems is the following: use the number of AMPs plus two more. For larger systems with hundreds of AMP processors, the SESSIONS option is available to lower the default. Remember, these sessions are running on your poor little computer as well as on Teradata.
Each session loads the data to Teradata across the network or channel. Every AMP plays an essential role in the MultiLoad process. They receive the data blocks, hash each row and send the rows to the correct AMP. When the rows come to an AMP, it stores them in worktable blocks on disk. But, lest we get ahead of ourselves, suffice it to say that there is ample reason for multiple sessions to be established.
Visualpath, #306, Niligiri Block, Aditya Enclave, Ameerpet, Hyderabad.ph-8374187525 Page 106
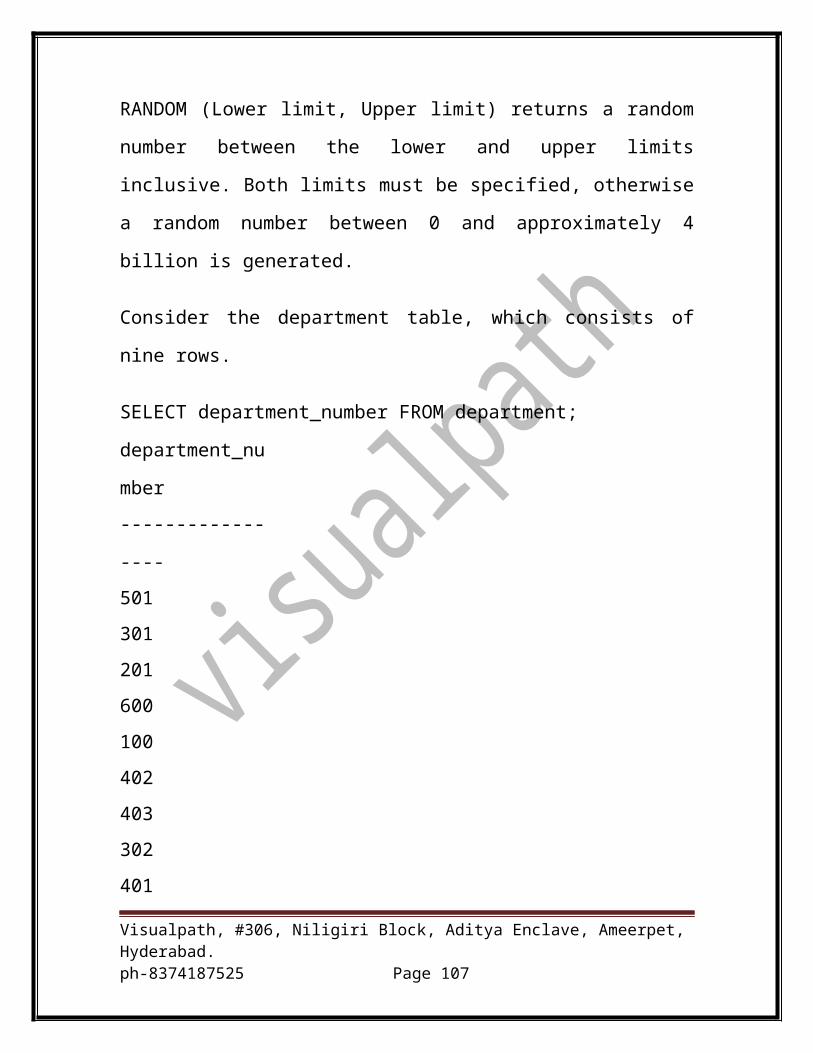
What about the extra two sessions? Well, the first one is a control session to handle the SQL and logging. The second is a back up or alternate for logging. You may have to use some trial and error to find what works best on your system configuration. If you specify too few sessions it may impair performance and increase the time it takes to complete load jobs. On the other hand, too many sessions will reduce the resources available for other important database activities.
Third, the required support tables are created. They are the following:
Type of Table Table Details
ERRORTABLES MultiLoad requires two error tables per target table. The first error table contains constraint violations, while the second error table stores Unique Primary Index violations.
WORKTABLES Work Tables hold two things: the DML tasks requested and the input data that is ready to APPLY to the AMPs.
LOGTABLE The LOGTABLE keeps a record of the results from each phase of the load so that MultiLoad knows the proper point from which to RESTART.
Figure 5-2
The final task of the Preliminary Phase is to apply utility locks to the target tables. Initially, access locks are placed on all target tables, allowing other users to read or write to the table for the time being. However, this lock does prevent the opportunity for a user to request an exclusive lock. Although, these locks will still allow the MultiLoad user to drop the table, no one else may DROP or ALTER a target table while it is locked for loading. This leads us to Phase 2.
Phase 2: DML Transaction Phase
In Phase 2, all of the SQL Data Manipulation Language (DML) statements are sent ahead to Teradata. MultiLoad allows the use of multiple DML functions. Teradata’s Parsing Engine (PE) parses the DML and generates a step-by-step plan to execute the request. This execution plan is then communicated to each AMP and stored in the appropriate worktable for each target table. In other words, each AMP is going to work off the same page.
Visualpath, #306, Niligiri Block, Aditya Enclave, Ameerpet, Hyderabad.ph-8374187525 Page 107
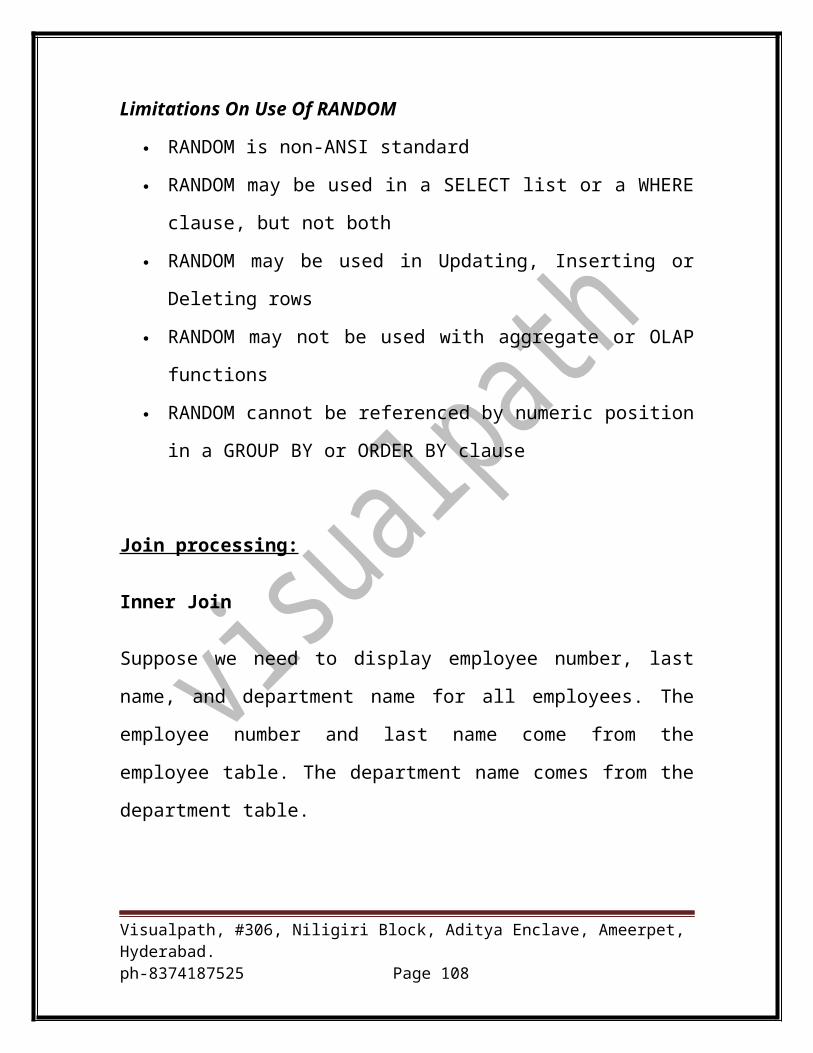
Later, during the Acquisition phase the actual input data will also be stored in the worktable so that it may be applied in Phase 4, the Application Phase. Next, a match tag is assigned to each DML request that will match it with the appropriate rows of input data. The match tags will not actually be used until the data has already been acquired and is about to be applied to the worktable. This is somewhat like a student who receives a letter from the university in the summer that lists his courses, professor’s names, and classroom locations for the upcoming semester. The letter is a “match tag” for the student to his school schedule, although it will not be used for several months. This matching tag for SQL and data is the reason that the data is replicated for each SQL statement using the same data record.
Phase 3: Acquisition Phase
With the proper set-up complete and the PE‘s plan stored on each AMP, MultiLoad is now ready to receive the INPUT data. This is where it gets interesting! MultiLoad now acquires the data in large, unsorted 64K blocks from the host and sends it to the AMPs.
At this point, Teradata does not care about which AMP receives the data block. The blocks are simply sent, one after the other, to the next AMP in line. For their part, each AMP begins to deal with the blocks that they have been dealt. It is like a game of cards — you take the cards that you have received and then play the game. You want to keep some and give some away.
Similarly, the AMPs will keep some data rows from the blocks and give some away. The AMP hashes each row on the primary index and sends it over the BYNET to the proper AMP where it will ultimately be used. But the row does not get inserted into its target table, just yet. The receiving AMP must first do some preparation before that happens. Don’t you have to get ready before company arrives at your house? The AMP puts all of the hashed rows it has received from other AMPs into the worktables where it assembles them into the SQL. Why? Because once the rows are reblocked, they can be sorted into the proper order for storage in the target table. Now the utility places a load lock on each target table in preparation for the Application Phase. Of course, there is no Acquisition Phase when you perform a MultiLoad DELETE task, since no data is being acquired.
Visualpath, #306, Niligiri Block, Aditya Enclave, Ameerpet, Hyderabad.ph-8374187525 Page 108
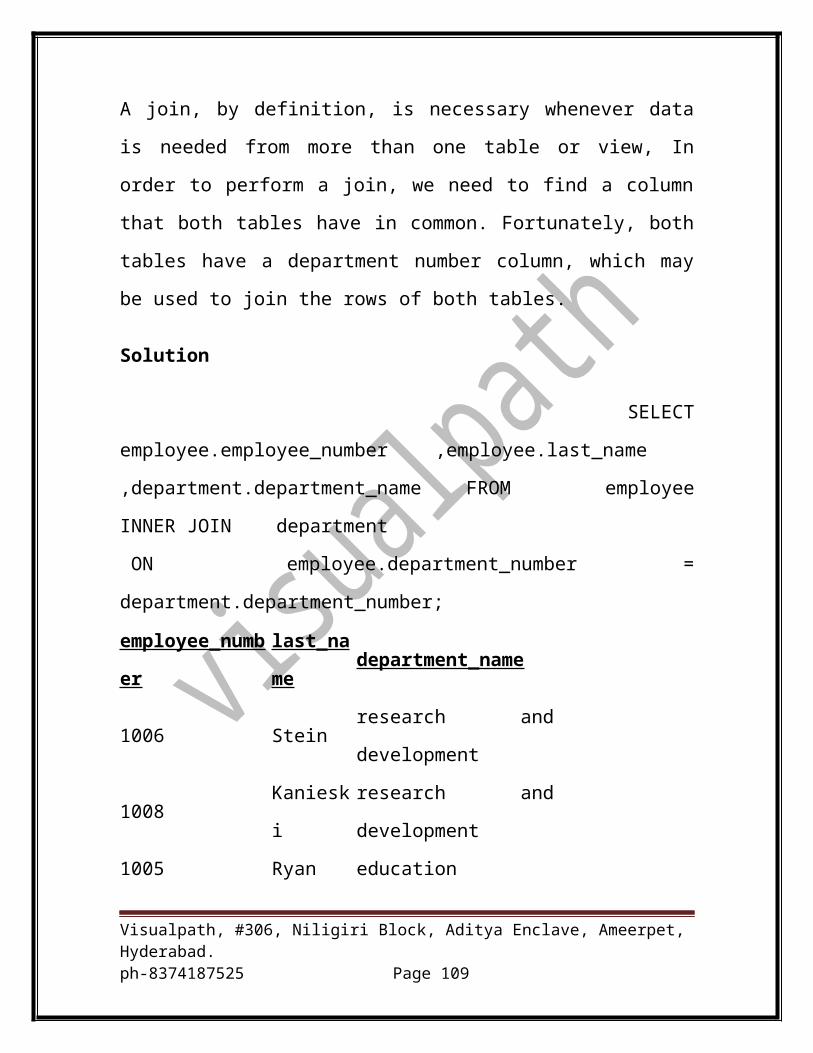
Phase 4: Application Phase
The purpose of this phase is to write, or APPLY, the specified changes to both the target tables and NUSI subtables. Once the data is on the AMPs, it is married up to the SQL for execution. To accomplish this substitution of data into SQL, when sending the data, the host has already attached some sequence information and five (5) match tags to each data row. Those match tags are used to join the data with the proper SQL statement based on the SQL statement within a DMP label. In addition to associating each row with the correct DML statement, match tags also guarantee that no row will be updated more than once, even when a RESTART occurs.
Remember, MultiLoad allows for the existence of NUSI processing during a load. Every hash-sequence sorted block from Phase 3 and each block of the base table is read only once to reduce I/O operations to gain speed. Then, all matching rows in the base block are inserted, updated or deleted before the entire block is written back to disk, one time. This is why the match tags are so important. Changes are made based upon corresponding data and DML (SQL) based on the match tags. They guarantee that the correct operation is performed for the rows and blocks with no duplicate operations, a block at a time. And each time a table block is written to disk successfully, a record is inserted into the LOGTABLE. This permits MultiLoad to avoid starting again from the very beginning if a RESTART is needed.
What happens when several tables are being updated simultaneously? In this case, all of the updates are scripted as a multi-statement request. That means that Teradata views them as a single transaction. If there is a failure at any point of the load process, MultiLoad will merely need to be RESTARTed from the point where it failed. No rollback is required. Any errors will be written to the proper error table.
Phase 5: Clean Up Phase
Those of you reading these paragraphs that have young children or teenagers will certainly appreciate this final phase! MultiLoad actually cleans up after itself. The utility looks at the final Error Code (&SYSRC). MultiLoad believes the adage, “All is well that ends well.” If the last error code is zero (0), all of the job steps have ended successfully (i.e., all has certainly ended well). This being the case, all empty error tables, worktables and the log table are dropped. All locks, both Teradata and MultiLoad, are released. The
Visualpath, #306, Niligiri Block, Aditya Enclave, Ameerpet, Hyderabad.ph-8374187525 Page 109
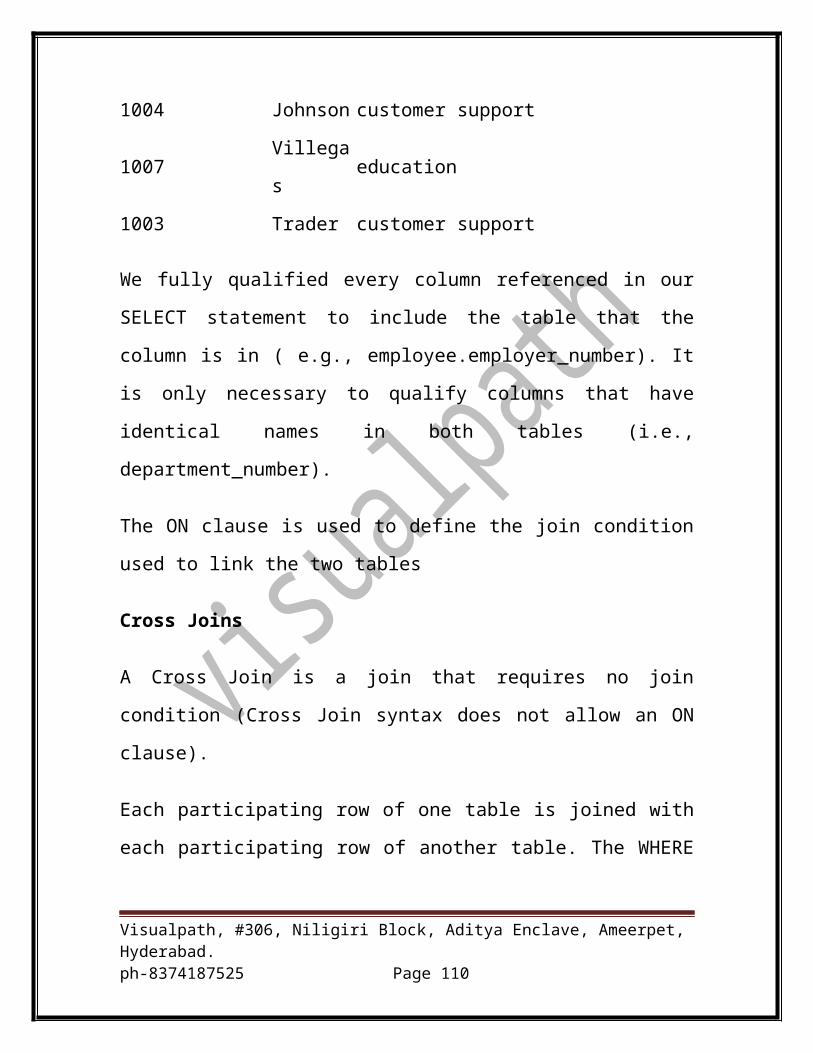
statistics for the job are generated for output (SYSPRINT) and the system count variables are set. After this, each MultiLoad session is logged off. So what happens if the final error code is not zero? Stay tuned. Restarting MultiLoad is a topic that will be covered later in this chapter.
A Simple MultiLoad IMPORT Script
MultiLoad can be somewhat intimidating to the new user because there are many commands and phases. In reality, the load scripts are understandable when you think through what the IMPORT mode does:
Setting up a Logtable
Logging onto Teradata
Identifying the Target, Work and Error tables
Defining the INPUT flat file
Defining the DML activities to occur
Naming the IMPORT file
Telling MultiLoad to use a particular LAYOUT
Telling the system to start loading
Finishing loading and logging off of Teradata
Step One: Setting up a Logtable and Logging onto Teradata — MultiLoad requires you specify a log table right at the outset with the .LOGTABLE command. We have called it CDW_Log. Once you name the Logtable, it will be automatically created for you. The Logtable may be placed in the same database as the target table, or it may be placed in another database. Immediately after this you log onto Teradata using the .LOGON command. The order of these two commands is interchangeable, but it is recommended to define the Logtable first and then to Log on, second. If you reverse the order, Teradata will give a warning message. Notice that the commands in MultiLoad require a dot in front of the command key word.
Step Two: Identifying the Target, Work and Error tables —In this step of the script you must tell Teradata which tables to use. To do this, you use
Visualpath, #306, Niligiri Block, Aditya Enclave, Ameerpet, Hyderabad.ph-8374187525 Page 110
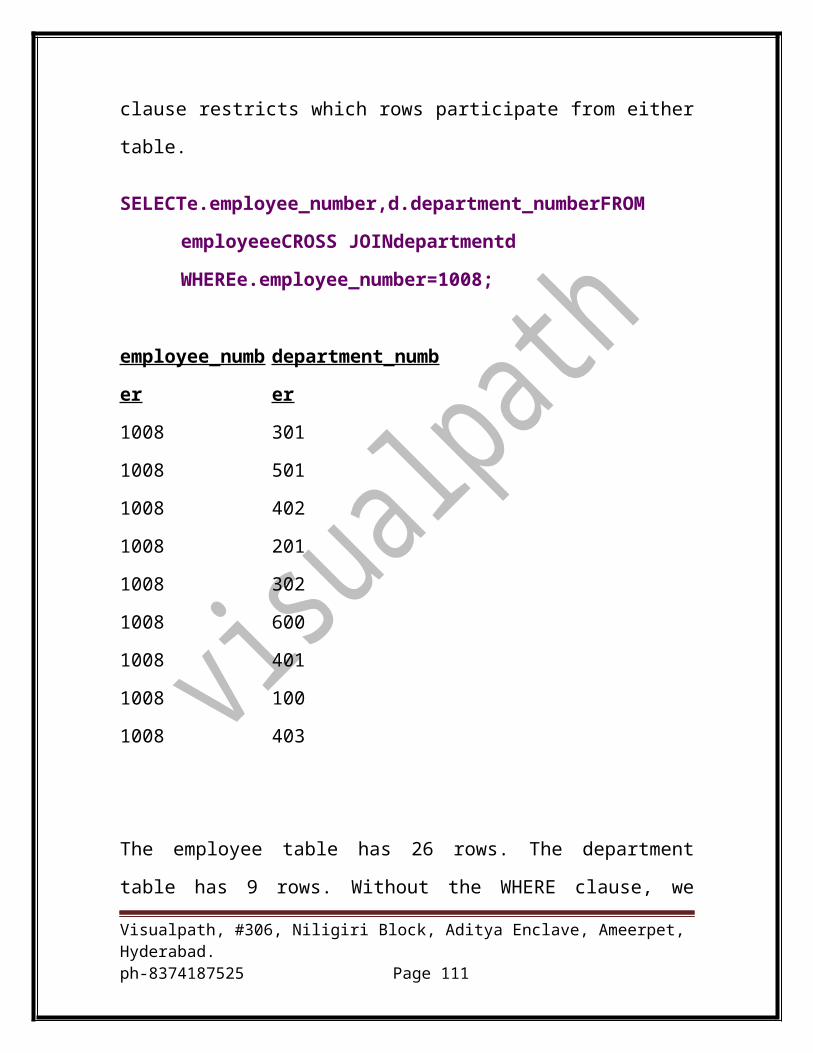
the .BEGIN IMPORT MLOAD command. Then you will preface the names of these tables with the sub-commands TABLES, WORKTABLES AND ERROR TABLES. All you must do is name the tables and specify what database they are in. Work tables and error tables are created automatically for you. Keep in mind that you get to name and locate these tables. If you do not do this, Teradata might supply some defaults of its own!
At the same time, these names are optional. If the WORKTABLES and ERRORTABLES had not specifically been named, the script would still execute and build these tables. They would have been built in the default database for the user. The name of the worktable would be WT_EMPLOYEE_DEPT1 and the two error tables would be called ET_EMPLOYEE_DEPT1 and UV_EMPLOYEE_DEPT1, respectively.
Sometimes, large Teradata systems have a work database with a lot of extra PERM space. One customer calls this database CORP_WORK. This is where all of the logtables and worktables are normally created. You can use a DATABASE command to point all table creations to it or qualify the names of these tables individually.
Step Three: Defining the INPUT flat file record structure — MultiLoad is going to need to know the structure the INPUT flat file. Use the .LAYOUT command to name the layout. Then list the fields and their data types used in your SQL as a .FIELD. Did you notice that an asterisk is placed between the column name and its data type? This means to automatically calculate the next byte in the record. It is used to designate the starting location for this data based on the previous fields length. If you are listing fields in order and need to skip a few bytes in the record, you can either use the .FILLER (like above) to position to the cursor to the next field, or the “*” on the Dept_No field could have been replaced with the number 132 ( CHAR(11)+CHAR(20)+CHAR(100)+1 ). Then, the .FILLER is not needed. Also, if the input record fields are exactly the same as the table, the .TABLE can be used to automatically define all the .FIELDS for you. The LAYOUT name will be referenced later in the .IMPORT command. If the input file is created with INDICATORS, it is specified in the LAYOUT.
Step Four: Defining the DML activities to occur —The .DML LABEL names and defines the SQL that is to execute. It is like setting up executable code in a programming language, but using SQL. In our example, MultiLoad is being told to INSERT a row into the SQL01.Employee_Dept table. The
Visualpath, #306, Niligiri Block, Aditya Enclave, Ameerpet, Hyderabad.ph-8374187525 Page 111
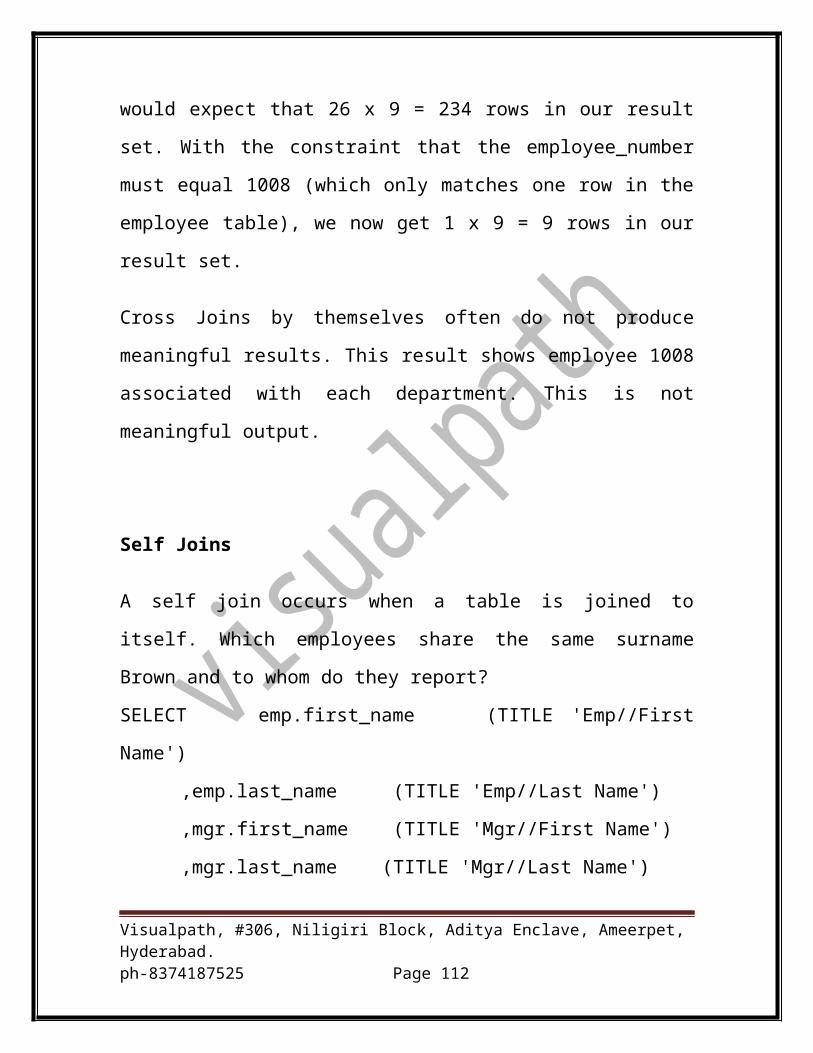
VALUES come from the data in each FIELD because it is preceded by a colon (:). Are you allowed to use multiple labels in a script? Sure! But remember this: Every label must be referenced in an APPLY clause of the .IMPORT clause.
Step Five: Naming the INPUT file and its format type —This step is vital! Using the .IMPORT command, we have identified the INFILE data as being contained in a file called “CDW_Join_Export.txt”. Then we list the FORMAT type as TEXT. Next, we referenced the LAYOUT named FILEIN to describe the fields in the record. Finally, we told MultiLoad to APPLY the DML LABEL called INSERTS — that is, to INSERT the data rows into the target table. This is still a sub-component of the .IMPORT MLOAD command. If the script is to run on a mainframe, the INFILE name is actually the name of a JCL Data Definition (DD) statement that contains the real name of the file.
Notice that the .IMPORT goes on for 4 lines of information. This is possible because it continues until it finds the semi-colon to define the end of the command. This is how it determines one operation from another. Therefore, it is very important or it would have attempted to process the END LOADING as part of the IMPORT — it wouldn’t work.
Step Six: Finishing loading and logging off of Teradata —This is the closing ceremonies for the load. MultiLoad to wrap things up, closes the curtains, and logs off of the Teradata system.
Important note: Since the script above in Figure 5-7 does not DROP any tables, it is completely capable of being restarted if an error occurs. Compare this to the next script in Figure 5-8. Do you think it is restartable? If you said no, part yourself on the back.
Error Treatment Options for the .DML LABEL Command
MultiLoad allows you to tailor how it deals with different types of errors that it encounters during the load process, to fit your needs. Here is a summary of the options available to you:
ERROR TREATMENT OPTIONS FOR .DML LABEL
Visualpath, #306, Niligiri Block, Aditya Enclave, Ameerpet, Hyderabad.ph-8374187525 Page 112
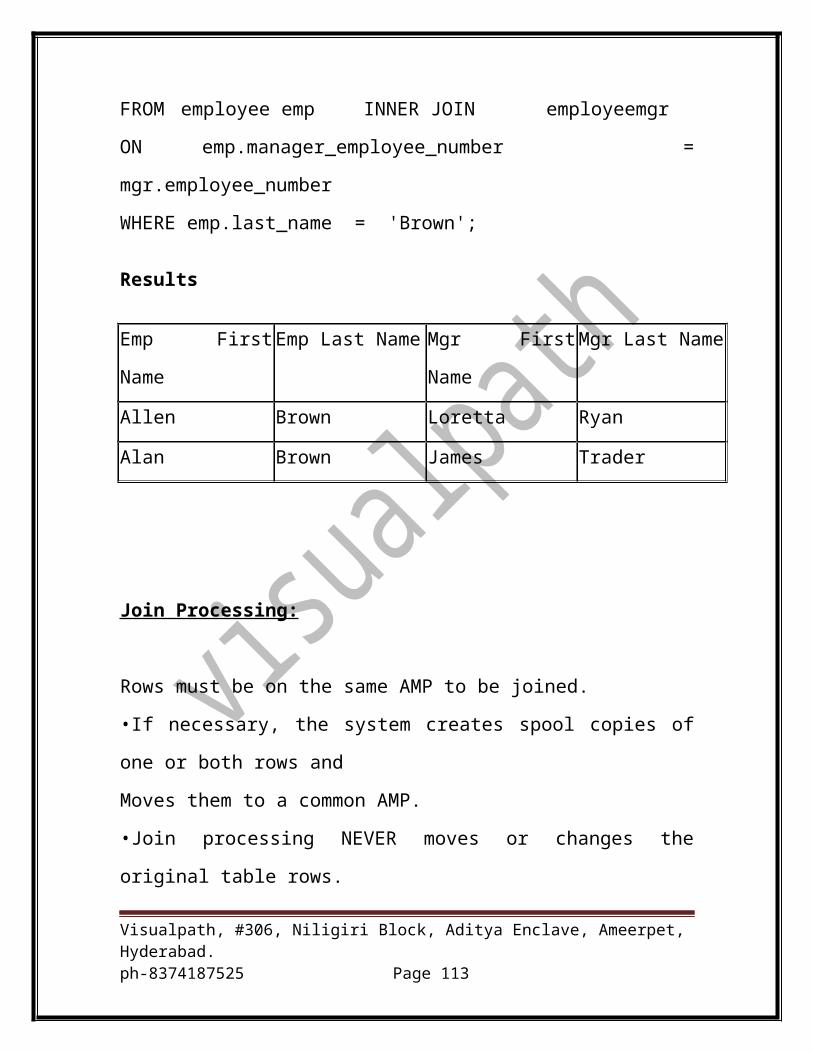
Figure 5-9
In IMPORT mode, you may specify as many as five distincterror-treatment optionsfor one.DML statement. For example, if there is more than one instance of a row, do you want MultiLoad to IGNORE the duplicate row, or to MARK it (list it) in an error table? If you do not specify IGNORE, then MultiLoad will MARK, or record all of the errors. Imagine you have a standard INSERT load that you know will end up recording about 20,000 duplicate row errors. Using the following syntax “IGNORE DUPLICATE INSERT ROWS;” will keep them out of the error table. By ignoring those errors, you gain three benefits:
1. You do not need to see all the errors.2. The error table is not filled up needlessly.3. MultiLoad runs much faster since it is not conducting a duplicate row check.
When doing an UPSERT, there are two rules to remember:
The default is IGNORE MISSING UPDATE ROWS. Mark is the default for all operations. When doing an UPSERT, you anticipate that some rows are missing, otherwise, why do an UPSERT. So, this keeps these rows out of your error table.
The DO INSERT FOR MISSING UPDATE ROWS is mandatory. This tells MultiLoad to insert a row from the data source if that row does not exist in the target table because the update didn’t find it.
The table that follows shows you, in more detail, how flexible your options are:
Visualpath, #306, Niligiri Block, Aditya Enclave, Ameerpet, Hyderabad.ph-8374187525 Page 113

ERROR TREATMENT OPTIONS IN DETAIL
DML LABEL OPTION WHAT IT DOES
MARK DUPLICATE INSERT ROWS This option logs an entry for all duplicate INSERT rows in the UV_ERR table. Use this when you want to know about the duplicates.
IGNORE DUPLICATE INSERT ROWS
This tells MultiLoad to IGNORE duplicate INSERT rows because you do not want to see them.
MARK DUPLICATE UPDATE ROWS This logs the existence of every duplicate UPDATE row.
IGNORE DUPLICATE UPDATE ROWS
This eliminates the listing of duplicate update row errors.
MARK MISSING UPDATE ROWS This option ensures a listing of data rows that had to be INSERTed since there was no row to UPDATE.
IGNORE MISSING UPDATE ROWS This tells MultiLoad NOT to list UPDATE rows as an error. This is a good option when doing an UPSERT since UPSERT will INSERT a new row.
MARK MISSING DELETE ROWS This option makes a note in the ET_Error Table that a row to be deleted is missing.
IGNORE MISSING DELETE ROWS This option says, “Do not tell me that a row to be deleted is missing”.
DO INSERT for MISSING UPDATE ROWS
This is required to accomplish an UPSERT. It tells MultiLoad that if the row to be updated does not exist in the target table, then INSERT the entire row from the data source.
Visualpath, #306, Niligiri Block, Aditya Enclave, Ameerpet, Hyderabad.ph-8374187525 Page 114
An IMPORT Script with Error Treatment OptionsThe command .DML LABEL names any DML options (INSERT, UPDATE OR DELETE) that immediately follow it in the script. Each label must be given a name. In IMPORT mode, the label will be referenced for use in the APPLY Phase when certain conditions are met.
/* Setup the MultiLoad Logtables, Logon Statements*/.LOGTABLE SQL01.CDW_Log;.LOGON TDATA/SQL01,SQL01;
Sets up a Logtable and then logs on to Teradata.
DATABASE SQL01; Specifies the database in which to find the target table.
/*Drop Error Tables */DROP TABLE WORKDB.CDW_ET;DROP TABLE WORKDB.CDW_UV;
Drops Existing error tables in the work database.
/* Begin Import and Define Work and Error Tables */.BEGIN IMPORT MLOAD TABLES
Employee_DeptWORKTABLES
WORKDB.CDW_WTERRORTABLES
WORKDB.CDW_ETWORKDB.CDW_UV;
Begins the Load Process by telling us first the names of the Target Table, Work table and error tables are in a work database. Note there is no comma between the names of the error tables (pair).
/* Define Layout of Input File */.LAYOUT FILEIN;
.FIELD Employee_No * CHAR(11);
.FIELD First_Name * CHAR(14);
.FIELD Last_Name * CHAR(20);
.FIELD Dept_No * CHAR(6);
.FIELD Dept_Name * CHAR(20);
Names the LAYOUT of the INPUT file.Defines the structure of the INPUT file. Notice the dots before the FIELD command and the semi-colons after each FIELD definition.
/* Begin INSERT Process on Table */
.DML LABEL INSERTSIGNORE DUPLICATE INSERT ROWS;
Names the DML Label
Tells MultiLoad NOT TO LIST duplicate INSERT
Visualpath, #306, Niligiri Block, Aditya Enclave, Ameerpet, Hyderabad.ph-8374187525 Page 115
rows in the error table; notice the option is placed AFTER the LABEL identification and immediately BEFORE the DML function.
INSERT INTO SQL01.Employee_Dept( Employee_No
,First_Name,Last_Name
,Dept_No,Dept_Name )
VALUES ( :Employee_No,:First_Name,,:Last_Name,,:Dept_No,,:Dept_Name );
Lists, in order, the VALUES to be INSERTed.
/* Specify IMPORT File and Apply Parameters */.IMPORT INFILE CDW_Join_Export.txt
FORMAT TEXT LAYOUT FILEINAPPLY INSERTS;
Names the Import File and States its Format type; names the Layout file to use and tells MultiLoad to APPLY the INSERTs.
.END MLOAD;
.LOGOFF;Ends MultiLoad and logs off of Teradata
An UPSERT Sample Script
The following sample script is provided to demonstrate how do an UPSERT — that is, to update a table and if a row from the data source table does not exist in the target table, then insert a new row. In this instance we are loading the Student_Profile table with new data for the next semester. The clause “DO INSERT FOR MISSING UPDATE ROWS” indicates an
Visualpath, #306, Niligiri Block, Aditya Enclave, Ameerpet, Hyderabad.ph-8374187525 Page 116
UPSERT. The DML statements that follow this option must be in the order of a single UPDATE statement followed by a single INSERT statement.
/* Setup Logtable, Logon Statements*/ .LOGTABLE SQL01.CDW_Log;.LOGON CDW/SQL01,SQL01; DATABASE SQL01;
Sets Up a Logtable and then logs on to Teradata. Specifies the database to work in (optional).
Begins the Load Process by telling us first the names of the target table, work table and error tables.
Names the LAYOUT of the INPUT file;An ALL CHARACTER based flat file. Defines the structure of the INPUT file; Notice the dots before the FIELD command and the semi-colons after each FIELD definition;
/* Begin INSERT and UPDATE Process on Table */ .DML LABEL UPSERTER
DO INSERT FOR MISSING UPDATE ROWS;
/* Without the above DO, one of these is guaranteed to fail on this same table. If the UPDATE fails because rows is missing, it corrects by doing the INSERT */ UPDATE SQL01.Student_Profile SET Last_Name = :Last_Name
Names the DML LabelTells MultiLoad to INSERT a row if there is not one to be UPDATED, i.e., UPSERT. Defines the UPDATE.
Visualpath, #306, Niligiri Block, Aditya Enclave, Ameerpet, Hyderabad.ph-8374187525 Page 117
,First_Name = :First_Name,Class_Code = :Class_Code,Grade_Pt = :Grade_Pt
WHERE Student_ID = :Student_ID; INSERTINTO SQL01.Student_ProfileVALUES ( :Student_ID
,:Last_Name,:First_Name,:Class_Code,:Grade_Pt );
Qualifies the UPDATE. Defines the INSERT. We recommend placing comma separators in front of the following column or value for easier debugging.
/* Specify IMPORT File and Apply Parameters */ .IMPORT INFILE CDW_EXPORT.DAT
LAYOUT FILEINAPPLY UPSERTER;
Names the Import File and it names the Layout file to use and tells MultiLoad to APPLY the UPSERTs.
.END MLOAD;
.LOGOFF;Ends MultiLoad and logs off of Teradata
Troubleshooting MultiLoad Errors — More on the Error Tables
The output statistics in the above example indicate that the load was entirely successful. But that is not always the case. Now we need to troubleshoot in order identify the errors and correct them, if desired. Earlier on, we noted that MultiLoad generates two error tables, the Acquisition Error and the Application error table. You may select from these tables to discover the problem and research the issues.
For the most part, the Acquisition error table logs errors that occur during that processing phase. The Application error table lists Unique Primary Index violations, field overflow errors on non-PI columns, and constraint errors that occur in the APPLY phase. MultiLoad error tables not only list the errors they encounter, they also have the capability to STORE those errors. Do you remember the MARK and IGNORE parameters? This is where they come into play. MARK will ensure that the error rows, along with some details about the errors are stored in the error table. IGNORE does neither; it is as if the error never occurred.
Visualpath, #306, Niligiri Block, Aditya Enclave, Ameerpet, Hyderabad.ph-8374187525 Page 118
THREE COLUMNS SPECIFIC TO THE ACQUISITION ERROR TABLE
ErrorCode System code that identifies the error.
ErrorField Name of the column in the target table where the error happened; is Left blank if the offending column cannot be identified.
HostData The data row that contains the error.
Figure 5-19
THREE COLUMNS SPECIFIC TO THE APPLICATION ERROR TABLE
Uniqueness Contains a certain value that disallows duplicate row errors in this table; can be ignored, if desired.
DBCErrorCode System code that identifies the error.
DBCErrorField Name of the column in the target table where the error happened; is left blank if the offending column cannot be identified. NOTE: A copy of the target table column immediately follows this column.
RESTARTing MultiLoad
Who hasn’t experienced a failure at some time when attempting a load? Don’t take it personally! Failures can and do occur on the host or Teradata (DBC) for many reasons. MultiLoad has the impressive ability to RESTART from failures in either environment. In fact, it requires almost no effort to continue or resubmit the load job. Here are the factors that determine how it works:
First, MultiLoad will check the Restart Logtable and automatically resume the load process from the last successful CHECKPOINT before the failure occurred. Remember, the Logtable is essential for restarts. MultiLoad uses neither the Transient Journal nor rollbacks during a failure. That is why you must designate a Logtable at the beginning of your script. MultiLoad either restarts by itself or waits for the user to resubmit the job. Then MultiLoad takes over right where it left off.
Visualpath, #306, Niligiri Block, Aditya Enclave, Ameerpet, Hyderabad.ph-8374187525 Page 119
Second, suppose Teradata experiences a reset while MultiLoad is running. In this case, the host program will restart MultiLoad after Teradata is back up and running. You do not have to do a thing!
Third, if a host mainframe or network client fails during a MultiLoad, or the job is aborted, you may simply resubmit the script without changing a thing. MultiLoad will find out where it stopped and start again from that very spot.
Fourth, if MultiLoad halts during the Application Phase it must be resubmitted and allowed to run until complete.
Fifth, during the Acquisition Phase the CHECKPOINT (n) you stipulated in the .BEGIN MLOAD clause will be enacted. The results are stored in the Logtable. During the Application Phase, CHECKPOINTs are logged each time a data block is successfully written to its target table.
HINT: The default number for CHECKPOINT is 15 minutes, but if you specify the CHECKPOINT as 60 or less, minutes are assumed. If you specify the checkpoint at 61 or above, the number of records is assumed.
RELEASE MLOAD — When You DON'T Want to Restart MultiLoad
What if a failure occurs but you do not want to RESTART MultiLoad? Since MultiLoad has already updated the table headers, it assumes that it still “owns” them. Therefore, it limits access to the table(s). So what is a user to do? Well there is good news and bad news. The good news is that if the job you may use the RELEASE MLOAD command to release the locks and rollback the job. The bad news is that if you have been loading multiple millions of rows, the rollback may take a lot of time. For this reason, most customers would rather just go ahead and RESTART.
Before V2R3: In the earlier days of Teradata it was NOT possible to use RELEASE MLOAD if one of the following three conditions was true:
In IMPORT mode, once MultiLoad had reached the end of the Acquisition Phase you could not use RELEASE MLOAD. This is sometimes referred to as the “point of no return.”
In DELETE mode, the point of no return was when Teradata received the DELETE statement.
If the job halted in the Apply Phase, you will have to RESTART the job.
Visualpath, #306, Niligiri Block, Aditya Enclave, Ameerpet, Hyderabad.ph-8374187525 Page 120
With and since V2R3: The advent of V2R3 brought new possibilities with regard to using the RELEASE MLOAD command. It can NOW be used in the APPLY Phase, if:
You are running a Teradata V2R3 or later version
You use the correct syntax:
RELEASE MLOAD <target-table> IN APPLY
The load script has NOT been modified in any way
The target tables either:
Must be empty, or
Must have no Fallback, no NUSIs, no Permanent Journals
You should be very cautious using the RELEASE command. It could potentially leave your table half updated. Therefore, it is handy for a test environment, but please don’t get too reliant on it for production runs. They should be allowed to finish to guarantee data integrity.
MultiLoad and INMODs
INMODs, or Input Modules, may be called by MultiLoad in either mainframe or LAN environments, providing the appropriate programming languages are used. INMODs are user written routines whose purpose is to read data from one or more sources and then convey it to a load utility, here MultiLoad, for loading into Teradata. They allow MultiLoad to focus solely on loading data by doing data validation or data conversion before the data is ever touched by MultiLoad. INMODs replace the normal MVS DDNAME or LAN file name with the following statement:
.IMPORT INMOD=<INMOD-name>
You will find a more detailed discussion on how to write INMODs for MultiLoad in “Teradata Utilities: Breaking The Barriers”.
How MultiLoad Compares with FastLoad
Function FastLoad MultiLoad
Error Tables must be defined Yes Optional.
Visualpath, #306, Niligiri Block, Aditya Enclave, Ameerpet, Hyderabad.ph-8374187525 Page 121
2 Error Tables have to exist for each target table and will automatically be assigned.
Work Tables must be defined No Optional.1 Error Table has to exist for each target table and will automatically be assigned.
Logtable must be defined No Yes
Allows Referential Integrity No No
Allows Unique Secondary Indexes No No
Allows Non-Unique Secondary Indexes
No Yes
Allows Triggers No No
Loads a maximum of n number of tables
One Five
DML Statements Supported INSERT INSERT, UPDATE, DELETE, and “UPSERT“
DDL Statements Supported CREATE and DROP TABLE
DROP TABLE
Transfers data in 64K blocks Yes Yes
Number of Phases Two Five
Is RESTARTable Yes Yes, in all 5 phases (auto CHECKPOINT)
Stores UPI Violation Rows Yes Yes
Allows use of Aggregated, Arithmetic calculations or
No Yes
Visualpath, #306, Niligiri Block, Aditya Enclave, Ameerpet, Hyderabad.ph-8374187525 Page 122

Conditional Exponentiation
Allows Data Conversion Yes, 1 per column Yes
NULLIF function Yes Yes
T-Pump:
An Introduction to TPump
The chemistry of relationships is very interesting. Frederick Buechner once stated, “My assumption is that the story of any one of us is in some measure the story of us all.” In this chapter, you will find that TPump has similarities with the rest of the family of Teradata utilities. But this newer utility has been designed with fewer limitations and many distinguishing abilities that the other load utilities do not have.
Do you remember the first Swiss ArmyTM knife you ever owned? Aside from its original intent as a compact survival tool, this knife has thrilled generations with its multiple capabilities. TPump is the Swiss ArmyTM knife of the Teradata load utilities. Just as this knife was designed for small tasks, TPump was developed to handle batch loads with low volumes. And, just as the Swiss ArmyTM knife easily fits in your pocket when you are loaded down with gear, TPump is a perfect fit when you have a large, busy system with few resources to spare. Let’s look in more detail at the many facets of this amazing load tool.
Why It Is Called “TPump”
TPump is the shortened name for the load utility Teradata Parallel Data Pump. To understand this, you must know how the load utilities move the data. Both FastLoad and MultiLoad assemble massive volumes of data rows into 64K blocks and then moves those blocks. Picture in your mind the way that huge ice blocks used to be floated down long rivers to large cities prior to the advent of refrigeration. There they were cut up and distributed to the people. TPump does NOT move data in the large blocks. Instead, it loads data one row at a time, using row hash locks. Because it locks at this level, and not at the table level like MultiLoad, TPump can make many simultaneous, or concurrent, updates on a table.
Visualpath, #306, Niligiri Block, Aditya Enclave, Ameerpet, Hyderabad.ph-8374187525 Page 123
Envision TPump as the water pump on a well. Pumping in a very slow, gentle manner results in a steady trickle of water that could be pumped into a cup. But strong and steady pumping results in a powerful stream of water that would require a larger container. TPump is a data pump which, like the water pump, may allow either a trickle-feed of data to flow into the warehouse or a strong and steady stream. In essence, you may “throttle” the flow of data based upon your system and business user requirements. Remember, TPump is THE PUMP!
TPump Has Many Unbelievable Abilities
Just in Time: Transactional systems, such those implemented for ATM machines or Point-of-Sale terminals, are known for their tremendous speed in executing transactions. But how soon can you get the information pertaining to that transaction into the data warehouse? Can you afford to wait until a nightly batch load? If not, then TPump may be the utility that you are looking for! TPump allows the user to accomplish near real-time updates from source systems into the Teradata data warehouse.
Throttle-switch Capability: What about the throttle capability that was mentioned above? With TPump you may stipulate how many updates may occur per minute. This is also called the statement rate. In fact, you may change the statement rate during the job, “throttling up” the rate with a higher number, or “throttling down” the number of updates with a lower one. An example: Having this capability, you might want to throttle up the rate during the period from 12:00noon to 1:30 PM when most of the users have gone to lunch. You could then lower the rate when they return and begin running their business queries. This way, you need not have such clearly defined load windows, as the other utilities require. You can have TPump running in the background all the time, and just control its flow rate.
DML Functions: Like MultiLoad, TPump does DML functions, including INSERT, UPDATE and DELETE. These can be run solo, or in combination with one another. Note that it also supports UPSERTs like MultiLoad. But here is one place that TPump differs vastly from the other utilities: FastLoad can only load one table and MultiLoad can load up to five tables. But, when it pulls data from a single source, TPump can load more than 60 tables at a time! And the number of concurrent instances in such situations is unlimited. That’s right, not 15, but unlimited for Teradata! Well OK, maybe by your
Visualpath, #306, Niligiri Block, Aditya Enclave, Ameerpet, Hyderabad.ph-8374187525 Page 124
computer. I cannot imagine my laptop running 20 TPump jobs, but Teradata does not care.
How could you use this ability? Well, imagine partitioning a huge table horizontally into multiple smaller tables and then performing various DML functions on all of them in parallel. Keep in mind that TPump places no limit on the number of sessions that may be established. Now, think of ways you might use this ability in your data warehouse environment. The possibilities are endless.
More benefits: Just when you think you have pulled out all of the options on a Swiss ArmyTM knife, there always seems to be just one more blade or tool you had not noticed. Similar to the knife, TPump always seems to have another advantage in its list of capabilities. Here are several that relate to TPump requirements for target tables. TPump allows both Unique and Non-Unique Secondary Indexes (USIs and NUSIs), unlike FastLoad, which allows neither, and MultiLoad, which allows just NUSIs. Like MultiLoad, TPump allows the target tables to either be empty or to be populated with data rows. Tables allowing duplicate rows (MULTISET tables) are allowed. Besides this, Referential Integrity is allowed and need not be dropped. As to the existence of Triggers, TPump says, “No problem!”
Support Environment compatibility: The Support Environment (SE) works in tandem with TPump to enable the operator to have even more control in the TPump load environment. The SE coordinates TPump activities, assists in managing the acquisition of files, and aids in the processing of conditions for loads. The Support Environment aids in the execution of DML and DDL that occur in Teradata, outside of the load utility.
Stopping without Repercussions: Finally, this utility can be stopped at any time and all of locks may be dropped with no ill consequences. Is this too good to be true? Are there no limits to this load utility? TPump does not like to steal any thunder from the other load utilities, but it just might become one of the most valuable survival tools for businesses in today’s data warehouse environment.
Visualpath, #306, Niligiri Block, Aditya Enclave, Ameerpet, Hyderabad.ph-8374187525 Page 125
TPump Has Some Limits
TPump has rightfully earned its place as a superstar in the family of Teradata load utilities. But this does not mean that it has no limits. It has a few that we will list here for you:
Rule #1: No concatenation of input data files is allowed. TPump is not designed to support this.
Rule #2: TPump will not process aggregates, arithmetic functions or exponentiation. If you need data conversions or math, you might consider using an INMOD to prepare the data prior to loading it.
Rule #3: The use of the SELECT function is not allowed. You may not use SELECT in your SQL statements.
Rule #4: No more than four IMPORT commands may be used in a single load task. This means that a most, four files can be directly read in a single run.
Rule #5: Dates before 1900 or after 1999 must be represented by the yyyy format for the year portion of the date, not the default format of yy. This must be specified when you create the table. Any dates using the default yy format for the year are taken to mean 20th century years.
Rule #6: On some network attached systems, the maximum file size when using TPump is 2GB. This is true for a computer running under a 32-bit operating system.
Rule #7: TPump performance will be diminished if Access Logging is used. The reason for this is that TPump uses normal SQL to accomplish its tasks. Besides the extra overhead incurred, if you use Access Logging for successful table updates, then Teradata will make an entry in the Access Log table for each operation. This can cause the potential for row hash conflicts between the Access Log and the target tables.
A Simple TPump Script — A Look at the Basics
Setting up a Logtable and Logging onto Teradata
Begin load process, add Parameters, naming the error table
Defining the INPUT flat file
Visualpath, #306, Niligiri Block, Aditya Enclave, Ameerpet, Hyderabad.ph-8374187525 Page 126
Defining the DML activities to occur
Naming the IMPORT file and defining its FORMAT
Telling TPump to use a particular LAYOUT
Telling the system to start loading data rows
Finishing loading and logging off of Teradata
The following script assumes the existence of a Student_Names table in the SQL01 database. You may use pre-existing target tables when running TPump or TPump may create the tables for you. In most instances you will use existing tables. The CREATE TABLE statement for this table is listed for your convenience.
Much of the TPump command structure should look quite familiar to you. It is quite similar to MultiLoad. In this example, the Student_Names table is being loaded with new data from the university’s registrar. It will be used as an associative table for linking various tables in the data warehouse.
/* This script inserts rows into a table called student_names from a single file */
Sets Up a Logtable and then logs on with .RUN.
.LOGTABLE WORK_DB.LOG_PUMP;
.RUN FILE C:\mydir\logon.txt;DATABASE SQL01;
The logon.txt file contains: .logon TDATA/SQL01,SQL01;.Also specifies the database to find the necessary tables.
.BEGIN LOAD ERRLIMIT 5 CHECKPOINT 1 SESSIONS 64TENACITY 2 PACK 40 RATE 1000
Begins the Load Process;Specifies optional parameters.
Visualpath, #306, Niligiri Block, Aditya Enclave, Ameerpet, Hyderabad.ph-8374187525 Page 127
ERRORTABLE SQL01.ERR_PUMP; ERRORTABLE names the error
table for this run.
Names the LAYOUT of the INPUT record;Notice the dots before the .FIELD and .FILLER commands and the semi-colons after each FIELD definition. Also, the more_junk field moves the field pointer to the start of the First_name data.Notice the comment in the script.
Names the DML LabelTells TPump to INSERT a row into the target table and defines the row format;Comma separators are placed in front of the following column or value for easier debugging.Lists, in order, the VALUES to be INSERTed. Colons precede VALUEs.
Names the IMPORT file;Names the LAYOUT to be called from above; tells TPump which DML Label to APPLY.
.END LOAD;
.LOGOFF;Tells TPump to stop loading and logs off all sessions.
Figure 6-4
Step One: Setting up a Logtable and Logging onto Teradata — First, you define the Logtable using the .LOGTABLE command. We have named it LOG_PUMP in the WORK_DB database. The Logtable is automatically created for you. It may be placed in any database by qualifying the table name with the name of the database by using syntax like this: <databasename>.<tablename>
Visualpath, #306, Niligiri Block, Aditya Enclave, Ameerpet, Hyderabad.ph-8374187525 Page 128

Next, the connection is made to Teradata. Notice that the commands in TPump, like those in MultiLoad, require a dot in front of the command key word.
Step Two: Begin load process, add Parameters, naming the Error Table— Here, the script reveals the parameters requested by the user to assist in managing the load for smooth operation. It also names the one error table, calling it SQL01.ERR_PUMP. Now let’s look at each parameter:
ERRLIMIT 5 says that the job should terminate after encountering five errors. You may set the limit that is tolerable for the load.
CHECKPOINT 1 tells TPump to pause and evaluate the progress of the load in increments of one minute. If the factor is between 1 and 60, it refers to minutes. If it is over 60, then it refers to the number of rows at which the checkpointing should occur.
SESSIONS 64 tells TPump to establish 64 sessions with Teradata.
TENACITY 2 says that if there is any problem establishing sessions, then to keep on trying for a period of two hours.
PACK 40 tells TPump to “pack” 40 data rows and load them at one time.
RATE 1000 means that 1,000 data rows will be sent per minute.
Step Three: Defining the INPUT flat file structure — TPump, like MultiLoad, needs to know the structure the INPUT flat file record. You use the .LAYOUT command to name the layout. Following that, you list the columns and data types of the INPUT file using the .FIELD, .FILLER or .TABLE commands. Did you notice that an asterisk is placed between the column name and its data type? This means to automatically calculate the next byte in the record. It is used to designate the starting location for this data based on the previous field’s length. If you are listing fields in order and need to skip a few bytes in the record, you can either use the .FILLER with the correct number of bytes as character to position to the cursor to the next field, or the “*” can be replaced by a number that equals the lengths of all previous fields added together plus 1 extra byte. When you use this technique, the .FILLER is not needed. In our example, this says to begin with Student_ID, continue on to load Last_Name, and finish when First_Name is loaded.
Visualpath, #306, Niligiri Block, Aditya Enclave, Ameerpet, Hyderabad.ph-8374187525 Page 129
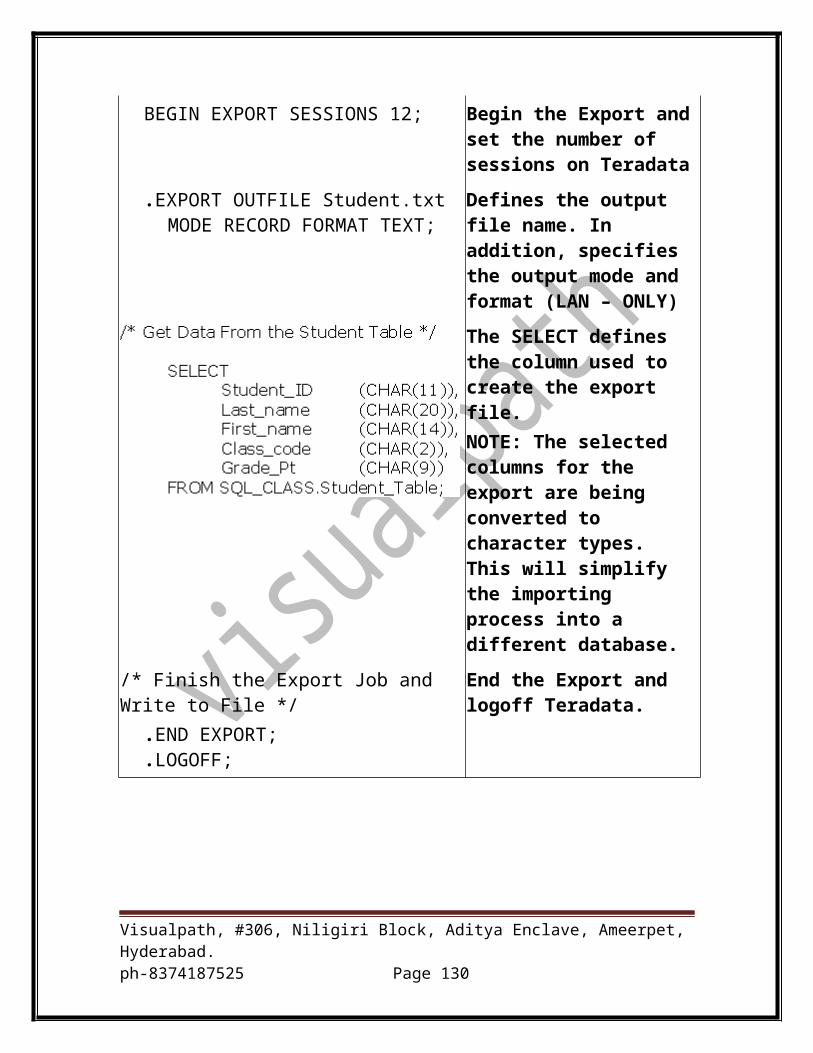
Step Four: Defining the DML activities to occur — At this point, the .DML LABEL names and defines the SQL that is to execute. It also names the columns receiving data and defines the sequence in which the VALUES are to be arranged. In our example, TPump is to INSERT a row into the SQL01.Student_NAMES. The data values coming in from the record are named in the VALUES with a colon prior to the name. This provides the PE with information on what substitution is to take place in the SQL. Each LABEL used must also be referenced in an APPLY clause of the .IMPORT clause.
Step Five: Naming the INPUT file and defining its FORMAT —Using the .IMPORT INFILE command, we have identified the INPUT data file as “CDW_Export.txt”. The file was created using the TEXT format.
Step Six: Associate the data with the description — Next, we told the IMPORT command to use the LAYOUT called, “FILELAYOUT.”
Step Seven: Telling TPump to start loading —Finally, we told TPump to APPLY the DML LABEL called INSREC — that is, to INSERT the data rows into the target table.
Step Seven: Finishing loading and logging off of Teradata —The .END LOAD command tells TPump to finish the load process. Finally, TPump logs off of the Teradata system.
TPump Script with Error Treatment Options
/* Setup the TPUMP Logtables, Logon Statements and Database Default */
.LOGTABLE SQL01.LOG_PUMP;
.LOGON CDW/SQL01,SQL01;DATABASE SQL01;
Sets up a Logtable and then logs on to Teradata.
Specifies the database containing the table.
/* Begin Load and Define TPUMP Parameters and Error Tables */
.BEGIN LOAD ERRLIMIT 5 CHECKPOINT 1
BEGINS THE LOAD PROCESS
Visualpath, #306, Niligiri Block, Aditya Enclave, Ameerpet, Hyderabad.ph-8374187525 Page 130
2A0C022B00000
SESSIONS 1 TENACITY 2 PACK 40RATE 1000 ERRORTABLE SQL01.ERR_PUMP;
SPECIFIES MULTIPLE PARAMETERS TO AID IN PROCESS CONTROL
NAMES THE ERRROR TABLE; TPump HAS ONLY ONE ERROR TABLE.
.LAYOUT FILELAYOUT;.FIELD Student_ID * VARCHAR (11);.FIELD Last_Name * VARCHAR (20);.FIELD First_Name * VARCHAR (14);.FIELD Class_Code * VARCHAR (2);.FIELD Grade_Pt * VARCHAR (8);
Names the LAYOUT of the INPUT file.
Defines the structure of the INPUT file; here, all Variable CHARACTER data and the file has a comma delimiter. See .IMPORT below for file type and the declaration of the delimiter.
.DML LABEL INSRECIGNORE DUPLICATE ROWSIGNORE MISSING ROWSIGNORE EXTRA ROWS;
INSERTINTO Student_Profile4( Student_ID,Last_Name,First_Name,Class_Code,Grade_Pt )VALUES ( :Student_ID,:Last_Name,:First_Name,:Class_Code,:Grade_Pt );
Names the DML Label;SPECIFIES 3 ERROR TREATMENT OPTIONS with the ; after the last option.
Tells TPump to INSERT a row into the target table and defines the row format.
Note that we place comma separators in front of the following column or value for easier debugging.
Visualpath, #306, Niligiri Block, Aditya Enclave, Ameerpet, Hyderabad.ph-8374187525 Page 131
Lists, in order, the VALUES to be INSERTed. A colon always precedes values.
.IMPORT INFILE CDW_Export.txtFORMAT VARTEXT ‘,’LAYOUT FILELAYOUTAPPLY INSREC;
Names the IMPORT file;Names the LAYOUT to be called from above; Tells TPump which DML Label to APPLY. Notice the FORMAT with a comma in the quotes to define the delimiter between fields in the input record.
.END LOAD;
.LOGOFF;Tells TPump to stop loading and Logs Off all sessions.
A TPump UPSERT Sample Script
Begins the load processSpecifies multiple parameters to aid in load managementNames the error table; TPump HAS ONLY ONE ERROR TABLE PER TARGET TABLE
Visualpath, #306, Niligiri Block, Aditya Enclave, Ameerpet, Hyderabad.ph-8374187525 Page 132
Visualpath, #306, Niligiri Block, Aditya Enclave, Ameerpet, Hyderabad.ph-8374187525 Page 133
A TPump UPSERT Sample Script
Sets Up a Logtable and then logs on to Teradata.
Visualpath, #306, Niligiri Block, Aditya Enclave, Ameerpet, Hyderabad.ph-8374187525 Page 134
Begins the load processSpecifies multiple parameters to aid in load managementNames the error table; TPump HAS ONLY ONE ERROR TABLE PER TARGET TABLE
Defines the LAYOUT for the 1st INPUT file; also has the indicators for NULL data.
Names the 1st DML Label and specifies 2 Error Treatment options.Tells TPump to INSERT a row into the target table and defines the row format.Lists, in order, the VALUES to be INSERTed. A colon always precedes values.
Names the Import File as UPSERT-FILE.DAT. The file name is under Windows so the “-“ is fine.The file type is FASTLOAD.
.END LOAD;
.LOGOFF;Tells TPump to stop loading and logs off all sessions.
Visualpath, #306, Niligiri Block, Aditya Enclave, Ameerpet, Hyderabad.ph-8374187525 Page 135
NOTE: The above UPSERT uses the same syntax as MultiLoad. This continues to work. However, there might soon be another way to accomplish this task. NCR has built an UPSERT and we have tested the following statement, without success:
We are not sure if this will be a future technique for coding a TPump UPSERT, or if it is handled internally. For now, use the original coding technique.
Monitoring TPump
TPump comes with a monitoring tool called the TPump Monitor. This tool allows you to check the status of TPump jobs as they run and to change (remember “throttle up” and “throttle down?”) the statement rate on the fly. Key to this monitor is the “SysAdmin.TpumpStatusTbl” table in the Data Dictionary Directory. If your Database Administrator creates this table, TPump will update it on a minute-by-minute basis when it is running. You may update the table to change the statement rate for an IMPORT. If you want TPump to run unmonitored, then the table is not needed.
You can start a monitor program under UNIX with the following command:
Below is a chart that shows the Views and Macros used to access the “SysAdmin.TpumpStatusTbl” table. Queries may be written against the Views. The macros may be executed.
Views and Macros to access the table SysAdmin.TpumpStatusTbl
Visualpath, #306, Niligiri Block, Aditya Enclave, Ameerpet, Hyderabad.ph-8374187525 Page 136
View SysAdmin.TPumpStatus
View SysAdmin.TPumpStatusX
Macro Sysadmin.TPumpUpdateSelect
Macro TPumpMacro.UserUpdateSelect
Handling Errors in TPump Using the Error Table
One Error Table
Unlike FastLoad and MultiLoad, TPump uses only ONE Error Table per target table, not two. If you name the table, TPump will create it automatically. Entries are made to these tables whenever errors occur during the load process. Like MultiLoad, TPump offers the option to either MARK errors (include them in the error table) or IGNORE errors (pay no attention to them whatsoever). These options are listed in the .DML LABEL sections of the script and apply ONLY to the DML functions in that LABEL. The general default is to MARK. If you specify nothing, TPump will assume the default. When doing an UPSERT, this default does not apply.
The error table does the following:
Identifies errors
Provides some detail about the errors
Stores a portion the actual offending row for debugging
When compared to the error tables in MultiLoad, the TPump error table is most similar to the MultiLoad Acquisition error table. Like that table, it stores information about errors that take place while it is trying to acquire data. It is the errors that occur when the data is being moved, such as data translation problems that TPump will want to report on. It will also want to report any difficulties compiling valid Primary Indexes. Remember, TPump has less tolerance for errors than FastLoad or MultiLoad.
COLUMNS IN THE TPUMP ERROR TABLE
ImportSeq Sequence number that identifies the IMPORT command where the error occurred
DMLSeq Sequence number for the DML statement involved with
Visualpath, #306, Niligiri Block, Aditya Enclave, Ameerpet, Hyderabad.ph-8374187525 Page 137
the error
SMTSeq Sequence number of the DML statement being carried out when the error was discovered
ApplySeq Sequence number that tells which APPLY clause was running when the error occurred
SourceSeq The number of the data row in the client file that was being built when the error took place
DataSeq Identifies the INPUT data source where the error row came from
ErrorCode System code that identifies the error
ErrorMsg Generic description of the error
ErrorField Number of the column in the target table where the error happened; is left blank if the offending column cannot be identified; This is different from MultiLoad, which supplies the column name.
HostData The data row that contains the error, limited to the first 63,728 bytes related to the error
Common Error Codes and What They Mean
TPump users often encounter three error codes that pertain to:
Missing data rows
Duplicate data rows
Extra data rows
Become familiar with these error codes and what they mean. This could save you time getting to the root of some common errors you could see in your future!
#1: Error 2816: Failed to insert duplicate row into TPump Target Table.
Nothing is wrong when you see this error. In fact, it can be a very good thing. It means that TPump is notifying you that it discovered a
Visualpath, #306, Niligiri Block, Aditya Enclave, Ameerpet, Hyderabad.ph-8374187525 Page 138
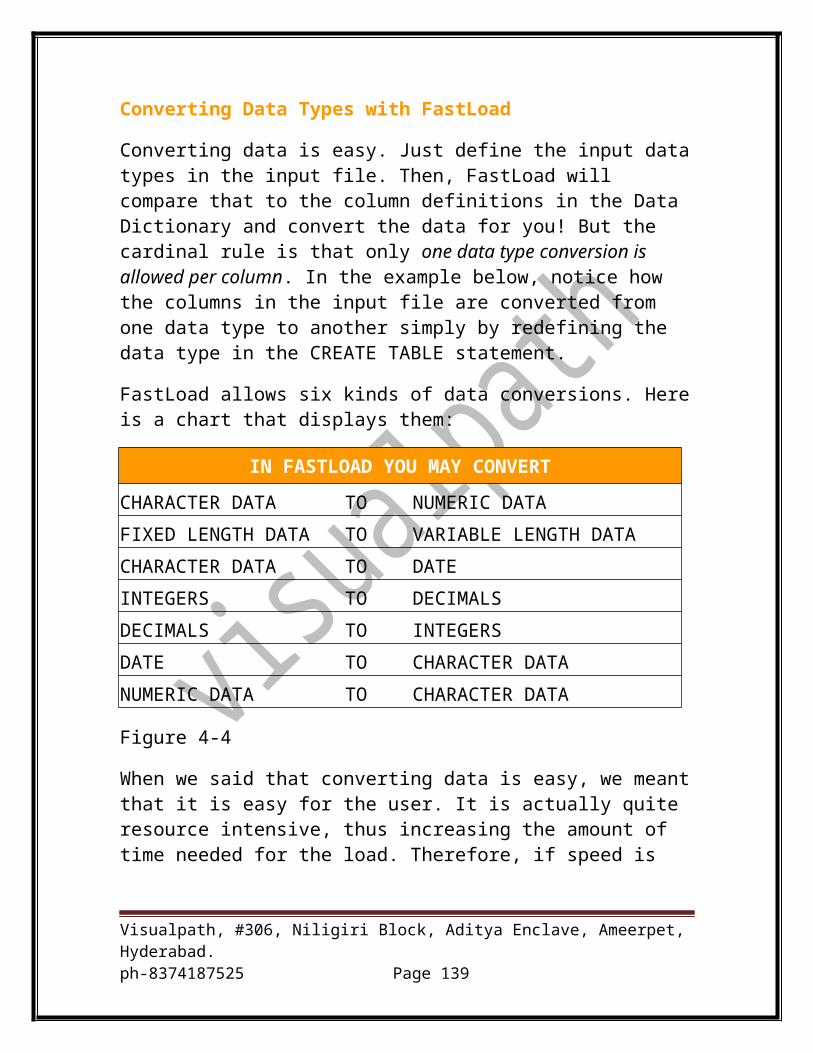
DUPLICATE row. This error jumps to life when one of the following options has been stipulated in the .DML LABEL:
MARK DUPLICATE INSERT ROWS
MARK DUPLICATE UPDATE ROWS
Note that the original row will be inserted into the target table, but the duplicate row will not.
#2: Error 2817: Activity count greater than ONE for TPump UPDATE/DELETE.
Sometimes you want to know if there were too may “successes.” This is the case when there are EXTRA rows when TPump is attempting an UPDATE or DELETE.
TPump will log an error whenever it sees an activity count greater than zero for any such extra rows if you have specified either of these options in a .DML LABEL:
MARK EXTRA UPDATE ROWS
MARK EXTRA DELETE ROW
At the same time, the associated UPDATE or DELETE will be performed.
#3: Error 2818: Activity count zero for TPump UPDATE or DELETE.
Sometimes, you want to know if a data row that was supposed to be updated or deleted wasn’t! That is when you want to know that the activity count was zero, indicating that the UPDATE or DELETE did not occur. To see this error, you must have used one of the following parameters:
MARK MISSING UPDATE ROWS
MARK MISSING DELETE ROWS
.BEGIN LOAD Parameters UNIQUE to TPump
MACRODB <databasename>
This parameter identifies a database that will contain any macros utilized by TPump. Remember, TPump does not run the SQL statements by itself. It places them into Macros and executes those Macros for efficiency.
Visualpath, #306, Niligiri Block, Aditya Enclave, Ameerpet, Hyderabad.ph-8374187525 Page 139
NOMONITOR Use this parameter when you wish to keep TPump from checking either statement rates or update status information for the TPump Monitor application.
PACK (n) Use this to state the number of statements TPump will “pack” into a multiple-statement request. Multi-statement requests improve efficiency in either a network or channel environment because it uses fewer sends and receives between the application and Teradata.
RATE This refers to the Statement Rate. It shows the initial maximum number of statements that will be sent per minute. A zero or no number at all means that the rate is unlimited. If the Statement Rate specified is less than the PACK number, then TPump will send requests that are smaller than the PACK number.
ROBUST ON/OFF ROBUST defines how TPump will conduct a RESTART. ROBUST ON means that one row is written to the Logtable for every SQL transaction. The downside of running TPump in ROBUST mode is that it incurs additional, and possibly unneeded, overhead. ON is the default. If you specify ROBUST OFF, you are telling TPump to utilize “simple” RESTART logic: Just start from the last successful CHECKPOINT. Be aware that if some statements are reprocessed, such as those processed after the last CHECKPOINT, then you may end up with extra rows in your error tables. Why? Because some of the statements in the original run may have already have found errors, in which case they would have recorded those errors in an error table.
TPump and MultiLoad Comparison Chart
Function MultiLoad TPump
Error Tables must be defined Optional, 2 per target Optional, 1 per target
Visualpath, #306, Niligiri Block, Aditya Enclave, Ameerpet, Hyderabad.ph-8374187525 Page 140
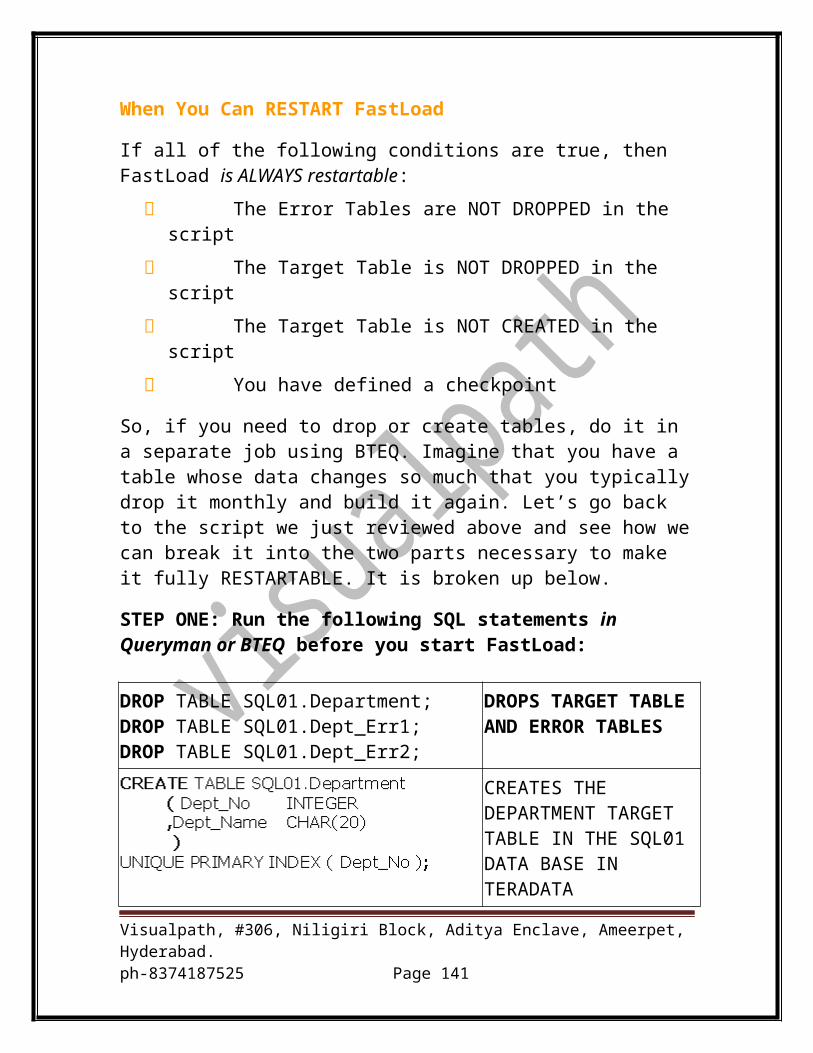
table table
Work Tables must be defined Optional, 1 per target table
No
Logtable must be defined Yes Yes
Allows Referential Integrity No Yes
Allows Unique Secondary Indexes
No Yes
Allows Non-Unique Secondary Indexes
Yes Yes
Allows Triggers No Yes
Loads a maximum of n number of tables
Five 60
Maximum Concurrent Load Instances
15 Unlimited
Locks at this level Table Row Hash
DML Statements Supported INSERT, UPDATE, DELETE, “UPSERT“
INSERT, UPDATE, DELETE, “UPSERT“
How DML Statements are Performed
Runs actual DML commands
Compiles DML into MACROS and executes
DDL Statements Supported All All
Transfers data in 64K blocks Yes No, moves data at row level
RESTARTable Yes Yes
Stores UPI Violation Rows Yes, with MARK option
Yes, with MARK option
Allows use of Aggregated, Arithmetic calculations or Conditional Exponentiation
No No
Allows Data Conversion Yes Yes
Performance Improvement As data volumes increase
By using multi-statement requests
Table Access During Load Uses WRITE lock on Allows simultaneous
Visualpath, #306, Niligiri Block, Aditya Enclave, Ameerpet, Hyderabad.ph-8374187525 Page 141
tables in Application Phase
READ and WRITE access due to Row Hash Locking
Effects of Stopping the Load Consequences No repercussions
Resource Consumption Hogs available resources
Allows consumption management via Parameters
Some important commands:
ABORT Abort any and all active running requests and transactions, but do not exit BTEQ.
DEFAULTS Reset all BTEQ Format command options to their defaults. This will utilize the default configurations.
LOGOFF End the current session or sessions, but do not exit BTEQ.
LOGON Starts a BTEQ Session. Every user, application, or utility must LOGON to Teradata to establish a session.
QUIT End the current session or sessions and exit BTEQ.
SESSIONS Specifies the number of sessions to use with the next LOGON command.
ERROROUT Write error messages to a specific output file.
EXPORT Open a file with a specific format to transfer information directly from the Teradata database.
FORMAT Enable/inhibit the page-oriented format command options.
IMPORT Open a file with a specific format to import information into Teradata.
INDICDATA One of multiple data mode options for data selected
Visualpath, #306, Niligiri Block, Aditya Enclave, Ameerpet, Hyderabad.ph-8374187525 Page 142
from Teradata. The modes are INDICDATA, FIELD, or RECORD MODE.
QUIET Limit BTEQ output displays to all error messages and request processing statistics.
REPEAT Submit the next request a certain amount of times
RUN Execute Teradata SQL requests and BTEQ commands directly from a specified run file.
ABORT Abort any active transactions and requests.
ERRORLEVEL Assign severity levels to particular error numbers.
EXIT End the current session or sessions and exit BTEQ.
GOTO Skip all intervening commands and resume after branching forward to the specified label.
HANG Pause BTEQ processing for a specific amount of time.
IF…THEN Test a stated condition, and then resume processing based on the test results.
LABEL The GOTO command will always GO directly TO a particular line of code based on a label.
MAXERROR Specifies a maximum allowable error severity level.
QUIT End the current session or sessions and exit BTEQ.
REPEAT Submit the next request a certain amount of times.
QUIET Limit BTEQ output displays to all error messages and request processing statistics.
RECORDMODE One of multiple data mode options for data selected from Teradata. (INDICDATA, FIELD, or RECORD).
SEPARATOR Specifies a character string or specific width of blank characters separating columns of a report.
SUPPRESS Replace each and every consecutively repeated value with completely-blank character strings.
Visualpath, #306, Niligiri Block, Aditya Enclave, Ameerpet, Hyderabad.ph-8374187525 Page 143
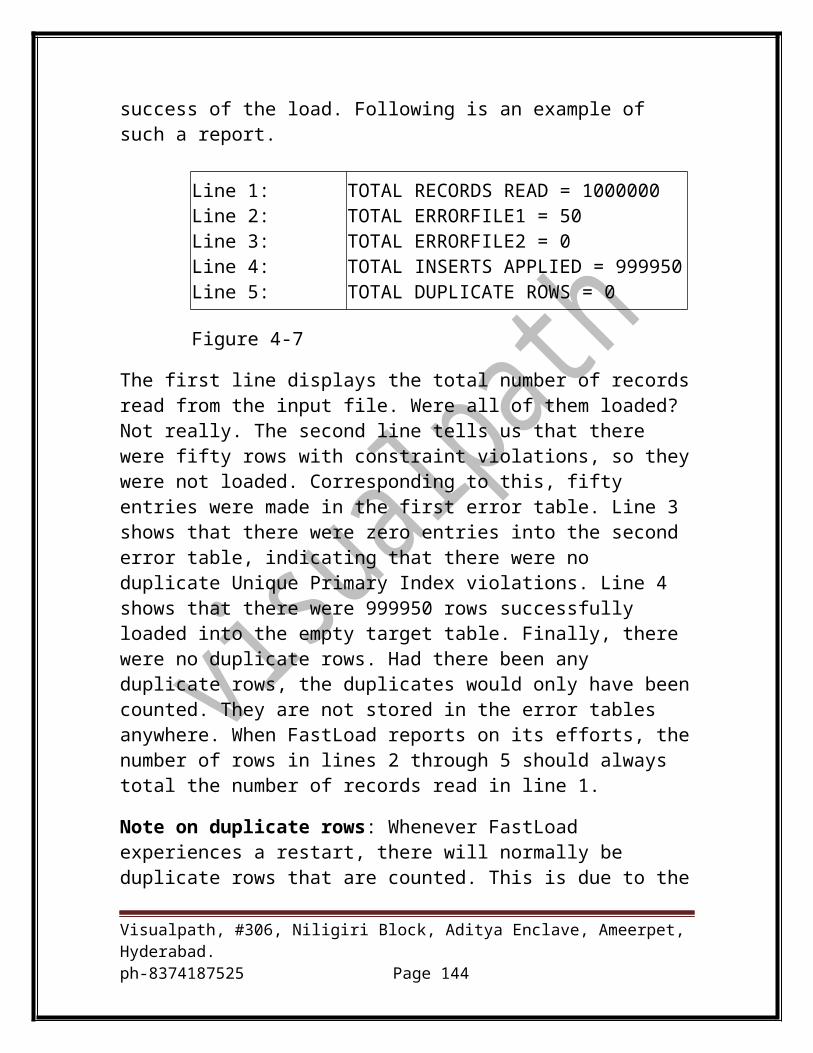
ACCEPT Allows the value of utility variables to be accepted directly from a file or from environmental variables.
LOGON LOGON command or string used to connect sessions established through the FastExport utility.
LOGTABLE FastExport utilizes this to specify a restart log table. The purpose is for FastExport checkpoint information.
RUN FILE Used to point to a file that FastExport is to use as standard input. This will Invoke the specified external file as the current source of utility and Teradata SQL commands.
SET Assigns a data type and value to a variable.
FIELD Constitutes a field in the input record section that provides data values for the SELECT statement.
FILLER Specifies a field in the input record that will not be sent to Teradata for processing. It is part of the input record to provide data values for the SELECT statement.
LAYOUT Specifies the data layout for a file. It contains a sequence of FIELD and FILLER commands. This is used to describe the import file that can optionally provide data values for the SELECT.
BEGIN LOADING This identifies and locks the FastLoad target table for the duration of the load. It also identifies the two error tables to be used for the load. CHECKPONT and INDICATORS are subordinate commands in the BEGIN LOADING clause of the script. CHECKPOINT, which will be discussed below in detail, is not the default for FastLoad. It must be specified in the script. INDICATORS is a keyword related to how FastLoad handles nulls in the input file. It identifies columns with nulls and uses a bitmap at the beginning of each row to show which fields contain a null instead of data. When the INDICATORS option is on, FastLoad looks at each
Visualpath, #306, Niligiri Block, Aditya Enclave, Ameerpet, Hyderabad.ph-8374187525 Page 144
bit to identify the null column. The INDICATORS option does not work with VARTEXT.
DEFINE This names the Input file and describes the columns in that file and the data types for those columns.
DELETE Deletes all the rows of a table. This will only work in the initial run of the script. Upon restart, it will fail because the table is locked.
DROP TABLE Drops a table and its data. It is used in FastLoad to drop previous Target and error tables. At the same time, this is not a good thing to do within a FastLoad script since it cancels the ability to restart.
ERRLIMIT Specifies the maximum number of rejected ROWS allowed in error table 1 (Phase I). This handy command can be a lifesaver when you are not sure how corrupt the data in the Input file is. The more corrupt it is, the greater the clean up effort required after the load finishes. ERRLIMIT provides you with a safety valve. You may specify a particular number of error rows beyond which FastLoad will immediately precede to the abort. This provides the option to restart the FastLoad or to scrub the input data more before loading it. Remember, all the rows in the error table are not in the data table. That becomes your responsibility.
HELP Designed for online use, the Help command provides a list of all possible FastLoad commands along with brief, but pertinent tips for using them.
HELP TABLE Builds the table columns list for use in the FastLoad DEFINE statement when the data matches the Create Table statement exactly. In real life this does not happen very often.
INSERT This is FastLoad’s favorite command! It inserts rows into the target table.
SLEEP Working in conjunction with TENACITY, the SLEEP command specifies the amount minutes to
Visualpath, #306, Niligiri Block, Aditya Enclave, Ameerpet, Hyderabad.ph-8374187525 Page 145
wait before retrying to logon and establish all sessions. This situation can occur if all of the loader slots are used or if the number of requested sessions are not available. The default is 6 minutes. For example, suppose that Teradata sessions are already maxed-out when your job is set to run. If TENACITY were set at 4 and SLEEP at 10, then FastLoad would attempt to logon every 10 minutes for up to 4 hours. If there were no success by that time, all efforts to logon would cease.
TENACITY Sometimes there are too many sessions already established with Teradata for a FastLoad to obtain the number of sessions it requested to perform its task or all of the loader slots are currently used. TENACITY specifies the amount of time, in hours, to retry to obtain a loader slot or to establish all requested sessions to logon. The default for FastLoad is “no tenacity”, meaning that it will not retry at all. If several FastLoad jobs are executed at the same time, we recommend setting the TENACITY to 4, meaning that the system will continue trying to logon for the number of sessions requested for up to four hours.
.BEGIN [IMPORT] MLOAD .BEGIN DELETE MLOAD
Task This command communicates directly with Teradata to specify if the MultiLoad mode is going to be IMPORT or DELETE. Note that the word IMPORT is optional in the syntax because it is the DEFAULT, but DELETE is required. We recommend using the word IMPORT to make the coding consistent and easier for others to read. Any parameters for the load, such as error limits or checkpoints will be included under the .BEGIN command, too. It is important to know which commands or parameters are optional since, if you do not include them, MultiLoad may supply defaults that may impact your load.
.DML LABEL Task The DML LABEL defines treatment options and labels for the application (APPLY) of data for the INSERT, UPDATE, UPSERT and DELETE operations. A LABEL is simply a name for a requested SQL activity. The LABEL is defined first, and then referenced later in the APPLY clause.
Visualpath, #306, Niligiri Block, Aditya Enclave, Ameerpet, Hyderabad.ph-8374187525 Page 146
.END MLOAD Task This instructs MultiLoad to finish the APPLY operations with the changes to the designated databases and tables.
.FIELD Task This defines a column of the data source record that will be sent to the Teradata database via SQL. When writing the script, you must include a FIELD for each data field you need in SQL. This command is used with the LAYOUT command.
Bteq scripts:Simple script:.RUN FILE = mylogon.txt (127.0.0.1/database name then password)DATABASE tmp;DELETE FROM Employee_Table;.IF ERRORCODE = 0 THEN .GOTO INSEMPS/* ERRORCODE is a reserved word that contains the outcome status for every SQL statement executed in BTEQ. A zero (0) indicates that statement worked. */Create Table Employee_Table(Employee_No Integer, Last_name char(20), First_name char(20), Salary Decimal(8,2), Dept_No SmallInt)Unique Primary Index (Employee_No);.LABEL INSEMPS INSERT INTO Employee_Table (1232578, 'Chambers', 'Mandee', 48850.00, 100);INSERT INTO Employee_Table (1256349, 'Harrison' ,'Herbert', 54500.00, 400);.QUIT
Bteqexport script: exporting a file from database to a parameter file.run file = mylogon.txtdatabase tmp;.export indicdata file= sample1ex.txtsel * from employee_table;.export reset.logoffexit;
Bteq import: importing a parameter file into a database, Program:.Run file = mylogon.txtdatabase tmp(name);.import indicdata(mode) file = sample1ex.txt.quiet on.repeat *using eno (integer),f_name(char(20)),l_name(char(20)),sal(decimal(8,2)),deptno (smallint)
Visualpath, #306, Niligiri Block, Aditya Enclave, Ameerpet, Hyderabad.ph-8374187525 Page 147
insert into employee_table(employee_no,first_name,last_name,salary,dept_no)values(:eno,:f_name,:l_name,:sal,:deptno);.quit
Fast export scripts:Data:ct t1(x1 int,y1 char(10), z1 decimal(9,4));;ins t1(1,'Netezza' , 600.0000);ins t1(2,'Netezza' , 600.0000);ins t1(3,'teradata', 500.0000);ins t1(4,'Netezza' , 600.0000);ins t1(5,'DB2' , 500.0000);Fast export using set command:.LOGTABLE tmp.RestartLog1_fxp; .logon 127.0.0.1/dbc,dbc ;database tmp;.SET YY TO 'Netezza';.SET ZZ TO 600.0000;.BEGIN EXPORT SESSIONS 4 ;.EXPORT OUTFILE FXP_DEF.OUT;SELECT x1,y1,z1FROM T1 WHERE y1 = '&YY'AND z1 = &ZZORDER BY 1 ;.END EXPORT ;.LOGOFF ;Fast export using acceptcommand:.LOGTABLE tmp.RestartLog1_fxp; .logon 127.0.0.1/dbc,dbc ;database tmp;.ACCEPT YY, ZZ FROM FILE parmfile.txt;.BEGIN EXPORT SESSIONS 4 ;.EXPORT OUTFILE FXP_DEF_ACCEPT.out;SELECT x1,y1,z1FROM T1 WHERE y1 = '&YY'AND z1 = &ZZORDER BY 1 ;
Visualpath, #306, Niligiri Block, Aditya Enclave, Ameerpet, Hyderabad.ph-8374187525 Page 148
.END EXPORT ;
.LOGOFF ;
Fast export using layout command:.LOGTABLE tmp.RestartLog1_fxp; .logon 127.0.0.1/dbc,dbc ;database tmp;.BEGIN EXPORT SESSIONS 4 ;.LAYOUT Record_Layout;.FIELD YY 1 CHAR(8);.FIELD ZZ * CHAR(8);.IMPORT INFILE 'fexplaydatafile.txt' LAYOUT Record_LayoutFORMAT TEXT;.EXPORT OUTFILE FXP_DEF_LAYOUT.txt;SELECT x1,y1,z1FROM T1 WHEREy1 = :YYAND z1 = :ZZORDER BY 1 ;.END EXPORT ;.LOGOFF ;Fast load scripts:sessions 8;tenacity 4;sleep 3;logon 127.0.0.1/dbc,dbc;errlimit 1000;begin loading tmp.emp_tableerrorfiles tmp.emp_err1, tmp.emp_err2;defineempno (INTEGER),ename (VARCHAR(10)),sal (INTEGER),job (CHAR(10)),loc (CHAR(10))file=myfexpload.txt;insert into tmp.emp_table values(:empno,:ename,:sal,:job,:loc);end loading;logoff;fload optimized scripts:LOGON 127.0.0.1/dbc,dbc;BEGIN LOADING TMP.T1 ERRORFILES TMP.T1_1, TMP.T1_2;DEFINE FILE=FXP_rec_text.out;HELP TABLE TMP.T1;INSERT INTO TMP.T1.*;END LOADING;LOGOFF;Multiload scripts using vartxt mode:logtable tmp.t1_log;
Visualpath, #306, Niligiri Block, Aditya Enclave, Ameerpet, Hyderabad.ph-8374187525 Page 149
.logon 127.0.0.1/dbc,dbc;
.begin import mload tables tmp.t1worktables tmp.t1_wrkerrortables tmp.t1_er1 tmp.t1_er2 ;.layout internal;.field x1 * varchar(10);.field y1 * varchar(20);.field z1 * varchar(10);.dml label tdmload;insert tmp.t1(x1,y1,z1) values (:x1, :y1, :z1);.import infile md.txt format vartext ',' layout internalapply tdmload;.end mload;.logoff;Multiload scripts using txt mode:.logtable tmp.t1_log;.logon 127.0.0.1/dbc,dbc;.begin import mload tables tmp.t1worktables tmp.t1_wrkerrortables tmp.t1_er1 tmp.t1_er2 ;.layout internal;.field x1 1 Integer;.field y1 13 varchar(20);.field z1 26 decimal(9,4);.dml label tdmload;insert tmp.t1(x1,y1,z1) values (:x1, :y1, :z1);.import infile md.txtformat text layout internalapply tdmload;.end mload;.logoff;
Visualpath, #306, Niligiri Block, Aditya Enclave, Ameerpet, Hyderabad.ph-8374187525 Page 150
Visualpath, #306, Niligiri Block, Aditya Enclave, Ameerpet, Hyderabad.ph-8374187525 Page 151