teradata Index Wizard User Guide -...
162
Teradata Index Wizard User Guide Release 12.0 B035-2506-067A July 2007
-
Upload
trinhxuyen -
Category
Documents
-
view
232 -
download
0
Transcript of teradata Index Wizard User Guide -...
Teradata Index WizardUser Guide
Release 12.0B035-2506-067A
July 2007
The product or products described in this book are licensed products of Teradata Corporation or its affiliates.
Teradata, BYNET, DBC/1012, DecisionCast, DecisionFlow, DecisionPoint, Eye logo design, InfoWise, Meta Warehouse, MyCommerce, SeeChain, SeeCommerce, SeeRisk, Teradata Decision Experts, Teradata Source Experts, WebAnalyst, and You’ve Never Seen Your Business Like This Before are trademarks or registered trademarks of Teradata Corporation or its affiliates.
Adaptec and SCSISelect are trademarks or registered trademarks of Adaptec, Inc.
AMD Opteron and Opteron are trademarks of Advanced Micro Devices, Inc.
BakBone and NetVault are trademarks or registered trademarks of BakBone Software, Inc.
EMC, PowerPath, SRDF, and Symmetrix are registered trademarks of EMC Corporation.
GoldenGate is a trademark of GoldenGate Software, Inc.
Hewlett-Packard and HP are registered trademarks of Hewlett-Packard Company.
Intel, Pentium, and XEON are registered trademarks of Intel Corporation.
IBM, CICS, DB2, MVS, RACF, Tivoli, and VM are registered trademarks of International Business Machines Corporation.
Linux is a registered trademark of Linus Torvalds.
LSI and Engenio are registered trademarks of LSI Corporation.
Microsoft, Active Directory, Windows, Windows NT, and Windows Server are registered trademarks of Microsoft Corporation in the United States and other countries.
Novell and SUSE are registered trademarks of Novell, Inc., in the United States and other countries.
QLogic and SANbox trademarks or registered trademarks of QLogic Corporation.
SAS and SAS/C are trademarks or registered trademarks of SAS Institute Inc.
SPARC is a registered trademarks of SPARC International, Inc.
Sun Microsystems, Solaris, Sun, and Sun Java are trademarks or registered trademarks of Sun Microsystems, Inc., in the United States and other countries.
Symantec, NetBackup, and VERITAS are trademarks or registered trademarks of Symantec Corporation or its affiliates in the United States and other countries.
Unicode is a collective membership mark and a service mark of Unicode, Inc.
UNIX is a registered trademark of The Open Group in the United States and other countries.
Other product and company names mentioned herein may be the trademarks of their respective owners.
THE INFORMATION CONTAINED IN THIS DOCUMENT IS PROVIDED ON AN “AS-IS” BASIS, WITHOUT WARRANTY OF ANY KIND, EITHER EXPRESS OR IMPLIED, INCLUDING THE IMPLIED WARRANTIES OF MERCHANTABILITY, FITNESS FOR A PARTICULAR PURPOSE, OR NON-INFRINGEMENT. SOME JURISDICTIONS DO NOT ALLOW THE EXCLUSION OF IMPLIED WARRANTIES, SO THE ABOVE EXCLUSION MAY NOT APPLY TO YOU. IN NO EVENT WILL TERADATA CORPORATION BE LIABLE FOR ANY INDIRECT, DIRECT, SPECIAL, INCIDENTAL, OR CONSEQUENTIAL DAMAGES, INCLUDING LOST PROFITS OR LOST SAVINGS, EVEN IF EXPRESSLY ADVISED OF THE POSSIBILITY OF SUCH DAMAGES.
The information contained in this document may contain references or cross-references to features, functions, products, or services that are not announced or available in your country. Such references do not imply that Teradata Corporation intends to announce such features, functions, products, or services in your country. Please consult your local Teradata Corporation representative for those features, functions, products, or services available in your country.
Information contained in this document may contain technical inaccuracies or typographical errors. Information may be changed or updated without notice. Teradata Corporation may also make improvements or changes in the products or services described in this information at any time without notice.
To maintain the quality of our products and services, we would like your comments on the accuracy, clarity, organization, and value of this document. Please e-mail: [email protected]
Any comments or materials (collectively referred to as “Feedback”) sent to Teradata Corporation will be deemed non-confidential. Teradata Corporation will have no obligation of any kind with respect to Feedback and will be free to use, reproduce, disclose, exhibit, display, transform, create derivative works of, and distribute the Feedback and derivative works thereof without limitation on a royalty-free basis. Further, Teradata Corporation will be free to use any ideas, concepts, know-how, or techniques contained in such Feedback for any purpose whatsoever, including developing, manufacturing, or marketing products or services incorporating Feedback.
Copyright © 2001-2007 by Teradata Corporation. All Rights Reserved.
Preface
Purpose
This book provides information on Teradata® Index Wizard, which is a Teradata® Tools and Utilities product. The Teradata Tools and Utilities are a group of products designed to work with the Teradata Database.
Teradata Index Wizard allows a Teradata Database administrator to create or identify a workload, perform index analysis for a workload, and verify and apply index recommendations to increase efficiency and maximize system performance.
Audience
This book is intended for use by:
• System and application programmers
• System administrators
• Teradata Database administrators and developers
• System operators and other database specialists
Supported Releases
This book supports the following releases:
• Teradata Database 12.00.00
• Teradata Tools and Utilities 12.00.00
• Teradata Index Wizard 12.0
Note: See “Version and Copyright Information” on page 34 to verify the Teradata Index Wizard version number.
To locate detailed supported release information:
1 Go to www.info.teradata.com.
2 Navigate to General Search > Publication Product ID.
3 Enter 3119.
4 Open the version of the Teradata Tools and Utilities ##.##.## Supported Versions spreadsheet associated with this release.
Teradata Index Wizard User Guide 3
PrefacePrerequisites
The spreadsheet includes supported Teradata Database versions, platforms, and product release numbers.
Prerequisites
The following prerequisite knowledge is required for this product:
• Relational database management systems
• SQL and Teradata SQL
• Basic concepts and facilities of the Teradata Database
• Connectivity software, such as ODBC or CLIv2
Changes to This Book
The following changes were made to this book in support of the current release. Changes are marked with change bars. For a complete list of changes to the product, see the Release Definition associated with this release.
4 Teradata Index Wizard User Guide
PrefaceAdditional Information
Additional Information
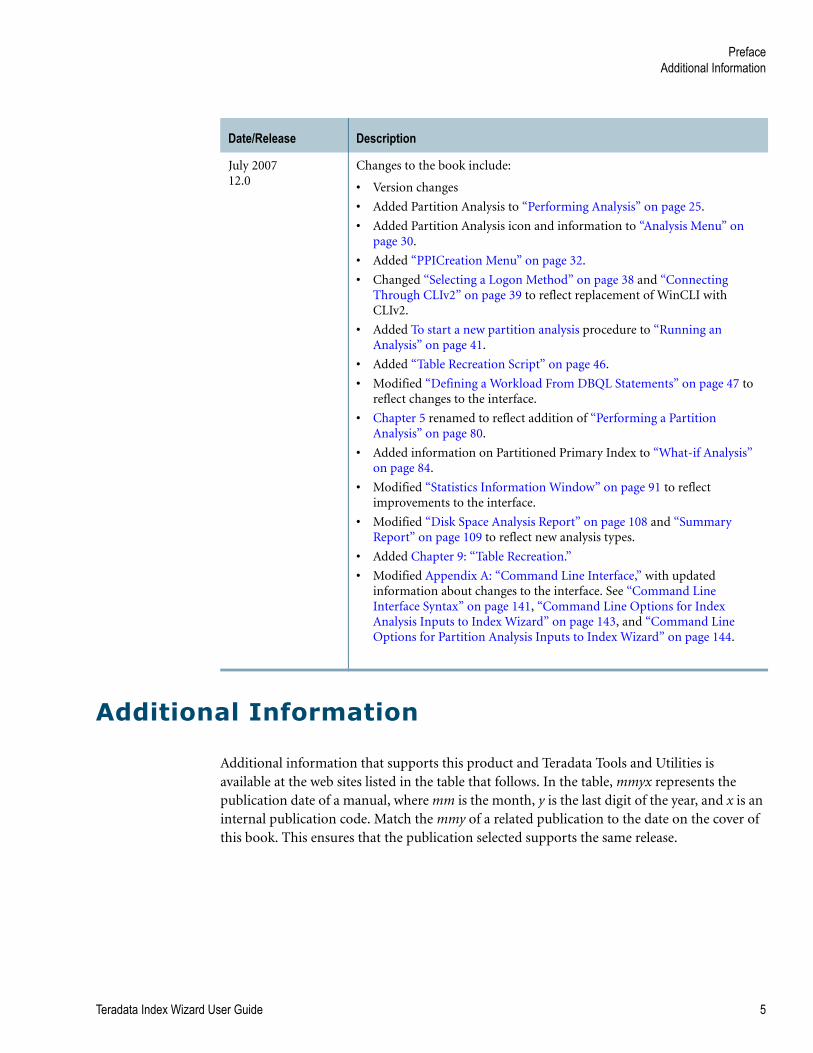
Additional information that supports this product and Teradata Tools and Utilities is available at the web sites listed in the table that follows. In the table, mmyx represents the publication date of a manual, where mm is the month, y is the last digit of the year, and x is an internal publication code. Match the mmy of a related publication to the date on the cover of this book. This ensures that the publication selected supports the same release.
Date/Release Description
July 200712.0
Changes to the book include:
• Version changes
• Added Partition Analysis to “Performing Analysis” on page 25.
• Added Partition Analysis icon and information to “Analysis Menu” on page 30.
• Added “PPICreation Menu” on page 32.
• Changed “Selecting a Logon Method” on page 38 and “Connecting Through CLIv2” on page 39 to reflect replacement of WinCLI with CLIv2.
• Added To start a new partition analysis procedure to “Running an Analysis” on page 41.
• Added “Table Recreation Script” on page 46.
• Modified “Defining a Workload From DBQL Statements” on page 47 to reflect changes to the interface.
• Chapter 5 renamed to reflect addition of “Performing a Partition Analysis” on page 80.
• Added information on Partitioned Primary Index to “What-if Analysis” on page 84.
• Modified “Statistics Information Window” on page 91 to reflect improvements to the interface.
• Modified “Disk Space Analysis Report” on page 108 and “Summary Report” on page 109 to reflect new analysis types.
• Added Chapter 9: “Table Recreation.”
• Modified Appendix A: “Command Line Interface,” with updated information about changes to the interface. See “Command Line Interface Syntax” on page 141, “Command Line Options for Index Analysis Inputs to Index Wizard” on page 143, and “Command Line Options for Partition Analysis Inputs to Index Wizard” on page 144.
Teradata Index Wizard User Guide 5
PrefaceAdditional Information
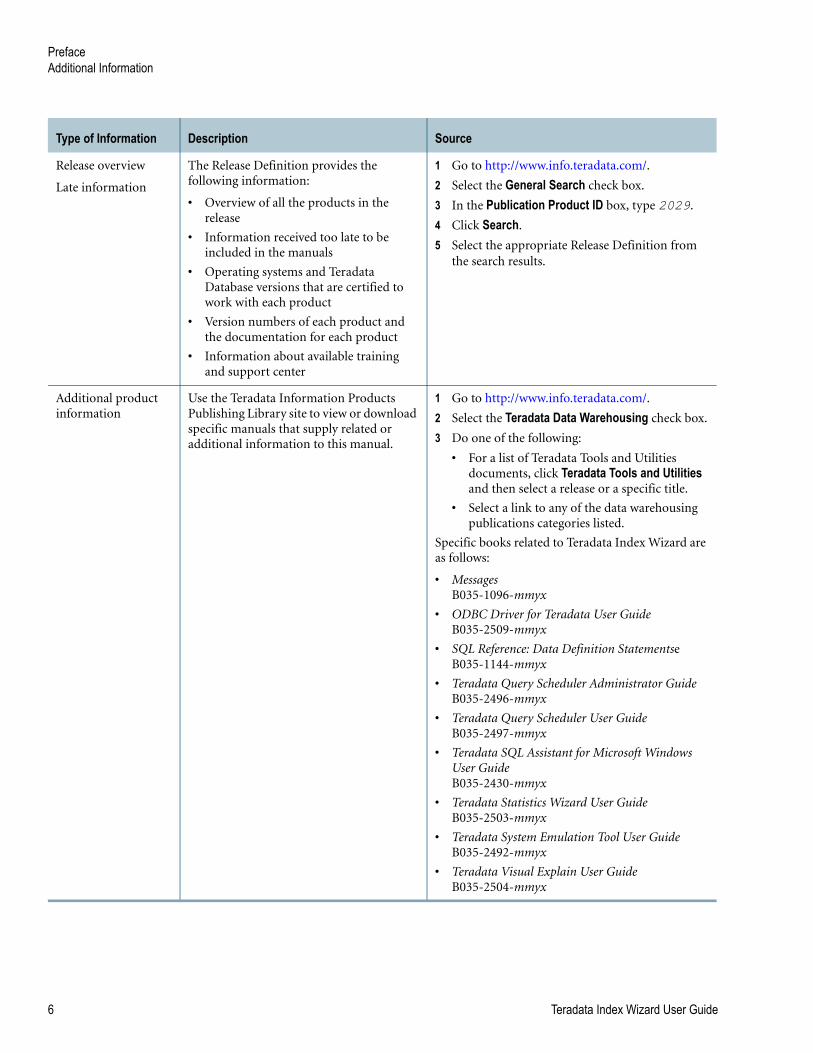
Type of Information Description Source
Release overview
Late information
The Release Definition provides the following information:
• Overview of all the products in the release
• Information received too late to be included in the manuals
• Operating systems and Teradata Database versions that are certified to work with each product
• Version numbers of each product and the documentation for each product
• Information about available training and support center
1 Go to http://www.info.teradata.com/.
2 Select the General Search check box.
3 In the Publication Product ID box, type 2029.
4 Click Search.
5 Select the appropriate Release Definition from the search results.
Additional product information
Use the Teradata Information Products Publishing Library site to view or download specific manuals that supply related or additional information to this manual.
1 Go to http://www.info.teradata.com/.
2 Select the Teradata Data Warehousing check box.
3 Do one of the following:
• For a list of Teradata Tools and Utilities documents, click Teradata Tools and Utilities and then select a release or a specific title.
• Select a link to any of the data warehousing publications categories listed.
Specific books related to Teradata Index Wizard are as follows:
• MessagesB035-1096-mmyx
• ODBC Driver for Teradata User GuideB035-2509-mmyx
• SQL Reference: Data Definition StatementseB035-1144-mmyx
• Teradata Query Scheduler Administrator GuideB035-2496-mmyx
• Teradata Query Scheduler User GuideB035-2497-mmyx
• Teradata SQL Assistant for Microsoft Windows User GuideB035-2430-mmyx
• Teradata Statistics Wizard User GuideB035-2503-mmyx
• Teradata System Emulation Tool User GuideB035-2492-mmyx
• Teradata Visual Explain User GuideB035-2504-mmyx
6 Teradata Index Wizard User Guide

PrefaceAdditional Information
CD-ROM images Access a link to a downloadable CD-ROM image of all customer documentation for this release. Customers are authorized to create CD-ROMs for their use from this image.
1 Go to http://www.info.teradata.com/.
2 Select the General Search check box.
3 In the Title or Keyword box, type CD-ROM.
4 Click Search.
Ordering information for manuals
Use the Teradata Information Products Publishing Library site to order printed versions of manuals.
1 Go to http://www.info.teradata.com/.
2 Select the How to Order check box under Print & CD Publications.
3 Follow the ordering instructions.
General information about Teradata
The Teradata home page provides links to numerous sources of information about Teradata. Links include:
• Executive reports, case studies of customer experiences with Teradata, and thought leadership
• Technical information, solutions, and expert advice
• Press releases, mentions and media resources
1 Go to Teradata.com.
2 Select a link.
Type of Information Description Source
Teradata Index Wizard User Guide 7

PrefaceAdditional Information
8 Teradata Index Wizard User Guide
Table of Contents
Preface. . . . . . . . . . . . . . . . . . . . . . . . . . . . . . . . . . . . . . . . . . . . . . . . . . . . . . . . . . . . . . . . . . . . .3
Purpose . . . . . . . . . . . . . . . . . . . . . . . . . . . . . . . . . . . . . . . . . . . . . . . . . . . . . . . . . . . . . . . . . . . . . . .3
Audience . . . . . . . . . . . . . . . . . . . . . . . . . . . . . . . . . . . . . . . . . . . . . . . . . . . . . . . . . . . . . . . . . . . . . .3
Supported Releases . . . . . . . . . . . . . . . . . . . . . . . . . . . . . . . . . . . . . . . . . . . . . . . . . . . . . . . . . . . . . .3
Prerequisites . . . . . . . . . . . . . . . . . . . . . . . . . . . . . . . . . . . . . . . . . . . . . . . . . . . . . . . . . . . . . . . . . . .4
Changes to This Book. . . . . . . . . . . . . . . . . . . . . . . . . . . . . . . . . . . . . . . . . . . . . . . . . . . . . . . . . . . .4
Additional Information . . . . . . . . . . . . . . . . . . . . . . . . . . . . . . . . . . . . . . . . . . . . . . . . . . . . . . . . . .5
Chapter 1: Introduction . . . . . . . . . . . . . . . . . . . . . . . . . . . . . . . . . . . . . . . . . . . . . . . . . . . . . . . . . . . . 21
How Teradata Index Wizard Works . . . . . . . . . . . . . . . . . . . . . . . . . . . . . . . . . . . . . . . . . . . . . . 21
Index Wizard Features . . . . . . . . . . . . . . . . . . . . . . . . . . . . . . . . . . . . . . . . . . . . . . . . . . . . . . . . . 21
Teradata Analyst Pack. . . . . . . . . . . . . . . . . . . . . . . . . . . . . . . . . . . . . . . . . . . . . . . . . . . . . . . . . . 22
Ways the Analyst Pack Tools Work Together . . . . . . . . . . . . . . . . . . . . . . . . . . . . . . . . . . . 23
How Index Wizard Works . . . . . . . . . . . . . . . . . . . . . . . . . . . . . . . . . . . . . . . . . . . . . . . . . . . . . . 24
Online Help . . . . . . . . . . . . . . . . . . . . . . . . . . . . . . . . . . . . . . . . . . . . . . . . . . . . . . . . . . . . . . . . . . 26
Using Online Help . . . . . . . . . . . . . . . . . . . . . . . . . . . . . . . . . . . . . . . . . . . . . . . . . . . . . . . . . 26
Chapter 2: Interface . . . . . . . . . . . . . . . . . . . . . . . . . . . . . . . . . . . . . . . . . . . . . . . . . . . . . . . . . . . . . . . . 27
File Menu . . . . . . . . . . . . . . . . . . . . . . . . . . . . . . . . . . . . . . . . . . . . . . . . . . . . . . . . . . . . . . . . . . . . 27
View Menu. . . . . . . . . . . . . . . . . . . . . . . . . . . . . . . . . . . . . . . . . . . . . . . . . . . . . . . . . . . . . . . . . . . 28
Workload Menu . . . . . . . . . . . . . . . . . . . . . . . . . . . . . . . . . . . . . . . . . . . . . . . . . . . . . . . . . . . . . . 29
Analysis Menu . . . . . . . . . . . . . . . . . . . . . . . . . . . . . . . . . . . . . . . . . . . . . . . . . . . . . . . . . . . . . . . . 30
Reports Menu . . . . . . . . . . . . . . . . . . . . . . . . . . . . . . . . . . . . . . . . . . . . . . . . . . . . . . . . . . . . . . . . 30
Validation Menu . . . . . . . . . . . . . . . . . . . . . . . . . . . . . . . . . . . . . . . . . . . . . . . . . . . . . . . . . . . . . . 31
Creation Menu . . . . . . . . . . . . . . . . . . . . . . . . . . . . . . . . . . . . . . . . . . . . . . . . . . . . . . . . . . . . . . . 32
PPICreation Menu . . . . . . . . . . . . . . . . . . . . . . . . . . . . . . . . . . . . . . . . . . . . . . . . . . . . . . . . . . . . 32
Tools Menu . . . . . . . . . . . . . . . . . . . . . . . . . . . . . . . . . . . . . . . . . . . . . . . . . . . . . . . . . . . . . . . . . . 33
Teradata Index Wizard User Guide 9

Table of Contents
Windows Menu. . . . . . . . . . . . . . . . . . . . . . . . . . . . . . . . . . . . . . . . . . . . . . . . . . . . . . . . . . . . . . . .33
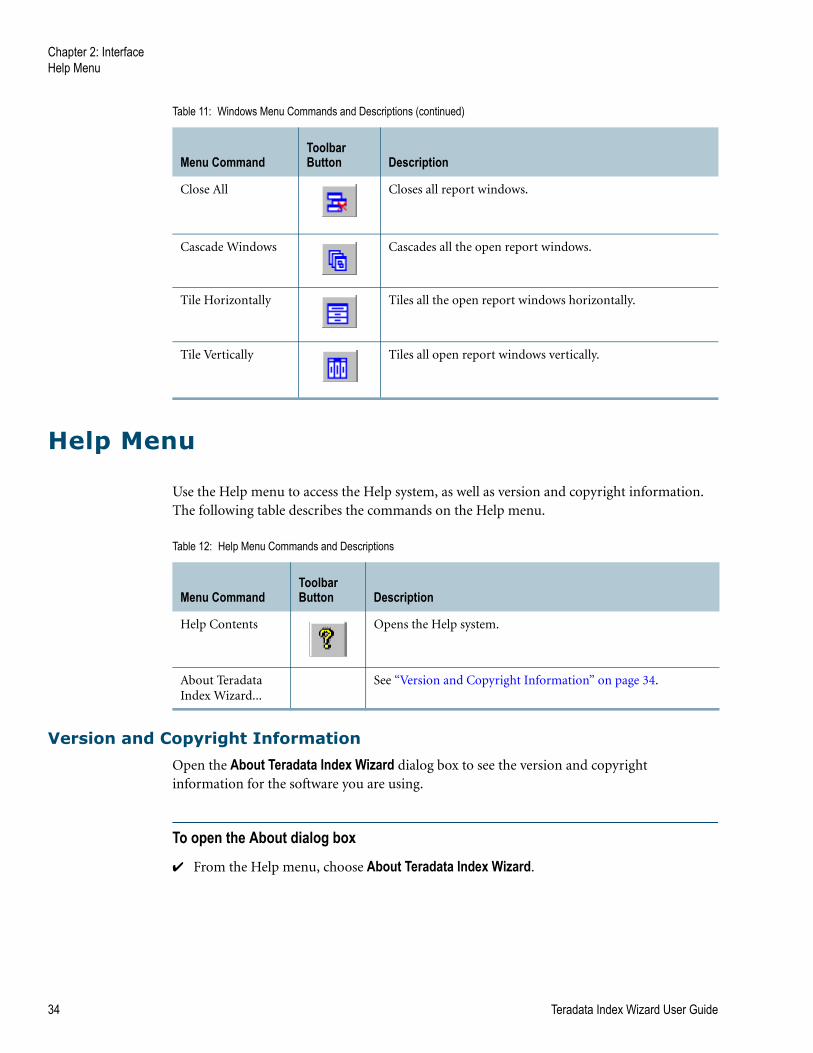
Help Menu. . . . . . . . . . . . . . . . . . . . . . . . . . . . . . . . . . . . . . . . . . . . . . . . . . . . . . . . . . . . . . . . . . . .34
Version and Copyright Information . . . . . . . . . . . . . . . . . . . . . . . . . . . . . . . . . . . . . . . . . . .34
Status Bar . . . . . . . . . . . . . . . . . . . . . . . . . . . . . . . . . . . . . . . . . . . . . . . . . . . . . . . . . . . . . . . . . . . . .35
Shortcut Menus. . . . . . . . . . . . . . . . . . . . . . . . . . . . . . . . . . . . . . . . . . . . . . . . . . . . . . . . . . . . . . . .35
Chapter 3: Index Wizard-Quick Start . . . . . . . . . . . . . . . . . . . . . . . . . . . . . . . . . . . . . . . . . . . .37
Launching Teradata Index Wizard . . . . . . . . . . . . . . . . . . . . . . . . . . . . . . . . . . . . . . . . . . . . . . . .37
Selecting a Logon Method . . . . . . . . . . . . . . . . . . . . . . . . . . . . . . . . . . . . . . . . . . . . . . . . . . . . . . .38
Connecting Through ODBC. . . . . . . . . . . . . . . . . . . . . . . . . . . . . . . . . . . . . . . . . . . . . . . . . .38
Connecting Through CLIv2 . . . . . . . . . . . . . . . . . . . . . . . . . . . . . . . . . . . . . . . . . . . . . . . . . .39
Connection Errors . . . . . . . . . . . . . . . . . . . . . . . . . . . . . . . . . . . . . . . . . . . . . . . . . . . . . . . . . .40
Defining a Workload . . . . . . . . . . . . . . . . . . . . . . . . . . . . . . . . . . . . . . . . . . . . . . . . . . . . . . . . . . .40
Running an Analysis . . . . . . . . . . . . . . . . . . . . . . . . . . . . . . . . . . . . . . . . . . . . . . . . . . . . . . . . . . . .41
Selecting Reports . . . . . . . . . . . . . . . . . . . . . . . . . . . . . . . . . . . . . . . . . . . . . . . . . . . . . . . . . . . . . . .43
Validating Recommendations . . . . . . . . . . . . . . . . . . . . . . . . . . . . . . . . . . . . . . . . . . . . . . . . . . . .44
Validation Results Report . . . . . . . . . . . . . . . . . . . . . . . . . . . . . . . . . . . . . . . . . . . . . . . . . . . .45
Executing Recommendations . . . . . . . . . . . . . . . . . . . . . . . . . . . . . . . . . . . . . . . . . . . . . . . . . . . .46
Table Recreation Script . . . . . . . . . . . . . . . . . . . . . . . . . . . . . . . . . . . . . . . . . . . . . . . . . . . . . . . . .46
Chapter 4: Workload Definition . . . . . . . . . . . . . . . . . . . . . . . . . . . . . . . . . . . . . . . . . . . . . . . . . . .47
Defining a Workload From DBQL Statements . . . . . . . . . . . . . . . . . . . . . . . . . . . . . . . . . . . . . .47
Defining a Workload Using Statement Text . . . . . . . . . . . . . . . . . . . . . . . . . . . . . . . . . . . . . . . .52
Defining a Workload From QCD Statements . . . . . . . . . . . . . . . . . . . . . . . . . . . . . . . . . . . . . . .54
Errors While Defining a Workload . . . . . . . . . . . . . . . . . . . . . . . . . . . . . . . . . . . . . . . . . . . . . . . .56
Importing a Workload . . . . . . . . . . . . . . . . . . . . . . . . . . . . . . . . . . . . . . . . . . . . . . . . . . . . . . . . . .57
Setting the TLE. . . . . . . . . . . . . . . . . . . . . . . . . . . . . . . . . . . . . . . . . . . . . . . . . . . . . . . . . . . . .59
Handling Errors . . . . . . . . . . . . . . . . . . . . . . . . . . . . . . . . . . . . . . . . . . . . . . . . . . . . . . . . . . . .61
Import Options . . . . . . . . . . . . . . . . . . . . . . . . . . . . . . . . . . . . . . . . . . . . . . . . . . . . . . . . . . . .63
Defining a Workload from an Existing Workload. . . . . . . . . . . . . . . . . . . . . . . . . . . . . . . . . . . .64
Adding Additional Workload Statements . . . . . . . . . . . . . . . . . . . . . . . . . . . . . . . . . . . . . . .65
Updating an Existing Workload . . . . . . . . . . . . . . . . . . . . . . . . . . . . . . . . . . . . . . . . . . . . . . . . . .66
Add Statements Options . . . . . . . . . . . . . . . . . . . . . . . . . . . . . . . . . . . . . . . . . . . . . . . . . . . . .68
Additional Workload Functions . . . . . . . . . . . . . . . . . . . . . . . . . . . . . . . . . . . . . . . . . . . . . . . . . .69
10 Teradata Index Wizard User Guide
Table of Contents
Workload Cleanup. . . . . . . . . . . . . . . . . . . . . . . . . . . . . . . . . . . . . . . . . . . . . . . . . . . . . . . . . 70
Viewing Workload Details . . . . . . . . . . . . . . . . . . . . . . . . . . . . . . . . . . . . . . . . . . . . . . . . . . 71
Workload Summary. . . . . . . . . . . . . . . . . . . . . . . . . . . . . . . . . . . . . . . . . . . . . . . . . . . . . . . . 72
Displaying Statement Text . . . . . . . . . . . . . . . . . . . . . . . . . . . . . . . . . . . . . . . . . . . . . . . . . . 72
Chapter 5: Analysis. . . . . . . . . . . . . . . . . . . . . . . . . . . . . . . . . . . . . . . . . . . . . . . . . . . . . . . . . . . . . . . . . . 73
Performing an Index Analysis . . . . . . . . . . . . . . . . . . . . . . . . . . . . . . . . . . . . . . . . . . . . . . . . . . . 73
Advanced Index Parameters . . . . . . . . . . . . . . . . . . . . . . . . . . . . . . . . . . . . . . . . . . . . . . . . . 75
Index Analysis Summary Window . . . . . . . . . . . . . . . . . . . . . . . . . . . . . . . . . . . . . . . . . . . . 80
Performing a Partition Analysis. . . . . . . . . . . . . . . . . . . . . . . . . . . . . . . . . . . . . . . . . . . . . . . . . . 80
Partition Analysis Summary Window . . . . . . . . . . . . . . . . . . . . . . . . . . . . . . . . . . . . . . . . . 82
Restarting an Analysis. . . . . . . . . . . . . . . . . . . . . . . . . . . . . . . . . . . . . . . . . . . . . . . . . . . . . . . . . . 83
What-if Analysis . . . . . . . . . . . . . . . . . . . . . . . . . . . . . . . . . . . . . . . . . . . . . . . . . . . . . . . . . . . . . . 84
View Details Button . . . . . . . . . . . . . . . . . . . . . . . . . . . . . . . . . . . . . . . . . . . . . . . . . . . . . . . . 88
Advanced Button . . . . . . . . . . . . . . . . . . . . . . . . . . . . . . . . . . . . . . . . . . . . . . . . . . . . . . . . . . 89
Statistics Information Window. . . . . . . . . . . . . . . . . . . . . . . . . . . . . . . . . . . . . . . . . . . . . . . 91
What-if Analysis Results . . . . . . . . . . . . . . . . . . . . . . . . . . . . . . . . . . . . . . . . . . . . . . . . . . . . 94
What-if Analysis Process . . . . . . . . . . . . . . . . . . . . . . . . . . . . . . . . . . . . . . . . . . . . . . . . . . . . 96
Analysis Summary. . . . . . . . . . . . . . . . . . . . . . . . . . . . . . . . . . . . . . . . . . . . . . . . . . . . . . . . . . . . . 97
View Reports . . . . . . . . . . . . . . . . . . . . . . . . . . . . . . . . . . . . . . . . . . . . . . . . . . . . . . . . . . . . . . . . . 98
Chapter 6: Reports . . . . . . . . . . . . . . . . . . . . . . . . . . . . . . . . . . . . . . . . . . . . . . . . . . . . . . . . . . . . . . . . . 101
Existing Indexes Report . . . . . . . . . . . . . . . . . . . . . . . . . . . . . . . . . . . . . . . . . . . . . . . . . . . . . . . 102
Update Frequency Report . . . . . . . . . . . . . . . . . . . . . . . . . . . . . . . . . . . . . . . . . . . . . . . . . . . . . 103
Table Usage Analysis Report . . . . . . . . . . . . . . . . . . . . . . . . . . . . . . . . . . . . . . . . . . . . . . . . . . . 103
Table Scan Report . . . . . . . . . . . . . . . . . . . . . . . . . . . . . . . . . . . . . . . . . . . . . . . . . . . . . . . . . . . . 104
Workload Analysis Report . . . . . . . . . . . . . . . . . . . . . . . . . . . . . . . . . . . . . . . . . . . . . . . . . . . . . 105
Object Global Use Count Report. . . . . . . . . . . . . . . . . . . . . . . . . . . . . . . . . . . . . . . . . . . . . . . . 106
Index Recommendation Report . . . . . . . . . . . . . . . . . . . . . . . . . . . . . . . . . . . . . . . . . . . . . . . . 107
Query Cost Analysis Report . . . . . . . . . . . . . . . . . . . . . . . . . . . . . . . . . . . . . . . . . . . . . . . . . . . . 107
Disk Space Analysis Report . . . . . . . . . . . . . . . . . . . . . . . . . . . . . . . . . . . . . . . . . . . . . . . . . . . . 108
Summary Report . . . . . . . . . . . . . . . . . . . . . . . . . . . . . . . . . . . . . . . . . . . . . . . . . . . . . . . . . . . . . 109
Index Maintenance Cost Report . . . . . . . . . . . . . . . . . . . . . . . . . . . . . . . . . . . . . . . . . . . . . . . . 110
Viewing Reports from Other Workloads . . . . . . . . . . . . . . . . . . . . . . . . . . . . . . . . . . . . . . . . . 111
Teradata Index Wizard User Guide 11
Table of Contents
Chapter 7: Validation . . . . . . . . . . . . . . . . . . . . . . . . . . . . . . . . . . . . . . . . . . . . . . . . . . . . . . . . . . . . . . .113
The Validation Process . . . . . . . . . . . . . . . . . . . . . . . . . . . . . . . . . . . . . . . . . . . . . . . . . . . . . . . . .113
Loading Recommendations from QCD . . . . . . . . . . . . . . . . . . . . . . . . . . . . . . . . . . . . . . . . . . .114
Loading Recommendations from File. . . . . . . . . . . . . . . . . . . . . . . . . . . . . . . . . . . . . . . . . . . . .116
Validation Results . . . . . . . . . . . . . . . . . . . . . . . . . . . . . . . . . . . . . . . . . . . . . . . . . . . . . . . . . . . . .116
Chapter 8: Recommendations . . . . . . . . . . . . . . . . . . . . . . . . . . . . . . . . . . . . . . . . . . . . . . . . . . . .119
Executing a Recommendation Immediately . . . . . . . . . . . . . . . . . . . . . . . . . . . . . . . . . . . . . . .119
Execution Results Window . . . . . . . . . . . . . . . . . . . . . . . . . . . . . . . . . . . . . . . . . . . . . . . . . .120
Schedule Recommendation . . . . . . . . . . . . . . . . . . . . . . . . . . . . . . . . . . . . . . . . . . . . . . . . . . . . .120
Schedule Recommendation Errors . . . . . . . . . . . . . . . . . . . . . . . . . . . . . . . . . . . . . . . . . . . . . . .122
Chapter 9: Table Recreation . . . . . . . . . . . . . . . . . . . . . . . . . . . . . . . . . . . . . . . . . . . . . . . . . . . . . .125
Viewing the Table Recreation Script . . . . . . . . . . . . . . . . . . . . . . . . . . . . . . . . . . . . . . . . . . . . . .125
Chapter 10: Index Wizard Tools . . . . . . . . . . . . . . . . . . . . . . . . . . . . . . . . . . . . . . . . . . . . . . . . . . .127
Executing SQL Feature . . . . . . . . . . . . . . . . . . . . . . . . . . . . . . . . . . . . . . . . . . . . . . . . . . . . . . . . .127
Working With Other Teradata Client Tools . . . . . . . . . . . . . . . . . . . . . . . . . . . . . . . . . . . . . . .129
Preferences. . . . . . . . . . . . . . . . . . . . . . . . . . . . . . . . . . . . . . . . . . . . . . . . . . . . . . . . . . . . . . . . . . .129
Index Analysis Inputs . . . . . . . . . . . . . . . . . . . . . . . . . . . . . . . . . . . . . . . . . . . . . . . . . . . . . . . . . .131
Chapter 11: Data Demographics . . . . . . . . . . . . . . . . . . . . . . . . . . . . . . . . . . . . . . . . . . . . . . . . . . .133
Data Demographics Window Overview . . . . . . . . . . . . . . . . . . . . . . . . . . . . . . . . . . . . . . . . . . .133
The Data Demographics Menu Options . . . . . . . . . . . . . . . . . . . . . . . . . . . . . . . . . . . . . . .134
Data Demographics Window Controls . . . . . . . . . . . . . . . . . . . . . . . . . . . . . . . . . . . . . . . .135
Data Demographics Graph Types . . . . . . . . . . . . . . . . . . . . . . . . . . . . . . . . . . . . . . . . . . . . . . . .137
12 Teradata Index Wizard User Guide
Table of Contents
Disk Space Utilization Graph . . . . . . . . . . . . . . . . . . . . . . . . . . . . . . . . . . . . . . . . . . . . . . . 137
Spool Space Utilization Graph . . . . . . . . . . . . . . . . . . . . . . . . . . . . . . . . . . . . . . . . . . . . . . 138
Row Count/Avg. Row Size Graph . . . . . . . . . . . . . . . . . . . . . . . . . . . . . . . . . . . . . . . . . . . 138
Blocks Distribution Graph . . . . . . . . . . . . . . . . . . . . . . . . . . . . . . . . . . . . . . . . . . . . . . . . . 139
Statistics Details Graph . . . . . . . . . . . . . . . . . . . . . . . . . . . . . . . . . . . . . . . . . . . . . . . . . . . . 139
Appendix A: Command Line Interface . . . . . . . . . . . . . . . . . . . . . . . . . . . . . . . . . . . . . . . . . . . 141
Invoking the GUI . . . . . . . . . . . . . . . . . . . . . . . . . . . . . . . . . . . . . . . . . . . . . . . . . . . . . . . . . . . . 141
Opening Parameters . . . . . . . . . . . . . . . . . . . . . . . . . . . . . . . . . . . . . . . . . . . . . . . . . . . . . . . . . . 141
Command Line Interface Syntax . . . . . . . . . . . . . . . . . . . . . . . . . . . . . . . . . . . . . . . . . . . . . . . . 141
Command Line Options. . . . . . . . . . . . . . . . . . . . . . . . . . . . . . . . . . . . . . . . . . . . . . . . . . . . . . . 142
Appendix B: Index Wizard Error Messages . . . . . . . . . . . . . . . . . . . . . . . . . . . . . . . . . . . . . 147
Error Messages . . . . . . . . . . . . . . . . . . . . . . . . . . . . . . . . . . . . . . . . . . . . . . . . . . . . . . . . . . . . . . 147
Glossary . . . . . . . . . . . . . . . . . . . . . . . . . . . . . . . . . . . . . . . . . . . . . . . . . . . . . . . . . . . . . . . . 149
Index . . . . . . . . . . . . . . . . . . . . . . . . . . . . . . . . . . . . . . . . . . . . . . . . . . . . . . . . . . . . . . . . . . . . 157
Teradata Index Wizard User Guide 13

Table of Contents
14 Teradata Index Wizard User Guide
List of Figures
Figure 1: Index Wizard Architecture. . . . . . . . . . . . . . . . . . . . . . . . . . . . . . . . . . . . . . . . . . . . . . 24
Figure 2: Index Wizard Window . . . . . . . . . . . . . . . . . . . . . . . . . . . . . . . . . . . . . . . . . . . . . . . . . 27
Figure 3: Status Bar . . . . . . . . . . . . . . . . . . . . . . . . . . . . . . . . . . . . . . . . . . . . . . . . . . . . . . . . . . . . 35
Figure 4: Example of a Shortcut Menu . . . . . . . . . . . . . . . . . . . . . . . . . . . . . . . . . . . . . . . . . . . . 36
Figure 5: Index Wizard Main Window . . . . . . . . . . . . . . . . . . . . . . . . . . . . . . . . . . . . . . . . . . . . 37
Figure 6: Define a Workload using Statements Dialog Box . . . . . . . . . . . . . . . . . . . . . . . . . . . 53
Figure 7: Define a Workload from QCD Statements Dialog Box. . . . . . . . . . . . . . . . . . . . . . . 55
Figure 8: Warning Dialog Box . . . . . . . . . . . . . . . . . . . . . . . . . . . . . . . . . . . . . . . . . . . . . . . . . . . 56
Figure 9: Import File Dialog Box . . . . . . . . . . . . . . . . . . . . . . . . . . . . . . . . . . . . . . . . . . . . . . . . . 58
Figure 10: Set Target Level Emulation Dialog Box . . . . . . . . . . . . . . . . . . . . . . . . . . . . . . . . . . 60
Figure 11: Error Handling Dialog Box . . . . . . . . . . . . . . . . . . . . . . . . . . . . . . . . . . . . . . . . . . . . 61
Figure 12: Create from Existing Workload Dialog Box. . . . . . . . . . . . . . . . . . . . . . . . . . . . . . . 64
Figure 13: Update Existing Workload Dialog Box . . . . . . . . . . . . . . . . . . . . . . . . . . . . . . . . . . . 67
Figure 14: Workload Clean Up Dialog Box . . . . . . . . . . . . . . . . . . . . . . . . . . . . . . . . . . . . . . . . 70
Figure 15: Index Analysis Dialog Box . . . . . . . . . . . . . . . . . . . . . . . . . . . . . . . . . . . . . . . . . . . . . 74
Figure 16: Index Analysis Parameters Dialog Box . . . . . . . . . . . . . . . . . . . . . . . . . . . . . . . . . . . 76
Figure 17: Index Types Dialog Box . . . . . . . . . . . . . . . . . . . . . . . . . . . . . . . . . . . . . . . . . . . . . . . 79
Figure 18: Index Analysis Summary Window . . . . . . . . . . . . . . . . . . . . . . . . . . . . . . . . . . . . . . 80
Figure 19: Partition Analysis Dialog Box . . . . . . . . . . . . . . . . . . . . . . . . . . . . . . . . . . . . . . . . . . 81
Figure 20: Select Workload Dialog Box . . . . . . . . . . . . . . . . . . . . . . . . . . . . . . . . . . . . . . . . . . . 84
Figure 21: Workload Statements Report. . . . . . . . . . . . . . . . . . . . . . . . . . . . . . . . . . . . . . . . . . . 85
Figure 22: What-If Analysis: Add Index Dialog Box . . . . . . . . . . . . . . . . . . . . . . . . . . . . . . . . . 86
Figure 23: View Details Dialog Box and View Statement Dialog Box . . . . . . . . . . . . . . . . . . . 89
Figure 24: Analysis Options Dialog Box: Set Costs Tab . . . . . . . . . . . . . . . . . . . . . . . . . . . . . . 90
Figure 25: Analysis Options Dialog Box: Set Statistics Samples Tab . . . . . . . . . . . . . . . . . . . . 91
Figure 26: Statistics Information Window . . . . . . . . . . . . . . . . . . . . . . . . . . . . . . . . . . . . . . . . . 92
Figure 27: Analysis Results Dialog Box . . . . . . . . . . . . . . . . . . . . . . . . . . . . . . . . . . . . . . . . . . . . 94
Figure 28: Performance Improvement Chart . . . . . . . . . . . . . . . . . . . . . . . . . . . . . . . . . . . . . . . 95
Figure 29: Validation Results Window . . . . . . . . . . . . . . . . . . . . . . . . . . . . . . . . . . . . . . . . . . . 117
Figure 30: Select Recommendations Dialog Box . . . . . . . . . . . . . . . . . . . . . . . . . . . . . . . . . . . 121
Figure 31: Schedule Recommendations Dialog Box . . . . . . . . . . . . . . . . . . . . . . . . . . . . . . . . 122
Figure 32: Execute SQL - Query Window. . . . . . . . . . . . . . . . . . . . . . . . . . . . . . . . . . . . . . . . . 128
Teradata Index Wizard User Guide 15
List of Figures
Figure 33: Data Demographics Window. . . . . . . . . . . . . . . . . . . . . . . . . . . . . . . . . . . . . . . . . . .134
Figure 34: Navigation Controls for Table Graphs . . . . . . . . . . . . . . . . . . . . . . . . . . . . . . . . . . .136
16 Teradata Index Wizard User Guide
List of Tables
Table 1: File Menu Commands and Descriptions . . . . . . . . . . . . . . . . . . . . . . . . . . . . . . . . . . . 28
Table 2: File Menu Commands and Descriptions (when report is open) . . . . . . . . . . . . . . . . 28
Table 3: View Menu Commands and Descriptions . . . . . . . . . . . . . . . . . . . . . . . . . . . . . . . . . . 28
Table 4: Workload Menu Commands and Descriptions. . . . . . . . . . . . . . . . . . . . . . . . . . . . . . 29
Table 5: Analysis Menu Commands and Descriptions . . . . . . . . . . . . . . . . . . . . . . . . . . . . . . . 30
Table 6: Reports Menu Commands and Descriptions . . . . . . . . . . . . . . . . . . . . . . . . . . . . . . . 31
Table 7: Validation Menu Commands and Descriptions . . . . . . . . . . . . . . . . . . . . . . . . . . . . . 32
Table 8: Creation Menu Commands and Descriptions. . . . . . . . . . . . . . . . . . . . . . . . . . . . . . . 32
Table 9: PPICreation Menu . . . . . . . . . . . . . . . . . . . . . . . . . . . . . . . . . . . . . . . . . . . . . . . . . . . . . 32
Table 10: Tools Menu Commands and Descriptions . . . . . . . . . . . . . . . . . . . . . . . . . . . . . . . . 33
Table 11: Windows Menu Commands and Descriptions . . . . . . . . . . . . . . . . . . . . . . . . . . . . . 33
Table 12: Help Menu Commands and Descriptions . . . . . . . . . . . . . . . . . . . . . . . . . . . . . . . . . 34
Table 13: About Dialog Box . . . . . . . . . . . . . . . . . . . . . . . . . . . . . . . . . . . . . . . . . . . . . . . . . . . . . 35
Table 14: Connect Through CLIv2 Dialog Box Description. . . . . . . . . . . . . . . . . . . . . . . . . . . 39
Table 15: Connection Errors Dialog Box Description. . . . . . . . . . . . . . . . . . . . . . . . . . . . . . . . 40
Table 16: Report Buttons and Description . . . . . . . . . . . . . . . . . . . . . . . . . . . . . . . . . . . . . . . . . 43
Table 17: Define Workload Using Statements Dialog Box Description . . . . . . . . . . . . . . . . . 54
Table 18: Define Workload from QCD Statements Dialog Box Description . . . . . . . . . . . . . 55
Table 19: Warning Dialog Box Description . . . . . . . . . . . . . . . . . . . . . . . . . . . . . . . . . . . . . . . . 57
Table 20: Importing a Workload Dialog Box Description . . . . . . . . . . . . . . . . . . . . . . . . . . . . 58
Table 21: Set Target Level Emulation Dialog Box Description. . . . . . . . . . . . . . . . . . . . . . . . . 60
Table 22: Error Handling Dialog Box Description . . . . . . . . . . . . . . . . . . . . . . . . . . . . . . . . . . 62
Table 23: Import Option Descriptions . . . . . . . . . . . . . . . . . . . . . . . . . . . . . . . . . . . . . . . . . . . . 63
Table 24: Create from Existing Workload Dialog Box Description . . . . . . . . . . . . . . . . . . . . . 65
Table 25: Add Workload Statements Dialog Box Description . . . . . . . . . . . . . . . . . . . . . . . . . 66
Table 26: Update an Existing Workload Dialog Box Description . . . . . . . . . . . . . . . . . . . . . . 67
Table 27: Add Statements Option Dialog Box Description . . . . . . . . . . . . . . . . . . . . . . . . . . . 69
Table 28: Workload Details Dialog Box Description. . . . . . . . . . . . . . . . . . . . . . . . . . . . . . . . . 71
Table 29: Index Analysis Dialog Box Description . . . . . . . . . . . . . . . . . . . . . . . . . . . . . . . . . . . 75
Table 30: Index Analysis Parameters Dialog Box Description . . . . . . . . . . . . . . . . . . . . . . . . . 76
Table 31: Partition Analysis Dialog Box Description. . . . . . . . . . . . . . . . . . . . . . . . . . . . . . . . . 82
Table 32: What-If Analysis Dialog Box Description . . . . . . . . . . . . . . . . . . . . . . . . . . . . . . . . . 85
Teradata Index Wizard User Guide 17
List of Tables
Table 33: What-If Analysis: Add Index Dialog Box Description . . . . . . . . . . . . . . . . . . . . . . . .86
Table 34: Analysis Options Dialog Box: Set Costs Tab Description. . . . . . . . . . . . . . . . . . . . . .89
Table 35: Analysis Options Dialog Box: Set RAS Tab Description. . . . . . . . . . . . . . . . . . . . . . .90
Table 36: Analysis Options Dialog Box: Set Statistics Samples Tab Description . . . . . . . . . . .91
Table 37: Analysis Results Dialog Box Description . . . . . . . . . . . . . . . . . . . . . . . . . . . . . . . . . . .94
Table 38: Analysis Statistics Dialog Box Descriptions . . . . . . . . . . . . . . . . . . . . . . . . . . . . . . . . .96
Table 39: Index Analysis Summary Window Description . . . . . . . . . . . . . . . . . . . . . . . . . . . . .98
Table 40: View Report Dialog Box Description . . . . . . . . . . . . . . . . . . . . . . . . . . . . . . . . . . . . . .99
Table 41: Existing Indexes Report Description . . . . . . . . . . . . . . . . . . . . . . . . . . . . . . . . . . . . .102
Table 42: Update Frequency Report Description. . . . . . . . . . . . . . . . . . . . . . . . . . . . . . . . . . . .103
Table 43: Table Usage Analysis Report Description . . . . . . . . . . . . . . . . . . . . . . . . . . . . . . . . .104
Table 44: Table Scan Report Description . . . . . . . . . . . . . . . . . . . . . . . . . . . . . . . . . . . . . . . . . .104
Table 45: Workload Analysis Report Description . . . . . . . . . . . . . . . . . . . . . . . . . . . . . . . . . . .105
Table 46: Object Global Use Count Report Description . . . . . . . . . . . . . . . . . . . . . . . . . . . . . .106
Table 47: Index Recommendation Report Description. . . . . . . . . . . . . . . . . . . . . . . . . . . . . . .107
Table 48: Query Cost Analysis Report Description . . . . . . . . . . . . . . . . . . . . . . . . . . . . . . . . . .108
Table 49: Disk Space Analysis Report Description . . . . . . . . . . . . . . . . . . . . . . . . . . . . . . . . . .109
Table 50: Summary Report Description . . . . . . . . . . . . . . . . . . . . . . . . . . . . . . . . . . . . . . . . . . .110
Table 51: Index Maintenance Cost Report Description . . . . . . . . . . . . . . . . . . . . . . . . . . . . . .111
Table 52: View Report Dialog Box Description . . . . . . . . . . . . . . . . . . . . . . . . . . . . . . . . . . . . .111
Table 53: Recommendations from QCD Dialog Box Description . . . . . . . . . . . . . . . . . . . . . .115
Table 54: Index Validation Dialog Box Description . . . . . . . . . . . . . . . . . . . . . . . . . . . . . . . . .115
Table 55: Validation Results Window Description . . . . . . . . . . . . . . . . . . . . . . . . . . . . . . . . . .117
Table 56: Execute Recommendation Dialog Box Description . . . . . . . . . . . . . . . . . . . . . . . . .119
Table 57: Execution Results Window Description. . . . . . . . . . . . . . . . . . . . . . . . . . . . . . . . . . .120
Table 58: Select Recommendations Dialog Box Description . . . . . . . . . . . . . . . . . . . . . . . . . .121
Table 59: Schedule Recommendations Dialog Box Descriptions. . . . . . . . . . . . . . . . . . . . . . .122
Table 60: Schedule Recommendation Errors . . . . . . . . . . . . . . . . . . . . . . . . . . . . . . . . . . . . . . .123
Table 61: Preferences Dialog Box Description . . . . . . . . . . . . . . . . . . . . . . . . . . . . . . . . . . . . . .130
Table 62: Data Demographics Menu Descriptions . . . . . . . . . . . . . . . . . . . . . . . . . . . . . . . . . .134
Table 63: Bar and Line Graph View Options . . . . . . . . . . . . . . . . . . . . . . . . . . . . . . . . . . . . . . .135
Table 64: Disk Space Utilization Icon Descriptions. . . . . . . . . . . . . . . . . . . . . . . . . . . . . . . . . .137
Table 65: Spool Space Utilization Icon Descriptions. . . . . . . . . . . . . . . . . . . . . . . . . . . . . . . . .138
Table 66: Row Count/Average Row Size Icon Descriptions . . . . . . . . . . . . . . . . . . . . . . . . . . .139
Table 67: Blocks Distribution Icon Descriptions . . . . . . . . . . . . . . . . . . . . . . . . . . . . . . . . . . . .139
Table 68: Statistics Details Icon Descriptions. . . . . . . . . . . . . . . . . . . . . . . . . . . . . . . . . . . . . . .140
18 Teradata Index Wizard User Guide
List of Tables
Table 69: Statistics Details Graph Icon Descriptions . . . . . . . . . . . . . . . . . . . . . . . . . . . . . . . . 140
Table 70: Command Line Options for Logon Information . . . . . . . . . . . . . . . . . . . . . . . . . . 142
Table 71: Command Line Options for Defining a Workload . . . . . . . . . . . . . . . . . . . . . . . . . 143
Table 72: Command Line Options for Index Inputs to the Wizard. . . . . . . . . . . . . . . . . . . . 143
Table 73: Command Line Options for Partition Analysis Inputs to the Wizard . . . . . . . . . 145
Table 74: Command Line for Specifying Output File Name . . . . . . . . . . . . . . . . . . . . . . . . . 145
Table 75: Error Messages . . . . . . . . . . . . . . . . . . . . . . . . . . . . . . . . . . . . . . . . . . . . . . . . . . . . . . 147
Teradata Index Wizard User Guide 19

List of Tables
20 Teradata Index Wizard User Guide
CHAPTER 1
Introduction
Indexing is one of the most powerful tuning options available to a database designer or database administrator (DBA). Traditionally, index selection has been a complex and manual process requiring the DBA to have detailed knowledge of the application workloads and data demography of your Teradata Warehouse, as well as experience and understanding of parallel query plan optimization. As more application workloads are introduced, analyzing the impact and derived benefit of an index becomes increasingly difficult. To determine a good set of indexes, designers had to rely on their application experience and intuition.
Teradata Index Wizard takes the guesswork out of indexing. Index Wizard automates index selection and creates statistical information that allows DBAs to make a fully informed index choice.
How Teradata Index Wizard Works
Teradata Index Wizard consists of a database server component and a front-end client application. The index analysis engine is inside the Teradata parser and works closely with the parallel optimizer to enumerate, simulate, and evaluate index selection candidates. The client front end is a graphical Microsoft Windows interface, providing step-by-step instructions for workload definition and index analysis, and reports for both workload and index analysis.
Index Wizard Features
The following is a description of the basic features of Index Wizard:
• Graphical User Interface (GUI) supported on Microsoft Windows platforms.
• Interfaces with the Teradata Database Query Log (DBQL) facility to define workloads from a collection of SQL statements captured in the query log.
• Works with other client tools including Teradata System Emulation Tool, Teradata Visual Explain, and Teradata Statistics Wizard.
• Imports workloads onto a test system for analysis, saving production system resources.
• Validates recommendations on the production system before actually creating the new set of indexes.
Teradata Index Wizard User Guide 21
Chapter 1: IntroductionTeradata Analyst Pack
Additional Index Wizard Features
What-if analysis on a workload
Allows you to perform what-if analysis on a given workload. You can “play” with various aspects of the index information to tweak recommendations for greater performance. For more details, see “What-if Analysis” on page 84.
Schedule recommended indexes
Allows you to schedule a recommended set of indexes for a specific date and time. This feature works with Teradata Query Scheduler 6.2. For more details, see “Schedule Recommendation” on page 120.
Index Wizard can be started from other client programs
Index Wizard can be started from Teradata Visual Explain, Teradata Statistics Wizard, and Teradata Manager. Index Wizard can also open these applications (except Teradata Manager) to help in your evaluation of recommended indexes. For more information, see “Working With Other Teradata Client Tools” on page 129.
Teradata System Emulation Tool can be used to help evaluate recommendations
The workload, along with the environment of the production system, can be imported to a test system using a separate tool called Teradata System Emulation Tool. For information about this tool, see “Teradata Analyst Pack” on page 22.
Data Demographics Window
Index Wizard provides a Data Demographics window that displays the demography details of selected tables. For more details, see Chapter 11: “Data Demographics.”
Execute SQL Window Option
Index Wizard has an option that enables you to create and execute SQL statements either through Teradata SQL Assistant or through an Execute SQL-Query window in Index Wizard. For more details, see “Executing SQL Feature” on page 127.
Teradata Analyst Pack
Teradata Index Wizard is part of a suite of software tools called the Teradata Analyst Pack. As application environments expand to include mixed workloads for both decision support and near real time analytic processing, managing and maximizing the performance of the Teradata Database becomes a more challenging task.
To meet this challenge, the Teradata Analyst Pack helps information technology professionals analyze and tune their Teradata Warehouse for better performance.
The Teradata Analyst Pack is targeted at query or workload-based analysis and focuses on the execution performance at the individual query level.
22 Teradata Index Wizard User Guide
Chapter 1: IntroductionTeradata Analyst Pack
Teradata Analyst tools include:
• Teradata Index Wizard
• Teradata Statistics Wizard
• Teradata Visual Explain
• Teradata System Emulation Tool
The ability to analyze and understand the detailed steps involved in the query plan along with the influences of the system configuration, data demographics, and index structure, are the first steps in identifying opportunities to improve performance of the active data warehouse.
You can open the Teradata Analyst tools noted above by clicking their respective buttons on the toolbar or selecting Tools from the menu bar and selecting the application.
Note: You must install the tools to access them through Index Wizard.
Ways the Analyst Pack Tools Work Together
• Identify the queries or workload to be analyzed for performance tuning. Logging onto Teradata DBQL is one easy way to selectively capture SQL queries at query run time.
• Capture query plans into the Query Capture Database (QCD). For individual queries or a small set of queries, use the Teradata Visual Explain Launch QCF feature. For bigger workloads, the Teradata Index Wizard Workload Definition feature can be used to define the workload and capture query plans for all queries in the workload.
Optionally, export the captured query plans, system cost parameters, statistics, data demographics, random AMP samples, and object definitions from the production or target system to a test system using Teradata System Emulation Tool. This step is not necessary, but enables off loading of the analysis activities from the production to the test environment.
• Find out the statistics and data demographics for the tables involved in the workload using Teradata Statistics Wizard. Statistics recommended by TSWiz for the tables/columns in the workload can be applied immediately. At this point, you can optionally recapture the plans for the workload and compare them using Teradata Visual Explain's query or bulk compare feature. Doing this allows you to visualize and measure the improvements achieved by implementing the Teradata Statistics Wizard recommendations.
• Perform index analysis for the workload using Teradata Index Wizard. In the case of analysis on a test system, the index recommendations can be validated back on the production system using the Validate Recommendations feature. This will simulate the indexes without actually creating them, and produce a query plan as though the indexes were present. Validation also collects sampled statistics as part of the process, thus ensuring up-to-date statistics are available for the proposed indexes.
• Analyze the output of the Teradata Index Wizard reports to understand the recommendations' impact on performance (estimated performance improvement), and cost to implement (in terms of disk space and creation time). Utilize Teradata Visual Explain to compare pre- and post-recommendation plans (post recommendation plans are automatically generated and stored for each query in the workload during Index Validation). Implement the recommendations on the production system to achieve the
Teradata Index Wizard User Guide 23
Chapter 1: IntroductionHow Index Wizard Works
performance improvement desired, or alternatively, use the what-if analysis mode to identify potential performance improvements of your own proposed secondary indexes.
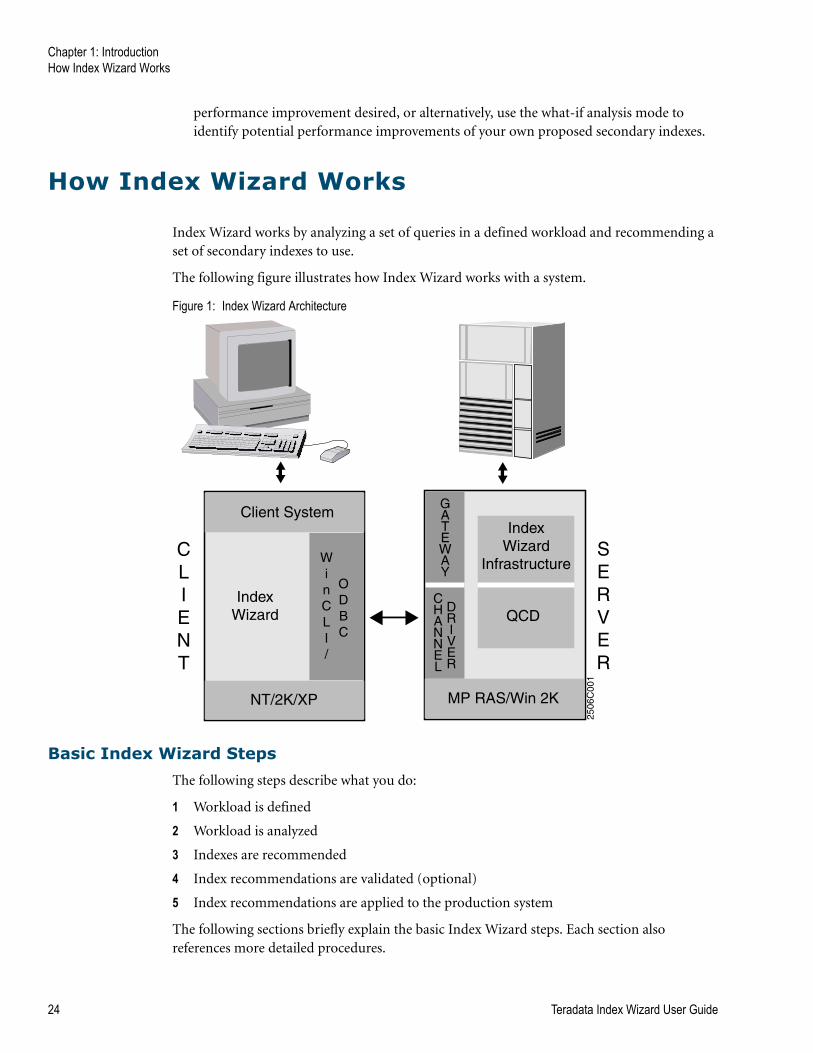
How Index Wizard Works
Index Wizard works by analyzing a set of queries in a defined workload and recommending a set of secondary indexes to use.
The following figure illustrates how Index Wizard works with a system.
Figure 1: Index Wizard Architecture
Basic Index Wizard Steps
The following steps describe what you do:
1 Workload is defined
2 Workload is analyzed
3 Indexes are recommended
4 Index recommendations are validated (optional)
5 Index recommendations are applied to the production system
The following sections briefly explain the basic Index Wizard steps. Each section also references more detailed procedures.
Client System
NT/2K/XP
IndexWizard
WinCLI/
ODBC
CLIENT
MP RAS/Win 2K
GATEWAY
SERVER
CHANNEL
DRIVER
IndexWizard
Infrastructure
QCD
2506
C00
1
24 Teradata Index Wizard User Guide
Chapter 1: IntroductionHow Index Wizard Works
Defining a Workload
A workload is a set of SQL statements created or defined using the Workload Definition dialog box. Index Wizard creates several workload reports after a workload is defined.
Workloads can be defined in the following ways:
• Using Database Query Log (DBQL) - The Database Query Log (DBQL) provides the capability to store, in system tables, the performance-related data for a request.
For more information, see “Defining a Workload From DBQL Statements” on page 47.
• Using Statement Text - SQL statements can be directly keyed into a workload. The SQL statements can also be selected from one or more files.
For more information, see “Defining a Workload Using Statement Text” on page 52.
• From QCD Statements - An existing set of execution plans in a QCD can be selected to form a workload. The workload is created in the QCD in which the execution plans exist.
For more information, see “Defining a Workload From QCD Statements” on page 54.
• Importing Workload - Users can import workloads from other sources including other Teradata client tools.
For more information, see “Importing a Workload” on page 57.
• From an Existing Workload - A new workload can be created from an existing workload.
For more information, see “Defining a Workload from an Existing Workload” on page 64.
Performing Analysis
After the workload is defined, it is analyzed and a new set of indexes is recommended. Index Wizard may also recommend that indexes be added or dropped to enhance system performance.
There are four types of analysis:
• Index Analysis An index analysis is performed on a workload.
For more information, see “Performing an Index Analysis” on page 73.
• Partition Analysis A partition analysis is performed on a workload
For more information, see “Performing a Partition Analysis” on page 80.
• Restarting an Analysis If an Index analysis was interrupted, it can be restarted.
For more information, see “Restarting an Analysis” on page 83.
• What-If Analysis This type of analysis allows you to check your own recommendations. on the workload to determine the performance benefits.
For more information, see “What-if Analysis” on page 84.
For more information on the available input settings for an index analysis, see “Advanced Index Parameters” on page 75.
Reports
Index Wizard creates several reports about workloads and indexes. Some reports are created when a workload is defined. Others are created when a workload is analyzed.
Teradata Index Wizard User Guide 25
Chapter 1: IntroductionOnline Help
For information on Index Wizard reports, see Chapter 6: “Reports.”
Validating an Index
Index Wizard validates index recommendations on a production system without actually updating the production table index. This feature is optional, but highly recommended because it ensures the index recommendation will help database performance before actually adding the indexes.
The execution plans obtained with the recommendation can be compared with the original query plans (those without the index recommendations) using Teradata Visual Explain’s Compare feature. Index Wizard interfaces with Teradata Visual Explain in providing a query-by-query compare.
For information on validation, see Chapter 7: “Validation.”
Executing Recommendations
After an index recommendation is validated, Index Wizard allows you to apply (execute) the index to the production system.
You can execute an index immediately or schedule the execution to occur at a different time and day.
For details about executing recommendation and scheduling recommendations, see Chapter 8: “Recommendations.”
Online Help
Using Online Help
Teradata Index Wizard has online Help that can help answer your questions about how to use its features. Help is opened in a browser window. Microsoft Internet Explorer, version 6.0 or later, is the recommended browser for viewing Help.
To open Help
✔ From the toolbar, click .
After the Help window is open, you can navigate to or search for other topics.
To get Help within a window or dialog box
✔ From most windows and dialog boxes, press F1 to see context-sensitive Help for the window or dialog box you are looking at. Occasionally when F1 will not invoke Help, press Shift + F1.
26 Teradata Index Wizard User Guide
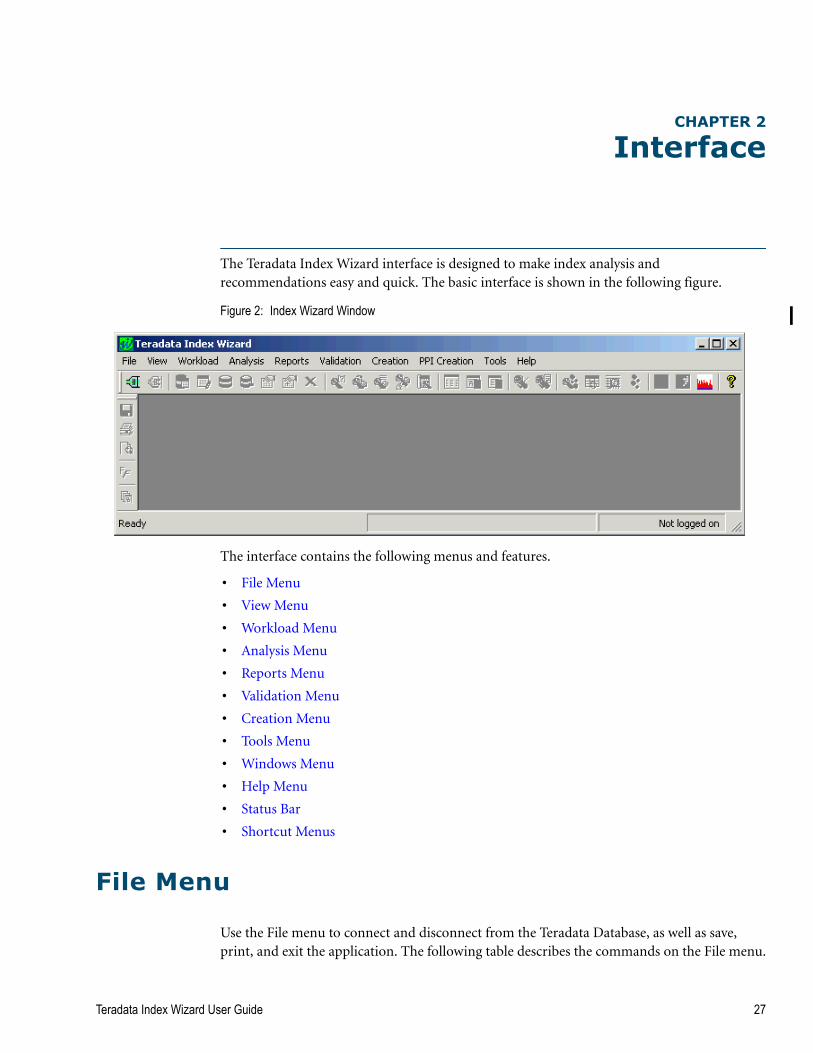
CHAPTER 2
Interface
The Teradata Index Wizard interface is designed to make index analysis and recommendations easy and quick. The basic interface is shown in the following figure.
Figure 2: Index Wizard Window
The interface contains the following menus and features.
• File Menu
• View Menu
• Workload Menu
• Analysis Menu
• Reports Menu
• Validation Menu
• Creation Menu
• Tools Menu
• Windows Menu
• Help Menu
• Status Bar
• Shortcut Menus
File Menu
Use the File menu to connect and disconnect from the Teradata Database, as well as save, print, and exit the application. The following table describes the commands on the File menu.
Teradata Index Wizard User Guide 27

Chapter 2: InterfaceView Menu
When a report is open, the following commands appear on the File menu:
View Menu
Use the View menu to control the views of different application elements including the toolbar and status bar. You can also view the Workload Details window. The following table describes the commands on the View menu.
Table 1: File Menu Commands and Descriptions
Menu CommandToolbar Button Description
Connect Connects to the Teradata Database server. For more information, see “Selecting a Logon Method” on page 38.
Disconnect Disconnects from the Teradata Database server.
Exit Closes Index Wizard.
Table 2: File Menu Commands and Descriptions (when report is open)
Menu Command
Toolbar Button Description
Save As Saves the active report.
Print Prints the active report.
Print Preview Previews the report about to be printed.
Print Setup Opens the Print Setup window where you can set various print options.
Table 3: View Menu Commands and Descriptions
Menu Command Sub MenuToolbar Button Description
Toolbar> Standard Displays and hides the Standard toolbar across the top of the window.
Reports Displays and hides the Reports toolbar on the left side (default position) of the window.
28 Teradata Index Wizard User Guide
Chapter 2: InterfaceWorkload Menu
Workload Menu
Use the Workload menu to control various aspects of a workload. The following table describes the commands on the Workload menu.
Status Bar> Standard Displays and hides the status bar at the bottom of the window.
Information Displays and hides the Information bar at the bottom of the window.
Workload Details
Displays the View Workload Details window. This window shows the information about the currently cached workload.
Analysis Summary
Shows the Index Analysis Summary window. For more information, see “Summary Report” on page 109.
Change Font Changes the font type and size on reports. This option is only available when a report is present.
Table 3: View Menu Commands and Descriptions (continued)
Menu Command Sub MenuToolbar Button Description
Table 4: Workload Menu Commands and Descriptions
Menu Command Sub Menu
Toolbar Button Description For More Information
Create > From DBQL Statements
Selects SQL statements from the DBQL.
“Defining a Workload From DBQL Statements” on page 47
Using Statements Text
Used to enter the SQL statements or select the statements from one or more files.
“Defining a Workload Using Statement Text” on page 52
From QCD Statements
Selects SQL statements from the QCD.
“Defining a Workload From QCD Statements” on page 54
Import Workloads
Imports a workload from a production system using Teradata System Emulation Tool.
“Importing a Workload” on page 57
From Existing Workload
Creates a new workload from an existing one. See for greater detail.
“Defining a Workload from an Existing Workload” on page 64
Update Existing Workload
Updates an existing workload. “Updating an Existing Workload” on page 66
Teradata Index Wizard User Guide 29
Chapter 2: InterfaceAnalysis Menu
Analysis Menu
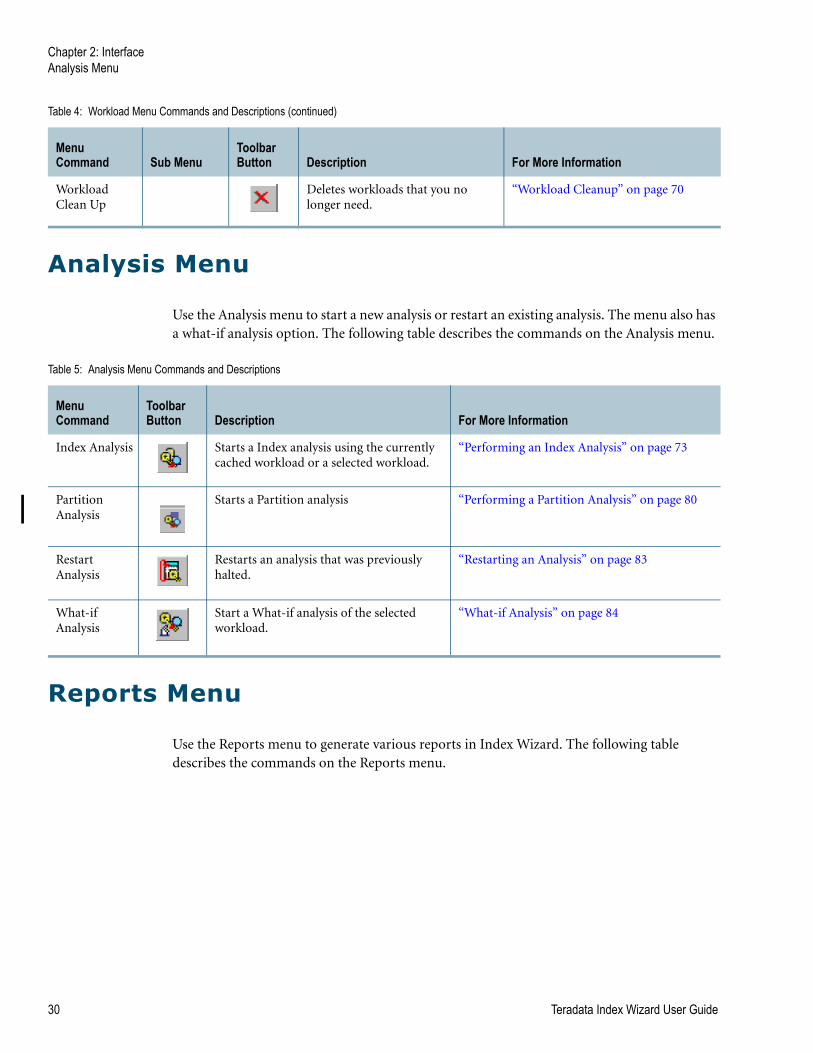
Use the Analysis menu to start a new analysis or restart an existing analysis. The menu also has a what-if analysis option. The following table describes the commands on the Analysis menu.
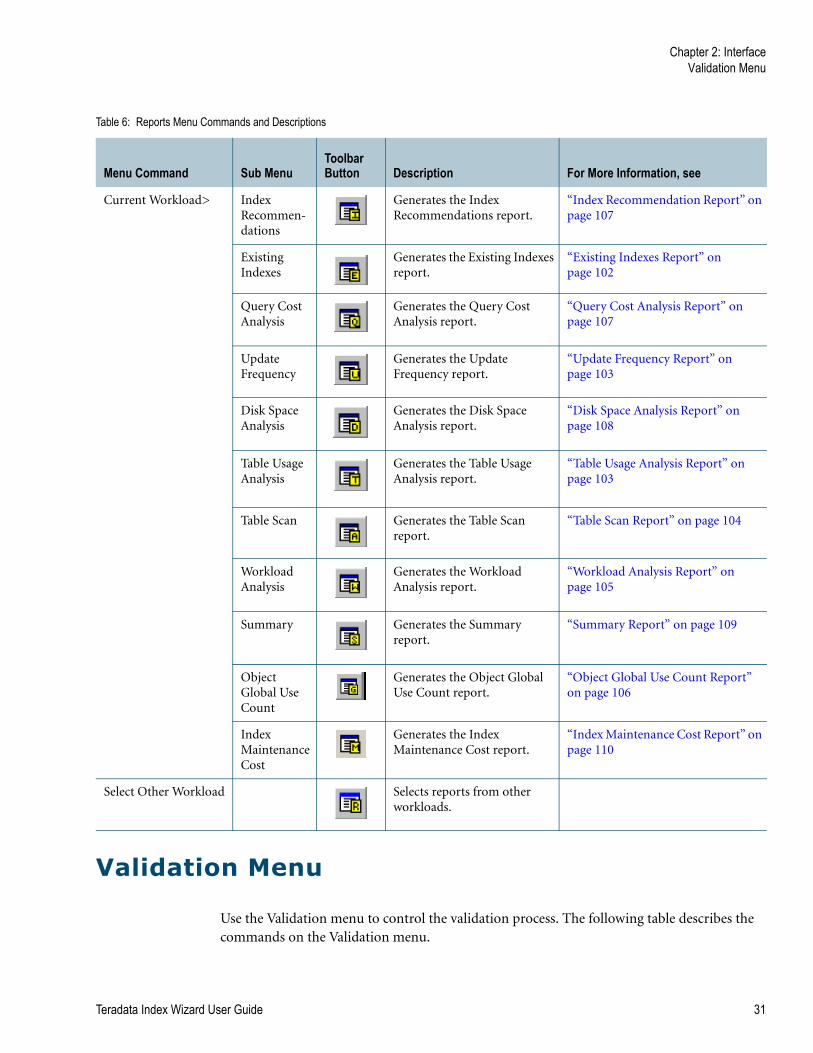
Reports Menu
Use the Reports menu to generate various reports in Index Wizard. The following table describes the commands on the Reports menu.
Workload Clean Up
Deletes workloads that you no longer need.
“Workload Cleanup” on page 70
Table 4: Workload Menu Commands and Descriptions (continued)
Menu Command Sub Menu
Toolbar Button Description For More Information
Table 5: Analysis Menu Commands and Descriptions
Menu Command
Toolbar Button Description For More Information
Index Analysis Starts a Index analysis using the currently cached workload or a selected workload.
“Performing an Index Analysis” on page 73
Partition Analysis
Starts a Partition analysis “Performing a Partition Analysis” on page 80
Restart Analysis
Restarts an analysis that was previously halted.
“Restarting an Analysis” on page 83
What-if Analysis
Start a What-if analysis of the selected workload.
“What-if Analysis” on page 84
30 Teradata Index Wizard User Guide
Chapter 2: InterfaceValidation Menu
Validation Menu
Use the Validation menu to control the validation process. The following table describes the commands on the Validation menu.
Table 6: Reports Menu Commands and Descriptions
Menu Command Sub MenuToolbar Button Description For More Information, see
Current Workload> Index Recommen-dations
Generates the Index Recommendations report.
“Index Recommendation Report” on page 107
Existing Indexes
Generates the Existing Indexes report.
“Existing Indexes Report” on page 102
Query Cost Analysis
Generates the Query Cost Analysis report.
“Query Cost Analysis Report” on page 107
Update Frequency
Generates the Update Frequency report.
“Update Frequency Report” on page 103
Disk Space Analysis
Generates the Disk Space Analysis report.
“Disk Space Analysis Report” on page 108
Table Usage Analysis
Generates the Table Usage Analysis report.
“Table Usage Analysis Report” on page 103
Table Scan Generates the Table Scan report.
“Table Scan Report” on page 104
Workload Analysis
Generates the Workload Analysis report.
“Workload Analysis Report” on page 105
Summary Generates the Summary report.
“Summary Report” on page 109
Object Global Use Count
Generates the Object Global Use Count report.
“Object Global Use Count Report” on page 106
Index Maintenance Cost
Generates the Index Maintenance Cost report.
“Index Maintenance Cost Report” on page 110
Select Other Workload Selects reports from other workloads.
Teradata Index Wizard User Guide 31
Chapter 2: InterfaceCreation Menu
Creation Menu
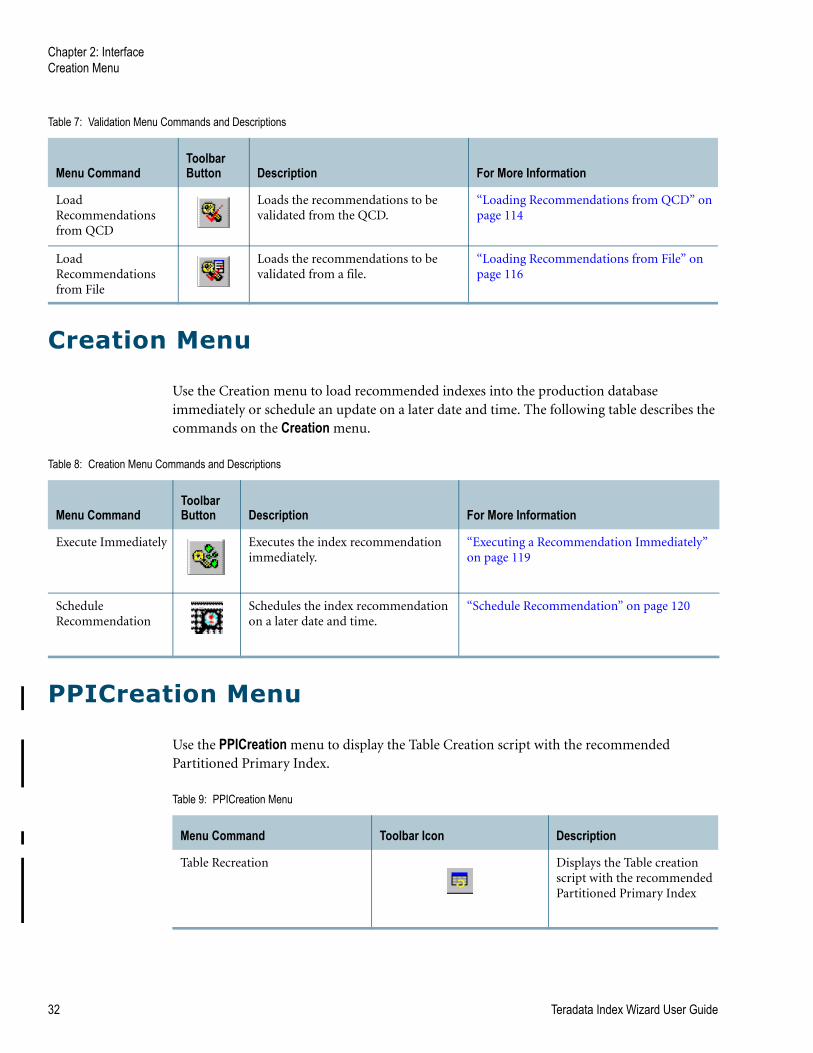
Use the Creation menu to load recommended indexes into the production database immediately or schedule an update on a later date and time. The following table describes the commands on the Creation menu.
PPICreation Menu
Use the PPICreation menu to display the Table Creation script with the recommended Partitioned Primary Index.
Table 7: Validation Menu Commands and Descriptions
Menu CommandToolbar Button Description For More Information
Load Recommendations from QCD
Loads the recommendations to be validated from the QCD.
“Loading Recommendations from QCD” on page 114
Load Recommendations from File
Loads the recommendations to be validated from a file.
“Loading Recommendations from File” on page 116
Table 8: Creation Menu Commands and Descriptions
Menu CommandToolbar Button Description For More Information
Execute Immediately Executes the index recommendation immediately.
“Executing a Recommendation Immediately” on page 119
Schedule Recommendation
Schedules the index recommendation on a later date and time.
“Schedule Recommendation” on page 120
Table 9: PPICreation Menu
Menu Command Toolbar Icon Description
Table Recreation Displays the Table creation script with the recommended Partitioned Primary Index
32 Teradata Index Wizard User Guide
Chapter 2: InterfaceTools Menu
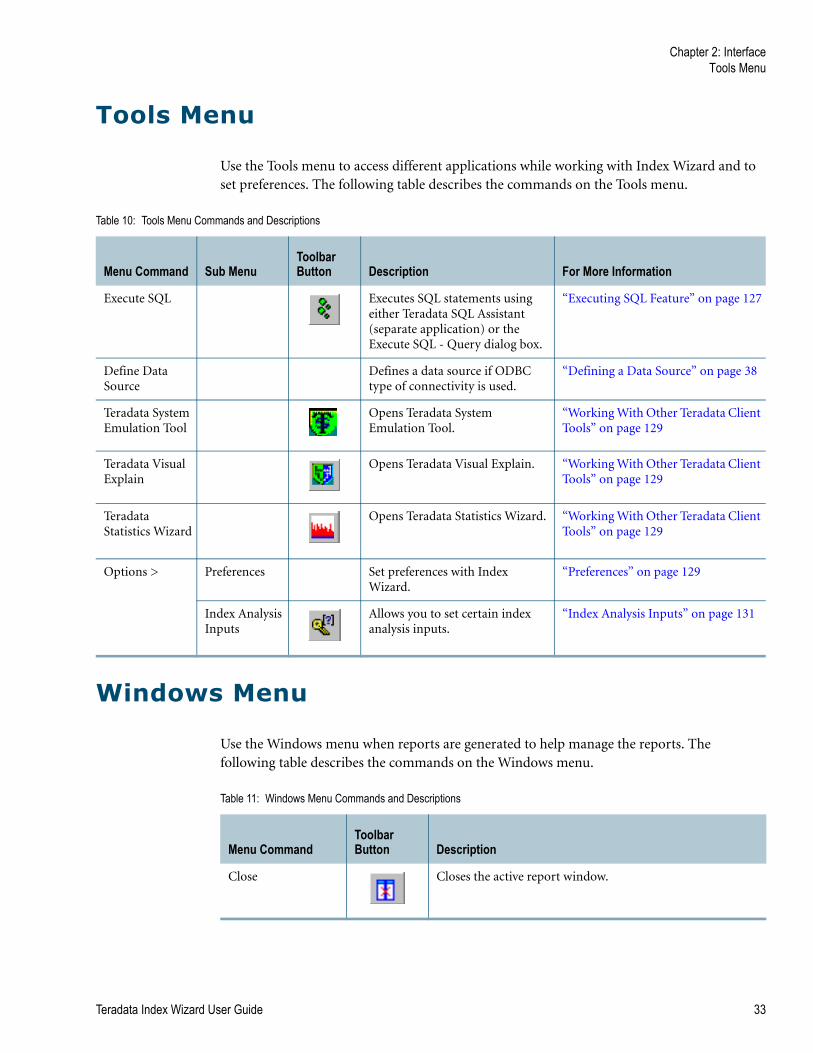
Tools Menu
Use the Tools menu to access different applications while working with Index Wizard and to set preferences. The following table describes the commands on the Tools menu.
Windows Menu
Use the Windows menu when reports are generated to help manage the reports. The following table describes the commands on the Windows menu.
Table 10: Tools Menu Commands and Descriptions
Menu Command Sub MenuToolbar Button Description For More Information
Execute SQL Executes SQL statements using either Teradata SQL Assistant (separate application) or the Execute SQL - Query dialog box.
“Executing SQL Feature” on page 127
Define Data Source
Defines a data source if ODBC type of connectivity is used.
“Defining a Data Source” on page 38
Teradata System Emulation Tool
Opens Teradata System Emulation Tool.
“Working With Other Teradata Client Tools” on page 129
Teradata Visual Explain
Opens Teradata Visual Explain. “Working With Other Teradata Client Tools” on page 129
Teradata Statistics Wizard
Opens Teradata Statistics Wizard. “Working With Other Teradata Client Tools” on page 129
Options > Preferences Set preferences with Index Wizard.
“Preferences” on page 129
Index Analysis Inputs
Allows you to set certain index analysis inputs.
“Index Analysis Inputs” on page 131
Table 11: Windows Menu Commands and Descriptions
Menu CommandToolbar Button Description
Close Closes the active report window.
Teradata Index Wizard User Guide 33
Chapter 2: InterfaceHelp Menu
Help Menu
Use the Help menu to access the Help system, as well as version and copyright information. The following table describes the commands on the Help menu.
Version and Copyright Information
Open the About Teradata Index Wizard dialog box to see the version and copyright information for the software you are using.
To open the About dialog box
✔ From the Help menu, choose About Teradata Index Wizard.
Close All Closes all report windows.
Cascade Windows Cascades all the open report windows.
Tile Horizontally Tiles all the open report windows horizontally.
Tile Vertically Tiles all open report windows vertically.
Table 11: Windows Menu Commands and Descriptions (continued)
Menu CommandToolbar Button Description
Table 12: Help Menu Commands and Descriptions
Menu CommandToolbar Button Description
Help Contents Opens the Help system.
About Teradata Index Wizard...
See “Version and Copyright Information” on page 34.
34 Teradata Index Wizard User Guide
Chapter 2: InterfaceStatus Bar
Copyright dates and legal notices are also provided.
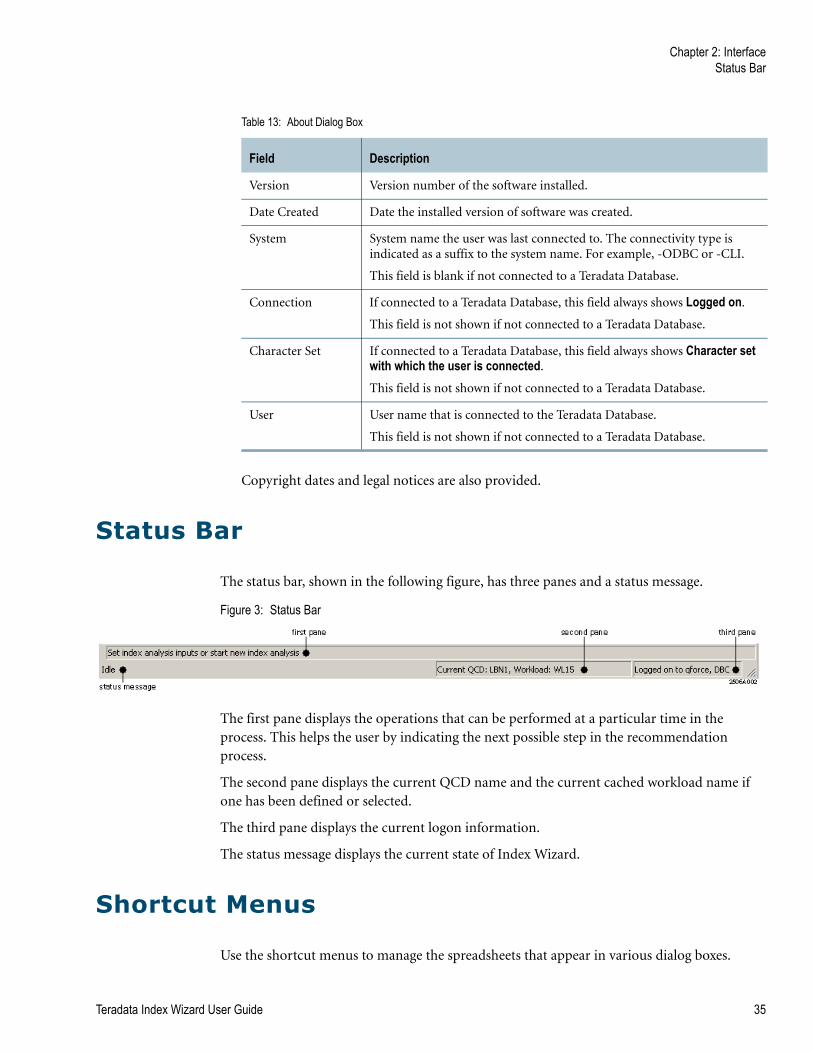
Status Bar
The status bar, shown in the following figure, has three panes and a status message.
Figure 3: Status Bar
The first pane displays the operations that can be performed at a particular time in the process. This helps the user by indicating the next possible step in the recommendation process.
The second pane displays the current QCD name and the current cached workload name if one has been defined or selected.
The third pane displays the current logon information.
The status message displays the current state of Index Wizard.
Shortcut Menus
Use the shortcut menus to manage the spreadsheets that appear in various dialog boxes.
Table 13: About Dialog Box
Field Description
Version Version number of the software installed.
Date Created Date the installed version of software was created.
System System name the user was last connected to. The connectivity type is indicated as a suffix to the system name. For example, -ODBC or -CLI.
This field is blank if not connected to a Teradata Database.
Connection If connected to a Teradata Database, this field always shows Logged on.
This field is not shown if not connected to a Teradata Database.
Character Set If connected to a Teradata Database, this field always shows Character set with which the user is connected.
This field is not shown if not connected to a Teradata Database.
User User name that is connected to the Teradata Database.
This field is not shown if not connected to a Teradata Database.
Teradata Index Wizard User Guide 35
Chapter 2: InterfaceShortcut Menus
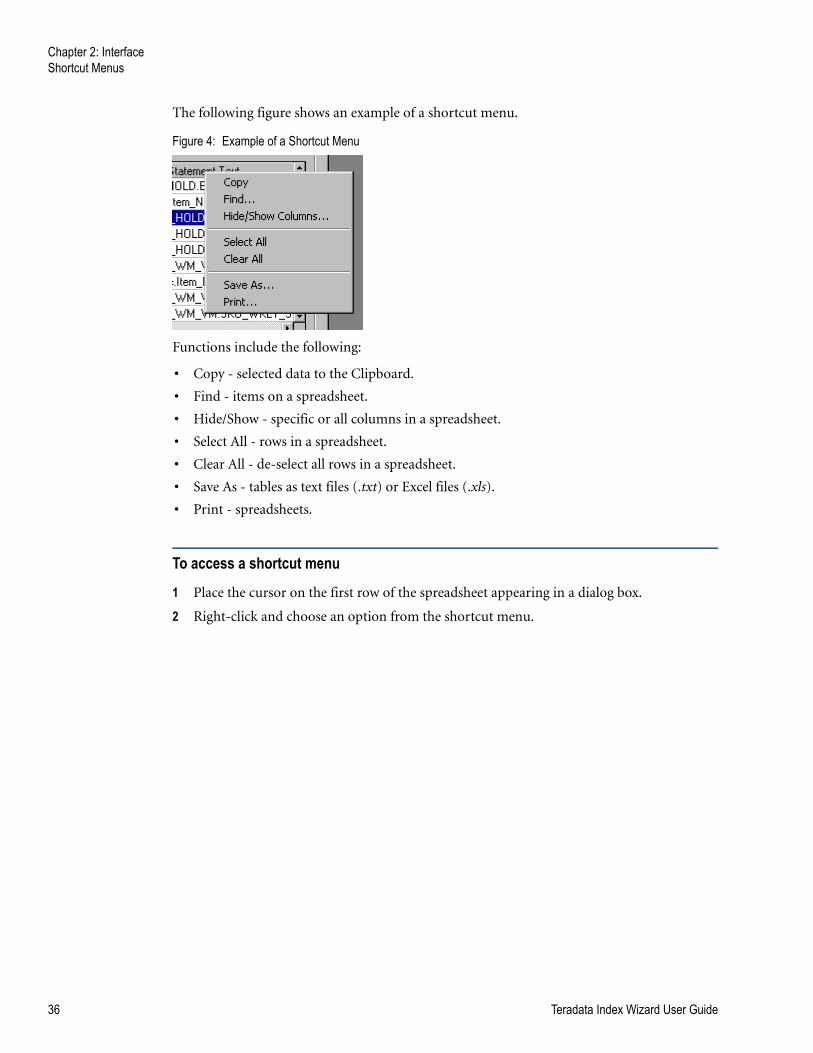
The following figure shows an example of a shortcut menu.
Figure 4: Example of a Shortcut Menu
Functions include the following:
• Copy - selected data to the Clipboard.
• Find - items on a spreadsheet.
• Hide/Show - specific or all columns in a spreadsheet.
• Select All - rows in a spreadsheet.
• Clear All - de-select all rows in a spreadsheet.
• Save As - tables as text files (.txt) or Excel files (.xls).
• Print - spreadsheets.
To access a shortcut menu
1 Place the cursor on the first row of the spreadsheet appearing in a dialog box.
2 Right-click and choose an option from the shortcut menu.
36 Teradata Index Wizard User Guide
CHAPTER 3
Index Wizard-Quick Start
The quick start is intended for experienced Teradata Database users who may be new to Index Wizard. The quick start runs through the steps to define, analyze, and validate a workload and create index recommendations.
The steps are shown in order below, but can be performed in any order.
• Launching Teradata Index Wizard
• Selecting a Logon Method
• Defining a Workload
• Running an Analysis
• Selecting Reports
• Validating Recommendations
• Executing Recommendations
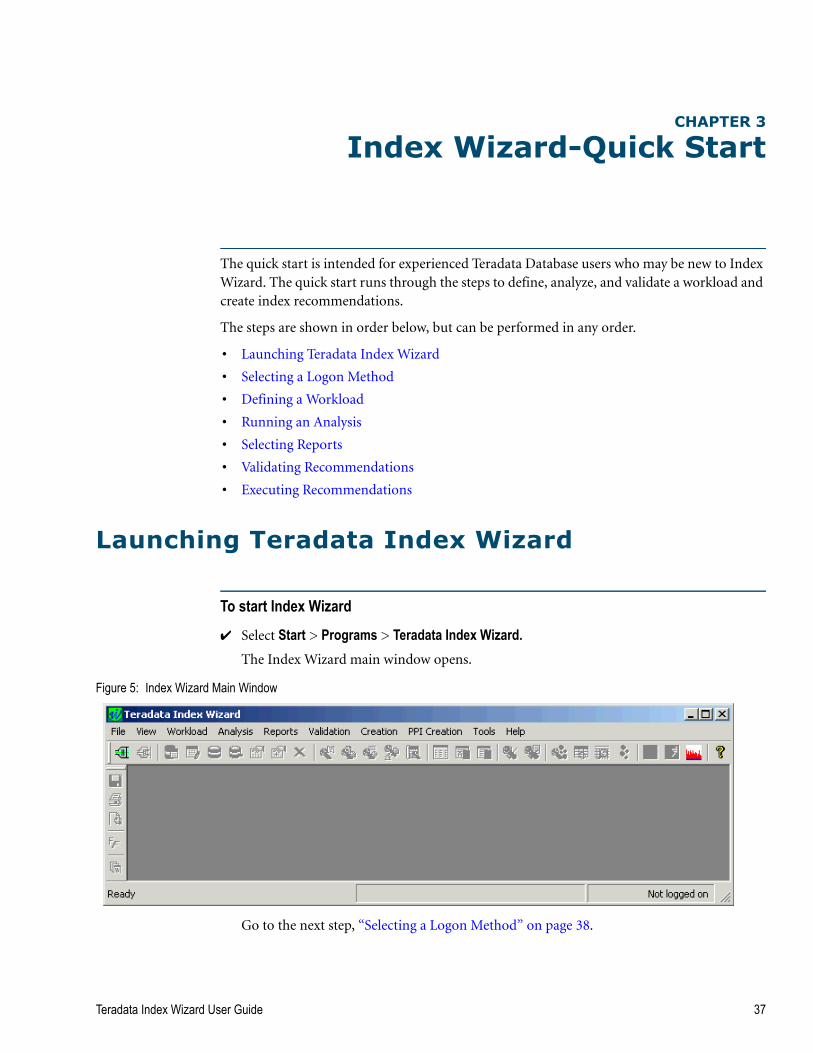
Launching Teradata Index Wizard
To start Index Wizard
✔ Select Start > Programs > Teradata Index Wizard.The Index Wizard main window opens.
Figure 5: Index Wizard Main Window
Go to the next step, “Selecting a Logon Method” on page 38.
Teradata Index Wizard User Guide 37
Chapter 3: Index Wizard-Quick StartSelecting a Logon Method
Selecting a Logon Method
To use Index Wizard, you need to log on to the Teradata Database. Before logging on, select a logon method. You can connect using either ODBC or CLIv2.
To select a logon method
1 Go to Tools > Options > Preferences. The Preferences dialog box opens and the Connectivity tab is active.
2 Choose the connectivity type, either ODBC or CLIv2.
3 Click Apply, and click OK.
4 Each logon method uses a slightly different procedure:
• If you are logging on with ODBC, follow the procedure, “Connecting Through ODBC” on page 38.
• If you are logging on with CLIv2, follow the procedure, “Connecting Through CLIv2” on page 39.
Connecting Through ODBC
Teradata Index Wizard allows you to connect to a Teradata Database via ODBC.
To connect using ODBC
The ODBC connection procedure assumes you have already created a data source. If you have not defined a data source, do so before connecting. See “Defining a Data Source” on page 38.
1 Select File > Connect or click .
The Please Select a Data Source dialog box opens.
2 Select a data source, and click OK.
The Teradata Database Connect dialog box opens. To fill in the fields, refer to ODBC Driver for Teradata User Guide. See “Additional Information” on page 5.
You are now logged on to the selected Teradata Database.
If errors occur, see “Connection Errors” on page 40.
3 Go to the next step, “Defining a Workload” on page 40.
Defining a Data Source
Use the ODBC Data Source Administrator to create ODBC data sources. You can also use the ODBC Data Source Administrator to configure some features of the drivers installed on your system.
38 Teradata Index Wizard User Guide
Chapter 3: Index Wizard-Quick StartSelecting a Logon Method
To define a data source
1 Open the Microsoft ODBC Data Source Administrator using one of these options:
• From the Teradata Index Wizard main window, select Tools > Define Data Source.
• Or, from your Windows desktop, select Start > Programs > ODBC > 32-bit ODBC Administrator. The ODBC Data Source Administrator dialog box opens.
2 Open the Create New Data Source dialog box using one of these options:
• From the System DSN tab, click Add.
• Or, from the User DSN tab, click Add.
3 From the Drivers list, select Teradata.
4 Click Finish.
The ODBC Driver Setup for Teradata Database dialog box opens. This dialog box is specific to your Teradata Database.
5 Fill out the information in this dialog box. Refer to ODBC Driver for Teradata User Guide. See “Additional Information” on page 5.
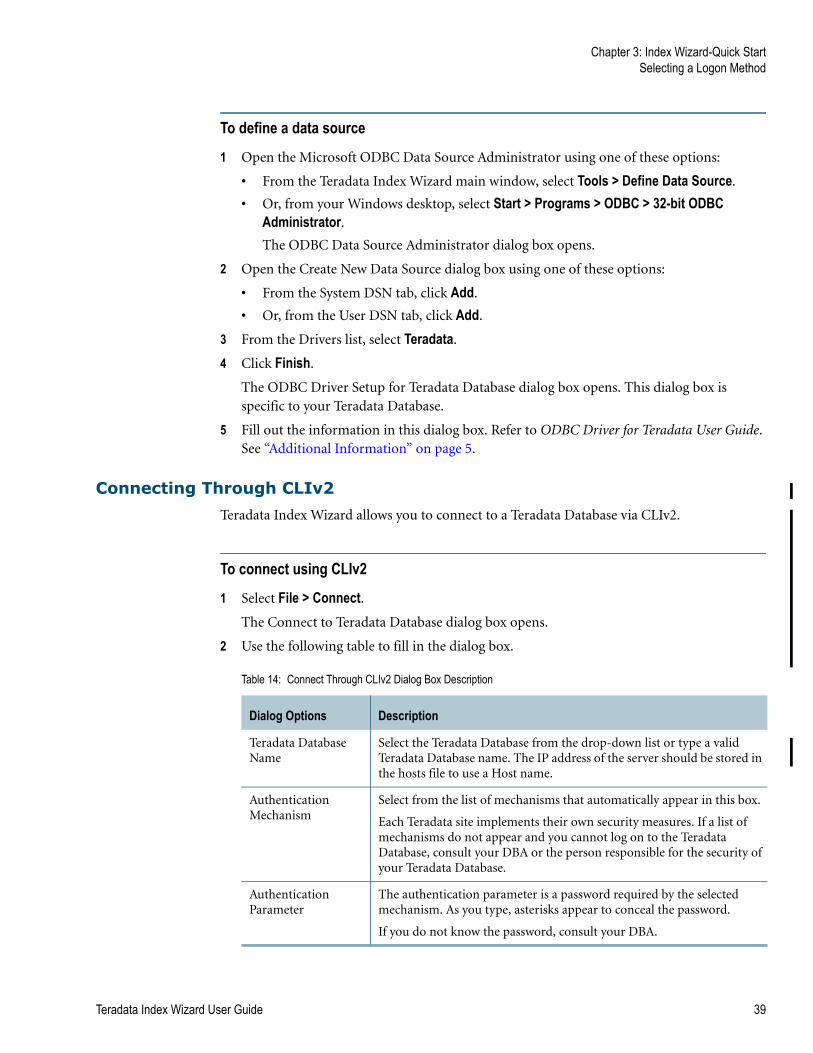
Connecting Through CLIv2
Teradata Index Wizard allows you to connect to a Teradata Database via CLIv2.
To connect using CLIv2
1 Select File > Connect.The Connect to Teradata Database dialog box opens.
2 Use the following table to fill in the dialog box.
Table 14: Connect Through CLIv2 Dialog Box Description
Dialog Options Description
Teradata Database Name
Select the Teradata Database from the drop-down list or type a valid Teradata Database name. The IP address of the server should be stored in the hosts file to use a Host name.
Authentication Mechanism
Select from the list of mechanisms that automatically appear in this box.
Each Teradata site implements their own security measures. If a list of mechanisms do not appear and you cannot log on to the Teradata Database, consult your DBA or the person responsible for the security of your Teradata Database.
Authentication Parameter
The authentication parameter is a password required by the selected mechanism. As you type, asterisks appear to conceal the password.
If you do not know the password, consult your DBA.
Teradata Index Wizard User Guide 39
Chapter 3: Index Wizard-Quick StartDefining a Workload
3 After you have filled in the fields, click OK.You are now logged on to the selected Teradata Database.
If any errors occur, see “Connection Errors” on page 40.
4 Go to the next step, “Defining a Workload” on page 40.
Connection Errors
If the logon information provided is not correct, an error message appears. The following table explains the possible problem of each type of connection error. For more information about error messages, see Appendix B: “Index Wizard Error Messages.”
Defining a Workload
The starting point for the index recommendation process is capturing a representative sample of active SQL statements. This is done by defining a a set of queries as a workload. Typically, a workload is comprised of a set of queries from a production system.
User Name Select the user name from the drop-down list or type in a valid user name. The user name should already be defined for the server.
Password Enter the password for the user name defined in the User Name field.
Session Character Set [Optional] Select the session character set from the list. Choose one of the following: ASCII, KANJISJIS_0S, UTF16, or UTF8.
Default Database [Optional] Select the default Teradata Database for the session.
Account String [Optional] Specify the logon account string.
Table 14: Connect Through CLIv2 Dialog Box Description (continued)
Dialog Options Description
Table 15: Connection Errors Dialog Box Description
Error Type Description
Name error If the Teradata Database name specified is not present in the Hosts file, Name error appears.
User Name error If there is a user name error or if the user does not exist in the Teradata Database name, a User Name error appears. For more information, see “Defining a Data Source” on page 38.
Password error If the password for the user is not valid or is incorrect, the Password error appears. For more information, see “Defining a Data Source” on page 38.
40 Teradata Index Wizard User Guide
Chapter 3: Index Wizard-Quick StartRunning an Analysis
Index Wizard provides the following ways to define a workload:
• Selecting queries from the DBQL.
• Keying in the SQL statement manually. The SQL statements can also be selected from one or more files.
• Using an existing set of execution plans from the user defined QCD.
• Importing SQL statements from a file.
• Creating a new workload from an existing one.
To define a workload
1 Select Workload>Create and choose a workload definition method.
The types of definitions are shown below. For specific procedures about each workload definition method, click on the following types:
• Defining a Workload From DBQL Statements
• Defining a Workload Using Statement Text
• Defining a Workload From QCD Statements
• Importing a Workload
• Defining a Workload from an Existing Workload
• Updating an Existing Workload
2 Fill in the dialog box as needed.
After the workload is created, it is stored, and a summary window opens showing the workload.
3 Click OK to complete the workload definition step.
After a workload is created, it stays in the workload cache and is used by default in the analysis, reports, and validations steps.
The following reports are available after the workload is defined:
• Existing Indexes Report
• Update Frequency Report
• Table Usage Analysis Report
• Workload Analysis Report
• Table Scan Report
4 Go to the next step, “Running an Analysis” on page 41
For more information on workloads, see Chapter 4: “Workload Definition.”
Running an Analysis
After the workload is defined, the next step is to analyze the queries in the workload and recommend secondary indexes that enhance performance.
Teradata Index Wizard User Guide 41

Chapter 3: Index Wizard-Quick StartRunning an Analysis
To start a new index analysis
1 Select Analysis > Index Analysis.
The Index Analysis dialog box appears.
2 The QCD should already be loaded. If it is not, click to search.
3 The cached workload should already be loaded into the Workload Name box.
If it is not, click .
4 Under Select Tables, ensure all the tables are highlighted.
Data Demographics are available for these tables. For more information, see Chapter 11: “Data Demographics.”
5 Under Recommendation Identification, enter a unique recommendation tag in the Recommendation Tag box.
6 Click Advanced to set additional recommendation parameters.
For more information, see “Advanced Button” on page 89.
7 Click OK to begin the analysis.
The index analysis engine runs inside the Teradata parsing engine to enumerate possible secondary index candidate combinations. The engine then evaluates them against the workload by simulating the index set and using the Teradata Optimizer to cost the queries using the simulated indexes.
After the Teradata Database returns with the analysis results, the Index Analysis Summary dialog box appears showing the analysis summary. The analysis also creates a series of reports showing the results of the analysis.
For more details on analysis, see Chapter 5: “Analysis.”
Go to the next step, “Selecting Reports” on page 43.
To start a new partition analysis
1 Select Analysis >Partition Analysis.
The Partition Analysis dialog box appears.
2 Under Workload Statements, the QCD should already be loaded. If it is not, click to search.
3 The cached workload should already be loaded into the Workload Name box.
If it is not, click .
4 Under Select Tables, ensure all the tables are highlighted.
Data Demographics are available for these tables. For more information, see Chapter 11: “Data Demographics.”
42 Teradata Index Wizard User Guide
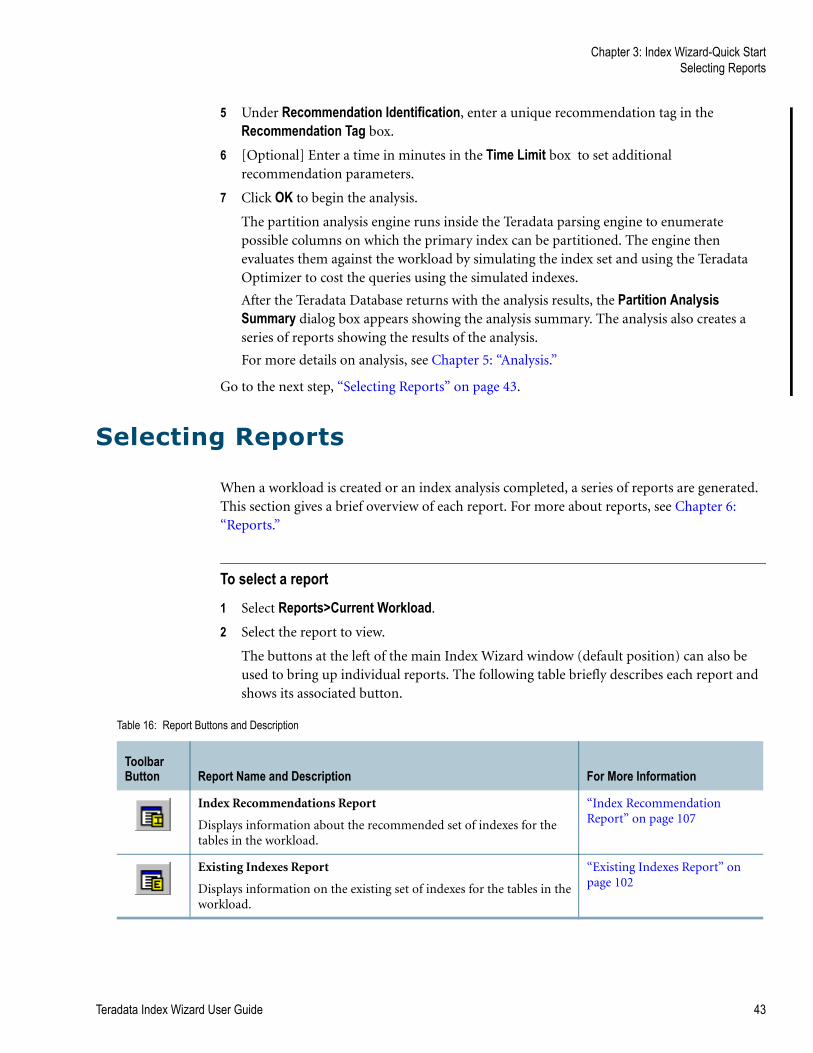
Chapter 3: Index Wizard-Quick StartSelecting Reports
5 Under Recommendation Identification, enter a unique recommendation tag in the Recommendation Tag box.
6 [Optional] Enter a time in minutes in the Time Limit box to set additional recommendation parameters.
7 Click OK to begin the analysis.
The partition analysis engine runs inside the Teradata parsing engine to enumerate possible columns on which the primary index can be partitioned. The engine then evaluates them against the workload by simulating the index set and using the Teradata Optimizer to cost the queries using the simulated indexes.
After the Teradata Database returns with the analysis results, the Partition Analysis Summary dialog box appears showing the analysis summary. The analysis also creates a series of reports showing the results of the analysis.
For more details on analysis, see Chapter 5: “Analysis.”
Go to the next step, “Selecting Reports” on page 43.
Selecting Reports
When a workload is created or an index analysis completed, a series of reports are generated. This section gives a brief overview of each report. For more about reports, see Chapter 6: “Reports.”
To select a report
1 Select Reports>Current Workload.
2 Select the report to view.
The buttons at the left of the main Index Wizard window (default position) can also be used to bring up individual reports. The following table briefly describes each report and shows its associated button.
Table 16: Report Buttons and Description
Toolbar Button Report Name and Description For More Information
Index Recommendations Report
Displays information about the recommended set of indexes for the tables in the workload.
“Index Recommendation Report” on page 107
Existing Indexes Report
Displays information on the existing set of indexes for the tables in the workload.
“Existing Indexes Report” on page 102
Teradata Index Wizard User Guide 43

Chapter 3: Index Wizard-Quick StartValidating Recommendations
Go to the next step, “Validating Recommendations” on page 44.
Validating Recommendations
The validation step is a way to check the impact of applying index recommendations on the production. The validation step does not actually apply the index to the production system.
Query Cost Analysis Report
Displays the execution cost improvement for the SQL statements with the recommended set of indexes.
“Query Cost Analysis Report” on page 107
Update Frequency Report
Displays the relative number of updates on a given table in the workload when compared to the number of accesses from the table.
“Update Frequency Report” on page 103
Disk Space Analysis Report
Displays the estimated space required to store the recommended indexes.
“Disk Space Analysis Report” on page 108
Index Maintenance Cost Report
Displays the estimated cost of maintaining recommended indexes for a particular recommendation ID on a workload.
“Index Maintenance Cost Report” on page 110
Table Usage Analysis Report
Displays the usage of tables within the workload.
“Table Usage Analysis Report” on page 103
Table Scan Report
This report contains information about the usage of tables in the workload. It aids the user in selecting tables over which the set of indexes will be recommended. Table cardinality (estimates), access types, and geographies can give clues as to where an index might be of value.
“Table Scan Report” on page 104
Object Global Use Count Report
Shows the objects that are accessed the most on a table.
“Object Global Use Count Report” on page 106
Workload Analysis Report
This report provides a statement-wise analysis of the workload.
“Workload Analysis Report” on page 105
Summary Report
This report shows details about the secondary index count and recommendation count made in a specific analysis for all tables in a workload.
“Summary Report” on page 109
Table 16: Report Buttons and Description (continued)
Toolbar Button Report Name and Description For More Information
44 Teradata Index Wizard User Guide
Chapter 3: Index Wizard-Quick StartValidating Recommendations
To validate an index recommendation
1 Click Validation > Load Recommendations from QCDThe Recommendations from QCD dialog box opens prompting for an index recommendation to validate. Index Wizard defaults to the last workload/recommendation in the cache.
2 Make sure Workload Name is correct.
3 Under Select Analysis Type and Tag, check the appropriate check box (Index Analysis or Partition Analysis) and make sure the tag is correct.
4 Clear the Validate on Another System check box.
5 Click Next. A dialog box appears containing recommendation information. Specify which individual recommendations to validate by selecting or deselecting them. Click View DDL Statements to view the DDL for implementing the recommendation. There is an option for setting the data sampling for collecting sample statistics. Click Data Sampling to open this dialog box.
6 Select Validate to begin the validation.
The system validates the index recommendation by simulating the indexes and generating query plans for each query in the workload. The plans are stored in the QCD and compared to the plans saved without the recommendations.
When the validation is complete, a Validation Results Report displays.
After viewing the Validation Results Report, go to the next step, “Executing Recommendations” on page 46.
Validation Results Report
The Validation Results Report displays information on the validation analysis of the recommended index.
Additionally, the summary contains the QCD name and System name where the validation was completed and an overall percentage improvement in cost for the entire workload.
To view data using Visual Explain
✔ Click Compare.
The Teradata Visual Explain application opens showing a graphic comparison between the plan with the index recommendations and the plan with the existing indexes.
For more information on validation, see Chapter 7: “Validation.”
Go to the next step, “Executing Recommendations” on page 46.
Teradata Index Wizard User Guide 45
Chapter 3: Index Wizard-Quick StartExecuting Recommendations
Executing Recommendations
The final step in the quick start is implementing a recommended index (referred to as execution). Index Wizard provides two ways to implement the recommendations. You can implement the recommended indexes immediately or schedule the indexes to be created in the future.
To execute recommendations immediately
1 Click Creation>Execute Immediately.
The Execute Recommendations dialog box appears.
2 Select the recommendations the list that to execute (the default is all recommendations).
To schedule recommendations at a later time
1 Click Creation>Schedule Recommendations.
The Schedule Recommendations dialog box appears.
2 Select the recommendations from the list to schedule.
3 Select the time, fill in the remaining information, and click Schedule.
For more information, see Chapter 8: “Recommendations.”
Table Recreation Script
Because it involves changes and modifications to the physical structure of a table, the implementation of recommended Partitioned Primary Index is not supported by Teradata Index Wizard.
The Table Recreation Script can be viewed and used to recreate the table with the Partitioned Primary Index recommended by the Partition Analysis.
To view the Table Recreation Script
1 Click PPI Creation>Table Recreation. The Select Workload dialog box appears.
2 Select the workload to view the Table Recreation Script and click View Script. The Table Recreation dialog box appears.
46 Teradata Index Wizard User Guide
CHAPTER 4
Workload Definition
A workload is a set of SQL statements executed against a Teradata Database. A single SQL statement is also a valid workload. Index Wizard analyzes these defined workloads and makes index recommendations. The following workload actions are described in this section:
• Defining a Workload From DBQL Statements
• Defining a Workload Using Statement Text
• Defining a Workload From QCD Statements
• Importing a Workload
• Defining a Workload from an Existing Workload
• Updating an Existing Workload
Defining a Workload From DBQL Statements
To define a workload from DBQL statements
1 Click Workload>Create>From DBQL Statements.
The Define Workload from DBQL Statements dialog box appears.
Teradata Index Wizard User Guide 47
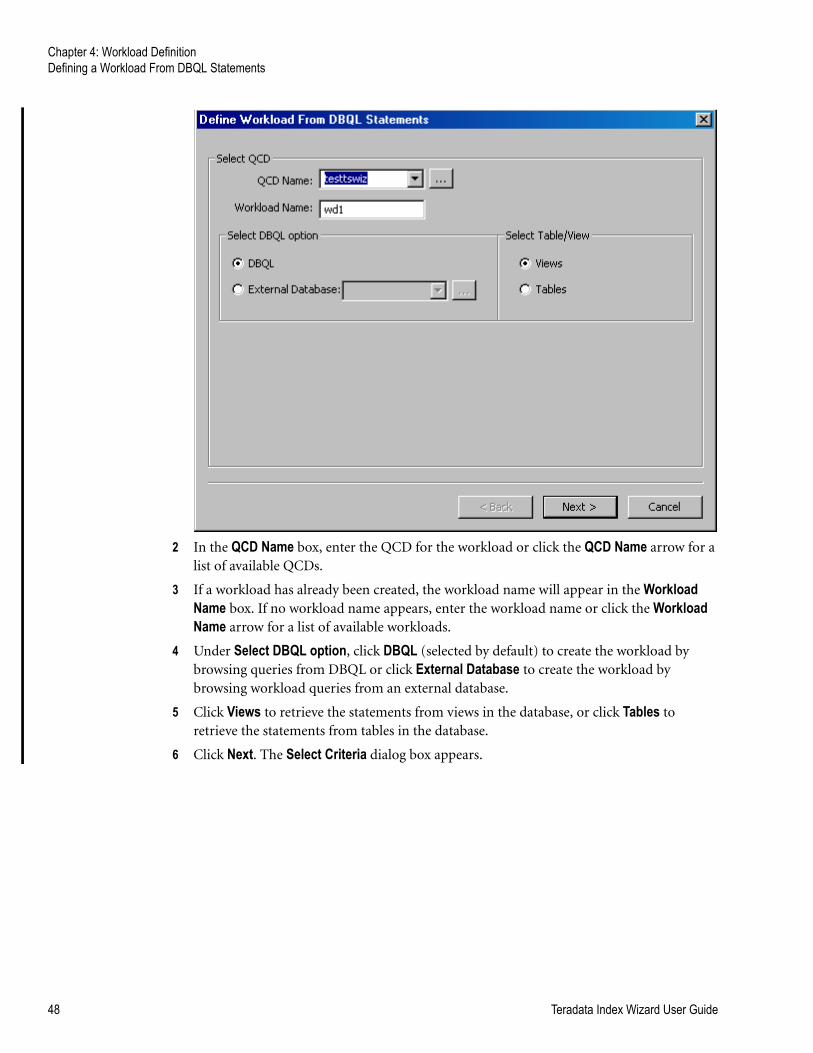
Chapter 4: Workload DefinitionDefining a Workload From DBQL Statements
2 In the QCD Name box, enter the QCD for the workload or click the QCD Name arrow for a list of available QCDs.
3 If a workload has already been created, the workload name will appear in the Workload Name box. If no workload name appears, enter the workload name or click the Workload Name arrow for a list of available workloads.
4 Under Select DBQL option, click DBQL (selected by default) to create the workload by browsing queries from DBQL or click External Database to create the workload by browsing workload queries from an external database.
5 Click Views to retrieve the statements from views in the database, or click Tables to retrieve the statements from tables in the database.
6 Click Next. The Select Criteria dialog box appears.
48 Teradata Index Wizard User Guide
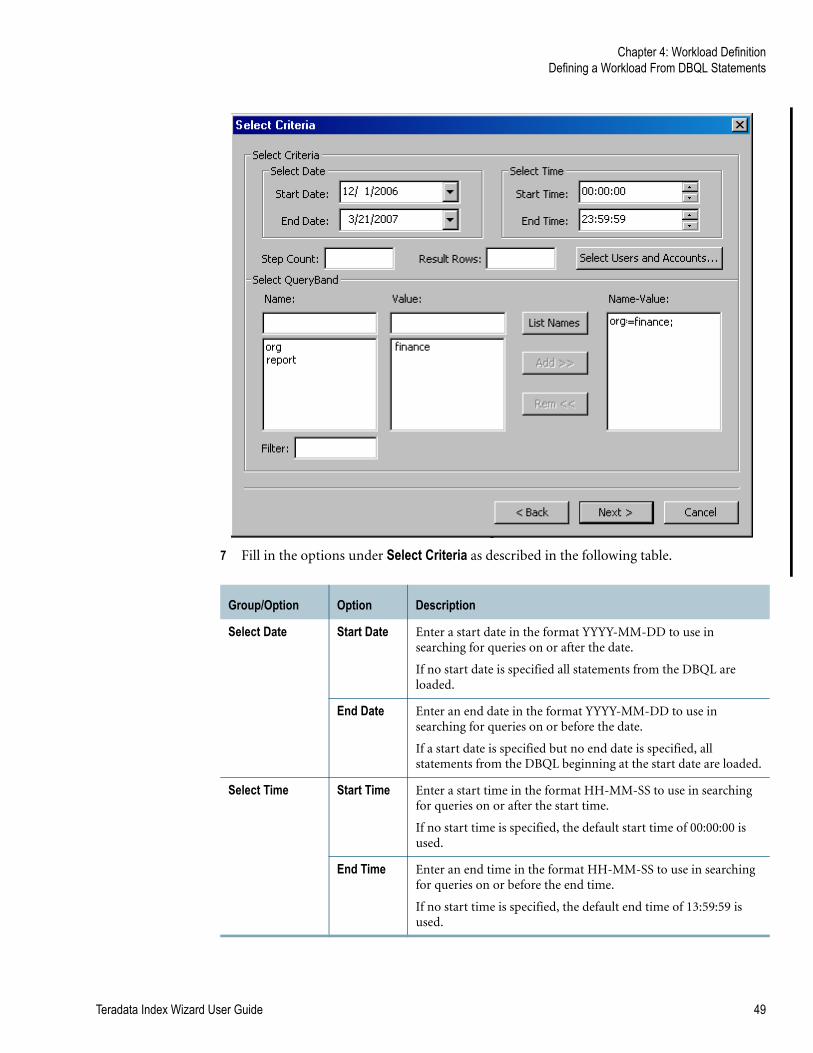
Chapter 4: Workload DefinitionDefining a Workload From DBQL Statements
7 Fill in the options under Select Criteria as described in the following table.
Group/Option Option Description
Select Date Start Date Enter a start date in the format YYYY-MM-DD to use in searching for queries on or after the date.
If no start date is specified all statements from the DBQL are loaded.
End Date Enter an end date in the format YYYY-MM-DD to use in searching for queries on or before the date.
If a start date is specified but no end date is specified, all statements from the DBQL beginning at the start date are loaded.
Select Time Start Time Enter a start time in the format HH-MM-SS to use in searching for queries on or after the start time.
If no start time is specified, the default start time of 00:00:00 is used.
End Time Enter an end time in the format HH-MM-SS to use in searching for queries on or before the end time.
If no start time is specified, the default end time of 13:59:59 is used.
Teradata Index Wizard User Guide 49
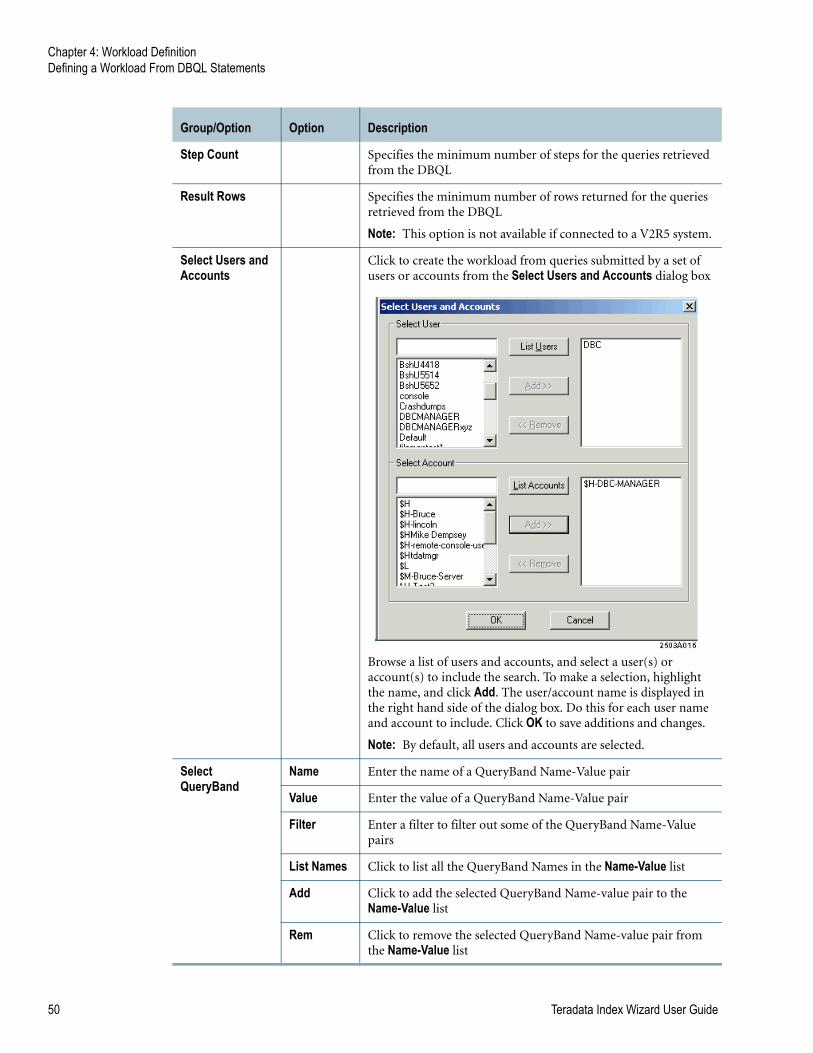
Chapter 4: Workload DefinitionDefining a Workload From DBQL Statements
Step Count Specifies the minimum number of steps for the queries retrieved from the DBQL
Result Rows Specifies the minimum number of rows returned for the queries retrieved from the DBQL
Note: This option is not available if connected to a V2R5 system.
Select Users and Accounts
Click to create the workload from queries submitted by a set of users or accounts from the Select Users and Accounts dialog box
Browse a list of users and accounts, and select a user(s) or account(s) to include the search. To make a selection, highlight the name, and click Add. The user/account name is displayed in the right hand side of the dialog box. Do this for each user name and account to include. Click OK to save additions and changes.
Note: By default, all users and accounts are selected.
Select QueryBand
Name Enter the name of a QueryBand Name-Value pair
Value Enter the value of a QueryBand Name-Value pair
Filter Enter a filter to filter out some of the QueryBand Name-Value pairs
List Names Click to list all the QueryBand Names in the Name-Value list
Add Click to add the selected QueryBand Name-value pair to the Name-Value list
Rem Click to remove the selected QueryBand Name-value pair from the Name-Value list
Group/Option Option Description
50 Teradata Index Wizard User Guide
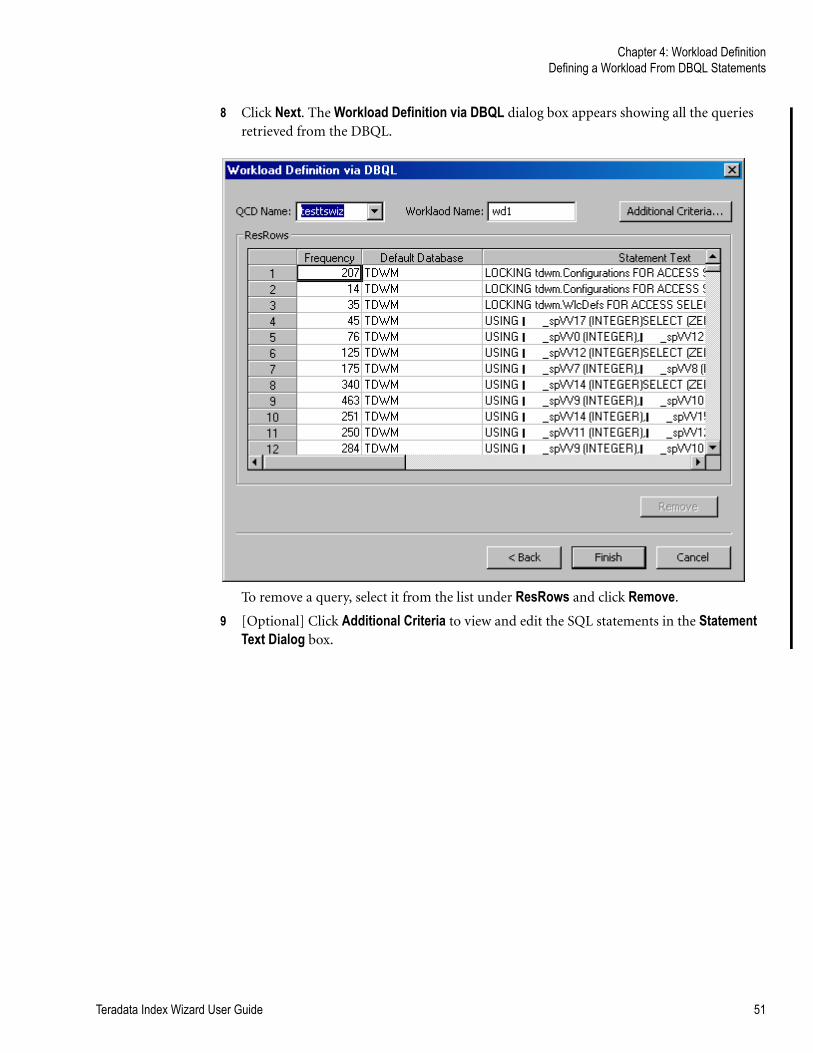
Chapter 4: Workload DefinitionDefining a Workload From DBQL Statements
8 Click Next. The Workload Definition via DBQL dialog box appears showing all the queries retrieved from the DBQL.
To remove a query, select it from the list under ResRows and click Remove.
9 [Optional] Click Additional Criteria to view and edit the SQL statements in the Statement Text Dialog box.
Teradata Index Wizard User Guide 51
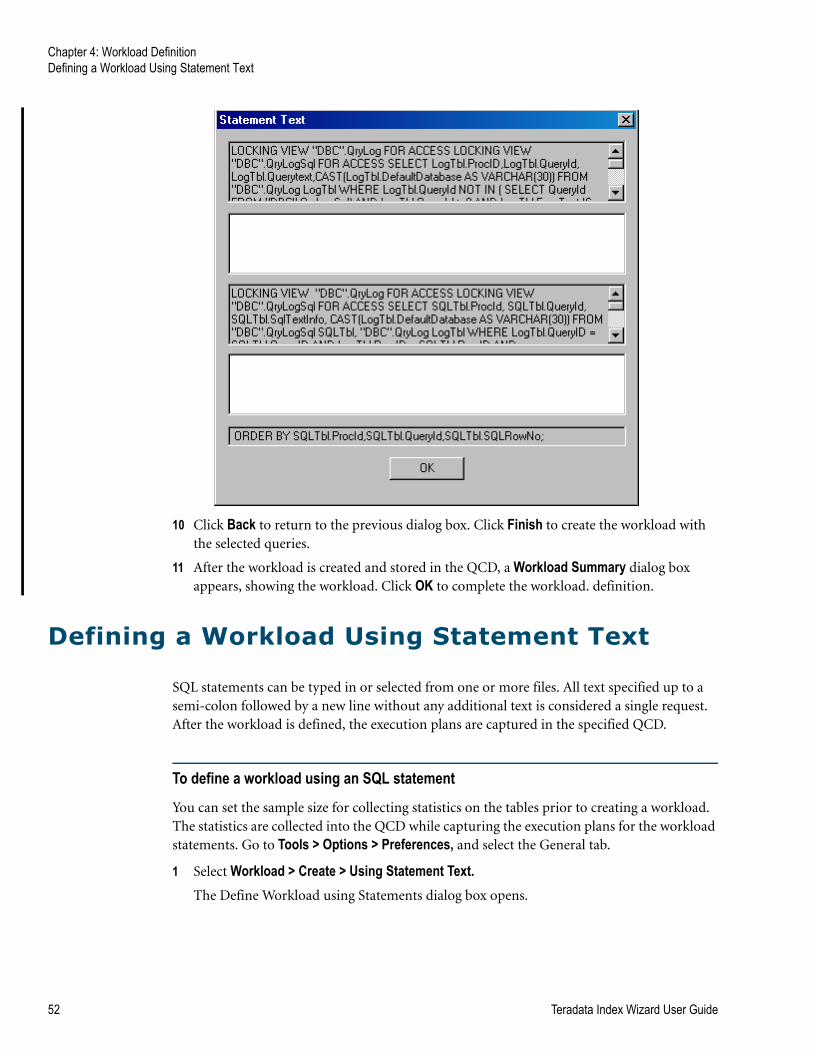
Chapter 4: Workload DefinitionDefining a Workload Using Statement Text
10 Click Back to return to the previous dialog box. Click Finish to create the workload with the selected queries.
11 After the workload is created and stored in the QCD, a Workload Summary dialog box appears, showing the workload. Click OK to complete the workload. definition.
Defining a Workload Using Statement Text
SQL statements can be typed in or selected from one or more files. All text specified up to a semi-colon followed by a new line without any additional text is considered a single request. After the workload is defined, the execution plans are captured in the specified QCD.
To define a workload using an SQL statement
You can set the sample size for collecting statistics on the tables prior to creating a workload. The statistics are collected into the QCD while capturing the execution plans for the workload statements. Go to Tools > Options > Preferences, and select the General tab.
1 Select Workload > Create > Using Statement Text. The Define Workload using Statements dialog box opens.
52 Teradata Index Wizard User Guide
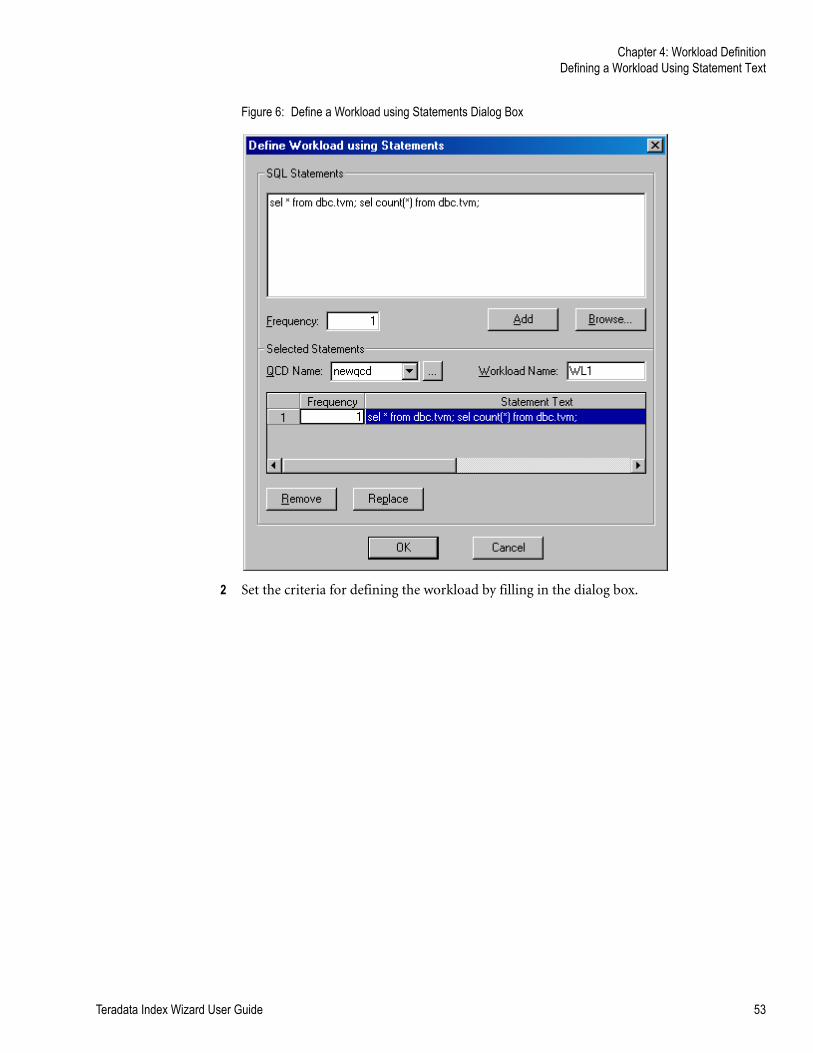
Chapter 4: Workload DefinitionDefining a Workload Using Statement Text
Figure 6: Define a Workload using Statements Dialog Box
2 Set the criteria for defining the workload by filling in the dialog box.
Teradata Index Wizard User Guide 53
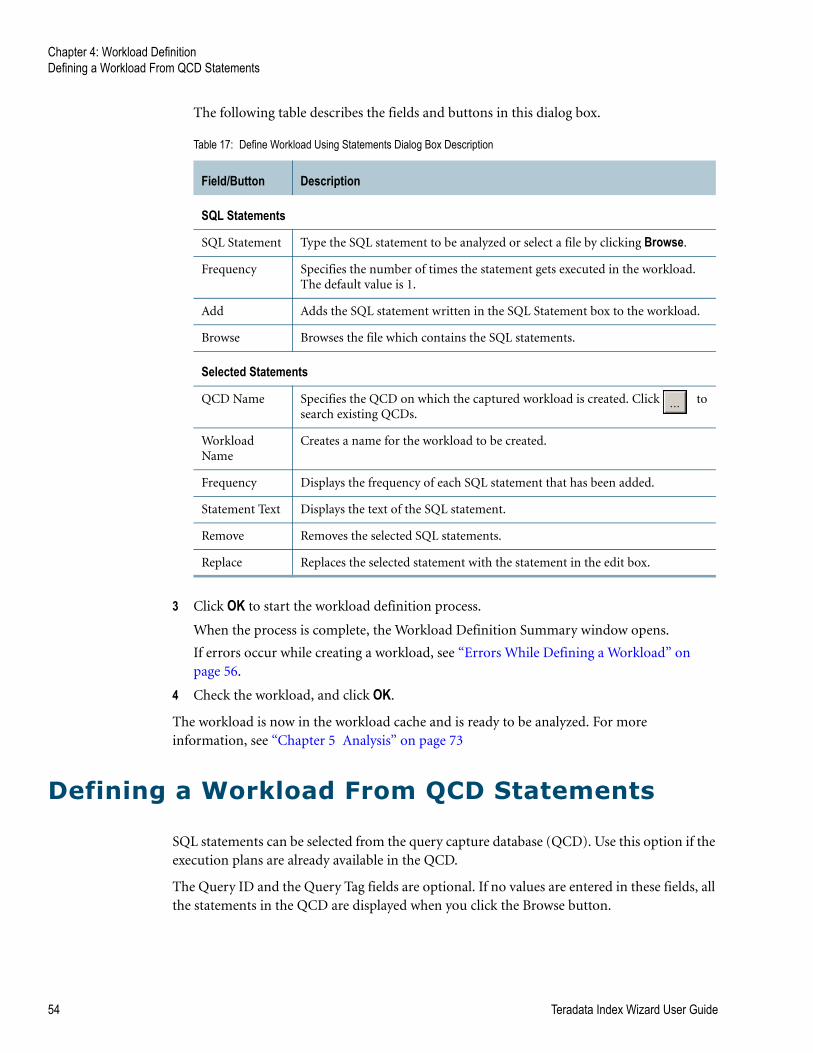
Chapter 4: Workload DefinitionDefining a Workload From QCD Statements
The following table describes the fields and buttons in this dialog box.
3 Click OK to start the workload definition process.
When the process is complete, the Workload Definition Summary window opens.
If errors occur while creating a workload, see “Errors While Defining a Workload” on page 56.
4 Check the workload, and click OK.
The workload is now in the workload cache and is ready to be analyzed. For more information, see “Chapter 5 Analysis” on page 73
Defining a Workload From QCD Statements
SQL statements can be selected from the query capture database (QCD). Use this option if the execution plans are already available in the QCD.
The Query ID and the Query Tag fields are optional. If no values are entered in these fields, all the statements in the QCD are displayed when you click the Browse button.
Table 17: Define Workload Using Statements Dialog Box Description
Field/Button Description
SQL Statements
SQL Statement Type the SQL statement to be analyzed or select a file by clicking Browse.
Frequency Specifies the number of times the statement gets executed in the workload. The default value is 1.
Add Adds the SQL statement written in the SQL Statement box to the workload.
Browse Browses the file which contains the SQL statements.
Selected Statements
QCD Name Specifies the QCD on which the captured workload is created. Click to search existing QCDs.
Workload Name
Creates a name for the workload to be created.
Frequency Displays the frequency of each SQL statement that has been added.
Statement Text Displays the text of the SQL statement.
Remove Removes the selected SQL statements.
Replace Replaces the selected statement with the statement in the edit box.
54 Teradata Index Wizard User Guide
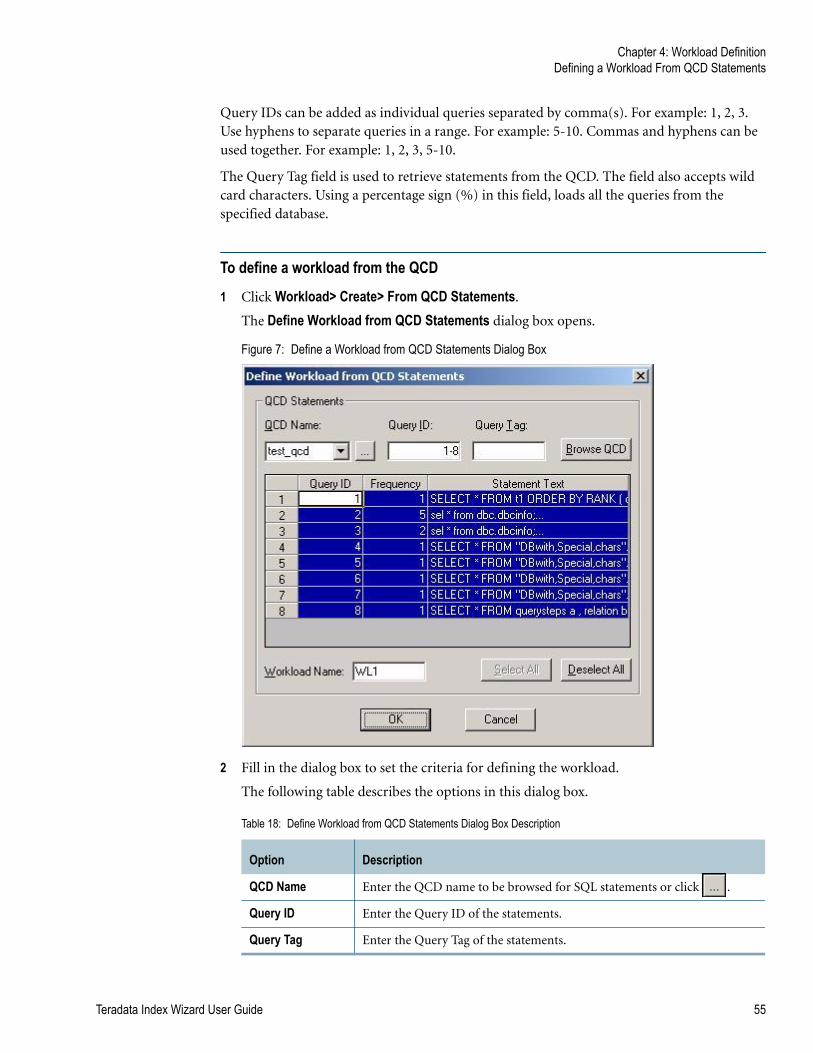
Chapter 4: Workload DefinitionDefining a Workload From QCD Statements
Query IDs can be added as individual queries separated by comma(s). For example: 1, 2, 3. Use hyphens to separate queries in a range. For example: 5-10. Commas and hyphens can be used together. For example: 1, 2, 3, 5-10.
The Query Tag field is used to retrieve statements from the QCD. The field also accepts wild card characters. Using a percentage sign (%) in this field, loads all the queries from the specified database.
To define a workload from the QCD
1 Click Workload> Create> From QCD Statements.
The Define Workload from QCD Statements dialog box opens.
Figure 7: Define a Workload from QCD Statements Dialog Box
2 Fill in the dialog box to set the criteria for defining the workload.
The following table describes the options in this dialog box.
Table 18: Define Workload from QCD Statements Dialog Box Description
Option Description
QCD Name Enter the QCD name to be browsed for SQL statements or click .
Query ID Enter the Query ID of the statements.
Query Tag Enter the Query Tag of the statements.
Teradata Index Wizard User Guide 55
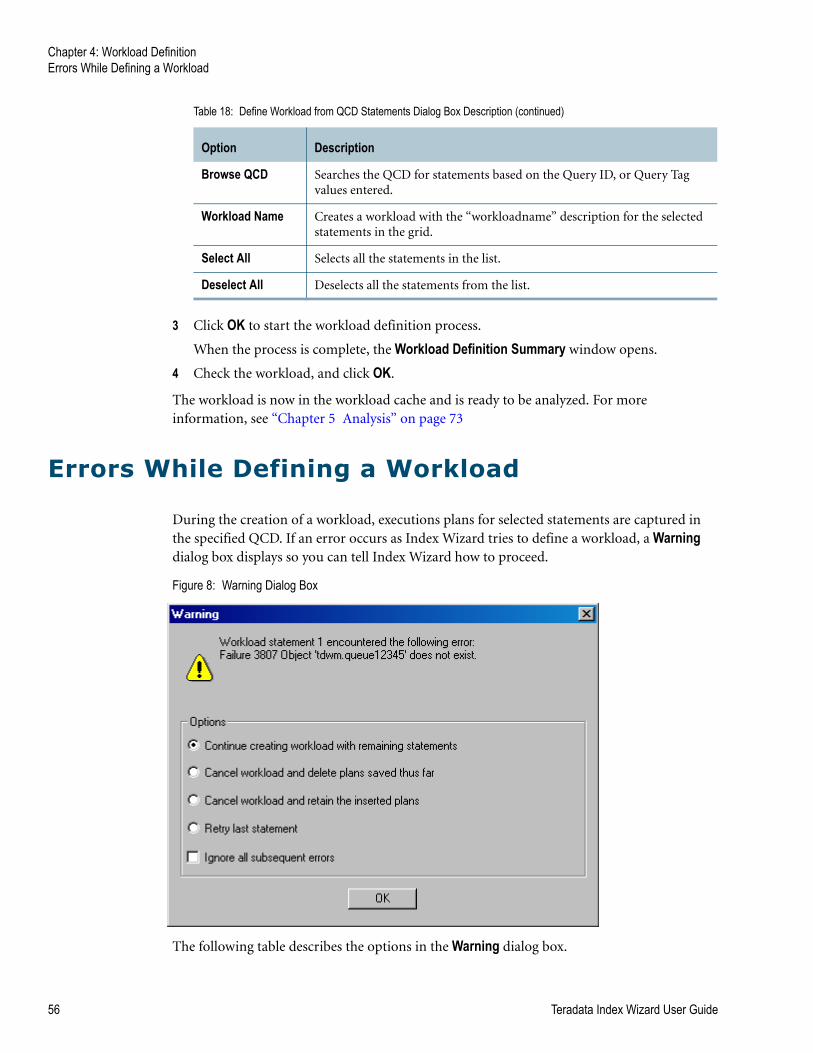
Chapter 4: Workload DefinitionErrors While Defining a Workload
3 Click OK to start the workload definition process.
When the process is complete, the Workload Definition Summary window opens.
4 Check the workload, and click OK.
The workload is now in the workload cache and is ready to be analyzed. For more information, see “Chapter 5 Analysis” on page 73
Errors While Defining a Workload
During the creation of a workload, executions plans for selected statements are captured in the specified QCD. If an error occurs as Index Wizard tries to define a workload, a Warning dialog box displays so you can tell Index Wizard how to proceed.
Figure 8: Warning Dialog Box
The following table describes the options in the Warning dialog box.
Browse QCD Searches the QCD for statements based on the Query ID, or Query Tag values entered.
Workload Name Creates a workload with the “workloadname” description for the selected statements in the grid.
Select All Selects all the statements in the list.
Deselect All Deselects all the statements from the list.
Table 18: Define Workload from QCD Statements Dialog Box Description (continued)
Option Description
56 Teradata Index Wizard User Guide
Chapter 4: Workload DefinitionImporting a Workload
Importing a Workload
SQL statements can be imported from another system onto a test system. When the file containing the imported workload information (.mcf file) is opened, the environment of the production system is imported onto the test system.
To import a workload
1 Click Workload>Create> Import WorkloadThe Select a File to Import Workload dialog box opens.
2 Choose the workload file to import, and click Open.
Table 19: Warning Dialog Box Description
Option Description
Continue creating workload with remaining statements?
Ignores the error and continues with the workload creation.
Cancel workload and delete plans saved thus far?
Halts the workload creation process. Plans already inserted as a part of the workload are deleted.
Cancel workload and retain the inserted plans?
Halts the workload creation process. Plans already inserted as a part of the workload are retained in the QCD.
Retry last statement Resubmits the last statement.
Ignore all subsequent errors Suppresses any further non-critical errors during workload creation. Critical errors will still appear even if you have selected this check box.
Note: This option is available when the Continue creating workload with remaining statements? button has been selected.
Teradata Index Wizard User Guide 57
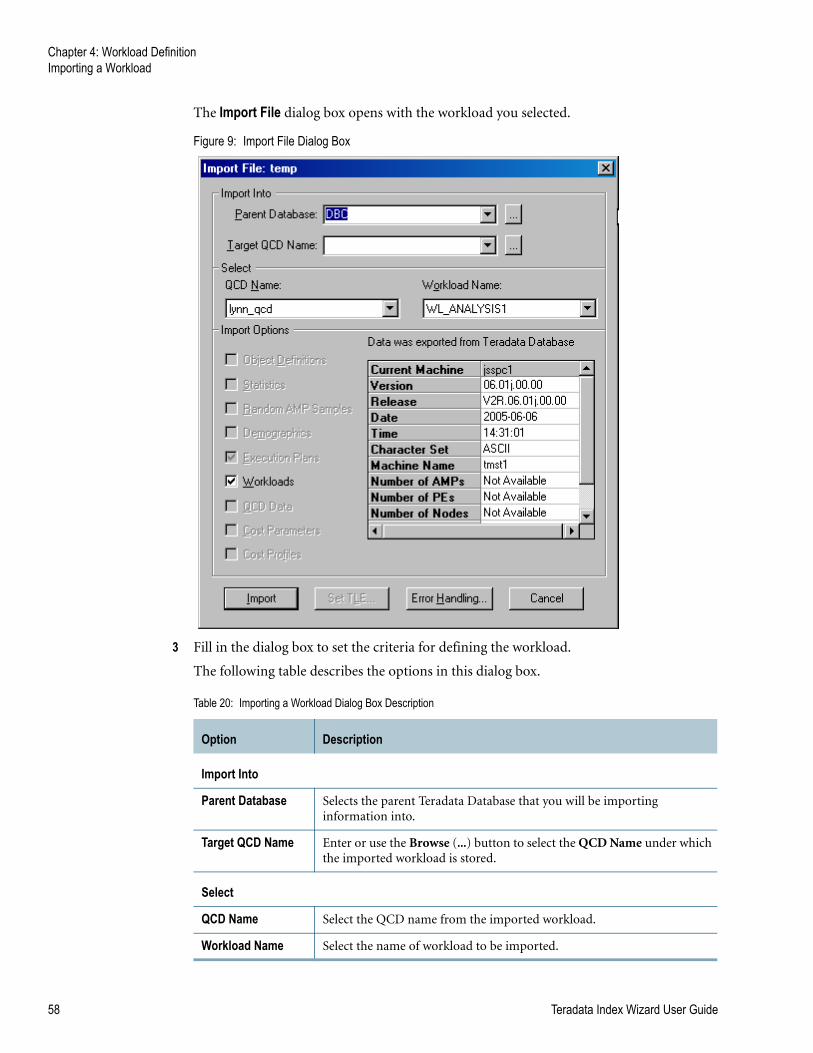
Chapter 4: Workload DefinitionImporting a Workload
The Import File dialog box opens with the workload you selected.
Figure 9: Import File Dialog Box
3 Fill in the dialog box to set the criteria for defining the workload.
The following table describes the options in this dialog box.
Table 20: Importing a Workload Dialog Box Description
Option Description
Import Into
Parent Database Selects the parent Teradata Database that you will be importing information into.
Target QCD Name Enter or use the Browse (...) button to select the QCD Name under which the imported workload is stored.
Select
QCD Name Select the QCD name from the imported workload.
Workload Name Select the name of workload to be imported.
58 Teradata Index Wizard User Guide
Chapter 4: Workload DefinitionImporting a Workload
4 Click Import to start the workload definition process.
When the process is complete, the Workload Definition Summary window opens.
5 Check the workload, and click OK.
The workload is now in the workload cache and is ready to be analyzed. For more information, see “Chapter 5 Analysis” on page 73
Setting the TLE
TLE is a feature that enables you to emulate a production environment on a completely different and foreign environment.
When TLE options are imported and enabled, the Optimizer generates plans relative to the emulated production environment rather than the local environment. This enables you to confidently perform and test administrative and performance enhancing modifications, such as indexing, without the risk of saturating or altering the production environment.
To set the TLE
1 From the Import File dialog box, click Set TLE.
The Set Target Level Emulation dialog box opens with the Set RAS tab active. The following figure shows the Set Cost Profile tab active.
Import Options
Check Boxes>
Object definitionsStatisticsRandom AMP SampleDemographicsExecution PlanWorkloads QCD DataCost ParametersCost Profiles
Use these check boxes to set import options for the workload you are importing. See “Import Options” on page 63 for a detailed explanation of these options.
Import Starts the import operation.
Set TLE Opens the Set Target Emulation dialog box. For more information, see “Setting the TLE” on page 59.
Error Handling Opens the Error Handling dialog box, which has several options for handling errors that may occur when importing a workload. For more information, see “Handling Errors” on page 61.
Table 20: Importing a Workload Dialog Box Description (continued)
Option Description
Teradata Index Wizard User Guide 59
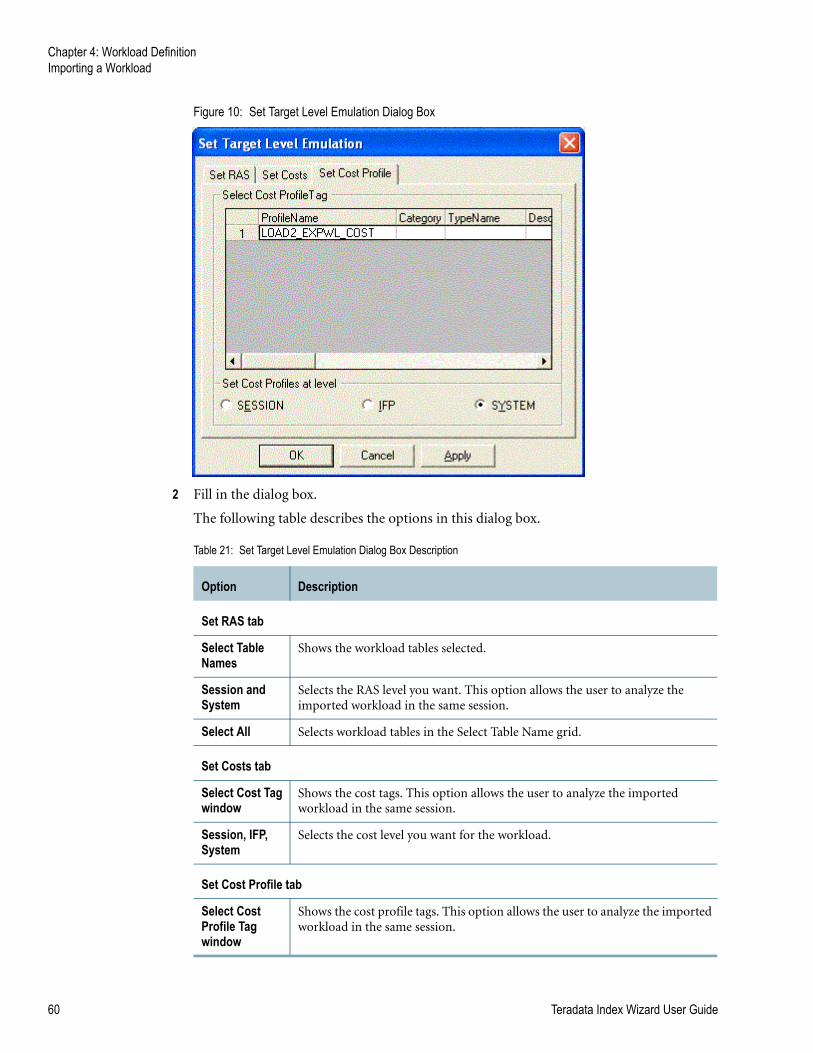
Chapter 4: Workload DefinitionImporting a Workload
Figure 10: Set Target Level Emulation Dialog Box
2 Fill in the dialog box.
The following table describes the options in this dialog box.
Table 21: Set Target Level Emulation Dialog Box Description
Option Description
Set RAS tab
Select Table Names
Shows the workload tables selected.
Session and System
Selects the RAS level you want. This option allows the user to analyze the imported workload in the same session.
Select All Selects workload tables in the Select Table Name grid.
Set Costs tab
Select Cost Tag window
Shows the cost tags. This option allows the user to analyze the imported workload in the same session.
Session, IFP, System
Selects the cost level you want for the workload.
Set Cost Profile tab
Select Cost Profile Tag window
Shows the cost profile tags. This option allows the user to analyze the imported workload in the same session.
60 Teradata Index Wizard User Guide
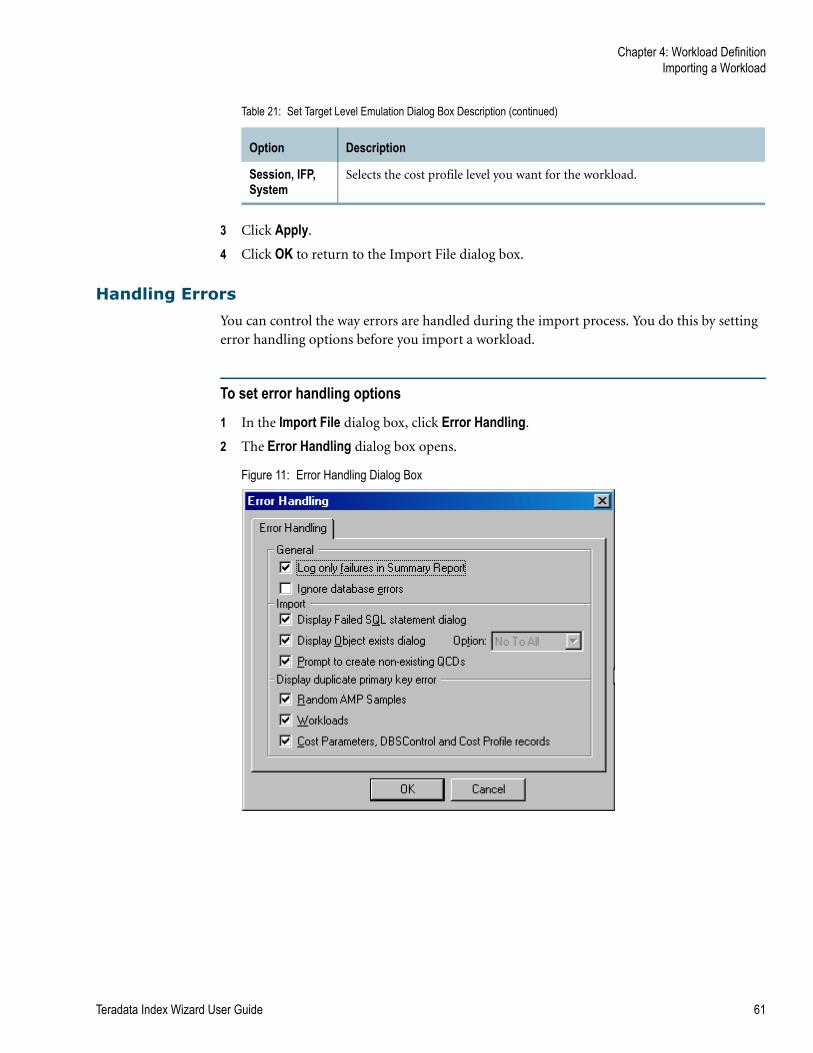
Chapter 4: Workload DefinitionImporting a Workload
3 Click Apply.
4 Click OK to return to the Import File dialog box.
Handling Errors
You can control the way errors are handled during the import process. You do this by setting error handling options before you import a workload.
To set error handling options
1 In the Import File dialog box, click Error Handling.
2 The Error Handling dialog box opens.
Figure 11: Error Handling Dialog Box
Session, IFP, System
Selects the cost profile level you want for the workload.
Table 21: Set Target Level Emulation Dialog Box Description (continued)
Option Description
Teradata Index Wizard User Guide 61
Chapter 4: Workload DefinitionImporting a Workload
3 Fill in the dialog box. The following table describes the options in this dialog box.
Table 22: Error Handling Dialog Box Description
Option Description
General
Log only failures in Summary Report
Logs failed operations into the summary report. Consult the log file for the cause of any failures.
Ignore database errors Teradata Database error messages are ignored during import. If you clear this check box, all Teradata Database error messages are displayed.
Import
Display Failed SQL statement dialog
Displays the SQL Statement Failed dialog box. This dialog box allows you to abort the import, ignore the error, or enter SQL to correct insufficient access rights or permanent space errors. Teradata Database errors that can be retried include: 2644, 2843, 3250, 3523, or 3524.
If you clear this check box, errors are automatically ignored.
Display Object exists dialog
Shows a message that the object already exists on the machine and gives you the option to overwrite.
If you clear this check box, the Option drop-down box is enabled and you can choose the following:
Yes To All drops all existing objects and recreate all exported objects.
No To All does not drop existing objects and continue with the import operation.
Cancel automatically aborts the import operation if any objects already exist.
Prompt to create non-existing QCDs
Displays a message to create a QCD if the target QCD doesn't exist.
If you clear this check box, a target QCD is created automatically.
Display duplicate primary key error
Random AMP samples Opens a dialog box that allows you to enter a new system name/RAS tag if a duplicate prime key error occurs while importing Random AMP Samples.
If you clear the Random AMP Samples check box and if the rows already exist on the import system, the import operation will fail with duplicate prime key errors.
Select Use the new tag for the rest of the RAS import if you want the new RAS tag used if duplicate primary key errors occur in the rest of the import of the RAS rows. If you clear this check box, the same dialog box displays for all RAS tags when the duplicate primary key error occurs.
62 Teradata Index Wizard User Guide
Chapter 4: Workload DefinitionImporting a Workload
4 Click OK to return to the Import File dialog box.
Import Options
Import options affect how the workload is imported.
To set import options
1 In the Import File dialog box, locate the import options on the left side of the dialog box.
2 Fill in the dialog box. The following table explains each import option.
3 Continue filling in the other fields in the Import File dialog box.
Workloads Opens a dialog box that allows you to enter a new workload name if a duplicate prime key error occurs while importing workloads.
If you clear the Workloads check box and a workload already exists in the target QCD, the import operation will fail with duplicate prime key errors.
Cost Parameters, DBSControl and Cost Profile records
Opens a dialog box that allows you to enter a new cost tag if a duplicate prime key error occurs while importing cost parameters.
If you clear the Cost Parameters check box and rows already exist on the import system, the import operation will fail due to any duplicate prime key errors.
If you select this check box, Index Wizard will also export DBSControl records and active or inactive cost profiles.
Table 22: Error Handling Dialog Box Description (continued)
Option Description
Table 23: Import Option Descriptions
Import Option Description
Object Definitions Imports the object definition.
Statistics Imports the information statistics.
Random AMP Sample Imports random AMP samples.
Demographics Imports the data demographics captured on the tables.
Execution Plan Imports the execution plan.
Workloads Imports workload data.
QCD Data Imports QCD data.
Cost Parameters Imports the cost parameters.
Cost Profiles Imports active or inactive cost profiles.
Teradata Index Wizard User Guide 63
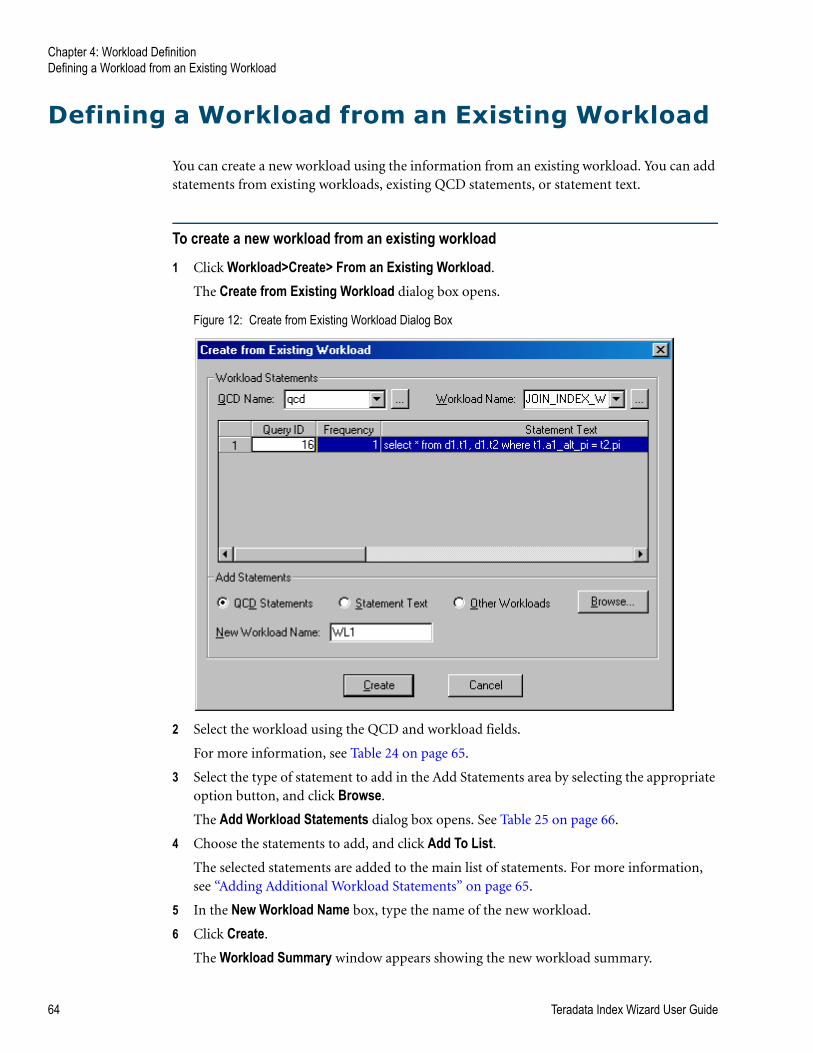
Chapter 4: Workload DefinitionDefining a Workload from an Existing Workload
Defining a Workload from an Existing Workload
You can create a new workload using the information from an existing workload. You can add statements from existing workloads, existing QCD statements, or statement text.
To create a new workload from an existing workload
1 Click Workload>Create> From an Existing Workload.
The Create from Existing Workload dialog box opens.
Figure 12: Create from Existing Workload Dialog Box
2 Select the workload using the QCD and workload fields.
For more information, see Table 24 on page 65.
3 Select the type of statement to add in the Add Statements area by selecting the appropriate option button, and click Browse.
The Add Workload Statements dialog box opens. See Table 25 on page 66.
4 Choose the statements to add, and click Add To List. The selected statements are added to the main list of statements. For more information, see “Adding Additional Workload Statements” on page 65.
5 In the New Workload Name box, type the name of the new workload.
6 Click Create.
The Workload Summary window appears showing the new workload summary.
64 Teradata Index Wizard User Guide
Chapter 4: Workload DefinitionDefining a Workload from an Existing Workload
7 Check to ensure the workload is correct, and click OK.
The workload is now in the workload cache and is ready to be analyzed. For more information, see “Chapter 5 Analysis” on page 73
The following table explains the Create from Existing Workload dialog box.
Adding Additional Workload Statements
There are several ways to add statements to the new workload including:
• QCD Statements
• Statement Text
• Other Workloads
Table 24: Create from Existing Workload Dialog Box Description
Window Option Description
Workload Statements
QCD Name Enter the QCD name to be browsed for SQL statements.
Workload Name Enter the workload or click to browse for workloads.
Statement Shows the Query ID, frequency, and statement text.
Add Statements
Add Statement Use Add Statements to add additional statements to an existing workload. The Browse button opens a dialog box based on the additional workload statement source. Use the dialog box to select the additional statement.
Types of statements include:
• QCD Statements
• Statement Text
• Other Workloads
For information about these dialog boxes, see “Adding Additional Workload Statements” on page 65.
Click to open a window based on the workload choice.
Note: Only highlighted statements are included in the workload definition.
New Workload Name
Names the new workload.
Create Creates the new workload with the selected statements.
Teradata Index Wizard User Guide 65
Chapter 4: Workload DefinitionUpdating an Existing Workload
The following table explains each option.
Updating an Existing Workload
You can update a workload that has already been created by using the Update Existing Workload option. You can add additional SQL statements or make other changes, then re-define the workload.
To update an existing workload
1 Click Workload>Update Existing Workload
Table 25: Add Workload Statements Dialog Box Description
Window Option Description
QCD Statements
Query IDQuery tag
Enter the Query ID or Query tag of the statement you want to add. Click to look for existing workloads in the QCD.
Click Add to List to add the statements.
SQL Statements
SQL Statements field
Enter the SQL statements you want to add to the workload in the field
Use the Browse button to add statements from a file.
Use the Frequency box to indicate the frequency of statements with in workload.
Click Add to add the workloads to the Selected Statements field.
Click Add to List to add the statements.
Other Workloads
Workload Name Enter a workload name, or click Browse to get a list of existing workloads.
Statements field Shows the statements to be added.
Click Add to List to add the statements.
66 Teradata Index Wizard User Guide
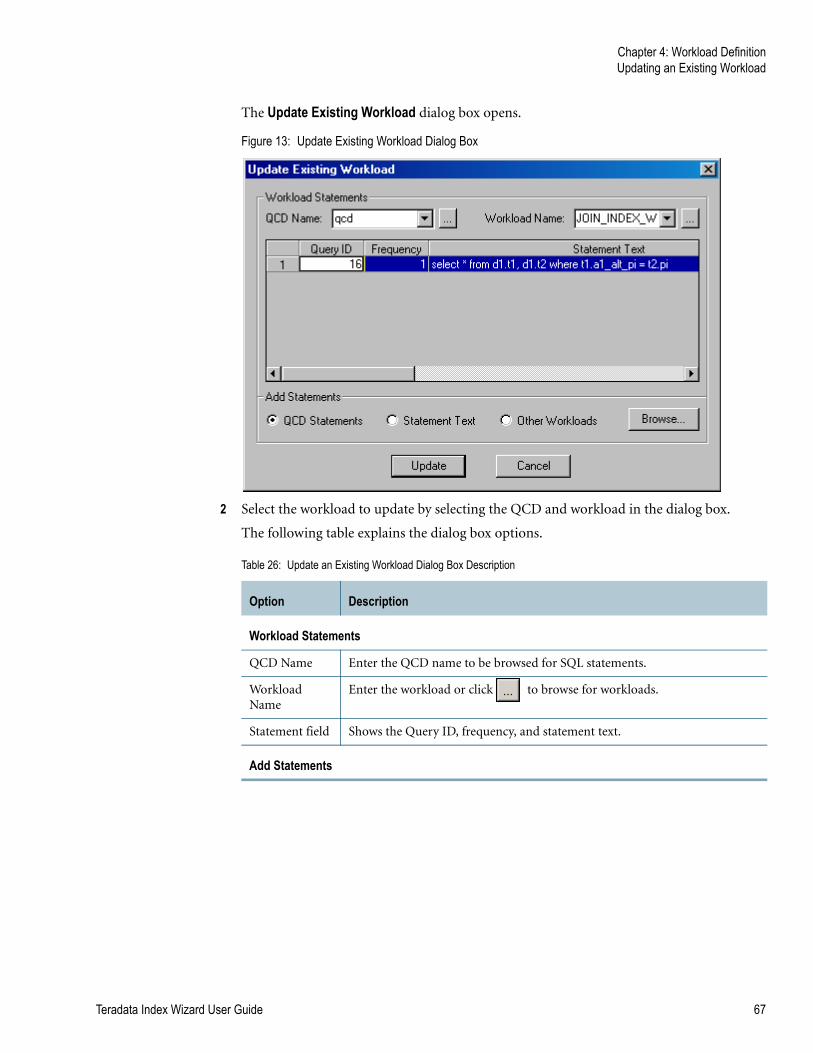
Chapter 4: Workload DefinitionUpdating an Existing Workload
The Update Existing Workload dialog box opens.
Figure 13: Update Existing Workload Dialog Box
2 Select the workload to update by selecting the QCD and workload in the dialog box.
The following table explains the dialog box options.
Table 26: Update an Existing Workload Dialog Box Description
Option Description
Workload Statements
QCD Name Enter the QCD name to be browsed for SQL statements.
Workload Name
Enter the workload or click to browse for workloads.
Statement field Shows the Query ID, frequency, and statement text.
Add Statements
Teradata Index Wizard User Guide 67
Chapter 4: Workload DefinitionUpdating an Existing Workload
3 Select the type of update information you want, QCD Statement, Statement Text, Other Workloads, and click Browse.
The Add QCD Statements dialog box opens allowing you to choose the statements to add to the existing workload.
4 Click Add to List. The selected statements are added to the existing workload.
5 Close the Add QCD Statements dialog box.
6 In the Update Existing Workload dialog box, and click Update.
Index Wizard updates the workload with the new statements and opens the Workload Definition Summary window showing the new workload.
7 Click OK to close the window.
The workload is now loaded into the workload cache and is ready to be analyzed. For more information, see “Chapter 5 Analysis” on page 73.
You can also perform a what-if analysis (see “What-if Analysis” on page 84) or validate the index recommendation (see “Chapter 7 Validation” on page 113).
Add Statements Options
There are several ways to add statements to an existing workload including:
• QCD Statements
• Statement Text
• Other Workloads
Add Statement options
Use Add Statements field to add additional QCD statements to an existing workload. The Browse button opens a dialog box based on the additional workload statement source. Use the dialog box to select the additional statement. Types of statements include:
• QCD Statements
• Statement Text
• Other Workloads
For more information about these dialog boxes, see “Add Statements Options” on page 68.
The Browse button opens a window based on the workload choice
Note: Only highlighted statements are included in the workload definition.
Update Updates the workload with the selected statements from the list.
Table 26: Update an Existing Workload Dialog Box Description (continued)
Option Description
68 Teradata Index Wizard User Guide
Chapter 4: Workload DefinitionAdditional Workload Functions
The following table explains each option.
Additional Workload Functions
There are additional functions that allow you to manage workloads better. These functions include the following:
• “Workload Cleanup” on page 70
• “Viewing Workload Details” on page 71
• “Workload Summary” on page 72
• “Displaying Statement Text” on page 72
Table 27: Add Statements Option Dialog Box Description
Option Description
QCD Statements
Query IDQuery tag
Enter the Query ID or Query tag of the statement you want to add. Click to browse for existing workloads in the QCD.
Click Add to List to add the statements.
SQL Statements
SQL Statements field
Enter the SQL statements you want to add to the workload in the field
Use the Browse button to add statements from a file.
Use the Frequency box to indicate the frequency of statements within a workload.
Click Add to add the workloads to the Selected Statements field.
Click Add to List to add the statements.
Other Workloads
Workload Name Enter a workload name, or click Browse to get a list of existing workloads
Statements field Shows the statements to be added.
Click Add to List to add the statements.
Teradata Index Wizard User Guide 69
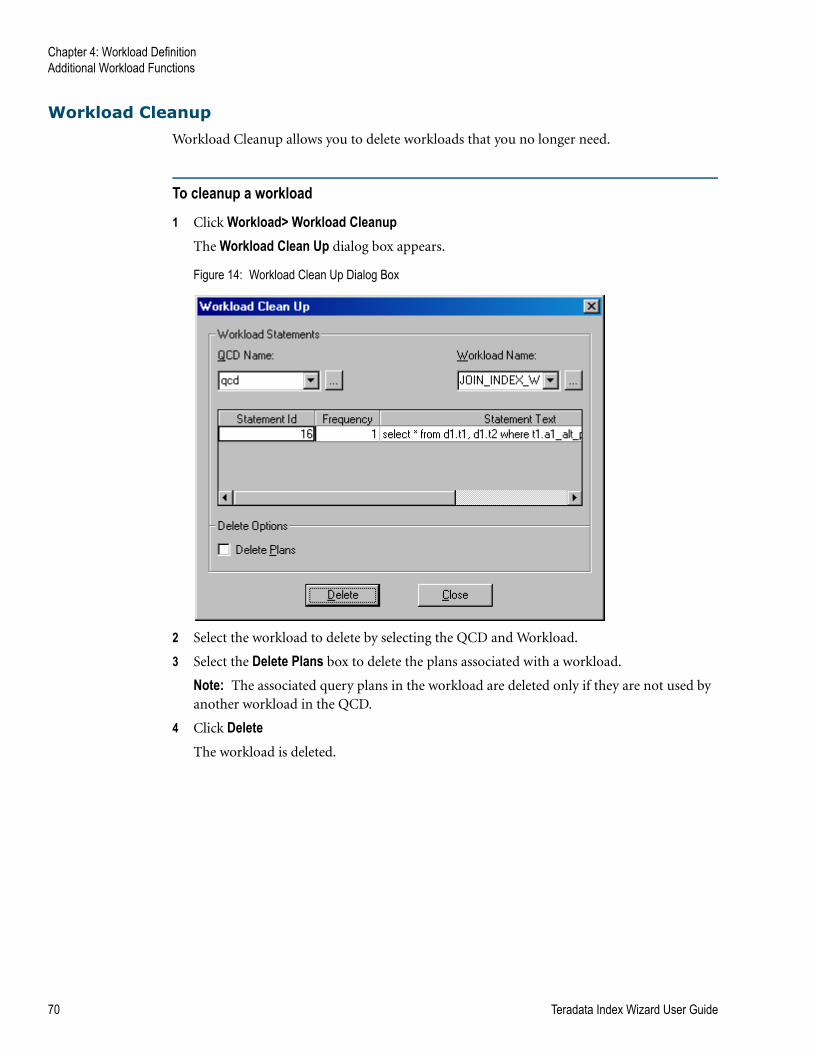
Chapter 4: Workload DefinitionAdditional Workload Functions
Workload Cleanup
Workload Cleanup allows you to delete workloads that you no longer need.
To cleanup a workload
1 Click Workload> Workload CleanupThe Workload Clean Up dialog box appears.
Figure 14: Workload Clean Up Dialog Box
2 Select the workload to delete by selecting the QCD and Workload.
3 Select the Delete Plans box to delete the plans associated with a workload.
Note: The associated query plans in the workload are deleted only if they are not used by another workload in the QCD.
4 Click Delete
The workload is deleted.
70 Teradata Index Wizard User Guide
Chapter 4: Workload DefinitionAdditional Workload Functions
Viewing Workload Details
You can view the statements and operations on a particular workload.
To view workload details
1 Click View>Workload Details.The View Workload Details dialog box opens.
2 Enter a QCD and Workload name or click .
The following table describes the options in the dialog box.
3 Click OK.
The Workload Summary window appears showing the workload.
Table 28: Workload Details Dialog Box Description
Option Description
Workload Statements
Statement ID Displays the Query ID of the statement.
Frequency Displays the frequency of the statement within the workload.
Statement text Displays the text of the SQL statement.
Workload Status This section of the dialog box displays the status of the operations performed on the workload.
Recommendation Id Displays the recommendations ID, if analysis was performed on the workload. Each time an analysis is present, a new row is entered in the Workload Status table.
Index Tag Displays the index tag of the recommendations. For every recommendation, a new row for Index Tag is entered in the Workload Status table.
Validated System Displays the name of the system on which the validation was last performed.
Validated Time Displays the time when the validation was last performed.
Validated QCD Displays the QCD on which validation was last performed.
Executed System Displays the system on which the recommendations were applied. This is the last system on which the recommendation was executed.
Remarks Describes the last operation performed on the workload.
Teradata Index Wizard User Guide 71

Chapter 4: Workload DefinitionAdditional Workload Functions
Workload Summary
After the workload is created, the Workload Summary window appears.
The window summarizes the workload just created.
The window shows the workload name and ID as well as the number of statements and the begin and end time.
Displaying Statement Text
Index Wizard lets you view the statement text for workloads.
You can also view statement text for the complete index/statistics DDL. See “View Details Button” on page 88.
You can also view the Table Recreation text for creating a table with the recommended partitioned primary index. See “Viewing the Table Recreation Script” on page 125.
To view statement text
1 Define a workload using any of the methods provided.
2 You can also view an existing workload using the View menu.
3 Right-click on the statement you want to view, and click View Statements.
The View Statement dialog box appears showing the workload statements.
72 Teradata Index Wizard User Guide

CHAPTER 5
Analysis
After a workload is created, the next step is to analyze it for index recommendations that will improve Teradata Database performance.
Index Wizard may recommend that an index be added, dropped, or that no recommendation can be made.
The methods of analyzing include:
• Index Analysis - performs a new analysis on the current workload in the workload cache.
• Partition Analysis -performs a new analysis using the information from the current workload
• Restart Analysis - continues a previously halted analysis.
• What-if Analysis - allows you to play with various analysis criteria to find the best set of indexes.
This section explains the following index analysis topics:
• Performing an Index Analysis
• Performing a Partition Analysis
• Restarting an Analysis
• What-if Analysis
• Analysis Summary
• View Reports
Performing an Index Analysis
The Index Analysis option starts a new analysis using the information from the current workload. The following steps explain how.
To start an Index analysis
1 Click Analysis >Index Analysis.
The Index Analysis dialog box appears. See Figure 15 on page 74.
Note: If a workload was created prior to this analysis, the workload information is already in place when the dialog box opens. Check to ensure the desired workload is loaded.
2 Click Select All and Deselect All to choose the tables from the list.
Teradata Index Wizard User Guide 73
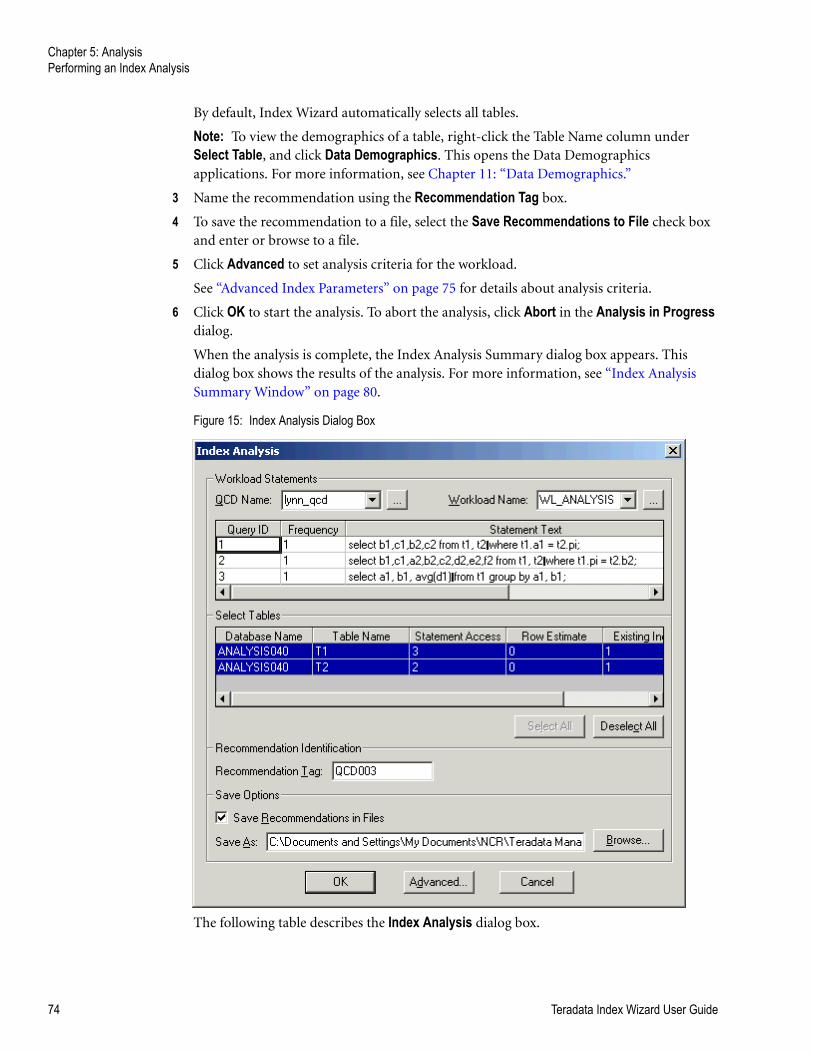
Chapter 5: AnalysisPerforming an Index Analysis
By default, Index Wizard automatically selects all tables.
Note: To view the demographics of a table, right-click the Table Name column under Select Table, and click Data Demographics. This opens the Data Demographics applications. For more information, see Chapter 11: “Data Demographics.”
3 Name the recommendation using the Recommendation Tag box.
4 To save the recommendation to a file, select the Save Recommendations to File check box and enter or browse to a file.
5 Click Advanced to set analysis criteria for the workload.
See “Advanced Index Parameters” on page 75 for details about analysis criteria.
6 Click OK to start the analysis. To abort the analysis, click Abort in the Analysis in Progress dialog.
When the analysis is complete, the Index Analysis Summary dialog box appears. This dialog box shows the results of the analysis. For more information, see “Index Analysis Summary Window” on page 80.
Figure 15: Index Analysis Dialog Box
The following table describes the Index Analysis dialog box.
74 Teradata Index Wizard User Guide
Chapter 5: AnalysisPerforming an Index Analysis
Advanced Index Parameters
You can set various parameters that determine index recommendations.
To set advanced index parameters
1 From the Index Analysis dialog box, click Advanced.
The Index Analysis Parameters dialog box appears.
Note: You can also open this dialog box by clicking Tools>Options>Index Analysis Inputs. For more information, see “Index Analysis Inputs” on page 131.
Table 29: Index Analysis Dialog Box Description
Field/Button Description
QCD Name If you created a workload prior to performing this analysis, the QCD is already in this field.
If no QCD name appears, click to view the available QCDs from the drop-down menu.
Workload Name If you created a workload prior to performing this analysis, the workload is already in this field.
If no workload name appears, click to view the available workloads from the drop-down menu.
Workload Statements Spreadsheet
This shows the queries used in the current workload. Specifically the spreadsheet shows the Query ID, Frequency, and Statement Text.
Select Tables field Shows a spreadsheet of the tables selected to be analyzed. The columns include Database Name, Table Name, Statement Access, Row Estimate, and Existing Indexes.
Select All\Deselect All
Use these buttons to select or deselect all the statements in the Select Tables section. To select a single table, click the table in the spreadsheet.
Recommendation Tag
Use this option to give the index recommendation a tag.
Save Recommenda-tions in Files
Use this option to save the recommendations to a file.
Advanced Allows you to set various parameters for the analysis. See “Advanced Index Parameters” on page 75 for more information.
Teradata Index Wizard User Guide 75
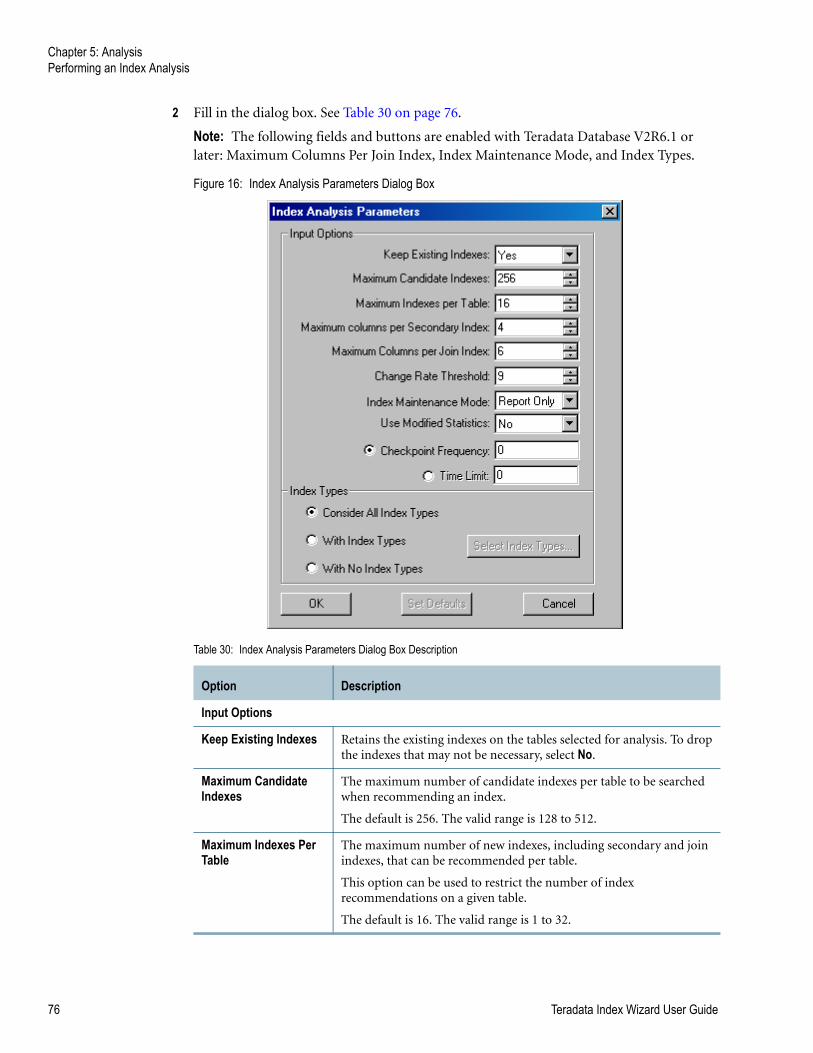
Chapter 5: AnalysisPerforming an Index Analysis
2 Fill in the dialog box. See Table 30 on page 76.
Note: The following fields and buttons are enabled with Teradata Database V2R6.1 or later: Maximum Columns Per Join Index, Index Maintenance Mode, and Index Types.
Figure 16: Index Analysis Parameters Dialog Box
Table 30: Index Analysis Parameters Dialog Box Description
Option Description
Input Options
Keep Existing Indexes Retains the existing indexes on the tables selected for analysis. To drop the indexes that may not be necessary, select No.
Maximum Candidate Indexes
The maximum number of candidate indexes per table to be searched when recommending an index.
The default is 256. The valid range is 128 to 512.
Maximum Indexes Per Table
The maximum number of new indexes, including secondary and join indexes, that can be recommended per table.
This option can be used to restrict the number of index recommendations on a given table.
The default is 16. The valid range is 1 to 32.
76 Teradata Index Wizard User Guide
Chapter 5: AnalysisPerforming an Index Analysis
Maximum Columns Per Secondary Index
The maximum number of composite secondary index columns to be considered in the index as specified by the INITIATE INDEX ANALYSIS statement used to start this analysis.
The default is 4. The valid range is 1 to 64.
Maximum Columns Per Join Index
The maximum number of referenced columns in a single-table join index to be considered for index analysis.
The default is 6. The valid range is 1 to 16.
Note: Although the Teradata Database supports single column join indexes with as many columns that can fit within the system row size limit, Index Wizard is limited to recommendations involving no more than 16.
Change Rate Threshold Specifies if columns are used for an index analysis. Columns with a change rating greater than specified are not considered during index analysis for potential indexes.
Every column appearing in an UPDATE SET clause is automatically assigned a change rating ranging from 0 to 9, representing how frequently it is updated. The columns that are frequently updated, are assigned a very high update frequency of 9, while columns that are never updated are assigned a change rating of 0.
For example, if the value is specified as 5, all columns having a change rating of 5 or less are considered for an index. This value is common for all columns to be considered for index analysis.
The default threshold for a Teradata 12.0 database is 9. The default threshold for Teradata database versions earlier than 12.0 is 5. The valid range is 0 to 9.
Index Maintenance Mode Controls how estimated index maintenance costs are used during analysis. Choose from the following:
• Off: Maintenance costs are not estimated (feature is turned off).
• Report Only: Maintenance costs are estimated only as supplemental information for the final index recommendations.
• Evaluate: Maintenance costs are used to evaluate and choose between candidate indexes and are also included along with the final recommendations.
The default is Report Only.
Use Modified Statistics Specifies that modified statistics should be considered during the index analysis, if they are available. Modified statistics are read from the TableStatistics table of the QCD from the ModifyStats column rather than the statistics gathered with COLLECT STATISTICS (QCD Form).
If the ModifiedStats column is not populated, then the statistics stored in StatisticsInfo are used instead and the result is the same as if you had not specified this option.
If the modified statistics of a given column are older than the statistics recorded for the same column as part of another plan capture, then the latest among them is used.
Table 30: Index Analysis Parameters Dialog Box Description (continued)
Option Description
Teradata Index Wizard User Guide 77
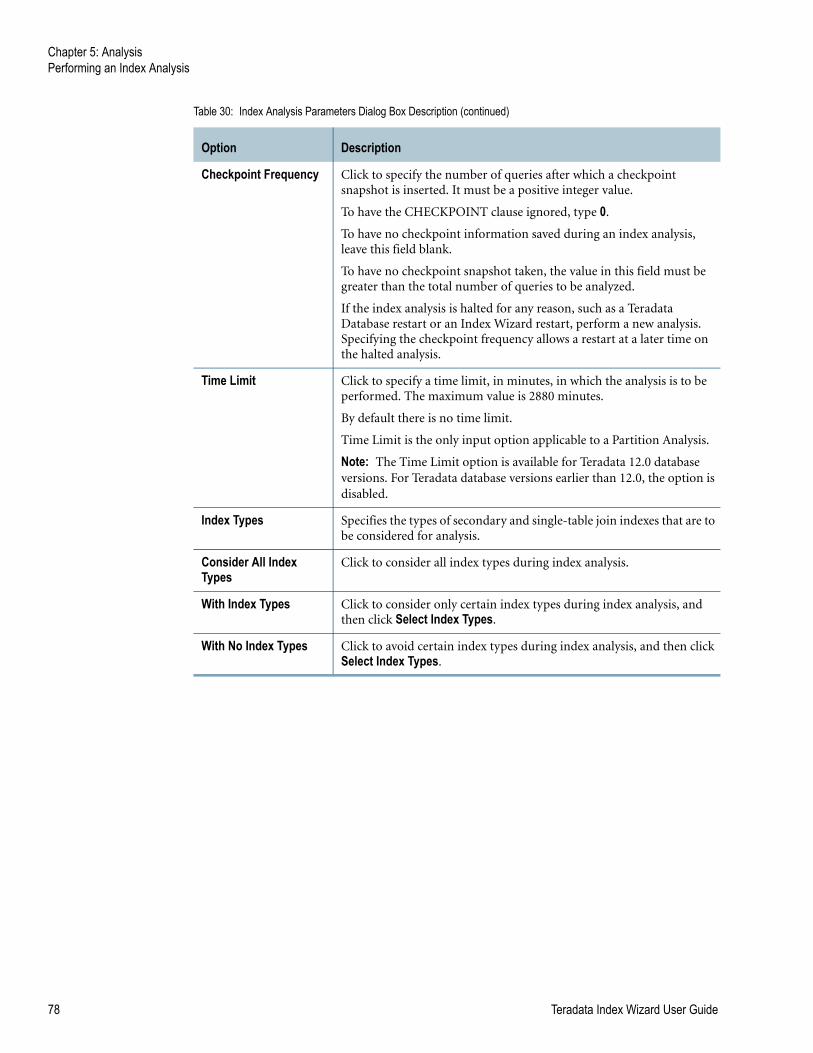
Chapter 5: AnalysisPerforming an Index Analysis
Checkpoint Frequency Click to specify the number of queries after which a checkpoint snapshot is inserted. It must be a positive integer value.
To have the CHECKPOINT clause ignored, type 0.
To have no checkpoint information saved during an index analysis, leave this field blank.
To have no checkpoint snapshot taken, the value in this field must be greater than the total number of queries to be analyzed.
If the index analysis is halted for any reason, such as a Teradata Database restart or an Index Wizard restart, perform a new analysis. Specifying the checkpoint frequency allows a restart at a later time on the halted analysis.
Time Limit Click to specify a time limit, in minutes, in which the analysis is to be performed. The maximum value is 2880 minutes.
By default there is no time limit.
Time Limit is the only input option applicable to a Partition Analysis.
Note: The Time Limit option is available for Teradata 12.0 database versions. For Teradata database versions earlier than 12.0, the option is disabled.
Index Types Specifies the types of secondary and single-table join indexes that are to be considered for analysis.
Consider All Index Types
Click to consider all index types during index analysis.
With Index Types Click to consider only certain index types during index analysis, and then click Select Index Types.
With No Index Types Click to avoid certain index types during index analysis, and then click Select Index Types.
Table 30: Index Analysis Parameters Dialog Box Description (continued)
Option Description
78 Teradata Index Wizard User Guide
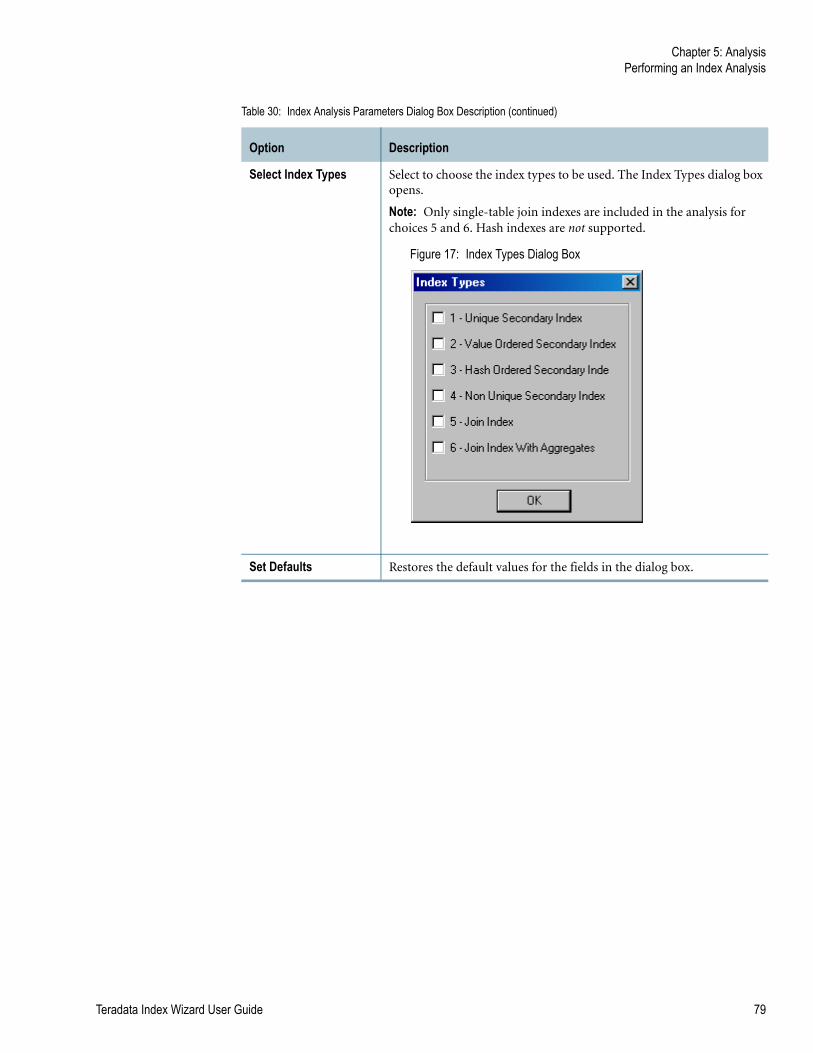
Chapter 5: AnalysisPerforming an Index Analysis
Select Index Types Select to choose the index types to be used. The Index Types dialog box opens.
Note: Only single-table join indexes are included in the analysis for choices 5 and 6. Hash indexes are not supported.
Figure 17: Index Types Dialog Box
Set Defaults Restores the default values for the fields in the dialog box.
Table 30: Index Analysis Parameters Dialog Box Description (continued)
Option Description
Teradata Index Wizard User Guide 79
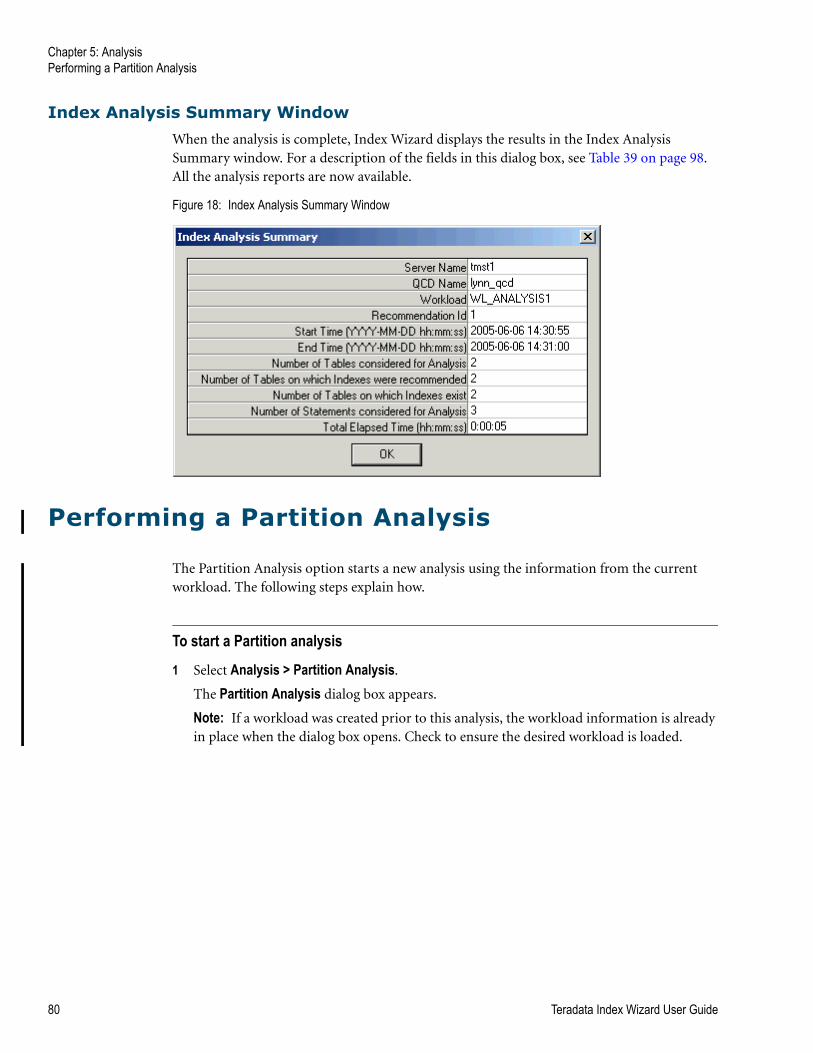
Chapter 5: AnalysisPerforming a Partition Analysis
Index Analysis Summary Window
When the analysis is complete, Index Wizard displays the results in the Index Analysis Summary window. For a description of the fields in this dialog box, see Table 39 on page 98. All the analysis reports are now available.
Figure 18: Index Analysis Summary Window
Performing a Partition Analysis
The Partition Analysis option starts a new analysis using the information from the current workload. The following steps explain how.
To start a Partition analysis
1 Select Analysis > Partition Analysis.
The Partition Analysis dialog box appears.
Note: If a workload was created prior to this analysis, the workload information is already in place when the dialog box opens. Check to ensure the desired workload is loaded.
80 Teradata Index Wizard User Guide
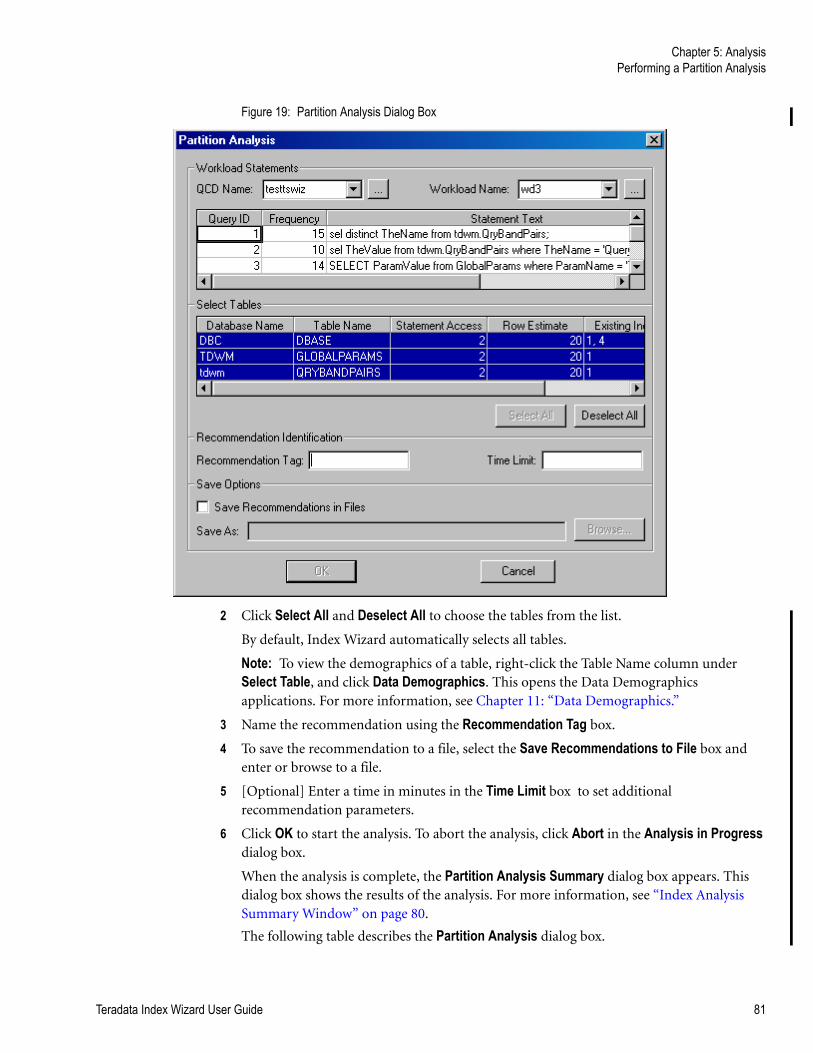
Chapter 5: AnalysisPerforming a Partition Analysis
Figure 19: Partition Analysis Dialog Box
2 Click Select All and Deselect All to choose the tables from the list.
By default, Index Wizard automatically selects all tables.
Note: To view the demographics of a table, right-click the Table Name column under Select Table, and click Data Demographics. This opens the Data Demographics applications. For more information, see Chapter 11: “Data Demographics.”
3 Name the recommendation using the Recommendation Tag box.
4 To save the recommendation to a file, select the Save Recommendations to File box and enter or browse to a file.
5 [Optional] Enter a time in minutes in the Time Limit box to set additional recommendation parameters.
6 Click OK to start the analysis. To abort the analysis, click Abort in the Analysis in Progress dialog box.
When the analysis is complete, the Partition Analysis Summary dialog box appears. This dialog box shows the results of the analysis. For more information, see “Index Analysis Summary Window” on page 80.
The following table describes the Partition Analysis dialog box.
Teradata Index Wizard User Guide 81
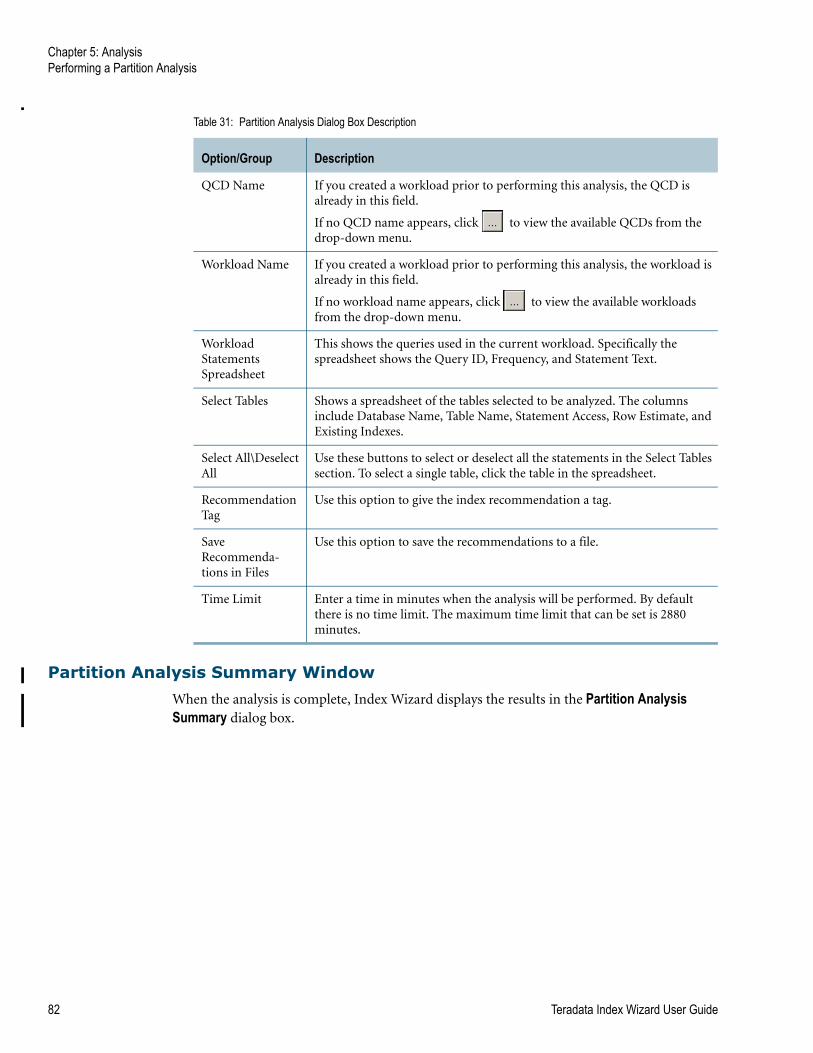
Chapter 5: AnalysisPerforming a Partition Analysis
Partition Analysis Summary Window
When the analysis is complete, Index Wizard displays the results in the Partition Analysis Summary dialog box.
Table 31: Partition Analysis Dialog Box Description
Option/Group Description
QCD Name If you created a workload prior to performing this analysis, the QCD is already in this field.
If no QCD name appears, click to view the available QCDs from the drop-down menu.
Workload Name If you created a workload prior to performing this analysis, the workload is already in this field.
If no workload name appears, click to view the available workloads from the drop-down menu.
Workload Statements Spreadsheet
This shows the queries used in the current workload. Specifically the spreadsheet shows the Query ID, Frequency, and Statement Text.
Select Tables Shows a spreadsheet of the tables selected to be analyzed. The columns include Database Name, Table Name, Statement Access, Row Estimate, and Existing Indexes.
Select All\Deselect All
Use these buttons to select or deselect all the statements in the Select Tables section. To select a single table, click the table in the spreadsheet.
Recommendation Tag
Use this option to give the index recommendation a tag.
Save Recommenda-tions in Files
Use this option to save the recommendations to a file.
Time Limit Enter a time in minutes when the analysis will be performed. By default there is no time limit. The maximum time limit that can be set is 2880 minutes.
82 Teradata Index Wizard User Guide
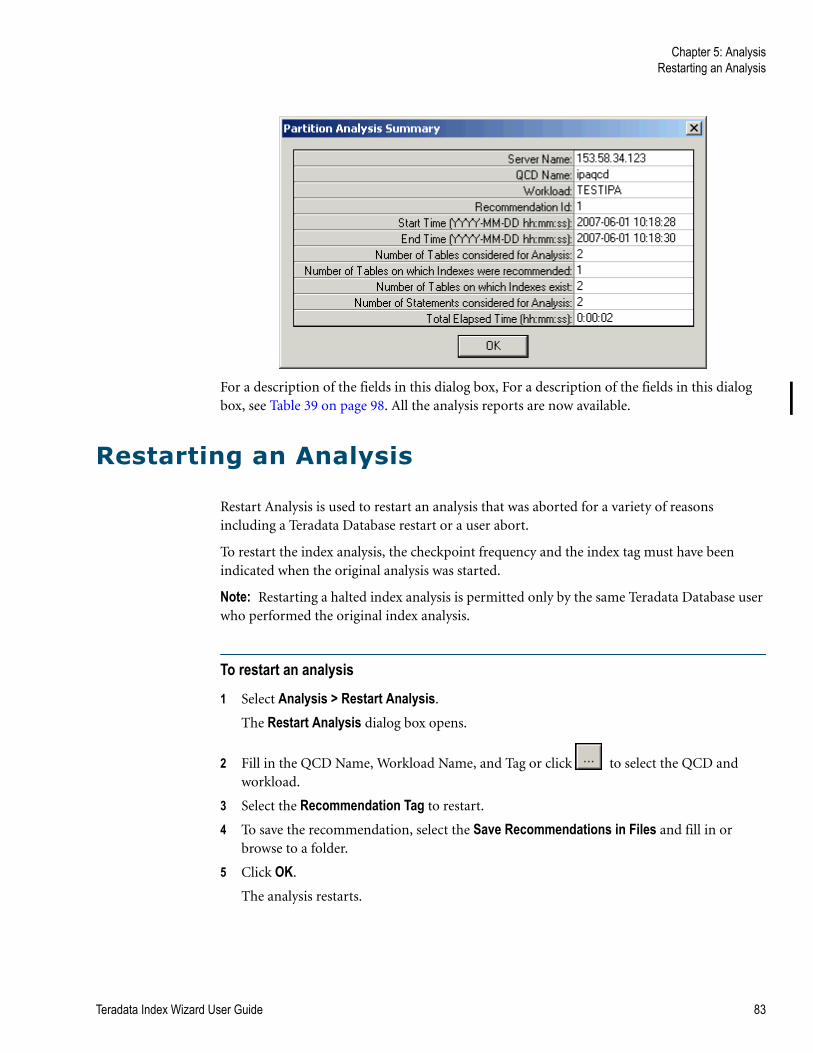
Chapter 5: AnalysisRestarting an Analysis
For a description of the fields in this dialog box, For a description of the fields in this dialog box, see Table 39 on page 98. All the analysis reports are now available.
Restarting an Analysis
Restart Analysis is used to restart an analysis that was aborted for a variety of reasons including a Teradata Database restart or a user abort.
To restart the index analysis, the checkpoint frequency and the index tag must have been indicated when the original analysis was started.
Note: Restarting a halted index analysis is permitted only by the same Teradata Database user who performed the original index analysis.
To restart an analysis
1 Select Analysis > Restart Analysis.
The Restart Analysis dialog box opens.
2 Fill in the QCD Name, Workload Name, and Tag or click to select the QCD and workload.
3 Select the Recommendation Tag to restart.
4 To save the recommendation, select the Save Recommendations in Files and fill in or browse to a folder.
5 Click OK.
The analysis restarts.
Teradata Index Wizard User Guide 83
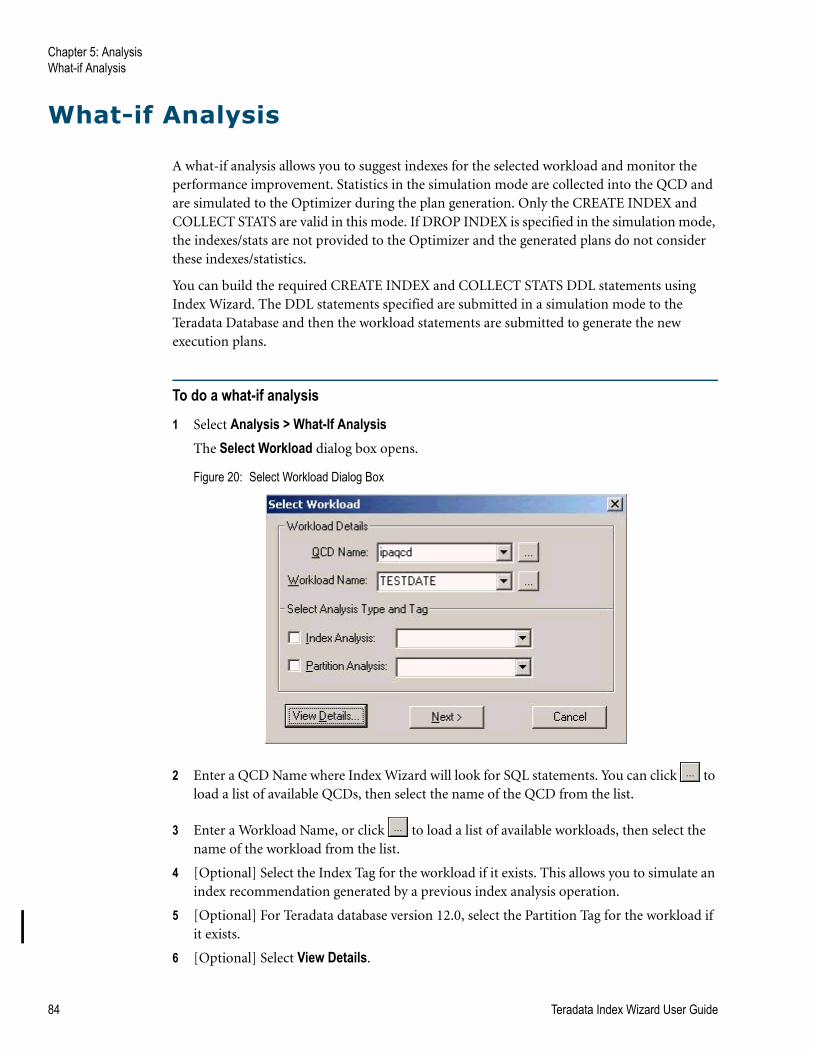
Chapter 5: AnalysisWhat-if Analysis
What-if Analysis
A what-if analysis allows you to suggest indexes for the selected workload and monitor the performance improvement. Statistics in the simulation mode are collected into the QCD and are simulated to the Optimizer during the plan generation. Only the CREATE INDEX and COLLECT STATS are valid in this mode. If DROP INDEX is specified in the simulation mode, the indexes/stats are not provided to the Optimizer and the generated plans do not consider these indexes/statistics.
You can build the required CREATE INDEX and COLLECT STATS DDL statements using Index Wizard. The DDL statements specified are submitted in a simulation mode to the Teradata Database and then the workload statements are submitted to generate the new execution plans.
To do a what-if analysis
1 Select Analysis > What-If AnalysisThe Select Workload dialog box opens.
Figure 20: Select Workload Dialog Box
2 Enter a QCD Name where Index Wizard will look for SQL statements. You can click to load a list of available QCDs, then select the name of the QCD from the list.
3 Enter a Workload Name, or click to load a list of available workloads, then select the name of the workload from the list.
4 [Optional] Select the Index Tag for the workload if it exists. This allows you to simulate an index recommendation generated by a previous index analysis operation.
5 [Optional] For Teradata database version 12.0, select the Partition Tag for the workload if it exists.
6 [Optional] Select View Details.
84 Teradata Index Wizard User Guide
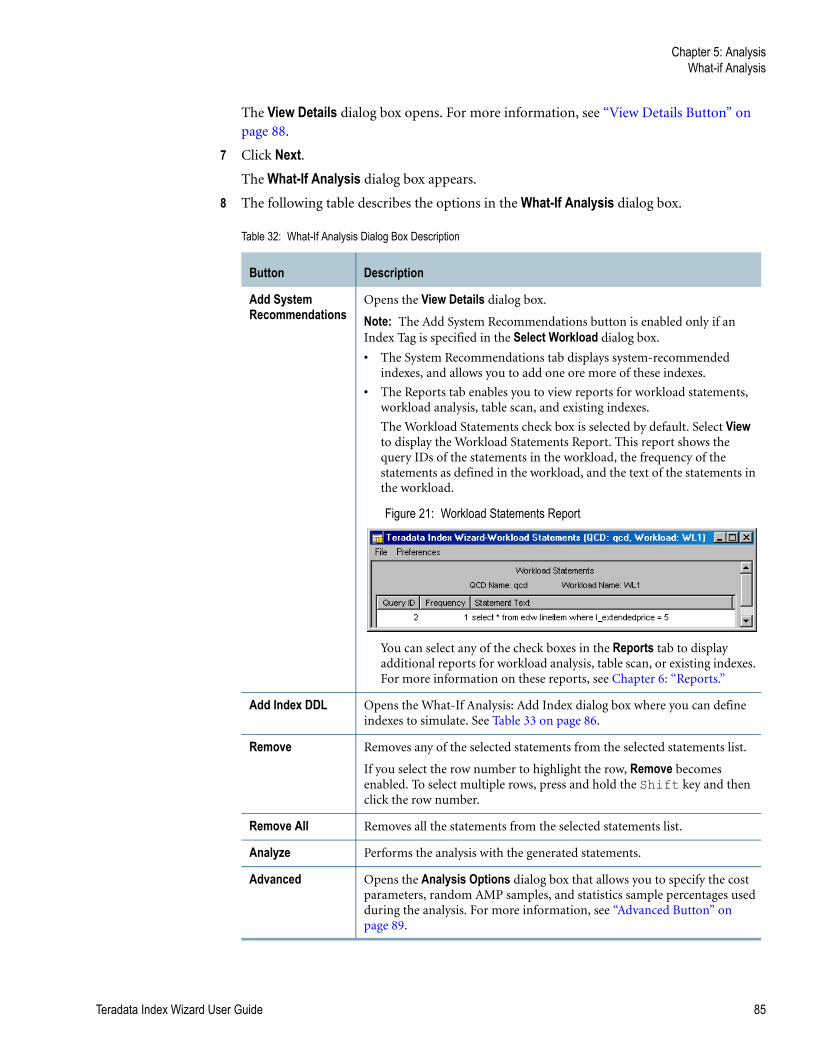
Chapter 5: AnalysisWhat-if Analysis
The View Details dialog box opens. For more information, see “View Details Button” on page 88.
7 Click Next.The What-If Analysis dialog box appears.
8 The following table describes the options in the What-If Analysis dialog box.
Table 32: What-If Analysis Dialog Box Description
Button Description
Add System Recommendations
Opens the View Details dialog box.
Note: The Add System Recommendations button is enabled only if an Index Tag is specified in the Select Workload dialog box.
• The System Recommendations tab displays system-recommended indexes, and allows you to add one ore more of these indexes.
• The Reports tab enables you to view reports for workload statements, workload analysis, table scan, and existing indexes.
The Workload Statements check box is selected by default. Select View to display the Workload Statements Report. This report shows the query IDs of the statements in the workload, the frequency of the statements as defined in the workload, and the text of the statements in the workload.
Figure 21: Workload Statements Report
You can select any of the check boxes in the Reports tab to display additional reports for workload analysis, table scan, or existing indexes. For more information on these reports, see Chapter 6: “Reports.”
Add Index DDL Opens the What-If Analysis: Add Index dialog box where you can define indexes to simulate. See Table 33 on page 86.
Remove Removes any of the selected statements from the selected statements list.
If you select the row number to highlight the row, Remove becomes enabled. To select multiple rows, press and hold the Shift key and then click the row number.
Remove All Removes all the statements from the selected statements list.
Analyze Performs the analysis with the generated statements.
Advanced Opens the Analysis Options dialog box that allows you to specify the cost parameters, random AMP samples, and statistics sample percentages used during the analysis. For more information, see “Advanced Button” on page 89.
Teradata Index Wizard User Guide 85
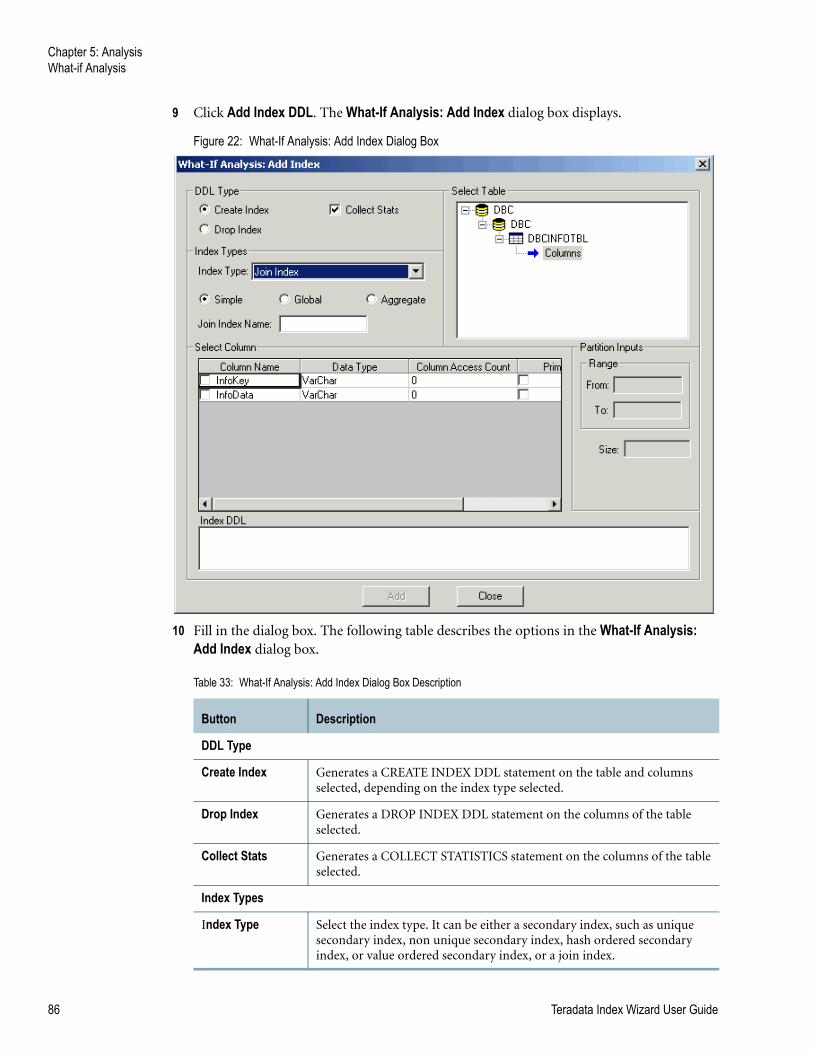
Chapter 5: AnalysisWhat-if Analysis
9 Click Add Index DDL. The What-If Analysis: Add Index dialog box displays.
Figure 22: What-If Analysis: Add Index Dialog Box
10 Fill in the dialog box. The following table describes the options in the What-If Analysis: Add Index dialog box.
Table 33: What-If Analysis: Add Index Dialog Box Description
Button Description
DDL Type
Create Index Generates a CREATE INDEX DDL statement on the table and columns selected, depending on the index type selected.
Drop Index Generates a DROP INDEX DDL statement on the columns of the table selected.
Collect Stats Generates a COLLECT STATISTICS statement on the columns of the table selected.
Index Types
Index Type Select the index type. It can be either a secondary index, such as unique secondary index, non unique secondary index, hash ordered secondary index, or value ordered secondary index, or a join index.
86 Teradata Index Wizard User Guide
Chapter 5: AnalysisWhat-if Analysis
SimpleGlobalAggregate
Specify if the join index is of this type.
For definitions of these index types, see the “Glossary” on page 149.
Note: These buttons are enabled when the index type selected is join index.
Join Index Name Specify the join index name.
Note: This field is enabled when the index type selected is join index.
Select Table
Select a table on which the index and statistics will be simulated.
Select Column
Select the column(s) on which the index and statistics will be simulated. The columns in this table will be dynamically loaded depending on the type of index selected.
• For Non Unique Secondary Indexes and Unique Secondary Indexes: Select the index columns from the grid.
• For Value Ordered Secondary Indexes and Hash Ordered Secondary Indexes: Select the index columns and the Order By column. You can select only one Order By column.
• For Partitioned Primary Index: Select a index column from grid, you can select only a column with data type either INTEGER or DATE, as at present TIWiz supports only these two data types for PPI recommendations.
Note: A column selected as an Order By column must also be selected as an index column. If this is not the case, Index Wizard automatically selects and adds that column to the index columns.
• For SIMPLE and GLOBAL Join Indexes: Select the columns for the join index and specify which of these columns make the primary index.
• For AGGREGATE Join Indexes: Select the columns for the join index. From the Aggregate Function column, select the aggregate function on the selected column(s) if you would like to have one and specify which of these columns would make the primary index. The columns in the Group By clause are determined by the selected non-aggregate columns. The order in the Group By clause is determined by the order in which they appear in the grid.
Note: A column selected as a primary index within a join index must also be selected as a join index column. If this is not the case, it automatically gets selected and is added to the join index columns list.
Partition Inputs
From Specifies the Start value/ date for range. It can be either integer or date depending on the partition by column
To Specifies the End value/ date for range. It can be either integer or date depending on the partition by column.
Table 33: What-If Analysis: Add Index Dialog Box Description (continued)
Button Description
Teradata Index Wizard User Guide 87
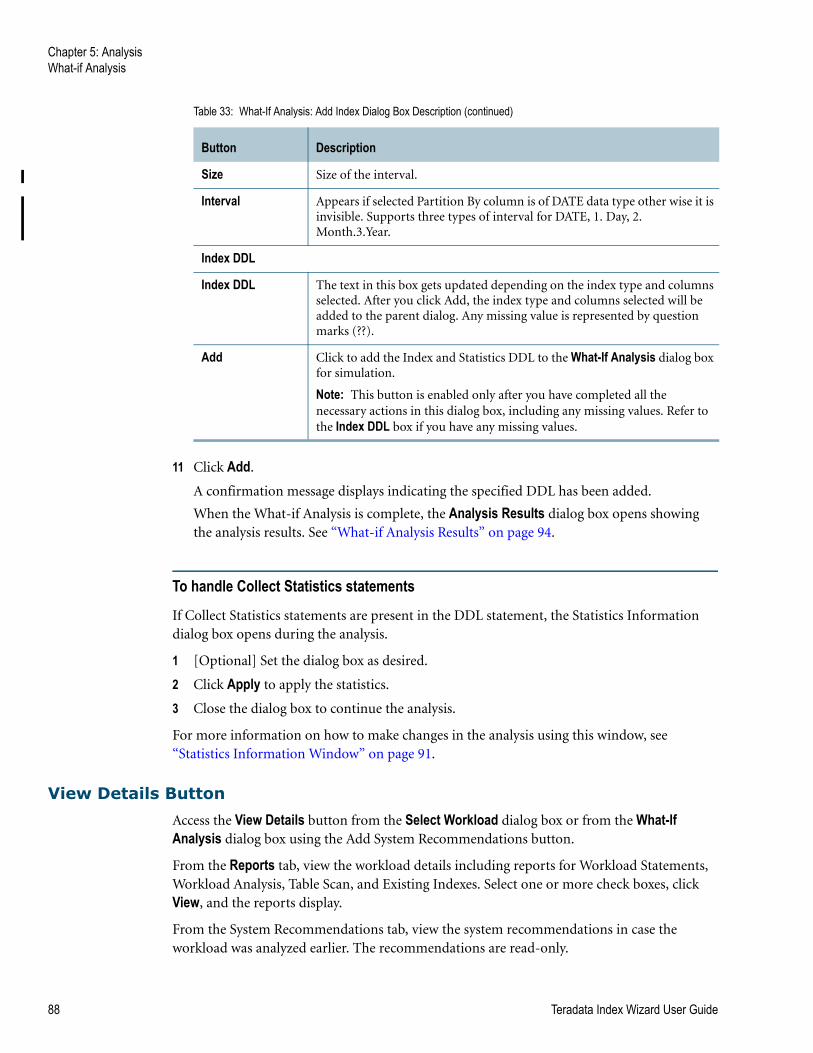
Chapter 5: AnalysisWhat-if Analysis
11 Click Add.
A confirmation message displays indicating the specified DDL has been added.
When the What-if Analysis is complete, the Analysis Results dialog box opens showing the analysis results. See “What-if Analysis Results” on page 94.
To handle Collect Statistics statements
If Collect Statistics statements are present in the DDL statement, the Statistics Information dialog box opens during the analysis.
1 [Optional] Set the dialog box as desired.
2 Click Apply to apply the statistics.
3 Close the dialog box to continue the analysis.
For more information on how to make changes in the analysis using this window, see “Statistics Information Window” on page 91.
View Details Button
Access the View Details button from the Select Workload dialog box or from the What-If Analysis dialog box using the Add System Recommendations button.
From the Reports tab, view the workload details including reports for Workload Statements, Workload Analysis, Table Scan, and Existing Indexes. Select one or more check boxes, click View, and the reports display.
From the System Recommendations tab, view the system recommendations in case the workload was analyzed earlier. The recommendations are read-only.
Size Size of the interval.
Interval Appears if selected Partition By column is of DATE data type other wise it is invisible. Supports three types of interval for DATE, 1. Day, 2. Month.3.Year.
Index DDL
Index DDL The text in this box gets updated depending on the index type and columns selected. After you click Add, the index type and columns selected will be added to the parent dialog. Any missing value is represented by question marks (??).
Add Click to add the Index and Statistics DDL to the What-If Analysis dialog box for simulation.
Note: This button is enabled only after you have completed all the necessary actions in this dialog box, including any missing values. Refer to the Index DDL box if you have any missing values.
Table 33: What-If Analysis: Add Index Dialog Box Description (continued)
Button Description
88 Teradata Index Wizard User Guide
Chapter 5: AnalysisWhat-if Analysis
To view the statement text
✔ In the View Details dialog box, right-click any statement and click View DDL.
The View Statement dialog box appears and displays the complete index/statistics DDL text.
Figure 23: View Details Dialog Box and View Statement Dialog Box
Advanced Button
The Advanced button on the What-If Analysis dialog box opens the Analysis Options dialog box to modify the statistics collected for the tables in the workload during the What-if analysis. The dialog box has three tabs.
The following table explains the options in the Set Costs tab.
Table 34: Analysis Options Dialog Box: Set Costs Tab Description
Option Description
Cost Tag Selects the cost tag for which the cost parameters must be set.
Comment Shows the comment associated with the cost tag.
Level Session: Sets the cost parameters at session level.
IFP: Sets the cost parameters at IFP level.
System: Sets the cost parameters at system level.
Teradata Index Wizard User Guide 89
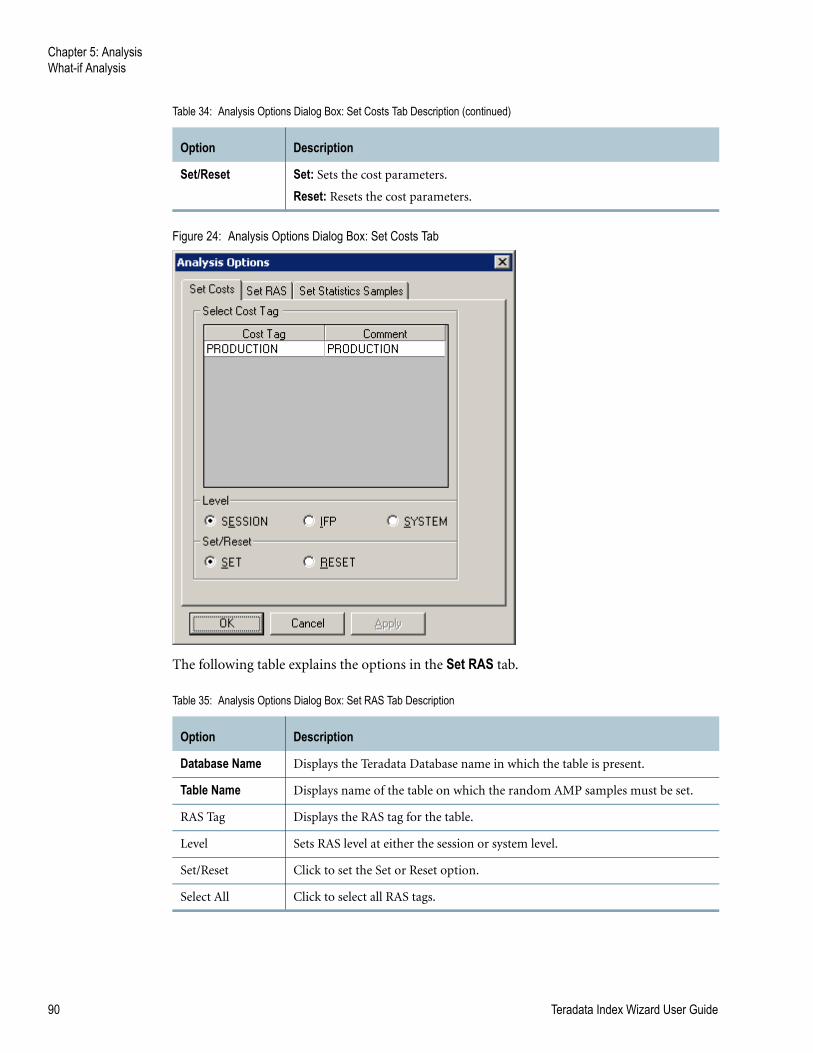
Chapter 5: AnalysisWhat-if Analysis
Figure 24: Analysis Options Dialog Box: Set Costs Tab
The following table explains the options in the Set RAS tab.
Set/Reset Set: Sets the cost parameters.
Reset: Resets the cost parameters.
Table 35: Analysis Options Dialog Box: Set RAS Tab Description
Option Description
Database Name Displays the Teradata Database name in which the table is present.
Table Name Displays name of the table on which the random AMP samples must be set.
RAS Tag Displays the RAS tag for the table.
Level Sets RAS level at either the session or system level.
Set/Reset Click to set the Set or Reset option.
Select All Click to select all RAS tags.
Table 34: Analysis Options Dialog Box: Set Costs Tab Description (continued)
Option Description
90 Teradata Index Wizard User Guide

Chapter 5: AnalysisWhat-if Analysis
The following table explains the options in the Set Statistics Samples tab.
Figure 25: Analysis Options Dialog Box: Set Statistics Samples Tab
Statistics Information Window
The What-if analysis starts after you click Analyze. During the analysis, the Statistics Information window opens if:
• Collect Statistics statements are present in the DDL statement, and
• The View/Modify Statistics Information Samples option is set to “Yes” in the Analysis Options - Set Statistics Samples dialog box.
Table 36: Analysis Options Dialog Box: Set Statistics Samples Tab Description
Option Description
View/Edit Statistics Samples
Sets the option to view/modify the statistics samples for the tables in the workload. The default is Yes.
Set Defaults Sets the default sample size for tables with the specified cardinalities.
Teradata Index Wizard User Guide 91

Chapter 5: AnalysisWhat-if Analysis
To make changes to the what-if analysis
1 When the Statistics Information window opens, use the navigation pane to drill down to the specific table to view.
Figure 26: Statistics Information Window
The following table describes the information in the Statistics Information window.
2 Make the changes using the editable fields.
3 Click Apply to apply the changes to the current analysis.
4 Close the Statistics Information window to continue the analysis.
Group/Option Option Description
Statistics Information Database Displays the name of database where the table exists.
Table Name Displays the name of table where the column exists.
Column Name Displays the name of column associated with the interval statistics.
Interval Type Select the type of interval from the list:
• All (Default)
• High-Biased Intervals• Equal-Height Intervals
Version For internal use.
92 Teradata Index Wizard User Guide
Chapter 5: AnalysisWhat-if Analysis
Summary Information Min Value Minimum value for the entire column/index.For example, if entering a date value, it must be in the form of MMDDYYYY.
Note: This information is about the column as a whole. This is also known as interval 0 data.
Mode Value The most frequently used (popular) value in the interval.
Note: This information is about the column as a whole. This is also known as interval 0 data.
Sampled Displays whether the statistics are sampled or not.
Mode Frequency
Displays the number of rows having the Mode Value.
Note: This information is about the column as a whole. This is also known as interval 0 data.
Number of Nulls Displays the number of rows with one of the statistics fields being null.
Note: This information is about the column as a whole. This is also known as interval 0 data.
Sample Percent Displays the percentage of statistics sampled if statistics were collected on the column.
Number of Rows
Displays the number of rows in the table.
Note: This information is about the column as a whole. This is also known as interval 0 data.
Number of Uniques
Number of distinct Non-Mode values in the interval.
Note: This information is about the column as a whole. This is also known as interval 0 data.
Number of Intervals
Number of intervals in the frequency distribution for the column/index. The maximum number of intervals for Teradata Database version 12.0 is 200. For Teradata Database versions earlier than 12.0, the maximum number of intervals is 100.
Number of All Nulls
Displays the number of rows with all of the statistics fields being nulls.
Average AMP RPV
Displays the average AMP-local RPV obtained by averaging the average RPV from each AMP.
Number of Amps
Displays the number of Amps in the connected Teradata Database.
Note: The following values are displayed in the spreadsheet for all intervals.
Max Value The highest value in the interval.
Mode Value The most frequently used value in the interval.
Mode Frequency The number of rows having the Mode Value.
Group/Option Option Description
Teradata Index Wizard User Guide 93
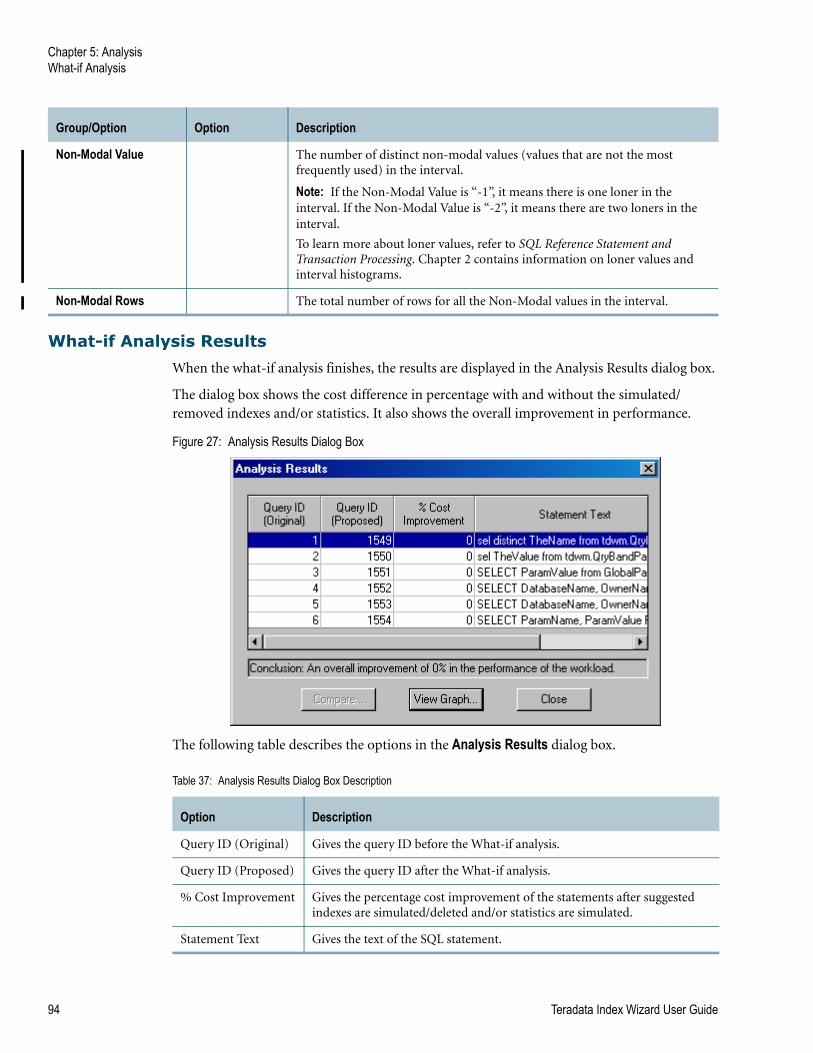
Chapter 5: AnalysisWhat-if Analysis
What-if Analysis Results
When the what-if analysis finishes, the results are displayed in the Analysis Results dialog box.
The dialog box shows the cost difference in percentage with and without the simulated/removed indexes and/or statistics. It also shows the overall improvement in performance.
Figure 27: Analysis Results Dialog Box
The following table describes the options in the Analysis Results dialog box.
Non-Modal Value The number of distinct non-modal values (values that are not the most frequently used) in the interval.
Note: If the Non-Modal Value is “-1”, it means there is one loner in the interval. If the Non-Modal Value is “-2”, it means there are two loners in the interval.
To learn more about loner values, refer to SQL Reference Statement and Transaction Processing. Chapter 2 contains information on loner values and interval histograms.
Non-Modal Rows The total number of rows for all the Non-Modal values in the interval.
Group/Option Option Description
Table 37: Analysis Results Dialog Box Description
Option Description
Query ID (Original) Gives the query ID before the What-if analysis.
Query ID (Proposed) Gives the query ID after the What-if analysis.
% Cost Improvement Gives the percentage cost improvement of the statements after suggested indexes are simulated/deleted and/or statistics are simulated.
Statement Text Gives the text of the SQL statement.
94 Teradata Index Wizard User Guide
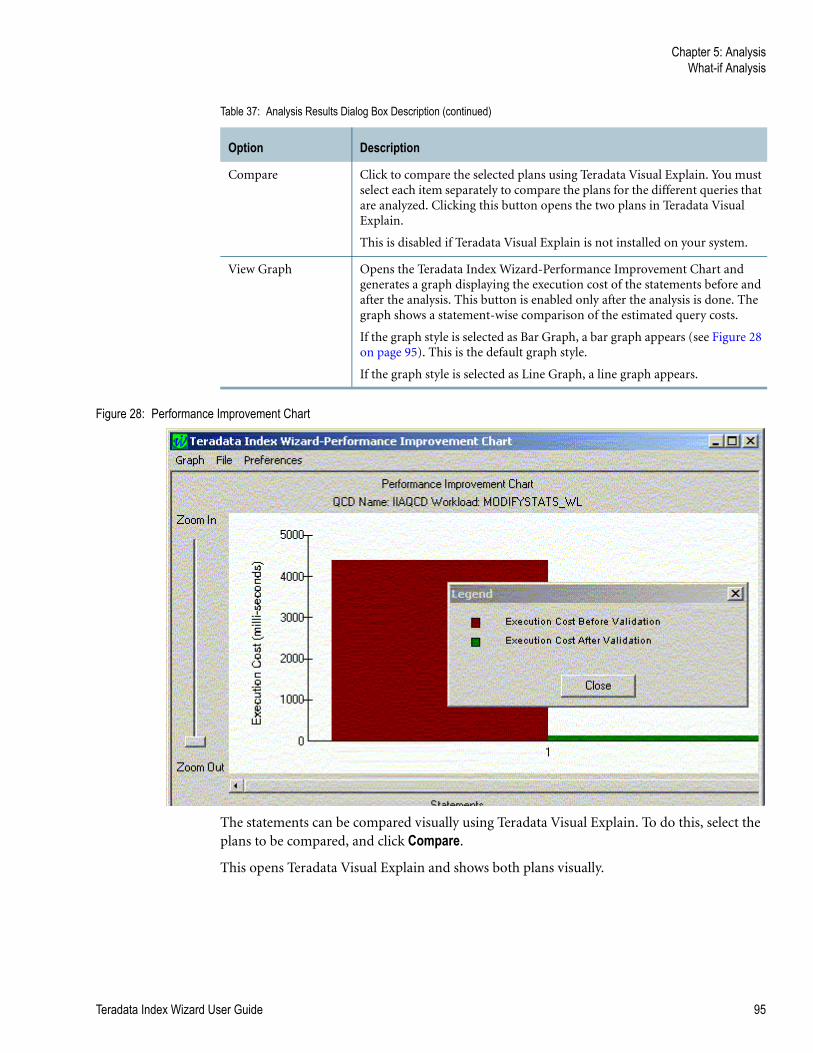
Chapter 5: AnalysisWhat-if Analysis
Figure 28: Performance Improvement Chart
The statements can be compared visually using Teradata Visual Explain. To do this, select the plans to be compared, and click Compare.
This opens Teradata Visual Explain and shows both plans visually.
Compare Click to compare the selected plans using Teradata Visual Explain. You must select each item separately to compare the plans for the different queries that are analyzed. Clicking this button opens the two plans in Teradata Visual Explain.
This is disabled if Teradata Visual Explain is not installed on your system.
View Graph Opens the Teradata Index Wizard-Performance Improvement Chart and generates a graph displaying the execution cost of the statements before and after the analysis. This button is enabled only after the analysis is done. The graph shows a statement-wise comparison of the estimated query costs.
If the graph style is selected as Bar Graph, a bar graph appears (see Figure 28 on page 95). This is the default graph style.
If the graph style is selected as Line Graph, a line graph appears.
Table 37: Analysis Results Dialog Box Description (continued)
Option Description
Teradata Index Wizard User Guide 95
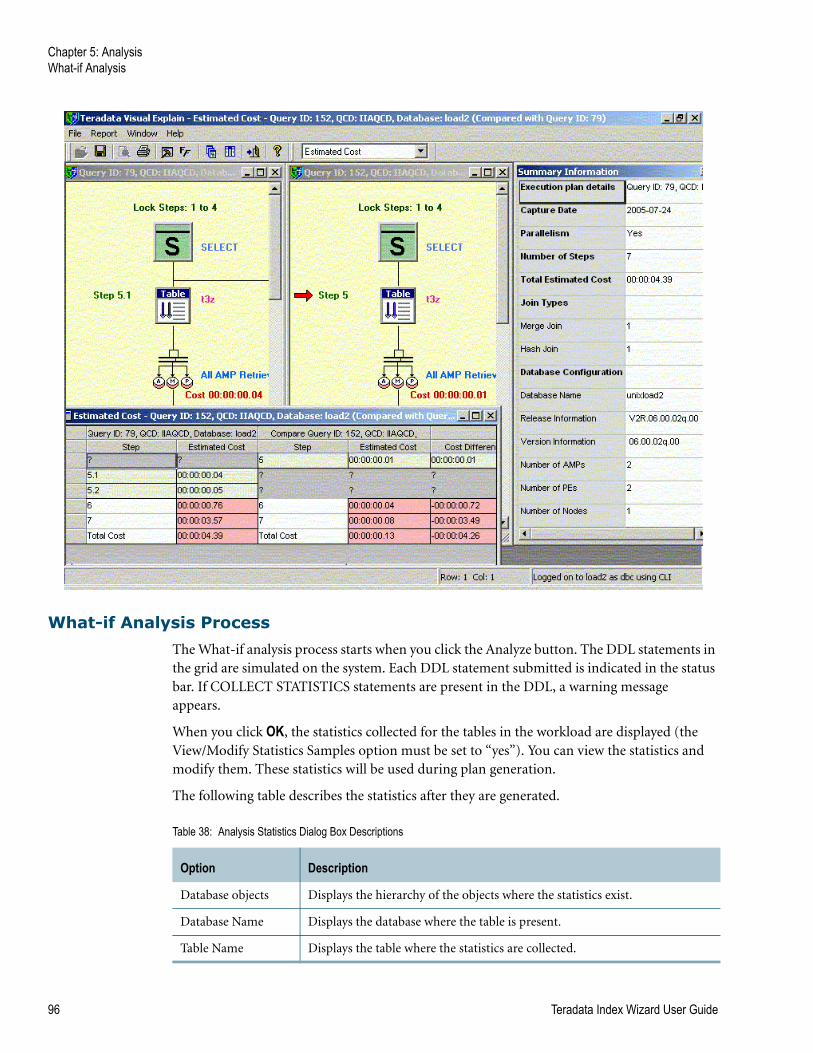
Chapter 5: AnalysisWhat-if Analysis
What-if Analysis Process
The What-if analysis process starts when you click the Analyze button. The DDL statements in the grid are simulated on the system. Each DDL statement submitted is indicated in the status bar. If COLLECT STATISTICS statements are present in the DDL, a warning message appears.
When you click OK, the statistics collected for the tables in the workload are displayed (the View/Modify Statistics Samples option must be set to “yes”). You can view the statistics and modify them. These statistics will be used during plan generation.
The following table describes the statistics after they are generated.
Table 38: Analysis Statistics Dialog Box Descriptions
Option Description
Database objects Displays the hierarchy of the objects where the statistics exist.
Database Name Displays the database where the table is present.
Table Name Displays the table where the statistics are collected.
96 Teradata Index Wizard User Guide
Chapter 5: AnalysisAnalysis Summary
The workload statements are submitted to the server and the new plans are captured. During this phase, if the statistics were modified using the above option, the Optimizer uses the modified statistics. Otherwise, it uses the collected statistics while generating the plans. Additionally, the status bar displays the statement that is currently being processed.
If you do not perform an abort, the new execution costs for the statements in the workload are obtained. The dialog box shows the cost difference in percentage with and without the simulated indexes and statistics, and the overall improvement of the performance. You can compare these statements using Teradata Visual Explain. Select the plans to be compared and click Compare.
Analysis Summary
The Analysis Summary window shows a summary of the analysis recommendation. See Figure 18 on page 80.
To view the analysis summary
1 Click View>Analysis Summary. The Analysis Summary window opens. The following table explains the information in the window.
2 Click OK to close the Analysis Summary window.
Interval Type Selects the interval types to be displayed. The values are All, High-biased, and Equal.
Column Name Displays the column name where the statistics are collected.
Number of Rows Displays the number of rows in the table.
Number of Nulls Displays the number of null values.
Number of Intervals Displays the number of intervals of statistics collected.
Number of Unique Displays the number of unique values for the column where the statistics are collected.
Version Displays the version.
Time Stamp Adds a time stamp.
Minimum Value Displays the minimum value for interval 0.
Mode Value Displays the mode value of interval 0.
Mode Frequency Displays the mode frequency of interval 0.
Table 38: Analysis Statistics Dialog Box Descriptions (continued)
Option Description
Teradata Index Wizard User Guide 97
Chapter 5: AnalysisView Reports
View Reports
Use the View Reports dialog box to select a previously created report.
To view a report from another workload.
1 Select Reports > Select Workload.
The View Reports dialog box opens.
2 Select the QCD name, Workload, and Index Tag or click to search.
The workload appears in the field.
3 Right-click the workload statements in the field. The View Statement dialog box opens for you to view the statement text.
4 In the Select Report list, click a report name to open the report of your choice or select All to view all reports.
5 Click OK.
The report(s) open.
Table 39: Index Analysis Summary Window Description
Option Description
Server Name Displays the server name where the analysis is performed.
QCD Name Displays the QCD name.
Workload Shows the workload name.
Recommendations ID Displays the recommendations ID.
Start Time Start time of the analysis.
End Time End time of the analysis.
Number of tables considered in the analysis.
Shows the number of tables analyzed.
Numbers of tables on which indexes where recommended.
Shows the number of table that received an index recommendation.
Number of table on which indexes exist
Shows the number of table that have an index.
Number of statements considered for analysis
Shows the number of statements that where considered for analysis.
Total elapse time Shows the total time taken by Index Wizard for the analysis.
98 Teradata Index Wizard User Guide
Chapter 5: AnalysisView Reports
The following table describes the View Report dialog box options.
Table 40: View Report Dialog Box Description
Option Description
QCD Name Displays the name of the QCD. Click to search.
Workload Name Displays the list of workloads in the QCD.
Index Tag Displays the list of index tags for the workload, if present.
Statement Id Displays the statement ids of the statements in the workload.
Frequency Displays the frequency of the statements as defined in the workload.
Statement Text Display the text of the statements in the workload.
View Report Select the report to be viewed.
Teradata Index Wizard User Guide 99

Chapter 5: AnalysisView Reports
100 Teradata Index Wizard User Guide
CHAPTER 6
Reports
Index Wizard creates a set of reports when a workload is created and a set after a workload is analyzed. Workload reports are designed to help you select tables within a workload to be analyzed. Analysis reports provide the data you need to make a decision about the index recommendation.
Reports are managed using the Reports toolbar on the left side of the window (default position).
Workload Reports
Workload Reports provide information about the tables in a defined workload. The reports assist you in deciding which tables make the best candidates for an index analysis.
Workload reports also provide a snapshot of table information which can be compared with report information after an analysis.
The following reports are created when a workload is defined:
• Existing Indexes Report
• Update Frequency Report
• Table Usage Analysis Report
• Table Scan Report
• Workload Analysis Report
• Object Global Use Count Report
Analysis Reports
Analysis reports provide information about the results of the index analysis. They are designed to help you decide if the index recommendation is appropriate or not.
The following reports are created after a workload is analyzed:
• Index Recommendation Report
• Query Cost Analysis Report
• Disk Space Analysis Report
• Summary Report
• Index Maintenance Cost Report
Teradata Index Wizard User Guide 101

Chapter 6: ReportsExisting Indexes Report
Existing Indexes Report
The Existing Indexes Report provides a general view of the information about the table including index type, unique flags, and index names. This report is created when a workload is defined.
To open the existing indexes report
1 Select Reports > Current Workload > Existing Indexes...– or –
From the Reports toolbar, select .
2 Use the Reports toolbar to manage the report.
The following table explains the information in the report.
Table 41: Existing Indexes Report Description
Column Name Description
Database Name Shows the name of the database.
Table Name Shows the name of individual tables.
Columns Shows the list of columns (comma separated), which comprises the index.
Index Type Shows the type of the index including:
• Primary
• Secondary
• Join
• Unique primary index
• Hash index
• Cover index
• Hash-ordered secondary index
• Value-ordered secondary index
• Partition primary index
Unique Flag Indicates whether the index is unique or not.
Index Name Shows the name of the index, if present.
Index Number Shows the number of the index.
Index Used Shows if an index is used in the workload.
Query Text Shows the text of the SQL statement.
102 Teradata Index Wizard User Guide
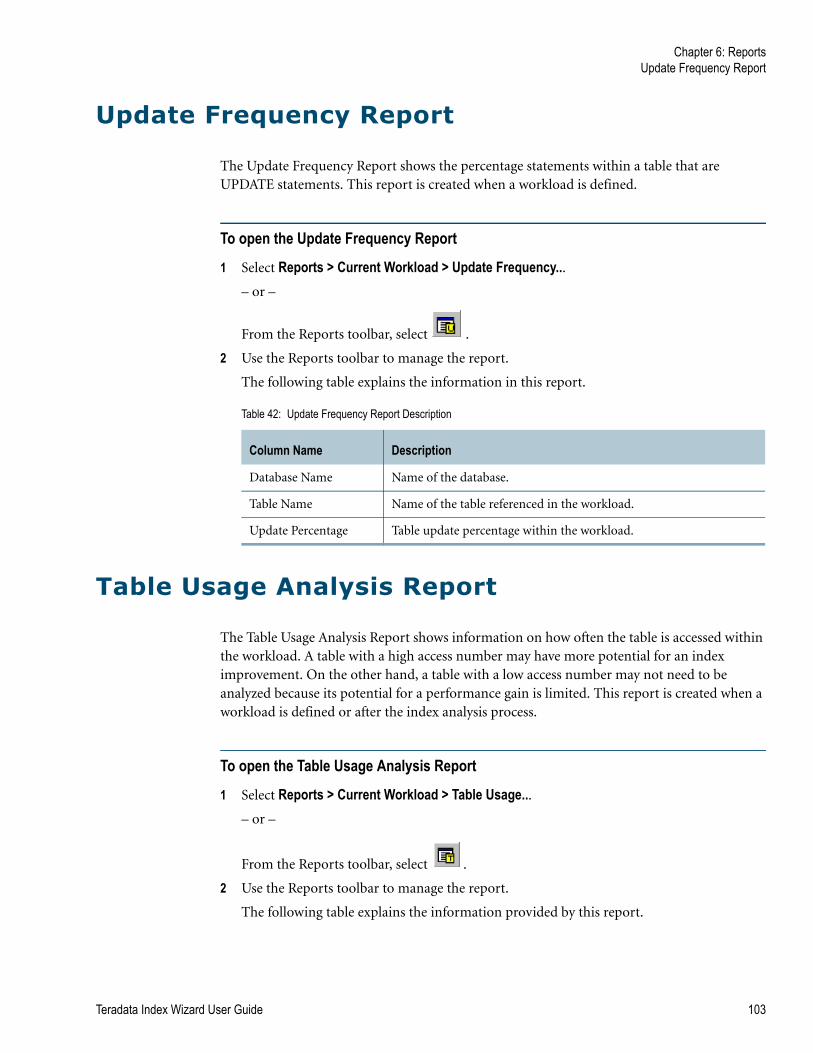
Chapter 6: ReportsUpdate Frequency Report
Update Frequency Report
The Update Frequency Report shows the percentage statements within a table that are UPDATE statements. This report is created when a workload is defined.
To open the Update Frequency Report
1 Select Reports > Current Workload > Update Frequency... – or –
From the Reports toolbar, select .
2 Use the Reports toolbar to manage the report.
The following table explains the information in this report.
Table Usage Analysis Report
The Table Usage Analysis Report shows information on how often the table is accessed within the workload. A table with a high access number may have more potential for an index improvement. On the other hand, a table with a low access number may not need to be analyzed because its potential for a performance gain is limited. This report is created when a workload is defined or after the index analysis process.
To open the Table Usage Analysis Report
1 Select Reports > Current Workload > Table Usage... – or –
From the Reports toolbar, select .
2 Use the Reports toolbar to manage the report.
The following table explains the information provided by this report.
Table 42: Update Frequency Report Description
Column Name Description
Database Name Name of the database.
Table Name Name of the table referenced in the workload.
Update Percentage Table update percentage within the workload.
Teradata Index Wizard User Guide 103
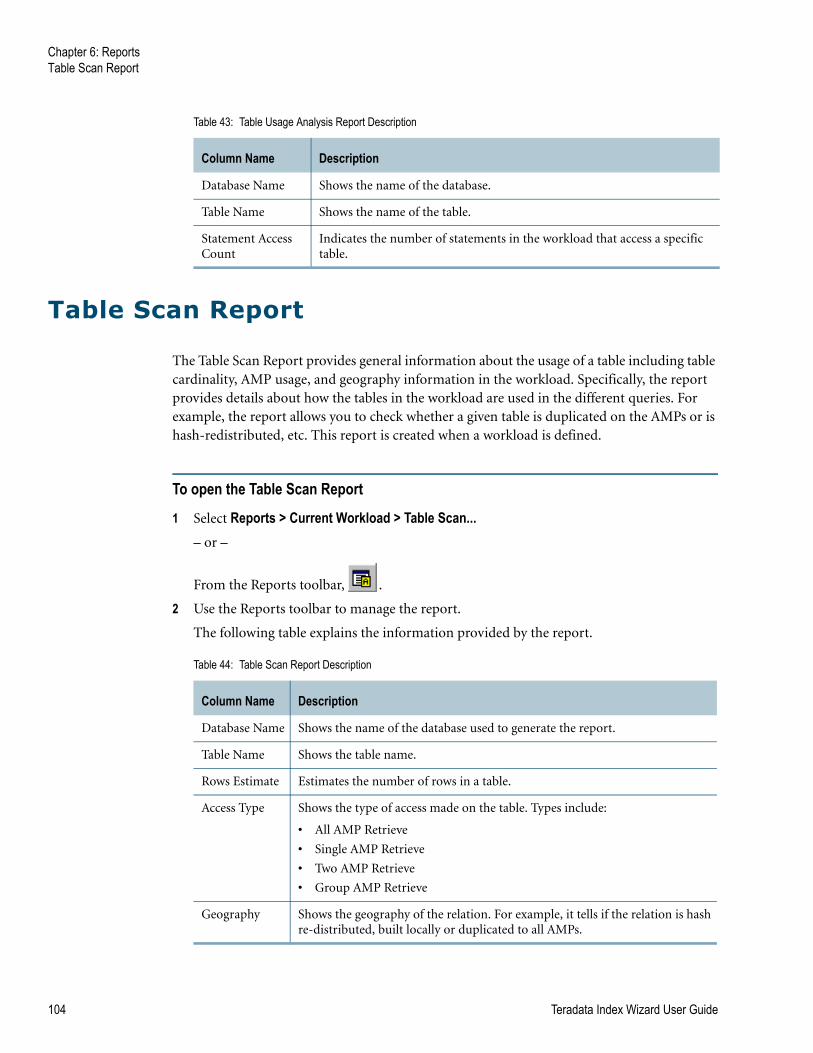
Chapter 6: ReportsTable Scan Report
Table Scan Report
The Table Scan Report provides general information about the usage of a table including table cardinality, AMP usage, and geography information in the workload. Specifically, the report provides details about how the tables in the workload are used in the different queries. For example, the report allows you to check whether a given table is duplicated on the AMPs or is hash-redistributed, etc. This report is created when a workload is defined.
To open the Table Scan Report
1 Select Reports > Current Workload > Table Scan...– or –
From the Reports toolbar, .
2 Use the Reports toolbar to manage the report.
The following table explains the information provided by the report.
Table 43: Table Usage Analysis Report Description
Column Name Description
Database Name Shows the name of the database.
Table Name Shows the name of the table.
Statement Access Count
Indicates the number of statements in the workload that access a specific table.
Table 44: Table Scan Report Description
Column Name Description
Database Name Shows the name of the database used to generate the report.
Table Name Shows the table name.
Rows Estimate Estimates the number of rows in a table.
Access Type Shows the type of access made on the table. Types include:
• All AMP Retrieve
• Single AMP Retrieve
• Two AMP Retrieve
• Group AMP Retrieve
Geography Shows the geography of the relation. For example, it tells if the relation is hash re-distributed, built locally or duplicated to all AMPs.
104 Teradata Index Wizard User Guide
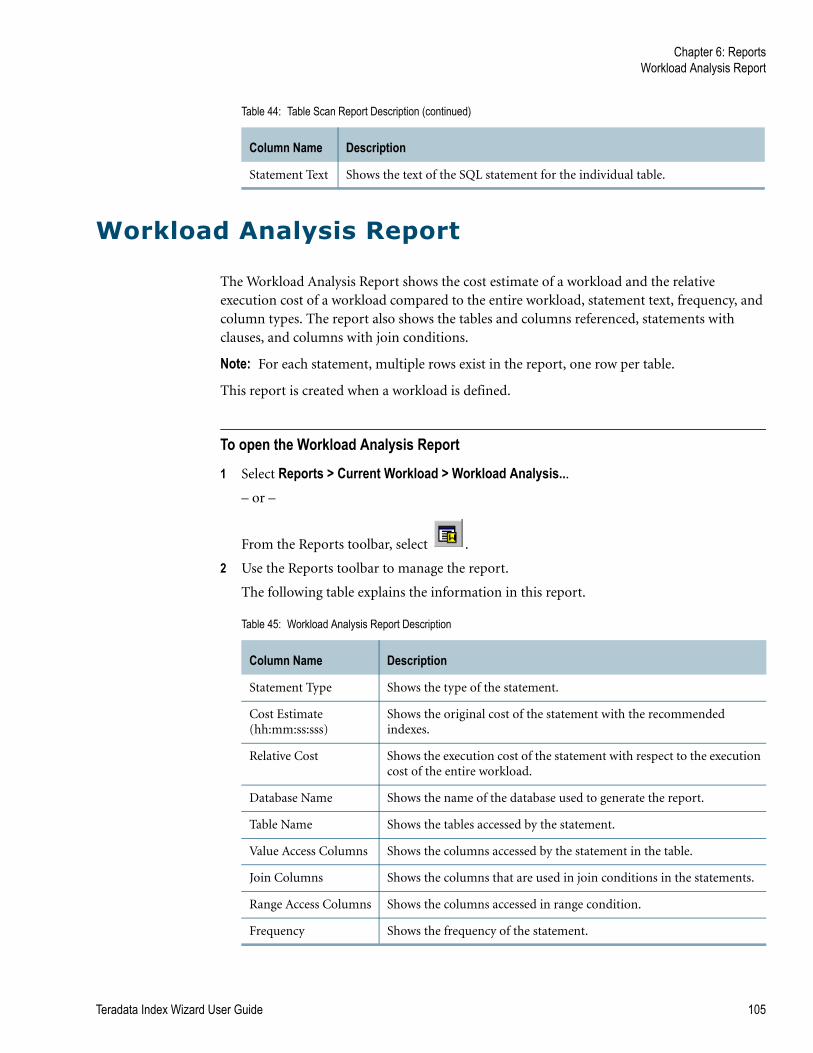
Chapter 6: ReportsWorkload Analysis Report
Workload Analysis Report
The Workload Analysis Report shows the cost estimate of a workload and the relative execution cost of a workload compared to the entire workload, statement text, frequency, and column types. The report also shows the tables and columns referenced, statements with clauses, and columns with join conditions.
Note: For each statement, multiple rows exist in the report, one row per table.
This report is created when a workload is defined.
To open the Workload Analysis Report
1 Select Reports > Current Workload > Workload Analysis... – or –
From the Reports toolbar, select .
2 Use the Reports toolbar to manage the report.
The following table explains the information in this report.
Statement Text Shows the text of the SQL statement for the individual table.
Table 44: Table Scan Report Description (continued)
Column Name Description
Table 45: Workload Analysis Report Description
Column Name Description
Statement Type Shows the type of the statement.
Cost Estimate(hh:mm:ss:sss)
Shows the original cost of the statement with the recommended indexes.
Relative Cost Shows the execution cost of the statement with respect to the execution cost of the entire workload.
Database Name Shows the name of the database used to generate the report.
Table Name Shows the tables accessed by the statement.
Value Access Columns Shows the columns accessed by the statement in the table.
Join Columns Shows the columns that are used in join conditions in the statements.
Range Access Columns Shows the columns accessed in range condition.
Frequency Shows the frequency of the statement.
Teradata Index Wizard User Guide 105
Chapter 6: ReportsObject Global Use Count Report
Object Global Use Count Report
The Object Global Use Count Report provides object use count information to help identify objects most often accessed. This information helps identify tables that have a high potential for performance improvements. This report is created when a workload in defined.
To open the Object Global Use Count Report
1 Select Reports > Create Workload > Object Global Use Count…– or –
From the Reports toolbar, select .
2 Use the Reports toolbar to manage the reports.
The following table explains the information provided in the report.
Statement Text Shows the text of the SQL statement.
Table 45: Workload Analysis Report Description (continued)
Column Name Description
Table 46: Object Global Use Count Report Description
Column Name Description
Database Name The name of the database that owns the object.
Object Name Shows the object name.
Object Type Indicates the object type, either Index, Table, or View.
Columns Shows the columns (comma separated) that comprise the index.
Note: This is an empty string for the table and the view object types.
Index Type Shows the type of index.
Note: This is an empty string for the table and view object types.
Index Number Displays the index number.
Note: This is Zero for the table and view object types.
Global Use Count Displays the object use count of the objects available from the DBC.tables and DBC.indices views.
Last Access Timestamp Displays the Last Access Timestamp.
Recommended for drop
This column is visible only when an index analysis is performed on a workload. This column shows “YES” if the index was recommended for DROP when the workload was analyzed.
106 Teradata Index Wizard User Guide
Chapter 6: ReportsIndex Recommendation Report
Index Recommendation Report
The Index Recommendation Report shows the recommended secondary index for each table if one is recommended. Use the information in this table to help you make a decision about whether the index recommended is appropriate or not. The report also suggests indexes that can be dropped.
The statistics used for the analysis are saved in the Index Recommendations table.
This report is created after a workload is analyzed.
To open the Index Recommendation Report
1 Select Reports > Current Workload > Index Recommendation... – or –
From the Reports toolbar, select .
2 Use the Reports toolbar to manage the report.
The following table describes the information provided in the report.
Query Cost Analysis Report
The Query Cost Analysis Report shows the query cost of specific types of statements (SELECT, INSERT, DELETE) without the original recommended index and with the proposed recommended index. At the statement level, this allows you to see a percentage of how much a recommended index improves the query cost estimate.
Costs are shown in time, with the difference shown as a percentage.
The report also provides the SQL statements in the workload.
Table 47: Index Recommendation Report Description
Column Name Description
Database Name Shows the database for the table.
Table Name Shows the name of the table on which the index was recommended.
Index Type Shows the type of index recommended, for example a Hash-Ordered Secondary Index.
Time Estimate(hh:mm:sss:sss)
Shows the time estimate to actually create the recommended index.
Note: This is an empty string for partition analysis recommendations.
Index DDL Shows the DDL statement text used to create/drop the index.
Stats DDL Shows the DDL statements used to collect statistics.
Teradata Index Wizard User Guide 107
Chapter 6: ReportsDisk Space Analysis Report
Use the report to compare the execution cost with and without the recommended index at the query level.
This report is created after a workload is analyzed.
To open the Query Cost Analysis Report
1 Select Reports > Current Workload > Query Cost Analysis... – or –
From the Reports toolbar, select .
2 Use the Reports toolbar to manage the report.
The following table explains the information in the report.
Disk Space Analysis Report
The Disk Space Analysis Report shows the space estimate to store the recommended indexes.
This information is helpful in databases where space is a factor. You may see performance improvements by using the recommended index, but it may take up too much space.
This report is created after a workload is analyzed.
Table 48: Query Cost Analysis Report Description
Column Name Description
Statement Type The type of the SQL statement (SELECT, INSERT, DELETE.).
Original Cost Estimate (hh:mm:ss.sss)
The execution cost of the statement without the recommended index.
Proposed Cost Estimate (hh:mm: ss.sss)
The estimated execution cost of each statement type with the recommended index.
Percentage Change The percentage increase/decrease of cost in executing the statement. The proposed cost may be higher than the original cost as statistics were used during the analysis and this may cause the Optimizer to make more accurate estimates. The index recommendations are still considered useful for the query.
No. of Index Recommendations
Number of recommendations given for the current statement.
Statement Text The text of the SQL statement.
108 Teradata Index Wizard User Guide
Chapter 6: ReportsSummary Report
To open the Disk Space Analysis Report
1 Select Reports > Current Workload > Disk Space Analysis... – or –
From the Reports toolbar, select .
2 Use the Reports toolbar to manage the report.
The following table explains the information provided by this report.
Summary Report
The Summary Report provides details about the secondary index counts and recommendation counts made in a specific analysis for all tables in the workload. This report is created after a workload is analyzed.
The footnote on the report shows the statement count in the workload, number of tables accessed by the workload, and the time analysis.
The report also shows the table name in which the index must be created or dropped and the DDL statement for creating/dropping the index.
The statement text of the query ID can be viewed by right-clicking the QueryID column.
To open the Summary Report
1 Select Reports > Create Workload > Summary...
– or –
From the Reports toolbar, select .
2 Use the Reports toolbar to manage the report.
Table 49: Disk Space Analysis Report Description
Column Name Description
Analysis Type Shows the type of analysis
Database Name Shows the name of the database used to generate the report.
Table Name Shows the name of the table.
Index DDL/ Expression Text
Indicates the index definition.
Size (KB) Provides the estimated size of the index in kilobytes.
Teradata Index Wizard User Guide 109
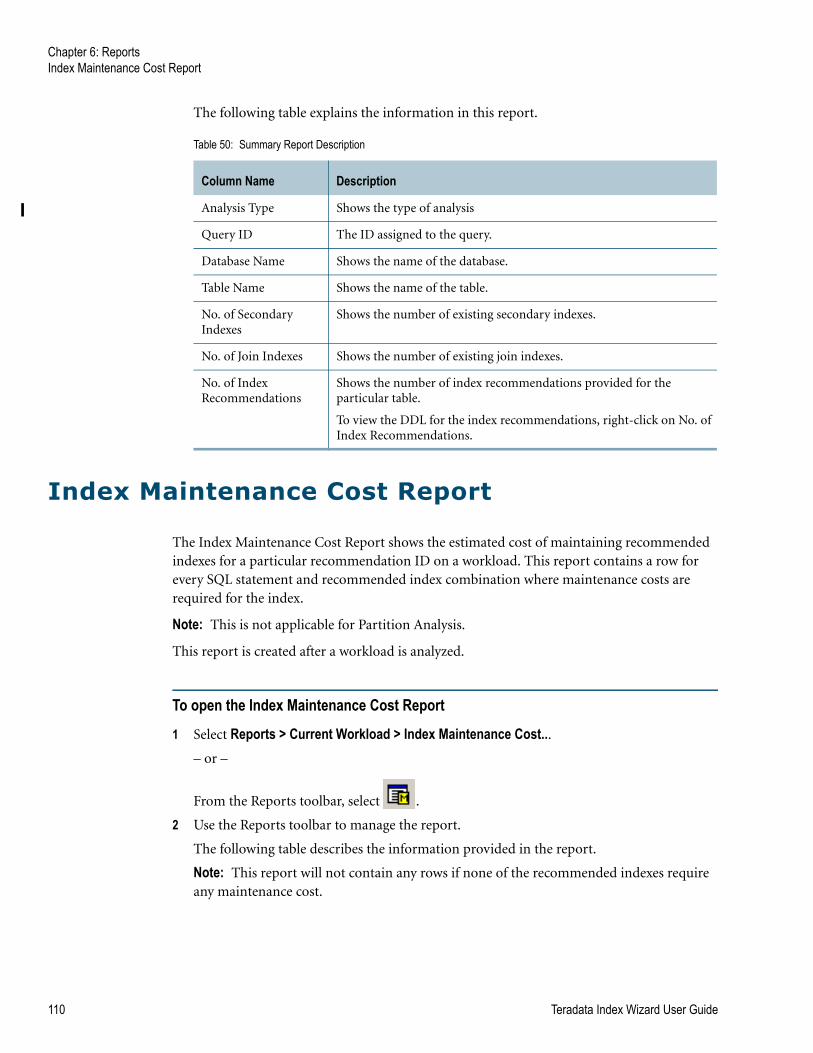
Chapter 6: ReportsIndex Maintenance Cost Report
The following table explains the information in this report.
Index Maintenance Cost Report
The Index Maintenance Cost Report shows the estimated cost of maintaining recommended indexes for a particular recommendation ID on a workload. This report contains a row for every SQL statement and recommended index combination where maintenance costs are required for the index.
Note: This is not applicable for Partition Analysis.
This report is created after a workload is analyzed.
To open the Index Maintenance Cost Report
1 Select Reports > Current Workload > Index Maintenance Cost... – or –
From the Reports toolbar, select .
2 Use the Reports toolbar to manage the report.
The following table describes the information provided in the report.
Note: This report will not contain any rows if none of the recommended indexes require any maintenance cost.
Table 50: Summary Report Description
Column Name Description
Analysis Type Shows the type of analysis
Query ID The ID assigned to the query.
Database Name Shows the name of the database.
Table Name Shows the name of the table.
No. of Secondary Indexes
Shows the number of existing secondary indexes.
No. of Join Indexes Shows the number of existing join indexes.
No. of Index Recommendations
Shows the number of index recommendations provided for the particular table.
To view the DDL for the index recommendations, right-click on No. of Index Recommendations.
110 Teradata Index Wizard User Guide
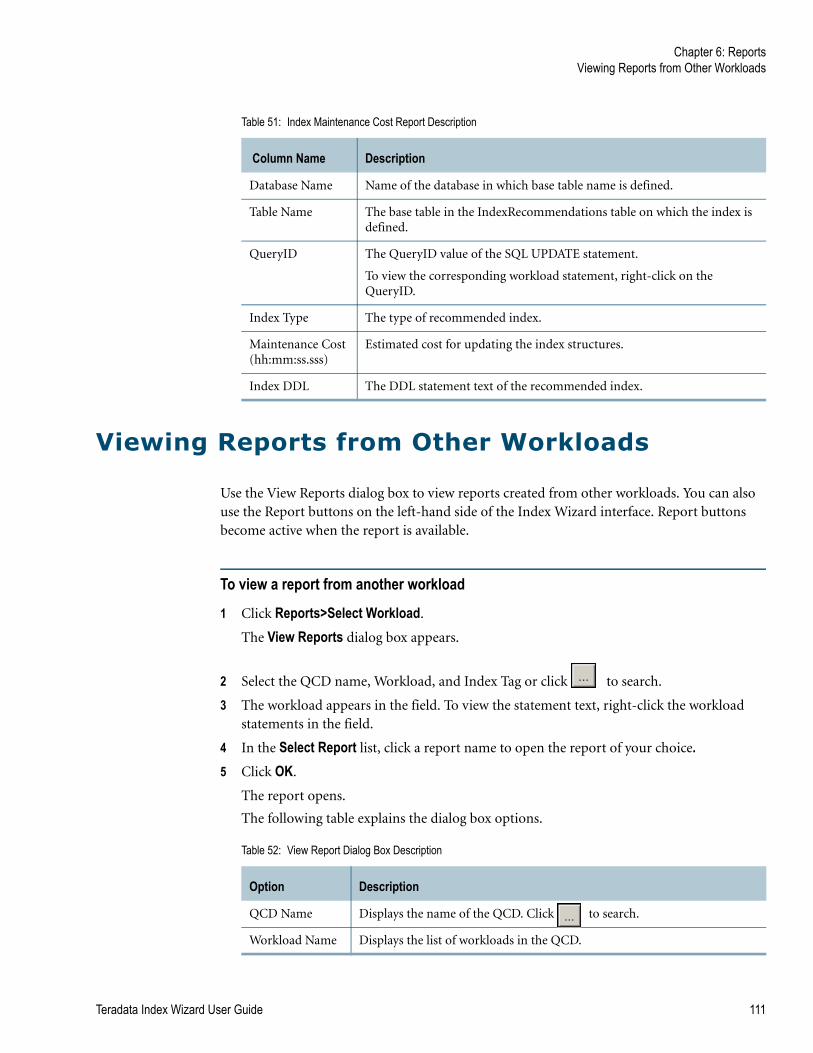
Chapter 6: ReportsViewing Reports from Other Workloads
Viewing Reports from Other Workloads
Use the View Reports dialog box to view reports created from other workloads. You can also use the Report buttons on the left-hand side of the Index Wizard interface. Report buttons become active when the report is available.
To view a report from another workload
1 Click Reports>Select Workload.
The View Reports dialog box appears.
2 Select the QCD name, Workload, and Index Tag or click to search.
3 The workload appears in the field. To view the statement text, right-click the workload statements in the field.
4 In the Select Report list, click a report name to open the report of your choice.5 Click OK.
The report opens.
The following table explains the dialog box options.
Table 51: Index Maintenance Cost Report Description
Column Name Description
Database Name Name of the database in which base table name is defined.
Table Name The base table in the IndexRecommendations table on which the index is defined.
QueryID The QueryID value of the SQL UPDATE statement.
To view the corresponding workload statement, right-click on the QueryID.
Index Type The type of recommended index.
Maintenance Cost(hh:mm:ss.sss)
Estimated cost for updating the index structures.
Index DDL The DDL statement text of the recommended index.
Table 52: View Report Dialog Box Description
Option Description
QCD Name Displays the name of the QCD. Click to search.
Workload Name Displays the list of workloads in the QCD.
Teradata Index Wizard User Guide 111
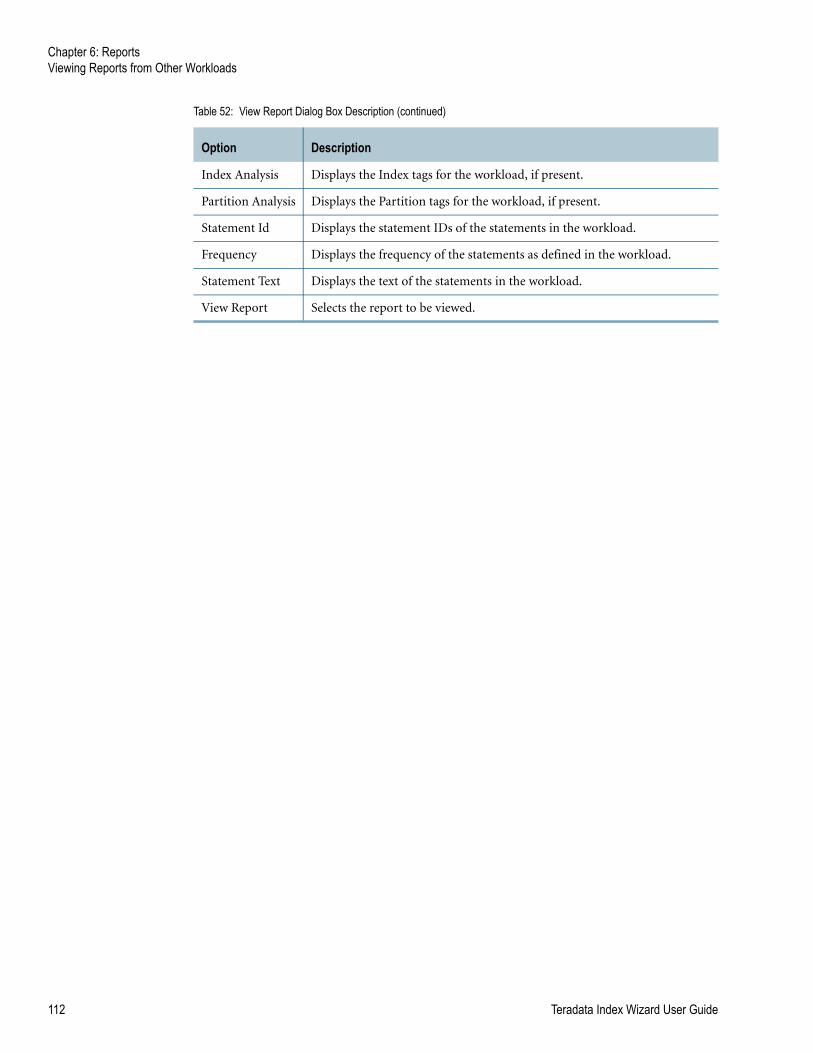
Chapter 6: ReportsViewing Reports from Other Workloads
Index Analysis Displays the Index tags for the workload, if present.
Partition Analysis Displays the Partition tags for the workload, if present.
Statement Id Displays the statement IDs of the statements in the workload.
Frequency Displays the frequency of the statements as defined in the workload.
Statement Text Displays the text of the statements in the workload.
View Report Selects the report to be viewed.
Table 52: View Report Dialog Box Description (continued)
Option Description
112 Teradata Index Wizard User Guide
CHAPTER 7
Validation
Index validation is the process of checking to see if the recommended indexes actually improve system performance. Validation does not involve the actual execution of the recommendations, but permits the Teradata Optimizer to use the recommended indexes in the plan generation. If the recommendations are created with a COLLECT STATISTICS option, Index Wizard collects statistics on a sample size and saves them in the QCD. The sampled statistics are used during index validation.
The validation process occurs in a simulated session mode. The index and the required statistics (as indicated by the recommendations) are simulated for the plan generation. Index recommendations are validated on the set of statements that were analyzed. The statements are submitted to the Teradata Database in a “no execute” mode. During validation, the query plans are saved into the specified QCD.
Recommendations for the workload are loaded either from QCD or from a file.
Validation topics include the following:
• The Validation Process
• Loading Recommendations from QCD
• Loading Recommendations from File
• Validation Results
The Validation Process
Validation can be done in any of the following ways:
• Analysis performed on the production system and validated on the production system.
• Analysis performed on the test system and validated on the production system.
• Analysis performed on the production system and validated on the test system.
• Analysis performed on the test system and validated on the test system.
Note: It is recommended that the last two options not be used during validation because the collected statistics are from the local system and a test system is usually an emulated production system where the table data does not exist.
When the analysis and validation are performed on the same system, you can select the recommendations from the QCD and leave the Validate on Another System unchecked.
When the analysis is performed on one system (test system) and the validation is performed on another system (production system), the following scenarios can occur:
Teradata Index Wizard User Guide 113
Chapter 7: ValidationLoading Recommendations from QCD
• The user is logged on to the system where the workload is analyzed and wants to validate on another system. In this case, check the Validate on Another System option in the Load Recommendations from QCD window to log on to the system on which validation must be done. Additionally, the recommendations can be loaded using either the QCD or the file, if they were saved at the time of analysis.
• The user is logged on to the system where the validation is to be performed. In this case, the recommendations can be loaded from QCD (if the analysis results are available on this system by importing of the recommendations earlier) or from the file that was saved at the time analysis was performed.
Loading Recommendations from QCD
The analysis recommendations are stored in the QCD. The recommendations can be validated to see whether there is an improvement in the performance of the system in executing the statements of the workload.
To load recommendations from the QCD
1 Click Validation>Load Recommendation from QCD.The Recommendations from QCD dialog box opens. See Table 53 for more information.
2 From the drop-down list box, select the QCD Name and Workload Name.
– or –
Click to load the QCD Name and click located next to the Workload Name to load the workload name.
3 [Optional] Select the Index Analysis check box to display and select Index tags for the workload, if any are present.
4 [Optional] Select the Partition Analysis check box to display and select Partition tags for the workload, if any are present.
5 If you select Validate on Another System, you will be prompted to log on to another system.
6 Click Next. The Index Validation dialog box appears. See Table 54 for more information.
7 Click View Workload to check to ensure the index is correct.
8 Click the Data Sampling to set the validation sampling criteria.
9 Click the View DDL to view DDL statements.
10 Click Validate to start the validation.
114 Teradata Index Wizard User Guide
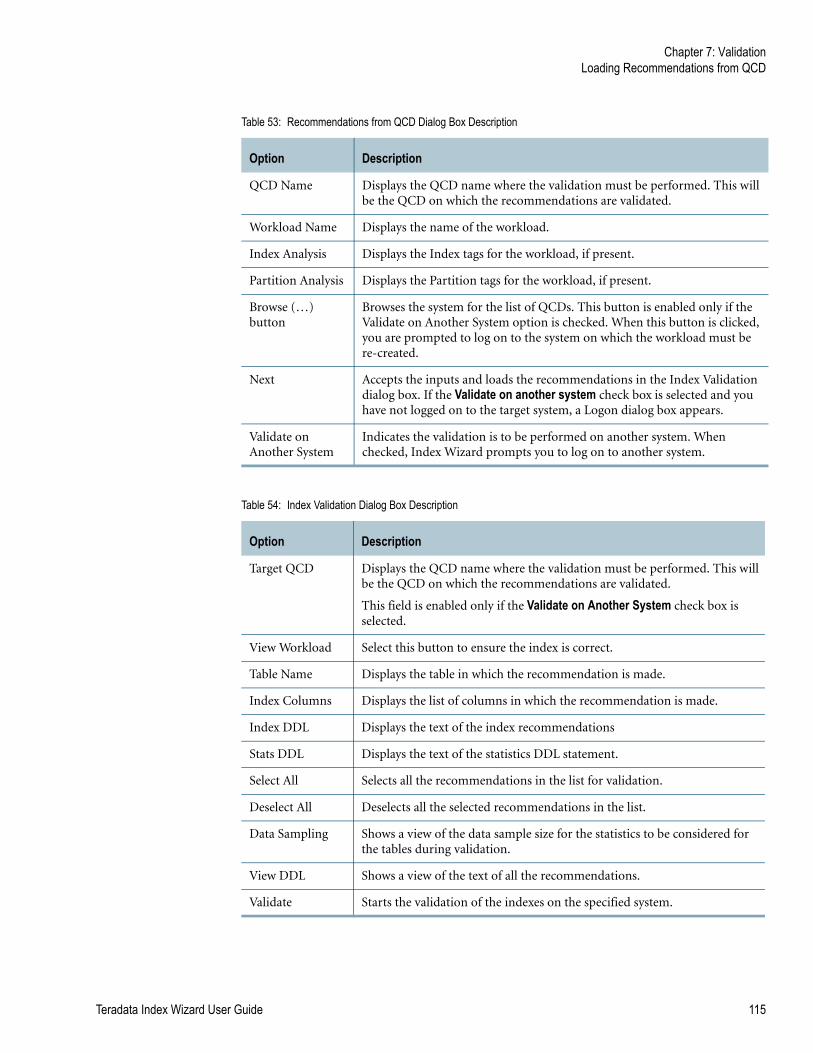
Chapter 7: ValidationLoading Recommendations from QCD
Table 53: Recommendations from QCD Dialog Box Description
Option Description
QCD Name Displays the QCD name where the validation must be performed. This will be the QCD on which the recommendations are validated.
Workload Name Displays the name of the workload.
Index Analysis Displays the Index tags for the workload, if present.
Partition Analysis Displays the Partition tags for the workload, if present.
Browse (…) button
Browses the system for the list of QCDs. This button is enabled only if the Validate on Another System option is checked. When this button is clicked, you are prompted to log on to the system on which the workload must be re-created.
Next Accepts the inputs and loads the recommendations in the Index Validation dialog box. If the Validate on another system check box is selected and you have not logged on to the target system, a Logon dialog box appears.
Validate on Another System
Indicates the validation is to be performed on another system. When checked, Index Wizard prompts you to log on to another system.
Table 54: Index Validation Dialog Box Description
Option Description
Target QCD Displays the QCD name where the validation must be performed. This will be the QCD on which the recommendations are validated.
This field is enabled only if the Validate on Another System check box is selected.
View Workload Select this button to ensure the index is correct.
Table Name Displays the table in which the recommendation is made.
Index Columns Displays the list of columns in which the recommendation is made.
Index DDL Displays the text of the index recommendations
Stats DDL Displays the text of the statistics DDL statement.
Select All Selects all the recommendations in the list for validation.
Deselect All Deselects all the selected recommendations in the list.
Data Sampling Shows a view of the data sample size for the statistics to be considered for the tables during validation.
View DDL Shows a view of the text of all the recommendations.
Validate Starts the validation of the indexes on the specified system.
Teradata Index Wizard User Guide 115
Chapter 7: ValidationLoading Recommendations from File
When the validation starts, a new data source is created for the specified system if you selected the Validate on Another System check box.
After you click Validate, the system recommendations are simulated on the system and the execution plans for the statements in the workload are captured. During this time, the Progress - Simulating Recommendations and Capturing Execution Plan progress bars are shown.
The difference in the execution time of the statements is calculated and overall cost difference for the workload is calculated.
For information about the Validation Results window, see “Validation Results” on page 116.
Loading Recommendations from File
You can load a recommendation from a saved recommendation plans.
To load a recommendation from a file
1 Click Validation>Load Recommendations from File.
The Select a File for Validation dialog box appears.
2 Select or browse for the file to load recommendations, and click Open.
The Select Workload dialog box appears.
3 Click Next to load the recommendation.
For an explanation of all the fields in the Validation window, see “Loading Recommendations from QCD” on page 114.
When recommendations are loaded from a file, the plans are first imported on the system where the validation is performed. This option can be accessed by selecting the Load Recommendation from File option from the Validation menu.
When you click the Validate button, the process is confirmed, the validation process starts, and the results of the validation are displayed in the Validation Results window.
See “Validation Results” on page 116 for more information on validation results.
Validation Results
The Validation Results window:
• Shows the results of the validation and the query IDs of the statements before and after validation.
• Shows the system where the recommendations were made and the system where the validation was completed, along with the overall cost difference in executing the workload before and after validation.
116 Teradata Index Wizard User Guide
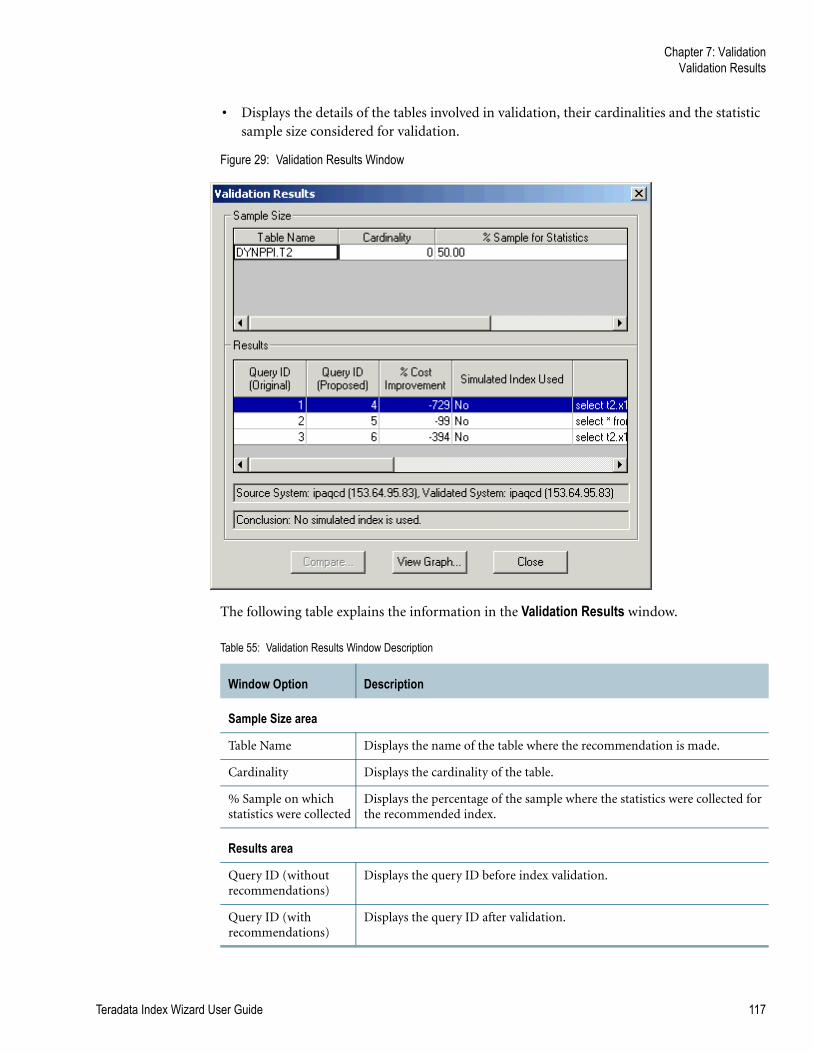
Chapter 7: ValidationValidation Results
• Displays the details of the tables involved in validation, their cardinalities and the statistic sample size considered for validation.
Figure 29: Validation Results Window
The following table explains the information in the Validation Results window.
Table 55: Validation Results Window Description
Window Option Description
Sample Size area
Table Name Displays the name of the table where the recommendation is made.
Cardinality Displays the cardinality of the table.
% Sample on which statistics were collected
Displays the percentage of the sample where the statistics were collected for the recommended index.
Results area
Query ID (without recommendations)
Displays the query ID before index validation.
Query ID (with recommendations)
Displays the query ID after validation.
Teradata Index Wizard User Guide 117
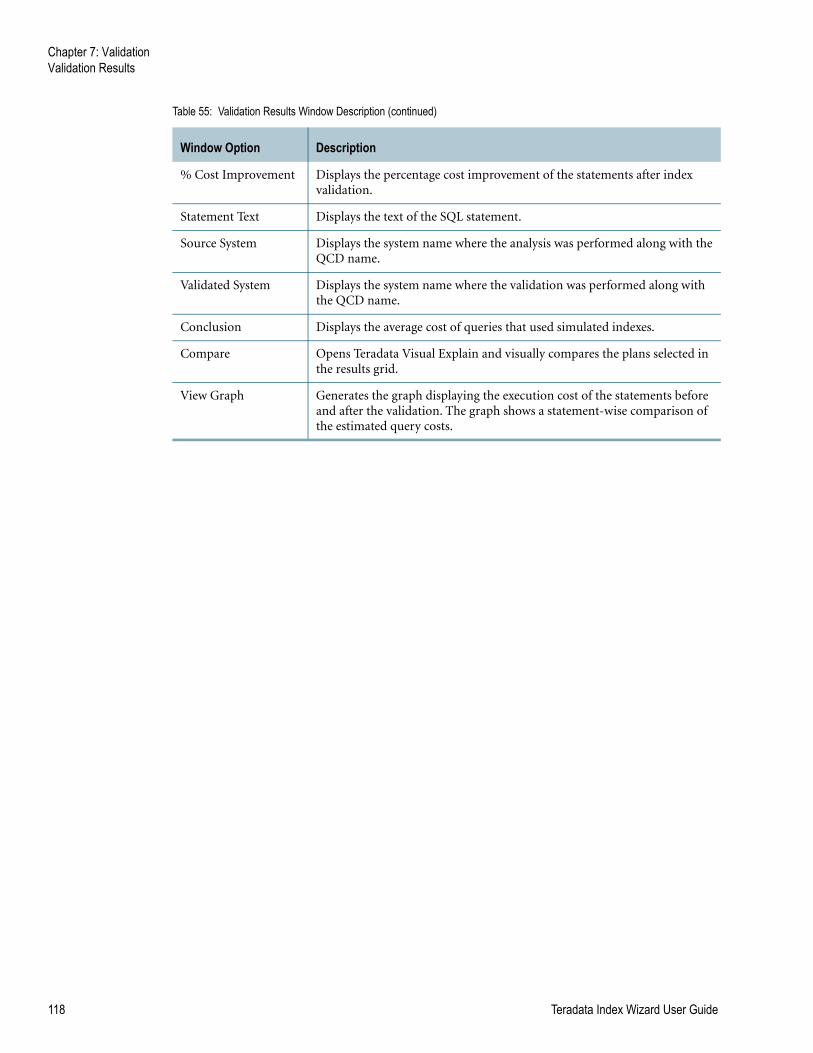
Chapter 7: ValidationValidation Results
% Cost Improvement Displays the percentage cost improvement of the statements after index validation.
Statement Text Displays the text of the SQL statement.
Source System Displays the system name where the analysis was performed along with the QCD name.
Validated System Displays the system name where the validation was performed along with the QCD name.
Conclusion Displays the average cost of queries that used simulated indexes.
Compare Opens Teradata Visual Explain and visually compares the plans selected in the results grid.
View Graph Generates the graph displaying the execution cost of the statements before and after the validation. The graph shows a statement-wise comparison of the estimated query costs.
Table 55: Validation Results Window Description (continued)
Window Option Description
118 Teradata Index Wizard User Guide
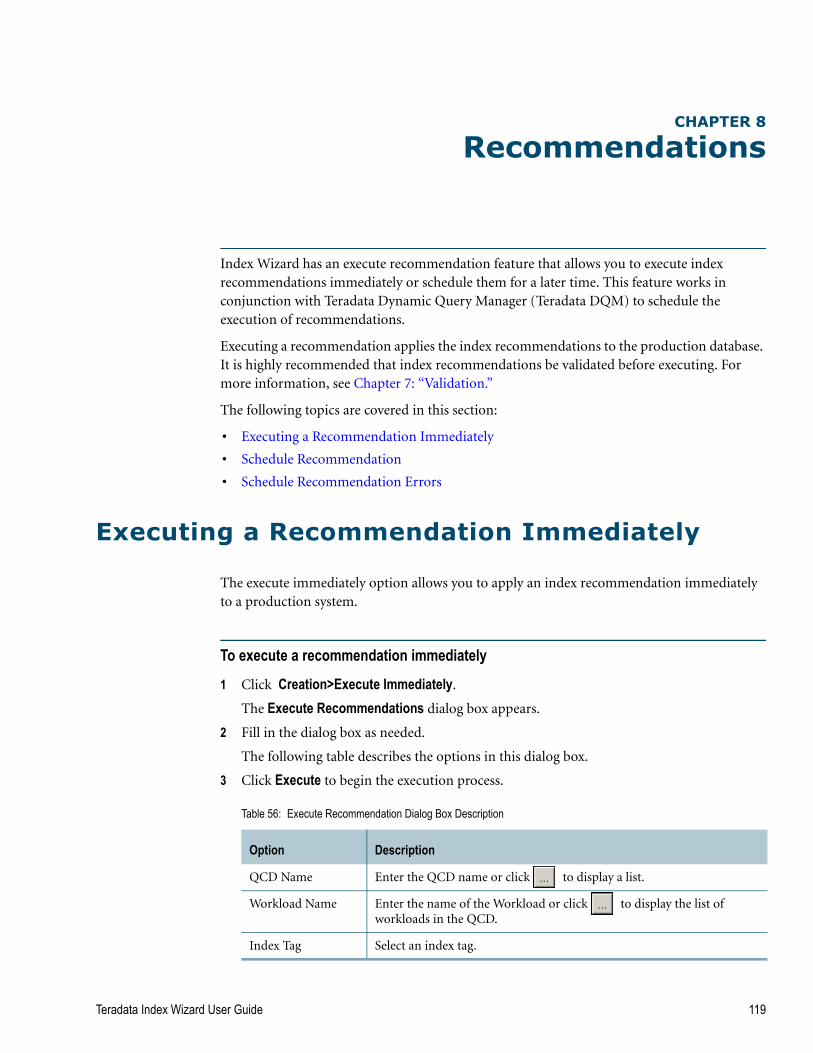
CHAPTER 8
Recommendations
Index Wizard has an execute recommendation feature that allows you to execute index recommendations immediately or schedule them for a later time. This feature works in conjunction with Teradata Dynamic Query Manager (Teradata DQM) to schedule the execution of recommendations.
Executing a recommendation applies the index recommendations to the production database. It is highly recommended that index recommendations be validated before executing. For more information, see Chapter 7: “Validation.”
The following topics are covered in this section:
• Executing a Recommendation Immediately
• Schedule Recommendation
• Schedule Recommendation Errors
Executing a Recommendation Immediately
The execute immediately option allows you to apply an index recommendation immediately to a production system.
To execute a recommendation immediately
1 Click Creation>Execute Immediately.
The Execute Recommendations dialog box appears.
2 Fill in the dialog box as needed.
The following table describes the options in this dialog box.
3 Click Execute to begin the execution process.
Table 56: Execute Recommendation Dialog Box Description
Option Description
QCD Name Enter the QCD name or click to display a list.
Workload Name Enter the name of the Workload or click to display the list of workloads in the QCD.
Index Tag Select an index tag.
Teradata Index Wizard User Guide 119
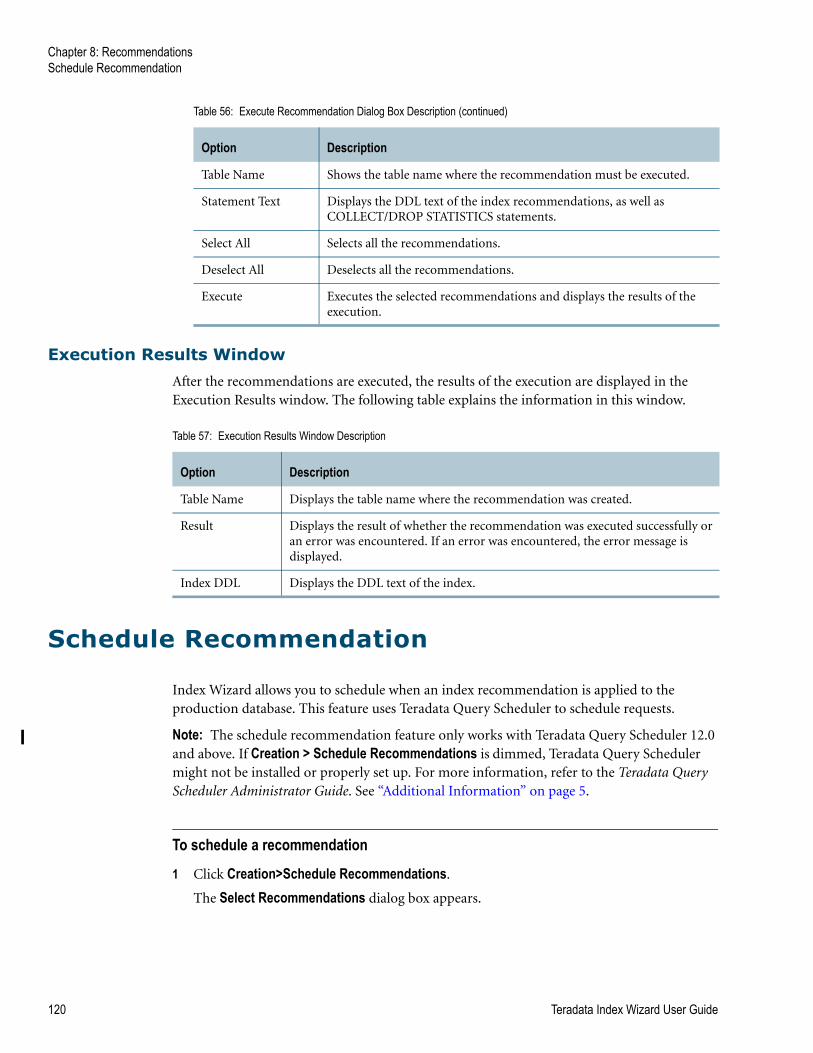
Chapter 8: RecommendationsSchedule Recommendation
Execution Results Window
After the recommendations are executed, the results of the execution are displayed in the Execution Results window. The following table explains the information in this window.
Schedule Recommendation
Index Wizard allows you to schedule when an index recommendation is applied to the production database. This feature uses Teradata Query Scheduler to schedule requests.
Note: The schedule recommendation feature only works with Teradata Query Scheduler 12.0 and above. If Creation > Schedule Recommendations is dimmed, Teradata Query Scheduler might not be installed or properly set up. For more information, refer to the Teradata Query Scheduler Administrator Guide. See “Additional Information” on page 5.
To schedule a recommendation
1 Click Creation>Schedule Recommendations.
The Select Recommendations dialog box appears.
Table Name Shows the table name where the recommendation must be executed.
Statement Text Displays the DDL text of the index recommendations, as well as COLLECT/DROP STATISTICS statements.
Select All Selects all the recommendations.
Deselect All Deselects all the recommendations.
Execute Executes the selected recommendations and displays the results of the execution.
Table 56: Execute Recommendation Dialog Box Description (continued)
Option Description
Table 57: Execution Results Window Description
Option Description
Table Name Displays the table name where the recommendation was created.
Result Displays the result of whether the recommendation was executed successfully or an error was encountered. If an error was encountered, the error message is displayed.
Index DDL Displays the DDL text of the index.
120 Teradata Index Wizard User Guide
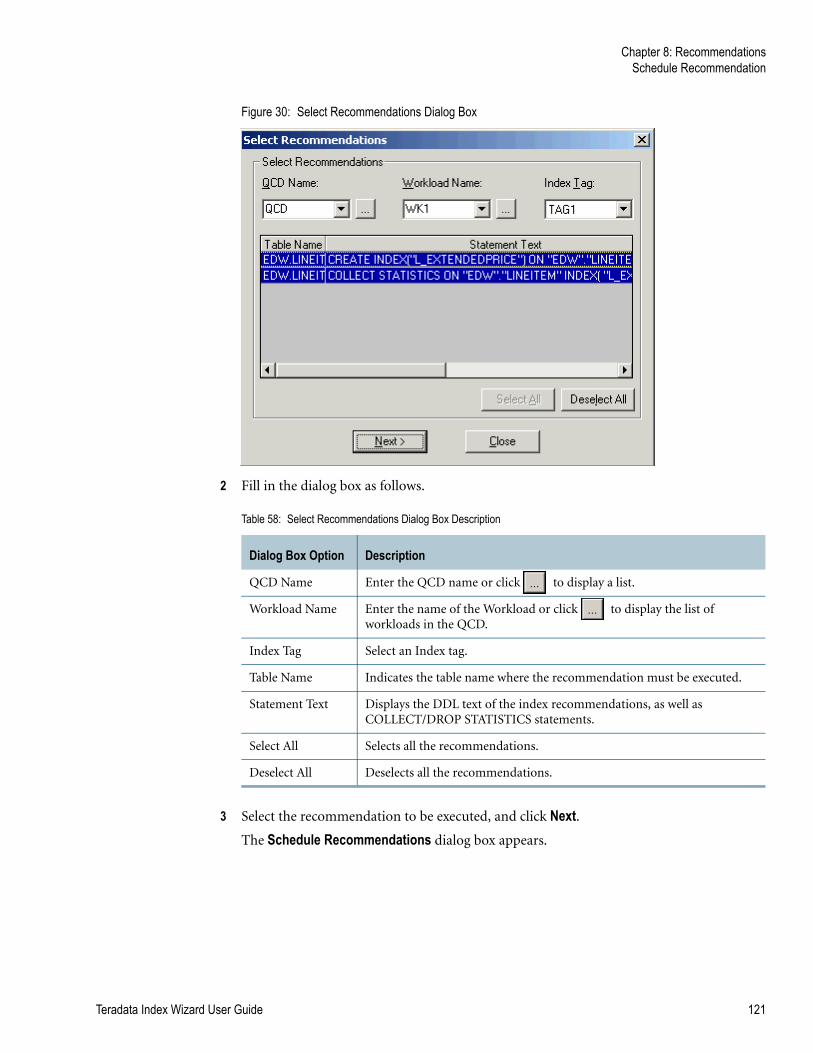
Chapter 8: RecommendationsSchedule Recommendation
Figure 30: Select Recommendations Dialog Box
2 Fill in the dialog box as follows.
3 Select the recommendation to be executed, and click Next. The Schedule Recommendations dialog box appears.
Table 58: Select Recommendations Dialog Box Description
Dialog Box Option Description
QCD Name Enter the QCD name or click to display a list.
Workload Name Enter the name of the Workload or click to display the list of workloads in the QCD.
Index Tag Select an Index tag.
Table Name Indicates the table name where the recommendation must be executed.
Statement Text Displays the DDL text of the index recommendations, as well as COLLECT/DROP STATISTICS statements.
Select All Selects all the recommendations.
Deselect All Deselects all the recommendations.
Teradata Index Wizard User Guide 121
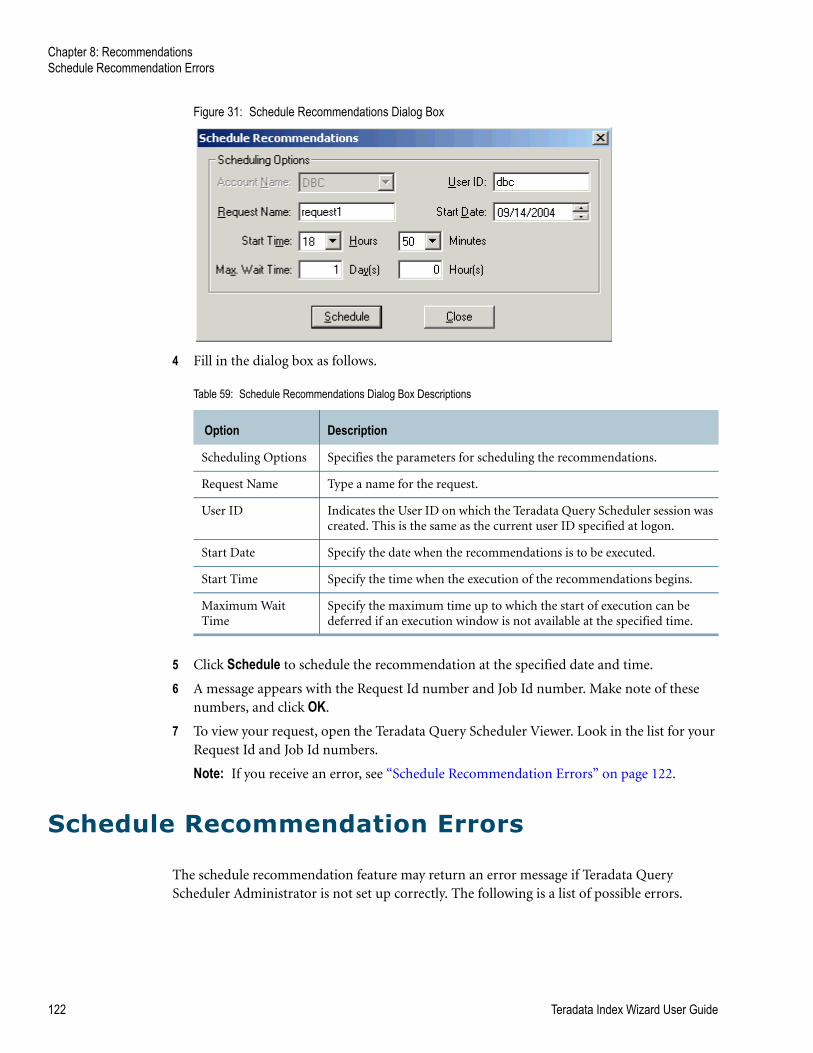
Chapter 8: RecommendationsSchedule Recommendation Errors
Figure 31: Schedule Recommendations Dialog Box
4 Fill in the dialog box as follows.
5 Click Schedule to schedule the recommendation at the specified date and time.
6 A message appears with the Request Id number and Job Id number. Make note of these numbers, and click OK.
7 To view your request, open the Teradata Query Scheduler Viewer. Look in the list for your Request Id and Job Id numbers.
Note: If you receive an error, see “Schedule Recommendation Errors” on page 122.
Schedule Recommendation Errors
The schedule recommendation feature may return an error message if Teradata Query Scheduler Administrator is not set up correctly. The following is a list of possible errors.
Table 59: Schedule Recommendations Dialog Box Descriptions
Option Description
Scheduling Options Specifies the parameters for scheduling the recommendations.
Request Name Type a name for the request.
User ID Indicates the User ID on which the Teradata Query Scheduler session was created. This is the same as the current user ID specified at logon.
Start Date Specify the date when the recommendations is to be executed.
Start Time Specify the time when the execution of the recommendations begins.
Maximum Wait Time
Specify the maximum time up to which the start of execution can be deferred if an execution window is not available at the specified time.
122 Teradata Index Wizard User Guide
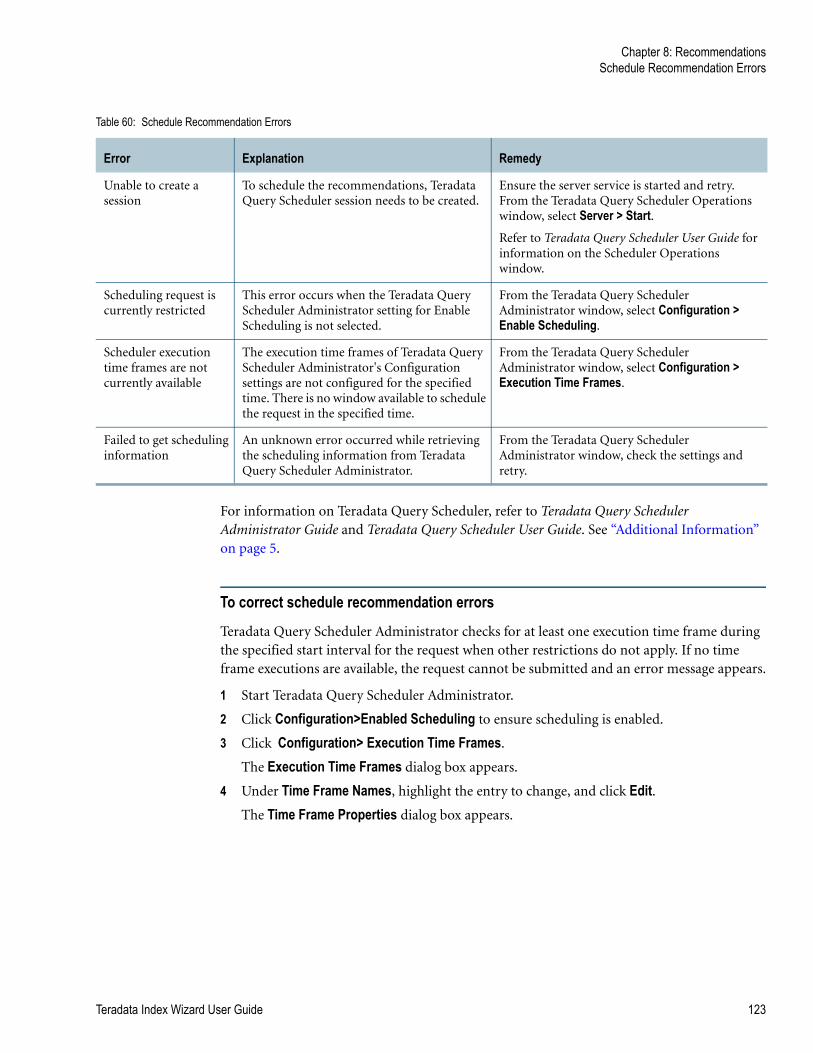
Chapter 8: RecommendationsSchedule Recommendation Errors
For information on Teradata Query Scheduler, refer to Teradata Query Scheduler Administrator Guide and Teradata Query Scheduler User Guide. See “Additional Information” on page 5.
To correct schedule recommendation errors
Teradata Query Scheduler Administrator checks for at least one execution time frame during the specified start interval for the request when other restrictions do not apply. If no time frame executions are available, the request cannot be submitted and an error message appears.
1 Start Teradata Query Scheduler Administrator.
2 Click Configuration>Enabled Scheduling to ensure scheduling is enabled.
3 Click Configuration> Execution Time Frames.
The Execution Time Frames dialog box appears.
4 Under Time Frame Names, highlight the entry to change, and click Edit. The Time Frame Properties dialog box appears.
Table 60: Schedule Recommendation Errors
Error Explanation Remedy
Unable to create a session
To schedule the recommendations, Teradata Query Scheduler session needs to be created.
Ensure the server service is started and retry. From the Teradata Query Scheduler Operations window, select Server > Start. Refer to Teradata Query Scheduler User Guide for information on the Scheduler Operations window.
Scheduling request is currently restricted
This error occurs when the Teradata Query Scheduler Administrator setting for Enable Scheduling is not selected.
From the Teradata Query Scheduler Administrator window, select Configuration > Enable Scheduling.
Scheduler execution time frames are not currently available
The execution time frames of Teradata Query Scheduler Administrator's Configuration settings are not configured for the specified time. There is no window available to schedule the request in the specified time.
From the Teradata Query Scheduler Administrator window, select Configuration > Execution Time Frames.
Failed to get scheduling information
An unknown error occurred while retrieving the scheduling information from Teradata Query Scheduler Administrator.
From the Teradata Query Scheduler Administrator window, check the settings and retry.
Teradata Index Wizard User Guide 123
Chapter 8: RecommendationsSchedule Recommendation Errors
5 Ensure the following options are set:
• Enable Time Frame check box is selected.
• The Every Day check box is selected or under Days one or more of the check boxes are selected.
• Under Time, the Time From and Time To entries are between 0 to 24.
6 Click OK to close the Time Frame Properties dialog box.
7 Click Close to close the Execution Time Frames dialog box.
124 Teradata Index Wizard User Guide
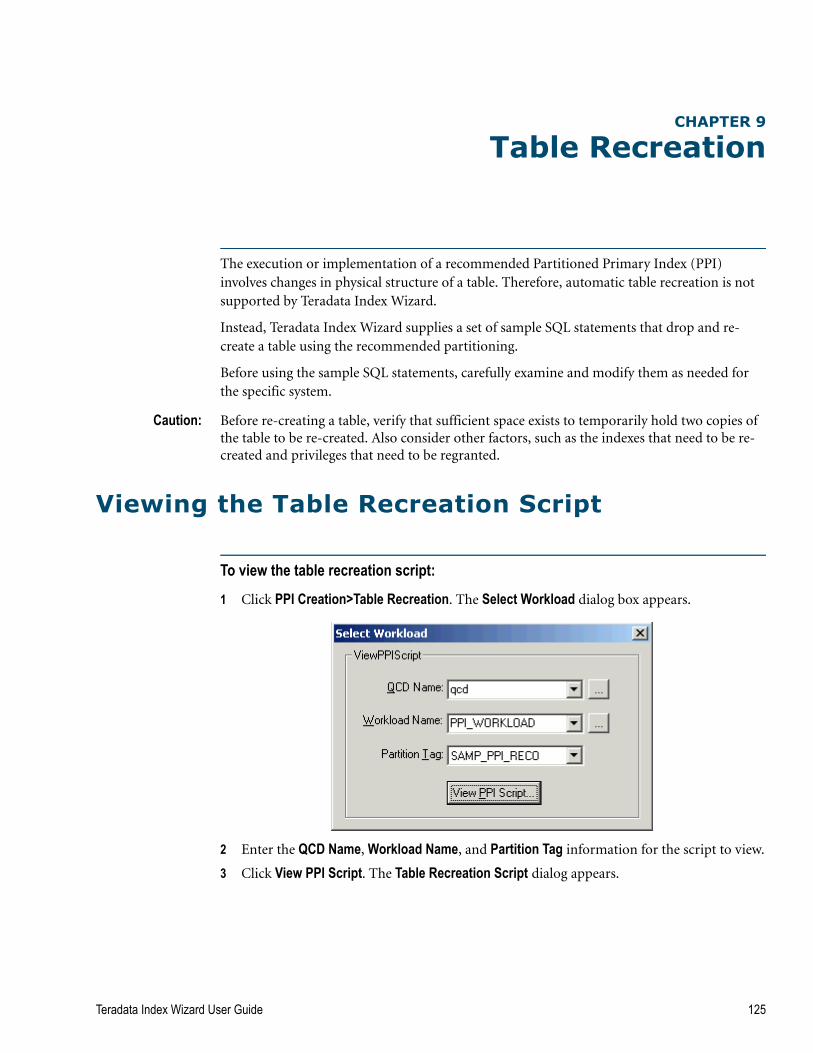
CHAPTER 9
Table Recreation
The execution or implementation of a recommended Partitioned Primary Index (PPI) involves changes in physical structure of a table. Therefore, automatic table recreation is not supported by Teradata Index Wizard.
Instead, Teradata Index Wizard supplies a set of sample SQL statements that drop and re-create a table using the recommended partitioning.
Before using the sample SQL statements, carefully examine and modify them as needed for the specific system.
Caution: Before re-creating a table, verify that sufficient space exists to temporarily hold two copies of the table to be re-created. Also consider other factors, such as the indexes that need to be re-created and privileges that need to be regranted.
Viewing the Table Recreation Script
To view the table recreation script:
1 Click PPI Creation>Table Recreation. The Select Workload dialog box appears.
2 Enter the QCD Name, Workload Name, and Partition Tag information for the script to view.
3 Click View PPI Script. The Table Recreation Script dialog appears.
Teradata Index Wizard User Guide 125
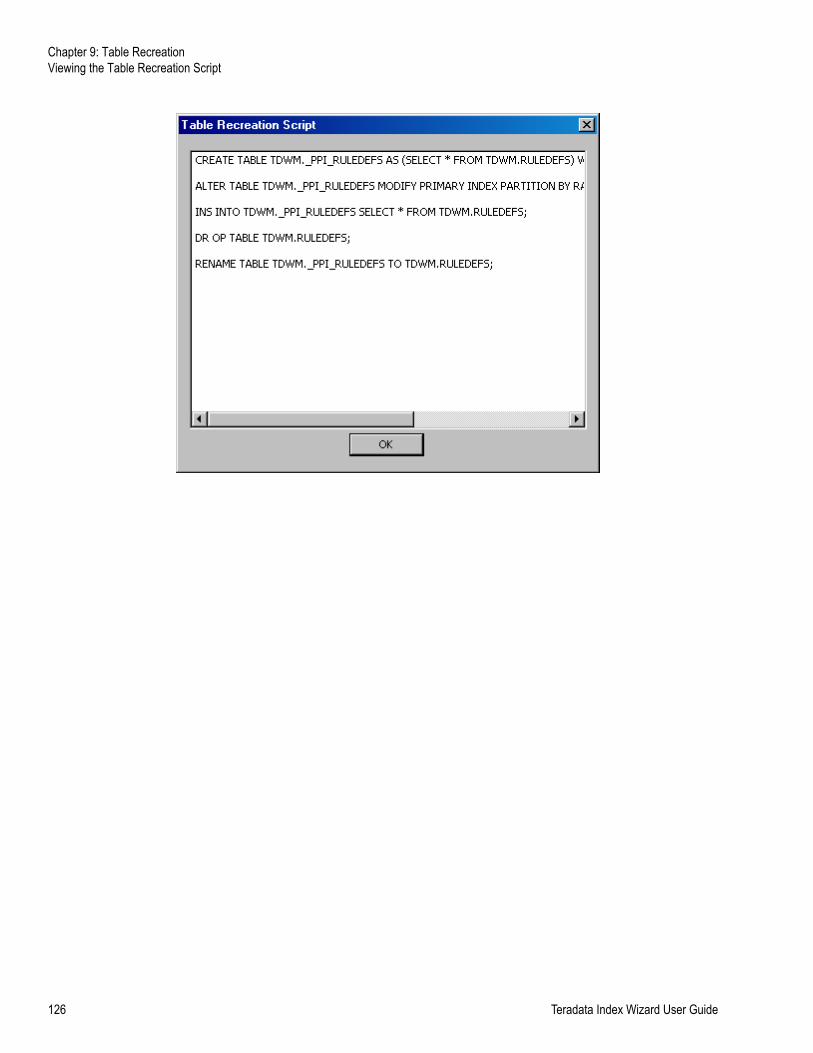
Chapter 9: Table RecreationViewing the Table Recreation Script
126 Teradata Index Wizard User Guide
CHAPTER 10
Index Wizard Tools
Index Wizard has a set of tools that help you connect to the Teradata Database, work with index recommendations, and set Index Wizard preferences. The following topics are part of the Index Wizard Tools menu.
• Executing SQL Feature
• Working With Other Teradata Client Tools
• Preferences
• Index Analysis Inputs
Executing SQL Feature
The Execute SQL feature allows you to execute SQL statements either from the Index Wizard interface, called the Execute SQL- Query window, or through Teradata SQL Assistant. Teradata SQL Assistant opens by default.
To use Teradata SQL Assistant to execute queries, see the Teradata SQL Assistant for Microsoft Windows User Guide for information about this application. See “Additional Information” on page 5.
Before using the Index Wizard Execute SQL - Query window, you must follow the procedure, “To select the Execute SQL - Query Window.”
Note: The native Execute SQL - Query window uses the same session as Index Wizard. It also displays a history of recent queries. If you use Teradata SQL Assistant, a new session is created.
To select the Execute SQL - Query Window
1 Click Tools>Options> Preferences.2 Click the General tab.
3 Clear the check box Use SQL Assistant instead of Execute SQL Query window. Now, when Execute SQL is selected, Index Wizard opens the Execute SQL - Query window instead of Teradata SQL Assistant.
Teradata Index Wizard User Guide 127
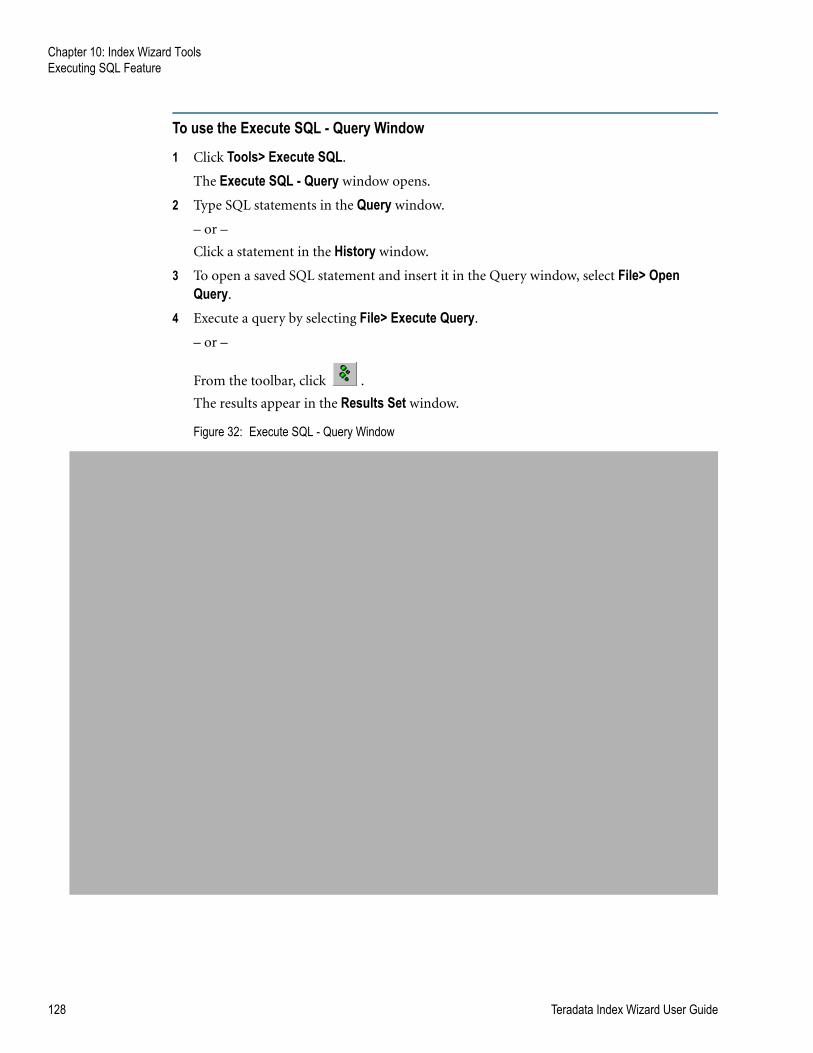
Chapter 10: Index Wizard ToolsExecuting SQL Feature
To use the Execute SQL - Query Window
1 Click Tools> Execute SQL.
The Execute SQL - Query window opens.
2 Type SQL statements in the Query window.
– or –
Click a statement in the History window.
3 To open a saved SQL statement and insert it in the Query window, select File> Open Query.
4 Execute a query by selecting File> Execute Query.
– or –
From the toolbar, click .
The results appear in the Results Set window.
Figure 32: Execute SQL - Query Window
128 Teradata Index Wizard User Guide

Chapter 10: Index Wizard ToolsWorking With Other Teradata Client Tools
Working With Other Teradata Client Tools
Index Wizard is designed to work with other client tools to provide the DBA with the toolset necessary to fine tune the database to maximum efficiency. The tools Index Wizard works with include:
• Teradata System Emulation Tool
• Teradata Visual Explain
• Teradata Statistics Wizard
• Teradata SQL Assistant
These applications can be started from Index Wizard by clicking the respective buttons on the toolbar or selecting them from the Tools menu.
Teradata Visual Explain also starts when Compare is clicked during the index validation process.
Applications opened from Index Wizard automatically connect to the same database.
Note: Statistics Wizard can be started from Index Wizard but does not automatically connect to the same database.
To open client tools
1 From the Tools menu, choose the tool to open.
2 The application opens.
For information about how to use the application, refer to the Help menu or the user guide. See “Additional Information” on page 5.
Preferences
The Preferences window allows you to set the connectivity type, default directory for saved files, and several other options. They include the QCD Access option, Execute SQL option, and the Data Demographics capture option.
For more information on connecting using ODBC or CLIv2 see the following:
• “Connecting Through ODBC” on page 38
• “Connecting Through CLIv2” on page 39
To change preferences
1 Click Tools> Options> Preferences.
The Preferences dialog box opens.
Teradata Index Wizard User Guide 129
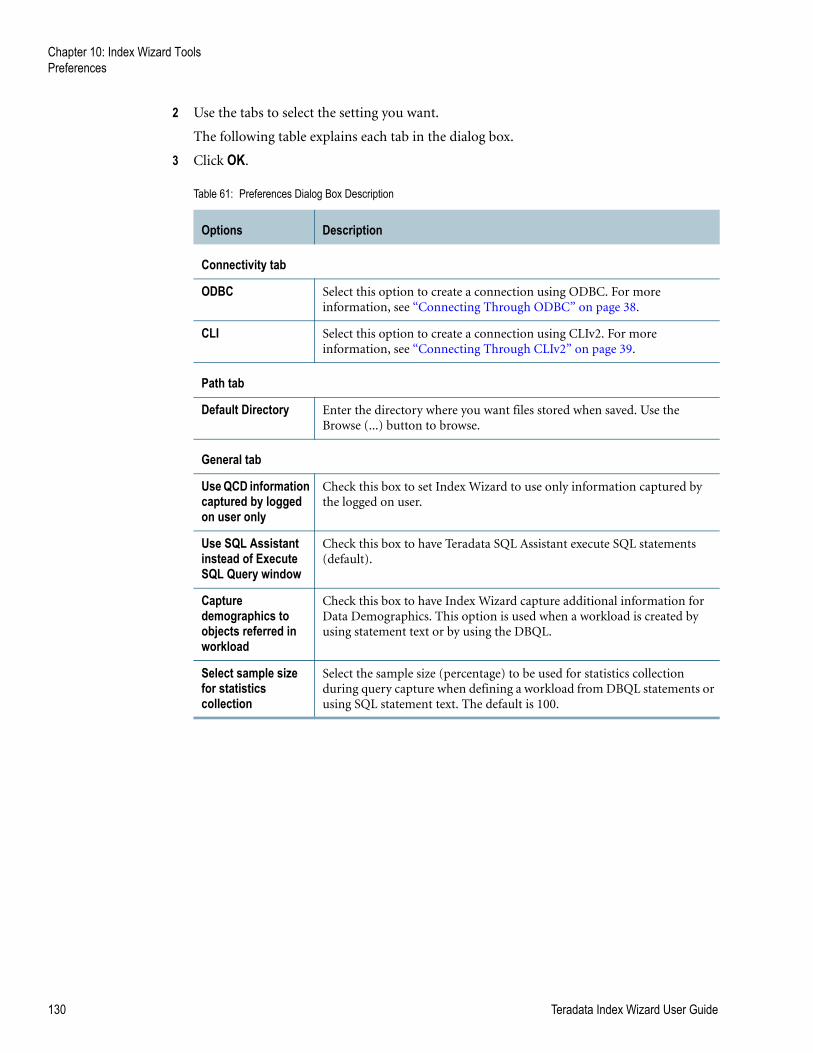
Chapter 10: Index Wizard ToolsPreferences
2 Use the tabs to select the setting you want.
The following table explains each tab in the dialog box.
3 Click OK.
Table 61: Preferences Dialog Box Description
Options Description
Connectivity tab
ODBC Select this option to create a connection using ODBC. For more information, see “Connecting Through ODBC” on page 38.
CLI Select this option to create a connection using CLIv2. For more information, see “Connecting Through CLIv2” on page 39.
Path tab
Default Directory Enter the directory where you want files stored when saved. Use the Browse (...) button to browse.
General tab
Use QCD information captured by logged on user only
Check this box to set Index Wizard to use only information captured by the logged on user.
Use SQL Assistant instead of Execute SQL Query window
Check this box to have Teradata SQL Assistant execute SQL statements (default).
Capture demographics to objects referred in workload
Check this box to have Index Wizard capture additional information for Data Demographics. This option is used when a workload is created by using statement text or by using the DBQL.
Select sample size for statistics collection
Select the sample size (percentage) to be used for statistics collection during query capture when defining a workload from DBQL statements or using SQL statement text. The default is 100.
130 Teradata Index Wizard User Guide
Chapter 10: Index Wizard ToolsIndex Analysis Inputs
Index Analysis Inputs
With Index Wizard, you can set different input parameters for an analysis. Input parameters are also explained in “Advanced Index Parameters” on page 75.
To set index analysis inputs
1 Click Tools>Options> Index Analysis InputsThe Index Analysis Parameters dialog box opens.
2 Fill in the dialog box.
See Table 30 on page 76 which explains the options in this dialog box.
3 Click OK. The inputs take effect on the currently loaded workload.
Teradata Index Wizard User Guide 131

Chapter 10: Index Wizard ToolsIndex Analysis Inputs
132 Teradata Index Wizard User Guide
CHAPTER 11
Data Demographics
The Data Demographics window visually depicts the demographics of a selected table, its sub-tables, and statistics in its stat fields. This same window is used in Teradata Visual Explain and Teradata System Emulation Tool.
Demographic information is presented in a graphical format such as bar graphs or line graphs and in a report form.
Data Demographics Window Overview
Open the Data Demographics window through the Index Analysis dialog box. A workload must be defined to start a new analysis.
The Data Demographics window shows several different graphs of information about the selected table. For a list of specific graphs, see “Data Demographics Graph Types” on page 137.
Each type of information is also viewable in report form.
Graphs and reports can be saved and printed.
To open the Data Demographics Window
1 Start a workload analysis by clicking Analysis> New Analysis.
The Index Analysis dialog box opens showing the current workload.
2 Right-click the Table Name column in Select Tables, and click Data Demographics.
The Data Demographics window opens. See the following figure.
To learn how the Data Demographics window works, see “Data Demographics Window Controls” on page 135
Teradata Index Wizard User Guide 133
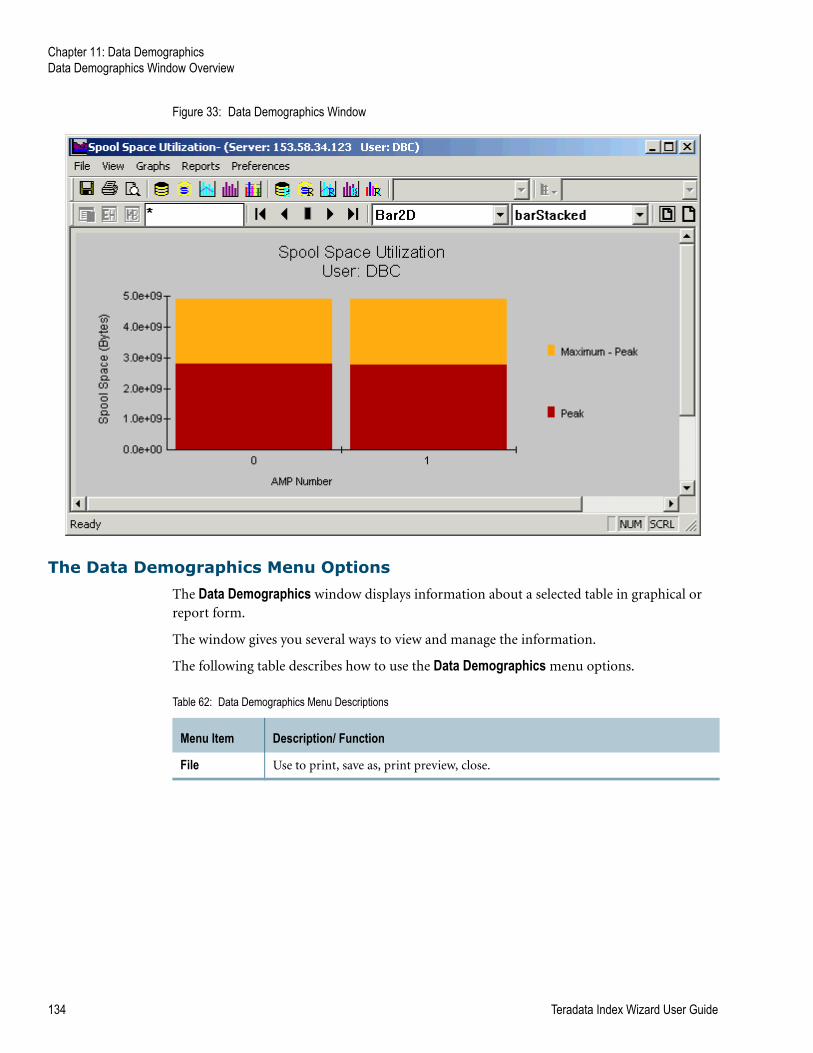
Chapter 11: Data DemographicsData Demographics Window Overview
Figure 33: Data Demographics Window
The Data Demographics Menu Options
The Data Demographics window displays information about a selected table in graphical or report form.
The window gives you several ways to view and manage the information.
The following table describes how to use the Data Demographics menu options.
Table 62: Data Demographics Menu Descriptions
Menu Item Description/ Function
File Use to print, save as, print preview, close.
134 Teradata Index Wizard User Guide
Chapter 11: Data DemographicsData Demographics Window Overview
Data Demographics Window Controls
Use the controls in the Data Demographics window to manage the different types of information available. The controls are explained as follows.
Selecting Bar or Line Graphs
Graphs can be presented using lines, 2D bars, or 3D bars. Use the Bar/Line drop-down menu to select the type you want.
Each type of bar graph and line graph has additional options that can be selected from the additional drop-down box, shown below.
Graph options are shown in the following table.
View • Set Font- sets the fonts for reports.
• Restore Default Preferences- restores the default preferences.
• Change Graph Settings- changes the type of graph displayed.
• Change Graph Perspective- change the perspective of a 3D graph.
• Fit in Window- fit the graph in the current window size.
• Actual Size- shows the graph in its actual size.
Use these controls to move from view to view.
• First Page
• Previous Page
• Current Page
• Next Page
• Last Page
• Fit in Window- fit the graph in the current window size.
• Actual Size- shows the graph in its actual size.
Graphs Selects the type of graph you want to see.
Report View each type graph in report form.
Preferences Sets the preferences for each type of graph.
Table 62: Data Demographics Menu Descriptions (continued)
Menu Item Description/ Function
Table 63: Bar and Line Graph View Options
Graph Type Descriptions
Bar2D and Bar3D Bar Graphs
• barStacked- shows the graph bars stacked on top in each other.
• barZClustered- shows the bar graphs side by side.
Teradata Index Wizard User Guide 135
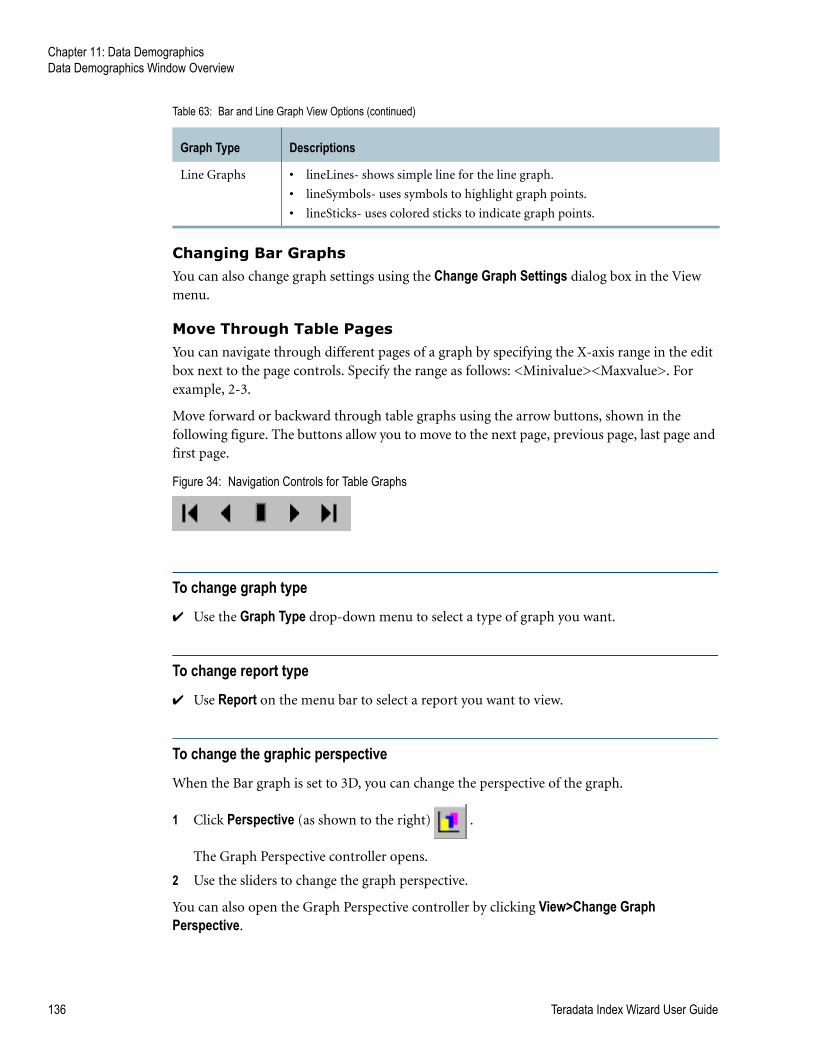
Chapter 11: Data DemographicsData Demographics Window Overview
Changing Bar Graphs
You can also change graph settings using the Change Graph Settings dialog box in the View menu.
Move Through Table Pages
You can navigate through different pages of a graph by specifying the X-axis range in the edit box next to the page controls. Specify the range as follows: <Minivalue><Maxvalue>. For example, 2-3.
Move forward or backward through table graphs using the arrow buttons, shown in the following figure. The buttons allow you to move to the next page, previous page, last page and first page.
Figure 34: Navigation Controls for Table Graphs
To change graph type
✔ Use the Graph Type drop-down menu to select a type of graph you want.
To change report type
✔ Use Report on the menu bar to select a report you want to view.
To change the graphic perspective
When the Bar graph is set to 3D, you can change the perspective of the graph.
1 Click Perspective (as shown to the right) .
The Graph Perspective controller opens.
2 Use the sliders to change the graph perspective.
You can also open the Graph Perspective controller by clicking View>Change Graph Perspective.
Line Graphs • lineLines- shows simple line for the line graph.
• lineSymbols- uses symbols to highlight graph points.
• lineSticks- uses colored sticks to indicate graph points.
Table 63: Bar and Line Graph View Options (continued)
Graph Type Descriptions
136 Teradata Index Wizard User Guide
Chapter 11: Data DemographicsData Demographics Graph Types
To change graph preferences
Each type of graph has a Settings dialog box used to set parameters for the graph display.
1 Click Preferences and choose the graph to change.
2 Fill in the dialog box as needed, and click OK.
Data Demographics Graph Types
There are several types of information graphs available in the Data Demographics window. Each depicts information visually using bars or lines and in a report form. Each graph can be printed and saved for presentations or reports.
The type of information graphs include:
• Disk Space Utilization Graph
• Spool Space Utilization Graph
• Row Count/Avg. Row Size Graph
• Blocks Distribution Graph
• Statistics Details Graph
Disk Space Utilization Graph
The Disk Space Utilization graph shows the disk space utilization of the table on the AMPs in the system.
To open the disk space utilization graph
✔ In the Data Demographics window, click Graphs>Disk Space Utilization.
To change the settings for the disk space utilization graph
✔ Click Preferences>Disk Space Utilization.
The following table describes the Disk Space Utilization icons.
Table 64: Disk Space Utilization Icon Descriptions
Icon Description
Opens the Disk Space Utilization graph.
Opens the Disk Space Utilization graph in a report form.
Teradata Index Wizard User Guide 137
Chapter 11: Data DemographicsData Demographics Graph Types
To open the disk space utilization report
✔ Click Reports>Disk Space Utilization.
Spool Space Utilization Graph
The Spool Space Utilization graph shows the spool space use of the table over the AMPs in the system.
To open the spool space utilization graph
✔ Click Graphs>Spool Space Utilization.
To change the settings of the spool space utilization graph
1 Click Preferences>Spool Space Utilization.
The Spool Space Utilization Settings window opens.
2 Set the options, and click OK.
To view the spool space utilization report
✔ Click Reports>Spool Space Utilization.
Row Count/Avg. Row Size Graph
The Row Count/Avg. Row Size graph row distribution of the tables (and sub-tables) over the AMPs in the system. The sub-table for the table can be selected from the Standard box.
To open the row count/avg. row size graph
✔ Click Graph>Row Count/Avg. Row Size.
Table 65: Spool Space Utilization Icon Descriptions
Icons Description
Opens the Disk Spool Space Utilization graph.
Opens Spool Space Utilization graph in a report form.
138 Teradata Index Wizard User Guide
Chapter 11: Data DemographicsData Demographics Graph Types
To view the report form of this graph
✔ Click Report>Row Count/Avg. Row Size.
Blocks Distribution Graph
The Block Distribution graph shows block distribution of the selected tables (or sub-tables) over the AMPs in the system.
To open the blocks distribution graph
✔ Click Graph>Blocks Distribution.
To view the report form of this graph
✔ Click Report>Blocks Distribution.
Statistics Details Graph
The Statistics Detail graph shows the statistics of the specified column or index of the table.
To view the statistics collected on the table or sub-table
✔ Click Graph>Statistics Details.
Table 66: Row Count/Average Row Size Icon Descriptions
Icon Description
Opens the Row Count/Avg. Row Size graph.
Opens the Row Count/Avg. Row Size graph in a report form.
Table 67: Blocks Distribution Icon Descriptions
Button Description
Opens the Blocks Distribution graph.
Opens the Blocks Distribution graph in a report form.
Teradata Index Wizard User Guide 139
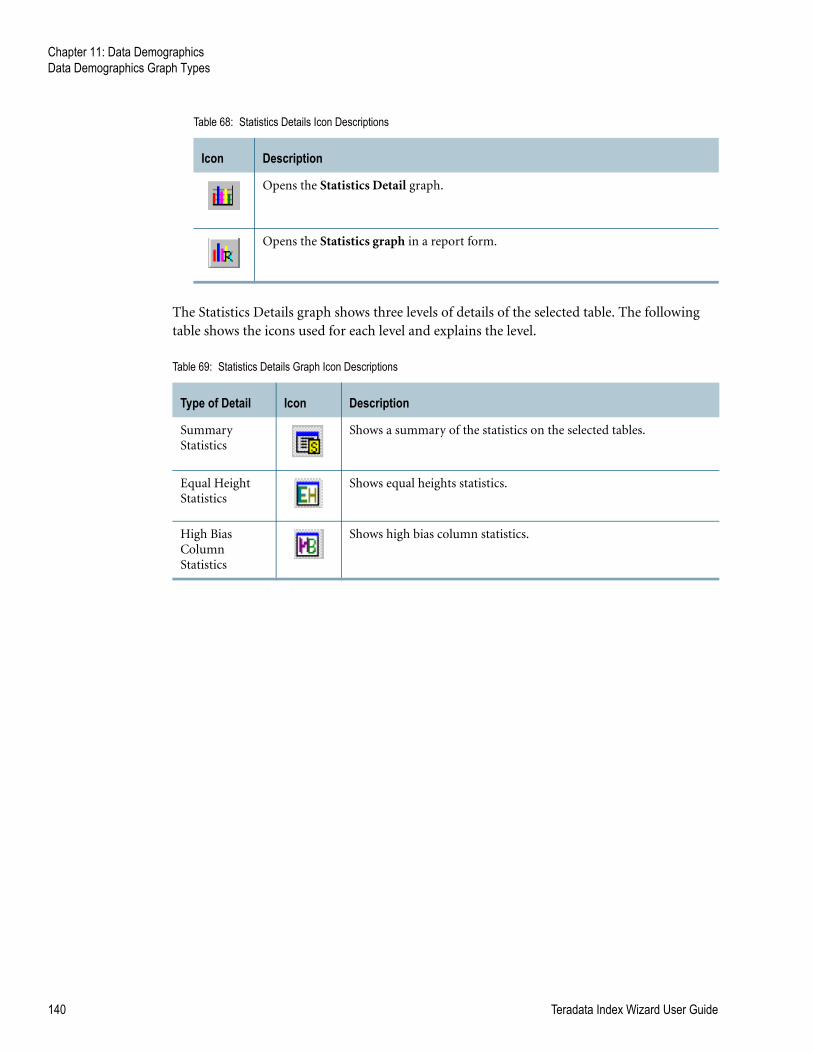
Chapter 11: Data DemographicsData Demographics Graph Types
The Statistics Details graph shows three levels of details of the selected table. The following table shows the icons used for each level and explains the level.
Table 68: Statistics Details Icon Descriptions
Icon Description
Opens the Statistics Detail graph.
Opens the Statistics graph in a report form.
Table 69: Statistics Details Graph Icon Descriptions
Type of Detail Icon Description
Summary Statistics
Shows a summary of the statistics on the selected tables.
Equal Height Statistics
Shows equal heights statistics.
High Bias Column Statistics
Shows high bias column statistics.
140 Teradata Index Wizard User Guide
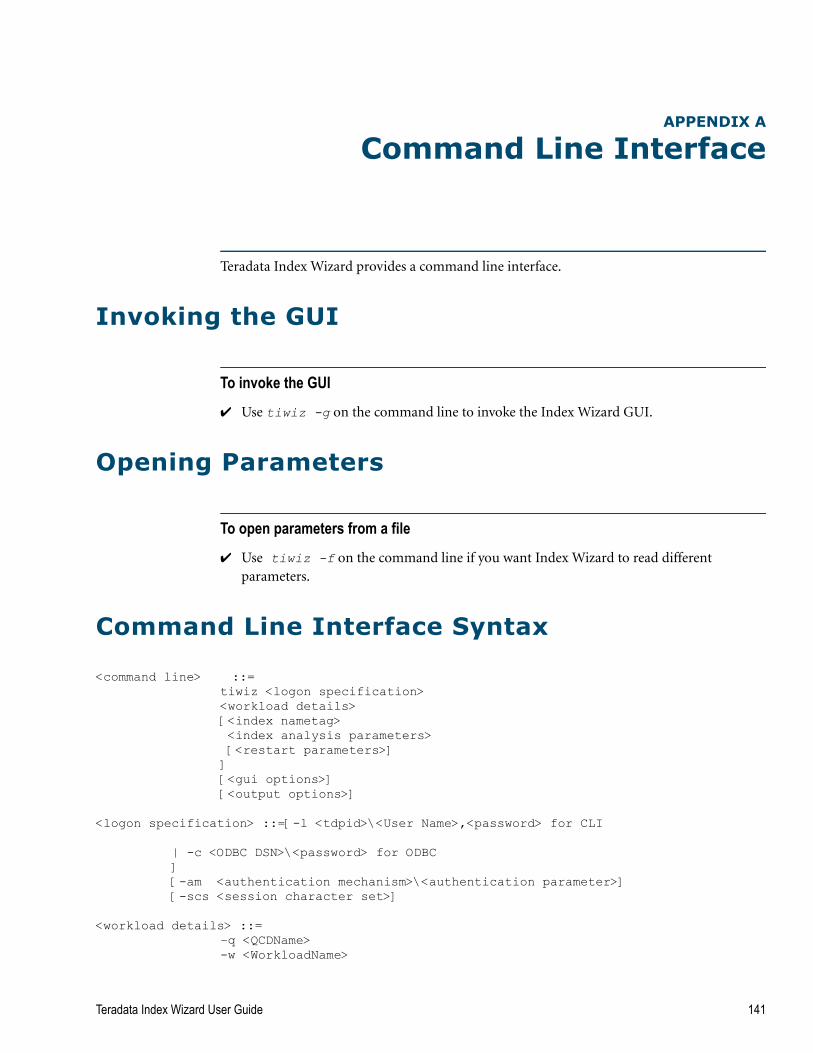
APPENDIX A
Command Line Interface
Teradata Index Wizard provides a command line interface.
Invoking the GUI
To invoke the GUI
✔ Use tiwiz -g on the command line to invoke the Index Wizard GUI.
Opening Parameters
To open parameters from a file
✔ Use tiwiz -f on the command line if you want Index Wizard to read different parameters.
Command Line Interface Syntax
<command line> ::=tiwiz <logon specification> <workload details> [<index nametag> <index analysis parameters> [<restart parameters>]
][<gui options>][<output options>]
<logon specification> ::=[-l <tdpid>\<User Name>,<password> for CLI
| -c <ODBC DSN>\<password> for ODBC][-am <authentication mechanism>\<authentication parameter>][-scs <session character set>]
<workload details> ::=–q <QCDName> -w <WorkloadName>
Teradata Index Wizard User Guide 141
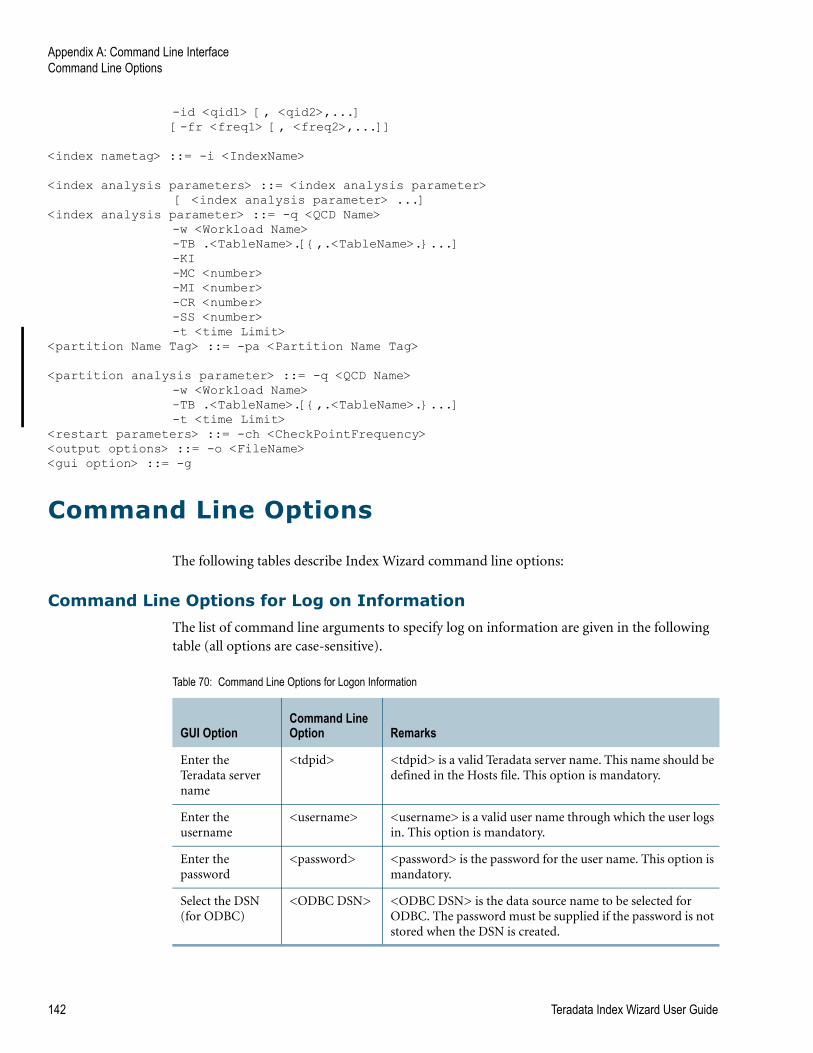
Appendix A: Command Line InterfaceCommand Line Options
-id <qid1> [, <qid2>,...][-fr <freq1> [, <freq2>,...]]
<index nametag> ::= -i <IndexName>
<index analysis parameters> ::= <index analysis parameter> [ <index analysis parameter> ...]
<index analysis parameter> ::= -q <QCD Name>-w <Workload Name>-TB .<TableName>.[{,.<TableName>.}...]-KI-MC <number>-MI <number>-CR <number>-SS <number>-t <time Limit>
<partition Name Tag> ::= -pa <Partition Name Tag>
<partition analysis parameter> ::= -q <QCD Name>-w <Workload Name>-TB .<TableName>.[{,.<TableName>.}...]-t <time Limit>
<restart parameters> ::= -ch <CheckPointFrequency><output options> ::= -o <FileName><gui option> ::= -g
Command Line Options
The following tables describe Index Wizard command line options:
Command Line Options for Log on Information
The list of command line arguments to specify log on information are given in the following table (all options are case-sensitive).
Table 70: Command Line Options for Logon Information
GUI OptionCommand Line Option Remarks
Enter the Teradata server name
<tdpid> <tdpid> is a valid Teradata server name. This name should be defined in the Hosts file. This option is mandatory.
Enter the username
<username> <username> is a valid user name through which the user logs in. This option is mandatory.
Enter the password
<password> <password> is the password for the user name. This option is mandatory.
Select the DSN (for ODBC)
<ODBC DSN> <ODBC DSN> is the data source name to be selected for ODBC. The password must be supplied if the password is not stored when the DSN is created.
142 Teradata Index Wizard User Guide
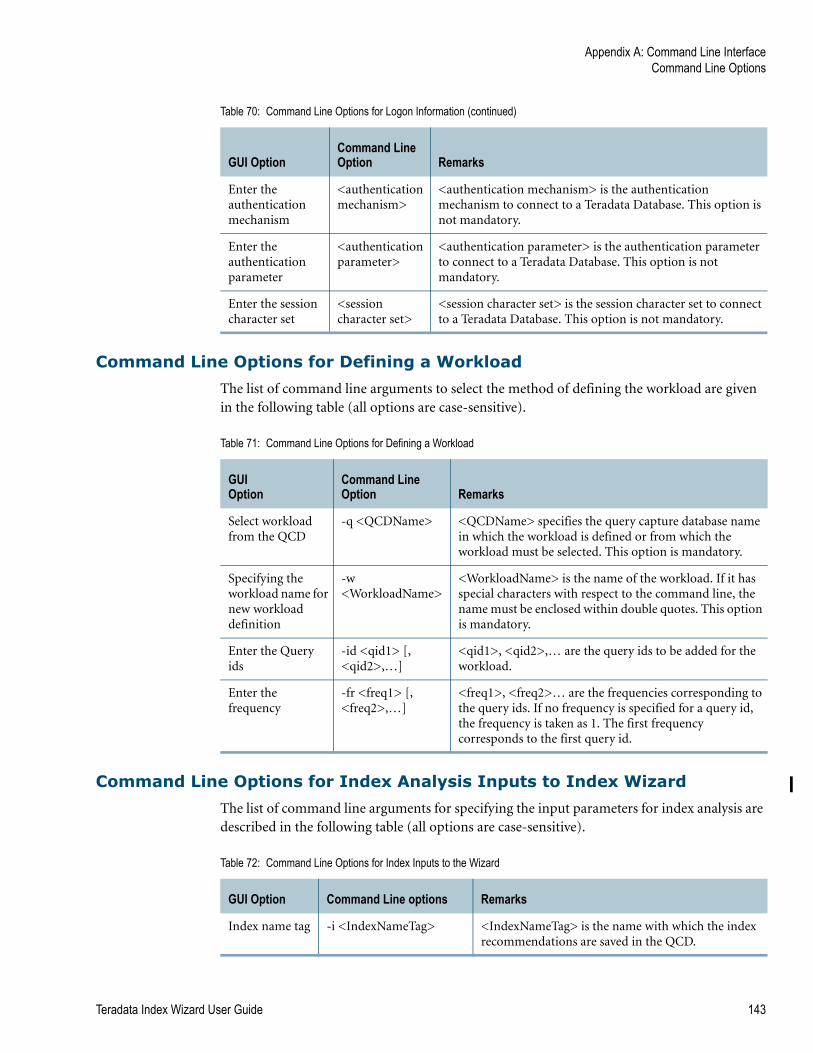
Appendix A: Command Line InterfaceCommand Line Options
Command Line Options for Defining a Workload
The list of command line arguments to select the method of defining the workload are given in the following table (all options are case-sensitive).
Command Line Options for Index Analysis Inputs to Index Wizard
The list of command line arguments for specifying the input parameters for index analysis are described in the following table (all options are case-sensitive).
Enter the authentication mechanism
<authentication mechanism>
<authentication mechanism> is the authentication mechanism to connect to a Teradata Database. This option is not mandatory.
Enter the authentication parameter
<authentication parameter>
<authentication parameter> is the authentication parameter to connect to a Teradata Database. This option is not mandatory.
Enter the session character set
<session character set>
<session character set> is the session character set to connect to a Teradata Database. This option is not mandatory.
Table 70: Command Line Options for Logon Information (continued)
GUI OptionCommand Line Option Remarks
Table 71: Command Line Options for Defining a Workload
GUI Option
Command Line Option Remarks
Select workload from the QCD
-q <QCDName> <QCDName> specifies the query capture database name in which the workload is defined or from which the workload must be selected. This option is mandatory.
Specifying the workload name for new workload definition
-w <WorkloadName>
<WorkloadName> is the name of the workload. If it has special characters with respect to the command line, the name must be enclosed within double quotes. This option is mandatory.
Enter the Query ids
-id <qid1> [, <qid2>,…]
<qid1>, <qid2>,… are the query ids to be added for the workload.
Enter the frequency
-fr <freq1> [, <freq2>,…]
<freq1>, <freq2>… are the frequencies corresponding to the query ids. If no frequency is specified for a query id, the frequency is taken as 1. The first frequency corresponds to the first query id.
Table 72: Command Line Options for Index Inputs to the Wizard
GUI Option Command Line options Remarks
Index name tag -i <IndexNameTag> <IndexNameTag> is the name with which the index recommendations are saved in the QCD.
Teradata Index Wizard User Guide 143
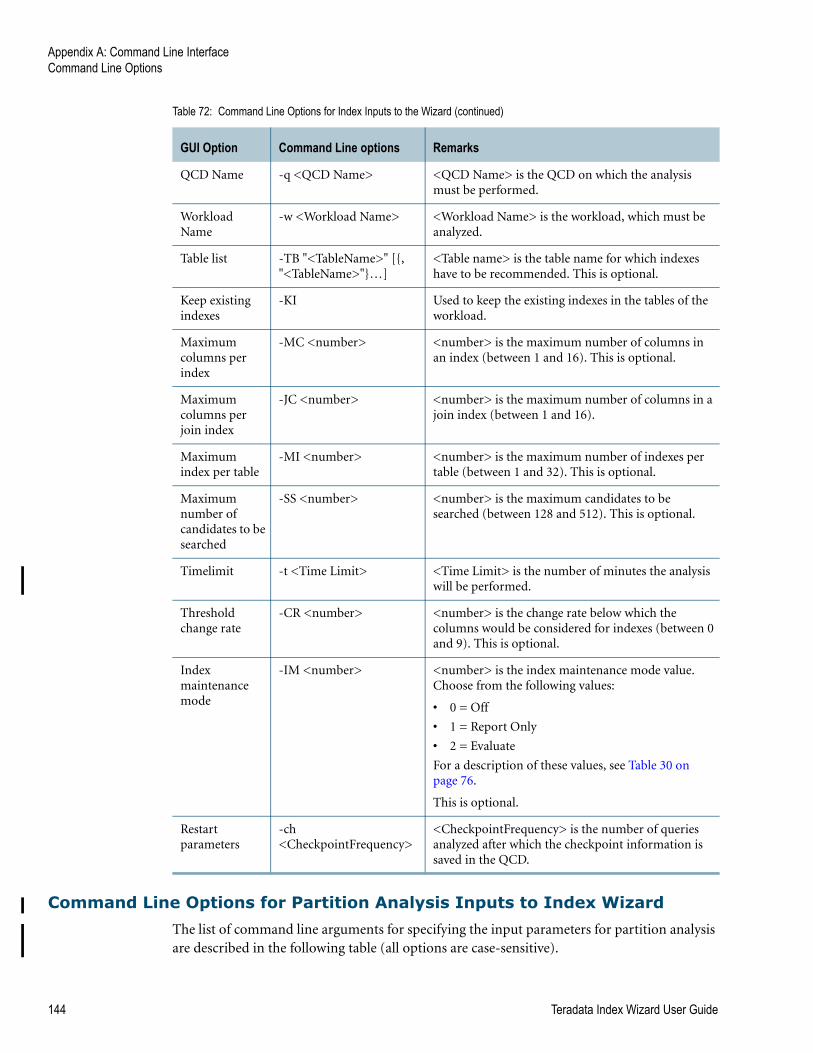
Appendix A: Command Line InterfaceCommand Line Options
Command Line Options for Partition Analysis Inputs to Index Wizard
The list of command line arguments for specifying the input parameters for partition analysis are described in the following table (all options are case-sensitive).
QCD Name -q <QCD Name> <QCD Name> is the QCD on which the analysis must be performed.
Workload Name
-w <Workload Name> <Workload Name> is the workload, which must be analyzed.
Table list -TB "<TableName>" [{, "<TableName>"}…]
<Table name> is the table name for which indexes have to be recommended. This is optional.
Keep existing indexes
-KI Used to keep the existing indexes in the tables of the workload.
Maximum columns per index
-MC <number> <number> is the maximum number of columns in an index (between 1 and 16). This is optional.
Maximum columns per join index
-JC <number> <number> is the maximum number of columns in a join index (between 1 and 16).
Maximum index per table
-MI <number> <number> is the maximum number of indexes per table (between 1 and 32). This is optional.
Maximum number of candidates to be searched
-SS <number> <number> is the maximum candidates to be searched (between 128 and 512). This is optional.
Timelimit -t <Time Limit> <Time Limit> is the number of minutes the analysis will be performed.
Threshold change rate
-CR <number> <number> is the change rate below which the columns would be considered for indexes (between 0 and 9). This is optional.
Index maintenance mode
-IM <number> <number> is the index maintenance mode value. Choose from the following values:
• 0 = Off
• 1 = Report Only
• 2 = Evaluate
For a description of these values, see Table 30 on page 76.
This is optional.
Restart parameters
-ch <CheckpointFrequency>
<CheckpointFrequency> is the number of queries analyzed after which the checkpoint information is saved in the QCD.
Table 72: Command Line Options for Index Inputs to the Wizard (continued)
GUI Option Command Line options Remarks
144 Teradata Index Wizard User Guide
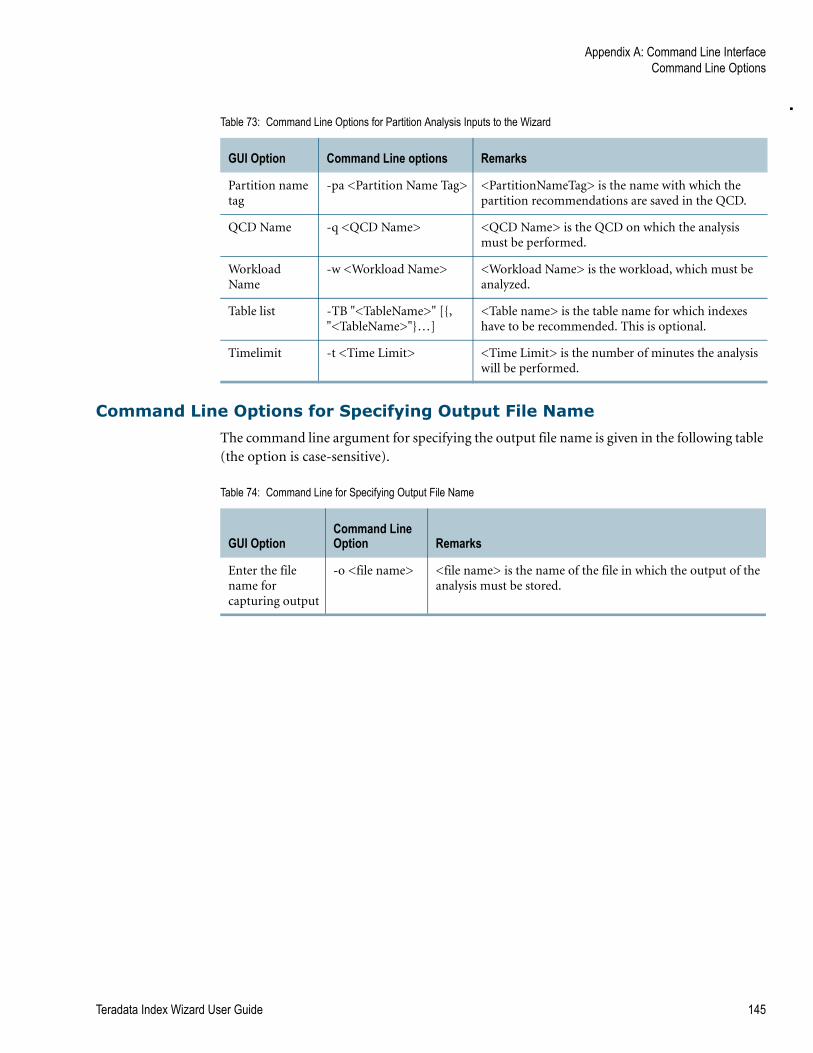
Appendix A: Command Line InterfaceCommand Line Options
Command Line Options for Specifying Output File Name
The command line argument for specifying the output file name is given in the following table (the option is case-sensitive).
Table 73: Command Line Options for Partition Analysis Inputs to the Wizard
GUI Option Command Line options Remarks
Partition name tag
-pa <Partition Name Tag> <PartitionNameTag> is the name with which the partition recommendations are saved in the QCD.
QCD Name -q <QCD Name> <QCD Name> is the QCD on which the analysis must be performed.
Workload Name
-w <Workload Name> <Workload Name> is the workload, which must be analyzed.
Table list -TB "<TableName>" [{, "<TableName>"}…]
<Table name> is the table name for which indexes have to be recommended. This is optional.
Timelimit -t <Time Limit> <Time Limit> is the number of minutes the analysis will be performed.
Table 74: Command Line for Specifying Output File Name
GUI OptionCommand Line Option Remarks
Enter the file name for capturing output
-o <file name> <file name> is the name of the file in which the output of the analysis must be stored.
Teradata Index Wizard User Guide 145

Appendix A: Command Line InterfaceCommand Line Options
146 Teradata Index Wizard User Guide
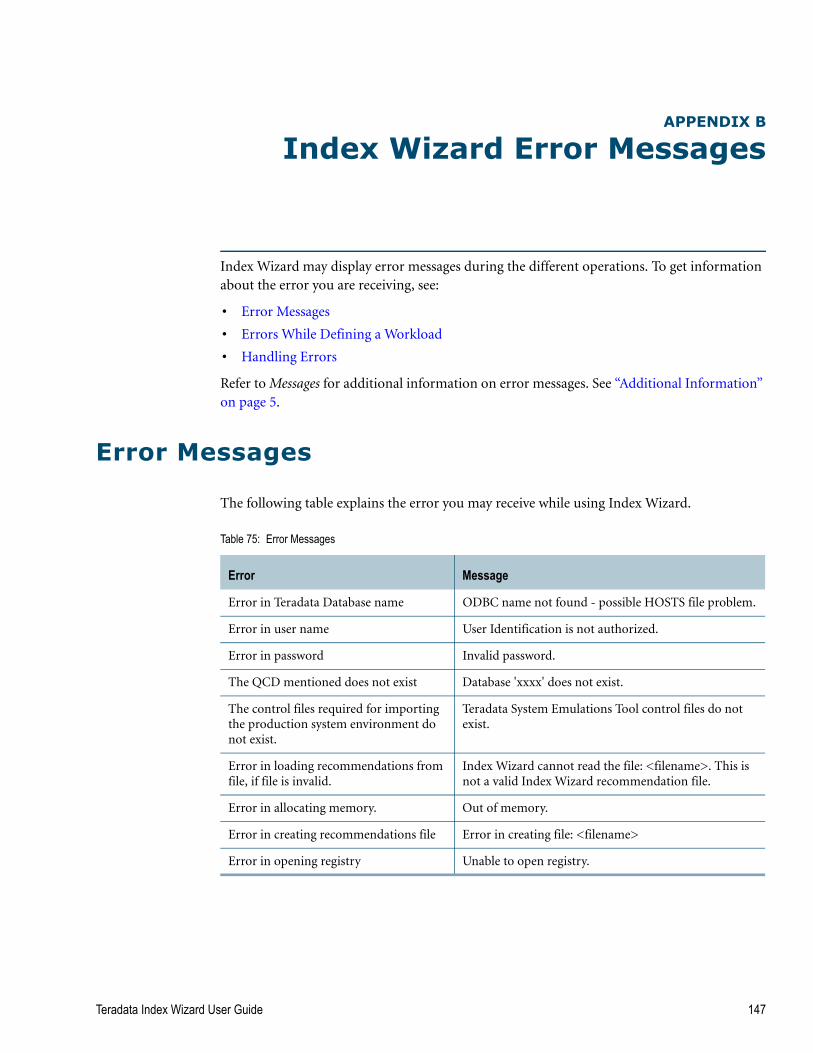
APPENDIX B
Index Wizard Error Messages
Index Wizard may display error messages during the different operations. To get information about the error you are receiving, see:
• Error Messages
• Errors While Defining a Workload
• Handling Errors
Refer to Messages for additional information on error messages. See “Additional Information” on page 5.
Error Messages
The following table explains the error you may receive while using Index Wizard.
Table 75: Error Messages
Error Message
Error in Teradata Database name ODBC name not found - possible HOSTS file problem.
Error in user name User Identification is not authorized.
Error in password Invalid password.
The QCD mentioned does not exist Database 'xxxx' does not exist.
The control files required for importing the production system environment do not exist.
Teradata System Emulations Tool control files do not exist.
Error in loading recommendations from file, if file is invalid.
Index Wizard cannot read the file: <filename>. This is not a valid Index Wizard recommendation file.
Error in allocating memory. Out of memory.
Error in creating recommendations file Error in creating file: <filename>
Error in opening registry Unable to open registry.
Teradata Index Wizard User Guide 147

Appendix B: Index Wizard Error MessagesError Messages
148 Teradata Index Wizard User Guide
Glossary
A
administrator A special user responsible for allocating resources to a community of users.
access module processor (AMP) A virtual processor that receives steps from a parsing engine (PE) and performs Teradata Database functions to retrieve or update data. Each AMP is associated with one virtual disk, where the data is stored. An AMP manages only its own virtual disk and not the virtual disk of any other AMP.
aggregate join index An aggregate join index is a Teradata Database object created using the CREATE JOIN INDEX statement, but specifying one or more columns that are derived from an aggregate expression. Define an aggregate join index as a join index that specifies SUM or COUNT aggregate operations. No other aggregate functions are permitted in the definition of a join index; however, most of the other simple aggregate statistics can be derived from these using column expressions. You can create aggregate join indexes as either single-table or as multiple join indexes. Aggregate join indexes can also be sparse.
C
call-level interface (CLI) A programming interface designed to support SQL access to Teradata Databases from shrink-wrapped application programs. SQL/CLI provides and international standard implementation-independent CLI to access SQL databases. Client-server tools can easily access database through dynamic link libraries. It supports and encourages a rich set of client-server tools.
column In the relational model of Teradata SQL, databases consist of one or more tables. In turn, each table consists of fields, organized into one or more columns by zero or more rows. All of the fields of a given column share the same attributes.
cost This is the outlay of database resources used by a given query.
D
data definition The statements and facilities that manipulate Teradata Database structures and the Data Dictionary information kept about these structures. These statements include CREATE, DROP, ALTER, and MODIFY.
data definition language (DDL) In Teradata SQL, the statements and facilities that manipulate Teradata Database structures (such as CREATE, MODIFY, DROP, GRANT, REVOKE, and GIVE) and the dictionary information kept about those structures. In the typical, pre-relational data management system, data definition and data manipulation facilities are separated, and the data definition facilities are less flexible and more difficult to use than in a relational system.
Teradata Index Wizard User Guide 149
Glossary
data dictionary In the Teradata Database, the information automatically maintained about all tables, views, macros, databases, and users known to the Teradata Database system. It includes information about ownership, space allocation, accounting, and access right relationships between those objects. Data Dictionary information is updated automatically during the processing of Teradata SQL data definition statements. It is used by the parser to obtain information needed to process all Teradata SQL statements.
data manipulation language (DML) In Teradata SQL, the statements and facilities that manipulate or change the information content of the database. These statements include INSERT, UPDATE, and DELETE.
data source name (DSN) Through a data source name, the ODBC driver for Teradata maps a logical name to the necessary software components and any additional information required for accessing the Teradata Database. The user chooses the DSN. The DSN should be a name that reflects the type of data or system it represents.
database A related set of tables that share a common space allocation and owner. A collection of objects that provide a logical grouping for information. The objects include, tables, views, macros, triggers, and stored procedures.
database query log (DBQL) A historical record of SQL statements that are run in Teradata over a period of time.
DBA Acronym for database administrator
domain name A group of computers whose hostnames (the unique name by which a computer is known on a network) share a common suffix, that is the domain name.
E
export This refers to extracting or transferring system information from the tables and views of a given Teradata Database and saving it so it can be manipulated or pulled into another system.
F
field The basic unit of information stored in the Teradata Database. A field is either null, or has a single numeric or string value.
frequency The number of times a particular statement exists within a workload.
G
global join index Also known as a global index. It is a single-table join index, except for one important difference: each global index row carries a pointer to its base table that can be used as an alternate way to access base table rows. Using a join index for base table access is referred to as partial covering because such a join index only partially covers the query.
globally distributed objects (GDO) A data structure that is shared by all of the virtual processors in the Teradata Database configuration.
150 Teradata Index Wizard User Guide
Glossary
graphical user interface (GUI) The use of pictures rather than just words to represent the input and output of a program. A program with a GUI runs under a Windows operating system. The GUI displays certain icons, buttons, dialog boxes in its windows on the screen and the user controls it by moving a pointer on the screen (typically controlled by a mouse) and selecting certain objects by pressing buttons on the mouse. This contrasts with a command line interface where communication is by exchange of strings of text.
H
hash-ordered secondary index a secondary index whose rows are ordered by hash.
I
import This refers to the process of pulling system information into a program. To add system information from an external source to another system. The system receiving the data must support the internal format or structure of the data.
index analysis The process Teradata Index Wizard uses analyze a set SQL statements to find indexes to recommend.
interface processor (IFP) Used to manage the dialog between the Teradata Database and the host. Its components consist of session control, client interface, the parser, the dispatcher, and the BYNET. One type of IFP is a communications processor (COP). A COP contains a gateway process for communicating with workstations via a network.
internet protocol (IP) Data transmission standard; the standard that controls the routing and structure of data transmitted over the Internet.
J
join A select operation that combines information from two or more tables to produce a result.
K
kilobyte (KB) 1000 bytes.
L
log A record of events. A file that records events. Many programs produce log files. Often you will look at a log file to determine what is happening when problems occur. Log files have the extension “.log”.
M
macro A set of Teradata SQL statements stored by the Teradata Database and executed by a single EXECUTE statement. Each macro execution is implicitly treated as a transaction.
Teradata Index Wizard User Guide 151
Glossary
N
name A word supplied by the user that refers to an object, such as a column, database, macro, table, user, or view.
non unique secondary index One of two types of secondary indexes. A secondary index may be specified at table creation or at any time during the life of the table. It may consist of up to 16 columns. To get the benefit of the index, the query has to specify a value for all columns in the secondary index. A non unique secondary index is usually specified in order to prevent full-table scans.
null The absence of a value for a field.
O
object In object-oriented programming, a unique instance of a data structure defined according to the template provided by its class. Each object has its own values for the variables belonging to its class and can respond to the messages, or methods, defined by its class.
object definition Shows the details of the structure and instances of the objects used by a given query. Object definitions are used to create tables, views, macros, triggers, join indexes, and stored procedures in a database.
open database connectivity (ODBC) Under ODBC, drivers are used to connect applications with databases. The ODBC driver processes ODBC calls from an application, but passes SQL requests to the Teradata Database for processing. See “Connecting Through ODBC” on page 38 for more information.
P
parameter A variable name in a macro for which an argument value is substituted when the macro is executed.
parser A program executing in a parsing engine that translates Teradata SQL statements entered by a user into the steps that accomplish the user’s intensions.
parsing engine (PE) An instance (virtual processor) of the database management session control, parsing, and dispatching processes and their data context (caches).
production system A Teradata Database used in a live environment at a customer site. A system that is actively used for day to day business operations. This differs from a test or development system that is used to create new queries or test new features before using them on the production system.
Q
query A Teradata SQL statement, such as a SELECT statement.
query capture database (QCD) A database of relational tables that store the steps of any query plan captured by the Query Capture Facility (QCF). See “Defining a Workload From QCD Statements” on page 54 for more information.
152 Teradata Index Wizard User Guide

Glossary
query capture facility (QCF) Provides a method to capture and store the steps from any query plan in a set of predefined relational tables called the Query Capture Database (QCD).
R
random AMP sample (RAS) An arbitrary sample from an Access Module Processor (AMP). These are samples of the tables in a query or all of the tables in a given database.
request In host software, a message sent from an application program to the Teradata Database.
result The information returned to the user to satisfy a request made of the Teradata Database.
row The fields that represent one entry under each column in a table. The row is the smallest unit of information operated on by data manipulation statements.
S
session In client software, a logical connection between an application program on a host and the Teradata Database. It permits the application program to send one request to and receive one response from the Teradata Database at a time.
simple join index The primary function of a simple join index is to provide the Optimizer with a cost-effective means for satisfying any query that specifies a frequently performed join operation. The simple join index permits you to define a permanent prejoin table without violating the normalization of the database schema.
statement A request for processing by the Teradata Database that consists of a keyword verb, optional phrases, and operands. It is processed as a single entity.
statistics These are the details of the processes used to collect, analyze, and transform the database objects used by a given query.
stored procedures Combinations of procedural and non-procedural statements run using a single call statement.
structured query language (SQL) SQL is a standardized query language for requesting information from a database. SQL consists of a set of facilities for defining, manipulating, and controlling data in a relational database.
T
table A two-dimensional structure made up of one or more columns with zero or more rows that consist of fields of related information. See also database.
target system A Teradata Database from which you export Optimizer-specific information for modeling on a second, test system.
target level emulation (TLE) Permits you to emulate a target environment (target system) by capturing system-level information from that environment. The captured information is
Teradata Index Wizard User Guide 153
Glossary
stored in the relational table SystemFE.Opt_Cost_Table. The information in this table can be used on a test system with the appropriate column and indexes to make the Optimizer generate query plans as if it were operating in the target system rather than the test system.
Teradata Director Program Identifier (TDPID) The name of the Teradata Database being monitored. Also used to establish a preprocessor connection to the Teradata Database.
Teradata DQM Acronym for Teradata Dynamic Query Manager
Teradata SET Acronym for Teradata System Emulation Tool.
Teradata Warehouse A Teradata Warehouse provides information that enables decision-makers within an organization to manage customer relationships efficiently. It is about integrating advanced decision support with day-to-day, even minute-to-minute decision making that increases quality which encourages customer loyalty and thus secures an organization's bottom line.
test system A Teradata Database where you want to import Optimizer-specific information to emulate a target system and create new queries or test new features.
TIWIZ Acronym for Teradata Index Wizard
trigger One or more Teradata SQL statements associated with a table and executed when specified conditions are met.
U
Unicode, UTF-8, and UTF-16 character sets UTF-8 and UTF-16 are two of the standard ways of encoding Unicode character data. The Teradata Database supports UTF8 and UTF16 client character sets. The UTF8 client character set supports UTF-8 encoding. The Teradata Database supports UTF-8 characters that can consist of from one to three bytes. The UTF16 client character set supports UTF-16 encoding. The Teradata Database supports the Unicode 4.1 standard, where each defined character requires exactly 16 bits. There are restrictions imposed by the Teradata Database on using the UTF8 and UTF16 character sets. For details, see International Character Set Support.
unique secondary index One of two types of secondary indexes. A secondary index may be specified at table creation or at any time during the life of the table. It may consist of up to 16 columns. To get the benefit of the index, the query has to specify a value for all columns in the secondary index. A unique secondary index has two purposes: It can speed up access to a row which otherwise might require a full table scan without having to reply on the primary index, and it can be used to enforce uniqueness of a column or set of columns.
user A database associated with a person who uses the Teradata Database. The database stores the person’s private information and accesses other Teradata Databases.
V
value ordered secondary index A non-unique secondary index can be value ordered which means the non unique secondary index can be sorted on the key values themselves rather than
154 Teradata Index Wizard User Guide
Glossary
on the corresponding hash codes. This is useful for range queries where only a portion of the index subtable will be accessed. With a value-ordered non unique secondary index, only those blocks in the non unique secondary index subtable that are within the range are scanned. It must be a number value, up to 4 bytes, versus a longer character column. DATE is the most commonly used data type. The actual data value is stored as part of the non unique secondary index structure.
view An alternate way of organizing and presenting information in the Teradata Database. A view, like a table, has rows and columns. However, the rows and columns of a view are not directly stored by the Teradata Database. They are derived from the rows and columns of tables (or other views) whenever the view is referenced.
W
workload A workload is a set of SQL statements executed against a database. A single SQL statement is also a valid workload.
Teradata Index Wizard User Guide 155

Glossary
156 Teradata Index Wizard User Guide

Index
AAbout Teradata Index Wizard dialog box 34acronyms 149Add QCD Statements dialog box 68Add System Recommendations button 88advanced index parameters 75Analysis menu See menusAnalysis Options dialog box 85, 89analysis reports
overview 43viewing reports 101
Analysis Results dialog box 88, 94ASCII 40
Bbar graphs 135blocks distribution graph 139
Ccapturing
data demographics 130logged on user 130
CD-ROM images 7Change Graph Settings dialog box 136change rate threshold 77changing
bar graphs 136font 29graphic perspective 136logon method 38
character setscommand line syntax 141setting
command line interface 143Windows interface 40
UTF-16 154UTF-8 154
checkpoint frequency 78, 83, 142CLIv2
connecting to the Teradata Database 39Collect Statistics statements, handling 88command line
defining a workload 143help 141inputs to Index Wizard 143, 144
interface 141interface syntax 141log on information 142opening the GUI 141options 142specifying output file name 145
Connect to Teradata Database dialog box 39connecting to the Teradata Database
CLIv2 39ODBC 38
connections errorsdatabase name error 40password error 40user name error 40
connectivity type, setting 130copyright information 35cost profiles
handling errors 63import options 63
Create from Existing Workload dialog box 64create new data source 38Create New Data Source dialog box 39creating workloads 47creation
scheduled recommendation 120Creation menu See menus
Ddata demographics
blocks distribution 139changing to bar or line graphs 135disk space utilization graph 137graph types 136, 137menu options 134overview 133row count/avg. row size 138spool space utilization 138statistics details 139
Data Demographics windowcontrols 135opening 133
database name error 40database query log See DBQLdefault directory, setting 130Define Workload from DBQL Statements dialog box 47Define Workload using Statements dialog box 52
Teradata Index Wizard User Guide 157
Index
Define Workloads from QCD Statements dialog box 55defining a data source 38defining a workload
from a existing workload 64, 66from the QCD 54importing a workload 57introduction 25quick start 40using an SQL statement 52
defining workloadsfrom DBQL statements 47
Disk Object Global Use Count Reportcolumn descriptions 106
Disk Space Analysis Reportcolumn descriptions 108opening 108
disk space utilizationbutton descriptions 137graph 137
displayingstatement text 72
documentationMessages (errors) 6ODBC Driver for Teradata 6online Help 34SQL Reference, Data Definition Statements 6Teradata Query Scheduler 6Teradata SQL Assistant 6Teradata Statistics Wizard 6Teradata System Emulation Tool 6Teradata Visual Explain 6
EError Handling dialog box 61error messages
display object exists 62documentation 6duplicate primary key 62error in allocating memory 147error in creating recommendations file 147error in loading recommendations from file 147error in opening registry 147error in password 147error in Teradata Database name 147error in user name 147SQL statement failed 62The control files required for importing... 147The QCD mentioned does not exist 147
errorsdocumentation 6schedule recommendation errors, correcting 123See connection errors
execute immediately option 119
Execute Recommendations dialog box 46, 119execute SQL 128Execute SQL - Query window 128Execute SQL window 129executing recommendations
immediately 119quick start 46
Execution Results window 120Execution Time Frames dialog box 123Existing Indexes Report
opening 102option descriptions 102
FFile menu See menus
Ggeneral information about Teradata 7general tab 130graph preferences 137graphs 135, 139
HHelp menu See menushelp, online 26, 34
Iimplementing a recommended index 46Import File dialog box 58importing a workload
brief description 25how to 57options 63setting the TLE 59
index analysisanalysis process 96, 97inputs 131new analysis 73, 80overview 73quick start 41restart analysis 83what-if analysis 84what-if analysis results 94
Index Analysis dialog box 42, 73, 74, 80, 81Index Analysis Parameters dialog box 75, 131Index Analysis Summary window 74, 80, 97Index Maintenance Cost Report 110index maintenance mode 77, 144Index Recommendation Report 107index recommendations
applying immediately 119
158 Teradata Index Wizard User Guide
Index
Index Types dialog box 79index types, setting 78Index Validation dialog box 114index validation See validationIndex Validation window 115Index Wizard See Teradata Index Wizardindex/statistics DDL text, viewing 89Information Products Publishing Library 7
Jjoin indexes
aggregate join indexdefined 149specifying in what-if analysis 87
columns, setting number of 77global join index
defined 150specifying in what-if analysis 87
simple join indexdefined 153specifying in what-if analysis 87
viewing the number of 110
KKANJISIS_OS 40keeping existing indexes 76
Lline graphs 135loading recommendations
from a file 116from QCD 114
log on methodsconnecting through ODBC 38connecting through WinCLI 39
logged on user, setting preferences 130
Mmaintenance costs, specifying 77maximum
candidate indexes 76columns per secondary index 77indexes per table 76wait time 122
menusAnalysis menu 30Creation menu 32File menu 27Help menu 34Reports menu 30Tool menu 33
Validation menu 31View menu 28Windows menu 33Workload menu 29
Messages, see documentation 6
OObject Global Use Count Report
opening 106ODBC
connecting to the Teradata Database 38defining a data source 39documentation 6driver setup 39ODBC Data Source Administrator 38toolbar button 33
ODBC Data Source Administrator 39ODBC Data Source Administrator dialog box 39ODBC Driver Setup for Teradata Database dialog box 39opening parameters from file 141ordering publications 7
Pparameters
opening from file 141partition analysis
PPI creation 125Partition Analysis dialog box 42Partition Analysis Summary window 81, 82password error 40Performance Improvement Chart 95Please Select a Data Source dialog box 38PPI creation
table recreation script 125Preferences dialog box 129
Connectivity tab 38, 130General tab 130Path tab 130
product version numbers 3, 35
QQCD
Access option 129loading recommendations from 114selecting SQL statements from 29, 54statements 25
query capture database See QCDquery capture facility See QCFQuery Cost Analysis Report
opening 107option descriptions 107
Teradata Index Wizard User Guide 159
Index
Rrecommendations
executing a recommendation immediately 119executing, quick start 46loading recommendations from file 116loading recommendations from QCD 114scheduling a recommendation 120validating 44
Recommendations from QCD dialog box 45, 114reports
Disk Space Analysis 108Existing Indexes 102Index Maintenance Cost 110Index Recommendations 107Object Global Use Count 106Query Cost Analysis 107Summary 109Table Scan 104Table Usage 103Update Frequency 103Workload Analysis 105Workload Statements 85
Reports menu See menusReports tab 85Reports toolbar
location 101restart an analysis 83Restart Analysis dialog box 83row count/avg. row size 139row count/avg. row size graph 138
Ssample size, selecting 130Schedule Recommendations dialog box 46, 121scheduled recommendation 120scheduling options 122Select a File for Validation dialog box 116Select a File to Import Workload dialog box 57Select Recommendations dialog box 120Select Users and Accounts 50Select Workload dialog box 84, 116session character sets See character setsSet Cost Profile tab 60Set Costs tab 60, 89Set RAS tab 60, 90Set Statistics Samples tab 91Set Target Level Emulation dialog box 59Shortcut menus 36single join index recommendations
index types, setting 78join index, setting number of columns 77statistics collection, setting sample size 130
spool space utilization
button descriptions 138graph 138
SQL Assistant See Teradata SQL AssistantSQL Reference, Data Definition Statements
documentation 6SQL statements
defining a workload 52errors defining a workload using SQL statements 56
startdate 122time 122
statement text, viewing 89statistics collection, selecting sample size 130statistics details
button descriptions 139graph 139
Statistics Information dialog box 88Statistics Wizard See Teradata Statistics Wizardstatus bar 35Summary Report
opening 109option descriptions 109
System Recommendations tab 85
Ttable recreation 125
partition analysis 125Table Scan Report
opening 104option descriptions 104
Table Usage Reportcolumn descriptions 103opening 103
technical support 7Teradata Database Connect dialog box 38Teradata Index Wizard
error messages 147quick start 37
Teradata Query Schedulercorrecting errors 123documentation 6error explanations and remedies 122scheduling recommendations 120
Teradata SQL Assistantdocumentation 6opening using menu option 129preferences, setting 130toolbar button 33
Teradata Statistics Wizarddocumentation 6opening using menu option 129toolbar button 33
Teradata System Emulation Tool
160 Teradata Index Wizard User Guide
Index
documentation 6opening using menu option 129toolbar button 33
Teradata Visual Explaindocumentation 6opening using menu option 129toolbar button 33viewing data using 45
Time Frame Properties dialog box 123tools
index analysis inputs 131other Teradata client tools 129preferences 129
Tools menu See menus
UUnicode 154Update Existing Workload dialog box 67Update Frequency Report
opening 103option descriptions 103
updating an existing workloadhow to 66statement options 68
Use SQL Assistant instead of Execute SQL Query window check box 130
user name error 40UTF-16 character sets 40, 154UTF-8 character sets 40, 154
Vvalidation
analysis 45brief description 26executing recommendations 46loading recommendation from file 116loading recommendations from QCD 114overview 113production system 113results 116results report 45test system 113validating recommendations 44validation process 113
Validation menu See menusValidation Results Report 45version numbers 3
Teradata Index Wizard 35View Details dialog box 85, 89View menu See menusView Reports dialog box 98, 111View Statement dialog box 72, 89, 98View Workload Details dialog box 71
viewinganalysis reports 98, 111data using Visual Explain 45reports 43statement text for index and statistics 89statement text for workloads 72
Visual Explain See Teradata Visual Explain
WWarning dialog box 56what-if analysis 84
advanced button 89analysis summary 97index types, specifying 86statistics information window 91Teradata Visual Explain 95view details button 88what-if analysis results 94
What-If Analysis Add Index dialog box 86What-If Analysis dialog box 85Windows menu See menusworkload
cleanup 70creating
from existing workload 64from the QCD 54using SQL statement text 52
importing a workload 57quick start 40status 71summary 72updating from existing workload 66
workload analysisbrief description 25types of 25
Workload Analysis Reportopening 105option descriptions 105
Workload Clean Up dialog box 70Workload Definition Summary window 54, 56Workload menu See menusworkload reports, viewing 101Workload Statements Report
opening 85workloads
definingDBQL statements, from 47
Teradata Index Wizard User Guide 161

Index
162 Teradata Index Wizard User Guide