
Tectonite Topmount Installation & Care Instructions · Franke Consumer Products, Inc., at its...
8
INST TEC2011 1. PHILLIPS SCREWDRIVER 3. SILICONE SEALANT 2. HOLE SAW 4. ADJUSTABLE WRENCH 6. DRILL 7. JIGSAW 5. PIPE WRENCH CONGRATULATIONS! You have purchased a quality product designed for long lasting beauty and easy installation. The following instructions will take you step-by-step through the installation process and care of your product. We recommend reading the entire instruction booklet before beginning. TOOLS AND MATERIALS 1. Long phillips head screwdriver 2. 2" Hole saw if you are installing a new countertop 3. Tube of silicone sealant for mounting the faucet, strainers and sink 4. Adjustable wrench 5. Pipe wrench if steel pipe is used 6. Drill 7. Jigsaw SINKS Franke Consumer Products, Inc. warrants its sinks to be free of manufacturing defects in material and workmanship under normal residential usage for the lifetime of the sink. AUTHORIZED RESELLERS Warranties are not applicable to products sold by unauthorized resellers. The consumer accepts responsibility to research the integrity and reputation of the reseller to ensure they are authorized to sell and provide appropriate pre purchase and post purchase service. Internet resellers should be particularly scrutinized as they are very difficult to evaluate and often provide very limited or no customer service. GENERAL This warranty applies only to the original owner, providing the product has been installed in accordance with our installation instructions, used as recommended and in a normal residential application. In the event of a warranty claim, the owner will be required to provide proof of purchase, a sales receipt. This warranty covers all components which make the product operational. Franke Consumer Products, Inc., at its option, may repair or replace the product or components necessary to restore the product to good working condition. Franke reserves the right to inspect the installation prior to the actual replacement of the product or component part. This warranty does not cover misuse or abuse, accidental damages, scuffs or scratches, improper installation, abnormal usage, negligence or damage caused by improper maintenance or cleaning. Normal wear of parts is excluded from the warranty. Damage caused by impurities or acts beyond our control are not covered. Any product or part which has been repaired or altered in any manner outside of Franke's factory, unless previously authorized in writing by Franke, will void warranty. Any replacement excludes transportation and any labor re-installation costs. This warranty does not allow recovery of incidental or consequential damages such as loss of use, delay, property damage or other consequential damage, and Franke accepts no liability for such damages. The Franke warranty is limited to the above conditions and to the warranty period specified herein and is exclusive. Franke DISCLAIMS all other warranties, expressed or implied, including IMPLIED WARRANTIES OF MERCHANTABILITY AND/OR FITNESS FOR AS PARTICULAR PURPOSE. This warranty gives you specific legal rights that may vary from state to state. WARRANTY: Limited Lifetime Warranty For additional products and accessories, please visit our website or call our customer service at 1.800.637.6485 www.frankeusa.com Tectonite Topmount Installation & Care Instructions BUYER PROTECTION LIMITED WARRANTY Need New UPC Code
Transcript of Tectonite Topmount Installation & Care Instructions · Franke Consumer Products, Inc., at its...

INST TEC2011
1. PHILLIPS SCREWDRIVER
3. SILICONE SEALANT
2. HOLE SAW
4. ADJUSTABLE WRENCH
6. DRILL
7. JIGSAW
5. PIPE WRENCH
CONGRATULATIONS!
You have purchased a quality product designed forlong lasting beauty and easy installation. The followinginstructions will take you step-by-step through theinstallation process and care of your product. We recommend reading the entire instruction booklet before beginning.
TOOLS AND MATERIALS
1. Long phillips head screwdriver2. 2" Hole saw if you are installing a new countertop3. Tube of silicone sealant for mounting the faucet,
strainers and sink4. Adjustable wrench5. Pipe wrench if steel pipe is used6. Drill7. Jigsaw
SINKSFranke Consumer Products, Inc. warrants its sinks to be free ofmanufacturing defects in material and workmanship under normalresidential usage for the lifetime of the sink.
AUTHORIZED RESELLERSWarranties are not applicable to products sold by unauthorized resellers.The consumer accepts responsibility to research the integrity andreputation of the reseller to ensure they are authorized to sell andprovide appropriate pre purchase and post purchase service. Internetresellers should be particularly scrutinized as they are very difficult toevaluate and often provide very limited or no customer service.
GENERALThis warranty applies only to the original owner, providing the product has been installed in accordance with our installation instructions, usedas recommended and in a normal residential application. In the event ofa warranty claim, the owner will be required to provide proof of purchase, a sales receipt.
This warranty covers all components which make the product operational.Franke Consumer Products, Inc., at its option, may repair or replace theproduct or components necessary to restore the product to good workingcondition. Franke reserves the right to inspect the installation prior to theactual replacement of the product or component part.
This warranty does not cover misuse or abuse, accidental damages,scuffs or scratches, improper installation, abnormal usage, negligence ordamage caused by improper maintenance or cleaning. Normal wear ofparts is excluded from the warranty. Damage caused by impurities or actsbeyond our control are not covered. Any product or part which has beenrepaired or altered in any manner outside of Franke's factory, unlesspreviously authorized in writing by Franke, will void warranty. Anyreplacement excludes transportation and any labor re-installation costs.This warranty does not allow recovery of incidental or consequentialdamages such as loss of use, delay, property damage or otherconsequential damage, and Franke accepts no liability for such damages.
The Franke warranty is limited to the above conditions and to the warrantyperiod specified herein and is exclusive. Franke DISCLAIMS all otherwarranties, expressed or implied, including IMPLIED WARRANTIES OFMERCHANTABILITY AND/OR FITNESS FOR AS PARTICULAR PURPOSE. Thiswarranty gives you specific legal rights that may vary from state to state.
WARRANTY:Limited Lifetime Warranty
For additional products and accessories, please visit our website or callour customer service at 1.800.637.6485
www.frankeusa.com
Tectonite Topmount Installation & Care Instructions
BUYER PROTECTION LIMITED WARRANTY
Need New UPC Code

LENGTH
WID
TH
USING A 2" HOLESAW, DRILL A HOLEON THE INSIDE OFTHE LINE THAT WASTRACED USING THECUT-OUT TEMPLATE.
COUNTERTOP
COUNTERTOP
USING A JIGSAW, CUT ALONG OUTLINETRACED ON COUNTERTOP.
4.
5.
3.
2.1.
Step 2
PREPARING AN EXISTING COUNTERTOP 1. Make sure existing countertop cutout opening is the
proper size. Set the new sink into opening. The sink rimshould rest evenly on the countertop. (Slight adjustments can be made using a file or a saber saw)
2. Use caution not to chip or crack the counter top when filing or sawing.
3. After final fitting, remove the new sink from cut-out.
4. For new countertop instructions see the following instructions.
PREPARING A NEW COUNTERTOPUSING THE SINK AS A TEMPLATE1. Carefully place the sink upside down on
the countertop at the desired position. Trace the sink outline on the countertop.(Do not cut along this line)
2. Draw a line 3/8" inside the sink outline. Measure the cut-out line you just drew and compare to all sink dimensions.The cut-out line should be approximately3/4" smaller than the overall sink dimensions.
3. Double check both measurements.
4. Drill a pilot hole inside the cutting line.
5. Using a jigsaw, cut along the inside line to cut the opening in the countertop.
SUPPLY VALVESWASTE TRAP
SUPPLYLINES
Step 1
REMOVING EXISTING SINK1. Leave the faucet and drain outlet in place.
2. Shut off water supply valves. (Usually under sink)
3. Relieve pressure by opening hot and cold faucet valves.Let water run until it stops flowing.
4. Disconnect the supply lines from the water supply valves.
5. Disconnect the drain fitting from the waste trap.
6. Remove frame or rim fasteners around underside of old sink.
7. Lift sink out with faucet and drain fitting still in place.
CUT ALONG DOTTED LINE OF TEMPLATE PATTERN FOUND
ON SINK PACKAGING.
1.
COUNTERTOP CUT-OUT PATTERN
COUNTERTOPTRACE COMPLETELY AROUNDEDGE OF CUT-OUT TEMPLATE
USING A 2" HOLESAW, DRILL A HOLEON THE INSIDE OFTHE LINE THAT WASTRACED USING THECUT-OUT TEMPLATE.
COUNTERTOP
3. 4.
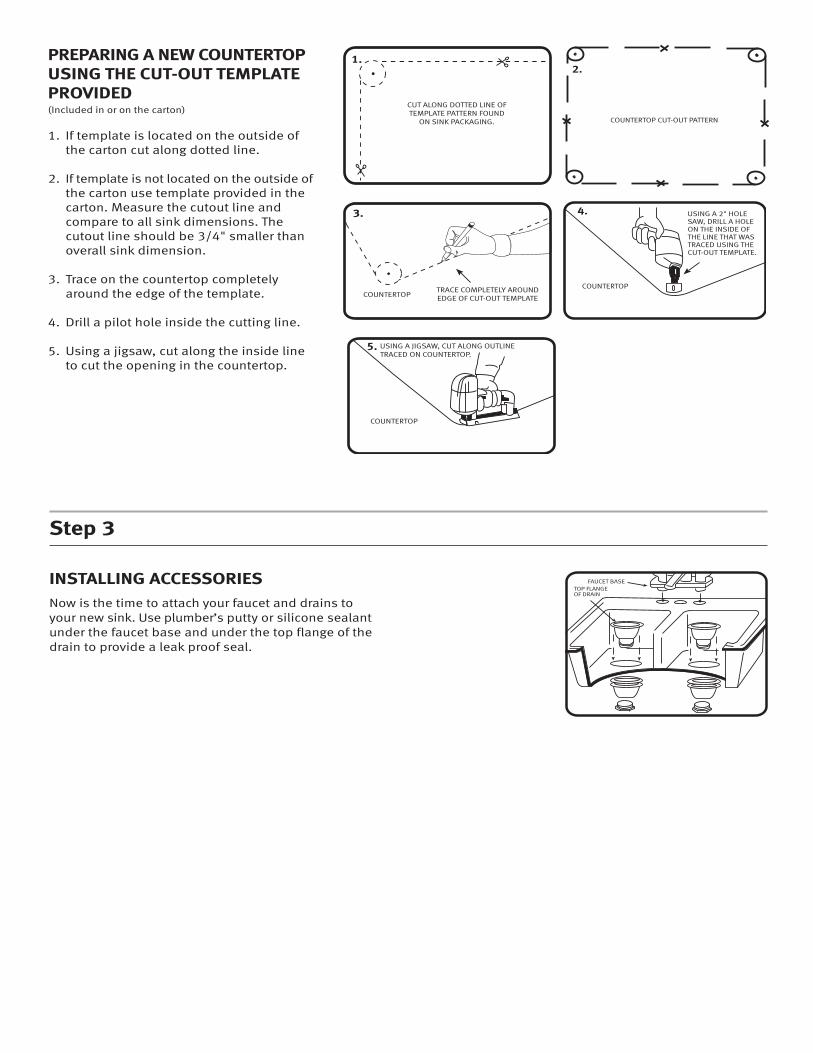
PREPARING A NEW COUNTERTOPUSING THE CUT-OUT TEMPLATEPROVIDED(Included in or on the carton)
1. If template is located on the outside of the carton cut along dotted line.
2. If template is not located on the outside ofthe carton use template provided in the carton. Measure the cutout line and compare to all sink dimensions. The cutout line should be 3/4" smaller than overall sink dimension.
3. Trace on the countertop completely around the edge of the template.
4. Drill a pilot hole inside the cutting line.
5. Using a jigsaw, cut along the inside line to cut the opening in the countertop.
2.
Step 3
INSTALLING ACCESSORIESNow is the time to attach your faucet and drains toyour new sink. Use plumber’s putty or silicone sealantunder the faucet base and under the top flange of thedrain to provide a leak proof seal.
FAUCET BASETOP FLANGE OF DRAIN
COUNTERTOP
USING A JIGSAW, CUT ALONG OUTLINETRACED ON COUNTERTOP.
5.

SLOWLY TIGHTENTHE CLIP
WITH ASCREW DRIVER
SINK
SINK
APPLY A BEAD OFSILICONE SEALANTAROUND THE RIM
COUNTERTOP
4.
1.
3.
1. With sink in the upside down position, placea continuous and generous bead of silicone sealant around the entire perimeter of the rim. This serves as a watertight seal.
2. Lift sink, turn face up, and lower into the countertop cutout opening.
3. Line up front rim with the front edge of the counter.
4. The clip is adjustable to countertopthickness by flipping the clip over to provide a tight seal.
5. Underneath the countertop begin tightening clips with a screwdriver in an even fashion, alternating sides while tightening, until the entire rim is sealed.
6. Do not over tighten. It is only necessary to draw the rim down snugly to the countertop.
7. Wipe excess sealant from perimeter with a wet cloth.
5.
COUNTERTOPCOUNTERTOP
Step 5
FINISHING1. Re-connect and tighten hot and cold faucet supply
lines, strainer, drain, and trap assembly. NOTE: Depending on the location of sink drain holes it may be necessary to adjust the drain pipefittings under the sink to accommodate the newsink installation.
2. Turn on water supply, check all connections for leaks. If leak appears, tighten joint slightly. Do notover tighten.
3. With stopper in place fill sink and check for leaks under sink and around drain flange.
4. Remove stopper and let water drain while checkingdrain connections.
Step 4
INSERTING SINK AND TIGHTENING MOUNTING CLIPS
CARE INSTRUCTIONSTo insure long-lasting beauty the best preventativemaintenance is to ensure that the sink is clean, dryand exposed to room atmosphere when not in use.Rinse and towel dry to keep it relatively free of waterspots, especially if you have hard water.
To clean your sink, use the mildest procedure thatwill do the job, generally liquid detergent and water.Rinse and dry.
STAINS. To avoid hard water spots wipe sink dry withclean soft towel after use.
CAUTION. Steel wool pads leave tiny particles thatmay cause rust spots. Rubber mats are acceptable ifremoved after each use.
SINK
CLIPCLIP
CLIP CLIP
CLI
P
CLIP
CLIP CLIP
CLIP CLIP
CLI
P
CLIP
2.

1. Con el fregadero boca abajo, coloque unalínea continua y abundante del sellador de silicona a lo largo de todo el perímetro del borde. Esto logrará un sello impermeable.
2.Levante el fregadero, póngalo boca arriba y déjelo deslizar dentro de la abertura recortadaen la cubierta.
3.Alinee el reborde frontal con el borde frontalde la cubierta.
4.La grapa se puede ajustar al grueso de la cubierta del mostrador dándole vuelta a la grapa para lograr un sello hermético.
5. Comience a atornillar las grapas debajo de lacubierta del mostrador en forma uniforme con un destornillador, alternando de lado mientras se aprietan, hasta que se selle todo el borde.
6.No apriete demasiado. Sólo es necesario queel reborde se a comode bien sobre la cubierta.
7.Usando un trapo húmedo limpie el sobrante de sellador por todo el perímetro.
Paso 5
PARA TERMINAR1.Vuelva a conectar y apretar las líneas de suministro
de agua caliente y fría al grifo, el cedazo, drenaje y el ensamble de la trampa de desechos. NOTA: Según la ubicación de los orificios de drenaje del fregadero podría ser necesario ajustarlos accesorios de la tubería del drenaje debajo delfregadero para ajustarse a la instalación del fregadero nuevo.
2.Abra el suministro de agua y verifique que no haya fugas en ninguna de las conexiones. Si apareciera una fuga, apriete un poco más la conexión. Pero no apriete demasiado.
3. Con el tapón en su sitio, llene el fregadero y verifique que no haya fugas debajo del fregaderoy alrededor del reborde del drenaje.
4.Quite el tapón y deje desaguar, siempre verificandoque no haya fugas en las conexiones del drenaje.
Paso 4
CÓMO INSERTAR EL FREGADERO Y APRETAR LAS GRAPS DE INSTALACIÓN
INSTRUCCIONES DE CUIDADOEl mejor mantenimiento preventivo para asegurar unabelleza duradera es conservar el fregadero limpio yseco, y expuesto a temperatura de ambiente cuando nose usa. Enjuague y limpie con una toalla para conservarlolibre de manchas de agua, particularmente si tieneagua dura.
Use el procedimiento más suave posible para limpiar su fregadero, usualmente un detergente líquido y agua.Enjuague y seque.
MANCHAS.Para evitar las manchas de agua dura seque elfregadero con una toalla suave y limpia luego de utilizarlo.
PRECAUCIÓN. Las almohadillas de lana de acero puedenocasionar manchas de oxidación. Se puede utilizartapetes de hule, siempre y cuando los quite después deusarlos cada vez.
APRIETE LA GRAPALENTAMENTE CON UN
DESTORNILLADOR
FREGADERO
FREGADERO
APLIQUE UNA TIRA CONTINUA DEL SELLADOR DE SILICONAA TODO EL PERÍMETRO DEL BORDE
CUBIERTA
4.
1.
3.
5.
CUBIERTA CUBIERTA
FREGADERO
GRAPA GRAPA
GRAPAGRAPA
GR
AP
A
GR
AP
A
GRAPAGRAPA
GRAPAGRAPA
GR
AP
A
GR
AP
A
2.

BASE DEL GRIFOREBORDE SUPERIORDEL DRENAJE
CORTE A LO LARGO DE LA LÍNEAPUNTEADA DEL PATRÓN DE LAPLANTILLA INCLUIDA CON EL EMPAQUE DEL FREGADERO.
1.
PATRÓN DE RECORTE DE LA CUBIERTA
CUBIERTARASTRO COMPLETAMENTE ALREDEDOR DE BORDE DE
PLANTILLA DE RECORTE
CON LA SIERRA CILÍNDRICADE 2", TALADRE UN ORIFICIO
EN LA PARTE INTERNA DE LA LÍNEA QUE TRAZÓ USANDO LA PLANTILLA DE
RECORTE.
CUBIERTA
CUBIERTA
CON LA SIERRA DE VAIVÉN, RECORRA A TODOLO LARGO EL BOSQUEJO
TRAZADO EN LA CUBIERTA.
3.4.
5.
CÓMO PREPARAR UNA CUBIERTA NUEVA CÓMO USARLA PLANTILLA DE RECORTE PROVISTA(Viene impresa en el cartón de empaque o se inclluyeen el interior del mismo)
1.Si la plantilla viene impresa en el cartón,recórtela siguiendo la línea punteada.
2.Si la plantilla no viene colocada en el ladoexterior del empaque, utilice la plantilla que se incluye dentro del empaque. Midala línea de corte y compare con todas lasdimensiones del fregadero. La línea de corte deberá ser 1/2" más pequeña que ladimensión total del fregadero.
3.Trace todo el contorno de la plantilla de la cubierta.
4.Taladre un orificio piloto por la parte interna de la línea de recorte.
5.Con la sierra de vaivén recorra a todo lo largo la línea interna para recortar la abertura de la cubierta.
2.
Paso 3
CÓMO INSTALAR LOS ACCESORIOSAhora es el momento de colocar sus nuevos grifos ydrenajes en su nuevo fregadero. Utilice masilla deplomero o sellador de silicona debajo de la base delgrifo y debajo del reborde superior del drenaje paralograr un sello a prueba de fugas.

CUBIERTA
4.CON LA SIERRA CILÍNDRICADE 2", TALADRE UN ORIFICIO
EN LA PARTE INTERNADE LA LÍNEA QUETRAZÓ USANDO LAPLANTILLA DERECORTE.
CUBIERTA
CON LA SIERRA DE VAIVÉN, RECORRA A TODO LOLARGO EL BOSQUEJO
TRAZADO EN LACUBIERTA.
5.
VÁLVULAS DE SUMINISTRO
TRAMPA DE DESECHOS
LÍNEAS DE SUMINISTRO
LARGO
ANCHO
3.
2. 1.
Paso 2
CÓMO PREPARAR UNA CUBIERTA EXISTENTE1.Cerciórese de que la abertura recortada en la cubierta
existente es del tamaño correcto. Deslice el fregadero nuevopor la abertura.El borde del fregadero deberá apoyarse uniformemente sobre la cubierta. (Se pueden hacer pequeños ajustes con una lima o una sierra de vaivén)
2.Tenga cuidado de no astillar o romper la cubierta si usa la lima o corta con la sierra.
3.Después del ajuste final, extraiga el nuevo fregadero de la abertura recortada.
4.Para las instrucciones de la cubierta nueva consulte las instrucciones siguientes.
CÓMO PREPARAR UNA CUBIERTA NUEVAUSE EL FREGADERO COMO PLANTILLA1.Cuidadosamente coloque elfregadero
boca abajo sobre la cubierta en la ubicación deseada. Trace el contorno delfregadero en la cubierta. (No corte a lo largo de este trazo)
2.Trace una línea a 3/8" (9.5 mm) dentro del contorno de la plantilla del fregadero. Mida la línea de corte que acaba de trazary compare con todas las dimensiones del fregadero. La línea de corte debe ser cerca de 3/4" (19 mm) más pequeña que la dimensión total del fregadero.
3.Compruebe ambas mediciones dos veces.
4.Taladre un orificio piloto por la parte interna de la línea de recorte.
5.Con la sierra de vaivén recorra a todo lo largo la línea interna para recortar la abertura de la cubierta.
Paso 1
CÓMO QUITAR EL FREGADERO EXISTENTE1.Deje en su sitio el grifo y la salida del drenaje.
2.Cierre las válvulas de corte del suministro de agua.(Normalmente se encuentran debajo de fregadero)
3.Libere la presión dejando abiertas las válvulas del agua fría y caliente. Deje correr el agua hasta que acabe de fluir.
4.Desconecte las líneas de alimentación de las válvulas de suministro de agua.
5.Desconecte el accesorio del drenaje de la trampa de desechos.
6.Quite el marco o los sujetadores del borde que se encuentraalrededor de la parte inferior del fregadero antiguo.
7.Extraiga el fregadero con todo y el grifo y el accesorio de drenaje.

INST TEC2011
1. DESTORNILLADOR PHILLIPS
3. SELLADOR DE SILICONA
2. ORIFICIO
4. LLAVE INGLESA AJUSTABLE
6. TALADRO
7. SIERRA DE VAIVÉN
5. LLAVE DE TUERCAS PARA TUBERÍA
¡FELICITACIONES!
Ha comprado un producto de calidad y diseñadopara brindar belleza duradera y muy fácil de instalar.Las instrucciones que aparecen a continuación levan a guiar paso a paso por el proceso de instalacióny cuidado de su producto. Le sugerimos que lea todoel manual de instrucciones antes de seguir adelante.
HERRAMIENTASY MATERIALES
1.Destornillador largo de cabeza Phillips2.Sierra cilíndrica de 2 pulg Si es que va a instalar
una cubierta nueva3.Tubo de sellador de silicona para instalar el grifo,
coladeras y fregadero4.Llave inglesa ajustable5.Llave de tuercas para tubería si usa tubería de acero6.Taladro7.Sierra de vaivén8. Guantes
SINKSFranke Consumer Products, Inc. warrants its sinks to be free ofmanufacturing defects in material and workmanship under normalresidential usage for the lifetime of the sink.
AUTHORIZED RESELLERSWarranties are not applicable to products sold by unauthorized resellers.The consumer accepts responsibility to research the integrity andreputation of the reseller to ensure they are authorized to sell andprovide appropriate pre purchase and post purchase service. Internetresellers should be particularly scrutinized as they are very difficult toevaluate and often provide very limited or no customer service.
GENERALThis warranty applies only to the original owner, providing the product has been installed in accordance with our installation instructions, usedas recommended and in a normal residential application. In the event ofa warranty claim, the owner will be required to provide proof of purchase, a sales receipt.
This warranty covers all components which make the product operational.Franke Consumer Products, Inc., at its option, may repair or replace theproduct or components necessary to restore the product to good workingcondition. Franke reserves the right to inspect the installation prior to theactual replacement of the product or component part.
This warranty does not cover misuse or abuse, accidental damages,scuffs or scratches, improper installation, abnormal usage, negligence ordamage caused by improper maintenance or cleaning. Normal wear ofparts is excluded from the warranty. Damage caused by impurities or actsbeyond our control are not covered. Any product or part which has beenrepaired or altered in any manner outside of Franke's factory, unlesspreviously authorized in writing by Franke, will void warranty. Anyreplacement excludes transportation and any labor re-installation costs.This warranty does not allow recovery of incidental or consequentialdamages such as loss of use, delay, property damage or otherconsequential damage, and Franke accepts no liability for such damages.
The Franke warranty is limited to the above conditions and to the warrantyperiod specified herein and is exclusive. Franke DISCLAIMS all otherwarranties, expressed or implied, including IMPLIED WARRANTIES OFMERCHANTABILITY AND/OR FITNESS FOR AS PARTICULAR PURPOSE. Thiswarranty gives you specific legal rights that may vary from state to state.
WARRANTY:Limited Lifetime Warranty
For additional products and accessories, please visit our website or callour customer service at1.800.637.6485
www.frankeusa.com
Instrucciones de instalación y cuidado de Tectonite Topmount
GARANTÍA LIMITADA DE PROTECCIÓN AL COMPRADOR
Need New UPC Code