Techniques to Expand the Capability of Your Camera
35
Techniques to Expand the Capability of Your Camera • High Dynamic Range - Mar 2 – Combine images with range of exposures to increase dynamic range • Panorama - Mar 16 – Stitch together adjacent scenes to expand the field of view • Focus Stacking - Apr 6 – Combine images taken at diferent focal distances to increase depth of field Dallas Camera Club Frank Richards 3-16-2021
Transcript of Techniques to Expand the Capability of Your Camera

Techniques to Expand the Capability of Your Camera
• High Dynamic Range - Mar 2
– Combine images with range of exposures to increase dynamic range
• Panorama - Mar 16
– Stitch together adjacent scenes to expand the field of view
• Focus Stacking - Apr 6
– Combine images taken at diferent focal distances to increase depth of field
Dallas Camera ClubFrank Richards 3-16-2021

Creating a Panoramic Image

What is a Panorama
• Panorama – A image containing a wide view. Comes from Greek pan + horama which translates to all + view
• Panoramic photos are often created by taking a series of photographs and merging them together using special software
• They tell a more complex story and draw the viewer closer to the feeling of what it was like to be there.
• Panoramas are typically horizontal, but can be vertical


A Little History
• In the film days, making a panowas tedious and often employed– Spliced negatives– Special cameras were made
that moved film as camera or lens pans
• Digital made to much easier– Extremely high quality, high resolution images can be made without
any special gear– Cameras with built in pano provide capability for a quick grab– Most cameras and lenses that photographers already have can be used– Special software readily available to stitch multiple images together

So What?
• I am at Grand Tetons NP wanting to take photo of the mountain range that more than fills the frame
• My cropped, wide angle shot includes bold foreground, but the mountains recede into the distance
• I really wanted mountains to be dominant with more detail to provide a sense of the vast landscape
• I need a longer lens to get mountain detail and suppress foreground, but that only covers a small part of the mountain range
• How about taking several pictures and combining them• That will work, so I get out my tripod, zoom in on the
mountains and take a sequence of images panning to cover the entire mountain range
• These images are then combined to provide the vast landscape I was seeing and wanted to capture

Conventional Digital Panorama Photo
• Photographed from fixed position on a tripod
• Pan to take several exposures to cover scene
• These images are merged with software to form panoramic photo
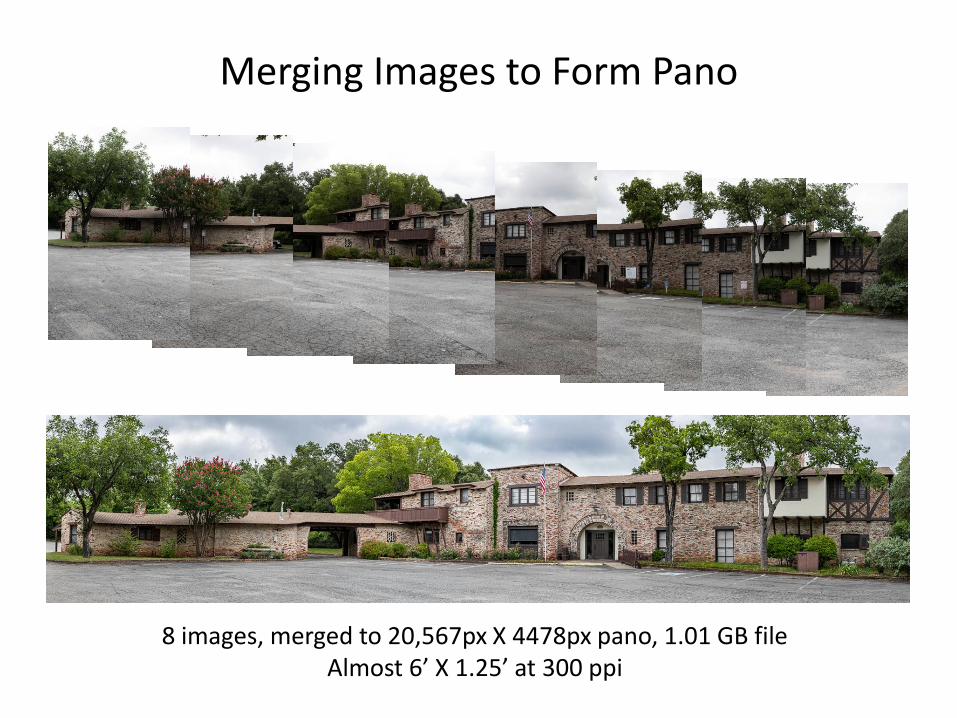
Merging Images to Form Pano
8 images, merged to 20,567px X 4478px pano, 1.01 GB fileAlmost 6’ X 1.25’ at 300 ppi

Digging a Little Deeper
• Panorama image is generally defined as having an aspect ratio greater than 2:1
– Around 3:1 aspect ratio is thought of as classical standard
– Greater than 3:1 is certainly a panoramic image, but it is a little cumbersome to view and display and hard to sell. Doesn’t present well in digital format.
– Can buy standard sheet paper and frames for 2:1 and 3:1 images
• Panoramic images are often
– Trying to get detail of distant subjects
– Using normal to short telephoto lenses in 40 to 100mm* range
– Providing normal to slightly compressed perspective
– Balancing foreground with distant objects
– Providing images with high resolution that can be printed in large sizes with lots of detail
* Will use 35mm equivalent when talking about focal length
Some Thoughts on Composition
• Tight framing allows selectivity that panos cannot. Pano must have desired aesthetics in its whole and inspire the viewer.
• Each individual shot should contribute to whole. Several blah frames suggest weak final pano
• Eye tends to go to center first unless other object really stands out. Then typically scan side to side. Not much vertical eye movement
• Key elements must not be too small in final image. Using telephoto lens to compress perspective can help
• Some classical composition rules can work well – rule of thirds, leading lines, diagonals, detail, texture, repetition…
• Place most important features in the middle third of image
• Try to have interesting sky with clouds. Reduce amount of dull, gray sky
• Extend the foreground into the middle of the frame to create interest.
• Frame the shot with elements at each end to hold eye within the image. Try not to push vertical elements into the outer thirds
• Watch out for distractions and objects that run top to bottom dividing the frame


Camera Setup - Big Picture
• Every frame needs to be the same when merge
– With fixed exposure, in-camera processing, focal distance, DOF and camera location
– This equates to fixed f-stop, shutter speed, ISO, in-camera processing, focal distance and camera/lens nodal point location
• Shot with camera vertical
• Overlap images
• Shot RAW

Camera Setup – Digging Deeper
• Camera leveled on tripod and rotated around fixed point.– All images shot from same point with same perspective– Camera setup in portrait orientation to provide vertical working space– Overlap images by 30 to 50%– For images to merge seamlessly, pixels must align frame to frame
• Camera setting that impact image perspective and exposure kept constant– Focal length (zoom)– Point of focus (turn off autofocus)– Aperture (DOF)– ISO (noise and rendering)– Can set WB or use AWB (adjust WB in post if needed)– So what is left
• Shutter speed used to determine exposure • Oh yes, be careful when it windy
– Manual mode to ensure key parameters do not change frame to frame– Shoot RAW for highest quality and greatest flexibility in post processing– Do not use polarizing filter

Equipment• Can shoot panos with about any camera
• Lens focal length in 40 to 100mm range generally works well. Better to go longer than shorter
• Do not use filters – especially polarizer
• Sturdy tripod and panning head with level base
• Bubble level on base, in-camera or bubble level on-camera to align with horizon
• Timer, cable or remote release
• Need to be able to mount camera vertically and rotate about lens nodal point. L-bracket mount or nodal plate (costly pro add-on)

Conventional PanoramaMaintain spatial relationships as pan from one position

Camera Is Moved Between Photographs
Parallax - the relative position of an object appears to change when viewed from different camera positions. Parallax worsens as objects get closer to camera

Making the Images• Mount camera vertically• Set up tripod and level the base• Turn off autofocus. Focus on subject. Stop down so near subjects and
foreground are within DOF. Focus at hyperfocal point or infinity for distant subjects
• If hand holding – use viewfinder, hold camera level, plant feet and rotate your body, follow horizon
• Use manual mode• Set exposure (next slide)• Test photo(s) to verify focus and exposure
Making the Images
• Best not to shot in strong sunlight
• Watch out for zoom or focus creep
• Long exposures – Watch for wind and moving objects such as people and clouds
• Get in habit of panning the same direction.
• Overlap each shot by 30% (longer lens) to 50% (shorter lens) of frame
• Insert dark frame (hand or fingers) so you can easily determine where sequence starts and stops in post processing. Very useful if shooting several panosequences and test images of same subject

Setting Exposure
• Exposure setting can be tricky because illumination can vary significantly over scene
• Meter brightest area and check histogram to ensure highlights are not blown out
• Don’t worry about point light sources
• Set f-stop to provide desired DOF
• Take several test shots to confirm exposure and DOF
• Make sure main subject is well within exposure range
• In extreme lighting, can use AEB/Pano stack – LR supports

Processing Software
• Merging involves scaling, rotating, aligning and stitching the individual images in software
• Lightroom does a good job and is easy to use
• Photoshop keeps layers so can blur mask edges to improve stitching. You can also solve problems and retouch individual images after merged.
• PTGui – been around for a long time. Available via license
• Want to see more options - https://fixthephoto.com/best-photo-stitching-software.html

Processing LR and PS
• Select images for pano
• Make sure color temperature of all images are the same
• Don’t make any edits to the individual images prior to merging
• Had good luck with auto projection mode in PS
• Merge - LR pano file will be dng and PS will be psd. Both provide great post processing latitude
• Post processing – make global and local adjustments as required
• Fill in irregular boundary – crop or use Boundary Warp slider in LR
• Panos files can be large – 3:1 pano might be 15-30K px long and the file size exceeding a GB.

Processing Example
• To create pano starting in Lightroom, select images and right click
– Photo Merge > Panorama
– Photo Merge > HDR Panorama
– Edit In >Merge to Panorama in Photoshop…
Richland > Independent Studies > Deep Ellum 9

Sharing Panoramas
• Digital display is problematic – especially if aspect ratio is approaching 3:1 or greater
• Most photo inkjet printers can make panos
– Roll paper may be used with most printers to make panoramas of almost unlimited length
– Cut sheet paper is also available in pano sizes
– Both Canon (length 26.6” max) and Epson inkjet printers can utilize extra long sheets of paper - perfect for printing your own panoramic images

Printer Paper for Panos
• Red River has the best selection sheet paper in pano sizes that I am aware of
– 8.5”X25” (Gloss 1, Satin/Luster 3, Matte 1, Fine Art 2, Metallic 1)
– 13”X38” (Gloss 1, Satin/Luster 5, Matte 2, Fine Art 6, Metallic 2)
• Hahnemühle has 2 sheet papers in 8.5”X24” pano format
• If you have a favorite paper, take a look and see if it is available in pano sheet stock
• Frame Destination has several standard frames in sizes for panos with aspect ratios of 2:1 and 3:1

And There Is More
• We have focused on linear panos• 2D matrix of images may be used to make very
large, high res images• 360 deg pano includes the whole horizon• Interactive 360 deg virtual tour where user
controls view – think Google Maps street view• Special motorized heads and software are
available to help make huge panoramic images that combine 100s or 1000s of photos into huge mosaic (https://www.earthcam.net/projects/inauguration/gigapixel)
• Spherical – like a planetarium shows the nighttime sky

Attachments
• Attachment A - Parallax and Determining Nodal Point
• Attachment B - What Happens If You Have to Move Camera
Attachment AParallax and Determining Nodal Point
• Parallax, or the shifting of objects as the camera changes position, is the enemy of the panorama photographer. If you are photographing a distant landscape, this effect is minimized by the great distance to the subject; however, if there are foreground objects close to the camera, parallax created as the camera pans can cause headaches for the stitching software and leaves your image with unwanted issues.
• Eliminate parallax if pan around the lens nodal point
• Finding the nodal point of a lens is relatively easy. Stick two straight objects such as poles into the ground around 4-6 feet apart. Set up your camera on the nodal head or rail so that when you look through the lens, the poles align perfectly. As you pan the camera round the poles will separate with the effects of distortion. By adjusting the cameras position on the nodal rail, eventually you will be able to keep both poles aligned while panning.

Attachment BWhat Happens If You Have to Move Camera
• When photographing long linear subject (block of houses, motel, street scene…), you may not have room to pan.
• Move the camera holding as much constant as possible.
• Would like to capture each photo as orthographic projection
• But, each photo has its own perspective (vanishing points) causing distortion of scale front to back
• Parallax causes relationship of objects change as you move

Camera Is Moved Between Photographs
Parallax - the position or direction of an object appears to change when viewed from different positions, e.g. through the viewfinder and the lens of a camera.


What’s Important When Camera Is Moved
• Constrain camera setting as discussed previously
• Multi-point perspective distortion and parallax are problematic
– Subject with depth is a problem
– Planar subject is okay
• Some things help simulate an orthographic projection
– When moving camera, maintain constant distance to subject. Level camera for each shot. Shoot perpendicular to plane of subject
– Shoot with longest lens that covers desired field of view
– Shoot many closely spaced photos
– Center walls and other features in the frame when depth is an issue
– Don’t shoot into sides – don’t see front and both sides at the same time
– Consider placement of objects in front and behind subject plane
• Parallax can be used to remove objects in foreground and background
What’s Important When Camera Is Moved
• Pay attention to shooting conditions
– Try to photograph when clutter is minimal – avoid residents coming and going, cars on street, people mowing yards, trash pickup day…
– Choose overcast or clear day. Broken clouds move, change exposure and cast shadows.
– Look for calm day if trees and shrubs are involved
• Post processing
– Most pano software does not handle changing camera location
– Manually stack image layers to make pano - scale, rotate, perspective correction, match exposure, feather to blend edges