Technique Tip: More on Breathing plus Posture and Hands
8
28 AMERICAN RECORDER SUMMER 2021 LEARN HTTPS://AMERICANRECORDER.ORG This article is the second in a series of articles covering basic technique tips for the recorder. PART 1: “Use of Air and Breath Control: The Respiratory System” / AR Spring 2021 In the first installment, we discussed use of air in everyday breathing, as well as in producing good musical tone. Then we used exercises that did not require a recorder, in order to develop solid breathing support and become aware of how the body feels when we use correct breathing techniques. In this article, we continue those breathing exercises to incorporate use of the recorder. Then we look at posture, and briefly at embouchure. Finally, we examine hand position and efficient use of your fingers when playing the recorder. WRITTEN BY LOBKE SPRENKELING Lobke Sprenkeling obtained her Bachelor’s and Master’s degrees as a recorder player and theatrical performer at the Royal Conservatory of The Hague and Utrecht Conservatory, Netherlands, She continued her studies at the Escola Superior de Música de Catalunya, Spain, with a national scholarship from the Dutch Prince Bernhard Culture Fund. In 2016 she earned her music Ph.D. cum laude at the Universidad Politècnica de València. She also studied multidisciplinary theater from a musical perspective (Carlos III University, Madrid, and the Yale University Summer Program); her specific interest in the relationship between musician and body has led to her performing in and creating multidisciplinary works. She taught recorder at the pre-conservatory program (ages 8-18) of Conservatorio Profesional of Valencia (2007-16), and has taught in Europe, the U.S. and Mexico. She currently teaches recorder at the Real Conservatorio Superior de Música de Madrid. Info: https://.lobke.world. Technique Tip: More on Breathing plus Posture and Hands Body and Hand Position Basics
Transcript of Technique Tip: More on Breathing plus Posture and Hands
28 AMERICAN RECORDER SUMMER 2021
LEARN
HTTPS://AMERICANRECORDER.ORG
This article is the second in a series of articles covering basic technique tips for the recorder.
PART 1: “Use of Air and Breath Control: The Respiratory System” / AR Spring 2021 In the first installment, we discussed use of air in everyday breathing, as well as in producing good musical tone. Then we used exercises that did not require a recorder, in order to develop solid breathing support and become aware of how the body feels when we use correct breathing techniques.
In this article, we continue those breathing exercises to incorporate use of the recorder. Then we look at posture, and briefly at embouchure.
Finally, we examine hand position and efficient use of your fingers when playing the recorder.
WRITTEN BY LOBKE SPRENKELINGLobke Sprenkeling obtained her
Bachelor’s and Master’s degrees as a recorder player and theatrical performer at the Royal Conservatory of The Hague and Utrecht Conservatory, Netherlands, She continued her studies at the Escola Superior de Música de Catalunya, Spain, with a national scholarship from the Dutch Prince Bernhard Culture Fund. In 2016 she earned her music Ph.D. cum laude at the Universidad Politècnica de València. She also studied multidisciplinary theater from a musical perspective (Carlos III University, Madrid, and the Yale University Summer Program); her specific interest in the relationship between musician and body has led to her performing in and creating multidisciplinary works. She taught recorder at the pre-conservatory program (ages 8-18) of Conservatorio Profesional of Valencia (2007-16), and has taught in Europe, the U.S. and Mexico. She currently teaches recorder at the Real Conservatorio Superior de Música de Madrid. Info: https://.lobke.world.
Technique Tip: More on Breathing plus Posture and HandsBody and Hand Position Basics

29AMERICAN RECORDER SUMMER 2021
LEARN
HTTPS://AMERICANRECORDER.ORG
Before we take up the recorder for breathing exercises, it would be helpful to review the
suggested activities in the previous issue (AR Spring 2021). We’ll do one more exercise that does not involve actually playing a recorder.
An exercise for opening up•Step 1: Exhale through the mouth,
producing a fffffff sound until you have reached the end of your breath (at this point, there is still at least 1 liter, or about 61 cubic inches, of air in your lungs). Immediately open your mouth in the form of “oh” or “ah”, whichever is better for you to use to fully open your windpipe.
The diaphragm will quickly return from its position of tension to a more relaxed position, pulling the lungs along so that the lungs automatically open and air flows in naturally—without you having to do anything. This is the neutral position of the diaphragm where there is no tension.
•Step 2: Now we will add another activity to Step 1 that will help us develop correct and useful breath support for the recorder. After all, we have to inhale a lot of air in a short amount of time in order to be able to play an entire musical phrase. Exhale with ffffffff, and open your mouth as before with “oh” or “ah” to let the diaphragm return to its neutral position.
This time, however, go further: help this natural breathing pro-cess along by breathing in a little more, thus lowering the diaphragm even more. This is called abdomi-nal breathing. In other words, we continue the downward direction of the expanding lungs by using the abdominal muscles.In the photos at right, I demonstrate
the approximate position of the dia-phragm with my hands in the differ-ent phases of this exercise.
1
2 3
▲1: Hands showing diaphragm position at full exhalation. The diaphragm is under full tension..
2: Diaphragm in neutral phase. After simply opening the airways.
3: Diaphragm after further inhalation. Abdominal breathing.
• Recorder: www.webaddress.com• Recorder: www.webaddress.com• Recorder: www.webaddress.com• Recorder: www.webaddress.com
LINKS Of INTEREST:
30 AMERICAN RECORDER SUMMER 2021 HTTPS://AMERICANRECORDER.ORG
ARS is pleased to offer Frances Blaker’s book containing her articles taken from 20 years of American Recorder, available on the ARS web site athttps://americanrecorder.org/openingmeasures
Technique Tip: More on Breathing, plus Posture and HandsLEARN
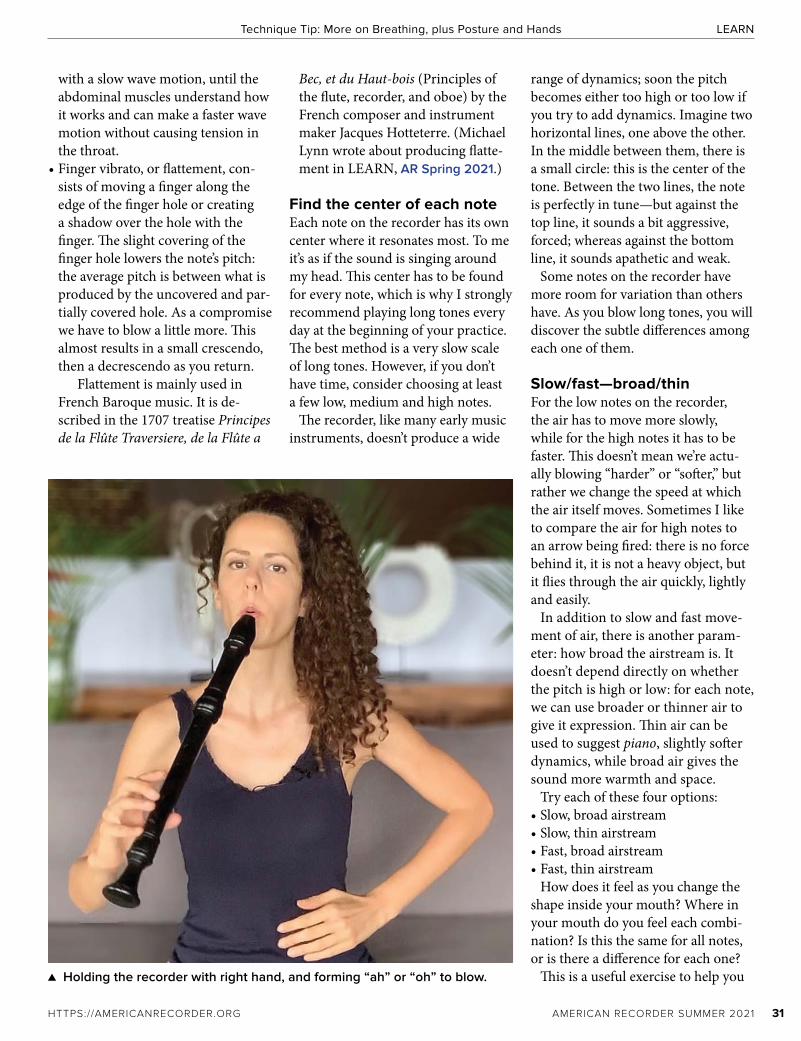
Now practice with a recorderWe hold the recorder with the right hand—and also balance it using the lower lip, the right thumb, and op-tionally the right hand little finger at the ridge between holes 6 and 7. In this exercise, the left hand is on the stomach or waist so that we can feel our breathing.
When the recorder is resting on the lower lip, we first exhale all of the air—not yet into the recorder, but above it. We then immediately open the mouth in the form of an “oh” or “ah.” Instead of blowing out as before, we now blow into the recorder (see photo on page 31). This allows us to perform the breathing exercises as before, but now to combine them with playing the recorder.
The next step is to play a long tone with both hands on the recorder, while continuing to focus on dia-phragmatic breathing and the feeling that it produces. The goal is that, when playing a musical piece on the recorder, we maintain this awareness of our breath support, so that the note is stable and centered without any breathing problems.
The basic tone on the recorder should be smooth, like a lake without any waves. Vibrato is an ornament in early music, and having a continuous vibrato would be like playing with a continuous trill. In addition, a con-tinuous vibrato can be uncontrolled, with no abdominal support and with some tension in the throat.
When we use vibrato, we do so in a very controlled way in two possible forms: air vibrato and finger vibrato.•Air vibrato consists of a wave
movement when blowing into the recorder: less, more, less, more. This can go from slow to fast and back again, but it must be very regular. Try it first on ffffff with-out the recorder, and feel and hear how it works: ffffFFFFffffFFFFffff. Then try it on the recorder, starting
31AMERICAN RECORDER SUMMER 2021HTTPS://AMERICANRECORDER.ORG
with a slow wave motion, until the abdominal muscles understand how it works and can make a faster wave motion without causing tension in the throat.
•Finger vibrato, or flattement, con-sists of moving a finger along the edge of the finger hole or creating a shadow over the hole with the finger. The slight covering of the finger hole lowers the note’s pitch: the average pitch is between what is produced by the uncovered and par-tially covered hole. As a compromise we have to blow a little more. This almost results in a small crescendo, then a decrescendo as you return.
Flattement is mainly used in French Baroque music. It is de-scribed in the 1707 treatise Principes de la Flûte Traversiere, de la Flûte a
Bec, et du Haut-bois (Principles of the flute, recorder, and oboe) by the French composer and instrument maker Jacques Hotteterre. (Michael Lynn wrote about producing flatte-ment in LEARN, AR Spring 2021.)
Find the center of each noteEach note on the recorder has its own center where it resonates most. To me it’s as if the sound is singing around my head. This center has to be found for every note, which is why I strongly recommend playing long tones every day at the beginning of your practice. The best method is a very slow scale of long tones. However, if you don’t have time, consider choosing at least a few low, medium and high notes.
The recorder, like many early music instruments, doesn’t produce a wide
range of dynamics; soon the pitch becomes either too high or too low if you try to add dynamics. Imagine two horizontal lines, one above the other. In the middle between them, there is a small circle: this is the center of the tone. Between the two lines, the note is perfectly in tune—but against the top line, it sounds a bit aggressive, forced; whereas against the bottom line, it sounds apathetic and weak.
Some notes on the recorder have more room for variation than others have. As you blow long tones, you will discover the subtle differences among each one of them.
Slow/fast—broad/thinFor the low notes on the recorder, the air has to move more slowly, while for the high notes it has to be faster. This doesn’t mean we’re actu-ally blowing “harder” or “softer,” but rather we change the speed at which the air itself moves. Sometimes I like to compare the air for high notes to an arrow being fired: there is no force behind it, it is not a heavy object, but it flies through the air quickly, lightly and easily.
In addition to slow and fast move-ment of air, there is another param-eter: how broad the airstream is. It doesn’t depend directly on whether the pitch is high or low: for each note, we can use broader or thinner air to give it expression. Thin air can be used to suggest piano, slightly softer dynamics, while broad air gives the sound more warmth and space.
Try each of these four options:•Slow, broad airstream•Slow, thin airstream•Fast, broad airstream•Fast, thin airstream
How does it feel as you change the shape inside your mouth? Where in your mouth do you feel each combi-nation? Is this the same for all notes, or is there a difference for each one?
This is a useful exercise to help you ▲ Holding the recorder with right hand, and forming “ah” or “oh” to blow.
Technique Tip: More on Breathing, plus Posture and Hands LEARN

Technique Tip: More on Breathing, plus Posture and Hands
32 AMERICAN RECORDER SUMMER 2021
LEARN
HTTPS://AMERICANRECORDER.ORG
begin to develop dynamics on the recorder, and to adapt the character of each note to what we want to express.
Playing the recorder has a lot in common with singing: a small amount of resistance, or the way the air fl ows through the airways, as well as how the oral cavity plays a role in resonance and sound (although when playing the recorder, the jaw must re-main in a neutral position). Th ere is a lot of subtlety—and, at the same time, an organic fl uidity in both instru-ments, which takes time and eff ort to perfect. Working properly on sound transforms our instrument from a school instrument into sublime beauty. It is not without reason that, from the Baroque era to the present day, the recorder has been called fl auto dolce (sweet fl ute in Italian).
General body alignmentNow that we’ve worked on breathing, let’s look at posture. Make sure your body is aligned to avoid unnecessary tension: head over heart, heart over pelvis. Th e shoulders are relaxed. Did you know that your head weighs about 11 pounds? Th is is why it is important to keep your head straight on top of your shoulders—otherwise the muscles in the neck and shoulders will have to work hard and tension will arise.
If we try to play with a bent neck, the forward weight of the head dis-rupts the alignment of the spine and leads to tension in the neck muscles. As the recorder drops, almost parallel to the body, the elbows move behind the body, which in turn leads to tension in the shoulders.
Playing with the head tilted back too much also causes problems, although
Did you know that your head weighs about 11 pounds?
this is less common. It creates tension in the neck as well, since the weight of the head is now towards the back, which isn’t particularly good for the cervical vertebrae.
Make sure that your knees are not locked but loose. Stand with your feet hip-width apart, with your body weight evenly distributed between both feet.
Holding the recorderHold the recorder at an angle of about 45 degrees to your body. Also make sure to keep the recorder more or less in front of the body and not to the side. A bit to the side is fi ne, but if you hold it too much to the side, it will be diffi cult to blow straight into the recorder, which hinders a relaxed and centered embouchure.
Stand (or sit) with the recorder at its 45-degree angle—with your shoulders relaxed, and your elbows hanging down but not pressed into your body. Th ere will be a little space between your elbows and your torso. Don’t lift the elbows, or there will be tension in your shoulders and arms.
Focus on the space within the circle that your arms make when playing the recorder. Notice how much space there actually is around you. Feel how much space there is at your back. Imagine all of the space above you. Even focus on the space under your feet, under the fl oor. Feel how the Earth supports you!
Being aware of all this space helps you form a better connection with your body while playing. It avoids un-necessary muscle tension and makes correct breathing technique easier.
When you are nervous—for exam-ple in a performance—it also helps you relax. Note: when we are nervous, it’s not unusual to raise the shoulders slightly. Th is is defi nitely something to check and to avoid.
Try the positions in the fi rst three photos on page 33. You will feel for
EmbouchureSince we have become more aware of breathing, and now are adding good posture to our practice routine, this could be the right moment to discuss the embouchure.
The jaw should be loose and in a neutral position—as if you were completely focused on a movie and your mouth was open a little. Make sure the jaw doesn’t move while playing!
Most of the tongue lies relaxed in the mouth like a large piece of meat. It is only the tip of the tongue that is active.
The embouchure itself is loose, with a slight U-shape (or “kissy mouth” shape), while the cheeks and the space between the nose and mouth are relaxed. This allows these spaces to serve as resonance chambers.
“Ah” / “oh”When you inhale, open your mouth (as in the photo below) as if you were saying “ah” or “oh.” When you do this, your inhalation is soundless and effi cient.
The weight of the recorder remains on your lower lip.

Technique Tip: More on Breathing, plus Posture and Hands
33AMERICAN RECORDER SUMMER 2021
LEARN
HTTPS://AMERICANRECORDER.ORG
1
2 3
⊳1: Good posture. Head over heart, heart over pelvis; recorder at an angle of about 45 degrees to your body, shoulders relaxed, elbows hanging down; space within the circle made by your arms.
2: Elbows lifted too high, with head back and chin thrust forward. When the elbows are held up, that extra weight must be carried by the shoulders—this creates tension in your shoulders and arms, as does the head position.
3: Arms clamped to the sides, head forward. Keeping the elbows too close to the body is a position that also activates certain muscles, namely those of the upper arms—and the shoulders easily become slightly hunched. In addition, this posture diminishes drastically the feeling of having some physical space—and of course is another source of tension, especially in your shoulders and arms.
4: Practicing right hand support of the recorder, using the right hand little finger. The recorder is balanced and supported by the lower lip, right hand thumb and right hand little finger, which is anchored just below the little ridge above the last finger hole.
5: Shifting to a fingering adding fingers of the right hand. The right hand little finger is lifted, since it is no longer needed to support and balance the recorder.
4 5
34 AMERICAN RECORDER SUMMER 2021 HTTPS://AMERICANRECORDER.ORGAMERICAN RECORDER SUMMER 2021 HTTPS://AMERICANRECORDER.ORG
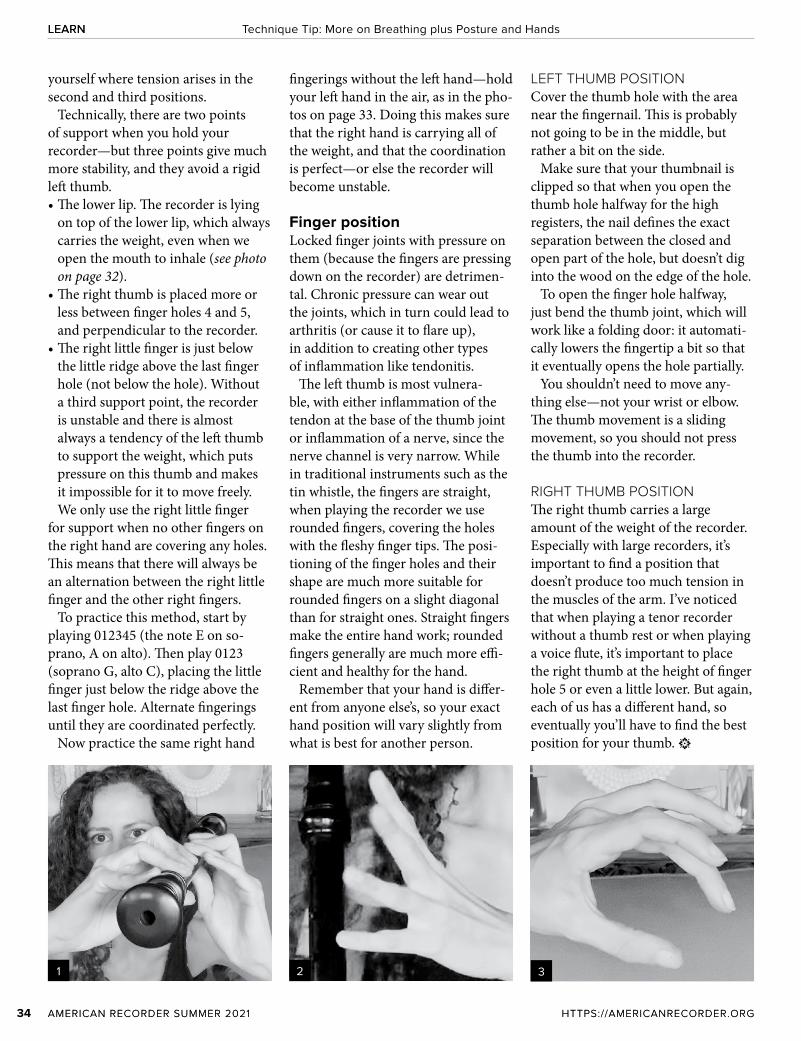
fingerings without the left hand—hold your left hand in the air, as in the pho-tos on page 33. Doing this makes sure that the right hand is carrying all of the weight, and that the coordination is perfect—or else the recorder will become unstable.
Finger positionLocked finger joints with pressure on them (because the fingers are pressing down on the recorder) are detrimen-tal. Chronic pressure can wear out the joints, which in turn could lead to arthritis (or cause it to flare up), in addition to creating other types of inflammation like tendonitis.
The left thumb is most vulnera-ble, with either inflammation of the tendon at the base of the thumb joint or inflammation of a nerve, since the nerve channel is very narrow. While in traditional instruments such as the tin whistle, the fingers are straight, when playing the recorder we use rounded fingers, covering the holes with the fleshy finger tips. The posi-tioning of the finger holes and their shape are much more suitable for rounded fingers on a slight diagonal than for straight ones. Straight fingers make the entire hand work; rounded fingers generally are much more effi-cient and healthy for the hand.
Remember that your hand is differ-ent from anyone else’s, so your exact hand position will vary slightly from what is best for another person.
LEARN Technique Tip: More on Breathing plus Posture and HandsLEARN
yourself where tension arises in the second and third positions.
Technically, there are two points of support when you hold your recorder—but three points give much more stability, and they avoid a rigid left thumb.•The lower lip. The recorder is lying
on top of the lower lip, which always carries the weight, even when we open the mouth to inhale (see photo on page 32).
•The right thumb is placed more or less between finger holes 4 and 5, and perpendicular to the recorder.
•The right little finger is just below the little ridge above the last finger hole (not below the hole). Without a third support point, the recorder is unstable and there is almost always a tendency of the left thumb to support the weight, which puts pressure on this thumb and makes it impossible for it to move freely.We only use the right little finger
for support when no other fingers on the right hand are covering any holes. This means that there will always be an alternation between the right little finger and the other right fingers.
To practice this method, start by playing 012345 (the note E on so-prano, A on alto). Then play 0123 (soprano G, alto C), placing the little finger just below the ridge above the last finger hole. Alternate fingerings until they are coordinated perfectly.
Now practice the same right hand
LEfT THUMb POSITIONCover the thumb hole with the area near the fingernail. This is probably not going to be in the middle, but rather a bit on the side.
Make sure that your thumbnail is clipped so that when you open the thumb hole halfway for the high registers, the nail defines the exact separation between the closed and open part of the hole, but doesn’t dig into the wood on the edge of the hole.
To open the finger hole halfway, just bend the thumb joint, which will work like a folding door: it automati-cally lowers the fingertip a bit so that it eventually opens the hole partially.
You shouldn’t need to move any-thing else—not your wrist or elbow. The thumb movement is a sliding movement, so you should not press the thumb into the recorder.
RIGHT THUMb POSITIONThe right thumb carries a large amount of the weight of the recorder. Especially with large recorders, it’s important to find a position that doesn’t produce too much tension in the muscles of the arm. I’ve noticed that when playing a tenor recorder without a thumb rest or when playing a voice flute, it’s important to place the right thumb at the height of finger hole 5 or even a little lower. But again, each of us has a different hand, so eventually you’ll have to find the best position for your thumb. •
31 2
35AMERICAN RECORDER SUMMER 2021HTTPS://AMERICANRECORDER.ORG
4
5 6
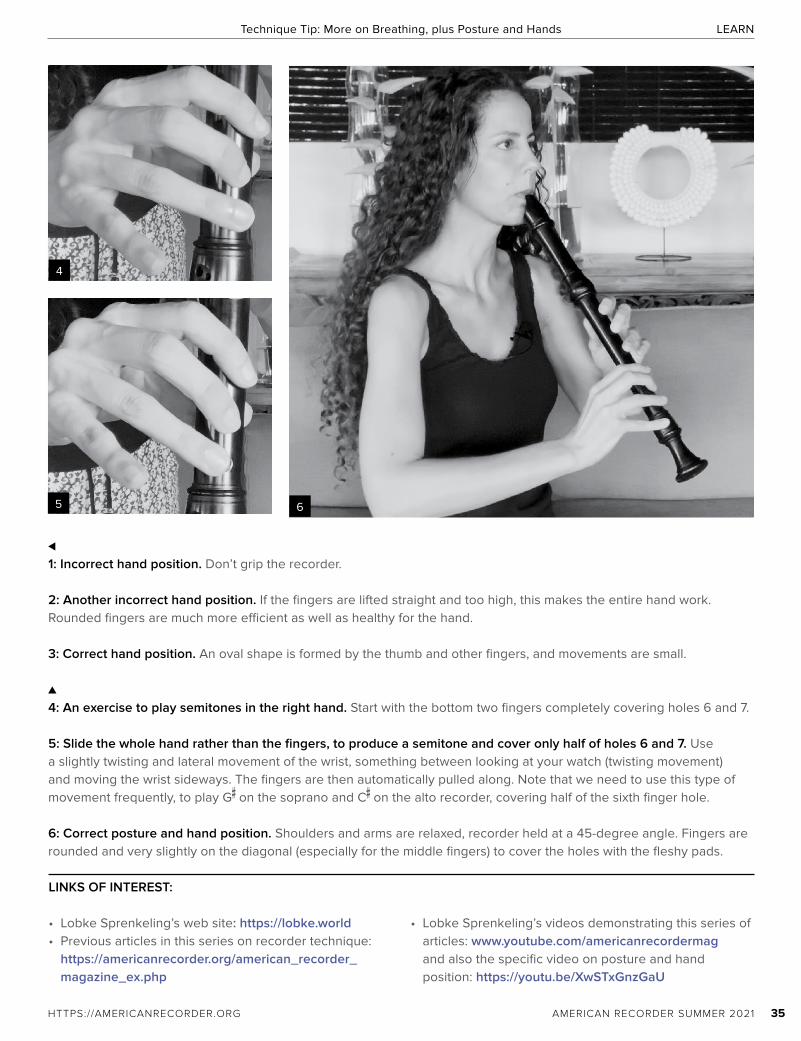
⊳1: Incorrect hand position. Don’t grip the recorder.
2: Another incorrect hand position. If the fingers are lifted straight and too high, this makes the entire hand work. Rounded fingers are much more efficient as well as healthy for the hand.
3: Correct hand position. An oval shape is formed by the thumb and other fingers, and movements are small.
▲4: An exercise to play semitones in the right hand. Start with the bottom two fingers completely covering holes 6 and 7.
5: Slide the whole hand rather than the fingers, to produce a semitone and cover only half of holes 6 and 7. Use a slightly twisting and lateral movement of the wrist, something between looking at your watch (twisting movement) and moving the wrist sideways. The fingers are then automatically pulled along. Note that we need to use this type of movement frequently, to play G
# on the soprano and C
# on the alto recorder, covering half of the sixth finger hole.
6: Correct posture and hand position. Shoulders and arms are relaxed, recorder held at a 45-degree angle. Fingers are rounded and very slightly on the diagonal (especially for the middle fingers) to cover the holes with the fleshy pads.
LINKS Of INTEREST:
• Lobke Sprenkeling’s web site: https://lobke.world • Previous articles in this series on recorder technique:
https://americanrecorder.org/american_recorder_magazine_ex.php
• Lobke Sprenkeling’s videos demonstrating this series of articles: www.youtube.com/americanrecordermag and also the specific video on posture and hand position: https://youtu.be/XwSTxGnzGaU
Technique Tip: More on Breathing, plus Posture and Hands LEARN