TECHNICAL PROTOCOLS FOR AGRICULTURE FOR...
65
2014 TECHNICAL PROTOCOLS FOR AGRICULTURE FOR KHARIF, RABI & SUMMER SESSON
Transcript of TECHNICAL PROTOCOLS FOR AGRICULTURE FOR...

2014
TECH
NIC
AL P
ROTO
COLS
FO
R AG
RICU
LTU
RE F
OR
K
HAR
IF, R
ABI &
SU
MM
ER S
ESSO
N
Life Academy of Vocational Studies (LAVS): Technical protocols for different crop seasons
Ma
y 1
, 2
01
4
2 TECHNICAL PROTOCOLS FOR AGRICULTURE FOR KHARIF, RABI & SUMMER SESSON
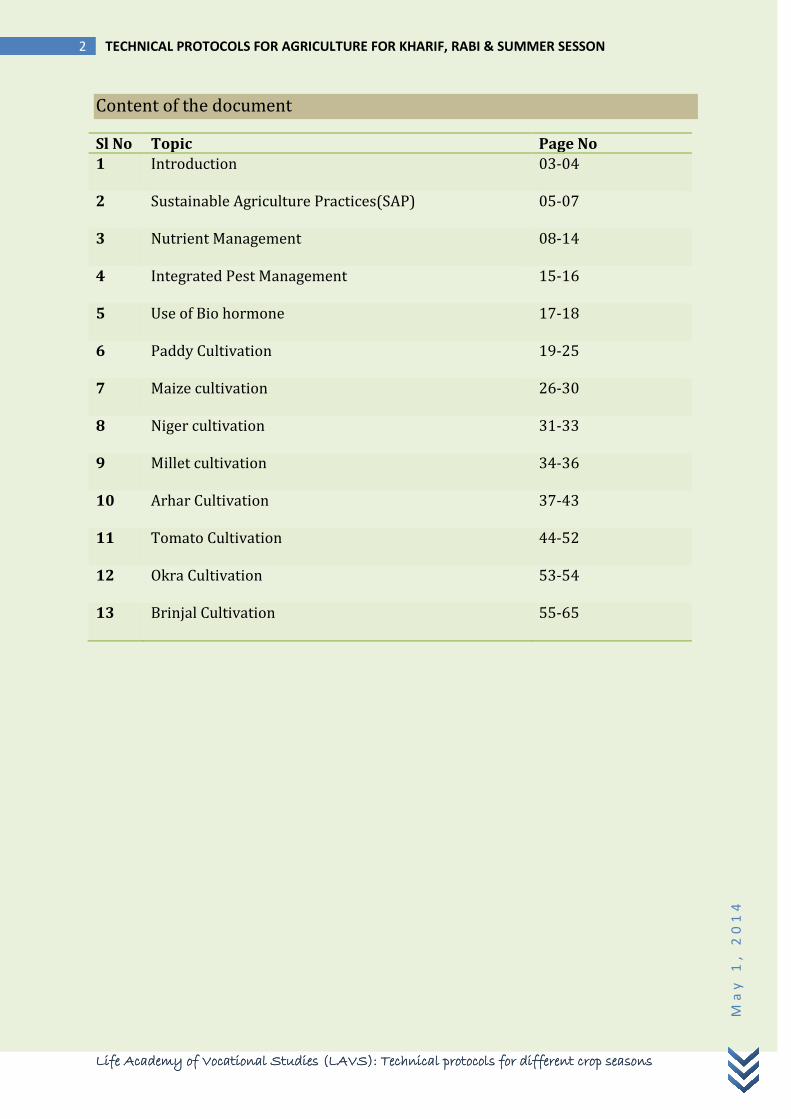
Content of the document
Sl No Topic Page No 1 Introduction 03-04
2 Sustainable Agriculture Practices(SAP) 05-07
3 Nutrient Management 08-14
4 Integrated Pest Management 15-16
5 Use of Bio hormone 17-18
6 Paddy Cultivation 19-25
7 Maize cultivation 26-30
8 Niger cultivation 31-33
9 Millet cultivation 34-36
10 Arhar Cultivation 37-43
11 Tomato Cultivation 44-52
12 Okra Cultivation 53-54
13 Brinjal Cultivation 55-65

Life Academy of Vocational Studies (LAVS): Technical protocols for different crop seasons
Ma
y 1
, 2
01
4
3 TECHNICAL PROTOCOLS FOR AGRICULTURE FOR KHARIF, RABI & SUMMER SESSON
INTRODUCTION Sustainable Agriculture refers to a range of strategies for addressing many problems that effect agriculture. Such problems include loss of soil productivity from excessive soil erosion and associated plant nutrient losses, surface and ground water pollution from pesticides, fertilizers and sediments, impending shortages of non- renewable resources, and low farm income from depressed commodity prices and high production costs. Furthermore, “Sustainable” implies a time dimension and the capacity of a farming system to endure indefinitely. Sustainable agriculture is viewed as an answer to damages caused by chemical intensive and input driven green revolution agenda which besides causing environmental hazards has led to farmer’s distress, indebtedness and deaths (Suicide).
The proposed project shall focus on the following generic practices:
"Agriculture is the backbone of human existence. For any civilisation to prosper, agriculture has to be healthy and sustainable. We need to get our focus back on agriculture which is the primary industry. Our earth has plenty for everyone. We only have to manage its resources well. “Some of the standard practices to be promoted are mentioned below:
• Land Development • Soil and Moisture Conservation
• Water Harvesting & Water Management • Use of organic manure and bio-fertilizers
• Use of bio-pesticides • Conservation and use of indigenous seed varieties • Use of eco friendly appropriate technologies
District Information
Districts: Koraput
Mention Agro-climate, soil condition, Cropping pattern, major crops of the Intervened area Agro Climatic Zones Eastern Plateau and Hill region (VII) Major Crops Paddy,Maize,Arhar,Niger,Millet,Tomato,Brinjal & Okra Major Agricultural Season Kharif & Rabi Geographic coordinates of district headquarters:
Latitude Longitude Altitude
18048’43.70” N 82042’43.16”E 969 m (MSL)
Rainfall:
Rainfall Rainfall Normal RF(mm)
Rainy days (number)
Normal Onset Normal Cessation
SW monsoon (June-Sep):
1232.3 62.4 June 2nd week September 2nd week
NE Monsoon(Oct-Dec):
165.2 9.3 Oct 1st week December 1st week

Life Academy of Vocational Studies (LAVS): Technical protocols for different crop seasons
Ma
y 1
, 2
01
4
4 TECHNICAL PROTOCOLS FOR AGRICULTURE FOR KHARIF, RABI & SUMMER SESSON
Major Soils:
Major Soils (common names like red sandy loam deep soils (etc.,)*
Area ( ‘000 ha)
Red soils 437.9 Alluvial soils 200.0 Mixed Red & Yellow soils 140.0 Red and black soils 60.0 Total 837.9
Agriculture Land use
Agriculture Land use Area (‘000 ha) Cropping intensity % Net sown area 287.0 134.7 % Area sown more than once 99.7 Gross cropped area 386.7 Major crop Area (‘000 ha): Major Crop Kharif Rabi Total Paddy 114.7 16.1 130.8 Millet 74.2 0.13 74.3 Maize 15.1 3.2 18.2 Niger 38.3 3.6 41.9 Arhar 5.7 0 5.7 Sowing period Sowing window for 5 major field crops
Paddy Finger millet Niger Maize Arhar
Kharif- Rainfed June 2nd week to July 2nd week
June 2nd week to July 2nd week
July 3rd week to September 1st week
June 2nd week to July 1st week
June 2nd week to July 2nd week
Kharif-Irrigated
June 2nd week to July 2nd week
June 2nd week to July 2nd week
August 1st week to September 1st week
June 2nd week to July 1st week
June 1st week to July 1st week
Life Academy of Vocational Studies (LAVS): Technical protocols for different crop seasons
Ma
y 1
, 2
01
4
5 TECHNICAL PROTOCOLS FOR AGRICULTURE FOR KHARIF, RABI & SUMMER SESSON
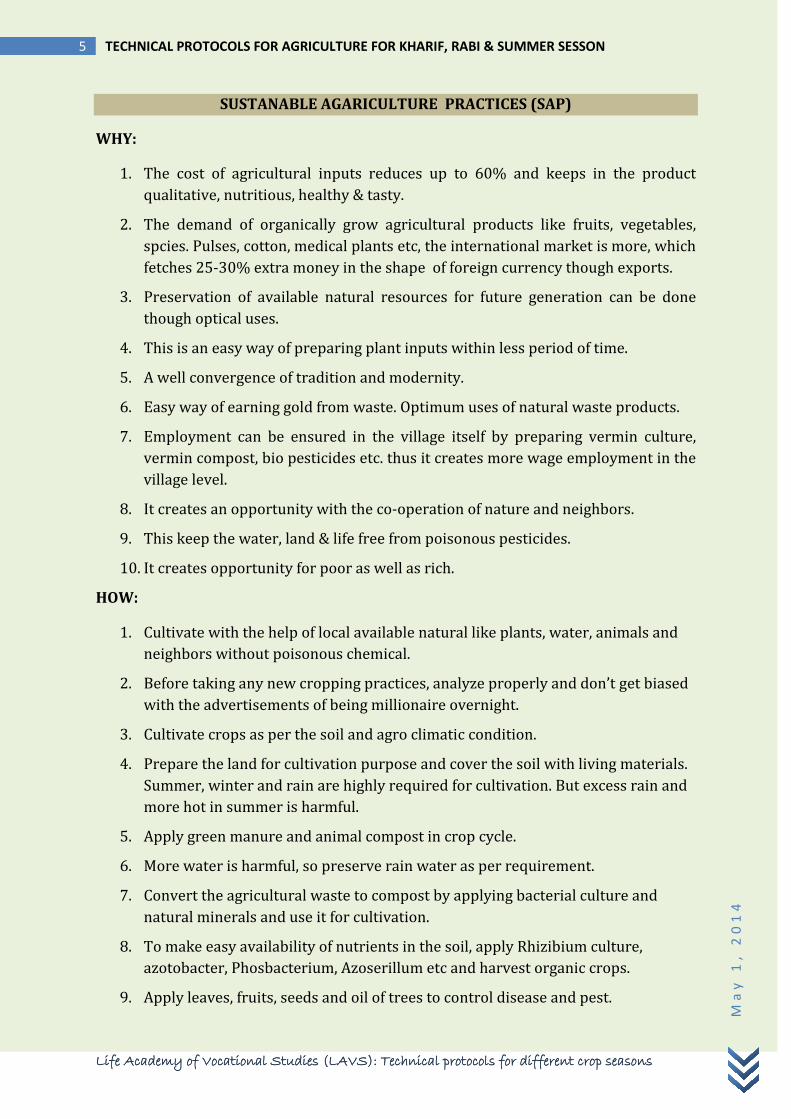
SUSTANABLE AGARICULTURE PRACTICES (SAP)
WHY:
1. The cost of agricultural inputs reduces up to 60% and keeps in the product qualitative, nutritious, healthy & tasty.
2. The demand of organically grow agricultural products like fruits, vegetables, spcies. Pulses, cotton, medical plants etc, the international market is more, which fetches 25-30% extra money in the shape of foreign currency though exports.
3. Preservation of available natural resources for future generation can be done though optical uses.
4. This is an easy way of preparing plant inputs within less period of time.
5. A well convergence of tradition and modernity.
6. Easy way of earning gold from waste. Optimum uses of natural waste products.
7. Employment can be ensured in the village itself by preparing vermin culture, vermin compost, bio pesticides etc. thus it creates more wage employment in the village level.
8. It creates an opportunity with the co-operation of nature and neighbors.
9. This keep the water, land & life free from poisonous pesticides.
10. It creates opportunity for poor as well as rich.
HOW:
1. Cultivate with the help of local available natural like plants, water, animals and neighbors without poisonous chemical.
2. Before taking any new cropping practices, analyze properly and don’t get biased with the advertisements of being millionaire overnight.
3. Cultivate crops as per the soil and agro climatic condition.
4. Prepare the land for cultivation purpose and cover the soil with living materials. Summer, winter and rain are highly required for cultivation. But excess rain and more hot in summer is harmful.
5. Apply green manure and animal compost in crop cycle.
6. More water is harmful, so preserve rain water as per requirement.
7. Convert the agricultural waste to compost by applying bacterial culture and natural minerals and use it for cultivation.
8. To make easy availability of nutrients in the soil, apply Rhizibium culture, azotobacter, Phosbacterium, Azoserillum etc and harvest organic crops.
9. Apply leaves, fruits, seeds and oil of trees to control disease and pest.

Life Academy of Vocational Studies (LAVS): Technical protocols for different crop seasons
Ma
y 1
, 2
01
4
6 TECHNICAL PROTOCOLS FOR AGRICULTURE FOR KHARIF, RABI & SUMMER SESSON
10. Preserve beneficial predators and parasite inse4cts in the cropping area and collect from the laboratory to control insect and pest if it is required.
11. Increase the number of beneficial insects and reduce the number of harmful insects by putting different insect traps.
12. Apply bio pesticides to the crop. But wait with patience for its usefulness.
1. SEEDS, SEEDLINGS & SOIL TREATMENT BY ORGANIC METHODS
Pure seeds and seedlings hekp the plant grow healthy. The plants can be saved from disease, insects and virus attack by doing seeds and seedlings treatment properly, by which the farmers can get more fruits, flower and yield. Now-a-days the treatment is mainly done by using chemicals which is very costly. Though several alternatives have been taken till date to make the work easy and cost effective, these are not being reached at farmers’ door steps. There are some experimental low cost methods of seeds, seeding and soil given below:-
1.1 SOIL TREATMENT:-
Mix 50 gm Trichoderma Viride and 100 gm sudomonas powder with 1 basket of half decomposed cow dung. Cover the mixture with polythene and gunny bags up to 8 days under shade. After fungus developed in the mixture, apply in mother bed before seed sowing.
1.2 SEED TREATMENT a. Hard coated seeds
Take 1 part cow dung in mud pot and add 15 part water to make a solution. Then soak the hard coated seeds up to 30 minutes in the solution and dry and seeds under shade. After drying sow the seeds in the prepared mother bed.
b. Thin coated seeds
Take 1 part of cow urine in mud pot and mix 3 part water to it. Then soak the thin coated seeds up to 30 minutes in the solution by covering the seeds with a thick clean cloth and dry the seeds under shade. Then after drying sow the seeds in the prepared mother bed.
c. Pulses seeds
Soak the pulses seeds in one part curd and 1 part water solution up to 30 minutes and dry the seeds under shade after soaking. Then sow the seeds in cultivable land.
d. Bulb or tuber type seeds
Take one part honey and mix 1 part shee & 1 part water to make solution. Soak the bulbs/tuber in the solution up to 30 minutes. Then sow the bulbs/tuber in the prepared land. In this method onion, garlic etc can be treated.

Life Academy of Vocational Studies (LAVS): Technical protocols for different crop seasons
Ma
y 1
, 2
01
4
7 TECHNICAL PROTOCOLS FOR AGRICULTURE FOR KHARIF, RABI & SUMMER SESSON
e. Seed treatment by electric method
In this method soak the seeds up to 6 to 8 hours and dry the seeds under shade up to 24 hours. Then after drying sow the seeds in the prepared field.
f. Seed treatment by Bacha (acarus calamus)
Take 250 gm of bacha powder and add 3 liter of water and keep the solution over night.
g. Seed treatment by cultures
Mix 5 gm Trichoderma Virida dust, 10 gm Sudomonas dust and 50 gm half decomposed farm yard manure and dry under shady place up to 2 to 4 days. Then treat 1 Kg seeds up to 30 minutes. This mixture can also be applied to nursery bed.
1.3 NURSERY BED TREATMENT:
Prepare a mixture of 5 gm Trichoderma Virida, 10gm Sudomonas dust with 1 liter of water and apply it in the root zone of seedlings. This treatment should be done before 7 to 8 day before uprooting of seedlings up to 15 to 20 minutes before transplantation. By doing this methods most of the disease in vegetables can be checked.
1.4 SEEDLING TREATMENTS:
prepare a pit having 1 ft length, 1 ft depth and cover the pit with a polytheen sheet. Then pore 5 liters water to it. Against add 25 gm Trichoderma Viride dust & 50gm Sudomonas Dust. Then treat the bunch of seedlings up to 15 to 20 minutes before transplantation. By doing this methods most of the disease in vegetables can be checked.
1.5 Seed treatment by cow urine:
this is a best recommended seed treatment method for organic cultivation. Prepare a mixture of cow urine (Milking local cow) with 2.5 liter of water. Then treat the seed up to 30 minutes by using thin cloth.

Life Academy of Vocational Studies (LAVS): Technical protocols for different crop seasons
Ma
y 1
, 2
01
4
8 TECHNICAL PROTOCOLS FOR AGRICULTURE FOR KHARIF, RABI & SUMMER SESSON
NUTRIENTS MANAGEMENT FOR BETTER YIELD
The main reasons for adopting chemical fertilizers by farmers are as follows:
1. It is not difficult to prepare unlike manure
2. The effect of fertilizer is visible immediately.
3. No need to have a bigger space to prepare and no need to use in quantities.
But previously farmers, even scientists and government people did not take the bad impact of chemical fertilizer. By using the chemical fertilizer abundantly, the soil condition has become so worse that it’s the time now to take precautionary majors. There are several alternate ways of restoring the soil conditions. Some of them are narrated below:
POT MANURE (BIO FERTILIZER)
Method 1
Ingredients:
1. Cow dung - 1 kg
2. Cow urine - 1 Liter
3. Jaggery/Curd/Oil cake - 50 Gm.
4. Earthen Pot/Bucket with plastic Cover - 1 No.
5. Rope to bind the pot - 1 No.
Preparation Method:
Put the cow dung, cow urine and jiggery/curd/oil cake in the earthen pot and stir well. Close the pot with the plastic cover and tie it tightly. The ingredients will be proportionately increased if the pot/bucket is bugger. Keep the pot in shade and use it after 10 days.
Usage:
This pot manure is to be diluted with water in 1:5 or 1:10 propo0rtion before using. This can be used in any type of crop, land and plant. However the farmer can decide the quantity to be used based on the condition of plant and land. This can also be used in the paddy field when the field is wet. For use in grown up plants, dig a pit a little away from the plant root, put the manure by diluting in 1:5 proportion, cover the pit with soil and apply some water, this manure is to be applied during morning or evening time for better result. If we apply this directly on the plant or during noon, the plant will be burnt. If the plant grows well but does not bear fruit/flower by applying this manure apply some ash at the plant root.

Life Academy of Vocational Studies (LAVS): Technical protocols for different crop seasons
Ma
y 1
, 2
01
4
9 TECHNICAL PROTOCOLS FOR AGRICULTURE FOR KHARIF, RABI & SUMMER SESSON
POT MANURE (Method 2)
Ingredients:
1. Kitchen residues like boiled rice extracts, vegetable skin/scrap, rotten food stuff etc.
2. Jiggery / Curd/Butter milk - 50Gm. 3. Chopped lawn grass 4. Ash/Lime 5. Old flowers taken from flower vessel 6. Bucket/Earthen pot with plastic cover 7. A rope to tie
Preparation Method:
Keep putting all residual material listed above in the pot or bucket daily and keep it in shake. Close the bucket with the plastic cover when the bucket is almost full. The residues normally decompose within 20/30 days. Leave the bucket as it is if the residues are not composed within this period. It would be better if you have two buckets so that both are used one by one. Care should be takne not to put paper, polythene, glass plastic etc. the manure made out of this procedure is a good replacement of those who don’t have cow to make normal manure.
The usage is same as described above. We can make the unused material very useful.
Benefits:
1. Ensure vegetable growth of the plants 2. Increase crop yields 3. Increase the disease, insect & pest attack resistance power of the crop 4. Require less time of preparation with less investment 5. Reduce the dependency of farmer on market purchase
PANCHAGABYA
This is basically the solution of 5 ingredients, which receives from cow and used as liquid organic fertilizer by the farmer of Tamilnadu States. This gives better nutrituion to the crop. The five components are cow dung, urine, milk curd & Ghee. The farmer of our state also can be used by preparing this.
Ingredients:
1. Fresh cow dung : 7 Kgs 2. Cow Urine : 5 liters 3. Cow Ghee : 1 Kg 4. Cow milk : 2 liters 5. Cow Curd : 3 liters

Life Academy of Vocational Studies (LAVS): Technical protocols for different crop seasons
Ma
y 1
, 2
01
4
10 TECHNICAL PROTOCOLS FOR AGRICULTURE FOR KHARIF, RABI & SUMMER SESSON
Preparation:
Mix 7 Kgs dung along with 5 liters cow urine in an earthen pot and put it under shed to clear the excreted gases. In every 2 days intervals stir the solution properly up to 15 days. Then after 15 days mix the other ingredients i.e. milk 2 liters, curd 2 liters & ghee 1 liter with the solution and stir it 2 times per day for 7 days. After 22 days this solution is ready for application in the field. This solution can be stored up to 6 months. Mix water after drying.
Application:
3% panchagabya solution can be used for all types of crops. Spray 3 liter panchabagya in dilution with 97 liters of water per acre.
AMRUTA PANI
Ingredients:
1. Fresh cow dung from milking cow : 10 Kgs 2. Water : 200 liters 3. Cow Ghee : 250 gm 4. Soil from banyan root : 2 Kgs 5. Jaggier : 500 gm
Mix the above ingredients properly in a drum and stir the solution two times per day up to 7 days. After 7 days filter the solution and apply to the crop in every 25 days intervals. This helps the plants to grow and keep the plants free from insect and disease attack. This can be used in all crops.
BIJAMRUTA
Ingredients:
1. Fresh cow dung : 5 Kgs 2. Cow Urine : 5 liters 3. Lime power : 250 gm 4. Cow milk : 1 liter 5. Water : 50 liters
Preparation:
Take a 50 liter capacity drum or cement tank and a cotton cloth. Put 5 kg cow dung inside the cotton cloth and tie it properly. Hang the cotton cloths in the middle of the drum of the drum. Then in another pot take 1 liter water with 250 gm lime power. Extract juice of cow dung and lime powder solution. Mix both the extract with both the extract with 5 liter cow urine and stir it properly.

Life Academy of Vocational Studies (LAVS): Technical protocols for different crop seasons
Ma
y 1
, 2
01
4
11 TECHNICAL PROTOCOLS FOR AGRICULTURE FOR KHARIF, RABI & SUMMER SESSON
Application:
Spray the prepared Bijamruta solution with 7 days during the flowering stage. This can also be used for the treatment of seeds, seedling & bulbs.
AZOLA CULTURE:
Azola is a fern type living aquatic plant. This helps in nitrogen fixation in the soil. To cultivate Azola before cultivation of paddy or 1 month before transplanting of paddy divide the plots into several small plots. Apply 1 ton green azola per hector in the small plots. After 7 to 10 days the population of azola in the fields will be more. Then drain out the water from the Azola plots and mix the Azola plots and mix the Azola properly in the soil by ploughing. After 4 to 5 days of poddling, transplants the paddy seedlings in the field.
Benefits:
1. This reduces the soil and water temperature 2. Don’t allow the weeds to grow in the cultivated field 3. Lighten the soil and increase the water holding capacity of the soil 4. Add more nitrogenous fertilizer to the soil 5. Ensure good crop production
VERMI WASH (MICRO NUTRIENTS)
Most often the production of fruit and vegetable hampers due to the deficiency of micro nutrient. To meet this micro nutrient deficiency the small and marginal farmer has to spend 500 to 600 rupees every season. To sue in regular basis farmer can prepare the vermin wash in the back yard with less investment. The vermin wash contains the micro nutrient like Nitrogen, Phosphorus, Potassium, Magnesuim, Zinc, Copper, Calcium, Ferrous, Sulphate, Sodium etc. this also contains vitamins (B12) and hormone (gibberellins).
ADVANTAGES
This increases the crop yield This increases the disease tolerance capacity This ensure the plant food preparation mechanism This increases the rate of compost making mechanism This can also be used in drip irrigation system
METHOD OF PREPARATION
Row materials required:
One earthen pot of 25 – 30 liter capacity One earthen pot of 5 liter capacity

Life Academy of Vocational Studies (LAVS): Technical protocols for different crop seasons
Ma
y 1
, 2
01
4
12 TECHNICAL PROTOCOLS FOR AGRICULTURE FOR KHARIF, RABI & SUMMER SESSON
½ inch size brick pieces of 2-3 bricks / small stone pebbles. Course sand 3-4 kgs Soil of ant hill / soft virgin soil 3-4 kgs Dried coconut husk / dried whole leaves / coir. Half decomposed compost 15-20 kgs Earth worms (Eisinis foetida/Eudrillus eugenae) 100 – 250 gms Water Tripod stand
Preparation:
Step-1
• The big earthen pot is to be washed from inside as well as outside thoroughly. Make a small hole at the bottom.
• Take 4-5 bricks & make pieces of ½ inch size. Wash them with water. Place thses pieces in the bottom of the pot with care so that the pot will not develop cracks. Wash the course sand properly to remove the dirt, dust. Pour this sand into the pot.
• Pour the ant hill soil / soft soil into the pot. Sprinkle water on this layer
Step-2
• Spread thinly some dried coconut husk / coir on the soil surface. • Now spread the half decomposed compost on this layer evenly. • Spread the earth worms on this layer & sprinkle water on it. • Fill the pot with slurry of cow dung, dried leaves as well as crushed crop residues
on this layer & sprinkle water on it. • Now put this earthen pot on the tripod stand
Step-3
• Make a small whole at the bottom of the small pot pass a piece of cotton cloth thru this hole. Place the small earthen pot on the top of the big earthen pot.
• Fill this pot with water. • Make sure that water trickles very slowly from small pot to the big pot. • A gunny bag cover can be placed on the top of this small pot.
Step-4
The earthworms will start the process of digesting inside the pot.
• You will get about 1-1.5 liters (it varies) worm wash through the out let per day. Use the worm wash only after 20-25 days, as digestion will take some time. Initially put back any worm wash collected in the small pot.
• Collect the Vermi wash in a small opaque plastic pot and

Life Academy of Vocational Studies (LAVS): Technical protocols for different crop seasons
Ma
y 1
, 2
01
4
13 TECHNICAL PROTOCOLS FOR AGRICULTURE FOR KHARIF, RABI & SUMMER SESSON
• Harvest the compost when it is fully decomposed. It generally takes 2-3 months.
• Again repeat to get worm wash from the same pot
• Worm wash contains NPK + Micronutrient + growth hormones, the strength of these elements in the worm wash collected, depends on the feeding given to the earth worms.
Step-5
• Slurry of cow dung mixed with dried leaves & crop residue to be frequently added in the big pot as & when needed.
• When Full mass is digested by earthworms, it will look like tea leaf (this takes approx.30 days), remove the material from the pot use as worm compost, and start the process again with fresh material. Use extra worms generated for more units or worm composing.
APPLICATION
Spray on the crop diluting it with 10 parts of water. This can also be used with 250ml of cow urine to prevent insect and pest attack. In every 10-12 day interval foliar spray to the crop is required.
PRECAUTIONARY MEASURES
• The required raw materials should free from plastic, Iron & Tin
• The termite soil should free from the live termites and termite eggs
• The vermin wash pot should be kept in high elevated shady place
• The top earthen pot should always be filled with water
• The half decomposed compost should mix in the main pot as and when required
• Use only clean plastic or earthen pot for the collection of vermin wash
• Don’t use tin or iron pot for the collection of vermin wash
• Don’t expose the pot ot sun ray
• This arrangement is to be safe guarded from the enemies of earth worms such as snakes, cat, rodents, hen, ants etc
• Never keep big pot flooded with water.
MAGIC TONIC
Raw materials required:
1. Cow dung – 1kg
2. Cow urine – 2 lit

Life Academy of Vocational Studies (LAVS): Technical protocols for different crop seasons
Ma
y 1
, 2
01
4
14 TECHNICAL PROTOCOLS FOR AGRICULTURE FOR KHARIF, RABI & SUMMER SESSON
3. Jiggery – 50 gm
4. Curd – 50 – 100 gm
5. Oil cake/neem cake – 100 gm
6. Bitter leaf (neem/karanja/karada etc) – 1 kg
7. Bad odour leaf (Tulsi, Pokasung, Ukalli pots,Lime etc)- 1kg
8. Sticky leaf – 1 kg
9. Garlic paste – 50 – 100 gm
10. Turmeric powder – 50 – 100 gm
11. Earthen pot (15 lit capacity) -1
12. Coir rope/polythene
Preparation:
• Make the leaves into small pieces and put in the earthen pot
• Add 1 kg fresh cow dung and 1 lit cow urine to the eathen pot
• Mix curd 50 gm, oil cake – 100 gm, Jaggery 50 gm, garlic paste 50 gm & 50 gm turmeric powder with the leaf, cow dung & urine mixture
• Cover the mouth of the earthen pot with polythene and tie with coir rope
• In every seven day interval stir the mixture for better decomposition
• After one month from the date of preparation add two time more water and filter the liquid extract to the plastic or glass pot.
• Mix the liquid extract with 1 full spoon milk and ½ spoon turmeric power for better life
Application:
After one week of preparation spray on the crop diluting it with 10-15 parts water (depending upon the growth of the crops)
Advantages:
• Prevent plant/crop from the insect & pest attack
• Ensure vegetative growth of the leaves
• Increase crop yield
• Require less time for preparation
• Reduces the input cost
• Reduce the dependency on market to purchase
• Eco-friendly and optimum use of available resources

Life Academy of Vocational Studies (LAVS): Technical protocols for different crop seasons
Ma
y 1
, 2
01
4
15 TECHNICAL PROTOCOLS FOR AGRICULTURE FOR KHARIF, RABI & SUMMER SESSON
INTEGRATED DISEASE AND PEST MANAGEMENT:
Insect and pest control by Neem oil: - The oil collected from traditional crusher or available at market can be used for insect and pest control. For different types of insect 2 to 5 ml oil and then the solution should be mixed with water properly. Now in market different poisons from neem oil are available in EC form, which can be mixed with water directly. Those are Neemajal, Boineem, aachik, Neemcidin, Jayneem, Econeem, Groneem, Multineem, ripellin, Margosan, Jawan, Neemgard, Nimin etc.
Neem seed Extract:- use 5% neem seed pest collected from trees, which can be stored in home up to 6 months to kill the harmful insects. Put 500 gm grinded neem seed in red cloth and soak up to 12 hours (overnight) in 1 liter of water. In the morning filter the neem solution and again add 10 liter of water. Then put a small pinch of detergent powder or shampoo and spray in the field. This can be sprayed along with pesticides by seeing the stages of insect attack. The second spray can be done after 15 days or first spray.
Neem cake: Apply 10 kg neem cake per decimal (guntha) of land at the time of land preparation to control termite, ants, root borer and all insects that attack nursery seedling and all soil born diseases like wilting, root rot etc.
Insect and pest control by karanja and other plants: like Neem, oil of Karanja plants and Karanja cake can be used to control disease and pest in the crop.
Like the above two plants 1000 types of plants are having insect control capacity, 100 different plants are having fungal disease control capacity, 58 different plants have maggets control capacity and 22 plants have rodent fungal disease control capacity , 58 different plants have maggets control capacity and 22 plants have rodent killing capacity. Application of Korada and custard apple leaves to control leaf curling disease of paddy, hengu & green banana in the root zone of brinjal (egg plants) to control wilting disease, mix dry leaves of begonia (vetex), Kochila (Nox vomica), pokasunga and beetle box dust to control black gram, green gram, pigeon pea seeds etc in the storage room has been practiced since ancient age. Similarly sucking pest like aphids, white fly, Mites and plant lice in vegetables can be controlled by spraying custard apple apple leaves pest & oil or oil or Cotton, Niger & Soybean oil along with detergent powder and pesticides (synthetic parathyroid type). In different vegetables sucking pest can be controlled by using caster and mustard cake.
Chilly and Garlic pest solution: At first grind 7.5 kg green chilly in a grinder and soak overnight with 25 liters water. Soak 1250 gm garlic pest with 625 ml kerosene overnight. In the morning prepare a third solution with 75 gm detergent power and 1 liter water. Then you need to mix all the filtered solution with detergent solution and after 4 hours make it 200 liters by adding required quantity of water. Spray it over 1 acre of land.

Life Academy of Vocational Studies (LAVS): Technical protocols for different crop seasons
Ma
y 1
, 2
01
4
16 TECHNICAL PROTOCOLS FOR AGRICULTURE FOR KHARIF, RABI & SUMMER SESSON
Cow urine and cow dung solution: mix 12.5 kg (one basket) cow dung with 15.5 liters cow urine (one bucket) & 12.5 liters water. Then after 4 days make it 200 liters solution by mixing like (calcium carbonate) and water. Spray in one acre of land to control insect and pest.
Insect control through birds: This is good organic method to control caterpillar insect from the field. Tobacco caterpillar insect of Ground nut, Caster & Cole crops and fruit bore holiothis insect of tomato, Bengali gram & pigeon pea can be destroyed from the cropping field by birds. So for the purpose use 20 nos English “T” shaped bird rest place should he made by bamboo to destroy the insect from Bengali gram filed. Similarly in ground nut and caster field insect can be checked by putting boiled paddy grains Millets in the bird rest place.
Leaves juice of Pokasunga: Boil 100 gm pokasunga leaf in one liter of water up to 20 minutes and spray the solution after cooling to save the crop from insect and pest attack.
Insect control by podina leaves: Mix 200 gm podina leaves pest with 5 liters of water. Then in this solution soak sprouted paddy seeds up to 30 minutes and dry shade up to 10 minutes. By doing this all disease in paddy will be controlled and fetch more yield.
Insect Traps
a. Sticky insect traps (yellow pot):
Like human the insects have also attraction to different colours. Mostly the insects like sucking pest, moths, white fly etc are attracted towards the yellow colour. So we can also trap the insects by using the yellow colours with adhesive materials like caster oil, grees or gum on earthen pot, tin, paper etc. this yellow pot should be placed inside the cropping area above a bamboo stump. This insect trap is called stickly trap. Per hectare 20 nos. of traps are required to kill the insect properly. The height of the traps should be equal to be plants or 1 ft more than the plants. Mostly the sucking pests are being attracted towards the yellow colour and sit on the pot. Then they are trapped by the used stickly materials. The traps should be placed at an interval of 10 ft.
b. Traditional insect traps:
Take 250 ml capacity earthen bowl and add jaggier (guar) water wolution to it. Then add the magic tonic solution or neem oil to it. Put the earthen bowl just above the plants by making a bamboo stand. The insects like moths, white flies etc attract towards the jaggier solution. Finally they eat the solution and trap by the magic tonic solutions. This trap should be placed in an interval of 10 ft.

Life Academy of Vocational Studies (LAVS): Technical protocols for different crop seasons
Ma
y 1
, 2
01
4
17 TECHNICAL PROTOCOLS FOR AGRICULTURE FOR KHARIF, RABI & SUMMER SESSON
USE OF BIO HORMONE FOR BETTER YIELD
Farmer usually spray different types of hormone and different methods to get maximum yield. Like this one best bio method of preparation of hormone is described below. These can be prepared and used very easily with less investment.
Ingredients:
1. Earthen pot (15-20 liter capacity)- 4 nos
2. Rotten Tomato: 10 kg
3. Bark of Neem & Karanja tree : 2-3 kg Each
4. Cow dung: 5-7 Kg
5. Four leg stand having 3 steps : 1 no
6. Cow urine: 5 liters
7. Water: 5-8 liters
Preparation Methods:
Clean all the four earthen pots properly before use and carefully make holes having size 0.5 to 1 cm in three earthen pots. Put 3 earthen pots in each steps and boride 4” pot inside the soil below the stands. The mouth of the 4” earthen pot should be placed 4” above from the ground level. Now put 7 kg rotten tomato, 1 part cow dung, 4 part water, 1 liter cow urine, 3 kg chapped neem bark in the 2nd earthen pot & mix it properly. Also in the third earthen pot put 1.5 kg rotten tomato, 4 part water, 1 part cow urine & 3 kg bark of karanja tree and mix it properly.
Close all the holes of earthen pot with paddy straw or think sticks. After 20 days all the ingredients will he decomposed and open all the holes of earthen pot, then the liquid hormone will be collected in the 4” earthen pot within 10 to 15 days. Then put 1 full spoon of milk to keep the hormone safe up to 6 months.
Application:
Spray one part of hormone with a dilution of 15 part of water to the crop at the time of flowering
Benefits:
1. The flower and fruit bearing capacity of the plants will be up to 25% -30%
2. This will check the fruit falling.
3. The crop yield will be increased up to 20-25%
4. Also this can be worked as a preventive against sucking pest attack.

Life Academy of Vocational Studies (LAVS): Technical protocols for different crop seasons
Ma
y 1
, 2
01
4
18 TECHNICAL PROTOCOLS FOR AGRICULTURE FOR KHARIF, RABI & SUMMER SESSON
SOME IMPORTANT THINGS TO BE REMEMBERED TO GET OPTIMUM YIELDS
1. Before cultivation 4 to 5 summer ploughing is required to expose the insect eggs, larva, nematodes & fungus inside the soil into sun and destroy them.
2. Cultivate disease and pest resistant varieties in disease and insect affected areas.
3. Cultivate and harvest the crop in right time.
4. At the time of cultivation apply 6 quintals of bio- fertilizer (neem cake, karanja cake, mustard cake) per hectare to the soil and also farm yard manure (FYM).
5. Before cultivation culvate and mix green manures (Dhanicha & Sunhump) in the soil.
6. Apply vermin compost, vermin was, green leaf manure, bacteria culture (azotobacter, Phosphobacterium, and azosperillum) along with compost of FYM for upland crop cultivation.
7. If there is a incidence of insect or pest in the crop, then Install pheromone traps & light traps in the field or spray cow urine, N.P.V, leaf pest of tulsi & Pokasunga on the crop to prevent insect cultivation.
8. Treat the seed, seeding or root with Trichoderma Viride culture to save the crop from disease attack.
9. Destroy all infected plants immediately when noticed in the field and clean all dried leaves from Scale insect Milly bugs, top shoot borer attacked areas.
10. Spray 5% neem oil to the crop to save the crop from sucking pest attack.
11. Apply 200 kg neem cake per hectare of land at the time of last land preparation or transplanting/sowing to save the crop from root nut disease causing nematodes.
12. Apply 15 kg bleaching powder per hectare of land before transplanting to save crop from wilting disease.
13. Preserve predators like Braken, Syrphid fly, Carabid Beetle, Spider, Dragon fly, Damsel Fly, Mirid Bug, Pentatomid Bug, Hunter Thrips, and Lady Bird Beetle in the cropping field to save the crops from harmful insects.
14. Install 20-25 nos. bird perches per hectare to control insects.
15. Spray 500-1000 gm B.T (Bacillus Thuringiensis) per hectare to save the crop from disease attack.
16. Treat 100 gm seeds with 2 gm Trchoiderma Viride culture to save the crop from soil born disease attack.
17. Use Plantomycine or Agromycine to save the crop from fungul disease.
18. Use cow urine or neem oil to save the crop from viral disease and Neem guard or neem cake to save the crop from disease caused by nematodes.
19. Weeding, earthing up, intercultural operation should be done at proper time.
20. Proper care of grains should be taken after harvesting.

Life Academy of Vocational Studies (LAVS): Technical protocols for different crop seasons
Ma
y 1
, 2
01
4
19 TECHNICAL PROTOCOLS FOR AGRICULTURE FOR KHARIF, RABI & SUMMER SESSON
Paddy System of Rice Intensification (SRI)
Introduction
This is a cultivation practice for Rice that is taken up in a different and more biologically enriched environment for growth. Yields are increased by 50 – 100% or more, with a reduction in plant populations (by 80 – 90%), less water (by 25-50%), without using new 'improved' varieties (all varieties respond to the methods) or using chemical fertilizers (just adding compost to the soil), with usually lowered costs of production, and thus considerably increased net economic returns per hectare.The key features of SRI include
• Transplanting young seedlings
• Reduce plant population
• Maintain aerated soil conditions
• Provide as much organic matter as possible to the soil
• Actively aerate the soil
• Re-emphasize biology
• Rediscover the potentials of synergy and symbiosis
Climate: Rice crop needs a hot and humid climate. It is suited to regions which have high humidity, prolonged sunshine and an assured supply of water. The average temperature ranges from 21 to 370C.Temperature require for blooming is in the range of 26.5 to 29.50C and at the time of ripening the temperature should be between 20-250C.
Soil:
Farmers following SRI method should first get the soil tested and know all the details. Saline or alkali soils are not suitable for SRI cultivation. In saline soils paddy yields would be satisfactory when it is cultivated under flooded conditions. But in SRI method the field is drained intermittently. When soil is allowed to dry the salts accumulate in the surface resulting in damage to the rice plant. Land selected for SRI method should be level. When the plot is irrigated the water should spread uniformly across the field.
Similarly, whenever needed, there should be facility to drain the excess water. SRI method of cultivation responds better to organic manures rather than chemical fertilisers. The organic matter is the food for the soil microorganisms. When the soil is alive with microorganisms then the nutrients needed for the plant would be in readily available form. This means that rather than the nutrients in the soil the form in which they are present is more important. When soil is rich with microorganisms then the plant grows healthily, develops resistance to pests and diseases and yields higher. Thus methods of improving the soil fertility should be taken up right from the beginning.

Life Academy of Vocational Studies (LAVS): Technical protocols for different crop seasons
Ma
y 1
, 2
01
4
20 TECHNICAL PROTOCOLS FOR AGRICULTURE FOR KHARIF, RABI & SUMMER SESSON
Nursery Preparation
• 8-12 days old seedlings are transplanted. • The bed should be 4 feet wide. • Two kgs seed would be needed for transplanting in one acre. For raising this, a
nursery bed of 400 sq.ft. would be required. • Depending upon the convenience a single bed or several smaller beds (say, 4
beds of 4 x25 feet) can be prepared. • As the roots of 8-12 day old seedling would grow upto 30 inches, it is necessary
to prepare raised beds of5-6 inches.
Nursery bed is prepared in this manner:
• 1st layer: 1 inch thick well decomposed FYM • 2nd layer: 1 ½ inch soil • 3rd layer: 1 inch thick well decomposed FYM • 4th layer: 2 ½ inch soil
All these layers should be thoroughly mixed. Make a channel around the nursery bed. To prevent the wet soil dropping down the bed should be made secure on all sides with wooden planks, bamboos or any other suitable material.
Land Preparation
• It is ideal that the field is dry ploughed and puddling by tractor is avoided.
• Particularly in black soils the field should be ploughed and kept ready during summer itself.
• The field should be watered and transplanted. This way it would be easy to operate the weeder later.
• As puddling by tractor is not done, the weeder would not get stuck and less energy would be sufficient to run the weeder.
• The field should be level and there should be no standing water while transplanting.
• Wide spacing is important in SRI method. The row to row distance and within a row plant to plant distance should be 10 x 10 inches(25 x 25 cms). With this spacing there would be 16 plant per square metre in SRI method.
• If there is any doubt regarding the survival of plant then two plants can be transplanted per hill. In the conventional method 33-40 hills are transplanted per square metre with 4-5 plants per hill.
• There are several ways by which to transplant at 10 x 10 inches spacing. Take a rope and tie a knot or a stick at every 10 inches. Using this rope as guide, transplant one row after the other. However, markers are available to help transplanting at 10 x 10 inches spacing.

Life Academy of Vocational Studies (LAVS): Technical protocols for different crop seasons
Ma
y 1
, 2
01
4
21 TECHNICAL PROTOCOLS FOR AGRICULTURE FOR KHARIF, RABI & SUMMER SESSON
• For the rows to be straight it is ideal that a rope is tied along the length of the field and the marker is drawn along the rope. After pulling the marker once, i.e. for every 2 metres it is ideal to leave 12-13 inches path. Tie a rope as guide and draw the marker again along the rope.
• Farmers are advised to leave paths for every 2 metres.
• These paths result in good aeration of the paddy fields. As a result the pest and disease intensity gets reduced. These paths are also useful for observation and inter-culture operations.
Transplantation
• Young, 8-12 day seedlings are transplanted in SRI method. The nursery should be raised with utmost care. Similarly, care should be taken to transplant the seedling without experiencing any ‘shock’.
• In the conventional method, the practice is to pull the seedlings by holding the plant. But in SRI method the plants would be very small. So a metal sheet is pushed 4-5 inches below the nursery and lifted on to the plate. This means that the seedlings along with the soil are taken on to the sheet.
• In SRI method the seedlings are transplanted shallow with the roots forming a ‘L’ shape. Start at 1 inch above the intersection of the horizontal and vertical lines and gently pull down using the pointing finger. The field should be lightly irrigated either on the same day or the day after transplantation.
Seed treatment
• Root treatment of the seedlings by liquid bio fertilizer such: Azospirillum, Azatobacter, P.S.M, Potash etc. (1st dose: 100ml. Azospirillum +100 ml. Azatobacter +200 ml.
• P.S.M+200 ml. Potash per acre with ponded water at one corner of the main field) Second dosage of FYM mixed with bio fertilizers.(2nd dose: 100 ml. Azospirillum +100ml. Azatobacter + 200 ml. P.S.M+200 ml. potash + 10 -15 lt. Water + 80-100 kg. dry FYM).
• The mixture was kept for 7 days under shade with polythene covered and the same was applied in the field in crispy form.
Stages of Development
Seed soaking, broadcasting
• Soak the paddy seed for 12 hours. Transfer the soaked seed into a gunny bag or make a heap and cover it with gunny cloth. Leave it for 24 hours. At this time the seed germinates.
• To ensure uniform broadcasting, make the seed into 4 equal parts. Broadcast each part separately one after the other. Two seeds should be separated by a distance of length of one seed.

Life Academy of Vocational Studies (LAVS): Technical protocols for different crop seasons
Ma
y 1
, 2
01
4
22 TECHNICAL PROTOCOLS FOR AGRICULTURE FOR KHARIF, RABI & SUMMER SESSON
• Cover the seed with a thin layer of well decomposed FYM or dry soil. Even paddy straw can be used for this purpose. The seed is protected from direct sun and rain by this layer.
• Depending upon the need, water the bed daily in the morning and evening. The water should be gently sprinkled over the bed.
Germination-It takes 4 -5 days for 85% and 6 days for 95% germination of seeds in the nursery bed. At this stage plants were found to bear at least 4 to 5 leaves with height of 5 to 6”. The nursery bed is given irrigation by the rose cane in every 5 days interval. The raised beds were provided with the drainage channels of 1 ft. width.
Seedling stage- Hills were placed at 10” (25 cm) spacing. During tillering stage each clump was found to bear around 35 -50 nos. of tillers, projecting the advantages over the traditional method of paddy cultivation.
Tillering
• The tillering continued up to 60 DAT. Profuse tillering is observed at this stage. The effective tillers per hill were on an average 30 to 35 tillers. At this stage the field is maintained dry and wet alternately.
• Stem Elongation-The stem elongation continues up to 80 DAT and in the vegetative log phase. In this stage the crop switches over from veg. to reproductive phase. The water was maintained at 3-5 cm .In this period of time the stem elongated 2 to 3 cm in every week.
• Pannicle Initiation-At 60 to 75 DAT the panicle initiation starts. The field is maintained alternately dry and wet.
• Pannicle development-At 75 to 80 DAT the rachis gets fully developed.
• Flowering-At 80 to 85 DAT the flowering gets completed. At this stage the water is maintained at 4 to 6cm.
• Milk grain-The milk grain formation gets completed within 90 DAT. The number of grains on an average is 80 to 100 per panicle.
• Dough grain-The grains complete dough stage within 95 to 100 DAT. The grains are filled and the coloration changed from whitish color to golden yellow color.
• Mature grain stage-The grain continued to mature up to 120 DAT. Harvesting was done at 20-25% moisture in the grain. The crop attended physiological maturity at 105 DAT. The plot was drained 10-15 days before harvest.
Varieties:
Proposed varieties –
Swarna, CR 1014,CR 1002, Heera & Sarala
Life Academy of Vocational Studies (LAVS): Technical protocols for different crop seasons
Ma
y 1
, 2
01
4
23 TECHNICAL PROTOCOLS FOR AGRICULTURE FOR KHARIF, RABI & SUMMER SESSON
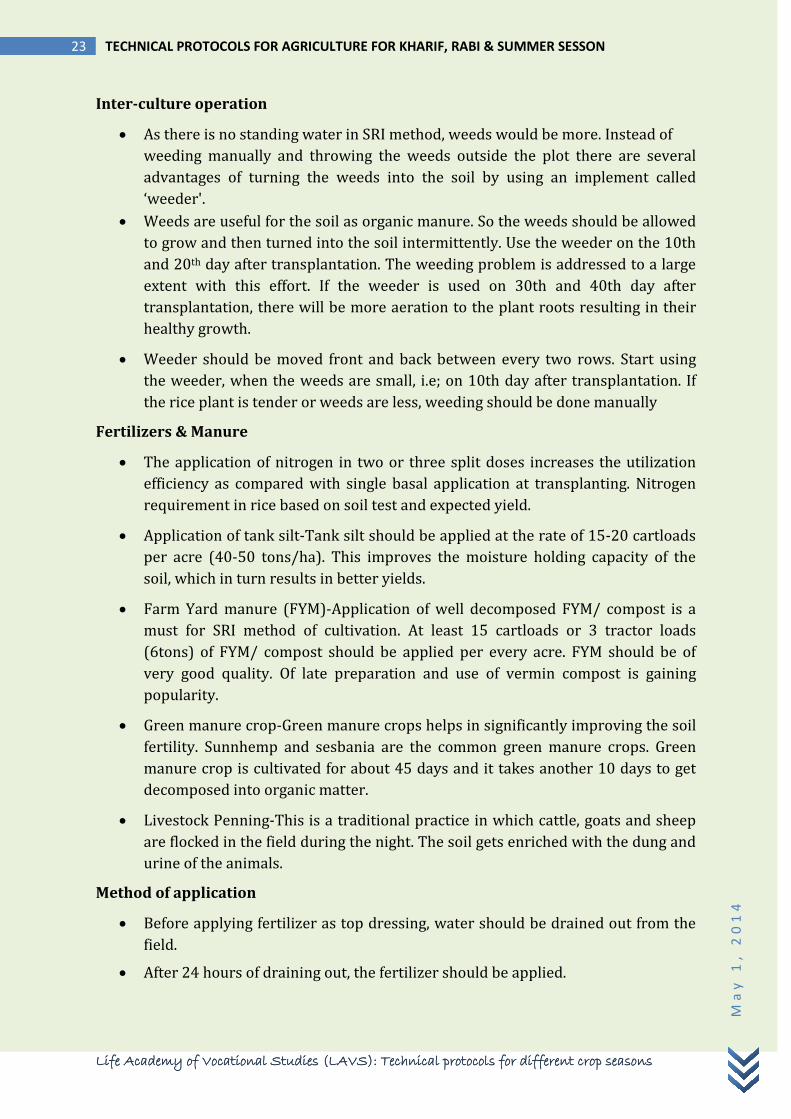
Inter-culture operation
• As there is no standing water in SRI method, weeds would be more. Instead of weeding manually and throwing the weeds outside the plot there are several advantages of turning the weeds into the soil by using an implement called ‘weeder'.
• Weeds are useful for the soil as organic manure. So the weeds should be allowed to grow and then turned into the soil intermittently. Use the weeder on the 10th and 20th day after transplantation. The weeding problem is addressed to a large extent with this effort. If the weeder is used on 30th and 40th day after transplantation, there will be more aeration to the plant roots resulting in their healthy growth.
• Weeder should be moved front and back between every two rows. Start using the weeder, when the weeds are small, i.e; on 10th day after transplantation. If the rice plant is tender or weeds are less, weeding should be done manually
Fertilizers & Manure
• The application of nitrogen in two or three split doses increases the utilization efficiency as compared with single basal application at transplanting. Nitrogen requirement in rice based on soil test and expected yield.
• Application of tank silt-Tank silt should be applied at the rate of 15-20 cartloads per acre (40-50 tons/ha). This improves the moisture holding capacity of the soil, which in turn results in better yields.
• Farm Yard manure (FYM)-Application of well decomposed FYM/ compost is a must for SRI method of cultivation. At least 15 cartloads or 3 tractor loads (6tons) of FYM/ compost should be applied per every acre. FYM should be of very good quality. Of late preparation and use of vermin compost is gaining popularity.
• Green manure crop-Green manure crops helps in significantly improving the soil fertility. Sunnhemp and sesbania are the common green manure crops. Green manure crop is cultivated for about 45 days and it takes another 10 days to get decomposed into organic matter.
• Livestock Penning-This is a traditional practice in which cattle, goats and sheep are flocked in the field during the night. The soil gets enriched with the dung and urine of the animals.
Method of application
• Before applying fertilizer as top dressing, water should be drained out from the field.
• After 24 hours of draining out, the fertilizer should be applied.

Life Academy of Vocational Studies (LAVS): Technical protocols for different crop seasons
Ma
y 1
, 2
01
4
24 TECHNICAL PROTOCOLS FOR AGRICULTURE FOR KHARIF, RABI & SUMMER SESSON
• Application on the moist soil, followed by an interculture operation, helps in mixing the fertilizer with soil and preventing its loss.
• The water should be refilled after 24 to 48 hours of top dressing.
• If draining the field before fertilizer application is not possible, fertilizer can be broadcasted in standing water followed by interculture operation. In this case water should not be allowed to go out of the field at least for 24 hours.
Harvesting & Yield
The grain matures even while the crop is green in colour. The crop cutting is carried under 5x5 mt. space .A rice variety which yields 60 quintals of grains and 90 quintals of straw from one hectare, requires 140 kg of nitrogen. Under Indian conditions a good crop of rice can be harvested by applying 80 to 100 kg of nitrogen.
Post harvest process
Packaging: Packaging is essential to avoid spoilage and to prolong the quality. Packaging of paddy/rice is also important for long-term storage to fulfil the demand of old rice in the market, particularly in case of Basmati and non-parboiled rice. Packaging is closely related to labeling and branding. In present scenario, branding and labelling of rice has significant impact on consumer preference. More care is required in packaging of rice meant for export. This is because of demonstrative effect and the requirements of consumers in different countries; exporters have now started using transparent, colourful and attractive packaging. For good packaging, the packages must possesses following qualities:
• It must protect rice very well and should be long lasting.
• It must look clean.
• It must be convenient to handle and carry out from the store easily.
• It must attract the consumer.
• It must be easily identifiable.
• It must tell information about rice i.e. name and address of packer, pack-size (quantity), quality (grade), variety and date of packing etc.
Method of packing: The rice should be packed in new, clean, sound and dry jute bags, cloth bags, poly woven bags, polyethylene, polypropylene, high molecular high density polyethylene paper packages or in other food grade plastic/packaging materials. The packages shall be free from insect infestation, fungus contamination, deleterious substances and undesirable or obnoxious smell.
Importance & Uses
Rice provides minerals, vitamins, and fiber, although all constituents except carbohydrates are reduced by milling. Rice is a staple food and used by many ways as under:

Life Academy of Vocational Studies (LAVS): Technical protocols for different crop seasons
Ma
y 1
, 2
01
4
25 TECHNICAL PROTOCOLS FOR AGRICULTURE FOR KHARIF, RABI & SUMMER SESSON
Staple food: Rice is used as a staple food by more than 60 percent of world population.
Cooking of rice is a most popular way of eating.
Starch: Rice starch is used in making ice cream, custard powder, puddings, gel, distillation of potable alcohol, etc.
Rice bran: It is used in confectionery products like bread, snacks, cookies and biscuits. The defatted bran is also used as cattle feed, organic fertilizer (compost), and medicinal purpose and in wax making.
Rice bran oil: Rice bran oil is used as edible oil, in soap and fatty acids manufacturing. It is also used in cosmetics, synthetic fibers, detergents and emulsifiers. It is nutritionally superior and provides better protection to heart.
Flaked rice: It is made from parboiled rice and used in many preparations.
Puffed rice: It is made from paddy and used as whole for eating.
Parched rice: It is made from parboiled rice and is easily digestible.
Rice husk: It is used as a fuel, in board and paper manufacturing, packing and building materials and as an insulator. It is also used for compost making and chemical derivatives.
Rice broken: It is used for making food item like breakfast cereals, baby foods, rice flour, noodles, rice cakes, etc. and also used as a poultry feed.
Rice straw: Mainly used as animal feed, fuel, mushroom bed, for mulching in horticultural crops and in preparation of paper and compost.
Paddy as a seed: The paddy is used as seed.

Life Academy of Vocational Studies (LAVS): Technical protocols for different crop seasons
Ma
y 1
, 2
01
4
26 TECHNICAL PROTOCOLS FOR AGRICULTURE FOR KHARIF, RABI & SUMMER SESSON
Maize Introduction
Maize is one of the most important food crops of India, occupying fourth position in the total production of food grains. It is also a chief source of fodder for the cattle.
Maize is native of America. Its cultivation in India dates back to the Maratha Empire.Maize is cultivated all over the world and stands next to Brazil, China, Mexico and the USA.In respect to area and production it stands next to rice, wheat, jowar and bajra. Bihar, M.P.,Punjab, Rajasthan and U.P. produce 75% of the total production in this country. Being an important cereal it is directly consumed as food in different forms viz. chappaties, porridge, flakes, etc. Maize is also used as an important feed for cattle and pigs. It is an important cereal in the world which is used as food for men and feed for animals. It has very high yielding capacity and that is why it is called the queen of the cereals.
Stages of Maize Growth
1. Seedling stage-This is the sprouting stage which comes about one week after sowing and plants have about 2-4 leaves at this stage.
2. Grand growth stage-This is knee height stage of the plant which arrives about 35 to 45 days after sowing-Plants need first top dressing of nitrogenous fertilizers and final mechanical or manual inter cultivation at this stage. If this operation is delayed for some days, the leaves will be damaged.
3. TasseIling stage-This stage is more technically called as flowering initiation stage. At this stage, the tassels (male flowers) are formed at the apex of the plant after 14 to 15 leaves have come out. Final top dressing of nitrogenous fertilizers is done at this stage. Fertilizer application after this stage does not give any response.
4. Silting stage-This stage of maize plant is also known as comb initiation stage. At this stage the female flowers or cobs are formed in the axis of the to 13th leaf.
5. Soft dough stage-This may also be called as milky stage. It commences after pollination and fertilization are over. At this stage, grains start developing but they do not become hard. This stage may be guessed by seeing the silks on the top of the cob which remain partially green and the covering of the cobs also remain green at this stage. This is the best stage for using the green cob~ for table purposes.
6. Hard dough stage-This is the maturity stage at. which the leaves get dried, silks vanish or they get dried completely and become very brittle. Harvesting should be done at this stage
Climate
• Maize is a warm weather plant. It grows from sea level to 3000 metres altitude.

Life Academy of Vocational Studies (LAVS): Technical protocols for different crop seasons
Ma
y 1
, 2
01
4
27 TECHNICAL PROTOCOLS FOR AGRICULTURE FOR KHARIF, RABI & SUMMER SESSON
• The most suitable temperature for germination is 21°C and for growth 32°C.
• About 50 to 75 cm of well distributed rain, is conducive to proper growth.
• Maize is very sensitive stagnant water, particularly during its early stages of growth.
Soil
• Maize requires fertile deep and well drained soil.
• PH of the soil should be 6.5 to 7.5 to get a good crop.
• Waterlogged soil is most harmful for its cultivation.
• The water holding capacity of the soil should be good
Land Preparation
• Maize crop needs well aerated, moist, weed free land.
• The field should be given 3-4 times inter-crossing ploughings followed by planking after each ploughing.
• For good and proper water management the field should be uniformly levelled.
Selection of seeds
• Certified seed of improved varieties should be used to get more yield from a small piece of land.
• New hybrids should be used every year.
• A farmer can use his own seed of improved variety of one year old.
• The seed rate varies according to the varieties.
A. For hybrids : 22-25 kgfha
B. For Composites : 17-20 kgfha
C. For fodder : 50-60 kgfha
The seeds should be sown about 4-5 cm deep. The planting is done by one of the following methods:
Planting in plain field with no earthing up-This method is used when the crop is grown for fodder purposes.
Planting in plain fields and earthing up-This method is usually adopted in hilly areas.
Planting in narrow furrows-This method is adopted when the rainfall is low.
Planting on the sides of a ridge-This method is usually adopted in high rainfall areas.
Time of sowing
In most parts of India, maize is grown during kharif season. Its sowing is done with the onset of monsoon.
Life Academy of Vocational Studies (LAVS): Technical protocols for different crop seasons
Ma
y 1
, 2
01
4
28 TECHNICAL PROTOCOLS FOR AGRICULTURE FOR KHARIF, RABI & SUMMER SESSON
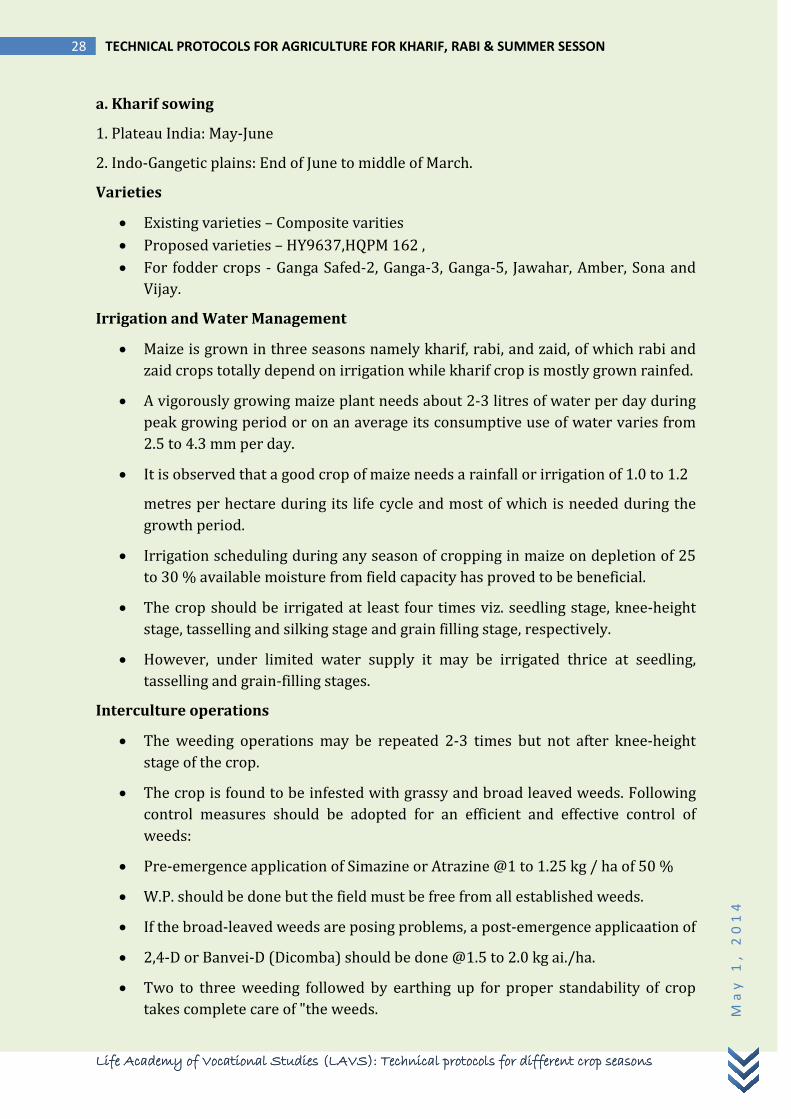
a. Kharif sowing
1. Plateau India: May-June
2. Indo-Gangetic plains: End of June to middle of March.
Varieties
• Existing varieties – Composite varities • Proposed varieties – HY9637,HQPM 162 , • For fodder crops - Ganga Safed-2, Ganga-3, Ganga-5, Jawahar, Amber, Sona and
Vijay.
Irrigation and Water Management
• Maize is grown in three seasons namely kharif, rabi, and zaid, of which rabi and zaid crops totally depend on irrigation while kharif crop is mostly grown rainfed.
• A vigorously growing maize plant needs about 2-3 litres of water per day during peak growing period or on an average its consumptive use of water varies from 2.5 to 4.3 mm per day.
• It is observed that a good crop of maize needs a rainfall or irrigation of 1.0 to 1.2
metres per hectare during its life cycle and most of which is needed during the growth period.
• Irrigation scheduling during any season of cropping in maize on depletion of 25 to 30 % available moisture from field capacity has proved to be beneficial.
• The crop should be irrigated at least four times viz. seedling stage, knee-height stage, tasselling and silking stage and grain filling stage, respectively.
• However, under limited water supply it may be irrigated thrice at seedling, tasselling and grain-filling stages.
Interculture operations
• The weeding operations may be repeated 2-3 times but not after knee-height stage of the crop.
• The crop is found to be infested with grassy and broad leaved weeds. Following control measures should be adopted for an efficient and effective control of weeds:
• Pre-emergence application of Simazine or Atrazine @1 to 1.25 kg / ha of 50 %
• W.P. should be done but the field must be free from all established weeds.
• If the broad-leaved weeds are posing problems, a post-emergence applicaation of
• 2,4-D or Banvei-D (Dicomba) should be done @1.5 to 2.0 kg ai./ha.
• Two to three weeding followed by earthing up for proper standability of crop takes complete care of "the weeds.

Life Academy of Vocational Studies (LAVS): Technical protocols for different crop seasons
Ma
y 1
, 2
01
4
29 TECHNICAL PROTOCOLS FOR AGRICULTURE FOR KHARIF, RABI & SUMMER SESSON
• The most appropriate time for first weeding is when the maize seedlings become two weeks old. Two hoeings at a week interval should be given afterwards to keep the soil friable, clean and free from crust formation.
Earthing Up
Earthing is a common practice in maize cultivation and is easily done in line sown crop. It has a number of advantages.
1. To irrigate the field easily.
2. To do the interculture operations easily.
3. To drain away the water easily.
4. To apply the fertilizers, pesticides, weedicides, etc. easily.
5. It gives extra support to the plants.
6. It gives enough space to the plants to get sufficient sunlight.
7. The soil gets loosened.
8. Plant roots get more aeration.
Thinning
It is an important practice to retain the healthy plants in the field and remove the old or weaker or unwanted plants from the field. This is done when the seedlings are 15-16 cm high. The thinning and replanting at pro- per spacing of seedlings can efficiently be done while hand hoeing and weed control.
Application of Fertilizers and Manures
30-45 cartloads of farmyard manure (FYM) or compost should be applied before 20-35 days of sowing and mixed well with the soil to get more yield. For composite varieties, N 120 kg, P2Os 60 kg and K2O 40 kg per ha. should be applied. One third of N and whole quantity of P2Os and K2O should be applied as basal dose. The other 2 equal doses of N, one dose to be applied at knee height state (35days after planting) and the remaining at tasselling stage. The basal dose should be applied with the help of fertilizer drill or use a funnel attached behind the plough. The N should not be applied when the soil is wet as it will go to the sub-soil by leaching. Application of BHC or DDT @20-25 kg per ha is useful to avoid the attack of soil infesting insects.
Crop Rotation
Some suitable crop rotations are given below.
A. One year rotations
1. Maize-berseem
2. Maize-potato
3. Maize-wheat

Life Academy of Vocational Studies (LAVS): Technical protocols for different crop seasons
Ma
y 1
, 2
01
4
30 TECHNICAL PROTOCOLS FOR AGRICULTURE FOR KHARIF, RABI & SUMMER SESSON
B. Two year rotations
1. Maize-senji-sugarcane-cotton
2. Maize-wheat-cotton-berseem
3. Maize-wheat -sugarcane
4. Maize-toria-sugarcane
C. Three year rotation
1. Maize -wheat -jowar -sugarcane.
Some crops like moong beans, soyabean etc. are also grown as mixed crop with main maize crop.
Harvesting
• Maize crop grown for grain purpose should be harvested when the grains are fully mature, nearly dry and do not contain more than 20-30 % moisture.
• Clean the cobs by removing husk and then dry in the sun for 6-8 days till they get Completely dry.
• Remove the grains from the cobs by sticks or maize shellers.
Uses
• For fodder purpose, maize crop should be harvested at the milking to early dough stage.
• For silage making, harvesting at late dough stage is desirable.
Yield
Generally, hybrid varieties yield about 50 to 60 quintal grains per ha and composite varieties 45 to 50 quintals, per hectare.
Post Harvest process
• The grains should be properly dried before storage. • The grains can be stored in seed bins or earthen pots or jute bags. • The storage place should be free from moisture, insects, rodents, termites, etc. • The containers should be plastered with mud.

Life Academy of Vocational Studies (LAVS): Technical protocols for different crop seasons
Ma
y 1
, 2
01
4
31 TECHNICAL PROTOCOLS FOR AGRICULTURE FOR KHARIF, RABI & SUMMER SESSON
Niger (Oil seed) Oils and fats are important items of human diet all over the world. The niger seed oil is used for human food, medicines and manufacturing a number of industrial products. Its oilcakes are used as cattle feed and leaves add organic matter to the soil. Niger (Guizotia abyssinica) is an oilseed crop. India is considered to be the chief niger producing country in the world with an area of 5 lakh hectares. It is mainly grown in the states of Madhya Pradesh, Bihar, Maharashtra, Orissa, Karnataka and Tamil Nadu.
Climate:
A moderate, well spread rainfall of 100-125 cm during, crop growth suits this crop. The most suitable temperature for germination is 20°C and 27-30oC for plant growth and 25°C for flowering and seed formation.
Soil
• Soils like sandy loam, loam and clay loam are the best for its cultivation.
• Clay soils are not suitable for its cultivation.
• Even light red soil and brownish loam soils with sufficient depth and good texture are suitable for this crop.
• It is more often grown on poor soils of coarse texture.
• Soil pH 7.5 is good for its cultivation.
• Water logged soils are most harmful for its cultivation.
Land Preparation
• Niger crop requires a fine textured and well drained soil.
• Field is prepared by giving 2 or 3 ploughings with soil turning plough or by disc-plough, followed by harrowing and planking.
• After sowing, field is divided into seed beds separated by water channels.
• These channels will also act as drainage channels to drain out the excess rain water.
Seed and Sowing
• Weed free seeds about 6-8 kg seeds is required for sowing one hectare of the field.
• The seed is treated with Thiram at the rate of 2.5 g/kg seed to give protection against the seed borne diseases.
• The depth of the seed is adjusted to 2 or 3 cm deep in the soil depending upon the soil moisture content.
• Sowing time of niger crop in Madhya Pradesh is July and spacing is 30 x 15cm.

Life Academy of Vocational Studies (LAVS): Technical protocols for different crop seasons
Ma
y 1
, 2
01
4
32 TECHNICAL PROTOCOLS FOR AGRICULTURE FOR KHARIF, RABI & SUMMER SESSON
• Seed can be sown by broadcasting method when soil moisture content is reasonably high.
• Seeds are sown by pora method or by seed drill in lines, at proper seed depth to ensure soil moisture for the germination of seed.
Varieties
Existing Verities – Desi
Recommended varities–GA-10, GA-2, GA-5, PHULBANI LOCAL, UTKAL NIGER-150
(ONS-150),
Interculture Operations:
Thinning is done to regulate the spacing between plants and to produce sturdy plants for higher yields. The appropriate time for thinning is about a fortnight after sowing. Extra plants required for planting in vacant spaces should be replaced from specially prepared nursery at one corner of the field. Thinning operation combined with hand hoeing is advantageous. Niger field gets infested by a number of weeds which damage the crop severely during 3-5 weeks after sowing.
Both mono cot and dicot weeds are found in niger field. Hand hoeing or wheel hoeing or weeding by triphali after two weeks of sowing, at the time of thinning gives better results. Under compelling circumstances use of herbicides like Atrazine or Propazine at the rate of 0.5 kg per hectare in 800 litres of water, as pre-emergence spray controls most of these weeds. Also spraying on the surface of moist soil, six days after sowing with Chloraprophomweedicide effectively controls cuscuta.
Manures and Fertilizers:
Well decomposed, 10-15 tonnes of Farmyard manure should be added to the soil about a month before sowing of the crop.Half dose of nitrogen is applied along with phosphatic and potassic fertilizers at the time of sowing and rest half dose of the nitrogenous fertilizer is applied as top dressing before flowering. Recommended dose of fertilizers for niger crop
Harvesting, Threshing and Yield
• The crop matures in November or December i.e. after three months of sowing.
• The leaves dry up and the head turns blackish in colour.
• The plants are cut with the help of sickles and stacked in the threshing yard for a week.
• They are then spread in the sun to dry for 2-3 days and threshed by beating with sticks and winnowed to clean the seeds.
• The average yield of the niger is about 450 kg per hectare but under favourable conditions it has recorded the yield up to 600 kg/hectare.

Life Academy of Vocational Studies (LAVS): Technical protocols for different crop seasons
Ma
y 1
, 2
01
4
33 TECHNICAL PROTOCOLS FOR AGRICULTURE FOR KHARIF, RABI & SUMMER SESSON
Crop Rotation
Some of the crop rotations are given here.
1. Niger -wheat -paddy ~ niger
2. Niger -barley ~ sorghum -niger
3. Niger -gram -bajra -niger
Mixed Cropping
Niger is mostly grown under rainfed conditions and uncertainty of rainfall poses a great risk in its production. Therefore, marginal farmers usually grow it mixed with some other crops to cover the risk. These crops are mostly minor millets and cereal crops like bajra, sorghum and maize. Other crops like soyabean, arhar, groundnut, peas, etc. are also grown mixed with niger.
Uses and Importance
Niger seeds are edible and its seeds contain 43% oil which is used for culinary purposes. Its oil is semidrying in nature. Therefore, it has a wide range of application in industries, manufacturing paints, varnishes and soft soaps. Its oil is well known for its medicinal uses for pains, swelling, and anointing the body and can also be used as an illuminant. Niger cake is used for feeding milch cattle and as manure. The crop sheds a large quantity of dried leaves in the field which add organic matter to the soil.

Life Academy of Vocational Studies (LAVS): Technical protocols for different crop seasons
Ma
y 1
, 2
01
4
34 TECHNICAL PROTOCOLS FOR AGRICULTURE FOR KHARIF, RABI & SUMMER SESSON
Millet Introduction
Minor millets can be grown even in poor soil and climatic conditions. They have short growing season and can be very well fitted into multiple cropping systems both under irrigated as well as dry farming conditions. They can provide nutritious grain and fodder in a short span of time. Their long storability under ordinary conditions has made them "famine reserves".
Minor millets or small millets as opposed to major millets (Maize, Jowar & Bajra) may be defined as millets cultivated for their small grains which are borne on short, slender grassy plants. In other words they refer to a group of small seeded cereal crops. The most important minor millets cultivated in India are: finger millet (ragi), proso millet, barnyard millet, italian millet, kodo millet, little millet, job's tears and, teff. Among these there is a separate booklet on ragi (finger millet).
Small millets have a capacity for wide adaptation. They can withstand a certain degree of soil acidity and alkalinity, stress due to moisture and temperature and variation in soils from heavy to sandy infertile.
Climate-This millet grows faster in warm and dry climate. It is highly drought tolerant and can be grown in scanty rainfall areas which receives only40-50 cms rainfall annually.
Soil-It can be grown from gravely to stony upland poor soils to loamy soils.
The crop has a capacity to produce some quantity of yield and straw even under adverse conditions. The soil should be well drained and best soils suitable for its cultivation are sandy loam sand loams.
Land preparation
The field should be ploughed to good tilth so that it enables to retain moisture.
Seed and Sowing
• Line sowing at 3-4 cms deep is beneficial.
• Spacing is 40-45 x 8-10 cms and seed rate per hectare is 10-15 kilograms.
• It generally does not require any irrigation when sown in kharif.
• During rainy season care should be taken to avoid water logging.
Varieties
• Existing varities – Ludrahi,Rukhi ,Sathia,Chakri
• Proposed varities - Niwas -1, Dindori -73
Interculture operations
• Field should be free of weeds up to 35-40 days of sowing.

Life Academy of Vocational Studies (LAVS): Technical protocols for different crop seasons
Ma
y 1
, 2
01
4
35 TECHNICAL PROTOCOLS FOR AGRICULTURE FOR KHARIF, RABI & SUMMER SESSON
• Two weedings at an interval of 15 days are essential.
Manures & Fertilizers
• Application of 60 kg N per hectare is recommended.
• Half N should be applied at the time of sowing. The remaining N should be applied about 40-45 days after sowing.
Irrigation
In areas with a rainfall of 60 to 75 cm, it is cultivated as a rainfed crop. In areas where the rainfall is less, at least two irrigations are necessary, first immediately after thinning and second in the first week of September. Under irrigated conditions, yield up to 15 q/ha can be obtained.
Diseases and pests
• Fungal diseases like ergot, smut and rust are the most commonly seen diseases in kodo millet.
• Ergot appears in the form of honey like liquid which later on turns dark brown and sticky. If this disease spreads it is better not to grow this crop for some time to avoid spreading of the disease to next crop season. Use of healthy seeds only can avoid incidence of the disease.
• Smut affects the ears which become black due to the same coloured masses. Those black masses are covered by a thin yellow membrane. Seed treatment with hot water at 55°C for 7- 12 minutes or with agrosan or ceresan at the rate of2.5 -3 gm/ kg of seed kill tile disease.
• Rust infection can be seen as brown pustules on leaves. Because it affects the green portion of the plant (mainly leaves), it in turn hinders the photosynthesis and causes considerable loss in yield. A spray with 0.2% solution of dithane M -45 may control the disease.
Mixed cropping
Kudo can be grown as a pure crop or mixed with red gram (arhar), sesamum and sunnhemp. It can also be mixed with sorghum and black gram. It is generally grown in rotation with mustard, linseed, gram, barley etc.
Harvesting and yield
The plant are cut close to the ground, bundled and stacked for a week and then threshed by bullocks or machine. The average yield ranges from 8-16 q of grain and 15-40 quintals of fodder per hectare. Grains can be stored after drying them to a moisture percentage of 10-12 per cent. The grain is easily preserved and proves as a good famine reserve.

Life Academy of Vocational Studies (LAVS): Technical protocols for different crop seasons
Ma
y 1
, 2
01
4
36 TECHNICAL PROTOCOLS FOR AGRICULTURE FOR KHARIF, RABI & SUMMER SESSON
Little Millet (Panicum miliare)
Little millet known as kutki in Hindi .It is an annual grass which has leafy stem and tillers profusely. Cultural practices are almost similar to barnyard millet.
Climate-
This millet grows faster in warm and dry climate. It is highly drought tolerant and can be grown in scanty rainfall areas which receive only40-50 cms rainfall annually.
Soil-
It can be grown from gravely to stony upland poor soils to loamy soils. The crop has a capacity to produce some quantity of yield and straw even under adverse conditions. The soil should be well drained and best soils suitable for its cultivation are sandy loams and loams.
Land preparation-
The field should be ploughed to good tilth so that it enables to retain moisture. It is grown on a limited scale as poor man's crop capable of withstanding both drought and water logging. Like other millets it is grown in kharif season
Seed and Sowing-
Line sowing at 3-4 cms deep is beneficial. Spacing is 40-45 x 8-10 cms and seed rate per hectare is 10-15 kilograms. It generally does not require any irrigation when sown in kharif. During rainy season care should be taken to avoid water logging.
Seed rate per hectare is 12.5 kilograms. They can be grown between July and October.
Composition and Uses
All millets are cooked as rice after dehaulling.

Life Academy of Vocational Studies (LAVS): Technical protocols for different crop seasons
Ma
y 1
, 2
01
4
37 TECHNICAL PROTOCOLS FOR AGRICULTURE FOR KHARIF, RABI & SUMMER SESSON
Arhar Introduction:
Arhar (Cajanus cajan) is an important pulse as well as fodder crop. It is an annual legume shrub. It is grown in states of Uttar Pradesh, Madhya Pradesh, Karnataka, Gujarat, Andhra Pradesh, Maharashtra, Haryana and Bihar. Arhar or pigeon Pea has been growing in India since time immemorial as a choicest pulse crop. Its green plants also serve as an excellent source of green fodder to the animals.
Climate:
For better germination and establishment of seedlings, a temperature range of 20-250 C is considered favourable. For the vegetative growth, the optimum temperature range is 130 C to 250 C. The plants can thrive well in regions where annual rainfall is 250 cm, provided the fields are well drained. They can also thrive well under very low rainfall i.e. 50 cm per annum, provided the soil is deep enough to hold the water for sufficient time. Bright sunny days are very essential during the flowering and the ripening stages of arhar.
Soil:
Well drained, alluvial and loamy soils are very good for its cultivation. It grows very successfully in black cotton soils of Madhya Pradesh. Saline alkaline soils prone to water logging are not good for this crop. The most favourable pH value ranges from 5.9 to 7.0.
Land Preparation:
Arhar responds well to properly tilled and well drained seed bed. Since the young seedlings grow very slowly for the first month or two, it is necessary to keep the field weed free during this growth period. One deep ploughing followed by two to three hoeings by a blade harrow are sufficient as preparatory tillage.Well tilled and well drained soils are necessary for proper root development. The field may be properly bunded after preparatory tillage to prevent erosion. Clods should be broken properly.
Proposed varieties –
Vishakha, jagriti, Durga & Prabhat & T 21
Seed and Sowing:
The arhar seed should be treated with Thiram or Captan @ 3g per kg of seed before sowing to avoid the attack of seed borne diseases. A seed rate of 15 kg/hectare is sufficient. The seed should be sown in lines at a distance of 60 to 75 cm from row to row and 15 to 20 cm from plant to plant.
The seed should be placed at the depth of two centimeters with the help of a seed drill. The best time of sowing arhar is in the first fortnight of June. Before sowing the seed, the field should be irrigated. In rainfed areas the sowing is done after first showers of monsoons.

Life Academy of Vocational Studies (LAVS): Technical protocols for different crop seasons
Ma
y 1
, 2
01
4
38 TECHNICAL PROTOCOLS FOR AGRICULTURE FOR KHARIF, RABI & SUMMER SESSON
Seed inoculation/Treatment :
A packet containing bacteria culture is bought from a reliable source. The seed is soaked in water for about 12 hours (over.; night). A gur-solution 10% (100 gm gur in 1 litre water) is made, boiled and cooled to room temperature. Bacterial culture is now added to the this solution. The seed is thoroughly mixed with this bacteria containing gur solution and dried under shade for one hour. This whole process of seed treatment with bacterial culture is called inoculation. In case inoculation is not possible then 50 kg of top soil of any other field in which arhar crop was grown successfully last year can be broadcasted over the new field to get the required bacteria in the field.
Irrigation:
When the crop is sown in June, it needs one to two irrigations before monsoon. If the monsoon is not satisfactory two to three irrigations may be given depending upon the need of the crop. During rainy season, water should not be allowed to stand in the field.The furrows in between the ridges help the excess water to drain out.
Interculture operations:
The possible way to control weeds is spraying pre-planting weedicides such as Basalin kg a.i./ha. in 800 litres of water and stirring soil with bar-harrow, so that weedicide is incorporated in the soil. Another way of weed control is to grow short duration crop like moong, cowpea etc. as an intercrop between the rows of arhar crop.
Fertilizers and Manures:
Reserved phosphate containing considerable amount of free lime is preferable for acid and moist soils. Superphosphate gives better results on the dried soils. It is recommended to add 30 kg of nitrogen, 100 kg phosphorus and 60 kg potash per hectare as a basal dose. Arhar is very susceptible to zinc deficiency. Zinc deficient plants show stunted growth, reduced leaf size, and yellow brown spots on the leaves. Apply about 20 kg of zinc sulphate per hectare. Zinc deficiency in the standing crop can be rectified by spraying 5 kg zinc sulphate and 2-5 kg lime dissolved in 800 to 1000 litres of water per hectare. To improve the physical conditions of the soil, farmyard manure (FYM) 8-10 cartloads per hectare is recommended.
Diseases & Pests:
Bacterial leaf spot and stem canker. This disease is caused by Xanthonwnas campestris . The pathogen enters the leaf through the stomata. It causes destruction of chloroplasts, granulation of protoplasts, distortion and collapse of cells and ultimate formation of bacterial pockets on leaves. Control 1. Grow resistant varieties like Ageti, 5-10, etc. 2. Remove the affected plants and bum them. 3. Apply streptocycline (100 ppm) followed by Agallal -3 f (2000 ppm) at 10 days interval.
Wilt –
This disease is caused by fungus Fusarium oxysporum udum . In this disease the leaves of the affected plants turn yellowish in colour and drop. This results in drying out of whole plant.

Life Academy of Vocational Studies (LAVS): Technical protocols for different crop seasons
Ma
y 1
, 2
01
4
39 TECHNICAL PROTOCOLS FOR AGRICULTURE FOR KHARIF, RABI & SUMMER SESSON
After removing the outer epidermal strip of the roots, black streaks on the wood are found. The affected tissues become black. Control 1. Adopt 3-4 years crop rotation as the disease is soil borne. 2. Sow disease resistant varieties like F-18, F-52, ST-l, ST- 2 and ST-3 etc. 3. Remove the diseased plants carefully by hand, bum them outside the field so that the pathogens may not spread in the same field.
Stem rot –
It is caused by Phytophthora dreschsleri var. c ajani. Brown to dark brown lesions appear on the stem near the soil surface. The lesions rapidly appear on the whole stem portion which results in drying of the plant. Control 1. Grow only resistant varieties. 2. Good drainage system controls the disease effectively. 3. Remove the affected plants and burn them.
Sterility mosaic –
It is caused by virus. The virus is spreading from plant to plant under field conditions through mite. The affected plants become light greenish in colour. The plants remain stunted, leaves are reduced in size and no flowers or fruits are produced on these plants. Control 1. Grow disease resistant varieties only. 2. Remove the affected plants and bum them outside the field on cement floor so that they may not spread again. . 3. Control mites with Metasystox 0.1 per cent. Three to four sprays are needed to control the mites.
Galerucid beetle - is dangerous during night hours. The beetles make the holes in the leaves. The photosynthetic activities of the plants are reduced, resulting in retarded plant growth. Control Apply Aldicarb @ 10 kg per hectare.
Hairy caterpillar –
It causes a heavy damage to the crop by eating the green leaves. The moth lays eggs in clusters. The young larvae come out and are also very congregated. Control I, Dust BHC 10% @ 25-30 kg per hectare, 2, Collect the egg and larvae of the pest and bum them away from the field.
Tur pod fly –
The larvae of the pest grow and feed on the seeds. The attacked pods are slightly twisted or deformed, The eggs are laid on these tender pods. Control Spray the crop with Thiodan @ 1.5 litres in 1000 litres of water per hectare.
Pod borer –
The larvae of this pest feed on tender leaves and twigs. When pod formation takes place they bore the pod, enter into them and eat away the grains. The caterpillars are green with dark brown, grey lines on the sides of the body. Control 1. Spray the crop with Thiodan 1.5 litres in 1000 litres of water per hectare. 2. Spray Nuvacron 40 EC @ 750 ml in 1000 litres of water per hectare. 5. Leaf hopper

Life Academy of Vocational Studies (LAVS): Technical protocols for different crop seasons
Ma
y 1
, 2
01
4
40 TECHNICAL PROTOCOLS FOR AGRICULTURE FOR KHARIF, RABI & SUMMER SESSON
Harvesting and Yield:
The crop takes about 175-240 days to mature depending upon the variety. The crop is ready to be harvested when two-third or three-fourth of the pods turn brown and a large portion of the field is mature. In general, the plants are cut within 8-10 cm above the ground with sharp sickles or with a 'gandasa'. The harvested crop is left in the field for drying. The crop should be cut before it becomes over ripe, otherwise pod shattering may result.The harvested crop is dried well in the sun so that pods become brittle and respond to stick beating. The dried pods can be threshed by trampling animals or by a thresher. The winnowed grains are properly cleaned and dried in the sun to reduce the moisture content for safe storage. The average yield of arhar crop is about 20-24 quintals\hectare grains and 60-70. quintals of sticks \ hectare. Mixed Cropping Some of the mixed cropping patterns are as under.
1. Pigeon pea + maize
2. Pigeon pea + gram
3. Pigeon pea + soyabean
4. Pigeon pea + sorghum
Post Harvest Technology:
For use as a human food, dry pigeonpea seeds are consumed after dehulling (or dehusking), and this process is the major postharvest operation before utilization. Pigeonpeas are commonly stored in over ground structures and are attacked by pulse beetles, this seriously deteriorates grain and makes it unhygienic. Pigeonpea is traditionally dehulled in two ways depending on the magnitude of operation. One is the large scale commercial dehulling of large quantities of pigeonpea into dhal in mechanically operated mills and the other is the small scale home processing method adopted by villagers using a stone chakki.
After the developing pods are harvested in the field, they are shelled to separate the green pigeonpeas from their pod walls. Shelling recovery is very important to processors and shelling is done mechanically or by hand depending on the volume of product handled by the processor.
Blanching is an essential heat treatment operation in the canning and freezing process. Seeds are heated at 185 oF (85 oC) for 5 min in hot water, and then cooled immediately in cold water to about 80 oF (26.7 oC). The other method involves steam blanching, which causes less shrinkage and lower nutrient losses. After blanching and cooling, cans of different sizes are filled with seeds and a 2 per cent brine solution at 195 oF (90.5 oC to 93.3 oC).
Uses and Importance: It is a rich source of protein and is consumed by the vegetarian population of the country as split pulse as 'dal'. Its seeds are rich in iodine, iron, a number of essential amino acids like cystine, arginine etc. It is used as feed for milch animals. Green and dried leaves are fed to the animals.

Life Academy of Vocational Studies (LAVS): Technical protocols for different crop seasons
Ma
y 1
, 2
01
4
41 TECHNICAL PROTOCOLS FOR AGRICULTURE FOR KHARIF, RABI & SUMMER SESSON
Arhar crop has a thick and strong stem, therefore, growing this crop at a frequent interval between sorghum or maize crop, protect these succulent and weak-stemmed crops from breaking by winds. Its leaves and roots leave a good amount of organic matter and nitrogenous fertilizers produced in excess by nitrogen-fixing bacteria. It is a deep rooted crop, so is very useful in controlling the soil erosion on slightly sloppy hills. Its strong sticks are useful in making baskets, thatching roofs and as fuel.
IMPROVED PRACTICE
Selection In organic farming, stress is given to on-farm seed production and seed preservation. For seed purposes, identify vigorously growing healthy plants, free from insect pests and diseases. Tag them for easy identification and harvest the gram separately. Collect only healthy pods. Use an appropriate grading sieve to obtain uniformity in size and weight of the grains. Drying of seeds in the sun is essential to obtain a moisture level below 8%.
Seed treatment
• Treat the seeds with a mixture of beejamrut (200 gm/kg seed) and Trichoderma viride (8 gm/kg of seed). Dry the seeds in the shade.
• Once again treat the seeds with red gram Rhizobium and PSB biofertilizer (5 gm each per kg of seed) and dry the treated seeds in the shade. These seeds should be sown within 4–6 hours of treatment.
• Seeds are soaked in diluted panchagavya for 20 minutes, dried and then treated with Trichoderma viride , PSB and rhizobium.
Seed rate and sowing:
Seeds are sown 4–6 cm deep. The quantity of seed used and the spacing varies, depending upon the crop variety and the crop duration, as follows: Very early maturing (monocrop): 20 kg/ha, spacing 120 x 30 cm
• Early maturing (monocrop): 20 kg/ha, spacing 120 x 30 cm
• Medium duration (monocrop): 15 kg/ha spacing 60 x 20 cm ,
• Intercrop: 5 kg/ha, spacing 30 x 20
• Long duration (monocrop): 12–15 kg/ha, spacing 60 x 20 cm
• Intercrop: 5 kg/ha, spacing 90 x 20 cm
Pre-cultivation practices
• It requires at least one deep tilling upto 1.5 feet and one shallow tilling.
• Application of 10–20 quintals of well decomposed FYM or 10–12 quintals of enriched compost or 5 to 10 quintals of vermin-compost mixed with 5 kg PSB (phosphate solubilizing biofertilizer) during the last tilling, when the soil is wet, is highly beneficial. • Apply 500 litres of sanjeevak or jeevamrut /ha at the time of sowing, or immediately after sowing, as soil treatment.

Life Academy of Vocational Studies (LAVS): Technical protocols for different crop seasons
Ma
y 1
, 2
01
4
42 TECHNICAL PROTOCOLS FOR AGRICULTURE FOR KHARIF, RABI & SUMMER SESSON
• This ensures ready availability of microorganisms for better fertility of the soil.
• Plant trees of neem, babul, pongam, sesban, glyricidia , etc., on farm bunds to get leaf litter for soil nutrition.
CULTIVATION:
Between 50–60 days of germination, the main shoot tip (known as the ‘mother’ shoot locally) and the secondary branch tips (secondary shoots, known as ‘daughters’) are pruned. This stimulates a large number of tertiary shoots (‘grandchildren’) which bear larger numbers of pods, increasing the yield by 30–50%. ‘Grandchildren’ grow only at the expense of mothers and grandmothers, so goes a local saying.
Weeds: Weed management is required only up to 60 days of crop growth.
• The first weeding (hoeing) is to be done 20–25 days after sowing, while second hoeing is done 50–60 days after sowing.
• Do not throw or burn the uprooted or cut weeds. Leave them in the field as mulch.
• Normally, no weeding is required 60 days after crop growth, but in case it is needed, then manual weeding should be done only in alternate rows.
MANAGING SOIL FERTILITY
• Use of green manure crops is an ideal proposition for soil enrichment.
• Taking advantage of showers, sprinkle 1–2 kg seeds each of sunhemp, sesban, horse gram, cow pea, green gram and black gram and allow them to grow for 30 days.
• Incorporate this green manure crop in the soil by shallow tilling during the first week of July and sow red gram 7–8 days after incorporation.
• The addition of 5–10 quintals of neem leaf/seed manure has also been found to be beneficial, not only in terms of increased nutrient supply, but also in terms of reduced problem of soil borne pathogens and nematodes .
Package of organic practices
• Sanjeevak , a fermented liquid manure prepared from cattle dung and cow urine, is a key on-farm input in fertility management of soils under organic management. Amrut pani , a soil tonic, can also be used in place of sanjeevak .
• Around 200 litres of sanjeevak /acre are applied to the soil, either along with the irrigation water or sprinkled over the soil surface during or after mild rains. A minimum of three applications of sanjeevak is necessary: the first at the time of sowing; the second after 25–30 days (after the first weeding); and the third, after 50–60 days (after the second weeding).
• For better crop growth, jeevamrut (life tonic) is used as a foliar spray, at least on three occasions, with intervals of 20 days, after 20 days of sowing.

Life Academy of Vocational Studies (LAVS): Technical protocols for different crop seasons
Ma
y 1
, 2
01
4
43 TECHNICAL PROTOCOLS FOR AGRICULTURE FOR KHARIF, RABI & SUMMER SESSON
WATER REQUIREMENTS It requires 35–40 cm water during its entire growth period. Optimum moisture is necessary during
a. budding;
b. flowering; and
c. pod formation stages.
As red gram is a rain-fed crop which is generally grown in assured rainfall areas, it usually does not require any irrigation. If water stress does develop, protective irrigation may be given in alternate rows at these three stages. Avoid further interculture operations after the harvesting of the intercrop. Use harvested intercrops’ biomass as mulch to preserve soil moisture and to maintain microbial activity.
PROBLEM INSECTS AND DISEASES: Pod borers or bollworms (Helicoverpa)
• Spray 5% neem seed kernel extract (NSKE) two or three times, at intervals of 15 days. NSKE enriched with 5% cow urine is even more effective.
• The azadirachtin in the NSKE controls the bollworm and other sucking pests.
• Alternatively, 20 kg of neem leaves boiled with 100 litres of water can also be used.
• Garlic, chili and neem crushed in cow urine can be sprayed on leaves as well.
• Caterpillars can be controlled by spraying 500–1000 ml HNPV (nuclear polyhydrous virus) per ha.

Life Academy of Vocational Studies (LAVS): Technical protocols for different crop seasons
Ma
y 1
, 2
01
4
44 TECHNICAL PROTOCOLS FOR AGRICULTURE FOR KHARIF, RABI & SUMMER SESSON
Tomato
Introduction-
Tomato is one of the most important vegetable crops. Among vegetables, it is one of the richest source of vitamin C and iron. Therefore, from nutrition point of view, tomato is a very wholesome vegetable. Because of its wide industrial uses, cultivation of tomato is more profitable than that of other vegetables. Tomato, Lycopersicon esculentum belongs to the family Solanaceae and is related to brinjal. Tomato is a herbaceous annual plant with bisexual flowers. The fruit is a true berry. It is a self- pollinated crop but in, some cases cross pollination has also beep reported. Depending upon the growth habit, the tomato plants have been, categorized into two-indeterminate and determinate types. The plant of indeterminate type terminates in a vegetative bud, whereas that of the determinate type terminates in a flower bud and is appropriately called "self topping" or self pruning.
Climate –
Tomato is a warm season crop and is highly susceptible to frost. High temperature and high humidity favour the development of foliage diseases. Light intensity is a very important factor for vitamin C content in tomato fruits. Under low light intensity, vitamin C is much lower than in higher intensity. Tomato pollen grains germinate best at 29.4°C, nearly as well at 21°C, poorly at 10°C, and very poorly at 38°C. Tomato withstands drought well but fruits are subject to blossom end rot and to growth cracks if moisture supply follows drought.
Soil-
A well-drained, fairly light fertile loam with a good moisture holding capacity is ideal for growing a good crop of tomato. Generally, light soils are good for an early crop, while clay loam and silt loam soils are well suited for heavy yields. Poor and medium quality land produces good early crop if managed properly. Tomato crop prefers a soil reaction ranging from pH 6.0 to 7.0. In acidic soils liming will be beneficial.
Soil preparation-
Tomato should be planted in well pulverized field by first ploughing with soil turning plough and other 4-5 ploughings with country plough. Ploughing should be followed by planking. Tomato is normally planted in raised beds of 60- 75 cm width.
Transplanting and spacing-
Seedlings become ready for transplanting in 4-5 weeks time. Seedlings 5 mm in diameter are better for field setting. The seedlings should be about 15 cm in length at the time of transplanting. The transplanting of autumn crop is done during July- August and for the spring crop in January-February.
• Row to row and plant to plant spacing is maintained at 60 x 45 cm.
• Planting can be done on both the sides one-meter-wide beds.

Life Academy of Vocational Studies (LAVS): Technical protocols for different crop seasons
Ma
y 1
, 2
01
4
45 TECHNICAL PROTOCOLS FOR AGRICULTURE FOR KHARIF, RABI & SUMMER SESSON
Raising of seedlings –
Loam soils rich in organic matter are suitable for raising the nursery. The seeds should be treated with 0.2% Ceresan or Agrosan G.N. @ 2 g/kg of seed, before sowing. Nursery beds should be drenched with 2% Brassicol or Captan. The seed beds should also be sterilized with 40% Formaline. Generally, 10% Formaldehyde is used for fumigating the dug up soil and soon after fumigation the beds are covered with polythene sheet for about 24 hours. The seeds are sown only after 5-6 days of fumigation.
The seeds should be broadcast. After sowing, the seeds are mixed with soil or covered with a thin layer of rotten farmyard manure and sand. Every morning a light irrigation is applied to the beds.After germination, a regular spray of Dithane M-45 or Difoltan 0.2% is also given.Normally 400-500 g/ha of seeds are sufficient for the spring crop and 1.2 to 2 kg/ha for a summer crop, since the mortality of seedlings is high in the summer season.
Hardening of seedlings-
For better survival of the seedlings, it is advisable to harden the seedlings. The hardened plants can withstand better the extremes of temperature. Hardening is done at 40°C temperature for 6 hours daily for 5-12 days. Plants are allowed to nearly wilt for 2-3 days before watering. This practice is repeated 2-3 times.
By hardening, the percentage of seedling survival increases considerably under stress condition. Hardening of transplants can also be accelerated by treating with Cycocel at 0.2% on seedlings at 4 to 5 leaf stage. Foliar application of Sucrose (10% with small quantity of detergent) three times at one day interval before planting markedly reduces post planting shock and mortality.
Proposed varieties – Selection 22, 5005, Laxmi, Navodaya
Weed Control-
The period for checking growth of weeds is 35 to 40 days after transplanting. The problem can be overcome by the application of herbicides such as Alachlor or Butachlor @ 2 kg a.i./ha. They are applied as pre-emergent spray, one week after transplanting of tomato seedlings. These herbicides control all the weeds for 45 days. Inter-tillage and hoeing should also be done to keep the field free of weeds and to facilitate soil aeration and proper root development.
Staking Staking plants has proved' to be beneficial in the cultivation of tomato. It has been observed that staked plants give more yield per plant than the unstacked plants. For staking, bamboo or arhar sticks are used. These sticks are inserted in the ground near the plants and they are loosely tied with jute strings to keep the plants straight.
Manures and Fertilizers-
70 to 100 kg of nitrogen usually in the form of ammonium sulphate, 35-40 kg of phosphorus in the form of superphosphate and 35-60 kg of potash in the form of

Life Academy of Vocational Studies (LAVS): Technical protocols for different crop seasons
Ma
y 1
, 2
01
4
46 TECHNICAL PROTOCOLS FOR AGRICULTURE FOR KHARIF, RABI & SUMMER SESSON
muriate of potash per hectare. In addition, about 20 cartloads of fully decomposed farmyard manure is also applied.
The fertilizers are placed in bands 7.5 to 10 cm deep on both sides of row before making the furrows. The nitrogenous fertilizer is applied in two equal split doses, the first to be given before transplanting along with phosphatic and potassic fertilizers and the second dose to be applied around each plant about 45 days after transplanting.
Application of 19-24 kg/ha borax at the time of transplanting reduces cracking of fruits. Borax (0.3 per cent) can also be sprayed 3-4 times at the time of fruiting for improving the quality of fruits.
Irrigation-
Generally the furrow method of irrigation is practiced. The first irrigation is supplied soon after transplanting. Subsequent irrigations are given at 8-10 days interval or as per the requirement of the crop.During winter, the plants are not irrigated at the time of ripening of the fruits to retard the process but they are irrigated during the summer to promote the process of ripening. During autumn, field moisture plays a vital role in the incidence of leaf curl virus. Excess moisture enhances the incidence of leaf curl disease.
Growth Regulators-The foliar application of PCPA (para-chloro phenoxy acetic acid) 50-100 ppm at the flowering stage increases the fruit set at low and high temperature. The application of Cycocel (500 ppm) on the plants in the nursery 3-4 days before transplanting and another spray of it 25-30 days after transplanting reduces the incidence of leaf curl disease and increases the early and total yield.
In order to enhance the ripening of fruits Ethrel (1000 ppm) can be sprayed on the plants at the time of initiation of ripening. An early spray may damage the foliage and reduce the size of the fruits. A foliar spray of Ethrel (250 ppm) in the nursery 3-4 days before transplanting increases the plant stand in the field and finally the total yield.
Harvesting and Yield -The following stages of maturity for harvesting are-:
Green stage: The fruits are fully developed but are green and suitable for sending to distant markets.
Pink stage: Some of the portion is red or pink and the fruit is not fully ripe. It is most suited for local markets.
Ripe stage: The major portion of the fruit is red and the softening begins. It may be picked up for home and table use. 4. Full ripe stage: The fruits develop maximum colour and turn soft. Such fruits are suitable for processing purposes.
Tomatoes are normally picked at 4 days interval during warm season and at weekly interval when weather is cool. On an average, a normal crop of tomato yields about 250 quintal fruits per hectare. An excellent crop may produce as high as 400 quintal fruits from one hectare field.

Life Academy of Vocational Studies (LAVS): Technical protocols for different crop seasons
Ma
y 1
, 2
01
4
47 TECHNICAL PROTOCOLS FOR AGRICULTURE FOR KHARIF, RABI & SUMMER SESSON
Post Harvest Process - After harvesting, the fruits should be cleaned and unmarketable fruits such as cracked, bruised, scald, diseased etc. should be separated. Good quality fruits should be graded into four specified grades namely Super-A, Super, Fancy and Commercial. Then fruits are packed into the baskets and sent to the markets. Tomatoes are sold to consumers through roadside dealers or house to house vegetable vendors. The wholesalers may buy them directly or through cooperative markets for sending them to distant markets. For local markets, tomatoes are picked in the evening and sold away early in the morning. Tomato fruits, as they ripen, should be sorted out and sent to the market.
IMPROVED ORGANIC PRACTICE
Seed
The plant is propagated largely through seed, though vegetative propagation is also possible.
Selection
• The contents of the ripe fruits are squeezed out and fermented for 2–5 days. When the seeds settle down, they are dried in sun or shade and stored in airtight containers. Good tomato seeds remain viable for about four years and the germination is between 85–90 per cent.
• Lemon juice can be used for seed extraction in place of corrosive hydrochloric acid (which is commonly used). The seeds should be treated with the juice for 2–3 hours @ 20 lemons/kg of wet seeds. The seeds treated by this method are shiny and fetch good prices in the market.
• Seeds can also be extracted from ripe fruits by squeezing the fruits on well-spread rice bran (@ 1 kg rice bran for 1 kg seed). After thorough mixing and drying for 24–48 hours, the bran is separated from the mixture by a hand winnower.
Treatment
• Seeds are soaked for six hours in a fermented mixture of buttermilk (3 days old) and water (1:4 ratio) and dried under the shade to remove excess moisture. The practice is applicable only for 6 to 12 month old seeds. Coconut can also be used as a substitute for buttermilk.
• The seeds can also be treated with sweet flag rhizome extract for 30 minutes before sowing. This confers resistance against a number of bacterial and fungal diseases.
• The seeds can be mixed with Trichoderma viride and Pseudomonas fluorescens (@ 5 gm/100 gm of seeds). This will help in the control of early blight and other pathogens.
Seed rate-
The seed rate for commercial tomato varieties is around 400–500 gm/ha.

Life Academy of Vocational Studies (LAVS): Technical protocols for different crop seasons
Ma
y 1
, 2
01
4
48 TECHNICAL PROTOCOLS FOR AGRICULTURE FOR KHARIF, RABI & SUMMER SESSON
Nursery preparation techniques
• For raising seedlings for one hectare about six cents of nursery area is required.
• Raised beds of dimensions 7.5 x 1.2 x 0.1 m are prepared.
• They are covered with a layer of farmyard manure and sand in equal proportion. Addition of farmyard manure should be @ 4 kg/m2.
• Field solarisation and seed treatment are helpful in minimising disease infection. Neem cake and groundnut cake (@ 2 kg/cent) can also be added to enrich nursery soil.
• The soil can be disinfected further by cultivating it well and then covering it with a clear plastic sheet so that it gets heated up thoroughly under the mid-day sun.
• Dusting of wood ash on seedlings in the nursery acts as an insect repellent and protects the young plants from pest and disease attacks. It also serves as a good source of mineral nutrients.
• Soil solarisation of nursery plots by covering them with transparent polythene sheets of 200 guage for about 5-6 weeks, along with seed treatment techniques, have been standardized. If the temperature is high (<30--), then the beds are covered by green black sheets, about 1 m above the ground with suitable support.
CULTIVATION
Sowing
• Line sowing of seeds may be done in the raised beds.
• The seeds should be sown thinly, leaving 2.5–3 cm spacing between rows.
• Soon after sowing, the beds should be irrigated using a rose can and covered with paddy straw or coconut fronds.
• Water should be sprinkled on the beds every day.
• The seeds germinate in 7–10 days.
• The plants must be hardened as they approach transplanting day.
• Spraying 4000 ppm sodium chloride can also help in hardening seedlings.
• They are ready for transplanting 4–5 weeks after sowing.
• At the time of transplanting, the plant should be about 7.5–10 cm in height, with a sturdy stem.
• Spraying 10% sugar solution several days before transplanting is reported to improve survival rate and to promote the plant’s growth.
• A hundred grams of asafoetida mixed with five litres of water can be used for treating the root portion of the seedlings.

Life Academy of Vocational Studies (LAVS): Technical protocols for different crop seasons
Ma
y 1
, 2
01
4
49 TECHNICAL PROTOCOLS FOR AGRICULTURE FOR KHARIF, RABI & SUMMER SESSON
• They should be soaked for 15 to 30 minutes in the solution before transplanting in the main field.
• After uprooting from the nursery bed, the roots of seedlings can also be dipped in cow dung and cow’s urine slurry/cow pat pit/amrut pani /panchagavya overnight before transplanting to the field. The auxins and nitrogen in the urine and dung help in better root growth and early establishment.
Main field preparation
• A well prepared seed bed with 4–5 ploughings is necessary for transplanting tomato.
• The seedlings are transplanted on flat beds, on the sides of raised beds or ridges.
Transplanting
• Transplanting can be done on small flat beds in light soils where irrigation is available and on shoulders in shallow furrows where irrigation water is scanty. On heavy soils, the seedlings are normally transplanted on ridges.
• The seedlings are transplanted in rows 60–75 cm apart. The planting distance within a row is 30 cm for determinate varieties and 60 cm for indeterminate varieties.
• Raised bed methods need less water and the incidence of pests and disease is also low.
Direct sowing
• Seeding of 3–5 seeds in a clump at 25–30 cm ensures 2–3 plants per clump.
• After the plants have established, thinning should be done to maintain only 1–2 seedlings per hill.
Weeds
• Weeds are problematic and care should be taken especially during the initial stages of plant growth.
• Weeding is mostly done manually. Forty-five days after transplanting is the most critical stage
• The plants require frequent shallow hoeing especially during the first four weeks after transplanting.
MANAGING SOIL FERTILITY
• Farmyard manure should be applied at the rate of 25 tonnes/ha several weeks before sowing. Green manure with crops like sunhemp (Crotalaria juncea ), cowpea (Vigna catjang ), daincha
• (Sesbania aculeata ) and cluster bean (Cyamopsis tetragonoloba ) can also be used to substitute for farmyard manure to an extent.

Life Academy of Vocational Studies (LAVS): Technical protocols for different crop seasons
Ma
y 1
, 2
01
4
50 TECHNICAL PROTOCOLS FOR AGRICULTURE FOR KHARIF, RABI & SUMMER SESSON
• Neem cake can be applied @ 150–250 kg/ha.
• Top dressing can be given with groundnut cake (@ 80–100 kg/ha) after 40 days of sowing.
• The soil can also be enriched by using vermicompost or biodung compost as additional supplements.
• Plant vigour can be further stimulated through bio enhancers, viz., amrut pani /jeevamrut introduced through irrigation water and foliar spray of BD/BD liquid manures.
Intercrops and crop rotation
• Intercrops like spinach, radish, pulses and oilseeds can be grown with tomato.
• Cropping systems like okra-tomato, tomato-onion are popular.
• Non-solanaceous crops like rice, maize, sorghum, wheat, millets, cabbage, cauliflower, radish, watermelon, onion, garlic, groundnut, cotton, safflower, sunflower and sesame can be grown after the tomato crop.
• A gap of at least one year should be allowed between two solanaceous crops such as tomato, chili, brinjal, capsicum and potato.
Training and pruning
• Auxiliary shoots should be removed every week leaving behind well placed lateral shoots.
• The growing tips should be pinched off when the plants are 1.5 metres tall.
Staking-
• Staking is needed for hybrids which are generally of tall stature and heavy bearers.
• The plants are staked 15– 20 days after transplanting or when they are 15–25 cm high.
• Staking can be done either by using individual wooden stakes or by pulling overhead wires to which the individual plants are tied.
Application of tank silt Application of tank silt @ 25 tonnes/ha to irrigated tomato supplies micronutrients that build resistance to pests and also save expenditures on plant protection. Prevention of flower drop A spray of neem seed and cow dung mixture can be given. To prepare this mixture, five kilograms of neem seed are ground well and diluted with water and then filtered. Twenty-five kilos of fresh cow dung are mixed thoroughly with this filtrate. The resulting product is sufficient for spraying on one hectare of land provided one adds the required quantity of water.
WATER REQUIREMENTS
• The crop should be irrigated at intervals of 8–12 days.

Life Academy of Vocational Studies (LAVS): Technical protocols for different crop seasons
Ma
y 1
, 2
01
4
51 TECHNICAL PROTOCOLS FOR AGRICULTURE FOR KHARIF, RABI & SUMMER SESSON
• In the summer, the crop needs frequent irrigation due to the high evaporation rate.
• The open furrow method of irrigation is widely adopted.
• Staked crops require water at every 5–7 days interval.
Conservation techniques- Mulching with straw, saw dust and black polythene helps in moisture conservation. Mulching also helps in controlling weeds and reducing the incidence of pests and disease, thereby ensuring quality fruits.
INSECTS- Fruit borer (Helicoverpa armigera )
• Monitor top three leaves for Helicoverpa eggs and hand pick larvae. • Intercropping tomato with marigold is an effective IPM practice. Planting of the
trap crop should be adjusted in such a manner that tomato flowering coincides with the tight bud stage of the marigolds. Marigolds attract both fruit borer and leaf miner adults for egg laying.
• Place 15–20 bird perches per hectare. This invites predatory birds.
• Spray 5% neem seed kernel extract, Andrographis kashayam or five leaf extract to kill larvae at their early stages.
• Soil application of the seed extracts of Strychnos nux-vomica @ 1.5 gm/plant at an interval of 20 days, twice, when there is severe borer attack. Tobacco caterpillar (Spodoptera litura ) • Plant castor @ 125 per hectare as a trap crop. Castor attracts the egg laying moths. The egg masses and larvae can be collected and destroyed.
• Pheromone traps can be installed @ 10 per hectare to monitor the pest.
• 5% neem seed kernel extract can be sprayed to kill the young larvae. Serpentine leaf miner (Liriomyza trifolii )
• Grow one row of field bean as an intercrop after every eight rows of tomato. Field beans should be sown 10–12 days before transplanting the tomato seedlings.
• Spray 5% neem seed kernel extract or ginger, garlic, chili extract (@1 litre/tank). White fly (Bemisia tabaci )
• Cover the nursery bed with a 40 mesh nylon net to prevent entry of the flies. • Sow pearl millet as a barrier crop around the main field. This should be done 15 days before transplanting the tomato.
• Install 50 yellow sticky traps/ha.
• Spray 5% neem kernel extract
DISEASES Damping off (Pythium aphanidermatum )
• Use certified seeds.

Life Academy of Vocational Studies (LAVS): Technical protocols for different crop seasons
Ma
y 1
, 2
01
4
52 TECHNICAL PROTOCOLS FOR AGRICULTURE FOR KHARIF, RABI & SUMMER SESSON
• Partial sterilisation of the soil by surface burning of a thick stack of farm trash; solarisation by covering the nursery bed with alkathene. • Formation of raised beds with better drainage facilities.
• Application of 400 gm of neem cake per sq. m. of nursery bed 15 days before sowing, and watering at 3–5 days’ interval. • Use of light soil for nursery beds, thin planting, light and frequent irrigation and application of well decomposed manure.
• Seed treatment using leaf extract of Bougainvillea glabra (@ 20ml per litre of water) for six hours. Early blight (Alternaria solani )
• Crop rotation with a non-solanaceous crop.
• Do not grow tomato in soils where potato was intensively cultivated.
• Remove infected plant parts such as branches, leaves, buds, and burn them.
• Destruction of collateral host is desirable.
• Spray 5% eucalyptus or lantana leaf extract in the evening.
• Diluted cow dung can be applied to the root zone of the affected plants.
• Treatment with Trichoderma viride or Pseudomonas fluorescens @ 5 gm/100 gm of seeds. Late blight (Phytophthora infestans )
• Five kilos of wood ash should be mixed with 50 litres of water and kept aside for two hours. Fusariam wilt (Fusarium oxysporum f. lycopersici ) • Crop rotation with non-solanaceous crops reduces inoculums in the soil.
• Seedling root dip in a solution containing ten grams each of turmeric and asafetida dissolved in a litre of water is preferred before transplanting.
• Keep the fruits away from the soil by proper training and pruning.
• Pull out the affected plants and destroy them.
• Use varieties like Mar globe, Kanora, Sioux and Roma which are resistant.
• Spray fifteen days’ old panchagavya, diluted with ten parts of water. Powdery mildew (Leveillula taurica and Erysiphe polygoni )
• Spray a mixture of milk and water in equal quantities every three to four days at the first sign of mildew symptoms.

Life Academy of Vocational Studies (LAVS): Technical protocols for different crop seasons
Ma
y 1
, 2
01
4
53 TECHNICAL PROTOCOLS FOR AGRICULTURE FOR KHARIF, RABI & SUMMER SESSON
Okra Introduction
Okra (Abelmoschus esculentus ), popularly known as lady's finger, is an annual vegetable crop grown from the seeds. Its tender green fruits are used as a vegetable and are generally marketed in the fresh stage, but sometimes in canned or dehydrated form. Ladies finger (Okra) Vegetables are a rich source of vitamins and minerals. This plant is native to India where one can find its wild forms. It is grown in summer months and during the rainy season in almost all parts of the country especially in plains.
Climate –
Okra requires a long and warm growing season. Being tender, it is highly sensitive to frost.Okra seeds do not germinate below 18 o C but thrives best during warm, moist season, although it grows fairly well in the hottest summer.
Soil –
Sandy to clay soils, so long as they are well manured, supplied with enough organic matter and with good drainage are fit for okra cultivation. However, loose, friable and well manured loam soils are the best. For best yield, soil pH should range between 6.0 and 6.8.
Existing varieties – Desi
Recommended varieties – Arka, Anamika, Parbhani Kranti (low return variety)
Seed and Sowing –
Early spring and autumn, are the main sowing seasons of the area. The crop is sown in February -March and the latter in June -July.Seed rate varies according to the sowing season. For a spring-summer crop about 20 kg seed/ha is required. whereas 8-10 kg seed/ha is sufficient for the rainy season crop. Soaking of seed in water for 24 hours before sowing is recommended to enhance germination percentage. For sowing, land should be well prepared with 2-5 ploughings. Well-rotten farmyard manure should be incorporated at the time of land preparation and about 20 days before sowing.
For spring-summer crop, seed should be sown in ridge in February-March.
The spacing between ridges should be kept 45 cm and the plant distance should be 15, cm. The ridges should run south to north and the seed should be sown on the side of the ridge facing east. The main or rainy season crop can be sown in flat beds at a distance of 45 to 60 cm x 25 to 30 cm.
For large scale sowing drill method is most economical, but the seed rate may have to be increased from 10 to 15 kg/hectare.
Manures and Fertilizers –
Apply 250 quintals of well-rotten FYM and incorporate it well into the soil before field preparation. Then apply about 1.5 quintal of ammonium sulphate as top dressing
Life Academy of Vocational Studies (LAVS): Technical protocols for different crop seasons
Ma
y 1
, 2
01
4
54 TECHNICAL PROTOCOLS FOR AGRICULTURE FOR KHARIF, RABI & SUMMER SESSON
between the rows before fruiting. It has been reported that 80 kg N/ha as soil application results in maximum fruit yield in spring-summer season crop.
Irrigation –
Seed should be sown when the soil is moist and enough soil moisture should be maintained to get a good germination stand. The crop should be irrigated at an interval of 4-5 days in summer and whenever required in rainy season. If rains are satisfactory no irrigation is required in rainy season crop.
Interculture operations-
To keep weeds under control in okra field, three to four hoeings are required. The first hoeing may be given when the seedlings are two weeks old and subsequent hoeing may be given at fortnightly intervals.As an alternative, Basalin @ 2.5 litres per hectare four days before sowing can be sprayed and incorporated into the soil by harrowing. In case Dasalin is not available, Lasso @ 5 litres/ha as pre-emergence spray, a day after sowing may be applied. The spray may be followed by one hoeing after 60 days if the population of weed is more.
Harvesting and Yield –
Okra should be picked or collected every third or fourth day in the morning. Pick only those pods that are still tender and their tips break when they are bend a little. The healthy pods formed first should be retained in the plant for seed. They should be picked when they are 6 to 7 days old in plains and 8 to 9 days in hills and other places of cold climate. The yield of okra varieties varies from 65 to 75 quintals of green fruits per hectare during spring-summer and 115 to 125 quintals during rainy season.
Post harvest process –
After picking keep the fruits in shade, taking care that they are not injured due to rubbing and pressing, otherwise the bruised and injured edges of the pods will become black. This will spoil them and lower the market value. The fruits are graded based on size. Long fruits are preferred for fresh markets; 6–8 cm long fruits are sorted for the processing industry and export. For local markets, the fruits are filled in jute bags or baskets, covered, and water sprinkled over them. Shelf life of okra can be extended up to 8 or 10 days by storing the pods at 7–10 °C and 95% relative humidity.

Life Academy of Vocational Studies (LAVS): Technical protocols for different crop seasons
Ma
y 1
, 2
01
4
55 TECHNICAL PROTOCOLS FOR AGRICULTURE FOR KHARIF, RABI & SUMMER SESSON
Brinjal In India it is grown round the year and has assumed the position equal to tomato and potato. Its cultivation by small and marginal farmers can help them generate additional income as well as valuable vegetable for their families.
Introduction
Brinjal or egg plant ( Solanum melongena ) is one of the most common, popular and principal vegetable crop. It can be grown in almost all parts of India, except higher altitudes, all the year round. Brinjal is believed to be the native of India. More than 16 species are found to grow in various parts of the country.
Climate
• Brinjal is a warm season crop and, therefore is very susceptible to frost. • Low temperature during the cool season causes deformation of fruits. • A long and warm growing season is desirable for successful brinjal cultivation. • Cool nights and short summers are unfavourable. • Temperature of 13 to 21 o C is most favourable for better growth and yield in
brinjal. The brinjal seeds germinate well at 25 o C.
Soil
• Brinjal can be grown in soils varying from light sandy to heavy clay. • Light soils are good for an early crop, while clay loam and silt loam are well suited
for high yield. • Generally, silt loam and clay loam soils are preferred for brinjal cultivation. • The soil should be deep fertile and well drained. • The optimum soil Ph for brinjal should range from 5.5 to 6.0.
Land preparation
• The soil should be thoroughly prepared by being ploughed 4-5 times before transplanting the seedlings.
• Bulky organic manures like well rotten cowdung manure or com- post should be applied at least 15-20 days before actual transplanting and well incorporated into the soil.
Raising of seedlings
• There are generally two sowings viz. June to July for the autumn crop and in November for the spring season crop.
• A third rainy season crop can be raised by sowing the seeds in March. • Seedlings of 4 to 6 weeks old are generally transplanted in each case. • Seeds are sown in well prepared and raised nursery beds 6-12 mm deep in rows
and 5 cm apart. • The seedbeds should be made fertile by mixing compost, farmyard manure or leaf
mould.
Life Academy of Vocational Studies (LAVS): Technical protocols for different crop seasons
Ma
y 1
, 2
01
4
56 TECHNICAL PROTOCOLS FOR AGRICULTURE FOR KHARIF, RABI & SUMMER SESSON
• Straw or some other mulch material should also be used to cover the top soil till germination. Brinjal seeds arc light in weight having an average germ inability of 75 to 80 per cent.
• To transplant one hectare of land, about 500 to 750 g of seeds are sufficient for sowing.
Transplanting
• The seedlings are ready for transplanting when they attain a height of 15 cm with four leaves in 4 to 6 weeks period.
• Usually, the spacing for the bushy, non spreading type should be 50 to 60 cm in both ways and for spreading cultivars row to row distance should be 75 to 90 cm and that for plant to plant 60 to 70 cm both in flat beds or ridges.
• Brinjal plants are transplanted at 45 X 60 cm in case of long fruit cultivars and at 60 X75 and 90 X 90 cm in case of round and high yielding cultivars.
Varieties
• Existing varieties – Pusa Purple Long,Pusa Kranti • Proposed varieties – Siliguri, Arka series (Navnit /Kusumkar)
Weeding
• Frequent shallow cultivation should be done at regular intervals so as to keep the field free from the weeds and to facilitate soil aeration for proper root development.
• Deep cultivation in brinjal is injurious because of the damage of the roots and exposure of the moist soil to the surface.
• Besides, other beneficial effects mulching has an influence in controlling weeds. Mulching brinjal plants with black poly1hene sheets will reduce weed growth, increase crop growth, improve earliness and increase the overall yield.
• The herbicide DCP A (dimethyl tetrachloroterephthale) is recommended for use in brinjal plants. Trifluralin @ 1 kg\ha is also rccommended to apply immediately after transplanting.
Manures and Fertilizers
State Farmyard manure (Tonnes/ha)
N (Kg/ha) P2O5 (Kg/ha)
K2O (Kg/ha)
Odisha 20 100 60 25
Irrigation
• Irrigation is to be given every 4 th day during summer season, and at an interval of 10-15 days in winter season.
• Drip method of irrigation has proved very successful for brinjal. With this method, water used is much less than other methods of water application, weed growth is reduced and yield is generally much higher.

Life Academy of Vocational Studies (LAVS): Technical protocols for different crop seasons
Ma
y 1
, 2
01
4
57 TECHNICAL PROTOCOLS FOR AGRICULTURE FOR KHARIF, RABI & SUMMER SESSON
Insect Pests and Diseases
SLNo
Pests/Diseases Description Treatment
1 Shoot and fruit borer (Leucinodes orbonalis)
• The caterpillars bore into the young shoots and fruits, as a result of which the shoots wither and dry up.
• Affected fruits also become, unfit for consumption and in severe cases, they may even rot.
• The infected shoots should be removed or destroyed
• Ratoon crop should be avoided and suitable crop rotation should be followed.
• The infestation can be reduced by the spray of Sevin (0.4%) at 10 days interval and the fruits may be harvested after three days.
• It has been suggested to spray the crop with Lindane 0.1% or Endrin 0.2% or DDT 0.2% five times at fortnightly interval starting one month after transplanting.
2 Epilachna beetle (Epilachna vigintioctopunctata)
• It is a polyphagous insect and feeds on the leaves of potato, brinjal, tomato, etc. by scrapping in a characteristic manner leaving the veins intact.
• The grubs are yellowish in colour and stout bodied with stiff hair on their bodies.
• The beetle is bronze to red, small, spherical and mottled with black spots.
• Hand picking of grubs, adults and eggs along with infested leaves during the early stage of attack and destroying them are suggested to reduce the infestation.
• The crop may be dusted with 5% BHC @20 kg\ha or sprayed with 0.05% DDT (50%WP) or 0.05% Malathion (50EC) for the control of this pest.
3 Stem boror
(Ellzophera pelticella)
• Pale white caterpillars of this pest attack the stem and often kill the young plants.
• Due to the attack on the older plants, the infested plants wither, growth is stunted and fruit yield is adversely affected.
• Removal a nd destruction of affected plants or plant parts help to reduce the infestation.
• The crop may be sprayed with 0.03% Diazinon or 0.1% Lindane or 0.1% Carbaryl.
• The fruit should be picked before spraying, and after spraying the fruits should not be harvested for the next 6-7 days.
4 Jassids (Empoasca sp.)
• Both nymph and adult of this insect suck the sap from the lower surface of the leaves.
• The infested leaves curl upwards along the margin which may turn yellowish and show burnt up patches.
• These insects also transmit mycoplasma disease such as little leaf and virus disease like mosaic.
• It may be controlled by the spray of 0.1% Ekalox at three weeks interval before fruiting.
• During the fruiting stages, the crop should be sprayed with Malathion (0.15%) at one week interval.
• The fruits should not be harvested for one week after the spray.
• Phorate or Aldicarb granules at 1.0 kg/ha. Applied 15 days after transplanting followed by three fortnightly sprays of

Life Academy of Vocational Studies (LAVS): Technical protocols for different crop seasons
Ma
y 1
, 2
01
4
58 TECHNICAL PROTOCOLS FOR AGRICULTURE FOR KHARIF, RABI & SUMMER SESSON
• Fruit setting is adversely affected by the infestation
Carbaryl (0.2%) or Quinolphos (0.5%) after fruit set will give effective control against this pest
5 Leaf roller (Eublemma olivacea)
• Caterpillars of this insect roll the leaves and feed on chlorophyll while remaining inside the folds.
• The folded leaves wither and dry up. The caterpillar may also bore into the plants to wither.
• Collection and destruction of infested leaves along with insects in initial stages help to minimize the infestation.
• Spraying of 0.1 % Carbaryl or 0.05% Malathion or Dichlorvos(DDVP)is also effective.
6 Cotton aphid • The aphid is small, soft, yellowish green or greenish brown and is found in colonies of hundreds on the tender shoots and the under surface of the tender leaves.
• Both nymph and adult suck the sap of the leaves. In case of severe attack, the affected leaves curl and dry up.
• Black sooty-mould develops on the honeydew secreted by the aphid which falls on the leaves and adversely affects the process of photosynthesis.
• Because of inhibited photosynthesis, plant growth is arrested and fruit size is reduced.
• Spraying of 0.1% Malathion or 0.05% Dichlorvos (DDVP) is effective in controlling the pest
7 Root -knot nematodes
• Due to the attack the plants become stunted and leaves show chlorotic symptoms.
• Fruiting is adversely affected.
• Nematodes may be controlled by the soil fumigation with Nemagon or DD(dichloropropane- dichloropropene).
• Application of Phorate @ 4.95 kg per ha will also be effective. Proper crop rotation will help in reduction of nematode population
8 Termi tes • Termites live at the root and stem below the ground level and tunnels upwards.
• The affected plants turn pale, wither and dry away.
• Soil application with 5% Chlordane or Heptachlor @ 22 kg\ha is very effective in minimizing the attack of termites.
• Soil application of Aldrin is also very effective in controlling the termites.
• In sandy or termite infested soils, growing of brinjal crop should be avoided.
9 Damping -off • This is a fungal disease caused by Phytophthora or Pythium spp.
• The disease may be controlled if the nursery soil is sterilized before sowing and the seeds are treated with Ceresan before

Life Academy of Vocational Studies (LAVS): Technical protocols for different crop seasons
Ma
y 1
, 2
01
4
59 TECHNICAL PROTOCOLS FOR AGRICULTURE FOR KHARIF, RABI & SUMMER SESSON
• The fungus attack usually starts on the germinating seed spreading to the 22ypocotyls, basal stem and developing roots.
• The affected seedlings are pale green and a brownish lesion is found at the basal portion of the stem.
• The lesion girdles the stem, later extending upwards and downwards. The affected tissues rot and the seedling falls down.
sowing. • Hot water treatment (at 51°C for 30
minutes) of seeds has also “been very effective in controlling the disease.
10 Phomopsis blight
• When the leaves are infected, small circular spots appear which become grey to brown and have a light coloured centre with irregular blackish margins.
• The affected leaves may turn yellow and die. Lesions may also develop on petiole and stem, causing blighting of affected portions.
• Use hot water (50 Oc for 30 minutes) treated seeds.
• For self- sown seeds, remove calyx of the fruit, dip for 20 minutes in mercuric chloride solution (25 g per 35 litres of water).
• After extraction of seeds, thoroughly dry them in the sun for about a week, then treat with Thiram or Bavistin.
• Spray the plants in nursery beds with Dithane M-45 (0.2 per cent). Repeat spraying in the field at 10 days interval. Difoltan (0,2%) and Captan (0.2%) are also recommended for spraying
11 Bacterial wilt • This disease is caused by the bacterium Preudomonas solanaceanum.
• The characteristic symptoms of the disease are wilting, stunting and yellowing of the leaves.
• Afterwards the whole plant collapses.
• Proper crop rotations reduce the disease infestation.
• Brinjal crop should not be sown in the wilt affected fields.
• Resistant varieties should be cultivated.
12 Little leaf disease
• The leaves are malformed into tiny chlorotic structures.
• The petiole gets considerably shorter, many buds appear in the axil of leaves, internode gets shortened and the plant gets a bushy appearance.
• Floral parts are deformed and the plant becomes sterile.
• The infected plants do not bear any fruits and if the fruiting occurs, the fruits are very hard and unfit for consumption
• Removal of the diseased plants in the initial stages and fort- nightly spray of the insecticides such as Ekalox or Folidol till the fruit set will help to check the spread of the disease..
• Disease control can also be achieved when Phorate @ 1.0 kg\ha is applied to the seed bed followed by seedlings dipping in acquous solution of 0.05% Tetracycline along with 0.05% Monocrotophos

Life Academy of Vocational Studies (LAVS): Technical protocols for different crop seasons
Ma
y 1
, 2
01
4
60 TECHNICAL PROTOCOLS FOR AGRICULTURE FOR KHARIF, RABI & SUMMER SESSON
Harvesting and Yield
• The brinjal fruits are harvested when they are immature. • At harvesting, the calyx and stamen are left attached to the fruit. • While harvesting, large round varieties should be handled with care. • For harvesting, the stalk of the fruits should be cut with a knife or other sharp
instruments. • The yield of brinjal varies depending upon the varieties, season, management
practices, etc. Generally, the yield ranges between 250 to 400 quintals of fruits ‘per hectatre.
Post Harvest Process
After harvesting, fruits are cleaned and graded. Deformed and pest damaged fruits are discarded. Then the fruits are packed in the baskets for the markets. The brinjal fruits can be stored for a day or two in summer and I 3-4 days in winter season provided they are kept in shade. The fruit can be kept for 7 to 10 days in fairly good condition at 8-10 o C temperature and 85-95% relative humidity. Waxing of the fruits (in 3% concentration) reduces weight loss and retards change in acidity and starch, sugar and ascorbic acid contents. The storage life at room temperature (25-45 oC) is improved if the fruits are given wax emulsion.
Uses and Composition
Brinjal is very rich in nutritive value. The unripe brinjal fruit is primarily used as a cooked vegetable for the preparation of various dishes in different regions of the world. It has got much potent as raw material in pickle making and dehydration industries. It is supposed to contain medicinal properties. White brinjal is said to be good for diabetic patients. It can also cure toothache if fried brinjal fruit with til oil is taken. It also acts as an excellent remedy for those suffering from liver infection. Brinjal seeds are used to increase appetite, as they are believed to be good appetizer. Its leaves are taken to remove constipation and other intestinal problems.
IMPROVED ORGANIC CULTIVATION
SEED
The brinjal plant grows better if transplanted. Its sowing and transplanting time varies according to the agro-climatic conditions of the region. In northern India, brinjal is sown during June–July as an autumn winter crop, and in November as a spring-summer crop. In June–July, after sowing, it takes four weeks for the seedlings to be ready for transplanting, while in November it takes 6–8 weeks.
During this period, the seedlings are to be protected from winter cold, especially during the nights, in the months of December, January and February. Farmers keep their own seed obtained from the previous season’s crop. Healthy mother plants are selected and average size, well-shaped fruit typical of a variety, are allowed to ripen on the plants. When the fruits become yellow, they are cut open and the pulp is washed after keeping

Life Academy of Vocational Studies (LAVS): Technical protocols for different crop seasons
Ma
y 1
, 2
01
4
61 TECHNICAL PROTOCOLS FOR AGRICULTURE FOR KHARIF, RABI & SUMMER SESSON
it for a few days in water. The seeds that sink in the water are dried in the shade and stored. It is advisable that during storage, the seed is mixed with ash from cow dung cake or wood, to protect it from pest attack.
A. Treatment-The stored seed that is too small or discoloured is eliminated before planting. The seed is usually soaked in 45–50 0C lukewarm water for at least 30–45 minutes. Usually one cup (200 ml) of fresh cow urine is added to every litre of water that is used for treating the seed. This reduces the chances of fungal and bacterial diseases.
B. Seed bed preparation • Three grams of seed can produce 600–700 seedlings, of which about 60% will be
strong and usable. To produce 15,000–20,000 seedlings, sufficient for planting in one hectare, 300–350 gm of seed is usually sown.
• Around 25 to 30 raised beds of 4 m x 1 m or 1.2 m are prepared to raise the seedlings needed for planting the main field. Seedling beds are usually made by mixing sifted soil and compost in the ratio of 1 : 1 and adding 25% rice hulls or sand to improve drainage • Seedling beds should be made on plots where water does not stagnate and which receive morning sunlight for at least 5–6 hours. In the cold season, burnt rice husks are added to the seedbed to absorb more sunlight and to provide necessary warmth. Compost @3 kg/m2 or vermicompost @ 2 kg/m2 and neem seed cake (de-oiled) @ 500 gm/m2 should be added to the seed beds 14–16 days prior to the sowing of the seeds.
• Biocontrol agents, viz., Trichoderma viride and Pseudomonas fluorescens should also be added @ 50 gm/m2. The seed, mixed with some ash, is sown 3– 5 mm deep in the beds and a gap of roughly 5–6 cm is maintained between seedling rows.
• To prevent fungal disease like damping off, seedling beds are kept 12–15 cm high and 75–85 cm wide and watering is done only early mornings. The beds are soaked well for about eight to nine days before sowing the seed; and are levelled and weeded just before planting.
• If nematodes are common, the seedbed should be treated with extracts made from neem seed cake. If wilt diseases are common, the seed is usually treated with biocontrol agents like Trichoderma viride before planting. Rice gruel is used as an adhesive agent for the purpose and the seed is dried in the shade 30–40 minutes before sowing.
C. Seed bed irrigation
In order to keep the bed moist, the seedbed is irrigated at regular intervals. Watering is stopped 7–10 days before transplanting in order to harden the seedlings. Two days before transplanting, the seedlings are again watered.

Life Academy of Vocational Studies (LAVS): Technical protocols for different crop seasons
Ma
y 1
, 2
01
4
62 TECHNICAL PROTOCOLS FOR AGRICULTURE FOR KHARIF, RABI & SUMMER SESSON
CULTIVATION
A. Preparation of the main field
Field bunds are repaired and fields are cross-ploughed three to four times, two to three weeks prior to transplanting. Ridges – about 25–30 cm high and 60–75 cm wide at the base – are created by use of either a tractor or a bullock plough.
At the time of these ridges being constructed, large clods between them are broken and 20–25 cm wide irrigation channels cum walking paths are created. The field is then irrigated well, seven to eight days before planting. A day before planting, holes are prepared on the ridges, about 60–70 cm apart, and all grasses and weeds removed. A few hours before planting, one handful (roughly 150–175 gm) of vermicompost is poured into each hole along with some wood-ash and a cup of water.
B. Transplanting seedlings
Seeds usually germinate in 6–8 days (optimum temperature for germination is 24–29 0C) and are ready for transplanting when they have four to five true leaves and are about 9–10 cm tall. Transplanting is usually done in the late afternoon, because seedling roots should not be exposed to sunlight or air during transplantation. Organic farmers often dip seedlings in a homemade solution to prevent bacterial and fungal infections. The solution is made by mixing 100 ml of cow urine, 5 gm of asafoetida powder and 10 gm of dry or 20 gm of freshly crushed turmeric in one litre of water (it is better to prepare this mixture twelve hours prior to dipping the seedlings in it).
At the time of transplantation, the plant is held in such a way that the roots hang freely (and are not bent upwards) and part of the stem (up to the place where the seed leaf has emerged) is under the ground. The holes are then filled with topsoil which is pressed firmly to remove any air gaps. No watering is done during transplantation or immediately thereafter. The first watering of the plants should be done 48 hours later (in the afternoon). Plant to plant, the distance between transplanted seedlings should be 60–75 cm, and row-to-row, the distance should be 90–100 cm (as already explained in the previous section).
C. Weeds
Since the brinjal plant is a slow growing crop, it is unable to compete with fast growing weeds. Shallow inter-cultivation enables the farmer to remove weeds from the early growth stage itself. Sometimes, a spreading shade tolerant legume can be used as a cover crop in between erect plants that do not produce enough shade.
By close spacing, sunlight can be blocked, also keeping the weed population under control. About three to four hoeings and weedings are normally needed for effective control of weeds and good growth of plants. Mulching with black polyethene or organic waste reduces weed growth and ensures early bearing and good yields.

Life Academy of Vocational Studies (LAVS): Technical protocols for different crop seasons
Ma
y 1
, 2
01
4
63 TECHNICAL PROTOCOLS FOR AGRICULTURE FOR KHARIF, RABI & SUMMER SESSON
MANAGING SOIL FERTILITY
• Planting density for brinjal is usually 14,000–15,000/ha for large seedlings and 18,000– 20,000/ha for smaller seedlings. The plants remain in the field for around 150–165 days, making the brinjal a high nutrient demanding crop.
• Organic growers use 25 to 30 tonnes of farmyard manure/ha or 15 to 20 tonnes of compost/ha at field preparation stage (i.e., two to three weeks before the seedlings are transplanted). Neem cake is also applied @ 200 kg/ha. About five tonnes of vermicompost are used during transplanting: 150–200 gm of vermicompost and 10–15 gm of neem seed cake are put into every transplanting hole a few hours before the seedlings are transplanted.
• Dried chicken manure or goat/sheep droppings should be used for side dressing @ 2 tonnes/ha, once at three weeks and once at six weeks after transplantation. Leaves of nitrogen fixing trees, fresh azolla, duckweed, etc., can be mixed with straw and used as mulch around the plants. This practice suppresses weeds, helps retain moisture and provides food for the earthworms and soil microorganisms that will supply nutrition for the plants.
• Inter-planting of bushy legumes such as French bean, soybean or fenugreek, or trailing legumes such as horse gram, can help to maintain soil fertility. Rotation with leguminous crops/fodder is also practised.
• Liquid manure mixed with water in the ration of 1 : 1, vermiwash or fermented cow urine diluted six to eight times with water should be sprayed or sprinkled on the leaf surface after transplantation @ 150–200 ml per plant at intervals of 7–8 days, starting from the fourth week and continuing up to the tenth.
• Farmers use rich organic nutrition such as chicken manure, oilseed cake, vermicompost, etc., both as basal dose and for side or top dressing. Biofertilisers such as azotobacter and phosphobacter are used along with vermiwash, diluted urine solution, manure tea, etc. Rock phosphate and wood ash are also added, depending upon soil test results (the use of ash has to be avoided in alkaline/saline soils).
WATER REQUIREMENTS
Brinjal, being a medium deep-rooted crop, needs irrigation at frequent intervals. Total water required is about 30 mm per week for the first 10–12 weeks; thereafter, about 20mm is usually sufficient. The brinjal plant suffers seriously from moisture stress and frequent irrigation is required (8–10 days’ interval in winter, 4–5 days’ interval in summer, and as and when needed during the rainy season).
Usually the summer crop needs 6–7 irrigations per month while the winter crop needs 3–4 waterings every month. The weekly requirement of water is 3–4 litres/m2 at peak stage during the hot season and 2–3 litres/m2 during the cool season. Nutrient and water need is highest around the flowering stage, i.e., between the fifth and eighth week
Life Academy of Vocational Studies (LAVS): Technical protocols for different crop seasons
Ma
y 1
, 2
01
4
64 TECHNICAL PROTOCOLS FOR AGRICULTURE FOR KHARIF, RABI & SUMMER SESSON
from the date of transplantation. Thereafter, water supply can be reduced by about 50%, especially if the surface area is covered with 3–6 cm deep layer of dry leaf or leaf mould; semi-decomposed dry straw can be used as mulch material. If the soil is sandy and temperature is high, 50% more water may be required.
A. Drainage The soil has to be frequently loosened to remove weeds and enhance drainage, especially if the soil is clayey. Brinjal plant roots are very sensitive to water logging and the plant will suffer from many bacterial and fungal diseases if the soil remains too wet.
B. Water conservation
To conserve water, the beds should be wide and the crop planted in double or triple rows (i.e., 135 cm beds and 20–25 cm wide channels). This allows proper use of mulch and cover crops to reduce evaporation and competition from weeds for water during the stress period.
Drip irrigation, especially when applied 10–12 cm below the soil, can reduce water requirement by 40–50%. Bamboo pipes with small holes drilled in them and connected with the aid of cycle tyre tubes can be used for this purpose. The beds should radiate from a central point at which the water tank is located and water sent by gravitational force.
C. Irrigation
High yields in brinjal can be obtained under optimum moisture conditions. Timely irrigation is essential for good fruit set and fruit development. Drip irrigation is beneficial for reducing water use and weed control.
PEST MANAGEMENT
A. Brinjal fruit and shoot borers (Leucinodes orbonalis ) –
• The nursery bed should be protected with muslin cloth to prevent any initial attacks.
• Install a plastic funnel trap baited with the sex pheromone of the brinjal fruit and shoot borer @ 100/ha with a spacing of 10 m x 10 m, 15–20 days after transplanting the crop. The pheromone septa should be changed at 30 day intervals. Clip and destroy the infested shoots along with the larvae at weekly intervals.
• Sanitize the area through careful removal of freshly damaged fruits during each harvest.
• Neem based foliar spray of NSKE (4%) is also effective • Trichoderma chilonis @ 50,000/ha or Bacillus thuringiensis @ 500 gm/ha may
be sprayed. • Fresh cow dung solution (100 gm/litre of water) should be sprayed after every 10–15 day intervals.
• Neem and karanj cake @ of 90 kg/acre should be incorporated into the field during the last ploughing.

Life Academy of Vocational Studies (LAVS): Technical protocols for different crop seasons
Ma
y 1
, 2
01
4
65 TECHNICAL PROTOCOLS FOR AGRICULTURE FOR KHARIF, RABI & SUMMER SESSON
B. Stem borer (Euzophera perticella ) Same as with the fruit and shoot borer
C. White fly (Bemisia tabaci ) • Handpick the eggs and destroy them.Use two Chrysoparla grubs per plant
(5,000 chrysops per acre) Spray a solution of cow urine with water in a ratio of 1 : 6 on the plant.
D. Leaf-eating beetle (Epilachna sp .) • Handpick the eggs and larvae if the infestation is limited only to a few plants. • Ash and kerosene, mixed together, should be sprayed on the affected parts. If
the problem persists, spray a tobacco decoction.
DISEASES MANGEMENT
A. Damping off (Phytophthora sp.; Pythium sp. ) • Use seeds from disease-free plants • Use resistant varieties like Florida Market or Pusa Bhairab • Allow long rotation • Seeds must be treated with hot water at 50 °C for 30 minutes • A mixture of cow urine, kerosene may be sprayed on the plant. • Snails and fish remains are first decomposed in a pot containing water. The water
is then sprayed on infected crops. B. Sclerotinia (Sclerotinia sp .) • Long crop rotation • Selection of resistant varieties. C. Bacterial wilt (Pseudomonas solanacearum ) • Cultivate leguminous crops like French bean in the same field or nearby. • Affected plants must be uprooted and burnt. They can also be destroyed by
having them covered fully with fresh cow dung. D. Little leaf of brinjal (Mycoplasma ) • The disease affected plants should be destroyed • Disease resistant varieties such as Pusa and Purple Cluster should be cultivated. • Neem cake, bonedust, and vermicompost mixed in a proportion of 1 : 1 : 1 and
applied to the soil gives very good results.