TECHNICAL MANUAL V: NOV 181.identification of the material and supplier. synonyms glazed / unglazed...
85
1 DESIGN, HANDLING AND MECHANIZATION TECHNICAL MANUAL V: NOV 18
Transcript of TECHNICAL MANUAL V: NOV 181.identification of the material and supplier. synonyms glazed / unglazed...
1
DESIGN, HANDLING AND MECHANIZATION
TECHNICAL MANUAL V: NOV 18
1. Product
2. Handling and Storage
3. Inspection
4. Machining Parameters
5. Cutting Recommendations
6. Design and Production of a Neolith Countertop
7. Extreme Heat
8. Glue
9. Tiling and Paving
10. Repairs
11. Tools
10. Cleaning Products
INDEX
TEC
HN
ICA
L M
AN
UA
L
0. SDS Sheet
mdarney
Sticky Note
Completed set by mdarney
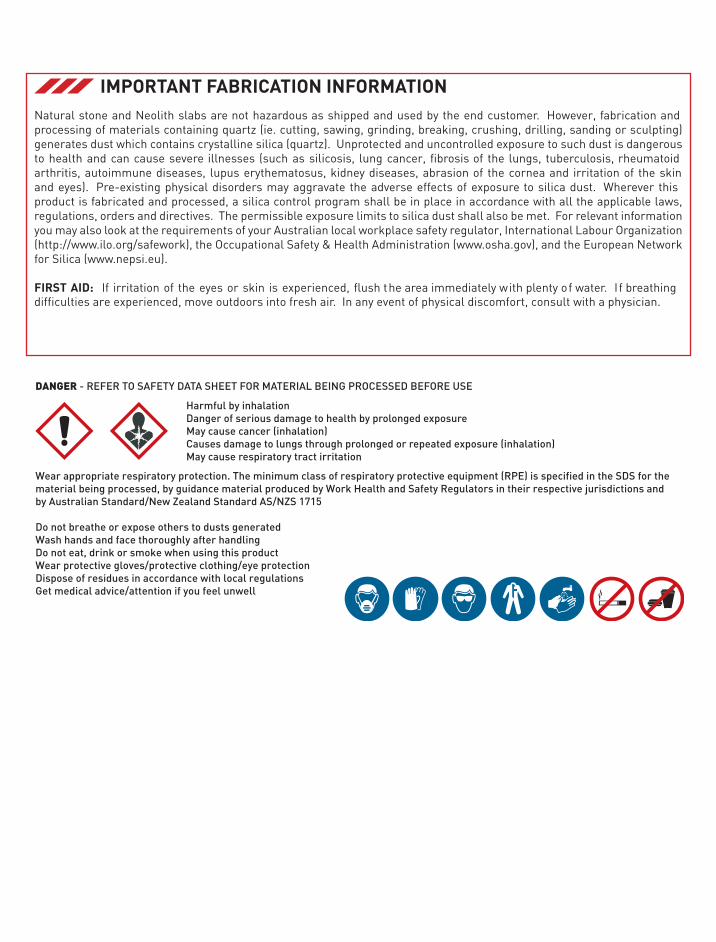
IMPORTANTFABRICATIONINFORMATIONNatural stone and Neolith slabs are not hazardous as shipped and used by the end customer. However, fabrication and processing of materials containing quartz (ie. cutting, sawing, grinding, breaking, crushing, drilling, sanding or sculpting) generates dust which contains crystalline silica (quartz). Unprotected and uncontrolled exposure to such dust is dangerous to health and can cause severe illnesses (such as silicosis, lung cancer, fibrosis of the lungs, tuberculosis, rheumatoid arthritis, autoimmune diseases, lupus erythematosus, kidney diseases, abrasion of the cornea and irritation of the skin and eyes). Pre-existing physical disorders may aggravate the adverse effects of exposure to silica dust. Wherever this product is fabricated and processed, a silica control program shall be in place in accordance with all the applicable laws, regulations, orders and directives. The permissible exposure limits to silica dust shall also be met. For relevant information you may also look at the requirements of your Australian local workplace safety regulator, International Labour Organization (http://www.ilo.org/safework), the Occupational Safety & Health Administration (www.osha.gov), and the European Network for Silica (www.nepsi.eu).
FIRSTAID: If irritation of the eyes or skin is experienced, flush the area immediately with plenty of water. I f breathing difficulties are experienced, move outdoors into fresh air. In any event of physical discomfort, consult with a physician.
DANGER - REFER TO SAFETY DATA SHEET FOR MATERIAL BEING PROCESSED BEFORE USE
Harmful by inhalationDanger of serious damage to health by prolonged exposureMay cause cancer (inhalation)Causes damage to lungs through prolonged or repeated exposure (inhalation)May cause respiratory tract irritation
Wear appropriate respiratory protection. The minimum class of respiratory protective equipment (RPE) is specified in the SDS for the material being processed, by guidance material produced by Work Health and Safety Regulators in their respective jurisdictions and by Australian Standard/New Zealand Standard AS/NZS 1715
Do not breathe or expose others to dusts generated Wash hands and face thoroughly after handlingDo not eat, drink or smoke when using this productWear protective gloves/protective clothing/eye protectionDispose of residues in accordance with local regulationsGet medical advice/attention if you feel unwell
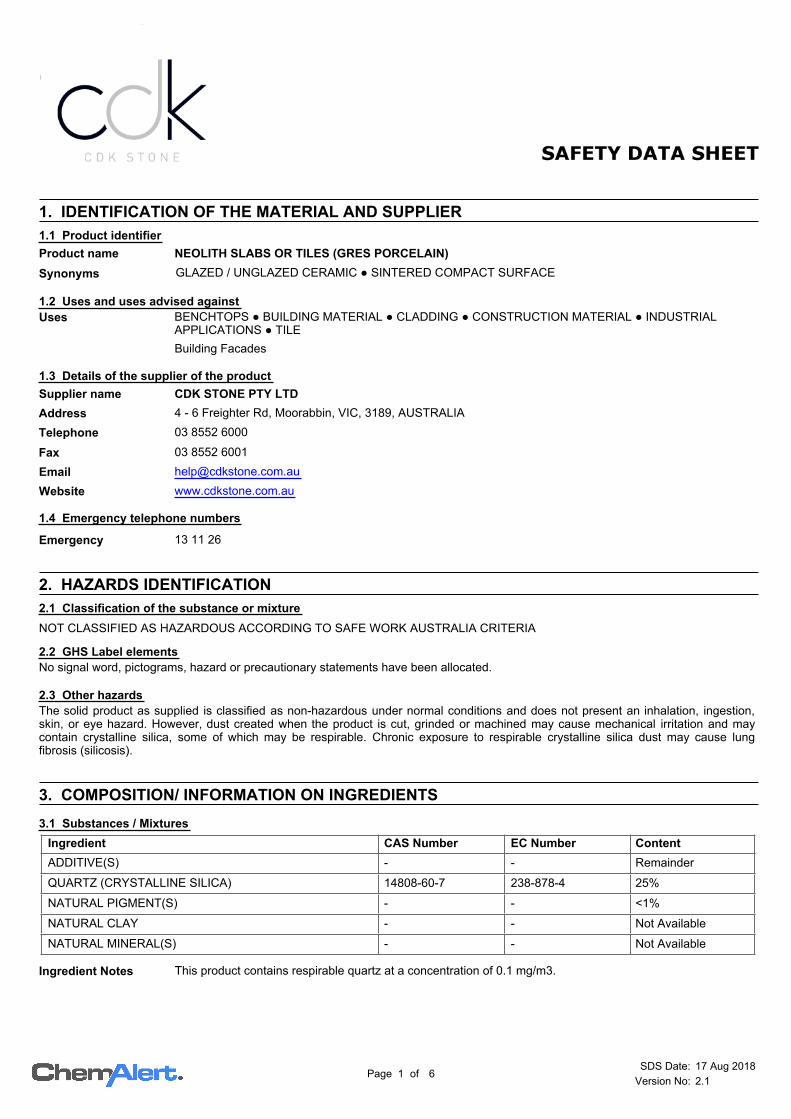
1. IDENTIFICATION OF THE MATERIAL AND SUPPLIER
GLAZED / UNGLAZED CERAMIC ● SINTERED COMPACT SURFACESynonyms
BENCHTOPS ● BUILDING MATERIAL ● CLADDING ● CONSTRUCTION MATERIAL ● INDUSTRIALAPPLICATIONS ● TILE
Uses
Building Facades
1.2 Uses and uses advised against
1.3 Details of the supplier of the product
CDK STONE PTY LTDSupplier name
4 - 6 Freighter Rd, Moorabbin, VIC, 3189, AUSTRALIAAddress
03 8552 6000Telephone
03 8552 6001Fax
13 11 26Emergency
1.4 Emergency telephone numbers
www.cdkstone.com.auWebsite
1.1 Product identifier
NEOLITH SLABS OR TILES (GRES PORCELAIN)Product name
2. HAZARDS IDENTIFICATION
NOT CLASSIFIED AS HAZARDOUS ACCORDING TO SAFE WORK AUSTRALIA CRITERIA
2.2 GHS Label elementsNo signal word, pictograms, hazard or precautionary statements have been allocated.
The solid product as supplied is classified as non-hazardous under normal conditions and does not present an inhalation, ingestion,skin, or eye hazard. However, dust created when the product is cut, grinded or machined may cause mechanical irritation and maycontain crystalline silica, some of which may be respirable. Chronic exposure to respirable crystalline silica dust may cause lungfibrosis (silicosis).
2.3 Other hazards
2.1 Classification of the substance or mixture
3. COMPOSITION/ INFORMATION ON INGREDIENTS
Ingredient CAS Number EC Number Content
Remainder- -ADDITIVE(S)
25%14808-60-7 238-878-4QUARTZ (CRYSTALLINE SILICA)
<1%- -NATURAL PIGMENT(S)
Not Available- -NATURAL CLAY
Not Available- -NATURAL MINERAL(S)
This product contains respirable quartz at a concentration of 0.1 mg/m3.Ingredient Notes
3.1 Substances / Mixtures
SDS Date: 17 Aug 2018
Version No: 2.1ofPage 1 6
NEOLITH SLABS OR TILES (GRES PORCELAIN)PRODUCT NAME
4. FIRST AID MEASURES
(Dust exposure) Flush gently with running water, irrigating under eyelids. Seek medical attention if irritationdevelops.
4.1 Description of first aid measures
Eye
(Dust exposure) If inhaled remove from contaminated area. Apply artificial respiration if not breathing.Inhalation
(Dust exposure) Gently flush affected areas with water. Seek medical attention if irritation develops.Skin
Due to product form and application, ingestion is considered unlikely.Ingestion
Eye wash facilities and safety shower are recommended.First aid facilities
See Section 11 for more detailed information on health effects and symptoms.4.2 Most important symptoms and effects, both acute and delayed
4.3 Immediate medical attention and special treatment neededTreat symptomatically.
5. FIRE FIGHTING MEASURES
Non flammable. May evolve toxic gases if strongly heated.5.2 Special hazards arising from the substance or mixture
No fire or explosion hazard exists.5.3 Advice for firefighters
None allocated.
5.4 Hazchem code
Use an extinguishing agent suitable for the surrounding fire.5.1 Extinguishing media
6. ACCIDENTAL RELEASE MEASURES
Wear Personal Protective Equipment (PPE) as detailed in section 8 of the SDS.6.1 Personal precautions, protective equipment and emergency procedures
Prevent product from entering drains and waterways.6.2 Environmental precautions
If spilt, collect and reuse where possible.6.3 Methods of cleaning up
See Sections 8 and 13 for exposure controls and disposal.6.4 Reference to other sections
7. HANDLING AND STORAGE
Ensure material is adequately labelled and protected from physical damage.7.2 Conditions for safe storage, including any incompatibilities
No information provided.7.3 Specific end uses
7.1 Precautions for safe handling
Before use carefully read the product label. Use of safe work practices are recommended to avoid eye or skin contact and inhalation.Observe good personal hygiene, including washing hands before eating. Prohibit eating, drinking and smoking in contaminatedareas.
SDS Date: 17 Aug 2018
Version No: 2.1ofPage 2 6
NEOLITH SLABS OR TILES (GRES PORCELAIN)PRODUCT NAME
8. EXPOSURE CONTROLS / PERSONAL PROTECTION
8.1 Control parameters
Exposure standards
Ingredient ReferenceTWA STEL
ppm mg/m³ ppm mg/m³
Quartz (respirable dust) SWA [AUS] -- 0.1 -- --
Biological limits
No biological limit values have been entered for this product.
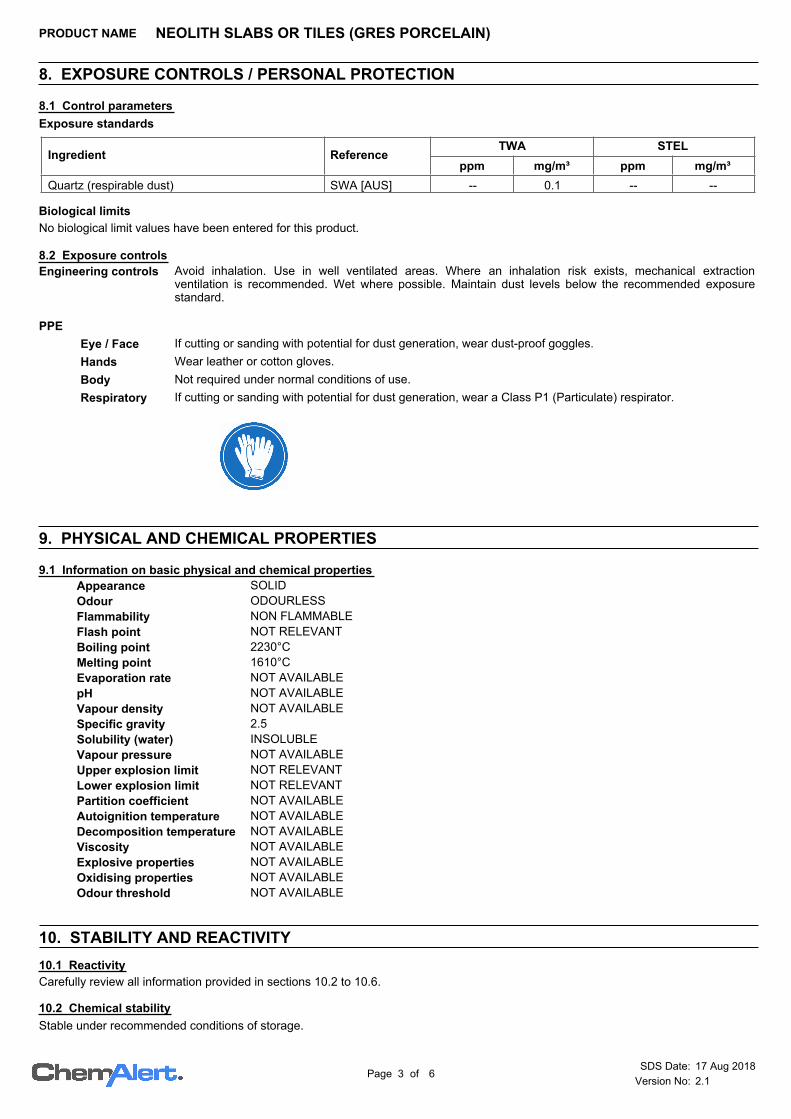
PPE
Eye / Face If cutting or sanding with potential for dust generation, wear dust-proof goggles.
Hands Wear leather or cotton gloves.
Body Not required under normal conditions of use.
Respiratory If cutting or sanding with potential for dust generation, wear a Class P1 (Particulate) respirator.
Avoid inhalation. Use in well ventilated areas. Where an inhalation risk exists, mechanical extractionventilation is recommended. Wet where possible. Maintain dust levels below the recommended exposurestandard.
8.2 Exposure controlsEngineering controls
9. PHYSICAL AND CHEMICAL PROPERTIES
9.1 Information on basic physical and chemical propertiesSOLIDAppearanceODOURLESSOdourNON FLAMMABLEFlammabilityNOT RELEVANTFlash point2230°CBoiling point1610°CMelting pointNOT AVAILABLEEvaporation rateNOT AVAILABLEpHNOT AVAILABLEVapour density2.5Specific gravityINSOLUBLESolubility (water)NOT AVAILABLEVapour pressureNOT RELEVANTUpper explosion limitNOT RELEVANTLower explosion limitNOT AVAILABLEPartition coefficientNOT AVAILABLEAutoignition temperatureNOT AVAILABLEDecomposition temperatureNOT AVAILABLEViscosityNOT AVAILABLEExplosive propertiesNOT AVAILABLEOxidising propertiesNOT AVAILABLEOdour threshold
10. STABILITY AND REACTIVITY
10.2 Chemical stability
Stable under recommended conditions of storage.
10.1 ReactivityCarefully review all information provided in sections 10.2 to 10.6.
SDS Date: 17 Aug 2018
Version No: 2.1ofPage 3 6

NEOLITH SLABS OR TILES (GRES PORCELAIN)PRODUCT NAME
10.4 Conditions to avoid
Avoid heat, sparks, open flames and other ignition sources.
10.5 Incompatible materials
Incompatible with strong acids (e.g. hydrofluoric acid).
May evolve toxic gases if heated to decomposition.10.6 Hazardous decomposition products
Polymerization is not expected to occur.
10.3 Possibility of hazardous reactions
11. TOXICOLOGICAL INFORMATION
This product is expected to be of low toxicity. Ingestion is considered unlikely due to product form.Acute toxicity
Mechanical irritant. Prolonged or repeated contact may result in mild irritation due to mechanical action.Skin
Mechanical irritant. Due to product form and nature of use, the potential for exposure is reduced. Productmay only present a hazard if material is cut, drilled or sanded with dust generation, which may result inmechanical irritation.
Eye
Not classified as causing skin or respiratory sensitisation.Sensitisation
Dust can be generated during cutting of the product. Dusts are mechanical irritants that may cause throatirritation.
STOT - singleexposure
Not applicable for solids.Aspiration
Adverse health effects, usually associated with long term exposure to high respirable crystalline silica quartzdust levels are not anticipated due to the product form. This product may only present a hazard if rocks arecut or drilled with dust generation. Chronic exposure to dust may cause lung fibrosis (silicosis).
STOT - repeatedexposure
Not classified as a reproductive toxin.Reproductive
Adverse health effects, usually associated with long term exposure to high respirable crystalline silica quartzdust levels are not anticipated due to product form. This product may only present a hazard if rocks are cutor drilled with dust generation. Respirable crystalline silica quartz is classified as carcinogenic to humans(IARC Group 1).
Carcinogenicity
Not classified as a mutagen.Mutagenicity
11.1 Information on toxicological effects
12. ECOLOGICAL INFORMATION
12.1 Toxicity
The substance is inert there is no evidence of significant toxicity.
12.2 Persistence and degradabilityBeing inorganic, the substance will not biodegrade.
12.4 Mobility in soil
No information provided.
The main component/s of this product are not anticipated to cause any adverse effects to plants or animals.
12.5 Other adverse effects
12.3 Bioaccumulative potentialThe substance is inert and will not be absorbed and accumulate in tissues.
13. DISPOSAL CONSIDERATIONS
Reuse where possible. Dispose of in accordance with local regulations.
13.1 Waste treatment methods
Waste disposal
Dispose of in accordance with relevant local legislation.Legislation
SDS Date: 17 Aug 2018
Version No: 2.1ofPage 4 6
NEOLITH SLABS OR TILES (GRES PORCELAIN)PRODUCT NAME
14. TRANSPORT INFORMATION
LAND TRANSPORT (ADG) SEA TRANSPORT (IMDG / IMO) AIR TRANSPORT (IATA / ICAO)
None allocated.
None allocated. None allocated.
None allocated. None allocated.
None allocated.14.3 Transporthazard class
14.4 Packing Group
None allocated.
None allocated.
None allocated.
None allocated. None allocated.
None allocated.
14.1 UN Number
14.2 ProperShipping Name
No information provided.
14.5 Environmental hazards
None allocated.Hazchem code
14.6 Special precautions for user
NOT CLASSIFIED AS A DANGEROUS GOOD BY THE CRITERIA OF THE ADG CODE, IMDG OR IATA
15. REGULATORY INFORMATION
A poison schedule number has not been allocated to this product using the criteria in the Standard for theUniform Scheduling of Medicines and Poisons (SUSMP).
15.1 Safety, health and environmental regulations/legislation specific for the substance or mixture
Poison schedule
AUSTRALIA: AICS (Australian Inventory of Chemical Substances)All components are listed on AICS, or are exempt.
Inventory listings
Safework Australia criteria is based on the Globally Harmonised System (GHS) of Classification andLabelling of Chemicals.
Classifications
16. OTHER INFORMATIONPERSONAL PROTECTIVE EQUIPMENT GUIDELINES:The recommendation for protective equipment contained within this report is provided as a guideonly. Factors such as form of product, method of application, working environment, quantity used,product concentration and the availability of engineering controls should be considered before finalselection of personal protective equipment is made.
HEALTH EFFECTS FROM EXPOSURE:It should be noted that the effects from exposure to this product will depend on several factorsincluding: form of product; frequency and duration of use; quantity used; effectiveness of controlmeasures; protective equipment used and method of application. Given that it is impractical toprepare a report which would encompass all possible scenarios, it is anticipated that users willassess the risks and apply control methods where appropriate.
Additional information
SDS Date: 17 Aug 2018
Version No: 2.1ofPage 5 6
NEOLITH SLABS OR TILES (GRES PORCELAIN)PRODUCT NAME
ACGIH American Conference of Governmental Industrial HygienistsCAS # Chemical Abstract Service number - used to uniquely identify chemical compoundsCNS Central Nervous SystemEC No. EC No - European Community NumberEMS Emergency Schedules (Emergency Procedures for Ships Carrying Dangerous
Goods)GHS Globally Harmonized SystemGTEPG Group Text Emergency Procedure GuideIARC International Agency for Research on CancerLC50 Lethal Concentration, 50% / Median Lethal ConcentrationLD50 Lethal Dose, 50% / Median Lethal Dosemg/m³ Milligrams per Cubic MetreOEL Occupational Exposure LimitpH relates to hydrogen ion concentration using a scale of 0 (high acidic) to 14 (highly
alkaline).ppm Parts Per MillionSTEL Short-Term Exposure LimitSTOT-RE Specific target organ toxicity (repeated exposure)STOT-SE Specific target organ toxicity (single exposure)SUSMP Standard for the Uniform Scheduling of Medicines and PoisonsSWA Safe Work AustraliaTLV Threshold Limit ValueTWA Time Weighted Average
Abbreviations
This document has been compiled by RMT on behalf of the manufacturer, importer or supplier of theproduct and serves as their Safety Data Sheet ('SDS').
It is based on information concerning the product which has been provided to RMT by themanufacturer, importer or supplier or obtained from third party sources and is believed to representthe current state of knowledge as to the appropriate safety and handling precautions for the productat the time of issue. Further clarification regarding any aspect of the product should be obtaineddirectly from the manufacturer, importer or supplier.
While RMT has taken all due care to include accurate and up-to-date information in this SDS, itdoes not provide any warranty as to accuracy or completeness. As far as lawfully possible, RMTaccepts no liability for any loss, injury or damage (including consequential loss) which may besuffered or incurred by any person as a consequence of their reliance on the information containedin this SDS.
Report status
Risk Management Technologies 5 Ventnor Ave, West Perth Western Australia 6005 Phone: +61 8 9322 1711 Fax: +61 8 9322 1794 Email: [email protected] Web: www.rmtglobal.com
Prepared by
[ End of SDS ]
SDS Date: 17 Aug 2018
Version No: 2.1ofPage 6 6
TE
CH
NIC
AL
MA
NU
AL
01. PRODUCT

01. PRODUCT
1.1 Product Range
Arctic White
Avorio
Humo
Nero
Nieve
Perla
Arena
Aspen Grey
Barro
Basalt Beige
Basalt Black
Basalt Grey
Beton
Cement
Concrete Taupe
Lava
Nero Zimbabwe
Phedra
Pierre Bleue
Pietra di Luna
Pietra di Osso
Pietra di PiomboT
EC
HN
ICA
L M
AN
UA
L
Luna
Mirage
Krater Retrostone
Zaha’s Stone
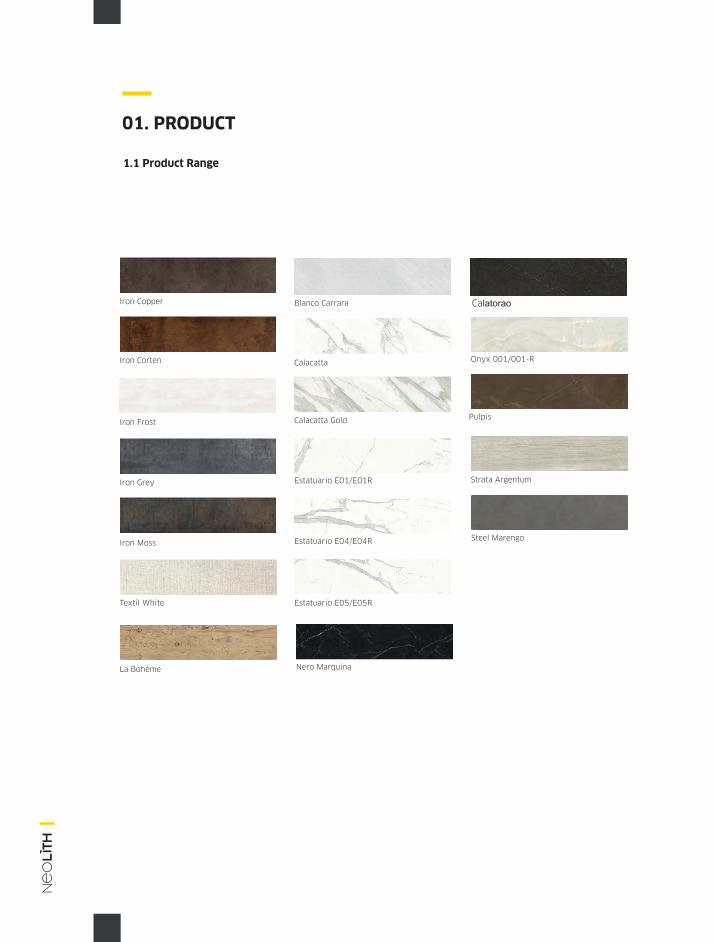
Iron Copper
Iron Corten
Iron Frost
Iron Grey
Iron Moss
Textil White
Blanco Carrara
Calacatta
Calacatta Gold
Estatuario E01/E01R
Estatuario E04/E04R
Estatuario E05/E05R
Nero Marquina
Onyx 001/001-R
Pulpis
Strata Argentum
Steel Marengo
La Bohème
01. PRODUCT
1.1 Product Range
Calatorao
01. PRODUCT
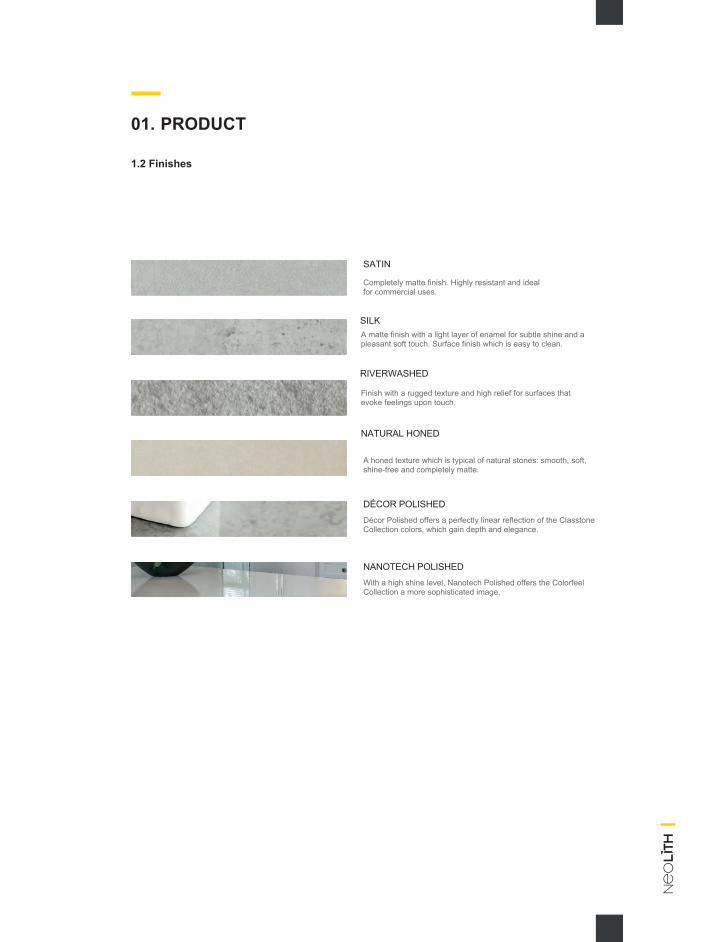
1.2 Finishes
SATIN
Completely matte finish. Highly resistant and ideal for commercial uses.
A honed texture which is typical of natural stones: smooth, soft, shine-free and completely matte.
DÉCOR POLISHEDDécor Polished offers a perfectly linear reflection of the Classtone Collection colors, which gain depth and elegance.
NANOTECH POLISHEDWith a high shine level, Nanotech Polished offers the Colorfeel Collection a more sophisticated image.
SILKA matte finish with a light layer of enamel for subtle shine and a pleasant soft touch. Surface finish which is easy to clean.
RIVERWASHED
Finish with a rugged texture and high relief for surfaces that evoke feelings upon touch.
NATURAL HONED
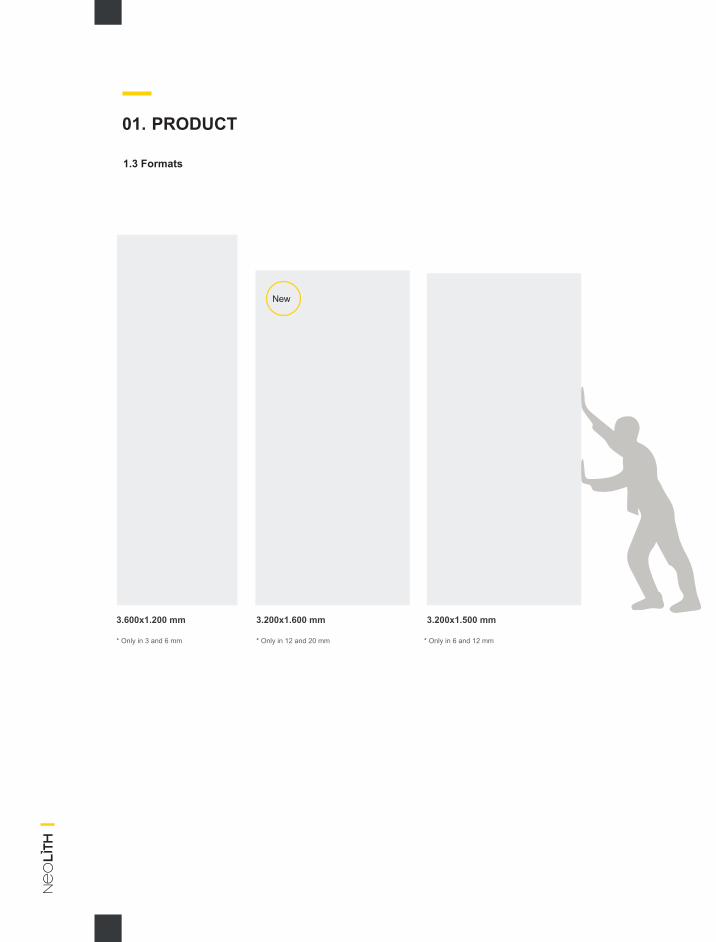
01. PRODUCT
1.3 Formats
3.200x1.500 mm 3.600x1.200 mm
* Only in 6 and 12 mm
3.200x1.600 mm
* Only in 12 and 20 mm* Only in 3 and 6 mm
New
01. PRODUCT
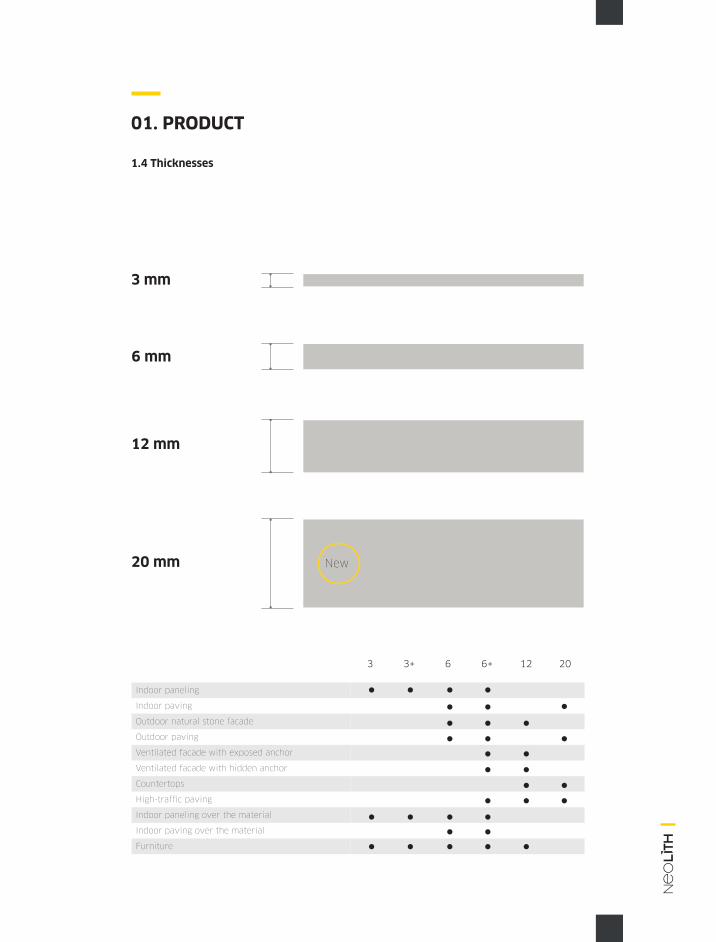
1.4 Thicknesses
6 mm
3 mm
12 mm
20 mm New
3 3+ 6 6+ 12 20
Indoor paneling
Indoor paving
Outdoor natural stone facade
Outdoor paving
Ventilated facade with exposed anchor
Ventilated facade with hidden anchor
Countertops
High-traffic paving
Indoor paneling over the material
Indoor paving over the material
Furniture

01. PRODUCT
1.5 Product Technical Characteristics
Product characteristics as per the finishes:
TEST STANDARD DETERMINATION Unit FINISH
SATIN SILK POLISHED RIVERWASHED
Determination of Dimensions and Surface Appearance
ISO 10545-2 Thickness* mm ± 0,2 ± 0,2 ± 0,2 ± 0,2
Tolerance Flatness Slab width
mm ± 2 (0,1%) ± 2 (0,1%) ± 2 (0,1%)
± 2 (0,1%)
Tolerance Flatness Slab length
mm ± 4 (0,1%) ± 4 (0,1%) ± 4 (0,1%)
± 4 (0,1%)
ToleranceDimensions**
mm ± 1 (0,2%) ± 1 (0,2%) ± 1 (0,2%) ± 1 (0,2%)
Water Absorption ISO-10545-3 Boiling Absorption % ≤ 0,1 ≤ 0,1 ≤ 0,1 ≤ 0,1
Apparent Density gr/cm3 2,4 2,4 2,4 2,4
Impact Resistance ISO 10545-5 Coefficient of restitution
- 0,8 0,8 0,6 0,8
Deep Abrasion Resistance
ISO-10545-6 Lost Volume mm3 130 - - -
Surface Abrasion Resistance
ISO 10545-7 Visual Appearance Clase PEI III PEI II PEI I PEI II
Linear Thermal Expansion
ISO 10545-8 Expansion 25 - 100oC (Average)
10-6· oC 5,7 5,7 5,7 5,7
Resistance to Sudden Temperature Change
ISO 10545-9 Damage - No Damage NoDamage
NoDamage
NoDamage
Moisture Expansion ISO 10545-10 Coefficient of Expansion
mm/m < 0,1 < 0,1 < 0,1 < 0,1
Freeze Resistance ISO 10545-12 Damage - No Damage No Damage
NoDamage
NoDamage
Chemical Resistance ISO 10545-13 Cleaning Products Clase UA GA GA GA
Pool Salts Clase UA GA GA GA
Weak Concentrations
Clase ULA GLA GLB GLA
High Concentrations
Clase UHA GHA GHB GHA
Stain Resistance ISO 10545-14 Visual Appearance Clase 5 5 5 5
Release of Lead and Cadmium
ISO 10545-15 Lead Concentration mg/dm2 <0,01 <0,01 <0,01 <0,01
Cadmium Concentration
mg/dm2 <0,001 <0,001 <0,001 <0,001
Lightfastness DIN 51094 Chromatic Change - NoChange
NoChange
NoChange
NoChange
Anti-Slip Properties DIN 51130 Critical Angle of Slip (Shoes method)
Clase R9 R9 - R10
DIN 51097 Critical Angle of Slip (Barefoot areas)
Clase A A - A
ANSI A137.1 Coefficient of Dynamic Friction
Clase 0,41 – 0,57 0,42 0,21 0,53
* Slabs without mesh ** Cut Slabs/Tiles

01. PRODUCT
1.5 Product Technical Characteristics
Bending Resistance as per the slab thickness:
TEST STAN-DARD
DETERMI-NATION
Unit 3600 x 1200 3200 x 1500
3 mm 3+ 6 mm 6+ 3+3 6+3 6+6 6+ 12 mm 20 mm
Weight - Grammage Kg/m2
7 8 14 15 16 23 30 15 29
Mass 34 38 67 72 76 110 143 77 148
Bending Resistance
ISO 10545-4
Breaking Force
N 353 430 1449 1807 1337 2735 3149 1807 5451 15748
Modulus of Rupture
N/mm2
48 54 48 53 47 57 47 53 51 55

02. HANDLING AND STORAGE
TE
CH
NIC
AL
MA
NU
AL

Neolith Slab handled with a clamp
02. HANDLING AND STORAGE
Neolith slabs must be loaded, unloaded and transported by means of a forklift, bridge crane or other hoisting device.Whenever handling and transporting, the slabs must be balanced taking their center of gravity into account.
The following table summarizes the approx. weight per slab and per square meter:
Format 3600 x 1200 mm 3200 x 1500 mm
Thicknesses (mm) 3 3+ 6 6+ 3+3 6+3 6+6 6+ 12 20
Weight (kg/m2) 7 8 14 15 16 23 30 14 29 48
Weight of full slab (Kg)
34 38 67 72 76 110 143 77 148 245
Table 1: Formats and weights per thickness.
2.1 Transporting with a clamp
Always pay attention to the movement and handling of the slabs to prevent splintering or breakage.TheSize recommends using the following type of clamp for lifting and moving individual slabs:
TEC
HN
ICA
L M
AN
UA
L

The additional width of this clamp will prevent the slab from bending during handling to, thus, prevent undesirable breakage.
Recommendations:
Clamping more than 2 slabs at the same time is not recommended.
Before lifting polished slabs with the clamp, remove the protective plastic.
Make sure to cover all metal surfaces that may come into contact with the slab with adhesive foam tape.
Make sure to cover all metal surfaces that may come into contact with the slab with adhesive foam tape.
If this type of clamp is not available, use a 2 cm thick plank of approximately 3 m x 20 cm so the clamp can secure onto 12 mm slabs.
Fixing the ends of the slab with clamps to the plank so the slab doesn’t sag during handling is recommended.
Position the plank to the rear of the slab to be lifted.
1) Place the clamp on the slab and the plank.
2) Fix the clamp and lift the slab and plank with care.
3) Avoid sudden changes in direction.
TEC
HN
ICA
L M
AN
UA
L
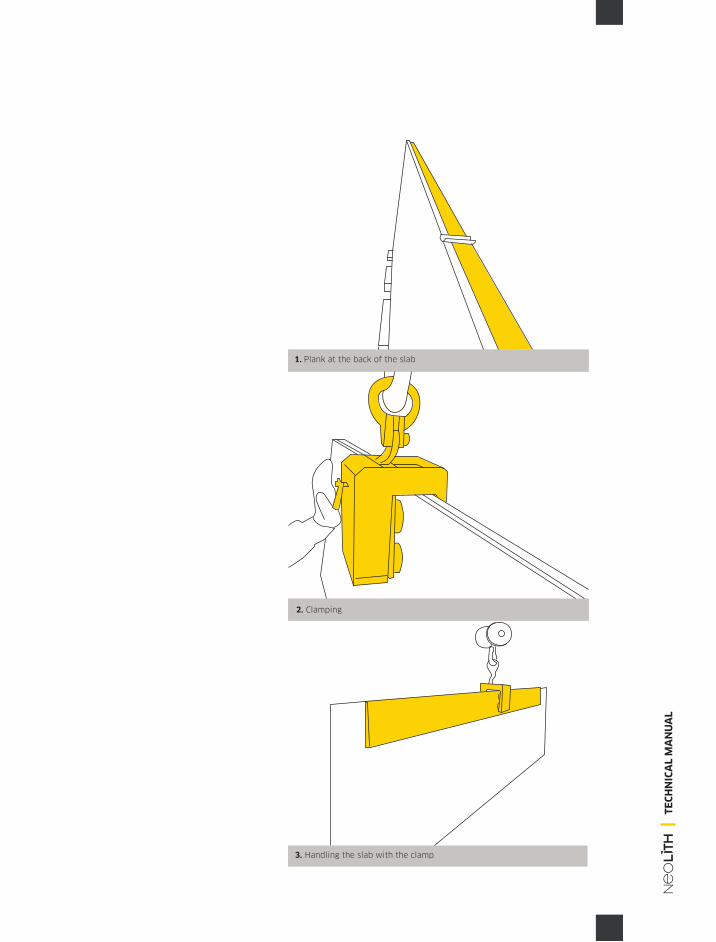
1. Plank at the back of the slab
2. Clamping
3. Handling the slab with the clamp
TE
CH
NIC
AL
MA
NU
AL
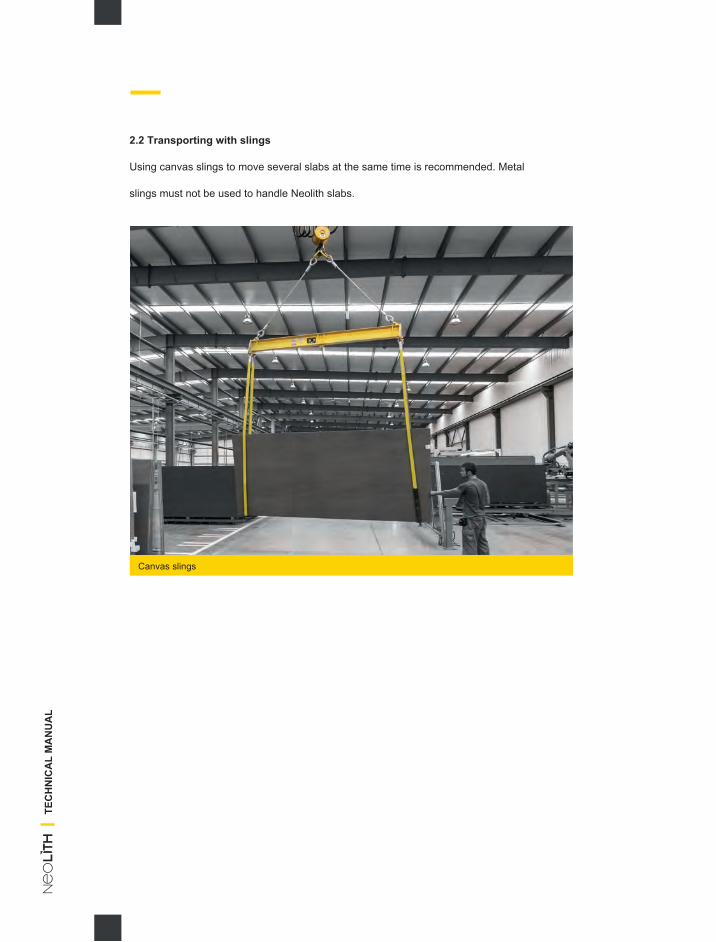
2.2 Transporting with slings
Using canvas slings to move several slabs at the same time is recommended. Metal
slings must not be used to handle Neolith slabs.
Canvas slings
TEC
HN
ICA
L M
AN
UA
L
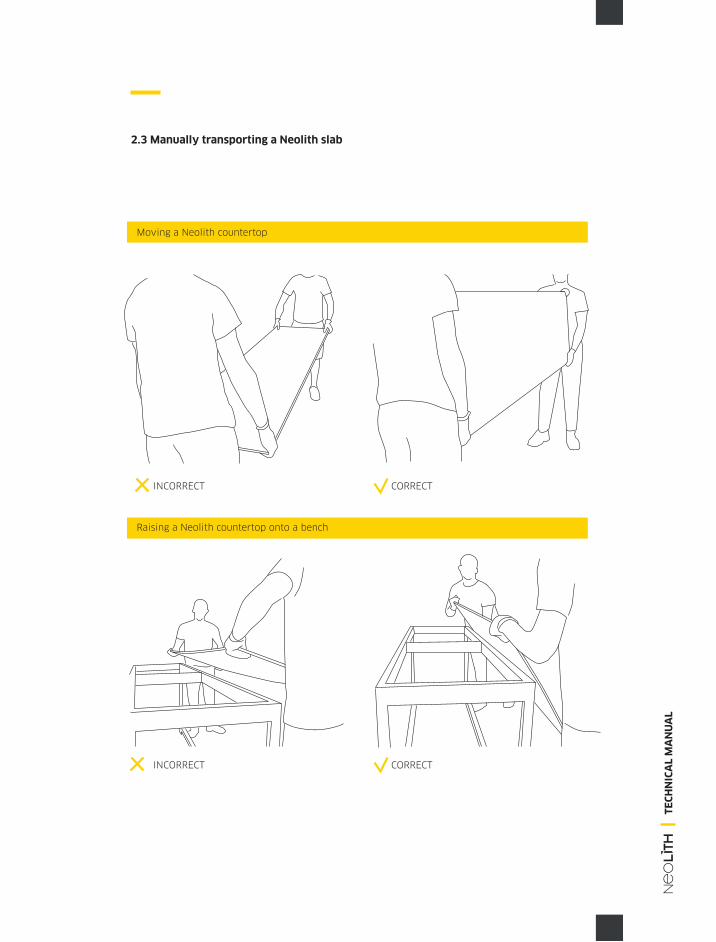
2.3 Manually transporting a Neolith slab
Moving a Neolith countertop
INCORRECT
INCORRECT
CORRECT
CORRECT
Raising a Neolith countertop onto a bench
TE
CH
NIC
AL
MA
NU
AL
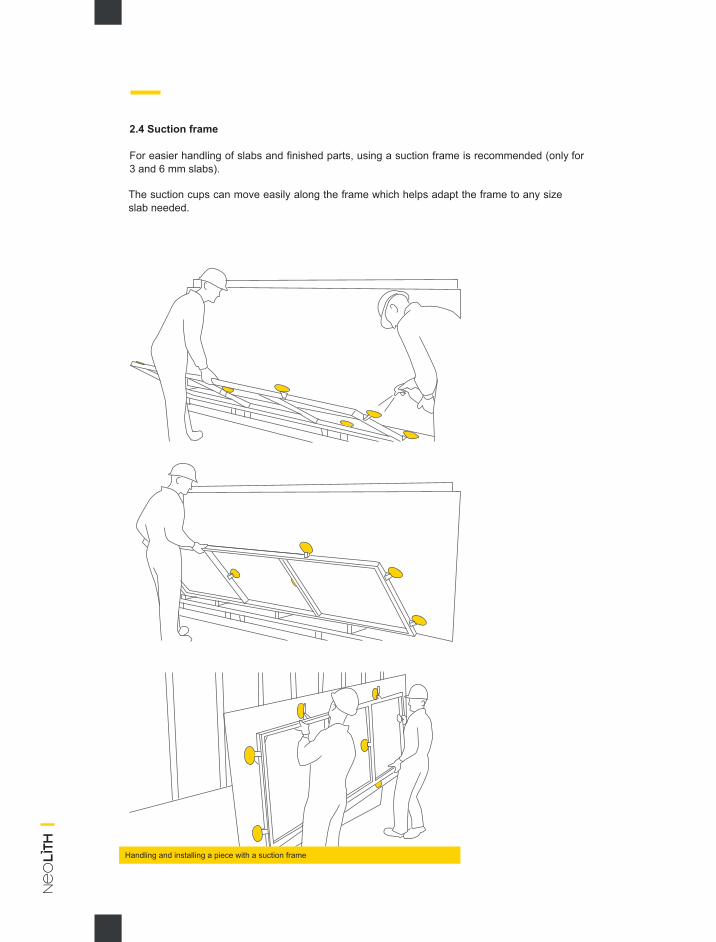
2.4 Suction frame
For easier handling of slabs and finished parts, using a suction frame is recommended (only for 3 and 6 mm slabs).
The suction cups can move easily along the frame which helps adapt the frame to any size slab needed.
Handling and installing a piece with a suction frame
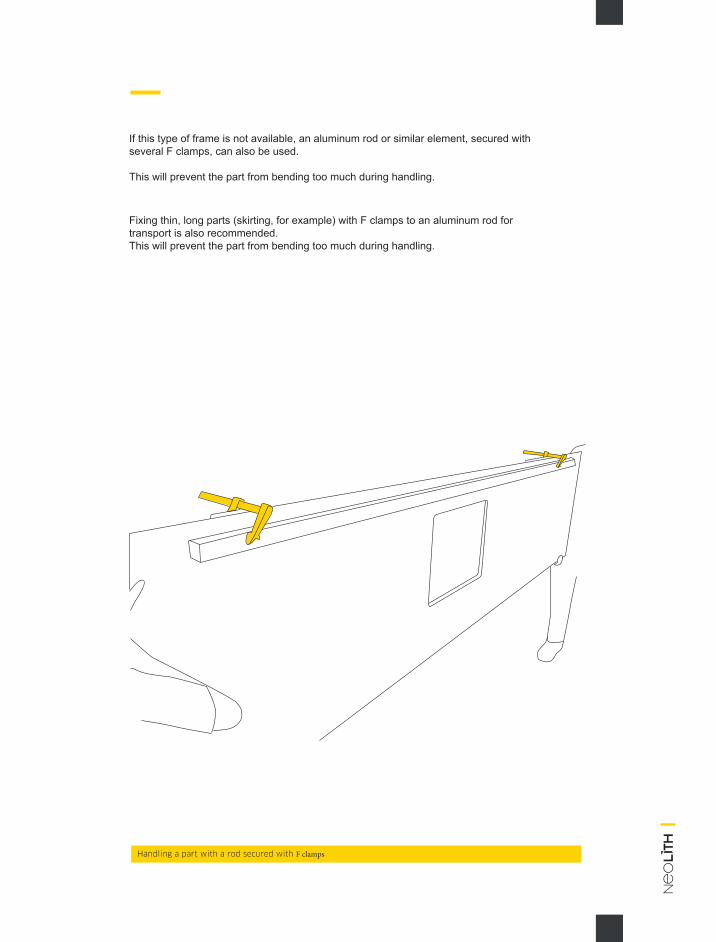
If this type of frame is not available, an aluminum rod or similar element, secured with several F clamps, can also be used.
This will prevent the part from bending too much during handling.
Fixing thin, long parts (skirting, for example) with F clamps to an aluminum rod for transport is also recommended.This will prevent the part from bending too much during handling.
Handling a part with a rod secured with F clamps
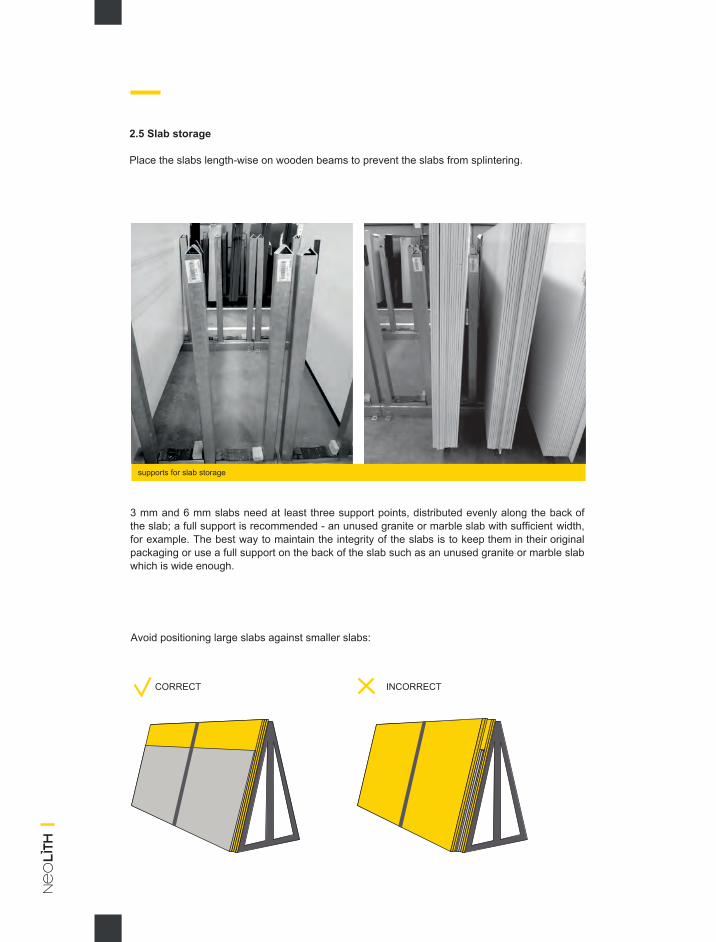
2.5 Slab storage
Place the slabs length-wise on wooden beams to prevent the slabs from splintering.
3 mm and 6 mm slabs need at least three support points, distributed evenly along the back of the slab; a full support is recommended - an unused granite or marble slab with sufficient width, for example. The best way to maintain the integrity of the slabs is to keep them in their original packaging or use a full support on the back of the slab such as an unused granite or marble slab which is wide enough.
Avoid positioning large slabs against smaller slabs:
INCORRECTCORRECT
supports for slab storage

The supports must be able to hold the entire surface of the part during transport. Supports that are too small may cause the part to break:
2.6 Transport by road
When in a truck, the slabs must be completely supported and securing the slabs mechanically (eg. truck or ratchet straps) is recommended as they could become loose with strong wind and break.
Lightweight slabs and tiles may easily fall from a truck or to the ground so always secure the slabs to a sawhorse while unloading.Pay special attention in the shop if the slabs are stored outdoors; secure the slabs to sawhorses to protect them from gusts of wind.
INCORRECTCORRECT
Storage of Neolith slabs in the shop
3.1 Slab characteristics
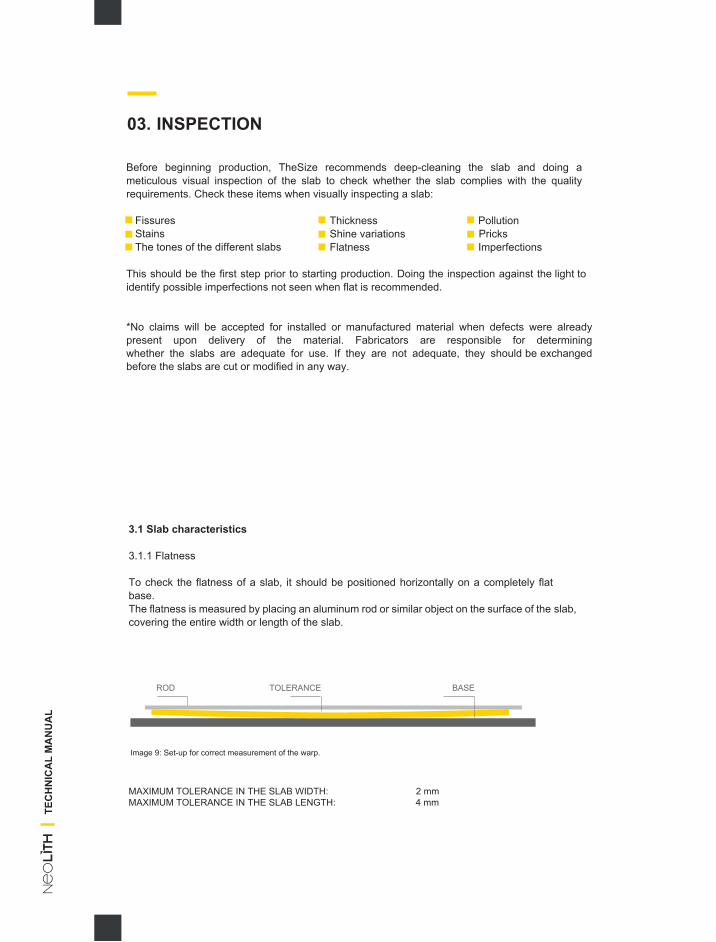
3.1.1 Flatness
To check the flatness of a slab, it should be positioned horizontally on a completely flat base.The flatness is measured by placing an aluminum rod or similar object on the surface of the slab, covering the entire width or length of the slab.
PollutionPricks
Fissures Stains The tones of the different slabs
Thickness Shine variations Flatness Imperfections
This should be the first step prior to starting production. Doing the inspection against the light to identify possible imperfections not seen when flat is recommended.
*No claims will be accepted for installed or manufactured material when defects were alreadypresent upon delivery of the material. Fabricators are responsible for determiningwhether the slabs are adequate for use. If they are not adequate, they should be exchangedbefore the slabs are cut or modified in any way.
03. INSPECTION
Before beginning production, TheSize recommends deep-cleaning the slab and doing a meticulous visual inspection of the slab to check whether the slab complies with the quality requirements. Check these items when visually inspecting a slab:
Image 9: Set-up for correct measurement of the warp.
TOLERANCE BASEROD
2 mmMAXIMUM TOLERANCE IN THE SLAB WIDTH: MAXIMUM TOLERANCE IN THE SLAB LENGTH: 4 mm
TEC
HN
ICA
L M
AN
UA
L
3.1.2 Tone
TheSize is constantly working so the tone of the current batches matches the tone of previous batches. Despite our efforts, slight variations in tone may occur between different batches of the same model due to the use of natural raw materials. Deviations in tone are more noticeable among the various thicknesses of a single model given the way in which each thickness is produced.Before cutting, visually inspect the slabs to ensure the tone of the different slabs is acceptable. Do this inspection under lighting conditions that are similar to what would be found at the place of installation. We recommend not combining slabs from different batches.
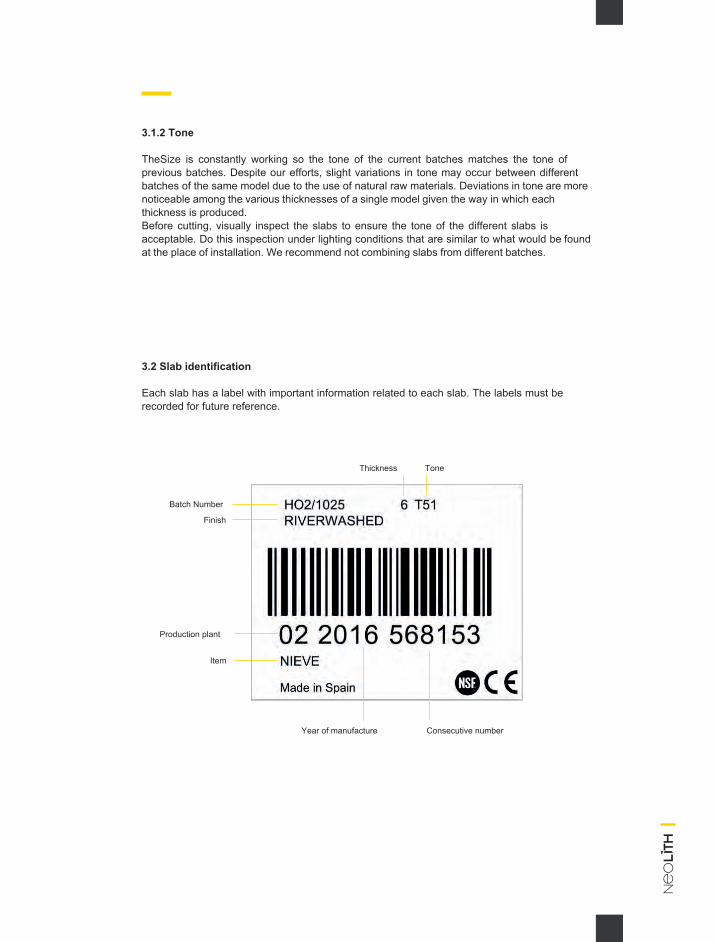
3.2 Slab identification
Each slab has a label with important information related to each slab. The labels must be recorded for future reference.
Thickness
Item
Year of manufacture Consecutive number
Production plant
Batch Number
Finish
Tone
TE
CH
NIC
AL
MA
NU
AL
04. MACHINING PARAMETERS
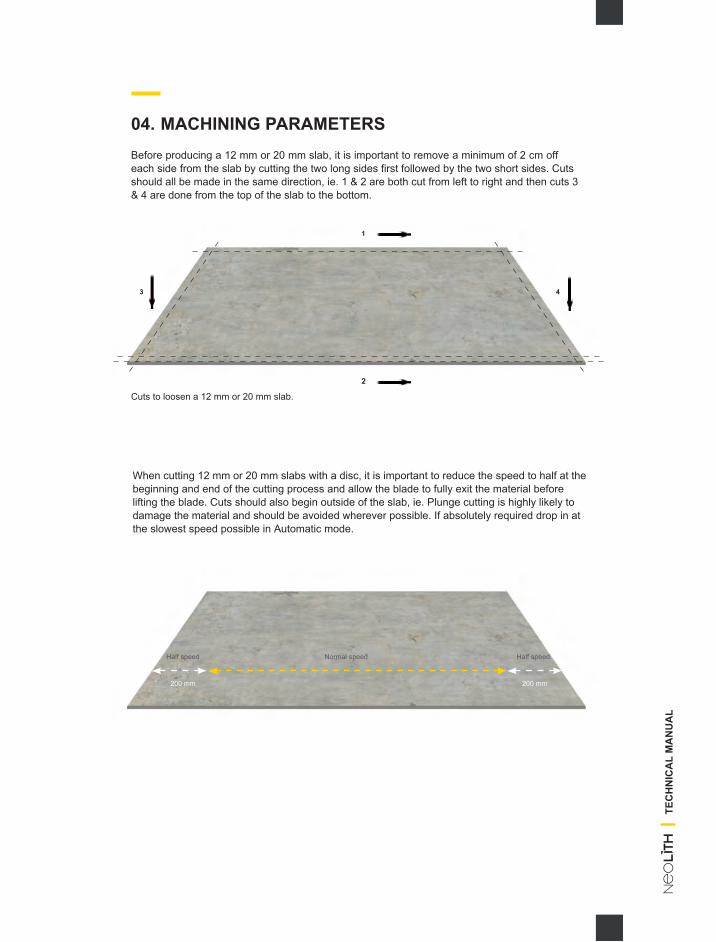
When cutting 12 mm or 20 mm slabs with a disc, it is important to reduce the speed to half at the beginning and end of the cutting process and allow the blade to fully exit the material before lifting the blade. Cuts should also begin outside of the slab, ie. Plunge cutting is highly likely to damage the material and should be avoided wherever possible. If absolutely required drop in at the slowest speed possible in Automatic mode.
04. MACHINING PARAMETERSBefore producing a 12 mm or 20 mm slab, it is important to remove a minimum of 2 cm off each side from the slab by cutting the two long sides first followed by the two short sides. Cuts should all be made in the same direction, ie. 1 & 2 are both cut from left to right and then cuts 3 & 4 are done from the top of the slab to the bottom.
Cuts to loosen a 12 mm or 20 mm slab.
1
2
3 4
200 mm 200 mm
Normal speedHalf speed Half speed
TEC
HN
ICA
L M
AN
UA
L
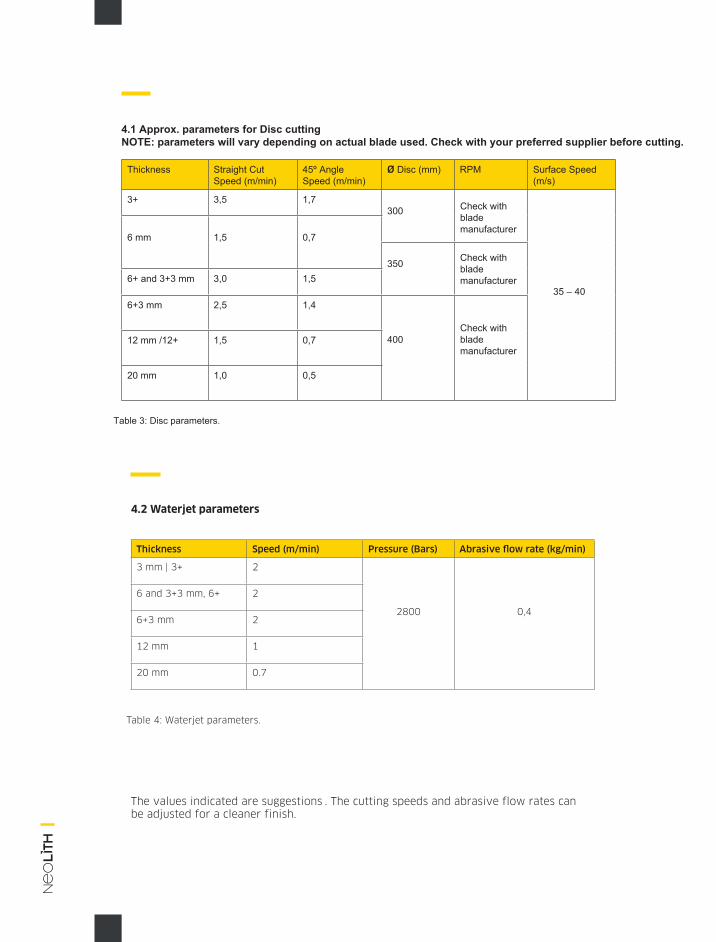
4.1 Approx. parameters for Disc cutting NOTE: parameters will vary depending on actual blade used. Check with your preferred supplier before cutting.
Thickness Straight Cut Speed (m/min)
45º Angle Speed (m/min)
Ø Disc (mm) RPM Surface Speed (m/s)
3+ 3,5 1,7300 Check with
blade manufacturer
35 – 40
6 mm 1,5 0,7
3506+ and 3+3 mm 3,0 1,5
6+3 mm 2,5 1,4
40012 mm /12+ 1,5 0,7
20 mm 1,0 0,5
Table 3: Disc parameters.
Check with blade manufacturer
Check with blade manufacturer
4.2 Waterjet parameters
The values indicated are suggestions . The cutting speeds and abrasive flow rates can be adjusted for a cleaner finish.
Thickness Speed (m/min) Pressure (Bars) Abrasive flow rate (kg/min)
3 mm | 3+ 2
2800 0,4
6 and 3+3 mm, 6+ 2
6+3 mm 2
12 mm 1
20 mm 0.7
Table 4: Waterjet parameters.
TE
CH
NIC
AL
MA
NU
AL
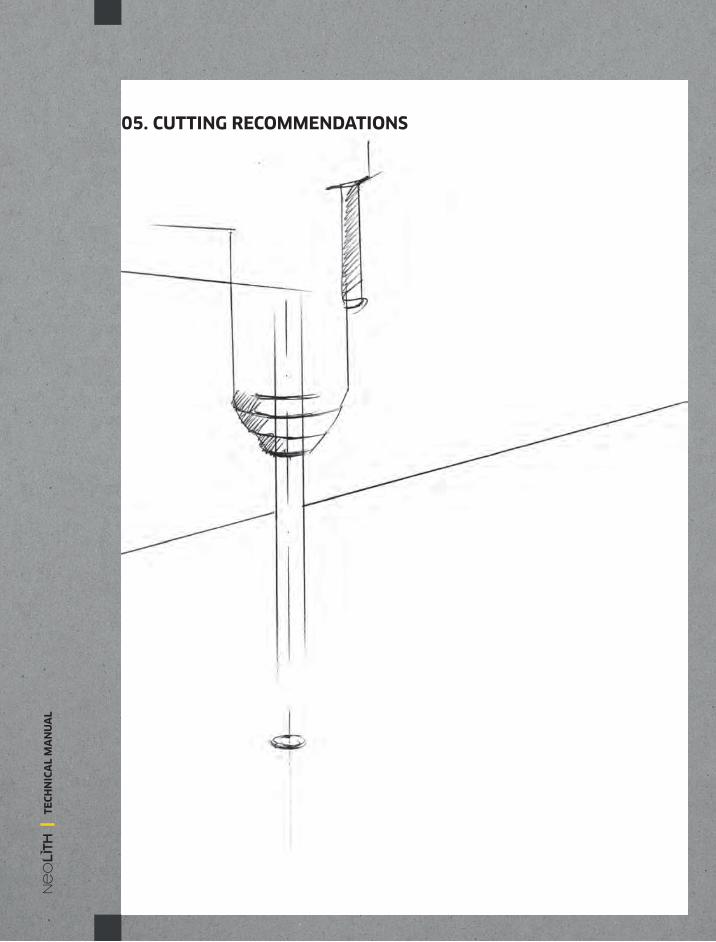
05. CUTTING RECOMMENDATIONS
05. CUTTING RECOMMENDATIONS
5.1 Bridge saw or similar
Before beginning
Check that the bench is straight, level and free of any debris. Check that there is enough
support for the slab.
While cutting, it’s important to use the maximum water flow to cool the disc. Be sure the water flow is aimed at the cutting area.
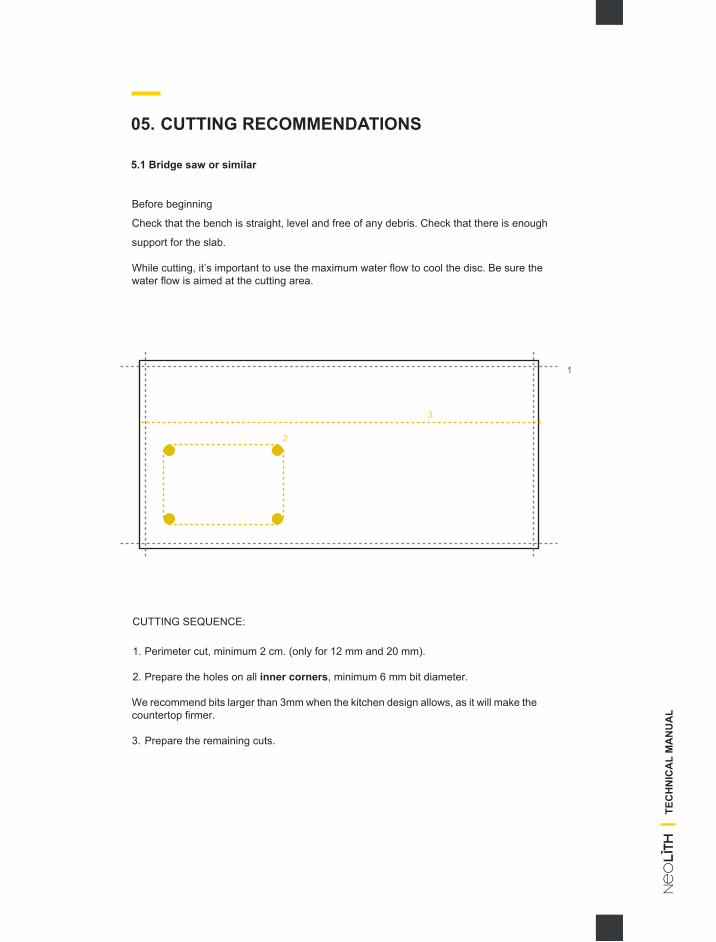
CUTTING SEQUENCE:
1. Perimeter cut, minimum 2 cm. (only for 12 mm and 20 mm).
2. Prepare the holes on all inner corners, minimum 6 mm bit diameter.
We recommend bits larger than 3mm when the kitchen design allows, as it will make the countertop firmer.
3. Prepare the remaining cuts.
1
2
3
TEC
HN
ICA
L M
AN
UA
L
RECOMMENDATIONS:
Make sure all cutting is done in the forward direction only and that the disc rotation coincides with the cutting direction.
The cutting disc should be at least 1.5 mm past the bottom of the slab thickness to ensure a clean cut. Note that the perimeter cut of the slab may be used as a final cut for the part to be made.
In the exceptional case that the disc is lowered directly onto the slab, do it in automatic mode at the slowest possible speed.
Periodically check the blade flanges and don’t use the disc if it does not easily fit onto the spindle.
Cutting 45º angles (mitred cuts) in Neolith requires a slower cutting speed. It also helps to have something at the beginning and end of the cut to keep the disc aligned.
When using a new disc, do a few cuts so the disc segments can adapt and the diamonds have a chance to open.
All cutouts must have previously drilled holes:- A minimum radius of 6 mm.- Never lower the disc directly on the slab before drilling the corners.
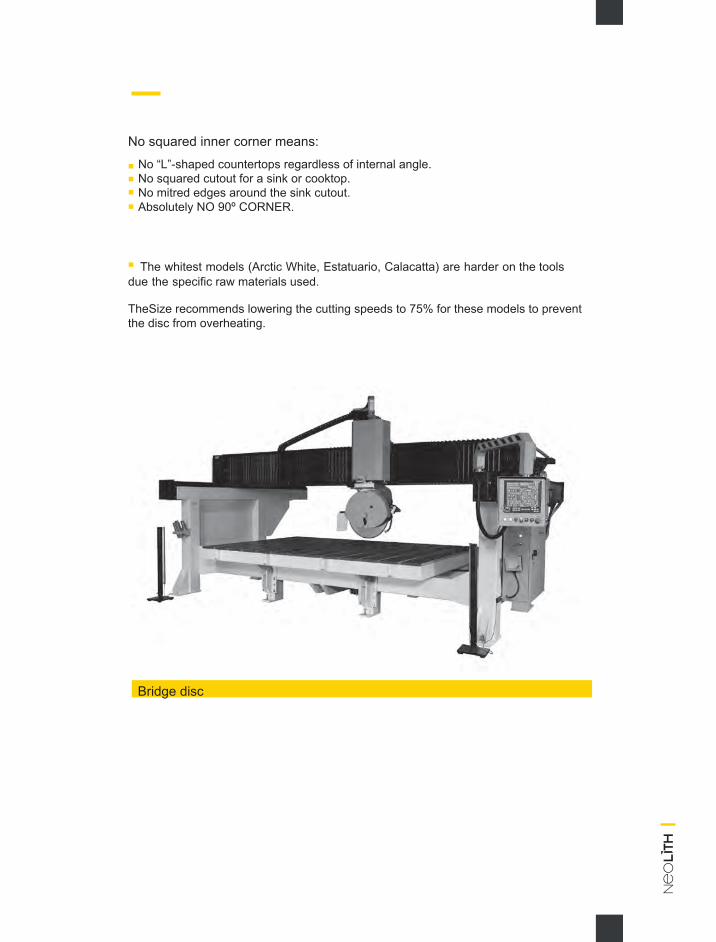
No squared inner corner means:
No “L”-shaped countertops regardless of internal angle. No squared cutout for a sink or cooktop.No mitred edges around the sink cutout.Absolutely NO 90º CORNER.
The whitest models (Arctic White, Estatuario, Calacatta) are harder on the tools due the specific raw materials used.
TheSize recommends lowering the cutting speeds to 75% for these models to prevent the disc from overheating.
Bridge disc
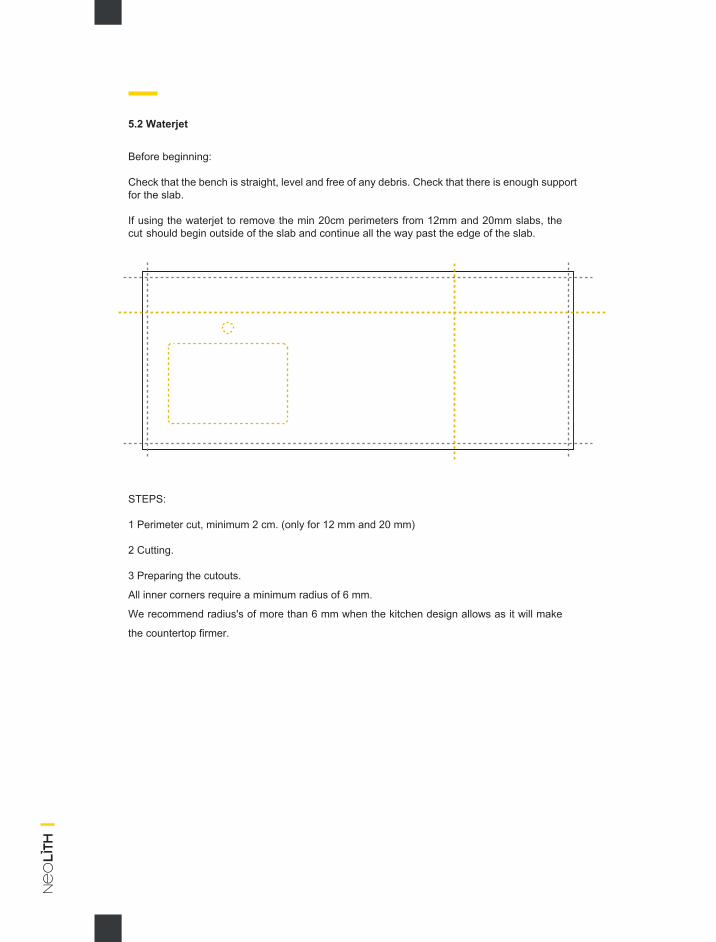
5.2 Waterjet
Before beginning:
Check that the bench is straight, level and free of any debris. Check that there is enough support for the slab.
If using the waterjet to remove the min 20cm perimeters from 12mm and 20mm slabs, the cut should begin outside of the slab and continue all the way past the edge of the slab.
STEPS:
1 Perimeter cut, minimum 2 cm. (only for 12 mm and 20 mm)
2 Cutting.
3 Preparing the cutouts.
All inner corners require a minimum radius of 6 mm.
We recommend radius's of more than 6 mm when the kitchen design allows as it will make
the countertop firmer.
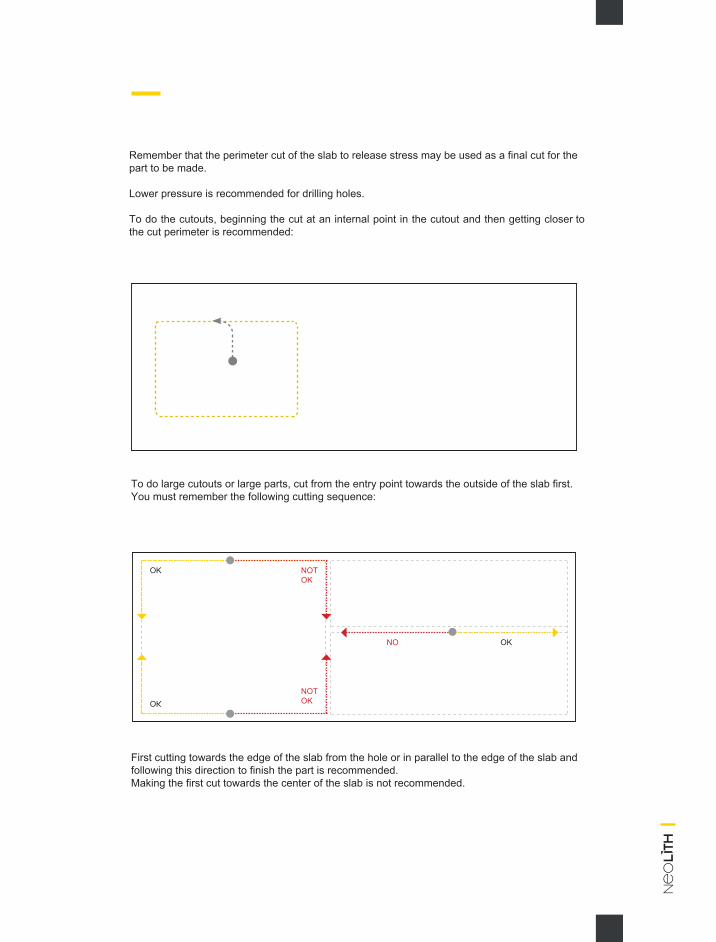
To do large cutouts or large parts, cut from the entry point towards the outside of the slab first. You must remember the following cutting sequence:
First cutting towards the edge of the slab from the hole or in parallel to the edge of the slab and following this direction to finish the part is recommended.Making the first cut towards the center of the slab is not recommended.
Remember that the perimeter cut of the slab to release stress may be used as a final cut for the part to be made.
Lower pressure is recommended for drilling holes.
To do the cutouts, beginning the cut at an internal point in the cutout and then getting closer to the cut perimeter is recommended:
OK
OK
OK
NOT OK
NOT OK
NO
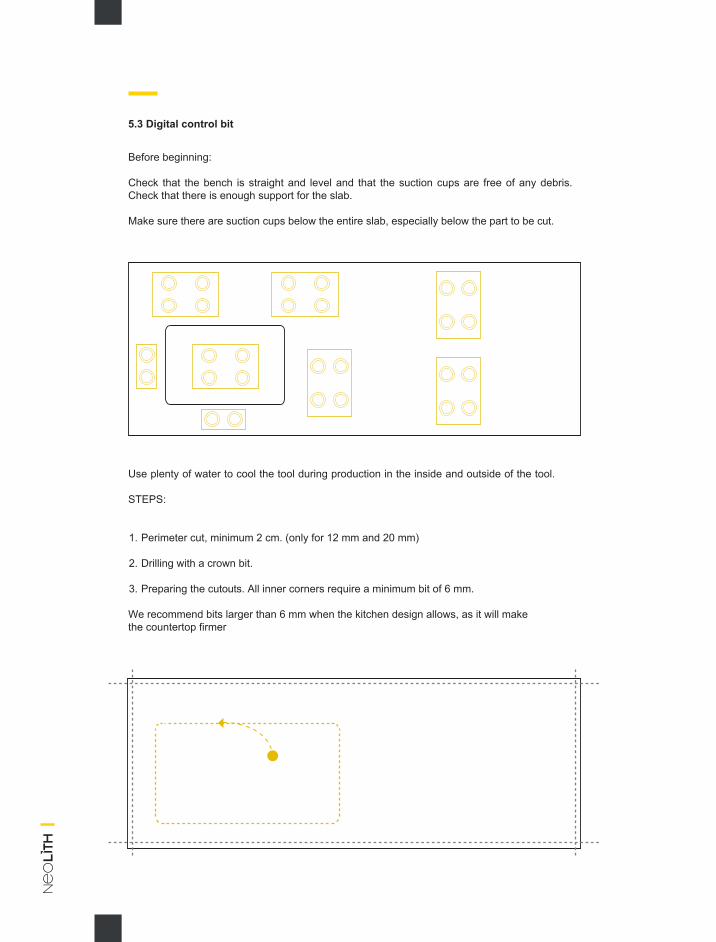
5.3 Digital control bit
Before beginning:
Check that the bench is straight and level and that the suction cups are free of any debris. Check that there is enough support for the slab.
Make sure there are suction cups below the entire slab, especially below the part to be cut.
Use plenty of water to cool the tool during production in the inside and outside of the tool.
STEPS:
1. Perimeter cut, minimum 2 cm. (only for 12 mm and 20 mm)
2. Drilling with a crown bit.
3. Preparing the cutouts. All inner corners require a minimum bit of 6 mm.
We recommend bits larger than 6 mm when the kitchen design allows, as it will make the countertop firmer
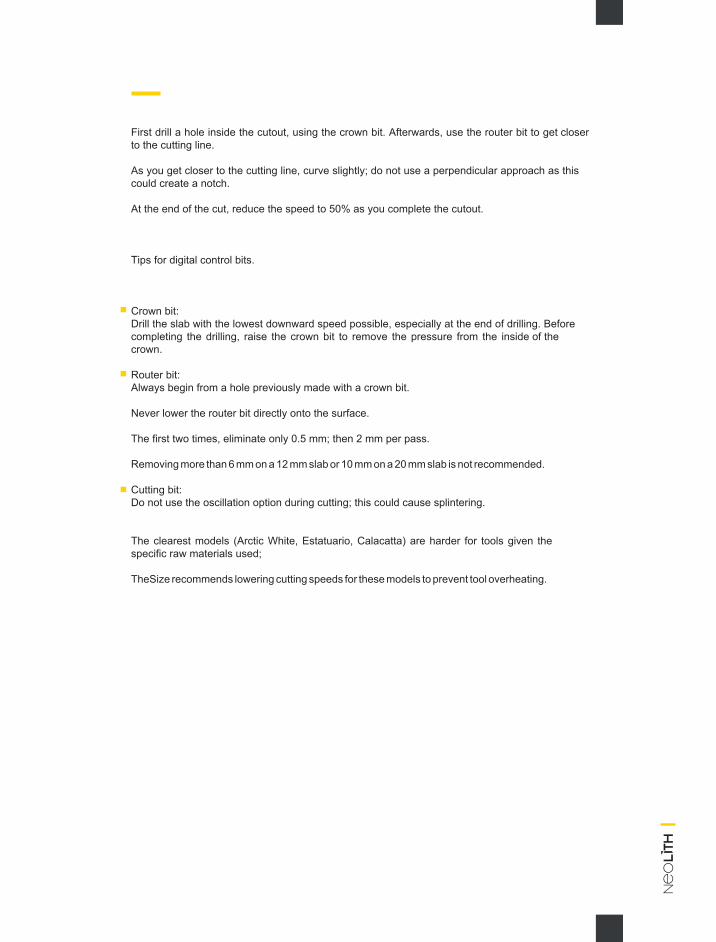
First drill a hole inside the cutout, using the crown bit. Afterwards, use the router bit to get closer to the cutting line.
As you get closer to the cutting line, curve slightly; do not use a perpendicular approach as this could create a notch.
At the end of the cut, reduce the speed to 50% as you complete the cutout.
Tips for digital control bits.
Crown bit:Drill the slab with the lowest downward speed possible, especially at the end of drilling. Before completing the drilling, raise the crown bit to remove the pressure from the inside of the crown.
Router bit:Always begin from a hole previously made with a crown bit.
Never lower the router bit directly onto the surface.
The first two times, eliminate only 0.5 mm; then 2 mm per pass.
Removing more than 6 mm on a 12 mm slab or 10 mm on a 20 mm slab is not recommended.
Cutting bit:Do not use the oscillation option during cutting; this could cause splintering.
The clearest models (Arctic White, Estatuario, Calacatta) are harder for tools given the specific raw materials used;
TheSize recommends lowering cutting speeds for these models to prevent tool overheating.
06. DESIGN AND PRODUCTION OF A NEOLITHCOUNTERTOP
TE
CH
NIC
AL
MA
NU
AL
TheSize Surfaces recommends the following end uses for the various Neolith thicknes-ses:
Paneling: 3mm, 3+, 6 mm and 6+Paving: 6 mm, 6+, 12 mm and 20 mmCountertops: 3+3, 6+3, 6+6, 12 and 20 mm.
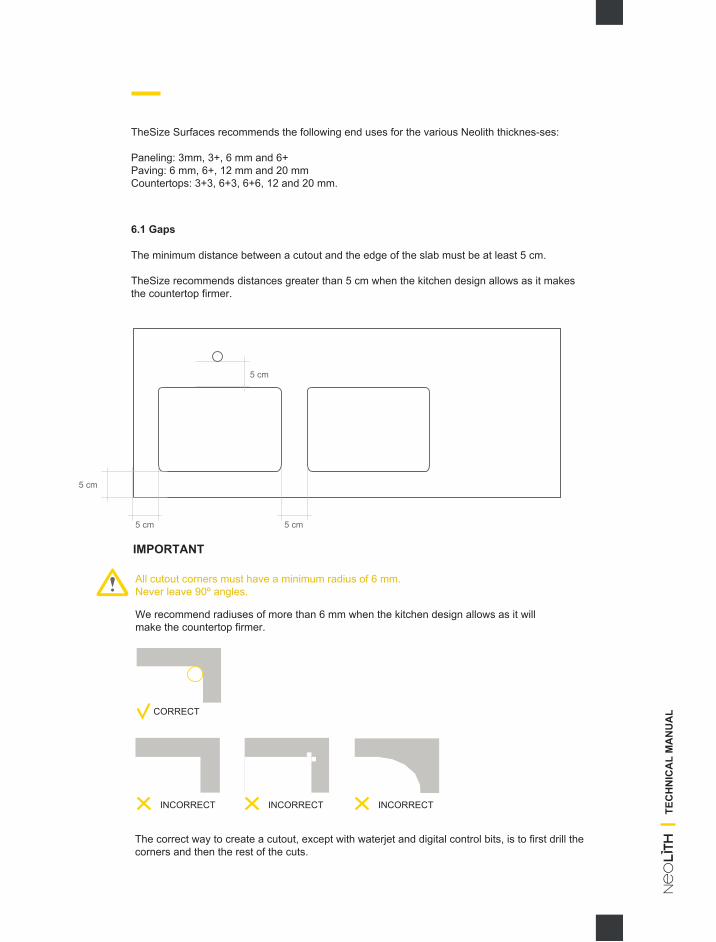
6.1 Gaps
The minimum distance between a cutout and the edge of the slab must be at least 5 cm.
TheSize recommends distances greater than 5 cm when the kitchen design allows as it makes the countertop firmer.
IMPORTANT
All cutout corners must have a minimum radius of 6 mm.Never leave 90º angles.
We recommend radiuses of more than 6 mm when the kitchen design allows as it will make the countertop firmer.
5 cm
5 cm
5 cm
5 cm
The correct way to create a cutout, except with waterjet and digital control bits, is to first drill the corners and then the rest of the cuts.
CORRECT
INCORRECT INCORRECT INCORRECT TEC
HN
ICA
L M
AN
UA
L
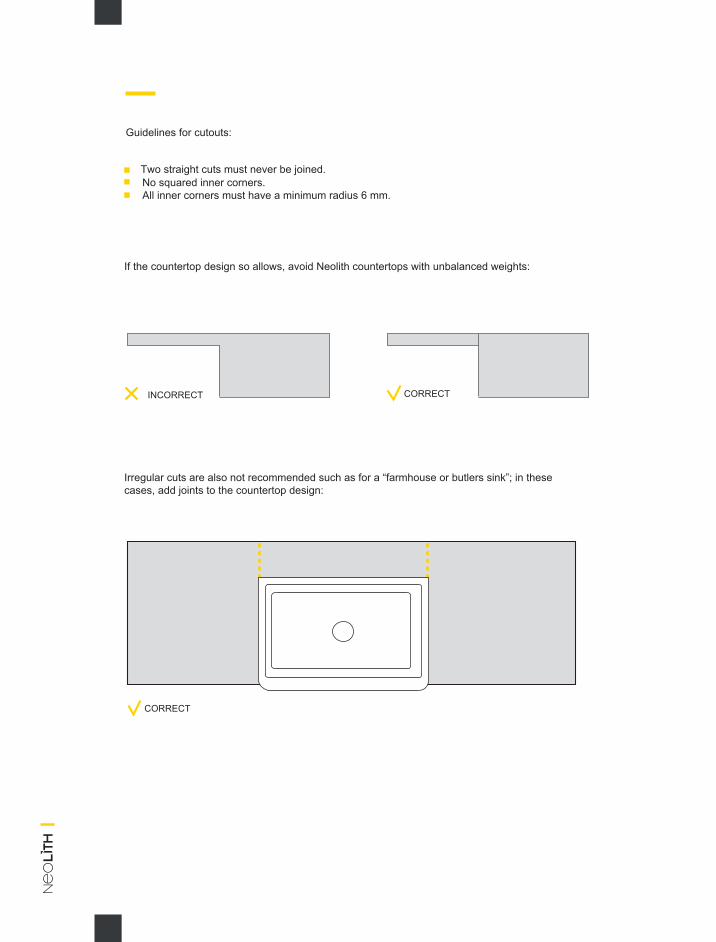
Guidelines for cutouts:
Two straight cuts must never be joined. No squared inner corners. All inner corners must have a minimum radius 6 mm.
If the countertop design so allows, avoid Neolith countertops with unbalanced weights:
Irregular cuts are also not recommended such as for a “farmhouse or butlers sink”; in these cases, add joints to the countertop design:
INCORRECT CORRECT
CORRECT
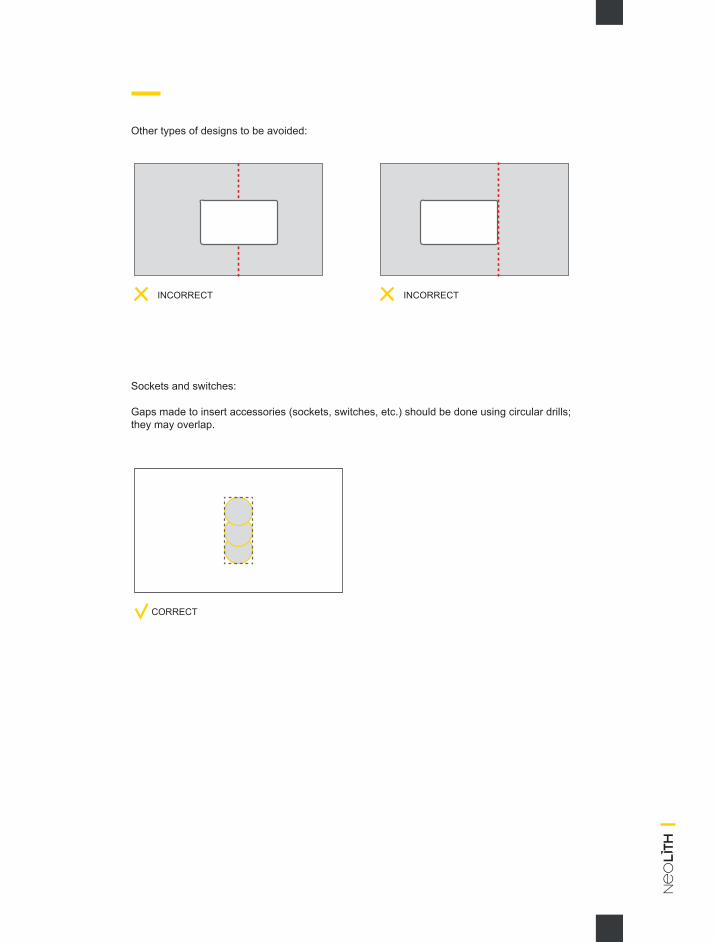
Other types of designs to be avoided:
Sockets and switches:
Gaps made to insert accessories (sockets, switches, etc.) should be done using circular drills; they may overlap.
INCORRECT INCORRECT
CORRECT
6.2 Countertop reinforcement
A full substrate is recommended for the best results.
Countertops with mitered edges:
Reinforcements for 45º edges must be made with Neolith strips or dense granite; be careful when using other materials for reinforcement. The difference in the thermal expansion can cause the countertop to curve or the 45º edges may open over time.
NEVER USE QUARTZ / ENGINEERED STONE REINFORCEMENT.
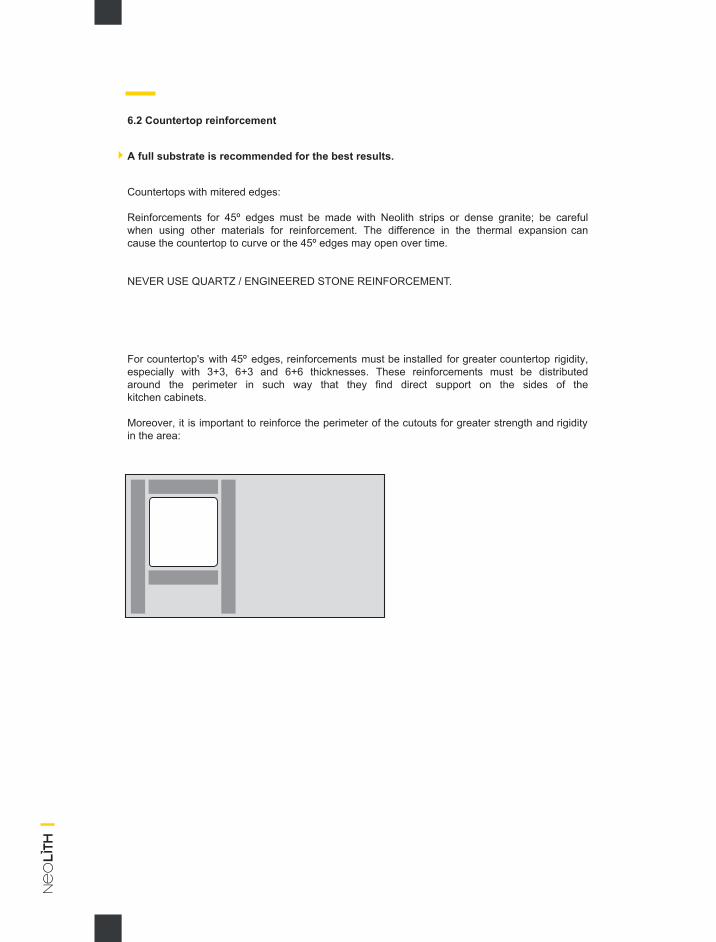
For countertop's with 45º edges, reinforcements must be installed for greater countertop rigidity, especially with 3+3, 6+3 and 6+6 thicknesses. These reinforcements must be distributed around the perimeter in such way that they find direct support on the sides of the kitchen cabinets.
Moreover, it is important to reinforce the perimeter of the cutouts for greater strength and rigidity in the area:
jwoodyatt
Highlight
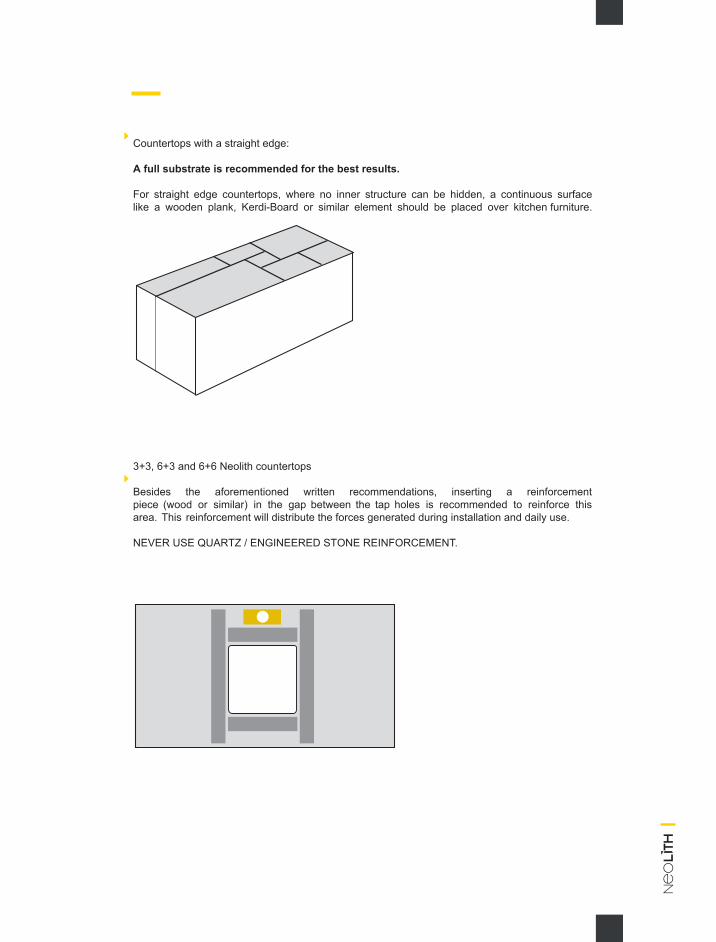
Countertops with a straight edge:
A full substrate is recommended for the best results.
For straight edge countertops, where no inner structure can be hidden, a continuous surface like a wooden plank, Kerdi-Board or similar element should be placed over kitchen furniture.
3+3, 6+3 and 6+6 Neolith countertops
Besides the aforementioned written recommendations, inserting a reinforcement piece (wood or similar) in the gap between the tap holes is recommended to reinforce this area. This reinforcement will distribute the forces generated during installation and daily use.
NEVER USE QUARTZ / ENGINEERED STONE REINFORCEMENT.
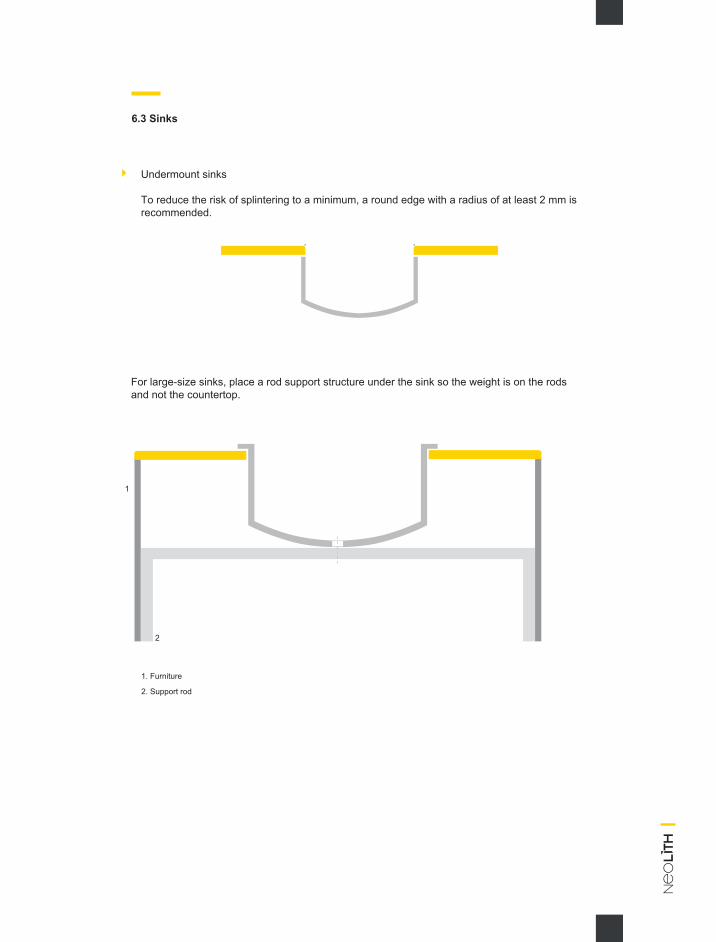
1. Furniture
2. Support rod
1
2
6.3 Sinks
Undermount sinks
To reduce the risk of splintering to a minimum, a round edge with a radius of at least 2 mm is recommended.
For large-size sinks, place a rod support structure under the sink so the weight is on the rods and not the countertop.
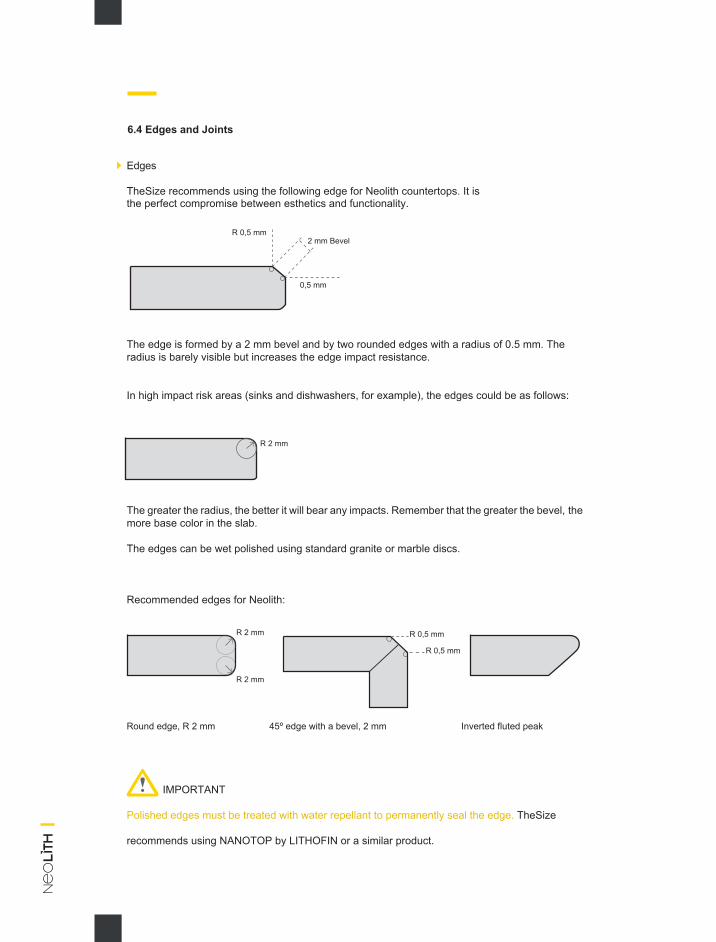
The edge is formed by a 2 mm bevel and by two rounded edges with a radius of 0.5 mm. The radius is barely visible but increases the edge impact resistance.
In high impact risk areas (sinks and dishwashers, for example), the edges could be as follows:
The greater the radius, the better it will bear any impacts. Remember that the greater the bevel, the more base color in the slab.
The edges can be wet polished using standard granite or marble discs.
Recommended edges for Neolith:
Round edge, R 2 mm 45º edge with a bevel, 2 mm Inverted fluted peak
IMPORTANT
Polished edges must be treated with water repellant to permanently seal the edge. TheSize
recommends using NANOTOP by LITHOFIN or a similar product.
6.4 Edges and Joints
Edges
TheSize recommends using the following edge for Neolith countertops. It is the perfect compromise between esthetics and functionality.
R 0,5 mm
R 2 mm
R 2 mm
R 2 mm
0,5 mm
2 mm Bevel
R 0,5 mm
R 0,5 mm

Joints
Given the texture of Neolith slabs, a micro-bevel for all joints is recommended. Even if the straight edges are perfect, they may seem “splintered” due to the texture of Neolith slabs.
Each joint requires additional support (any technique will work).
The suface finish may not be “touched-up”; once the Neolith surface is polished or ground, there is no way back.
Producing samples so your customer can approve the edges and joints is highly recommended. (joint with a micro-bevel, 45º edge with a 2 mm bevel or a round 2 mm edge).
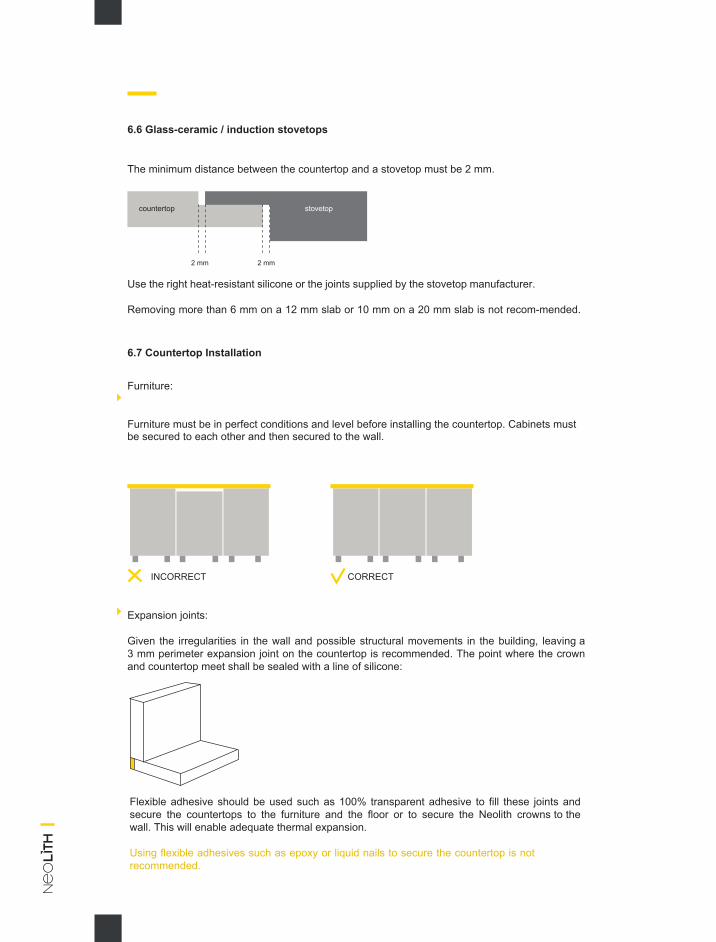
The minimum distance between the countertop and a stovetop must be 2 mm.
Expansion joints:
Given the irregularities in the wall and possible structural movements in the building, leaving a 3 mm perimeter expansion joint on the countertop is recommended. The point where the crown and countertop meet shall be sealed with a line of silicone:
Flexible adhesive should be used such as 100% transparent adhesive to fill these joints and secure the countertops to the furniture and the floor or to secure the Neolith crowns to the wall. This will enable adequate thermal expansion.
Using flexible adhesives such as epoxy or liquid nails to secure the countertop is not recommended.
6.6 Glass-ceramic / induction stovetops
Use the right heat-resistant silicone or the joints supplied by the stovetop manufacturer.
Removing more than 6 mm on a 12 mm slab or 10 mm on a 20 mm slab is not recom-mended.
6.7 Countertop Installation
Furniture:
Furniture must be in perfect conditions and level before installing the countertop. Cabinets must be secured to each other and then secured to the wall.
countertop stovetop
2 mm 2 mm
INCORRECT CORRECT
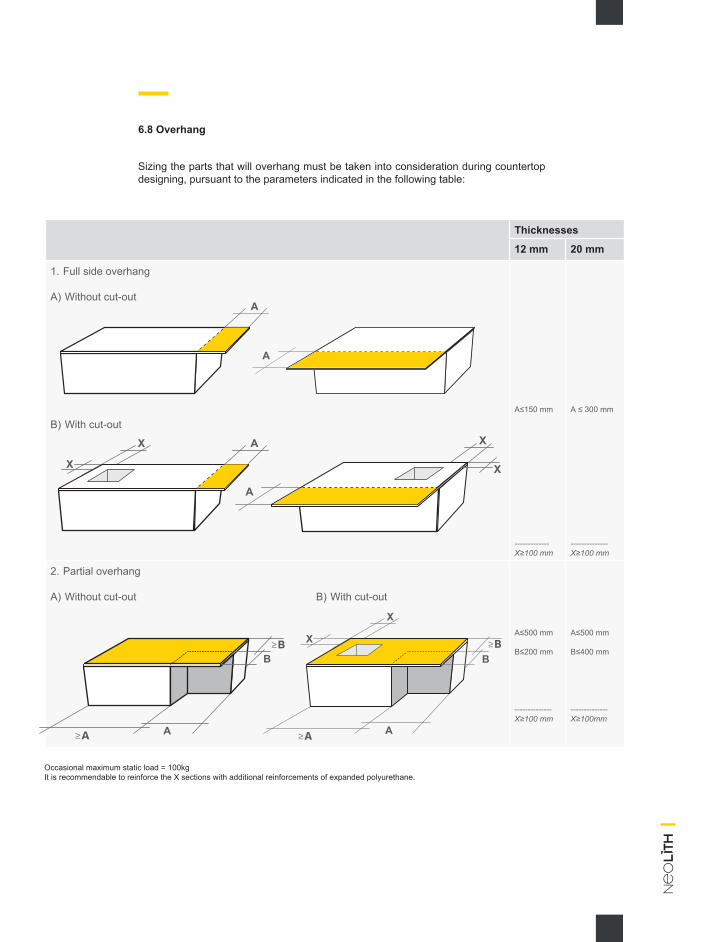
6.8 Overhang
Sizing the parts that will overhang must be taken into consideration during countertop designing, pursuant to the parameters indicated in the following table:
Thicknesses
12 mm 20 mm
1. Full side overhang
A) Without cut-out
B) With cut-outA≤150 mm
-------------X≥100 mm
A ≤ 300 mm
--------------X≥100 mm
2. Partial overhang
A) Without cut-out B) With cut-out
A≤500 mm
B≤200 mm
--------------X≥100 mm
A≤500 mm
B≤400 mm
--------------X≥100mm
A
A
AX
X
X
X
A
Occasional maximum static load = 100kgIt is recommendable to reinforce the X sections with additional reinforcements of expanded polyurethane.
X
X
A
B
A
B
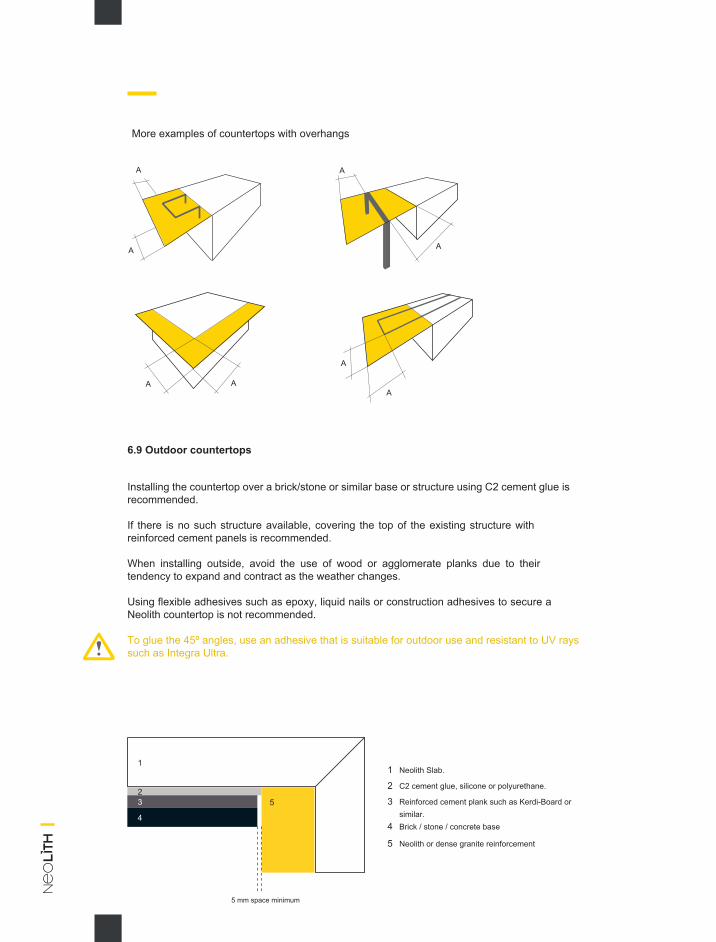
6.9 Outdoor countertops
Installing the countertop over a brick/stone or similar base or structure using C2 cement glue is recommended.
If there is no such structure available, covering the top of the existing structure with reinforced cement panels is recommended.
When installing outside, avoid the use of wood or agglomerate planks due to their tendency to expand and contract as the weather changes.
Using flexible adhesives such as epoxy, liquid nails or construction adhesives to secure a Neolith countertop is not recommended.
To glue the 45º angles, use an adhesive that is suitable for outdoor use and resistant to UV rays such as Integra Ultra.
5 mm space minimum
Neolith Slab.
C2 cement glue, silicone or polyurethane.
Reinforced cement plank such as Kerdi-Board or similar. Brick / stone / concrete base
Neolith or dense granite reinforcement
11
2
3
4
5
253
4
A
A
A
A
A AA
A
More examples of countertops with overhangs
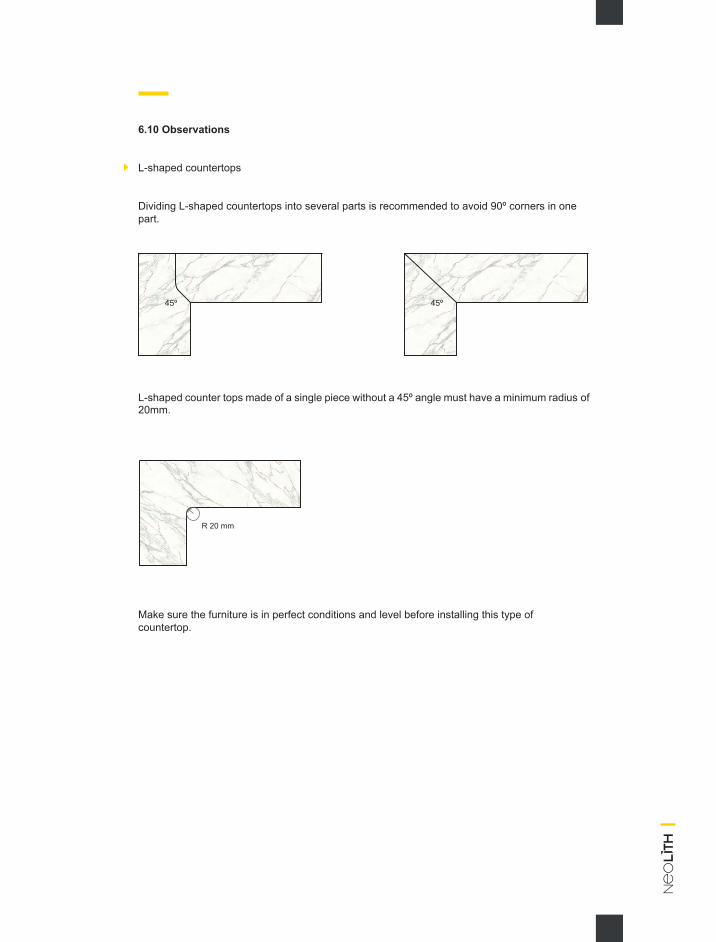
6.10 Observations
L-shaped countertops
Dividing L-shaped countertops into several parts is recommended to avoid 90º corners in one part.
L-shaped counter tops made of a single piece without a 45º angle must have a minimum radius of20mm.
Make sure the furniture is in perfect conditions and level before installing this type of countertop.
45º 45º
R 20 mm
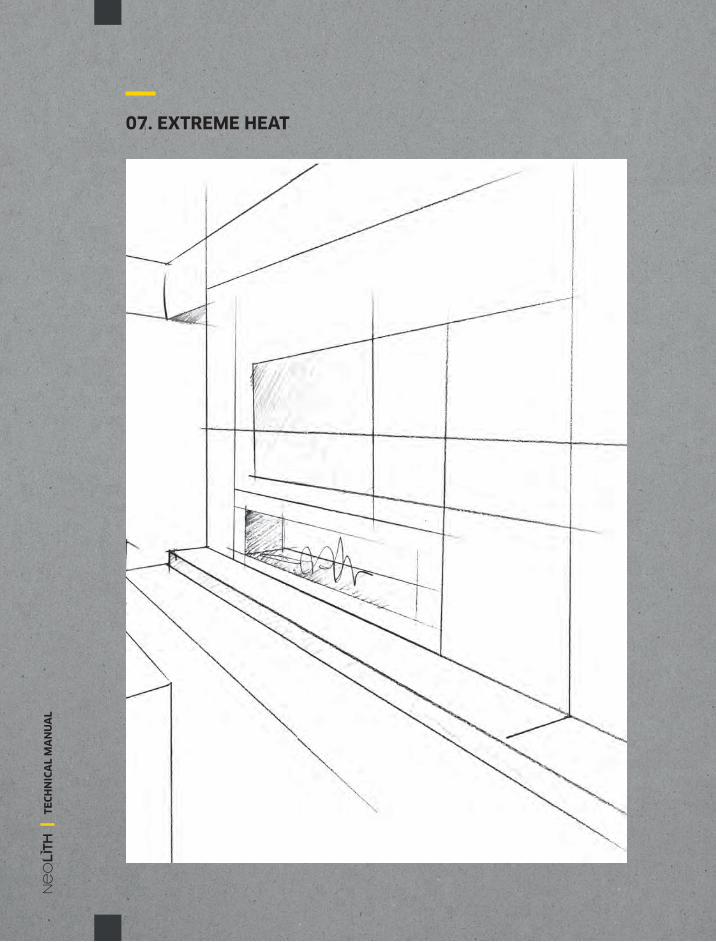
07. EXTREME HEAT
TE
CH
NIC
AL
MA
NU
AL

Neolith parameters that are essentially relevant for this use:
Maximum temperature: 300º C Linear thermal expansion: between 5.3º and 6.7º. 10-6 xºC-1
If grills and/or barbecue grills are to be placed in a Neolith countertop, keep the following in mind:
· Always remember that all material expands when subject to temperature changes (i.e. themetal structure of a barbecue grill) to prevent stress due to a lack of space for such expansion.
· Metal materials expand much more than Neolith; therefore, prevent direct contact byleaving enough space (which will depend on the dimensions of the barbecue grill, maximumtemperature it may reach, etc.).
· Polishing the edges of the cutout is recommended to eliminate any micro-fissures createdwhen cutting. The more intense this treatment is, the less risk there will be in the future.
· Inner corners must have minimum radiuses of 10 mm. We recommend diameters of morethan 10 mm or producing the countertop in several parts, when the design so allows:
· Leaving a minimum space of 5 mm between the grill/barbecue grill and filling with thermalinsulation such as fiberglass thermal insulation tape is recommended.
07. EXTREME HEAT
View of the top of the grill/barbecue grill built into a Neolith countertop
Neolith is not recommended for inner paneling for a fireplace.
TEC
HN
ICA
L M
AN
UA
L
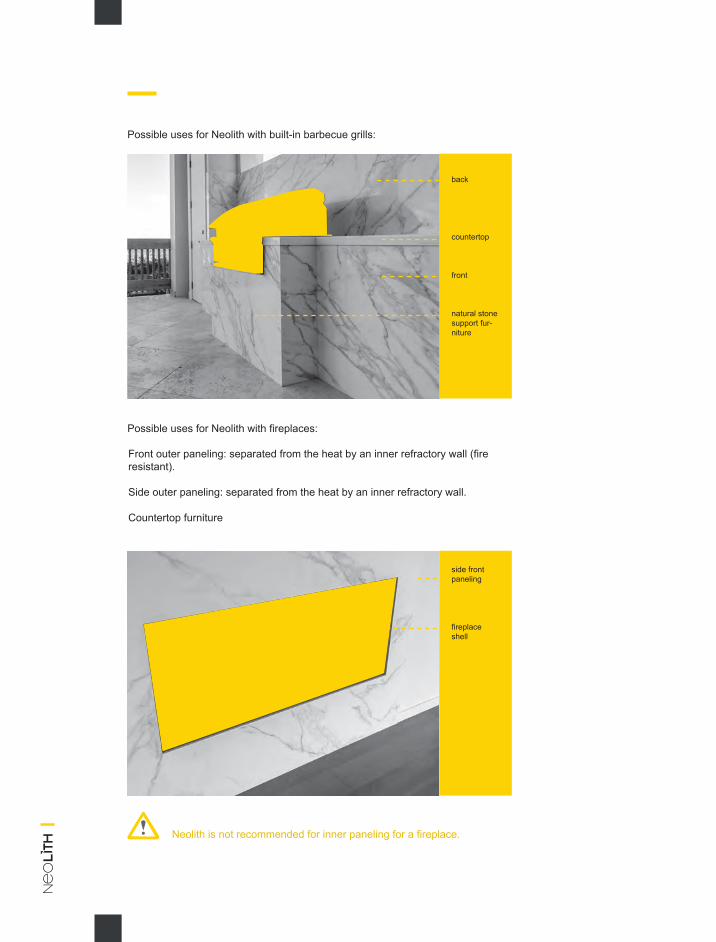
Possible uses for Neolith with built-in barbecue grills:
Neolith is not recommended for inner paneling for a fireplace.
Possible uses for Neolith with fireplaces:
Front outer paneling: separated from the heat by an inner refractory wall (fire resistant).
Side outer paneling: separated from the heat by an inner refractory wall.
Countertop furniture
back
countertop
front
natural stone support fur-niture
side front paneling
fireplace shell
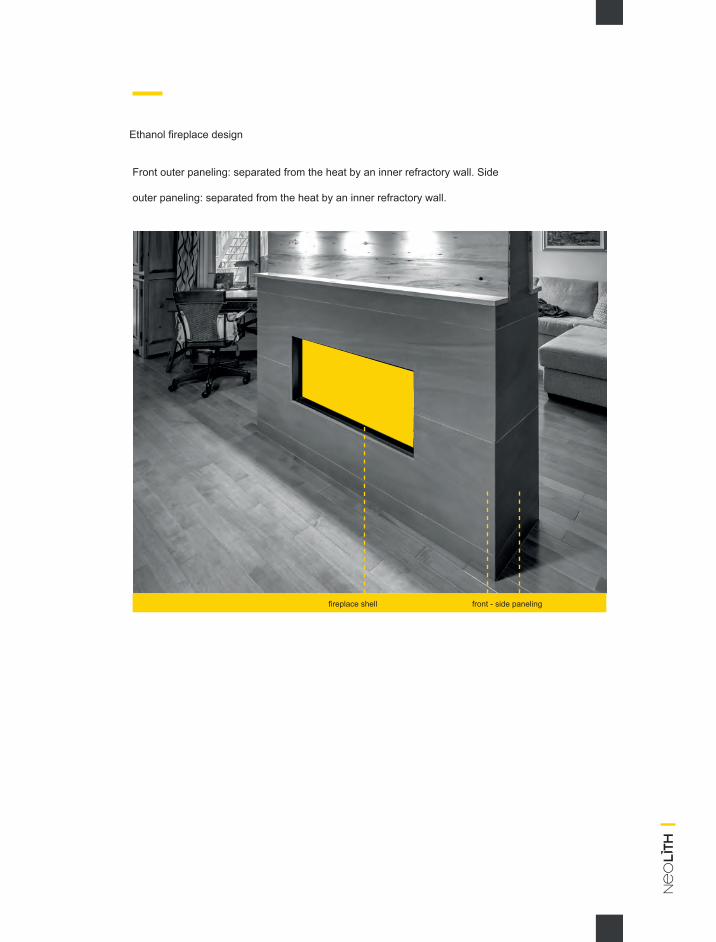
Ethanol fireplace design
Front outer paneling: separated from the heat by an inner refractory wall. Side
outer paneling: separated from the heat by an inner refractory wall.
fireplace shell front - side paneling
TE
CH
NIC
AL
MA
NU
AL
08. GLUE
08. GLUE
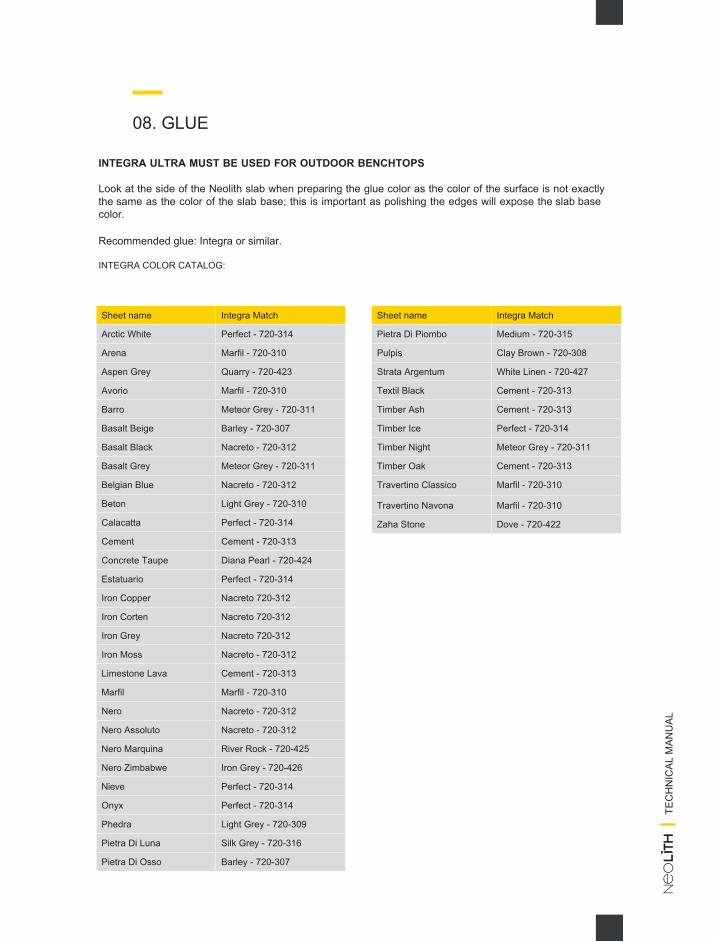
INTEGRA ULTRA MUST BE USED FOR OUTDOOR BENCHTOPS
Look at the side of the Neolith slab when preparing the glue color as the color of the surface is not exactly the same as the color of the slab base; this is important as polishing the edges will expose the slab base color.
Recommended glue: Integra or similar.
INTEGRA COLOR CATALOG:
TEC
HN
ICA
L M
AN
UA
L
Sheet name Integra Match
Arctic White Perfect - 720-314
Arena Marfil - 720-310
Aspen Grey Quarry - 720-423
Avorio Marfil - 720-310
Barro Meteor Grey - 720-311
Basalt Beige Barley - 720-307
Basalt Black Nacreto - 720-312
Basalt Grey Meteor Grey - 720-311
Belgian Blue Nacreto - 720-312
Beton Light Grey - 720-310
Calacatta Perfect - 720-314
Cement Cement - 720-313
Concrete Taupe Diana Pearl - 720-424
Estatuario Perfect - 720-314
Iron Copper Nacreto 720-312
Iron Corten Nacreto 720-312
Iron Grey Nacreto 720-312
Iron Moss Nacreto - 720-312
Limestone Lava Cement - 720-313
Marfil Marfil - 720-310
Nero Nacreto - 720-312
Nero Assoluto Nacreto - 720-312
Nero Marquina River Rock - 720-425
Nero Zimbabwe Iron Grey - 720-426
Nieve Perfect - 720-314
Onyx Perfect - 720-314
Phedra Light Grey - 720-309
Pietra Di Luna Silk Grey - 720-316
Pietra Di Osso Barley - 720-307
Sheet name Integra Match
Pietra Di Piombo Medium - 720-315
Pulpis Clay Brown - 720-308
Strata Argentum White Linen - 720-427
Textil Black Cement - 720-313
Timber Ash Cement - 720-313
Timber Ice Perfect - 720-314
Timber Night Meteor Grey - 720-311
Timber Oak Cement - 720-313
Travertino Classico Marfil - 720-310
Travertino Navona Marfil - 720-310
Zaha Stone Dove - 720-422

56
TE
CH
NIC
AL
MA
NU
AL
09. TILING AND PAVING
09. TILING AND PAVING
9.1 Indoor installation.
Leave a 2-3 mm space between tiles.Create movement joints every 25 m2 or as dictated by applicable national law.The adhesive must be applied with a notched trowel using the double-glue technique; in other words, the adhesive must be applied to the back of the tile and the sublayer.
Neolith must be installed with class C2 adhesive pursuant to standard EN 12004 and class “highly flexible S2”.
9.2 Outdoor installation.
Create flexible movement joints of around 1 cm wide in the corners. Create movement joints every 9-12 m2 or as dictated by applicable national law.The building structural joints must be absolutely respected.
The tiles must be installed with a large joint between them. The width of the joint must be determined pursuant to the local climate conditions, the size of the tiles and flexibility of the sublayer.
In warm climates and during poor weather (strong winds, for example), using class E adhesives (with open time) is recommended pursuant to standard EN 12004.
In cold climates and during the winter, it is best to use class F adhesives (quick fixing) as per EN 12004.
9.3 Tiling over other Tiles.
Check that the old tiling is well-fixed. Otherwise, remove any loose tiles and fill the gaps with mortar that is compatible with the support.
Wash the old tiling with water and soap to eliminate any grease or dust, rinse well and let dry.
Apply bonding resin before tiling above the old tiles, following the recommendations for installation indoors or outdoors.
9.4 Manual Cutting
Manual ceramic cutter:
Neolith can be cut without any problems using traditional machines. Thicknesses of 3 and 6 mm can be cut using manual cutters. Cutting with a grinder is recommended for 12 mm. If the part has reinforcement mesh, the mesh must be cut with a cutter after splitting.
Grinder:
Tiles may be cut with no problems using a diamond disc available from TheSize.
Irregular cut:
Use crown bits, available from TheSize, for round holes. Gaps made to insert accessories (sockets, switches, etc.) should be done using circular drills; they may overlap.
A radius of at least 3 mm must be left on any inner corner of a gap. Never leave a 90 degree angle.
9.5 Tile RejointingRecommended Products:High-performance, anti-fluorescence, quick fix and dry, water-repellant, anti-mold, class CG2 as per EN 13888.
High-performance, polymer modified, water-resistant technology for filling joints of up to 6 mm wide, class CG2 as per EN 13888.
Deep clean the surface after re-jointing with the right soap, wash the surface and absorb any excess water using the right equipment and do any other necessary operations to complete the work as per the specifications.
For more information, read our “Tiling and Paving Guide”, available in the download area on our website: www.neolith.com.
59
10. REPAIRS
TE
CH
NIC
AL
MA
NU
AL
10. REPAIRS
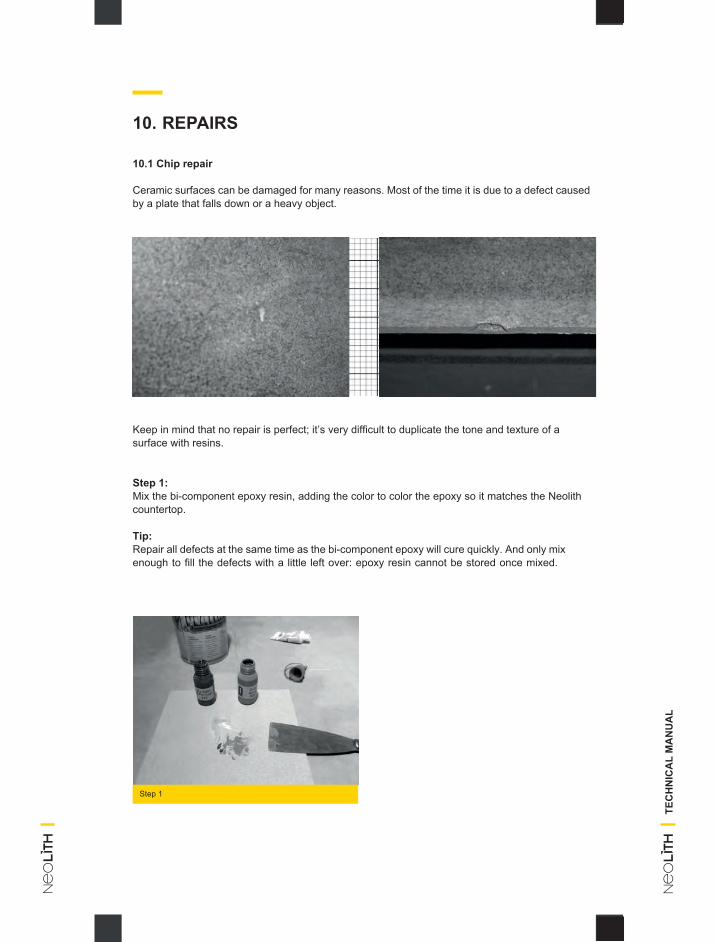
10.1 Chip repair
Ceramic surfaces can be damaged for many reasons. Most of the time it is due to a defect caused by a plate that falls down or a heavy object.
Keep in mind that no repair is perfect; it’s very difficult to duplicate the tone and texture of a surface with resins.
Step 1:Mix the bi-component epoxy resin, adding the color to color the epoxy so it matches the Neolith countertop.
Tip:Repair all defects at the same time as the bi-component epoxy will cure quickly. And only mix enough to fill the defects with a little left over: epoxy resin cannot be stored once mixed.
Step 1
TEC
HN
ICA
L M
AN
UA
L
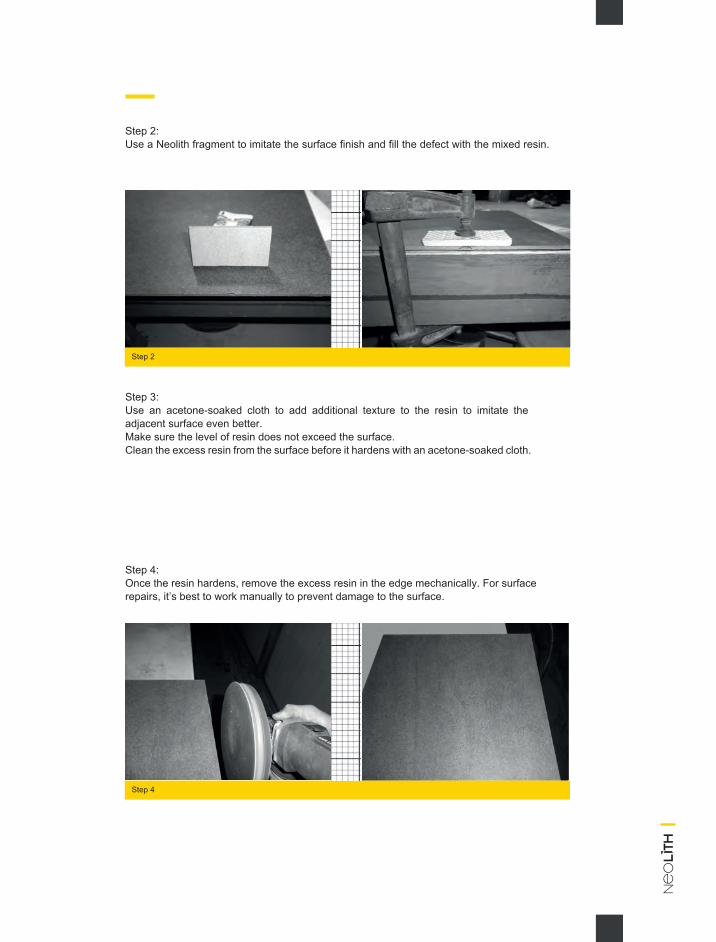
Step 2:Use a Neolith fragment to imitate the surface finish and fill the defect with the mixed resin.
Step 3:Use an acetone-soaked cloth to add additional texture to the resin to imitate the adjacent surface even better.Make sure the level of resin does not exceed the surface.Clean the excess resin from the surface before it hardens with an acetone-soaked cloth.
Step 4:Once the resin hardens, remove the excess resin in the edge mechanically. For surface repairs, it’s best to work manually to prevent damage to the surface.
Step 2
Step 4
10.2 Repairing surface scratches in Neolith Polished.
Necessary materials:- Cerium oxide powder (90% purity, optical quality)- Rubber gloves- Smooth cloth- Water- Electric drill / Grinder- Polishing pad (lamb wool, felt or leather pads)- Spray bottle- Goggles
Determine the depth of the scratches before polishing the scratches on the surface. If you can feel the scratches with your fingernail, they’re too deep to be polished with cerium oxide. You must first sand the entire surface.
Only then can you polish the surface with cerium oxide.
Instructions:
1. Mix a little cerium oxide with the water to form a fine paste (creamy consistency) -mixing in asmall bowl is recommended so the paste can be applied easily to the polishing pad.
2. Deep clean the surface to eliminate all dirt and grease residue.
3. Apply the polishing paste to the pad.
4. Place the pad on the drill and work the area.
5. Move the pad up and down, left and right in the area.
6. Keep the surface damp to prevent overheating - if there’s enough paste, just spray a littlewater on to keep the area damp.
7. Clean any residue and inspect the repair - keep working until you get a satisfactory result.
8. Clean the pad for later use.
63
11. TOOLS
TE
CH
NIC
AL
MA
NU
AL

11. TOOLS
LARGE BLADES
Diarex USC Blades for Ultra Compact Surfaces
DB300PUCS DB350PUCS DB350SUCS DB400SUCS DB400UCS DB450SUCS DB450UCS
Portable Saw only 300mm Portable Saw only 350mm Bridge Saw Speed 350mm Bridge Saw Speed 400mm Bridge Saw Standard 400mm Bridge Saw Speed 450mm Bridge Saw Standard 450mm
GRINDING CUP
Diarex Pro-Series Grinding Cup 100mm Red
DCW4DP1A DCW4DP2A DCW4DP3A DCW4DP4A
Coarse M14 Thread #30/40 Medium M14 Thread #50/60Fine M14 Thread #140/170 Ultra Fine M14 Thread #200/230
TEC
HN
ICA
L M
AN
UA
L
DIAMOND POLISHING DISCS
Diarex Elite Polishing Pads 100mm
DE.4V.1 DE.4V.2 DE.4V.3 DE.4V.4 DE.4V.5 DE.4V.6
Polishing Pad Position 1 Red Polishing Pad Position 2 Yellow Polishing Pad Position 3 Blue Polishing Pad Position 4 Green Polishing Pad Position 5 Orange Polishing Pad Position 6 White
VACUUM BRAZED CORE DRILLS
Diarex Ultra Vacuum Brazed Core Drills with M14 Thread
DCD006VDU Core Drill 6mm DCD008VDU Core Drill 8mm DCD010VDU Core Drill 10mm DCD020VDU Core Drill 20mm DCD025VDU Core Drill 25mm DCD030VDU Core Drill 30mm DCD032VDU Core Drill 32mm DCD035VDU Core Drill 35mm
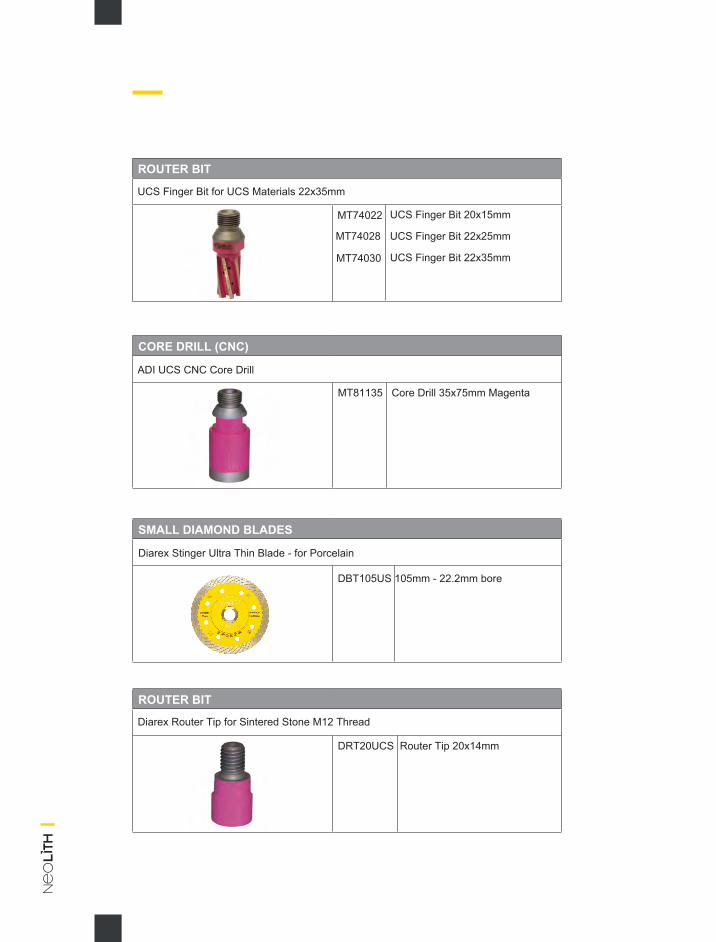
CORE DRILL (CNC)
MT81135 Core Drill 35x75mm Magenta
SMALL DIAMOND BLADES
Diarex Stinger Ultra Thin Blade - for Porcelain
ROUTER BIT
DRT20UCS Router Tip 20x14mm
ROUTER BIT
MT74022 UCS Finger Bit 20x15mm
UCS Finger Bit for UCS Materials 22x35mm
ADI UCS CNC Core Drill
Diarex Router Tip for Sintered Stone M12 Thread
DBT105US 105mm - 22.2mm bore
MT74028 UCS Finger Bit 22x25mm
MT74030 UCS Finger Bit 22x35mm
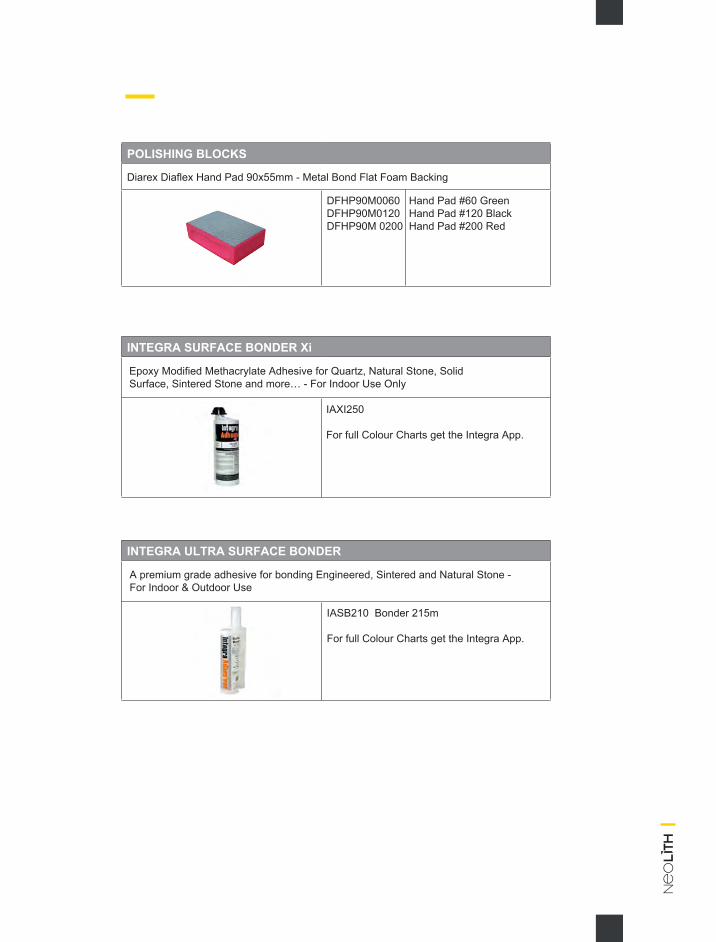
INTEGRA SURFACE BONDER Xi
Epoxy Modified Methacrylate Adhesive for Quartz, Natural Stone, Solid Surface, Sintered Stone and more… - For Indoor Use Only
IAXI250
For full Colour Charts get the Integra App.
POLISHING BLOCKS
Diarex Diaflex Hand Pad 90x55mm - Metal Bond Flat Foam Backing
DFHP90M0060 Hand Pad #60 Green DFHP90M0120 Hand Pad #120 Black DFHP90M 0200 Hand Pad #200 Red
INTEGRA ULTRA SURFACE BONDER
A premium grade adhesive for bonding Engineered, Sintered and Natural Stone - For Indoor & Outdoor Use
IASB210 Bonder 215m
For full Colour Charts get the Integra App.
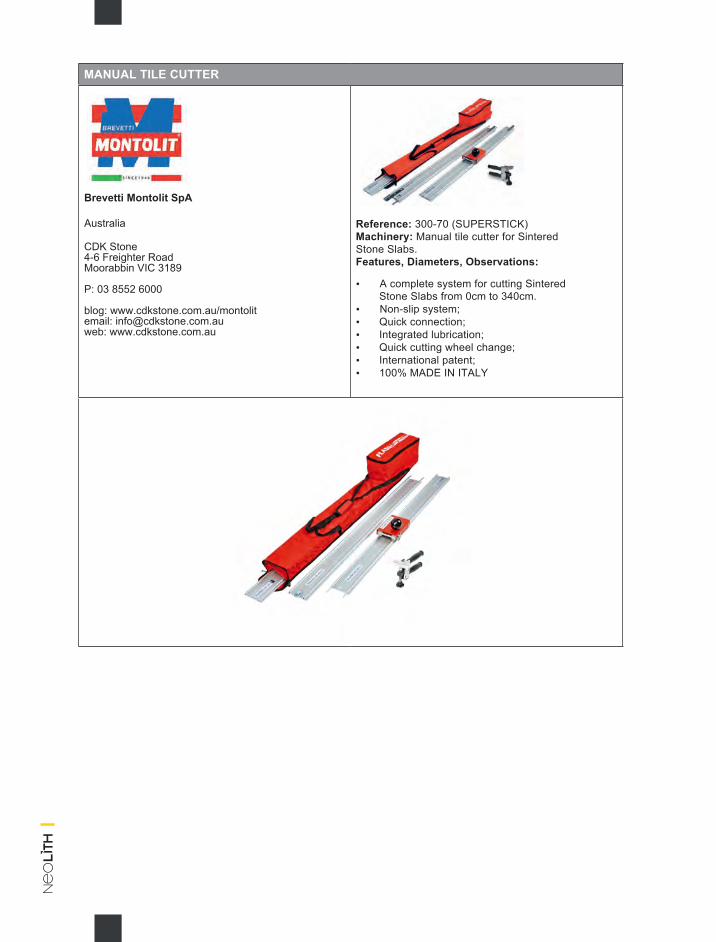
MANUAL TILE CUTTER
Brevetti Montolit SpA
Australia
CDK Stone4-6 Freighter RoadMoorabbin VIC 3189
P: 03 8552 6000
blog: www.cdkstone.com.au/montolit email: [email protected]: www.cdkstone.com.au
Reference: 300-70 (SUPERSTICK)Machinery: Manual tile cutter for Sintered Stone Slabs. Features, Diameters, Observations:
• A complete system for cutting SinteredStone Slabs from 0cm to 340cm.
• Non-slip system;• Quick connection;• Integrated lubrication;• Quick cutting wheel change;• International patent;• 100% MADE IN ITALY
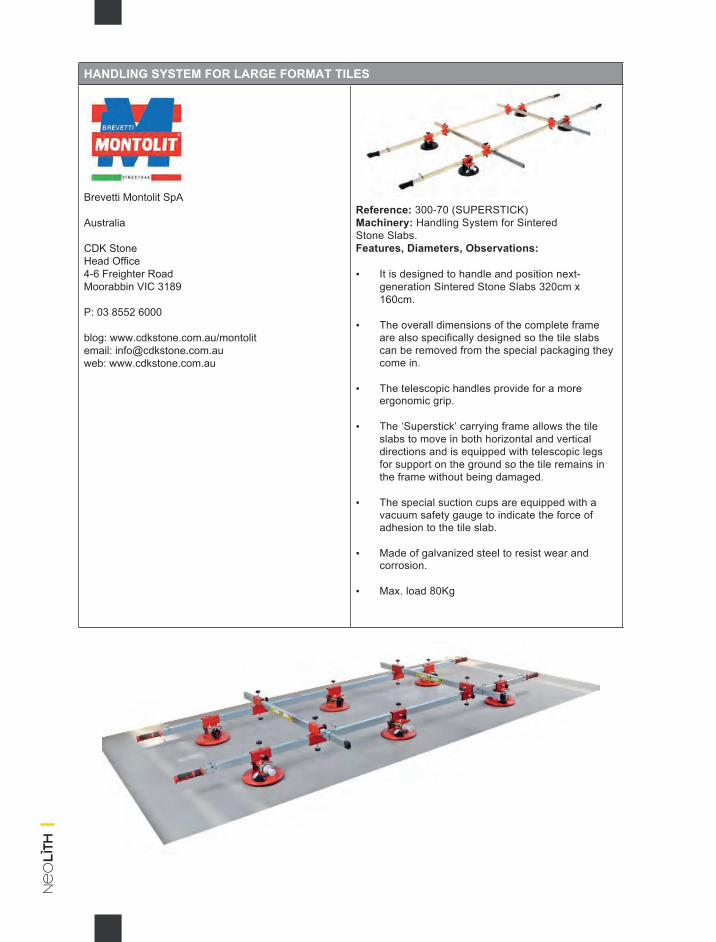
HANDLING SYSTEM FOR LARGE FORMAT TILES
Brevetti Montolit SpA
Australia
CDK StoneHead Office4-6 Freighter RoadMoorabbin VIC 3189
P: 03 8552 6000
blog: www.cdkstone.com.au/montolitemail: [email protected]: www.cdkstone.com.au
Reference: 300-70 (SUPERSTICK)Machinery: Handling System for Sintered Stone Slabs.Features, Diameters, Observations:
• It is designed to handle and position next-generation Sintered Stone Slabs 320cm x160cm.
• The overall dimensions of the complete frameare also specifically designed so the tile slabscan be removed from the special packaging theycome in.
• The telescopic handles provide for a moreergonomic grip.
• The ‘Superstick’ carrying frame allows the tileslabs to move in both horizontal and verticaldirections and is equipped with telescopic legsfor support on the ground so the tile remains inthe frame without being damaged.
• The special suction cups are equipped with avacuum safety gauge to indicate the force ofadhesion to the tile slab.
• Made of galvanized steel to resist wear andcorrosion.
• Max. load 80Kg
BOGIE FOR LARGE TILES
Brevetti Montolit SpA
Australia
CDK StoneHead Office4-6 Freighter RoadMoorabbin VIC 3189
P: 03 8552 6000
blog: www.cdkstone.com.au/montolit email: [email protected]: www.cdkstone.com.au
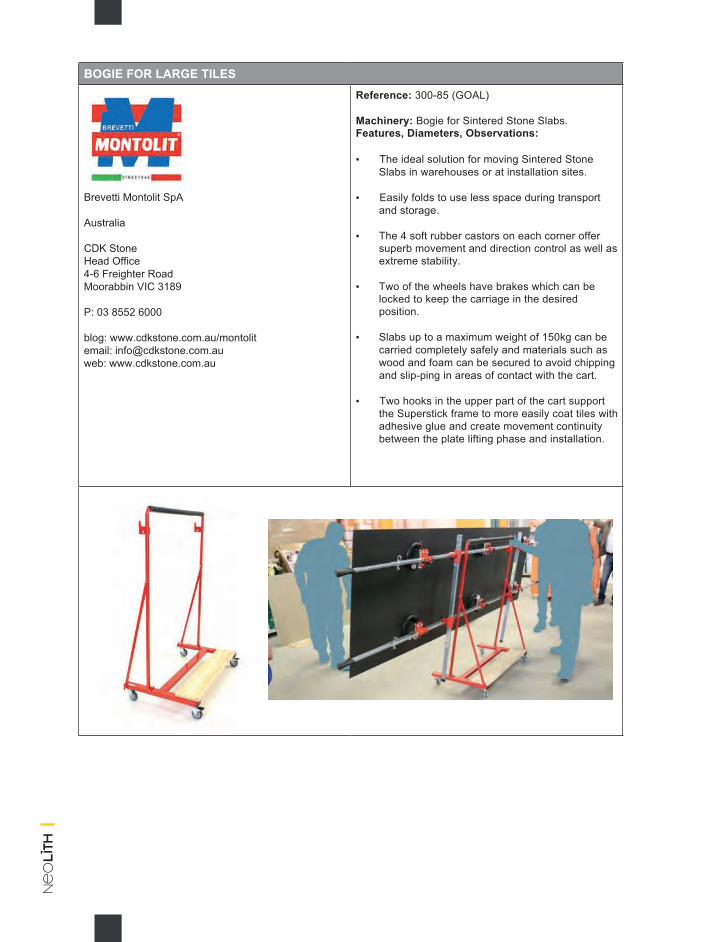
Reference: 300-85 (GOAL)
Machinery: Bogie for Sintered Stone Slabs. Features, Diameters, Observations:
• The ideal solution for moving Sintered StoneSlabs in warehouses or at installation sites.
• Easily folds to use less space during transportand storage.
• The 4 soft rubber castors on each corner offersuperb movement and direction control as well asextreme stability.
• Two of the wheels have brakes which can belocked to keep the carriage in the desiredposition.
• Slabs up to a maximum weight of 150kg can becarried completely safely and materials such aswood and foam can be secured to avoid chippingand slip-ping in areas of contact with the cart.
• Two hooks in the upper part of the cart supportthe Superstick frame to more easily coat tiles withadhesive glue and create movement continuitybetween the plate lifting phase and installation.
PLASTIC CORNER PROTECTOR FOR SINTERED STONE SLABS
Brevetti Montolit SpA
Australia
CDK StoneHead Office4-6 Freighter RoadMoorabbin VIC 3189
P: 03 8552 6000
blog: www.cdkstone.com.au/montolit email: [email protected]: www.cdkstone.com.au
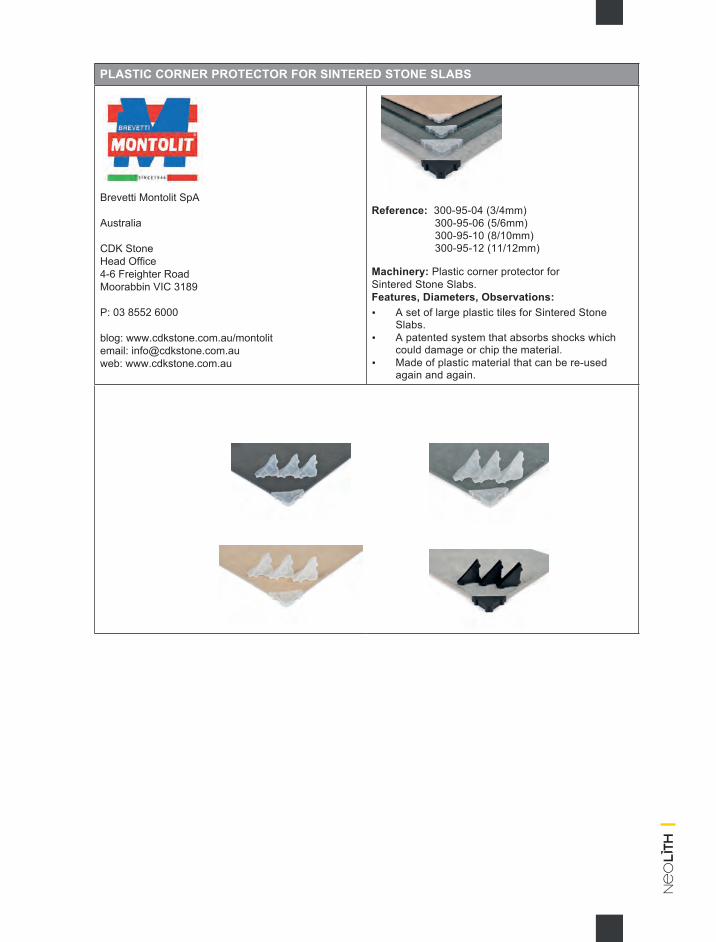
Reference: 300-95-04 (3/4mm)300-95-06 (5/6mm)300-95-10 (8/10mm)300-95-12 (11/12mm)
Machinery: Plastic corner protector for Sintered Stone Slabs.Features, Diameters, Observations: • A set of large plastic tiles for Sintered Stone
Slabs.• A patented system that absorbs shocks which
could damage or chip the material.• Made of plastic material that can be re-used
again and again.
MASONARY WET SAW
FLEXAustralia
CDK StoneHead Office4-6 Freighter RoadMoorabbin VIC 3189
P: 03 8552 6000
email: [email protected]: www.cdkstone.com.au
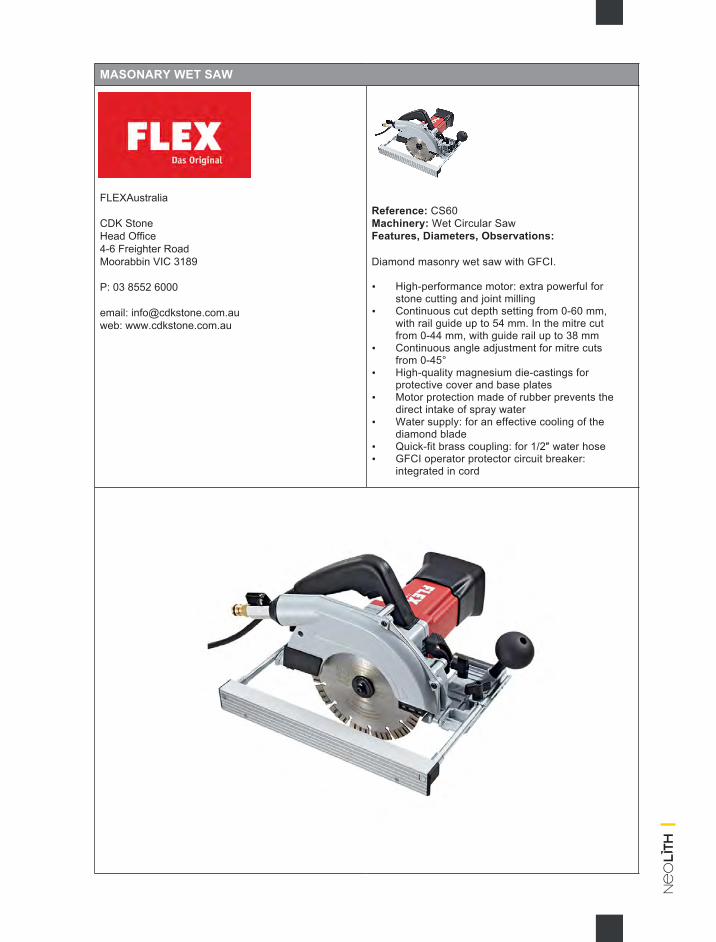
Reference: CS60Machinery: Wet Circular Saw Features, Diameters, Observations:
Diamond masonry wet saw with GFCI.
• High-performance motor: extra powerful forstone cutting and joint milling
• Continuous cut depth setting from 0-60 mm,with rail guide up to 54 mm. In the mitre cutfrom 0-44 mm, with guide rail up to 38 mm
• Continuous angle adjustment for mitre cutsfrom 0-45°
• High-quality magnesium die-castings forprotective cover and base plates
• Motor protection made of rubber prevents thedirect intake of spray water
• Water supply: for an effective cooling of thediamond blade
• Quick-fit brass coupling: for 1/2″ water hose• GFCI operator protector circuit breaker:
integrated in cord
DIAMOND BLADE
Diarex
Australia
CDK StoneHead Office4-6 Freighter RoadMoorabbin VIC 3189
P: 03 8552 6000
email: [email protected]: www.cdkstone.com.au
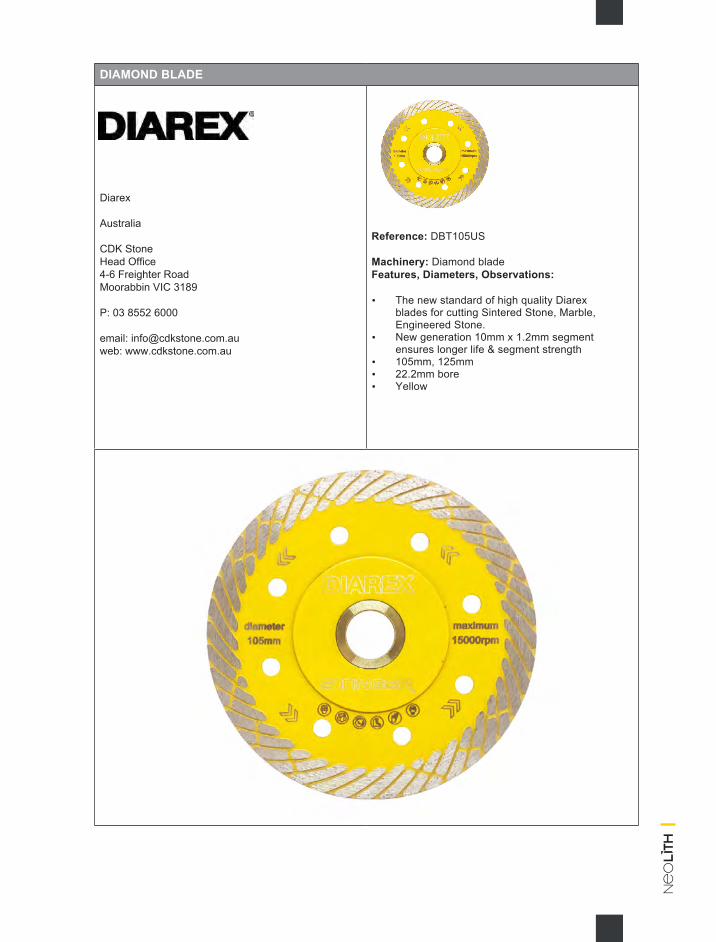
Reference: DBT105US
Machinery: Diamond bladeFeatures, Diameters, Observations:
• The new standard of high quality Diarexblades for cutting Sintered Stone, Marble,Engineered Stone.
• New generation 10mm x 1.2mm segmentensures longer life & segment strength
• 105mm, 125mm• 22.2mm bore• Yellow
DIAMOND CORE-BITS FOR DRILLING
DiarexAustralia
CDK StoneHead Office4-6 Freighter RoadMoorabbin VIC 3189
P: 03 8552 6000
email: [email protected]: www.cdkstone.com.au
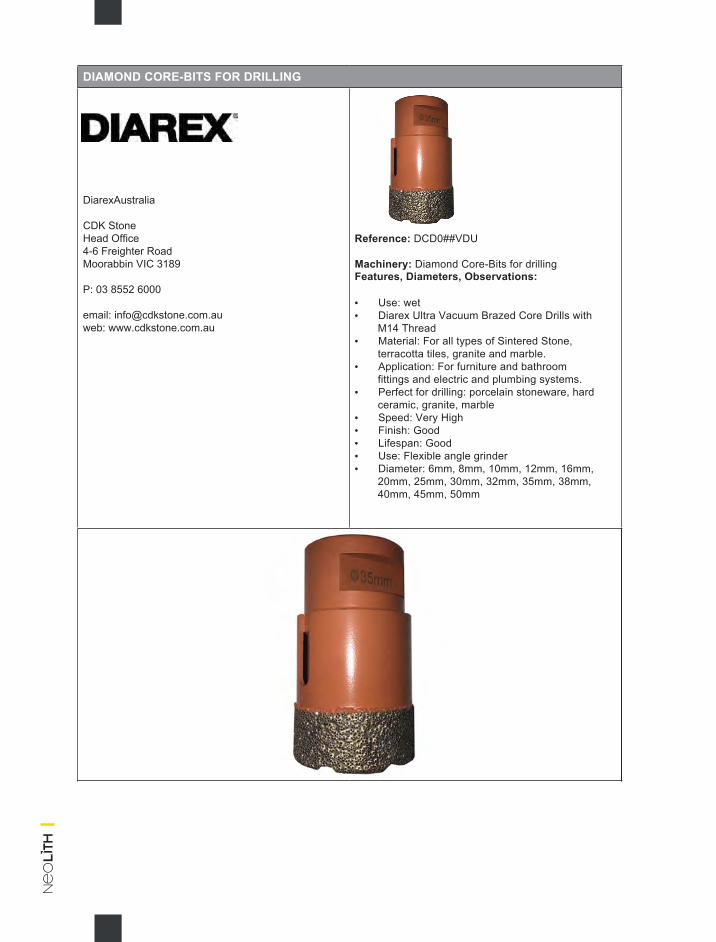
Reference: DCD0##VDU
Machinery: Diamond Core-Bits for drilling Features, Diameters, Observations:
• Use: wet• Diarex Ultra Vacuum Brazed Core Drills with
M14 Thread• Material: For all types of Sintered Stone,
terracotta tiles, granite and marble.• Application: For furniture and bathroom
fittings and electric and plumbing systems.• Perfect for drilling: porcelain stoneware, hard
ceramic, granite, marble• Speed: Very High• Finish: Good• Lifespan: Good• Use: Flexible angle grinder• Diameter: 6mm, 8mm, 10mm, 12mm, 16mm,
20mm, 25mm, 30mm, 32mm, 35mm, 38mm,40mm, 45mm, 50mm
DIAMOND HAND PADS
Diarex
Australia
CDK StoneHead Office4-6 Freighter RoadMoorabbin VIC 3189
P: 03 8552 6000
email: [email protected]: www.cdkstone.com.au
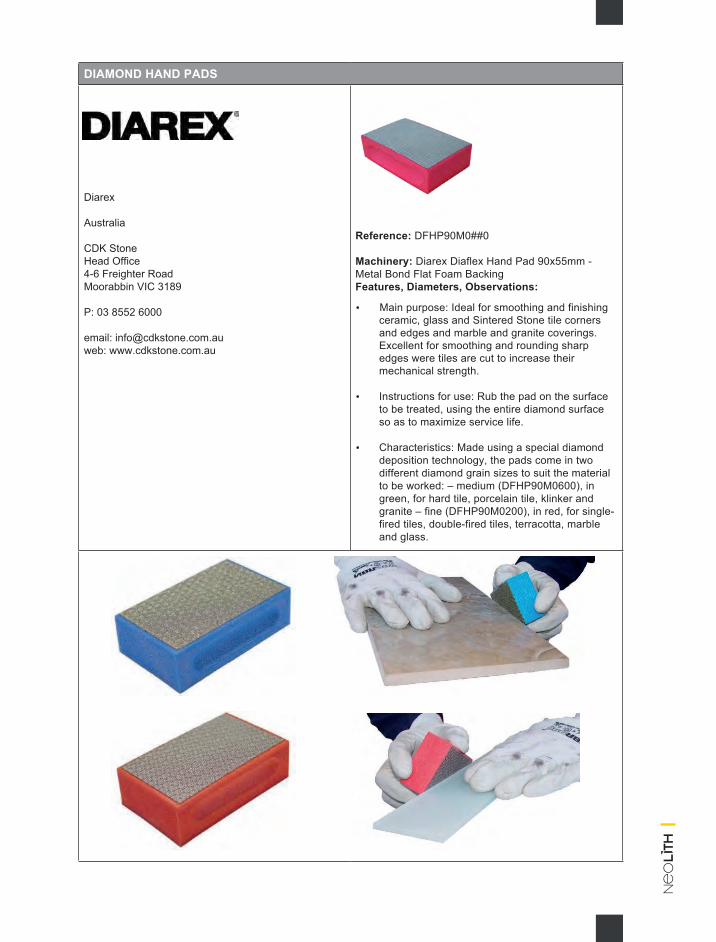
Reference: DFHP90M0##0
Machinery: Diarex Diaflex Hand Pad 90x55mm - Metal Bond Flat Foam BackingFeatures, Diameters, Observations:
• Main purpose: Ideal for smoothing and finishingceramic, glass and Sintered Stone tile cornersand edges and marble and granite coverings.Excellent for smoothing and rounding sharpedges were tiles are cut to increase theirmechanical strength.
• Instructions for use: Rub the pad on the surfaceto be treated, using the entire diamond surfaceso as to maximize service life.
• Characteristics: Made using a special diamonddeposition technology, the pads come in twodifferent diamond grain sizes to suit the materialto be worked: – medium (DFHP90M0600), ingreen, for hard tile, porcelain tile, klinker andgranite – fine (DFHP90M0200), in red, for single-fired tiles, double-fired tiles, terracotta, marbleand glass.
12. CLEANING PRODUCTS
TE
CH
NIC
AL
MA
NU
AL
HEAVY ORGANIC DIRT REMOVAL
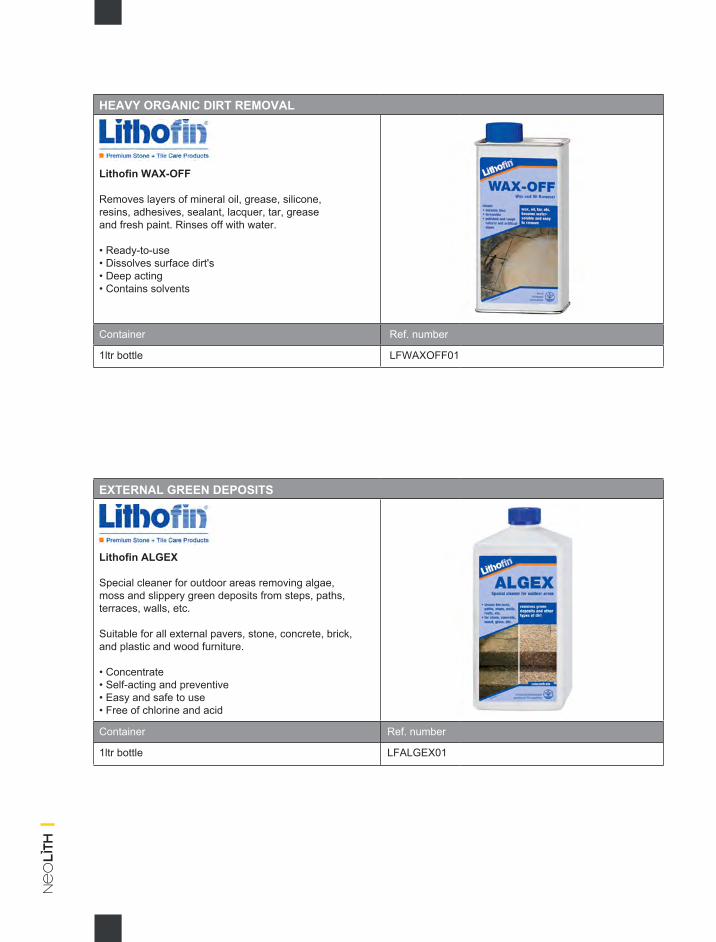
Lithofin WAX-OFF
Removes layers of mineral oil, grease, silicone,resins, adhesives, sealant, lacquer, tar, grease and fresh paint. Rinses off with water.
• Ready-to-use• Dissolves surface dirt's• Deep acting• Contains solvents
Container Ref. number
1ltr bottle LFWAXOFF01
EXTERNAL GREEN DEPOSITS
Lithofin ALGEX
Special cleaner for outdoor areas removing algae,moss and slippery green deposits from steps, paths,terraces, walls, etc.
Suitable for all external pavers, stone, concrete, brick,and plastic and wood furniture.
• Concentrate• Self-acting and preventive• Easy and safe to use• Free of chlorine and acid
Container Ref. number
1ltr bottle LFALGEX01
EPOXY GROUT
Lithofin Resin-EX
Removes residues of epoxy grout, brush-in systems, similar organic substances such as resins.
• Professional use product• This product is NOT suitable for acid sensitivesurfaces.
Container Ref. number
1ltr bottle LFRESINEX01
BATHROOM AND SANITARY AREAS
Lithofin KF Active-Clean
For regular cleaning of bathroom, toilet andsanitary areas, promoting hygienic cleanliness.
Removes lime scale, soap scum, body oils, rust andgrease deposits from baths and showers. Cleans chrome, ceramics, glass, basins, grout lines, stainless steel etc.
• Concentrate - high yield• Contains acid• Self-acting
Container Ref. number
1ltr bottle LFKACTCLN01
Products for countertops, sinks and shower trays
BENCHTOP CLEANING
Lithofin MN Easy-Clean
Ideal for every-day cleaning of small stone surfaces such as kitchen benchtops, tabletops and bathroom vanities. Lithofin MN Easy-Clean leaves your surfaces hygienically clean, streak free; as well as enhancing the stones appearance.
• Ready to use• Cleans, protects and maintains• Streak-free finish• Safe-to-use in food preparation areas
Container Ref. number
500ml bottle1ltr bottle
LFMECLNS0.5LFMECLNR01
Products for floors and facades
INTERNAL FLOOR CLEANING
Container Ref. number
1ltr bottle LFKVITCLN01
Lithofin KF Vitra-Clean
For every-day cleaning of ceramic and porcelain floors subjected to normal levels of wear. Selected raw materials ensure an optimum, streak-free cleaning effect without building up layers. Surfaces become more attractive and less sensitive with continued use.
• Concentrate – very high yield• Free of wax• Mildly alkaline• Does not form layers
THOROUGH CLEANING
Container Ref. number
1ltr bottle LFKINTCLN01
Lithofin KF Intensive Cleaner
For occasional thorough cleaning or for regularcleaning of floors subjected to heavy usage.
Removes stubborn and accumulated dirt, oil andgrease films, care product residues from internal and external surfaces and grout lines.
Suitable for all ceramic and porcelains finishes.
• Concentrate• Extra strong• Alkaline• Highly active
NEWLY INSTALLED SURFACES
Container Ref. number
1ltr bottle LFKCRR01
Lithofin KF Cement Residue Remover
Special product for removing grout residues andbuilders dirt from newly installed ceramic andporcelain tiles. Prepares surfaces for use.
Effortlessly removes cement-based grout residues, mortar, rust, lime, efflorescence and hardened dirt layers.
• Concentrate• Acid-based• Acts rapidly• Low odour• Easy to use