Backdoor Jobs_ - Chennai - CVs - Backdoor Jobs Sap Bangalore
Technical Analysis of the FlowerPippi Backdoor In the campaign that we observed targeting Japan, Philippines, and Argentina on June 20, we saw TA505
use a seemingly new malware that we named “FlowerPippi,” from the malware’s algorithm name and the
unused string in the malware (pipipipip). This malware can also be found on VirusTotal.
Some of FlowerPippi’s variants were packed by a custom packer — the same one that TA505 uses. The
unpacked payload is written in C++ and works as backdoor or downloader malware. FlowerPippi doesn’t
have an AutoRun function by itself; it is standalone and straightforwardly retrieves the payload.
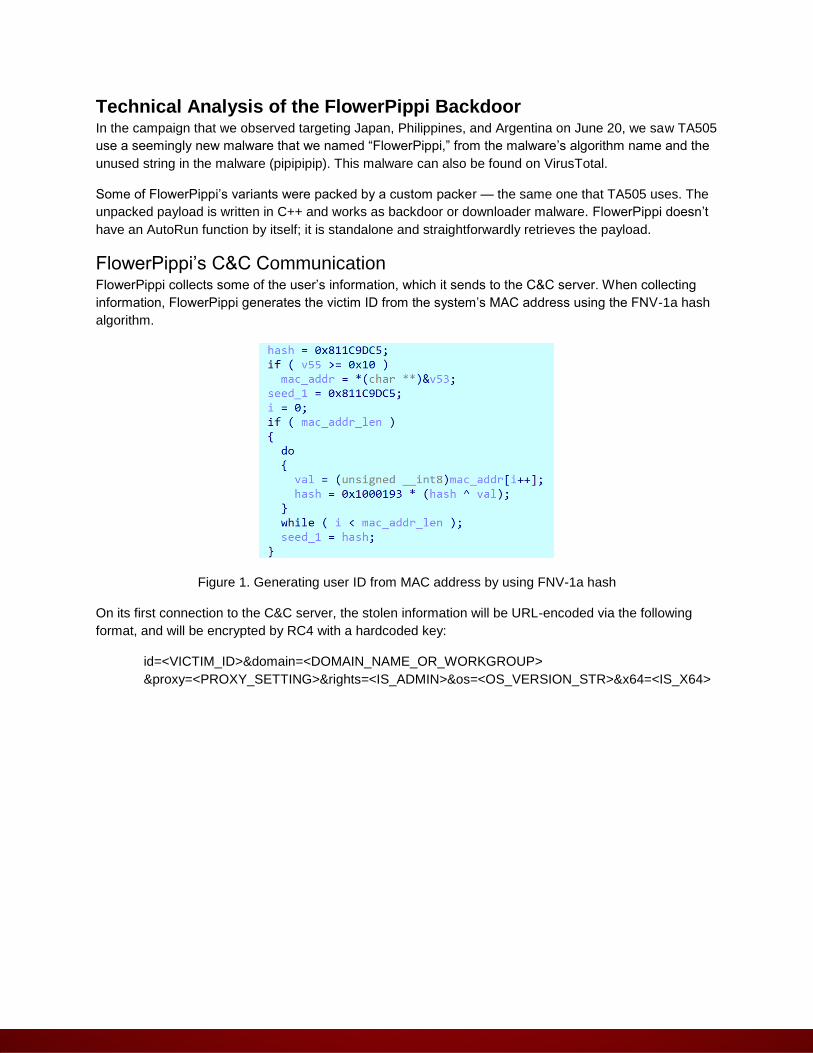
FlowerPippi’s C&C Communication FlowerPippi collects some of the user’s information, which it sends to the C&C server. When collecting
information, FlowerPippi generates the victim ID from the system’s MAC address using the FNV-1a hash
algorithm.
Figure 1. Generating user ID from MAC address by using FNV-1a hash
On its first connection to the C&C server, the stolen information will be URL-encoded via the following
format, and will be encrypted by RC4 with a hardcoded key:
id=<VICTIM_ID>&domain=<DOMAIN_NAME_OR_WORKGROUP>
&proxy=<PROXY_SETTING>&rights=<IS_ADMIN>&os=<OS_VERSION_STR>&x64=<IS_X64>
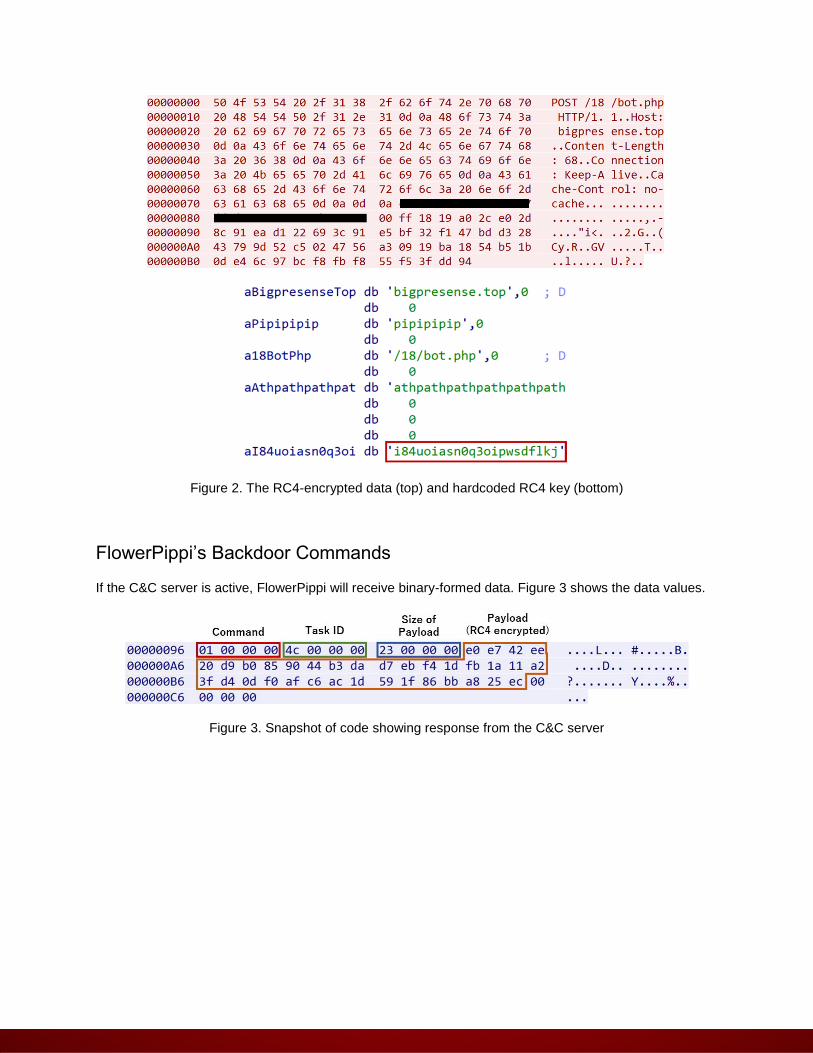
Figure 2. The RC4-encrypted data (top) and hardcoded RC4 key (bottom)
FlowerPippi’s Backdoor Commands
If the C&C server is active, FlowerPippi will receive binary-formed data. Figure 3 shows the data values.
Figure 3. Snapshot of code showing response from the C&C server
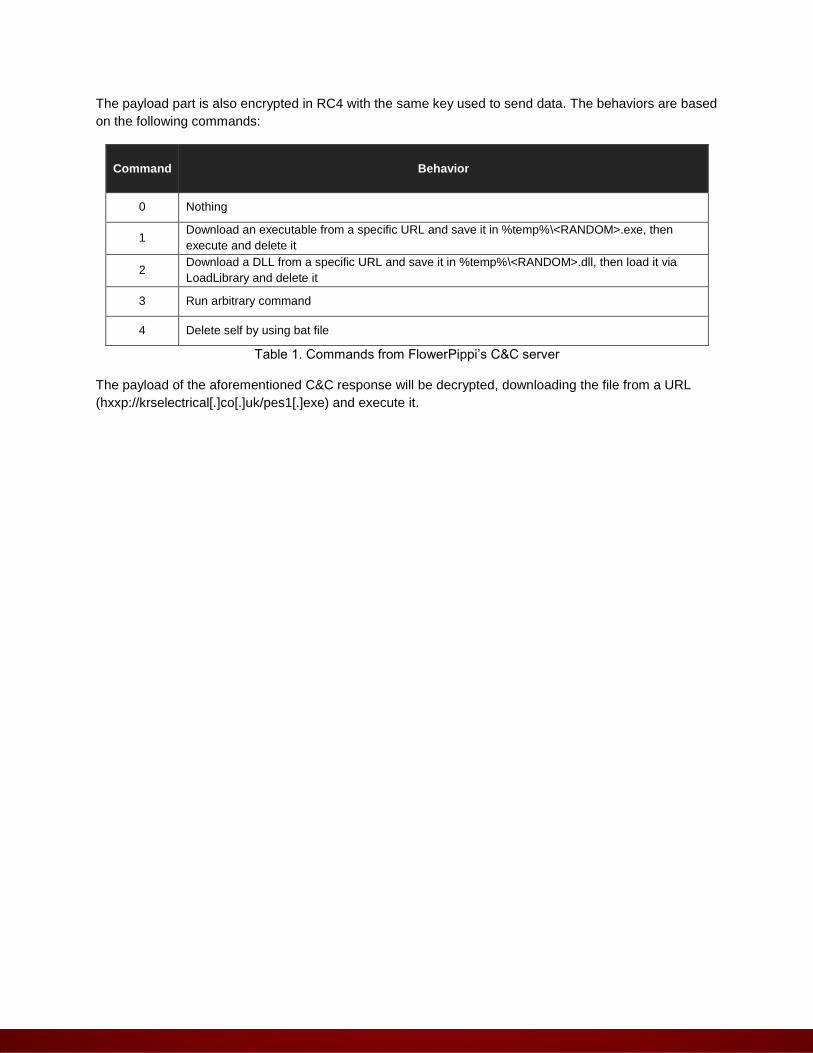
The payload part is also encrypted in RC4 with the same key used to send data. The behaviors are based
on the following commands:
Command Behavior
0 Nothing
1 Download an executable from a specific URL and save it in %temp%\<RANDOM>.exe, then
execute and delete it
2 Download a DLL from a specific URL and save it in %temp%\<RANDOM>.dll, then load it via
LoadLibrary and delete it
3 Run arbitrary command
4 Delete self by using bat file
Table 1. Commands from FlowerPippi’s C&C server
The payload of the aforementioned C&C response will be decrypted, downloading the file from a URL
(hxxp://krselectrical[.]co[.]uk/pes1[.]exe) and execute it.
Technical Analysis of the Gelup Downloader Malware
In the same June 20 campaign, we also found another apparently new, undisclosed malware, which we
named “Gelup”. A custom packer was also used to pack some variants of this malware. Again, it uses the
same packer that TA505 has been using.
The unpacked payload is written in C++ and basically works as a downloader for another malware. What
makes Gelup different, however, is its obfuscation technique and UAC-bypassing function by mocking
trusted directories (spoofing the file’s execution path in a trusted directory), abusing auto-elevated
executables, and using the dynamic-link library (DLL) side-loading technique.
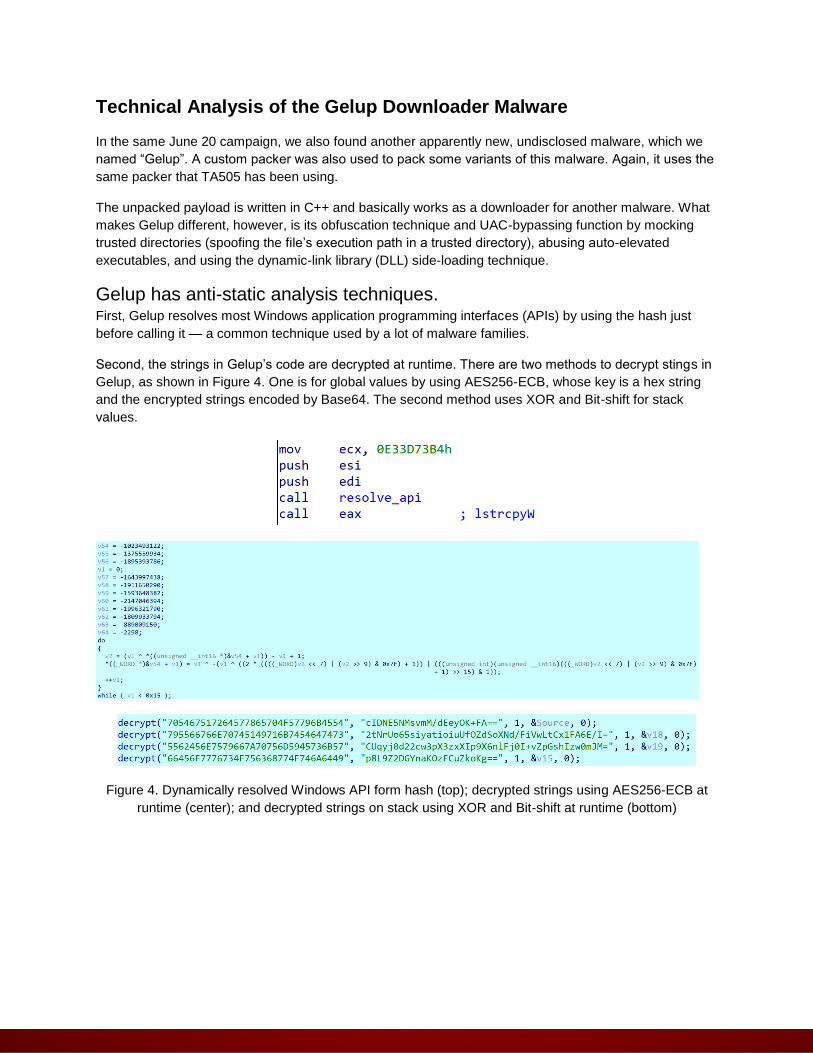
Gelup has anti-static analysis techniques. First, Gelup resolves most Windows application programming interfaces (APIs) by using the hash just
before calling it — a common technique used by a lot of malware families.
Second, the strings in Gelup’s code are decrypted at runtime. There are two methods to decrypt stings in
Gelup, as shown in Figure 4. One is for global values by using AES256-ECB, whose key is a hex string
and the encrypted strings encoded by Base64. The second method uses XOR and Bit-shift for stack
values.
Figure 4. Dynamically resolved Windows API form hash (top); decrypted strings using AES256-ECB at
runtime (center); and decrypted strings on stack using XOR and Bit-shift at runtime (bottom)
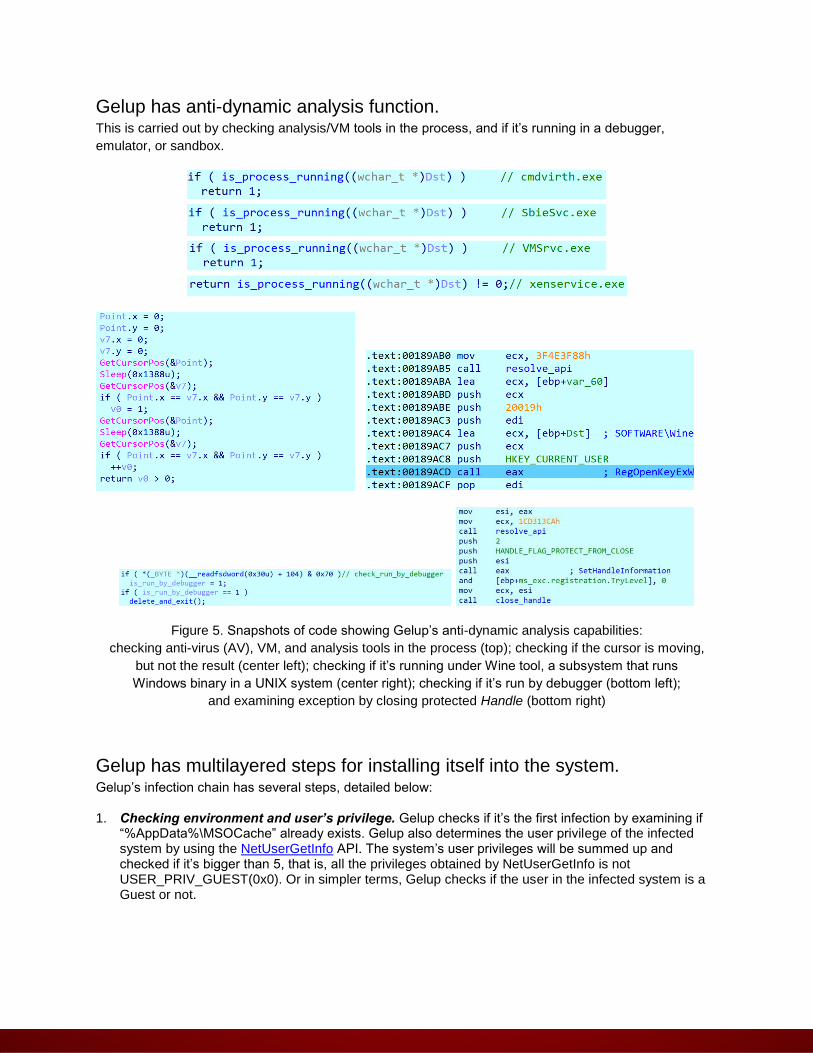
Gelup has anti-dynamic analysis function. This is carried out by checking analysis/VM tools in the process, and if it’s running in a debugger,
emulator, or sandbox.
Figure 5. Snapshots of code showing Gelup’s anti-dynamic analysis capabilities:
checking anti-virus (AV), VM, and analysis tools in the process (top); checking if the cursor is moving,
but not the result (center left); checking if it’s running under Wine tool, a subsystem that runs
Windows binary in a UNIX system (center right); checking if it’s run by debugger (bottom left);
and examining exception by closing protected Handle (bottom right)
Gelup has multilayered steps for installing itself into the system. Gelup’s infection chain has several steps, detailed below:
1. Checking environment and user’s privilege. Gelup checks if it’s the first infection by examining if “%AppData%\MSOCache” already exists. Gelup also determines the user privilege of the infected system by using the NetUserGetInfo API. The system’s user privileges will be summed up and checked if it’s bigger than 5, that is, all the privileges obtained by NetUserGetInfo is not USER_PRIV_GUEST(0x0). Or in simpler terms, Gelup checks if the user in the infected system is a Guest or not.

In case the user/account is Guest, Gelup copies itself into “%AllUsersProfile%\{RANDOM}.exe” and sets itself in the registry’s Run key. If the infected system’s user/account has the proper privileges, it proceeds with the UAC bypass process.
Figure 6. Snapshot of code showing how Gelup uses NetUserGetInfo to check the user's privilege
2. Bypassing UAC by mocking trusted directories. After checking the user privileges, Gelup tries to bypass UAC by “mocking” trusted directories and using DLL side-loading. This UAC-bypass technique was previously demonstrated by one of Tenable’s researchers last November 2018 as a proof of concept (PoC). This is the first time we've seen this technique used in the wild. As Tenable’s research demonstrated, if a specific executable satisfies the conditions listed below, it can be run with auto-elevation without the UAC dialog:
The executable must be configured for auto-elevation, that is, privileges are elevated automatically. To configure it, Windows OS will check if the executable has the “autoElevate” key enabled in its manifest. If the value is “true”, it will be passed onto the next check.
The executable must be properly signed.
The executable must be run in a trusted directory, such as C:\Windows\System32.
Gelup follows the aforementioned method to bypass UAC. First, Gelup tries to create a directory named “C:\\Windows ” (the space after “Windows” is not a typo). However, Windows does not allow the creation of a trailing spaced directory. In order to bypass this restriction, it abuses the CreateDirectoryW API with the “\\?\” universal naming convention (UNC) prefix. This technique can bypass this filtering and successfully create a trailing spaced directory. Next, Gelup creates a “System32” directory in the trailing spaced directory and copies a legitimate ComputerDefaults.exe from %Windir%\System32 to that directory. In Tenable’s PoC, the copied example file was winSAT.exe. However, the target file can be accepted if it’s properly signed and autoElevate is enabled. In fact, the copied ComputerDefaults.exe is signed by Microsoft and has the autoElevate key set as true.

Figure 7. Snapshot of code showing how a UNC prefix is used to create a trailing spaced directory (top);
and how the autoElevate key is enabled in the ComputerDefaults.exe manifest (bottom)
After that, Gelup copies itself into the trailing spaced directory and renamed as “propsys.dll”. During this time, Gelup trickily overwrites the Characteristics entry in its PE header with 0x2102 (IMAGE_FILE_DLL | MAGE_FILE_32BIT_MACHINE | IMAGE_FILE_EXECUTABLE_IMAGE) in order to work as a DLL.
Figure 8. Snippets of code showing: how Gelup overwrites the flag in
Characteristics entry of PE header with 0x2102 (top); and a comparison of code
of the overwritten DLL showing only one byte patched (bottom)
Gelup next executes the copied ComputerDefaults.exe by calling ShellExecuteExW. This legitimate program is affected by the DLL side-loading of propsys.dll. Finally, the renamed Gelup, as propsys.dll, will be successfully executed under the context of ComputerDefaults.exe without UAC dialog. Gelup will then create the directory “%AppData%\MSOCache” with the HIDDEN attribute. This directory creation will change the program flow at the start of execution.
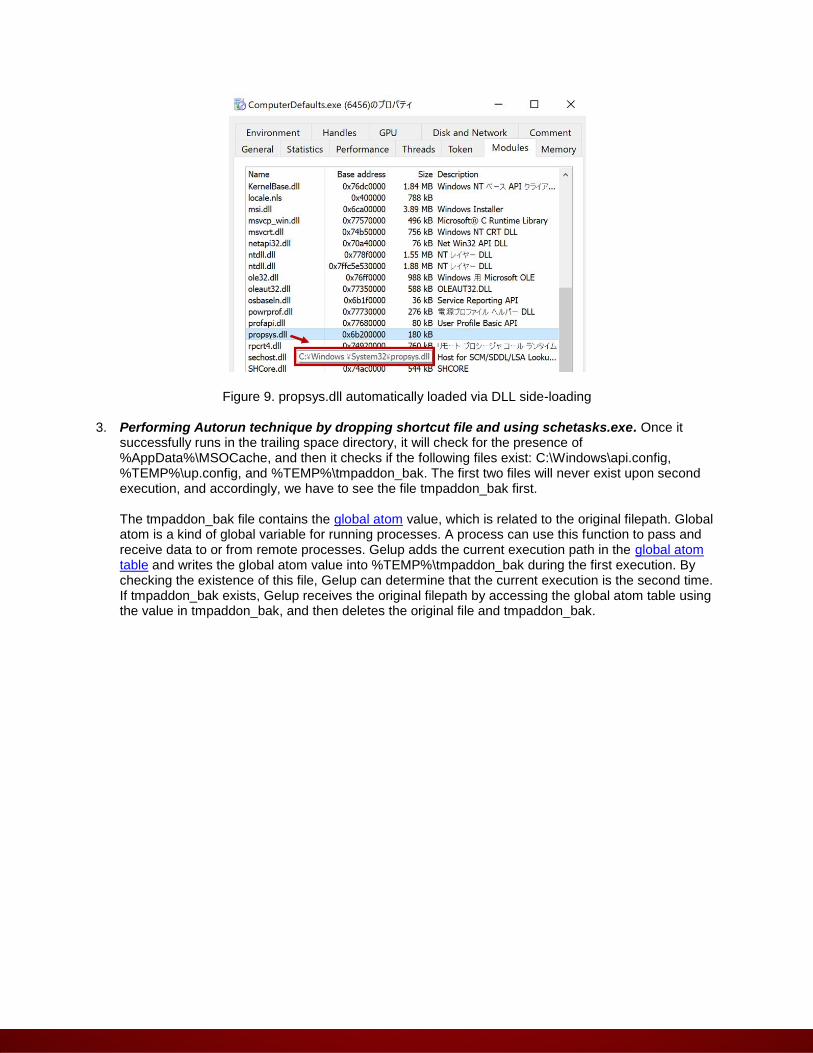
Figure 9. propsys.dll automatically loaded via DLL side-loading
3. Performing Autorun technique by dropping shortcut file and using schetasks.exe. Once it successfully runs in the trailing space directory, it will check for the presence of %AppData%\MSOCache, and then it checks if the following files exist: C:\Windows\api.config, %TEMP%\up.config, and %TEMP%\tmpaddon_bak. The first two files will never exist upon second execution, and accordingly, we have to see the file tmpaddon_bak first. The tmpaddon_bak file contains the global atom value, which is related to the original filepath. Global atom is a kind of global variable for running processes. A process can use this function to pass and receive data to or from remote processes. Gelup adds the current execution path in the global atom table and writes the global atom value into %TEMP%\tmpaddon_bak during the first execution. By checking the existence of this file, Gelup can determine that the current execution is the second time. If tmpaddon_bak exists, Gelup receives the original filepath by accessing the global atom table using the value in tmpaddon_bak, and then deletes the original file and tmpaddon_bak.

Figure 10. Screenshot of code showing how Gelup accesses global atom using tmpaddon_bak and
delete the original file (top); and the shortcut file binary embedded in Gelup (bottom)
After cleanup, Gelup creates the shortcut file “C:\$Recycle.Bin\<RANDOM>\<RANDOM>.lnk”, which is for C:\Windows \System32\ComputerDefaults.exe. It’s worth mentioning that Gelup doesn’t create a shortcut file at runtime; it literally has a shortcut file binary in itself. Gelup adds this shortcut file to the task scheduler by running the schetasks.exe command, shown below. This command will be executed with the highest privilege upon login:
schetasks.exe /create /rl highest /tn <RANDOM> /sc logon /tr
C:\$Recycle.Bin\<RANDOM>\<RANDOM>.lnk
After successfully running this command, Gelup copies C:\Windows\write.exe, which is a legitimate file, into C:\Windows\api.config. This file can be considered a sign indicating that scheduled tasks are being added. Once installation is finished, Gelup processes C&C communication next.
Gelup’s C&C Communication
Before starting C&C communication, Gelup writes a random string
in %AppData%\MSOCache\<RANDOM>.xml. This XML file will be used as a sign to identify if the current
connection is the first C&C connection or not — if it exists, it must be during the second or later time.
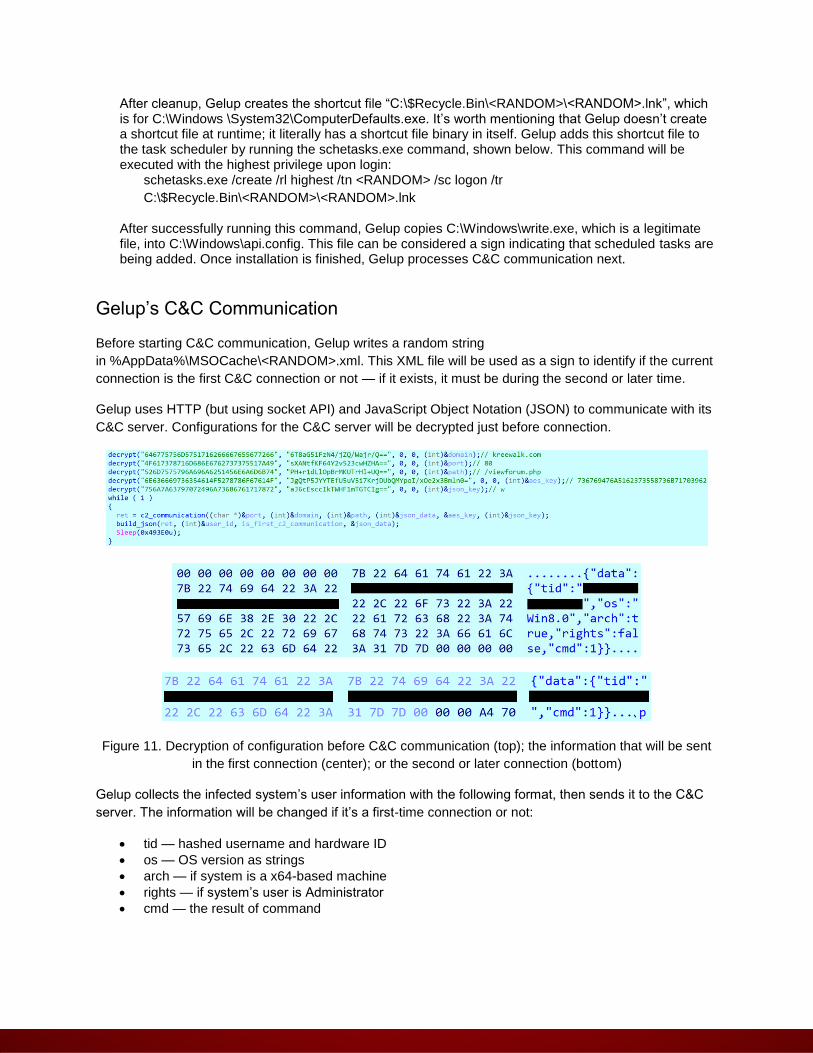
Gelup uses HTTP (but using socket API) and JavaScript Object Notation (JSON) to communicate with its
C&C server. Configurations for the C&C server will be decrypted just before connection.
Figure 11. Decryption of configuration before C&C communication (top); the information that will be sent
in the first connection (center); or the second or later connection (bottom)
Gelup collects the infected system’s user information with the following format, then sends it to the C&C
server. The information will be changed if it’s a first-time connection or not:
tid — hashed username and hardware ID
os — OS version as strings
arch — if system is a x64-based machine
rights — if system’s user is Administrator
cmd — the result of command

The JSON information will be encrypted by AES256-ECB, whose key
(736769476A5162373558736B71703962) is embedded in config, and is put in a JSON value of the key
“w”, which is also embedded in the config. Gelup next builds an HTTP request header by itself and set
this JSON as the body before it sends it by POST to its C&C server.
Figure 9. Encrypted information sent with HTTP POST
Further analysis showed that the C&C server looks active, but we couldn’t get a response from it. But as
a result of our analysis, we saw that the response is also in JSON format with the command encrypted
with the same key by AES256-ECB. The following are the accepted commands from the C&C server:
Command Behavior
100 Uninstall itself using MoveFileEx
200 Nothing
300 Save received file to %temp%\<specified_name>, then execute it
301 Save received file to %temp%\<specified_name>, then execute it via cmd.exe /C
302 Save received file to %temp%\<specified_name>, then load it (LoadLibrayryEx)
Table 1. Commands from Gelup’s C&C server
Analyzing the Shortcut File
The shortcut to the target file, which is used to bypass UAC, is embedded in Gelup’s binary itself. Thus,
this shortcut file could be created in the attacker’s environment. Below are some of the extracted
metadata as a result of parsing the shortcut file:
Created Timestamp (UTC): 2019/05/24 16:53:20 Accessed Timestamp (UTC): 2019/05/24 16:53:20 Serial No: F8EFD32C MAC Address: 08:00:27:CB:5D:D2 (CADMUS COMPUTER SYSTEMS (VirtualBox))
As the MAC Address shows, it appears the attackers also abuse VirtualBox, an open-source hosted
hypervisor, to create this shortcut and develop their malware or other tools.

TREND MICROTM RESEARCH
Trend Micro, a global leader in cybersecurity, helps to make the world safe for exchanging digital information.
Trend Micro Research is powered by experts who are passionate about discovering new threats, sharing key insights, and
supporting efforts to stop cybercriminals. Our global team helps identify millions of threats daily, leads the industry in
vulnerability disclosures, and publishes innovative research on new threats techniques. We continually work to anticipate new
threats and deliver thought-provoking research.
www.trendmicro.com