
TeamViewer Manual Meeting - dl.tvcdn.de · TeamViewer13Manual–Meeting Page 29 of 93. 3 Meeting...
93
TeamViewer GmbH • Jahnstraße 30 D-73037 Göppingen www.teamviewer.com TeamViewer 13 Manual Meeting Rev 13.1-201802
Transcript of TeamViewer Manual Meeting - dl.tvcdn.de · TeamViewer13Manual–Meeting Page 29 of 93. 3 Meeting...
TeamViewer GmbH • Jahnstraße 30 D-73037 Göppingen www.teamviewer.com
TeamViewer 13Manual
Meeting
Rev 13.1-201802

Table of contents
1 About TeamViewer 41.1 About the software 4
1.2 About the manual 4
2 Basics 62.1 How TeamViewer works 6
2.2 Description of the main TeamViewer window 6
3 Meeting 123.1 Meeting functions - overview 12
3.2 Hosting a meeting 13
3.3 Joining a meeting 17
3.4 Schedule meetings 19
3.5 The role distribution in a meeting 25
3.6 Meeting Room 27
3.7 Overview of the TeamViewer Panel 27
3.8 Record meeting 37
3.9 Transmitting sound and video 39
3.10 Lock meeting 39
4 Computers & Contacts – Managing Contacts 414.1 The TeamViewer account 43
4.2 Computers & Contacts options 47
TeamViewer 13 Manual – Meeting www.teamviewer.com Page 2 of 93
5 TeamViewer modules 645.1 The TeamViewer full version 64
5.2 The TeamViewer QuickJoin module 64
5.3 TeamViewer Portable 65
5.4 The TeamViewer MSI Package 66
5.5 TeamViewer on mobile devices 66
5.6 Customizable modules 66
6 Installation & configuration 676.1 Installing the TeamViewer full version 67
6.2 Using TeamViewer on a terminal server 68
6.3 Activating the TeamViewer license 70
7 Options 717.1 Category General 71
7.2 Category Security 73
7.3 Category Remote Control 74
7.4 Category Meeting 76
7.5 Category Computers & Contacts 79
7.6 Category Audio conferencing 82
7.7 Category Video 83
7.8 Category Custom invitation 84
7.9 Category Advanced 85
7.10 Policies for TeamViewer settings 93
TeamViewer 13 Manual – Meeting www.teamviewer.com Page 3 of 93

1 About TeamViewer
1.1 About the software
TeamViewer is an intuitive, fast and secure application for remote control and meetings. As anall-in-one solution, TeamViewer can be used to:
l Show your desktop for meetings, presentations or collaboration.
l Use the TeamViewer meeting function, e.g. for training sessions.
l Use the meeting apps for Android and iOS to participate in a meeting while being on theroad.
l Provide ad-hoc remote support to colleagues, friends or customers.
l Establish a connection between computers with different operating systems.TeamViewer runs on Windows, macOS, Linux or Google Chrome OS.
1.2 About the manual
This manual describes the use of TeamViewer for meetings.
Unless stated otherwise, the described functionality always refers to the TeamViewer fullversion for Microsoft Windows.
Instructions are given on the assumption that the TeamViewer full version is already installedon your computer. If you need help installing the program, read Section 6 "Installation & config-uration", Page 67 first.
If you are looking for help about the TeamViewer remote control functions, please read theTeamViewer Manual – Remote Control available separately on our website.
TeamViewer for macOS and Linux works similar to the Windows version in most cases but somefeatures might not yet be available for those operating systems. Feel free to use our free trialversions to get an idea of the various functions and contact our support team if you needfurther assistance.
macOS, iPhone, and iPad are trademarks of Apple Inc. Linux® is a registered trademark ofLinus Torvalds in the US and other countries. Android is a trademark of Google Inc. Windows,
TeamViewer 13 Manual – Meeting www.teamviewer.com Page 4 of 93
1 About TeamViewer

1 About TeamViewer
Microsoft, and Outlook are registered trademarks of Microsoft Corporation in the US andother countries. For simplification purposes, this manual refers to the operating systemsMicrosoft® Windows® XP, Microsoft® Windows® Vista, Microsoft® Windows® 7, Microsoft®Windows® 8 and Microsoft® Windows® 10 simply as “Windows”.
All supported operating systems can be found in our community underhttps://community.teamviewer.com/t5/Knowledge-Base/Which-operating-systems-are-supported/ta-p/24141.
TeamViewer 13 Manual – Meeting www.teamviewer.com Page 5 of 93
2 Basics
2.1 How TeamViewer works
With TeamViewer, you can easily and quickly start meetings or join them. With the use of aMeeting ID (which is automatically generated by TeamViewer and forwarded by the initiator),participants can connect to a meeting. The minimum requirement for connecting is theTeamViewer full version or a corresponding module and the Meeting ID.
All TeamViewer connections are highly encrypted and are thus protected from being accessedby third parties. For detailed technical information regarding connections, security and dataprivacy in TeamViewer, see the security statement on our website athttps://www.teamviewer.com/security/.
2.2 Description of the main TeamViewer window
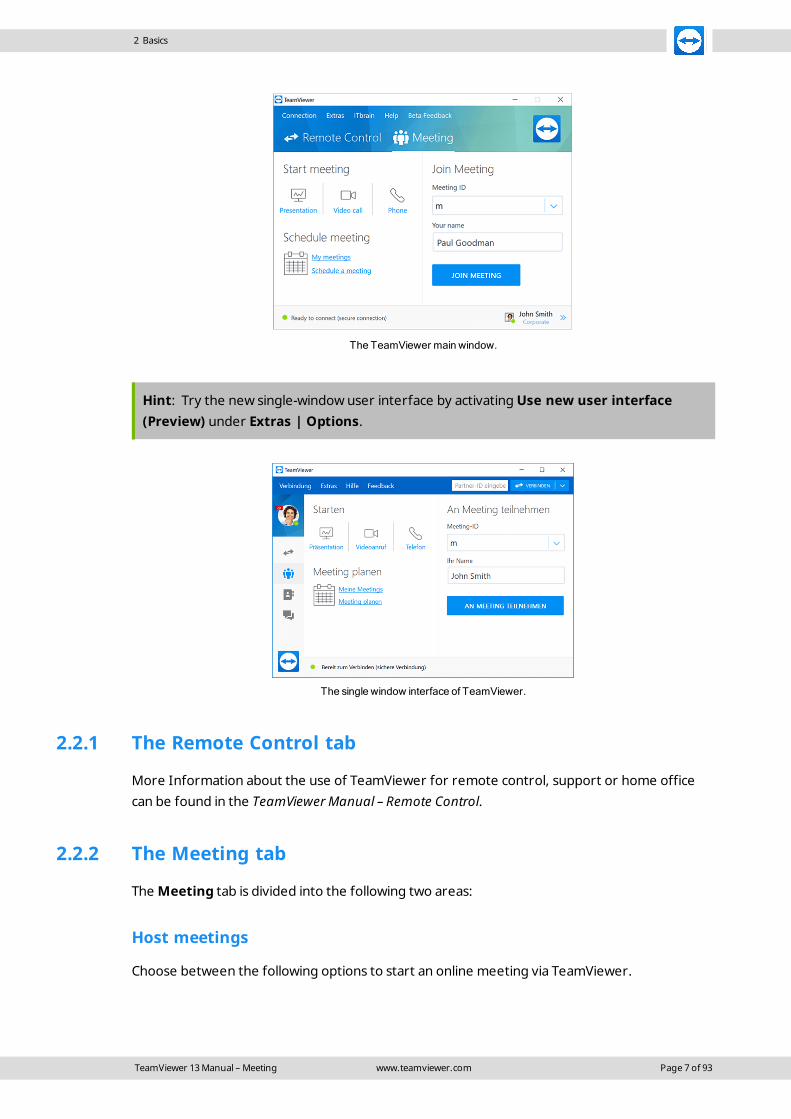
The main TeamViewer window is divided into the Remote Control and Meeting tabs.
TeamViewer 13 Manual – Meeting www.teamviewer.com Page 6 of 93
2 Basics
2 Basics
The TeamViewer main window.
Hint: Try the new single-window user interface by activating Use new user interface(Preview) under Extras | Options.
The single window interface of TeamViewer.
2.2.1 The Remote Control tab
More Information about the use of TeamViewer for remote control, support or home officecan be found in the TeamViewer Manual – Remote Control.
2.2.2 The Meeting tab
The Meeting tab is divided into the following two areas:
Host meetings
Choose between the following options to start an online meeting via TeamViewer.
TeamViewer 13 Manual – Meeting www.teamviewer.com Page 7 of 93
2 Basics
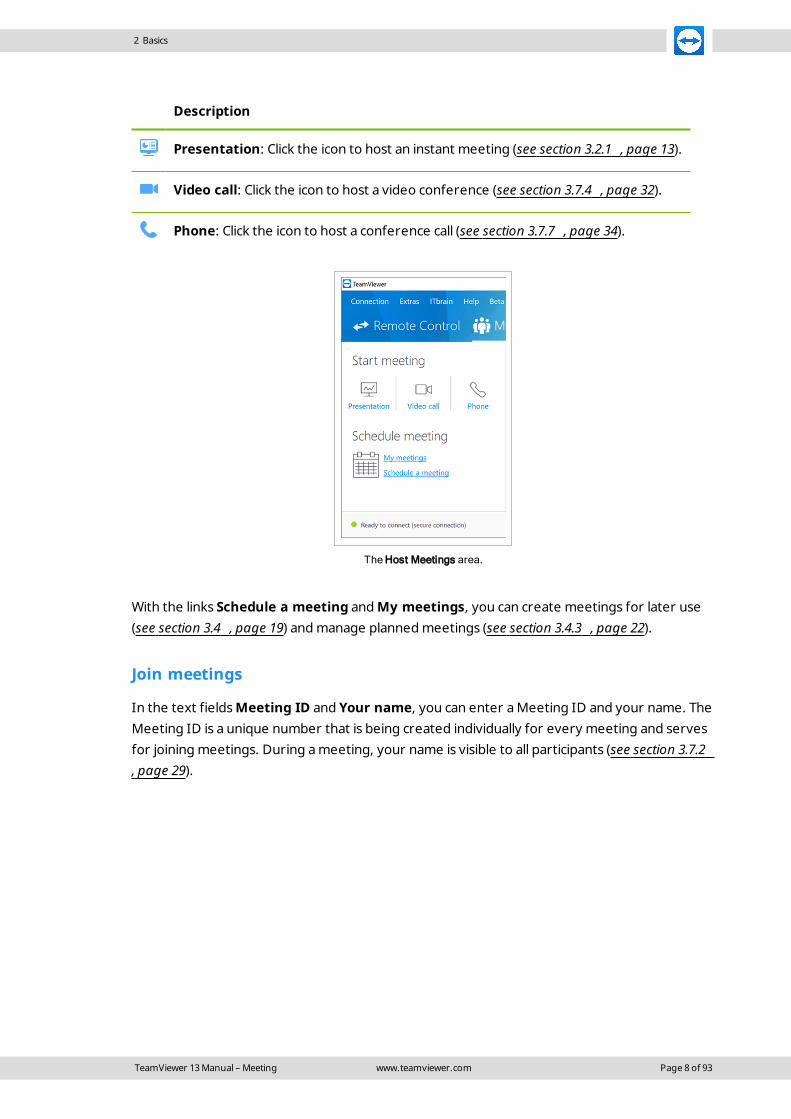
Description
Presentation: Click the icon to host an instant meeting (see section 3.2.1 , page 13).
Video call: Click the icon to host a video conference (see section 3.7.4 , page 32).
Phone: Click the icon to host a conference call (see section 3.7.7 , page 34).
TheHost Meetings area.
With the links Schedule a meeting and My meetings, you can create meetings for later use(see section 3.4 , page 19) and manage planned meetings (see section 3.4.3 , page 22).
Join meetings
In the text fieldsMeeting ID and Your name, you can enter a Meeting ID and your name. TheMeeting ID is a unique number that is being created individually for every meeting and servesfor joining meetings. During a meeting, your name is visible to all participants (see section 3.7.2, page 29).
TeamViewer 13 Manual – Meeting www.teamviewer.com Page 8 of 93

2 Basics
The Join Meeting area.
To join a meeting, enter the aforementioned data in the text fields and click the Join meetingbutton. If the initiator of the meeting specified a password, it must be entered in the dialogthat will open. Otherwise, you are connected directly to the meeting (see section 3.3 , page 17).
2.2.3 The menu bar of the main TeamViewer window
The menu bar is located along the upper edge of the main TeamViewer window and containsthe menu items Connection, Extras and Help.
Themenu bar of themain TeamViewer window.
Connection
The Connection menu offers the options Invite Partner..., Setup unattended access..., andOpen Management Console.... These options are not relevant for hosting or joining a meet-ing. You can find further information in the TeamViewer Manual – Remote Control.
To quit TeamViewer, click Exit TeamViewer.
Tools
The Extras menu contains the following options:
TeamViewer 13 Manual – Meeting www.teamviewer.com Page 9 of 93
2 Basics
l To access the settings (see section 7 , page 71) click Options.
l To play or convert videos of recorded TeamViewer sessions (see section 3.8.1 , page 38),click Play or convert recorded session....
l To recommend TeamViewer to others, click Tell-A-Friend.
l To access the log files created by TeamViewer (especially if needed by the TeamViewerSupport team for analysis purposes), click Open log files... .
l To activate your license key on this computer, click Activate license (see section 6.3 ,page 70).
l To display available license updates, click Check for license updates.
Help
The Helpmenu contains the following options:
l If you need help with TeamViewer, you can access our Support website by clickingTeamViewer web help.
l To open up the Teamviewer Community website, click TeamViewer Community.
l To open up the TeamViewer website, click TeamViewer website.
l To view a brief introduction in TeamViewer, click How it works….
l To provide feedback on TeamViewer, click Feedback.
l To check whether you are running the latest version of TeamViewer, click Check for newversion.
l To obtain information about TeamViewer and the currently active license, click AboutTeamViewer.
TeamViewer 13 Manual – Meeting www.teamviewer.com Page 10 of 93
2 Basics
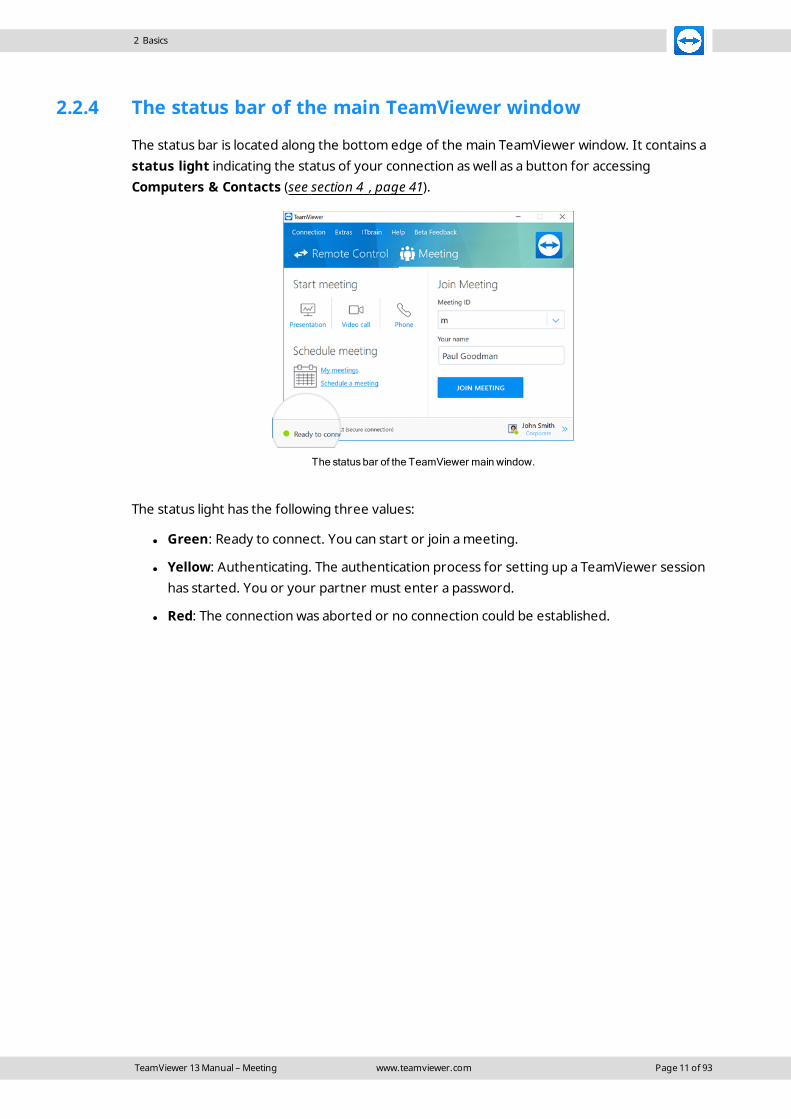
2.2.4 The status bar of the main TeamViewer window
The status bar is located along the bottom edge of the main TeamViewer window. It contains astatus light indicating the status of your connection as well as a button for accessingComputers & Contacts (see section 4 , page 41).
The statusbar of the TeamViewer main window.
The status light has the following three values:
l Green: Ready to connect. You can start or join a meeting.
l Yellow: Authenticating. The authentication process for setting up a TeamViewer sessionhas started. You or your partner must enter a password.
l Red: The connection was aborted or no connection could be established.
TeamViewer 13 Manual – Meeting www.teamviewer.com Page 11 of 93

3 Meeting
This section describes the use of the meeting function of TeamViewer using the TeamViewerfull version as an example.
You can use this function to present your screen to other people via the Internet.
To start a meeting, you need the TeamViewer full version. To join meetings, you can use theTeamViewer full version, the QuickJoin module, a web browser or the TeamViewer for meet-ings app for iOS and Android. For more information, see Section 5, Page 64.
Recommendation: To participate in meetings, it is recommended to connect directly to themeeting via a dynamic link. The link is available in an invitation message from the initiator of themeeting. By following the link, you are automatically connected to the meeting without theneed to enter further data. For more information, see Section 3.3.1, Page 17.
3.1 Meeting functions - overview
The Meeting function provides the following options:
l Start instant meetings with up to 25 participants or present your screen to individual per-sons.
l Plan meetings in advance and export them as a meeting request to Microsoft Outlookwhere you can conveniently invite participants.
l Managing meetings: Manage scheduled meetings using the My meetings function integ-rated in TeamViewer.
l Join meetings without TeamViewer software via web browser.
l Start meetings via the TeamViewer QuickConnect button to present individual windows(see section 3.2 , page 13).
l Join meetings while you are on the road using the Android and iOS app TeamViewer formeetings.
l Start a video conference or conference call with contacts without prior connection set-up.
TeamViewer 13 Manual – Meeting www.teamviewer.com Page 12 of 93
3 Meeting
3 Meeting
Examples
l Use the Meeting function for training sessions.
l Present individual applications to demonstrate their handling to participants.
l Give your PowerPoint presentation via the Internet to customers all over the world.
l Exchange ideas with colleagues at other locations. Use the different communicationmeans offered by TeamViewer (e.g. chat, video conferencing or Voice over IP).
Note: Please note that the number of possible meeting participants depends upon yourlicense. The current license overview can be found on our website underhttps://www.teamviewer.com/pricing/.
3.2 Hosting a meeting
You can start instant meetings with TeamViewer to exchange ideas with colleagues or custom-ers on a short notice or to present your screen to them. If you just want to present individualwindows, you can also start a meeting via the TeamViewer QuickConnect button. In addition,you can schedule meetings to start them at a later point in time.
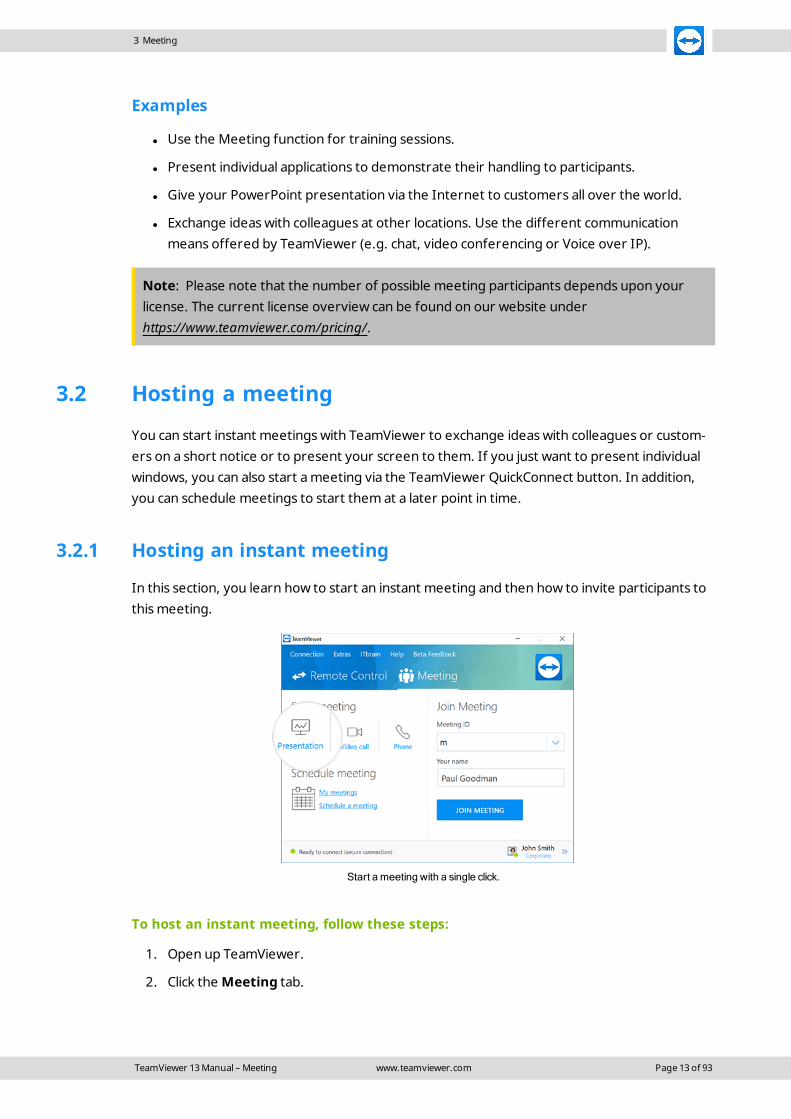
3.2.1 Hosting an instant meeting
In this section, you learn how to start an instant meeting and then how to invite participants tothis meeting.
Start a meeting with a single click.
To host an instant meeting, follow these steps:
1. Open up TeamViewer.
2. Click the Meeting tab.
TeamViewer 13 Manual – Meeting www.teamviewer.com Page 13 of 93

3 Meeting
3. In the Host meeting area click the icon.
4. You just started a meeting.
The TeamViewer panel will open (see section 3.7 , page 27).
5. Invite participants and make additional adjustments before you transfer your screen.
To invite participants to a meeting that has already started, follow these steps:
1. In the Participants widget within the TeamViewer Panel (see section 3.7.2 , page 29), clickthe button.
2. If you're logged into your TeamViewer account, continue with step 3, if not, continue withstep 3.1.
3. Invite participants to the meeting.
l Select the contact you wish to invite from the list.
The contact will receive an invitation message, which he must confirm.
l Click on By e-mail or phone….
The Invite participants dialog will open.
TeamViewer 13 Manual – Meeting www.teamviewer.com Page 14 of 93

3 Meeting
1. If necessary, change the invitation message in the dialog according to yourdemands.
l To send the message with your standard email program, click on the Open ase-mail button.
l To send the invitation text via other communication channels, such as socialnetworks, chats, or intranet, click the Copy to clipboard button.
Hint: You can also invite participants via telephone or otherwise. For this purpose, yousimply pass the Meeting ID displayed in the Participants widget and, if necessary, thecorresponding meeting password.
3.2.2 Hosting a meeting via the QuickConnect button
Note: To be able to use this function, you will need a TeamViewer account (see section 4.1 ,page 43).
With the QuickConnect function, you can present any application window or folder to acomputer or contact in your Computers & Contacts list or even collaborate with the partner inthis window. The QuickConnect button is displayed at the upper side of all windows.
TheQuickConnect button in an application window.
To establish a connection to a contact using the QuickConnect button, follow thesesteps:
1. Open up TeamViewer.
2. Log in to your TeamViewer account (see section 4.1.3 , page 45).
TeamViewer 13 Manual – Meeting www.teamviewer.com Page 15 of 93
3 Meeting
Note: If you have never used your TeamViewer account on a device, with an app orwithin a browser, you have to authorize the account usage at the first login. For furtherinformation, please refer to the TeamViewer Manual – Remote control.
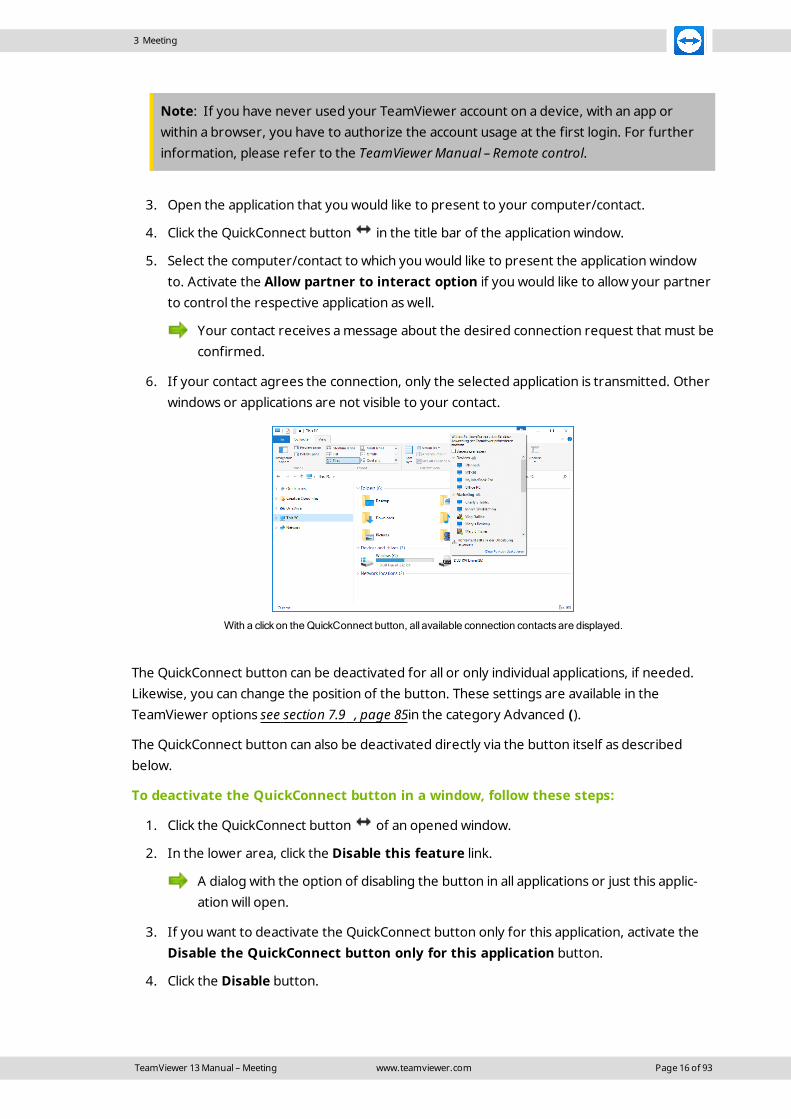
3. Open the application that you would like to present to your computer/contact.
4. Click the QuickConnect button in the title bar of the application window.
5. Select the computer/contact to which you would like to present the application windowto. Activate the Allow partner to interact option if you would like to allow your partnerto control the respective application as well.
Your contact receives a message about the desired connection request that must beconfirmed.
6. If your contact agrees the connection, only the selected application is transmitted. Otherwindows or applications are not visible to your contact.
With a click on theQuickConnect button, all available connection contacts are displayed.
The QuickConnect button can be deactivated for all or only individual applications, if needed.Likewise, you can change the position of the button. These settings are available in theTeamViewer options see section 7.9 , page 85in the category Advanced ().
The QuickConnect button can also be deactivated directly via the button itself as describedbelow.
To deactivate the QuickConnect button in a window, follow these steps:
1. Click the QuickConnect button of an opened window.
2. In the lower area, click the Disable this feature link.
A dialog with the option of disabling the button in all applications or just this applic-ation will open.
3. If you want to deactivate the QuickConnect button only for this application, activate theDisable the QuickConnect button only for this application button.
4. Click the Disable button.
TeamViewer 13 Manual – Meeting www.teamviewer.com Page 16 of 93

3 Meeting
5. The QuickConnect button is deactivated. This setting can be undone in the advancedoptions of TeamViewer (see section 7.9 , page 85).
3.3 Joining a meeting
If you want to join a meeting, you have several options:
Use either
l the link for joining meetings which you received from the initiator,
l the TeamViewer QuickJoin module,
l the TeamViewer full version,
l or your web browser.
The easiest and quickest way to join a meeting is to use the link from an invitation message. Noadditional data has to be entered and you are connected directly to the meeting.
3.3.1 Joining a meeting via a link/web browser
You received an invitation message with a link for participating in ameeting.
If you received an invitation message for a meeting, it contains a link in the formhttps://go.teamviewer.com/mXXXXXXXX (each "X" corresponds to a number between 1-9). By following the link, the web browser will open and you are connected to the meetingwithout the need to enter additional data.
In this process, the TeamViewer QuickJoin module is temporarily executed on yourcomputer. It already contains the Meeting ID and, if necessary, the meeting password andconnects automatically to the meeting. For more information, see section 5.2 "The TeamViewerQuickJoin module", page 64.
You received a Meeting ID and want to connect to the meeting via webbrowser.
To join a meeting via a web browser, follow these steps:
1. Open the following URL in your web browser: https://go.teamviewer.com.
2. Enter the Meeting ID in the Meeting-ID text field.
3. Click the Join meeting button.
4. If the initiator specified a meeting password, enter the meeting password in the sub-sequent dialog. Confirm your entry by clicking on the Log On button.
TeamViewer 13 Manual – Meeting www.teamviewer.com Page 17 of 93
3 Meeting
The Meeting window will open.
5. You can see the screen of the presenter and can interact with the participants using theTeamViewer Panel (see section 3.7 , page 27).
Note: If you cannot execute any other application on your computer, click the browserversion link before executing step 3. The Meeting window then opens in the browser. Thismethod requires the installation of Flash version 10 or higher and is limited in its scope offunctions compared to the application-based methods.
3.3.2 Joining a meeting with the TeamViewer QuickJoin module
With the TeamViewer QuickJoin module, you can easily and quickly join meetings.
To join a meeting with the TeamViewer QuickJoin module, follow these steps:
1. Start the QuickJoin module.
2. Enter the Meeting ID in the Meeting ID text field.
3. Underneath it, enter your name in the Your name text field.
4. Click the Join button.
5. If the initiator specified a meeting password, enter it in the subsequent dialog. Confirmyour entry by clicking on the Log On button.
The Meeting Room window will open.
If the initiator starts the meeting or it is already under way, the screen of thepresenter will be shown.
6. You can see the screen of the presenter and can interact with the participants using theTeamViewer Panel.
3.3.3 Joining a meeting with the TeamViewer full version
Another option of joining meetings is to use the TeamViewer full version. As a meeting parti-cipant, it does not offer any additional functions compared to the QuickJoin module.
To join a meeting with the TeamViewer full version, follow these steps:
1. Open up TeamViewer.
2. Click the Meeting tab.
3. In the Join Meeting area, enter the Meeting ID in the Meeting ID text field.
4. Underneath it, enter your name in the Your name text field.
5. Click the Join meeting button.
TeamViewer 13 Manual – Meeting www.teamviewer.com Page 18 of 93
3 Meeting
6. If the initiator specified a meeting password, enter it in the subsequent dialog. Confirmyour entry by clicking on the Log On button.
The Meeting Room window will open.
If the initiator starts the meeting or it is already under way, the screen of thepresenter will be shown.
7. You can see the screen of the presenter and can interact with the participants using theTeamViewer Panel.
3.4 Schedule meetings
Note: To be able to use this function, you will need a TeamViewer account (see section 4.1 ,page 43).
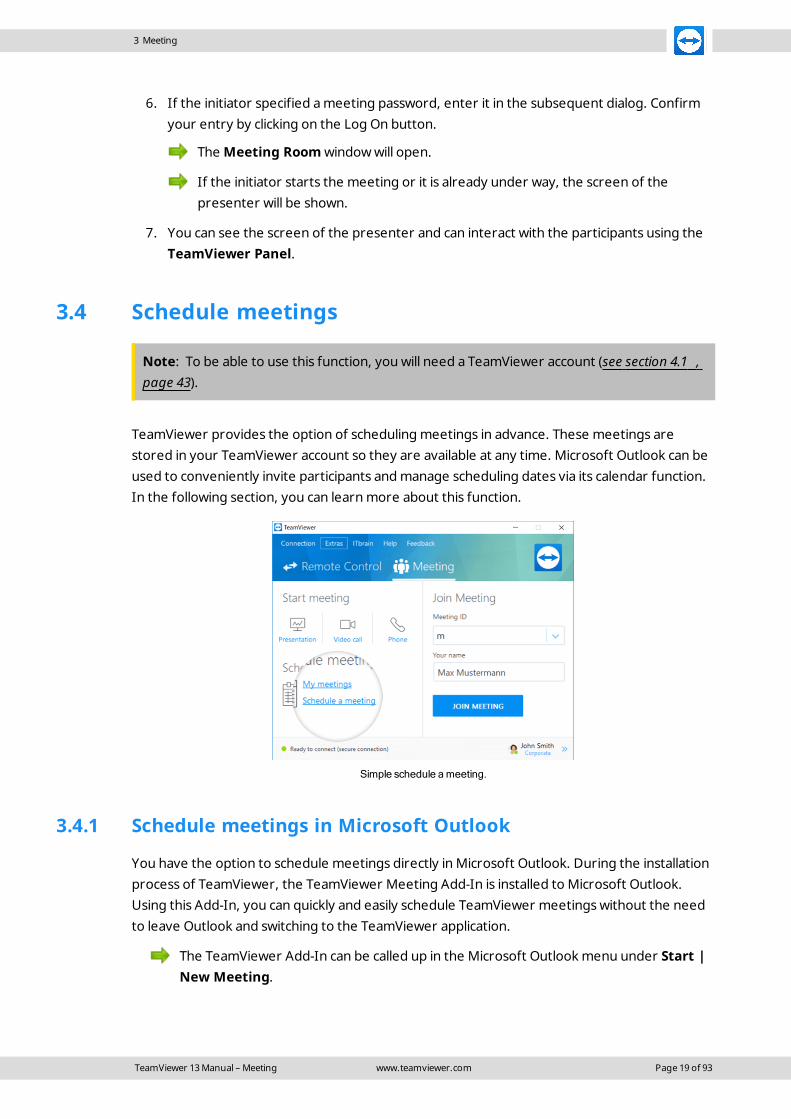
TeamViewer provides the option of scheduling meetings in advance. These meetings arestored in your TeamViewer account so they are available at any time. Microsoft Outlook can beused to conveniently invite participants and manage scheduling dates via its calendar function.In the following section, you can learn more about this function.
Simple schedule ameeting.
3.4.1 Schedule meetings in Microsoft Outlook
You have the option to schedule meetings directly in Microsoft Outlook. During the installationprocess of TeamViewer, the TeamViewer Meeting Add-In is installed to Microsoft Outlook.Using this Add-In, you can quickly and easily schedule TeamViewer meetings without the needto leave Outlook and switching to the TeamViewer application.
The TeamViewer Add-In can be called up in the Microsoft Outlook menu under Start |New Meeting.
TeamViewer 13 Manual – Meeting www.teamviewer.com Page 19 of 93

3 Meeting
The TeamViewer Meeting Add-In for Microsoft Outlook.
To schedule a meeting in Microsoft Outlook, follow these steps:
1. Open Microsoft Outlook.
2. Click the New Meeting icon in the Start tab.
A new meeting invitation will open. If you are not logged into your TeamVieweraccount already, a dialog box will open where you must log in (see section 4.1.3 ,page 45).
3. You can now invite participants and use further functions offered by Outlook.
You can make changes to the meeting data at any time. These will synchronize bidirectionallybetween Microsoft Outlook and TeamViewer. Afterwards, you can then send updated meetingchanges via Outlook.
All TeamViewer meetings will still be saved inMy Meetings (see section , page 23) and can becalled up or managed in any TeamViewer full version.
Note: If desired, the Meeting Add-In can be deactivated or removed within the Outlookand TeamViewer options.
3.4.2 Schedule meetings in TeamViewer
To schedule a meeting, follow these steps:
1. Open up TeamViewer.
2. Click the Meeting tab.
3. In the Host Meeting area, click the Schedule a meeting link. (If you are already loggedin to TeamViewer with your TeamViewer account, proceed with step 6.)
The TeamViewer - Sign In dialog will open.
4. Log in to your TeamViewer account by entering your username and password.
TeamViewer 13 Manual – Meeting www.teamviewer.com Page 20 of 93
3 Meeting
Note: If you have never used your TeamViewer account on a device, with an app orwithin a browser, you have to authorize the account usage at the first login. For furtherinformation, please refer to the TeamViewer Manual – Remote control.
The Schedule a Meeting dialog will open.
5. Enter the desired data.
6. Click the Save button.
The My Meetings dialog (see section 3.4.3 , page 22) will open.
7. If Microsoft Outlook is installed on your computer, a new meeting request is opened inOutlook.
8. You can now invite participants and use further functions offered by Outlook.
Note: If Microsoft Outlook is not installed, the dialogsMy Meetings and Invite Parti-cipants open. Participants must then be invited as described under Section 3.2.1, Page 13.
Note: An installation of Microsoft Outlook is not necessary for scheduling meetings.
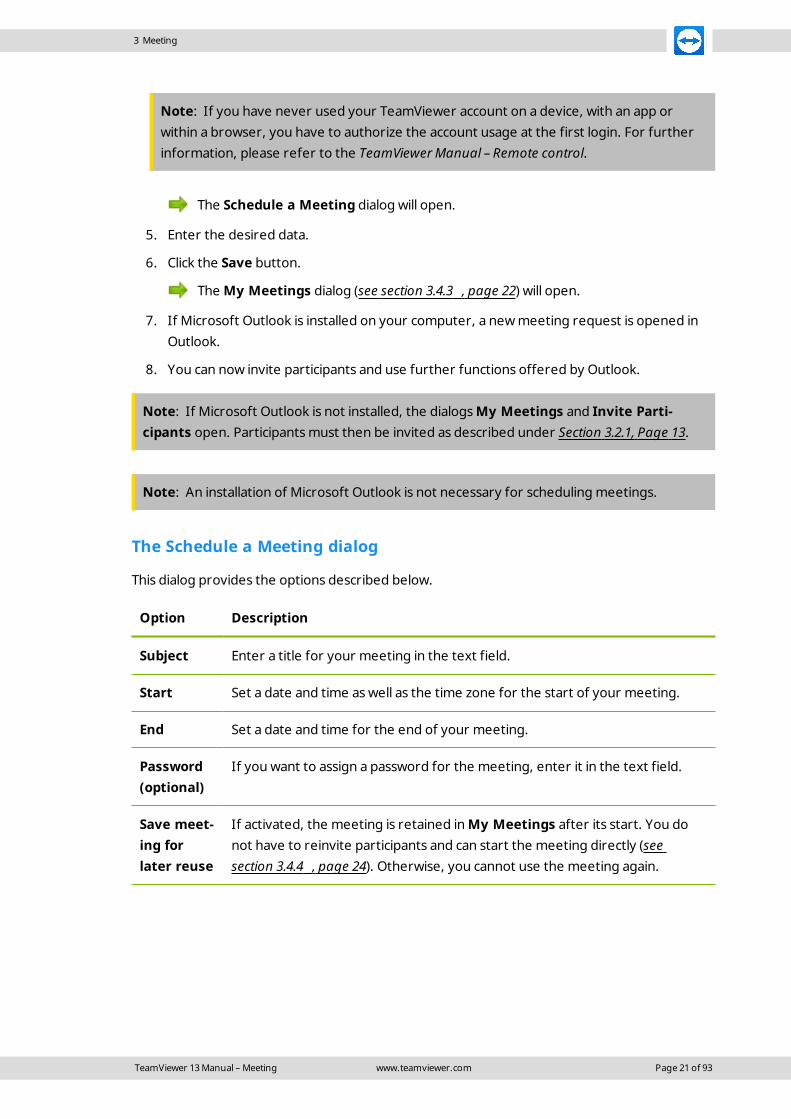
The Schedule a Meeting dialog
This dialog provides the options described below.
Option Description
Subject Enter a title for your meeting in the text field.
Start Set a date and time as well as the time zone for the start of your meeting.
End Set a date and time for the end of your meeting.
Password(optional)
If you want to assign a password for the meeting, enter it in the text field.
Save meet-ing forlater reuse
If activated, the meeting is retained inMy Meetings after its start. You donot have to reinvite participants and can start the meeting directly (seesection 3.4.4 , page 24). Otherwise, you cannot use the meeting again.
TeamViewer 13 Manual – Meeting www.teamviewer.com Page 21 of 93

3 Meeting
Option Description
ConfigureConferenceCall
To define conference call data for the meeting, click the link.
You can select from:
l No conference data for audio.
l Use TeamViewer conference data for audio.
l Use custom conference data for audio.
In the Schedule a Meeting dialog, you can create scheduledmeetings.
3.4.3 Managing scheduled meetings
You can easily manage your scheduled meetings from anywhere using your TeamVieweraccount. Scheduled meetings are linked to a TeamViewer account and are not stored locally ona computer. This means that all your scheduled meetings are available as soon as you log in toany TeamViewer using your account.
Centrallymanaging all scheduledmeetings.
Example: You are scheduling a meeting on your desktop computer. However, you want to useyour laptop to host it since it features a webcam. For this reason, log in to TeamViewer with
TeamViewer 13 Manual – Meeting www.teamviewer.com Page 22 of 93

3 Meeting
your TeamViewer account on your laptop and the meeting scheduled on your desktopcomputer will be available.
That is, you can start a meeting from any computer, regardless of the computer on which it wasscheduled.
To manage your scheduled meetings, follow these steps:
1. Open up TeamViewer.
2. Click the Meeting tab.
3. In the Host Meeting area, click the My meetings link.
The TeamViewer - Sign In dialog will open.
4. Log in to your TeamViewer account (see section 4.1.3 , page 45).
Note: If you have never used your TeamViewer account on a device, with an app orwithin a browser, you have to authorize the account usage at the first login. For furtherinformation, please refer to the TeamViewer Manual – Remote control.
The My Meetings dialog will open.
The My Meetings dialog
This dialog contains your scheduled meetings with Subject, Start and Meeting ID. In addition,it provides the options described below.
Button Description
New Meeting To schedule a new meeting, click the New Meeting… button. The Sched-ule a Meeting dialog will open (see section 3.4.1 , page 19).
Start To start a scheduled meeting, select it and click the Start button. TheMeeting window will open.
Hint: A meeting can also be started by double-clicking it.
Edit... To edit a scheduled meeting, select it and click the Edit... button.
Delete To delete a scheduled meeting, select it and click the Delete button.
Invite... To invite participants to the selected meeting, click the Invite... button.The Invite Participants dialog will open.
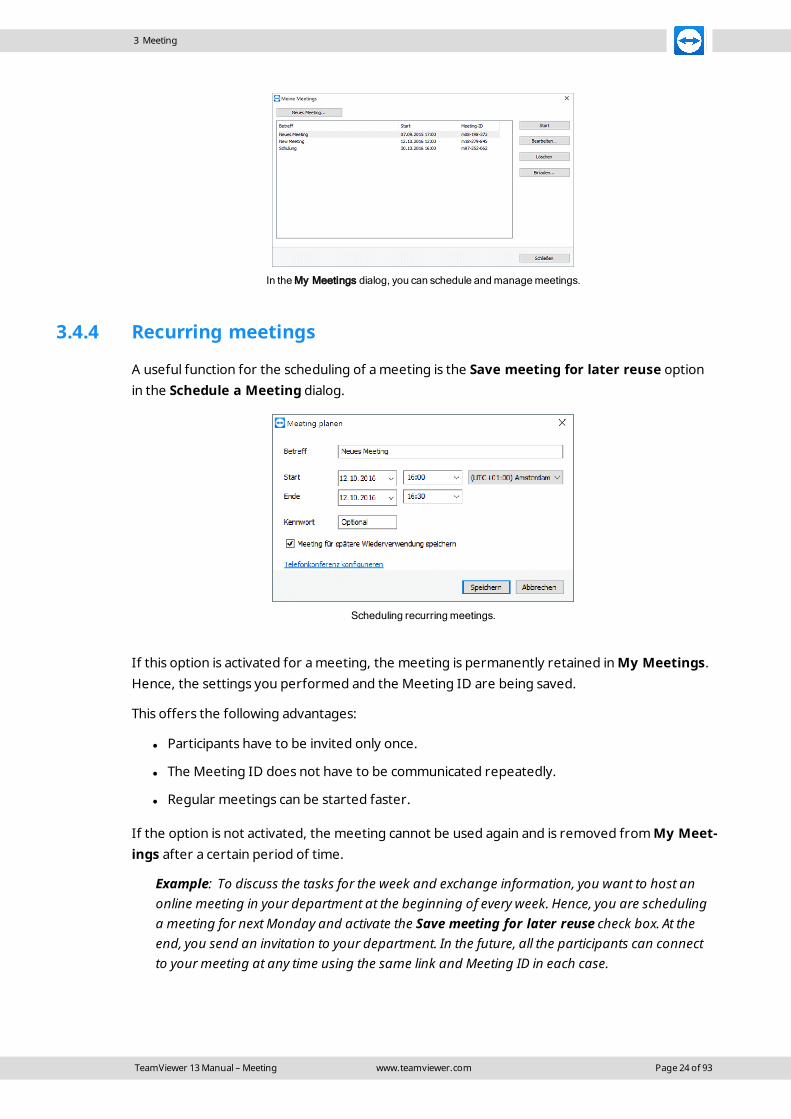
Close To close the My Meetings dialog, click the Close button.
TeamViewer 13 Manual – Meeting www.teamviewer.com Page 23 of 93
3 Meeting
In theMy Meetings dialog, you can schedule andmanagemeetings.
3.4.4 Recurring meetings
A useful function for the scheduling of a meeting is the Save meeting for later reuse optionin the Schedule a Meeting dialog.
Scheduling recurringmeetings.
If this option is activated for a meeting, the meeting is permanently retained inMy Meetings.Hence, the settings you performed and the Meeting ID are being saved.
This offers the following advantages:
l Participants have to be invited only once.
l The Meeting ID does not have to be communicated repeatedly.
l Regular meetings can be started faster.
If the option is not activated, the meeting cannot be used again and is removed fromMy Meet-ings after a certain period of time.
Example: To discuss the tasks for the week and exchange information, you want to host anonline meeting in your department at the beginning of every week. Hence, you are schedulinga meeting for next Monday and activate the Save meeting for later reuse check box. At theend, you send an invitation to your department. In the future, all the participants can connectto your meeting at any time using the same link and Meeting ID in each case.
TeamViewer 13 Manual – Meeting www.teamviewer.com Page 24 of 93

3 Meeting
3.5 The role distribution in a meeting
There are different roles in a meeting. TeamViewer differentiates between Organizer,Presenter and Participant.
3.5.1 The organizers
The organizer takes over the control in a meeting. At the beginning of a meeting, it is alwaysthe initiator. The organizer can assign most of the rights that provides him/her with the oppor-tunity to ensure that the meeting runs smoothly. The organizer role cannot be dropped (i.e.participants who have been named as organizers remain organizers until the end of the meet-ing). Within a meeting it is also possible to name several organizers.
3.5.2 The presenter
The presenter transfers his or her screen in a meeting. At the beginning of a meeting, it isalways the initiator. The presenter role can be passed on to any meeting participant by theorganizer or presenter. Each meeting always has only one presenter since only one participantcan transfer his or her screen at a time.
3.5.3 The participants
A participant in a meeting is anyone who connects to a meeting.
Each participant can be assigned another role as well as certain rights by the presenter andorganizers.
3.5.4 The rights of meeting participants
During a meeting, the presenter and the organizers have the option of assigning rights to indi-vidual participants. Using the Participants widget allows restricting the actions of participantsor assigning additional rights to them.
Click the display name of the participants and enable or disable the desired option.
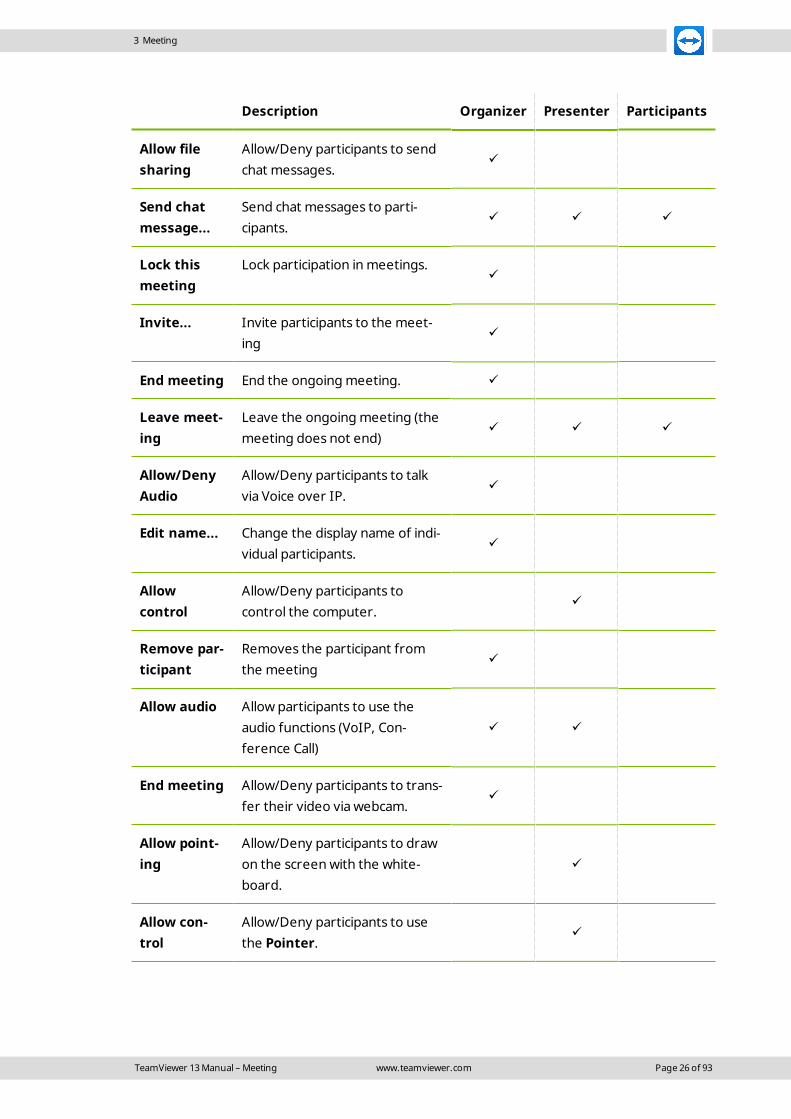
The organizer, presenter or a participant has the following rights and possibilities:
Description Organizer Presenter Participants
Allow filesharing
Allow/Deny participants toprovide files via the file box.
ü
TeamViewer 13 Manual – Meeting www.teamviewer.com Page 25 of 93
3 Meeting
Description Organizer Presenter Participants
Allow filesharing
Allow/Deny participants to sendchat messages.
ü
Send chatmessage...
Send chat messages to parti-cipants.
ü ü ü
Lock thismeeting
Lock participation in meetings.ü
Invite... Invite participants to the meet-ing
ü
End meeting End the ongoing meeting. ü
Leave meet-ing
Leave the ongoing meeting (themeeting does not end)
ü ü ü
Allow/DenyAudio
Allow/Deny participants to talkvia Voice over IP.
ü
Edit name... Change the display name of indi-vidual participants.
ü
Allowcontrol
Allow/Deny participants tocontrol the computer.
ü
Remove par-ticipant
Removes the participant fromthe meeting
ü
Allow audio Allow participants to use theaudio functions (VoIP, Con-ference Call)
ü ü
End meeting Allow/Deny participants to trans-fer their video via webcam.
ü
Allow point-ing
Allow/Deny participants to drawon the screen with the white-board.
ü
Allow con-trol
Allow/Deny participants to usethe Pointer.
ü
TeamViewer 13 Manual – Meeting www.teamviewer.com Page 26 of 93

3 Meeting
Description Organizer Presenter Participants
Assign asorganizer
Allow/Deny participants to talkvia Voice over IP.
ü
Assign aspresenter
Pass on the presenter role toanother participant.
ü ü
3.6 Meeting Room
The Meeting Room appears after you connected to a meeting as a participant and it has not yetbeen started by the initiator.
If no screen contents are transferred, theMeeting Room is shown.
As a participant, you also see the waiting room if the presenter stopped the transmission of hisor her (see section 3.7.3 , page 30).
The Meeting Room contains information about the current meeting (e.g. name of presenter,subject, date, time, Meeting ID or conference call data).
Hint: If the participants use your personalized QuickJoin module with custom design, themeeting (see section 5.6 , page 66).
3.7 Overview of the TeamViewer Panel
The TeamViewer Panel provides different functions during a meeting.
After the start of a meeting, it will open on the side of the initiator as well as on the side of theparticipants.
TeamViewer 13 Manual – Meeting www.teamviewer.com Page 27 of 93

3 Meeting
The TeamViewer Panel.
The available functions and widgets are described in detail in the following sections.
The TeamViewer Panel itself has the following properties:
l It can be placed anywhere on the screen. As a result, important parts of the screen arenot being hidden.
l It is transparent. If you present your screen, the panel is not visible to the participants.
l Individual widgets can be detached from the panel. Drag the widgets from the panel andadjust the size and position individually. Alternatively, click the icon to detach therespective widget from the TeamViewer Panel.
l The panel can be minimized to the edge of the screen using the icon on the left side of
the panel.
l With the icon at the left side of the panel, all participants except for the presenter can
display the meeting window in full-screen mode.
l The presenter can lock it into position in the top right corner of the screen. This way, thepanel does not overly any transferred screen content. Drag the panel to the upper rightcorner of your screen.
3.7.1 Menu bar options
The menu bar is located at the top edge of the panel. Clicking on the icons calls up differentfunctions.
TeamViewer 13 Manual – Meeting www.teamviewer.com Page 28 of 93

3 Meeting
Icon/Function Description
Close all con-nections
Closes all ongoing meetings.
Video
Open the My videowidget (see section 3.7.4 , page 32).
Audio
Open the Audiowidget (see section 3.7.5 , page 33).
Chat
Open the Audiowidget (see section 4.2.7 , page 57).
File box
Open the File box widget (see section 3.7.9 , page 36).
Whiteboard
Open the Whiteboardwidget (see section 3.7.10 , page 36).
Functions
The context menu of the icon provides the opportunity (depending onyour role) to call up the Participants and Screen sharingwidgets or toperform Scaling settings for the display of the meeting window.
3.7.2 The Participants widget – Seeing and managing participants
For the organizers, the Meeting ID and optionally also the Meeting password are displayed inthe upper area of the widget. As an organizer, you also have the option to invite participants tothe meeting by clicking the Invite... button (see section 3.2.1 , page 13).
In the lower area, you can see all the participants of the meeting. Depending on your role, youalso have the following options:
TeamViewer 13 Manual – Meeting www.teamviewer.com Page 29 of 93

3 Meeting
Symbol Description Organizer Presenter Participants
MoreOptions (ordisplayname)
Click the display name and assignindividual rights to every parti-cipant via the drop-down menu(see section 3.5.4 , page 25).
ü ü
Click the icon to lock the meeting(see section , page 40).
ü
Click the button to invite addi-tional participants to the meeting.
ü
Microphoneon/off(next toname)
Click the icon to allow/deny indi-vidual participants to commu-nicate via Voice over IP. ü
Options
Click the icon in the widgetheader and select from the follow-ing options:
l Participants can see eachother: If activated, all thenames of the meeting par-ticipants are visible to every-one in the Participantswidget.
l Close: Closes the widget.
ü
Allow/DenyRemoteControl(next tothe name)
Click the icon to allow/deny indi-vidual participants to control yourcomputer.
ü
3.7.3 The Screen sharing widget – Managing displayed contents
This widget is only available to the presenter.
TeamViewer 13 Manual – Meeting www.teamviewer.com Page 30 of 93

3 Meeting
As the presenter, this widget allows you to see your desktop from the perspective of the parti-cipants. This gives you an overview of which monitor and which of your windows are visible forthe participants.
You have the following options:
Symbol Description
Click the icon and via the drop-down menu select the monitor (ifseveral monitors are connected) or the applications to be transferred.
With Advanced selection… , you can also perform the followingsettings in the Application Selection dialog:
l Show TeamViewer Panel: If activated, the TeamViewer Panelof the presenter is visible within the meeting window for all par-ticipants.
l Present all windows: If activated, all windows of the screen arepresented.
l Present new windows: If activated, only newly opened win-dows are presented.
l In the bottom area, select individual windows to be presented.
Pause present-ation
Click the icon to pause the presentation of your screen. The image onthe side of the participants will be "frozen" until you click the icon.
This allows you to perform changes or edit sensitive data without theparticipants seeing it (e.g. entry of a password).
Click to stop thescreen sharing.
Click the icon to stop presenting your screen (the participants willenter the meeting room).
TeamViewer 13 Manual – Meeting www.teamviewer.com Page 31 of 93

3 Meeting
Symbol Description
Resume present-ation
Click the icon to continue the presentation of your screen.
Options
Click the icon in the widget header and select from the followingoptions:
l Remove wallpaper: If activated, your wallpaper will beremoved.
l Share computer sounds and music: If activated, all sounds ofthe presenter’s computer will be transmitted to the participants(see section 3.9 , page 39).
l Quality: In the submenu, select the display quality of yourpresentation (see section 7.4 , page 76).
l Record meeting: Record the meeting (see section 3.8 , page 37).
l Close: Closes the widget.
3.7.4 The Videos widget – Transfer video via webcam
If you want to be seen by the participants, you can use the video transfer via webcam for thispurpose.
The following section describes how you can establish a video transfer to the participants. Inthe same vein, other participants can also establish a video transfer to you.
If several participants transfer their video, then all participants can see each other in a separatevideo widget.
TeamViewer 13 Manual – Meeting www.teamviewer.com Page 32 of 93

3 Meeting
To start a video transfer, follow these steps:
1. Open the My videowidget.
2. Move the mouse over your profile picture and click the icon .
Your webcam video will be transmitted.
3. To stop transmitting webcam video, click the icon .
Video Options
With the video options, you can perform changes to your camera settings. To do so, click theicon in the widget header.
Change the size of your transmitted video or select Video settings to display advanced videooptions.
The Video option menu will open (see section 7.7 , page 83).
Video conference
If several participants transfer their video, the Videos widget will open.
This widget displays all transferred videos in a grid. You can detach individual videos from thewidget via drag & drop and reattach them. With the icon in the widget header, you can
adjust the video size of the transferred videos or close the widget.
If the widget is detached from the TeamViewer panel , you can enlarge individual videowindows by clicking the video window. The selected video window will then be presented infocus and enlarged.
3.7.5 The Audio Widget – Transfer voice
To talk to Meeting participants, use the Audiowidget. Choose whether you want to use Voiceover IP or conference calls.
TeamViewer 13 Manual – Meeting www.teamviewer.com Page 33 of 93
3 Meeting
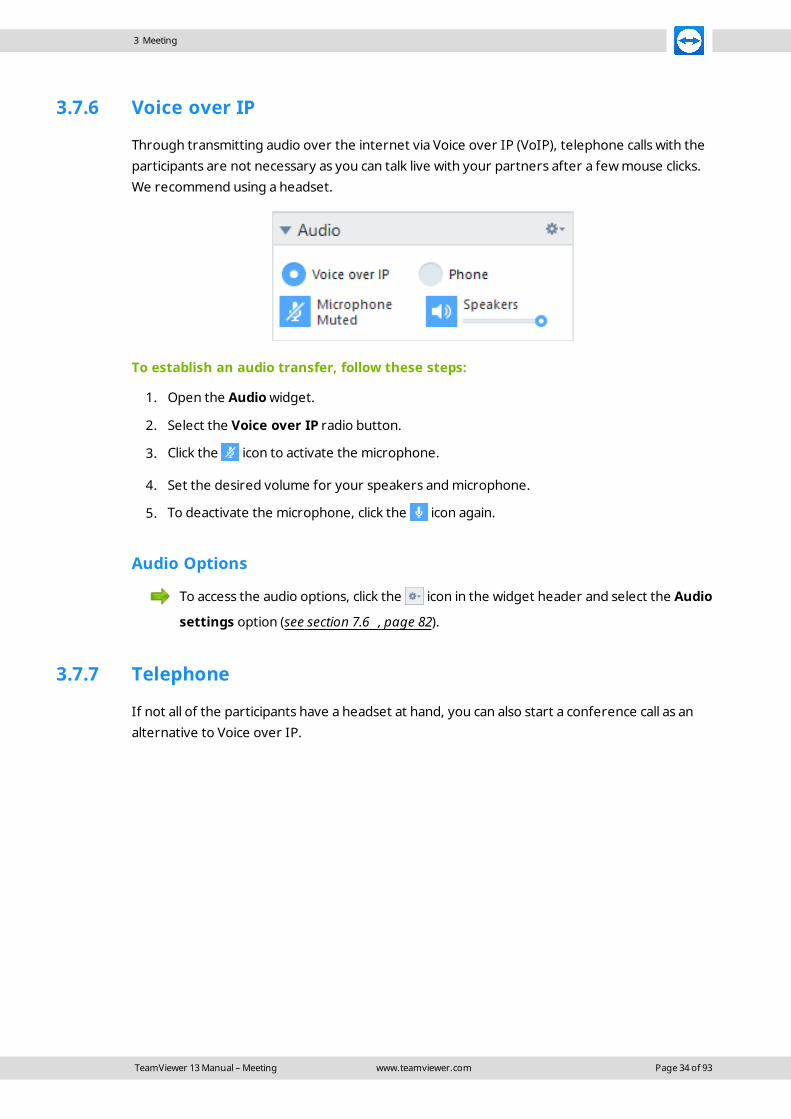
3.7.6 Voice over IP
Through transmitting audio over the internet via Voice over IP (VoIP), telephone calls with theparticipants are not necessary as you can talk live with your partners after a few mouse clicks.We recommend using a headset.
To establish an audio transfer, follow these steps:
1. Open the Audiowidget.
2. Select the Voice over IP radio button.
3. Click the icon to activate the microphone.
4. Set the desired volume for your speakers and microphone.
5. To deactivate the microphone, click the icon again.
Audio Options
To access the audio options, click the icon in the widget header and select the Audio
settings option (see section 7.6 , page 82).
3.7.7 Telephone
If not all of the participants have a headset at hand, you can also start a conference call as analternative to Voice over IP.
TeamViewer 13 Manual – Meeting www.teamviewer.com Page 34 of 93
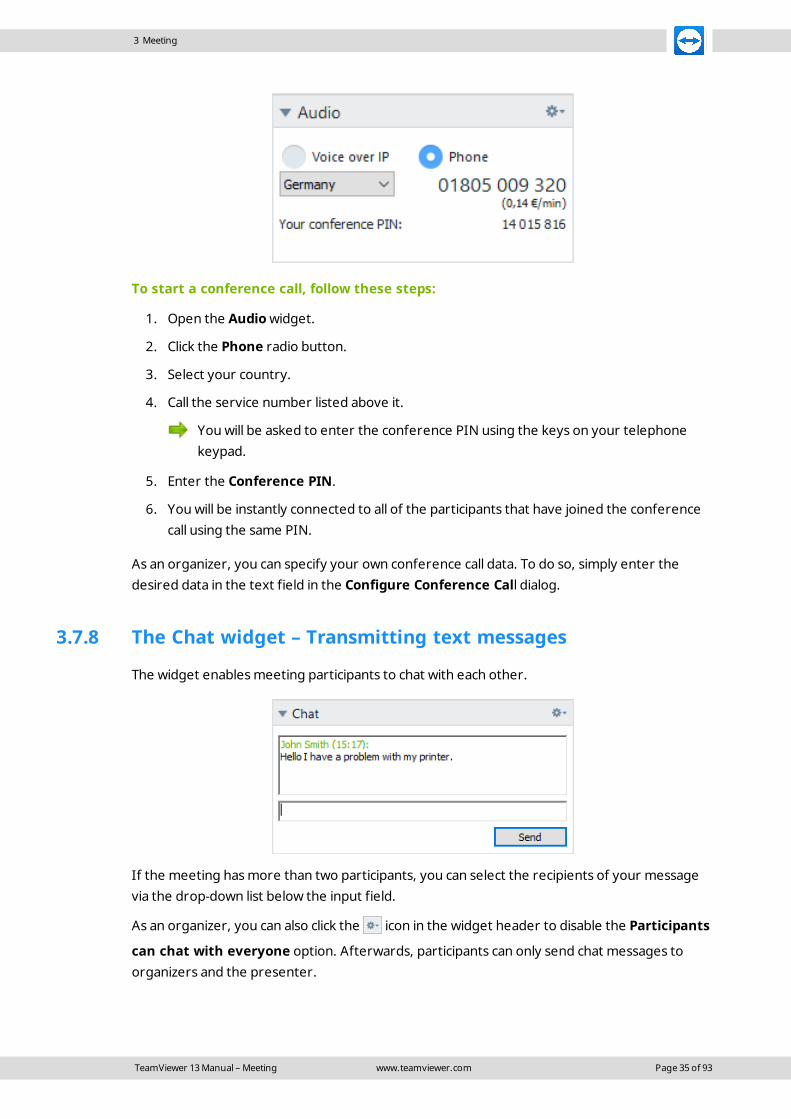
3 Meeting
To start a conference call, follow these steps:
1. Open the Audiowidget.
2. Click the Phone radio button.
3. Select your country.
4. Call the service number listed above it.
You will be asked to enter the conference PIN using the keys on your telephonekeypad.
5. Enter the Conference PIN.
6. You will be instantly connected to all of the participants that have joined the conferencecall using the same PIN.
As an organizer, you can specify your own conference call data. To do so, simply enter thedesired data in the text field in the Configure Conference Call dialog.
3.7.8 The Chat widget – Transmitting text messages
The widget enables meeting participants to chat with each other.
If the meeting has more than two participants, you can select the recipients of your messagevia the drop-down list below the input field.
As an organizer, you can also click the icon in the widget header to disable the Participants
can chat with everyone option. Afterwards, participants can only send chat messages toorganizers and the presenter.
TeamViewer 13 Manual – Meeting www.teamviewer.com Page 35 of 93
3 Meeting
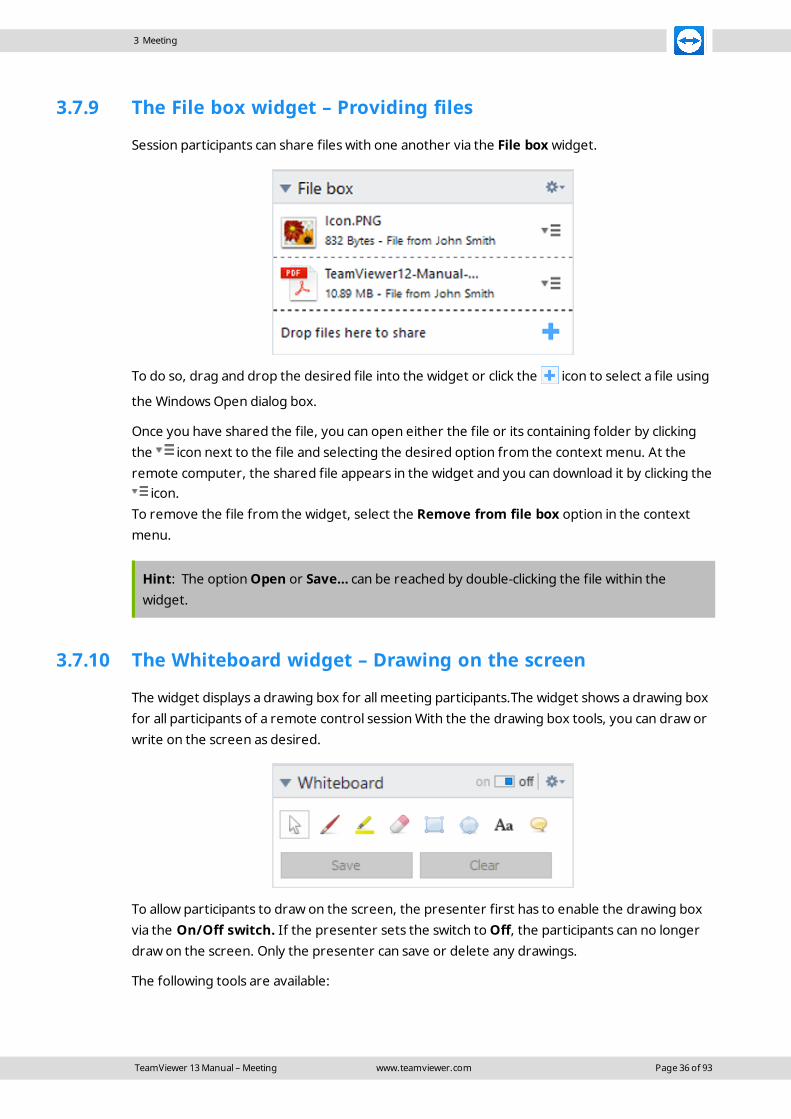
3.7.9 The File box widget – Providing files
Session participants can share files with one another via the File box widget.
To do so, drag and drop the desired file into the widget or click the icon to select a file using
the Windows Open dialog box.
Once you have shared the file, you can open either the file or its containing folder by clickingthe icon next to the file and selecting the desired option from the context menu. At theremote computer, the shared file appears in the widget and you can download it by clicking the
icon.To remove the file from the widget, select the Remove from file box option in the contextmenu.
Hint: The option Open or Save… can be reached by double-clicking the file within thewidget.
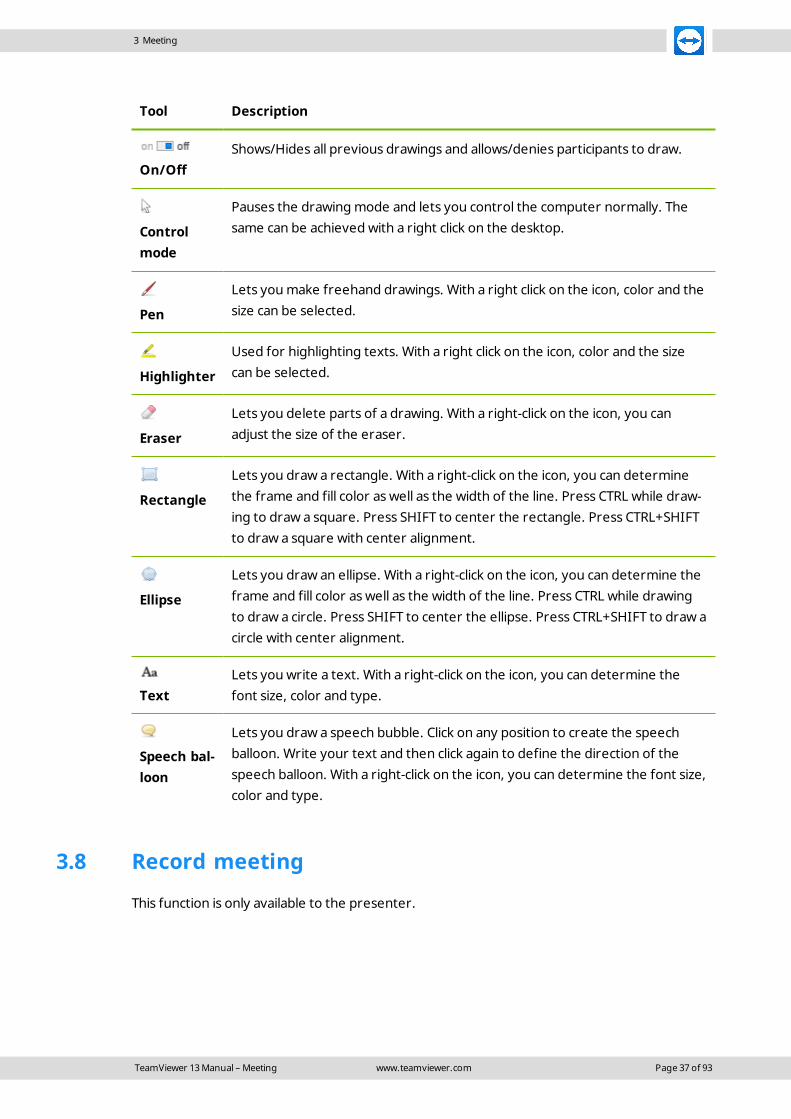
3.7.10 The Whiteboard widget – Drawing on the screen
The widget displays a drawing box for all meeting participants.The widget shows a drawing boxfor all participants of a remote control session With the the drawing box tools, you can draw orwrite on the screen as desired.
To allow participants to draw on the screen, the presenter first has to enable the drawing boxvia the On/Off switch. If the presenter sets the switch to Off, the participants can no longerdraw on the screen. Only the presenter can save or delete any drawings.
The following tools are available:
TeamViewer 13 Manual – Meeting www.teamviewer.com Page 36 of 93
3 Meeting
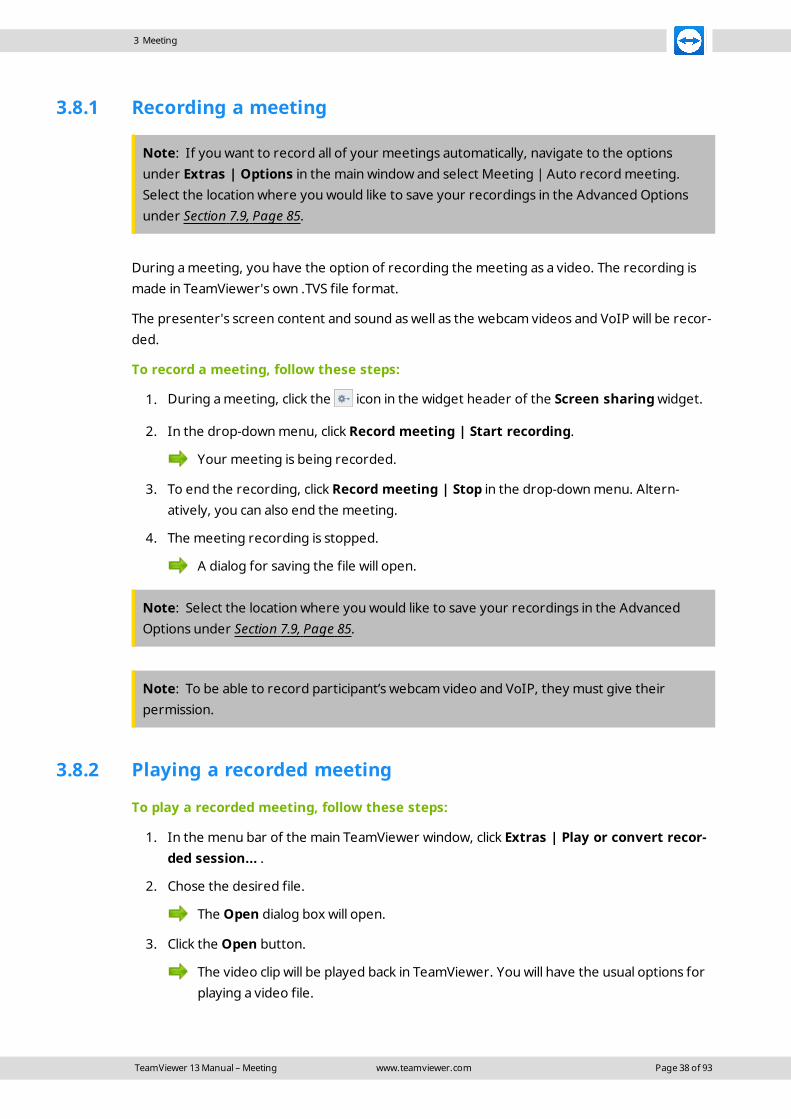
Tool Description
On/OffShows/Hides all previous drawings and allows/denies participants to draw.
Controlmode
Pauses the drawing mode and lets you control the computer normally. Thesame can be achieved with a right click on the desktop.
Pen
Lets you make freehand drawings. With a right click on the icon, color and thesize can be selected.
Highlighter
Used for highlighting texts. With a right click on the icon, color and the sizecan be selected.
Eraser
Lets you delete parts of a drawing. With a right-click on the icon, you canadjust the size of the eraser.
Rectangle
Lets you draw a rectangle. With a right-click on the icon, you can determinethe frame and fill color as well as the width of the line. Press CTRL while draw-ing to draw a square. Press SHIFT to center the rectangle. Press CTRL+SHIFTto draw a square with center alignment.
Ellipse
Lets you draw an ellipse. With a right-click on the icon, you can determine theframe and fill color as well as the width of the line. Press CTRL while drawingto draw a circle. Press SHIFT to center the ellipse. Press CTRL+SHIFT to draw acircle with center alignment.
TextLets you write a text. With a right-click on the icon, you can determine thefont size, color and type.
Speech bal-loon
Lets you draw a speech bubble. Click on any position to create the speechballoon. Write your text and then click again to define the direction of thespeech balloon. With a right-click on the icon, you can determine the font size,color and type.
3.8 Record meeting
This function is only available to the presenter.
TeamViewer 13 Manual – Meeting www.teamviewer.com Page 37 of 93
3 Meeting
3.8.1 Recording a meeting
Note: If you want to record all of your meetings automatically, navigate to the optionsunder Extras | Options in the main window and select Meeting | Auto record meeting.Select the location where you would like to save your recordings in the Advanced Optionsunder Section 7.9, Page 85.
During a meeting, you have the option of recording the meeting as a video. The recording ismade in TeamViewer's own .TVS file format.
The presenter's screen content and sound as well as the webcam videos and VoIP will be recor-ded.
To record a meeting, follow these steps:
1. During a meeting, click the icon in the widget header of the Screen sharingwidget.
2. In the drop-down menu, click Record meeting | Start recording.
Your meeting is being recorded.
3. To end the recording, click Record meeting | Stop in the drop-down menu. Altern-atively, you can also end the meeting.
4. The meeting recording is stopped.
A dialog for saving the file will open.
Note: Select the location where you would like to save your recordings in the AdvancedOptions under Section 7.9, Page 85.
Note: To be able to record participant’s webcam video and VoIP, they must give theirpermission.
3.8.2 Playing a recorded meeting
To play a recorded meeting, follow these steps:
1. In the menu bar of the main TeamViewer window, click Extras | Play or convert recor-ded session... .
2. Chose the desired file.
The Open dialog box will open.
3. Click the Open button.
The video clip will be played back in TeamViewer. You will have the usual options forplaying a video file.
TeamViewer 13 Manual – Meeting www.teamviewer.com Page 38 of 93

3 Meeting
Hint: Double-click the file in Windows Explorer to play it. TeamViewer will automatically startand play back the recorded session.
Convert a recorded meeting to AVI
Recorded meetings can be converted to the AVI video format for further processing.
To convert a recorded session, follow these steps:
1. Follow the above instructions for playing a recorded meeting.
2. In the Recorded session window, click the icon.
The Open dialog box will open.
3. Configure the settings as desired. To do so, use the drop-down lists and the Configure...or Browse... buttons.
4. Click the Start Conversion button.
5. The selected video is converted.
3.9 Transmitting sound and video
With TeamViewer you can transmit video and sound from the presenter's computer to theparticipants.
TeamViewer recognizes when fast moving images are displayed and optimizes the video trans-mission accordingly. For example, if a video is being played during a presentation, all parti-cipants can view this video in real time on their computer.
Sound transmission enables participants to hear, e.g., system sounds or music being played onthe presenter's computer.
As the presenter, you can stop computer sound transmission by clicking the icon in the
screen sharingwidget during a meeting and deactivating the Share computer sounds andmusic option, or turn off the function by default in the settings (see section 7.4 , page 76).
The improved transmission of videos can be deactivated in the settings (see section 7.3 ,page 74).
Note: Best possible transmission quality requires a local network or high bandwidth connec-tion.
3.10 Lock meeting
If you block a meeting, participants can only join the meeting after confirmation.
This has the following effects on participation in a meeting:
TeamViewer 13 Manual – Meeting www.teamviewer.com Page 39 of 93

3 Meeting
l Participants can only join the meeting if an organizer permits them to join.
l Participants who are removed from a blocked meeting, cannot again participate in themeeting.
To lock a meeting, follow these steps:
1. Host a spontaneous meeting.
2. Open the Participant widget in the meeting panel.
3. Click the icon next to the Meeting ID.
Participants can only join a meeting after confirmation.
4. The meeting is locked. To unlock the meeting, click the icon .
TeamViewer 13 Manual – Meeting www.teamviewer.com Page 40 of 93

4 Computers & Contacts –Managing Contacts
In Computers & Contacts, you can centrally manage computer and contact data ofTeamViewer connection partners.
You can see at a glance which computer or contact is available and you can start a meetingdirectly. Computers & Contacts also offers other useful functions similar to an instant messen-ger.
The Computers & Contacts list is linked to your TeamViewer account. This means that yourcontact information is not tied to a specific computer but is stored in a central location. This letsyou access your contacts from any computer running TeamViewer.
TeamViewer 13 Manual – Meeting www.teamviewer.com Page 41 of 93
4 Computers & Contacts – Managing Contacts

4 Computers & Contacts – Managing Contacts
In Computers&Contacts, you can see at a glance which computers and contacts are online.
Some functions of the Computers & Contacts list are not described in this manual because theyare particularly used for Remote Support with TeamViewer. This includes the integratedsystem health checks, service cases and notifications. You can find further information in theTeamViewer Manual – Remote Control.
Computers & Contacts offers the following advantages:
l See your computers and contacts online.
l Quickly set up a connection without the need to enter connection information.
l Access and manage your computers and contacts from anywhere in the world.
l Send messages to your contacts using the Group Chat, Offline Messages or blacklist con-tacts for chat.
l Manage computers and contacts in groups and add your own notes to them.
l Predefine connection settings for individual computers, contacts and groups.
l Set your own availability status.
l Direct start of a meeting with individual computers or contacts.
l Allows scheduling meetings.
l Video calls with up to 10 persons.
l Personal and professional presentation with profile pictures.
TeamViewer 13 Manual – Meeting www.teamviewer.com Page 42 of 93

4 Computers & Contacts – Managing Contacts
Note: Computers & Contacts is a component of the TeamViewer account. To be able to useit, you have to register once for a TeamViewer account (see section 4.1.1 , page 43).
4.1 The TeamViewer account
Note: You do not need a TeamViewer account to use TeamViewer.
Note: There is no extra charge for using a TeamViewer account. You can create and use aTeamViewer account for free.
With a TeamViewer account, you can save information regarding your computers and contactsin a central location and manage your Computers & Contacts from anywhere.
A TeamViewer account is required for using the following TeamViewer functions:
l TeamViewer QuickConnect.
l Computers & Contacts
l Schedule and manage Meetings.
l Web Login.
Hint: Using your TeamViewer account, you are also able the access other TeamViewerproducts like TeamViewer IoT (https://www.teamviewer.com/iot/) or Blizz(https://www.blizz.com).
4.1.1 Creating a TeamViewer account
To create a TeamViewer account, follow these steps:
1. In the TeamViewer main window, click Computers & Contacts on the
status bar.
The Computers & Contacts window will open.
2. In Computers & Contacts, click the Sign Up button.
This launches a wizard, which will guide you through the process of creating aTeamViewer account in two easy steps.
3. In the Create TeamViewer account - Step 1 of 2 dialog box, enter your Username, E-Mail and Password.
4. If you want to subscribe to our newsletter, activate the Subscribe to our free news-letter check box.
TeamViewer 13 Manual – Meeting www.teamviewer.com Page 43 of 93
4 Computers & Contacts – Managing Contacts
5. Click the Next button.
You will receive an e-mail with a validation link at the address provided.
6. In Create TeamViewer account - Step 2 of 2, you will be able to set up permanentaccess to this computer. To do so, enter any Computer name (for identification) andPassword (random password you can use for connections to this computer).
7. If you want to configure TeamViewer on this computer as a system service, activate the Iwant to control this computer from remote check box.
8. Click the Next button.
9. Click the Finish button.
10. To finish creating your TeamViewer account, click the validation link in the e-mail youreceived.
11. You have now successfully set up your TeamViewer account.
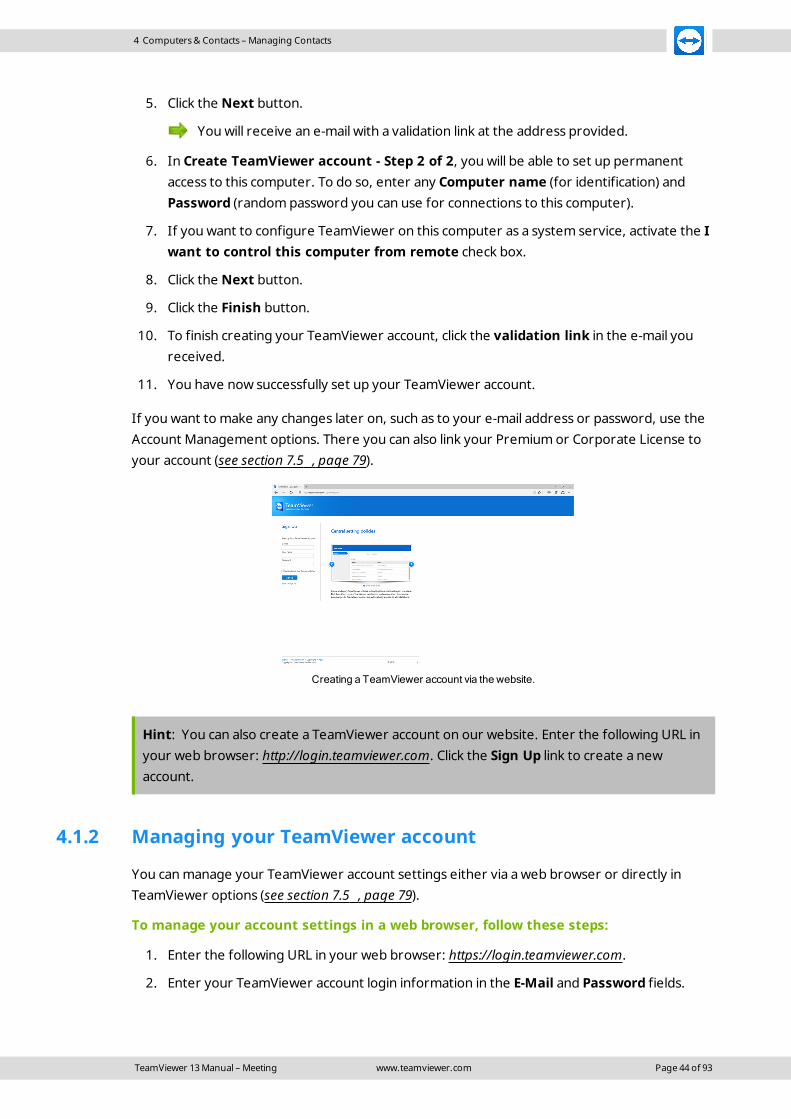
If you want to make any changes later on, such as to your e-mail address or password, use theAccount Management options. There you can also link your Premium or Corporate License toyour account (see section 7.5 , page 79).
Creating a TeamViewer account via the website.
Hint: You can also create a TeamViewer account on our website. Enter the following URL inyour web browser: http://login.teamviewer.com. Click the Sign Up link to create a newaccount.
4.1.2 Managing your TeamViewer account
You can manage your TeamViewer account settings either via a web browser or directly inTeamViewer options (see section 7.5 , page 79).
To manage your account settings in a web browser, follow these steps:
1. Enter the following URL in your web browser: https://login.teamviewer.com.
2. Enter your TeamViewer account login information in the E-Mail and Password fields.
TeamViewer 13 Manual – Meeting www.teamviewer.com Page 44 of 93
4 Computers & Contacts – Managing Contacts
3. Click Log On.
The user interface of the TeamViewer Management Console and Computers &Contacts will load.
Note: If you have never used your TeamViewer account on a device, with an app orwithin a browser, you have to authorize the account usage at the first login. For furtherinformation, please refer to the TeamViewer Manual – Remote control.
5. Click the Edit profile link in the upper right-hand corner.
A window containing your account settings will open.
6. You can now apply changes to your personal information.
4.1.3 Logging in and out of your TeamViewer account in Com-puters & Contacts
With your TeamViewer account, you can log into any Computers & Contacts list on anyTeamViewer full version. This way, all TeamViewer feature that require a TeamViewer accountare available.
To log into Computers & Contacts with a TeamViewer account, follow these steps:
1. In the TeamViewer main window, click Computers & Contacts on the
status bar.
The Computers & Contacts window will open.
2. Enter your account information in the E-Mail and Password fields.
3. Click Log On.
Note: If you have never used your TeamViewer account on a device, with an app orwithin a browser, you have to authorize the account usage at the first login. For furtherinformation, please refer to the TeamViewer Manual – Remote control.
4. You are now logged in and your Computers & Contacts appear.
TeamViewer 13 Manual – Meeting www.teamviewer.com Page 45 of 93

4 Computers & Contacts – Managing Contacts
You can log in to your account from anyTeamViewer.
To make logging back in easier, you have the option of remembering your e-mail and passwordand to stay signed in. To do so, activate the corresponding check box on the login screen.
Caution: Never activate the Keep me signed in option on an external (public) computer.Also, remember to log out whenever you leave this computer.
Note: If you own a Premium or Corporate license with your license linked to your account,this license will also be valid for unlicensed TeamViewer installations as long as you arelogged in.
Note: You can set up two factor authentication for your TeamViewer account. The accountis therefore protected with a temporary numerical code as well as the email and password.You can obtain further information about two factor authentication from the TeamViewerManual – Management Console.
To log out of your TeamViewer account in Computers & Contacts, follow these steps:
1. In the upper part of Computers & Contacts, click on your display name.
A drop-down menu will open.
TeamViewer 13 Manual – Meeting www.teamviewer.com Page 46 of 93

4 Computers & Contacts – Managing Contacts
2. Select Sign Out.
3. You are signed out of your TeamViewer account.
4.2 Computers & Contacts options
Below is a description of the available actions in Computers & Contacts.
Action Description
Open up the following options via the icon's context menu:
l Add remote computers to the Computers & Contacts list (see section 4.2.4 ,page 52)
l Add contacts to the Computers & Contacts list (see section 4.2.4 , page 52)
l Add groups (see section 4.2.2 , page 49)
l Create service cases
l Find nearby contacts and computers
Service cases are a component of the service queue, which is used for the organ-ization of support requests. Additional information about this is available fromthe TeamViewer Manual – Management Console.
Via the context menu, open the following TeamViewer functions:
l Open Management Console...: Opens the TeamViewer Management Con-sole. The Management Console will open in your default browser.You arelogged in automatically with your TeamViewer account.
l Open service queue...: Opens the service queue in the TeamViewer Man-agement Console.
Opens the chat window (see section 4.2.7 , page 57).
Opens notifications (see section 4.2.9 , page 63).
Starts searching your Computers & Contacts list (by group name, account nameor ID) as soon as you enter something into the search field.
TeamViewer 13 Manual – Meeting www.teamviewer.com Page 47 of 93
4 Computers & Contacts – Managing Contacts
Action Description
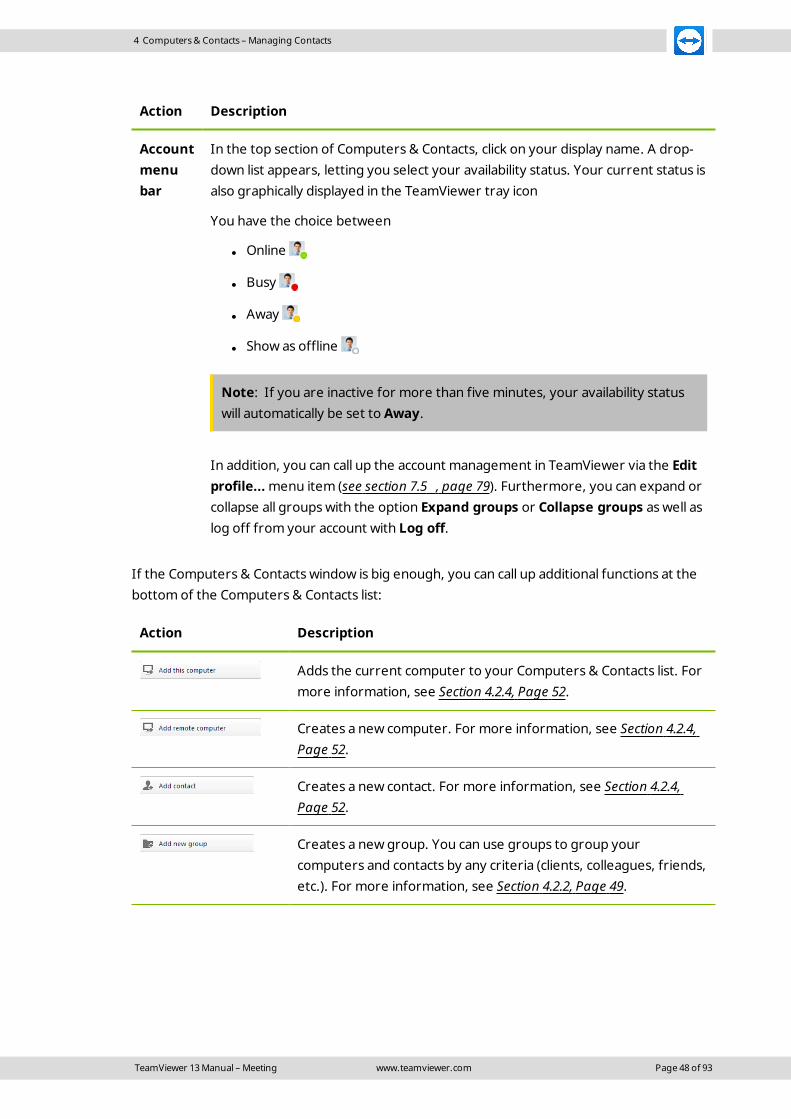
Accountmenubar
In the top section of Computers & Contacts, click on your display name. A drop-down list appears, letting you select your availability status. Your current status isalso graphically displayed in the TeamViewer tray icon
You have the choice between
l Online
l Busy
l Away
l Show as offline
Note: If you are inactive for more than five minutes, your availability statuswill automatically be set to Away.
In addition, you can call up the account management in TeamViewer via the Editprofile... menu item (see section 7.5 , page 79). Furthermore, you can expand orcollapse all groups with the option Expand groups or Collapse groups as well aslog off from your account with Log off.
If the Computers & Contacts window is big enough, you can call up additional functions at thebottom of the Computers & Contacts list:
Action Description
Adds the current computer to your Computers & Contacts list. Formore information, see Section 4.2.4, Page 52.
Creates a new computer. For more information, see Section 4.2.4,Page 52.
Creates a new contact. For more information, see Section 4.2.4,Page 52.
Creates a new group. You can use groups to group yourcomputers and contacts by any criteria (clients, colleagues, friends,etc.). For more information, see Section 4.2.2, Page 49.
TeamViewer 13 Manual – Meeting www.teamviewer.com Page 48 of 93

4 Computers & Contacts – Managing Contacts
Action Description
Find TeamViewer contacts and devices that are on the samenetwork. Add these contacts and devices to your Computers &Contacts list.
Additional information about this is available from the TeamViewerManual – Remote Control.
Persons from recentsessions
Adds the contact from one of your recent sessions to your Com-puters & Contacts list. To do this, click the name.
4.2.1 Online status of computers/contacts
Status Description
Online
Indicates that the contact or computer is accessible via TeamViewer.
Busy
Indicates that the contact or computer is online but busy.
Away
Indicates that the contact or computer is online but away.
Offline
Indicates that the contact or computer is currently not accessible via TeamViewer.
4.2.2 Adding groups
To create a new group, follow these steps:
1. Click the button.
2. In the context menu, select the option Add new group.
The Add Group dialog will open.
3. In the Group name field, enter the name of the new group.
4. Click the OK button.
5. A new group is created and appears in Computers & Contacts.
TeamViewer 13 Manual – Meeting www.teamviewer.com Page 49 of 93

4 Computers & Contacts – Managing Contacts
Note: Computers and contacts that are not currently online are listed in a separate "Offline"group by default. To learn how to deactivate this option, see Section 7.5, Page 79.
4.2.3 Share groups
You have the option to share groups from your computers & contacts list with individualcontacts from your list. In this way, entire groups can be made available to other contactsquickly and easily.
You can find further information in the TeamViewer Manual – Remote Control.
To share a group, follow these steps:
1. Select a group in your Computers & Contacts list.
2. In the context menu (right click) of the group choose the Share option.
The Share group dialog box will open.
3. Click the Add… button.
The Add user dialog box will open.
4. Select the contact from the list with whom you would like to share the group.
5. Click the OK button.
6. Edit the permissions if necessary.
7. Click the OK button.
The contact will receive a message, which he must accept.
8. You have shared a group. The contact can view the shared group in his Computers &Contacts list and can connect to the computers and contacts within this group.
The icon is displayed next to the group name of a group you have shared with any of yourcontacts.
The icon is displayed next to a group name of a group that has been shared with you bysomeone else.
Note: You can share one or more groups with as many contacts as you like.
Hint: By clicking on Share in the context menu (right click) of a contact, you can see whichgroup(s) are being shared with the contact. Further groups can be shared with the contactthrough that option as well.
TeamViewer 13 Manual – Meeting www.teamviewer.com Page 50 of 93

4 Computers & Contacts – Managing Contacts
The Share group dialog box
The Share group dialog box displays the contacts with whom you have shared the respectivegroup. Furthermore, you have the following options:
Description
Add… Click the button to share the selected group with a contact.
Remove Select a contact from the list and click the button to stop sharing a group withthis contact.
Permissions Select from the drop-down list which permissions you would like to grant thecontact for the shared group.
l Read: The contact can view the shared group in his Computers &Contacts list and can connect to the computers and contacts within thisgroup. The contact cannot make changes to the group (delete orrename contacts, add contacts, etc.).
l Read/Write: The contact can view the shared group in his Computers& Contacts list and can connect to the computers and contacts withinthis group. The contact can make changes to the group (delete orrename contacts, add contacts, etc.).
l Full access: The contact can view the shared group in his Computers &Contacts list and can connect to the computers and contacts within thisgroup. The contact can make changes to the group (delete or renamecontacts, add contacts, etc.). The contact can re-share shared groupsand move contacts and devices from a shared group to own groups.Devices that are assigned to an account can be moved within the com-pany into another shared group.
Recent connectionsnew
Within the group Recent connections the ten computers or contacts are displayed, to which aconnection was established recently. This includes remote control connections, presentations,file transfer or VPN.
This allows repeating connections to this devices or contacts without having to search throughthe whole Computers & Contacts list.
The following properties apply to this group:
l Ths group will always be displayed on top of the Computers & Contacts list.
l The group can not be renamed, shared, deleted or deactivated.
TeamViewer 13 Manual – Meeting www.teamviewer.com Page 51 of 93

4 Computers & Contacts – Managing Contacts
l The group only contains computers or contacts that are already added to your Com-puters & Contacts list.
l If computers or contacts are removed from your Computers & Contacts list, they are nolonger displayed in this group.
l For connections to computers or contacts in this group, the same possibibilities are avail-able as for entries in your regular Computers & Contacts list. For more information, seesection 4.2.6 "The computer or contact context menu", page 56.
4.2.4 Adding computers/contacts
You can add computers or contacts either by TeamViewer ID (computers) or TeamVieweraccount (contacts).
Contacts may include multiple computers. This is the case when a contact is logged intomultiple TeamViewer modules. Another advantage of creating a contact is that it allows you toconnect with the same person regardless of what computer he/she is using.
TeamViewer IDs, on the other hand, are associated with only one computer. You can connectwith a computer, but you do not know who is operating it.
Connecting with a TeamViewer ID might be a good idea if:
l The other side is not logged in to a TeamViewer account.
l The computer is unattended (such as a server).
l You are connecting to your own computer.
You can add both TeamViewer accountsaswell asTeamViewer IDs to Computers&Contacts.
To create a new computer/contact, follow these steps:
1. Select the group to which you wish to add a new computer/contact.
2. Click the button.
3. In the context menu, select the Add remote computer or Add contact option.
The Add computer/contact dialog box will open.
4. Configure the settings as desired.
TeamViewer 13 Manual – Meeting www.teamviewer.com Page 52 of 93

4 Computers & Contacts – Managing Contacts
5. Click the OK button.
6. A new computer/contact is created and appears in your list.
The Add computer/contact dialog box
The Add computer/contact dialog box lets you configure certain settings when adding acomputer/contact or a new group to Computers & Contacts. This dialog box also lets you saveconnection information for certain computers, contacts or groups.
The following settings can be configured:
Settings Description
TeamViewer ID /name or e-mail
In this text field, enter the TeamViewer ID or the account name of thecontact that you wish to add to Computers & Contacts.
Password (forTeamViewer IDonly)
If you are adding a TeamViewer ID to Computers & Contacts, you canenter the remote computer's permanent password in this text field.
Alias (only forTeamViewer ID)
Enter a display name for the added computer/contact in this text field.
Group Select the group that you wish to add your computer/contact to fromthe drop-down list.
Description Enter any additional information about the computer/contact.
Advanced Click this button to create parameters for connecting to the computer-/contact.
Advanced Properties
In the Add Group or Computer/Contact dialog, you can use the advanced settings to defineparameters for individual computers/contacts or entire groups. However, they only affectremote control sessions. For more information, please refer to the TeamViewer Manual –Remote Control.
To save connection parameters for specific computers, contacts or groups, followthese steps:
1. Log into Computers & Contacts using your TeamViewer account (see section 4.1.3 ,page 45).
TeamViewer 13 Manual – Meeting www.teamviewer.com Page 53 of 93

4 Computers & Contacts – Managing Contacts
Note: If you have never used your TeamViewer account on a device, with an app orwithin a browser, you have to authorize the account usage at the first login. For furtherinformation, please refer to the TeamViewer Manual – Remote control.
2. Right-click the desired computer, contact or group.
3. Select Properties from the context menu.
The Properties dialog box will open.
4. In the dialog box, click Advanced.
5. Enter the desired parameters.
6. Click the OK button.
7. You have now created parameters for establishing a connection to the selected com-puter, contact or group.
The following parameters can be defined:
Parameter Description Possible values
Remote res-olution
From the drop-down list, select the desired resol-ution on the remote computer upon connecting.
l Inherited
l Don't change
l Best fit
Window From the drop-down list, select whether youwould like the remote computer's screen toappear in full screen mode upon connecting.
l Inherited
l Windowed
l Full screen
l Maximized
Scaling From the drop-down list, select how you would likethe remote computer's screen to look uponconnecting.
l Inherited
l Best fit
l Scaled
l 100% (ori-ginal)
TeamViewer 13 Manual – Meeting www.teamviewer.com Page 54 of 93

4 Computers & Contacts – Managing Contacts
Parameter Description Possible values
Quality From the drop-down list, select the desired displayquality upon connecting.
l Inherited
l Automatic
l Optimizespeed
l Optimize qual-ity
l Custom Set-tings
Initial monitor From the drop-down list, select the monitor to betransmitted first upon connecting.
l Inherited
l Primary mon-itor
l All monitors
l Monitor X
Authenticationmode
From the drop-down list, select how you would liketo log onto the remote computer upon connect-ing.
l Inherited
l TeamViewerauthentication
l Windowsauthentication
Remote input From the drop-down list, select whether you wishto allow the remote partner to control thecomputer and see his/her screen upon connect-ing.
l Inherited
l Enableremote input
l Disableremote input
l Disableremote inputand showblack screen
4.2.5 Creating a quick connection from Computers & Contacts –Prompt for confirmation
For connections using prompt for confirmation, you will be able to connect without the need toenter a password. Instead, TeamViewer will send a direct connection request. The connectionpartner may accept or decline the request.
TeamViewer 13 Manual – Meeting www.teamviewer.com Page 55 of 93
4 Computers & Contacts – Managing Contacts
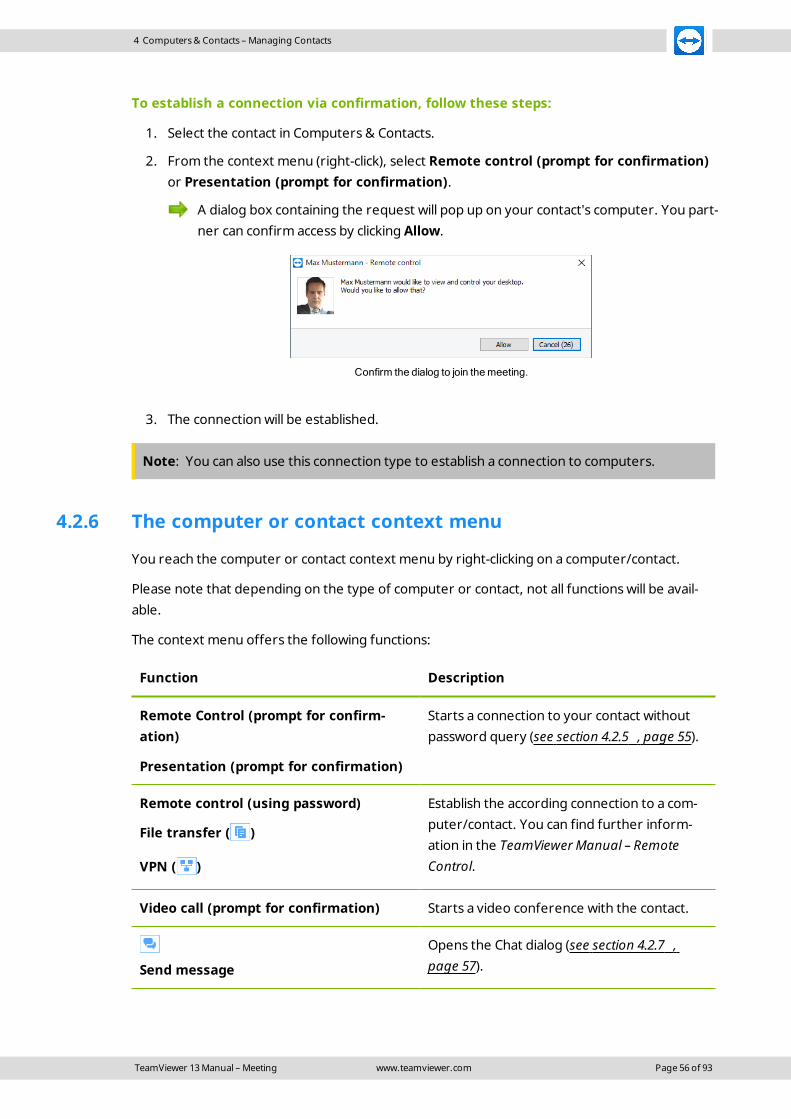
To establish a connection via confirmation, follow these steps:
1. Select the contact in Computers & Contacts.
2. From the context menu (right-click), select Remote control (prompt for confirmation)or Presentation (prompt for confirmation).
A dialog box containing the request will pop up on your contact's computer. You part-ner can confirm access by clicking Allow.
Confirm the dialog to join themeeting.
3. The connection will be established.
Note: You can also use this connection type to establish a connection to computers.
4.2.6 The computer or contact context menu
You reach the computer or contact context menu by right-clicking on a computer/contact.
Please note that depending on the type of computer or contact, not all functions will be avail-able.
The context menu offers the following functions:
Function Description
Remote Control (prompt for confirm-ation)
Presentation (prompt for confirmation)
Starts a connection to your contact withoutpassword query (see section 4.2.5 , page 55).
Remote control (using password)
File transfer ( )
VPN ( )
Establish the according connection to a com-puter/contact. You can find further inform-ation in the TeamViewer Manual – RemoteControl.
Video call (prompt for confirmation) Starts a video conference with the contact.
Send message
Opens the Chat dialog (see section 4.2.7 ,page 57).
TeamViewer 13 Manual – Meeting www.teamviewer.com Page 56 of 93

4 Computers & Contacts – Managing Contacts
Function Description
Send file
Opens a Windows dialog box so that you cansend a file to the selected contact. You canfind further information in theTeamViewer Manual – Remote Control.
Transfer files
Establishes a connection using the File Trans-fer connection mode . You can find furtherinformation in the TeamViewer Manual –Remote Control.
Wake up Wakes up the computer via Wake-on-LAN.This function is only available for offline com-puters and must be configured first in orderfor this function to work. More informationcan be found in the TeamViewer Manual –Wake-on-LAN.
More...
l Assign to account...: Assigns the com-puter to your account (see section 4.2.8, page 61).
l Delete: Permanently deletes the com-puter/contact.
l Shares: Opens the Shares dialog box(see section 4.2.3 , page 50).
l Properties: Opens the Properties dia-log box. This dialog box offers the samefunc-tions as the Add com-puter/contact dialog box (seesection 4.2.4 , page 52).
Alerts Alert messages for integrated system healthchecks.
Notifications Messages and news that affect yourTeamViewer account (see section 4.2.9 ,page 63).
4.2.7 Chatting via Computers & Contacts
You can send a message to any computer/contact. If the computer/contact is not currentlyonline, he/she will receive the message as soon as TeamViewer is started or the contact logs
TeamViewer 13 Manual – Meeting www.teamviewer.com Page 57 of 93

4 Computers & Contacts – Managing Contacts
into his/her TeamViewer account.
If your computer/contact is already online, he/she will receive the message immediately andyou can begin exchanging messages in real time.
Moreover, you can call up many useful functions from within the Chat window.
Note: TeamViewer chats are encrypted end-to-end.
Note: A maximum of 25 participants can join a group chat.
To send a message to a computer/contact, follow these steps:
1. Open the context menu of the desired computer or contact (right-click the com-puter/contact).
2. Click the icon.
The Chat dialog box will open.
3. Type your message in the input field at the bottom.
4. Activate the RETURN KEY on your keyboard.
Your message appears in the top section and is sent to your computer/contact.
5. If your computer/contact is online, he/she can respond to your message directly. You canalso send additional messages.
Note: To be able to send messages to a computer, you must have established a secureconnection to this computer previously at any time.
Hint: Alternatively, you can open the TeamViewer chat via the icon in the Computers &
Contacts list.
Hint: If you enabled the new user interface (see section 2.2 , page 6), you can open the chatin the navigation of the main window. To do so, select Chat in the navigation.
To start a group chat, follow these steps:
1. Click the icon in the Computers & Contacts list.
The Chat dialog box will open.
2. Click the New message button.
TeamViewer 13 Manual – Meeting www.teamviewer.com Page 58 of 93

4 Computers & Contacts – Managing Contacts
3. Enter the desired contact names.
1. Select the names from the drop-down list.
2. Confirm your selection by pressing RETURN or click on the contact.
4. Click in the text field to write a message. Confirm the input with RETURN.
The selected contacts will receive your message and can participate in the con-versation.
Starting a TeamViewer group chat.
Note: If your computer/contact is offline, he/she will receive all messages sent to him/herupon logging back in, even if the dialog box is closed in the meantime.
Note: A chat with multiple participants is only possible with contacts.
Available Chat window operations
In the Chat window, all chats with computers, contacts, or in groups will be displayed. Select achat and send messages to the chat partners.
TeamViewer 13 Manual – Meeting www.teamviewer.com Page 59 of 93
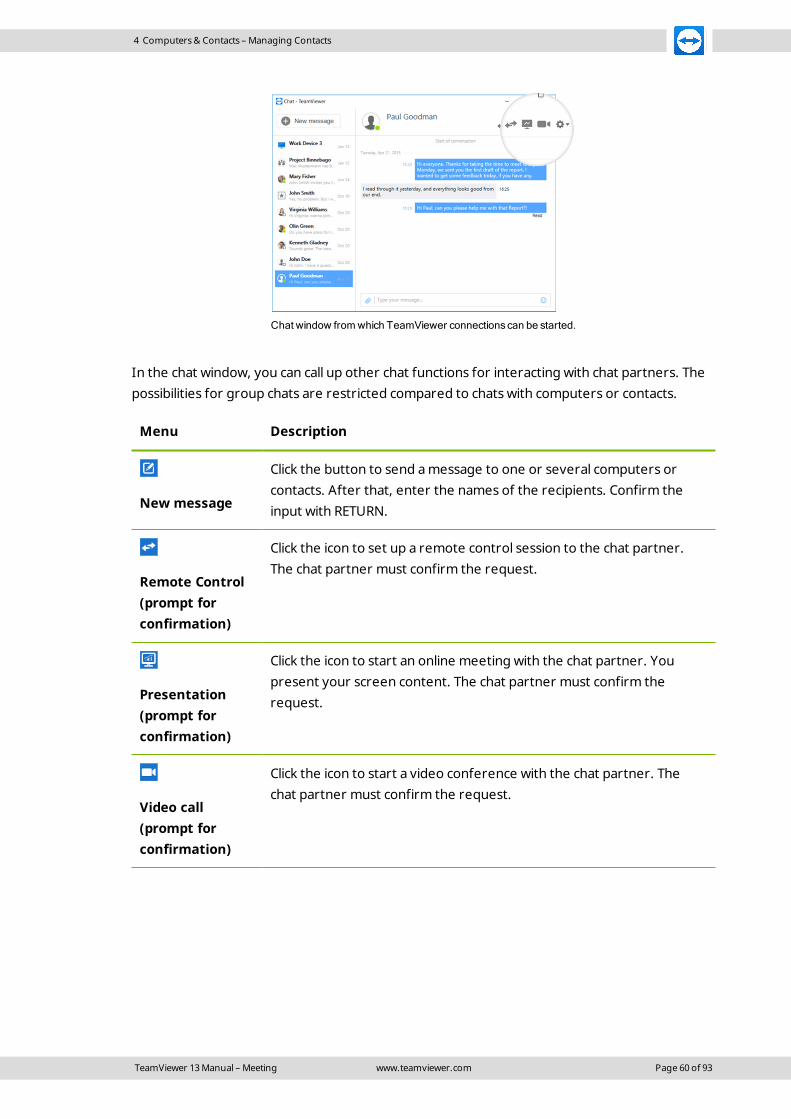
4 Computers & Contacts – Managing Contacts
Chat window fromwhich TeamViewer connections can be started.
In the chat window, you can call up other chat functions for interacting with chat partners. Thepossibilities for group chats are restricted compared to chats with computers or contacts.
Menu Description
New message
Click the button to send a message to one or several computers orcontacts. After that, enter the names of the recipients. Confirm theinput with RETURN.
Remote Control(prompt forconfirmation)
Click the icon to set up a remote control session to the chat partner.The chat partner must confirm the request.
Presentation(prompt forconfirmation)
Click the icon to start an online meeting with the chat partner. Youpresent your screen content. The chat partner must confirm therequest.
Video call(prompt forconfirmation)
Click the icon to start a video conference with the chat partner. Thechat partner must confirm the request.
TeamViewer 13 Manual – Meeting www.teamviewer.com Page 60 of 93

4 Computers & Contacts – Managing Contacts
Menu Description
Click the symbol to call up additional options for the current chat.
Choose from the following options:
l Add participant...: Select this option to invite other computersor contacts to a group chat. The participant must confirm therequest.
l Rename conversation...: Select this option if you want torename a group chat. The option is only available for group chats.
l Delete conversation...: Select this option to delete the currentconversation. The conversation is then removed from the chatwindow and the chat record is deleted.
l Delete chat record...: Select this option to delete the currentchat record. The chat record remains intact for the chat partner.
l Show notifications: Activate the option to receive popup noti-fication for messages within this conversation.
Send file
Click the icon to send a file to your chat partner. The chat partner mustconfirm the request.
The file is saved on the computer or on the contact’s device in theDownload folder under C:\Users\%username%\Downloads.
Emojis
Click the icon to open up a selection of emojis. Click an emoji to insert itinto the text field.
4.2.8 Assigning a computer to your TeamViewer account
For some TeamViewer functions, it must be guaranteed that the computer you are workingwith belongs to you. Therefore, computers must be assigned to your TeamViewer account forthe use of the following functions:
l Monitoring by the integrated system health checks.
l Wake-on-LAN (see TeamViewer Manual – Wake-on-LAN)
l Remote Monitoring and Asset Tracking with ITbrain.
l Easy access without password.
l Policies for TeamViewer settings (see section 7.10 , page 93).
There are two ways to assign a computer. Locally via the TeamViewer options or remotely viayour Computers & Contacts list.
TeamViewer 13 Manual – Meeting www.teamviewer.com Page 61 of 93

4 Computers & Contacts – Managing Contacts
Assigning a computer to your TeamViewer account locally
Assign a computer that you would like to wake up with Wake-on-LAN for example to yourTeamViewer account in the local TeamViewer options of the computer. With this method youcan also assign computers to your account that are not in your Computers & Contacts list.
To assign the computer to a TeamViewer account, follow these steps:
1. Open up TeamViewer.
2. Click Extras | Options in the menu bar.
The TeamViewer options dialog will open.
3. Select the category General.
4. Under Account assignment, click the Assign to account… button.
The Assign to account dialog box will open.
5. Enter the email address of your TeamViewer account in the E-mail text field.
6. Enter the password of your TeamViewer account in the Password text field.
7. Click the Assign button.
If the computer is not already part of your Computers & Contacts list, it is added toit.
8. You have assigned the computer to your TeamViewer account.
Assigning a computer to your TeamViewer account remotely
Assign a computer from your Computers & Contacts list that you would like to wake up withWake-on-LAN for example to your TeamViewer account via the context menu. The computermust be in your Computers & Contacts list and be configured for unattended access. With thismethod it is not necessary to have physical access to the computer.
To assign the remote computer to your TeamViewer account, follow these steps:
1. Mark the computer that you would like to assign on your Computers & Contacts list.
2. In the context menu (right-click) click the Assign now button.
The Assign to account dialog box will open.
3. In the Password text field, enter the personal password for the unattended access tothe computer.
4. Click the Assign button.
5. You have assigned the computer to your TeamViewer account.
TeamViewer 13 Manual – Meeting www.teamviewer.com Page 62 of 93
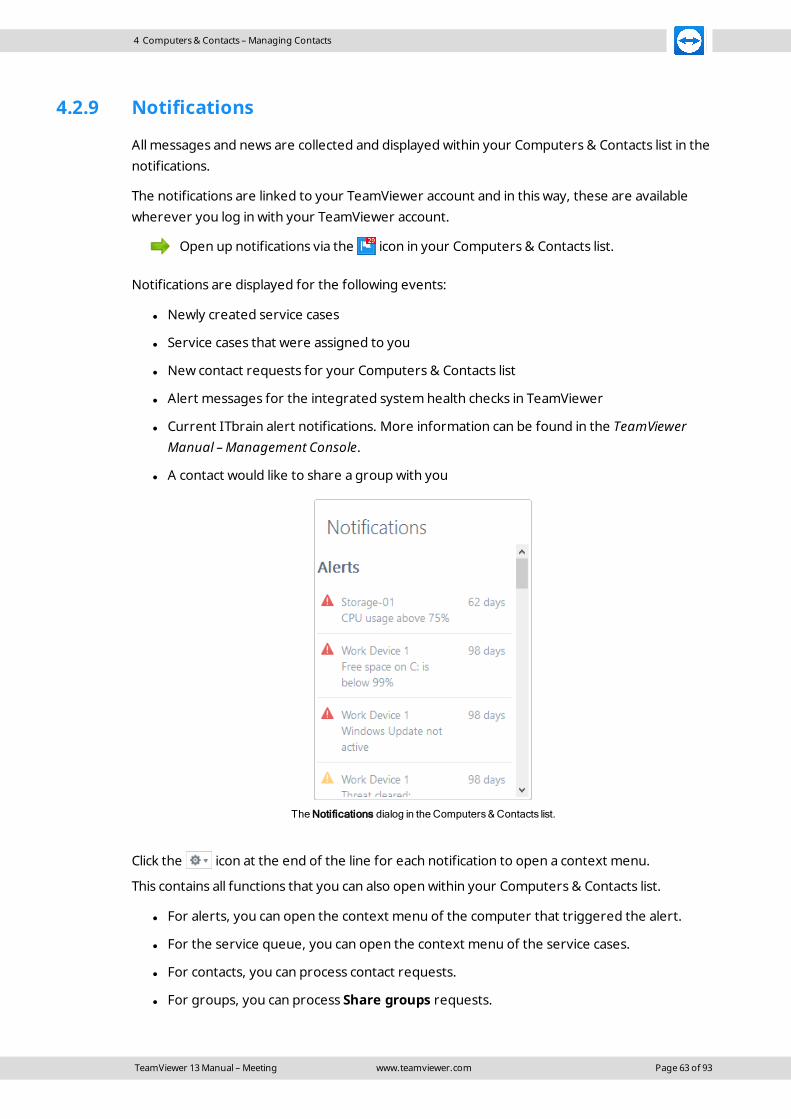
4 Computers & Contacts – Managing Contacts
4.2.9 Notifications
All messages and news are collected and displayed within your Computers & Contacts list in thenotifications.
The notifications are linked to your TeamViewer account and in this way, these are availablewherever you log in with your TeamViewer account.
Open up notifications via the icon in your Computers & Contacts list.
Notifications are displayed for the following events:
l Newly created service cases
l Service cases that were assigned to you
l New contact requests for your Computers & Contacts list
l Alert messages for the integrated system health checks in TeamViewer
l Current ITbrain alert notifications. More information can be found in the TeamViewerManual – Management Console.
l A contact would like to share a group with you
TheNotifications dialog in the Computers&Contacts list.
Click the icon at the end of the line for each notification to open a context menu.
This contains all functions that you can also open within your Computers & Contacts list.
l For alerts, you can open the context menu of the computer that triggered the alert.
l For the service queue, you can open the context menu of the service cases.
l For contacts, you can process contact requests.
l For groups, you can process Share groups requests.
TeamViewer 13 Manual – Meeting www.teamviewer.com Page 63 of 93
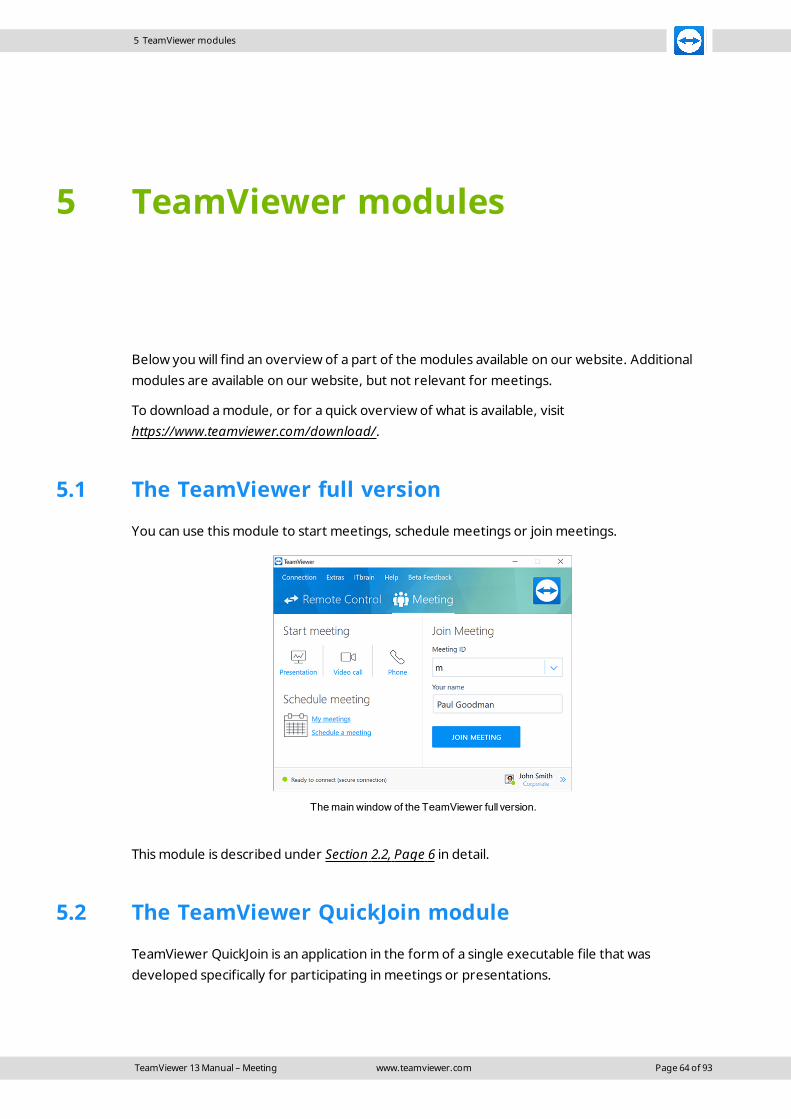
5 TeamViewer modules
Below you will find an overview of a part of the modules available on our website. Additionalmodules are available on our website, but not relevant for meetings.
To download a module, or for a quick overview of what is available, visithttps://www.teamviewer.com/download/.
5.1 The TeamViewer full version
You can use this module to start meetings, schedule meetings or join meetings.
Themain window of the TeamViewer full version.
This module is described under Section 2.2, Page 6 in detail.
5.2 The TeamViewer QuickJoin module
TeamViewer QuickJoin is an application in the form of a single executable file that wasdeveloped specifically for participating in meetings or presentations.
TeamViewer 13 Manual – Meeting www.teamviewer.com Page 64 of 93
5 TeamViewer modules
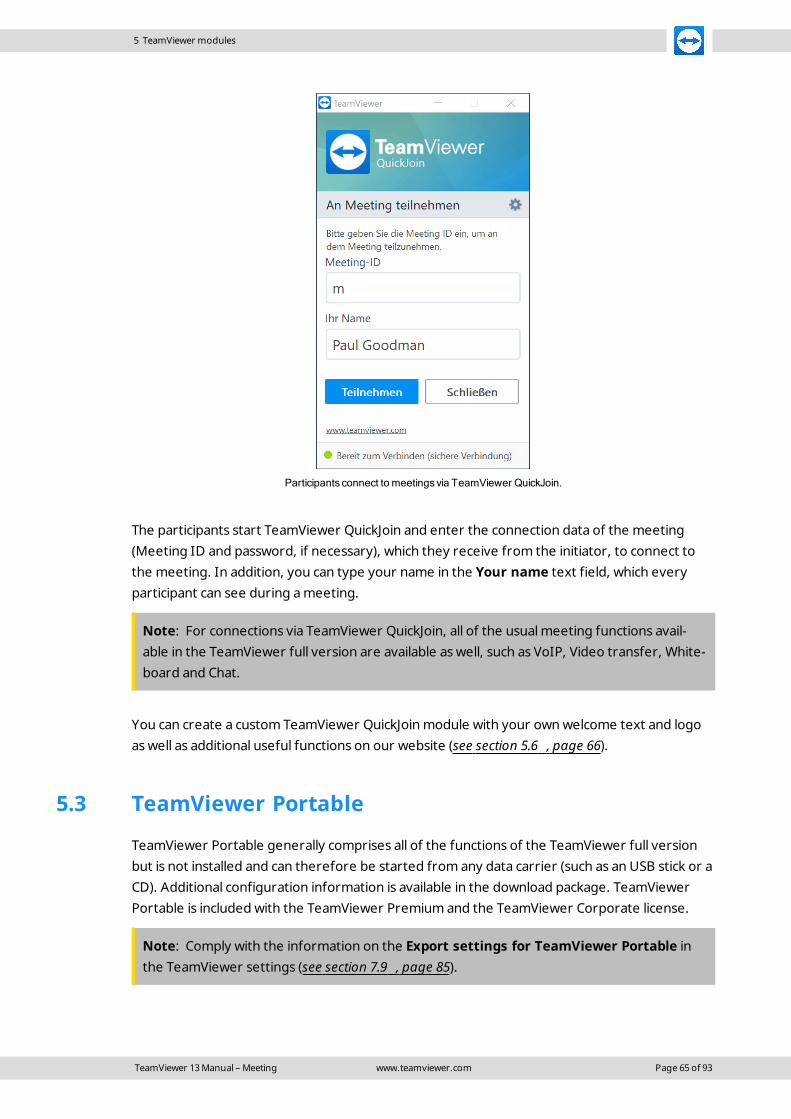
5 TeamViewer modules
Participants connect to meetings via TeamViewer QuickJoin.
The participants start TeamViewer QuickJoin and enter the connection data of the meeting(Meeting ID and password, if necessary), which they receive from the initiator, to connect tothe meeting. In addition, you can type your name in the Your name text field, which everyparticipant can see during a meeting.
Note: For connections via TeamViewer QuickJoin, all of the usual meeting functions avail-able in the TeamViewer full version are available as well, such as VoIP, Video transfer, White-board and Chat.
You can create a custom TeamViewer QuickJoin module with your own welcome text and logoas well as additional useful functions on our website (see section 5.6 , page 66).
5.3 TeamViewer Portable
TeamViewer Portable generally comprises all of the functions of the TeamViewer full versionbut is not installed and can therefore be started from any data carrier (such as an USB stick or aCD). Additional configuration information is available in the download package. TeamViewerPortable is included with the TeamViewer Premium and the TeamViewer Corporate license.
Note: Comply with the information on the Export settings for TeamViewer Portable inthe TeamViewer settings (see section 7.9 , page 85).
TeamViewer 13 Manual – Meeting www.teamviewer.com Page 65 of 93
5 TeamViewer modules
5.4 The TeamViewer MSI Package
The TeamViewer MSI package is a special installation file for the TeamViewer full version orTeamViewer Host. It can be used to implement TeamViewer in an Active Directory Domain viaGroup Policy Object (GPO). Additional configuration information is available in the downloadpackage. TeamViewer MSI is included with the TeamViewer Corporate license.
5.5 TeamViewer on mobile devices
TeamViewer is also available for mobile devices.
However, you can only join meetings, not host a meeting.
The “TeamViewer for Meetings“ App required for this purpose can be downloaded fromGoogle Play for Android and from the Apple AppStore for iOS.
Further information about these applications is available in the apps themselves or on ourwebsite under https://www.teamviewer.com/download/mobile-apps/.
5.6 Customizable modules
Some TeamViewer modules can be modified to meet your needs. This option is available for theQuickSupport, QuickJoin and Host modules.
It is possible to create one or more personalized QuickJoin modules. This provides you with addi-tional functions (such as the ability to alter the design by adding your company logo and colorscheme).
A detailed description of how to create a personalized TeamViewer module is available in theTeamViewer Manual – Management Console or on the Design & Deploy website within theTeamViewer Management Console.
TeamViewer 13 Manual – Meeting www.teamviewer.com Page 66 of 93
6 Installation & configuration
Below you will find a description of the installation and configuration process for theTeamViewer full version. Before you can install the software, you must download the fullversion from our website.
To do so, go to https://www.teamviewer.com/download/ and save the setup file on yourcomputer.
If you have decided on a different module as described in Section 5, Page 64, you can skip thissection.
6.1 Installing the TeamViewer full version
Run the setup file that you downloaded. An installation wizard will guide you through the install-ation process:
Welcome to TeamViewer
1. Decide on an installation type.
l In order to always manually start TeamViewer, if necessary, select the Install optionbutton.
l If you would like to install TeamViewer as a system service, select the Install to con-trol this computer later from remote option button. If you select this option,instructions will help you with the setup of TeamViewer as a system service.
l If you want to run TeamViewer only once, select the Run only option button.
2. Select a field of use.
l If you would like to use TeamViewer commercially (e.g. support, presentations, homeoffice, desktop sharing with colleagues, etc.) select the In the company / com-mercially option button.
l If you do not want to use TeamViewer commercially (e.g. connections with friends, rel-
TeamViewer 13 Manual – Meeting www.teamviewer.com Page 67 of 93
6 Installation & configuration

6 Installation & configuration
atives or your own computer), select the private / non-commercial option button.
l If both apply, select the Both option button.
3. If you want to make additional adjustments during the installation (see section 6.1.1 ,page 68), check the Show advanced settings check box. Otherwise, TeamViewer is auto-matically installed with the default settings.
4. Click the Accept button.
5. The installation of TeamViewer is complete.
6.1.1 Advanced settings
If you selected the Show advanced options check box under the installation instructions, youcan now implement additional settings for the installation.
To configure the Advanced settings, follow these steps:
1. Destination dir: Select a desired folder where TeamViewer would be installed.
2. Use TeamViewer Remote Print: If you enable this option, the remote printing functioncan be used during connections to this computer (on which TeamViewer is being installed). You can find further information in the TeamViewer Manual – Remote Control.
3. Use TeamViewer VPN: If you want to use TeamViewer VPN, select the check box. Thisfunction is not available for meetings.
4. Use TeamViewer Meeting Add-In for Outlook: If you enable this option, an OutlookAdd-In will be installed which enables to schedule TeamViewer meetings in the Outlookcalendar. (see section 3.4.1 , page 19).
5. Click the Finish button.
6. The installation of TeamViewer is complete.
Note: Some options are only available with Windows administrative rights.
6.2 Using TeamViewer on a terminal server
This section describes how to use TeamViewer on a terminal server. It is intended primarily forcompany network administrators. Home users can skip this section.
TeamViewer can be made equally accessible to all users when it is run on a terminal server. Byassigning a separate TeamViewer ID to each user, the server itself as well as each individualuser can work independently with TeamViewer. To do this, simply follow the steps below afterinstalling TeamViewer on the terminal server.
TeamViewer 13 Manual – Meeting www.teamviewer.com Page 68 of 93

6 Installation & configuration
To activate multi-user support on terminal servers, follow these steps:
1. Start TeamViewer on the terminal server (console).
2. Click Extras | Options in the menu bar.
The TeamViewer options dialog will open.
3. Select the Advanced category.
4. Click the Show advanced options button.
5. Select the Enable enhanced multi user support (for Terminal Servers) option.
6. Click the OK button.
Each user receives a separate TeamViewer ID.
From then on, regardless of where you log in from, your personal TeamViewer ID will bedisplayed in the main TeamViewer window. In addition to the User ID, the Server ID is alsodisplayed in the main window under Help | About TeamViewer. The Server ID of the consolecan be accessed at any time and corresponds to the user who is physically logged onto thisserver. For more information on TeamViewer IDs, see Section 2, Page 6.
User ID and Server ID in the 'About' dialog box.
Note: Please note that TeamViewer handles every terminal server user account as a separ-ate workstation. This affects licensing, among other factors (see section 6.3 , page 70).
TeamViewer 13 Manual – Meeting www.teamviewer.com Page 69 of 93
6 Installation & configuration
6.2.1 Special TeamViewer licensing terms for terminal server use
Since TeamViewer manages each terminal server user account as a separate workstation,every user must be licensed accordingly. An unlimited installation license (Premium or Corpor-ate License) is therefore recommended. The license can be activated in a console or usersession as described below. Please note that the license will thereafter automatically be activ-ated for all user accounts as well as the terminal server (console). It only needs to be activatedonce. However, separate licenses can also be issued to individual users if necessary by activ-ating single user licenses in user sessions.
6.3 Activating the TeamViewer license
Personal users can use the free version of TeamViewer.
To use TeamViewer in a commercial environment, you must purchase a license via our onlineshop under https://www.teamviewer.com/pricing/ and activate the license for your account byfollowing the link in the order confirmation email.
To activate your TeamViewer License, follow these steps:
1. Click the link in the order confirmation email.You will be forwarded to the TeamViewer Management Console.
2. Activate the license for your TeamViewer account by following the instructions in theTeamViewer Management Console.
3. Your TeamViewer license is now activated. As soon as you log in to TeamViewer with youraccount, you will be able to use the commercial features of TeamViewer.
Note: The license is not activated on the specific device and rather linked to yourTeamViewer account. Make sure to log in to make use of your license.
TeamViewer 13 Manual – Meeting www.teamviewer.com Page 70 of 93

7 Options
To access options, click Extras | Options in the TeamViewer main window. The TeamVieweroptions dialog box will open. On the left, you will see the categories described below.
Note: If your settings are configured via a policy for TeamViewer settings (see section 7.10 ,page 93), it is possible that specific options will not be available.
7.1 Category General
The General category includes some of the most common settings.
TheGeneral category offers basic options.
Important options for working with TeamViewer
Your displayname
Enter your name or company name here. This text will be displayed in thetitle bar of the Remote Control window and in the Chat window of theremote computer.If you are logged into your TeamViewer account, the display name of youraccount will be used instead.
TeamViewer 13 Manual – Meeting www.teamviewer.com Page 71 of 93
7 Options

7 Options
Important options for working with TeamViewer
StartTeamViewerwith Win-dows
If you did not configure TeamViewer to start with Windows during the install-ation process, you can do it here by checking the corresponding box.TeamViewer will then start automatically alongside Windows. TeamViewerwill then start automatically alongside Windows. That way, it will already berunning even before you log into Windows.
Use newuser inter-face (Pre-view)
If you want to use an alternative, new interface for TeamViewer, activatethe checkbox.
You can always return to the general user interface by deactivting theoption and restarting TeamViewer.
Note: Please note, that this interface is under constant developmentand only availabe as preview which is way there might be issues occuringfrom time to time.
Network settings
Proxy settings Click the Configure... button to open the Proxy Settings dialogbox.
Wake-on-LAN One click on the Configure… button opens the Wake-on-LANdialog. Here you can configure the settings for TeamViewer Wake-on-LAN. By configuring these settings, you can remotely operatethis computer even if it is switched off by waking it up before youestablish a connection.
Detailed instructions for configuration of TeamViewer Wake-on-LAN are available in the TeamViewer Manual - Wake-on-LAN.
Incoming LAN con-nections
You can choose between the following options:
l Deactivated: Allows no LAN connections.
l Accept: Accepts incoming LAN connections via Port 5938.
l Accept exclusively: No connection to TeamViewer serverswill be established and TeamViewer is available only via the IPaddress or the corresponding computer name.If you chose this option, you can’t host or join meetings.
TeamViewer 13 Manual – Meeting www.teamviewer.com Page 72 of 93
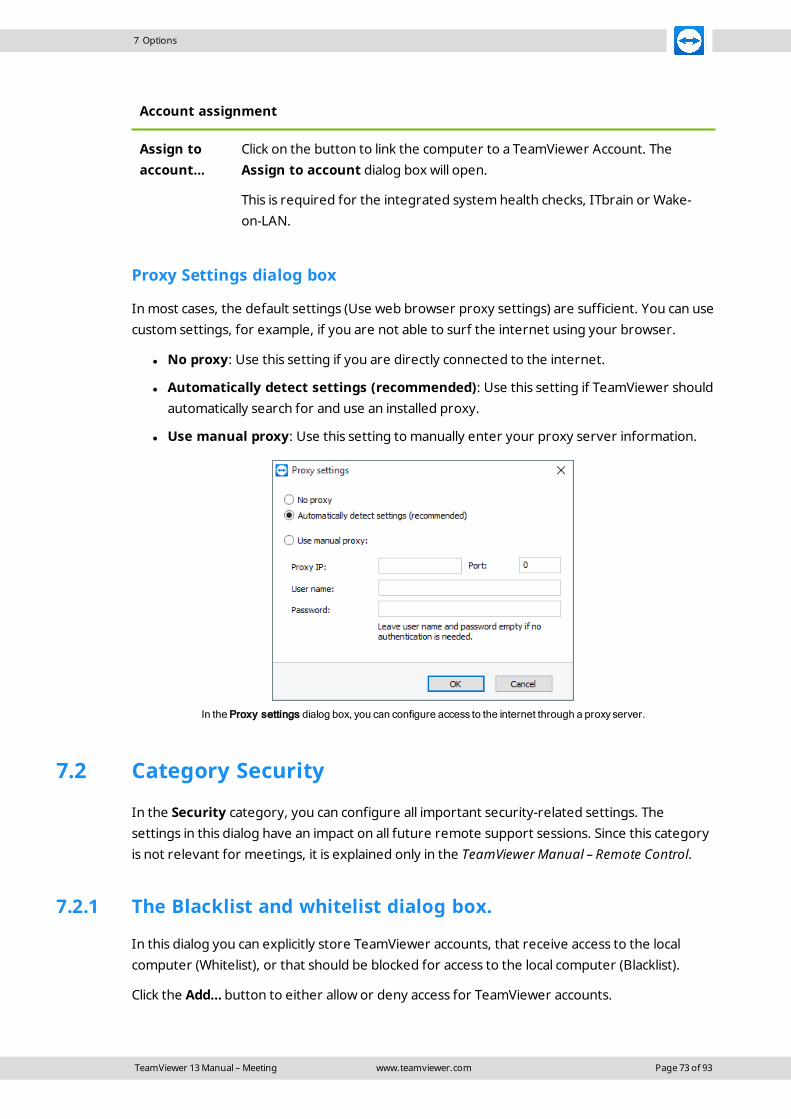
7 Options
Account assignment
Assign toaccount…
Click on the button to link the computer to a TeamViewer Account. TheAssign to account dialog box will open.
This is required for the integrated system health checks, ITbrain or Wake-on-LAN.
Proxy Settings dialog box
In most cases, the default settings (Use web browser proxy settings) are sufficient. You can usecustom settings, for example, if you are not able to surf the internet using your browser.
l No proxy: Use this setting if you are directly connected to the internet.
l Automatically detect settings (recommended): Use this setting if TeamViewer shouldautomatically search for and use an installed proxy.
l Use manual proxy: Use this setting to manually enter your proxy server information.
In the Proxy settings dialog box, you can configure access to the internet through a proxy server.
7.2 Category Security
In the Security category, you can configure all important security-related settings. Thesettings in this dialog have an impact on all future remote support sessions. Since this categoryis not relevant for meetings, it is explained only in the TeamViewer Manual – Remote Control.
7.2.1 The Blacklist and whitelist dialog box.
In this dialog you can explicitly store TeamViewer accounts, that receive access to the localcomputer (Whitelist), or that should be blocked for access to the local computer (Blacklist).
Click the Add… button to either allow or deny access for TeamViewer accounts.
TeamViewer 13 Manual – Meeting www.teamviewer.com Page 73 of 93

7 Options
If you activate the Also apply for meetings check box, these settings will also be applied tomeetings. Only contactss from your whitelist will then be able to join your meeting or contactsfrom your blacklist are accordingly excluded from being able to join your meeting.
Whitelist – allow access for the following partners
If you add TeamViewer IDs to your whitelist, only these IDs will be able to connect to yourcomputer. The possibility of a connection to your computer through other TeamVieweraccounts or TeamViewer IDs is excluded. This means that regardless of which computer theTeamViewer account is logged into from, the account will be able to access the computer thatcreated the whitelist at any time.
If you have joined a company profile with your TeamViewer account, you can also place theentire company profile on the Whitelist. Thus only the TeamViewer accounts that are part ofthe company profile can access this device.
Blacklist – allow access for the following partners
The blacklist generally lets you prevent certain partners from establishing a connection toyour computer. TeamViewer accounts on the blacklist cannot connect to your computer.
7.3 Category Remote Control
In the Remote Control category, you can configure all the settings relating to quality, sessionrecording or access to other computers. The settings in this dialog have an impact on all futureremote support sessions. Since this category is not relevant to meetings, it is explained only inthe TeamViewer Manual – Remote Control.
TeamViewer 13 Manual – Meeting www.teamviewer.com Page 74 of 93
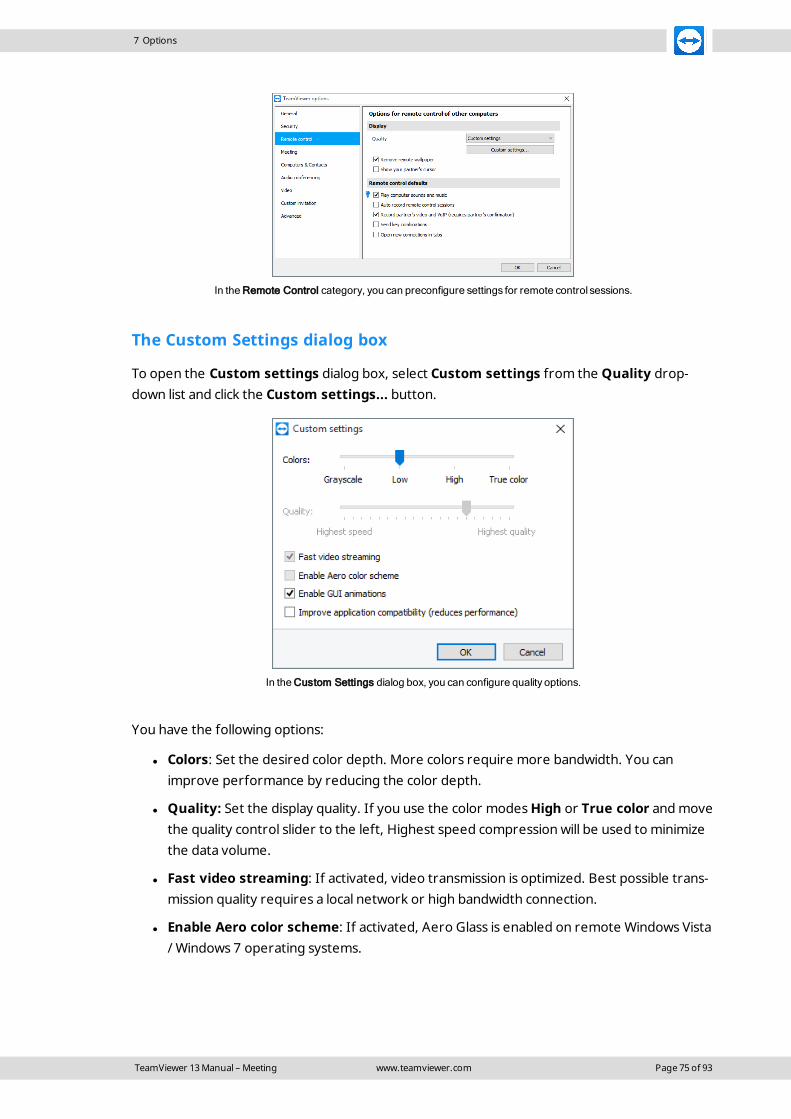
7 Options
In the Remote Control category, you can preconfigure settings for remote control sessions.
The Custom Settings dialog box
To open the Custom settings dialog box, select Custom settings from the Quality drop-down list and click the Custom settings... button.
In the Custom Settings dialog box, you can configure quality options.
You have the following options:
l Colors: Set the desired color depth. More colors require more bandwidth. You canimprove performance by reducing the color depth.
l Quality: Set the display quality. If you use the color modesHigh or True color and movethe quality control slider to the left, Highest speed compression will be used to minimizethe data volume.
l Fast video streaming: If activated, video transmission is optimized. Best possible trans-mission quality requires a local network or high bandwidth connection.
l Enable Aero color scheme: If activated, Aero Glass is enabled on remote Windows Vista/ Windows 7 operating systems.
TeamViewer 13 Manual – Meeting www.teamviewer.com Page 75 of 93
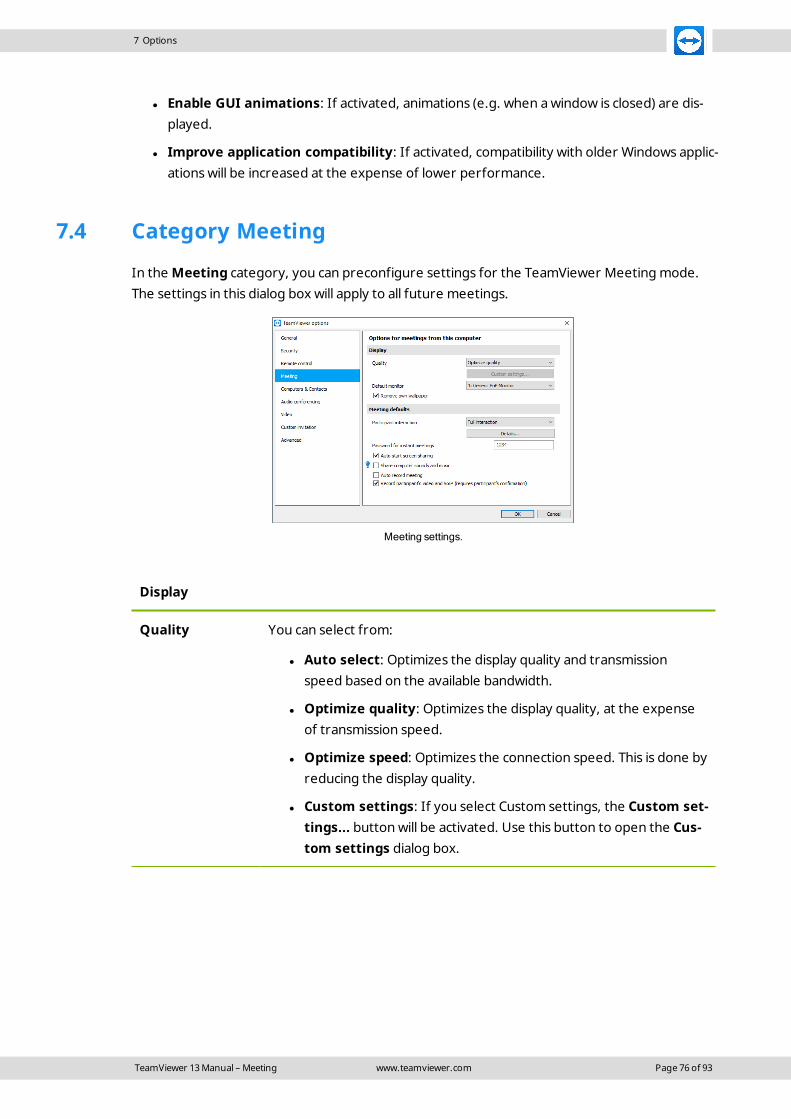
7 Options
l Enable GUI animations: If activated, animations (e.g. when a window is closed) are dis-played.
l Improve application compatibility: If activated, compatibility with older Windows applic-ations will be increased at the expense of lower performance.
7.4 Category Meeting
In the Meeting category, you can preconfigure settings for the TeamViewer Meeting mode.The settings in this dialog box will apply to all future meetings.
Meeting settings.
Display
Quality You can select from:
l Auto select: Optimizes the display quality and transmissionspeed based on the available bandwidth.
l Optimize quality: Optimizes the display quality, at the expenseof transmission speed.
l Optimize speed: Optimizes the connection speed. This is done byreducing the display quality.
l Custom settings: If you select Custom settings, the Custom set-tings... button will be activated. Use this button to open the Cus-tom settings dialog box.
TeamViewer 13 Manual – Meeting www.teamviewer.com Page 76 of 93

7 Options
Display
Default monitor From the drop-down list, select the monitor to be presented in a meet-ing if you are the presenter.
You can select from:
l n: A single connected monitor is displayed.
l All monitors: All connected monitors are displayed sim-ultaneously.
Remove ownwallpaper
If enabled, the wallpaper of your own computer is hidden during ameeting.
Meeting defaults
Participant inter-action
You can select from:
l Full interaction: All meeting participants can engage in themeeting and all the functions, such as VoIP, Chat or File box,are available.
l Minimal interaction (presentation mode): Only you as thepresenter can use the meeting functions. All other par-ticipants can only observe. However the meeting functionscan be enabled for all participants by demand.
l Custom settings: Click the Configure... button to performyour own interaction settings.
Password forInstant Meeting
In the text field, enter a password for the meetings you started. Ifyou want to allow others to join the meeting only via Meeting ID,you can leave this field empty.
Auto start screensharing
If enabled, your screen is presented as soon as the first participantconnects with your meeting.
Share computersounds and music
If activated, sound from the presenter's computer is transmitted tothe participants (see section 3.9 , page 39).
Auto record meet-ings
If activated, all the meetings are recorded automatically (seesection 3.8 , page 37).
TeamViewer 13 Manual – Meeting www.teamviewer.com Page 77 of 93
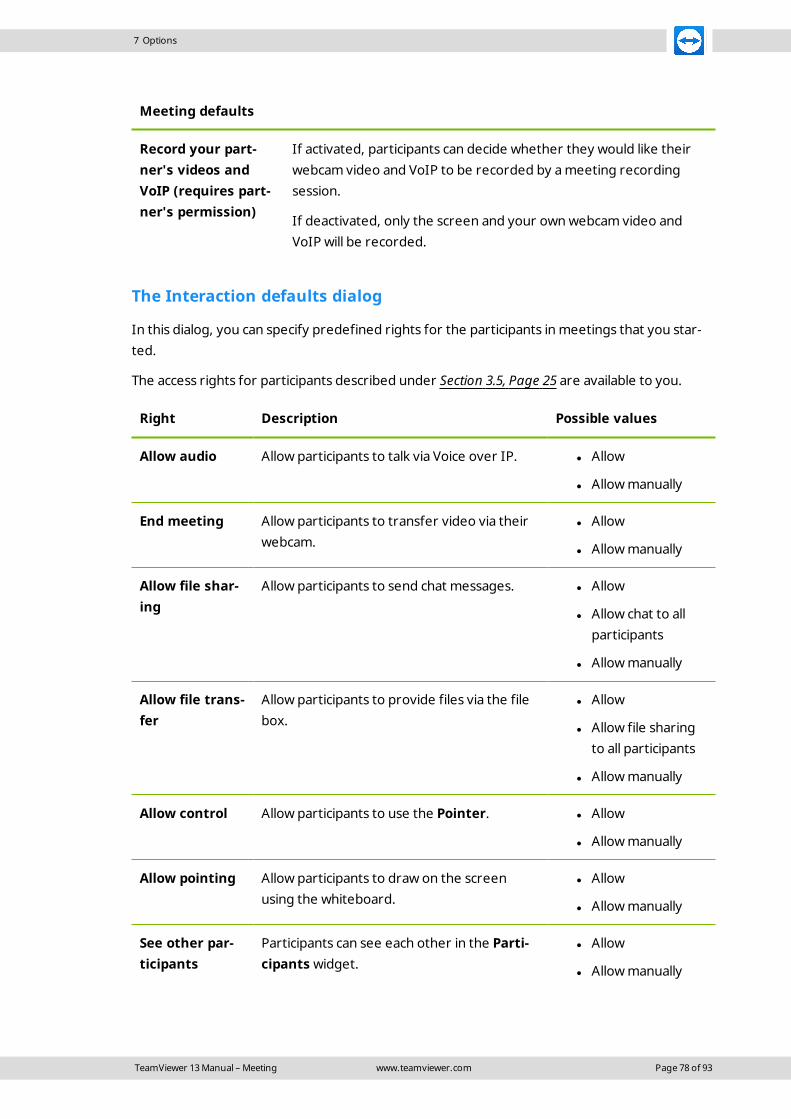
7 Options
Meeting defaults
Record your part-ner's videos andVoIP (requires part-ner's permission)
If activated, participants can decide whether they would like theirwebcam video and VoIP to be recorded by a meeting recordingsession.
If deactivated, only the screen and your own webcam video andVoIP will be recorded.
The Interaction defaults dialog
In this dialog, you can specify predefined rights for the participants in meetings that you star-ted.
The access rights for participants described under Section 3.5, Page 25 are available to you.
Right Description Possible values
Allow audio Allow participants to talk via Voice over IP. l Allow
l Allow manually
End meeting Allow participants to transfer video via theirwebcam.
l Allow
l Allow manually
Allow file shar-ing
Allow participants to send chat messages. l Allow
l Allow chat to allparticipants
l Allow manually
Allow file trans-fer
Allow participants to provide files via the filebox.
l Allow
l Allow file sharingto all participants
l Allow manually
Allow control Allow participants to use the Pointer. l Allow
l Allow manually
Allow pointing Allow participants to draw on the screenusing the whiteboard.
l Allow
l Allow manually
See other par-ticipants
Participants can see each other in the Parti-cipants widget.
l Allow
l Allow manually
TeamViewer 13 Manual – Meeting www.teamviewer.com Page 78 of 93

7 Options
The Custom Settings dialog box
To open the Custom settings dialog box, select Custom settings from the Quality drop-down list and click the Custom settings... button.
In the Custom Settings dialog box, you can configure quality options.
You have the following options:
l Colors: Set the desired color depth. More colors require more bandwidth. You canimprove performance by reducing the color depth.
l Quality: Set the display quality. If you use the color modesHigh or True color and movethe quality control slider to the left, Highest speed compression will be used to minimizethe data volume.
l Fast video streaming: If activated, video transmission is optimized. Best possible trans-mission quality requires a local network or high bandwidth connection.
l Enable Aero color scheme: If activated, Aero Glass is enabled on remote Windows Vista/ Windows 7 operating systems.
l Enable GUI animations: If activated, animations (e.g. when a window is closed) are dis-played.
l Improve application compatibility: If activated, compatibility with older Windows applic-ations will be increased at the expense of lower performance.
7.5 Category Computers & Contacts
Here you can manage your TeamViewer account and configure additional settings for yourComputers & Contacts.
TeamViewer 13 Manual – Meeting www.teamviewer.com Page 79 of 93

7 Options
The account management in TeamViewer providesadditional options.
Account settings (global settings)
Offline com-puters in sep-arate group
If activated, all offline partners are organized into a separate group.
Notify me ofincoming mes-sages
If activated, you will receive a brief notification of an incoming chatmessage from a partner. The notification will be displayed in the lowerright corner of the screen as a pop-up.
Notify me whenpartners sign in
If activated, you will receive a brief notification whenever one of yourcontacts logs into his/her TeamViewer account. The notification will bedisplayed in the lower right corner of the screen as a pop-up.
Notify me aboutservice casechanges
If activated, you will receive a brief notification as soon as a service caseis created or assigned to you.
Log sessions forconnectionreporting
If activated, all remote control sessions will be logged in theTeamViewer Management Console. More information can be found inthe TeamViewer Manual – Management Console.
Note: This function is not available for meetings.
TeamViewer 13 Manual – Meeting www.teamviewer.com Page 80 of 93
7 Options
Account settings (global settings)
Show commentwindow aftereach session
If activated, you can add a comment to a remote control session after ithas ended. The comment is then added to the corresponding session inthe TeamViewer Management Console. More information can be foundin the TeamViewer Manual – Management Console.
Note: In order to use this function, you must be logged into yourTeamViewer account and must be a member of a company profile.
Note: This function is not available for meetings.
Your name Enter a name being used to identify you during a TeamViewer meeting.This name will appear whenever you are logged into your TeamVieweraccount. The name will be visible in the Chat and in the Remote Controlwindow.
E-Mail To change your e-mail address, enter a new one. This is only necessaryif you are no longer using the current e-mail address.
New password To change the current password for your TeamViewer account, enter anew one.
Activatedlicense
If you own a Premium or a Corporate license, you can link it to yourTeamViewer account. To do so, click the Activate license link and enteryour license key. Then click Activate license. The license will be validwherever you are logged into your account, even if you are at an unli-censed TeamViewer installation.
Only partners inmy list may seemy onlinestatus and sendmessages to me
If activated, you will only appear online to partners who are in yourComputers & Contacts list. At the same time, only those partners will beable to send messages to you.
Delete account(available onlyin the webbrowser)
Click Delete account to permanently delete your TeamViewer account.You will be asked one more time if you would really like to delete youraccount.
Note: Deleting your account will also permanently delete your Computers & Contacts.
TeamViewer 13 Manual – Meeting www.teamviewer.com Page 81 of 93

7 Options
7.6 Category Audio conferencing
In the Audio conferencing category, you can configure and test the settings for your VoIPand conference call connections.
Audio conferencing settings.
Options for phone conferencing
Conference call To store your own conference call data, click the Configure... button.
Options for voice playback
Speakers From the drop-down list, select the device or speakers out of which you wouldlike the sound for your VoIP connection to come.
Volume Lets you control the volume of your speakers. By clicking on the Play button,you will hear a sound that is used to check the volume setting.
Mute(speakers)
Turns your speakers completely down.
Options for microphone
Microphone From the drop-down list, select the recording device or microphone thatyou would like to use for your VoIP connection.
Microphonelevel
Lets you control the volume of your microphone.
TeamViewer 13 Manual – Meeting www.teamviewer.com Page 82 of 93

7 Options
Options for microphone
Mute (micro-phone)
Completely silences your microphone.
Noisethreshold
Lets you remove any degree of background noise. To filter out no back-ground noise, move the slider to the left. To filter out most backgroundnoise, move the slider to the right.
7.7 Category Video
In the Video category, you can select your webcam and test its quality. You can also configurethe settings for your video driver.
Video settings.
Camera settings and preview
Videosource
From the drop-down list, select the Video source you would like to use for trans-mission in a video conference.The camera must support a minimum resolution of 320x240 pixels and comewith a DirectShow driver. To guarantee trouble-free functionality, we recom-mend using a webcam.Alternatively, you can select an image to display in video conferences in place ofa video. To do so, from the drop-down list select the Static image option andclick the Select image... button.
Advancedvideo set-tings
Once you have selected a webcam, you can adjust the settings for your partic-ular model here.
TeamViewer 13 Manual – Meeting www.teamviewer.com Page 83 of 93

7 Options
Camera settings and preview
Quality Here you can choose between the following options:
l Automatic (automatically determines the best ratio of quality to speed)
l Optimize quality
l Optimize speed
7.8 Category Custom invitation
Adapt the invitation for Meeting and Remote Control to your individual needs. The followingoptions are available to you.
Custom invitation settings
Option Description
Template From the drop-down list, select a standard invitation message for a remotecontrol session or meeting.
Subject Enter the subject line you wish to use for your invitation e-mail.
Invitationmessage
Customize the template text for your invitation e-mail. To review your invit-ation e-mail prior to sending, click the Test invitation button. The e-mail willopen in your default e-mail program. You can then send the e-mail directlyfrom this application. Click the Reset button to restore the default templatetext.
TeamViewer 13 Manual – Meeting www.teamviewer.com Page 84 of 93
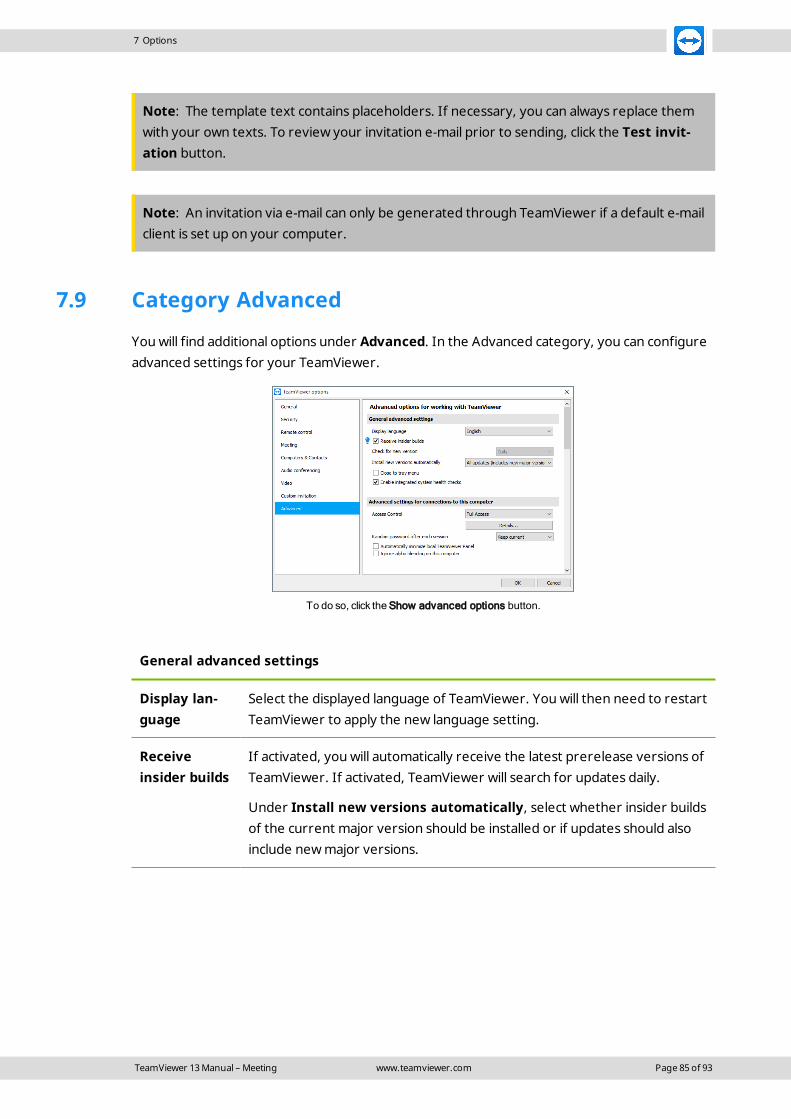
7 Options
Note: The template text contains placeholders. If necessary, you can always replace themwith your own texts. To review your invitation e-mail prior to sending, click the Test invit-ation button.
Note: An invitation via e-mail can only be generated through TeamViewer if a default e-mailclient is set up on your computer.
7.9 Category Advanced
You will find additional options under Advanced. In the Advanced category, you can configureadvanced settings for your TeamViewer.
To do so, click the Show advanced options button.
General advanced settings
Display lan-guage
Select the displayed language of TeamViewer. You will then need to restartTeamViewer to apply the new language setting.
Receiveinsider builds
If activated, you will automatically receive the latest prerelease versions ofTeamViewer. If activated, TeamViewer will search for updates daily.
Under Install new versions automatically, select whether insider buildsof the current major version should be installed or if updates should alsoinclude new major versions.
TeamViewer 13 Manual – Meeting www.teamviewer.com Page 85 of 93

7 Options
General advanced settings
Check fornew version
From the drop-down list, select the interval at which you would likeTeamViewer to automatically search for an update.
The following intervals are available:
l Weekly
l Monthly
l Never
Install newversions auto-matically
In the drop-down list, select whether or not TeamViewer should auto-matically install new versions.
The following options are available:
l All updates (includes new major versions): Updates will always beinstalled, even updates to newer major versions.
l Updates within this major version: Only updates within the cur-rent installed major version will be installed.
l Security updates within this major version: Only updates withinthe current installed major version necessary to improve security willbe installed.
l No automatic updates: Updates will never be installed auto-matically.
Close to traymenu
If activated, TeamViewer will minimize to the tray menu after the programis closed (info area of the windows task bar). TeamViewer can subsequentlybe shut down by right-clicking the icon in the system tray.
Enable integ-rated systemhealthchecks
If enabled, the computer can be monitored and its assets traced via theintegrated system checks and ITbrain. You can find further information inthe TeamViewer Manual – Remote Control.
TeamViewer 13 Manual – Meeting www.teamviewer.com Page 86 of 93

7 Options
Advanced settings for connections to this computer
Access Control Set what type of access your partner will have to yourcomputer:
l Full access
l Confirm all
l View and show
l Custom Settings
l Deny incoming remote control sessions
You can find further information in the TeamViewer Manual– Remote Control.
Random password aftereach session
From the dropdown list, select whether or when you'd likeTeamViewer to generate a new temporary password forincoming sessions.
The following options are available:
l Keep current: The new password will not be gen-erated until TeamViewer is restarted.
l Generate new: TeamViewer generates a new pass-word after each completed session.
l Deactivate: A password is generated only once.
l Show confirmation: TeamViewer asks you aftereach session whether you would like to generate anew password.
Automatically minimizelocal TeamViewer Panel
If activated, the local TeamViewer Panel (if unnecessary) willautomatically minimize to the screen edge after 10seconds.
Ignore alpha blending onthis computer
If activated, windows from the remote computer will not betransmitted half-transparent.
Full access if a partner con-nects from the Windowslogin screen
If activated, partners who connect from the Windows loginscreen will automatically have full access to your computer.
TeamViewer 13 Manual – Meeting www.teamviewer.com Page 87 of 93

7 Options
Advanced settings for connections to other computers
Start remote controlautomatically whenconnected to amobile device
If activated, a remote control session is automatically started whenconnecting to mobile devices. If deactivated, a dashboard withinformation about the device is displayed by default when con-necting to mobile devices.
Enable black screenif partner input isdeactivated
If activated, the screen on the remote computer is automaticallydeactivated as soon as the partner's input gets deactivated.
Temporarily saveconnection pass-words
If activated, passwords will be stored per the default settings toallow immediate reconnection. After the shut down of TeamViewerthe passwords are no longer saved.
Clipboard syn-chronization
If activated, any text copied to the clipboard will be available to thepartner.
Lock a remote com-puter
Specify whether the remote computer will be locked after conclu-sion of a Remote Control session.
Choose from the following options:
l Always: The remote computer will always be locked after aconnection.
l Never: The remote computer will never be locked.
l Automatic: The remote computer will be locked, if it was alsoblocked at the start of the connection.
Access Control Set what type of access you'll be granted on your partner'scomputer:
l Full access
l Confirm all
l View and show
l Custom Settings
l Deny outgoing remote control sessions
You can find further information in the TeamViewer Manual –Remote Control.
Automatic dis-connect of inactivesessions
Select a time period after which an outgoing remote control ses-sion is automatically terminated if there is no interaction in thedefined period.
TeamViewer 13 Manual – Meeting www.teamviewer.com Page 88 of 93
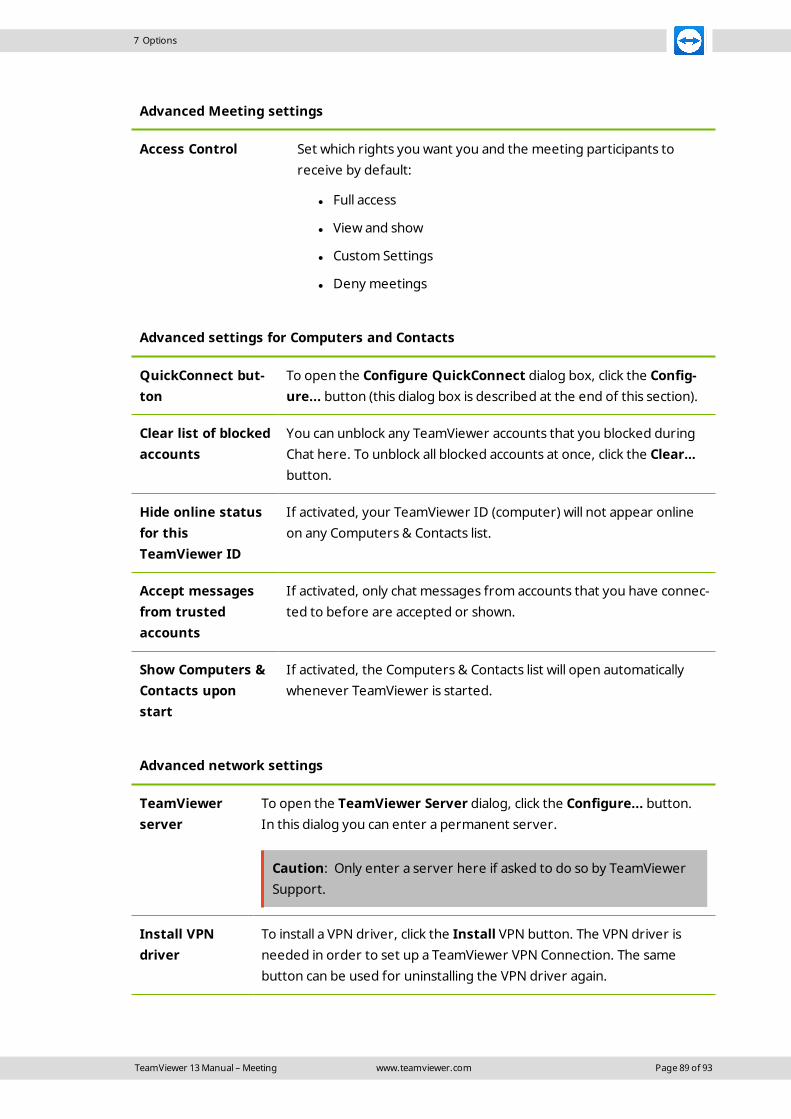
7 Options
Advanced Meeting settings
Access Control Set which rights you want you and the meeting participants toreceive by default:
l Full access
l View and show
l Custom Settings
l Deny meetings
Advanced settings for Computers and Contacts
QuickConnect but-ton
To open the Configure QuickConnect dialog box, click the Config-ure... button (this dialog box is described at the end of this section).
Clear list of blockedaccounts
You can unblock any TeamViewer accounts that you blocked duringChat here. To unblock all blocked accounts at once, click the Clear…button.
Hide online statusfor thisTeamViewer ID
If activated, your TeamViewer ID (computer) will not appear onlineon any Computers & Contacts list.
Accept messagesfrom trustedaccounts
If activated, only chat messages from accounts that you have connec-ted to before are accepted or shown.
Show Computers &Contacts uponstart
If activated, the Computers & Contacts list will open automaticallywhenever TeamViewer is started.
Advanced network settings
TeamViewerserver
To open the TeamViewer Server dialog, click the Configure... button.In this dialog you can enter a permanent server.
Caution: Only enter a server here if asked to do so by TeamViewerSupport.
Install VPNdriver
To install a VPN driver, click the Install VPN button. The VPN driver isneeded in order to set up a TeamViewer VPN Connection. The samebutton can be used for uninstalling the VPN driver again.
TeamViewer 13 Manual – Meeting www.teamviewer.com Page 89 of 93
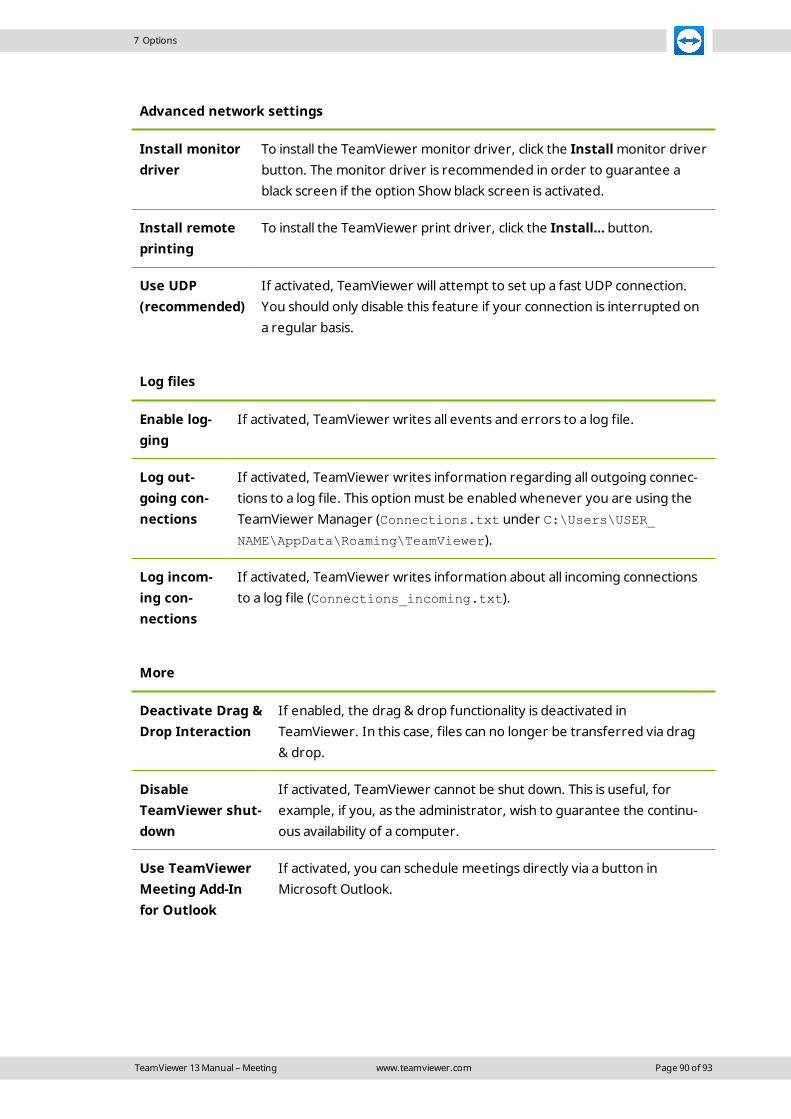
7 Options
Advanced network settings
Install monitordriver
To install the TeamViewer monitor driver, click the Install monitor driverbutton. The monitor driver is recommended in order to guarantee ablack screen if the option Show black screen is activated.
Install remoteprinting
To install the TeamViewer print driver, click the Install… button.
Use UDP(recommended)
If activated, TeamViewer will attempt to set up a fast UDP connection.You should only disable this feature if your connection is interrupted ona regular basis.
Log files
Enable log-ging
If activated, TeamViewer writes all events and errors to a log file.
Log out-going con-nections
If activated, TeamViewer writes information regarding all outgoing connec-tions to a log file. This option must be enabled whenever you are using theTeamViewer Manager (Connections.txt under C:\Users\USER_NAME\AppData\Roaming\TeamViewer).
Log incom-ing con-nections
If activated, TeamViewer writes information about all incoming connectionsto a log file (Connections_incoming.txt).
More
Deactivate Drag &Drop Interaction
If enabled, the drag & drop functionality is deactivated inTeamViewer. In this case, files can no longer be transferred via drag& drop.
DisableTeamViewer shut-down
If activated, TeamViewer cannot be shut down. This is useful, forexample, if you, as the administrator, wish to guarantee the continu-ous availability of a computer.
Use TeamViewerMeeting Add-Infor Outlook
If activated, you can schedule meetings directly via a button inMicrosoft Outlook.
TeamViewer 13 Manual – Meeting www.teamviewer.com Page 90 of 93
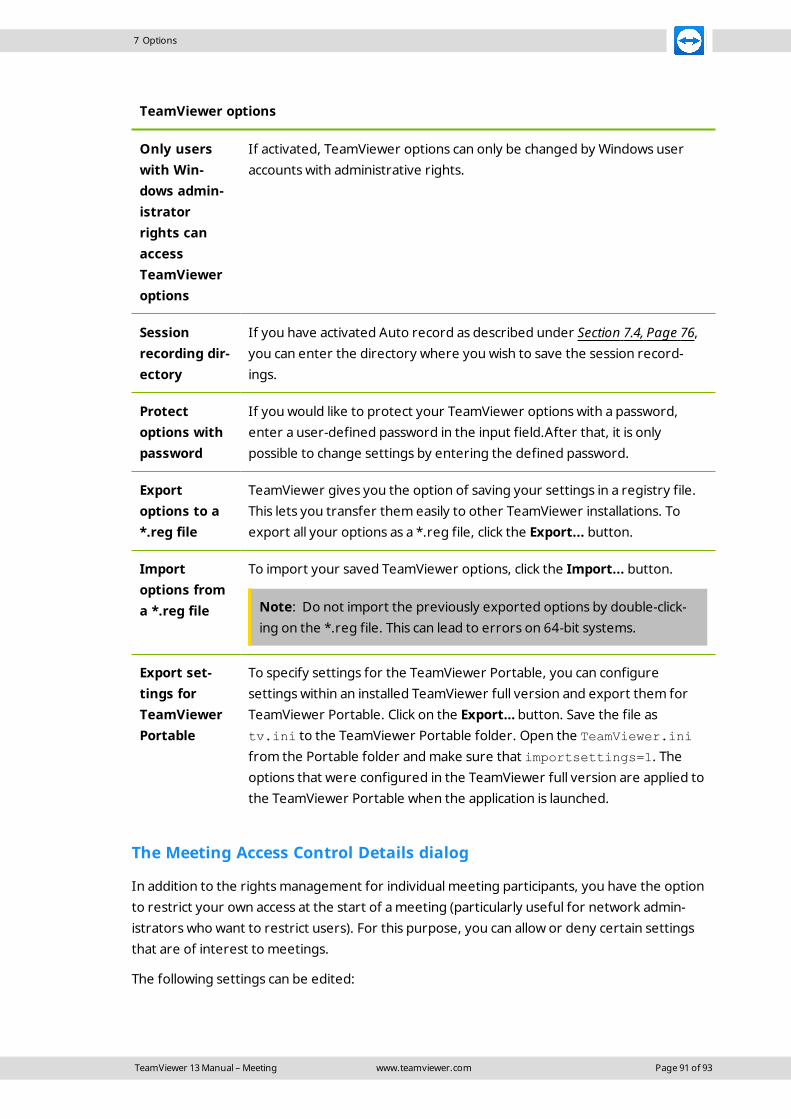
7 Options
TeamViewer options
Only userswith Win-dows admin-istratorrights canaccessTeamVieweroptions
If activated, TeamViewer options can only be changed by Windows useraccounts with administrative rights.
Sessionrecording dir-ectory
If you have activated Auto record as described under Section 7.4, Page 76,you can enter the directory where you wish to save the session record-ings.
Protectoptions withpassword
If you would like to protect your TeamViewer options with a password,enter a user-defined password in the input field.After that, it is onlypossible to change settings by entering the defined password.
Exportoptions to a*.reg file
TeamViewer gives you the option of saving your settings in a registry file.This lets you transfer them easily to other TeamViewer installations. Toexport all your options as a *.reg file, click the Export... button.
Importoptions froma *.reg file
To import your saved TeamViewer options, click the Import... button.
Note: Do not import the previously exported options by double-click-ing on the *.reg file. This can lead to errors on 64-bit systems.
Export set-tings forTeamViewerPortable
To specify settings for the TeamViewer Portable, you can configuresettings within an installed TeamViewer full version and export them forTeamViewer Portable. Click on the Export… button. Save the file astv.ini to the TeamViewer Portable folder. Open the TeamViewer.ini
from the Portable folder and make sure that importsettings=1. Theoptions that were configured in the TeamViewer full version are applied tothe TeamViewer Portable when the application is launched.
The Meeting Access Control Details dialog
In addition to the rights management for individual meeting participants, you have the optionto restrict your own access at the start of a meeting (particularly useful for network admin-istrators who want to restrict users). For this purpose, you can allow or deny certain settingsthat are of interest to meetings.
The following settings can be edited:
TeamViewer 13 Manual – Meeting www.teamviewer.com Page 91 of 93

7 Options
Setting Description Possible val-ues
Host meetings Lets you control, whether you may start a meeting. l Allowed
l Denied
Join meetings Lets you control, whether you may join a meeting. l Allowed
l Denied
Control remotecomputers
Lets you control, whether you may control a remotecomputer in a meeting (if allowed by the participant).
l Allowed
l Denied
Control thiscomputer
Lets you control, whether you may allow participants tocontrol your computer.
l Allowed
l Denied
Record meet-ings
Lets you control, whether you may record meetings. l Allowed
l Denied
Share files Lets you control, whether you may provide files in ameeting via the File box widget.
l Allowed
l Denied
Receive filesfrom the filebox
Lets you control, whether you may receive files in ameeting via the File box widget.
l Allowed
l Denied
The Configure QuickConnect dialog box
In this dialog box, you can configure various settings for the QuickConnect button. This buttoncan be used to present applications.
The following settings can be made:
Settings Description
Show Quick-Connect but-ton
If activated, the QuickConnect button is displayed in all windows/ap-plications.
Add In the text field, enter the process name of an application and click the Addbutton to disable QuickConnect for this application.
TeamViewer 13 Manual – Meeting www.teamviewer.com Page 92 of 93

7 Options
Settings Description
Remove Select an application from the list in which QuickConnect is already disabledand click the Remove button to re-enable QuickConnect for this applic-ation.
Position Use the slide control to select the position of the QuickConnect button onthe title bar of a window.
7.10 Policies for TeamViewer settings
The TeamViewer settings can be configured simultaneously for all of your devices with the aidof a policy. Use the TeamViewer Management Console to define central settings for yourdevices and to assign them to specific devices. Policy changes will be applied automatically to allinstallations.
You can either define settings for specific devices or for entire groups of your Computers &Contacts list. It is not necessary to have direct access to the device.
More information can be found in the TeamViewer Manual – Management Console.
Note: If the settings are configured using a setting policy, you will be notified about it withinthe TeamViewer options under General.
TeamViewer 13 Manual – Meeting www.teamviewer.com Page 93 of 93